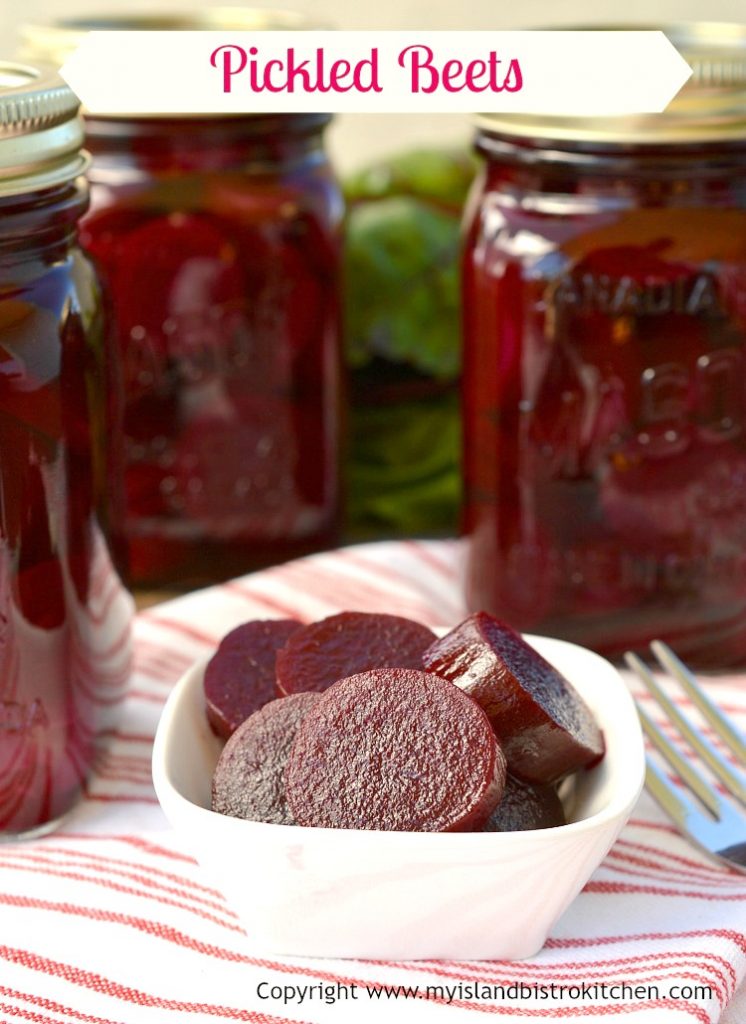
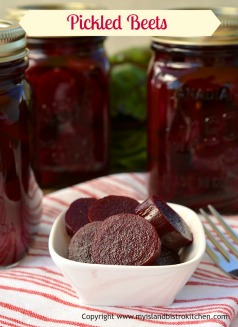
I so love pickled beets. They are something I grew up with and I make them every year. It’s a bit of a messy job but, oh, are the results so worth it! I look upon these as vegetable candy!
Pickled beets are really nothing more than cooked beets bottled with a vinegar-sugar-spice syrup. That’s it.
For pickling, I recommend cylinder beets if you can get them. They are long and slender and slice nicely for fitting in to the jars and also for presentation. Regular ball beets can, of course, be used for pickling and, in fact, that’s all my grandmothers would have used – just the regular garden variety. However, some of the round beets grow quite large and the slices have to be cut into two or three pieces to get them to fit in the jars and they don’t look quite as nice for presentation….same great taste, though.
Beets take awhile to cook so patience is required for this exercise. Try to select uniformly-sized ones so they all cook at the same rate. However, if you have a mixture of sizes, place the larger ones in the bottom of the pot and the smaller ones on top.
Don’t peel the beets before they are cooked. Simply remove the leaves, leaving about 1″ stem and the root end intact. Removing the stem or root end will cause bleeding and the vegetable will lose its vibrant color during the cooking process. The stem ends get removed after cooking and the beets get peeled after they are cooked. In fact, the skins will usually just slip off the cooked beets.
Because these vegetables are a bit messy to deal with, I use a portable burner and cook them outside so there is less chance of beet-spattered walls and counter in my kitchen. They do stain surfaces. I add a couple of teaspoons of cooking oil to the water in which the beets are cooked as I find it helps to prevent them from boiling over.
When the beets are starting to get along with their cooking, start the syrup to cook in a separate smaller stockpot. The syrup should cook for about 18-20 minutes at a slow boil. Don’t boil it too rapidly or for too long as it will evaporate and there won’t be enough syrup to fill the jars. This means more syrup has to be made and the syrup needs to go over the hot beets so timing is everything. For instructions on how to make the spice sachet used in the syrup, visit my posting on making mustard pickles. I also recommend that pickling vinegar be used. It will usually have 7% acidity, making it stronger than table vinegar and will help to preserve the beets longer.
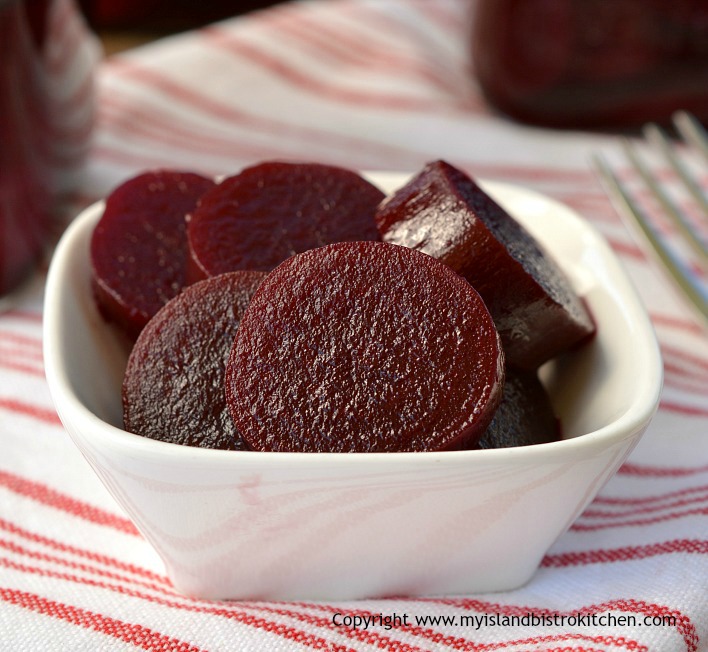
You can give the cooked beets a quick rinse under cold running water. It does make them a bit easier to handle. However, they have to be bottled hot so don’t over-do the rinsing. I recommend slicing the hot beets about 1/4″ thick. Pack them well into the hot sterilized jars, leaving about 1″ headroom. Ladle the hot syrup into the filled jars, filling each jar with the syrup to within 1/4″ from the top. Use a non-metal object to remove any air bubbles that may have formed in the jars and add more syrup, if necessary, to fill up the jars to about 1/4″ from the tops. Seal with heated lids and screw on the jar bands just until resistance is met. For greatest food safety, it is recommended that the filled jars be processed in a hot water bath following your canner manufacturer’s directions for your local altitude.
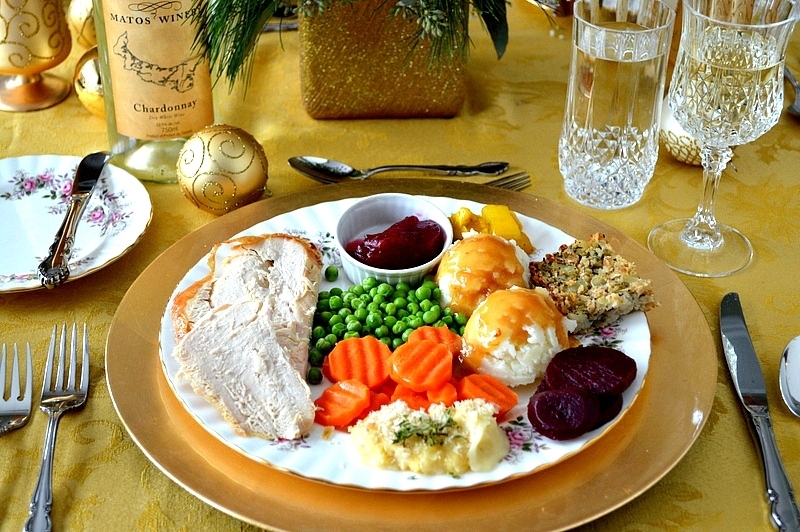
Pickled Beets with Roast Turkey Dinner
We enjoy these tasty morsels with cooked dinners such as the traditional Thanksgiving and Christmas turkey dinners as well as with roast beef or pork dinners. They are also good served with cold meats.
Pickled Beets
[Printable Recipe follows at end of posting]
Best Pickled Beets
Ingredients:
5 lbs cylinder beets, stem and root ends intact Boiling water 2 tsp cooking oil
2¾ cups brown sugar 2¾ cups pickling vinegar 1 cup + 3 tbsp water 2¾ tsp pickling spice, tied into a small cheesecloth sachet 2 – 6” cinnamon sticks ¼ tsp salt
Method: Remove the leaves from the beets, leaving about 1” stem in place. Rinse under cold water to remove any clay. In very large stock pot, place the larger beets on the bottom, then the smaller ones. Cover the beets with boiling water and add 2 tsp cooking oil. Cover and cook over medium-high heat until beets are fork tender.
As beets are nearing the cooked stage, begin making the syrup by combining the sugar, vinegar, water, pickling spice sachet, cinnamon sticks, and salt into a small stockpot. Bring to a boil over medium-high heat. Reduce heat to medium low and boil, uncovered, slowly for approximately 15-18 minutes.
Remove cooked beets from water, rinse quickly under cold water, peel, and remove and discard stem and root ends. Slice hot beets into ¼” thick slices and pack into sterilized jars, leaving 1” headroom.
Remove and discard the pickling spice sachet and cinnamon sticks from the syrup. Ladle hot syrup over beets leaving ¼“ headroom. Using a non-metal object, remove any air bubbles from the jars and add more syrup as necessary to fill jars to about ¼“ from the top. Wipe each jar rim clean with a damp cloth. Seal immediately with heated lids. Screw on jar bands just until resistance is met.
Process filled jars in hot water bath according to canner manufacturer’s directions for the proper time for your local altitude.
These tasty sweet pickled beets are easy to make, showy in presentation, and are a fine accompaniment to many meals. A Prince Edward Island favorite.
Ingredients
5 lbs cylinder beets, stem and root ends intact
Boiling water
2 tsp cooking oil
2¾ cups brown sugar
2¾ cups pickling vinegar
1 cup + 3 tbsp water
2¾ tsp pickling spice, tied into a small cheesecloth sachet
2 – 6” cinnamon sticks
¼ tsp salt
Instructions
Remove the leaves from the beets, leaving about 1” stem in place. Rinse under cold water to remove any clay. In very large stock pot, place the larger beets on the bottom, then the smaller ones. Cover the beets with boiling water and add 2 tsp cooking oil. Cover and cook over medium-high heat until beets are fork tender.
As beets are nearing the cooked stage, begin making the syrup by combining the sugar, vinegar, water, pickling spice sachet, cinnamon sticks, and salt into a small stockpot. Bring to a boil over medium-high heat. Reduce heat to medium low and boil, uncovered, slowly for approximately 15-18 minutes.
Remove cooked beets from water, rinse quickly under cold water, peel, and remove and discard stem and root ends. Slice hot beets into ¼” thick slices and pack into sterilized jars, leaving 1” headroom.
Remove and discard the pickling spice sachet and cinnamon sticks from the syrup. Ladle hot syrup over beets leaving ¼“ headroom. Using a non-metal object, remove any air bubbles from the jars and add more syrup as necessary to fill jars to about ¼“ from the top. Wipe each jar rim with a damp cloth. Seal immediately with heated lids. Screw on jar bands just until resistance is met.
Process filled jars in hot water bath according to canner manufacturer’s directions for the proper time for your local altitude.
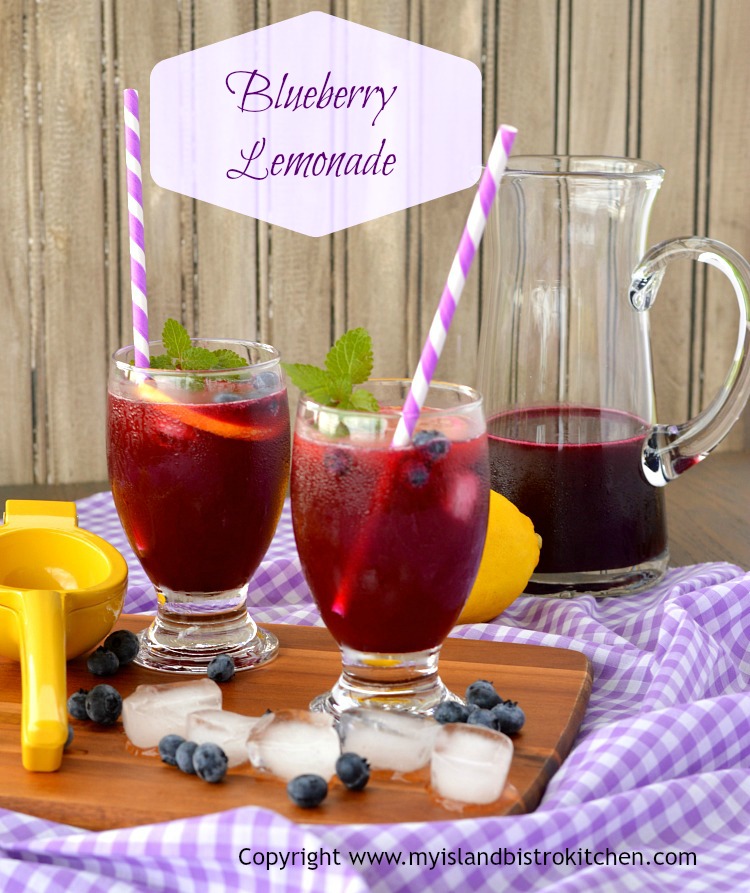
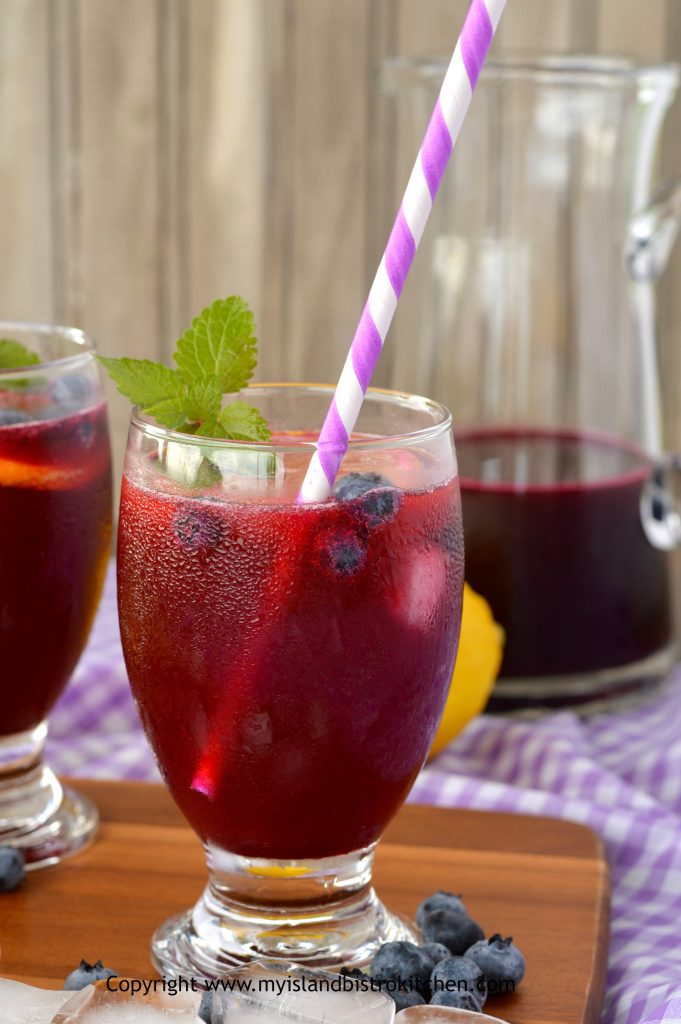
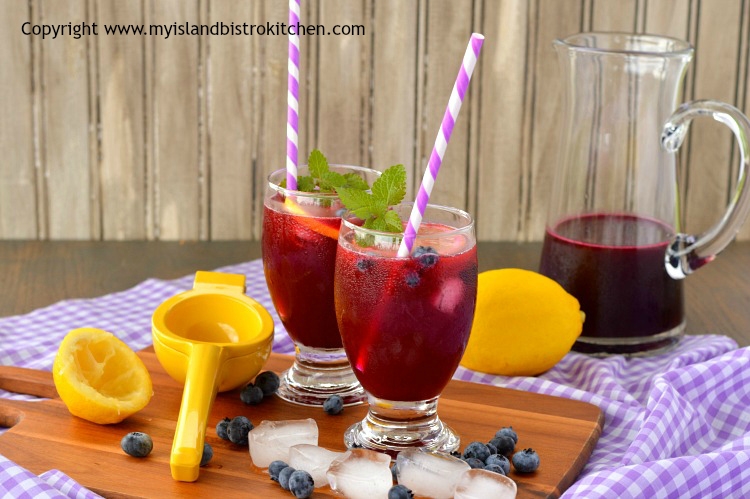
Lemonade is a wonderful refreshing drink on a hot summer’s day. Sometimes I like just plain old-fashioned lemonade and, other times, I like to flavor it using whatever berries are currently in season. My latest lemonade creation uses high bush blueberries to make blueberry lemonade concentrate. Fill a glass about one third full of the concentrate and top it up with lemon-lime soda for a tasty drink. You can, of course, top up the concentrate with lemon-flavored sparkling water instead of the soda.
Blueberry Lemonade
This recipe begins with a simple syrup which is infused with freshly squeezed lemon juice, grated lemon rind, and blueberry purée.
I am sometimes asked if it is necessary to use a simple syrup when making lemonade. In my view, it is essential and here is why. Ever try dissolving sugar in cold liquid? If you have, then you know the difficulty in getting the sugar to completely dissolve. Stir, stir, stir or shake, shake, shake and the sugar just does not want to completely dissolve and the mixture will appear cloudy. This is because sugar is not very soluble in cold liquid. At some point, you may have experienced a drink that had a nasty gritty sugar taste and texture and you may have noticed some undissolved sugar that fell to the bottom of the glass. This would have been the result of sugar mixed with cold liquid.
Lemonade is meant to be a bit tart but it does need some sugar to sweeten it a bit. So, how do you get the sugar successfully incorporated into the lemonade? It’s simple – you make a simple syrup. And, it’s called simple for a reason.
Simple syrup is nothing more than water and sugar heated until the sugar is perfectly dissolved. There are various formulas for simple syrup, depending on how thick you want the syrup and for what purpose it will be used. I tend to use 3/4 cup of sugar to 1 cup of water for simple syrups for beverages. My preference is to use super-fine sugar (aka caster sugar) because its fine texture means it dissolves easier than standard granulated sugar. Simply combine the sugar and water in a saucepan and heat over medium heat to the boiling point, stirring constantly, until the sugar is dissolved. Let the syrup boil gently for about 3-4 minutes, reducing the heat if necessary so the mixture does not boil too rapidly. Don’t boil the mixture rapidly or leave the liquid on the heat too long because you’ll lose some to evaporation. Remove the liquid from the heat and let it cool for about 30-40 minutes before adding any additional ingredients such as lemon juice, lemon rind, or puréed berries. Easy-peasy! And, you will have a much more refined drink that has a smooth, silky, velvet-like finish than you will get by trying to dissolve the sugar in cold water. It’s all about the quality in the end result.
Blueberry Lemonade
I used about 6 oz of high bush blueberries (the really nice big berries like the ones in the photo below) for this recipe and, with my potato masher, I loosely broke up the berries.
High Bush Blueberries
By gently mashing the berries, their juices get released quicker when they are heated. The berries were combined with 2/3 cup of water and cooked over medium heat for 5-7 minutes, just until they were softened and their juices were extracted. The mixture was cooled for about 30 minutes then puréed with an immersion blender. I added the blueberries, lemon juice, and lemon rind to the cooled simple syrup and let it sit for a couple of hours so the flavors would infuse the syrup.
To get the smooth liquid, strain the cooled mixture through a very fine mesh sieve twice to remove the pulp.
This concentrate will keep in a tightly sealed container in the refrigerator for three to four days.
Blueberry Lemonade
[printable recipe follows at end of posting]
Blueberry Lemonade
Ingredients: 1 cup water ¾ cup super-fine sugar (aka caster sugar)
½ cup freshly squeezed lemon juice 1 – 2 tbsp grated lemon rind
6 oz high bush blueberries 2/3 cup water
Method:
For the simple syrup: In small saucepan, combine the water and sugar together. Bring to a boil over medium heat, stirring constantly, until sugar is completely dissolved. Reduce heat slightly and boil gently for 3-4 minutes, stirring occasionally. Remove from heat and cool to room temperature (apx. 30-40 minutes).
For the blueberry purée: In pie plate, gently mash the berries with a potato masher to release their juices. Combine the berries and 2/3 cup water in a saucepan. Cook over medium heat, stirring constantly, for approximately 5-7 minutes, or until berries are softened and the mixture is quite juicy. Remove from heat and cool for about 30 minutes. Purée the berry mixture in a blender or with an immersion blender.
For the lemonade concentrate: Add the lemon juice, lemon rind, and puréed berry mixture to the cooled simple syrup. Stir well to fully combine the ingredients. Let mixture stand for at least an hour (or up to three hours) to allow the flavors to blend. Strain mixture twice through a fine mesh sieve to remove the pulp. Discard the pulp and pour concentrate into a bottle. Cover tightly and store in refrigerator for up to 3-4 days.
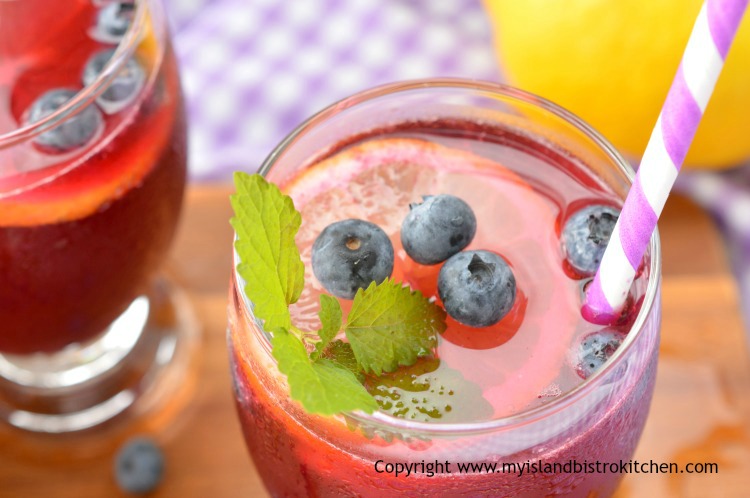
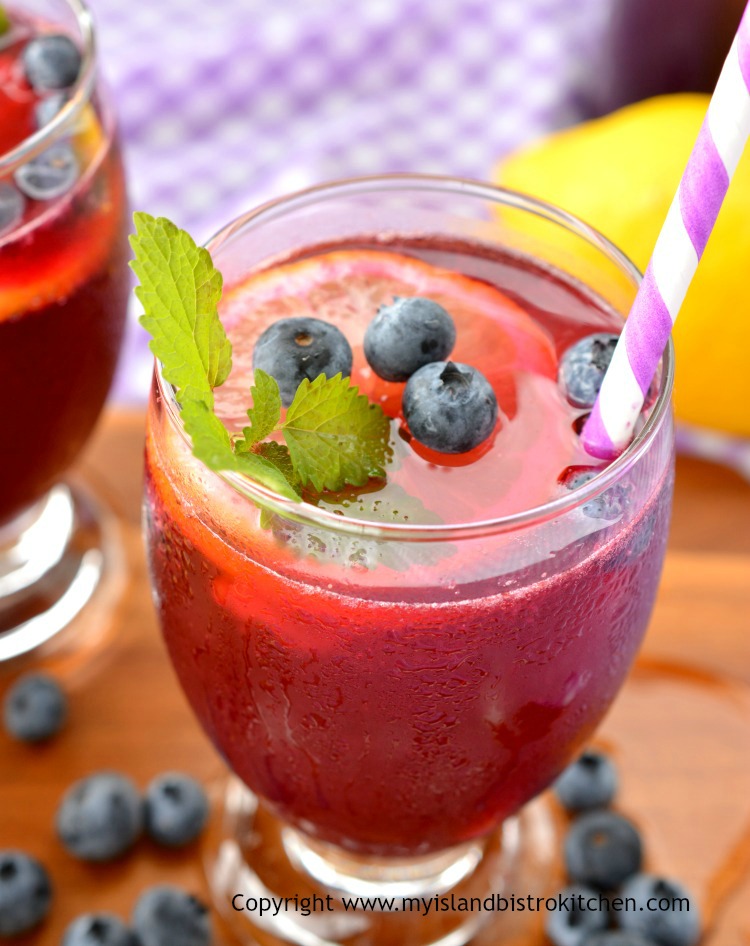
To serve: Fill a glass approximately one-third full of lemonade concentrate. Top up with lemon-lime soda or lemon-flavored sparkling water. Add ice cubes. Garnish with a lemon wheel, a sprig of lemon balm, and fresh blueberries, if desired.
This lemonade combines two complementary flavors to make a delightfully tasty and refreshing drink for a hot summer's day.
Ingredients
1 cup water
¾ cup super-fine sugar (aka caster sugar)
½ cup freshly squeezed lemon juice
1 – 2 tbsp grated lemon rind
6 oz high bush blueberries
2/3 cup water
Instructions
For the simple syrup: In small saucepan, combine the water and sugar together. Bring to a boil over medium heat, stirring constantly, until sugar is completely dissolved. Reduce heat slightly and boil gently for 3-4 minutes, stirring occasionally. Remove from heat and cool to room temperature (apx. 30-40 minutes).
For the blueberry purée: In pie plate, gently mash the berries with a potato masher to release their juices. Combine the berries and 2/3 cup water in a saucepan. Cook over medium heat, stirring constantly, for approximately 5-7 minutes, or until berries are softened and the mixture is quite juicy. Remove from heat and cool for about 30 minutes. Purée the berry mixture in a blender or with an immersion blender.
For the lemonade concentrate: Add the lemon juice, lemon rind, and puréed berry mixture to the cooled simple syrup. Stir well to fully combine the ingredients. Let mixture stand for at least an hour (or up to three hours) to allow the flavors to blend. Strain mixture twice through a fine mesh sieve to remove the pulp. Discard the pulp and pour concentrate into a bottle. Cover tightly and store in refrigerator for up to 3-4 days.
To serve: Fill a glass approximately one-third full of lemonade concentrate. Top up with lemon-lime soda or lemon-flavored sparkling water. Add ice cubes. Garnish with a lemon wheel, a sprig of lemon balm, and fresh blueberries, if desired.
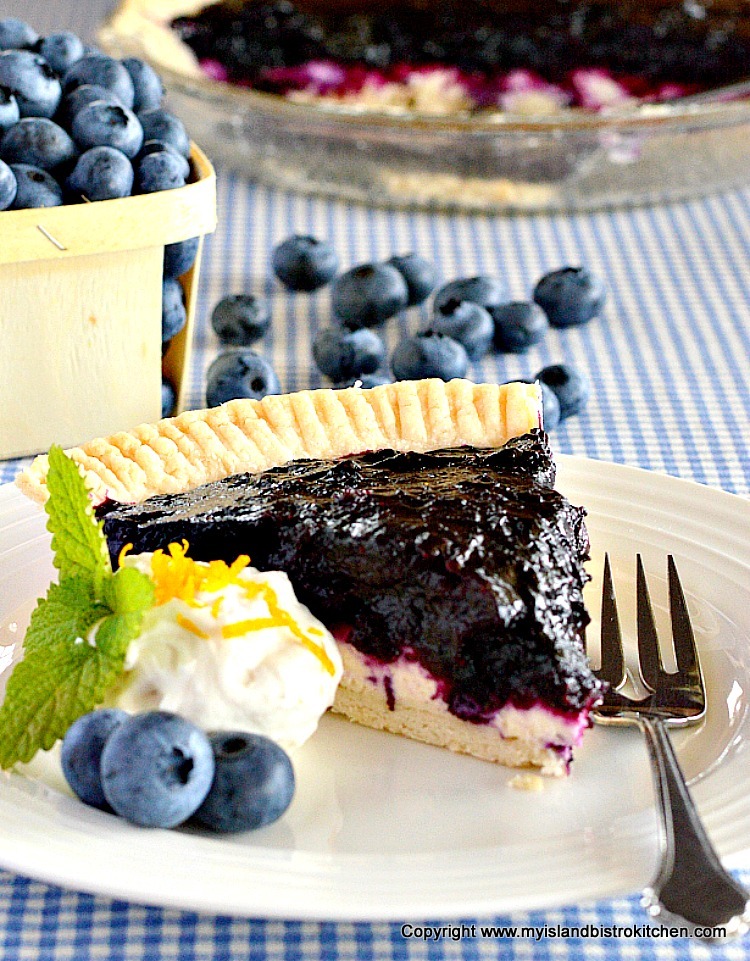
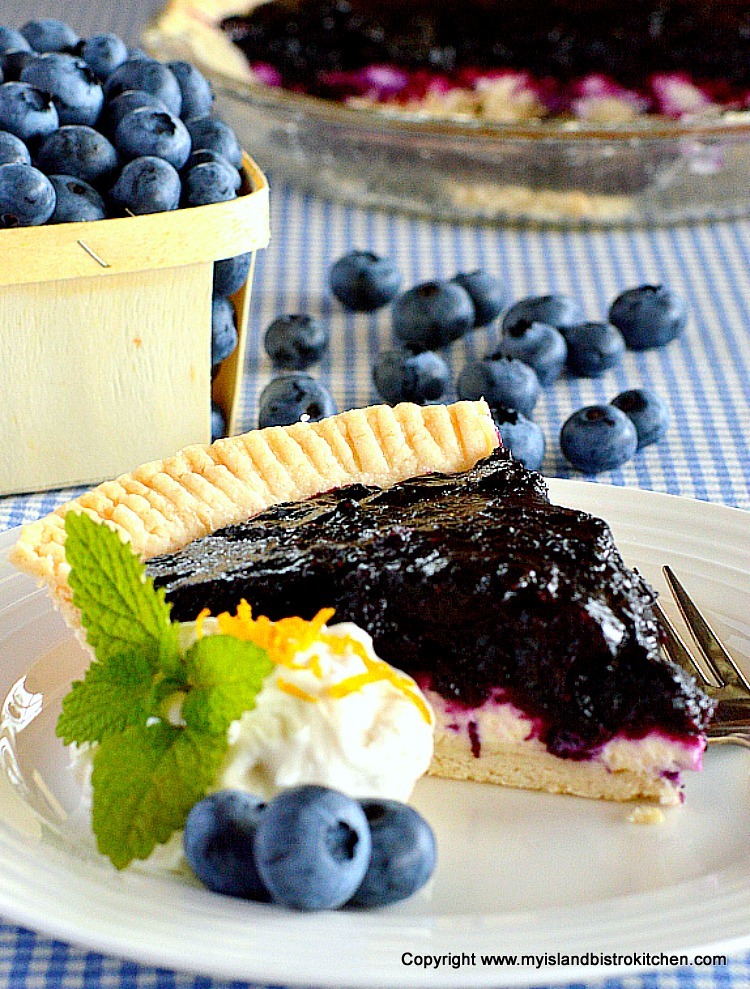
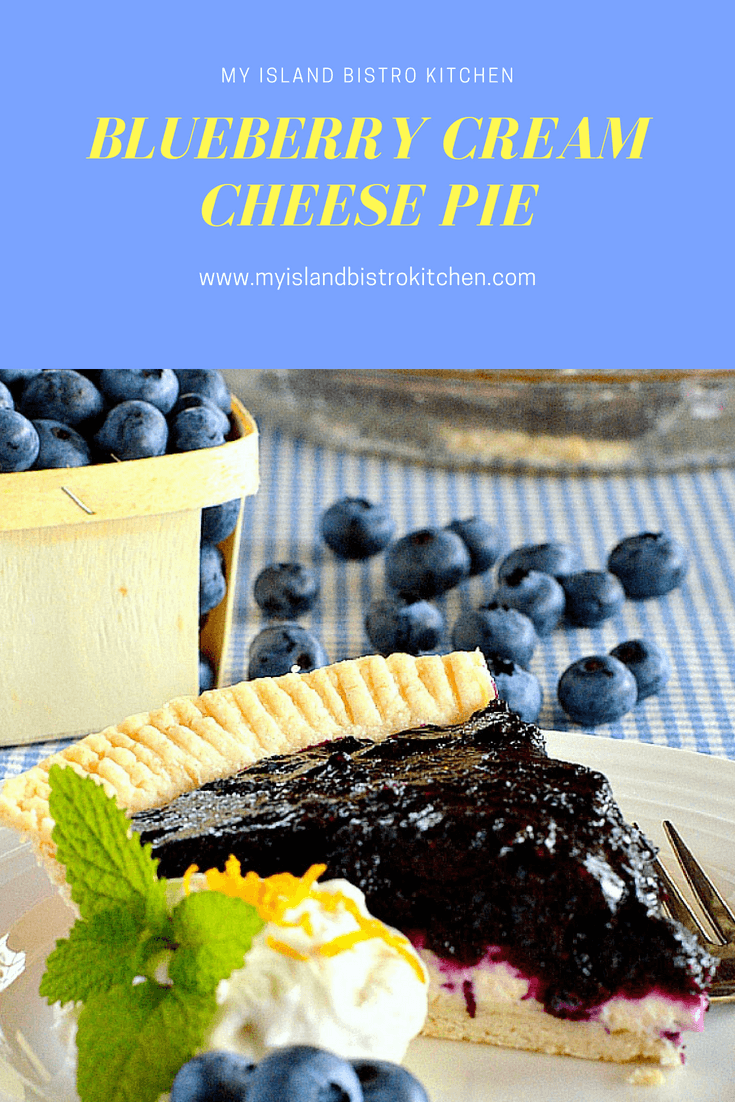
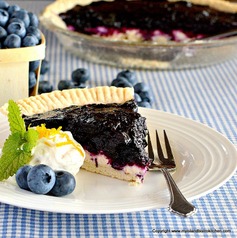
There are many ways to make blueberry pie but I have found that this is one of the tastiest. It’s also a great alternative to anyone who is not overly fond of double-crusted pies as this one is all about the filling!
Now, I love blueberries but sometimes I find they need a little help with a flavour boost. That’s why I have created this recipe for a blueberry filling that adds a gentle amount of cinnamon and nutmeg along with some orange juice and orange rind. To add a bit of depth and complexity to the flavor, I add a couple of tablespoons of Grand Marnier liqueur after the filling has cooked and been removed from the heat. This is an optional ingredient but a lovely flavor addition to the pie if you have the liqueur on hand.
As with any food, it is important to know what flavor combinations work and will complement each other. Cinnamon and nutmeg are two spices that go well with blueberries and, of course, blueberry and orange have long been a successful flavor combo. The other thing that is important is not to add in too many different flavors (or too much of any one additional flavor) as that can confuse the palate, detract from the authentic blueberry flavor, and not have the desired result. Sometimes less really is more!
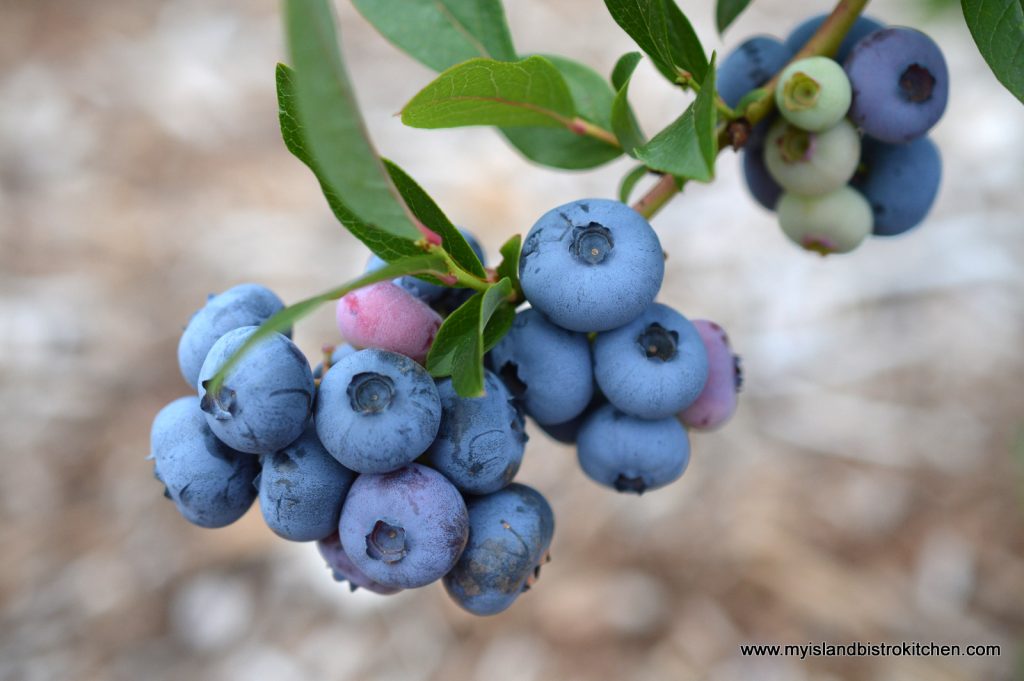
The blueberries I used in this recipe are locally-grown here on PEI. Over the past few years, a number of high bush blueberry u-picks have begun operating around the Island. These are the lovely, large plump blueberries which are very easy to pick off bushes so no need to get down on hands and knees to find them. They grown in clusters on the vine, almost like grapes and are quick, easy, and clean to pick. When these blueberries are in season in August and early September, we always have them fresh. The berries freeze well and this pie can certainly be made with the frozen berries so it can be enjoyed at any time throughout the year.
PEI Blueberries
This is one of the those pies that is best eaten the day it is made so plan to make the pie early in the morning, let it chill for the afternoon, and enjoy it with a dollop of whipped cream as a special dessert treat for dinner.
Blueberry Cream Cheese Pie
[printable recipe follows at end of posting]
Blueberry Cream Cheese Pie
Ingredients:
9” baked pie shell, cooled
6 oz. cream cheese, softened 3 tbsp sugar 1½ tbsp milk ½ tsp vanilla
¾ cup granulated sugar 3½ tbsp cornstarch Dash salt ¼ tsp cinnamon 1/8 tsp nutmeg 1 tsp finely grated orange rind 12 oz. high bush blueberries (apx. 2½ cups) 2 tsp orange juice 2 tbsp Grand Marnier liqueur ½ tbsp butter
1 cup whipping cream 1 tsp. vanilla 2 tbsp sugar
Method:
In small bowl, beat the cream cheese, sugar, milk, and vanilla. Spread over bottom of baked and cooled pie shell. Refrigerate for at least one hour.
In small bowl, combine the sugar, cornstarch, salt, cinnamon, nutmeg, and grated orange rind together. In medium-sized saucepan, combine the blueberries, orange juice, and cornstarch-sugar-spice mixture. Cook and stir over medium-low heat until mixture is thickened. Remove from heat and stir in Grand Marnier liqueur and butter. Let mixture cool to room temperature then spread over chilled cream cheese base. Refrigerate for at least one hour to allow pie to set.
Beat whipping cream and vanilla until soft peaks form then slowly beat in the sugar. Add a dollop of the whipped cream to each individual pie serving or, alternatively, completely cover chilled pie with the whipped cream. Refrigerate until use. Pie is best eaten the day it is made. (Note: Cool Whip can be substituted for the whipped cream, if desired.)
Yield: One 9” pie.
If you have made this recipe and enjoyed it and/or wish to share it with your friends and family, please do so on social media but be sure to share the direct link to this posting from my website.
Connect with My Island Bistro Kitchen on Social Media
Follow “the Bistro” on Pinterest at https://www.pinterest.ca/peibistro/ and pin the Pinterest-ready photo at the end of this posting to your favorite Pinterest boards!
For my pastry recipe along with hints and tips on making pastry, clickhere.
A luscious and decadent blueberry cream cheese pie that combines high bush blueberries with cinnamon, nutmeg and orange liqueur flavorings
Ingredients
9” baked pie shell, cooled
6 oz. cream cheese, softened
3 tbsp sugar
1½ tbsp milk
½ tsp vanilla
¾ cup granulated sugar
3½ tbsp cornstarch
Dash salt
¼ tsp cinnamon
1/8 tsp nutmeg
1 tsp finely grated orange rind
12 oz. high bush blueberries (apx. 2½ cups)
2 tsp orange juice
2 tbsp Grand Marnier liqueur
½ tbsp butter
1 cup whipping cream
1 tsp. vanilla
2 tbsp sugar
Instructions
In small bowl, beat the cream cheese, sugar, milk, and vanilla. Spread over bottom of baked and cooled pie shell. Refrigerate for at least one hour.
In small bowl, combine the sugar, cornstarch, salt, cinnamon, nutmeg, and grated orange rind together. In medium-sized saucepan, combine the blueberries, orange juice, and cornstarch-sugar-spice mixture. Cook and stir over medium-low heat until mixture is thickened. Remove from heat and stir in Grand Marnier liqueur and butter. Let mixture cool to room temperature then spread over chilled cream cheese base. Refrigerate for at least one hour to allow pie to set.
Beat whipping cream and vanilla until soft peaks form then slowly beat in the sugar. Add a dollop of the whipped cream to each individual pie serving or, alternatively, completely cover chilled pie with the whipped cream. Refrigerate until use. Pie is best eaten the day it is made. (Note: Cool Whip can be substituted for the whipped cream, if desired.)
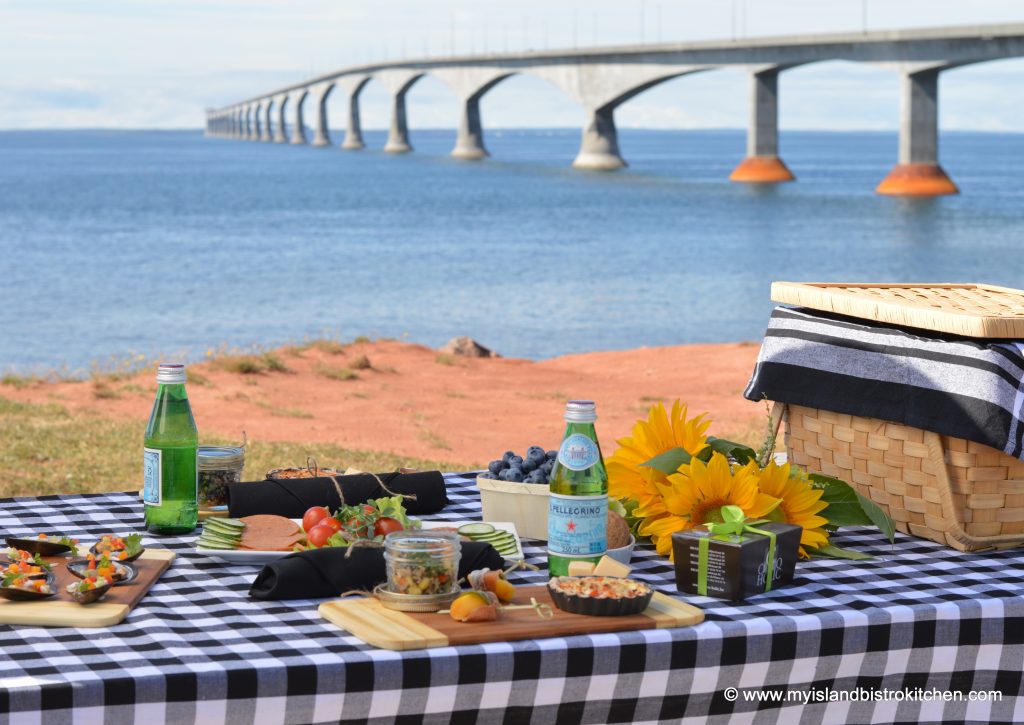
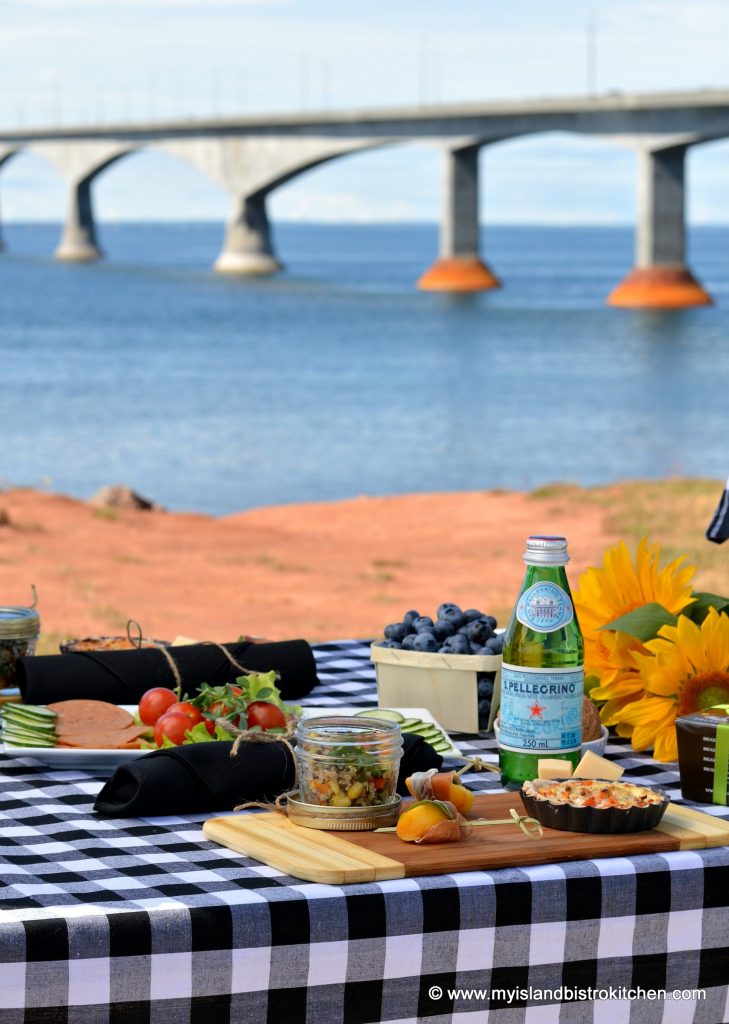
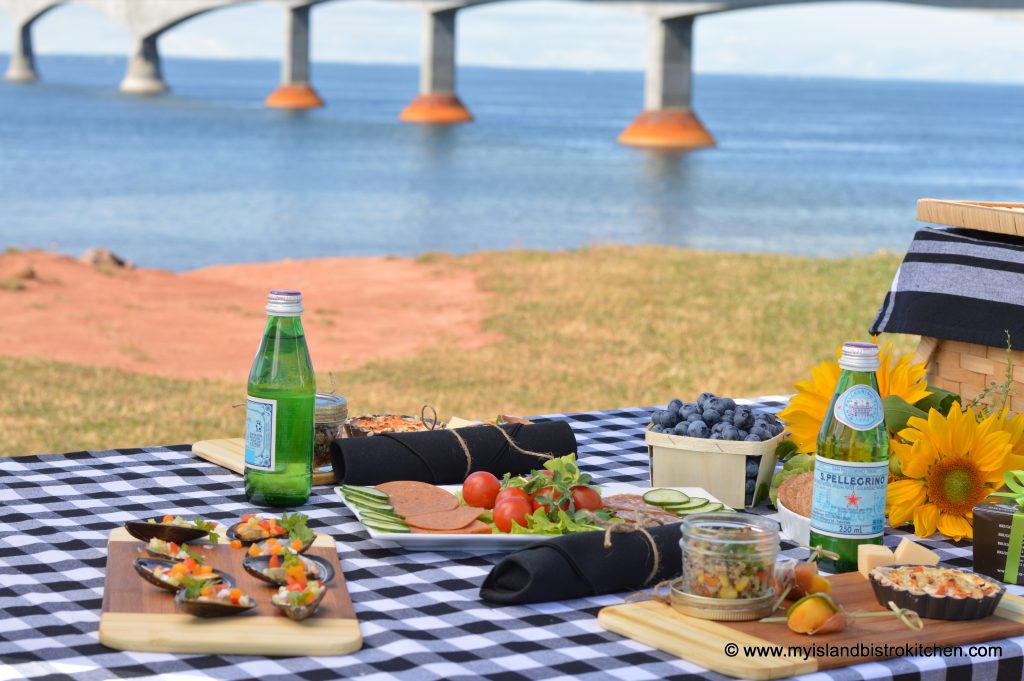
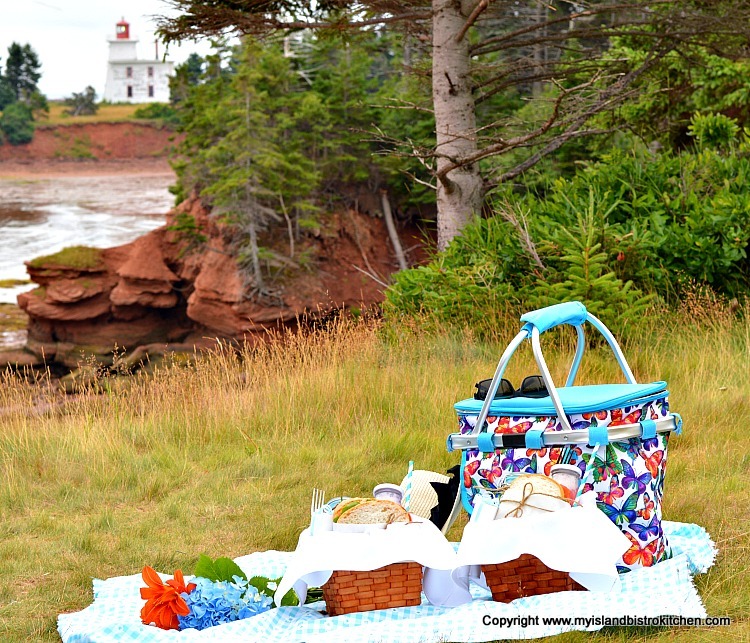
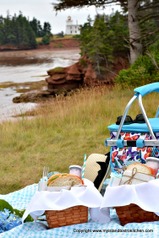
Picnics are a favorite summertime activity for us. We like to do a lot of daytripping around our province discovering and revisiting all that our wonderful Island has to offer. Prince Edward Island has many great locations that are suitable for picnics. Our picnic last weekend took us to a scenic location near the Confederation Bridge in Borden-Carleton.
Confederation Bridge
This bridge transcends the Northumberland Strait linking PEI with New Brunswick. At 12.9km (8 miles) in length, the bridge is the longest bridge in the world that crosses ice-covered water. Our Island winters can be quite harsh and the Strait is covered in thick ice for several months of the year. Building a bridge to withstand these conditions was no easy feat.
Before the bridge opened to traffic on May 31, 1997, the only ways on and off PEI were by ferry or air. Ferry service does still operate seasonally in the Eastern part of the Province at Wood Islands where ferries transport vehicular traffic between PEI and Nova Scotia.
The Confederation Bridge curves partway across the Strait and has a high navigational span that allows large ships to pass under the bridge. It’s pretty cool to see the large cruise ships going under the bridge!
Because the Confederation Bridge is an iconic element of PEI, it makes a fitting backdrop for a summertime Island picnic.
Bridge View
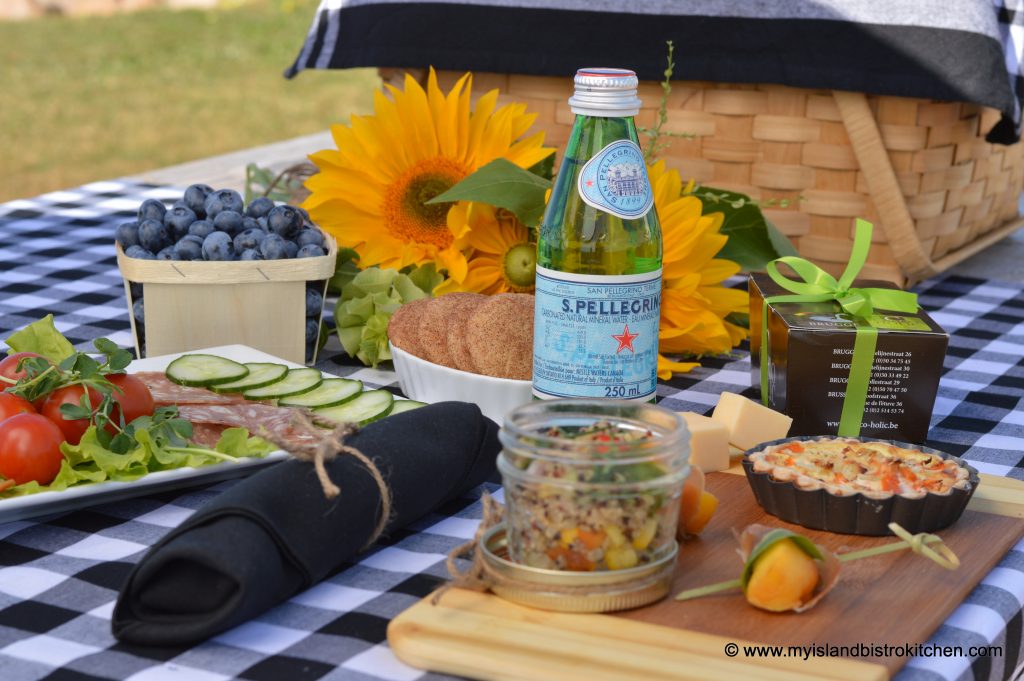
So, now that the stage has been set for the location, back to the picnic……I have chosen to go with a black and white theme and I’m a big fan of checkered fabric – checks just seem to speak of picnics. I have chosen to use my plain black dinner napkins and have wrapped the cutlery inside the napkins. This is easy to do before leaving home and it keeps the items together. To give the classy black napkins a more casual look for a picnic, I have tied each napkin with narrow twine.
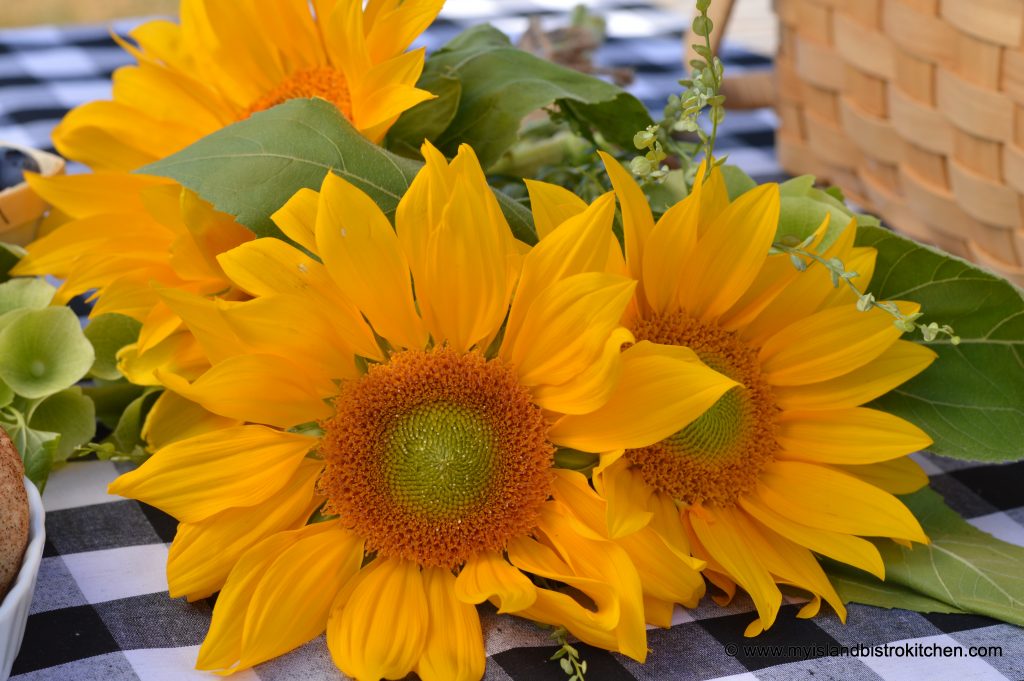
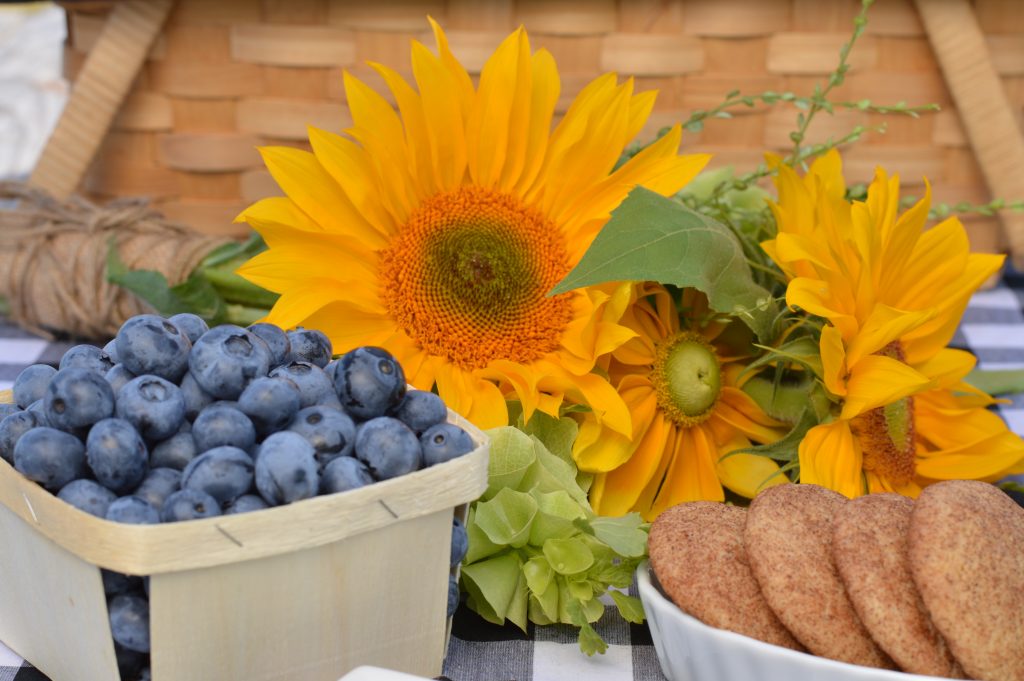
To add a punch of color to the table, I selected small bright yellow sunflowers paired with Bells of Ireland. Whether I am setting the table for an event at home or on the road, I like to see a well set table! These flowers were locally grown at Island Meadow Farm in York, PEI. They grow the most amazing array of flowers and I like to use them in my summer tablesettings.
Sunflowers and Bells of Ireland
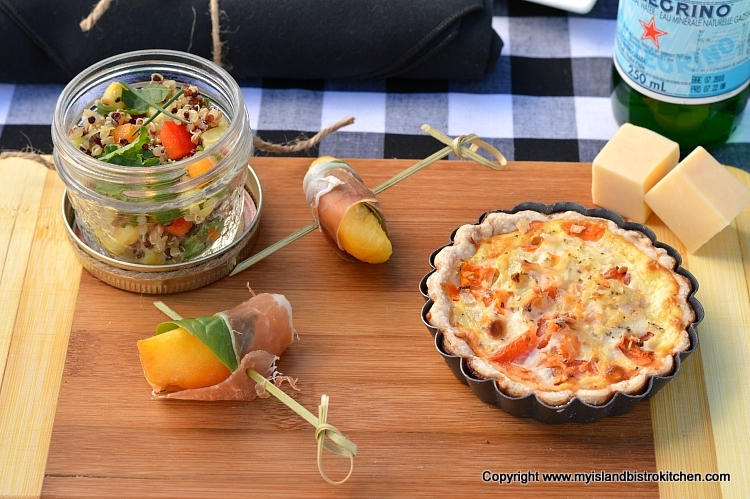
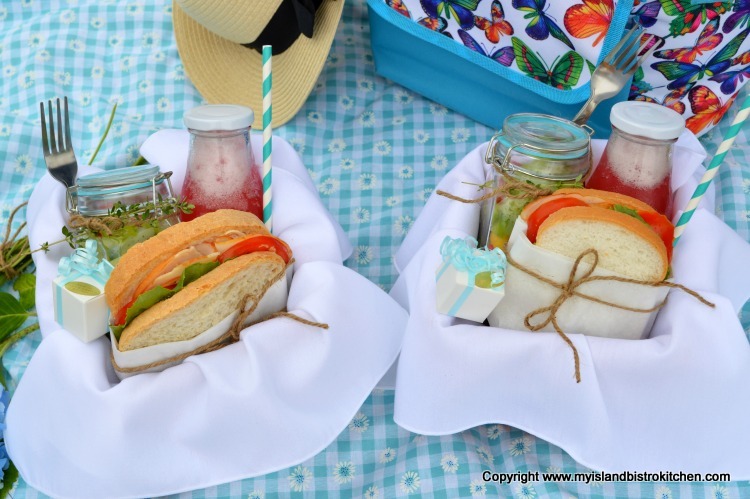
Picnics are meant to be casual fare so, while I always try to have a main, a side, some fruit, something sweet, and a beverage, I often like to include some finger/snacking foods as I have done today. Let’s start with the PEI mussels in the shell. These are steamed mussels to which I have added some red and orange pepper, celery, and red onion. A light dressing of a red wine vinaigrette makes these tasty little morsels.
PEI Mussels
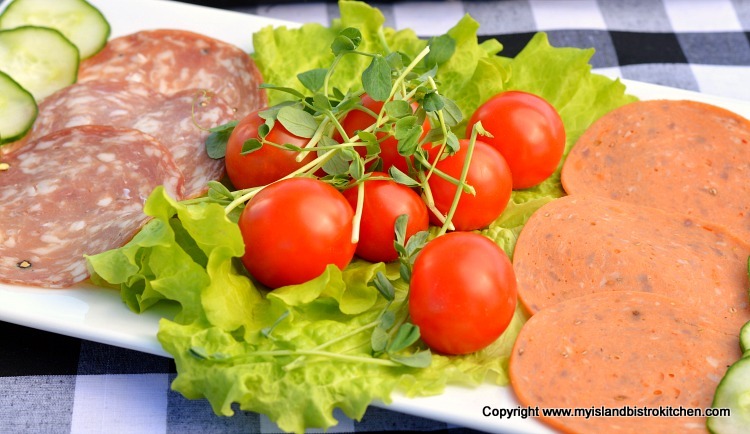
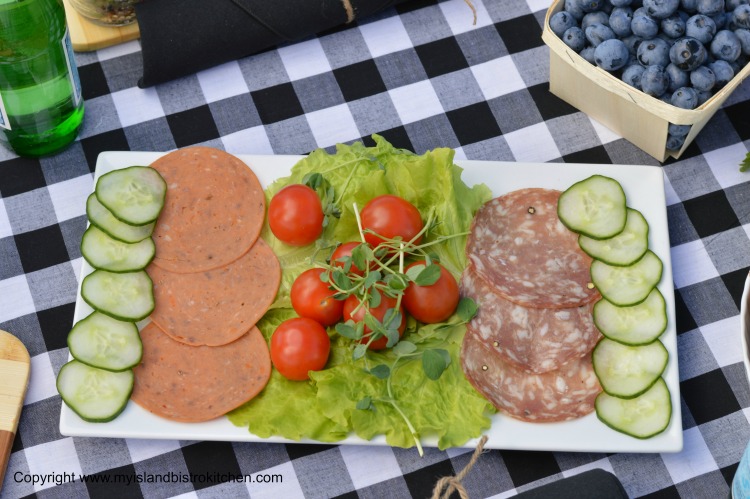
Cold cuts, cherry tomatoes, and cucumber are always good nibbling foods (and they add great color to the table).
The Nibbling Tray
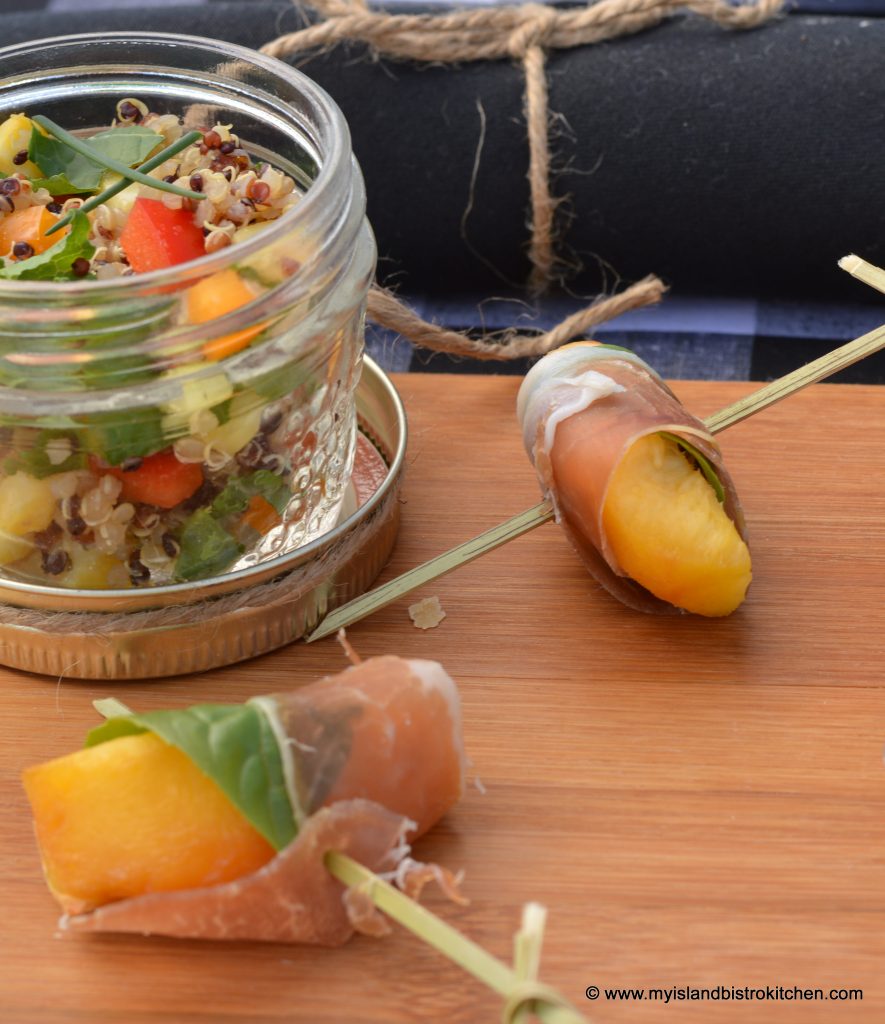
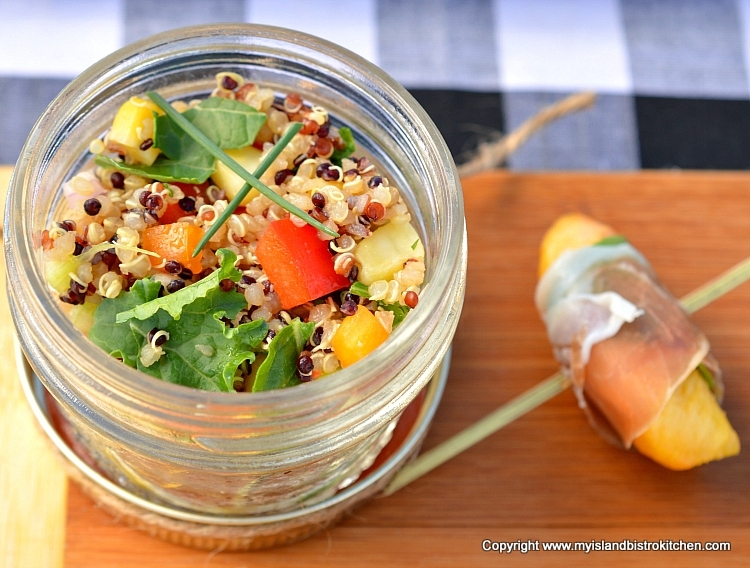
I wrapped peach wedges inside basil leaves and prosciutto (seen in the photo below). These little picnic hors d’oeuvres add color, texture, and flavor to the menu. They go particularly well with Gouda cheese.
Peaches in Prosciutto
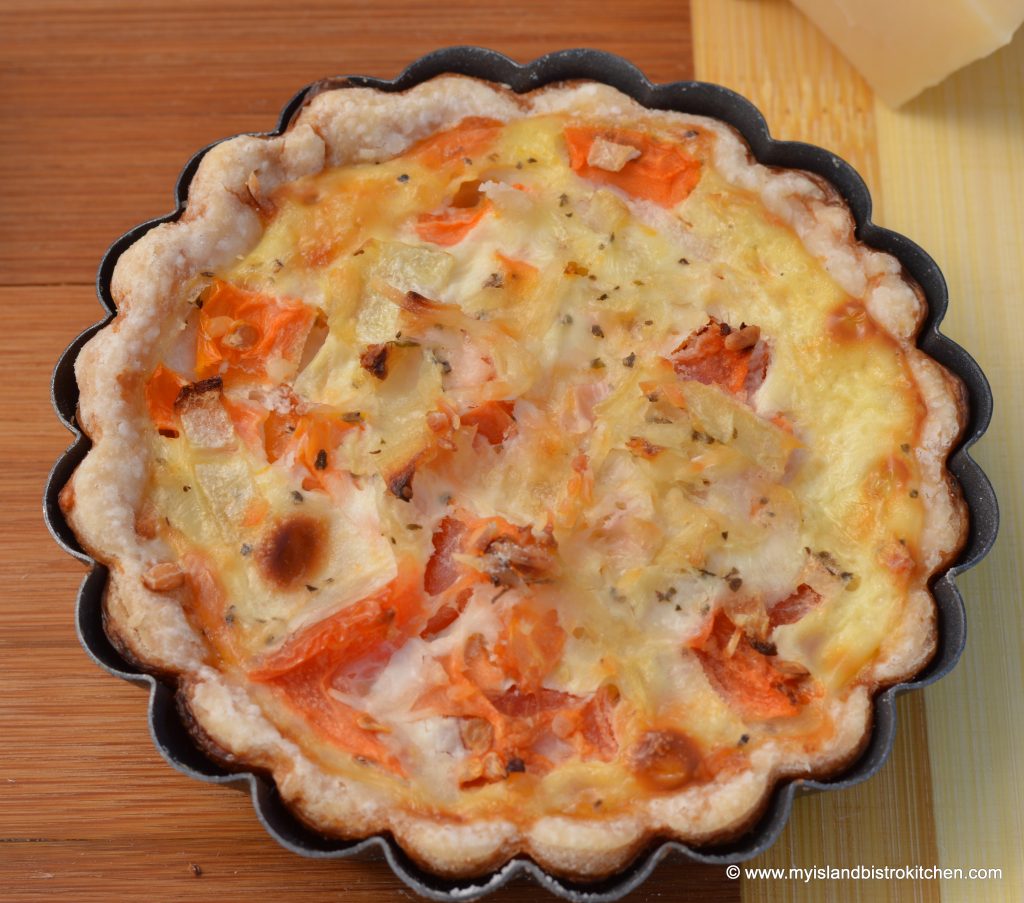
I have chosen small tomato quiches for the main in today’s picnic. The great thing about quiches is that they can be served, hot, warm, or cold and, when cold, are great travelers for the picnic basket.
Tomato Quiche
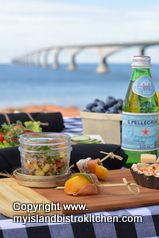
And, for a side, I opted for a quinoa salad with a balsamic vinaigrette dressing. To the quinoa I added peppers, corn, celery, red onion, and kale from our garden. Packing the salad into small Mason jars is an easy way to transport salads on a picnic.
Quinoa Salad
Plates are not always necessary for picnics. Here, I have used small breadboards which work equally well and they are easy to pack.
The Picnic Lunch
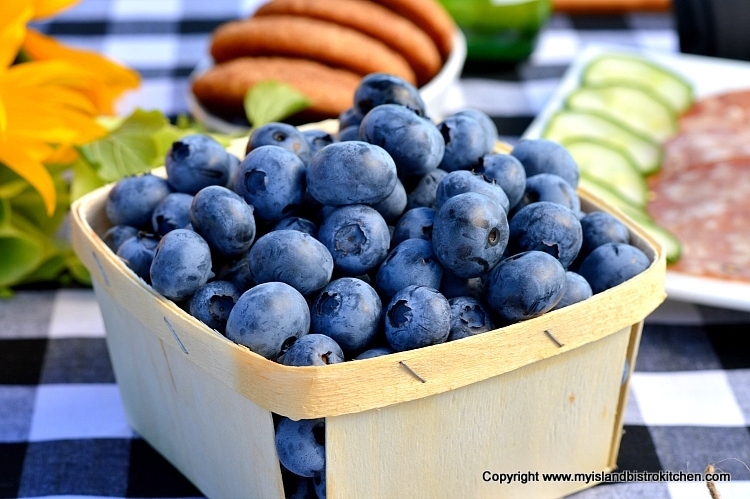
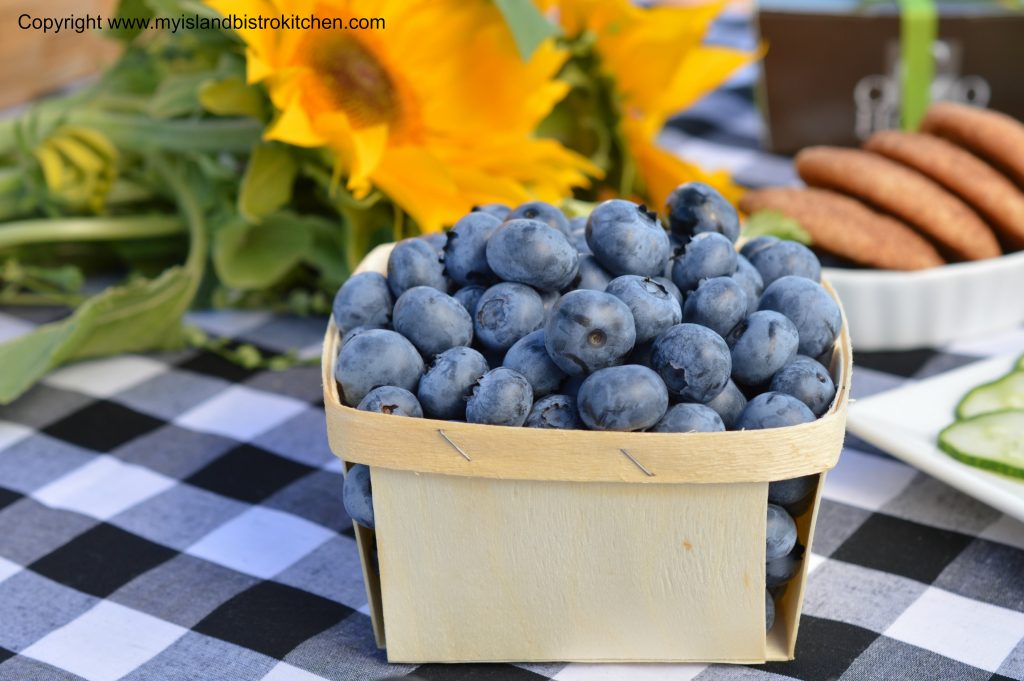
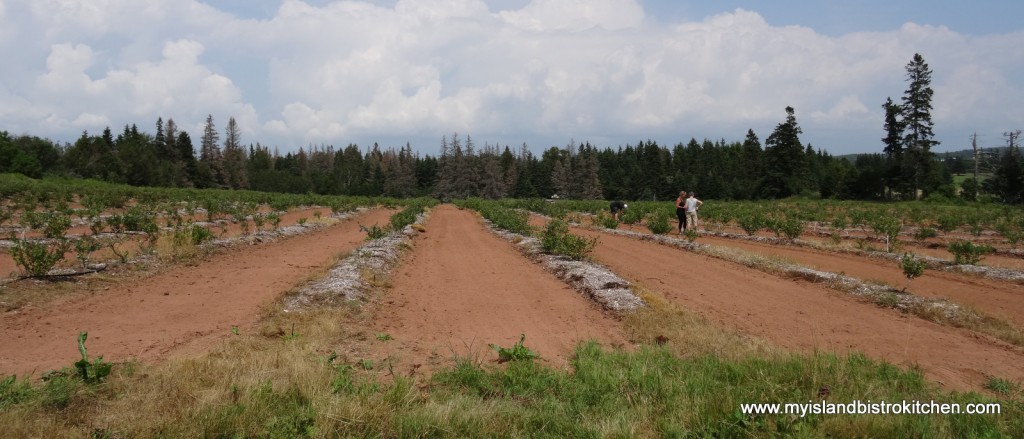
I popped by the Tryon Blueberries U-Pick in North Tryon on my way and picked a box of these amazing high-bush blueberries. I live on these berries when they are in season on the Island!
PEI Blueberries
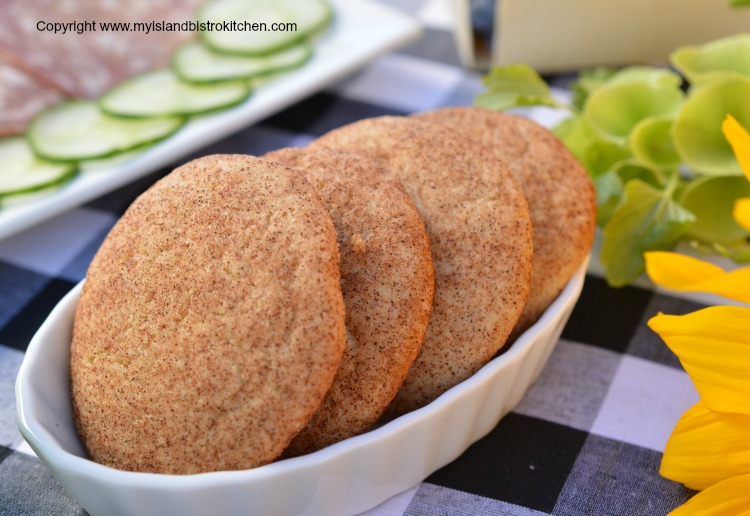
And, for the sweet tooth, I took along some of my homemade snickerdoodle cookies.
Snickerdoodle Cookies
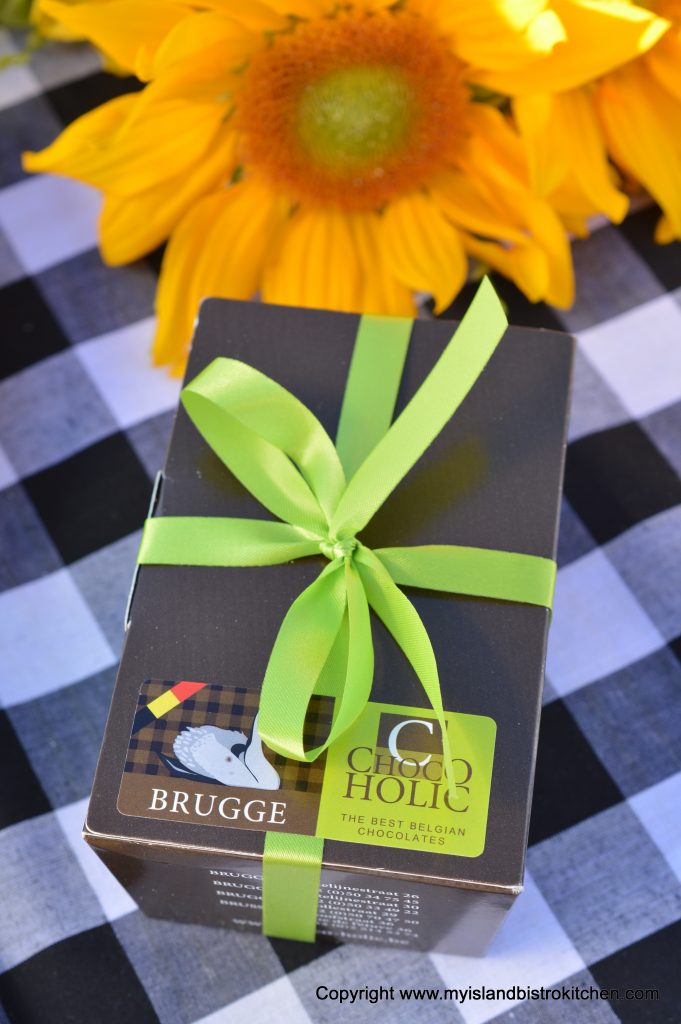
And, as an extra special treat, we enjoyed Belgian chocolates that we brought home from a wonderful visit to Brugge, Belgium. If you ever have the chance to visit Brugge, I highly recommend it. You can view photos of my visit to Brugge over on my travel blog, Island Shore Traveler, by clicking here.
Belgian Chocolates
I like to choose foods and elements to the picnic that are colorful and that blend well together.
A PEI Summer Picnic
I hope you have enjoyed a little “taste” of my picnic by the bridge.
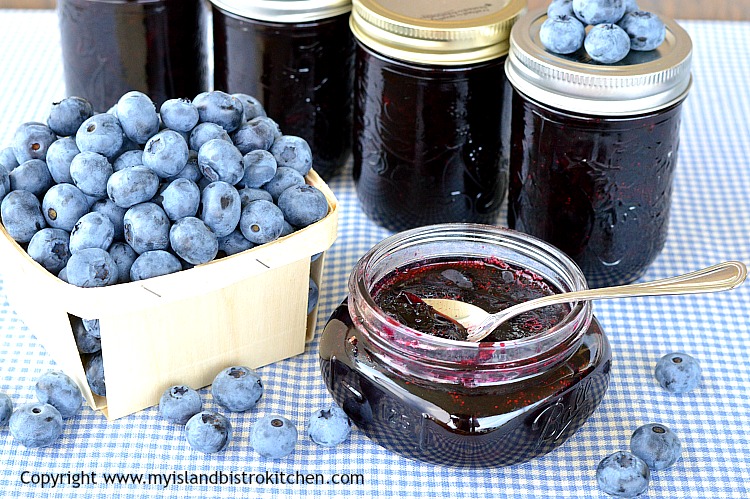
On my stove today was blueberry jam….but not just any jam…Blueberry AND Grand Marnier Jam! Blueberry and orange are a great flavor combo so why not add a little kick to the jam by adding an orange-flavored liqueur. This does add a level of richness and flavor complexity to the jam.
Blueberry and Grand Marnier Jam
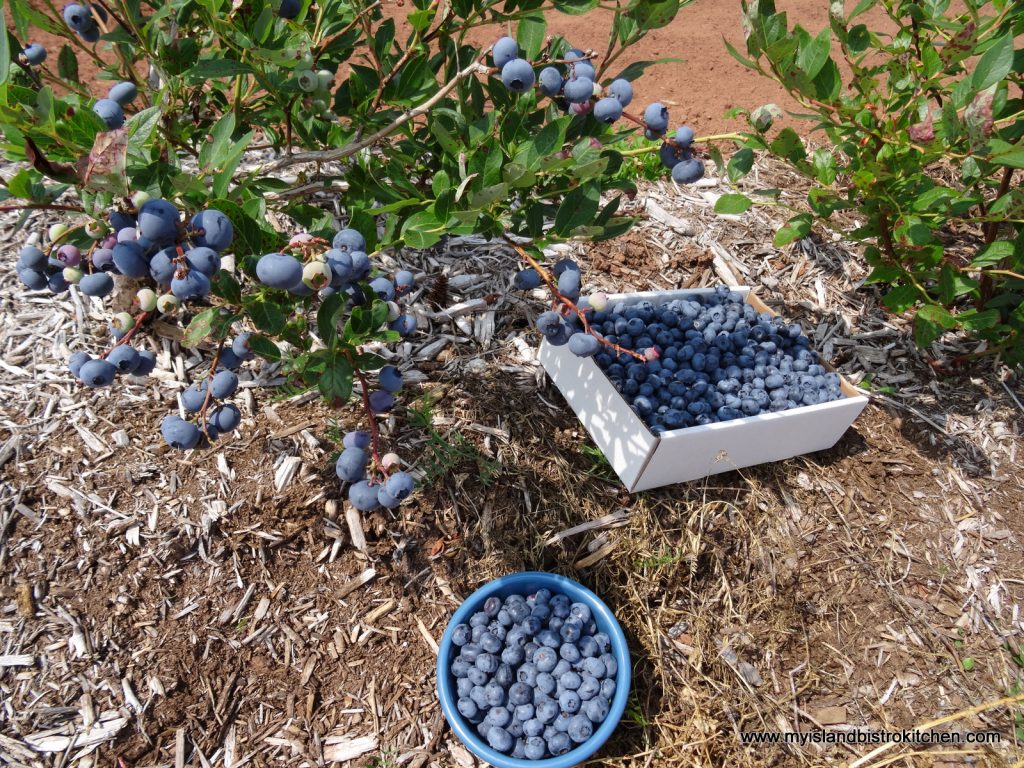
My berries came from the Tryon Blueberries U-pick in North Tryon, PEI. These are high bush blueberries and picking them is quick and easy since the vines are loaded with large flavorful berries. No need to get down on the hands and knees to pick these blueberries!
Tryon Blueberries U-pick FieldHigh Bush Blueberries
It takes probably no more than 10-15 minutes to pick a 5-pound box or bowlful and that’s generally from only 4-5 bushes.
This is an easy jam to make. I do use liquid pectin in the jam which gives it a soft set. I find blueberry jam takes forever to cook and thicken if I don’t use pectin. This is still a soft consistency jam that spreads easily and it is jam packed full of summer flavor!
Blueberry and Grand Marnier Jam
The berries need to be slightly crushed so that their juices get released quickly as this jam does not cook long. Only crush a few berries at a time, using a potato masher, and make sure they are in single layers as you crush them so that each berry gets broken open. There is no need to purée them as the idea is for the jam to still have some texture to it and not be completely smooth like a jelly.
Adding a bit of cinnamon, nutmeg, and lemon rind provides an additional flavor boost to the jam.
Blueberry and Grand Marnier Jam
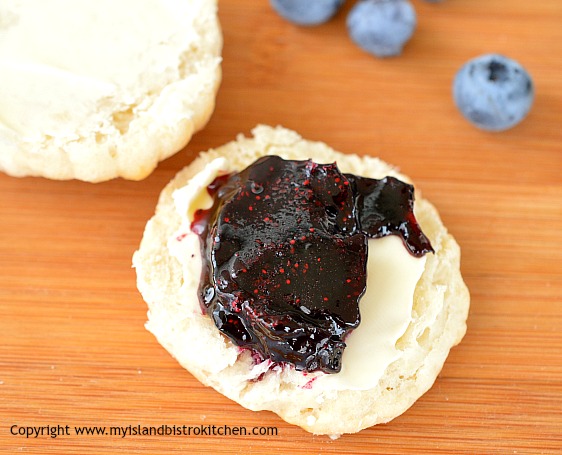
This is a super easy and quick jam to make. It is especially good on biscuits, scones, and toast. It’s also quite delightful dolloped on top of custard or Greek yogurt for a simple and quick dessert.
Blueberry and Grand Marnier Jam on Biscuits
[a printable version of recipe follows at end of post]
Blueberry and Grand Marnier Jam
Ingredients: 4 cups crushed high bush blueberries (apx. 2 lbs) 3¼ cups granulated sugar ½ tsp cinnamon ¼ tsp nutmeg 1 tsp finely grated lemon rind 2 tbsp freshly squeezed lemon juice 1 – 85ml pouch Certo liquid pectin ¼ cup Grand Marnier liqueur
Method: Wash berries. Using a potato masher, lightly crush berries to release their juice, mashing about one cup at a time, single layer.
In bowl, mix sugar and spices together. Stir in lemon rind.
Place crushed berries in large pot. Add the sugar-spice mixture and lemon juice. Stir well and bring to a full rolling boil, stirring to prevent scorching. Once boiling, boil hard for 1 minute, stirring continuously. Remove from heat and add the pouch of liquid pectin along with the Grand Marnier liqueur. Stir for 5 minutes, skimming off any foam that may form. Ladle into hot sterilized jars, filling to about ¼” from the top of each jar. Wipe each jar top. Cover jars with heated lids and screw on bands fingertip tight. Store jam in refrigerator or cold room. For greater longevity, process in a hot water bath, following canner manufacturer’s directions.
A quick and easy-to-make jam that is flavored with spices and Grand Marnier liqueur
Ingredients
4 cups crushed high bush blueberries (apx. 2 lbs)
3¼ cups granulated sugar
½ tsp cinnamon
¼ tsp nutmeg
1 tsp finely grated lemon rind
2 tbsp freshly squeezed lemon juice
1 - 85ml pouch Certo liquid pectin
¼ cup Grand Marnier liqueur
Instructions
Wash berries. Using a potato masher, lightly crush berries to release their juice, mashing about one cup at a time, single layer.
In bowl, mix sugar and spices together. Stir in lemon rind.
Place crushed berries in large pot. Add the sugar-spice mixture and lemon juice. Stir well and bring to a full rolling boil, stirring to prevent scorching. Once boiling, boil hard for 1 minute, stirring continuously. Remove from heat and add the pouch of liquid pectin along with the Grand Marnier liqueur. Stir for 5 minutes, skimming off any foam that may form. Ladle into hot sterilized jars, filling to about ¼” from the top of each jar. Wipe each jar top. Cover each jar with heated lids and screw on bands fingertip tight. Store jam in refrigerator or cold room. For greater longevity, process in a hot water bath, following canner manufacturer’s directions.
As I write this post on July 30th, I am celebrating Food Day Canada with a picnic featuring local Prince Edward Island food products. Food Day Canada is a day set aside to celebrate all the wonderful foods that we, as Canadians, enjoy.
For today’s picnic location, I have chosen the iconic Fort Amherst site, just across the harbour from Charlottetown. The building in the background of the photo above is known as the Blockhouse Point Lighthouse. The beacon for sailors was established in 1851 and is the second oldest lighthouse on the Island. Automated in 1962, no one lives in the lighthouse anymore but it was built with a two-story dwelling attached for the lighthouse keeper and his family.
We like to travel the Island in the summer and often pack a picnic lunch.
Picnic Lunch
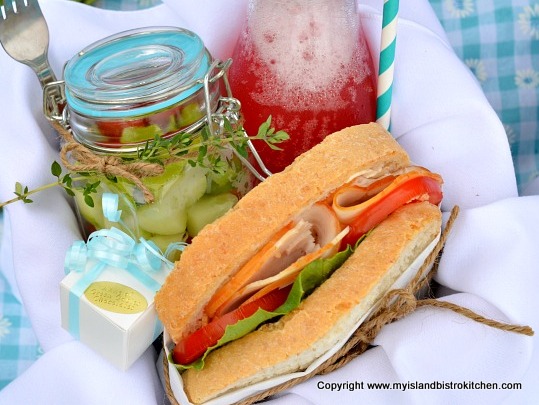
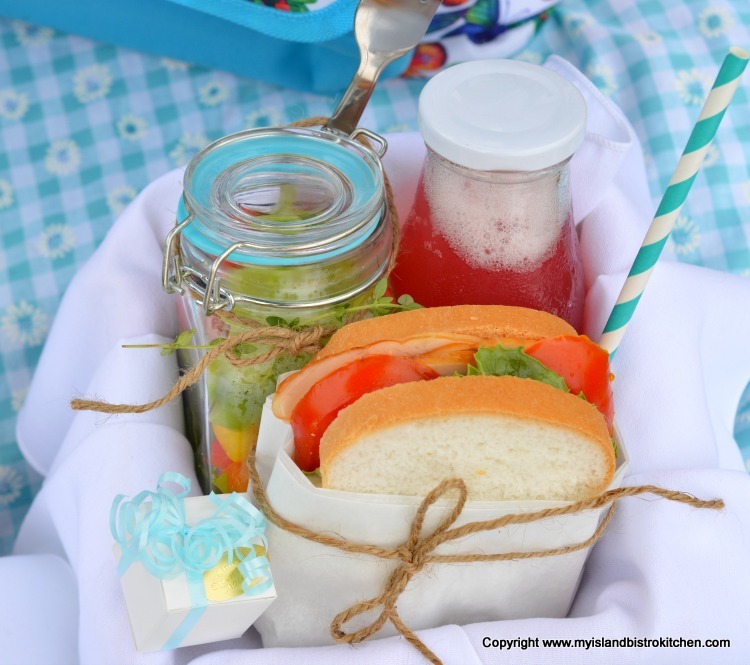
I like to sometimes pack individual picnic boxes or baskets, as I have done today. Each basket is like a personalized gift and it’s great fun to see picnic guests unpacking their baskets and discovering what surprises await them. It’s also a great way to customize the baskets to accommodate those with special dietary needs and food preferences since their lunch basket can be prepared especially for them. Nothing makes a guest feel more special than when the host/hostess plans and prepares for their special food needs!
The only downside to this style of picnic is that the baskets are obviously not insulated so, for travel purposes, I recommend they be transported inside a large insulated cooler with ice packs.
I have named this picnic the Locovore’s Picnic since I have selected Island products for the basket contents. Here’s the menu:
Locovore’s Picnic
Main
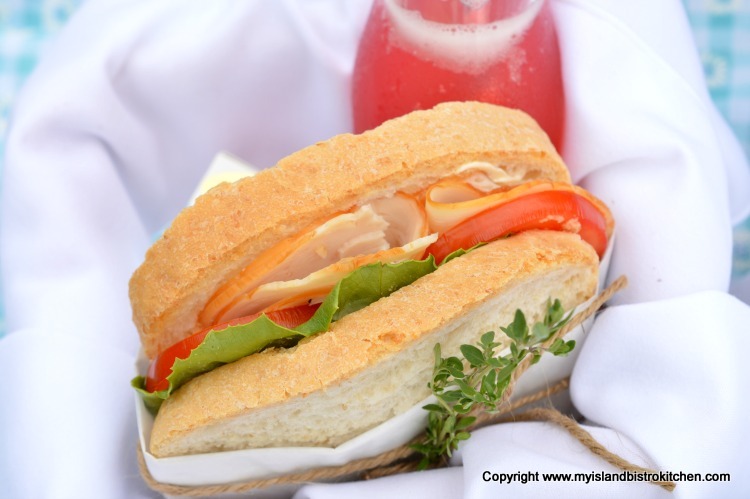
Sandwich – Larkin’s smoked chicken breast with Schurman Family Farm organic tomatoes and lettuce from the garden all on bread from Mary’s Bake Shoppe
Side
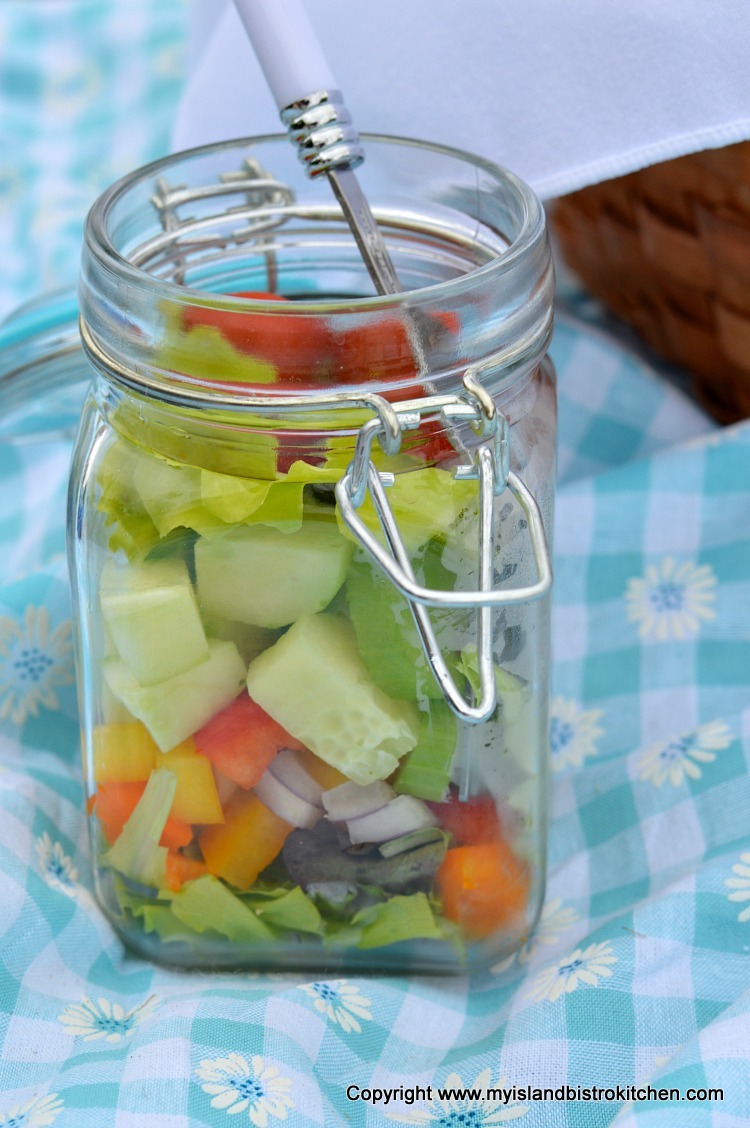
Tossed green salad with lettuce freshly picked from our garden and peppers, cucumbers, and tomatoes from Schurman Family Farm
Beverage
Homemade Rhubarb Cordial
Sweet Ending
Anne of Green Gables Island-made chocolate
Here’s a closer peek into the lunch baskets, each of which is lined with a white cloth napkin. I had just poured the lemon-lime soda into the rhubarb cordial (recipe here) before this photo was taken so it is still quite fizzy!
Individual Picnic Baskets
And, here’s a closer look….
Smoked Chicken Sandwich
I love packing the salads in these little glass jars. I have separate small containers for the vinaigrette which, of course, should only be added to the salad at the time of serving.
Salad in a Jar
Choosing a good quality bread will help the sandwich to hold together, especially if adding a number of ingredients as I have done here. Mary’s Bake Shoppe in Kensington, just outside Summerside, makes great bread and a number of different kinds. The one in the photograph below is oatbran bread, one of my all-time favorites.
Smoked Chicken Sandwich
I wrapped each sandwich in parchment paper secured with twine. This helps to keep it intact.
Sandwich Basket Contents
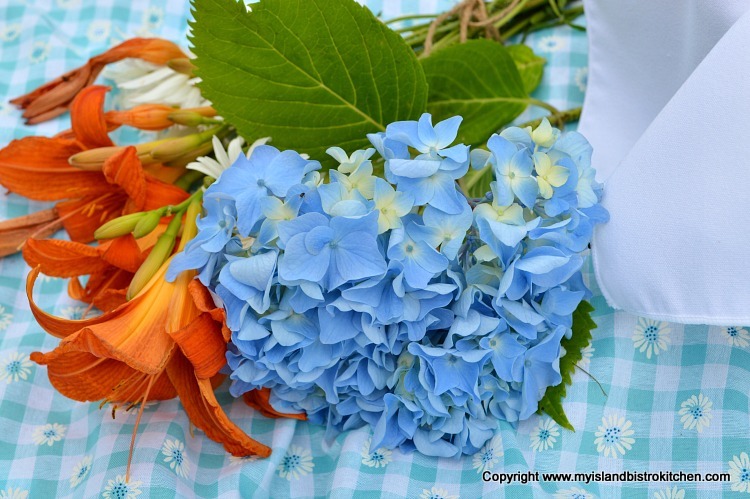
I have used a turquoise color theme for today’s picnic – it has a real summery feel to it!
Turquoise Summer Time Picnic
The flowers were picked from our own garden. It’s the little touches that make the event more special!
Summer Flower Picnic Bouquet
Time to stop photographing and eat lunch!
Let’s Eat Lunch!
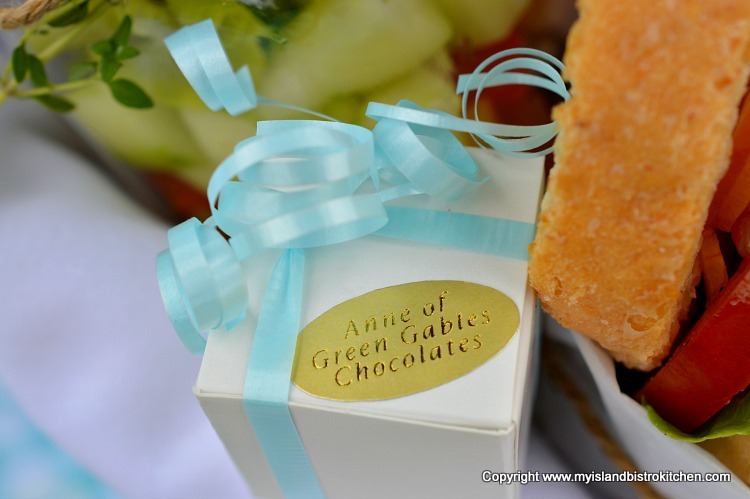
Curious to know what’s in that tiny white box with the pretty turquoise ribbon?
Anne of Green Gables Chocolates
These chocolates are hand-made right here on Prince Edward Island and they are quite divine!
Handmade PEI Chocolates
So, there you have it! This is how I spent Food Day Canada 2016!
The Locovore’s Picnic Basket
Great food with a lovely view! A perfect PEI summer day!
Picnic at Fort Amherst PEI
Thanks for coming along on my picnic this afternoon!
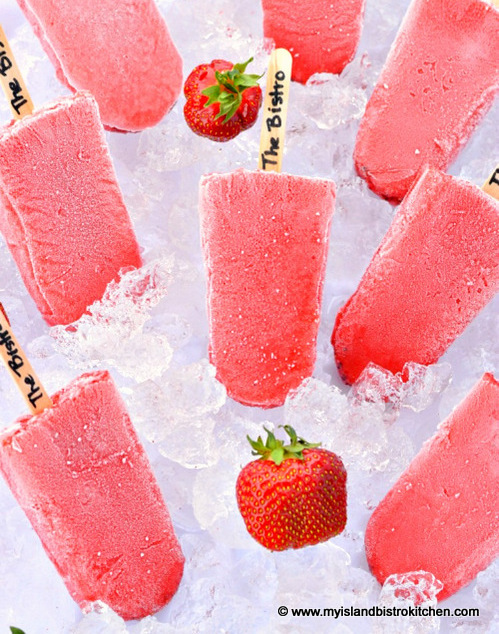
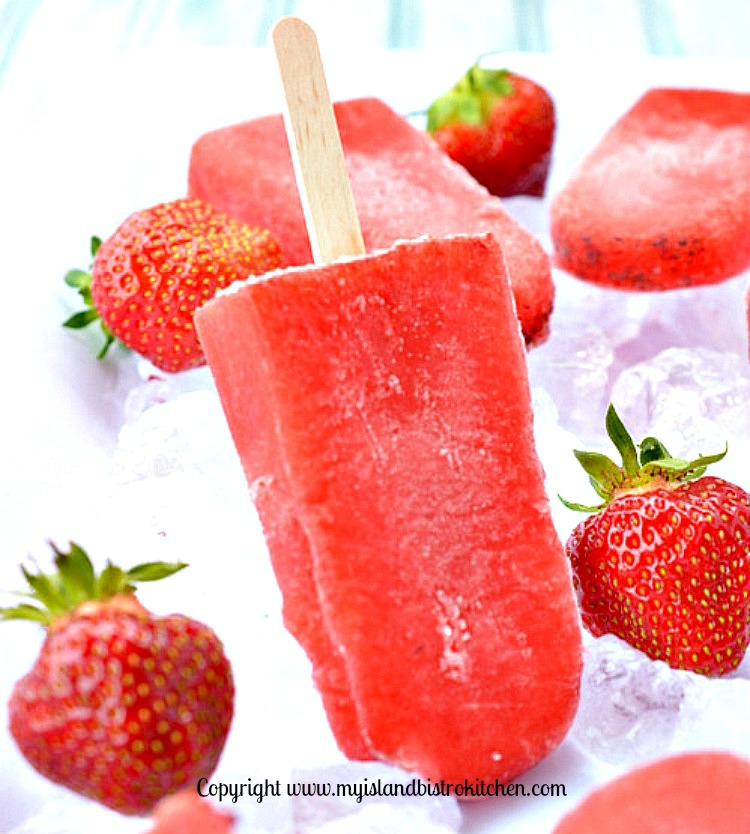
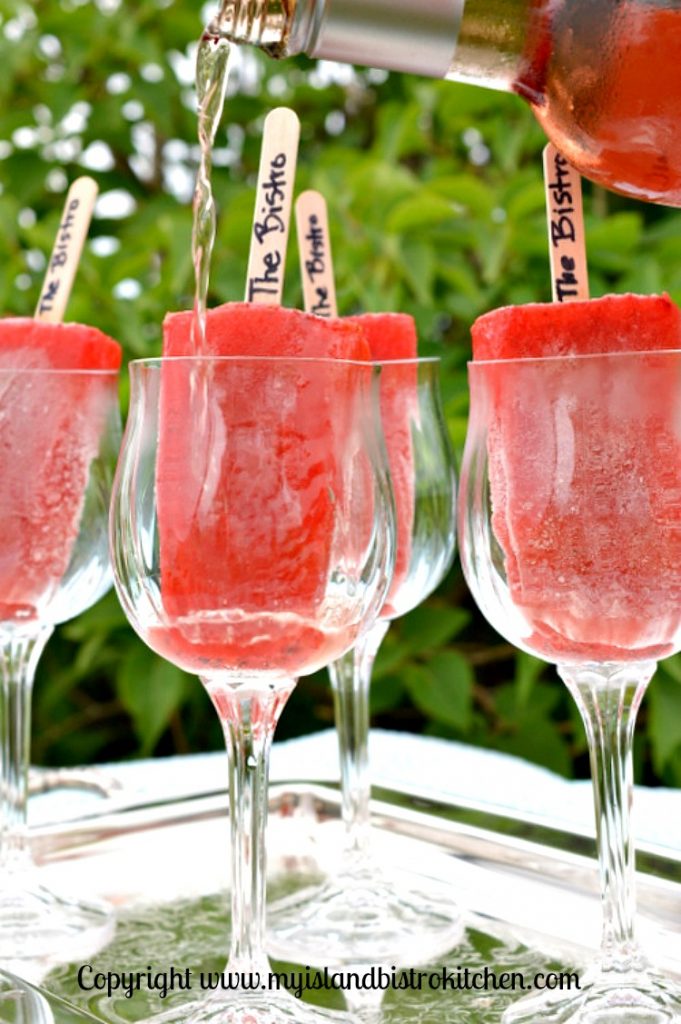
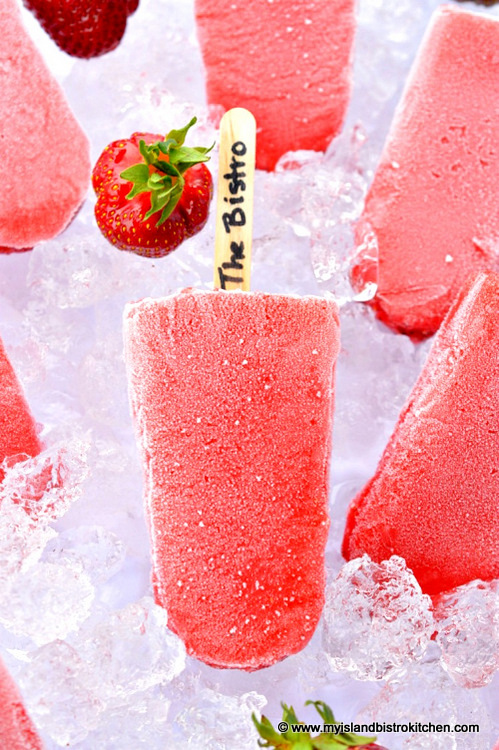
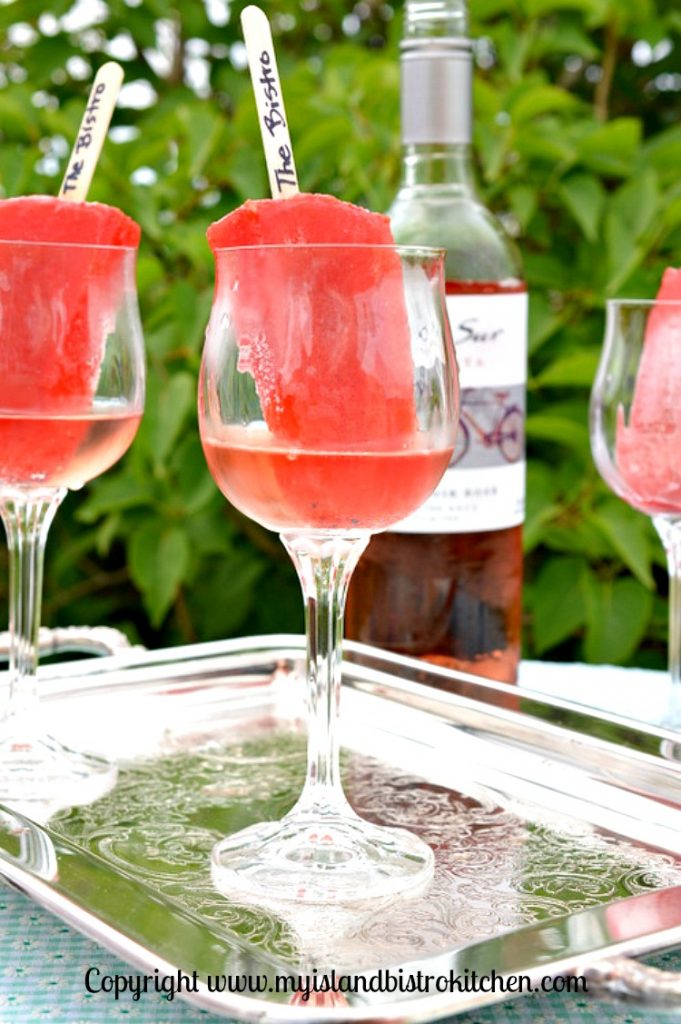
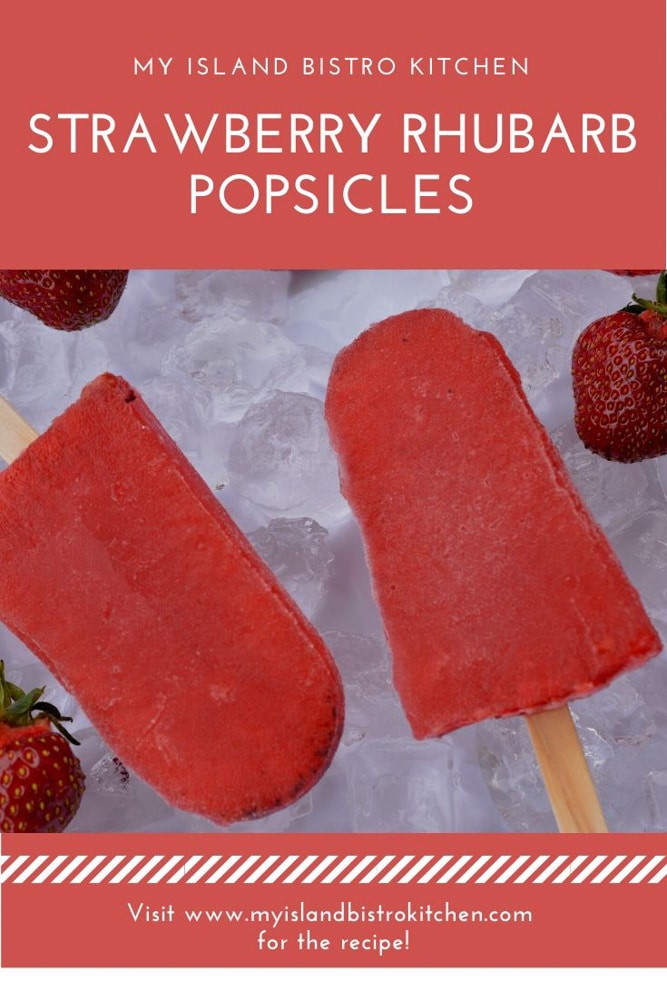
One of the quintessential summertime treats would have to be popsicles! They’re cool and refreshing and there are so many flavor combinations.
The one thing I find about homemade popsicles is that it is difficult to get them to freeze rock hard like the commercial varieties. One method I use is to add unflavored gelatin to the mix. While it won’t freeze as hard as store-bought ones which probably have all kinds of stabilizers added to them, adding gelatin does extend the life of the popsicles a wee bit before they melt. It also helps to hold the ingredients together.
Strawberry and Rhubarb Summertime Treats
One of my favorite flavor combos is strawberry and rhubarb. I use rhubarb juice (made from cooking the rhubarb and extracting its juice) in a lot of recipes, including this one.
To make this an adult treat, try serving the popsicle in a wine glass and adding a sparkling or rosé wine such as pinot noir rosé.
Strawberry Rhubarb Popsicles
Combining two great summer flavors, these are the perfect treat to cool off with this season.
Homemade Popsicles
[Printable recipe follows at end of post]
Strawberry Rhubarb Popsicles
Ingredients: ½ cup granulated sugar ½ cup water
4½ cups rhubarb, chopped into ½” pieces (apx. 1 lb. 2 oz) 2 tbsp granulated sugar 1 cup water
4½ oz strawberries 2 tbsp granulated sugar ½ tbsp strawberry balsamic vinegar Dash salt ½ tbsp lemon juice 1 tbsp Epicure Summer Berry Dip Mix (optional)
1 tbsp unflavored gelatin dissolved in 3 tbsp of the rhubarb juice ¼ cup boiling water
1/3-cup popsicle molds (enough for 9-10 popsicles)
Method:
In small saucepan, combine the first amount of sugar and water to make a simple syrup. Bring to a boil then reduce heat to medium low and boil gently for 3 minutes. Remove from heat and cool completely.
After simple syrup has cooled, cook the rhubarb and second amount of sugar in 1 cup water for about 7-10 minutes or until rhubarb is soft and mushy. Strain through a fine mesh sieve. Discard the pulp. This should yield approximately 1½ cups rhubarb juice.
Purée the strawberries and stir in 2 tbsp sugar.
Dissolve the gelatin in 3 tbsp of the rhubarb juice. Add ¼ cup boiling water. Stir 1-2 minutes until the gelatin is completely dissolved.
In large measuring cup, combine the simple syrup, rhubarb juice, puréed strawberries, strawberry balsamic vinegar, salt, lemon juice, Summer Berry Dip Mix (optional), and gelatin. Stir well. Distribute mixture evenly between 9-10 popsicle molds. Insert popsicle sticks and covers that came with the popsicle molds and place in freezer to freeze completely. If using wooden popsicle sticks, freeze the mixture for approximately 1 hours until thick and slushy, then insert the wooden sticks and return popsicles to freezer to freeze completely.
1 tbsp unflavored gelatin dissolved in 3 tbsp of the rhubarb juice
¼ cup boiling water
Instructions
In small saucepan, combine the first amount of sugar and water to make a simple syrup. Bring to a boil then reduce heat to medium low and boil gently for 3 minutes. Remove from heat and cool completely.
After simple syrup has cooled, cook the rhubarb and second amount of sugar in 1 cup water for about 7-10 minutes or until rhubarb is soft and mushy. Strain through a fine mesh sieve. Discard the pulp. This should yield approximately 1½ cups rhubarb juice.
Purée the strawberries and stir in 2 tbsp sugar.
Dissolve the gelatin in 3 tbsp of the rhubarb juice. Add ¼ cup boiling water. Stir 1-2 minutes until the gelatin is completely dissolved.
In large measuring cup, combine the simple syrup, rhubarb juice, puréed strawberries, strawberry balsamic vinegar, salt, lemon juice, Summer Berry Dip Mix (optional), and gelatin. Stir well. Distribute mixture evenly between 9-10 popsicle molds. Insert popsicle sticks and covers that came with the popsicle molds and place in freezer to freeze completely. If using wooden popsicle sticks, freeze the mixture for approximately 1 hours until thick and slushy, then insert the wooden sticks and return popsicles to freezer to freeze completely.
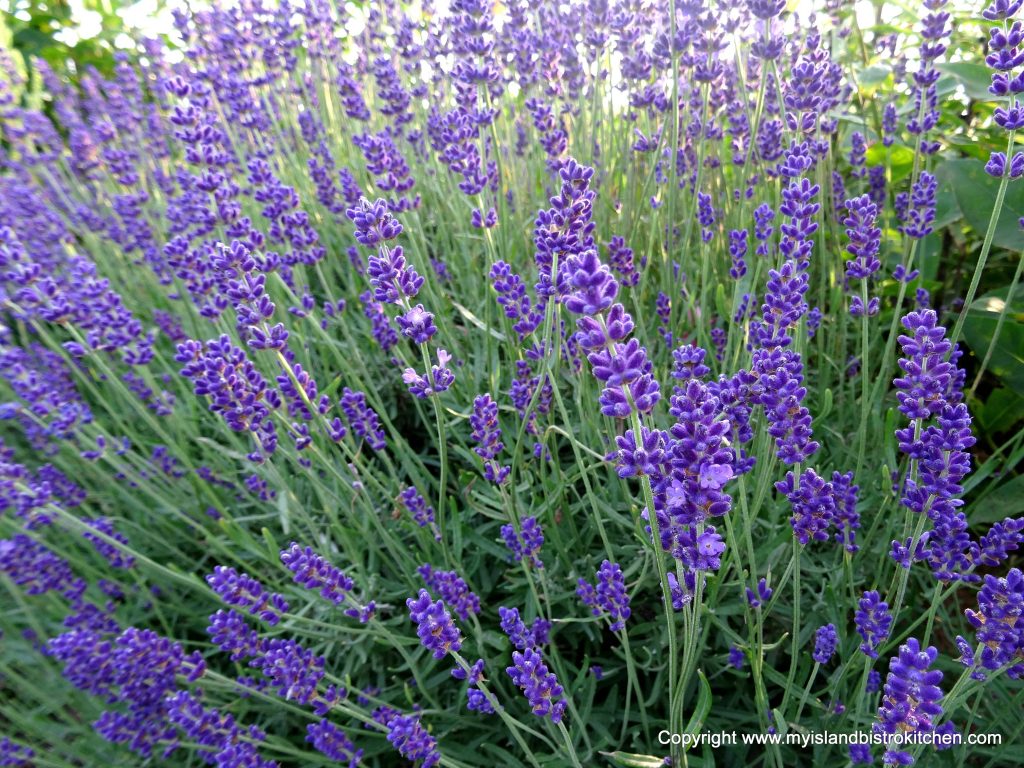
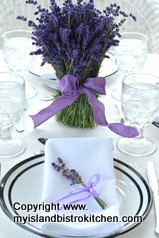
Harvesting my small lavender crop is one of my most favorite parts of summer. Working among the colorful and beautifully-scented flowers is a rite of summer for me.
Lavender Ready for Harvesting
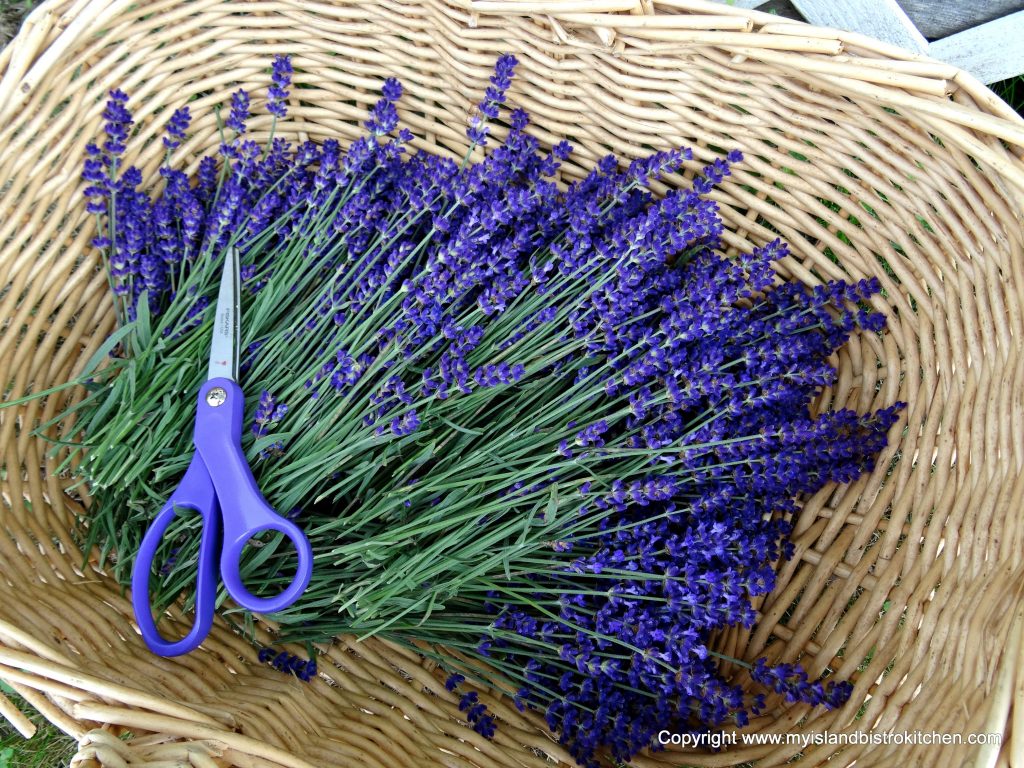
I picked the crop this weekend and, since it was such a lovely evening, I used it for the inspiration for my al fresco dining. And, of course, my menu drew its inspiration from these edible flowers as well.
Lavender Harvesting
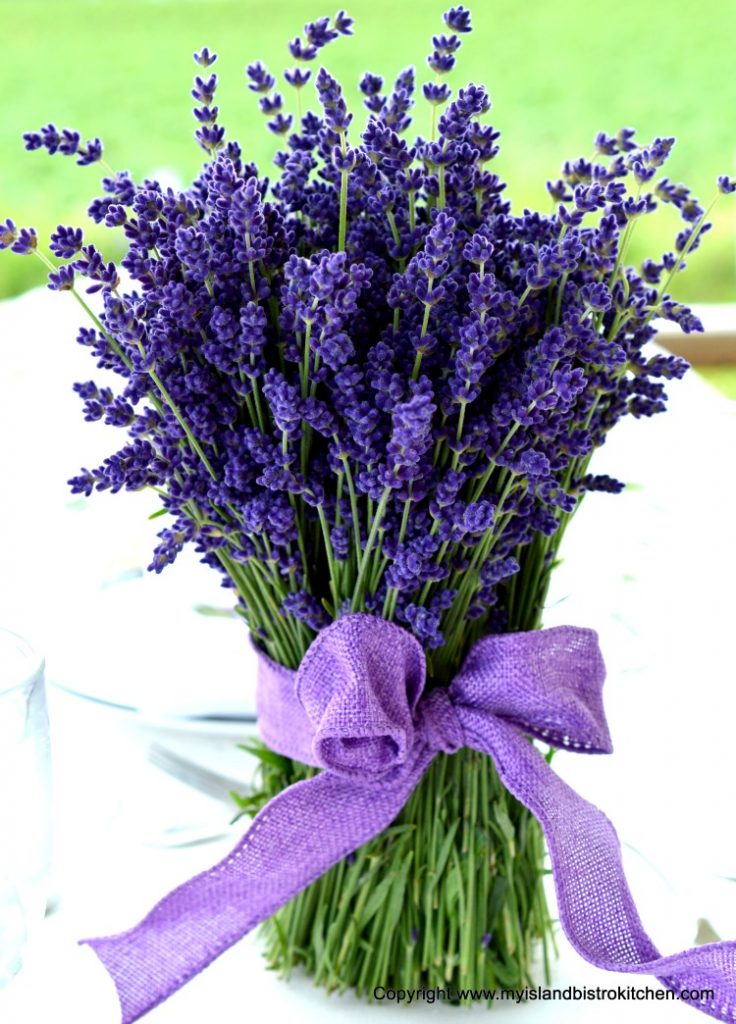
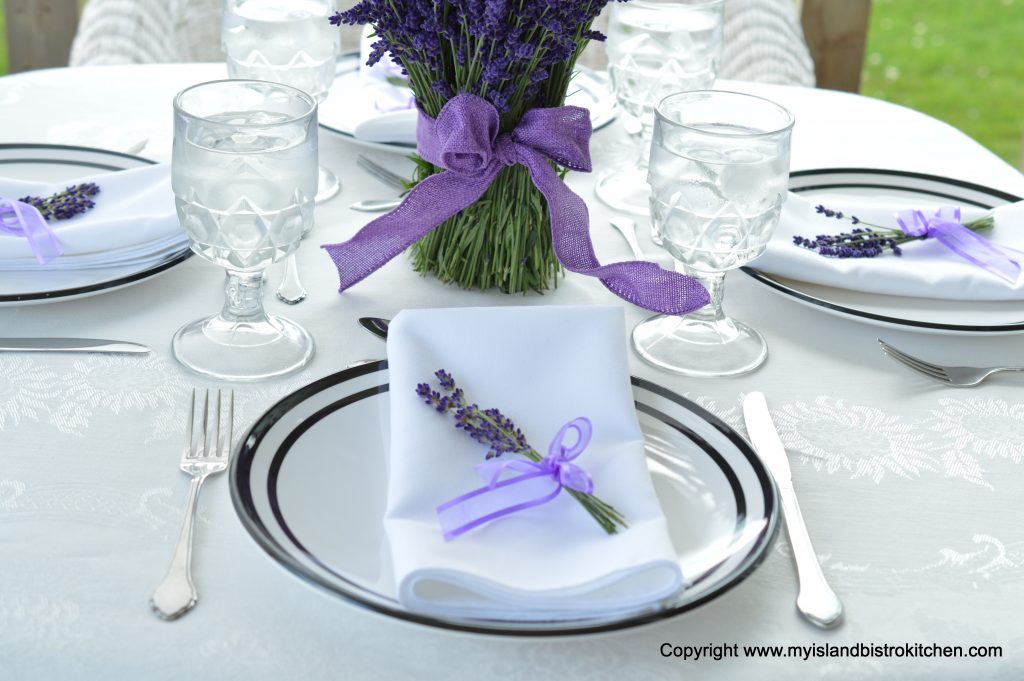
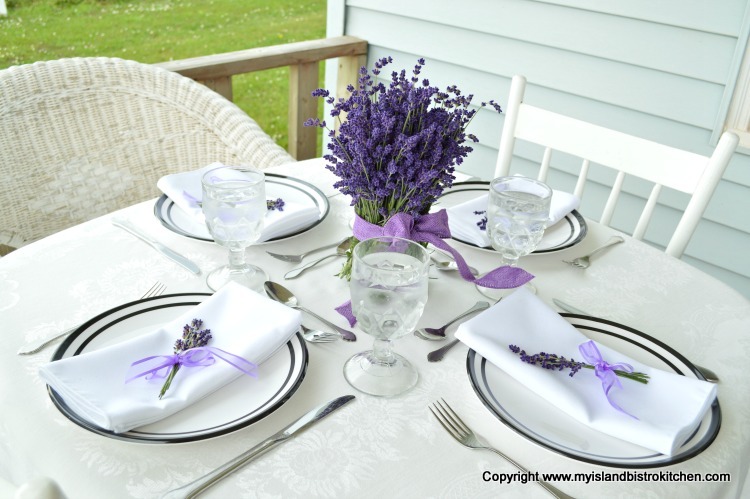
I wanted to keep the tablesetting simple since the table is a small square. So, I simply gathered together a lot of the flowers into a single stuke shape and tied it with a complimentary shade of wired burlap ribbon.
Lavender Bouquet
A simple trim on the ends of the stems formed an even base for the bouquet to stand upright in the center of the table.
Centerpiece
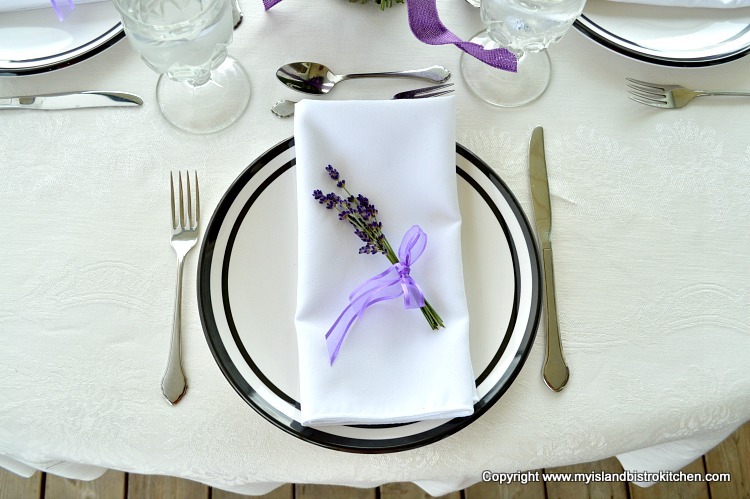
I carried the floral and color theme through by tying small bunches of the colorful stems with an airy ribbon. These gave a pop of color and definition to the white napkins.
Seasonal Tablesetting
I like the clean, crisp backdrop of a white tablecloth. I often tend to use plain white dishes because food really shows well on them. However, an all white table can be a challenge because it can sometimes look flat and lack definition. I acquired these white dishes with a double dark rim this summer. They work well in these kinds of situations because they lend some depth and definition to a table.
PlacesettingSummer Tablesetting
I used my antique stemmed water glasses to add a bit of height and nostalgia to the setting.
Al Fresco Tablesetting
This was my summery Saturday evening dining table.
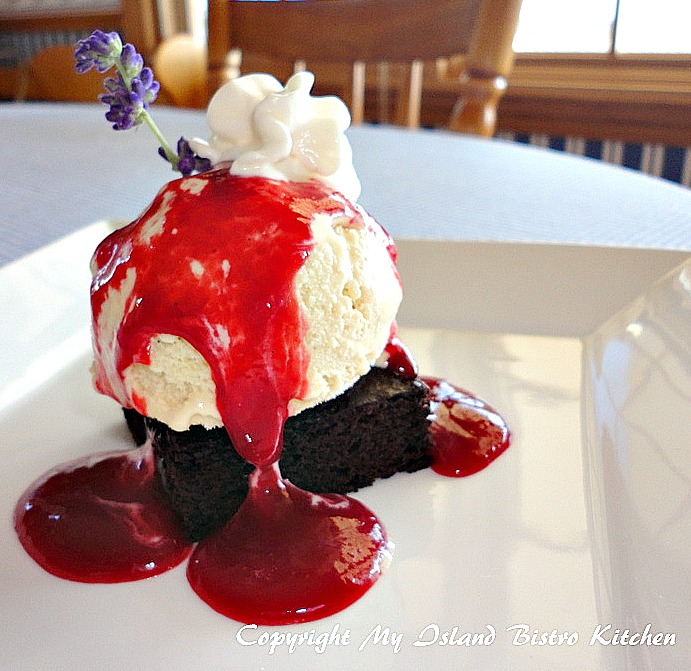
Four years ago, I wrote a story on the Five Sisters of Lavender Lane in Kelly’s Cross, PEI. These ladies had a small farm and sold edible lavender. Unfortunately, they are no longer in business but, by following this link, you can get my recipe for Lavender Honey Ice Cream which was the finale for my dinner last evening.
Lavender Honey Ice Cream on a Chocolate Brownie and Drizzled with Raspberry Coulis
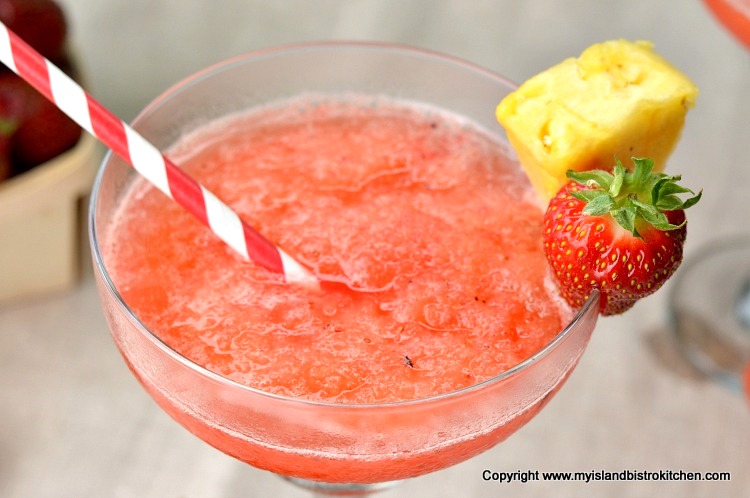
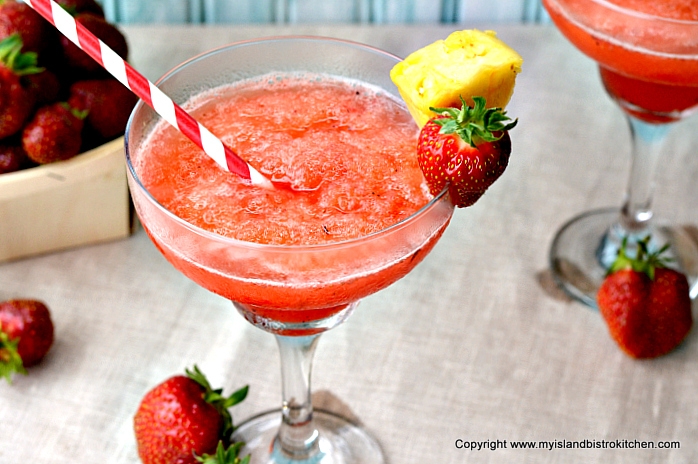
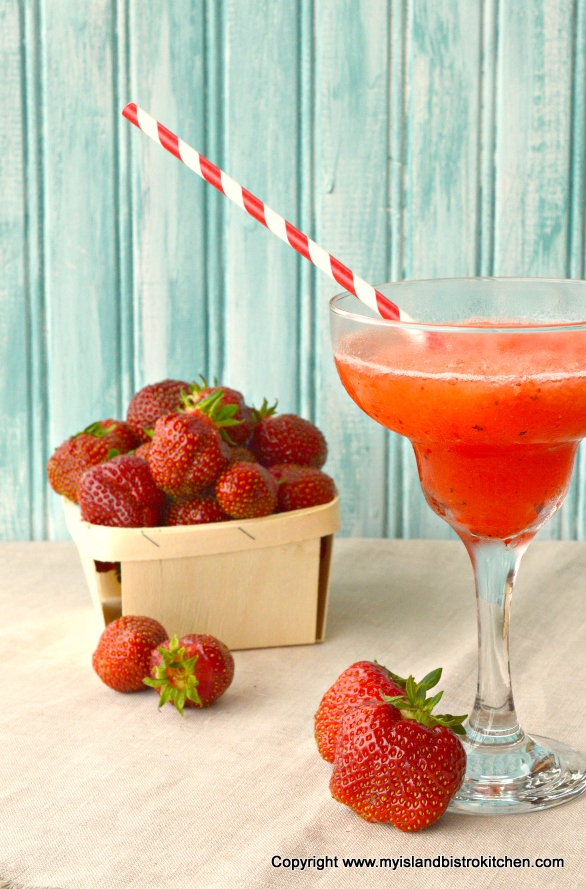
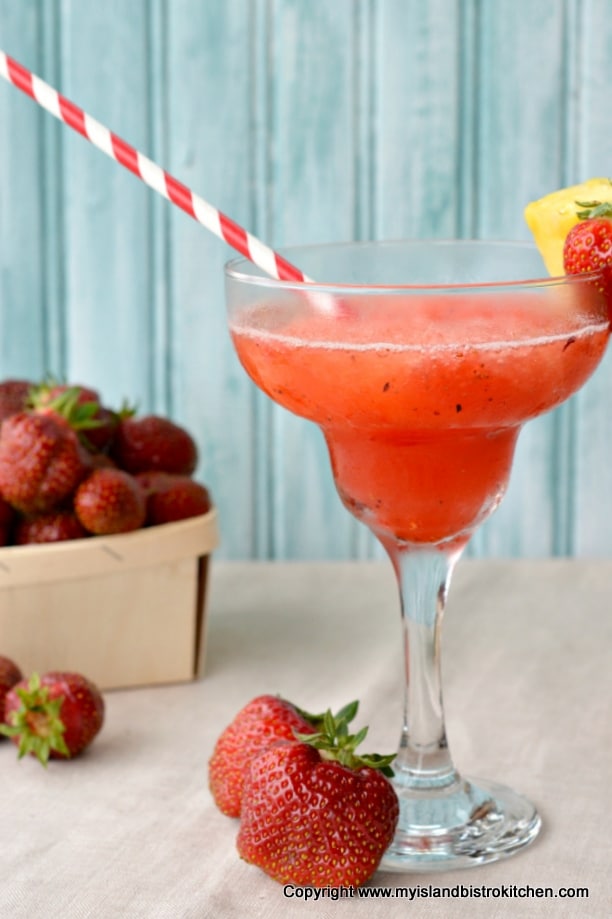
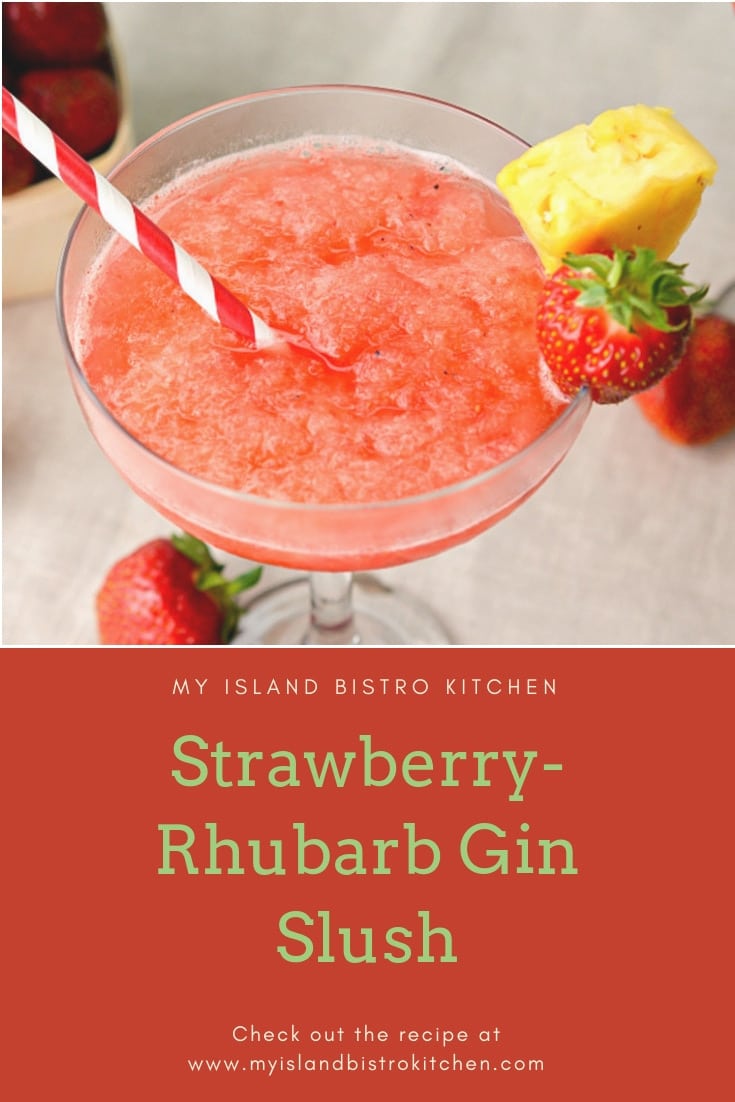
Strawberry Slush is my newest summer drink creation and it has quickly become a favorite! Strawberries take center stage in this beverage but there is also a mix of other fruit juices that include rhubarb, pineapple, lemon and orange juices, and some pink lemonade. The addition of Epicure’s “Summer Berry” sweet dip mix deepens the flavor and adds some interesting speckles throughout the slush. Because I know Epicure products may not be available everywhere, I have included this as an optional addition as the slush will still taste quite fine without it. My recipe calls for gin and any brand may be used.
Strawberry Slush
Slush takes 2-3 days to reach the desired consistency. Be sure to store it in the coldest part of the deep freeze and stir it once or twice each day while it is freezing. This helps to ensure that all the ingredients continue to be mixed. For other tips on making slush, visit my posting on making Rhubarb Slush by clicking here.
Strawberry Slush
Mix this slush with your favorite clear soda. There is no set ratio of how much slush to serve to the amount of soda. I use the slush to fill between 1/3 and 1/2 the glass and top up the remainder with soda. I prefer lemon-lime soda with this slush but seven up or gingerale also work well, too.
This is a lovely, colorful, and refreshing drink on a hot summer afternoon.
My Island Bistro Kitchen’s Strawberry Slush
(Printable recipe follows at end of post)
Strawberry Slush
Ingredients:
1½ cups water 1½ cups granulated sugar
7 oz rhubarb, chopped into ½” pieces Scant ½ cup water
1/3 cup pineapple juice ¼ cup freshly squeezed and strained lemon juice (1 small lemon) 5 oz (apx. ½ can) frozen pink lemonade, slightly thawed 5 oz (apx. ½ can) frozen orange juice, slightly thawed 10 oz strawberries puréed to equal approximately 1 1/3 cups purée, mixed with 1/3 cup granulated sugar 1½ tbsp Epicure’s “Summer Berry” sweet dip mix (optional) 1½ cups gin
Strawberries, lemon slices, or pineapple chunks for garnish, if desired Method:
In medium-sized saucepan, combine the water and granulated sugar to make a traditional simple syrup. Bring to a boil over high heat then reduce to medium-low heat and boil gently for approximately 4-5 minutes, stirring occasionally, until sugar has completely dissolved and liquid is clear. Remove from heat and let cool to room temperature, then chill.
In separate medium-sized saucepan, combine the rhubarb and scant half cup of water. Bring to a boil over medium-high heat then reduce to medium low and cook gently for about 10 minutes, stirring often, until rhubarb has broken down into a soft sauce-like consistency.
Pour rhubarb and its liquid into a fine sieve/strainer placed over a bowl or large measuring cup. Let juice drip from rhubarb, periodically pressing the rhubarb pulp with the back of a large spoon to extract as much juice as possible. This should yield approximately ½ cup of rhubarb juice. Chill. Discard rhubarb pulp.
Into a freezable container that can hold at least 8 cups of liquid, pour in the simple syrup, chilled rhubarb juice, pineapple juice, lemon juice, pink lemonade, orange juice, strawberry purée, Epicure Summer Berry mix, and gin. Stir well.
Place airtight cover on container. Freeze in the coldest part of the deep freeze, stirring 2-3 times during the freezing process. Be patient as this will take 2-3 days for it to reach the desired slush consistency.
To serve, fill glass between one-third and one-half full of slush and top up with a clear soda such as lemon-lime. Garnish with a lemon wheel, strawberry, or pineapple chunk and serve immediately. Keep remainder of slush stored in the coldest part of the freezer so it will maintain its consistency. Yield: Apx. 7½ cups of slush
Strawberries, lemon slices, or pineapple chunks for garnish, if desired
Instructions
In medium-sized saucepan, combine the water and granulated sugar to make a traditional simple syrup. Bring to a boil over high heat then reduce to medium-low heat and boil gently for approximately 4-5 minutes, stirring occasionally, until sugar has completely dissolved and liquid is clear. Remove from heat and let cool to room temperature, then chill.
In separate medium-sized saucepan, combine the rhubarb and scant half cup of water. Bring to a boil over medium-high heat then reduce to medium low and cook gently for about 10 minutes, stirring often, until rhubarb has broken down into a soft sauce-like consistency.
Pour rhubarb and its liquid into a fine sieve/strainer placed over a bowl or large measuring cup. Let juice drip from rhubarb, periodically pressing the rhubarb pulp with the back of a large spoon to extract as much juice as possible. This should yield approximately ½ cup of rhubarb juice. Chill. Discard rhubarb pulp.
Into a freezable container that can hold at least 8 cups of liquid, pour in the simple syrup, chilled rhubarb juice, pineapple juice, lemon juice, pink lemonade, orange juice, strawberry purée, Epicure Summer Berry mix, and gin. Stir well.
Place airtight cover on container. Freeze in the coldest part of the deep freeze, stirring 2-3 times during the freezing process. Be patient as this will take 2-3 days for it to reach the desired slush consistency.
To serve, fill glass between one-third and one-half full of slush and top up with a clear soda such as lemon-lime. Garnish with a lemon wheel, strawberry, or pineapple chunk and serve immediately.
Keep remainder of slush stored in the coldest part of the freezer so it will maintain its consistency.
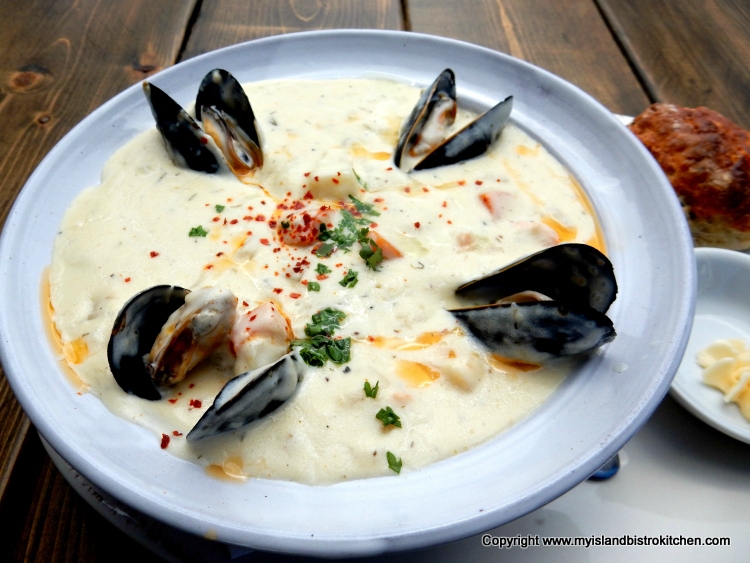
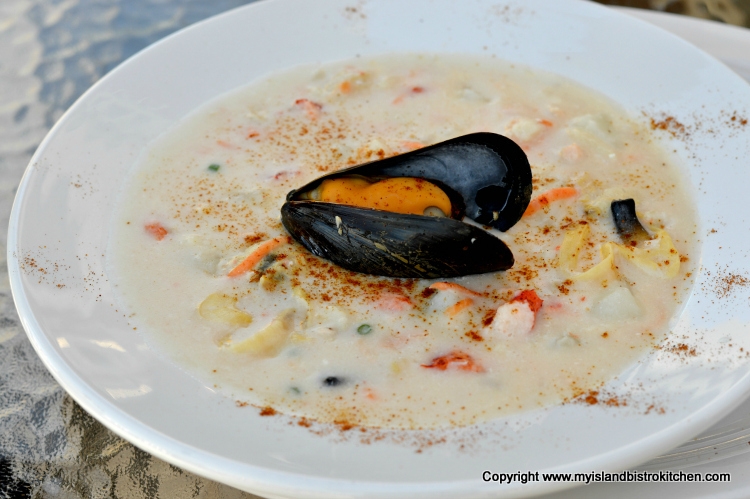
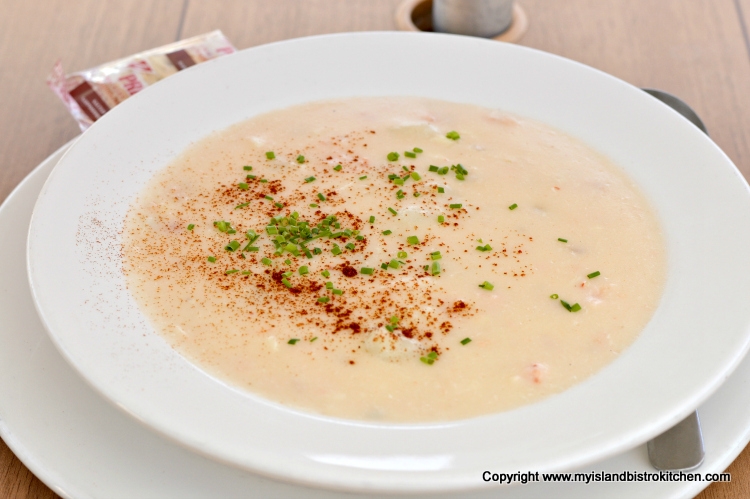
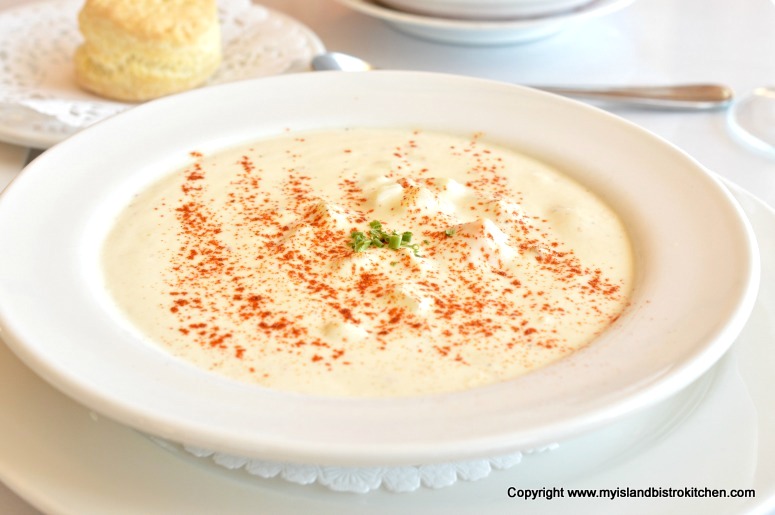
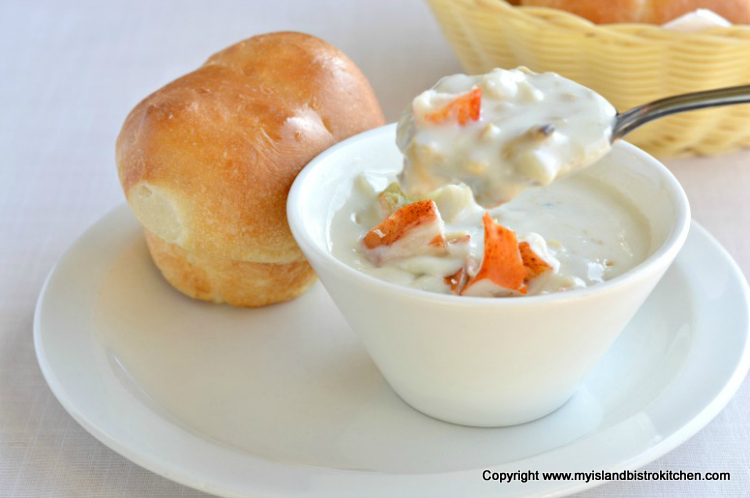
Seafood chowder is a very popular dish in Prince Edward Island and many Island restaurants include it on their menus. I just completed reviews of five (5) fabulous seafood chowders from restaurants in the Green Gables Resort Region (Cavendish, Prince Edward Island). Head on over to the Cavendish Beach website to read my guest post about these mouth-watering chowders from North Rustico, Stanley Bridge, Cavendish, and New Glasgow.
To whet your appetite, here are photos of each chowder:
From the Blue Mussel Café in North Rustico, PEI
Seafood Chowder from the Blue Mussel Café in North Rustico, PEI
From Chez Yvonne Restaurant in Cavendish, PEI
Seafood Chowder from Chez Yvonne Restaurant, Cavendish, PEI
From Carr’s Oyster Bar in Stanley Bridge, PEI
Seafood Chowder from Carr’s Oyster Bar in Stanley Bridge, PEI
From the PEI Preserve Company in New Glasgow, PEI
Seafood Chowder from the PEI Preserve Company in New Glasgow, PEI
From the New Glasgow Lobster Suppers in New Glasgow, PEI
Seafood Chowder from the New Glasgow Lobster Suppers in New Glasgow, PEI
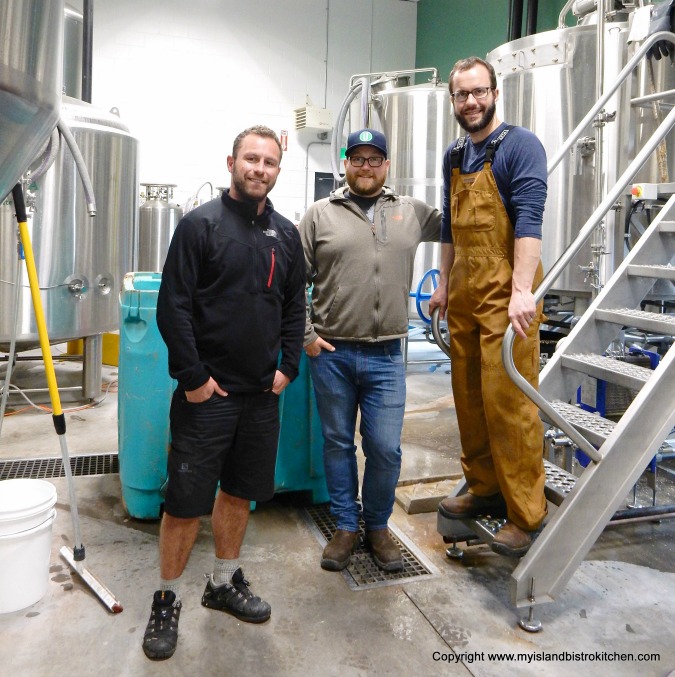
The craft beer brewing industry continues to grow thanks to consumers with a thirst for traditional hand-crafted beer and a demand for unique locally-made artisanal products. While not a huge industry on PEI, craft breweries are starting to emerge….and with remarkable success. As Upstreet Craft Brewing in Charlottetown, PEI, celebrates its first birthday, I thought it was time I paid a visit so I recently journeyed “upstreet” to meet Joey Seaman, one of the owners, for a tour and chat about the brewery.
Upstreet Craft Brewing Co-owner Joey Seaman
I began by asking Joey where the name “Upstreet” came from. He says that upstreet, means “anywhere but where you are” and, colloquially, if you are downtown and someone asks where you’re going, chances are you might say “I’m heading up the street” and, since the location of the brewery is ‘just up the street’ from downtown Charlottetown, it became the name of the brewery.
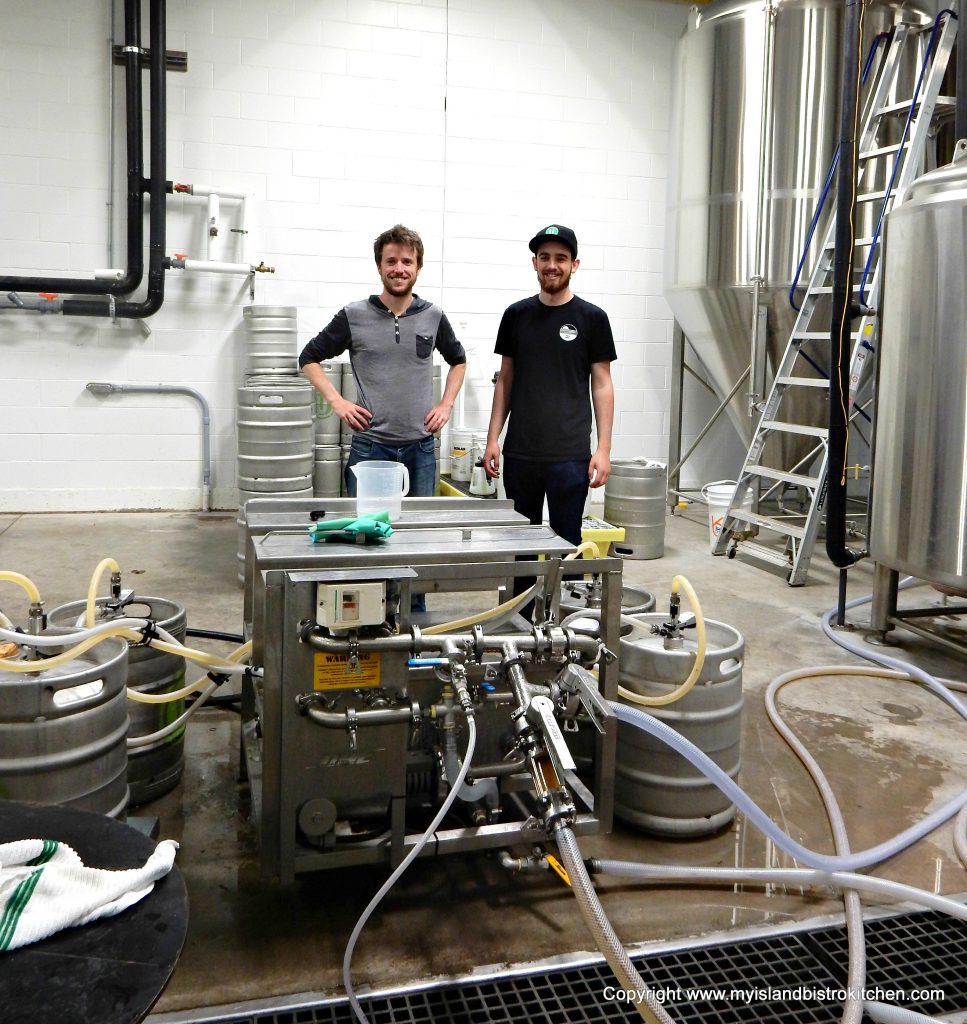
Upstreet Craft Brewing began operation in June 2015 when three friends, who were long-time hobby home beer brewers, decided to take the leap, leave the security of their careers, and co-found a craft brewery in their hometown. This trio – Joey Seaman, Mike Hogan, and Mitch Cobb — have turned their hobby and passion into a growing success story.
Upstreet Craft Brewing Owners Joey Seaman, Mitch Cobb, and Mike Hogan
The three partners are very hands-on at the brewery. Mike is the beer engineer who brews all the beer while Mitch looks after general management and operations and Joey takes care of sales.
Upstreet Craft Brewing’s Brew Engineer, Mike Hogan
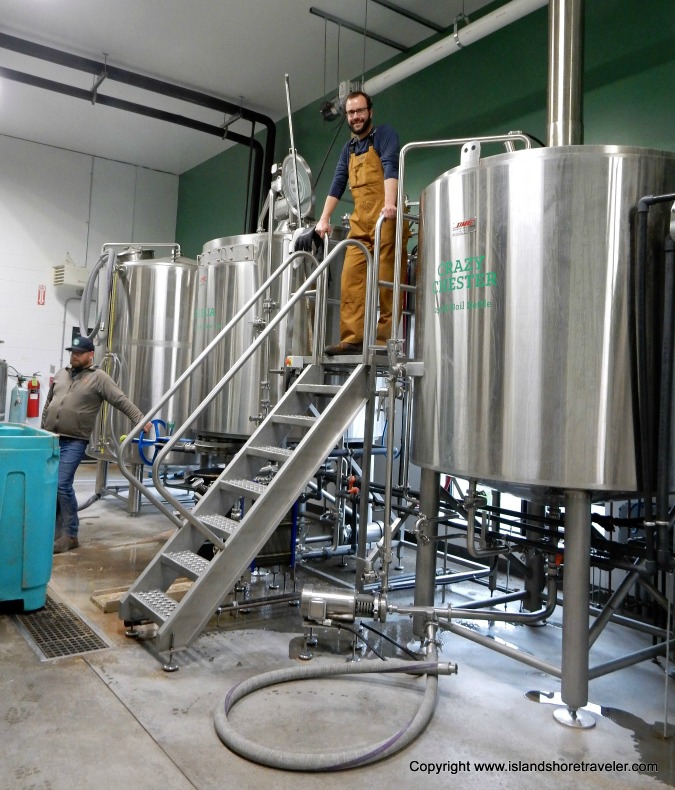
The brewery currently has 19 employees and is a beehive of activity.
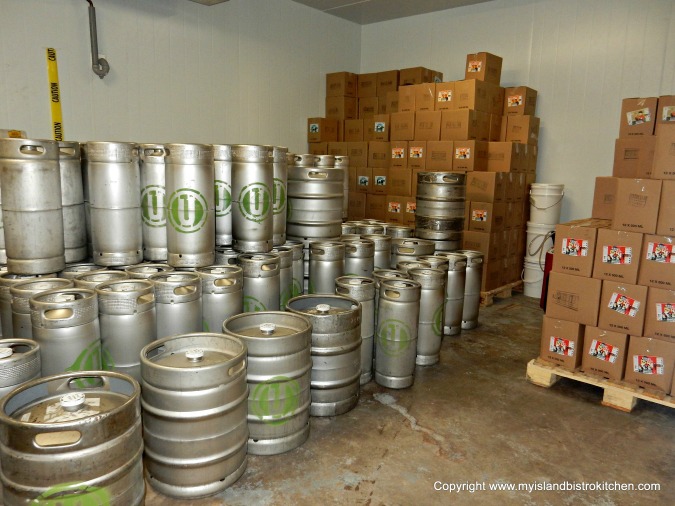
Craft beer is brewed in the traditional way in small batches using 4 main ingredients – barley, hops, yeast, and water. One of the trademarks of a craft brewery is that it offers the opportunity to experiment with ingredients and flavors because small batches of the beer can be produced. This is in contrast to industry giants that produce huge quantities of the same beers year in and year out. Craft breweries, on the other hand, are small enough that they can keep experimenting and come up with fresh new flavours that keeps customers returning. They can also produce small quantities of seasonal beers that are likely only to be purchased during a short period. Upstreet is currently brewing six batches of beer, four times a week. This translates into about 10,000 litres of beer a week. The brewery has built a strong local customer base that has meant Upstreet is presently at maximum capacity. To double their capacity and meet growing demand, the brewery just recently added two more fermentation tanks and they still can’t fully meet demand. In fact, at the time of writing, they have a wait list of 15 restaurants/bars wanting to sell their beer.
Filling the Kegs with Beer at Upstreet Craft Brewing
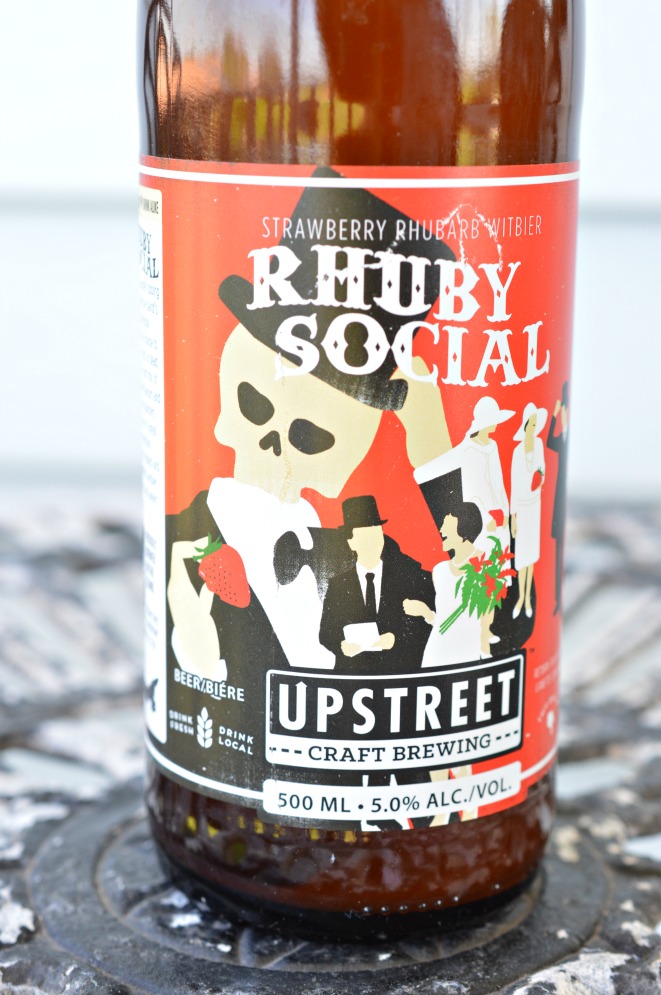
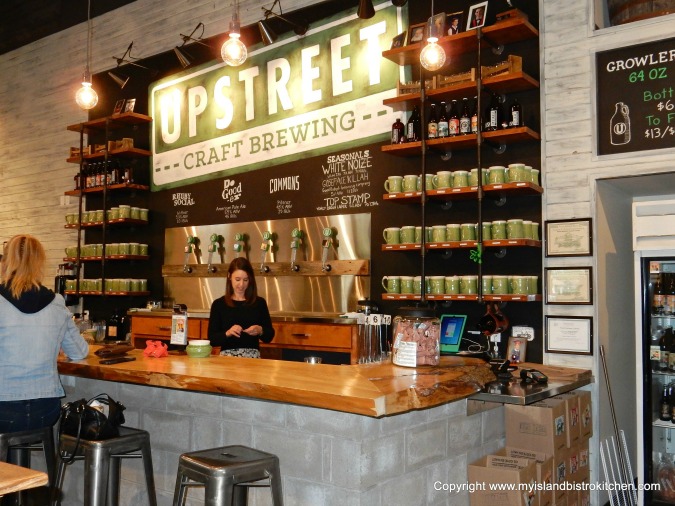
The brewery produces four mainstay flagship beers – Rhuby Social (Strawberry Rhubarb Witbier), Commons Czech Style Pilsner, Do Good-er (an American pale ale), and White Noize (a white IPA). Joey says their most popular beer is the Commons Pilsner which he describes as a clean crisp beer.
In addition, the brewery has brewed over 10 different beers, including seasonal brews, in the first year of operation. This includes specialty flavors like Imperial Pumpkin Ale brewed last autumn and Vanilla Cranberry Stout during the Christmas holiday season.
You won’t find canned beer at Upstreet. Instead, they use tall slim brown bottles that give a classic feel to the Upstreet beer experience.
Each bottle is labeled with an eye-catching unique label that contains information to educate the consumer on the beer product and experience. So, look for a beer profile on each bottle that will tell you the level of hoppiness and a description of the color and flavour.
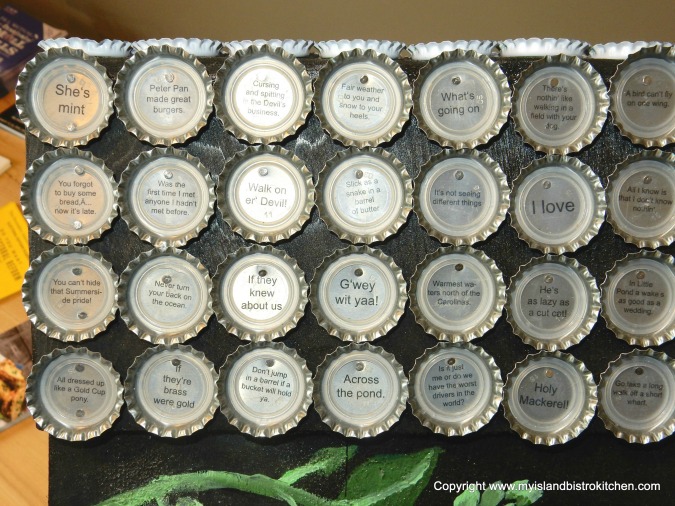
Check under each bottle cap for a unique PEI colloquial saying – great conversation pieces! The owners solicited submissions from the public of typical PEI sayings and received over 2000 suggestions in 48 hours – yes, we Islanders have lots of colloquial sayings!
As many readers will know, a growing sector of the alcoholic beverage industry is pairing foods with the different beverages. Many will be aware of food and wine pairings but there is also a burgeoning trend to pair craft beer with good food. The label on each bottle of Upstreet beer will also give a good food pairing suggestion, the type of event in which it might be enjoyed and even a suggestion for best listening tunes by which to enjoy the beer. For example:
White Noize, a strong beer, would pair well with a hearty chili that might be enjoyed after a day of skiing and while listening to some chill beats.
Rhuby Social, a tart and refreshing beer, would compliment spicy Asian foods and is a beer that could become a patio favorite while listening to the classics. Last fall, I attended a beer and food pairing event that was part of the PEI Fall Flavours Culinary Festival. Celebrity chefs Anna and Michael Olson recommended Upstreet’s Rhuby Social be paired with seafood such as PEI mussels, clams, and white fish.
Commons Pilsner would go well at a beach day event with Island seafood while listening to acoustic campfire jams.
The Do Good-er, the brewery’s “go-to” house party beer, would be a good choice for a BBQ while listening to some rock.
In addition to their bottled beers, the Brewery also sells growlers at the brewery. And, of course, they also sell and deliver kegs of beer to restaurants and bars and there are over 30 venues in Prince Edward Island and Nova Scotia currently carrying the Upstreet products.
Inside the cooler at Upstreet Craft Brewing
Joey says that, while their patrons come from all walks of life, he finds the largest growing market for craft beer is the female population who tend to like the dark beers and those that would be classed as bold, hoppy beers. New and creative flavours of beer may be contributors to that trend.
Taproom at Upstreet Craft Brewing
The brewery is not only a production facility. It, like many craft breweries, has a taproom onsite. The taproom, which can accommodate about 90 people, is a mix of industrial and eclectic décor. Be sure to check out the bar counter repurposed from an old elm tree that had to be taken down in the city.
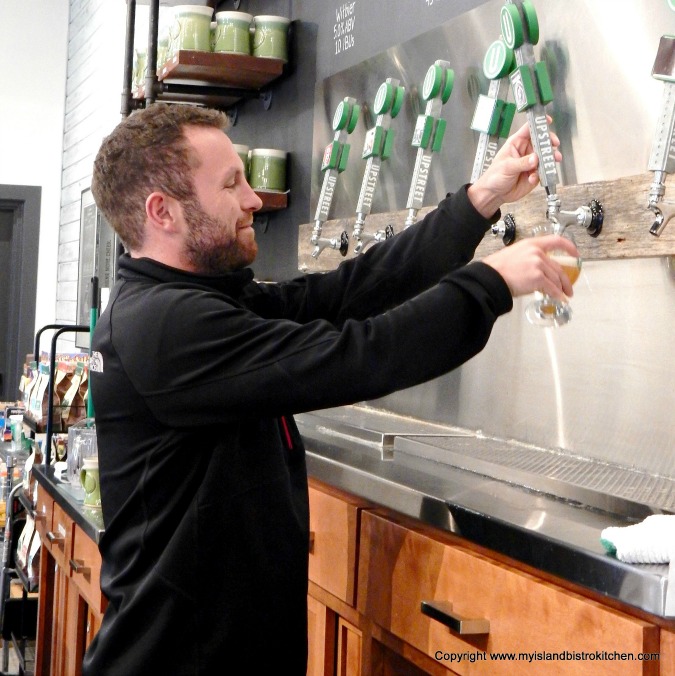
Joey Seaman pours a glass of beer in Upstreet Craft Brewing’s Taproom
While Upstreet does not have a full-fledged restaurant per se on site, it does have a chef as part of the team and the taproom does offer snack foods and tapas/small plates with a menu that changes according to season. However, don’t look for table service at Upstreet – in keeping with the casual atmosphere, you simply go to the bar to place both your drink and food order.
Upstreet Craft Brewing is very community minded. The brewery offers its taproom as a community space for locals to come and hang out. In fact, several groups meet at the brewery to socialize, including a group of local knitters! The brewery also hosts adult coloring nights and other community events and there is always a good selection of board games for patrons to enjoy over a glass of cold beer. In addition, the brewery offers a venue for local musicians to share their musical talents with patrons. The brewery is also a strong supporter of the local arts, music, and culture scene and, in fact, a percentage from the sale of every bottle of Do-Good-er beer goes to a “do good” fund to support local arts and culture.
The brewery, located at 41 Allen Street in Charlottetown, PEI, is open 7 days a week, noon to midnight.
Upstreet Craft Brewing, Charlottetown, PEI
As is my tradition when I visit a local producer, I develop a recipe or two using their product.
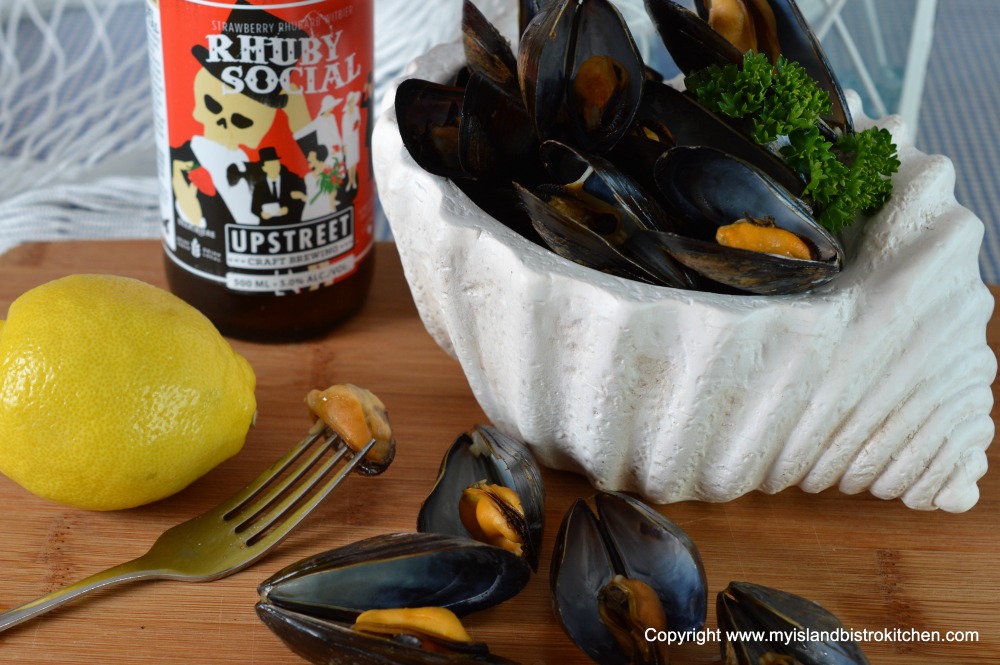
PEI Mussels Steamed in Rhuby Social Beer from Upstreet Craft Brewing
Click here for the link to my recipe for steaming PEI mussels in Upstreet Craft Brewing’s Rhuby Social beer and here for the link to my recipe for Rhubarb and Beer Barbeque Sauce, also using Rhuby Social beer.
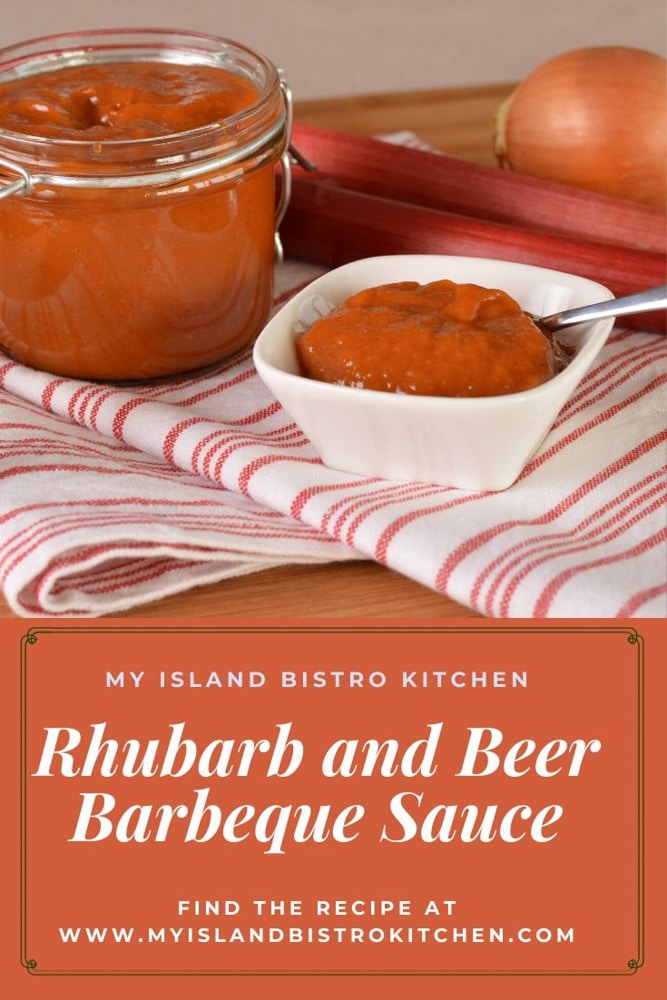
Rhubarb and Beer Barbeque Sauce Made with Rhuby Social Beer from Upstreet Craft Brewing
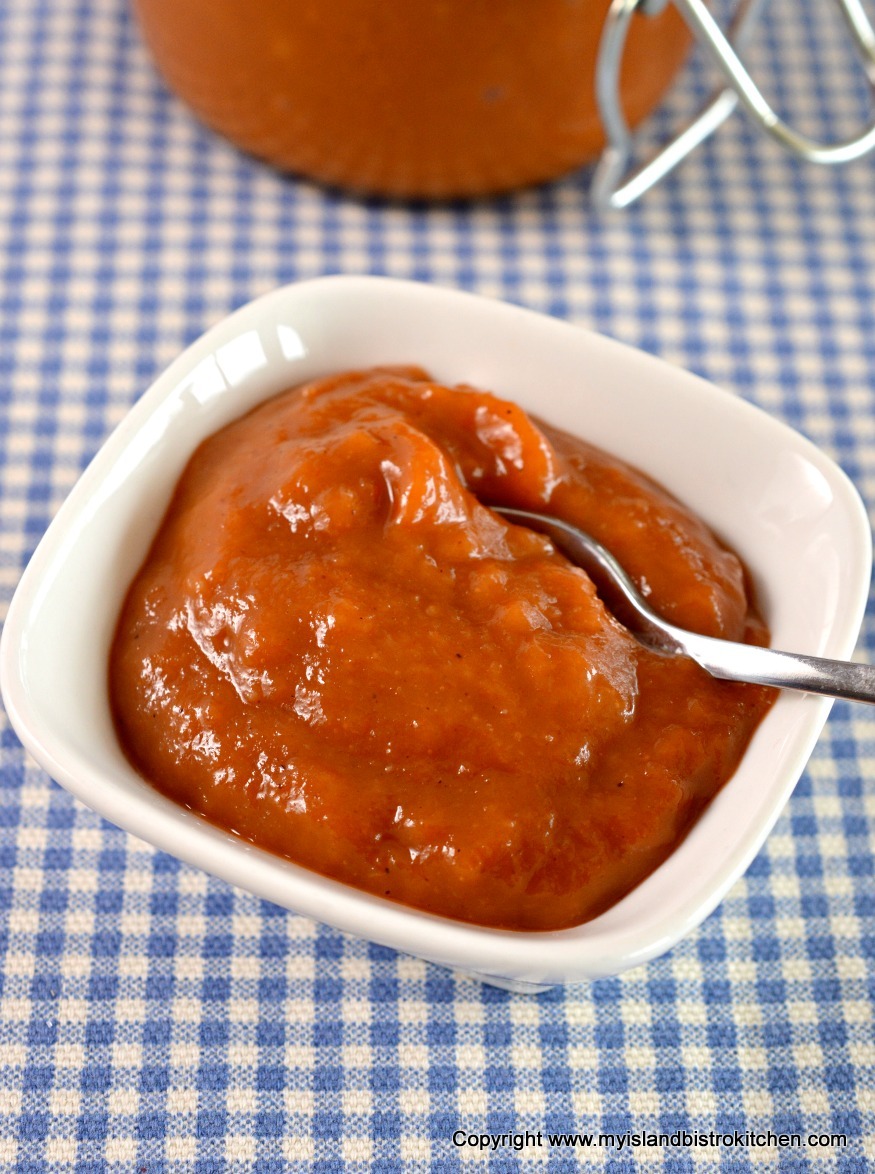
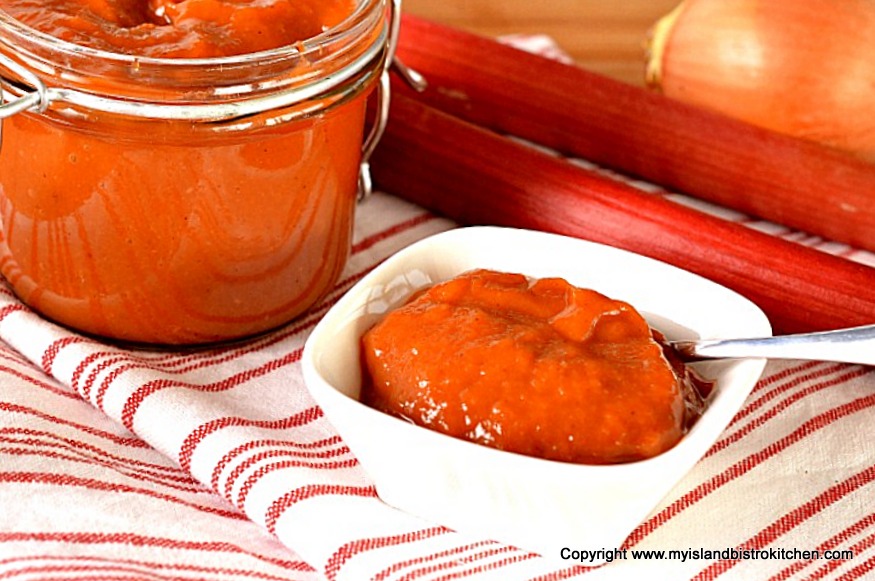
We have a good-sized patch of rhubarb and, every year, I develop one or more new recipes using it. I recently paid a visit to Upstreet Craft Brewing in Charlottetown in preparation for a story on this brewery and, lo and behold, they have a strawberry-rhubarb beer. This got me to thinking that I could combine the rhubarb with this beer to make a tasty barbeque sauce which is just what I did!
Rhubarb and Beer Barbeque Sauce
Now, this barbeque sauce takes a little time to make but the end result is so worth it. Just like making a traditional fine tomato sauce, the key is in letting the sauce simmer to allow the flavors to mix and mingle and get to know each other – very social just like Upstreet’s Rhuby Social beer! The sauce is a mix of savory, tart, and sweet, especially with the addition of crushed pineapple that goes well with rhubarb.
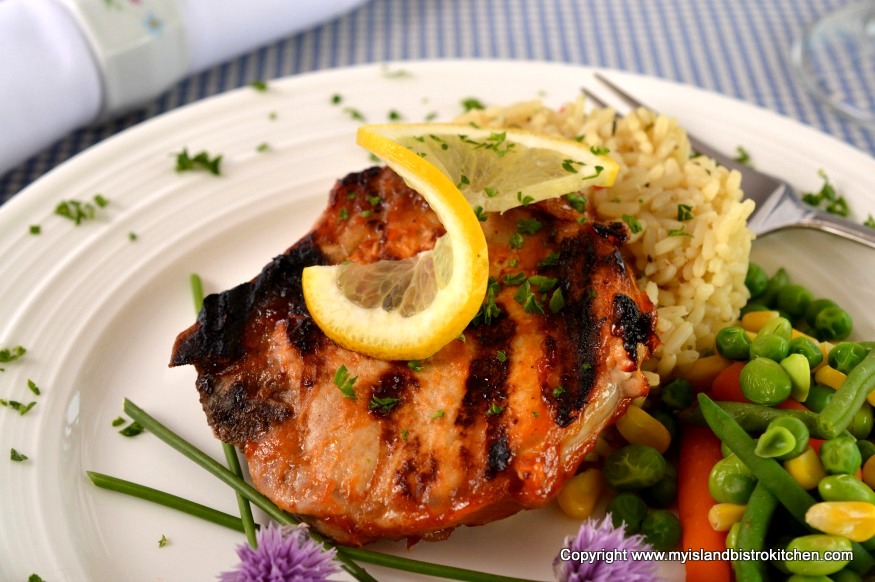
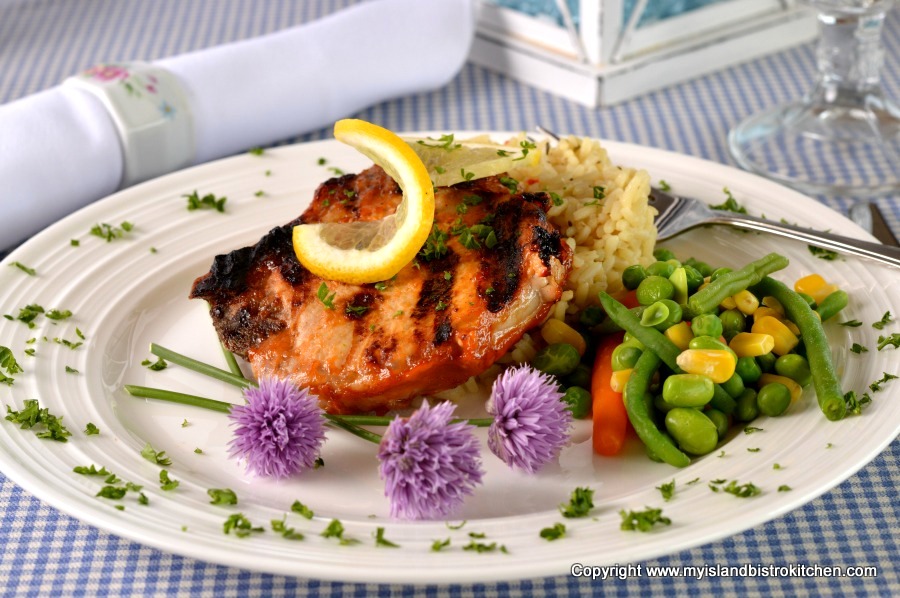
Porkchops with Rhubarb and Beer Barbeque Sauce
This barbeque sauce is particularly good on pork and chicken but also pairs well with burgers. This is my signature barbeque sauce for this summer. I use my immersion blender in the sauce but, if you like it more thick and chunky, leave it just as it is. I hope you enjoy it.
Porkchops with Rhubarb and Beer Barbeque Sauce
(Printable recipe follows at end of posting)
Rhubarb and Beer Barbeque Sauce
Ingredients:
½ lb rhubarb, sliced ½” thick 2 tbsp water 1½ tsp lemon juice 2-3 tbsp. oil ½ cup onion, finely chopped 3-4 cloves garlic, minced ½ cup ketchup 2 tbsp tomato paste 2 tbsp Dijon mustard ¼ cup maple syrup ½ cup brown sugar, firmly packed ¼ tsp cinnamon 2 tbsp apple cider vinegar ½ tbsp. Worcestershire sauce ½ tsp salt Pinch cayenne ¾ cup crushed pineapple with juice ½ cup Upstreet Craft Brewing’s “Rhuby Social” beer Method:
In medium-sized saucepan, combine rhubarb, water, and lemon juice. Bring to a boil. Reduce heat to medium-low and cook for approximately 10 minutes, or until rhubarb is soft and mushy.
In separate medium-sized saucepan, heat oil and, over medium heat, sauté onions until soft and translucent. Add garlic and cook for one additional minute, stirring constantly, being careful not to burn the onions or garlic. Add the cooked rhubarb, ketchup, tomato paste, mustard, maple syrup, brown sugar, cinnamon, vinegar, Worcestershire sauce, salt, and cayenne. Bring to a boil then reduce heat to medium low and cook for approximately 45 minutes or until thickened, stirring regularly.
Add the crushed pineapple and beer. Cook for apx. 30 minutes longer, stirring regularly to prevent scorching. Cool. Purée in blender, food processor, or with an immersion blender.
Store in refrigerator for up to 1 week. Use on chicken, pork, or burgers. Yield: Apx. 2½ cups
Savory and sweet barbeque sauce combines rhubarb, crushed pineapple, and beer to make a tasty sauce for pork, chicken, and burgers.
Ingredients
½ lb rhubarb, sliced ½” thick
2 tbsp water
1½ tsp lemon juice
2-3 tbsp. oil
½ cup onion, finely chopped
3-4 cloves garlic, minced
½ cup ketchup
2 tbsp tomato paste
2 tbsp Dijon mustard
¼ cup maple syrup
½ cup brown sugar, firmly packed
¼ tsp cinnamon
2 tbsp apple cider vinegar
½ tbsp. Worcestershire sauce
½ tsp salt
Pinch cayenne
¾ cup crushed pineapple with juice
½ cup Upstreet Craft Brewing’s “Rhuby Social” beer
Instructions
In medium-sized saucepan, combine rhubarb, water, and lemon juice. Bring to a boil. Reduce heat to medium-low and cook for approximately 10 minutes, or until rhubarb is soft and mushy.
In separate medium-sized saucepan, heat oil and, over medium heat, sauté onions until soft and translucent. Add garlic and cook for one additional minute, stirring constantly, being careful not to burn the onions or garlic. Add the cooked rhubarb, ketchup, tomato paste, mustard, maple syrup, brown sugar, cinnamon, vinegar, Worcestershire sauce, salt, and cayenne. Bring to a boil then reduce heat to medium low and cook for approximately 45 minutes or until thickened, stirring regularly. Add the crushed pineapple and beer. Cook for apx. 30 minutes longer, stirring regularly to prevent scorching. Cool. Purée in blender, food processor, or with an immersion blender. Store in refrigerator for up to 1 week. Use on chicken, pork, or burgers.
PEI Mussels Steamed in Rhuby Social Beer from Upstreet Craft Brewing
My recipe for steamed mussels calls for some aromatics to build a flavor base in which to steam the tasty little morsels. Aromatic cooking involves some type of fat or oil – I’m using butter in this recipe – combined with some aromatic vegetables and herbs. In this case, I am using onion, celery, and garlic along with some fresh thyme. The combination of a fat product and heat help to release the wonderful aromas of ingredients and infuse dishes with fabulous flavors. Ever walk into the tantalizing scent of a kitchen where onions and garlic are cooking in oil or butter? That’s aromatics at work.
Preparing this flavor base at the beginning of the cooking process adds depth and complexity to the dish. Since mussels cook rapidly, chop the vegetables up somewhat fine as they need to release their flavors quickly in order to add flavor to the dish.
The fresh mussels should be rinsed under cold water before they are cooked. If any of the shells don’t close up after this rinsing, tap the shells lightly. If they still don’t close, discard them. Any “beard” on the mussels also needs to be removed.
Once the vegetables have been sautéed and released their flavors, it’s time to add a small amount of lemon juice and some beer to the mixture. The lemon juice adds fresh, crisp notes to the broth. This helps to balance the seafood qualities of the broth once the mussels are added. Beer adds both depth and complexity of flavor to the mussels which should be steamed in a very small amount of liquid. If too much liquid is used, it will dilute the flavor altogether. It’s the steam, not the amount of liquid, that cooks the mussels. In this recipe, I have chosen to use a craft beer that has been brewed right here on Prince Edward Island at Upstreet Craft Brewing in Charlottetown (click here for my story on this brewery). The strawberry and rhubarb flavored “Rhuby Social” witbier with its slight tartness pairs particularly well with seafood.
It’s important not to overcook the mussels as they will become tough. I find that 5-7 minutes is usually sufficient; however, the amount of steaming time depends on several factors including how many (and the size of the) mussels in the pot, the weight of the pot, and amount of heat over which they are steamed. The ultimate test of doneness is a peek inside the pot to see if the shells have opened. It’s very important that, at the end of the steaming process, any shells that have not opened be discarded. If a shell has to be pried open, it is not considered safe for consumption.
These mussels can be eaten with bread dipped in the steaming broth. Simply strain the broth to remove the vegetables and herbs. Alternatively, they can be eaten dipped in melted butter or even with a simple splash of freshly squeezed lemon juice.
(Printable recipe follows at end of posting)
PEI Mussels Steamed in Beer
Ingredients: 2 lbs. PEI mussels, rinsed and beards removed
1 tbsp butter 1/3 cup onion, chopped 2-3 cloves garlic, minced 4” piece of celery with leaves, chopped ½ tsp salt 2 sprigs fresh thyme 2 tsp lemon juice 1 cup Upstreet Craft Brewing’s “Rhuby Social” Beer
Method: In medium-sized stock pot, melt the butter over medium-high heat. Add the onion, garlic, celery and salt. Sauté, stirring briskly, just until onion has softened and has started to become transparent. Add the thyme, lemon juice, and beer. Increase the heat to high and bring liquid to a boil. Add the mussels. Cover and steam the mussels for approximately 5-7 minutes, or until the mussel shells have opened. Remove pot from heat and let mussels stand in broth for 1-2 minutes.
Remove mussels from broth with a slotted spoon and discard any shells that have not opened. If desired, strain the broth and use for dipping bread to enjoy with the mussels. Alternatively, melt butter in which to dip the mussels.
Yield: Apx. 2 servings
If you have made this recipe and enjoyed it and/or wish to share it with your friends and family, please do so on social media but be sure to share the direct link to this posting from my website.
Connect with My Island Bistro Kitchen on Social Media
PEI Mussels steamed in an aromatic beer broth. Dip the mussels in melted butter for the ultimate treat.
Ingredients
2 lbs. PEI mussels, rinsed and beards removed
1 tbsp butter
1/3 cup onion, chopped
2-3 cloves garlic, minced
4” piece of celery with leaves, chopped
½ tsp salt
2 sprigs fresh thyme
2 tsp lemon juice
1 cup Upstreet Craft Brewing’s “Rhuby Social” Beer
Instructions
In medium-sized stock pot, melt the butter over medium-high heat. Add the onion, garlic, celery and salt. Sauté, stirring briskly, just until onion has softened and has started to become transparent. Add the thyme, lemon juice, and beer. Increase the heat to high and bring liquid to a boil. Add the mussels. Cover and steam the mussels for approximately 5-7 minutes, or until the mussel shells have opened. Remove pot from heat and let mussels stand in broth for 1-2 minutes.
Remove mussels from broth with a slotted spoon and discard any shells that have not opened. If desired, strain the broth and use for dipping bread to enjoy with the mussels. Alternatively, melt butter in which to dip the mussels.
Asparagus is one of the most versatile vegetables, both in the ways in which it can be prepared and the ingredients with which it can be paired. Locally, in Atlantic Canada, asparagus has a very short growing season in late May/early June and it is a harbinger of wonderful produce to come from the land.
I like to feature locally-grown asparagus in springtime on my dinner table and, for this recipe, I have chosen to combine Boursin cheese, prosciutto, and chicken breasts with the asparagus for this delightful entrée – Asparagus-stuffed Chicken Breasts. This stuffed chicken breast can be served whole or it can be sliced into 3/4″ slices and served on either a bed of rice or on a green salad. The latter is quite colorful as it shows the green asparagus stuffing. Continue reading Asparagus-stuffed Chicken Breasts Recipe→
Remember the days when a hamburger was simply ground beef flattened to about the depth of a pancake, a slice of processed cheese, and condiments were simply store-bought ketchup, mustard, and sweet pickle relish all sandwiched between a soggy bakery bun?
Today, burgers are becoming more gourmet and creative. Indeed, some border on works of art and can be towering structures! Specially created burger sauces, unique relishes, specialty meats, and gourmet cheeses are now common ingredients on burgers. And, of course, there are several different ways a burger can be cooked. Sometimes, as in the case of my recipe, more than one cooking method is used to cook the burgers. All this to say that the benchmark on burger creativity has now been raised to a new level.
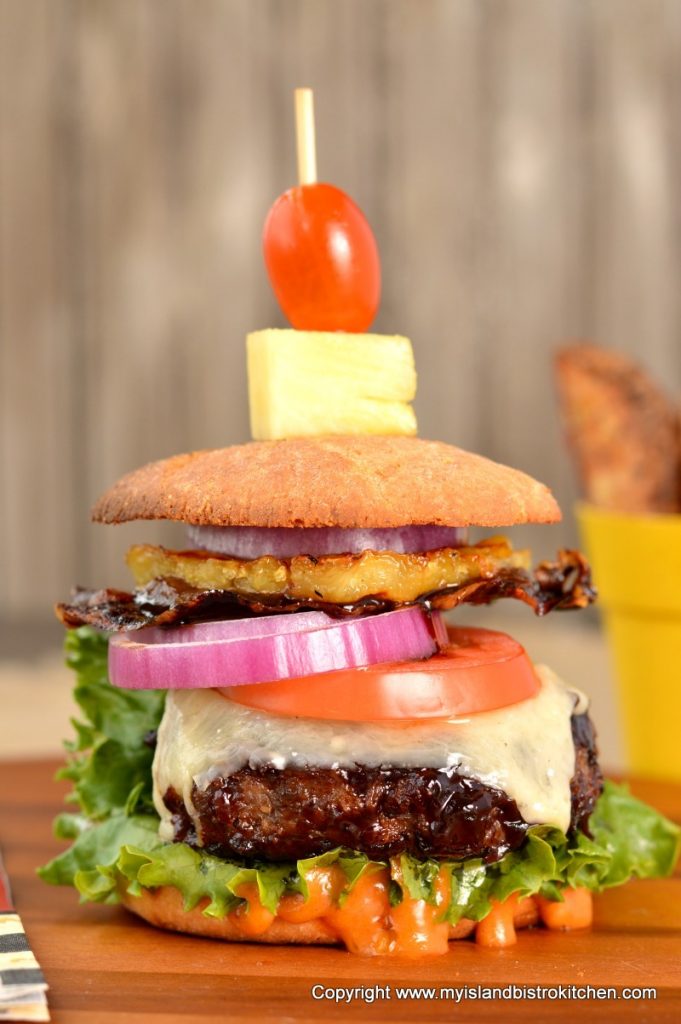
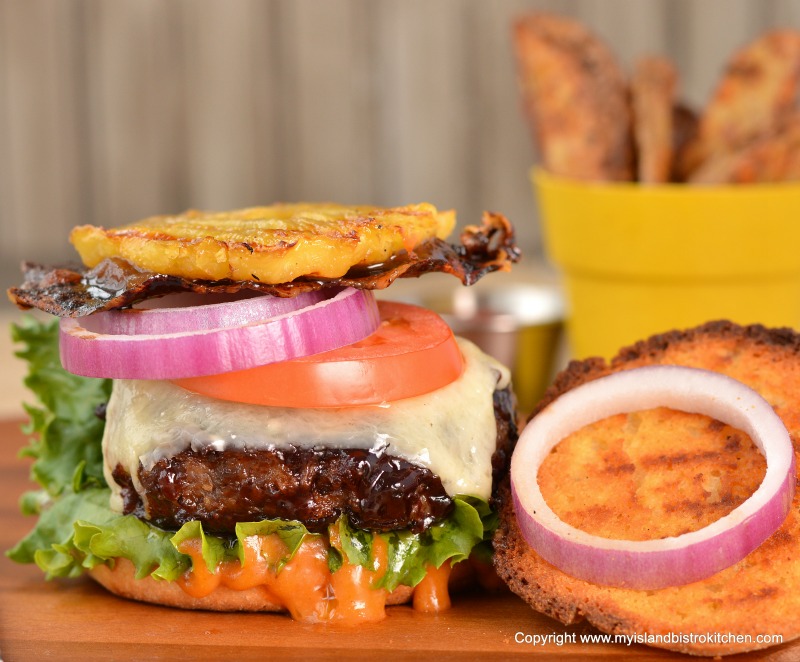
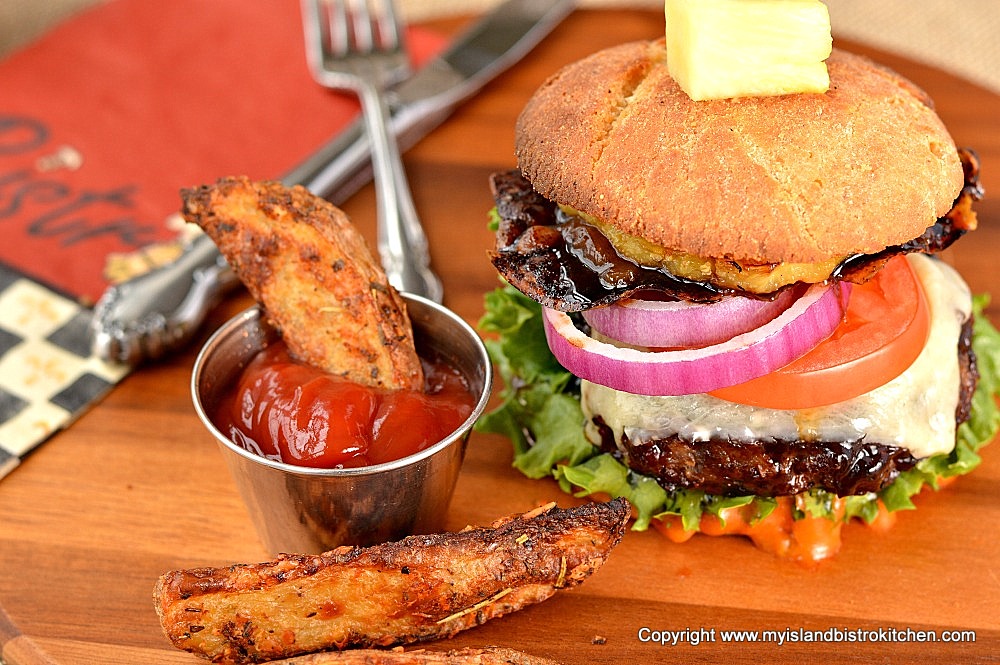
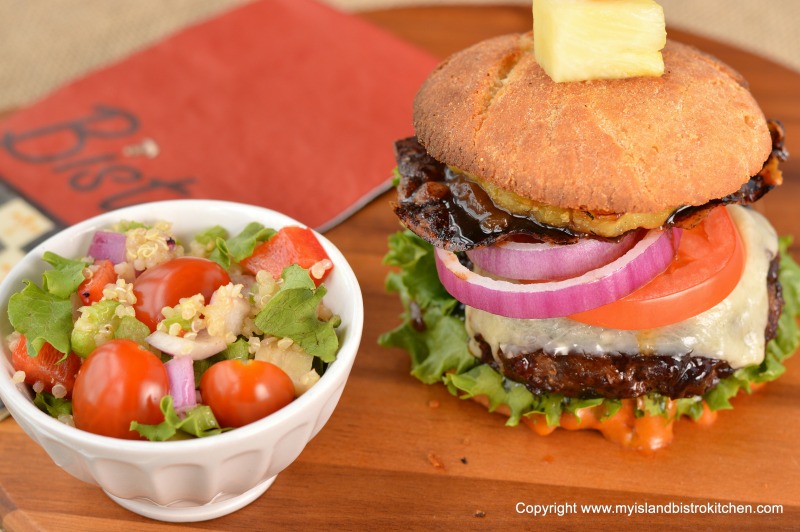
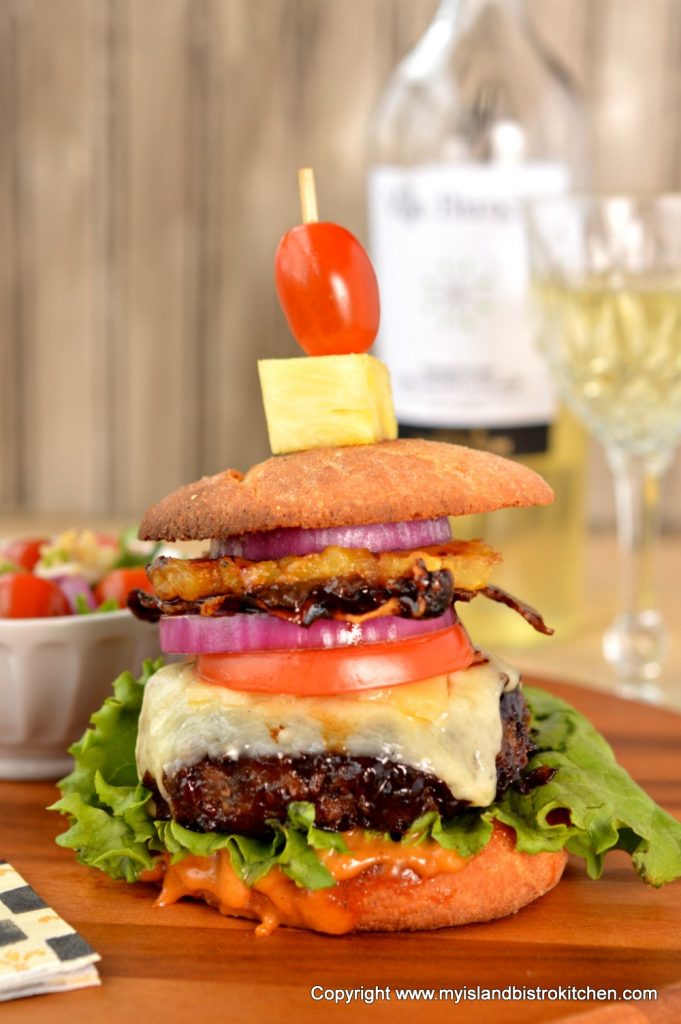
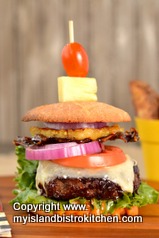
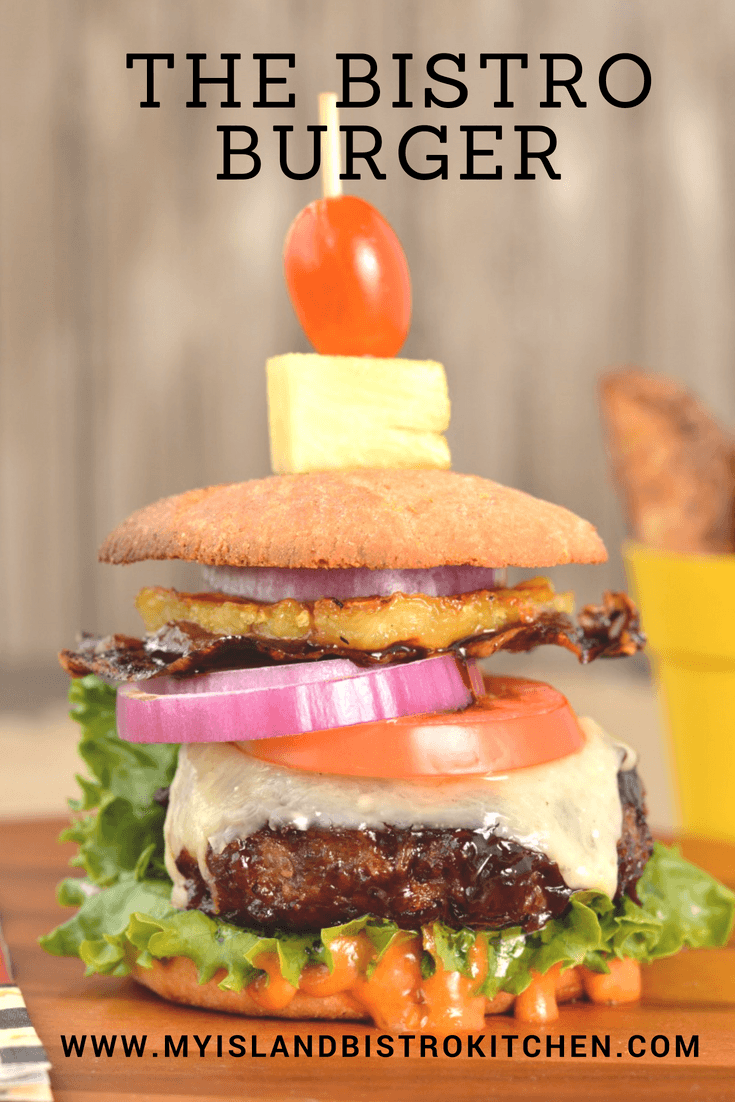
“The Bistro Burger” on a Gluten-Free (GF) Hamburger Roll
When I am developing any recipe, the first thing I think about is what flavors will play well together and be pleasing to the palate. As far as I’m concerned, it’s not about how many ingredients are included in the burger or how big or tall the burger is but rather it’s about the quality of ingredients and their ability to blend well and compliment each other.
I don’t personally like a whole lot of ingredients on my burger or ones that are, well, just plain wonky and don’t blend well with the beef. If there are too many ingredients, I find it hard to detect any discernible flavour and, for my taste, they detract from the burger experience. I still need to taste the beef! Any additions should only enhance, not smother or mask, the beefy flavor.
“The Bistro Burger”
My burger creation aims to strike the middle ground through the chosen selection of ingredients and a carefully-tested cooking method. In my view, there are two challenges with burger creation. The first challenge is to cook the burger perfectly so it is moist and juicy. The second challenge is to maintain, not mask, the flavor of the meat itself and to choose toppings with flavors that play well with, and bring out the savoriness of, good quality beef.
Now, that is not to say that new flavours cannot be introduced into burgers or that the types of ingredients typically associated with burgers cannot be prepared in different ways to “up” the calibre of the burger – onions can be carmelized or be in the form of jam, sauces can blend complimentary flavors, and veggies can be marinated. Other ingredients, such as the traditional bacon, can be replaced with alternatives such as prosciutto which can be eaten raw or candied. Fresh fruit can be added to infuse some sweetness to the burger and counter the savory flavour of the meat.
When I was creating this burger recipe, I had five (5) objectives in mind:
Recipe would be adaptable for those with a gluten intolerance/sensitivity;
Hamburger would include sauces and the relish made from my own recipes;
To the extent possible, locally-produced products, including the beef, would be used; (ingredient sources listed at end of posting)
Ingredients would be chosen for their ability to play well together and be pleasing to the palate; and
The resulting hamburger would be both eye appealing and appetizing.
The following is my recipe for a tasty beef burger that uses my own recipe creations for sauces and relish most of which were previously posted on this food blog. Also, to the extent possible, I have used locally-produced products. Following the recipe below, you will find some of my hints for burger making along with some explanations of my choices of ingredients in this burger. At the bottom of this posting, you will also find a printable version of the recipe.
The Bistro Burger
The Bistro’s Burger Sauce
Ingredients: 1/3 cup mayonnaise 2½ tbsp pure maple syrup 2 tbsp ketchup 2 tbsp rhubarb relish 1½ tsp Dijon mustard 1 tsp garlic powder 1½ tbsp. sour cream ½ tsp onion salt Salt and pepper, to taste
Yield: Apx. 1 cup
Frozen Flavor Burst Logs
Ingredients: 2 tbsp butter, softened at room temperature 2½ tsp mustard (Dijon or sweet) 2 tbsp finely grated Parmesan Cheese 1½ tsp dried parsley Yield: Apx. 6 Logs
Burger Patties:
Ingredients: 1 lb ground chuck (apx 80:20 ratio meat-to-fat content) ¼ cup finely grated Parmesan cheese 2 tbsp Blueberry Barbeque Sauce 1½ tbsp maple syrup ½ tsp onion salt ¼ tsp garlic salt 2 tsp dry onion soup mix Pinch cayenne pepper Salt and pepper, to taste 1 egg, lightly beaten ¼ cup+ medium-ground bread crumbs
Yield: Apx. 6 patties
Cooking oil Blueberry Barbeque Sauce 6 hamburger rolls of choice The Bistro’s Burger Sauce Rhubarb Relish Cheddar Cheese Slices Red Onion Tomato Bread and Butter Pickles 6 thin slices Proscuitto Maple Syrup and Brown Sugar (for candying the Proscuitto and pineapple) Fresh pineapple, sliced between 1/8” and ¼” thick
Method:
For the Bistro Burger Sauce, mix all ingredients together well. Store in tightly sealed jar. Refrigerate for up to one week.
For the Frozen Flavour Burst Logs, combine the butter, mustard, Parmesan Cheese, and parsley together. In teaspoon measures, portion out the mixture and shape into small logs or disk shapes. Place on plastic-lined tray and freeze for about 30 minutes.
Preheat oven to 375°F and panini grill to medium-high setting.
For the Burger Patties: In large bowl, mix all burger ingredients just until combined, adding more bread crumbs if necessary to achieve desired consistency.
Measure the meat mixture into six (6) equal portions (apx. 4 oz each). With hands, gently and loosely clump together the meat and enclose one frozen flavour burst log into centre of each burger and surround it with meat mixture. Shape into patties that are apx. 1” thick (or to desired thickness to match size of hamburger roll). Refrigerate for one hour before cooking to allow patties to firm up and give flavours time to blend.
Heat 1½ – 2 tbsp cooking oil in frypan over medium high heat. Sear burgers, two minutes each side. Do not press down on the burgers. Remove from frypan and brush Blueberry Barbeque Sauce over both sides of burgers and transfer to greased wire rack suspended over baking pan (to catch any drips). Bake in pre-heated oven until desired doneness is reached, adding the cheese slices to the burgers for the last minute of baking.
To candy the prosciutto – mix together 2 tbsp maple syrup with 2 tbsp. brown sugar. Lightly brush each thin slice of prosciutto with the mixture, being careful not to tear the delicate meat. Place over greased wire rack suspended over baking pan. Bake in 375° oven for apx 7-10 minutes or until prosciutto is browned and starts to become crispy.
Fresh pineapple slices can be added to the burgers without glazing them. However, to glaze the pineapple slices, mix together 2 tbsp maple syrup with 2 tbsp brown sugar. Lightly brush mixture on both sides of each pineapple slice and place slices on panini grill (set at medium-high) and press grill top down on to pineapple slices and grill on medium-high for about 1-2 minutes, or until pineapple is heated and has grill marks.
To assemble burgers:
Select hamburger rolls of choice and split in half, horizontally. Butter each half and, if desired, toast on grill or in oven. Slather a generous helping of burger sauce on the bottom half of each roll. Add lettuce and then the burger. Add pickles, sliced tomato, onion, candied prosciutto, rhubarb relish, and maple glazed pineapple. Place the top halves of the rolls on each burger and garnish each with a chunk of fresh pineapple and a cherry tomato. Serve with your favorite side salad or home fries.
Yield: Apx. 6 – 4oz burgers.
Burger-Making Hints and Additional Information on The Bistro Burger Ingredients
Meat
To get the juicy burger, there needs to be some fat mixed in with the meat. While I normally choose extra lean ground beef for recipes, the one exception I make to that is for burgers. The general standard is a ratio of 80:20 meat-to-fat content. My preference is to use ground chuck that is freshly ground by my local butcher while I wait. Burgers are no different than any other food – fresh is always best!
To get a really tasty burger, I like to enhance the meat with additional flavour, moisture, and some sort of binding agent(s). For mine, I enhanced the flavour with some grated Parmesan cheese, onion and garlic salts, dry onion soup mix, cayenne pepper, salt, and pepper. To give additional moisture (and flavor) to the burger, I used some of my blueberry barbeque sauce along with maple syrup (I used a chipotle and lemon grass infused syrup but plain maple syrup works well, too). Medium-grind bread crumbs add structure to the burger and help hold it together along with the addition of an egg. Don’t use fine bread crumbs that would typically be used to bread chicken, for example, as these are too fine and won’t add the needed structure and stability to the burger that coarser bread crumbs will provide. As well, if the bread crumbs are too fine, it will take too many which changes the texture of the burger. To make the recipe gluten-free, use gluten-free breadcrumbs.
To give an extra burst of flavor in each burger, I mix butter, mustard, finely grated parmesan cheese, and parsley together and, using a teaspoon measure, portion out and form the mixture into small logs or disks which I freeze for about 30 minutes. As I am forming each patty, I enclose one of the flavor burst logs in the centre, surrounded by the meat. As the burger cooks, it melts the flavour log and releases and distributes the flavour burst inside each burger.
When forming the burger patties, it is very important not to over knead the meat or the result will be a tough burger. It’s the same principle as applies to pastry or biscuit dough – too much kneading and you won’t have a tender product. Basically, just loosely clump together the burger mixture with your hands and form it into a disk shape. Resist the urge to pack the meat tightly or press down/flatten the patties as this, too, will create a tough burger.
The standard pre-cooked weight of each of my hamburger patties is approximately 4 oz and each one is about 1” thick.
Onions
My preference, if using raw onion on the burger, is to use red onions for both their flavour and color. Other options include fried or carmelized onions or even onion jam. While carmelized onions and onion jam are tasty, they don’t necessarily go with all burgers. The other ingredients and, particularly, the relishes or sauces used (and how many) will dictate the best way to present onions in the burger.
Sauce
A good sauce enhances the flavour of the burger. I use my own recipe made with mayonnaise, maple syrup, ketchup, rhubarb relish, mustard, sour cream, and some garlic and onion seasoning. This sauce contains the traditional condiments of mustard and ketchup but blends them with other complimentary flavours. The result is a colorful and tasty orange sauce. Truffle ketchup adds an “earthy” flavor to this sauce but it is an acquired taste. Any variety of tomato ketchup will work just fine.
Relish
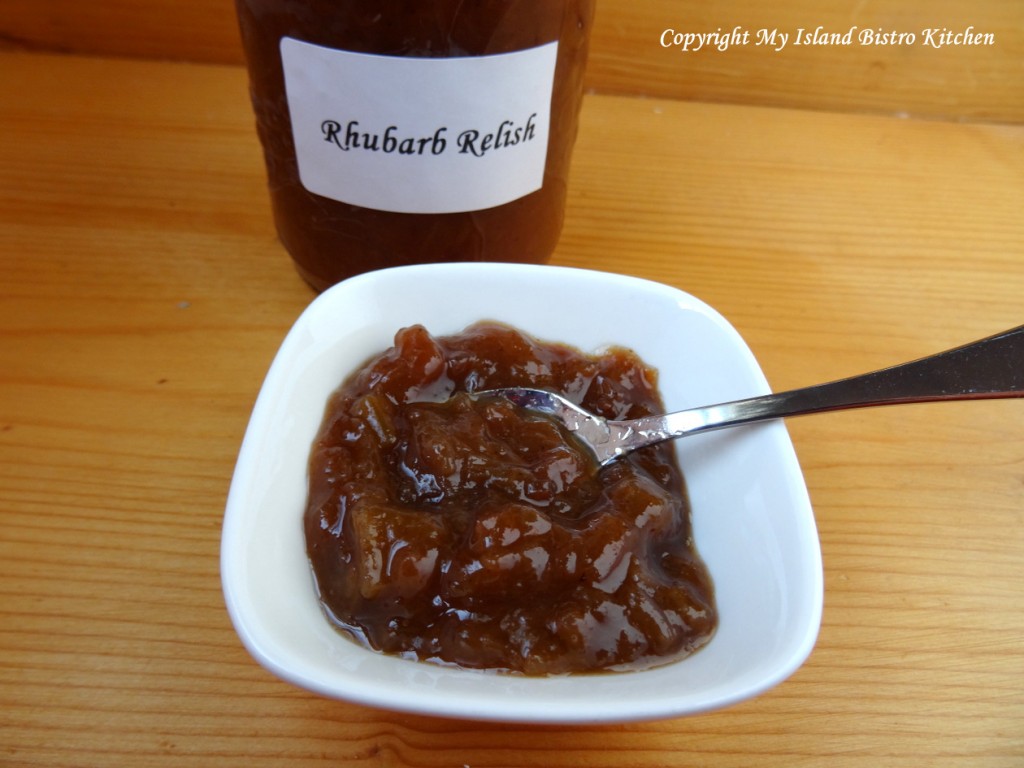
Traditionally, a sweet pickle relish has been used on burgers. However, to bring out the savory meat flavour, I am using my own recipe for rhubarb relish. You can access my recipe here. This relish works well with the other ingredients in this burger and ties in with the flavor of the sauce so I’m not introducing another flavor to confuse the taste buds. The sweetness of the rhubarb relish effectively counters, but blends in a positive way with, the savory flavour of the beef.
Rhubarb Relish
Cheese
Choose a cheese that melts well like a good quality cheddar, for example. I’m using COWS Creamery Extra-Old Cheddar produced here on PEI where it has been aged for at least two (2) years. This is a high quality cheese with rich, deep flavour that really compliments the beef well. The cheese has a firm texture and is a slower melting cheese. In fact, as it melts, it forms almost a second sauce on the burger and has a lovely tangy bite to it.
Prosciutto
While traditionally eaten raw, I have chosen to candy the prosciutto with a mixture of brown sugar and maple syrup. All I did for this process was very lightly brush both sides of the prosciutto with the mixture, lay it over a greased wire rack suspended over a baking pan, and bake it in a 375°F oven for apx 7-10 minutes, just until it is browned and crispy. This gives both flavor and a crunchy texture to the burger.
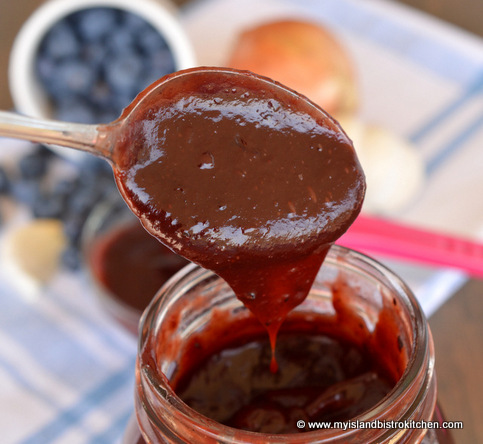
Barbeque Sauce
I used my own Blueberry Barbeque Sauce (recipe here) for my burgers. This dark barbeque sauce adds both flavor and a rich, deep color to the burger.
Blueberry Barbeque Sauce
Lettuce
Bright green lettuce adds great color to burgers. Choose a “sturdy” lettuce for burgers, such as that found on head lettuce (e.g. Boston lettuce). These are strong leaves that don’t tend to wilt so quickly as, for example, delicate lettuce leaves like the mesclun mix, when they come into contact with hot burgers.
Pickles
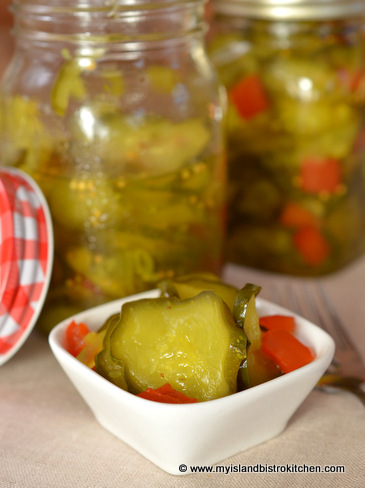
My preference for pickles in the burger are sweet homemade bread and butter pickles (get my recipe here).
Bread and Butter Pickles
These are a lovely, crisp pickle and their acidity plays off sweetness of any fruit added to the burger as well as the sauce. Pickles contribute a bit of sweet tang to the burger experience.
Pineapple
I like to add some sweetness to my burgers by adding a slice of fruit such as pineapple. The choice of fruit, however, has to be one that, structurally, is strong enough to hold together in the burger. I have chosen pineapple for this burger as it “holds its own” and pairs very well with the rhubarb relish and blueberry barbeque sauce. I cut the pineapple slice between 1/8” and ¼” thick, brush some of the brown sugar and maple syrup glaze on it, and grill it on my panini grill for a few minutes – just long enough for the pineapple to warm up and release its natural sweetness and get those wonderful grill marks that are very attractive.
“The Bistro Burger”
Hamburger Rolls
There are so many options for hamburger rolls – too many to list. I prefer ones that are not too soft as they quickly become soggy when the burger ingredients are added to the point that they sometimes break down before the burger even reaches the table. The hamburger rolls used in the photos in this posting are gluten-free homemade rolls. Whatever variety of rolls are chosen, they should be size-appropriate in relation to the burger – i.e., the patty should not extend beyond the sides of the roll but neither should it look like a little meatball in the center of the roll.
Cooking the Burger
There are a multitude of ways in which burgers can be cooked – grilled, broiled, sautéed, barbequed, fried, baked or, sometimes, a combination thereof. I recommend cooking them to your personal preferred method. For the ones in the photos in this post, I seared the burgers over medium-high heat in a heavy-bottomed frypan for 2 minutes on each side, without touching them and never flattening them. Any time a burger is pressed down when it is being cooked, it squeezes out the juices in the burger, resulting in a dry, tough burger.
After the searing process is complete, I remove the burgers from the pan and brush both sides with the blueberry barbeque sauce. I then transfer the burgers to a greased wire rack suspended over a baking pan (to catch any drips) and finish cooking the burgers in a 375°F oven. Placing the burgers on a cooking rack allows the heat and air to circulate around the burgers resulting in more even cooking. I am a big fan of using meat thermometers and I do use one when cooking the burgers so they are cooked to my personal preference.
Side Dishes
The most common side dishes served with burgers are fries.
“The Bistro Burger” with Homemade Fries
However, salads with vinaigrettes also work well as side dishes to burgers.
“The Bistro Burger” with a Side Salad
Wine Pairing
While a robust red wine or a beer are often paired with a burger, I have chosen to pair this one with Villa Bianchi’s Verdicchio Dei Castelli Di Jesi (Italy 2014). Pairing a white wine with a beef burger works so long as the wine chosen has a high degree of acidity to counter the protein and fat of the burger (not that my burger is a “fatty” one!). With floral and citrus notes along with a hint of almond, this Verdicchio is fresh and crisp and I found it compliments this burger nicely.
A delectable burger that combines flavours complimentary to savory beef
Ingredients
The Bistro’s Burger Sauce
1/3 cup mayonnaise
2½ tbsp pure maple syrup
2 tbsp ketchup
2 tbsp rhubarb relish (for recipe, visit My Island Bistro Kitchen's "Recipe" page)
1½ tsp Dijon mustard
1 tsp garlic powder
1½ tbsp. sour cream
½ tsp onion salt
Salt and pepper, to taste
Yield: Apx. 1 cup
Frozen Flavor Burst Logs:
2 tbsp butter, softened at room temperature
2½ tsp mustard (Dijon or sweet)
2 tbsp finely grated Parmesan Cheese
1½ tsp dried parsley
Yield: Apx. 6 Logs
Burger Patties:
1 lb ground chuck (apx 80:20 ratio meat-to-fat content)
¼ cup finely grated Parmesan cheese
2 tbsp Blueberry Barbeque Sauce (for recipe, visit My Island Bistro Kitchen's "Recipe" page)
1½ tbsp maple syrup
½ tsp onion salt
¼ tsp garlic salt
2 tsp dry onion soup mix
Pinch cayenne pepper
Salt and pepper, to taste
1 egg, lightly beaten
¼ cup+ medium-ground bread crumbs
Yield: Apx. 6 patties
Cooking oil
Blueberry Barbeque Sauce
6 hamburger rolls of choice
The Bistro’s Burger Sauce
Rhubarb Relish
Cheddar Cheese Slices
Red Onion
Tomato
Bread and Butter Pickles (for recipe, visit My Island Bistro Kitchen's "Recipe" page)
6 thin slices Proscuitto
Maple Syrup and Brown Sugar (for candying the Proscuitto and pineapple)
Fresh pineapple, sliced between 1/8” and ¼” thick
Instructions
For the Burger Sauce, combine all ingredients in a jar and mix well. Store in refrigerator, for up to 7 days.
For the Frozen Flavour Burst logs, combine the butter, mustard, Parmesan Cheese, and parsley together. In teaspoon measures, portion out the mixture and shape into small logs or disk shapes. Place on plastic-lined tray and freeze for about 30 minutes.
Preheat oven to 375°F and panini grill to medium-high setting.
For burger patties: In large bowl, mix all burger ingredients just until combined, adding more bread crumbs if necessary to achieve desired consistency.
Measure the meat mixture into six (6) equal portions (apx. 4 oz each). With hands, gently and loosely clump together the meat and enclose one frozen flavour burst log into centre of each burger and surround it with meat mixture. Shape into patties that are apx. 1” thick (or to desired thickness to match size of hamburger roll). Refrigerate for one hour before cooking to allow patties to firm up and give flavours time to blend.
Heat 1½ - 2 tbsp cooking oil in frypan over medium high heat. Sear burgers, two minutes each side. Do not press down on the burgers. Remove from frypan and brush Blueberry Barbeque Sauce over both sides of burgers and transfer to greased wire rack suspended over baking pan (to catch any drips). Bake in pre-heated oven until desired doneness is reached, adding the cheese slices to the burgers for the last minute of baking.
To candy the prosciutto – mix together 2 tbsp maple syrup with 2 tbsp. brown sugar. Lightly brush each thin slice of prosciutto with the mixture, being careful not to tear the delicate meat. Place over greased wire rack suspended over baking pan. Bake in 375° oven for apx 7-10 minutes or until prosciutto is browned and starts to become crispy.
Fresh pineapple slices can be added to the burgers without glazing them. However, to glaze the pineapple slices, mix together 2 tbsp maple syrup with 2 tbsp brown sugar. Lightly brush mixture on both sides of each pineapple slice and place slices on panini grill (set at medium-high) and press grill top down on to pineapple slices and grill on medium-high for about 1-2 minutes, or until pineapple is heated and has grill marks.
To assemble burgers:
Select hamburger rolls of choice and split in half, horizontally. Butter each half and, if desired, toast on grill or in oven. Slather a generous helping of burger sauce on the bottom half of each roll. Add lettuce and then the burger. Add pickles, sliced tomato, onion, candied prosciutto, rhubarb relish, and maple glazed pineapple. Place the top halves of the rolls on each burger and garnish each with a chunk of fresh pineapple and a cherry tomato. Serve with your favorite side salad or home fries.
Burger Sauce – my own homemade recipe Blueberry Barbeque Sauce – my own sauce recipe made with blueberries from Murray’s U-pick in North Tryon, PEI Ground Beef Patty – ground chuck, sourced from KJL Meats in Charlottetown, PEI. I had the butcher grind the beef especially to my personal specification using a ratio of approximately 20% fat to 80% meat to give that juicy burger result. Cheese – COWS Extra-old Cheddar from COWS Creamery, North River, PEI Bread and Butter Pickles – my own homemade recipe made with cucumbers from Balderston’s Farm Stand, Stratford, PEI Tomatoes – organic, from the greenhouses of the Schurman Family Farm in Spring Valley, PEI Rhubarb Relish – my own homemade recipe made with rhubarb from my garden
By now, if you are a regular follower of my food blog, you have probably detected that I like vintage foods and those that could be called comfort foods.
I grew up with tomato soup cake as standard fare in the household. It’s such a simple cake and, while it may seem bizarre to add a can of tomato soup to cake batter, it’s really tasty when some spices are added. The tomato soup cake my mother used to make was always a single layer (and always made in the pyrex glass 8″ square baking pan). It was never frosted and was generally considered to be an “every day cake” as opposed to a cake for a special occasion. My mother’s cake was rather dense in texture and contained no eggs. Spices consisted of cinnamon and cloves. Continue reading Vintage Tomato Soup Layer Cake Recipe→
For many years, I have been making this hearty soup known as Goulash. It’s a well-filled soup and is a very filling one! Good any time of the year, this soup is especially tummy-warming on cold days. Continue reading Rich and Hearty Goulash Soup Recipe→
I make a lot of muffins and freeze them to take to work for coffeebreak snacks. I am always testing out flavour combinations for muffins. This recipe for Zucchini Granola Muffins combines grated zucchini, applesauce, granola, orange rind, and spices to make tasty muffins. Adding some granola to the muffin tops makes them colorful and interesting. Continue reading Best Zucchini Granola Muffins Recipe→
This springtime tablesetting has a yellow theme going on – after dreary winter months, it’s always good to see some bright and cheery colors and yellow is definitely in that category.
The three yellow floral arrangements, a tall flanked by two shorter complementary ones, add a burst of color in the center of the table. For a longer table, simply add more down the length of the table, alternating between tall and short arrangements.
The yellow tapers in glass candlesticks lend both an air of height and elegance. By keeping everything in the same color, the eye is not kept busy trying to focus on the focal point of the table. I find using all one color lends a more elegant look and feel to a tablesetting.
The yellow round placemats are an inexpensive way to pull the color down from the centerpiece into each placesetting. Good quality basic white napkins are a must! Using napkin rings is an easy and quick way to present napkins at placesettings. There are several ways napkins can be folded into the rings but this is one of the more classic. Made of pewter, these napkin rings have a daffodil design so are perfect for springtime tables.
I am a big fan of white dishes. First, food looks fabulous against a white background. And, second, white goes with anything which means a set of basic white dinnerware is a good all-round investment. With white dishes, you can go with any color scheme on the table so, although the dinnerware remains the same, the look can change dramatically simply by using different tablecloths, placemats, chargers, napkins, and/or centerpieces.
Adding lots of glassware to the table gives it a light look and feel – just what’s needed for a springtime tablesetting!
Don’t worry about mixing and matching glass candlesticks – in fact, having several different styles on the table makes it more interesting and takes away from the “matchy-matchy” look. To keep the look casual, just weave the candlesticks in at random among the flowers – they don’t have to be symmetrically placed.
No need for charger plates to frame the plates when round placemats are used.
For more tablesetting inspiration, click on the “Tablescape” tab at the top of my home page.
—————————————————————————-
Thank you for visiting “the Bistro” today. If you enjoyed this posting and recipe, please share it on your social media websites.
Connect with “the Bistro” through the following social media:
There is nothing like the scent of a turkey roasting in the oven! I love a roast turkey dinner with all the trimmings and I especially love the bread stuffing or, you may know it as “dressing”. The theory is that, if it goes inside the turkey cavity, it’s called “stuffing” but, if it is cooked separately (as in a casserole or loaf pan), then it’s called “dressing”. Regardless what it’s called, it just would not be a roast turkey dinner without this wonderful savory side dish. Continue reading Bread Stuffing/Dressing Recipe for Roast Turkey/Chicken→
(Mostly) PEI and Maritime Food – Good Food for a Good Life!