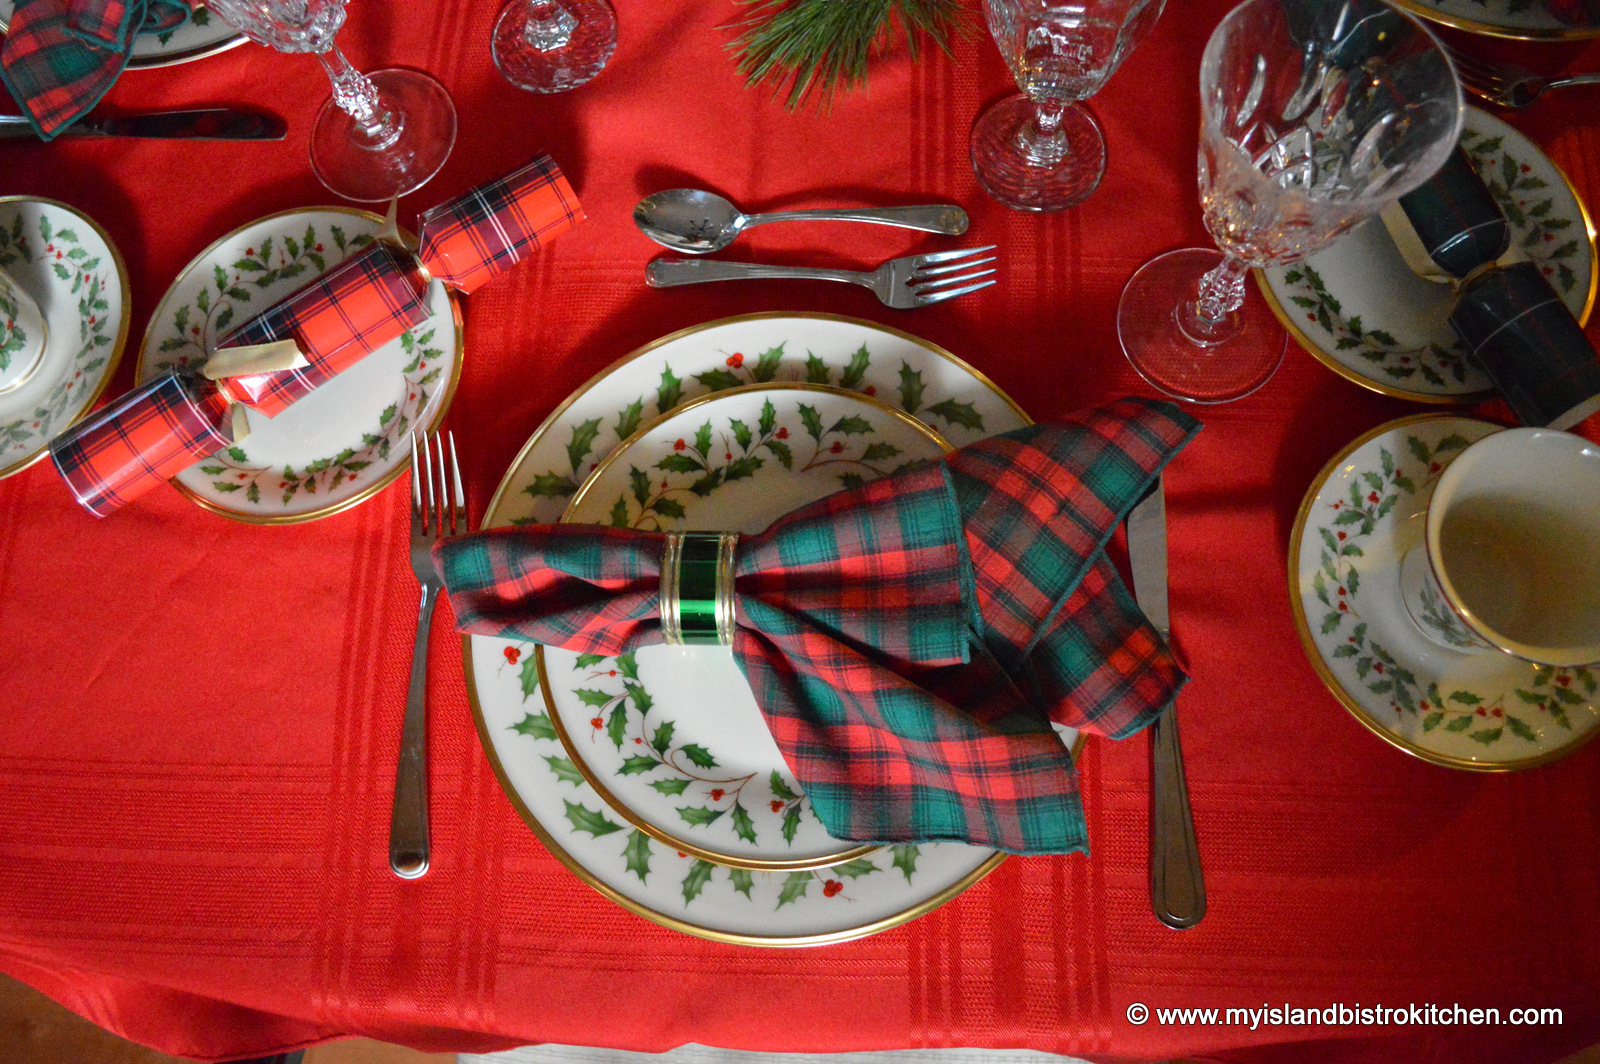
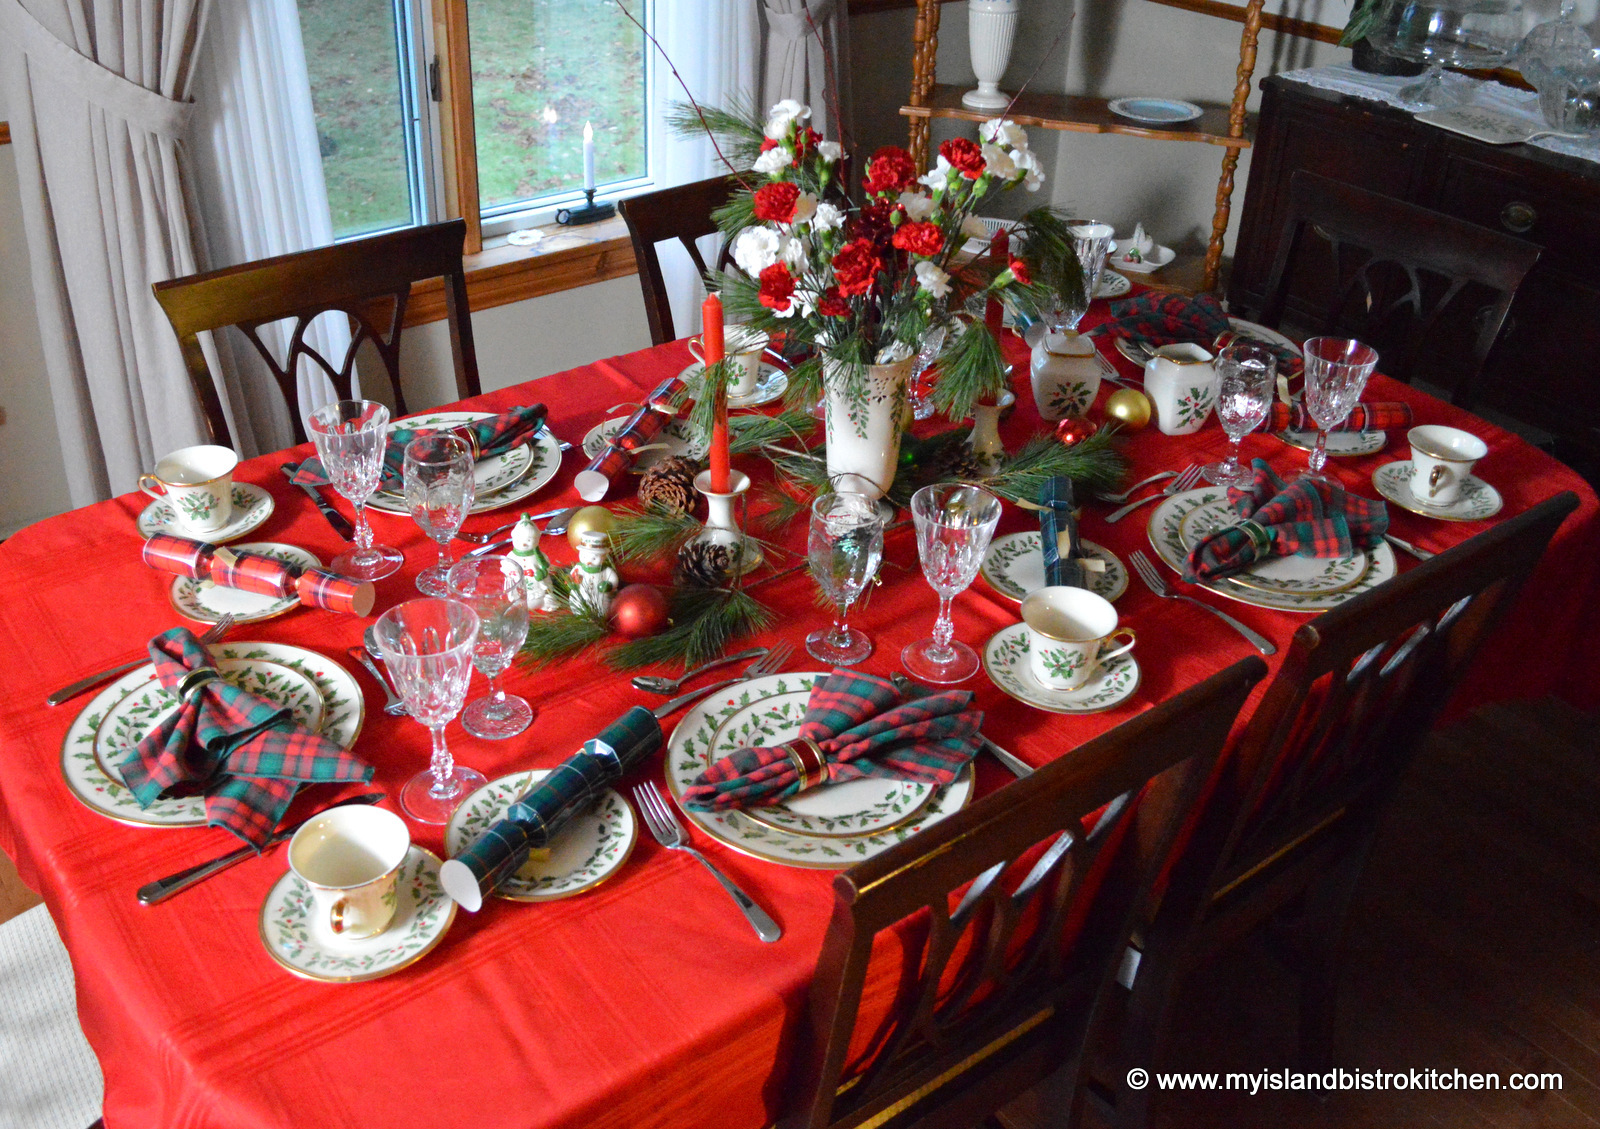
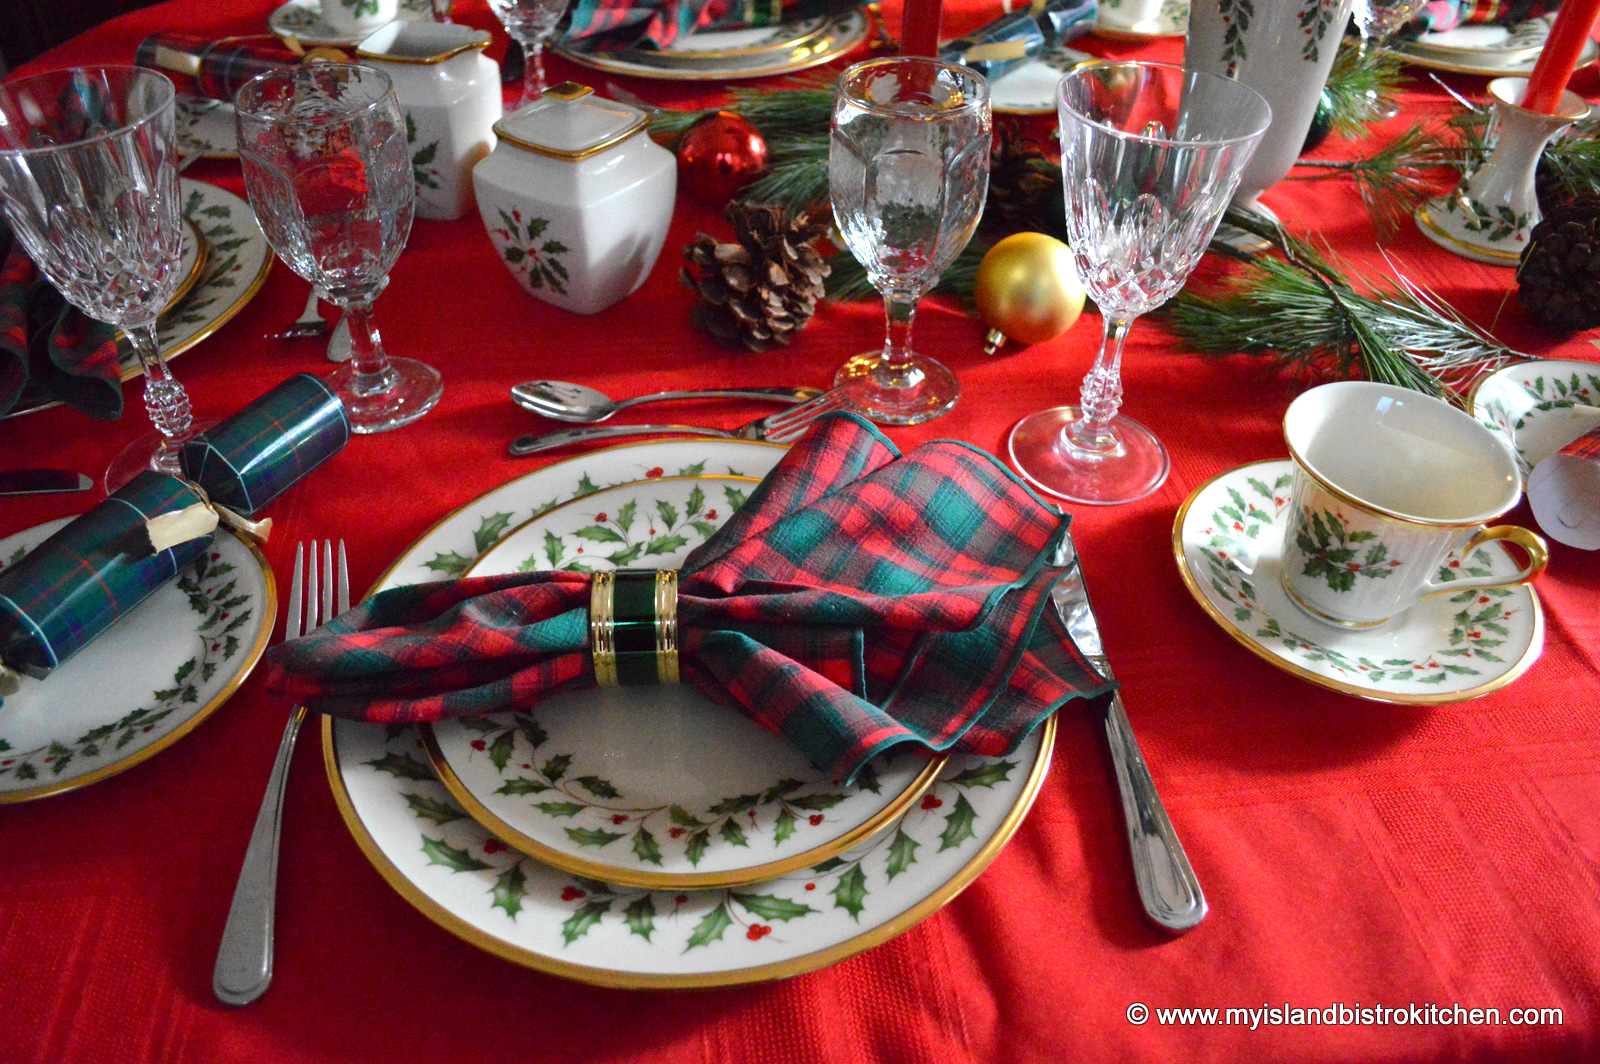
I love Christmas China but I don’t own it. When a friend discovered my fondness for Christmas China, she graciously offered her wonderful setting for 12 of Lenox’s “Holiday” pattern for a photoshoot for my Tablescapes section here on my food blog. Needless to say, I was thrilled to set her dining room table with six placesettings of this lovely China pattern.
I started with a solid red tablecloth to make the dinnerware pop. It adds a cheerful, vibrant, yet warm look to the table, perfect for a traditional Christmas dinner.
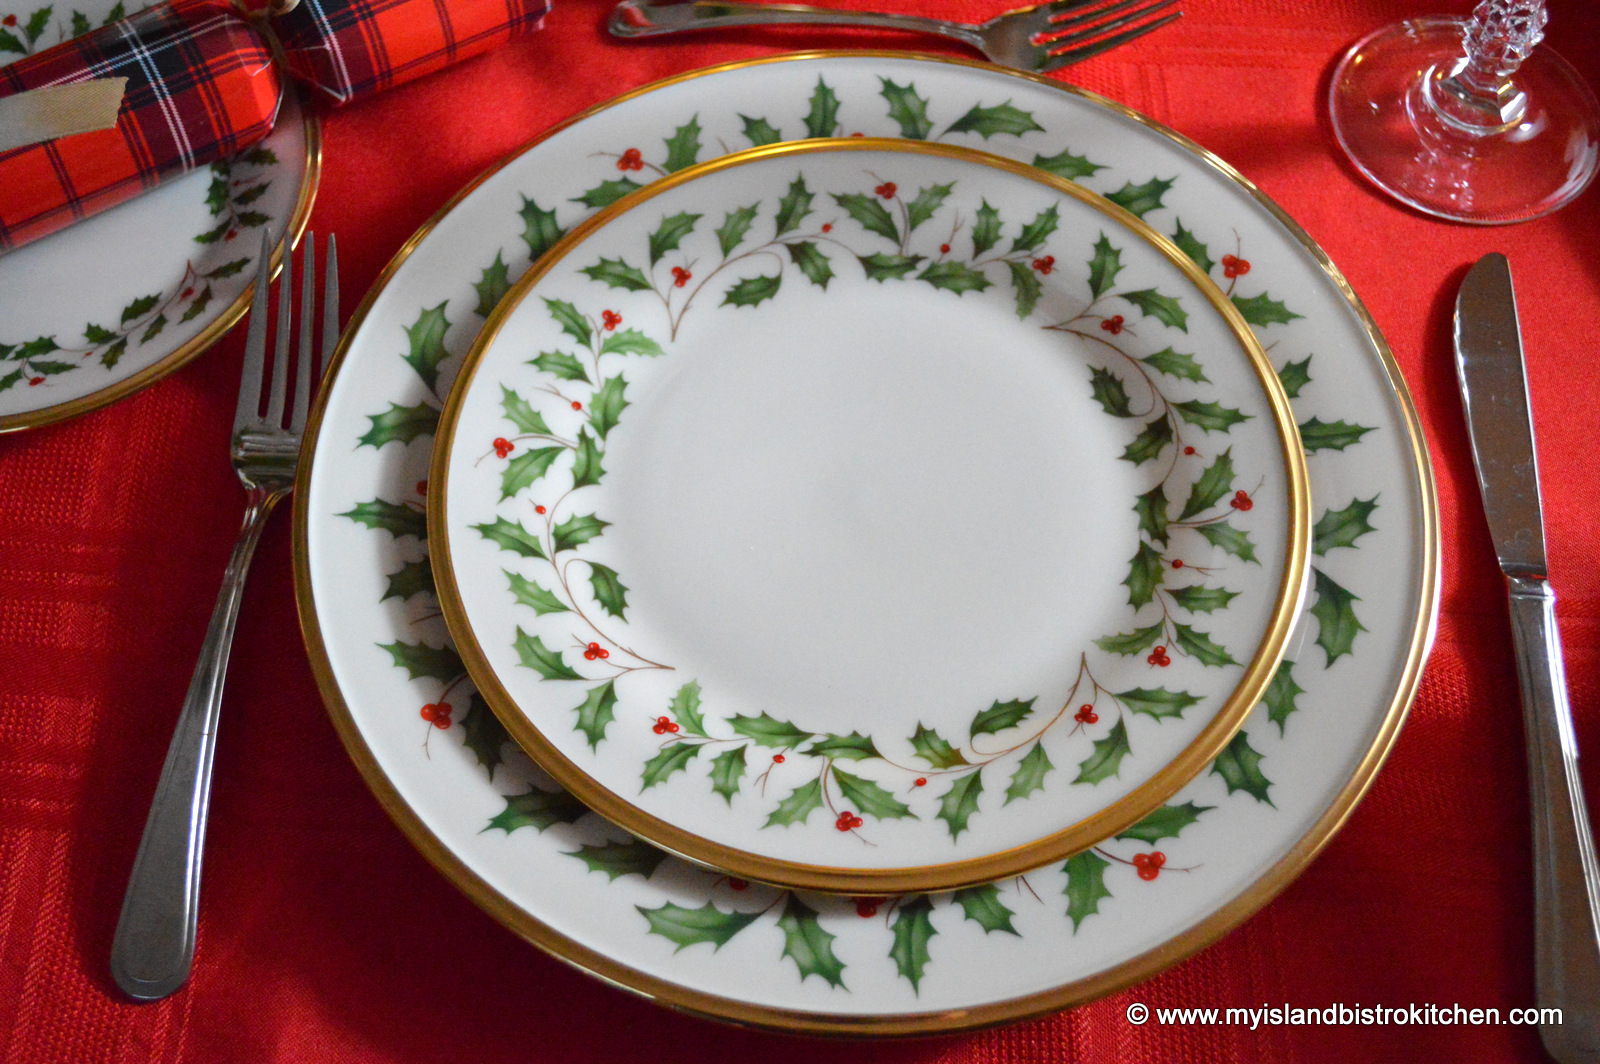
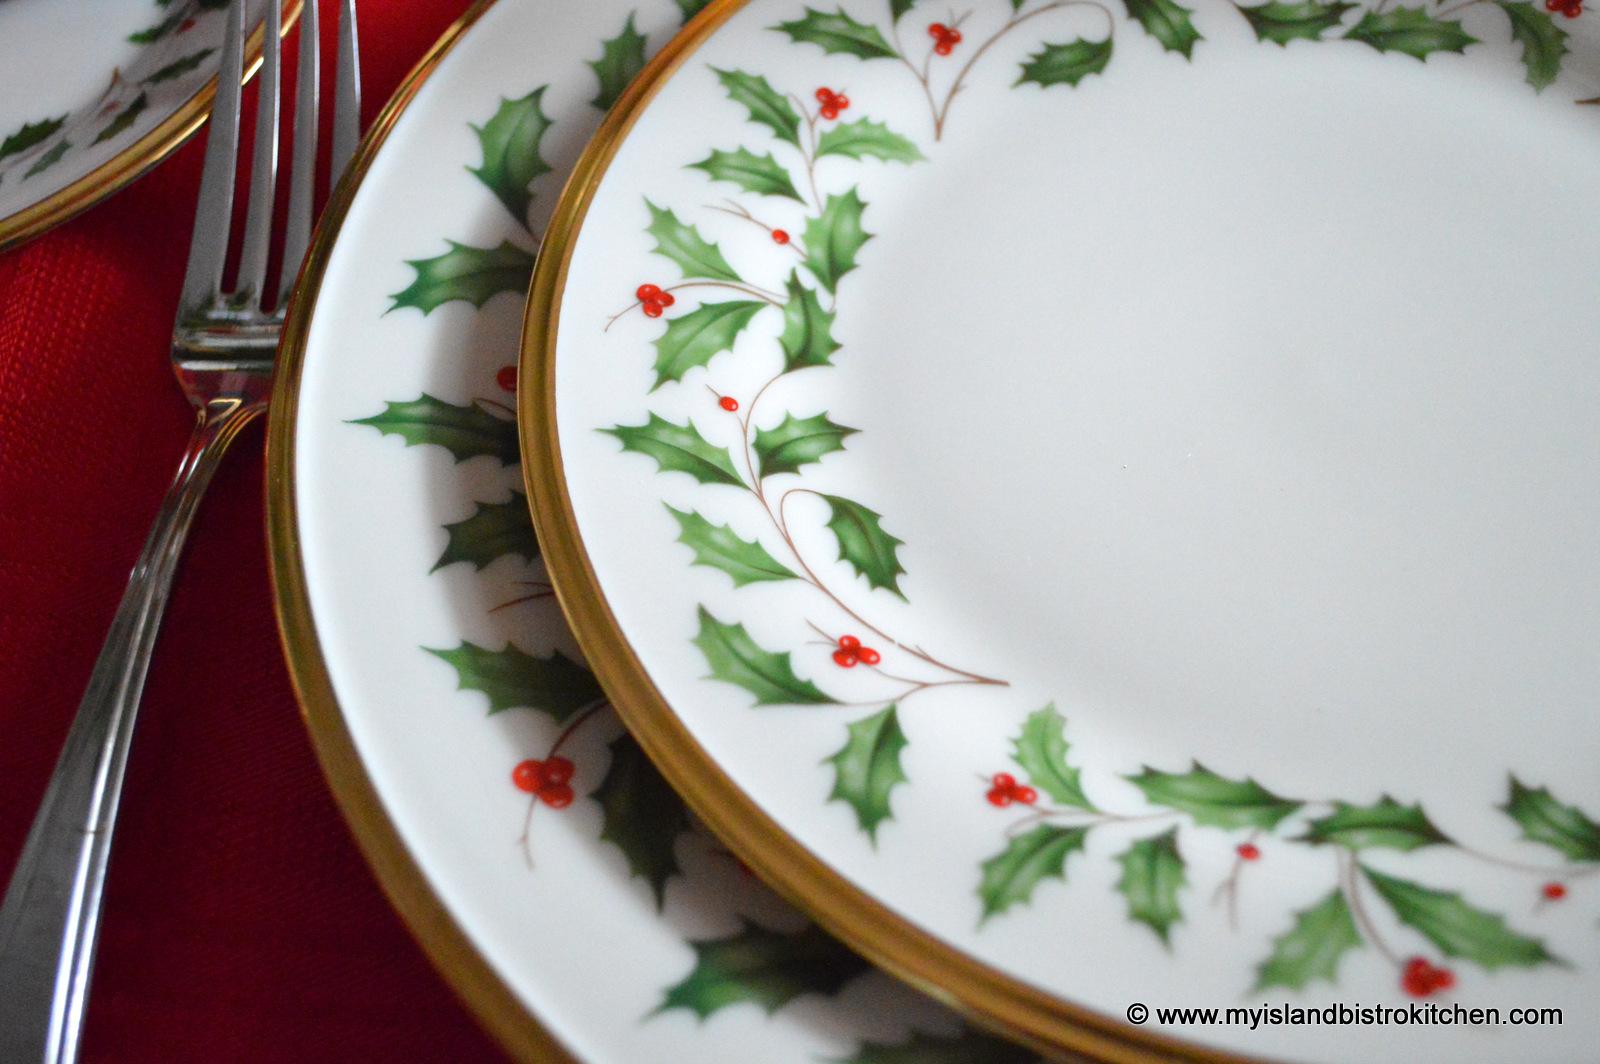
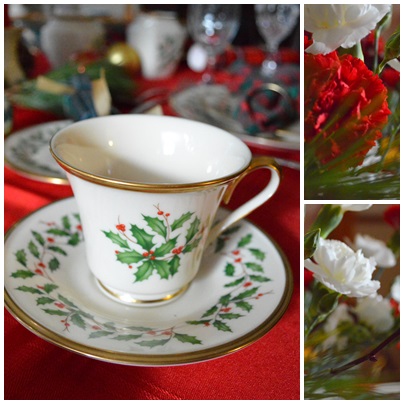
The China pattern is mostly soft white with a pattern of green holly leaves and red berries. Here’s a close-up of the pattern which is trimmed in 24-karat gold:
Lenox “Holiday” Pattern
And, for those who would like a closer view of the pattern, here it is:
The owner has the completer set to complement the dishes and has many other pieces as well, too many to use in one photoshoot!
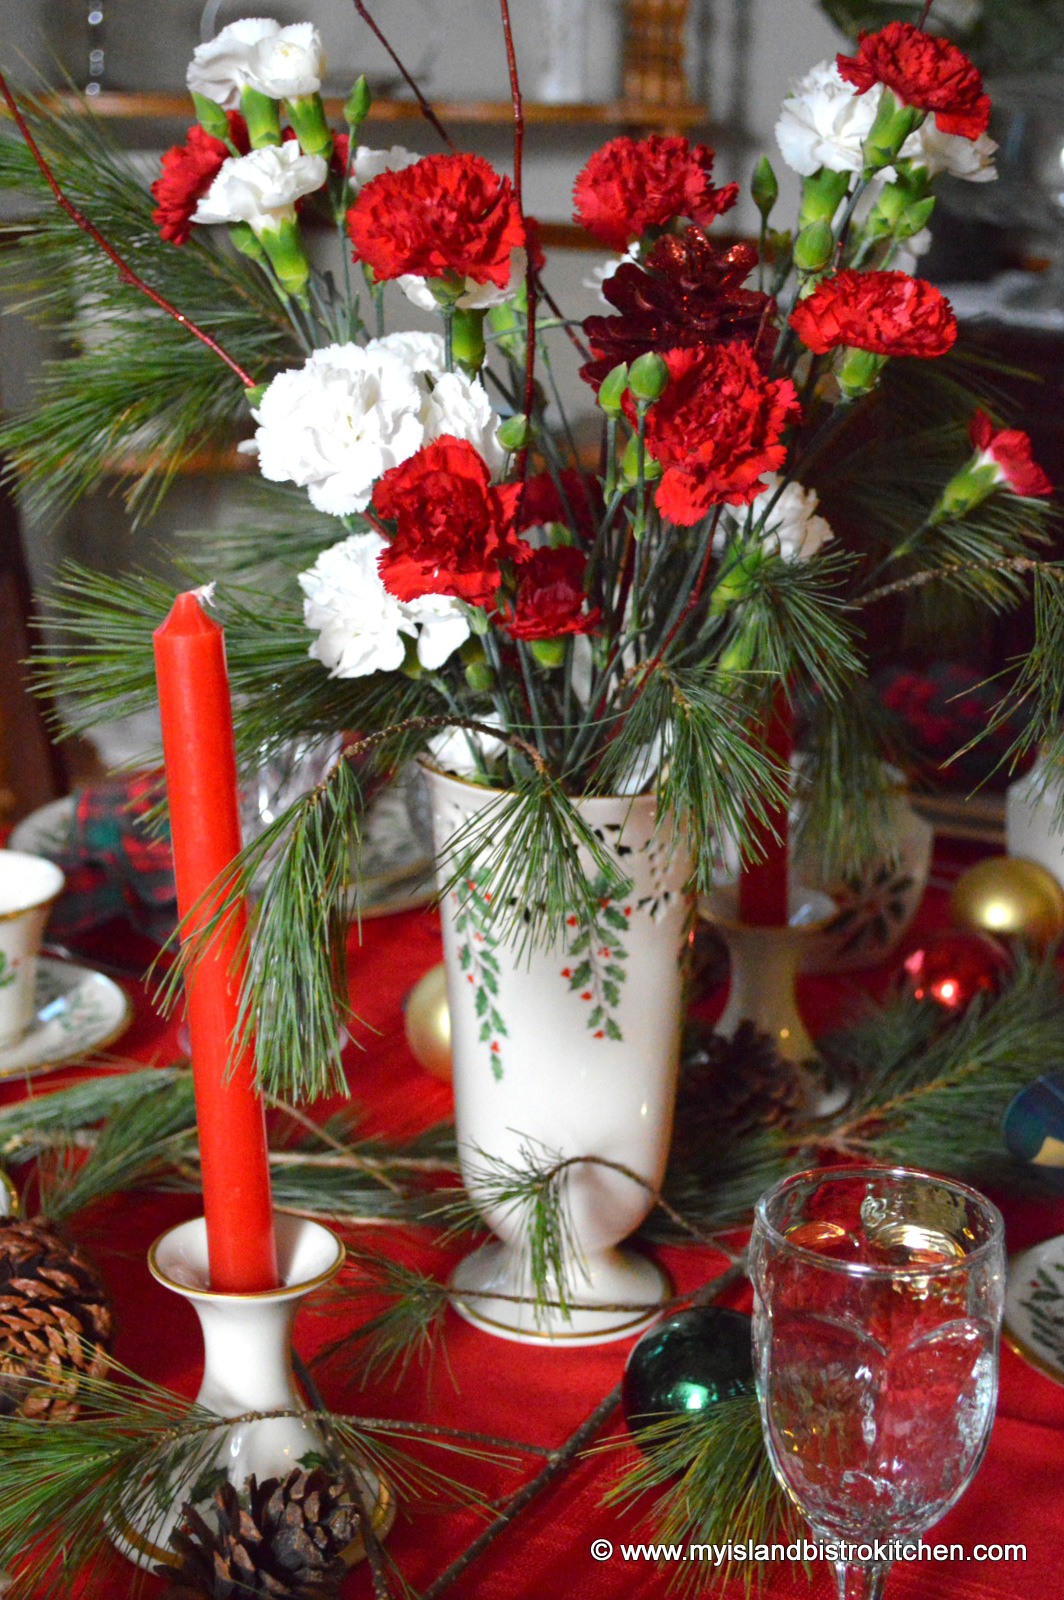
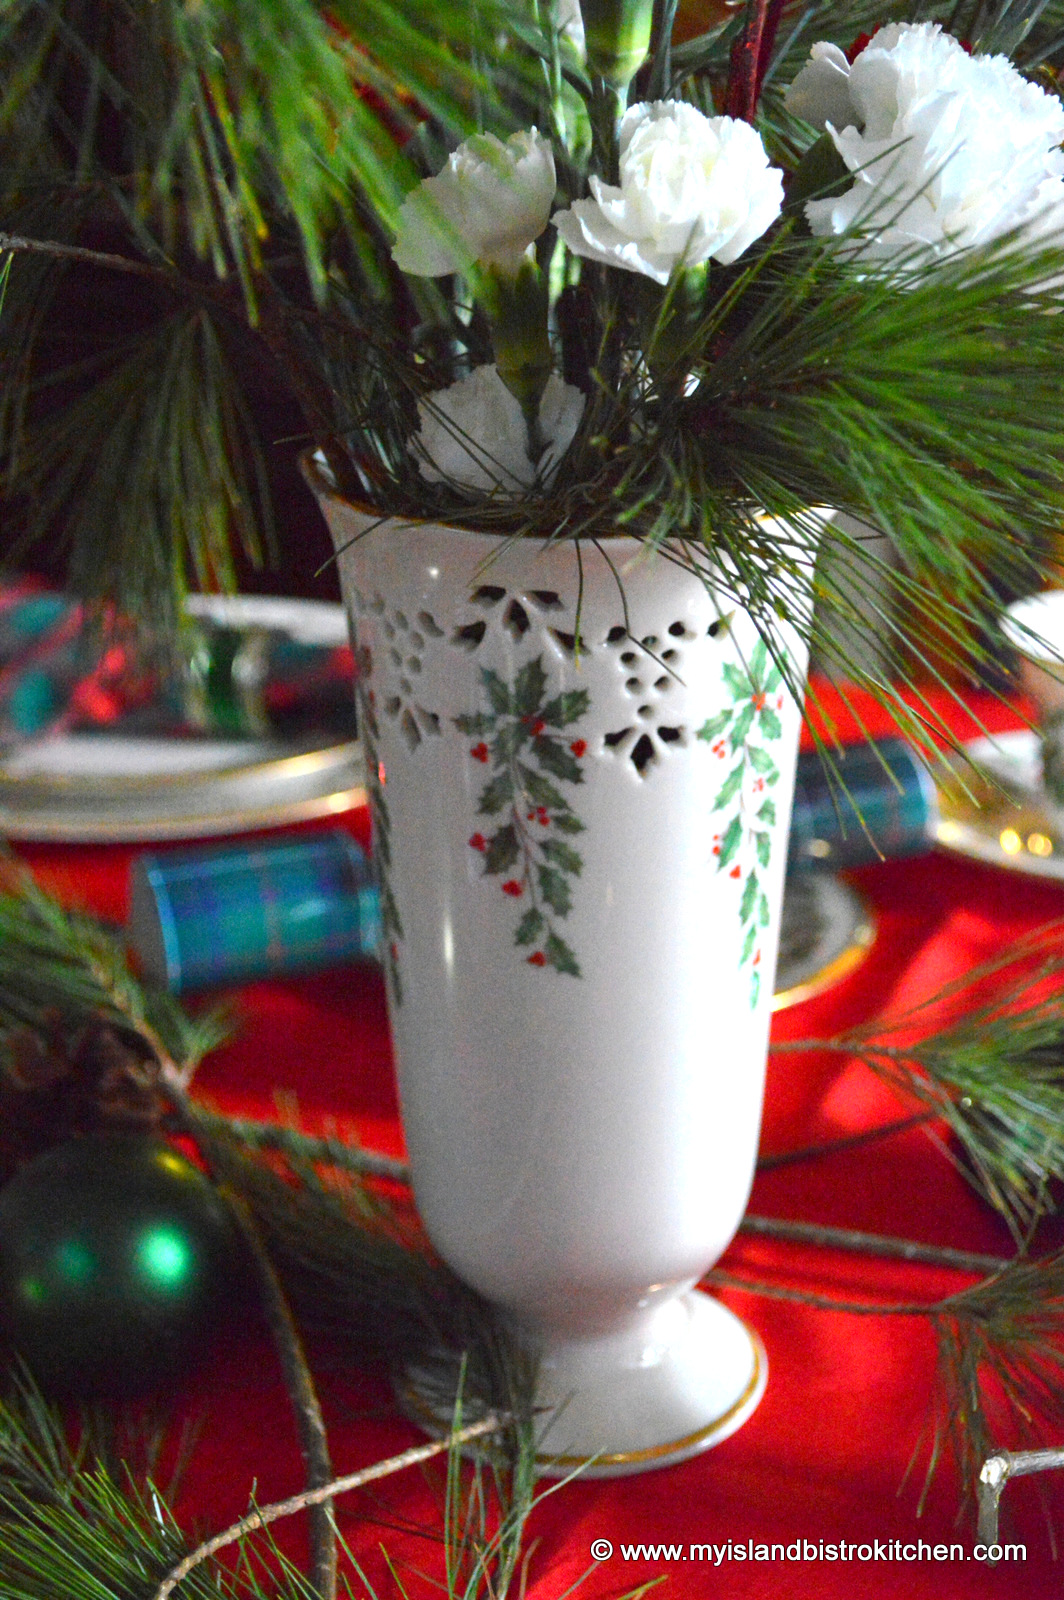
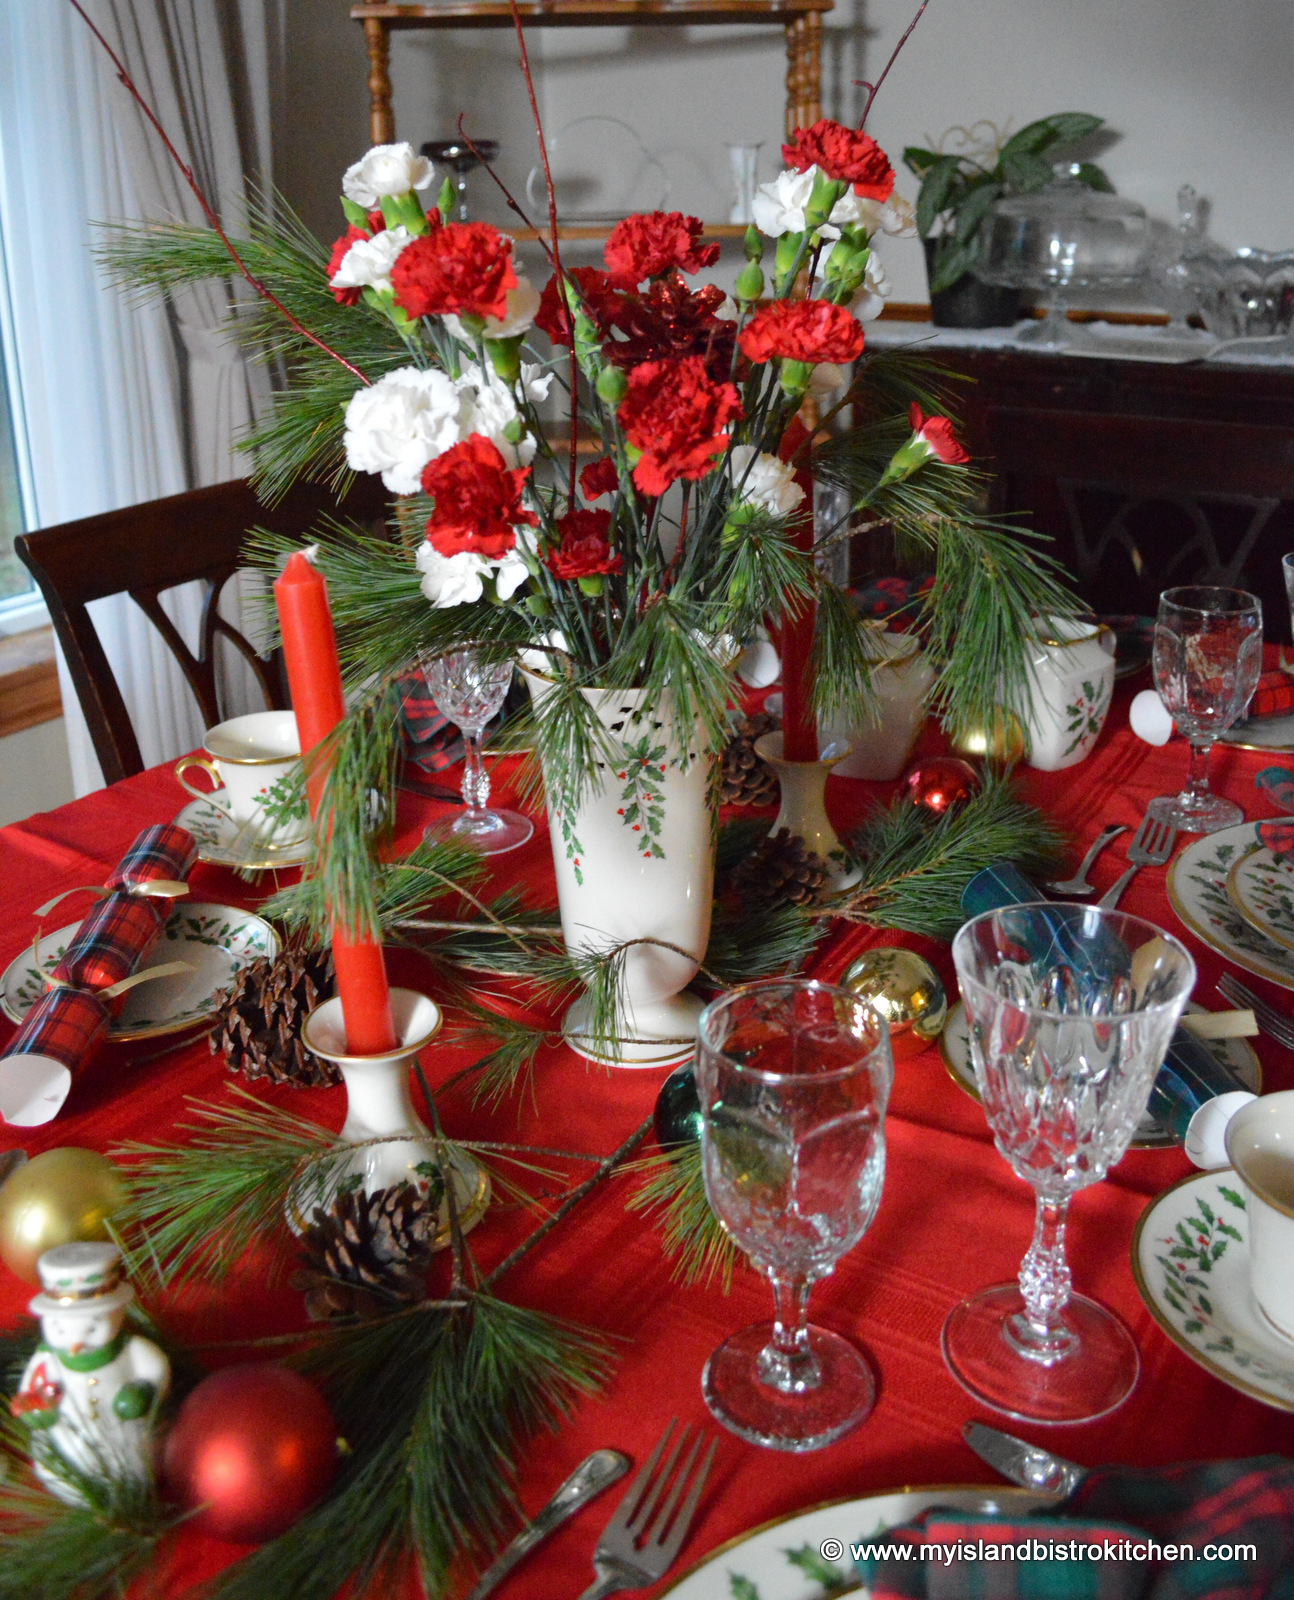
When I discovered she had the lovely vase and matching candlesticks in the “Holiday” pattern, I knew they had to be the centerpiece for the table.
Take a look at the beautiful cutwork in the design of the vase.
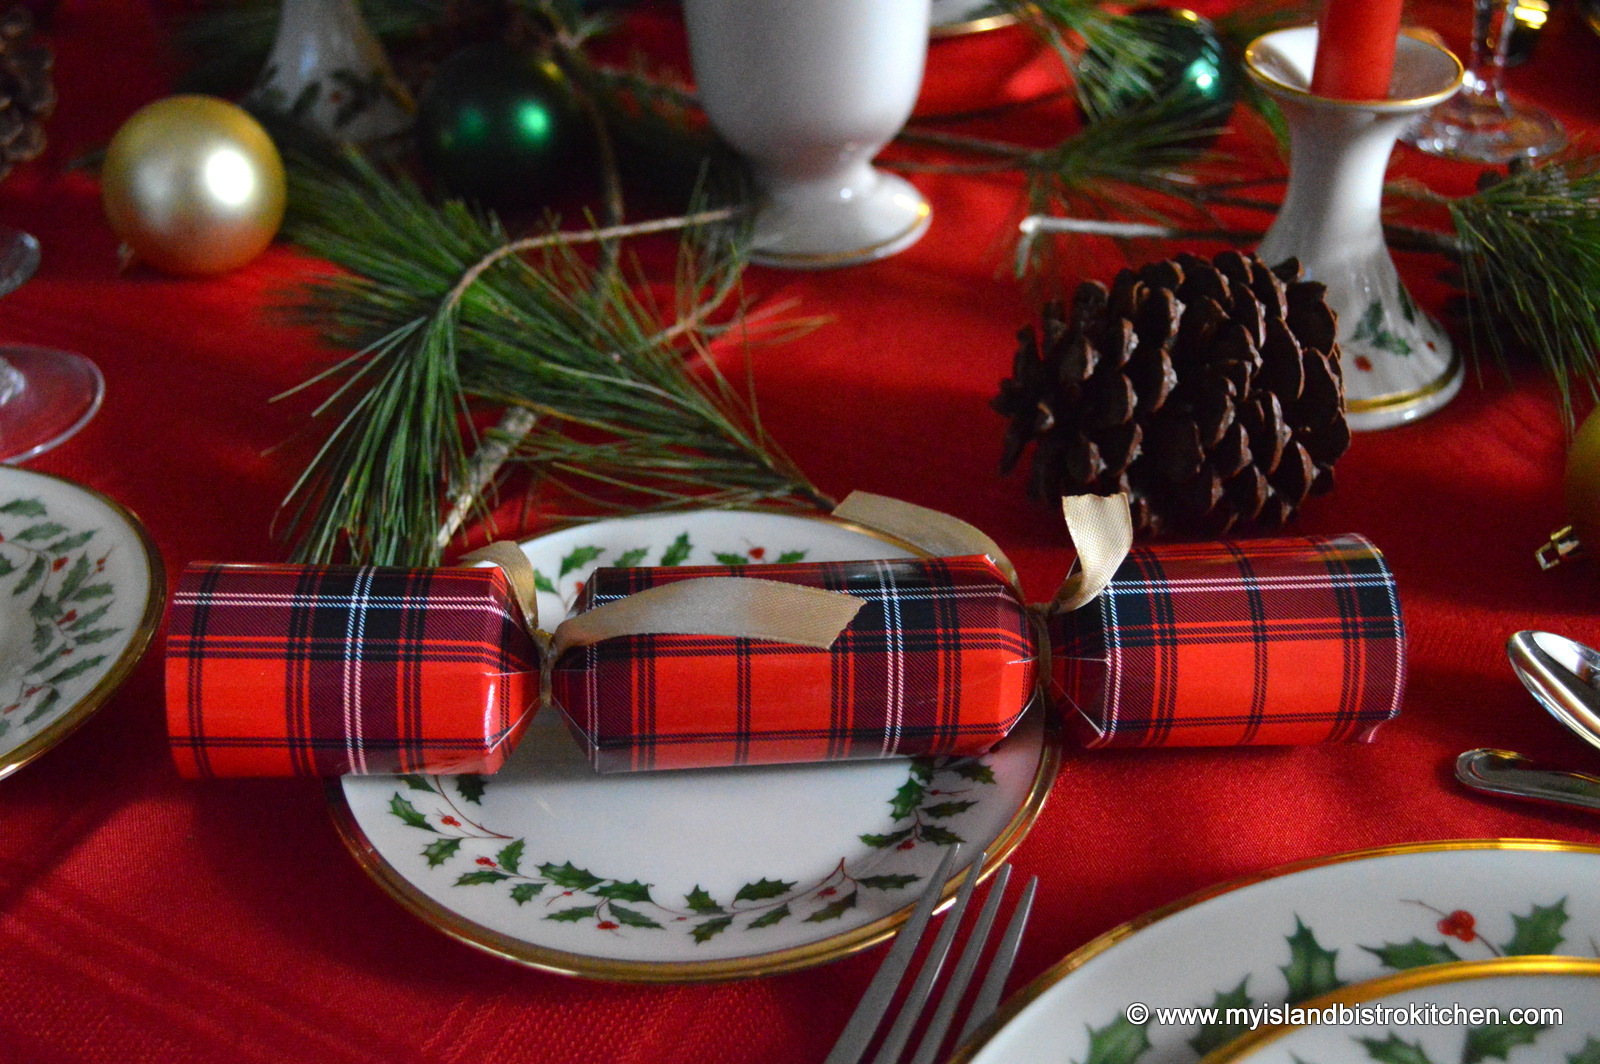
I chose red and white carnations with some fresh pine and red tapers to match the colors in the China pattern. To draw the eye to either end of the table, I simply trailed some fresh pine down the center of the table and added some pine cones and red, green, and gold balls to tie the look together.
I used the owner’s green and red plaid napkins. Plaid always gives such a nice warm feeling. Matching green napkin rings complete the look.
Plaid Christmas crackers add a fun and festive flair to the setting.
The little salt and pepper shakers also bear the “Holiday” pattern and add a touch of whimsy to the tablescape.
I hope you have enjoyed viewing the tablesetting featuring the beautiful Lenox “Holiday” pattern. My thanks to the owner for giving me the privilege of setting a holiday table with this beautiful China.
If you live on Prince Edward Island, where I live, and have beautiful China – Christmas or otherwise, vintage or formal – and would like to share and have it featured in a tablesetting here on my food blog, please don’t hesitate to get in touch with me to see what we could arrange. Unfortunately, I can’t commit to off-Island photoshoots of tablesettings due to travel logistics.
To view other Christmas and New Year’s Tablesettings, click on the links below:
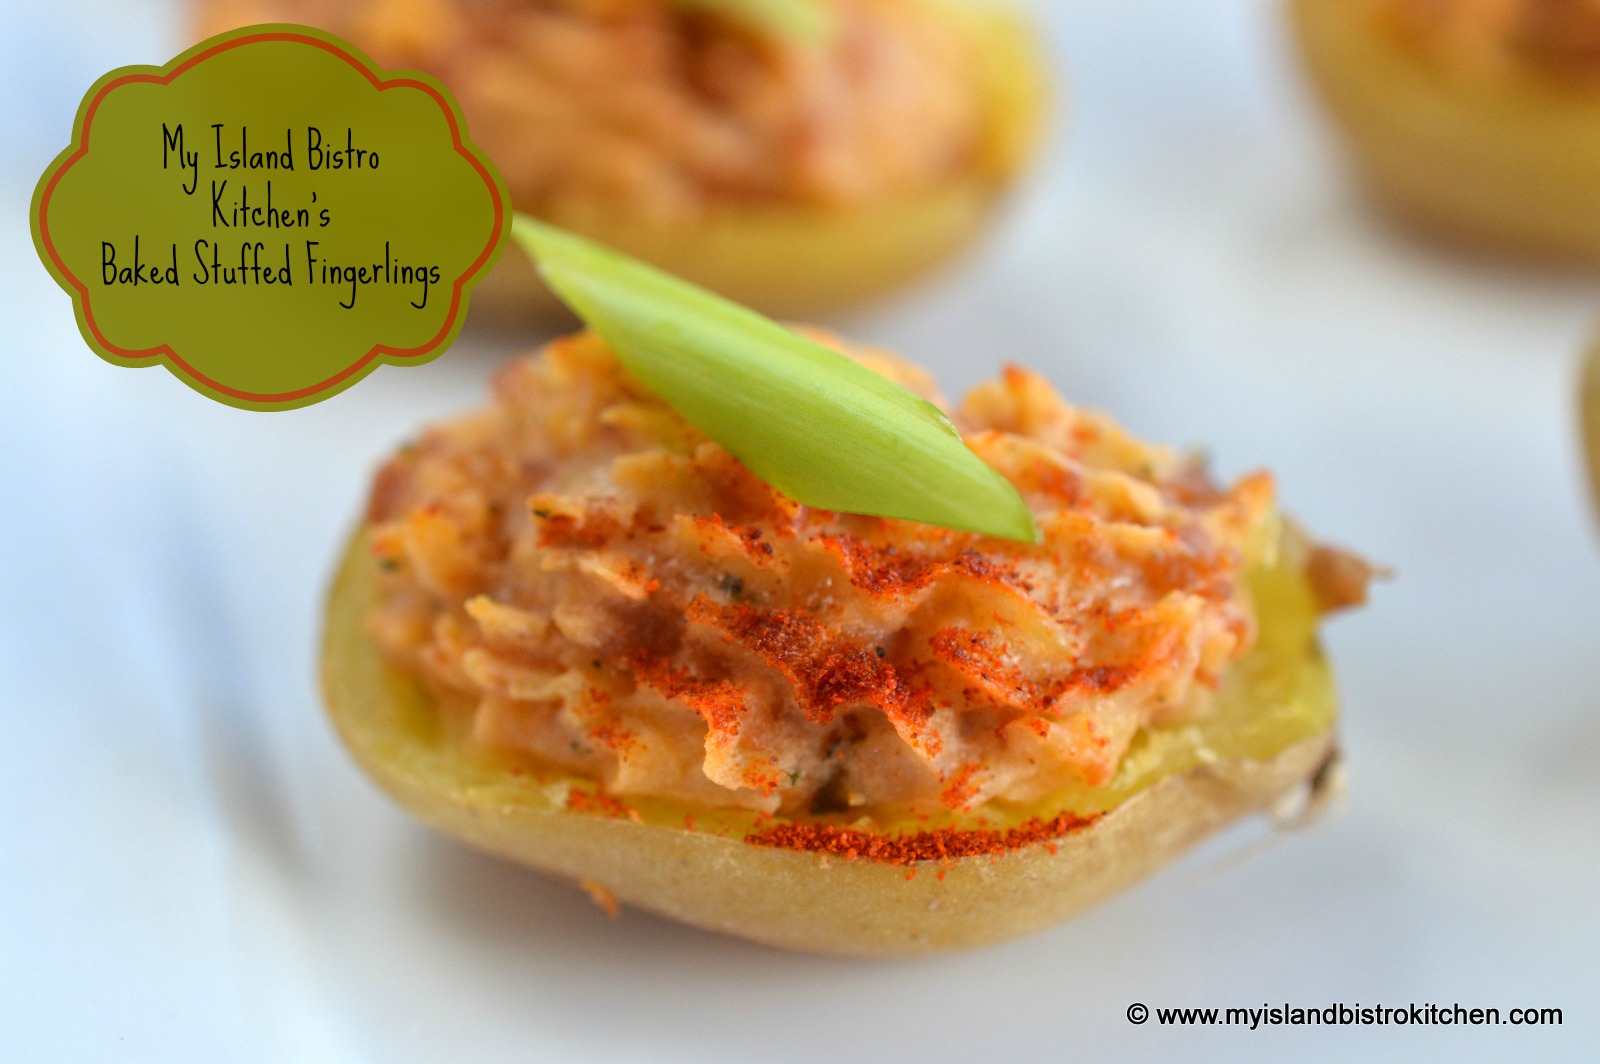
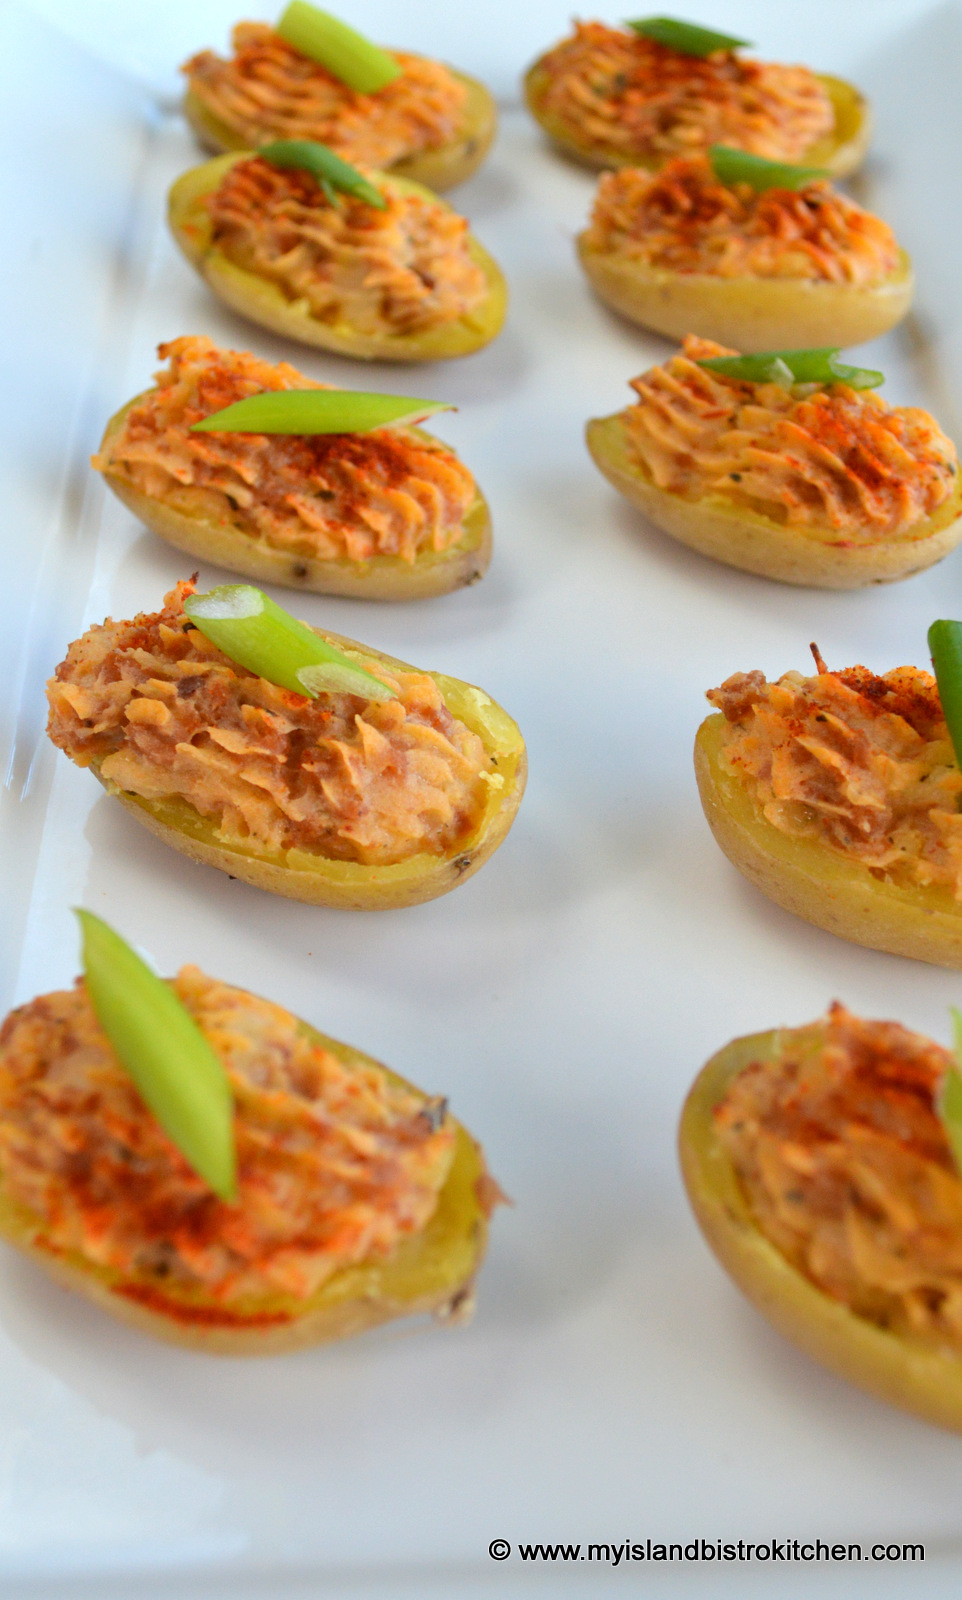
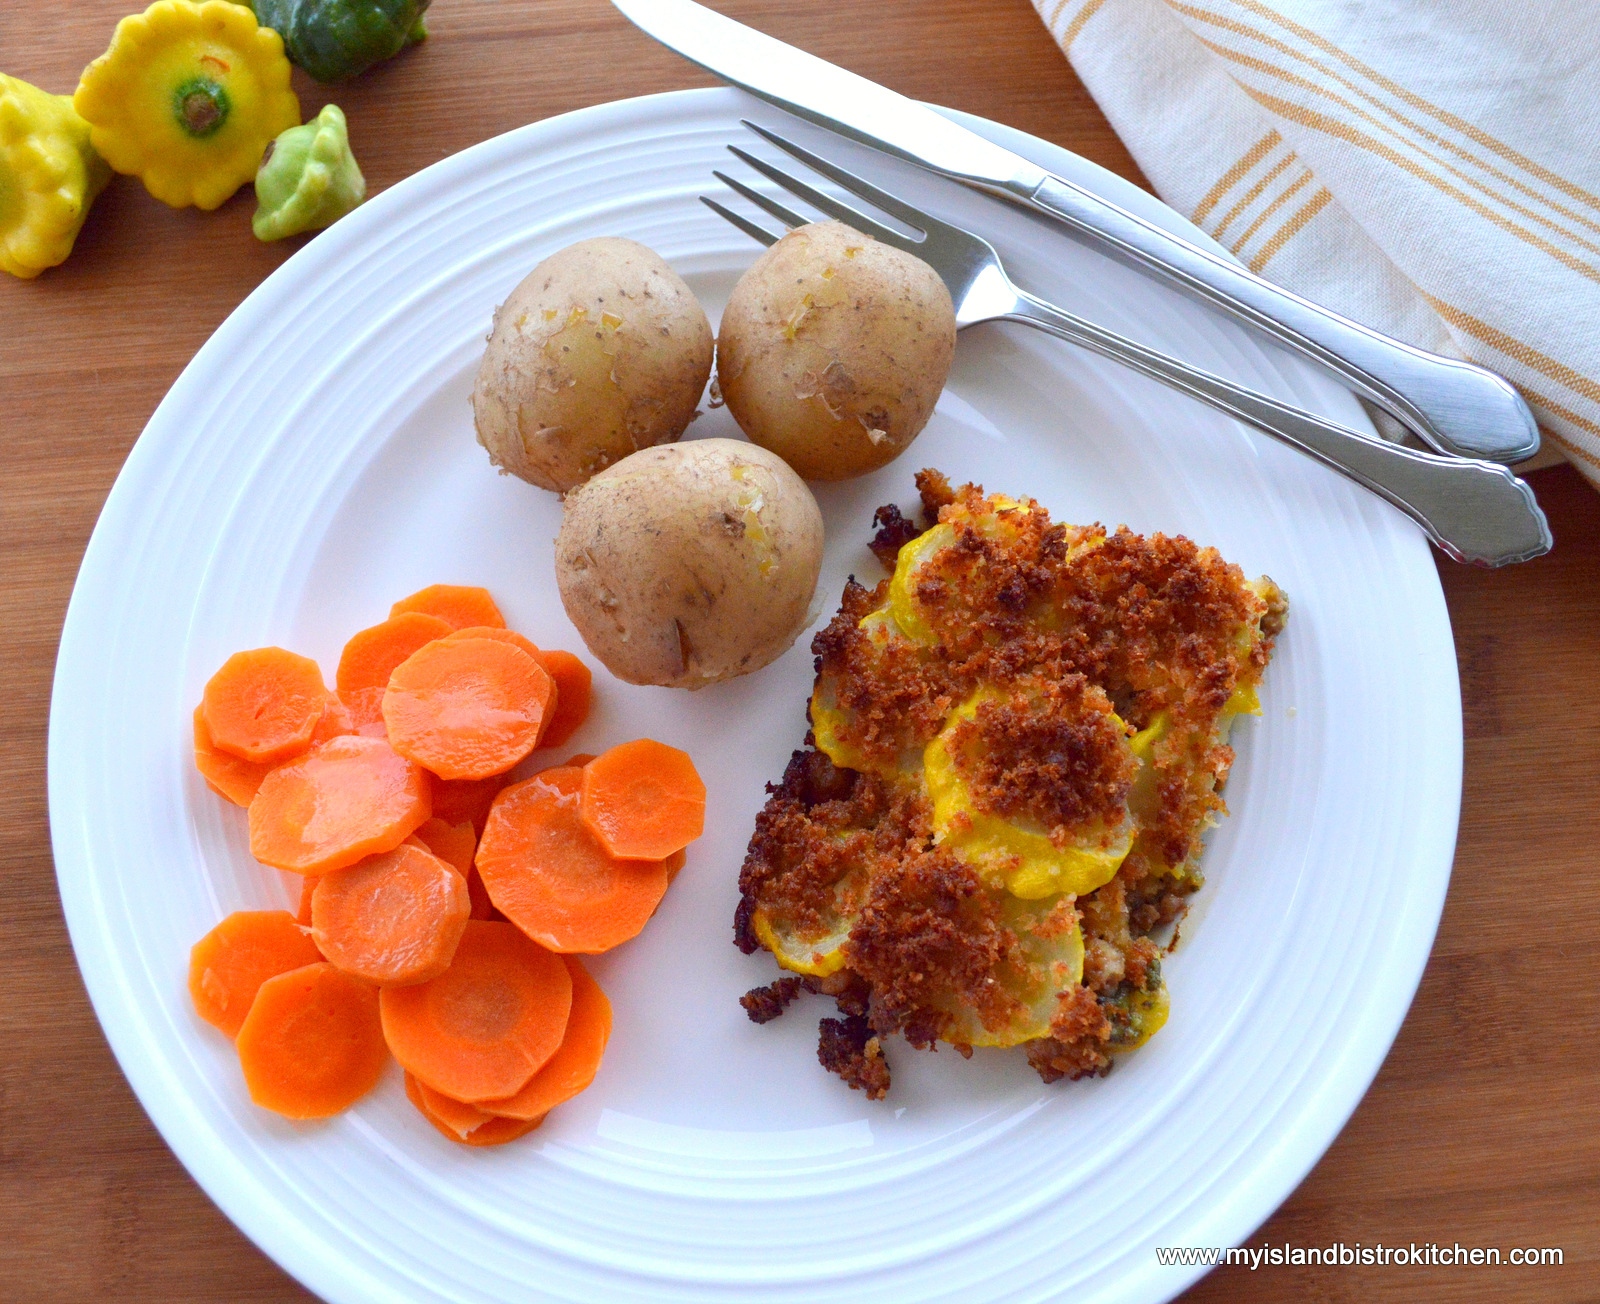
I love miniature potatoes. They’re fun to work with. They make wonderful hors d’oeuvres, are the perfect size for roasting, and are the ideal size to drop into soups just the way they are without cutting them up.
Through the Food Bloggers of Canada association of which I am a member, an opportunity arose this fall to take little creamer potatoes produced by the Little Potato™ Company of Alberta and create an original recipe using the potatoes. Coming into the Christmas party season, I immediately saw them as potential hors d’oeuvres.
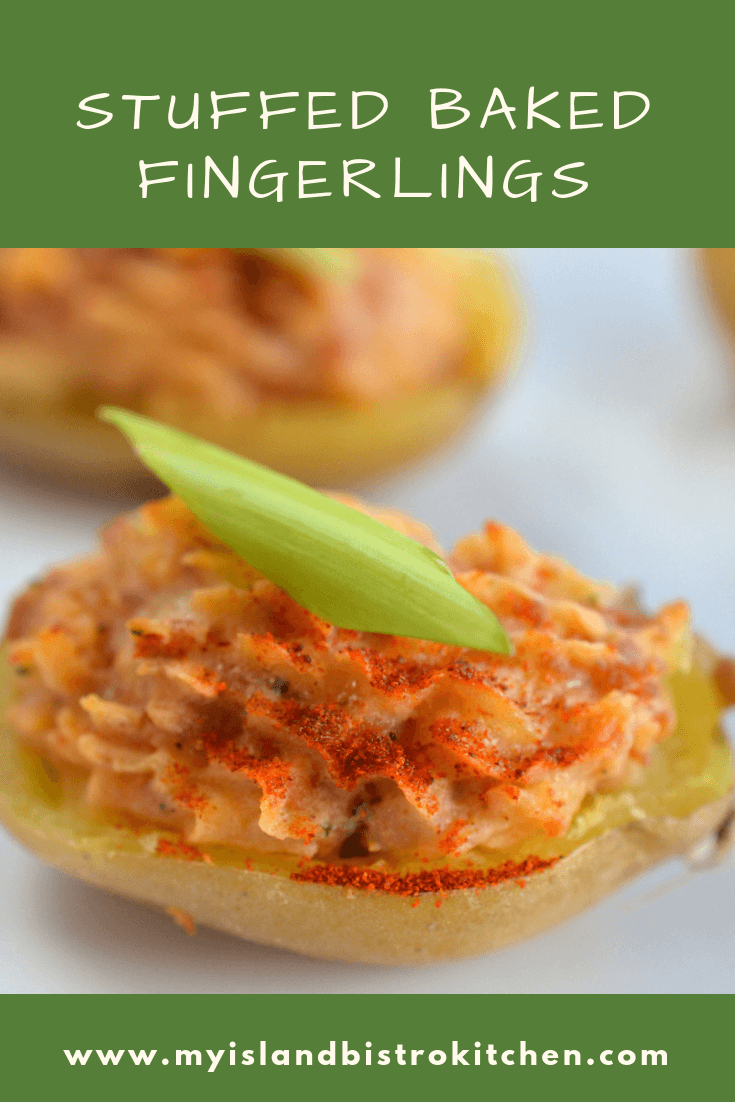
Stuffed Baked Fingerlings
The Little Potato™ Company grew their first acre of tiny potatoes in 1996. A father and daughter team, Jacob Van der Schaaf and Angela Santiago, planted, weeded, and harvested the first crop by hand. It was a success and soon Angela began marketing the potatoes at Farmers Markets and to restaurants.
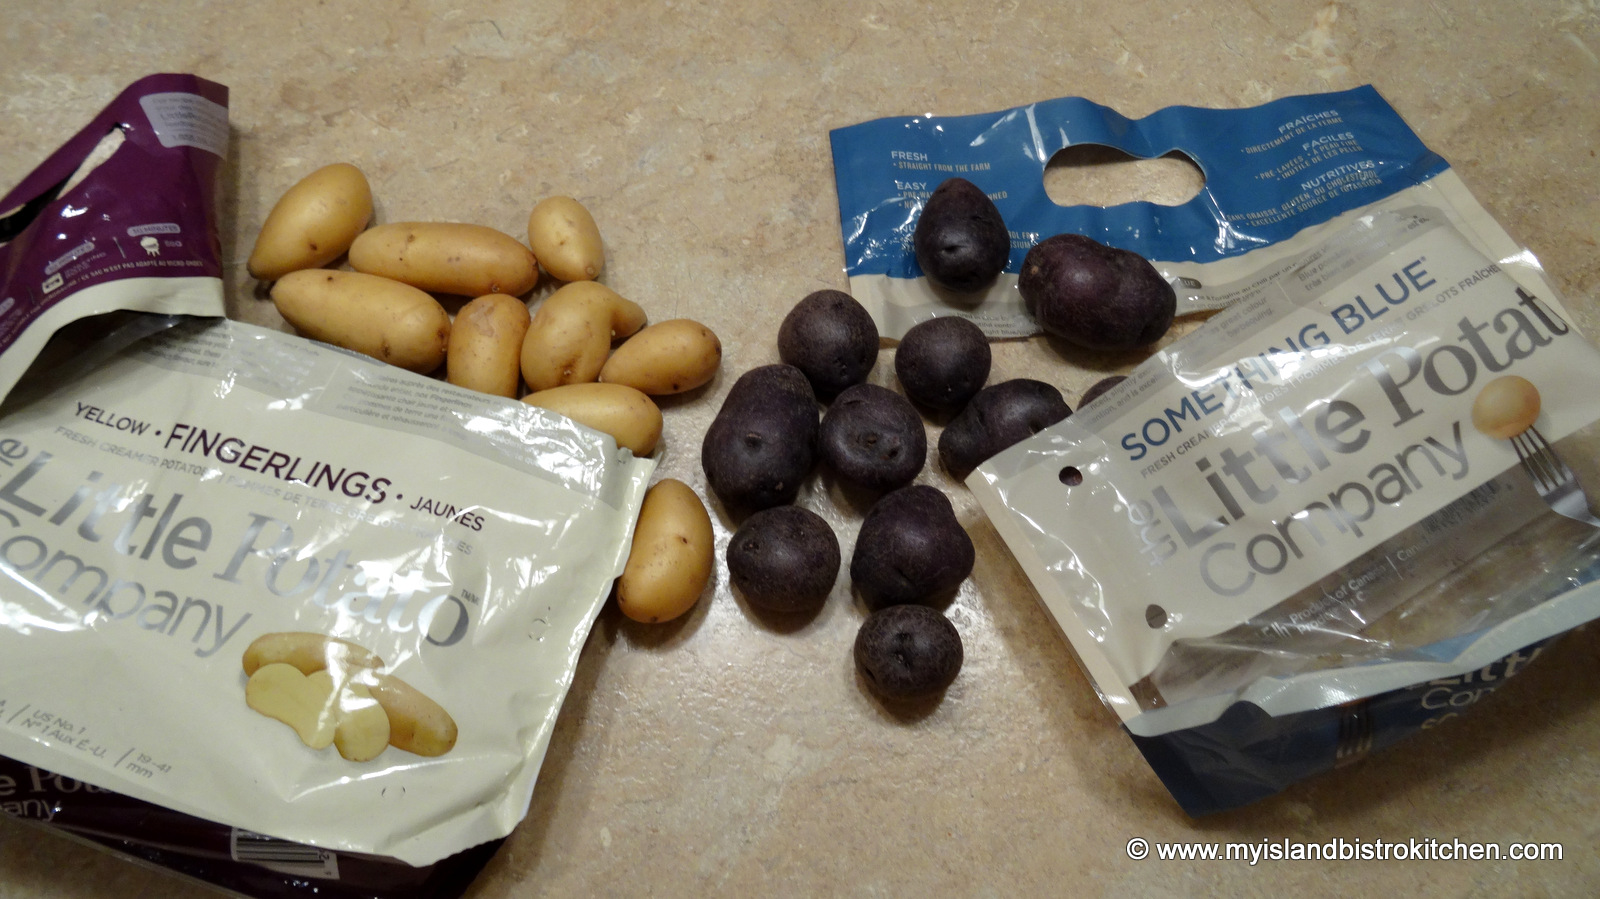
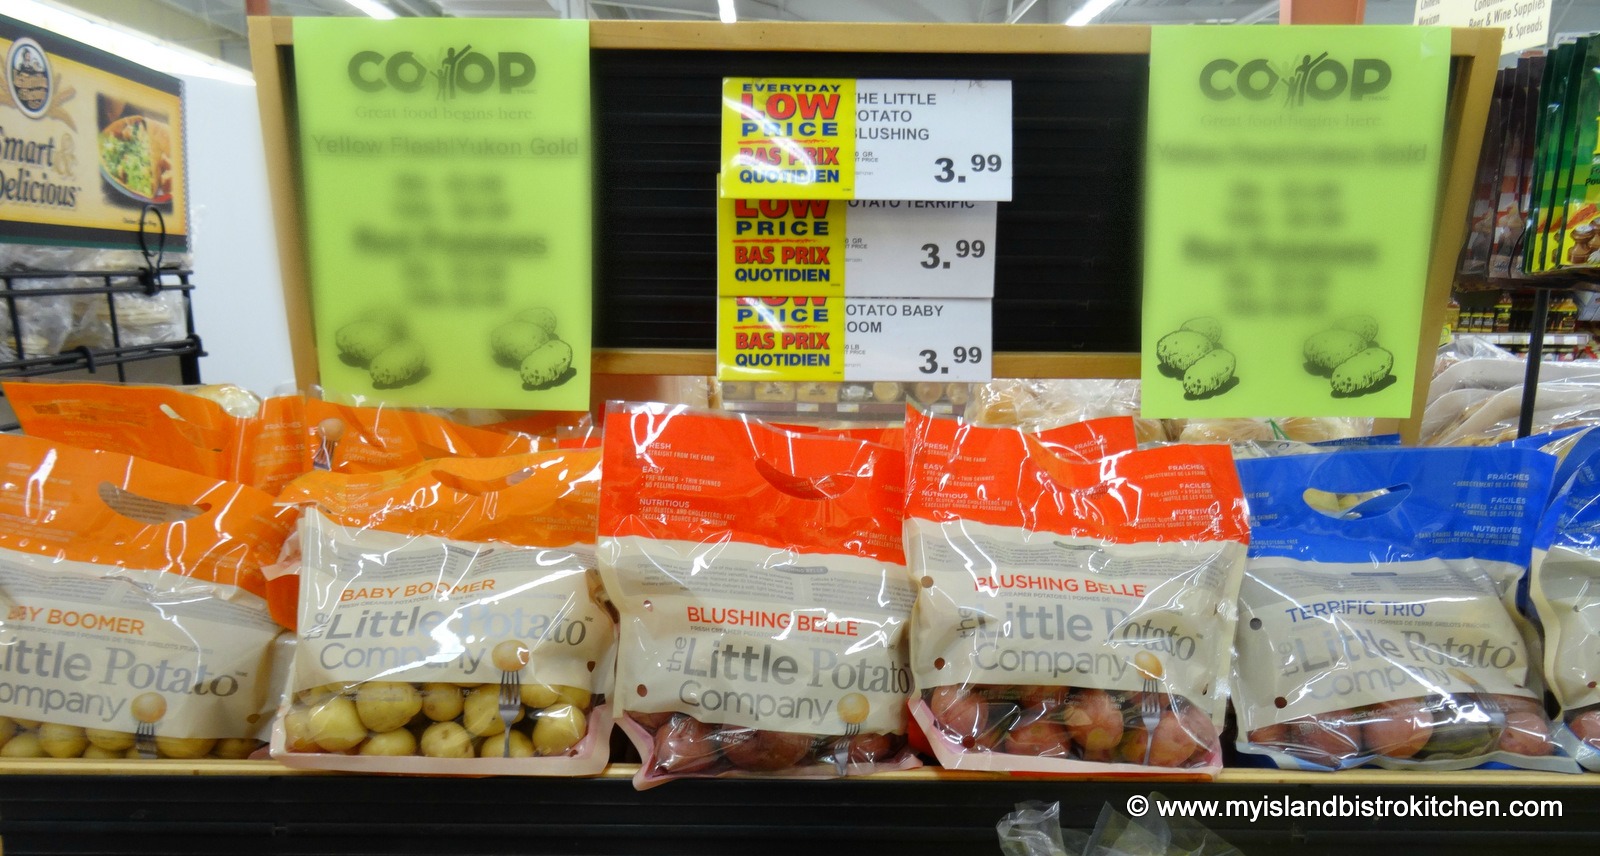
The tiny potatoes grew in such popularity that production expanded and, today, the Little Potato™ Company grows six varieties of the little gems which are available at grocery stores across North America. To learn more about The Little Potato™ Company and their various varieties of miniature potatoes, visit their website. You can also find them on Facebook.
The Little Potato Company varieties of potatoes available at the Co-op Food Market on Walker Avenue in Charlottetown, PEI
Two bags each of Little Potato™ Company yellow fingerlings and Something Blue® mini potatoes arrived via UPS at my door one evening. I was thrilled that the oblong fingerlings were sent since they are the perfect shape and size to use when making miniature stuffed baked potato hors d’oeuvres. The recipe I have created especially for these little creamer potatoes can also be used to stuff mini round potatoes as well but the shape of the fingerlings really lends them to being stuffed attractively.
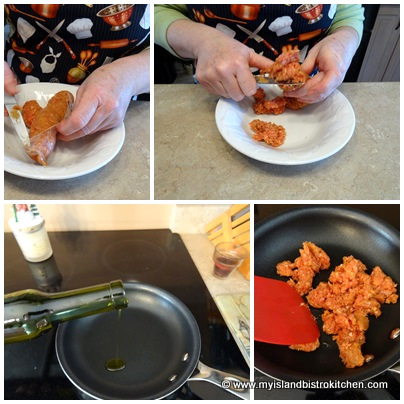
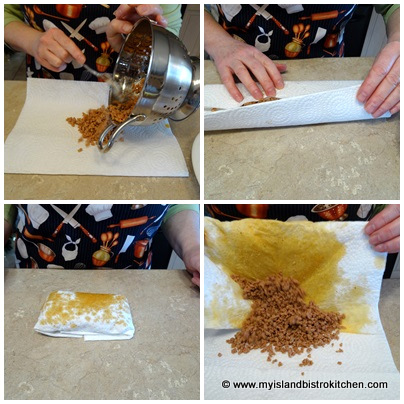
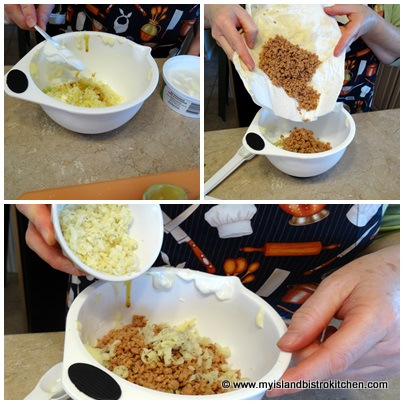
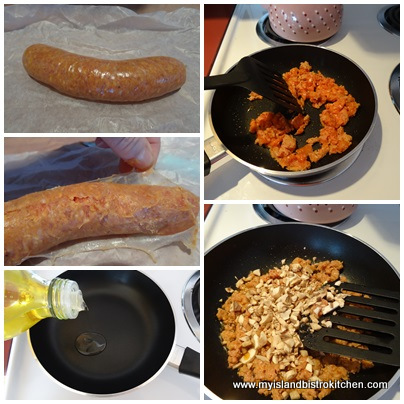
Any flavour of sausage can be used in this recipe. My choice is sweet Italian but, if you like hot flavours, then chipotle would be a good option. The sausage needs to be removed from its casing and it is important to break up the sausage meat really well as it is being scramble-fried because it is going to be piped through a pastry bag. Also, its purpose is to add flavour to the filling and a large chunk of sausage is not desirable in a tiny hors d’oeuvre.
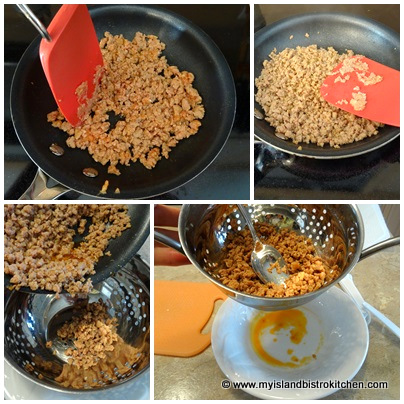
It’s also necessary to extract as much fat as possible from the cooked sausage as the fat can drip through the potato skin and make a messy hors d’oeuvre. To remove the fat, let the cooked sausage drain in a colander for about 15 minutes then wrap the meat in paper towel, repeating the process a couple of times, if necessary, to remove the excess fat.
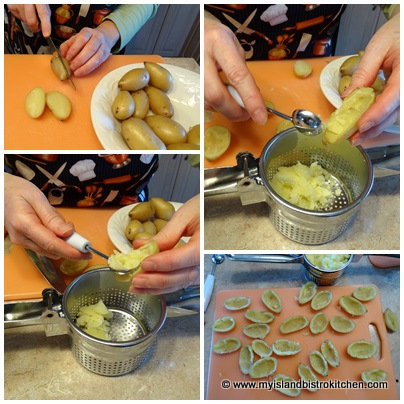
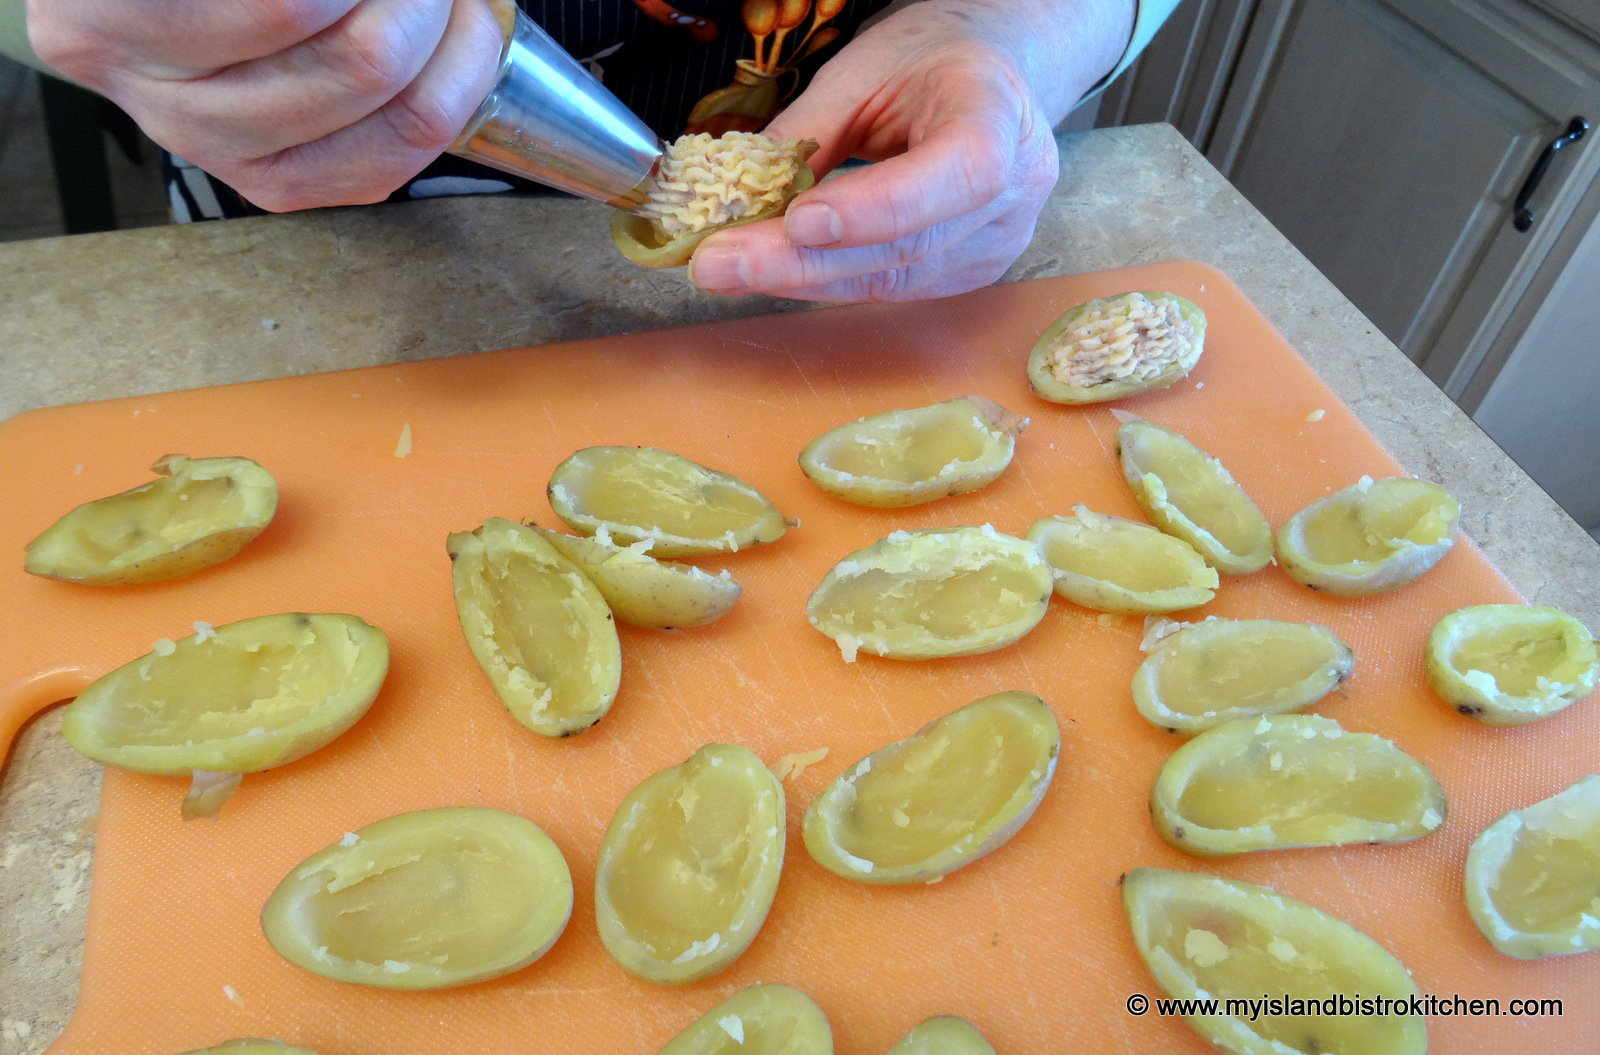
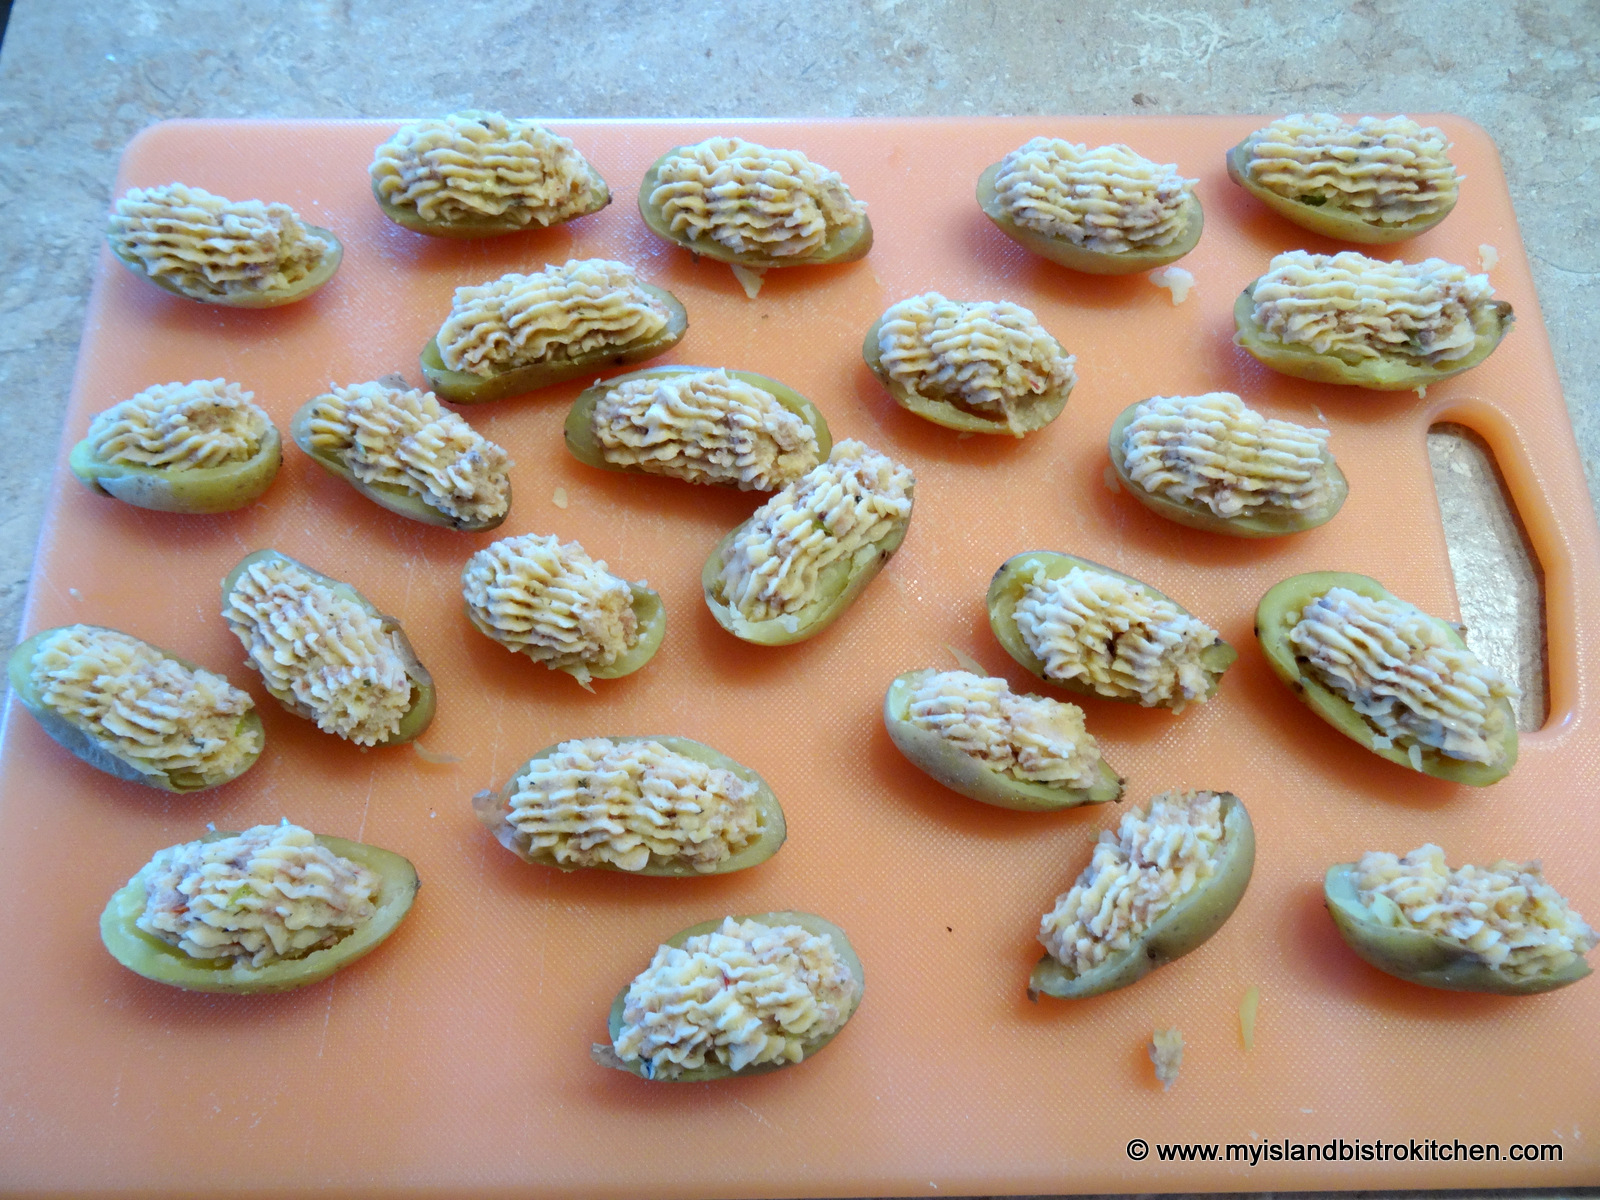
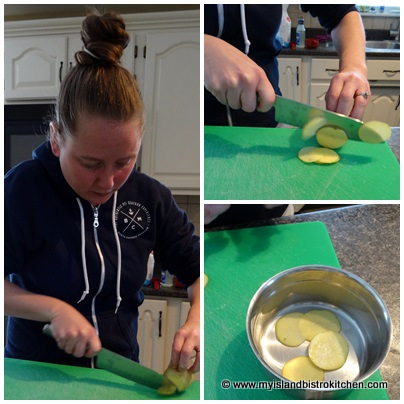
The little fingerlings take about 15 minutes to cook. Once they are removed from the boiling water, just barely let them cool enough that they can be handled. Slice each fingerling in half, horizontally. Then, using a melon baller, remove the potato pulp, leaving about a 1/16th inch thick wall of potato in each half to give the potato shape. Transfer the potato pulp to a potato ricer.
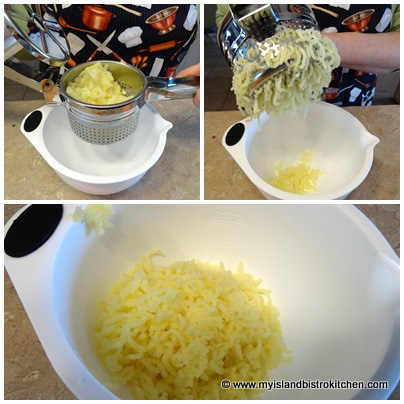
Press the potato through the ricer into a small bowl. The potatoes can be mashed instead of ricing but the potato ricer gives a smoother, finer texture that is completely lump-free.
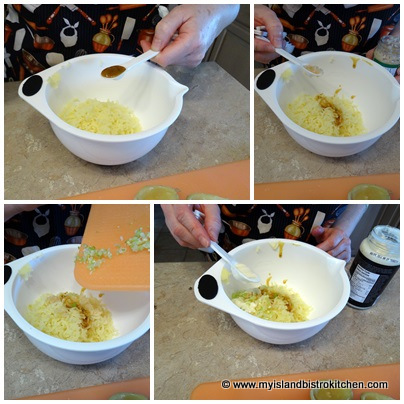
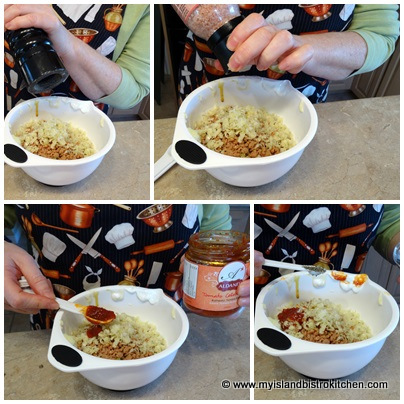
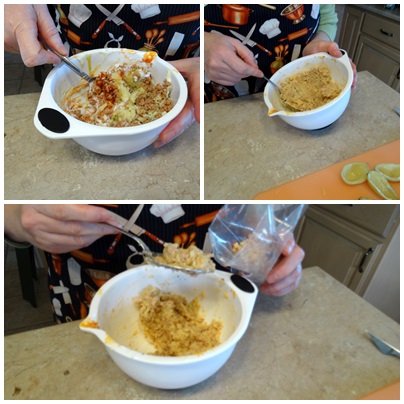
Add the remainder of the ingredients to the riced potato and mix well.
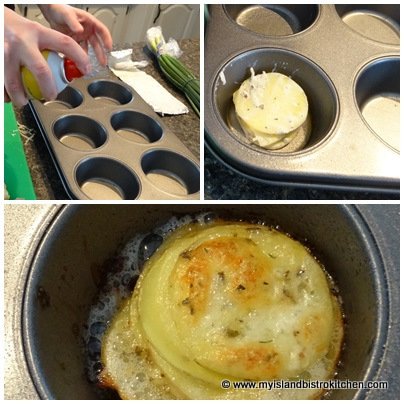
The filling can be transferred to the potatoes with a spoon but a piping bag and Wilton tip 8B makes the job quicker, easier, and will give a neater presentation.
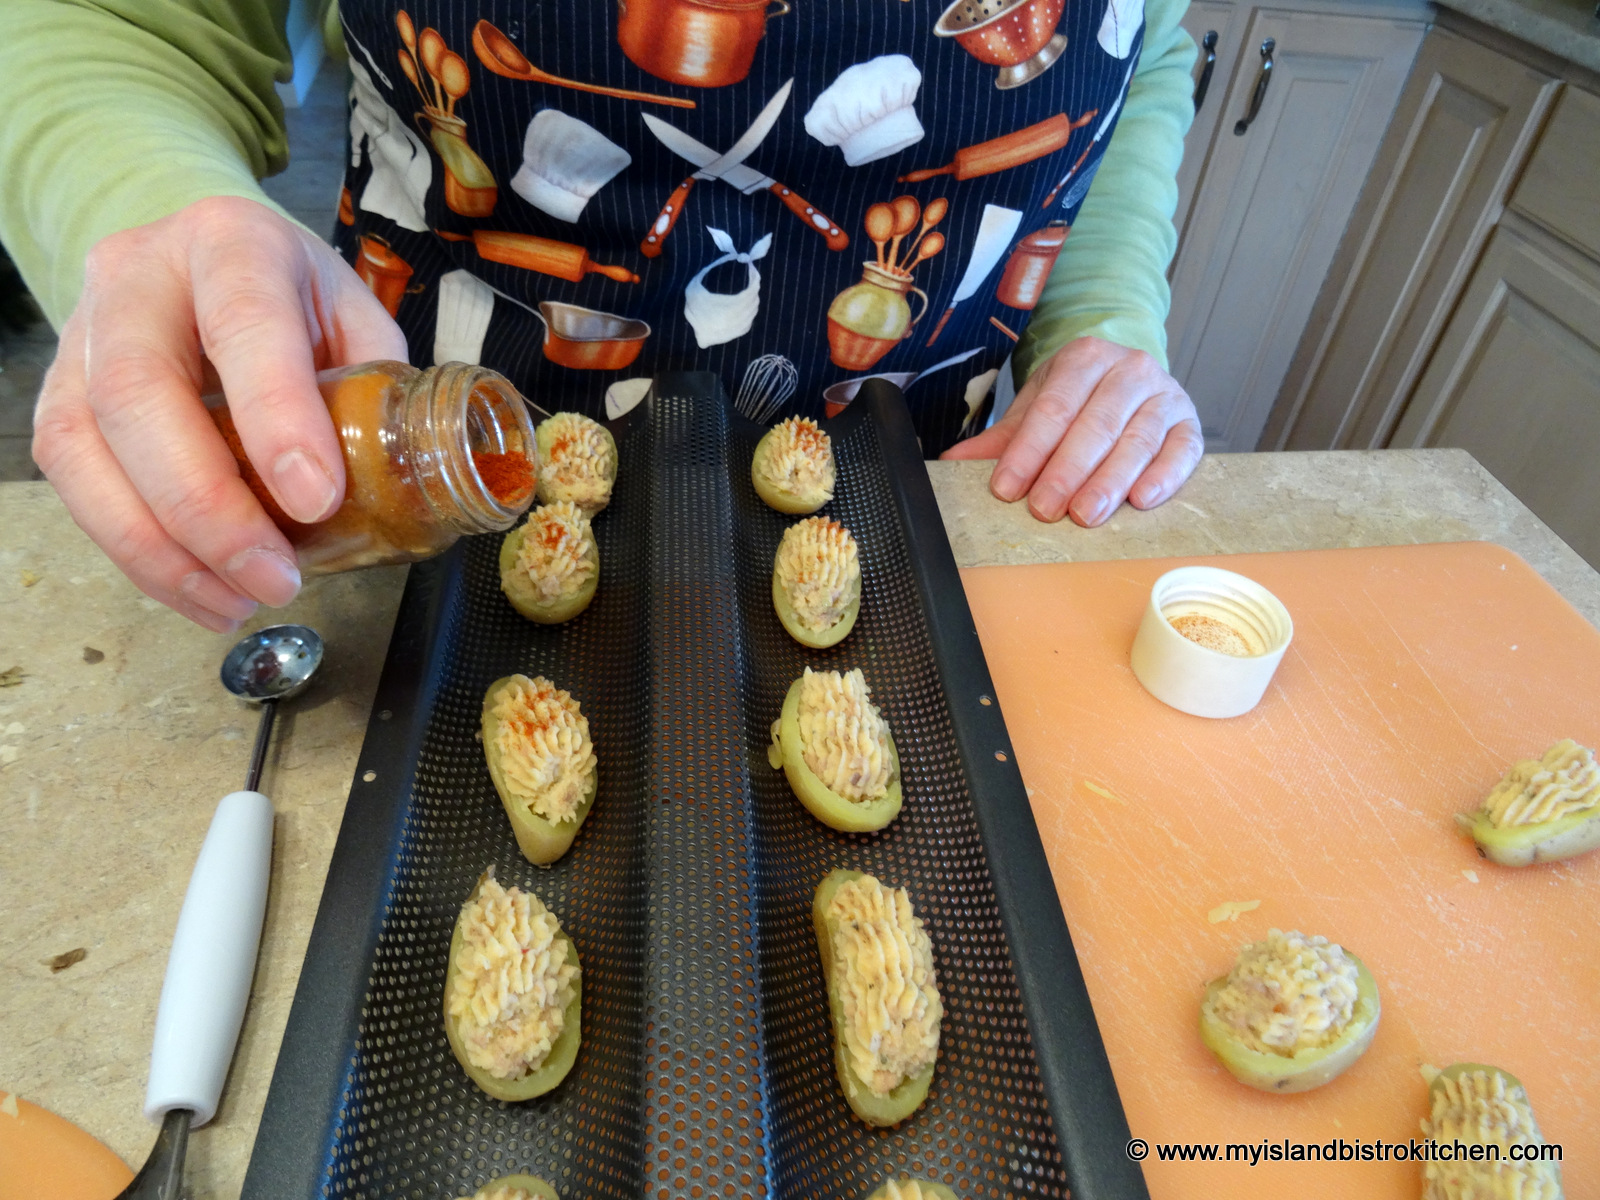
Add a sprinkle of paprika, and pop these little hors d’oeuvres into a 375ºF oven for about 12 minutes. Use either a parchment-lined baking sheet to bake the stuffed potatoes or, if you have a baguette pan, it works really well, too.
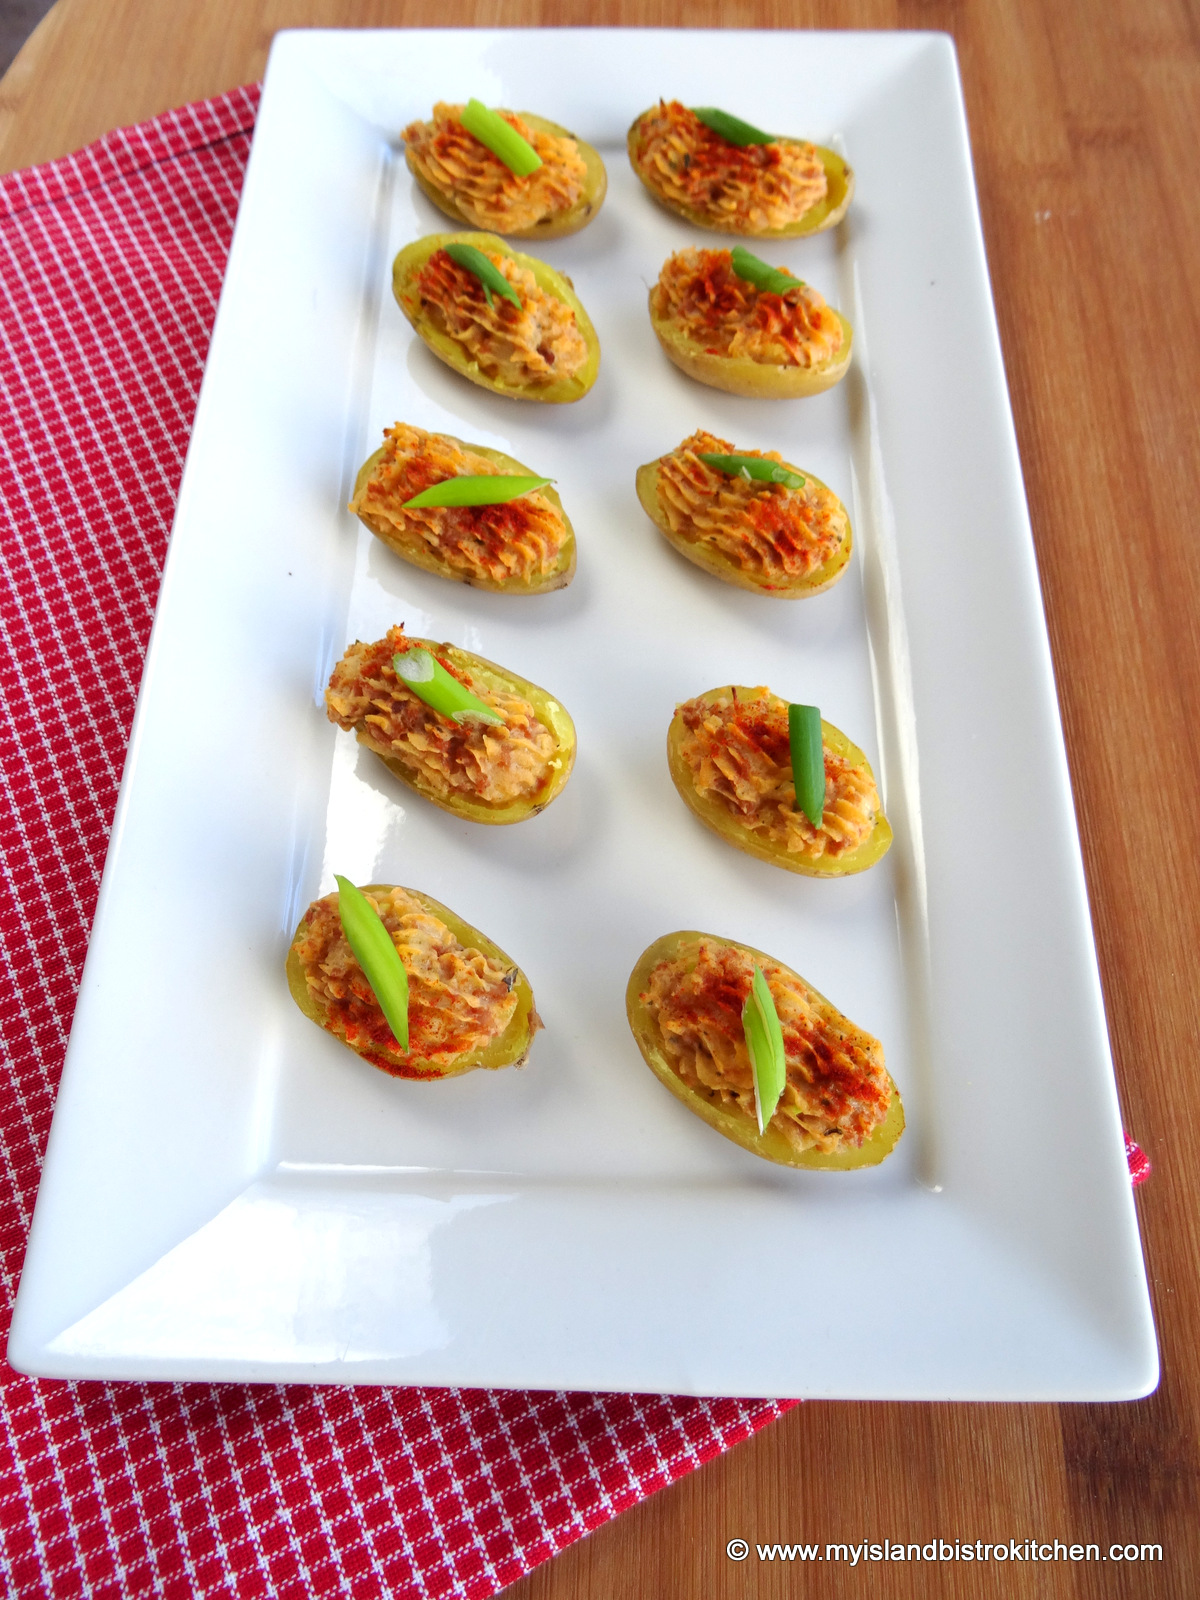
Garnish, if desired, with a sliver of green onion or chopped chives, then serve to the delight of guests at your next party.
Baked Stuffed Fingerling Hors d’oeuvres made with potatoes from The Little Potato Company
12 Little PotatoCompany fingerling creamer potatoes ½ tsp liquid chicken bouillon ½ tsp minced garlic 1 green onion, finely chopped 1½ tsp truffle aioli 2 tbsp sour cream 3 tbsp Gouda cheese, finely grated 1½ tsp tomato sauce ⅛ tsp basil Salt and pepper, to taste Paprika Slivers of green onion tops or chopped chives for garnish
Method:
Heat olive oil in small frypan. Remove sausage from casing and crumble. Add to hot oil. With the end of a flat, heat-resistant lifter or spatula, continue to break up the sausage as it cooks. Scramble fry until sausage is brown, approximately 7-10 minutes. Transfer sausage to a colander and let fat drip out for about 10-15 minutes. Then, roll the cooked sausage in paper towel to remove any remaining fat. Set aside.
Cook fingerling potatoes in boiling water for about 15 minutes or until fork tender. Remove from heat.
Preheat oven to 375ºF.
As soon as the potatoes are just cool enough to handle, cut each in half, horizontally. Using a melon baller, remove the potato pulp from the skin, leaving about a 1/16th inch thick wall of potato in each half to give the potato shape. Transfer potato pulp to a potato ricer. Press pulp through ricer into small bowl. Add remaining ingredients and mix until incorporated.
Transfer mixture to a pastry bag fitted with Wilton tip 8B. Pipe filling into each fingerling half. Sprinkle with paprika. Place mini stuffed potatoes on a parchment-lined baking sheet or in the cradle of a baguette pan. Bake in preheated oven for about 12 minutes. Remove and garnish with a sliver of green onion or chopped chives. Serve hot.
Yield:24 hors d’oeuvres
Pin Me To Pinterest!
Disclosure: The potatoes used in this recipe were provided to me, free of charge, from The Little Potato™ Company for the purposes of sampling them and creating a recipe with them. The recipe for Baked Stuffed Fingerlings in this posting is an original recipe developed by me in my home kitchen.
——————————–
Thank you for visiting “the Bistro” today. There are lots of ways to connect with “the Bistro” through social media:
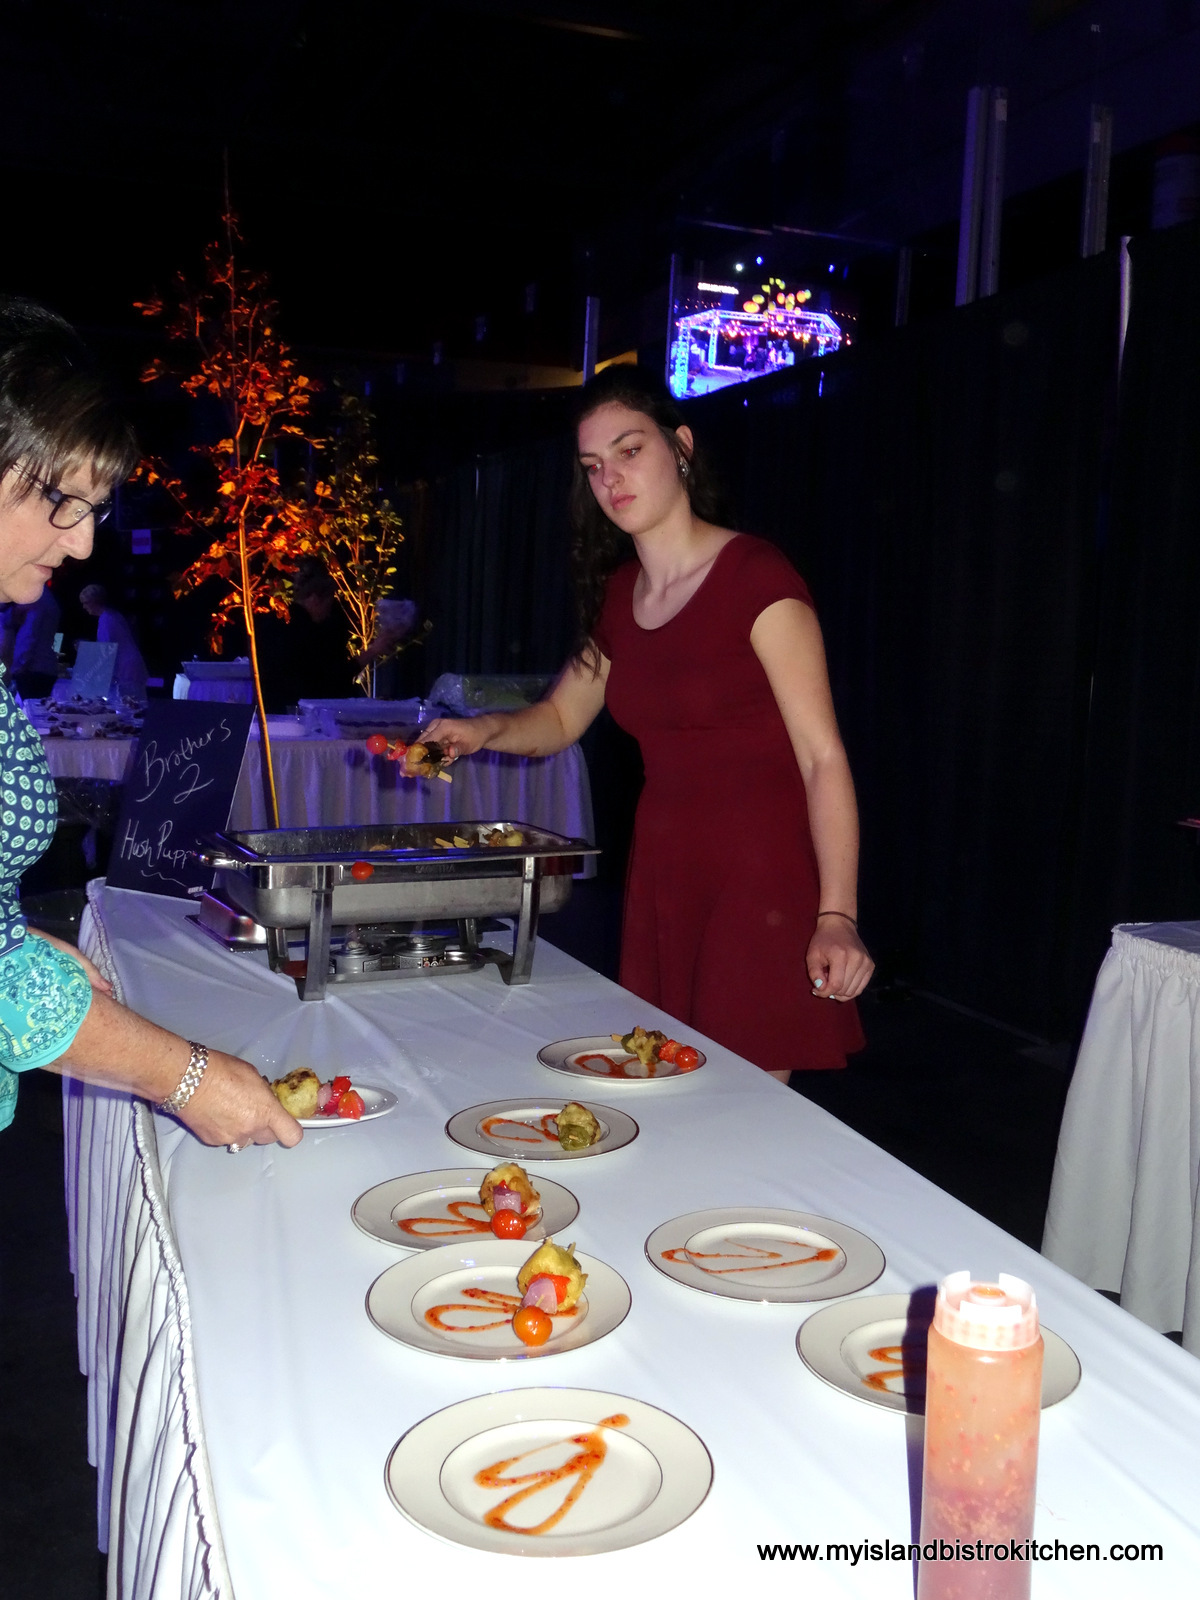
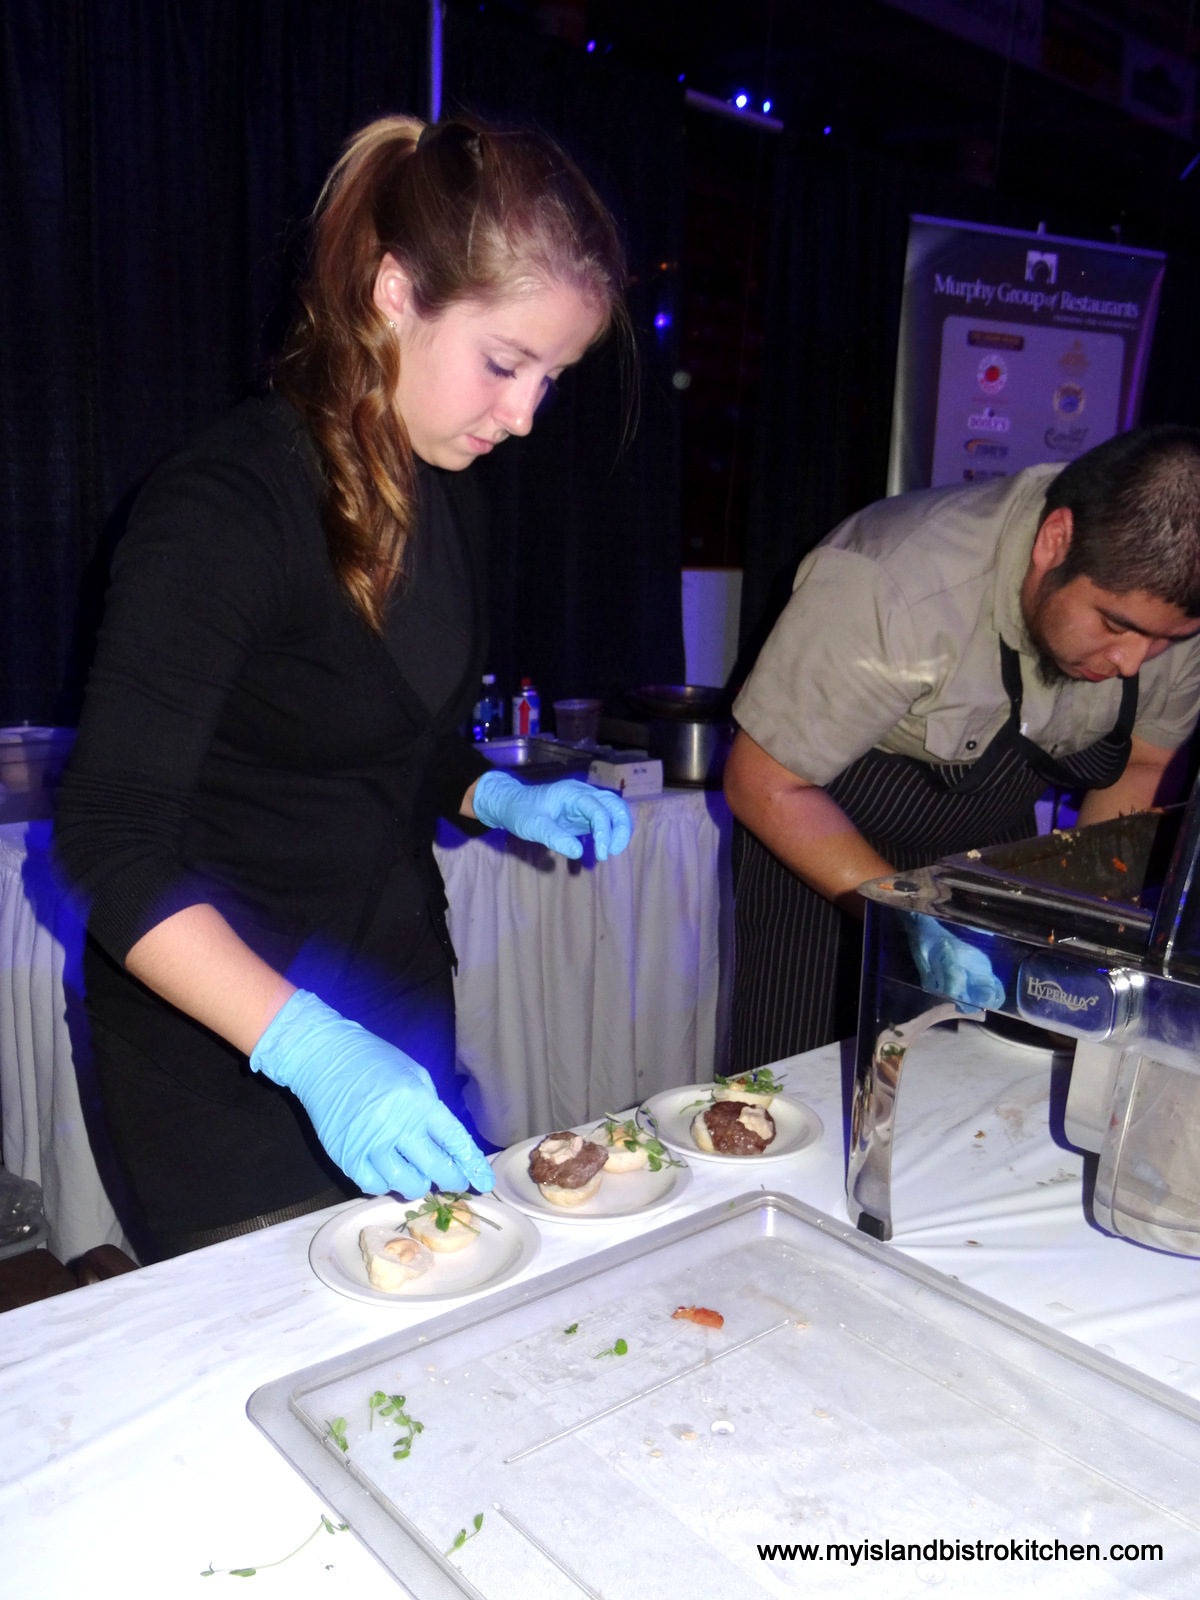
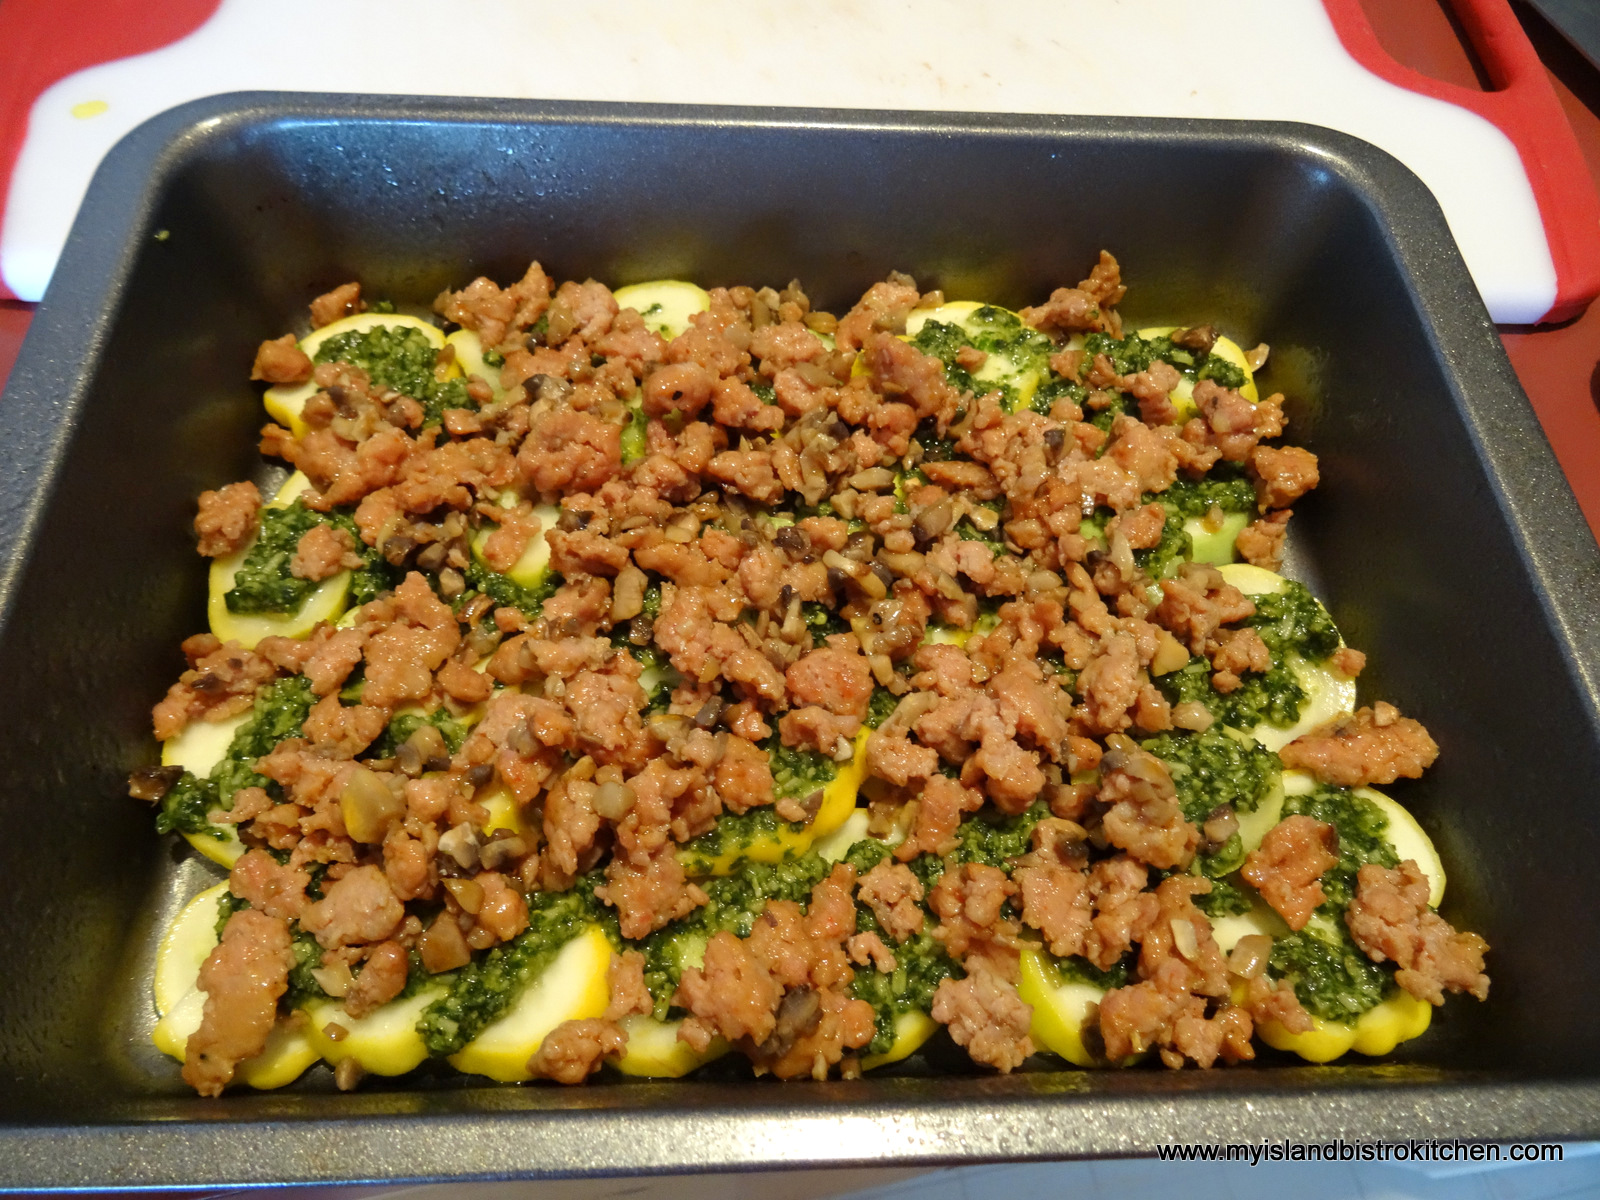
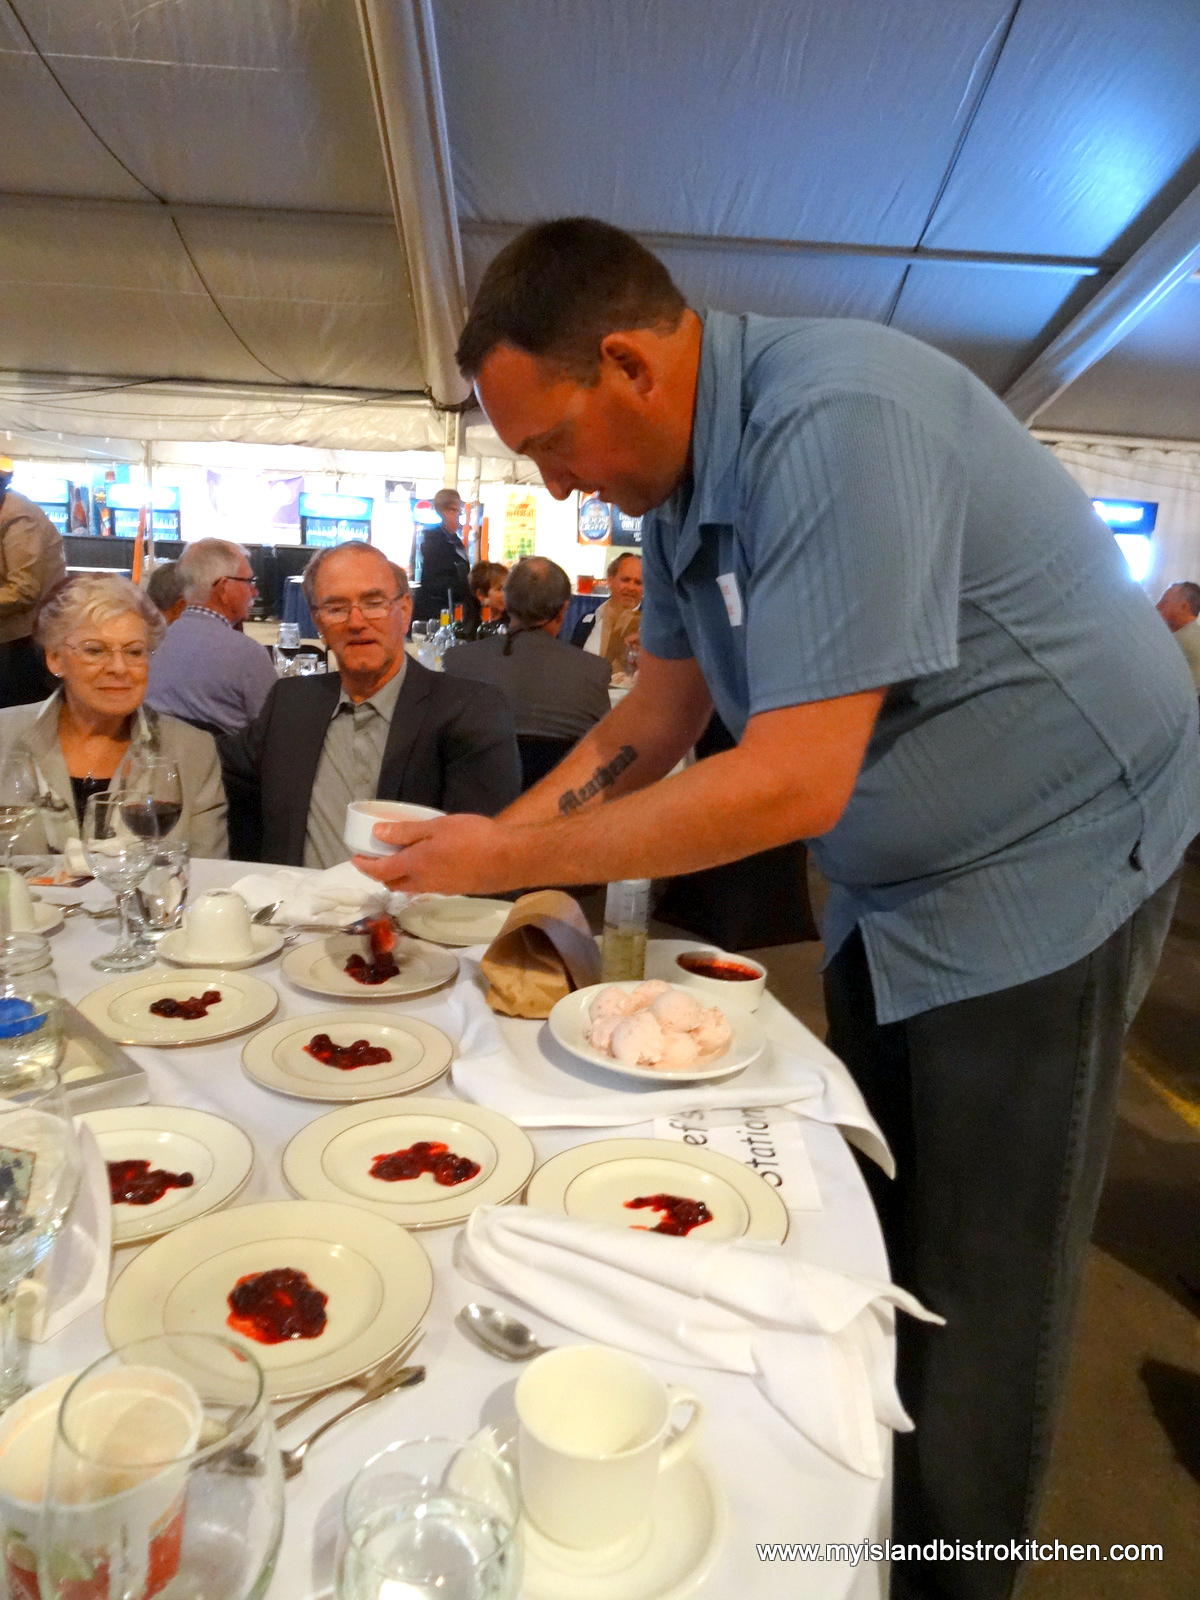
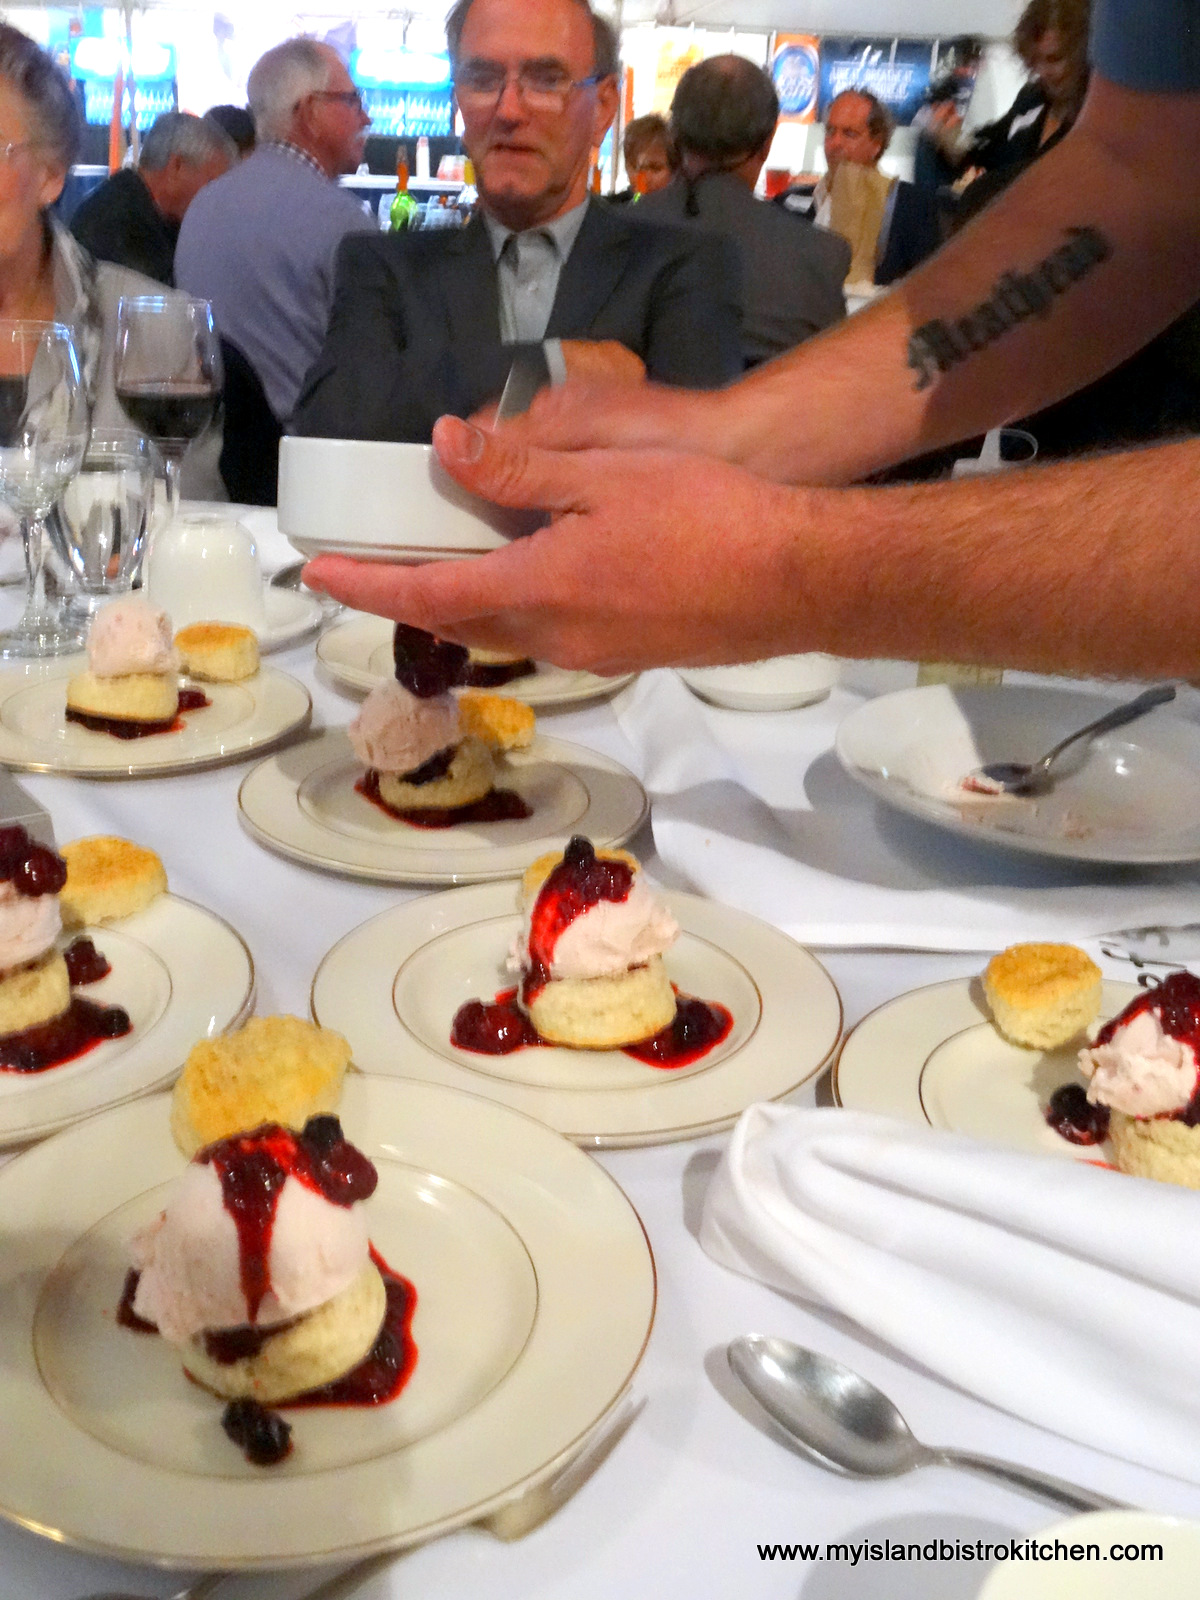
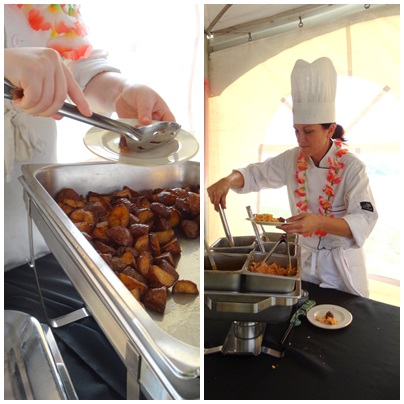
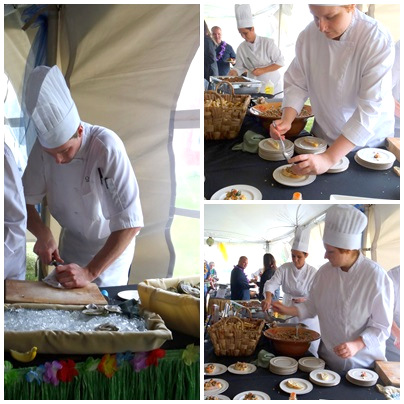
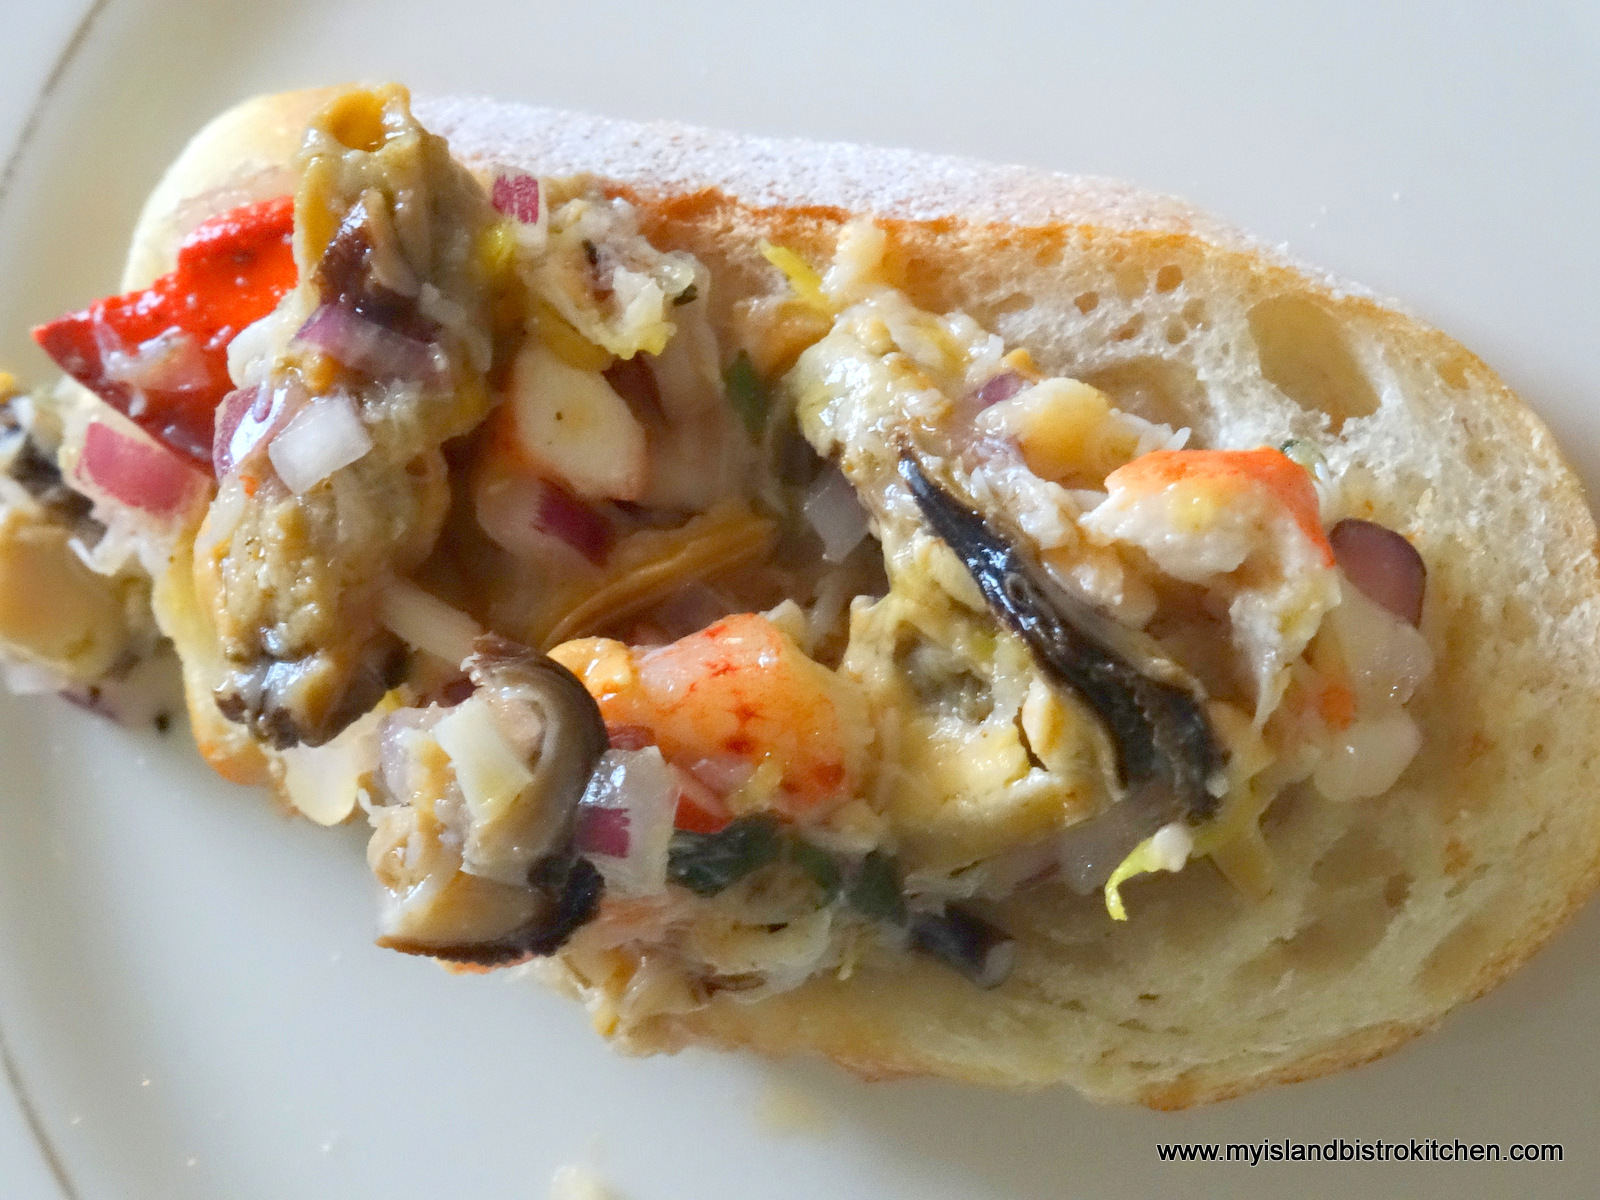
It’s the time of the year when people are busy with holiday preparations which often brings a host of events and a shortage of time to prepare for them. I recently met with a couple of Island chefs to chat about canapés and to find out what’s trendy these days in finger foods.
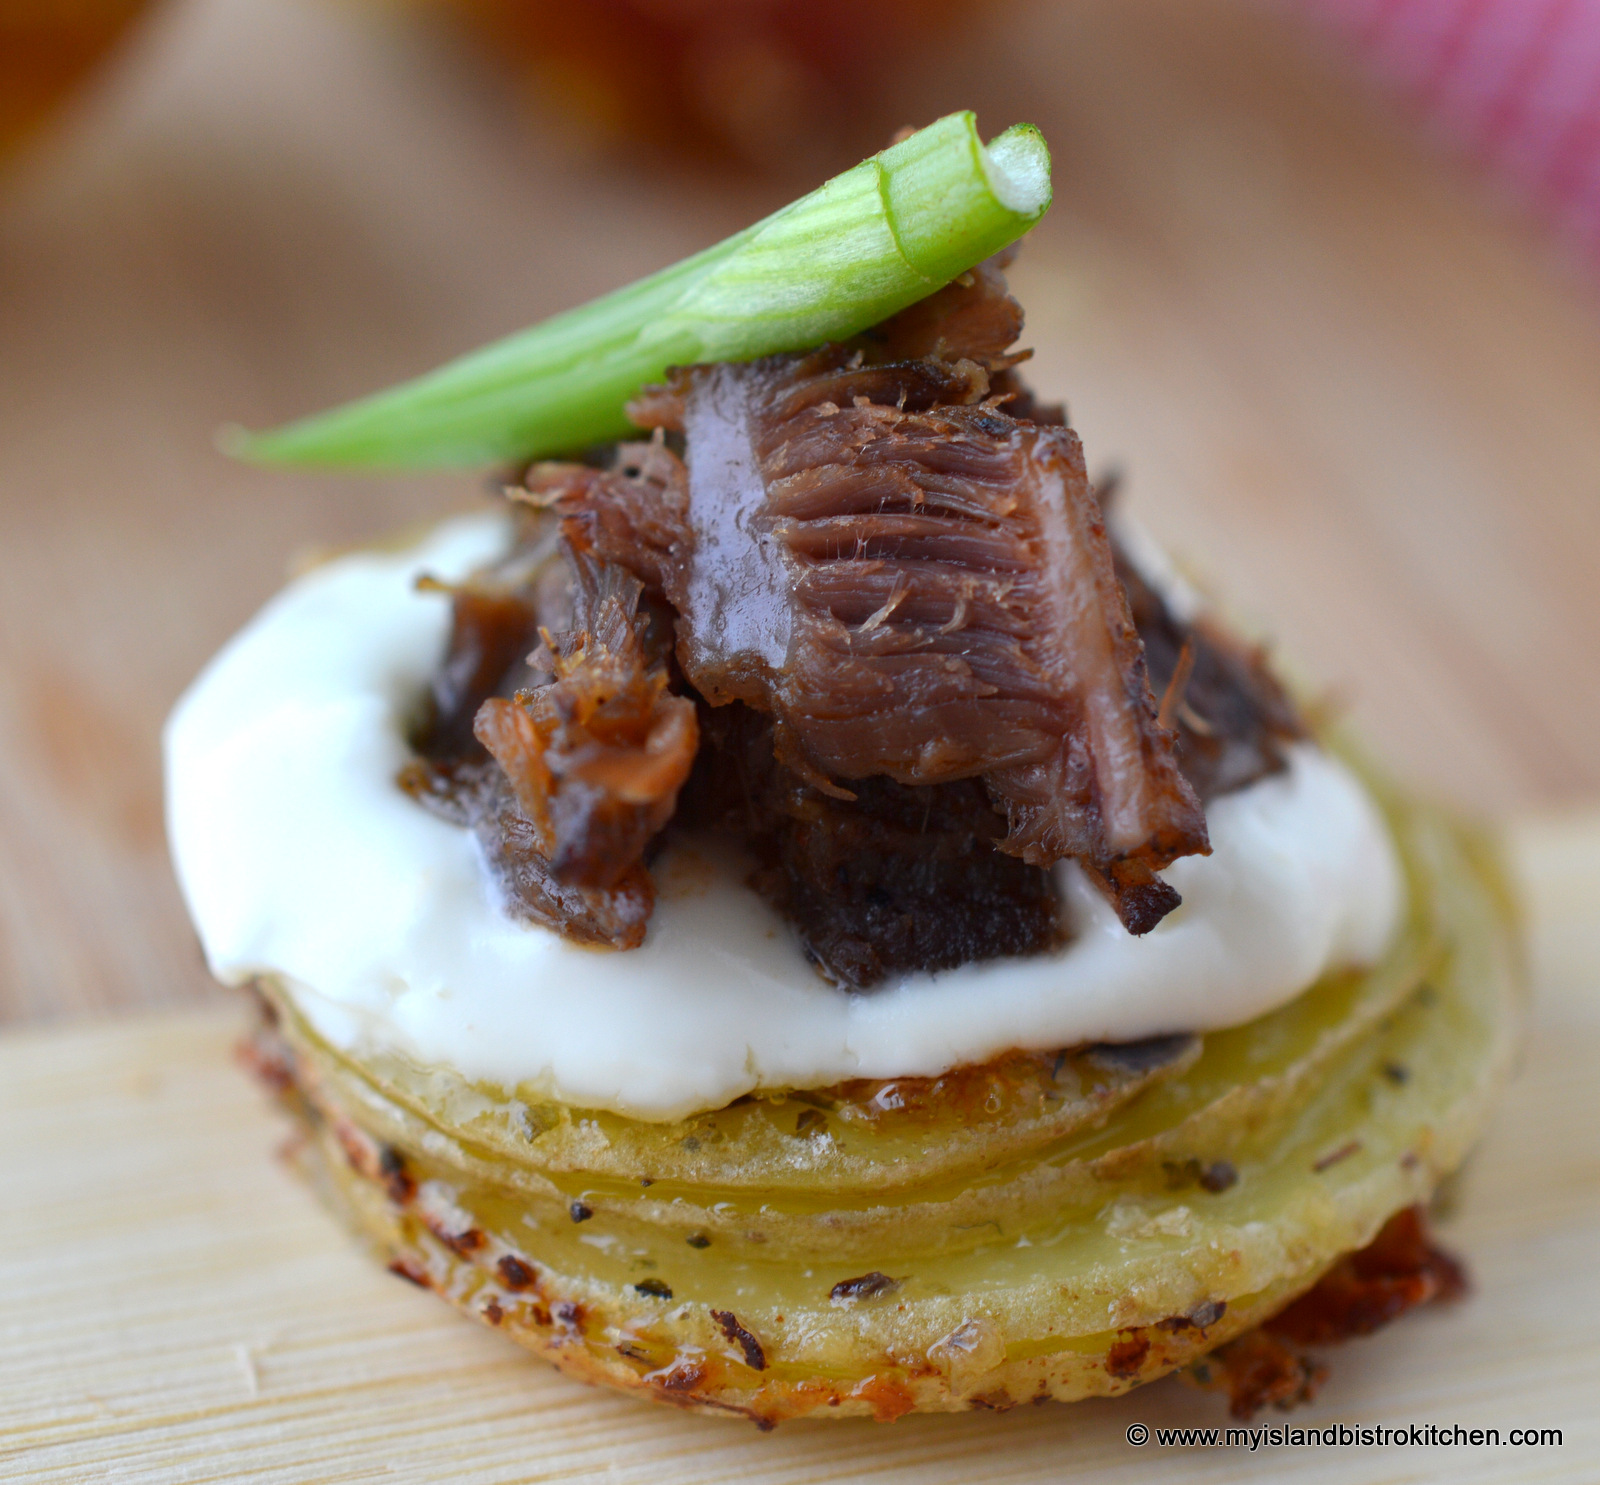
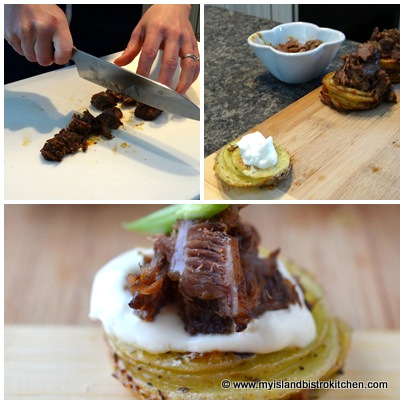
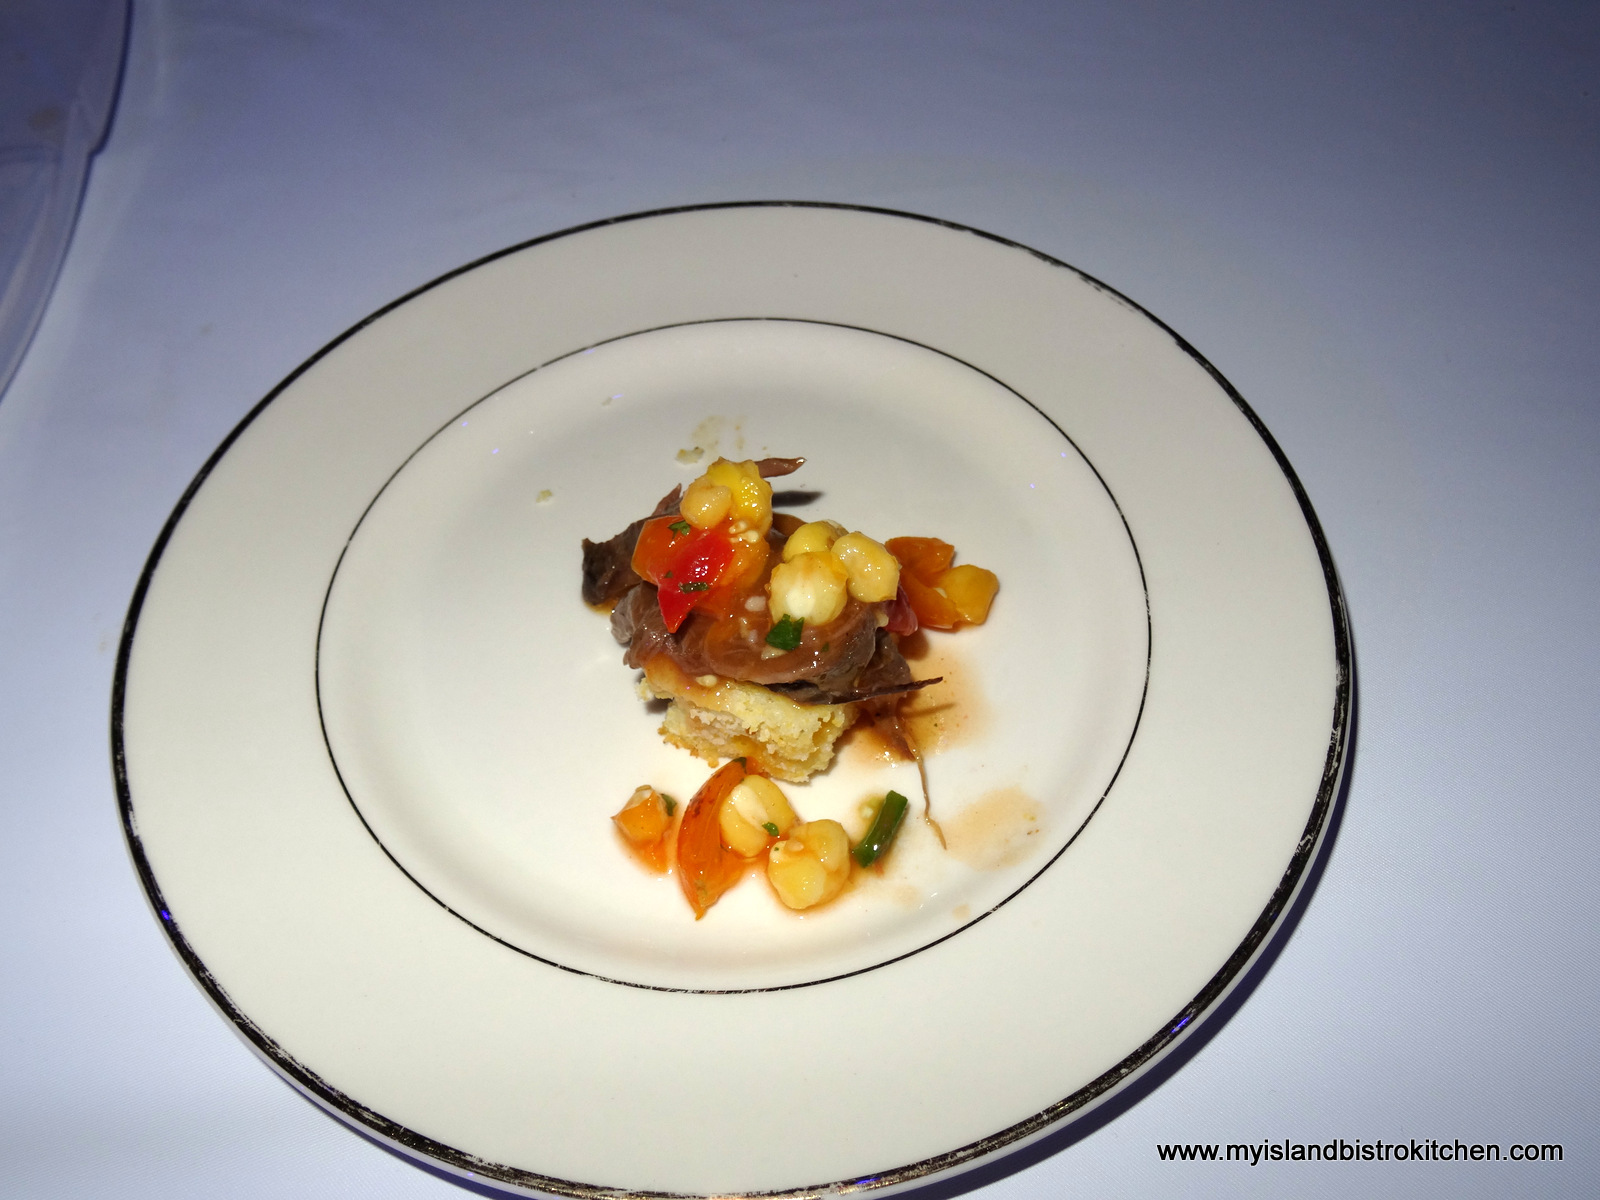
Canapé of potato base, topped with sour cream and tender beef
Jennifer & Mike Levy, from Rusticoville, PEI, operate Green Island Catering Company. Yes, there is help for your holiday events! The couple, both originally from Ontario, took a rather roundabout way to find their way to the Island. Both have university degrees and worked in the corporate world in Calgary before heading off to the sunny Caribbean to spend three years living and working in Grand Cayman. While soaking up the southern sun, they found themselves working in the food industry and becoming more interested in cooking. They came across some Prince Edward Islanders living in Grand Cayman who kept telling them about the Culinary Institute of Canada in Charlottetown, PEI, suggesting they check it out. But, first, they returned to their native Ontario where they spent a few months during which time Mike took a hobby cooking course at George Brown College which really sealed his interest in pursuing a career in culinary arts. Soon, they were on their way to PEI to study at the Culinary Institute from which both graduated from the two-year program in 2012.
While they have worked in various restaurants since graduating from culinary school, they have started a successful catering business and will cater any event of any size. In fact, they have catered the PEI Legislature’s “Speaker’s Tartan Tea” for the past three years.
I began by asking the chefs how many canapés should be prepared per person for an event. As a general rule, they suggest 3-5 per person if the time of the event is not a regular meal time or if it is at a time that guests most likely would have already eaten. However, if the event is between the hours of 11am – 1 pm or 5pm – 7pm, then 5-7 canapés should be prepared per guest.
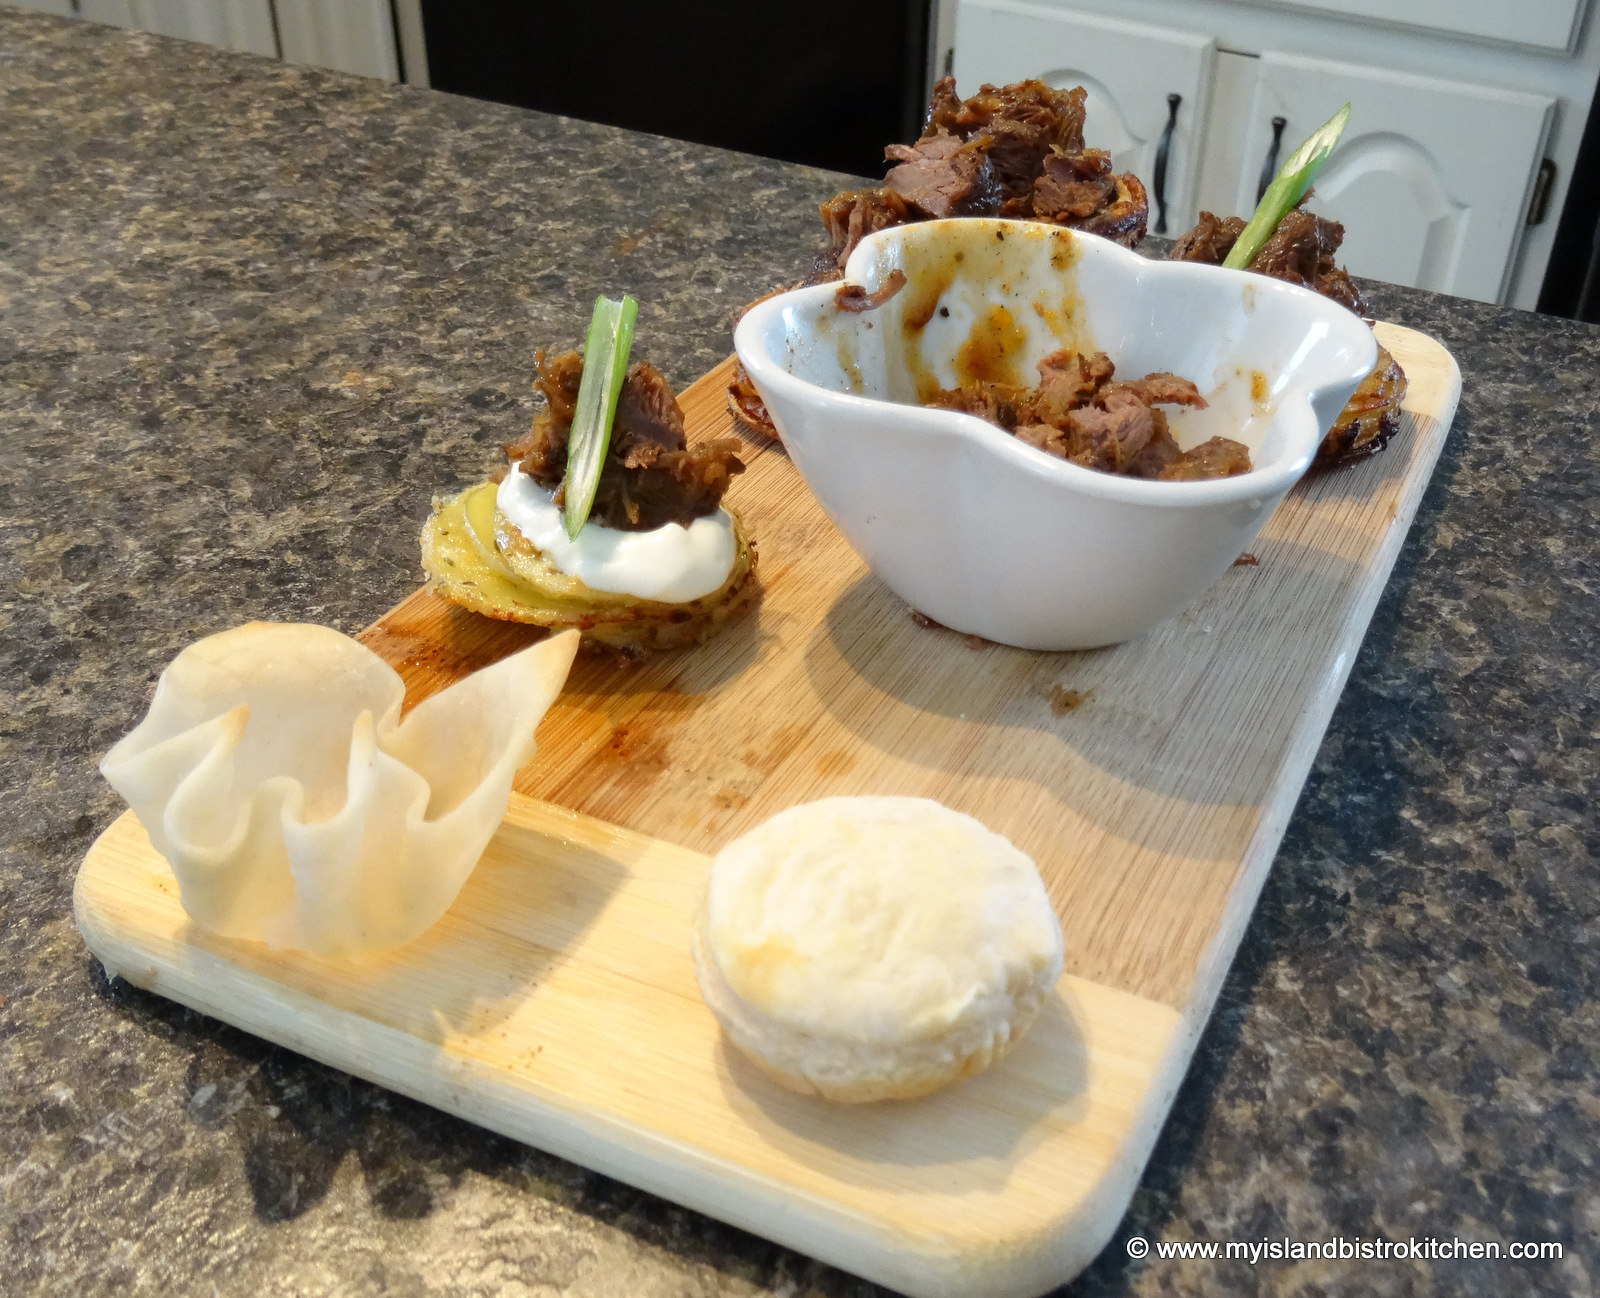
We then discussed what’s trendy in canapés these days. Canapés generally consist of three parts: a base, some kind of sauce, and a garnish. The base can consist of a variety of items – for example, small biscuits, phyllo pastry, spring roll wrappers, or wonton cups.
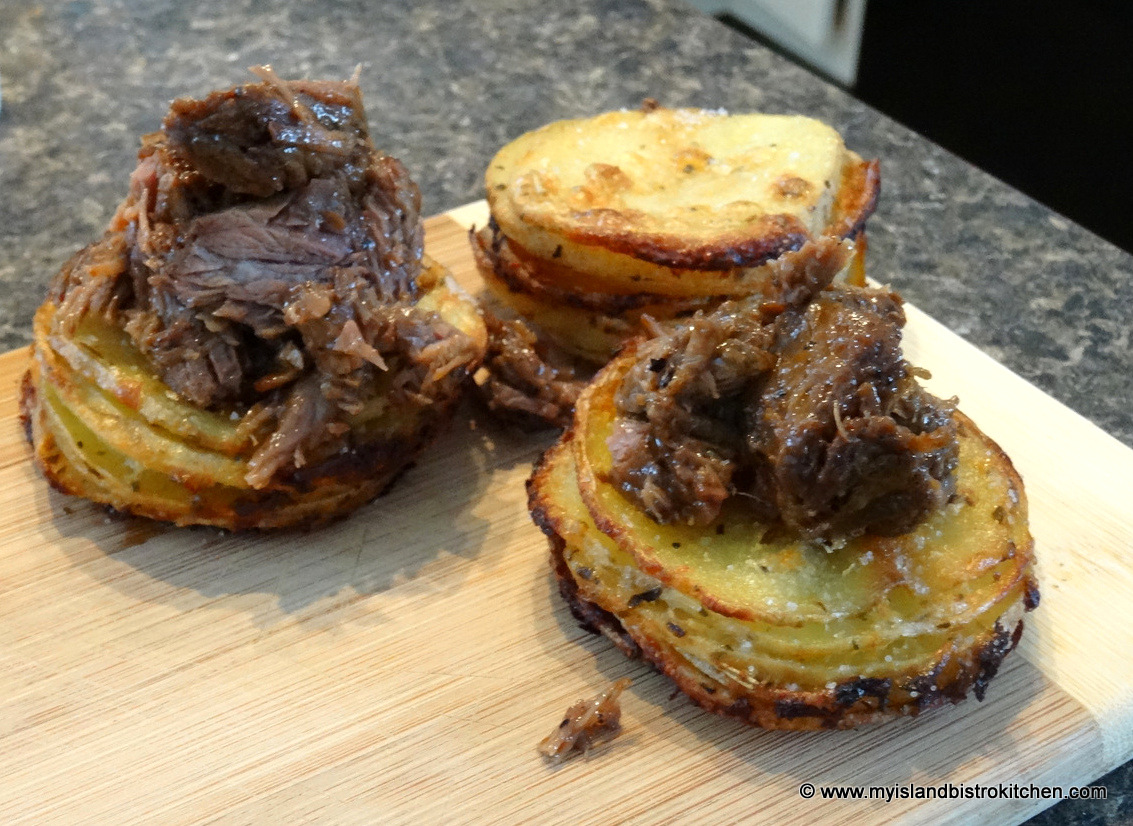
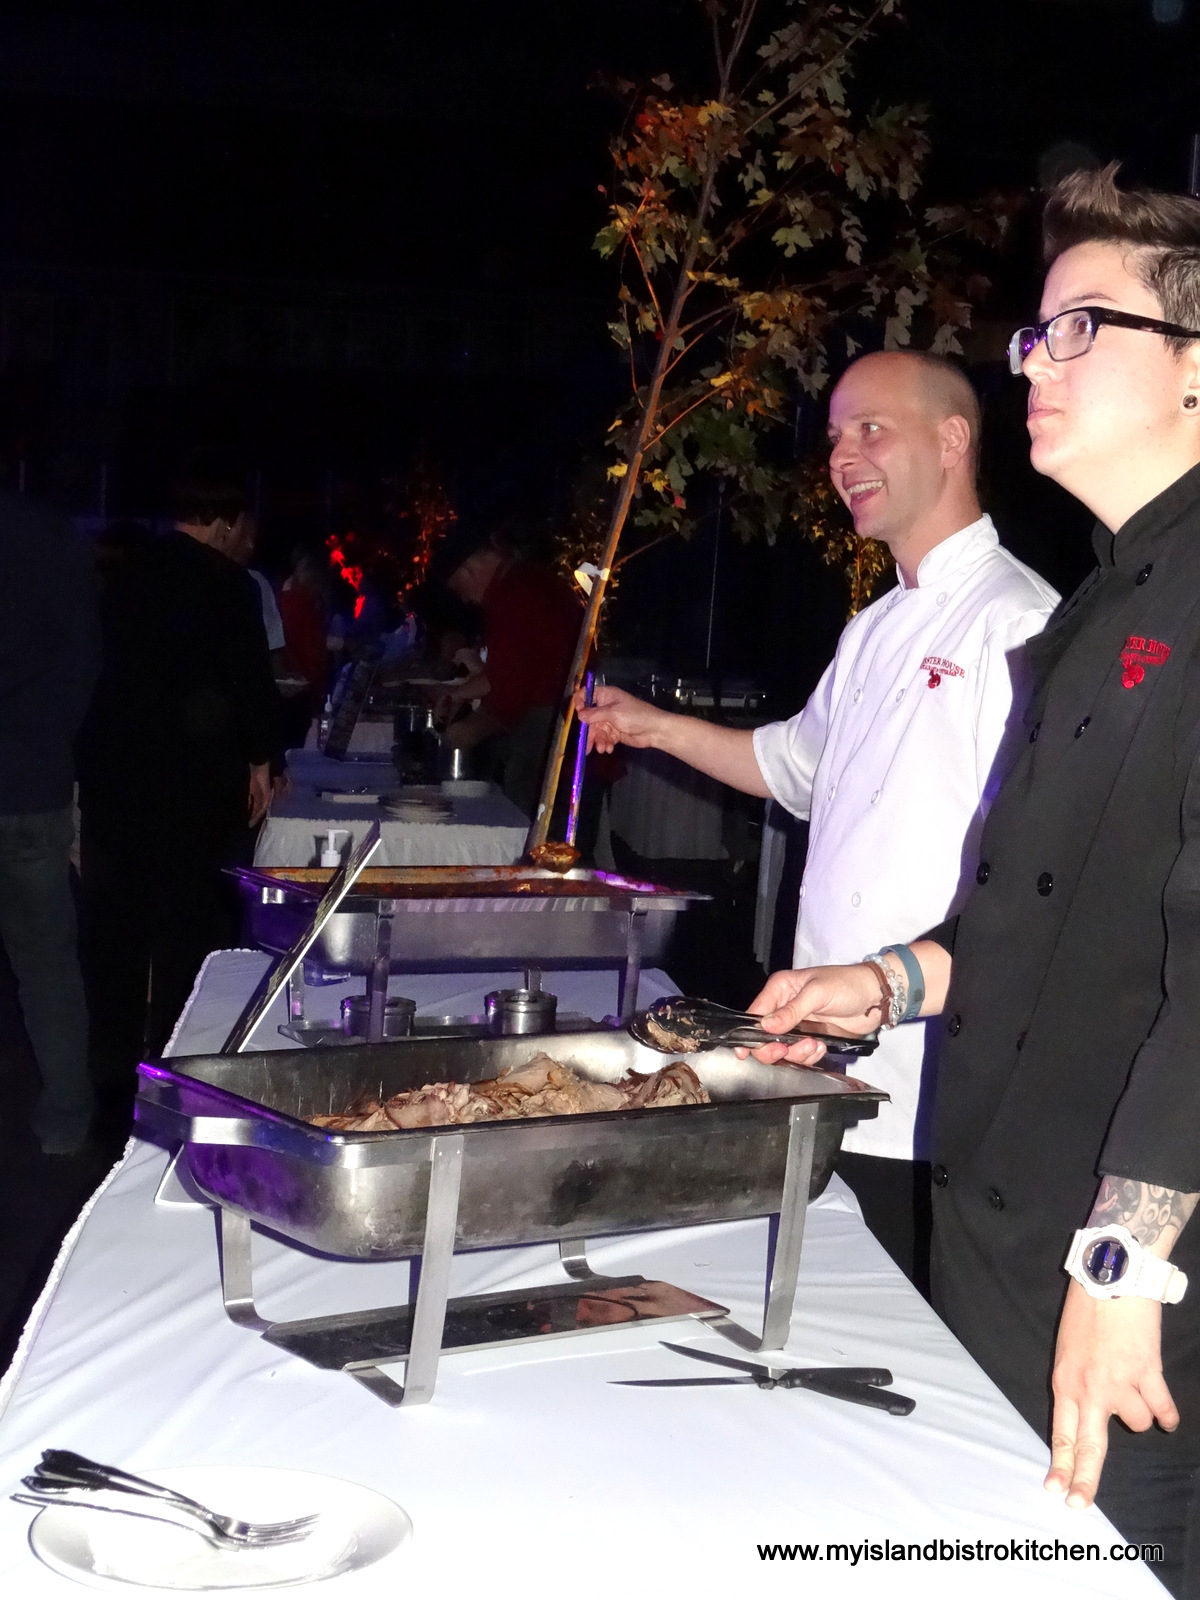
Braised beef and pulled pork tend to be popular in canapés, just as they are in main meal menu items.
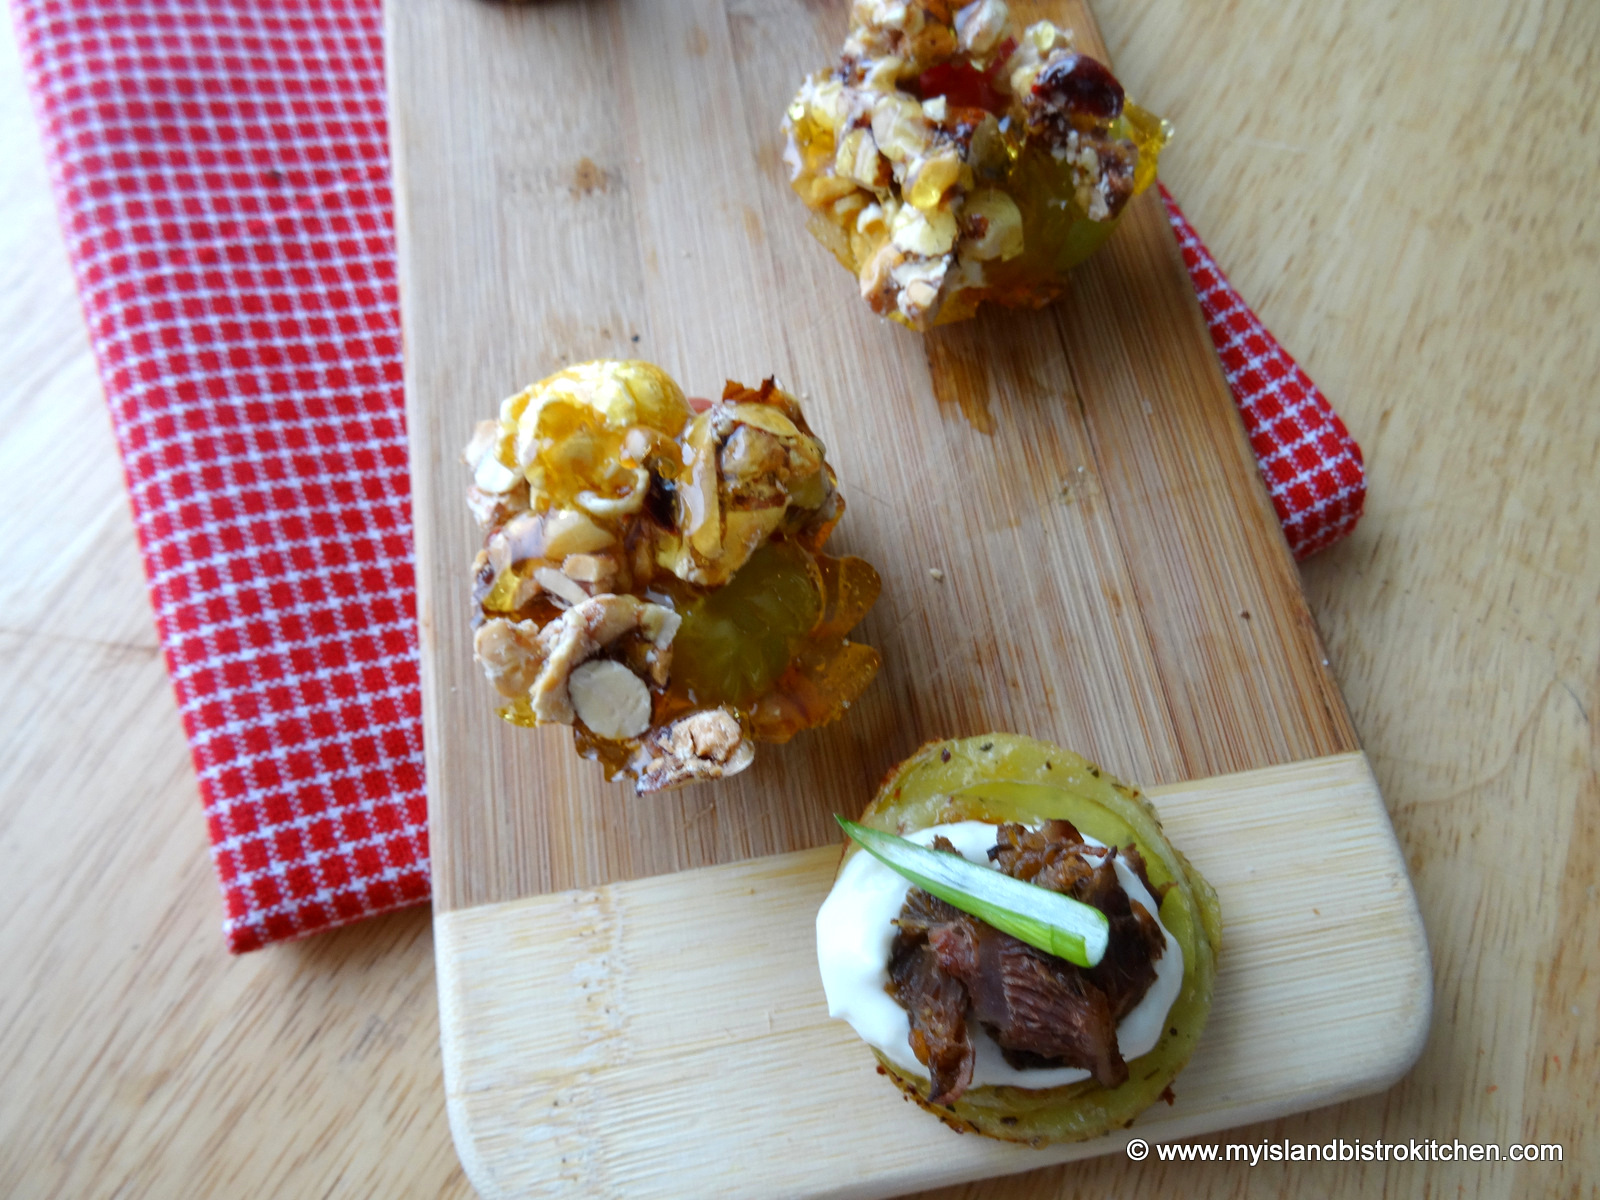
Braised beef atop a stack of cheesy potato slices
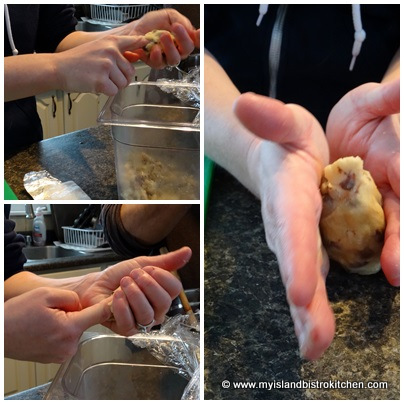
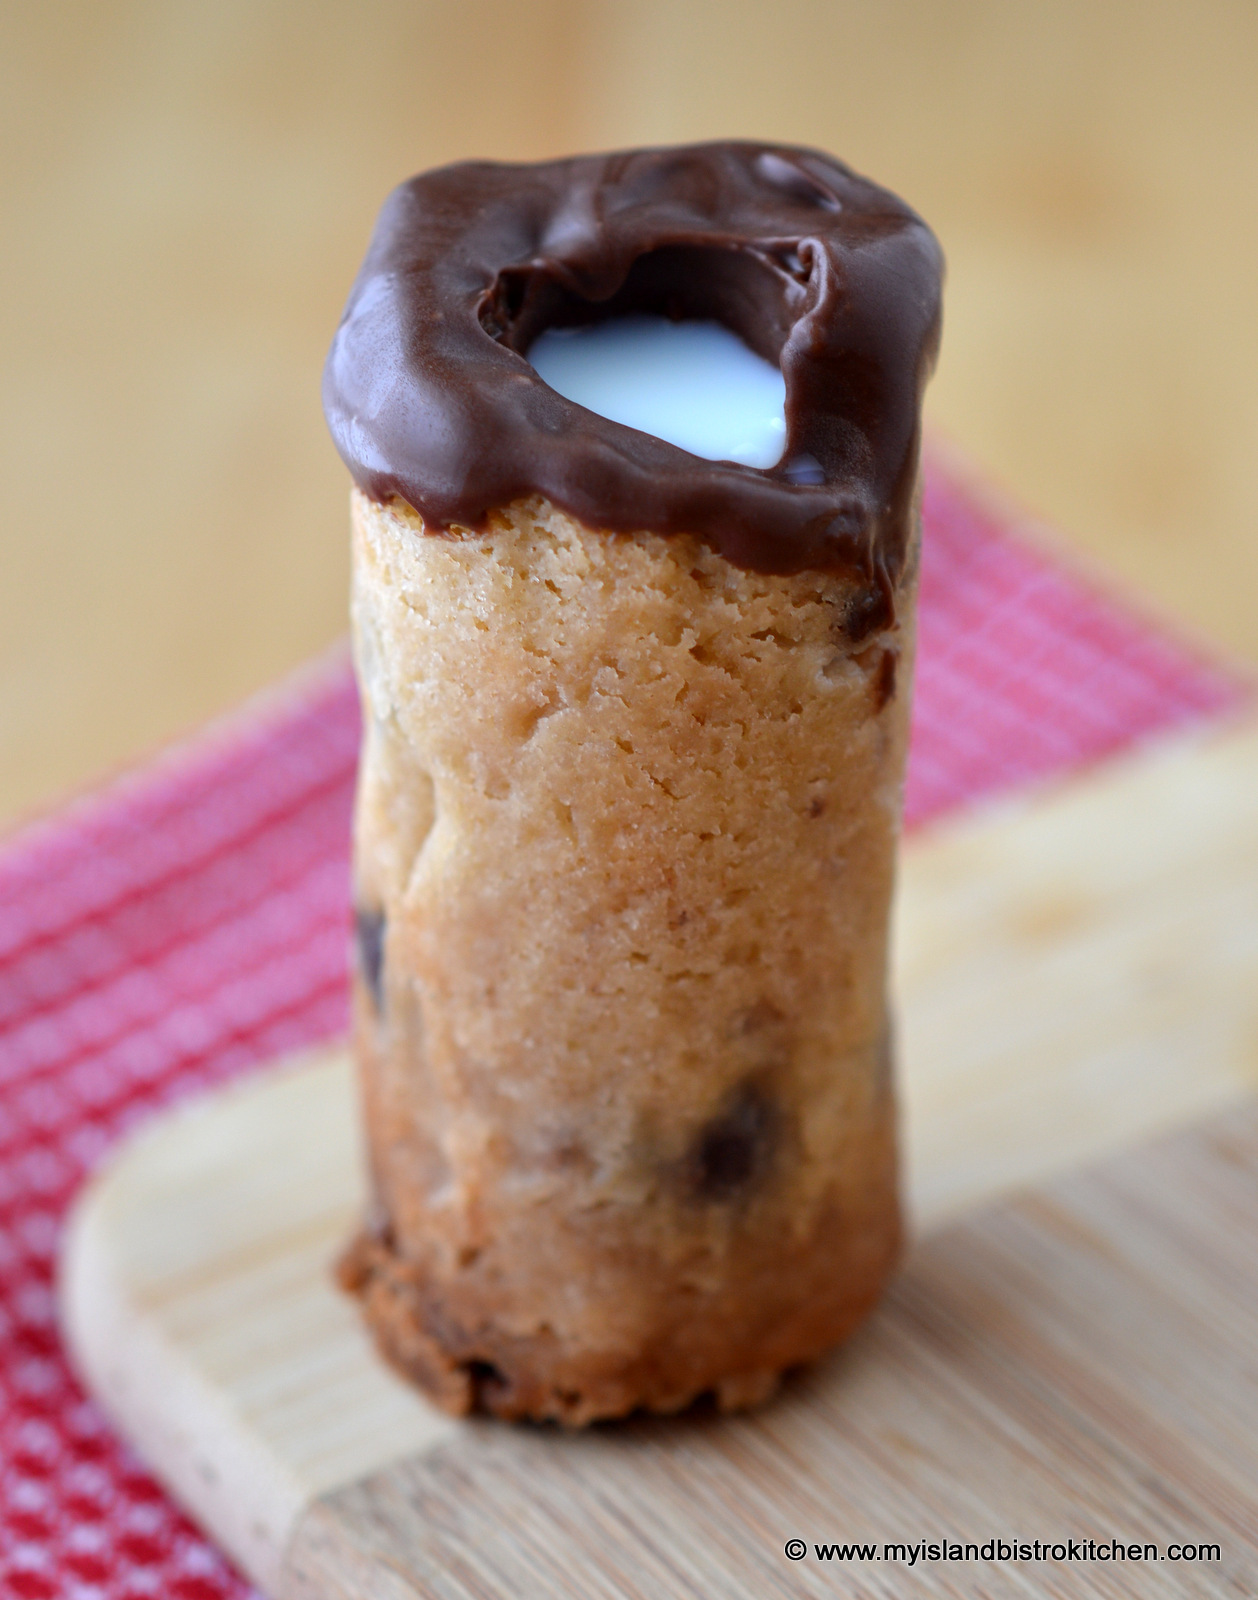
Foods that are easy to prepare and canapés that include comfort foods are also popular. For example, tiny tea biscuits topped with braised beef or turkey/chicken are quite popular. Cookie dough shot glasses are also quite a trendy novelty item – they consist of cookie dough formed into a container shape, baked, and filled with a favourite liqueur or, for the younger crowd, milk.
Making Cookie Shot Glasses
Cookie Shot Glass
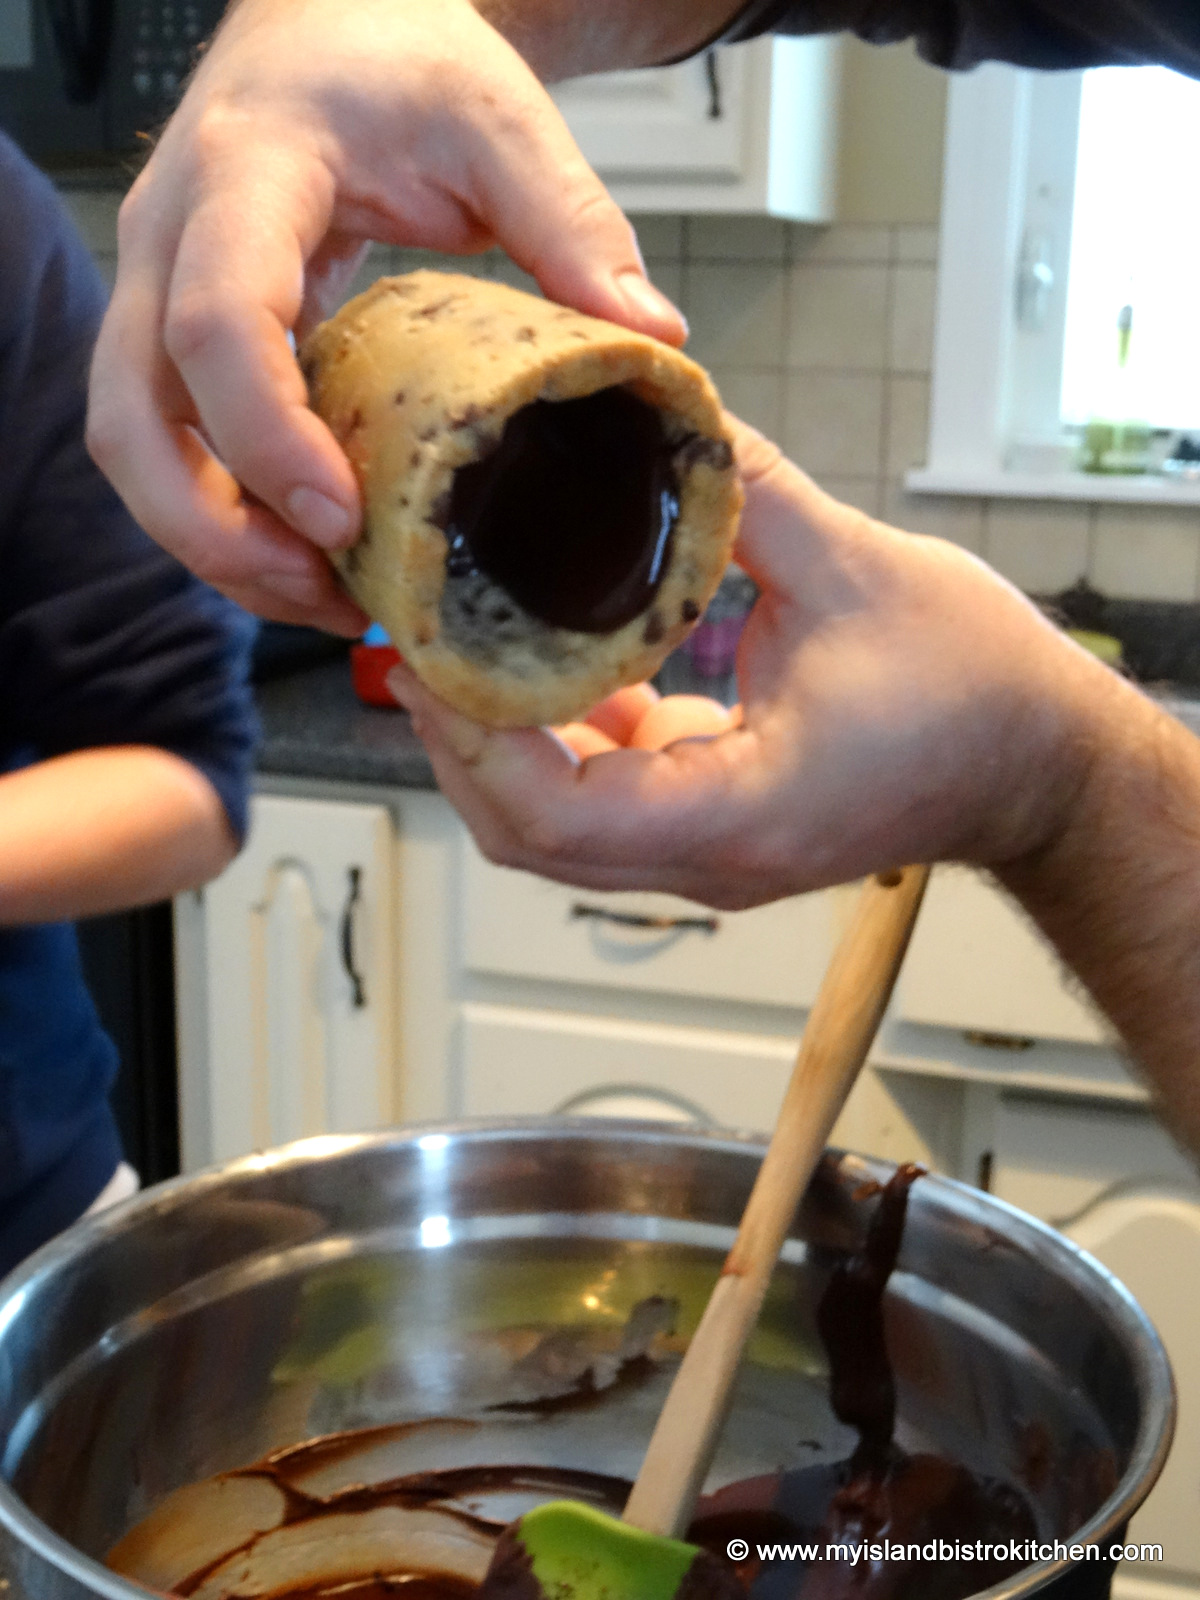
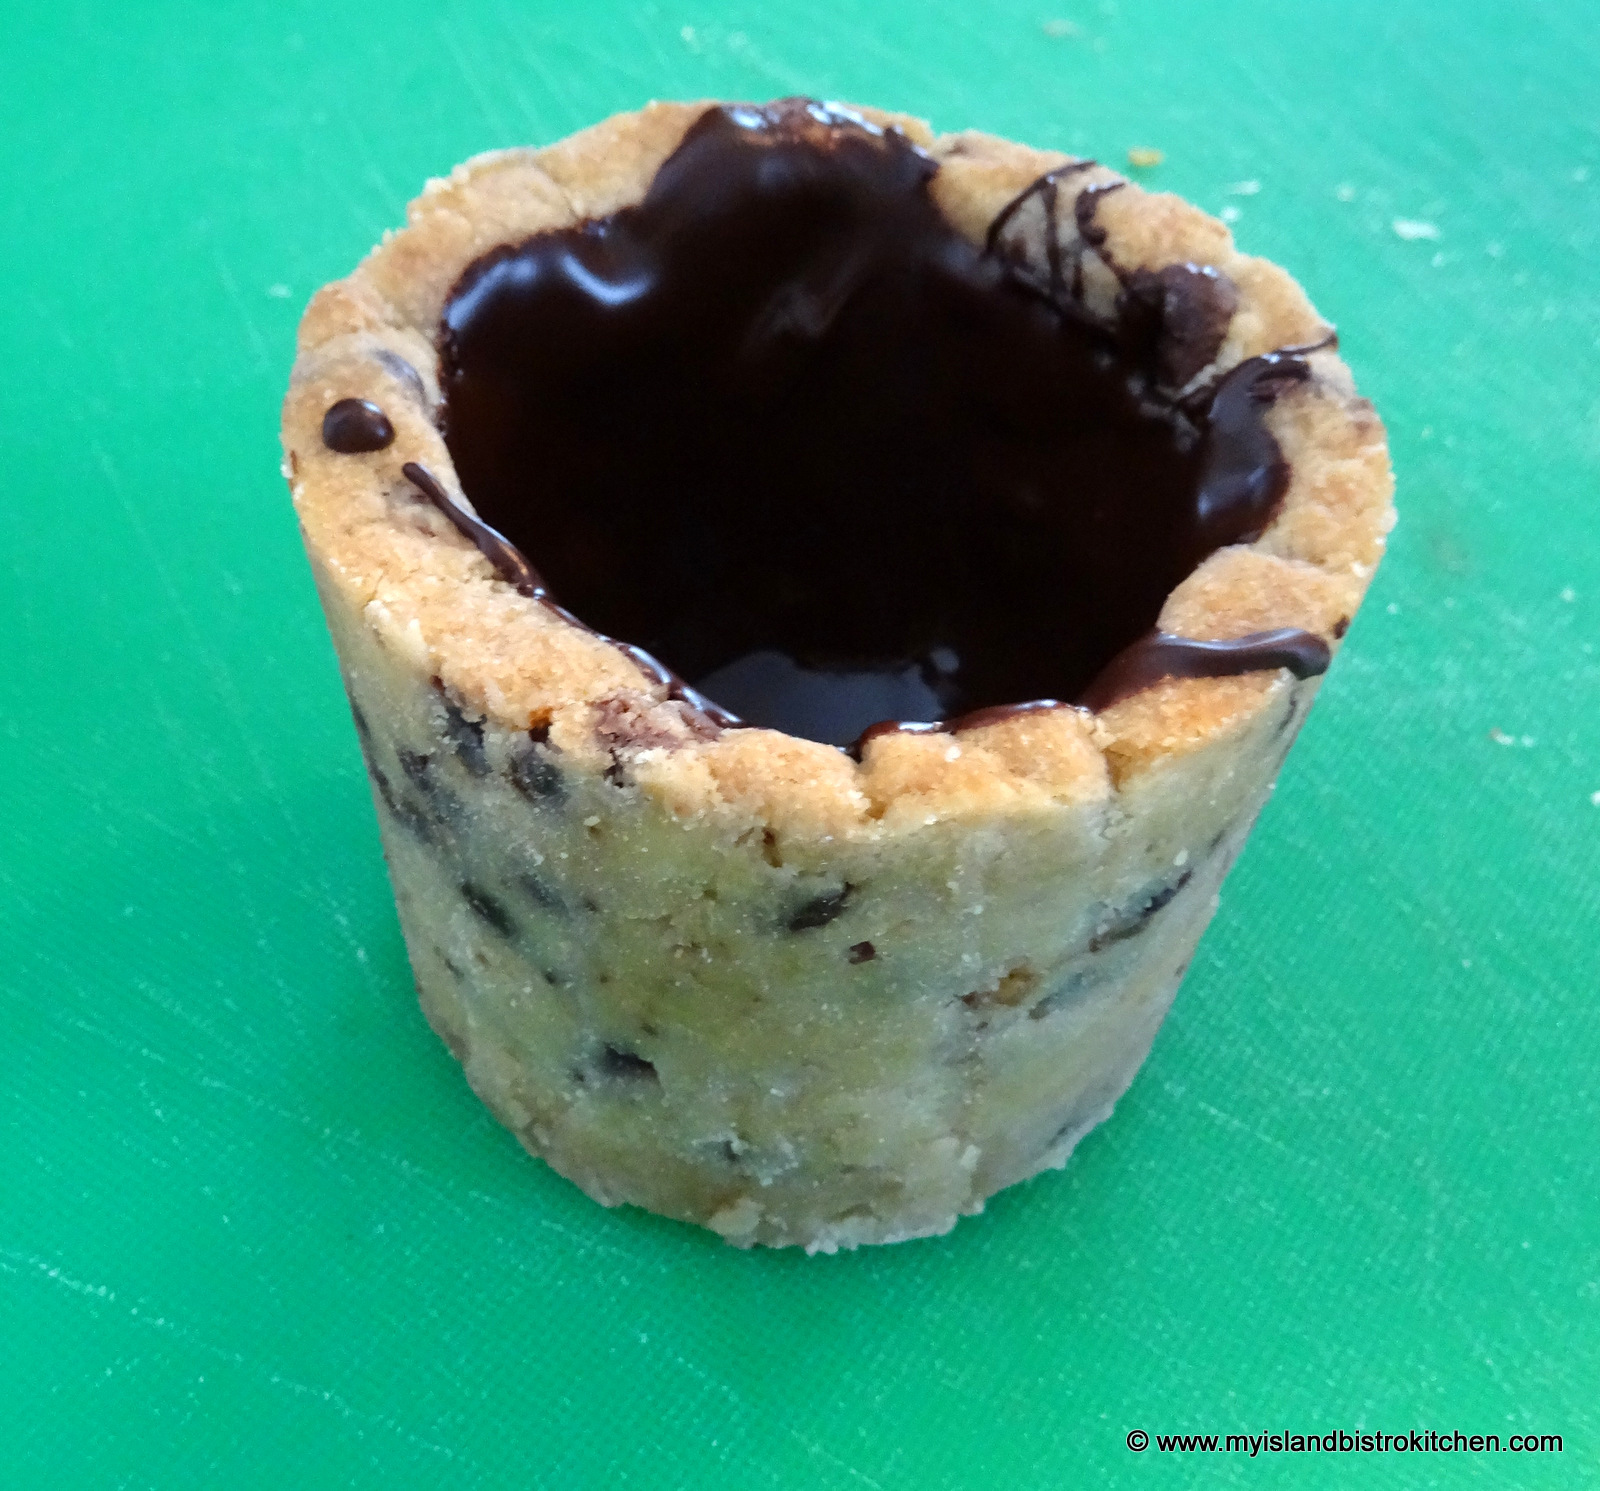
Or, make the cookie shot containers even larger and line them with melted chocolate (yum!)
Lining a larger cookie shot glass with melted chocolate
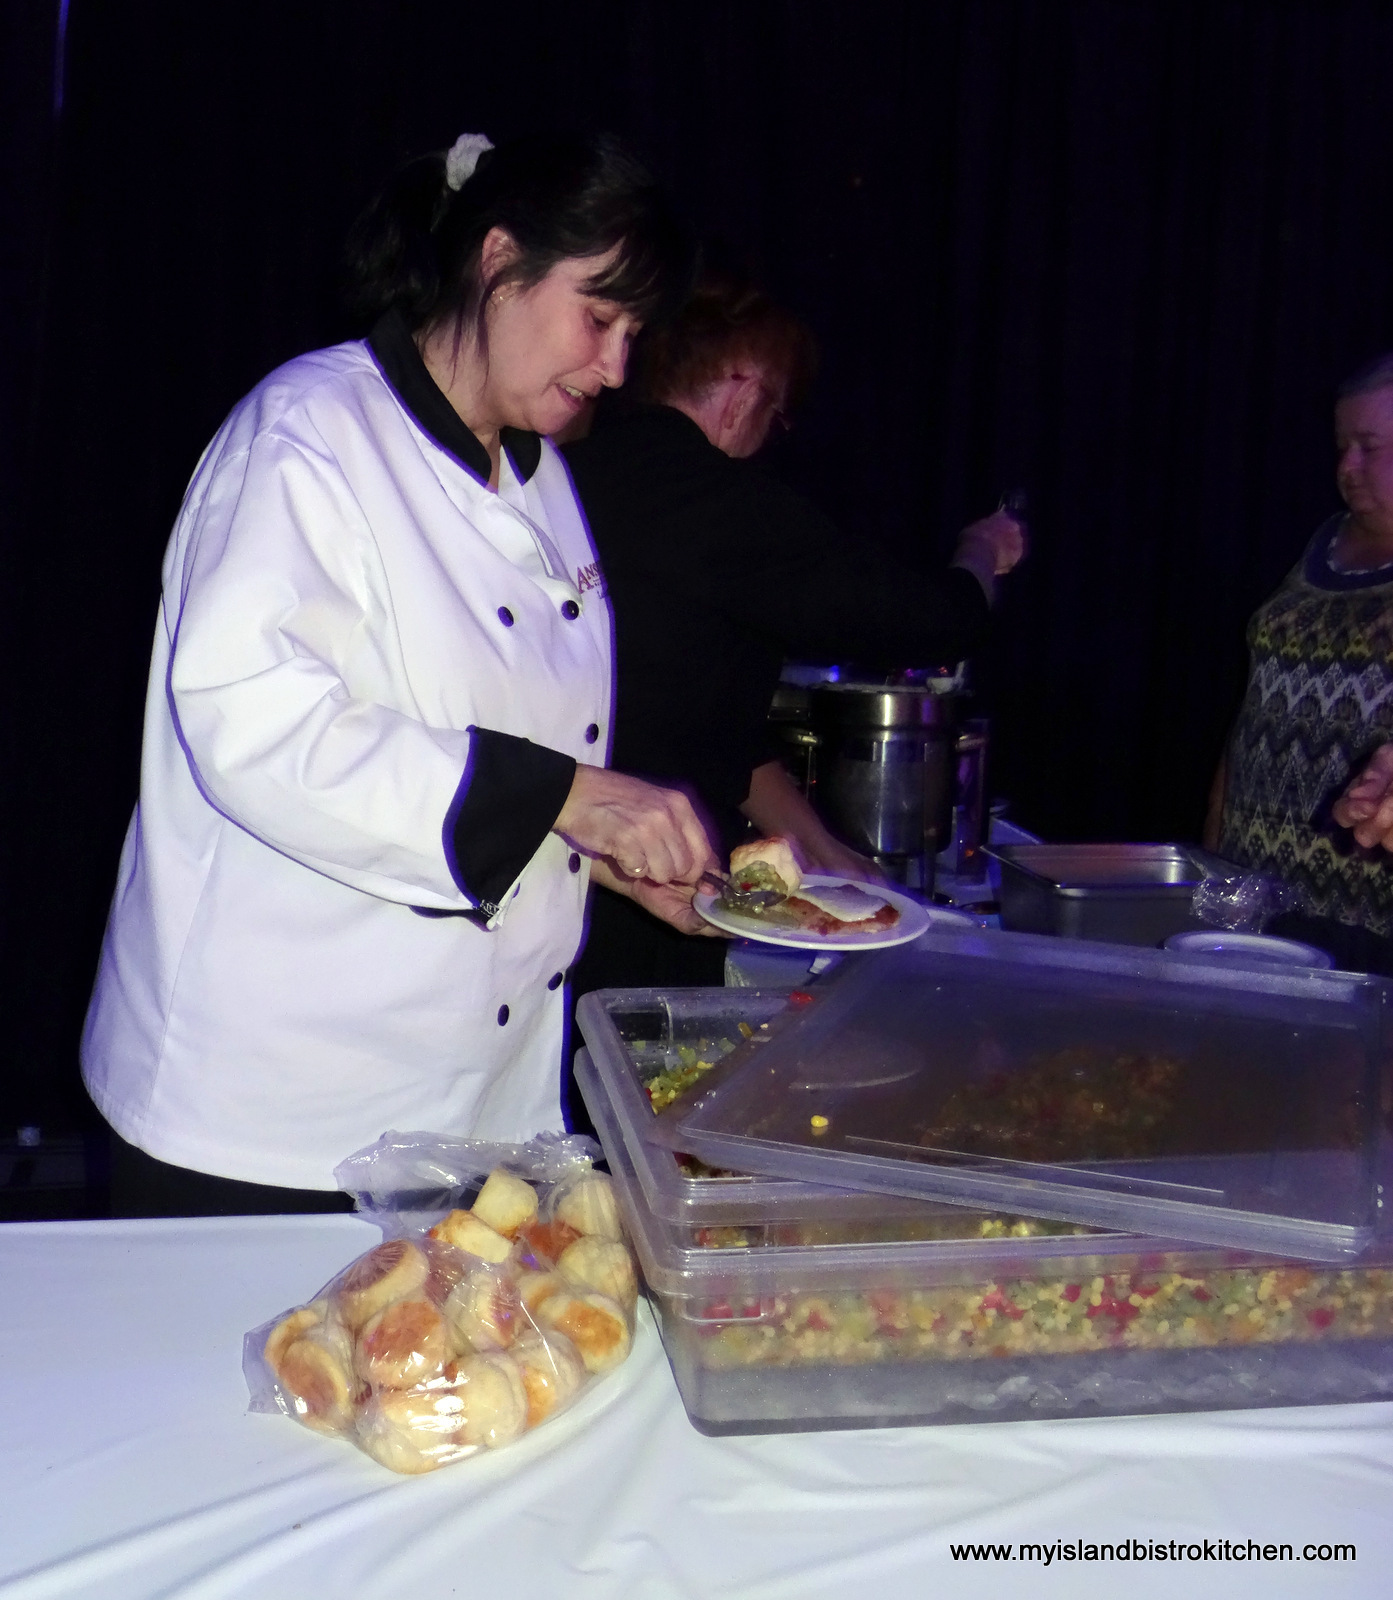
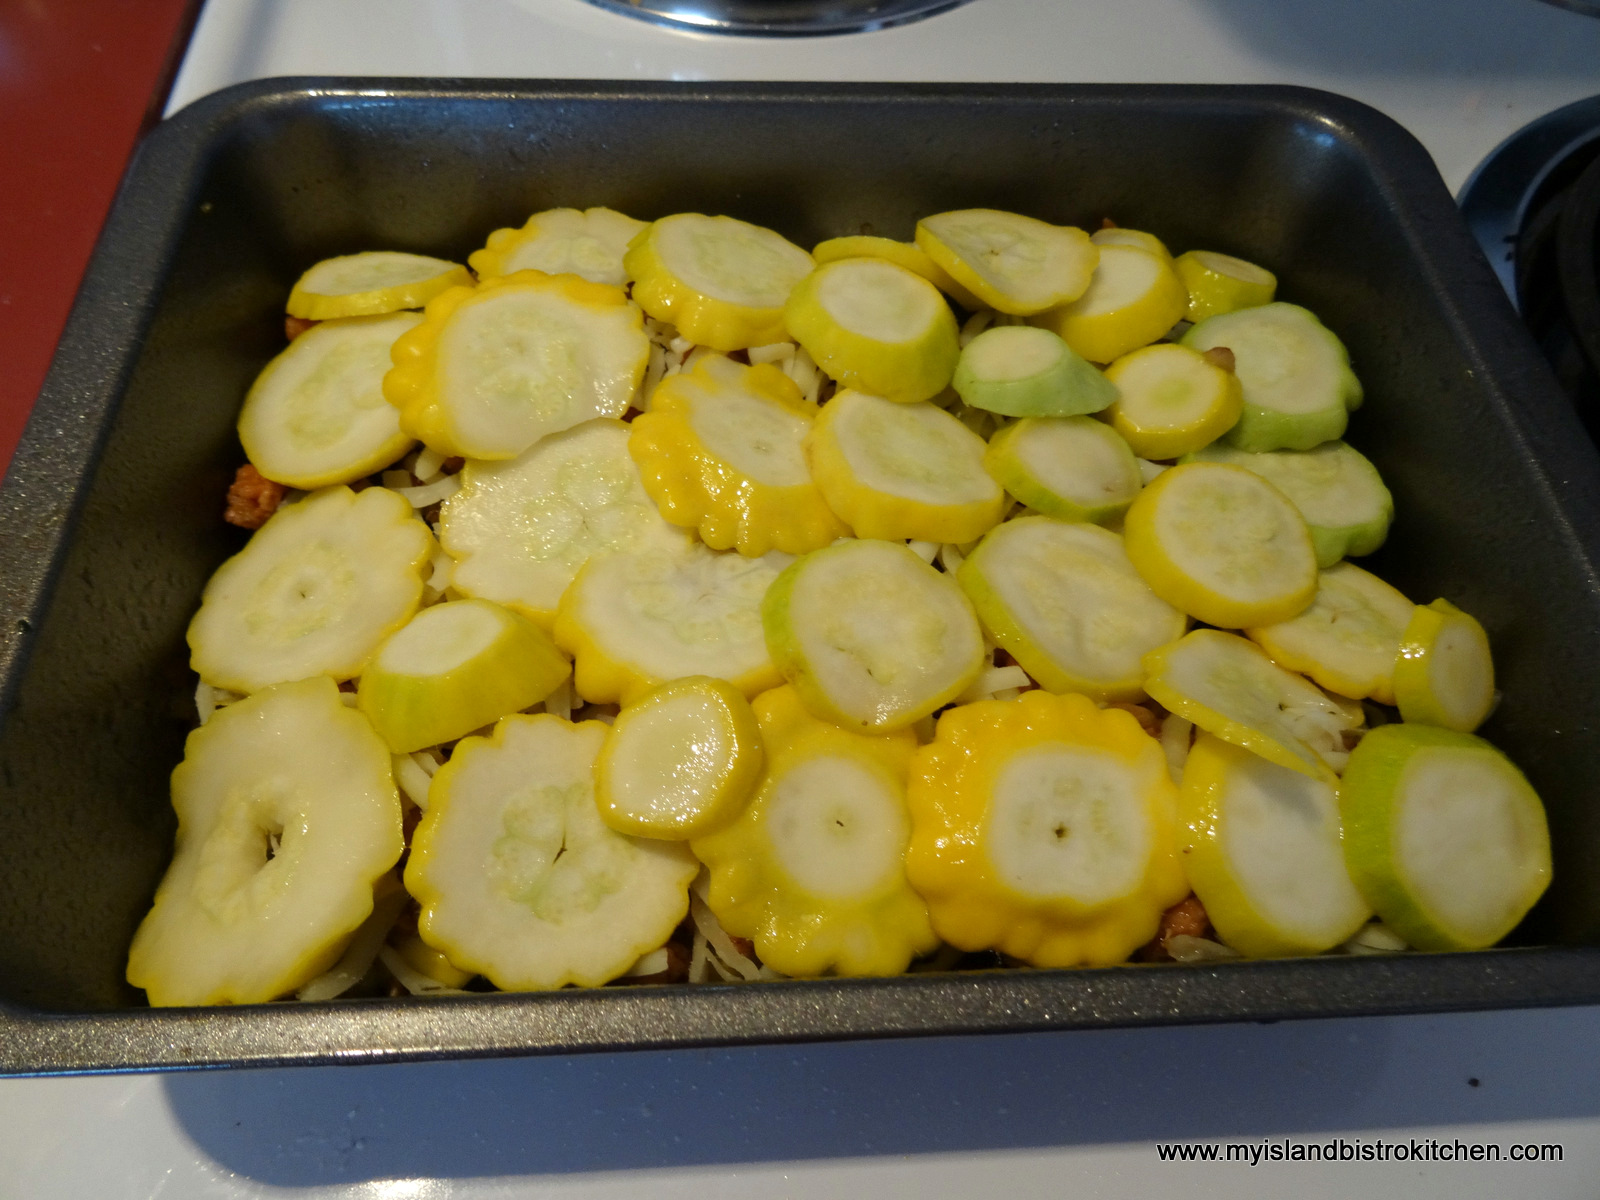
During my visit, the chefs demonstrated how to make a base from thinly sliced potatoes, seasoned with a mixture of herbs (such as rosemary, thyme, and oregano), grated Parmesan or Asiago cheese, and a bit of cream (yes, the real stuff!). Layered into greased muffin tins and baked for 20 minutes at 400°F, these make a tasty canapé base with a dob of sour cream or herbed cream cheese added and topped with braised beef or pulled pork.
Making Potato Base for CanapésMaking Potato Base for CanapésBaked Potato Base for Canapés
These canapés are tasty with, or without, the addition of sour cream.
Potato Base Canapé topped with Sour Cream and Braised Beef
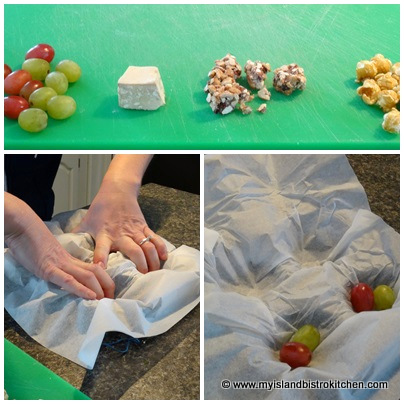
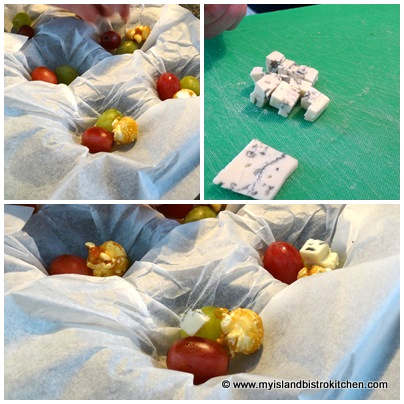
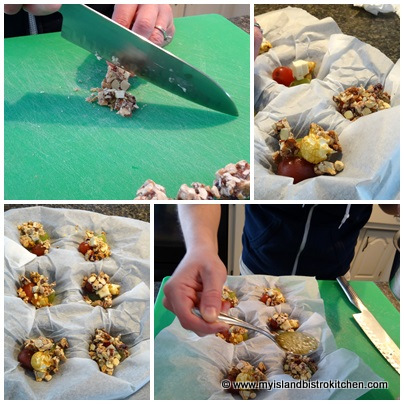
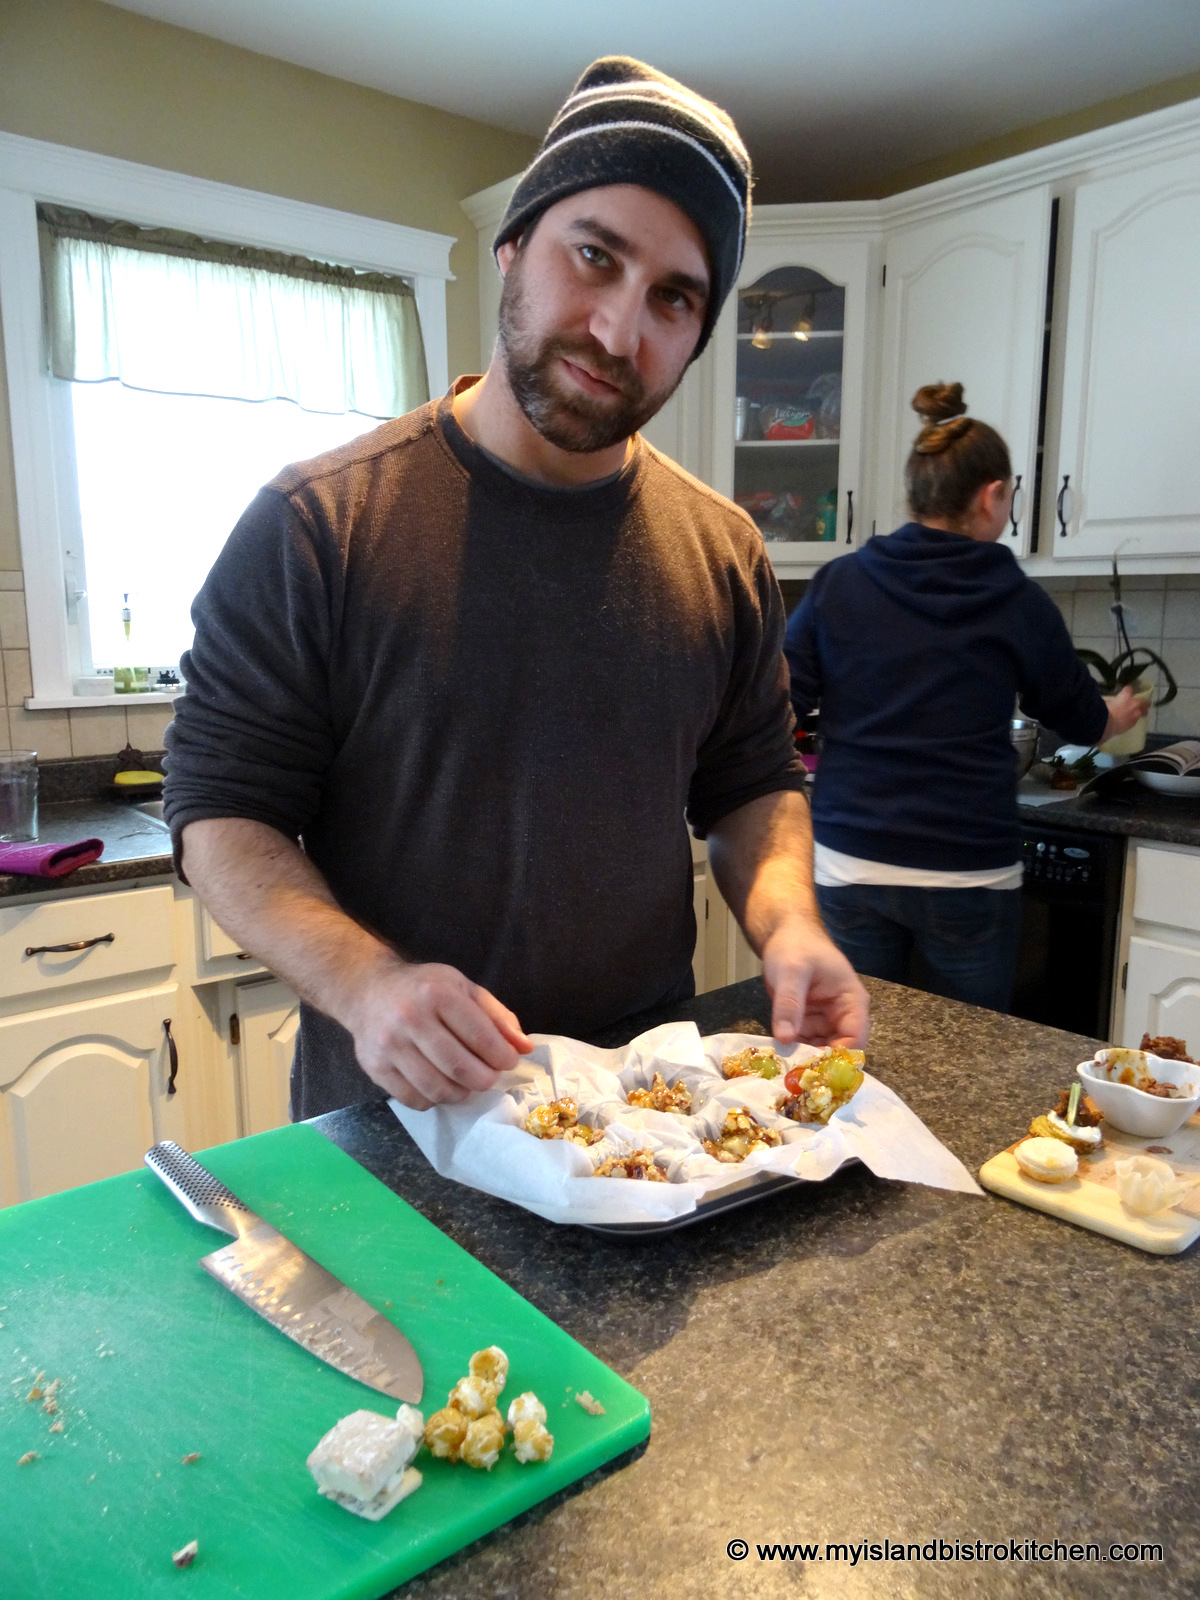
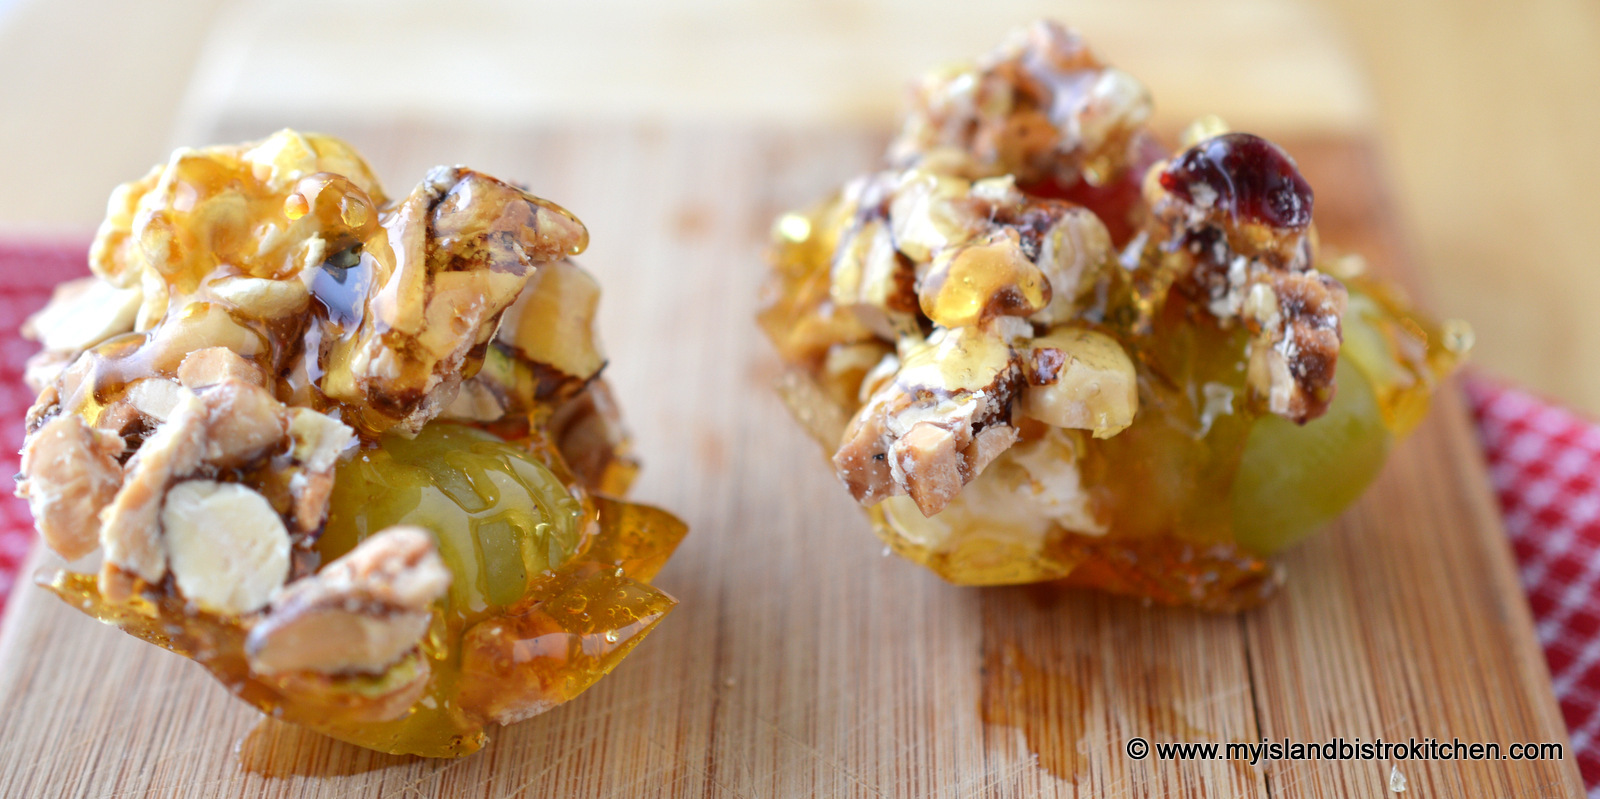
Jennifer also demonstrated how to make a sweet treat that consists of grapes, caramel popcorn, chopped nut clusters, and Cambozolo cheese, all held together with a caramel sauce made with corn syrup, sugar, and water.
Grape and Caramel ClustersGrape and Caramel ClustersGrape and Caramel ClustersMike gets ready to remove the Grape Cluster Canapés from the panGrape and Caramel Clusters
So, if you are short on time this holiday season and want to take the stress out of preparing for a cocktail party or other holiday event, you may want to consider having the event catered. Jennifer and Mike run a full service catering company and can be reached by phone at 902-963-2176, by email at greenislcatering@gmail.com, or through Facebook at https://www.facebook.com/pages/Green-Island-Catering-Company/
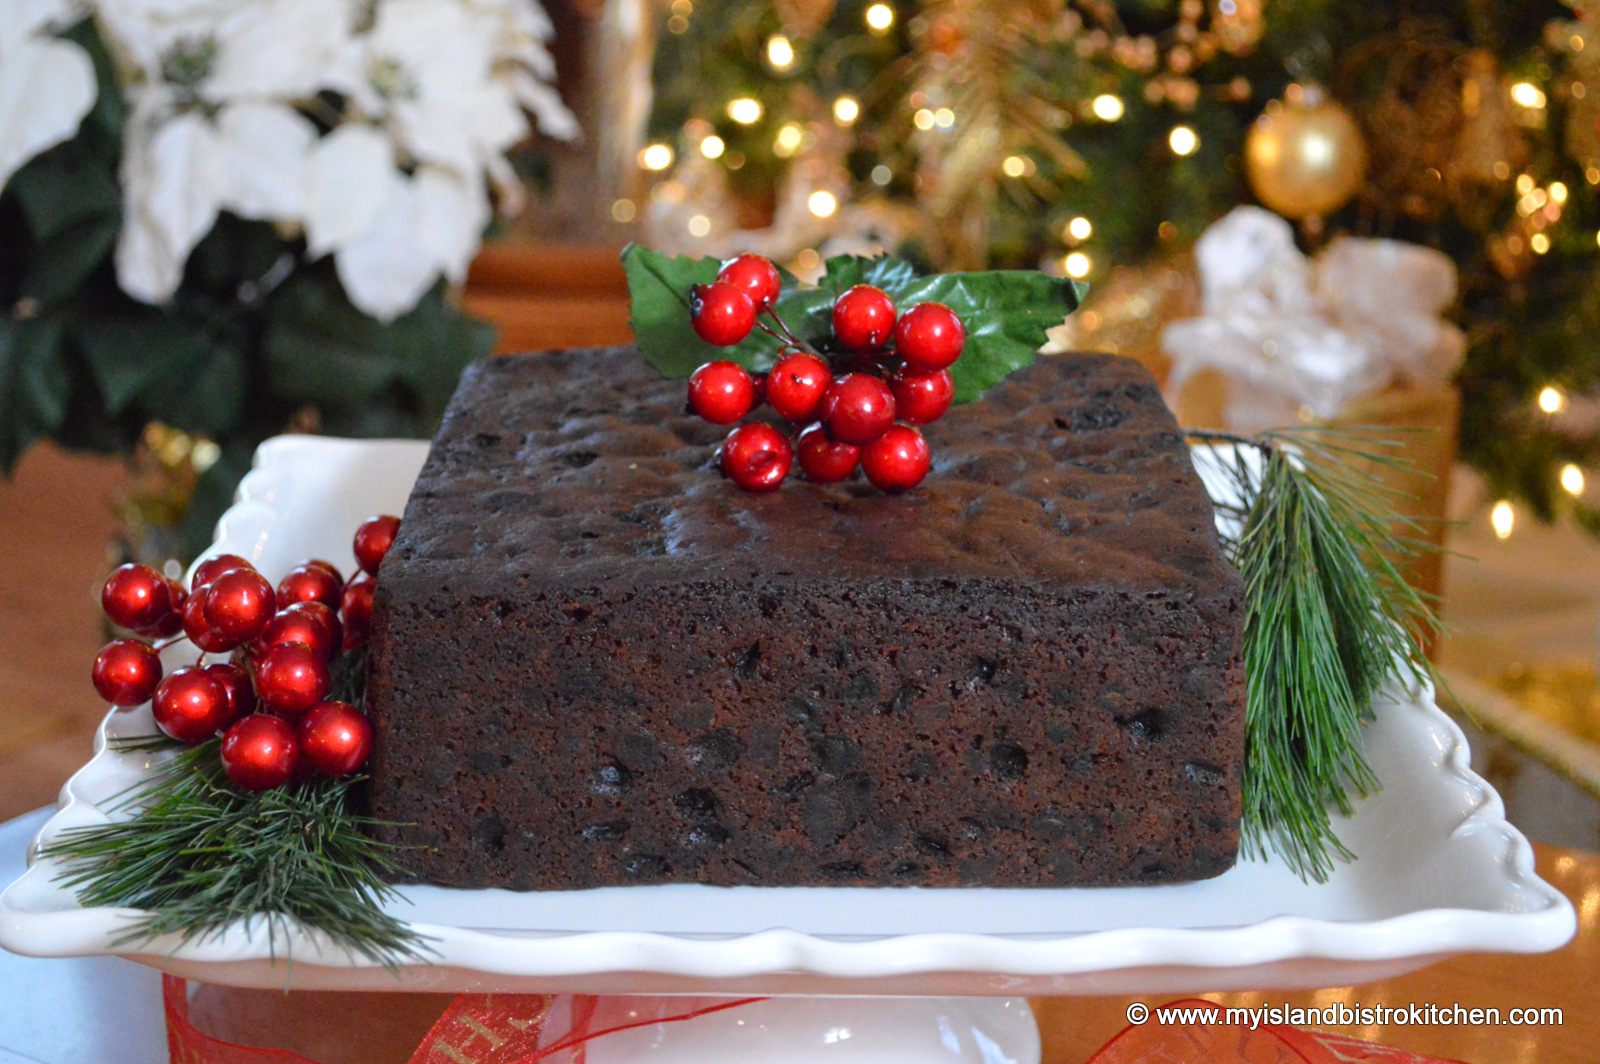
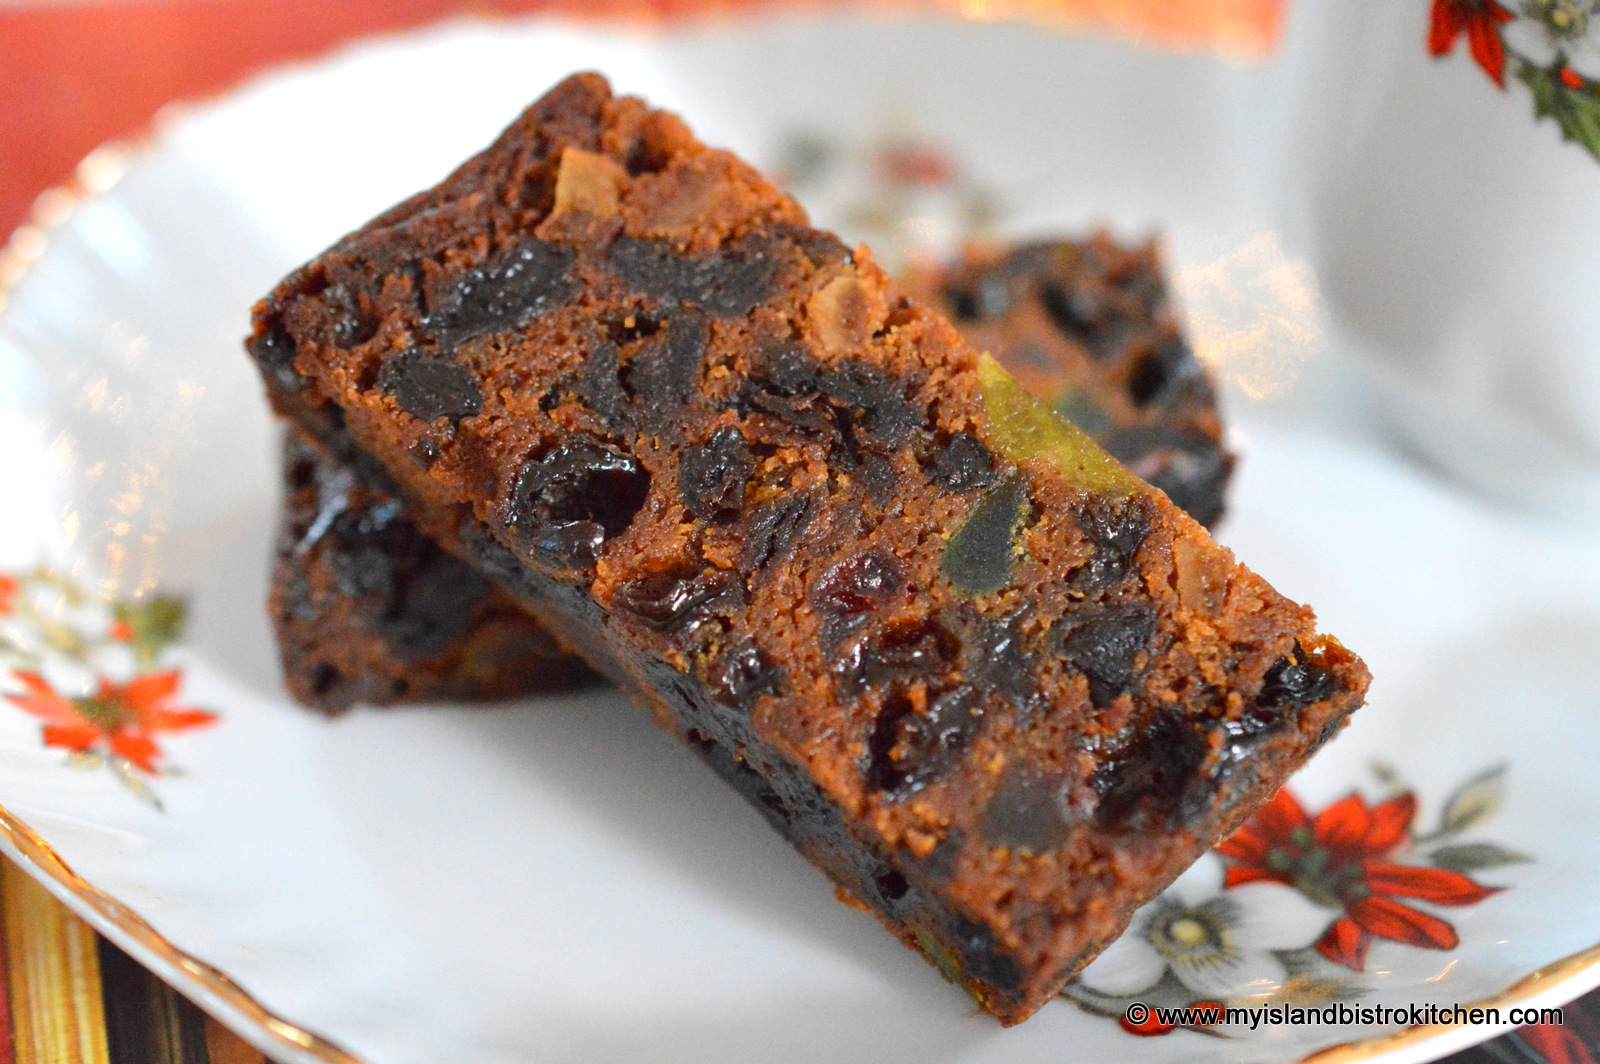
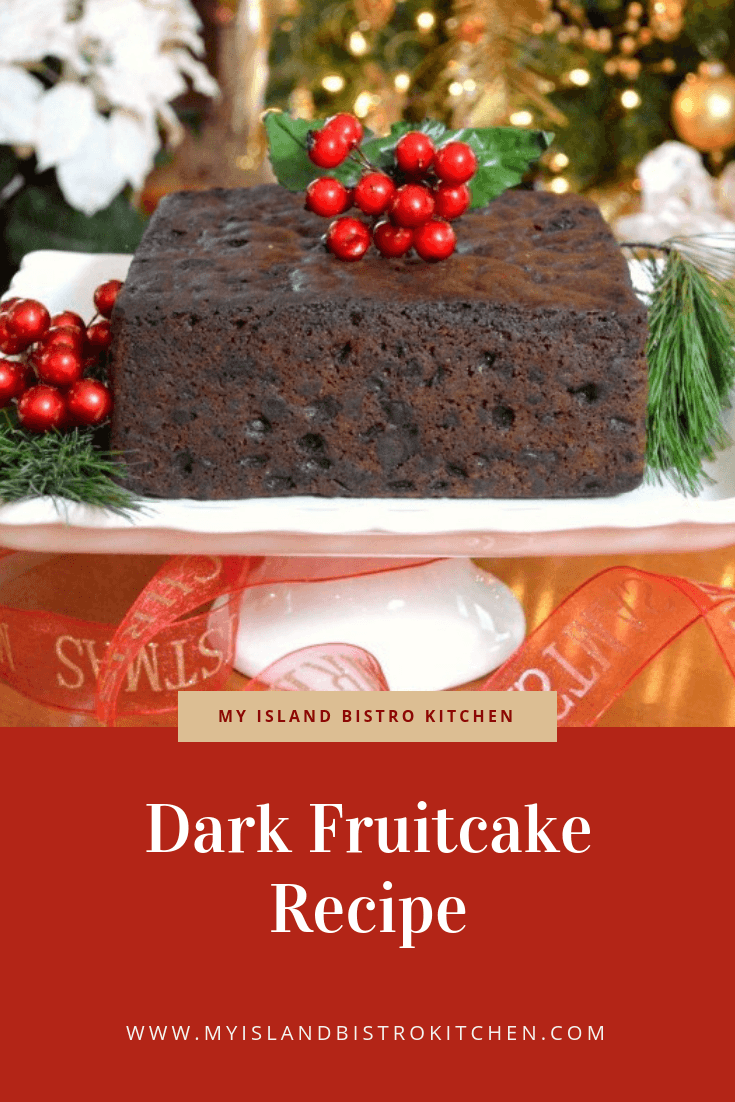
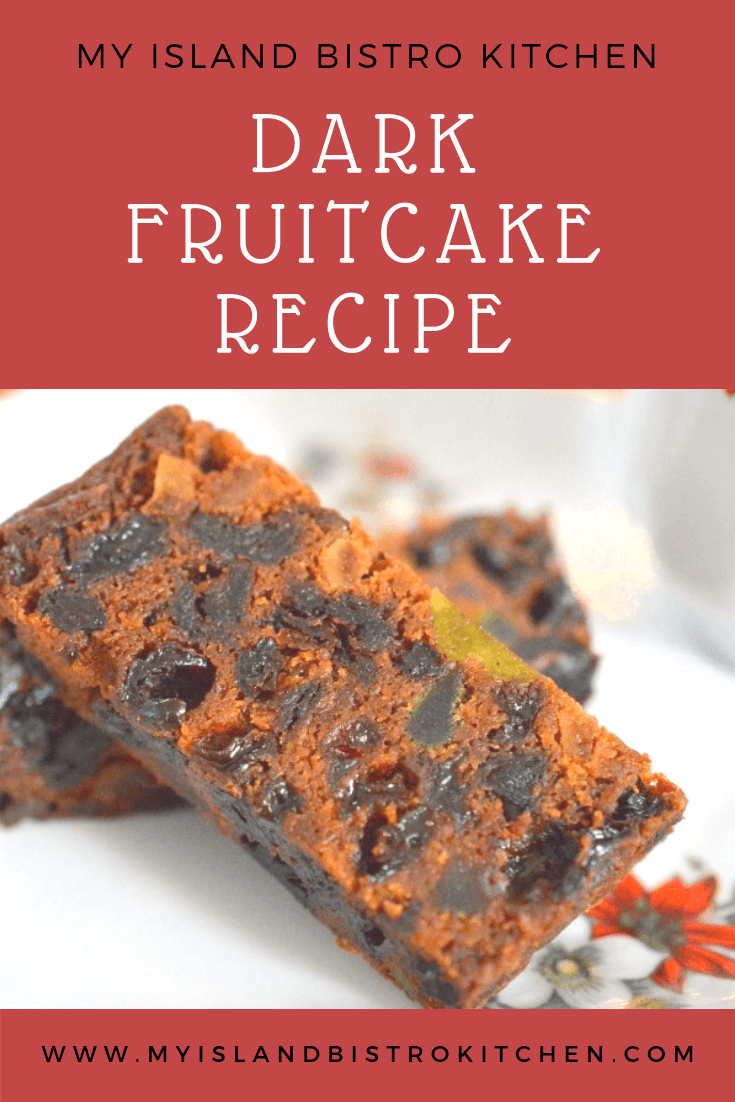
Fruitcakes. People either love them or loathe them and there seems to be no middle ground. I personally favour them and they have long been a part of my annual Christmas traditions.
My Island Bistro Kitchen’s Dark Fruitcake
There are basically two kinds of fruitcakes, a light cake and a dark cake. The dark fruitcake is characterized by the addition of molasses, spices, and often strawberry jam, all of which contribute to its dark color. The light fruit cake has a light-colored batter which makes the jewel tones of the glazed fruit pop. It is, by far, the most colorful of the two cakes. While I could not find any conclusive statistics, it seems to me that dark fruitcakes may perhaps be the more common.
Fruitcakes are sometimes called Christmas cakes since that’s often the only time of the year they make an appearance anymore. Years ago, however, fruitcake was a staple at weddings where the dark fruitcake was referred to as the groom’s cake while white pound cake was the bride’s cake. This tradition, at least where I live, has long since been dispensed with and replaced, instead, with many other cake flavor options.
I have been making fruitcakes for decades (I started making them when I was two! At least that’s my story and I’m sticking to it! Or, maybe it’s the vapors from the joy juice I’ve been brushing on my fruitcake over the past several weeks talking!). Some years I make both dark and light fruitcakes and, other years, one or the other. I simply love the smell of a fruitcake baking in the oven on a cold November afternoon. I always make my fruitcake around Remembrance Day as that gives it lots of time to “ripen” and mellow before the holidays. The making of the fruitcake heralds the beginning of my holiday preparations.
Fruitcakes are still considered a luxurious treat by many because the ingredients can be costly and the cake is time-consuming to make. Sometimes it is even hard to find the big sticky raisins, often referred to as Lexia raisins, which are a signature ingredient in a traditional dark fruitcake.
Lexia Raisins (big sticky raisins)
Essentially, a fruit cake is a mixture of candied/glazed fruit, different kinds of raisins, and often nuts, all held together by a small amount of batter. Before I share my recipe for dark fruitcake at the end of this posting, I am going to share some hints and tips from my many years of making fruitcakes. I hope you will find them helpful.
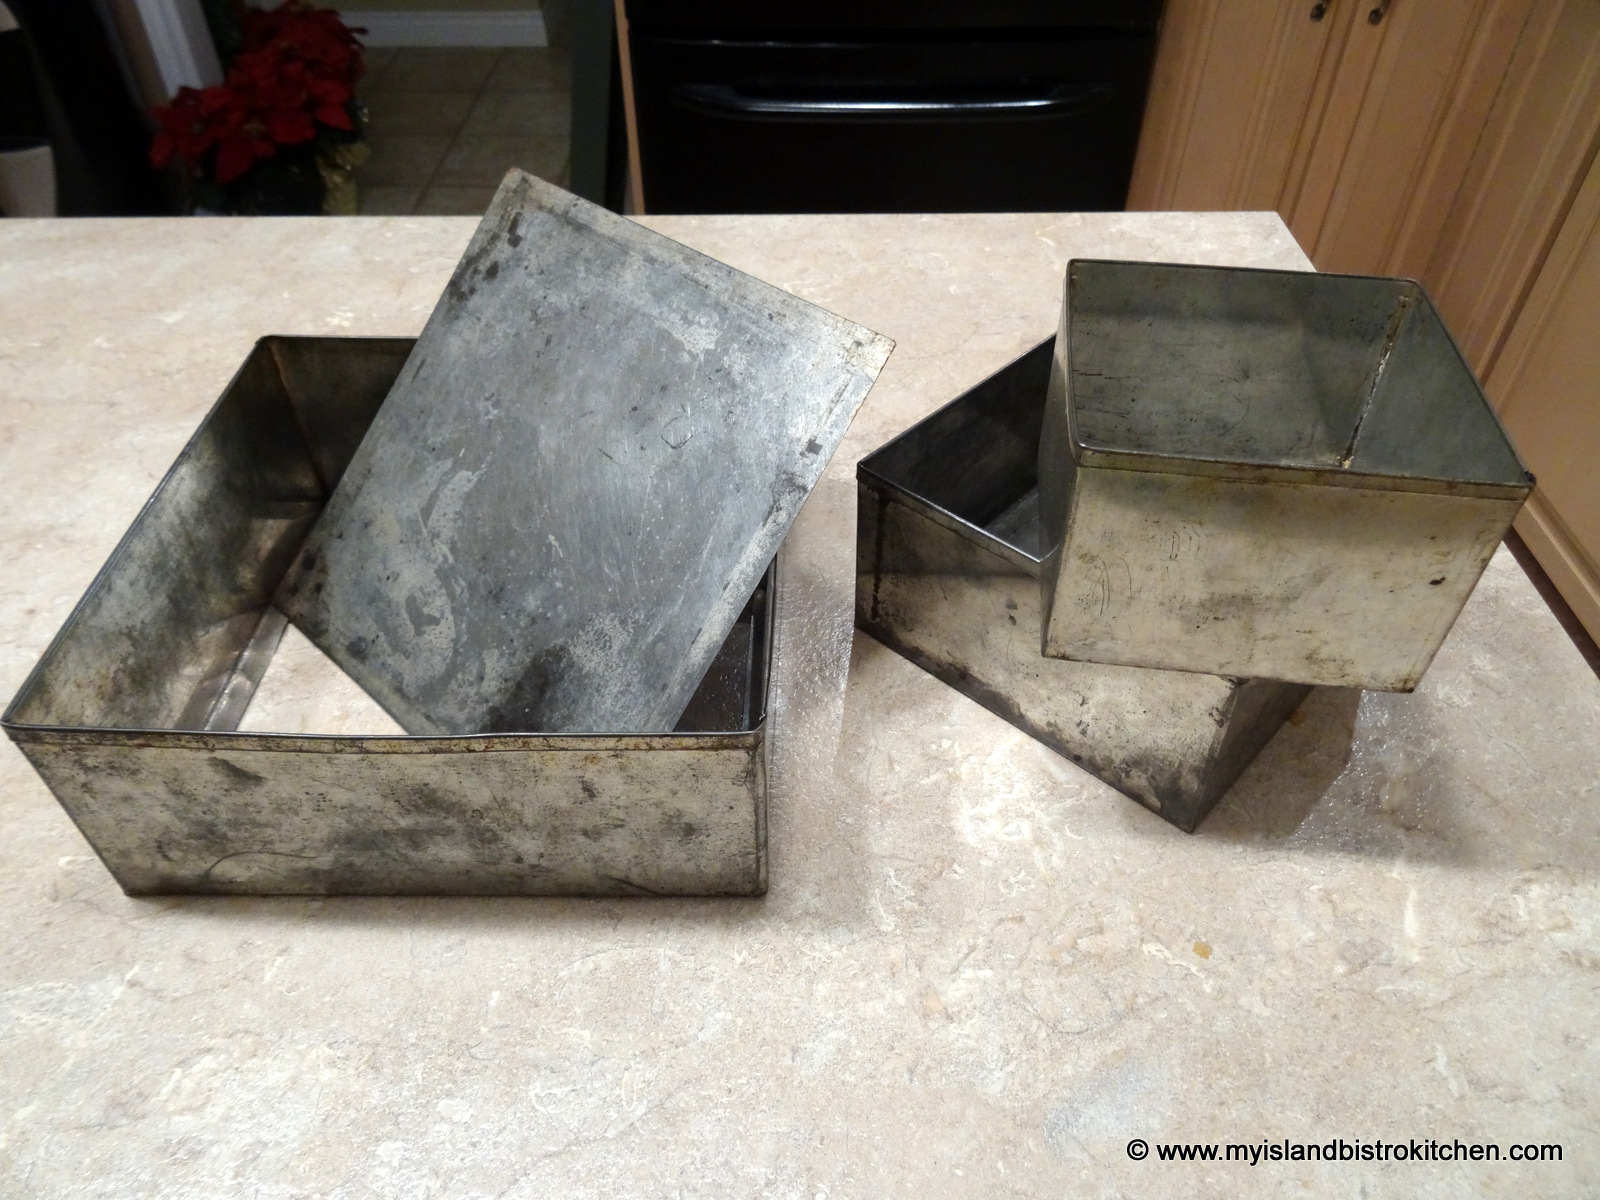
Cake Shape
Traditionally, fruitcakes are either square or round-shaped and quite deep – at least 2½” – 3” deep. The pans should be ones that have removable bottoms as this makes it easy to remove the cake from the pan. The pans below have been in my family for years and have held many fruitcakes. They may be old and discolored but they do the trick!
Fruitcake pans
Square cakes are infinitely easier to cut and plate more attractively than round cakes. With square pans, each piece can be cut to the same size and shape whereas, with round cakes, it is more difficult to get nice, even shaped pieces cut. There is a trick to cutting round cakes but it is certainly more complicated and time-consuming that cutting straight slices from a square-edged cake. However, the shape of the cake is a personal preference and the cake will taste the same regardless of shape.
It is very important to use the size of pan the recipe calls for as baking times have been tested for its size. Some bakers use loaf pans, 9”x13” shallow pans, or even muffin cups or soup cans in which to bake their fruit cakes. If changing a pan size from the one indicated by a recipe, remember that baking times will need to be adjusted accordingly as a more shallow or smaller cake will take less time than a deeper one to bake. Bakers will need to rely on their baking experience to determine when a cake is baked if they choose to use a pan size different from the one indicated in a recipe and in which the cake recipe has been tested.
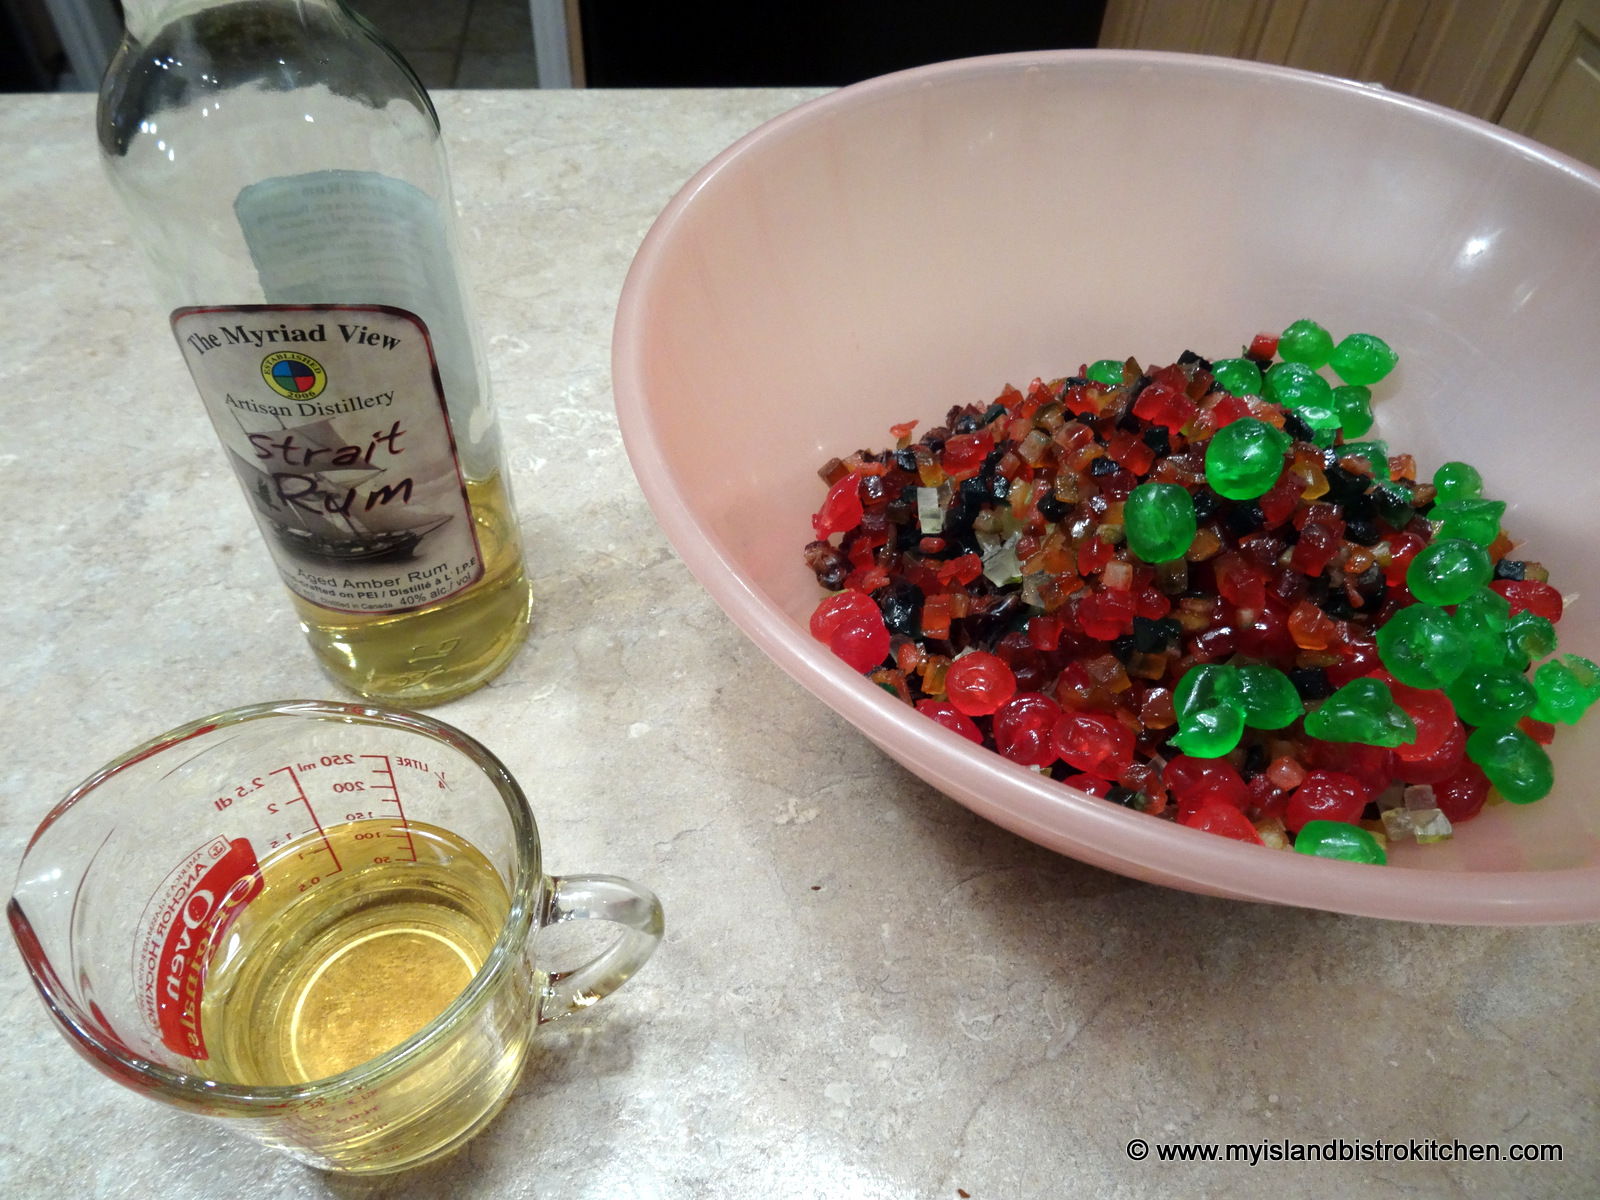
Soaking Fruit
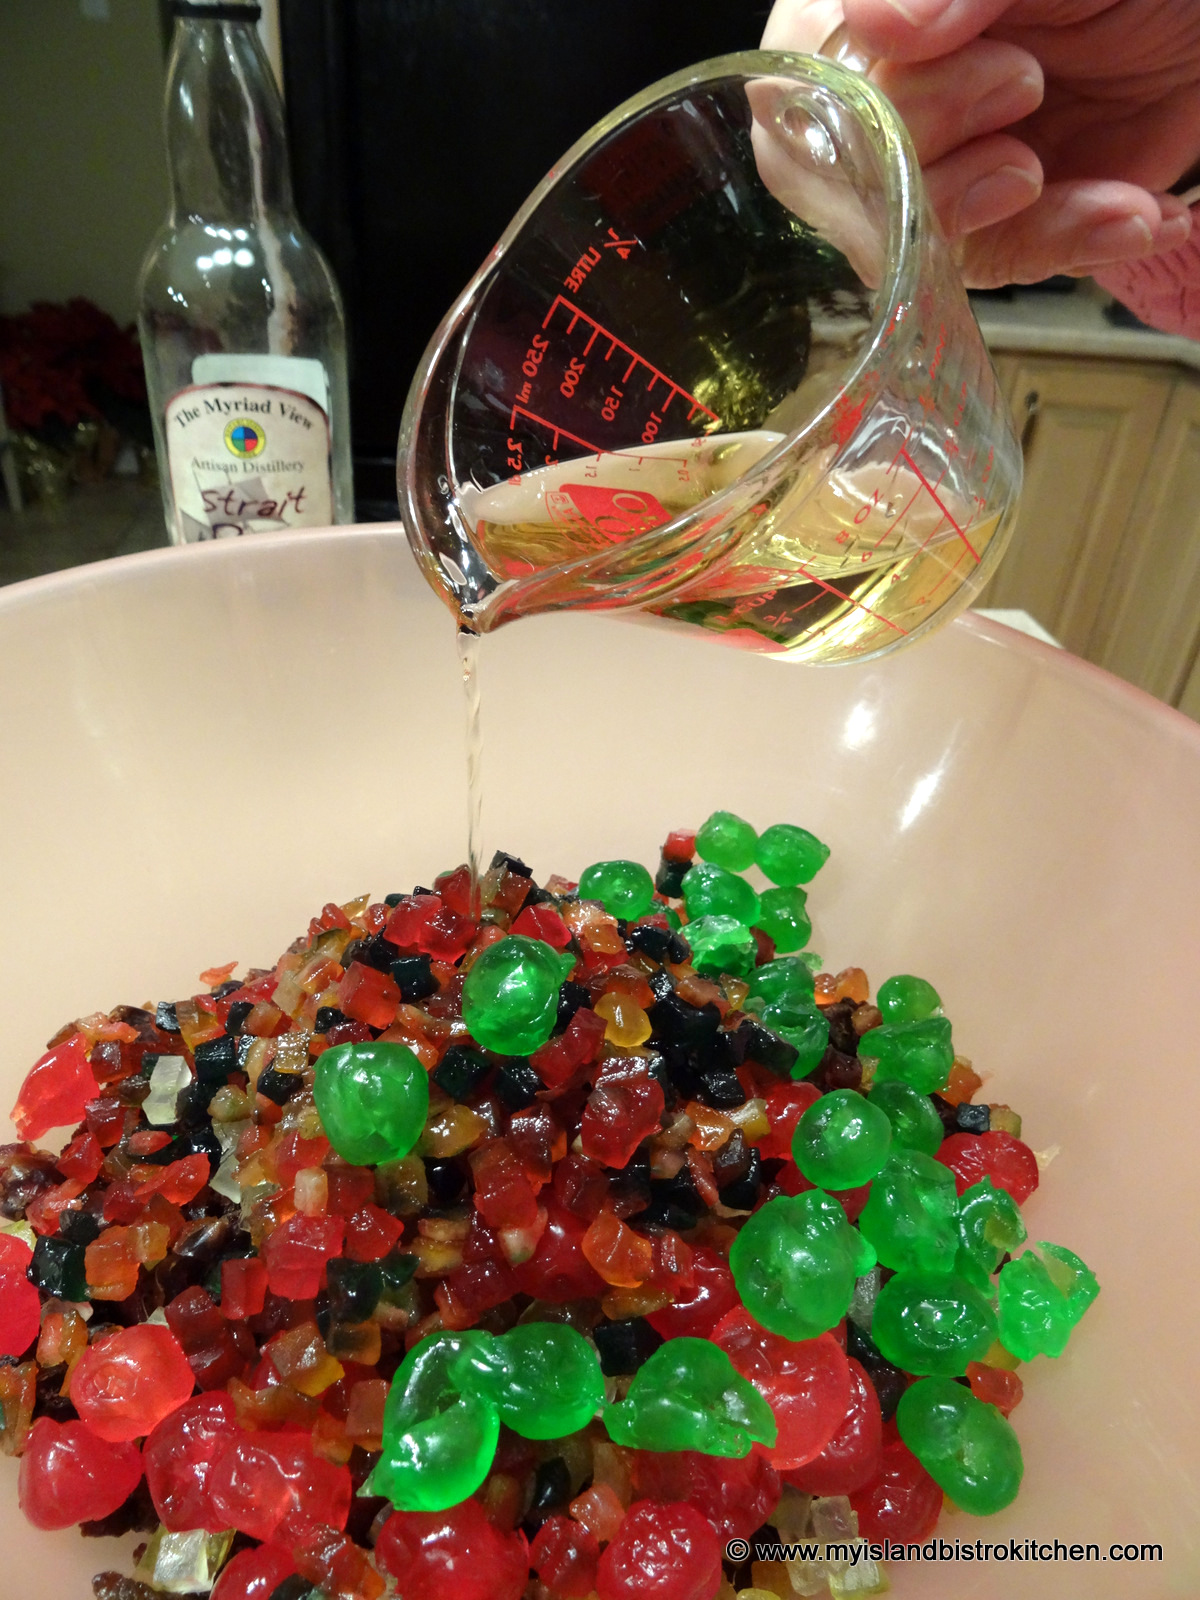
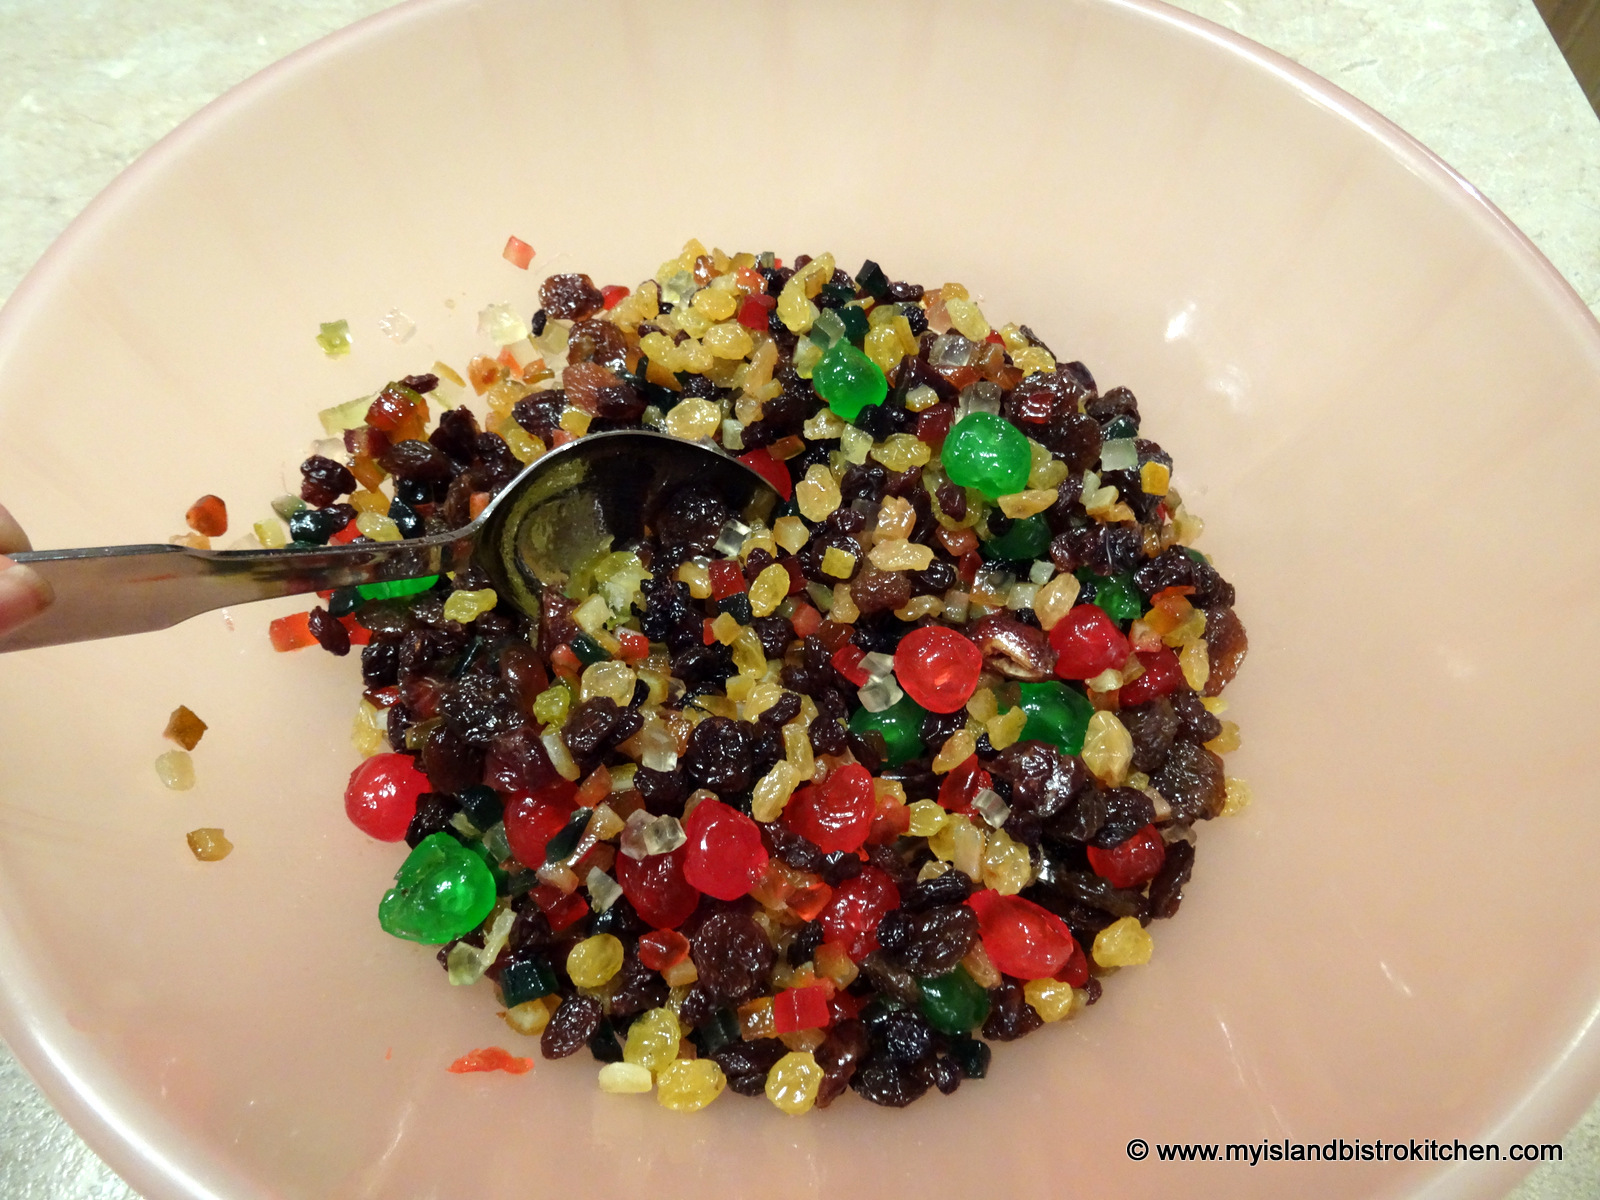
Commonly, the glazed and dry fruit, including the raisins and currants, are soaked in liquor, with rum or brandy the most commonly used types of libation. Alternatively the fruit can be soaked in a fruit juice.
The purpose of soaking the fruit is three-fold:
1) To soften/plump/rehydrated the dried fruit – the raisins, in particular; 2) To add flavour to the cake; and 3) As a preservative (if using liquor) to extend the shelf life of the cake.
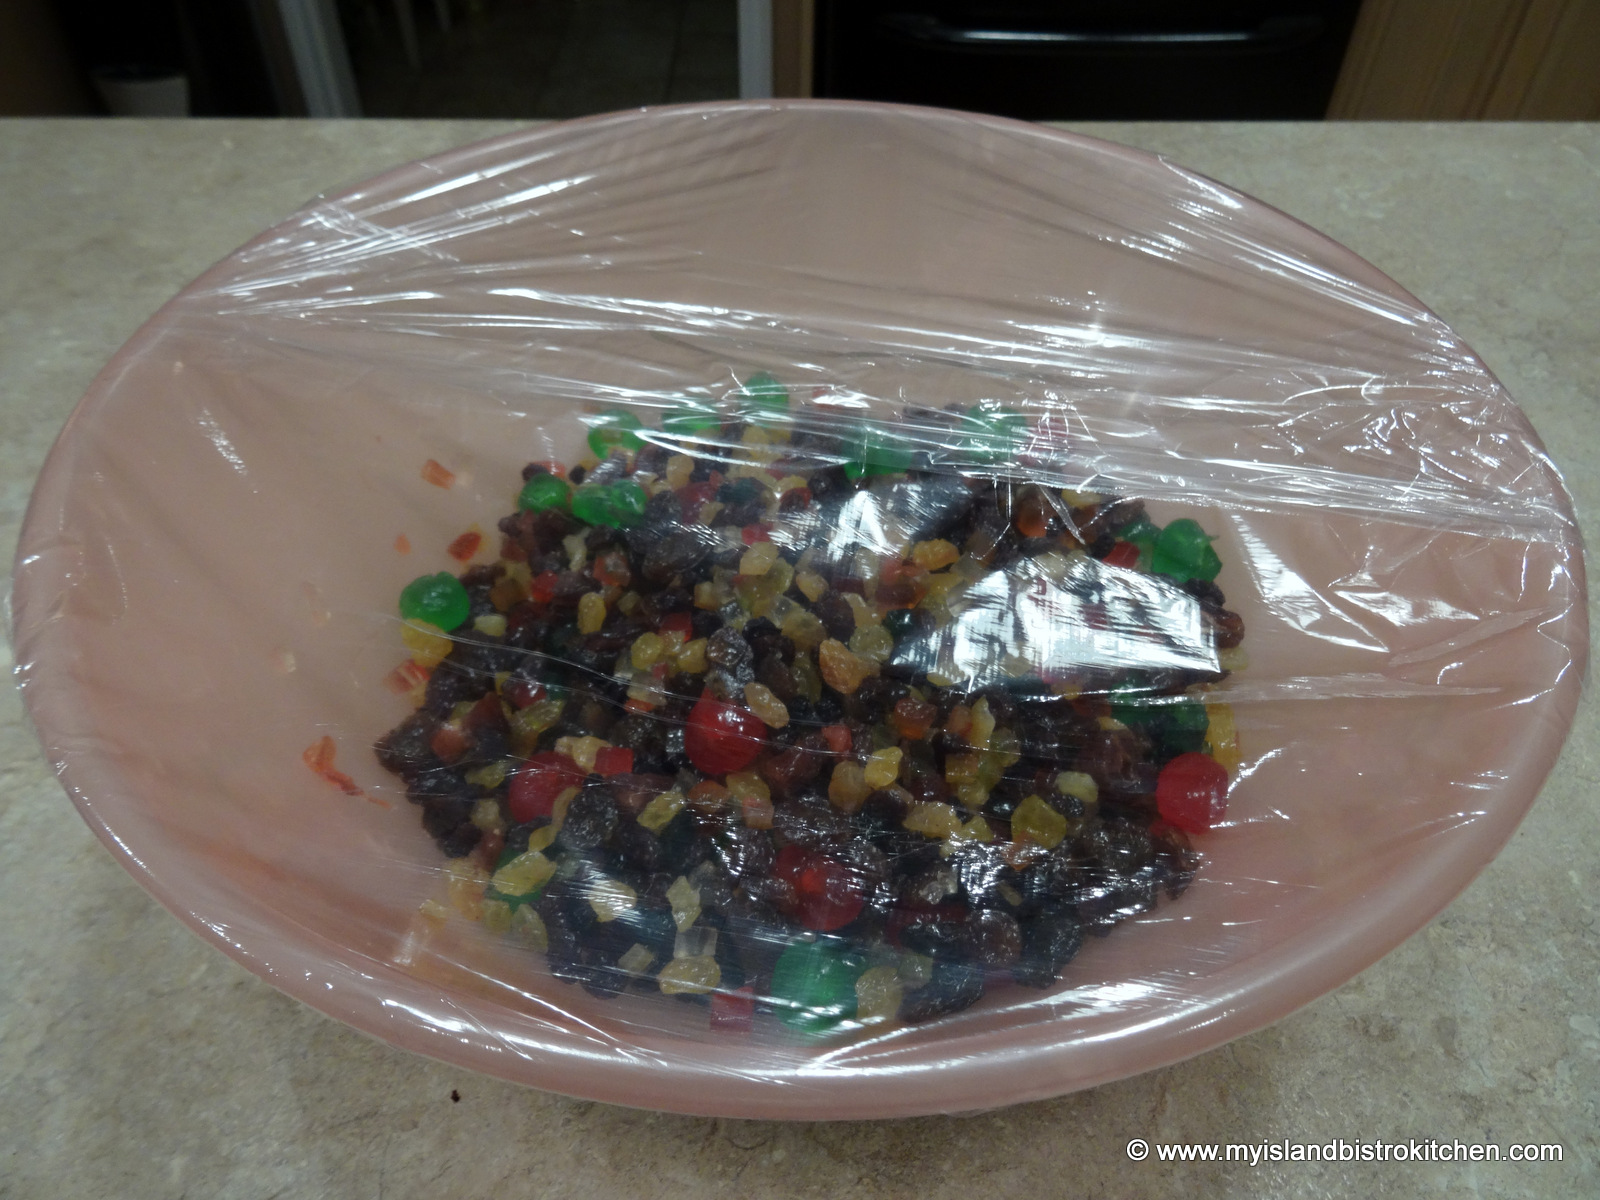
Some bakers soak the fruit for several months. I don’t find this necessary or that the cake has any significantly better flavour if made with fruit that has been soaked for months. In my opinion, the fruit will only absorb so much liquid and flavor, no matter how long it is soaked. I soak the fruit in a covered container for 24-48 hours, stirring it 3-4 times during the macerating process.
It is important to resist adding more liquor to the fruit soak than is called for in the recipe. Adding too much liquor will add too much liquid to the batter, making it too runny to hold the fruit from falling to the cake bottom and it may also cause the cake to sink in the center as it bakes, potentially causing a soggy cake.
Fruit and Nut Content
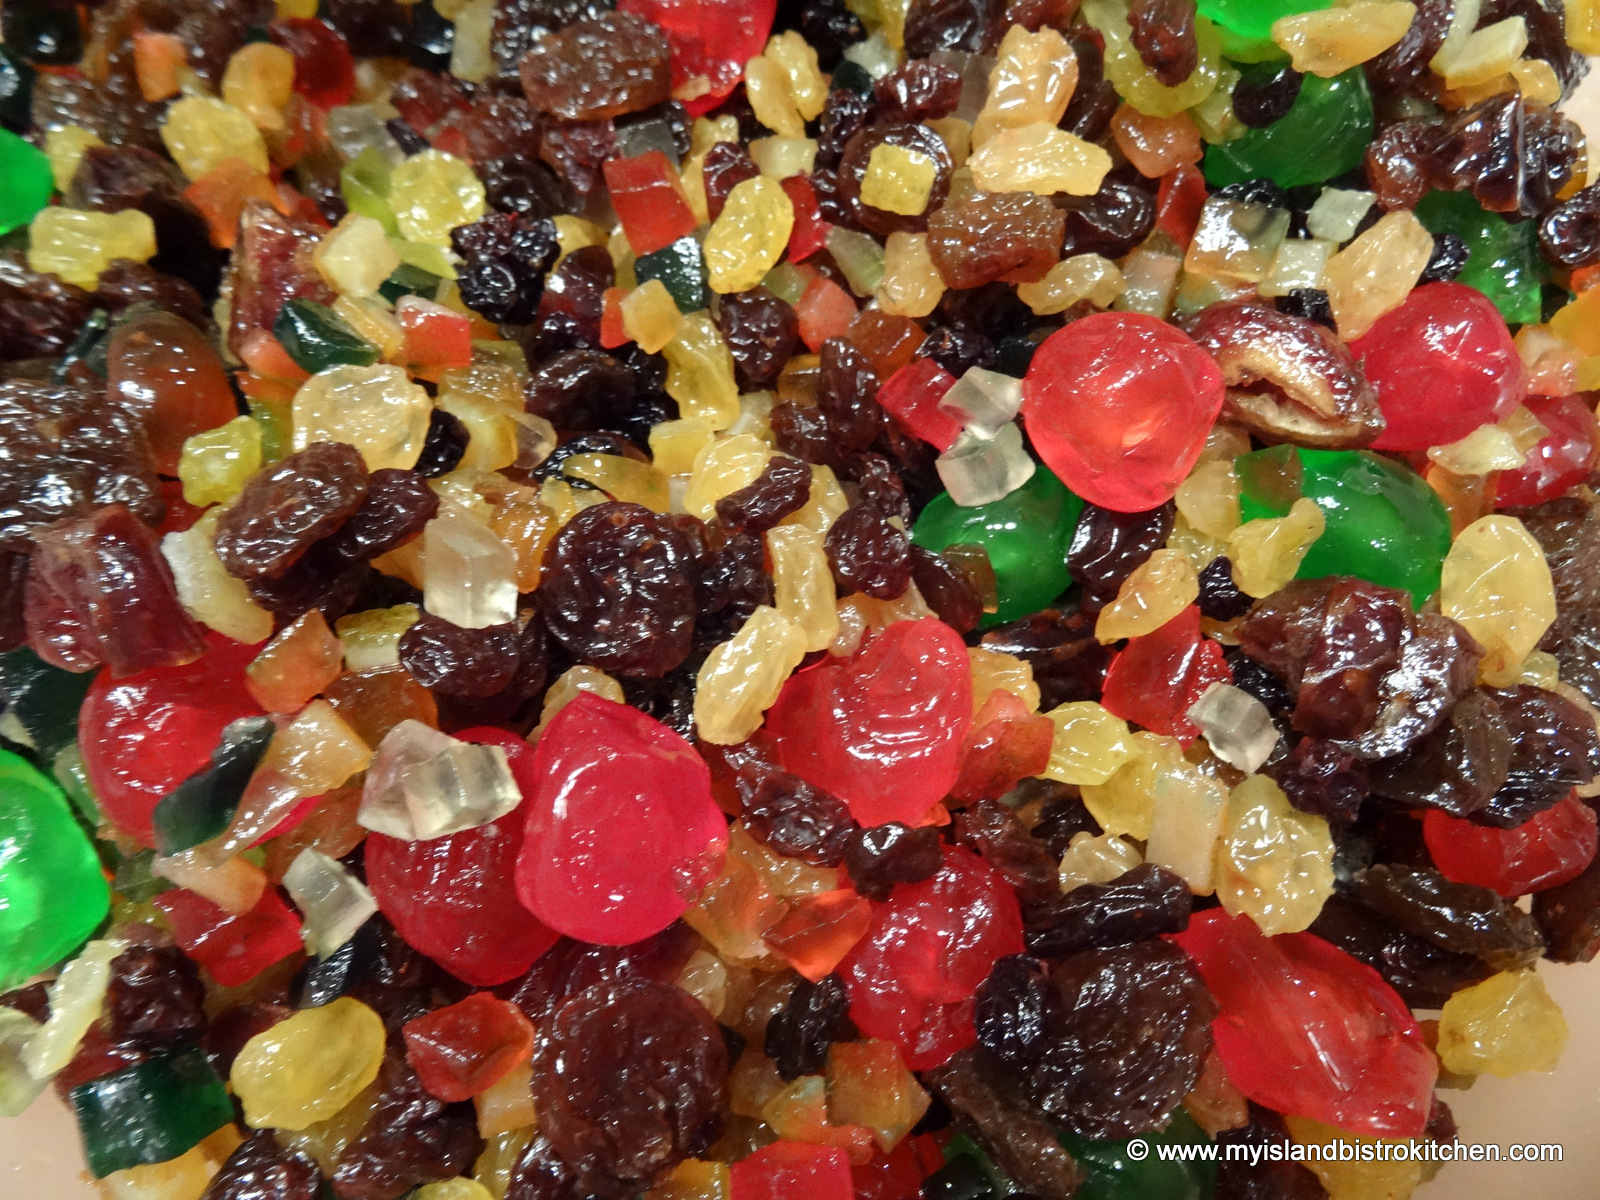
True traditional fruit cakes will have candied/glazed fruit, a mixture of raisins, and sometimes nuts. It is important that candied/glazed fruit be used and not, for example, fruit with a lot of liquid such as maraschino cherries or fresh fruit which will add too much excess liquid to the batter.
Jeweled-toned Fruit
Fruitcakes typically do contain nuts; however, my recipe below is nut-free. I find several issues with including nuts in a fruitcake:
1) Nuts, over the long term, can go rancid or, alternatively, be hard junks in an otherwise soft texture cake; 2) Chunks of nuts can make it difficult to cut the cake; and 3) Many people have nut allergies and cannot enjoy a piece of fruitcake made with nuts.
Fruitcake ingredients can be flexible which means substitute ingredients are perfectly acceptable so long as the overall weight content of the fruit that the recipe calls for is maintained. For example, my fruitcake recipe calls for 3 pounds of fruit and I have listed the weight content of each individual ingredient making up that 3-pound fruit content. If you don’t happen to like citron, for example, simply omit the 3 oz called for and replace it with another glazed fruit of the same weight.
Batter
A fruit cake batter is very thick and dense and contains very little flour content. Essentially, there is just enough batter to hold the ingredients together. The reason the batter needs to be thick (as opposed to runny) is that it needs to support the heavy fruit content and keep it suspended and distributed evenly throughout the cake. Otherwise, the fruit will fall to the bottom of the cake.
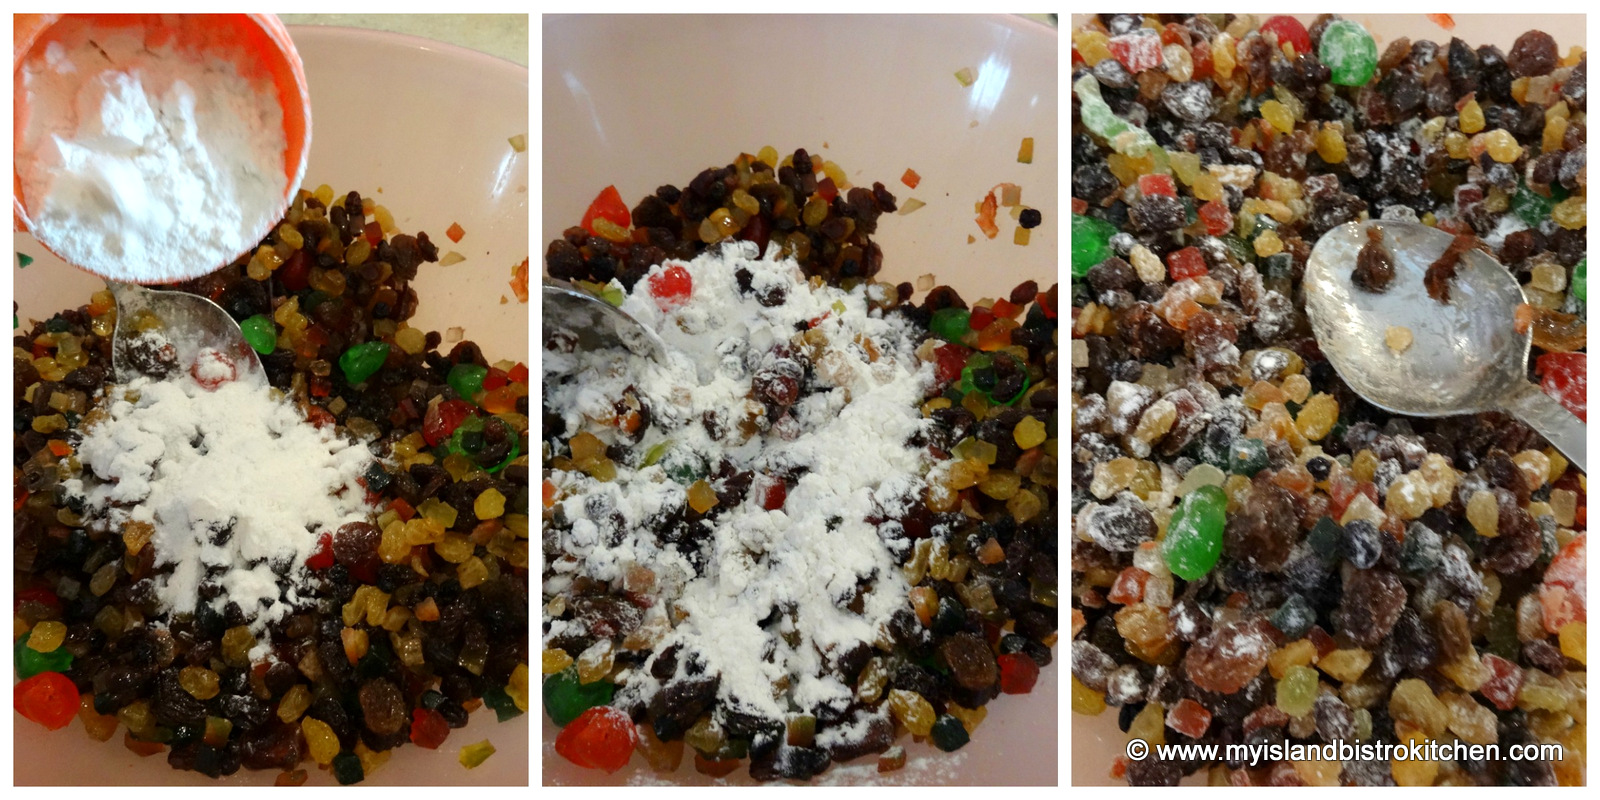
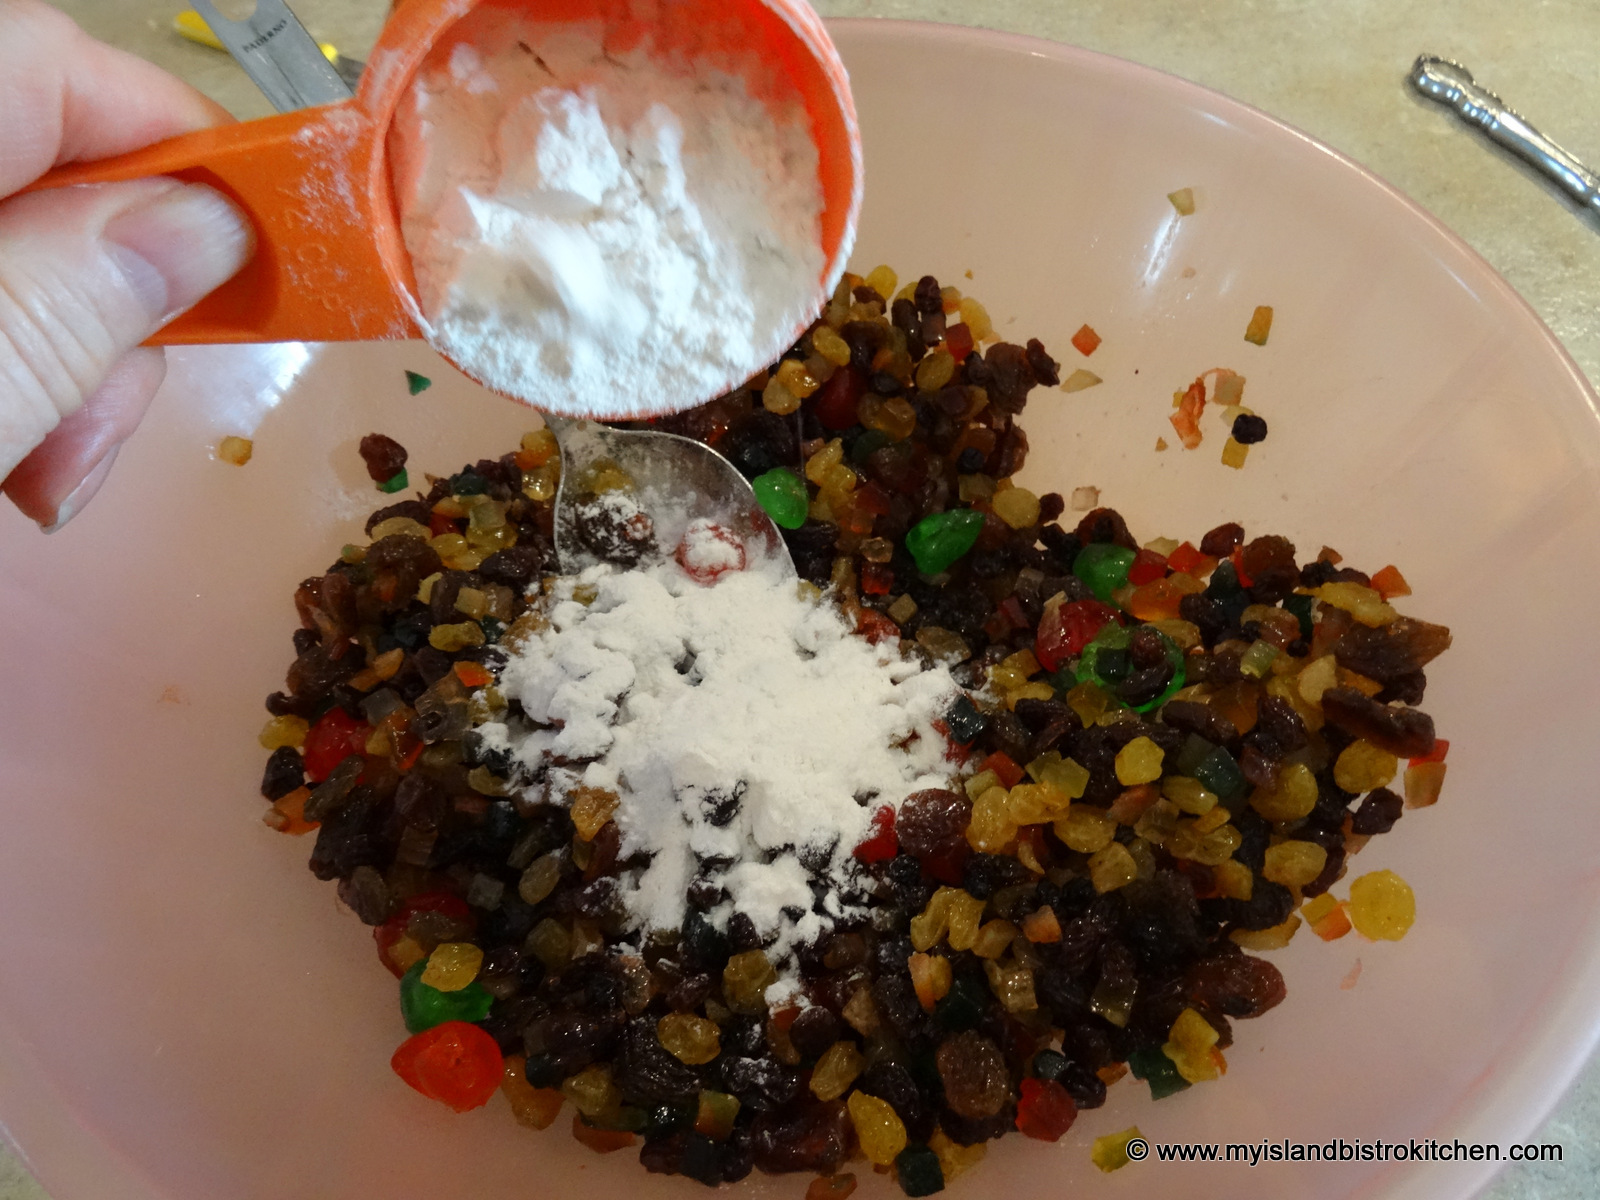
It is important to “flour” the fruit with a small amount of flour just before adding the fruit to the batter. This will also help to keep the fruit suspended throughout the cake. You will want to do this quickly and not leave the floured fruit any length of time before adding it to the batter as the flour when combined with the glaze on the fruit can turn into a gummy mess, thus defeating the purpose of flouring the fruit.
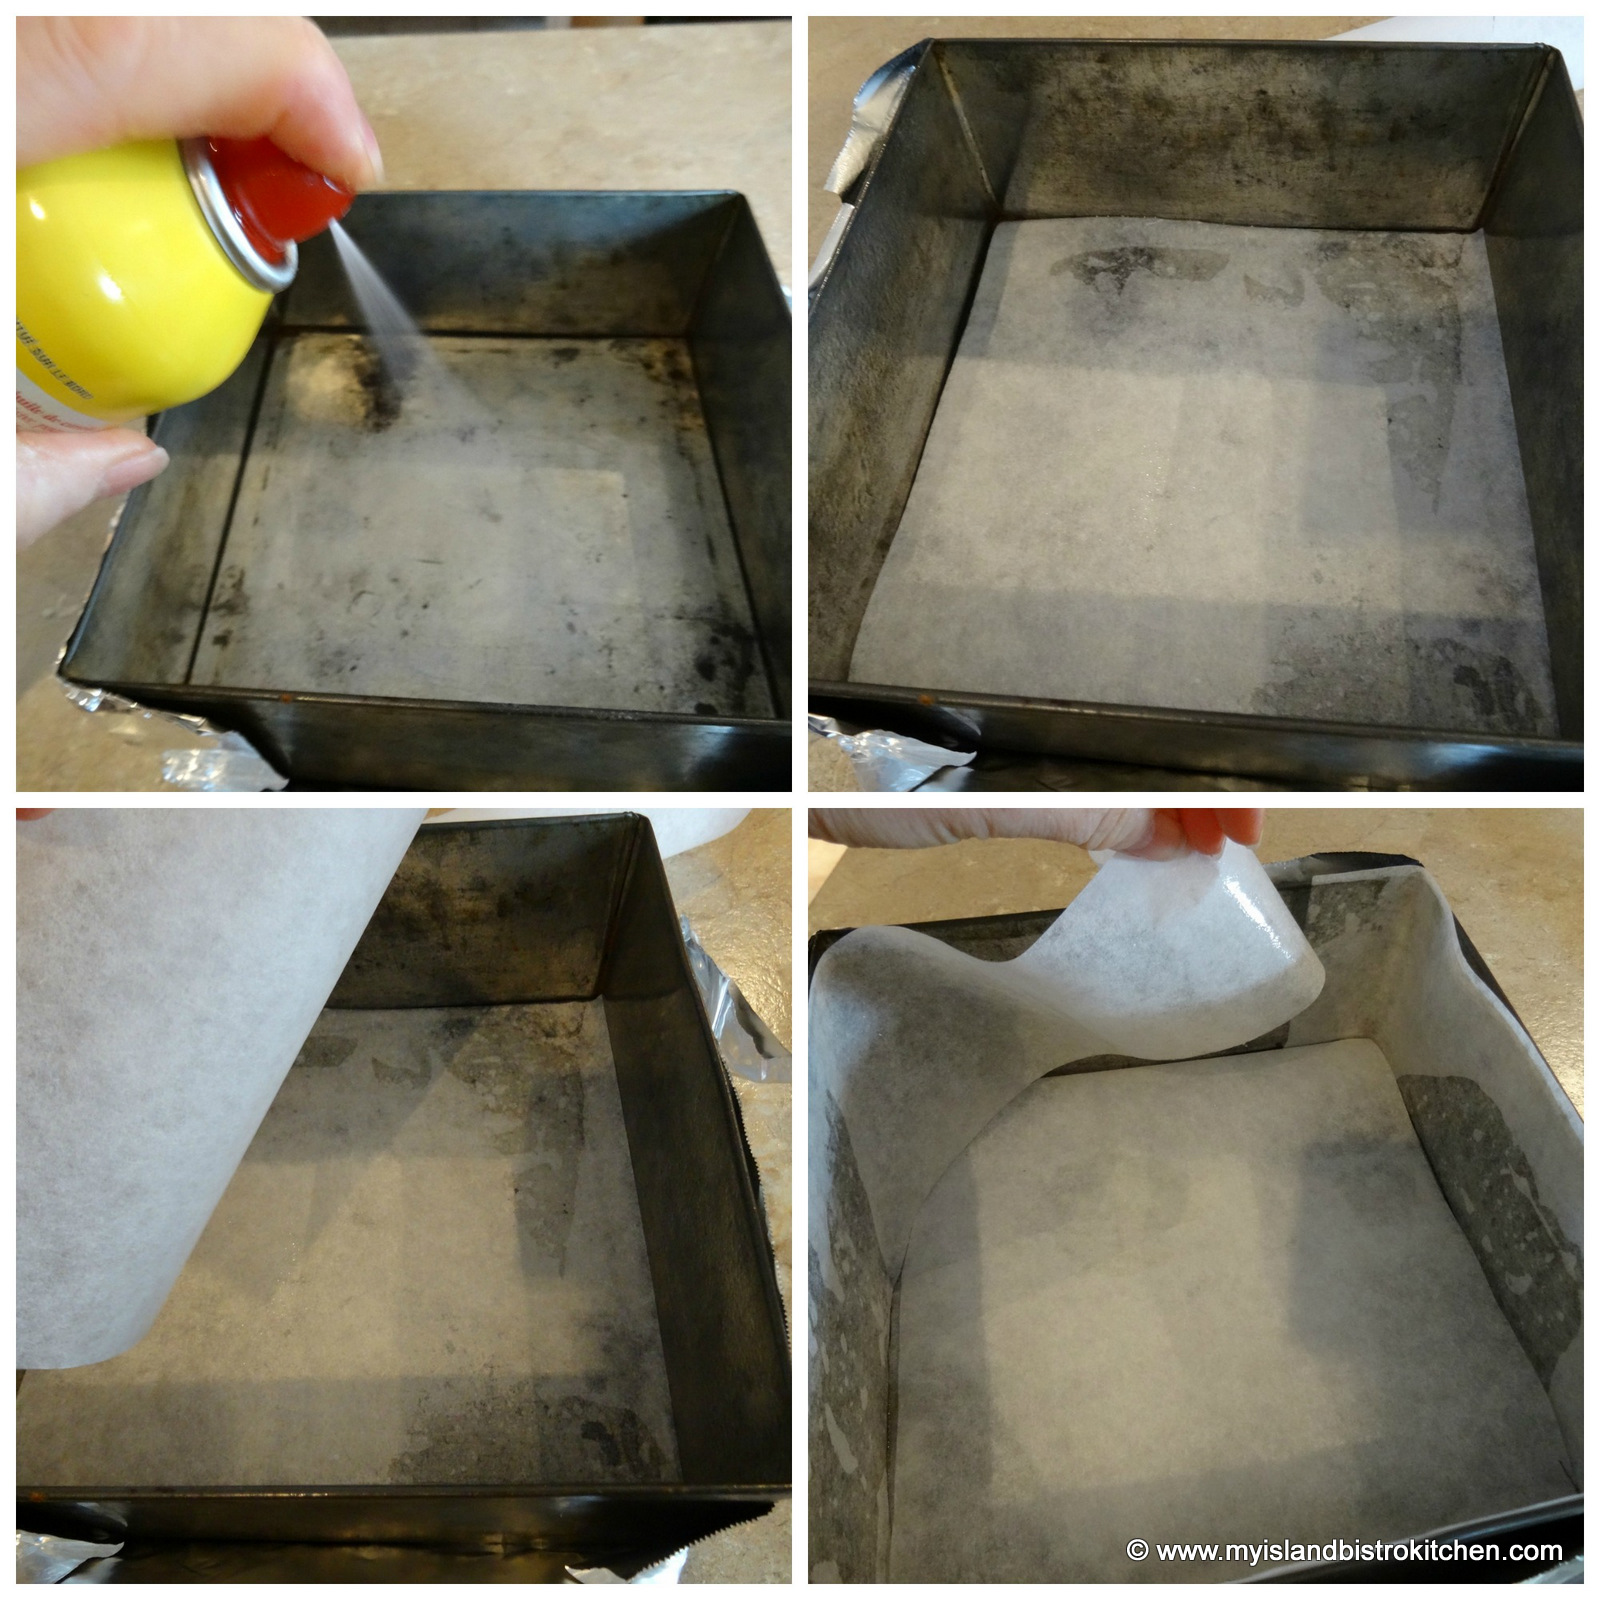
Preparing the Pan
The pan needs to be greased or sprayed with cooking oil then lined with either brown paper or parchment paper, then greased/sprayed again. I recommend lining the pan with a couple of layers of paper. Because there is very little leavening in the cake and because it is a heavy, thick cake, the pan can be fairly well filled without risk of batter running over the top.
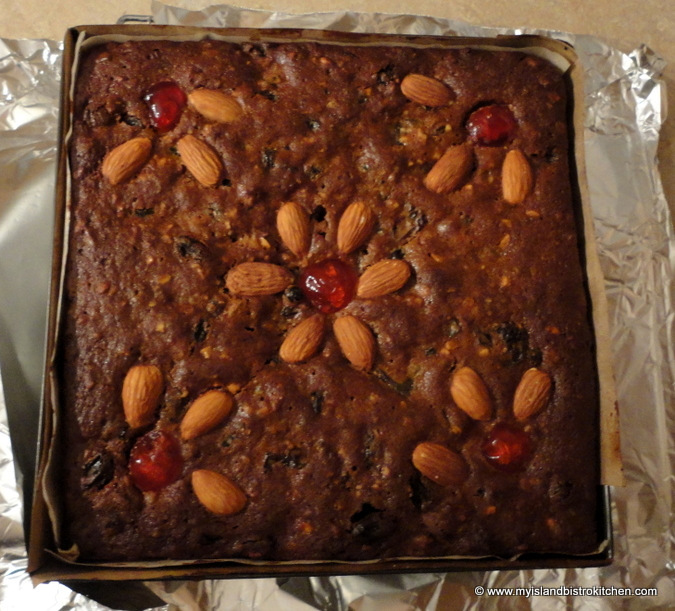
Decorating the Cake Top
There are many ways to decorate the top of a fruitcake and some are very elaborate and show-worthy. I do caution, however, about adding too much fruit to the top of the cake for decoration as glazed/candied fruits are weighty and may cause a cake to not rise properly or even to sink, especially in the center. I sometimes decorate the top of the cake as shown in the photo below but often leave it completely plain as it is easier to cut and plate.
Some bakers cover the cake with royal icing and marzipan. However, I find that the moisture from a dark fruit cake stains the icing making it less attractive.
Baking the Fruitcake
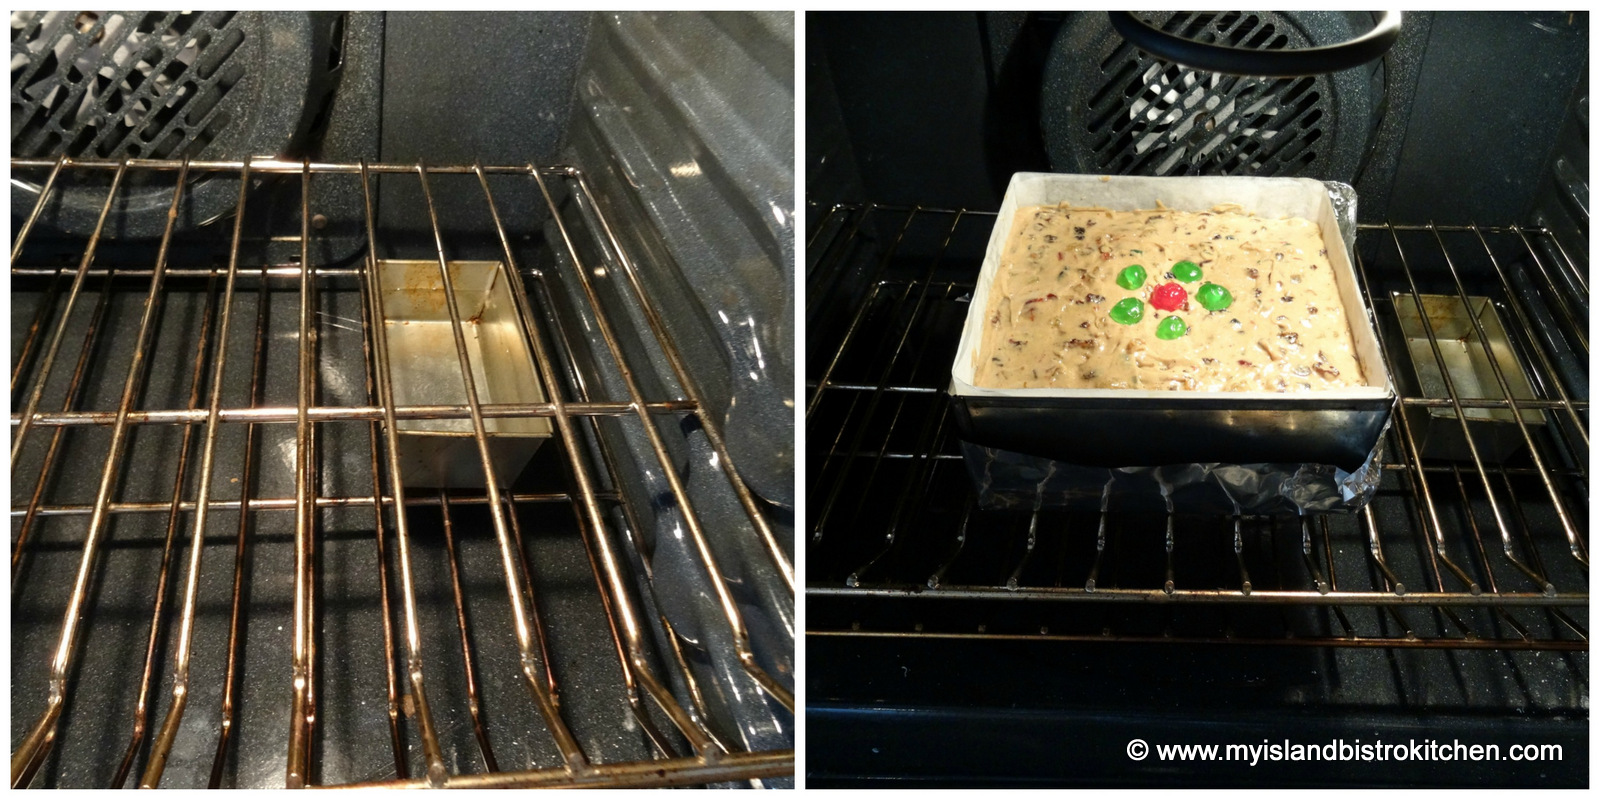
Baking is always the tricky part to fruitcake making. Fruitcakes need to be baked in slow ovens – i.e., 275ºF or less for several hours. Baking at too high a temperature will result in a dry cake. Bake the fruitcake in the center of the oven rack that is positioned in the lower third of the oven. This will allow for adequate airflow needed for the cake to bake properly and evenly on all sides. Include a small pan of hot tap water on the shelf below the cake (or on the floor of the oven). The steam from the water will help to keep the cake moist as it bakes.
No matter what kind of home oven you have or how good you think the air circulation in it is, I do not recommend baking more than one cake in the oven at a time. Fruitcakes are not cheap to make and you want to create a baking environment so the cake has the best chance of success. Leaving lots of room for airflow in the oven will help the cake bake evenly and properly. If you want more than one fruitcake, I recommend making them as separate batches and on separate days.
If the cake starts to darken too much before it is baked, loosely tent a piece of tin foil over the top of the cake. However, only do this if the cake top has completely set all over as, otherwise, the tin foil will stick to the cake and pull some of the batter away from it thus ruining the look of the cake top.
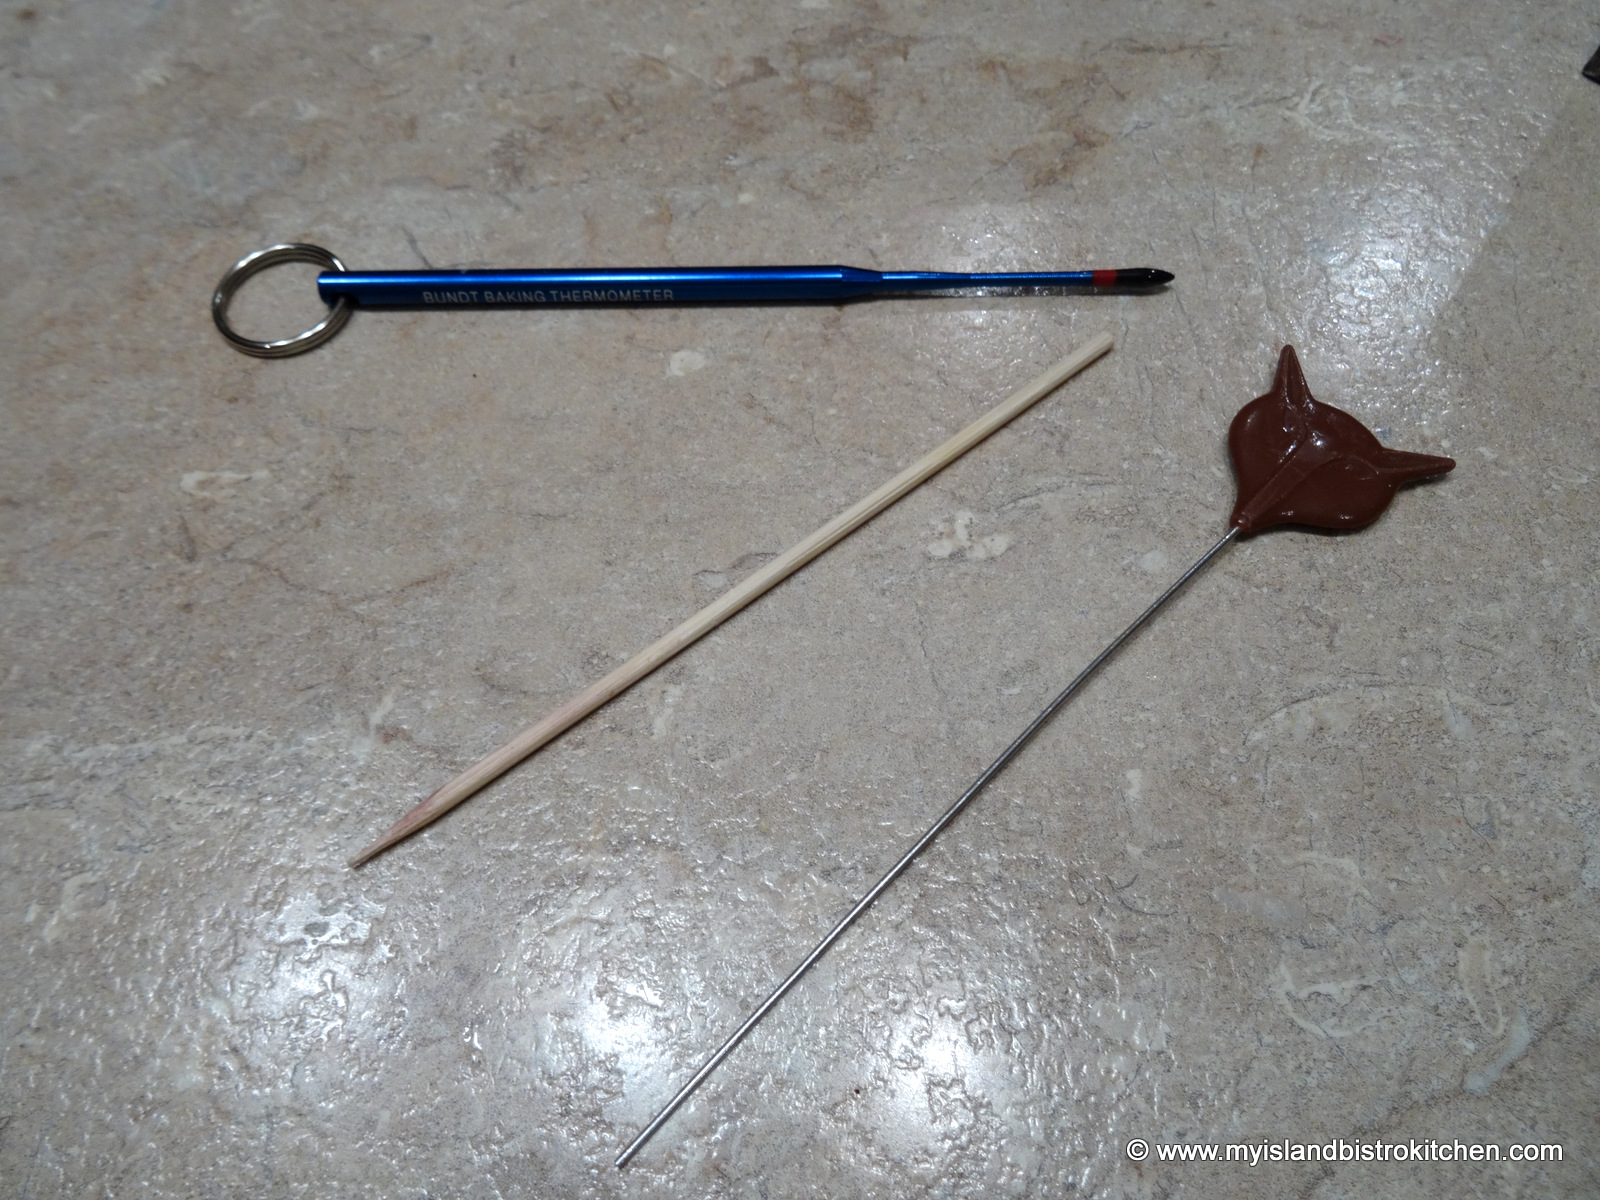
The cake is done when it is firm to the touch and a cake tester or wooden skewer inserted into the cake center comes out relatively clean but with some moisture on it. The cake should not, however, be doughy. I generally start testing my cake about ½ hour before its designated baking time is up, then check it at 15-minute intervals until it is done. The blue cake tester in the photo below is actually a cake thermometer. If the tip of the thermometer turns bright red after having been inserted into the center of the cake for 5 seconds, the cake is done.
Cake Testers
Cool the cake for at least 40 minutes or more before carefully removing it from the pan and transferring it to a wire rack to cool completely. If you are using a cake pan that does not have a removable bottom, I recommend leaving the cake in the pan longer to allow it to more completely set. Because a fruit cake is a dense cake, it will take several hours or overnight for the cake to cool completely.
Storing and Mellowing/Ripening the Cake
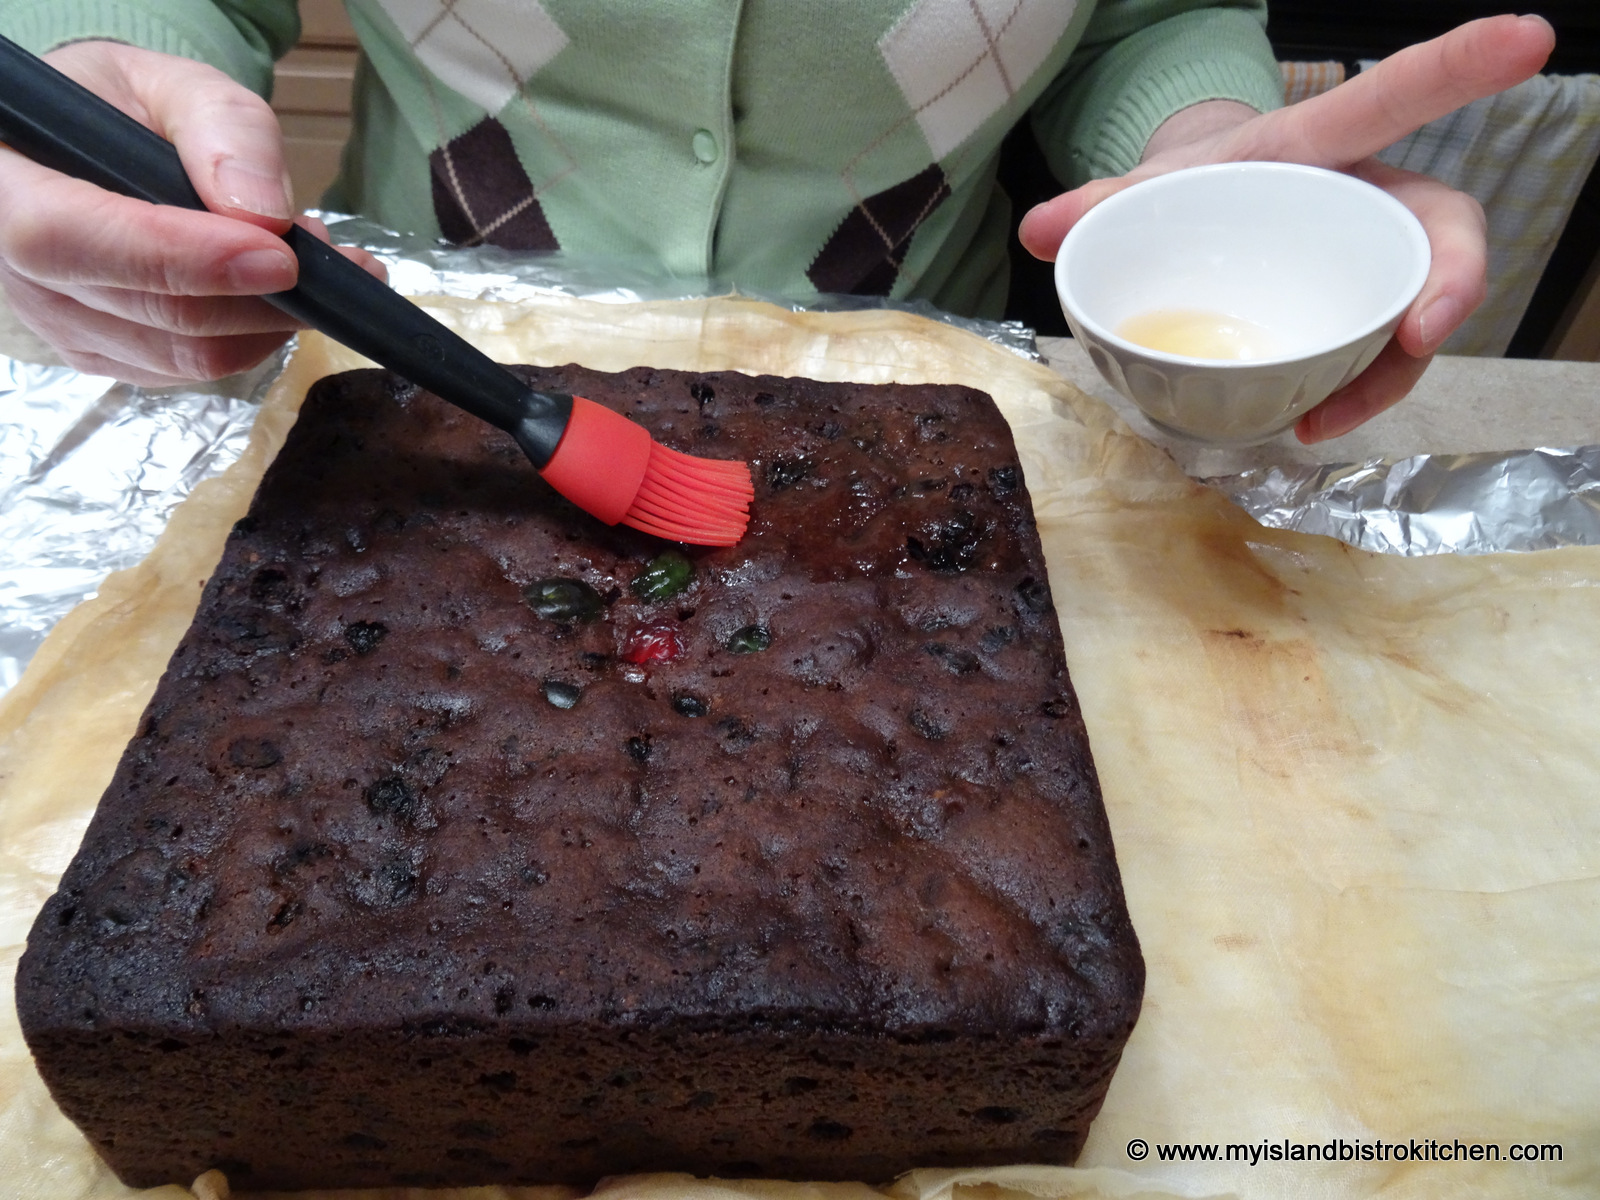
Once the cake has cooled completely, I brush a light coating of rum or brandy – whatever I have used in the cake – all over the cake. This adds more flavour and helps to maintain the cake’s moisture. This is not a “sousing” exercise and the cake, because it is new and fresh will quickly absorb the liquor applied to it. Do not saturate the cake with the liquor. Simply give it a brushing all over with the liquor and leave it at that. As a weekly application of the liquor occurs, the cake will absorb the alcohol more slowly than at first application.
Even if you plan to cut the cake into pieces to share with friends and family, do not cut into the cake before it has been brushed with the alcohol and given a chance to ripen for several weeks. If you do, you have defeated the purpose of the ripening process that allows the cake’s flavor to develop. You do not want any open cut sides of the cake during this process as too much liquor will get into the cut side, potentially creating a soggy and stodgy cake. There is a clear difference between a moist cake and a soggy one. Therefore, you want to be brush the hide of the cake, not cut sides.
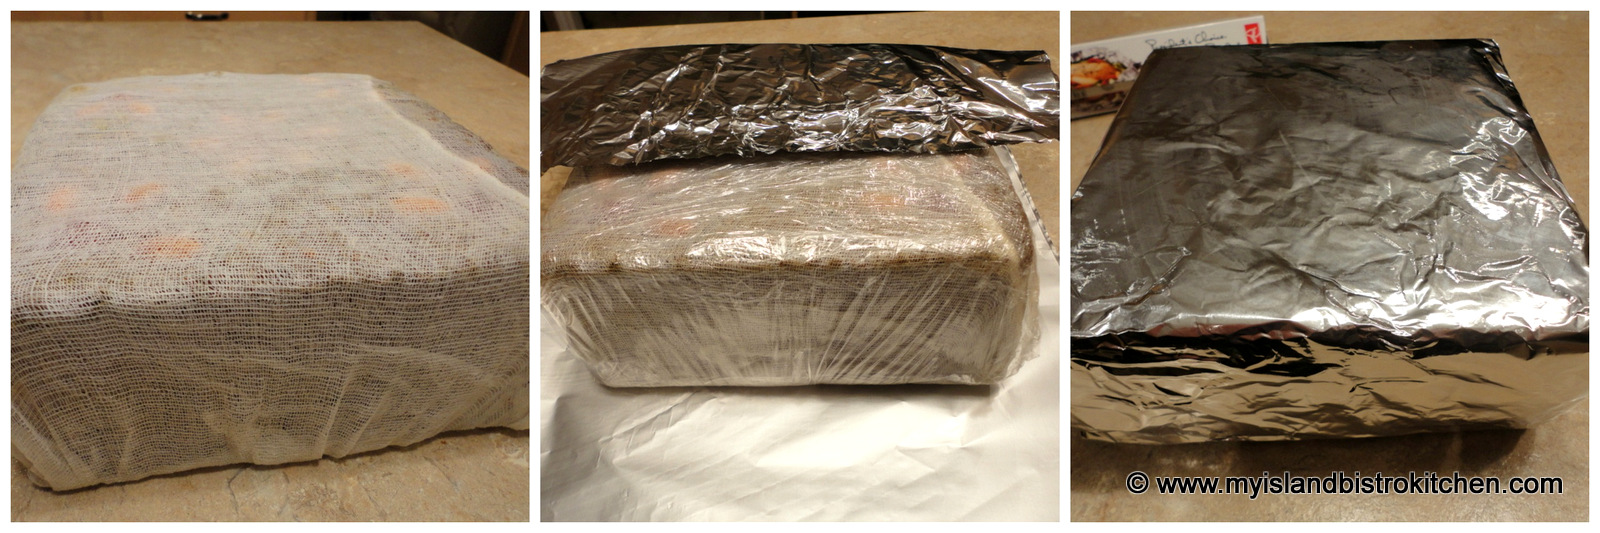
Wrap the cake in cheesecloth (which can also be soaked in liquor) followed by a double layer of plastic wrap and double of tin foil.
The cake is then placed in a sealed bag and stored it in a cool, dry place to mellow or ripen, a process of time that allows the cake’s flavours to mix and mingle. I leave the cake stored at a very cool room temperature for 3-4 weeks, giving it a weekly nightcap by brushing another light coating of the liquor all over the cake and re-wrapping it (re-soaking the cheesecloth in the liquor and wringing it out each time). The cake will, for the first while, continue to quickly absorb the liquor as soon as it is brushed on; however, that is not a license to keep adding more liquor. This application of liquor is meant to infuse flavour and keep the cake moist (but not soggy wet). The liquor-dampened cheesecloth wrapped around the cake that is tightly stored in plastic wrap will help to keep the cake moist as well. I do not apply the liquor beyond the 4-week period.
It is extremely important that the cake not be bathed or saturated with liquor for a couple of reasons. First, it will make the cake very wet and soggy which is not the hallmark texture of a good quality fruit cake. It may also cause the cake to sink down because it is so moisture-logged. When you think about it, the cake is wrapped in cheesecloth, then tightly in two layers of plastic wrap, two layers of tin foil, and sealed in a plastic bag to age. Applying too much liquor means there is no way it will evaporate and nowhere for it to go except into the cake, likely overloading it with liquid, resulting in a soggy mess.
Second, there certainly is such a thing as adding too much liquor to the cake as it will cause an offputting, potent, flavour. In essence, it will ruin the taste of the cake. Apply the old adage that less is more when applying the liquor. Use a light brushing of the liquor and the liquor-soaked cheesecloth to add any necessary flavor and moisture to the cake. I personally think that the reason some people may not like fruitcake is because they have, somewhere, been given a piece of fruitcake that was way too wet and had far too much liquor applied to it. If the first thing you taste when you bite into a piece of fruitcake is the liquor, the cake has had far too much liquor added to it, either in the cake itself or applied to it as it mellowed.
After letting the cake mellow, I remove the cheesecloth and keep the cake wrapped in plastic wrap and tin foil inside a sealed bag and store it in the refrigerator or freeze it. It’s important to let the cake ripen first at cool room temperature as it won’t mellow further once refrigerated or frozen.
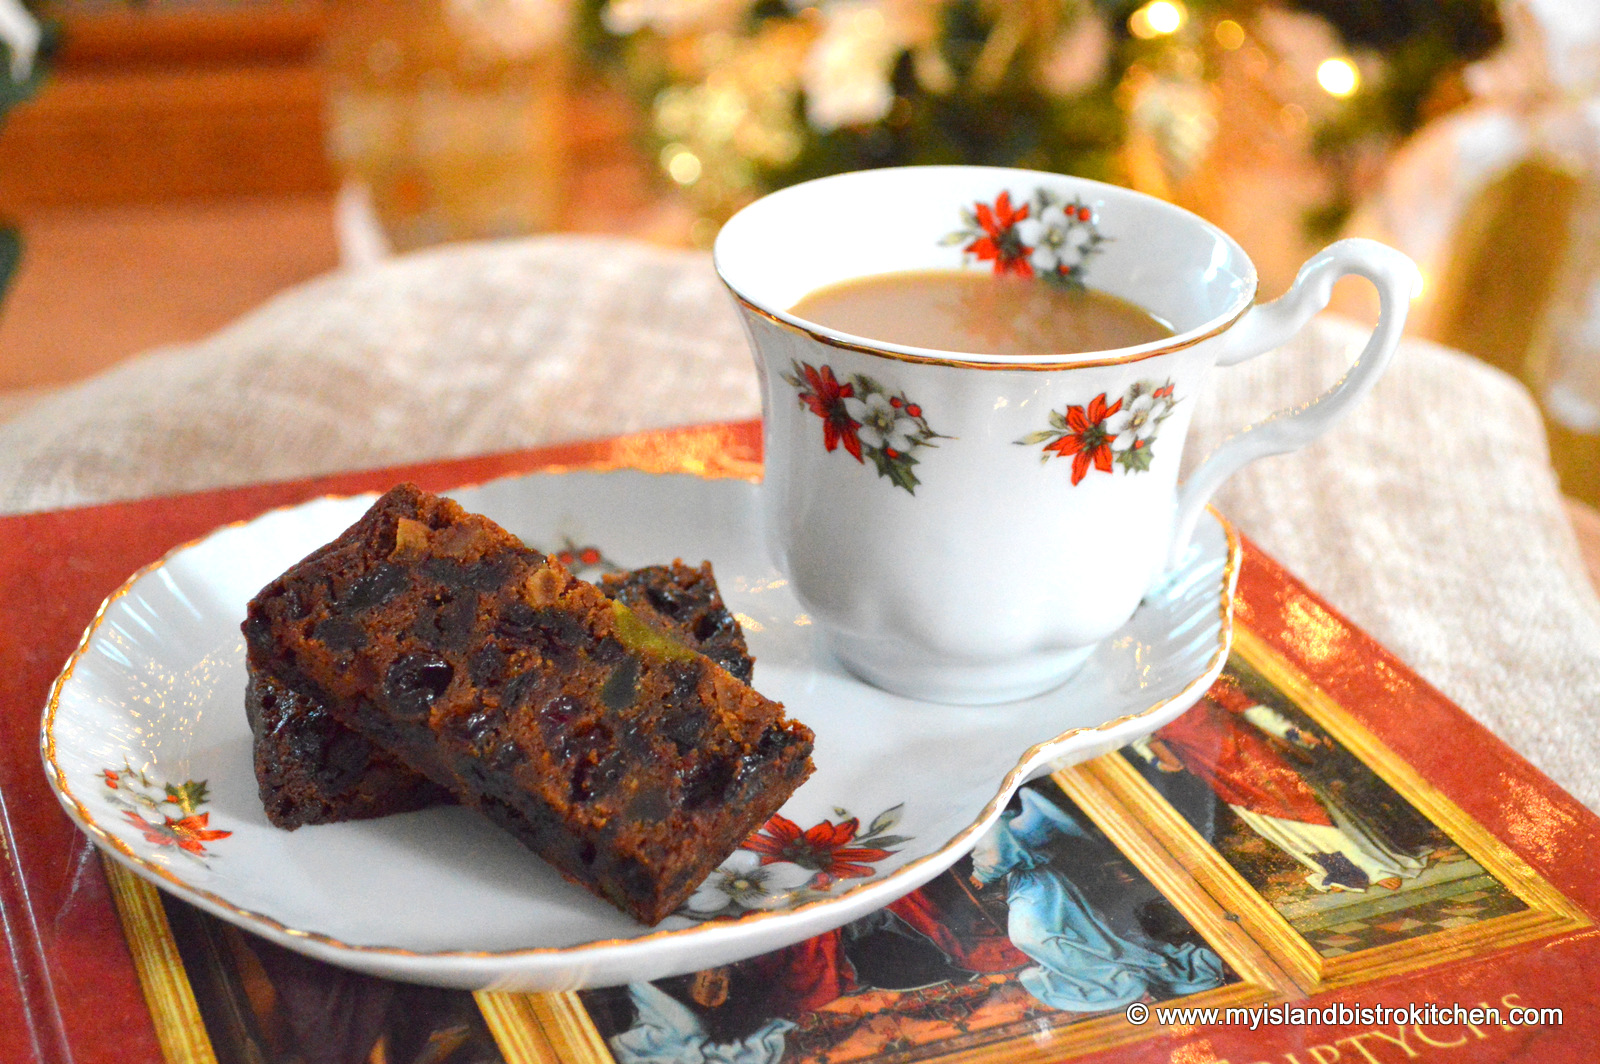
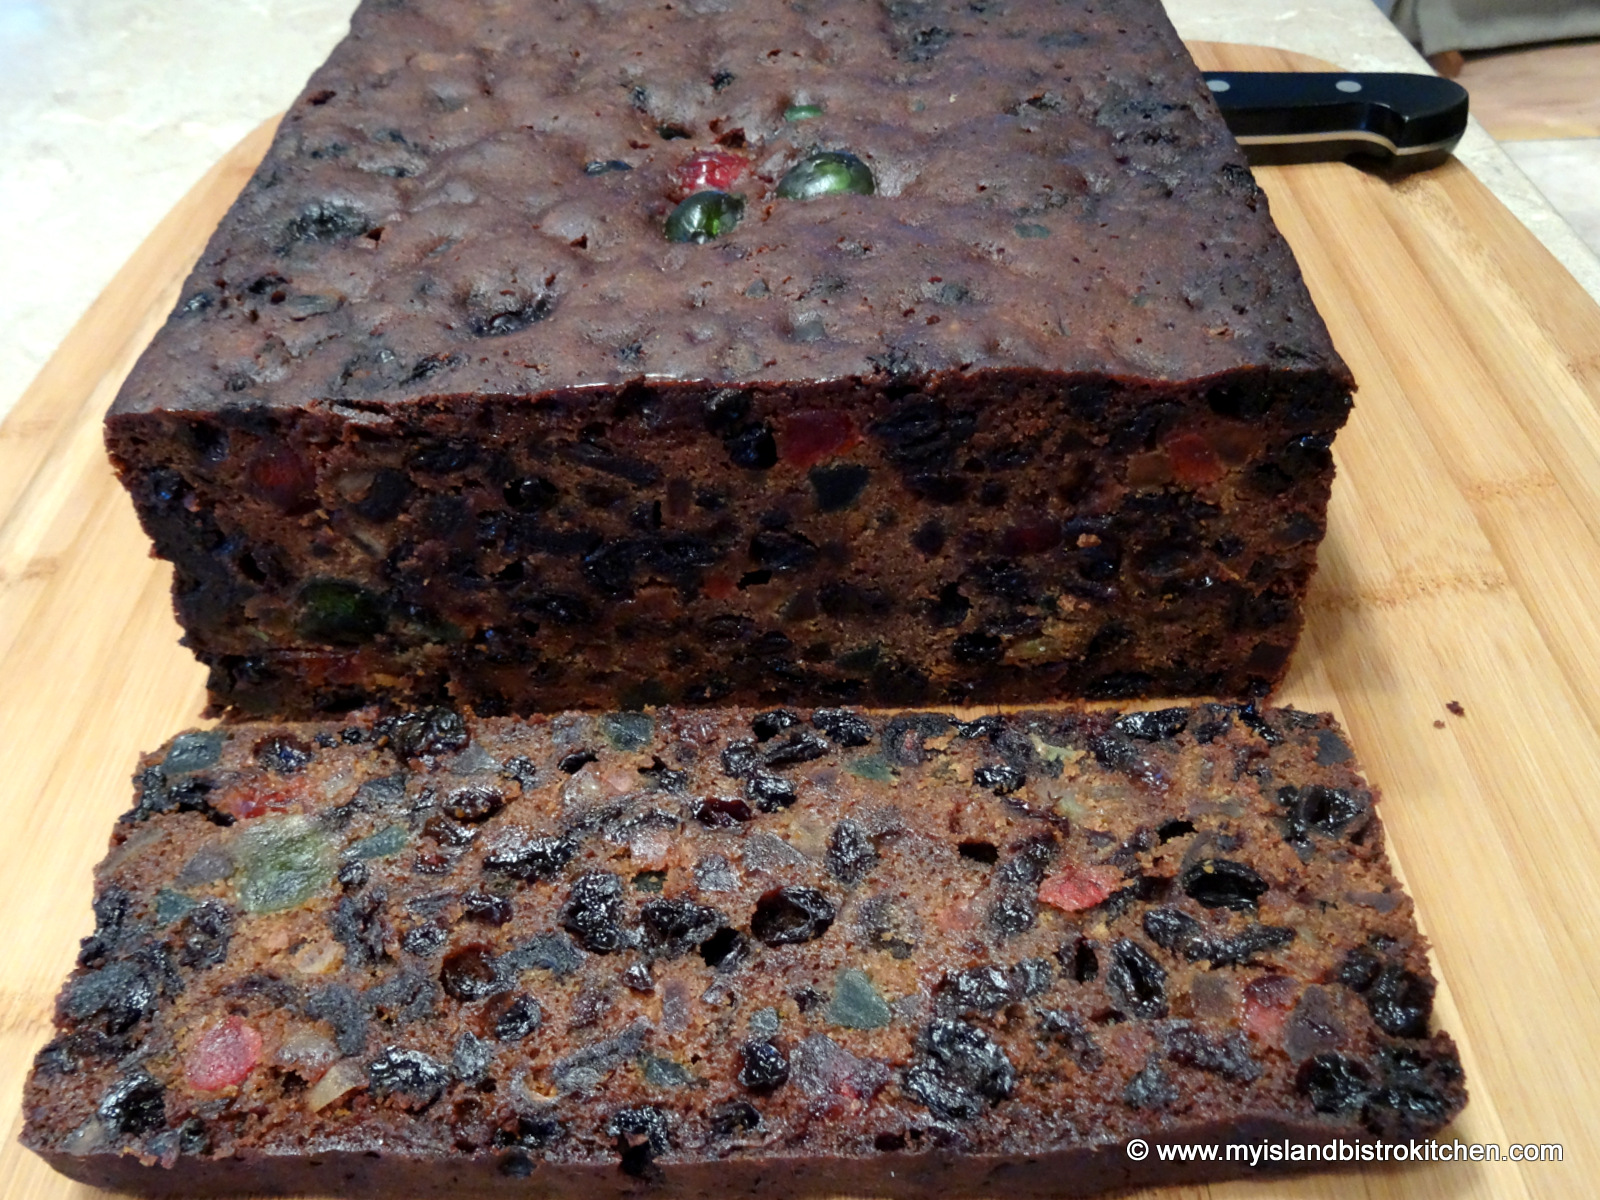
Slicing the Cake
I find the fruitcake slices easier from the refrigerator than at room temperature as it is a bit firmer when chilled. I recommend using a sharp, flat-edged knife to cut the cake as a serrated knife, for example, may pull the fruit during cutting, creating a ragged, uneven edge.
Making the first cut!
I cut each slab, across the full width of the cake, a good ½” wide. It needs to be a good width in order for it to hold together as it is being sliced.
For suggested serving size, I recommend slicing each slab into pieces that are about 1¼” wide.
[Printable recipe follows at end of posting]
Dark Fruitcake
Ingredients:
7 oz seeded raisins (i.e., Lexia) 7 oz golden raisins 7 oz cup sultana raisins 3 oz dates, chopped 2 oz currants 9 oz mixed glazed fruit 4 oz red glazed cherries 4 oz green glazed cherries 3 oz citron 2 oz mixed peel ⅔ cup rum ½ cup flour
2 cups flour ½ tsp salt 1 tsp baking powder ½ tsp soda 1 tsp cinnamon ½ tsp cloves ½ tsp allspice ½ tsp mace ½ tsp nutmeg
½ lb butter ¼ cup white sugar 1½ cups brown sugar 4 extra large eggs 1 tsp vanilla 1 tsp almond flavouring 2½ tbsp molasses ½ cup strawberry jam
Method:
Measure fruit and transfer to a large bowl. Mix well. Pour ⅔ cup of rum over fruit. Stir to coat. Cover tightly with plastic wrap. Let stand for 24-48 hours to macerate the fruit, stirring occasionally.
Prepare 8-inch square fruitcake pan that is 3 inches deep and has a removable bottom: Lightly spray the bottom and sides of the pan with cooking spray. Line the pan, bottom and sides, with brown paper or parchment paper. Lightly spray the paper.
Position oven rack in lower third of oven. Preheat oven to 275°F.
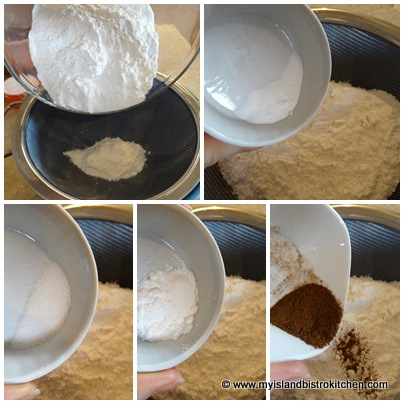
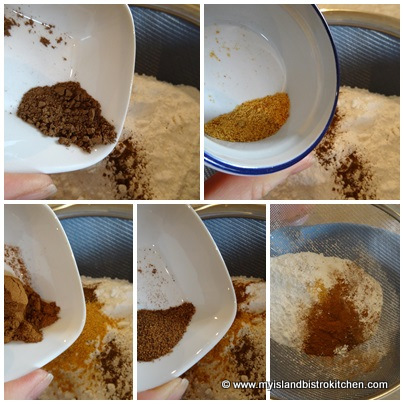
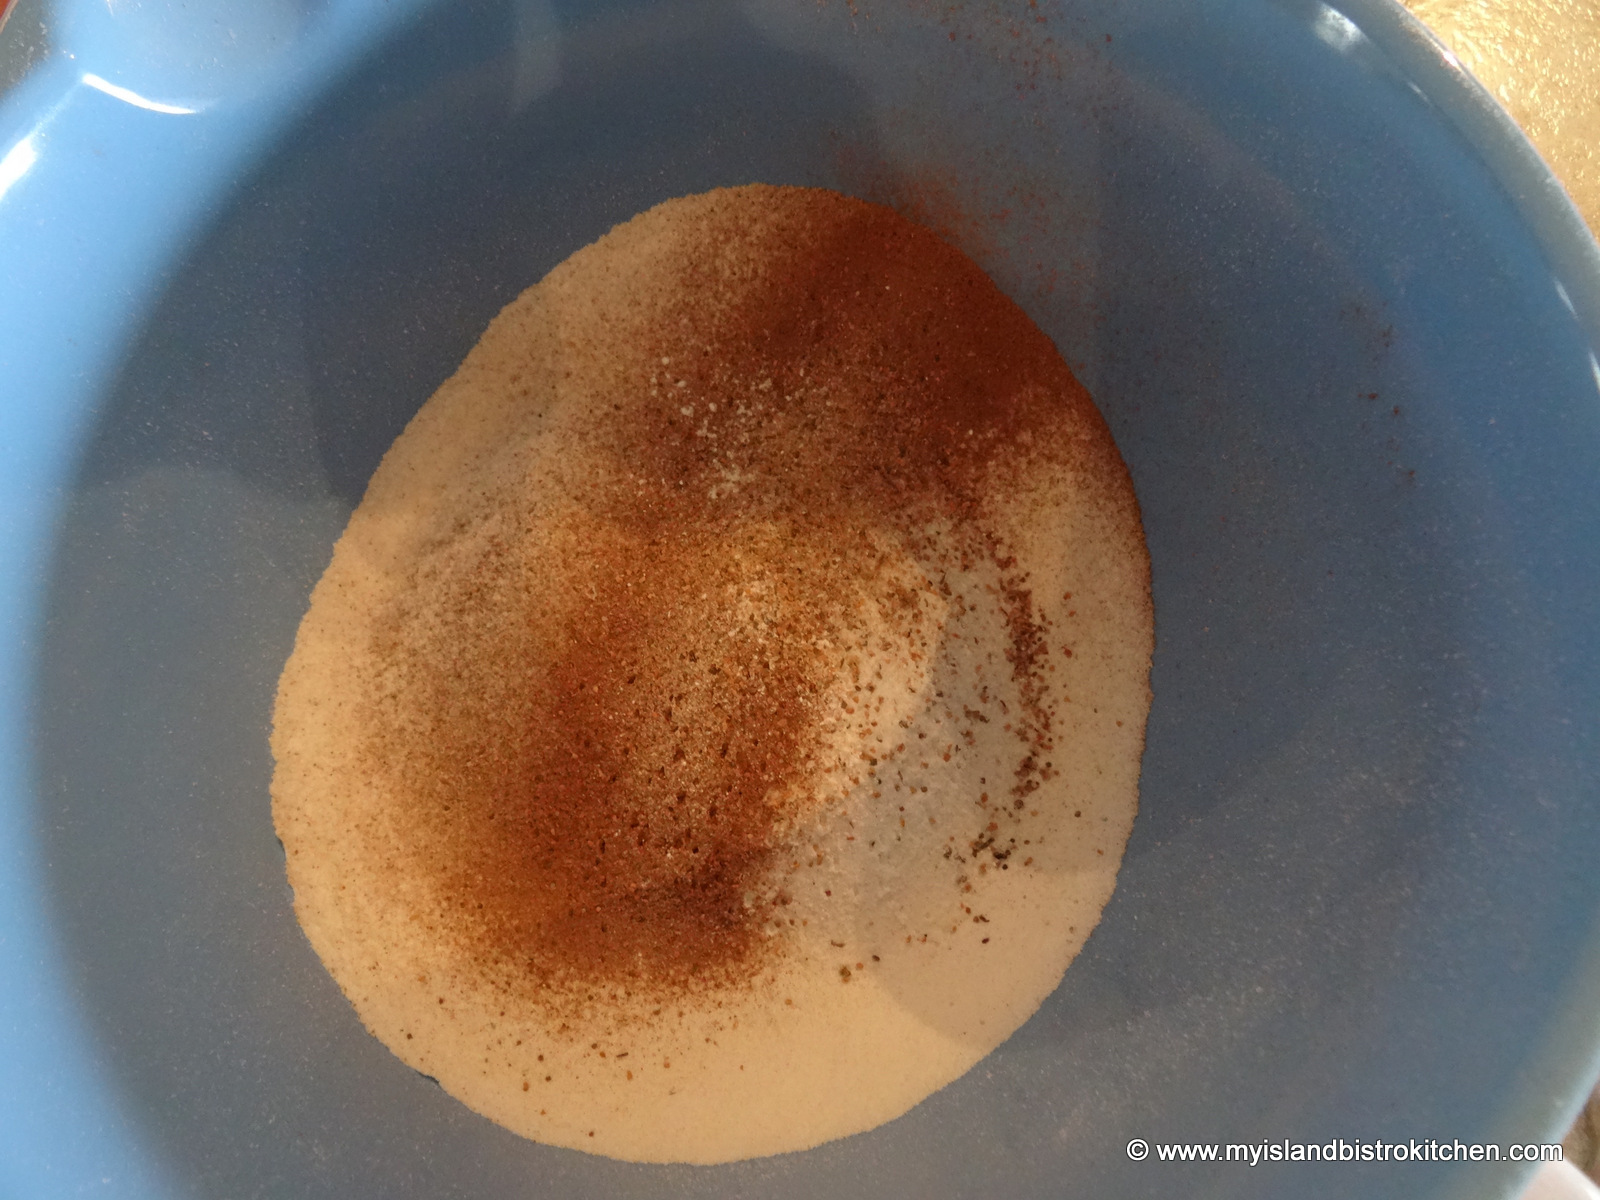
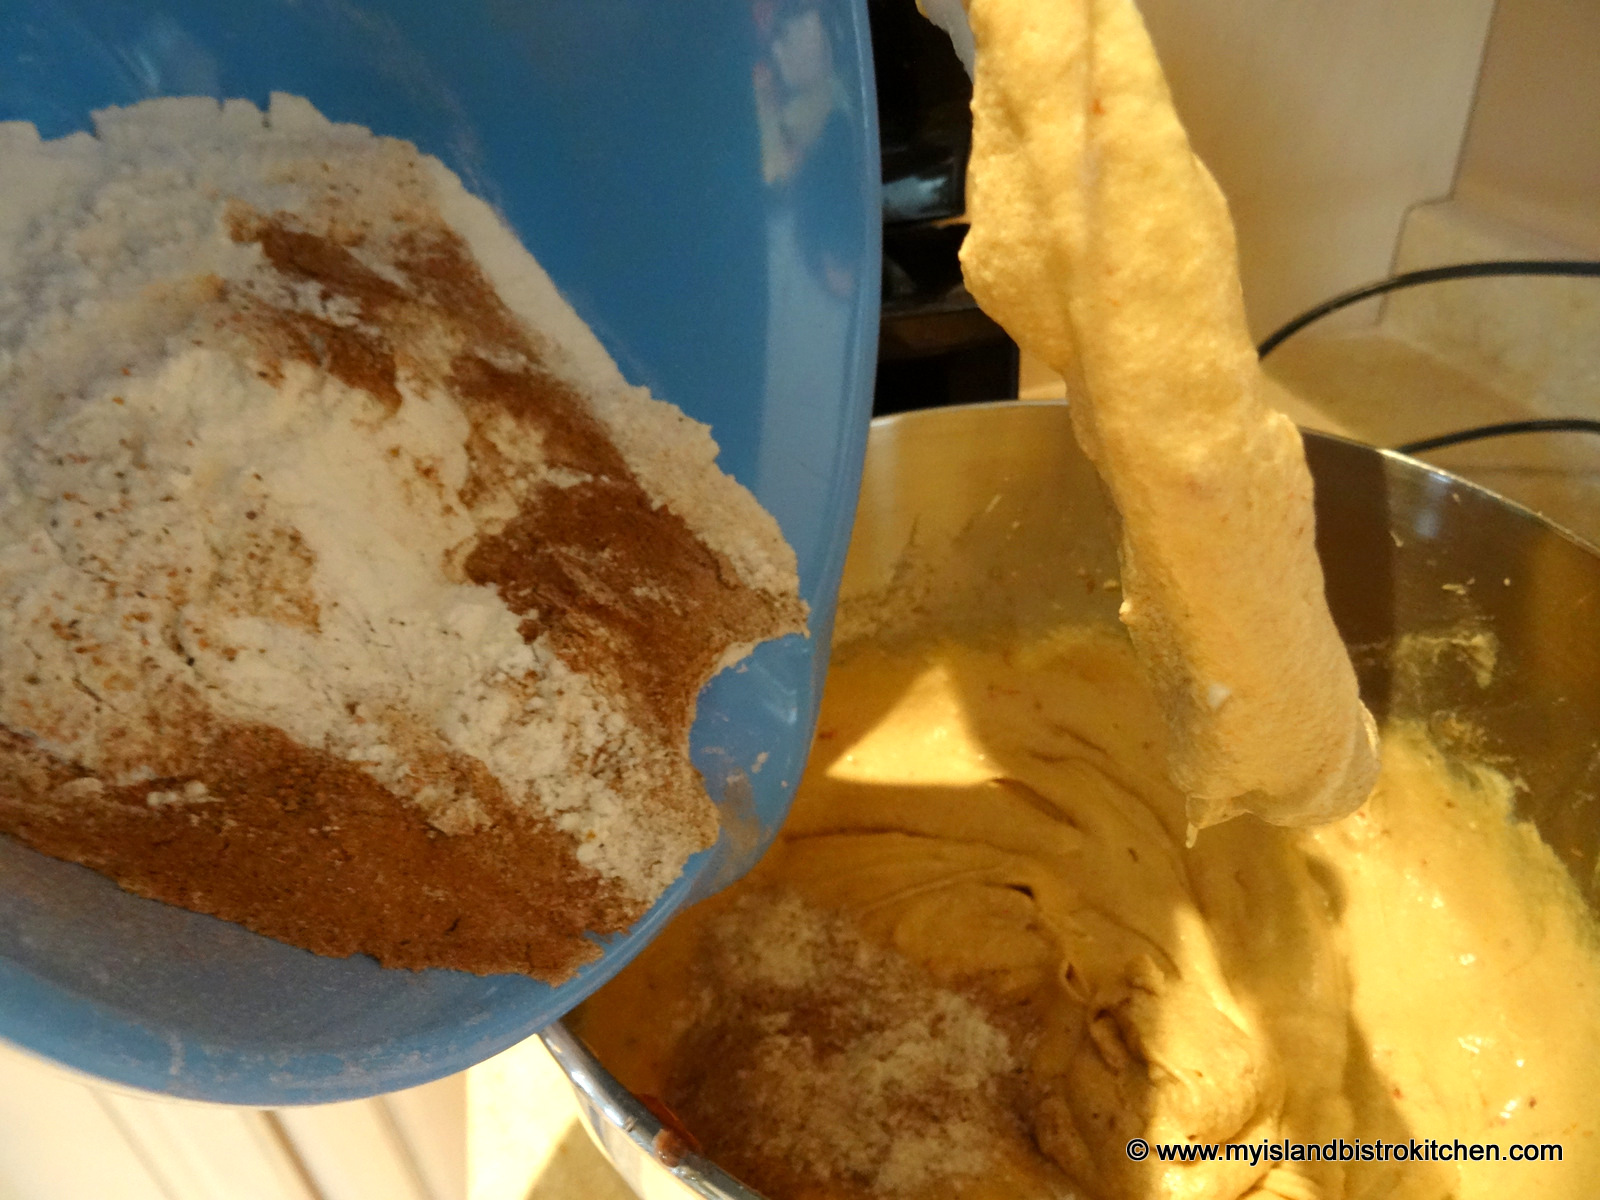
Sift together the dry ingredients. Set aside.
Sifted Dry Ingredients
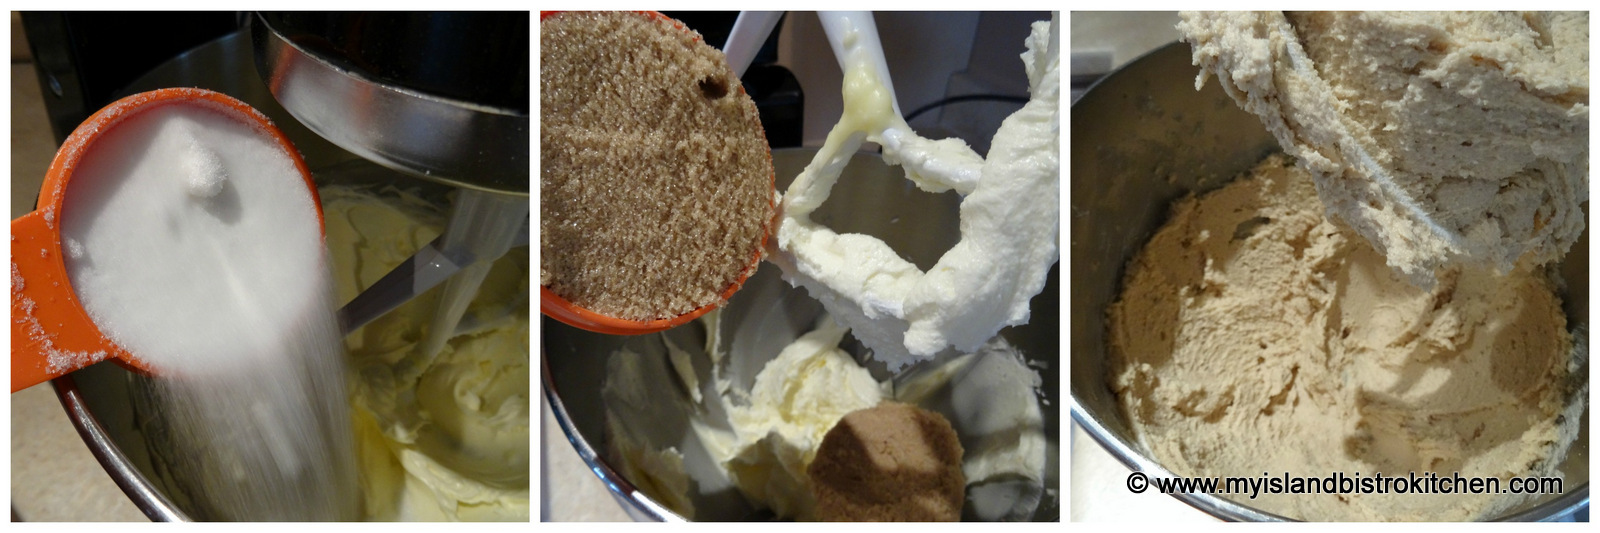
Using the paddle attachment on the stand mixer, cream the butter until light and fluffy.
Add the white sugar. Beat. Add the brown sugar and beat well, scraping the sides of the bowl with a spatula to ensure sugar is all incorporated.
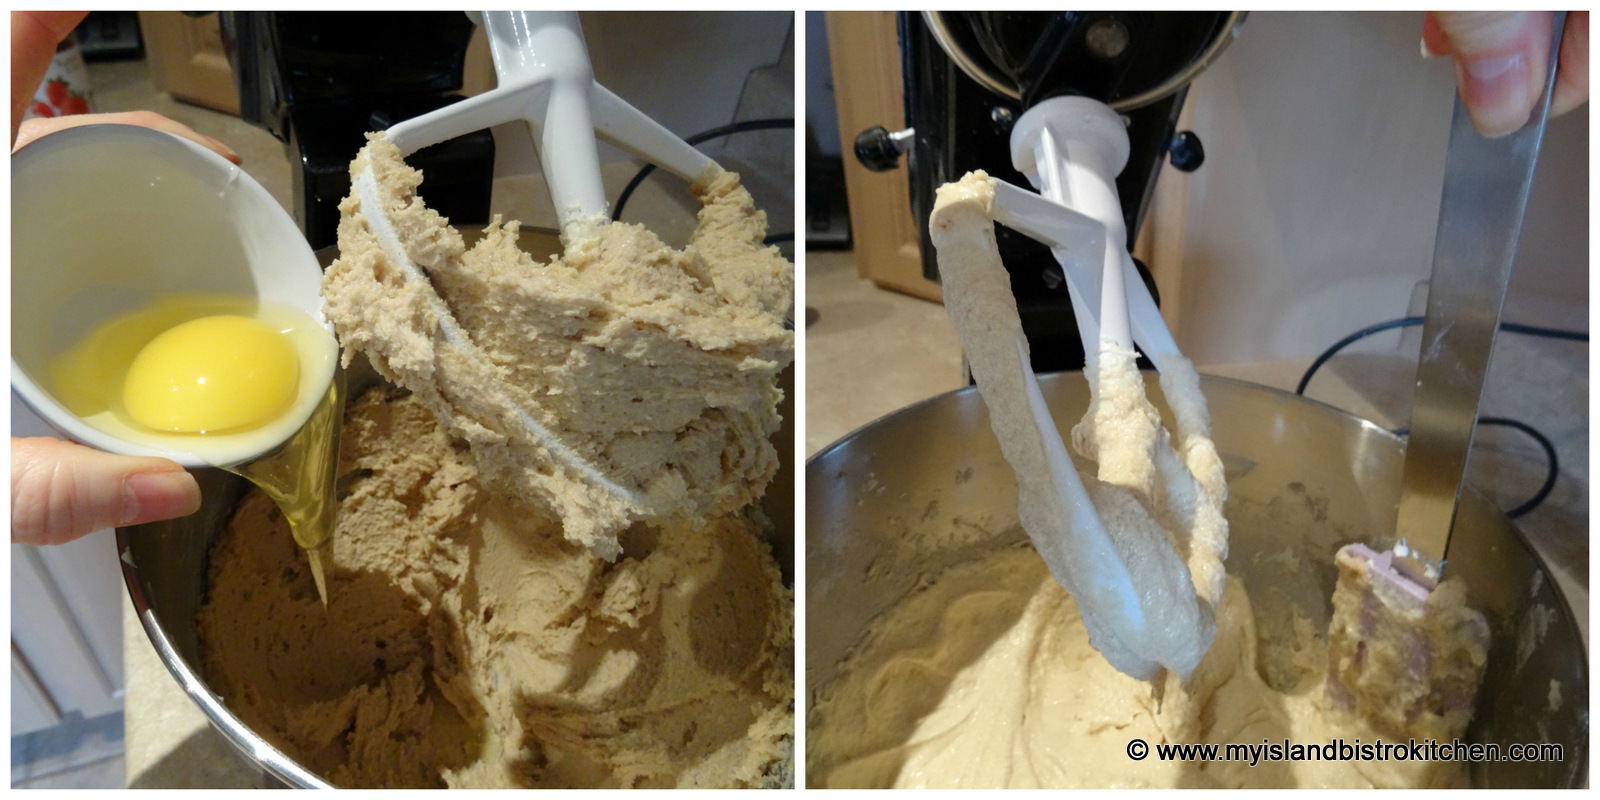
Add the eggs, one at a time, beating well after each addition.
Add the vanilla and almond flavouring followed by the molasses. Mix thoroughly. Mix in the strawberry jam.
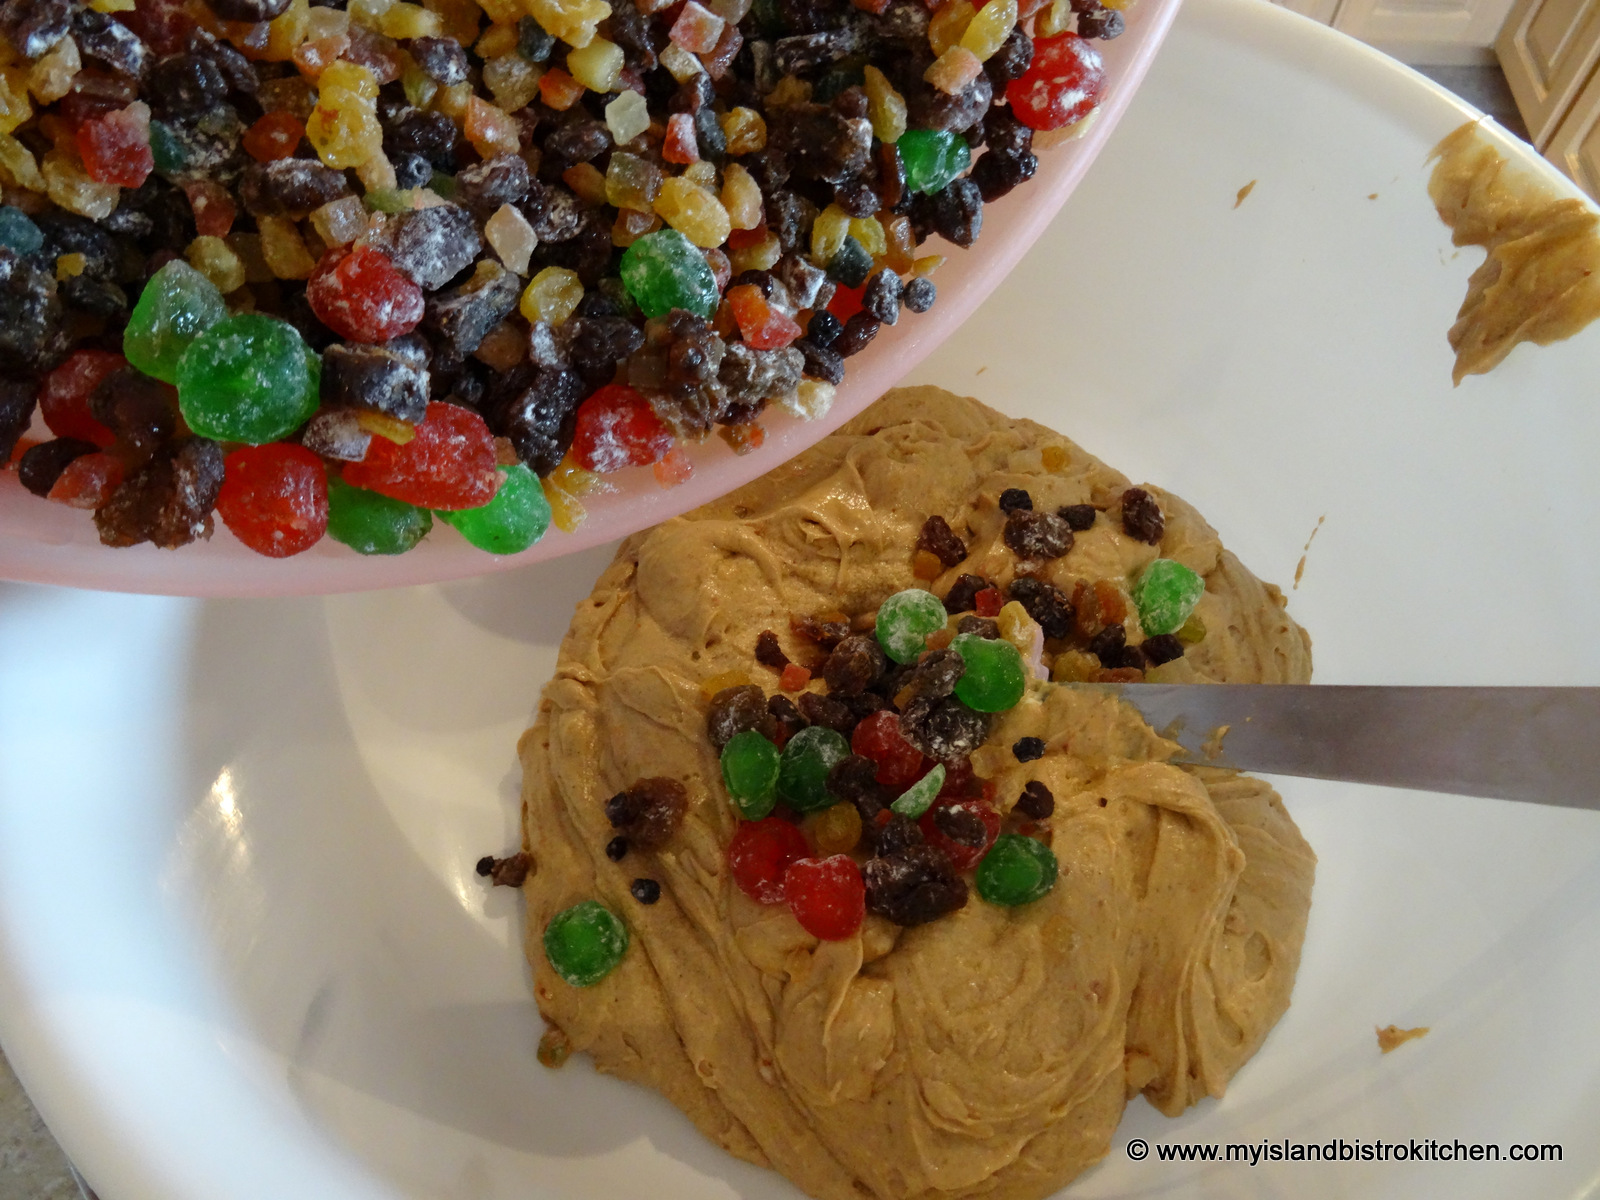
Add the dry ingredients and mix until combined into batter. Transfer batter to very large bowl.Sprinkle remaining ½ cup of flour (listed above in first set of ingredients) over the macerated fruit and toss ingredients lightly and quickly.
Add the floured fruit to the batter and mix thoroughly.
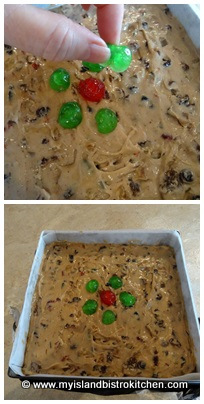
Transfer batter by large spoonfuls into the prepared baking pan. Use a knife to evenly spread the batter in the pan.
Add a few cherries as decorations to the top of the cake, if desired.
Place a small pan of water on the lower shelf in the oven. Bake fruitcake in the center of the oven rack (that has been positioned in the lower third of the oven) for about 5¾ hours or until cake is firm to the touch and cake tester inserted in center of cake comes out clean. Remove cake from oven and place on rack. Let cake cool in pan for about 40 minutes before carefully removing from pan and letting rest on cooling rack.
Let cake cool completely before brushing with rum and wrapping in cheesecloth, followed by plastic wrap and tin foil, then storing in a sealed plastic bag in a cool, dry area. Remove wrapping and brush cake top and sides with rum once a week. For best flavour, let cake “age” for at least 3-4 weeks before cutting and serving.
Tips and a recipe for making a delicious and traditional dark fruitcake flavored with rum and packed full of fruit. This cake is nut free.
Course Dessert
Cuisine American
My Island Bistro KitchenMy Island Bistro Kitchen
Ingredients
7ozseeded raisinsi.e., Lexia
7ozgolden raisins
7ozcup sultana raisins
3ozdateschopped
2ozcurrants
9ozmixed glazed fruit
4ozred glazed cherries
4ozgreen glazed cherries
3ozcitron
2ozmixed peel
⅔cuprum
½cupflour
2cupsflour
½tspsalt
1tspbaking powder
½tspsoda
1tspcinnamon
½tspcloves
½tspallspice
½tspmace
½tspnutmeg
½lbbutter
¼cupwhite sugar
1½cupsbrown sugar
4extra large eggs
1tspvanilla
1tspalmond flavouring
2½tbspmolasses
½cupstrawberry jam
Instructions
Measure fruit and transfer to a large bowl. Mix well. Pour ⅔ cup of rum over fruit. Stir to coat. Cover tightly with plastic wrap. Let stand for about 24 hours to macerate the fruit, stirring occasionally.
Prepare 8-inch square fruitcake pan that is 3 inches deep and has a removable bottom: Lightly spray the bottom and sides of the pan with cooking spray. Line the pan, bottom and sides, with brown paper or parchment paper. Lightly spray the paper.
Position oven rack in lower third of oven and preheat oven to 275°F.
Sift together the dry ingredients. Set aside.
Using the paddle attachment on the stand mixer, cream the butter until light and fluffy. Add the white sugar. Beat. Add the brown sugar and beat well, scraping the sides of the bowl with a spatula to ensure sugar is all incorporated.
Add the eggs, one at a time, beating well after each addition. Add the vanilla and almond flavouring followed by the molasses. Mix thoroughly. Mix in the strawberry jam.
Add the dry ingredients and mix until combined into batter. Transfer batter to very large bowl.
Sprinkle remaining ½ cup of flour over the macerated fruit and toss ingredients lightly and quickly. Add the floured fruit to the batter and mix thoroughly. Transfer batter by large spoonfuls into the prepared baking pan. Use a knife to evenly spread the batter in the pan. Add a few cherries as decorations to the top of the cake, if desired.
Place a small pan of water on the lower shelf in the oven. Place cake in the center of the oven rack (that has been positioned in the lower third of the oven) and bake fruitcake for about 5¾ hours or until cake is firm to the touch and cake tester inserted in center of cake comes out clean. Remove cake from oven and place on rack. Let cake cool in pan for about 40 minutes before carefully removing from pan and letting rest on cooling rack.
Let cake cool completely before brushing with rum and wrapping in cheesecloth, followed by plastic wrap and tin foil, then storing in a sealed plastic bag in a cool, dry area. Remove wrapping and brush cake top and sides with rum once a week. Let cake “age” for at least 3-4 weeks before cutting and serving.
Recipe Notes
Yield: 1 - 6 lb cake
NOTE: Be sure to read the entire posting that accompanies this recipe for tips on how to make the perfect fruit cake.
Copyright My Island Bistro Kitchen
If you have made this recipe and enjoyed it and/or wish to share it with your friends and family, please do so on social media but be sure to share the direct link to this posting from my website.
You may also enjoy these other Christmas cakes from My Island Bistro Kitchen:
Follow “the Bistro” on Pinterestat https://www.pinterest.ca/peibistro/ and pin the Pinterest-ready photo at the end of this posting to your favorite Pinterest boards!
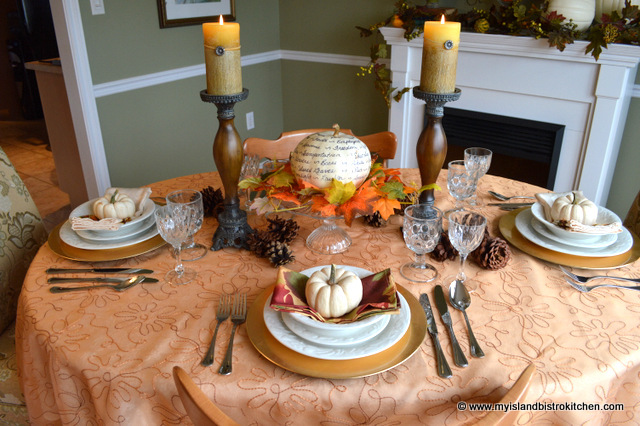
The autumn got away from me and I did not get around to sharing my 2014 Thanksgiving tablesetting. When I realized it was too late to share it on my blog for the Canadian Thanksgiving in October, I knew I’d have a second chance in late November to share it in time for the American Thanksgiving. So, this one is for our American friends to the South who will celebrate their Thanksgiving tomorrow… if you haven’t already set your Thanksgiving table, this one is quick and easy!
I went with a fairly simplistic setting this year. I started with an ivory tablecloth topped with a piece of orange drapery sheer. As you have probably noticed with my tablesettings, I tend to go for plain table coverings which make other elements of the tablesetting stand out.
I also try, where possible, to use props that I already have like, for example, the tall wooden candlesticks. The warmth of the wood seemed to work well with the autumn props. Scattering a few brown pine cones pulled the color scheme together.
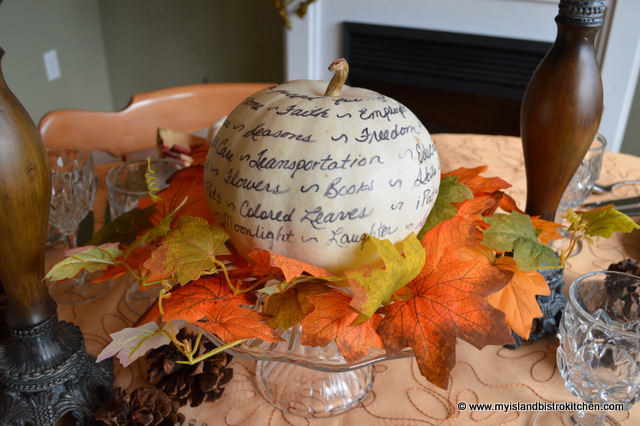
The focal point of the table is the small white pumpkin perched on a glass cake stand and surrounded by colored leaves. With a black marker, I simply wrote, round and round the pumpkin, all the things I am thankful for.
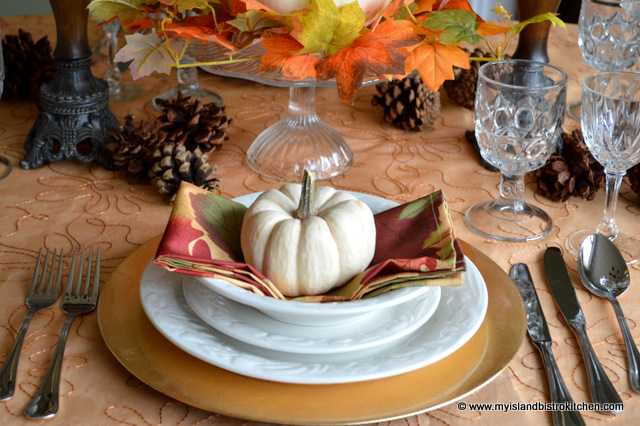
I used my standard gold charger plates topped with my everyday white stoneware dinnerware. A quick fold of the napkin placed in the soup bowl makes a colorful nest for the little white ornamental pumpkins which tie in with the white pumpkin centerpiece.
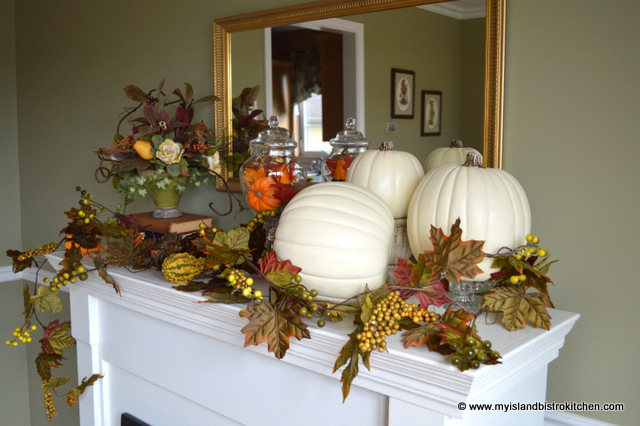
I love to decorate my fireplace mantles. A few white pumpkins, a garland of some colored leaves, a floral centerpiece, and a jar of mini orange pumpkins for a splash of color, and the look is complete.
This was a fairly easy, quick, and economical tablesetting to achieve. It’s suitable, obviously, for a more informal Thanksgiving dinner. My good China has a border of pink florals so really doesn’t blend well with the colors of autumn. That’s why white dinnerware is always a good choice as it goes with anything and food always looks so eye-popping when served on it!
Happy Thanksgiving to our American family and friends to the South!
Thank you for visiting “the Bistro” today. There are lots of ways to connect with “the Bistro” through social media:
Ulysses Press has offered me the opportunity to conduct a review of Dorothy Kern’s cookbook, Dessert Mash-Ups. Kern is the blogger behind “Crazy for Crust” food blog and Dessert Mash-Ups is her first cookbook.
I found this a delightful cookbook, all about desserts (what’s not to love about that speciality!). But, it’s more than that. It’s actually a teaching book that is sure to be a good reference tool for bakers, particularly those less experienced in the realm of baking. For example, there is a great section at the front of the book that provides a list of common pans any kitchen should have along with a list of useful gadgets and appliances. Additionally, the author also gives useful ingredient tips and suggestions along with storage and freezing tips. While candy making can be daunting for some, Kern takes away the trepidation by providing handy tips on candy dipping that both the novice and a more experienced candy maker would find useful. Including this type of information in the cookbook would be motivating I believe for those, perhaps less confident in candy making, to try the candy recipes in Kern’s book.
The book features over 50 recipes that are well laid out. Each recipe is introduced by a short paragraph that either comments about the recipe’s ingredients or gives the author’s personal story about, or connection to, the recipe. Step-by-step clear directions call for the ingredients in the order in which they appear on the ingredients list found on the right-hand side of each page and each recipe provides the yield along with the preparation and baking times. Where there is more than one component to a recipe (e.g., a cake, streusel, and icing), each set of ingredients is listed separately along with individual sets of directions which makes preparation easier. The directions are easy to understand, even for those less experienced with baking.
One of the things I most appreciated about the book is that, while it sometimes combines different ingredients in a recipe or “mashes” them up into something entirely different than you might think of (ever hear of lemon meringue pie fudge!), the recipes do not call for unusual ingredients that would be difficult to find.
The other bonus with this book is that each recipe is accompanied by a full-page color photograph of the finished product so you know the goal you are aiming for when making a recipe. The photographs are stunning and of high quality, making each recipe enticing to make. Of note, all food photographs in the book are the work of the author, herself.
I found the structure, content, and layout of this book well thought out with the reader in mind. The book is well organized and categorized into eight chapters: Breakfast but Better; Candy Concoctions; Cookies, Brownies, and Bars Together at Last; Pie Surprise; Cake & Cupcake Creations; New Takes on Cheesecake; Double Dips; and Holiday Mash-ups. At the beginning of each chapter, there is a page that lists all the recipes in that category along with their page numbers. There is also a useful alphabetized index at the back of the book.
Test-driving recipes
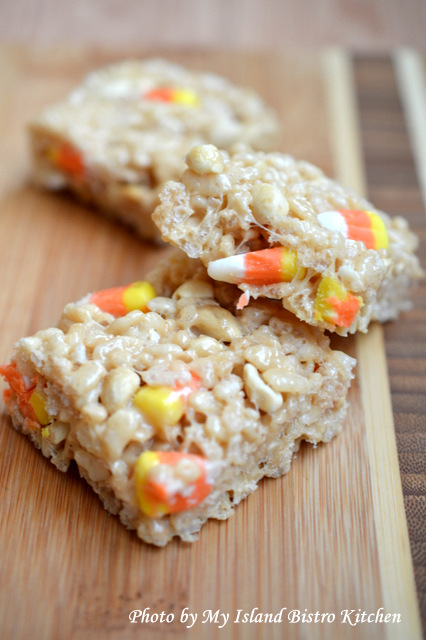
So, while a book might be lovely to look at and to leaf through, the real test comes when you make some recipes out of the book. I selected two: Payday Candy Corn Rice Krispies Treats (pp 134-135), and Rocky Road Cookie Fudge Bars (pp. 58-59). Both recipes turned out well for me with no issues and both were tasty and are ones I would repeat.
Payday Candy Corn Rice Krispies Treats
The twist on these perennial favorites is the addition of just a small amount of peanut butter, some peanuts, and the candy corn. I made them for Halloween treats and they were a hit. I also tested freezing them and found they freeze well, too. I would make them again, with or without the candy corn.
Payday Candy Corn Rice Krispies Treats from “Dessert Mash-Ups Cookbook by Dorothy Kern
Ulysses Press has given me permission to share the recipe and the book’s photograph for Rocky Road Cookie Fudge Bars along with my review of this cookbook. I made these bars and thoroughly enjoyed them.
Rocky Road Cookie Fudge Bars
Yield 36 bars Prep Time 20 minutes Bake Time 18 minutes Chill Time At least 4 hours
I’ll never forget eating rocky road ice cream when I was young. It was one of my mom’s favorite flavors, so it was always in the freezer. I’d pick out the almonds and marshmallows to save for last, because they were the best part. My love of the ice cream inspired these bars: a rich chocolate cookie bar topped with a rocky road candy that tastes like fudge. I hope it brings back memories of all your rocky road days like it does for me!
1⁄2 cup (1 stick) unsalted butter, softened 1⁄2 cup packed brown sugar 1⁄4 cup granulated sugar 1 teaspoon vanilla extract 1 large egg 1⁄3 cup unsweetened cocoa powder 1 teaspoon baking soda 1⁄4 teaspoon salt 1 cup all-purpose flour 1 (11.5-ounce) bag semisweet or milk chocolate chips 1⁄2 cup chopped walnuts or almonds 1 1⁄2 cups mini marshmallows
1. Preheat the oven to 350°F. Spray a 9 x 9-inch pan with cooking spray or line with foil and spray with cooking spray for easy cleanup.
2. In the bowl of a stand mixer fitted with the paddle attachment, cream together the butter, brown sugar, and granulated sugar. Add the vanilla and egg, and mix until smooth. Mix in the cocoa and baking soda, then add the salt and flour, and beat until well blended. Press into the prepared pan. (The batter will be sticky; it helps to spray your hands with cooking spray to keep it from sticking to you.)
3. Bake for 15 to 18 minutes, until the top just loses its sheen.
4. As soon as the bars come out of the oven (or a few minutes before), melt the chocolate chips in a large microwave- safe bowl on high for 1 1⁄2 to 2 minutes, stirring every 30 seconds until the chocolate melts and is smooth. Let it sit for about 2 minutes, then stir in the chopped nuts and mini marshmallows. Stir to coat completely.
5. Pour the marshmallow mixture on top of the hot cookie bars and spread carefully. Let set at room temperature before slicing. You can refrigerate the bars to speed hardening, but be sure to allow them to sit at room temperature for 30 minutes before slicing to avoid cracking in the chocolate. Store in an airtight container at room temperature; bars are best within 4 days.
Concluding Thoughts
The book contains a good variety of dessert recipes that would be suitable for families, potluck get-togethers, special occasions, and gift giving.
This book is a manageable size, has good flow, and is easy to read. In my view, this book would be most suitable for individuals who love to bake, have a sweet tooth, and/or those who don’t count calories!
Disclosure: I received a complimentary copy of Dessert Mash-Ups from Ulysees Press for the purposes of conducting a review of the cookbook. I received no compensation for this review and was under no obligation to provide a positive review. All opinions expressed are purely my own.
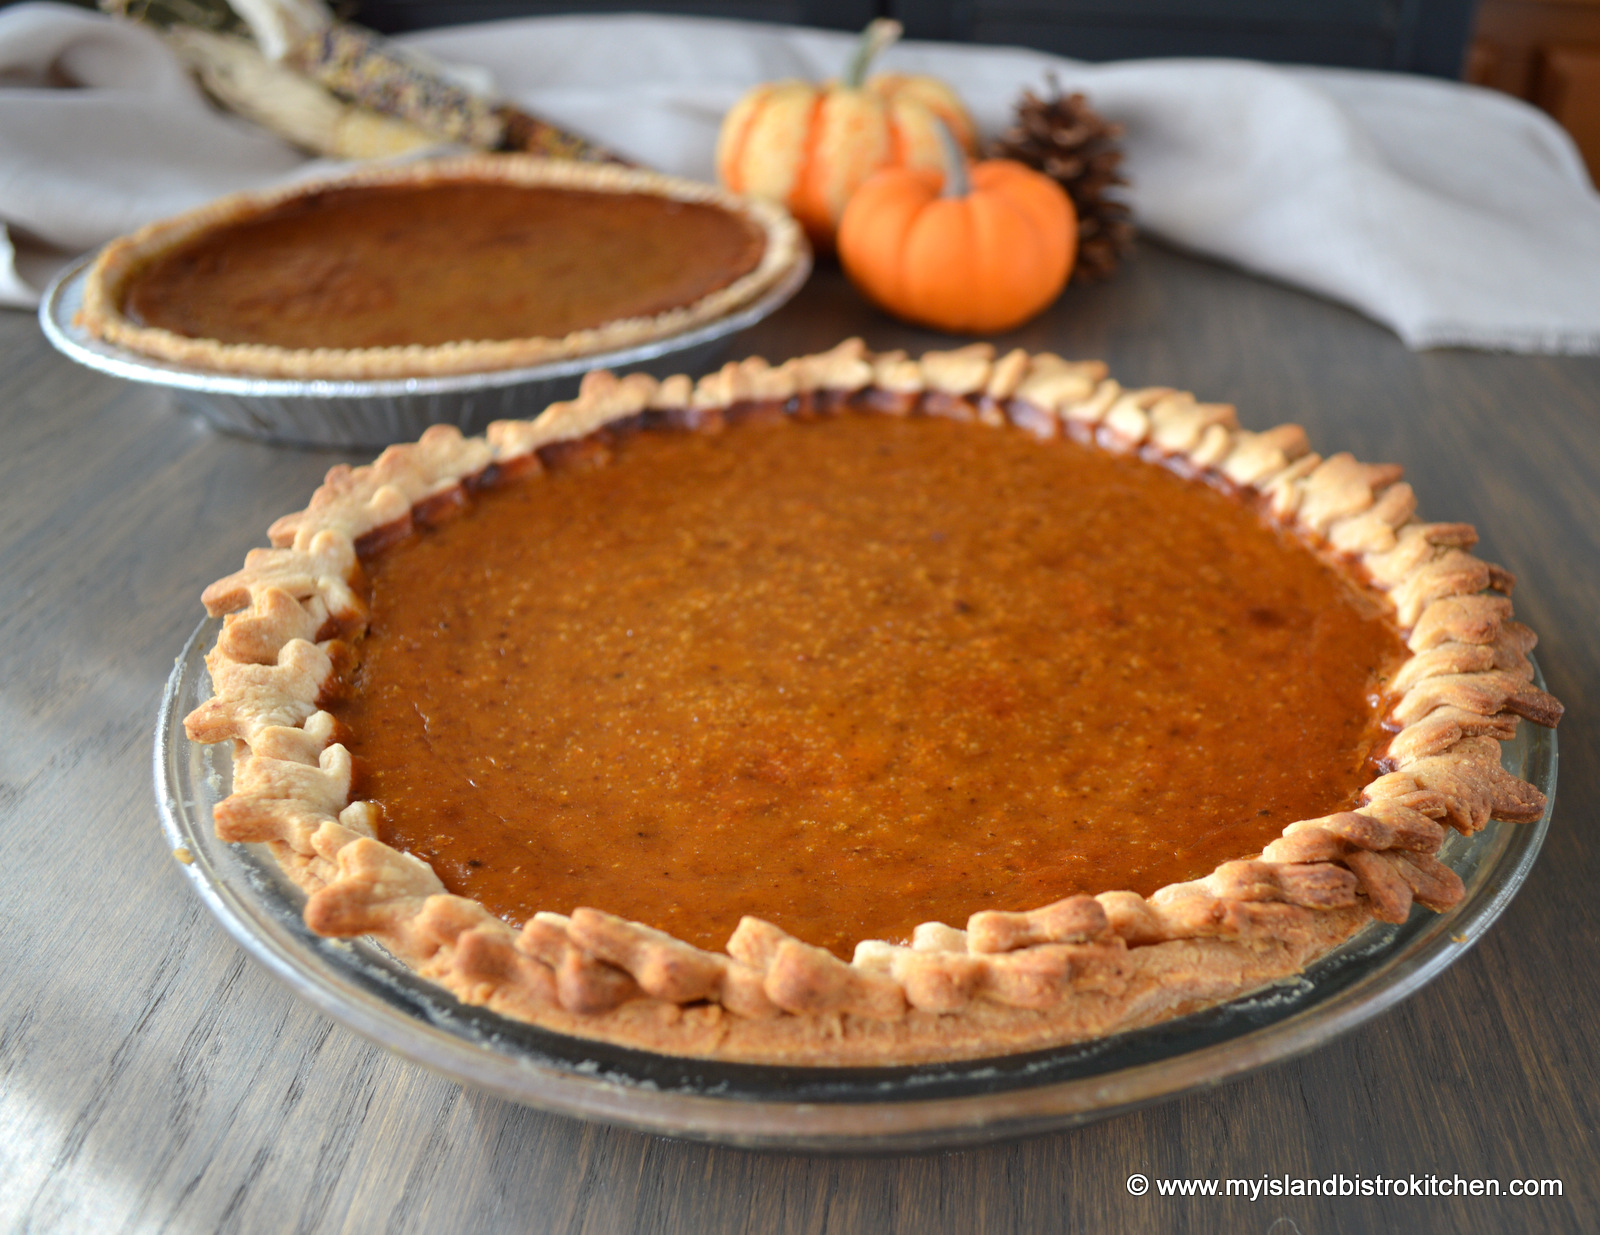
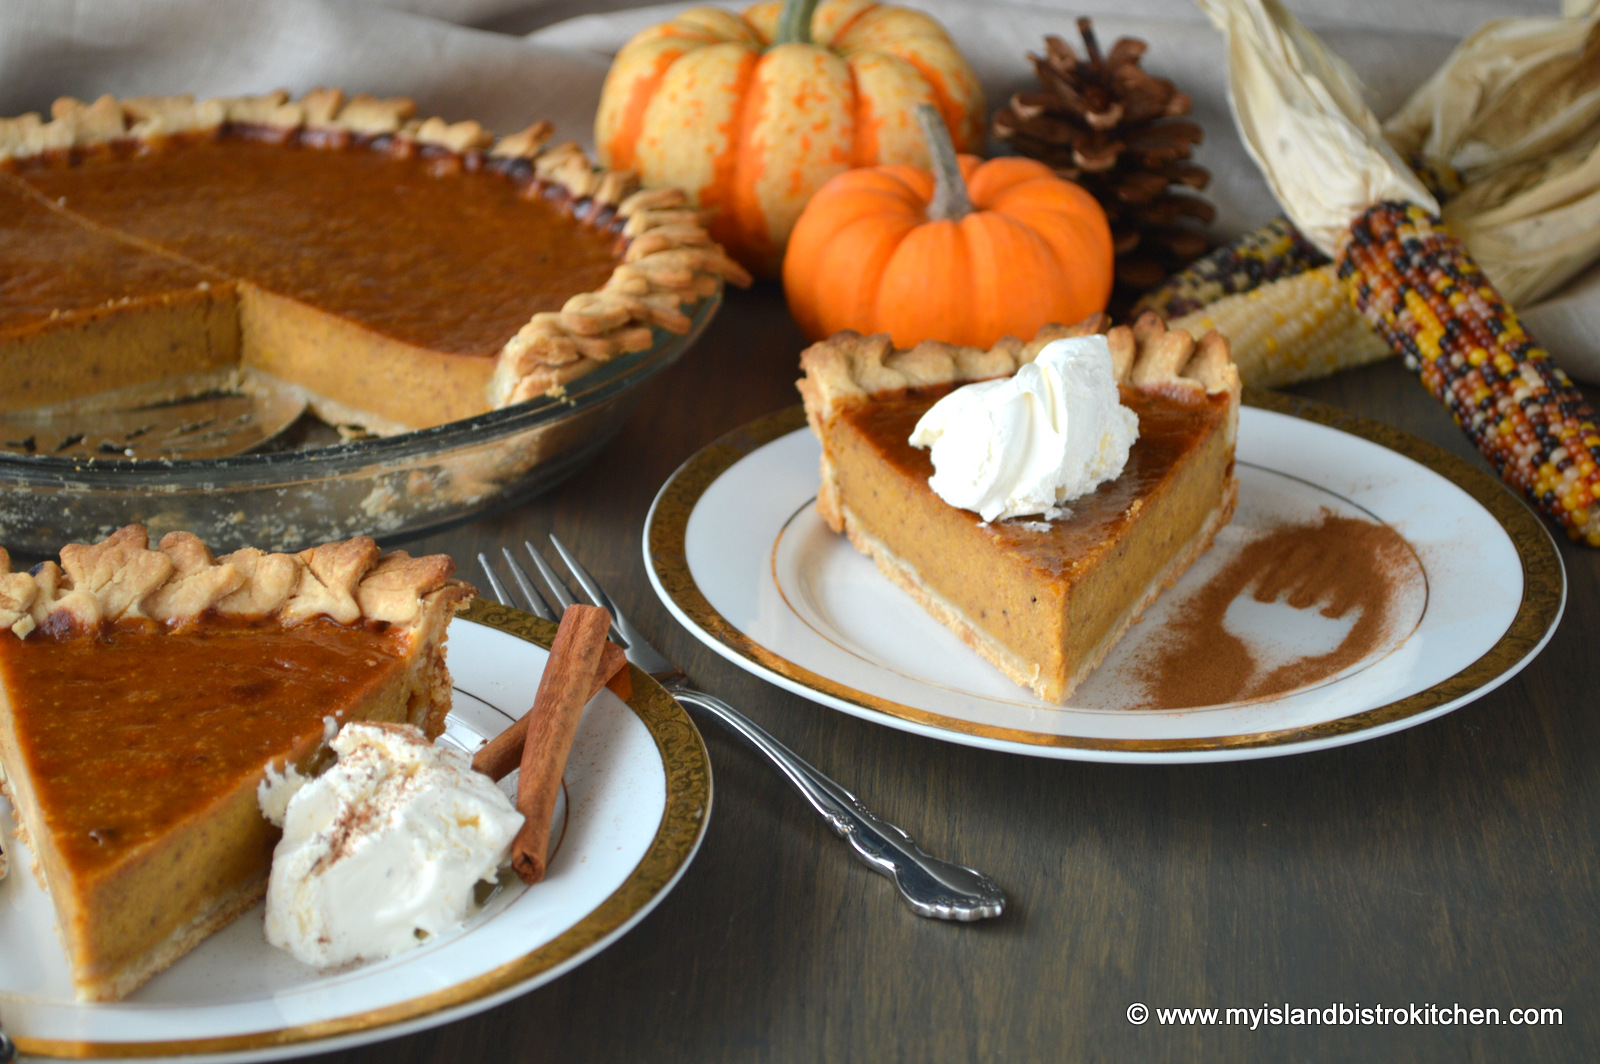
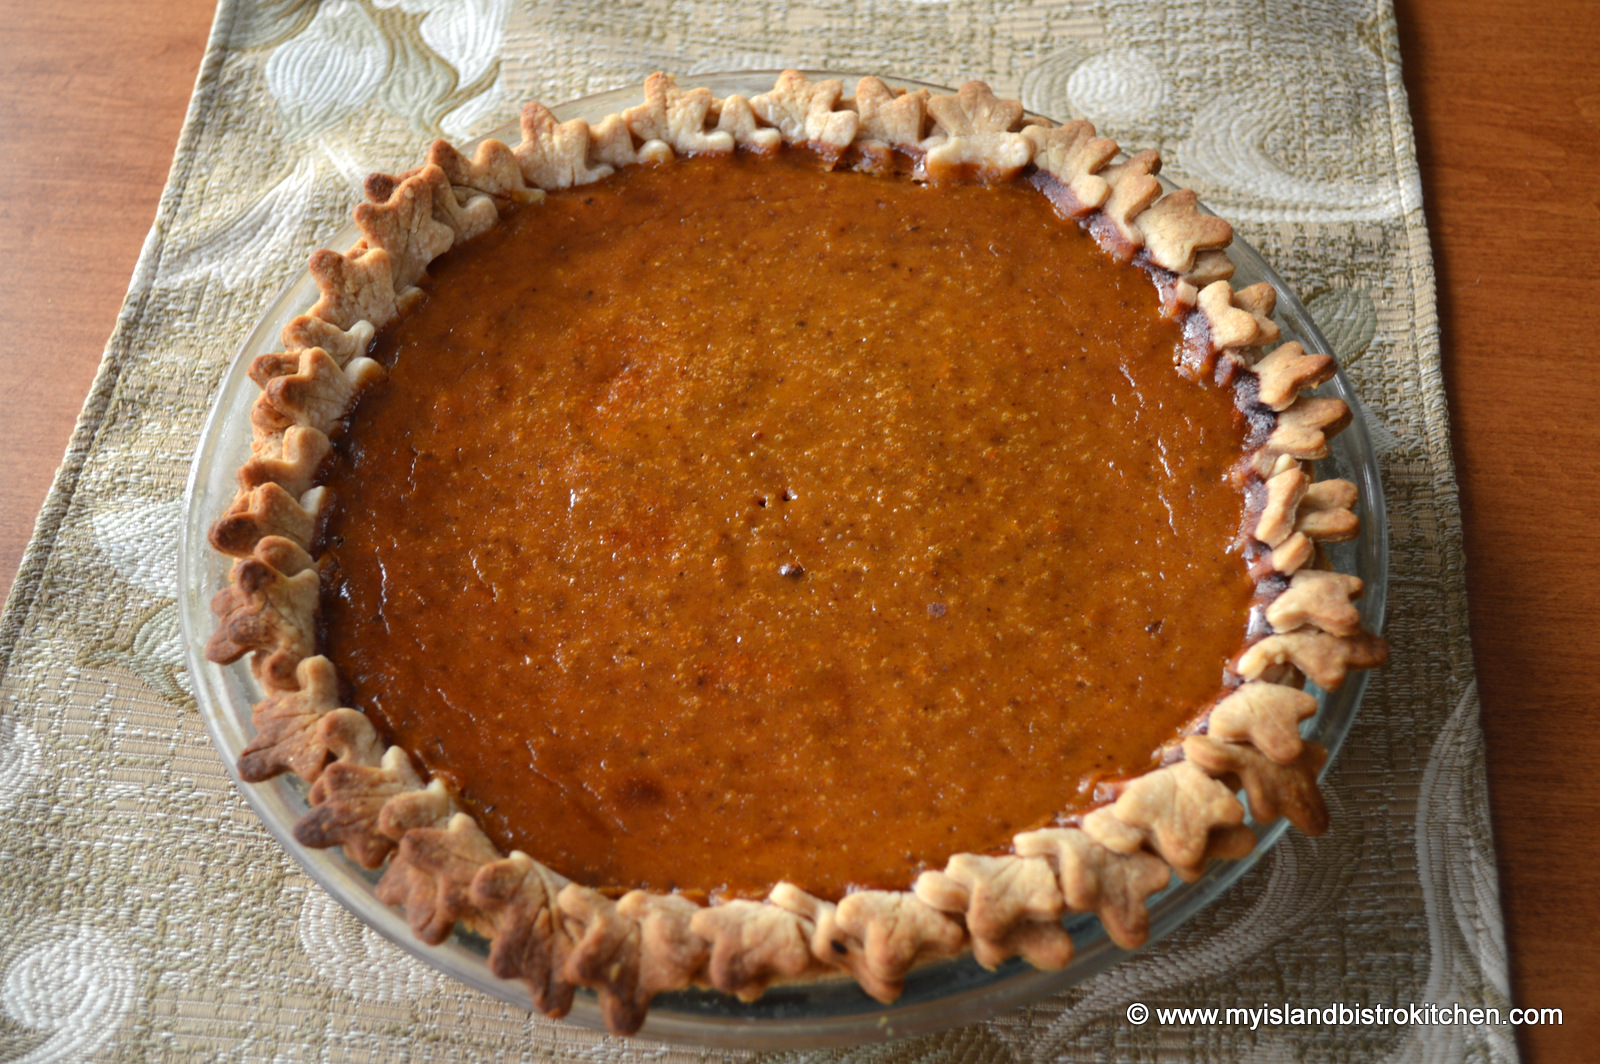
Move over pumpkin! Your cousin, squash, makes better pies!
Growing up, it was more common in our household to have squash rather than pumpkin pie. My ancestors always claimed squash makes a better, more tasty pie and I have to agree. Squash gives a richer pie with a depth of flavour that I don’t find characteristic of pumpkin.
Squash Pies
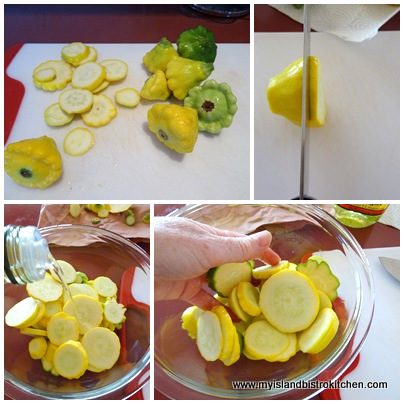
There are several different kinds of squash that can be used for pie making but my preference is the tall vase-or bell-shaped butternut squash. Butternut squash is considered a variety of winter squash. Though harvested in autumn, butternut squash is generally available in supermarkets through the winter months because of the squash’s long “keeping” quality. I’m guessing it is their availability through the winter months that has earned them the term “winter” squash since they certainly wouldn’t be harvested in the winter in our cold and frosty northeastern climate! With its mildly nutty flavour, butternut squash has a natural sweetness to it. The pulp of the butternut squash is bright orange in color and, while it loses that color when made in to a pie, it turns to a lovely caramel color.
Squash Pie
My grandmother always cooked her squash in a pot with some water on the stovetop. However, squash already has a high moisture content and adding more water to the mix can make it difficult to get the cooked squash sufficiently drained that you don’t end up with a soupy texture pie. My preference is to, instead, roast the squash as it reduces the moisture level and I find it also gives the squash an even deeper, richer flavour.
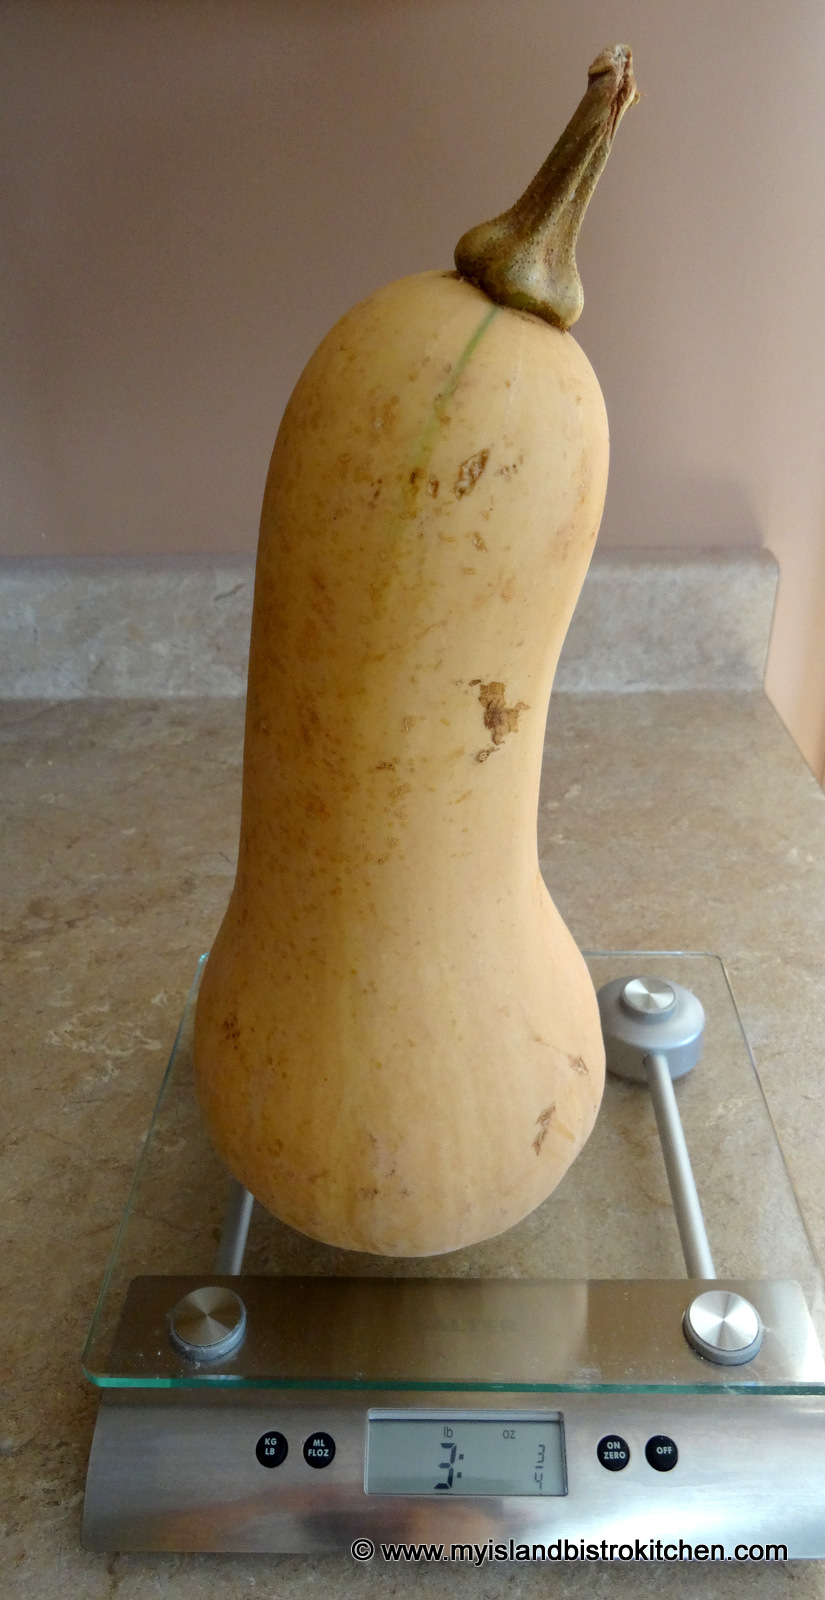
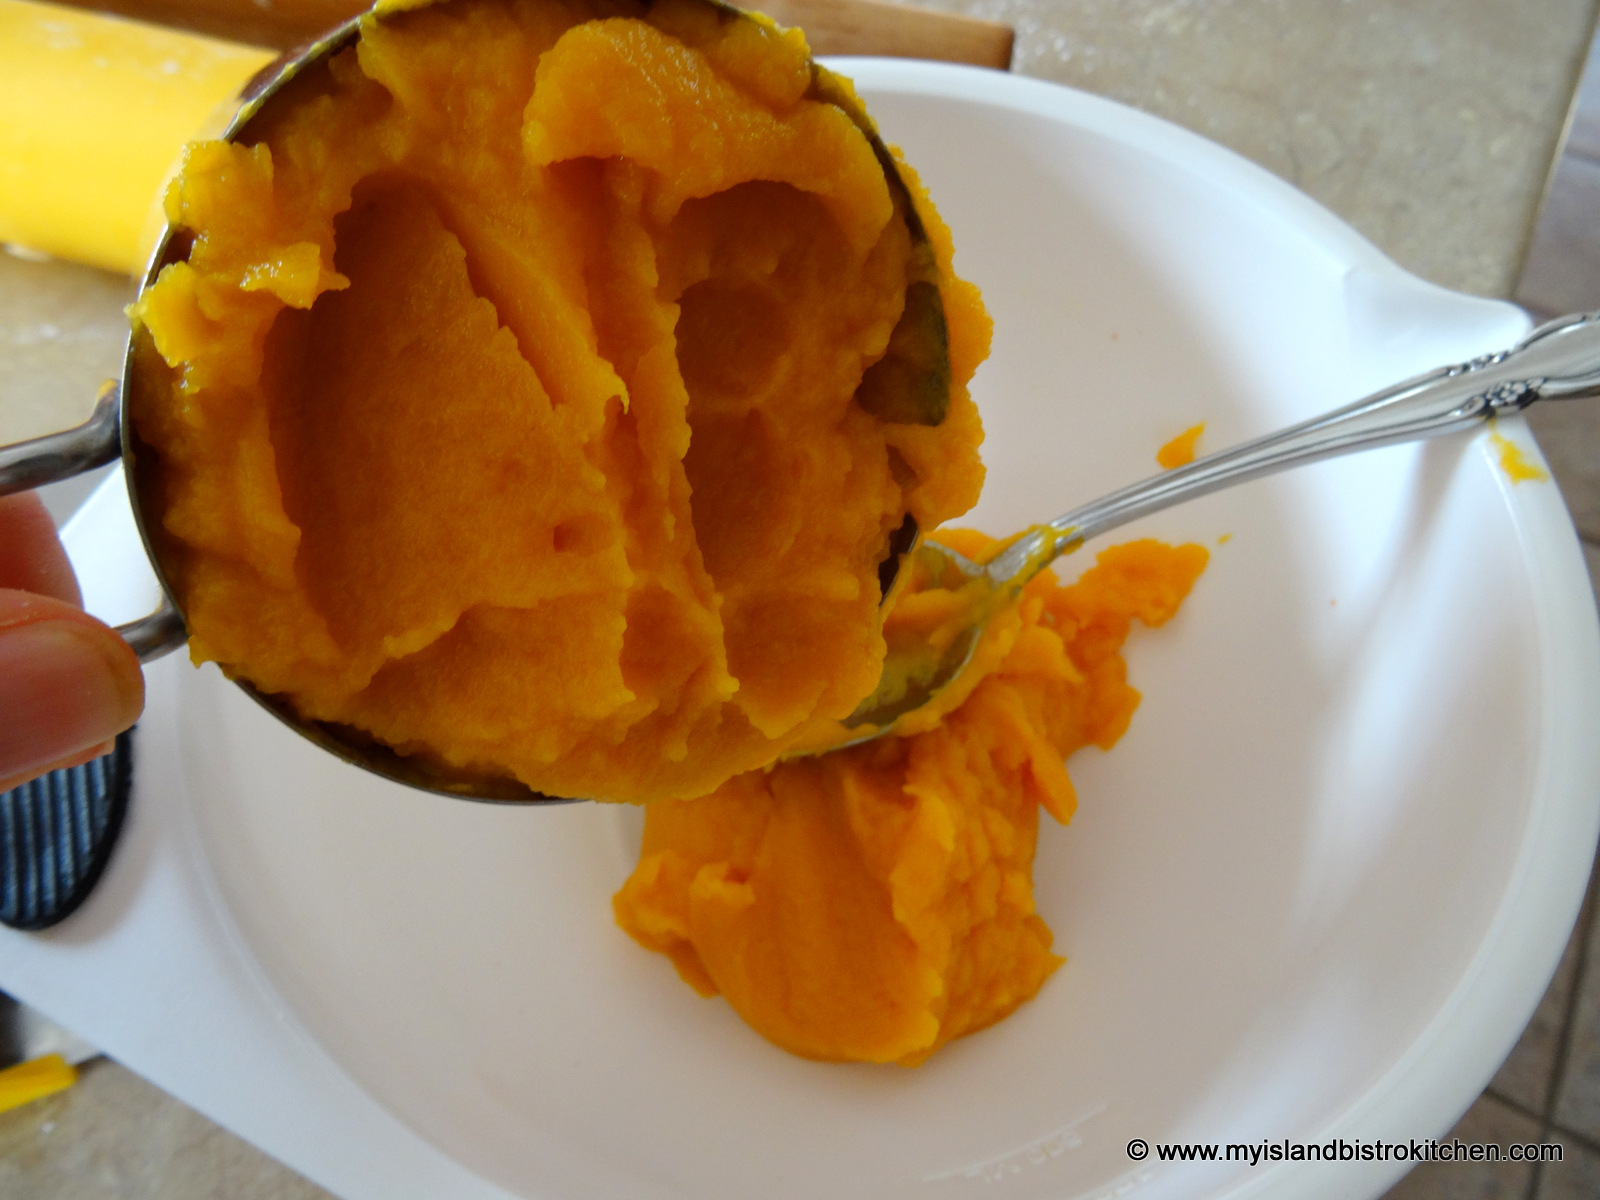
For my squash pie recipe (found at the end of this posting), 2 cups of puréed squash is needed. I used a butternut squash weighing 3 pounds which yielded 4 cups of purée, enough for 2 – 10″ pies. So, if all you want is one pie, try to find a squash that weighs 1½ to 1¾ pounds.
Butternut Squash
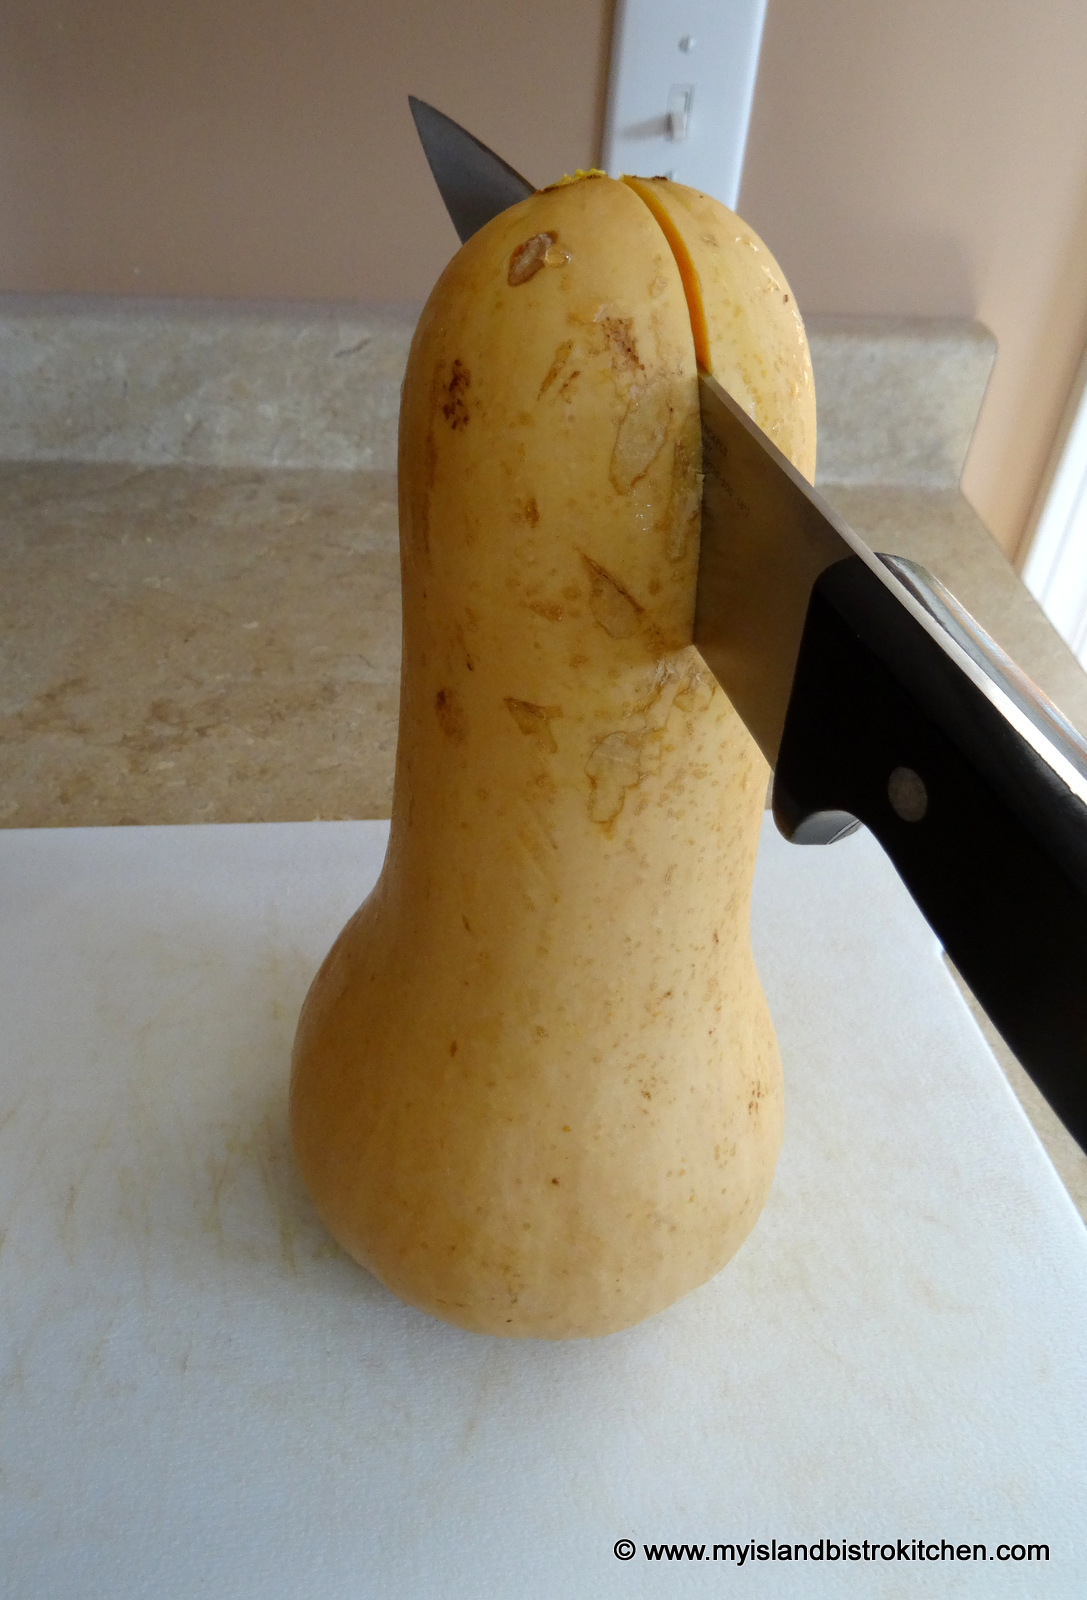
To roast the squash, I simply began by cutting the squash in half, starting at the top narrow end, slicing all the way through to the bottom.
With a spoon, remove the seeds.
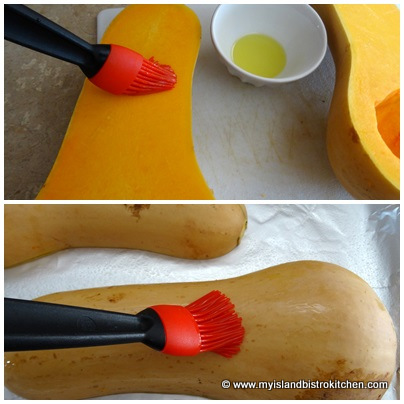
With a soft brush, apply a thin layer of olive oil to both the flesh and skin sides of the squash.
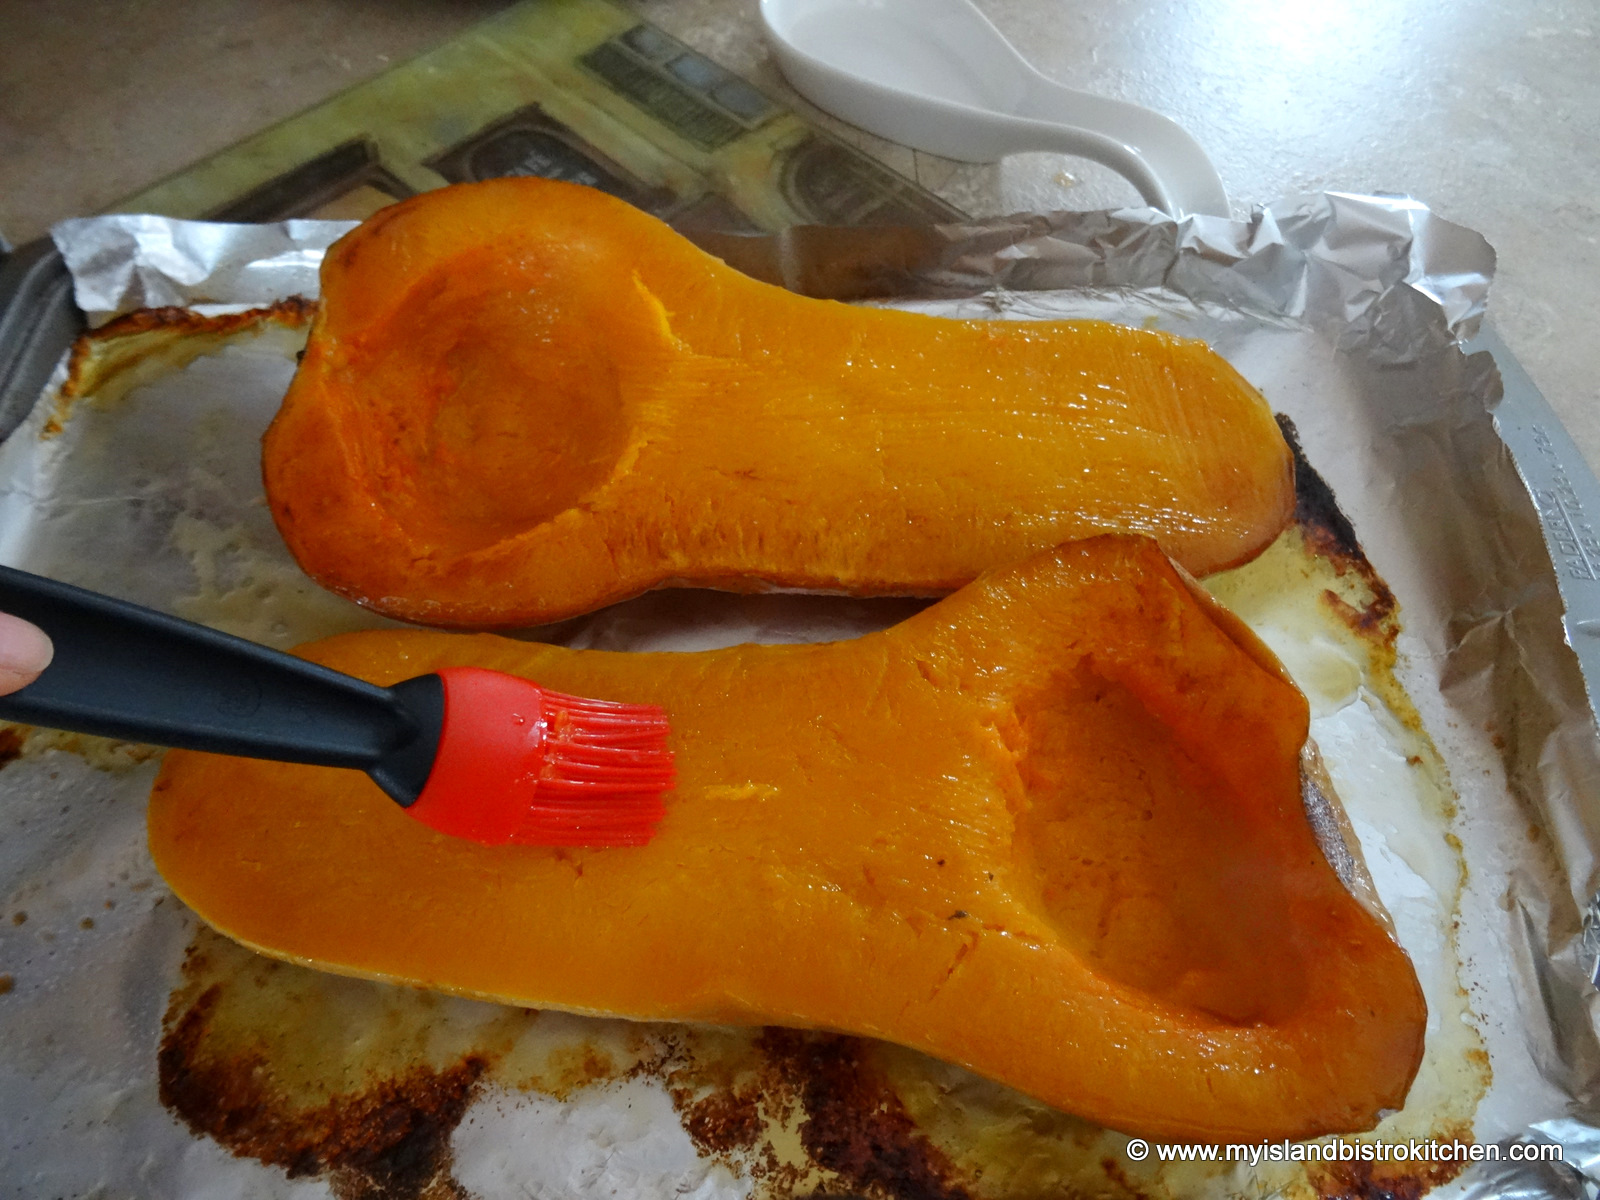
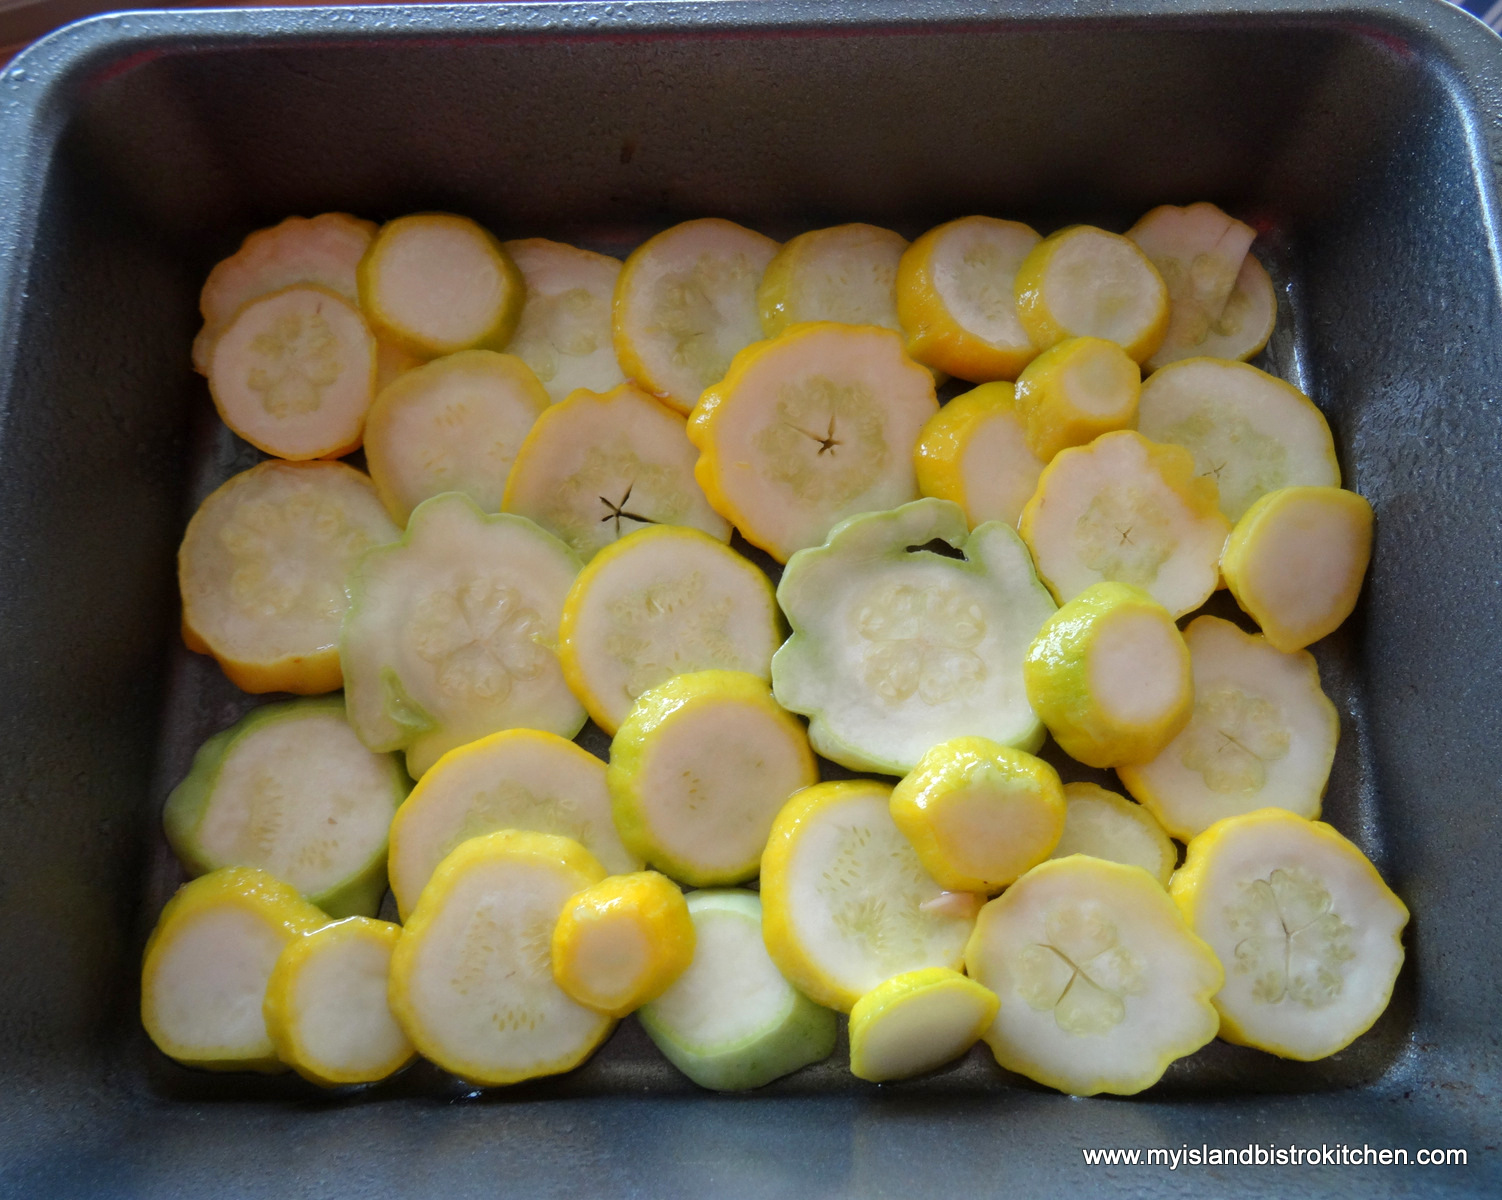
Place squash, flesh side down, on a greased, foil-lined, rimmed baking sheet. Bake in preheated 425°F oven for about a half hour. Remove the squash from the oven and, with a large lifter, carefully flip the pieces over, applying another light brushing of olive oil to the flesh side. Return the squash to the oven for about another half hour or so, until the flesh of the squash is very soft. Remove from oven.
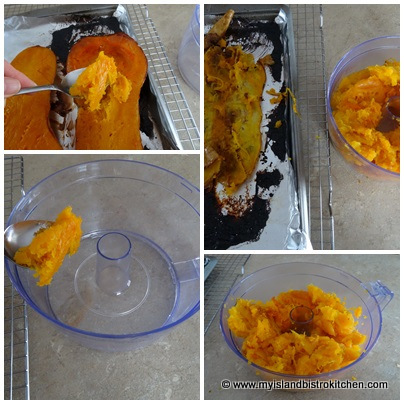
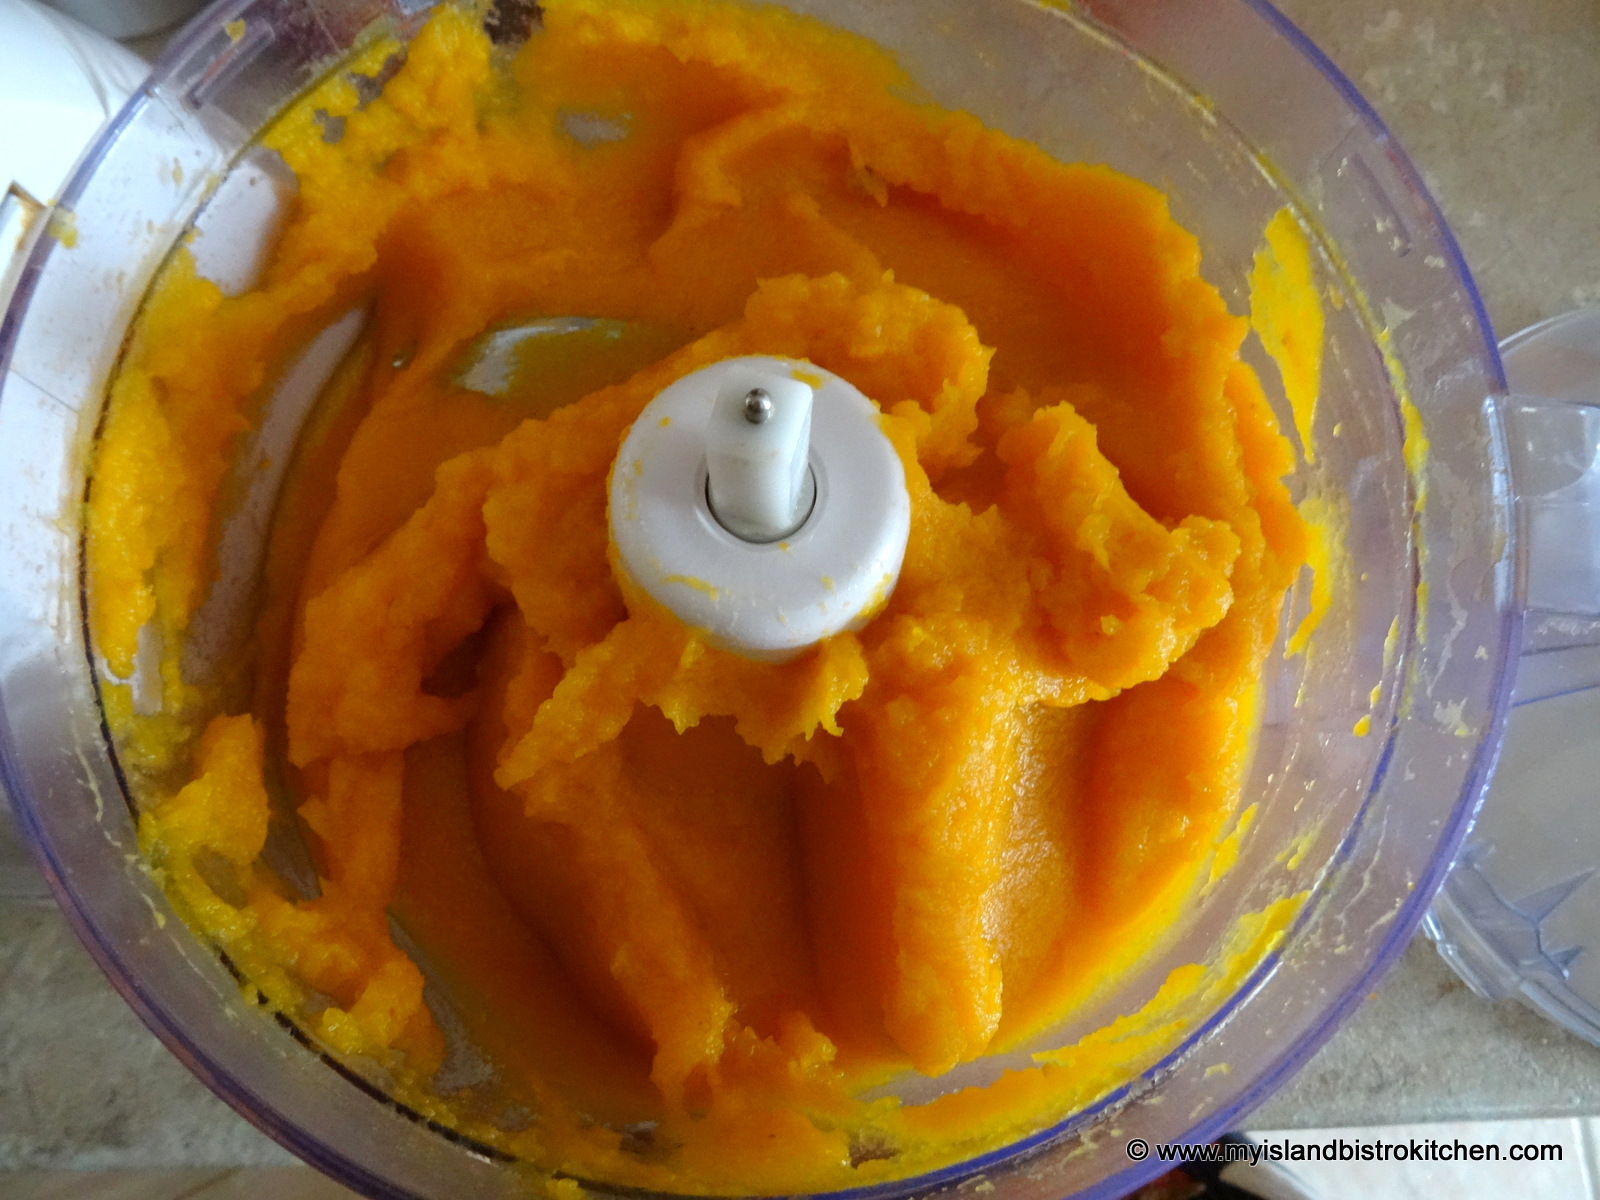
As soon as the squash has just cooled enough to handle, scoop the flesh from the skin of the squash and put it in the bowl of a food processor.
Process until the squash is puréed smooth.
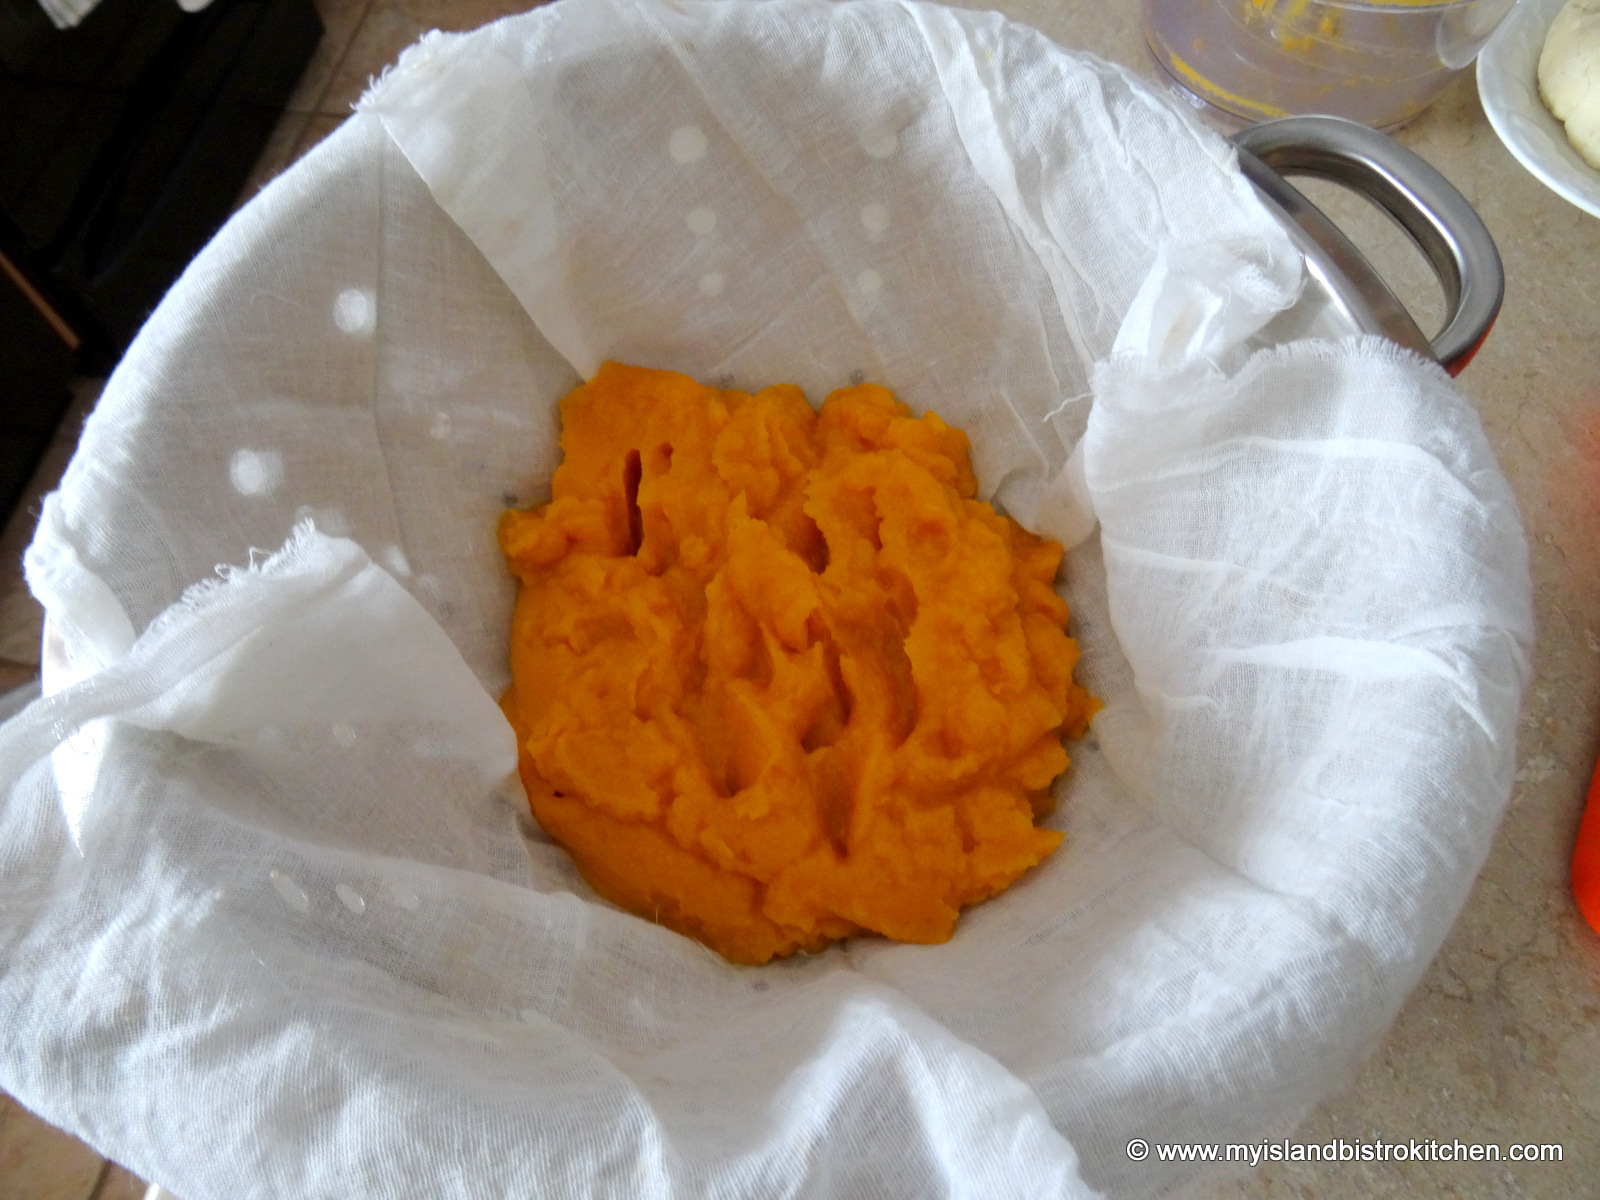
Then, transfer the purée to a cheesecloth-lined colander fitted over a large bowl or pot and leave it to drip for about an hour or so. The goal is to remove as much remaining liquid as possible. I find it helps to stir the mixture two to three times and to press down the mixture with the back of a large spoon to extract the liquid.
To make one pie, transfer 2 cups of the purée to a medium-sized bowl.
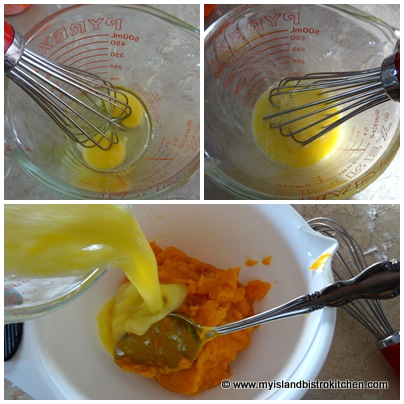
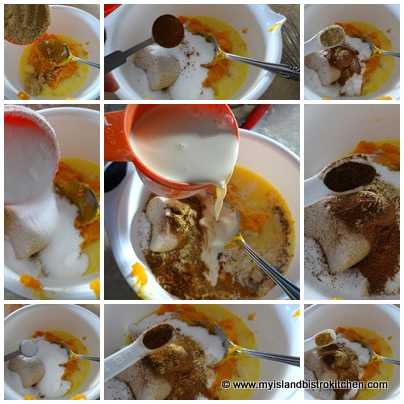
Add the slightly-beaten eggs.
Next, add the sugars, salt, spices, and evaporated milk.
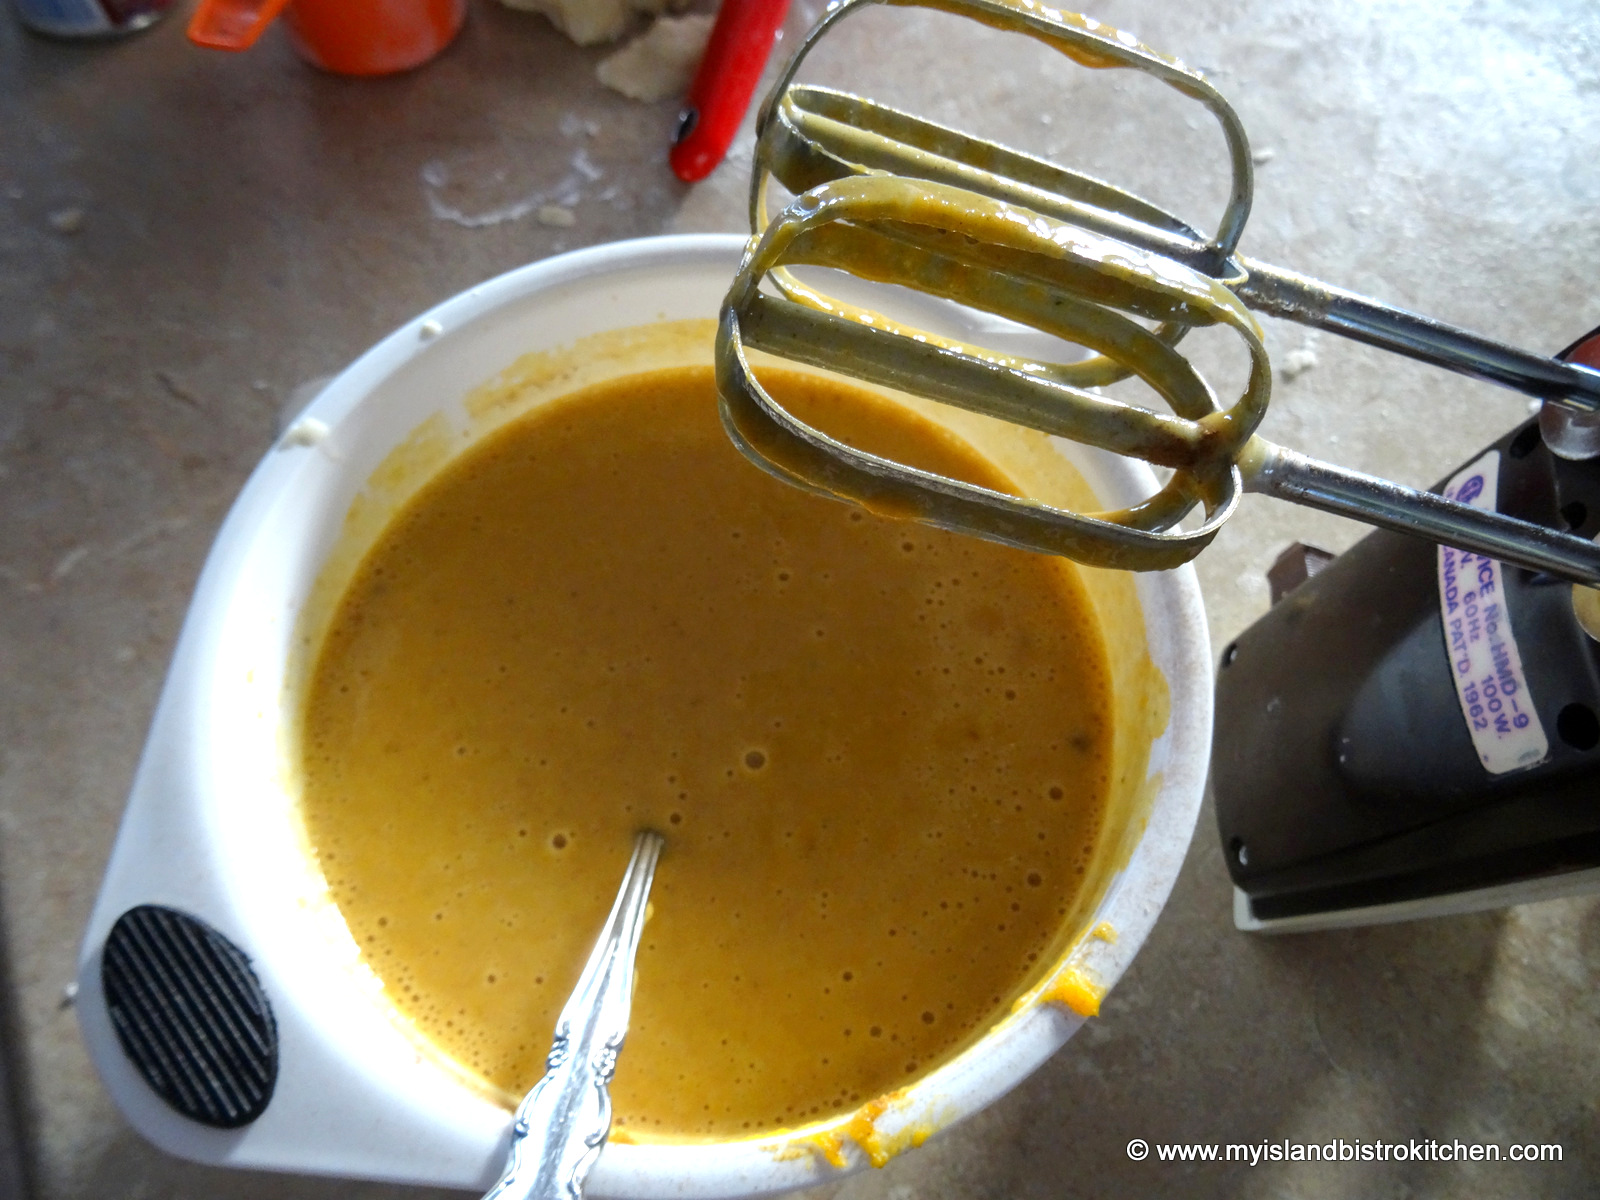
Mix the ingredients well – I use a hand mixer.
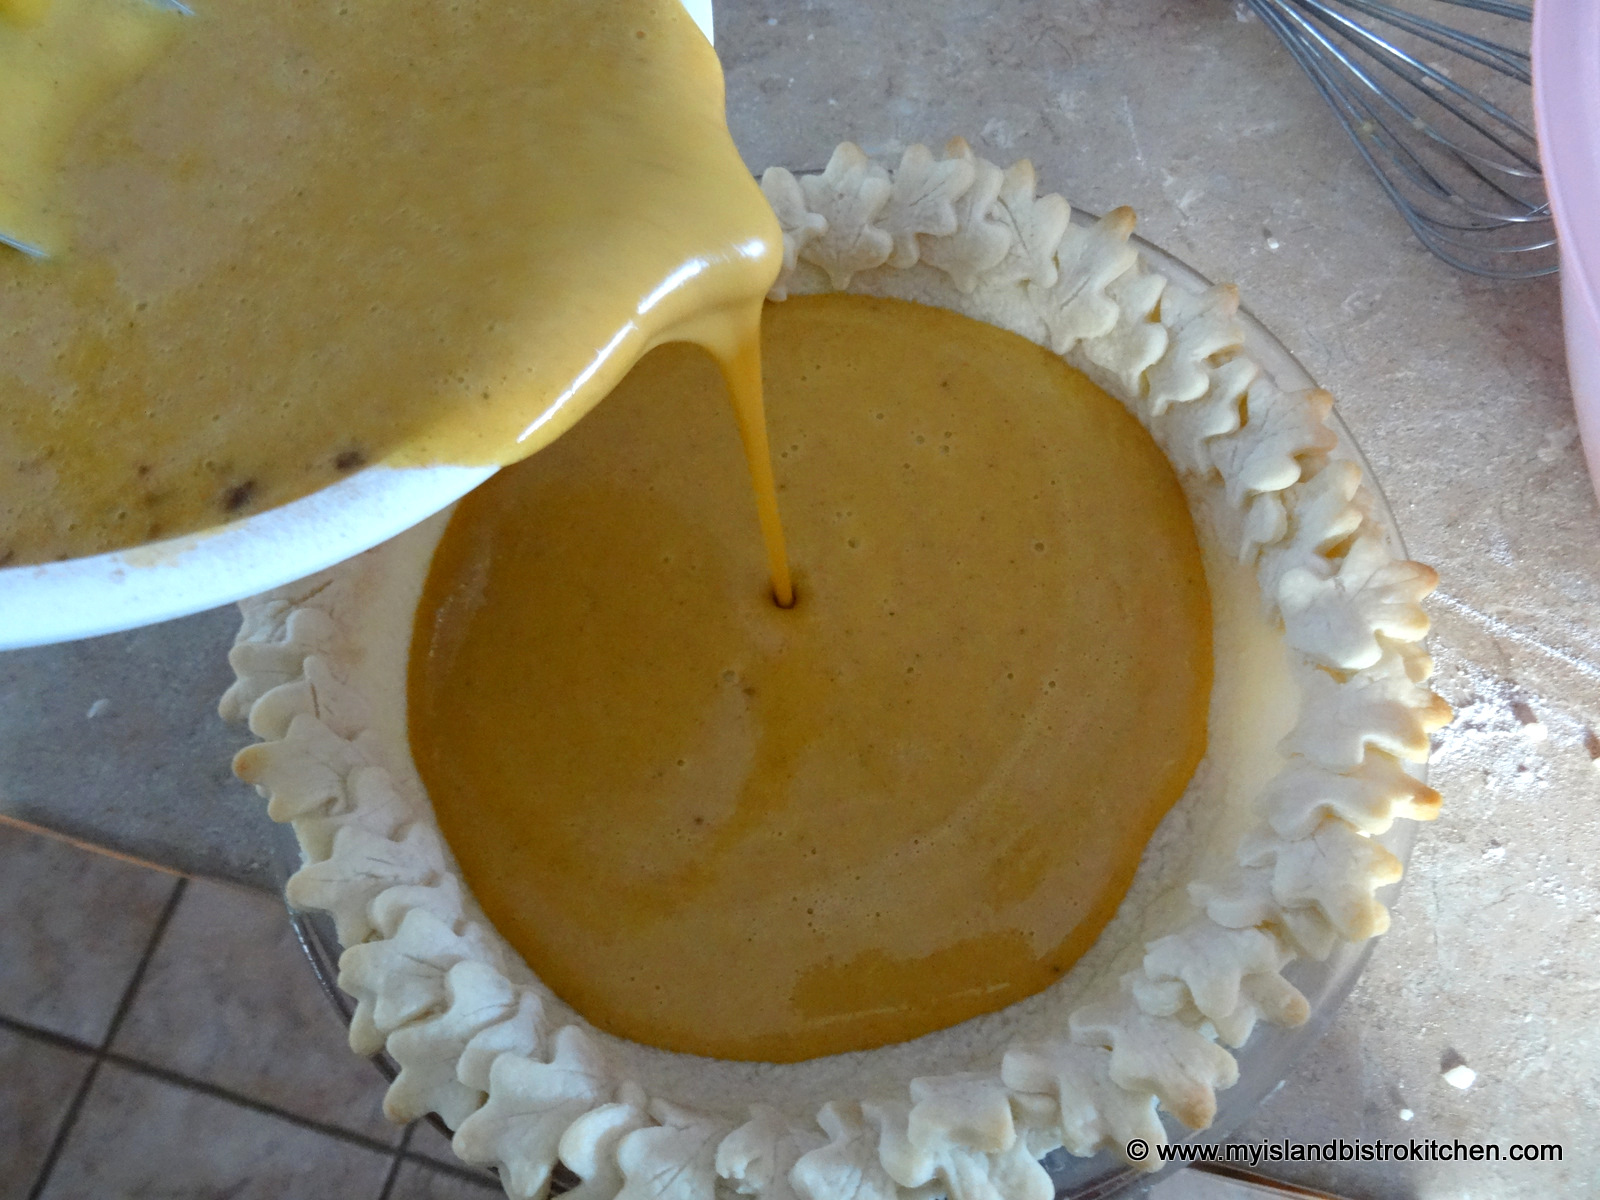
Pour the filling into the prepared pie crust. Although not necessary, I sometimes (but not always) pre-bake the crust for about 10 minutes to set it. If you do this, be sure to use pie weights to ensure the crust does not bubble up, creating air pockets underneath.
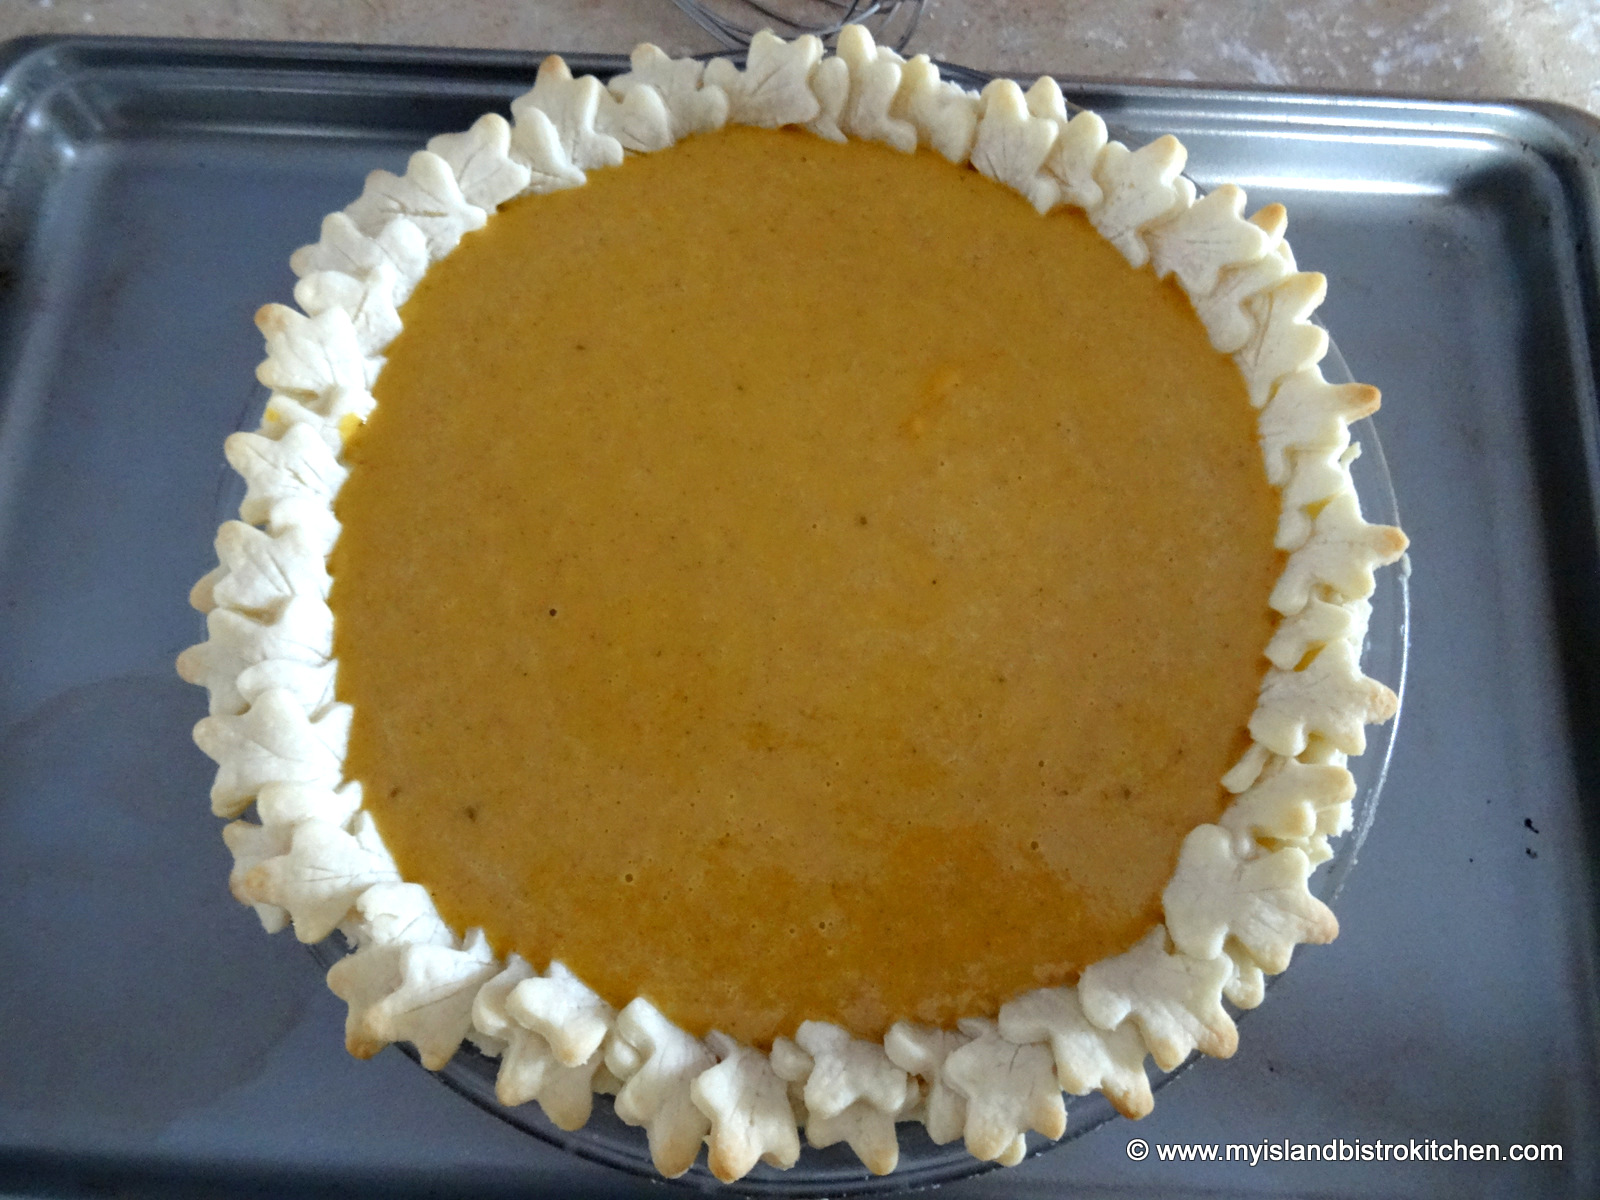
I find it useful to place the pie on a rimmed baking sheet for easy transport into the oven. The filling is very liquid at this point and it is very easy to spill it or slosh it up over the sides of the crust edges. In fact, sometimes, I only partially fill the pie, then set it on the oven rack and finish filling it there.
It helps to start baking the pie at 375°F for the first 15 minutes to give it a quick set then lower the temperature to 350°F and bake for another 1¼ hours longer or until a knife, or a toothpick, inserted into the center of the pie comes out clean.
The pie should be thoroughly cooled and allowed to set before cutting.
Squash Pie
For tips and hints on making pie pastry and a recipe for pastry, clickhere.
Squash Pie
1½ – 1¾ lb butternut squash Pastry for deep 10-inch single crust pie
For the pie filling: 2 cups squash purée 2 extra large eggs, slightly beaten ⅔ cup brown sugar, lightly packed ⅓ cup white sugar ¼ tsp salt 1 tsp cinnamon ½ tsp ginger ¼ tsp cloves ¼ tsp mace ⅛ tsp nutmeg 1⅔ cup evaporated milk
To roast the squash:
Preheat oven to 425°F.
Line large rimmed baking sheet with tin foil. Spray with cooking oil.
Cut the squash in half from top to bottom. Remove and discard seeds. Lightly brush olive oil on both sides of squash. Place squash, flesh side down, on baking sheet. Roast for about 30 minutes then remove from oven and carefully flip the squash halves over. Apply a light brushing of olive oil on the flesh side of the squash. Return squash to oven and continue roasting for another 20-30 minutes or until squash is very soft.
To prepare the squash purée:
Line a large colander with cheesecloth. Set aside.
Remove squash from oven. As soon as the squash has just cooled enough to handle, scoop the flesh from the squash and place it in the bowl of a food processor. Purée the squash until it is very smooth.
Transfer the purée to the cheesecloth-lined colander. Let sit for about an hour to allow any excess water to drain from the purée. From time to time, stir the purée and, with a large spoon, press out the moisture from the purée.
To make the pie filling:
Preheat oven to 375°F.
Transfer purée to a medium-sized bowl and add the eggs, sugars, salt, spices, and milk. With a mixer (either a hand or stand mixer), mix ingredients thoroughly. Pour mixture into prepared pie shell. Place on rimmed baking sheet.
Bake pie in lower third of oven at 375°F for 15 minutes then lower temperature to 350°F and continue baking pie for about 1¼ hours longer or until knife or toothpick inserted in center of pie comes out clean.
Let pie cool completely before cutting.
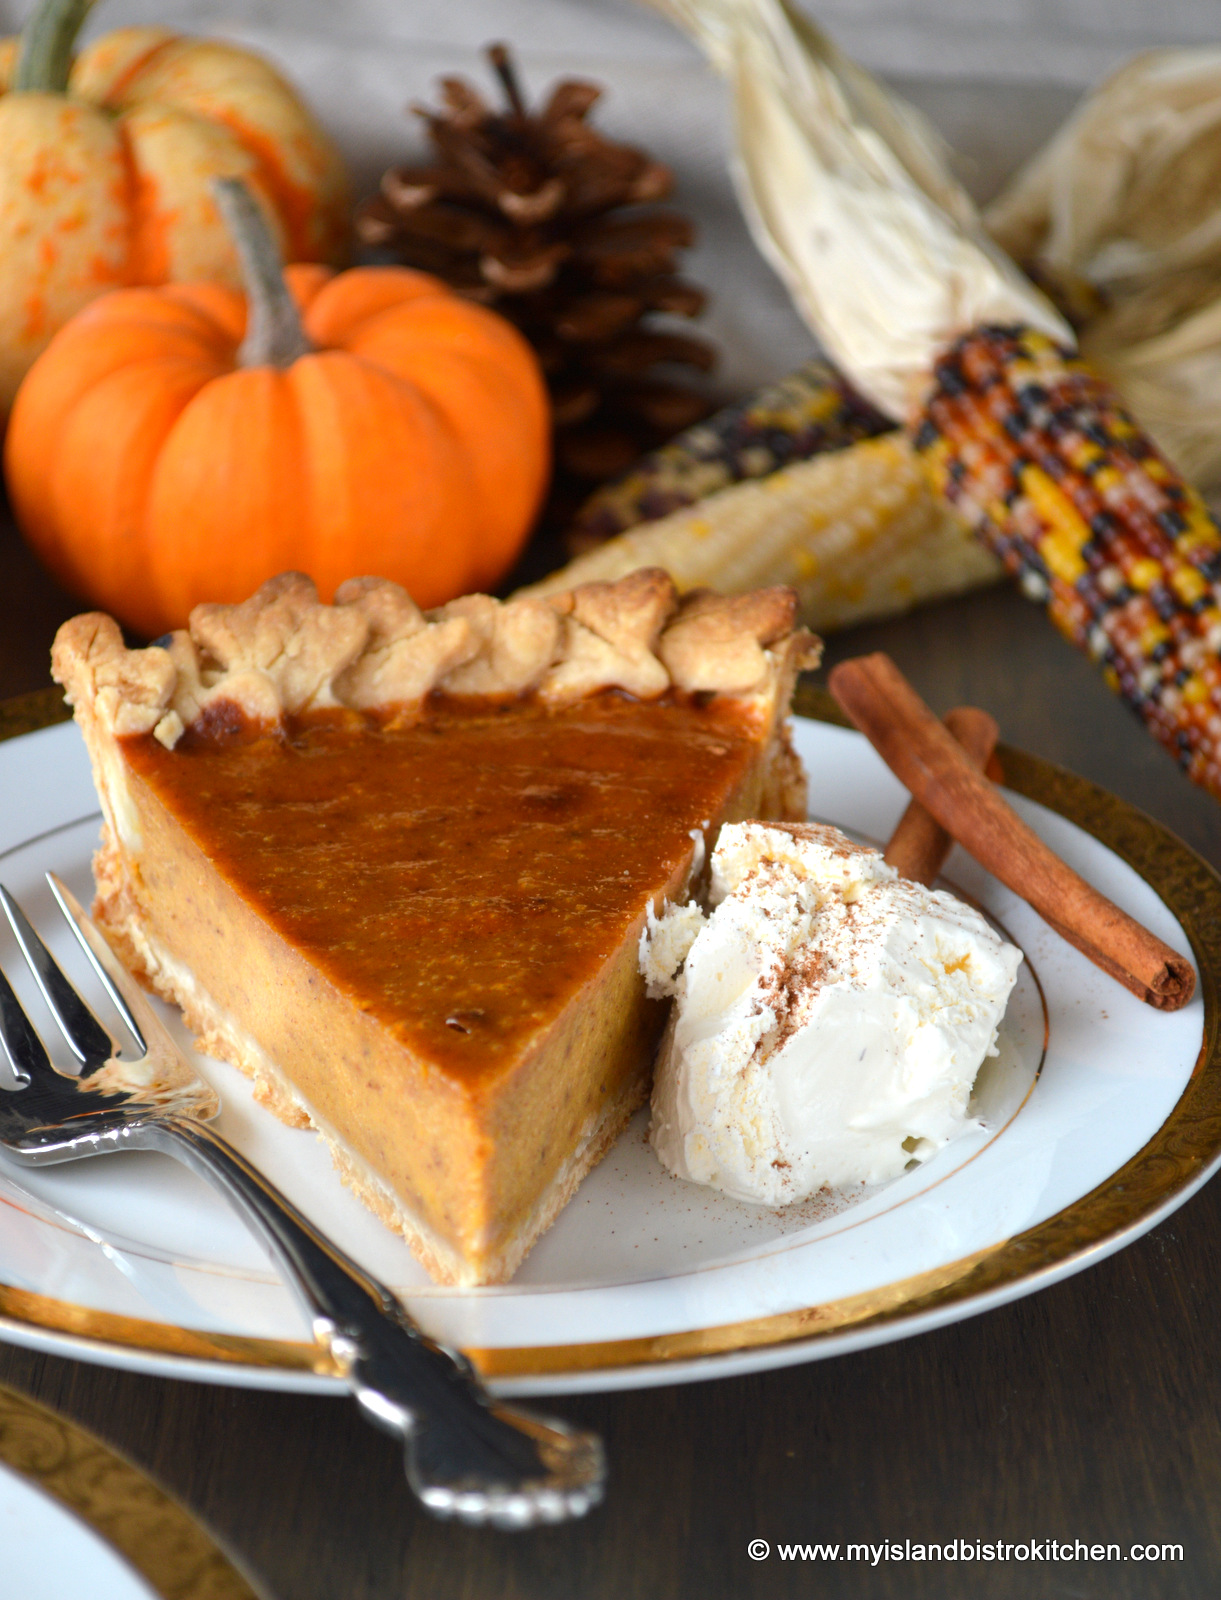
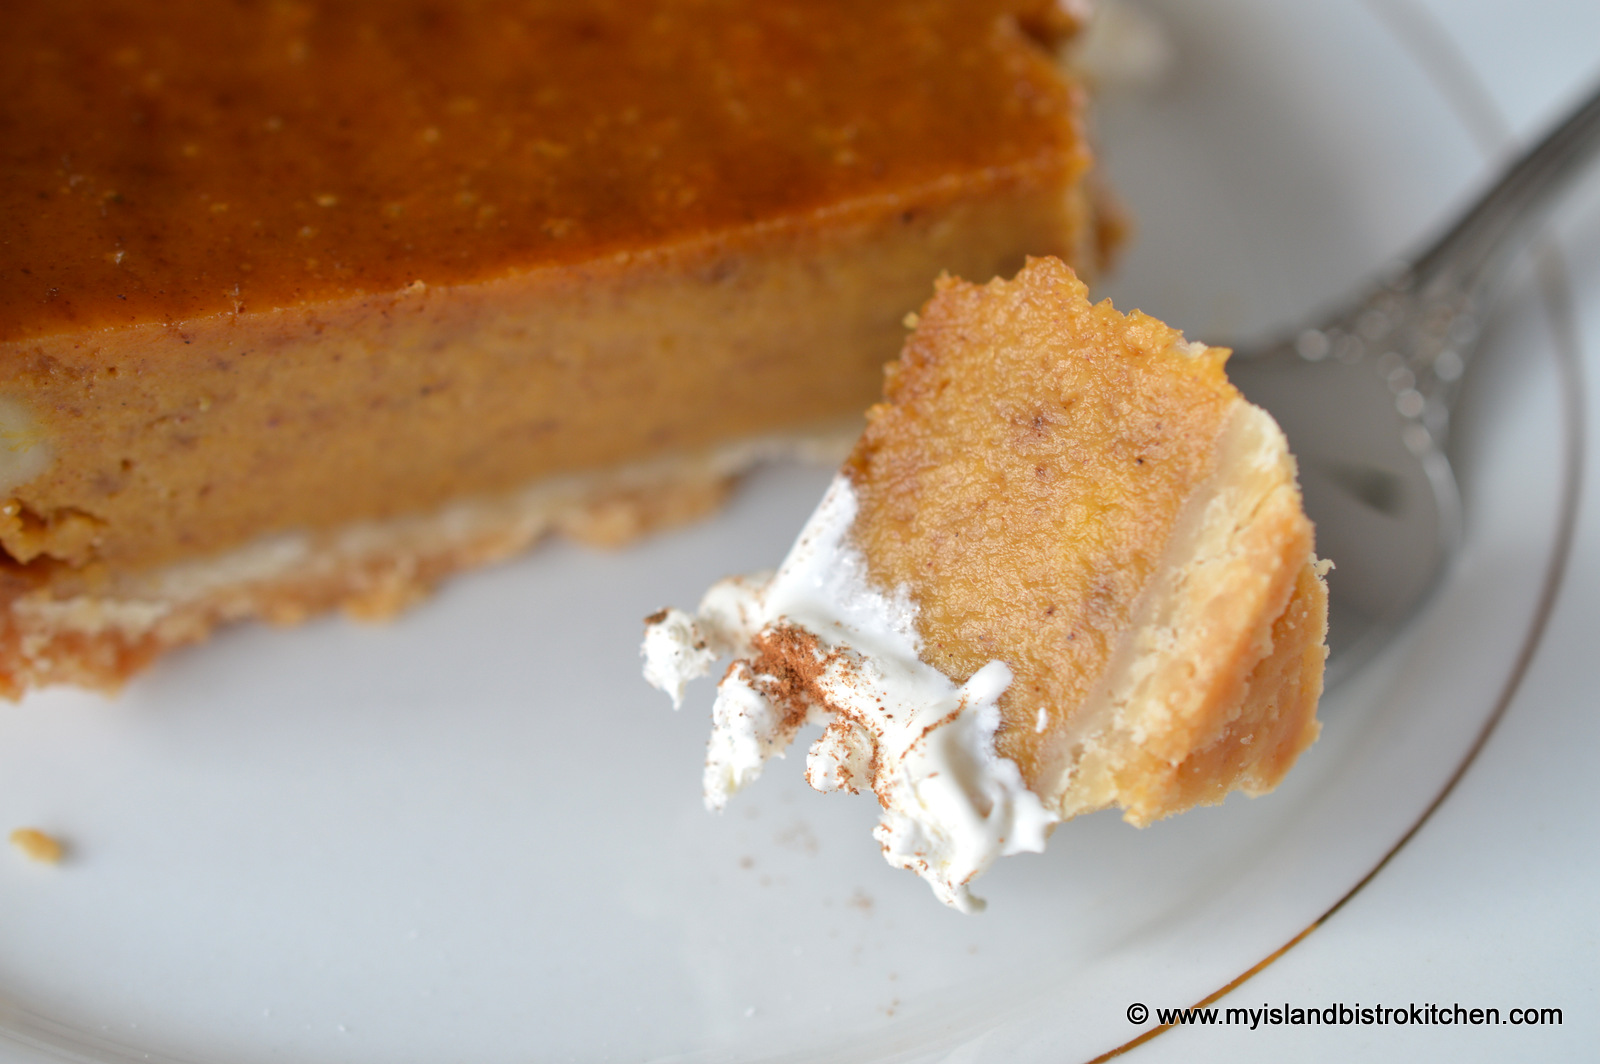
Serve with a dollop of whipped cream and a sprinkle of cinnamon.
Similar in taste to Pumpkin Pie, this Squash Pie is made with butternut squash and has a lovely deep flavour with spices similar to those used in pumpkin pie.
Course Dessert
Keyword pie, squash pie
Servings8
My Island Bistro KitchenBarbara99
Ingredients
1½ - 2lbbutternut squash
Pastry for deep 10-inch single crust pie
For the pie filling:
2cupssquash purée
2extra-large eggs, slightly beaten
⅔cupbrown sugar, lightly packed
⅓cupwhite sugar
¼tspsalt
1tspcinnamon
½tspginger
¼tspcloves
¼tspmace
⅛tspnutmeg
1⅔cupevaporated milk
Instructions
To roast the squash:
Preheat oven to 425°F.
Line large rimmed baking sheet with tin foil. Spray with cooking oil.
Cut the squash in half vertically. Remove and discard seeds. Lightly brush olive oil on both sides of squash. Place squash, flesh side down on baking sheet. Roast for about 30 minutes then remove from oven and carefully flip the squash halves over. Return squash to oven and continue roasting for another 20-30 minutes or until squash is very soft.
To prepare the squash purée:
Line a large colander with damp cheesecloth.
Remove squash from oven. As soon as the squash has cooled enough to handle, scoop the flesh from the squash and place it in the bowl of a food processor. Purée the squash until it is very smooth.
Transfer the purée to the cheesecloth-lined colander. Let sit for about an hour to allow any excess water to drain from the purée. From time to time, stir the purée and, with a large spoon, press out the moisture from the purée.
To make the pie filling:
Preheat oven to 375°F.
Transfer purée to a medium-sized bowl and add the eggs, sugars, salt, spices, and milk. With a mixer (either a hand or stand mixer), mix ingredients thoroughly. Pour mixture into prepared pie shell. Place on rimmed baking sheet.
Bake pie in lower third of oven at 375°F for 15 minutes then lower temperature to 350°F and continue baking pie for about 1¼ hours longer or until knife inserted in center of pie comes out clean.
Let pie cool completely before cutting.
Serve with a dollop of whipped cream and a sprinkle of cinnamon.
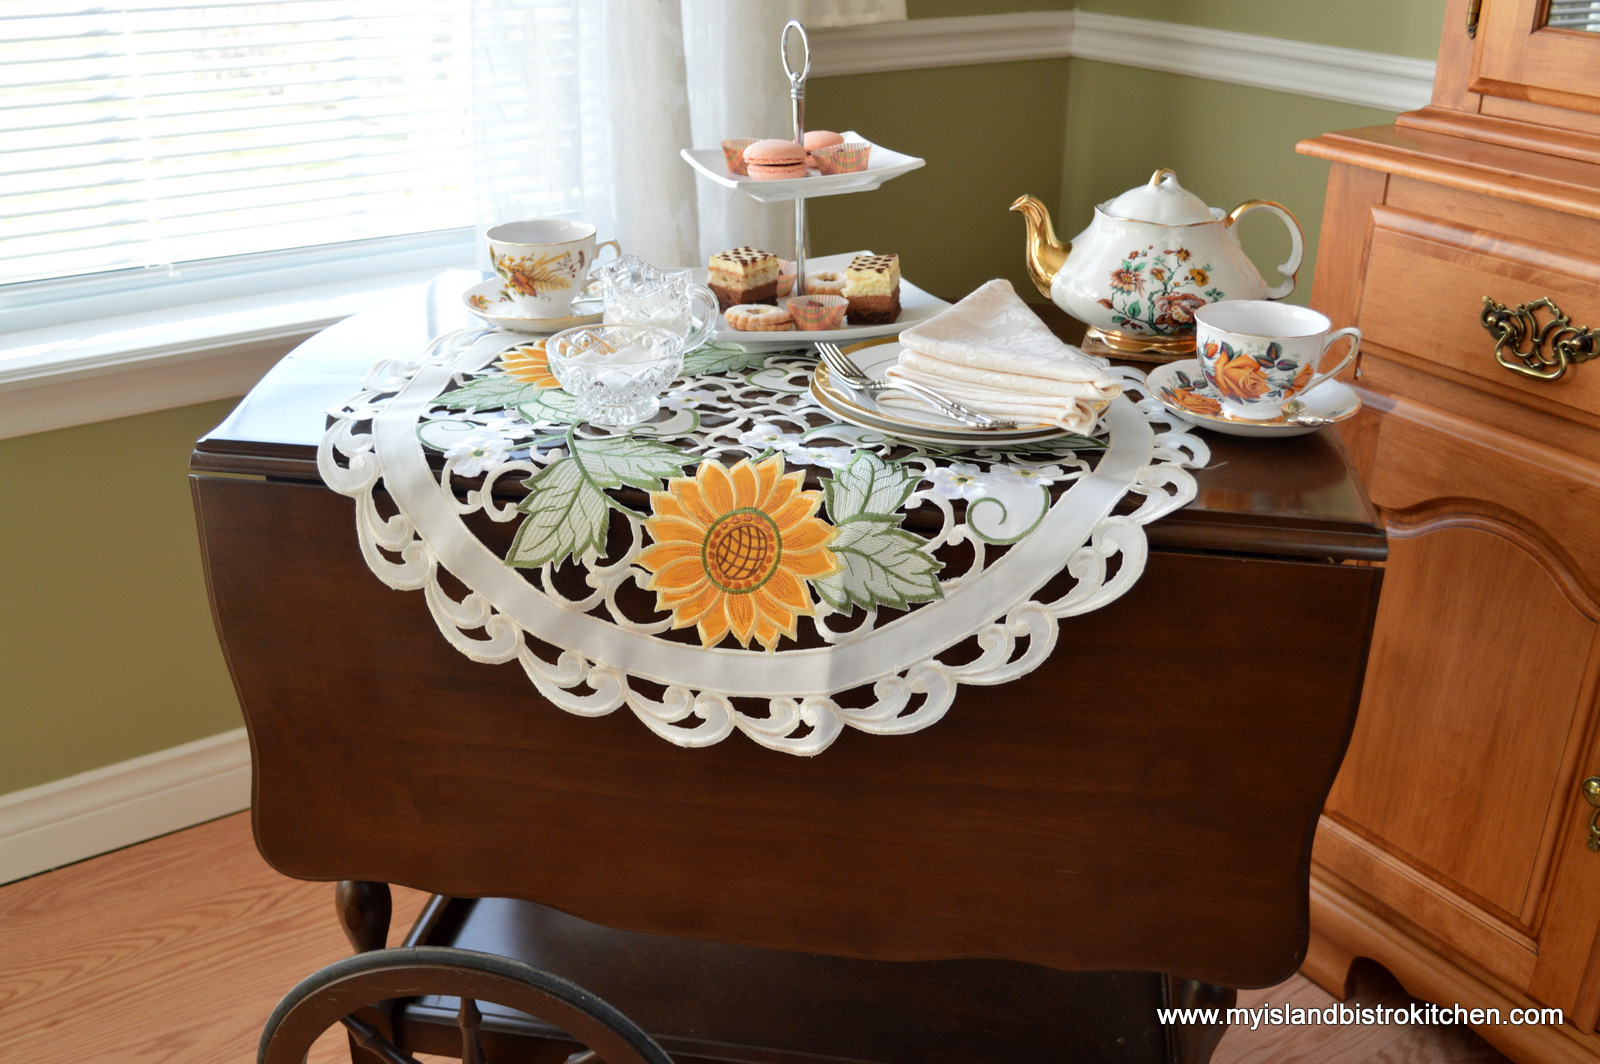
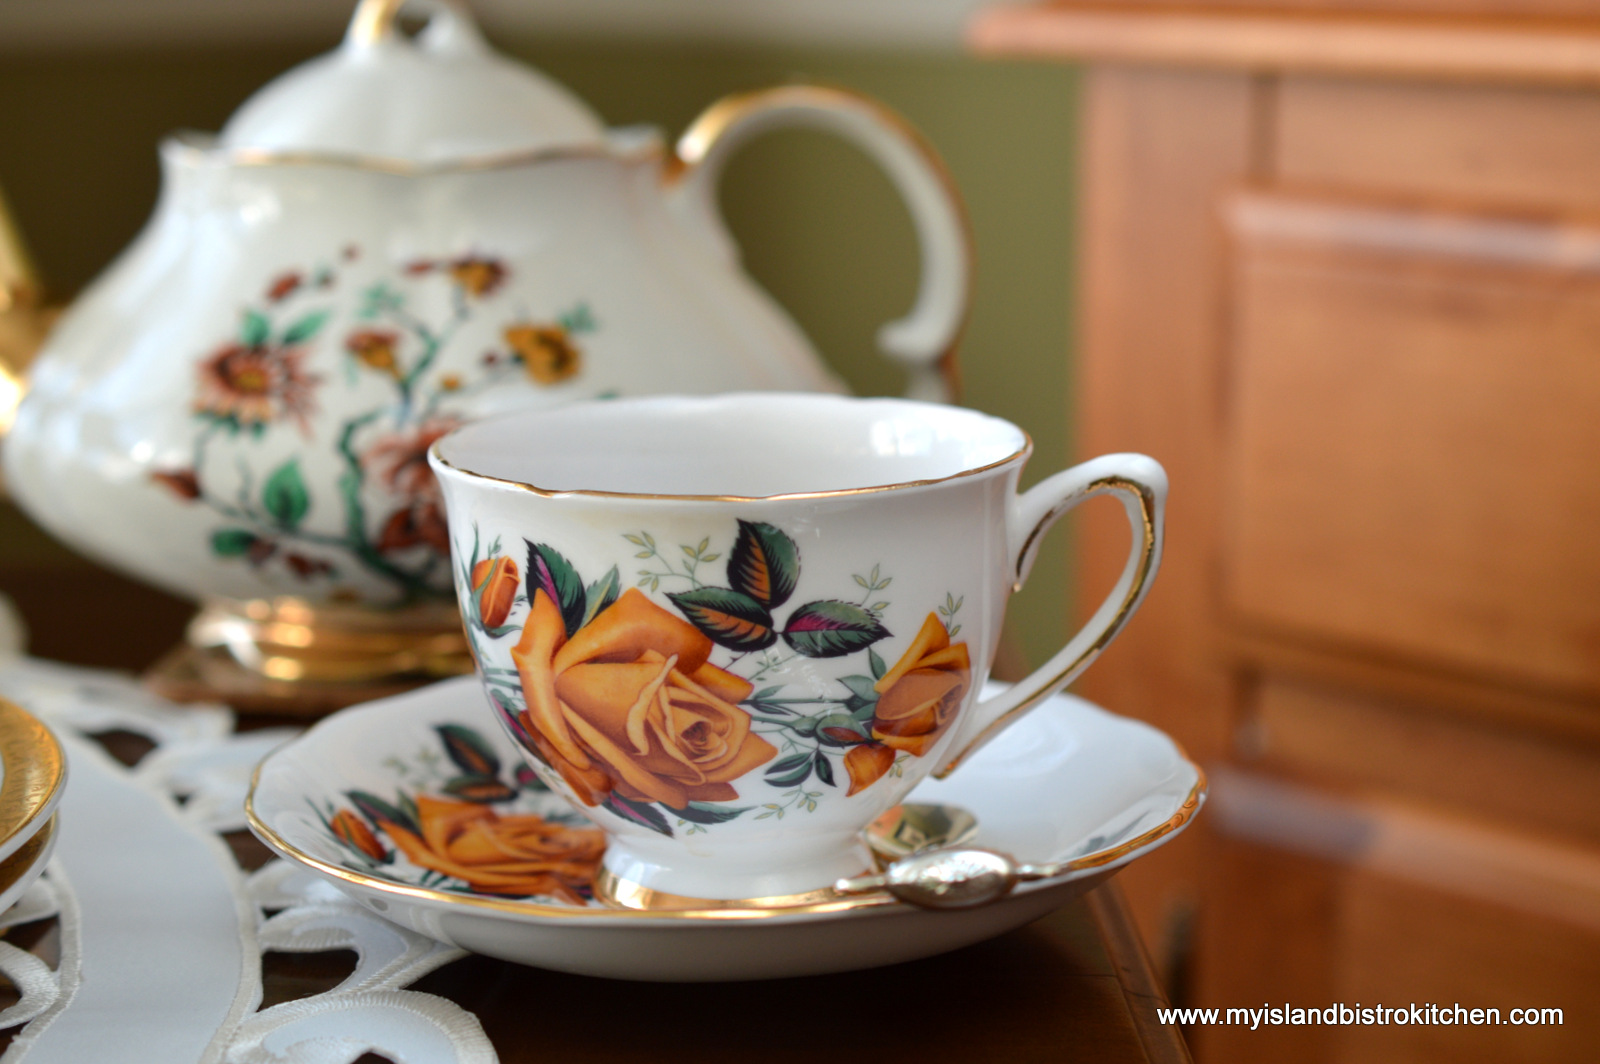
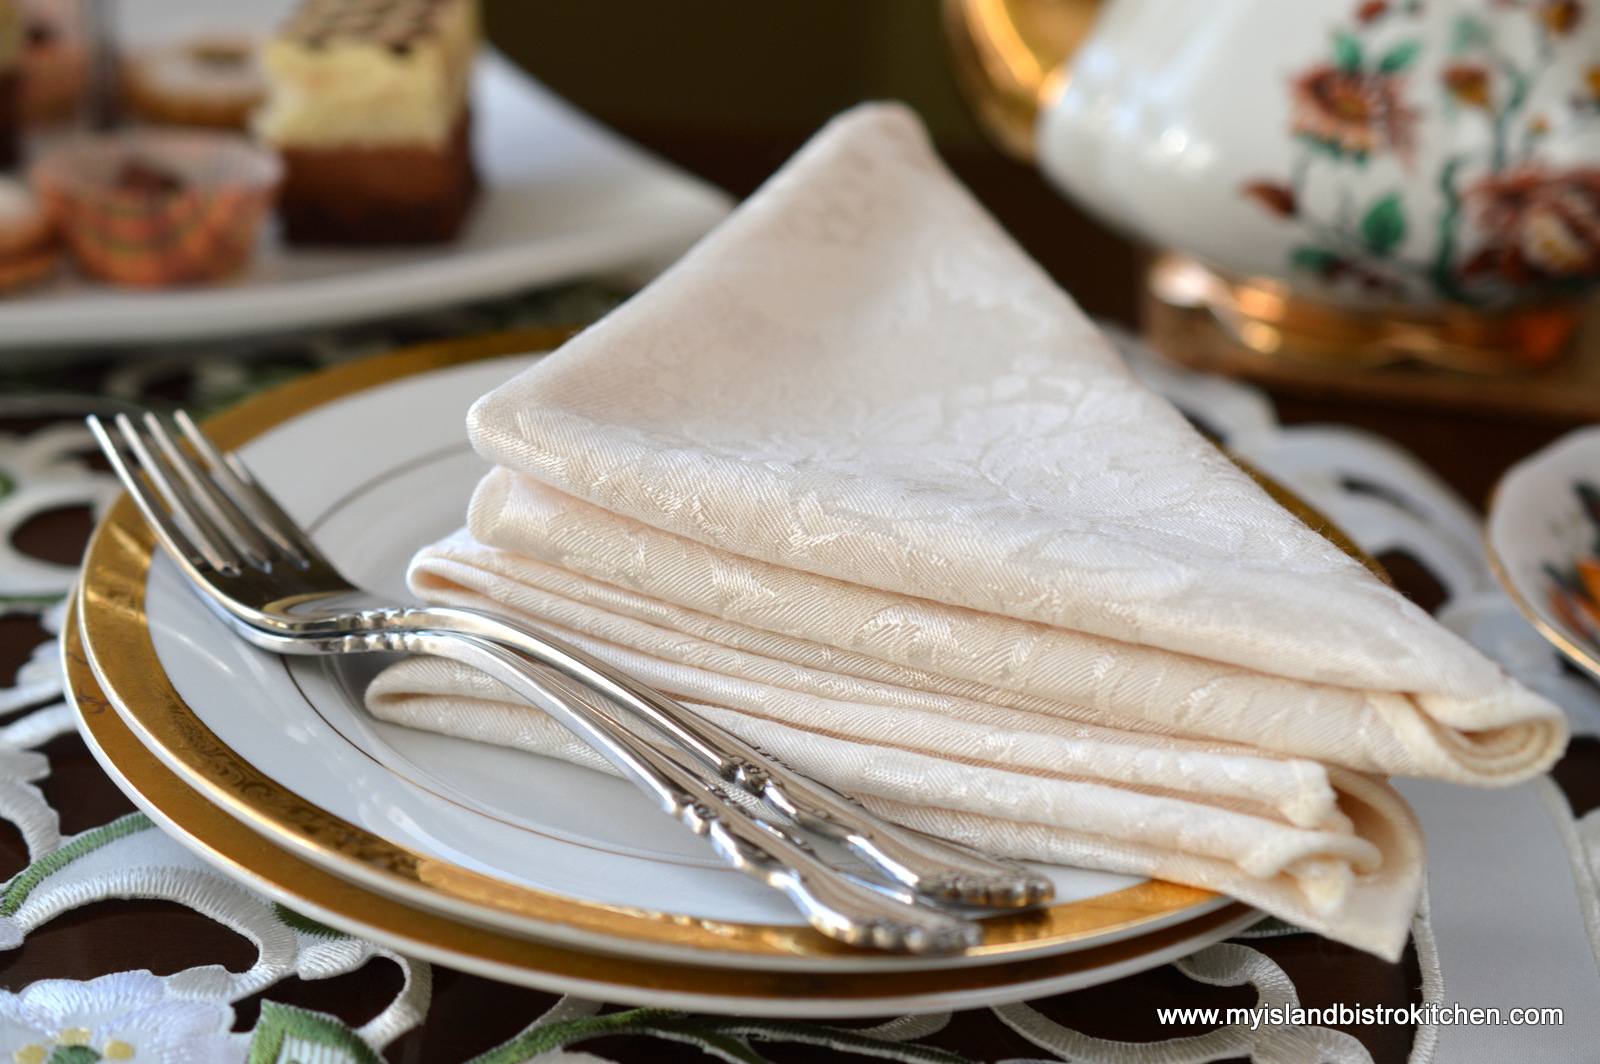
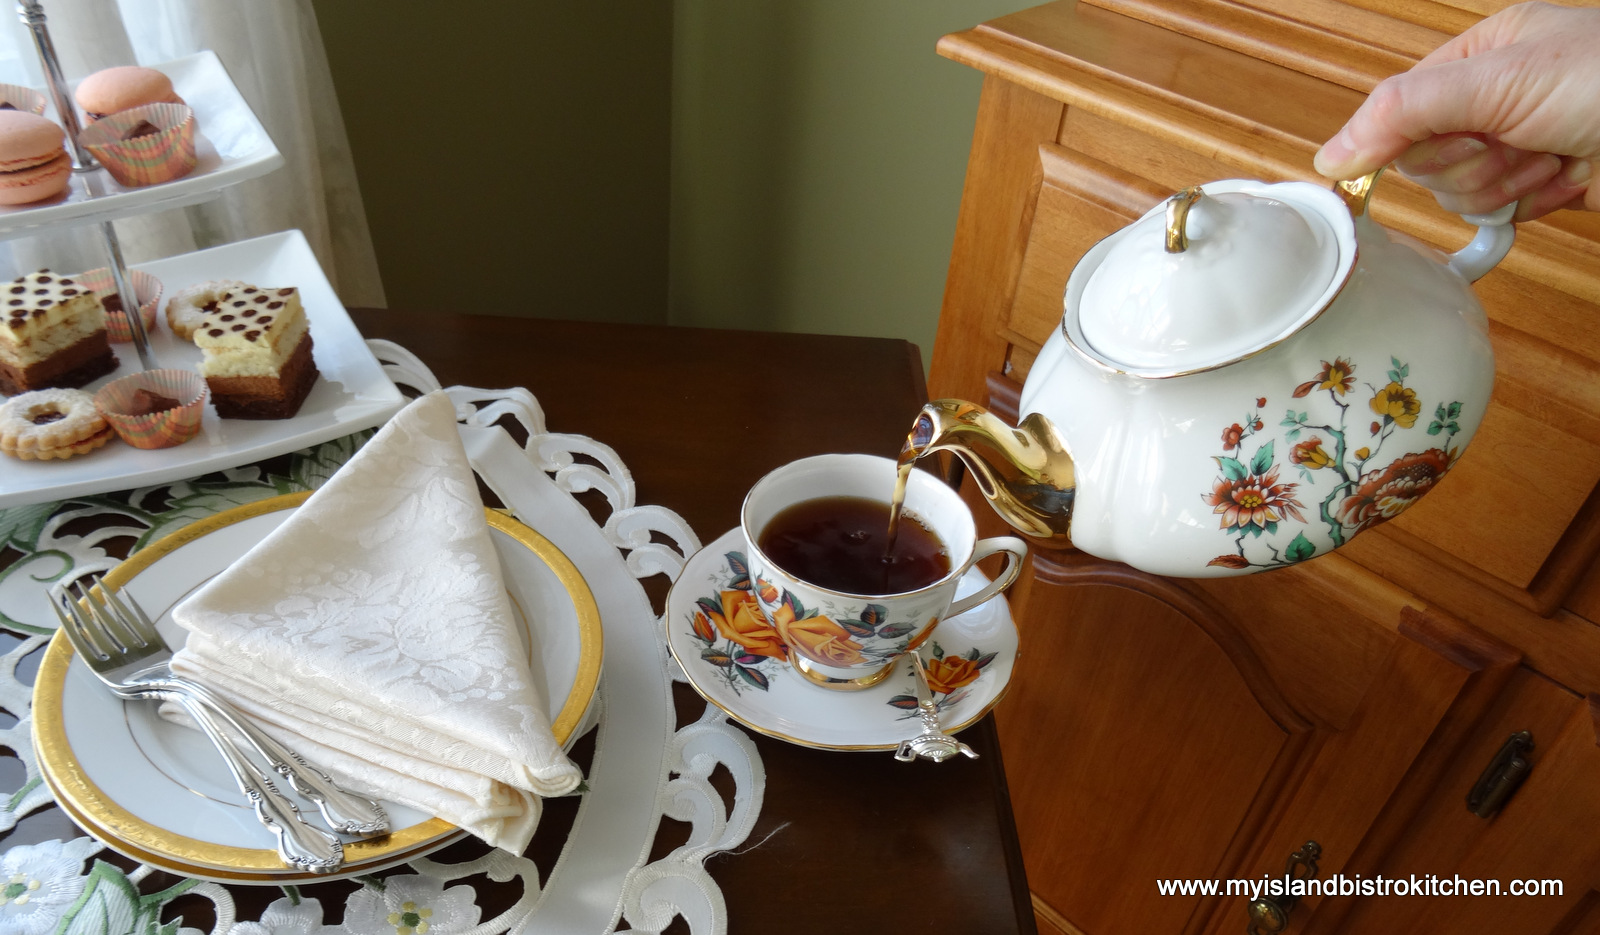
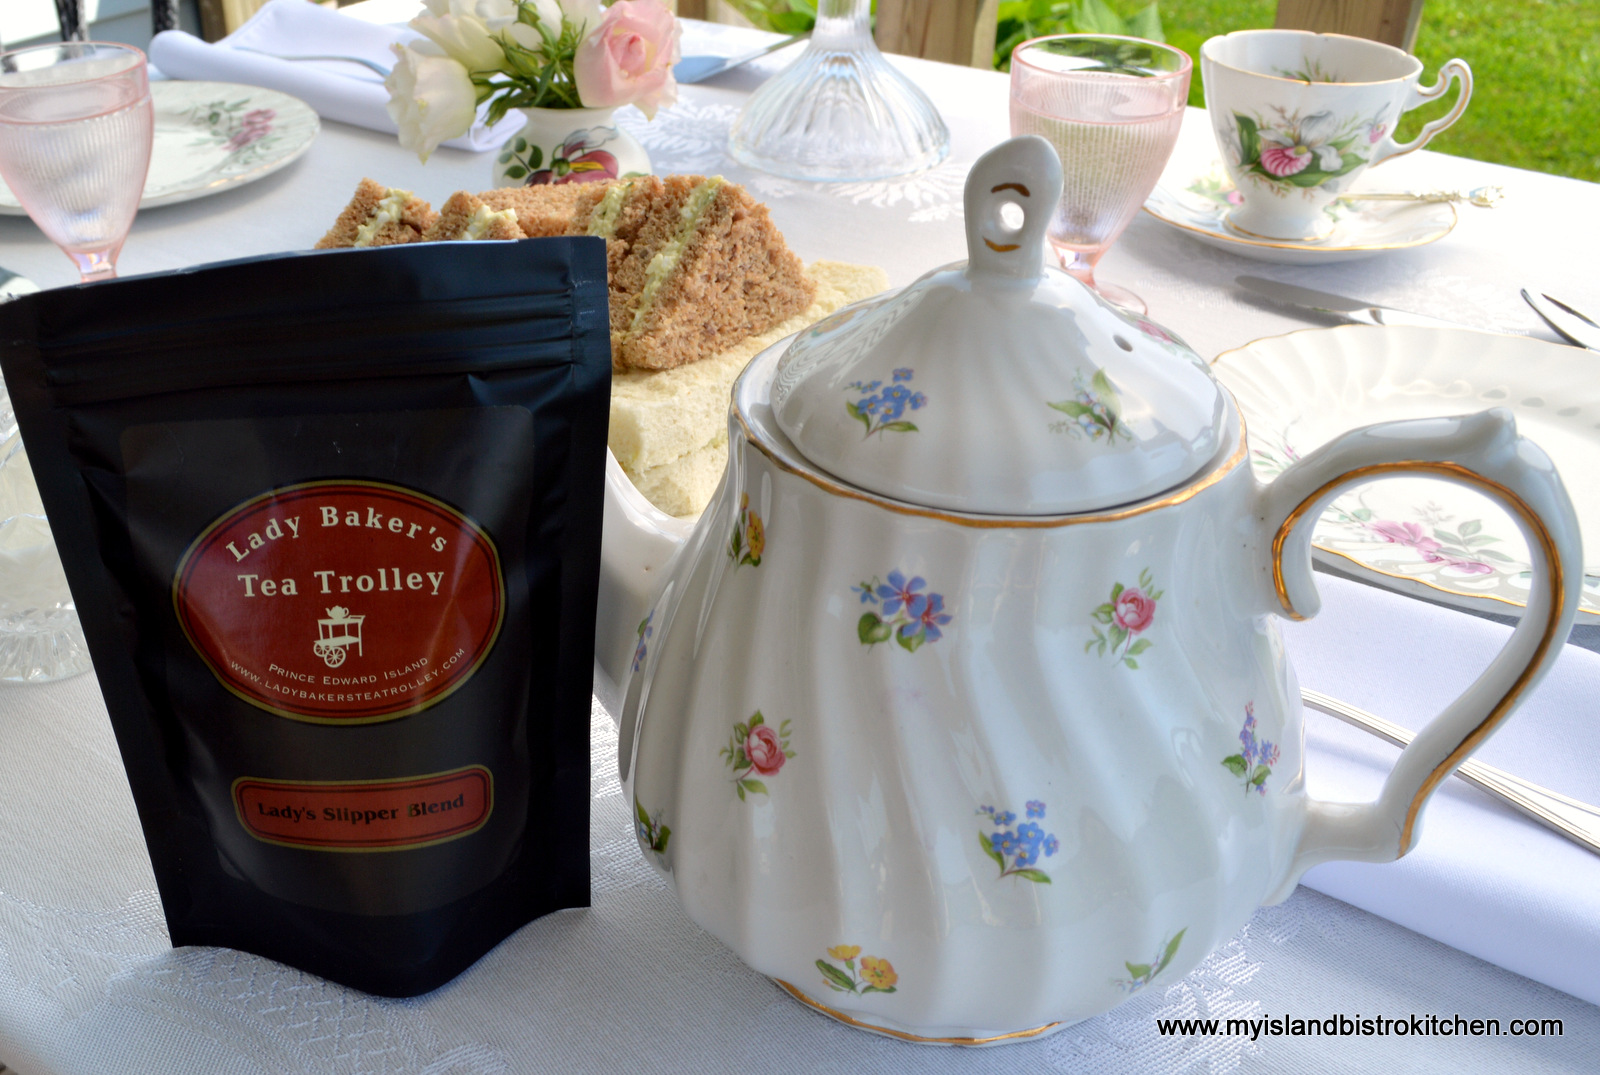
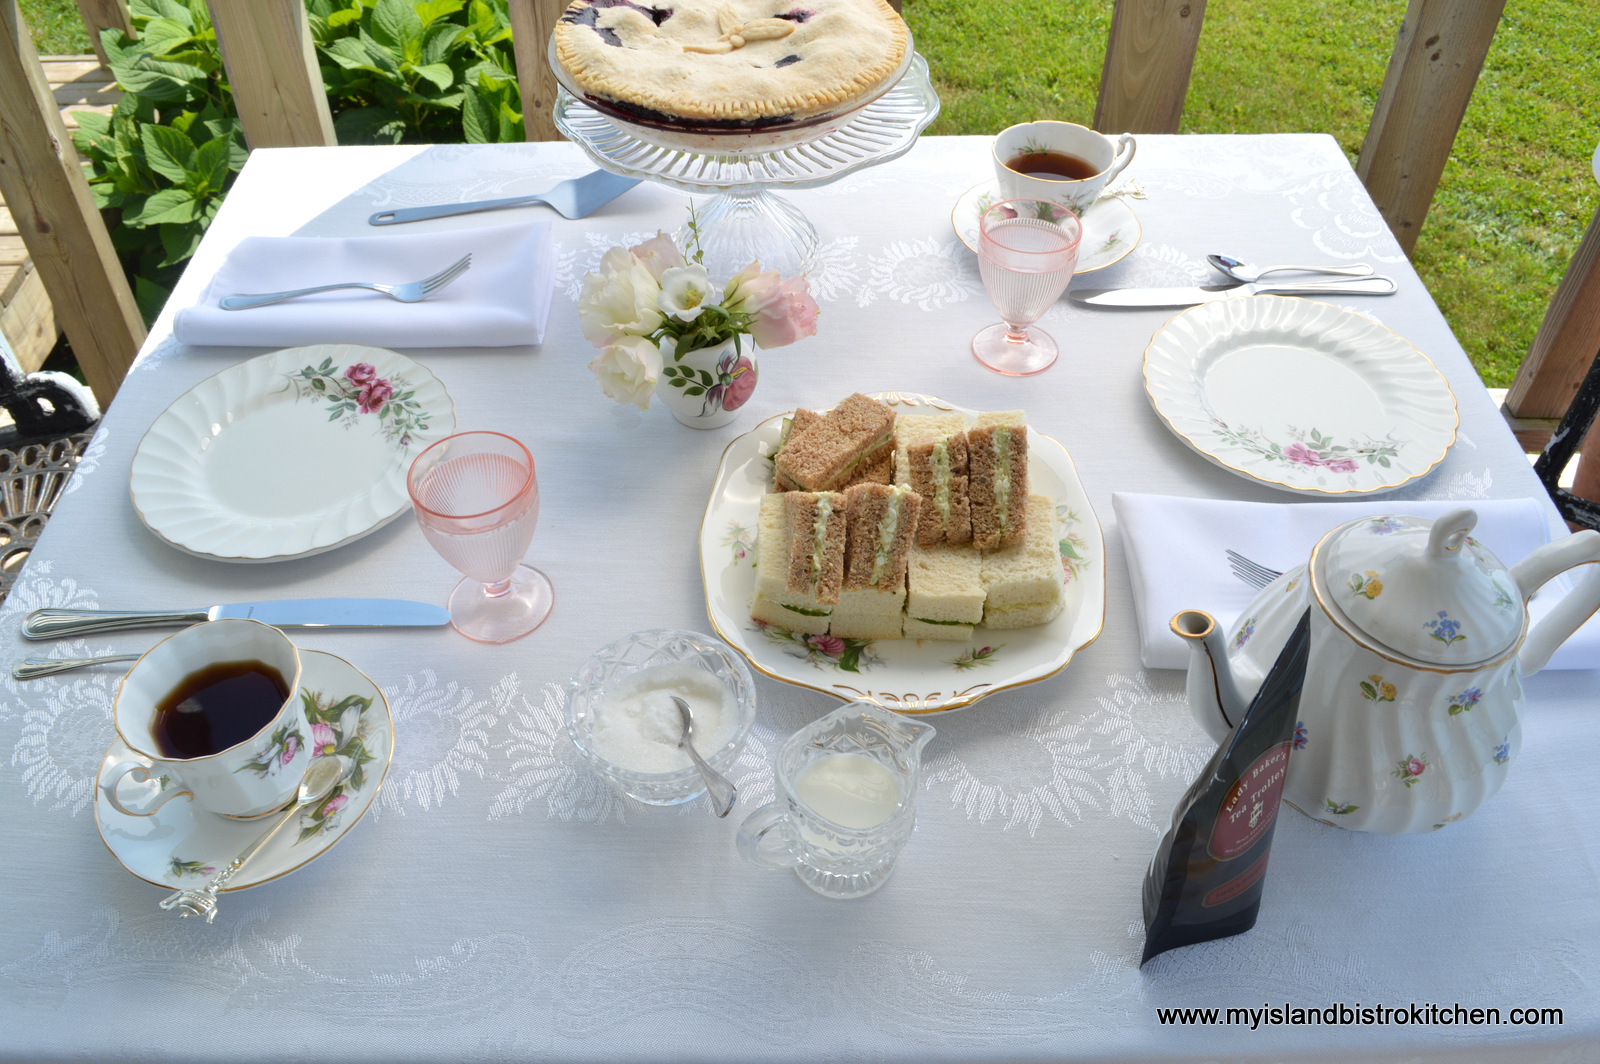
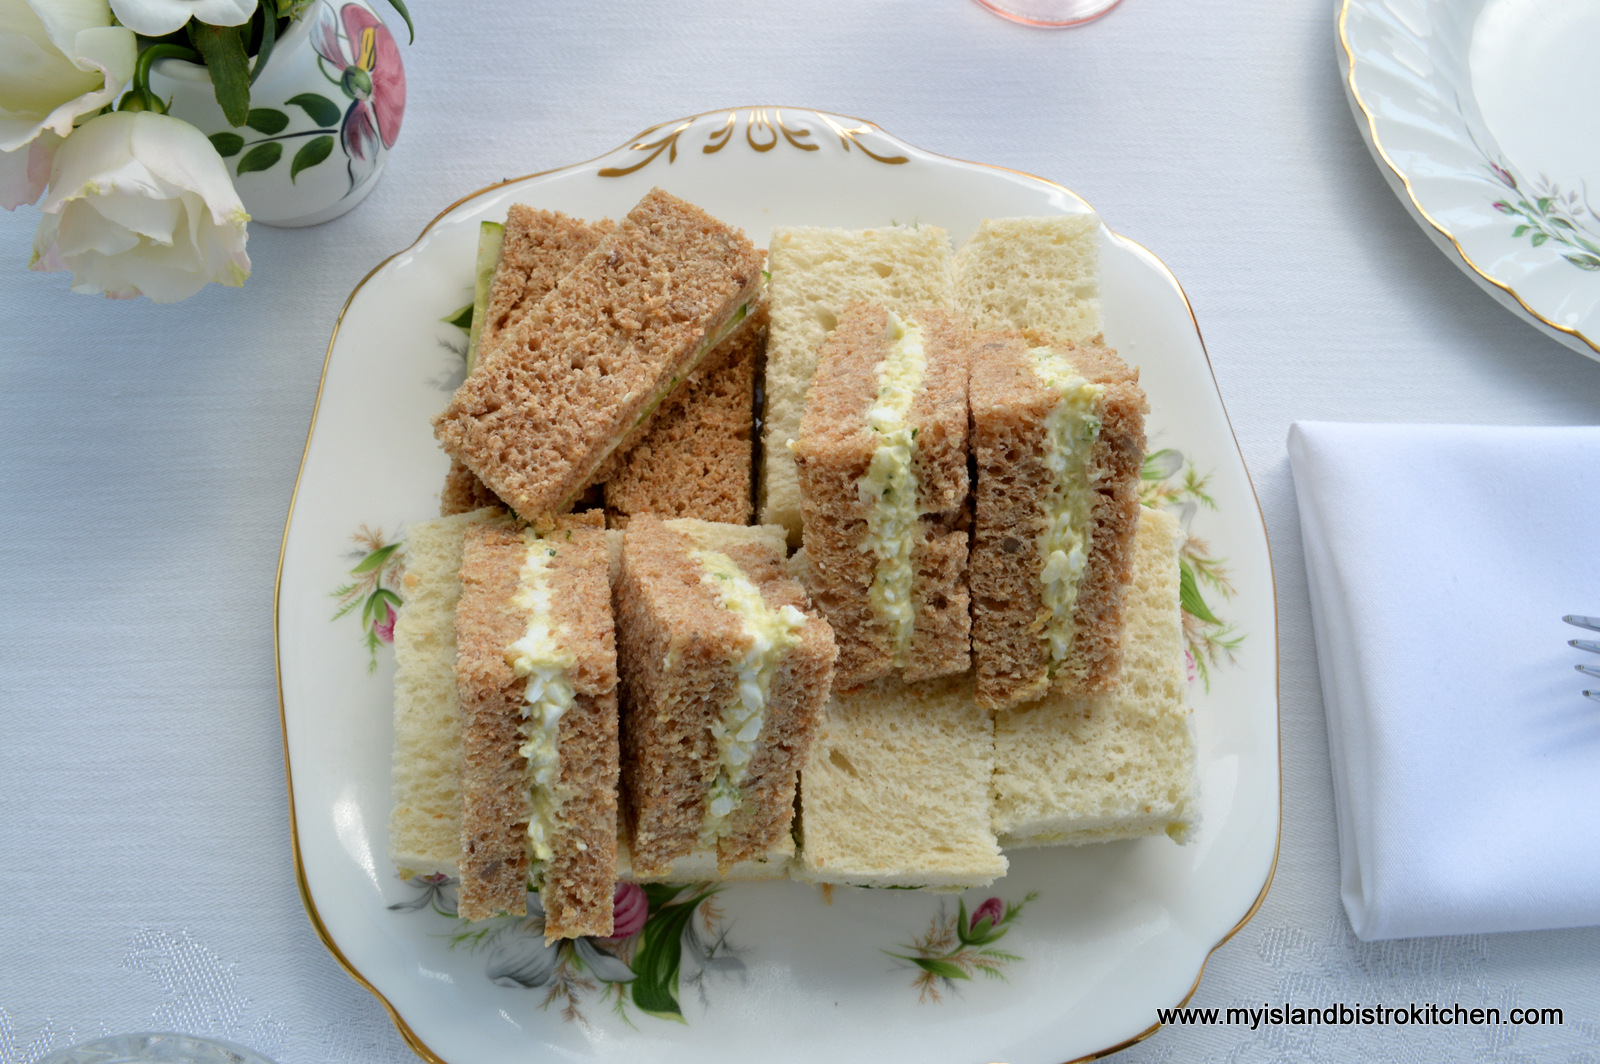
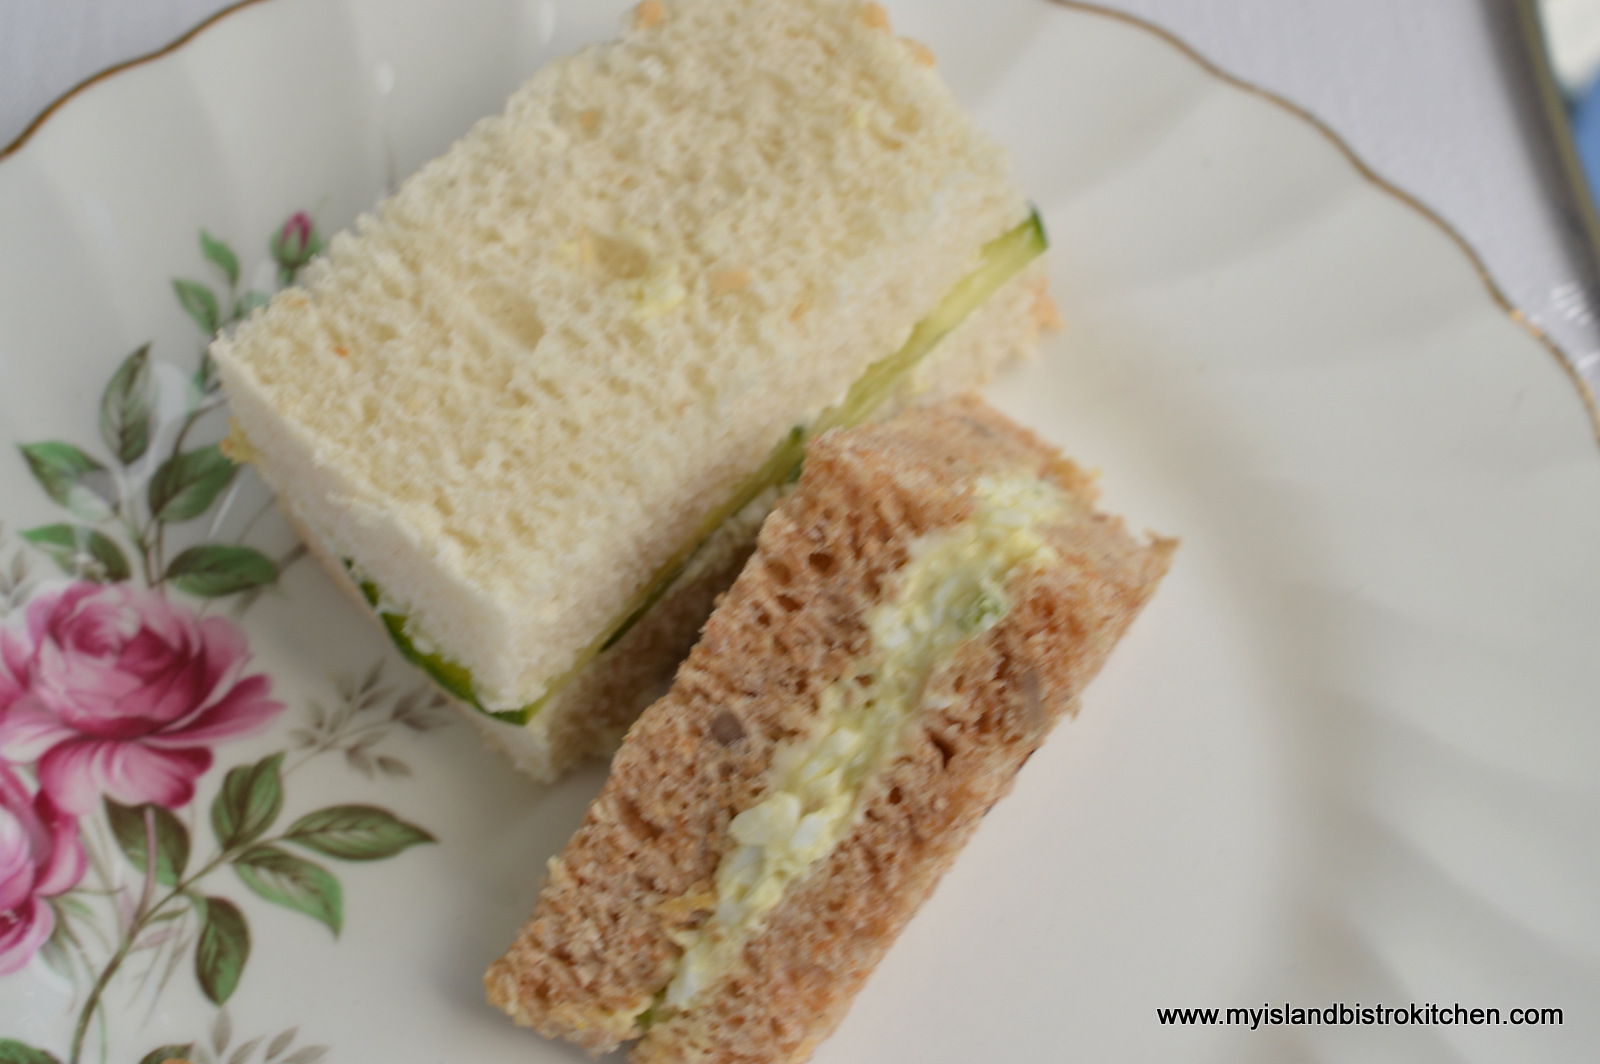
Lots of new things to share in today’s afternoon tea posting!
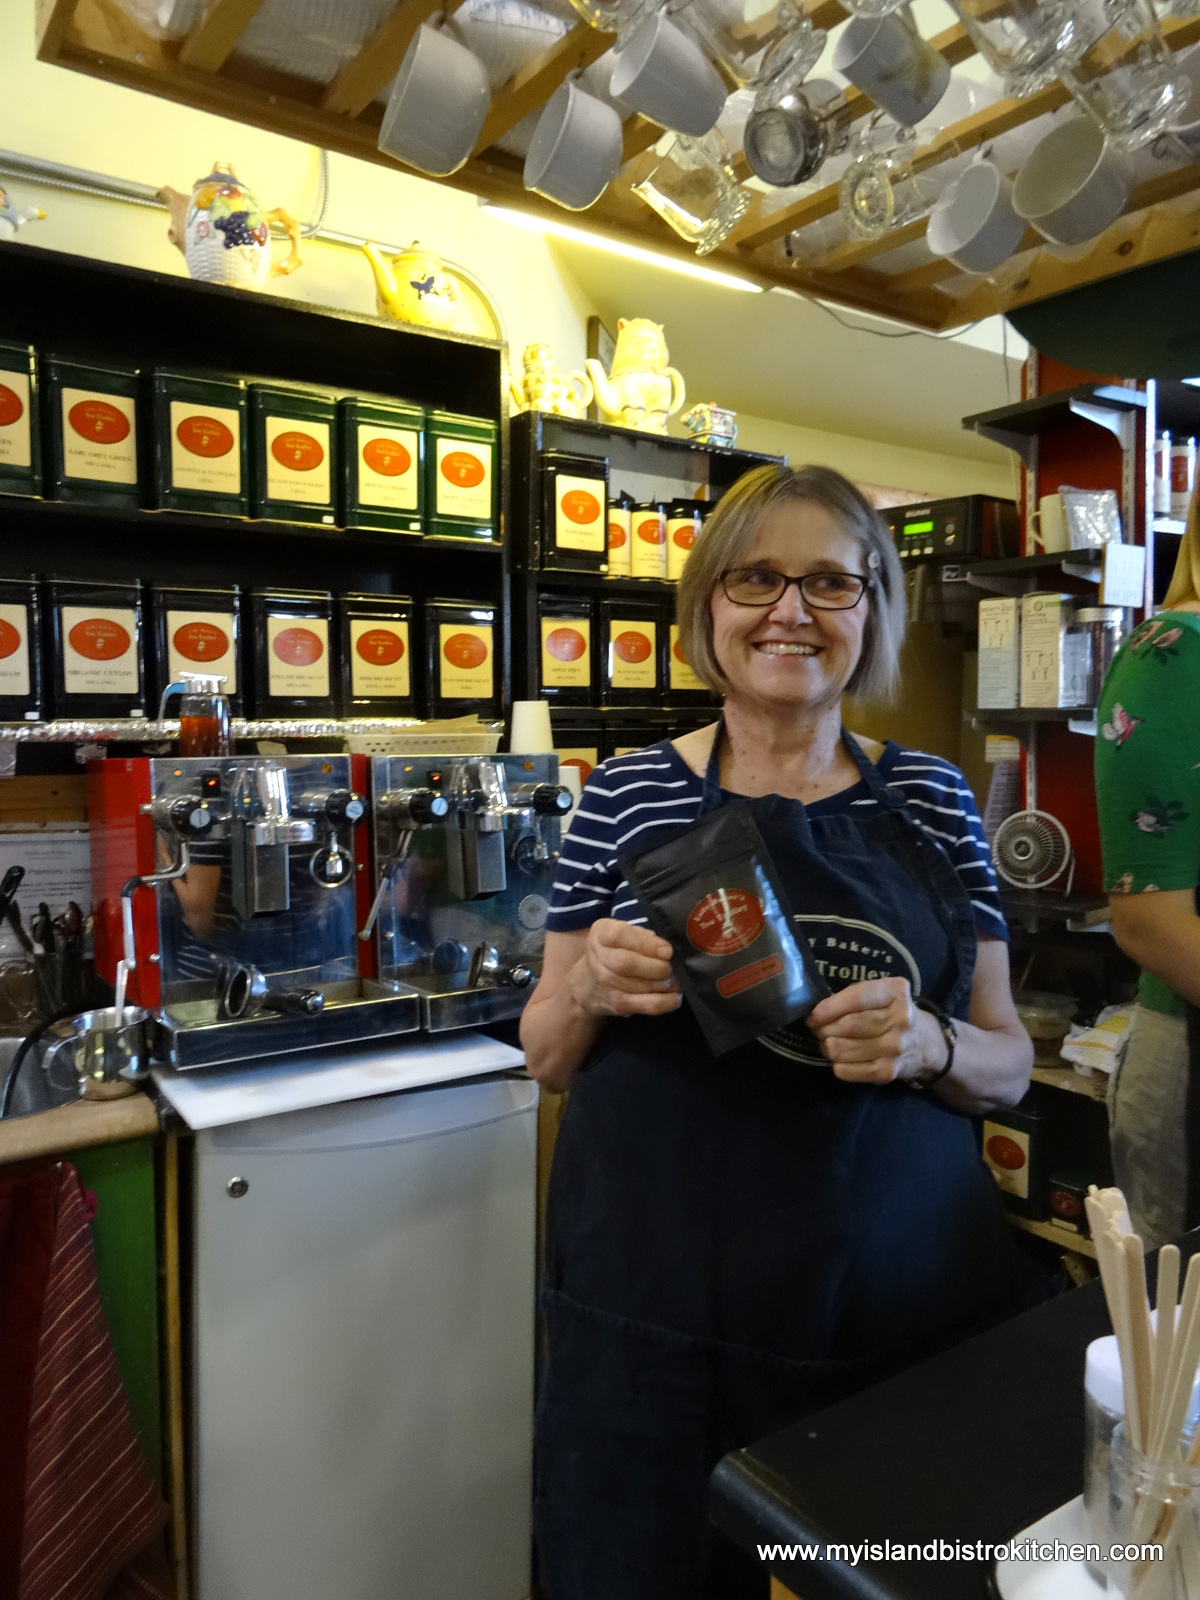
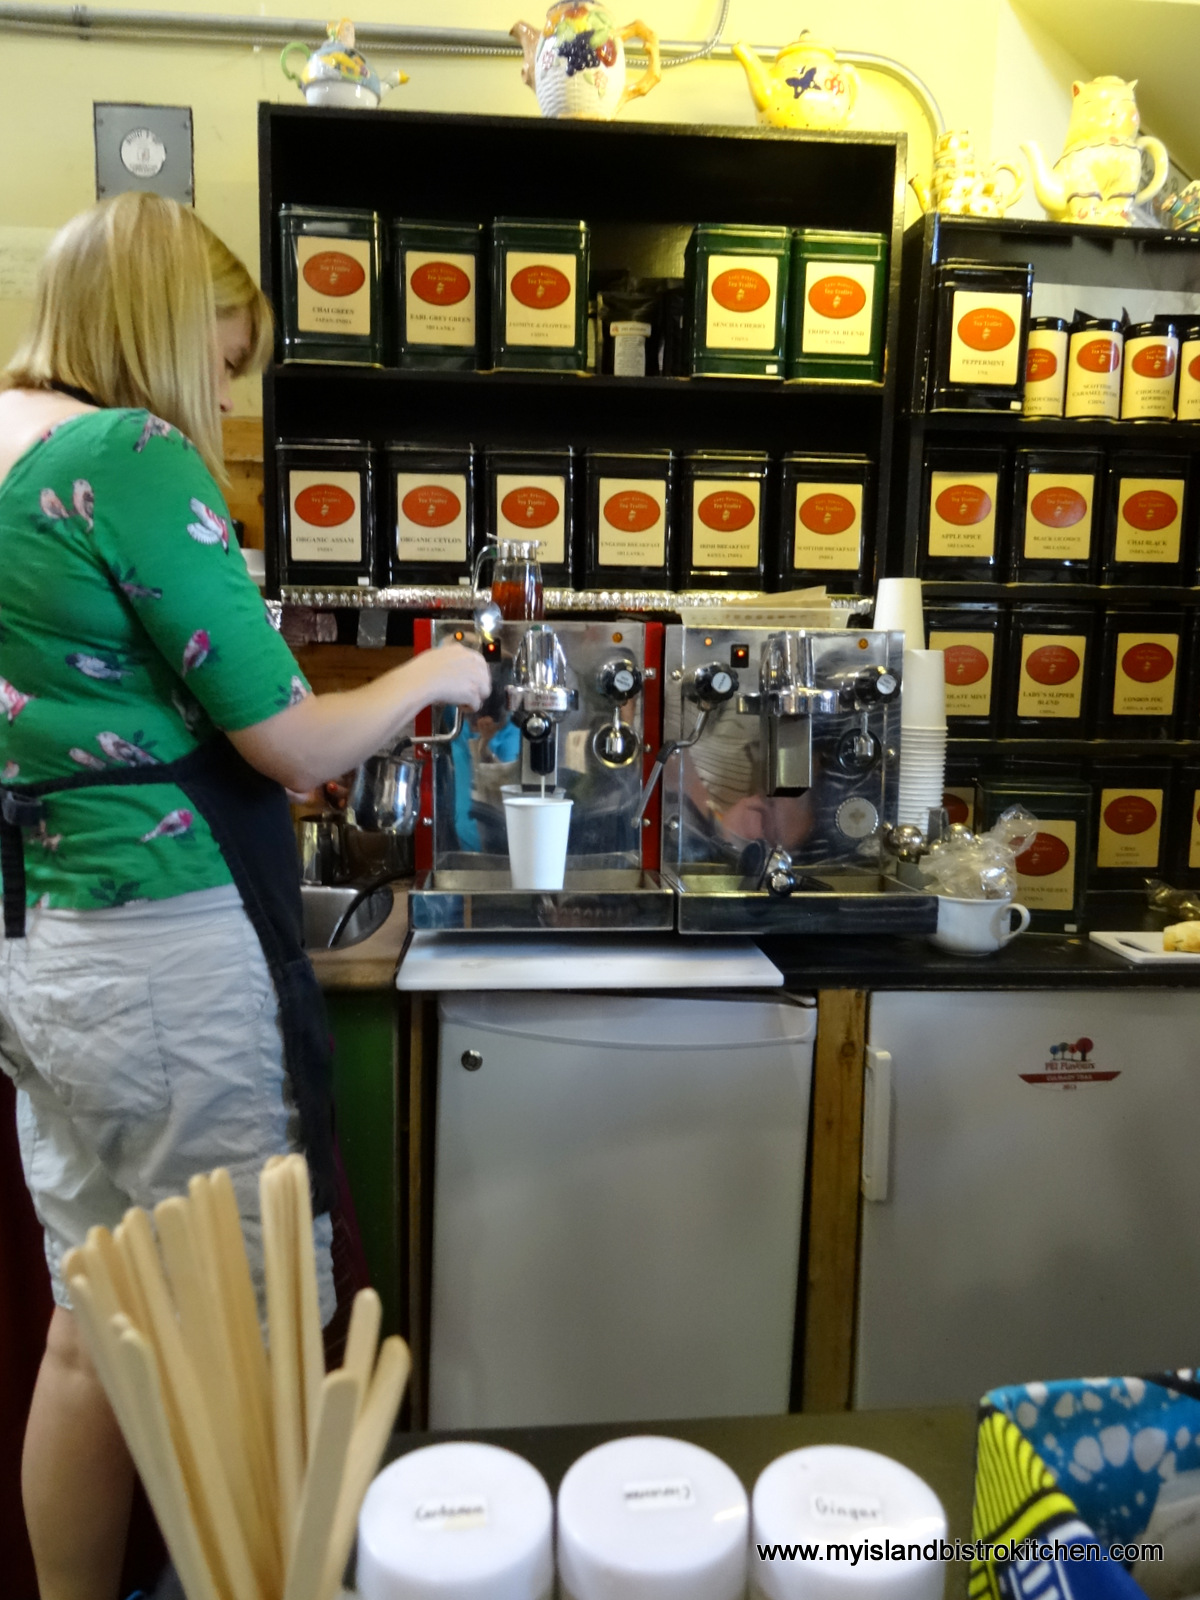
I have been looking for a long time for a tea cart, or tea trolley. I was specifically looking for a Roxton maple cart but none was showing up. However, I was able to find one in a darker wood that is in need of a little TLC at some point but is still usable in the meantime. So, our afternoon tea today was served via the new-to-me tea cart.
The second new acquistion is the little circular tablecloth. I bought it at the local Anne of Green Gables store on the corner of Queen and Richmond Street in downtown Charlottetown, PEI. They have a great selection of these types of small tablecloths, squares, and runners, and at reasonable prices. I particularly like the sunflower design for late summer and autumn use. It also looks great on the centre of my light maple dining room table.
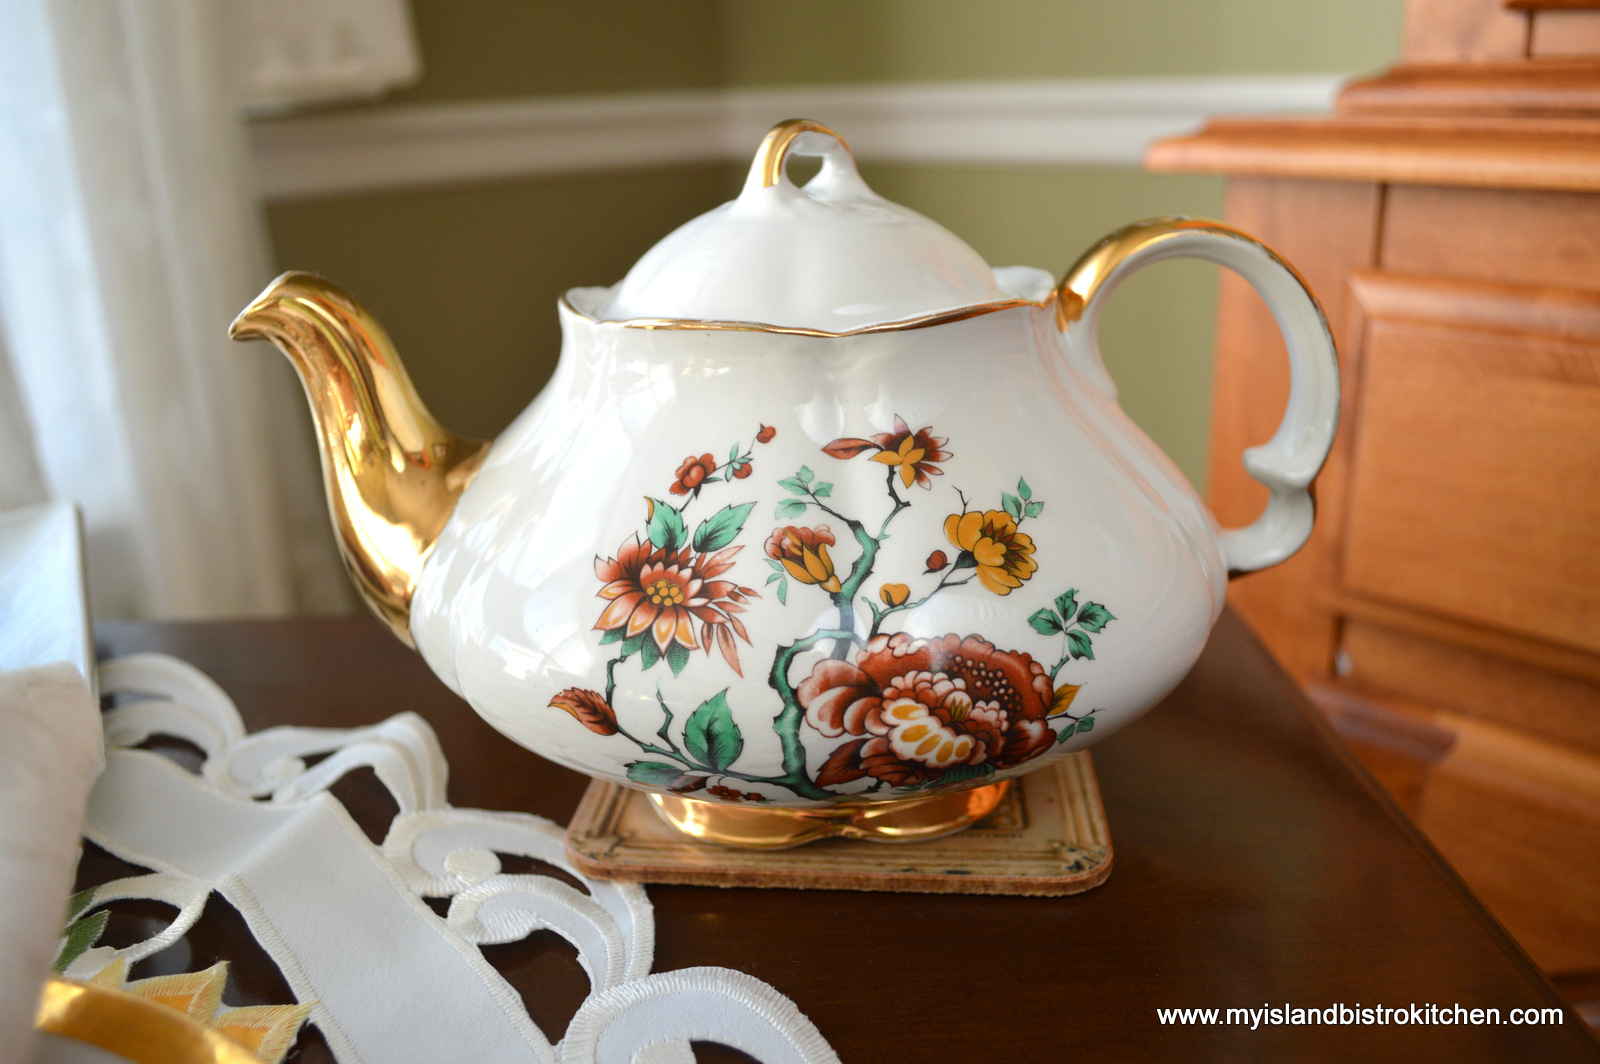
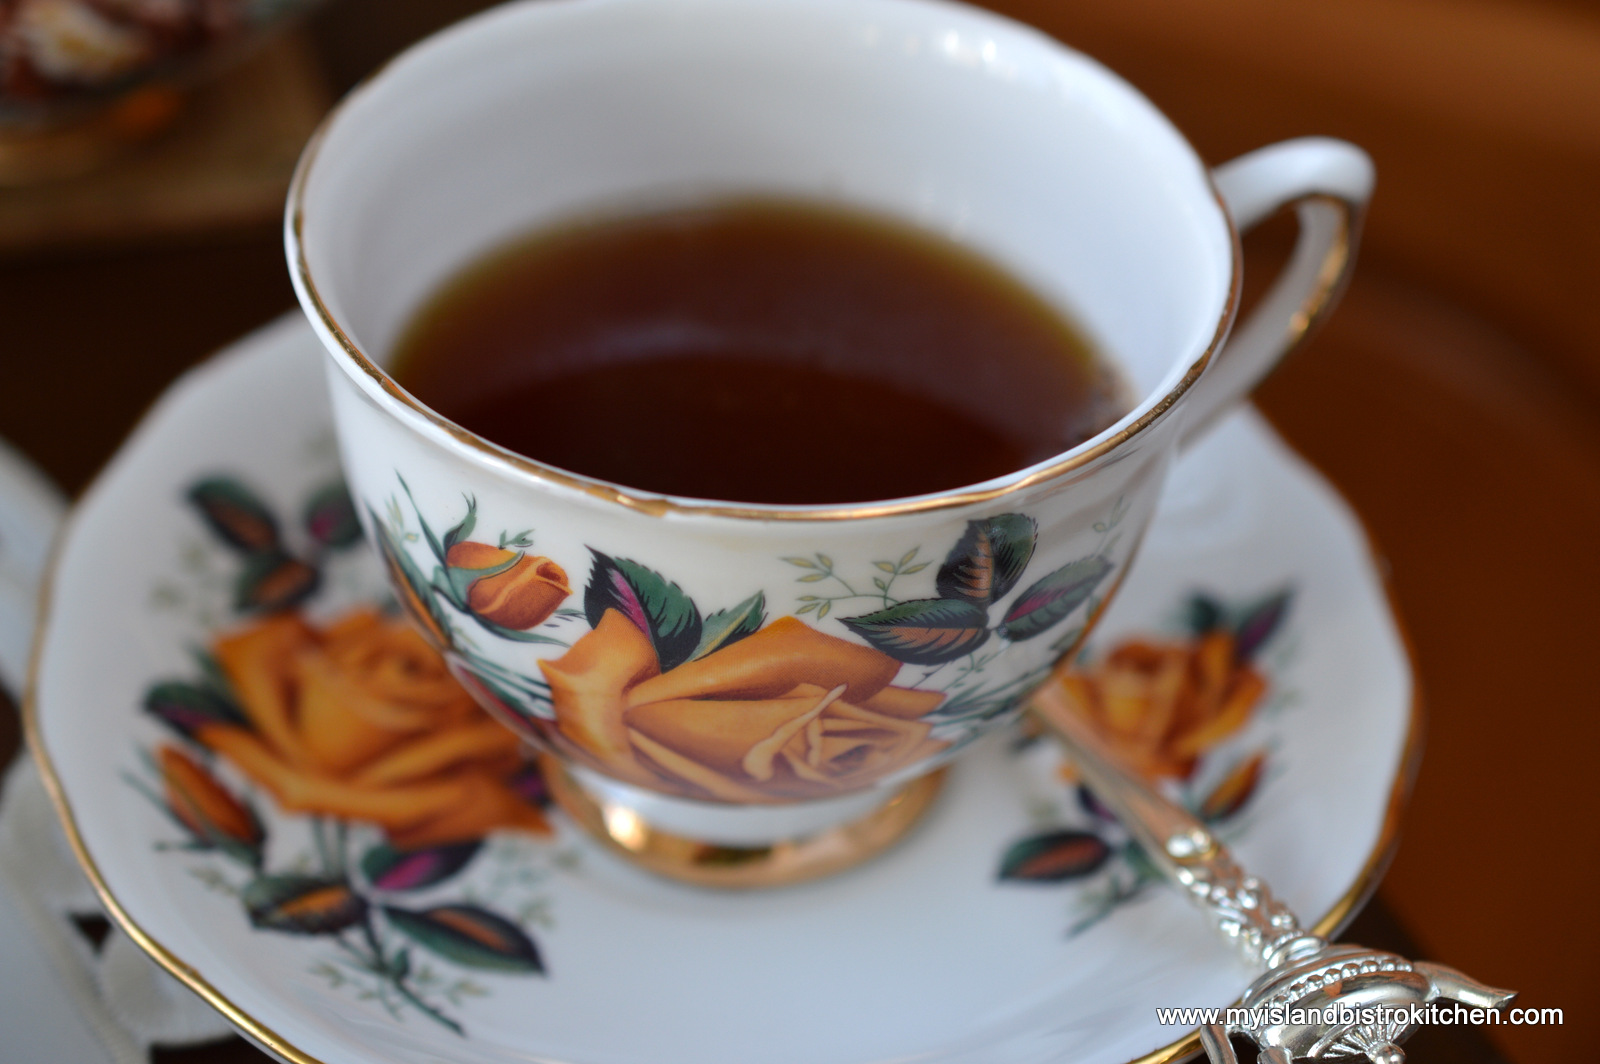
The third new treasure (I told you there were lots!) is the new-to-me Ellgreave teapot. While I tend to lean toward pretty pinks, yellows, and mauves in teapot colors, the shape and the gold trim of this one particularly took my eye. The colors are also suitable for autumn teas.
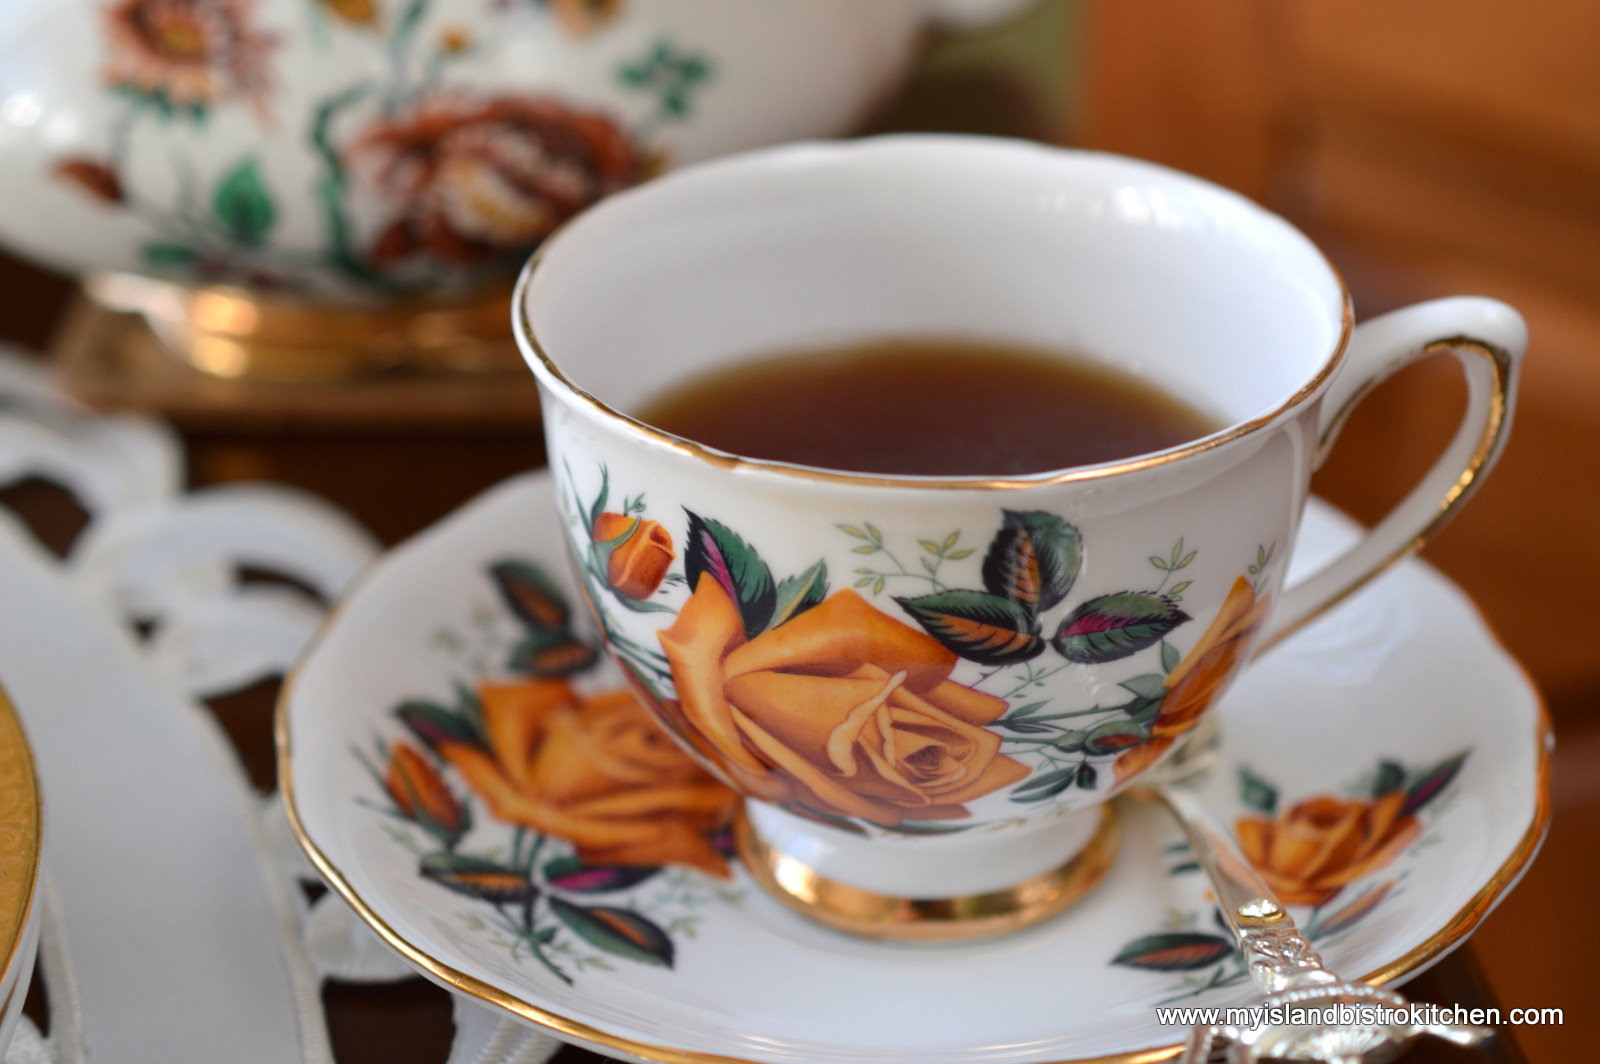
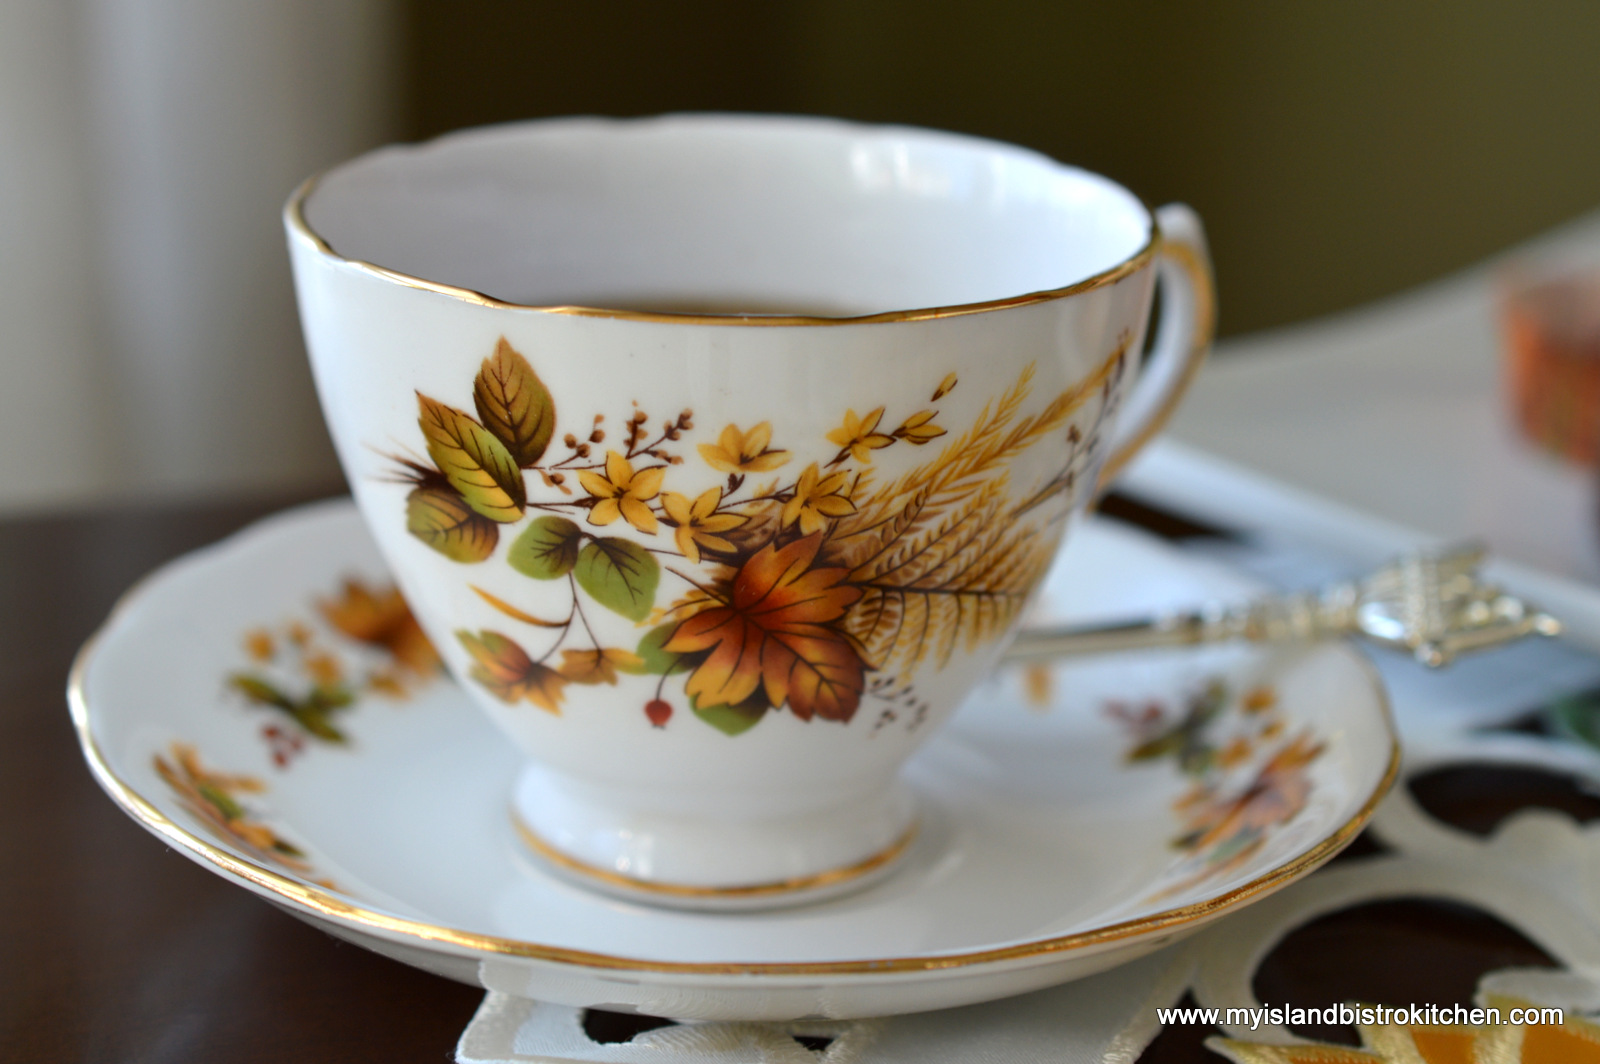
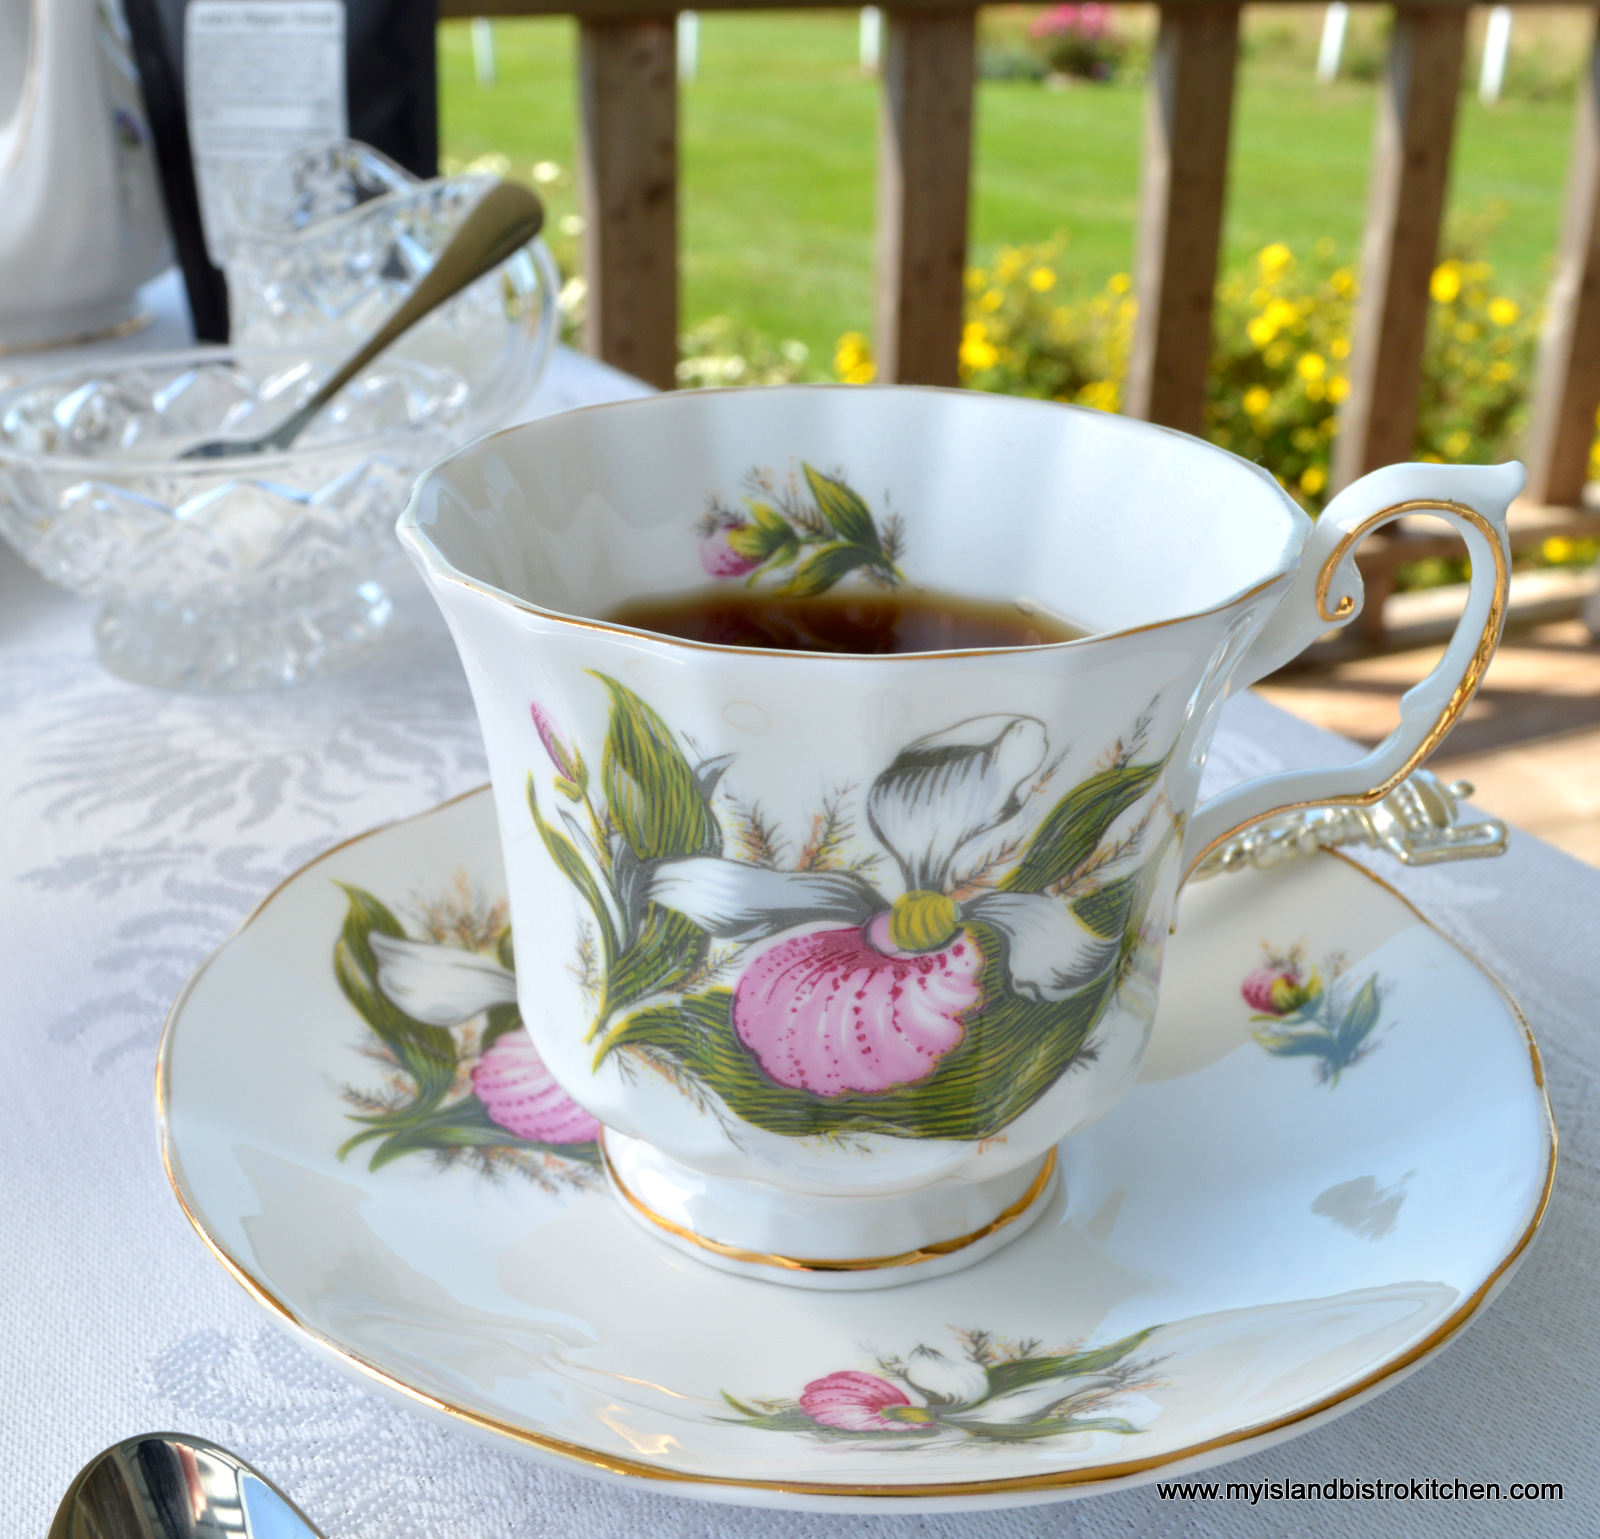
I chose a couple of teacups and saucers from my small autumn collection. Both blend well with the teapot colors.
I like the rich tones in the rose in the above teacup (Cololough, Eng.) along with its gold trim to match that on the teapot. I like the fall motif on the cup (Royal Vale, Eng.) below.
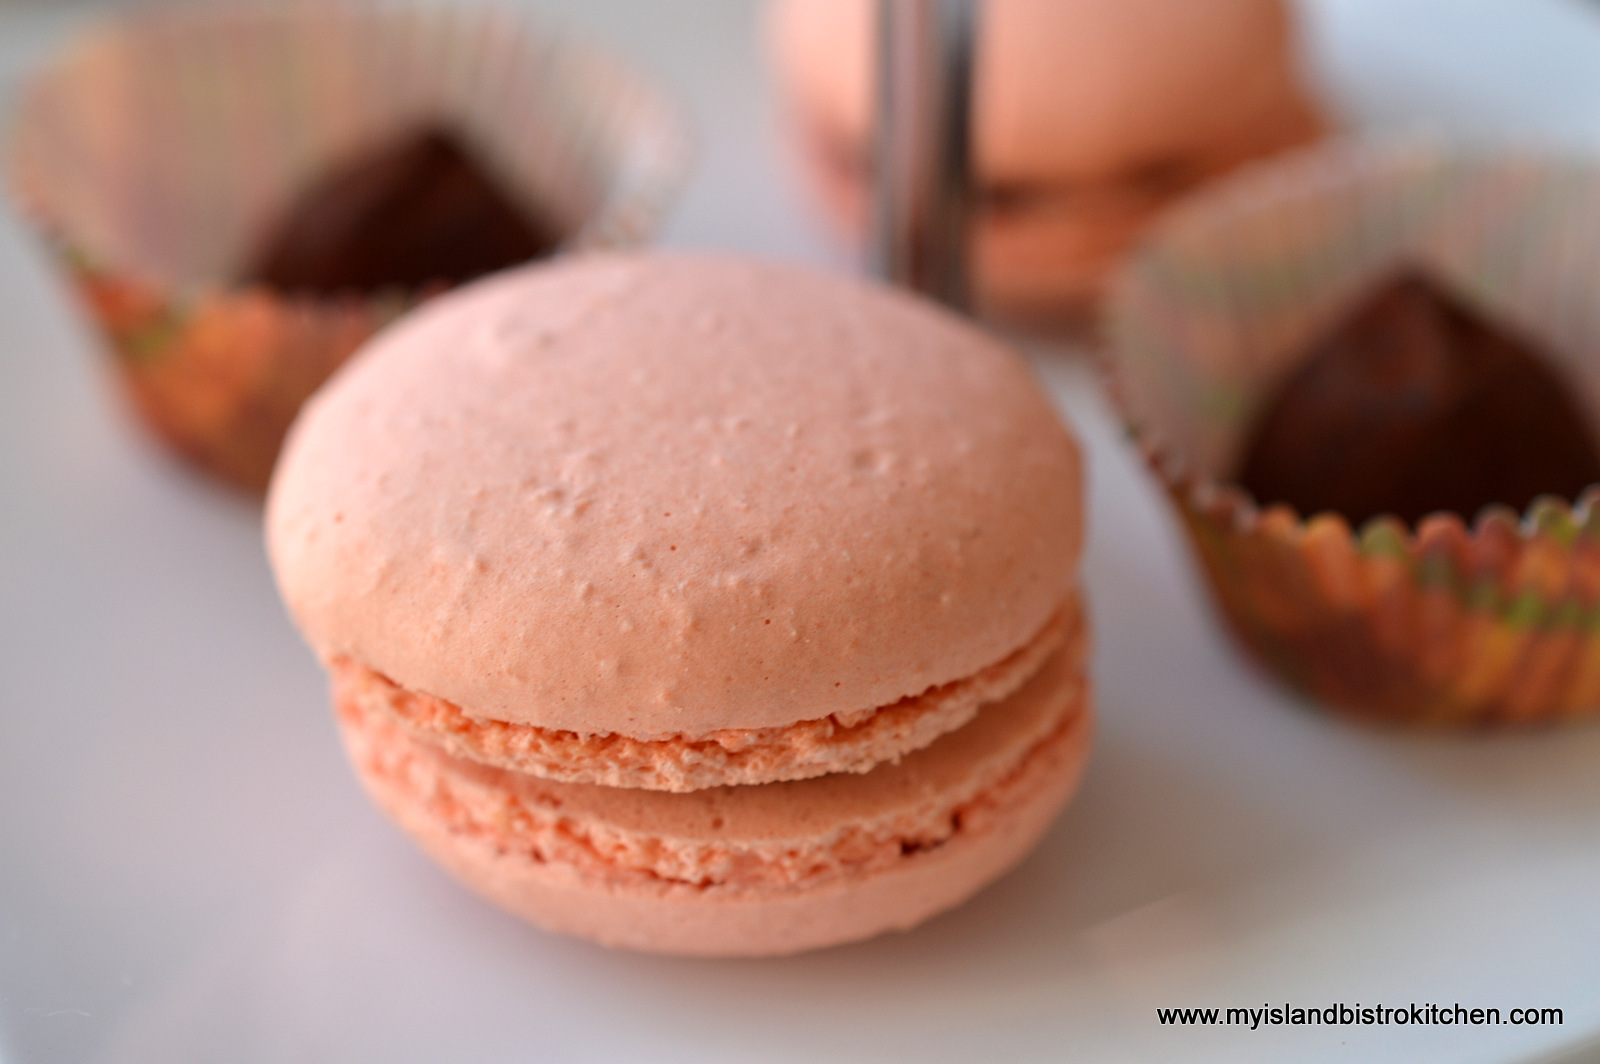
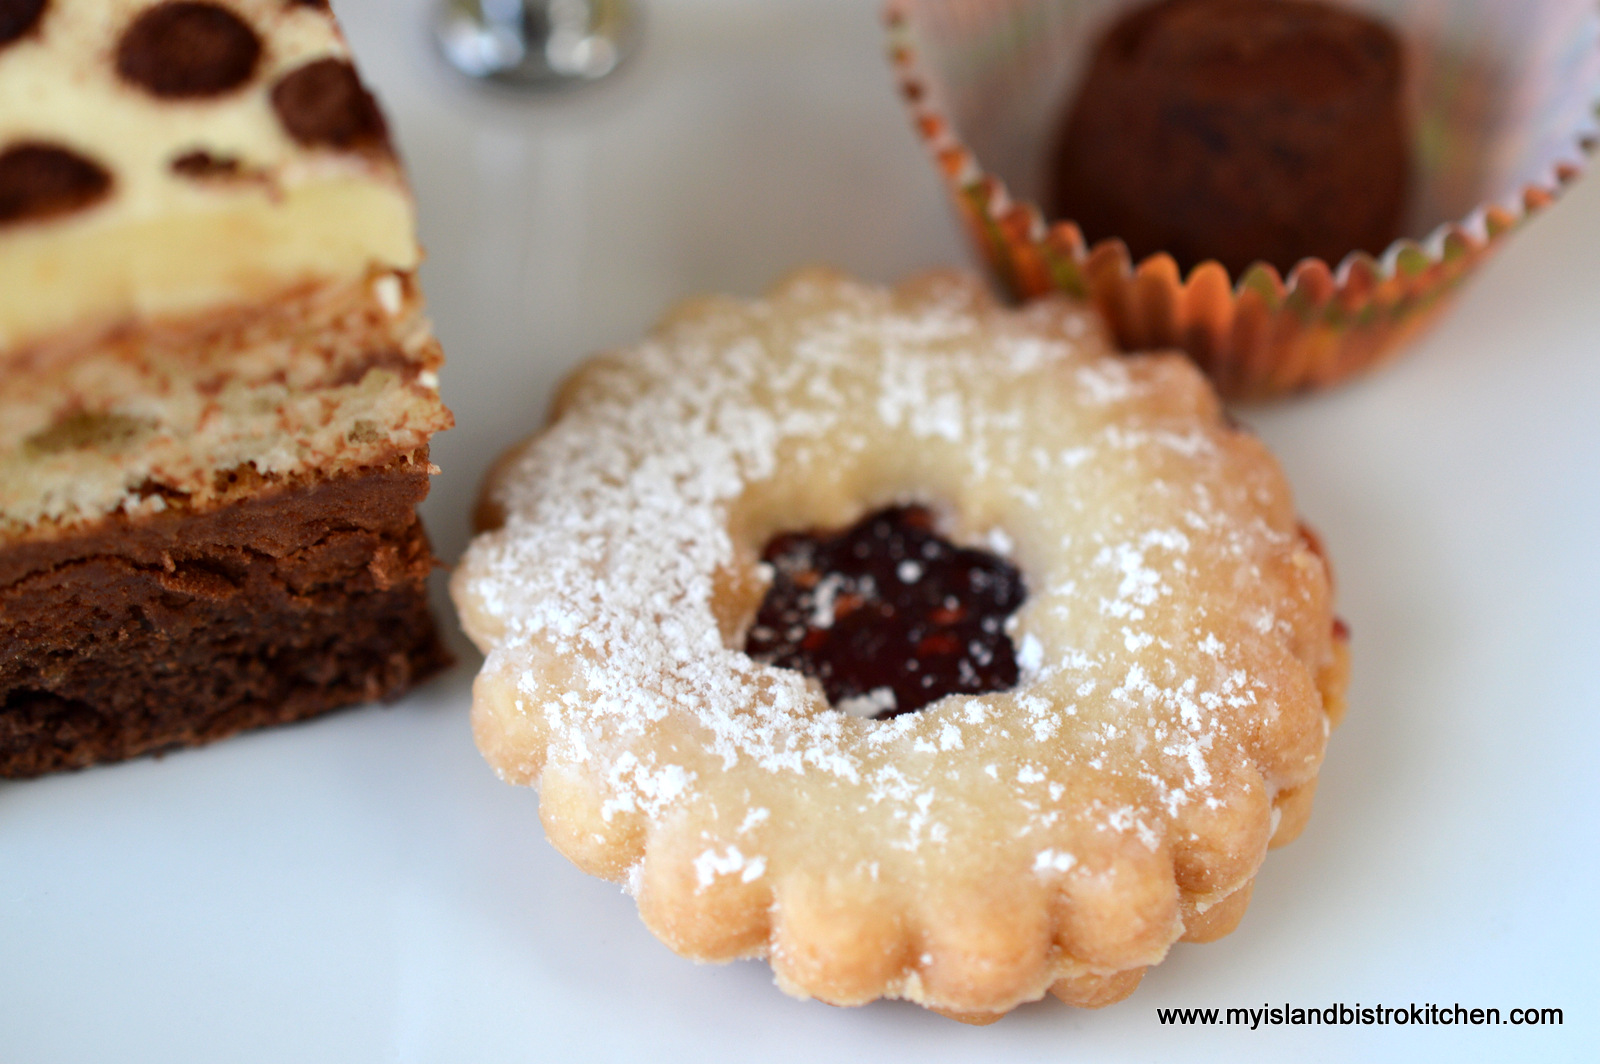
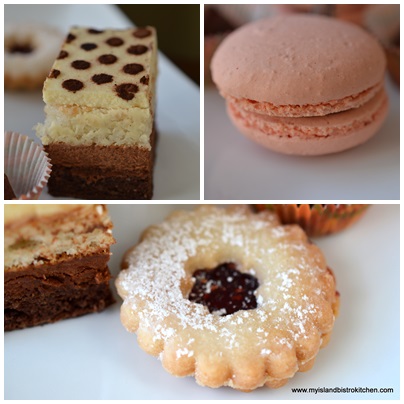
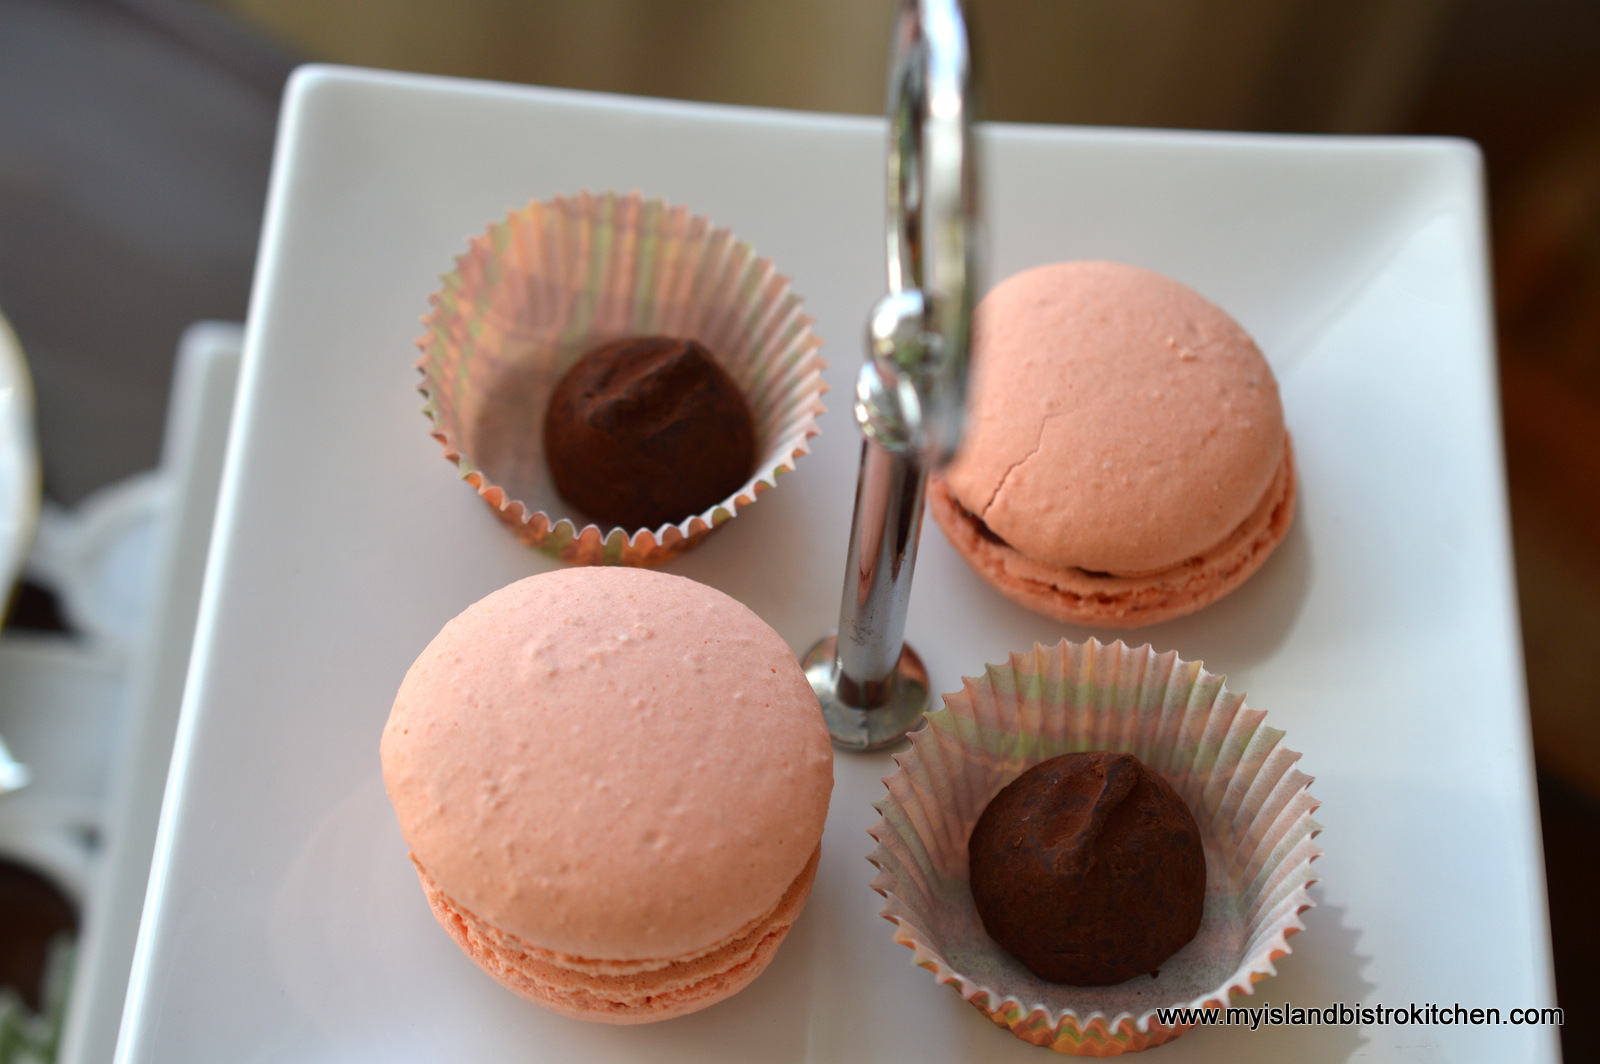
The fourth new discovery comes from Tony’s Bistro and Pâtisserie in Moncton, New Brunswick. I was recently overseas “to the mainland”, as many of us Islanders say, and on the recommendation of a colleague, went to Tony’s Bistro for lunch. It was difficult to pass by the two display cases filled with delectable sweet treats. While I normally prepare all the food for my afternoon teas, I thought it would be fun to have someone else’s sweets for a change. And, I was not disappointed! Eager to have a look at my choices? (Note: All food items on today’s tea table, with the exception of the chocolate truffles, came from Tony’s.)
First the Raspberry Macarons. These are so light and airy with just the right touch of chewiness. Divine perfection.
Raspberry Macaron
These crisp little raspberry-filled shortbreads had just the right amount of crunch.
Shortbread
And, last but not least, this delectable cake that no chocolate lover could resist!
So, if you are lucky enough to have a great French pâtisserie in your area, tea time can be very easy as you don’t have to bake! All you have to do is make a stop at your favorite pâtisserie and then add the location, dishes, fine company, and a good pot of tea. It’s also a good opportunity to try specialty items that you might not normally bake yourself.
Today’s tea selection is a classic, full-bodied black tea from King Cole, another New Brunswick company. My afternoon tea has a distinct New Brunswick influence today!
King Cole Tea in a Pretty China Cup
Now that the tea elements have been duly admired and photographed, it’s time to sit down for tea!
I hope you have enjoyed taking a peek at my afternoon tea. If you find yourself in Moncton, I recommend checking out Tony’s Bistro and Pâtisserie at 137 McLaughlin Drive.
————————
Thank you for visiting “the Bistro” today. There are lots of ways to connect with “the Bistro” through social media:
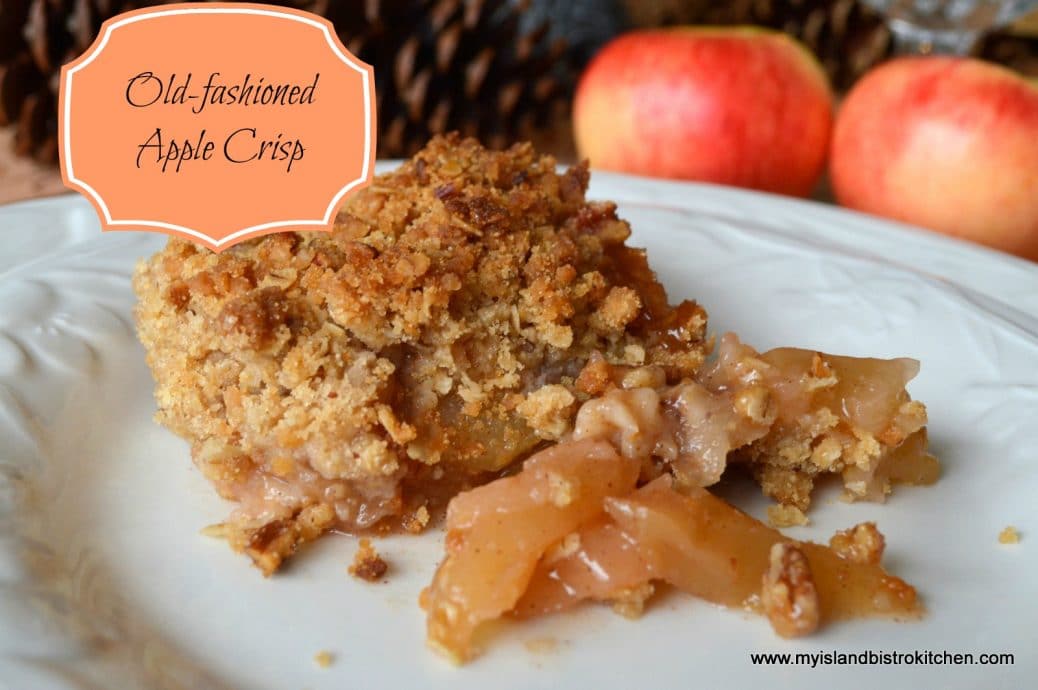
One of my all-time favorites is the traditional old-fashioned Apple Crisp dessert — the sweet apple flavour filling topped with a crisp, crunchy streusel. And, oh, the heavenly scent in the house when the apple crisp is baking! Continue reading Old-fashioned Apple Crisp→
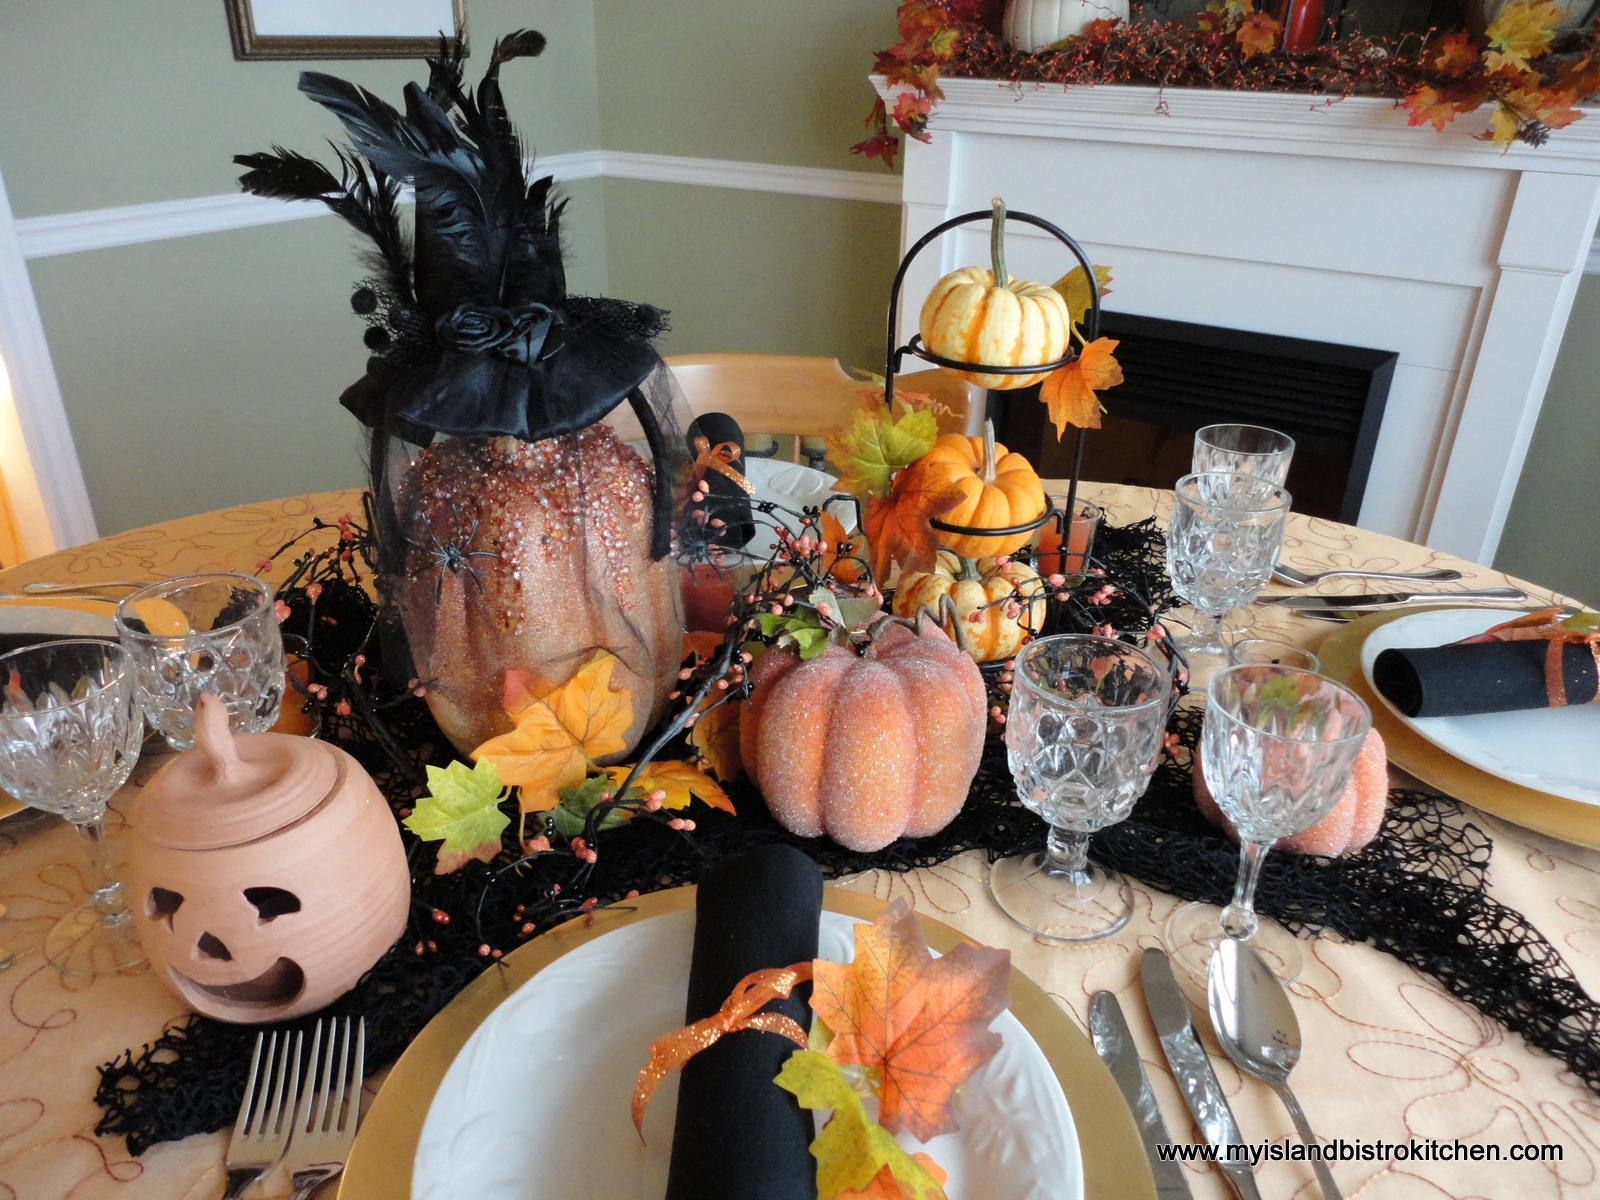
On this Halloween weekend, I am sharing my seasonal tablescape that has a distinctly pumpkin theme. I have chosen to use some good quality artificial decorations mixed in with some traditional ones that nature has provided.
Halloween Tablescape
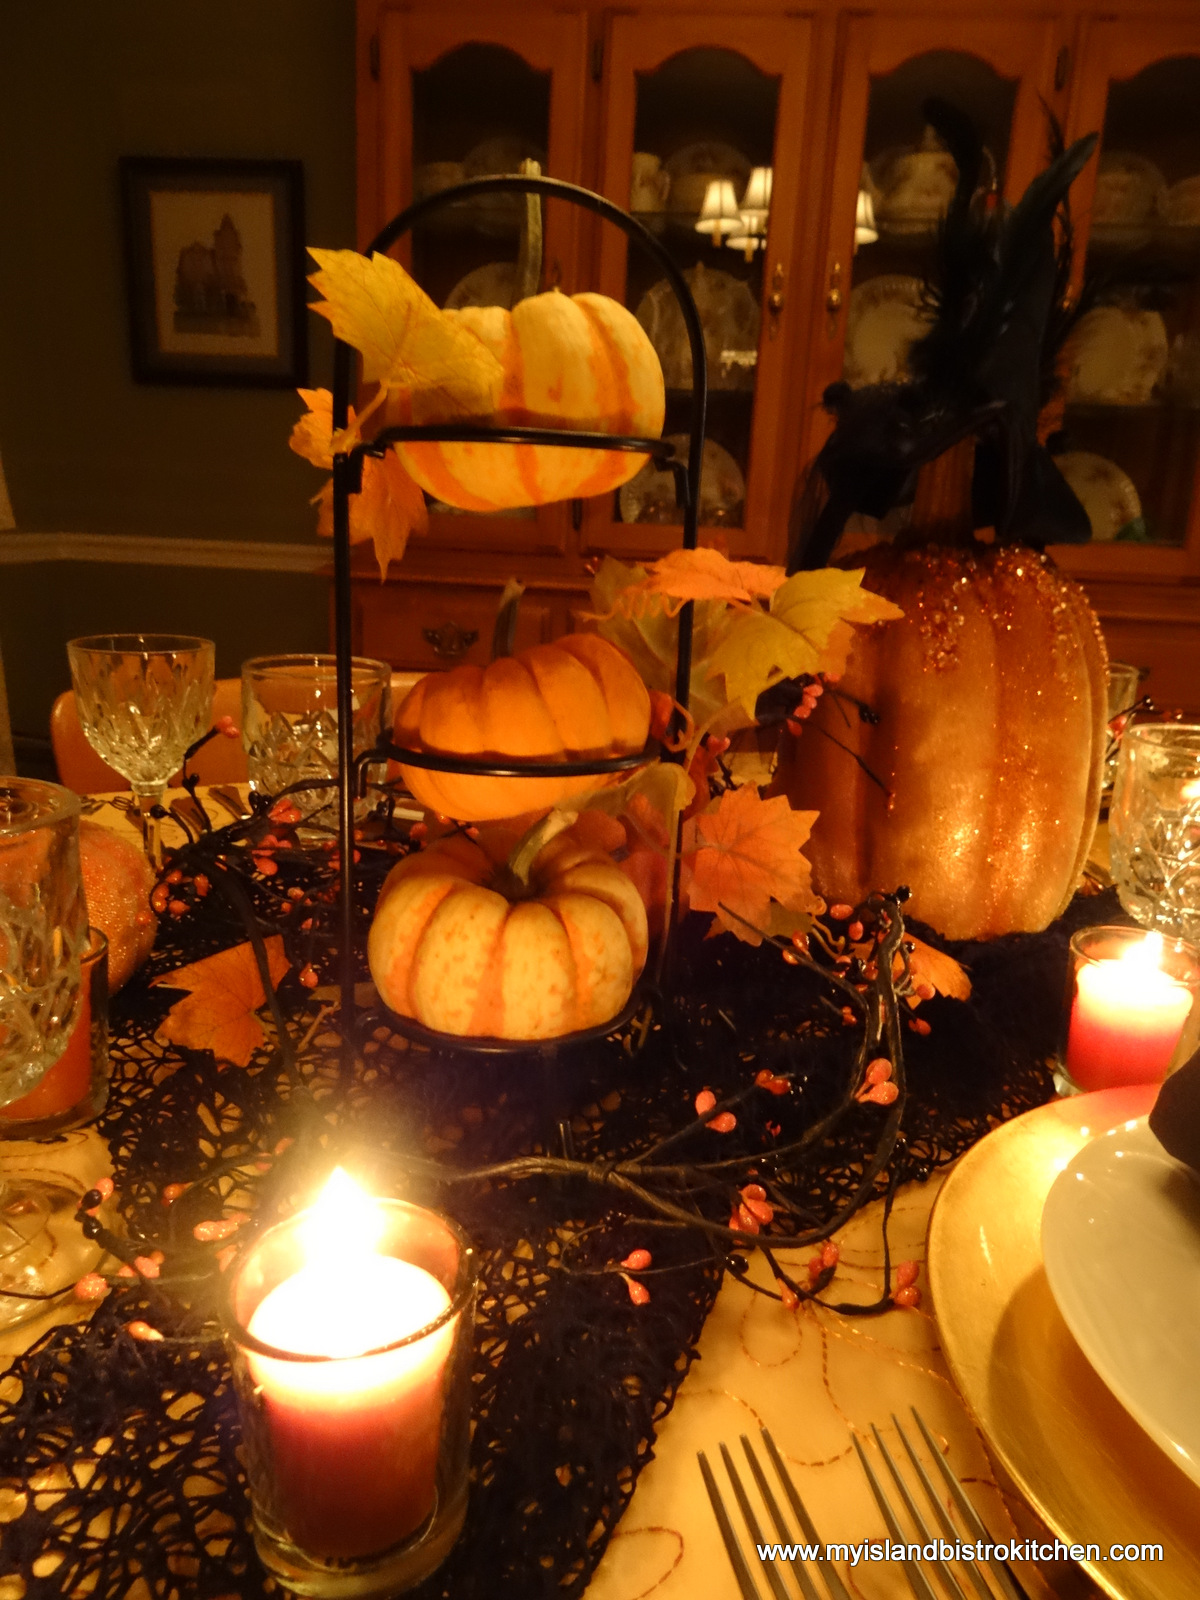
In keeping with the mood of the season, I have kept the lighting low and moody to give a golden glow to the dining room.
I have a little collection of fall and Halloween decorations and, wherever possible, I try to work with I have as opposed to going out and buying more. I have had the terracotta pumpkin below for years. It’s so much easier to get a Jack-o-Lantern this way than the mess of carving a real one!!!
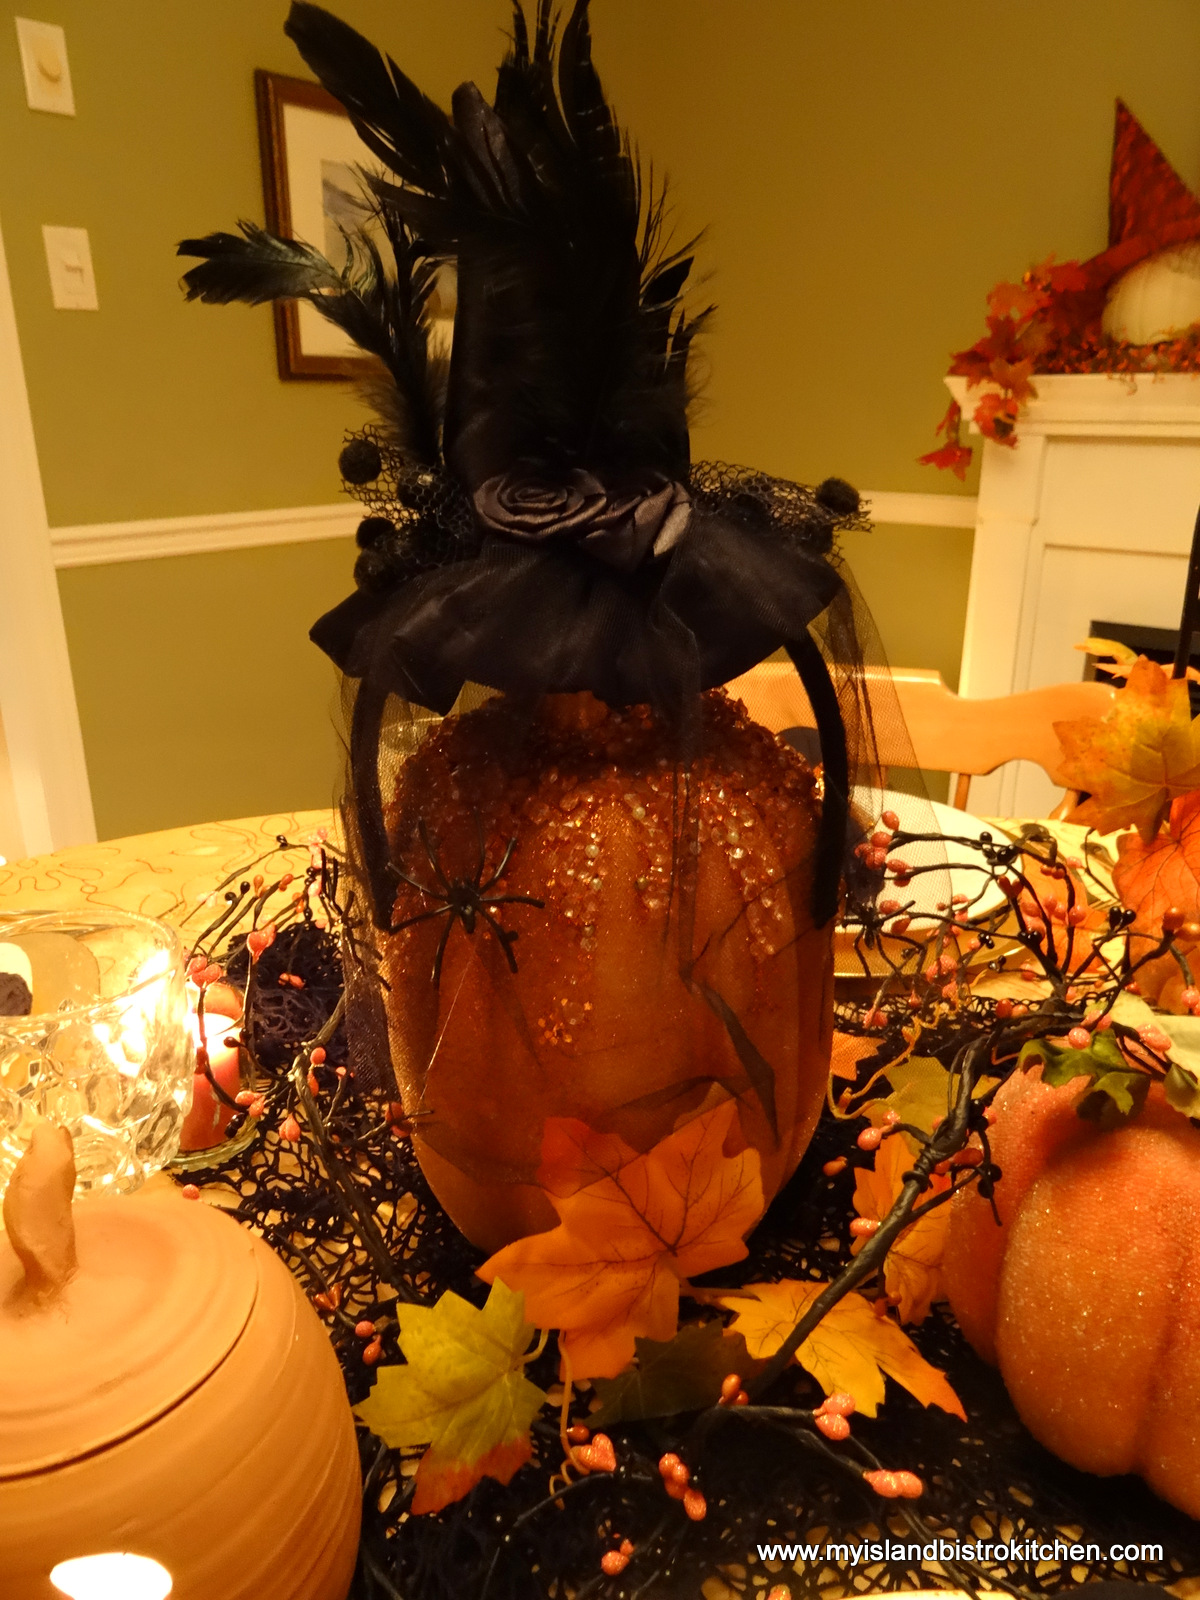
A glitzy pumpkin gets gussied up with a witch’s hat from the local dollar store. The headband/hat was a previous costume accessory.
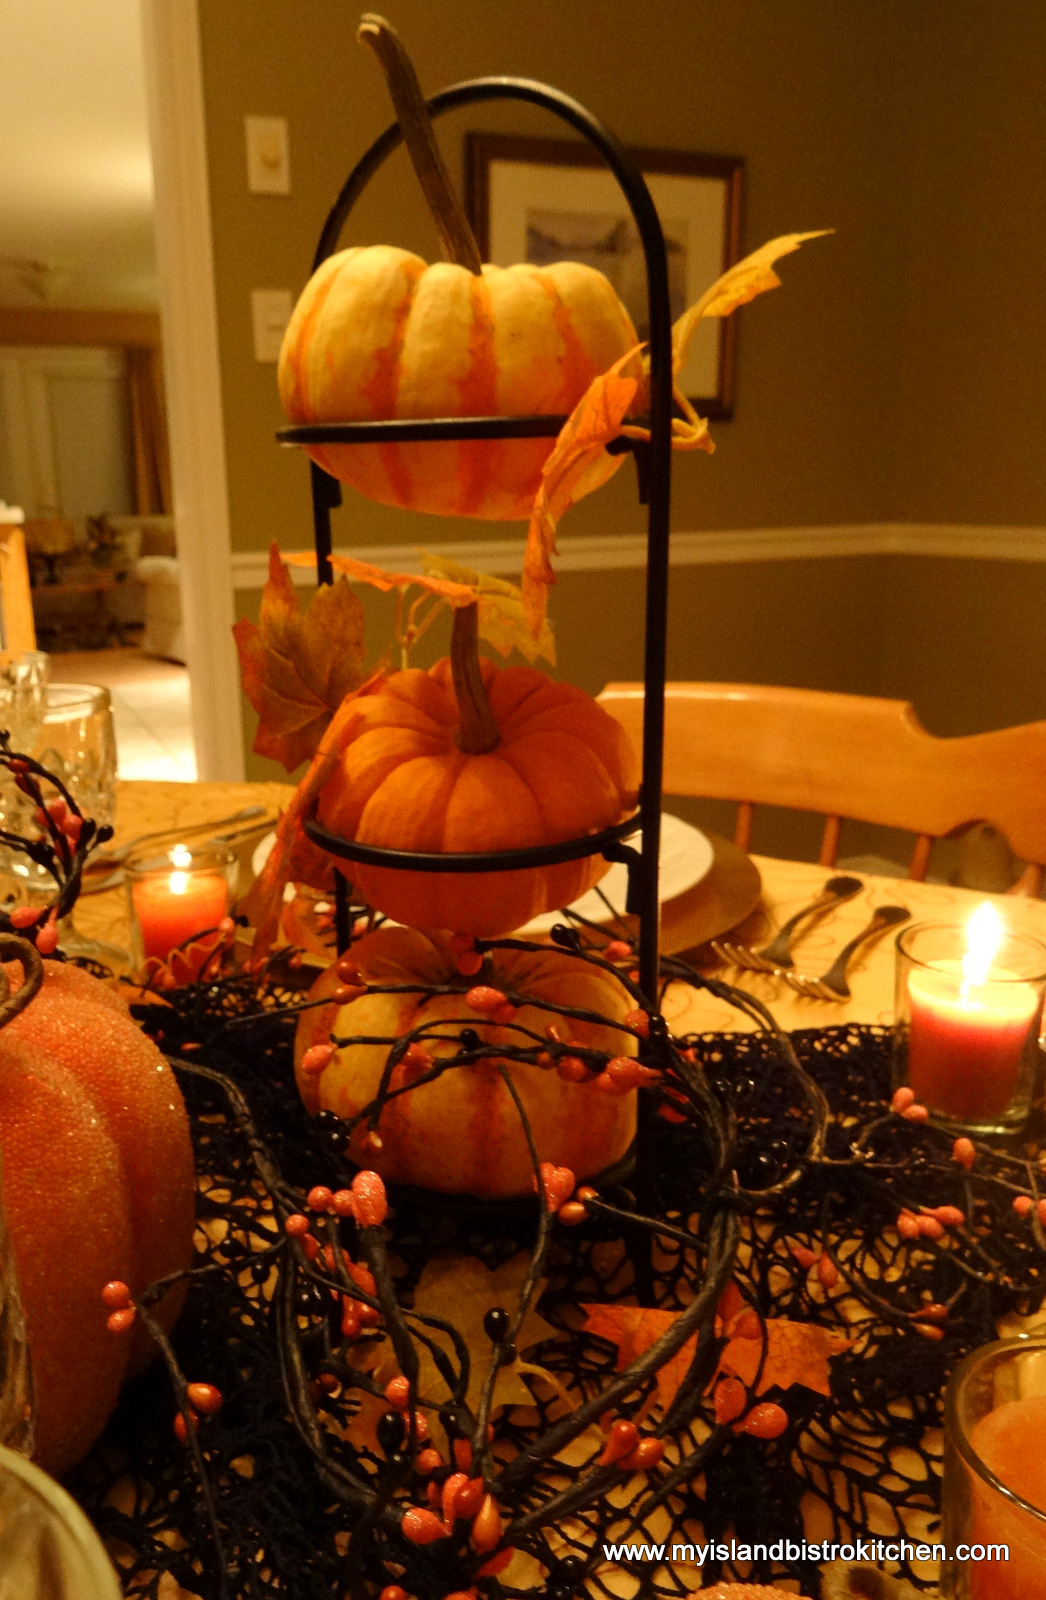
I found the little 3-tier server below at a local thrift store and it forms a nice tower for three mini pumpkins. It will also serve other purposes throughout the year.
When I am creating a tablescape like this, I try to vary the heights of the components as it adds interest and appeal to the eye.
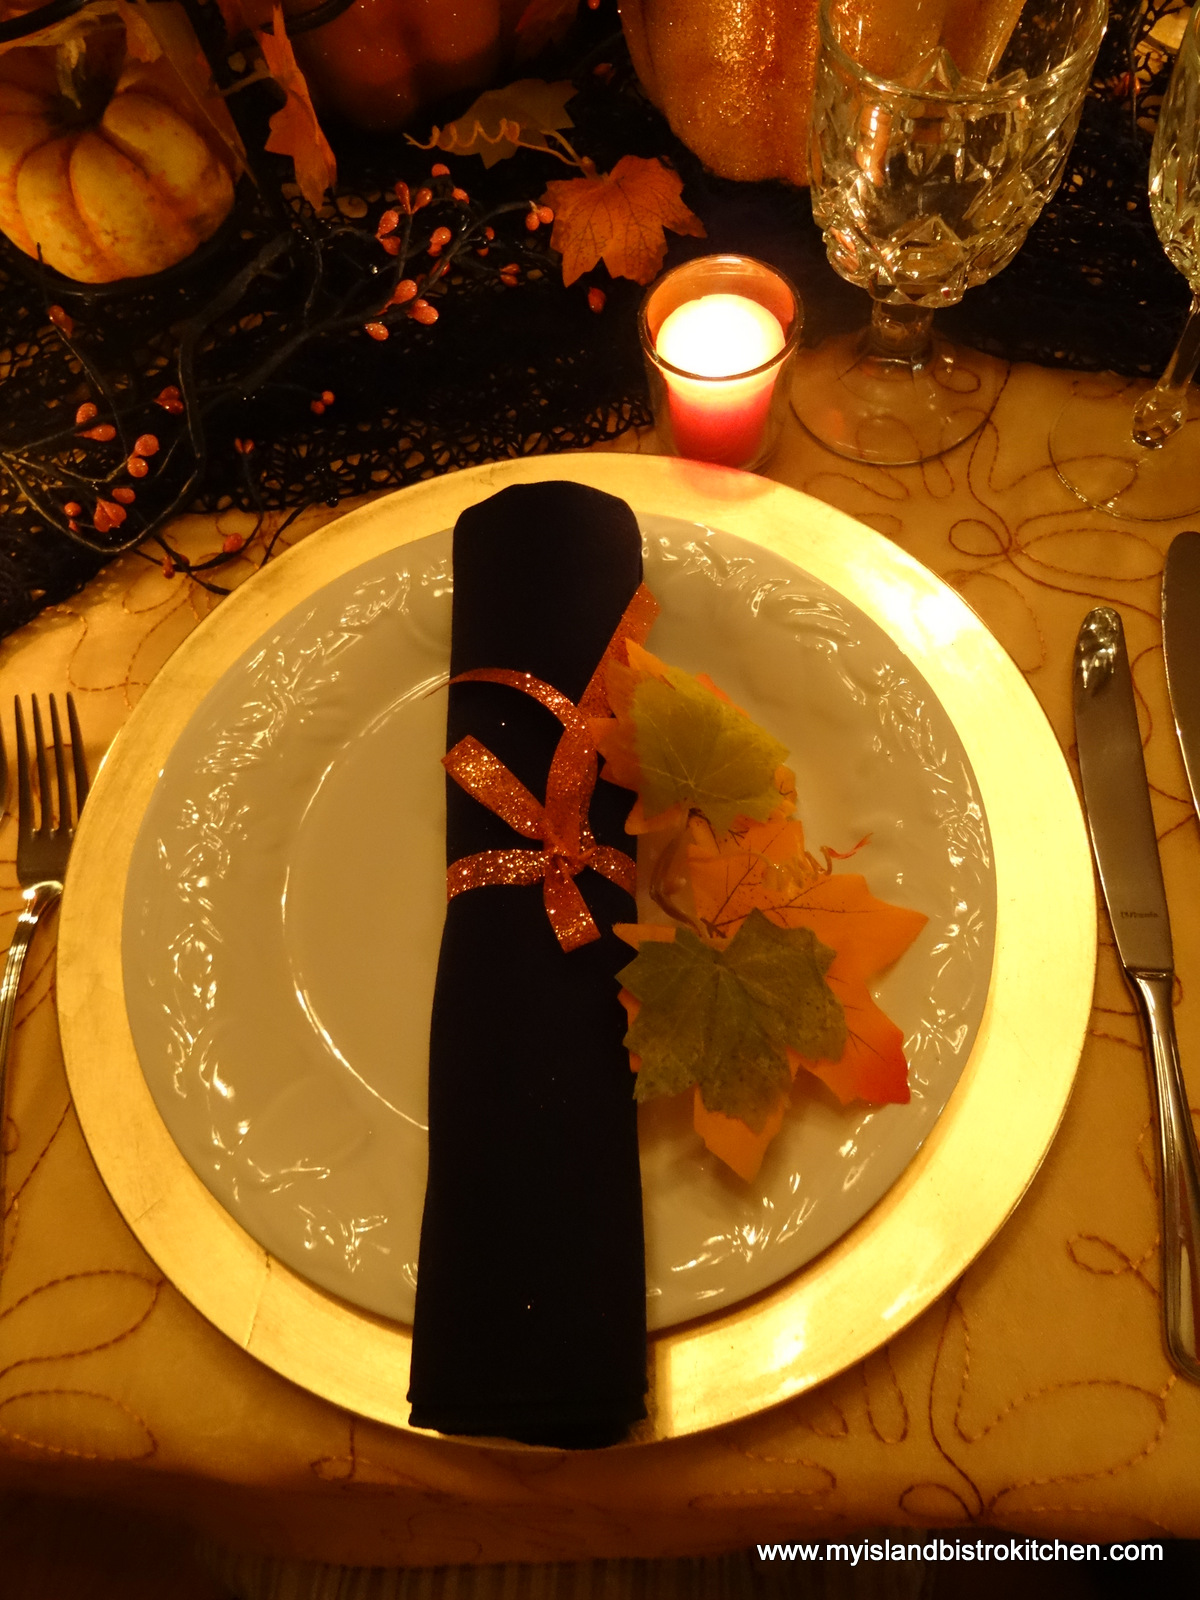
The color theme for the tablescape is orange, gold, ivory, and black. A piece of sheer orange curtain fabric over an ivory tablecloth makes an economical table covering without overtly screaming Halloween or competing with the focal point of the tablescape. A piece of black net fabric forms the base for the centerpiece display. The gold charger plates frame the white tableware, a good backdrop for the black napkins which are simply rolled and tied with glittery orange ribbon and accessorized with some colorful leaves.
Little orange votives tucked in through the tablescape add some extra drama to the scene. A number of years ago, I was able to get some good quality garlands of orange and black berries so they have been casually threaded in through the components of the centerpiece. The garlands are wired, making them easy to mold into areas needing some filler.
My fireplace mantle is decorated to compliment the table.
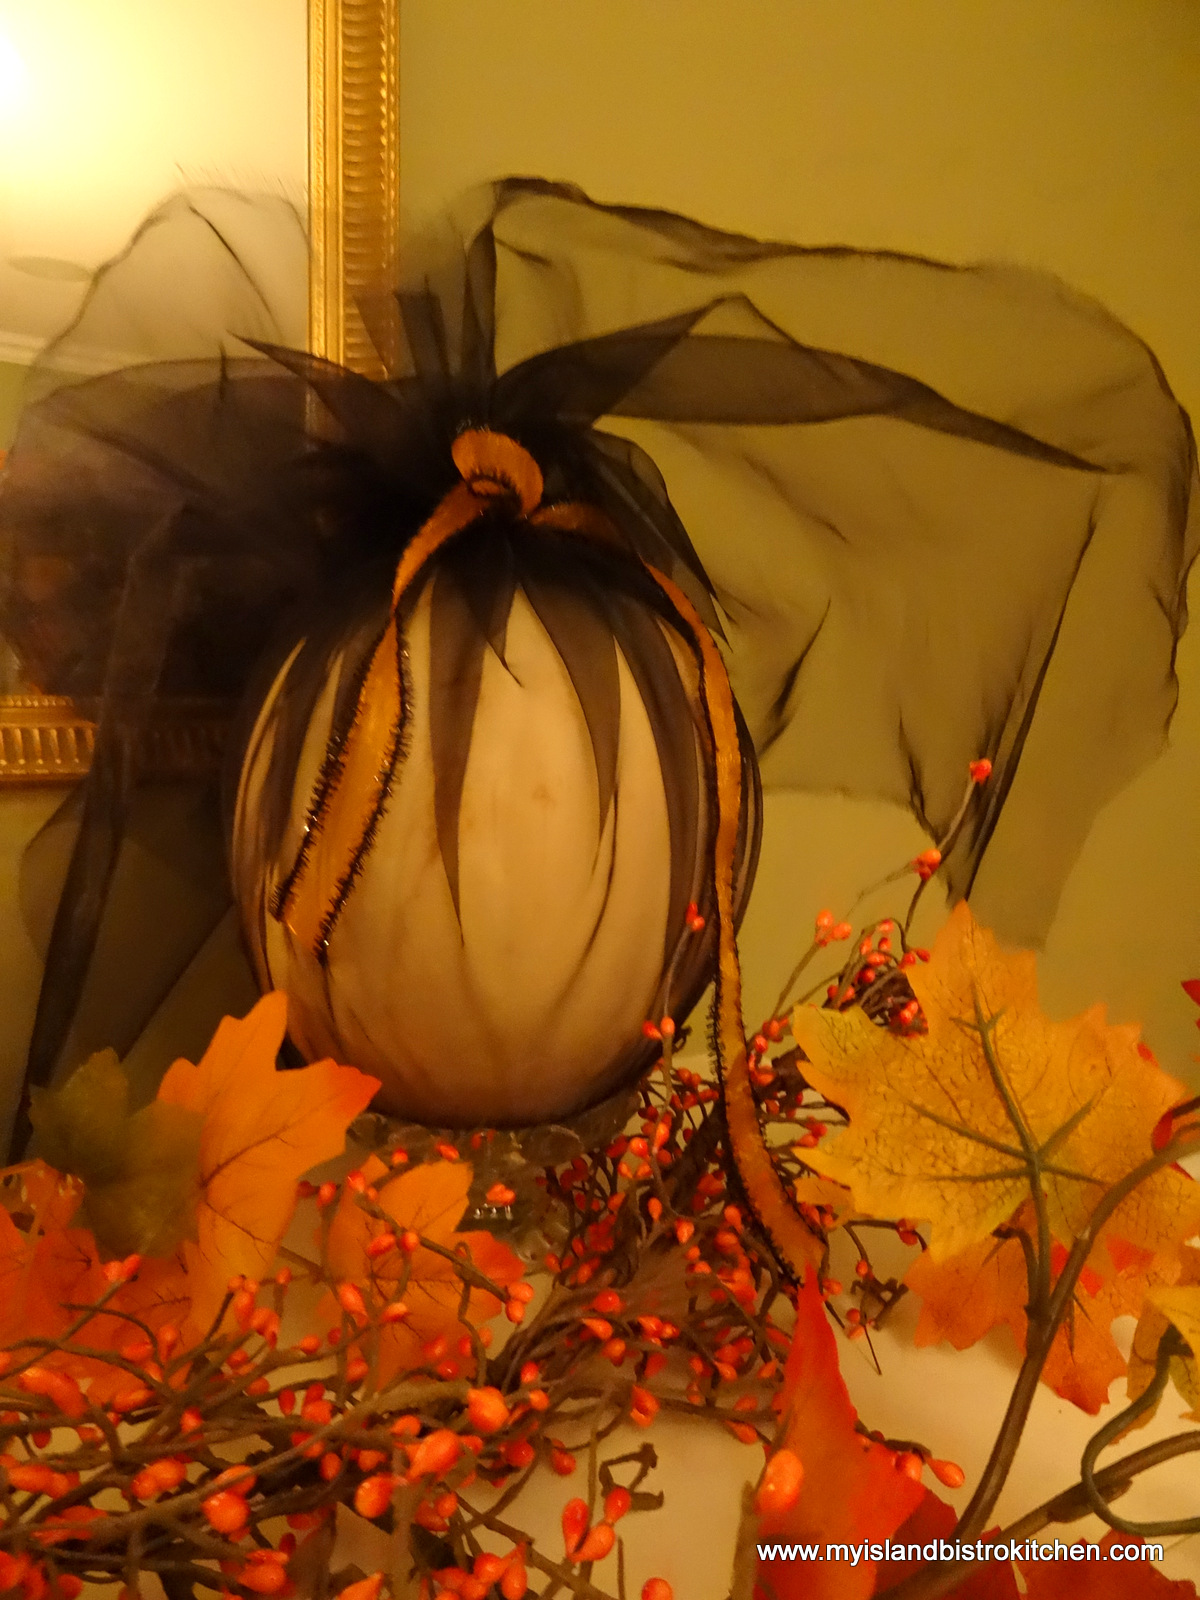
Framed behind garlands of orange berries and colored leaves, a white pumpkin dons a fancy witch’s hat.
The white pumpkin below is simply wrapped and tied in black organza, giving it a dramatic look by the simple folds in the fabric.
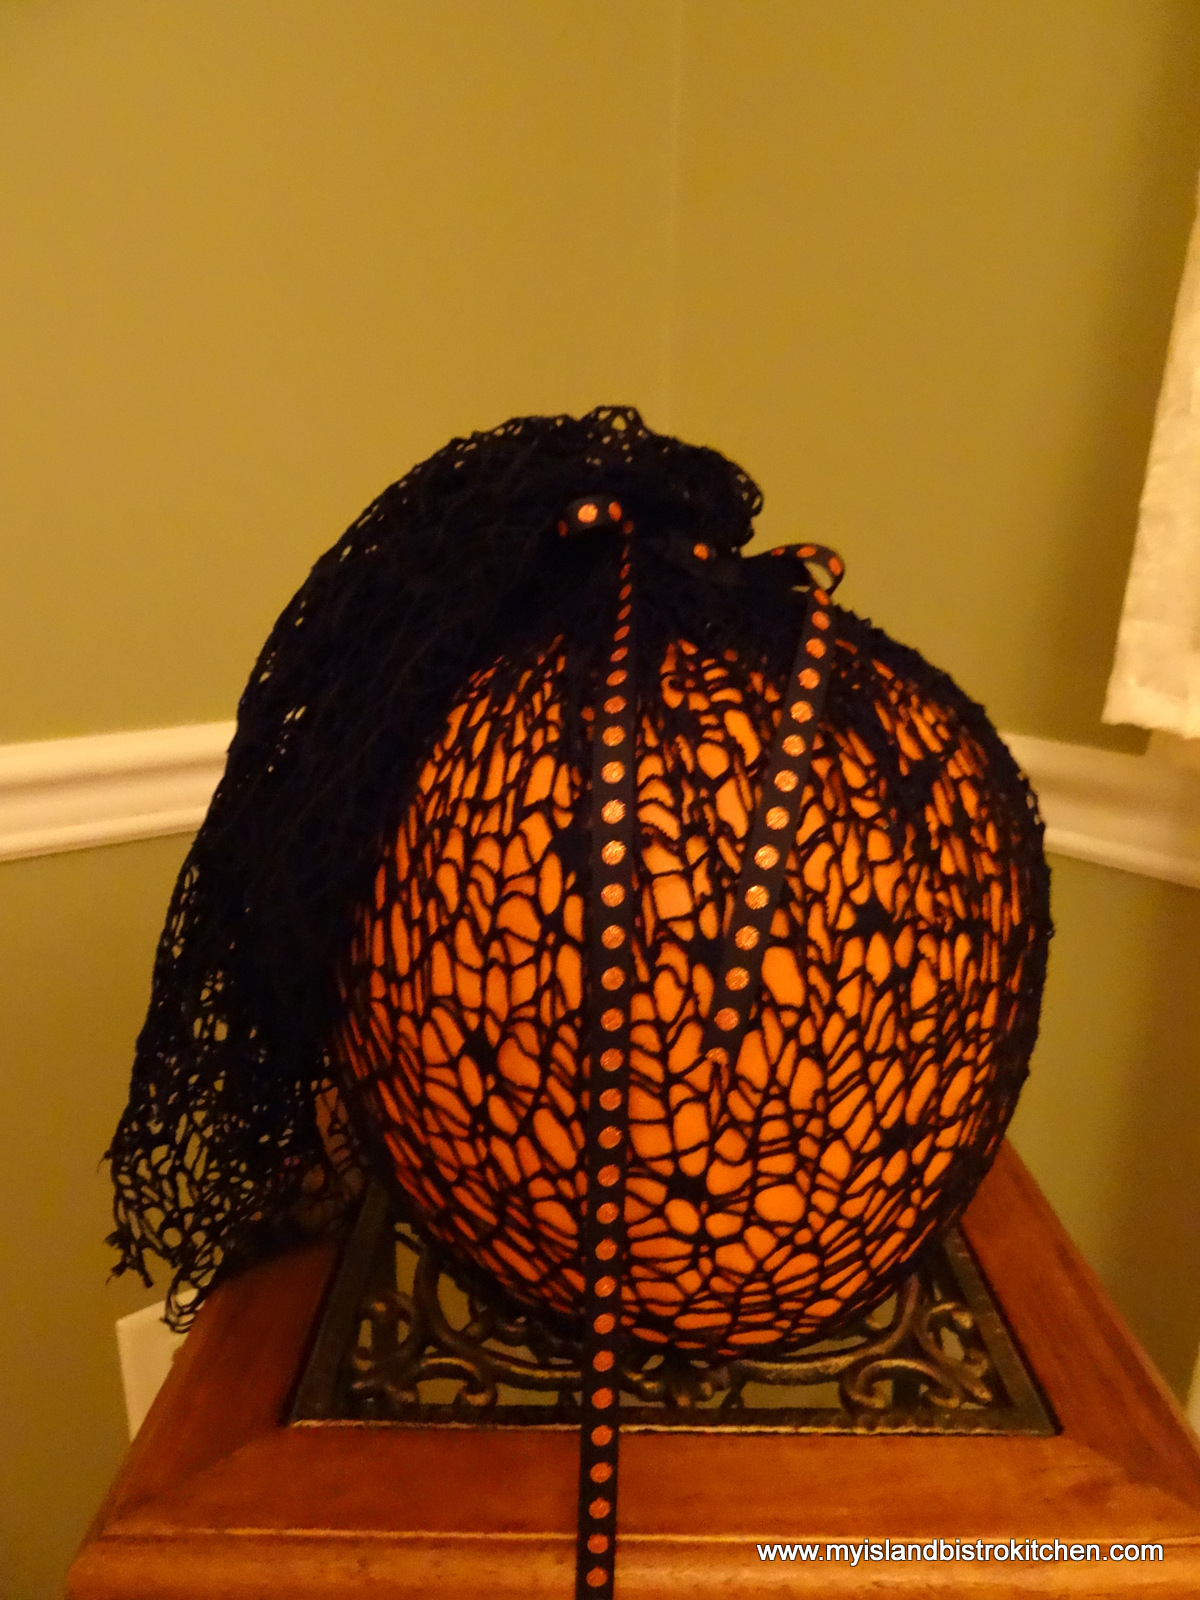
And, the orange pumpkin below is dressed in black spider web lace!
And, here is what the tablescape looked like in daylight…
Not nearly so dramatic but still colorful, nonetheless.
I hope you have enjoyed a glimpse into my Halloween festivities.
Thank you for visiting “the Bistro” today. There are lots of ways to connect with “the Bistro” through social media:
By now, most gardeners probably have tomatoes spilling out of their gardens.
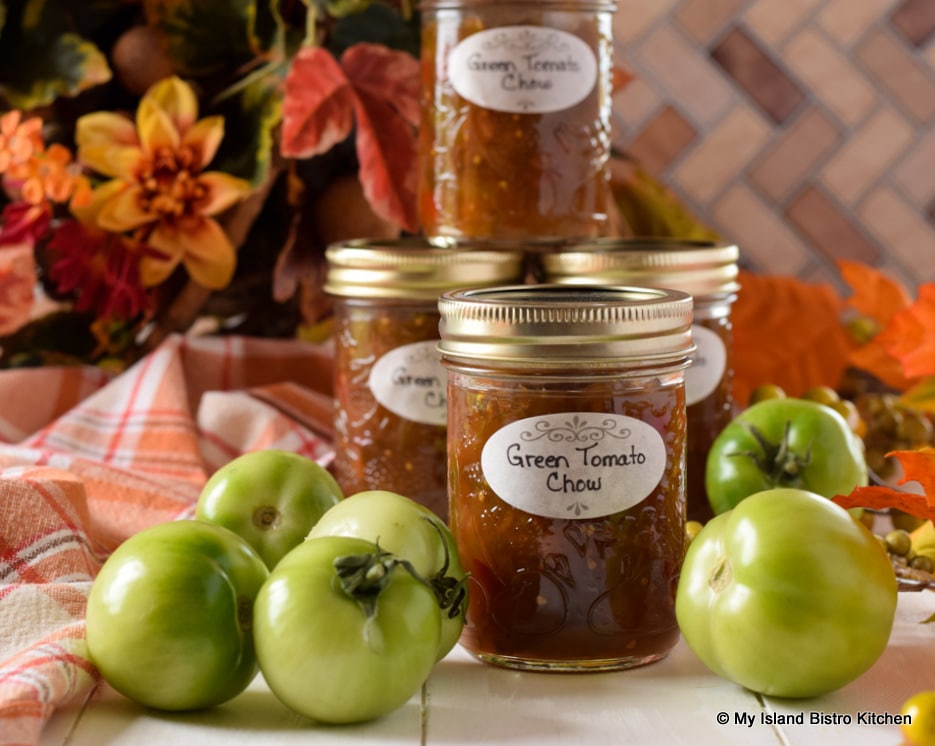
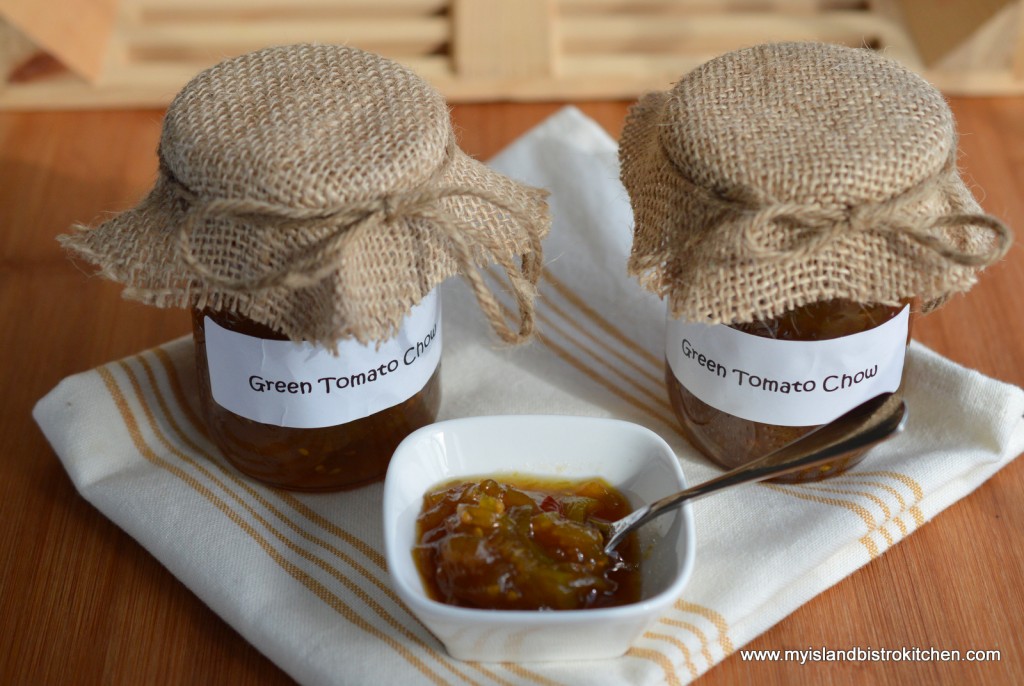
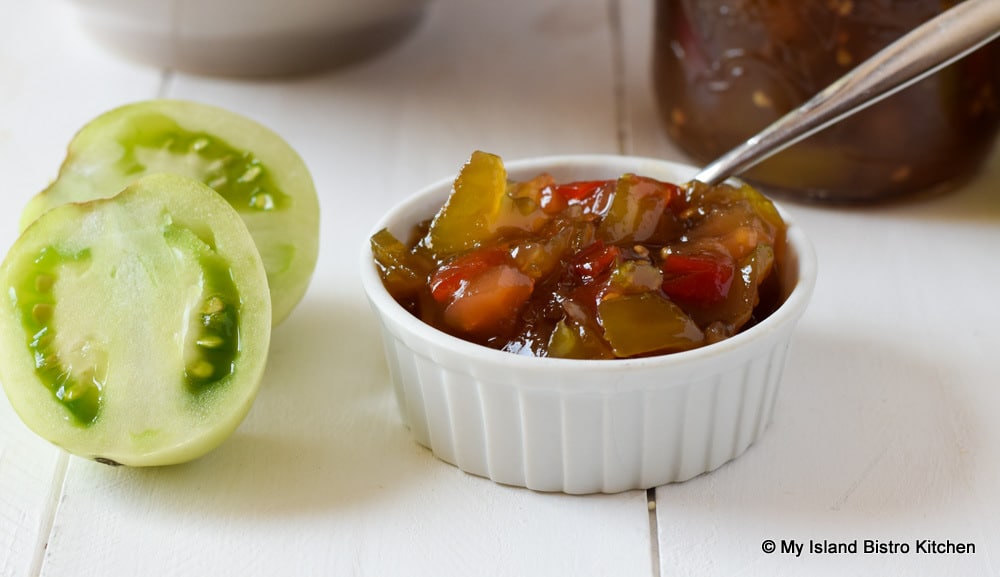
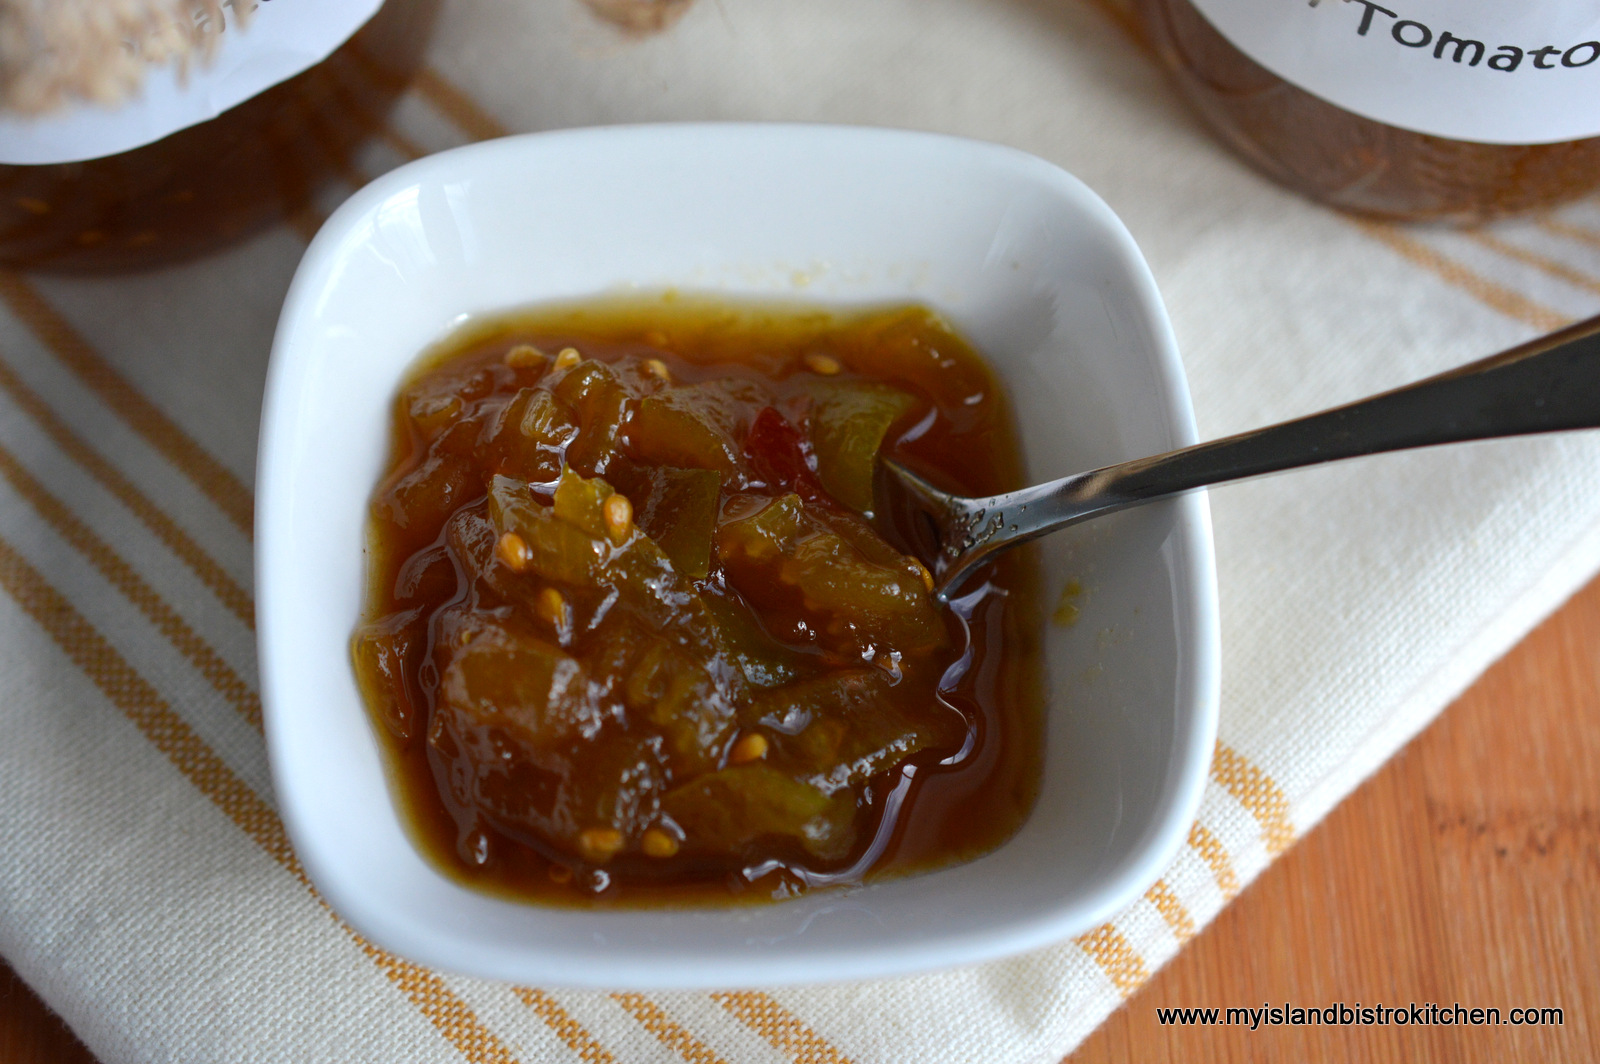
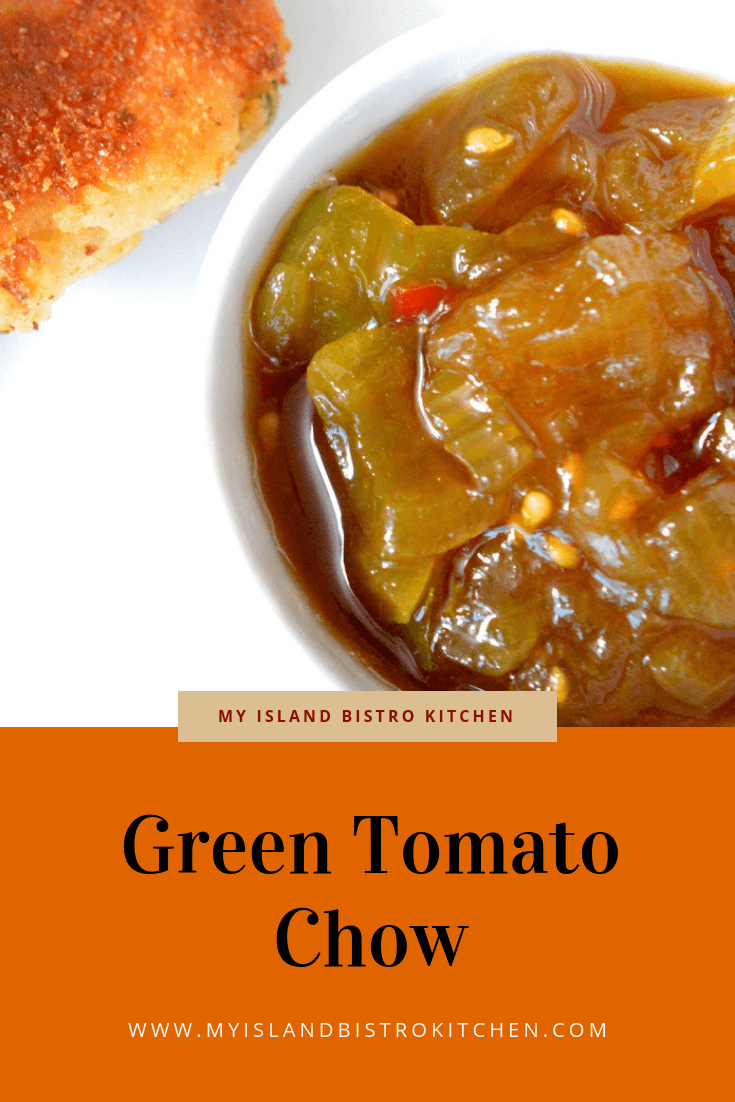
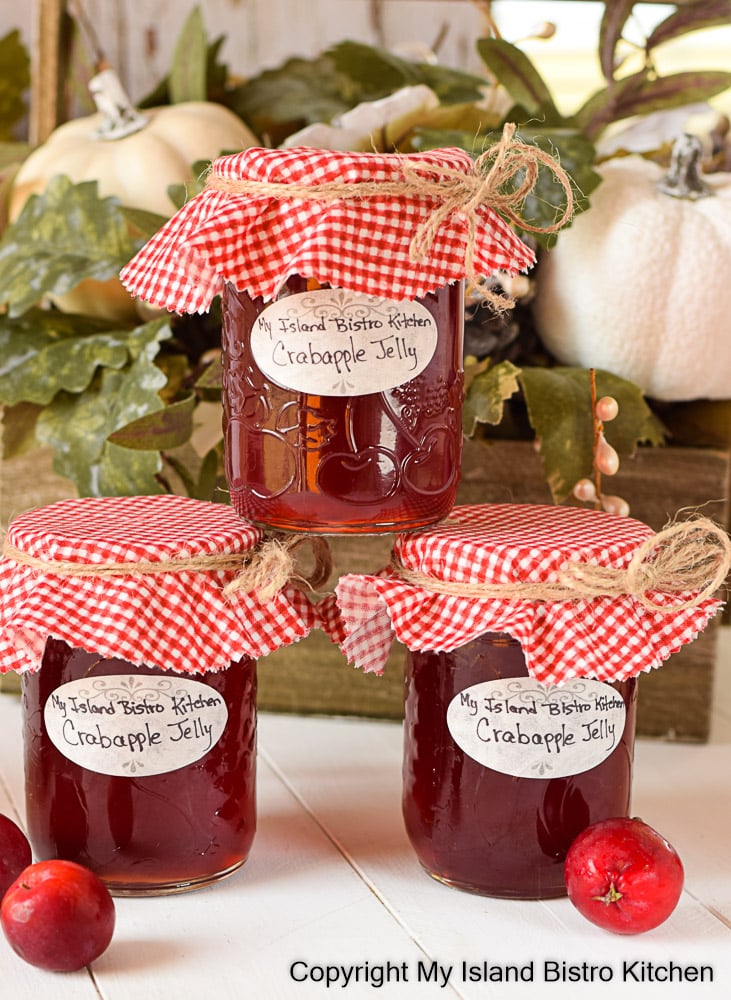
Do you have an abundance of green tomatoes you’re wondering what to do with? Today, I am sharing my recipe for Green Tomato Chow (recipe follows at end of posting), a tasty condiment that makes good use of green tomatoes.
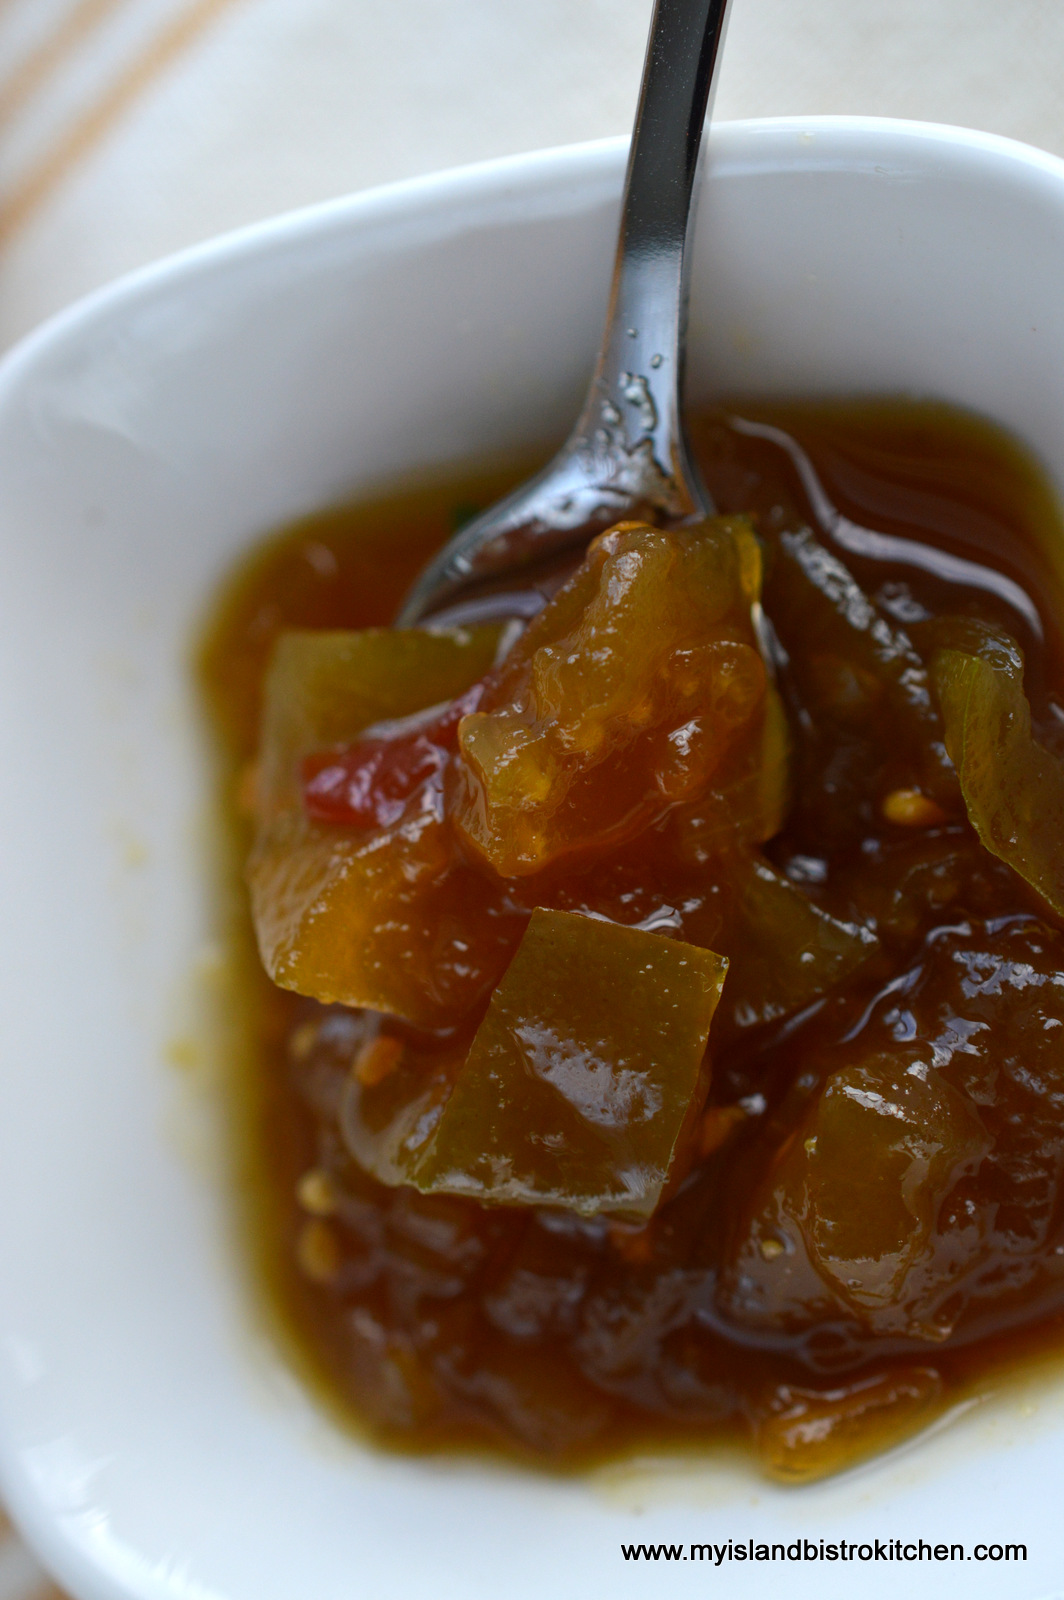
Green Tomato Chow
I grew up with chow being made every fall. It’s a great condiment to serve with cold meats, baked beans, stews, casseroles, chicken and meat pies, hot chicken/beef/turkey dinners, and, of course, if you are a Maritimer, with fish cakes.
Green Tomato Chow with Fish Cakes, Baked Beans, and a Homemade Biscuit
Chow is not difficult to make but, like any pickling and preserving, it can be a bit time-consuming since the vegetables have to be cut up and soaked for several hours (either all day or all night), then slowly simmered until cooked. Making chow is not something that can be rushed.
Green Tomato Chow
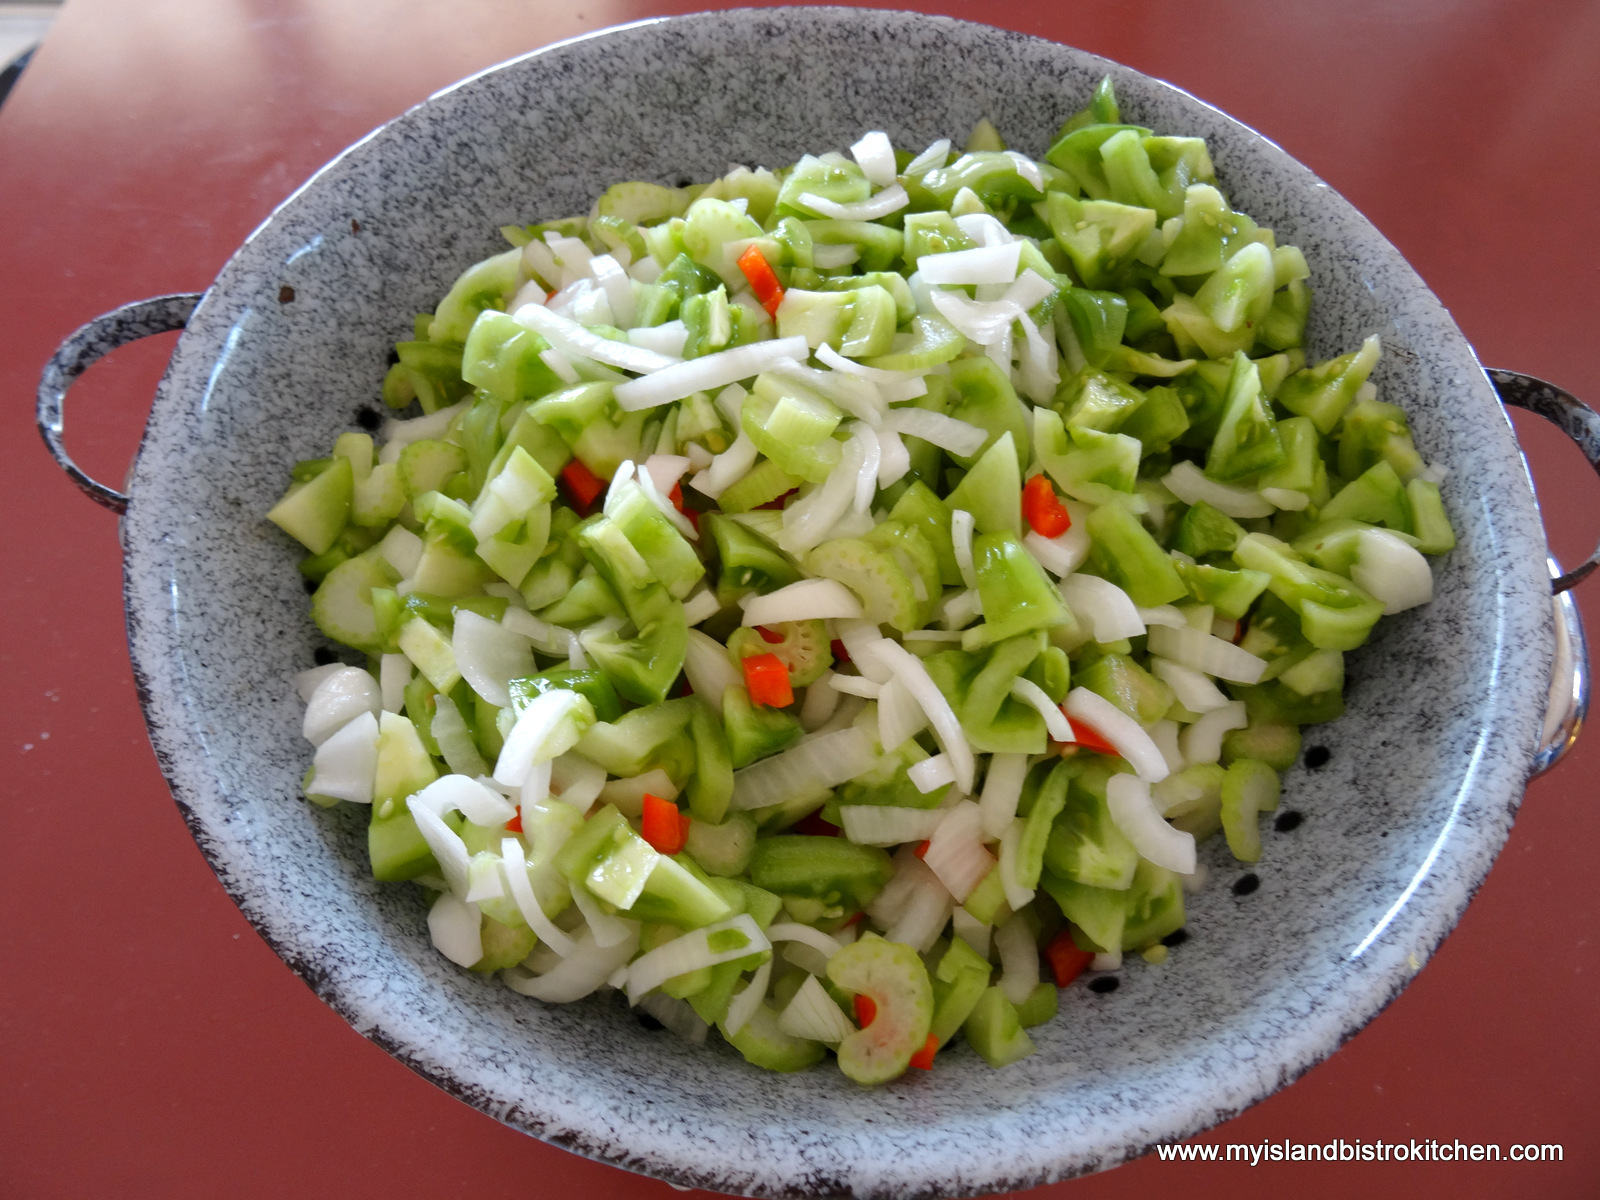
The first thing you need to do is gather up all the ingredients and equipment you will need. Chow is basically nothing more than green tomatoes, onions, celery, red pepper, vinegar, sugar, and spices along with some pickling salt. No out of the ordinary ingredients. A list of equipment and utensils needed to make the chow can be found further down in this post.
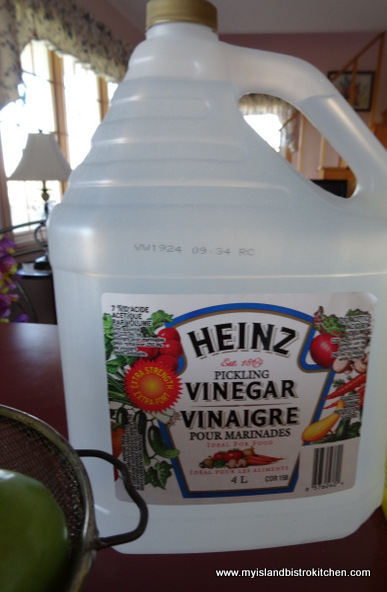
You can use regular white vinegar for this recipe but I recommend using the pickling vinegar which is stronger.
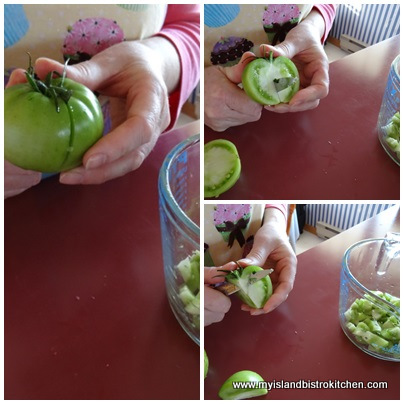
Any kind of green tomatoes will make good chow. The ones I’ve used are just the basic garden variety of tomatoes. It’s usually a case of whatever green tomatoes are available in the garden!
Some cooks cut the tomatoes crosswise into slices. I cut mine into chunks. Either works. You don’t, however, want to chop the vegetables up too finely as it will start to resemble more of a relish than a chow.
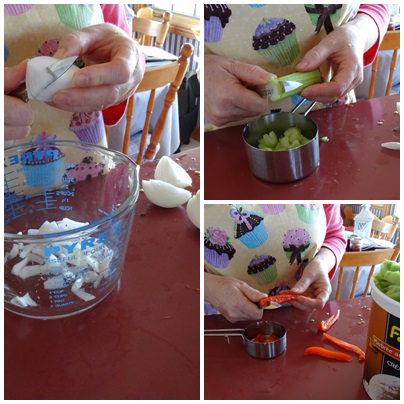
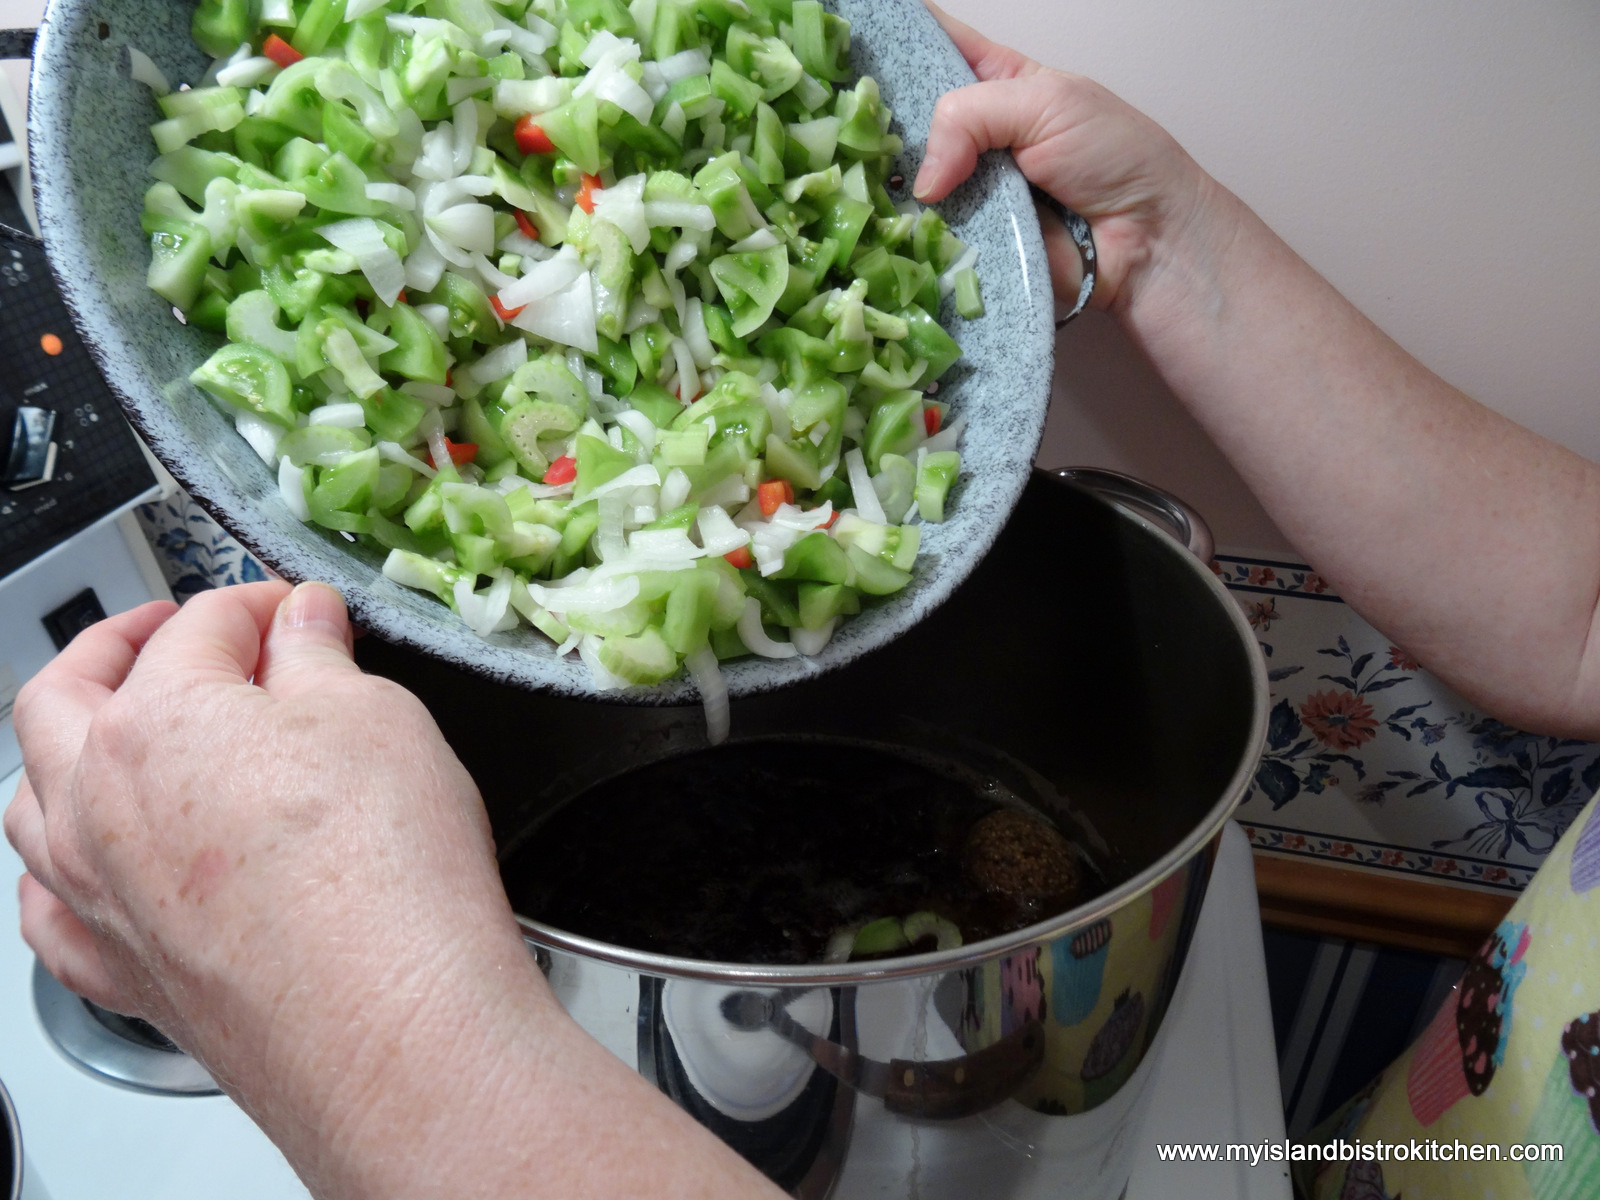
Cut up the onions, celery, and red pepper.
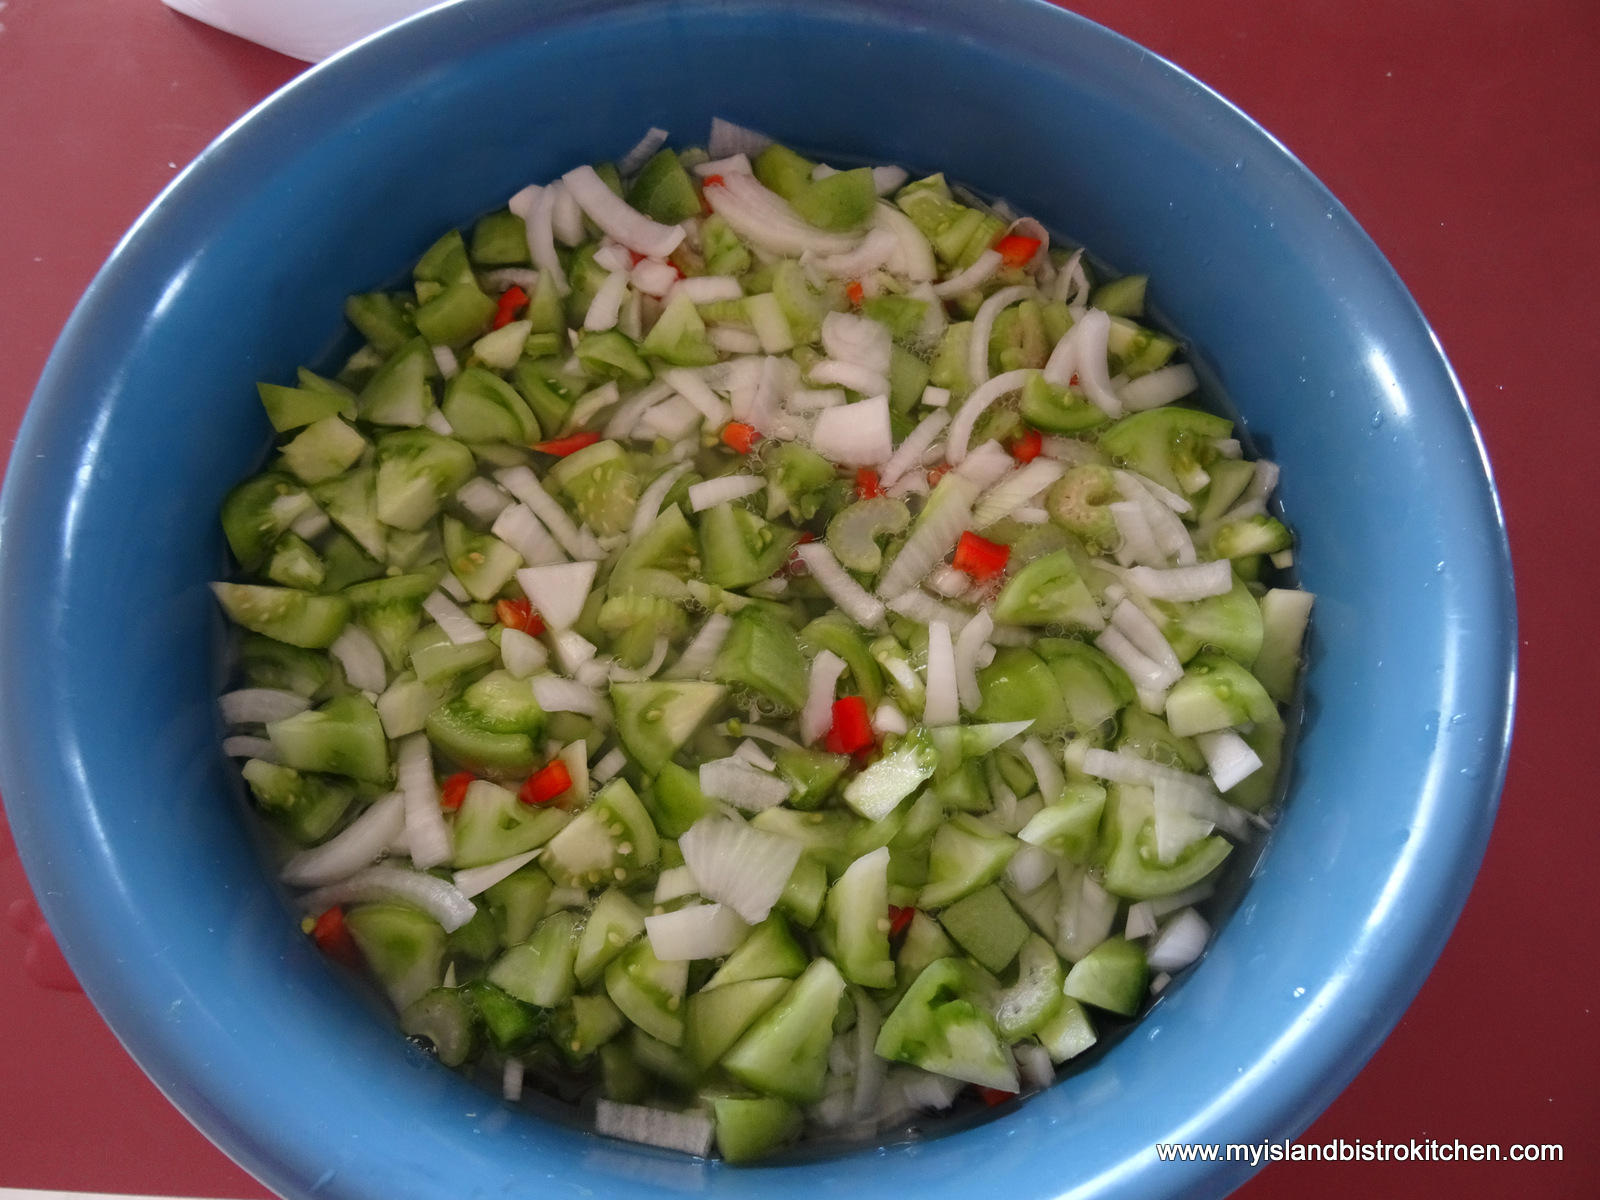
Place all the vegetables into a large bowl.
The vegetables need to be soaked for 7-8 hours in a salt brine. Be sure to use pickling salt, not regular table salt (see my posting on mustard pickles for explanation). It’s important to ensure that the salt is completely dissolved in water before pouring it over the vegetables. You will need enough salted cold water to completely cover the vegetables to soak. I use a ratio of 1/2 cup pickling salt to 4 cups of water.
Pour the salt brine over the vegetables and set the mixture aside to soak for 7 – 8 hours.
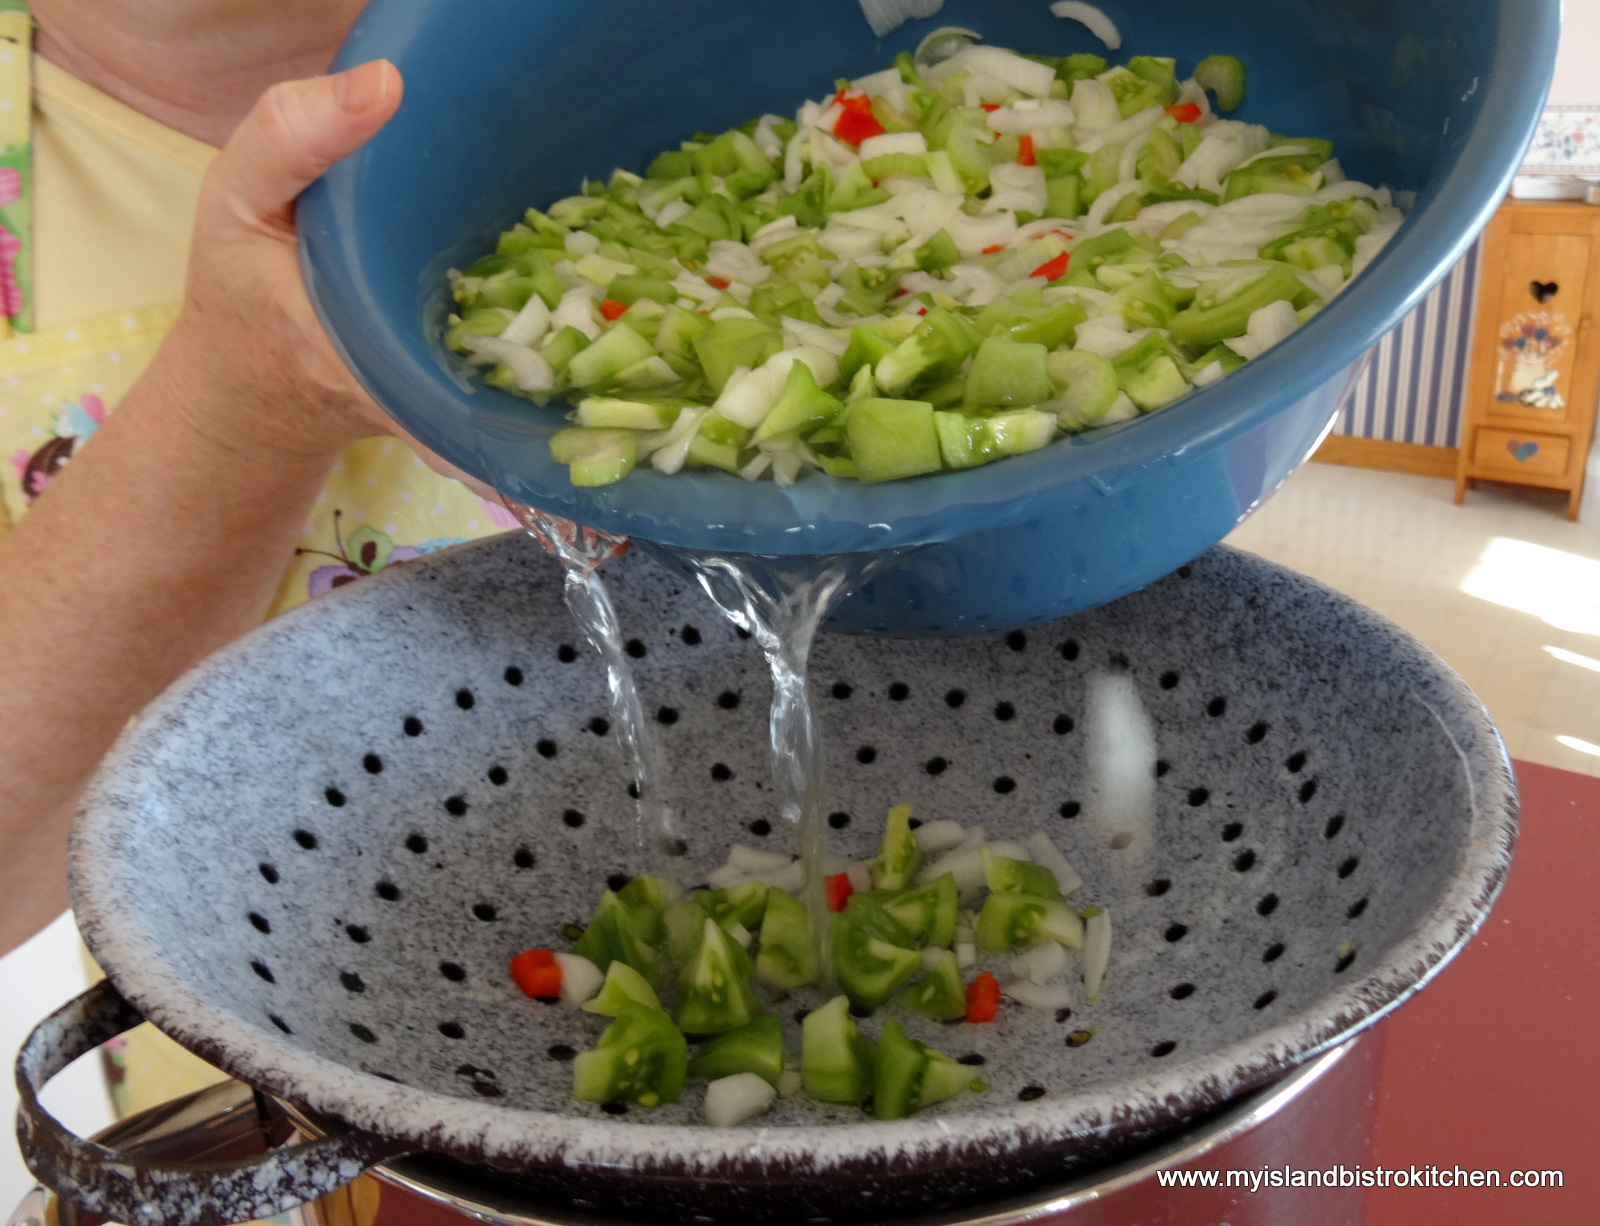
Drain the vegetables into a large colander.
Under cold running water, quickly rinse the vegetables to remove any salt residue. Swish the vegetables around to ensure that all are rinsed off.
You’ll want to get as much water drained out of the vegetables as possible so let them sit in the colander for 1 to 1 1/2 hours. You may want to carefully stir the vegetables around in the colander periodically during this period to ensure better drainage.
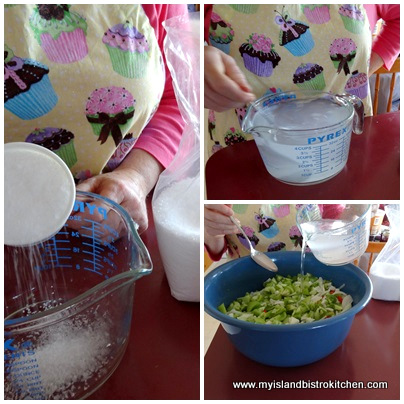
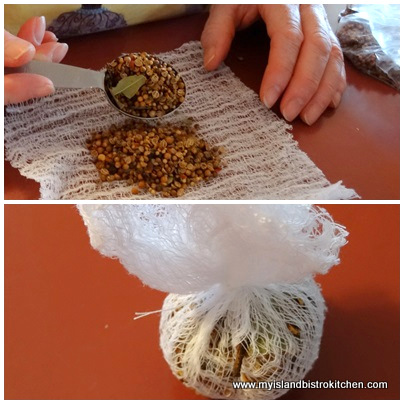
Meanwhile, prepare the spice sachet. I make a small cheesecloth sachet by doubling, or even folding the open weave cheesecloth over 3-4 times, and then placing the pickling spice mixture in the centre. The sides of the cheesecloth are then gathered up and tied with kitchen string or very strong thread. The whole spices need to be corralled in a sachet as, well, it’s not a very pleasant experience to unexpectedly bite into a whole clove in the chow, for example! I buy a pickling spice mix at my local bulk foods store. If you can’t find a product labelled “pickling spice” in your area, you can always make your own. In my mustard pickle posting I give an explanation of spices typically included in a pickling spice mix. This sachet will get dropped into the stockpot and infuse flavor into the chow base as the chow cooks.
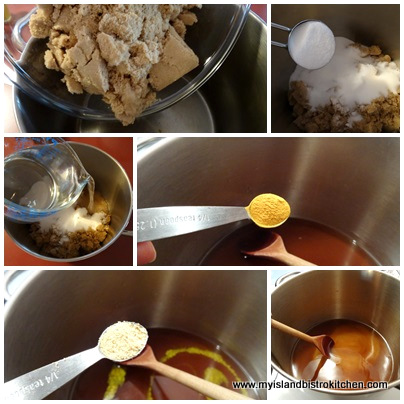
Into a large stockpot, place the sugars, spices, and vinegar. Stir well.
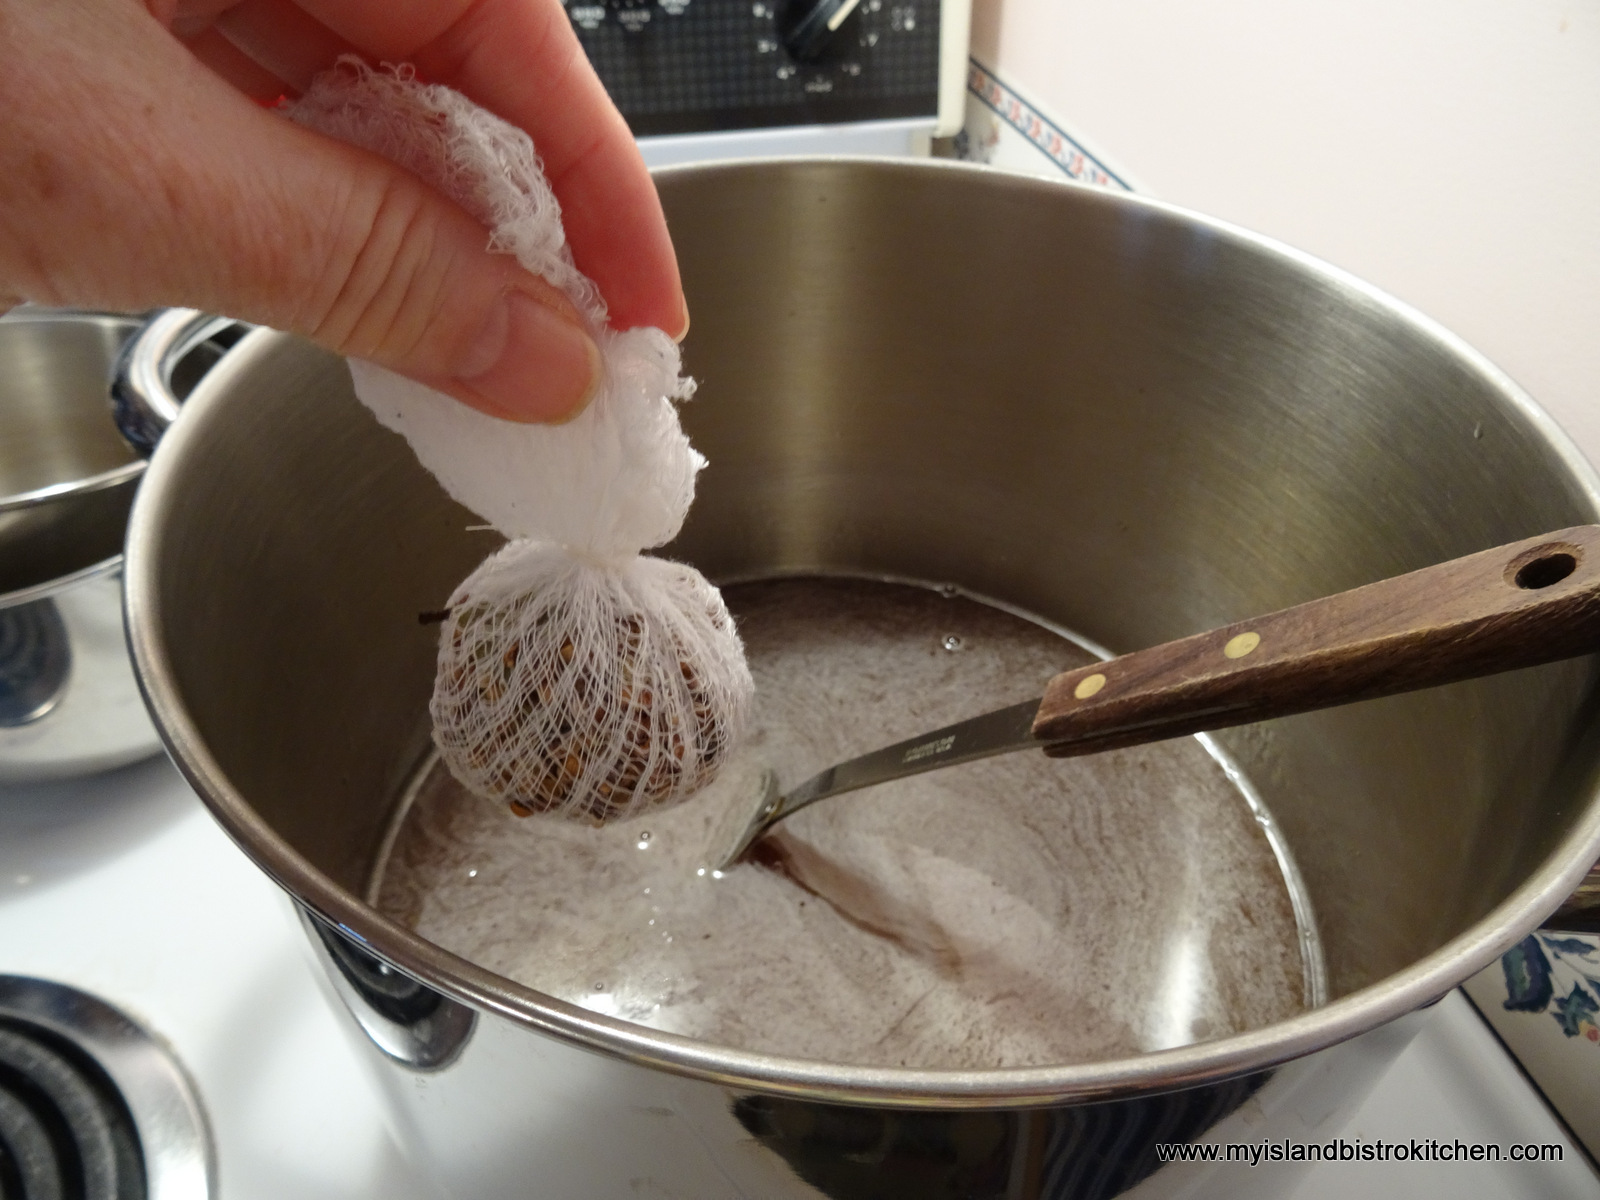
Drop in the spice sachet and bring mixture to a boil.
Add the drained vegetables and return mixture to a boil, then immediately reduce heat to medium-low.
Cook until vegetables are cooked, somewhat translucent, and the mixture is slightly thickened. Stir mixture occasionally to make sure it is not sticking to the bottom of the pot.
While the chow is cooking, start the bottle sterilization process. Again, refer to my mustard pickle posting for details on this and the proper canning jars to use.
Once the chow is cooked and thickened, remove it from the heat and remove and discard the pickling spice sachet. Bottle the chow while it is hot into the hot, sterilized bottles. With clean, damp cloth, wipe each jar rim to remove any sticky chow residue. Seal immediately with heated lids. Screw on jar bands just until resistance is met.
Process filled jars immediately in a hot water bath. I process my half-pint jars for 10 minutes (at a rolling boil) but you should refer to the canner manufacturer’s directions for the proper time for your local altitude. Cool the jars, undisturbed, on the counter for 24 hours and then store them in cool, dark place. Let chow age for at least 2 weeks before serving.
Green Tomato Chow
Chow making, like pickling, is a process and takes time. Make sure you read through the recipe several times before making the recipe to ensure understanding of the process and sequencing involved.
You will need the following equipment to make this chow:
Digital Scales for weighing tomatoes 7 pint-sized glass canning jars 7 – two-piece lid and screw band sets (lids must be brand new and not previously used) Cheesecloth for making spice sachet and kitchen string for tying sachet
Large measuring cup or bowl for mixing salt water brine Large bowl for soaking vegetables in salt water brine Large colander for draining vegetables Large heavy-bottomed stock pot for cooking chow Large pot for sterilizing jars Small saucepan for heating jar lids Water bath canner with basket Jar lifter tongs Wide-mouthed canning funnel Ladle or heat-proof glass measuring cup Chopstick or small heat-proof spatula Magnetic lid lifter A timer
Green Tomato Chow
Ingredients:
3 lbs green tomatoes, chopped into chunks 3¼ cups onions, chopped 1 cup celery, sliced ½ cup sweet red pepper, diced Apx. 1 cup pickling salt
Combine all ingredients into a large bowl. Using the ratio of ½ cup pickling salt to 4 cups cold water, cover ingredients completely with salted water. Add as much salted water as necessary to cover the vegetables. For this amount of vegetables, you will likely need at least 1 cup pickling salt dissolved in 8 cups water. Make sure the pickling salt is thoroughly dissolved in the water before pouring over vegetables. Let vegetables soak at room temperature for 7-8 hours. Drain vegetables in large colander. Quickly rinse vegetables with cold water to remove any traces of salted water residue on vegetables. Let vegetables drain in colander for 1 to 1½ hours, gently stirring the vegetables periodically for better drainage.
4 cups pickling vinegar 3 cups brown sugar, lightly packed 1 cup granulated sugar 1½ – 2 tbsp pickling spice tied into a small pickling spice sachet made with cheesecloth ¼ tsp tumeric ¼ tsp dry mustard
Method:
Combine vinegar, sugars, and spices into a large stockpot. Bring to a boil, stirring occasionally. Add the drained vegetables and bring to a boil over medium heat. Reduce heat to medium-low and cook mixture slowly for1 to 1½ hours until vegetables are cooked, somewhat translucent, and mixture is slightly thickened. Stir periodically.
While chow mixture is cooking, start the bottle sterilization process. Wash jars and lids in hot soapy water. Quickly wash the lids and do not let them stay in the hot dish water as, once heated enough to soften the rubber sealing compound and then cooled, they are no longer effective. Rinse jars and lid. (The lids will be heated to soften the rubber sealing compound at the time of bottling.)
Fill a large-sized pot about two-thirds full of hot tap water. Place the jars, upright, into the water. Ensure the jars are fully submerged, each jar filled with water, and that the water is at least an inch over the tops of the jars, adding more if necessary. Cover, bring to a boil, and boil gently for 10 minutes. Reduce heat to simmer and leave the jars in the hot water to have ready to fill once the chow is ready for bottling.
Fill the canner a good half full of hot tap water. Cover and bring to a boil to have it ready for processing of the filled jars. Once it comes to a full boil, reduce heat to keep the water gently boiling.
When the chow is ready to be bottled, use jar lifter tongs to carefully remove the hot sterilized jars from the water, one at a time, emptying the water from the jars back into the pot. Drain jars well.
Remove a small amount of the hot water from the stockpot in which the jars were sterilized and place in small saucepan over simmering heat. Place the lids in the hot water for just a few minutes to soften the rubber sealing compound. Do not boil the lids.
Boil a kettle of water to have ready to top up water in the canner, if needed, once the filled jars are added.
Remove and discard spice sachet from chow. Using a ladle, or a heat-proof glass measuring cup, and a wide-mouthed canning funnel, fill the hot sterilized jars with the chow, leaving about 1/2” headroom in each jar to allow for expansion during the hot water processing. Remove any trapped air bubbles in the jars with a chopstick or small heatproof spatula. Wipe the jar rims with a clean damp cloth to remove any stickiness that could prevent the lids from sealing properly to the jars.
Using a magnetic lid lifter, remove lids from the hot water and center the heated lids on jars so the sealing compound on the lid edges aligns with the jar rims. Fingertip tighten the ring/screw bands until resistance is encountered. Do not over-tighten.
Using jar lifter tongs, carefully place filled jars upright in the canner’s wire basket positioned in the canner, ensuring jars do not touch each other or fall over. Ensure the water level is at least 1” above the tops of jars, adding more boiling water as necessary. Cover with canner lid. Increase the heat to return the water to a full rolling boil then decrease the heat to just keep the water at a moderately rolling boil but not boiling over. Process jars in the hot water bath for 10 minutes, adjusting time as and if necessary, for higher altitudes. Start timing the processing from the point at which a full rolling boil is reached after filled jars have been added to the canner. At the end of the processing time, turn off heat and remove canner lid.
Let jars sit in the hot water for 5 minutes then, using jar lifter tongs, carefully remove the jars filled with chow, upright and one at a time, and transfer them to a heat-proof cutting board, that has been covered with a towel, to cool completely. Listen for the “pop” or “ping” sound as the bottles seal over the next few minutes or hours. The lids of properly sealed jars will curve downward.
Let jars rest, undisturbed, on counter for 24 hours. Cover jars with towel to keep light out. Then, after 24 hours, test each jar for proper sealing by pressing down on the center of each jar lid. If the lid is already pressed downward, and does not pop back up, it is properly sealed. Any jars that do not pass this test should be refrigerated and the chow used within a week or so. Store properly sealed chow bottles in cool, dark place. Refrigerate chow once jar has been opened.
For best flavor, let chow age for at least 2 weeks before serving.
Yield:Apx. 6 – 7 half-pint jars.
If you have made this recipe and enjoyed it and/or wish to share it with your friends and family, please do so on social media but be sure to share the direct link to this posting from my website.
This Green Tomato Chow is a sweet yet slightly tangy condiment. Lovely served with many meals, it is superb served with fish cakes.
Course Condiment
Cuisine Canadian
Keyword chow, Green Tomato Chow
My Island Bistro KitchenBarbara99
Ingredients
3lbsgreen tomatoes, chopped into chunks
3¼cupsonions, chopped
1cupcelery, sliced
½cupsweet red pepper, diced
Apx. 1 cup pickling salt
Combine all ingredients into a large bowl. Using the ratio of ½ cup pickling salt to 4 cups cold water, cover ingredients completely with salted water. Add as much salted water as necessary to cover the vegetables. For this amount of vegetables, you will likely need at least 1 cup pickling salt dissolved in 8 cups water. Make sure the pickling salt is thoroughly dissolved in the water before pouring over vegetables. Let vegetables soak at room temperature for 7-8 hours. Drain vegetables in large colander. Quickly rinse vegetables with cold water to remove any traces of salted water residue on vegetables. Let vegetables drain in colander for 1 to 1½ hours. Gently stir the vegetables periodically for better drainage.
4cupspickling vinegar
3cupsbrown sugar, lightly packed
1cupgranulated sugar
1½ - 2tbsppickling spice tied into a small pickling spice sachet made with cheesecloth
¼tsptumeric
¼tspdry mustard
Instructions
Combine vinegar, sugars, and spices into a large stockpot. Bring to a boil over medium heat, stirring occasionally. Add the drained vegetables and bring just to the boiling point. Reduce heat to medium-low and cook mixture, uncovered, slowly for 1 to 1½ hours, until vegetables are cooked, somewhat translucent, and mixture is slightly thickened. Stir periodically.
While chow mixture is cooking, start the bottle sterilization process. Wash jars and lids in hot soapy water. Quickly wash the lids and do not let them stay in the hot dish water as, once heated enough to soften the rubber sealing compound and then cooled, they are no longer effective. Rinse jars and lids. (The lids will later be heated to soften the rubber sealing compound at the time of bottling.)
Fill a large-sized pot about two-thirds full of hot tap water. Place the jars, upright, into the water. Ensure the jars are fully submerged, each jar filled with water, and that the water is at least an inch over the tops of the jars, adding more if necessary. Cover, bring to a boil, and boil gently for 10 minutes. Reduce heat to simmer and leave the jars in the hot water to have ready to fill once the chow is ready for bottling.
Fill the canner a good half full of hot tap water. Cover and bring to a boil to have it ready for processing of the filled jars. Once it comes to a full boil, reduce heat to keep the water gently boiling.
When the chow is ready to be bottled, use jar lifter tongs to carefully remove the hot sterilized jars from the water, one at a time, emptying the water from the jars back into the pot. Drain jars well.
Remove a small amount of the hot water from the stockpot in which the jars were sterilized and place in small saucepan over simmering heat. Place the lids in the hot water for a few minutes to soften the rubber sealing compound. Do not boil the lids.
Boil a kettle of water to have ready to top up water in the canner, if needed, once the filled jars are added.
Remove and discard spice sachet from chow. Using a ladle, or a heat-proof glass measuring cup, and a wide-mouthed canning funnel, fill the hot sterilized jars with the chow, leaving about 1/2” headroom in each jar to allow for expansion during the hot water processing. Remove any trapped air bubbles in the jars with a chopstick or small heatproof spatula. Wipe the jar rims with a clean damp cloth to remove any stickiness that could prevent the lids from sealing properly to the jars.
Using a magnetic lid lifter, remove lids from the hot water and center the heated lids on jars so the sealing compound on the lid edges aligns with the jar rims. Fingertip tighten the ring/screw bands until resistance is encountered. Do not over-tighten.
Using jar lifter tongs, carefully place filled jars upright in the canner's wire basket positioned in the canner, ensuring jars do not touch each other or fall over. Ensure the water level is at least 1” above the tops of jars, adding more boiling water as necessary. Cover with canner lid. Increase the heat to return the water to a full rolling boil then decrease the heat to just keep the water at a moderately rolling boil but not boiling over. Process jars in the hot water bath for 10 minutes, adjusting time as and if necessary, for higher altitudes. Start timing the processing from the point at which a full rolling boil is reached after jars have been added to the canner. At the end of the processing time, turn off heat and remove canner lid.
Let jars sit in the hot water for 5 minutes then, using jar lifter tongs, carefully remove the jars filled with chow, upright and one at a time, and transfer them to a heat-proof cutting board, that has been covered with a towel, to cool completely. Listen for the “pop” or “ping” sound as the bottles seal over the next few minutes or hours. The lids of properly sealed jars will curve downward. Let jars rest, undisturbed, on counter for 24 hours. Cover jars with towel to keep light out. Then, after 24 hours, test each jar for proper sealing by pressing down on the center of each jar lid. If the lid is already pressed downward, and does not pop back up, it is properly sealed. Any jars that do not pass this test should be refrigerated and the chow used within a week or so. Store properly sealed chow bottles in cool, dark place. Refrigerate chow once jar has been opened.
For best flavor, let chow age for at least 2 weeks before serving.
Recipe Notes
Yield: Apx. 6 – 7 half-pint jars. Exact yield will depend on how much the chow is cooked down.
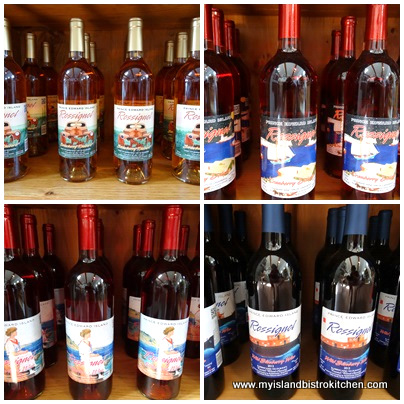
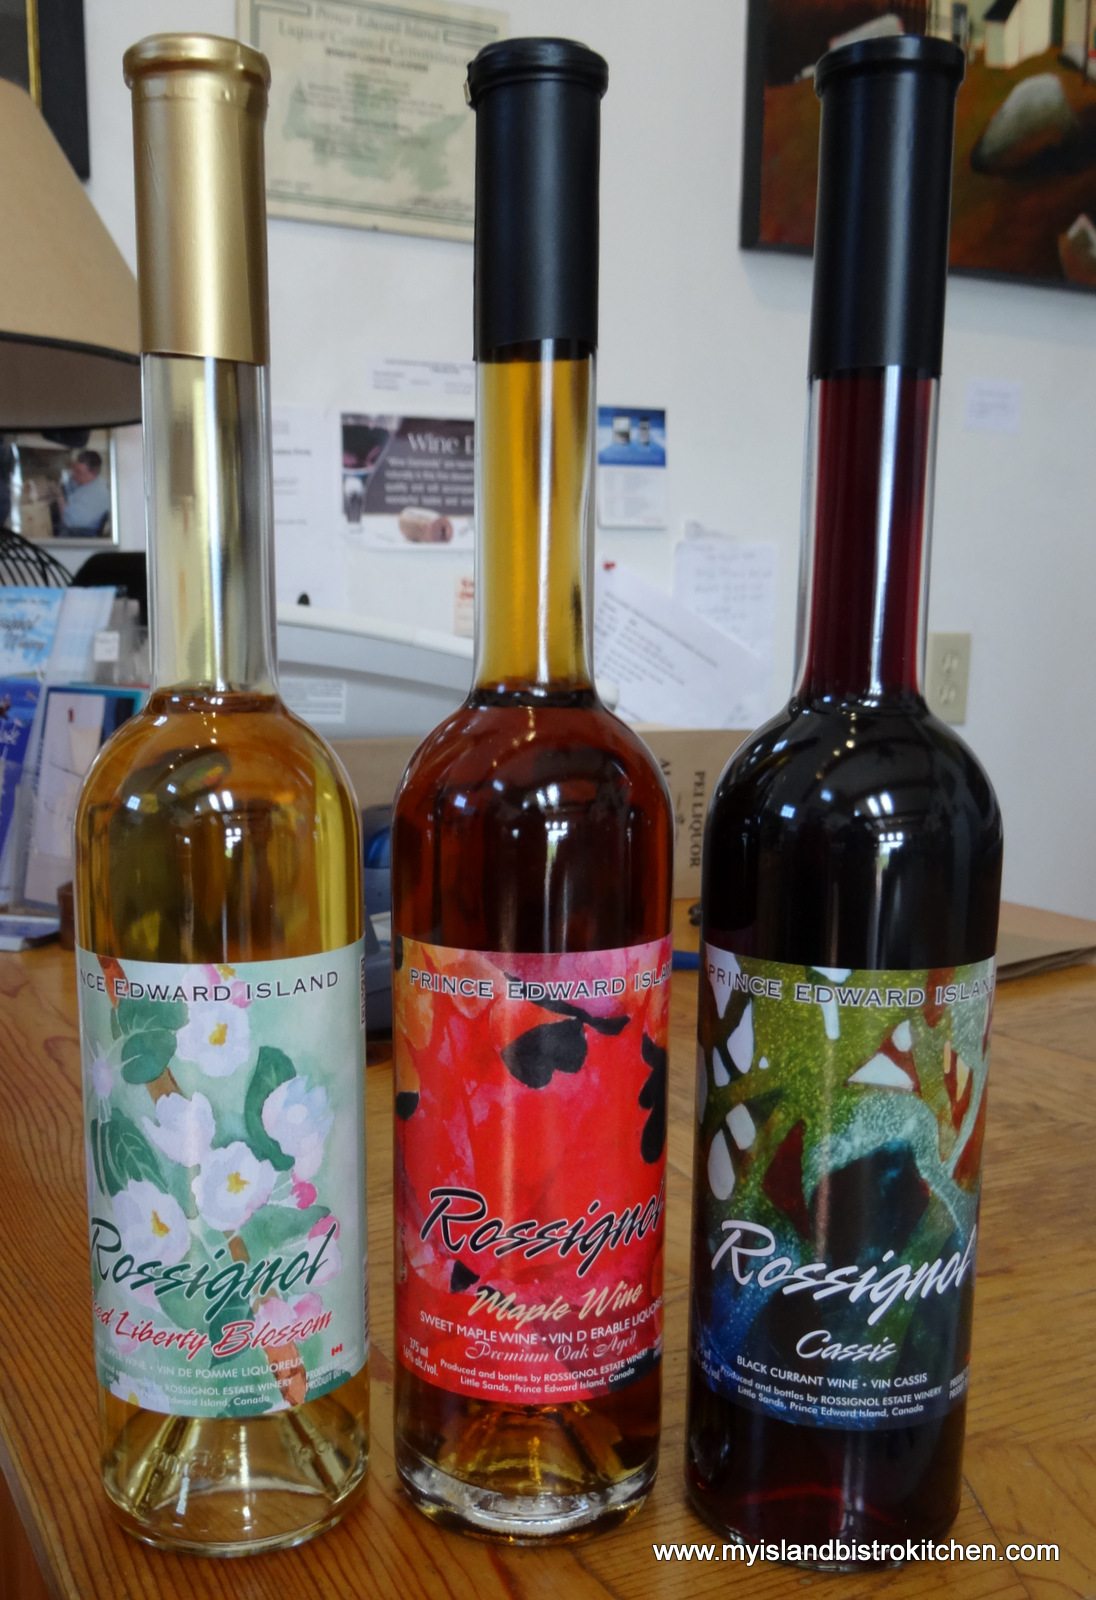
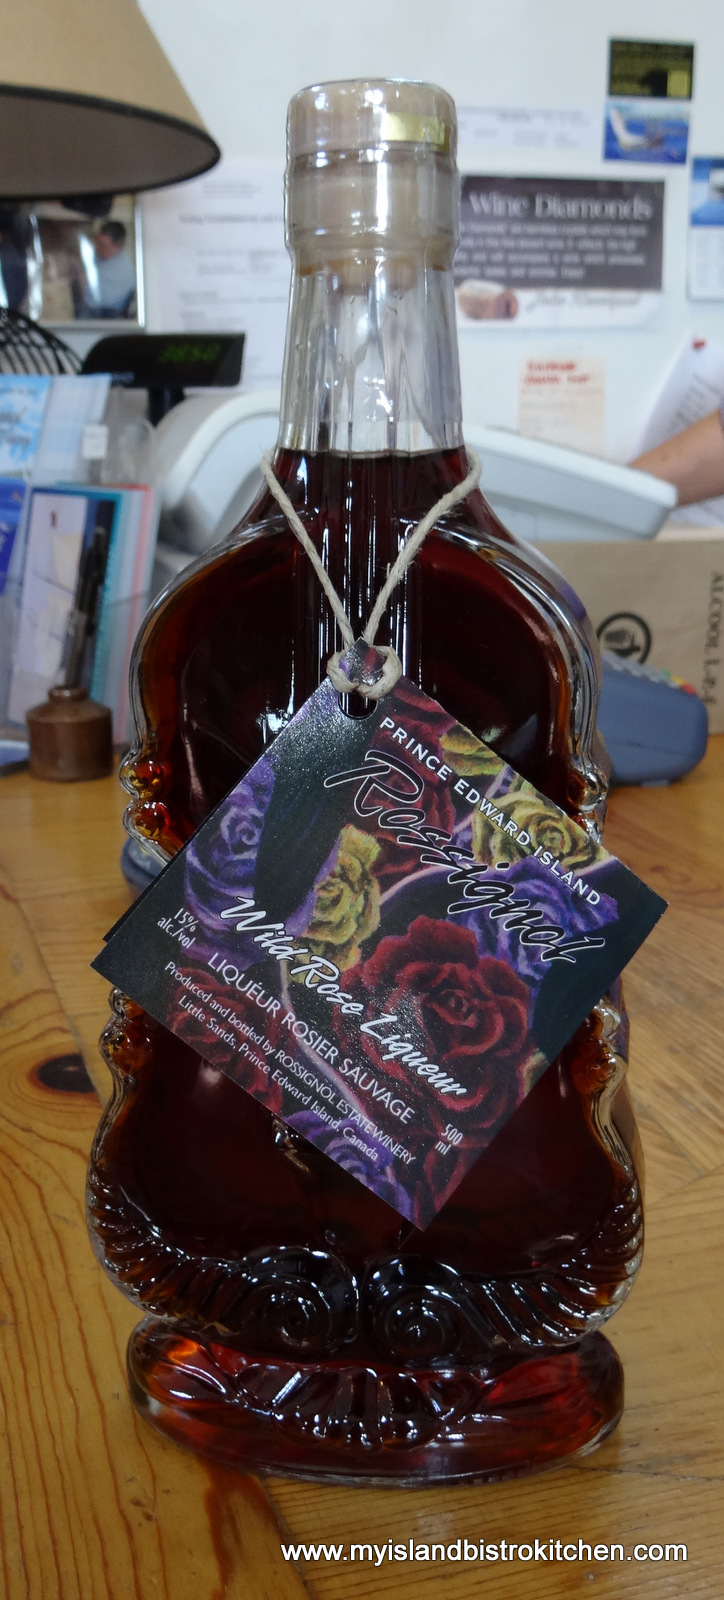
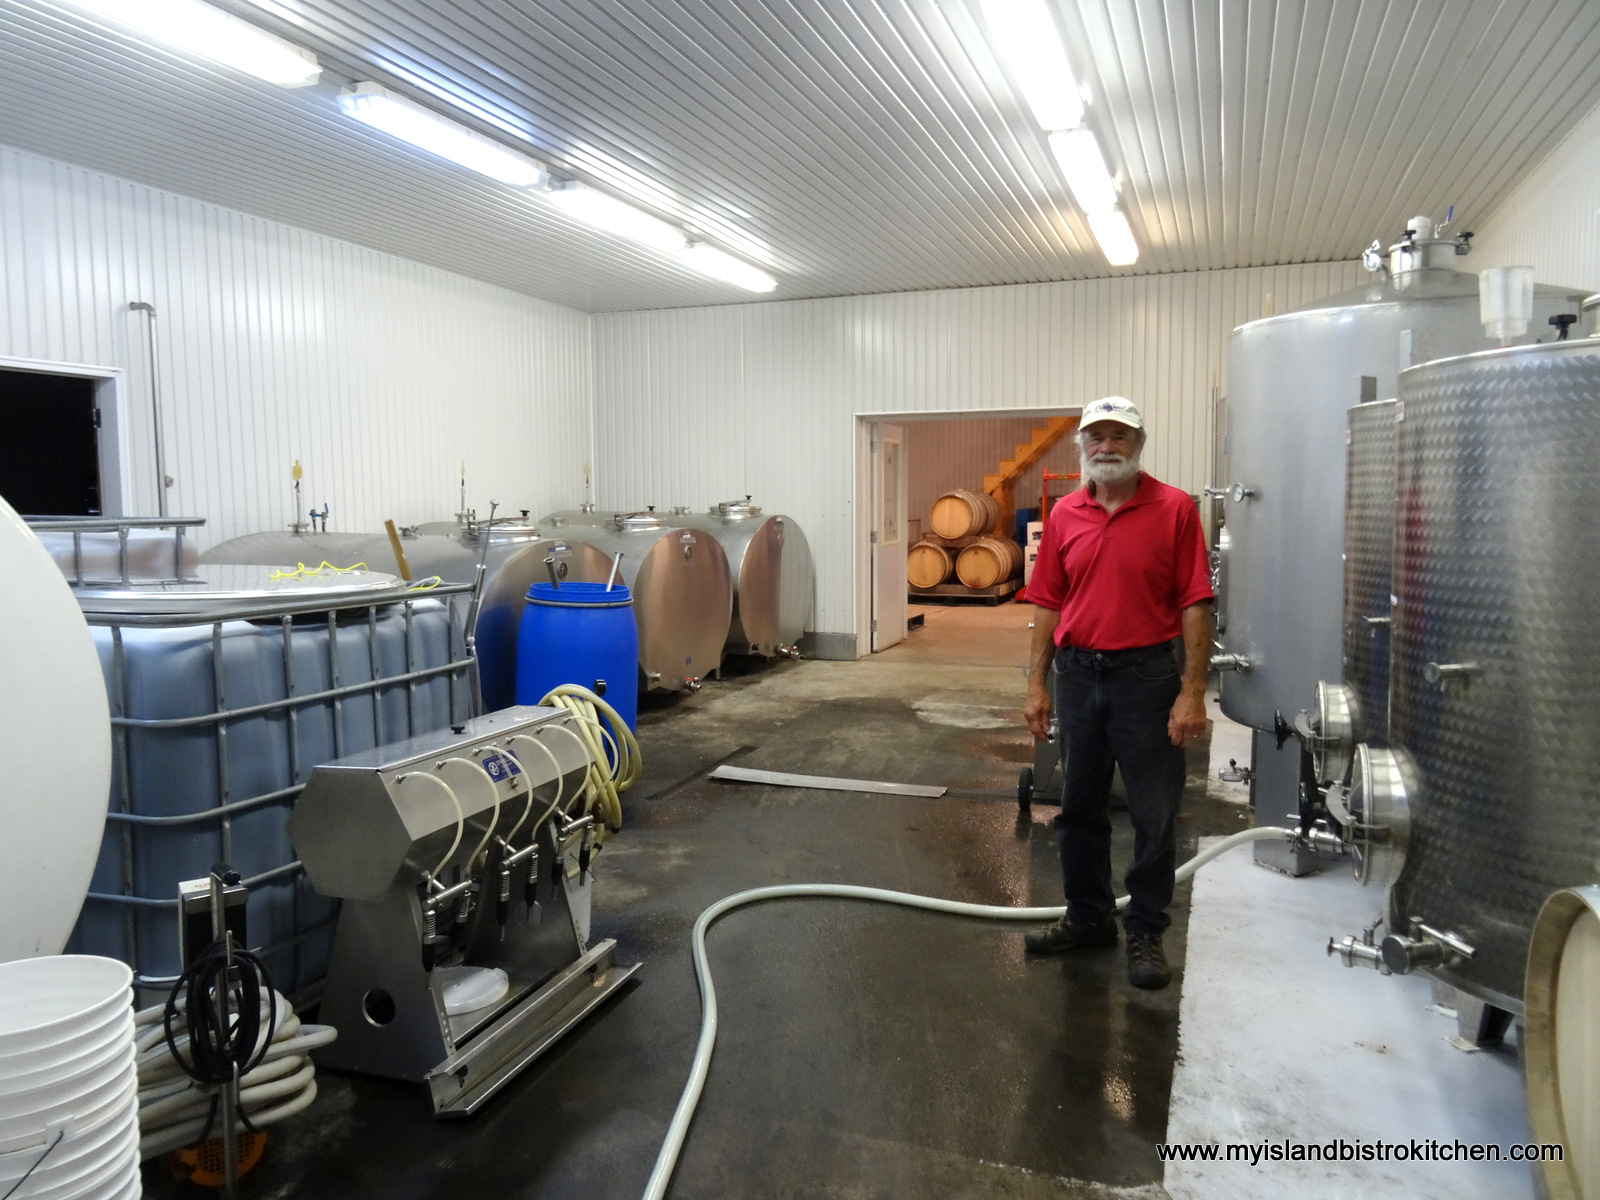
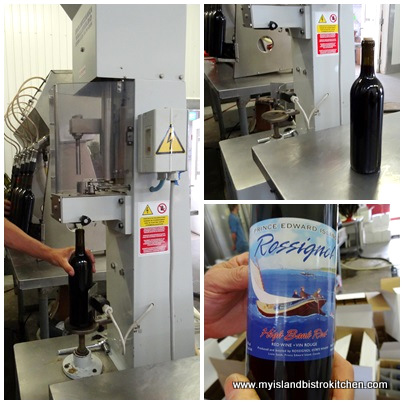
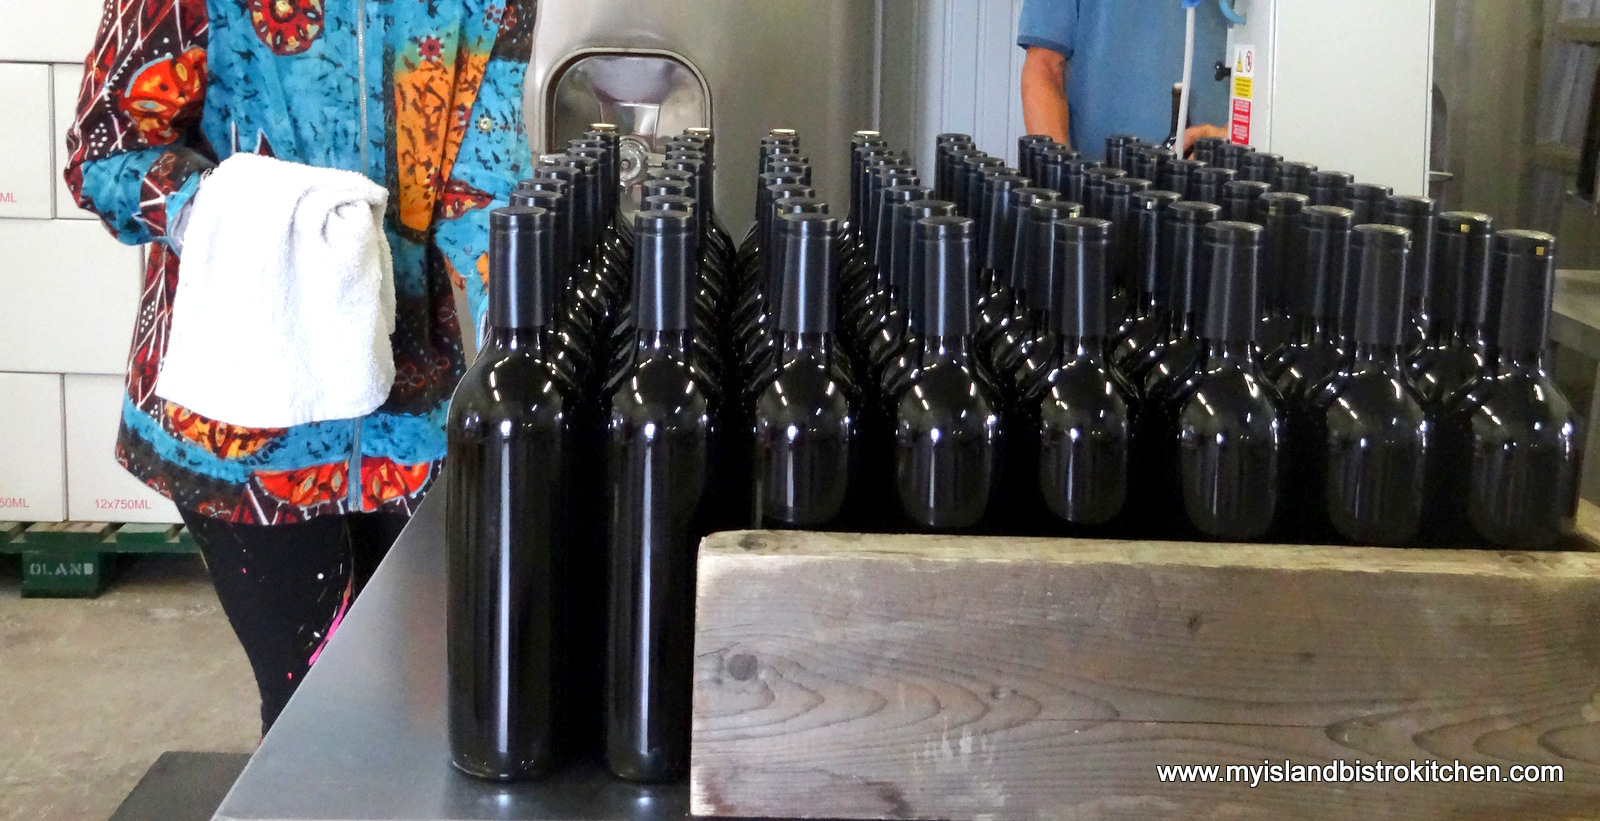
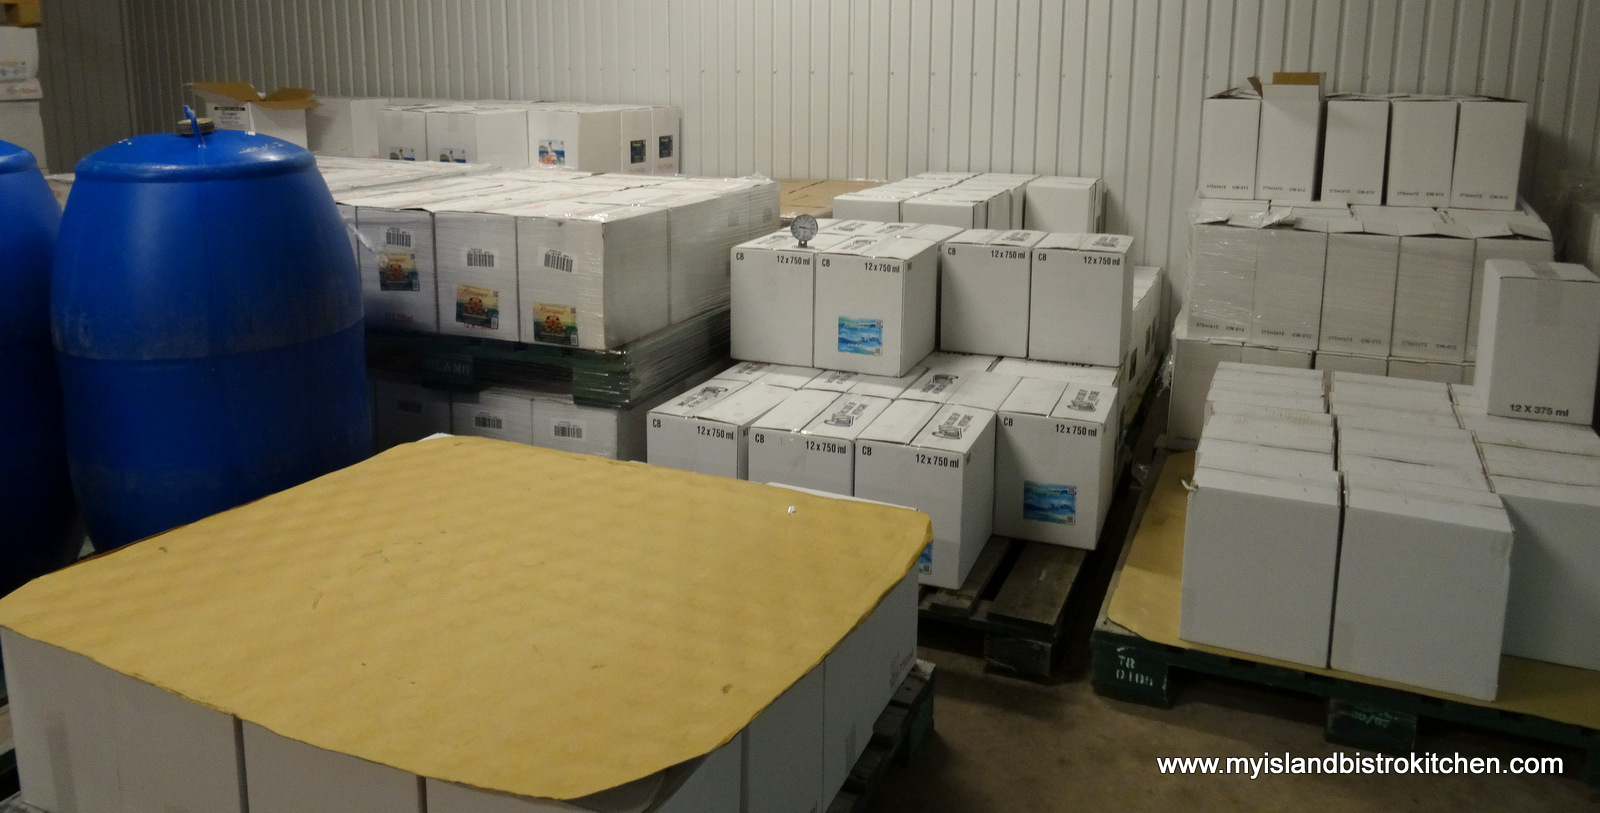
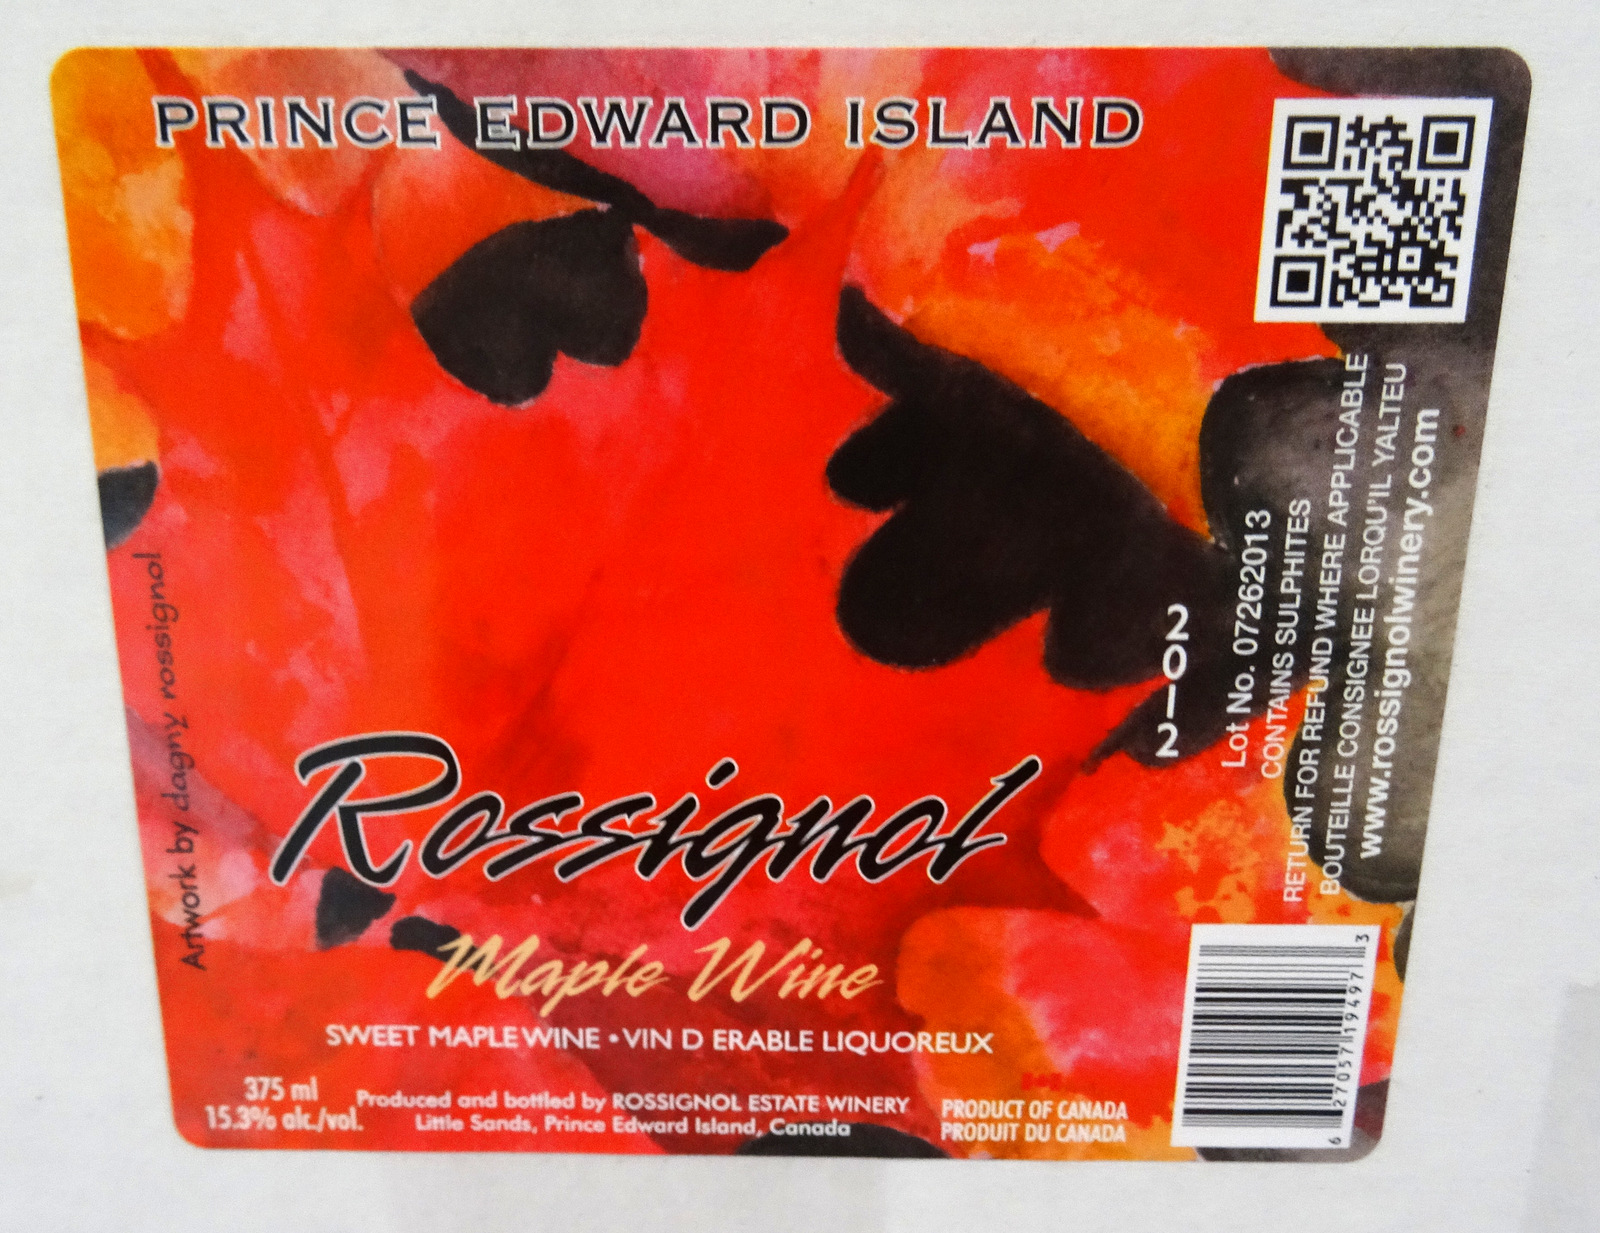
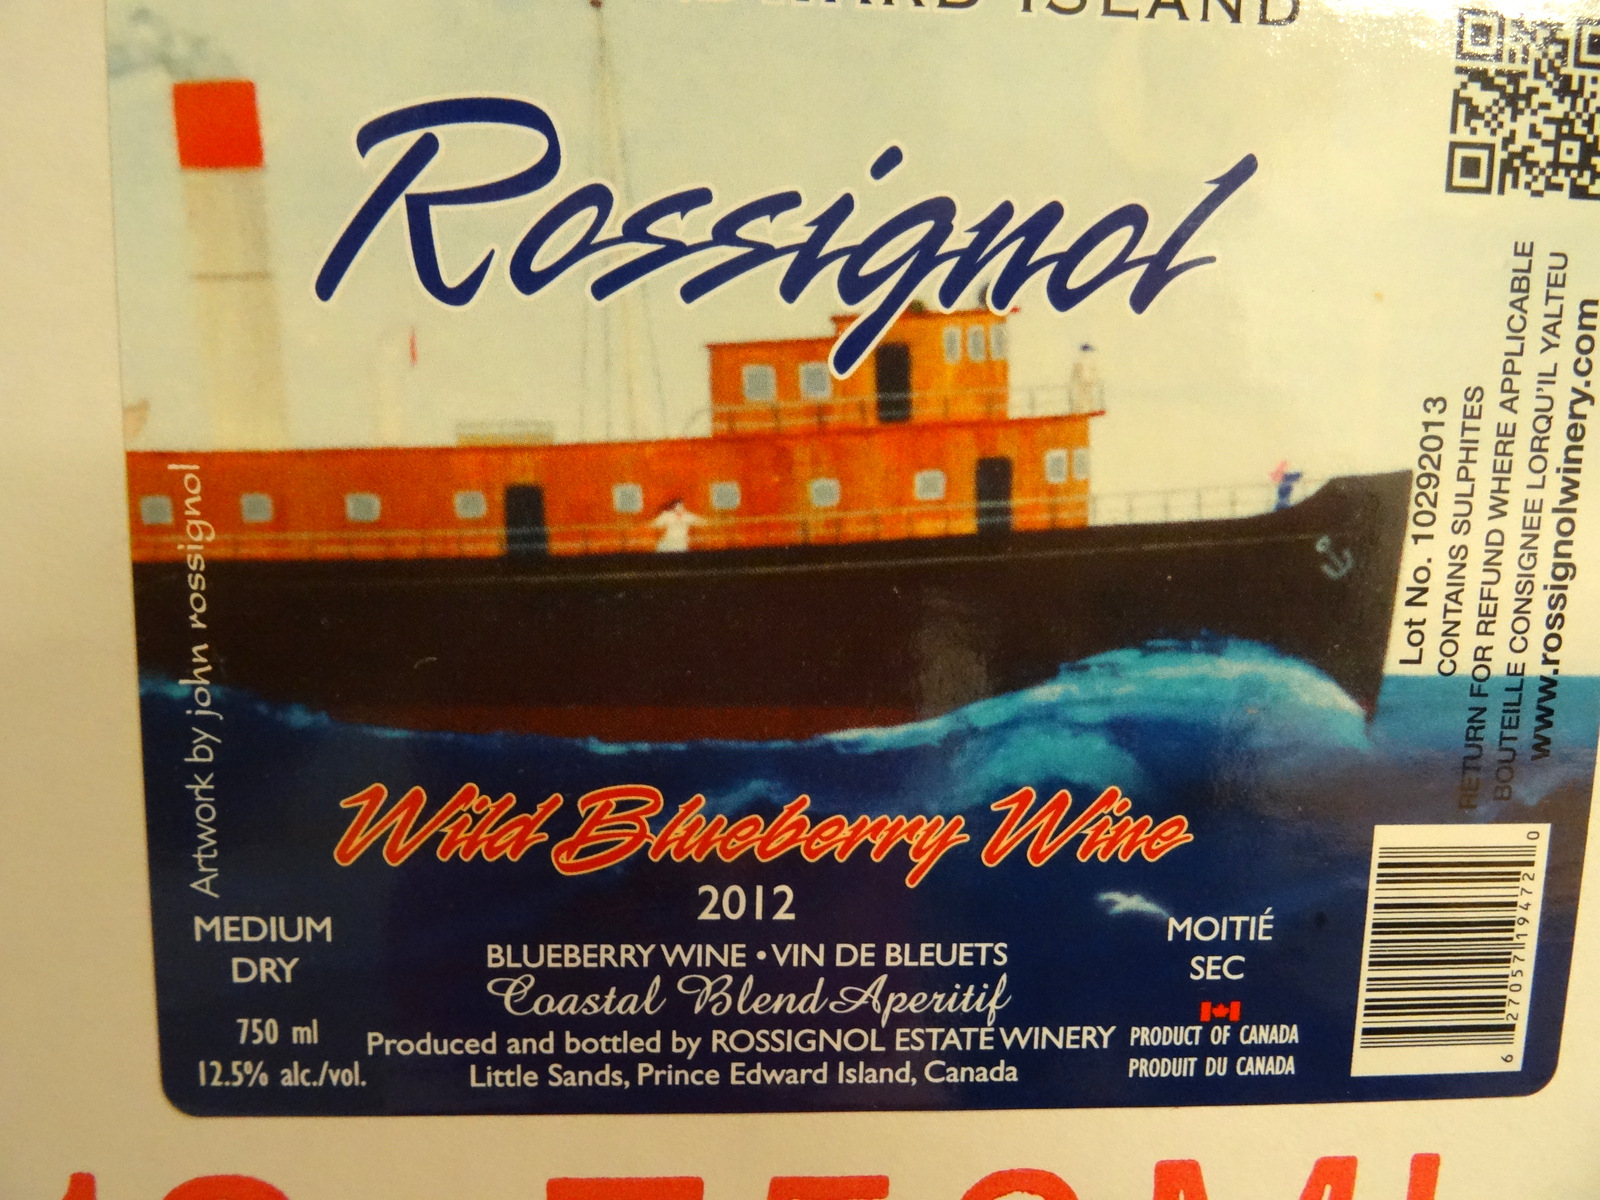
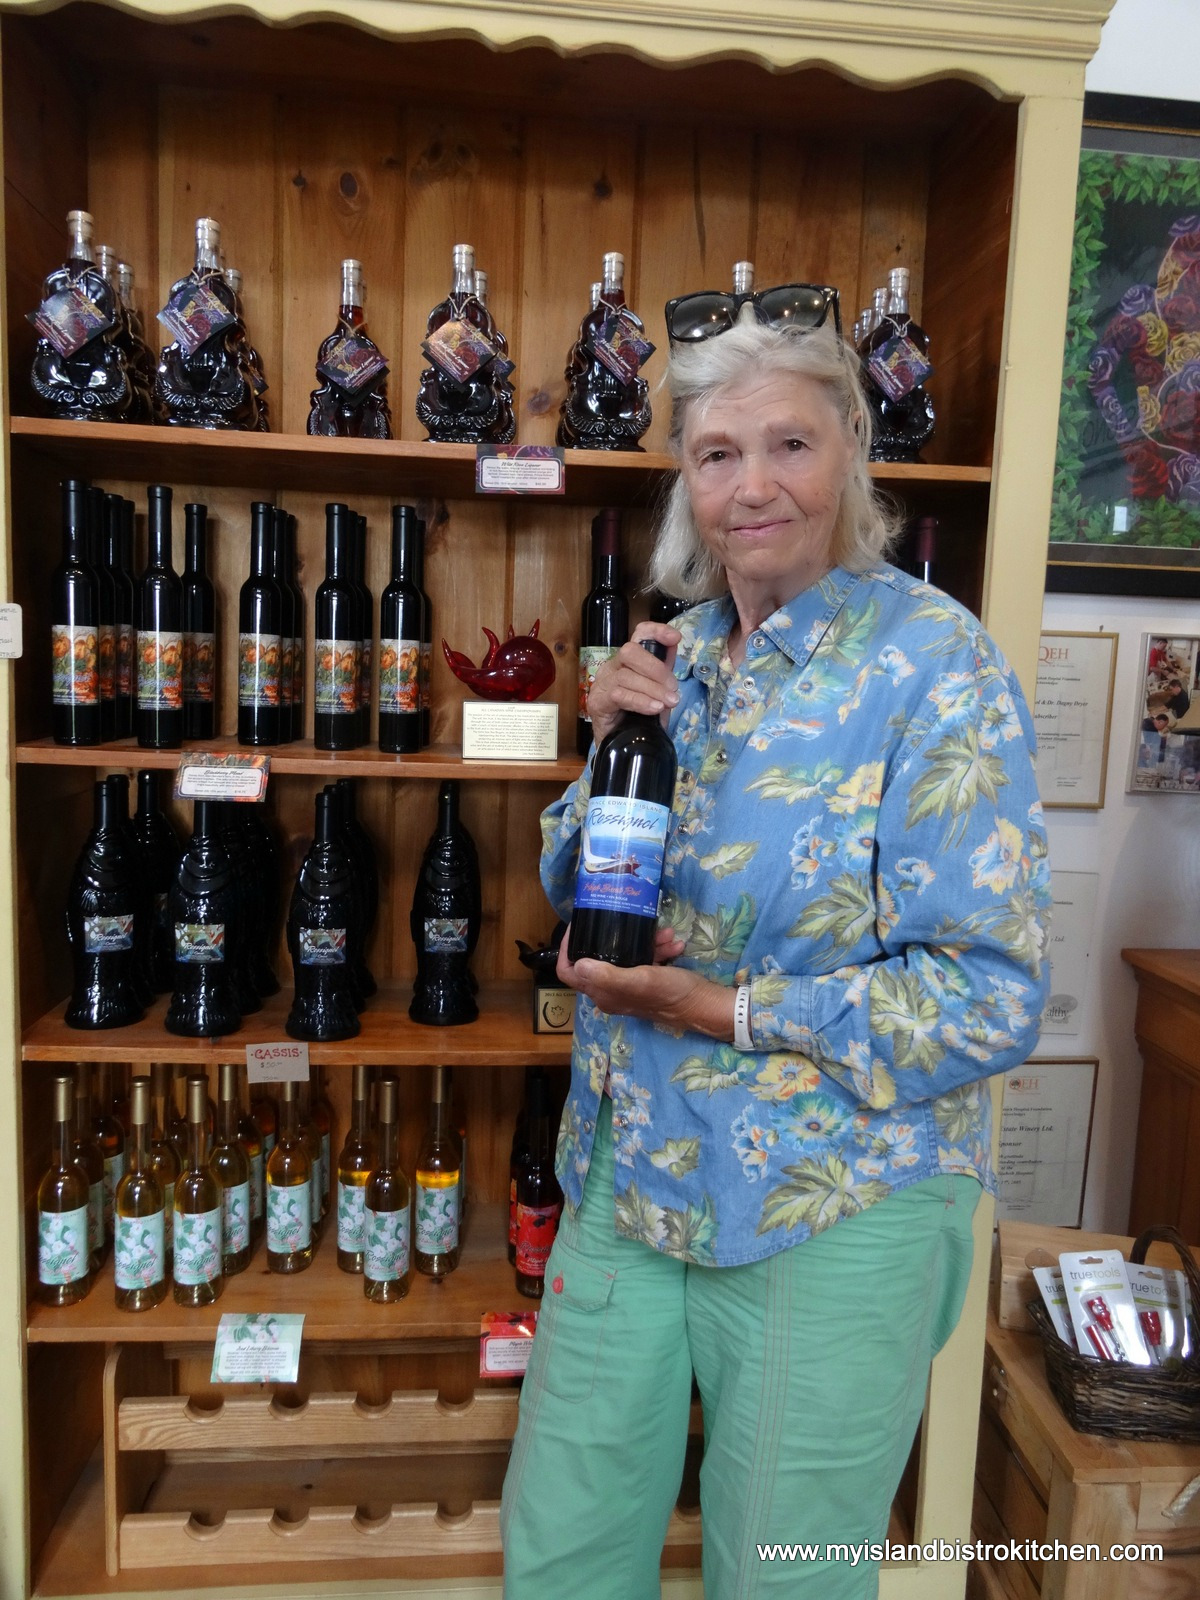
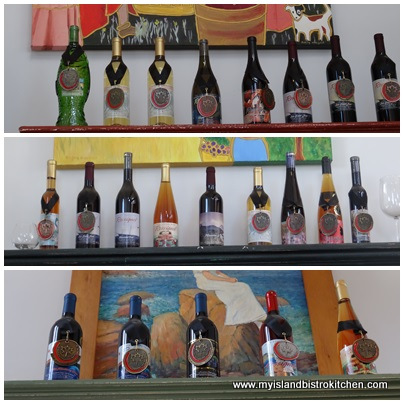
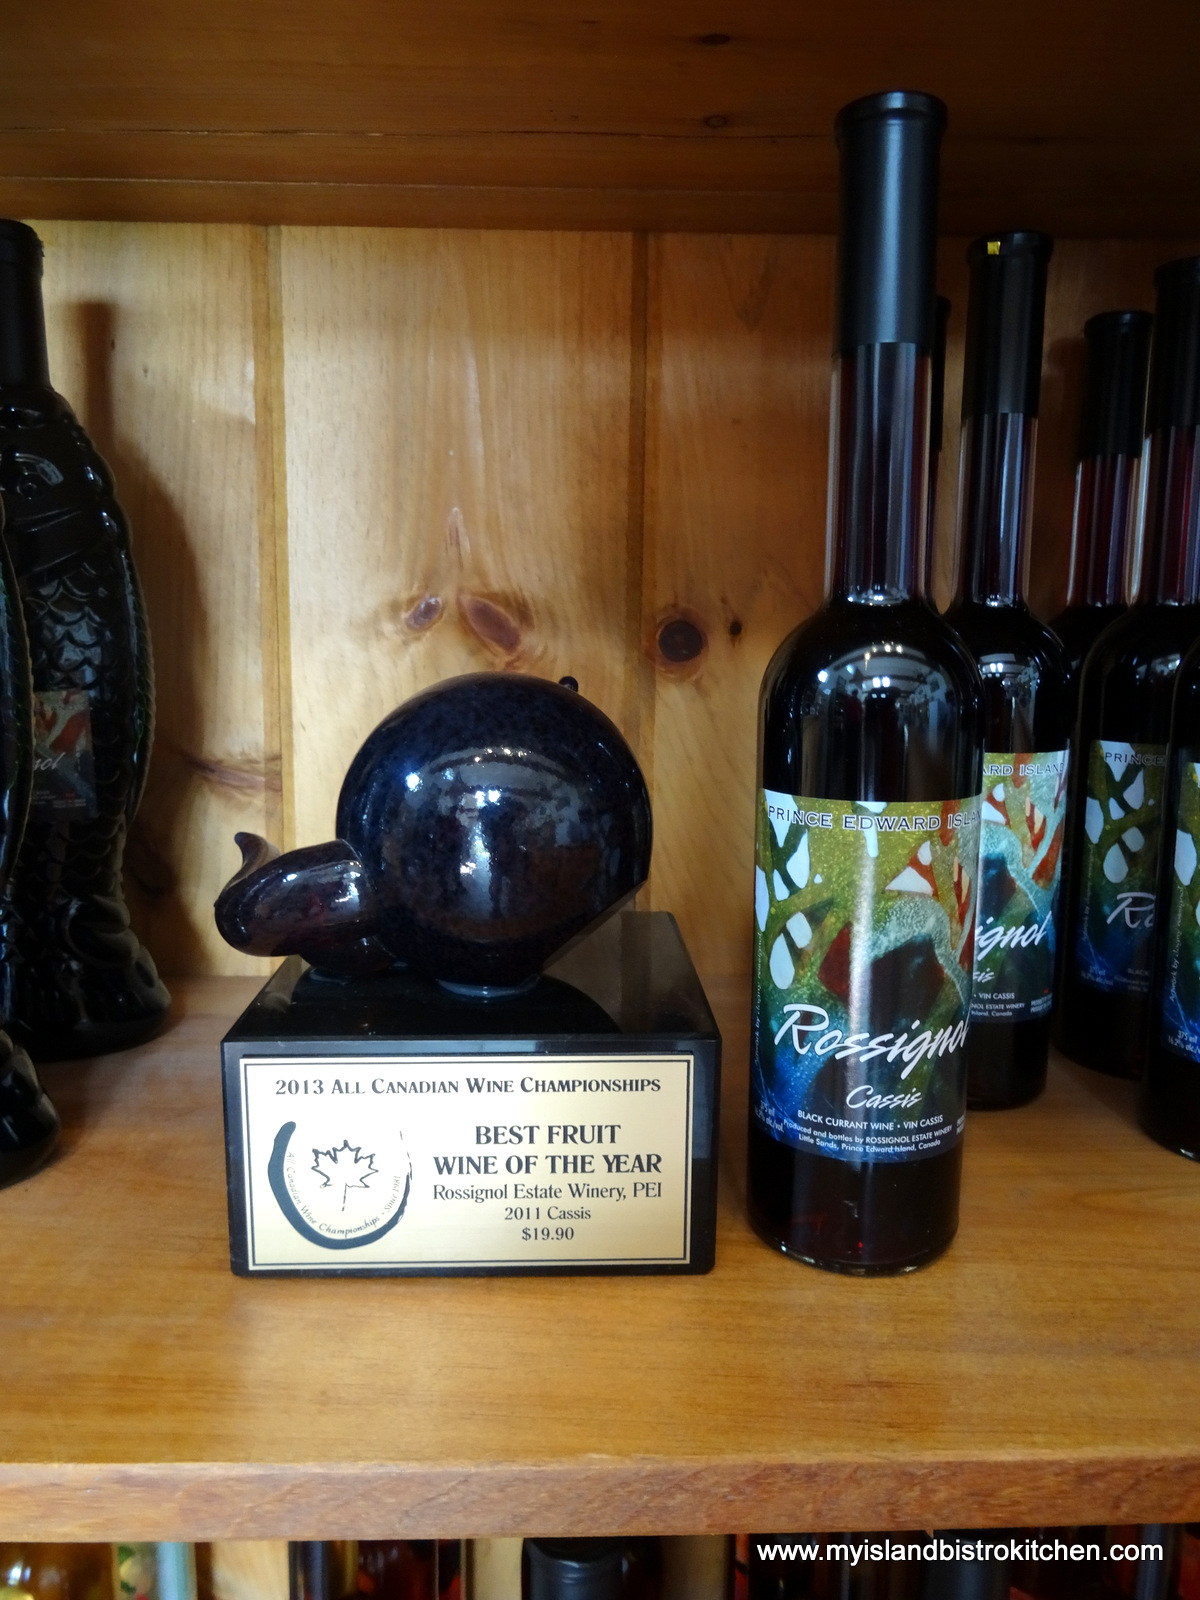
There are three wineries in Prince Edward Island and the oldest of them is Rossignol Winery. To find out more about Rossignol wines and products, I visited the winery and vineyards in Little Sands where I met owner and vintner, John Rossignol.
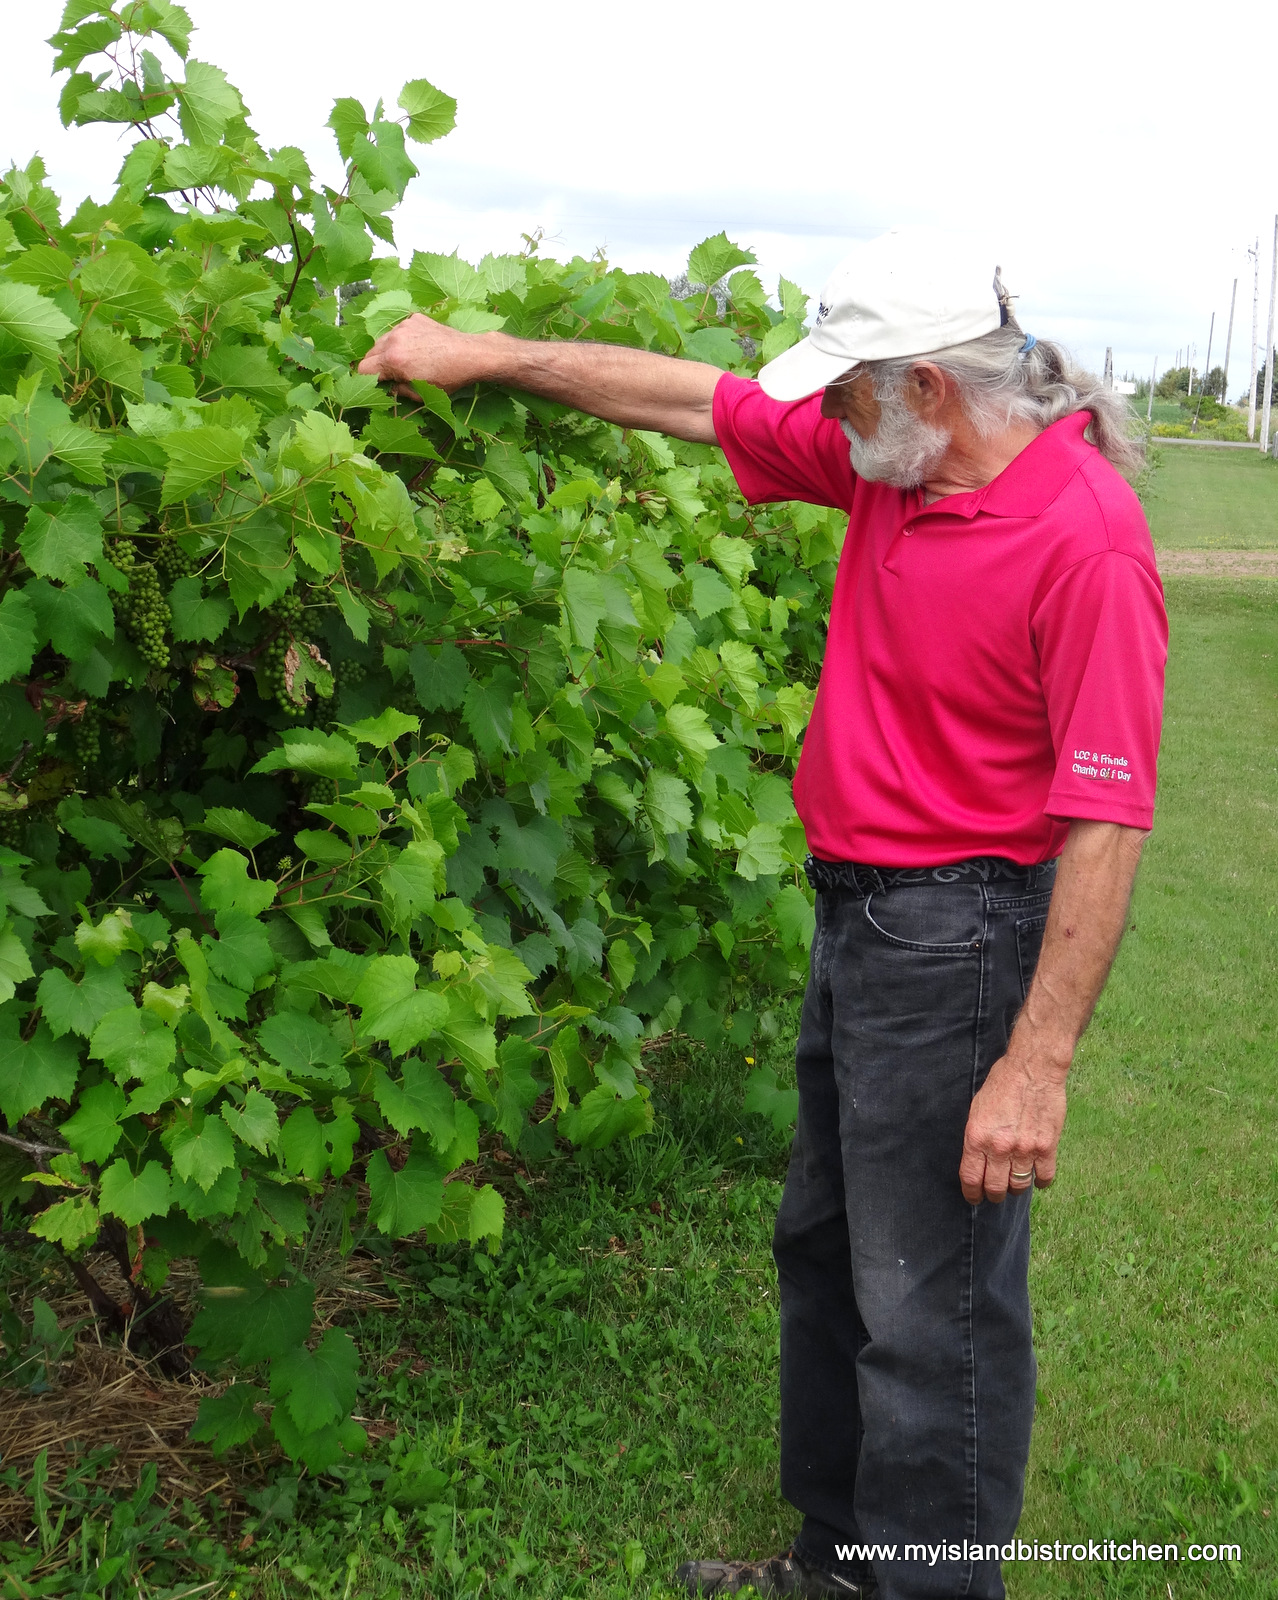
John Rossignol, owner, Rossignol Winery, Little Sands, PEI
In the early 1990s, John was looking for a new career and one which he could pursue while living in a rural environment. He had developed an interest in wine making and in a special place called Prince Edward Island (PEI) where there were no established wineries. Hence, he saw a potential niche market. However, his dream was not without some challenges, chief amongst them being that there were no existing laws in PEI governing and regulating commercial wine making. Working with the provincial government for over two years, John pursued his dream and, in 1995, the Liquor Control Act and Regulations were enacted which allowed for commercial wine production in PEI.
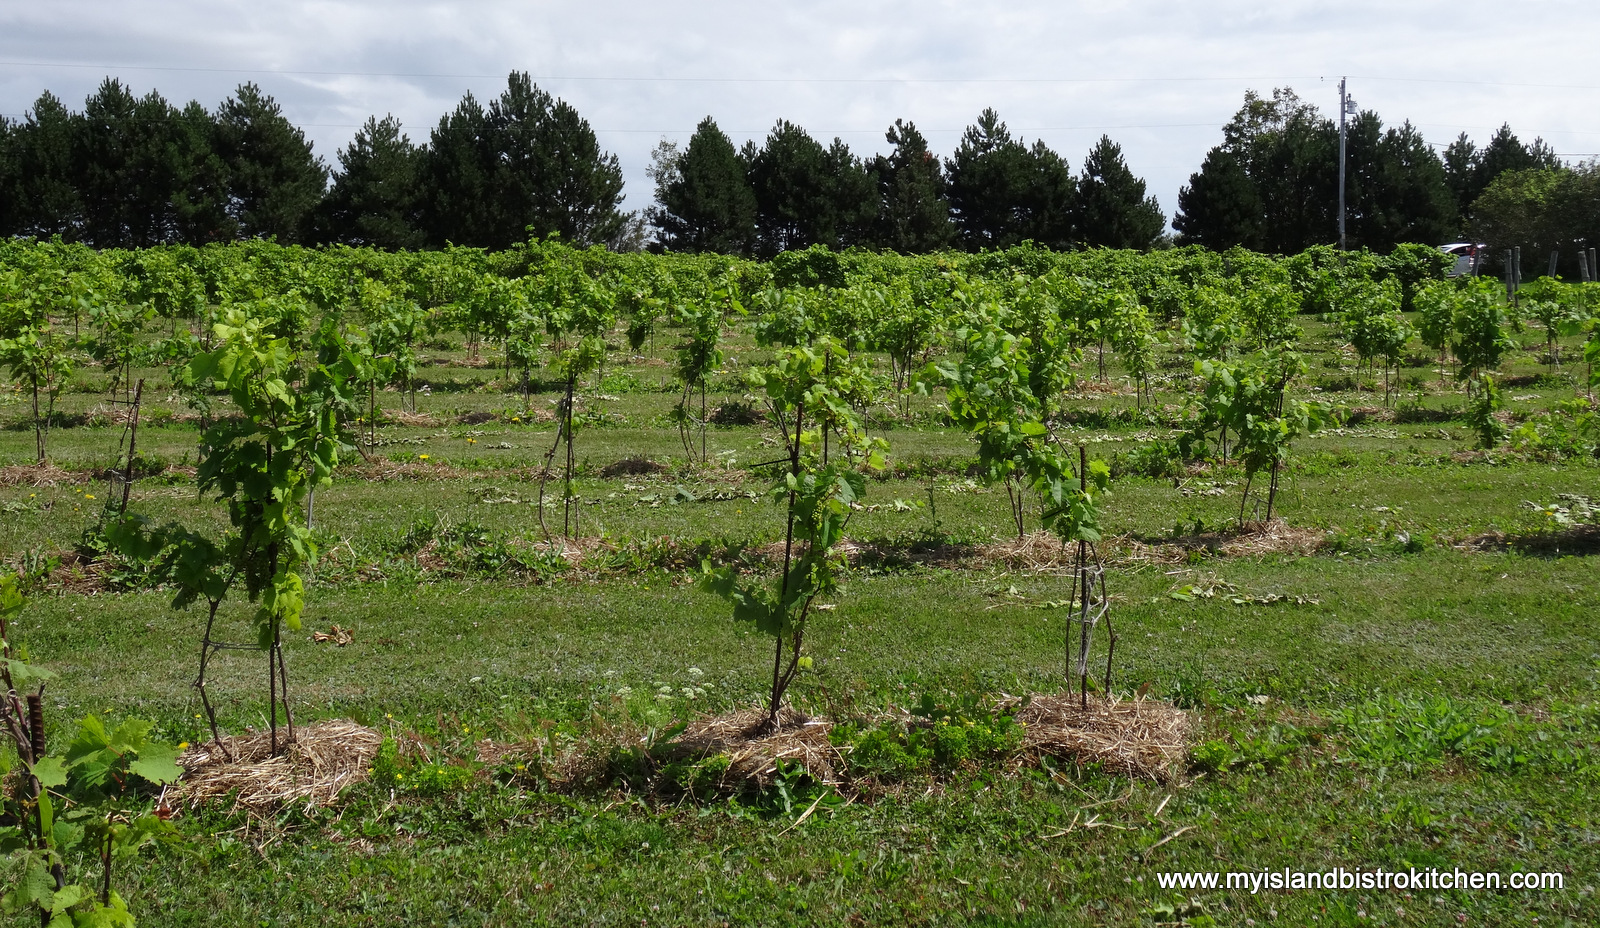
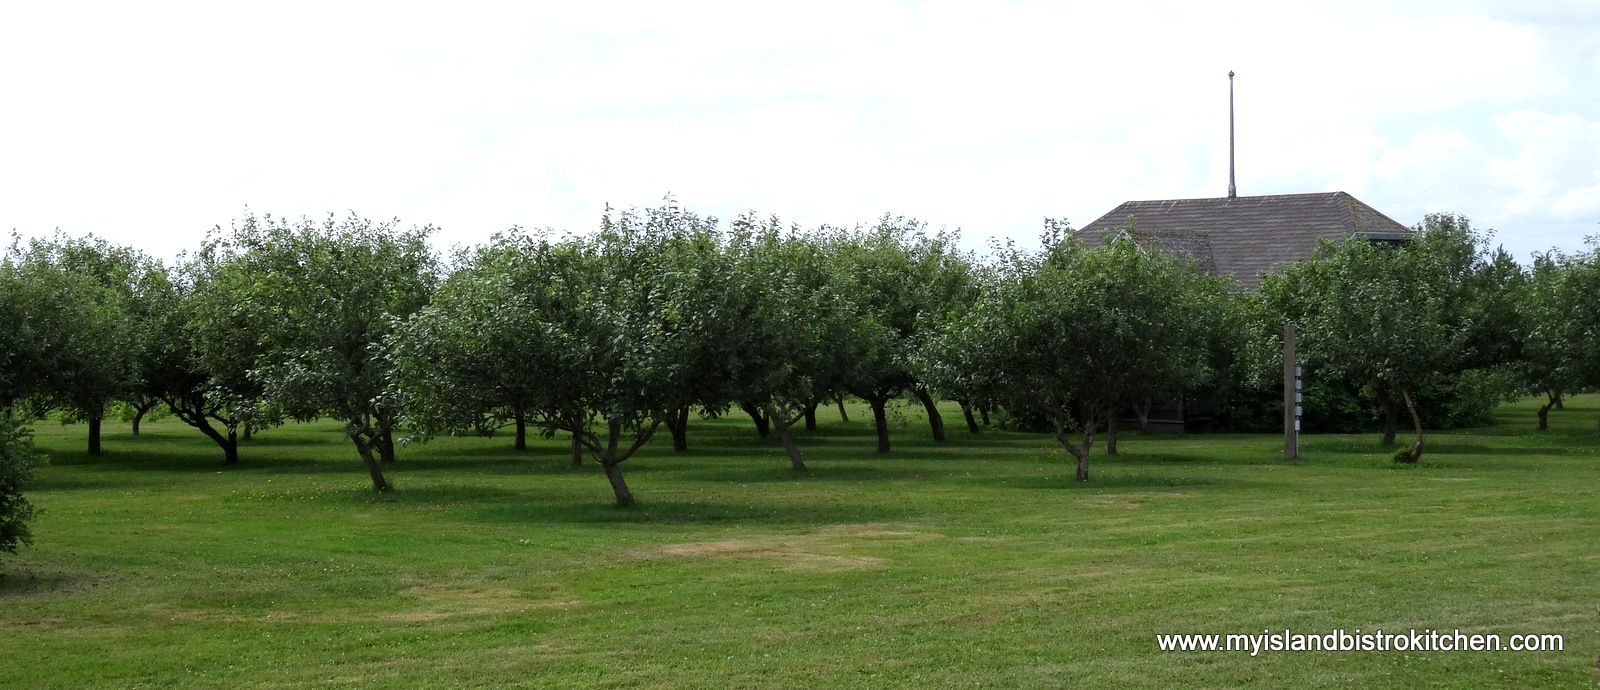
Grapevines at Rossingol Winery
In the meantime, while the process to develop and enact legislation was underway, John was optimistic so he planted grapevines to get a vineyard established so he’d have grapes available should the Province give permission for commercial wine making. The winery was built in 1994 and the first wine produced in 1995, upon enactment of the enabling legislation.
Rossignol Winery, Little Sands, PEI
Currently, there are about ten acres of grapevines grown onsite at the winery. The remainder of the grapes needed for production are sourced from other Island vineyards.
John grows four varieties of grapes. Two of the most common are Marechal Foch, a French hybrid grape that is successfully proven to grow well in the Maritime climates and l’acadie blanc that was developed in Nova Scotia.
John Rossignol checks the status of the grapes on the grapevines in his vineyard at the winery in Little Sands, PEI
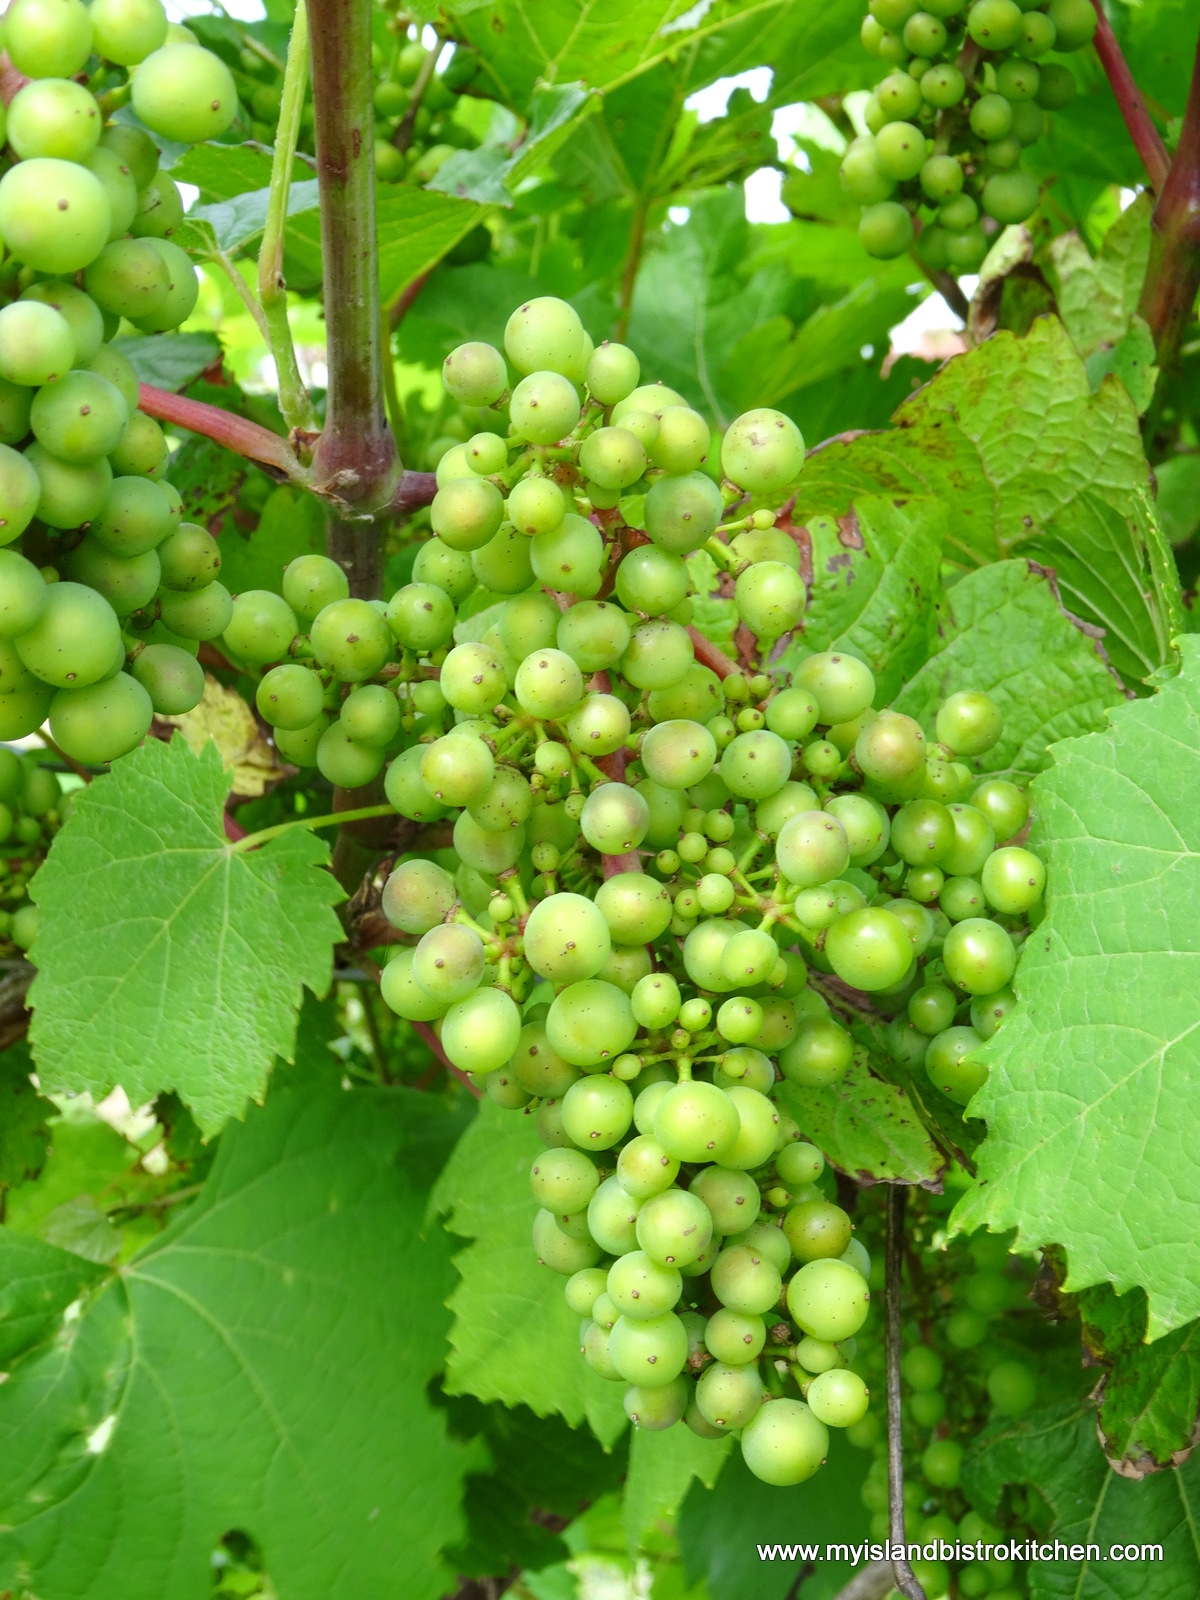
The grapes below were photographed in mid-August. They will be ready for harvesting in October.
The winery also has an onsite apple orchard to produce apples for its iced apple cider, “Liberty Blossom”.
Apple Orchard at Rossignol Winery, Little Sands, PEI
The wonderful sand sculptures at the winery are the artistic work of sand sculpter, Abe Waterman.
Sand Sculpture by Abe Waterman – at the Rossignol Winery, Little Sands, PEI
The detail in these works of art at the edge of the vineyard at the winery is incredible.
Since its beginnings, the winery has made a number of fruit wines (e.g., strawberry, wild blueberry, rhubarb). In the winery’s early years, John says this was a necessity as there weren’t enough grapes available to make the traditional wines as we think of them. Supportive of local products, John sources raw products such as Island strawberries, raspberries, and black currants from local farmers.
Fruit Wines Produced by Rossignol Winery, Little Sands, PEI
The fruit wines are especially popular in summer and are generally consumed as an aperitif. John likes the Strawberry Wine paired with cheese and says the blueberry wine can also be a table wine. This medium-sweet red wine is especially good paired with spicy, curried food. In total, the winery now produces 16 varieties of products under the Rossignol label.
When asked what the winery’s most popular wines are, John says the Little Sands White and the High Bank Red top the list. The winery also produces some specialty liqueurs, including their iced apple cider, maple liqueur, and cassis which they bottle in special Italian bottles. The cassis is a relatively new product for the winery which began the process four years ago to get this product ready for market. The cassis has been on the market for two years now and is particularly popular with chefs.
The winery also makes a wild rose liqueur from the hips of locally grown roses. These products are suitable as after-dinner drinks.
John indicates he experiences no great challenge to running a winery in rural PEI. He says PEI has good growing conditions for quality fruit which, in turn, means good quality wine.
“PEI has good growing conditions for quality fruit which, in turn, means good quality wine.” – John Rossignol
I asked John what his greatest satisfaction is from producing wine. He says, when he started in the business, it was always intended to be a lifestyle business which it remains today. He tells me he enjoys getting to work from his nearby home without going through city rush hour traffic. He also derives satisfaction from looking for new markets that keep the business interesting and different. But, perhaps most of all, John says he enjoys a business that actually allows him to be involved in all stages of the production of the finished product. That means he farms the grapes, makes the wine, and bottles, markets, and sells it so he gets to see the entire process of production from start to finish.
After our chat about the Rossignol products, John toured me through the winery.
The wine is sterilized by filtration and passes through three large tanks.
Tanks Containing Wine in Progress
Some products, such as the maple liqueur, are aged in traditional oak barrels.
Traditional Oak Barrels for Aging Wine
The barrels in the photo below contain red wine which has been aging for two years.
Oak Barrels of Red Wine Aging for Two Years
During my visit, the winery staff was busy bottling wine.
Bottling WineCorking and Labeling the Bottles
Freshly Bottled WineBoxes of Wine Ready for Shipment
Rossignol wines are presented in uniquely-labelled bottles. Labels feature the work of local painters, including John’s wife Dagny, as well as some of John’s own artwork.
Wine Bottle Label Designed by Dagny Rossignol
Wine Bottle Label Designed by John Rossignol
One of the earliest artists involved with producing artwork for Rossignol bottles is Nancy Perkins who happened to drop by the winery during my visit.
Nancy Perkins, One of the Designers of Wine Bottle Labels at Rossignol Winery
Rossignol wines and liqueurs are available at the winery located at 11147 Shore Road, in Little Sands, PEI, as well as at Island liquor stores. The winery has at times shipped their products to Ontario, Nova Scotia, New Brunswick, Manitoba, and Alberta Liquor Commissions. Recently, the winery has sent four shipments of wines to China which has shown a special interest in PEI wines.
The winery regularly sends samples of their wines to wine competitions and, as you can see from the photo below, they have garnered many medals attesting to the fine quality of wine being produced at Rossignol Winery.
Rossignol was recently awarded the gold medal for the best fruit wine in Canada at the All Canadian Wine Championships in Ontario. That’s great recognition and validation for a winery that was the pioneer in wine making in PEI and is still going strong, producing on average about 40,000 bottles of wine annually.
For more information on Rossignol Winery, visit their website at http://www.rossignolwinery.com/Rossignol-Winery.html
————
Thank you for visiting “the Bistro” today. There are lots of ways to connect with “the Bistro” through social media:
As I write this post, it’s apple season in Prince Edward Island and orchards are filled with trees bearing wonderful apples of so many varieties. There’s nothing like heading to a u-pick orchard to pick your own apples. I typically pick several pecks each fall — in fact, sometimes it’s easy to get carried away and pick too many! However, they do get processed into pies, crisps, sauces, and jellies like this Crabapple Jelly. Continue reading Crabapple Jelly→
If you are a regular patron of the Charlottetown Farmers’ Market and happen to be a tea drinker, chances are you are familiar with Katherine Burnett and the Lady Baker’s Tea Trolley brand of teas and tea bar at the market.
Katherine Burnett, owner of Lady Baker’s Tea Trolley Tea Bar at the Charlottetown Farmers Market
I recently sat down with Katherine for brunch at the farmers’market to learn more about her tea business.
Katherine Burnett, Owner, Lady Baker’s Tea Trolley
Katherine grew up on PEI but lived off Island for many years before returning in 2006. In 2001, while living in Charlotte, NC, Katherine began hosting tea parties as a ministry for the elderly. She named her afternoon tea party business “Lady Baker’s Tea Trolley” as a tribute to the memory of a friend, Irene Baker, who enjoyed the finer things in life, like afternoon tea. Interest in the tea parties grew to the point where Katherine was soon hosting afternoon teas for corporations, churches, and even the opera.
As her tea party business grew so, too, did her interest and knowledge in all things tea-related. She pursued online courses in tea blending and attended specialty tea conferences and is now at level 3 (of 4) of the process to be designated a tea sommelier. Katherine is also a member of the Tea Association of Canada.
In the fall of 2007, with just 16 varieties of tea and 2 tea-making machines, Katherine set up a tea bar at the popular Charlottetown Farmers’ Market. The teas come from the major tea-producing countries of India, China, Japan, Sri Lanka, South Africa, and Taiwan. The imported teas follow strict guidelines, are low in pesticides, and most come from members of the Ethical Tea Partnerships.
Katherine blends some of the teas herself and now sells some 60 varieties of loose tea.
She tells me her most popular blend, which incidentally is her personal favourite, is a black tea she calls the Lady’s Slipper Blend, aptly named after PEI’s official provincial flower. Her pumpkin spice blend enjoys popularity as well with her patrons who favour it for lattes. At the Lady Baker’s Tea Trolley bar at the market, look for specialty tea blends like Abegweit Lullaby to aid sleep and Pink Lady Grey which is an eye-appealing blend featuring Earl Grey tea and pink rose petals. Who knew where a small, modest personal collection of 13 china cups and saucers would lead Katherine!
Since there are several options to brewing tea (e.g., tea bags, loose leaf with infuser or loose tea directly in the tea pot), I asked Katherine for her preference. She says she prefers to brew loose leaf tea in an infuser in the tea pot. Katherine also recommends that the water for the tea first be filtered and then brought to a boil. If brewing green tea, let the water sit until it drops to the proper temperature (85°) before adding and brewing the tea leaves.
I asked Katherine if she sees any trends emerging in tea drinking. She says she is noticing a renewed popularity in tea drinking with specialty tea shops opening and with the wide variety of tea-brewing equipment and stylish infuser mugs readily available. As well, she notices an increased interest in green teas with information and research on its health benefits becoming more widely known. Additionally, there seems to be a new market for teas – those of high school and college age. In fact, this year Katherine prepared special tea packages to be included in the UPEI student welcome kits. With the university being located just across the street from the farmers’ market, it’s likely some of the students will visit the Lady Baker’s Tea Trolley bar on Saturday mornings. Katherine also sees more tea being used in ways other than as a beverage. For example, Chai and Matcha are now often used in baked goods such as muffins and energy bars. In fact, Katherine sells yummy homemade tea energy bars at her booth. Tea lattes are also becoming very popular — ⅔ cup of a strong tea topped up with ⅓ cup of foamed milk. Iced teas remain popular in the hot summer months when many find the drink hydrating and refreshing. Fruit blends of green teas, such as Katherine’s Island Strawberry blend, have become very popular iced teas.
Tea, like coffee, is an enduring popular drink. It’s a beverage that is moving with the times. With its various varieties and blends along with new ways of drinking tea and using it in baking, it’s proof of tradition blending successfully with modern trends.
In addition to being available at the farmers’ market, Lady Baker’s teas are available across PEI at specialty shops and are also found served in many of the Island’s finest restaurants and at select bed and breakfasts. The teas may also be ordered online via the Lady Baker’s Tea Trolley website at http://www.ladybakersteatrolley.com/
Now, it’s time for tea!
I decided to try the Lady’s Slipper tea blend for a late summer afternoon tea. This is a lovely, mellow tea blend with hints of vanilla. I have some pieces of Lady’s Slipper china so it seemed only fitting to feature them with this blend of tea.
The quintessential tea time sandwiches of egg salad and cucumber were served on my Lady Slipper plate.
I used two different styles of Lady’s Slipper china cups and saucers.
The great thing about afternoon tea is that several different pieces of china can be blended and used with success. Not everything has to match perfectly on the table. It just needs to blend.
These dainty little pink glasses blend well with the china and are the perfect size for an afternoon tea table.
The little pottery Lady’s Slipper vase in the photo below was a gift from an elementary school teacher. We had gone on an end of year school outing to a local theme park which had a small gift shop in a flying saucer (readers on PEI will likely guess which theme park I’m referring to). The teacher told us each to pick out something we wanted and it was her gift to us. Even as a small child, I liked pretty things and opted for a vase instead of a toy! I won’t tell you how many years ago that was but let’s just say it wasn’t yesterday! The lovely flowers in the vase are from Island Meadow Farms in York, PEI.
Fresh blueberry pie and vanilla ice cream for dessert!
I always say the sign of a true homemade pie is when some of the filling bubbles out 🙂 (Well, that’s my story anyway and I’m sticking to it!)
The blueberries for the pie came from Murray’s U-pick in North Tryon. They grow wonderful high bush blueberries.
I hope you have enjoyed meeting the lady behind Lady Baker’s Tea Trolley and dropping by for a spot of her Lady’s Slipper tea blend.
Please Note: Due to low lighting conditions at this event venue, it was very difficult to capture quality photos for this posting.
Several of the “signature” events of PEI’s Fall Flavours Festival focus on certain foods. The recent “Beef and Blues” event in Summerside was all about Island beef.
Food Network’s Corbin Tomaszeski was the celebrity guest chef who hosted the evening. You may recognize him from Food Network’s shows “Dinner Party Wars“, “Restaurant Makeover” and “Restaurant Takeover“. On this night, however, Chef Corbin was found “working the crowd” in the lobby of Credit Union Place before the event venue was open.
Chef Corbin Tomaszeski
The ice surface of Credit Union Place was transformed into a blues-themed venue for the sold-out event.
The evening began with Joe MacMillan providing blues music to set the tone for the evening.
Joe MacMillan
“Beef and Blues” was structured differently from other signature events of the Fall Flavours Festival that I have attended which, typically, have chefs from the Culinary Institute of Canada or a particular restaurant preparing the food. In the case of “Beef and Blues”, 12 Island restaurants each had stations at which they featured a dish prepared with Island Beef. Island restaurants participating were: Island Stone Pub, Gentleman Jim’s, Sims Corner Steakhouse & Oyster Bar, Rodd Mill River Resort, The Landing, The Catch, Anson’s Restaurant & Bar, Brother’s 2, Five Eleven West, The Big Orange Lunchbox, the Lobster House Restaurant & Oyster Bar, and Pendergast’s PEI Food. In addition, three restaurants or local food producers provided desserts: Sweet Things, Samuel’s Coffee House, and Five Eleven West.
Here’s a small sampling of some of the featured dishes.
The Brother’s 2 Restaurant in Summerside featured the hushpuppy and meatball skewer.
“Hushpuppy & Meatball Skewer” from the Brother’s 2 Restaurant in Summerside
This buttermilk chicken fried steak with tomato and corn salsa came from Anson’s Restaurant & Bar in Summerside.
“Buttermilk Chicken Fried Steak with Tomato & Corn Salsa” from Anson’s Restaurant & Bar
Guests were free to circulate, in any order they wished, amongst the stations to sample their offerings. At each placesetting at the tables, was a “Passport to Taste”.
“Passport to Taste”
Guests carried their “passport” as they visited the stations and checked off each sample they tried. At the end of the evening, guests could drop their “passports” into a ballot box for a draw for a three-course dinner prepared by PEI’s Chef Illona Daniel.
The Big Orange Lunchbox from Charlottetown featured dry roast beef ribs with waffle chips and marshmallow dip (yes, marshmallow dip!)
“Dry Roast Beef Ribs with Waffle Chips and Marshmallow Dip from the Big Orange Lunchbox
Events such as these put consumers in direct touch with local chefs whom they would probably not see at a restaurant.
No event would be complete without something for the sweet tooth! Christine Gallant from Sweet Treats in Summerside offered these delectable peach cobbler tartlets.
Peach Cobbler Tartlets from Sweet Treats
The table from Samuel’s Coffee House in Summerside was also a busy spot as the whoppie pies proved to be a popular item.
Whoppie Pies from Samuel’s Coffee House
This event offered the opportunity for local chefs to be extra creative with Island beef and gave patrons a good sampling of the many delicious ways in which Island beef can be prepared.
This being national organic week in Canada, I thought it was timely to pay a visit to a farmer who grows vegetables the natural way without chemicals. So, our visit today takes us to Just A Little Farm on the Green Road, near Bonshaw, PEI, where we meet farmer Jessica Vos.
Jessica Vos of Just A Little Farm, Green Road, PEI
When asked why she chose life as a farmer, Jessica explains that she grew up on a farm, worked in community gardens while in university, owned a landscaping business in Western Canada, is genuinely interested in food, and is happiest when outside working in the soil. Jessica has a degree in Human Ecology with a minor in nutrition and she is currently studying holistic nutrition.
View of part of the gardens at Just A Little Farm
It’s amazing how many varieties of vegetables and herbs Jessica grows. It would be a shorter list if you ask her what she doesn’t grow than what she does! In particular, Jessica grows a lot of lettuce and, by a lot, I mean a small field!
The Lettuce Field at Just A Little Farm
All the lettuce plants are started in Jessica’s small greenhouse and then transplanted.
New Lettuce Plants
Throughout the growing season, she has an ongoing planting cycle of seedling plants one week and transplanting the next.
Lettuce Plants Ready for Transplanting Outside
Jessica grows 5-6 varieties that have proven successful in PEI’s climate and she has fresh lettuce available until November. How I wish we had access to this on PEI all winter!!!
Because she does not use any chemicals, I asked Jessica how she controls for weeds. She says she uses the old-fashioned method of weeding by hand and hoe. The other method she has found success with is planting the vegetables close to each other to suffocate the weeds.
There are challenges to any kind of farming, especially in the control of pests that also find the produce tasty. In particular, the cucumber beetle, cabbage moth, and slugs pose problems. Jessica has had success using netting to cover vegetables most often attacked by the pests.
Netting to control for pests
This year, she is also using crushed up crab shell meal as a way to control for slugs.
Crushed Crab Shells
Placed in proximity to the plants slugs like to attack (such as basil, for example), the rough shells are a deterrent for slugs which don’t find them very comfortable to crawl over.
Crushed Crab Shells to Control Slugs
Despite the challenges which Jessica jovially refers to as “part of the fun”, there are also sources of satisfaction she finds in her farming. As she says, when her produce grows well and her customers are happy, Jessica is happy knowing she has produced and supplied them with chemical-free, healthy and nutritious produce.
Look at these gorgeous, healthy basil plants! I can attest they made some mighty fine basil pesto!
Love the dragon tongue beans on the right in the photo below!
A dragon tongue bean, anyone?
Jessica with her dragon tongue beans
All of Jessica’s produce is hand-washed before leaving the farm. Her new cooler storage unit is to the right in the photo below.
Jessica’s Washing Station and Cooler Unit
Throughout the growing season, you can find Jessica’s produce in nearby local stores like Gasses General Store in New Haven and Harvey’s in Crapaud.
Every Saturday morning in July and August, Jessica can be found direct-marketing her produce at the small farmers’ market in the seaside village of Victoria-by-the-Sea. She also supplies several local restaurants with fresh produce as well.
Jessica Vos at the Victoria-by-the-Sea Farmers’ MarketAt the Victoria-by-the-Sea Farmers’ Market
Like many organic farmers, Jessica also sells her produce through Community Shared Agriculture Boxes (CSA Boxes). This is where individuals (known as CSA members and sometimes referred to as shareholders) buy shares in her farm – i.e., at the beginning of the season, they sign a contract with Jessica and pay a certain sum of money upfront. In return, Jessica commits to do the best job she can to provide them with high-quality vegetables. Then, once harvest season begins, CSA members get a regular share of the vegetables from the farm as they are available. Currently, Jessica has about 15 CSA members who either receive a share of veggies weekly or bi-weekly. Jessica first tested the CSA method in the fall of 2013 and found a demand for it so this year, once a week, she fills her share boxes with whatever produce and herbs are currently available and heads to Victoria-by-the-Sea where her CSA members meet her to pick up their supply of fresh farm produce.
To contact Jessica and find out more about her chemical-free produce, visit Just A Little Farm’swebsite at http://www.justalittlefarm.com/
Earlier, I shared a recipe for Basil Pesto using fresh basil from Just A Little Farm. Today, I am featuring my recipe using pattypan squash from Jessica’s farm. This is a tasty side dish that combines pork sausage, mushrooms, basil pesto, and cheese with the pattypan squash.
Pattypan Squash and Sausage Casserole
Pattypan Squash and Sausage Casserole
Ingredients:
1 large sausage (e.g., Italian Sweet, Chorizo, Sun-dried Tomato) 2 tsp olive oil ½ cup chopped mushrooms
Apx. ¾ lb of small pattypan squash 2 tsp olive oil 2 – 3 tbsp basil pesto (homemade or store-bought) 2 – 3 tbsp grated mozzarella cheese ¾ cup fine bread crumbs 1½ tbsp grated Parmesan cheese 1½ – 2 tbsp melted butter
Method:
Heat oil in frying pan. Remove sausage from casing and discard casing. Crumble sausage into frying pan and scramble fry over medium low heat for about 5 minutes. Add chopped mushrooms. Cook for 3-4 minutes.
Slice pattypans about ⅛” thick . Toss in a bowl with apx. 2 tsp olive oil.
In greased 8½“ x 6½“ pan, lay a layer of pattypan slices, overlapping slightly to cover bottom of pan.
Loosely dob about 2 tbsp basil pesto over the squash.
Spread the sausage and mushroom mixture over the squash.
Sprinkle with Mozzarella cheese. Add another layer of squash, again, overlapping the slices to cover casserole.
In a small bowl, combine the bread crumbs, Parmesan cheese, and melted butter. Stir with a fork to mix. Sprinkle over squash.
Bake for approximately 35-40 minutes, until squash is fork-tender when tested.
Yield: 4 servings
Pattypan Squash and Sausage CasserolePattypan Squash and Sausage Casserole
Thank you for visiting “the Bistro” today. There are lots of ways to connect with “the Bistro” through social media:
The third weekend in September signals the Prince Edward Island International Shellfish Festival. Seafood lovers from all over the world converge on Charlottetown for a weekend full of everything related to seafood, lots of great PEI food and entertainment. Now in its 19th year, this Festival continues to grow in popularity each year.
This Festival was the idea of local restaurateur, Liam Dolan, who saw it as a way to extend the PEI tourism season into the late summer.
Liam Dolan
The weekend kicked off on Thursday evening with a grand feast and frolic dinner hosted by celebrity chef, Michael Smith. This dinner was held in a gigantic tent on the Charlottetown Event Grounds and this annual event always sells out early. Some 500 people attended this year’s dinner which was beach themed.
Chef Michael Smith, host of the Feast and Frolic Dinner at the PEI International Shellfish Festival, Charlottetown, PEI
The four-hour evening began with a meet and greet with Chef Smith — lots of autographs and photo opps.
Meet and Greet Chef Michael Smith
The competition for the best oyster grower on the Island was also underway during the reception hour where there were lots of opportunities to watch oyster shucking and taste all the different PEI oysters.
Oyster Shucking at the PEI International Shellfish Festival
These disappeared fast!
Some of the oyster competitors for the Oyster Grower of the Year Award.
Competitors in the Oyster Grower of the Year Competition
The oysters were formally being judged by a panel but guests also had the opportunity to vote for the peoples’ choice. This year, both honours went to Colville Bay Oysters of Souris, PEI.
Oyster Grower Award & Peoples’ Choice Award – Colville Bay Oysters
Lots of hors d’oeuvres were served by waiters who continuously circulated amongst the crowd with trays of tasty appetizers.
These Island Blue Mussel Spring Rolls were divine!
Island Blue Mussel Spring Rolls
Now, when you walk into a large tent and see beautifully set tables with a black and white theme, you’d probably think you’re going to a formal sit down dinner with a plated meal. Well you are, well…sort of…..but you may be doing the plating and serving! You see, this event is an interactive dinner and every guest participates in some event at some point during the evening.
A Maitre’D was selected from each table and was presented with a package of information, including roles to be assigned to table guests. Yes, each table had a bartender, a member of the paparazzi, beefiest cook, best cook, fastest cook, a beachcomber, and a rock star. Guests really embraced the concept and soon every one was fully engaged in the fun.
First, Chef Michael took the bartenders from each table aside to explain how to make Caesars.
Each bartender collected a kit of supplies and returned to their tables to make the Caesars tableside and then serve them to their tablemates.
Our table’s bartender mixing some CaesarsServing up the Caesars
Biscuits were on the table to accompany the chowder course but….no butter! That’s because, the fastest cook at each table had to actually make the butter. Lots and lots of shaking of a Mason jar full of milk and, voilà, freshly-made butter for the biscuits! Yup, you really did need to work for your dinner at this event!
Next came three versions of chowder – one cold and two hot, served in glass jars and presented in these cool wooden trays.
Mussel Chowders
Chef Michael then took all the “beachcombers” off to an onsite man-made beach to go combing for hidden beer caps. Once they found beer caps, they were each presented with a bucket of beer to bring back to their tables.
Then, we sent our table’s “Beefiest Cook” off with Chef Michael and back our cook came with a tray of slow roast striploin which he carved tableside and served to each guest at the table.
Carving and Serving the Slow Roast Striploin
Wait staff delivered large bowls of PEI lobster to each table along with bowls of garden-fresh vegetables and brown butter mashed PEI potatoes.
PEI Lobster!
Our “Best Cook” assignee joined Chef Michael at the back of the tent to learn how to plate food. He returned to the table with the makings for a summer berry shortcake – cowberry ice cream, fruit compotes, and biscuits.
Making Summer Berry Shortcake
Then our “Best Cook” wowed us with his plating skills!
Meanwhile, our “Rock Star” assignee was responsible for coaching us on our singing skills so we could sing the theme song, “A Day on a PEI Beach” at the end of the evening. Yours truly was the “Paparazzi” for our table.
While each table actually provided their own entertainment with all their assigned tasks, lively musical entertainment throughout the evening was provided by Mark Haines and Brad Fremlin.
Brad Fremlin (l) and Mark Haines (r) provided musical entertainment throughout the eveningChef Michael Smith with musicians Mark Haines and Brad Fremlin
This was a very unique way to serve dinner and it sure got people involved and interacting with others at their table. It kept the evening lively and moving along. Executing this kind of adventure for some 500 guests at a location where the only kitchen is a mobile one and where literally everything had to be brought in — food, equipment, tables, chairs, linens, dishes, etc. — is no small task. The sheer planning for this event would have been a monumental undertaking. Kudos go to Chef Michael Smith and the large team of chefs, waiters, hospitality and support staff from the Culinary Institute of Canada, and others for a phenomenal event.
Parade of large culinary team from the Culinary Institute of Canada who prepared the meal
If you ever have the opportunity to go to this annual dinner, I highly recommend it — but, fair warning, it will be full of hijinks and hilarity and come prepared to be an active participant, not just a spectator!
Event Tent at Rodd Crowbush Resort for “Lamb Luau”
If you’re in PEI in the month of September and see huge white tents with mobile kitchens nearby along with chefs bustling about, chances are there’s a Fall Flavours Festival event happening.
On Sunday, September 14, 2014, I traveled to the Rodd Crowbush Golf and Beach Resort in Morell, PEI. That’s where the sold-out Fall Flavors signature event, “Lamb Luau” hosted by celebrity chef, Chuck Hughes, was being held. This event was a partnership of Island East Tourism Group and the Rodd Crowbush Resort.
The main entrance to the hotel was decorated for fall.
Guests were greeted inside the hotel’s reception area and each presented with a lei and a Strait Shine® signature drink. Rum Mai Tai Punch with Myriad View Shine, anyone? (yes, the legal kind!).
Myriad View Rum Mai Tai Punch with Myriad View Shine
Guests then circulated throughout the Resort’s lobby, visiting four canape stations.
Serving Seafood Ceviche alongside the Mai Tai Punch
Ever tried a pickled mussel?
Pickled Mussels
Kerri Wynne MacLeod (pictured below), who co-hosted the event along with Patrick Ledwell, signalled when it was time for guests to make their way to the large tent on the Resort’s grounds where the main event was taking place.
Kerri Wynne MacLeod from Ocean 100, one of the co-hosts of “Lamb Luau”
Guests were seated at round tables in the centre of the tent with food stations set up around the outside edges of the tent.
The evening’s program:
Program for “Lamb Luau”
Food stations were themed. There was a seafood station, carving station, hot station, salad and vegetable station, potato station, and dessert station and each station was color-coded (yes, the colors of leis that guests selected mattered!). For the first “go” at the buffet, guests were directed to go to the station that had a colored ribbon that matched the color of their lei so that not everyone converged on the same station at the same time and so that everyone could quickly be served food without long delay of waiting as tables were individually called to start. After the first “go-round”, guests were free to choose the food stations at their leisure in any order they so chose.
While Island lamb was a highlight of the event, there were many other Island foods featured as well. Lots of seafood including mussels, oysters, lobster, and scallops; BBQ pulled pork; duck; Island corn on the cob; various salads; roasted PEI potatoes, to name but a few. Take a look at the menu:
“Lamb Luau” Menu
A good PEI food event will feature Island spuds, of course!
Potato Station
What would a PEI food event be without some oyster shucking!
Take a look at this yummy lobster and mussel bruschetta.
Mussel and Lobster Bruschetta
This being a signature event of the PEI Fall Flavours Festival, a Food Network celebrity chef was in attendance. Chef Chuck Hughes circulated throughout the evening, posing for photographs and signing copies of his cookbooks which were also on sale during the event.
Celebrity Chef Chuck Hughes at the “Lamb Luau” PEI Fall Flavours 2014 Event
(When you see Chef Hughes, be sure to ask him about all his food-themed tatoos, some of which he got on PEI during his visit for the Lamb Luau event.)
Musical entertainment was provided by Dylan Menzie and Band followed by a presentation of the Down East Dancers and a limbo demonstration.
Some desserts to finish off the evening — Whiskey ice cream proved popular as did the chocolate mousse and pumpkin crème brulée.
Desserts
Fall Flavours events, such as this one, are a great way to become acquainted with the many fine foods grown or produced on PEI. It’s also a chance to try foods you may not have tried before or maybe some familiar foods but prepared in a new or different way.
Rodd Crowbush Resort provided a stunning location for this event overlooking the famous Links at Crowbush Cove.
Thank you for visiting “the Bistro” today. There are lots of ways to connect with “the Bistro” through social media:
Chef Michael Smith’s Family Meals Cookbook, published 2014
Title:Family Meals Author: Chef Michael Smith Price: $32.00 (CDN$) Pages: >250 Available: Bookstores across Canada and online
Penguin Canada has offered me the opportunity to conduct a review of Chef Michael Smith’s latest cookbook, Family Meals. Michael Smith is a celebrity chef and Food Network Canada star who makes his home in Prince Edward Island on Canada’s East Coast. Known for his love and promotion of fresh, local ingredients, this is Smith’s 7th published cookbook.
The book is clearly influenced by Smith’s cooking for his own family in his home kitchen as the book contains many photos of his family in the kitchen and around the dining table. The focus of his book is to get the entire family cooking and eating together.
The book features 100 recipes that range from smoothies to sandwiches, snacks like kale chips, salads, soups, side dishes, and maritime mussel chowder, to old world chicken cacciatore and flaming banana splits. The book is well organized and categorized with chapters on breakfast and brunch; lunchbox and snacks; simple salads; soups, stews & casseroles; slow cookers & pressure cookers; family meals in minutes; meatless Mondays; vegetables & whole grains, and sweets and treats. One chapter is dedicated to slow cooker meals to encourage families to plan ahead and prepare meals in advance of arriving home hungry at mealtime with no idea what to put on the table quickly. And, yes, you’ll even find some lentil recipes, too, from the lentil hunter. Smith has also included tips in the book on, for example, ways for families to cook together, plan meals, organize the kitchen, and prepare lunchbox contents.
While the book has a broad range of recipes, some do call for ingredients that may be less familiar or accessible for some – e.g., wasabi peas, edamame, nori seaweed, miso paste. Several of Smith’s recipes veer toward the spicy category as he makes liberal use of lots of spices and garlic for flavouring many dishes. There are several innovative recipes in the book to encourage families to try new foods, or familiar foods in new ways, to add variety to their meals. However, that would be contingent upon how adventuresome family members are to try new or different foods. That said, the book does contain some more well-known, traditional family-style recipes like beef stew, spaghetti and meatballs, and baked beans. Smith also includes recipes that cross various cuisines – for example, there are Asian, Italian, Kenyan, and Greek-inspired recipes which would help to introduce children to foods and dishes from other countries and cultures.
The recipes are well laid out with instructions using the ingredients in the order in which they are listed. I found the instructions complete and easy to follow; however, in my opinion, some familiarity with cooking would be beneficial when making recipes from the book as novice cooks could find some challenging.
What I like most about this book is the full page color photo that accompanies each recipe. As we all know, we eat first with our eyes. If I see a color photo of an appetizing dish, I am more likely to be motivated to make it. This book scores high marks for the beautifully-executed photography. The photos are simplistic, clean, and are not overdone with props and excessive styling. The focus is on the food as it should be. Quality photos give the cook a point of reference of what he or she is aiming for and what his or her version of a recipe should look like.
The book itself is beautiful, printed on high quality paper giving it a distinctively professional look and feel. Weighing in at some 3 pounds, though, this is not a cookbook you would balance in one hand while stirring a pot with the other! However, it is a lovely collector’s book for anyone with a cookbook collection and is in keeping with the size and style of Smith’s earlier published cookbooks.
Test-driving recipes
It’s one thing to leaf through a cookbook filled with photos of appetizing-looking dishes but the real test comes when you make some recipes out of the book. I selected three: Nutty Seedy Granola (p. 4), Granola Muffins (p. 51), and A Pan of Pork Chops with Marmalade Mustard Pan Sauce (p. 167).
Nutty Seedy Granola
Nutty Seedy Granola from Chef Michael Smith’s “Family Meals” Cookbook
Beyond a doubt, this is the best granola I have ever had! It was easy to make and I chose to include many of the different suggested ingredients Smith gave for the content and I think that’s what made it so darn tasty. My version (photo above) turned out very similar to the one in the book’s photograph.
Granola Muffins
Granola Muffins from Chef Michael Smith’s “Family Meals” Cookbook
Granola Muffins from Chef Michael Smith’s “Family Meals” Cookbook….made in my square muffin tinsGranola Muffins from Chef Michael Smith’s “Family Meals” Cookbook
Because I had made the granola, I chose to then make the granola muffin recipe. These muffins are, in a word, yummy! With some granola in the muffins themselves and then some on top of the muffins, these are a real treat. They also freeze well. I made half the recipe the first time, liked them so much that I turned around and made the full batch. This recipe will now become part of my go-to muffin recipe collection. My muffins (see 3 photos above) very closely resembled the ones pictured in the cookbook.
A Pan of Pork Chops with Marmalade Mustard Pan Sauce
“A Pan of Pork Chops with Marmalade Mustard Pan Sauce from Chef Michael Smith’s “Family Meals” Cookbook
I found this recipe easy to make and it uses common ingredients I already had in the kitchen. This is a very tasty way to present pork chops and I would definitely make the recipe again. My version (in above photo) of the sauce turned out a little darker than the photo in the book, probably because I used my own peach marmalade which was deep in color to begin with.
Concluding Thoughts This book portrays the laid-back personality of Chef Michael Smith and his casual approach to cooking – look for phrases like “a splash or two of …”, “handfuls of fresh herbs”, “toss/stir the works together”, “a bottle of big beefy red wine” throughout the book. It shows his chatty, conversational style that those who follow Smith know is his style of cooking whether on television or in front of a live audience at events such as the Prince Edward Island International Shellfish Festival which he hosts each year.
In my view, this book would be most suitable for individuals who have some familiarity with cooking, home chefs who are adventuresome in meal preparation, families willing to try some, perhaps, less common or less traditional ingredients and, of course, for fans of Chef Michael Smith.
Disclosure:
I received a copy of the Family Meals cookbook for review from Penguin Canada. I received no compensation for this review and was under no obligation to provide a positive review. The opinions are my own.