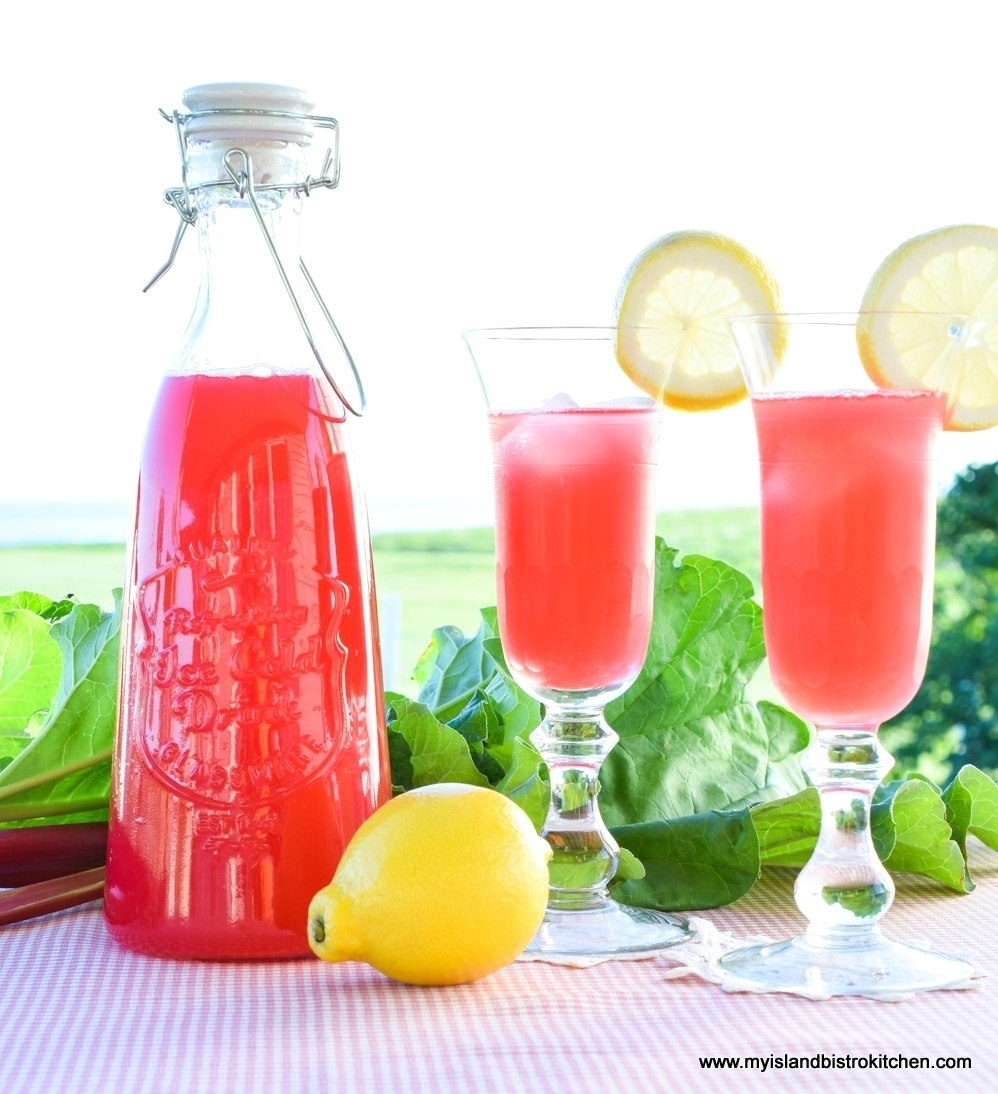
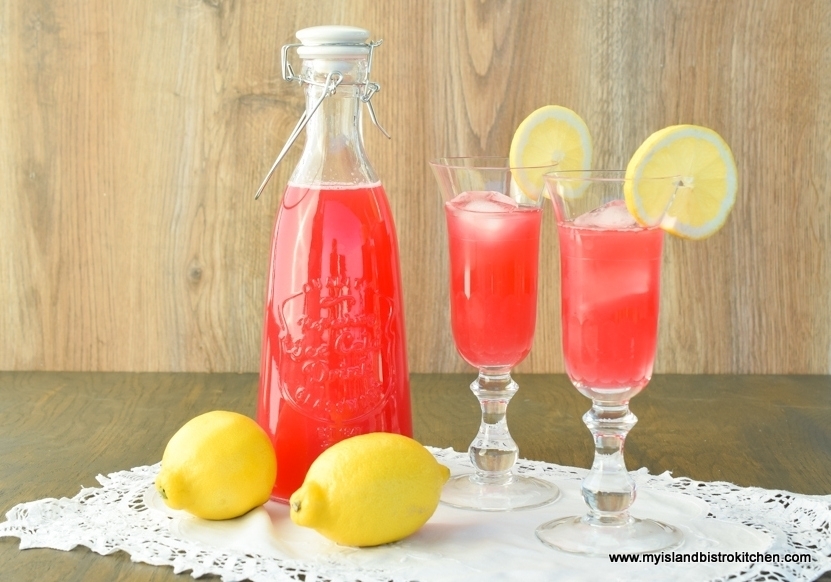
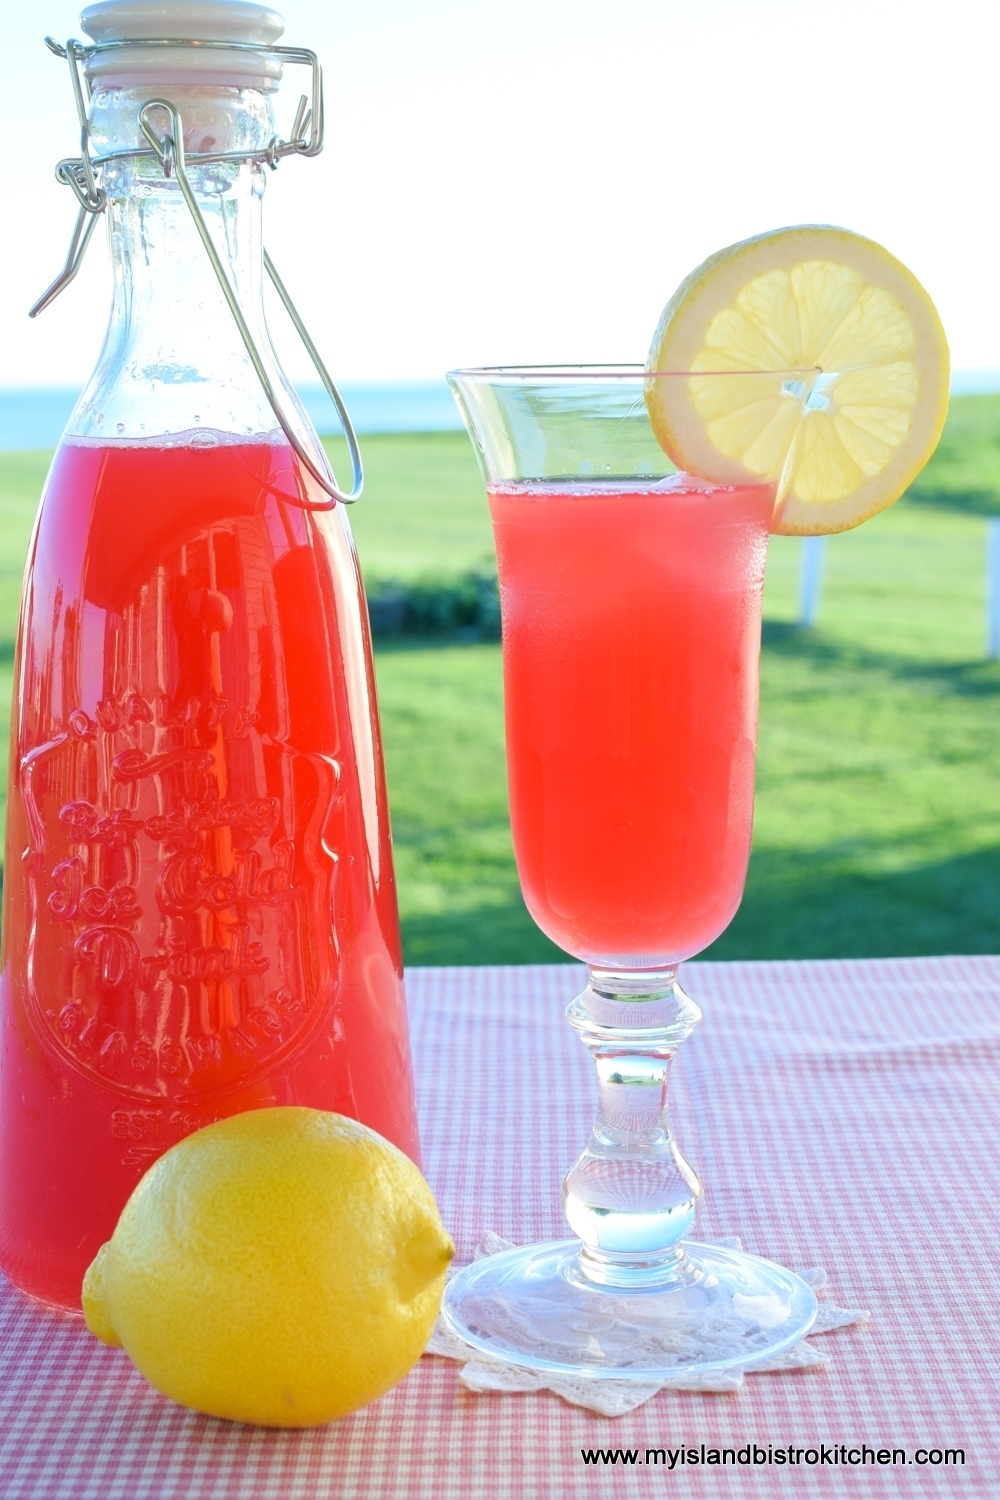
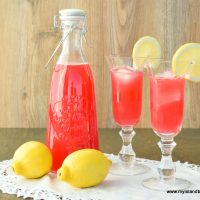
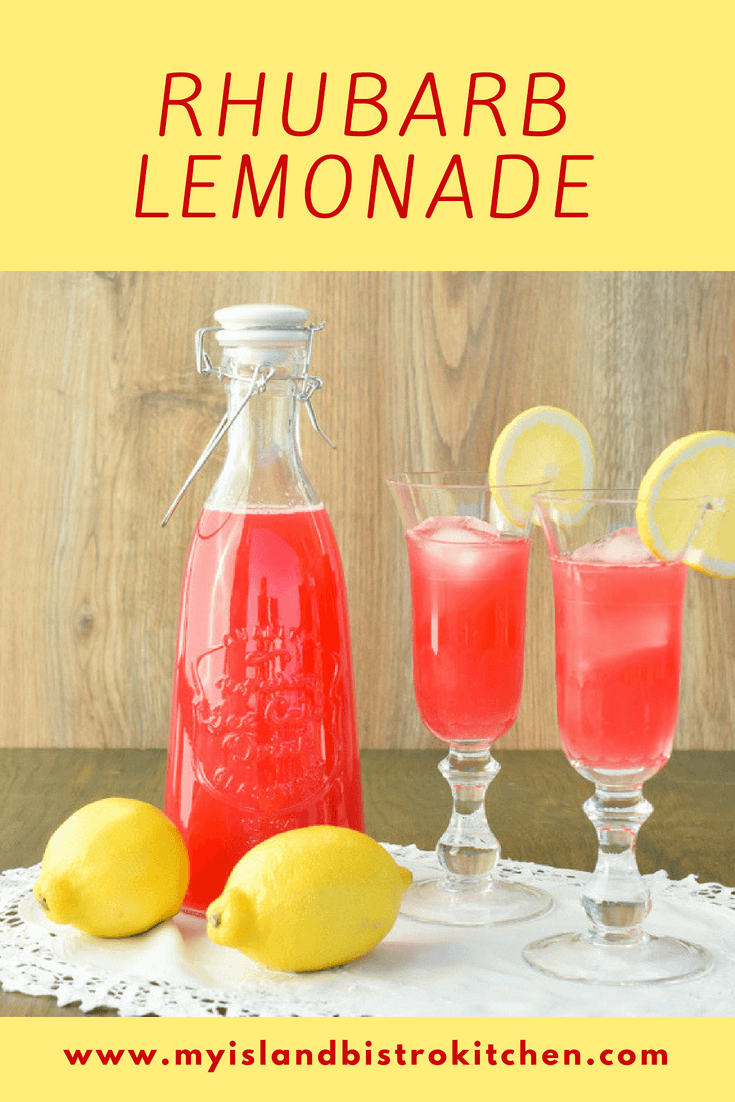
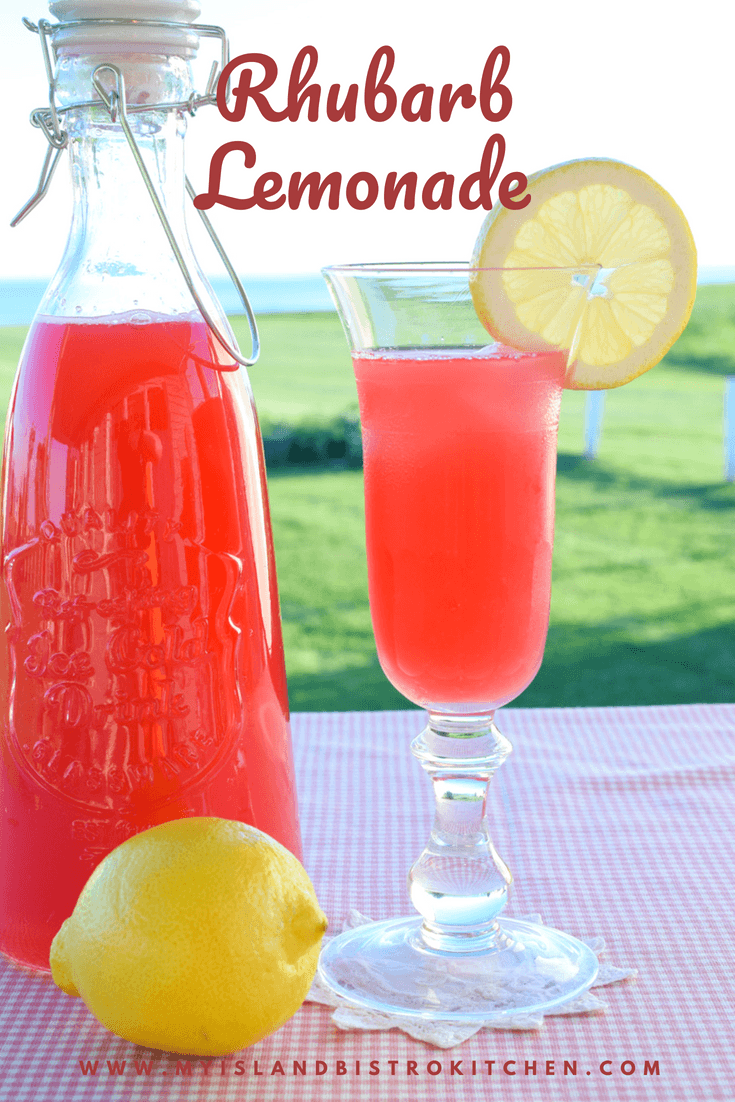
Lemonade is one of the most common of summer drinks. Served cold, it’s very refreshing on a hot summer’s day. Sometimes, I like to flavour my lemonades as I am doing today with rhubarb in the form of rhubarb lemonade.
Rhubarb Patch
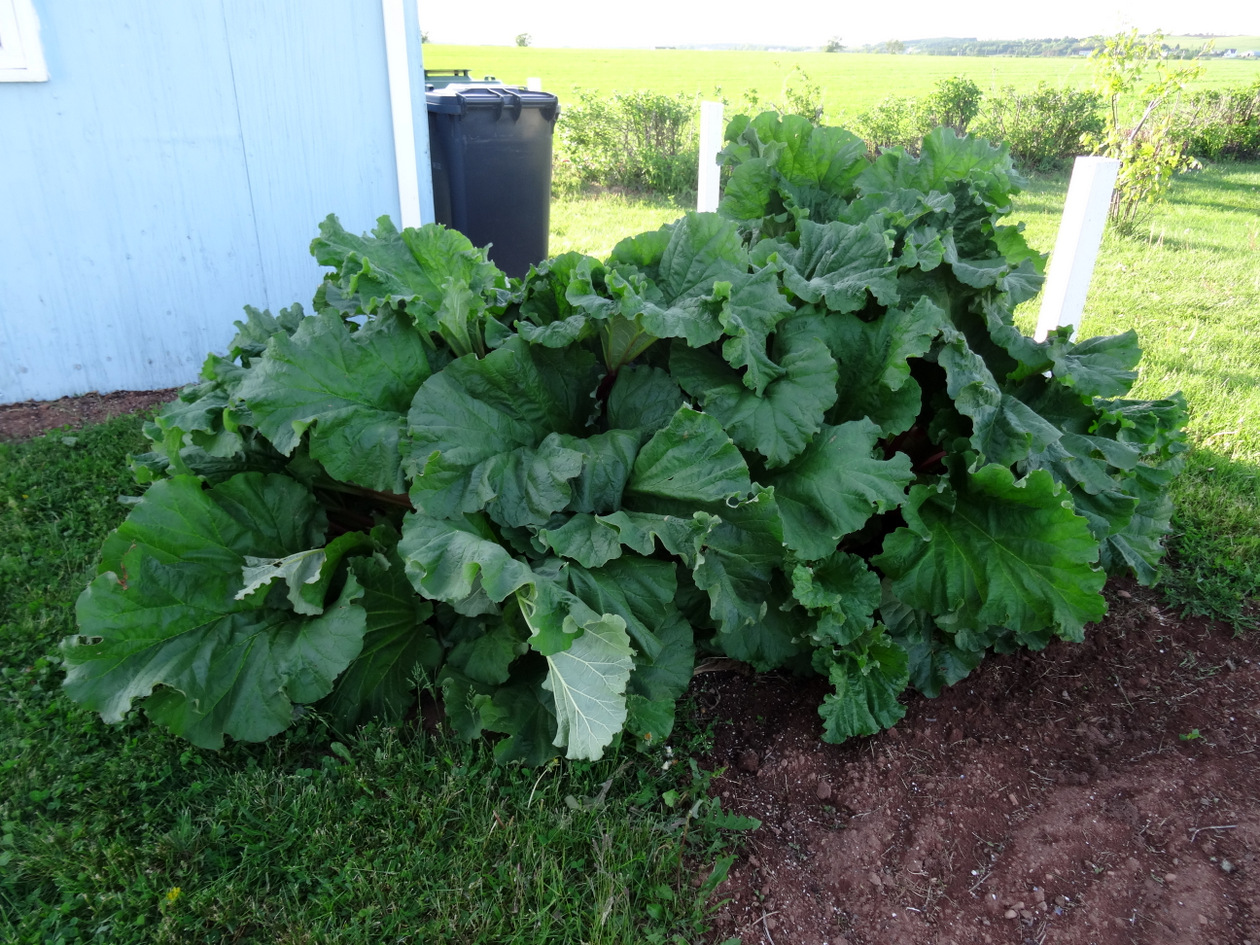
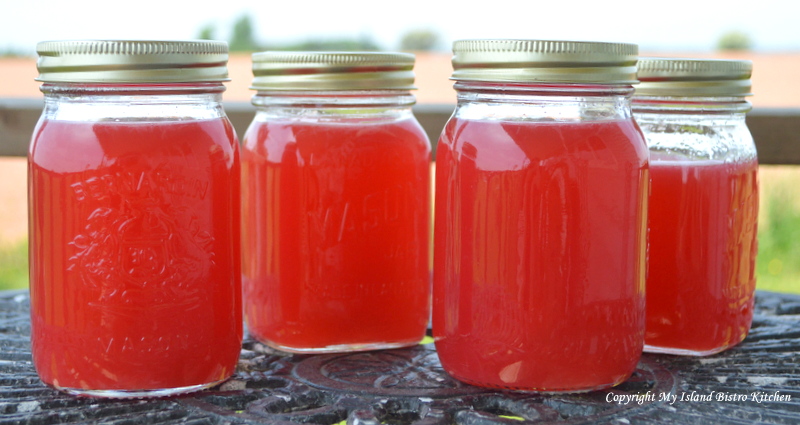
We have a good-sized patch of rhubarb so I make good use of it in many ways. I will often cook up some excess rhubarb near the end of rhubarb season, strain it, and freeze the juice for later use or, sometimes, I will make up an entire batch or two of rhubarb lemonade and freeze that to have at the ready for sipping on those sweltering hot summer days.
Rhubarb Lemonade
To make the rhubarb lemonade, I start with making a simple syrup of super-fine sugar (which you may know as caster sugar or instant-dissolving sugar) and water. The typical ratio for simple syrup is traditionally 1:1 sugar to water. However, with the super-fine sugar, I find that ratio is a bit too sweet so I back up the sugar content to 3/4 cup. Using the super-fine sugar (as opposed to granulated sugar) results in a lovely, silky smooth syrup. If I was to simply try and mix sugar with cold water, it would not dissolve properly and would leave a gritty, unpleasant texture to the drink. In a previous post for Blueberry Lemonade, I give more details on this process and you can access that post by clicking here.
Once the simple syrup has cooled to room temperature, simply add the freshly-squeezed lemon juice and some lemon rind to the syrup and let it sit a bit for the flavour to develop, then strain it through a fine mesh sieve to remove any lemon pulp, seeds, and the rind.
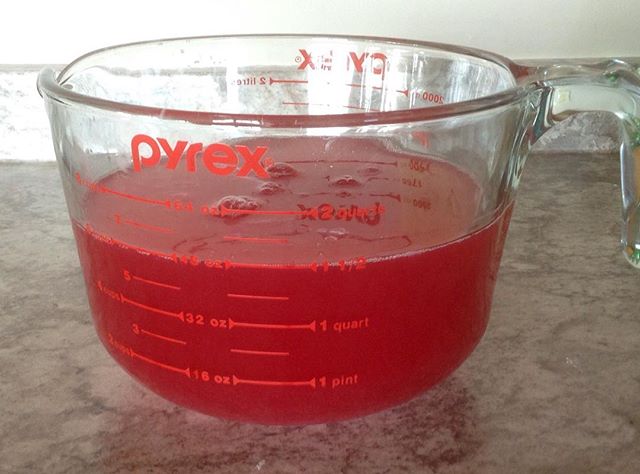
To make the rhubarb juice, cook rhubarb with water until the rhubarb is super soft and mushy. This will take about 8-10 minutes of cooking. It’s always hard to judge exactly how much rhubarb will be needed to generate the 4 cups of juice needed for this rhubarb lemonade but, generally speaking, 3 pounds of rhubarb and 3 cups of water should yield the 4 cups of juice. If it falls short by one-half cup or less, simply add up to one-half cup of water. If it is more than a half cup short, you will need to cook some more rhubarb in order to keep the rhubarb flavour sufficiently strong enough. Rhubarb juiciness varies depending on the variety and growing conditions, as well as its age, so that’s why it’s not an exact science as to exactly how much rhubarb to cook. Also, if the rhubarb is cooked too fast, too much water will evaporate and it will result in less juice.
To extract the juice from the cooked rhubarb, fit a fine mesh sieve with 3-4 layers of cheesecloth and place over a deep heat-proof bowl. Transfer the rhubarb to the sieve and let the juice drip through on its own. Near the end of the dripping, if the amount does not quite equal 4 cups, you may gently – very gently- press the back of a large spoon against the rhubarb mash to squeeze a bit more juice. Don’t press the mash too hard because some impurities from the mash will slip through the loose weave cheesecloth and the lemonade will not be clear.
The color in the rhubarb lemonade photos is natural. There is no food coloring used.
Rhubarb Juice
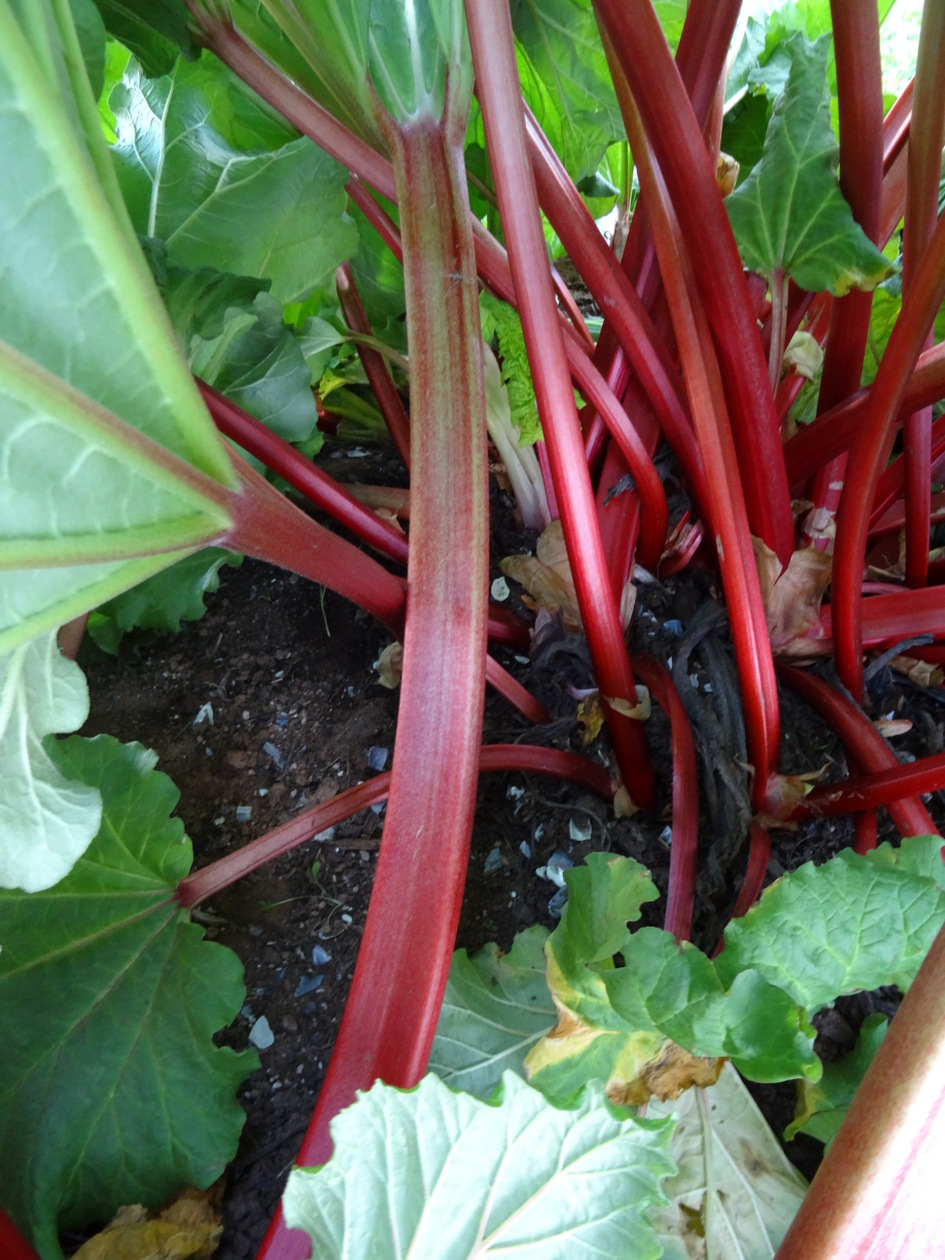
The glorious deep coral-red color comes from using the extracted juice from bright red rhubarb stalks so use the deepest red stalks you can find.
Rhubarb Stalks
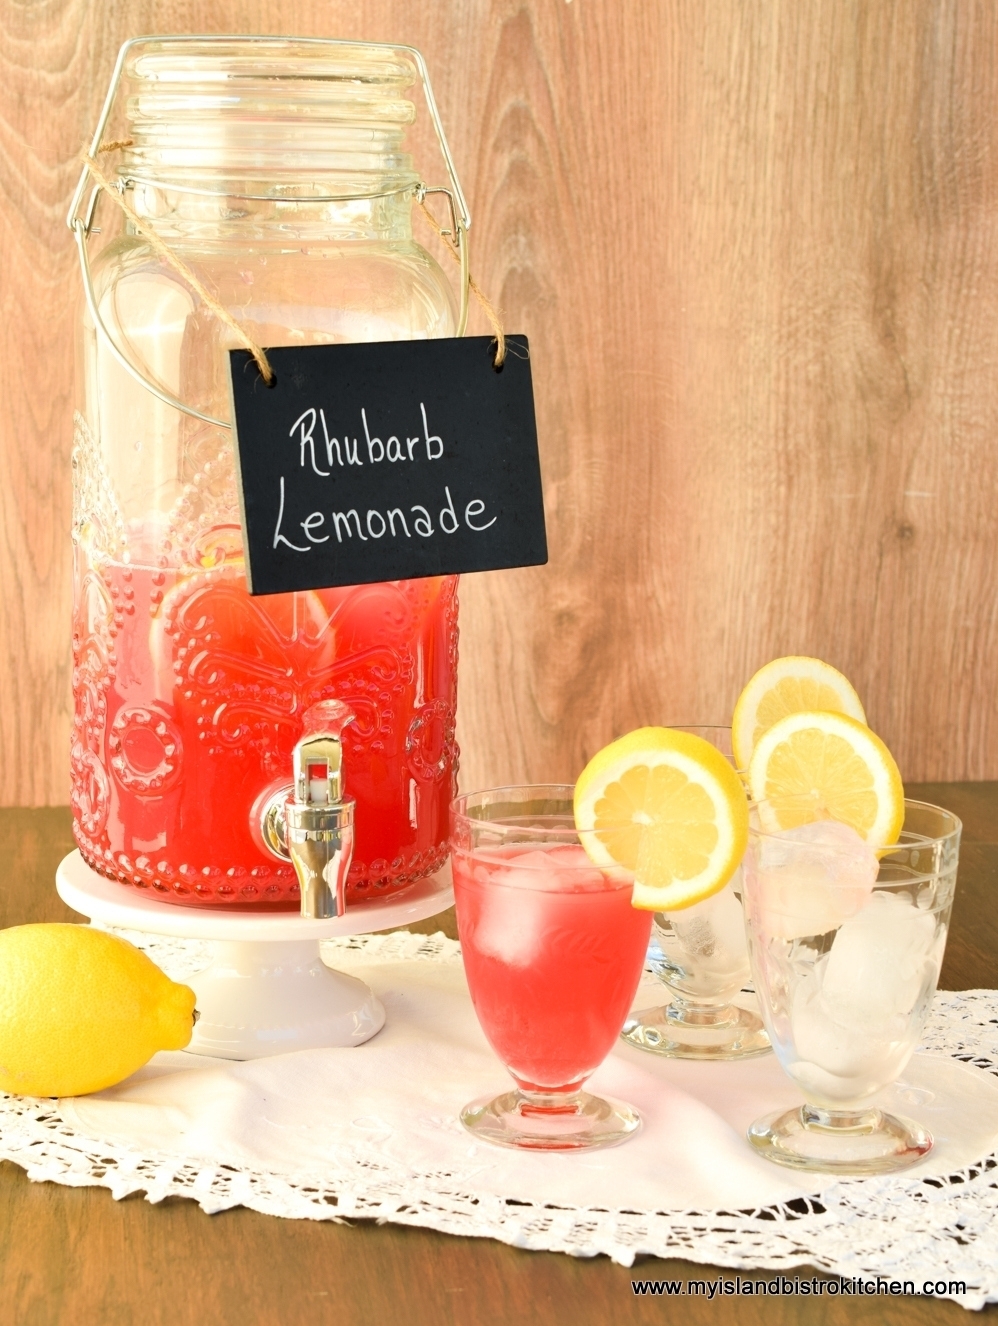
To make the lemonade, simply combine the strained lemon syrup with the rhubarb juice. Mix and chill then serve over ice in pretty glasses.
Rhubarb Lemonade
This lemonade freezes well but it can be kept, covered, in the refrigerator for 3-4 days. If you wish, you can also add some clear soda, such as grapefruit and lemon, to this lemonade for a fizzy drink. This rhubarb lemonade is a great crowd pleaser and is a lovely addition to summer picnics and gatherings.
Rhubarb Lemonade
[Printable recipe follows at end of posting]
Rhubarb Lemonade
Ingredients:
1 cup water ¾ cup super-fine sugar (aka caster sugar or instant dissolving sugar)
¾ cup freshly squeezed lemon juice 1 – 2 tbsp coarsely grated lemon rind
3 lbs rhubarb, chopped into 1” chunks 3 cups water
Method:
For the simple syrup: In small saucepan, combine the water and sugar together. Bring to a boil over medium heat, stirring constantly, until sugar is completely dissolved. Reduce heat to medium-low and boil gently for 3-4 minutes, stirring occasionally. Remove from heat and cool to room temperature (apx. 30-40 minutes). Add the lemon juice and lemon rind. Let mixture stand for at least an hour (or up to three hours) to allow the flavors to blend. Strain mixture twice through a fine mesh sieve to remove the lemon pulp and rind. Discard the pulp and rind.
For the rhubarb juice: Combine the rhubarb and water in a large pot. Cover and bring to a boil then reduce heat to medium-low and cook for approximately 8-10 minutes, or until rhubarb is completely softened. Place a large sieve over a big heatproof bowl. Line the sieve with 3-4 layers of cheesecloth. Remove the rhubarb from the heat and pour into the sieve, letting the juice drip through. It may be necessary to use the back of a large spoon to very gently press the rhubarb pulp in order to extract all the juice out of the rhubarb. This should yield about 4 cups, depending on the age and juiciness of the rhubarb. If it is slightly less than 4 cups, up to ½ cup water may be added to bring the amount to 4 cups.
To assemble: In large jug or bottle, combine 4 cups rhubarb juice with the simple syrup and lemon juice mixture. Stir well. Chill.
To serve: Stir the chilled lemonade. Fill a glass approximately one-half full of ice cubes and add the lemonade. Garnish with a lemon wheel, if desired.
Will keep, covered, in the refrigerator for 3-4 days. Freezes well.
With a perfect blend of sweet and tart notes, rhubarb and lemon combine to form Rhubarb Lemonade, a refreshing and thirst-quenching summertime sipper.
Course Drinks
Cuisine American
Servings6
My Island Bistro KitchenMy Island Bistro Kitchen
Ingredients
1cupwater
¾cupsuper-fine sugaraka caster sugar or instant dissolving sugar
¾cupfreshly squeezed lemon juice
1– 2 tbsp coarsely grated lemon rind
3lbsrhubarbchopped into 1” chunks
3cupswater
Instructions
For the simple syrup: In small saucepan, combine the water and sugar together. Bring to a boil over medium heat, stirring constantly, until sugar is completely dissolved. Reduce heat to medium-low and boil gently for 3-4 minutes, stirring occasionally. Remove from heat and cool to room temperature (apx. 30-40 minutes). Add the lemon juice and lemon rind. Let mixture stand for at least an hour (or up to three hours) to allow the flavors to blend. Strain mixture twice through a fine mesh sieve to remove the lemon pulp and rind. Discard the pulp and rind.
For the rhubarb juice: Combine the rhubarb and water in a large pot. Cover and bring to a boil then reduce heat to medium-low and cook for approximately 8-10 minutes, or until rhubarb is completely softened. Place a large sieve over a big heatproof bowl. Line the sieve with 3-4 layers of cheesecloth. Remove the rhubarb from the heat and pour into the sieve, letting the juice drip through. It may be necessary to use the back of a large spoon to very gently press the rhubarb pulp in order to extract all the juice out of the rhubarb. This should yield about 4 cups, depending on the age and juiciness of the rhubarb. If it is slightly less than 4 cups, up to ½ cup water may be added to bring the amount to 4 cups.
To assemble: In large jug or bottle, combine 4 cups rhubarb juice with the simple syrup and lemon juice mixture. Stir well. Chill.
To serve: Stir the chilled lemonade. Fill a glass approximately one-half full of ice cubes and add the lemonade. Garnish with a lemon wheel, if desired.
Recipe Notes
Will keep, covered, in the refrigerator for 3-4 days. Freezes well.
For other great lemonade recipes from My Island Bistro Kitchen, click on the links below:
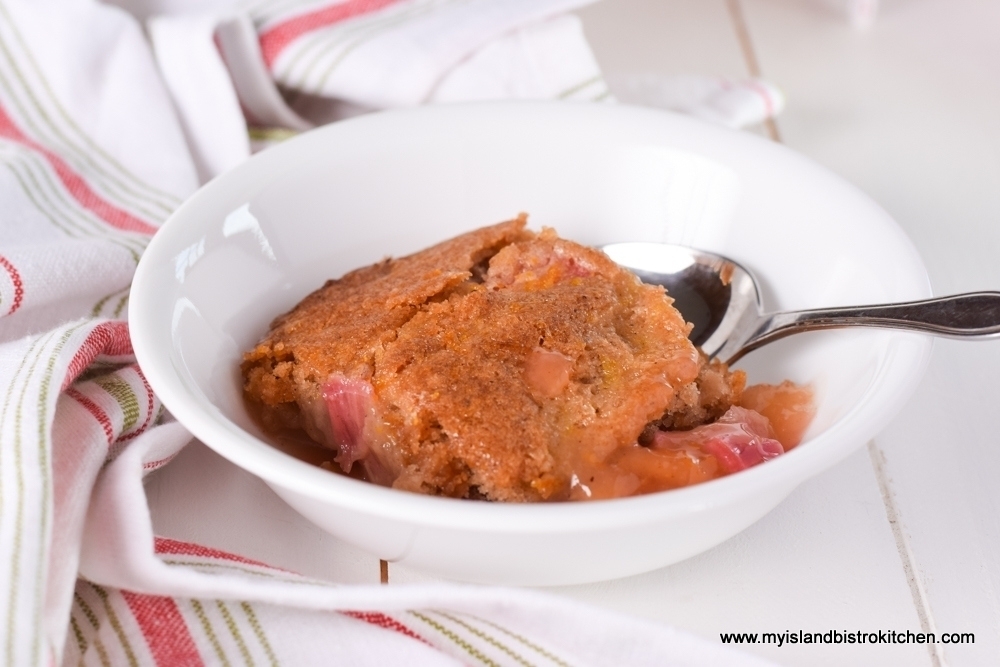
Today, I am sharing my recipe for a real old-fashioned type of dessert – Rhubarb Pudding Cake. The cake is “self-saucing” which means that the delectable sauce forms underneath the simple cake batter as the cake bakes. It’s an “all-in-one” pudding and cake! It may not be the most extravagant looking dessert but it sure is mighty tasty! If you are a rhubarb lover, you will love this dessert. Continue reading Old-fashioned Rhubarb Pudding Cake→
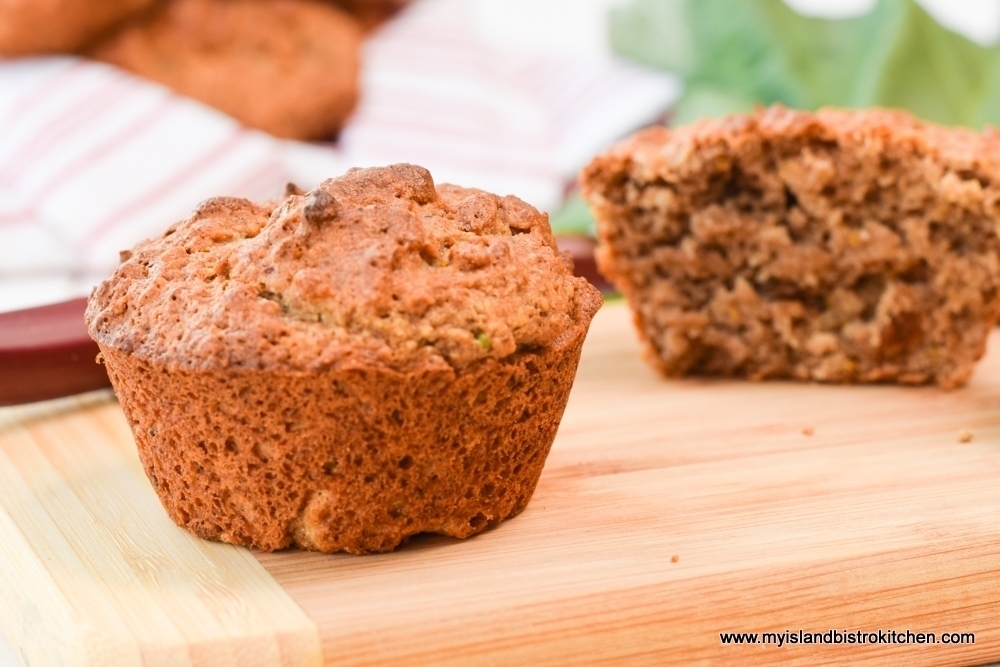
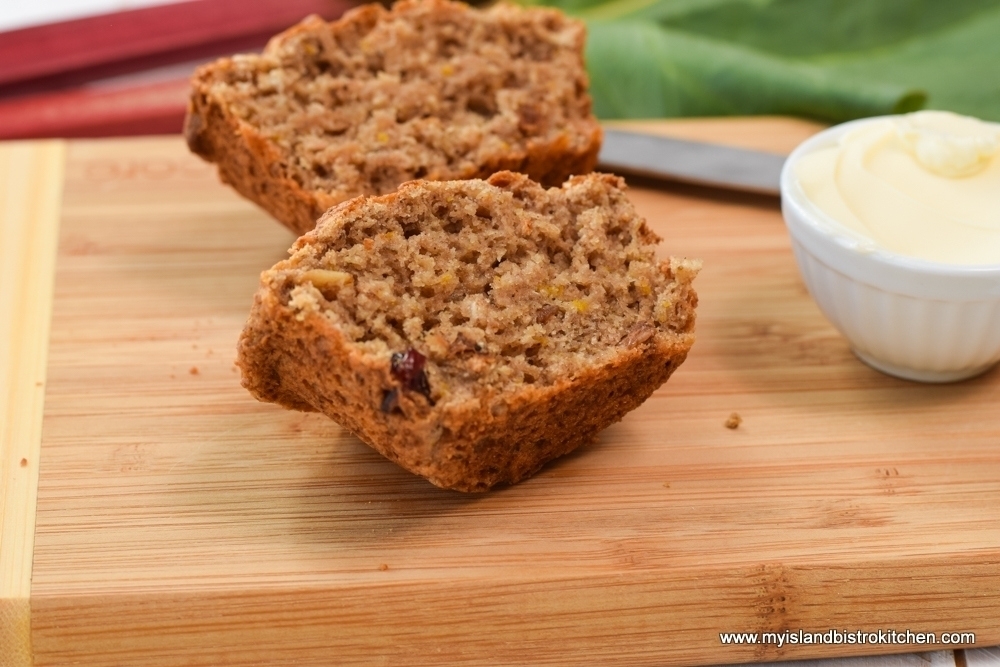
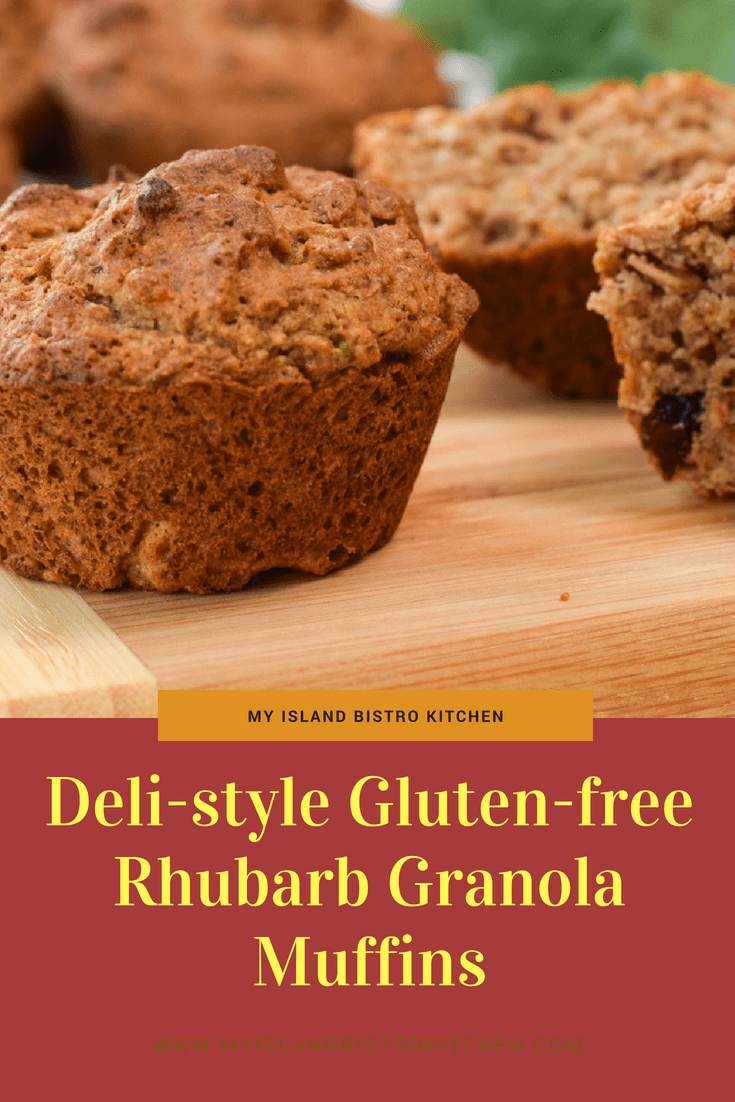
I love the produce our garden generates and its earliest treat is rhubarb. It is so versatile and I make lots of recipes using rhubarb. Today, a treat for my gluten-free diet followers — a new recipe for deli-style gluten-free Rhubarb Granola Muffins.
Deli-style Gluten-free Rhubarb Granola Muffins
There are many recipes for rhubarb muffins but many of them call for chopped rhubarb. Rhubarb has a lot of water content and cooks fast when used in chopped form in baking goods. This extra water content can cause some baked goods to turn out soggy, particularly in the areas where the rhubarb chunks land. To combat this problem, for this recipe, I cook the rhubarb then mash, or purée, it with a hand-held immersion blender. I then use the mashed/puréed rhubarb as part of the liquid content in the muffin batter. So, I still get rhubarb muffins but without the wet soggy spots.
When I make muffins, I like them to be deli- or café-style which is to say I’m looking for muffins that are a reasonable size, are hearty, have a lovely texture with a coarse crumb (not cake-like), and are filled with flavour.
Deli-style Gluten-free Rhubarb Granola Muffins
Muffins are, for lack of a better way of putting it, little individual quick breads. We all know that, appearance-wise, the perfect muffin should bear a slightly domed top that has a bit of firmness to it. There are a combination of factors that will contribute to that desired result — the right amount of leavening, the consistency of the batter, and the oven temperature.
Deli-style Gluten-free Rhubarb Granola Muffins
Rhubarb is, by nature, tart. However, it is important not to over-do the sugar content in the muffins because too much sugar will create a cake-like texture and the moist, open tender crumb, which is a hallmark feature of muffins, will be lost and you will end up with a product that more closely resembles a cupcake. A batter that is too runny will pose the risk of muffins that will rise to form stiff mountain peaks. Adding some Greek yogurt to the batter is one way to thicken it up and reduce this risk. Of course, the addition of the right proportions of leavening (baking powder and baking soda) are key. Having the muffins go into a really hot oven to start them baking is also key to getting a lovely gentle dome on the muffin tops. Using the high temperature allows the outside of the muffin to quickly set while still allowing the inside to continue to rise.
Since I have been developing gluten-free muffins, one thing I have discovered is that I end up with better quality, deli-style muffins when I use a blend of gluten-free flours versus, say, one all-purpose flour or only the one-to-one gluten free flour. Each gluten-free flour has its own unique qualities and properties and the right blend will provide structure, texture, and flavour to the muffins. The addition of granola to these muffins adds texture, flavour, and bulk to the muffins, making them more hearty and filling.
Deli-style Gluten-free Rhubarb Granola Muffins
[Printable recipe follows at end of posting]
Gluten Free Rhubarb Granola Muffins
Ingredients:
3½ oz rhubarb, chopped into ½ inch pieces 1½ tbsp orange juice
1 cup one-to-one gluten-free flour 2 tbsp potato starch ¼ cup gluten-free oat flour ¼ cup almond flour ¼ cup coconut flour ¾ tsp xanthan gum ¼ cup gluten-free quick oats 5½ tsp baking powder ½ tsp baking soda ½ tsp salt 1½ tbsp ground chia seeds 1¾ tsp cinnamon ¼ tsp cloves ½ tsp nutmeg 1/8 tsp ginger ¼ tsp allspice 2 tsp finely grated orange rind 2/3 cup granola
2/3 cup light brown sugar, lightly packed 2 extra-large eggs, room temperature, lightly beaten ¼ cup coconut oil, melted and cooled 1½ tsp vanilla 1½ tbsp orange juice ½ cup whole milk 2 tbsp pure maple syrup 1/3 cup cooled rhubarb purée 2 tbsp Greek style coconut yogurt or sour cream 1½ tsp rose water (optional)
Method:
In small sauce pan, combine the rhubarb and orange juice. Cook over medium-low heat until rhubarb is softened. Cool slightly then, using the back of a large spoon, mash up the rhubarb or, alternatively, use a handheld immersion blender to purée the rhubarb. Set aside to cool completely.
Preheat oven to 450°F.
Prepare 12 muffin cups (each ½-cup capacity) by spraying each muffin cup with cooking spray or greasing individually.
Combine flours, xanthan gum, quick oats, baking powder, soda, salt, ground chia seeds, spices, and grated orange rind together in a large bowl. Whisk ingredients well to combine. Stir in granola. Make a well in the center of the dry ingredients. Set aside.
In separate medium-sized bowl or large measuring cup, whisk together the brown sugar, eggs, coconut oil, vanilla, orange juice, milk, maple syrup, Greek yogurt or sour cream, and rose water (if using). Whisk ingredients well. Stir in cooled rhubarb purée.
Pour wet ingredients into well in dry ingredients. With large spoon, mix ingredients together just until dry ingredients are fully incorporated. Do not overmix.
Spoon batter into prepared muffin cups, filling almost to the rim of each cup. Transfer to pre-heated oven and immediately reduce oven temperature to 400°F. Bake for 20-22 minutes, or until muffins are just firm to the touch and a cake tester inserted into center of a muffin comes out clean. Do not overbake or muffins will be dry. Remove from oven and let muffins rest in pans for 5-7 minutes then gently remove from pan and transfer to wire rack to cool completely. Muffins freeze well.
Recipe Notes
Link to granola recipe: https://myislandbistrokitchen.com/2016/03/08/the-bistros-great-nut-free-granola/
For other gluten-free muffin recipes from My Island Bistro Kitchen, click on the links below:
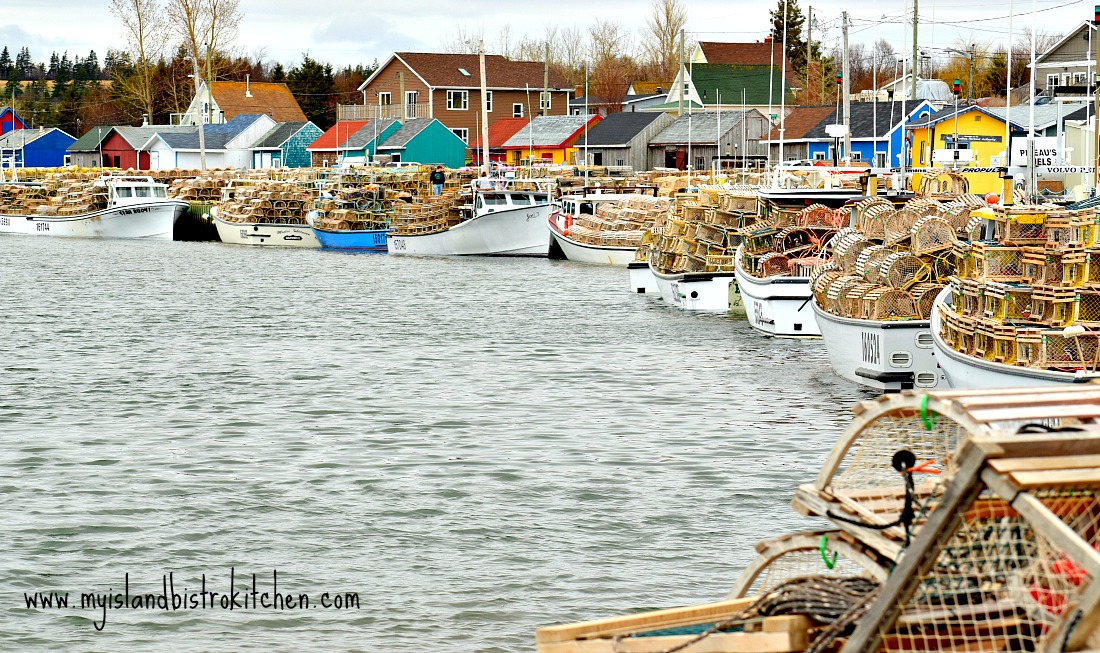
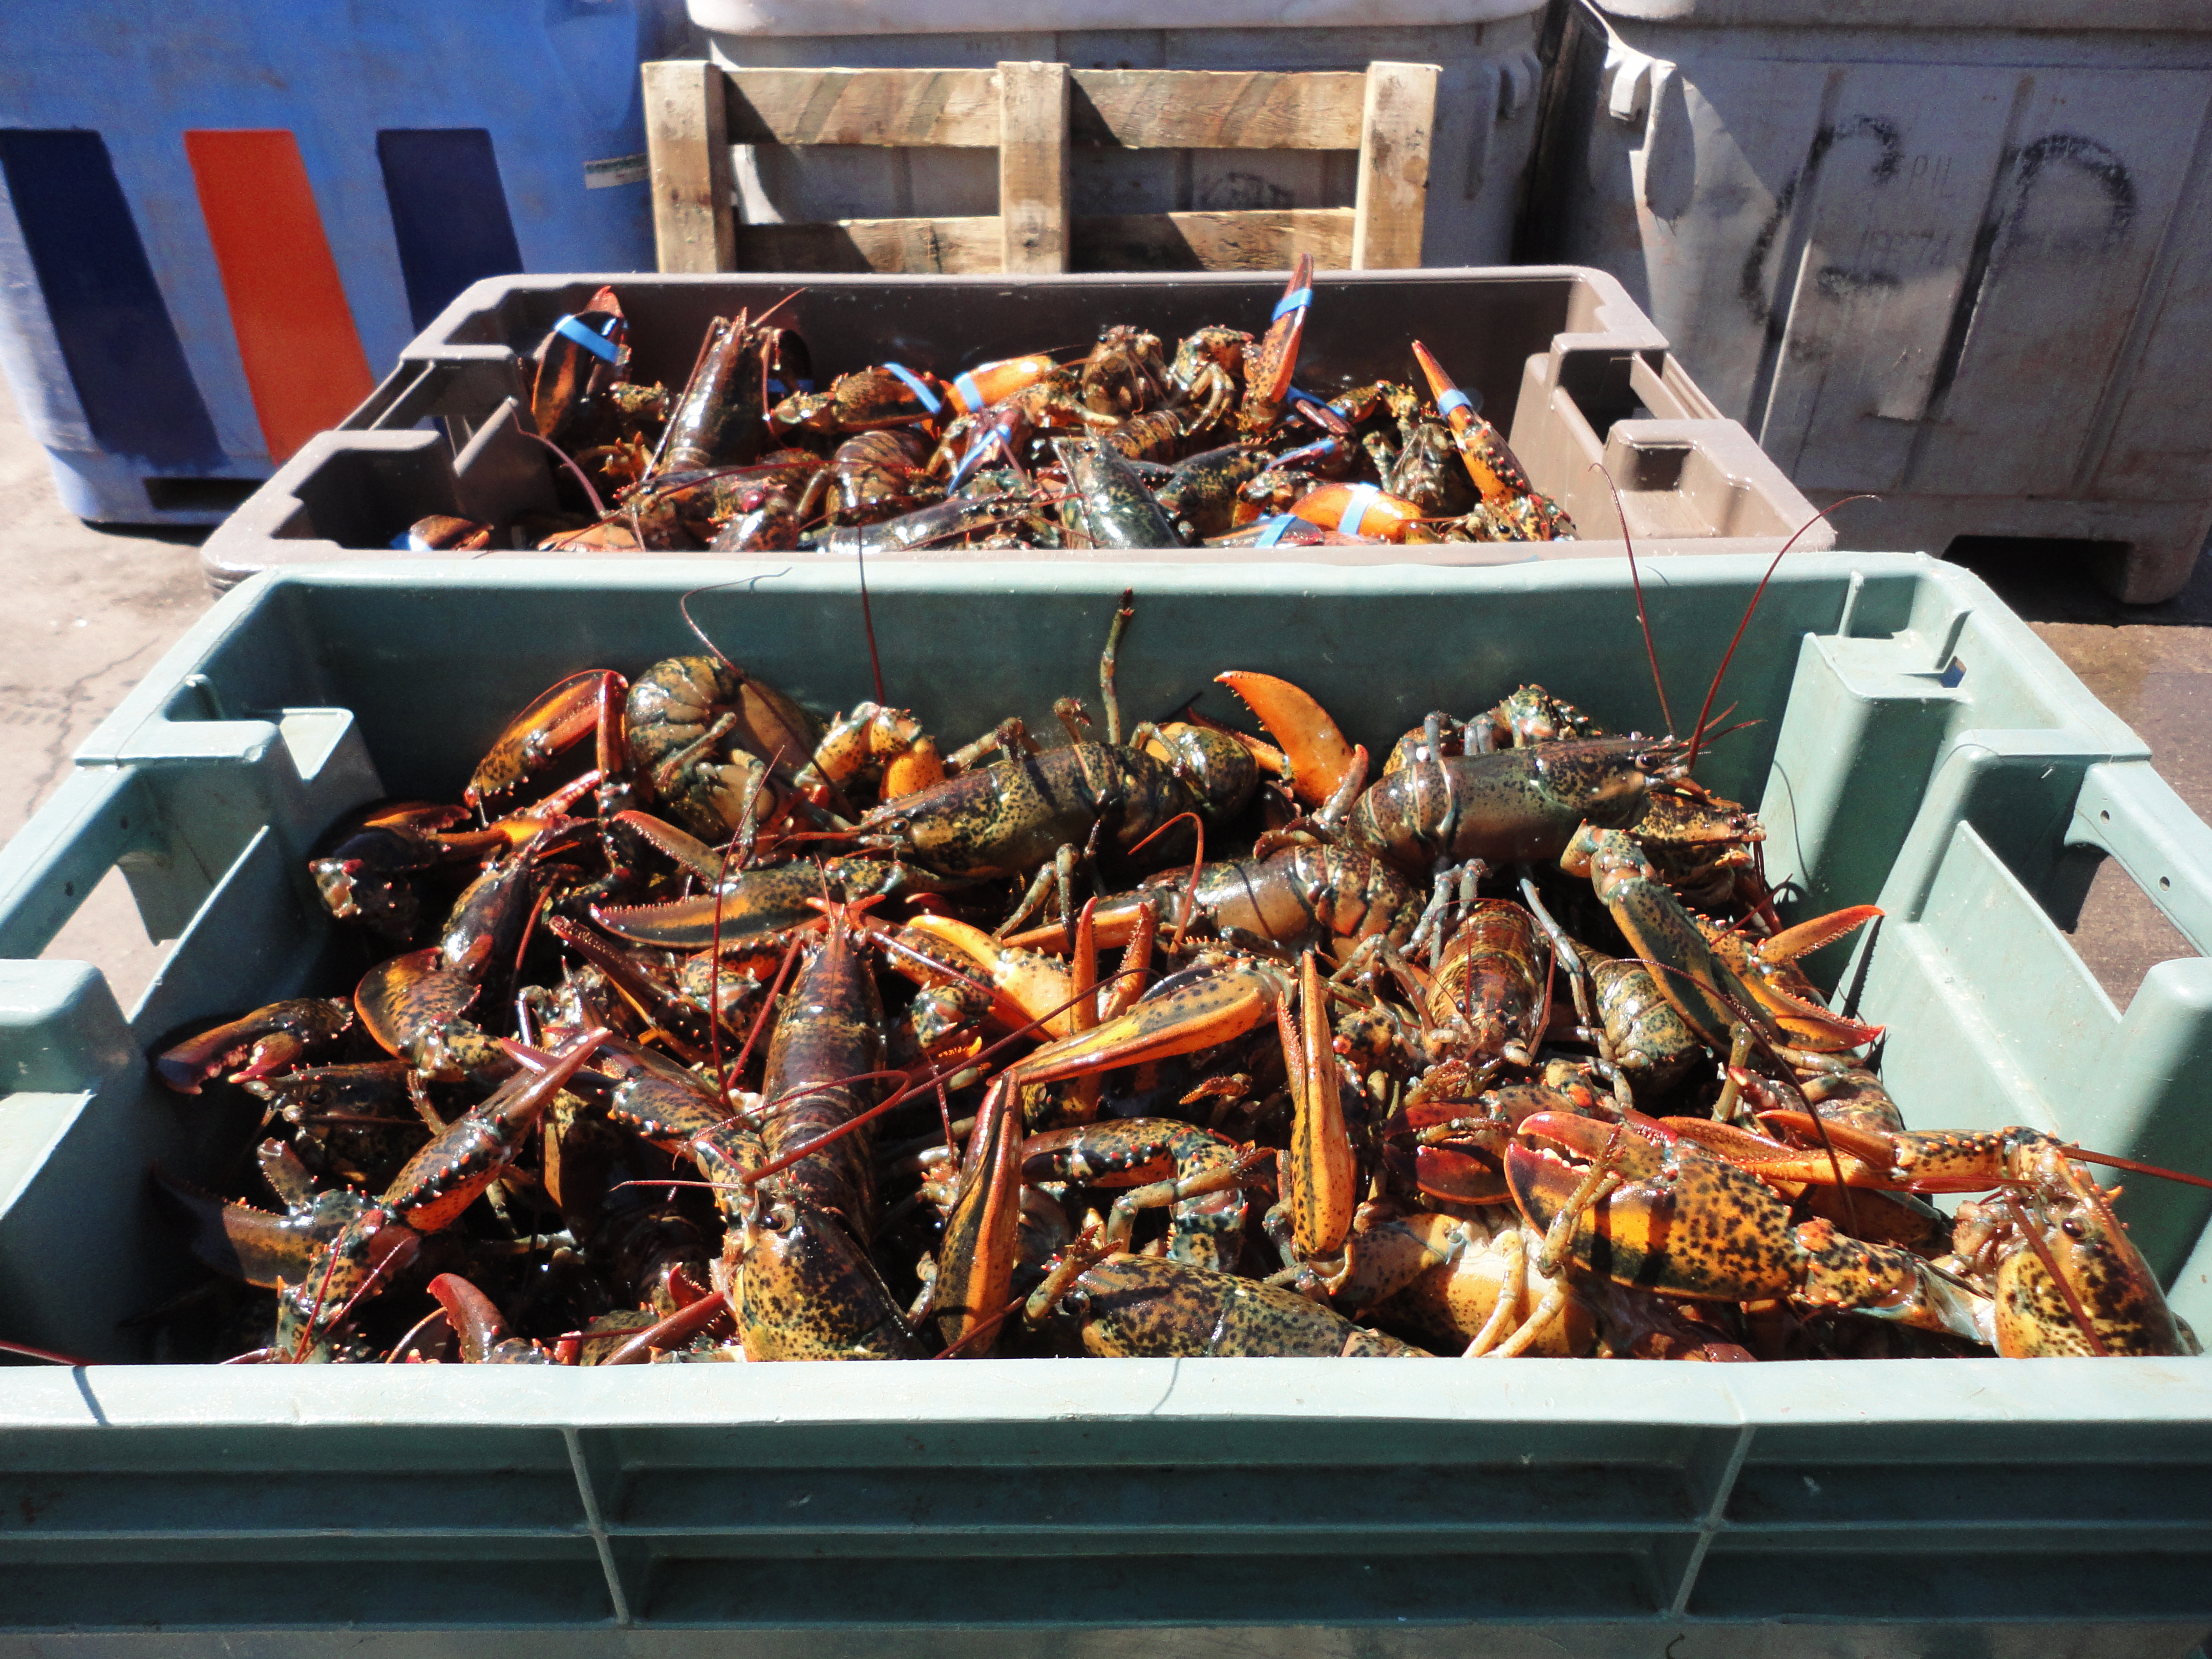
There is nothing better than lobster fresh from the sea and, living on Prince Edward Island, we are so fortunate to have ready access to this treat! The lobster fishery is one of PEI’s main fisheries.
Eve of Setting Day in the Fishing Village of North Rustico, PEI, Canada
It goes without saying that it’s a huge deal when the spring lobster fishing season opens.
Lobster Fishing in all weather on PEI
Many islanders make it an annual ritual to head to a nearby wharf or beach before 6am on setting day to see the boats head out to sea to drop their traps.
Early Morning Gathering in French River, PEI, to Watch Parade of Lobster Boats on Setting Day
The following day the fishers head back out to haul in the first catch of the season and we Islanders can’t wait for that first “feed” of lobster!
Arriving back in North Lake, PEI, with the day’s catchFresh Catch of Lobster
When lobster is in season on the Island, I make good use of it as an ingredient and I find no shortage of ways in which to use the succulent meat.
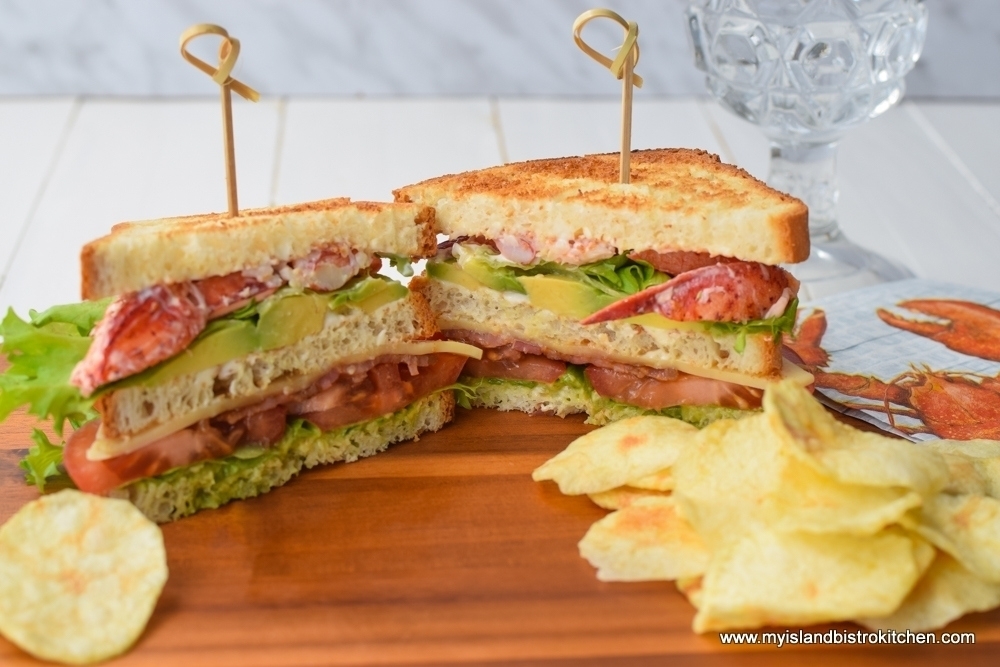
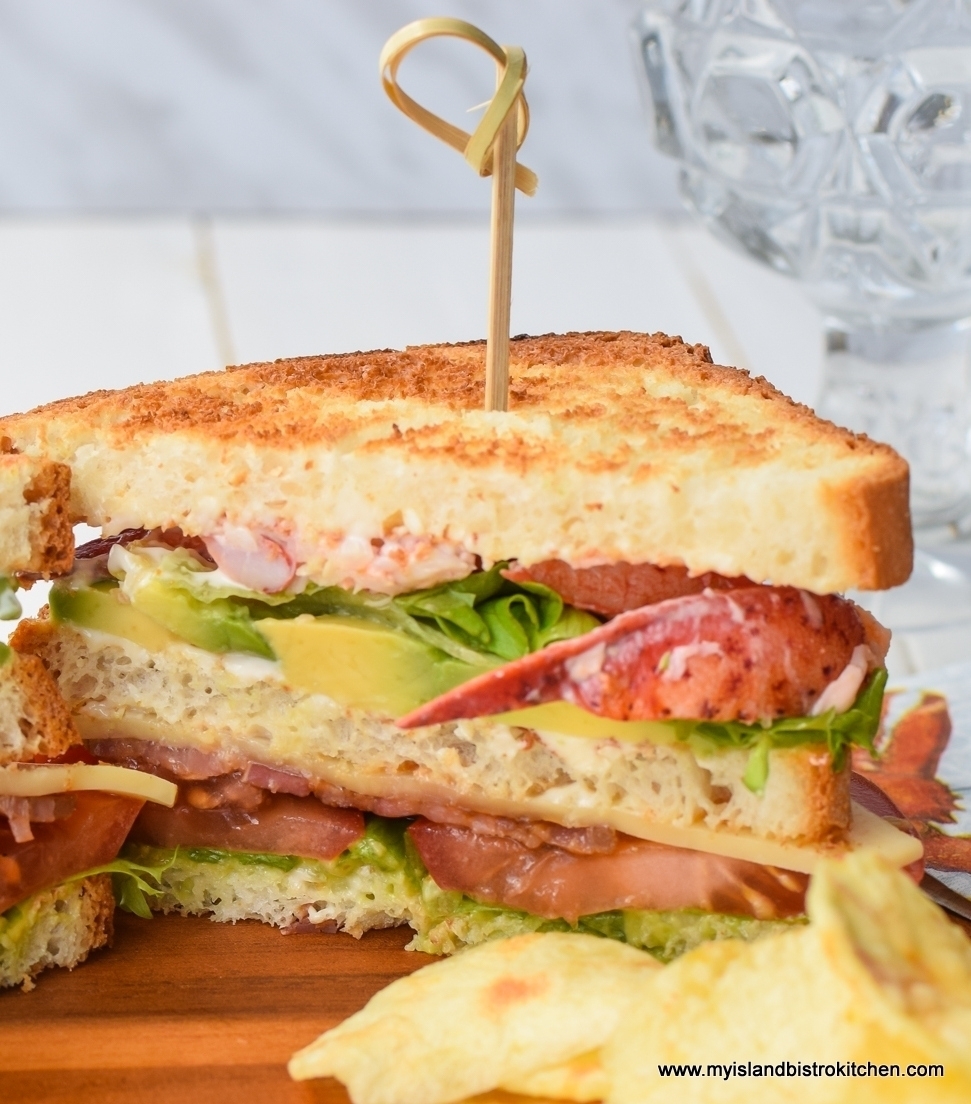
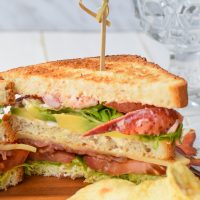
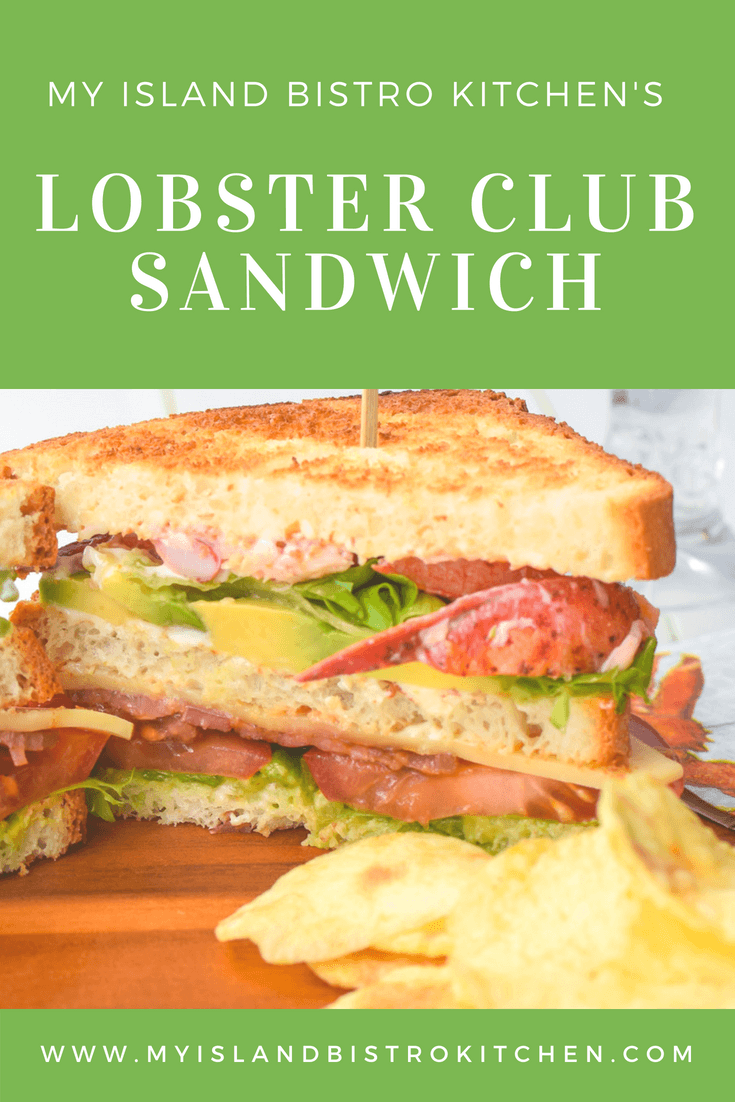
So, today, on my sandwich board, is a lobster club sandwich with a twist. It contains some of the elements of a traditional club sandwich but I jazz this version up a bit by adding lobster meat, avocado, pancetta, Havarti cheese, lemon mayonnaise , and an avocado spread. This fusion of complementary flavours results in a tasty (and hearty) colorful sandwich. A feast for the eyes as well as the stomach!
Lobster Club Sandwich
Lobster Club with a Twist
Sandwich ingredients:
3 slices bread of choice 2 – 3 oz cooked lobster, broken into bite-size pieces 1 oz pancetta, fried and drained 1 slice Havarti ½ small avocado, sliced and sprinkled with lemon juice to prevent browning (save the other half for the avocado spread) Lettuce of choice Tomato Salt and Pepper, to taste Avocado Spread (recipe follows) Lemon Mayonnaise (recipe follows) Butter
Avocado Spread:
½ small avocado (save the other half for slicing for sandwich) 1 – 1½ tsp lemon juice 1 tsp olive oil 1/8 – ¼ tsp garlic salt 1 small green onion, finely sliced or diced
Lemon Mayonnaise:
1 tbsp mayonnaise 1 tsp lemon juice 1 small green onion, finely sliced or diced
Avocado Spread: Chop ½ avocado into small bowl. Using a hand-held immersion blender, blend lemon juice, olive oil, garlic salt, and green onion with the avocado, just until mixed.
Lemon Mayonnaise: Mix mayonnaise, lemon juice, and green onion together well.
To Assemble Sandwich: Heat 1-2 tsp butter in small saucepan over medium heat. Reduce heat to medium-low, add the lobster and toss gently for 2-3 minutes, just long enough to warm the lobster. Toast and butter the three bread slices. Layer 1: Spread two pieces of bread with the avocado spread. Cover one slice of bread with lettuce and top with sliced tomato, pancetta, and Havarti slice. Top with the other slice of bread that is spread with avocado spread. Layer 2: Spread the top slice of bread with half the lemon mayonnaise. Lay the sliced avocado on top of the bread followed by a layer of lettuce. Top with the lobster. Spread the third slice of bread with the remaining lemon mayonnaise and place over the lobster. Secure sandwich with toothpicks and cut in half diagonally. Enjoy!
This ultimate club sandwich combines succulent lobster meat, pancetta, Havarti, and avocado with tomato, lettuce, avocado spread, and lemon mayonnaise to make a hearty meal.
Course Main Course
Cuisine American
Keyword lobster
Servings1
My Island Bistro KitchenMy Island Bistro Kitchen
Ingredients
Sandwich ingredients:
3slicesbread of choice
2 - 3ozcooked lobster,broken into bite-size pieces
1ozpancetta,fried and drained
1sliceHavarti
½small avocadosliced and sprinkled with lemon juice to prevent browning (save the other half for the avocado spread)
Lettuce of choice
Tomato
Salt and Pepperto taste
Avocado Spread(recipe follows)
Lemon Mayonnaise(recipe follows)
Butter
Avocado Spread:
½small avocado(save the other half for slicing for sandwich)
1– 1½ tsp lemon juice
1tspolive oil
1/8– ¼ tsp garlic salt
1small green onion,finely sliced or diced
Lemon Mayonnaise:
1tbspmayonnaise
1tsplemon juice
1small green onion,finely sliced or diced
Instructions
Avocado Spread: Chop ½ avocado into small bowl. Using a hand-held immersion blender, blend lemon juice, olive oil, garlic salt, and green onion with the avocado, just until mixed.
Lemon Mayonnaise: Mix mayonnaise, lemon juice, and green onion together well.
To Assemble Sandwich: Heat 1-2 tsp butter in small saucepan over medium heat. Reduce heat to medium-low, add the lobster and toss gently for 2-3 minutes, just long enough to warm the lobster. Toast and butter the three bread slices. Layer 1: Spread two pieces of bread with the avocado spread. Cover one slice of bread with lettuce and top with sliced tomato, pancetta, and Havarti slice. Top with the other slice of bread that is spread with avocado spread. Layer 2: Spread the top slice of bread with half the lemon mayonnaise. Lay the sliced avocado on top of the bread followed by a layer of lettuce. Top with the lobster. Spread the third slice of bread with the remaining lemon mayonnaise and place over the lobster. Secure sandwich with toothpicks and cut in half diagonally. Enjoy!
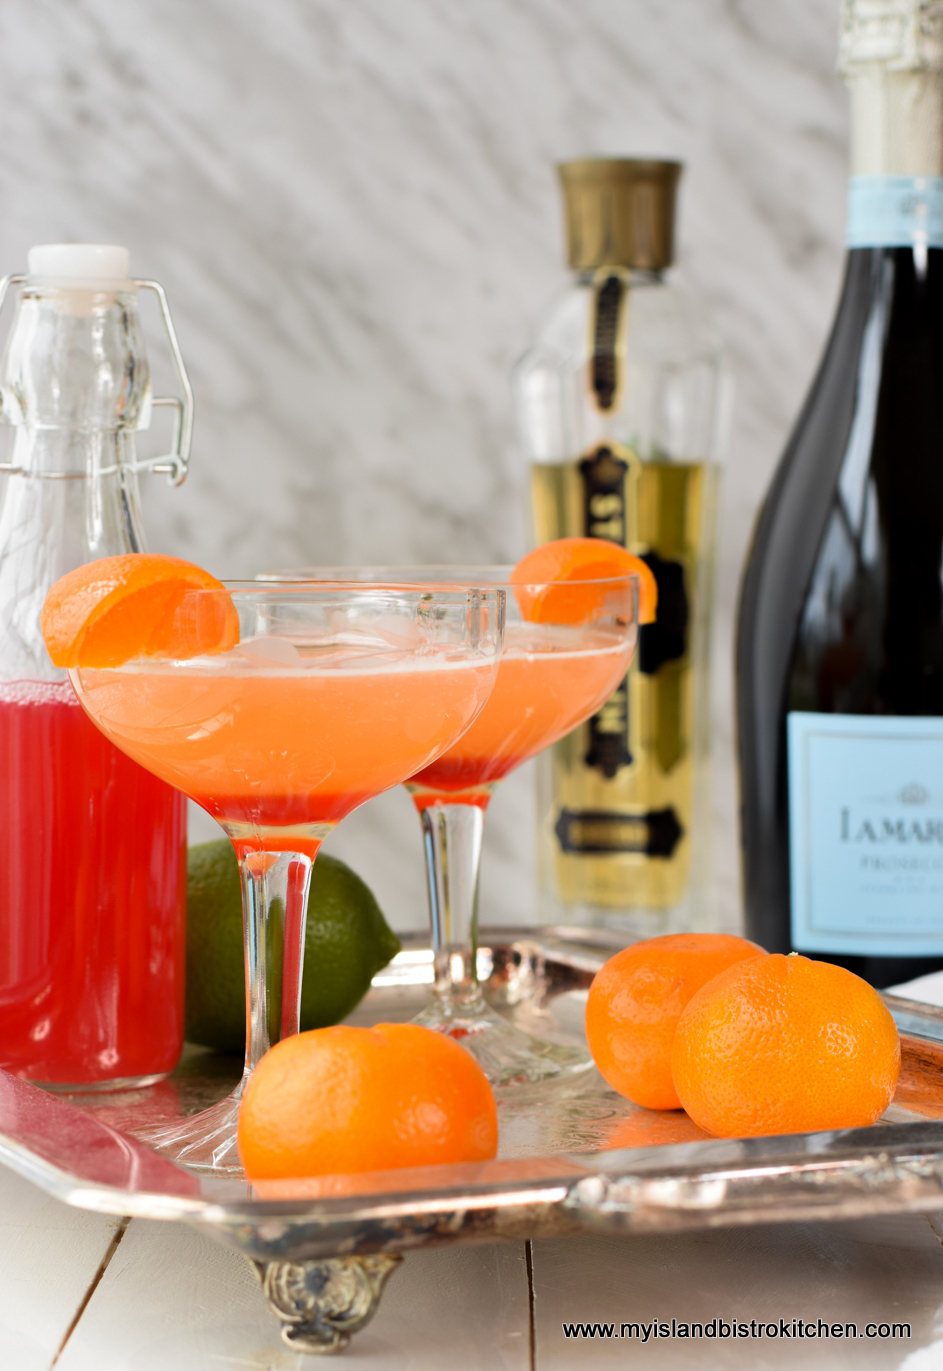
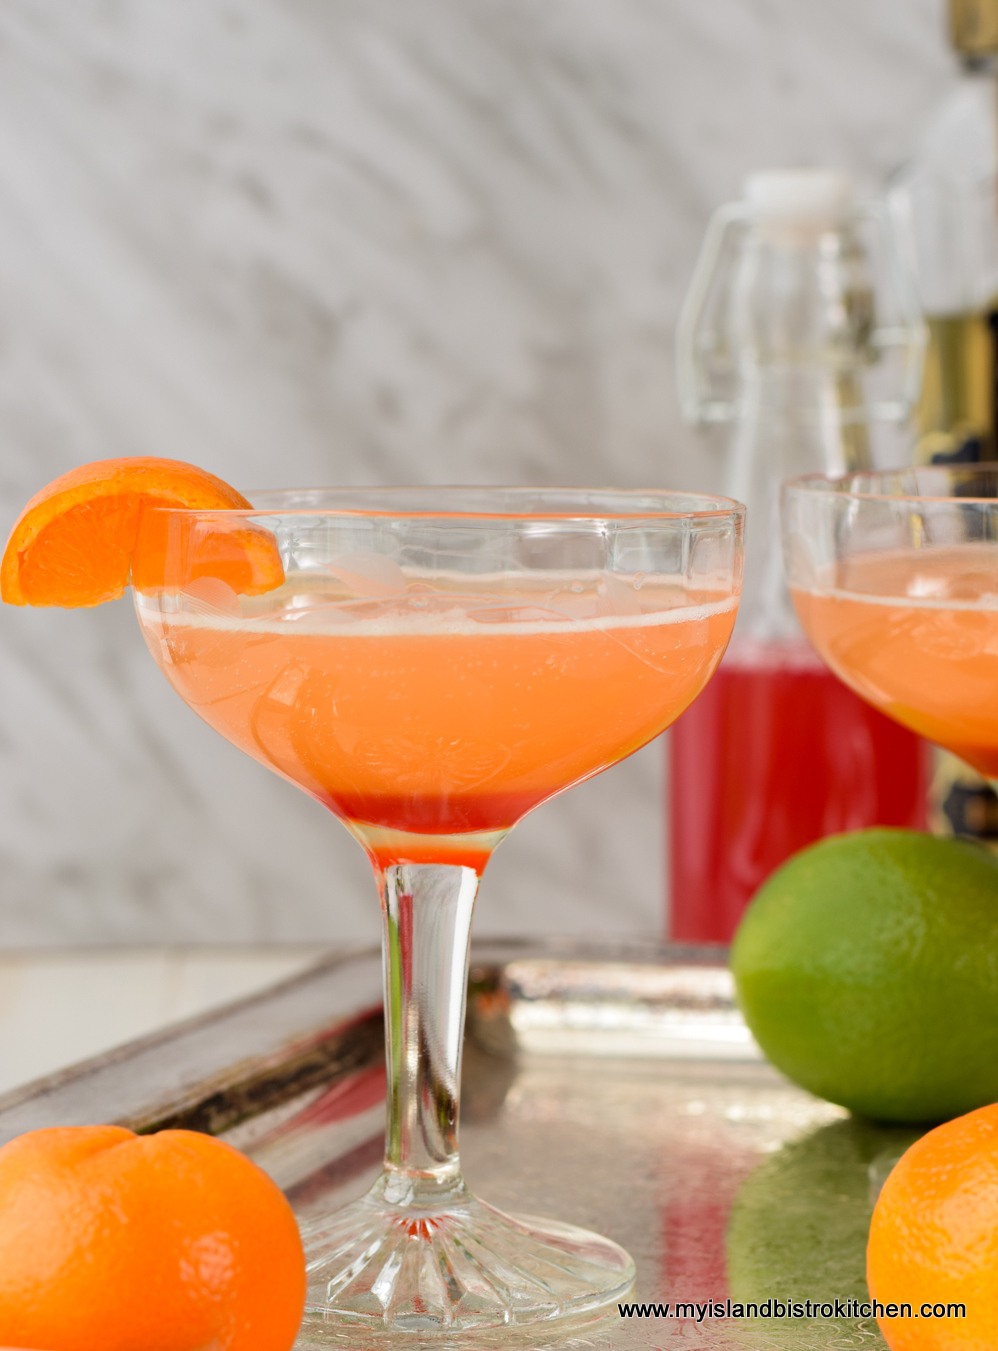
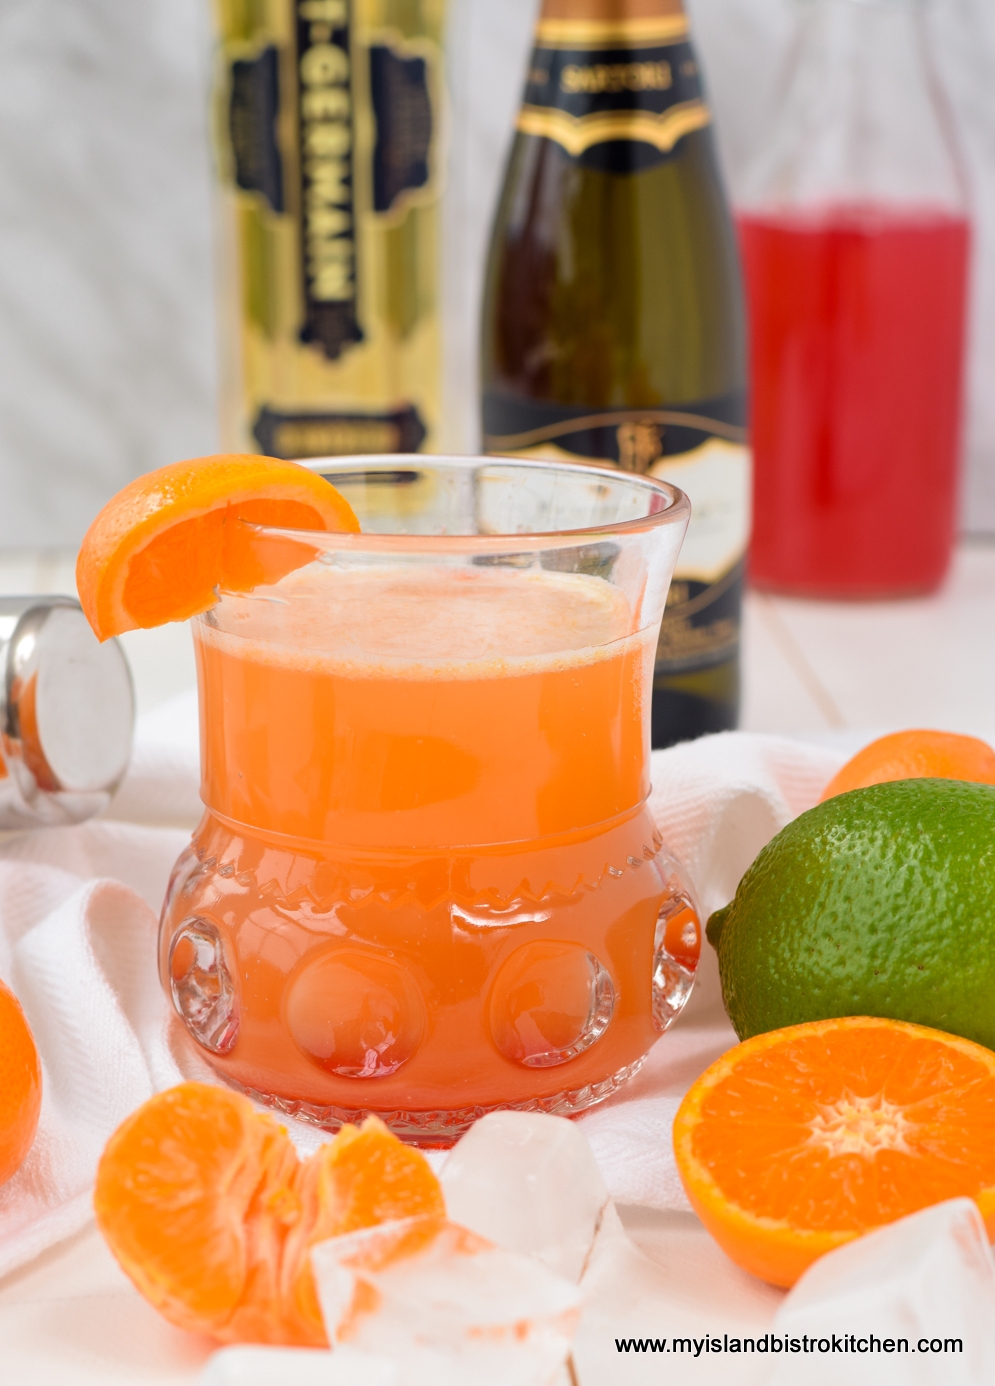
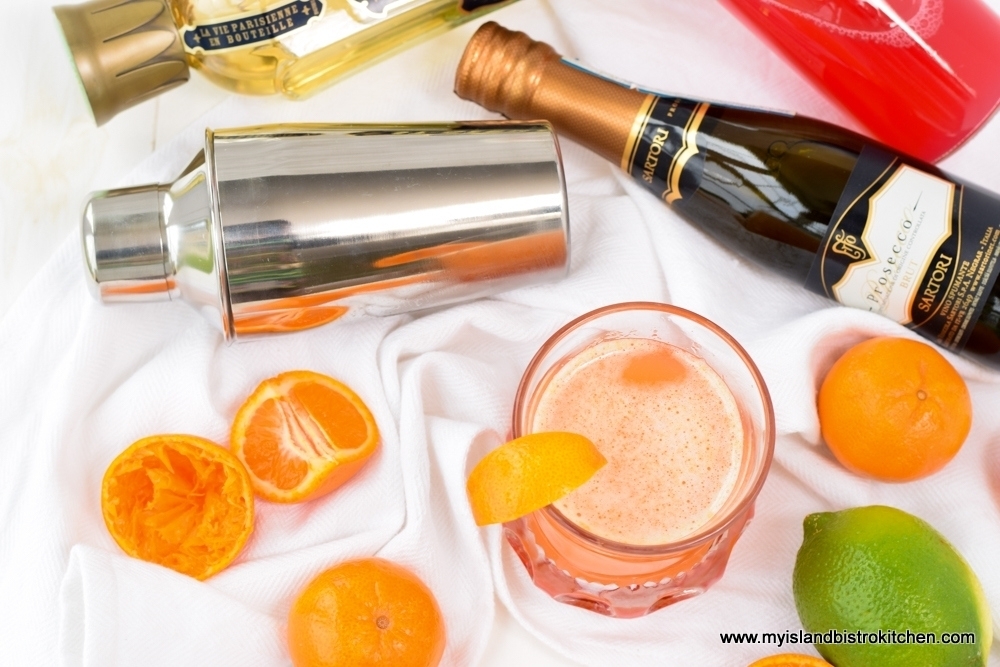
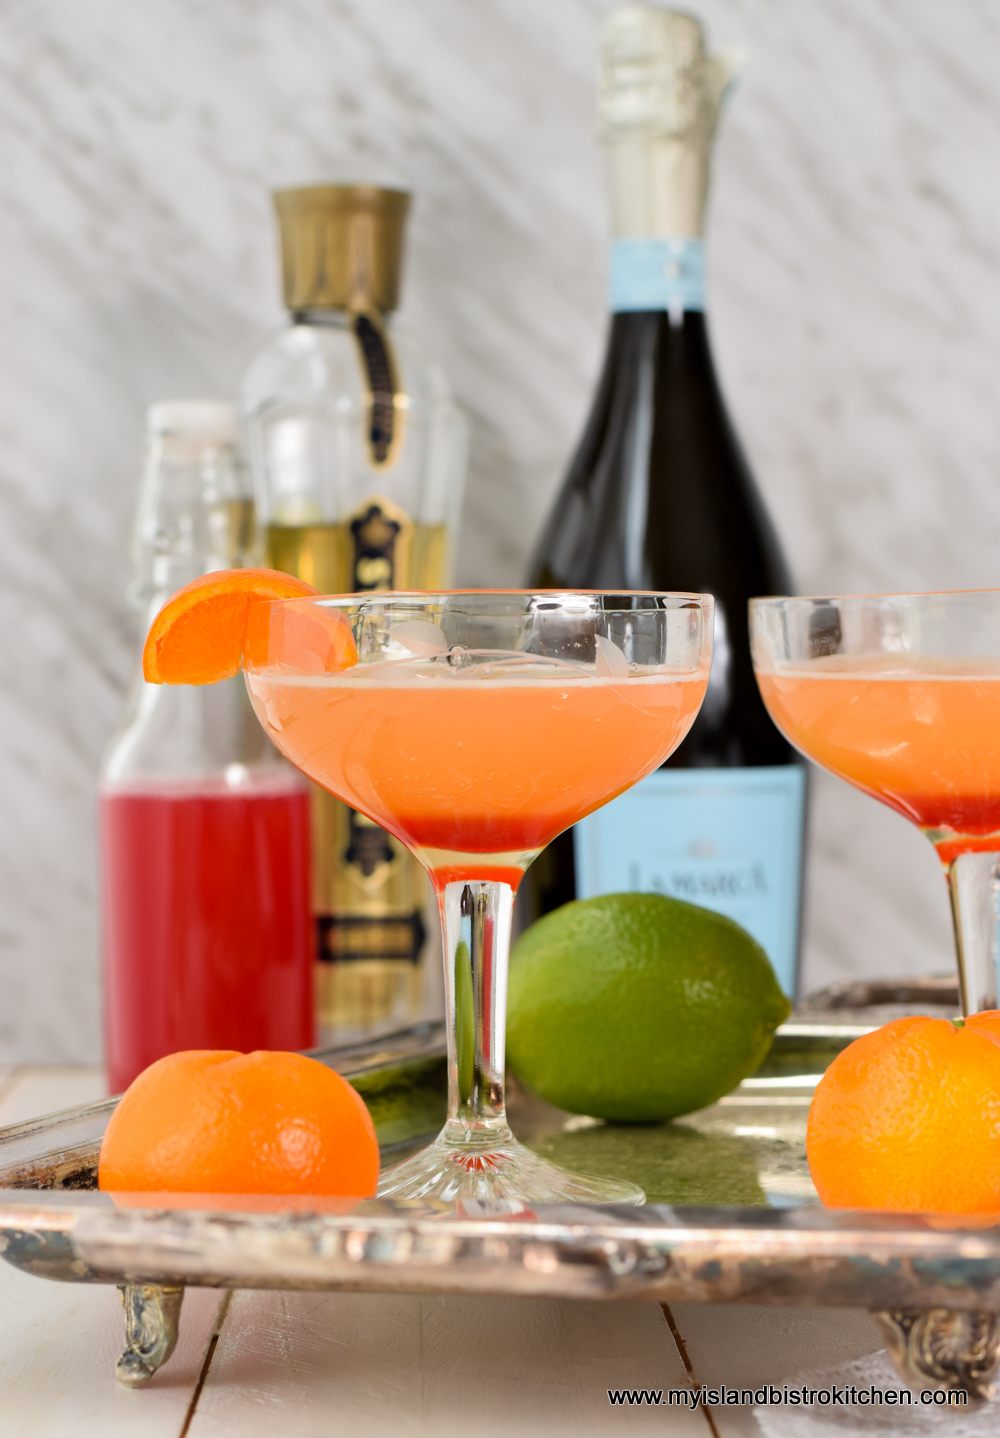
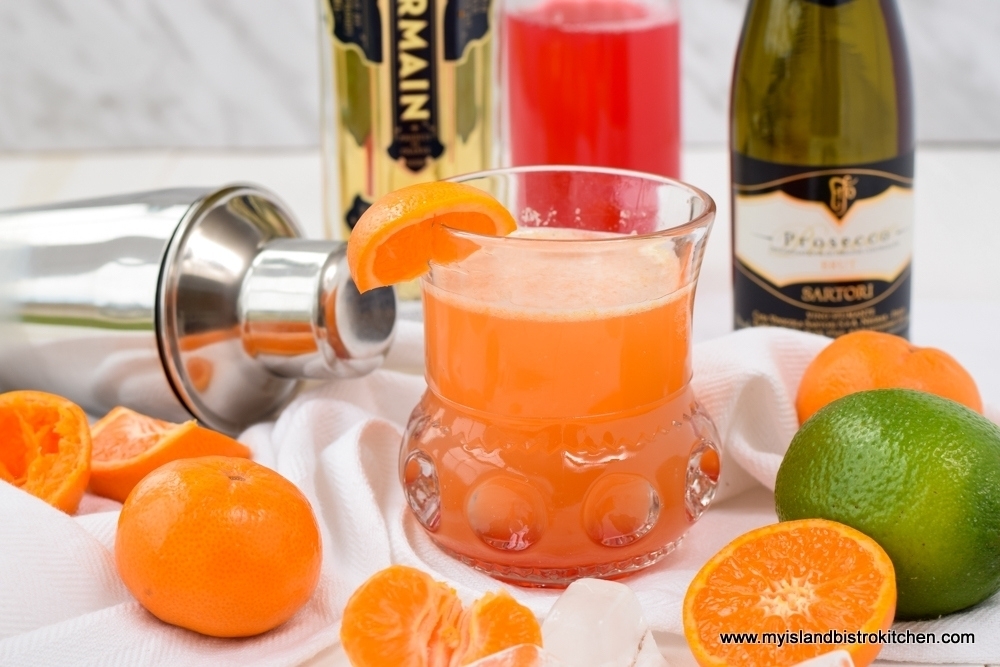
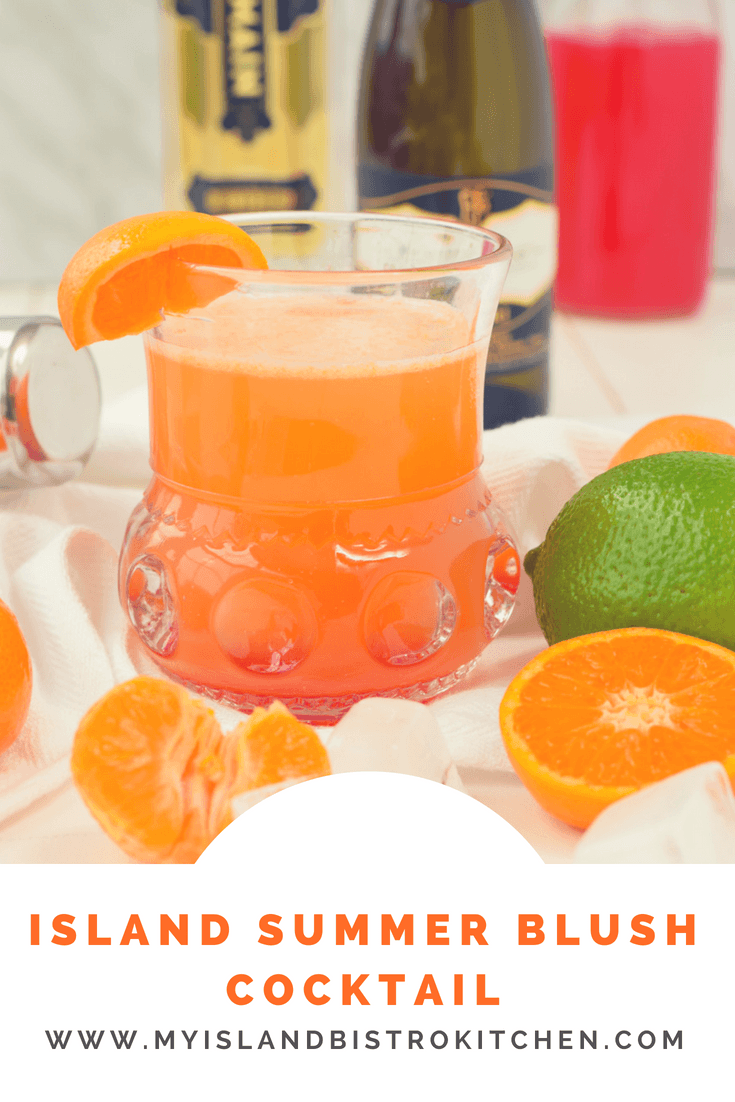
My newly-created Island Summer Blush Cocktail is packed full of flavours that speak of springtime and early summer — rhubarb, lime, clementine, elderflower liqueur, and fizzy Prosecco.
Island Summer Blush Cocktail
One of the key ingredients in this drink is my homemade rhubarb cordial. I have been making this cordial for many years and I continually find new ways to use it. We have a good-sized patch of rhubarb and, each spring, I make batches of this cordial and, what I don’t use at the time, I freeze for use at other times of the year. Click here for my rhubarb cordial recipe.
Rhubarb Cordial
My choice of elderflower liqueur was inspired by the royal wedding of Prince Harry and Meghan Markle on May 19, 2018. Prior to the wedding, it was announced that the flavours of the wedding cake would be lemon and elderflower. I combined those two flavours and developed my own recipe for a lemon and elderflower cake, the recipe for which you can find by clicking here. I then thought I would create a cocktail, using elderflower liqueur, to commemorate the royal event and thus was born the Island Summer Blush Cocktail.
Island Summer Blush Cocktail
Elderflower liqueur is made with the delicate starry white elderflower blossoms. It has complex notes and a somewhat seductive fragrance. I would describe this liqueur as a layered fusion of floral, tropical, and citrus notes. It certainly has exotic character and reminds me of a floral summer bouquet with fruity notes. Its light, floral profile makes it a great match for sharper flavours like rhubarb and citrus fruits. It marries well with sparkling wines and lends itself to a multitude of cocktail concoctions.
Island Summer Blush Cocktail
This cocktail is easy to make. Simply combine the rhubarb cordial (no substitutes), clementine and lime juices, and elderflower liqueur in a cocktail shaker. Fill the shaker with ice cubes then shake the mixture for 15-20 seconds or until condensation forms on the outside of the shaker indicating the mixture is super cold. Strain the mixture into your fancy glass of choice then add the Prosecco. Carefully tilt the glass slightly and slowly pour in the grenadine along the side of the glass. The grenadine should sink to the bottom of the glass giving the cocktail that lovely layered look. Garnish with a wedge of clementine.
Island Summer Blush Cocktail
The beautiful natural color of this cocktail reminds me of a blushing bride so, made with my Island rhubarb, flavoured with the elderflower flavour made trendy by the 2018 royal wedding, this is my Island Summer Blush Cocktail. A perfect spring and summer cocktail to leisurely enjoy.
Island Summer Blush Cocktail
[Printable recipe follows at end of posting]
Island Summer Blush Cocktail
Ingredients:
1.5 oz Rhubarb Cordial 1 oz freshly squeezed clementine juice (about 2 clementines) ½ oz Elderflower Liqueur 1 tsp freshly squeezed lime juice 2 oz Prosecco 2 tsp Grenadine
Method:
Pour Rhubarb Cordial, clementine juice, Elderflower Liqueur, and lime juice into shaker and fill with ice cubes. Shake for about 15-20 seconds then strain into glass. Top with Prosecco. Tip glass slightly and slowly pour Grenadine in down the side of the glass. Garnish with a clementine wedge. Serve immediately.
This Island Summer Blush Cocktail is a beautiful balance of sharp and sweet flavours. With a blend of rhubarb cordial, elderflower liqueur, citrus fruit juices, grenadine, and Prosecco, this is a lovely cocktail to especially enjoy in summer.
Pour Rhubarb Cordial, clementine juice, Elderflower Liqueur, and lime juice into shaker and fill with ice cubes. Shake for about 15-20 seconds then strain into glass. Top with Prosecco. Tip glass slightly and slowly pour Grenadine in down the side of the glass. Garnish with a clementine wedge. Serve immediately.
Recipe Notes
For my recipe for Rhubarb Cordial, follow this link: https://myislandbistrokitchen.com/2013/06/24/rhubarb-cordial/
Pin Me to Pinterest!
Island Summer Blush CocktailIsland Summer Blush Cocktail
The inspiration for this springtime Lemon Elderflower Cake was drawn from the announcement of the lemon and elderflower flavours for the May 2018 wedding cake of Prince Harry and Meghan Markle. I suspect, after this wedding, that elderflower will be the trendy new flavour for many recipes – either of the eating or drinking kind.
When I had the idea to make this cake, I questioned whether I could find elderflower liqueur (which is what I wanted to use) anywhere on PEI. However, a visit to a local liquor store revealed that they had had numerous requests to bring in elderflower liqueur in the past couple of months to the point that they decided to carry it to see if it was a product that would sell. I am told the bottles of St. Germain Elderflower Liqueur from France are selling well. I suspect people are curious about the flavour of elderflower, especially after it was announced as one of the flavours for the royal wedding cake.
Elderflower liqueur, made with the starry white elderflower blossoms, is rather difficult to describe. It has a somewhat seductive fragrance that I would describe as a layered fusion of floral and citrus notes perhaps from the lemon and grapefruit family. I think I can also detect hints of summer fruits like pears and peaches. It certainly has exotic character and would remind me of a floral summer bouquet with notes of fruit.
Lemon Elderberry Cake
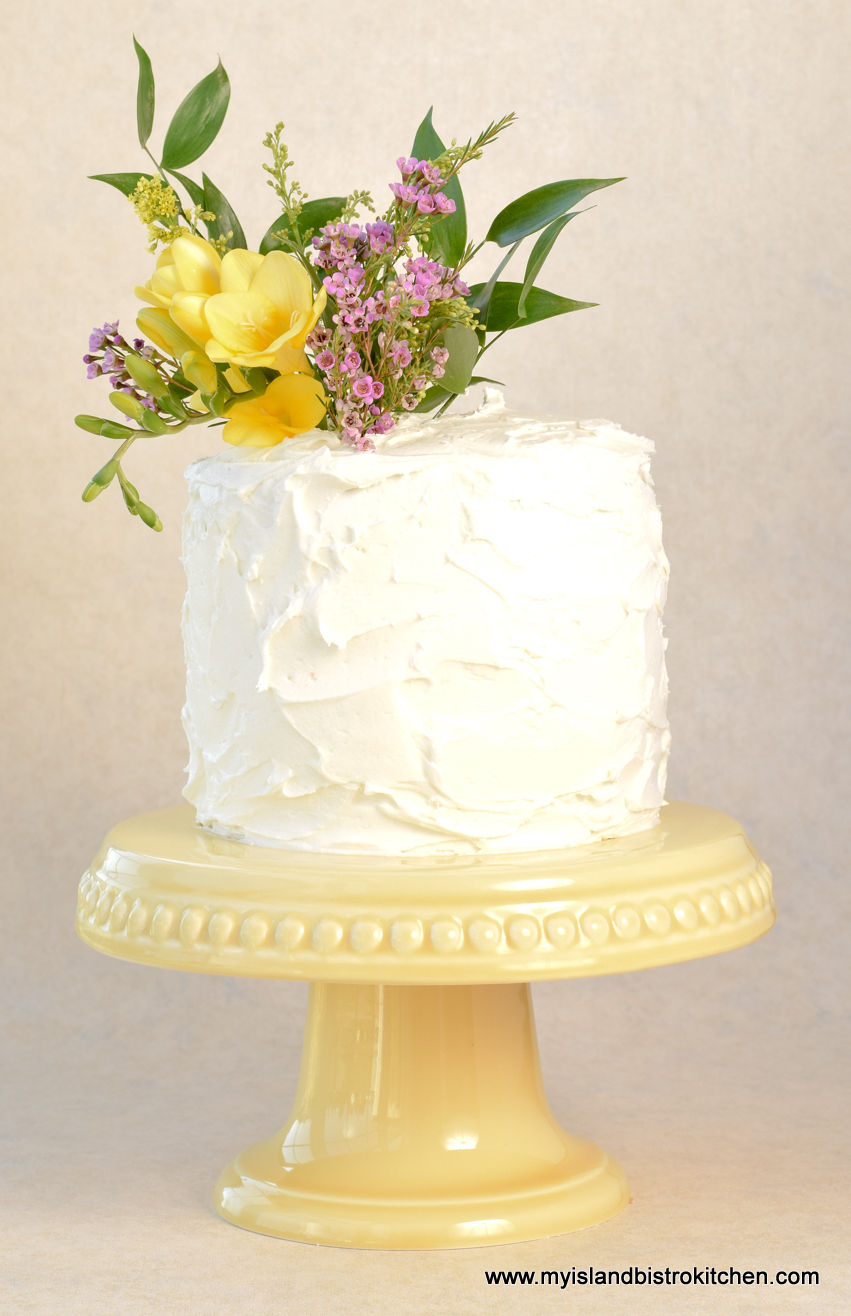
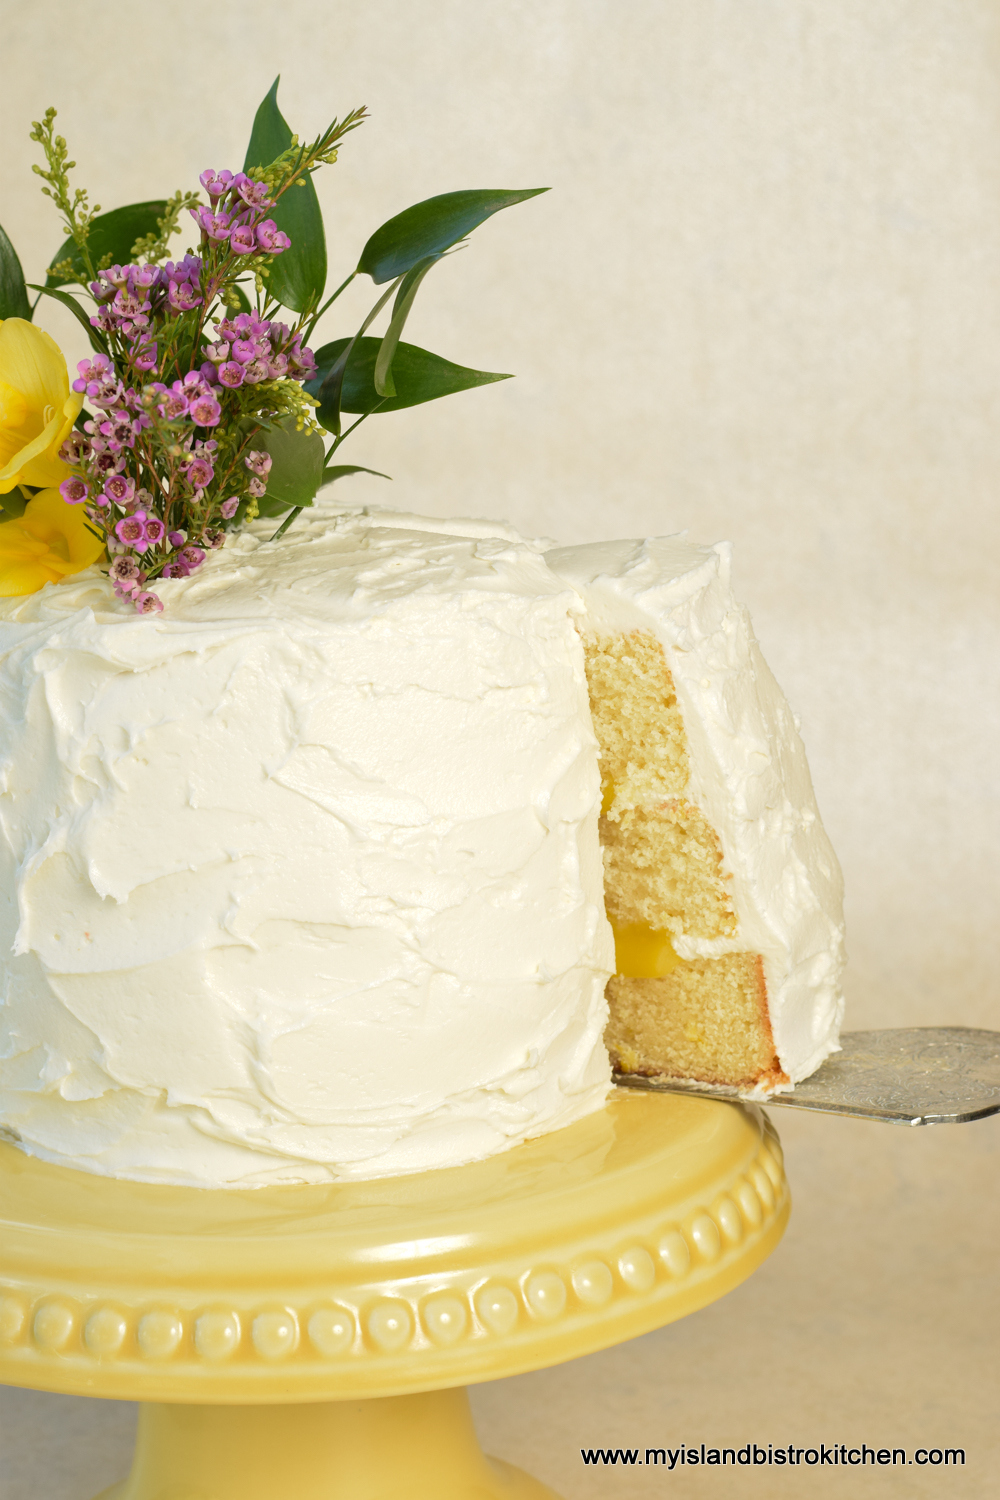
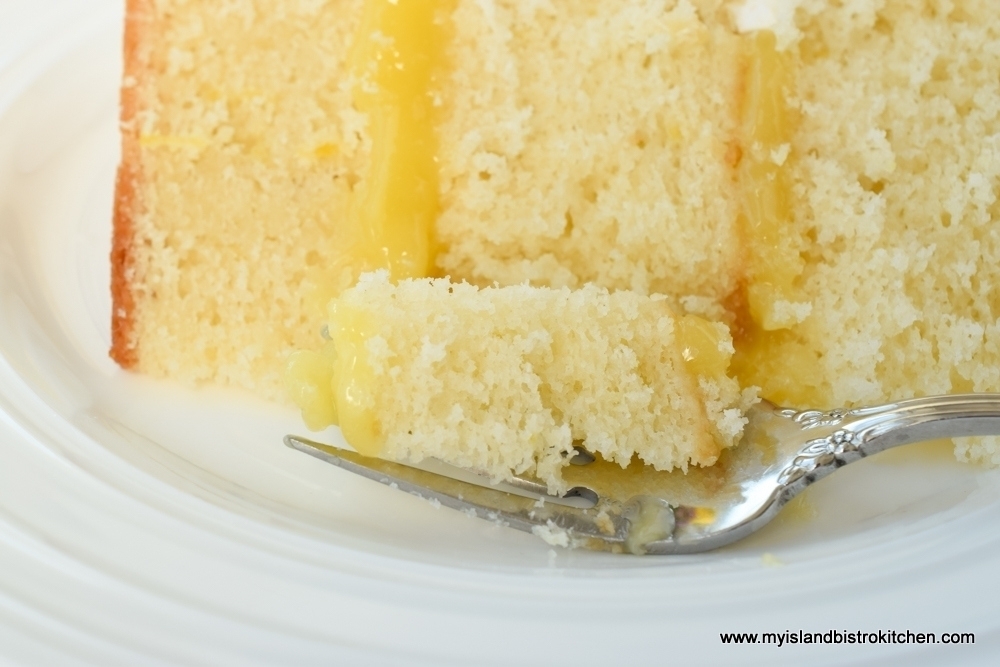
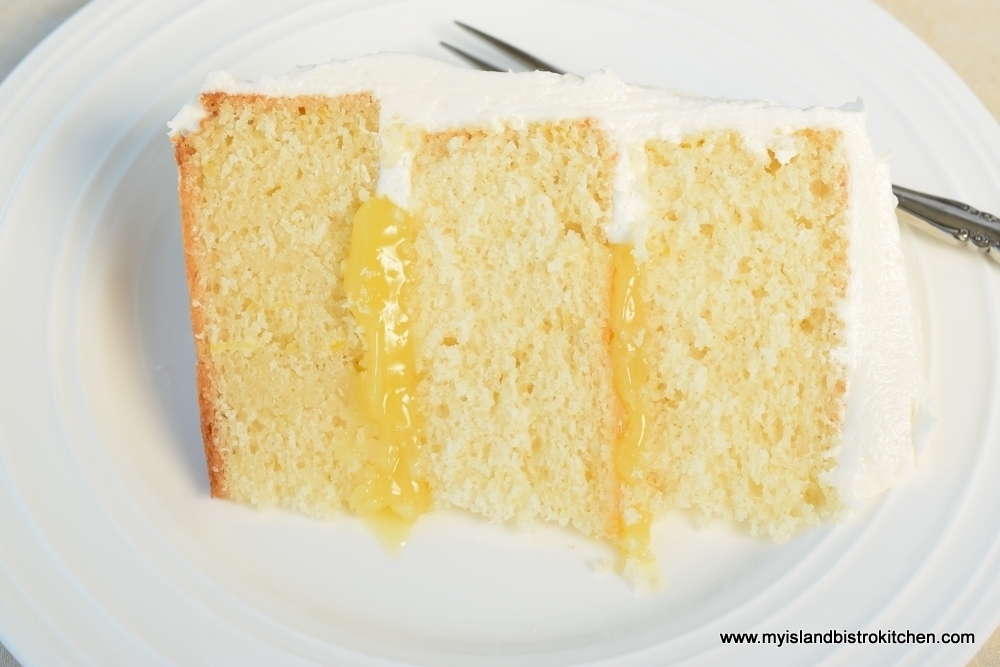
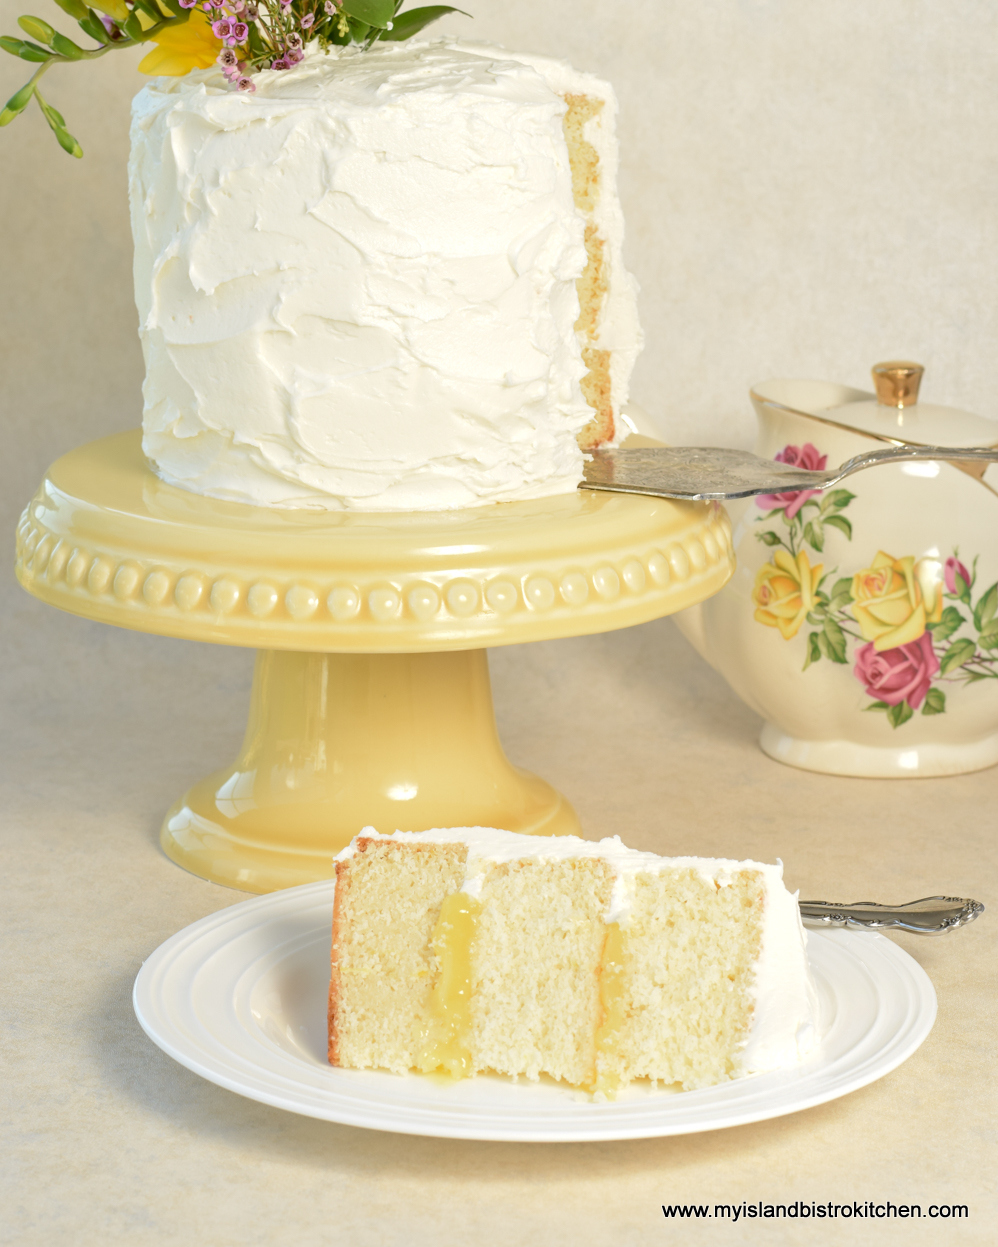
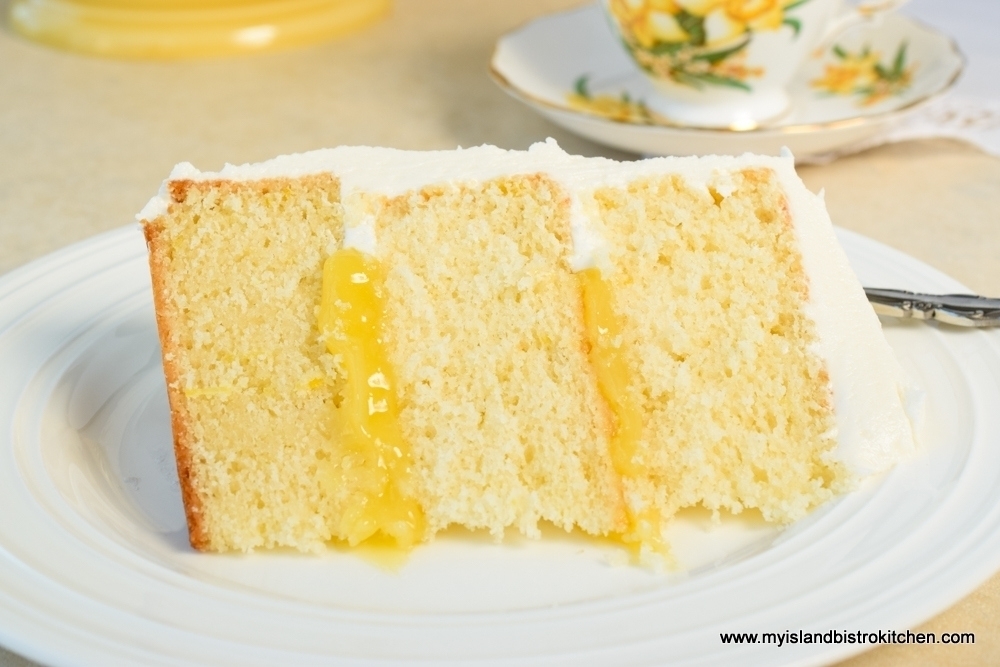
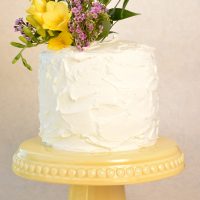
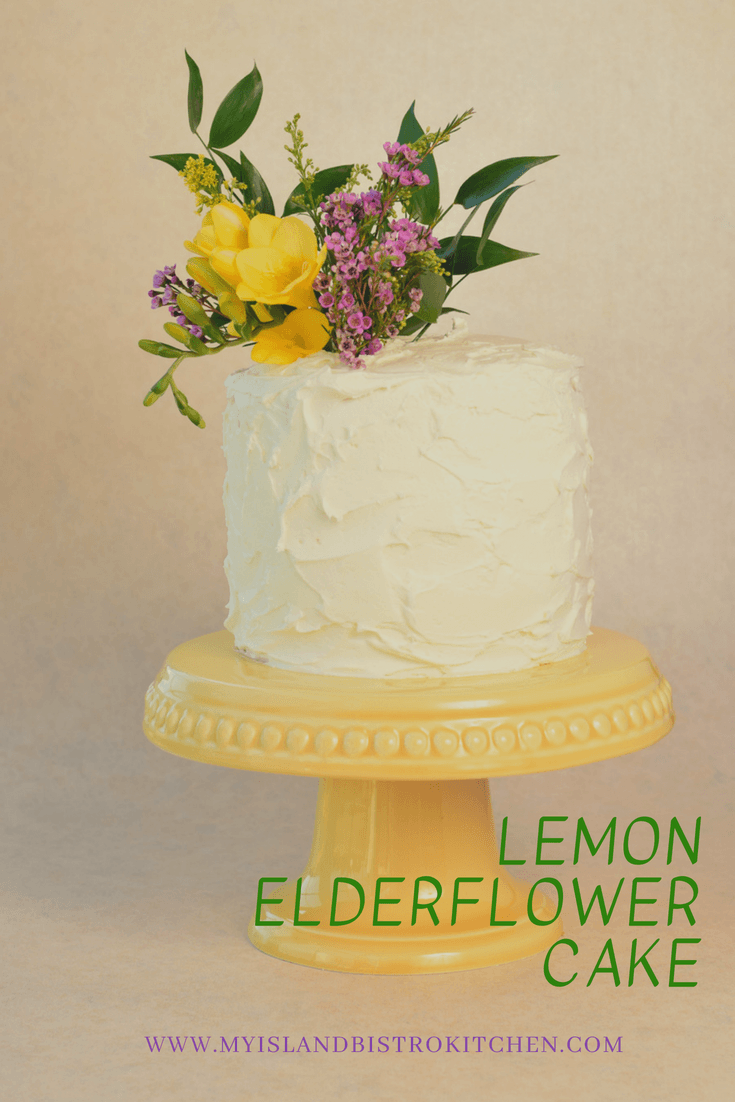
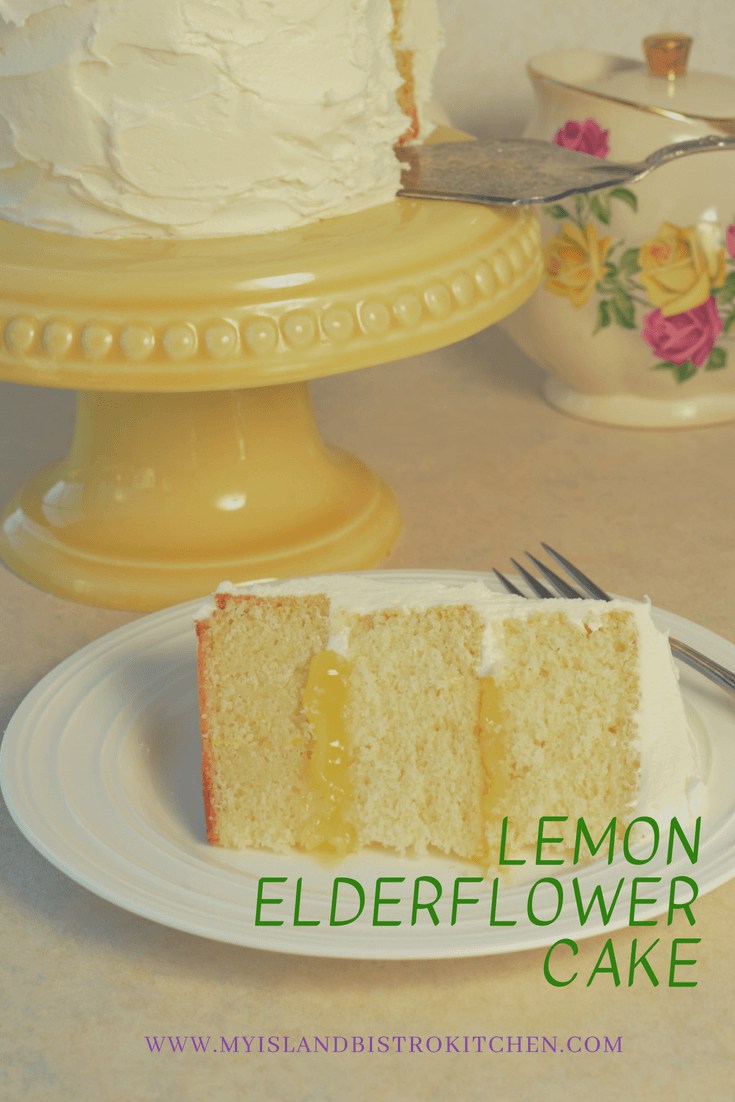
Nothing says springtime more than a lemon cake. I have blended freshly squeezed lemon juice with the flavour of elderflower liqueur to layer some flavour into a basic white cake and transform it into a tasty homemade Lemon Elderflower Cake. This is a true old-fashioned homemade cake that has a dense texture and moist crumb.
Lemon Elderflower Cake
I have chosen to fill the cake layers with decadent lemon curd. I make this curd regularly and it makes a dandy cake filling. For the icing, I have taken my standard buttercream recipe and flavoured it with the elderflower liqueur to tie the flavour of the icing and cake together.
Lemon Elderberry Cake filled with lemon curd and smothered in elderberry-flavoured buttercream icing
This batter is sufficient for either two standard layer cake pans, either 8” or 9” in diameter. However, for the cake in the photos, I used 6” round pans and layered three of them together. The recipe will yield four 6” cakes but four is too high for the cake to cut easily and stay together well enough to plate attractively. Save the fourth cake for a future use – it is divinely lovely served with crushed strawberries, ice cream, and a dollop of whipped cream. Just sayin’! What follows is the method for a three-tier 6” cake. If you choose to make the cake in either 8” or 9” round pans, just be aware that the baking times may need to be adjusted slightly from what the recipe indicates for the 6” cakes. With variances in ovens, I always recommend checking the cakes for doneness five minutes before the recipe indicates the cakes should be baked then checking them every five minutes thereafter until a cake tester inserted into the center of the cakes comes out clean – the true indicator that the cakes are baked.
I chose not to color the batter yellow with gel food coloring. I purposely left the cake white because I wanted the bright yellow lemon curd to stand out between the layers of the cake. If, however, it takes a yellow color to make the cake look like a lemon cake for you, by all means, add small amounts of yellow gel food coloring until you get the desired intensity of color.
Lemon Elderberry Cake
I am a huge proponent of the insulated baking strips placed around the cake pans to keep the cakes from baking unevenly and forming a dome as they bake. These strips come under various brand names. Mine are from Wilton and I swear by them. Simply soak them in water for a few minutes then squeeze out the water and wrap a strip around each cake pan just before it goes in the oven. I find the cakes bake much more evenly and there is less waste when it comes to leveling the cakes to prepare them for stacking together to form a tiered cake. Some small amount of leveling is likely still going to be necessary but not nearly as much as baking the cakes without the insulated strips.
It was not so long ago that all the rage in cake decorating was the use of fondant. Every one was anxious for the satiny smooth perfect finish. Then, the naked cake appeared on the scene and it had very little icing, giving a more rustic and casual look to a cake. While the naked cakes are still popular, particularly for folks who don’t want a lot of sugar icing, the current trend (at time of writing) is that tasty old-fashioned buttercream icing is back in style and piled on the cake in no particular fashion. This is great for people who are not particularly skilled with cake decorating because it is perfectly acceptable to have imperfections and uneven spreading of the icing. It’s meant to look homemade and casual.
When filling a cake with lemon curd or jam, it is advisable to pipe a ring of icing all around each layer of cake before adding the filling. This will create a dam to prevent the filling from seeping through the icing on the side of the cake. Pipe the icing ring about ½ inch in from the cake edge then spread the filling inside the dam.
Lemon Elderflower Cake
I also strongly recommend crumb coating the cake with a thin layer of the icing and then placing it in the refrigerator for 25-30 minutes to set. This will seal the cake and make the final layer of icing crumb- free.
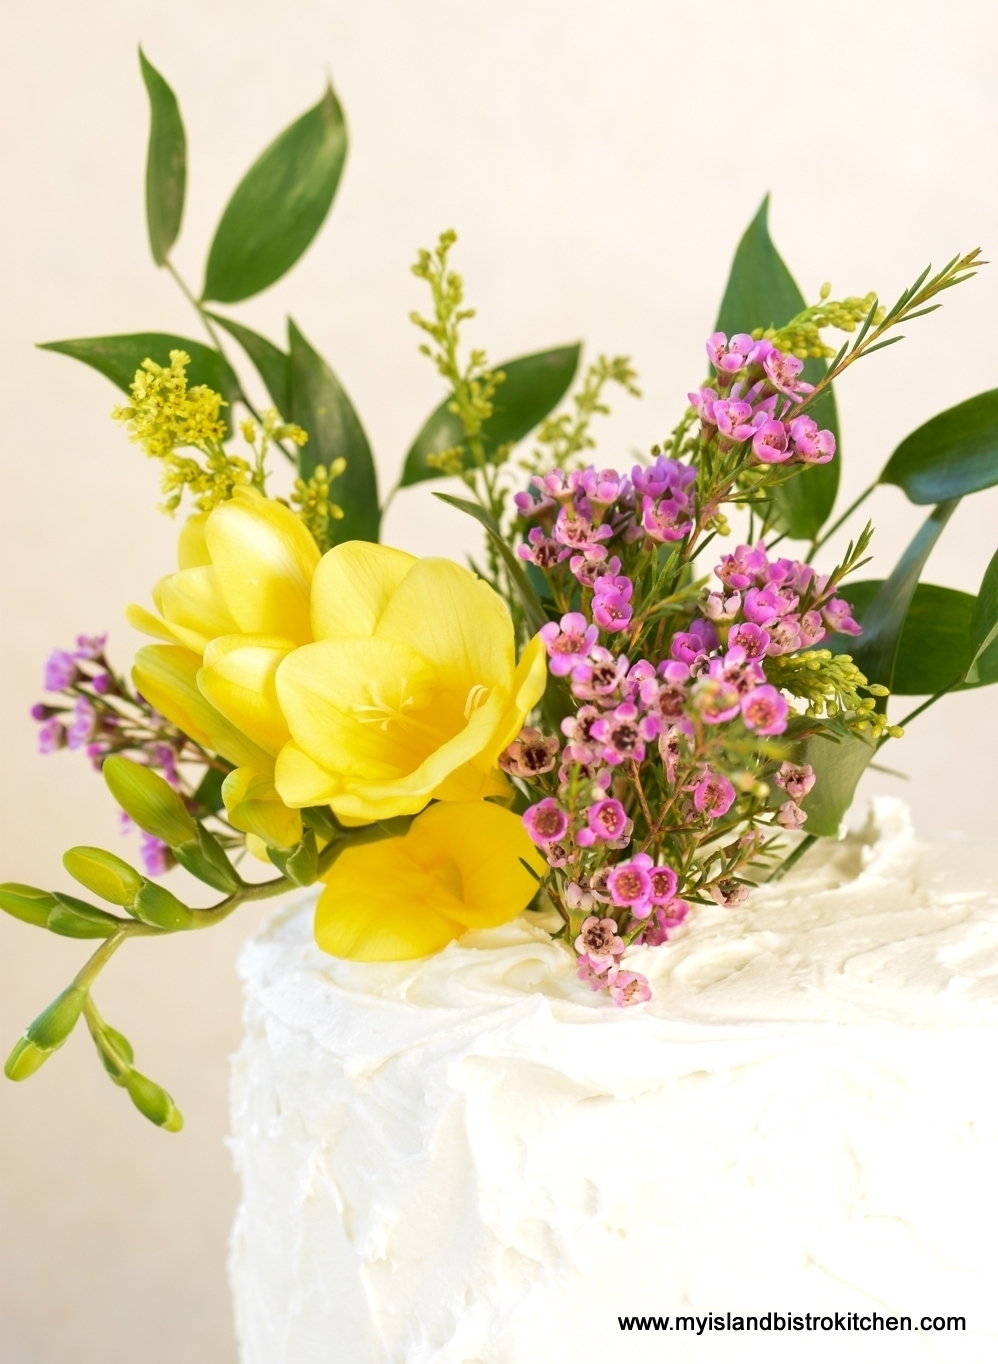
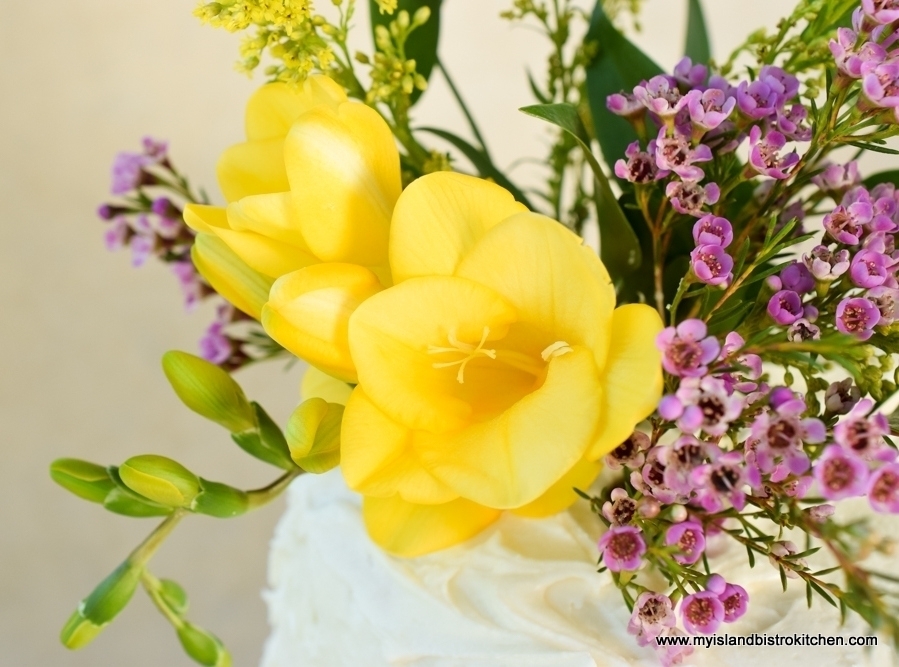
Fresh Freesia, Wax Flowers, and Italian Ruscus Adorn the top of Lemon Elderberry Cake
In keeping with a spring theme, I chose to decorate this cake with fresh bright yellow-colored freesia, some small wax flowers, and some Italian ruscus.
Yellow Freesia, Pink Wax Flowers, and Italian Ruscus Cake Topper for Lemon Elderberry Cake
[Printable recipe follows at end of posting]
Lemon Elderflower Cake
Ingredients:
¾ cup butter, room temperature 1¾ cups + 1 tbsp granulated sugar 2 large eggs, room temperature 4 large egg whites, room temperature ¼ cup freshly squeezed lemon juice, strained 1 tbsp finely grated lemon rind 1 tsp vanilla
3 cups cake flour 4 tsp baking powder ½ tsp baking soda ½ tsp salt
¾ cup + 2 tbsp milk 2 tbsp Elderflower liqueur
Icing: ¾ cup butter, room temperature ¾ cup shortening, room temperature ¾ tsp almond flavouring ¾ tsp vanilla 2 tbsp water 3 tbsp Elderflower Liqueur 1½ lbs icing sugar, sifted Dash of salt (optional)
½ – 2/3 cup Lemon Curd
Method:
Cake: Preheat oven to 350°F. Line four 6”x2” pans with parchment circles on the bottoms and line the sides of each pan with a long continuous strip of parchment paper. Spray pans lightly with cooking spray to hold the parchment in place. Spray parchment-lined pans lightly with cooking spray.
In bowl of stand mixer fitted with paddle attachment, cream butter then slowly add the sugar. Beat until mixture is light and fluffy. Add the whole eggs, one at a time, beating well after each addition. Repeat with the egg whites, adding one at a time. Add the lemon juice, grated lemon rind, and vanilla. Beat well.
Sift the cake flour, baking powder, baking soda, and salt together. In a one-cup measuring cup, combine the milk and Elderflower Liqueur. Add the dry ingredients to the creamed butter-sugar mixture alternately with the liquid ingredients in three additions, starting and ending with the dry ingredients, and beating well after each addition. Beat one additional minute on medium speed.
Transfer batter equally among the pans and bake for approximately 30-35 minutes, or until cake tester inserted into center of cakes comes out clean. It is recommended to check cakes the first time around the 25-minute baking point, then check them every five minutes until they test done. Cool cakes on wire cake racks for 10 minutes before removing from pans. Cool completely before frosting cakes.
Icing: In bowl of stand mixer fitted with paddle attachment, cream the butter and shortening together until blended and creamy. Beat in the almond flavouring, vanilla, water, and liqueur. Gradually add the icing sugar, a cup at a time, beating well after each addition.
Assembly: Use three of the four cakes. Reserve fourth for another use. Level each cake to the same height. Brush off loose crumbs from each cake. Place one cake on cake plate or cake stand. Spoon about ¾ cup icing into icing bag fitted with round tip. Pipe a circle of icing around cake edge, about ½“ in from the outside edge, to form a dam. Spoon lemon curd inside the dam. Place second layer of cake over filling and repeat with icing circle and lemon curd filling. Crumb coat the cake with a thin layer of the icing (this will look messy and that’s okay). Place cake in refrigerator to set for 25-30 minutes then remove and ice the cake with a thicker layer of icing. Decorate as desired. Refrigerate until use. (Freeze any leftover icing for a future use.)
Yield: One 3-layer 6” cake (or one 8” or 9” 2-layer cake)
Note: The baking times given are for the 6” cakes. This cake may be made in two 8” or 9” round pans; however, baking times may need to be adjusted.
Made with real lemon and a hint of elderberry liqueur, this Lemon Elderberry Cake is deliciously moist with its lemon curd filling and elderberry-flavoured buttercream icing.
Course Dessert
Cuisine American
Servings10
My Island Bistro KitchenMy Island Bistro Kitchen
Ingredients
Cake:
¾cupbutterroom temperature
1¾cups+ 1 tbsp granulated sugar
2large eggsroom temperature
4large egg whitesroom temperature
¼cupfreshly squeezed lemon juicestrained
1tbspfinely grated lemon rind
1tspvanilla
3cupscake flour
4tspbaking powder
½tspbaking soda
½tspsalt
¾cup+ 2 tbsp milk
2tbspElderflower Liqueur
Icing:
¾cupbutterroom temperature
¾cupshorteningroom temperature
¾tspalmond flavouring
¾tspvanilla
2tbspwater
3tbspElderflower Liqueur
1½lbsicing sugarsifted
Dash of saltoptional
½ - 2/3cupLemon Curd
Instructions
Cake:
Preheat oven to 350°F. Line four 6”x2” pans with parchment circles on the bottoms and line the sides of each pan with a long continuous strip of parchment paper. Spray pans lightly with cooking spray to hold the parchment in place. Spray parchment-lined pans lightly with cooking spray.
In bowl of stand mixer fitted with paddle attachment, cream butter then slowly add the sugar. Beat until mixture is light and fluffy. Add the whole eggs, one at a time, beating well after each addition. Repeat with the egg whites, adding one at a time. Add the lemon juice, grated lemon rind, and vanilla. Beat well.
Sift the cake flour, baking powder, baking soda, and salt together. In a one-cup measuring cup, combine the milk and Elderflower Liqueur. Add the dry ingredients to the creamed butter-sugar mixture alternately with the liquid ingredients in three additions, starting and ending with the dry ingredients, and beating well after each addition. Beat one additional minute on medium speed.
Transfer batter equally among the pans and bake for approximately 30-35 minutes, or until cake tester inserted into center of cakes comes out clean. It is recommended to check cakes the first time around the 25-minute baking point, then check them every five minutes until they test done. Cool cakes on wire cake racks for 10 minutes before removing from pans. Cool completely before frosting cakes.
Icing:
In bowl of stand mixer fitted with paddle attachment, cream the butter and shortening together until blended and creamy. Beat in the almond flavouring, vanilla, water, and liqueur. Gradually add the icing sugar, a cup at a time, beating well after each addition.
Assembly:
Use three of the four cakes. Reserve fourth for another use. Level each cake to the same height. Brush off loose crumbs from each cake. Place one cake on cake plate or cake stand. Spoon about ¾ cup icing into icing bag fitted with round tip. Pipe a circle of icing around cake edge, about ½“ in from the outside edge, to form a dam. Spoon lemon curd inside the dam. Place second layer of cake over filling and repeat with icing circle and lemon curd filling. Crumb coat the cake with a thin layer of the icing (this will look messy and that’s okay). Place cake in refrigerator to set for 25-30 minutes then remove and ice the cake with a thicker layer of icing. Decorate as desired. Refrigerate until use. (Freeze any leftover icing for a future use.)
Recipe Notes
Note: The baking times given are for the 6” cakes. This cake may be made in two 8” or 9” round pans; however, baking times may need to be adjusted.
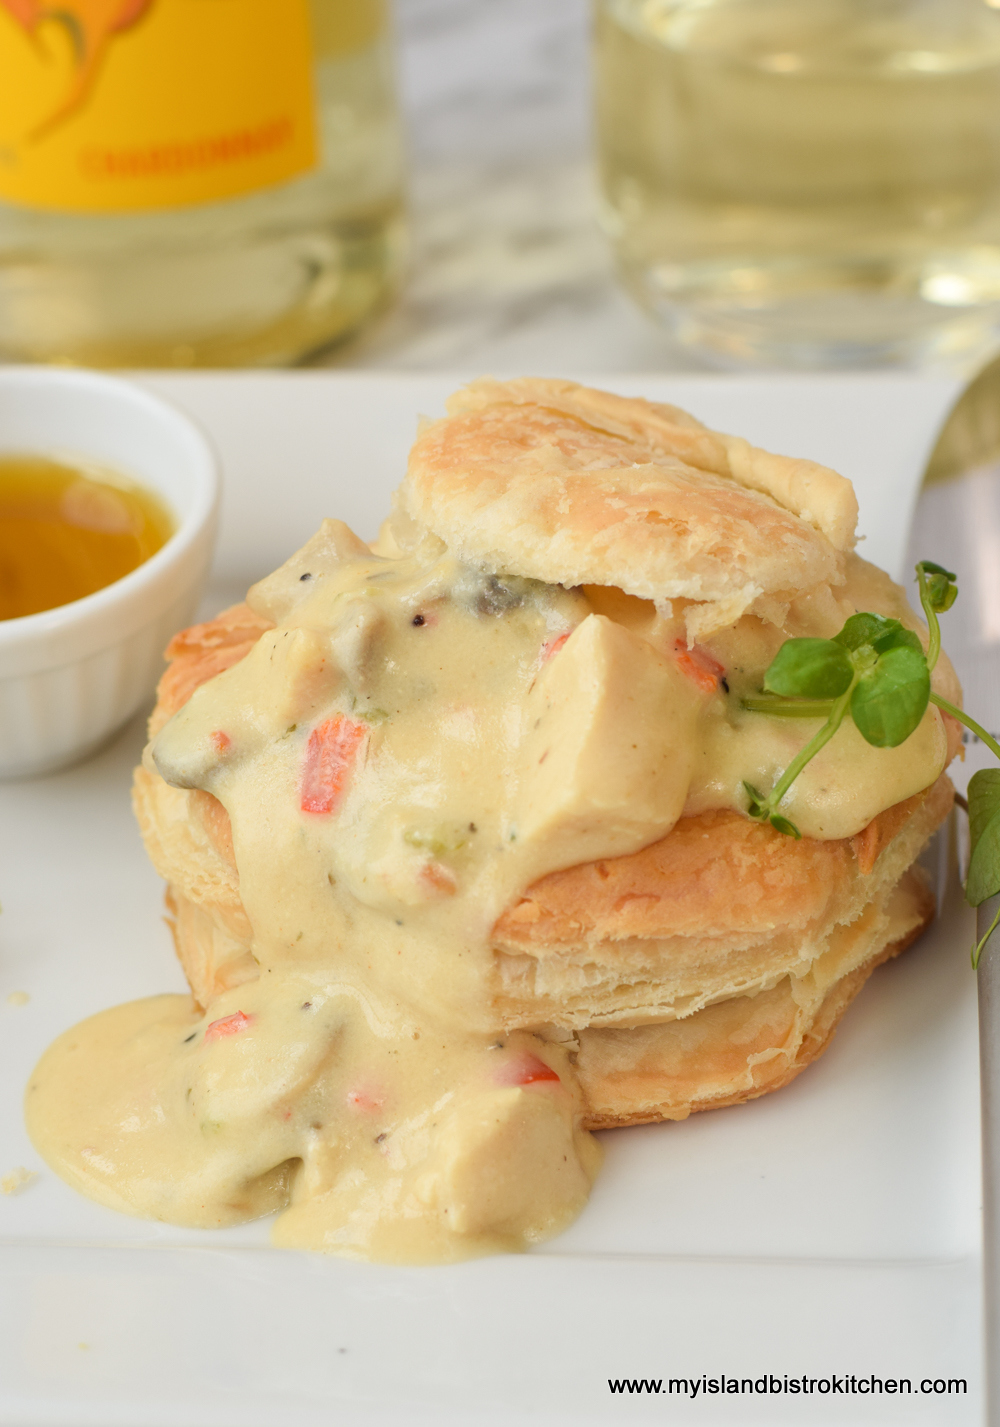
One of my favorite recipes is Chicken and Mushroom Vol-au-vent. Some may know this as “creamed chicken”. I actually make up a large batch of this delectable dish and freeze it in serving-sized portions. It makes a quick and easy meal when all that has to be done is bake the frozen patty shells, heat up the creamed mixture, and toss a green salad. Continue reading Chicken and Mushroom Vol-au-vent Recipe→
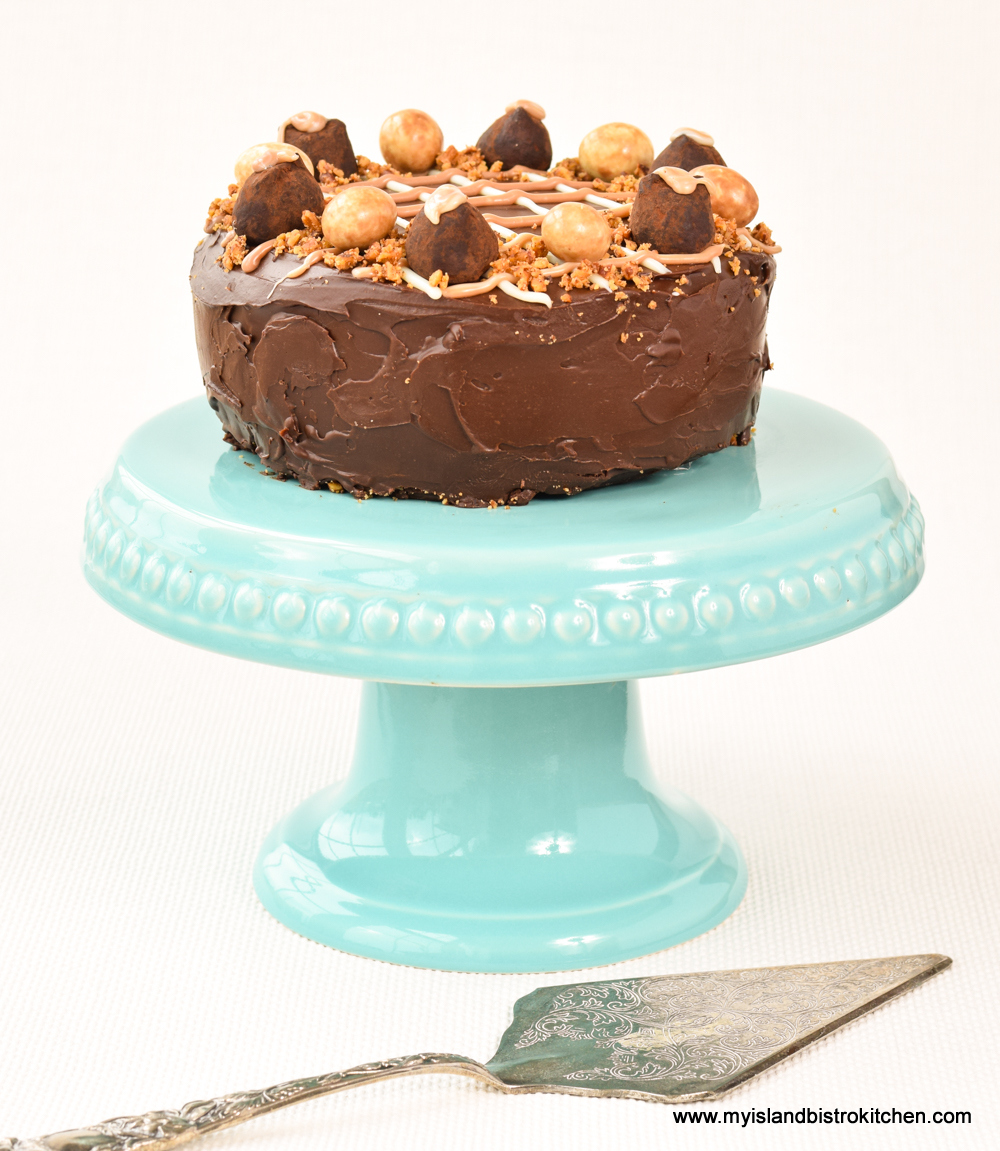
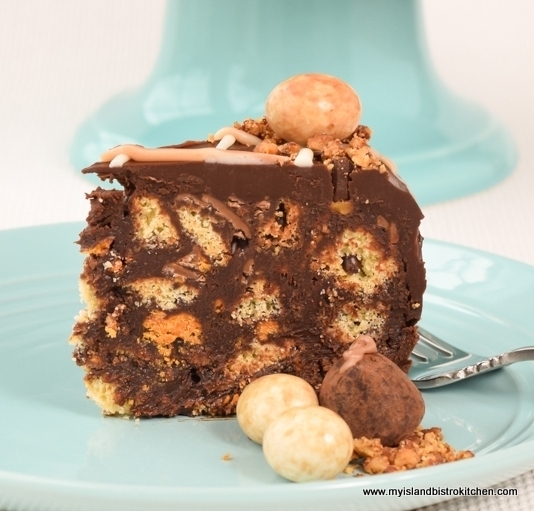
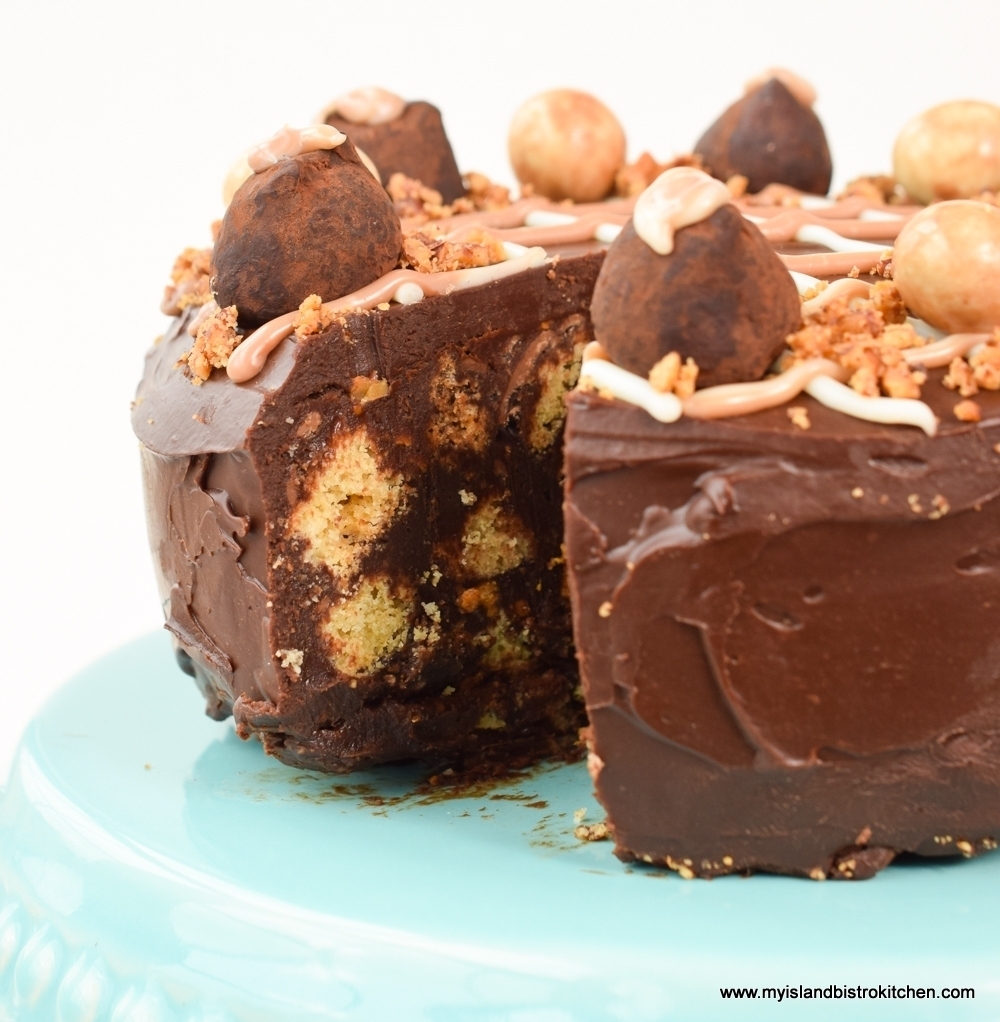
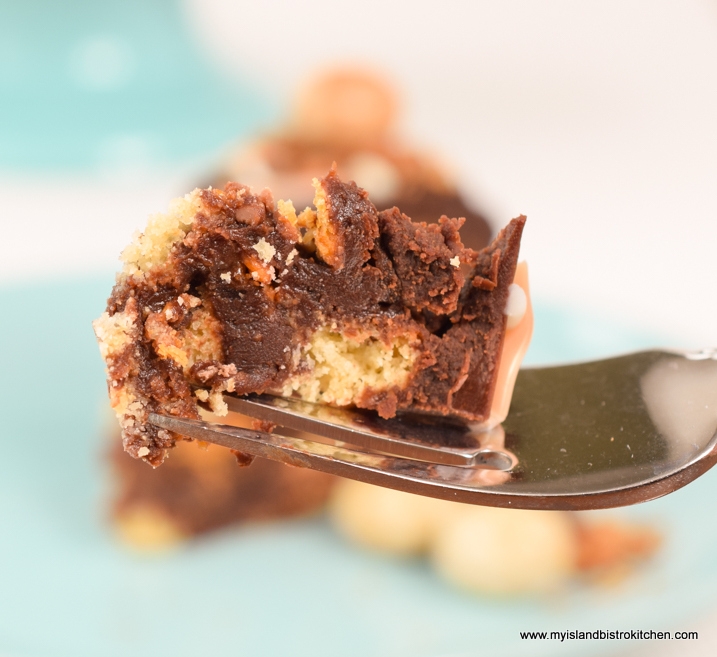
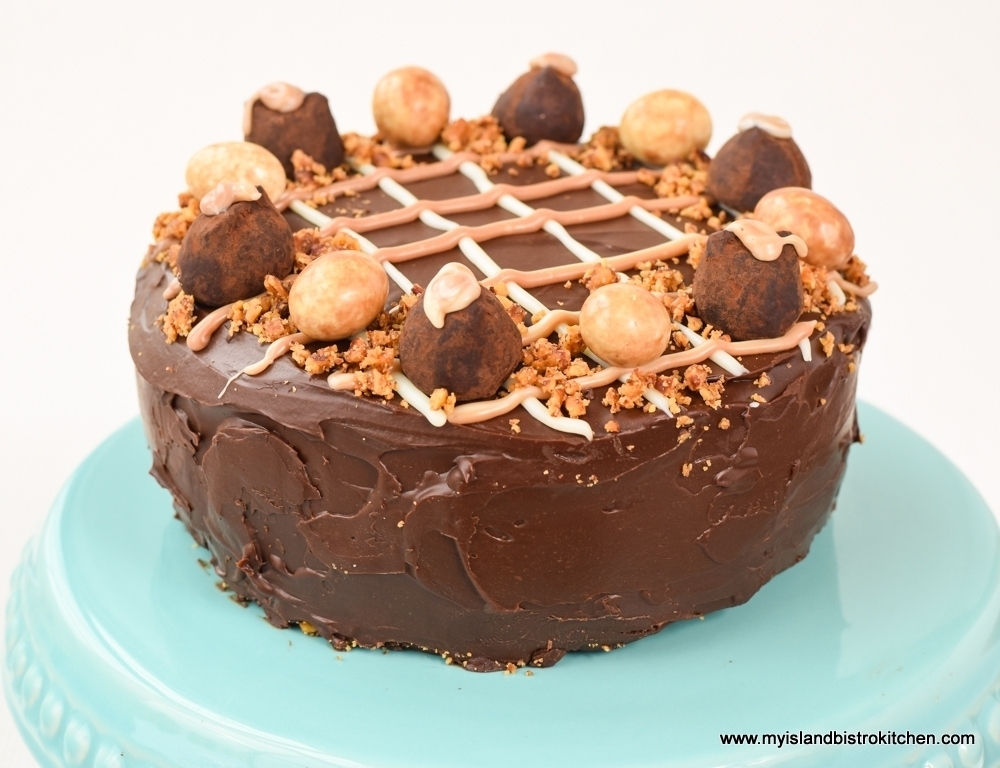
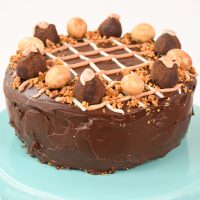
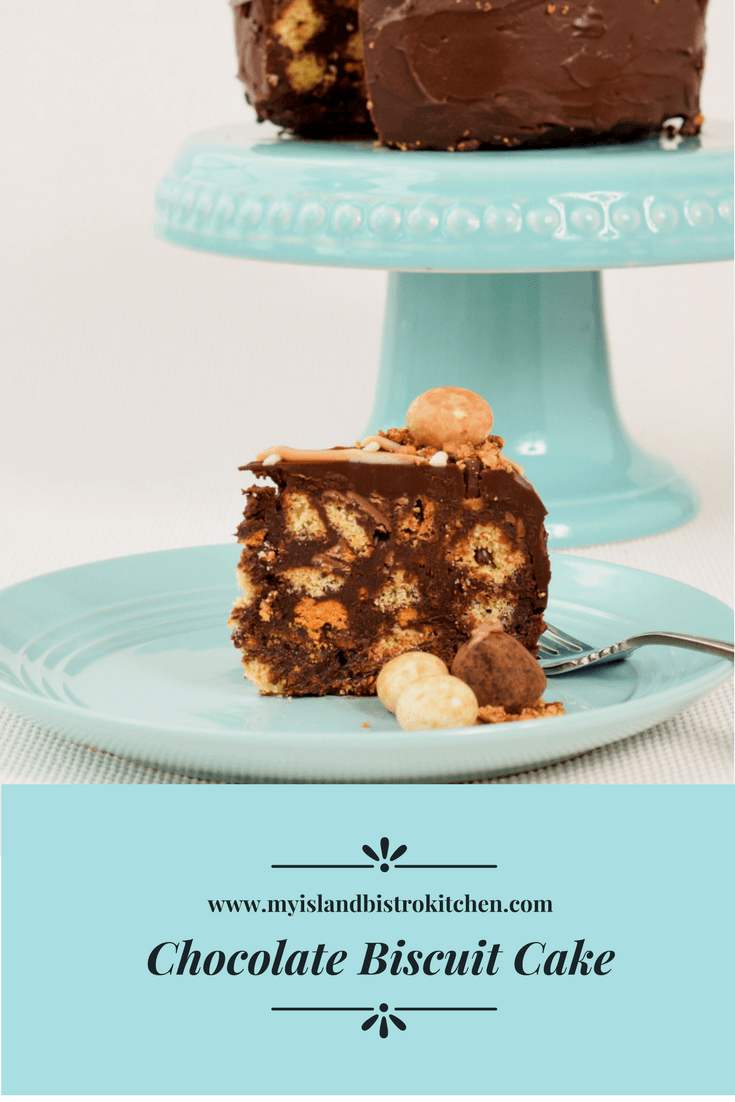
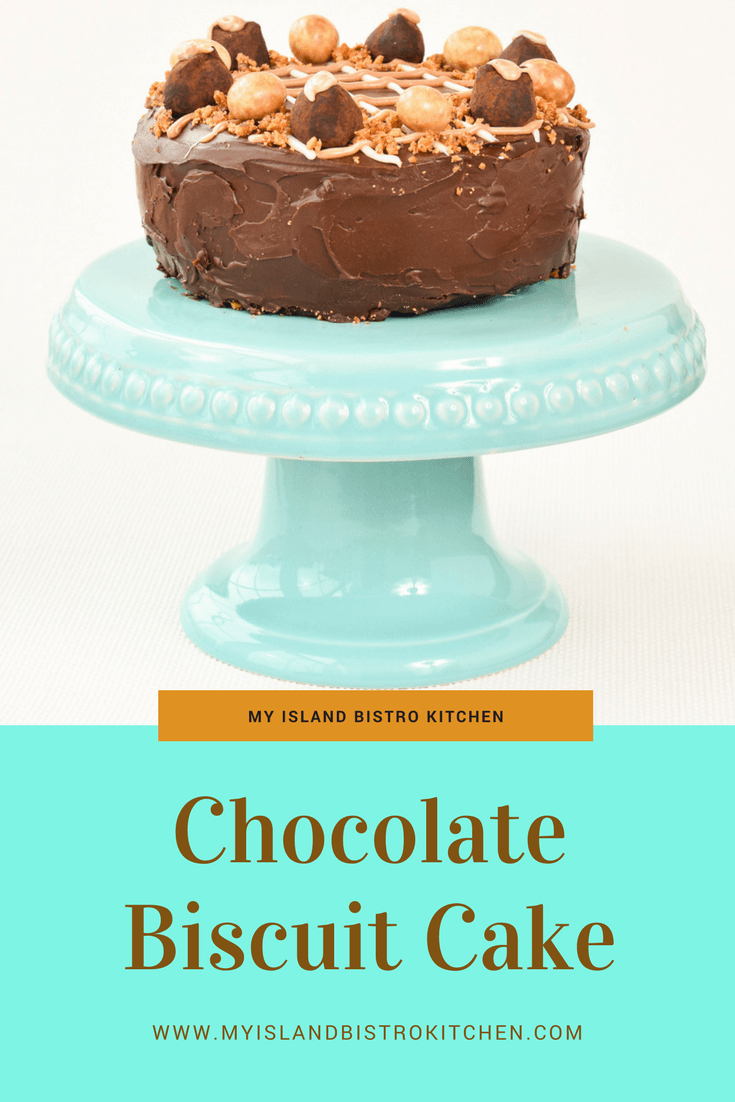
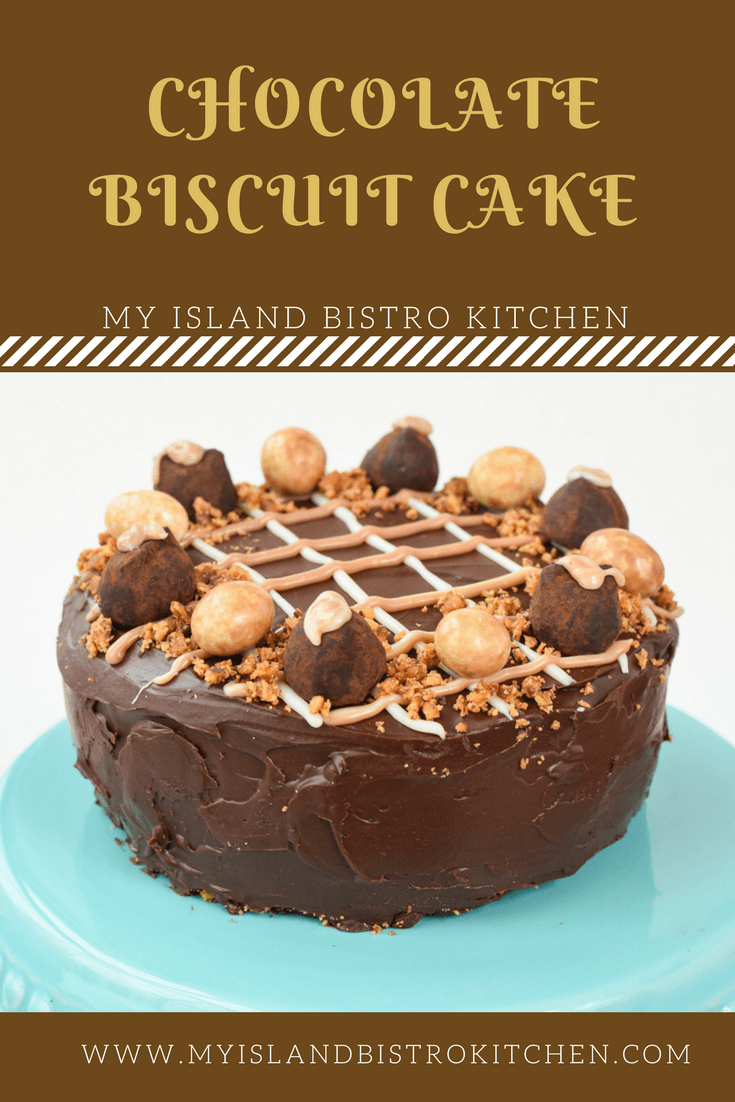
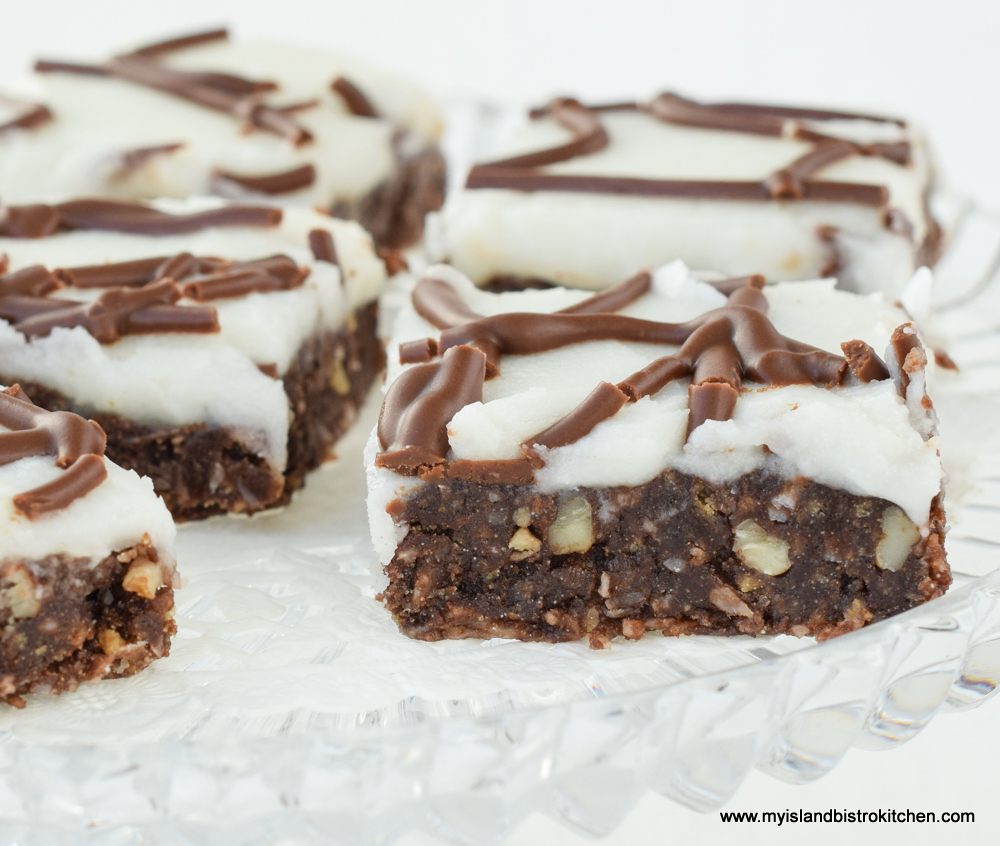
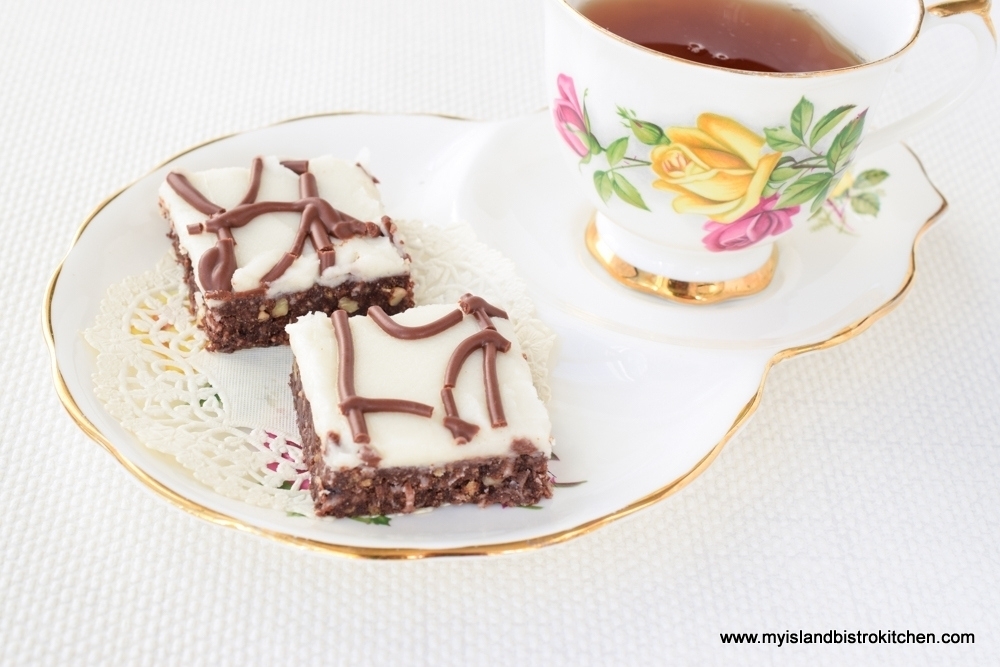
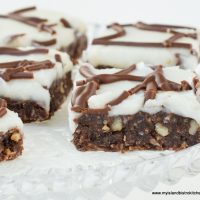
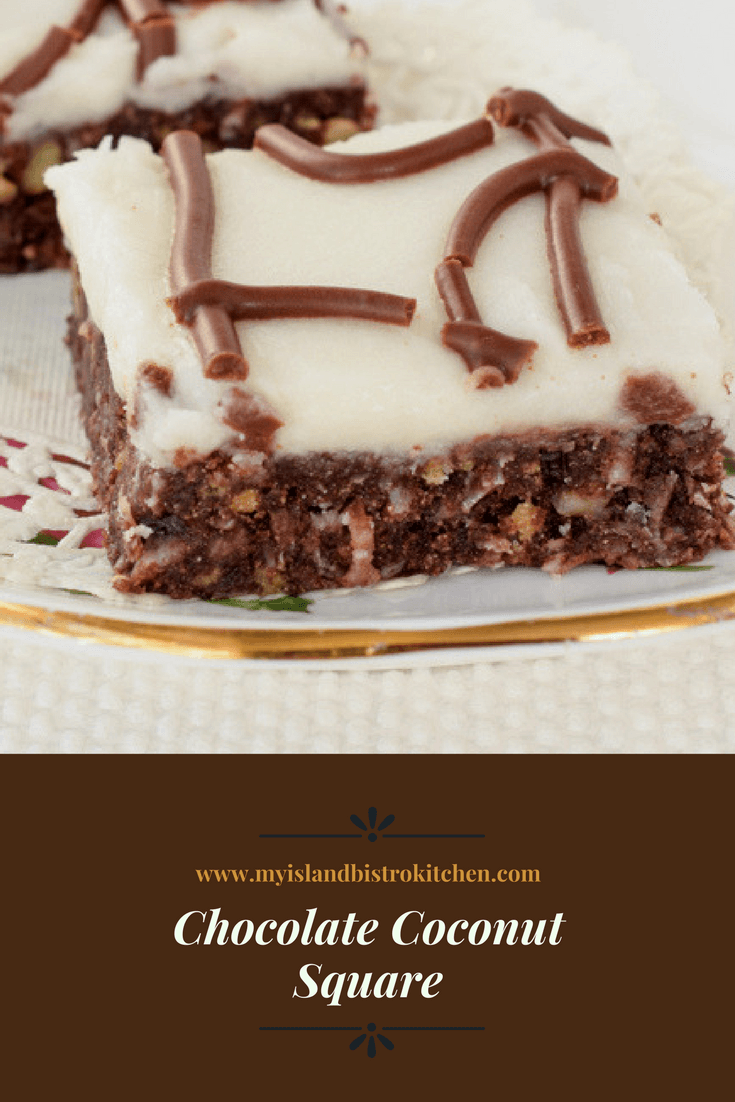
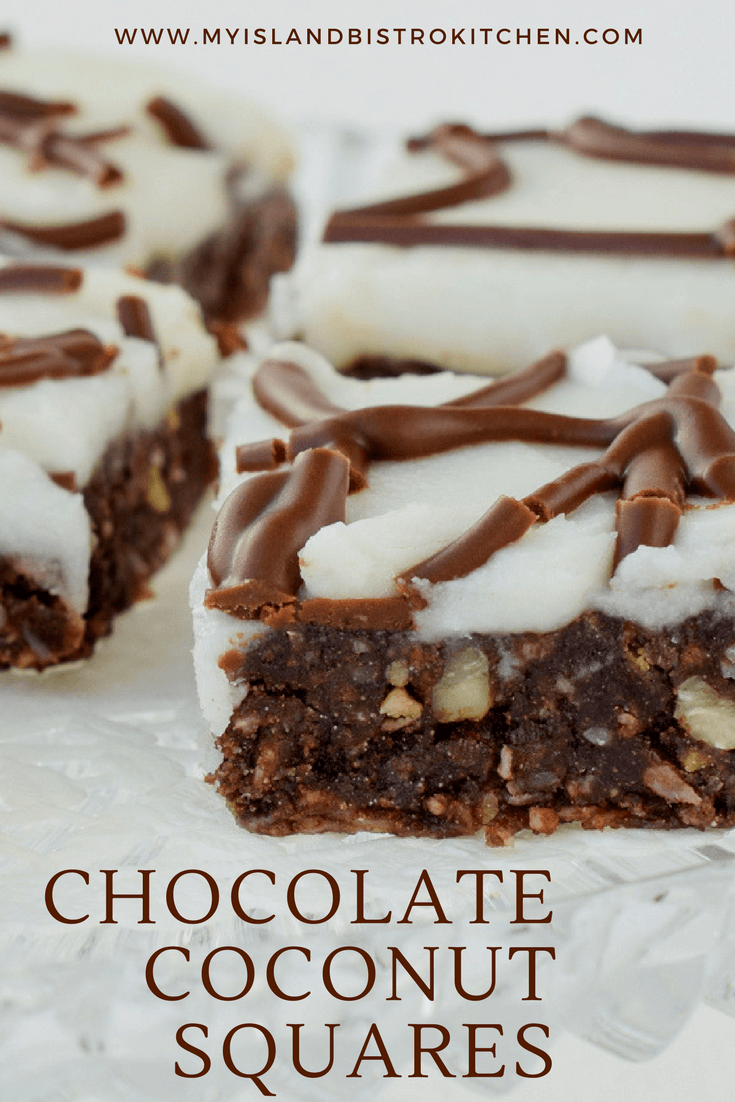
If you are a chocolate lover, this Chocolate Biscuit Cake is for you! What’s not to love about cookies and chocolate bar chunks encased in a rich ganache then smothered with a decadent chocolate ganache glaze!
Chocolate Biscuit Cake
I am giving alternate instructions for making a gluten-free version of the cake and want to point out, at the offset, if you are making the gluten-free version, ensure that all ingredients called for in the recipe (not just the cookies and chocolate bars) are, in fact, gluten free.
The Chocolate Biscuit Cake is said to be a favorite teatime treat of Her Majesty Queen Elizabeth II. It’s also said to be a favorite of Prince William who chose it as his groom’s cake at his April 2011 wedding to Katherine Middleton. There are many versions and recipes for this cake which is sometimes referred to as “refrigerator cake” because it is a no-bake cake that is set by refrigeration.
Chocolate Biscuit Cake
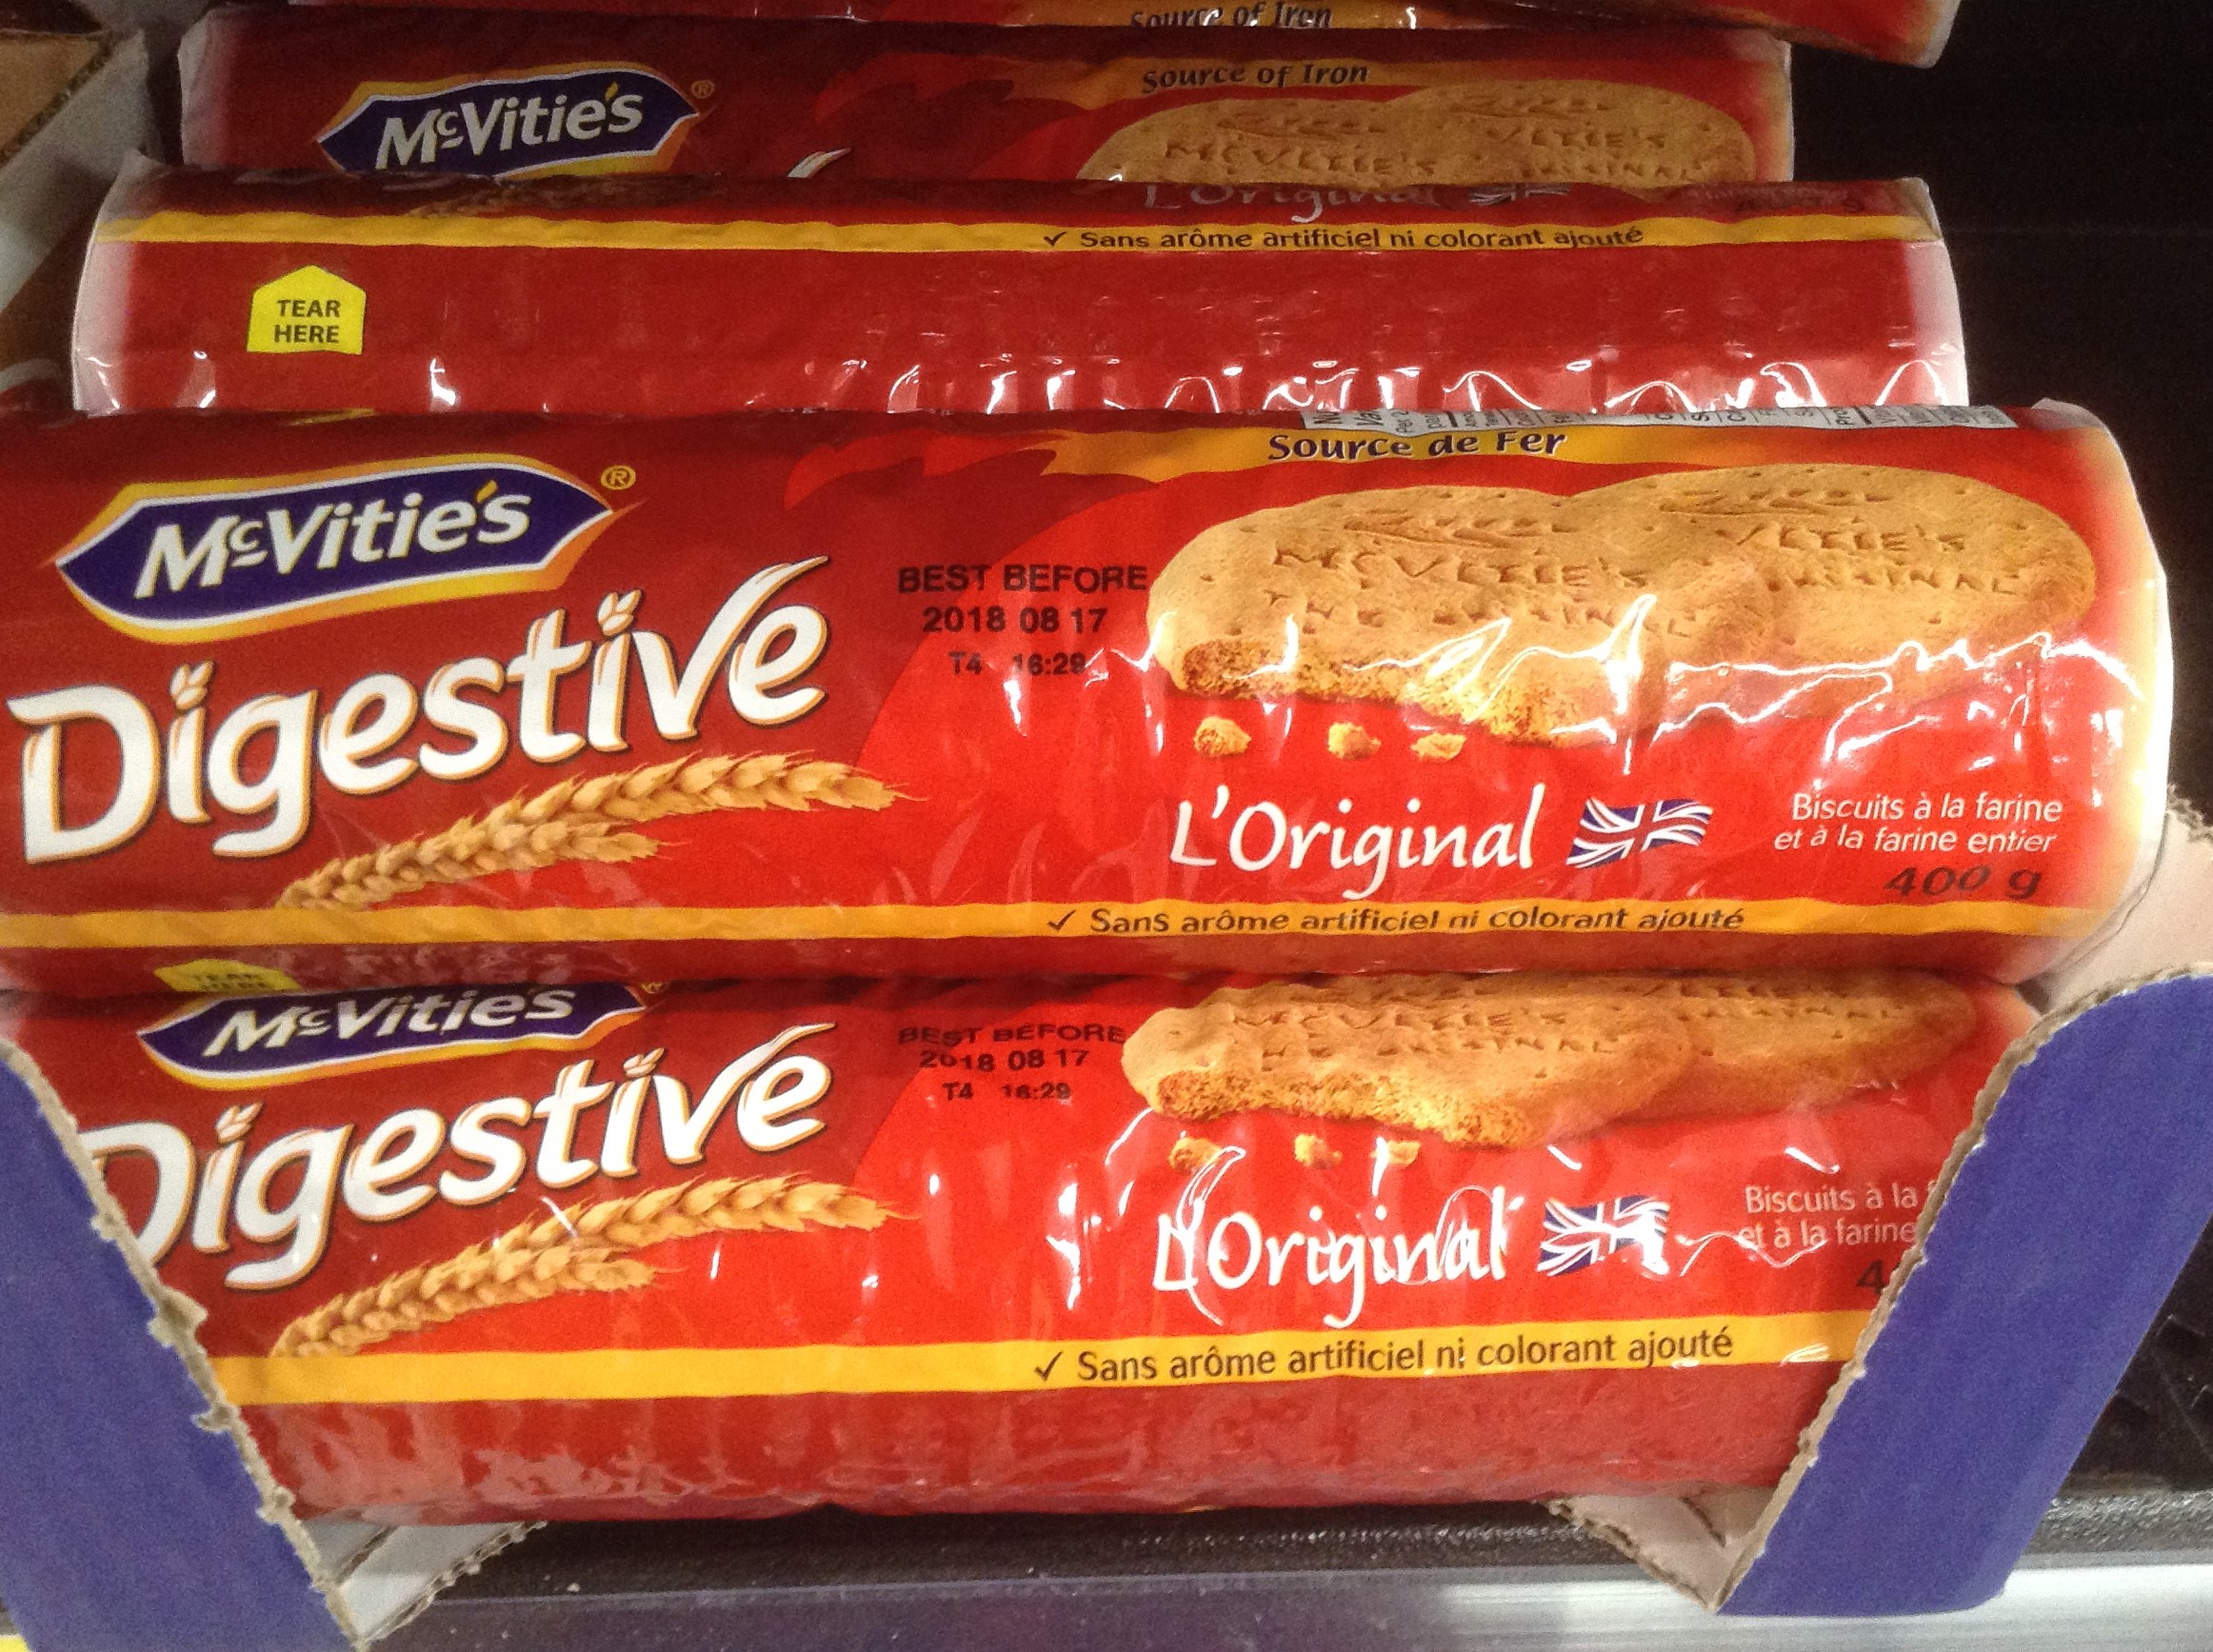
Traditionally, the cake is made with biscuits (the British term for what is known as “cookies” in North America). The sturdy, crisp Digestive cookies are the traditional ingredients. These would be found in the cookie aisles of the larger supermarkets, under brand names such as McVities, Christie, and others. The label on the package will say “Digestives”. The Digestives are very plain-flavored and thin.
McVitie’s Digestive Biscuits
Sometimes, rich tea biscuits may also be added to the cake and they will be labeled as “Rich Tea Biscuits”. They are similar to the Digestives, just a little bit sweeter.
McVitie’s Rich Tea Biscuits
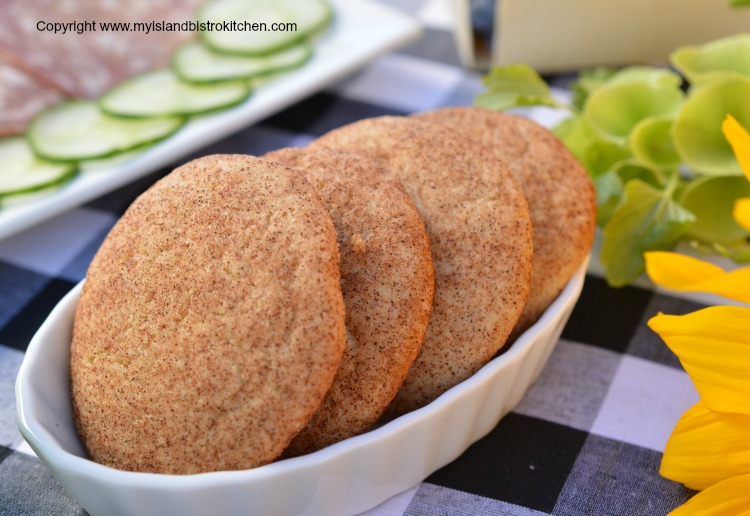
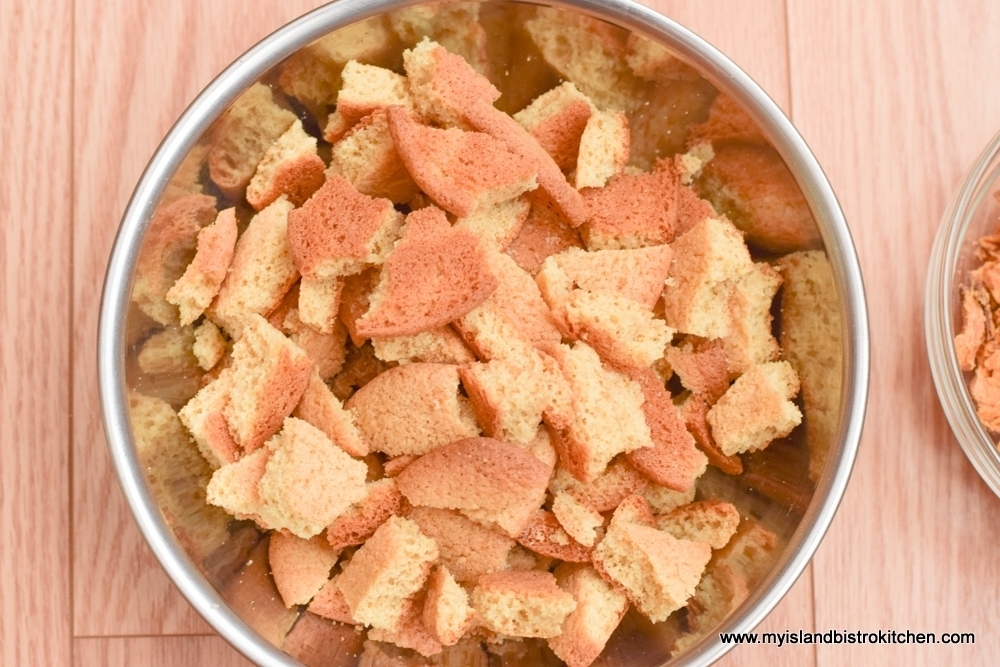
I wanted to make my version of the Chocolate Biscuit Cake gluten free and could not find any gluten-free commercially-made Digestive cookies locally. So, I improvised, knowing I’d need a “sturdy” cookie that would not become soggy or break apart in the cake as the warm ganache was added. I took my gluten-free Snickerdoodle recipe (click here for that recipe), halved it, using a medium egg instead of the extra-large egg the recipe calls for, omitted the nutmeg and cardamom, and did not roll the cookies in the spice-sugar mixture. I made the cookies the night before making the cake, baked them an extra 2 minutes to crisp them up, and left them on the counter overnight. This resulted in a hard, crisp, sturdy cookie that could hold its own in the cake. I weighed out the cookies to get 8 oz and it took 13 of the Snickerdoodles which were made the size indicated in my recipe.
Gluten Free Snickerdoodle Cookies
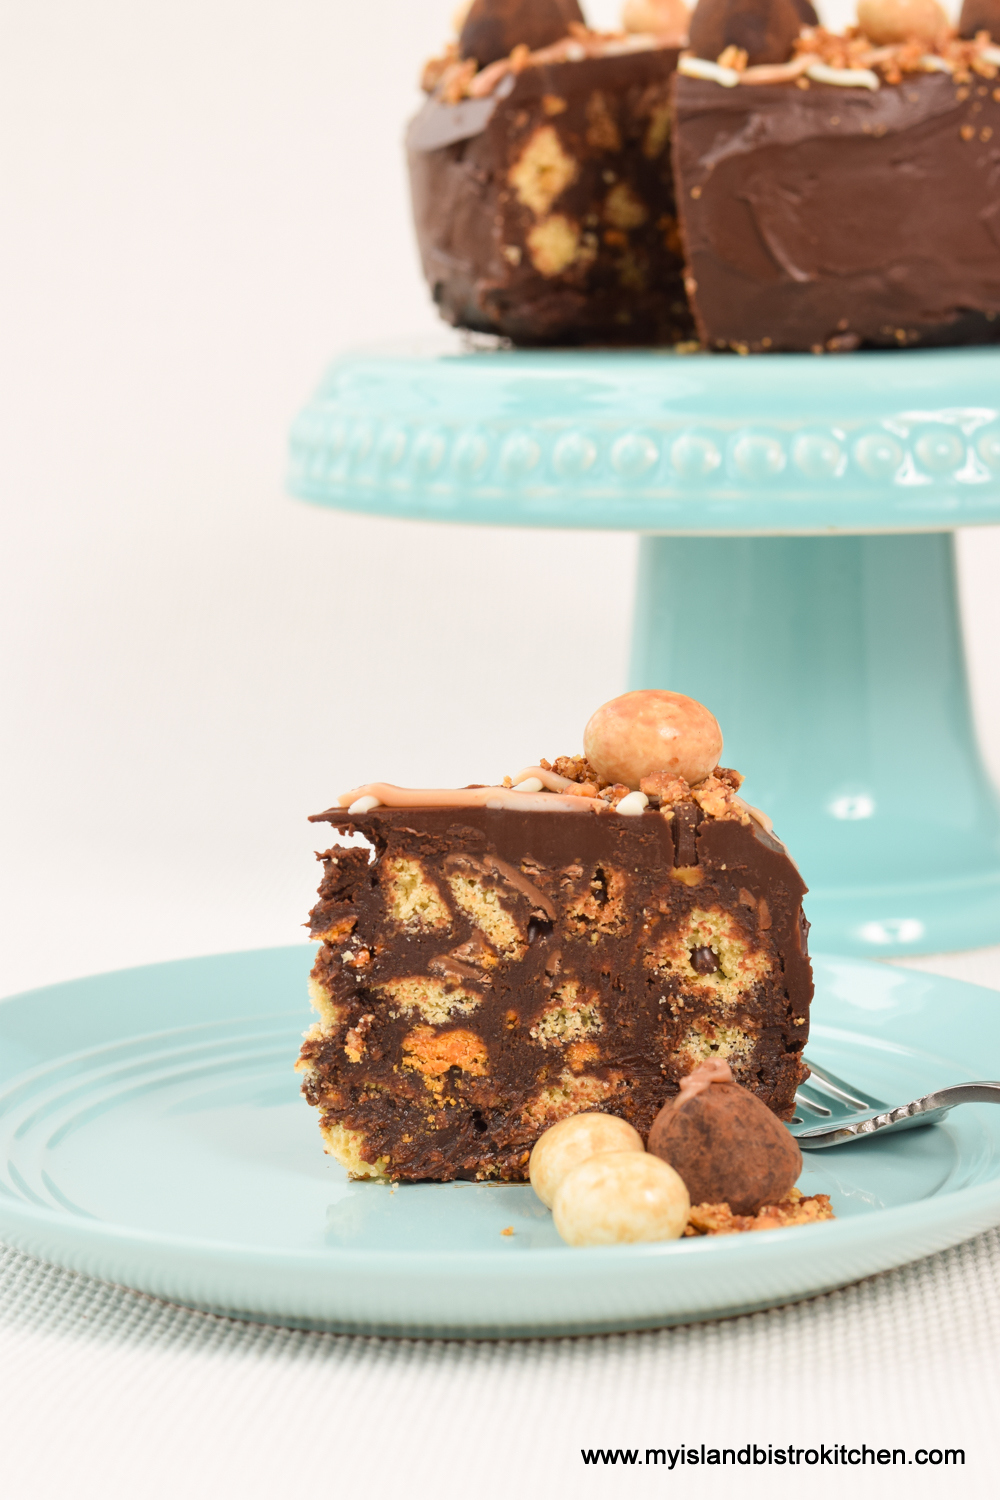
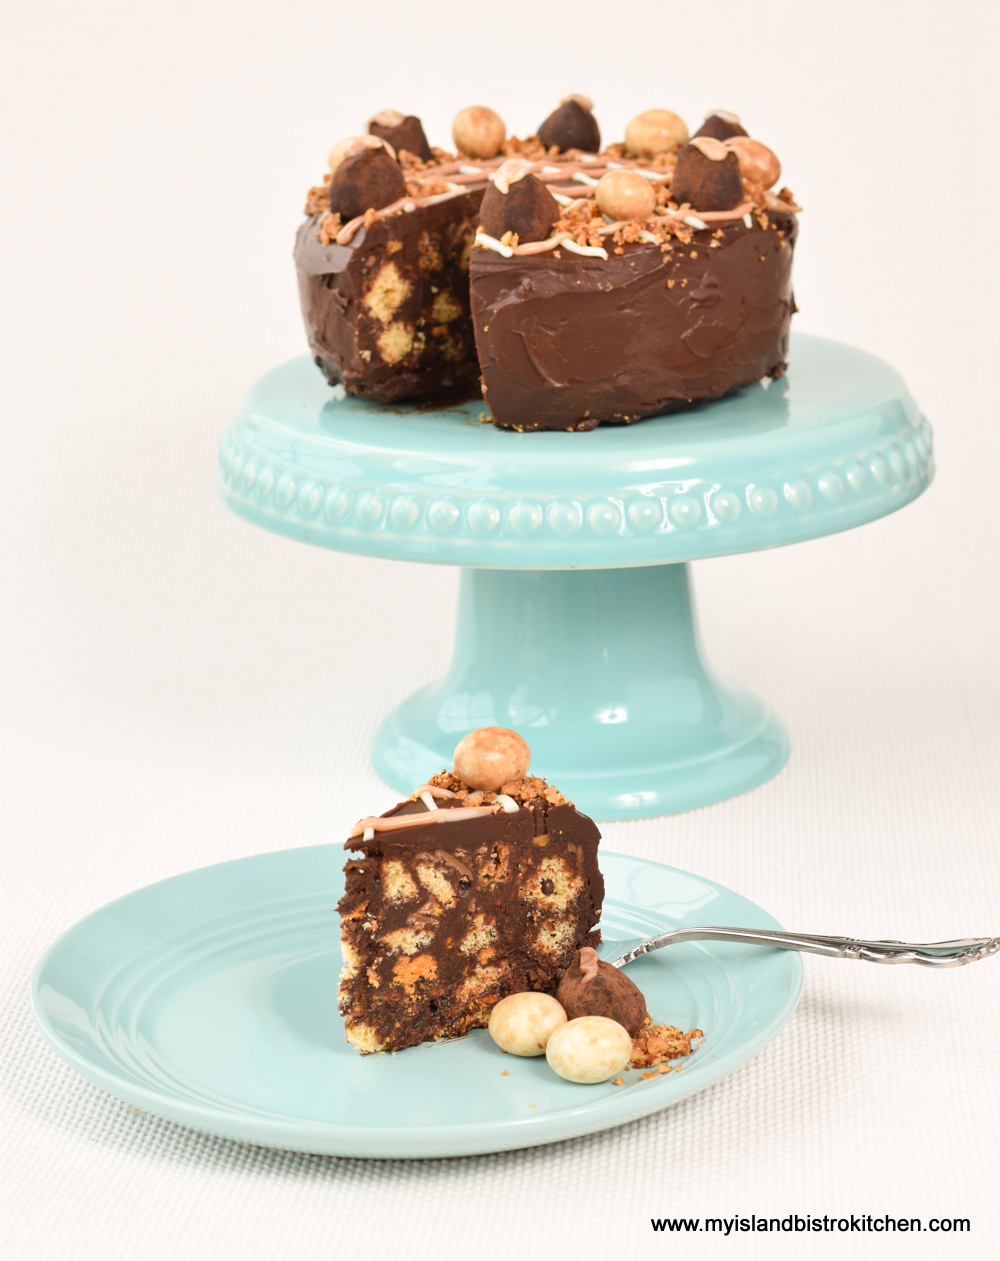
It’s really important to use crisp, not soft and chewy, cookies in this recipe as the cookies have to be able to stand up to being tossed with the chocolate ganache and packed into the pan without being broken into unrecognizable crumbs or becoming soggy. They are meant to give a crunchy texture to the cake. Break up the cookies by hand, not by food processor, into bite-sized chunks. Using a food processor will chop them up too fine and result in crumbs. You want to see actual chunks of cookies (er, biscuits!) in the cake. The photo below shows the size of the cookie chunks I used in the cake.
Chopped Cookies for Biscuit Cake
The photo below demonstrates how the cookies and chocolate bar chunks are visible in the finished cake.
Chocolate Biscuit Cake
I used crisp and crunchy Butterfinger chocolate bars in the recipe instead of using all cookies for the ingredients. I chose the Butterfinger bars because their label said they were gluten-free and also because I really like this bar and it is crunchy enough to remain intact in the cake. This added extra flavour and crunch and made the cake just a bit more interesting. If, however, you wish not to add chocolate bars to the cake, simply replace the 6 oz called for with that weight of additional cookies, either more Digestives or some Rich Tea Biscuits (or, for the gluten-free version, more gluten-free Snickerdoodles).
A good quality dark chocolate is needed for this recipe because it is a huge ingredient in the cake and ganache glaze and you really taste the properties of the chocolate in the ganache – don’t compromise on this ingredient. If you are making a gluten-free version of the cake, be sure to check the package label on the chocolate to ensure that it contains no trace of wheat because, as I discovered, some packages do say the chocolate contains, may contain, or may have been in contact with wheat.
Chocolate Biscuit Cake
Biscuit Cake is traditionally made with golden syrup which I could not source locally so I substituted amber corn syrup with success. I also added one medium-sized egg as a binder for the ingredients. Not all Biscuit Cakes call for an egg as an ingredient but I think it adds to, and helps stabilize, the texture of the ganache in the cake.
Adding the chocolate liqueur is optional but it really does add a dimension of deeper flavour. If you’re going to have an extravagant “death by chocolate” cake experience, you might as well go all the way!
Chocolate Biscuit Cake
Some Biscuit Cake recipes call for additional ingredients like raisins, nuts, and dried fruit. I don’t add those to my cake because, to me, that’s taking away from a Biscuit Cake and moving it more to a non-baked fruit cake. And, I don’t think the cake needs these ingredients – this, of course, is a personal preference.
The easiest pan to use for this recipe is the 6” round springform pan (3” deep) because it makes it so easy to unmold the cake. Line the bottom and sides of the pan with parchment paper to facilitate the removal of the cake from the pan. I recommend using a separate circle of parchment for the pan bottom and one long continuous strip of parchment to go around the sides of the pan. This is recommended over simply cutting a large piece of parchment paper and squashing it into the pan which will result in uneven nooks, crannies, and wrinkles into which the batter can escape. This will cause the cake to have an uneven appearance when unmolded.
If you don’t have a small springform pan, other pans (e.g., a non-springform 6” round pan (3” deep) or a 6”x9”x3″ loaf pan) can be used. However, the pan will need to be lined such that the liner gives “handles” with which to lift the cake from the pan since the sides of the pan will not spring open for easy removal. For example, you might line the pan with plastic wrap, leaving enough excess that it could be used to lift the cake from the pan. The cake mixture is likely to have cooled enough by this point that it is safe to pack it into a plastic wrap lined pan. However, if in doubt, I’d suggest lining the plastic wrapped pan with parchment paper so the cake is not in direct contact with the plastic wrap.
Chocolate Biscuit Cake
My preference, when preparing the chocolate ganache for the cake itself, is to use a double boiler or, if you don’t have one, a heatproof bowl over a pot of simmering water. I find this gives greater control and less risk of scorching the ingredients which could occur if heated over direct heat. It’s important to let this ganache cool for about 10 minutes before mixing it into the cookie and chocolate bar mixture because a really hot mixture will melt the chocolate on the Butterfinger bars thus losing that texture and it may cause even the most sturdy of cookies to become soggy. Cover the pan with plastic wrap secured with an elastic band. Refrigerate the cake for at least 3 hours to let it set, then unmold it to a serving plate.
The chocolate for the ganache glaze is chopped a bit finer than that needed for the ganache in the cake. The reason it needs to be a bit smaller is because the hot whipping cream mixture is used to melt the chocolate, off heat, and smaller pieces will melt easier and faster. The chocolate does not, however, need to be chopped super fine for this. After the hot whipping cream has been poured over the chocolate and let stand for 3-5 minutes, give the mixture a good stir. To make the ganache silky smooth, I recommend using a hand-held immersion blender. After letting the ganache sit for 12-15 minutes to cool slightly so it does not melt the cake, simply pour it over the top of the cake, letting the glaze run down the sides. Don’t worry about getting the ganache glaze perfectly smooth on the sides – it’s not fondant and imperfections are perfectly fine on this cake! Using an offset spatula or a dinner knife, spread the ganache so it covers the top and sides of the cake. Refrigerate for at least an hour before cutting and serving the cake.
Serve this delectable cake with just the plain ganache glaze or decorate as desired.
Chocolate Biscuit Cake
While it may sound like a stretch to be able to get 12 servings from a 6” cake, this Chocolate Biscuit Cake is very rich so small pieces per serving will suffice!
Chocolate Biscuit Cake
What a delightful decadent treat!
Chocolate Biscuit Cake
[Printable recipe follows at end of post]
Chocolate Biscuit Cake
Cake: 8 oz high quality dark chocolate, coarsely chopped 8 oz Digestive cookies (such as McVities) or, to make the cake gluten-free, 8 oz of My Island Bistro Kitchen’s Gluten-free Snickerdoodle cookies, broken into chunks by hand 6 oz Butterfinger Bars, broken or chopped into chunks
½ cup butter (no substitutes) 3 tbsp whipping cream (35%M.F.) ½ cup amber corn syrup 1 medium-sized egg, lightly beaten 2 tbsp chocolate liqueur (optional)
Chocolate Ganache Glaze: 6 oz dark chocolate, coarsely chopped 2/3 cup whipping cream (35%M.F.) 2 tbsp butter (no substitutes) 1½ tbsp chocolate liqueur (optional)
Method: Cake: Prepare 6” springform pan (3” deep) by lining bottom with a circle of parchment paper and lining the sides of the pan with a long continuous strip of parchment paper.
Coarsely chop the chocolate. Set aside.
In large, heatproof bowl, break up the cookies, by hand, into bite-sized chunks. Do the same for the Butterfinger bars, using a knife, if necessary to break up the crisp bars. Gently toss the cookies and chocolate bars together.
On cooktop, in top of double boiler over simmering water, melt the butter. When the butter is about half melted, whisk in the whipping cream, corn syrup, and slightly beaten egg. Stir in the 8 oz of coarsely chopped chocolate until it is melted. Remove from heat and stir in the chocolate liqueur. Cool for approximately 10 minutes.
Pour the slightly cooled chocolate mixture over the broken cookies and chocolate bar chunks. Stir gently until the mixture is coated with chocolate, trying not to further break up the cookies and bars.
Transfer mixture to the prepared pan and gently pack mixture into the pan. Using an offset spatula, or a dinner knife, smooth the top of the cake as best possible. Cover pan with plastic wrap secured with an elastic band. Refrigerate for at least 3 hours.
Prepare Chocolate Ganache Glaze as follows.
Chocolate Ganache Glaze: Chop the 6 oz dark chocolate into small chunks and place in a heatproof bowl.
In small, heavy-bottomed saucepan, over medium heat, bring the whipping cream and butter just to the boiling point, stirring to prevent scorching. Pour the hot cream over the chocolate pieces, tilting and swirling the bowl to ensure all the chocolate is covered with the cream. Add the chocolate liqueur. Let stand 3-5 minutes to allow the hot cream to melt the chocolate. Stir. Using a hand-held immersion blender, blend the mixture just until all the chocolate is smooth and no chocolate chunks remain.
Let ganache stand for 12-15 minutes. Meanwhile, unmold cake and transfer to serving plate. Pour the slightly cooled ganache over the cake, letting the ganache drip down the sides. Use an offset spatula, or knife, spread the ganache over top and sides of cake. Refrigerate for about an hour to set.
A decadent no-bake cake that features crumbled biscuits (cookies) and chocolate bar chunks in a rich chocolate ganache
Course Dessert
Servings12
My Island Bistro KitchenMy Island Bistro Kitchen
Ingredients
Cake:
8ozhigh quality dark chocolatecoarsely chopped
8ozDigestive cookiessuch as McVities or, to make the cake gluten-free, 8 oz of My Island Bistro Kitchen’s Gluten-free Snickerdoodle cookies, broken into chunks by hand
6ozButterfinger Barsbroken or chopped into chunks
½cupbutterno substitutes
3tbspwhipping cream35%M.F.
½cupamber corn syrup
1medium-sized egglightly beaten
2tbspchocolate liqueuroptional
Chocolate Ganache Glaze:
6ozdark chocolatecoarsely chopped
2/3cupwhipping cream35%M.F.
2tbspbutterno substitutes
1½tbspchocolate liqueuroptional
Instructions
Cake:
Prepare 6” springform pan (3” deep) by lining bottom with a circle of parchment paper and lining the sides of the pan with a long continuous strip of parchment paper.
Coarsely chop the chocolate. Set aside.
In large, heatproof bowl, break up the cookies, by hand, into bite-sized chunks. Do the same for the Butterfinger bars, using a knife, if necessary to break up the crisp bars. Gently toss the cookies and chocolate bars together.
On cooktop, in top of double boiler over simmering water, melt the butter. When the butter is about half melted, whisk in the whipping cream, corn syrup, and slightly beaten egg. Stir in the 8 oz of coarsely chopped chocolate until it is melted. Remove from heat and stir in the chocolate liqueur. Cool for approximately 10 minutes.
Pour the slightly cooled chocolate mixture over the broken cookies and chocolate bar chunks. Stir gently until the mixture is coated with chocolate, trying not to further break up the cookies and bars.
Transfer mixture to the prepared pan and gently pack mixture into the pan. Using an offset spatula, or a dinner knife, smooth the top of the cake as best possible. Cover pan with plastic wrap secured with an elastic band. Refrigerate for at least 3 hours.
Prepare Chocolate Ganache Glaze as follows.
Chocolate Ganache Glaze:
Chop the 6 oz dark chocolate into small chunks and place in a heatproof bowl.
In small, heavy-bottomed saucepan, over medium heat, bring the whipping cream and butter just to the boiling point, stirring to prevent scorching. Pour the hot cream over the chocolate pieces, tilting and swirling the bowl to ensure all the chocolate is covered with the cream. Add the chocolate liqueur. Let stand 3-5 minutes to allow the hot cream to melt the chocolate. Stir. Using a hand-held immersion blender, blend the mixture just until all the chocolate is smooth and no chocolate chunks remain.
Let ganache stand for 12-15 minutes. Meanwhile, unmold cake and transfer to serving plate. Pour the slightly cooled ganache over the cake, letting the ganache drip down the sides. Use an offset spatula, or knife, spread the ganache over top and sides of cake. Refrigerate for about an hour to set.
Serve cake plain or decorate as desired.
Recipe Notes
Be sure to read the accompanying blog post to this recipe as it gives hints and tips on making this Chocolate Biscuit Cake
If you have made this recipe and enjoyed it and/or wish to share it with your friends and family, please do so on social media but be sure to share the direct link to this posting from my website.
Connect with My Island Bistro Kitchen on Social Media
Follow “the Bistro” on Pinterest at https://www.pinterest.ca/peibistro/ and pin the Pinterest-ready photo found at the end of this post to your favorite Pinterest boards.
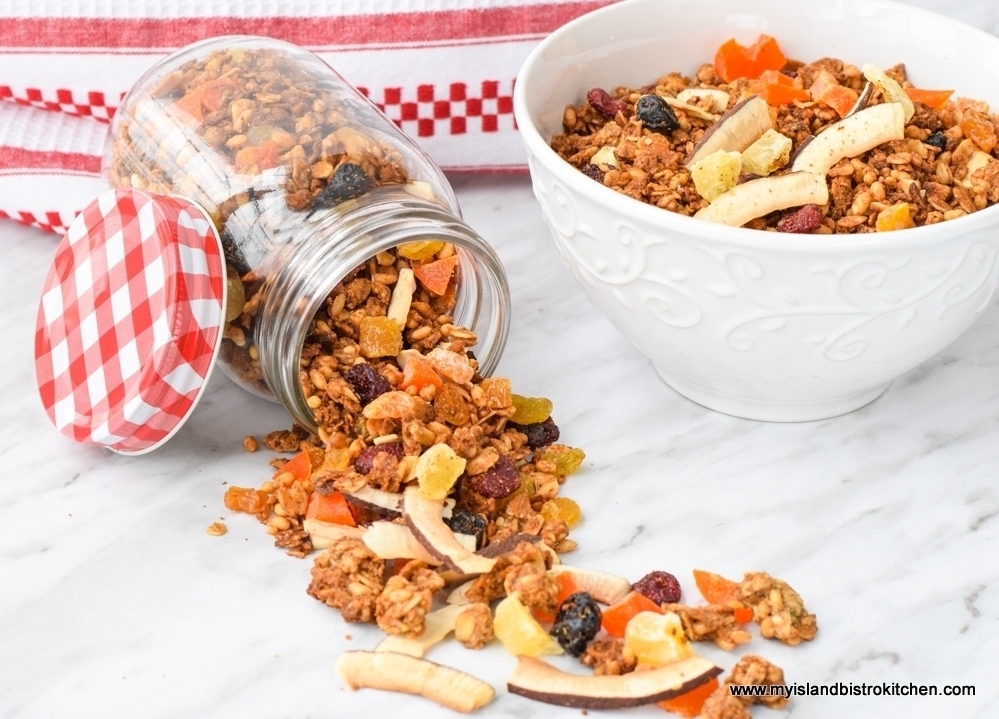
Today, I am sharing my recipe for Clumpy Almond Butter Granola. Homemade granola is so easy to make and customize to individual tastes. So long as you keep the proportions of ingredients, substitutions are perfectly acceptable. Continue reading Clumpy Almond Butter Granola Recipe→
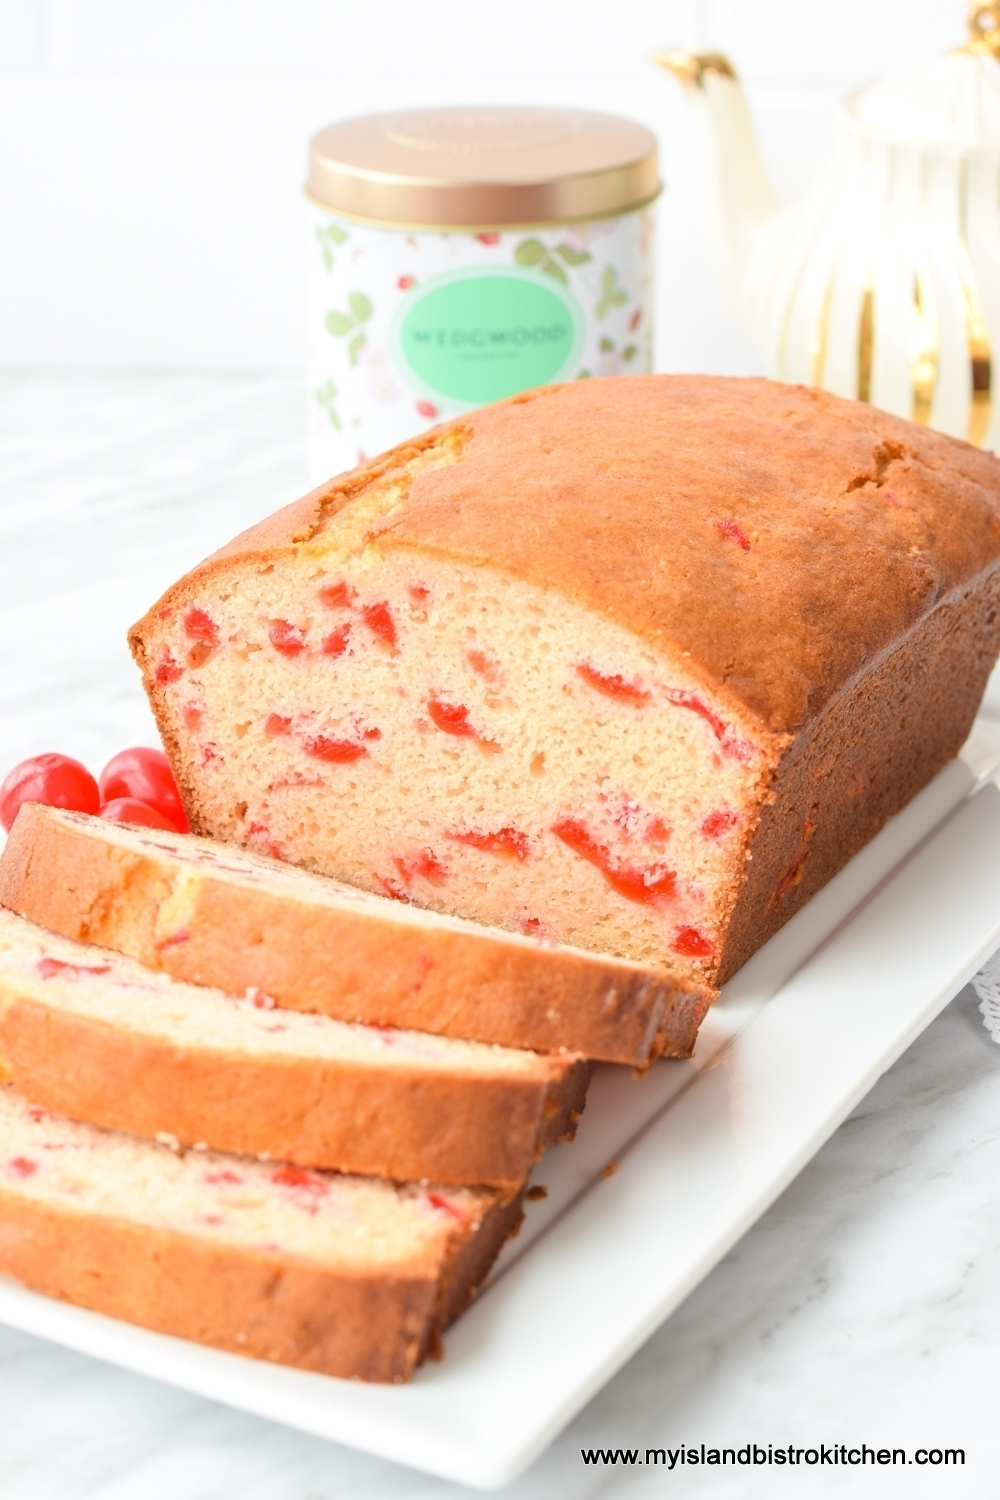
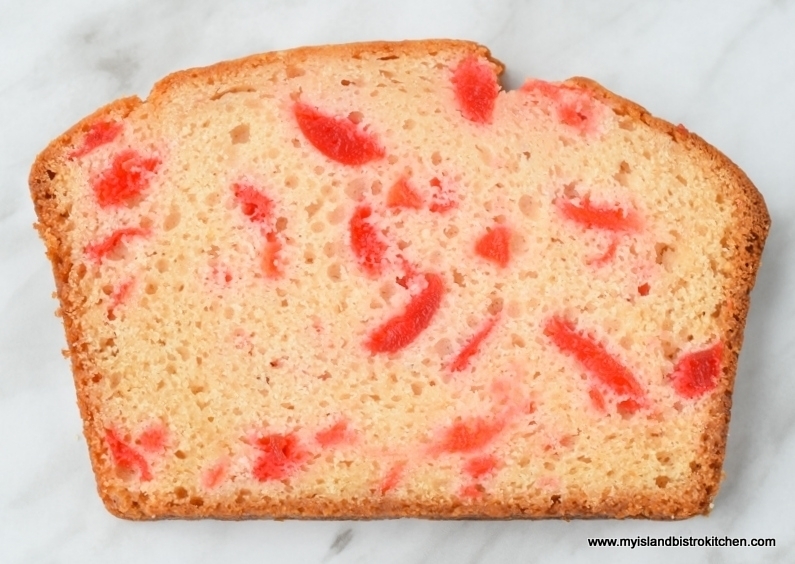
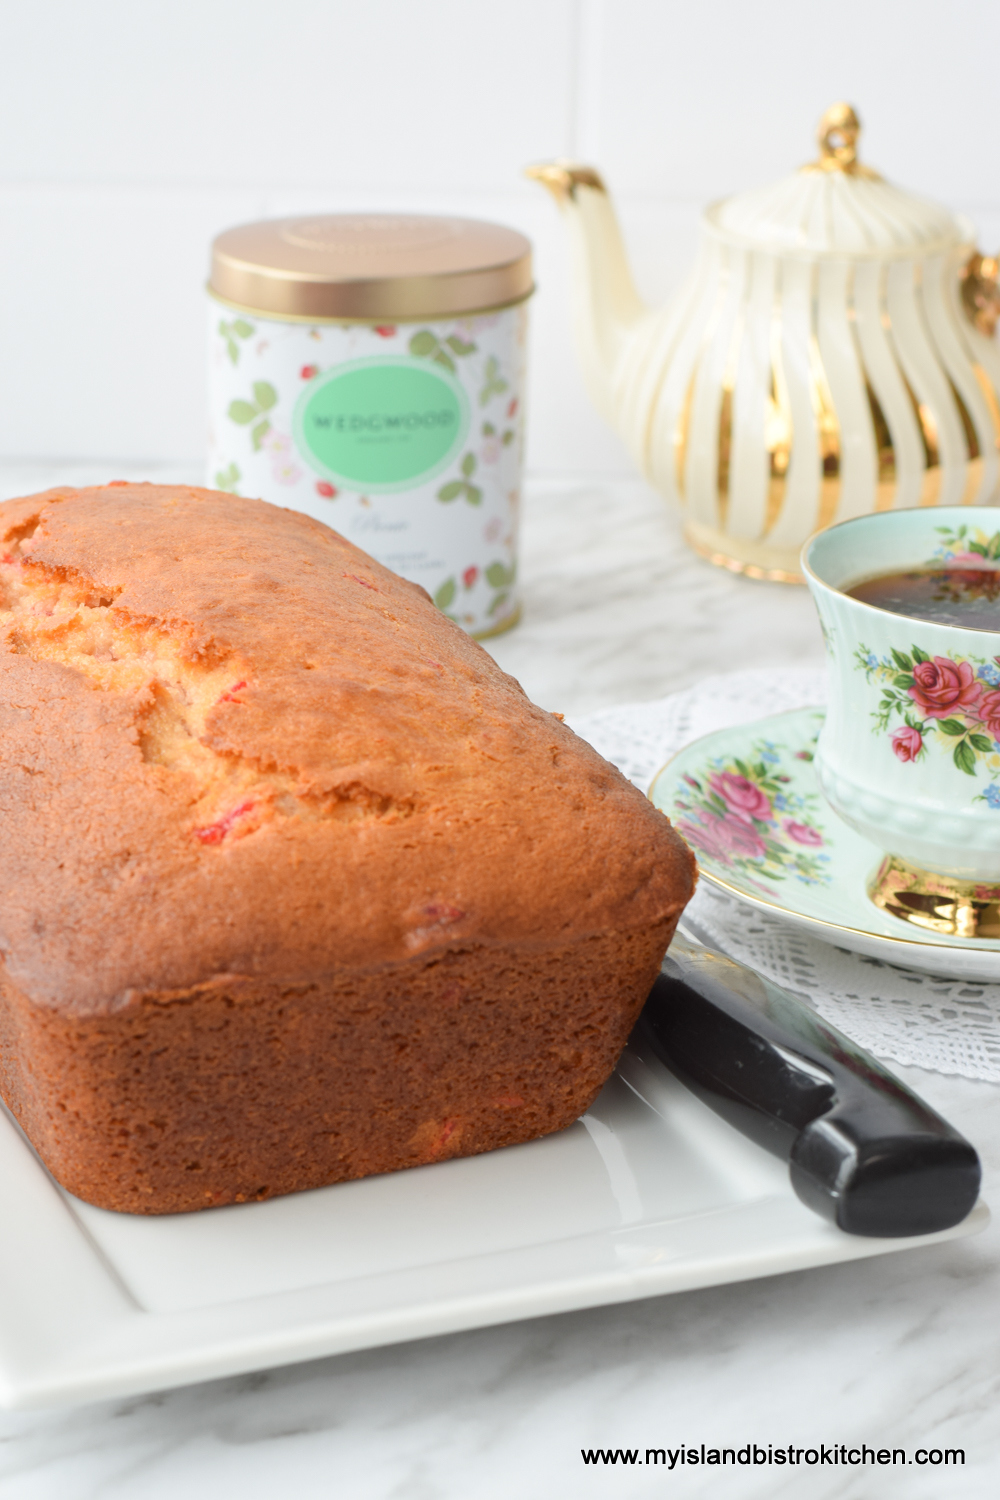
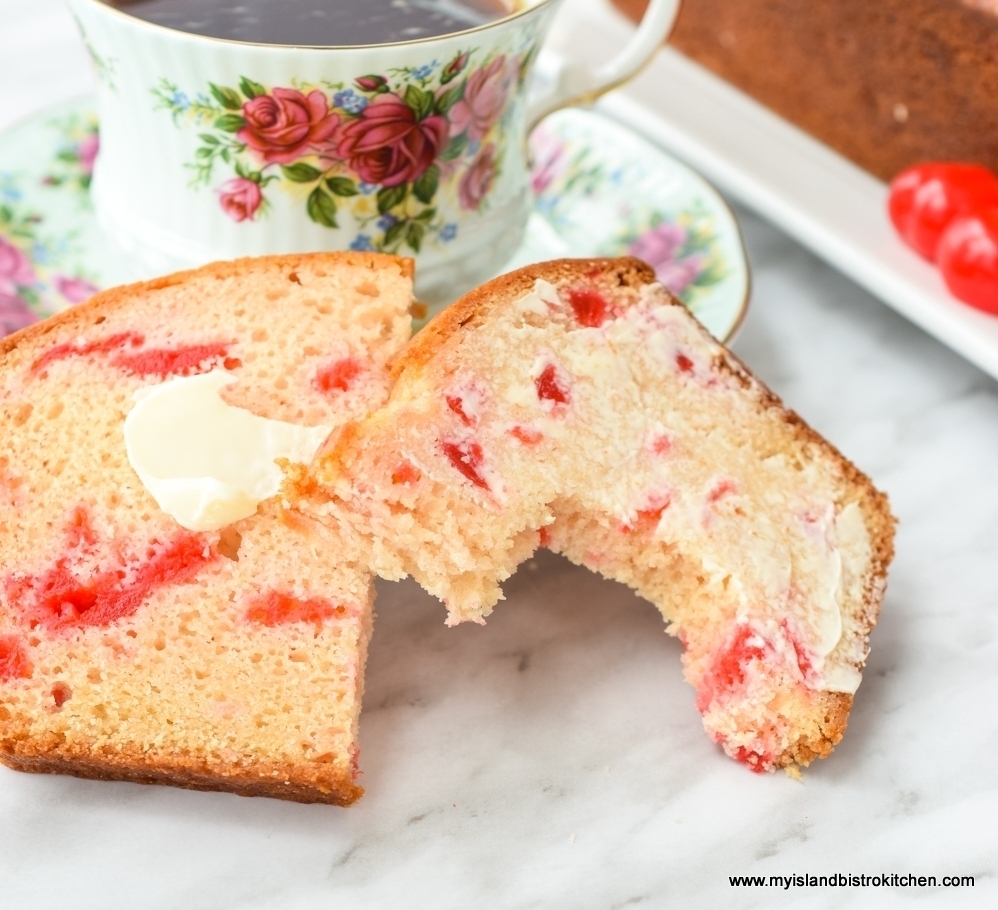
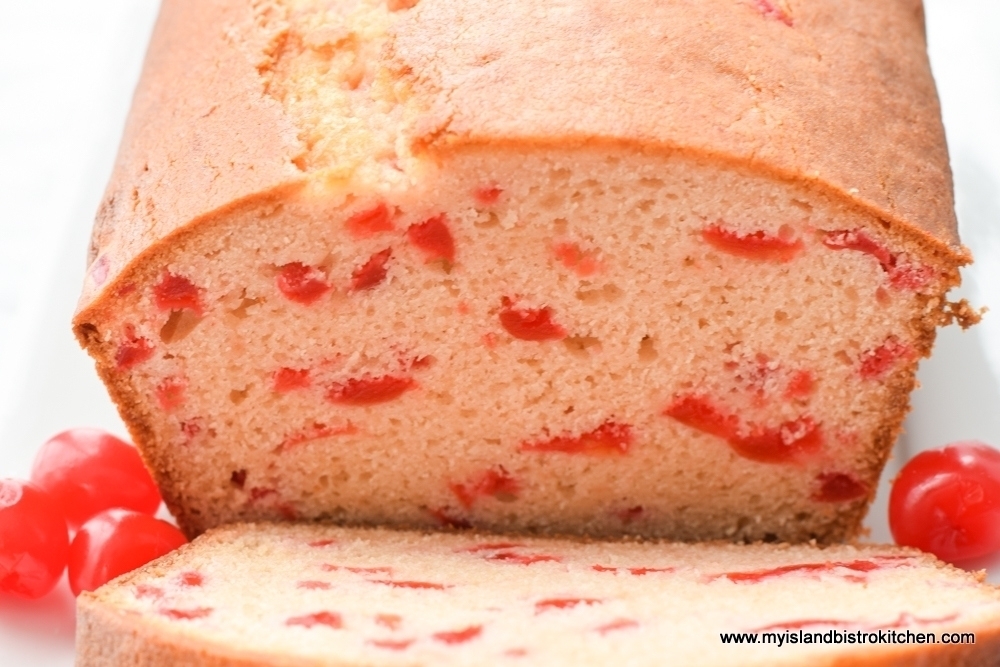
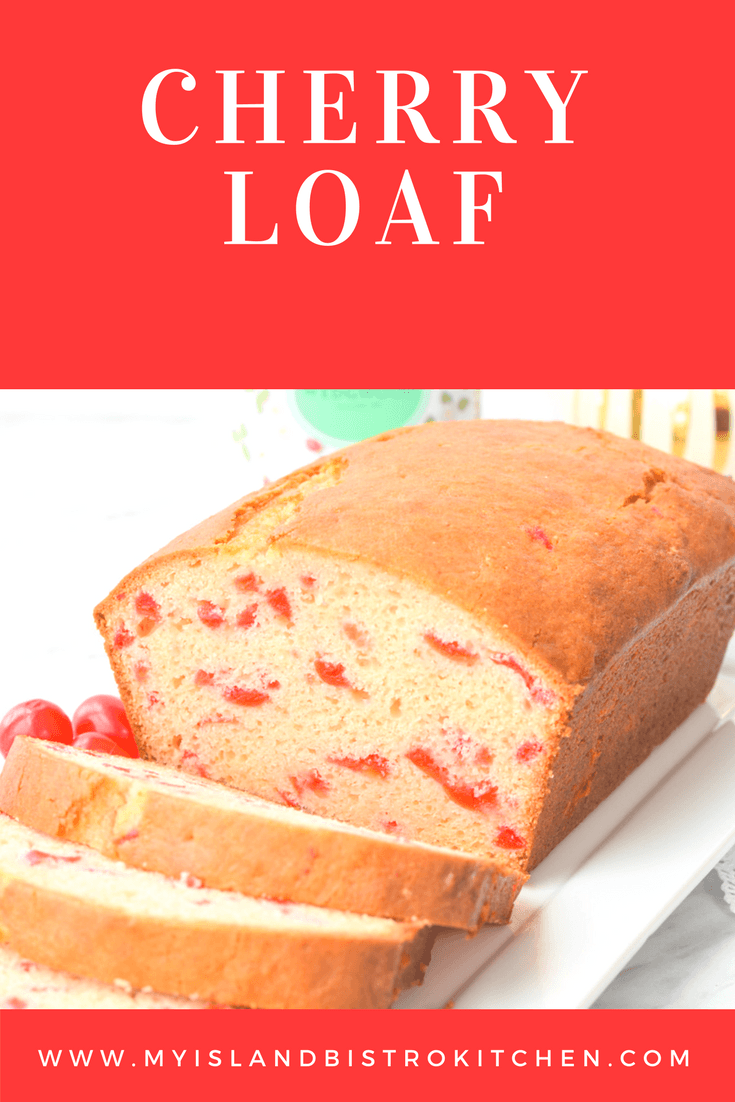
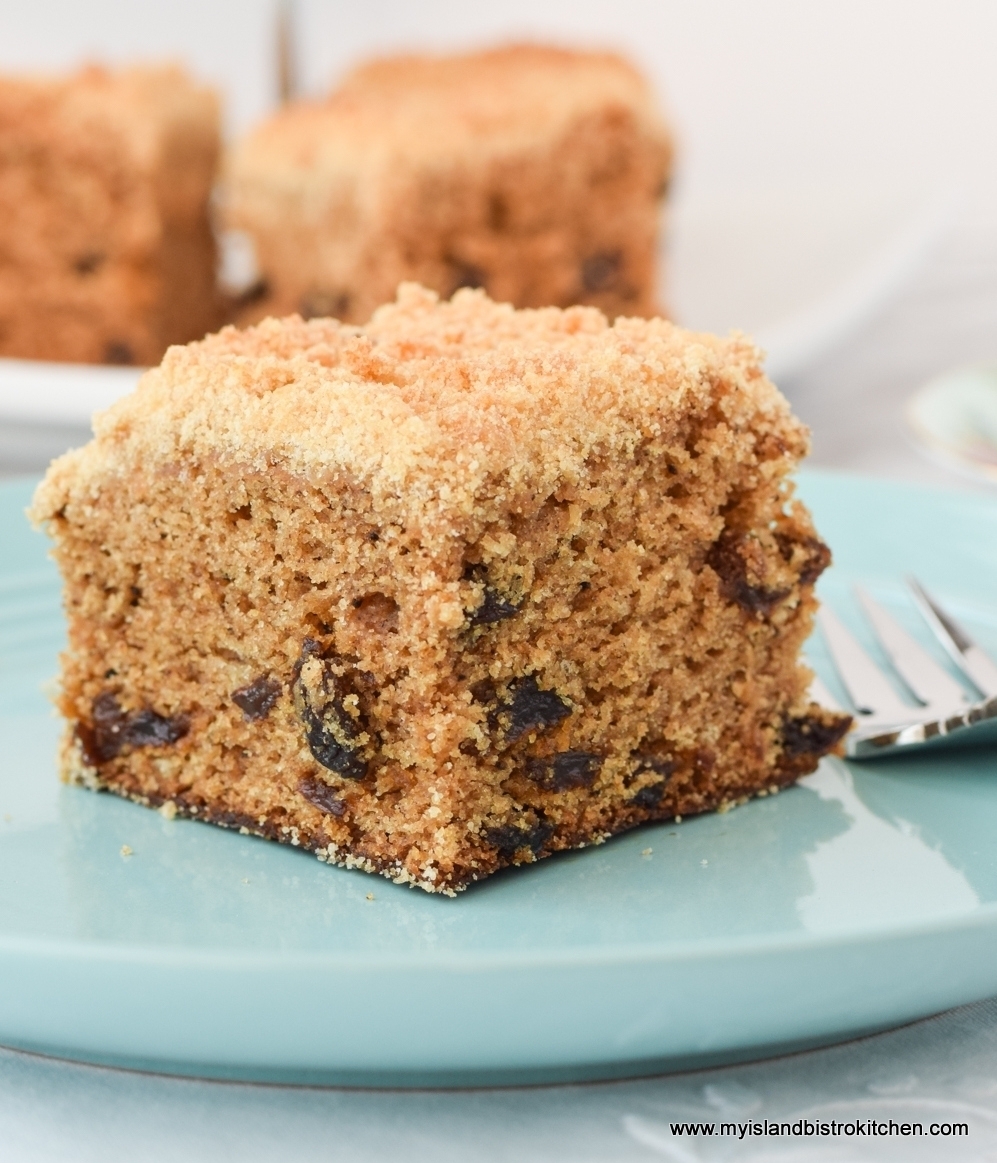
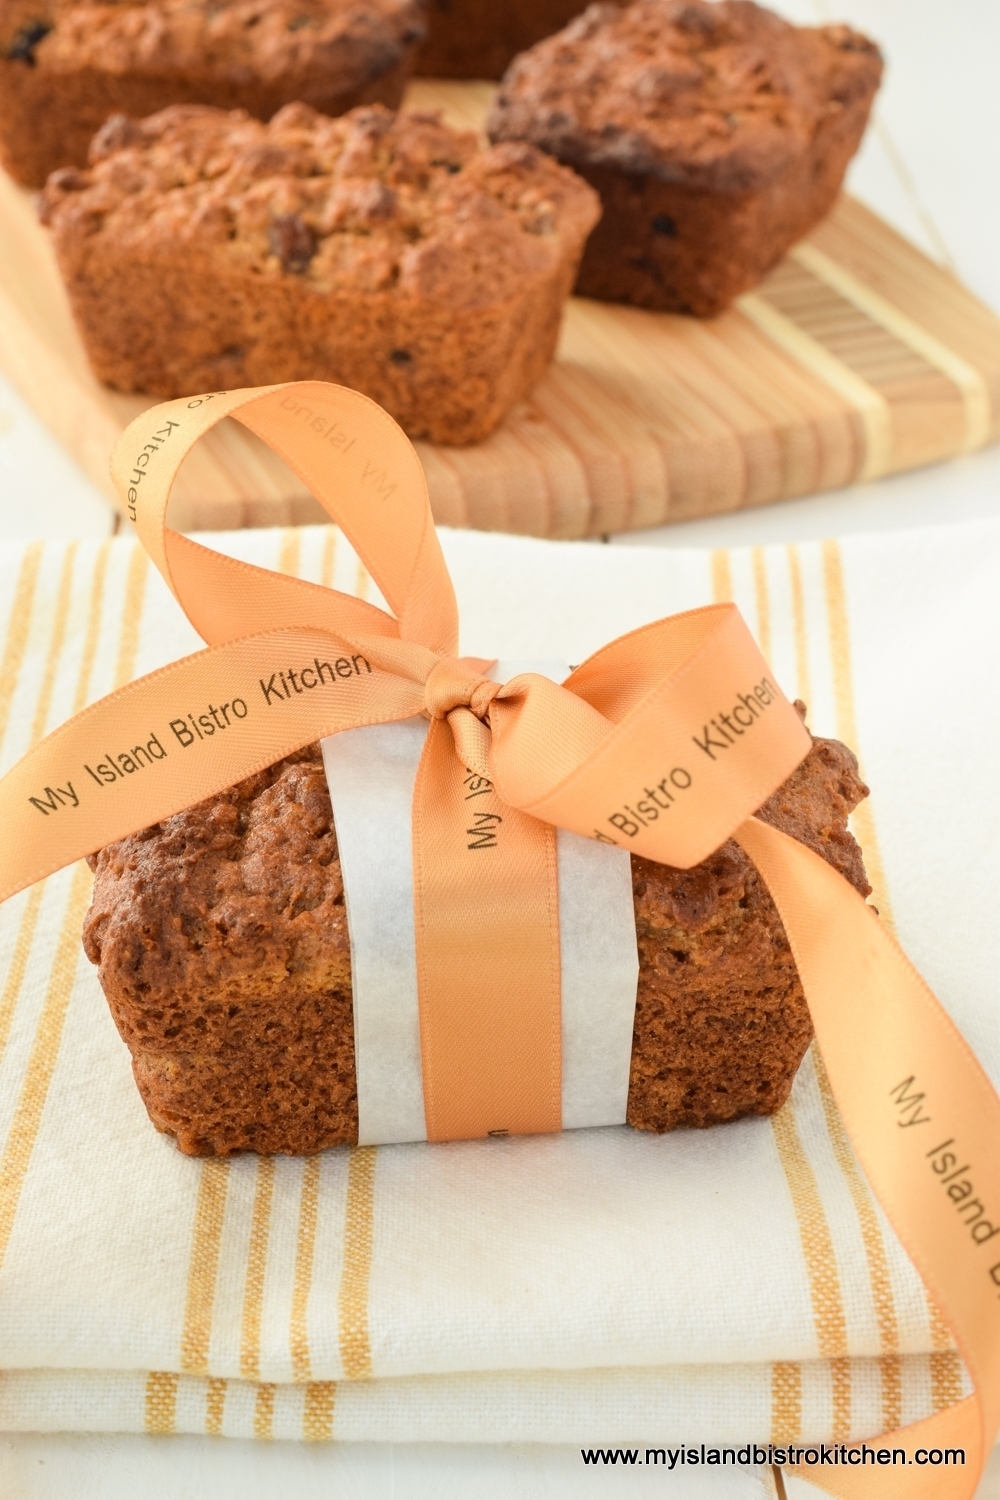
This Cherry Loaf recipe is as pretty as it is tasty, speckled with maraschino cherries that, themselves, lend great flavour to the loaf.
Quick breads, leavened with baking powder, and sometimes soda, are an easy alternative to muffins – but, they’re born of the same family! They are quick to make (because there is no yeast involved) and are great additions to breakfast, brunch, and coffeebreaks.
There are two methods for making quick breads.
Creaming Method– This method calls for the solid fat product (shortening, butter, or margarine) to be softened at room temperature for 25-30 minutes (not microwaved which can change its properties and can cause it to quickly become liquefied). The fat is then beaten/creamed, either by hand if you are prepared to devote some elbow grease to the process, or by electric mixer on low speed. The sugar is then added and creamed with the fat product until the mixture is a pale or light colour and the texture is airy or fluffy. This “creaming’ process whips air into the batter which allows air pockets (or bubbles) to form (and expand during baking) that, in addition to leavening agents such as baking powder and soda, help the cake or loaf to rise.
The room temperature eggs are then added, one at a time. Adding the eggs, with this technique, allows them time to, individually and slowly, mix in well with the creamed fat and sugar mixture and limit the possibility of them curdling. The watery eggs and the fat product don’t naturally mix well, or bind, together (same principle as trying to mix water and oil together). If all the eggs called for in the recipe are added all at once, they become more than what the fat-sugar mixture can handle at the same time and the ingredients separate and look curdled or scrambled. Adding the eggs slowly allows them to be better incorporated with the fat-sugar mixture.
With the creamed method, the liquid ingredients are combined together in one bowl or measuring cup and the dry ingredients are whisked together in a separate bowl. The dry ingredients are added to the creamed mixture alternately with the wet ingredients, beginning and ending with the dry ingredients (three additions of dry to two additions of wet ingredients). While the stand mixer should be fitted with the paddle attachment for the creaming method, it’s important not to over-beat the batter once the flour and liquid ingredients have been added because that will cause gluten to form and a loaf with a tough crumb is likely to result. Beat only until all the ingredients are incorporated and the batter is smooth.
This method will yield a moist texture loaf with a fine crumb (lots of tiny holes of fairly uniform size), reminiscent of a dense cake texture.
Slice of Cherry Loaf
Muffin Method – This method calls for the dry ingredients to be whisked together well in one bowl. All the liquid ingredients are mixed in a separate bowl with oil or a fat that has been liquefied (and, often, the sugar is mixed in with the liquid ingredients). The liquid ingredients are then simply added to the dry ingredients and stirred together just until the ingredients are barely combined.
Because no creaming of butter and sugar is involved in this method, the loaf will not have the added advantage of the air pockets being formed by this process to help the loaf to rise. In this method, the loaf will rely solely on leavening agents (baking powder, soda) to rise. The batter will often be lumpy which is okay (it will even out on its own during baking) and it’s important not to overmix the batter trying to get it smooth as this will activate the development of gluten that will result in a tough crumb.
For this method, stir the mixture by hand because an electric mixer will overmix the batter. This method will often yield a slightly drier texture (than the creaming method does) with a larger, coarser crumb in the loaf, closely resembling the texture of muffins, hence the name “muffin method”.
The muffin method is commonly used to mix up waffles and pancakes as well.
Cherry Loaf
My recipe for Cherry Loaf uses the creamed method because I want a delicate, refined texture in this particular loaf.
Cherry Loaf
All ingredients should be at room temperature for about 25-30 minutes before mixing the batter. The ingredients blend better if they are at room temperature. If you think of nice soft butter or shortening being hit with cold eggs or milk, it’s obvious that the ingredients will simply clump together rather than blend in well. The result will be a loaf that does not have the best texture possible.
There is a choice of fat product in this loaf – either shortening, butter, or margarine will yield a good loaf. Butter, however, will obviously give the most flavor 😉
This loaf calls for maraschino cherries. These are the best option for this loaf because they are soft and beautifully bright colored. Dried cherries are too chewy and coarse and will not create the lovely red-dotted speckles throughout the loaf. Maraschino cherries, however, are wet and if they are not blotted dry, they will add too much excess moisture to the loaf. I recommend blotting the cherries with a paper towel, cutting them, and blotting them again. The idea is not to dry them out but, rather, to remove the excess moisture.
Cherry Loaf
[Printable recipe follows at end of posting]
Cherry Loaf
Ingredients:
1/3 cup shortening, butter, or margarine ¾ cup granulated sugar ¼ cup brown sugar, lightly packed 2 large eggs, room temperature
2/3 cup milk, room temperature 1½ tbsp orange juice, room temperature 2½ tbsp maraschino cherry juice, room temperature 1 tsp vanilla ¼ tsp almond flavouring
2¼ cups all-purpose flour 2 tsp baking powder ¼ tsp baking soda ¼ tsp salt ¾ cup maraschino cherries, well-drained, blotted dry, and coarsely chopped
Method:
Bring shortening, butter, or margarine, eggs, milk, and orange and maraschino cherry juices to room temperature approximately 25-30 minutes before preparing batter.
Remove cherries from their juice and, using paper towel, blot them dry. Cut up cherries and blot again on paper towel to remove the excess moisture. Set aside.
Preheat oven to 350°F. Grease 9”x5”x3” loaf pan.
In 1-cup measuring cup, or small bowl, combine the milk, orange juice, cherry juice, vanilla, and almond flavouring. Stir to mix.
In medium-sized bowl, combine the flour, baking powder, baking soda, and salt. Whisk together well.
In bowl of stand mixer fitted with paddle attachment and on low speed, cream the shortening, butter, or margarine well. Gradually add the granulated sugar, then the brown sugar. Increase mixer speed to medium and beat until ingredients are pale-colored and mixture has an airy/fluffy texture. Stop mixer, as necessary, to scrape bowl with rubber spatula to ensure the ingredients are evenly incorporated.
Add the eggs, one at a time, beating well after each addition and using the spatula, as necessary, to scrape sides of bowl.
Add the flour mixture alternately with the milk mixture, starting and ending with the dry ingredients (three additions of dry ingredients with two additions of wet ingredients). Periodically scrape sides of bowl with spatula to ensure all ingredients are combined. Do not overmix.
Remove bowl from mixer stand and stir in the cherries by hand, just until they are blended in.
Transfer batter to prepared pan and, using a knife, smooth the top of the loaf. Bake for approximately 1 hour or until cake tester inserted into center of loaf comes out clean. If loaf starts to brown, it may be loosely tented with tin foil after about 45 minutes of baking; ensure loaf top is completely set before allowing the tin foil to touch it as it will peel off the top of the loaf. Let loaf rest in pan for 10 minutes then turn out on to wire rack to cool completely before cutting.
Yield: One loaf, 14 slices (sliced approximately ½” thick)
Notes: Loaf is best made the day before it is needed. Let cool completely on wire rack then place in airtight plastic bag and store in refrigerator overnight to allow the flavours time to blend and the loaf to soften. Loaf freezes well.
This flavourful cherry loaf is an easy-to-make moist quick bread that is speckled with colorful maraschino cherries
Course Snack
Cuisine American
Servings14
My Island Bistro KitchenMy Island Bistro Kitchen
Ingredients
1/3cupshortening, butter, or margarine
3/4cupgranulated sugar
1/4cupbrown sugar, lightly packed
2large eggs, room temperature
2/3cupmilk, room temperature
1 1/2tbsporange juice, room temperature
2 1/2tbspmaraschino cherry juice, room temperature
1tspvanilla
1/4tspalmond flavouring
2 1/4cupsall-purpose flour
2tspbaking powder
1/4tspbaking soda
1/4tspsalt
3/4cupmaraschino cherries, well-drained, blotted dry, and coarsely chopped
Instructions
Bring shortening, butter, or margarine, eggs, milk, and orange and maraschino cherry juices to room temperature approximately 25-30 minutes before preparing batter.
Remove cherries from their juice and, using paper towel, blot them dry. Cut up cherries and blot again on paper towel to remove the excess moisture. Set aside.
Preheat oven to 350°F. Grease 9”x5”x3” loaf pan.
In 1-cup measuring cup, or small bowl, combine the milk, orange juice, cherry juice, vanilla, and almond flavouring. Stir to mix.
In medium-sized bowl, combine the flour, baking powder, baking soda, and salt. Whisk together well.
In bowl of stand mixer fitted with paddle attachment and on low speed, cream the shortening, butter, or margarine well. Gradually add the granulated sugar, then the brown sugar. Increase mixer speed to medium and beat until ingredients are pale-colored and mixture has an airy/fluffy texture. Stop mixer, as necessary, to scrape bowl with rubber spatula to ensure the ingredients are evenly incorporated.
Add the eggs, one at a time, beating well after each addition and using the spatula, as necessary, to scrape sides of bowl.
Add the flour mixture alternately with the milk mixture, starting and ending with the dry ingredients (three additions of dry ingredients with two additions of wet ingredients). Periodically scrape sides of bowl with spatula to ensure all ingredients are combined. Do not overmix.
Remove bowl from mixer stand and stir in the cherries by hand, just until they are blended in.
Transfer batter to prepared pan and, using a knife, smooth the top of the loaf. Bake for approximately 1 hour or until cake tester inserted into center of loaf comes out clean. If loaf starts to brown, it may be loosely tented with tin foil after about 45 minutes of baking; ensure loaf top is completely set before allowing the tin foil to touch it as it will peel off the top of the loaf. Let loaf rest in pan for 10 minutes then turn out on to wire rack to cool completely before cutting.
Recipe Notes
Notes: Loaf is best made the day before it is needed. Let cool completely on wire rack then place in airtight plastic bag and store in refrigerator overnight to allow the flavours time to blend and the loaf to soften. Loaf freezes well.
[Copyright My Island Bistro Kitchen]
For other quick bread recipes from My Island Bistro Kitchen, click on the links below:
If you have made this recipe and enjoyed it and/or wish to share it with your friends and family, please do so on social media but be sure to share the direct link to this posting from my website.
Connect with My Island Bistro Kitchen on Social Media
Follow “the Bistro” on Pinterest at https://www.pinterest.ca/peibistro/ and pin the Pinterest-ready photo found at the end of this post to your favorite Pinterest boards.
I love a bowl of rich Irish Stew any time of the year but, for certain, I will make it around St. Patrick’s Day! It’s a filling and tummy-warming stew that is always a welcome sight on the dinner table. Continue reading My Island Bistro Kitchen’s Irish Stew→
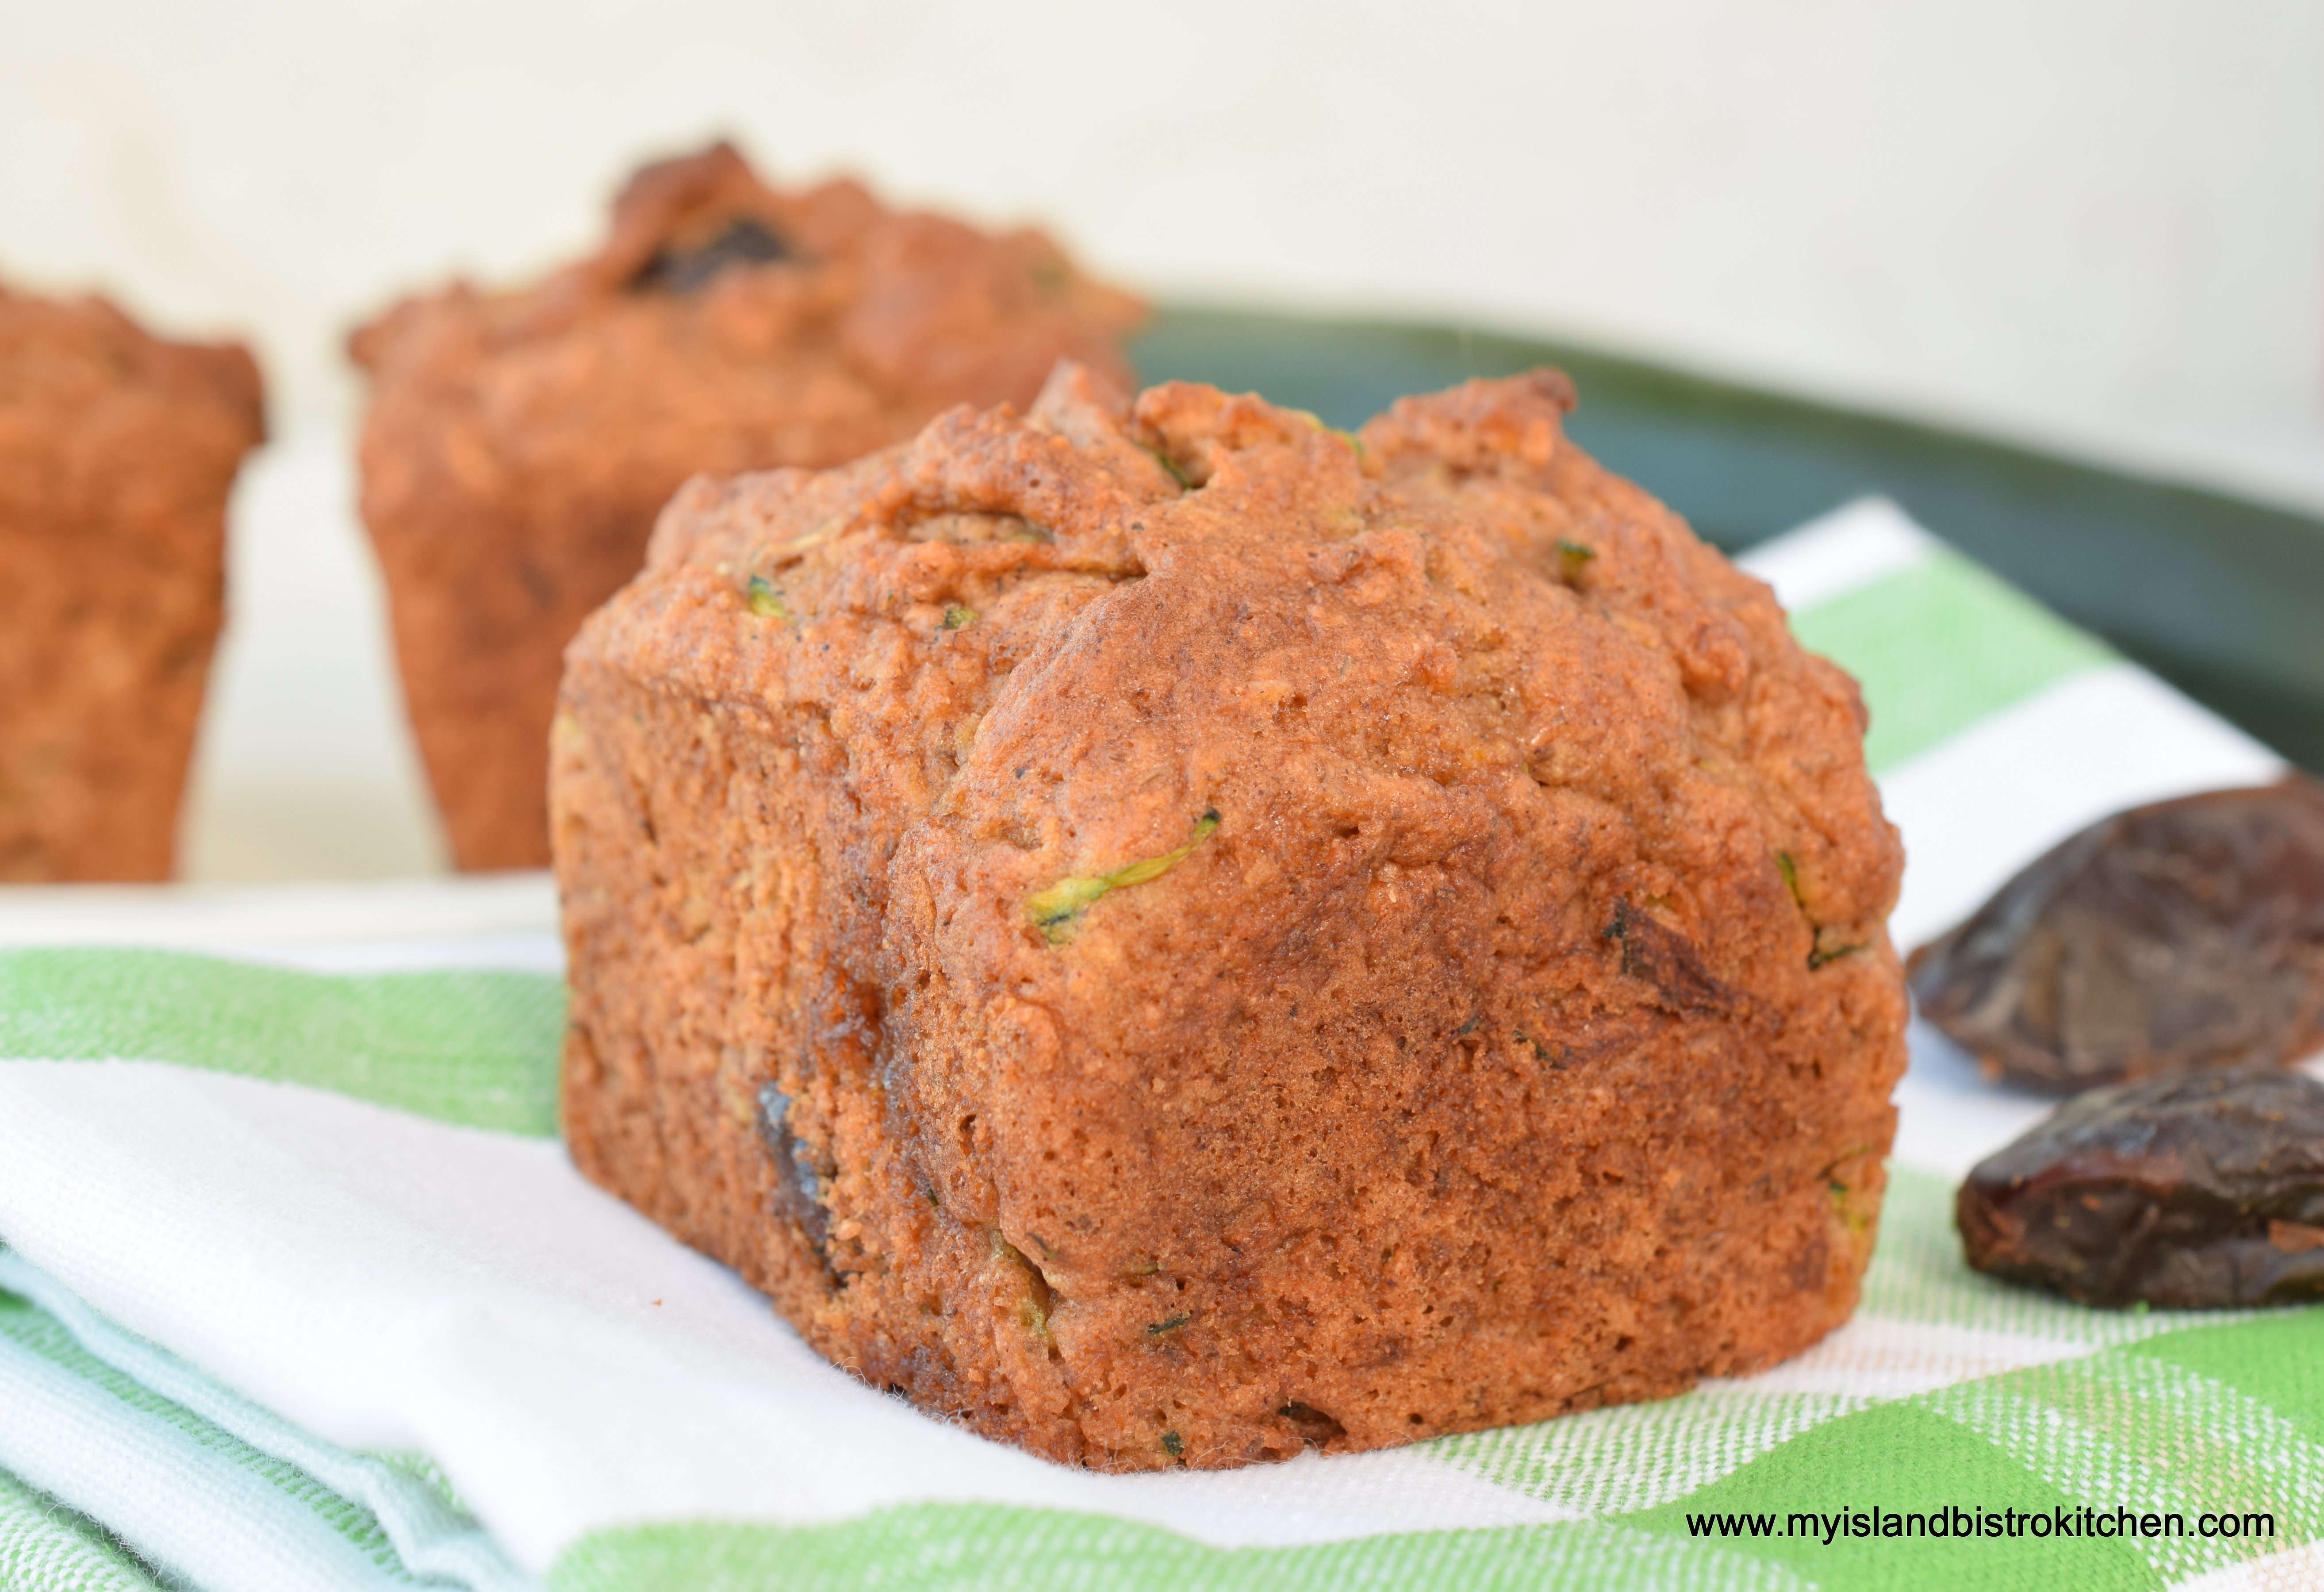
These Gluten-Free Zucchini Date Muffins will rival any traditional wheat-based muffins! They sport a lovely gently domed top that is the hallmark of a perfect muffin shape, they are packed full of flavor, and they have a lovely tender, moist crumb. Continue reading The Ultimate Gluten-Free Zucchini Date Muffins→
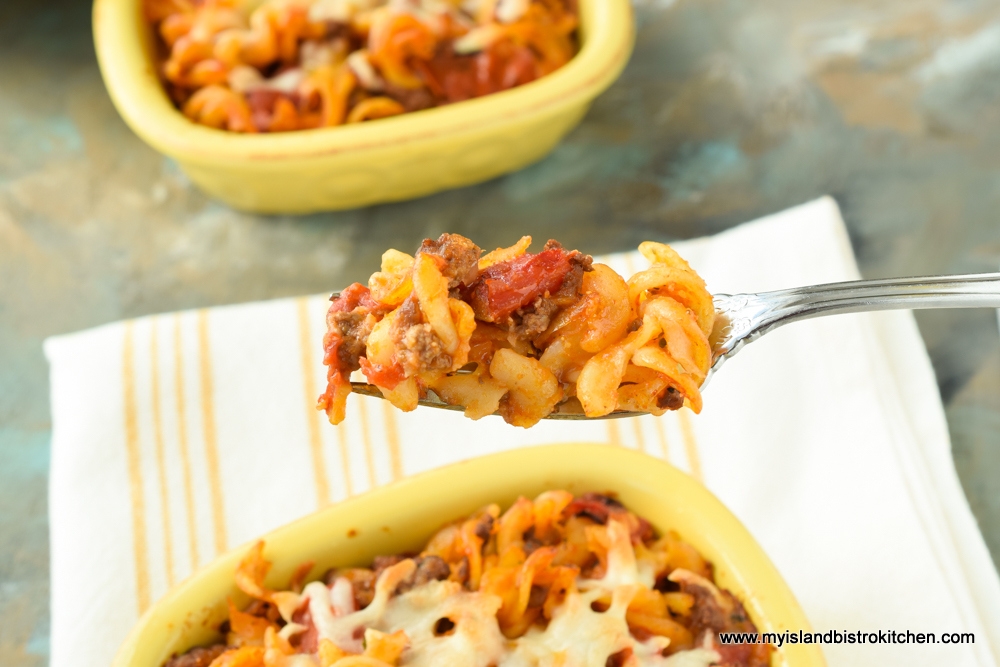
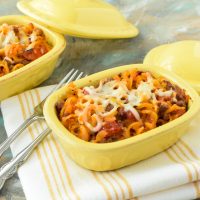
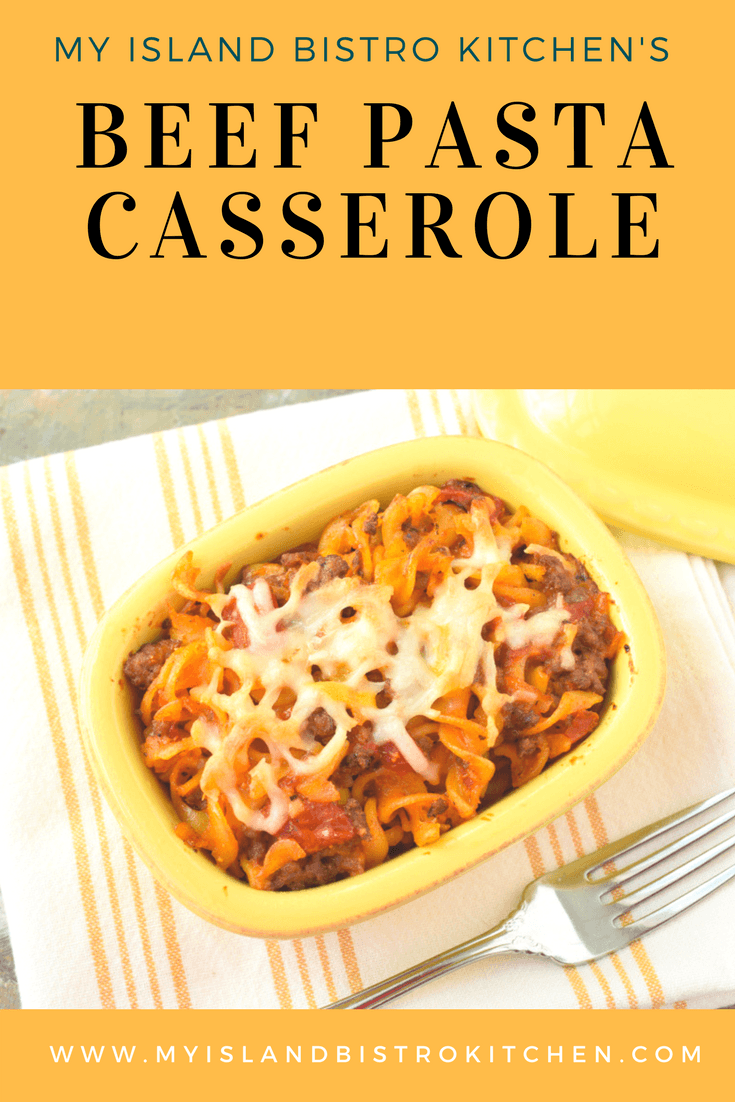
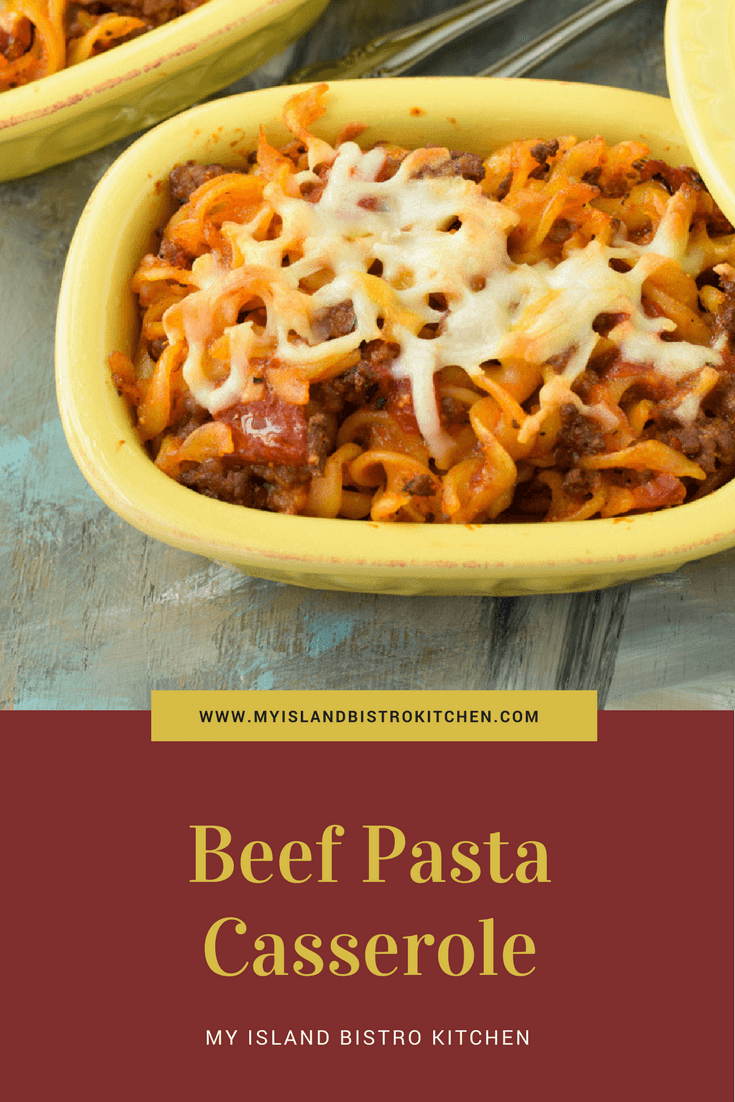
I am a huge fan of batch cooking and preparing make-ahead meals, like this Beef Pasta Casserole, to freeze for easy weeknight meal preparation.
I began batch cooking many years ago when I moved away from my family home and began life on my own. I went in search of cookbooks designed for cooking for one or two and didn’t find much on the market. What recipes I did find took ingredients that either weren’t available locally or the recipes called for sizes of ingredients that weren’t available in Canada.
I also soon discovered it really wasn’t much fun having to prepare a meal from scratch each night for one person. That’s when I realized I didn’t need cookbooks with recipes sized down to one or two servings; I needed a freezer and I needed to batch cook make-ahead meals!
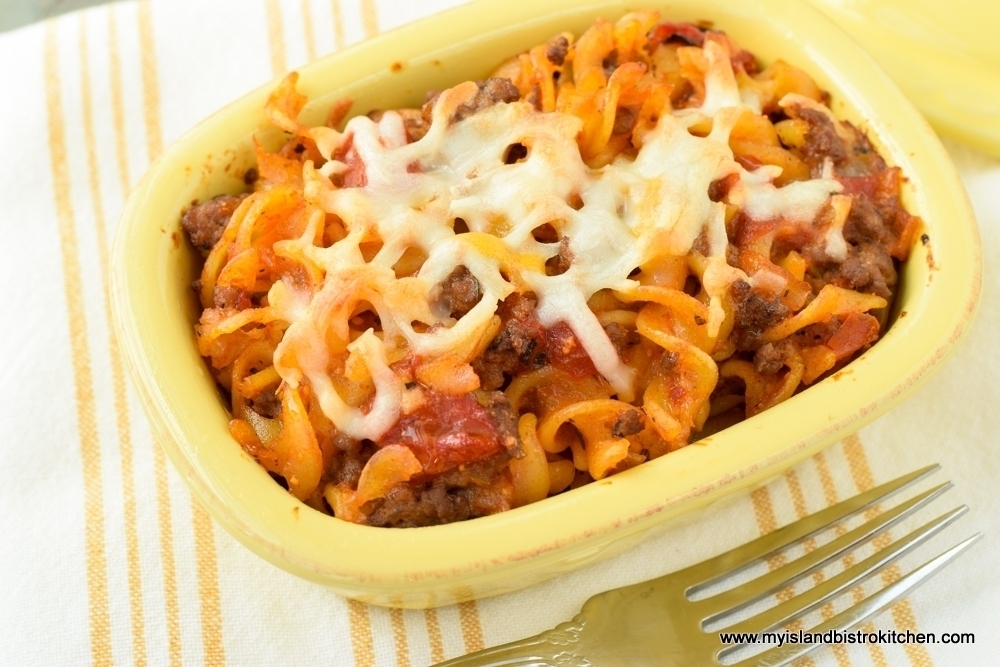
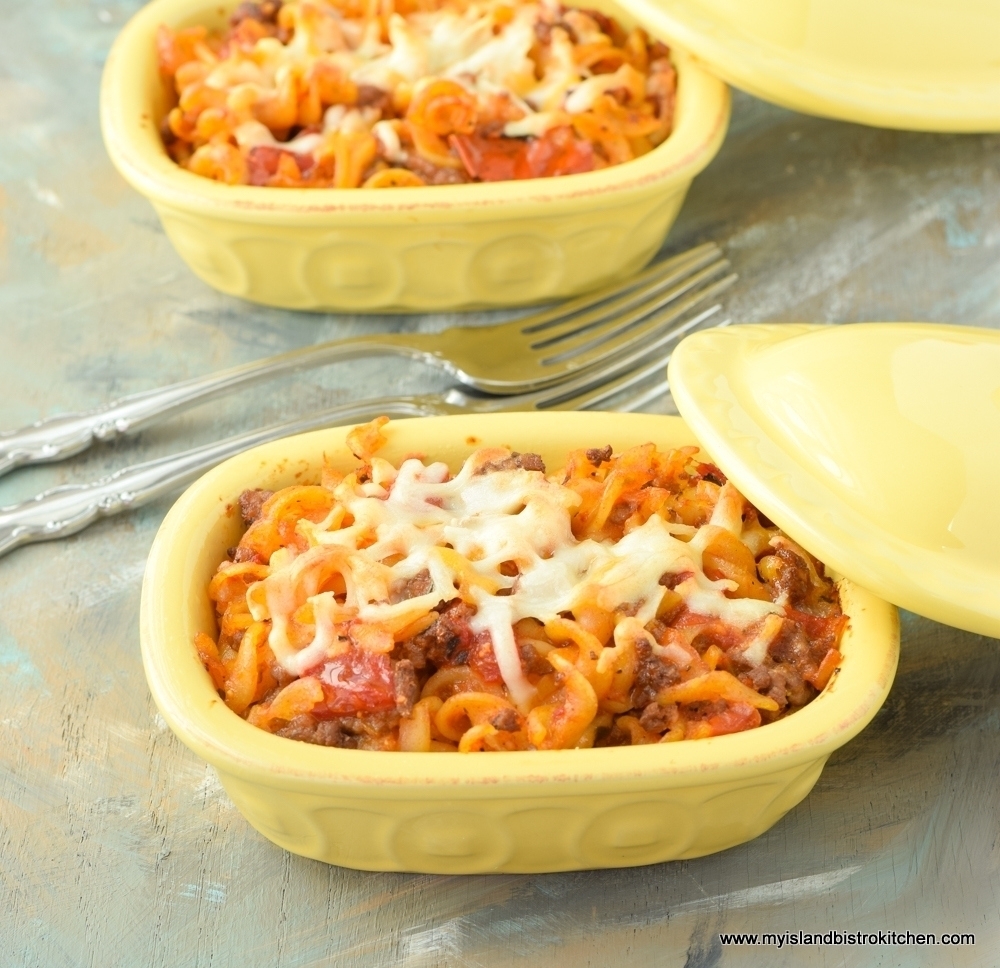
Beef Pasta Casserole
I currently have two freezers plus a deep freezer compartment in the bottom of the refrigerator and all are filled with make ahead-meals. The entrées are a mix of very basic fare, like baked beans, pasta casseroles, and fish cakes, and more elaborate meals like fillings for vol-au-vents and crèpes for nights that call for something a little extra special.
Batch cooking means you still do the prep work but it is all done upfront at once and it eases the pressure of meal preparation on weeknights, especially on nights where one is late getting home from work. So long as I have the makings for a salad in the fridge and some rolls, biscuits, or bread in the freezer, I can pull out a frozen entrée and have dinner on the table in 30 minutes or so. Clean-up is super easy, too, since there are no prep dishes or pots and pans to be washed, just the plate, glass, and utensils to be loaded into the dishwasher.
Beef Pasta Casserole
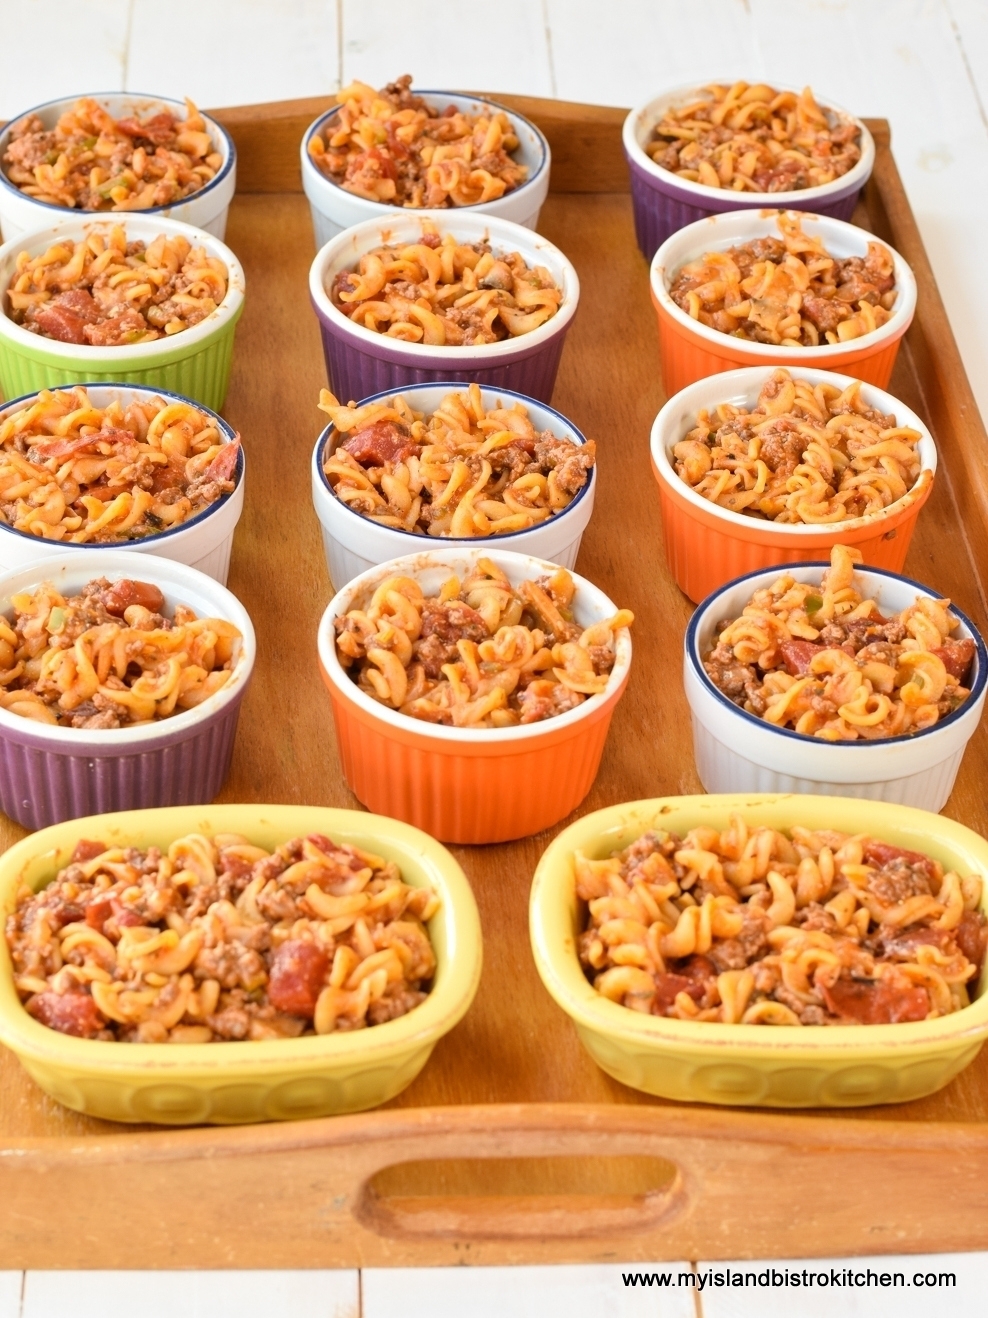
One of my standby casseroles is this beef pasta casserole. It’s not hard to prepare and does not take any wild or weird ingredients. This makes a huge casserole so it’s great to take to potlucks or divide into meal-sized servings and frozen. Use a large roaster or two 2-quart casseroles or, if you have a small household, divide the casserole up into small single serving casseroles or ramekins and freeze them. I have a ton of ramekins and small individual-sized casserole dishes as I find they are the perfect serving size for individual servings of casseroles. I store these casseroles, unbaked, in large plastic freezer containers in the freezer.
Beef Pasta Casserole Ready for the Freezer
Easy steps make this casserole. Brown the ground beef, drain, and set it aside. Cook the pasta. Next, sauté the onion, garlic cloves, celery, green pepper, and mushrooms. Then, combine all the liquid ingredients and canned tomatoes. Combine all the ingredients together along with some cheese and, voilà, that’s it! Top the casserole with some extra cheese and bake in the oven for 25-30 minutes. If freezing the casserole, freeze it unbaked and without the cheese topping which is best added at the time of baking.
Serve with your favorite green salad and biscuits, rolls, or bread.
Beef Pasta Casserole
Beef Pasta Casserole
Ingredients:
1½ lbs lean ground beef 1½ – 2 tbsp vegetable oil
1-2 tbsp vegetable oil 2/3 cup onion, chopped 3 garlic cloves, minced 1/3 cup celery, chopped ¼ cup green pepper, chopped ¾ cup sliced button mushrooms
1 – 284ml can tomato soup 1 tsp Worcestershire sauce ½ cup beef broth (homemade or commercial) ¼ cup tomato paste 1 tbsp maple syrup 2 tbsp basil pesto (homemade or commercial) 2 tsp Italian seasoning ¼ tsp ground ginger 1 – 398ml can diced tomatoes with juice Salt and pepper, to taste
400g fusilli (regular or gluten-free), cooked according to package directions and drained (about 5 cups raw pasta) 2/3 cup shredded cheese of choice (e.g., cheddar, or a blend of cheeses) 2 tbsp grated Parmesan cheese
½ cup shredded cheese of choice for topping casserole
Method:
In large frypan, heat the vegetable oil and brown the meat over medium-low heat. Drain. Set aside.
Preheat oven to 350°F.
In large saucepan, heat second amount of vegetable oil over medium heat. Sauté the onion, garlic, celery, and green pepper for approximately 2 minutes. Add the mushrooms and sauté for 3-4 minutes. Remove from heat and set aside.
In a large bowl or measuring cup, combine the tomato soup, Worcestershire sauce, beef broth, tomato paste, maple syrup, basil pesto, Italian seasoning, and ground ginger. Stir well. Stir in canned tomatoes with juice. Season with salt and pepper, to taste.
In large bowl or pot, combine the cooked pasta, meat, vegetables, liquid ingredients, 2/3 cup shredded cheese, and Parmesan cheese. Stir gently to combine ingredients. Transfer mixture to large greased roaster, two – 2-quart casseroles, or divide into individual serving-sized dishes such as ramekins.
Sprinkle casserole(s) with remaining ½ cup shredded cheese. Bake in oven for 25-30 minutes to heat through. Serve hot. Casserole freezes well.
Yield: 12-14 servings
If you have made this recipe and enjoyed it and/or wish to share it with your friends and family, please do so on social media but be sure to share the direct link to this posting from my website.
This tasty Beef Pasta Casserole is an easy-to-make weeknight casserole that combines ground beef, pasta, cheese, and a tomato-based sauce. Freezes well.
Course Main Course
Cuisine American
Servings12
My Island Bistro KitchenMy Island Bistro Kitchen
Ingredients
1 1/2lbslean ground beef
1 1/2 - 2tbspvegetable oil
1-2 tbspvegetable oil
2/3cuponion, chopped
3garlic cloves, minced
1/3cupcelery, chopped
1/4cupgreen pepper, chopped
3/4cupsliced button mushrooms
1 -284mlcan tomato soup
1tspWorcestershire sauce
1/2cup beef broth
1/4cuptomato paste
1tbspmaple syrup
2tbspbasil pesto
2tspItalian seasoning
1/4tspground ginger
1 -398mlcan diced tomatoes with juice
salt and pepper, to taste
400gfusilli (regular or gluten-free), cooked according to package directions and drained (about 5 cups raw pasta)
2/3cupshredded cheese of choice (e.g., cheddar, or a blend of cheeses)
2tbspgrated Parmesan cheese
1/2cupshredded cheese of choice for topping casserole
Instructions
In large frypan, heat the vegetable oil and brown the meat over medium-low heat. Drain. Set aside.
Preheat oven to 350°F.
In large saucepan, heat second amount of vegetable oil over medium heat. Sauté the onion, garlic, celery, and green pepper for approximately 2 minutes. Add the mushrooms and sauté for 3-4 minutes. Remove from heat and set aside.
In a large bowl or measuring cup, combine the tomato soup, Worcestershire sauce, beef broth, tomato paste, maple syrup, basil pesto, Italian seasoning, and ground ginger. Stir well. Stir in canned tomatoes with juice. Season with salt and pepper, to taste.
In large bowl or pot, combine the cooked pasta, meat, vegetables, liquid ingredients, 2/3 cup shredded cheese, and Parmesan cheese. Stir gently to combine ingredients. Transfer mixture to large greased roaster, two – 2-quart casseroles, or divide into individual serving-sized dishes such as ramekins.
Sprinkle casserole(s) with remaining ½ cup shredded cheese. Bake in oven for 25-30 minutes to heat through. Serve hot. Casserole freezes well.
Recipe Notes
[Copyright My Island Bistro Kitchen]
Looking for other tasty casseroles? Try these from My Island Bistro Kitchen:
This old-fashioned country farmhouse crumb cake has been a recipe in my family for years. It quite resembles a coffee cake and is a hearty dessert that is tasty and not too sweet. Its crumb topping adds a lovely texture element to the cake. Continue reading Country Farmhouse Crumb Cake→
Casserole recipes are useful for the home cook’s meal planning. They are a convenient entrée for a dinner meal, can be prepared ahead of time, are often a great way to use leftovers and re-purpose them into a new entrée, and they can stretch the food dollar. My Chicken Chow Mein Casserole is one that fits that bill nicely. Continue reading Chicken Chow Mein Casserole Recipe→
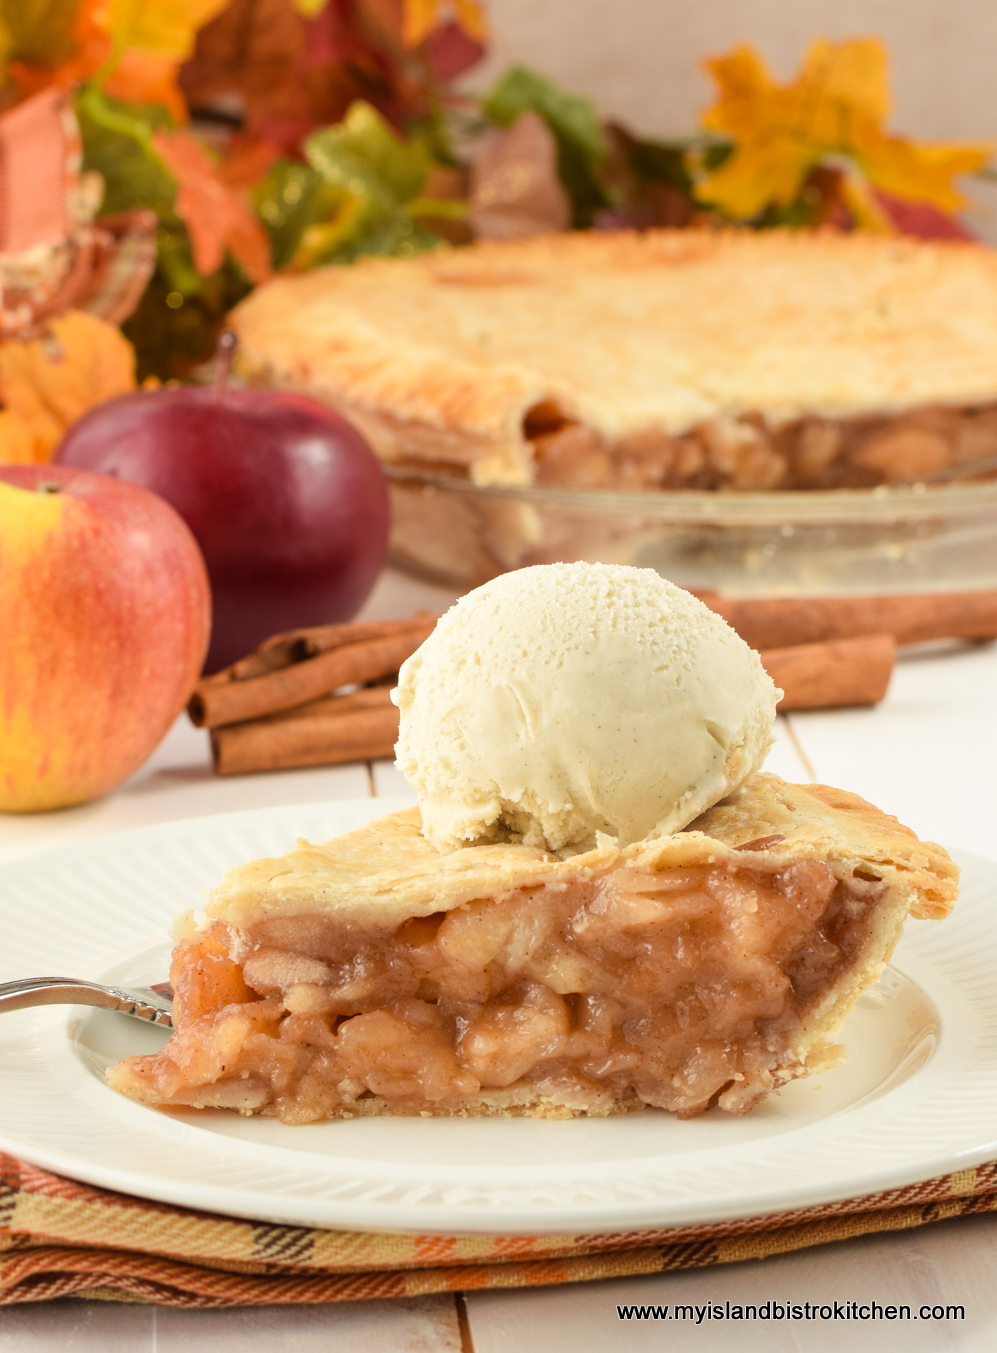
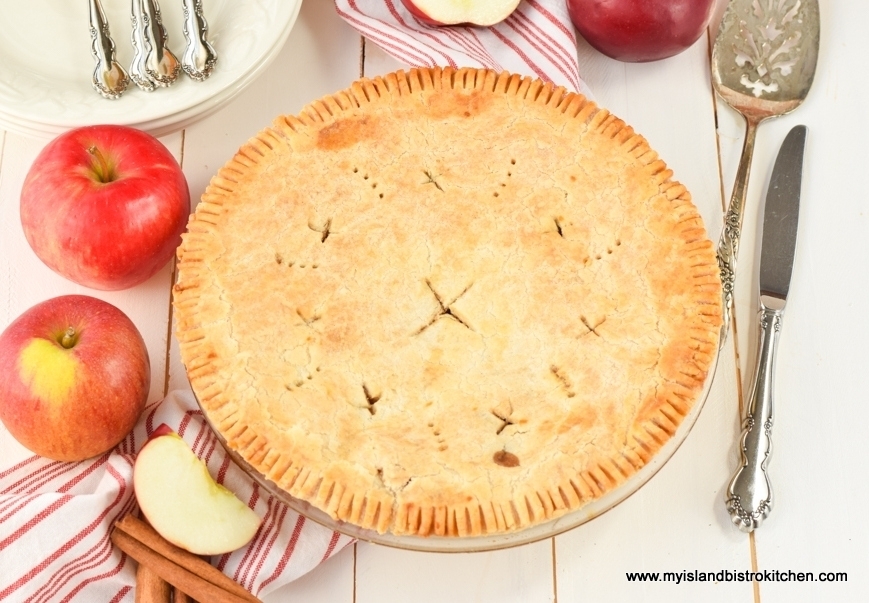
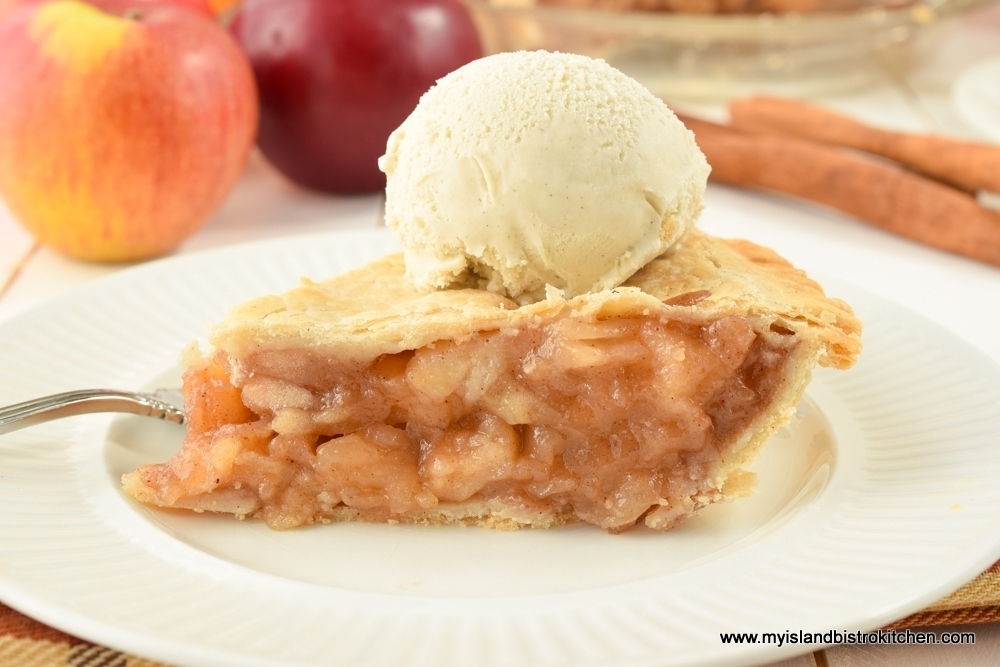
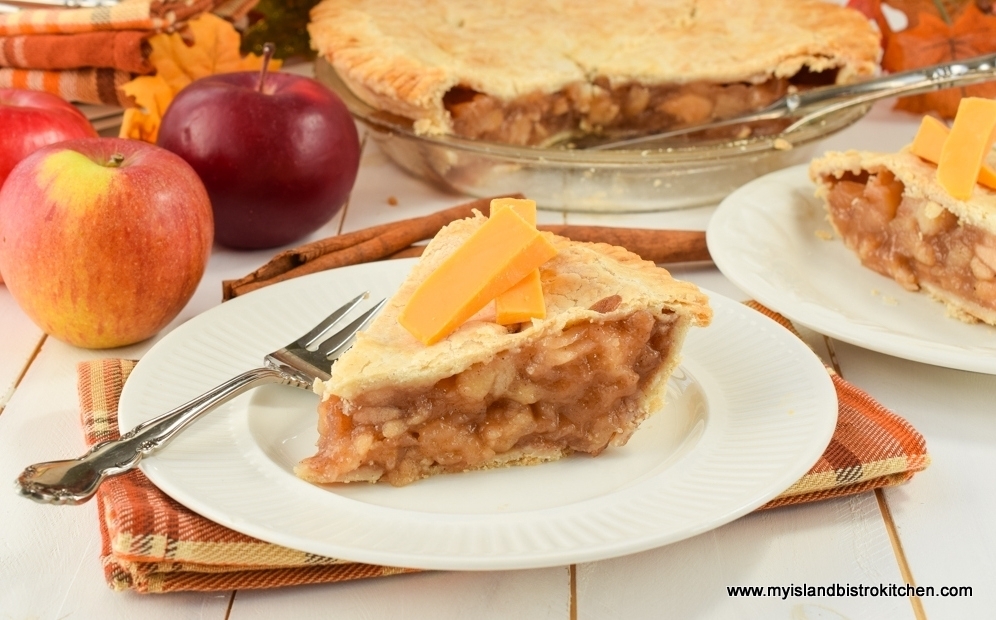
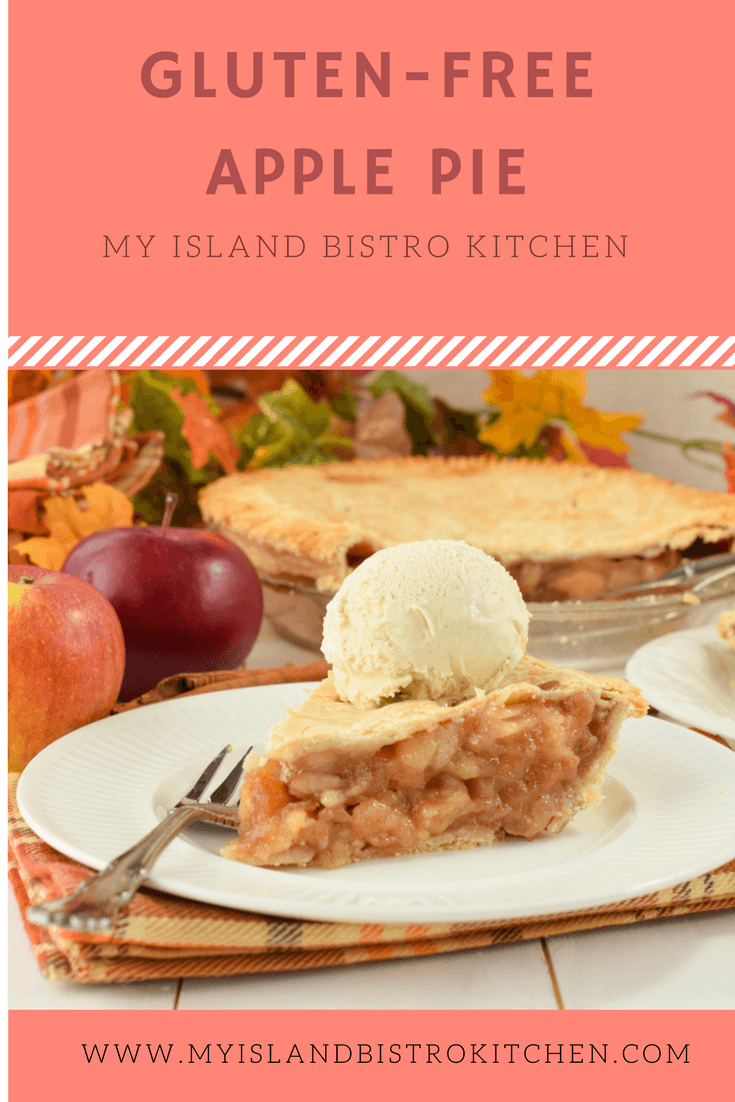
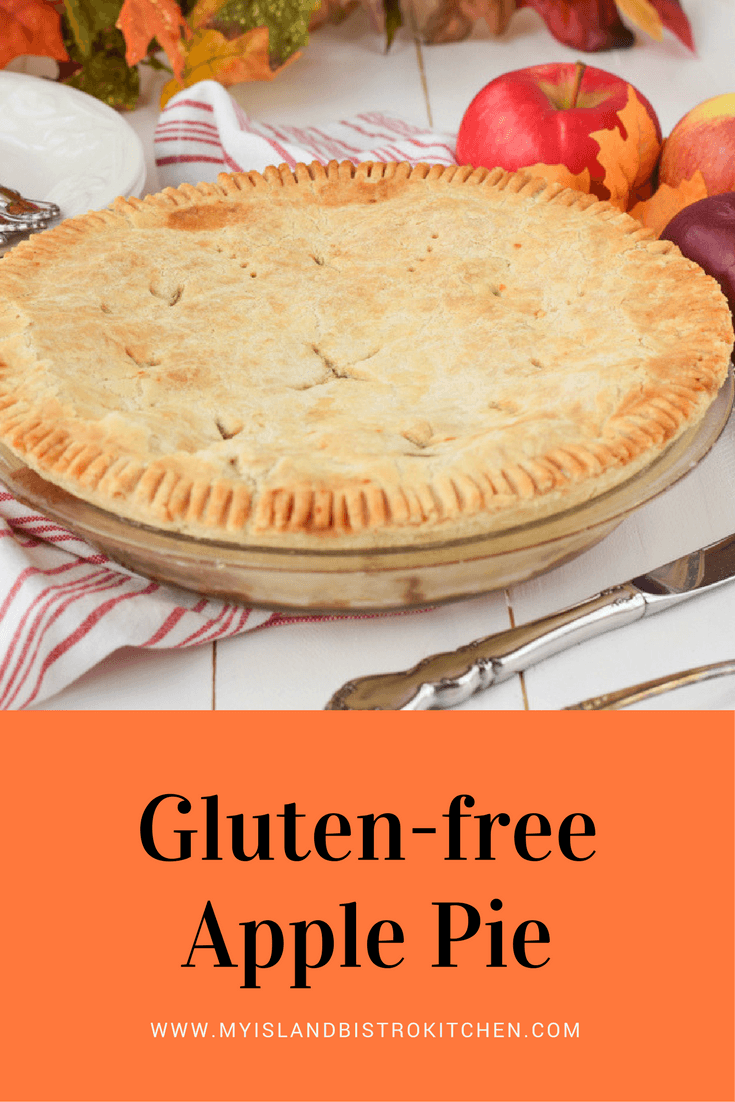
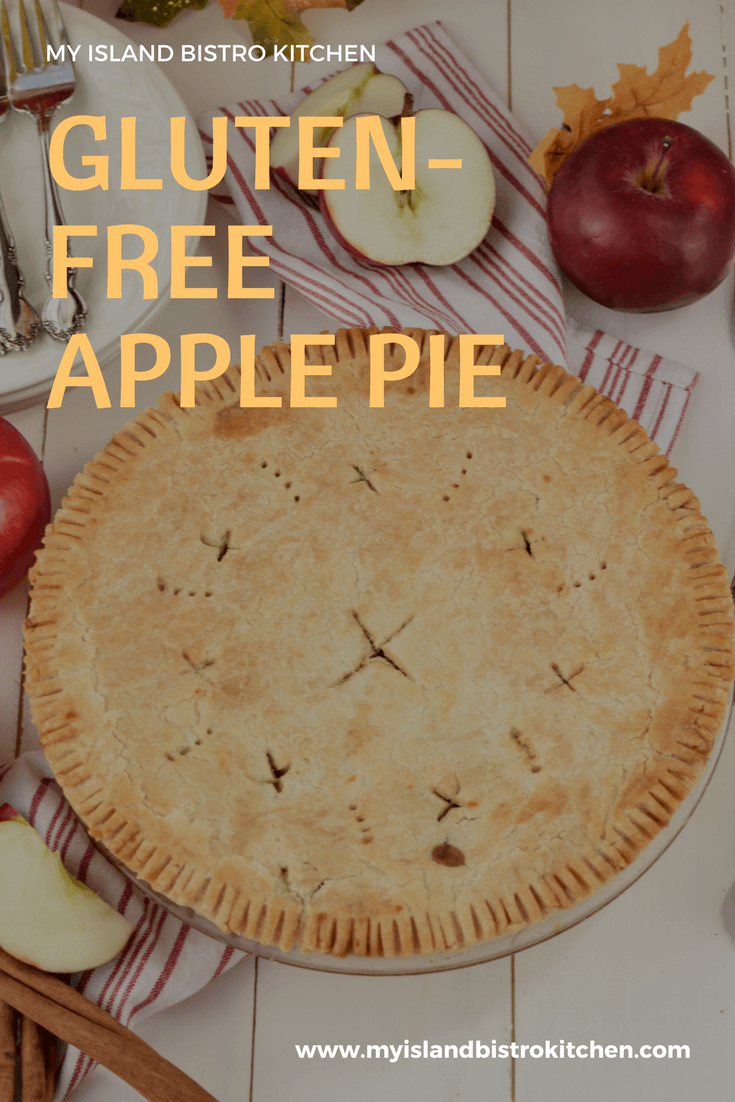
I earlier posted my recipe for Rustic Apple Pie. This apple pie recipe differs from that one in two ways. First, this one is gluten free. Yes, even the lovely tender, flaky crust is gluten free. Second, the filling is pre-cooked before being added to the pie.
Gluten-free Apple Pie
For those following a gluten-free diet, they know how difficult it can sometimes be to find a pie pastry that closely resembles a wheat flour version. I love making pastry and enjoy a lot of quiches and pies. It pains me that those on a gluten-free diet cannot enjoy the same foods simply because they don’t have a good gluten-free pastry recipe. So, I have developed this pie pastry recipe that, in my opinion, rivals any gluten version (and, in fact, is better than many I have been served). When I first started developing gluten-free pastry, I figured it would not roll out, would crumble into bits, be hard as a rock, and/or would not transfer, in one piece, to the pie plate. However, I have adapted the basic pastry recipe I have been using for years and I could not be more pleased with it. Serve this pastry to someone not on a gluten-free diet and I think they would be hard-pressed to know it’s gluten free!
Gluten-free Apple Pie
So, let’s start with some hints and tips on making the pastry, many of which apply to any pastry, gluten or gluten free.
The Pastry
First, all ingredients must be cold – super cold. Yes, even the flour should be chilled for 30-40 minutes in the refrigerator. I use a one-to-one gluten-free flour in this recipe. I have been having great success with Bob’s Red Mills 1-to-1 gluten-free flour in my baking and find it has better flavor than gluten-free all-purpose flour and has the texture in baked goods more closely resembling a wheat-based flour.
There are various schools of thought on the type of fat to use in pastry — butter, lard, or shortening. Using all butter in pastry will give a wonderful flavor and a lovely tanned crust. It can, however, be a bit finnicky to work with because it softens very easy and can quickly be over-blended with the flour. If overworked, a tough crust is likely. While lard is easy to work with and will give layers of flakiness in the pastry, it lacks the flavour that butter gives. Using shortening will yield a nice tender crust but, like lard, has little flavor. As with butter, shortening softens extremely easy as it is being worked with so, if the dough is overworked, it will yield a tough crust.
I find the best combination of fats to provide flakiness, tenderness, flavour, and structure to pastry is to use one part lard and one part butter. I coarsely chop/cube the butter and lard into the flour then take my pastry cutter and blend the fats to the consistency of large peas. There is no need to mash it or blend it finely.
For liquid, I combine vinegar, egg, and water to equal 2/3 cup – all ingredients to be super cold. Not all of this liquid may be required. It’s important to use only enough of the liquid that the dry ingredients are incorporated and will cling together and the dough forms a ball. Don’t add too much liquid or you will end up with a gummy mess that will yield a tough pastry. I don’t use a food processor to make the pastry as I find it is too easy to overprocess the dough. Mixing the pastry by hand gives more control and, I find, a flakier crust.
Gluten-free pastry has a different texture and consistency than wheat-based pastry. The most noticeable difference is the lack of elasticity that wheat-based pastry has from the gluten in it. To ensure the safe transferal of pastry from counter to pie plate in one piece, I recommend rolling out the pastry between two sheets of parchment paper. Once the pastry has been rolled to the desired thickness, generally somewhere between 1/16” about 1/8” thickness, simply remove the top sheet of parchment, slide your hand under the bottom sheet and carefully lift the pastry, flip it over into the pie plate, and peel off the parchment paper. A tip is to lightly flour the bottom piece of parchment and the top of the pastry. This will make the task of peeling off the parchment paper easier. Fit the dough snugly into the plate and trim pastry flush with pie plate edge. I don’t like thick pie crusts so you’ll notice, from the photos, that I roll my pastry quite thin. That’s a matter of personal preference so, if you like a thicker crust, by all means, go ahead and roll the pastry a little bit thicker.
Gluten-free Apple Pie
Roll the pastry for the top crust the same as for the bottom crust but make sure there is no wrinkle in the parchment paper as this will form a wrinkle imprint in the pastry as the pastry is being rolled out. This is less of a concern for the bottom pastry crust but, for presentation purposes, is an issue for the top crust. For this reason, I recommend starting with a new piece of parchment when rolling out the top crust pastry.
Don’t forget to dampen the outside rim of the bottom pie pastry before placing the top pastry over the filling. The pastry edge needs to be dampened lightly with water which will seal the two crusts together.
Gluten-free Apple Pie
The Filling
My traditional apple pie recipe calls for uncooked apples mixed with spices and sugar. That version will yield a pie where the layers of apples stay intact and totally visible once the pie is baked and sliced. For this apple pie recipe, however, I am pre-cooking the apples by sautéing them in butter, then mixing in the sugar, spices, and cornstarch while they sauté. The result is a filling that resembles the consistency of a can of apple pie filling (only this homemade version is, in my opinion, much better!).
Gluten-free Apple Pie
There are advantages to this method of making the filling. First, juices from the apples are released during the sautéing process and are thickened before going in to the pie. I find there is less chance of the pie boiling out significantly because the juices have already been released and thickened before going into the pie. Second, it is easier to arrange the filling in the pie because the apples have softened a bit. Whereas for raw apples there can be gaps in the filling, there are generally none with a pre-cooked filling.
The trick to this method is to not overcook the apples because, remember, they will continue to cook as the pie bakes. You still want to be able to see the apples (not applesauce) in the filling. For this reason, it’s important to use apples that have a crisp, firm texture so they can stand up to the sautéing and baking and still hold shape when the pie is sliced. My favorites are Spartans, Cortland, Pippins, Honeycrisp, and Lobo. I usually use a combination of at least three (and sometimes more) different varieties. Using a mix of apple varieties will give better flavor, especially if a blend of tart and sweet apples is used. Slice the apples at least ¼” thick for this filling.
I use mostly brown sugar combined with a small amount of granulated sugar for this recipe. Brown sugar will give a richer flavor and deeper color to the filling. Choosing spices for an apple pie filling is always subjective. Some use just cinnamon while others will add nutmeg. I like a blend of spices in my apple pies so have chosen cinnamon, nutmeg, and allspice for this recipe. A splash of brandy (optional) will also enhance the flavor of the pie but, note, just a small splash! Either flour or cornstarch can be used to thicken the filling. Cornstarch, however, will tend to yield a more clear filling than will flour.
Gluten-free Apple Pie
Preparing the Pie for the Oven
After the top pie pastry has been placed over the filling, the edges of the top and bottom pastries need to be pressed together to seal in the filling. There are various ways the pie edges can be joined. I tend to go with the simple pressing of the bottom and top pastry with the tines of a fork. I think this is also the easiest method to ensure the pie cuts out with the edges intact. Other methods, such as crimping, are raised up and can burn more quickly during baking and are also at risk of breaking off as the pie is cut.
Gluten-free Apple Pie
It’s important that the top pie pastry be vented for baking. Otherwise, the crusts may be soggy from too much steam trapped in the pie. It may also cause the top crust to leave the filling and puff up, leaving a hollow space between crust and filling. This will cause the crust to break when the pie is sliced and, for presentation purposes, the pie slice will not be visually pleasing when plated.
Use a sharp-tipped paring knife to cut criss-crosses in the pie pastry starting in the center with a slightly large “X” and then adding smaller ones all around the circumference of the pie. I also use the tines of a fork to prick the pie pastry in various places in the top crust pastry for added venting.
Brushing a very light coating of an egg-milk wash on the top crust will yield a crust with more “tan”. A sprinkle of granulated sugar may also be added but note this may cause the top crust to brown fast and before the pie is baked. If this happens, tent the pie loosely with tin foil.
I recommend placing the pie in the refrigerator for approximately 30 minutes or so before baking. This will chill the pastry and reduce chance of it shrinking significantly while baking.
Fruit pies have a tendency to boil out during baking, even if they are well vented and the filling pre-cooked, so I recommend placing the pie on a tinfoil-lined rimmed baking sheet. If the pie does boil out, you won’t be faced with an oven cleaning job.
Baking the Pie
Preheat the oven to 425°F and bake the pie at this temperature for 10 minutes then reduce the heat to 375°F and bake for approximately 40 minutes or until the crust is lightly tanned and juice from the pie is bubbling slightly through vented holes.
Transfer the pie to a cooling rack and allow it cool completely before cutting. This allows the filling to settle so it stays intact (instead of running) when the pie is cut.
Serving the Pie
This pie benefits from a few hours of refrigeration after it has cooled completely at room temperature. The chilled pie is easier to cut and the filling stays in place.
Gluten-free Apple Pie
The most common ways to serve apple pie are plain, with cheddar cheese, or with vanilla ice cream.
Gluten-free Apple Pie
This gluten-free apple pie is a tasty treat indeed!
Gluten-free Apple Pie
[Printable recipe follows at end of posting]
Gluten-free Apple Pie
Filling
Ingredients: 2/3 cup brown sugar, lightly packed ¼ cup granulated sugar 1 tsp cinnamon ½ tsp nutmeg 1/8 tsp allspice 1/8 tsp salt 3 tbsp cornstarch
2-3 tbsp butter
2½ lbs apples, peeled, cored, and sliced into ¼” thick slices (about 8 medium-large sized apples) 1 tbsp lemon juice 1 tbsp brandy (optional)
Method: In small bowl, whisk together the brown and white sugars, spices, salt, and cornstarch. Set aside.
Prepare apples and sprinkle with lemon juice and brandy (optional). With large wooden spoon, gently toss apples to coat with the lemon juice and brandy.
In large saucepan, melt butter over medium-high heat. Reduce heat to medium low and add the apples. Sauté for 5 minutes, stirring gently and frequently.
Stir in the sugar-spice-cornstarch mixture. Cook for 4 minutes, stirring gently and frequently. Remove from heat and cool filling completely.
While filling is cooling, prepare the pastry.
Pastry for 1 double-crusted 9” pie
2 cups (276g) gluten-free 1-to-1 flour ½ tsp salt 1½ tsp sugar
¼ cup cold butter (76g) ¼ cup cold lard (76g)
1 large egg (reserve apx 1 tsp of the yolk for the egg wash) 1 tsp white vinegar Enough water to make 2/3 cup liquid
1-2 tsp milk Method:
In medium-sized bowl, whisk the flour, salt, and sugar together. Cut the butter and lard into chunks and add to the flour. With a pastry cutter, cut the butter and lard into the flour until the fats resemble the size of large peas.
In a measuring cup, whisk the egg and vinegar together. Add enough cold water to measure 2/3 cup. Add the egg-vinegar-water mixture to the flour, small amounts at a time, and mix with a fork. Add only enough water that the dough clings together and can be formed into a ball.
Divide the dough in half. Form disk shapes with each piece. Place disks in the refrigerator for about 10-12 minutes to chill. Remove one disk from the refrigerator and place between two sheets of parchment paper. Roll pastry to desired thickness, generally between 1/16”and 1/8” thickness. Peel the top piece of parchment from the rolled out pastry. Slide hand under parchment that has the rolled pastry and carefully flip it into a 9” pie plate that has been lightly sprayed with cooking spray or greased. Cut off excess dough so pastry is flush with the pie plate edge. Place pie shell in refrigerator for 15-20 minutes to chill. Remove second disk of pastry from refrigerator.
Prepare pastry for the top crust in the same manner as for the bottom crust. Remove pie shell from refrigerator and arrange cooled pie filling in prepared cold shell. Brush edges of bottom crust along pie plate edge with a bit of water to moisten. Transfer pastry to the top of pie filling. Trim excess pastry from the pie plate edge. Press the edge of the pastry all around the pie plate rim with tines of fork to adhere top crust to bottom crust. Cut slits in top of pie pastry to allow steam to escape as pie bakes. For additional venting, prick the pie in several places with tines of a fork.
In small bowl, lightly beat the reserved egg yolk with 1-2 tsp milk. With a pastry brush, lightly brush the pie with the egg-milk mixture. Sprinkle with granulated sugar.
Place pie in refrigerator for 30 minutes to allow filling to settle and to chill pastry to reduce shrinkage while it bakes.
Preheat oven to 425°F.
Transfer pie to oven. Bake at 425°F for 10 minutes then reduce heat to 375°F. Bake for another 40 minutes then test with fork inserted into slit in center of pie to determine if apples are cooked. Apples should be fork-tender when pie is done. If not done, return pie to oven and check every 5 minutes until apples are fork tender. If pie browns too quickly before it is cooked, loosely tent pie with tin foil. Remove pie from oven and transfer to cooling rack.
A lightly spiced cooked apple pie filling sandwiched between a tender, flaky, and flavorful gluten-free pie crust.
Course Dessert
Cuisine American
Servings6
My Island Bistro KitchenMy Island Bistro Kitchen
Ingredients
2/3cupbrown sugar, lightly packed
1/4cupgranulated sugar
1tspcinnamon
1/2tspnutmeg
1/8tspallspice
1/8tspsalt
3tbspcornstarch
2-3tbspbutter
2 1/2 lbsapples, peeled, cored, and sliced into 1/4" thick slices (about 8 medium-large sized apples)
1tbsplemon juice
1tbspbrandy (optional)
Gluten-Free Pastry for 1 double-crusted 9" pie
2cups (276g)gluten-free 1-to-1 flour
1/2tspsalt
1 1/2 tspgranulated sugar
1/4cup (76g)cold butter
1/4cup (76g)cold lard
1large egg (reserve apx 1 tsp of the yolk for the egg wash)
1tspwhite vinegar
Enough cold water to make 2/3 cup liquid
1-2tspmilk
Instructions
Filling: In small bowl, whisk together the brown and white sugars, spices, salt, and cornstarch. Set aside.
Prepare apples and sprinkle with lemon juice and brandy (optional). With large wooden spoon, gently toss apples to coat with the lemon juice and brandy.
In large saucepan, melt butter over medium-high heat. Reduce heat to medium low and add the apples. Sauté for 5 minutes, stirring gently and frequently.
Stir in the sugar-spice-cornstarch mixture. Cook for 4 minutes, stirring gently and frequently. Remove from heat and cool filling completely.
While filling is cooling, prepare the pastry.
Gluten-free Pastry for 1 Double-crusted Pie
In medium-sized bowl, whisk the flour, salt, and sugar together. Cut the butter and lard into chunks and add to the flour. With a pastry cutter, cut the butter and lard into the flour until the fats resemble the size of large peas.
In a measuring cup, whisk the egg and vinegar together. Add enough cold water to measure 2/3 cup. Add the egg-vinegar-water mixture to the flour, small amounts at a time, and mix with a fork. Add only enough water that the dough clings together and can be formed into a ball.
Divide the dough in half. Form disk shapes with each piece. Place disks in the refrigerator for about 10-12 minutes to chill. Remove one disk from the refrigerator and place between two sheets of parchment paper. Roll pastry to desired thickness, generally between 1/16”and 1/8” thickness. Peel the top piece of parchment from the rolled out pastry. Slide hand under parchment that has the rolled pastry and carefully flip it into a 9” pie plate that has been lightly sprayed with cooking spray or greased. Cut off excess dough so pastry is flush with the pie plate edge. Place pie shell in refrigerator for 15-20 minutes to chill. Remove second disk of pastry from refrigerator.
Prepare pastry for the top crust in the same manner as for the bottom crust. Remove pie shell from refrigerator and arrange cooled pie filling in prepared cold shell. Brush edges of bottom crust along pie plate edge with a bit of water to moisten. Transfer pastry to the top of pie filling. Trim excess pastry from the pie plate edge. Press the edge of the pastry all around the pie plate rim with tines of fork to adhere top crust to bottom crust. Cut slits in top of pie pastry to allow steam to escape as pie bakes. For additional venting, prick the pie in several places with tines of a fork.
In small bowl, lightly beat the reserved egg yolk with 1-2 tsp milk. With a pastry brush, lightly brush the pie with the egg-milk mixture. Sprinkle with granulated sugar.
Place pie in refrigerator for 30 minutes to allow filling to settle and to chill pastry to reduce shrinkage while it bakes.
Preheat oven to 425°F.
Transfer pie to oven. Bake at 425°F for 10 minutes then reduce heat to 375°F. Bake for another 40 minutes then test with fork inserted into slit in center of pie to determine if apples are cooked. Apples should be fork-tender when pie is done. If not done, return pie to oven and check every 5 minutes until apples are fork tender. If pie browns too quickly before it is cooked, loosely tent pie with tin foil. Remove pie from oven and transfer to cooling rack.
Recipe Notes
[Copyright My Island Bistro Kitchen]
If you have made this recipe and enjoyed it and/or wish to share it with your friends and family, please do so on social media but be sure to share the direct link to this posting from my website.
Connect with My Island Bistro Kitchen on Social Media
Follow “the Bistro” on Pinterest at https://www.pinterest.ca/peibistro/ and pin the Pinterest-ready photo found at the end of this post to your favorite Pinterest boards.
This recipe for Glazed Lemon Pecan Sweet Bread is an adaptation of my great grandmother’s lemon sweet bread. Back in her day, this sweet bread would have been considered quite a luxurious treat, perhaps one reserved for company. Continue reading Glazed Lemon Pecan Sweet Bread→
I am always dismayed (and disheartened) at how many people toss a turkey carcass after the turkey dinner. To me, that is such a waste as there is a lot of goodness in that turkey carcass and it makes great homemade turkey stock that can be used in many recipes. Continue reading Homemade Turkey Stock Recipe→
These Gluten-Free Pumpkin-Mincemeat Muffins or mini loaves are super tasty and it’s hard to tell they are gluten-free! I believe this is so because I use a mix of gluten-free flours that include almond and coconut flours which lend exceptional texture and flavour to baked goods. Continue reading Gluten-Free Pumpkin-Mincemeat Muffins→
This no-bake chocolate coconut square is one of the easiest to make and it does not take a lot of ingredients. The recipe calls for graham wafer crumbs – to make this square gluten-free, use gluten-free graham style crumbs. There may be a number of brands of these crumbs available. I use the Kinnikinnick brand. In fact, the squares in the photos in this post are made with these gluten-free crumbs.
Chocolate Coconut Squares
This square is almost candy-bar quality. It is not a thick square but it is rich, moist, and very tasty! A great treat anytime and a sure favorite on any sweet tray.
Chocolate Coconut Squares
Unbaked Chocolate Coconut Square
Ingredients: ½ cup butter, softened at room temperature 2 tbsp brown sugar 2 tbsp granulated sugar 3 tbsp unsweetened cocoa
1 extra large egg, room temperature, beaten 1 tsp vanilla
2 cups graham wafer crumbs 1 cup shredded unsweetened coconut ½ cup chopped pecans
Method: Line 9”x9” baking pan with parchment paper, leaving enough paper overhang that finished square can be lifted from the pan for easy icing and cutting.
Combine butter, sugars, and cocoa in medium-sized heavy bottomed saucepan. Cook over medium low heat until butters melt and ingredients are combined and heated. Stir frequently to prevent scorching. Do not boil.
Add the beaten egg and vanilla. Cook over medium low heat for 2-3 minutes, stirring constantly.
Remove from heat and add the graham wafer crumbs, coconut, and pecans. Stir to combine ingredients well.
Spread mixture evenly in prepared pan. Cool. Ice with buttercream icing (recipe follows). Cut into squares of desired size.
Icing
Ingredients:
2 cups sifted powdered sugar (aka icing sugar/confectioner’s sugar) 3 tbsp butter, softened at room temperature 2½ tbsp water ½ tsp almond flavoring
1 – oz square semi-sweet chocolate 1 tbsp butter, softened at room temperature
Method: Combine the powdered sugar and butter in bowl of stand mixer. Mix on low speed to blend in butter. Add the water and almond flavoring and increase speed to medium-low to blend ingredients. Increase speed to high and beat an additional minute to ensure ingredients are well combined and icing is smooth. Additional water may be required to make icing of desired spreading consistency. If adding additional water, add by ½ teaspoon at a time.
Spread icing evenly over square. Melt the chocolate square and butter in small dish in microwave only until the ingredients have melted enough to be blended together. Drizzle in desired design over icing. Cut squares into desired size.
Line 9”x9” baking pan with parchment paper, leaving enough paper overhang that finished square can be lifted from the pan for easy icing and cutting.
Combine butter, sugars, and cocoa in medium-sized heavy bottomed saucepan. Cook over medium low heat until butters melt and ingredients are combined and heated. Stir frequently to prevent scorching. Do not boil.
Add the beaten egg and vanilla. Cook over medium low heat for 2-3 minutes, stirring constantly.
Remove from heat and add the graham wafer crumbs, coconut, and pecans. Stir to combine ingredients well.
Spread mixture evenly in prepared pan. Cool. Ice with buttercream icing (recipe follows). Cut into squares of desired size.
Icing
Combine the powdered sugar and butter in bowl of stand mixer. Mix on low speed to blend in butter. Add the water and almond flavoring and increase speed to medium-low to blend ingredients. Increase speed to high and beat an additional minute to ensure ingredients are well combined and icing is smooth. Additional water may be required to make icing of desired spreading consistency. If adding additional water, add by ½ teaspoon at a time.
Spread icing evenly over square. Melt the chocolate square and butter in small dish in microwave only until the ingredients have melted enough to be blended together. Drizzle in desired design over icing. Cut squares into desired size.
Yield: 1 – 9”x9” pan of squares
Recipe Notes
To make this square gluten-free, use gluten-free graham style crumbs.
[Copyright My Island Bistro Kitchen]
Enjoy these other squares, bars, and brownie recipes from My Island Bistro Kitchen:
If you have made this recipe and enjoyed it and/or wish to share it with your friends and family, please do so on social media but be sure to share the direct link to this posting from my website.
Connect with My Island Bistro Kitchen on Social Media