


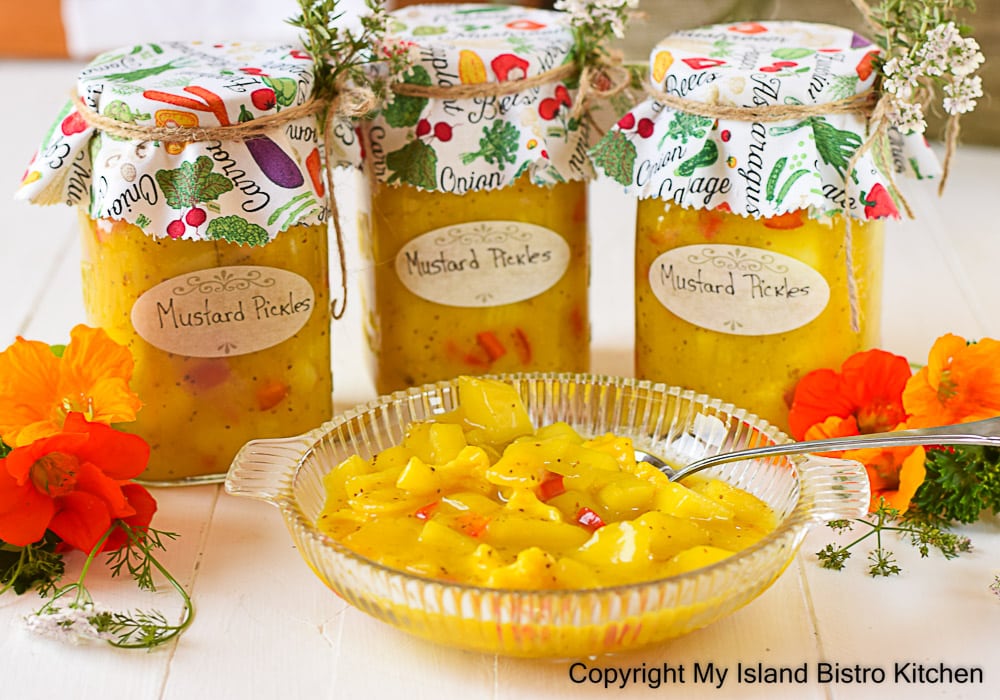
One of the most common fall flavors in many Prince Edward Island households surrounds pickle, chow, and relish-making. I love the smell of fresh mustard pickles in the house – not so much the mess, the tedious job of peeling and cutting up the cucumbers, and the “distressing” task of peeling strong pickling onions – an activity sure to bring a tear to the eye! In many Island households, a meal of any kind is not complete unless there are mustard pickles on the table. So, for most of us true cooks, we endure the process knowing the end result is worth the effort.
There are as many recipes for mustard pickles as there are cooks on the Island. There are any number of sites on the Internet that will give detailed and scientific instructions on how to make pickles. What follows is my recipe and the method for making mustard pickles that I have used for years.
Here are my hints and tips for ensuring a good batch of sweet mustard pickles.
Assemble the Necessary Ingredients

Pickling Cucumbers
Just like anything, fresh is always best. Some say only cucumbers that have been picked no longer than 24 hours should be used. Cucumbers that have been picked for days start to get soft and “punky” and are not good for pickling because they have already started to deteriorate and lose their freshness. So, look for firm pickling cucumbers, sometimes referred to as “field cucumbers”. Ask for them at your local farm stand and inquire when they were picked.
It’s always difficult to say exactly how many pounds of cucumbers will be needed for a certain number of cups of cut-up cucumbers as there are so many variables at play. First, it will largely depend on the variety and quality of the pickling/field cucumbers. Some have a lot of flesh and little gelatinous membrane while others have a lot of seeds and gelatinous membrane that must be removed and discarded leaving very little cucumber flesh to be cut up.
It also depends on what size chunks of cucumbers are cut up for the pickles – i.e., larger chunks will obviously fill up a cup faster than smaller ones will. While it may sound like a wide difference, I have used anywhere between 6 pounds and 9 pounds of cucumbers to get the 8 cups of cut-up cucumbers to make this recipe, the differences being attributed largely to the quality and variety of cucumbers and how much internal gelatinous membrane they had that had to be discarded.
Onions
Look for firm, fresh onions. Strong, fresh onions are needed for flavoring in the pickles. Sometimes, but not always, there are bags of “pickling onions” available on the market. These are smaller onions and are so named because they are a stronger tasting onion – you’ll quickly know their strength when you start to peel them!
I have no secret for avoiding the “tears” when peeling the onions. Some claim if you hold the onions underwater while peeling them, that works. Others say to peel them outside. No matter what method I have tried, it’s a teary job!

Cutting the Cucumbers and Onions for Mustard Pickles
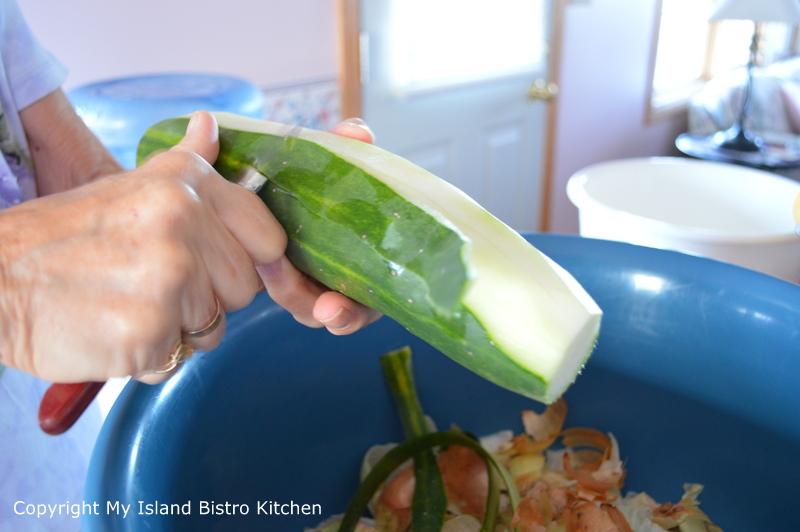
I always peel the cucumbers. Some cooks like to leave a few of the cucumbers with the peeling on them but I find this makes the pickles tough and I don’t particularly care for the appearance of them in the pickles. Once the cucumbers are peeled, slice them in half, lengthwise, then halve them again. If the cucumbers are particularly large, slice them in half again. Remove and discard all the seeds and inner gelatinous membrane from each cut section.

I am not too fussy when I cut up the cucumbers and onions – I don’t worry about getting the pieces all perfectly uniform sizes. I tend to like the cucumbers and onions cut in about ½”-3/4” pieces – any smaller and the pickles are starting to resemble relish. This, of course, is a personal preference. There is no right or wrong size of pickles.
Cauliflower and Red Pepper
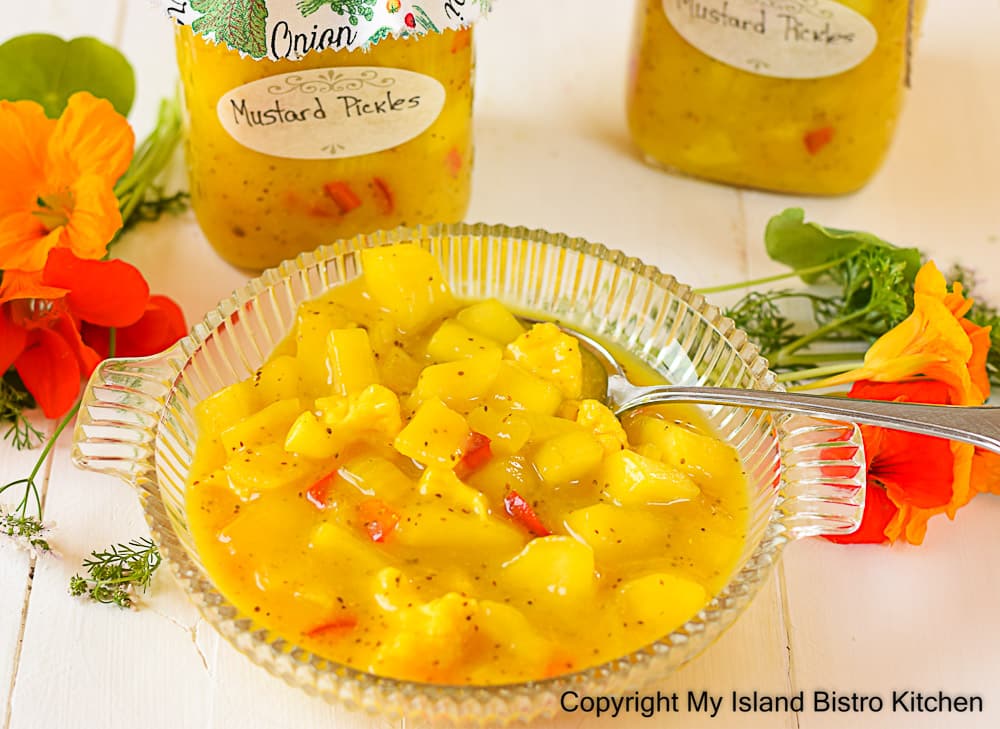
While certainly not necessary, cut-up cauliflower flowerets and sweet red pepper can be added to the pickles and I always do add them. The red pepper adds color and dresses the pickles up, both in the bottle and on the table. The cauliflower adds texture and variety to the pickles.
Pickling Salt
For both taste and preserving the pickles over the winter, as well as for color of the pickles, it is very important that proper pickling salt be used in the water/salt brine that is used to soak the cut-up cucumbers and onions. This is a coarse salt specifically made for pickling and it will be so marked on the label. NEVER use fine iodized table salt in pickles as this will produce a cloudy sauce that is a poor and unappetizing color (e.g., sort of a mossy-green-yellow color). It will also make the pickles taste too salty because the vegetables absorb too much of the salt. I can always tell when I see a bottle of discolored pickles that someone has made them using regular table salt.
The pickling salt is a slower dissolving salt. For this reason, make sure you stir it into the water for the soaking brine really well and that it is fully dissolved before pouring the brine over the cukes and onions. You don’t want any salt granules sitting on the cucumber mixture for hours. I find mixing some boiling water with the salt and stirring it well helps to dissolve the salt. Make sure, however, that the salt water brine is completely cooled before pouring over the vegetables.

Soaking the Vegetables
Unless you are using a recipe that specifically gives directions to the contrary, plan on soaking the cucumbers, cauliflower, and onions in the salt and water brine for at least for 8-10 hours. Cucumbers have a lot of water in them so, in order to have crisp pickles, the excess water needs to be removed from them. Soaking them in a slow-dissolving salt/water brine draws the natural water out of the cucumbers, opens their cells, and allows the mustard pickling sauce to penetrate them. This gives the pickles greater flavor, good color, and a longer shelf life.
Add the red pepper (if using) after the veggies have been rinsed and drained (the peppers do not need to soak in the salt water brine).

Draining the Vegetables
After the soaking period has ended, drain the vegetables thoroughly in a colander and rinse quickly with cold water to remove any excess salt. Just a brief, quick rinse is all that is required. Then, let them drain for about an hour or so to get as much water drained off of them as possible. If too much water is left on them, it will dilute the mustard sauce and make the pickles too runny.

Mustard Pickles Spices
Of course, the right mixture of pickling spice is necessary for flavorful pickles – the wrong combination of spices, or too much or too little, will leave you with pickles you won’t be satisfied with. Pickling spice, as a product, is not always available on the store shelf and sometimes I have had to create my own mixture using some or all of the following: mustard seed, whole allspice and cloves, coriander seed, red pepper flakes, bay leaves, cinnamon stick pieces, peppercorns, and whole or coarse pieces of dried ginger.
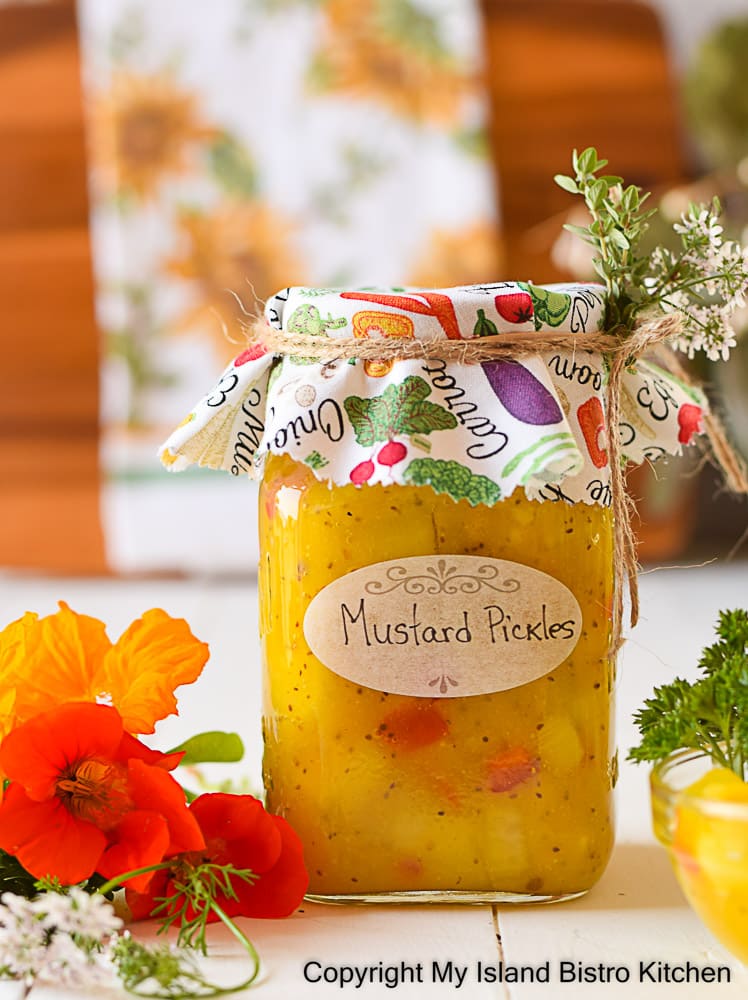
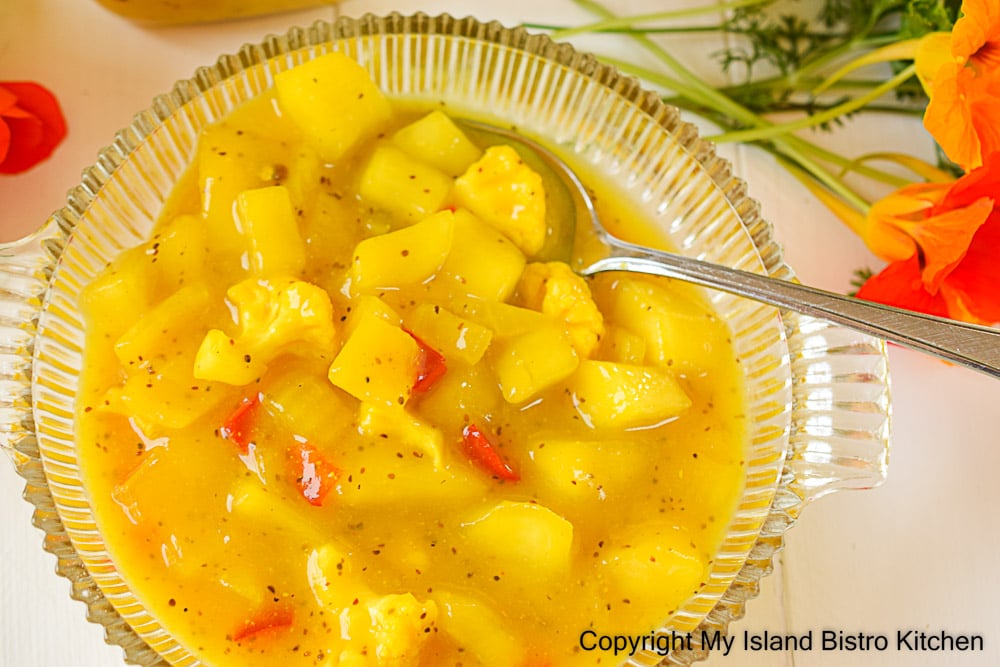
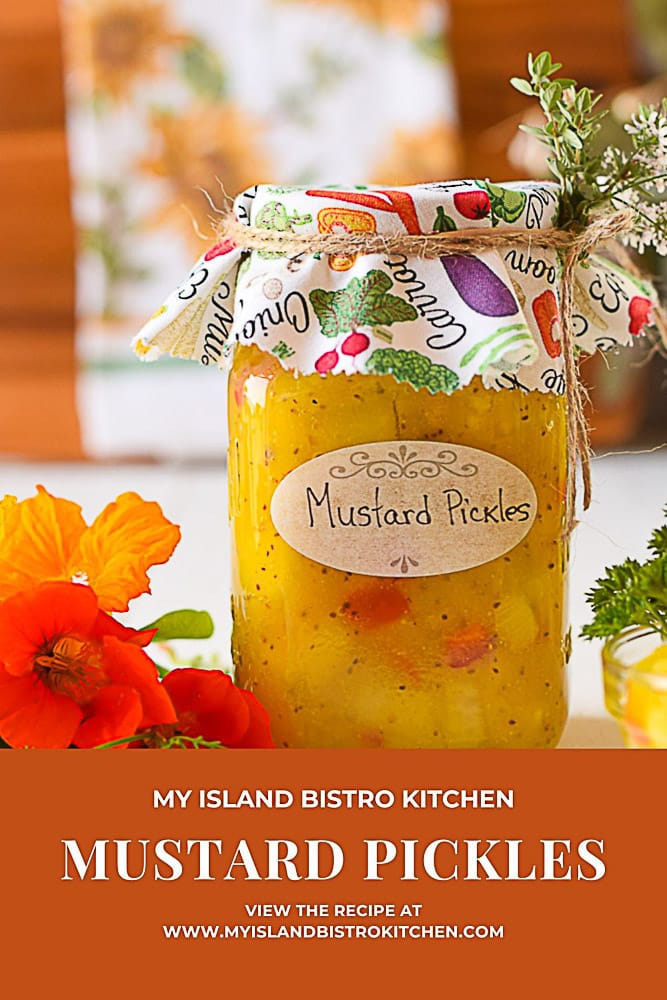
Whole spices (as opposed to dried) are said to be better because they will not cause the pickles to darken in color. The look you are going for is that nice, bright mustard yellow color like that shown in the photo below.
You don’t want whole spices and junks of cinnamon stick or bay leaves making their way into the pickle jars and on to the plate so it is necessary to contain them in a sachet.

To make a pickling spice sachet, you will need a small piece of cheesecloth (available at fabric stores or even at some dollar stores). This will have a very loose weave so I usually double or even fold it over 3-4 times and then place 1-1 1/2 tablespoons of the pickling spice mixture in the centre. Gather up the cheesecloth around the spice and tie it with a heavy thread or kitchen string. This sachet then gets dropped into the boiling vinegar and sugar mixture and left in during the entire pickle-cooking process. It then gets removed just before bottling the pickles. This sachet allows the vinegar and pickles to be infused and flavored with the spices without having the spices directly in the pickle mixture when they are bottled.
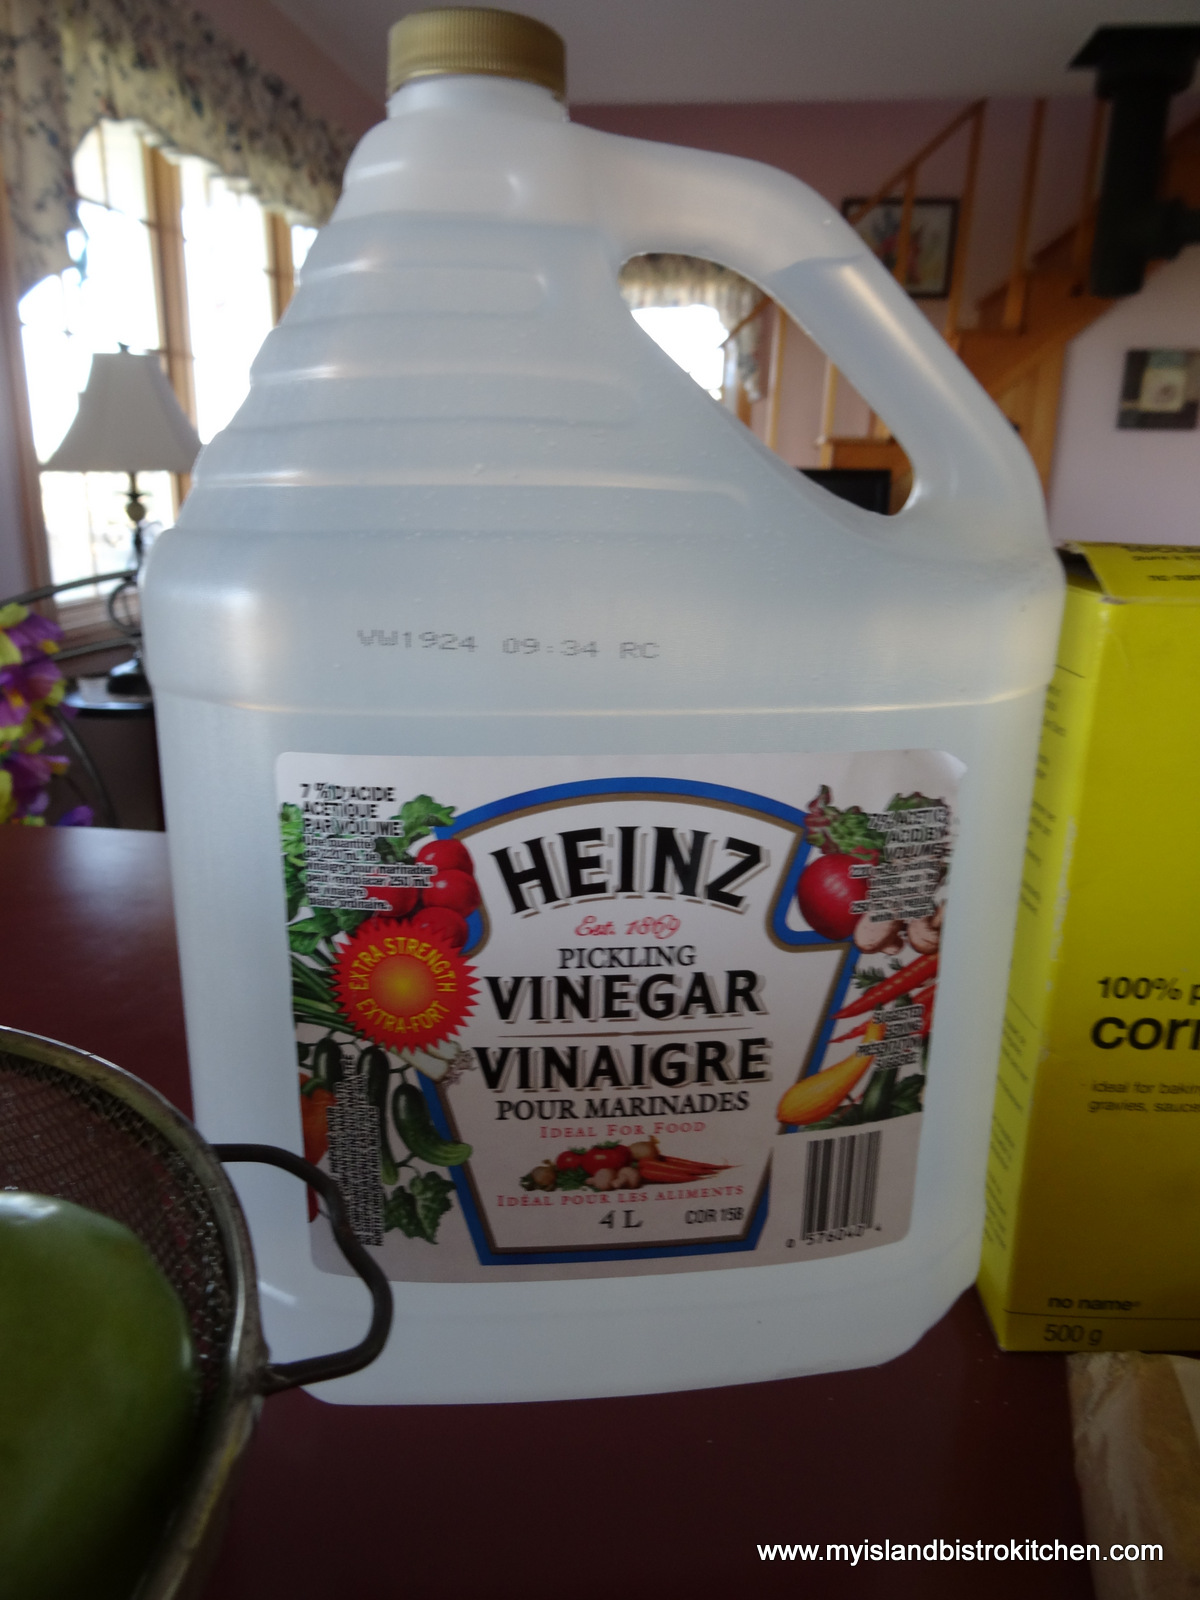
Pickling Vinegar
Be sure to use vinegar that is specially labelled for pickling – it will usually have 7% acidity, making it stronger than table vinegar and will help to preserve the pickles longer.
Boiling Vinegar and Sugar
It is important to boil the majority of the vinegar the recipe calls for along with the sugar. This helps the sugar to dissolve before the vegetables are added. The heat from the boiling mixture will also help the flavors from the spices in the sachet to infuse the vinegar.

Making the Sauce for Mustard Pickles
Mix part of the sugar the recipe calls for with the flour, dry mustard powder, and any other spices. Then add the remaining vinegar from the recipe ingredient list to make the paste for the pickle sauce. To this paste, add about ¾ cup of the boiling vinegar from the stockpot. This “tempers” the paste it so it doesn’t go lumpy when added to the boiling vinegar already in the pot.

Cook the sauce slowly to thicken it and stir often to prevent scorching. Be patient – this process can take several minutes. The mixture should coat a spoon and drip very slowly off the spoon when the sauce is thick enough to add the vegetables.

It is important that the sauce gets thickened to the right consistency before adding the drained vegetables as they will still have a lot of moisture in them and the sauce will not thicken any further after they have been added.
Heating the Vegetables
Heat the vegetables in the sauce slowly, stirring periodically – you want the veggies to stay crisp and crunchy, not be cooked to mush. Do NOT boil the vegetables.

Bottling the Pickles
Bottling, of course, is very important. Ensure that proper canning jars are used for the pickles. These are bottles such as Mason or Ball brand jars that are made of specially tempered glass capable of withstanding heat that will be necessary in the hot water canner for safe home canning of products. The glass jars have a wide mouth top and consist of a two-part lid and screw band.
While our ancestors may have used just any bottles they had at their disposal, using recycled bottles from store-bought products like pasta sauce, for example, is not recommended. First, these jars, having already been sealed by the manufacturer and the seals having been broken by the consumer to reveal the contents, no longer have proper sealing covers considered safe for home canning of products. Second, the bottles are generally made of glass not as thick as proper canning jars and, therefore, are not considered to be resistant to heat extremes. This means they could shatter or explode when placed in the hot water canner.
With the potential for so many air- and food-borne illnesses to occur today and with the changing conditions in which our foods are grown (or modified), along with the fact that most homes today do not have dedicated temperature-controlled cold rooms (or cold cellars like many of our ancestors had) in which to store home canned goods, it is all the more reason why both the proper canning jars and home canning procedures are an essential component to safe pickle making.
Inspect each bottle before filling it to ensure there are no chips or cracks. Ensure the bottles are sterilized and hot when you bottle the hot pickles. As a baseline, the bottles should be boiled in hot water for a minimum of 10 minutes and then kept in the hot water until they are filled with the pickles.
The metal lids for the canning jars are only single use and should never be reused for canning food. The rubber seal on the lids is good to be heated only once and affixed to a jar top. The lids must be heated to provide a proper seal – never place a cold, unheated lid on a hot filled canning jar. Simply place the lids in a small pan of hot water just long enough to heat the rubber piece. Do not boil them. Make sure the rims of the jars have been wiped with a damp clean cloth to remove any pickle residue. Even a small drop of it may prevent the lids from sealing properly and keeping out harmful bacteria that could cause the pickles to spoil or someone to become ill from consuming them. Once cooled, the orange-rust colored rubber around the circumference of the lid no longer has a sealing quality deemed safe for canning so make sure you place the hot lids on the hot jars immediately. Always, always use new lids for each canning session. The lids are inexpensive so don’t risk re-using them. Once you finish a bottle of pickles, turf the lid.
The screw bands, on the other hand, can be re-used so long as they don’t have any rust spots on them or any dents.
Processing the Filled Pickle Jars
Sweet mustard pickles are a fine addition to many entrées from “meat and potato” meals to casseroles to baked beans and fishcakes. Pickles do take some time and know-how to make but nothing beats homemade mustard pickles that no store-bought version can match.

Do you make mustard pickles or have recollections of your mother or grandmother making mustard pickles?
Mustard Pickles – My Island Bistro Kitchen Style
Ingredients:
8 cups peeled and chopped pickling/field cucumbers, seeds and gelatinous membrane removed (How many cucumbers this takes depends on the variety of cucumber and how much seedy, gelatinous membrane the cucumbers have and that must be removed as well as what size pieces the cucumbers are cut into for the pickles. Generally, it will be in the vicinity of 6+ pounds of cucumbers to yield 8 cups chopped but, note, this is a general guideline only)
4 cups onions, chopped
2 cups cauliflower flowerets (apx. 1 small cauliflower head)
4 cups white pickling vinegar (7% acidity)
3 1/2 cups granulated sugar
1/2 – 2/3 cup all-purpose flour, depending on how juicy or thick you like pickles
1 1/2 tbsp turmeric
1 1/2 tbsp celery seed
1 tbsp mixed pickling spice, tied in a cheesecloth sachet
1/2 cup dry mustard
1/4 tsp ginger powder
Pinch cayenne
1 small red pepper, chopped
¾ cup+ coarse pickling salt
Supplies and Equipment Needed:
7 pint and 1 half-pint glass canning jars
8 – two-piece lid and screw band sets (lids must be brand new and not previously used)
Cheesecloth for making spice sachet
Large bowl for soaking vegetables in salt water brine
Large colander for draining vegetables
Large heavy-bottomed stock pot for heating pickles
Large pot for sterilizing jars
Small saucepan for heating jar lids
Water bath canner with basket
Jar lifter tongs
Wide-mouthed canning funnel
Ladle or heat-proof glass measuring cup
Chopstick or small heat-proof spatula
Magnetic lid lifter
A timer
Method:
Make a brine of pickling salt and water using 1/2 cup coarse pickling salt to 4 cups of water. (I use apx. 6 cups water and 3/4 cup pickling salt for this recipe. The salt will dissolve better if it is mixed with 2 cups of boiling water and stirred. Then, when dissolved, add remaining 4 cups of cold water to cool the mixture down.) Enough brine is needed to completely cover the vegetables so, depending on the size of bowl the vegetables are soaking in, additional brine may need to be mixed up so have some extra pickling salt available for this purpose. Ensure the brine is completely cooled before pouring over the vegetables.
Wash and peel the cucumbers. Slice each in half, lengthwise. Slice in half again. Remove and discard the seeds and inner membrane of the cucumbers. Cut cucumbers to desired size, apx. 1/2″ – 3/4″ pieces.
Peel the onions and cut into pieces similar in size to cucumbers.
Separate the cauliflower into small bite-sized pieces.
Place cucumbers, onions, and cauliflower into a large bowl.
Pour prepared cooled brine over the vegetables, ensuring they are completely covered. Cover bowl with tea towel. Let stand 8-10 hours.
Drain vegetables in a colander and rinse quickly with cold water to remove any excess salt. Let vegetables drain for apx. 45-60 minutes.
Meanwhile, wash jars and lids in hot soapy water. Quickly wash the lids and do not let them stay in the hot dish water as, once heated enough to soften the rubber sealing compound and then cooled, they are no longer effective. Rinse. The lids will be heated at the time of bottling.
Fill a large-sized pot about two-thirds full of hot tap water. Place the jars, upright, into the water. Ensure the jars are fully submerged, each jar filled with water, and that the water is at least an inch over the tops of the jars, adding more if necessary. Cover, bring to a boil, and boil gently for 10 minutes. Turn heat to simmer and leave the jars in the hot water to have ready to fill once the pickles are ready for bottling.
Fill the canner a good half full of hot tap water. Cover and bring to a boil to have it ready for processing of the filled jars. Once it comes to a full boil, reduce heat to keep the water gently boiling.
In a large stock pot, bring to a boil, over medium-high heat, 3 cups of the vinegar and 3 cups of the sugar along with the pickling sachet made of pickling spice tied in cheesecloth. Boil 2-3 minutes.
In bowl, mix remaining 1/2 cup of sugar with the flour, turmeric, celery seed, dry mustard, ginger, and cayenne. Add the remaining 1 cup of vinegar to the dry ingredients and whisk until smooth. Add apx. 3/4 cup of the hot vinegar-sugar mixture to this sauce. This will “temper” it and keep it from going lumpy when added to the hot liquid mixture in the pot. Stir and pour this mixture into the vinegar-sugar mixture in pot. Cook sauce over medium heat until thickened, stirring frequently to prevent scorching. When sauce coats a spoon and drips off slowly, it is thick enough to add the vegetables. (This could take several minutes.)
Add the cup-up red pepper to the other vegetables and add all the vegetables to the thickened mustard sauce and cook over medium-low heat just until vegetables are heated through, apx. 12-15 minutes. Do not boil the vegetables.
Use jar lifter tongs to carefully remove the hot sterilized jars from the water, one at a time, emptying the water from the jars back into the pot. Drain jars well.
Remove a small amount of the hot water from the stockpot in which the jars were sterilized and place in small saucepan over simmering heat. Place the lids in the hot water to soften the rubber sealing compound. Do not boil the lids.
Boil a kettle of water to have ready to top up water in the canner, if needed, once the filled jars are added.
Remove and discard spice sachet from pickle mixture. Using a ladle or a heat-proof glass measuring cup and a wide-mouthed canning funnel, fill the hot sterilized jars with the pickles, leaving about 1/2” headroom in each jar to allow for expansion during the hot water processing. Remove any trapped air bubbles in the jars with a chopstick or small heatproof spatula. Wipe the jar rims with a clean damp cloth to remove any stickiness that could prevent the lids from sealing properly to the jars.
Using a magnetic lid lifter, remove lids from the hot water and center the heated lids on jars so the sealing compound on the lid edges aligns with the jar rims. Fingertip tighten the ring/screw bands until resistance is encountered. Do not over-tighten.
Using jar lifter tongs, carefully place filled jars upright in wire basket positioned in the canner, ensuring jars do not touch each other or fall over. Ensure the water level is at least 1” above the tops of jars, adding more boiling water as necessary. Cover with canner lid. Increase the heat to return the water to a full rolling boil then decrease the heat to just keep the water at a moderately rolling boil but not boiling over. Process jars in the hot water bath for 10 minutes, adjusting time as and if necessary, for higher altitudes. Start timing the processing from the point at which a full rolling boil is reached after jars have been added to the canner. At the end of the processing time, turn off heat and remove canner lid.
Let jars sit in the hot water for 5 minutes then, using jar lifter tongs, carefully remove the jars filled with pickles, upright and one at a time, and transfer them to a heat-proof cutting board, that has been covered with a towel, to cool completely. Listen for the “pop” or “ping” sound as the bottles seal over the next few minutes or hours. The lids of properly sealed jars will curve downward. Let jars rest, undisturbed, on counter for 24 hours. Cover jars with towel to keep light out. Then, after 24 hours, test each jar for proper sealing by pressing down on the center of each jar lid. If the lid is already pressed downward, and does not pop back up, it is properly sealed. Any jars that do not pass this test should be refrigerated and the pickles used within a week or so. Store properly sealed pickle bottles in cool, dark place. Refrigerate pickles once jar has been opened.
Yield: Apx. 7½ pint bottles
For other great pickle and relish recipes from My Island Bistro Kitchen, click on the links below:
Green Tomato Chow
Dill Pickles
Bread and Butter Pickles
Rhubarb Relish
Mustard Beans
Pickled Beets
If you have made this recipe and enjoyed it and/or wish to share it with your friends and family, please do so on social media but be sure to share the direct link to this posting from my website.
Connect with My Island Bistro Kitchen on Social Media
Join the Facebook page for My Island Bistro Kitchen: https://www.facebook.com/MyIslandBistroKitchen/
Follow “the Bistro” on Twitter: https://twitter.com/PEIBistro/
See the drool-worthy gallery of mouth-watering food photos from My Island Bistro Kitchen on Instagram: https://www.instagram.com/peibistro/
Follow “the Bistro” on Pinterest at https://www.pinterest.ca/peibistro/ and pin the Pinterest-ready photo at the end of this posting to your favorite Pinterest boards!
PEI Mustard Pickles Recipe
Ingredients
- 8 cups peeled and chopped pickling/field cucumbers, seeds and gelatinous membrane removed (How many cucumbers this takes depends on the variety of cucumber and how much seedy, gelatinous membrane the cucumbers have and that must be removed as well as what size pieces the cucumbers are cut into for the pickles. Generally, it will be in the vicinity of 6+ pounds of cucumbers to yield 8 cups chopped but, note, this is a general guideline only)
- 4 cups onions, chopped
- 2 cups cauliflower flowerets (apx. 1 small cauliflower head)
- 4 cups white pickling vinegar (7% acidity)
- 3 1/2 cups granulated sugar
- 1/2 - 2/3 cup all-purpose flour, depending on how juicy or thick you like pickles
- 1 1/2 tbsp turmeric
- 1 1/2 tbsp celery seed
- 1 tbsp mixed pickling spice, tied in a cheesecloth sachet
- 1/2 cup dry mustard
- 1/4 tsp ginger powder
- Pinch cayenne
- 1 small red pepper, chopped
- ¾+ cup coarse pickling salt
Instructions
- Make a brine of pickling salt and water using 1/2 cup coarse pickling salt to 4 cups of water. (I use apx. 6 cups water and 3/4 cup pickling salt for this recipe. The salt will dissolve better if it is mixed with 2 cups of boiling water and stirred. Then, when dissolved, add remaining 4 cups of cold water to cool the mixture down.) Enough brine is needed to completely cover the vegetables so, depending on the size of bowl the vegetables are soaking in, additional brine may need to be mixed up so have some extra pickling salt available for this purpose. Ensure the brine is completely cooled before pouring over the vegetables.
- Wash and peel the cucumbers. Slice each in half, lengthwise. Slice in half again. Remove and discard the seeds and inner membrane of the cucumbers. Cut cucumbers to desired size, apx. 1/2″ – 3/4″ pieces.
- Peel the onions and cut into pieces similar in size to cucumbers.
- Separate the cauliflower into small bite-sized pieces.
- Place cucumbers, onions, and cauliflower into a large bowl.
- Pour prepared cooled brine over the vegetables, ensuring they are completely covered. Cover bowl with tea towel. Let stand 8-10 hours.
Drain vegetables in a colander and rinse quickly with cold water to remove any excess salt. Let vegetables drain for apx. 45-60 minutes.
Meanwhile, wash jars and lids in hot soapy water. Quickly wash the lids and do not let them stay in the hot dish water as, once heated enough to soften the rubber sealing compound and then cooled, they are no longer effective. Rinse. The lids will be heated at the time of bottling. Fill a large-sized pot about two-thirds full of hot tap water. Place the jars, upright, into the water. Ensure the jars are fully submerged, each jar filled with water, and that the water is at least an inch over the tops of the jars, adding more if necessary. Cover, bring to a boil, and boil gently for 10 minutes. Turn heat to simmer and leave the jars in the hot water to have ready to fill once the pickles are ready for bottling.
- Fill the canner a good half full of hot tap water. Cover and bring to a boil to have it ready for processing of the filled jars. Once it comes to a full boil, reduce heat to keep the water gently boiling.
- In a large stock pot, bring to a boil, over medium-high heat, 3 cups of the vinegar and 3 cups of the sugar along with the pickling sachet made of pickling spice tied in cheesecloth. Boil 2-3 minutes.
In bowl, mix remaining 1/2 cup of sugar with the flour, turmeric, celery seed, dry mustard, ginger, and cayenne. Add the remaining 1 cup of vinegar to the dry ingredients and whisk until smooth. Add apx. 3/4 cup of the hot vinegar-sugar mixture to this sauce. This will “temper” it and keep it from going lumpy when added to the hot liquid mixture in the pot. Stir and pour this mixture into the vinegar-sugar mixture in pot. Cook sauce over medium heat until thickened, stirring frequently to prevent scorching. When sauce coats a spoon and drips off slowly, it is thick enough to add the vegetables. (This could take several minutes.)
Add the cup-up red pepper to the other vegetables and add all the vegetables to the thickened mustard sauce and cook over medium-low heat just until vegetables are heated through, apx. 12-15 minutes. Do not boil the vegetables.
- Use jar lifter tongs to carefully remove the hot sterilized jars from the water, one at a time, emptying the water from the jars back into the pot. Drain jars well.
Remove a small amount of the hot water from the stockpot in which the jars were sterilized and place in small saucepan over simmering heat. Place the lids in the hot water to soften the rubber sealing compound. Do not boil the lids.
- Boil a kettle of water to have ready to top up water in the canner, if needed, once the filled jars are added.
Remove and discard spice sachet from pickle mixture. Using a ladle or a heat-proof glass measuring cup and a wide-mouthed canning funnel, fill the hot sterilized jars with the pickles, leaving about 1/2” headroom in each jar to allow for expansion during the hot water processing. Remove any trapped air bubbles in the jars with a chopstick or small heatproof spatula. Wipe the jar rims with a clean damp cloth to remove any stickiness that could prevent the lids from sealing properly to the jars.
- Using a magnetic lid lifter, remove lids from the hot water and center the heated lids on jars so the sealing compound on the lid edges aligns with the jar rims. Fingertip tighten the ring/screw bands until resistance is encountered. Do not over-tighten.
- Using jar lifter tongs, carefully place filled jars upright in wire basket positioned in the canner, ensuring jars do not touch each other or fall over. Ensure the water level is at least 1” above the tops of jars, adding more boiling water as necessary. Cover with canner lid. Increase the heat to return the water to a full rolling boil then decrease the heat to just keep the water at a moderately rolling boil but not boiling over. Process jars in the hot water bath for 10 minutes, adjusting time as and if necessary, for higher altitudes. Start timing the processing from the point at which a full rolling boil is reached after jars have been added to the canner. At the end of the processing time, turn off heat and remove canner lid.
Let jars sit in the hot water for 5 minutes then, using jar lifter tongs, carefully remove the jars filled with pickles, upright and one at a time, and transfer them to a heat-proof cutting board, that has been covered with a towel, to cool completely. Listen for the “pop” or “ping” sound as the bottles seal over the next few minutes or hours. The lids of properly sealed jars will curve downward. Let jars rest, undisturbed, on counter for 24 hours. Cover jars with towel to keep light out. Then, after 24 hours, test each jar for proper sealing by pressing down on the center of each jar lid. If the lid is already pressed downward, and does not pop back up, it is properly sealed. Any jars that do not pass this test should be refrigerated and the pickles used within a week or so. Store properly sealed pickle bottles in cool, dark place. Refrigerate pickles once jar has been opened.
Recipe Notes
Yield: Apx. 7½ pint bottles
Copyright My Island Bistro Kitchen
Pin Me To Pinterest!
This post was last updated on September 15, 2022

Wish I knew about this when Kevin and I were losing our pickling virginity about a month ago. Good to have for next year though. Ours were tasty relish more than tasty pickles. Thanks for sharing.
I made a HUGE mistake. I prepared the cucumbers, onions and cauliflower 3 days ago and than I forgot about them! They have been soaking in water and pickling salt at room temperature. I assume they are no longer ok to use, but I wanted to make sure before I sent them to the compost. And advice you have would be appreciated 🙂
Hi Lisa,
Sad to have to say it but, if they have been soaking for 3 days now, they should be discarded. The veggies should only soak overnight or 8-10 hours during the day if you plan to make the pickles in the evening. They would be too punky and salty by this stage and probably wouldn’t keep after pickling so I don’t think it would be worth your time and the rest of the ingredients to make them up 🙁
Barbara