This moist and delicious Rum and Eggnog Cake is made from scratch then coated with a rum and eggnog glaze. Rum and Eggnog Cake is a classic adult treat around the holidays. As such, this cake is not intended for consumption by children. The cake is easy to make and is the perfect holiday dessert. Continue reading Rum and Eggnog Cake Recipe→
Some recipes just never grow old or go out of style and such is the case with this perfectly spiced, Classic Carrot Cake with Cream Cheese Frosting. Continue reading Classic Carrot Cake→
Mini Bundt cakes have become quite popular and trendy and they are ideal individual desserts that present so attractively on a plate. Today, I used my pan of fluted mini Bundt pan molds (each having a 1-cup capacity) to make individual Mini Blueberry Bundt Cakes with a lemon glaze. Continue reading Mini Blueberry Bundt Cakes→
Victoria Sponge Cake – sometimes called Victoria Sandwich – is one of the most basic, simple cake recipes. Essentially, it is made with basic pantry ingredients, filled with a favorite jam and whipped cream, and is unfrosted. Continue reading Classic Victoria Sponge Cake Recipe→
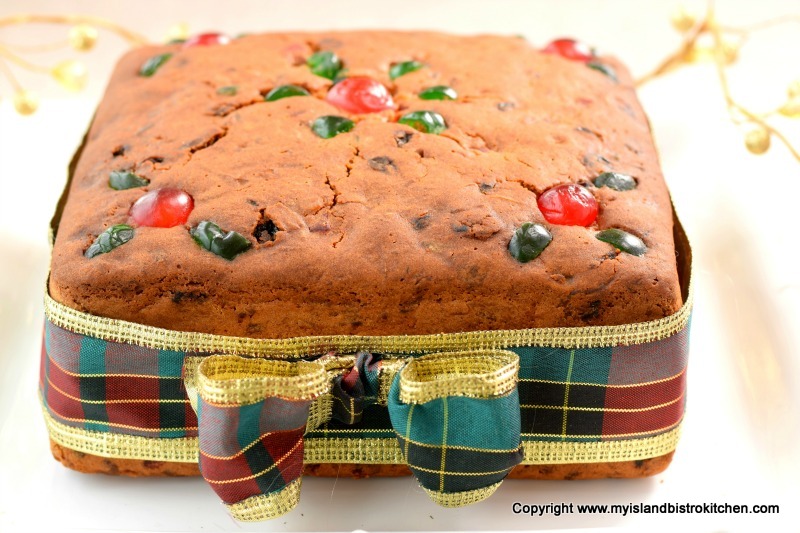
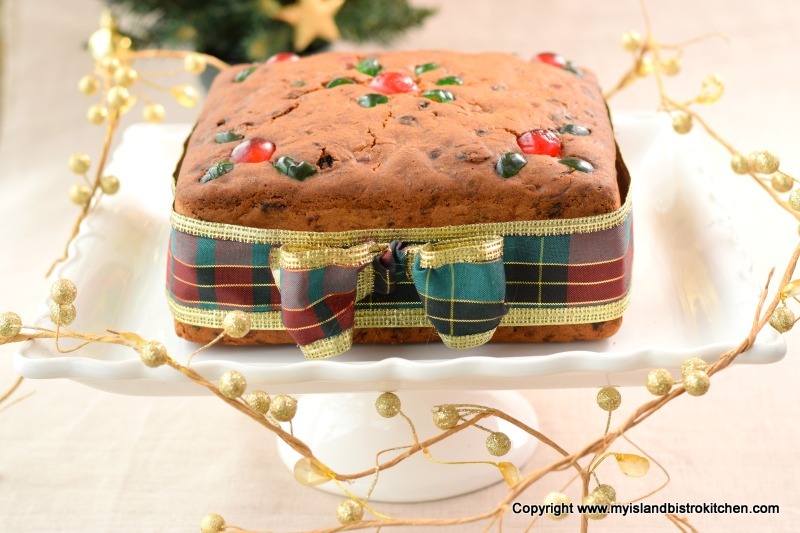
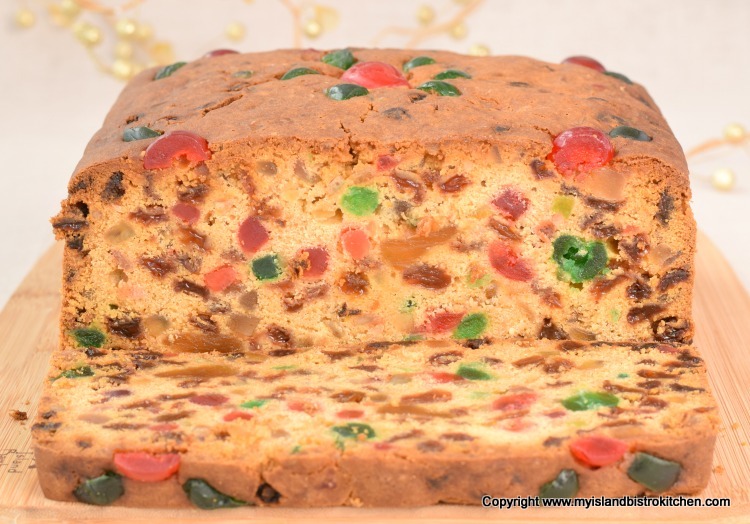
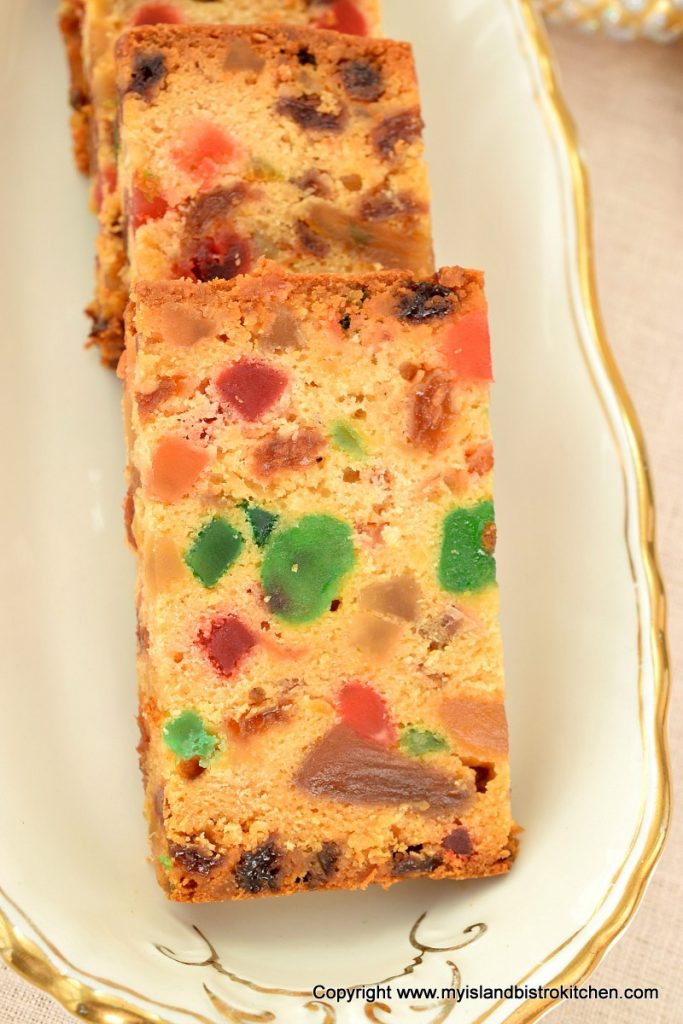
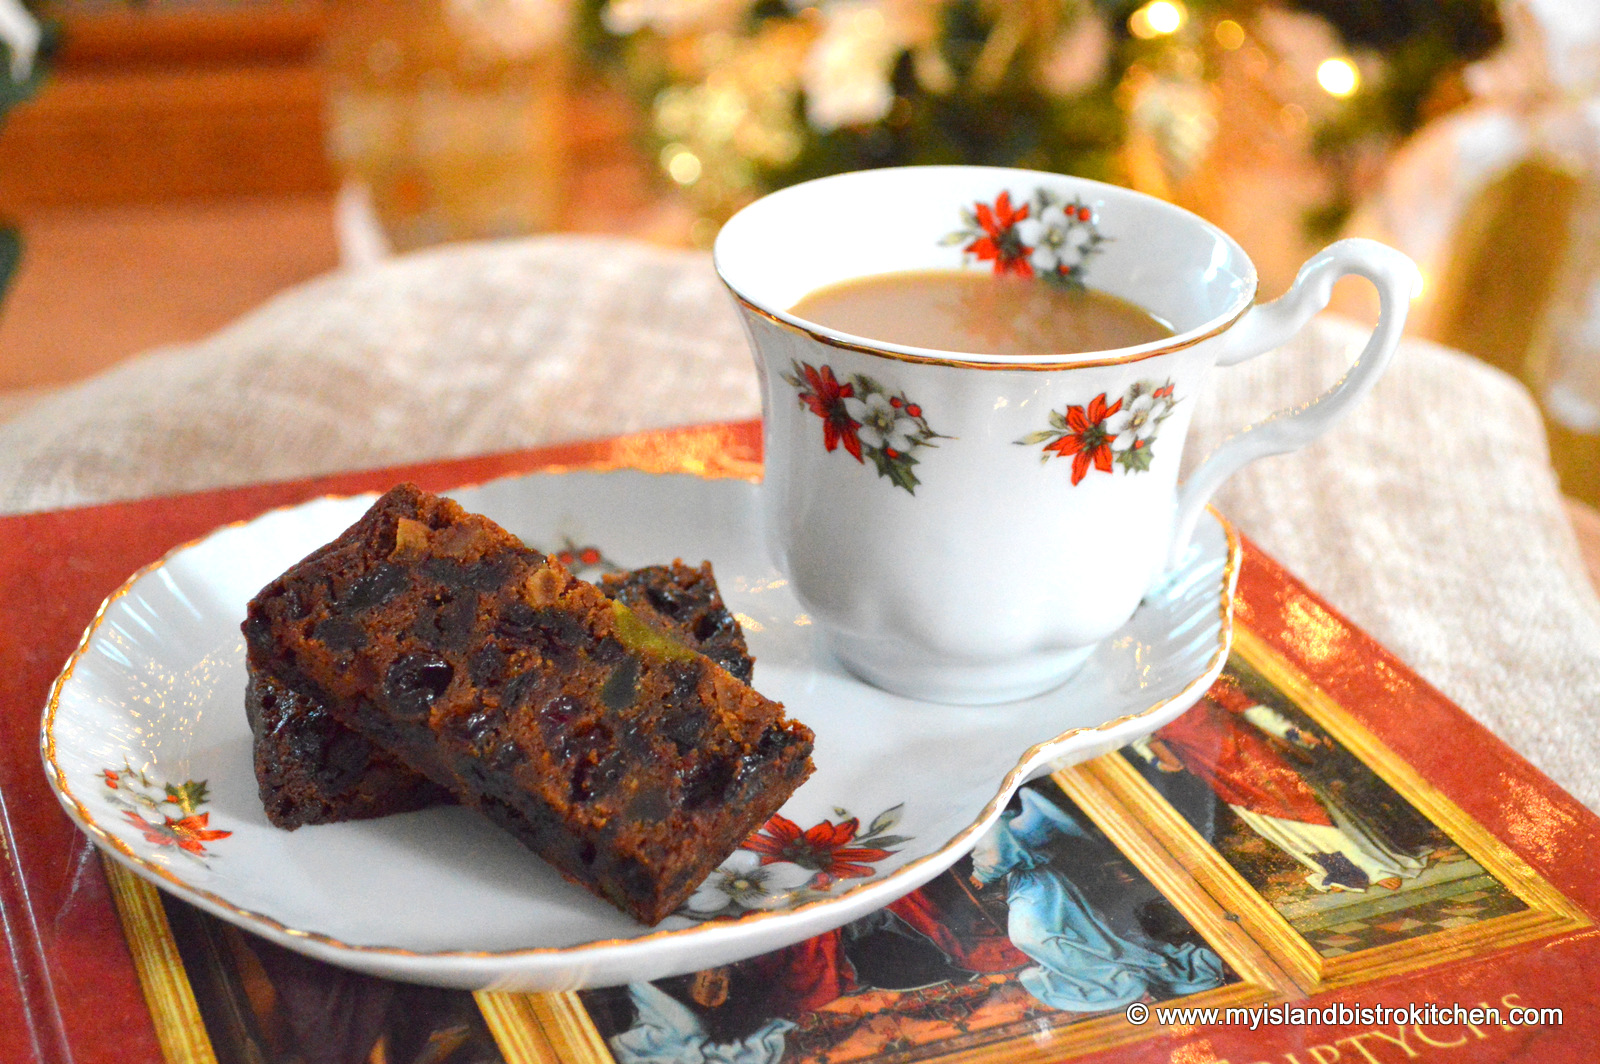
Less rich than a traditional fruitcake, a Dundee Cake still retains some of the elements of a fruitcake and makes a fine treat at Christmas or anytime, for that matter. It’s especially lovely as a teatime cake. Continue reading Spirited Dundee Cake Recipe→
The inspiration for this springtime Lemon Elderflower Cake was drawn from the announcement of the lemon and elderflower flavours for the May 2018 wedding cake of Prince Harry and Meghan Markle. I suspect, after this wedding, that elderflower will be the trendy new flavour for many recipes – either of the eating or drinking kind.
When I had the idea to make this cake, I questioned whether I could find elderflower liqueur (which is what I wanted to use) anywhere on PEI. However, a visit to a local liquor store revealed that they had had numerous requests to bring in elderflower liqueur in the past couple of months to the point that they decided to carry it to see if it was a product that would sell. I am told the bottles of St. Germain Elderflower Liqueur from France are selling well. I suspect people are curious about the flavour of elderflower, especially after it was announced as one of the flavours for the royal wedding cake.
Elderflower liqueur, made with the starry white elderflower blossoms, is rather difficult to describe. It has a somewhat seductive fragrance that I would describe as a layered fusion of floral and citrus notes perhaps from the lemon and grapefruit family. I think I can also detect hints of summer fruits like pears and peaches. It certainly has exotic character and would remind me of a floral summer bouquet with notes of fruit.
Lemon Elderberry Cake
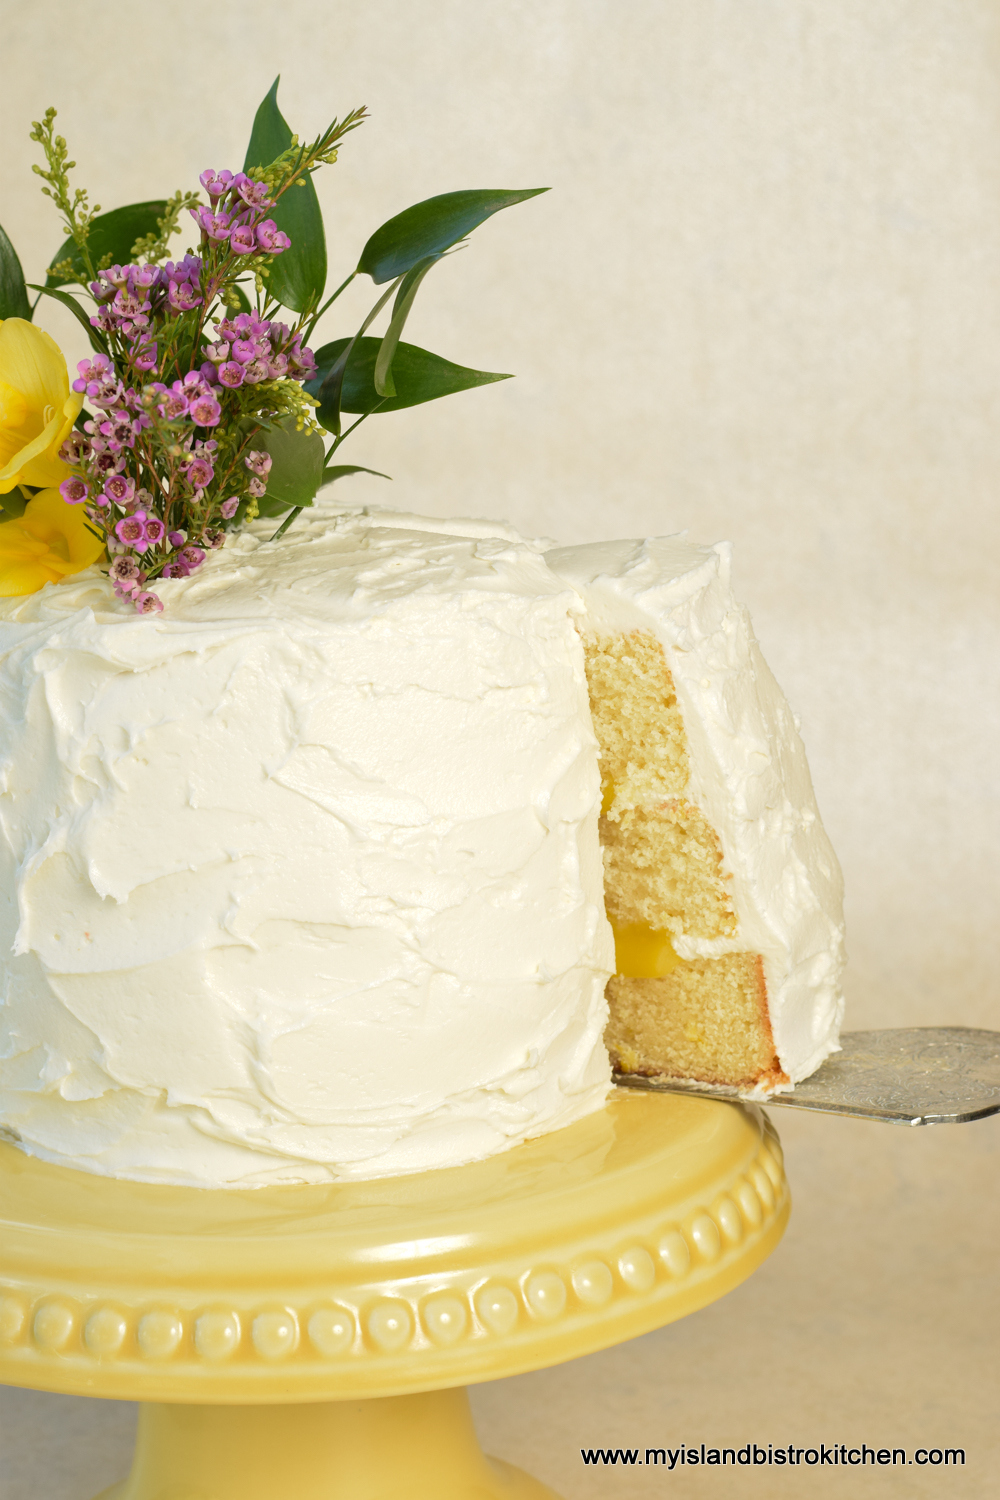
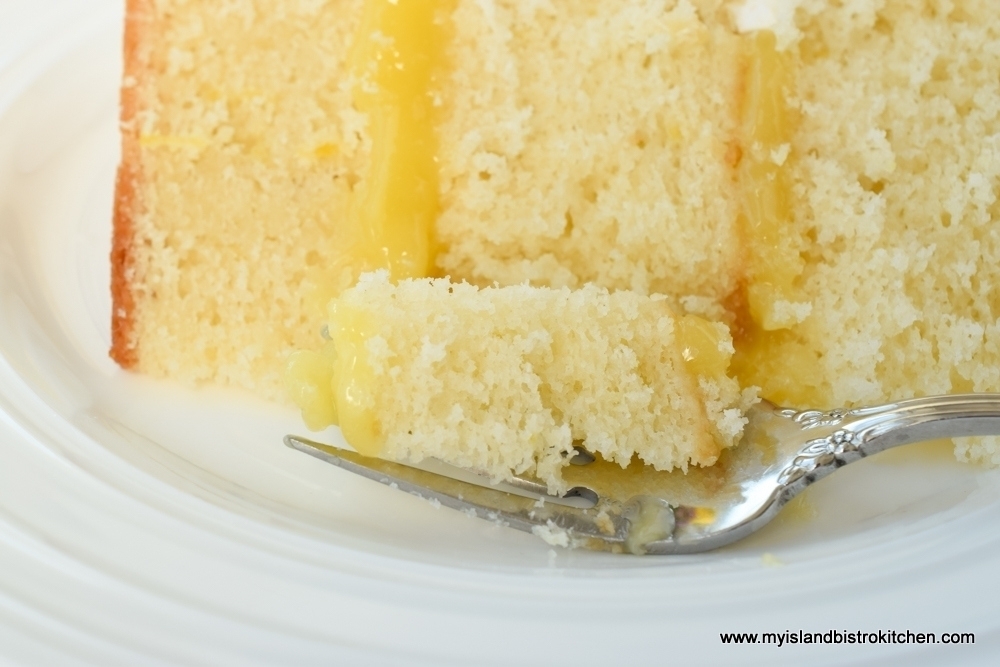
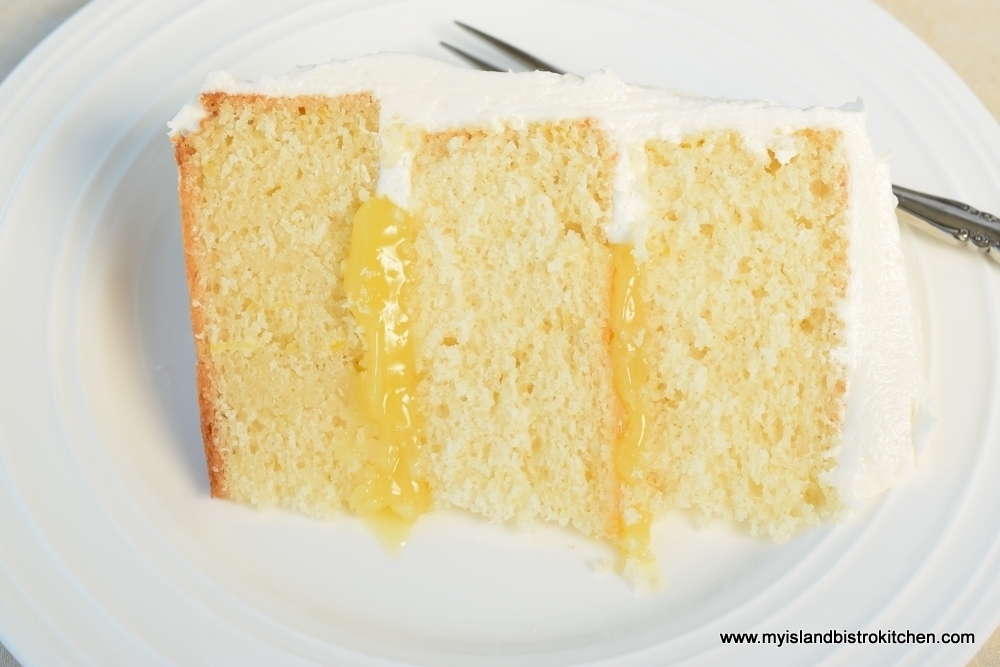
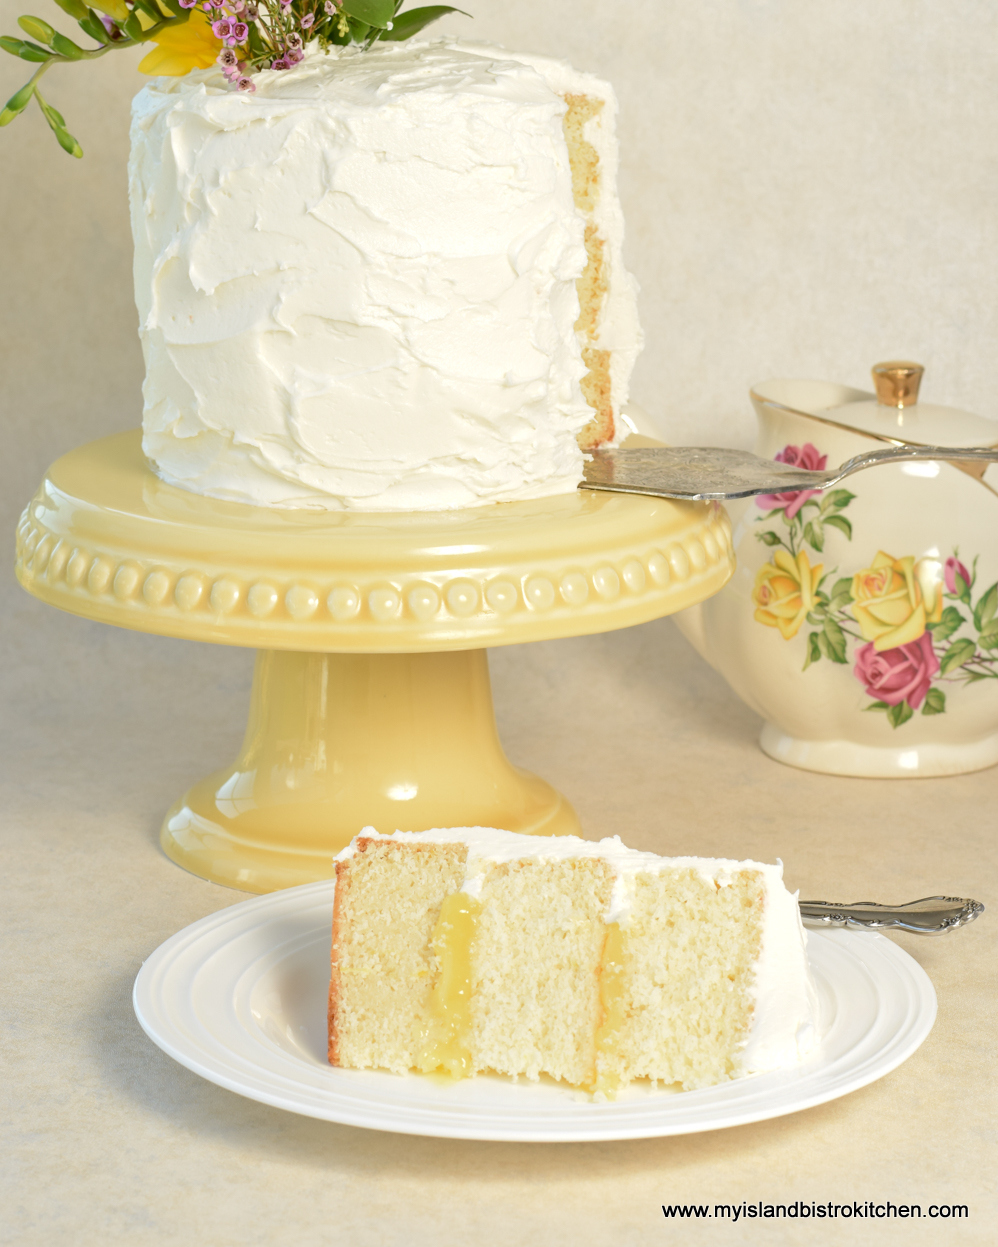
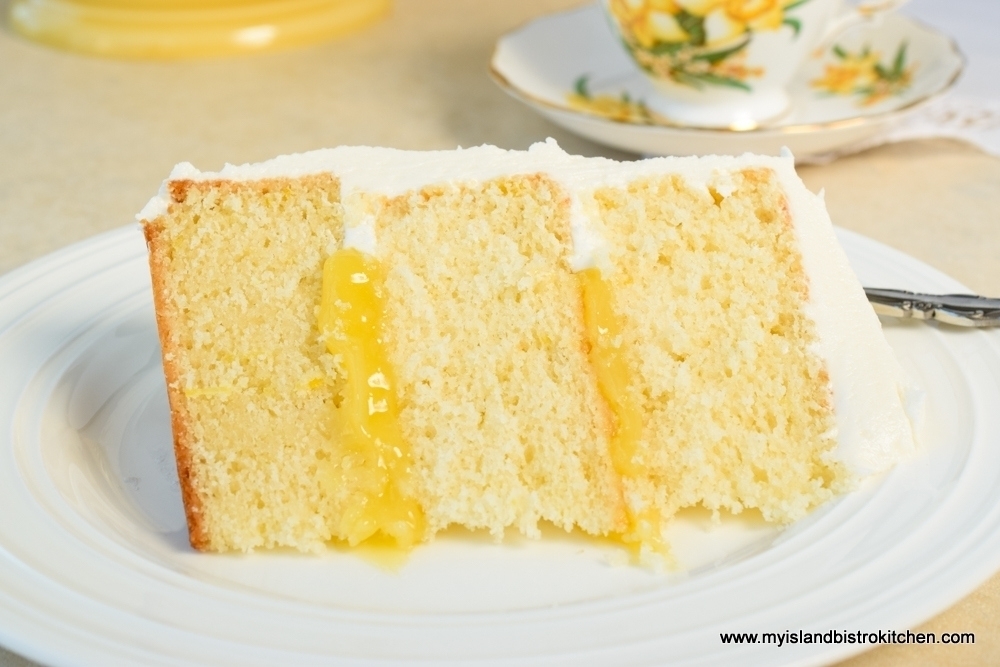
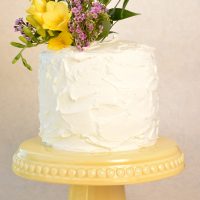
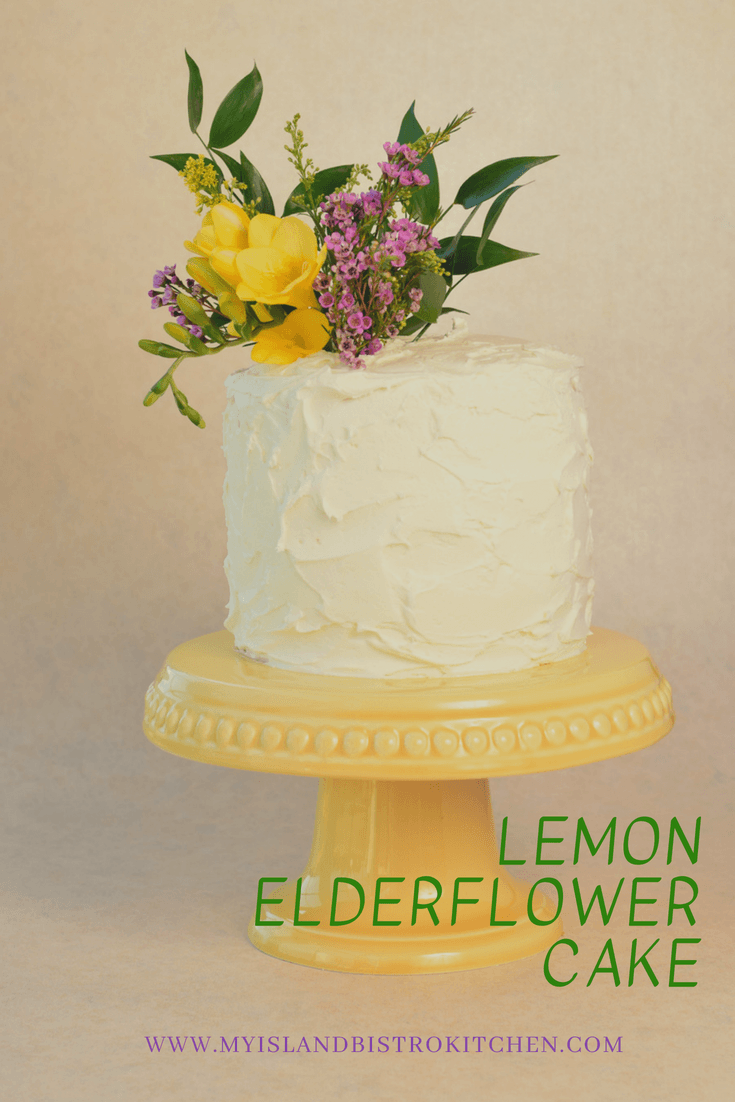
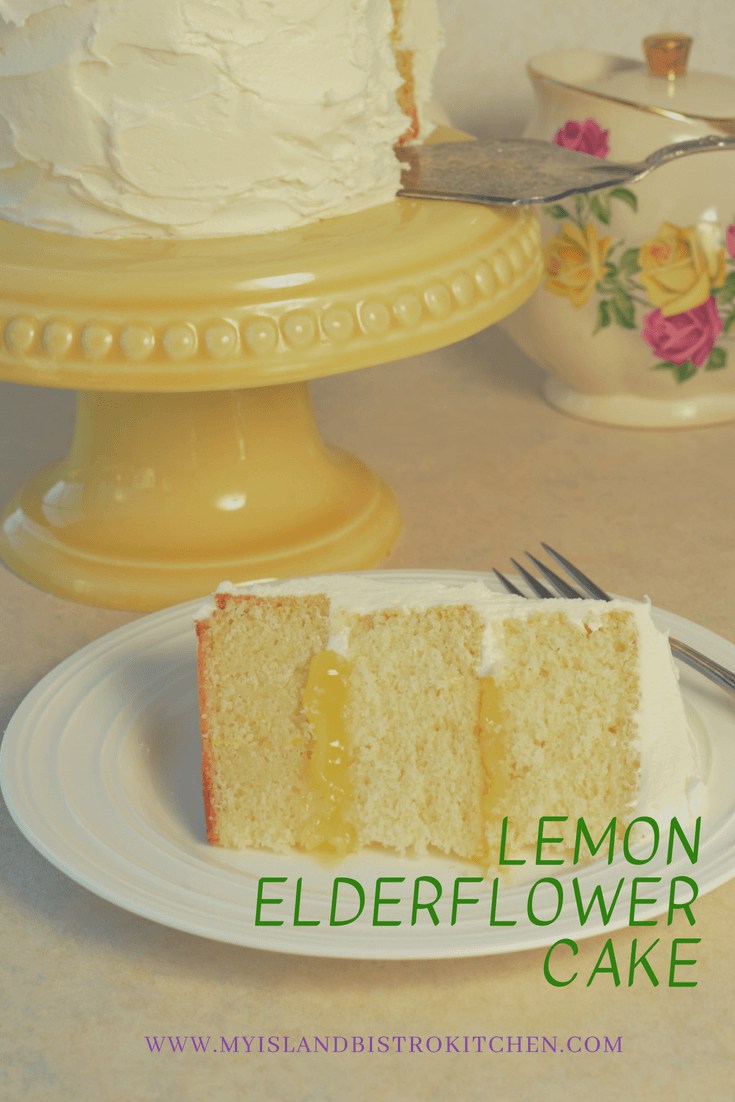
Nothing says springtime more than a lemon cake. I have blended freshly squeezed lemon juice with the flavour of elderflower liqueur to layer some flavour into a basic white cake and transform it into a tasty homemade Lemon Elderflower Cake. This is a true old-fashioned homemade cake that has a dense texture and moist crumb.
Lemon Elderflower Cake
I have chosen to fill the cake layers with decadent lemon curd. I make this curd regularly and it makes a dandy cake filling. For the icing, I have taken my standard buttercream recipe and flavoured it with the elderflower liqueur to tie the flavour of the icing and cake together.
Lemon Elderberry Cake filled with lemon curd and smothered in elderberry-flavoured buttercream icing
This batter is sufficient for either two standard layer cake pans, either 8” or 9” in diameter. However, for the cake in the photos, I used 6” round pans and layered three of them together. The recipe will yield four 6” cakes but four is too high for the cake to cut easily and stay together well enough to plate attractively. Save the fourth cake for a future use – it is divinely lovely served with crushed strawberries, ice cream, and a dollop of whipped cream. Just sayin’! What follows is the method for a three-tier 6” cake. If you choose to make the cake in either 8” or 9” round pans, just be aware that the baking times may need to be adjusted slightly from what the recipe indicates for the 6” cakes. With variances in ovens, I always recommend checking the cakes for doneness five minutes before the recipe indicates the cakes should be baked then checking them every five minutes thereafter until a cake tester inserted into the center of the cakes comes out clean – the true indicator that the cakes are baked.
I chose not to color the batter yellow with gel food coloring. I purposely left the cake white because I wanted the bright yellow lemon curd to stand out between the layers of the cake. If, however, it takes a yellow color to make the cake look like a lemon cake for you, by all means, add small amounts of yellow gel food coloring until you get the desired intensity of color.
Lemon Elderberry Cake
I am a huge proponent of the insulated baking strips placed around the cake pans to keep the cakes from baking unevenly and forming a dome as they bake. These strips come under various brand names. Mine are from Wilton and I swear by them. Simply soak them in water for a few minutes then squeeze out the water and wrap a strip around each cake pan just before it goes in the oven. I find the cakes bake much more evenly and there is less waste when it comes to leveling the cakes to prepare them for stacking together to form a tiered cake. Some small amount of leveling is likely still going to be necessary but not nearly as much as baking the cakes without the insulated strips.
It was not so long ago that all the rage in cake decorating was the use of fondant. Every one was anxious for the satiny smooth perfect finish. Then, the naked cake appeared on the scene and it had very little icing, giving a more rustic and casual look to a cake. While the naked cakes are still popular, particularly for folks who don’t want a lot of sugar icing, the current trend (at time of writing) is that tasty old-fashioned buttercream icing is back in style and piled on the cake in no particular fashion. This is great for people who are not particularly skilled with cake decorating because it is perfectly acceptable to have imperfections and uneven spreading of the icing. It’s meant to look homemade and casual.
When filling a cake with lemon curd or jam, it is advisable to pipe a ring of icing all around each layer of cake before adding the filling. This will create a dam to prevent the filling from seeping through the icing on the side of the cake. Pipe the icing ring about ½ inch in from the cake edge then spread the filling inside the dam.
Lemon Elderflower Cake
I also strongly recommend crumb coating the cake with a thin layer of the icing and then placing it in the refrigerator for 25-30 minutes to set. This will seal the cake and make the final layer of icing crumb- free.
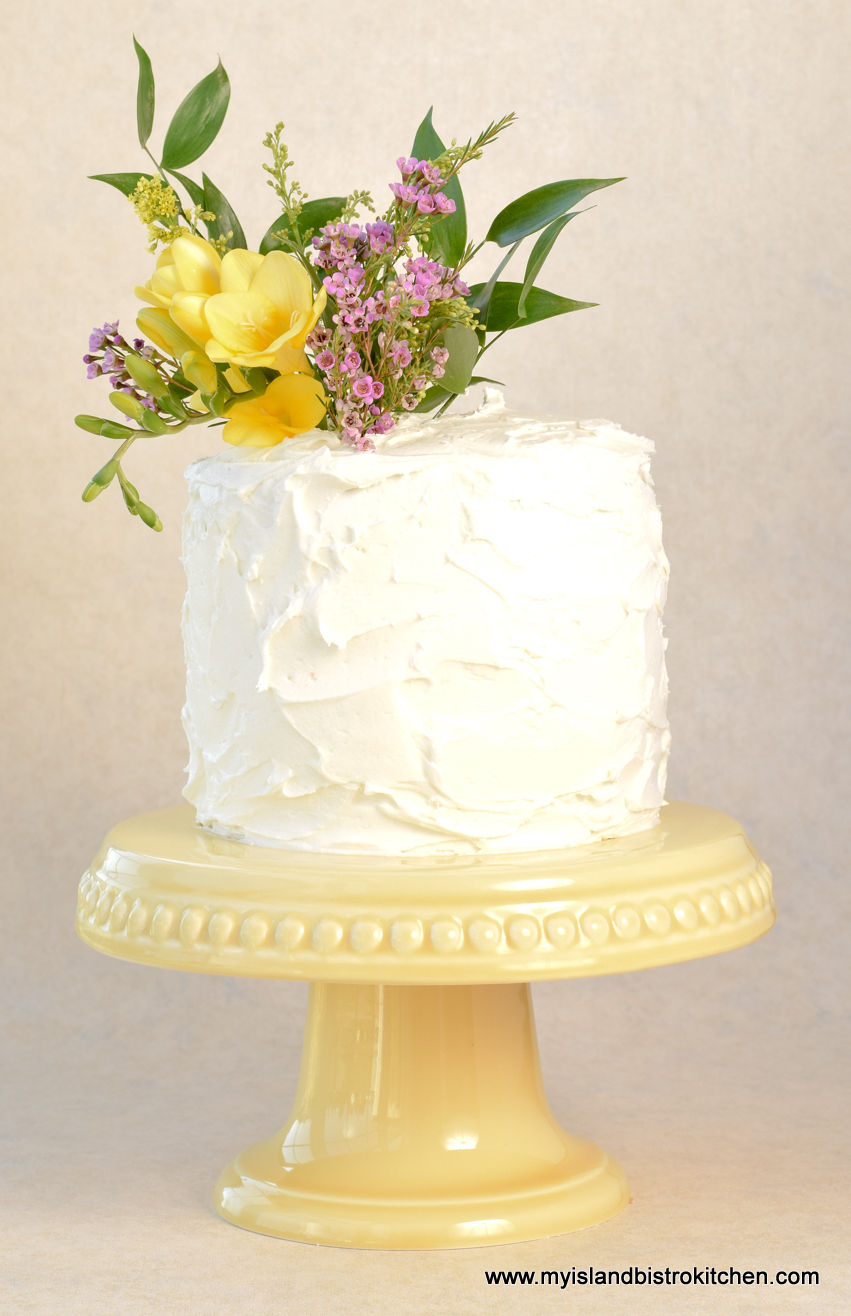
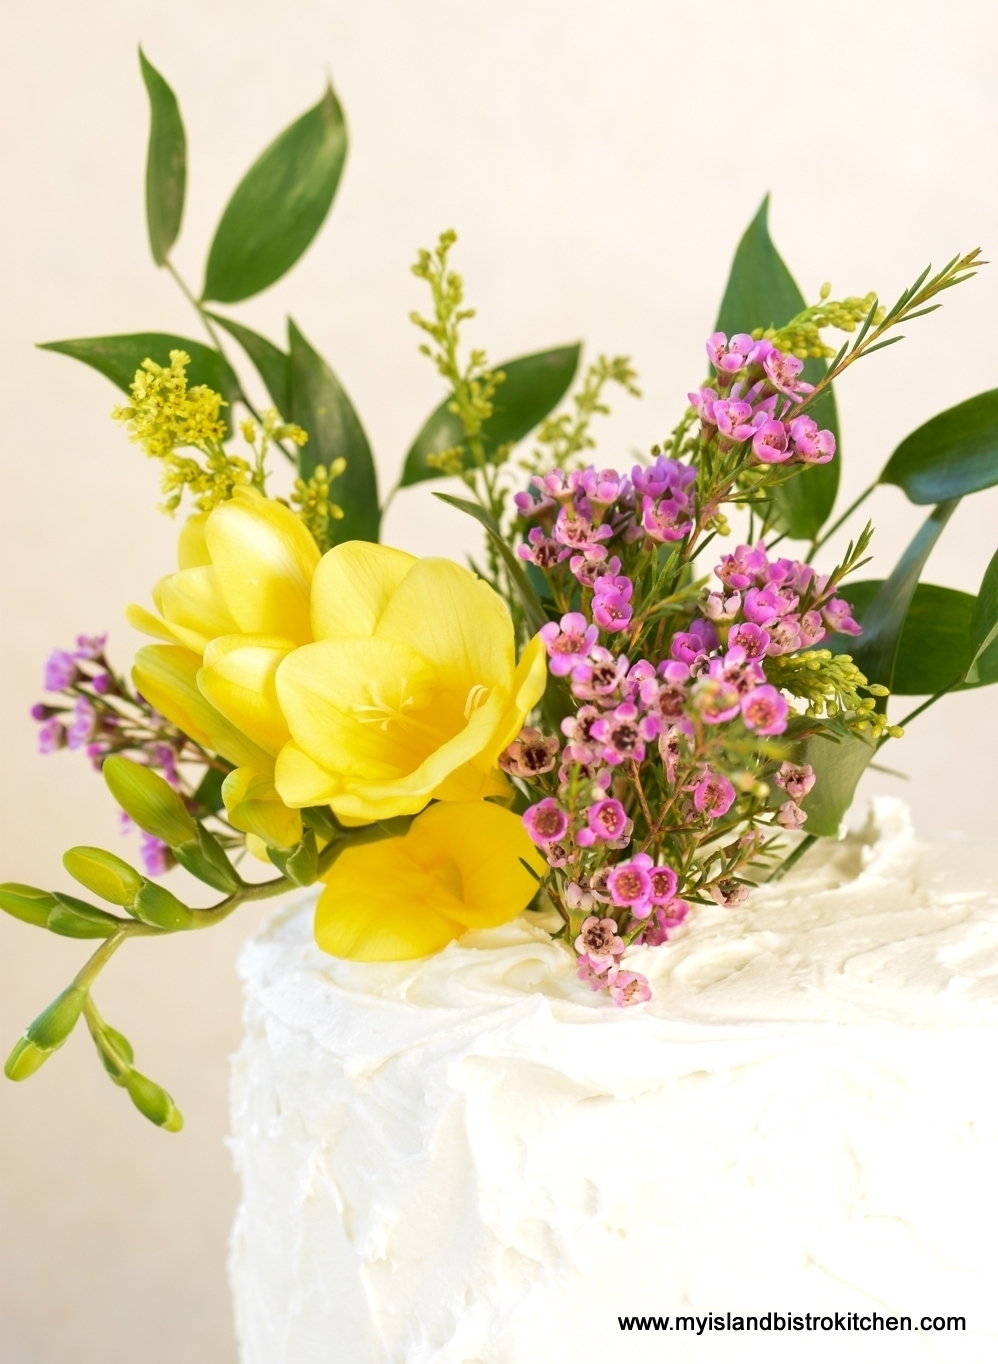
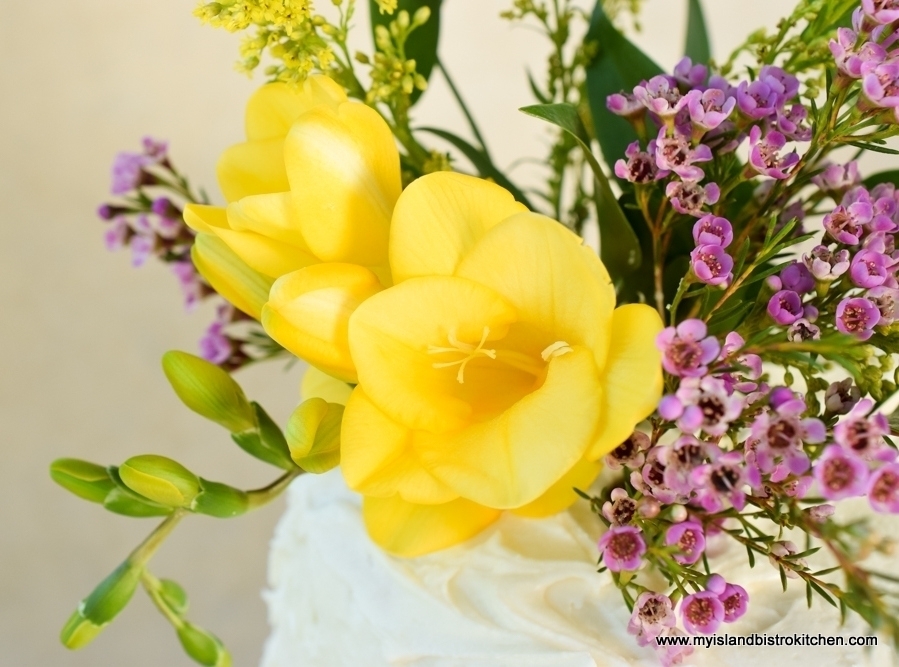
Fresh Freesia, Wax Flowers, and Italian Ruscus Adorn the top of Lemon Elderberry Cake
In keeping with a spring theme, I chose to decorate this cake with fresh bright yellow-colored freesia, some small wax flowers, and some Italian ruscus.
Yellow Freesia, Pink Wax Flowers, and Italian Ruscus Cake Topper for Lemon Elderberry Cake
[Printable recipe follows at end of posting]
Lemon Elderflower Cake
Ingredients:
¾ cup butter, room temperature 1¾ cups + 1 tbsp granulated sugar 2 large eggs, room temperature 4 large egg whites, room temperature ¼ cup freshly squeezed lemon juice, strained 1 tbsp finely grated lemon rind 1 tsp vanilla
3 cups cake flour 4 tsp baking powder ½ tsp baking soda ½ tsp salt
¾ cup + 2 tbsp milk 2 tbsp Elderflower liqueur
Icing: ¾ cup butter, room temperature ¾ cup shortening, room temperature ¾ tsp almond flavouring ¾ tsp vanilla 2 tbsp water 3 tbsp Elderflower Liqueur 1½ lbs icing sugar, sifted Dash of salt (optional)
½ – 2/3 cup Lemon Curd
Method:
Cake: Preheat oven to 350°F. Line four 6”x2” pans with parchment circles on the bottoms and line the sides of each pan with a long continuous strip of parchment paper. Spray pans lightly with cooking spray to hold the parchment in place. Spray parchment-lined pans lightly with cooking spray.
In bowl of stand mixer fitted with paddle attachment, cream butter then slowly add the sugar. Beat until mixture is light and fluffy. Add the whole eggs, one at a time, beating well after each addition. Repeat with the egg whites, adding one at a time. Add the lemon juice, grated lemon rind, and vanilla. Beat well.
Sift the cake flour, baking powder, baking soda, and salt together. In a one-cup measuring cup, combine the milk and Elderflower Liqueur. Add the dry ingredients to the creamed butter-sugar mixture alternately with the liquid ingredients in three additions, starting and ending with the dry ingredients, and beating well after each addition. Beat one additional minute on medium speed.
Transfer batter equally among the pans and bake for approximately 30-35 minutes, or until cake tester inserted into center of cakes comes out clean. It is recommended to check cakes the first time around the 25-minute baking point, then check them every five minutes until they test done. Cool cakes on wire cake racks for 10 minutes before removing from pans. Cool completely before frosting cakes.
Icing: In bowl of stand mixer fitted with paddle attachment, cream the butter and shortening together until blended and creamy. Beat in the almond flavouring, vanilla, water, and liqueur. Gradually add the icing sugar, a cup at a time, beating well after each addition.
Assembly: Use three of the four cakes. Reserve fourth for another use. Level each cake to the same height. Brush off loose crumbs from each cake. Place one cake on cake plate or cake stand. Spoon about ¾ cup icing into icing bag fitted with round tip. Pipe a circle of icing around cake edge, about ½“ in from the outside edge, to form a dam. Spoon lemon curd inside the dam. Place second layer of cake over filling and repeat with icing circle and lemon curd filling. Crumb coat the cake with a thin layer of the icing (this will look messy and that’s okay). Place cake in refrigerator to set for 25-30 minutes then remove and ice the cake with a thicker layer of icing. Decorate as desired. Refrigerate until use. (Freeze any leftover icing for a future use.)
Yield: One 3-layer 6” cake (or one 8” or 9” 2-layer cake)
Note: The baking times given are for the 6” cakes. This cake may be made in two 8” or 9” round pans; however, baking times may need to be adjusted.
Made with real lemon and a hint of elderberry liqueur, this Lemon Elderberry Cake is deliciously moist with its lemon curd filling and elderberry-flavoured buttercream icing.
Course Dessert
Cuisine American
Servings10
My Island Bistro KitchenMy Island Bistro Kitchen
Ingredients
Cake:
¾cupbutterroom temperature
1¾cups+ 1 tbsp granulated sugar
2large eggsroom temperature
4large egg whitesroom temperature
¼cupfreshly squeezed lemon juicestrained
1tbspfinely grated lemon rind
1tspvanilla
3cupscake flour
4tspbaking powder
½tspbaking soda
½tspsalt
¾cup+ 2 tbsp milk
2tbspElderflower Liqueur
Icing:
¾cupbutterroom temperature
¾cupshorteningroom temperature
¾tspalmond flavouring
¾tspvanilla
2tbspwater
3tbspElderflower Liqueur
1½lbsicing sugarsifted
Dash of saltoptional
½ - 2/3cupLemon Curd
Instructions
Cake:
Preheat oven to 350°F. Line four 6”x2” pans with parchment circles on the bottoms and line the sides of each pan with a long continuous strip of parchment paper. Spray pans lightly with cooking spray to hold the parchment in place. Spray parchment-lined pans lightly with cooking spray.
In bowl of stand mixer fitted with paddle attachment, cream butter then slowly add the sugar. Beat until mixture is light and fluffy. Add the whole eggs, one at a time, beating well after each addition. Repeat with the egg whites, adding one at a time. Add the lemon juice, grated lemon rind, and vanilla. Beat well.
Sift the cake flour, baking powder, baking soda, and salt together. In a one-cup measuring cup, combine the milk and Elderflower Liqueur. Add the dry ingredients to the creamed butter-sugar mixture alternately with the liquid ingredients in three additions, starting and ending with the dry ingredients, and beating well after each addition. Beat one additional minute on medium speed.
Transfer batter equally among the pans and bake for approximately 30-35 minutes, or until cake tester inserted into center of cakes comes out clean. It is recommended to check cakes the first time around the 25-minute baking point, then check them every five minutes until they test done. Cool cakes on wire cake racks for 10 minutes before removing from pans. Cool completely before frosting cakes.
Icing:
In bowl of stand mixer fitted with paddle attachment, cream the butter and shortening together until blended and creamy. Beat in the almond flavouring, vanilla, water, and liqueur. Gradually add the icing sugar, a cup at a time, beating well after each addition.
Assembly:
Use three of the four cakes. Reserve fourth for another use. Level each cake to the same height. Brush off loose crumbs from each cake. Place one cake on cake plate or cake stand. Spoon about ¾ cup icing into icing bag fitted with round tip. Pipe a circle of icing around cake edge, about ½“ in from the outside edge, to form a dam. Spoon lemon curd inside the dam. Place second layer of cake over filling and repeat with icing circle and lemon curd filling. Crumb coat the cake with a thin layer of the icing (this will look messy and that’s okay). Place cake in refrigerator to set for 25-30 minutes then remove and ice the cake with a thicker layer of icing. Decorate as desired. Refrigerate until use. (Freeze any leftover icing for a future use.)
Recipe Notes
Note: The baking times given are for the 6” cakes. This cake may be made in two 8” or 9” round pans; however, baking times may need to be adjusted.
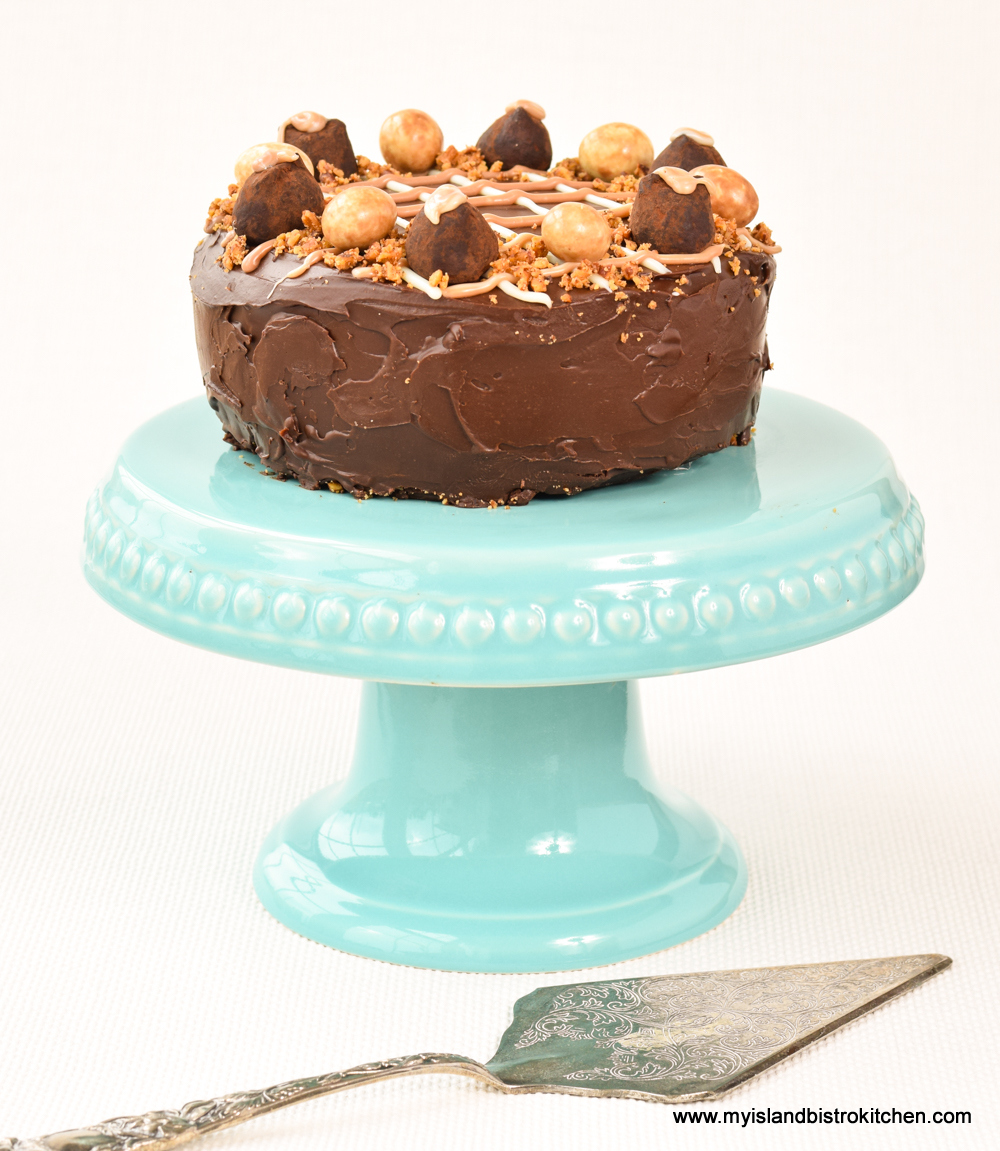
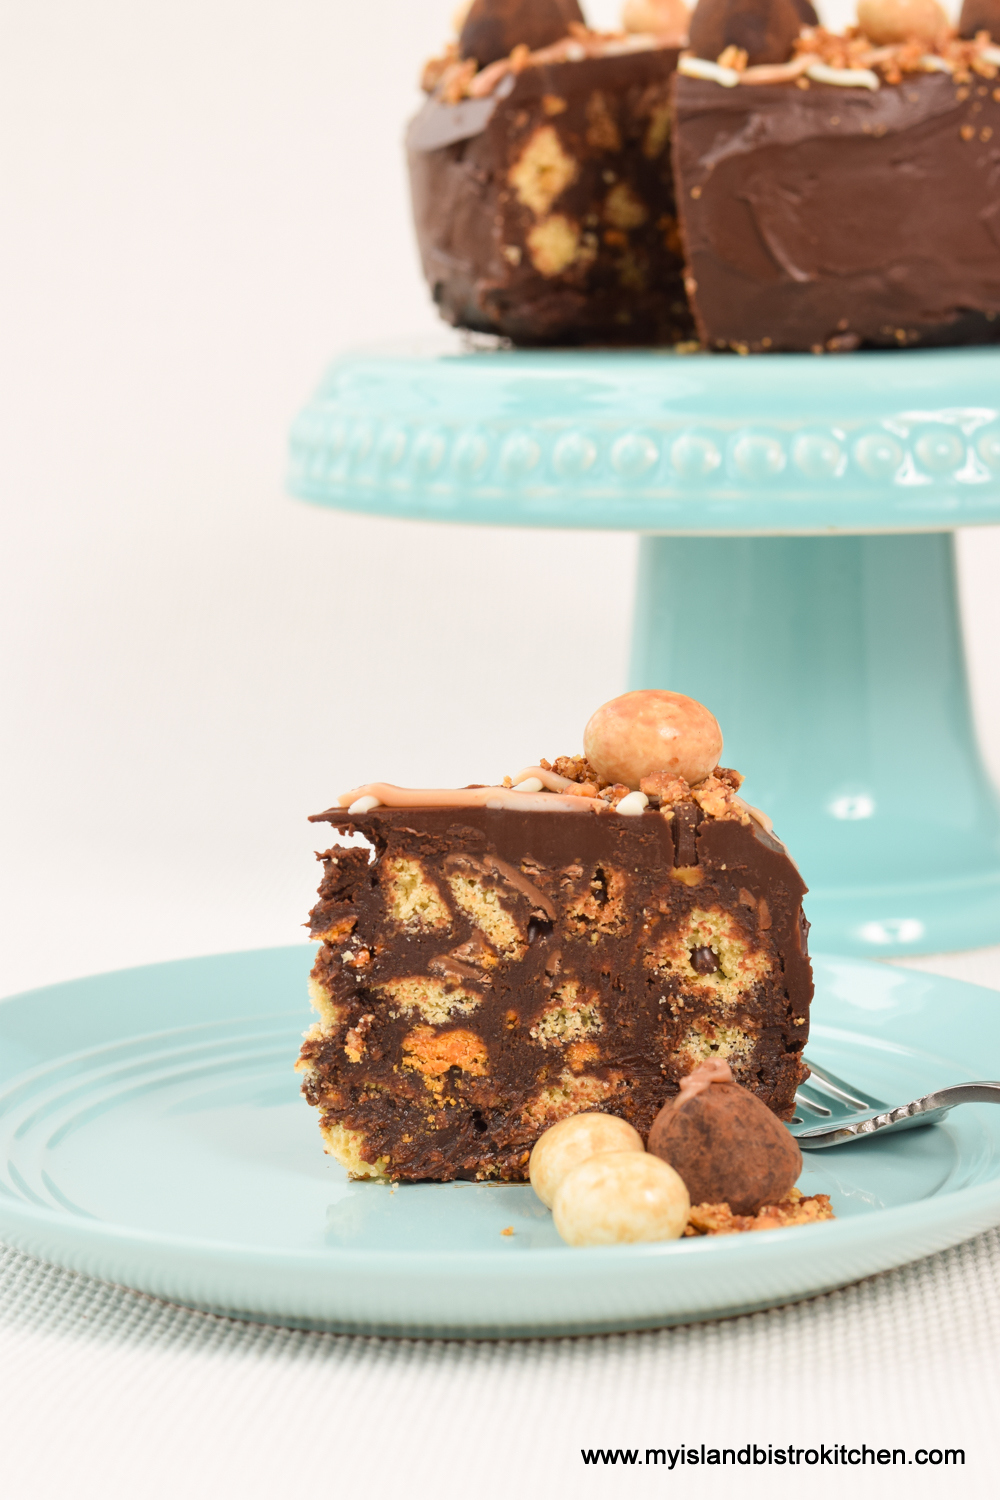
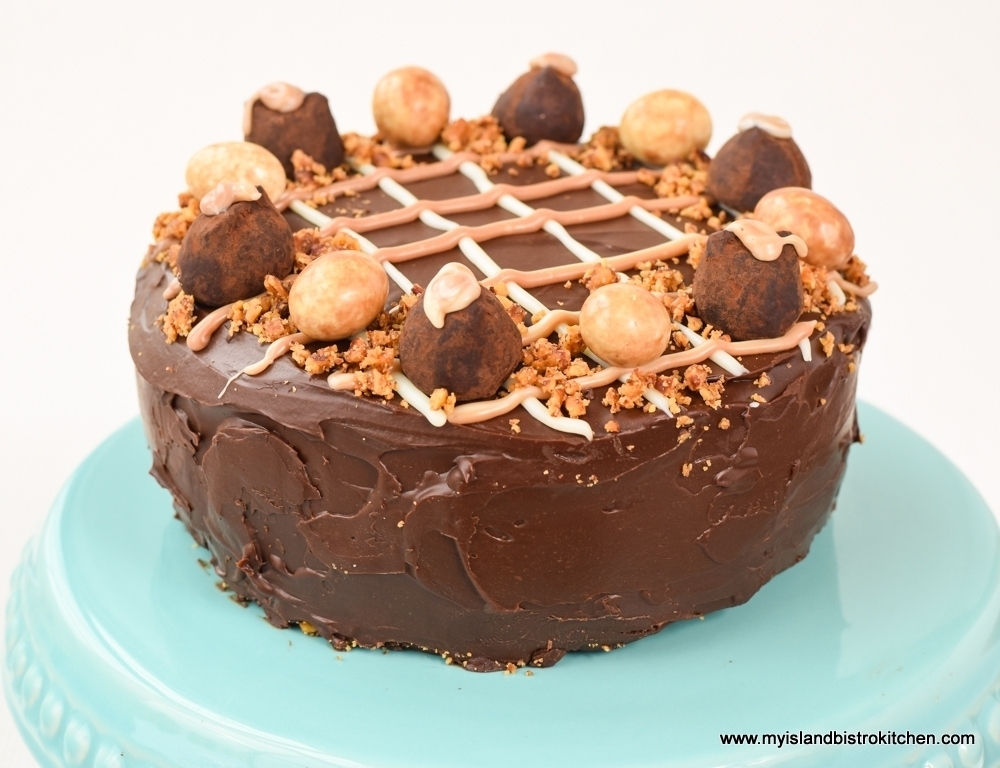
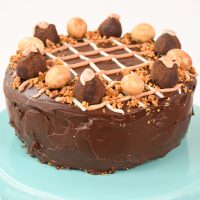
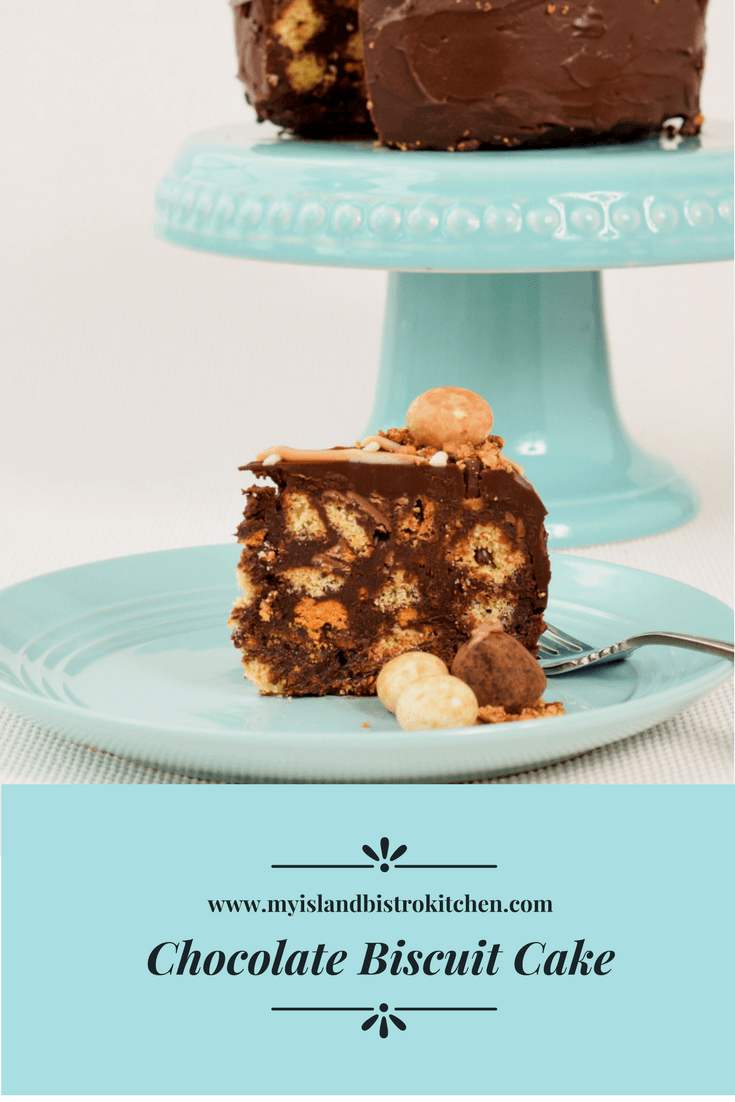
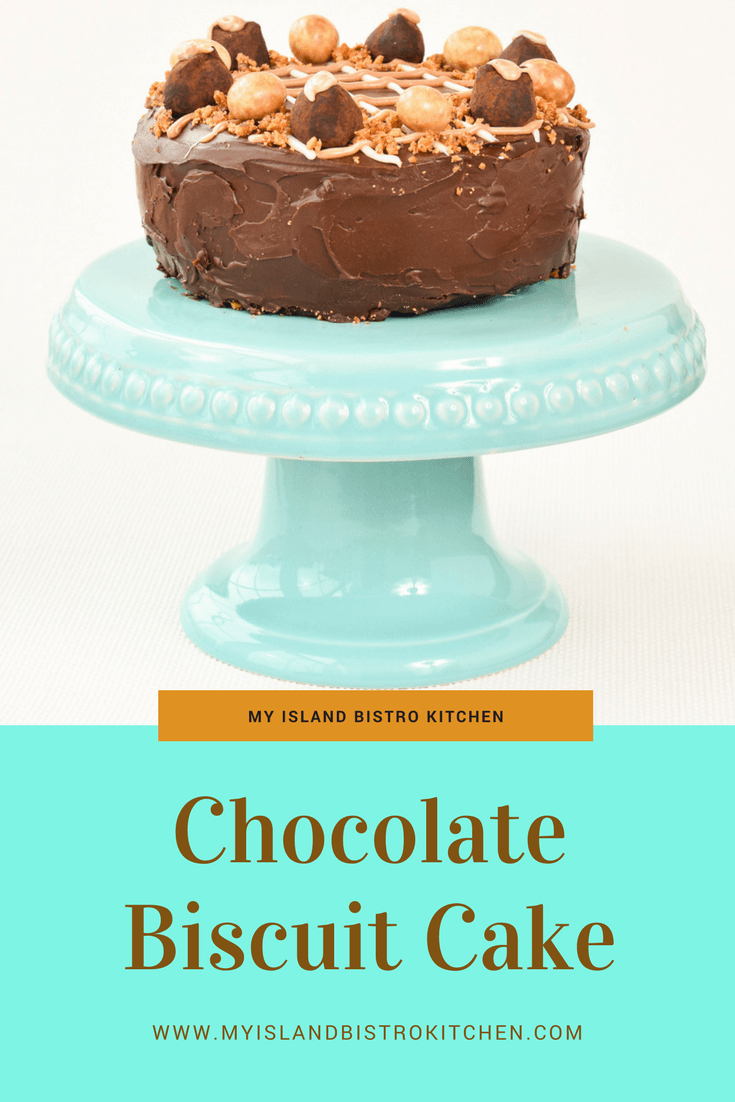
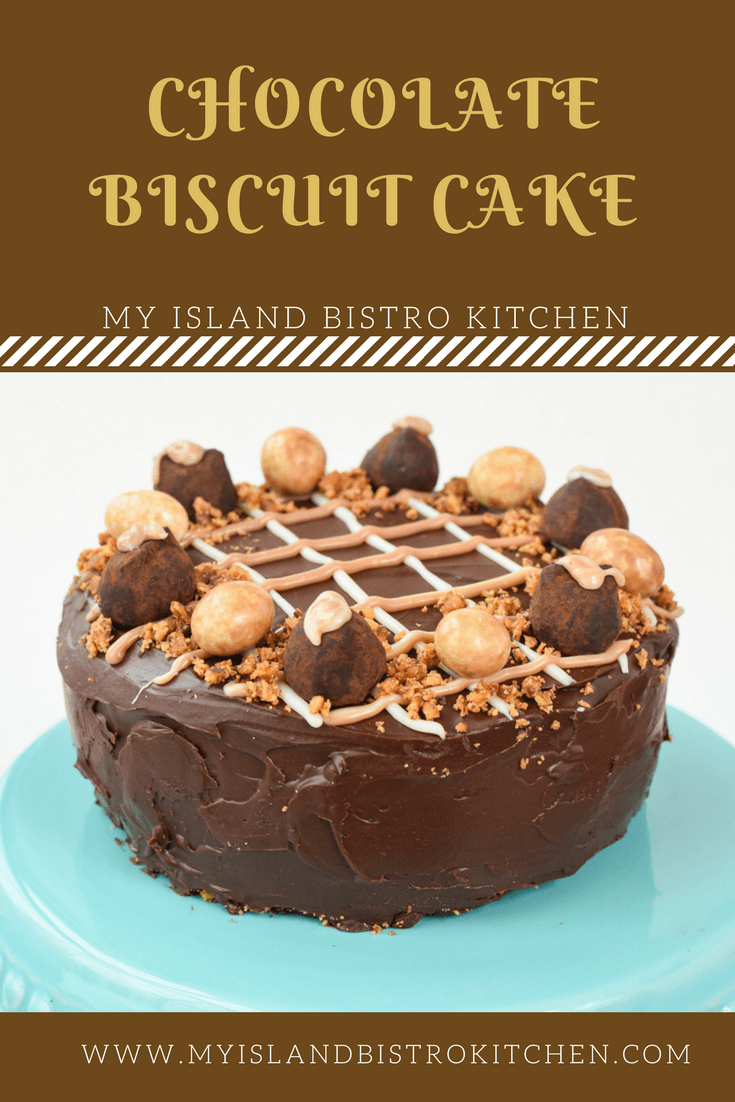
If you are a chocolate lover, this Chocolate Biscuit Cake is for you! What’s not to love about cookies and chocolate bar chunks encased in a rich ganache then smothered with a decadent chocolate ganache glaze!
Chocolate Biscuit Cake
I am giving alternate instructions for making a gluten-free version of the cake and want to point out, at the offset, if you are making the gluten-free version, ensure that all ingredients called for in the recipe (not just the cookies and chocolate bars) are, in fact, gluten free.
The Chocolate Biscuit Cake is said to be a favorite teatime treat of Her Majesty Queen Elizabeth II. It’s also said to be a favorite of Prince William who chose it as his groom’s cake at his April 2011 wedding to Katherine Middleton. There are many versions and recipes for this cake which is sometimes referred to as “refrigerator cake” because it is a no-bake cake that is set by refrigeration.
Chocolate Biscuit Cake
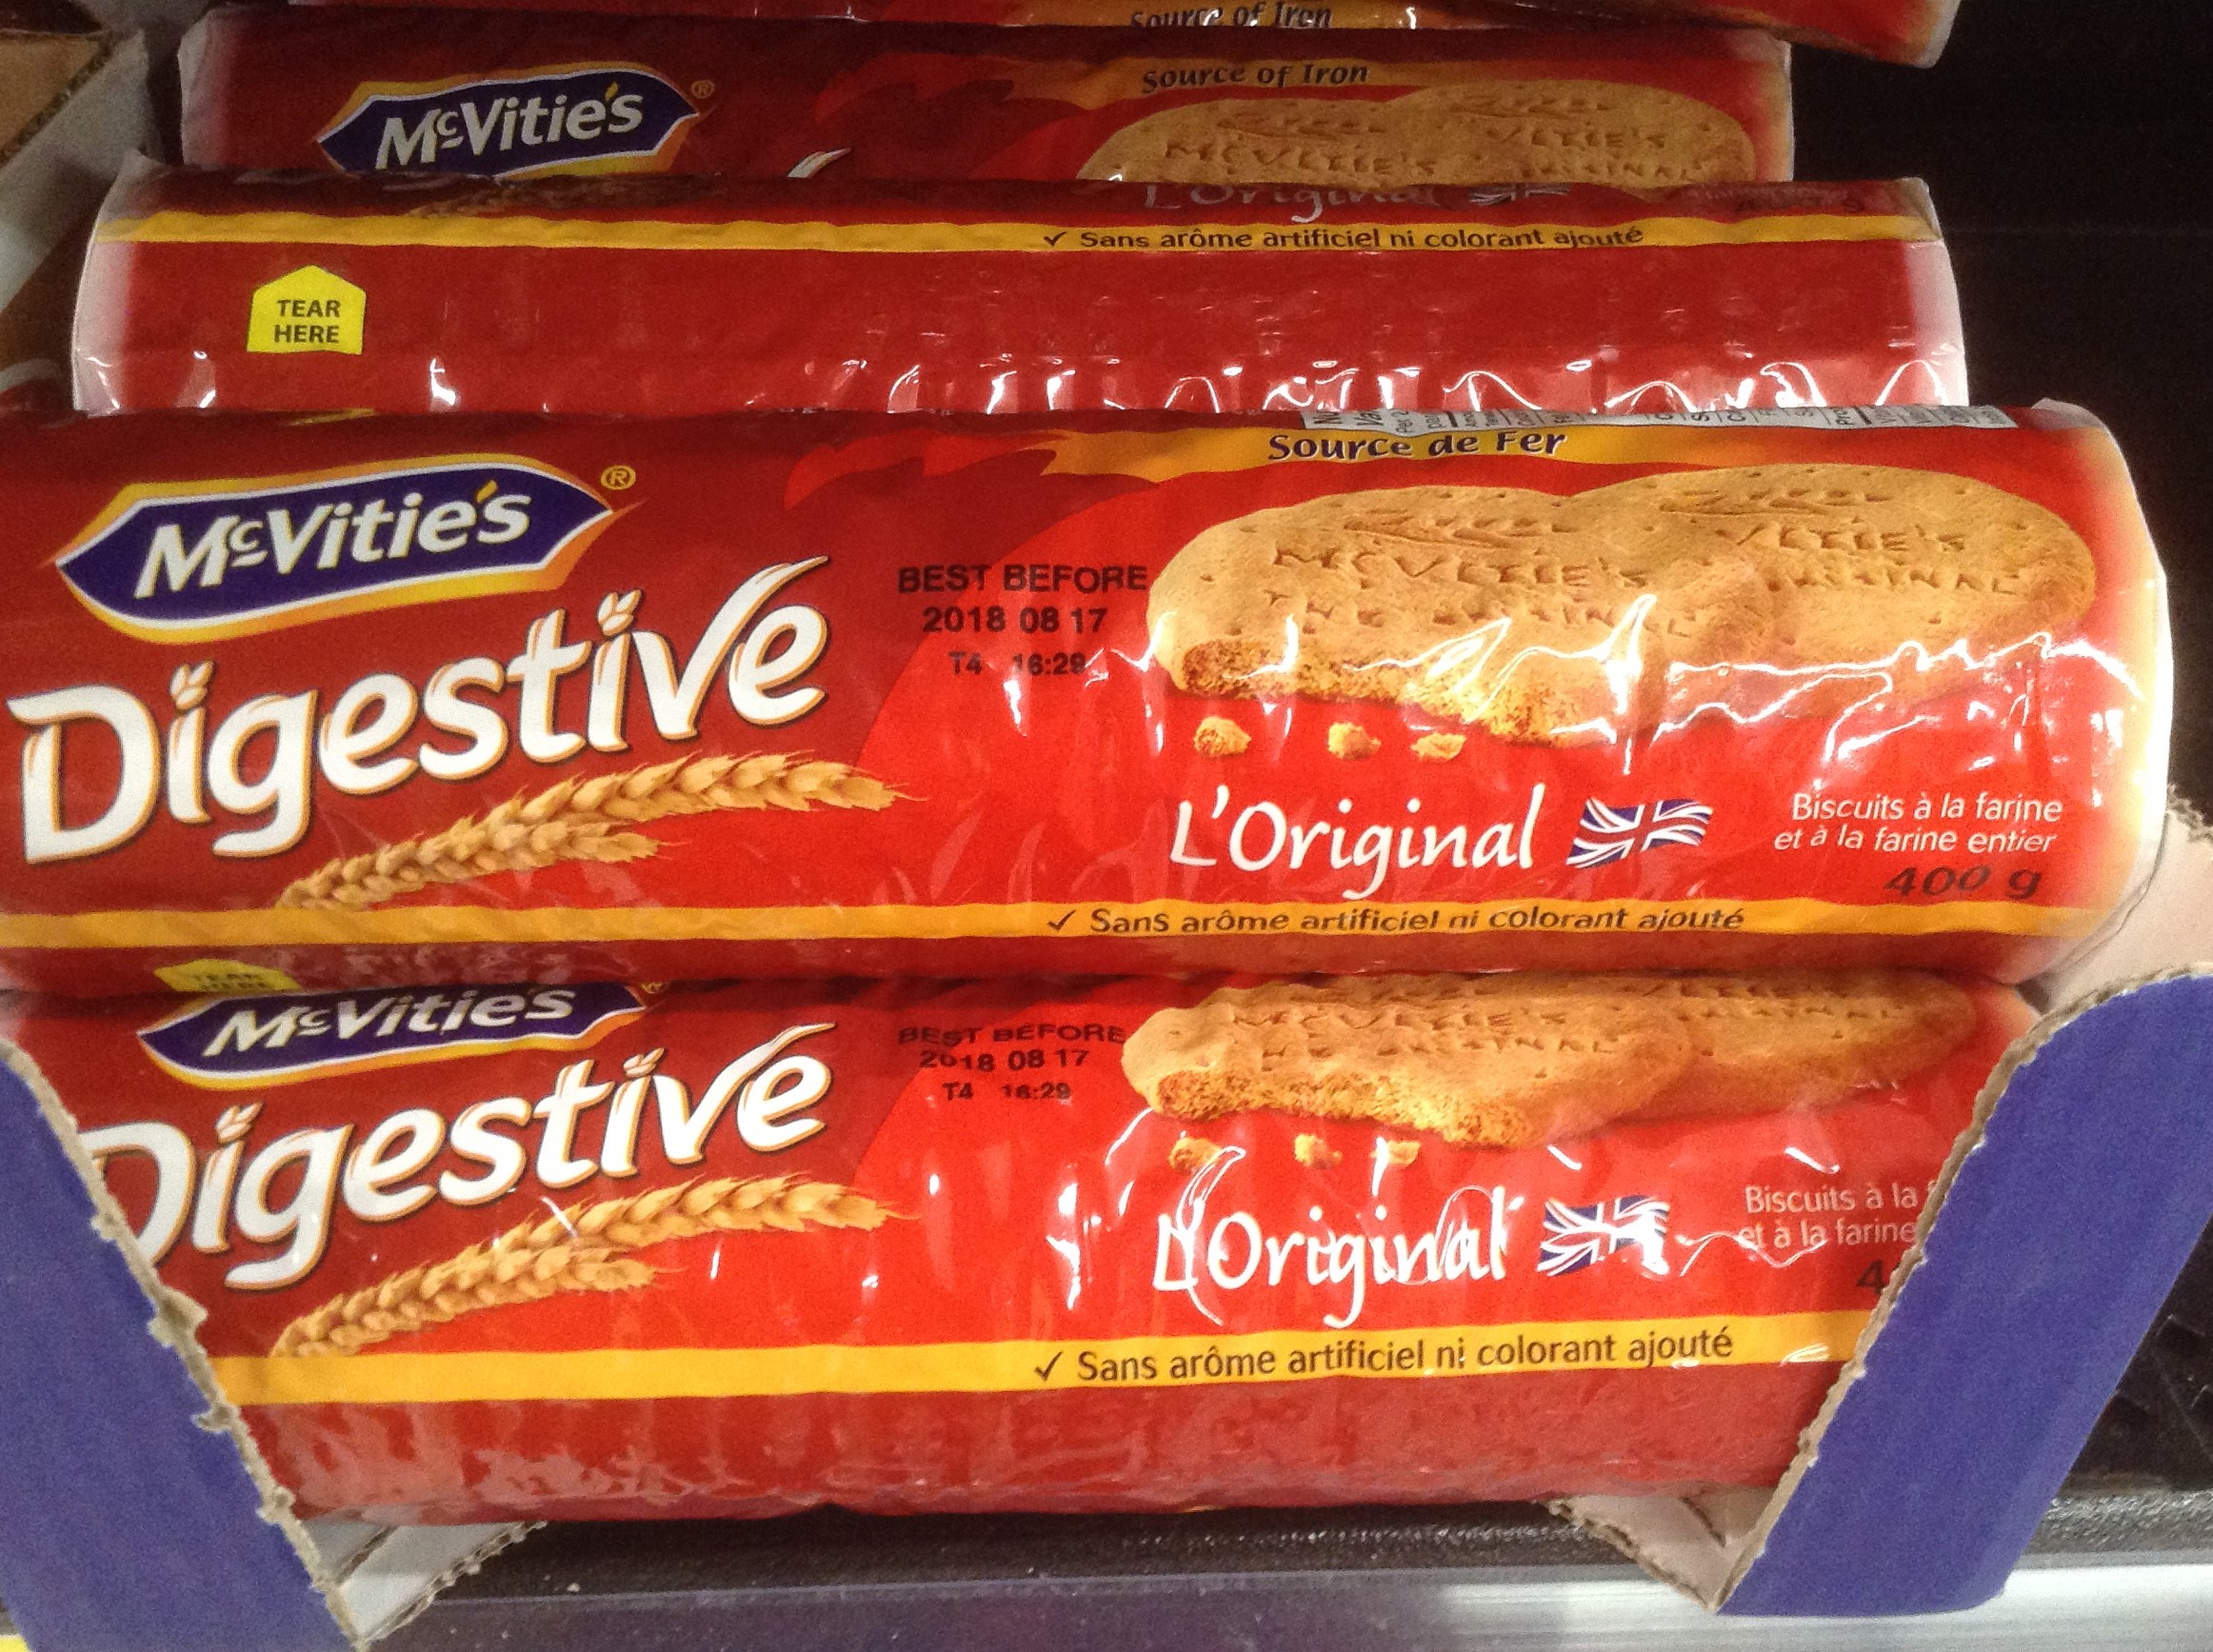
Traditionally, the cake is made with biscuits (the British term for what is known as “cookies” in North America). The sturdy, crisp Digestive cookies are the traditional ingredients. These would be found in the cookie aisles of the larger supermarkets, under brand names such as McVities, Christie, and others. The label on the package will say “Digestives”. The Digestives are very plain-flavored and thin.
McVitie’s Digestive Biscuits
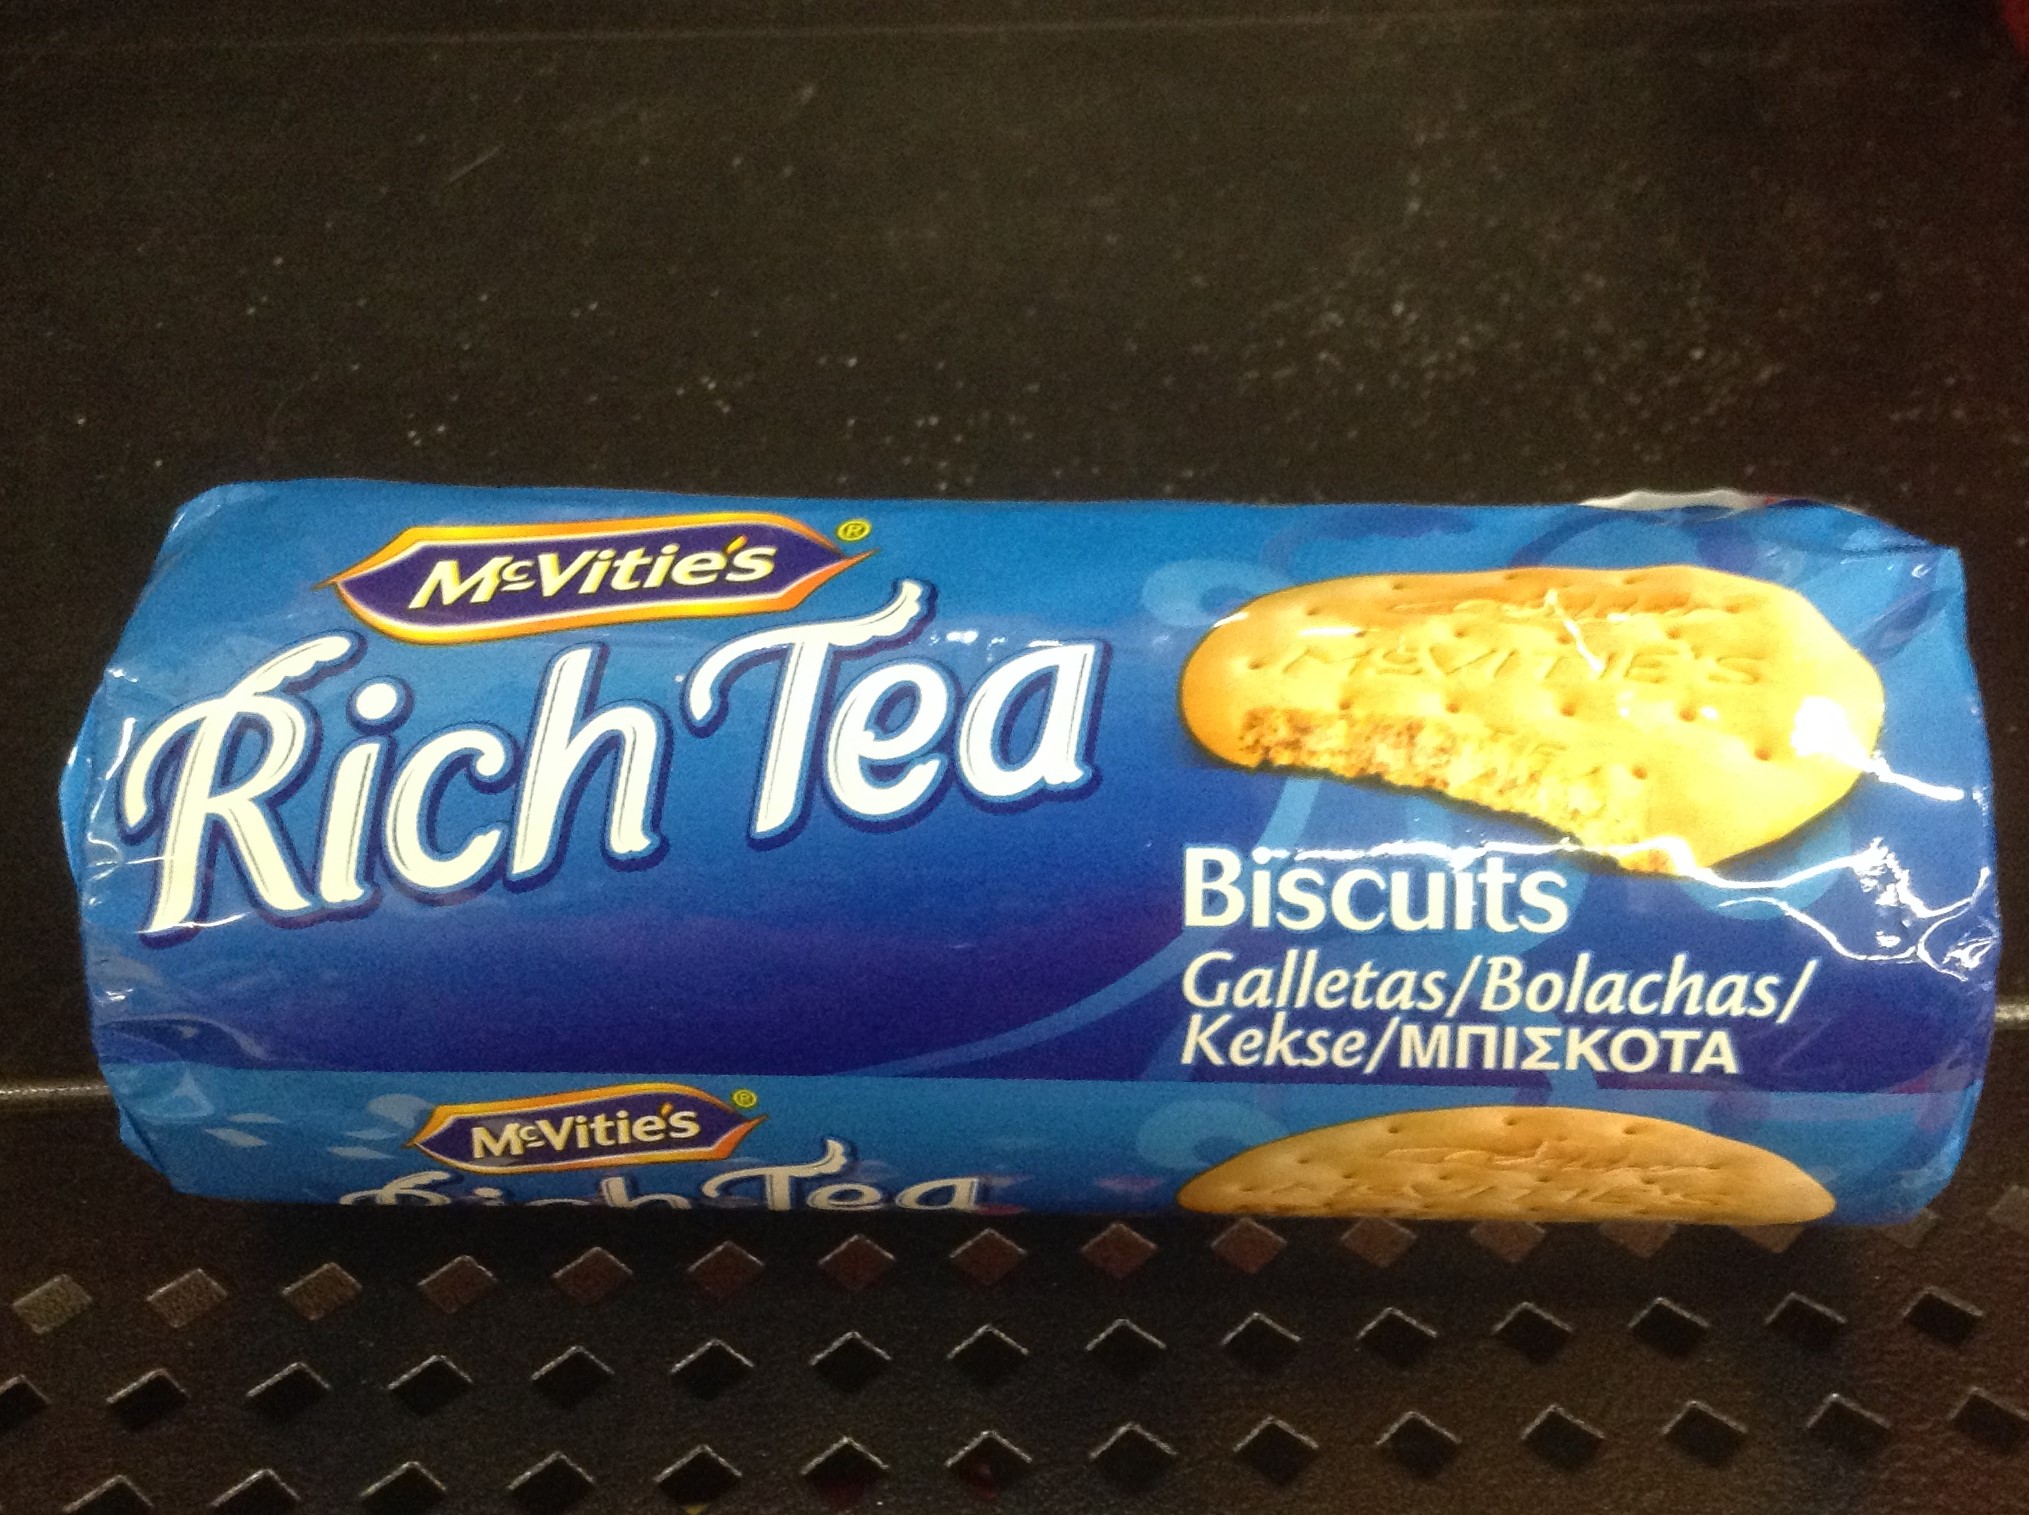
Sometimes, rich tea biscuits may also be added to the cake and they will be labeled as “Rich Tea Biscuits”. They are similar to the Digestives, just a little bit sweeter.
McVitie’s Rich Tea Biscuits
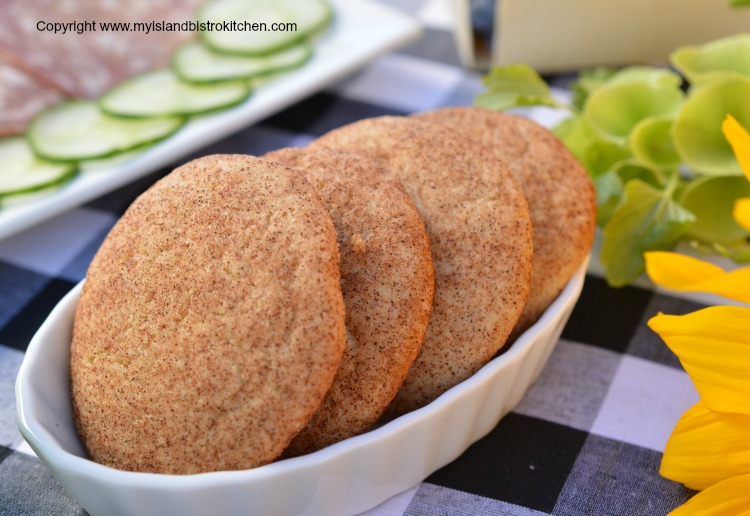
I wanted to make my version of the Chocolate Biscuit Cake gluten free and could not find any gluten-free commercially-made Digestive cookies locally. So, I improvised, knowing I’d need a “sturdy” cookie that would not become soggy or break apart in the cake as the warm ganache was added. I took my gluten-free Snickerdoodle recipe (click here for that recipe), halved it, using a medium egg instead of the extra-large egg the recipe calls for, omitted the nutmeg and cardamom, and did not roll the cookies in the spice-sugar mixture. I made the cookies the night before making the cake, baked them an extra 2 minutes to crisp them up, and left them on the counter overnight. This resulted in a hard, crisp, sturdy cookie that could hold its own in the cake. I weighed out the cookies to get 8 oz and it took 13 of the Snickerdoodles which were made the size indicated in my recipe.
Gluten Free Snickerdoodle Cookies
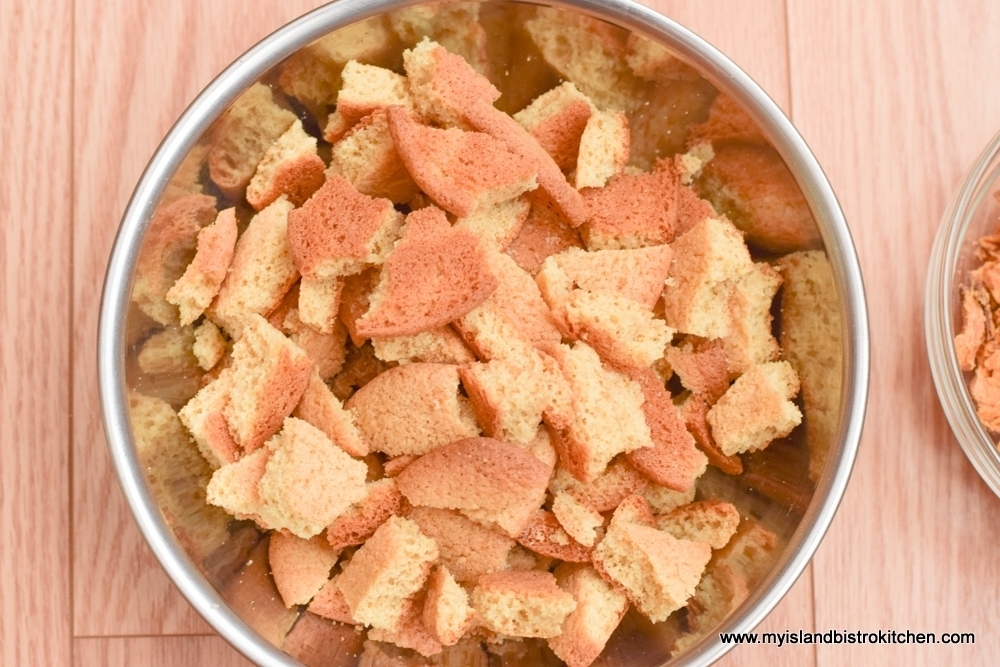
It’s really important to use crisp, not soft and chewy, cookies in this recipe as the cookies have to be able to stand up to being tossed with the chocolate ganache and packed into the pan without being broken into unrecognizable crumbs or becoming soggy. They are meant to give a crunchy texture to the cake. Break up the cookies by hand, not by food processor, into bite-sized chunks. Using a food processor will chop them up too fine and result in crumbs. You want to see actual chunks of cookies (er, biscuits!) in the cake. The photo below shows the size of the cookie chunks I used in the cake.
Chopped Cookies for Biscuit Cake
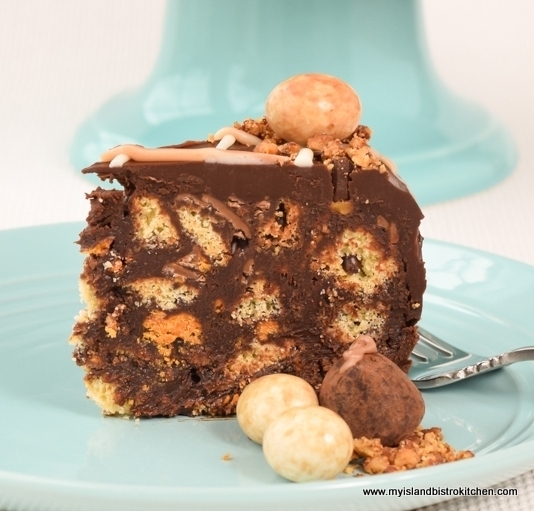
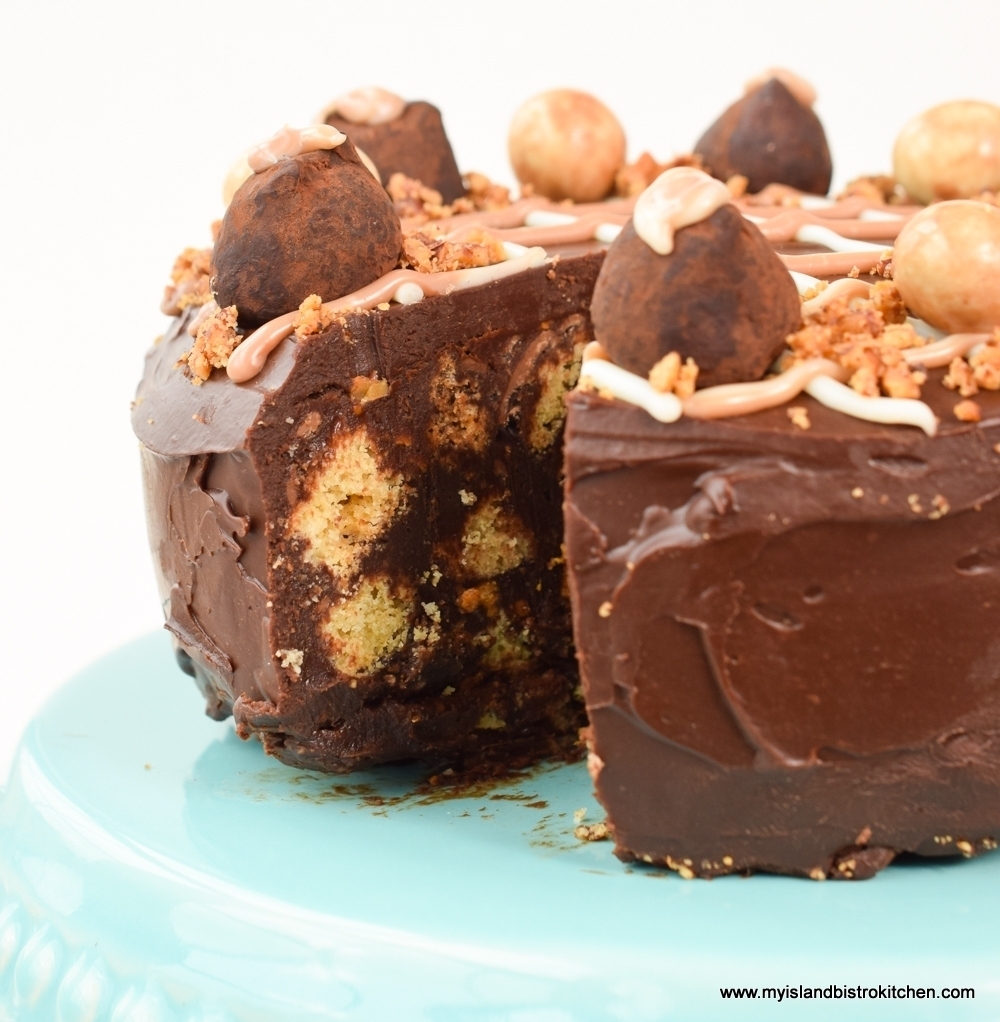
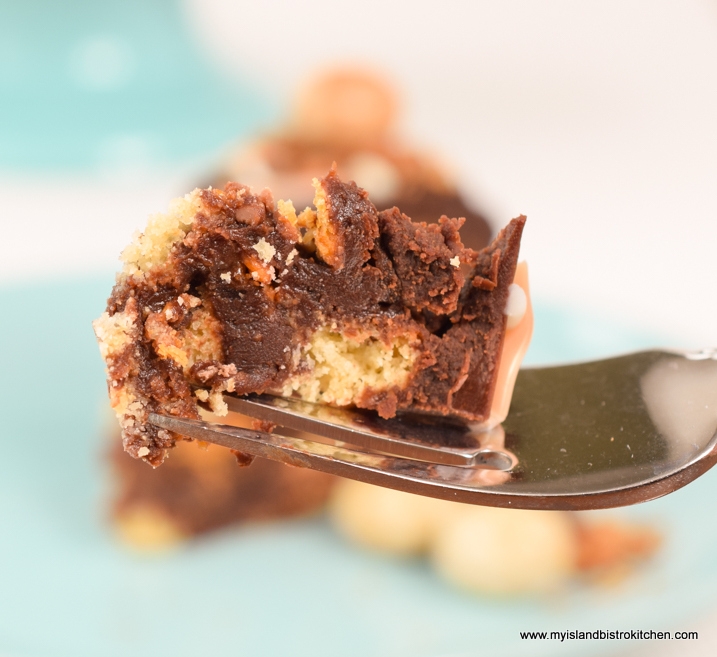
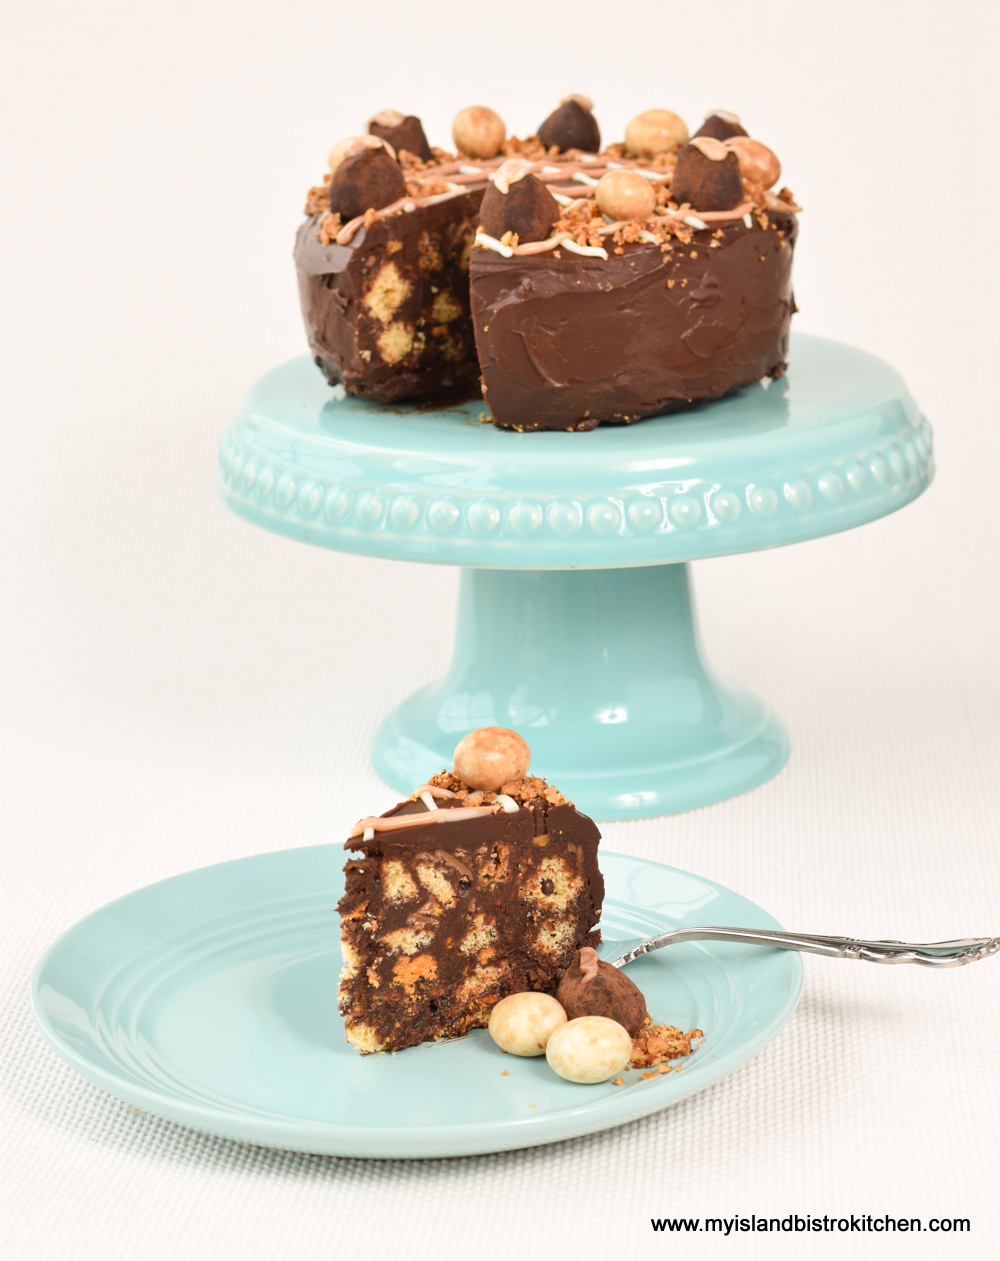
The photo below demonstrates how the cookies and chocolate bar chunks are visible in the finished cake.
Chocolate Biscuit Cake
I used crisp and crunchy Butterfinger chocolate bars in the recipe instead of using all cookies for the ingredients. I chose the Butterfinger bars because their label said they were gluten-free and also because I really like this bar and it is crunchy enough to remain intact in the cake. This added extra flavour and crunch and made the cake just a bit more interesting. If, however, you wish not to add chocolate bars to the cake, simply replace the 6 oz called for with that weight of additional cookies, either more Digestives or some Rich Tea Biscuits (or, for the gluten-free version, more gluten-free Snickerdoodles).
A good quality dark chocolate is needed for this recipe because it is a huge ingredient in the cake and ganache glaze and you really taste the properties of the chocolate in the ganache – don’t compromise on this ingredient. If you are making a gluten-free version of the cake, be sure to check the package label on the chocolate to ensure that it contains no trace of wheat because, as I discovered, some packages do say the chocolate contains, may contain, or may have been in contact with wheat.
Chocolate Biscuit Cake
Biscuit Cake is traditionally made with golden syrup which I could not source locally so I substituted amber corn syrup with success. I also added one medium-sized egg as a binder for the ingredients. Not all Biscuit Cakes call for an egg as an ingredient but I think it adds to, and helps stabilize, the texture of the ganache in the cake.
Adding the chocolate liqueur is optional but it really does add a dimension of deeper flavour. If you’re going to have an extravagant “death by chocolate” cake experience, you might as well go all the way!
Chocolate Biscuit Cake
Some Biscuit Cake recipes call for additional ingredients like raisins, nuts, and dried fruit. I don’t add those to my cake because, to me, that’s taking away from a Biscuit Cake and moving it more to a non-baked fruit cake. And, I don’t think the cake needs these ingredients – this, of course, is a personal preference.
The easiest pan to use for this recipe is the 6” round springform pan (3” deep) because it makes it so easy to unmold the cake. Line the bottom and sides of the pan with parchment paper to facilitate the removal of the cake from the pan. I recommend using a separate circle of parchment for the pan bottom and one long continuous strip of parchment to go around the sides of the pan. This is recommended over simply cutting a large piece of parchment paper and squashing it into the pan which will result in uneven nooks, crannies, and wrinkles into which the batter can escape. This will cause the cake to have an uneven appearance when unmolded.
If you don’t have a small springform pan, other pans (e.g., a non-springform 6” round pan (3” deep) or a 6”x9”x3″ loaf pan) can be used. However, the pan will need to be lined such that the liner gives “handles” with which to lift the cake from the pan since the sides of the pan will not spring open for easy removal. For example, you might line the pan with plastic wrap, leaving enough excess that it could be used to lift the cake from the pan. The cake mixture is likely to have cooled enough by this point that it is safe to pack it into a plastic wrap lined pan. However, if in doubt, I’d suggest lining the plastic wrapped pan with parchment paper so the cake is not in direct contact with the plastic wrap.
Chocolate Biscuit Cake
My preference, when preparing the chocolate ganache for the cake itself, is to use a double boiler or, if you don’t have one, a heatproof bowl over a pot of simmering water. I find this gives greater control and less risk of scorching the ingredients which could occur if heated over direct heat. It’s important to let this ganache cool for about 10 minutes before mixing it into the cookie and chocolate bar mixture because a really hot mixture will melt the chocolate on the Butterfinger bars thus losing that texture and it may cause even the most sturdy of cookies to become soggy. Cover the pan with plastic wrap secured with an elastic band. Refrigerate the cake for at least 3 hours to let it set, then unmold it to a serving plate.
The chocolate for the ganache glaze is chopped a bit finer than that needed for the ganache in the cake. The reason it needs to be a bit smaller is because the hot whipping cream mixture is used to melt the chocolate, off heat, and smaller pieces will melt easier and faster. The chocolate does not, however, need to be chopped super fine for this. After the hot whipping cream has been poured over the chocolate and let stand for 3-5 minutes, give the mixture a good stir. To make the ganache silky smooth, I recommend using a hand-held immersion blender. After letting the ganache sit for 12-15 minutes to cool slightly so it does not melt the cake, simply pour it over the top of the cake, letting the glaze run down the sides. Don’t worry about getting the ganache glaze perfectly smooth on the sides – it’s not fondant and imperfections are perfectly fine on this cake! Using an offset spatula or a dinner knife, spread the ganache so it covers the top and sides of the cake. Refrigerate for at least an hour before cutting and serving the cake.
Serve this delectable cake with just the plain ganache glaze or decorate as desired.
Chocolate Biscuit Cake
While it may sound like a stretch to be able to get 12 servings from a 6” cake, this Chocolate Biscuit Cake is very rich so small pieces per serving will suffice!
Chocolate Biscuit Cake
What a delightful decadent treat!
Chocolate Biscuit Cake
[Printable recipe follows at end of post]
Chocolate Biscuit Cake
Cake: 8 oz high quality dark chocolate, coarsely chopped 8 oz Digestive cookies (such as McVities) or, to make the cake gluten-free, 8 oz of My Island Bistro Kitchen’s Gluten-free Snickerdoodle cookies, broken into chunks by hand 6 oz Butterfinger Bars, broken or chopped into chunks
½ cup butter (no substitutes) 3 tbsp whipping cream (35%M.F.) ½ cup amber corn syrup 1 medium-sized egg, lightly beaten 2 tbsp chocolate liqueur (optional)
Chocolate Ganache Glaze: 6 oz dark chocolate, coarsely chopped 2/3 cup whipping cream (35%M.F.) 2 tbsp butter (no substitutes) 1½ tbsp chocolate liqueur (optional)
Method: Cake: Prepare 6” springform pan (3” deep) by lining bottom with a circle of parchment paper and lining the sides of the pan with a long continuous strip of parchment paper.
Coarsely chop the chocolate. Set aside.
In large, heatproof bowl, break up the cookies, by hand, into bite-sized chunks. Do the same for the Butterfinger bars, using a knife, if necessary to break up the crisp bars. Gently toss the cookies and chocolate bars together.
On cooktop, in top of double boiler over simmering water, melt the butter. When the butter is about half melted, whisk in the whipping cream, corn syrup, and slightly beaten egg. Stir in the 8 oz of coarsely chopped chocolate until it is melted. Remove from heat and stir in the chocolate liqueur. Cool for approximately 10 minutes.
Pour the slightly cooled chocolate mixture over the broken cookies and chocolate bar chunks. Stir gently until the mixture is coated with chocolate, trying not to further break up the cookies and bars.
Transfer mixture to the prepared pan and gently pack mixture into the pan. Using an offset spatula, or a dinner knife, smooth the top of the cake as best possible. Cover pan with plastic wrap secured with an elastic band. Refrigerate for at least 3 hours.
Prepare Chocolate Ganache Glaze as follows.
Chocolate Ganache Glaze: Chop the 6 oz dark chocolate into small chunks and place in a heatproof bowl.
In small, heavy-bottomed saucepan, over medium heat, bring the whipping cream and butter just to the boiling point, stirring to prevent scorching. Pour the hot cream over the chocolate pieces, tilting and swirling the bowl to ensure all the chocolate is covered with the cream. Add the chocolate liqueur. Let stand 3-5 minutes to allow the hot cream to melt the chocolate. Stir. Using a hand-held immersion blender, blend the mixture just until all the chocolate is smooth and no chocolate chunks remain.
Let ganache stand for 12-15 minutes. Meanwhile, unmold cake and transfer to serving plate. Pour the slightly cooled ganache over the cake, letting the ganache drip down the sides. Use an offset spatula, or knife, spread the ganache over top and sides of cake. Refrigerate for about an hour to set.
A decadent no-bake cake that features crumbled biscuits (cookies) and chocolate bar chunks in a rich chocolate ganache
Course Dessert
Servings12
My Island Bistro KitchenMy Island Bistro Kitchen
Ingredients
Cake:
8ozhigh quality dark chocolatecoarsely chopped
8ozDigestive cookiessuch as McVities or, to make the cake gluten-free, 8 oz of My Island Bistro Kitchen’s Gluten-free Snickerdoodle cookies, broken into chunks by hand
6ozButterfinger Barsbroken or chopped into chunks
½cupbutterno substitutes
3tbspwhipping cream35%M.F.
½cupamber corn syrup
1medium-sized egglightly beaten
2tbspchocolate liqueuroptional
Chocolate Ganache Glaze:
6ozdark chocolatecoarsely chopped
2/3cupwhipping cream35%M.F.
2tbspbutterno substitutes
1½tbspchocolate liqueuroptional
Instructions
Cake:
Prepare 6” springform pan (3” deep) by lining bottom with a circle of parchment paper and lining the sides of the pan with a long continuous strip of parchment paper.
Coarsely chop the chocolate. Set aside.
In large, heatproof bowl, break up the cookies, by hand, into bite-sized chunks. Do the same for the Butterfinger bars, using a knife, if necessary to break up the crisp bars. Gently toss the cookies and chocolate bars together.
On cooktop, in top of double boiler over simmering water, melt the butter. When the butter is about half melted, whisk in the whipping cream, corn syrup, and slightly beaten egg. Stir in the 8 oz of coarsely chopped chocolate until it is melted. Remove from heat and stir in the chocolate liqueur. Cool for approximately 10 minutes.
Pour the slightly cooled chocolate mixture over the broken cookies and chocolate bar chunks. Stir gently until the mixture is coated with chocolate, trying not to further break up the cookies and bars.
Transfer mixture to the prepared pan and gently pack mixture into the pan. Using an offset spatula, or a dinner knife, smooth the top of the cake as best possible. Cover pan with plastic wrap secured with an elastic band. Refrigerate for at least 3 hours.
Prepare Chocolate Ganache Glaze as follows.
Chocolate Ganache Glaze:
Chop the 6 oz dark chocolate into small chunks and place in a heatproof bowl.
In small, heavy-bottomed saucepan, over medium heat, bring the whipping cream and butter just to the boiling point, stirring to prevent scorching. Pour the hot cream over the chocolate pieces, tilting and swirling the bowl to ensure all the chocolate is covered with the cream. Add the chocolate liqueur. Let stand 3-5 minutes to allow the hot cream to melt the chocolate. Stir. Using a hand-held immersion blender, blend the mixture just until all the chocolate is smooth and no chocolate chunks remain.
Let ganache stand for 12-15 minutes. Meanwhile, unmold cake and transfer to serving plate. Pour the slightly cooled ganache over the cake, letting the ganache drip down the sides. Use an offset spatula, or knife, spread the ganache over top and sides of cake. Refrigerate for about an hour to set.
Serve cake plain or decorate as desired.
Recipe Notes
Be sure to read the accompanying blog post to this recipe as it gives hints and tips on making this Chocolate Biscuit Cake
If you have made this recipe and enjoyed it and/or wish to share it with your friends and family, please do so on social media but be sure to share the direct link to this posting from my website.
Connect with My Island Bistro Kitchen on Social Media
Follow “the Bistro” on Pinterest at https://www.pinterest.ca/peibistro/ and pin the Pinterest-ready photo found at the end of this post to your favorite Pinterest boards.
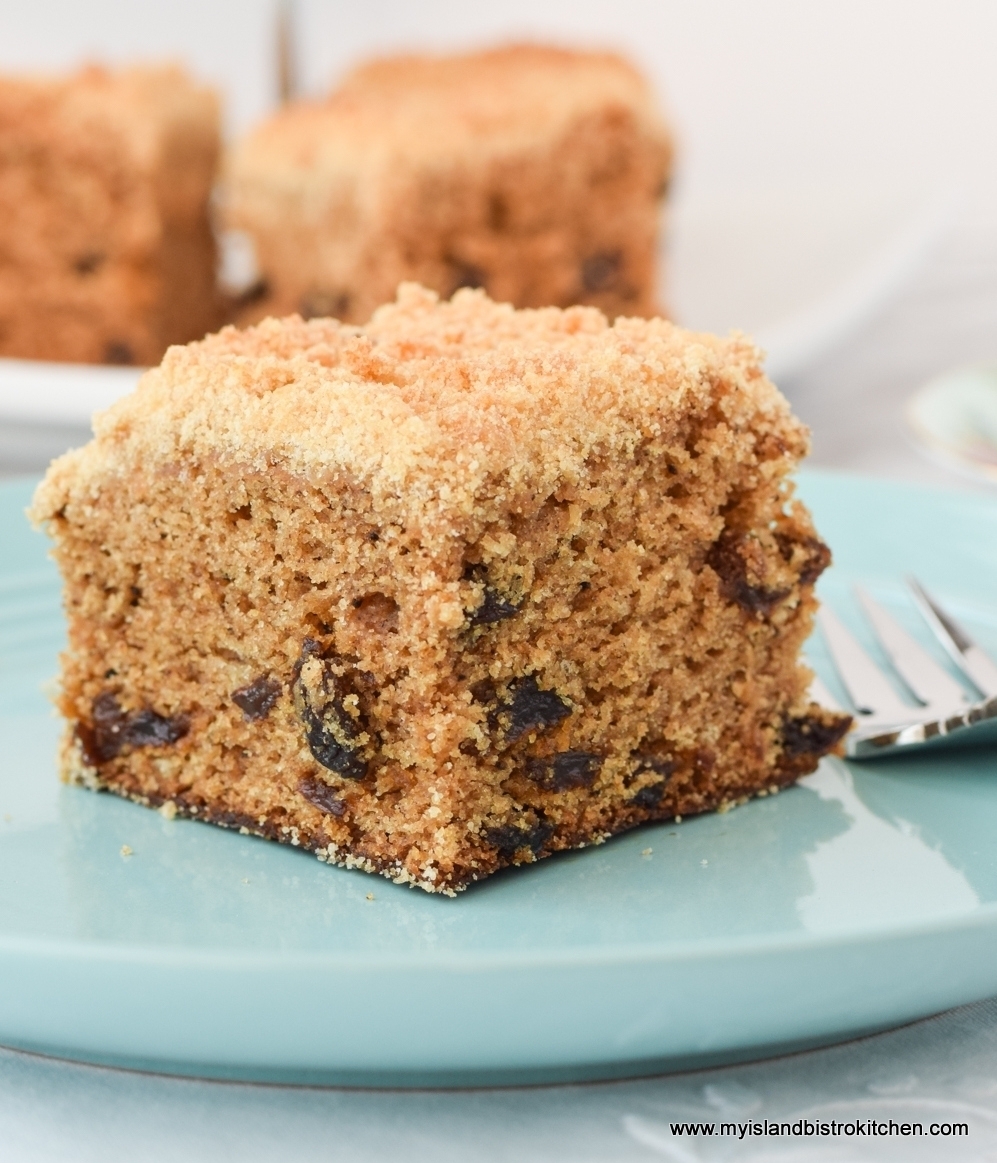
This old-fashioned country farmhouse crumb cake has been a recipe in my family for years. It quite resembles a coffee cake and is a hearty dessert that is tasty and not too sweet. Its crumb topping adds a lovely texture element to the cake. Continue reading Country Farmhouse Crumb Cake→
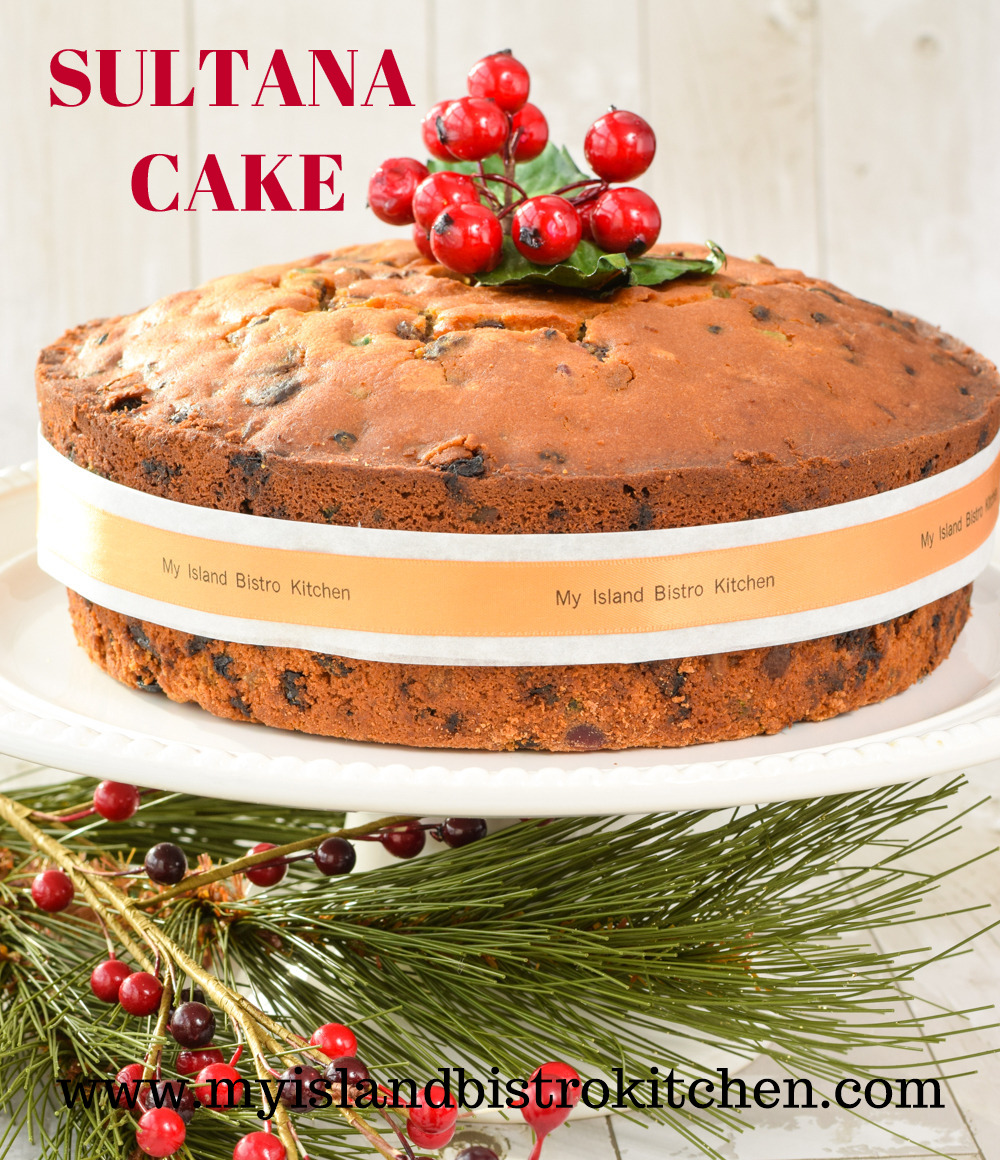
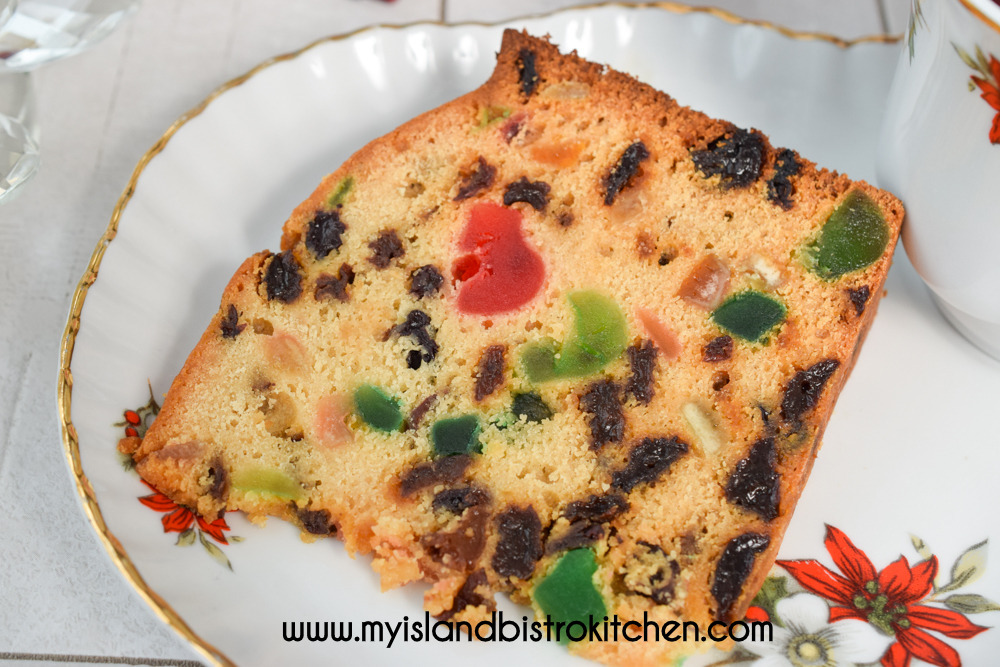
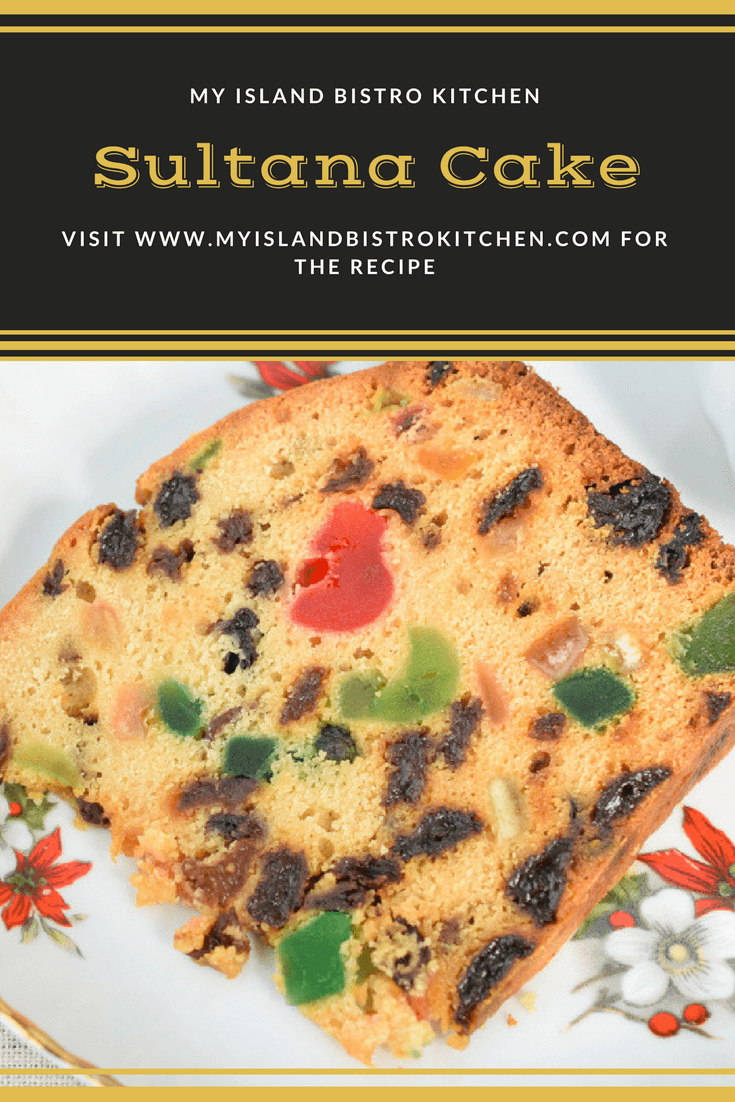
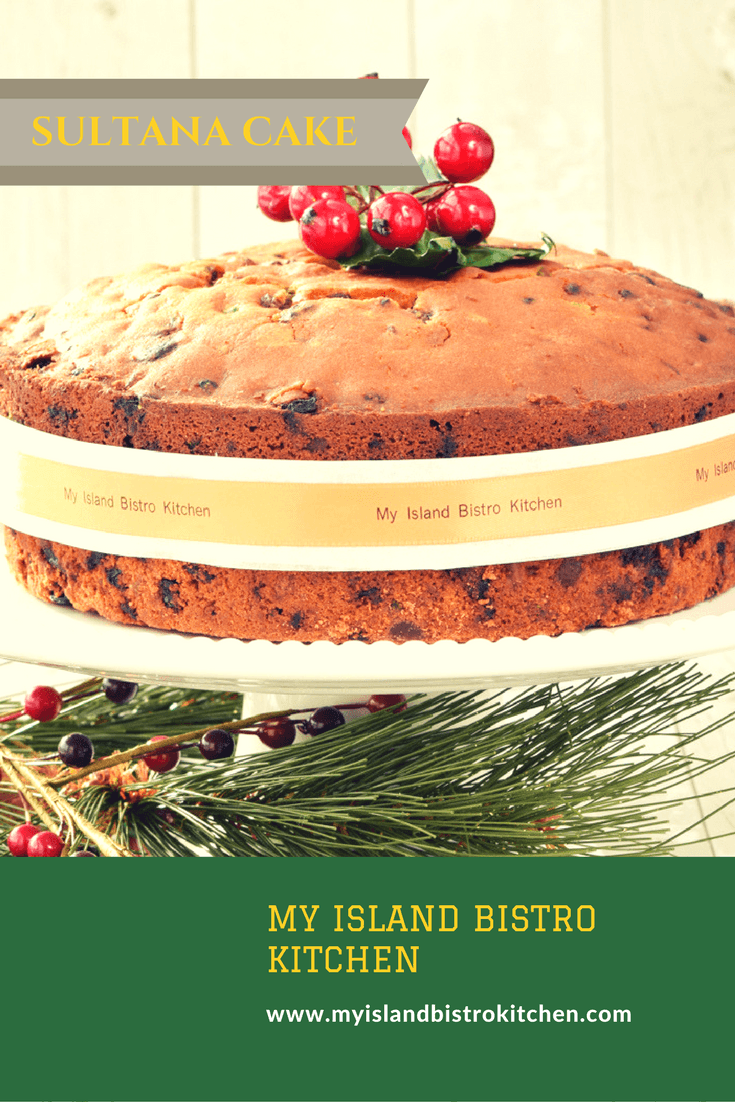
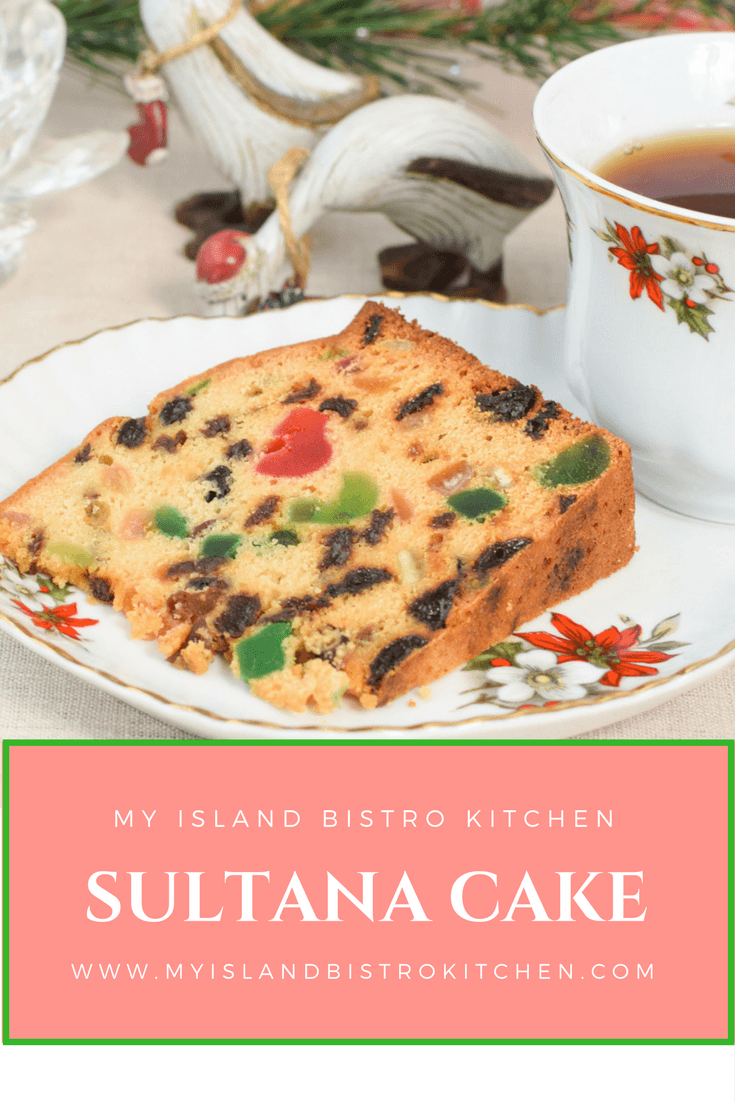
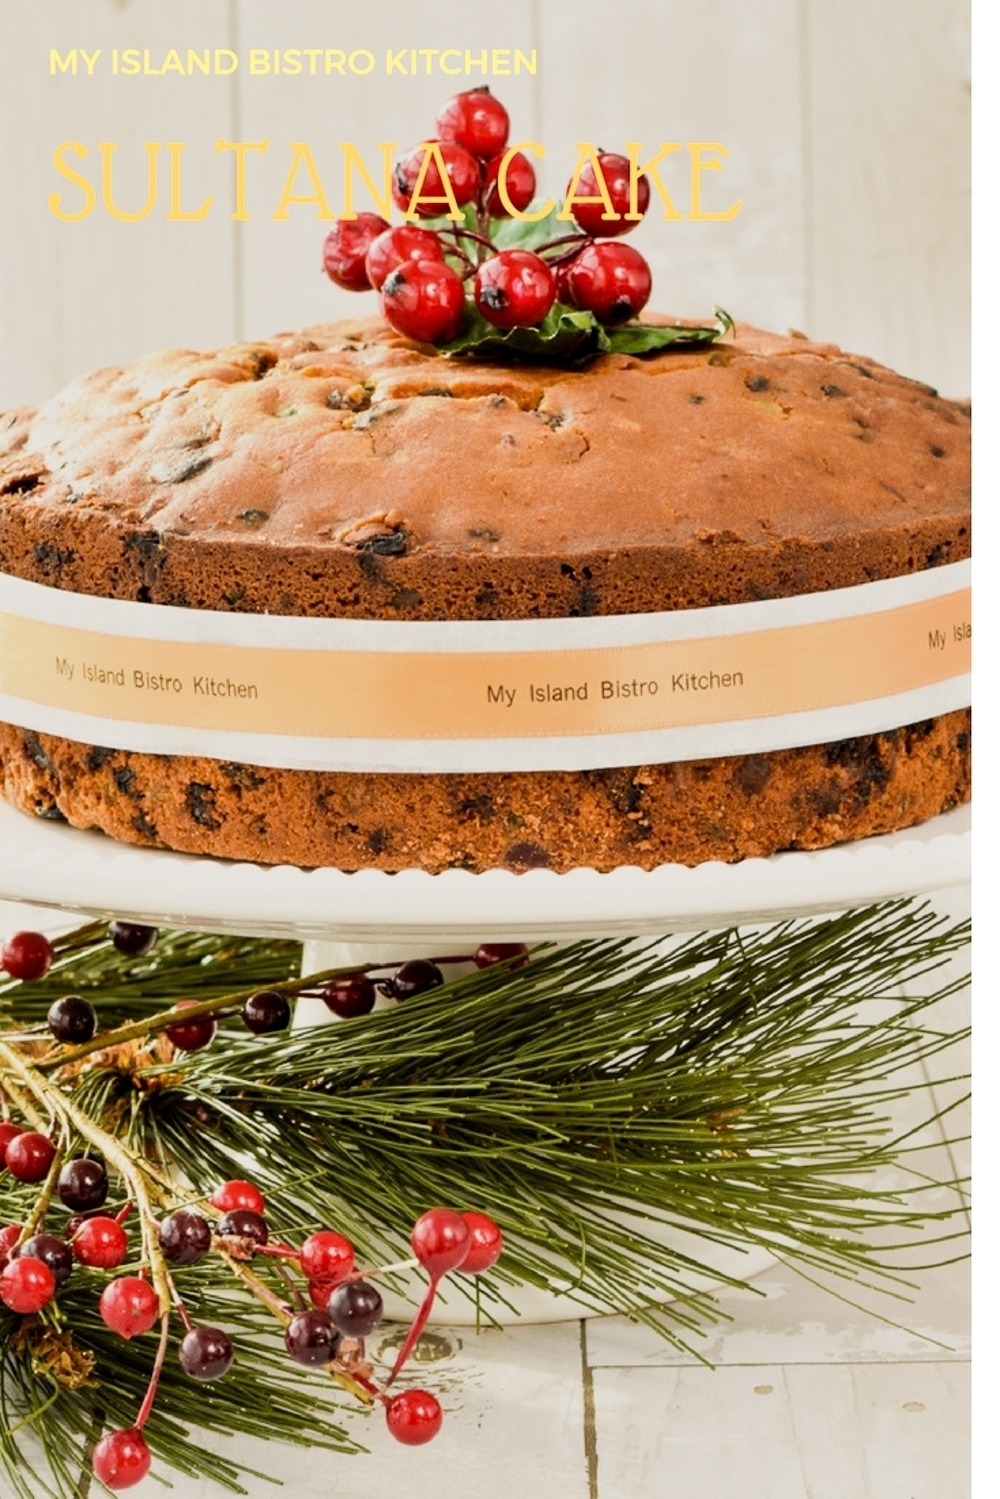
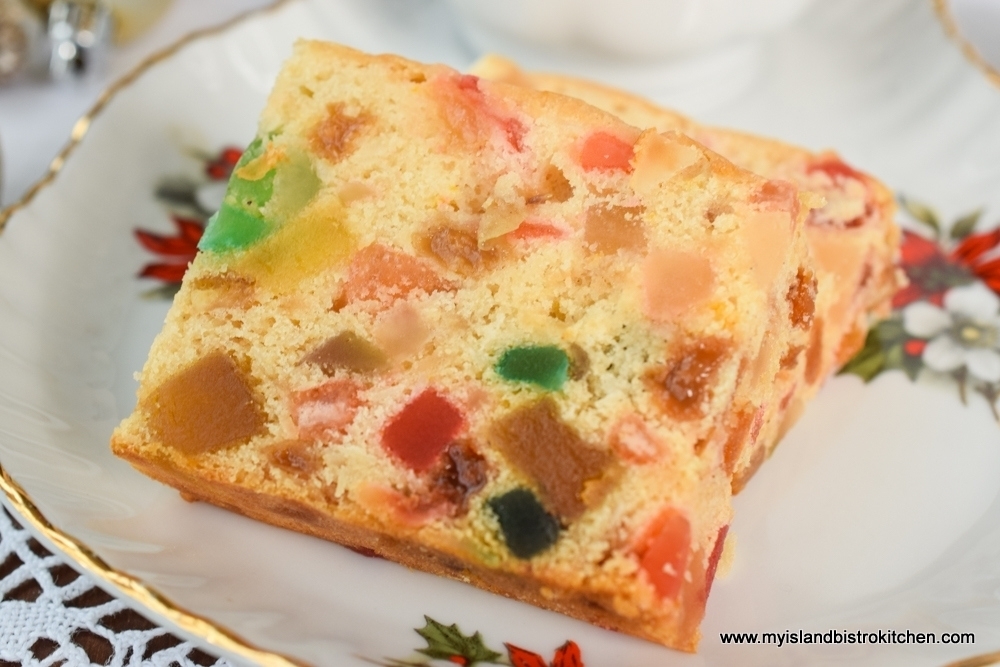
Sultana Cake, believed to be of British/Scottish origins, is so named because sultana raisins are the main ingredient. Often served at tea time, this unfrosted cake is a cross between a war cake, a Dundee cake, and a fruitcake. More sweet than a war cake and definitely less rich than a traditional fruitcake, this is a hearty, stick-to-the-ribs, kind of cake. Unlike a fruitcake, liquor is not common in a Sultana Cake.
Traditionally, I believe, Sultana Cake only had the raisins and maybe some nuts in it. My recipe, however, is slightly more luxurious with the addition of currants along with some glazed cherries and mixed fruit though the raisins are still the main ingredient.
Sultana Cake
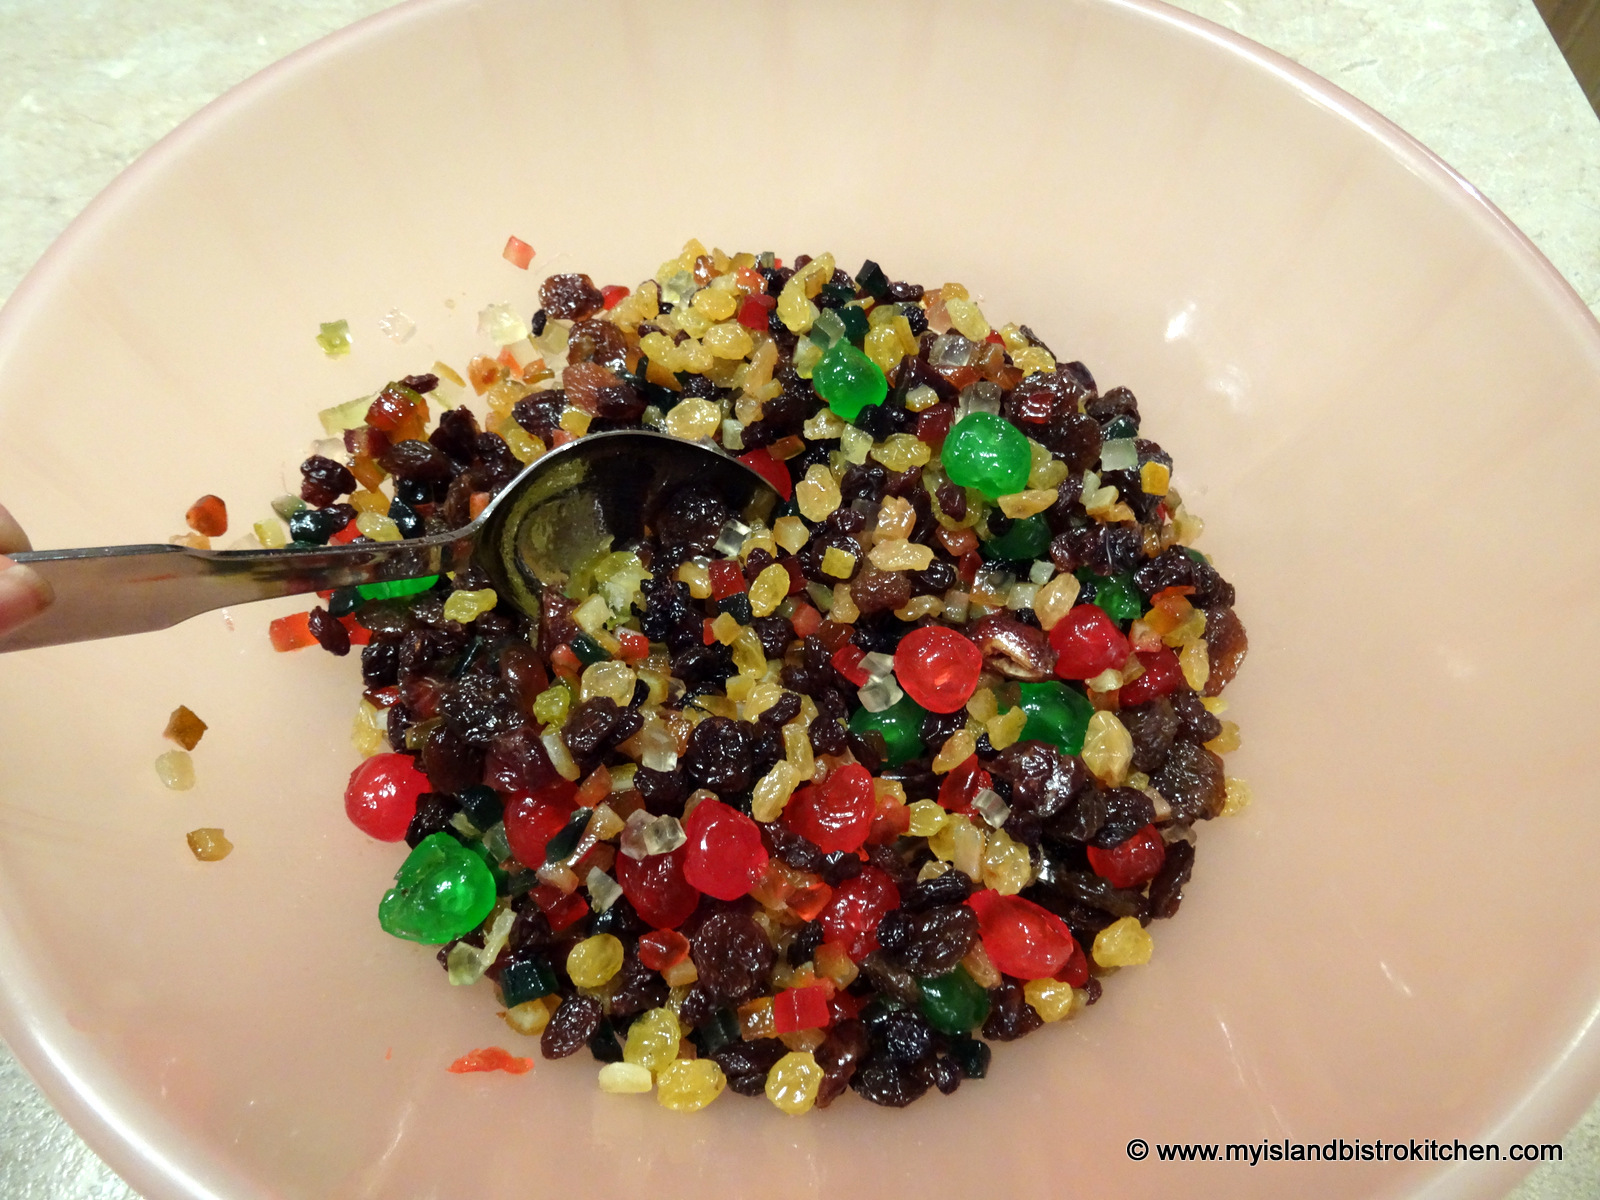
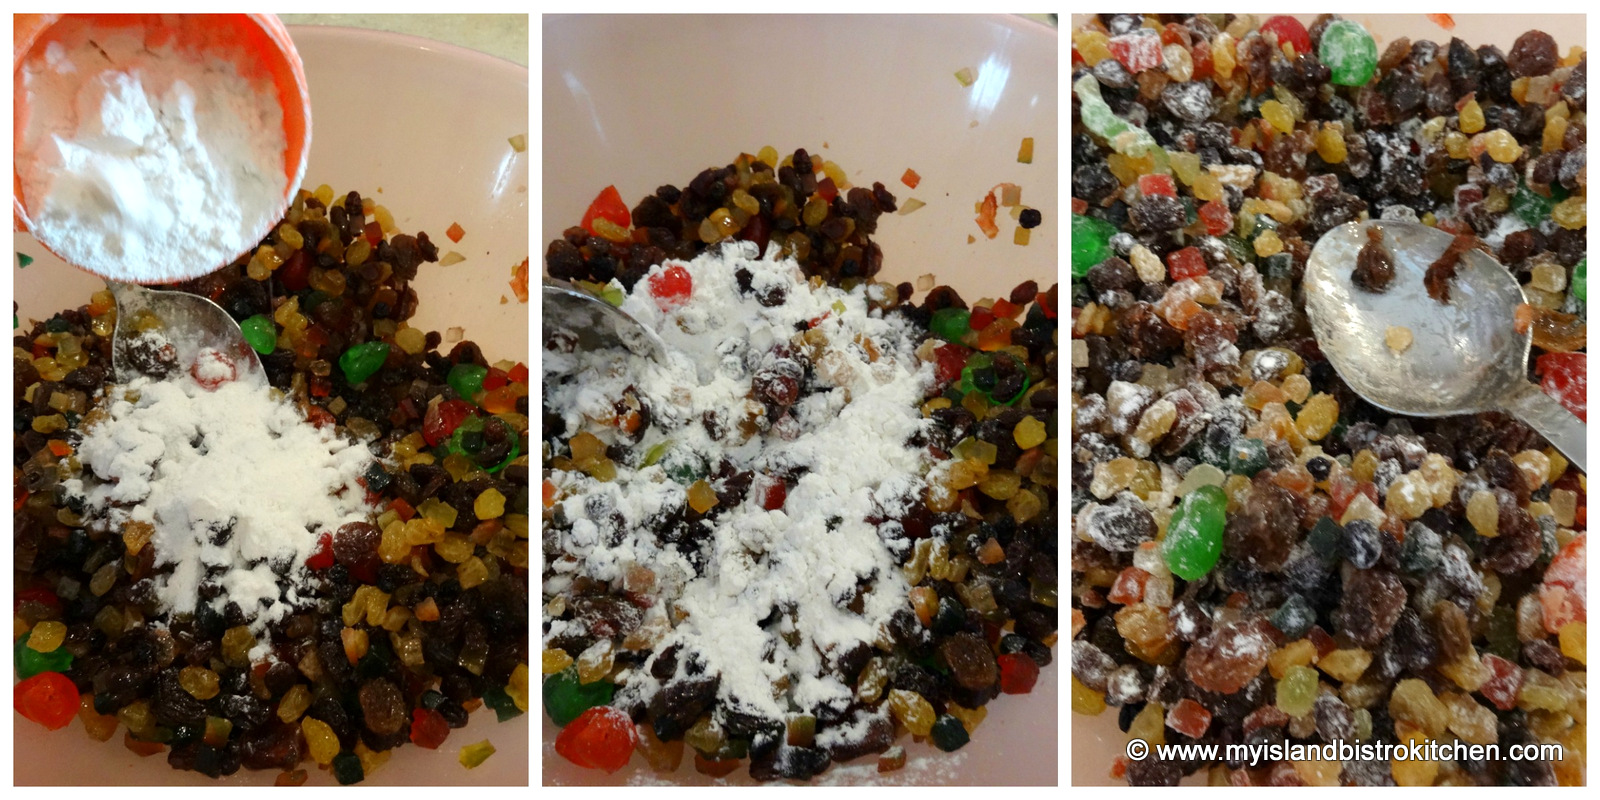
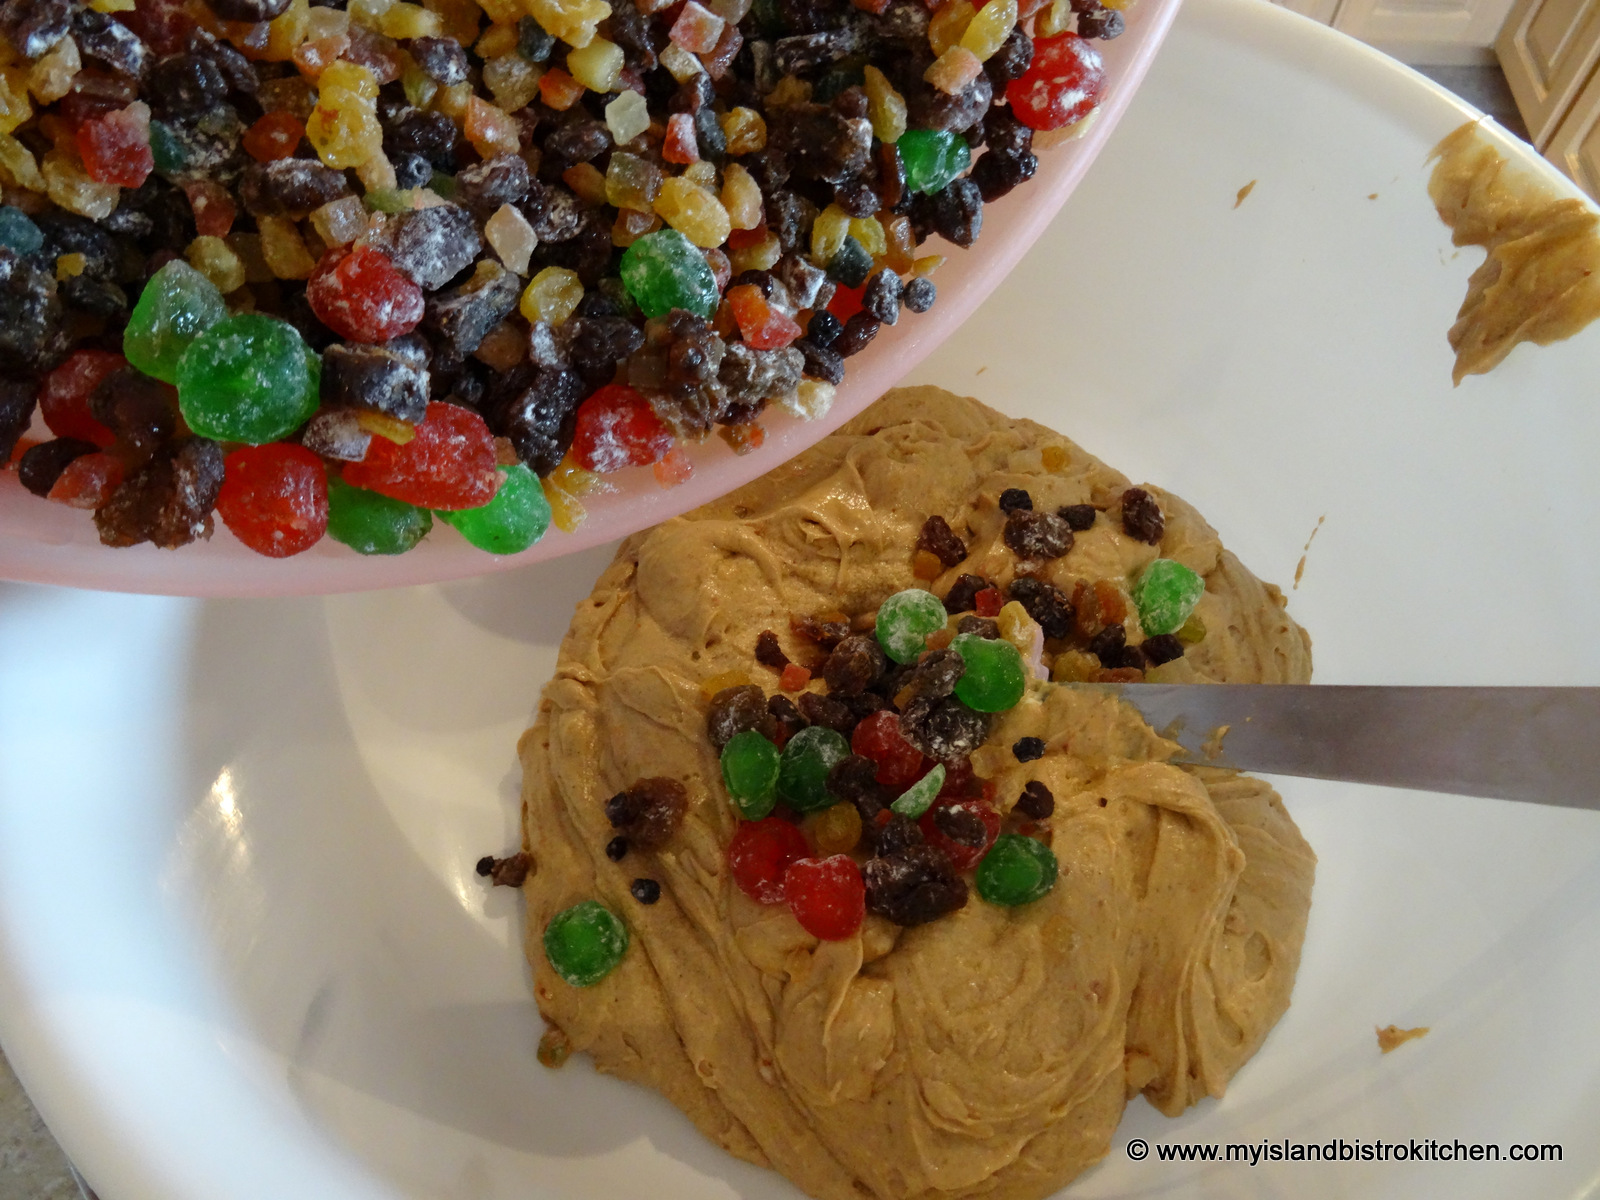
This is a much easier and quicker cake to make than is a fruitcake. There is no need to soak the fruit in liquor for a day or two before making the cake. Essentially, the raisins, currants, glazed cherries, and mixed fruit are dredged with 1/2 cup of the flour just before they are added to the batter to prevent them from dropping to the bottom of the cake during baking. I like to add some grated orange and lemon rind for extra flavour.
The butter should be softened at room temperature (not microwaved) for about 45 minutes or so before creaming. Microwaving the butter changes its consistency and it is more liquified. Butter that is softened naturally at room temperature is much creamier and fluffs better when beaten with the sugar. Yes, that lovely fluffy texture of the butter and sugar is what results in a soft even crumb in cakes.
The eggs and milk should be at room temperature for about 30 minutes or so before mixing in to the batter. The eggs need to be at roughly the same room temperature as the butter. If the eggs are cold and hit the soft warm butter, guess what? The eggs harden the butter again and this will un-do all the lovely creaming that has been done and will affect the cake’s texture, creating a dense hard crumb. The same holds true for the milk which also needs to be at room temperature to allow it to blend smoothly into the butter-sugar-egg mixture. Ever see cold milk poured into the cake batter that immediately looks lumpy or curdled? This can result in uneven baked products.
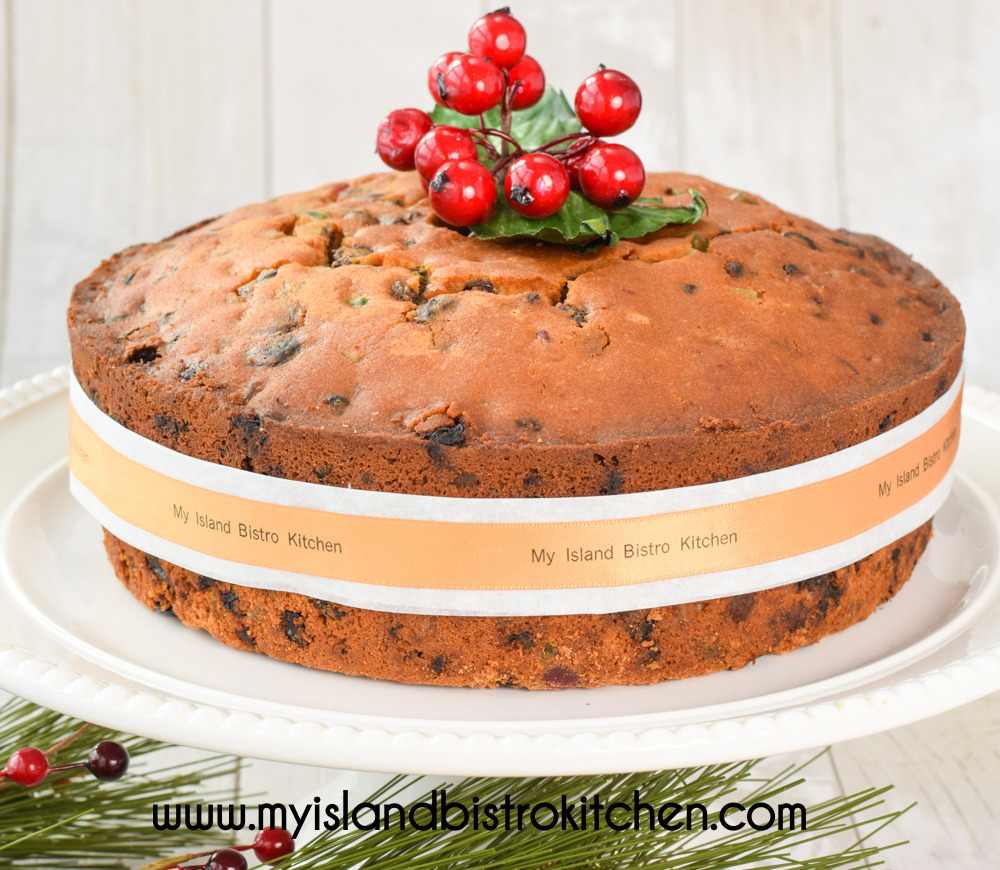
Sultana Cakes are traditionally made in round baking pans. My recipe calls for a 10″ round tube (funnel) pan that is 4″ deep. It has a 16-cup capacity so there is adequate room for the cake to expand as it bakes. Tube pans are great for dense cakes as they provide more uniform baking. With dense cakes, like Sultana Cake, it is sometimes difficult to get the outer edges of the cake and the center evenly baked at the same time. Removing the “center” of the cake eliminates this problem. Some pans have a removable bottom and these are very useful when it comes to removing the cake from the pan. I line the bottom of the pan with a layer of parchment and then spray the sides of the pan with cooking spray.
Placing a small pan of water on the bottom shelf, or floor, of the oven while the cake bakes helps to keep the cake moist. If the cake starts to brown too much, loosely tent it with tin foil.
Sultana Cake
Unlike a fruitcake that needs several weeks of ageing and mellowing before serving so that the flavours are deepened, a Sultana Cake does not need to age. That said, I usually do wrap and leave my Sultana Cake for 48-72 hours before cutting.
This is a delightful anytime cake although I often make it around Christmas. It’s a perfect alternative for anyone who finds fruitcake just a little too rich for their palate. It’s especially nice with a lovely cup of tea.
This cake freezes very well.
Sultana Cake
[Printable recipe follows at end of posting]
Sultana Cake
Ingredients:
1 lb sultana raisins ¼ lb currants 8 oz red and green glazed cherries 8 oz. mixed glazed fruit
1 cup unsalted butter, room temperature 1¾ cups brown sugar packed 5 large eggs, room temperature 1 tbsp vanilla 1 tsp lemon flavoring 1½ tsp grated orange rind 1½ tsp grated lemon rind
3½ cups all-purpose flour (reserve ½ cup for dredging the fruit) 1¼ tsp baking powder ¾ tsp salt
1 cup milk, room temperature
Method:
Preheat oven to 325°F. Spray 4” deep 10” round tube (funnel) pan with cooking spray and line bottom with parchment paper.
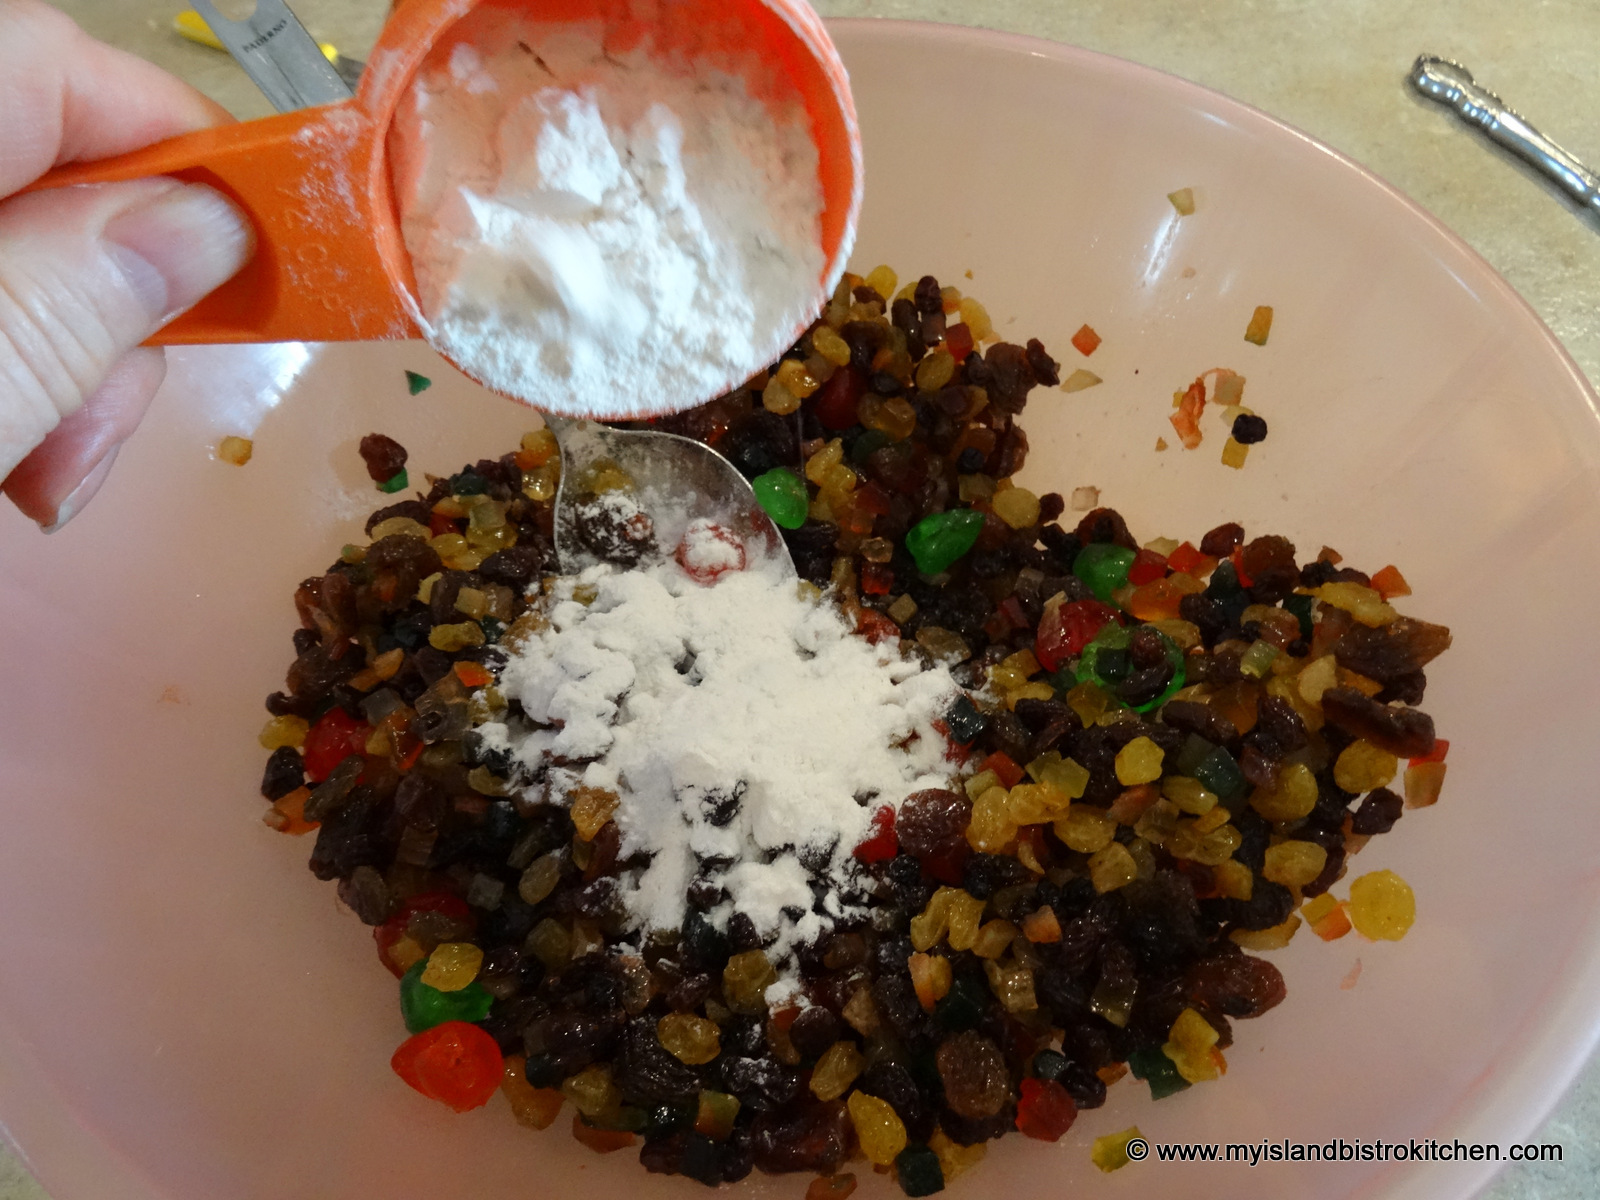
In large bowl, mix the raisins, currants, glazed cherries, and mixed fruit. Dredge with ½ cup of the flour called for in the recipe. Set aside.
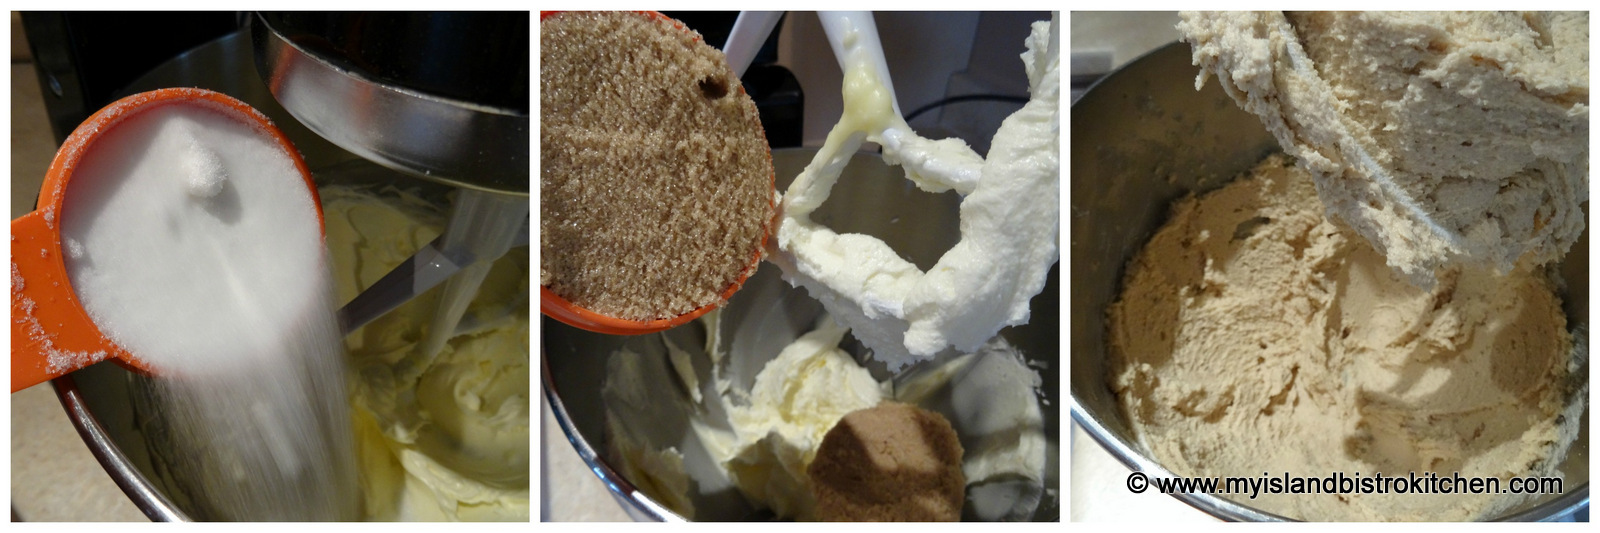
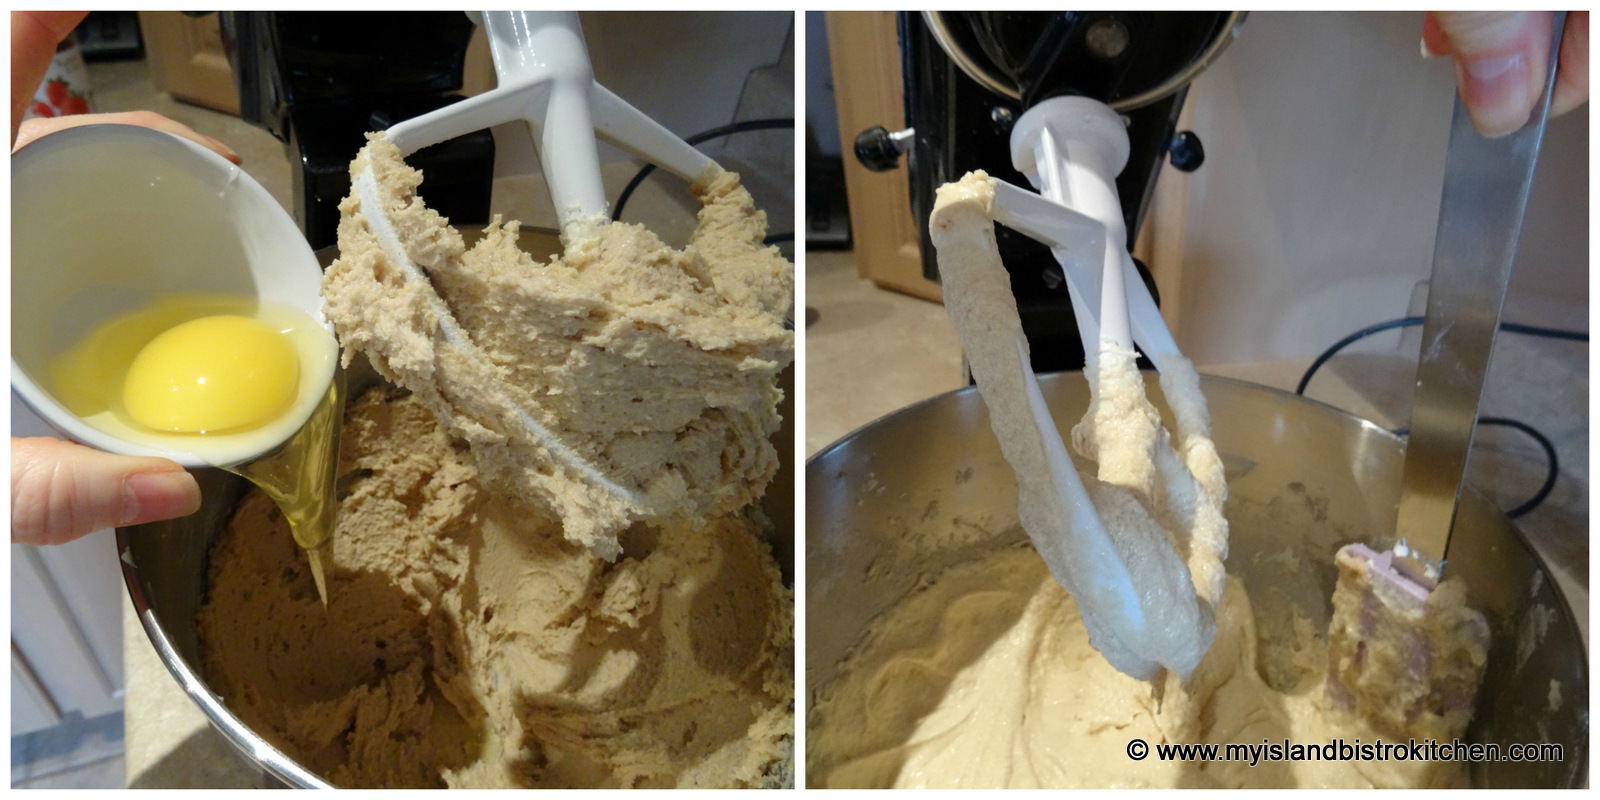
Cream the butter and sugar until light and fluffy. Add the eggs, one at a time, beating well after each addition. Beat at medium-high speed for one additional minute. Add the vanilla and lemon flavoring and mix well. Add the grated orange and lemon rind. Mix well.
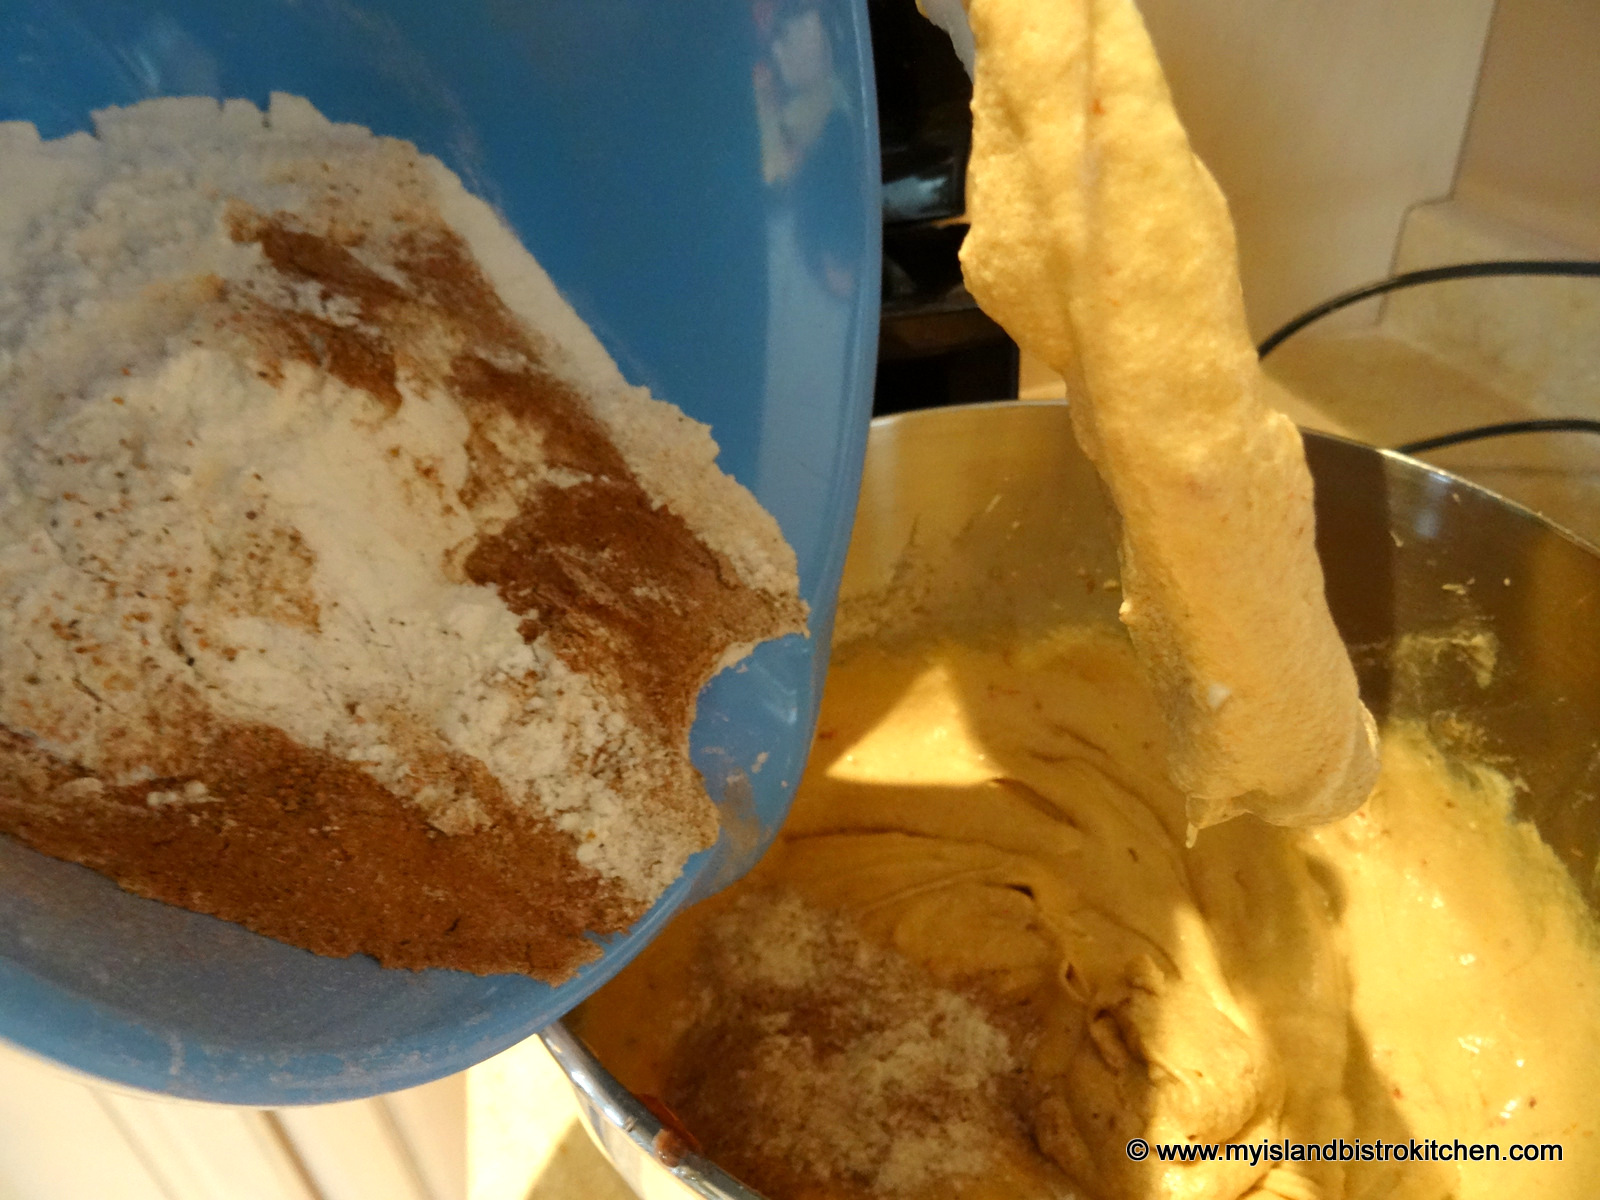
Sift remaining 3 cups of flour, baking powder, and salt together. Add to the creamed mixture alternately with the milk, beginning and ending with the dry ingredients. Beat at medium-high speed for 1 additional minute. Add the floured fruit mixture and stir just until ingredients are combined.
Spoon batter into prepared pan, using knife to smooth top. Place small pan of hot water on lower shelf, or floor, of oven to provide moisture to the cake as it bakes. Bake cake in center of middle rack for approximately 2½ hours or until cake tester inserted in or near centre of cake comes out clean. Let cake cool in pan for about 30 minutes before carefully removing from pan by inverting it on a tea towel and removing the paper. Carefully turn the cake top side up on to a wire cooling rack.
Less sweet than a fruitcake, this Sultana Cake, enhanced with glazed fruit, is moist and flavorful.
My Island Bistro KitchenMy Island Bistro Kitchen
Ingredients
1lbsultana raisins
¼lbcurrants
8ozred and green glazed cherries
8oz.mixed glazed fruit
1cupunsalted butter,room temperature
1¾cupsbrown sugar, packed
5large eggs,room temperature
1tbspvanilla
1tsplemon flavoring
1½tspgrated orange rind
1½tspgrated lemon rind
3½cupsall-purpose flour(reserve ½ cup for dredging the fruit)
1¼tspbaking powder
¾tspsalt
1cupmilk,room temperature
Instructions
Preheat oven to 325°F. Spray 4” deep 10” round tube (funnel) pan with cooking spray and line bottom with parchment paper.
In large bowl, mix the raisins, currants, glazed cherries, and mixed fruit. Dredge with ½ cup of the flour called for in the recipe. Set aside.
Cream the butter and sugar until light and fluffy. Add the eggs, one at a time, beating well after each addition. Beat at medium-high speed for one additional minute. Add the vanilla and lemon flavoring and mix well. Add the grated orange and lemon rind. Mix well.
Sift remaining 3 cups of flour, baking powder, and salt together. Add to the creamed mixture alternately with the milk, beginning and ending with the dry ingredients. Beat at medium-high speed for 1 additional minute. Add the floured fruit mixture and stir just until ingredients are combined.
Spoon batter into prepared pan, using knife to smooth top. Place small pan of hot water on lower shelf, or floor, of oven to provide moisture to the cake as it bakes. Bake cake in center of middle rack for approximately 2½ hours or until cake tester inserted in or near centre of cake comes out clean. Let cake cool in pan for about 30 minutes before carefully removing from pan by inverting it on a tea towel and removing the paper. Carefully turn the cake top side up on to a wire cooling rack.
Recipe Notes
[Copyright My Island Bistro Kitchen]
If you have made this recipe and enjoyed it and/or wish to share it with your friends and family, please do so on social media but be sure to share the direct link to this posting from my website.
Connect with My Island Bistro Kitchen on Social Media
Follow “the Bistro” on Pinterest at https://www.pinterest.ca/peibistro/ and pin the Pinterest-ready photo found at the end of this post to your favorite Pinterest boards.
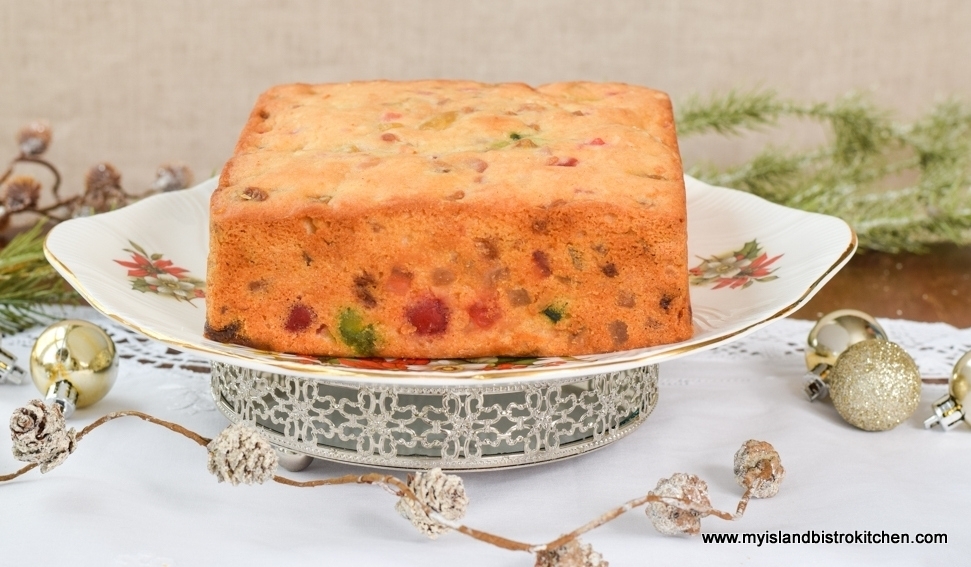
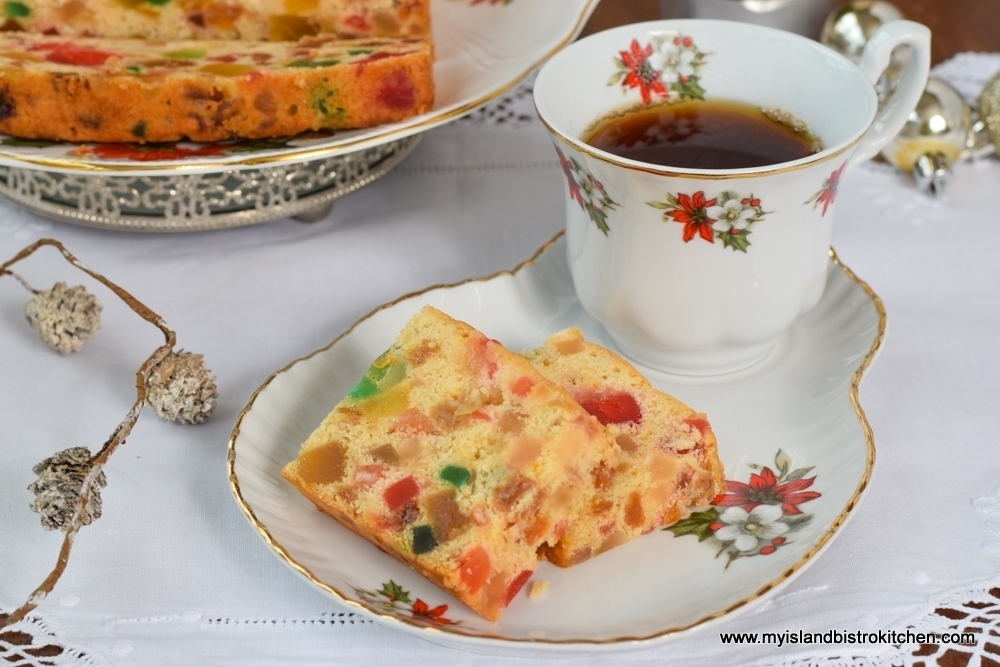
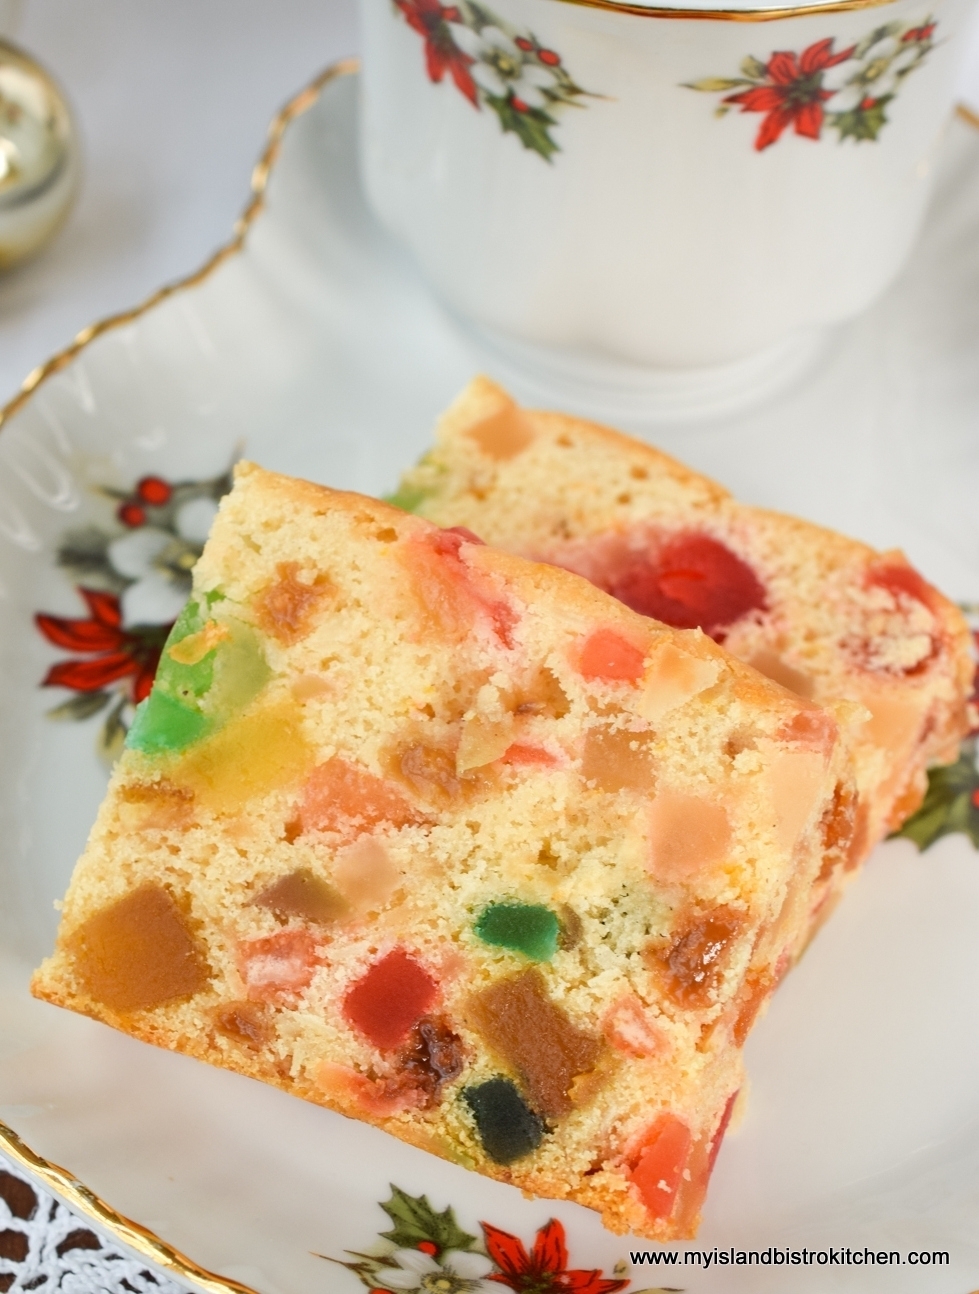
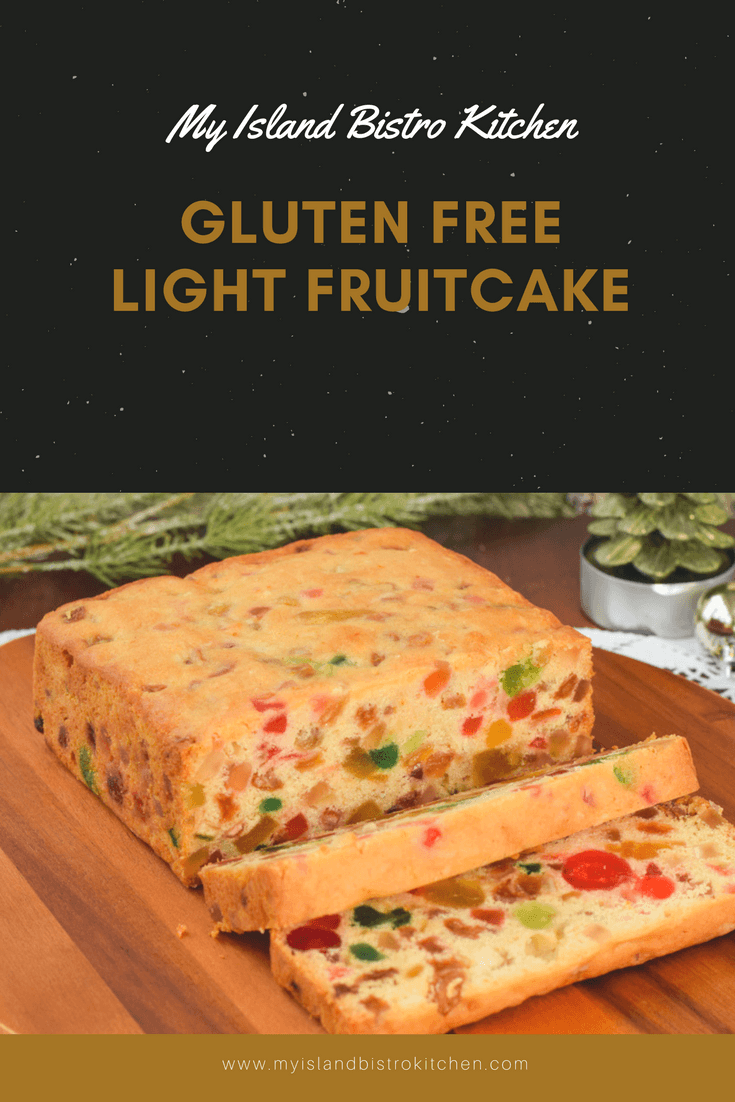
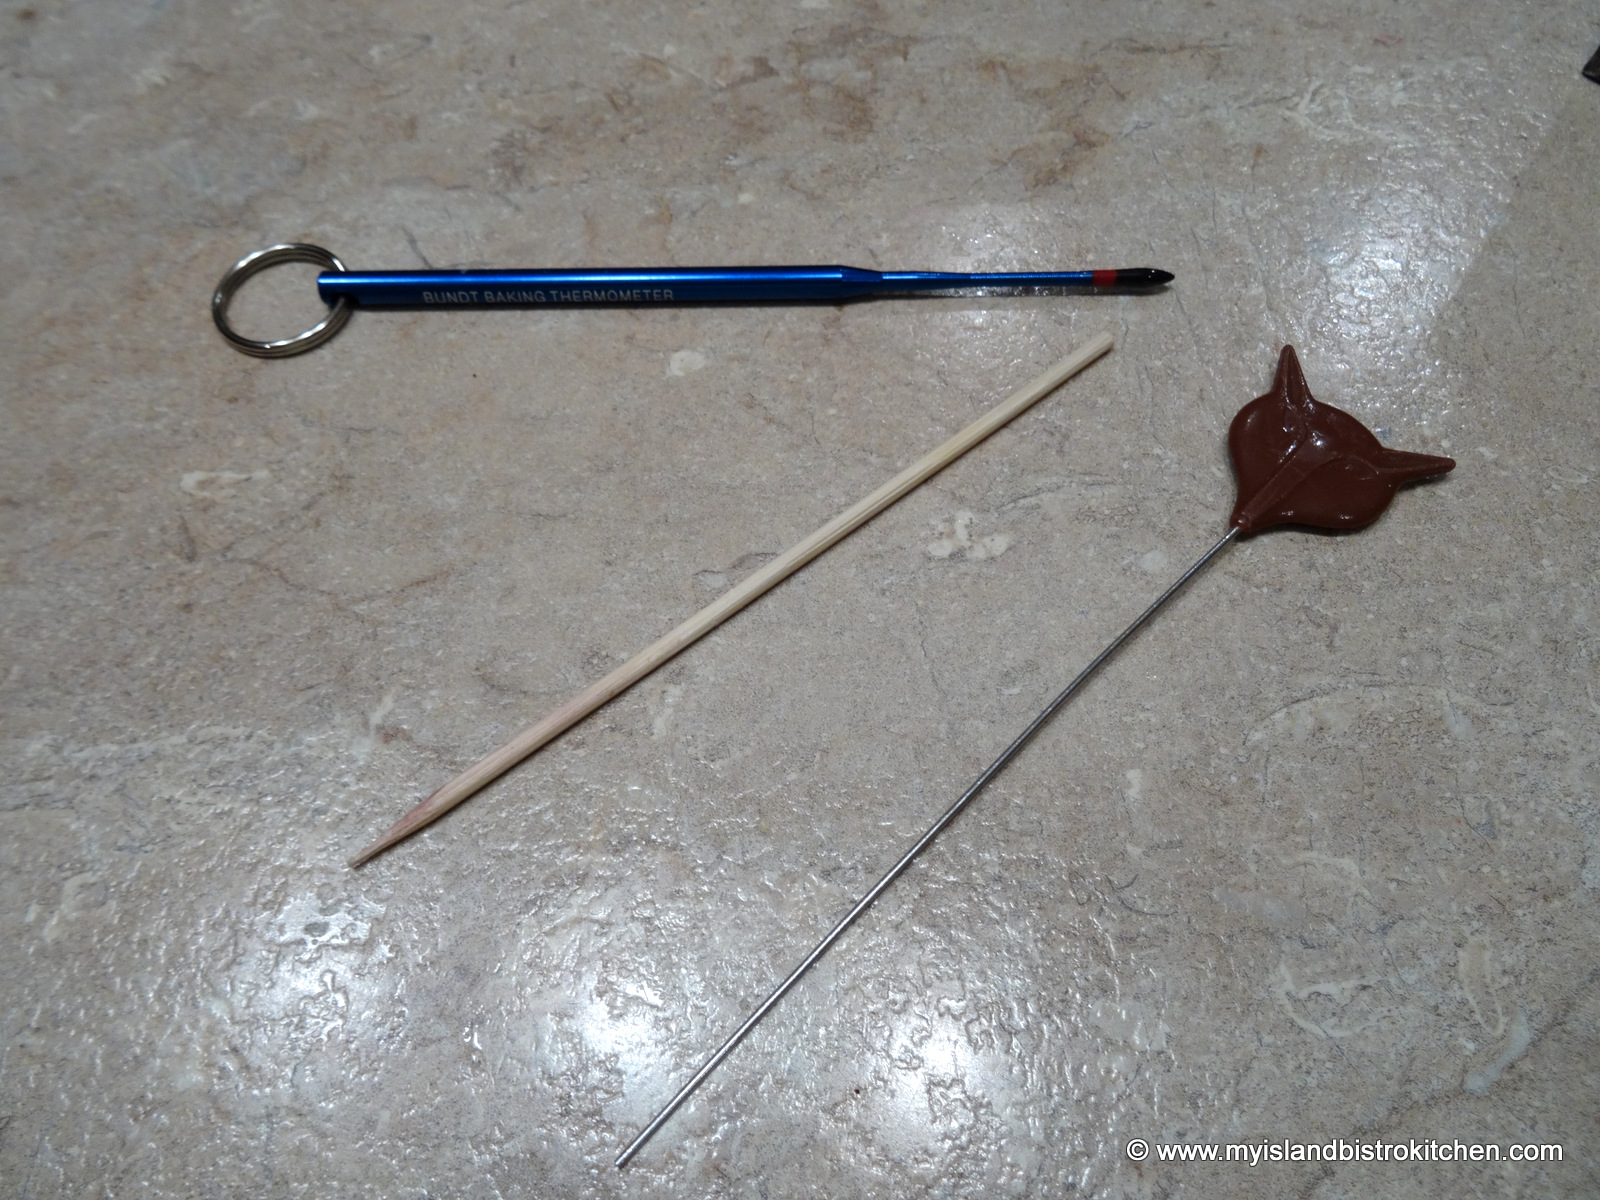
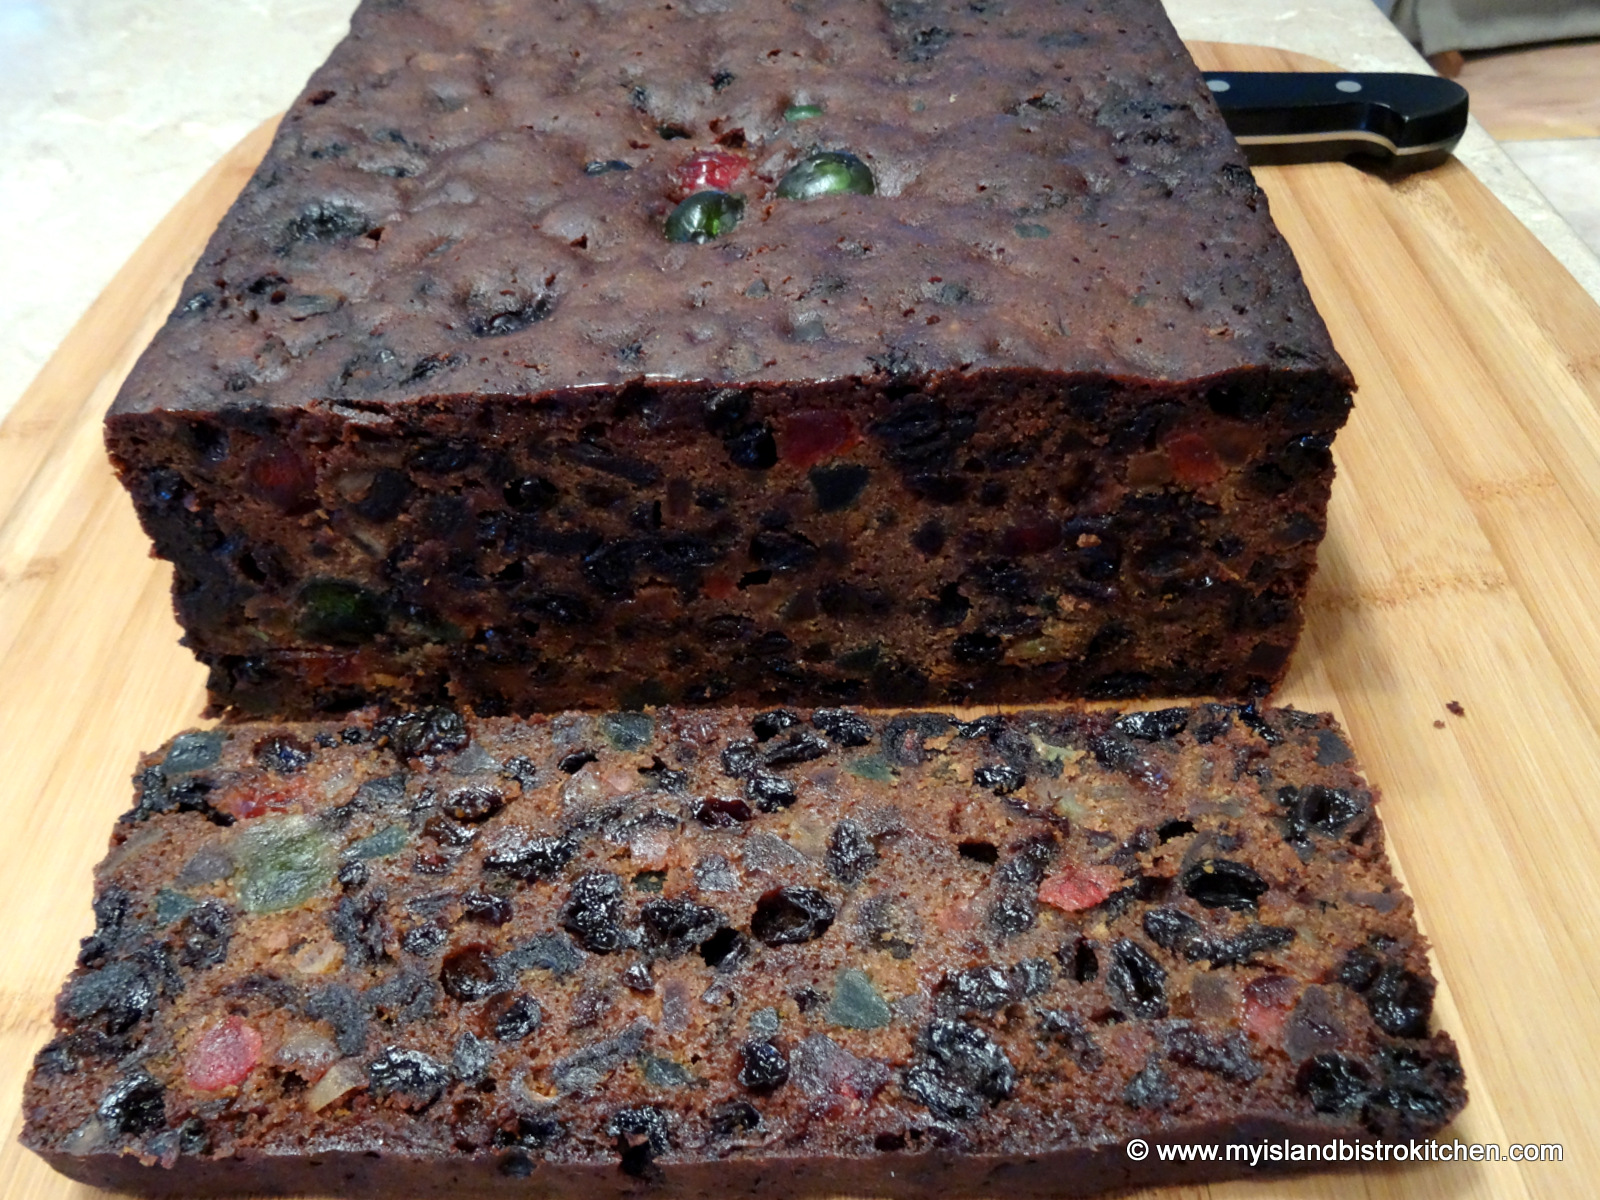
This posting contains my newly-developed recipe for gluten free light fruitcake.
This cake is so tasty that it’s hard to tell it is actually gluten free! The flours I use in this recipe are the one-to-one gluten free flour along with almond flour and coconut flour that add lovely flavour and texture to the cake batter.
Gluten Free Light Fruitcake
As always, ensure that all ingredients (not just the flours) called for in the recipe are indeed gluten free and have not been cross contaminated with products containing gluten.
Gluten Free Light Fruitcake
Rather than rewrite all the tips I have for making fruitcakes, I am directing readers to my previous postings for dark fruitcake and light fruitcake. While these two recipes are for regular fruitcakes that are not gluten free, the tips I have provided in those postings apply equally to this gluten free version of a fruitcake.
Gluten Free Light Fruitcake
[Printable recipe follows at end of posting]
Gluten-Free Light Fruitcake
Ingredients:
¼ lb golden sultana raisins 1½ oz green glazed cherries 2½ oz red glazed cherries 1½ oz glazed pineapple rings, chopped 3 oz mixed glazed fruit 2 tbsp citron 3 tbsp brandy 3 tbsp flaked coconut ½ tsp finely grated lemon rind ½ tsp finely grated orange rind
¼ cup butter, softened at room temperature 1/3 cup granulated sugar 2 large eggs, separated ¼ tsp pure vanilla ¼ tsp almond flavoring ¼ tsp lemon flavoring 3 tbsp applesauce
1½ tbsp orange juice 1 tbsp lemon juice 2 tbsp brandy
Few glazed cherries for cake top decoration (optional) Extra brandy for brushing on cake as it ages and for soaking cheesecloth in which to wrap the cake
Method:
In medium-sized bowl, combine the raisins, cherries, glazed pineapple, mixed glazed fruit, and citron. Mix well. Stir in the three tablespoons of brandy to coat the fruit. Cover tightly with plastic wrap. Let stand for about 24 hours to macerate the fruit, stirring occasionally. When ready to mix up the cake, add the coconut and grated lemon and orange rind. Stir well.
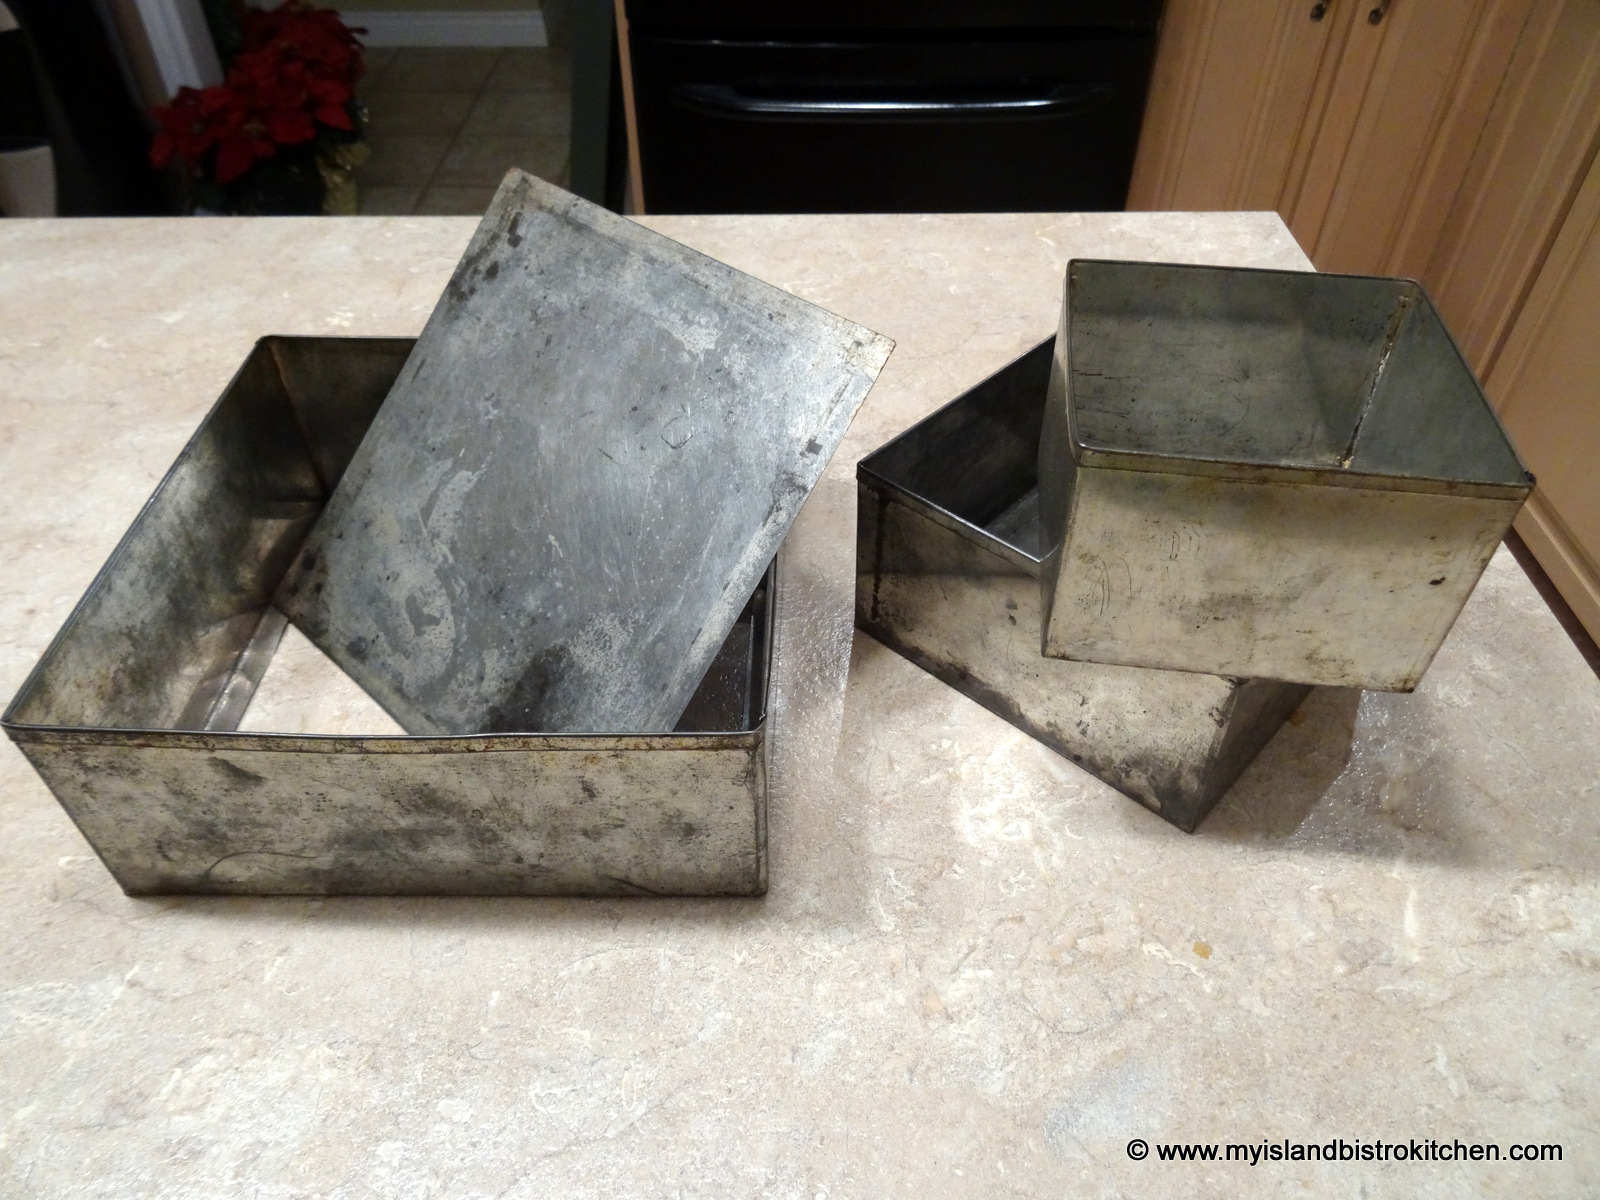
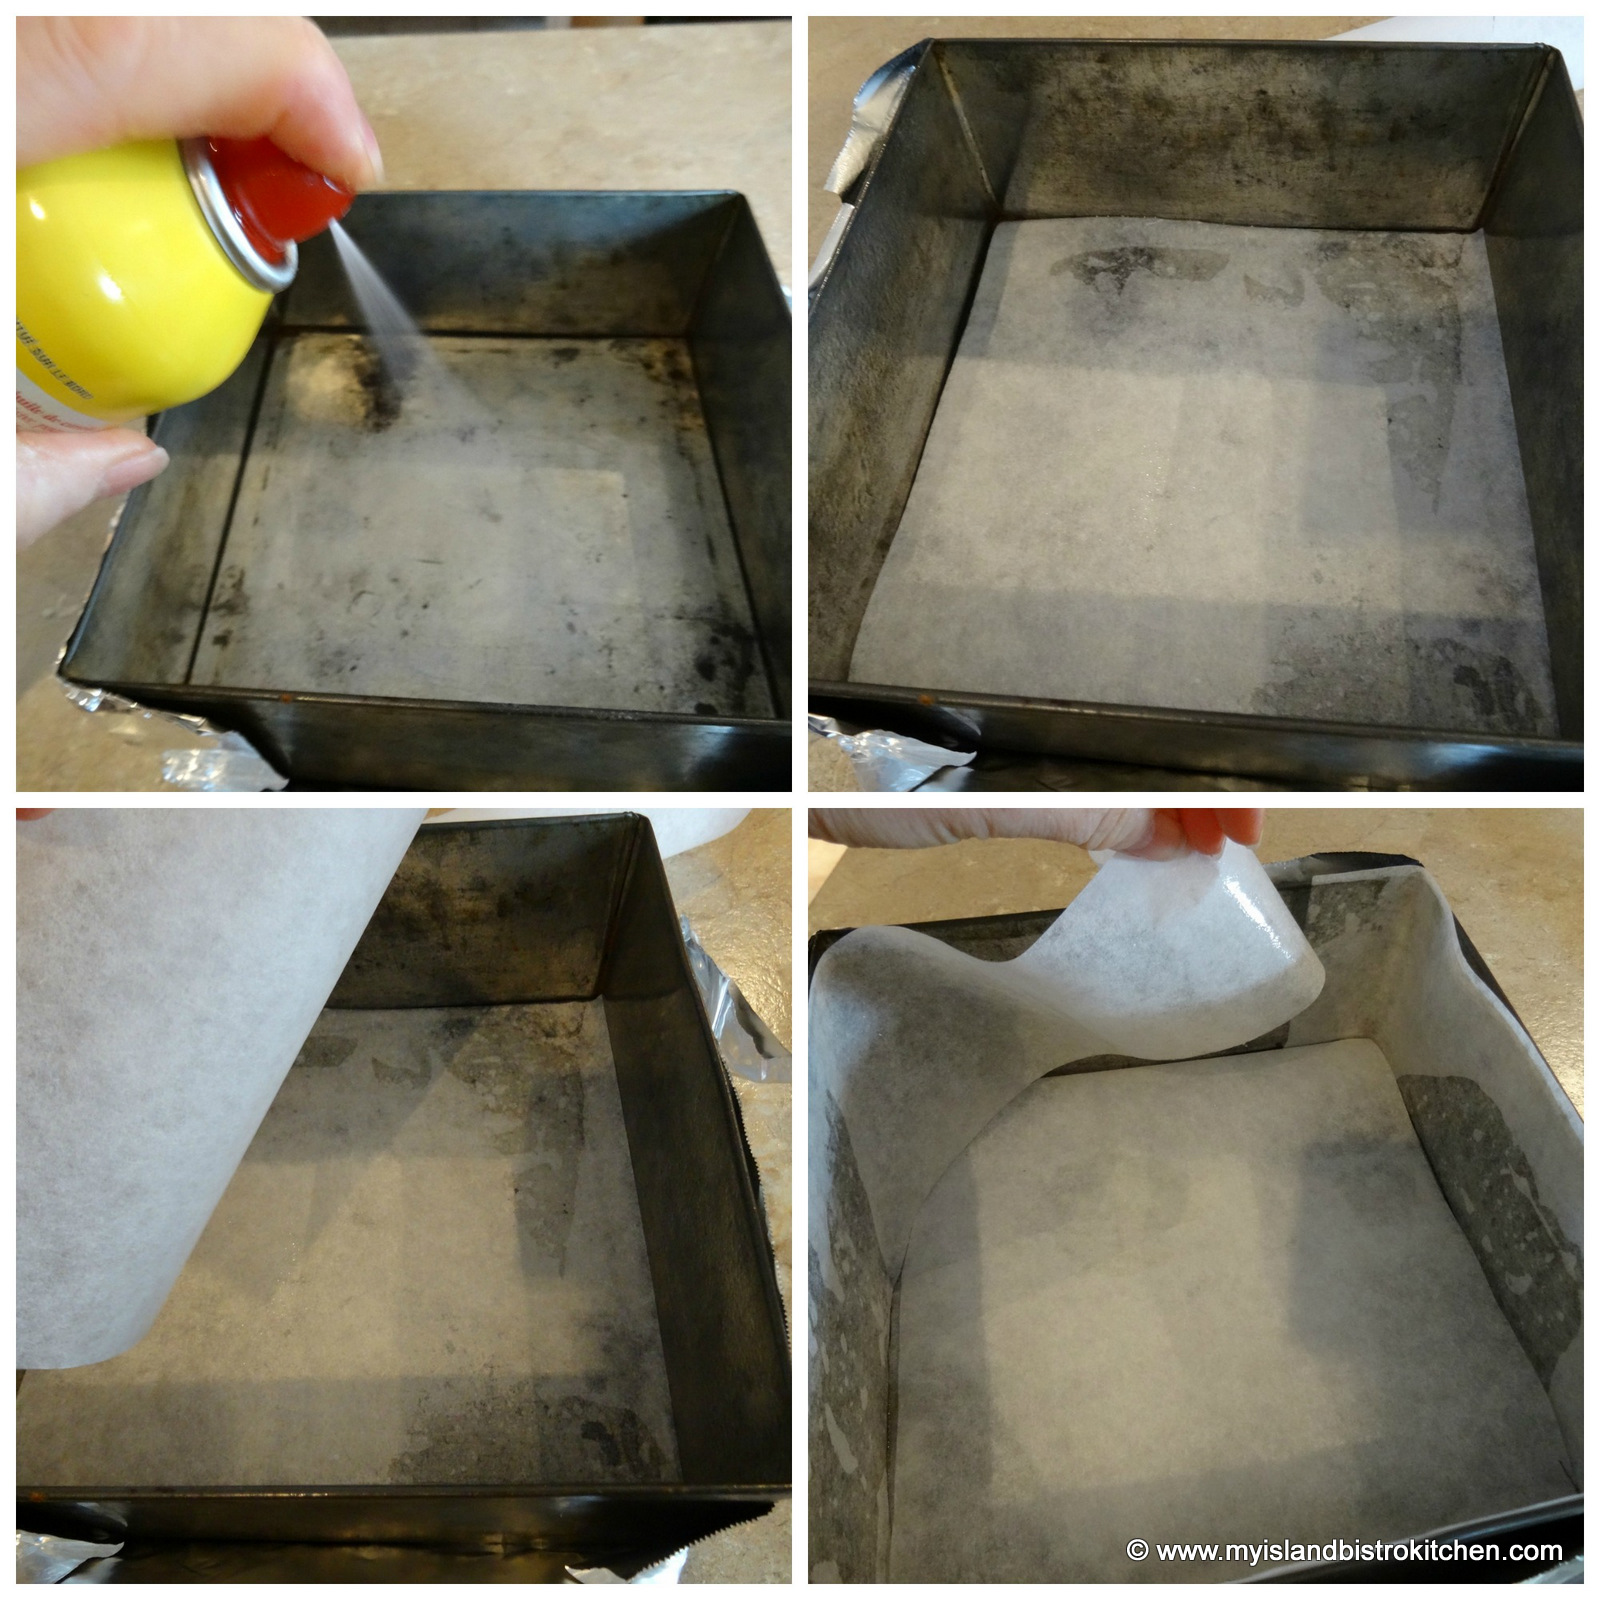
Prepare 6-inch square fruitcake pan that is at least 2¼” deep and has a removable bottom: Lightly spray the bottom and sides of the pan with cooking spray. Line the pan (bottom and sides), with brown paper or double thickness of parchment paper. Lightly spray the paper.
Preheat oven to 275°F.
In medium-sized bowl, and using an electric hand mixer, beat the butter until creamy. Gradually add the sugar and beat until mixture is light and creamy. Separate eggs and set aside the whites. Add the egg yolks to the creamed butter and sugar, one at a time, beating well after each addition and scraping the sides of the bowl with a spatula to ensure ingredients are all incorporated. Beat 1 additional minute. Beat in the vanilla, almond, and lemon flavorings. Stir in the applesauce.
Remove 3 tbsp of the one-to-one gluten free flour from the ¾-cup called for in the recipe and set aside to flour the fruit. Sift the remaining one-to-one gluten free flour, almond flour, and coconut flour together with the baking powder, xanthan gum, and salt.
In measuring cup or small bowl, combine the orange and lemon juices along with the two tablespoons of brandy.
Add the dry and wet ingredients to the beaten butter-sugar-egg mixture in three additions, starting and ending with the flour mixture. Transfer batter to a larger bowl, big enough to accommodate the amount of fruit to be added.
Sprinkle reserved 3 tablespoons of the one-to-one gluten free flour over the macerated fruit to which the coconut and grated lemon and orange rind have been added. Toss ingredients lightly and quickly. Gently fold the fruit mixture into the batter.
In clean bowl with clean beaters, beat the egg whites until stiff but not dry. Gently fold the whipped egg whites into the batter.
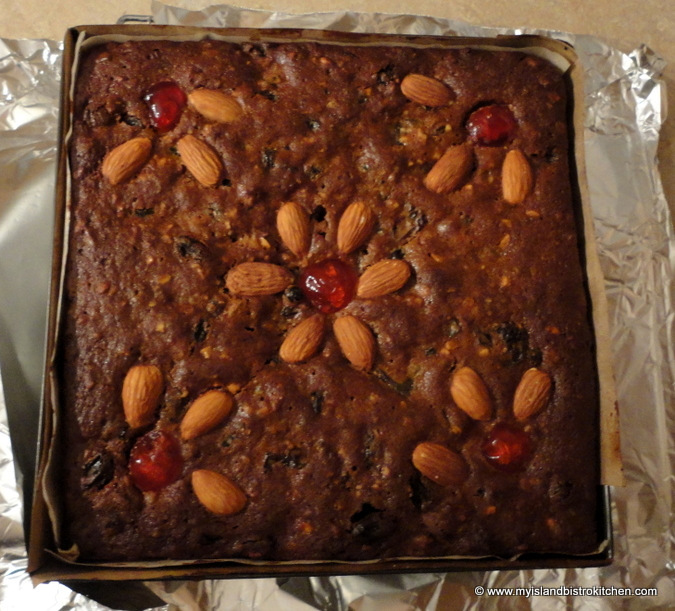
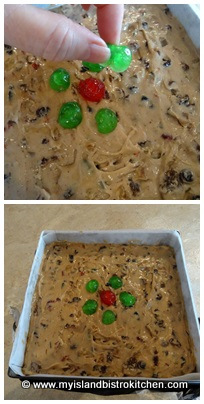
Transfer batter by large spoonfuls into the prepared baking pan. Use a knife to evenly spread the batter in the pan, smoothing the top. Add a few glazed cherries as decorations to the top of the cake, if desired.
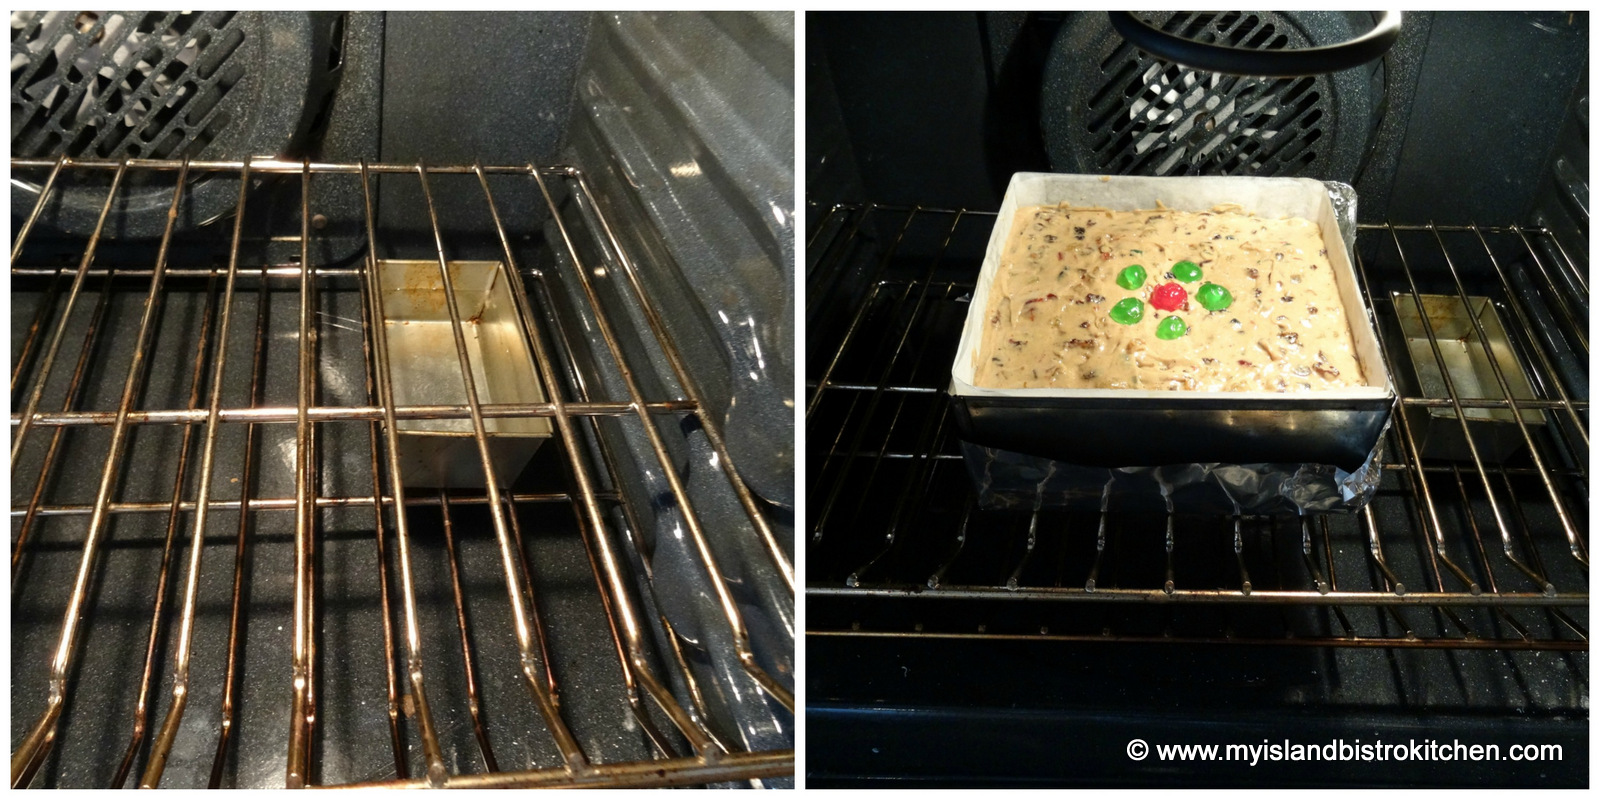
Place small pan of hot water on the lower rack in the oven. Place fruitcake in center of middle rack and bake for approximately 1¼ – 1½ hours, or until cake is firm to the touch and cake tester inserted into centre of cake comes out clean. After about 35-40 minutes or so of baking, loosely tent cake with tin foil to prevent it from browning too much. When cake is baked, remove from oven and place on rack. Let cake cool in pan for about 40 minutes before carefully removing from pan by inverting it on to a tea towel and removing the paper. Carefully turn the cake, top side up, on to a wire cooling rack.
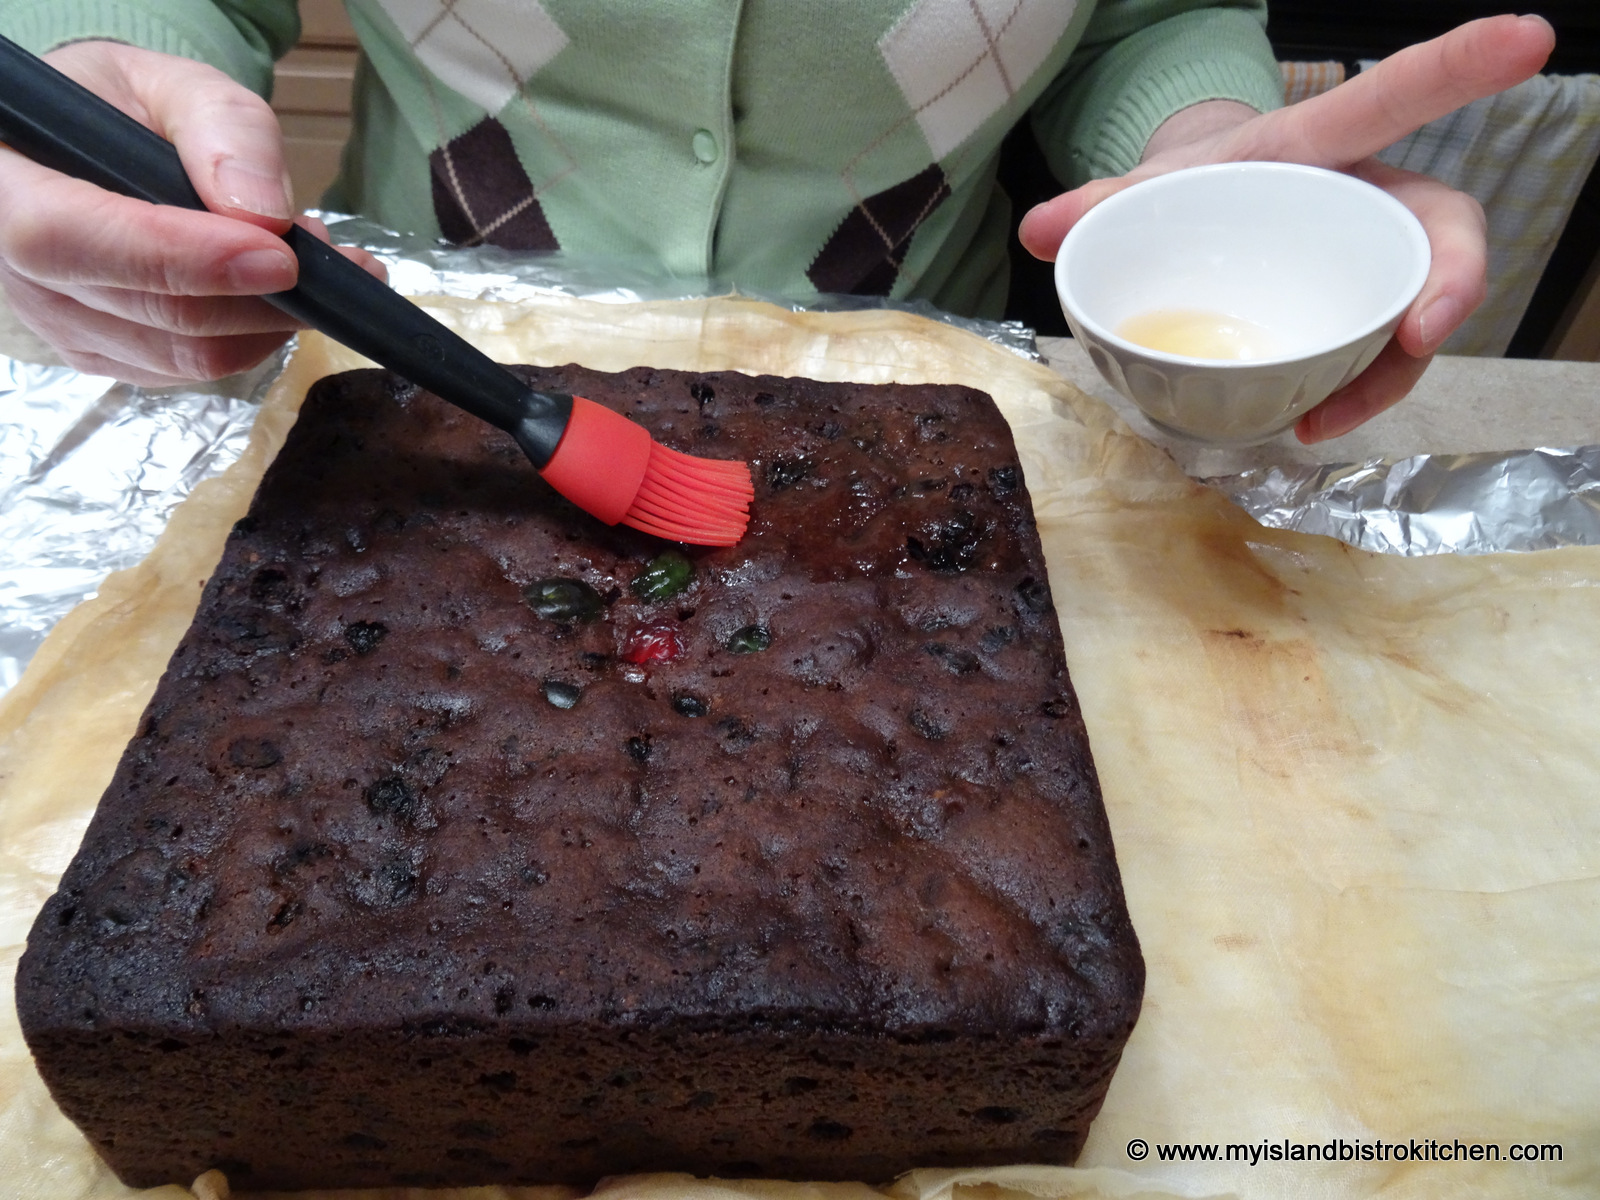
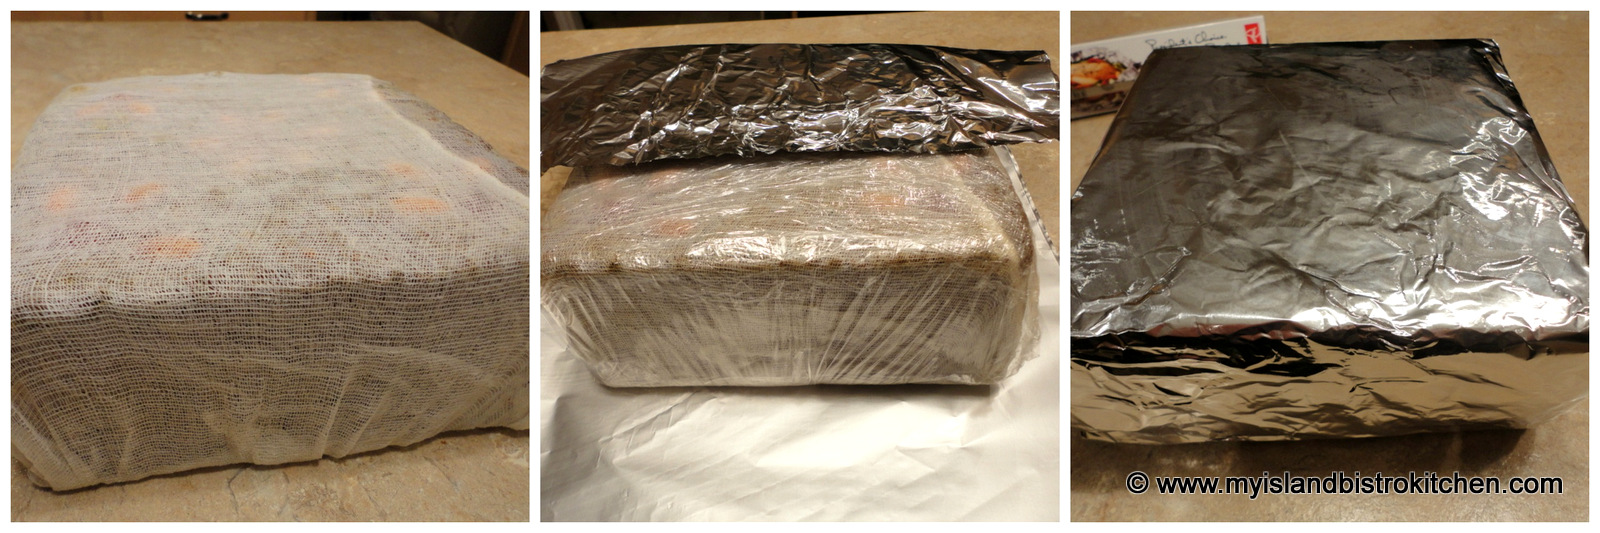
Let cake cool completely before brushing well with brandy and wrapping in brandy-soaked cheesecloth, followed by plastic wrap and tin foil. Store in a sealed plastic bag in a cool, dry area. Remove wrapping and brush cake top and sides with brandy once a week for 2-3 weeks, as the cake “ages”, before cutting and serving. After cake has aged 2-3 weeks, it is recommended to refrigerate the cake or, if not using in near future, freeze it.
Yield: 1 – 2 lb cake (apx. weight)
NOTE: As always, ensure that all ingredients used in the recipe are, in fact, gluten free.
A gluten free light fruitcake that is studded with a mixture of brandy-soaked glazed fruit baked within a batter made with gluten free one-to-one flour, almond flour, and coconut flour.
Ingredients
¼ lb golden sultana raisins
1½ oz green glazed cherries
2½ oz red glazed cherries
1½ oz glazed pineapple rings, chopped
3 oz mixed glazed fruit
2 tbsp citron
3 tbsp brandy
3 tbsp flaked coconut
½ tsp finely grated lemon rind
½ tsp finely grated orange rind
¼ cup butter, softened at room temperature
1/3 cup granulated sugar
2 large eggs, separated
¼ tsp pure vanilla
¼ tsp almond flavoring
¼ tsp lemon flavoring
3 tbsp applesauce
¾ cup one-to-one gluten-free flour
1½ tbsp almond flour
1 tbsp coconut flour
¾ tsp baking powder
¼ tsp xanthan gum
Pinch salt
1½ tbsp orange juice
1 tbsp lemon juice
2 tbsp brandy
Few glazed cherries for cake top decoration (optional)
Extra brandy for brushing on cake as it ages and for soaking cheesecloth in which to wrap the cake
Instructions
In medium-sized bowl, combine the raisins, cherries, glazed pineapple, mixed glazed fruit, and citron. Mix well. Stir in the three tablespoons of brandy to coat the fruit. Cover tightly with plastic wrap. Let stand for about 24 hours to macerate the fruit, stirring occasionally. When ready to mix up the cake, add the coconut and grated lemon and orange rind. Stir well.
Prepare 6-inch square fruitcake pan that is at least 2¼” deep and has a removable bottom: Lightly spray the bottom and sides of the pan with cooking spray. Line the pan (bottom and sides), with brown paper or double thickness of parchment paper. Lightly spray the paper.
Preheat oven to 275°F.
In medium-sized bowl, and using an electric hand mixer, beat the butter until creamy. Gradually add the sugar and beat until mixture is light and creamy. Separate eggs and set aside the whites. Add the egg yolks to the creamed butter and sugar, one at a time, beating well after each addition and scraping the sides of the bowl with a spatula to ensure ingredients are all incorporated. Beat 1 additional minute. Beat in the vanilla, almond, and lemon flavorings. Stir in the applesauce.
Remove 3 tbsp of the one-to-one gluten free flour from the ¾-cup called for in the recipe and set aside to flour the fruit. Sift the remaining one-to-one gluten free flour, almond flour, and coconut flour together with the baking powder, xanthan gum, and salt.
In measuring cup or small bowl, combine the orange and lemon juices along with the two tablespoons of brandy.
Add the dry and wet ingredients to the beaten butter-sugar-egg mixture in three additions, starting and ending with the flour mixture. Transfer batter to a larger bowl, big enough to accommodate the amount of fruit to be added.
Sprinkle reserved 3 tablespoons of the one-to-one gluten free flour over the macerated fruit to which the coconut and grated lemon and orange rind have been added. Toss ingredients lightly and quickly. Gently fold the fruit mixture into the batter.
In clean bowl with clean beaters, beat the egg whites until stiff but not dry. Gently fold the whipped egg whites into the batter.
Transfer batter by large spoonfuls into the prepared baking pan. Use a knife to evenly spread the batter in the pan, smoothing the top. Add a few glazed cherries as decorations to the top of the cake, if desired.
Place small pan of hot water on the lower rack in the oven. Place fruitcake in center of middle rack and bake for approximately 1¼ - 1½ hours, or until cake is firm to the touch and cake tester inserted into centre of cake comes out clean. After about 35-40 minutes or so of baking, loosely tent cake with tin foil to prevent it from browning too much. When cake is baked, remove from oven and place on rack. Let cake cool in pan for about 40 minutes before carefully removing from pan by inverting it on to a tea towel and removing the paper. Carefully turn the cake, top side up, on to a wire cooling rack.
Let cake cool completely before brushing well with brandy and wrapping in brandy-soaked cheesecloth, followed by plastic wrap and tin foil. Store in a sealed plastic bag in a cool, dry area. Remove wrapping and brush cake top and sides with brandy once a week for 2-3 weeks, as the cake “ages”, before cutting and serving. After cake has aged 2-3 weeks, it is recommended to refrigerate the cake or, if not using in near future, freeze it.
Notes
NOTE: As always, ensure that all ingredients used in the recipe are, in fact, gluten free.
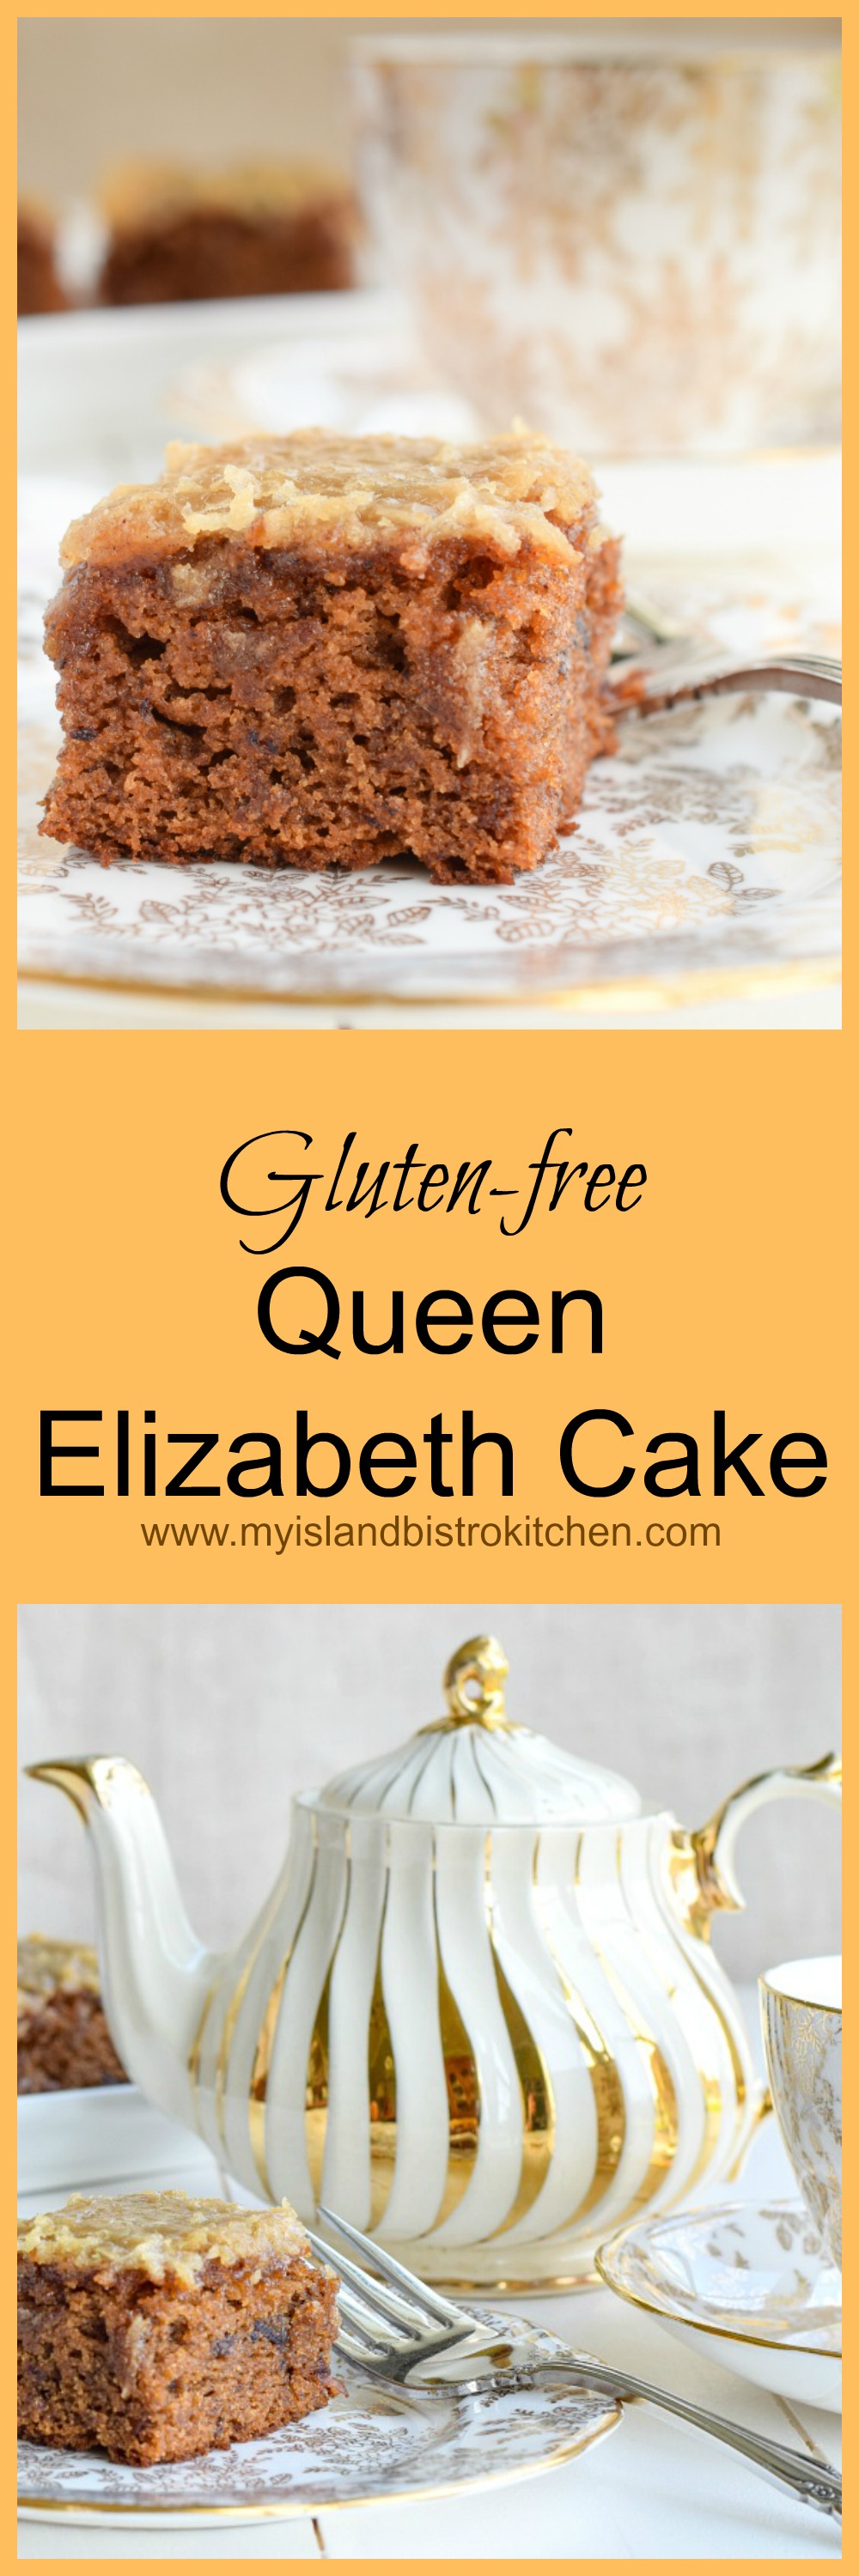
In an earlier posting, I shared my recipe for the regular gluten version of Queen Elizabeth Cake to coincide with Queen Elizabeth II’s actual birthday on April 21st. Today, I have a special treat for my food blog followers who must follow a gluten-free diet! I have adapted my regular version of this cake to make it gluten-free. It has passed my testing standards so I am pleased to share the recipe for this wonderfully moist and tasty Queen Elizabeth Cake that is made with very simple, basic ingredients. In fact, I’d even go so far as to suggest that it would be quite difficult to be able to tell that this version is gluten-free and, in my view, it certainly rivals its gluten version cousin in taste, texture, and overall quality.
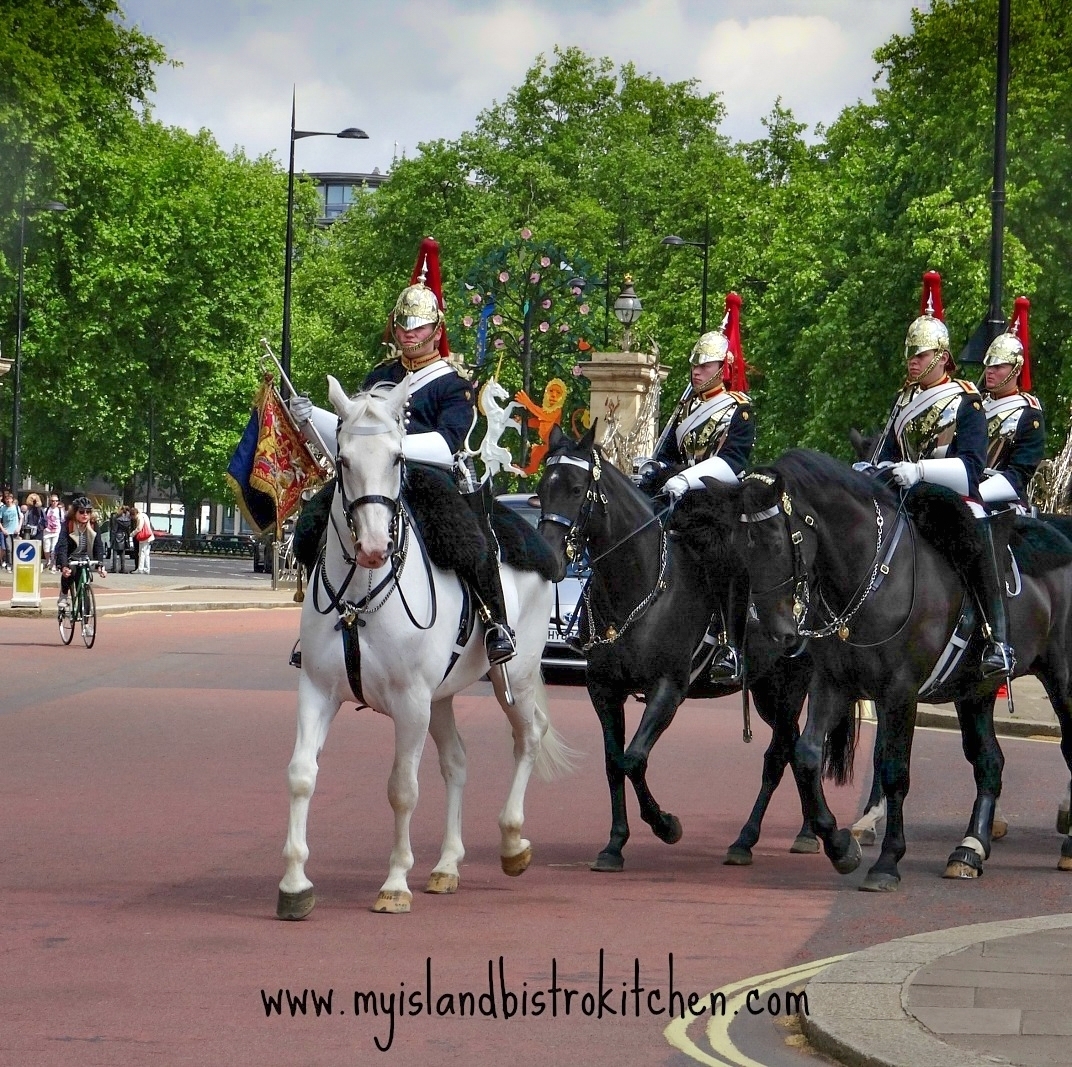
I am timing the original publication of this gluten-free Queen Elizabeth Cake recipe with the annual Trooping of the Colour celebrations celebrated in London in June of each year. The Trooping of the Colour, a major military ceremony filled with pomp and pageantry, is often referred to as the Queen’s Birthday Parade. This tradition is said to have started in 1748 when then King George II decided to combine his birthday parade with the annual spring military parade in June because he apparently felt his actual November birthday was too cold to have a birthday parade. This tradition has endured since then, regardless when the reigning monarch’s actual birthday is and this event is considered the official celebration of the sovereign’s birthday. Held annually on a Saturday in June, the Queen attends, arriving by horse and carriage from Buckingham Palace and traveling along the Mall to the Horse Guard’s Parade behind Whitehall.
The colorful display of pageantry involves several hundred officers and men, horses, and bands. The Queen takes the salute and inspects the troops dressed in ceremonial uniform. “Colours” refers to the regimental flags of the various troops and the colours correspond to the colours and insignia of the uniforms of the soldiers of the different units. The colours (flags) served a purpose on the battlefields as they provided a rallying or gathering point for troops and hence the title “trooping of the colours”.
London Pagentry
So, thus ends the brief history lesson! Now, on to the Gluten-free Queen Elizabeth Cake, believed to have been named for either the Queen Mother or the reigning monarch, Queen Elizabeth II. When I earlier shared my recipe for the gluten version of this cake, I conducted some research to try and determine the origins of the cake and its name. Click here to read the information I was able to find about the different stories about the naming of this cake.
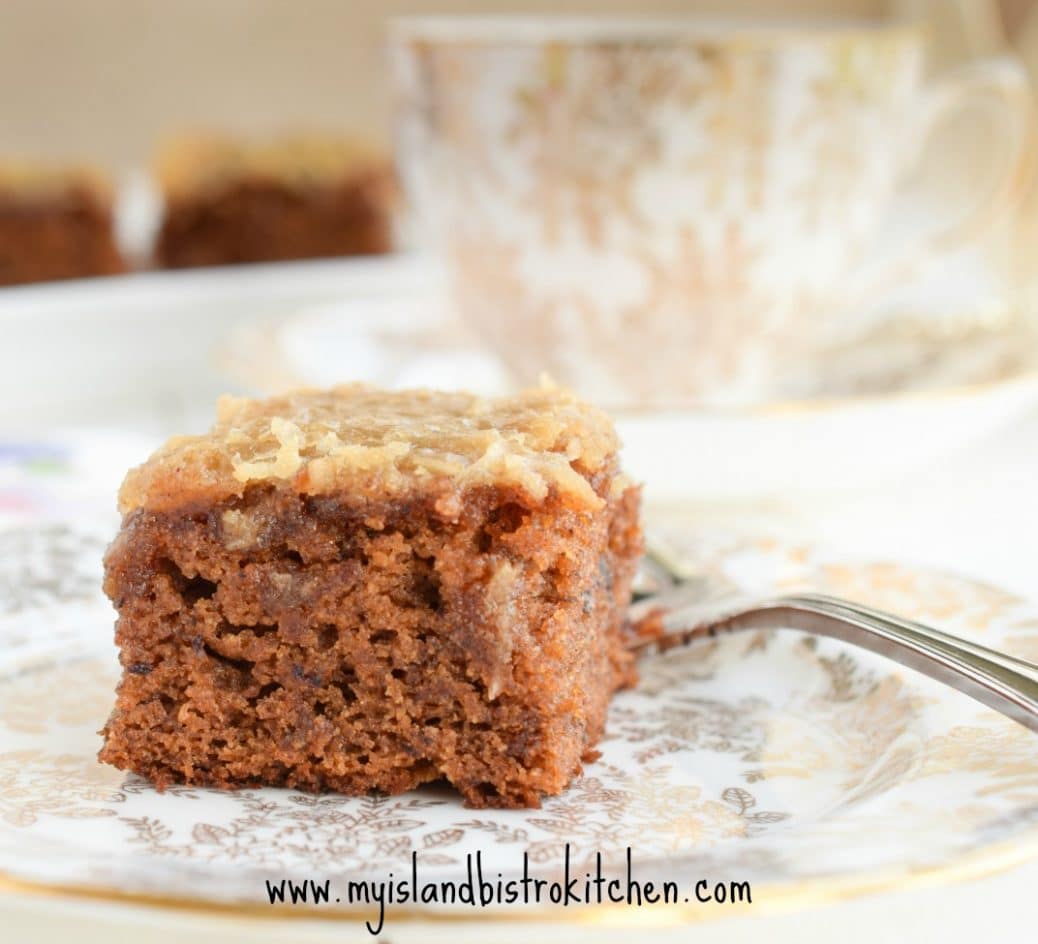
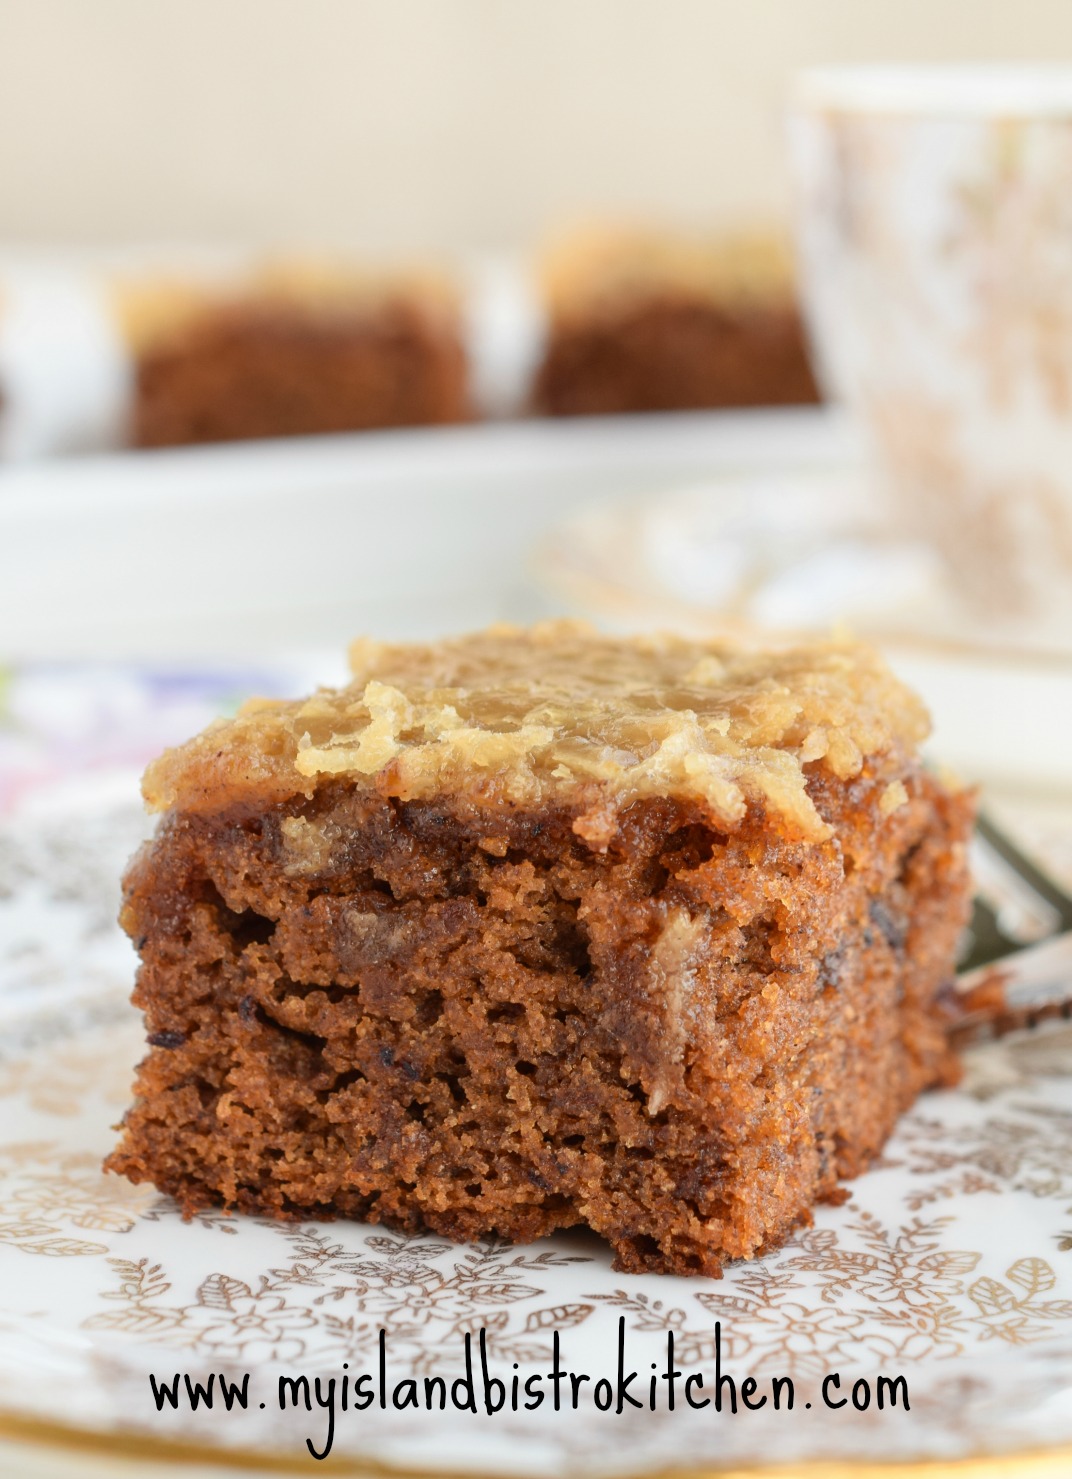
The texture of the gluten-free Queen Elizabeth Cake, like the gluten version, is somewhat dense and owes its lovely moist texture to the cooked dates. The combination of coconut and almond flours with the gluten-free 1-to-1 baking flour are the key to this cake’s texture. The almond and coconut flours really do provide a pleasing flavor to the cake.
Gluten-free Queen Elizabeth Cake
The following hints may be of use when making this cake:
This is a single layer cake. Use an 8” square baking pan to ensure this cake has a good height. A 9” square pan may be used but the cake will lack depth and more closely resemble a square as opposed to a cake. I find gluten-free flours take more leavening than gluten flours do and, even at that, it can still be difficult to get baked goods to rise to the height of a similar recipe that calls for gluten flour products. Grease the pan or line it with parchment paper or greased tin foil. Leaving an overhang of extra parchment paper or tin foil over the edge of the pan will make it easier to lift the entire baked cake from the pan and facilitate its cutting.
Let the date mixture cool completely at room temperature before incorporating it with the dry ingredients. If it is mixed with the dry ingredients while the mixture is either hot or warm, it may result in a “gummy” texture or soggy cake.
Mix the wet and dry ingredients using the rule of 3 parts dry and 2 parts wet ingredients, starting and ending with the dry ingredients.
Mix the ingredients well but don’t beat them as this may create a “tough crumb” cake.
Use cream to make the topping. I used 35% cream which gives a luxurious topping but 18% cream may also be used.
Start checking the cake for doneness at the point where the cake has been baking for 25 minutes then, if it is not baked, check it every 3-4 minutes after. The cake will be done when the cake tester, inserted into the center of the cake, comes out completely clean and dry.
When the cake tests almost baked (about 5 minutes before it is expected to come out of the oven), start making the topping. It needs to go on the warm cake that will go back in the oven for 3-4 minutes after the topping has been added.
The topping, like making homemade fudge, can set up really fast. Don’t leave it unattended. Stir the ingredients as they boil gently for the 3 minutes. Watch it carefully and, if you see if starting to “set up” and thicken really fast (even if it is before the 3 minutes of boiling is up), remove it from the stove and quickly stir in the vanilla and coconut. The mixture should be of the consistency that it can be poured from the saucepan and spread over the cake with a knife. If it becomes too thick, it will be too sugary and won’t be of spreading consistency. It will also become brittle and crack.
[Printable version of the recipe follows at end of posting]
Gluten-Free Queen Elizabeth Cake
Ingredients:
¾ cup dates, chopped (apx. 4¼ oz) ¾ tsp baking soda ¾ cup boiling water
¾ cup of 1-to-1 gluten free baking flour 1/3 cup almond flour 2½ tbsp coconut flour 1 tsp baking powder 1/8 tsp salt ¾ tsp cinnamon ¼ tsp nutmeg Pinch allspice ¼ cup butter, softened at room temperature 2/3 cup granulated sugar 1 extra large egg ¼ tsp orange extract ¾ tsp vanilla
Topping: 2½ tbsp melted butter ½ cup brown sugar 2¼ tbsp cream ¾ tsp vanilla ½ cup shredded coconut
Method: Cake: Place dates and soda in medium-sized saucepan. Add the boiling water. Simmer for about 4-5 minutes then cool completely at room temperature.
Position oven rack in centre of oven and preheat oven to 350°F. Grease 8” baking pan or line with parchment paper (or even greased tin foil).
Sift 1-to-1 gluten free baking flour, almond flour, coconut flour, baking powder, salt, and spices together. Set aside.
In bowl of stand mixer, cream the butter and sugar. Beat in the egg, orange extract, and vanilla. Transfer mixture to cooled dates. Stir well.
Transfer one-third of the sifted dry ingredients to the mixer bowl. Beat in one-half of the wet ingredients. Add another third of the dry ingredients. Blend well. Mix in the remainder of the wet ingredients. Finish by incorporating the remaining dry ingredients. Mix well to combine. Don’t overmix.
Spread batter evenly in prepared baking pan. Transfer to preheated oven and bake for approximately 25-30 minutes or until a cake tester inserted into center of cake comes out clean. Remove the cake from the oven. Increase oven temperature to 400°F to prepare for browning of cake’s topping.
Topping: About 5 minutes before the cake is due to be removed from the oven, begin to prepare the cake topping. In medium-sized saucepan, melt the butter. Blend in the brown sugar and cream. Bring to a boil over medium heat and boil for 3 minutes, stirring regularly to prevent scorching. Remove from heat and quickly stir in the vanilla and coconut. Pour and spread this mixture evenly over the warm cake and return it to the oven to brown slightly for 3-4 minutes. Remove cake from oven and place on wire rack to cool completely before cutting and serving.
Yield: 1 – 8” single layer cake
This cake is suitable as a snacking cake, dessert, tea cake, or even a picnic cake. The cake freezes well.
The Queen Elizabeth Cake pairs particularly well with a good cup of tea. My recommendation for a tea pairing would be an Earl Grey blend. The citrus notes in this black tea complement the sweetness of the cake. Earl Grey tea has a high concentration of tannins which makes it a suitable tea to cleanse the mouth after each bite of the cake so that each bite of this moist and flavorful cake is as equally tasty as the first!
A moist and tasty gluten-free cake featuring dates, spices, and a toffee-like topping.
Ingredients
¾ cup dates, chopped (apx. 4¼ oz)
¾ tsp baking soda
¾ cup boiling water
¾ cup of 1-to-1 gluten free baking flour
1/3 cup almond flour
2½ tbsp coconut flour
1 tsp baking powder
1/8 tsp salt
¾ tsp cinnamon
¼ tsp nutmeg
Pinch allspice
¼ cup butter, softened at room temperature
2/3 cup granulated sugar
1 extra large egg
¼ tsp orange extract
¾ tsp vanilla
Topping:
2½ tbsp melted butter
½ cup brown sugar
2¼ tbsp cream
¾ tsp vanilla
½ cup shredded coconut
Instructions
Cake:
Place dates and soda in medium-sized saucepan. Add the boiling water. Simmer for about 4-5 minutes then cool completely at room temperature.
Position oven rack in centre of oven and preheat oven to 350°F. Grease 8” baking pan or line with parchment paper (or even greased tin foil).
Sift 1-to-1 gluten free baking flour, almond flour, coconut flour, baking powder, salt, and spices together. Set aside.
In bowl of stand mixer, cream the butter and sugar. Beat in the egg, orange extract, and vanilla. Transfer mixture to cooled dates. Stir well.
Transfer one-third of the sifted dry ingredients to the mixer bowl. Beat in one-half of the wet ingredients. Add another third of the dry ingredients. Blend well. Mix in the remainder of the wet ingredients. Finish by incorporating the remaining dry ingredients. Mix well to combine. Don’t overmix.
Spread batter evenly in prepared baking pan. Transfer to preheated oven and bake for approximately 25-30 minutes or until a cake tester inserted into center of cake comes out clean. Remove the cake from the oven. Increase oven temperature to 400°F to prepare for browning of cake’s topping.
Topping:
About 5 minutes before the cake is due to be removed from the oven, begin to prepare the cake topping. In medium-sized saucepan, melt the butter. Blend in the brown sugar and cream. Bring to a boil over medium heat and boil for 3 minutes, stirring regularly to prevent scorching. Remove from heat and quickly stir in the vanilla and coconut. Pour and spread this mixture evenly over the warm cake and return it to the oven to brown slightly for 3-4 minutes. Remove cake from oven and place on wire rack to cool completely before cutting and serving.
Ever wonder about the history of old vintage recipes? I so wish that accurate records existed about the origins of some of the old nostalgic recipes like the one for Queen Elizabeth Cake, for example. Continue reading Queen Elizabeth Cake Recipe→
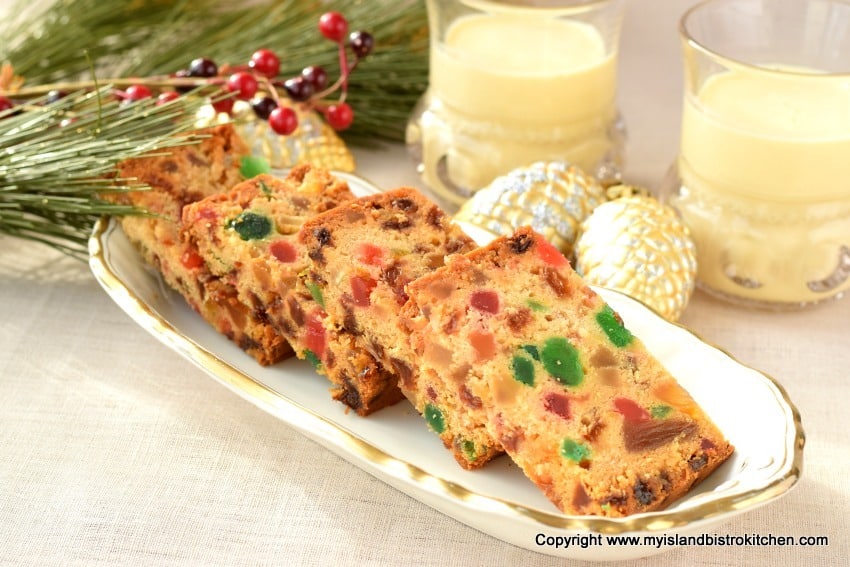
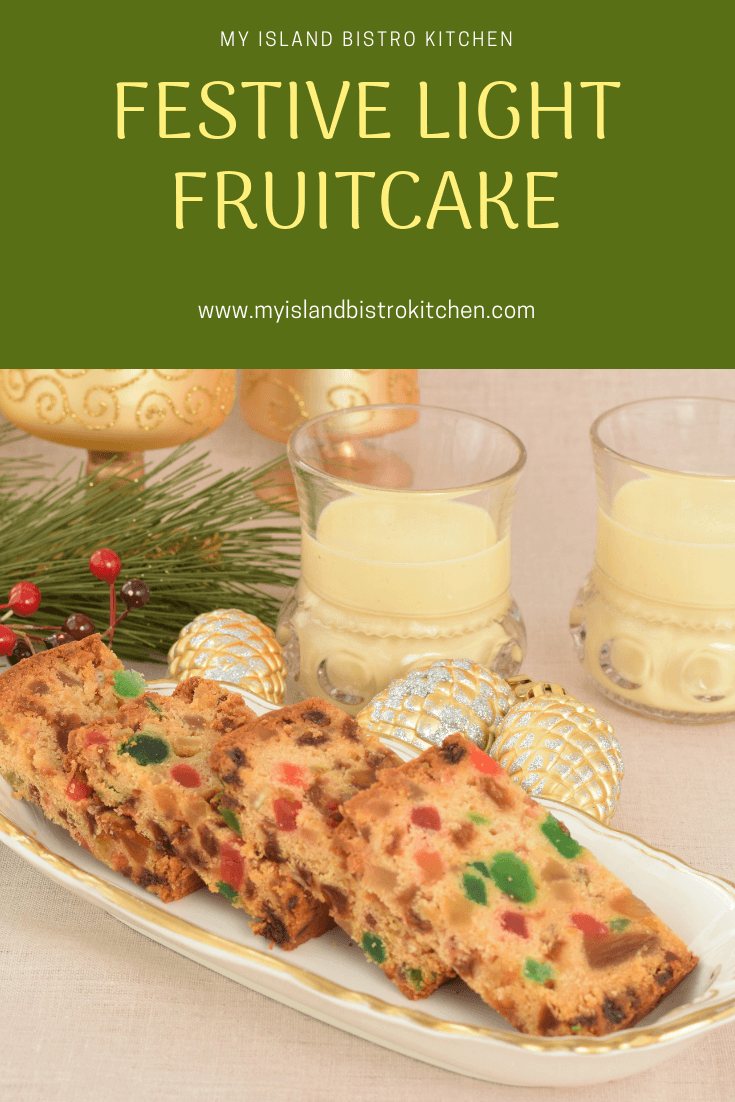
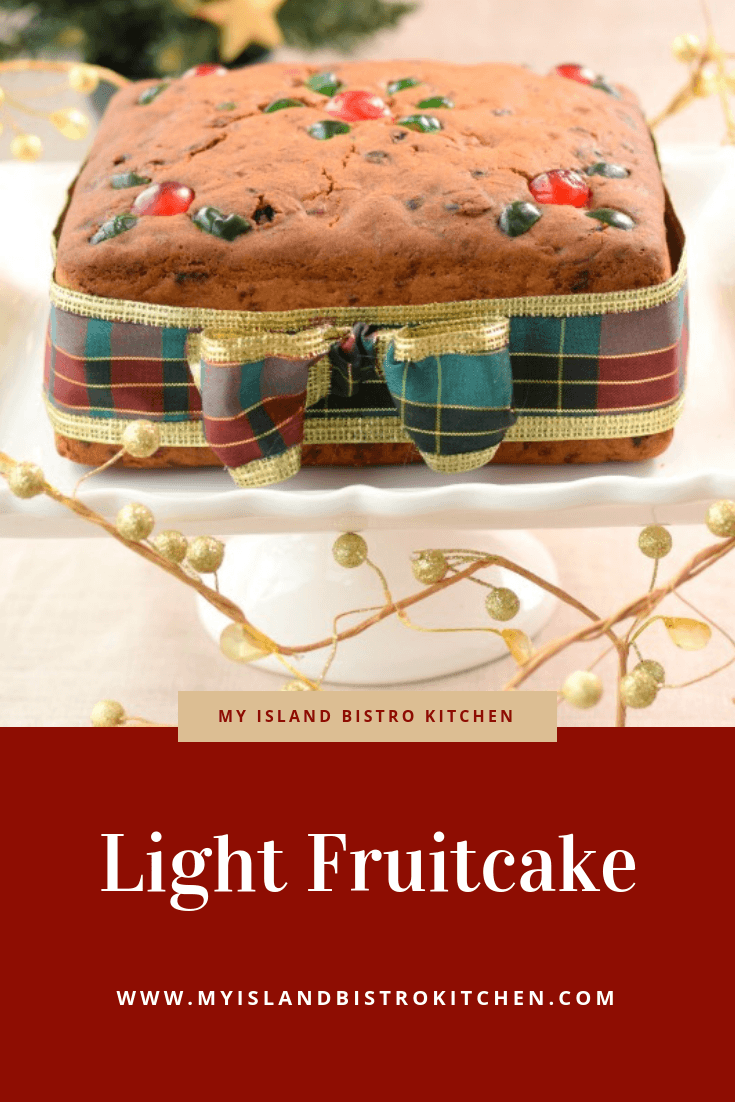
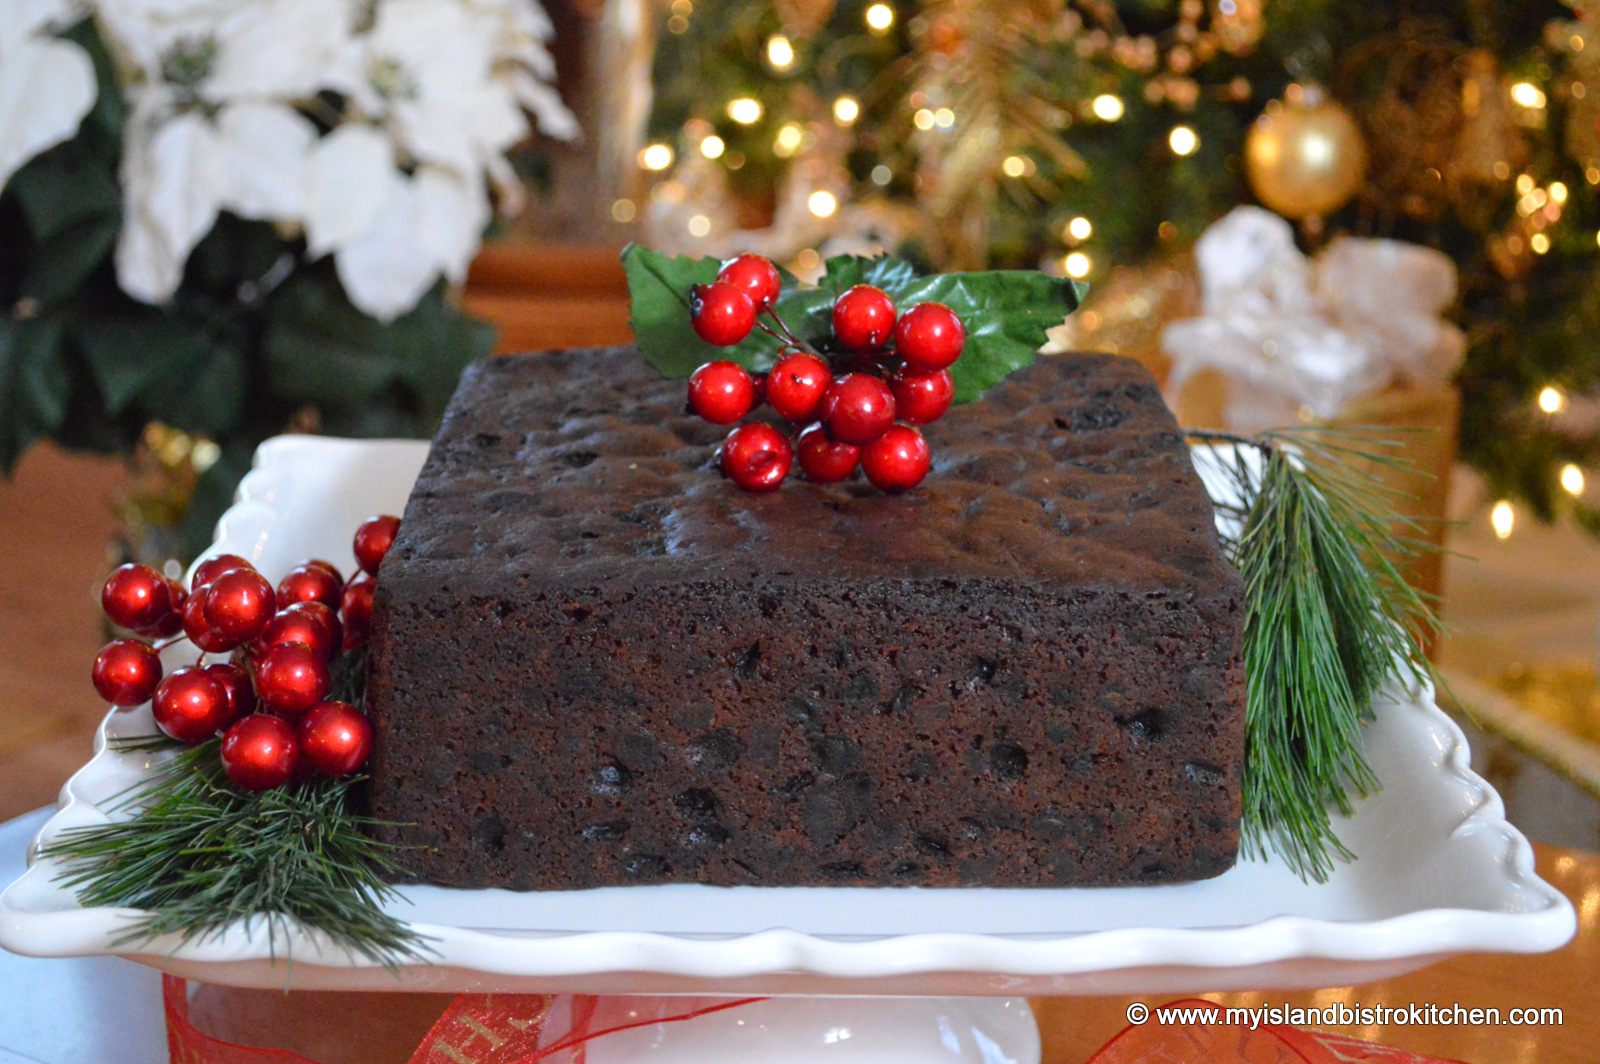
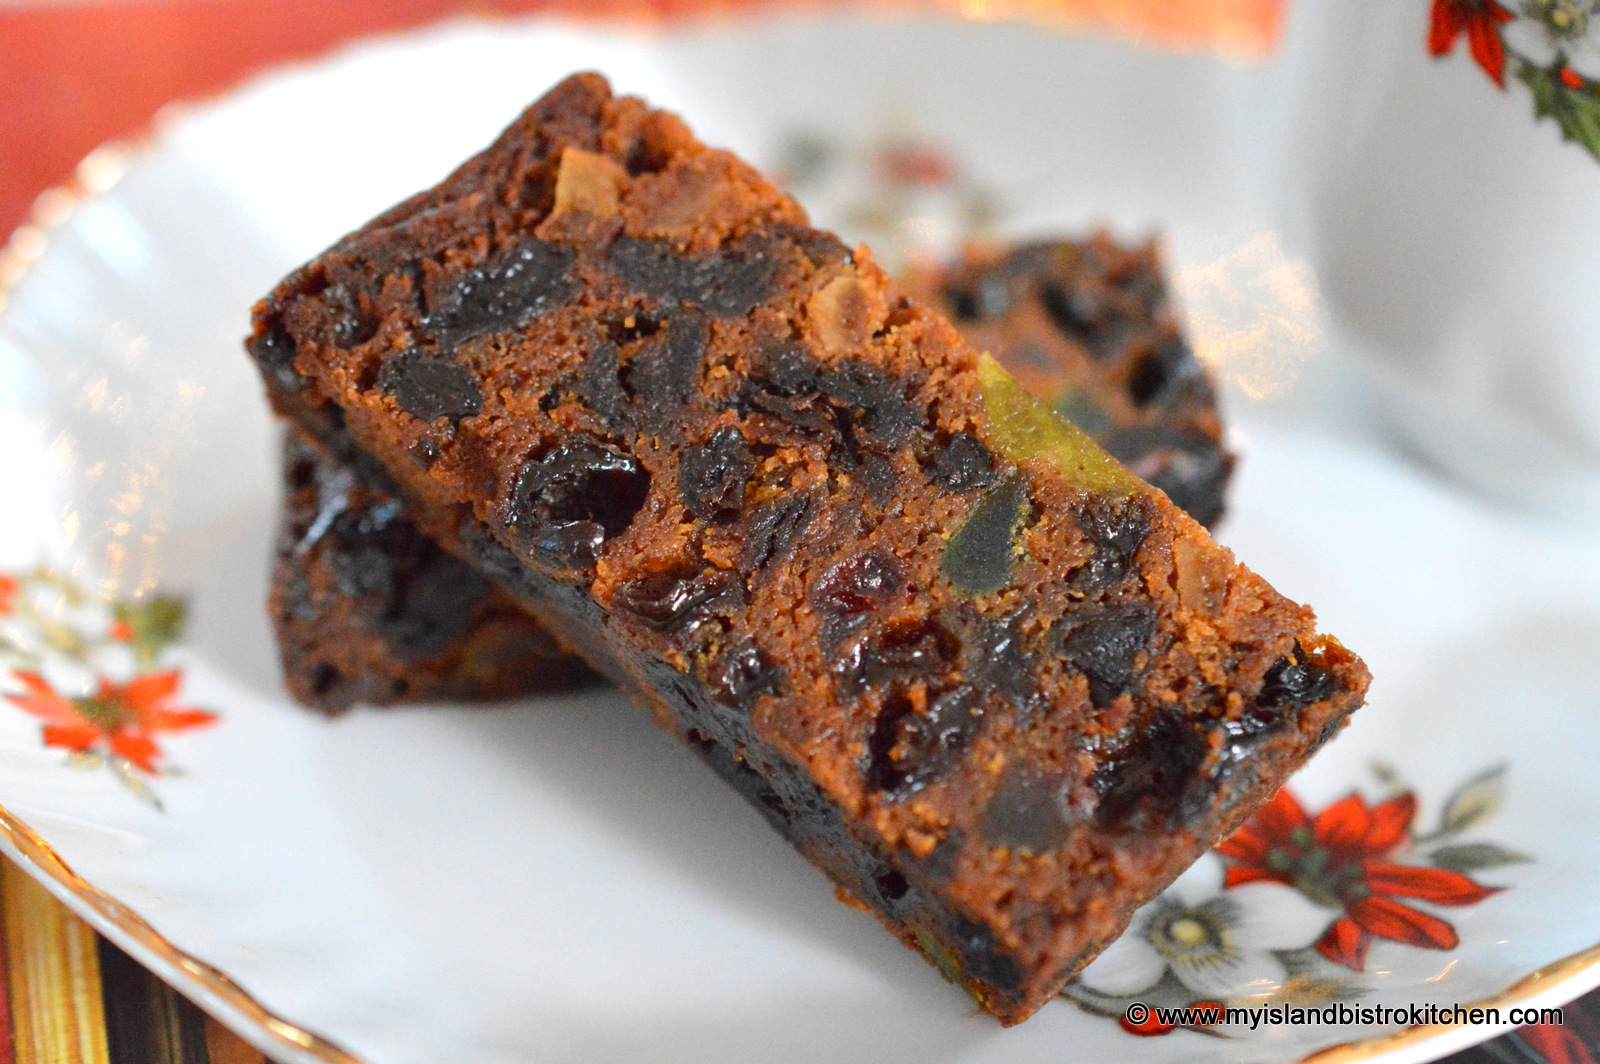
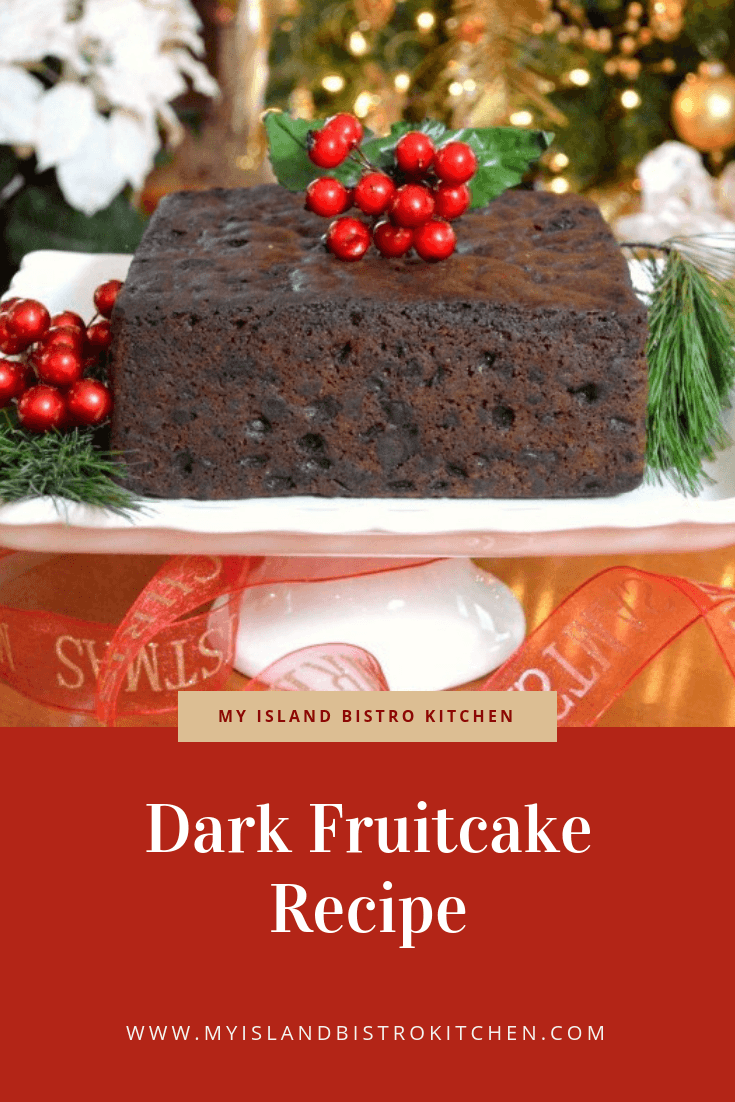
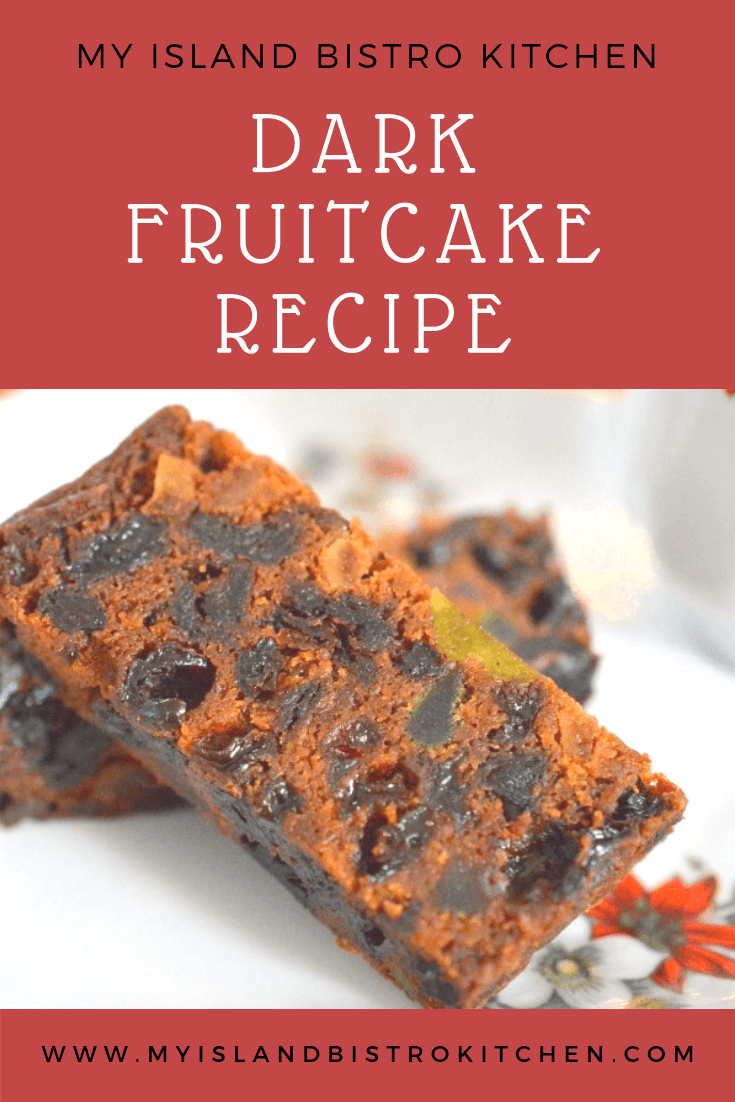
One of my favorite foods to make is the traditional fruitcake – both dark and light versions. And, I adore the scent in my home as the cakes bake. I don’t make both dark and light every year. Rather, I make a dark cake one year then, the following year, make a light cake.
Light Fruitcake
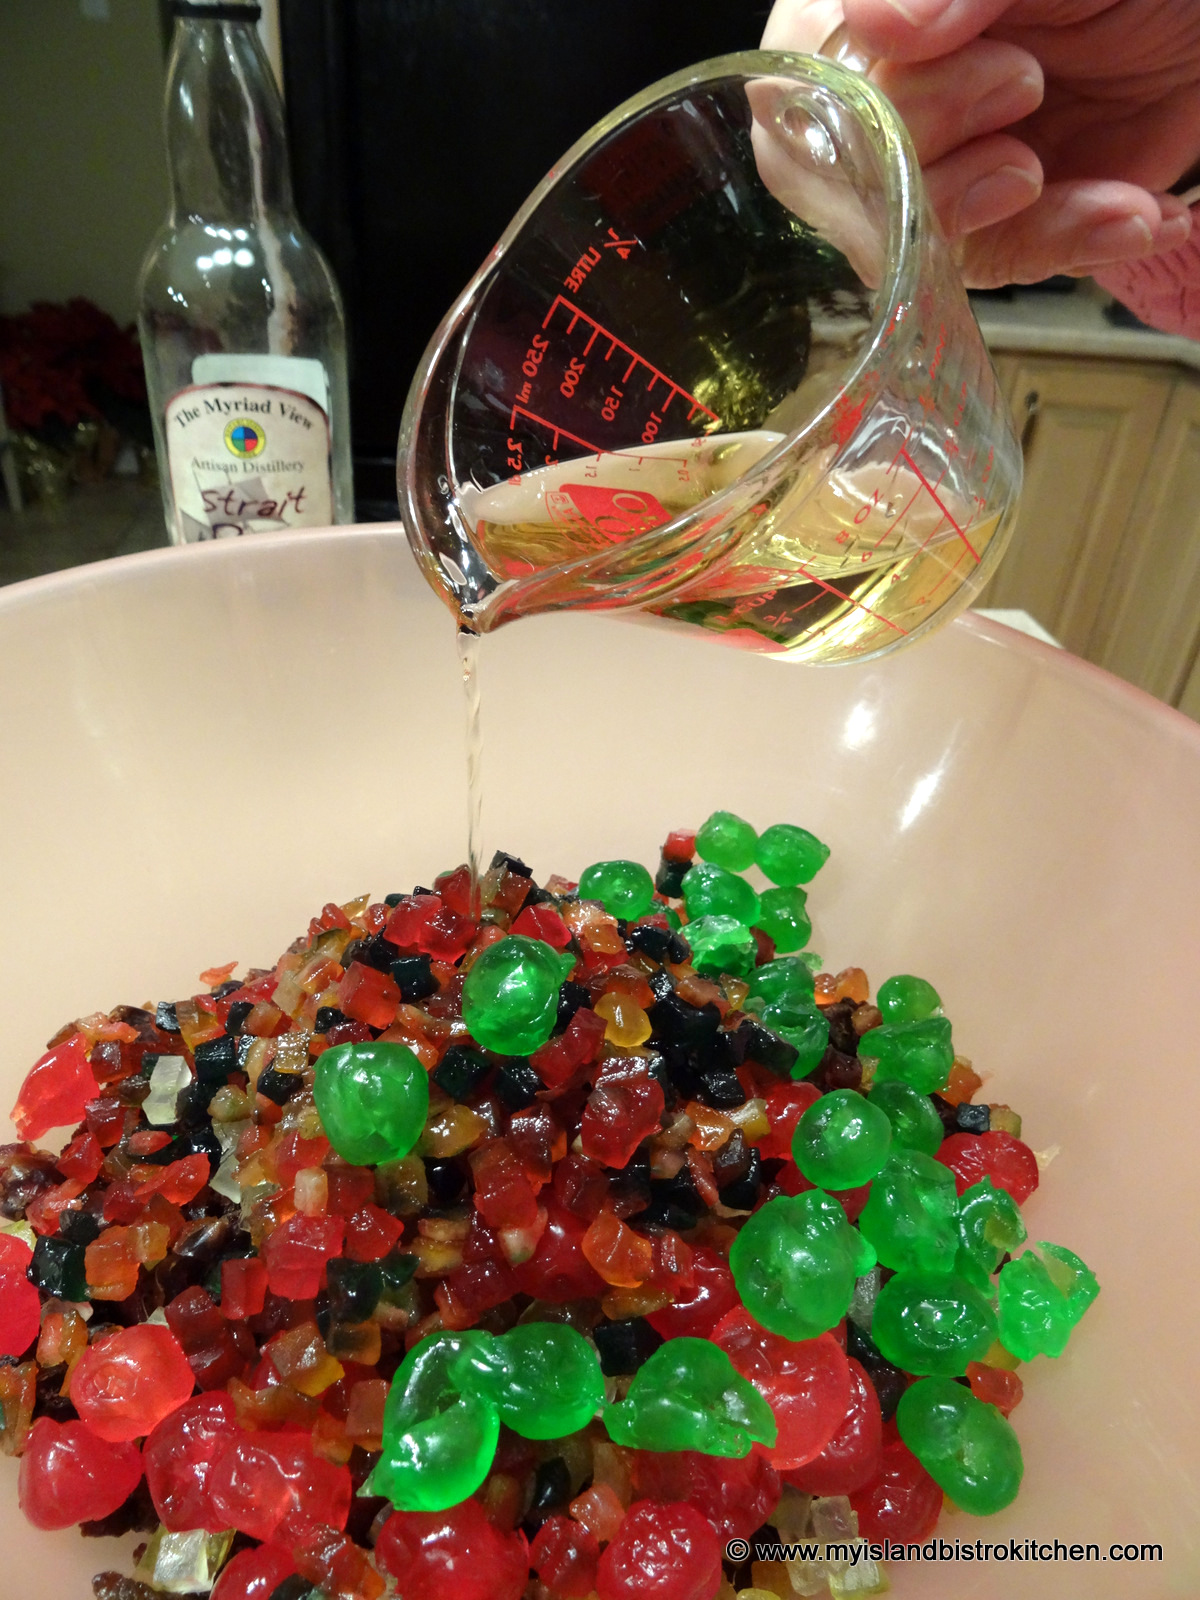
My Christmas season begins in early November when the first thing done to prepare for the holidays is to make the fruitcake. Fruitcakes do well with some “ageing” before they are cut – about 3 weeks is the absolute bare minimum a light fruitcake should age and, preferably longer. Dark fruitcakes take several weeks (and some will argue, months) to age and mellow before being cut into and served. This period allows the flavors to blend well and the cake to moisten which, of course, is always aided by a brushing of a weekly “nightcap” of whatever liquor is used in the cake. I tend to put rum in my dark cakes and brandy in the light fruitcakes. This libation not only helps to keep the cake moist but it also infuses flavor into the cake as it ages.
Light Fruitcake
Apart from their lighter color, light fruitcakes tend to be less rich and not quite as sweet as their dark counterparts. The wonderful thing about light fruitcakes is that the light-colored batter allows the jewel-toned glazed fruit to show well. Light fruitcake is both a flavorful and colorful addition to any holiday sweet tray.
Light Fruitcake
When I posted my recipe awhile back for my dark fruit cake, I offered several tips and hints on how to make fruitcakes. You can access that information by clicking here. The same tips and hints apply to light fruitcakes.
My version of a light fruitcake is nut-free. I find nuts can sometimes go rancid and can interfere with the nice soft texture of the fruitcake so I have long since dispensed with them in my cakes. As well, for any one with an allergy to nuts, a fruitcake with nuts would be off limits.
Jewel-toned Light Fruitcake
[Printable version of recipe follows at end of posting]
Light Fruit Cake
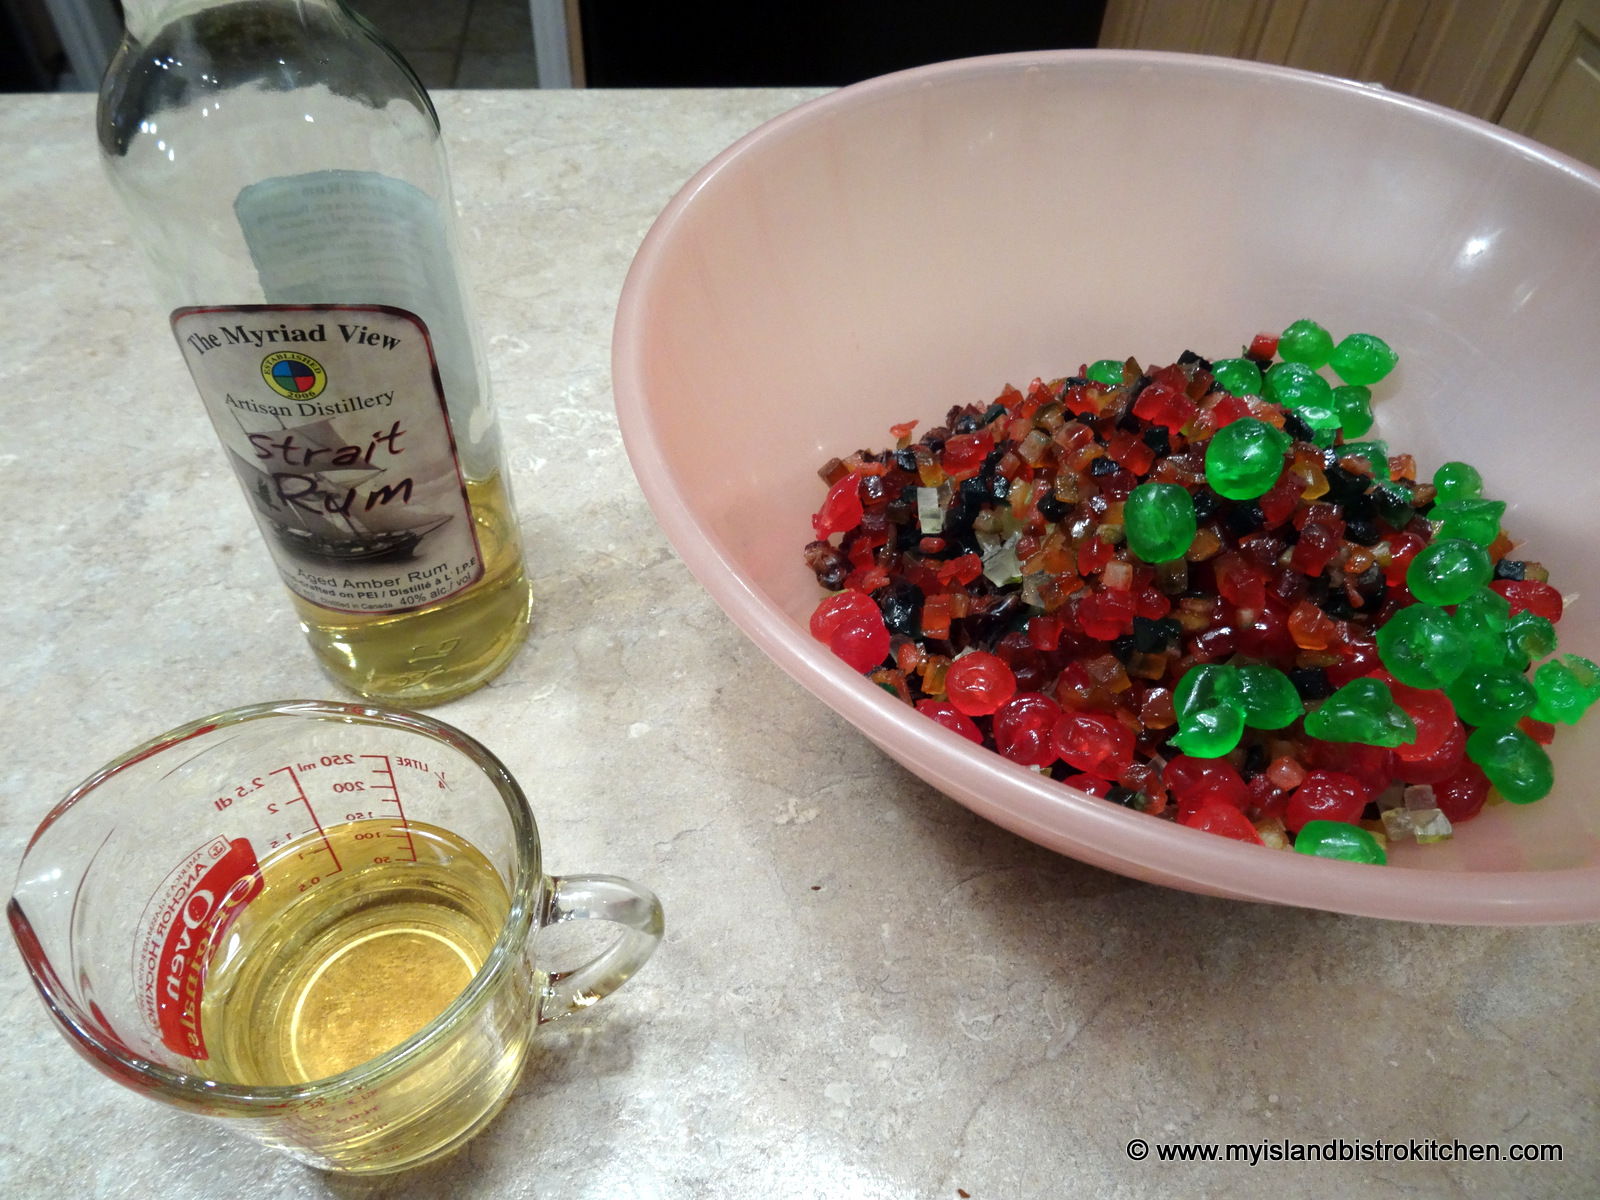
Ingredients: 1 lb golden sultana raisins 6 oz green glazed cherries 6 oz red glazed cherries 4 oz glazed pineapple rings, chopped ¾ lb mixed glazed fruit ¼ lb citron ½ cup brandy ¾ cup flaked coconut 2 tsp finely grated lemon rind 2 tsp finely grated orange rind
1 cup butter, softened at room temperature 1½ cup white sugar 5 large eggs, separated 1 tsp pure vanilla 1 tsp almond flavoring 1 tsp lemon flavoring ½ cup crushed pineapple, drained very well (reserve ¼ cup of the juice)
3¾ cups all-purpose flour (set aside 1 cup of the flour to flour the fruit mixture) 1½ tsp baking powder ¼ tsp salt
¼ cup orange juice ¼ cup freshly-squeezed lemon juice ¼ cup pineapple juice (from the drained crushed pineapple)
Extra brandy for brushing on cake as it ages and for soaking cheesecloth in which to wrap the cake
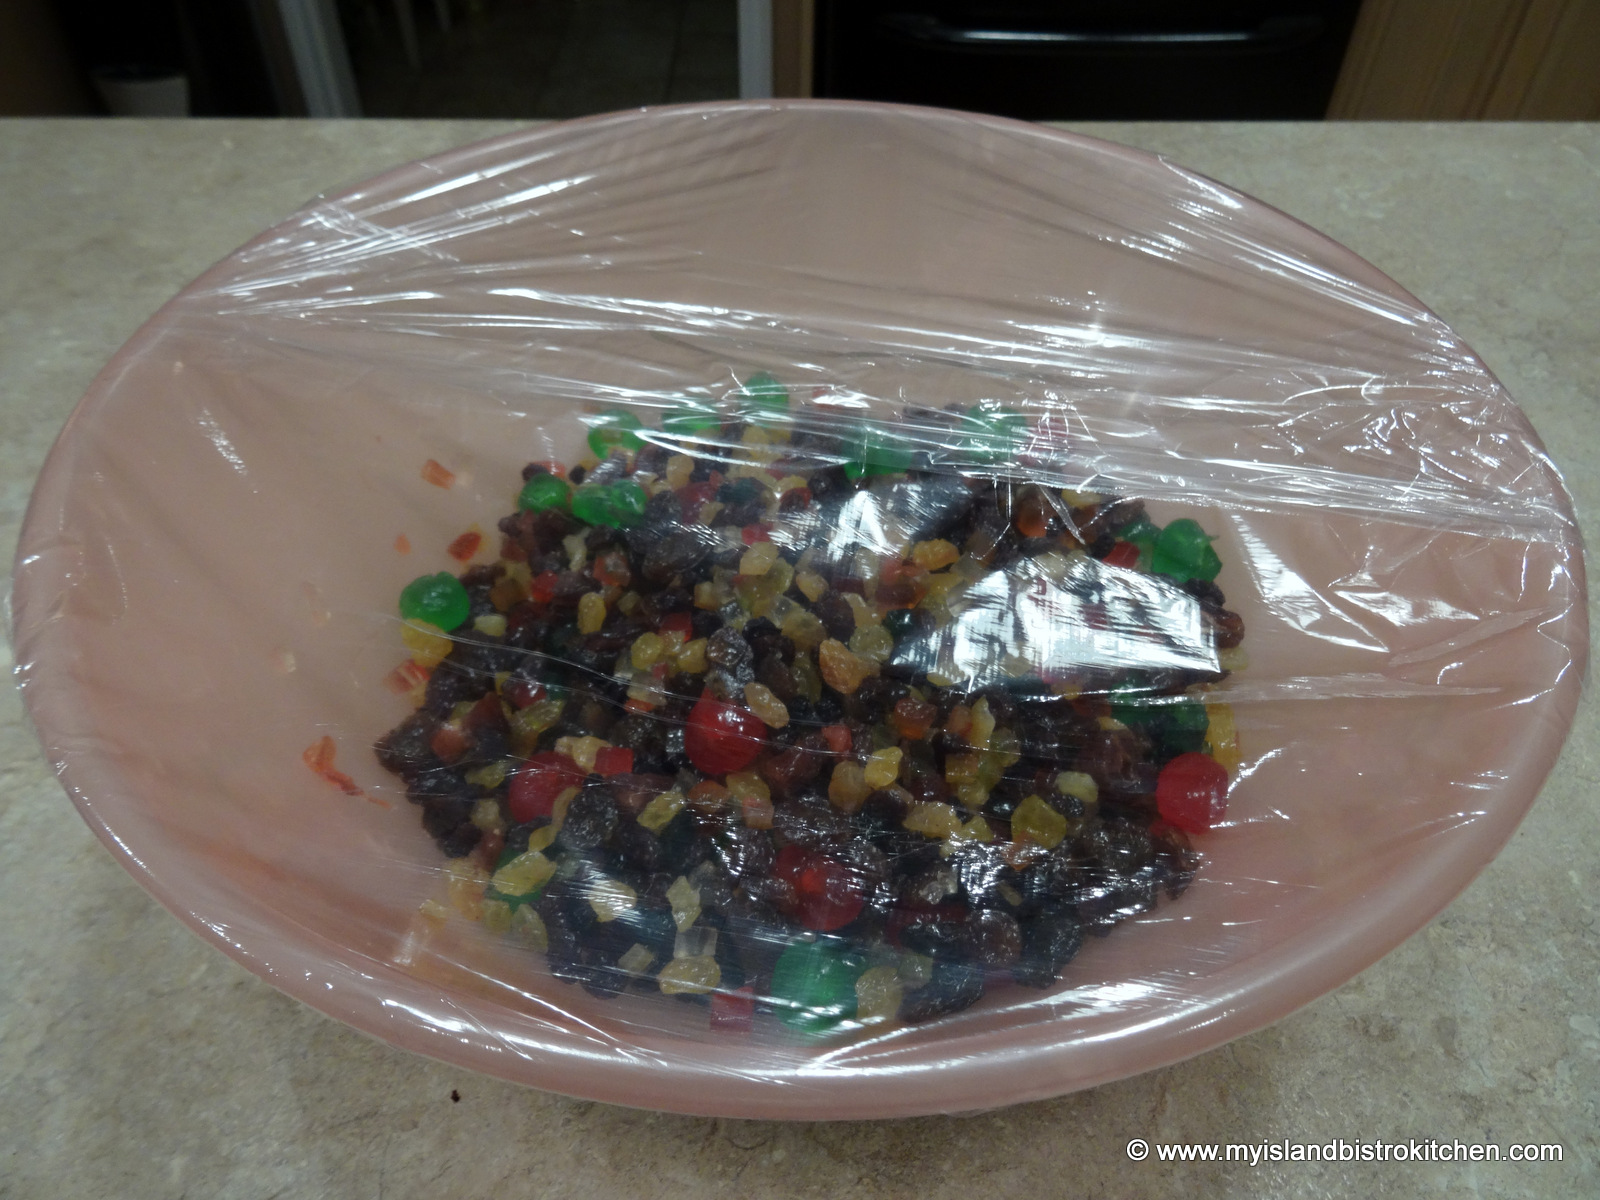
Method: In large bowl, combine the raisins, cherries, glazed pineapple, mixed glazed fruit, and citron. Mix well. Stir in the brandy to coat the fruit. Cover tightly with plastic wrap. Let stand for about 24 hours to macerate the fruit, stirring occasionally. When ready to mix up the cake, add the coconut and lemon and orange rind. Stir well.
Prepare 8-inch square fruitcake pan that is 3 inches deep and has a removable bottom: Lightly spray the bottom and sides of the pan with cooking spray. Line the pan (bottom and sides), with brown paper or double thickness of parchment paper. Lightly spray the paper.
Preheat oven to 275°F.
In large bowl of stand mixer and using the paddle attachment, beat the butter until creamy. Gradually add the sugar and beat until mixture is light and creamy. Beat in the egg yolks, one at a time, beating well after each addition and scraping the sides of the bowl with a spatula to ensure ingredients are all incorporated. Beat 1 additional minute. Beat in the vanilla, almond, and lemon flavorings. Stir in the drained crushed pineapple.
Sift together 2¾ cups of the flour, baking powder, and salt. In measuring cup or small bowl, combine the orange and lemon juices along with the reserved ¼ cup of pineapple juice.
Add the dry and wet ingredients to the beaten butter and sugar mixture in three additions, starting and ending with the flour mixture. Transfer batter to a very large bowl.
Sprinkle reserved cup of flour over the macerated fruit and toss ingredients lightly and quickly. Gently fold the fruit mixture into the batter.
In clean bowl, beat the egg whites until stiff but not dry. Gently fold the whipped egg whites into the batter.
Transfer batter by large spoonfuls into the prepared baking pan. Use a knife to evenly spread the batter in the pan, smoothing the top. Add a few cherries as decorations to the top of the cake, if desired.
Place small pan of hot water on the lower rack in the oven. Place fruitcake in center of middle rack and bake for approximately 5 – 5¼ hours or until cake is firm to the touch and cake tester inserted into centre of cake comes out clean. After about an hour or so of baking, loosely tent cake with tin foil to prevent it from browning too much. Remove cake from oven and place on rack. Let cake cool in pan for about 40 minutes before carefully removing from pan by inverting it on a tea towel and removing the paper. Carefully turn the cake top side up on to a wire cooling rack.
Let cake cool completely before brushing well with brandy and wrapping in brandy-soaked cheesecloth, followed by plastic wrap and tin foil. Store in a sealed plastic bag in a cool, dry area. Remove wrapping and brush cake top and sides with brandy once a week for 3-4 weeks as the cake “ages” before cutting and serving.
Yield: 1 – 6 lb, 6½ oz cake
For other Fruitcake, or fruitcake style, recipes from My Island Bistro Kitchen, click on the links below:
If you have made this recipe and enjoyed it and/or wish to share it with your friends and family, please do so on social media but be sure to share the direct link to this posting from my website.
Connect with My Island Bistro Kitchen on Social Media
Follow “the Bistro” on Pinterest at https://www.pinterest.ca/peibistro/ and pin the Pinterest-ready photo at the end of this posting to your favorite Pinterest boards!
By now, if you are a regular follower of my food blog, you have probably detected that I like vintage foods and those that could be called comfort foods.
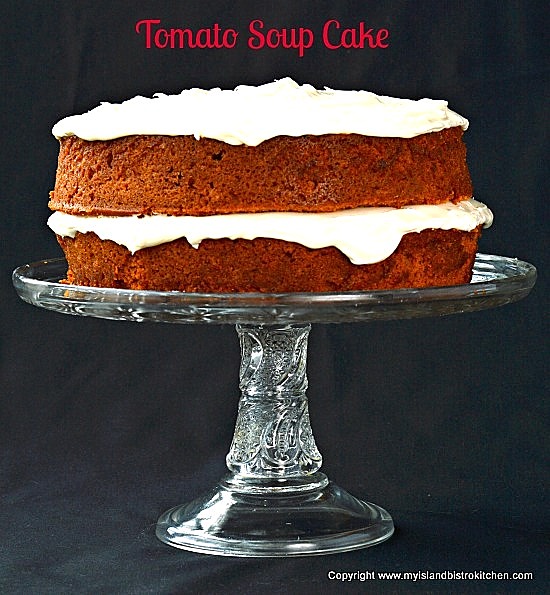
I grew up with tomato soup cake as standard fare in the household. It’s such a simple cake and, while it may seem bizarre to add a can of tomato soup to cake batter, it’s really tasty when some spices are added. The tomato soup cake my mother used to make was always a single layer (and always made in the pyrex glass 8″ square baking pan). It was never frosted and was generally considered to be an “every day cake” as opposed to a cake for a special occasion. My mother’s cake was rather dense in texture and contained no eggs. Spices consisted of cinnamon and cloves. Continue reading Vintage Tomato Soup Layer Cake Recipe→
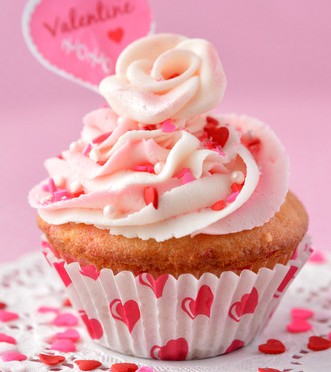
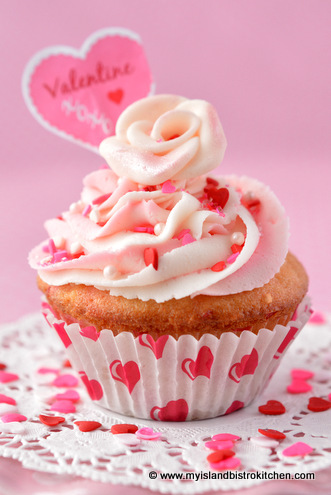
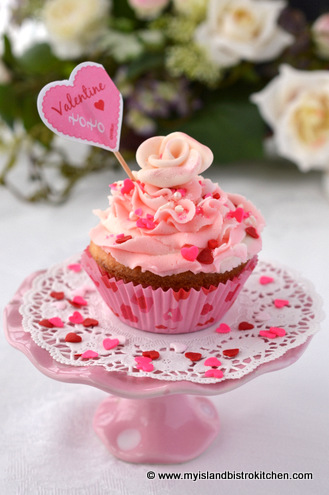
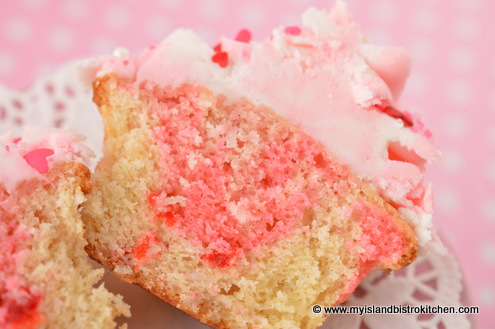
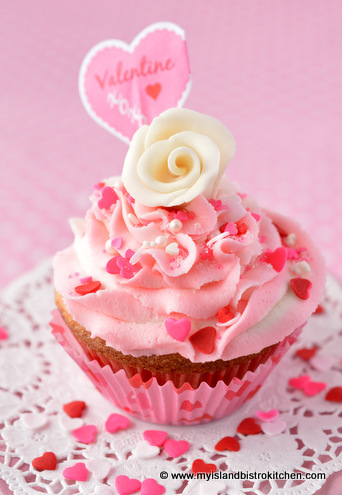
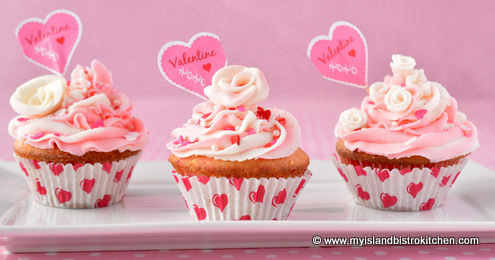
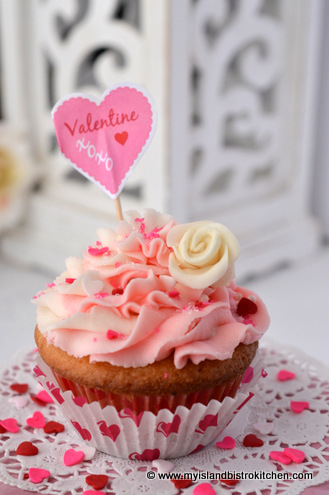
Today marks my 4th Blogiversary and I’m celebrating with my newly-developed recipe for Dreamy Hawaiian Cupcakes! These are perfect for any event, any time of the year but, with their pink swirl centers and mile high frosting, I think they would be very suitable for Valentines Day. So, they’re doing double duty as they celebrate my 4th Blogiversary and act as a catalyst for Valentine’s baking.
Dreamy Hawaiian Cupcake
These cupcakes deliver a flavor punch with coconut milk, amaretto, shredded coconut, and maraschino cherries. That’s a flavor combo that’s hard to beat!
Dreamy Hawaiian Cupcakes
In addition to the wonderful flavor, the coconut milk makes these cupcakes lovely and moist. They also have a fine tender crumb which makes them very velvety when you sink your teeth into them.
Here are my tips and recommendations for making cupcakes:
Use the best quality ingredients available. Don’t substitute margarine for the butter or artificial vanilla for pure vanilla in this recipe. Using lesser quality ingredients will affect the quality and taste of the cupcakes.
Measure ingredients accurately – that means, for example, spooning the flour into the measuring cup and then leveling it off with the flat side of a knife, without stirring the flour around in the cup or tapping it to shake the flour down into the cup.
Use the stated size of eggs – this matters as extra-large eggs (which this recipe calls for) yield more liquid than do large eggs. If you use smaller eggs than the recipe calls for, it will yield a drier cupcake.
Resist the urge to add increased amounts of ingredients such as more coconut or cherries than the recipe states as the liquid content in this recipe has been calculated to moisten the dry ingredients accurately. If more dry ingredients, such as extra coconut, are added without increasing the liquid content, the cupcakes will be dry.
All the ingredients should be at room temperature as this will help them to blend together better.
The eggs should be at room temperature for about 20 minutes or so before using them in this recipe.
Soften the butter at room temperature. Never melt the butter in the microwave to soften it as it will change the properties of the butter.
Add the dry and liquid ingredients alternately in three parts, always starting and ending with the dry ingredients.
Don’t overbeat the batter as this can make a tough crumb and a heavy, dense cupcake as opposed to a light-textured cupcake. Beat the batter on low speed and just until all the ingredients are incorporated.
Grease the top of the cupcake pan as, even if paper cupcake liners are used, there will always be at least one rogue cupcake that will rise up and stick to the top of the pan, making it difficult to remove the cupcake without damaging it.
Make sure your oven temperature is accurate and that the oven has been preheated. If the oven temperature is too high, it will dry out the cupcakes; if it is too low, they won’t rise and bake properly.
It’s also important not to overbake the cupcakes as that will make them dry. I recommend checking them at about the 14 or 15-minute baking point by either a light finger touch to see if the top of the cupcake is set and if it bounces back from the touch. Alternatively, use a cake tester to insert into the center of a cupcake. If it comes out clean, the cupcakes are baked.
Let the cupcakes rest in the cupcake pan for 3-4 minutes to allow them to set then gently remove them from the pan and transfer them to a wire rack to cool completely before decorating.
Dreamy Hawaiian Cupcakes
The frosting consists of two flavors to complement the cupcake flavor – coconut and cherry. Combined, these two recipes will give you ample to frost 12 cupcakes with mile high swirled frosting as shown in the photos. If, however, that’s just a tad too much frosting for your taste, simply make just one of the frosting recipes.
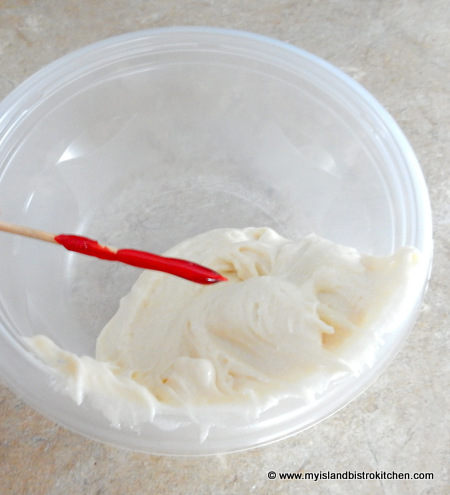
Dreamy Hawaiian Cupcake
I used Wilton decorating tip 2D for the swirl frosting and the two colors were achieved by filling one side of the decorating bag with white frosting and the other side with the cherry frosting.
Dreamy Hawaiian Cupcakes
Dreamy Hawaiian Cupcakes
Ingredients:
1½ cups all-purpose flour 1½ tsp baking powder ¼ tsp baking soda ½ tsp salt
½ cup butter, room temperature 1 cup granulated sugar 2 extra-large eggs 1 tsp vanilla 1 tbsp Amaretto ½ cup coconut milk 1/3 cup shredded coconut ¼ cup chopped maraschino cherries, well drained and patted dry
Pink food coloring
Method:
Preheat oven to 350°. Grease 12 muffin cups or, alternatively, line each cup with paper cupcake liners.
In medium-sized bowl, combine four dry ingredients. Set aside.
Fit mixer with paddle attachment. Cream butter and sugar until fluffy. Add the eggs, one at a time, beating well after each addition. Add the vanilla and Amaretto.
Add the dry ingredients in three parts alternately with the coconut milk, starting and ending with the dry ingredients.
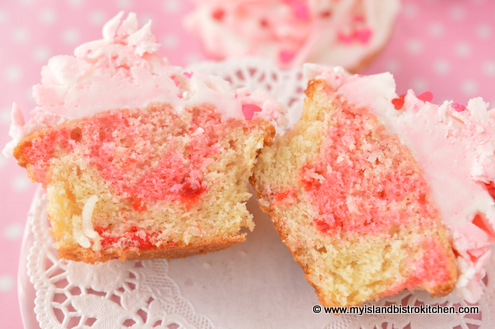
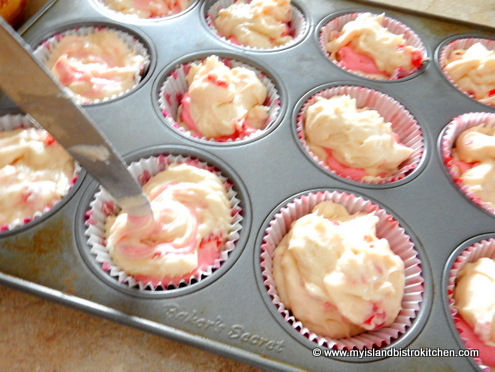
Remove ½ cup of the batter and add the food coloring to it, just enough to tint the batter pink.
Add the coconut and chopped cherries to the white batter.
Fill each muffin cup about 1/3 full with the white coconut batter. Divide the ½ cup of pink batter between the 12 cupcakes.
Divide the remaining white batter evenly between the 12 cupcakes.Use the tip of a knife to gently swirl the pink batter into the white in each cupcake.
Bake in center of oven for 15-19 minutes or until cupcakes spring back to a light touch or a cake tester inserted into center of a cupcake comes out clean. Cool cupcakes in pan for 3-4 minutes then carefully transfer them to wire rack to cool completely.
Frost and decorate cupcakes as desired. The two frosting recipes provided with this recipe will, combined, easily frost the 12 cupcakes with the amount of swirled frosting shown in the photographs that accompany the cupcake recipe. If less frosting is desired, make only one of the recipes.
Yield:12 cupcakes
Dreamy Hawaiian Cupcakes
Coconut Frosting
¼ cup butter ¼ cup shortening 1 tbsp coconut milk ¼ tsp almond flavouring Apx. 2 cups confectioners (powdered) sugar, sifted Sprinkle of salt (optional)
Beat butter and shortening together. Add coconut milk and almond flavouring. Blend in enough sifted confectioners sugar for desired spreading consistency.
Cherry Frosting
¼ cup butter ¼ cup shortening 1½ tbsp cherry juice ¼ tsp almond flavouring Apx. 2 cups confectioners (powdered) sugar, sifted Sprinkle of salt (optional)
Beat butter and shortening together. Add cherry juice and almond flavouring. Blend in enough confectioners sugar for desired spreading consistency.
To achieve dual-colored swirl frosting, fit cake decorating bag with Wilton 2D decorating tip. Fill one side of decorating bag with the white frosting and the other half with the pink frosting. Pipe onto cupcake in swirl motion.
—————————————————————————-
Thank you for visiting “the Bistro” today. If you enjoyed this posting and recipe, please share it on your social media websites.
Connect with “the Bistro” through the following social media:
Preheat oven to 350°. Grease 12 muffin cups or, alternatively, line each cup with paper cupcake liners.
In medium-sized bowl, combine four dry ingredients. Set aside.
Fit mixer with paddle attachment. Cream butter and sugar until fluffy. Add the eggs, one at a time, beating well after each addition. Add the vanilla and Amaretto.
Add the dry ingredients in three parts alternately with the coconut milk, starting and ending with the dry ingredients.
Remove ½ cup of the batter and add the food coloring to it, just enough to tint the batter pink.
Add the coconut and chopped cherries to the white batter.
Fill each muffin cup about 1/3 full with the white coconut batter. Divide the ½ cup of pink batter between the 12 cupcakes. Divide the remaining white batter evenly between the 12 cupcakes. Use the tip of a knife to gently swirl the pink batter into the white in each cupcake.
Bake in center of oven for 15-19 minutes or until cupcakes spring back to a light touch or a cake tester inserted into center of a cupcake comes out clean. Cool cupcakes in pan for 3-4 minutes then carefully transfer them to wire rack to cool completely.
Frost and decorate cupcakes as desired. The two frosting recipes provided with this recipe will, combined, easily frost the 12 cupcakes with lots of swirled frosting. If less frosting is desired, make only one of the recipes.
Coconut Frosting: Beat butter and shortening together. Add coconut milk and almond flavouring. Blend in enough sifted confectioners sugar for desired spreading consistency.
Cherry Frosting: Beat butter and shortening together. Add cherry juice and almond flavouring. Blend in enough confectioners sugar for desired spreading consistency.
To achieve dual-colored swirl frosting, fit cake decorating bag with Wilton 2D decorating tip. Fill one side of decorating bag with the white frosting and the other half with the pink frosting. Pipe onto cupcake in swirl motion.
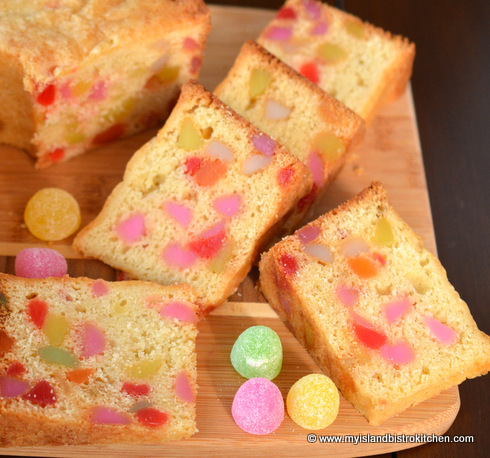
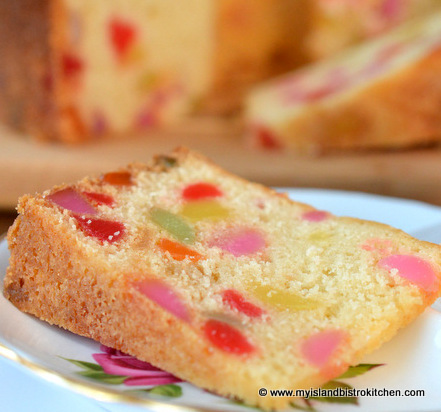
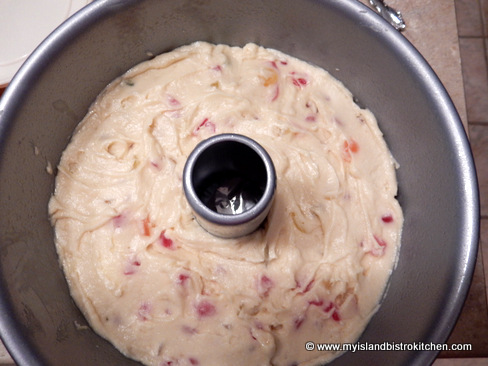
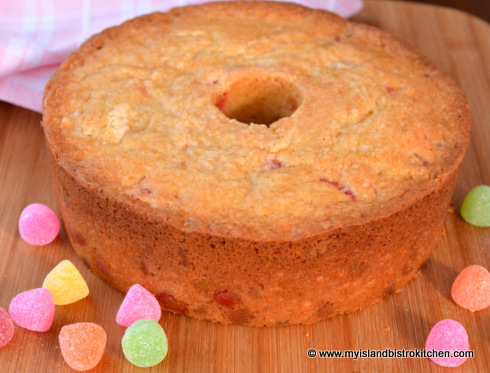
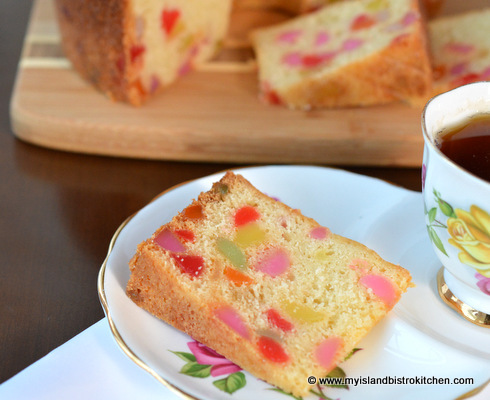
This is one of my all-time favorite cakes! It’s colorful and it’s tasty. While I make this cake at any time of the year (and it’s often a staple in my freezer because it freezes very well), it’s a great Christmas cake because of the colorful gumdrops which give it a festive appearance. It is also a perfect alternative for those who do not like the traditional fruitcakes associated with the holiday season. It’s lighter, both in the color of the cake and its texture, than a fruitcake and yet it is colorful with its myriad of shades of gumdrops.
Gumdrop Cake
The cake is a bit time-consuming to make because cutting the sticky gumdrops can be a bit tedious and it does take over 2 hours to bake so you do need to do some planning ahead to make this cake. That said, the method is not at all difficult.
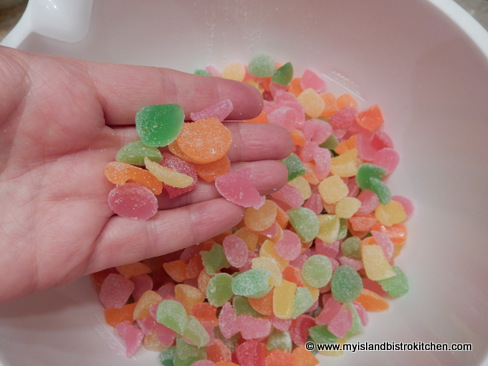
To begin, buy good sugared gumdrops. Hard to believe it but there is a difference in the quality of gumdrops. Don’t use black gumdrops in this cake – those are good for snacking while cutting up the other colored gumdrops 😉 Black gumdrops are just plain ugly in a cake and may bleed out their intense color. I also don’t put a lot of white gumdrops in the cake either because they are not bright and showy enough. Cut each of the gumdrops into 3-5 pieces, depending on the size of the gumdrops to begin with.
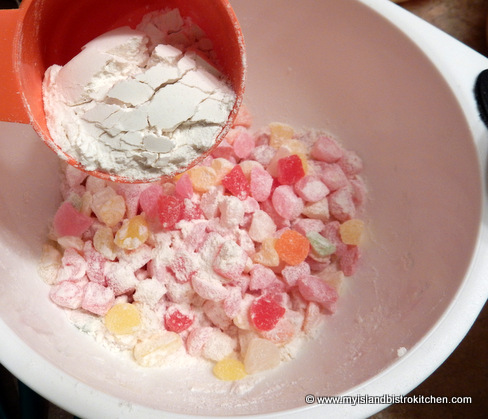
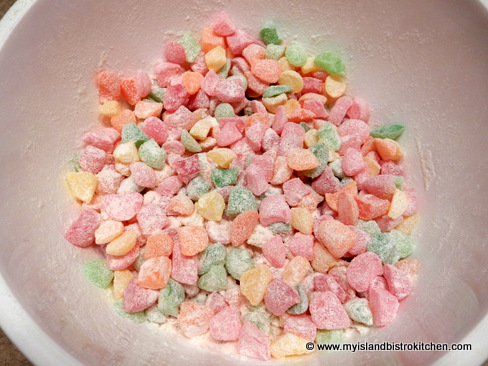
The thing about gumdrops is that they are heavy, even when they are cut. This means there is a possibility they could fall to the bottom of the cake with the top half or more of the cake having few, if any, gumdrops. To counter this issue, make sure the gumdrops are well dredged (floured). Dredging means some of the flour called for in the recipe is used to coat the cut sticky edges of the gumdrops so they don’t all stick to each other and fall, with their collected weight, to the bottom of the cake.
To dredge the gumdrops, simply place the cut gumdrops in a bowl and add a small amount of flour from the amount called for in the recipe. By spoon or by hand, toss the gumdrops in the flour, making sure the cut side of each gumdrop is well floured.
The other tip to avoid ‘falling gumdrops’ is to only use a reasonable amount in the recipe. It’s tempting to add lots and lots more gumdrops; however, those add weight to the cake and they will likely all get together and congregate to have a party at the bottom of the cake. This cake has a light batter so it doesn’t have the power to hold up a lot of heavy gumdrops. I use 1 pound of gumdrops for this cake and find it is sufficient.
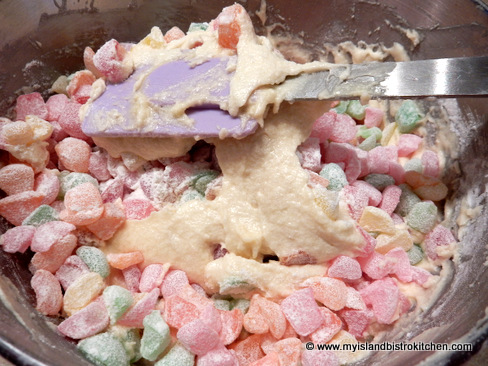
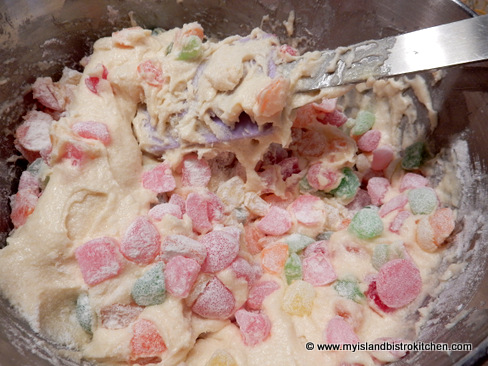
Adding the gumdrops to the batter is the last step in making this cake so, when doing so, fold them in gently with a rubber spatula and don’t over-mix. Just fold them in till there is no flour visible. Over-mixing them will remove the flour from their floured edges and may cause the gumdrops to fall to the bottom of the cake. The flour is meant to act as a “barrier” between the sticky gumdrops and the wet batter. As shown in the photograph below, just keep gently rolling the spatula over and under the batter until all the gumdrops are incorporated.
Gently folding in the gumdrops
You can see how each roll of the spatula brings up more batter each time until the gumdrops are finally all blended in.
The batter for this cake will not result in a lily-white cake because it uses butter. To get a white cake, shortening would have to be used but you would be sacrificing the butter flavour for which this cake is meant. Use the good stuff!
Gumdrop Cake
The butter will cream much easier and faster if it is at room temperature so take the butter out of the fridge an hour or two ahead of preparing the cake. Avoid the temptation of softening the butter in the microwave as, inevitably, some of it will melt and that causes a different texture to the butter. I also remove the eggs and the milk from the fridge about 35-40 minutes before making the cake, bringing them to room temperature. I find this helps the ingredients to incorporate better and more smoothly than if they are used in their refrigerated cold state.
The best pan to use for this cake is a funnel cake pan. The hole in the center of this pan helps the cake to bake evenly without it falling in the center, leaving it unbaked and gummy. I use my large 16-cup angel food pan for this recipe but a slightly smaller funnel pan would accommodate the amount of batter called for in this recipe.
Place the oven rack in the center of the oven to bake the cake and place the cake pan in the center of the rack. If the cake starts to brown too quickly on the top, loosely lay a piece of tin foil over the top of the pan once the top of the cake is set. It takes about 2 hours and 15 minutes for this cake to bake in my oven but I recommend that you start testing for doneness at the 2 hour point so the cake does not dry out. It is done when a cake tester inserted near the center close to the funnel comes out clean and the top of the cake is no longer sticky.
Remove the cake from the oven and let it cool in the pan for 20-30 minutes then turn it out on to a wire rack, removing the parchment paper from the bottom of the cake. Let the cake cool completely before cutting. This cake is best left for a day or two to age before slicing it.
3 cups flour (reserve 1/4 cup for dredging cut gumdrops) 2½ tsp baking powder ½ tsp salt
1 cup milk, room temperature
1 lb gumdrops, cut into 3-5 pieces each
Method:
Place oven rack in center of oven and preheat oven to 300°F. Grease large funnel pan and line bottom with parchment paper.
In medium-sized bowl, dredge the cut gumdrops with 1/4 cup of the flour, making sure that the cut edges of each gumdrop are well floured. Set aside. In separate bowl, sift together the remaining flour, baking powder and salt. Set aside.
In bowl of stand mixer, cream the butter. Gradually add the sugar, beating until well incorporated. Add the eggs, one at a time, beating well after each addition. Beat in the vanilla along with the almond and lemon flavourings. Add the dry and wet ingredients in three parts (3 parts dry and 2 parts wet) starting and ending with the dry ingredients. After all ingredients have been added, beat batter on medium speed for 1 minute.
Remove bowl from stand mixer and, by hand, gently fold in the floured gumdrops just until incorporated and no dry flour remains visible. Do not overmix.
Transfer batter to prepared pan and, with knife, smooth batter out even. Bake for approximately 2¼ hours or until cake tester inserted near funnel center of pan comes out clean. Remove cake from oven and let cool in pan for 20-30 minutes then turn cake out onto wire rack to cool completely. Cake will slice better a day or two after baking.
Gumdrop Cake
If you have made this recipe and enjoyed it and/or wish to share it with your friends and family, please do so on social media but be sure to share the direct link to this posting from my website.
Connect with My Island Bistro Kitchen on Social Media
Follow “the Bistro” on Pinterestat https://www.pinterest.ca/peibistro/ and pin the Pinterest-ready photo found at the end of this post to your favorite Pinterest boards.
A buttery cake loaded with flavour and dotted with colorful gumdrops.
Ingredients
1 cup butter, softened
1 2/3 cups granulated sugar
3 eggs, room temperature
1¼ tsp vanilla
1 tsp almond flavouring
1 tsp lemon flavouring
3 cups flour (reserve 1/4 cup for dredging cut gumdrops)
2½ tsp baking powder
½ tsp salt
1 cup milk, room temperature
1 lb gumdrops, cut into 3-5 pieces each
Instructions
Place oven rack in center of oven and preheat oven to 300°F. Grease large funnel pan and line bottom with parchment paper.
In medium-sized bowl, dredge the cut gumdrops with 1/4 cup of the flour, making sure that the cut edges of each gumdrop are well floured. Set aside. In separate bowl, sift together the remaining flour, baking powder and salt. Set aside.
In bowl of stand mixer, cream the butter. Gradually add the sugar, beating until well incorporated. Add the eggs, one at a time, beating well after each addition. Beat in the vanilla along with the almond and lemon flavourings. Add the dry and wet ingredients in three parts (3 parts dry and 2 parts wet) starting and ending with the dry ingredients. After all ingredients have been added, beat batter on medium speed for 1 minute.
Remove bowl from stand mixer and, by hand, gently fold in the floured gumdrops just until incorporated and no dry flour remains visible. Do not overmix.
Transfer batter to prepared pan and, with knife, smooth batter out even. Bake for approximately 2¼ hours or until cake tester inserted near funnel center of pan comes out clean. Remove cake from oven and let cool in pan for 20-30 minutes then turn cake out onto wire rack to cool completely. Cake will slice better a day or two after baking.
Fruitcakes. People either love them or loathe them and there seems to be no middle ground. I personally favour them and they have long been a part of my annual Christmas traditions.
My Island Bistro Kitchen’s Dark Fruitcake
There are basically two kinds of fruitcakes, a light cake and a dark cake. The dark fruitcake is characterized by the addition of molasses, spices, and often strawberry jam, all of which contribute to its dark color. The light fruit cake has a light-colored batter which makes the jewel tones of the glazed fruit pop. It is, by far, the most colorful of the two cakes. While I could not find any conclusive statistics, it seems to me that dark fruitcakes may perhaps be the more common.
Fruitcakes are sometimes called Christmas cakes since that’s often the only time of the year they make an appearance anymore. Years ago, however, fruitcake was a staple at weddings where the dark fruitcake was referred to as the groom’s cake while white pound cake was the bride’s cake. This tradition, at least where I live, has long since been dispensed with and replaced, instead, with many other cake flavor options.
I have been making fruitcakes for decades (I started making them when I was two! At least that’s my story and I’m sticking to it! Or, maybe it’s the vapors from the joy juice I’ve been brushing on my fruitcake over the past several weeks talking!). Some years I make both dark and light fruitcakes and, other years, one or the other. I simply love the smell of a fruitcake baking in the oven on a cold November afternoon. I always make my fruitcake around Remembrance Day as that gives it lots of time to “ripen” and mellow before the holidays. The making of the fruitcake heralds the beginning of my holiday preparations.
Fruitcakes are still considered a luxurious treat by many because the ingredients can be costly and the cake is time-consuming to make. Sometimes it is even hard to find the big sticky raisins, often referred to as Lexia raisins, which are a signature ingredient in a traditional dark fruitcake.
Lexia Raisins (big sticky raisins)
Essentially, a fruit cake is a mixture of candied/glazed fruit, different kinds of raisins, and often nuts, all held together by a small amount of batter. Before I share my recipe for dark fruitcake at the end of this posting, I am going to share some hints and tips from my many years of making fruitcakes. I hope you will find them helpful.
Cake Shape
Traditionally, fruitcakes are either square or round-shaped and quite deep – at least 2½” – 3” deep. The pans should be ones that have removable bottoms as this makes it easy to remove the cake from the pan. The pans below have been in my family for years and have held many fruitcakes. They may be old and discolored but they do the trick!
Fruitcake pans
Square cakes are infinitely easier to cut and plate more attractively than round cakes. With square pans, each piece can be cut to the same size and shape whereas, with round cakes, it is more difficult to get nice, even shaped pieces cut. There is a trick to cutting round cakes but it is certainly more complicated and time-consuming that cutting straight slices from a square-edged cake. However, the shape of the cake is a personal preference and the cake will taste the same regardless of shape.
It is very important to use the size of pan the recipe calls for as baking times have been tested for its size. Some bakers use loaf pans, 9”x13” shallow pans, or even muffin cups or soup cans in which to bake their fruit cakes. If changing a pan size from the one indicated by a recipe, remember that baking times will need to be adjusted accordingly as a more shallow or smaller cake will take less time than a deeper one to bake. Bakers will need to rely on their baking experience to determine when a cake is baked if they choose to use a pan size different from the one indicated in a recipe and in which the cake recipe has been tested.
Soaking Fruit
Commonly, the glazed and dry fruit, including the raisins and currants, are soaked in liquor, with rum or brandy the most commonly used types of libation. Alternatively the fruit can be soaked in a fruit juice.
The purpose of soaking the fruit is three-fold:
1) To soften/plump/rehydrated the dried fruit – the raisins, in particular; 2) To add flavour to the cake; and 3) As a preservative (if using liquor) to extend the shelf life of the cake.
Some bakers soak the fruit for several months. I don’t find this necessary or that the cake has any significantly better flavour if made with fruit that has been soaked for months. In my opinion, the fruit will only absorb so much liquid and flavor, no matter how long it is soaked. I soak the fruit in a covered container for 24-48 hours, stirring it 3-4 times during the macerating process.
It is important to resist adding more liquor to the fruit soak than is called for in the recipe. Adding too much liquor will add too much liquid to the batter, making it too runny to hold the fruit from falling to the cake bottom and it may also cause the cake to sink in the center as it bakes, potentially causing a soggy cake.
Fruit and Nut Content
True traditional fruit cakes will have candied/glazed fruit, a mixture of raisins, and sometimes nuts. It is important that candied/glazed fruit be used and not, for example, fruit with a lot of liquid such as maraschino cherries or fresh fruit which will add too much excess liquid to the batter.
Jeweled-toned Fruit
Fruitcakes typically do contain nuts; however, my recipe below is nut-free. I find several issues with including nuts in a fruitcake:
1) Nuts, over the long term, can go rancid or, alternatively, be hard junks in an otherwise soft texture cake; 2) Chunks of nuts can make it difficult to cut the cake; and 3) Many people have nut allergies and cannot enjoy a piece of fruitcake made with nuts.
Fruitcake ingredients can be flexible which means substitute ingredients are perfectly acceptable so long as the overall weight content of the fruit that the recipe calls for is maintained. For example, my fruitcake recipe calls for 3 pounds of fruit and I have listed the weight content of each individual ingredient making up that 3-pound fruit content. If you don’t happen to like citron, for example, simply omit the 3 oz called for and replace it with another glazed fruit of the same weight.
Batter
A fruit cake batter is very thick and dense and contains very little flour content. Essentially, there is just enough batter to hold the ingredients together. The reason the batter needs to be thick (as opposed to runny) is that it needs to support the heavy fruit content and keep it suspended and distributed evenly throughout the cake. Otherwise, the fruit will fall to the bottom of the cake.
It is important to “flour” the fruit with a small amount of flour just before adding the fruit to the batter. This will also help to keep the fruit suspended throughout the cake. You will want to do this quickly and not leave the floured fruit any length of time before adding it to the batter as the flour when combined with the glaze on the fruit can turn into a gummy mess, thus defeating the purpose of flouring the fruit.
Preparing the Pan
The pan needs to be greased or sprayed with cooking oil then lined with either brown paper or parchment paper, then greased/sprayed again. I recommend lining the pan with a couple of layers of paper. Because there is very little leavening in the cake and because it is a heavy, thick cake, the pan can be fairly well filled without risk of batter running over the top.
Decorating the Cake Top
There are many ways to decorate the top of a fruitcake and some are very elaborate and show-worthy. I do caution, however, about adding too much fruit to the top of the cake for decoration as glazed/candied fruits are weighty and may cause a cake to not rise properly or even to sink, especially in the center. I sometimes decorate the top of the cake as shown in the photo below but often leave it completely plain as it is easier to cut and plate.
Some bakers cover the cake with royal icing and marzipan. However, I find that the moisture from a dark fruit cake stains the icing making it less attractive.
Baking the Fruitcake
Baking is always the tricky part to fruitcake making. Fruitcakes need to be baked in slow ovens – i.e., 275ºF or less for several hours. Baking at too high a temperature will result in a dry cake. Bake the fruitcake in the center of the oven rack that is positioned in the lower third of the oven. This will allow for adequate airflow needed for the cake to bake properly and evenly on all sides. Include a small pan of hot tap water on the shelf below the cake (or on the floor of the oven). The steam from the water will help to keep the cake moist as it bakes.
No matter what kind of home oven you have or how good you think the air circulation in it is, I do not recommend baking more than one cake in the oven at a time. Fruitcakes are not cheap to make and you want to create a baking environment so the cake has the best chance of success. Leaving lots of room for airflow in the oven will help the cake bake evenly and properly. If you want more than one fruitcake, I recommend making them as separate batches and on separate days.
If the cake starts to darken too much before it is baked, loosely tent a piece of tin foil over the top of the cake. However, only do this if the cake top has completely set all over as, otherwise, the tin foil will stick to the cake and pull some of the batter away from it thus ruining the look of the cake top.
The cake is done when it is firm to the touch and a cake tester or wooden skewer inserted into the cake center comes out relatively clean but with some moisture on it. The cake should not, however, be doughy. I generally start testing my cake about ½ hour before its designated baking time is up, then check it at 15-minute intervals until it is done. The blue cake tester in the photo below is actually a cake thermometer. If the tip of the thermometer turns bright red after having been inserted into the center of the cake for 5 seconds, the cake is done.
Cake Testers
Cool the cake for at least 40 minutes or more before carefully removing it from the pan and transferring it to a wire rack to cool completely. If you are using a cake pan that does not have a removable bottom, I recommend leaving the cake in the pan longer to allow it to more completely set. Because a fruit cake is a dense cake, it will take several hours or overnight for the cake to cool completely.
Storing and Mellowing/Ripening the Cake
Once the cake has cooled completely, I brush a light coating of rum or brandy – whatever I have used in the cake – all over the cake. This adds more flavour and helps to maintain the cake’s moisture. This is not a “sousing” exercise and the cake, because it is new and fresh will quickly absorb the liquor applied to it. Do not saturate the cake with the liquor. Simply give it a brushing all over with the liquor and leave it at that. As a weekly application of the liquor occurs, the cake will absorb the alcohol more slowly than at first application.
Even if you plan to cut the cake into pieces to share with friends and family, do not cut into the cake before it has been brushed with the alcohol and given a chance to ripen for several weeks. If you do, you have defeated the purpose of the ripening process that allows the cake’s flavor to develop. You do not want any open cut sides of the cake during this process as too much liquor will get into the cut side, potentially creating a soggy and stodgy cake. There is a clear difference between a moist cake and a soggy one. Therefore, you want to be brush the hide of the cake, not cut sides.
Wrap the cake in cheesecloth (which can also be soaked in liquor) followed by a double layer of plastic wrap and double of tin foil.
The cake is then placed in a sealed bag and stored it in a cool, dry place to mellow or ripen, a process of time that allows the cake’s flavours to mix and mingle. I leave the cake stored at a very cool room temperature for 3-4 weeks, giving it a weekly nightcap by brushing another light coating of the liquor all over the cake and re-wrapping it (re-soaking the cheesecloth in the liquor and wringing it out each time). The cake will, for the first while, continue to quickly absorb the liquor as soon as it is brushed on; however, that is not a license to keep adding more liquor. This application of liquor is meant to infuse flavour and keep the cake moist (but not soggy wet). The liquor-dampened cheesecloth wrapped around the cake that is tightly stored in plastic wrap will help to keep the cake moist as well. I do not apply the liquor beyond the 4-week period.
It is extremely important that the cake not be bathed or saturated with liquor for a couple of reasons. First, it will make the cake very wet and soggy which is not the hallmark texture of a good quality fruit cake. It may also cause the cake to sink down because it is so moisture-logged. When you think about it, the cake is wrapped in cheesecloth, then tightly in two layers of plastic wrap, two layers of tin foil, and sealed in a plastic bag to age. Applying too much liquor means there is no way it will evaporate and nowhere for it to go except into the cake, likely overloading it with liquid, resulting in a soggy mess.
Second, there certainly is such a thing as adding too much liquor to the cake as it will cause an offputting, potent, flavour. In essence, it will ruin the taste of the cake. Apply the old adage that less is more when applying the liquor. Use a light brushing of the liquor and the liquor-soaked cheesecloth to add any necessary flavor and moisture to the cake. I personally think that the reason some people may not like fruitcake is because they have, somewhere, been given a piece of fruitcake that was way too wet and had far too much liquor applied to it. If the first thing you taste when you bite into a piece of fruitcake is the liquor, the cake has had far too much liquor added to it, either in the cake itself or applied to it as it mellowed.
After letting the cake mellow, I remove the cheesecloth and keep the cake wrapped in plastic wrap and tin foil inside a sealed bag and store it in the refrigerator or freeze it. It’s important to let the cake ripen first at cool room temperature as it won’t mellow further once refrigerated or frozen.
Slicing the Cake
I find the fruitcake slices easier from the refrigerator than at room temperature as it is a bit firmer when chilled. I recommend using a sharp, flat-edged knife to cut the cake as a serrated knife, for example, may pull the fruit during cutting, creating a ragged, uneven edge.
Making the first cut!
I cut each slab, across the full width of the cake, a good ½” wide. It needs to be a good width in order for it to hold together as it is being sliced.
For suggested serving size, I recommend slicing each slab into pieces that are about 1¼” wide.
[Printable recipe follows at end of posting]
Dark Fruitcake
Ingredients:
7 oz seeded raisins (i.e., Lexia) 7 oz golden raisins 7 oz cup sultana raisins 3 oz dates, chopped 2 oz currants 9 oz mixed glazed fruit 4 oz red glazed cherries 4 oz green glazed cherries 3 oz citron 2 oz mixed peel ⅔ cup rum ½ cup flour
2 cups flour ½ tsp salt 1 tsp baking powder ½ tsp soda 1 tsp cinnamon ½ tsp cloves ½ tsp allspice ½ tsp mace ½ tsp nutmeg
½ lb butter ¼ cup white sugar 1½ cups brown sugar 4 extra large eggs 1 tsp vanilla 1 tsp almond flavouring 2½ tbsp molasses ½ cup strawberry jam
Method:
Measure fruit and transfer to a large bowl. Mix well. Pour ⅔ cup of rum over fruit. Stir to coat. Cover tightly with plastic wrap. Let stand for 24-48 hours to macerate the fruit, stirring occasionally.
Prepare 8-inch square fruitcake pan that is 3 inches deep and has a removable bottom: Lightly spray the bottom and sides of the pan with cooking spray. Line the pan, bottom and sides, with brown paper or parchment paper. Lightly spray the paper.
Position oven rack in lower third of oven. Preheat oven to 275°F.
Sift together the dry ingredients. Set aside.
Sifted Dry Ingredients
Using the paddle attachment on the stand mixer, cream the butter until light and fluffy.
Add the white sugar. Beat. Add the brown sugar and beat well, scraping the sides of the bowl with a spatula to ensure sugar is all incorporated.
Add the eggs, one at a time, beating well after each addition.
Add the vanilla and almond flavouring followed by the molasses. Mix thoroughly. Mix in the strawberry jam.
Add the dry ingredients and mix until combined into batter. Transfer batter to very large bowl.Sprinkle remaining ½ cup of flour (listed above in first set of ingredients) over the macerated fruit and toss ingredients lightly and quickly.
Add the floured fruit to the batter and mix thoroughly.
Transfer batter by large spoonfuls into the prepared baking pan. Use a knife to evenly spread the batter in the pan.
Add a few cherries as decorations to the top of the cake, if desired.
Place a small pan of water on the lower shelf in the oven. Bake fruitcake in the center of the oven rack (that has been positioned in the lower third of the oven) for about 5¾ hours or until cake is firm to the touch and cake tester inserted in center of cake comes out clean. Remove cake from oven and place on rack. Let cake cool in pan for about 40 minutes before carefully removing from pan and letting rest on cooling rack.
Let cake cool completely before brushing with rum and wrapping in cheesecloth, followed by plastic wrap and tin foil, then storing in a sealed plastic bag in a cool, dry area. Remove wrapping and brush cake top and sides with rum once a week. For best flavour, let cake “age” for at least 3-4 weeks before cutting and serving.
Tips and a recipe for making a delicious and traditional dark fruitcake flavored with rum and packed full of fruit. This cake is nut free.
Course Dessert
Cuisine American
My Island Bistro KitchenMy Island Bistro Kitchen
Ingredients
7ozseeded raisinsi.e., Lexia
7ozgolden raisins
7ozcup sultana raisins
3ozdateschopped
2ozcurrants
9ozmixed glazed fruit
4ozred glazed cherries
4ozgreen glazed cherries
3ozcitron
2ozmixed peel
⅔cuprum
½cupflour
2cupsflour
½tspsalt
1tspbaking powder
½tspsoda
1tspcinnamon
½tspcloves
½tspallspice
½tspmace
½tspnutmeg
½lbbutter
¼cupwhite sugar
1½cupsbrown sugar
4extra large eggs
1tspvanilla
1tspalmond flavouring
2½tbspmolasses
½cupstrawberry jam
Instructions
Measure fruit and transfer to a large bowl. Mix well. Pour ⅔ cup of rum over fruit. Stir to coat. Cover tightly with plastic wrap. Let stand for about 24 hours to macerate the fruit, stirring occasionally.
Prepare 8-inch square fruitcake pan that is 3 inches deep and has a removable bottom: Lightly spray the bottom and sides of the pan with cooking spray. Line the pan, bottom and sides, with brown paper or parchment paper. Lightly spray the paper.
Position oven rack in lower third of oven and preheat oven to 275°F.
Sift together the dry ingredients. Set aside.
Using the paddle attachment on the stand mixer, cream the butter until light and fluffy. Add the white sugar. Beat. Add the brown sugar and beat well, scraping the sides of the bowl with a spatula to ensure sugar is all incorporated.
Add the eggs, one at a time, beating well after each addition. Add the vanilla and almond flavouring followed by the molasses. Mix thoroughly. Mix in the strawberry jam.
Add the dry ingredients and mix until combined into batter. Transfer batter to very large bowl.
Sprinkle remaining ½ cup of flour over the macerated fruit and toss ingredients lightly and quickly. Add the floured fruit to the batter and mix thoroughly. Transfer batter by large spoonfuls into the prepared baking pan. Use a knife to evenly spread the batter in the pan. Add a few cherries as decorations to the top of the cake, if desired.
Place a small pan of water on the lower shelf in the oven. Place cake in the center of the oven rack (that has been positioned in the lower third of the oven) and bake fruitcake for about 5¾ hours or until cake is firm to the touch and cake tester inserted in center of cake comes out clean. Remove cake from oven and place on rack. Let cake cool in pan for about 40 minutes before carefully removing from pan and letting rest on cooling rack.
Let cake cool completely before brushing with rum and wrapping in cheesecloth, followed by plastic wrap and tin foil, then storing in a sealed plastic bag in a cool, dry area. Remove wrapping and brush cake top and sides with rum once a week. Let cake “age” for at least 3-4 weeks before cutting and serving.
Recipe Notes
Yield: 1 - 6 lb cake
NOTE: Be sure to read the entire posting that accompanies this recipe for tips on how to make the perfect fruit cake.
Copyright My Island Bistro Kitchen
If you have made this recipe and enjoyed it and/or wish to share it with your friends and family, please do so on social media but be sure to share the direct link to this posting from my website.
You may also enjoy these other Christmas cakes from My Island Bistro Kitchen:
Follow “the Bistro” on Pinterestat https://www.pinterest.ca/peibistro/ and pin the Pinterest-ready photo at the end of this posting to your favorite Pinterest boards!
Remembrance Day Service at the cenotaph in front of Province House, Charlottetown, PEI, Canada [11 November 2012]Every year on November 11th we pause to remember the sacrifices and achievements of those who valiantly and selflessly served our country in times of war and conflict, and in peacekeeping missions around the world. We remember those who gave the ultimate sacrifice – their lives for their country so future generations could have a better, more secure life. We think about their achievements and the role they played in forming Canada’s nationhood. We thank them for the peace, freedom, and human rights we enjoy in Canada today.
Those of us who have been fortunate enough never to have known or experienced war have opportunities to demonstrate our respect and gratitude for, and remembrance of, these acts of bravery and sacrifice. For example, we wear a poppy on the left breast, close to the heart to signify remembrance of the lives lost.
Poppy
Thousands of people across the country will attend Remembrance Day ceremonies in their local communities where they will respectfully observe a moment’s silence at 11am on the 11th day of the 11th month to mark the time the Armistice was signed to end WWI. Wreaths will be laid in commemoration.
Remembrance Day Wreath
One of the most well-known poems about war was written in May, 1915, by Lt. Col. John McCrae, a Canadian Medical Officer in WWI. While stationed near Ypres, Belgium, where some of the most horrific and bloodiest fighting of WWI occurred, he was motivated to write about the death he saw around him and of the prolific red poppies growing amidst the devastation of war in the Flanders area of western Belgium. His poem, “In Flanders Fields” has become synonymous with Remembrance Day in Canada and Lt. Col. McCrae is often credited with being the catalyst that led to the poppy being identified as the symbol of remembrance of the blood shed by soldiers who were casualties of battle.
“In Flanders Fields”
On this Remembrance Day, I am going to focus my food blog feature story on war cake, a wartime dessert that is still made and served in several Island households today.
War Cake
As a small child I well remember my grandmother making war cake and this was long after WWII had ended. I loved her war cake! It is such a simple raisin-spice cake that is characterized by the absence of eggs and milk — ingredients that would have been scarce during wartime. This cake is sometimes referred to as “boiled raisin cake” because raisins form the main content and the majority of the ingredients are boiled, then cooled, before they are mixed with flour and baking soda and then baked in the oven. Because of food shortages during war time, many foods were rationed.
Ration Books, Cards, and Stickers
Born of necessity, homemakers during wartime became resourceful, frugal, adaptable, and creative in order to feed their families. Cooking tended to be very basic. Women were known to have saved their ration stickers so they could buy the raisins and sugar that the war cake recipe called for – thus war cake would have been a very prized commodity.
War cake was made for consumption on the home front but many also made the cakes in tin cans and packed them in socks, mittens, and underwear they were shipping overseas for their loved ones serving in the war. Imagine the excitement when a soldier would have received this package from home and discovered a mother’s or sister’s war cake inside! Amazingly, with the slow mail and ship service during WWI and WWII, there is evidence these cakes were received as the soldiers would refer to them in their letters home, letters that would have looked much like the July 7, 1914, letter in the photograph below.
Letter from a soldier written from “Somewhere in France” on July 7, 1914. In the letter, the soldier encloses two pansies as “souvenirs from France”, one flower each for the young lady he was writing to and her mother. All these years later, the pressed pansies have still retained their color and are intact.Old War Cake Recipes
In my research for this story, I examined many recipes for war cake and found similarities amongst them all. Some were very sketchy in terms of amount of ingredients to be put in the batter and many were almost totally devoid of any directions. While the amounts of the ingredients may vary slightly, all of the recipes I reviewed were essentially the same in ingredient content. All called for big, sticky raisins (you may know these as “Lexia” raisins), a variety of spices of the cook’s choice, either brown or white sugar or a combination of both, shortening or lard, boiling water, flour, and soda. One thing I noted was the significant amount of sugar that the recipes called for – i.e., two cups per cake. Sugar was one item that was commonly rationed during wartime and a cake taking two cups of sugar would certainly have been considered a luxurious dessert, I am sure. Flavour may vary from cake to cake based on spices used in the batter. The choice of spices varies but typically consisted of cinnamon, nutmeg, and cloves, as a minimum, with ginger frequently appearing in recipes. I added mace and cardamom to my cake to give it a bit more flavour (recipe follows at end).
Ingredients for War Cake
I am told these cakes were often made with lard (as opposed to butter) for a couple of reasons. First, lard has a longer shelf life than butter would have had and, for cakes being sent overseas to the soldiers, it would have been a long journey for the cakes to reach Europe so shelf life of the cakes was an important factor. Second, butter was often scarce during wartime because there were no big herds of cattle on local farms so butter would have been used sparingly, even for those living on farms and churning their own. Lard, on the other hand, would have been much more readily available, particularly on farms. I found a couple of recipes that indicated either butter or shortening could be used in the recipe; however, butter was called for in a much lesser quantity than the shortening, if the latter was used instead. For example, I found one recipe that called for 2 tablespoons of butter or 1 cup of shortening which demonstrates how judiciously butter would have been used, if at all.
While its ingredients are simple, war cake takes some time to make. All of the ingredients, except the flour and soda, are boiled on the stove for 5 minutes. Then it is important to let the boiled raisin mixture cool to room temperature as the mixture will thicken naturally on its own as it cools. This will normally take 4-5 hours. If the flour and soda are added into a mixture that is too hot, the result is likely to be a gummy cake. When the raisin mixture is cooled, the flour and soda are stirred in and the mixture turned into the baking pan. My grandmother made her war cake in a loaf pan; however, traditionally, war cake seems to have been made in some kind of a round pan – usually a tube pan or, in the case of overseas shipping during war time, in tin cans. War cake is a very dense cake which makes it sometimes difficult to get the center of the cake baked without drying out the outside edges. It is also a heavier type cake which makes it somewhat prone to falling in the center. A tube (or Bundt pan, if you have one) removes the baking uncertainty and helps the cake to bake more evenly.
War Cake Baked in a Bundt Pan
War cakes take, on average, about an hour to bake. The old recipes I reviewed didn’t even mention baking the cake let alone at what temperature (in fact, one recipe simply said “to thicken” but didn’t elaborate on what thickening agent was to be used!). These recipes predate our modern electronic ovens! While some suggest baking the cake at 350F, I thought that might be a bit high so I baked my war cake at 335F for one hour. Because there are no eggs or milk in the cake for moistness, it is very easy to overbake the cake and end up with a dry product. Hence, it is important to time the baking carefully and to use a cake tester starting at about the 45-minute point. If the cake starts to darken on the top or edges too quickly, simply place a piece of tin foil loosely over the top. Adding a small pan of water to the lower shelf in the oven while baking the cake will also help to keep the cake moist.
Including a Small Pan of Hot Water on the Bottom Shelf of the Oven Helps to Keep the Cake Moist During Baking
Because of the texture of the cake, it may seem soft on the top and not baked; however, if a cake tester comes out of the cake clean, it’s time to remove it from the oven before it dries out.
War cake is a “stick to the ribs” substantial, hearty kind of cake. It goes particularly well with a nice cup of tea.
War Cake and Tea
In keeping with the traditional way war cake was served, I have photographed the cake plain, just as it would have been eaten during wartime.
Sliced War Cake
War cake was not traditionally iced. However, it would be lovely served with a dollop of whipped cream or vanilla or maple ice cream. It could also be dressed with a brown sugar sauce or, to make a plain cake really decadent, why not serve all three – ice cream, brown sugar sauce, and whipped cream!
War Cake on a Tea Table
War Cake
Regardless where you are in the world, if you have any wartime memories (either your own or those passed down to you from your ancestors) of war cake made for consumption on the home front or to send to the soldiers fighting the war, I would love to hear about them. War cake is a part of wartime culinary history.
Here are some photographs of the Remembrance Day Ceremony at the cenotaph in downtown Charlottetown, PEI, this morning.
Remembrance Day in Charlottetown, PEI [11 November 2012]Lest We Forget
Hon. Robert W.J. Ghiz, Premier of the Province of Prince Edward Island lays a wreath on behalf of the people of the Island at the Remembrance Day Service in Charlottetown, PEI [11 November 2012]Small Child Watches as a Veteran lays a Wreath at the Remembrance Day Service in Charlottetown, PEI ]11 November 2012]
Remembrance Day 2012
Veterans Laying Wreaths at Remembrance Day Service in Charlottetown, PEI [11 November 2012]At the Charlottetown Cenotaph – Remembrance Day 2012
Flag Flies at Half-Mast on Remembrance Day, Charlottetown, PEI [11 November 2012]
An old-fashioned cake made with large sticky raisins and a mixture of spices. Common cake during war time.
Course Cake
Cuisine Canadian
Keyword war cake
Servings12
My Island Bistro KitchenMy Island Bistro Kitchen
Ingredients
3/4cupshortening
2cupsbrown sugar, lightly packed
1poundlarge, sticky raisins
1tspsalt
1tspcinnamon
1tspnutmeg
1/2tspcloves
1/4tspginger
1/8tspmace
1/8tspcardamon
2cupsboiling water
3cupsall-purpose flour
2tspsoda
Instructions
Assemble ingredients.
Place the shortening, brown sugar, raisins, salt, spices, and boiling water into a large saucepan. Over medium-high heat, bring mixture to a boil. Reduce heat to medium or slightly lower and boil mixture for five minutes. Remove from heat and set saucepan on cooling rack. Let mixture cool to room temperature (4-5 hours), stirring occasionally.
In bowl, whisk the flour and baking soda together. Set aside.
Grease large tube or Bundt pan.
When raisin mixture has cooled completely, add the flour and baking soda. Stir until dry ingredients have been completely mixed into the raisin mixture.
Spoon mixture into greased pan. Add a small pan of hot water to lower shelf in oven for moisture while cake is baking. Bake cake on middle rack in 335°F preheated oven. If cake starts to brown on the top too quickly, loosely place a piece of tin foil on top of cake. Bake apx. 1 hour but begin to test cake for doneness, using a cake tester, at the 45-minute point as cake can dry out very quickly.
Remove cake from oven and place pan on cooling rack for 10 minutes then remove from pan. Allow cake to cool completely before cutting.
Recipe Notes
[Copyright My Island Bistro Kitchen]
(Mostly) PEI and Maritime Food – Good Food for a Good Life!