Tag Archives: comfort foods

Vintage Tomato Soup Layer Cake Recipe

By now, if you are a regular follower of my food blog, you have probably detected that I like vintage foods and those that could be called comfort foods.

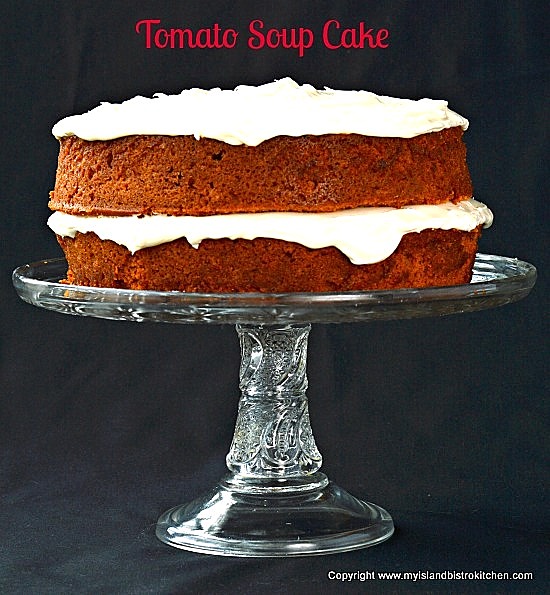
I grew up with tomato soup cake as standard fare in the household. It’s such a simple cake and, while it may seem bizarre to add a can of tomato soup to cake batter, it’s really tasty when some spices are added. The tomato soup cake my mother used to make was always a single layer (and always made in the pyrex glass 8″ square baking pan). It was never frosted and was generally considered to be an “every day cake” as opposed to a cake for a special occasion.  My mother’s cake was rather dense in texture and contained no eggs. Spices consisted of cinnamon and cloves.

Tomato Soup Cake
Tomato Soup Cake

I have used my mother’s recipe as inspiration but have completely revamped the recipe to turn this cake into a more decadent dessert.  I’ve added eggs for lightness, moisture, and a tender crumb and added some molasses and a small amount of nutmeg for added flavour.  A hefty dose of cream cheese frosting takes a plain old basic cake to new heights. On top of great flavour, the cake has a beautiful rusty-orange color.

Tomato Soup Cake
Tomato Soup Cake

I bake this cake in two 8″ round pans and the batter will rise to the very top of each pan.  Nine-inch (9″) round pans can also be used but the cakes will obviously not be quite as thick and the baking time will need to be adjusted as they will take slightly less time to bake than the 8″ cakes.  I highly recommend using bake even strips, dampened and wrapped snugly around each pan – these help to keep cakes even as they bake as opposed to tops that have peaks and valleys.  These strips really do make a difference.  That said, though, there is usually some leveling that still has to take place on the cakes and, for this, I recommend a cake leveler or, alternatively, you can use a serrated knife.  Make sure both cakes are the same height and that any loose crumbs are brushed from the cakes before frosting.

Tomato Soup Cake
Tomato Soup Cake

(Printable recipe follows at end of post)

Tomato Soup Layer Cake

Ingredients:

2¼ cups all-purpose flour
2¾ tsp baking powder
1 tsp baking soda
½ tsp salt
1½ tsp cinnamon
½ tsp cloves
¼ tsp nutmeg
⅔ cup shortening, softened to room temperature
1⅓ cups sugar
2 large eggs (at room temperature for 15-20 minutes)
1 – 10 oz can tomato soup
2 tbsp milk
2 tbsp molasses

Method:

Preheat oven to 350°F and position rack in center of oven.

Prepare two 8” round cake pans by greasing the pans and lining the bottom of each pan with parchment paper .

In medium bowl, whisk together the flour, baking powder, baking soda, salt, cinnamon, cloves, and nutmeg.

In large bowl with mixer set at medium speed, cream the shortening and sugar together until well blended.  Add eggs, one at a time, beating well after each addition.

In a separate bowl or large measuring cup, combine the tomato soup, milk, and molasses.

Add the dry ingredients to the creamed mixture alternately with the liquid ingredients, starting and ending with the flour mixture.  Beat well after each addition, scraping bottom and sides of bowl with rubber spatula as necessary to ensure all dry ingredients are incorporated.  Finally, beat batter one additional minute at medium-high speed.

Divide batter equally between the two prepared pans, spreading evenly.  Bake for apx.  38-40 minutes or until cake tester inserted into center of a cake comes out clean and cake springs back to a light finger touch.  Transfer cakes to wire rack and let cool in pans for 10 minutes. With the edge of a small flat-edged paring knife, gently loosen edges of each cake from the pans.  Invert cakes onto a wire rack and allow to cool completely before frosting with cream cheese frosting.

Yield: 1 – 8” layer cake, apx. 10-12 servings


Cream Cheese Frosting

Ingredients:

8 oz cream cheese, softened to room temperature
½ cup butter or margarine, softened
2 tsp vanilla
2 tsp milk
1 lb sifted icing (confectioner’s/powdered) sugar (weighed after sifted)

Method:

With mixer set at medium speed, beat cream cheese and butter or margarine until creamy and well-blended.  Beat in vanilla and milk.  Add about one-third of the icing sugar.  Beat well to blend.  Add remaining icing sugar in two separate additions, beating well after each addition and scraping bowl often with rubber spatula to ensure sugar is well blended into creamed mixture.  Beat for 1-2 minutes longer until frosting is smooth, light, and fluffy.

Yield:  Enough to fill and completely frost 1 – 8” or 1 – 9” layer cake.

To assemble cake:

Even each cake top by using a cake leveler or serrated knife, ensuring both cakes are the same height. Lightly brush away any loose crumbs remaining on the sides of the cakes.  Sandwich together the two cake layers with a generous amount of cream cheese frosting.  With the remaining frosting, cover the top of cake and, if desired, the sides or, alternatively, leave the sides without frosting for a more rustic looking cake.

Tomato Soup Cake
Tomato Soup Cake


Vintage Tomato Soup Layer Cake

Yield: 1 - 8" layer cake, apx. 10-12 servings

A moist and flavorful spice cake with a tender crumb

Ingredients

  • 2¼ cups all-purpose flour
  • 2¾ tsp baking powder
  • 1 tsp baking soda
  • ½ tsp salt
  • 1½ tsp cinnamon
  • ½ tsp cloves
  • ¼ tsp nutmeg
  • 2/3 cup shortening, softened to room temperature
  • 1 1/3 cups sugar
  • 2 large eggs (at room temperature for 15-20 minutes)
  • 1 – 10oz can tomato soup
  • 2 tbsp milk
  • 2 tbsp molasses
  • Frosting:
  • 8 oz cream cheese, softened to room temperature
  • ½ cup butter or margarine, softened
  • 2 tsp vanilla
  • 2 tsp milk
  • 1 lb sifted icing (confectioner’s/powdered) sugar (weighed after sifted)

Instructions

  1. Preheat oven to 350°F and position rack in center of oven.
  2. Prepare two 8” round cake pans by greasing the pans and lining the bottom of each pan with parchment paper.
  3. In medium bowl, whisk together the flour, baking powder, baking soda, salt, cinnamon, cloves, and nutmeg.
  4. In large bowl with mixer set at medium speed, cream the shortening and sugar together until well blended. Add eggs, one at a time, beating well after each addition.
  5. In a separate bowl or large measuring cup, combine the tomato soup, milk, and molasses.
  6. Add the dry ingredients to the creamed mixture alternately with the liquid ingredients, starting and ending with the flour mixture. Beat well after each addition, scraping bottom and sides of bowl with rubber spatula as necessary to ensure all dry ingredients are incorporated. Finally, beat batter one additional minute at medium-high speed.
  7. Divide batter equally between the two prepared pans, spreading evenly. Bake for apx. 38-40 minutes or until cake tester inserted into center of a cake comes out clean and cake springs back to a light finger touch. Transfer cakes to wire rack and let cool in pans for 10 minutes. With the edge of a small flat-edged paring knife, gently loosen edges of each cake from the pans. Invert cakes onto a wire rack and allow to cool completely before frosting with cream cheese frosting.
  8. Frosting:
  9. With mixer set at medium speed, beat cream cheese and butter or margarine until creamy and well-blended. Beat in vanilla and milk. Add about one-third of the icing sugar. Beat well to blend. Add remaining icing sugar in two separate additions, beating well after each addition and scraping bowl often with rubber spatula to ensure sugar is well blended into creamed mixture. Beat for 1-2 minutes longer until frosting is smooth, light, and fluffy.
  10. To assemble cake:
  11. Even each cake top by using a cake leveler or serrated knife, ensuring both cakes are the same height. Lightly brush away any loose crumbs remaining on the sides of the cakes. Sandwich together the two cake layers with a generous amount of cream cheese frosting. With the remaining frosting, cover the top of cake and, if desired, the sides or, alternatively, leave the sides without frosting for a more rustic looking cake.
Schema/Recipe SEO Data Markup by Yummly Rich Recipes
https://myislandbistrokitchen.com/2016/04/26/vintage-tomato-soup-layer-cake/

Tomato Soup Cake
Tomato Soup Cake

Pin Me To Pinterest!

Tomato Soup Cake
Tomato Soup Cake

Blueberry Grunt

Blueberry Grunt

I don’t know about you but once the Christmas holidays are over, I crave comfort foods.  You know, the foods that are basic, nostalgic, or that you have a sentimental attachment to and that take you down memory lane.  Some might even refer to these dishes as vintage.  Maybe your mom made them for you when you were a child or you remember them from visits to grandma’s house.  I’m talking about foods like macaroni and cheese, baked beans, scalloped potatoes, apple pie or crisp, homemade stews and “boiled dinners“, and baked bread.  Cottage pie, rice pudding, roast chicken dinners, meatloaf with mashed potatoes, and fruit cobblers are other comfort foods commonly enjoyed in North American culture.  There are many other dishes that bring us comfort in the cold Canadian winters so this list is not exhaustive and what constitutes comfort food may vary between cultures and regions of Canada.

These foods, in their traditional content, are by no means gourmet fare nor are they necessarily devoid of calories.  They’re typically plain and simple stick-to-the-ribs kind of fare and they generate feelings of contentment and satisfaction …  you feel warm and cozy when eating the meal.  These kinds of dishes take basic, easy-to-find ingredients and are not usually difficult or complicated to make.  They’re the kinds of foods that, when you walk into a home where they are being prepared, your appetite is immediately whetted and you harken back to early memories of enjoying those foods.  They are hearty classics and endure over time, generation after generation.  Yes, even the old tuna casserole is still considered a comfort food by many!

This month, I am going to focus many of my blog postings on some of my favorite comfort foods.  Today, I am starting with my recipe for Blueberry Grunt.  I don’t know the origin of this dessert or how it got its name but it’s really just a fruit cobbler – a slightly thickened fruit sauce on the bottom topped by a biscuit-like dumpling.  This dessert is often made on the stove top where the dumplings are put in the pot on top of the bubbling blueberry sauce, covered and let simmer for about 15 minutes.  However, my recipe calls for the dessert to be baked in the oven.

Baked Blueberry Grunt


My featured Island product in this recipe are the blueberries.  Each summer, I pack away several bags of these sweet little Island-grown morsels for use in my favorite recipes like this one for Blueberry Grunt.

[Printable recipe follows at end of posting]

Blueberry Grunt

Ingredients:
4 cups blueberries, fresh or frozen
1/2 cup white sugar
2 tbsp brown sugar
1 tbsp + 1 tsp cornstarch
2 tsp lemon juice
1 1/2 tsp grated lemon rind
1/2 cup water
1/2 tsp cinnamon
1/4 tsp nutmeg
1/8 tsp cardamon

Topping:
2 cups flour
4 tsp baking powder
1/4 tsp salt
2 1/2 tbsp white sugar
1 cup milk
2 1/2 tbsp cold butter

Method:

Preheat oven to 400F.

In a small bowl, mix together the sugars, cornstarch, and spices.  Stir in the grated lemon rind.  Set aside.

In saucepan, combine blueberries and the sugar mixture.  Add the lemon juice and water.  Bring to a boil then reduce heat and simmer mixture for 5-6 minutes.  Remove from heat.

Meanwhile, in a large bowl, combine flour, baking powder, salt and sugar.  Cut in cold butter until mixture resembles coarse oatmeal.  Add enough milk to make a soft dough mixture that will cling together.

Grease a 1 1/2 or 2-quart baking dish or 8 individual ramekins.  Spoon the blueberry mixture into baking dish(es).


Divide the dumpling dough into 8 portions.

Place dumplings over blueberry mixture (close together if baking in one casserole or centered if using individual dishes).

Bake in 400F oven for about 20-25 minutes or until dumplings are done and lightly golden brown on top.

Serve hot with a dollop of whipped cream or vanilla ice cream (or both!).

Serves:  8

What are your favorite comfort foods?

Blueberry Grunt

An easy to prepare comfort dessert, Blueberry Grunt consists basically of blueberries baked in a flavorful sauce under tea biscuit dumplings. Serve hot with vanilla ice cream and/or whipping cream.
Course Dessert
Cuisine Canadian
Keyword blueberries, blueberry grunt
Servings 8
My Island Bistro Kitchen My Island Bistro Kitchen

Ingredients

Blueberry Base:

  • 4 cups blueberries, fresh or frozen
  • 1/2 cup white sugar
  • 2 tbsp brown sugar
  • 1 tbsp + 1 tsp cornstarch
  • 2 tsp lemon juice
  • 1 1/2 tsp grated lemon rind
  • 1/2 cup water
  • 1/2 tsp cinnamon
  • 1/4 tsp nutmeg
  • 1/8 tsp cardamom

Topping:

  • 2 cups flour
  • 4 tsp baking powder
  • 1/4 tsp salt
  • 2 1/2 tbsp white sugar
  • 1 cup milk
  • 2 1/2 tbsp cold butter

Instructions

  1. Preheat oven to 400F.
  2. In a small bowl, mix together the sugars, cornstarch, and spices. Stir in the grated lemon rind. Set aside.
  3. In saucepan, combine blueberries and the sugar mixture. Add the lemon juice and water. Bring to a boil then reduce heat and simmer mixture for 5-6 minutes. Remove from heat.
  4. Meanwhile, in a large bowl, combine flour, baking powder, salt and sugar. Cut in cold butter until mixture resembles coarse oatmeal. Add enough milk to make a soft dough mixture that will cling together.
  5. Grease a 1 1/2 or 2-quart baking dish or 8 individual ramekins. Spoon the blueberry mixture into baking dish(es).
  6. Divide the dumpling dough into 8 portions.
  7. Place dumplings over blueberry mixture (close together if baking in one casserole or centered if using individual dishes).
  8. Bake for about 20-25 minutes or until dumplings are done and lightly golden brown on top.
  9. Serve hot with a dollop of whipped cream or vanilla ice cream (or both!).

Recipe Notes

Yield: 8 servings

Thank you for visiting “the Bistro” today.

Did you Know?

You can join the Facebook page for My Island Bistro Kitchen:  https://www.facebook.com/MyIslandBistroKitchen/

Follow “the Bistro” on Twitter:  https://twitter.com/PEIBistro/

See the drool-worthy gallery of mouth-watering food photos from My Island Bistro Kitchen on Instagram: https://www.instagram.com/peibistro/

Follow “the Bistro” on Pinterest at https://www.pinterest.ca/peibistro/

Blueberry Grunt
Blueberry Grunt