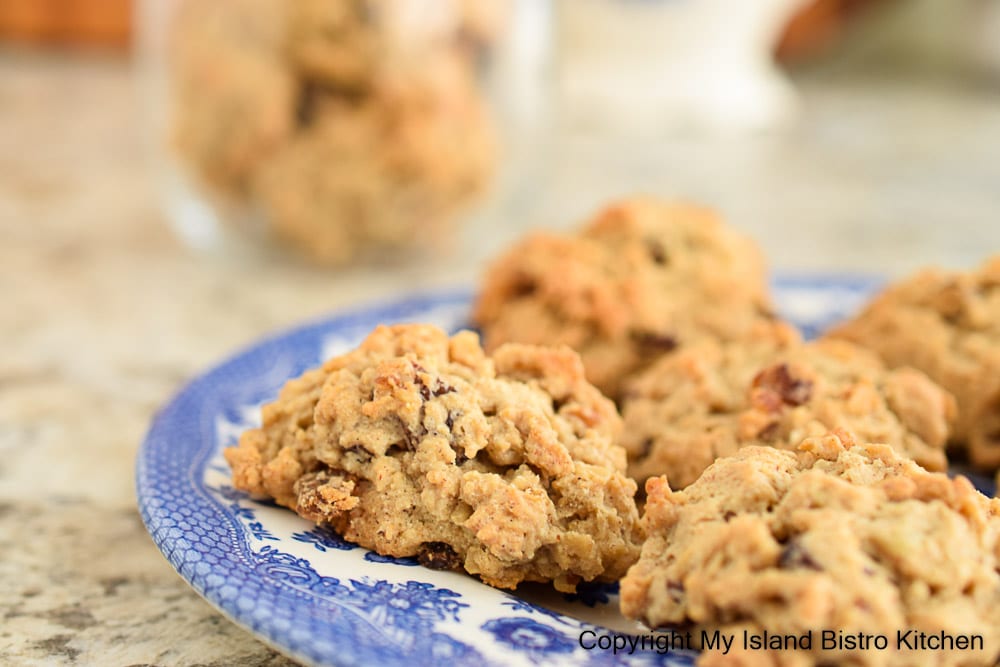
These old-fashioned Oatmeal Raisin Drop Cookies are a cookie jar favorite. Filled with plump raisins and pecans, the cookies have a delicious flavor profile owing to the combination of warm spices. The cookies have a lovely soft texture with a short, tender crumb and the key to keeping them soft is not to overbake them. Continue reading Oatmeal Raisin Drop Cookies→
Hermit Cookies are hearty old-fashioned lightly spiced drop cookies with additions of dried fruits and nuts. There are various recipes for Hermits that call for different add-ins. I add dates, raisins, dried cranberries, and nuts in my recipe. Continue reading Hearty Hermit Cookies Recipe→
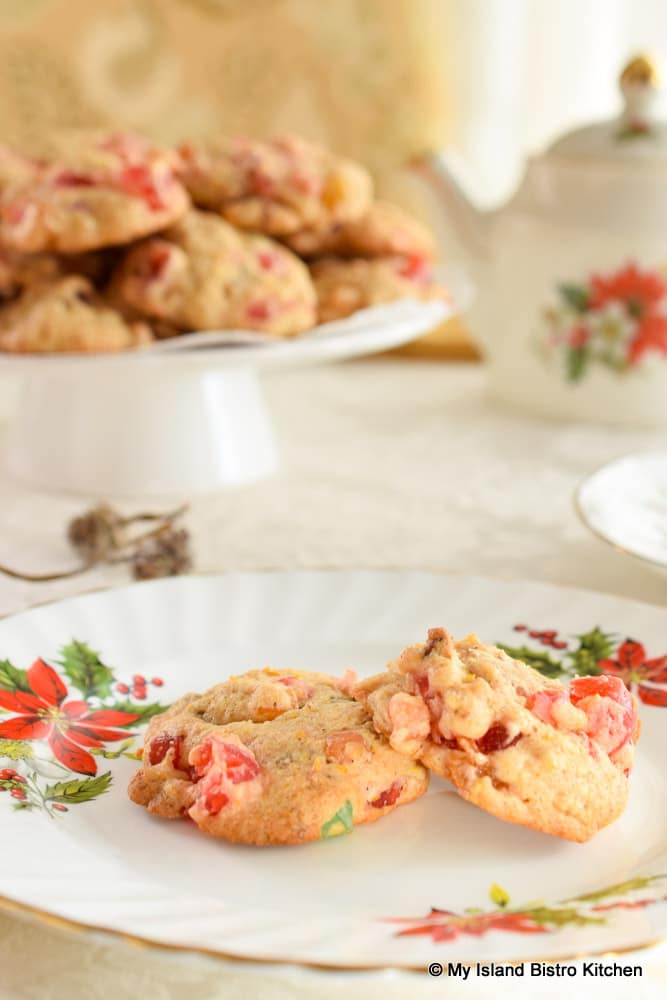
These Christmas Fruitcake Drop Cookies are what I like to describe as a deconstructed light fruitcake turned into mighty tasty little cookies. The cookies, themselves, are not difficult or complicated to make though there are a couple of time delays required for them. One is the period required to soak the fruit in brandy and the second is the cookie dough resting period in the refrigerator. Continue reading Christmas Fruitcake Drop Cookies→
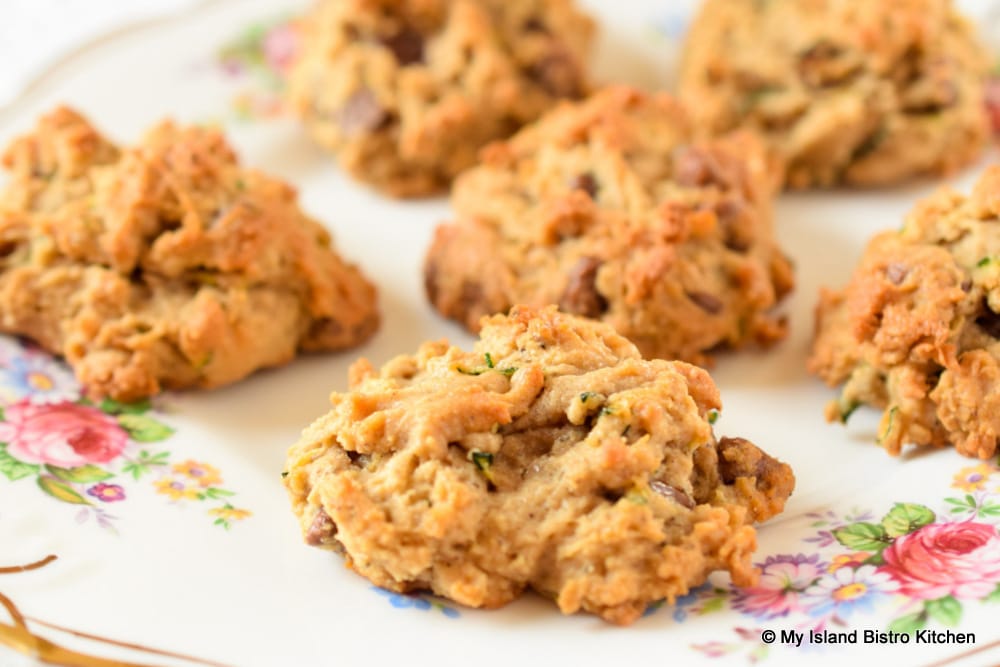
As the old saying goes, there’s more than one way to eat your vegetables and these cookies prove it! This cookie recipe combines ordinary zucchini with chocolate chips that results in yummy Zucchini Chocolate Chip Drop Cookies. Continue reading Zucchini Chocolate Chip Drop Cookies→
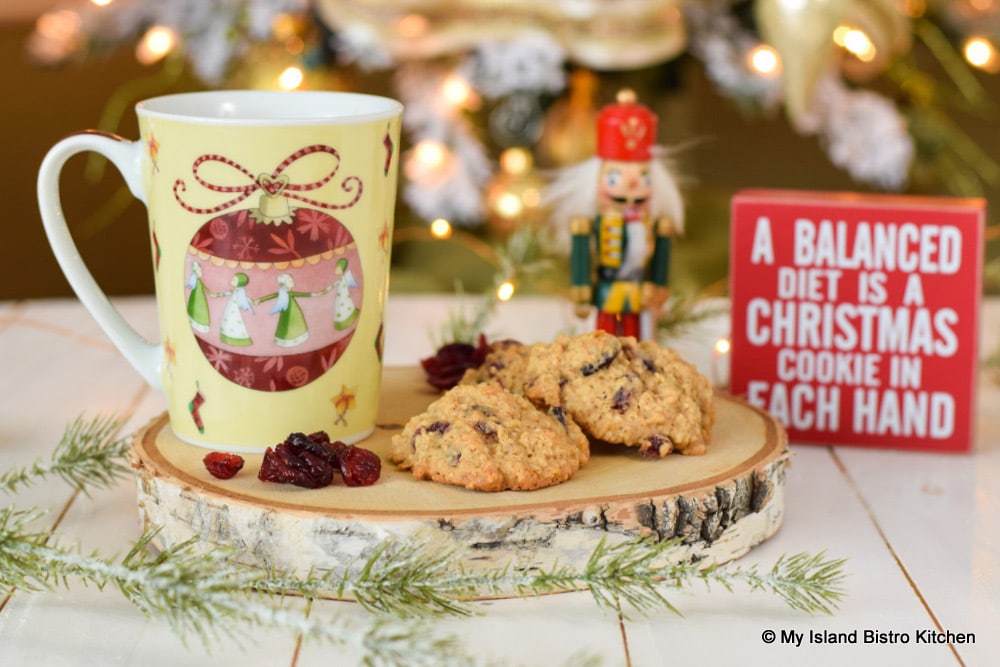
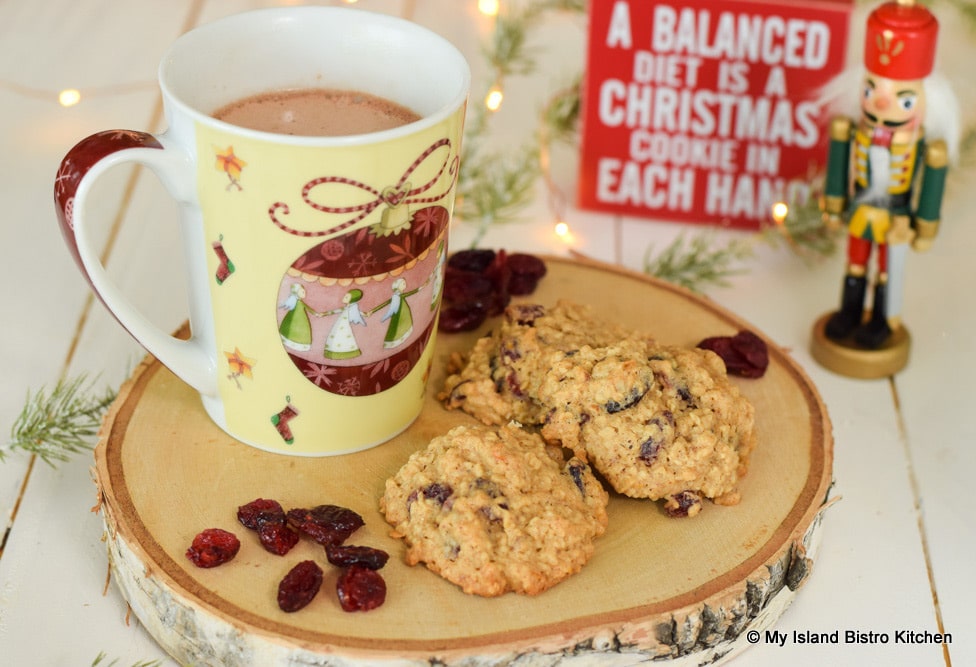
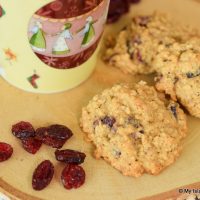
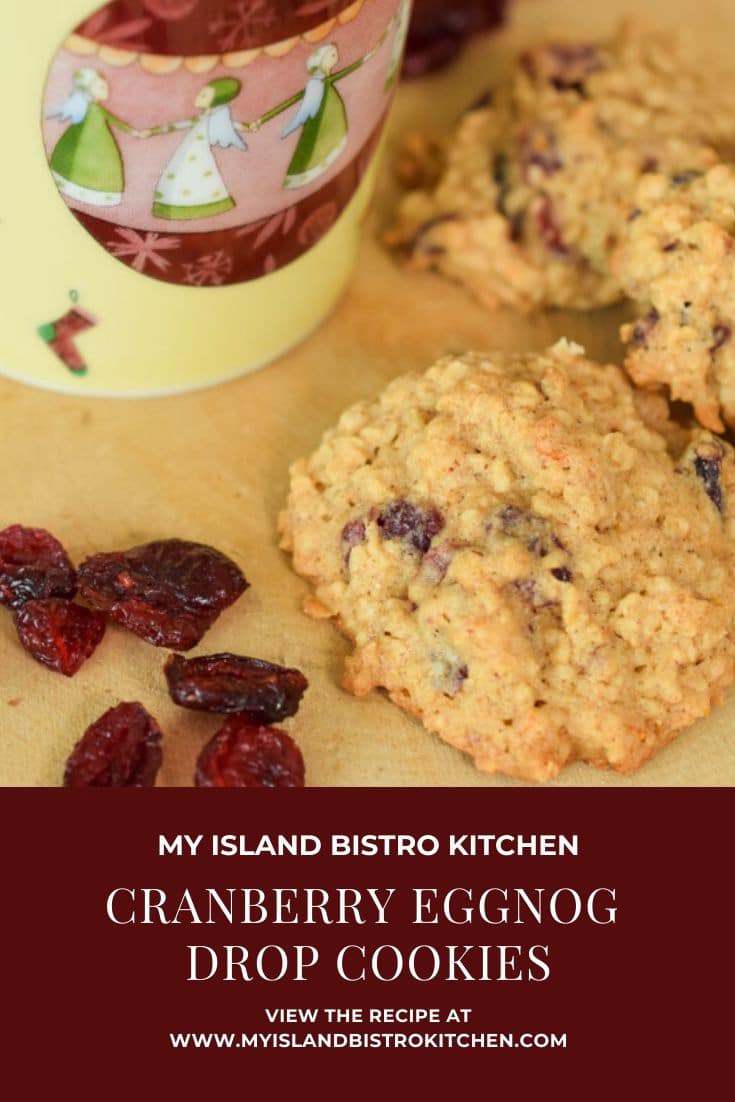
These hearty Cranberry and Eggnog Cookies are good any time but they are especially good at Christmas. This is because they combine traditional flavors of the season – eggnog, dried cranberries, orange rind, pecans, and the warm spices we associate with Christmas – cinnamon, nutmeg, allspice, and cloves.
Cranberry and Eggnog Drop Cookies
Cranberry and Eggnog Drop Cookies are easy to make. Make sure all the ingredients are at room temperature before making these cookies. I do NOT recommend softening the butter in the microwave for baked products as it changes the properties of the butter and liquifies it too much. For butter at room temperature, I remove it from the refrigerator about an hour before I need it and dice the amount I need into about 1” cubes. This hastens the softening.
For other ingredients (e.g., eggs, milk, yogurt) for which a recipe calls for them to be at room temperature, I usually take them from the refrigerator about 30 minutes or so before using them in a recipe. Simply put, room temperature ingredients incorporate into most batters much better than do cold ingredients.
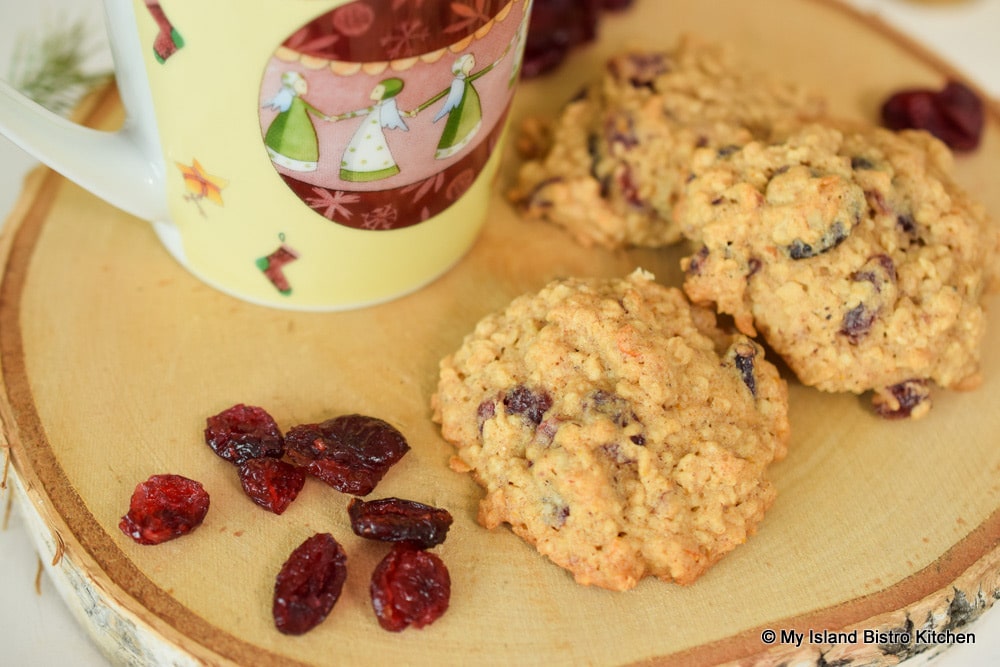
Cranberry and Eggnog Drop Cookies
Two baking sheets of these cookies can be baked at once with the oven racks positioned in the upper and lower third of the oven. Rotate the cookie sheets and switch them between racks halfway through the baking to ensure even baking of all the cookies. These cookies will have a tender texture and be somewhat soft and chewy if they are not overbaked.
I have given a baking time guide of 13-16 minutes. However, some judgment on the part of the cook is required to determine the baking time for his or her oven because ovens are known for baking somewhat differently. The cookies are done when they are just barely set and the edges and the underneath sides just start to turn a light golden tan color. Overbaking will result in a harder, crisper cookie.
These festive Cranberry and Eggnog Drop Cookies are hearty, wholesome cookies that freeze well and are perfect for holiday cookie exchanges.
1½ cups quick cooking rolled oats ¾ cup dried cranberries 1/3 cup chopped pecans
½ cup salted butter, room temperature ¾ cup brown sugar, firmly packed 1 large egg, room temperature, lightly beaten with fork ¼ cup eggnog, room temperature 1½ tsp finely grated orange rind 1 tsp pure vanilla
Method:
Position oven racks in upper and lower third of oven. Preheat oven to 350°F. Line two large baking sheets with parchment paper.
Sift the flour, baking powder, and spices together into a bowl. Set aside.
In separate bowl, combine the rolled oats, cranberries, and pecans. Set aside.
In bowl of stand mixer fitted with paddle attachment, cream the butter at medium speed. Gradually blend in the brown sugar and beat until light and fluffy, stopping to scrape sides of bowl with rubber spatula, as required. Add the egg, eggnog, grated orange rind, and vanilla. Beat until combined with butter and brown sugar.
Reduce speed to low and gradually add the sifted dry ingredients, Increase speed slightly and mix well until ingredients are incorporated.
Stir in the rolled oats, cranberries, and nut mixture until combined.
Drop dough by rounded tablespoonful onto prepared cookie sheets, leaving approximately 1½ – 2” between cookies. Bake 13-16 minutes (rotating and switching baking sheets between racks halfway through the baking), or until edges and bottoms of cookies are light golden tanned. Remove from oven and let cookies cool on baking sheets for 2-3 minutes before using a cookie lifter to transfer cookies to wire rack to cool completely.
Store cookies in airtight container at room temperature for up to 5 days or freeze for longer storage.
These festive Cranberry and Eggnog Drop Cookies are hearty, wholesome cookies that are perfect for holiday cookie exchanges.
Course Snack
Cuisine Canadian
Keyword cookies,, cranberry,, eggnog
My Island Bistro KitchenBarbara99
Ingredients
1cupall-purpose flour
1tspbaking powder
¾tspcinnamon
¼tspnutmeg
¼tspallspice
1/8tspcloves
1½cupsquick cooking rolled oats
¾cupdried cranberries
1/3cupchopped pecans
½cupsalted butter, room temperature
¾cupbrown sugar, firmly packed
1large egg, room temperature, lightly beaten with fork
¼cupeggnog, room temperature
1½tspfinely grated orange rind
1tsppure vanilla
Instructions
Position oven racks in upper and lower third of oven. Preheat oven to 350°F. Line two large baking sheets with parchment paper.
Sift the flour, baking powder, and spices together into a bowl. Set aside.
In separate bowl, combine the rolled oats, cranberries, and pecans. Set aside.
In bowl of stand mixer fitted with paddle attachment, cream the butter at medium speed. Gradually blend in the brown sugar and beat until light and fluffy, stopping to scrape sides of bowl with rubber spatula, as required. Add the egg, eggnog, grated orange rind, and vanilla. Beat until combined with butter and brown sugar.
Reduce speed to low and gradually add the sifted dry ingredients, Increase speed slightly and mix well until ingredients are incorporated.
Stir in the rolled oats, cranberries, and nut mixture until combined.
Drop dough by rounded tablespoonful onto prepared cookie sheets, leaving approximately 1½ - 2” between cookies. Bake 13-16 minutes (rotating and switching baking sheets between racks halfway through the baking), or until edges and bottoms of cookies are light golden tanned. Remove from oven and let cookies cool on baking sheets for 2-3 minutes before using a cookie lifter to transfer cookies to wire rack to cool completely.
Store cookies in airtight container at room temperature for up to 5 days or freeze for longer storage.
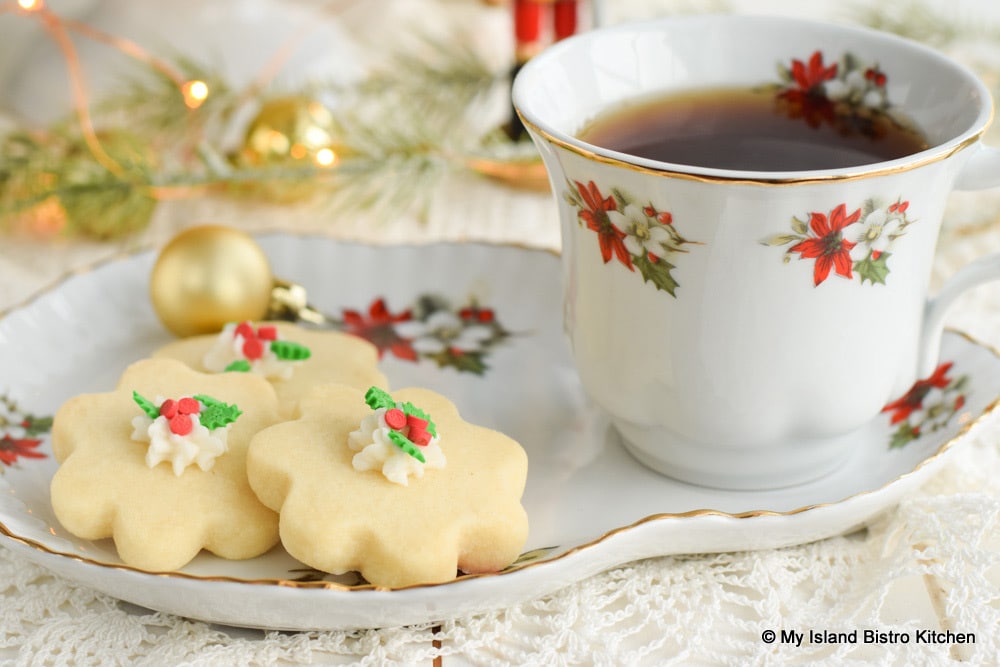
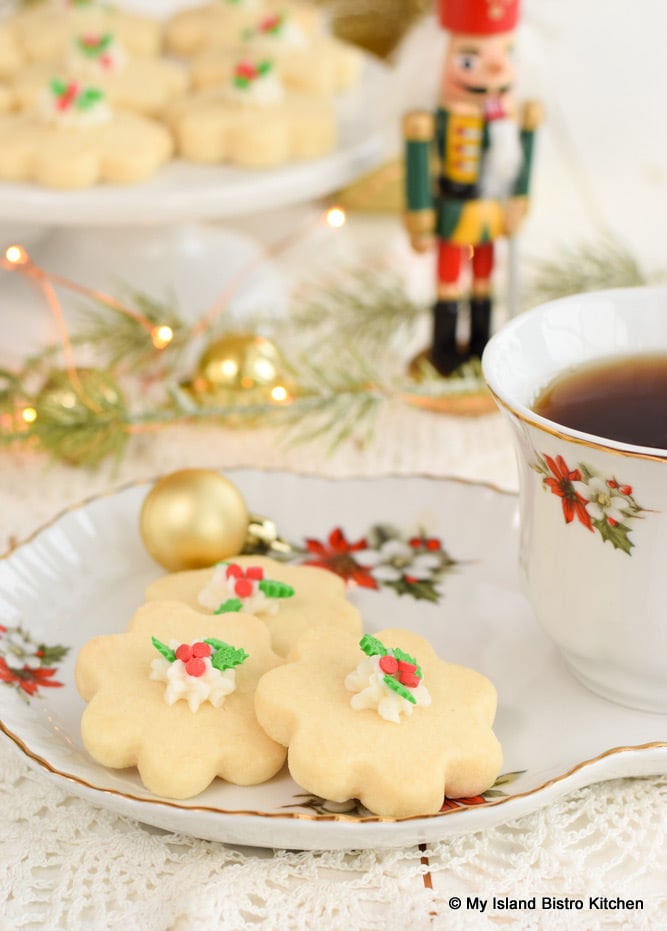
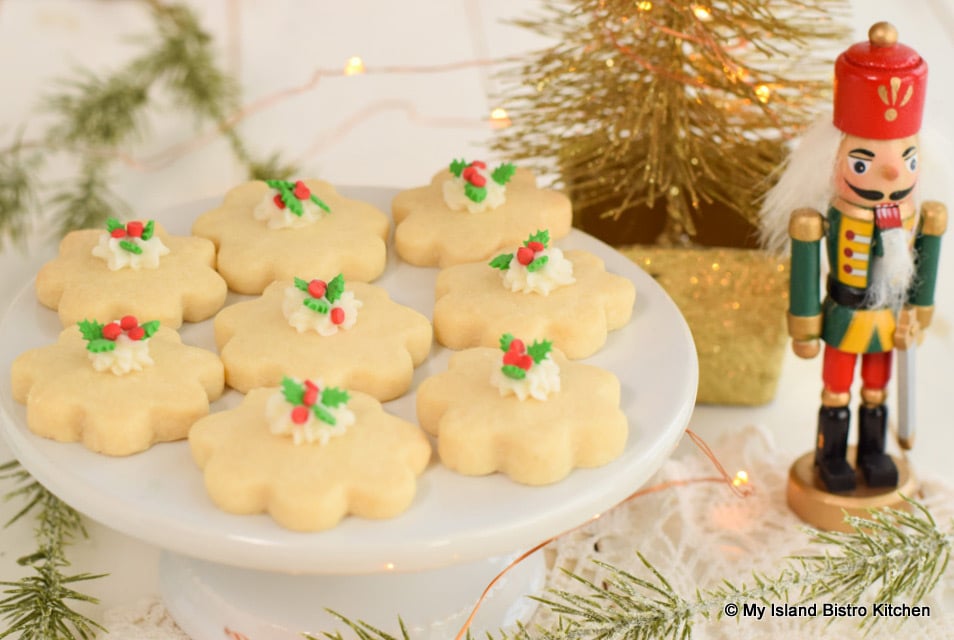
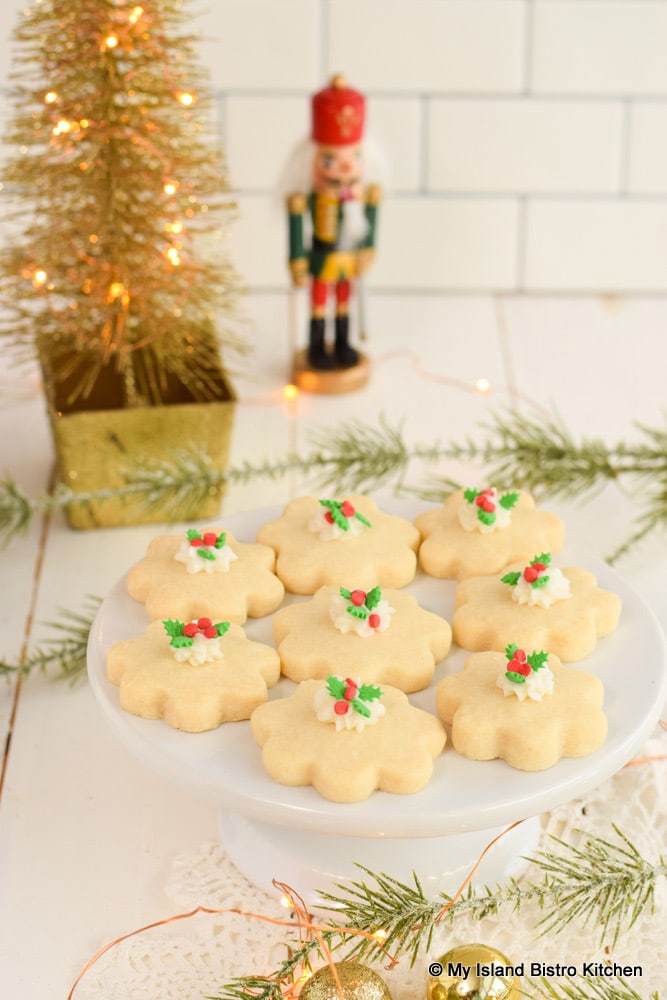
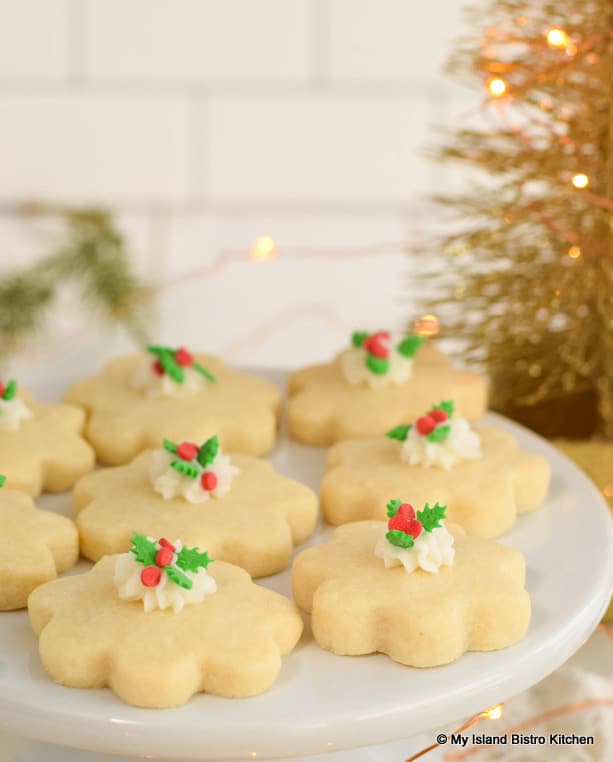
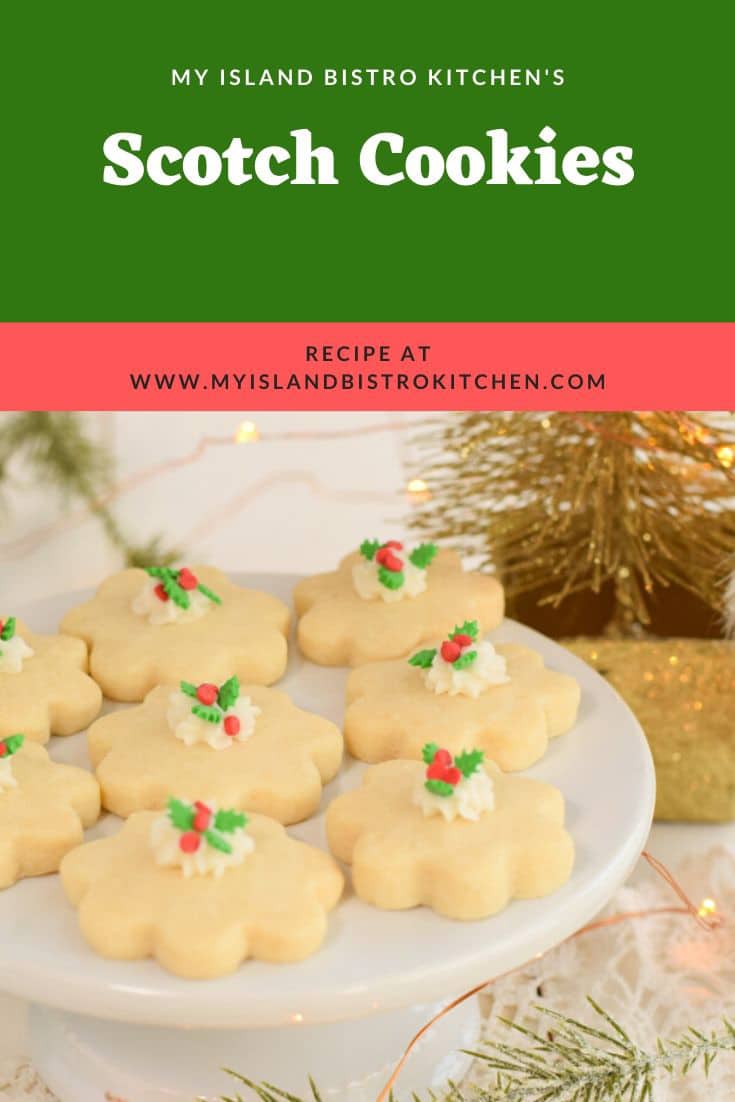
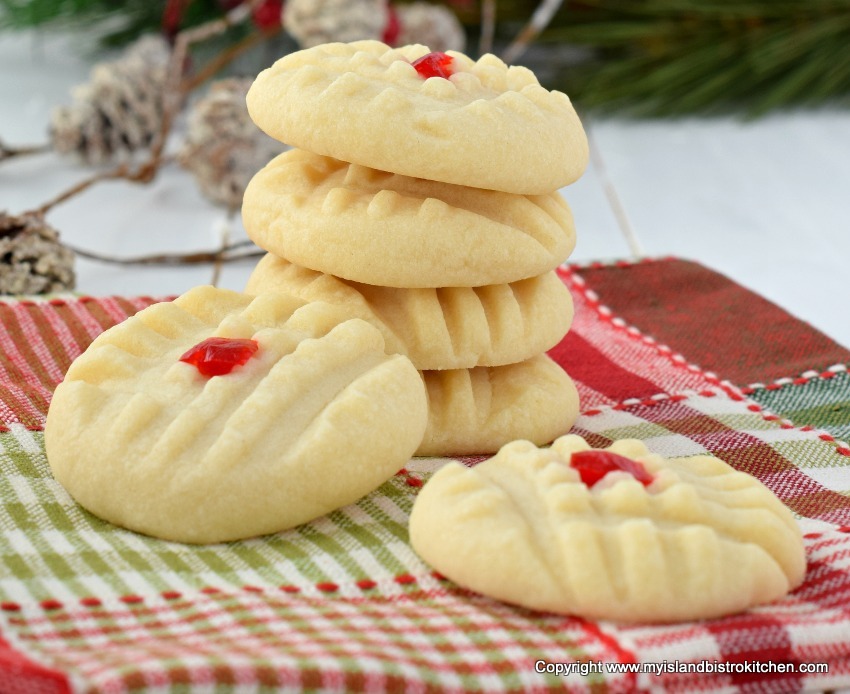
Scotch Cookies (sometimes called “Scotch Cakes”), close cousins of Shortbread, are a must-have Christmas tradition in many PEI households. They are a very common addition to holiday sweet plates. I am often asked if I have a recipe for Scotch Cookies and this is it.
The proportions of the main ingredients in these Scotch Cookies follow the holy grail ratio for traditional Scottish Shortbread – 1 part sugar, 2 parts butter, and 3 parts flour. What differentiates Scotch Cookies from traditional Scottish Shortbread are the liberties taken with ingredients for Scotch Cookies and their decorations. In that way, I suppose one could refer to Scotch Cookies as a modernized version of traditional Shortbread.
Scotch Cookies
Texture of Scotch Cookies
If you have ever heard someone refer to a cookie as “short”, they mean it has a crumbly texture that melts in the mouth. This texture is achieved by producing a somewhat dry dough which comes from the high flour content in relation to the proportion of fat in the recipe. The use of icing sugar and addition of cornstarch, and only moisture that comes from the butter are also contributing factors. There will be a shortness and crispness to a well-made Scotch Cookie.
INGREDIENTS
Butter
Butter is considered an essential ingredient for which I do not recommend any substitutes in Scotch Cookies. Yes, use the good stuff in Scotch Cookies because you can taste the difference and pure butter is a main contributor to both flavor and the crumbly texture in these cookies. The cookies may be made with either salted or unsalted butter. If using unsalted butter, add ¼ teaspoon or a little more of salt to the dry ingredients.
Icing Sugar vs Granulated or Brown Sugar
While traditional Shortbread will typically be made using granulated sugar, I use icing sugar in my Scotch Cookies. Some of you may know icing sugar as powdered or confectioner’s sugar. I find this sugar gives a much more light and tender crumb in the cookies than does traditional granulated or even brown sugar (called for in some recipes). Make sure the icing sugar is sifted before measuring out the ½ cup called for in the recipe.
Additional Flavorings
Traditional Shortbread would not typically have any additional flavorings added – it’s basically just the sugar, butter, and flour in Shortbread. However, I sometimes like to add just a small amount each of pure vanilla and almond flavoring in my Scotch Cookies. These flavorings are entirely optional in this recipe. If added, they should be in very small amounts – i.e., ¼ tsp and 1/8 tsp, respectively. These cookies are meant to taste like butter and adding too much flavoring will interfere with that pure flavor so do exercise caution in how much is added.
Cornstarch
My recipe calls for 1/3 cup cornstarch to which I attribute the melt-in-your-mouth tender texture in the cookies. Mix it in with the flour before incorporating it into the butter/sugar mixture. Cornstarch works magic in combination with the other ingredients to create the “shortness” texture in the cookies.
Flour
Basic, all-purpose flour is fine to use in Scotch Cookies. No special flour is required.
No Leavening in Scotch Cookies
There is no leavening in Scotch Cookies which makes the dough great from which to cut shapes since the stiff, dry dough retains its shape during baking.
Scotch Cookies
MEASURING INGREDIENTS
When measuring the icing sugar and cornstarch, as well as the flour, make sure you use an accurate measure. To measure, simply spoon the dry ingredients into the measuring cups without stirring, and then, with the flat side of a table knife, level off the excess. Do not pack the dry ingredients into the cup, tap the measuring cup with the spoon to settle the dry ingredients into the cup, or tamp the cup on the counter to make room for more. This will result in an inaccurate measure of the ingredients and may cause the dough to be overly dry if too much of these ingredients is used.
TEXTURE OF DOUGH AND CHILLING DOUGH
Shortbread/Scotch Cookie dough is considered a dry dough as no liquid is added, save for the moisture that comes from the butter. The dough texture will be soft when mixed. Placing it in the refrigerator for 15-20 minutes or so to chill will help it to firm up enough to roll out and cut out shapes. The dough for Scotch Cookies should not be over-kneaded or worked as it will get the gluten in the flour all excited and stirred up resulting in tough cookies. Just work it enough that the dough comes together and can be rolled out to about ¼“ thickness. The scraps of dough should be handled in the same manner until all the dough has been cut out in shapes. Minimal handling of the dough is one of the keys to tender Scotch Cookies.
I recommend dividing the dough in half and forming discs with each half. It is a smaller amount of dough to work with at a time, especially for gathering up and re-working the dough for the remainder of the cookie cutting.
CUTTING OUT SCOTCH COOKIES
Scotch Cookies are intended to be small, dainty cookies, about two-bite size.
Because the dough is a dry dough, it does not spread during baking. It, therefore, lends itself well to being cut with any shape of cutter desired. I recommend a cookie cutter of about 1¾ – 2” in diameter as a suitable size.
Scotch Cookies
BAKING THE SCOTCH COOKIES
I use insulated cookie sheets lined with parchment paper for baking my Scotch Cookies. I find the insulated sheets give a bit more protection for the cookies from the heat. That is not to say that other cookie sheets do not work well.
The oven rack should be positioned in the center of the oven to allow good air circulation for the cookies to bake evenly. The cookies (of the size indicated in this recipe) are baked in a slow oven (300°F) for about 22-24 minutes. They will be almost the same color when baked as was the dough. They should not be brown on the edges or the underside side as they are meant to be very pale and delicate. Once removed from the oven, let the cookies rest 3-4 minutes on the baking sheet before transferring them to a wire rack to cool completely.
DECORATING SCOTCH COOKIES
A significant difference between Scotch Cookies and Shortbread is that Shortbread is left plain, unfrosted. With Scotch Cookies, however, liberties can be taken to decorate them with a small dob of icing piped in the center of each cookie which may, if desired, be decorated with a small bit of very well drained maraschino cherry, a dragée, or quinns of choice as I have done in the photos here with the holly leaves and berries. The cookies can, of course, be left unfrosted, if desired.
Scotch Cookies Decorated with Christmas Quinns
STORING SCOTCH COOKIES
Undecorated, the cookies can be stored in layers separated by wax paper in an airtight container in a cool location for about 4-5 days. Alternatively, they can be frozen for longer storage. If applying icing and decorations to the cookies, I recommend doing so just before serving. This will ensure no damage occurs to the icing or decorations during storage plus the cookies are easier stored in layers, undecorated.
[Printable recipe follows at end of post]
The Bistro’s Scotch Cookies
Ingredients:
1 cup salted butter, room temperature ½ cup sifted icing sugar (aka confectioner’s sugar or powdered sugar) ¼ tsp vanilla (optional) 1/8 tsp almond flavoring (optional) 1½ cups all-purpose flour 1/3 cup cornstarch
Method:
In bowl of stand mixer fitted with paddle attachment, cream the butter at medium speed until it is light in color and very soft and smooth, about 3-4 minutes. Reduce the speed and gradually add the icing sugar, continuing to beat the mixture until blended and smooth, stopping to scrape the sides of the bowl with a rubber spatula if required. Beat in the vanilla and almond flavoring, if using.
Sift the flour and cornstarch together. With mixer set on low speed, add the dry ingredients and mix until all are incorporated, stopping to scrape the sides of the bowl with a rubber spatula as required. Mixture will be soft. Divide dough in half and form each half into a disc shape. Wrap discs separately in plastic wrap and chill in refrigerator for about 15-20 minutes, or just until dough becomes firm enough to roll out.
Position oven rack in center of oven and preheat oven to 300°F. Line cookie sheet(s) with parchment paper.
Remove dough from refrigerator and, on very lightly floured surface, roll each disc of dough evenly to approximately ¼“ thick. With lightly floured cookie cutter of choice about 1¾“ – 2” in diameter, cut out shapes and transfer cookies to prepared baking sheet. Gather and re-roll scraps of dough until all dough has been used up and cut out into shapes, being careful not to overwork dough. Place cookies about 1½” apart on the prepared baking sheet(s). Bake 22-24 minutes, or until cookies are just set. Cookies will be very light colored. Note that baking times will need to be adjusted if other sized cookie cutters are used.
Remove cookies from oven and leave on baking sheet for about 3-4 minutes before, using a flat cookie lifter, transferring them to wire rack to cool completely.
Cookies may be left plain or a small dab of icing may be piped on to center of each cookie and then, if desired, topped with a small bit of well-drained maraschino cherry, dragée or quinns of choice.
Yield: Apx. 3 – 3½ dozen cookies. [Note that exact yield will depend on thickness to which dough is rolled and the size of cutter used.]
If you have made this recipe and enjoyed it and/or wish to share it with your friends and family, please do so on social media but be sure to share the direct link to this posting from my website.
These melt-in-the-mouth Scotch Cookies have a delectable buttery flavor and a tender light crumb.
Course Sweet Treats
Cuisine Canadian
Keyword Scotch Cakes, Scotch Cookies, shortbread
My Island Bistro KitchenMy Island Bistro Kitchen
Ingredients
1cupsalted butter, room temperature
½cupsifted icing sugar (aka confectioner’s sugar or powdered sugar)
¼tspvanilla (optional)
1/8tspalmond flavoring (optional)
1½cupsall-purpose flour
1/3cupcornstarch
Instructions
In bowl of stand mixer fitted with paddle attachment, cream the butter at medium speed until it is light in color and very soft and smooth, about 3-4 minutes. Reduce the speed and gradually add the icing sugar, continuing to beat the mixture until blended and smooth, stopping to scrape the sides of the bowl with a rubber spatula if required. Beat in the vanilla and almond flavoring, if using.
Sift the flour and cornstarch together. With mixer set on low speed, add the dry ingredients and mix until all are incorporated, stopping to scrape the sides of the bowl with a rubber spatula as required. Mixture will be soft. Divide dough in half and form each half into a disc shape. Wrap discs separately in plastic wrap and chill in refrigerator for about 15-20 minutes, or just until dough becomes firm enough to roll out.
Position oven rack in center of oven and preheat oven to 300°F. Line cookie sheet(s) with parchment paper.
Remove dough from refrigerator and, on very lightly floured surface, roll each disc of dough evenly to approximately ¼“ thick. With lightly floured cookie cutter of choice about 1¾“ – 2” in diameter, cut out shapes and transfer cookies to prepared baking sheet. Gather and re-roll scraps of dough until all dough has been used up and cut out into shapes, being careful not to overwork dough. Place cookies about 1½” apart on the prepared baking sheet(s). Bake 22-24 minutes, or until cookies are just set. Cookies will be very light colored. Note that baking times will need to be adjusted if other sized cookie cutters are used.
Remove cookies from oven and leave on baking sheet for about 3-4 minutes before, using a flat cookie lifter, transferring them to wire rack to cool completely.
Cookies may be left plain or a small dab of icing may be piped on to center of each cookie and then, if desired, topped with a small bit of well-drained maraschino cherry, dragée or quinns of choice.
Recipe Notes
Yield:Apx. 3 – 3½ dozen cookies. [Note that exact yield will depend on thickness to which dough is rolled and the size of cutter used.]
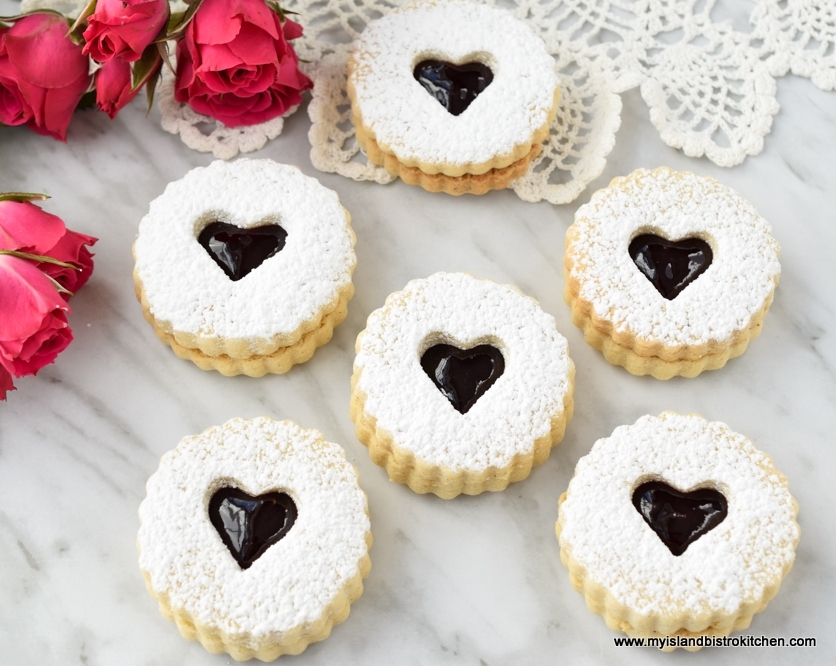
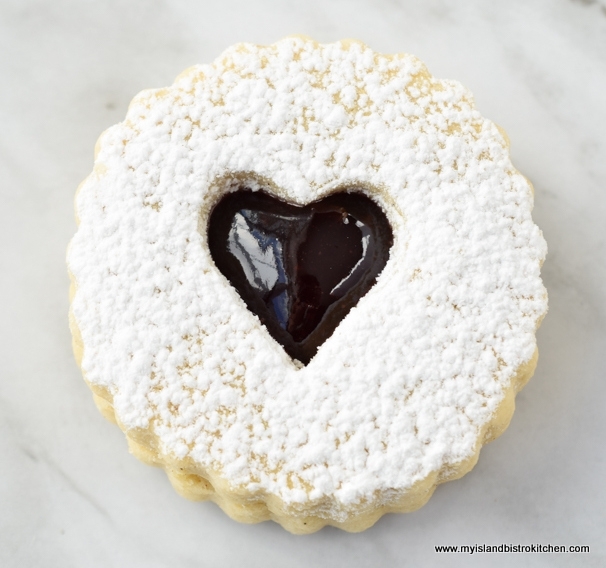
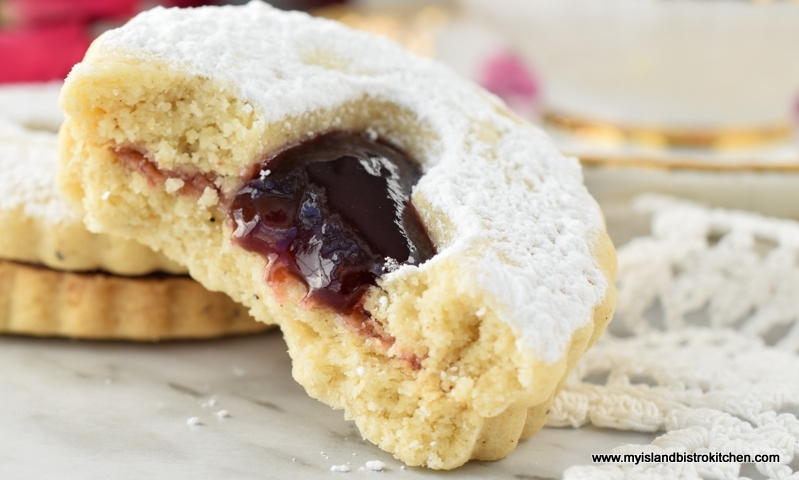
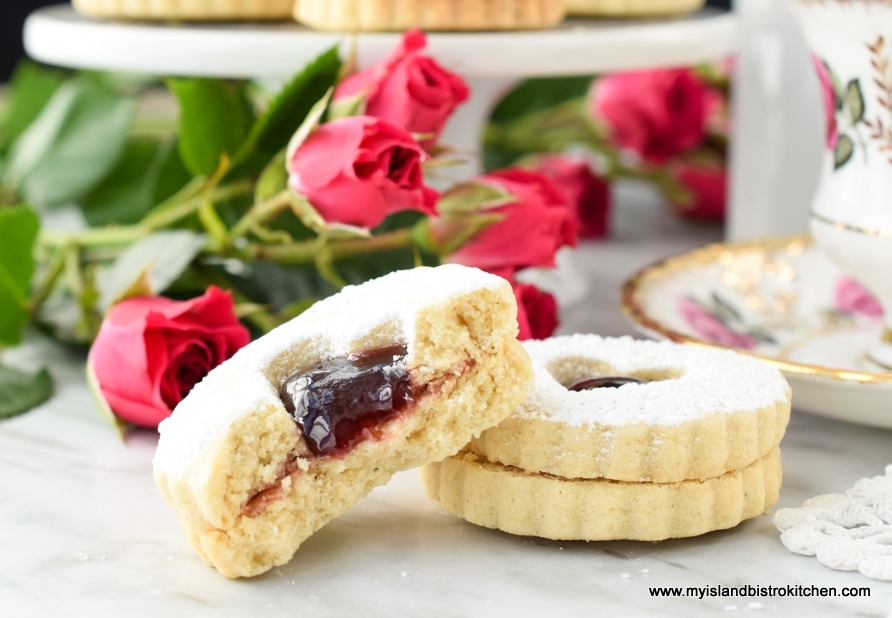
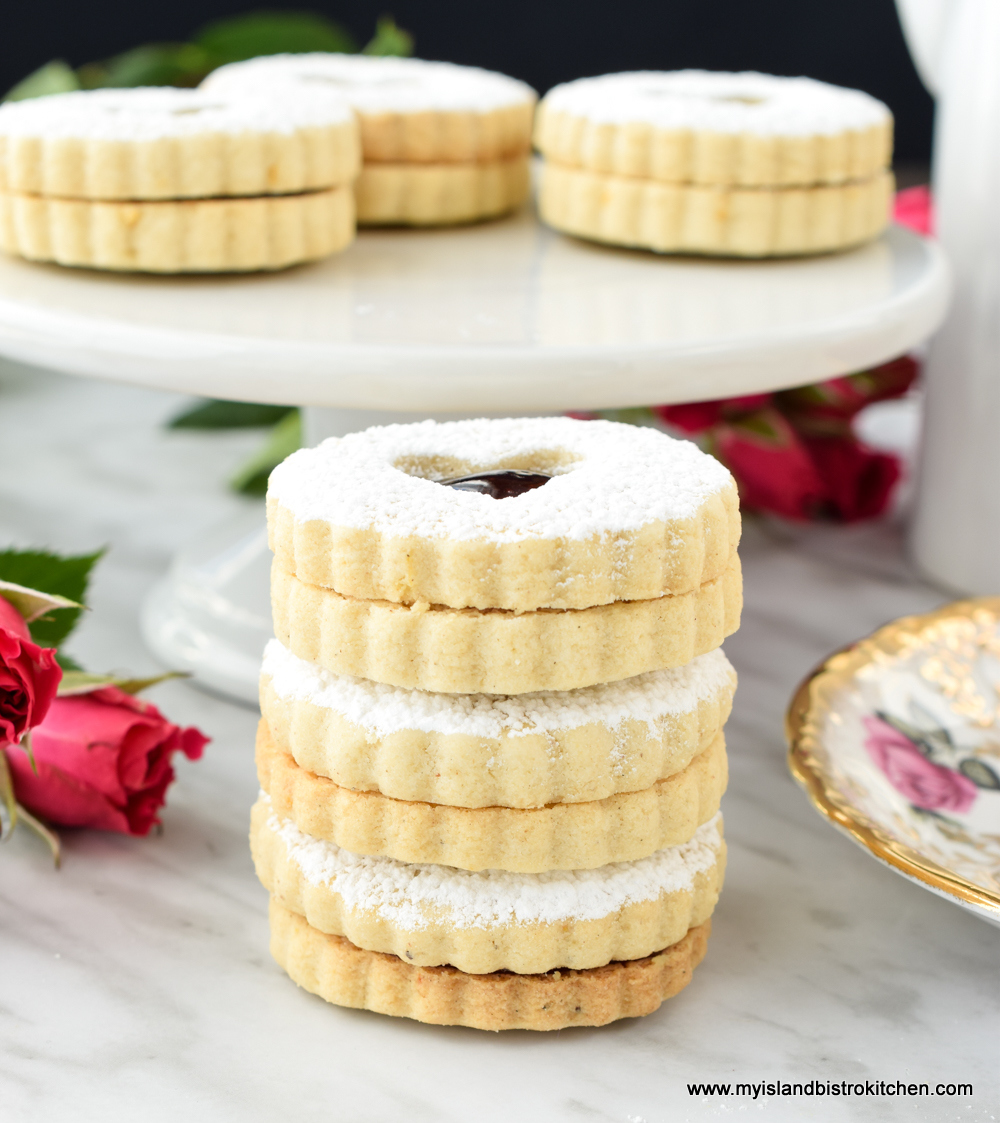
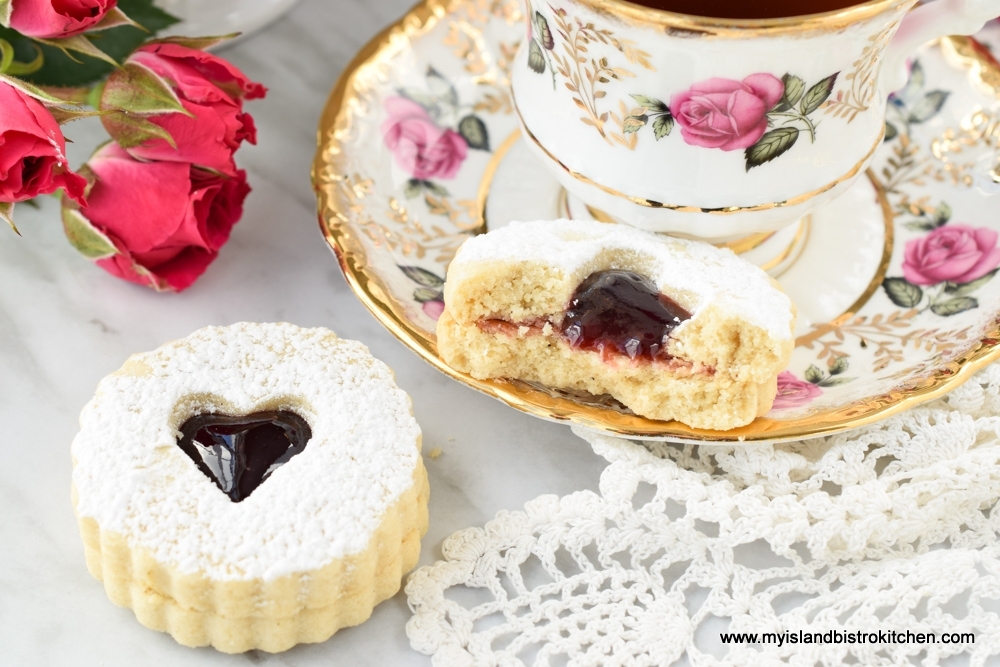
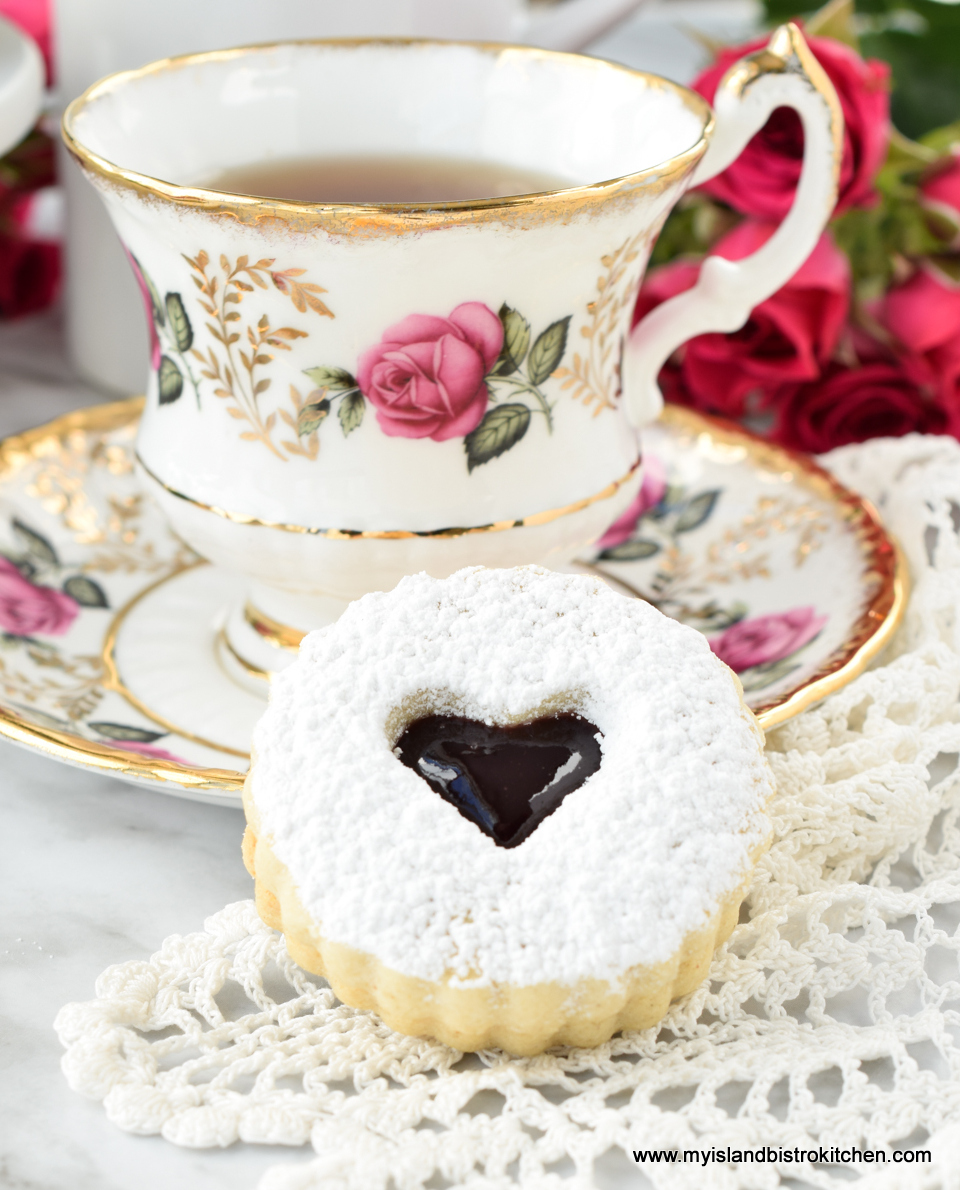
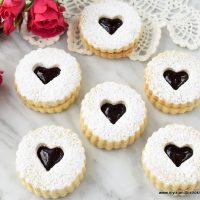
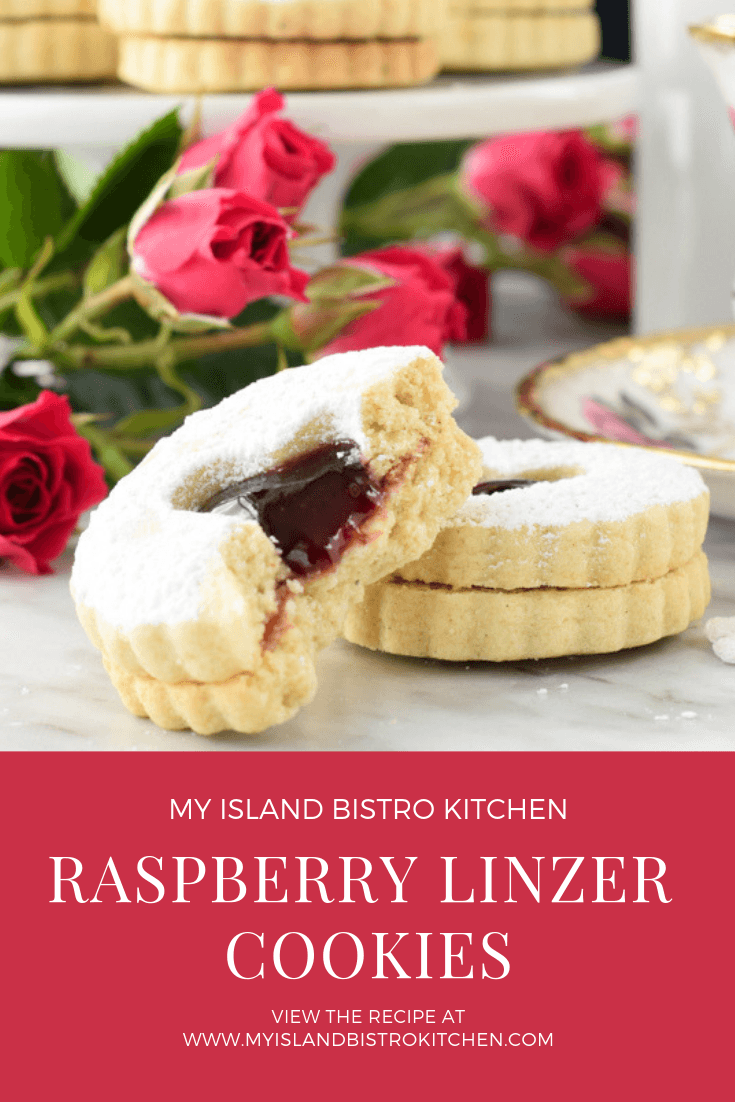
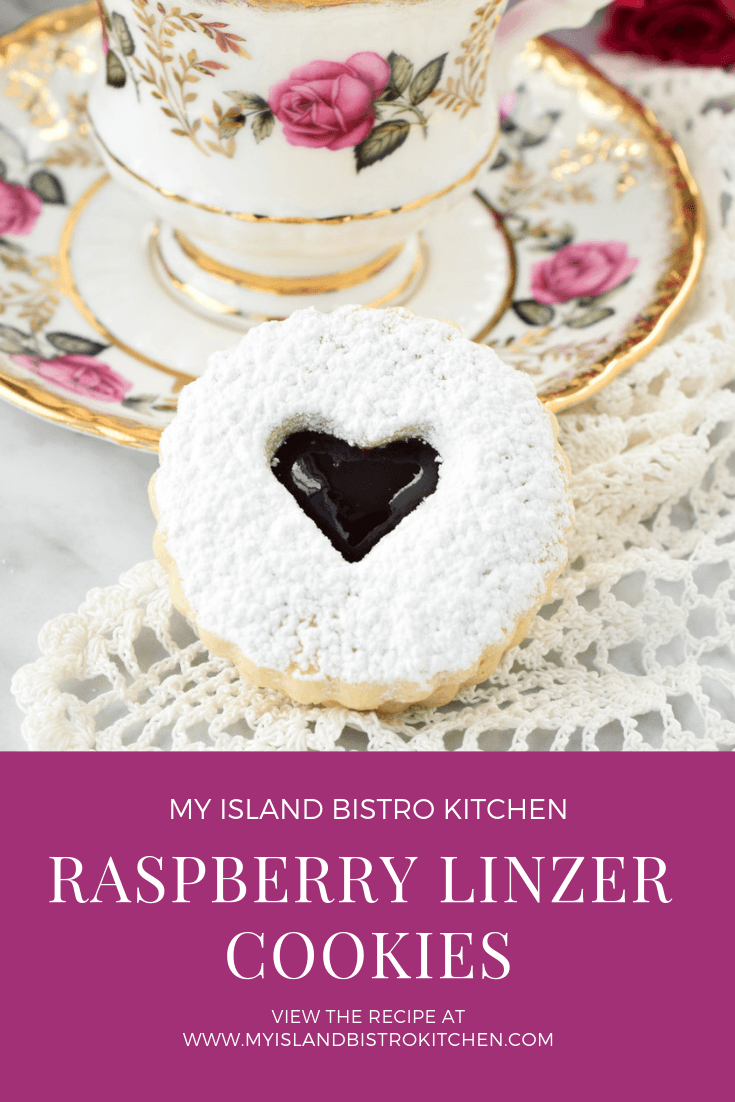
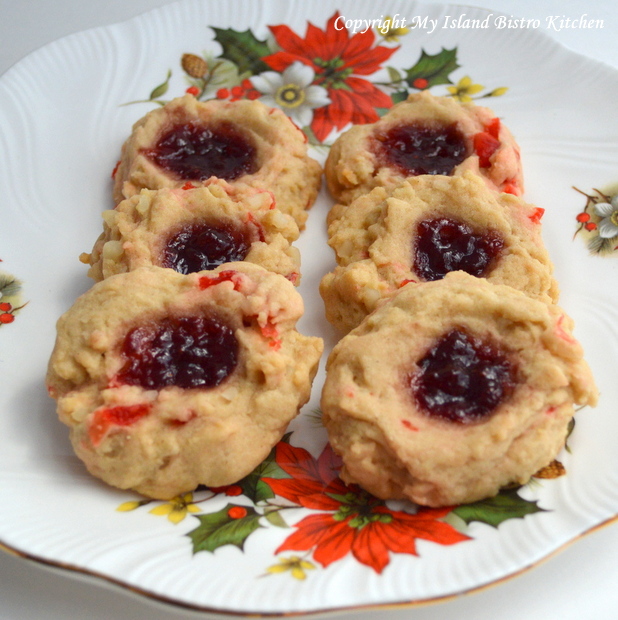
Today, I am featuring Classic Raspberry Linzer Cookies. These cookies, so-named for the Austrian Linzer Torte they replicate, are simply two shortbread-type cookies sandwiched together with jam. The cookies are commonly filled with raspberry jam which produces a very showy cookie. These cookies are traditionally found on sweet trays at Christmas but they are wonderful any time of the year. So, there is no need to wait for Christmas to enjoy them! You can legitimately actually have two cookies without feeling guilty when you eat one of these sandwich cookies – bonus!
Raspberry Linzer Cookies
The Linzer Torte, said to be the oldest cake recipe in the world and dating back to the late 1600s, is believed to have originated in the City of Linz in Austria. Made with a rich buttery crust of primarily butter, flour, and ground nuts, the torte was traditionally filled with black currant preserves and topped with a lattice crust that allowed the preserves to shine through.
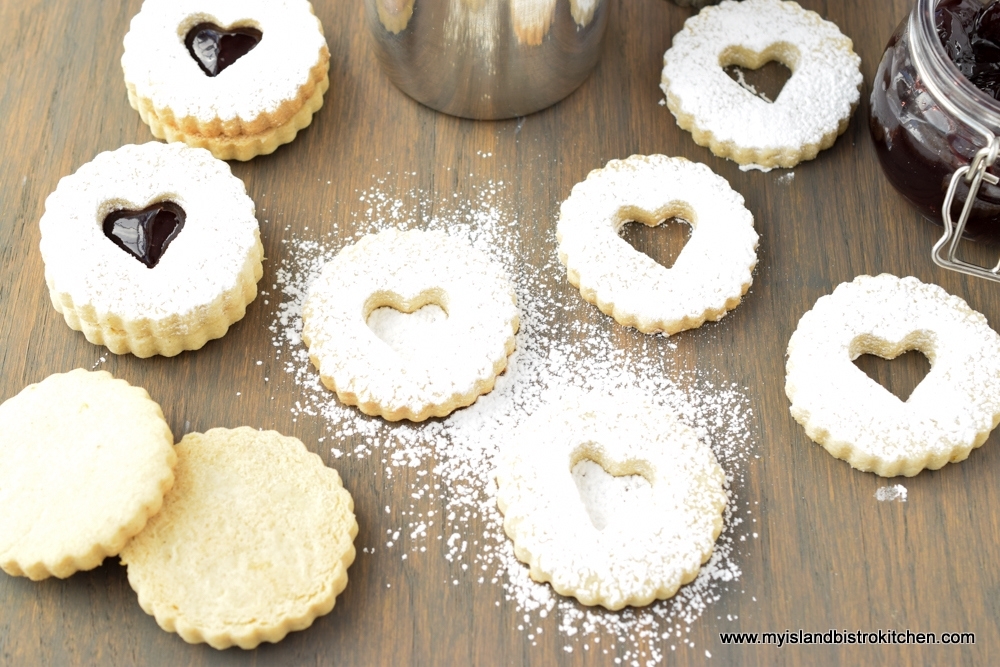
Linzer cookies are a take on the Linzer Torte put into a cookie format. Two cookies are sandwiched together with jam and the top cookie is generously dusted with powdered sugar making it very showy. To keep the jam filling visible, a simple cut-out is made in the top cookie.
Raspberry Linzer Cookies
The ingredients for the cookies are fairly basic and the texture closely resembles shortbread. That is to say, the cookies have a short, crisp, yet tender texture.
Texture of Linzer Cookies
While Linzer Cookies are obviously different than a torte, several of the ingredients are the same – butter, flour, and ground almonds. I add small amounts of cinnamon, cardamom, and cloves but in such small amounts that the flavours are very subtle. Some grated orange rind, vanilla, and almond flavoring are the only other injections of flavour into the rich buttery dough.
Classic Raspberry Linzer Cookies
To make these cookies gluten free, replace the 2¼ cups all-purpose flour with an equal amount of gluten-free 1-to-1 baking flour.
Raspberry Linzer Cookies
Tips for Making Linzer Cookies
Make sure all ingredients are at room temperature.
Do not overmix or overhandle the dough. Just mix it enough so it will cling together.
Divide the dough in half and form each half into a disc. Wrap the discs, separately, in plastic wrap and chill the dough for 35-45 minutes or until dough is firm enough to roll out. This will make the dough less sticky and easier to handle. The dough can be made up to a day ahead but it will need to be removed from the refrigerator for several minutes before rolling it out as it will be far too hard to allow the dough to be rolled out without it cracking or breaking apart.
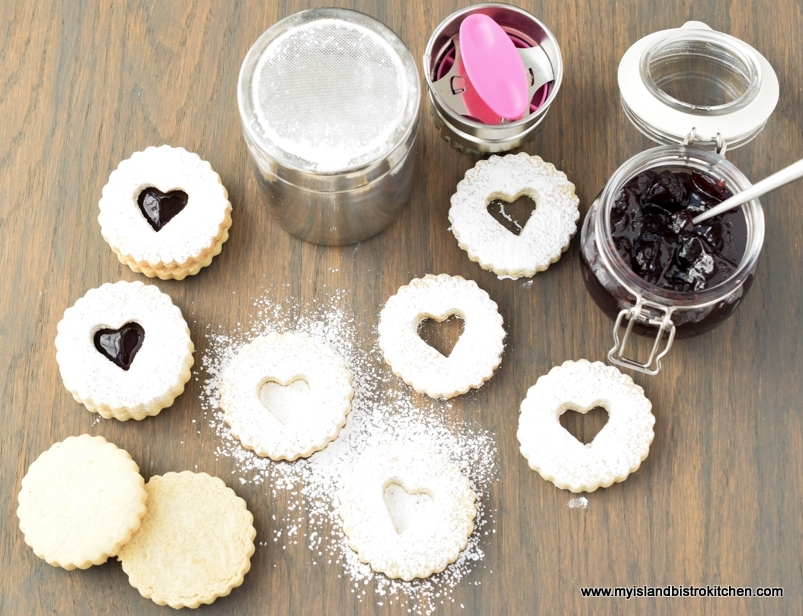
Special Linzer cookie cutters (seen at top of photo below) exist for cutting out these two-part cookies. These cutters have a plunger attachment that allows different interchangeable cut-out inserts to be used to cut out small shapes, like hearts, circles, and diamonds, in the centers of cookies. This cut-out, of course, allows the pretty jam or preserves to show through. If you don’t have a Linzer cutter, simply cut out the shape of the cookie with any 2” cookie cutter and then use a small 1” cookie cutter to cut out the center hole in half the cookie batch. Many sets of nesting cookie cutters have various sizes of cutters suitable for this purpose.
Raspberry Linzer Cookies
Work with one dough disc at a time. Roll the dough to about 1/8” thick. Two cookies will be sandwiched together so about 1/8” thickness is thick enough for each cookie half. Make sure you cut out an even number of whole cookies and cookies with the cut-outs so you will have matched pairs.
The cookies, once cut out and placed 1” apart on parchment-lined baking sheets need to go back into the refrigerator for about 20 minutes. This is an important step because the fat in the chilled cookies will take longer to melt once the cookies are placed in the oven than would room-temperature cookies. The chilling will mean the cookies will spread less as they bake and we want these cookies to hold their shape perfectly, especially the cut-out centers in the top cookies.
Do not overbake the cookies. Bake them for 11-13 minutes, just until the cookies are set and have a light golden color.
Dust the cut-out cookie tops with powdered sugar BEFORE placing them over the filled cookie bottoms (a small fine wire mesh sieve works well for this or a small metal mesh-topped can can also be used (seen in photo above)). If you wait to sugar-coat the cookies until after they have been assembled, the sugar will cover the jam filling and cause it to become cloudy and lose its clear, shimmery appearance.
Sugar-dusted Cookie Tops for Linzer Cookies
Any red jam or black currant jam can be used in these cookies. My preference is to use raspberry as the flavour blends well with the ground almonds and the orange flavoring in the cookies. I do recommend, whatever type of jam is used, that it be seedless. Do not spread the jam right to the outside edge of the bottom cookies as the jam will ooze out. Keep the jam in the center of the cookie bottoms. When the top cookie is placed on the jam-filled bottom, it will spread the jam further out in the cookie. No jam should be visible on the outside edges of Linzer cookies. If a bit more jam is desired in the cookies, use a tiny coffee spoon to carefully drop a bit more jam into the center of the assembled sandwich cookies.
Classic Raspberry Linzer Cookies
It is not recommended to freeze the assembled cookies for a couple of reasons. First, the jam is likely to soak into the cookies, especially as they thaw. This will cause the cookies to lose their crisp texture. Second, it takes up more container and freezer space to freeze the cookies in single layers so that the powdered sugar does not fall off the cookies or transfer onto the jam-filled centers, marring the look of the cookies.
Store filled cookies in airtight container in refrigerator for up to 3-4 days.
Classic Raspberry Linzer Cookies
[Printable recipe follows at end of posting]
Classic Raspberry Linzer Cookies
Ingredients:
2¼ cups all-purpose flour (to make them gluten free, substitute an equal amount of gluten-free 1-to-1 baking flour ¾ cup finely ground almonds 1 tbsp cornstarch ¾ tsp baking powder ¼ tsp cinnamon ¼ tsp cardamom Pinch cloves
1 cup butter, room temperature (no substitutes) 2/3 cup granulated sugar 3 tbsp powdered sugar (aka icing sugar or confectioner’s sugar) 2 large egg yolks, room temperature 1 tsp vanilla ¼ tsp almond flavoring 1 tsp finely grated orange rind
Seedless raspberry jam (1/2 – ¾ cup)
Additional powdered sugar for dusting cookies
Method:
Sift dry ingredients together. Set aside.
In bowl of stand mixer fitted with paddle attachment, cream the butter at medium speed until fluffy and pale yellow. Slowly add the sugars and cream well for 2-3 minutes, scraping the sides of the bowl as necessary. Reduce speed to low and add the egg yolks, one at a time, beating well after each addition. Add the vanilla and almond flavoring as well as the grated orange rind. Mix to combine well.
With mixer set on low speed, gradually blend in the dry ingredients, mixing just until dry ingredients are fully incorporated. Do not overmix. Turn dough on to a lightly floured surface and gather the dough, working it just enough that it clings together. Divide the dough into two equal portions and form each half into a round disc. Wrap discs separately in plastic wrap and refrigerate for 35-45 minutes, or until firm enough to roll.
On lightly floured surface, roll a dough disc into 1/8” thickness. Using a 2” Linzer cookie cutter (either straight edged or fluted), cut cookies from one half the dough. Gather dough scrapes and continue cutting out the cookies until the dough is used up. These will be the cookie bottoms. Roll out remaining dough disc in the same manner for the cookie tops. To cut out the cookie tops, use the same Linzer cutter but fitted with one of the insert shapes to cut out a small 1” shape in the center of each cookie. Repeat until an equal number of cookies with cut out centers have been cut as there are whole cookies. If you do not have a Linzer cookie cutter, use any 2” cookie cutter and a 1” cutter of any shape for the center cut-out of half the cookies.
Place cookies about 1” apart on parchment-lined baking sheets. Refrigerate cookies for about 20 minutes.
Meanwhile, preheat oven to 350°F. Bake cookies on the middle oven rack for 11-13 minutes, or just until cookies are set and a light golden color. Do not overbake. Remove cookies from oven and cool on baking sheet for about 3-4 minutes then, using a flat lifter/spatula, transfer them to a wire rack to cool completely.
To assemble sandwich cookies, place the cookie halves that have the cut-out centers on a cutting board (these will be the top cookies). Dust the cookies generously with sifted powdered sugar, covering the cookies with an even coating of the sugar. On the flat side (i.e., the underneath side) of the whole cookies, spread about 1 – 1½ teaspoons jam in the center of each cookie, being careful not to spread the jam all the way to the cookie edges (stay within ¼” of the cookie edge). Place the cut-out sugar-dusted cookie tops over the jam-spread bottom cookies to create the sandwich. If desired, use a tiny spoon to carefully add a bit more jam into the center cut-out of each cookie.
Store cookies in an airtight container in the refrigerator for up to 3-4 days. To freeze cookies, package unassembled cookies between layers of parchment paper in an airtight container. Bring cookies to room temperature before filling with jam and assembling as above described.
Sugar-dusted jam-filled Linzer Cookies have a tender and crisp texture and buttery flavour complemented by ground almonds and subtle spice seasonings.
Course Dessert
Keyword Linzer Cookies
Servings26
My Island Bistro KitchenMy Island Bistro Kitchen
Ingredients
2¼cupsall-purpose flour (to make them gluten freesubstitute an equal amount of gluten-free 1-to-1 baking flour
¾cupfinely ground almonds
1tbspcornstarch
¾tspbaking powder
¼tspcinnamon
¼tspcardamom
Pinchcloves
1cupbutterroom temperature (no substitutes)
2/3cupgranulated sugar
3tbsppowdered sugaraka icing sugar or confectioner’s sugar
2large egg yolksroom temperature
1tspvanilla
¼tspalmond flavoring
1tspfinely grated orange rind
Seedless raspberry jam1/2 – ¾ cup
Additional powdered sugar for dusting cookies
Instructions
Sift dry ingredients together. Set aside.
In bowl of stand mixer fitted with paddle attachment, cream the butter at medium speed until fluffy and pale yellow. Slowly add the sugars and cream well for 2-3 minutes, scraping the sides of the bowl as necessary. Reduce speed to low and add the egg yolks, one at a time, beating well after each addition. Add the vanilla and almond flavoring as well as the grated orange rind. Mix to combine well.
With mixer set on low speed, gradually blend in the dry ingredients, mixing just until dry ingredients are fully incorporated. Do not overmix. Turn dough on to a lightly floured surface and gather the dough, working it just enough that it clings together. Divide the dough into two equal portions and form each half into a round disc. Wrap discs separately in plastic wrap and refrigerate for 35-45 minutes, or until firm enough to roll.
On lightly floured surface, roll a dough disc into 1/8” thickness. Using a 2” Linzer cookie cutter (either straight edged or fluted), cut cookies from one half the dough. Gather dough scrapes and continue cutting out the cookies until the dough is used up. These will be the cookie bottoms. Roll out remaining dough disc in the same manner for the cookie tops. To cut out the cookie tops, use the same Linzer cutter but fitted with one of the insert shapes to cut out a small 1” shape in the center of each cookie. Repeat until an equal number of cookies with cut out centers have been cut as there are whole cookies. If you do not have a Linzer cookie cutter, use any 2” cookie cutter and a 1” cutter of any shape for the center cut-out of half the cookies.
Place cookies about 1” apart on parchment-lined baking sheets. Refrigerate cookies for about 20 minutes.
Meanwhile, preheat oven to 350°F. Bake cookies on the middle oven rack for 11-13 minutes, or just until cookies are set and a light golden color. Do not overbake. Remove cookies from oven and cool on baking sheet for about 3-4 minutes then, using a flat lifter/spatula, transfer them to a wire rack to cool completely.
To assemble sandwich cookies, place the cookie halves that have the cut-out centers on a cutting board (these will be the top cookies). Dust the cookies generously with sifted powdered sugar, covering the cookies with an even coating of the sugar. On the flat side (i.e., the underneath side) of the whole cookies, spread about 1 – 1½ teaspoons jam in the center of each cookie, being careful not to spread the jam all the way to the cookie edges (stay within ¼” of the cookie edge). Place the cut-out sugar-dusted cookie tops over the jam-spread bottom cookies to create the sandwich. If desired, use a tiny spoon to carefully add a bit more jam into the center cut-out of each cookie.
Store cookies in an airtight container in the refrigerator for up to 3-4 days. To freeze cookies, package unassembled cookies between layers of parchment paper in an airtight container. Bring cookies to room temperature before filling with jam and assembling as above described.
Recipe Notes
Yield: Approximately 26 sandwiched cookies.
[Copyright My Island Bistro Kitchen]
If you have made this recipe and enjoyed it and/or wish to share it with your friends and family, please do so on social media but be sure to share the direct link to this posting from my website.
Connect on social media with My Island Bistro Kitchen:
The folklore of rum running during prohibition in Prince Edward Island (PEI) is the stuff of which legends and ballads are made. In PEI, so the stories go, locals would set sail in fishing boats, under the cover of darkness, and head out to sea to meet ships from St. Pierre and Miquelon carrying rum. The locals, known as rumrunners, would buy the rum and head back to Island shores with the smuggled contraband liquor. Continue reading The Rumrunners – Rum and Raisin Cookies→
How can a cookie with only 6 simple ingredients taste this good!!! Well, they’re not called Marvelous Melting Moments without good reason. One bite of these sweet temptations and, from the rich, tender crumb of the cookie, you’ll find they quickly melt in your mouth. Continue reading Marvelous Melting Moments Recipe→
Sugar and spice and everything nice! That pretty much sums up the smell in the kitchen when these Molasses Spice Cookies are baking. These cookies have a lovely blend of spices that make them a real taste treat, especially with a tall glass of cold milk. Continue reading Molasses Spice Cookies→
Today, I am sharing my recipe for old-fashioned Gingersnaps. These wafer-thin, crisp cookies are flavoured with ginger, cinnamon, and cloves, all scents that make the kitchen smell divine when they are baking. Continue reading Gingersnaps→
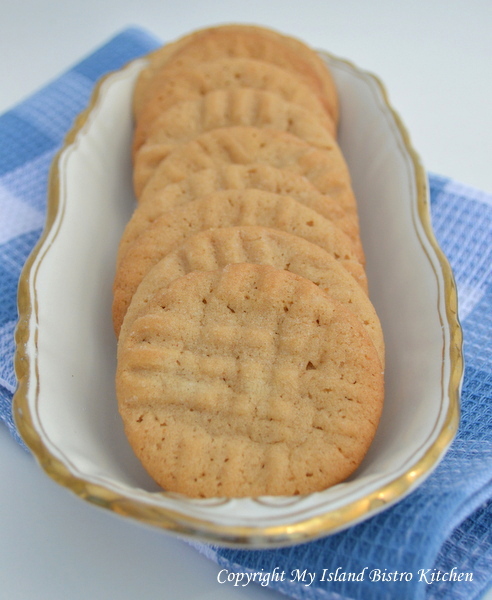
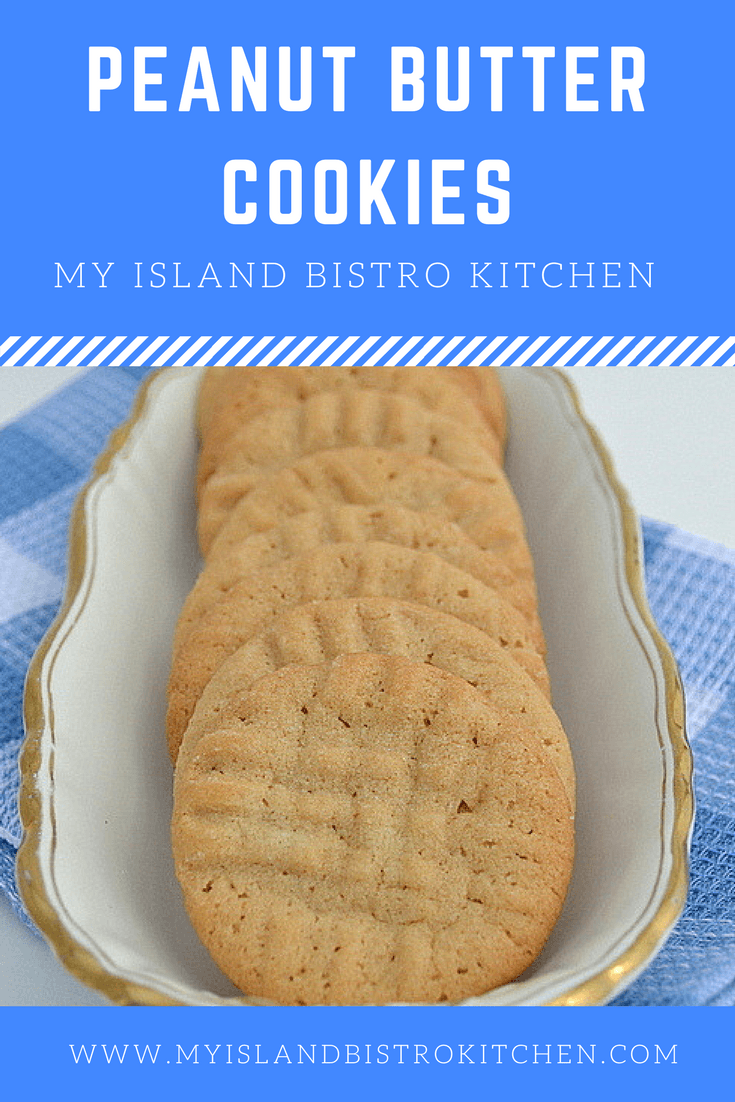
Peanut Butter Cookies are an old favourite and, over the years, many a cookie jar has been filled with them.
These cookies take very few ingredients and nothing out of the ordinary that would not be in most cupboards. Either smooth or crunchy peanut butter may be used – whichever is your preference – in the cookies. In order to keep the cookies a bit soft, watch the baking time, checking them at the 10-minute point.
Peanut Butter Cookies
Ingredients:
¼ cup shortening ¼ cup butter ½ cup brown sugar ½ cup white sugar ½ cup peanut butter 1 egg, well-beaten 1 tsp vanilla 1 cup flour 1 tsp soda 1/8 tsp salt
Method:
Assemble ingredients. Line baking sheets with parchment paper.
Position oven rack in center of oven and preheat oven to 350F.
Cream shortening, and butter together. Beat in brown and white sugars until fluffy.
Mix in peanut butter.
Add egg and vanilla.
Sift flour, soda, and salt together. Add to wet ingredients and mix just until dry ingredients are incorporated.
If dough is very soft, refrigerate for 30-40 minutes. Shape dough into small balls about 1” in diameter. Place on baking sheet about 2 ½” – 3” apart as these cookies spread.
With fork dipped in sugar, press down cookies in a traditional criss-cross pattern with the tines of the fork.
Bake on center rack in oven for 10-12 minutes. Cool on baking sheet for 2-3 minutes then transfer to cooling rack.
Classic peanut butter cookies have been a cookie jar favorite for years and these melt-in-your-mouth cookies take very few ingredients and are easy to make.
Course Cookies
Keyword cookies,, peanut butter cookies
My Island Bistro KitchenBarbara99
Ingredients
¼cupshortening
¼cupbutter
½cupbrown sugar
½cupwhite sugar
½cuppeanut butter
1egg, well-beaten
1tspvanilla
1cupflour
1tspsoda
1/8tspsalt
Instructions
Assemble ingredients. Line baking sheets with parchment paper.
Position oven rack in center of oven and preheat oven to 350°F.
In bowl of stand mixer, cream shortening and butter together. Beat in brown and white sugars until fluffy.
Mix in peanut butter.
Add egg and vanilla.
Sift flour, soda, and salt together. Add to bowl mixture and mix just until dry ingredients are incorporated.
If dough is very soft, refrigerate for 30-40 minutes. Shape dough into small balls about 1” in diameter. Place prepared baking sheet about 2½” – 3” apart as these cookies spread.
With fork dipped in sugar, press down cookies in a traditional criss-cross pattern with the tines of the fork.
Bake for approximately 10-12 minutes. Cool on baking sheet for 2-3 minutes then transfer to cooling rack.
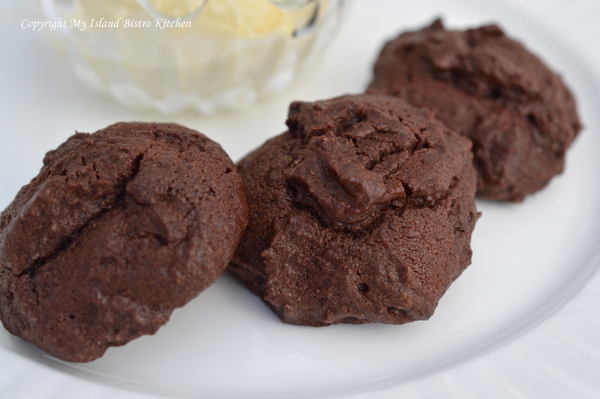
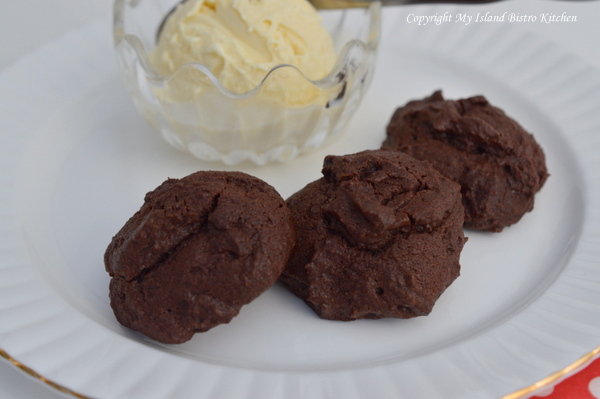
I have always been a chocolate lover. These chocolate cookies were ones my Mother often made when I was a child. I like the rich chocolate flavour and somewhat chewy center they have. These cookies don’t take any uncommon ingredients or ones most bakers wouldn’t have in their cupboards. Of course, using the best cocoa you can find will make for a richer, more flavourful cookie.
They are very easy to make and, being drop cookies, there is no rolling the dough and cutting out shapes and no need for any icing. Simply scoop up some dough with a teaspoon and use another to slide the dough off the spoon and on to the cookie sheet. These cookies can be dressed up with 1/2 cup of either chopped nuts, dates, raisins, or even chocolate chips. However, I don’t add any extras to them as I like the smooth texture and flavour they have on their own without any further additions.
[Printable recipe follows at end of posting]
Chocolate Drop Cookies
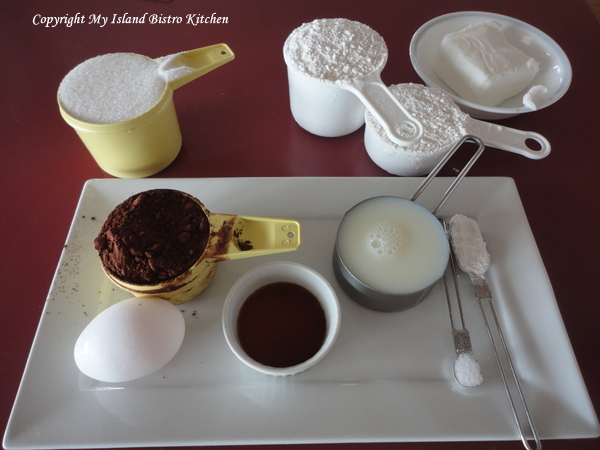
1/2 cup shortening, softened 1 cup white sugar 1 egg 1 tsp vanilla 1/2 cup milk 1 1/2 cups flour 1/2 cup cocoa 1 tsp baking powder 1/4 tsp salt
Method:
Preheat oven to 375F.
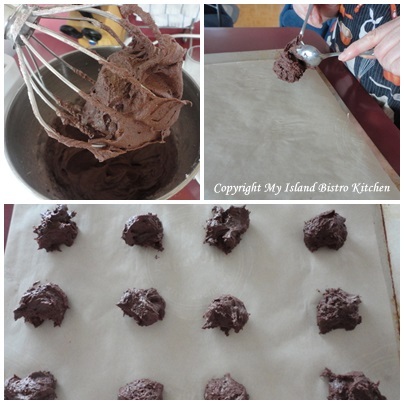
With electric mixer, beat shortening and sugar together until light and fluffy (1-2 minutes). Beat in egg, vanilla, and milk.
Into separate bowl, sift together the flour, cocoa, baking powder, and salt. Add to wet ingredients and stir just until dry ingredients are incorporated.
Drop by teaspoonfuls onto parchment-lined baking sheet.
Bake 10-11 minutes. Do not overbake or cookies will be dry.
Yield: Apx. 3 dozen
These cookies are good any time and make good lunch box treats as well as picnic basket fare. They are especially good with a dish of vanilla ice cream!
Chocolate lovers will love these easy-to-make rich Chocolate Drop Cookies with their slightly chewy interior
Course Cookies
Keyword chocolate cookies, cookies,
My Island Bistro KitchenMy Island Bistro Kitchen
Ingredients
1/2cupshortening, softened
1cupwhite sugar
1egg
1tspvanilla
1/2cupmilk
1 1/2cupsflour
1/2cupcocoa
1tspbaking powder
1/4tspsalt
Instructions
Preheat oven to 375F. Line baking sheet with parchment paper.
With electric mixer, beat shortening and sugar together until light and fluffy (1-2 minutes). Beat in egg, vanilla, and milk.
Into separate bowl, sift together the flour, cocoa, baking powder, and salt. Add to creamed mixture and stir just until dry ingredients are incorporated.
Drop by teaspoonfuls onto prepared baking sheet.
Bake 10-11 minutes. Do not overbake or cookies will be dry. Let cookies rest on baking sheet for 3-4 minutes then transfer to wire rack to cool completely.
Recipe Notes
Yield: Apx. 3 dozen
Pin Me To Pinterest!
Chocolate Drop Cookies
Thank you for visiting “the Bistro” today. There are lots of ways to connect with “the Bistro” through social media:
Join My Island Bistro Kitchen on Facebook Follow the Bistro’s tweets on twitter @PEIBistro Find the Bistro on Pinterest at “Island Bistro Kitchen” Follow along on Instagram at “peibistro”
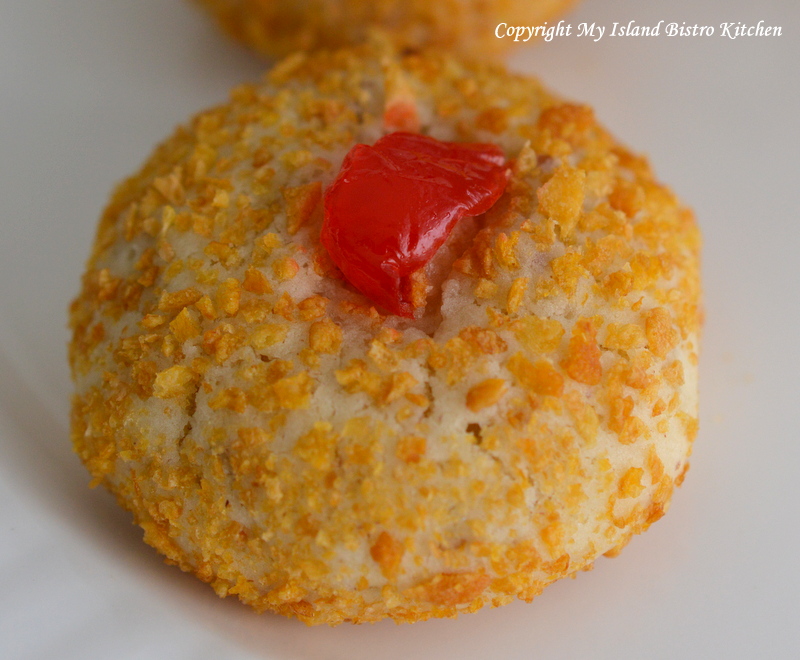
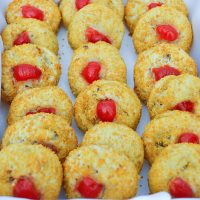
My Mother often made Cherry Wink Cookies when I was a small child so they have been a family favorite for many years. They are not difficult to make and don’t take any hard-to-find or unusual ingredients.
[Printable recipe follows at end of posting]
Cherry Winks
Ingredients:
3/4 cup shortening or butter, softened at room temperature 1 cup white sugar 2 eggs, unbeaten, room temperature 4 tbsp milk, room temperature 1 tsp vanilla 2 1/4 cups all-purpose flour 1 tsp baking powder 1/2 tsp soda 1/2 tsp salt 1 cup chopped dates 3/4 cup chopped pecans apx. 2 1/2 – 3 cups cornflakes apx. 15 maraschino cherries, blotted dry in paper towel, and cut into quarters
Method:
Preheat oven to 375F.
In bowl of stand mixer, cream shortening or butter. Add sugar and cream until light and fluffy. Add eggs, one at a time, and beat well after each addition. Beat in milk and vanilla.
In separate bowl, combine flour, baking powder, soda, and salt. Whisk together to blend. Mix in the dates and pecans. Add to creamed mixture and stir until well combined.
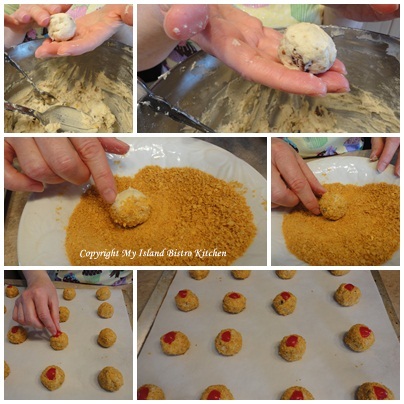
Crush cornflakes crumbs by placing in a sealed ziplock bag and crushing with a rolling pin.
Transfer crumbs to shallow bowl. Shape dough into small balls. Roll each cookie ball in the crumbs to coat. Place on parchment-lined baking sheets. Top each cookie with piece of cherry.
Bake for 10-12 minutes. Do not overbake. Let cool on cookie sheet for 2 minutes then transfer to wire rack to finish cooling.
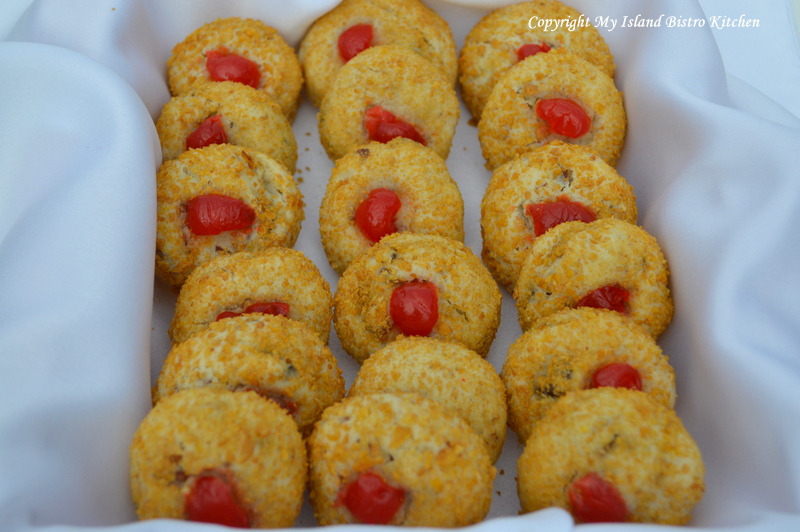
Makes approximately 4 dozen cookies.
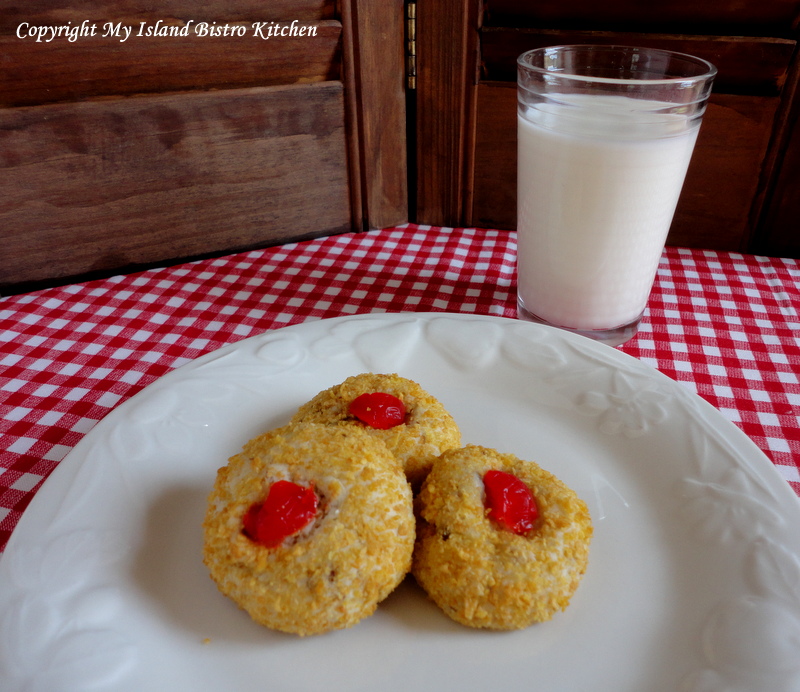
These cookies go especially well with a glass of cold milk!
…and one is never enough!
A box of these cookies makes a wonderful, tasty gift!
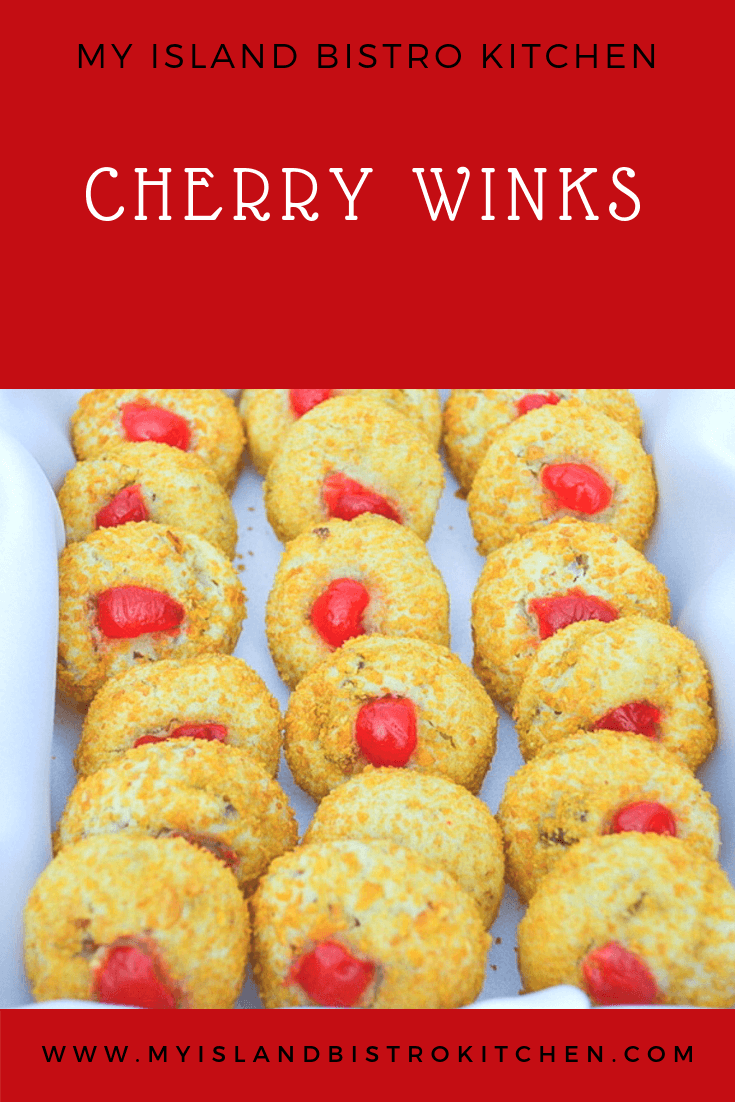
Cherry Winks are a cookie jar favorite! Cookies are coated in crushed cornflake crumbs and topped with a cherry. Both showy and tasty!
Course Snack
Keyword cherry winks, cookies,
My Island Bistro KitchenMy Island Bistro Kitchen
Ingredients
¾cupshortening or butter, softened at room temperature
1cupwhite sugar
2eggs, unbeaten (room temperature)
4tbspmilk, room temperature
1tspvanilla
2¼cupsall-purpose flour
1tspbaking powder
½tspsoda
½tspsalt
1cupchopped dates
¾cupchopped pecans
apx. 2½ - 3 cups cornflakes
apx. 15 maraschino cherries, blotted dry in paper towel, and cut into quarters
Instructions
Position oven rack in center of oven and preheat oven to 375°F.
In bowl of stand mixer, cream shortening or butter. Add sugar and cream until light and fluffy. Add eggs, one at a time, and beat well after each addition. Beat in milk and vanilla.
In separate bowl, combine flour, baking powder, soda, and salt. Whisk together to blend. Mix in the dates and pecans. Add to creamed mixture and stir until well combined.
Crush cornflake crumbs by placing in a sealed ziplock bag and crushing with a rolling pin.
Transfer crumbs to shallow bowl. Shape dough into small balls. Roll each cookie ball in the crumbs to coat. Place on parchment-lined baking sheets. Top each cookie with piece of cherry.
Bake for 10-12 minutes. Do not overbake. Let cool on cookie sheet for 2 minutes then transfer to wire rack to finish cooling.
Recipe Notes
Yield:Apx. 4 dozen cookies.
[Copyright My Island Bistro Kitchen]
Pin Me To Pinterest!
Cherry Winks
If you have made this recipe and enjoyed it and/or wish to share it with your friends and family, please do so on social media but be sure to share the direct link to this posting from my website.
Connect with My Island Bistro Kitchen on Social Media
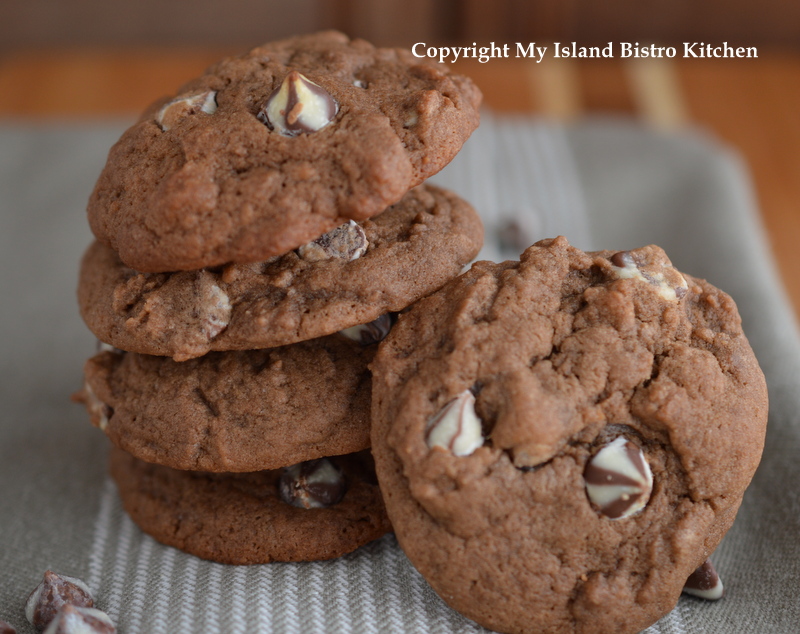
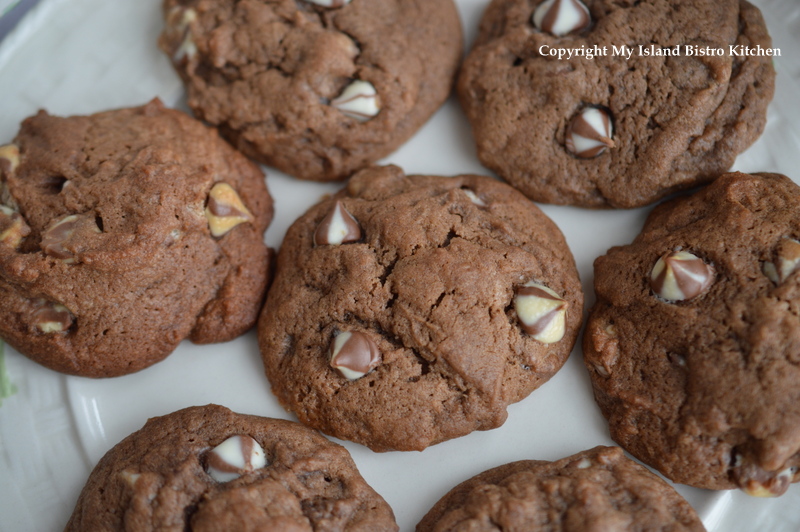
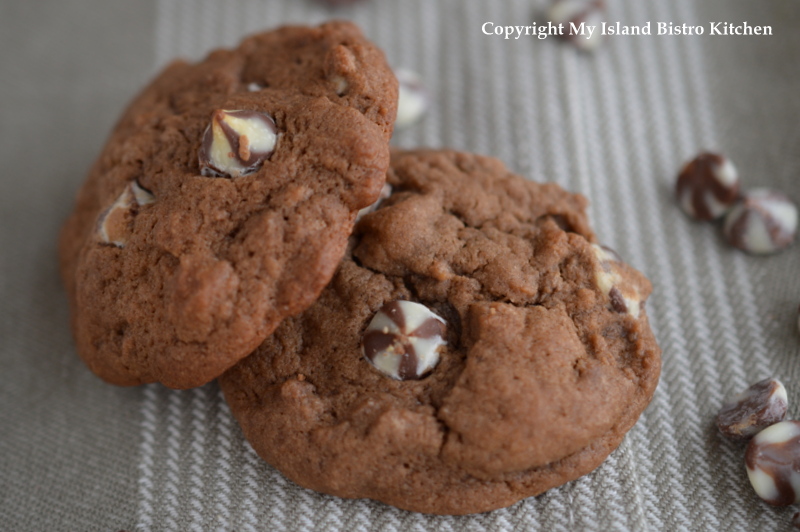
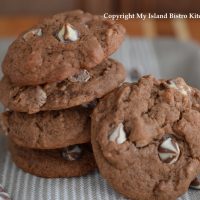
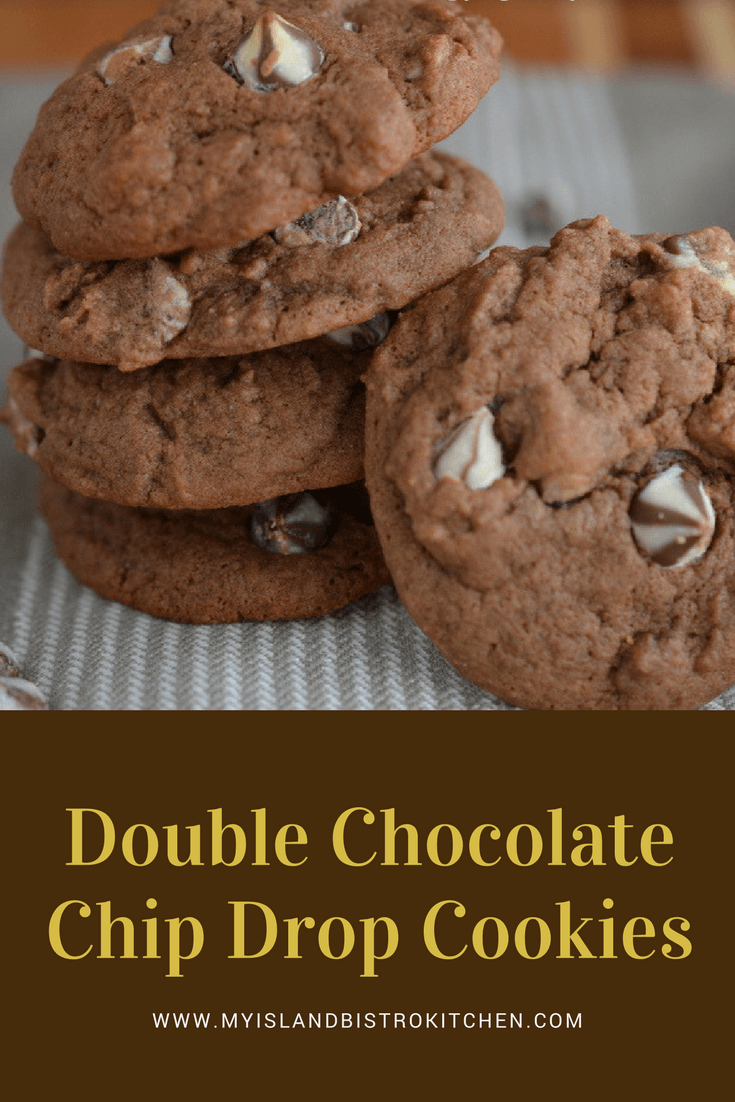
Double Chocolate Chip Drop Cookies Made with Stout
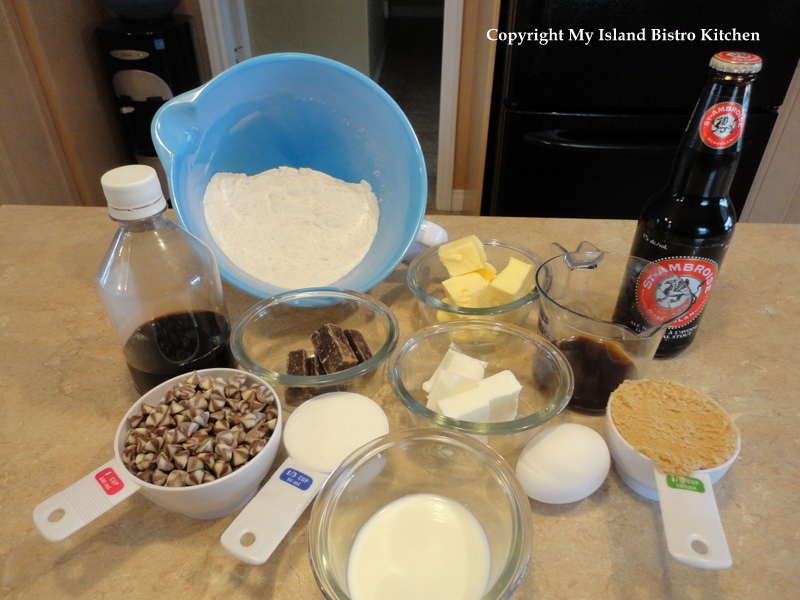
Well, for my Cookie of the Month for March, I tried to find out if there is a cookie recipe that traces its origins to Ireland or, alternatively, a cookie that is particularly popular on the Emerald Isle. However, I had no luck in tracking down any (maybe it was lack of Irish luck!)
I decided to create a special recipe and give it a distinctly Irish flavour using stout in honour of St. Patrick’s Day on March 17th. As you know, whenever possible, I like to feature Island products in my cooking and baking. At the time of writing, PEI does have a brewing company that produces stout – The Island Brewing Company produces Gahan Sydney Street Stout. However, it is apparently a limited edition and is not available in local liquor stores year-round — at least I couldn’t track down any. So, instead, I opted to use Montreal-brewed St. Ambroise Oatmeal Stout because it boasts hints of espresso and chocolate.
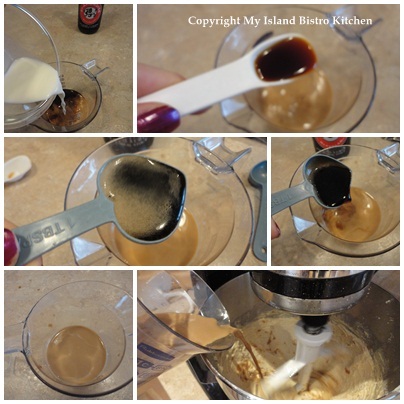
I knew I was going to be making a chocolate cookie with a hint of coffee flavour so a stout with both chocolate and coffee flavour could only enhance the cookie’s taste. Like any ingredient, moderation is the trick. My goal was to flavour the cookie with the stout and bring out the chocolate flavour – I wasn’t aiming for a beer-tasting cookie. Therefore, I used only 1 1/2 tablespoons of stout as part of the liquid ingredients.
This recipe calls for both butter and shortening in the ingredients and I recommend both be used. For more information on why some cookie recipes call for both types of fat, click here.
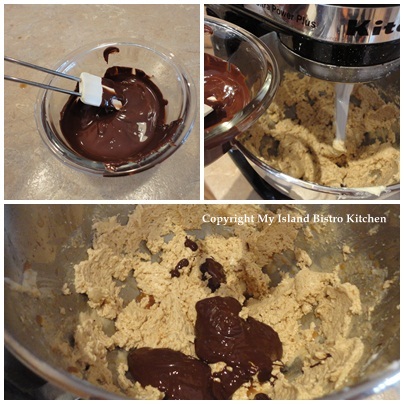
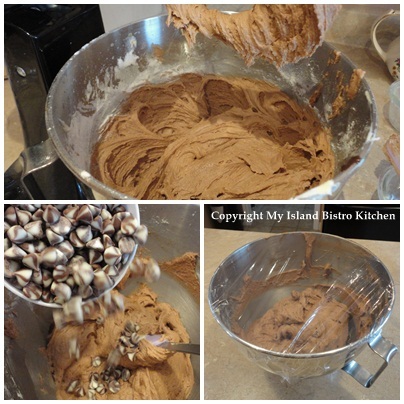
For the chocolate, I chose to use semi-sweet squares of chocolate because I find the flavour a bit more intense than powdered cocoa. Using some brewed coffee gives these cookies a distinct mocha flavour. For interest, color, and texture, I used swirled milk and white chocolate chips.
This dough does well when it is chilled and allowed to “rest” for 24 hours after mixing and before baking the cookies. The purpose of letting the dough “rest” is to allow the liquid ingredients, including the egg, to get fully incorporated and absorbed into the other ingredients. The “resting” period makes for a drier and firmer cookie dough and this controls its spread while baking so you don’t end up with a really flat cookie.
Refrigerating the cookie dough also allows the fat content in the dough to firm up, and cold, firm butter/shortening takes longer to melt in the oven. This delay in melting gives the cookies a chance to rise up instead of immediately spreading out. As a result, the cookies begin to bake, create structure, and are able to hold their shape before the butter, in particular, breaks down and flattens and spreads them out. I do not recommend skipping the dough chilling step for these cookies.
If the dough is particularly hard when it comes out of the refrigerator to the point that it can’t be scooped or spooned without chibbling it, let it rest at room temperature for 10 – 15 minutes. Do not, however, bring the dough completely back to room temperature and soften as that will defeat the objective of having the butter and shortening firm up in the dough before the cookies enter the hot oven and start spreading out.
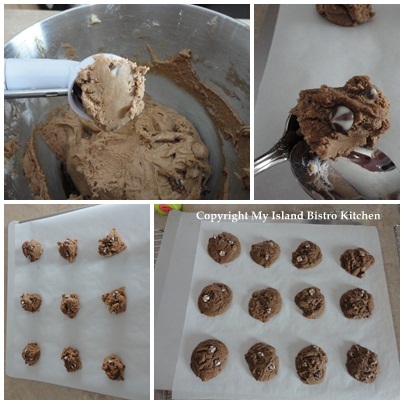
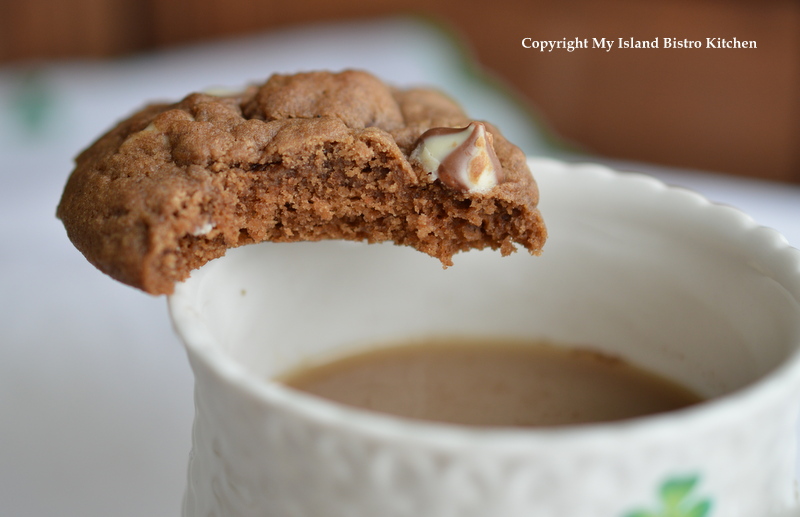
I like the drop cookies to be soft and somewhat chewy and, of course, the key to that texture is to slightly underbake the cookies – bake these no more than 10-12 minutes at 350F and let them cool on the baking sheet for 2-3 minutes before moving them to a wire rack to finish cooling.
My Island Bistro Kitchen’s Double Chocolate Chip Drop Cookies
Ingredients:
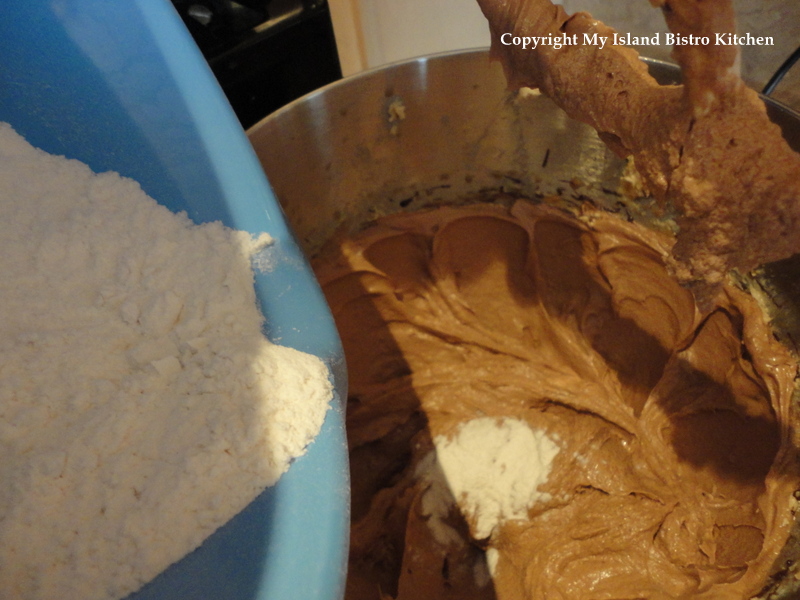
1/2 cup butter, softened 1/4 cup shortening, softened 1/2 cup brown sugar 1/3 cup white sugar 1 egg 2 tbsp. cold brewed coffee 1 1/2 tbsp stout 2 tbsp milk 1 tsp vanilla 2 1/2 squares of semi-sweet chocolate, melted 2 cups flour 1/2 tsp. salt 1/2 tsp baking soda 1/2 tsp baking powder 1 cup chocolate chips
Method:
Assemble ingredients.
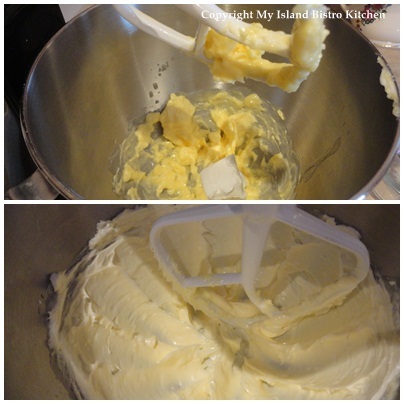
Cream butter and shortening.
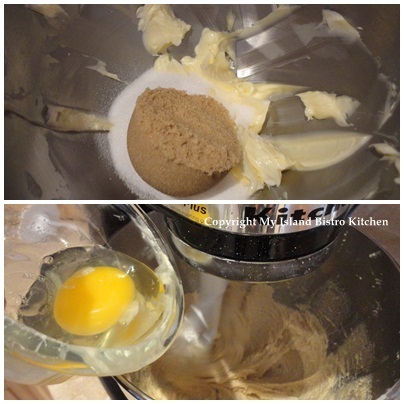
Add brown and white sugars. Beat until light and fluffy. Add egg and beat until blended.
In separate bowl, or large measuring cup, mix coffee, stout, milk, and vanilla. Stir to combine. Add to mixture. Mix well.
Add melted chocolate and mix to blend.
Combine dry ingredients. Add to mixture and stir just until flour is incorporated.
Stir in chocolate chips. Cover bowl with plastic wrap and refrigerate dough for 24 hours.
Line baking sheets with parchment paper. Drop by cookie scoop or spoonfuls onto baking sheet, leaving about 2 inches between the cookies. Bake at 350F oven for 10-12 minutes. Let cookies cool on baking sheet for 2-3 minutes then transfer them to a wire rack to finish cooling.
These make a fine treat for St. Patrick’s Day (but are just as good any time of the year!)
My Island Bistro Kitchen's Double Chocolate Chip Drop Cookies
These Double Chocolate Chip Drop Cookies are both tasty and showy. Flavoured with a wee bit of stout. A treat anytime but especially good for a St. Patrick's Day treat!
Course Snack
My Island Bistro KitchenMy Island Bistro Kitchen
Ingredients
1/2cupbuttersoftened
1/4cupshorteningsoftened
1/2cupbrown sugar
1/3cupwhite sugar
1egg
2tbsp.cold brewed coffee
1 1/2tbspstout
2tbspmilk
1tspvanilla
2 1/2squares of semi-sweet chocolatemelted
2cupsflour
1/2tsp.salt
1/2tspbaking soda
1/2tspbaking powder
1cupchocolate chips
Instructions
Assemble ingredients.
Cream butter and shortening.
Add brown and white sugars. Beat until light and fluffy. Add egg and beat until blended.
In separate bowl, or large measuring cup, mix coffee, stout, milk, and vanilla. Stir to combine. Add to mixture. Mix well.
Add melted chocolate and mix to blend.
Combine dry ingredients. Add to mixture and stir just until flour is incorporated.
Stir in chocolate chips. Cover bowl with plastic wrap and refrigerate dough for 24 hours.
Line baking sheets with parchment paper. Drop by cookie scoop or spoonfuls onto baking sheet, leaving about 2 inches between the cookies. Bake at 350F oven for 10-12 minutes. Let cookies cool on baking sheet for 2-3 minutes then transfer them to a wire rack to finish cooling.
Recipe Notes
[Copyright My Island Bistro Kitchen]
If you have made this recipe and enjoyed it and/or wish to share it with your friends and family, please do so on social media but be sure to share the direct link to this posting from my website.
Connect with My Island Bistro Kitchen on Social Media
Follow “the Bistro” on Pinterest at https://www.pinterest.ca/peibistro/ and pin the Pinterest-ready photo found at the end of this post to your favorite Pinterest boards.
These Old-fashioned Sugar Cookies are one of the plainest cookies yet they have endured throughout time and are often counted amongst the favorites in many families. The cookies are aptly named given the amount of sugar in them in proportion to the amounts of other ingredients. Despite the amount of sugar in most sugar cookie recipes, they are not really an overly sweet or rich cookie. Continue reading Old Fashioned Sugar Cookies→
(Mostly) PEI and Maritime Food – Good Food for a Good Life!