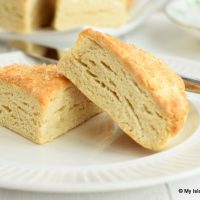
Gluten-free Scones
Ingredients
- 1 1/3 cups gluten-free 1-to-1 baking flour
- 1/3 cup finely ground almond flour
- 1/3 cup coconut flour
- 1 tbsp potato starch
- ½ tsp xanthan gum
- ¼ cup granulated sugar
- 4 tsp baking powder
- ½ tsp salt
- 1/3 cup cold unsalted* butter, cut into ½“ cubes
- 1 extra-large egg (cold), lightly beaten with fork
- ½ cup whipping cream (cold) with ¾ tbsp removed and reserved for brushing tops of scones
- ¼ cup 2% milk (cold)
- 1 – 2 tsp granulated or turbinado sugar for sprinkling tops of scones (optional)
Instructions
-
Position oven rack in center of oven and preheat oven to 400°F. Line baking sheet with parchment paper.
-
In large bowl, sieve or sift the flours, potato starch, xanthan gum, sugar, baking powder, and salt together. Drop the cubes of butter into the dry ingredients and toss to coat the butter. Cut in the butter with a wire pastry cutter until mixture resembles coarse crumbs or pea-sized pieces. Quickly run fingers through the mixture several times, scooping up bits of the butter and rubbing them into long paper-thin slivers between the thumb and forefinger. It is not necessary to do this with every piece of butter – just quickly pick several at random.
-
Make a well in the center of the dry ingredients.
-
In a small bowl or large measuring cup, lightly whisk the egg, whipping cream, and milk together. Pour liquid ingredients all at once into well in center of dry ingredients. Using a fork, stir dough just enough that the liquid is absorbed into the dry ingredients and the dough can be roughly brought together. Dough will be soft and sticky and some floury spots may remain. Transfer dough onto lightly floured work surface, gently working it just until the dry ingredients are barely incorporated and a shaggy dough mass forms.
-
Fold the dough in half over onto itself. Lightly press the dough down. Turn the dough a half turn and repeat the folding exercise. Do this 3-4 times.
-
To make wedge-style scones: With a bench/pastry scraper or sharp knife, divide the dough into two equal parts. Lightly press and form each part into a small circle about ¾” thick. Transfer to prepared baking sheet. Cut each circle into six equal wedges and separate the scones by about ¾”, still keeping each group of six wedges in a circular shape for baking.
-
Using a pastry brush, lightly brush the reserved whipping cream on tops of scones and sprinkle with sugar.
-
To make round-shaped scones: Lightly press dough into circle about ¾“ thick. Use a lightly floured 1¾” – 2” round cutter to cut scones from dough. Push the cutter straight down and out of the dough without twisting the cutter in the process. Re-flour the cutter before cutting out each scone. Gather dough scraps and form into a circle from which to cut remaining scones. Transfer scones to prepared baking sheet, placing scones about 1” apart.
-
Lightly brush the reserved whipping cream on tops of scones and sprinkle with sugar.
-
Bake scones 15-17 minutes or until they are just light golden brown on the edges and tops are golden tanned. Rotate the baking sheet partway through the baking. Remove scones from oven and leave them on the baking sheet for 3-4 minutes before transferring them to a wire rack.
-
*salted butter may be substituted for the unsalted butter in which case, reduce the ½ teaspoon of salt called for in the recipe to ¼ teaspoon.
Recipe Notes
To serve: Serve warm scones along with clotted or English double cream and a favorite jam. Or, simply enjoy with a good slather or butter on the scones.
Yield: 1 dozen wedge-shaped scones or 10 – 2” round scones (exact number will depend on size of cutter used and thickness of dough)
Copyright My Island Bistro Kitchen 2020