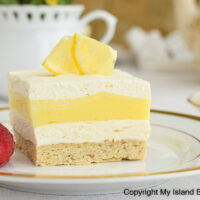
Luscious Lemon Layer Dessert
Ingredients
Base:
- 2/3 cup butter, room temperature
- ¼ cup granulated sugar
- 1 large egg yolk, room temperature
- ½ tsp pure vanilla extract
- 1/16 tsp pure almond extract
- 1 1/8 cups all-purpose flour
- 1/3 cup finely chopped pecans
- 1/16 tsp salt
Whipped Cream:
- 2 cups cold whipping cream (36%M.F.)
- 2½ tbsp granulated sugar or icing sugar (aka confectioner’s sugar)
- ¾ tsp pure vanilla extract
Cream Cheese Layer:
- 1 – 250g (8oz) package cream cheese, softened at room temperature
- ½ cup sifted or sieved icing sugar (aka confectioner’s sugar)
- 1½ cups of the whipped cream
Lemon Layer:
- 1 – 212g package of Lemon Pie Filling (NOT lemon pudding), prepared according to package directions
- ½ tbsp (1½ tsp) cornstarch
Whipped Topping Layer:
- Remaining whipped cream
Instructions
Base:
-
Position oven rack in center of oven and preheat oven to 350°F. Grease or very lightly spray 9”x9” square baking pan with cooking oil spray. This is a deep dessert so make sure your pan is at least 2“ deep.
-
In bowl of stand mixer fitted with paddle attachment, cream the butter at medium-high speed for 2-3 minutes, stopping to scrape sides of bowl as necessary. Reduce speed to medium-low and gradually add the sugar and beat until mixture is combined and smooth. Scrape sides of bowl and increase speed to medium and beat 1 minute. Add the egg yolk along with the vanilla and almond extracts. Beat well. With mixer set to slowest speed, gradually add the flour (with the 1/16 tsp of salt mixed in), about ½ cup at a time. Add the finely chopped pecans. Mix just until ingredients are incorporated. Do not overmix.
-
Press mixture evenly into prepared pan. A piece of waxed paper will keep the dough from sticking to hands as the dough is pressed into the pan. Prick base all over with tines of fork to allow steam to release as the base bakes and to eliminate air pockets from forming.
-
Bake base 20 minutes, or just until top appears dry and edges of base start to turn very pale golden in color and start to show signs of slightly pulling away from pan sides. Do not overbake or base will be hard. Cool base completely in pan on wire cooling rack before adding remaining layers of dessert.
Whipped Cream:
-
In bowl of stand mixer fitted with whisk attachment, beat whipping cream at medium-high speed until soft peaks begin to form. Gradually add the sugar, then the vanilla, and continue beating until stiff peaks form.
-
Divide whipped cream into two portions (one portion of apx. 1½ cups and the remainder for the 2nd portion) and refrigerate both portions until called for in the recipe.
Cream Cheese Layer:
-
In bowl of stand mixer fitted with paddle attachment, cream the cream cheese until soft and creamy. Blend in the icing sugar until smooth. Remove bowl from mixer stand and fold in 1½ cups of the whipped cream. Do not over-fold. Spread mixture evenly over completely cooled base. Refrigerate.
Lemon Layer:
-
Place dry lemon pie filling mix into bowl and whisk in ½ tablespoon cornstarch until well blended. Prepare the lemon pie filling according to the package directions. Cool filling completely at room temperature, stirring frequently to aid thickening. Spread filling evenly over the chilled cream cheese layer. Refrigerate for about 40 minutes before adding next layer.
Whipped Topping Layer:
-
Spread remaining portion of whipped cream over chilled lemon layer of dessert. Chill dessert for at least three hours before serving. If desired, garnish with chopped pecans, slivers of fresh lemon, or fresh fruit such as blackberries, raspberries, or blueberries.
Recipe Notes
Yield: 9 generous servings
[Copyright My Island Bistro Kitchen]