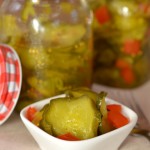
Bread and Butter Pickles
Ingredients
- 6 - 6½ lbs small pickling cucumbers, peeling on, sliced either 3/16” or 1/4" thick
- 4 cups silver-skinned onions, peeled and thinly sliced
- 1 sweet red pepper, diced
- 1 sweet green pepper, diced
- ½ cup coarse pickling salt (no substitutions)
- 5-6 dozen+ ice cubes
Syrup:
- 5 cups granulated sugar
- 1 tsp tumeric
- 1 tbsp mustard seed
- 1 tsp celery seed
- 3 cups white pickling vinegar (7% acidity)
- ½ cinnamon stick
Instructions
-
Wash the cucumbers and trim and discard their ends. Using a mandolin, or by hand, slice the cucumbers either 3/16" or 1/4" thick, depending on the desired thickness of the pickle slices. Slice onions and dice the peppers.
-
Combine the sliced cucumbers, onions, and peppers in a large bowl. Sprinkle pickling salt over vegetables. Stir mixture with a large wooden spoon to distribute the pickling salt. Completely cover mixture with a layer of ice cubes. Place a large bowl over the vegetables and weigh it down with a weight (a couple of freezer ice packs work well as weights) to keep the vegetables soaking in the brine. Let sit at room temperature for 3 hours, adding more ice cubes as they melt to ensure vegetables are kept cold.
-
When cucumbers have been soaking in the brine for about 2 hours or so, begin the bottle sterilization process.
-
Wash jars in hot soapy water. Rinse. Fill a large-sized stockpot about two-thirds full of hot tap water. Place the jars, upright, into the water. Use more than one stockpot if necessary to accommodate all jars needed for the recipe. Ensure the jars are fully submerged, each jar filled with water, and that the water is at least an inch over the tops of the jars, adding more if necessary. Cover, bring to a boil, and boil gently for 10 minutes. Turn off heat and leave the jars in the hot water to have ready to fill once the pickles are ready.
-
Just as the vegetables are coming to the end of their 3-hour soaking time, fill the hot water canner about half full of hot tap water. Cover and bring to a boil to have it ready for processing of the filled jars. Reduce heat to keep canner water hot. Note that, depending on the size of canner(s) used, and number of filled jars, two canners may be required to accommodate the number of jars in this recipe as all the filled pickle jars must be hot water processed as soon as they are filled. They must not be allowed to cool before going into the hot water canner.
-
Transfer brine-soaked vegetables into 1-2 large colanders and rinse briefly with cold water to remove any salt residue. Just a quick rinse will suffice. Drain the vegetables for at least 20 minutes.
-
In large stock pot, combine all of the syrup ingredients. Bring the syrup just to the boiling point over medium-high heat, stirring occasionally. Add the vegetables. Bring the mixture just barely to the boiling point, stirring occasionally. Remove pot from heat.
-
Using jar lifter tongs, carefully remove the hot sterilized jars from the water, one at a time, emptying the water from the jars back into the pot. Drain jars well.
-
Boil a kettle of water to have ready, if needed, to top up water levels after the filled jars are added to the hot water canner.
-
Using a slotted spoon to scoop the vegetables from the syrup and a wide-mouthed funnel, fill hot sterilized jars with the vegetables leaving 1” headroom in each bottle. Pour the hot syrup into the bottles, leaving ½” headroom in each bottle. Remove any air bubbles that may appear in the jars by inserting a knife or small heat-proof spatula into each bottle and gently moving vegetables to allow liquid to fill any pockets of air that may have formed. Add more syrup, if necessary, to bring syrup level up to ½” from jar rim.
-
With clean, damp cloth, wipe clean each jar rim. Center the heated lids on jars so the sealing compound on the lid edges aligns with the jar rims. Fingertip tighten ring/screw bands on jars until resistance is encountered. Do not over-tighten.
-
Using jar lifter tongs, carefully place filled jars upright in wire basket positioned in the canner, ensuring jars do not touch each other or fall over. Ensure the water level is at least 1” above the tops of jars, adding more boiling water as necessary. If a canner is not completely full of filled jars, add enough hot empty jars to fill it to capacity to prevent filled jars from toppling over during processing.
-
Cover with canner lid. Increase the heat to return the water to a full rolling boil then decrease the heat to just keep the water at a moderately rolling boil but not boiling over. Process pint-sized jars in the hot water bath for 15 minutes, adjusting time as and if necessary for altitude. Start timing the processing from the point at which a full rolling boil is reached after jars have been added to the canner. At the end of the processing time, turn off heat and remove canner lid.
-
Let jars sit in the hot water for 5 minutes then, using jar lifter tongs, carefully remove the jars filled with pickles, one at a time, and transfer them to a heat-proof cutting board, that has been covered with a towel to protect it from the wet bottles, to cool completely.
-
Listen for the “pop” or “ping” sound as the bottles seal over the next few minutes or hours. The lids of properly sealed jars will curve downward. Cover the jars with a towel to keep light out. Let jars rest, undisturbed, on counter for 24 hours. Then, test each jar for proper sealing by lightly pressing down on the center of each jar lid. If the lid is already pressed downward, and does not pop back up, it is properly sealed. Any jars that do not pass this test should be refrigerated and the pickles used within a week or so. Store properly sealed pickle bottles in cool, dark place. Refrigerate pickles once jar has been opened.
Recipe Notes
Yield: Apx. 7-9 pint bottles
NOTE 1: How many jars of pickles this recipe will yield will be determined by how tightly or loosely the vegetables are packed into the jars. This will also dictate how much syrup is used, too. For this reason, ensure you have sufficient jars sanitized. It is always best to have extras sanitized than not enough as there is no time to properly sanitize extra bottles once filled jars are ready to go into the hot water canner.
NOTE 2: While, historically, the lids (with the orange-rust colored gasket on their underside) were preheated in simmering hot water for 1-2 minutes to soften the lid gasket before applying the lids to the hot jars, Bernardin® (the company that manufactures canning lids available in Canada) is now (2024) saying that preheating their particular brand of lids is no longer necessary to provide a proper seal as the sealing compound they use in their lid manufacturing performs better at room temperature. They recommend washing the lids in hot soapy water, rinsing them, and setting the lids aside until needed in the canning process.
Note this pertains specifically to the Bernardin® brand of lids. Other manufacturers’ lids may differ so, if you are using another brand of lids, do check the manufacturer’s instructions for lid preparation of their particular brand lids. Typically, if the lids need to be preheated, the method is simply to place the lids in a small pan of simmering hot water over low heat just long enough to heat the rubber piece. This doesn't take longer than a minute or two at most. Do not boil the lids.
[Copyright My Island Bistro Kitchen]