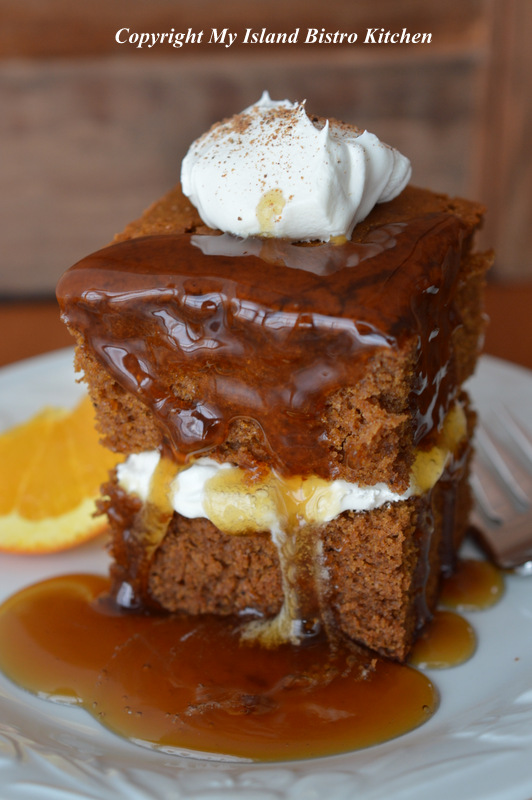
Gingerbread with Whipped Cream and Brown Sugar Sauce
Do you have certain desserts that you associate with different seasons or times of the year? Gingerbread is one dessert I tend to associate most with the coldest winter months for some reason. It’s a plain but tasty dessert any time of the year but it’s a particularly good comfort food in the dead of winter. Continue reading Gingerbread→
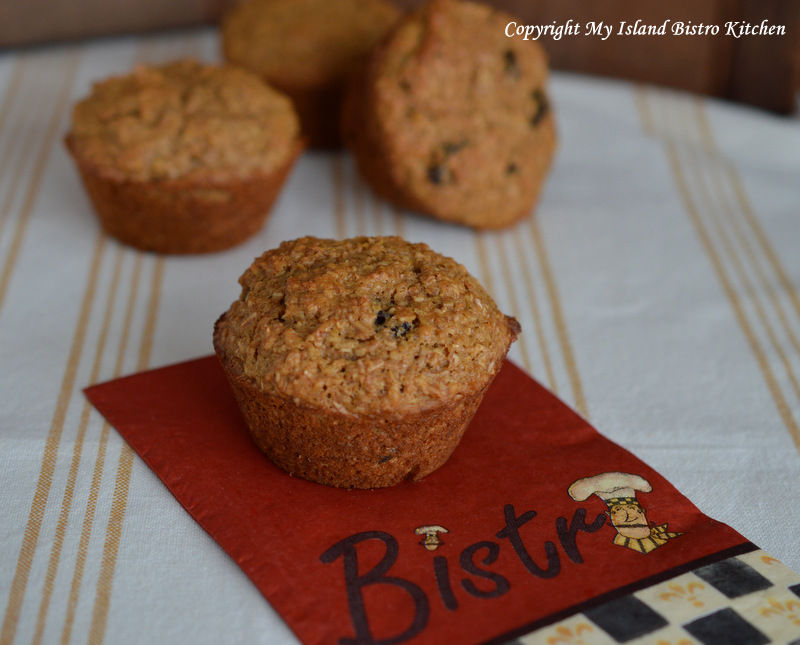
Today, I am featuring my recipe for the Bistro’s Bran Muffins, the perfect breakfast muffin. These easy-to-make classic bran muffins are wholesome and packed full of flavor. Continue reading The Bistro’s Bran Muffins→
Cool fall and cold winter days always put me in the mood for good old-fashioned homemade soup — dinner in a pot and it smells sooooo good simmering away on the stove. So, my soup pot today contains Hamburger Soup in the making. Continue reading Hamburger Soup→
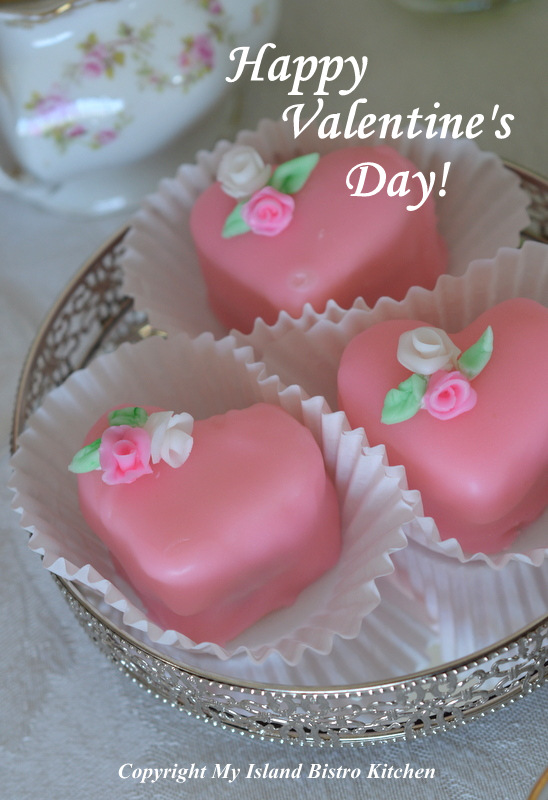
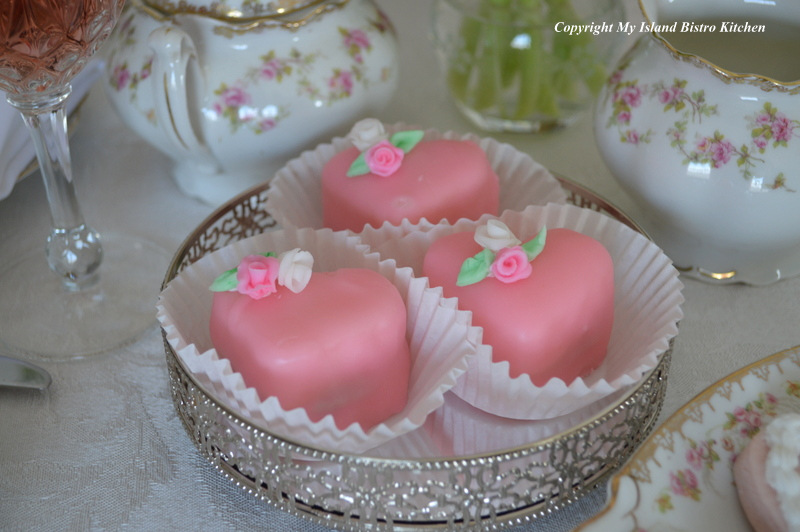
Is there anything more genteel than afternoon tea! And, is there anything more perfect for a tea event than petit fours. They are so dainty covered in poured fondant; it’s like each one is a tiny parcel waiting to be unwrapped to see what lies inside. For these, I used a simple white cake sandwiched together with rich strawberry jam.
Petit Fours
Today’s tea is more on the sweet side. A selection of some of my favorite squares, melting moments, divinity fudge, and macarons.
Tea Table Fancies
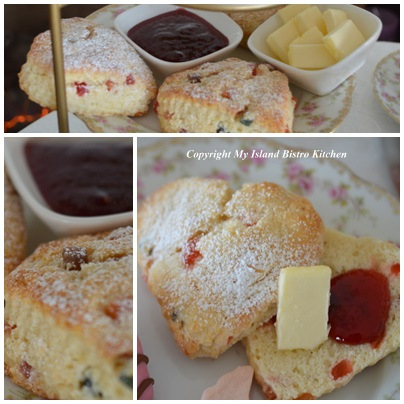
The addition of a lovely fruit scone never goes wrong, particularly when spread with delectable homemade strawberry jam.
Fruit Scone with Strawberry Jam
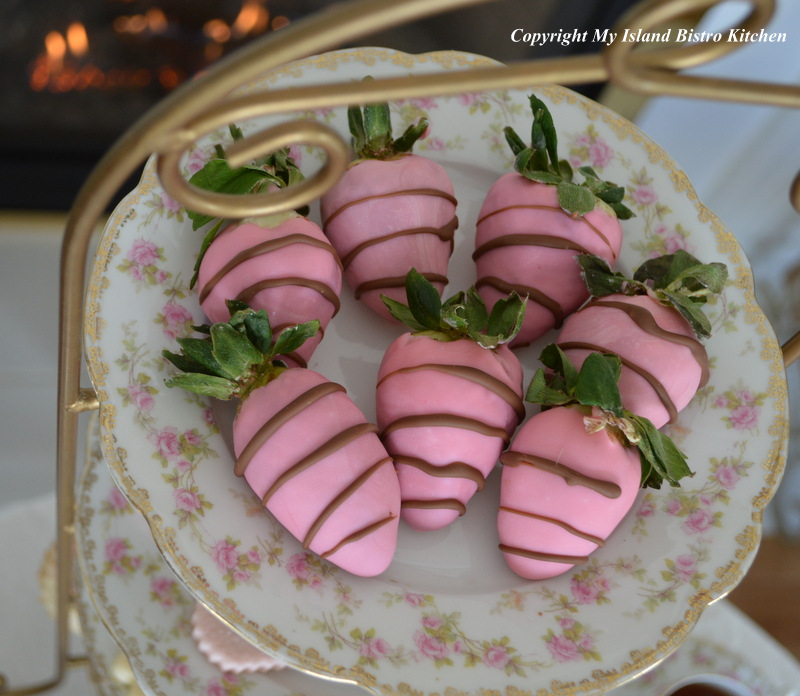
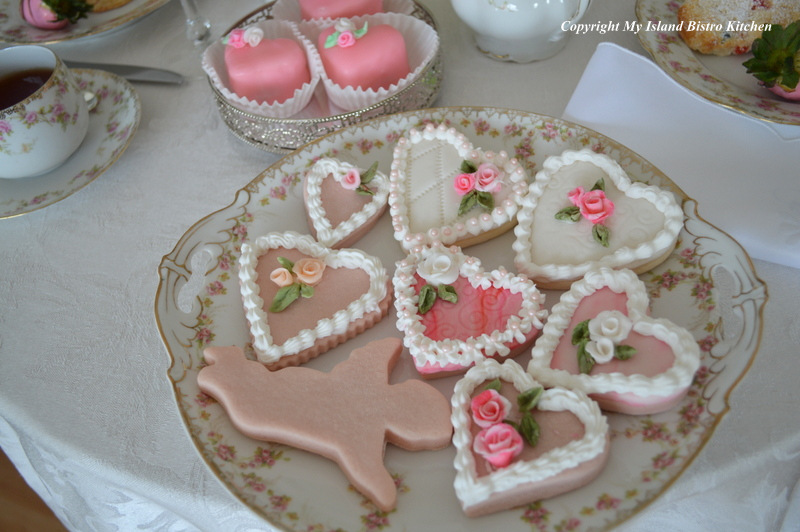
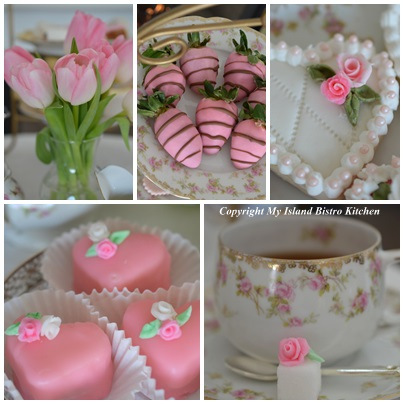
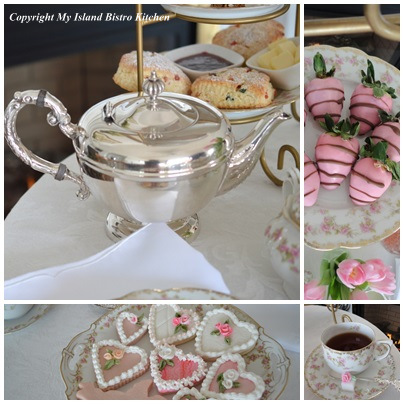
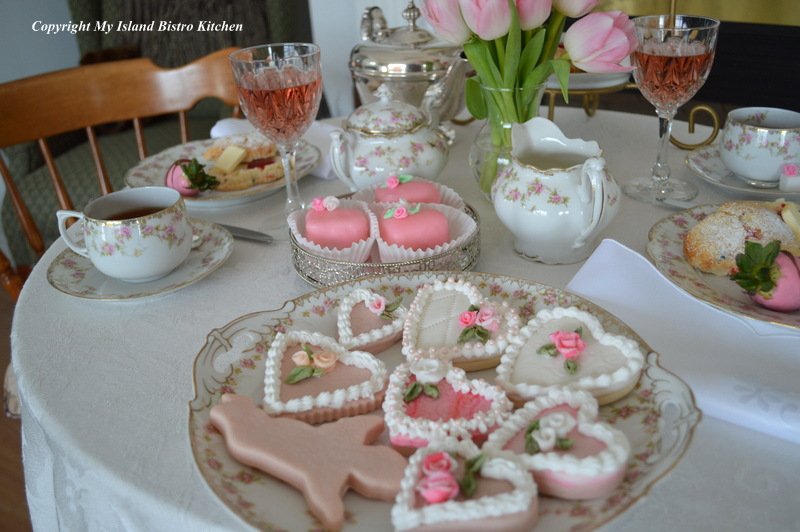
What would Valentine’s be without chocolate-dipped strawberries. In keeping with the pink theme and the delicate pink dishes, I have dipped the strawberries in pink chocolate.
Chocolate Dipped Strawberries
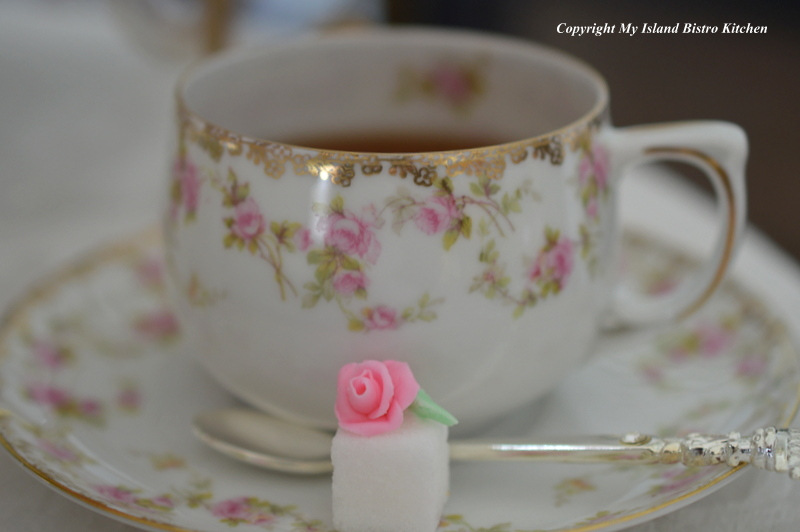
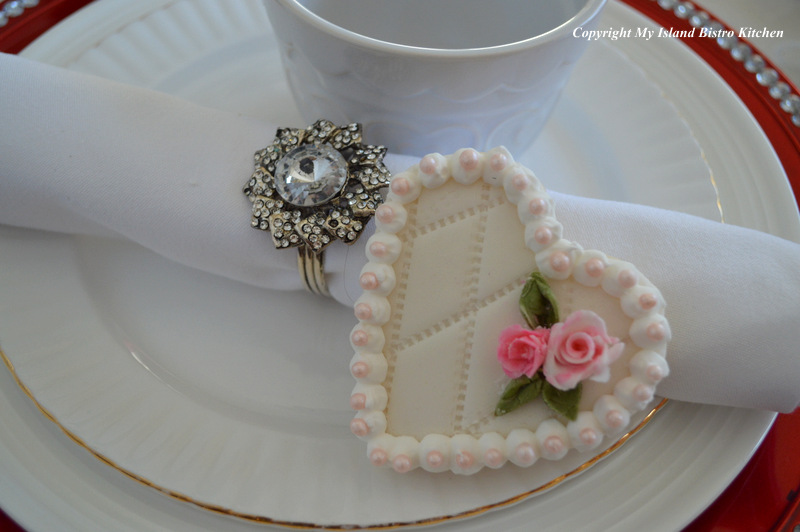
These dishes with their dainty pink rose design are perfect for a Valentine’s tea.
These hand-decorated cookies are sure to be a conversation piece.
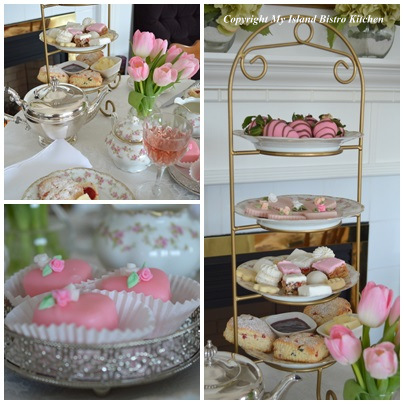
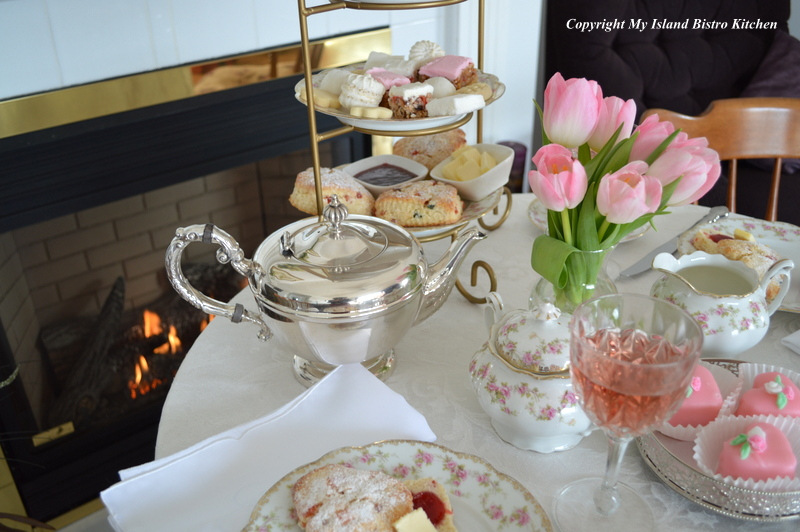
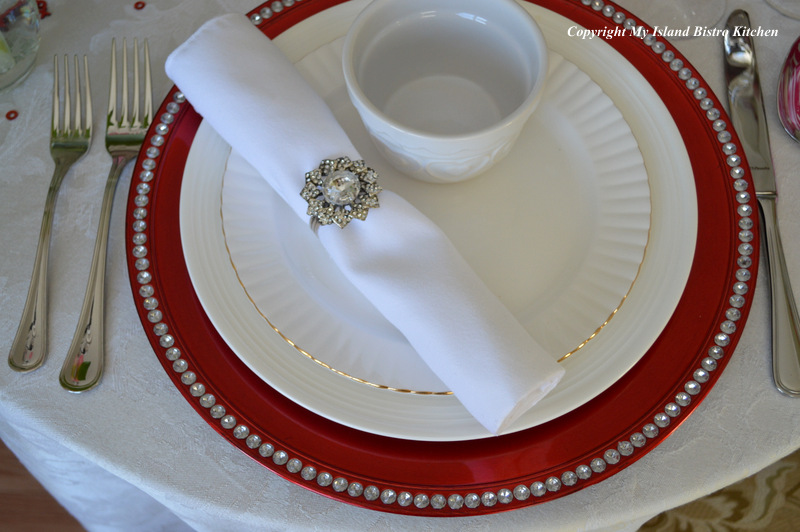
This four-tier server is perfect for small tea tables since it doesn’t take up much space yet accommodates the different courses of the tea.
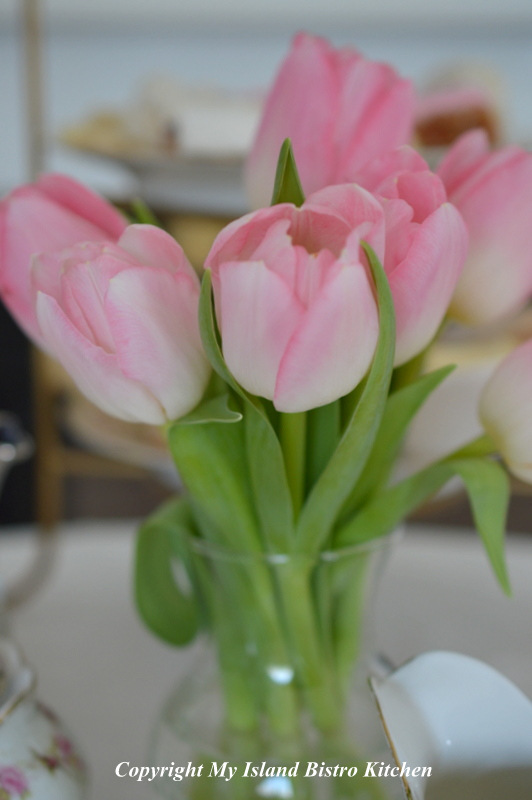
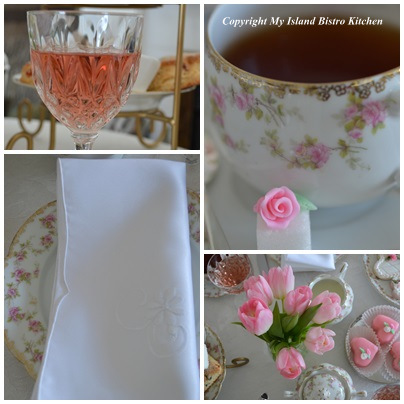
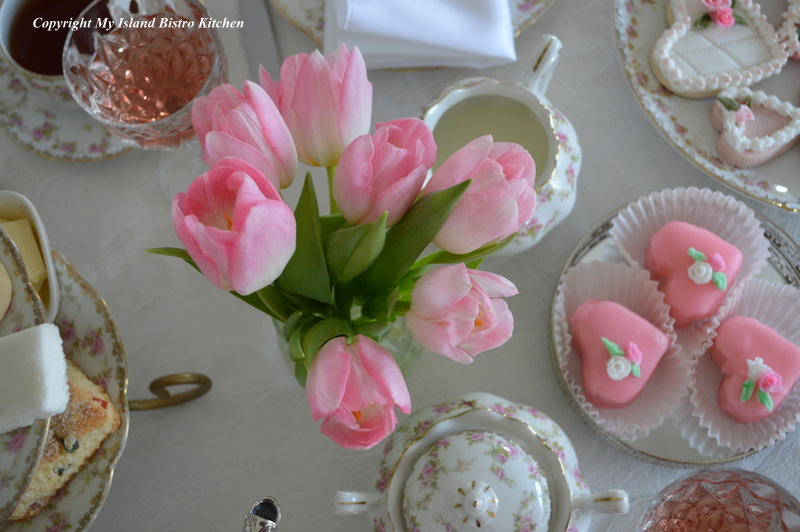
While roses are the most commonly associated flower with Valentine’s, there are other flowers that are equally as beautiful. Today, I have chosen delicate pink tulips from the greenhouses of Vanco Farms in Mount Albion, PEI.
Tulips are said to symbolize perfect love and the different colors of tulips have different meanings. Pink tulips symbolize affection and caring.
Can you tell the color theme was pink!
These scones, fresh from the oven, and lightly dusted with confectioner’s sugar, melt in the mouth and are a perfect prelude to the next course of sweets!
I like this antique silver teapot. It lends elegance to the table.
Even Cupid drops in for a visit!
There is something cozy about a winter afternoon tea by the fireside.
I love this pink and white tea set. So delicate.
The tiny flowers on the cookies and petit fours are made from fondant.
I hope you have enjoyed a glimpse into my Valentine’s Tea.
Thank you for visiting “the Bistro” today.
Be sure to visit my Facebook page atMy Island Bistro Kitchen. You may also wish to follow me on twitter @PEIBistro, on Pinterest at “Island Bistro Kitchen”, and on Instagram at “PEIBistro”.
As many of you know, I am part of the year-long Canadian Food Experience Project. Each month, food blogger participants are prompted by a prescribed theme upon which to base a posting on their individual blogs. The February theme is “My Canadian Love Affair”.
What follows is the menu and description of my Valentine’s dinner 2014, using several of my favorite Island food products. In order to meet the timelines of the Project, I have prepared my dinner a week early so it can be included in the Project’s monthly round-up. My Canadian Love Affair is all about the great local food produced on Prince Edward Island, Canada’s smallest province.
When I think of foods that I love, well….there are many! But, coming from an Island blessed with rich red fertile soil and surrounded by the sea, I would have to say that seafood and potatoes would rank high on my list. So, for my Valentine’s dinner, I have incorporated both but the potatoes in one of the recipes may be presented in a form that could surprise some of you. Here’s a taste to whet your appetite ….
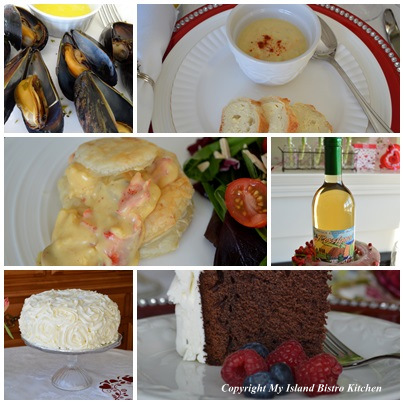
The following is the four-course menu for my Valentine’s Dinner which features some of my favorite Island products:
Starter
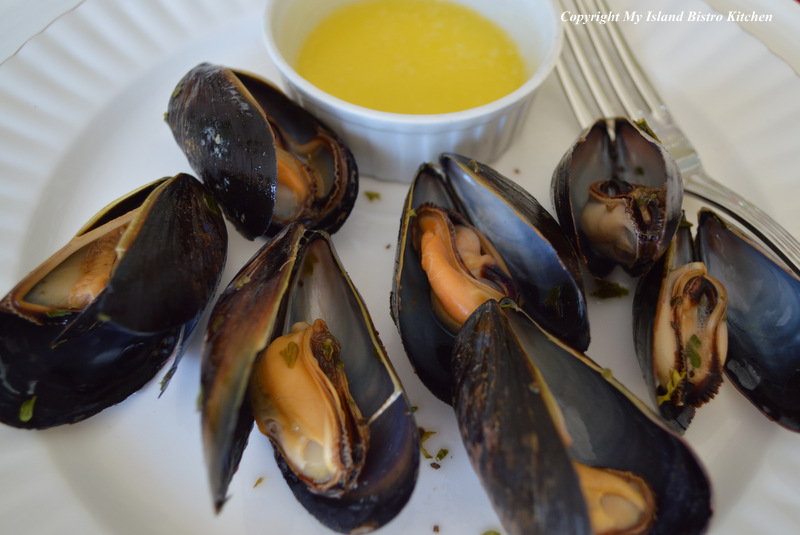
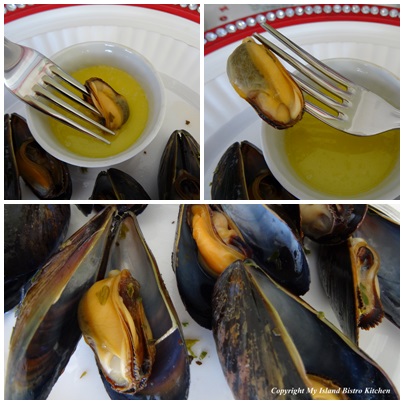
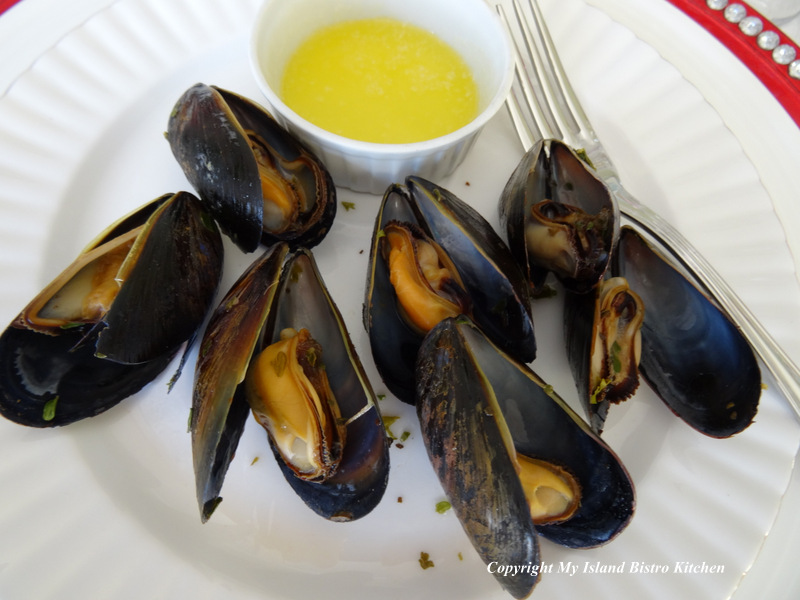
Island Mussels
(steamed in apple cider and herbs and dipped in Island-churned butter)
Soup
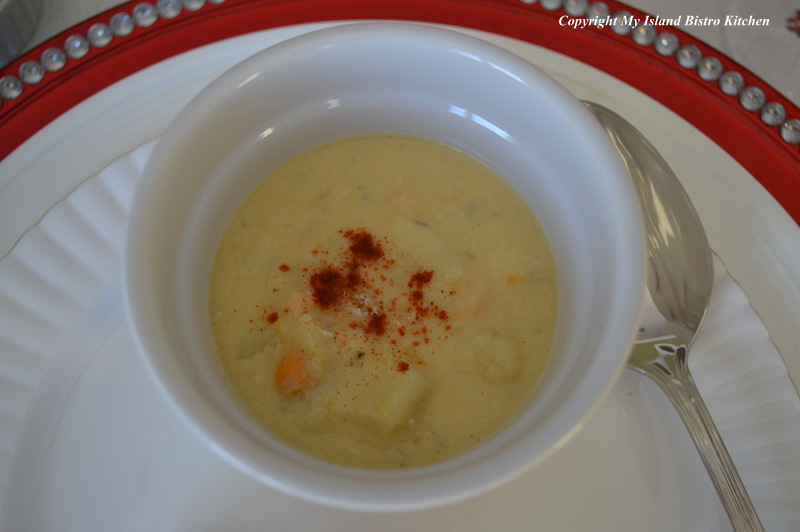
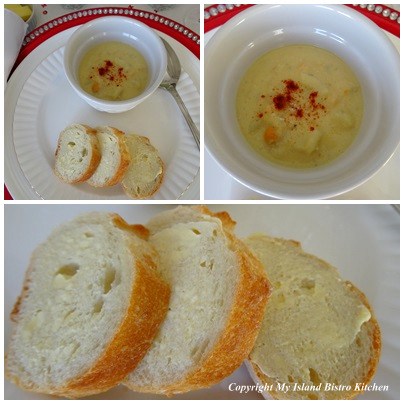
Jeff McCourt’s PEI Seafood Chowder
(a rich, smooth, and creamy chowder filled
with a variety of PEI seafood and Island potatoes)
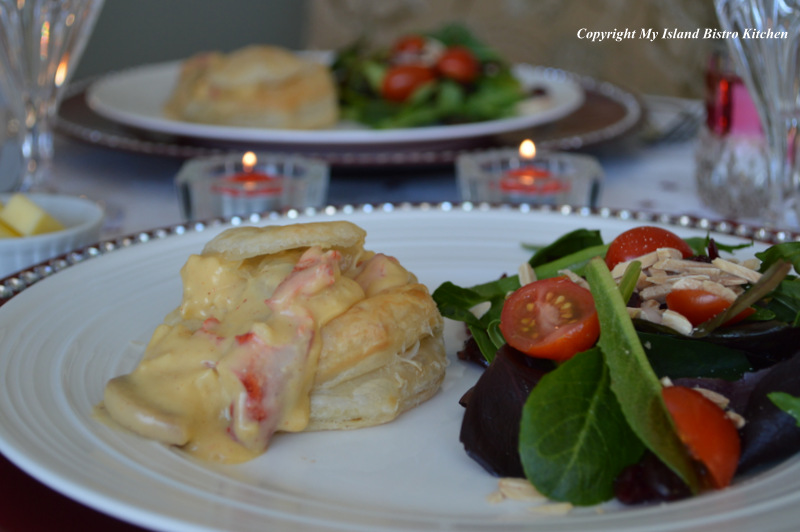
Main
Lobster Newburg served in a patty shell accompanied by a crisp green salad
(lobster and mushrooms in a rich sherry and cheese sauce)
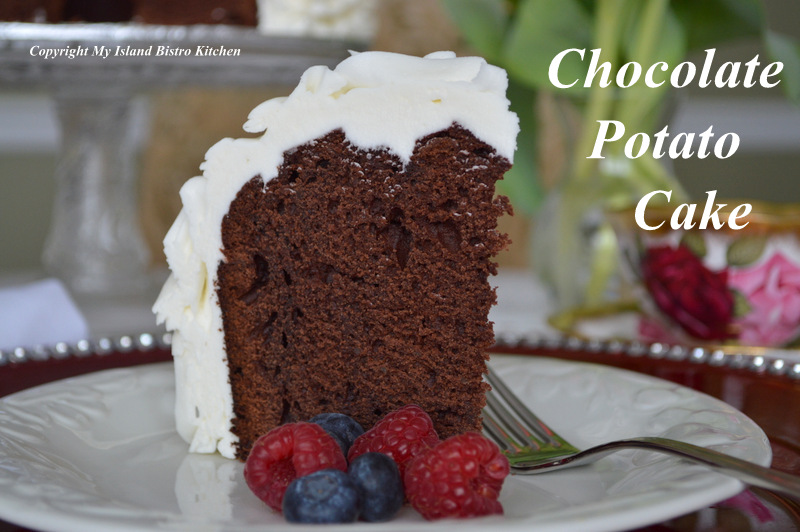
Dessert
Chocolate Potato Cake
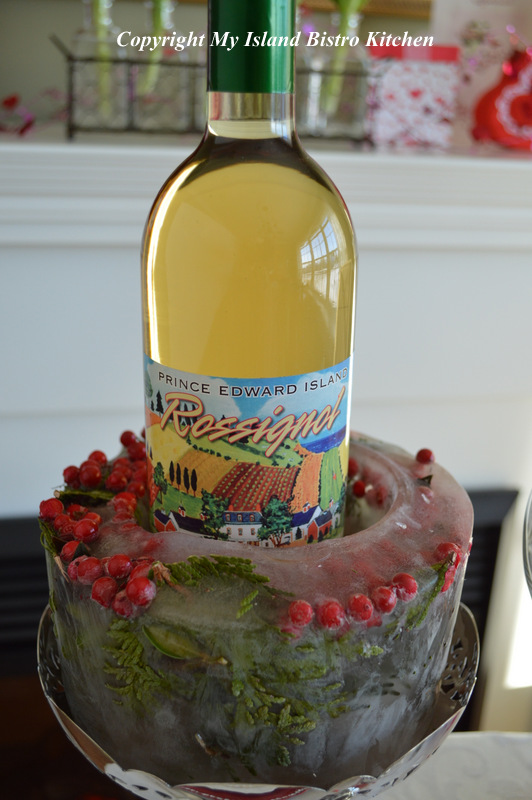
Wine Pairing: Rossignol’s Little Sands White Wine (PEI)
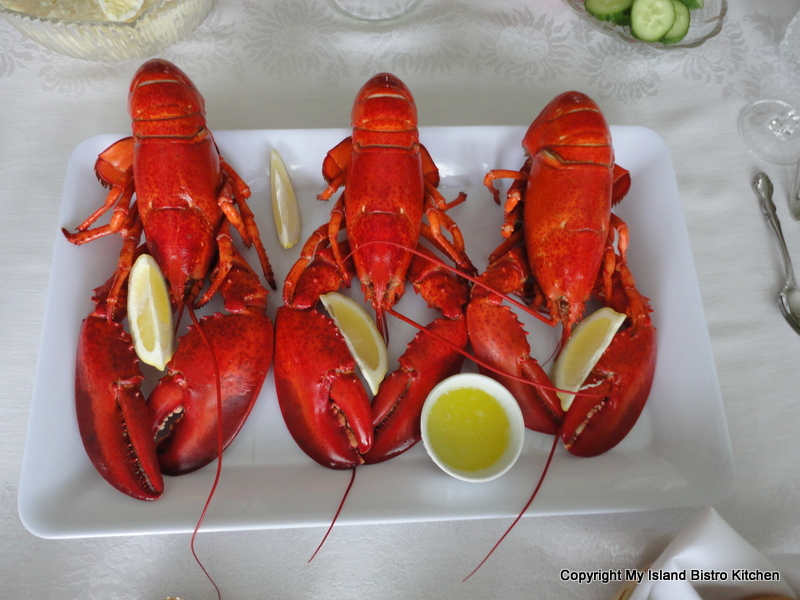
PEI Mussels
It would be hard to surpass PEI mussels. They are shipped all over the globe and are world renowned. There are many ways to prepare mussels and there are many different liquids in which they can be steamed, each of which will give a slightly different flavor to the mussels. The important thing about steaming mussels is to use very little liquid. Using too much liquid will diminish the flavor of the mussels. It is the steam from the liquid that forces the mussel shells open, not the amount of liquid itself. These delicacies take very little time to cook – they are cooked when the shells open, a process that generally takes about 5-7 minutes. Be sure to discard any shells that have not opened during the steaming process.
Today, I have steamed the mussels in a small amount of apple cider enhanced by a sprinkle each of lemon thyme, parsley, and basil all dried from our garden last summer. How much liquid is needed is based, of course, on how many mussels are being steamed. Because I was only steaming about 15-20 mussels for these two appetizers, I only used about 2 tbsp of apple cider.
While mussels are used in various recipes, including mussel chowder, the most common way to eat mussels on the Island is dipped in melted butter (oh-là-là!). Mussels are a common food found at many get-togethers because they are quick and easy to prepare and are so very tasty.
For the second course, I couldn’t bypass an all-time favorite of mine – a good seafood chowder.
Seafood Chowder
This recipe comes courtesy of the Culinary Boot Camps at the Culinary Institute of Canada in Charlottetown. This award-winning recipe was developed by Chef Jeff McCourt who was the chef instructor at the one-day “Island Flavors” Boot Camp that I attended a couple of years ago. This chowder was one of the dishes that participants made at the Boot Camp. The Culinary Institute kindly gave me permission to share the seafood chowder recipe as part of the story I was writing on the Boot Camps. If you find yourself on PEI during the summer/fall seasons when the Culinary Boot Camps are operating, this is a fantastic way to learn about cooking with local Island products and flavors. Click here to see my story on the Boot Camps and to get the PEI Seafood Chowder recipe.
I have made many seafood chowder recipes but have not found any that I liked better than this one. It is filled with a great variety of delectable Island seafood along with PEI potatoes and has a rich, tasty chowder base. Seafood chowder is a great way to sample several different kinds of local seafood all in one dish. This recipe suggests a variety of seafood that includes lobster, oysters, clams, mussels, scallops, and crab. On PEI, we would typically serve the seafood chowder with crusty rolls, biscuits, or baguette slices.
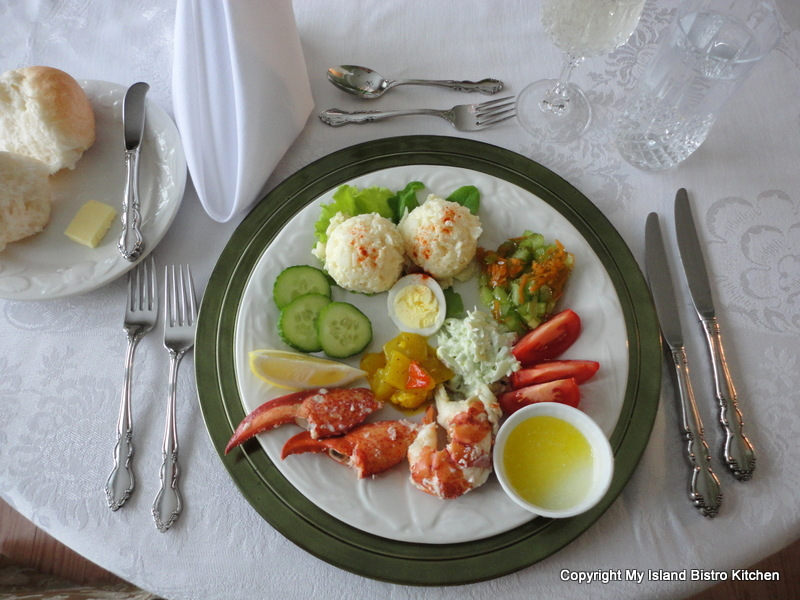
For my main course, I simply had to choose lobster! Lobster is still the seafood king on the Island and Islanders love their lobster.
Lobster
The most typical way Islanders enjoy their lobster is straight out of the shell, dipped in melted butter, and served with potato salad, coleslaw, and rolls. A jellied salad and slices of tomato and cucumber are also often included.
There are numerous enterprises around the Island that, seasonally, serve lobster suppers that generally consist of mussels, seafood chowder, lobster in the shell, salads, rolls, and a selection of pies and other desserts. There are three main lobster supper venues on PEI. Saint Anne’s Church Lobster Suppers in Hope River, not far from Cavendish, PEI, began in 1963 when a priest came up with the idea to have lobster suppers as a means to raise money to pay off the $35,000 mortgage on the church. New Glasgow Lobster Suppers in New Glasgow, in operation since 1958, and Fishermen’s Wharf Restaurant in North Rustico also serve full lobster suppers as well. A traditional lobster supper at one of these establishments is a must-stop for lobster lovers visiting PEI. In addition, most restaurants on the Island will feature lobster in one form or another on their menus. Last summer, I crisscrossed the Island in search of the best lobster roll on PEI since these are a common menu item for many restaurants. Click here to read about which one was my favorite.
The popularity of lobster is somewhat ironic. Today, it is a high-priced food, often considered by many a luxury and reserved for special occasions. However, on PEI, that was not always the case. I remember speaking with an Island woman who grew up about 65 years ago in an Island fishing community where her father was a lobster fisherman. She remembers being embarrassed opening her lunch at school and revealing a lobster sandwich since lobster was associated with poor people! My, how times have changed!
As a child, I had no interest in eating lobster. In fact, when my family was having a “feed of lobster” at home, my mother always roasted me a chicken! They would coax me to try the lobster but it just didn’t appeal to me. Finally, as a young adult, I gave in and tried a bite of lobster….well, let’s just say that’s when my love affair with lobster began and I’ve been making up for all the years I didn’t eat it!
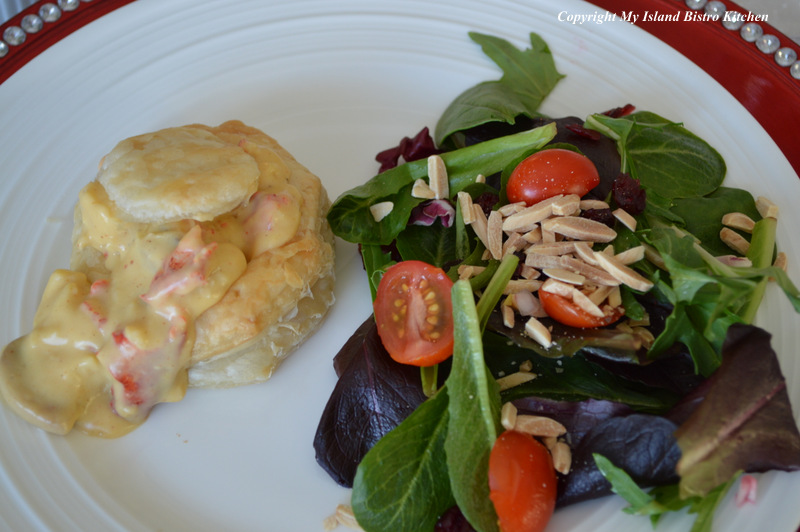
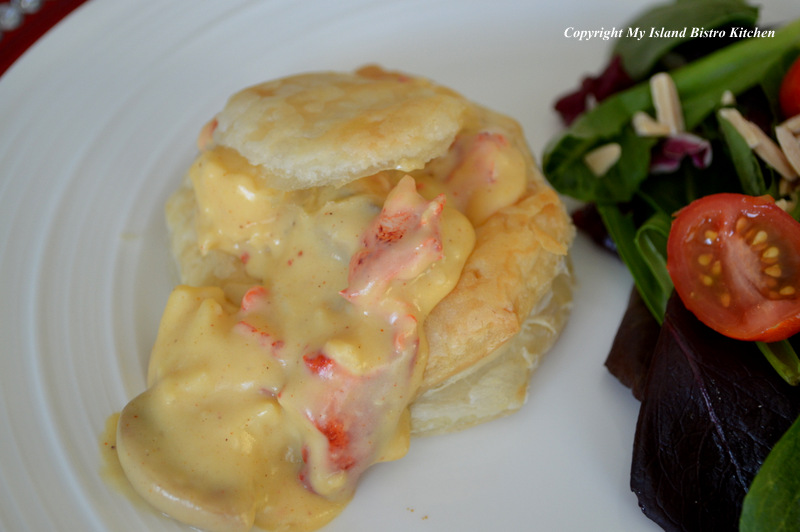
So, it would be a logical choice that I would choose lobster as the main course for a special Valentine’s dinner. I have opted to go with a traditional Lobster Newburg served in light and airy patty shells accompanied by a crisp green salad.
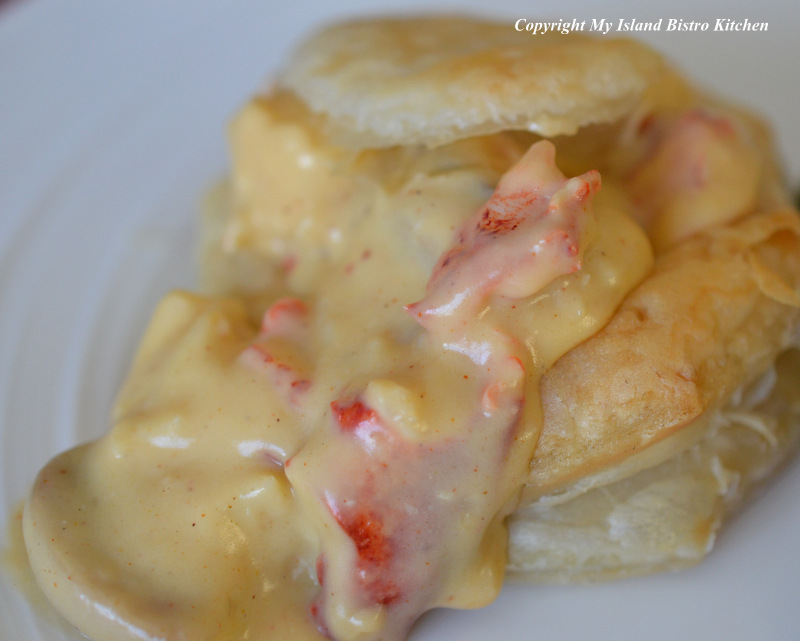
Lobster Newburg
Lobster is fished in PEI from spring through to fall so we have no winter lobster fishing season on the Island. Many of us freeze lobster meat when it is in season to enjoy in recipes, like Lobster Newburg, throughout the remainder of the year. My recipe for Lobster Newburg can be made with either fresh or frozen lobster meat.
Lobster Newburg
Lobster Newburg, although it is often considered an elaborate menu item, is really quite easy to prepare. It’s also a good way to stretch lobster to increase the number of servings you can get from the meat of a lobster. What makes Lobster Newburg so tasty and silky in texture is the sauce. This is a rich, creamy cheese and sherry sauce so large portion sizes are not necessary. I traditionally serve Lobster Newburg in patty shells. However, it can also be presented over toast points or served over a bed of steamed rice. Or, it may be served in small individual casserole dishes with a side of steamed asparagus spears. The recipe for my Lobster Newburg follows at the end of this posting.
Much as Islanders have an enduring love affair with food that comes from the sea that surrounds us, we also have a special fondness for our famous PEI potatoes. For the past two years, I have followed a couple of potato farmers from the planting of the crop to the harvesting process. To read these stories and get a couple of my favorite potato recipes, here are the two links to the postings for Smith Farms of Newton, PEI and Eric C. Robinson Inc., of Albany, PEI.
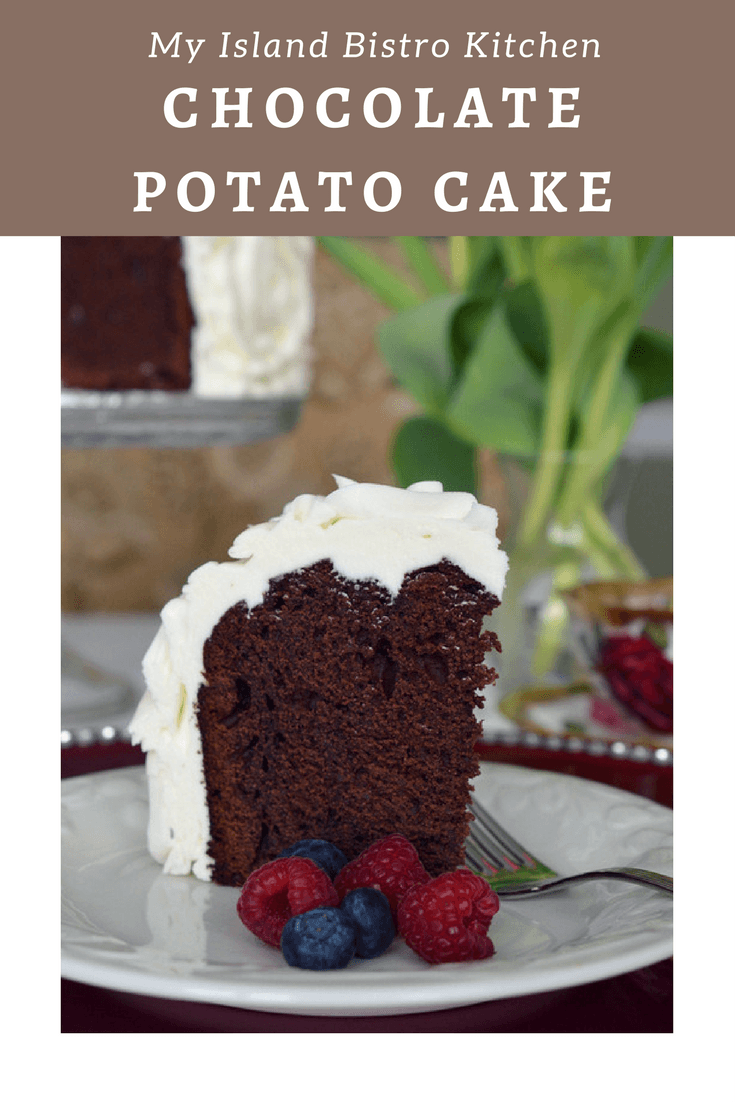
I have chosen to serve a Chocolate Potato Cake as a finale to my Valentine’s dinner. Yes, potatoes in a cake! It’s amazing how many different ways potatoes can be served. Earlier this week, I posted my recipe for Chocolate Potato Cake on my food blog.
To make this feast truly a PEI dinner, I chose a white wine from PEI’s Rossignol Winery in Little Sands, PEI. The Island has three wineries – the other two are Newman Estate Winery in Gladstone and Matos Winery in St. Catherine’s, PEI. Each makes fine wine that is a great accompaniment to any meal.
Rossignol’s Little Sands White Wine
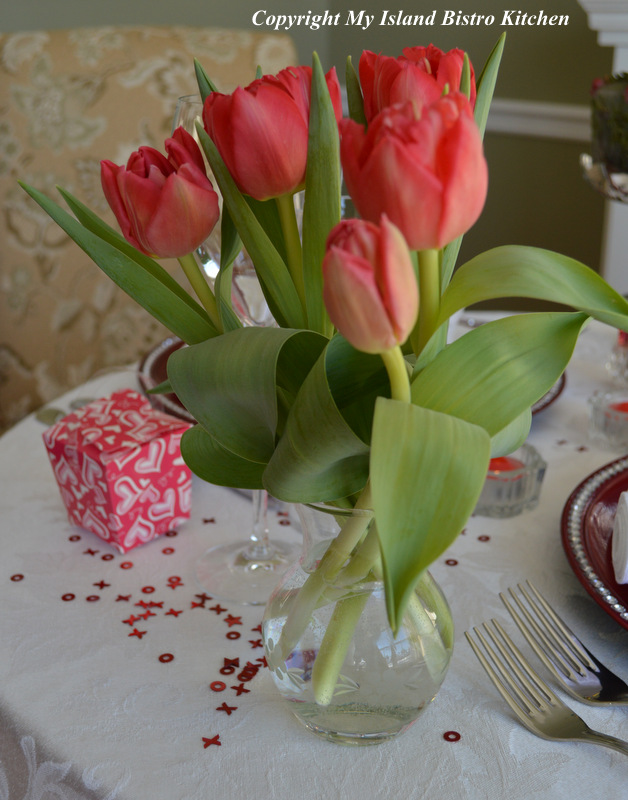
To compliment the tablesetting, I chose locally-grown tulips from Vanco Farms’ greenhouses in Mount Albion, PEI. Aren’t they beautiful flowers!
Vanco Tulips
So, this is my local flavors Valentine’s dinner for 2014, featuring some of my favorite and most loved local PEI foods and wine. I hope you enjoy them, too!
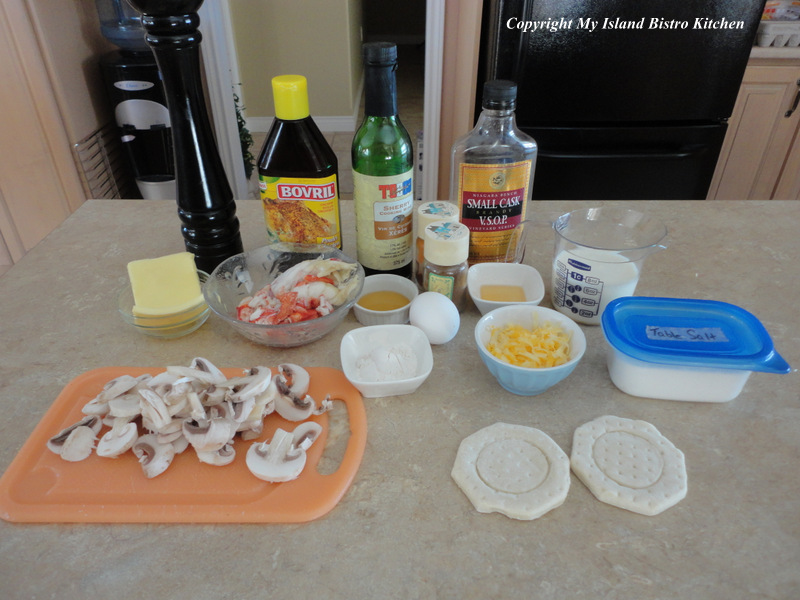
Lobster Newburg
Ingredients:
4-5 oz cooked lobster (either fresh or frozen)
1 tbsp butter
3 oz mushrooms, sliced
1 tbsp butter
1½ tbsp flour
⅛ tsp paprika
pinch nutmeg
¾ cup whole milk or half-and-half
2 tbsp grated cheddar cheese
1 egg yolk, slightly beaten
½ tbsp sherry
1½ tsp brandy
1 tsp liquid chicken bouillon
salt and pepper, to taste
Method:
Assemble ingredients.
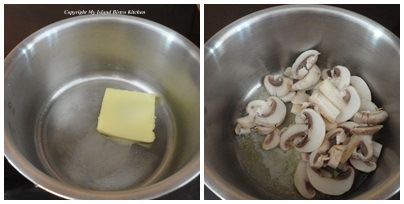
Melt first amount of butter in a medium-sized saucepan. Add and sauté mushrooms for approximately 2 minutes. Set aside.
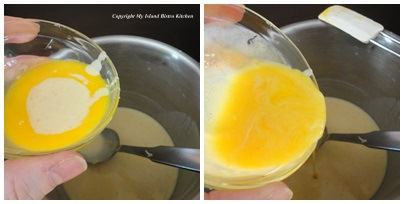
In separate saucepan, melt remaining tablespoon of butter. Add flour, paprika, and nutmeg. Whisk in the milk until mixture is smooth. Add cheese. Stir mixture constantly until slightly thickened.
Add approximately 2 tbsp of the hot sauce to the egg yolk to temper the egg so it won’t curdle when added to the hot sauce. Add the tempered egg to the sauce in the pan.
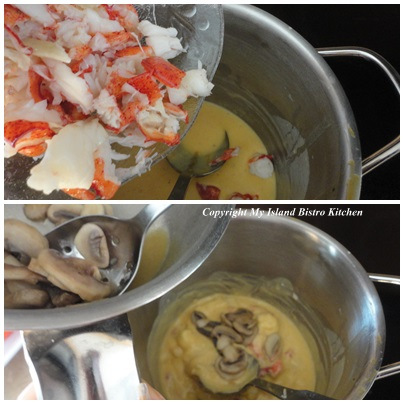
Cook for 1-2 minutes, stirring constantly, then add the lobster meat and mushrooms.
Add the sherry and brandy and cook and stir slowly for 1-2 minutes to heat the lobster and mushrooms. Add salt and pepper to taste, if desired.
Serve immediately in baked patty shells or over toast points or steamed rice.
Yield: 2-3 servings
Thank you for visiting “the Bistro” today.
Be sure to visit my Facebook page at My Island Bistro Kitchen. You may also wish to follow me on twitter @PEIBistro, on Pinterest at “Island Bistro Kitchen”, and on Instagram at “PEIBistro”.
We are familiar with cakes made with vegetables like carrot and zucchini. However, have you ever heard of potato cake?
We Islanders like our spuds, there is no doubt about it. Potatoes are a very versatile vegetable and can be prepared and served in many different ways but have you ever heard of having them for dessert? Well, combine potatoes with chocolate and some light spice seasoning and you have a really tasty cake.
What follows is my creation of a recipe for chocolate potato cake. This is a fairly dense-textured cake so don’t look for it to have the same “foggy” and fluffy texture of a typical chocolate cake mix out of a box! Despite the two cups of sugar in the recipe, it is not overly or sickeningly sweet. The potatoes are cooked and mashed really well before adding them to the cake batter. It is important that they be lump-free as, otherwise, you will have lumps in the cake batter. The mashed potatoes should be warm when added to the batter.
You may find two or three of the ingredients different in this cake recipe. For example, I have added a pinch of cayenne pepper because I find it enhances the depth of the chocolate flavor. The key, of course, is not to overdo it – if you add too much, there will be excessive “heat” in the cake….just a pinch is all it takes. The addition of the espresso powder is also another good way to draw out the flavor of the cocoa and lend a mocha flavor to the cake. I have quite a collection of balsamic vinegars from our local Liquid Gold store here in Charlottetown. One of them is the dark chocolate balsamic vinegar which is delicious when simmered on the stove, reduced down, and drizzled over ice cream. If you have never tried a good quality balsamic vinegar reduction in this way, you are missing out on a delectable treat. I added 1/2 tbsp of this balsamic vinegar to the chocolate cake batter. This is a chocolate all-the-way cake!
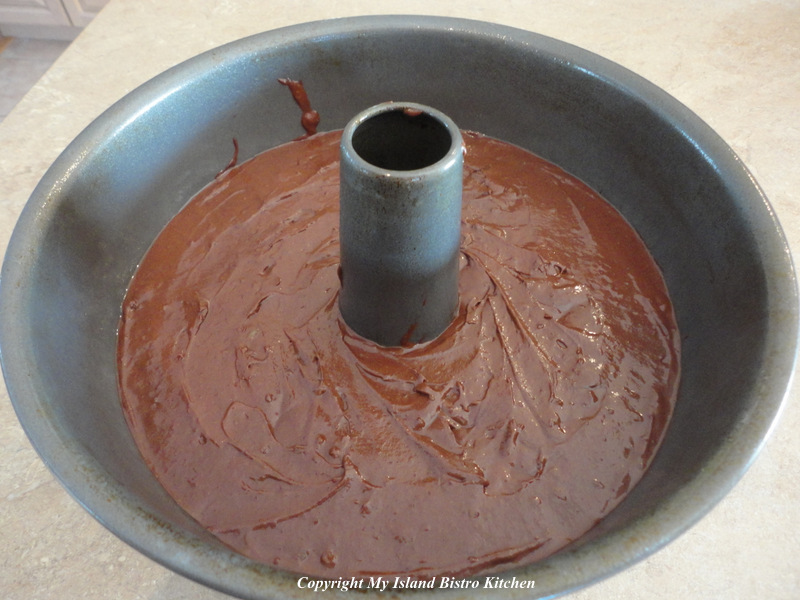
I recommend baking this cake in a 10″ tube or bundt cake pan. These pans have a hollow tube in the center of the pan and this allows dense-batter cakes to rise and bake more evenly. There is also less chance of the cake falling in the middle or the outsides of the cake baking too quickly and drying out before the centre of the cake is baked.
The key to making this cake is not to overbake it. Start checking it at about the 40-45-minute baking point. If a cake tester does not come out clean at that point, continue to bake it but check it every 4-5 minutes. If it overbakes, it will be dry.
Chocolate Potato Cake
2½ cups flour
¼ tsp salt
2¾ tsp baking powder
¼ tsp soda
1 tsp cinnamon
¼ tsp allspice
pinch cayenne
⅔ cup cocoa
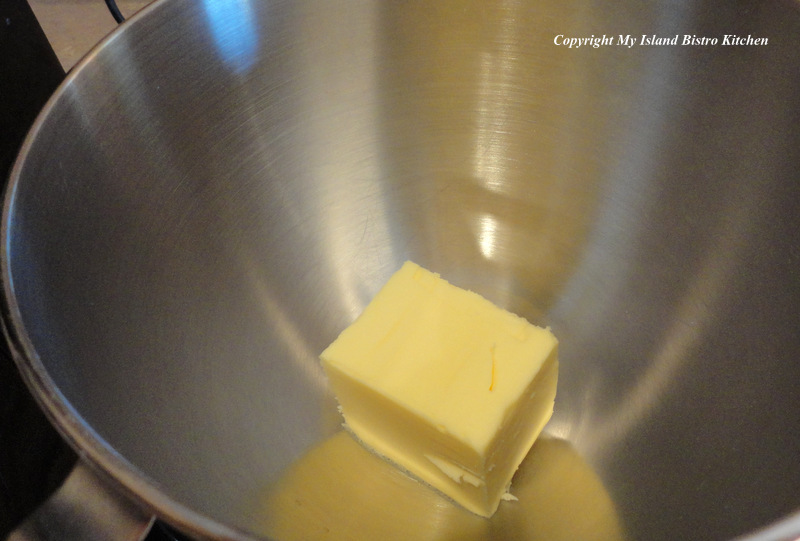
¾ cup butter
1 cup white sugar
1 cup brown sugar
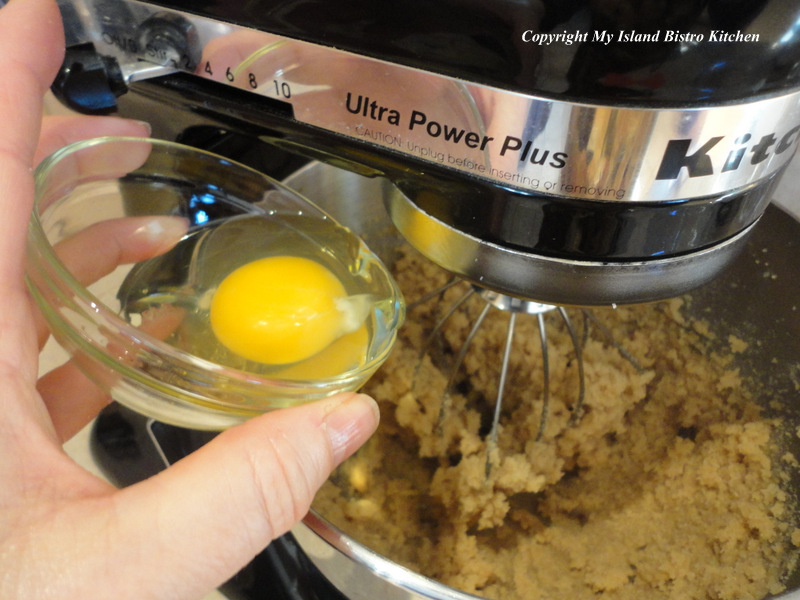
3 eggs
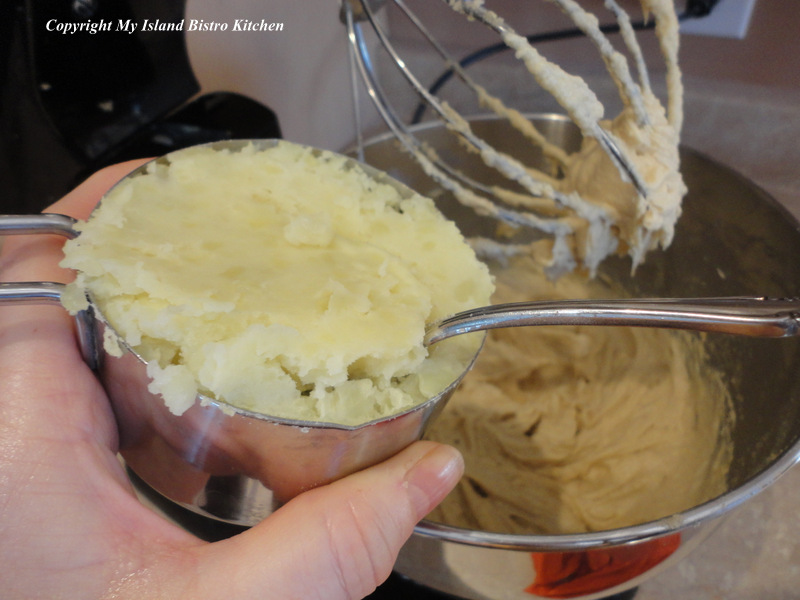
1 cup warm mashed potatoes
½ cup milk
1½ tsp espresso powder dissolved in ⅓ cup hot water
½ tbsp dark chocolate balsamic vinegar (optional, but good)
1½ tsp vanilla
Method:
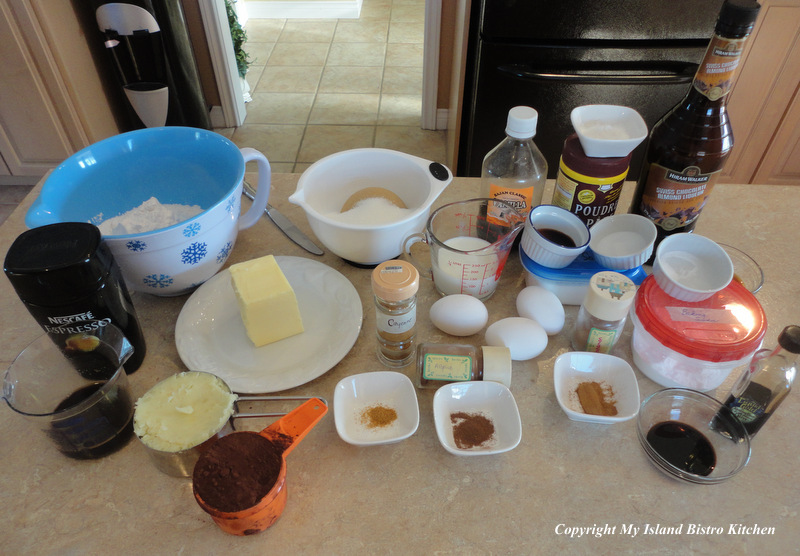
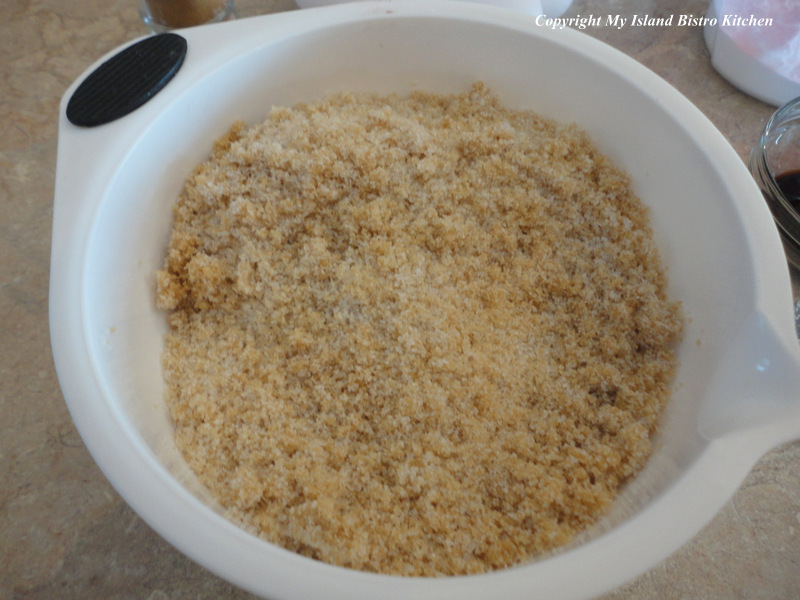
Assemble ingredients.
Ingredients for Chocolate Potato Cake
Preheat oven to 350°F.
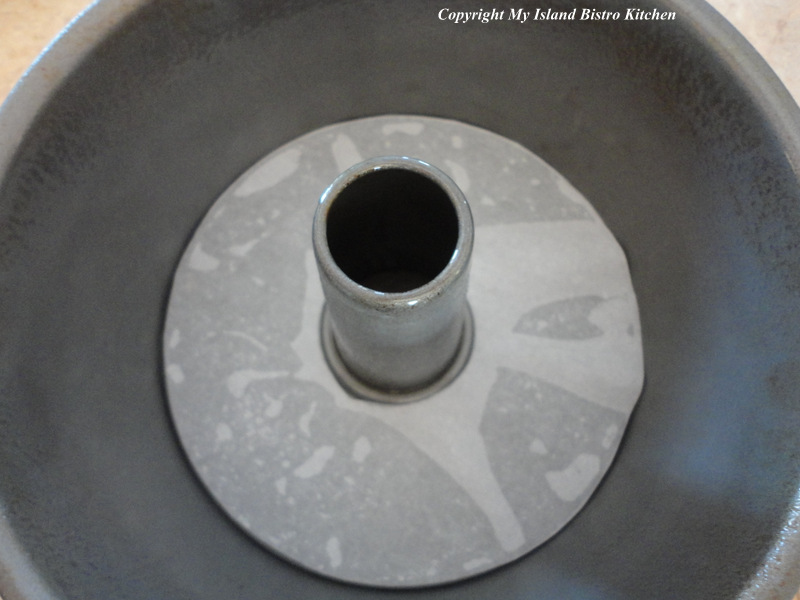
Line bottom of 10” tube pan with parchment paper.Grease or spray cooking oil on sides of pan.
Tube Pan Prepared for Chocolate Potato Cake
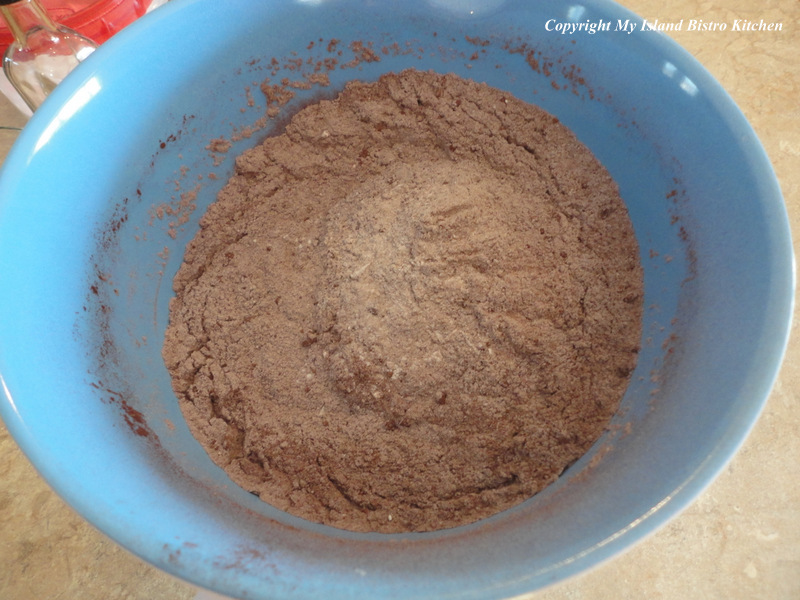
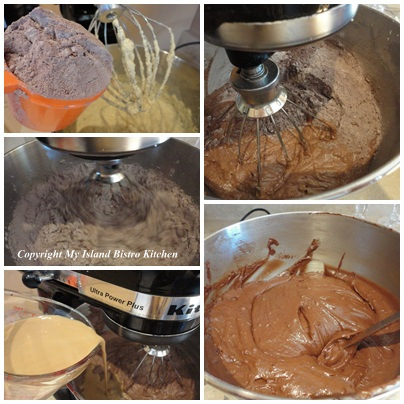
Sift or whisk together the flour, salt, baking powder, soda, cinnamon, allspice, cayenne, and cocoa.Set aside.
In separate bowl, combine the brown and white sugars.
In bowl of stand mixer, cream the butter and sugars until fluffy (2-3 mins on medium-high speed).
Add the eggs, one at a time and beat well to incorporate after each addition.
Add the mashed potatoes and beat on medium-high speed for 1-2 minutes until batter is smooth.
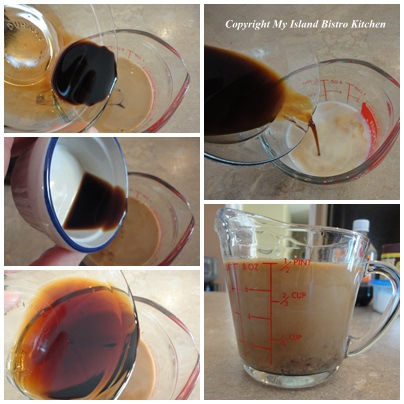
Add the coffee, liqueur, balsamic vinegar, and vanilla to the milk to make 1 cup of liquid. (Note – if you choose not to add the liqueur and/or balsamic vinegar, replace them with milk so that the liquid measurement equals 1 cup.)
Add the sifted dry ingredients alternately with the liquid ingredients, starting and ending with the flour mixture (process is three additions of dry ingredients to two of liquid), mixing well after each addition.
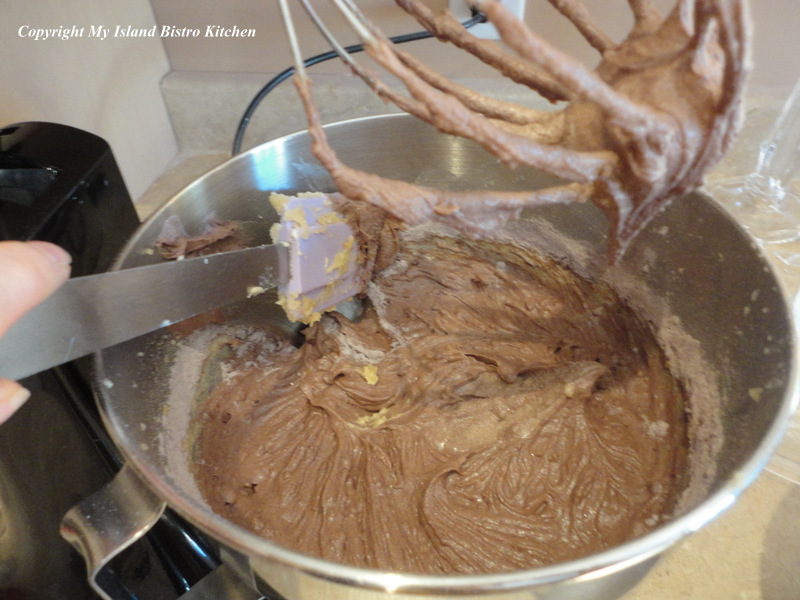
Scrape sides of bowl with spatula as necessary to ensure all ingredients are incorporated.
Scrape Sides of Bowl Frequently
Pour batter into prepared tube pan.
Bake for apx. 40-55 minutes or until cake tester inserted in center of cake comes out clean and the cake springs back to a light touch.Do not overbake or cake will be dry.
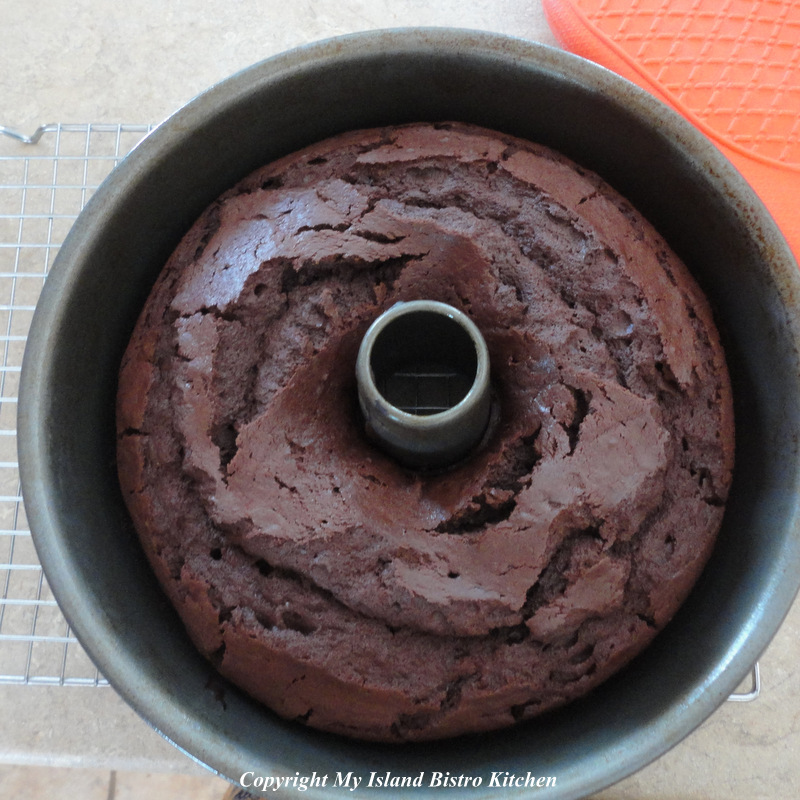
Baked Chocolate Potato Cake
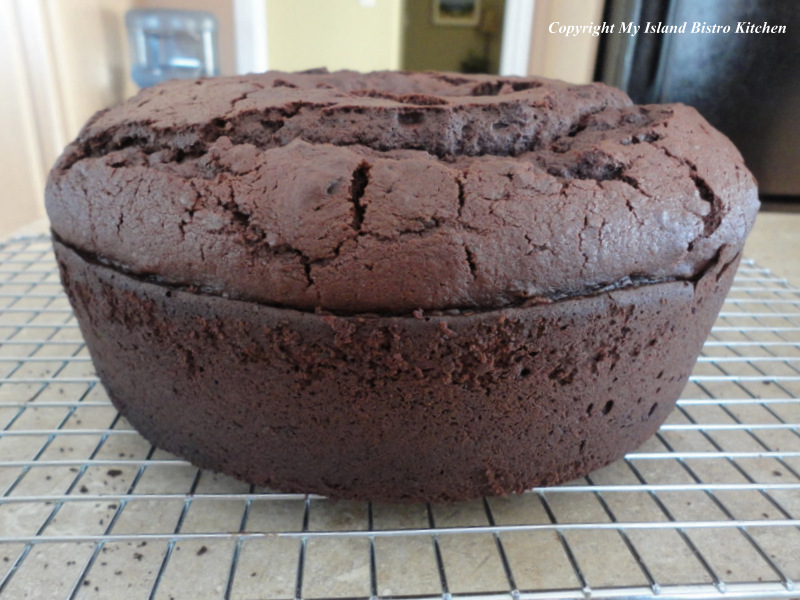
Let cake cool in pan for 10 minutes then transfer to a wire rack to cool completely.
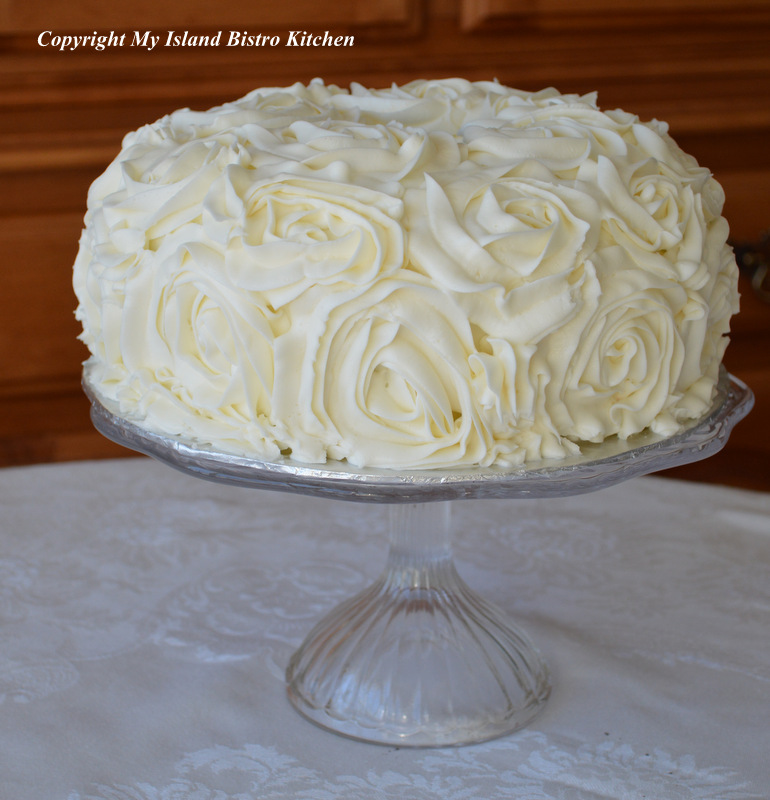
Ice with your favorite frosting.
Enjoy!
Pin Me to Pinterest!
Chocolate Potato Cake
Thank you for visiting “the Bistro” today.
Be sure to visit my Facebook page atMy Island Bistro Kitchen. You may also wish to follow me on twitter @PEIBistro, on Pinterest at “Island Bistro Kitchen”, and on Instagram at “PEIBistro”.
(Mostly) PEI and Maritime Food – Good Food for a Good Life!