Ever wonder about the history of old vintage recipes? I so wish that accurate records existed about the origins of some of the old nostalgic recipes like the one for Queen Elizabeth Cake, for example. Continue reading Queen Elizabeth Cake Recipe
Monthly Archives: April 2017
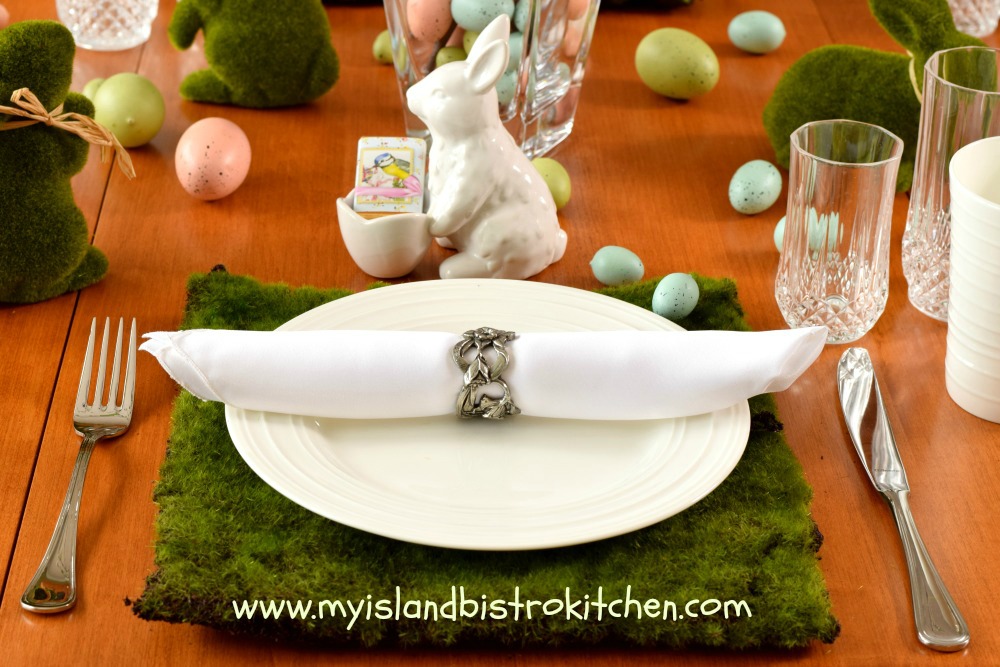
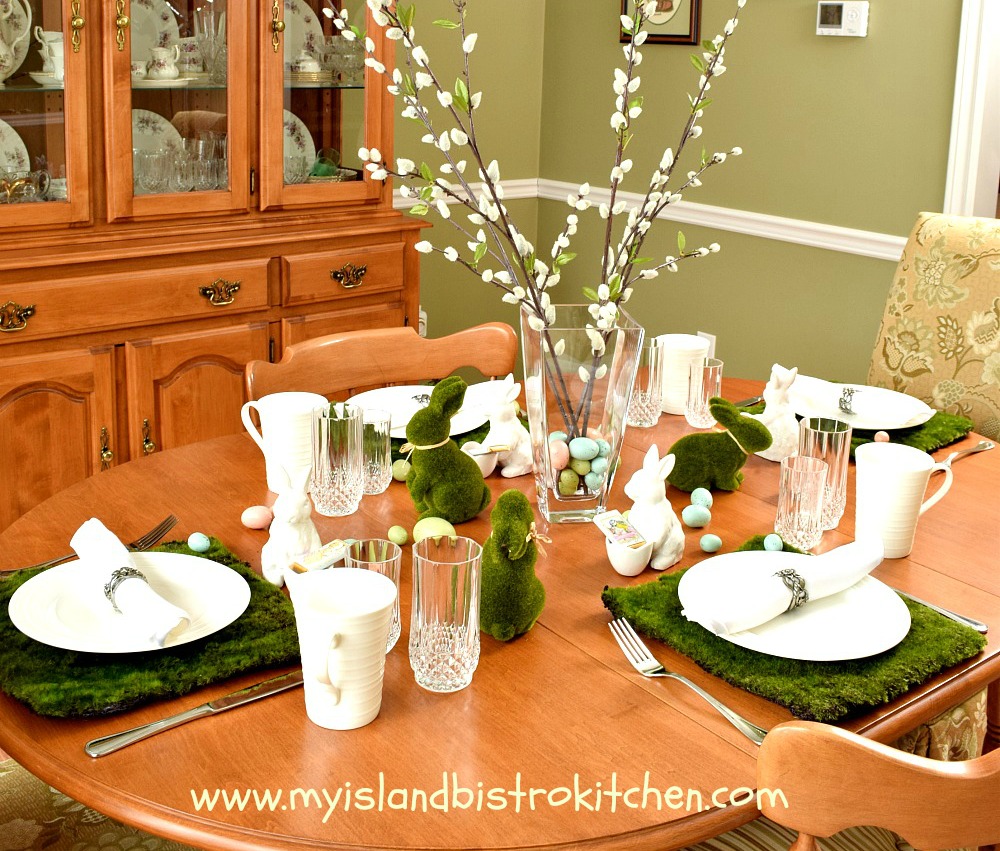
The Bunnies Are Ready For Easter Breakfast Tablesetting
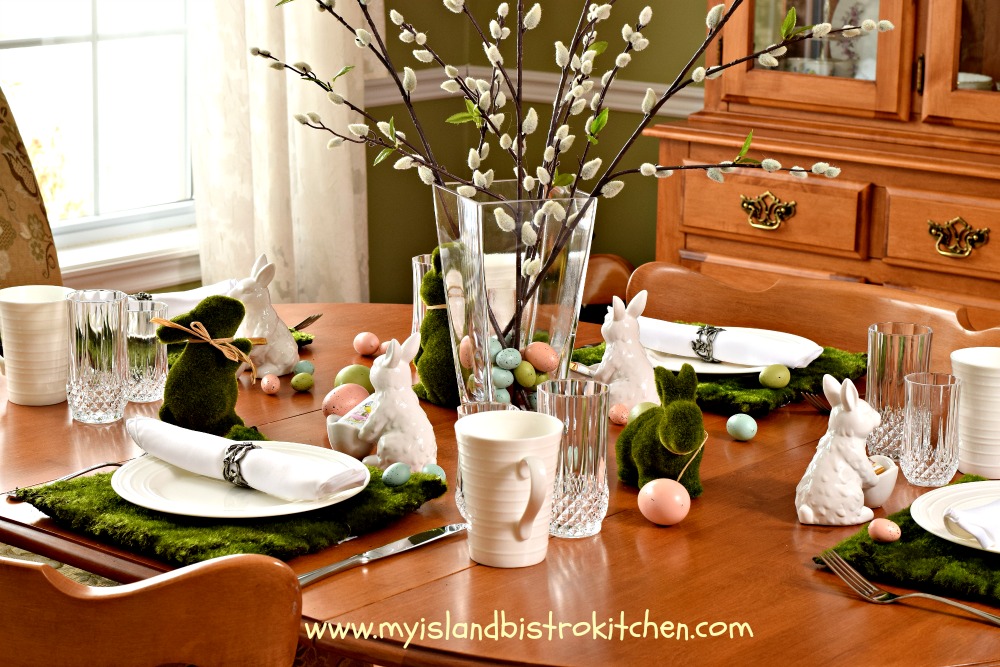
It’s all about whimsy, springtime, and bunnies in this earthy-themed tablesetting for Easter morning breakfast.
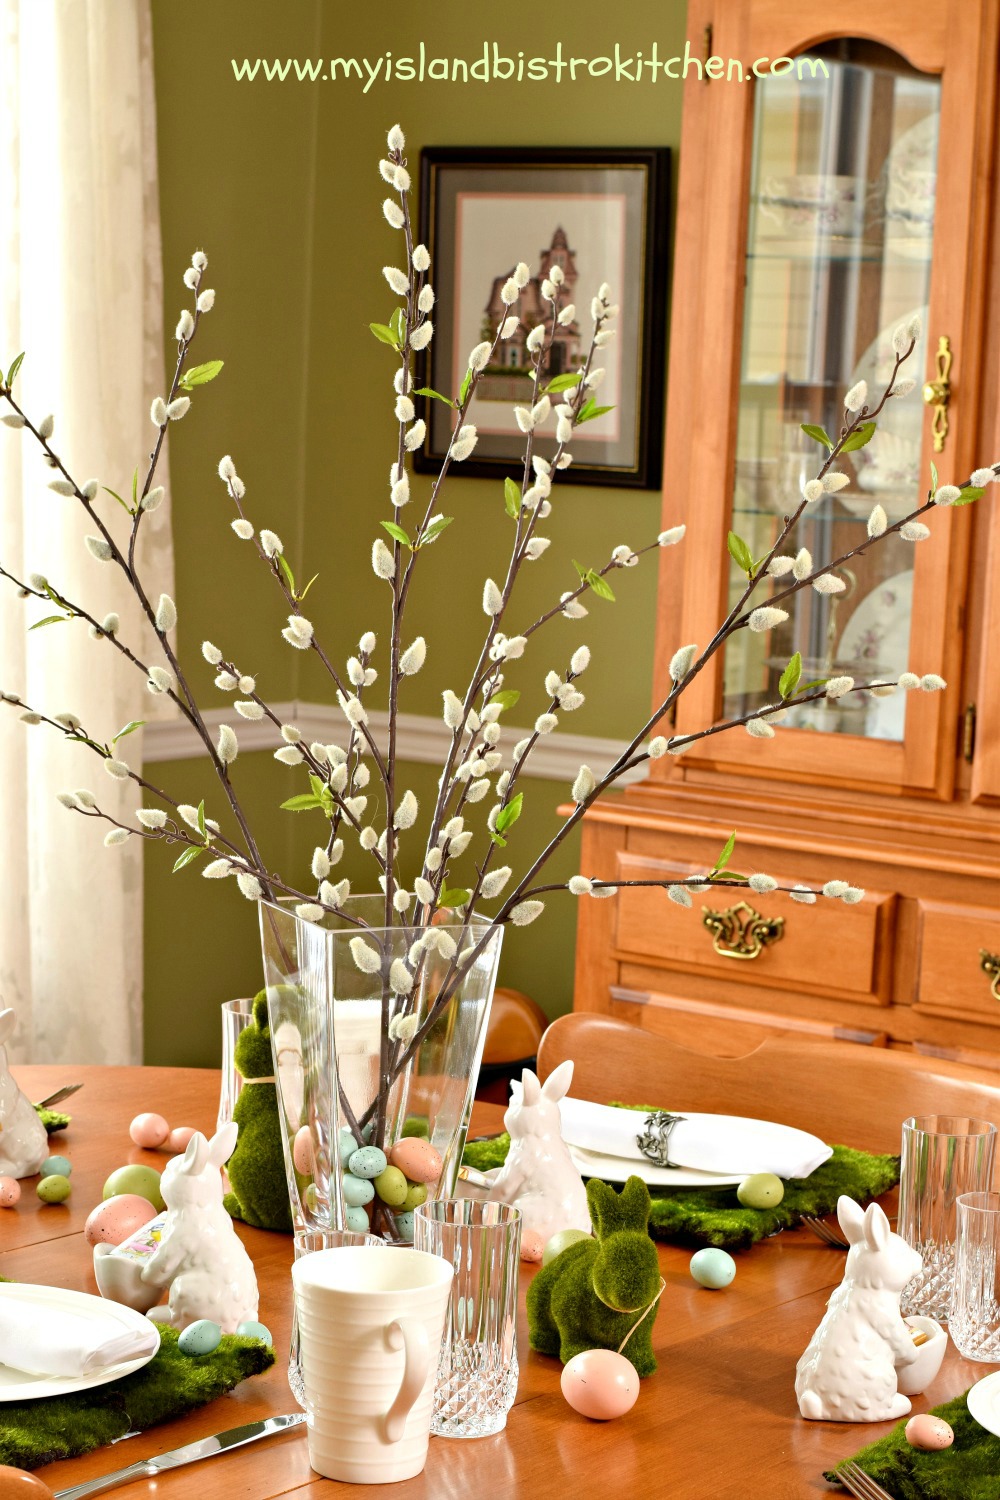
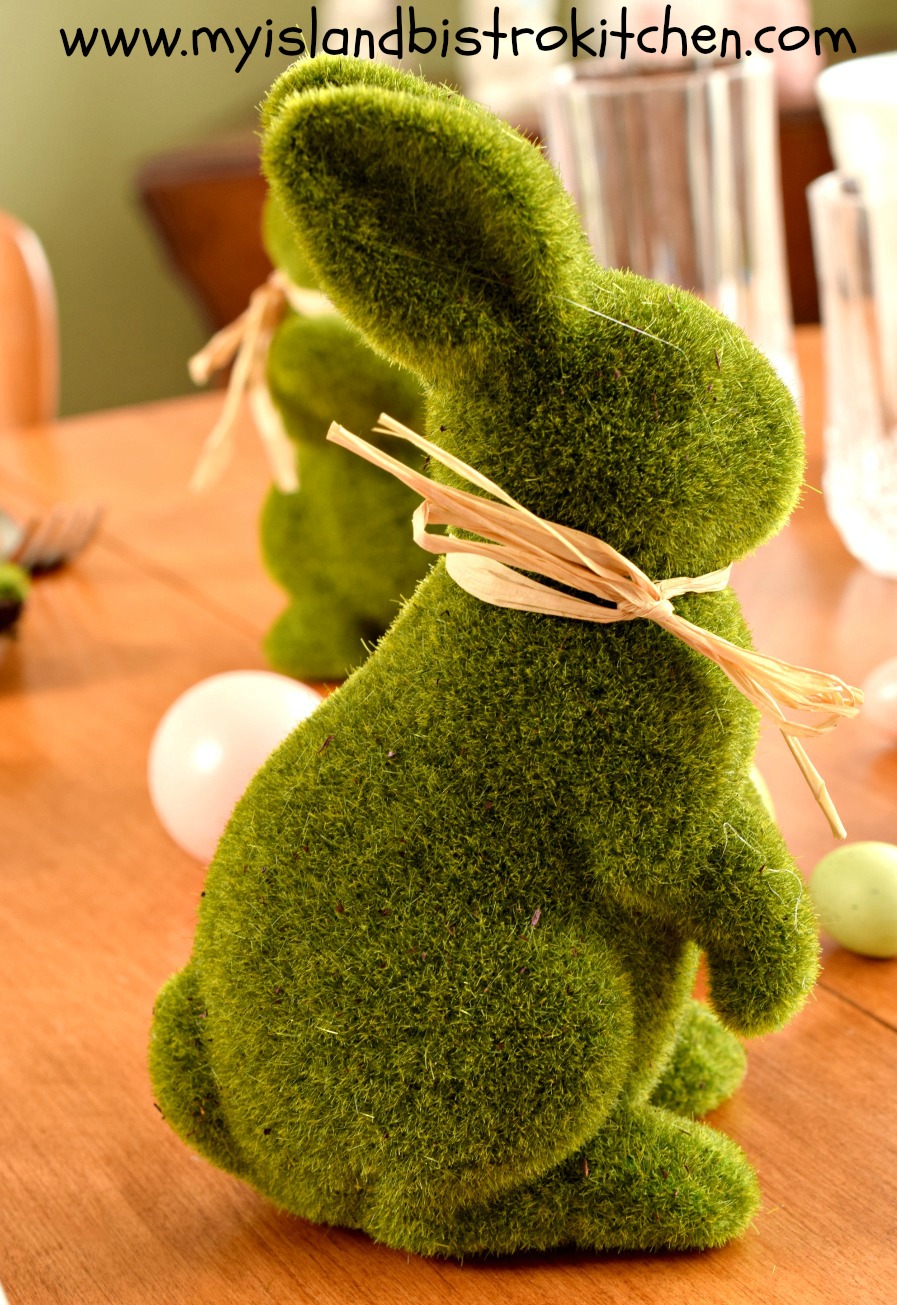
Simple stalks of pussywillows are casually contained in a glass vase and secured by colorful Easter eggs at their base. Easter eggs are strewn about the table in and among whimsical little green moss bunnies. I really think the trio of green bunnies is on an Easter egg hunt!
These little fellas are so cute!
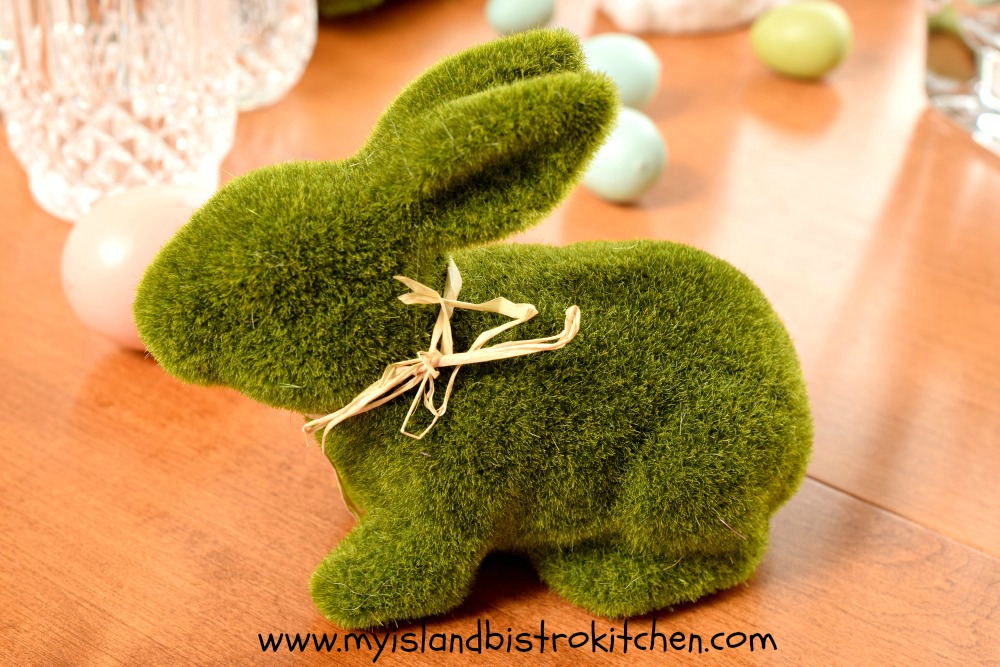
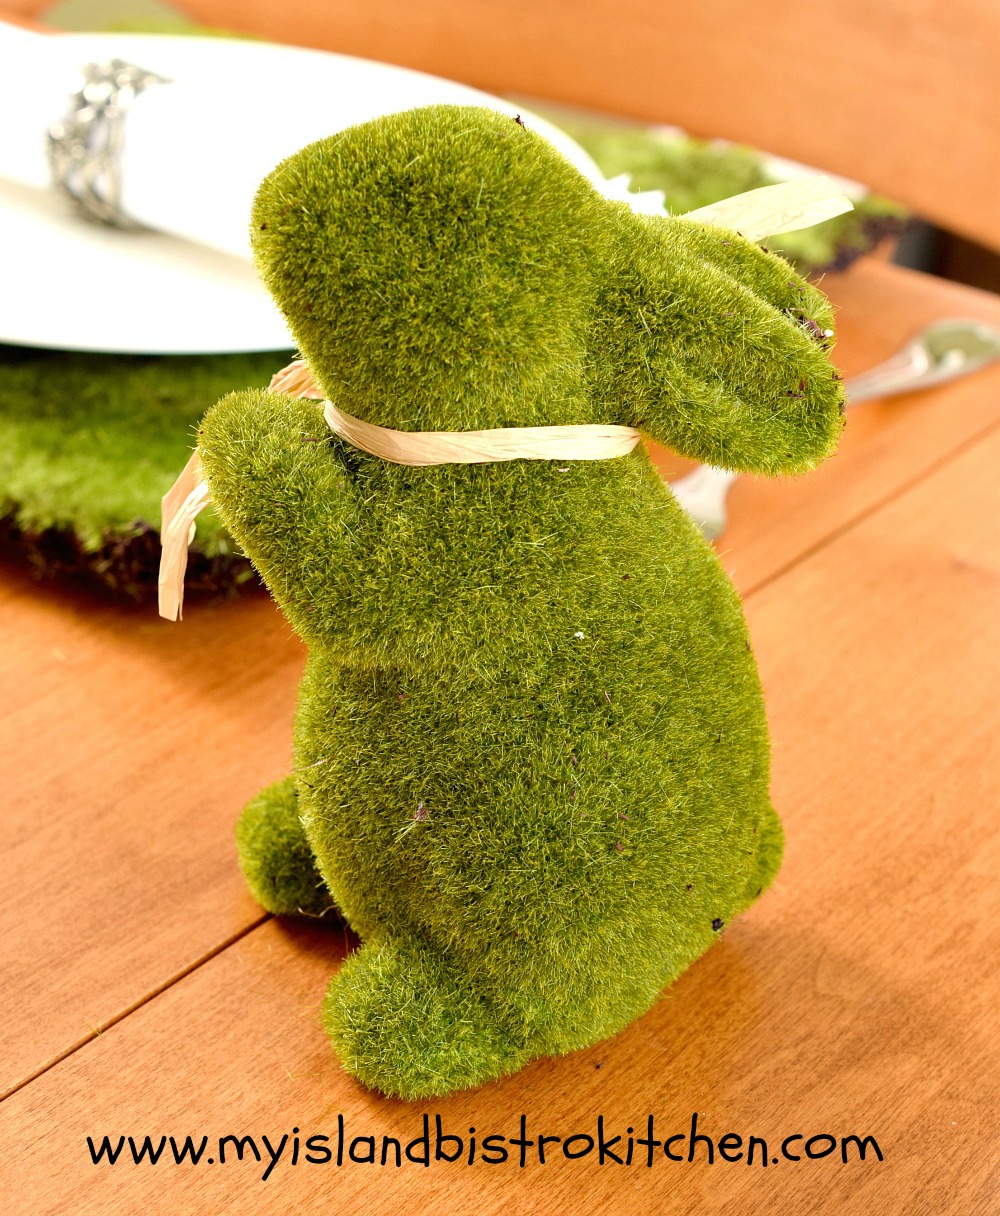
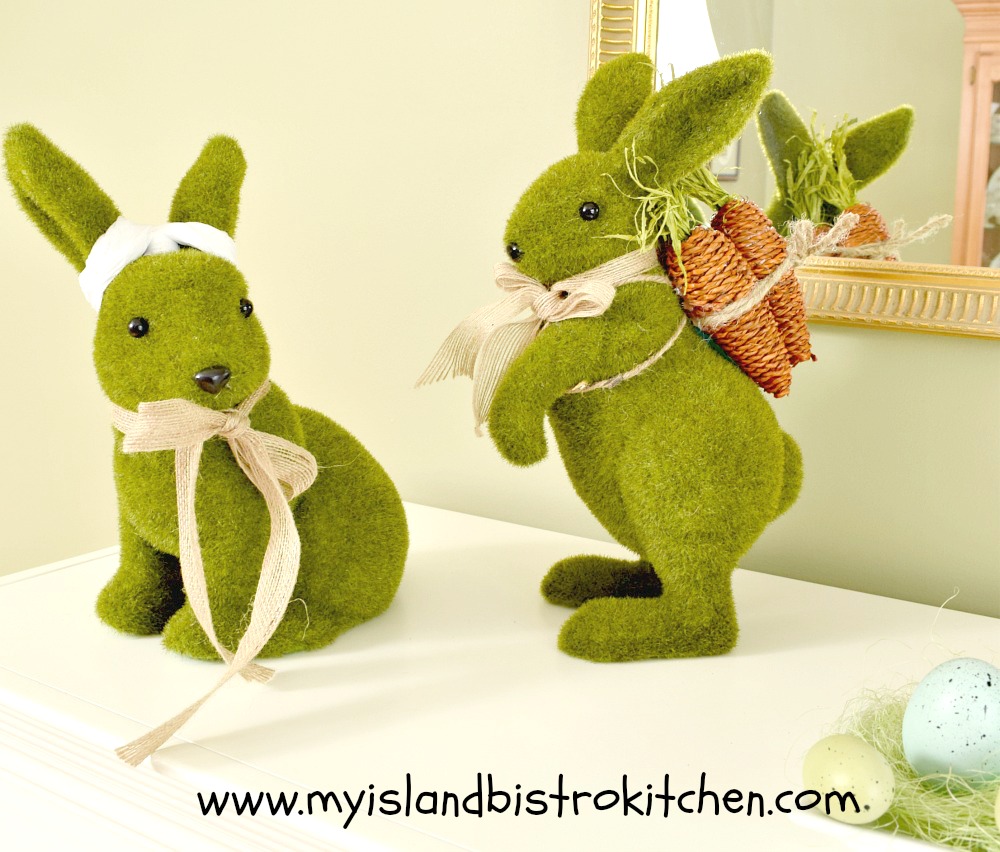
The green faux-moss bunnies are kind of a refreshing change from the traditional pastel colored bunnies.
In a departure from traditional placemats, I have used squares of imitation moss. The white dinnerware pops atop the green moss mats. White dinnerware works for any occasion and really is a good investment. I’ve used very plain flatware in keeping with the informal tablesetting.
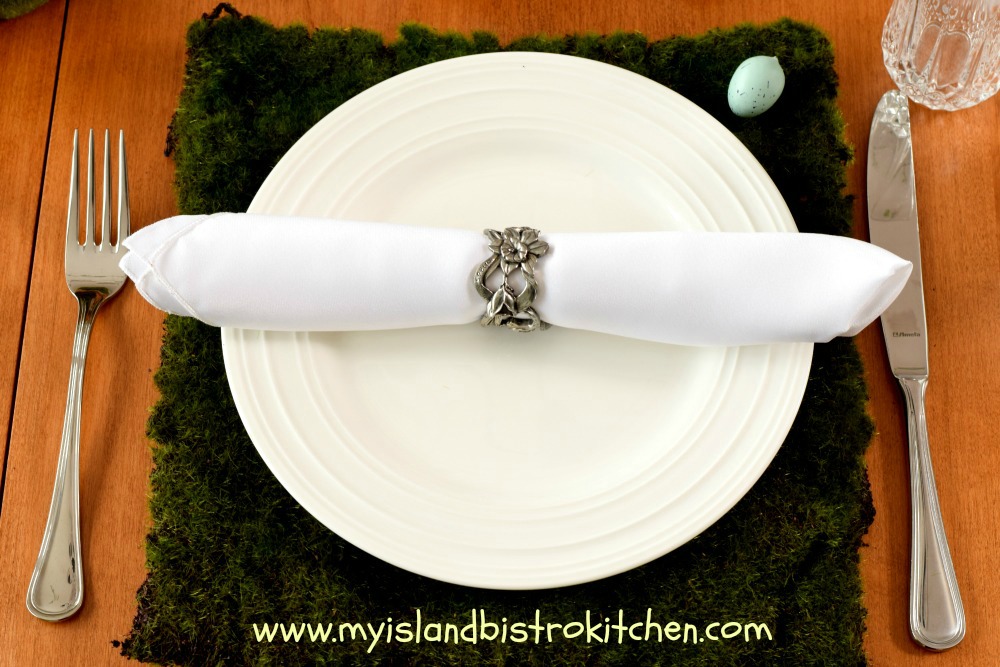
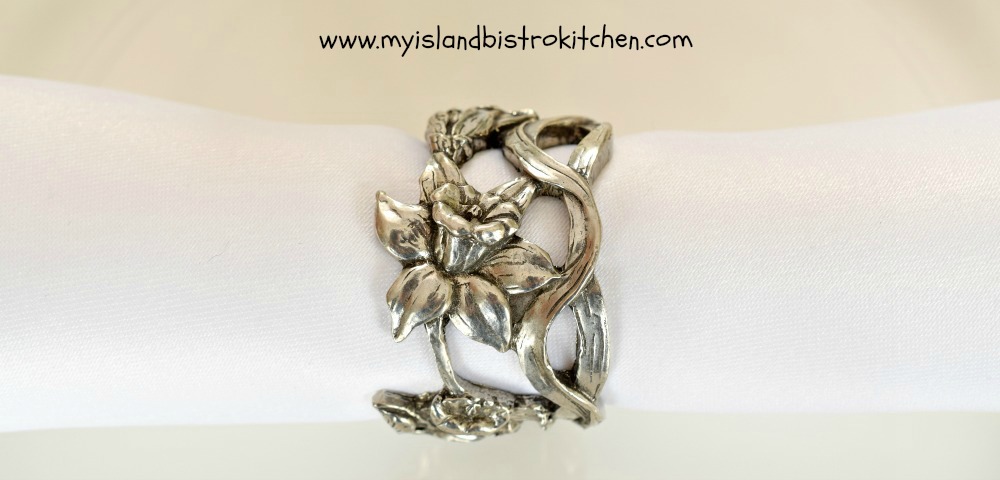
Simple napkin rolls are held in place with pewter napkin rings that feature springtime daffodils. These were made by Seagull Pewter in Pugwash, Nova Scotia.
This setting is meant to be fun and informal.
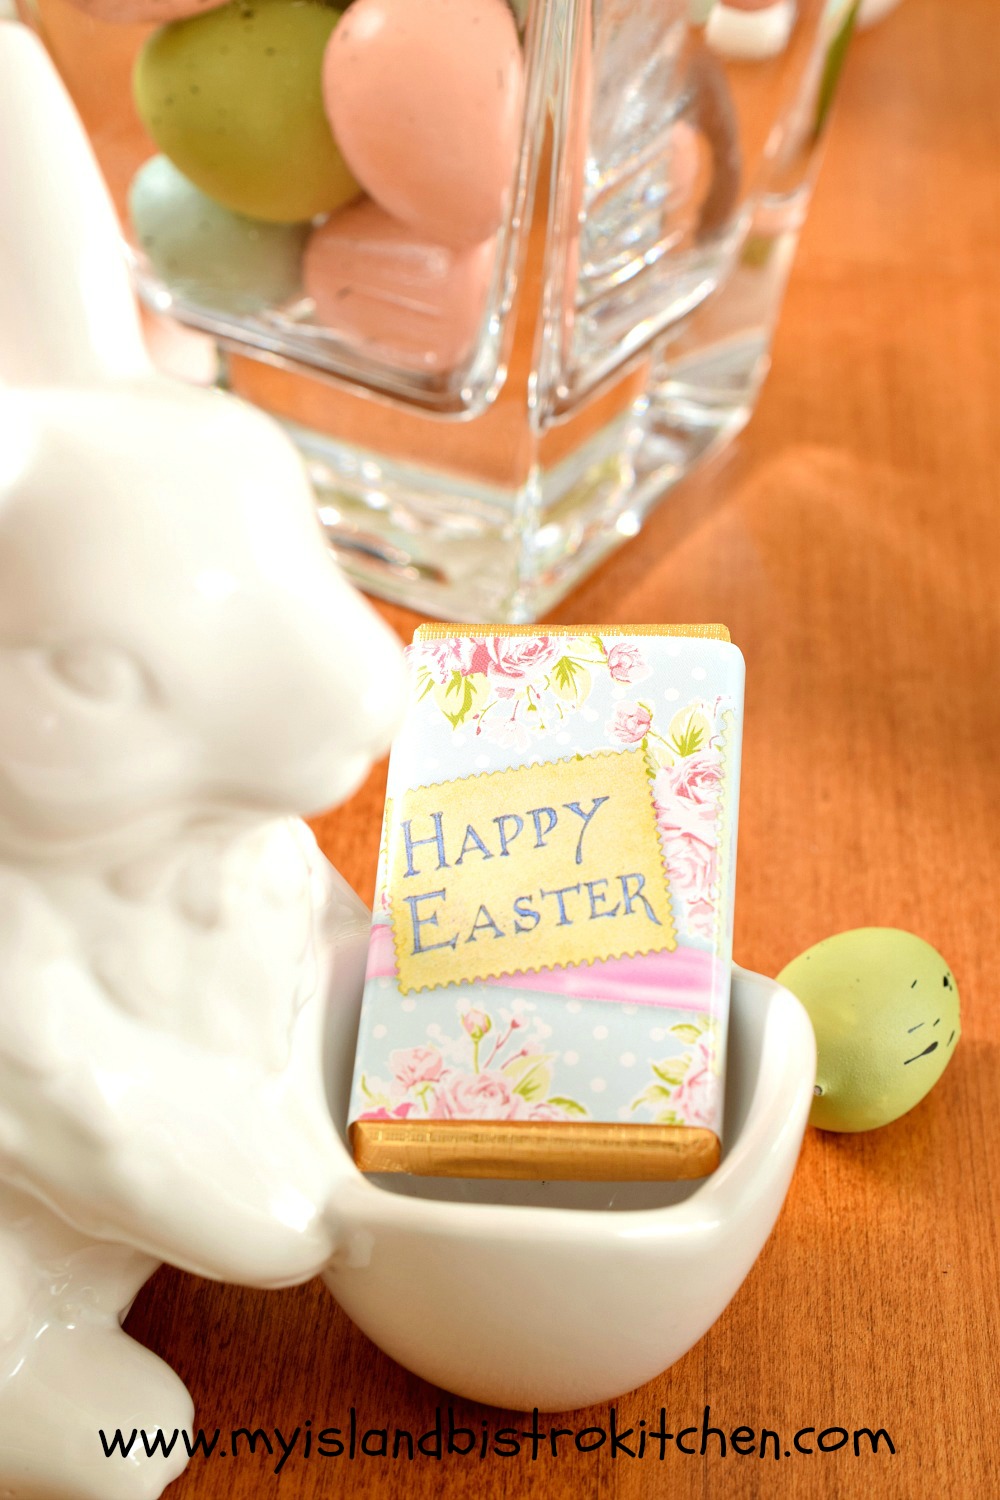
The bunny eggcups keep the bunny theme going.
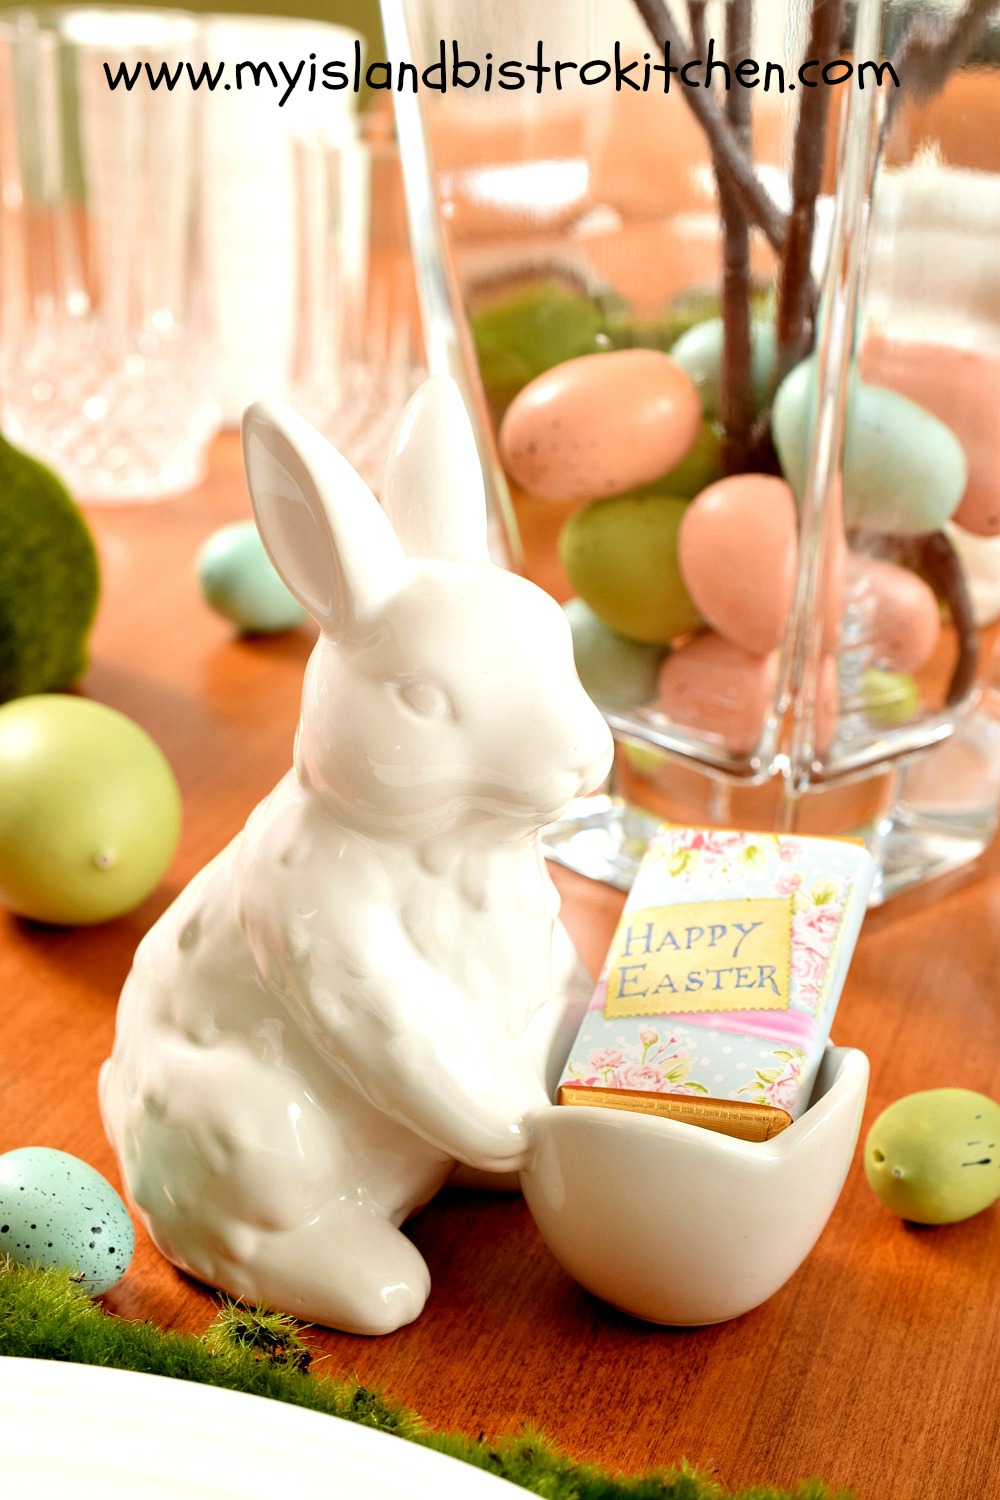
Little Easter chocolate bars adorn each cup but are easily set aside and replaced with a boiled egg, if desired, at breakfast. Who says you can’t have chocolate for a breakfast treat!
I have added a couple of larger faux moss-covered whimsical bunnies to my dining room mantle to coordinate the theme throughout the room.
Joyeous Easter!
For more Easter-themed tablesetting inspiration, click on the links below:
Tulip Time Tablescape
Tulip Clusters Springtime Tablescape
Tip Toe Through the Tulips Easter Tablesetting
Springtime Yellow Tablescape
Peter Cottontail Tablesetting for Easter
Easter Tablesetting
A Casual Tablescape for Easter Brunch
Easter Breakfast Tablesetting
Luscious Lemon Curd
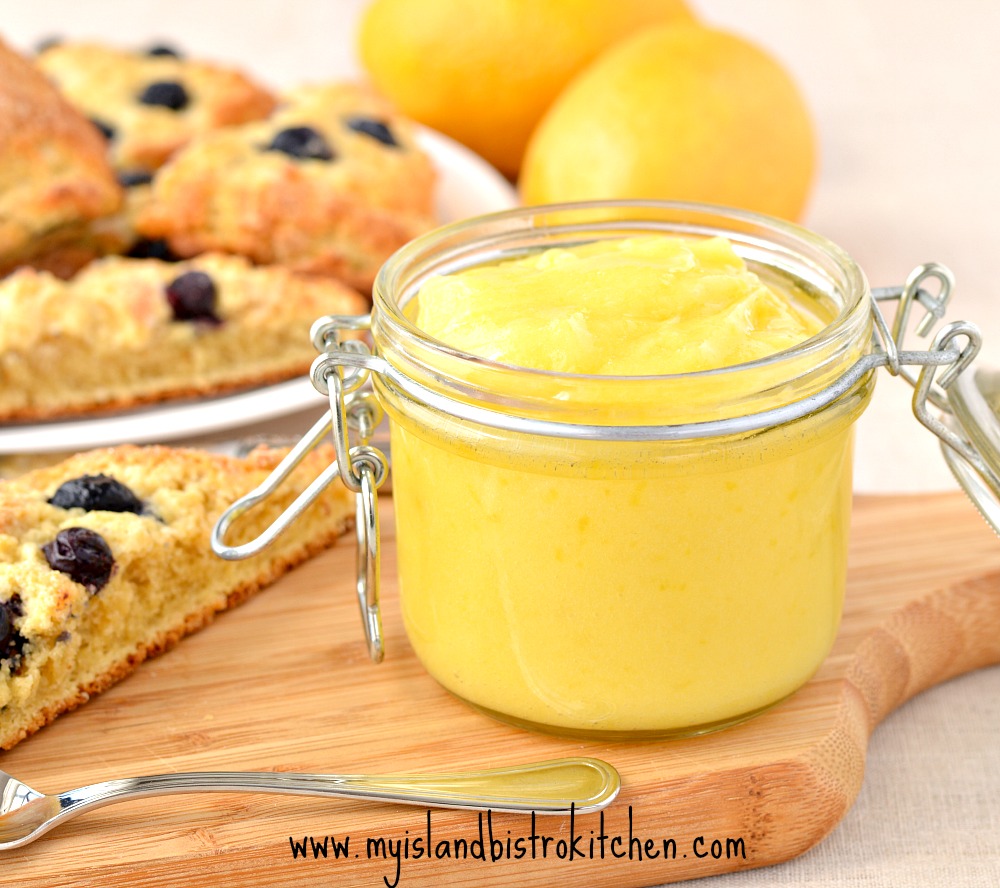
I adore lemon curd – luscious lemon curd – that wonderful balance of lemon’s acidity and tartness with the sweetness of sugar. I love it so much that it’s a staple in my refrigerator. Continue reading Luscious Lemon Curd
Tulip Time Tablescape
2019 Update: As of January 2019, Vanco Farm mentioned in this posting is no longer operating its tulip retail outlet at their greenhouse operation in Mount Albion, PEI. Their fabulous tulips are still available, though, at various locations throughout PEI, including major supermarkets and florist shops.
Living in Atlantic Canada, it’s not unheard of to still have snow in April. That’s one reason why I like to use springtime elements in my tablesettings beginning as early as possible – if I can’t see spring outside, I can at least create a spring zone in my dining room which is what I’ve done with this tablesetting.
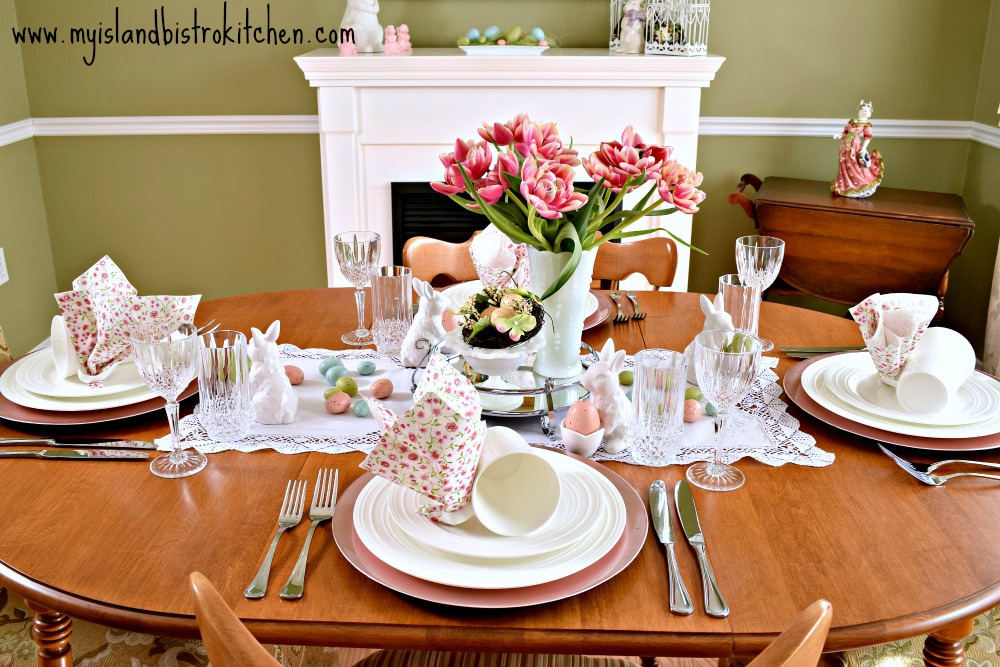
I love paying a visit to the retail outlet at Vanco Farm greenhouses in Mount Albion, PEI, a short drive from Charlottetown. They grow fabulous tulips all winter long in their big greenhouses. If you haven’t already read the story I wrote about Vanco’s tulip-growing operation, click here.
Sometimes, I have a particular color scheme in mind when I make the drive to Vanco’s. Other times, however, I go with an open mind in search of a color or type of tulip that will inspire my creativity in developing a tablescape. This is what occurred with this tablesetting.
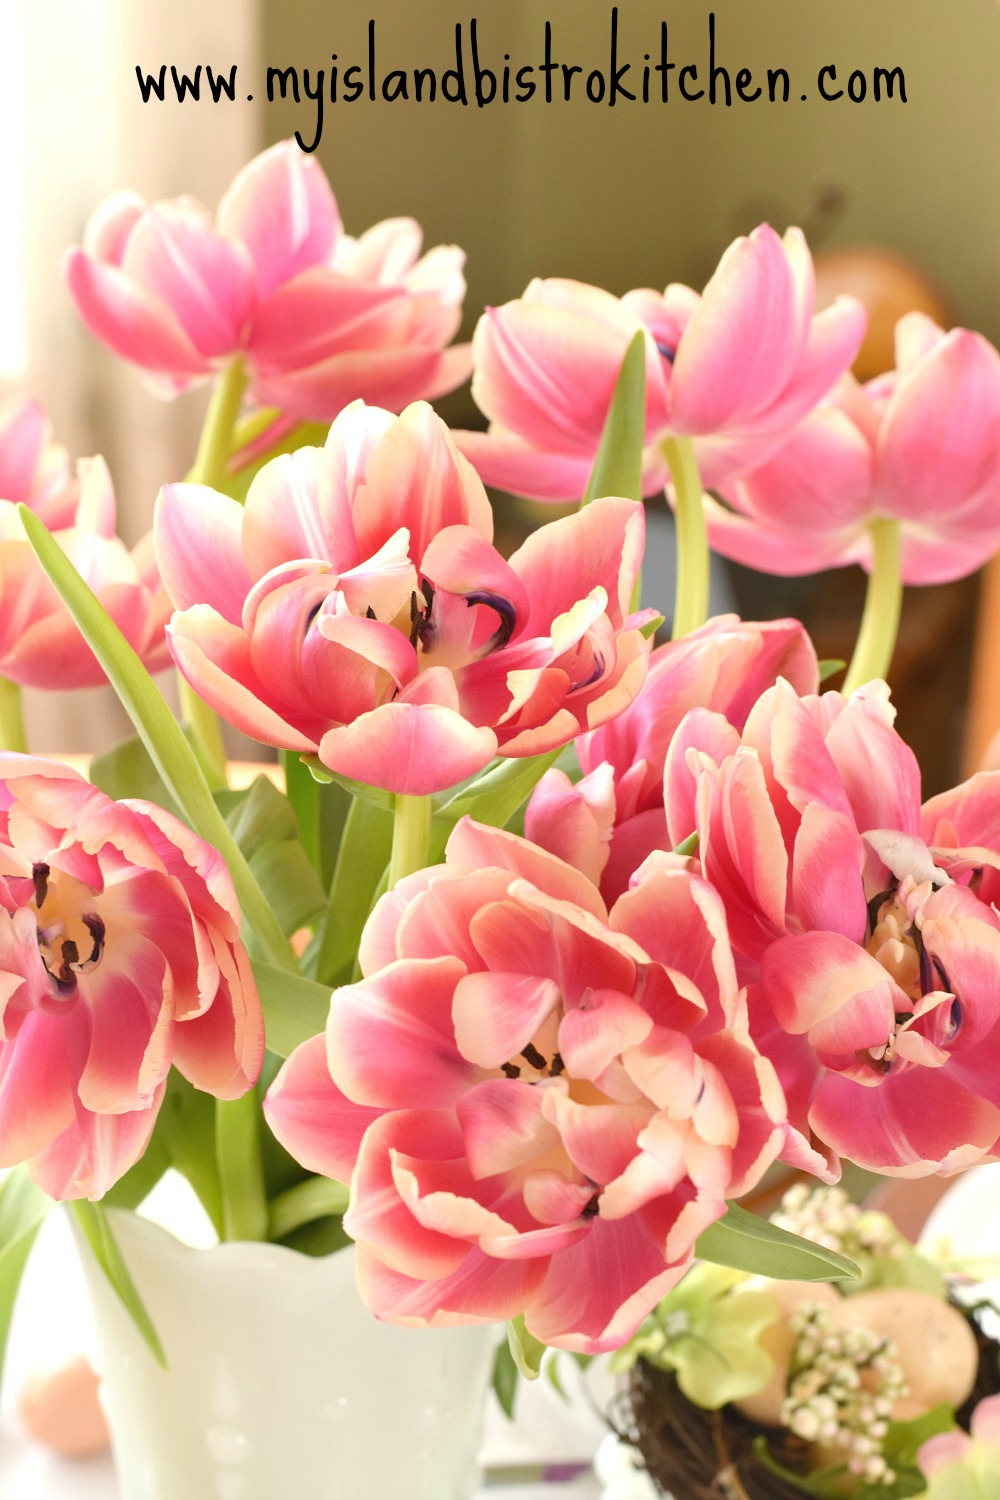
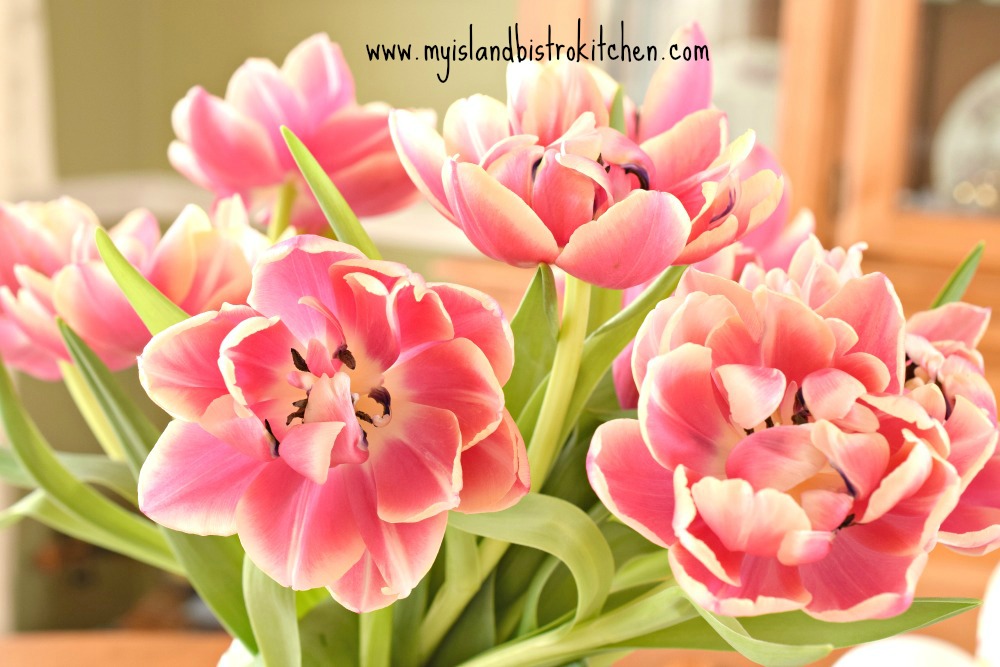
When I arrived at the greenhouses, they had these spectacular double flowered tulips in a coral pink shade with a soft ivory/pale yellow edge. They resemble peonies because they are packed with layers of petals. They were too delightful to pass up so they became the focal point of this Easter tablesetting and inspired the color theme.
If you are a regular reader of my food blog, you will recall that I sometimes like to corral the elements of my tablescape into a container such as a basket or tray. This keeps the table clean and nondistracting. This is also a good choice if you plan on removing the centerpiece from the table during the meal and replacing it with a ham or turkey on a platter. It’s much easier to pick up one container off the table than several individual items.
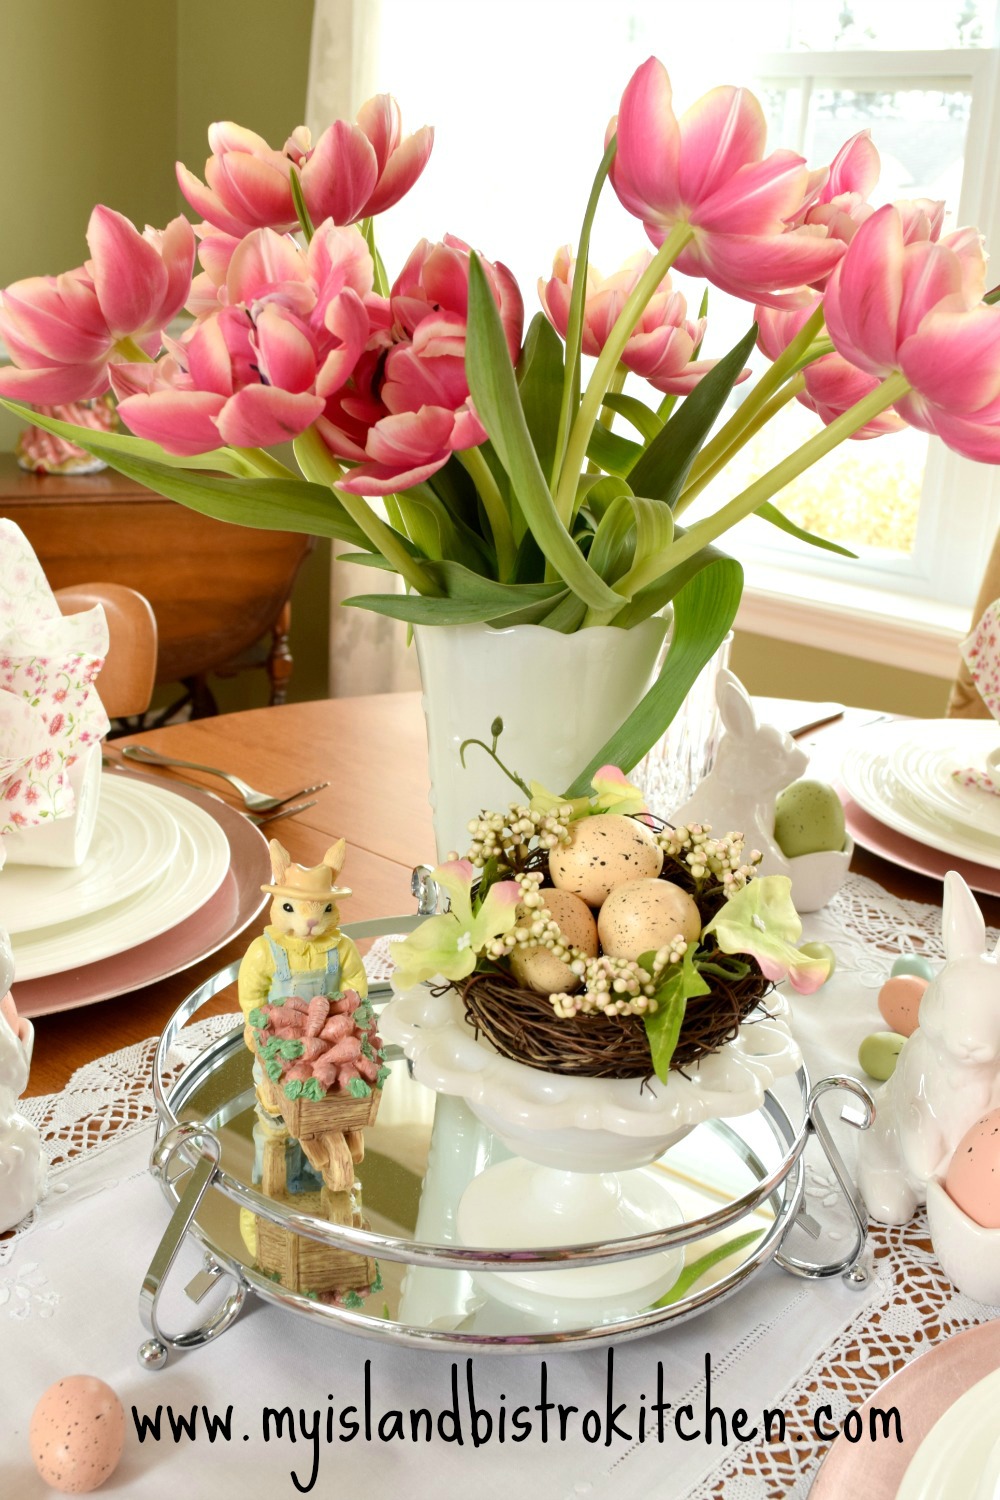
What I have used today for the base of the centerpiece is actually a silver mirrored bathroom vanity tray — I’m a big fan of repurposing items I have around the house.
To keep the focus on the flowers, I have used a white milk glass vase. This conceals all the tulip stems so they are not competing for the eye’s attention and the colorful tulip blooms just pop above the white vase. The plain white vase also coordinates well with the dinnerware.
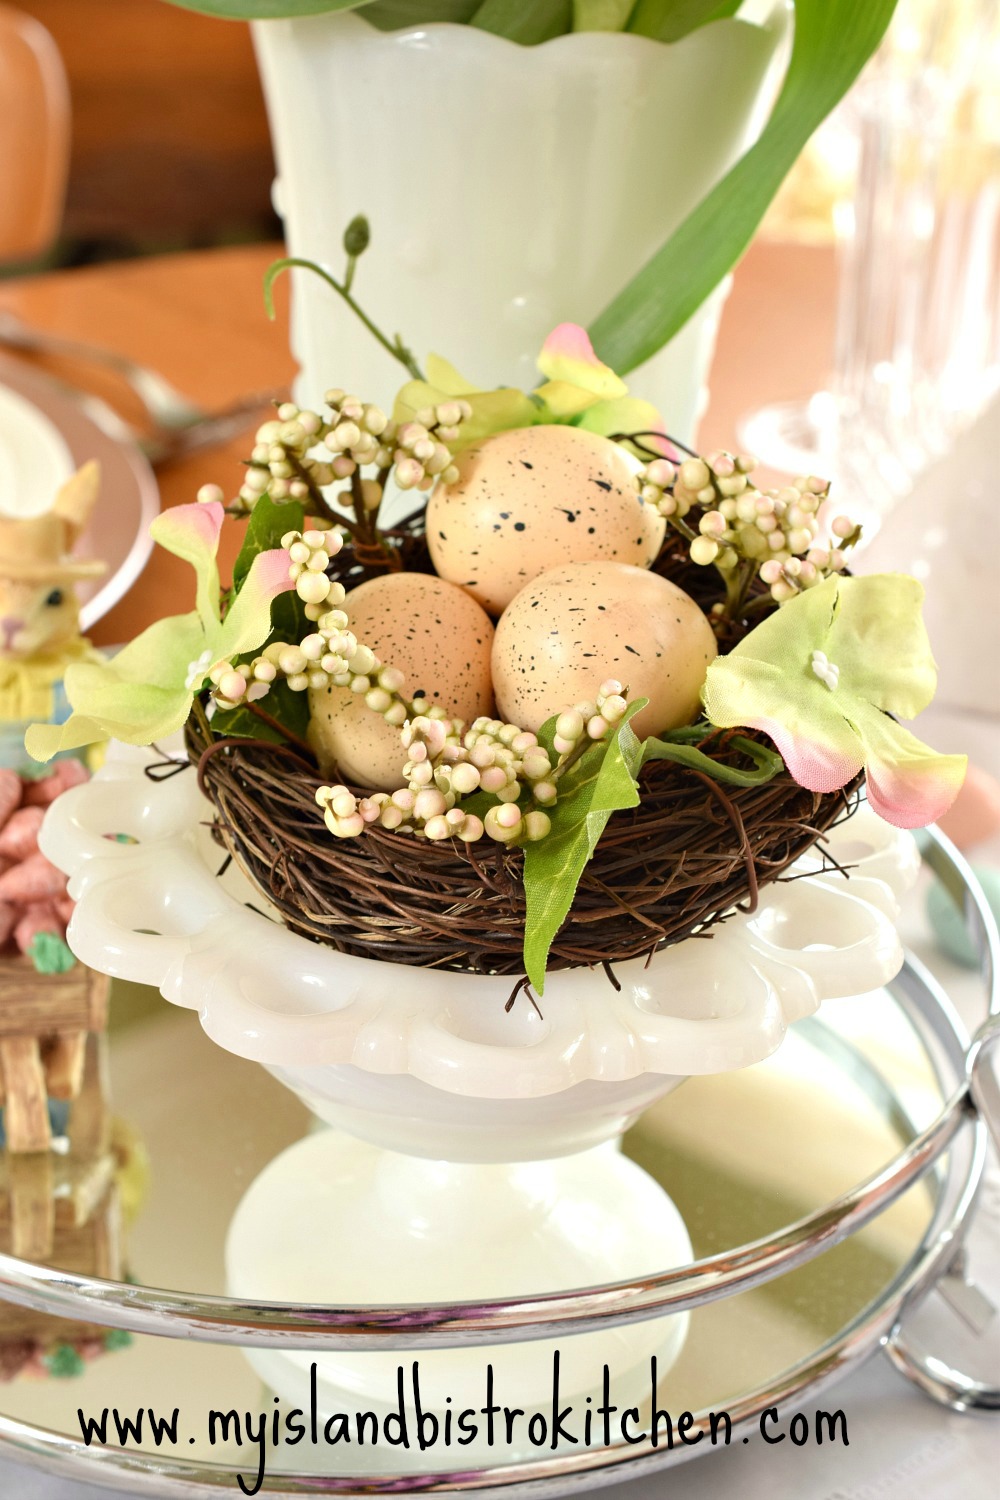
To add some interest to the centerpiece, I’ve also placed a bird’s nest on a small companion piece of white milk glass and added a small Easter figurine. Adding elements that connect and enhance each other is a trademark of effective tablescape creations.
The little bunnies, like the one in the photo below, are actually egg cups but I use them to hold decorative eggs, small chocolate bars, or even flowers in tablesettings other than those prepared for breakfast.
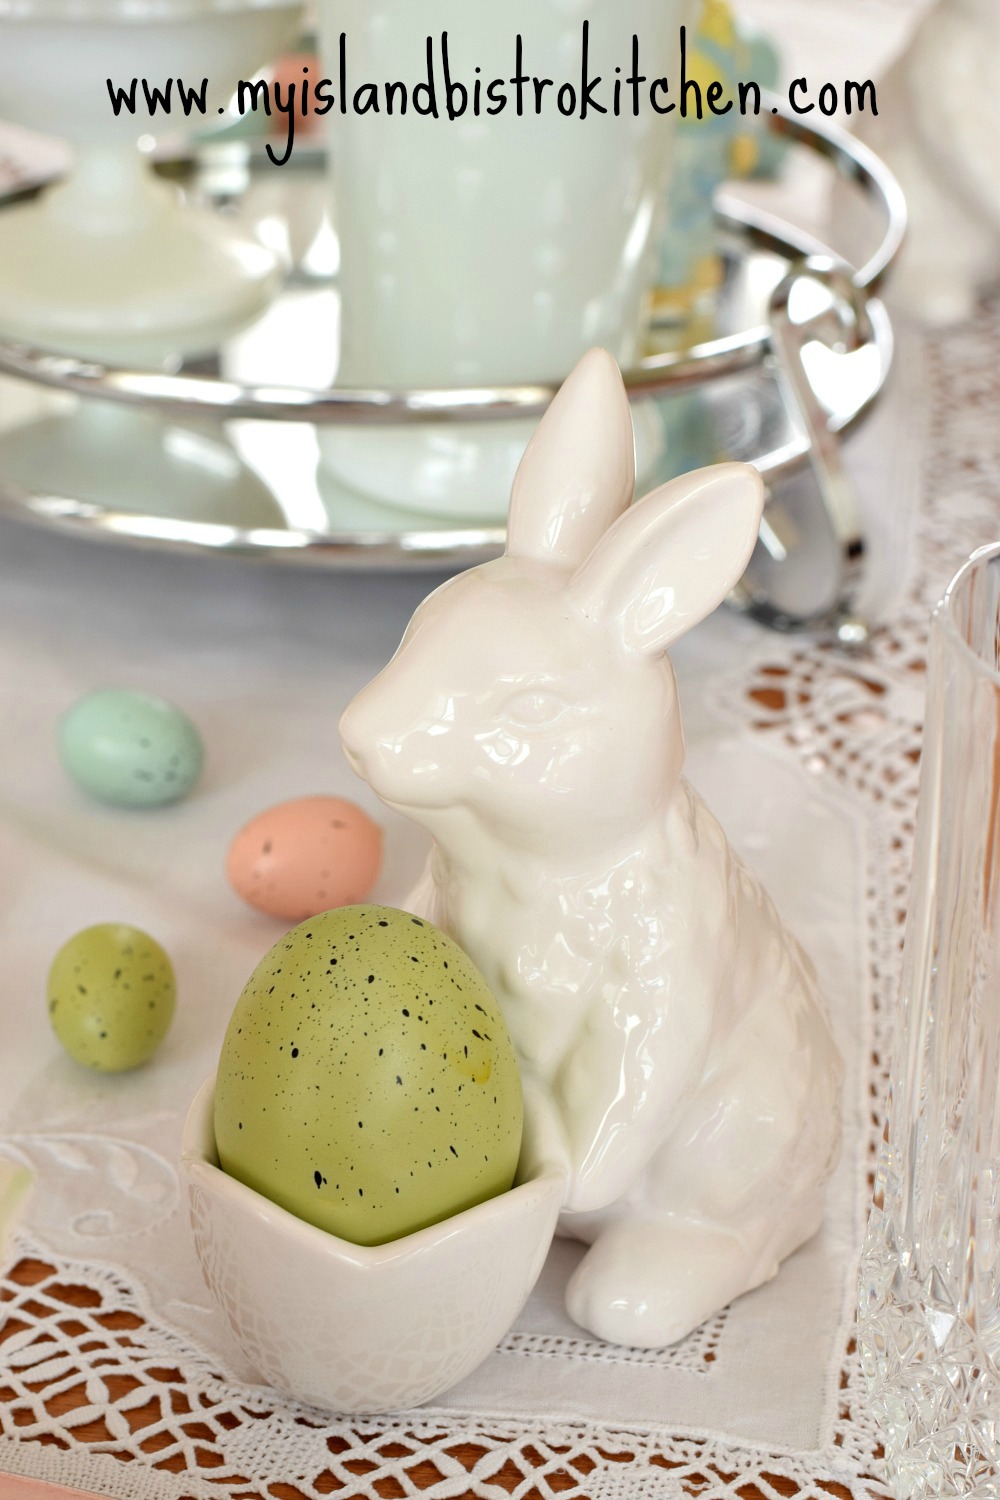
If desired, add some colorful Easter eggs casually strewn about the table to complete the seasonal tablescape.
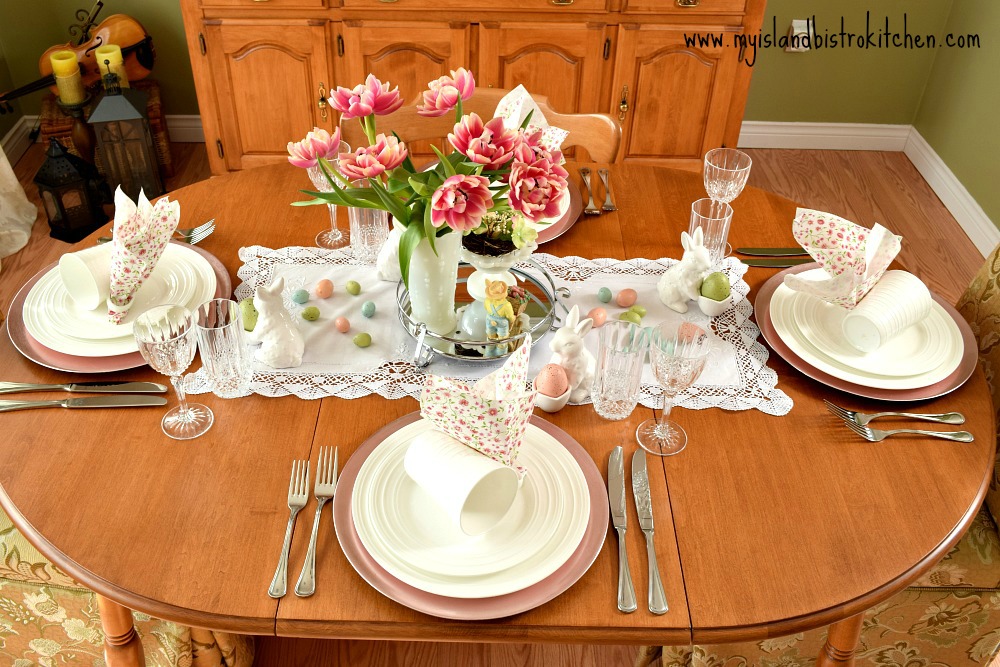
If you can only afford one set of dinnerware, I recommend buying plain white in the best quality you can afford. White is so completely versatile. I maintain you can’t set a poor looking table if you go with white dishes! There are so many styles, shapes, textures, and colors of white dinnerware. There are blue whites, grey whites, beige whites, and brilliant whites. I have three sets of white dishes and none of them are the same shade or made of the same material. The ones in this tablesetting are made of porcelain and are a contemporary design.

With white dinnerware, it can be paired with solid or patterned colors for table linens and the look is easily changed completely, sometimes by simply switching up the charger plates. And, the best part of white dishes is that food looks really appetizing against the white background. In today’s setting, I have used basic pale pink/mauve charger plates to frame each placesetting and to give the air of a well set table.
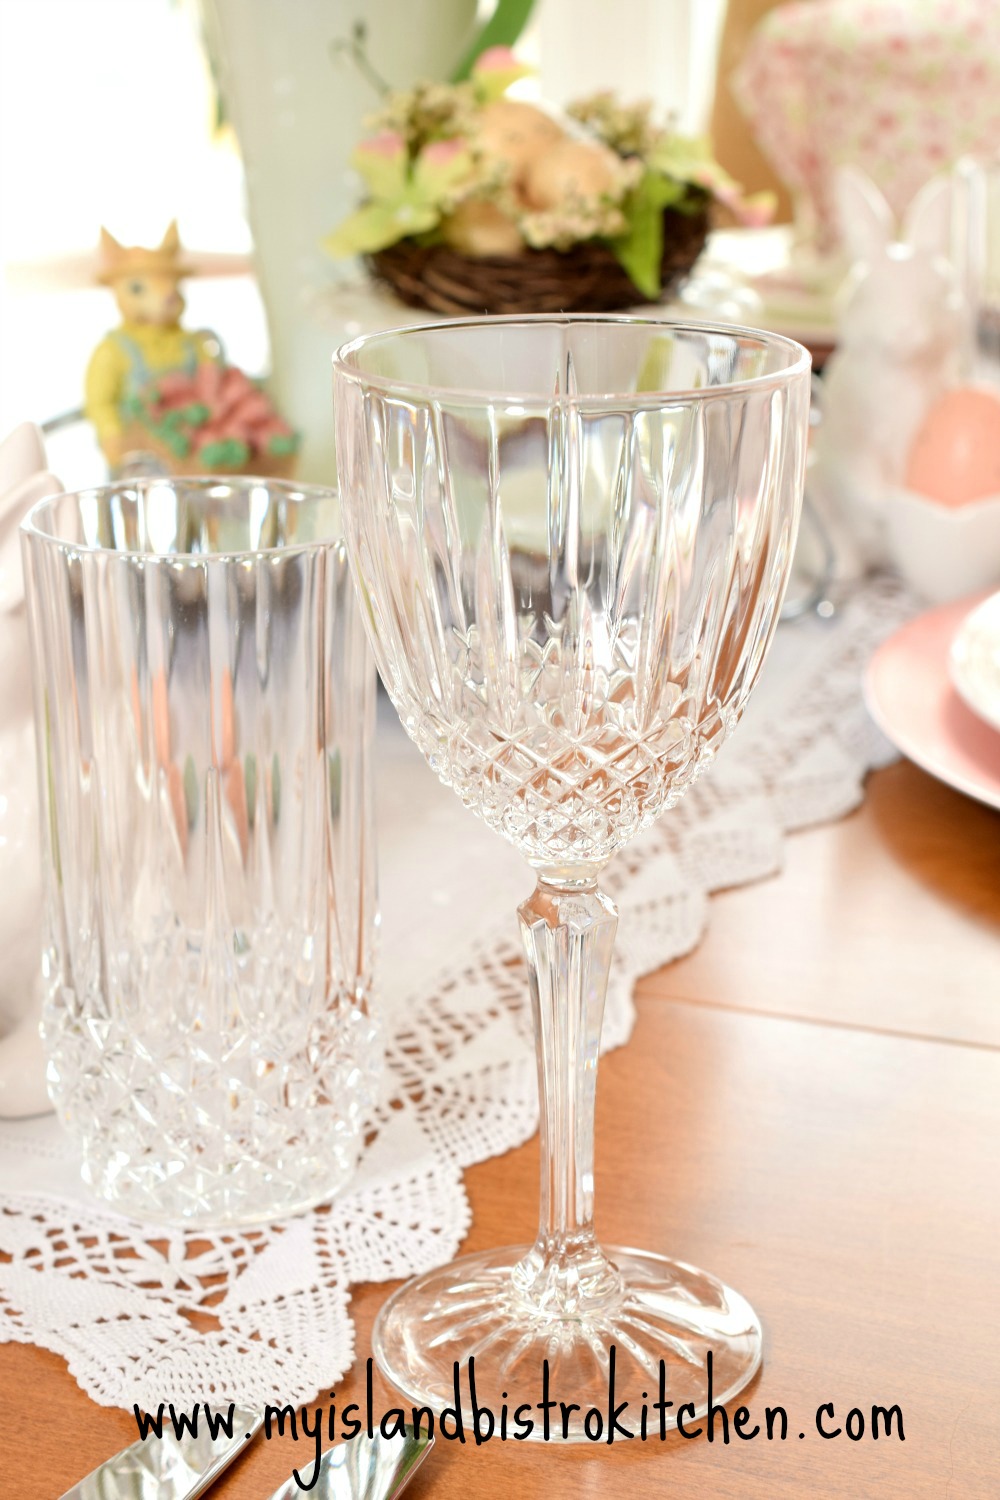
For glassware, I have chosen some pieces of cut glass to add some sparkle to the table.
I rarely use paper napkins in a tablesetting. However, these matched perfectly so I used them for that reason and also because they are stiff enough to be able to stand in the design I have chosen for them. Cloth napkins, particularly my large dinner napkins, would have been unlikely to have had the same effect.

Because this is a casual tablesetting, I have opted to place the mugs atop the plates, allowing them to form a leaning post for the napkins. This gives a great pop of color to the white placesettings and also keeps each placesetting clean and simple. This is a casual tablesetting so it works. I would not, however, choose this arrangement if I was setting a very formal table.
The only table linen I have chosen to use in this setting is a short runner made of handmade Belgian lace that I brought home from a visit to Bruges. Using minimal linen on the table keeps the look airy and casual.

For other Easter and springtime tablescape inspiration, click on the links below:
Tulip Clusters Springtime Tablescape
Tip Toe Through the Tulips Easter Tablesetting
Springtime Yellow Tablescape
Peter Cottontail Tablesetting for Easter
Easter Tablesetting
A Casual Tablescape for Easter Brunch
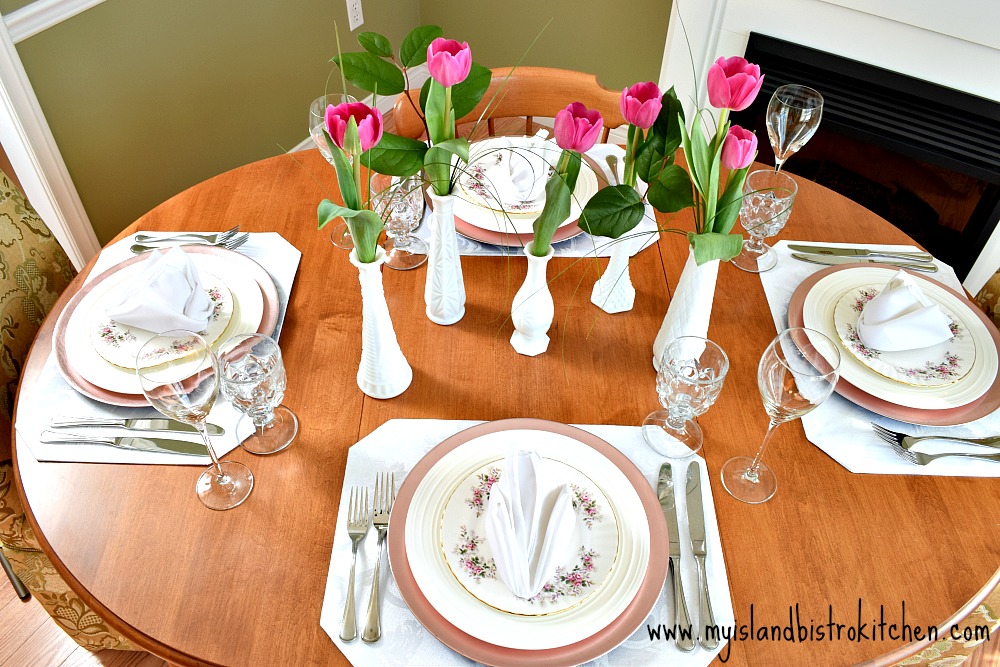
Tulip Clusters Springtime Tablescape
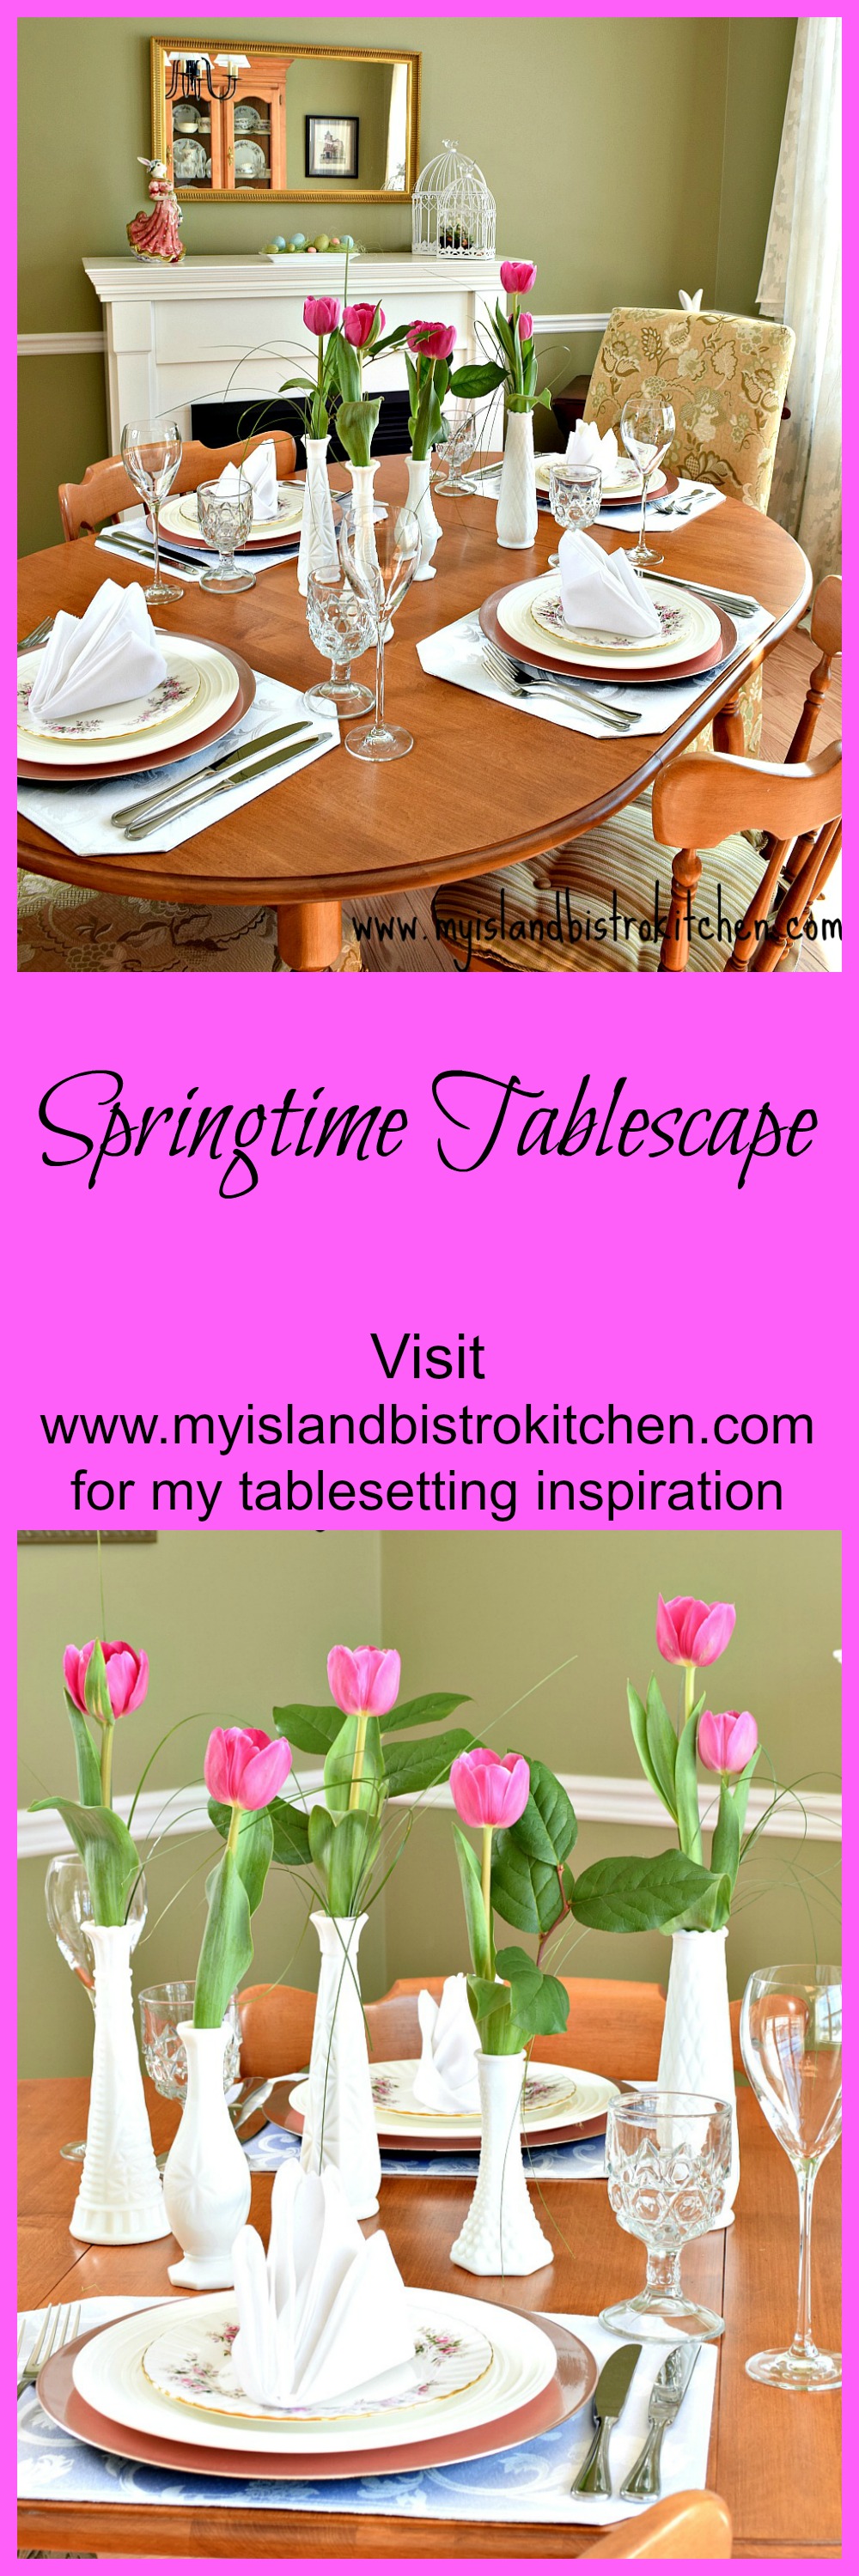
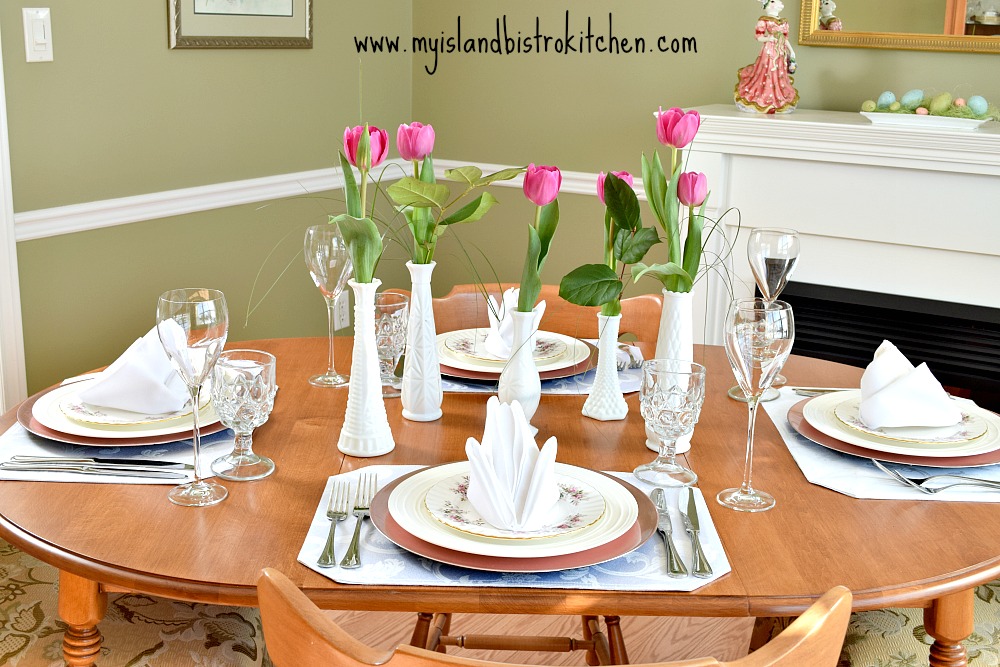
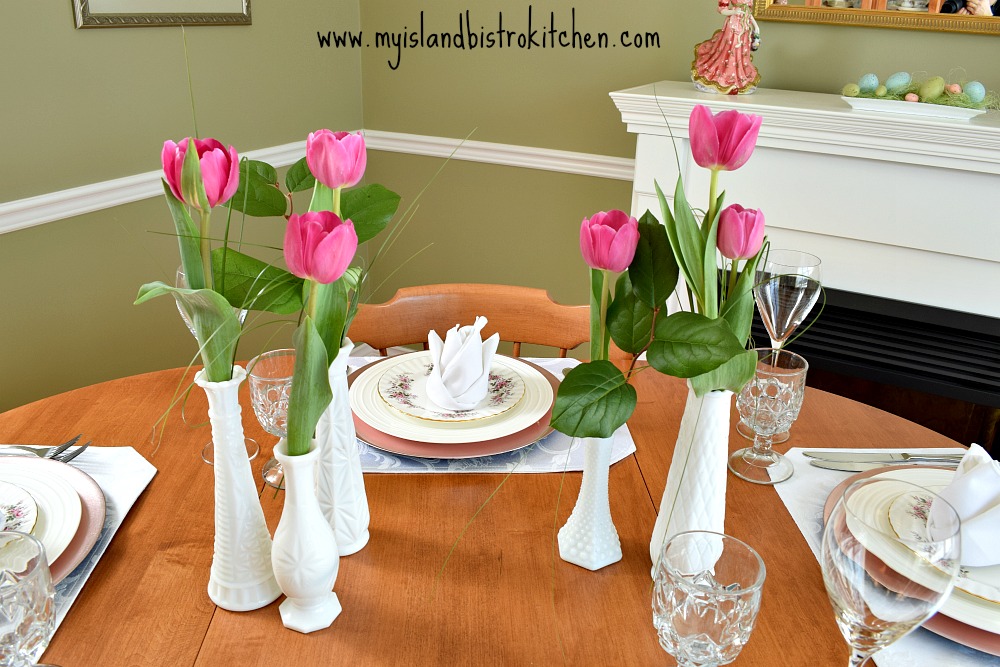
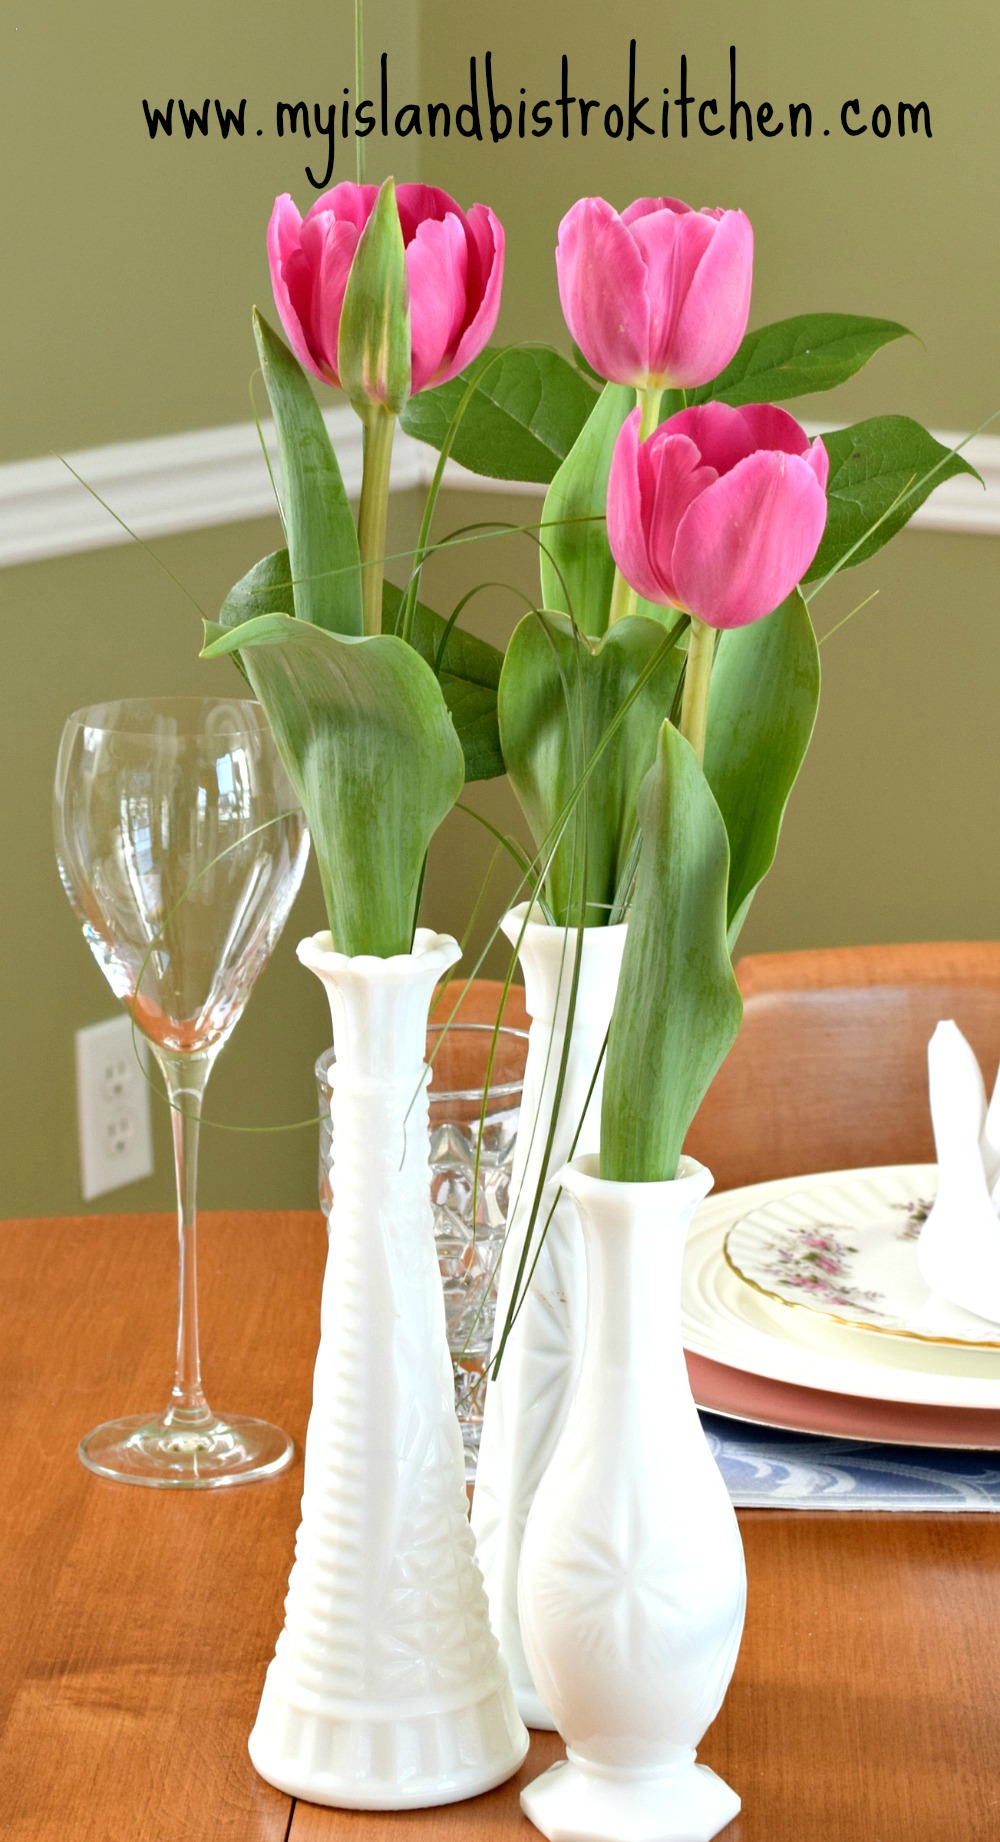
If you are looking for a tablesetting that is casual and contemporary, consider using single flowers in individual vases as opposed to the traditional floral centerpiece. This is an easy-to-do tablescape for anyone, even those who are not knacky with floral design. If you can fill a vase with water and place a flower in it, you can do this tablescape!
Vases
White milk glass has seen a resurgence in popularity in recent years and remains, at time of writing, quite trendy. It’s clean, unobtrusive, and nondistracting on the table. One of the things I like best about milk glass is that it’s opaque meaning the flower stems are not visible. The other great thing about milk glass is that it’s inexpensive and often available at thrift shops for very little money. In addition, it’s easy to mix and match milk glass shapes, sizes, and textures and still have the tablescape work and look aesthetically pleasing.
In this setting, I have used a mixture of heights and designs of milk glass bud vases because this makes for a more interesting tablescape design. Always opt for an odd number of vases versus even numbers as this is more pleasing to the eye.

Positioning of Vases
The vases can be interspersed along the center of the table as shown in the photo above.
Or, as demonstrated in the following photo, they can be grouped into clusters of two and three and strategically placed in the center of the table.
The vases can also all be clustered close together in the center for a real concentrated burst of color making this a very versatile style of tablescape.
With this type of tablescape, it’s easy to adjust the number of vases according to the size of the table. For example, if the table seats 12 or 16, add more clusters of vases here and there down the length of the table.
Flowers and Greenery
I have chosen tulips for this design because it’s springtime and I love tulips! However, any single bloom flowers will work – roses, Gerbers, daisies, carnations, etc. Two blooms can be added in one or two of the vases but try to keep the whole setting informal, simplistic, and not too contrived or equally balanced. It’s also attractive if the heights of the tulips are varied, too.
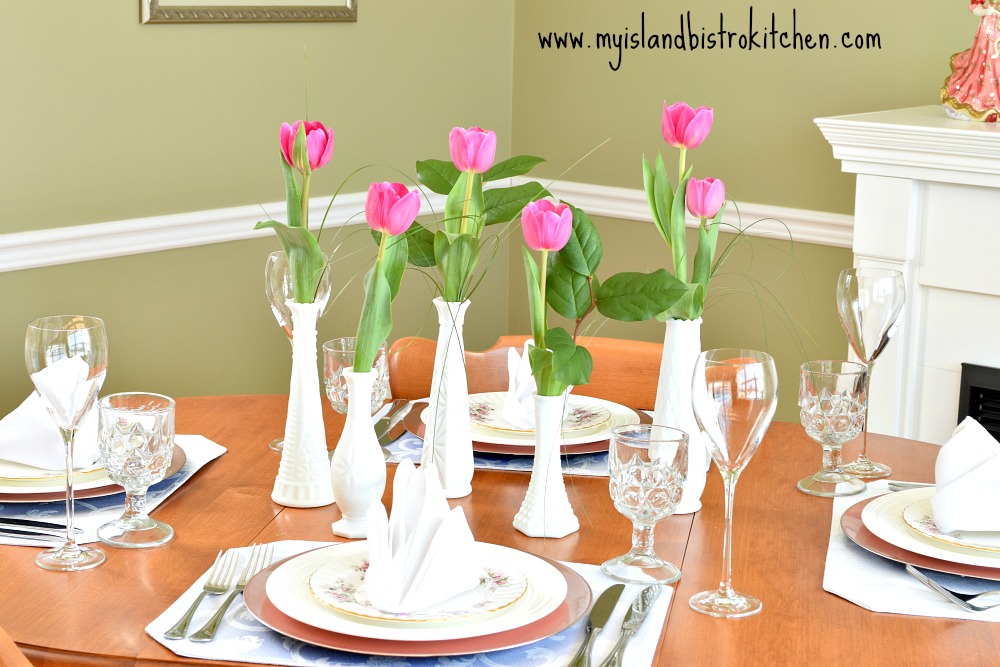
To add more interest and some visual weight to the look, I have added a small sprig of salal to a couple of the vases, but not them all. Adding salal to every vase is starting to cross over into the zone of trying to have every vase identical. Also, adding some wispy bear grass adds texture and interest so long as not too much is added.
The tulips were greenhouse-grown here on Prince Edward Island at Vanco Farms in Mount Albion. Click here to read the story I wrote a few years ago on their tulip production.
For unity, I recommend going with all one color of flower for all the vases as it’s less distracting to the eye and looks more coordinated.
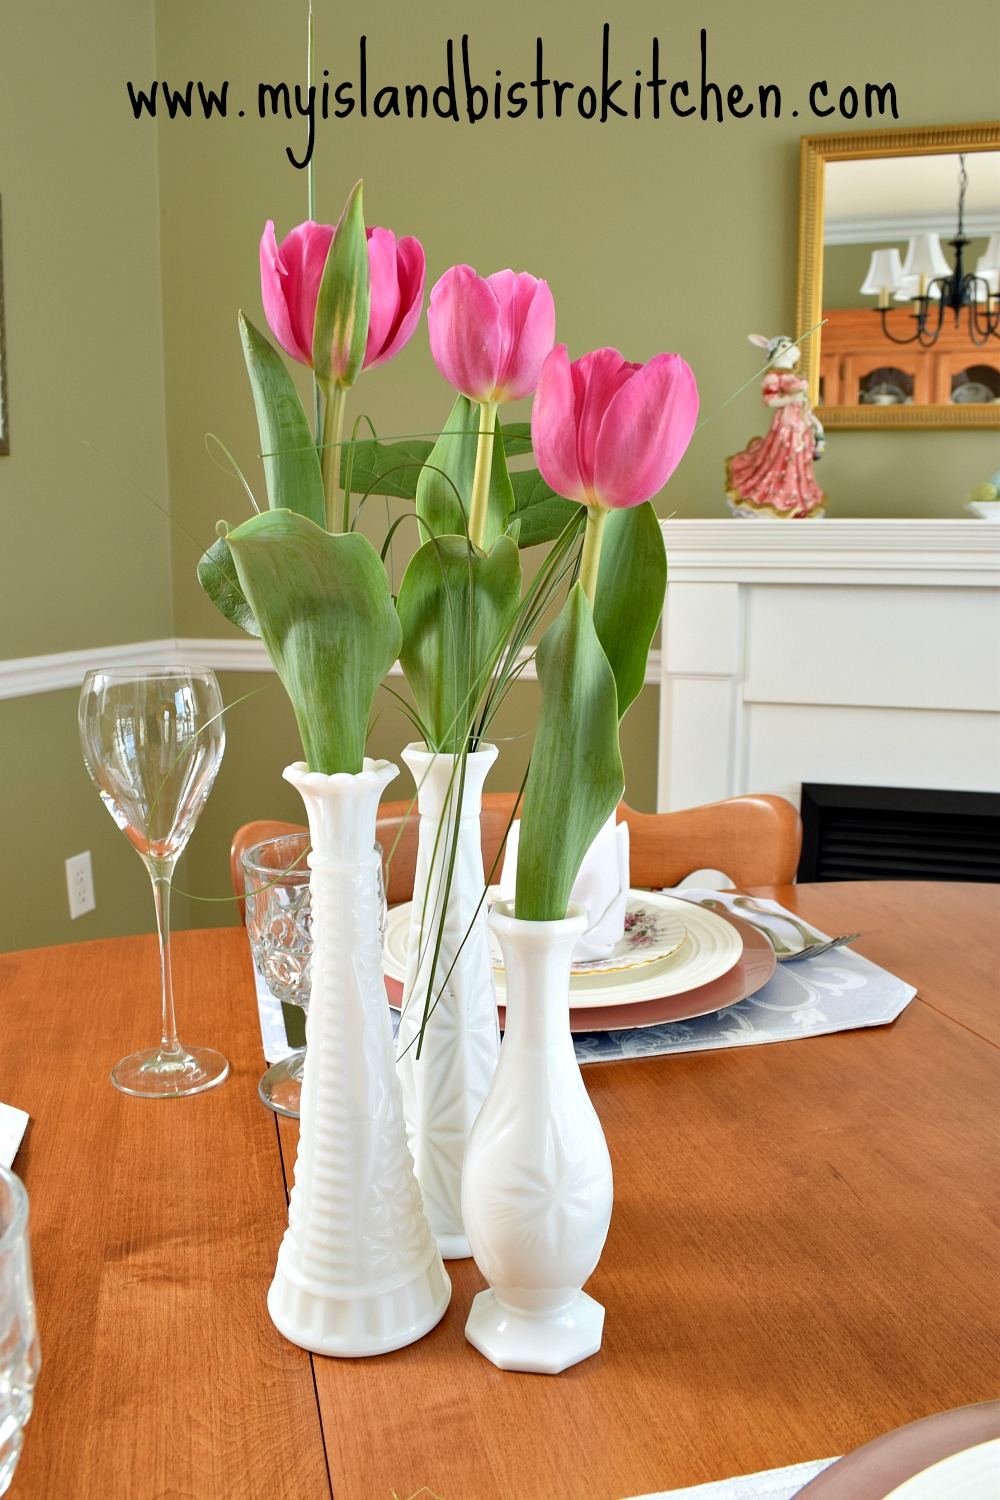
Table Linens
In modern, contemporary and casual tablesettings, it’s very common to forego tablecloths and, as shown in this setting, to let the wood of the table be visible. It gives a lighter, more airy, and less fussy look to the table than if a full tablecloth was used. I have opted to use basic white placemats simply to “ground” each individual placesetting.
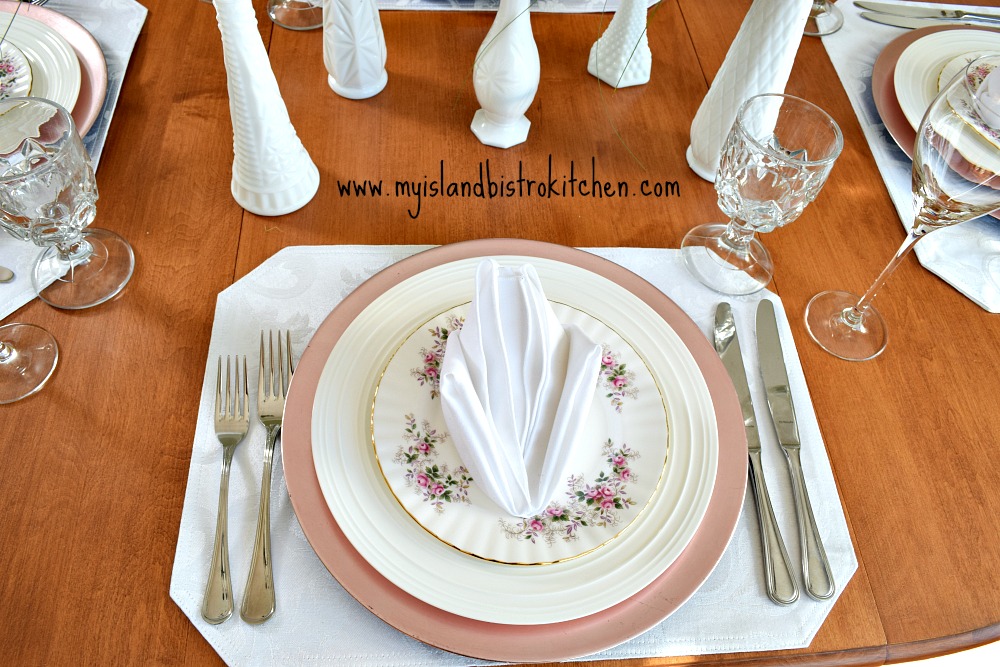
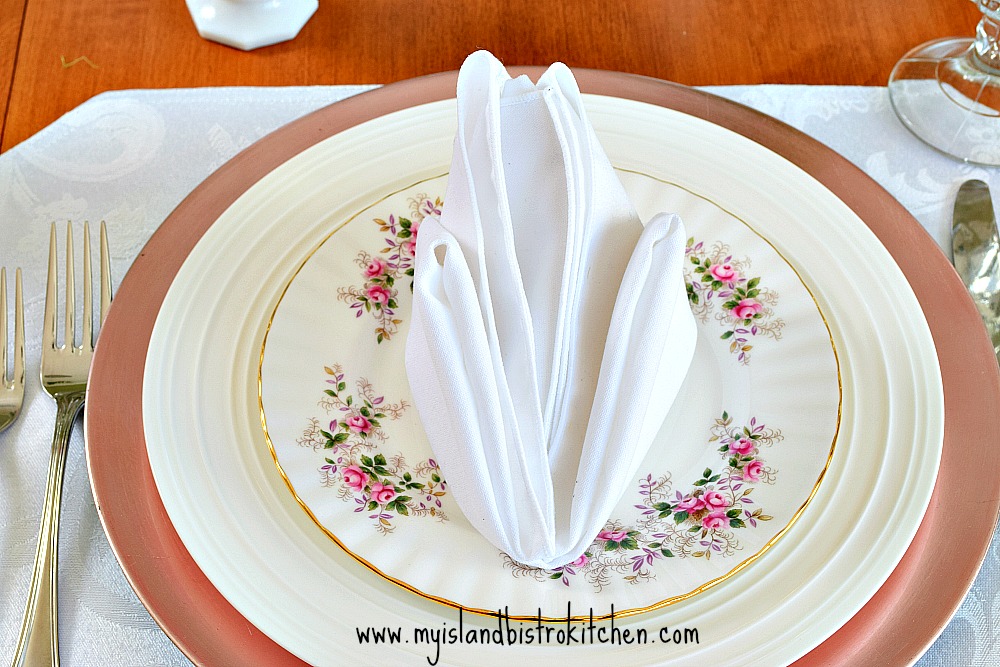
I’m a big fan of high-quality plain white napkins because they go with almost anything. In this setting, I have chosen the pure elegance napkin fold and placed it in the center of each plate. Because the top plate in the setting is patterned, the plain white napkin keeps the setting more simplistic and less distracting than if a patterned napkin was used. This napkin fold dresses up the setting, giving it a wee bit of height. Placing the napkin on the plate keeps each place setting neat and tidy.
Dinnerware
I advocate for the use of white dinnerware because it shows food to its best. However, I also like to set a pretty table with my formal Royal Albert “Lavender Rose” china. But, sometimes, the china can be a bit formal for the occasion. In these situations, I pair pieces of my china with my white porcelain everyday dinnerware as I have done here.
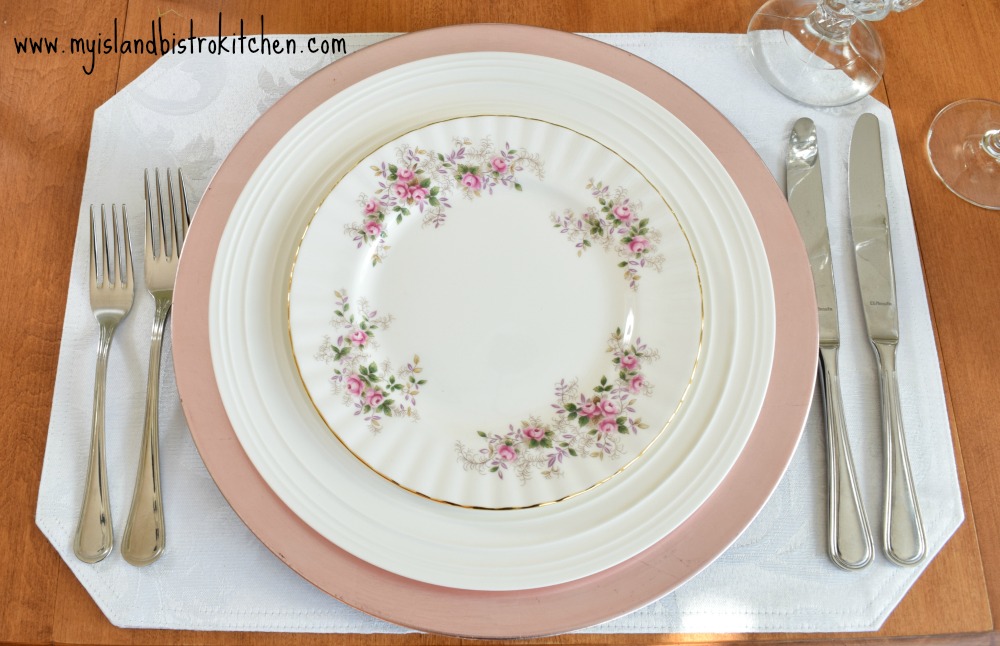
Pale pink charger plates have been used to frame each setting topped with the white dinner plate and then the Lavender Rose salad plate on top. This salad plate gives color to the setting and the colors match the tulips. By mixing the plain white with the patterned china, it makes for a more interesting setting without becoming overly formal.
Glassware
The wine glasses I have selected for this setting are quite tall. They have a simple sleek shape, almost reminiscent of the tulip shape. These work well with a contemporary/modern tablesetting.
Flatware
Because I have gone with a more casual contemporary look for this setting, I have used a simple design of flatware. I have not included the dessert fork and spoon because those can be placed on the table along with the dessert course. Foregoing them in the initial setting helps to keep the look of the table clean and simple, particularly when there are five vases as opposed to one single floral centerpiece.

I hope you have enjoyed viewing this springtime tablesetting! It’s great to see bright cheery colors after a long winter!
For other springtime and Easter tablesettings, click on the following links:
Tip Toe Through the Tulips Easter Tablesetting
Springtime Yellow Tablescape
Peter Cottontail Tablesetting for Easter
Easter Tablesetting
A Casual Tablescape for Easter Brunch