Best Zucchini Granola Muffins Recipe

Zucchini Granola Muffins
Best Zucchini Granola Muffins

I make a lot of muffins and freeze them to take to work for coffeebreak snacks. I am always testing out flavour combinations for muffins.  This recipe combines grated zucchini, applesauce, granola, orange rind, and spices to make tasty muffins. Adding some granola to the muffin tops makes them colorful and interesting.

Zucchini Granola Muffins
Best Zucchini Granola Muffins

Muffins are not difficult to make and one of the most important tips I have for muffin making is not to over mix the ingredients – this will lead to a tough-textured muffin. Stir the wet ingredients into the dry just until the two are barely combined – it’s okay if you still see a small bit of the dry ingredients. Don’t worry, by the time you spoon the batter into the muffin tin cups, all the dry ingredients will get incorporated.

In a perfect muffin, look for texture that is uniform and neither soggy nor too dry and that has a medium crumb that is moist and tender and somewhat loose. A well-baked muffin will also reveal round gas holes that are uniformly distributed as shown in the photo below.

Zucchini Granola Muffins

I like to start the muffins baking in a really hot oven (475°F) and then immediately reduce the heat (down to 400°F for these) when I place the muffins in the oven. It’s important that the oven is preheated. I find this quick start of high heat helps the muffins to rise really quickly at the beginning of the baking period and will give them that nice symmetrically-formed, slightly rounded dome-shaped top that is customary in muffins (see photo below). A well-formed muffin should not have any sharp peak or knob on the top.

Zucchini Granola Muffins
Best Zucchini Granola Muffins

The crust of a good muffin should be thin and tender with a rough, pebbled surface.  The muffin, on all sides (including the bottom), should have a uniformly browned crust with no sign of darkness or burning.

Zucchini Granola Muffins
Best Zucchini Granola Muffins

I do not recommend using paper liners in the muffin tins for these as the muffins won’t have a nice brown crust and I find some of the muffin sticks to the liners – these taste too good to lose any to a paper liner!

I have used The Bistro’s Great Nut-free Granola in this recipe.  This is my own recipe that you can find here. It’s quite easy to make.

The Bistro's Great Nut-free Granola
The Bistro’s Great Nut-free Granola

The muffin recipe has not been tested using any other kind of granola than my own recipe. Therefore, if you choose to use other granola as an ingredient in these muffins, the results may differ as some granola is loose texture while another type may be large and clumped together.  This will obviously affect the amount of granola needed in the recipe.

Zucchini Granola Muffins
Best Zucchini Granola Muffins

While these are delightful warm from the oven, the muffins also freeze well – all I do is simply split them in two, add a slather of butter, put the two halves back together, and wrap them tightly in plastic wrap then pop them in to a freezer bag. This makes lunch packing quick and easy on work day mornings.

Best Zucchini Granola Muffins

(printable recipe follows at end of this post)

Best Zucchini Granola Muffins

Ingredients:

1⅔ cup all-purpose flour
⅓ cup whole wheat flour
1 tbsp baking powder
½ tsp baking soda
½ tsp salt
2½ tsp cinnamon
⅛ tsp nutmeg
2 tsp finely grated orange rind
1¼ cups of The Bistro’s Great Nut-free Granola

2 extra-large eggs, slightly beaten
¾ cup brown sugar, firmly packed
½ cup vegetable oil
1 tsp vanilla
⅓ cup milk
1 cup coarsely grated zucchini
⅔ cup applesauce
Apx. ¼ – ⅓ cup granola for topping (optional)

Method:

Preheat oven to 475°F. Prepare muffin tins by greasing or spraying with cooking oil, ensuring the top of the muffin tins are also well-greased/sprayed.

In large bowl, whisk together the all-purpose and whole wheat flours, baking powder, baking soda, salt, cinnamon, and nutmeg.  Stir in orange rind and mix in the granola. Set aside.

In medium-sized bowl, whisk together the eggs, brown sugar, vegetable oil, vanilla and milk.  Stir in the zucchini and applesauce just until well combined.

Pour the wet ingredients into the dry and stir only until mixed. Do not overmix.  Spoon batter into prepared muffin tins, filling each cup a generous ¾ full.  Sprinkle some granola on top of each muffin, if desired.

Transfer muffins to oven and immediately reduce the oven temperature to 400°F.  Bake for 18-20 minutes or until muffins are just firm to the touch and a cake tester inserted into the center of a muffin comes out clean.

Let muffins rest in muffin tins for about 5 minutes then transfer to wire rack to finish cooling.

Yield:  14-16 standard-sized muffins

—————————————————————————-

You might also enjoy these other tasty muffin recipes from My Island Bistro Kitchen:

Rhubarb and Orange Muffins
Blueberry Muffins
Cranberry-Banana Eggnog Muffins
The Bistro’s Bran Muffins  

Thank you for visiting “the Bistro” today.  If you enjoyed this posting and recipe, please share it on your social media websites.

Connect with “the Bistro” through the following social media:

Join My Island Bistro Kitchen on Facebook
Follow “the Bistro’s” tweets on Twitter
Follow “the Bistro” on Pinterest
Follow “the Bistro” on Instagram

——————————————————————————

Best Zucchini Granola Muffins

Yield: 14-16 standard-sized muffins

Ingredients

  • 1 2/3 cup all-purpose flour
  • 1/3 cup whole wheat flour
  • 1 tbsp baking powder
  • ½ tsp baking soda
  • ½ tsp salt
  • 2½ tsp cinnamon
  • 1/8 tsp nutmeg
  • 2 tsp finely grated orange rind
  • 1¼ cups of The Bistro’s Great Nut-free Granola
  • 2 extra-large eggs, slightly beaten
  • ¾ cup brown sugar, firmly packed
  • ½ cup vegetable oil
  • 1 tsp vanilla
  • 1/3 cup milk
  • 1 cup coarsely grated zucchini
  • 2/3 cup applesauce
  • Apx. ¼ - 1/3 cup granola for topping (optional)

Instructions

  1. Preheat oven to 475°F. Prepare muffin tins by greasing or spraying with cooking oil, ensuring the top of the muffin tins are also well-greased/sprayed.
  2. In large bowl, whisk together the all-purpose and whole wheat flours, baking powder, baking soda, salt, cinnamon, and nutmeg. Stir in orange rind and mix in the granola. Set aside.
  3. In medium-sized bowl, whisk together the eggs, brown sugar, vegetable oil, vanilla and milk. Stir in the zucchini and applesauce just until well combined.
  4. Pour the wet ingredients into the dry and stir only until mixed. Do not overmix. Spoon batter into prepared muffin tins, filling each cup a generous ¾ full. Sprinkle some granola on top of each muffin, if desired.
  5. Transfer muffins to oven and immediately reduce the oven temperature to 400°F. Bake for 18-20 minutes or until muffins are just firm to the touch and a cake tester inserted into the center of a muffin comes out clean.
  6. Let muffins rest in muffin tins for about 5 minutes then transfer to wire rack to finish cooling.
Schema/Recipe SEO Data Markup by Yummly Rich Recipes
https://myislandbistrokitchen.com/2016/03/30/best-zucchini-granola-muffins/

Zucchini Granola Muffins
Best Zucchini Granola Muffins


Colorful Zucchini Granola Muffins on Cooling Rack
Zucchini Granola Muffins

Springtime Yellow Tablescape

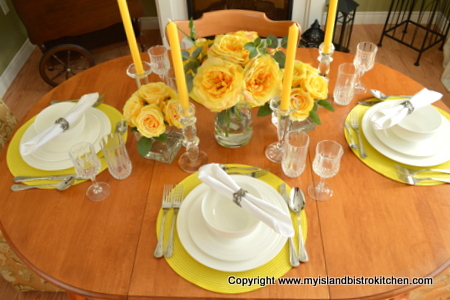
This springtime tablesetting has a yellow theme going on – after dreary winter months, it’s always good to see some bright and cheery colors and yellow is definitely in that category.

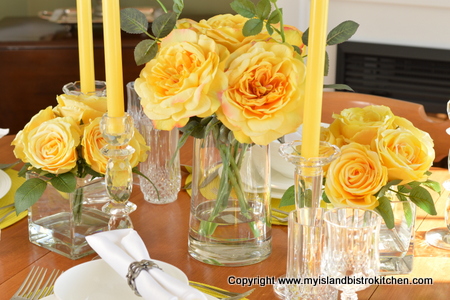
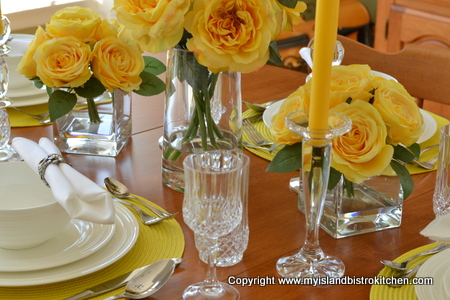
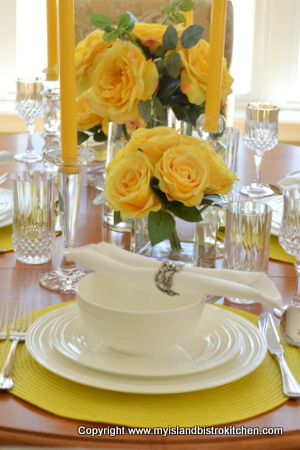
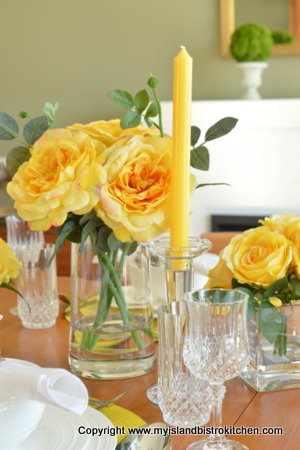
The three yellow floral arrangements, a tall flanked by two shorter complementary ones, add a burst of color in the center of the table. For a longer table, simply add more down the length of the table, alternating between tall and short arrangements.

The yellow tapers in glass candlesticks lend both an air of height and elegance. By keeping everything in the same color, the eye is not kept busy trying to focus on the focal point of the table. I find using all one color lends a more elegant look and feel to a tablesetting.

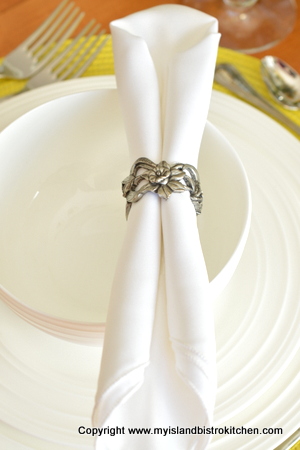
The yellow round placemats are an inexpensive way to pull the color down from the centerpiece into each placesetting. Good quality basic white napkins are a must! Using napkin rings is an easy and quick way to present napkins at placesettings.  There are several ways napkins can be folded into the rings but this is one of the more classic. Made of pewter, these napkin rings have a daffodil design so are perfect for springtime tables.

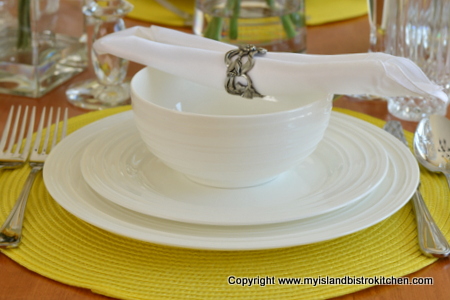
I am a big fan of white dishes. First, food looks fabulous against a white background. And, second, white goes with anything which means a set of basic white dinnerware is a good all-round investment. With white dishes, you can go with any color scheme on the table so, although the dinnerware remains the same, the look can change dramatically simply by using different tablecloths, placemats, chargers,  napkins, and/or centerpieces.

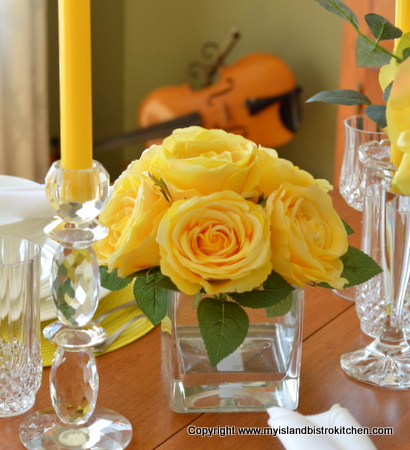
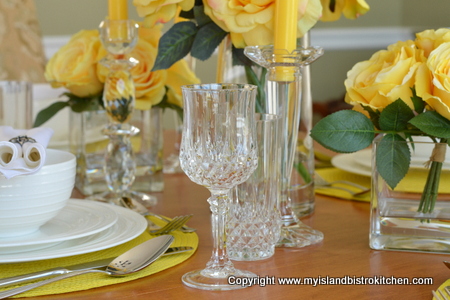
Adding lots of glassware to the table gives it a light look and feel – just what’s needed for a springtime tablesetting!

Don’t worry about mixing and matching glass candlesticks – in fact, having several different styles on the table makes it more interesting and takes away from the “matchy-matchy” look. To keep the look casual, just weave the candlesticks in at random among the flowers – they don’t have to be symmetrically placed.

DSC_0054

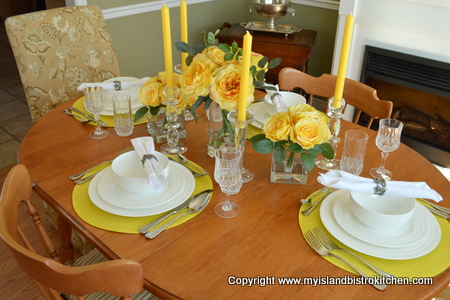
No need for charger plates to frame the plates when round placemats are used.

For more tablesetting inspiration, click on the “Tablescape” tab at the top of my home page.

—————————————————————————-

Thank you for visiting “the Bistro” today.  If you enjoyed this posting and recipe, please share it on your social media websites.

Connect with “the Bistro” through the following social media:

Join My Island Bistro Kitchen on Facebook

Follow “the Bistro’s” tweets on Twitter

Follow “the Bistro” on Pinterest

Follow “the Bistro” on Instagram


Bread Stuffing/Dressing Recipe for Roast Turkey/Chicken

There is nothing like the scent of a turkey roasting in the oven!  I love a roast turkey dinner with all the trimmings and I especially love the bread stuffing or, you may know it as  “dressing”. The theory is that, if it goes inside the turkey cavity, it’s called “stuffing” but, if it is cooked separately (as in a casserole or loaf pan), then it’s called “dressing”.   Regardless what it’s called, it just would not be a roast turkey dinner without this wonderful savory side dish. Continue reading Bread Stuffing/Dressing Recipe for Roast Turkey/Chicken

The Bistro’s Best Deviled Eggs Recipe

The Bistro's Best Devilled Eggs
The Bistro’s Best Devilled Eggs

Devilled Eggs are so tasty and easy to make.  They are perfect for potlucks, picnics, snacks, and even appetizers or hors d’oeuvres.  And, of course, they are often found at many Easter gatherings.  To top it off, they are showy, too.  I have never taken a plate of these to any function and had any left over!

The Bistro's Best Devilled Eggs
The Bistro’s Best Devilled Eggs

There are many versions of this timeless food but I like them plain and simple and not too seasoned or spicy.  I do use a pastry bag and decorating tip to pipe the filling into the egg cavities.  However, you don’t have to have these tools. Simply spoon the filling into the egg cavity and swirl it around with the tip of a knife. With a sprinkle of paprika, some green herbs or green onions, you will have an attractive looking plate of devilled eggs.

The Bistro's Best Devilled Eggs
The Bistro’s Best Devilled Eggs

I recommend not sprinkling the eggs with paprika until serving time as, sometimes, the paprika can “bleed” and the eggs can have a smudgy red cast to them.

The Bistro's Best Devilled Eggs
The Bistro’s Best Devilled Eggs

(Printable version of recipe follows at end of posting)

The Bistro’s Devilled Eggs

Ingredients:

5 hard-boiled eggs, cooled, peeled, and sliced in half lengthwise
2 – 2½ tbsp mayonnaise
1 tsp sour cream
½ tsp prepared mustard
1½ tsp onion, minced
¾ tbsp sweet pickle relish
2 tsp Parmesan cheese, finely grated
Pinch garlic powder
½ tsp fresh dill, chopped fine
¾ tsp fresh parsley, chopped
Pinch cayenne
Salt and pepper, to taste

Paprika
Fresh parsley, chopped
Sprigs of fresh herbs (optional)
Method:

Gently scoop out egg yolks and place in small bowl. Set egg whites aside.

Mash egg yolks with fork. Add all remaining ingredients. Mix well.

Fill egg white cavities with the devilled egg mixture using either a pastry bag fitted with a large decorative tip (I use a Wilton 6B tip) or, alternatively, use a spoon.

Refrigerate devilled eggs at least 1 hour before serving. At time of serving, sprinkle with chopped fresh parsley and/or paprika. Garnish each with a small sprig of a fresh herb, if desired.

Yield: 10 servings (1 devilled egg each)

The Bistro’s Best Devilled Eggs

Yield: 10 servings

Serving Size: (1 devilled egg each)

Always a crowd pleaser, these devilled eggs are both tasty and easy to make.

Ingredients

  • 5 hard-boiled eggs, cooled, peeled, and sliced in half lengthwise
  • 2 – 2½ tbsp mayonnaise
  • 1 tsp sour cream
  • ½ tsp prepared mustard
  • 1½ tsp onion, minced
  • ¾ tbsp sweet pickle relish
  • 2 tsp Parmesan cheese, finely grated
  • Pinch garlic powder
  • ½ tsp fresh dill, chopped fine
  • ¾ tsp fresh parsley, chopped
  • Pinch cayenne
  • Salt and pepper, to taste
  • Paprika
  • Fresh parsley, chopped
  • Sprigs of fresh herbs (optional)

Instructions

  1. Gently scoop out egg yolks and place in small bowl. Set egg whites aside.
  2. Mash egg yolks with fork. Add all remaining ingredients. Mix well.
  3. Fill egg white cavities with the devilled egg mixture using either a pastry bag fitted with a large decorative tip (I use a Wilton 6B tip) or, alternatively, use a spoon.
  4. Refrigerate devilled eggs at least 1 hour before serving. At time of serving, sprinkle with chopped fresh parsley and/or paprika. Garnish each with a small sprig of a fresh herb, if desired.
Schema/Recipe SEO Data Markup by Yummly Rich Recipes
https://myislandbistrokitchen.com/2016/03/20/the-bistros-best-devilled-eggs/

—————————————————————————-

Thank you for visiting “the Bistro” today.  If you enjoyed this posting and recipe, please share it on your social media websites.

Connect with “the Bistro” through the following social media:

Join My Island Bistro Kitchen on Facebook

Follow “the Bistro’s” tweets on Twitter

Follow “the Bistro” on Pinterest

Follow “the Bistro” on Instagram

——————————————————————————

The Bistro's Best Devilled Eggs
The Bistro’s Best Devilled Eggs

PEI Potato Leek Soup Recipe

PEI Potato Leek Soup

I am not sure which country can, in fact, lay claim to being the originator of Potato Leek Soup.  Some say it is of Welsh origin while others give Ireland credit for this tasty soup.  If you have ever eaten Vichyssoise, a cold version of Potato Leek Soup, you may attribute its origins to France due to its association with Vichy.  Then, of course, there is Tattie and Leekie soup from Scotland. Continue reading PEI Potato Leek Soup Recipe

The Bistro’s Great Nut-free Granola Recipe

The Bistro's Great Nut-Free Granola
The Bistro’s Great Nut-Free Granola

This granola recipe features a tasty mixture of toasted rolled oats, coconut, and dried fruits and berries.  Notably missing in this recipe are any nuts or whole seeds which are often found in granola.  This is intentional.  For anyone who, for any reason, cannot consume nuts or whole seeds, this Nut-free Granola is especially for you! Continue reading The Bistro’s Great Nut-free Granola Recipe

Best Creamy Scalloped Potatoes Recipe

Creamy Scalloped Potatoes
Best Creamy Scalloped Potatoes

One of my very favorite ways to present potatoes is in the form of Scalloped Potatoes.  A mixture of potatoes, onions, and milk along with a bit of seasoning and grated cheese make this a great comfort food dish any time of the year.  My mother often made scalloped potatoes sometime on the weekend and made enough that we’d have leftovers for dinner a day or two later. To this day, I still believe that this is one dish that is better a day or two after it is made as the flavours really settle in. Continue reading Best Creamy Scalloped Potatoes Recipe