Ham, Cheese, & Tomato Panini

Ham, Cheese, & Tomato Panini

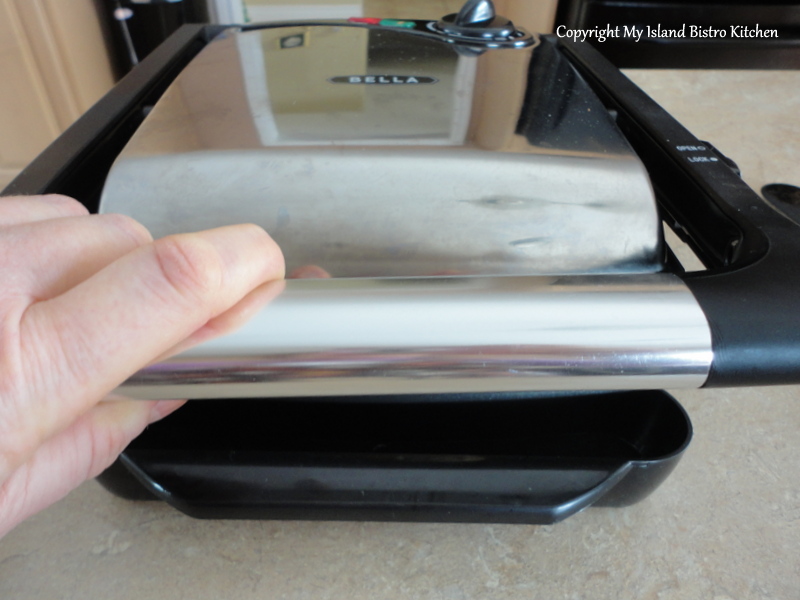
There are so many ways to serve a sandwich other than just throwing two pieces of bread and some filling together.  One of my favorite ways to serve sandwiches is to make them into panini.  I bought a Bella panini grill a couple of years ago and I have certainly gotten use out of it.

Panini is nothing more than bread or rolls, some kind of spread, and a filling which usually involves some variety of deli meat and cheese.  Often, a vegetable such as tomato is added as well.  The sandwich is then heated in a sandwich press or panini grill where it is pressed flat and toasted.

If you are lucky enough to be near a bakery or a supermarket that makes a variety of breads and rolls, you are likely to find ones suitable for use in panini grills. Rolls identified simply as panini rolls or Ciabiata, Focaccia, or baguettes are all suitable for use in these types of sandwiches. Here in Charlottetown, the Atlantic Superstore has a good variety of rolls that they sell individually.  You can, of course, use any plain bread you wish but the sandwich will be more interesting if made with some type of artisan bread or rolls.

Today, I am going to share with you how I make a Ham, Cheese, & Tomato Panini.

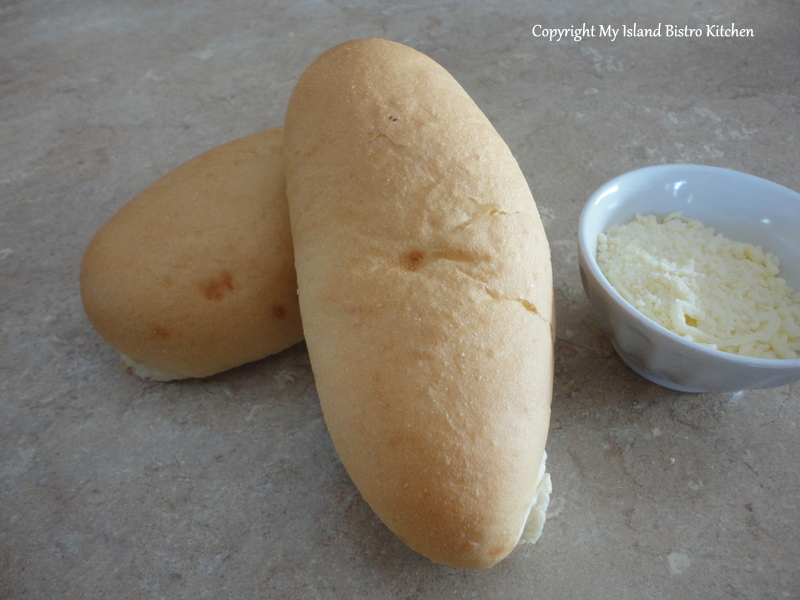
First, I have chosen puffy oval-shaped rolls that were simply labelled “Panini  Rolls” at the Superstore and I split them in half, horizontally.

Panini Rolls
Panini Rolls

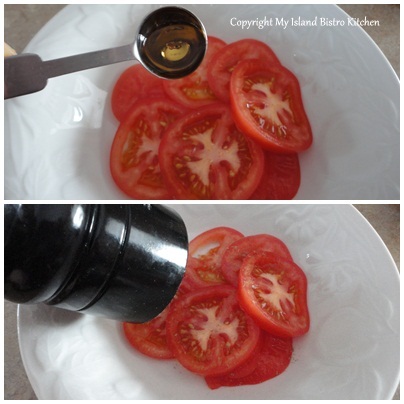
I sliced tomato rather thinly and sprinkled it with about 1/2 tsp. Cranberry Pear White Balsamic Vinegar from the Liquid Gold store here in Charlottetown.  If you have been following my blog, you will recall the feature story I did last summer on this store and their fabulous balsamic vinegars and olive oils.  I then sprinkled the tomatoes with some fresh ground pepper and sea salt and set them aside while I prepared the rest of the sandwich.

Marinating Tomatoes in Cranberry-Pear Balsamic Vinegar

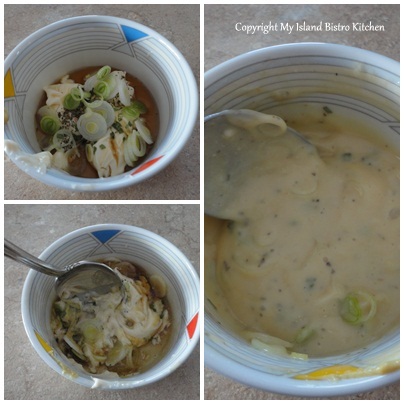
To make the mayonnaise spread, I combined 1 tbsp maple syrup with 1 1/2 tbsp mayonnaise, 1 tsp. Dijon mustard, and a pinch each of basil and chives.  I then added 1 green onion, thinly sliced.

Mixing Mayonnaise Spread

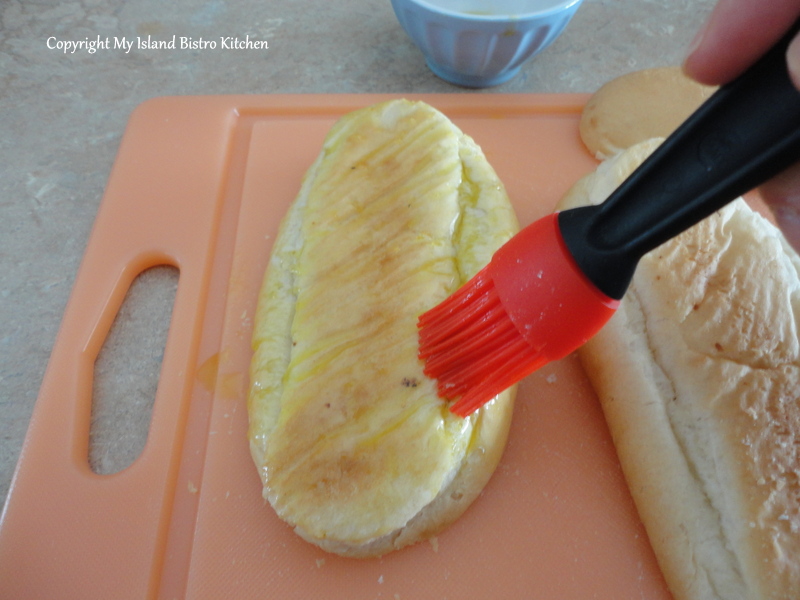
Using a good quality extra virgin olive oil (I used Liquid Gold’s Arbosana), I brushed olive oil over all the outside edges of the rolls.  This is one of the occasions where you want to use the very best quality olive oil you can find because the taste really does come through.

Brushing the rolls with olive oil

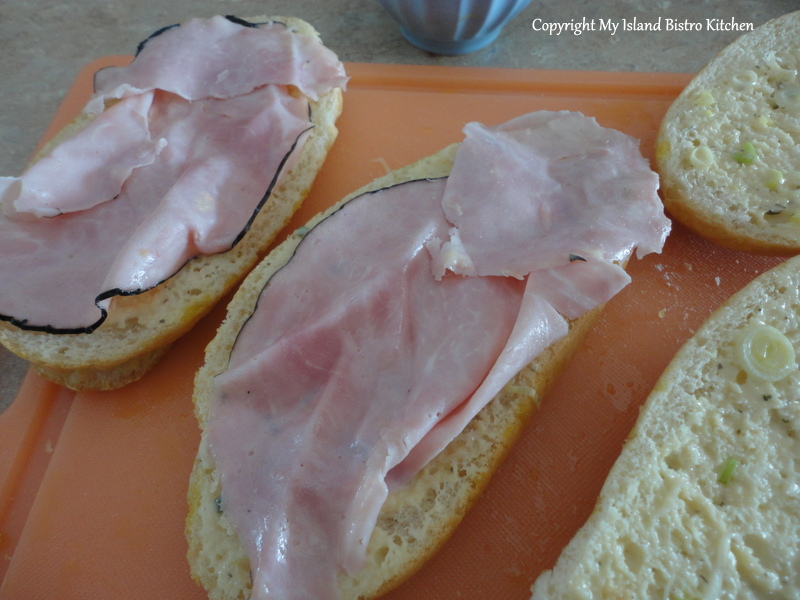
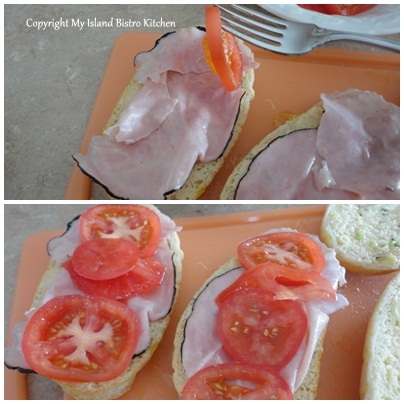
I flipped the rolls over and spread the mayonnaise on each of the interior sides of the rolls.  On one side of the roll, I started building the sandwich, starting first with a good quality Black Forest deli ham that was sliced very thin.

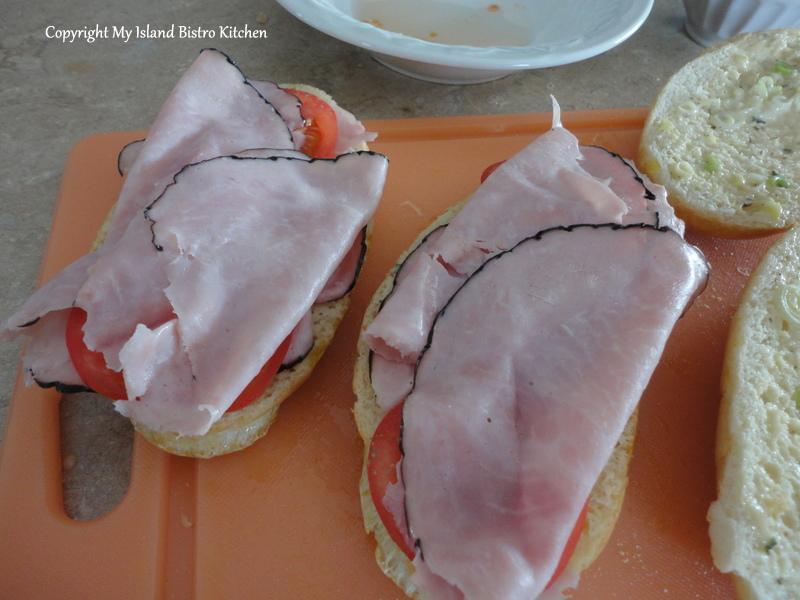
I then added the marinated tomatoes

Adding the marinated tomatoes

and another slice of ham

and, finally, added the grated cheese.

Adding grated cheese

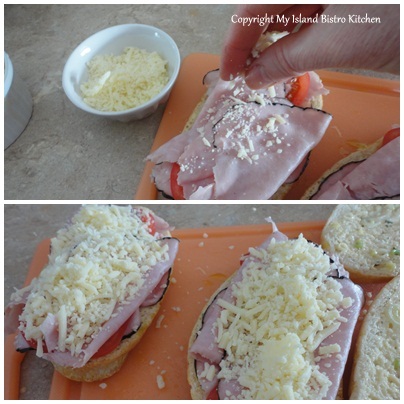
You can use any of your favorite cheeses in this sandwich – I happened to have some Italiano mixture (mozzarella, asiago, smoked provolone, and parmesan) in the fridge so that’s what I used.

I then put the top part of the roll on the sandwich and transferred it to the heated panini grill.

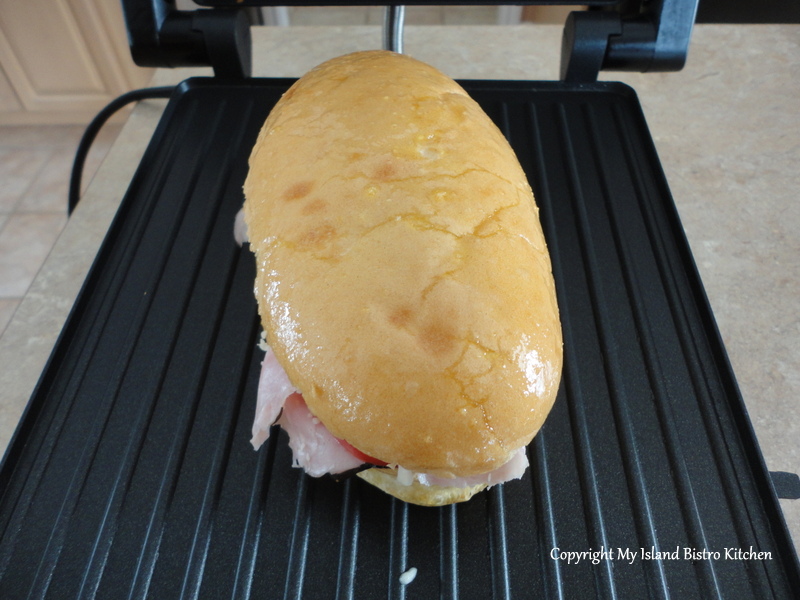
I pressed and held down the top of the panini grill for about 20 seconds or so.

Panini Grill
Panini Grill

I grilled the sandwich on the medium setting for probably about 4-5 minutes, essentially just long enough for the sandwich to be heated, the cheese melted, and the roll to have a nice crisp crust.  Since each brand of grill will differ slightly, you will want to follow the manufacturer’s instructions for grilling panini and do some testing with your particular grill.

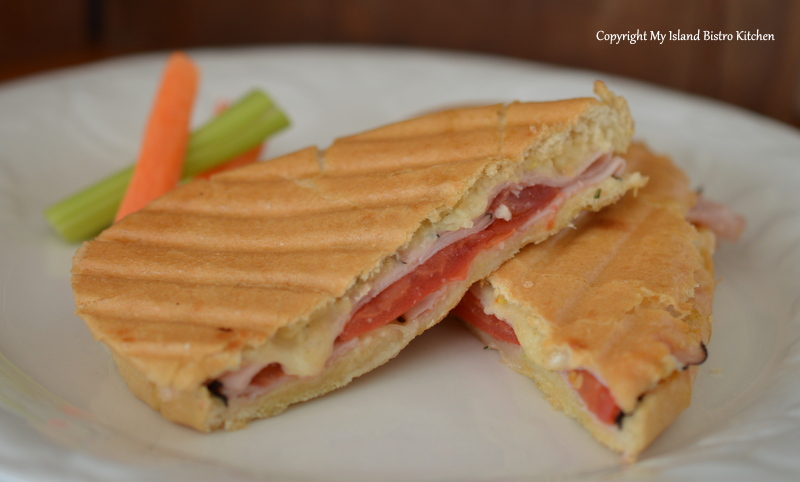
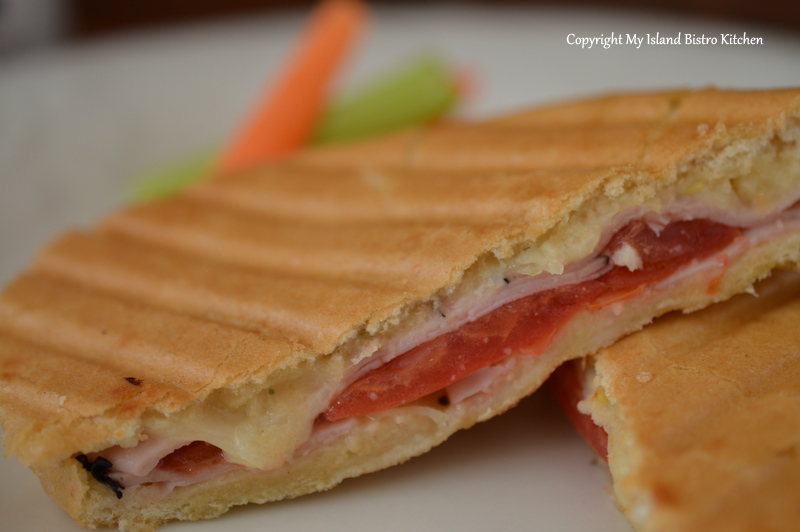
I sliced the panini diagonally and served it with carrot and celery sticks.

Ham, Cheese, & Tomato Panini

1 medium-sized tomato

1/2 tsp. Liquid Gold Cranberry Pear White Balsamic Vinegar

Fresh ground pepper and sea salt

1 tbsp maple syrup

1 1/2 tbsp mayonnaise

1 tsp Dijon mustard

pinch dried basil

pinch dried chives

1 small green onion, thinly sliced (white and light green parts only)

2 oz. deli-style Black Forest ham, thinly sliced

1 oz. grated Italian blend cheese

2 panini rolls of choice

1 – 1 1/2 tbsp extra virgin olive oil

Directions:

Slice tomato thinly.  Drizzle with 1/2 tsp. Cranberry Pear White Balsamic Vinegar, freshly ground pepper, and sea salt.  Set aside to marinate as you prepare remainder of ingredients.

In small bowl, combine the maple syrup, mayonnaise, Dijon mustard, herbs, and green onion.  Mix well.

Split panini roll in half, horizontally.  Brush virgin olive oil on all outside edges of roll. Flip rolls over and spread mayonnaise mixture on both interior sides of roll.  Lay slice of ham on one side of roll.  Add the marinated tomatoes.  Add second layer of ham.  Sprinkle with grated cheese.  Place top of roll over layers of sandwich.  Transfer to heated panini maker and grill according to manufacturer’s instructions.

Makes 2 panini.


Thank you for visiting “the Bistro” today. There are lots of ways to connect with “the Bistro” through social media:

Join My Island Bistro Kitchen on Facebook
Follow the Bistro’s tweets on twitter @PEIBistro
Find the Bistro on Pinterest at “Island Bistro Kitchen”
Follow along on Instagram at “peibistro”

Belgian Waffles with Strawberries

Belgian Waffle with Fresh Strawberries, Whipped Cream, and Chocolate Sauce
Belgian Dessert Waffle with Fresh Strawberries, Whipped Cream, and Chocolate Sauce

The first time I had Belgian waffles was in Ogunquit, Maine, a long time ago.  We used to vacation there and we found a wonderful little café that opened only for breakfast and their specialty was the Belgian waffle served with huge, fresh Maine blueberries.  Naturally, a Belgian waffle maker had to be purchased so we could make them at home because waffles are, in fact, quite easy to make and just take standard baking ingredients!

Waffles are very versatile.  They can be a breakfast food, eaten at brunch, lunch, for dessert or even as a main course for dinner, depending on the topping.  There is nothing like creamed chicken atop a puffy Belgian waffle for good old-fashioned comfort food!

I love fresh berries, especially strawberries and blueberries, on waffles. Good drizzled with pure maple syrup,  a rich chocolate sauce is also an option and a real treat for waffles.  So, why not take a lowly basic waffle and dress it up for a tasty meal at any time of day.

Waffle Ingredients
Waffle Ingredients

Belgian Waffles

1 cup all-purpose flour
1/2 tbsp baking powder
1/4 tsp baking soda
pinch salt
1 cup milk
1/2 tsp vanilla
2 medium-sized eggs, separated
2 tbsp melted butter
Separate the eggs.  Beat the egg whites stiff.  Set aside. 

In separate bowl, mix the egg yolks and all remaining ingredients.

With electric mixer, beat until well-blended.

Gently fold the egg whites into the flour and milk mixture.  Fold just until they are incorporated.  This will yield a light, fluffy waffle.

Heat waffle maker and cook waffles according to manufacturer’s directions.

To serve, add sliced fruit, a dollop of whipped cream, and drizzle with your favorite syrup or topping.  Dust with confectioner’s sugar, if desired.

Yield: Apx. 3-4 waffles

Belgian Waffles

Perfectly puffy Belgian Waffles with Strawberries are a fabulous treat especially with a dollop of whipped cream and drizzled with chocolate syrup
Course Breakfast
Cuisine Canadian
Keyword Belgian Waffles, waffles
Servings 4
My Island Bistro Kitchen Barbara99

Ingredients

  • 1 cup all-purpose flour
  • 1/2 tbsp baking powder
  • 1/4 tsp baking soda
  • pinch salt
  • 1 cup milk
  • 1/2 tsp vanilla
  • 2 medium-sized eggs, separated
  • 2 tbsp melted butter

Instructions

  1. Separate the eggs. Beat the egg whites stiff. Set aside.
  2. In separate bowl, mix the egg yolks and all remaining ingredients. With electric mixer, beat until well-blended.
  3. Gently fold the egg whites into the flour and milk mixture. Fold just until they are incorporated. This will yield a light, fluffy waffle.
  4. Heat waffle maker and cook waffles according to manufacturer's directions.
  5. To serve, add sliced fruit, a dollop of whipped cream, and drizzle with your favorite syrup or topping. Dust with confectioner's sugar, if desired.

Recipe Notes

Yield: Apx. 3-4 waffles

Thank you for visiting “the Bistro” today. There are lots of ways to connect with “the Bistro” through social media:

Join My Island Bistro Kitchen on Facebook
Follow the Bistro’s tweets on twitter @PEIBistro
Find the Bistro on Pinterest at “Island Bistro Kitchen”
Follow along on Instagram at “peibistro”

PIN ME TO PINTEREST!

Puffy Belgian Waffles topped with fresh strawberries, whipped cream, and a dollop of rich chocolate syrup

Valentine’s Day Breakfast in Bed

Happy Valentine’s Day, everyone!  Be sure to use the occasion to show special appreciation for those you love.  One of the most ultimate ways to pamper a loved one on any day (and not just on Valentine’s) is by preparing and serving him or her breakfast in bed.

Valentine's Day Breakfast in Bed Tray
Valentine’s Day Breakfast in Bed Tray

This is a very simple breakfast menu I have selected for the bed tray:  Freshly squeezed orange juice, fresh fruit cup sprinkled with coconut, heart-shaped Irish Cream French Toast with pure Canadian maple syrup, and a wee pot of tea. (Recipe for the French Toast follows at end of posting)

There is nothing like fresh-squeezed orange juice to start the day!   The little juice jug was a find at a thrift shop.  Bed trays have limited space so I’m always on the look-out for items that will be suitable for this purpose.  I have opted to make the event special by serving the juice in a stemmed glass.


I have selected fruit with different colors and textures and dressed the fruit cup with some coconut and orange zest.  The glass pedestal dessert dish is perfect for serving fresh fruit because it allows the colors of the fruit to show through giving color to the tray.

I sprinkled the French toast with confectioner’s sugar and added a dollop or two of whipped cream.   My heart-shaped cookie cutter didn’t have as deep a cut in the center as I would have liked; consequently, the heart-shape isn’t as prominent or doesn’t show up as well in the photographs.   I added the fan-cut strawberry to give both color and flavour.

What dresses up the food is the presentation.  Yes, it’s all about the presentation!  I covered the tray with a couple of my best quality white napkins and folded the third, using a “blingy” napkin ring as napkin jewelry.  Out came the wee Sadler teapot I found in a second-hand shop last summer.  From my teacup collection, I selected one that is predominantly pink since my color theme for this bed tray is pink and red.

Every bed tray should be adorned with a small bouquet of fresh flowers.  I thoroughly enjoy having access to Island greenhouse-grown tulips over the winter.  I drove out to Vanco Farms in Mount Albion to specifically select these pink and red tulips, knowing they would be perfect on this tray!  I think the pink and red make a stunning color combination!

And, of course, adding a lovely card and a gift will make a special someone’s Valentine’s Day just a tad more special!


My Island Bistro Kitchen’s Irish Cream French Toast

2 eggs
3 tbsp milk
2 tsp Irish Cream Liqueur (follow link at bottom of posting for my recipe for homemade Irish Cream Liqueur)
1/2 tbsp orange juice
1/4 tsp vanilla
1/4 tsp cinnamon
pinch cardamom
1/2 tsp freshly grated orange rind

With whisk, beat eggs lightly.  Add remainder of ingredients in order given.  Whisk to combine.  Pour mixture into a flat pan or pie plate.  Dip each bread slice into the mixture, turning to coat both sides.

Melt 1 tsp. butter in skillet.  Transfer dipped bread to hot skillet.  Over medium heat, fry bread till browned.  Flip bread to brown other side.  Transfer to serving plate.  Sprinkle with confectioner’s sugar and add a dollop of whipped cream, if desired.  Serve warm with maple syrup.


Click on this link for my recipe for homemade Irish Cream Liqueur.


Thank you for visiting “the Bistro” today. There are lots of ways to connect with “the Bistro” through social media:

Join My Island Bistro Kitchen on Facebook
Follow the Bistro’s tweets on twitter @PEIBistro
Find the Bistro on Pinterest at “Island Bistro Kitchen”
Follow along on Instagram at “peibistro”

Pancakes for Shrove Tuesday

Shrove Tuesday is often commonly referred to as “Pancake Day” or “Pancake Tuesday”.  Shrove Tuesday always falls on the Tuesday before Ash Wednesday which signifies the beginning of Lent, a 40-day period leading to Easter in the Christian calendar.  In some denominations, Lent is a period of abstaining from certain things, which may include rich food indulgences such as meals made with butter, eggs, and fat, for the 40-days of Lent.  So, legend has it that the day before Lent was the last day to indulge and also to feast on the foods that would not carry over and last until after Lent – foods like butter, eggs, and milk.  Or, perhaps it was considered best to get the items used up before Ash Wednesday lest they become temptations during Lent, a period of fasting!  Supposedly, if they mixed together some butter, eggs, fat, milk, flour, and some sort of leavening and put that in a pan on the stove, it produced pancakes!

On PEI, there are always lots of pancake breakfasts or suppers on or around Pancake Day.  Some use them as fundraisers and others, well, it’s just part of tradition.  One way or another, many Islanders will have, or serve, pancakes for a meal today, either for breakfast or for supper.

This year, with Easter being early, Pancake Day happens to fall just before Valentine’s Day.  So, I’ve opted to dress the pancakes up by serving them with strawberries shaped into hearts along with some fresh blueberries.

And, of course, you know, I’m going to have some gorgeous Island-grown greenhouse red tulips from Vanco Farms (Mount Albion, PEI) on the table somewhere!

Pancakes are a simple food, not taking any ingredients unlikely to be found in most cupboards.  There are many variations to the basic pancake recipe; blueberries, chocolate chips, apple, and just about anything can be added to the pancake batter.  Butter and maple syrup are the most common toppings although blueberry, strawberry, chocolate, or other favorite sauces can also be used.

I tend to like the plain pancakes with butter and maple syrup and a light dusting of confectioner’s sugar and some fresh fruit on the side.

And, of course, I am using pure, all-natural Canadian maple syrup!

Pancakes are always good comfort food!

Some recipes will result in flat pancakes, almost crepe-like just as my grandmother used to make, while pancakes from other recipes will rise and be quite thick.  My recipe produces nice, puffy pancakes.

Today, I made just a half recipe of the pancakes as my recipe halves as easily as it doubles.   Here is the full recipe:

Basic Pancakes

1 egg, beaten

1 1/4 cups milk

2 1/2 tbsp cooking oil

1/4 tsp vanilla

1 1/4 cups flour

1 tbsp baking powder

1/4 tsp baking soda

1/4 tsp salt

2 1/2 tbsp sugar

Whisk egg.  Add milk, oil, and vanilla.  Whisk to mix.

Add remaining ingredients in order listed.  Whisk until dry ingredients are incorporated.  Let mixture stand for 5-7 minutes.

Meanwhile, melt about 1/2 tbsp butter in skillet.  Using 1/3 cup measure, pour mixture into round shapes in skillet – I don’t worry about getting the pancakes perfectly round shapes.  When pancakes are puffed up, edges start to appear dry, and bubbles appear on tops of pancakes, turn the pancakes to brown their other side.

Serve hot with butter and/or desired sauce.

Makes 9-10 medium-sized pancakes.

Basic Pancakes

A great easy-to-make recipe for homemade pancakes. Dress them up with lots of fresh fruit and a drizzle of maple syrup.
Course Breakfast
Keyword Pancakes
Servings 4
My Island Bistro Kitchen My Island Bistro Kitchen

Ingredients

  • 1 egg beaten
  • cups milk
  • tbsp cooking oil
  • ¼ tsp vanilla
  • cups flour
  • 1 tbsp baking powder
  • ¼ tsp baking soda
  • ¼ tsp salt
  • tbsp sugar

Instructions

  1. Whisk egg. Add milk, oil, and vanilla. Whisk to mix.
  2. Add remaining ingredients in order listed. Whisk until dry ingredients are incorporated. Let mixture stand for 5-7 minutes.
  3. Meanwhile, melt about 1/2 tbsp butter in skillet. Using 1/3 cup measure, pour mixture into round shapes in skillet - I don't worry about getting the pancakes perfectly round shapes. When pancakes are puffed up, edges start to appear dry, and bubbles appear on tops of pancakes, turn the pancakes to brown their other side.
  4. Serve hot with butter and/or desired sauce.

Recipe Notes

Yield: 9-10 medium-sized pancakes.

Thank you for visiting “the Bistro” today. There are lots of ways to connect with “the Bistro” through social media:

Join My Island Bistro Kitchen on Facebook
Follow the Bistro’s tweets on twitter @PEIBistro
Find the Bistro on Pinterest at “Island Bistro Kitchen”
Follow along on Instagram at “peibistro”

Pin Me To Pinterest!

Pancakes
Homemade Pancakes

Old Fashioned Sugar Cookies

Sugar Cookies
Sugar Cookies

These Old-fashioned Sugar Cookies are one of the plainest cookies yet they have endured throughout time and are often counted amongst the favorites in many families.  The cookies are aptly named given the amount of sugar in them in proportion to the amounts of other ingredients.  Despite the amount of sugar in most sugar cookie recipes, they are not really an overly sweet or rich cookie. 

Growing up in PEI, sugar and molasses cookies were a standard staple in many Island homes.  My grandmothers always had them on hand yet their cookies varied significantly because, of course, they used different recipes and probably some different ingredients or proportions.  One grandmother always made round cookies while the other always cut her cookies into squares.  One made soft cookies while the other made cookies that were quite hard.

I remember visiting one grandmother and, as soon as I’d get in the door, I’d always ask for cookies to which the response was ‘you don’t have to ask, just go and help yourself’.  I’d trot into her pantry and there were always two large cookie tins on the counter – one for molasses cookies and the other for sugar cookies.  I’d return to the kitchen to find Gramma, with a big, happy smile on her face, having taken up her position in her Boston rocker beside the stove, waiting for me to occupy the companion rocker and have a visit.  I’d rock away munching on the cookies — a sugar in one hand and a molasses cookie in the other — and we’d chat about this and that and nothing in particular.  I think it made her day to have me pop in for a visit and to see little fingers fishing cookies out of the tins!  I never remember visiting that there weren’t cookies in those tins!  Gramma really was a cookie-type grandmother!  Great memories!


Sugar Cookies and Hot Cocoa

Both molasses and sugar cookies were considered wholesome and substantial cookies that didn’t take ingredients homemakers would not be likely to have in their pantries.  So, they were quite an economical cookie to make.  No matter the recipe, sugar cookies have common ingredients – some kind of fat (butter, shortening, or lard), sugar (white or brown or a combination), eggs, flour, leavening agent (baking soda, cream of tartar, and/or baking powder), vanilla, and often a small quantity of milk.  Sugar cookies can be rolled and cut into desired shapes or they can be drop cookies, depending on the recipe used.

The recipe I use is for rolled sugar cookies.  They are neither soft nor hard.  The  batter is quite dense.  These cookies hold their shape well.  I chill the dough for a couple of hours before rolling it out and then chill the cut cookies on the baking sheet for 10-15 minutes before baking them.  This helps to contain their shape and keep them from spreading.  I add just small amounts of two spices – cardamom and nutmeg —  not enough to change them from sugar to spice cookies but sufficient to give the flavour a bit of complexity for the taste buds.  I also add the seeds from one-half of a vanilla bean as well as 1 tsp pure vanilla.  I like the flavour from the vanilla bean seeds and I especially like the little black specks in the appearance of the cookie.  My recipe calls for butter but some will use half shortening and half butter.  Butter, of course, will make a richer cookie.

The key to baking cookies that will determine if they are soft or hard is the baking time.  For softer, more chewy cookies, remove them from the oven when they are ever-so-slightly undercooked.

So, I introduce you to my old-fashioned sugar cookies.

Old-fashioned Sugar Cookies

Ingredients:

seeds from 1/2 vanilla bean

1 cup butter (no substitutes), softened at room temperature
1 cup white sugar
2 large eggs, room temperature
1/4 cup milk, room temperature
1 tsp vanilla

3 1/4 cups all-purpose flour
1 1/2 tsp cream of tartar
1 tsp soda
1/4 tsp salt
1/8 tsp cardamom
1/8 tsp nutmeg

Method:

Using the tip of a sharp knife, split open the vanilla bean lengthwise.  Using the edge of the knife blade , scrape the seeds from the vanilla bean.  Set aside.


Cream butter and sugar until light and fluffy.  Add eggs and beat well.  Add milk, vanilla, and vanilla bean seeds.  Beat just until combined.

In separate bowl, sift or sieve flour, cream of tartar, soda, salt, cardamon, and nutmeg.  Add to liquid ingredients and stir just until flour mixture is combined with liquid ingredients.

Chill dough for 1-2 hours.

Preheat oven to 375°F.  Line baking sheets with parchment paper.

On floured surface, gather dough together and roll out dough to a scant 1/4″ thickness.  Cut into desired shapes.

Decorate with raisins and/or sprinkle of sugar, if desired.

Place on parchment-lined baking sheets, spacing cookies about 1½” apart.  Chill cookies in refrigerator for 10-15 minutes.  Remove and bake for 8-10 minutes.  Immediately transfer cookies to wire racks to cool.

Makes about 3 dozen – 2 5/8″ cookies.  Yield will vary depending on size of cookie cutters used.

Store cookies in an airtight container and keep at room temperature for up to 5 days or store in freezer for longer storage.

Thank you for visiting “the Bistro” today. There are lots of ways to connect with “the Bistro” through social media:

Join My Island Bistro Kitchen on Facebook
Follow the Bistro’s tweets on twitter @PEIBistro
Find the Bistro on Pinterest at “Island Bistro Kitchen”
Follow along on Instagram at “peibistro”

Old-fashioned Sugar Cookies

Simple, classic Old-fashioned Sugar Cookies are perfect for the cookie jar and the dough is perfect for making cut-out cookies in any shape desired.
Course Cookies
Keyword cookies,, sugar cookies
My Island Bistro Kitchen Barbara99

Ingredients

  • seeds from 1/2 vanilla bean
  • 1 cup butter (no substitutes), softened at room temperature
  • 1 cup white sugar
  • 2 large eggs, room temperature
  • ¼ cup milk, room temperature
  • 1 tsp vanilla
  • cups all-purpose flour
  • tsp cream of tartar
  • 1 tsp soda
  • ¼ tsp salt
  • 1/8 tsp cardamom
  • 1/8 tsp nutmeg

Instructions

  1. Using the tip of a sharp knife, split open the vanilla bean lengthwise. Using the edge of the knife blade, scrape the seeds from the vanilla bean. Set aside.
  2. Cream butter and sugar until light and fluffy. Add eggs and beat well. Add milk, vanilla, and vanilla bean seeds. Beat just until combined.
  3. In separate bowl, sift or sieve flour, cream of tartar, soda, salt, cardamon, and nutmeg. Add to liquid ingredients and stir just until flour mixture is combined with liquid ingredients.
  4. Chill dough for 1-2 hours.
  5. Preheat oven to 375°F. Line baking sheets with parchment paper.
  6. On floured surface, gather dough together and roll out dough to a scant ¼" thickness. Cut into desired shapes.
  7. Decorate with raisins and/or sprinkle of sugar, if desired.
  8. Place on parchment-lined baking sheets, spacing cookies about 1½" apart. Chill cookies in refrigerator for 10-15 minutes. Remove and bake for 8-10 minutes. Immediately transfer cookies to wire racks to cool.

Recipe Notes

Makes about 3 dozen - 2 5/8" cookies. Yield will vary depending on size of cookie cutters used.

Store cookies in an airtight container and keep at room temperature for up to 5 days or store in freezer for longer storage.

Pin This Custom Photo To Your Favorite Pinterest Board!

Sugar Cookies
Sugar Cookies