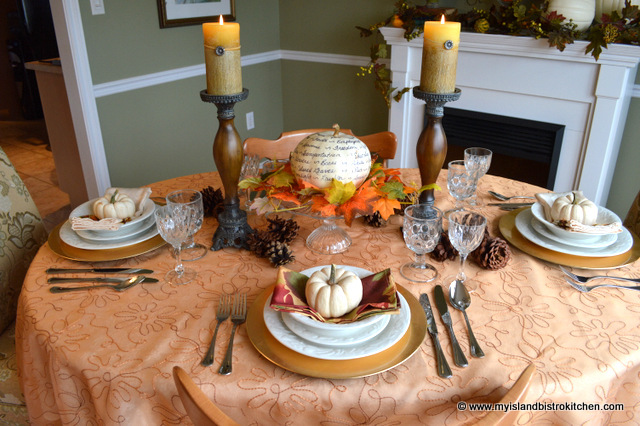
The autumn got away from me and I did not get around to sharing my 2014 Thanksgiving tablesetting. When I realized it was too late to share it on my blog for the Canadian Thanksgiving in October, I knew I’d have a second chance in late November to share it in time for the American Thanksgiving. So, this one is for our American friends to the South who will celebrate their Thanksgiving tomorrow… if you haven’t already set your Thanksgiving table, this one is quick and easy!
I went with a fairly simplistic setting this year. I started with an ivory tablecloth topped with a piece of orange drapery sheer. As you have probably noticed with my tablesettings, I tend to go for plain table coverings which make other elements of the tablesetting stand out.
I also try, where possible, to use props that I already have like, for example, the tall wooden candlesticks. The warmth of the wood seemed to work well with the autumn props. Scattering a few brown pine cones pulled the color scheme together.
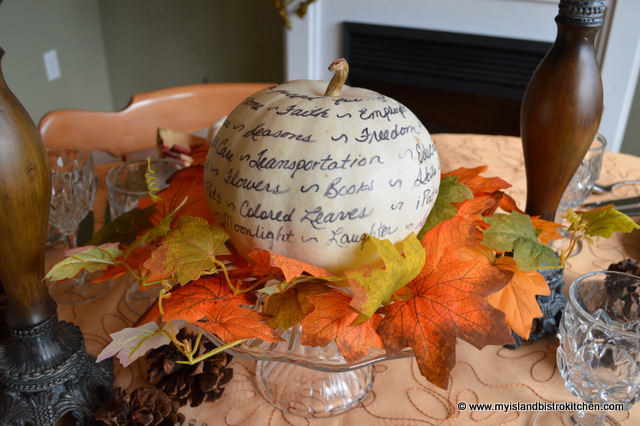
The focal point of the table is the small white pumpkin perched on a glass cake stand and surrounded by colored leaves. With a black marker, I simply wrote, round and round the pumpkin, all the things I am thankful for.
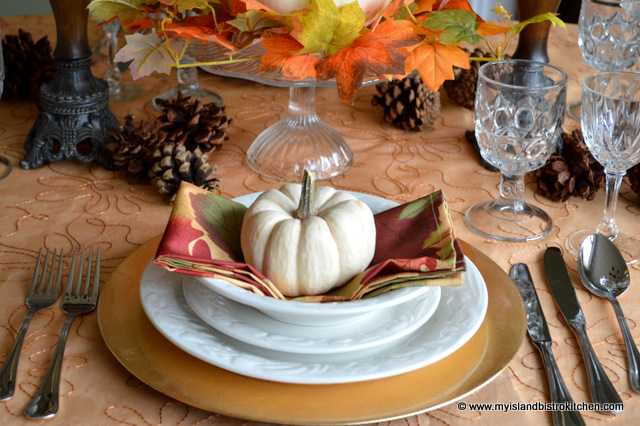
I used my standard gold charger plates topped with my everyday white stoneware dinnerware. A quick fold of the napkin placed in the soup bowl makes a colorful nest for the little white ornamental pumpkins which tie in with the white pumpkin centerpiece.
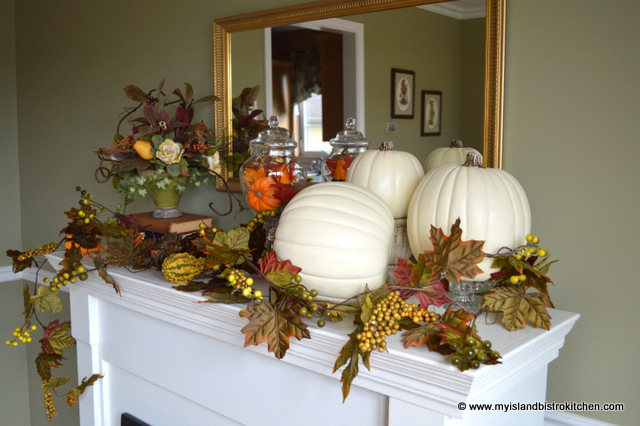
I love to decorate my fireplace mantles. A few white pumpkins, a garland of some colored leaves, a floral centerpiece, and a jar of mini orange pumpkins for a splash of color, and the look is complete.
This was a fairly easy, quick, and economical tablesetting to achieve. It’s suitable, obviously, for a more informal Thanksgiving dinner. My good China has a border of pink florals so really doesn’t blend well with the colors of autumn. That’s why white dinnerware is always a good choice as it goes with anything and food always looks so eye-popping when served on it!
Happy Thanksgiving to our American family and friends to the South!
Thank you for visiting “the Bistro” today. There are lots of ways to connect with “the Bistro” through social media:
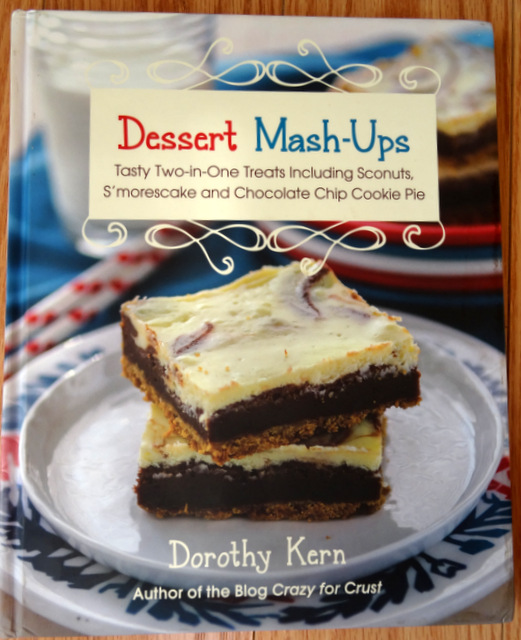
Ulysses Press has offered me the opportunity to conduct a review of Dorothy Kern’s cookbook, Dessert Mash-Ups. Kern is the blogger behind “Crazy for Crust” food blog and Dessert Mash-Ups is her first cookbook.
I found this a delightful cookbook, all about desserts (what’s not to love about that speciality!). But, it’s more than that. It’s actually a teaching book that is sure to be a good reference tool for bakers, particularly those less experienced in the realm of baking. For example, there is a great section at the front of the book that provides a list of common pans any kitchen should have along with a list of useful gadgets and appliances. Additionally, the author also gives useful ingredient tips and suggestions along with storage and freezing tips. While candy making can be daunting for some, Kern takes away the trepidation by providing handy tips on candy dipping that both the novice and a more experienced candy maker would find useful. Including this type of information in the cookbook would be motivating I believe for those, perhaps less confident in candy making, to try the candy recipes in Kern’s book.
The book features over 50 recipes that are well laid out. Each recipe is introduced by a short paragraph that either comments about the recipe’s ingredients or gives the author’s personal story about, or connection to, the recipe. Step-by-step clear directions call for the ingredients in the order in which they appear on the ingredients list found on the right-hand side of each page and each recipe provides the yield along with the preparation and baking times. Where there is more than one component to a recipe (e.g., a cake, streusel, and icing), each set of ingredients is listed separately along with individual sets of directions which makes preparation easier. The directions are easy to understand, even for those less experienced with baking.
One of the things I most appreciated about the book is that, while it sometimes combines different ingredients in a recipe or “mashes” them up into something entirely different than you might think of (ever hear of lemon meringue pie fudge!), the recipes do not call for unusual ingredients that would be difficult to find.
The other bonus with this book is that each recipe is accompanied by a full-page color photograph of the finished product so you know the goal you are aiming for when making a recipe. The photographs are stunning and of high quality, making each recipe enticing to make. Of note, all food photographs in the book are the work of the author, herself.
I found the structure, content, and layout of this book well thought out with the reader in mind. The book is well organized and categorized into eight chapters: Breakfast but Better; Candy Concoctions; Cookies, Brownies, and Bars Together at Last; Pie Surprise; Cake & Cupcake Creations; New Takes on Cheesecake; Double Dips; and Holiday Mash-ups. At the beginning of each chapter, there is a page that lists all the recipes in that category along with their page numbers. There is also a useful alphabetized index at the back of the book.
Test-driving recipes
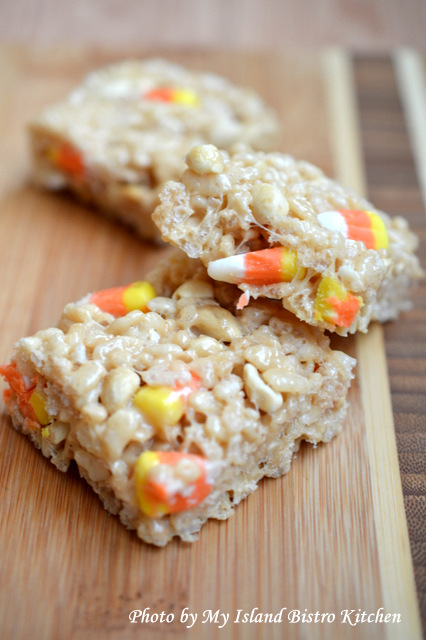
So, while a book might be lovely to look at and to leaf through, the real test comes when you make some recipes out of the book. I selected two: Payday Candy Corn Rice Krispies Treats (pp 134-135), and Rocky Road Cookie Fudge Bars (pp. 58-59). Both recipes turned out well for me with no issues and both were tasty and are ones I would repeat.
Payday Candy Corn Rice Krispies Treats
The twist on these perennial favorites is the addition of just a small amount of peanut butter, some peanuts, and the candy corn. I made them for Halloween treats and they were a hit. I also tested freezing them and found they freeze well, too. I would make them again, with or without the candy corn.
Payday Candy Corn Rice Krispies Treats from “Dessert Mash-Ups Cookbook by Dorothy Kern
Ulysses Press has given me permission to share the recipe and the book’s photograph for Rocky Road Cookie Fudge Bars along with my review of this cookbook. I made these bars and thoroughly enjoyed them.
Rocky Road Cookie Fudge Bars
Yield 36 bars Prep Time 20 minutes Bake Time 18 minutes Chill Time At least 4 hours
I’ll never forget eating rocky road ice cream when I was young. It was one of my mom’s favorite flavors, so it was always in the freezer. I’d pick out the almonds and marshmallows to save for last, because they were the best part. My love of the ice cream inspired these bars: a rich chocolate cookie bar topped with a rocky road candy that tastes like fudge. I hope it brings back memories of all your rocky road days like it does for me!
1⁄2 cup (1 stick) unsalted butter, softened
1⁄2 cup packed brown sugar
1⁄4 cup granulated sugar
1 teaspoon vanilla extract
1 large egg
1⁄3 cup unsweetened cocoa powder
1 teaspoon baking soda
1⁄4 teaspoon salt
1 cup all-purpose flour
1 (11.5-ounce) bag semisweet or milk chocolate chips
1⁄2 cup chopped walnuts or almonds
1 1⁄2 cups mini marshmallows
1. Preheat the oven to 350°F. Spray a 9 x 9-inch pan with cooking spray or line with foil and spray with cooking spray for easy cleanup.
2. In the bowl of a stand mixer fitted with the paddle attachment, cream together the butter, brown sugar, and granulated sugar. Add the vanilla and egg, and mix until smooth. Mix in the cocoa and baking soda, then add the salt and flour, and beat until well blended. Press into the prepared pan. (The batter will be sticky; it helps to spray your hands with cooking spray to keep it from sticking to you.)
3. Bake for 15 to 18 minutes, until the top just loses its sheen.
4. As soon as the bars come out of the oven (or a few minutes before), melt the chocolate chips in a large microwave- safe bowl on high for 1 1⁄2 to 2 minutes, stirring every 30 seconds until the chocolate melts and is smooth. Let it sit for about 2 minutes, then stir in the chopped nuts and mini marshmallows. Stir to coat completely.
5. Pour the marshmallow mixture on top of the hot cookie bars and spread carefully. Let set at room temperature before slicing. You can refrigerate the bars to speed hardening, but be sure to allow them to sit at room temperature for 30 minutes before slicing to avoid cracking in the chocolate. Store in an airtight container at room temperature; bars are best within 4 days.
Concluding Thoughts
The book contains a good variety of dessert recipes that would be suitable for families, potluck get-togethers, special occasions, and gift giving.
This book is a manageable size, has good flow, and is easy to read. In my view, this book would be most suitable for individuals who love to bake, have a sweet tooth, and/or those who don’t count calories!
Disclosure: I received a complimentary copy of Dessert Mash-Ups from Ulysees Press for the purposes of conducting a review of the cookbook. I received no compensation for this review and was under no obligation to provide a positive review. All opinions expressed are purely my own.
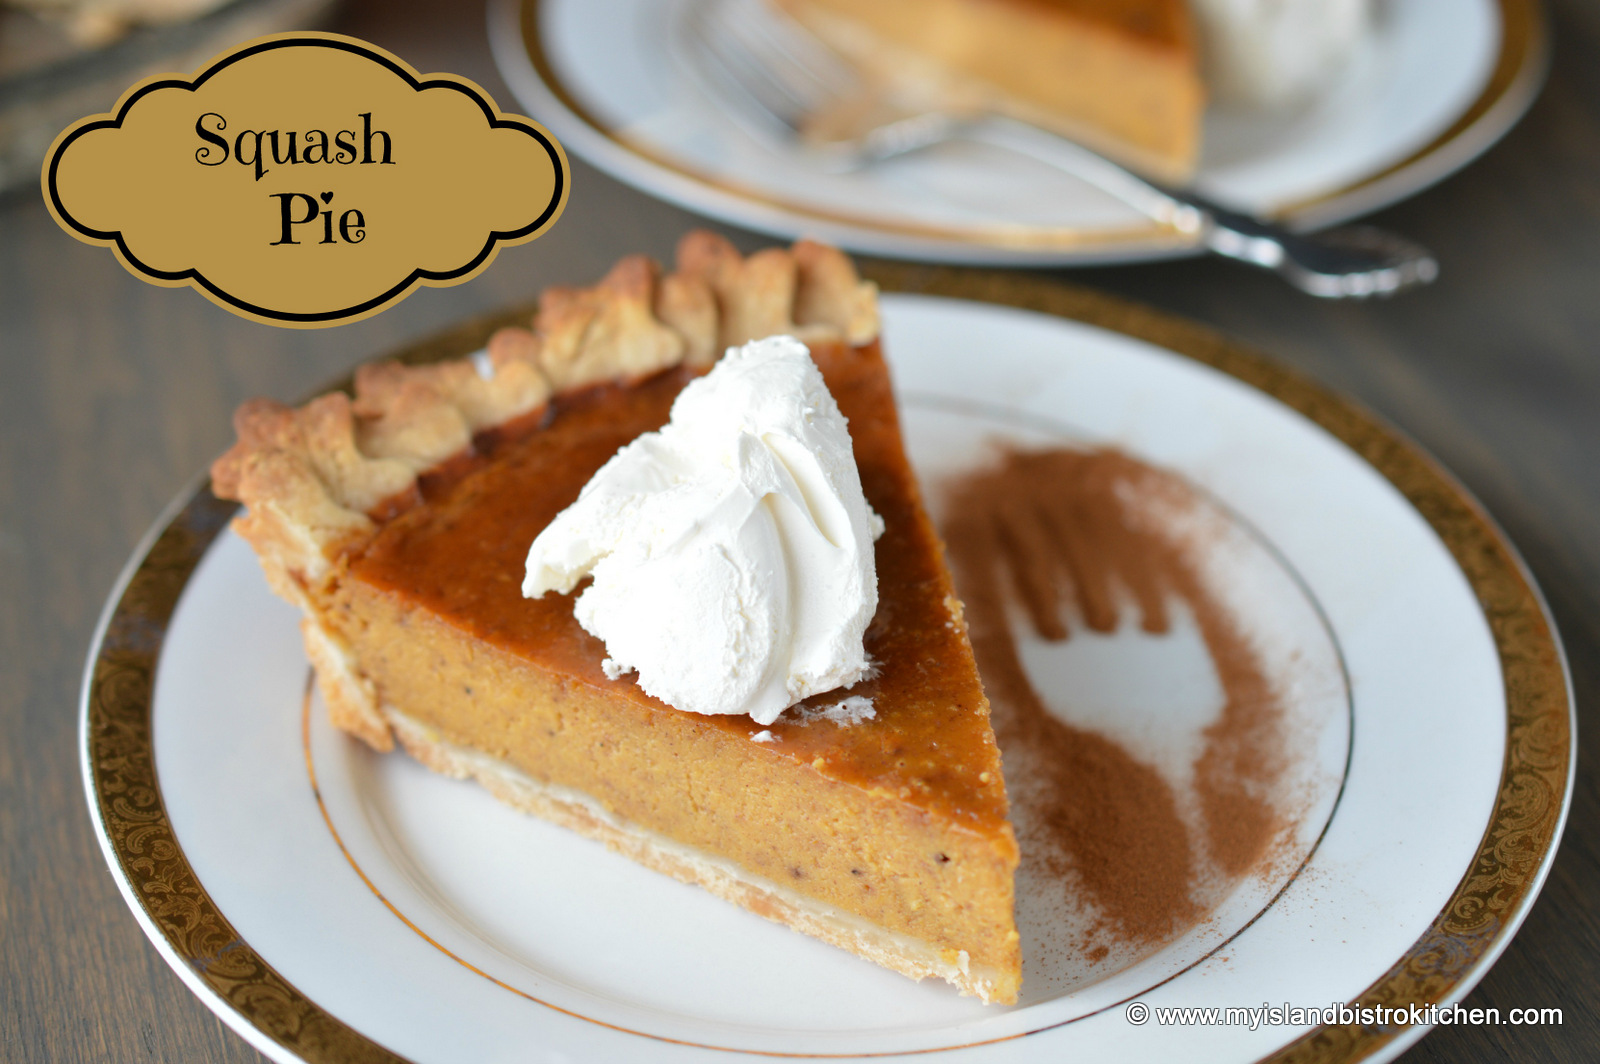
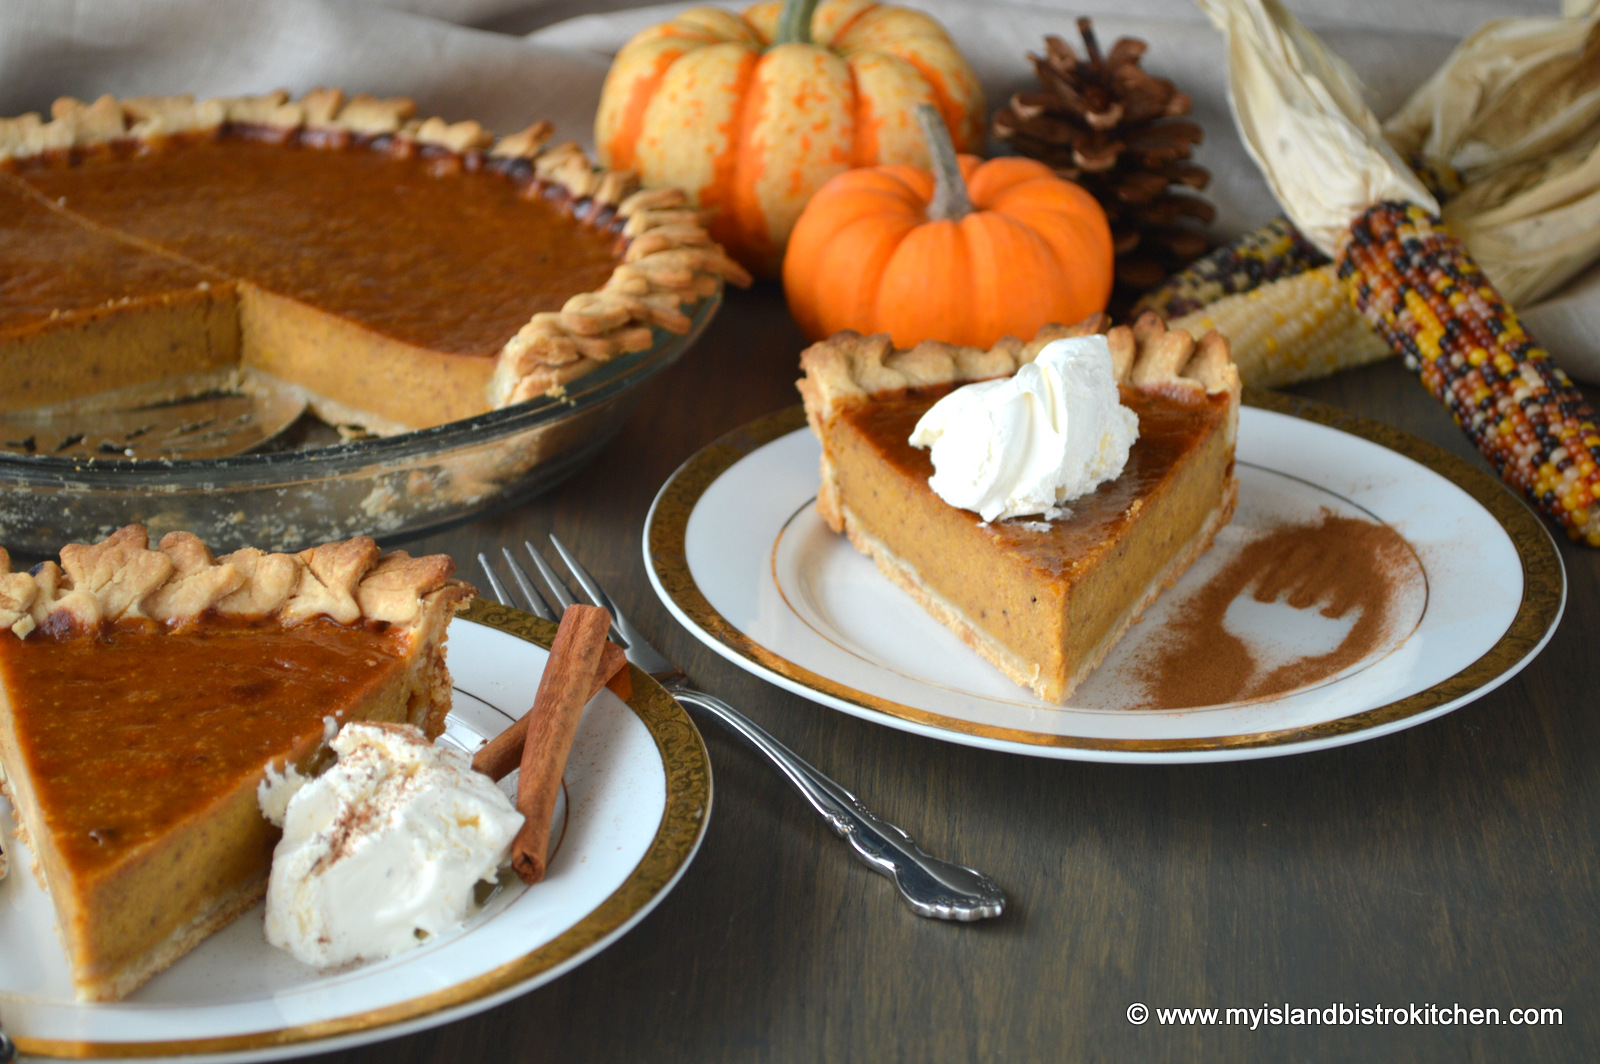
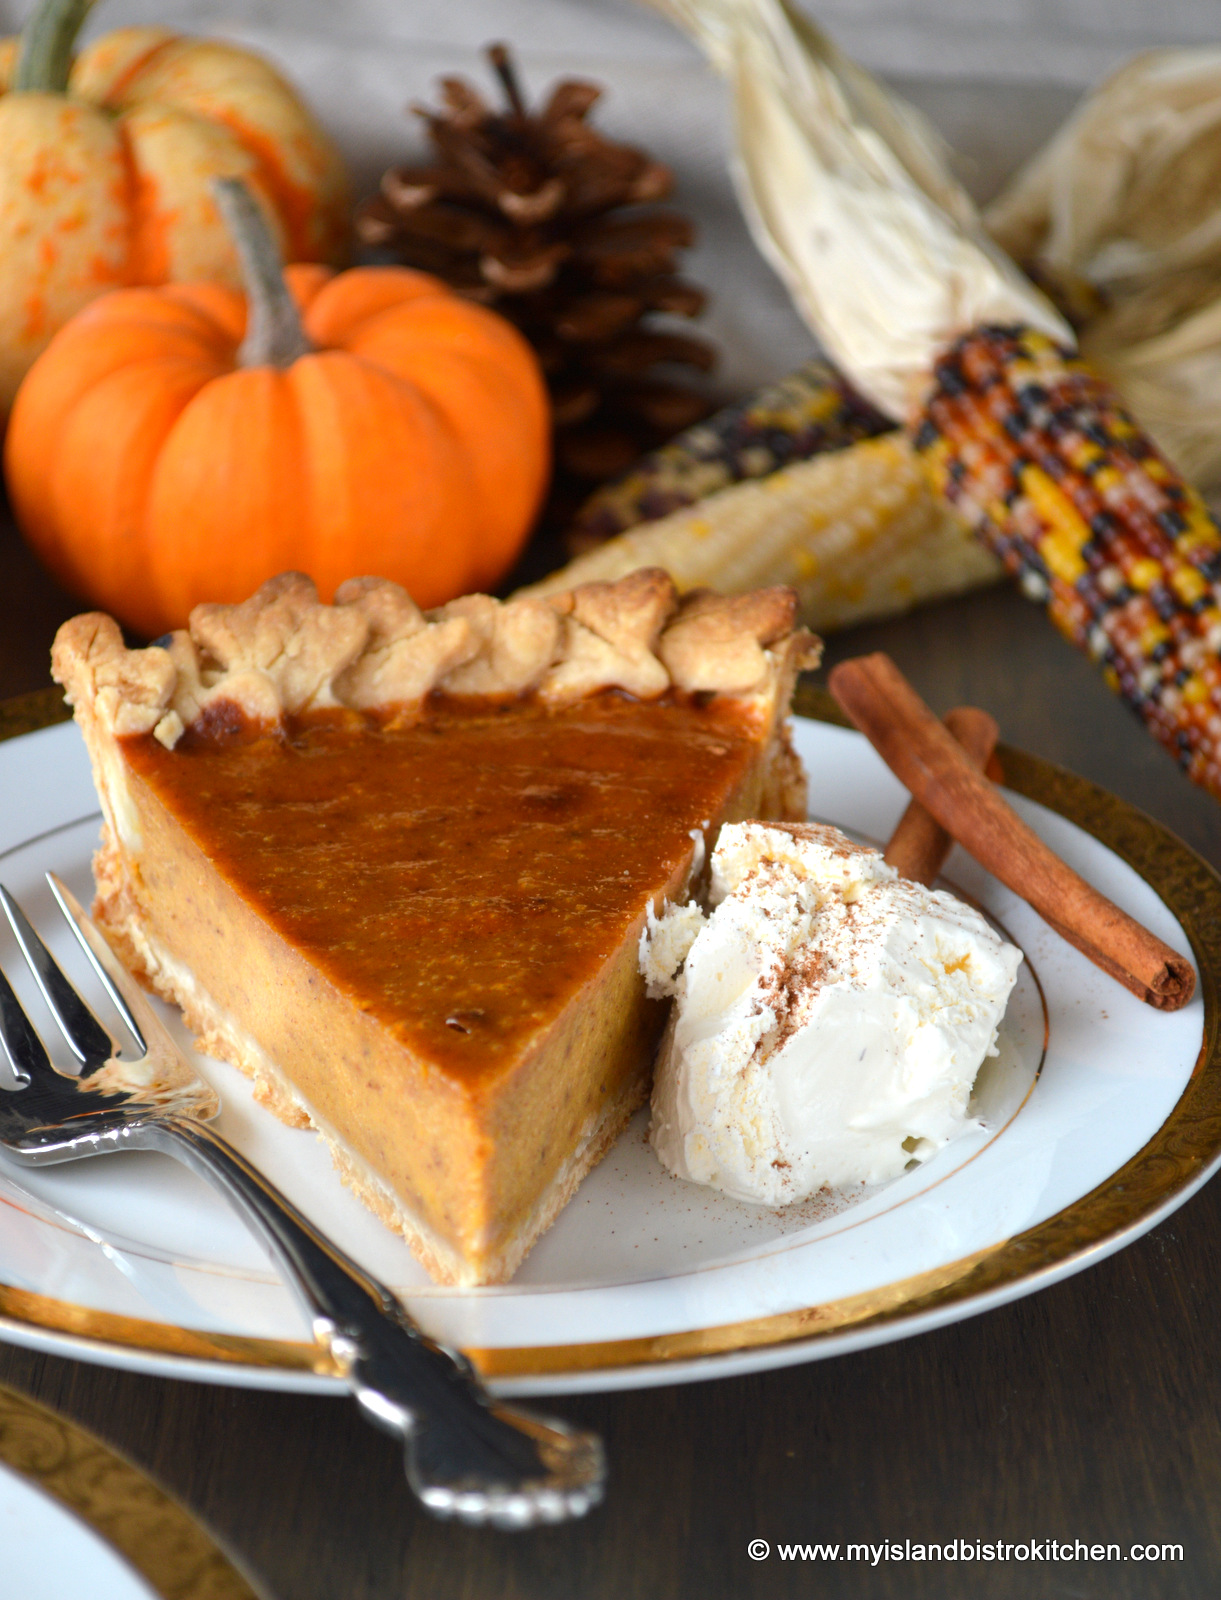
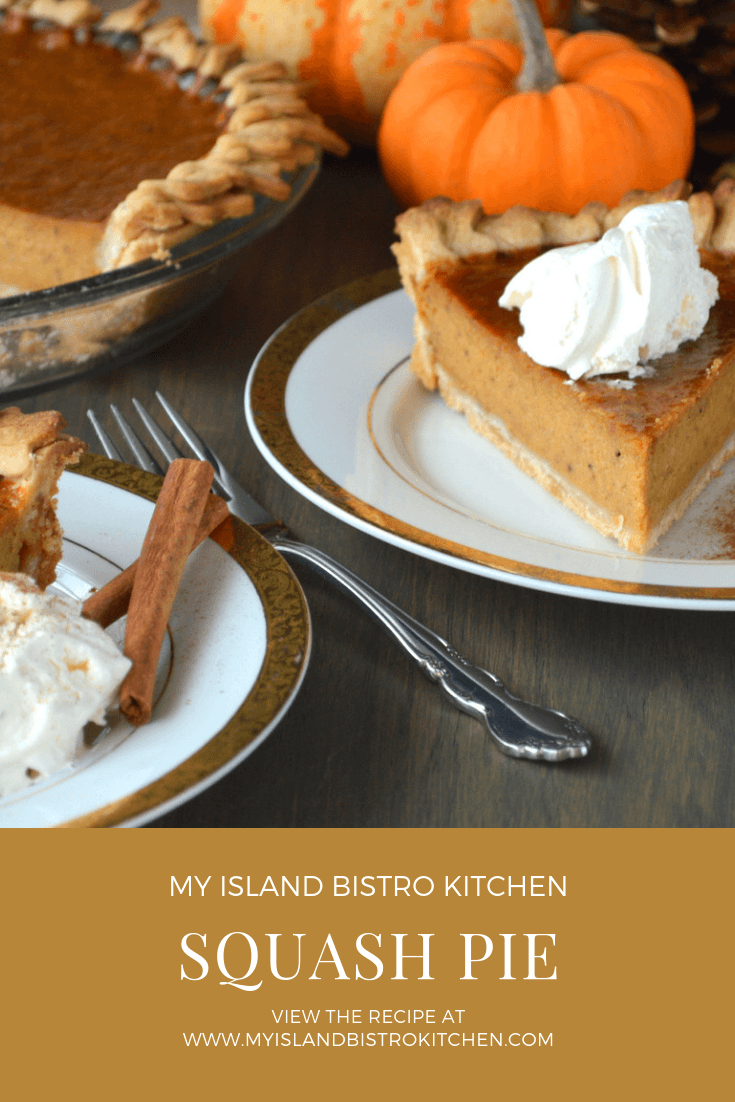
Move over pumpkin! Your cousin, squash, makes better pies!
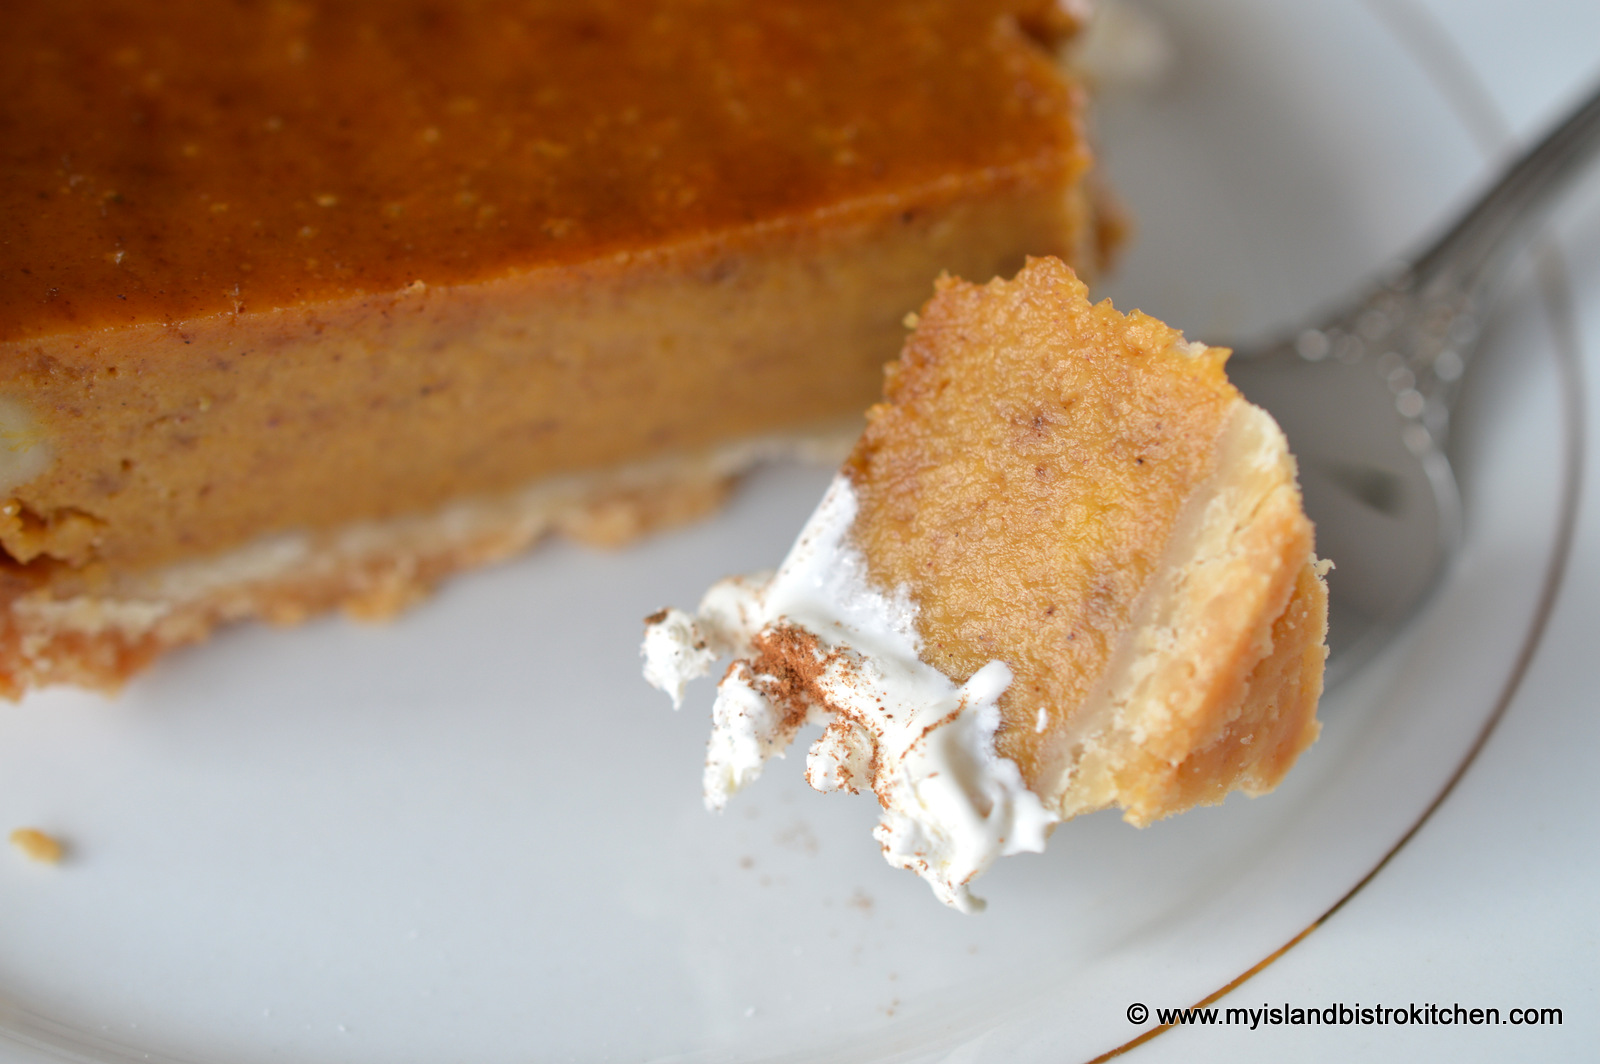
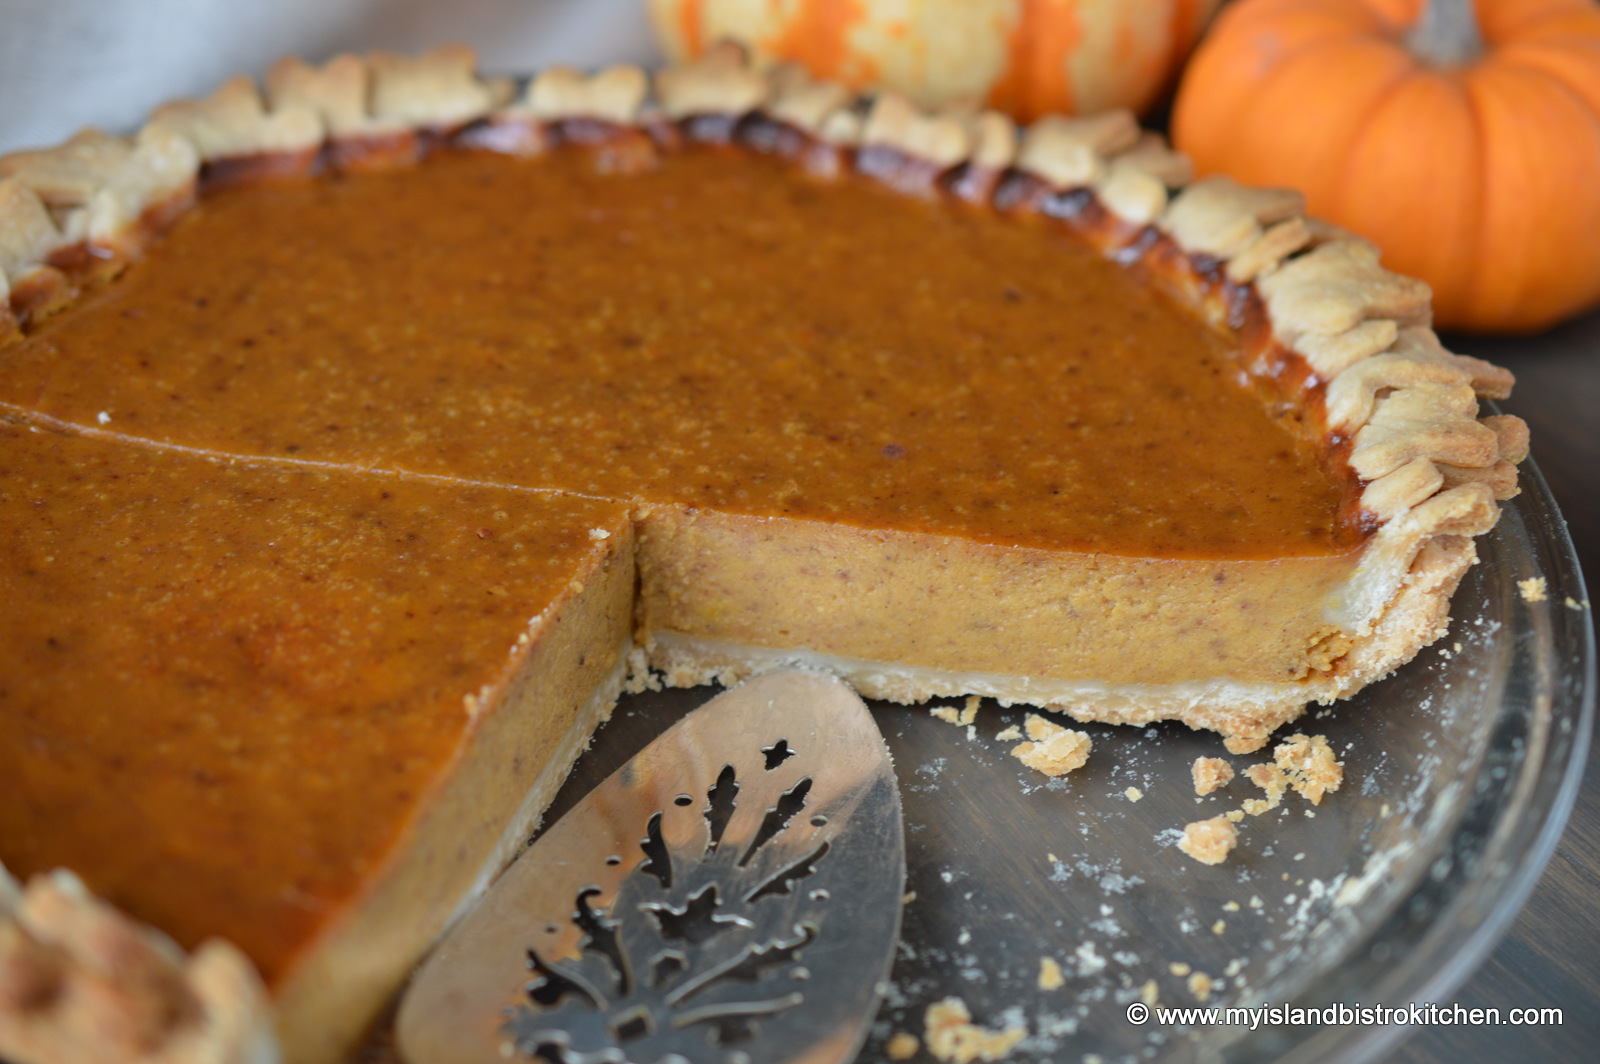
Growing up, it was more common in our household to have squash rather than pumpkin pie. My ancestors always claimed squash makes a better, more tasty pie and I have to agree. Squash gives a richer pie with a depth of flavour that I don’t find characteristic of pumpkin.
Squash Pies
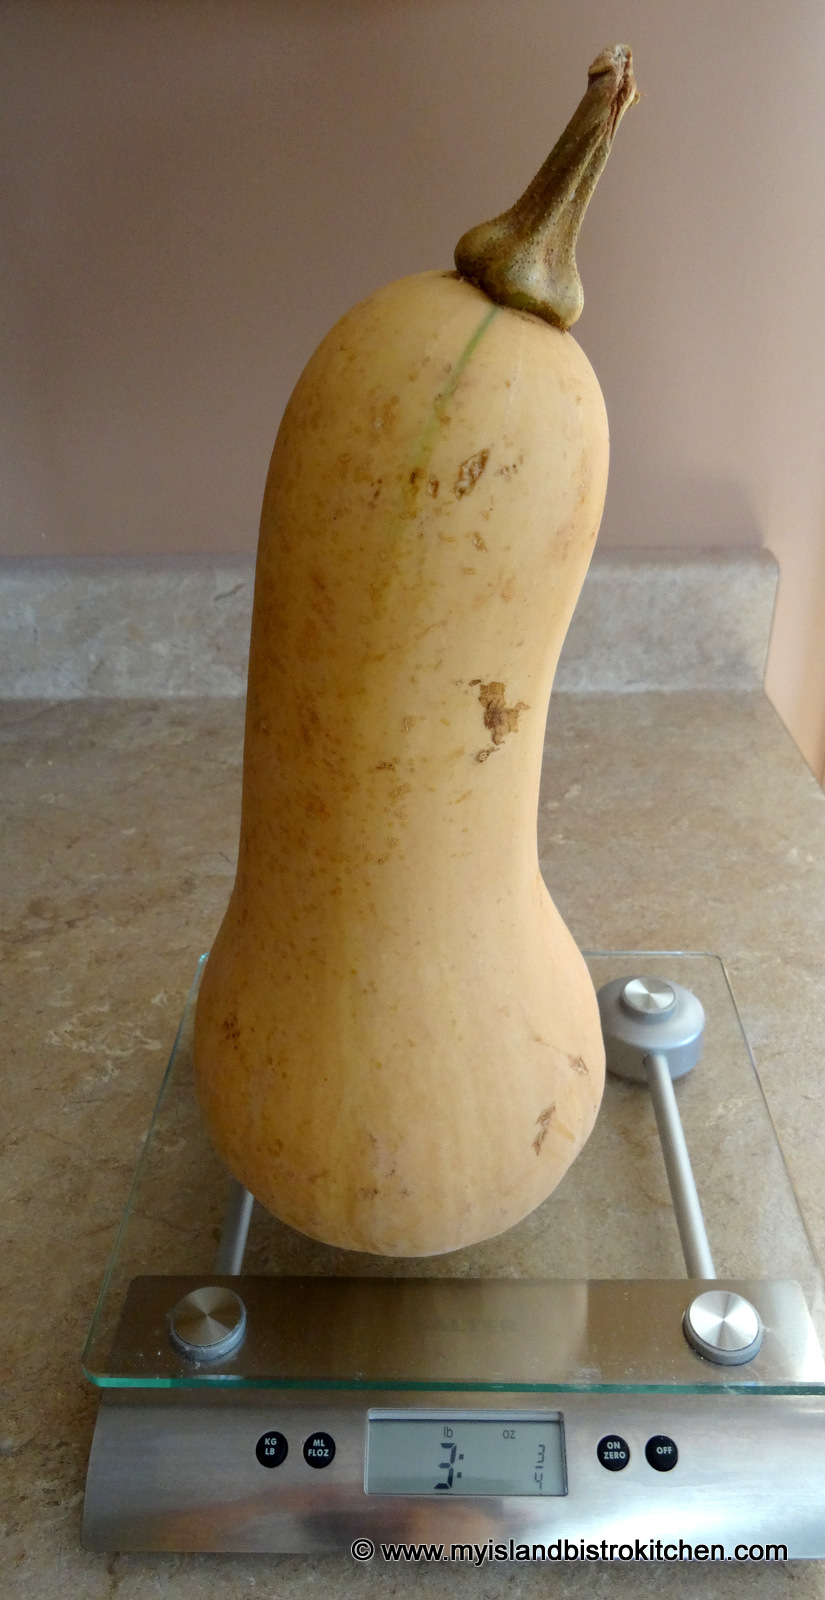
There are several different kinds of squash that can be used for pie making but my preference is the tall vase-or bell-shaped butternut squash. Butternut squash is considered a variety of winter squash. Though harvested in autumn, butternut squash is generally available in supermarkets through the winter months because of the squash’s long “keeping” quality. I’m guessing it is their availability through the winter months that has earned them the term “winter” squash since they certainly wouldn’t be harvested in the winter in our cold and frosty northeastern climate! With its mildly nutty flavour, butternut squash has a natural sweetness to it. The pulp of the butternut squash is bright orange in color and, while it loses that color when made in to a pie, it turns to a lovely caramel color.
Squash Pie
My grandmother always cooked her squash in a pot with some water on the stovetop. However, squash already has a high moisture content and adding more water to the mix can make it difficult to get the cooked squash sufficiently drained that you don’t end up with a soupy texture pie. My preference is to, instead, roast the squash as it reduces the moisture level and I find it also gives the squash an even deeper, richer flavour.
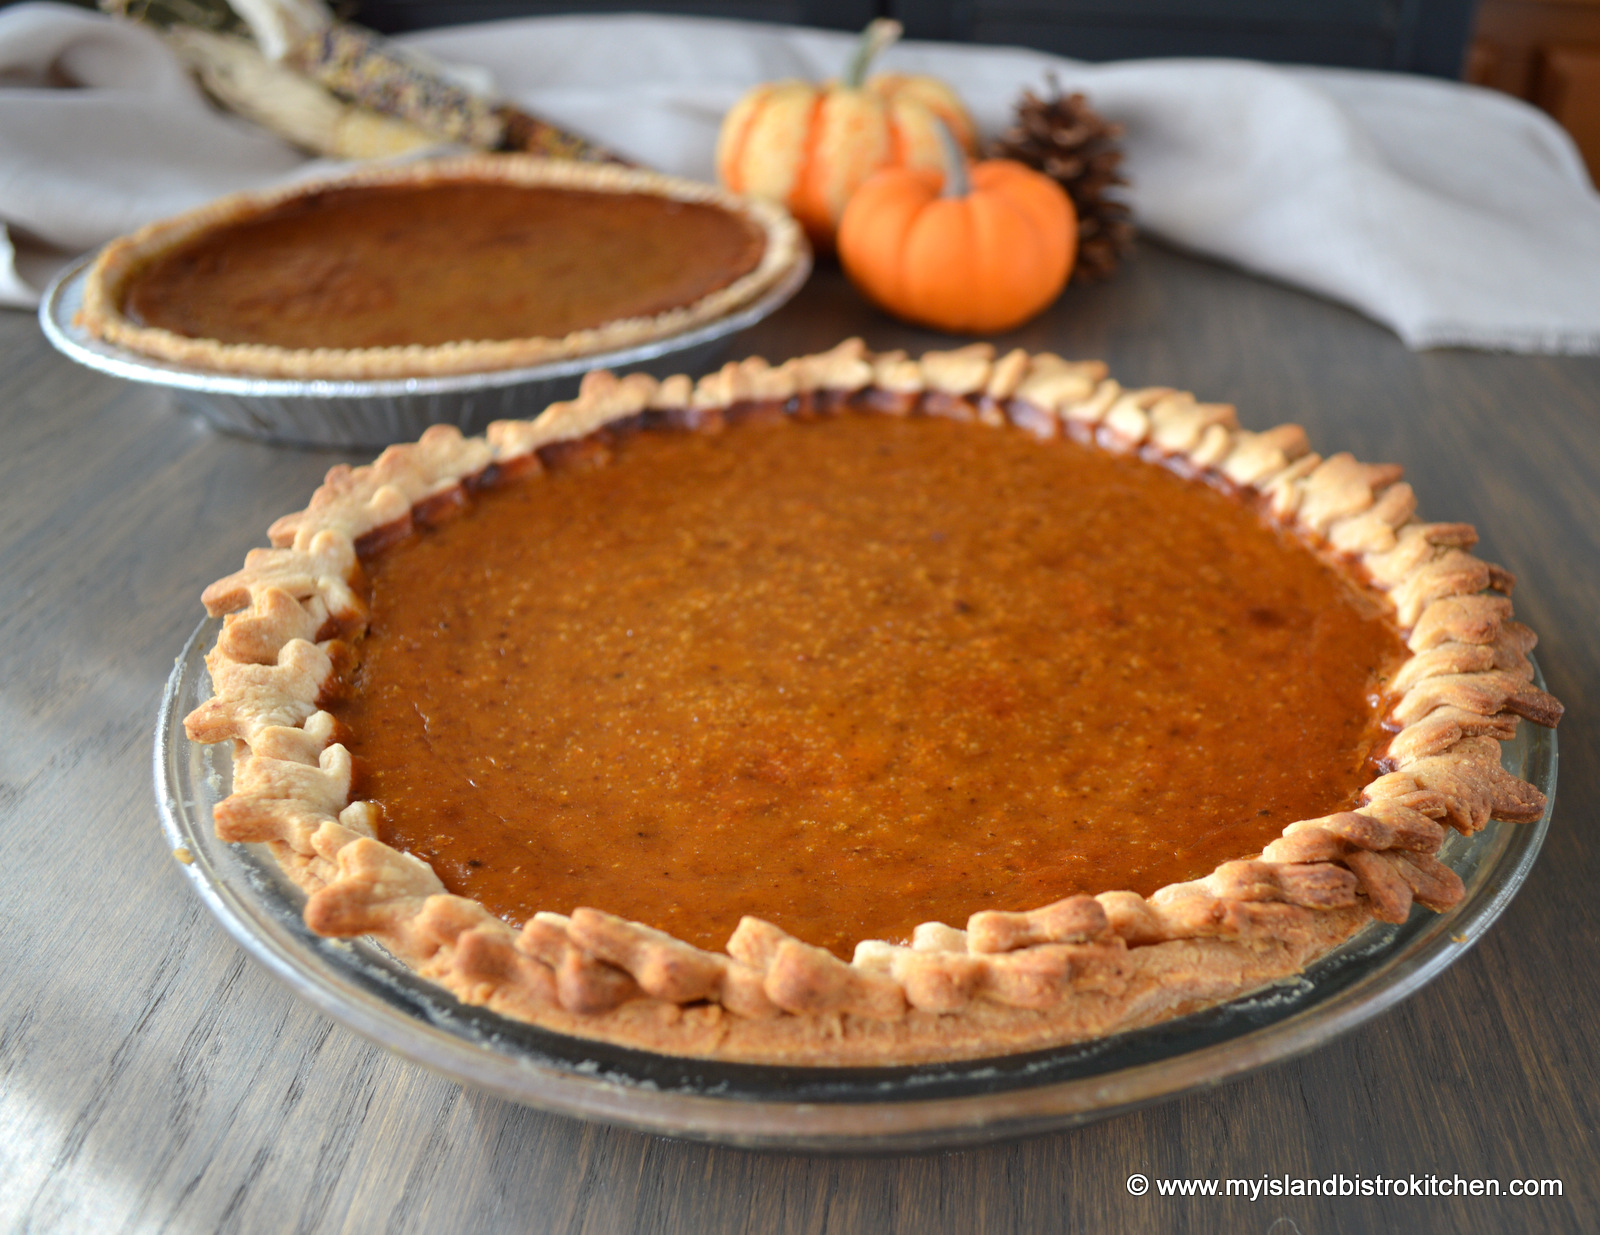
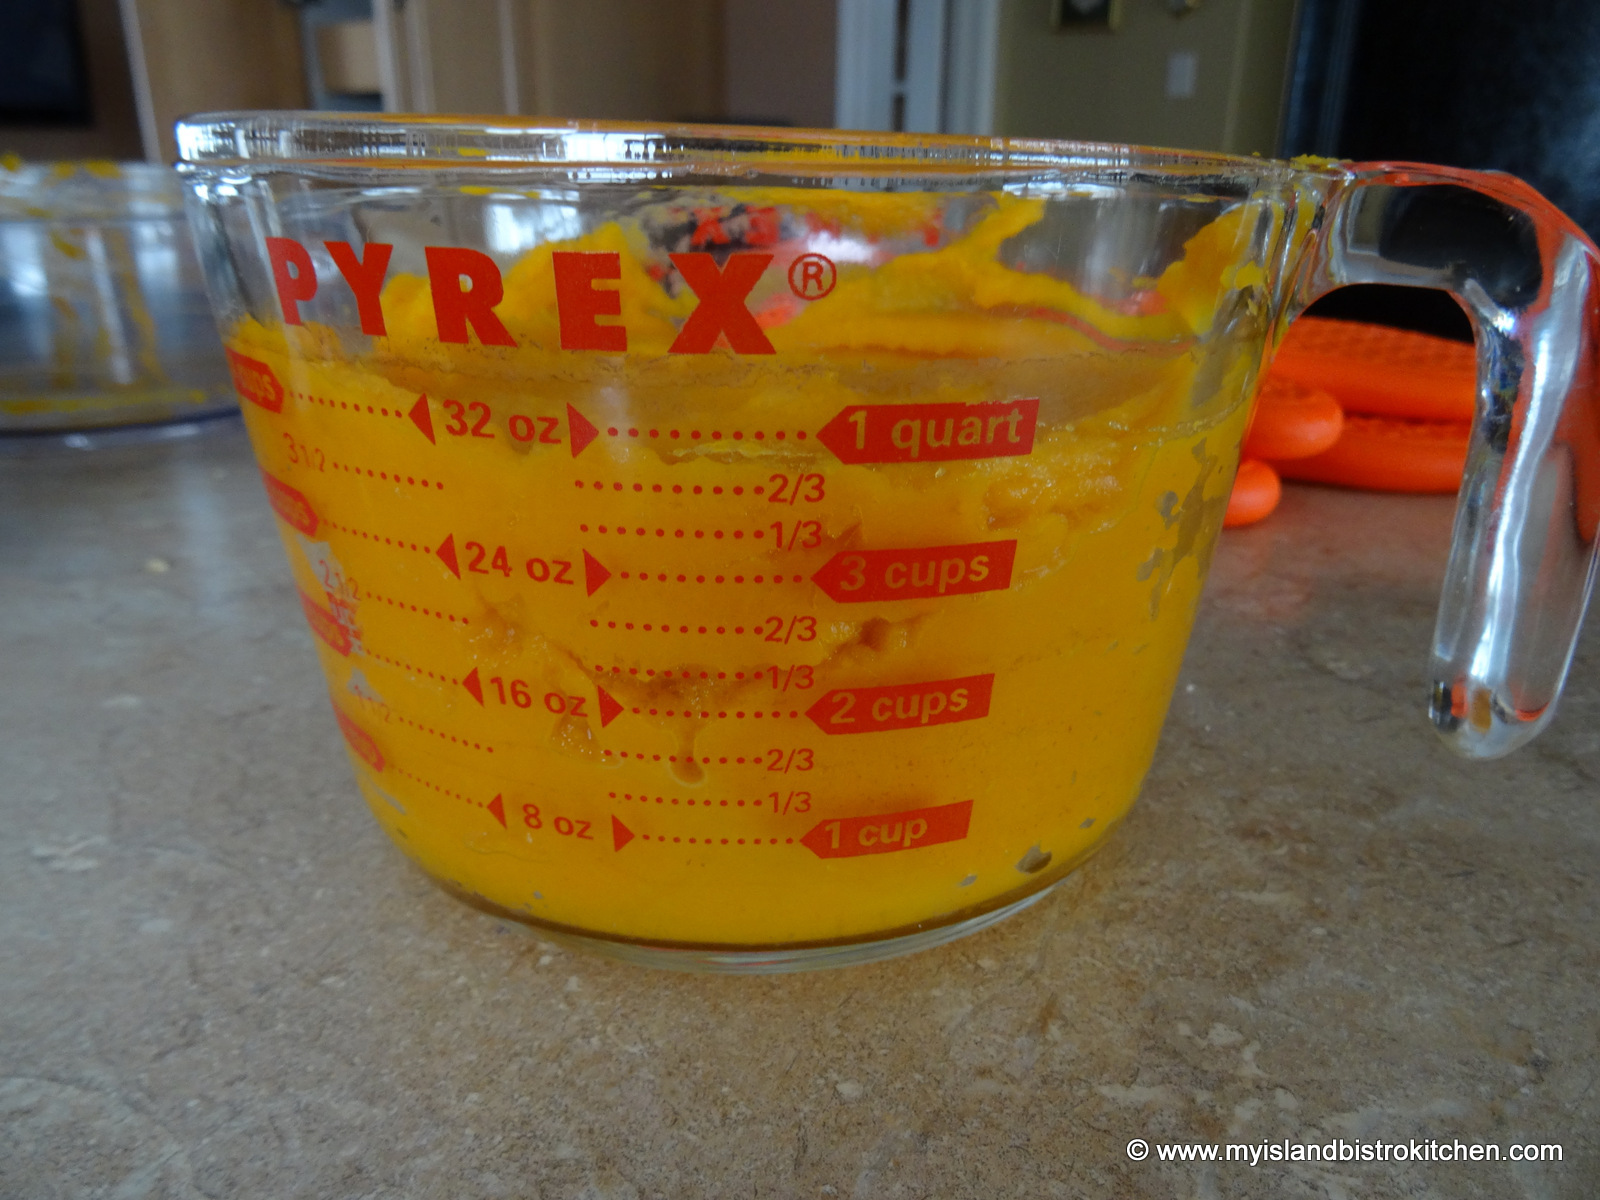
For my squash pie recipe (found at the end of this posting), 2 cups of puréed squash is needed. I used a butternut squash weighing 3 pounds which yielded 4 cups of purée, enough for 2 – 10″ pies. So, if all you want is one pie, try to find a squash that weighs 1½ to 1¾ pounds.
Butternut Squash
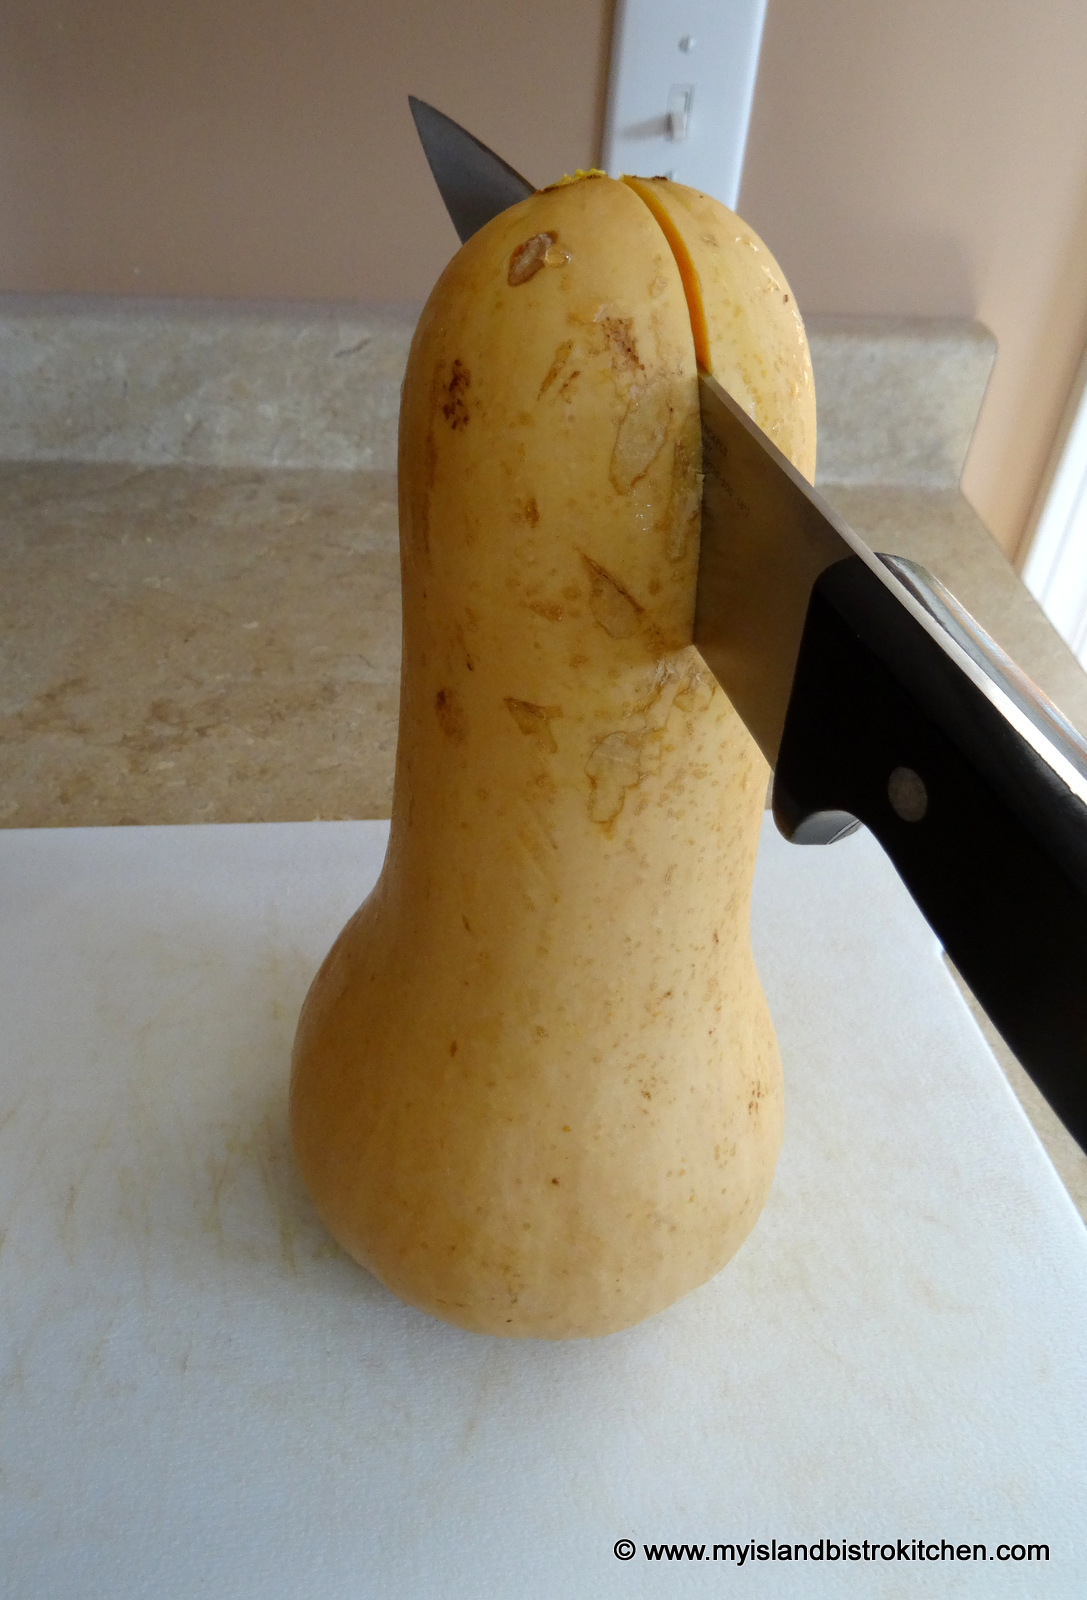
To roast the squash, I simply began by cutting the squash in half, starting at the top narrow end, slicing all the way through to the bottom.
With a spoon, remove the seeds.
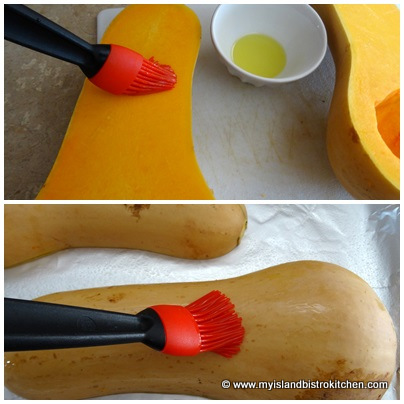
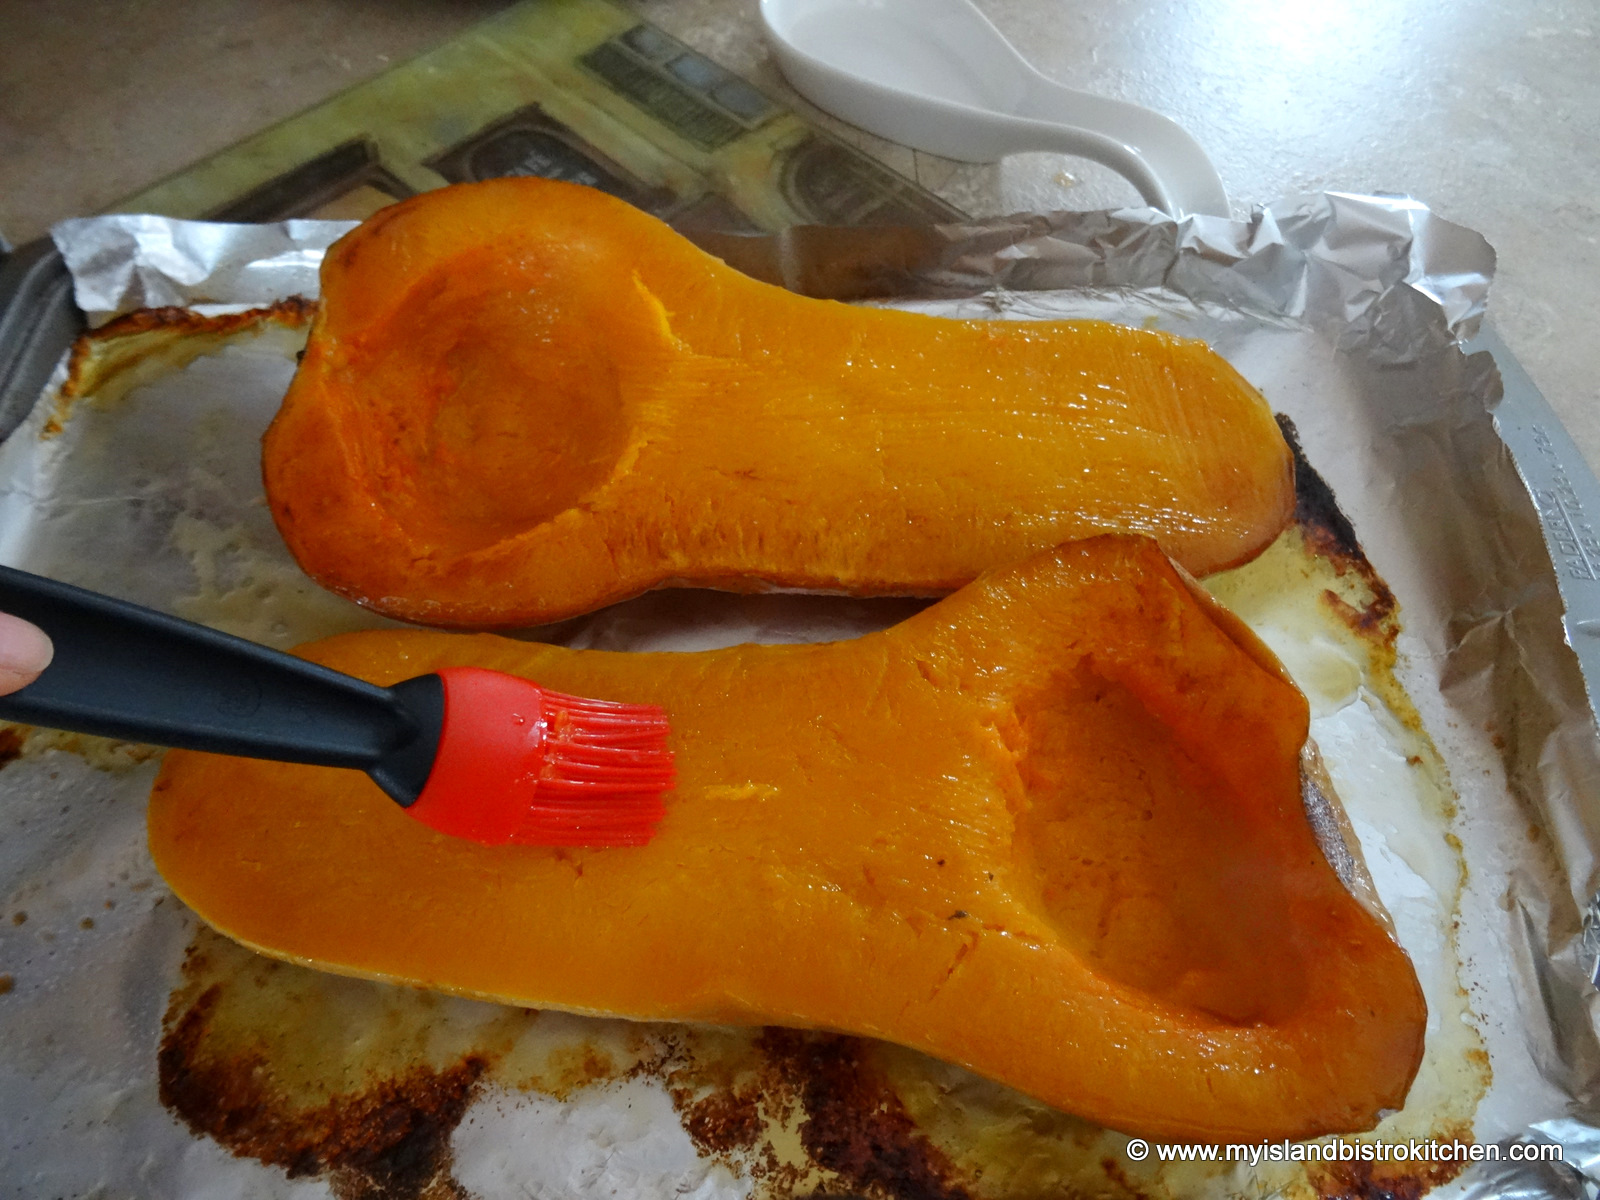
With a soft brush, apply a thin layer of olive oil to both the flesh and skin sides of the squash.
Place squash, flesh side down, on a greased, foil-lined, rimmed baking sheet. Bake in preheated 425°F oven for about a half hour. Remove the squash from the oven and, with a large lifter, carefully flip the pieces over, applying another light brushing of olive oil to the flesh side. Return the squash to the oven for about another half hour or so, until the flesh of the squash is very soft. Remove from oven.
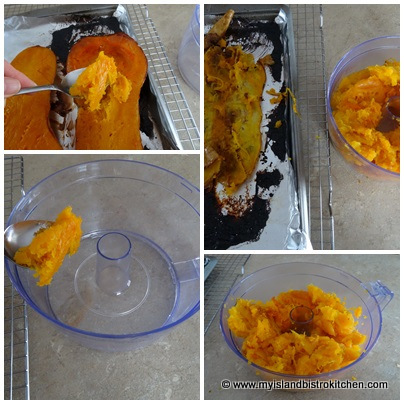
As soon as the squash has just cooled enough to handle, scoop the flesh from the skin of the squash and put it in the bowl of a food processor.
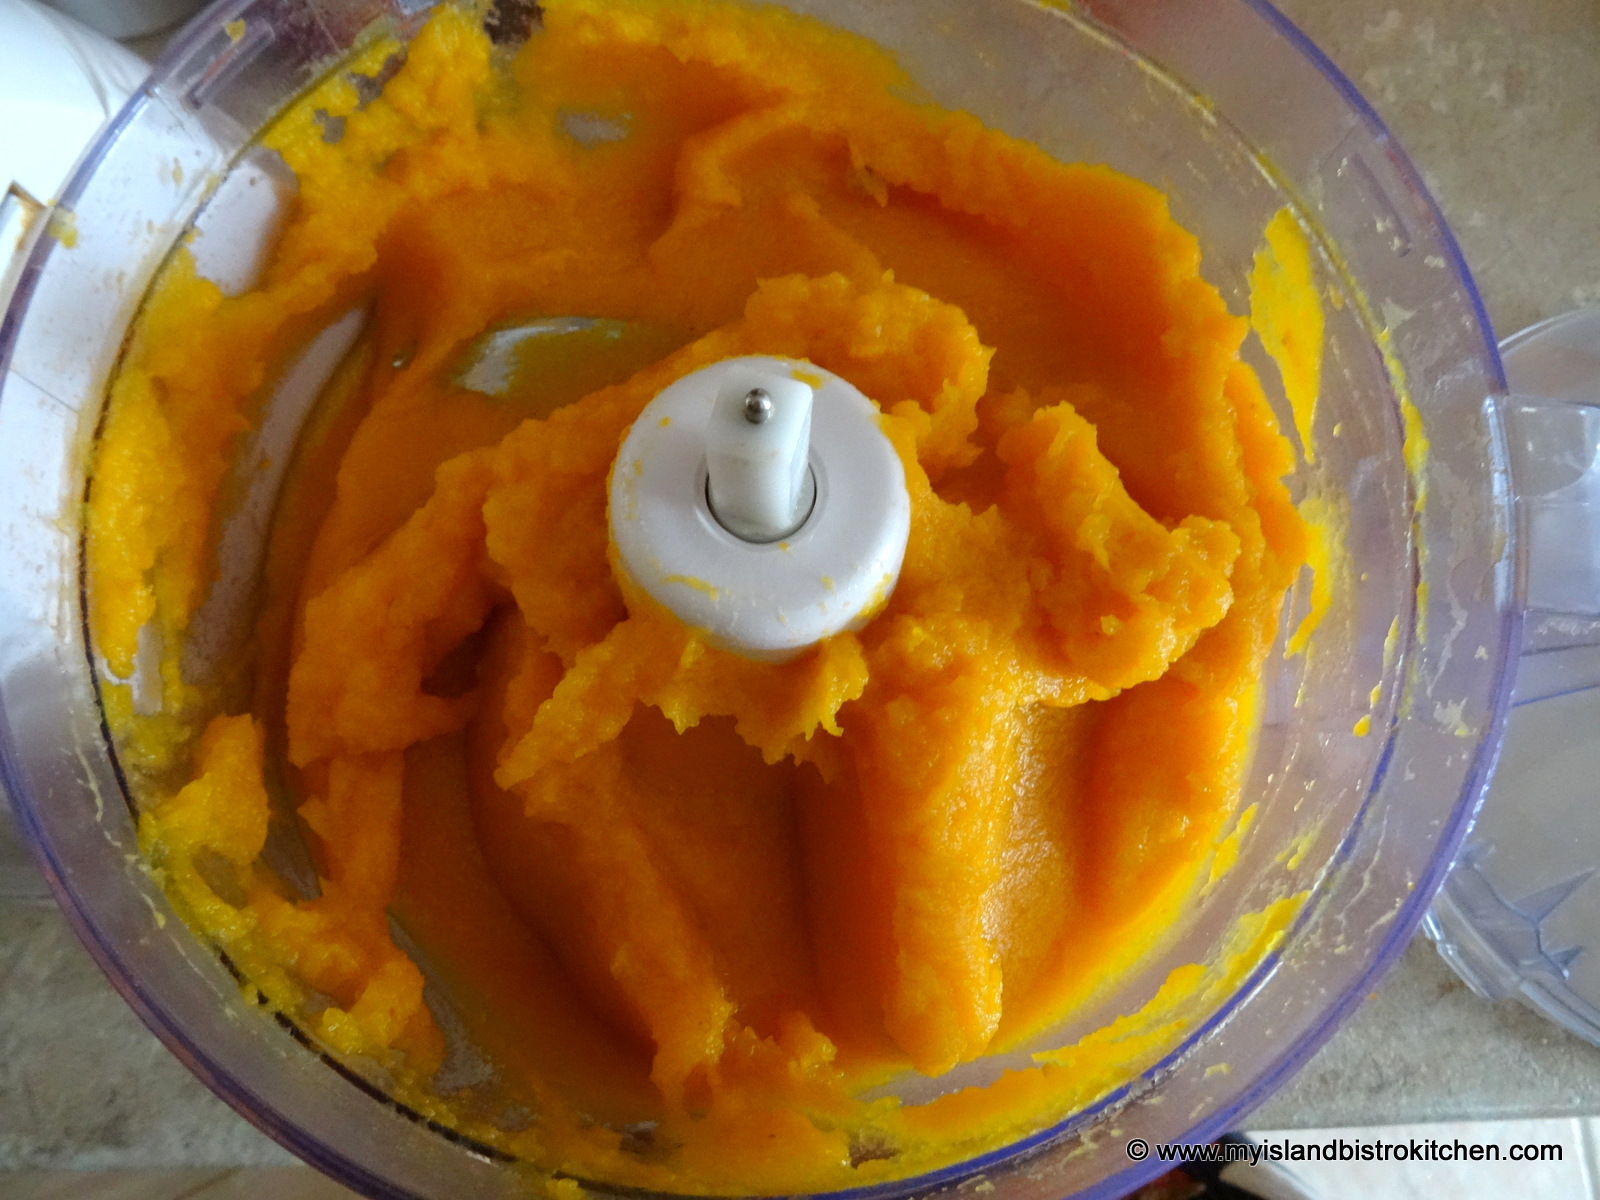
Process until the squash is puréed smooth.
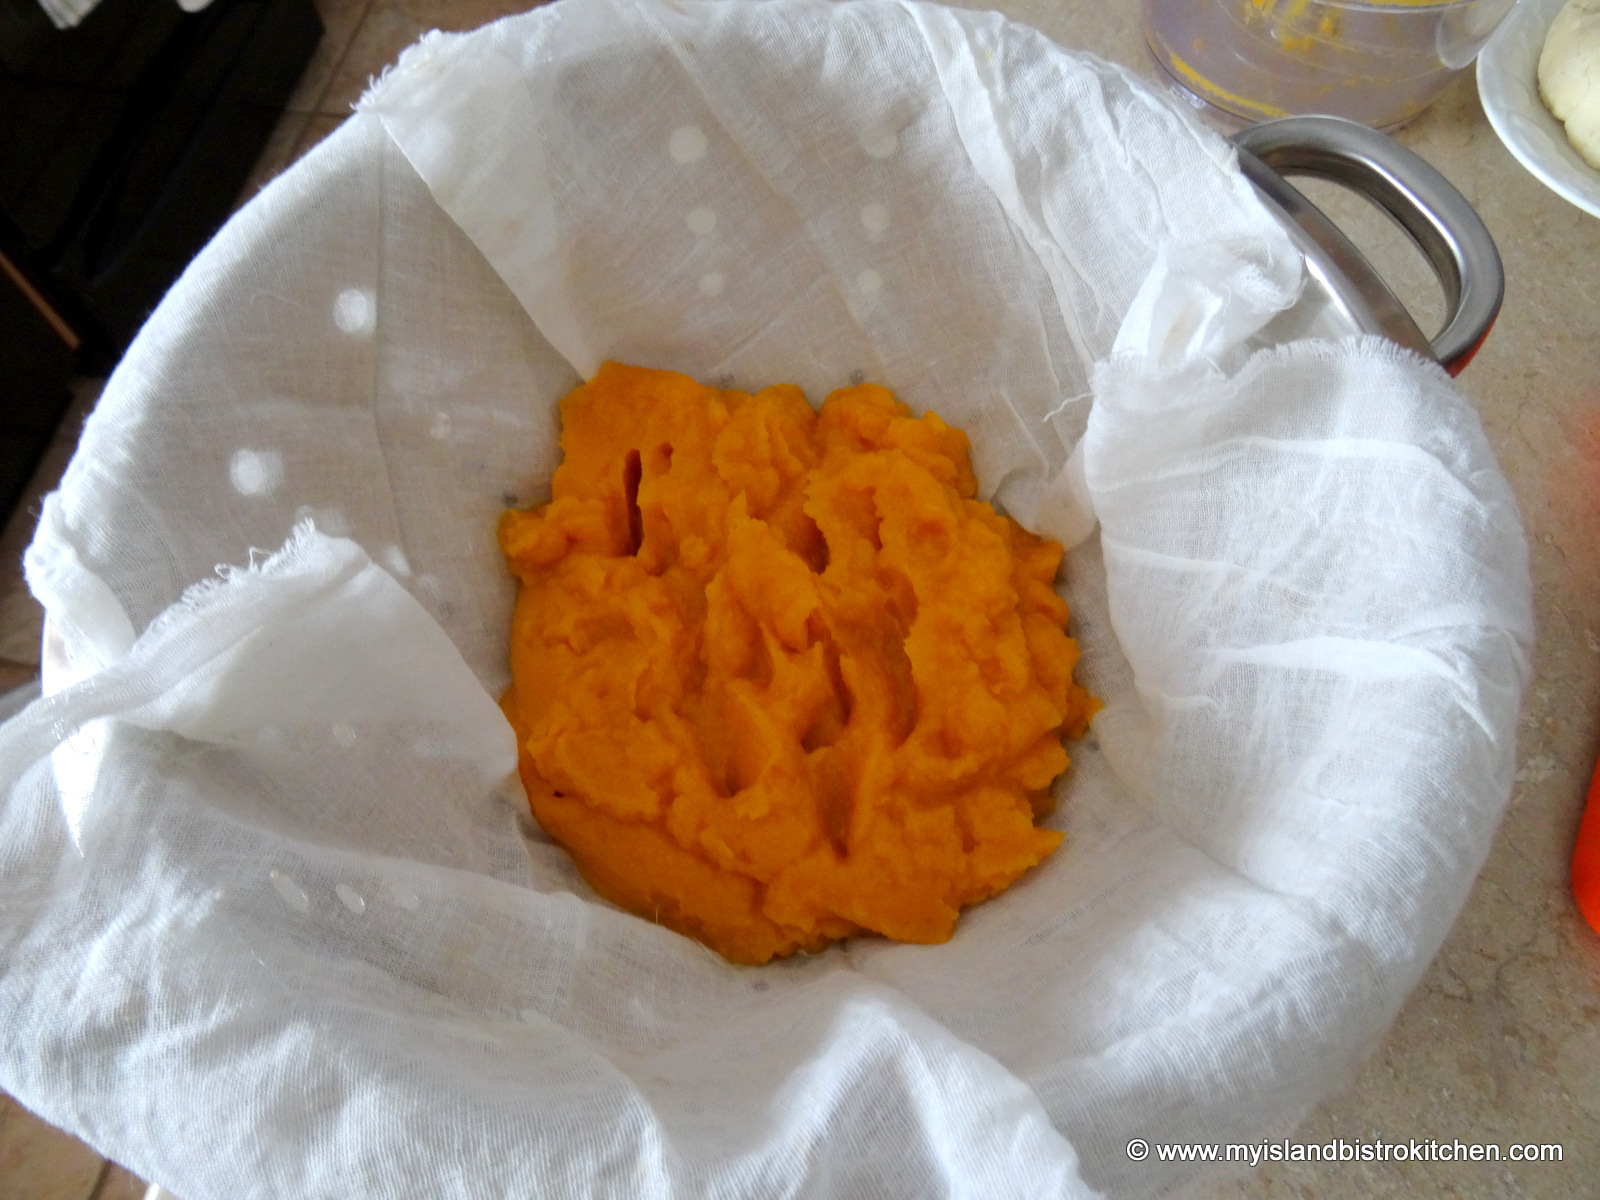
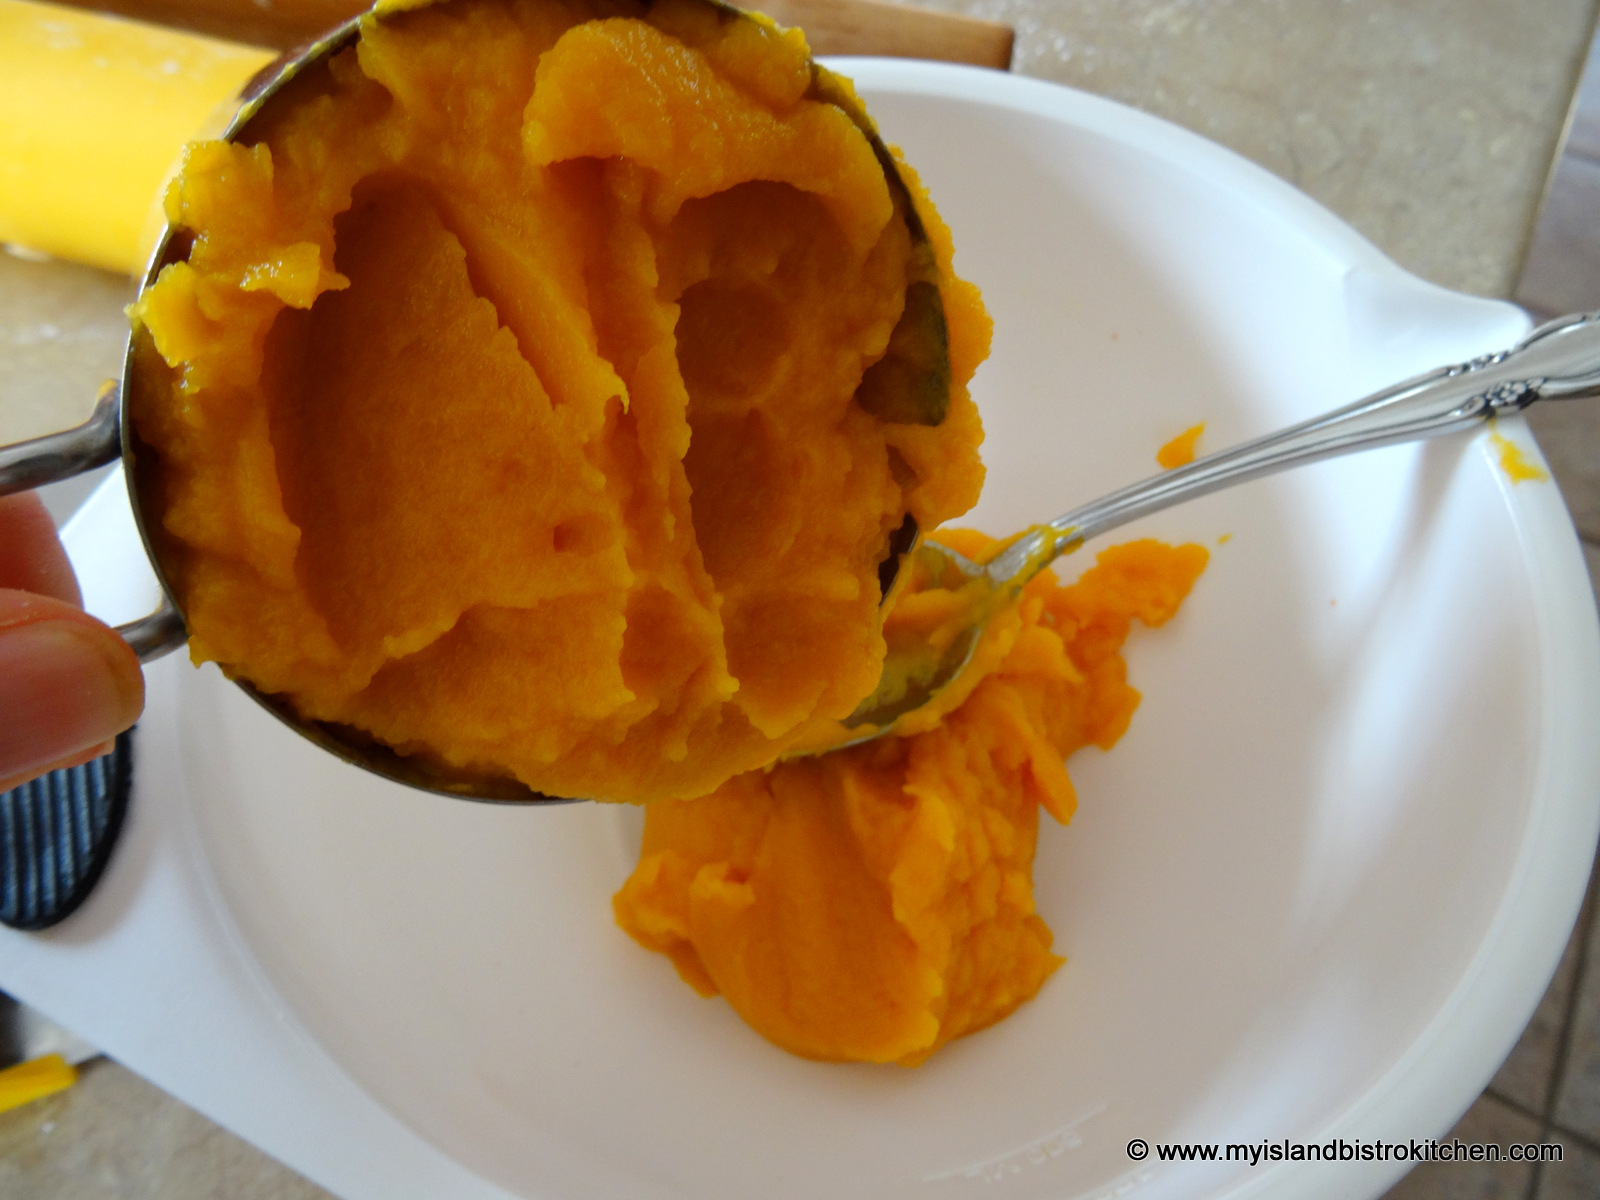
Then, transfer the purée to a cheesecloth-lined colander fitted over a large bowl or pot and leave it to drip for about an hour or so. The goal is to remove as much remaining liquid as possible. I find it helps to stir the mixture two to three times and to press down the mixture with the back of a large spoon to extract the liquid.
To make one pie, transfer 2 cups of the purée to a medium-sized bowl.
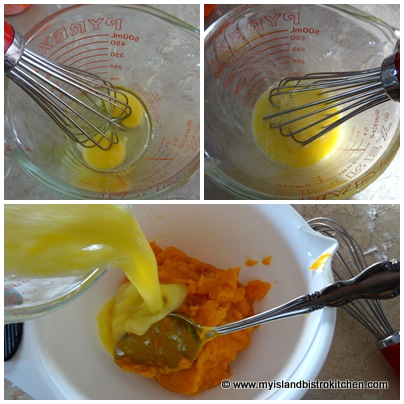
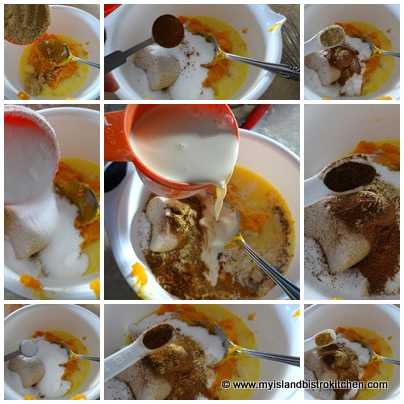
Add the slightly-beaten eggs.
Next, add the sugars, salt, spices, and evaporated milk.
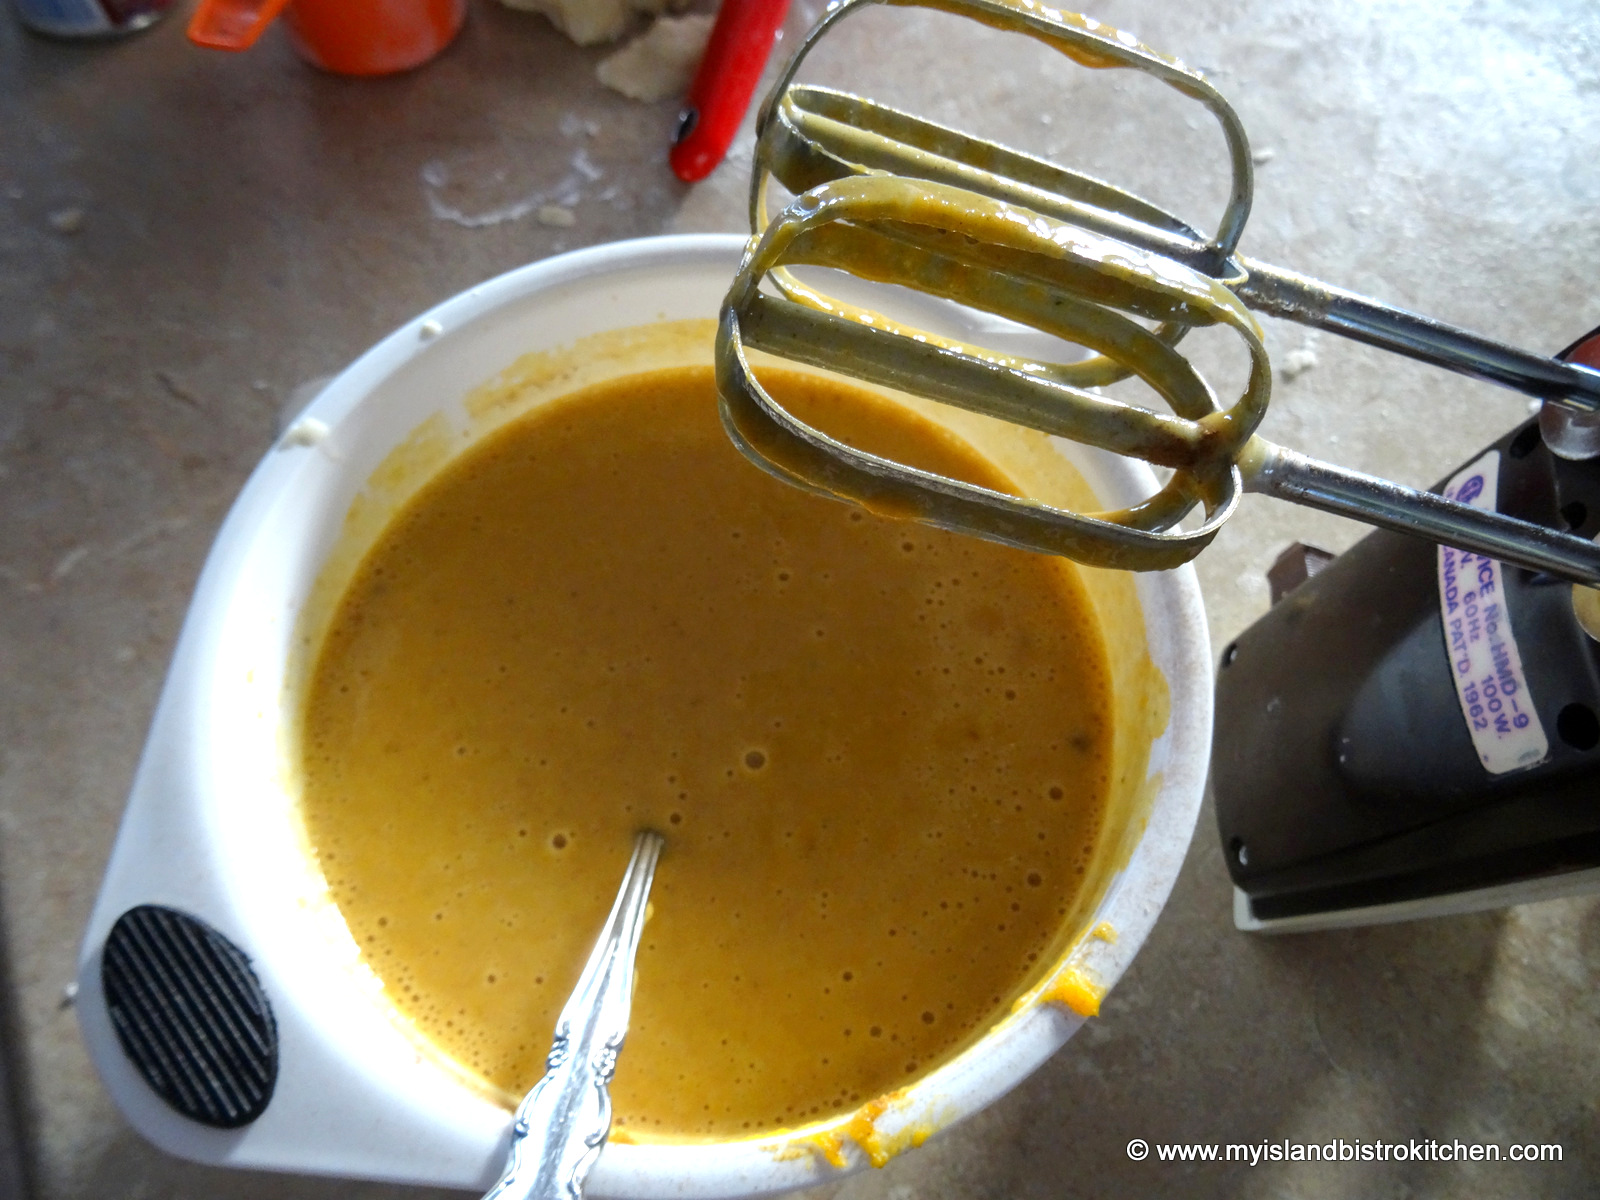
Mix the ingredients well – I use a hand mixer.
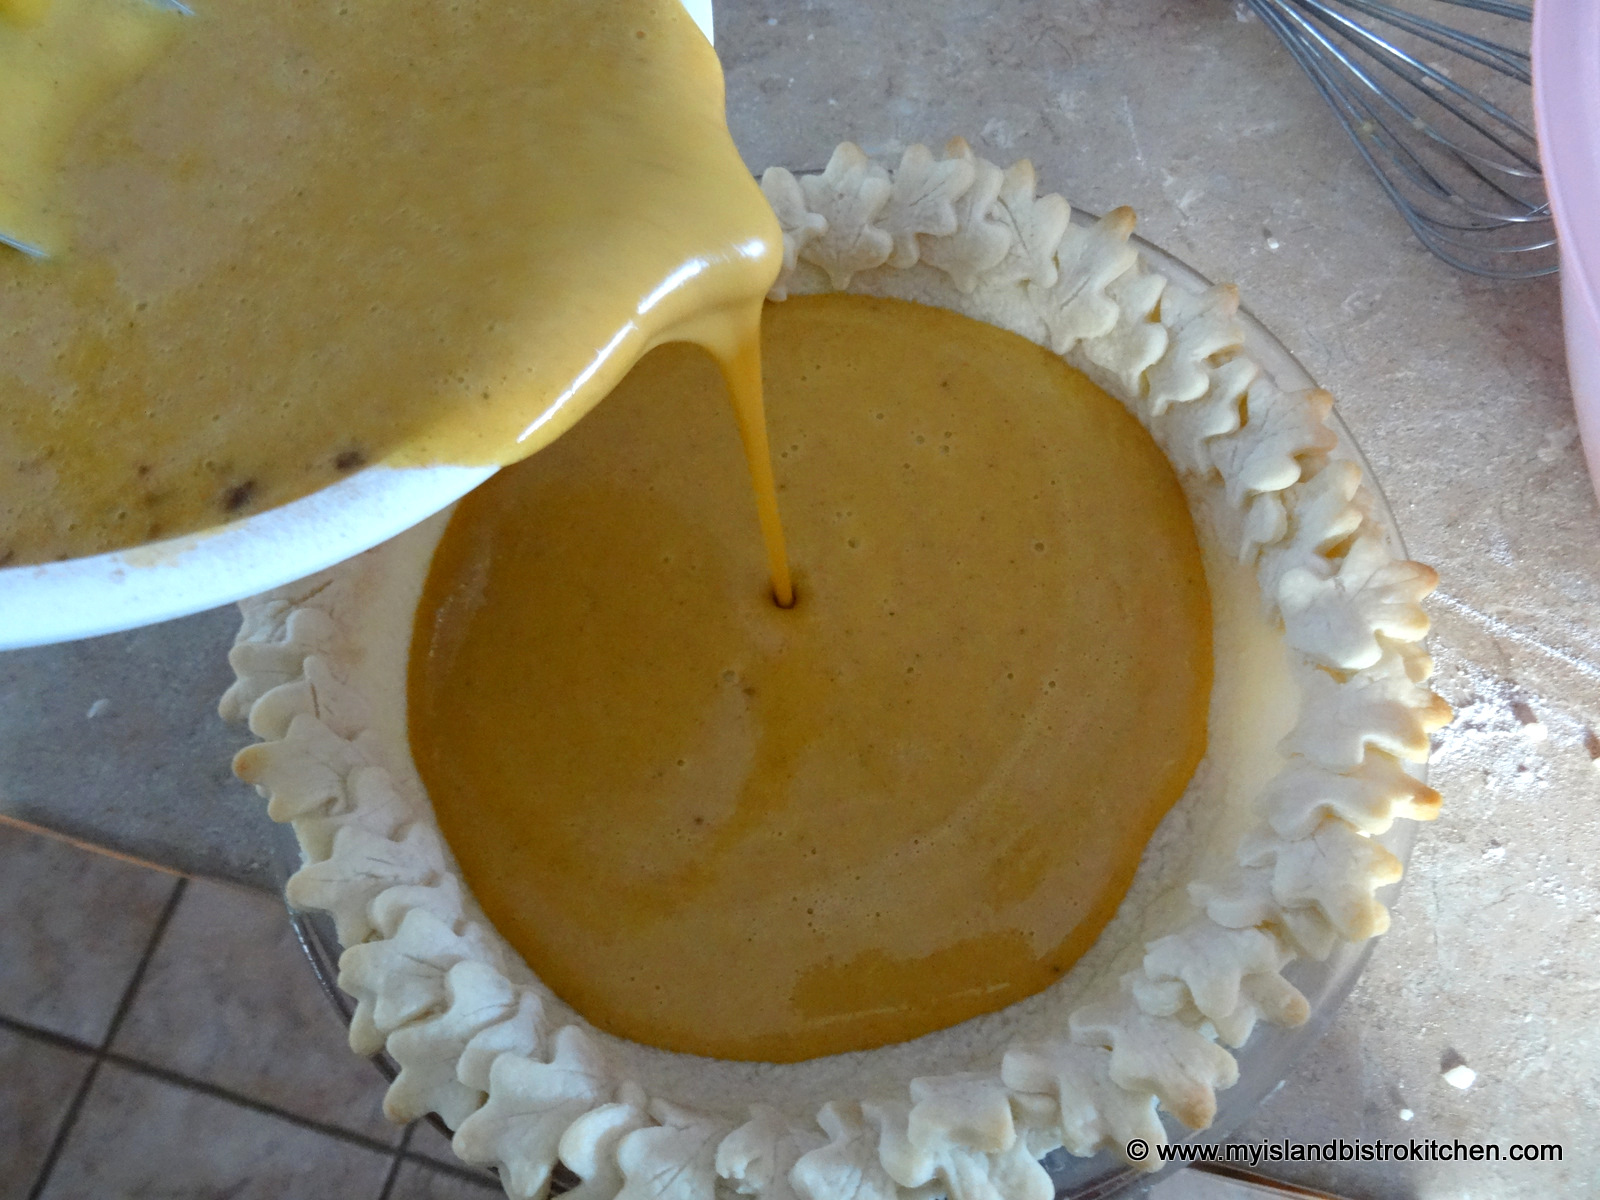
Pour the filling into the prepared pie crust. Although not necessary, I sometimes (but not always) pre-bake the crust for about 10 minutes to set it. If you do this, be sure to use pie weights to ensure the crust does not bubble up, creating air pockets underneath.
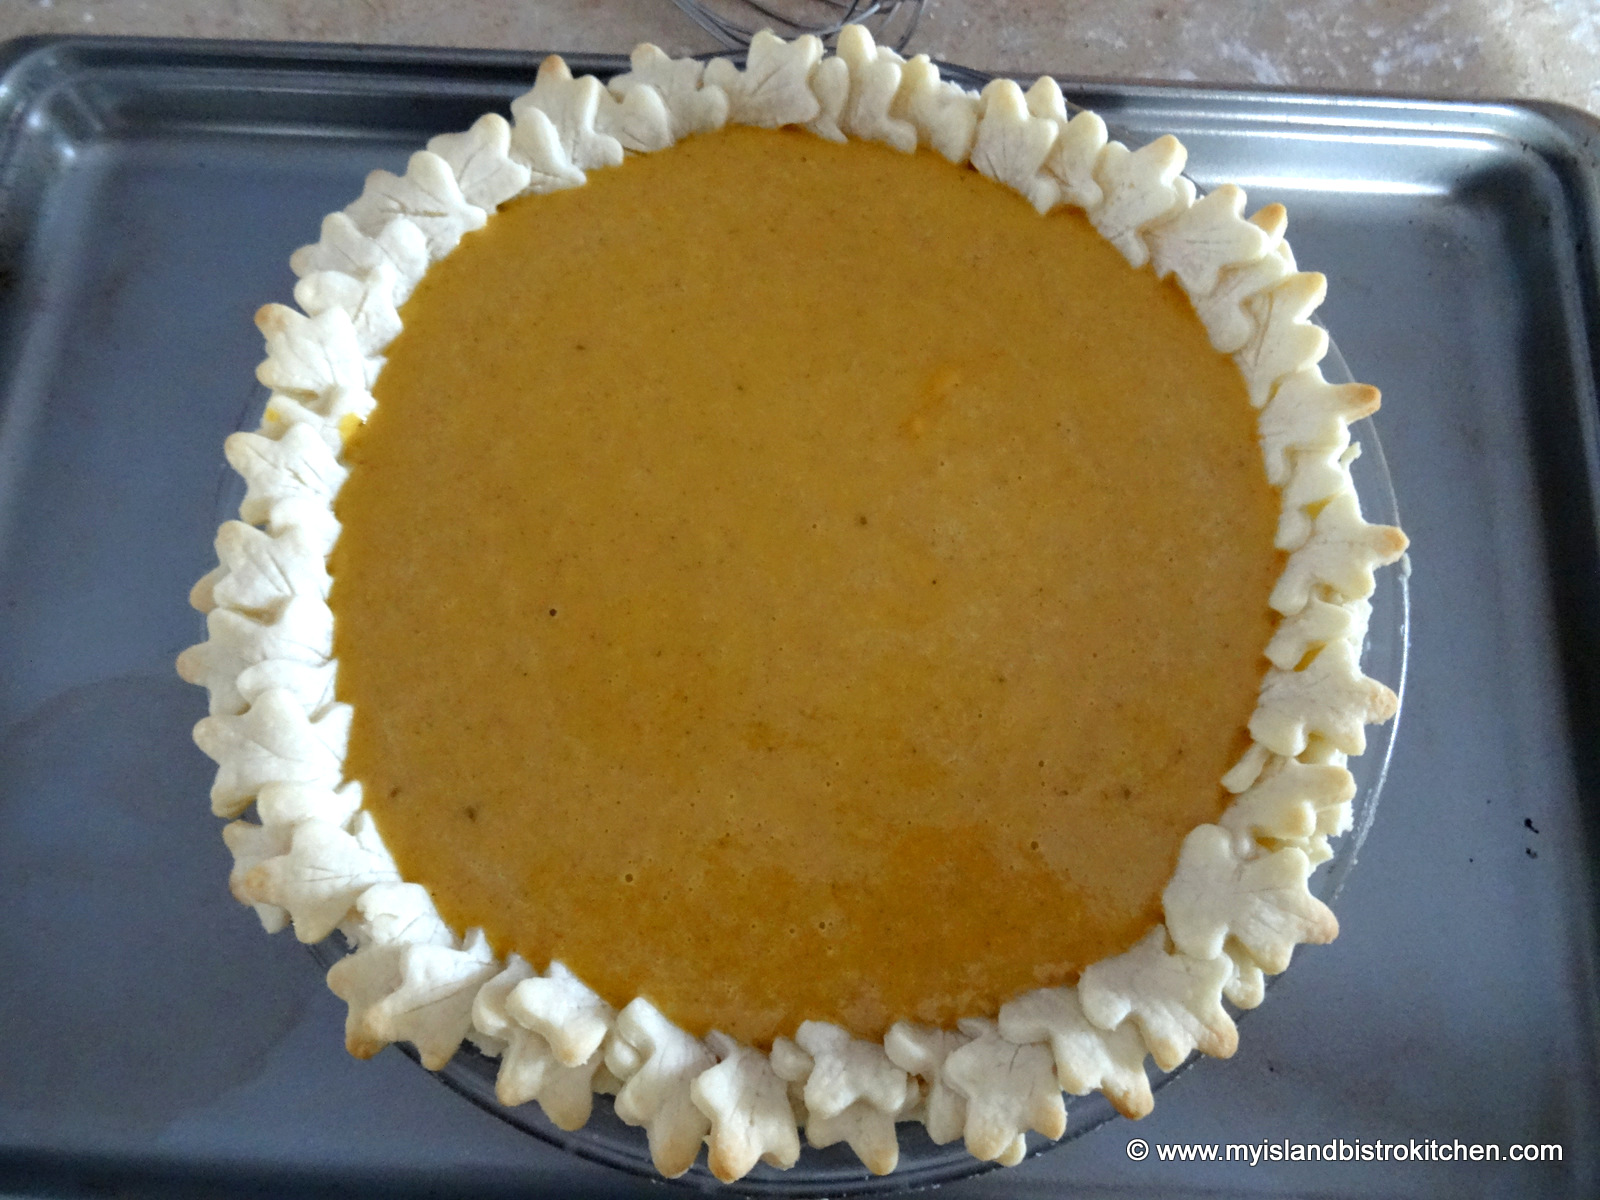
I find it useful to place the pie on a rimmed baking sheet for easy transport into the oven. The filling is very liquid at this point and it is very easy to spill it or slosh it up over the sides of the crust edges. In fact, sometimes, I only partially fill the pie, then set it on the oven rack and finish filling it there.
It helps to start baking the pie at 375°F for the first 15 minutes to give it a quick set then lower the temperature to 350°F and bake for another 1¼ hours longer or until a knife, or a toothpick, inserted into the center of the pie comes out clean.
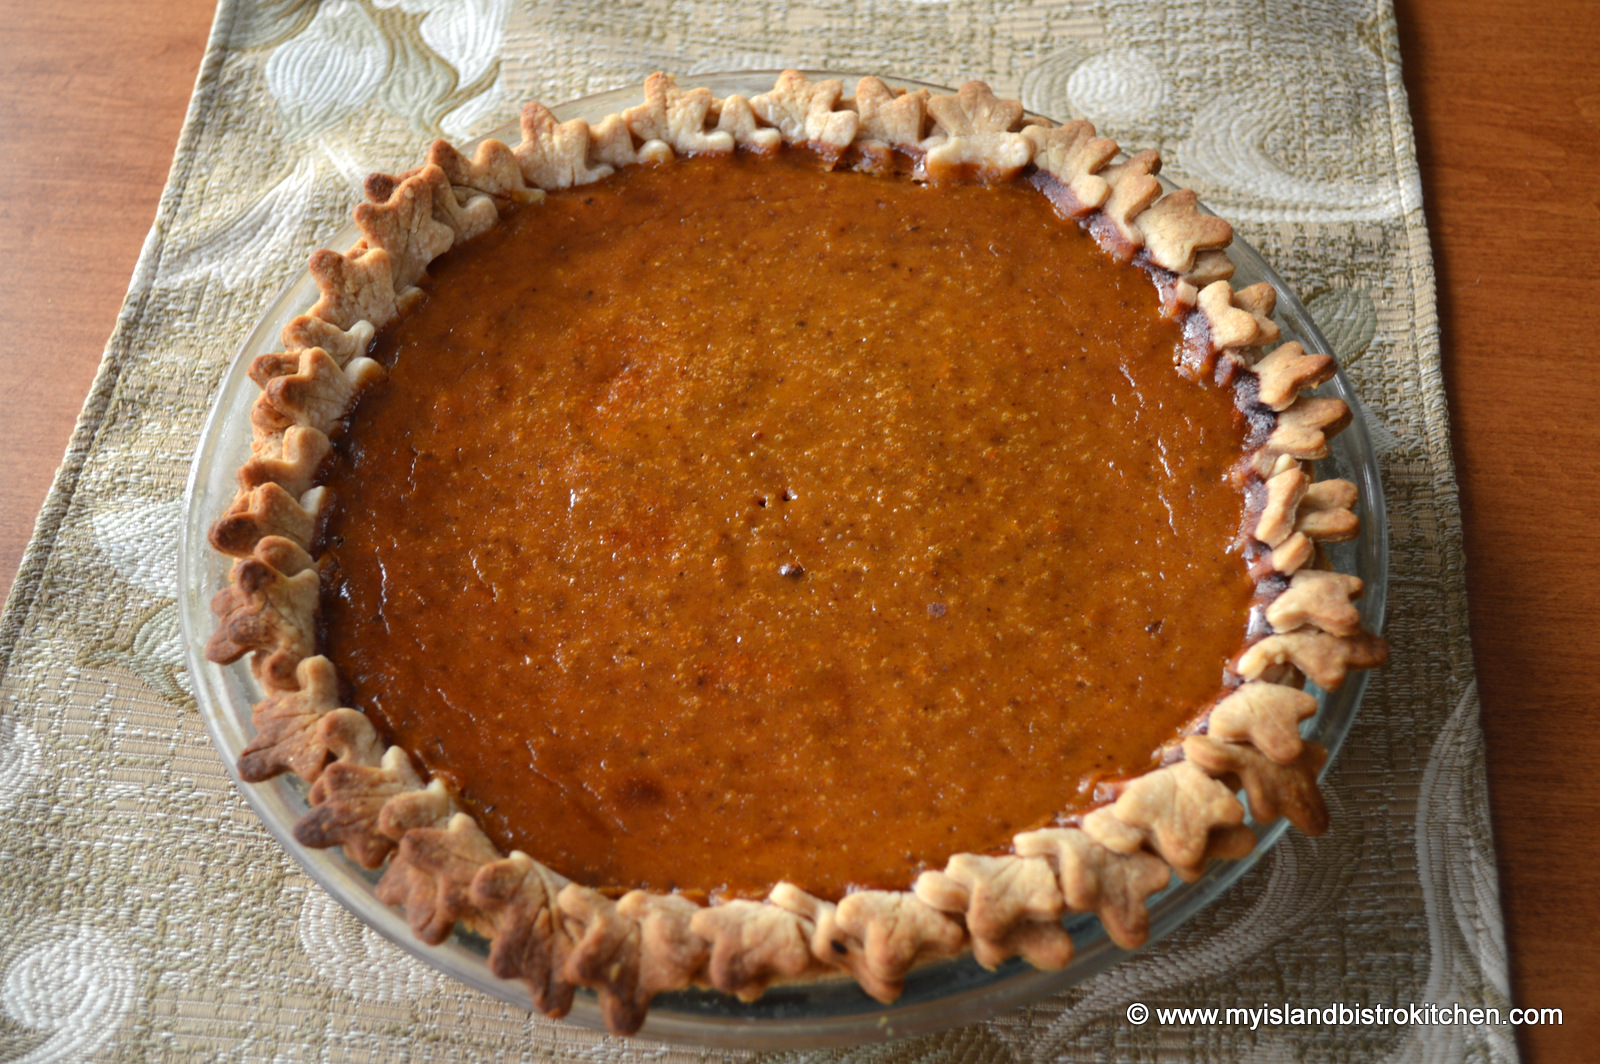
The pie should be thoroughly cooled and allowed to set before cutting.
Squash Pie
For tips and hints on making pie pastry and a recipe for pastry, clickhere.
Squash Pie
1½ – 1¾ lb butternut squash
Pastry for deep 10-inch single crust pie
For the pie filling:
2 cups squash purée
2 extra large eggs, slightly beaten
⅔ cup brown sugar, lightly packed
⅓ cup white sugar
¼ tsp salt
1 tsp cinnamon
½ tsp ginger
¼ tsp cloves
¼ tsp mace
⅛ tsp nutmeg
1⅔ cup evaporated milk
To roast the squash:
Preheat oven to 425°F.
Line large rimmed baking sheet with tin foil. Spray with cooking oil.
Cut the squash in half from top to bottom. Remove and discard seeds. Lightly brush olive oil on both sides of squash. Place squash, flesh side down, on baking sheet. Roast for about 30 minutes then remove from oven and carefully flip the squash halves over. Apply a light brushing of olive oil on the flesh side of the squash. Return squash to oven and continue roasting for another 20-30 minutes or until squash is very soft.
To prepare the squash purée:
Line a large colander with cheesecloth. Set aside.
Remove squash from oven. As soon as the squash has just cooled enough to handle, scoop the flesh from the squash and place it in the bowl of a food processor. Purée the squash until it is very smooth.
Transfer the purée to the cheesecloth-lined colander. Let sit for about an hour to allow any excess water to drain from the purée. From time to time, stir the purée and, with a large spoon, press out the moisture from the purée.
To make the pie filling:
Preheat oven to 375°F.
Transfer purée to a medium-sized bowl and add the eggs, sugars, salt, spices, and milk. With a mixer (either a hand or stand mixer), mix ingredients thoroughly. Pour mixture into prepared pie shell. Place on rimmed baking sheet.
Bake pie in lower third of oven at 375°F for 15 minutes then lower temperature to 350°F and continue baking pie for about 1¼ hours longer or until knife or toothpick inserted in center of pie comes out clean.
Let pie cool completely before cutting.
Serve with a dollop of whipped cream and a sprinkle of cinnamon.
Yield:8-10 servings
Squash Pie
If you have made this recipe and enjoyed it and/or wish to share it with your friends and family, please do so on social media but be sure to share the direct link to this posting from my website.
Similar in taste to Pumpkin Pie, this Squash Pie is made with butternut squash and has a lovely deep flavour with spices similar to those used in pumpkin pie.
Course
Dessert
Keyword
pie, squash pie
Servings8
My Island Bistro KitchenBarbara - My Island Bistro Kitchen
Ingredients
1½ - 2lbbutternut squash
Pastry for deep 10-inch single crust pie
For the pie filling:
2cupssquash purée
2extra-large eggs, slightly beaten
⅔cupbrown sugar, lightly packed
⅓cupwhite sugar
¼tspsalt
1tspcinnamon
½tspginger
¼tspcloves
¼tspmace
⅛tspnutmeg
1⅔cupevaporated milk
Instructions
To roast the squash:
Preheat oven to 425°F.
Line large rimmed baking sheet with tin foil. Spray with cooking oil.
Cut the squash in half vertically. Remove and discard seeds. Lightly brush olive oil on both sides of squash. Place squash, flesh side down on baking sheet. Roast for about 30 minutes then remove from oven and carefully flip the squash halves over. Return squash to oven and continue roasting for another 20-30 minutes or until squash is very soft.
To prepare the squash purée:
Line a large colander with damp cheesecloth.
Remove squash from oven. As soon as the squash has cooled enough to handle, scoop the flesh from the squash and place it in the bowl of a food processor. Purée the squash until it is very smooth.
Transfer the purée to the cheesecloth-lined colander. Let sit for about an hour to allow any excess water to drain from the purée. From time to time, stir the purée and, with a large spoon, press out the moisture from the purée.
To make the pie filling:
Preheat oven to 375°F.
Transfer purée to a medium-sized bowl and add the eggs, sugars, salt, spices, and milk. With a mixer (either a hand or stand mixer), mix ingredients thoroughly. Pour mixture into prepared pie shell. Place on rimmed baking sheet.
Bake pie in lower third of oven at 375°F for 15 minutes then lower temperature to 350°F and continue baking pie for about 1¼ hours longer or until knife inserted in center of pie comes out clean.
Let pie cool completely before cutting.
Serve with a dollop of whipped cream and a sprinkle of cinnamon.
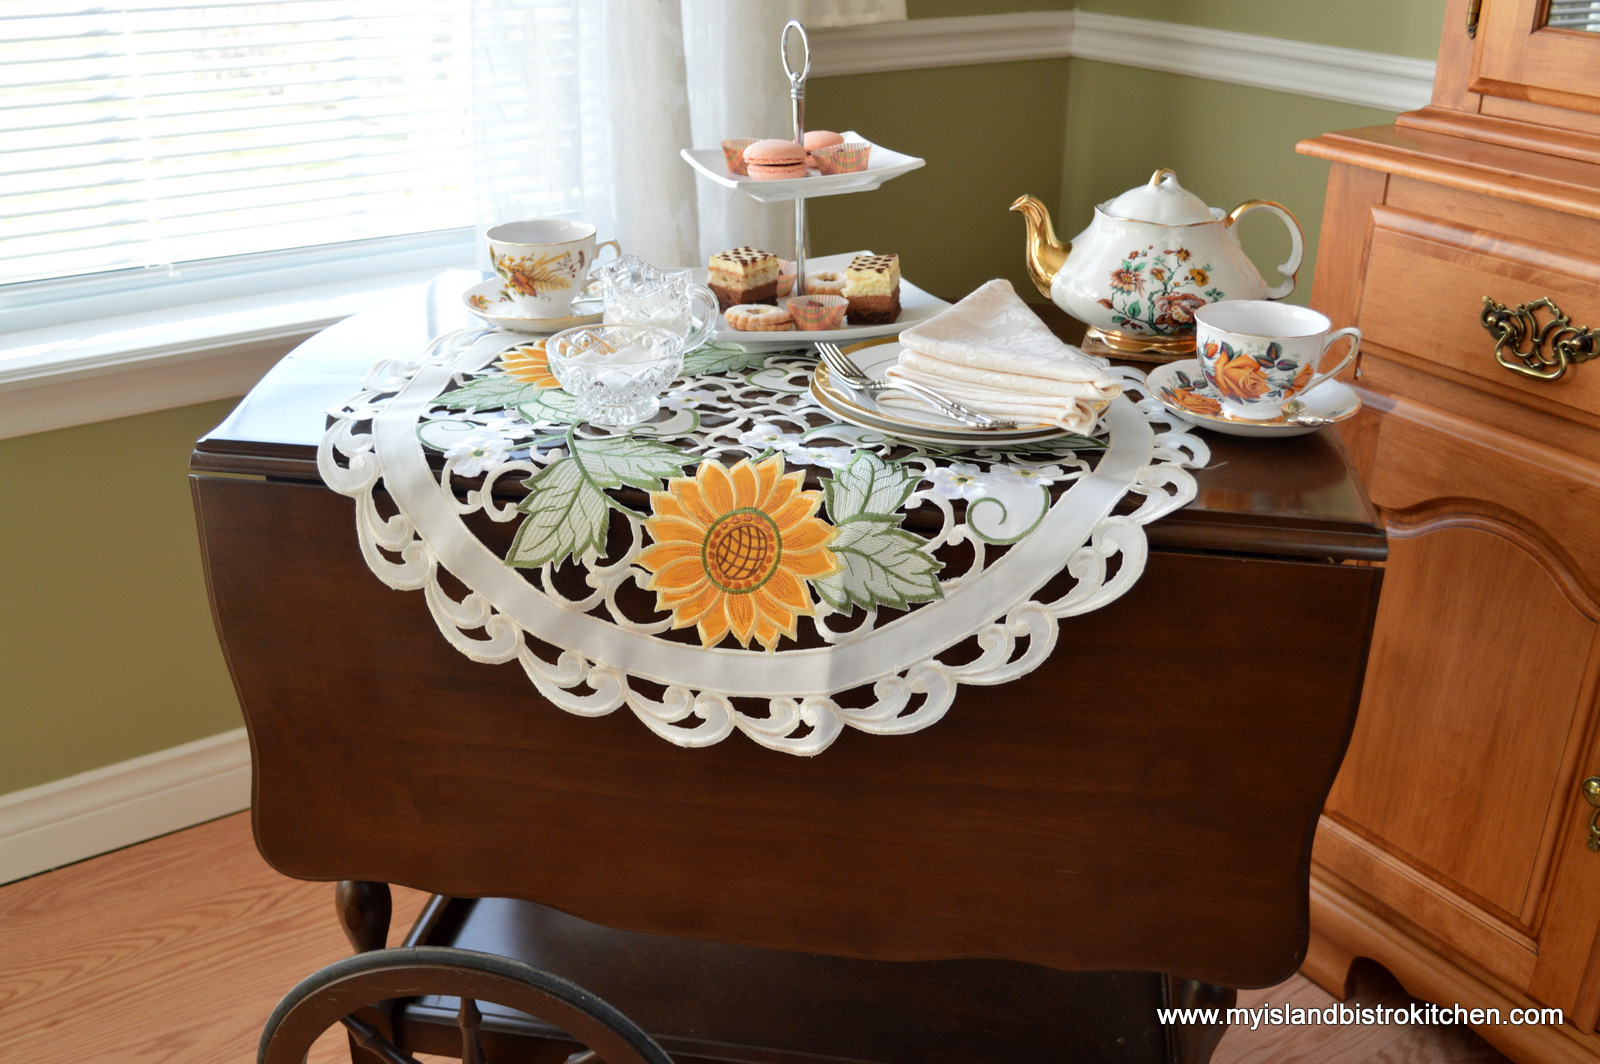
Lots of new things to share in today’s afternoon tea posting!
I have been looking for a long time for a tea cart, or tea trolley. I was specifically looking for a Roxton maple cart but none was showing up. However, I was able to find one in a darker wood that is in need of a little TLC at some point but is still usable in the meantime. So, our afternoon tea today was served via the new-to-me tea cart.
The second new acquistion is the little circular tablecloth. I bought it at the local Anne of Green Gables store on the corner of Queen and Richmond Street in downtown Charlottetown, PEI. They have a great selection of these types of small tablecloths, squares, and runners, and at reasonable prices. I particularly like the sunflower design for late summer and autumn use. It also looks great on the centre of my light maple dining room table.
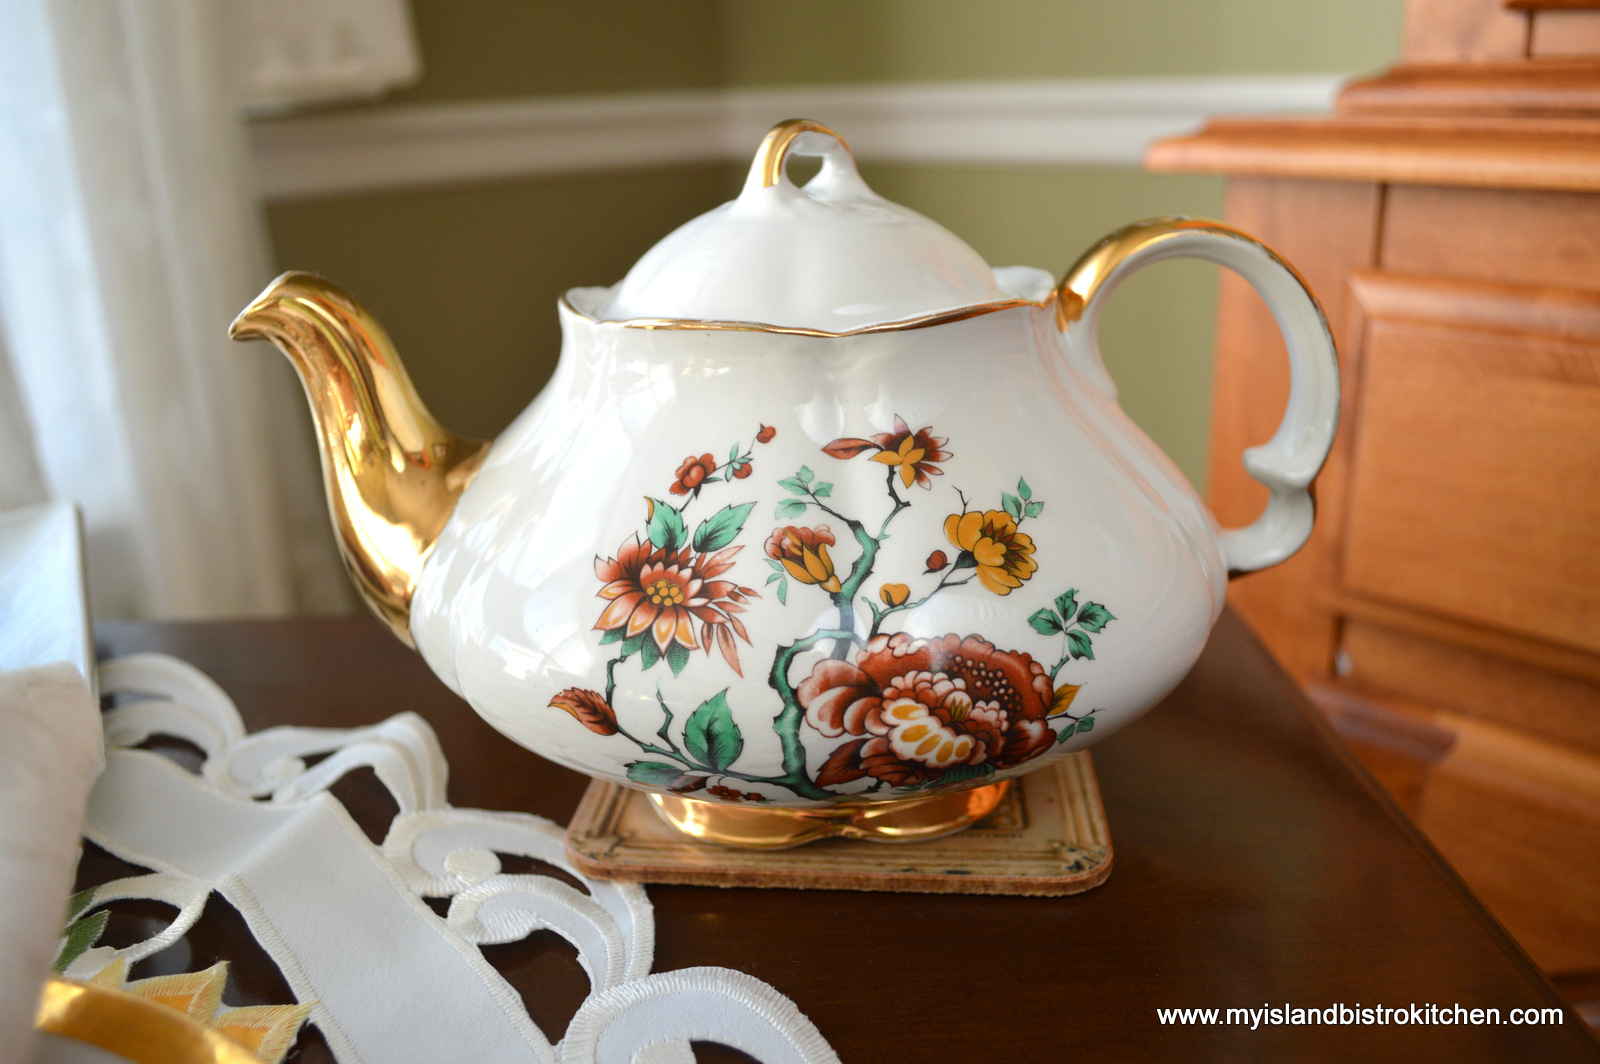
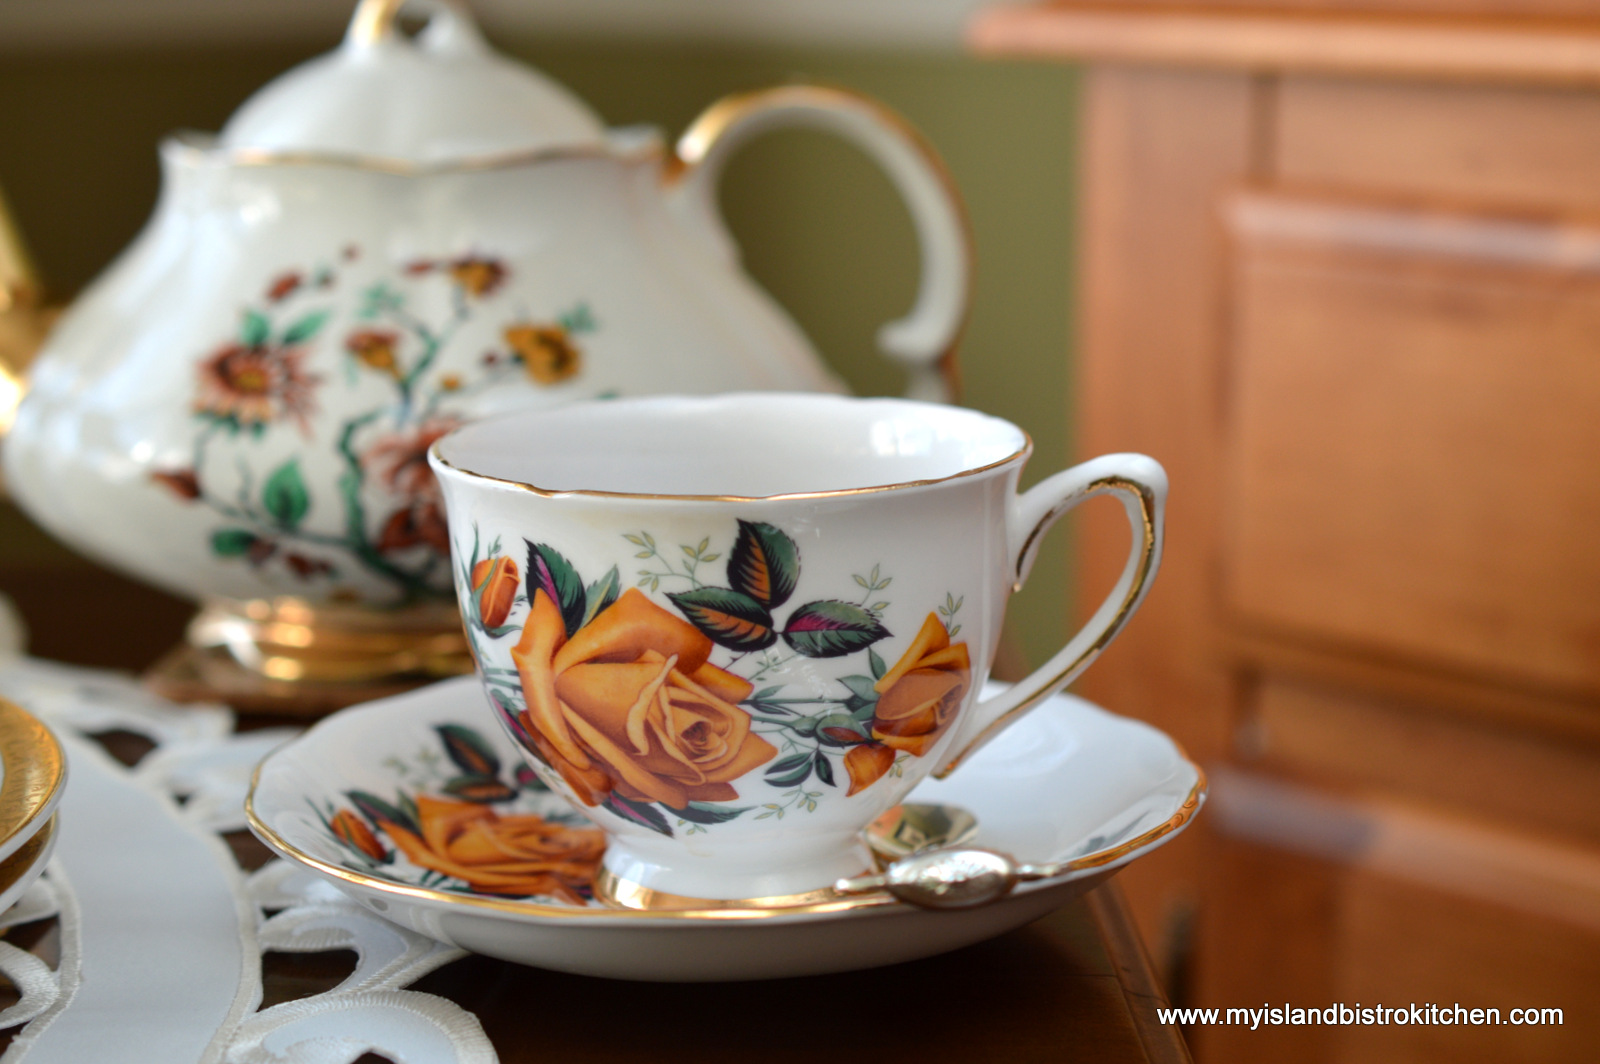
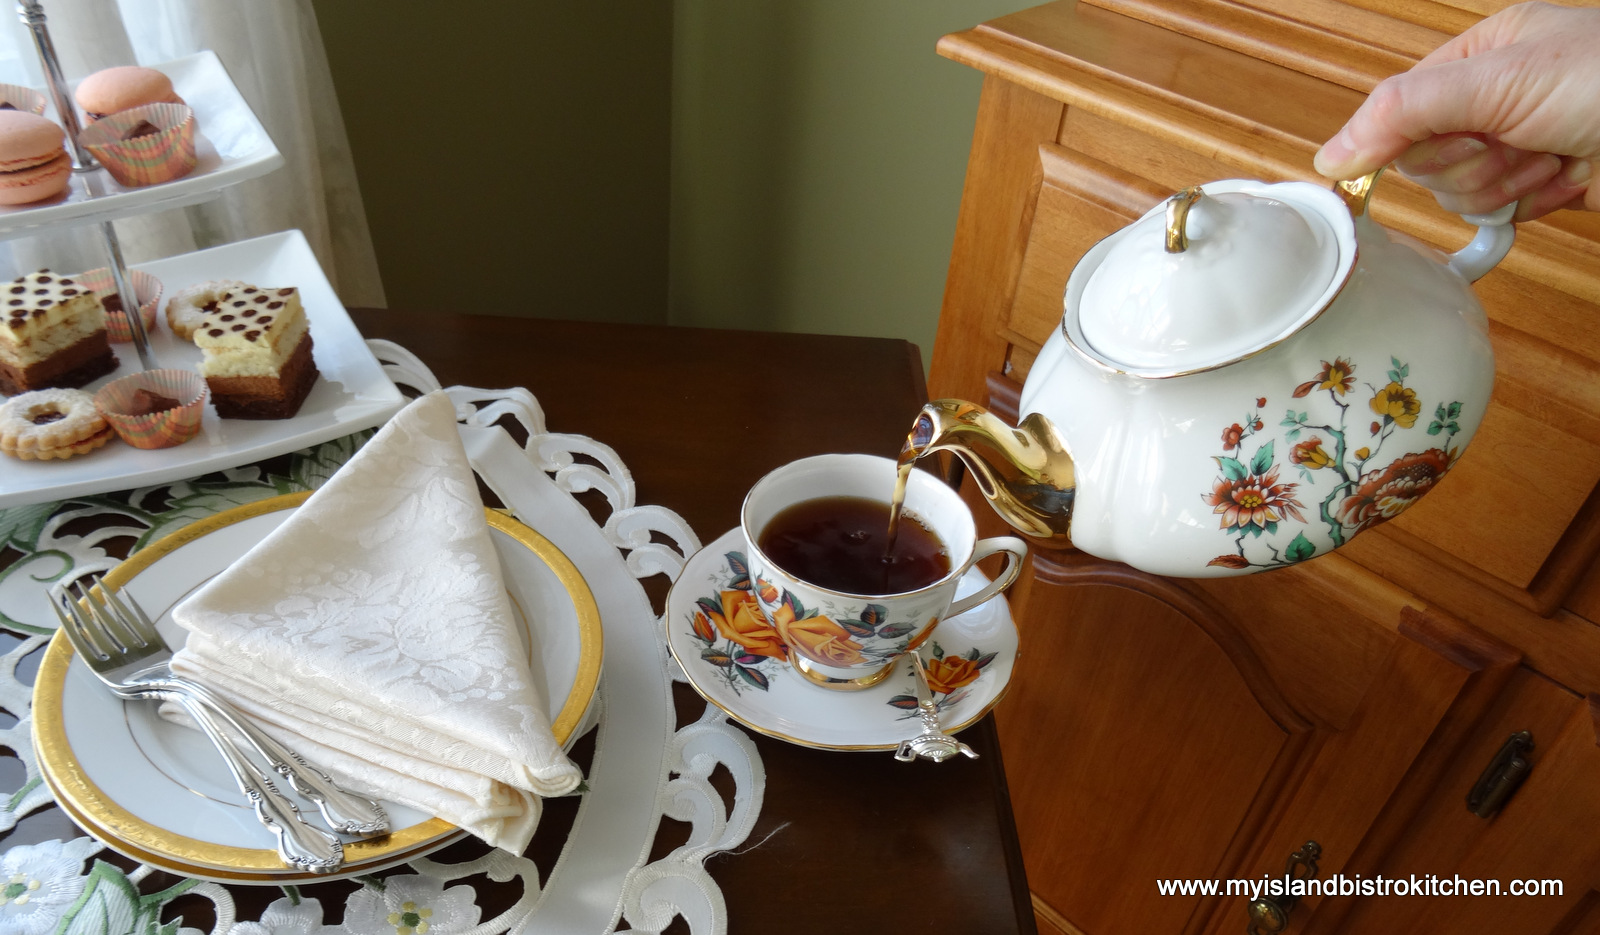
The third new treasure (I told you there were lots!) is the new-to-me Ellgreave teapot. While I tend to lean toward pretty pinks, yellows, and mauves in teapot colors, the shape and the gold trim of this one particularly took my eye. The colors are also suitable for autumn teas.
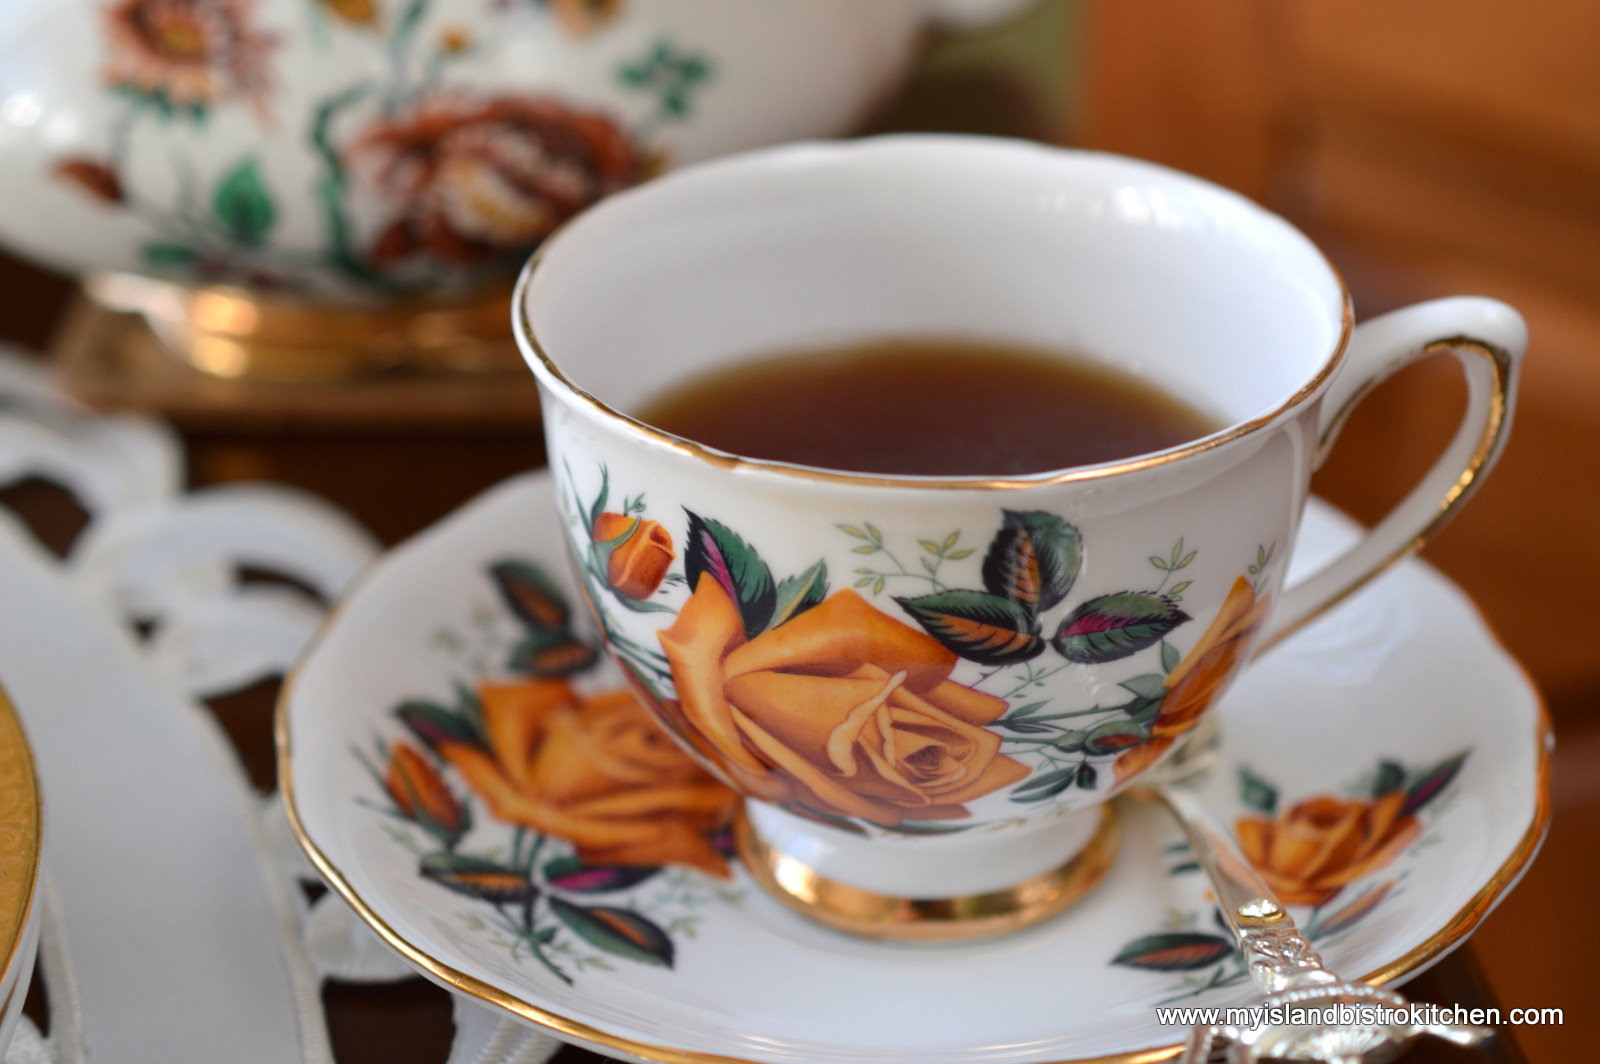
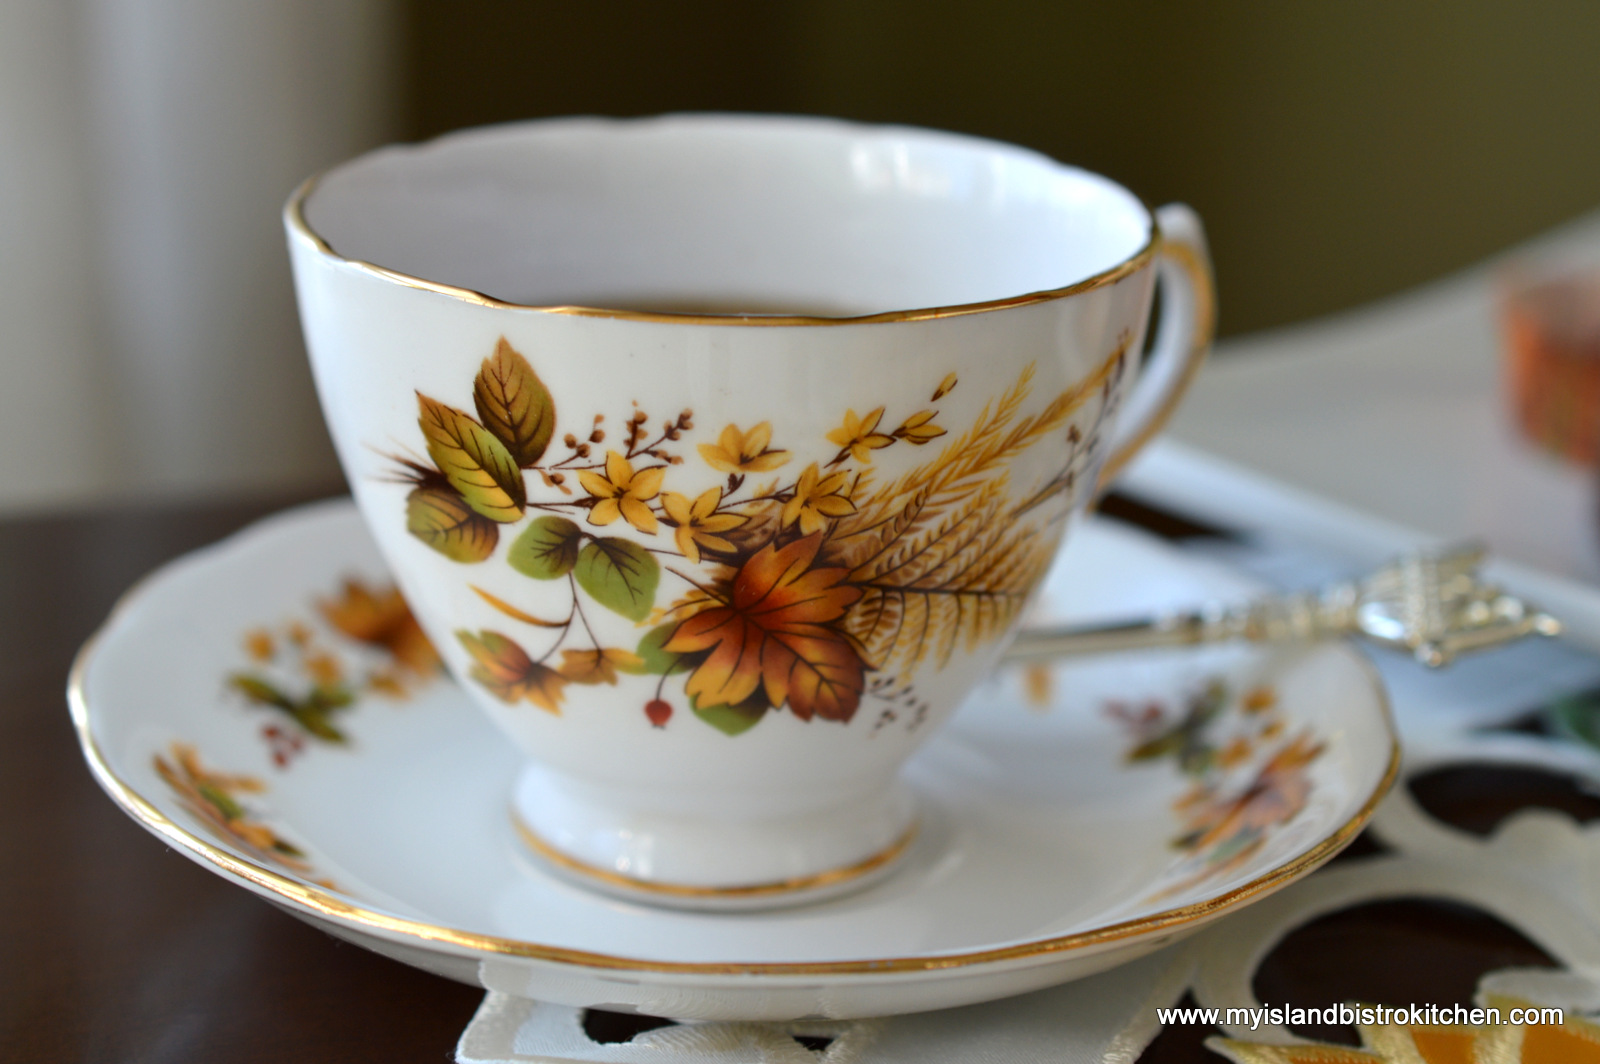
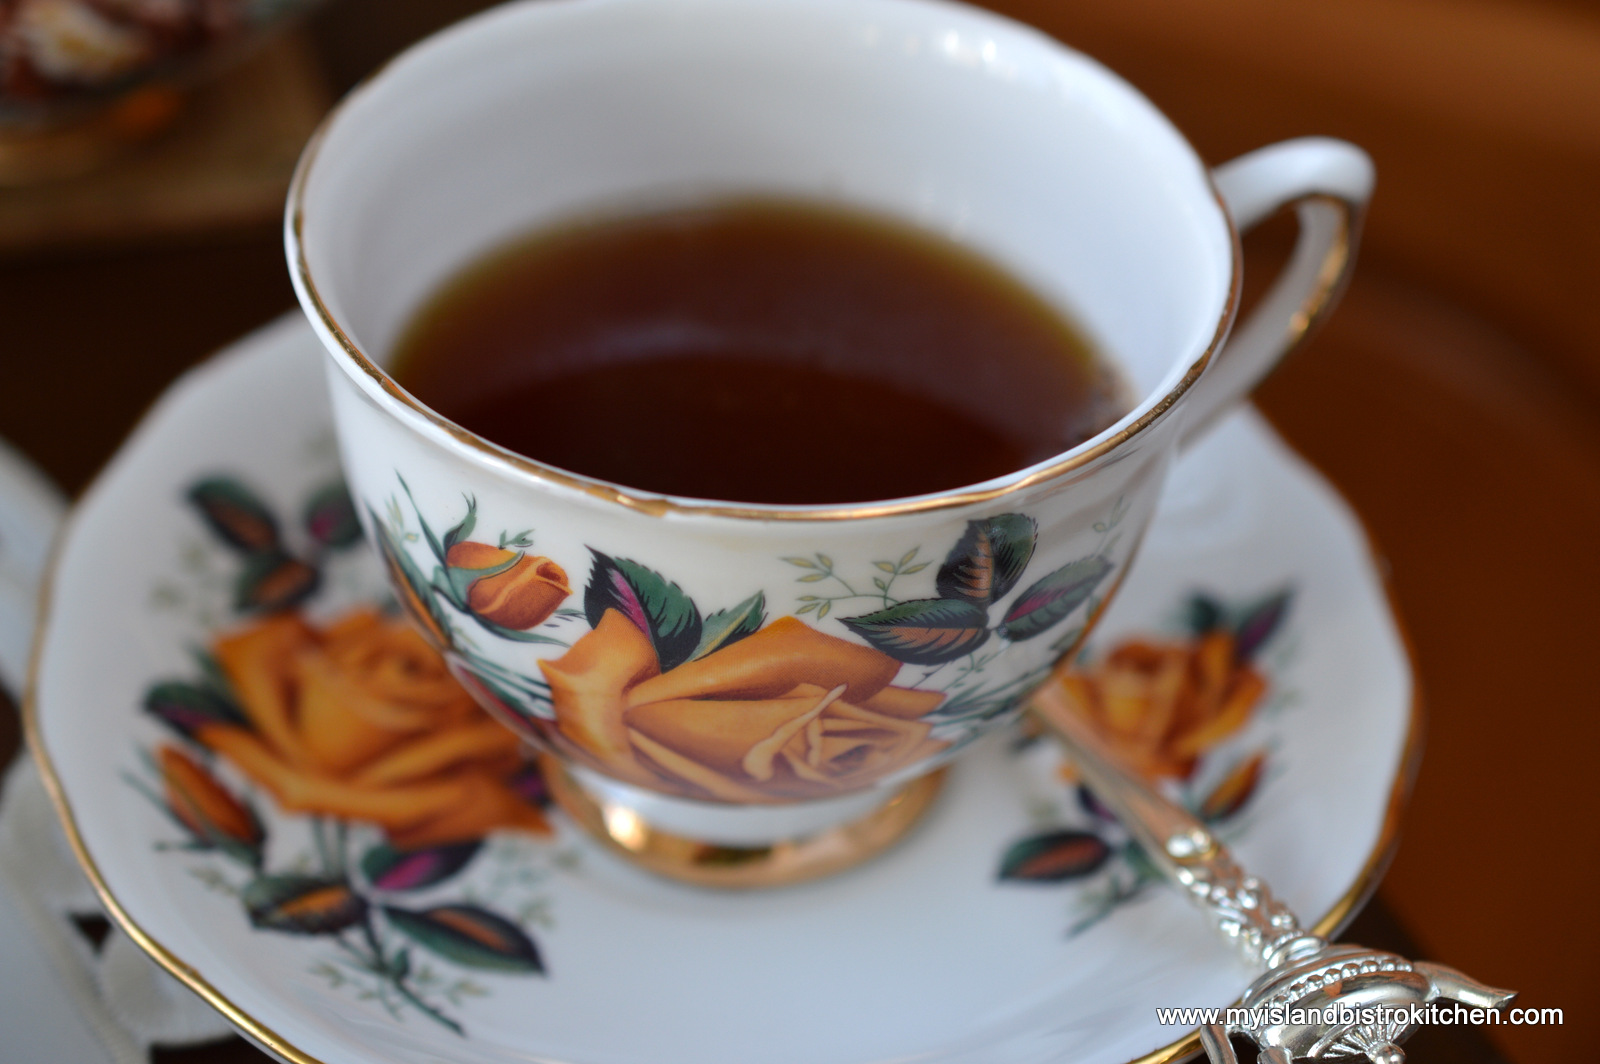
I chose a couple of teacups and saucers from my small autumn collection. Both blend well with the teapot colors.
I like the rich tones in the rose in the above teacup (Cololough, Eng.) along with its gold trim to match that on the teapot. I like the fall motif on the cup (Royal Vale, Eng.) below.
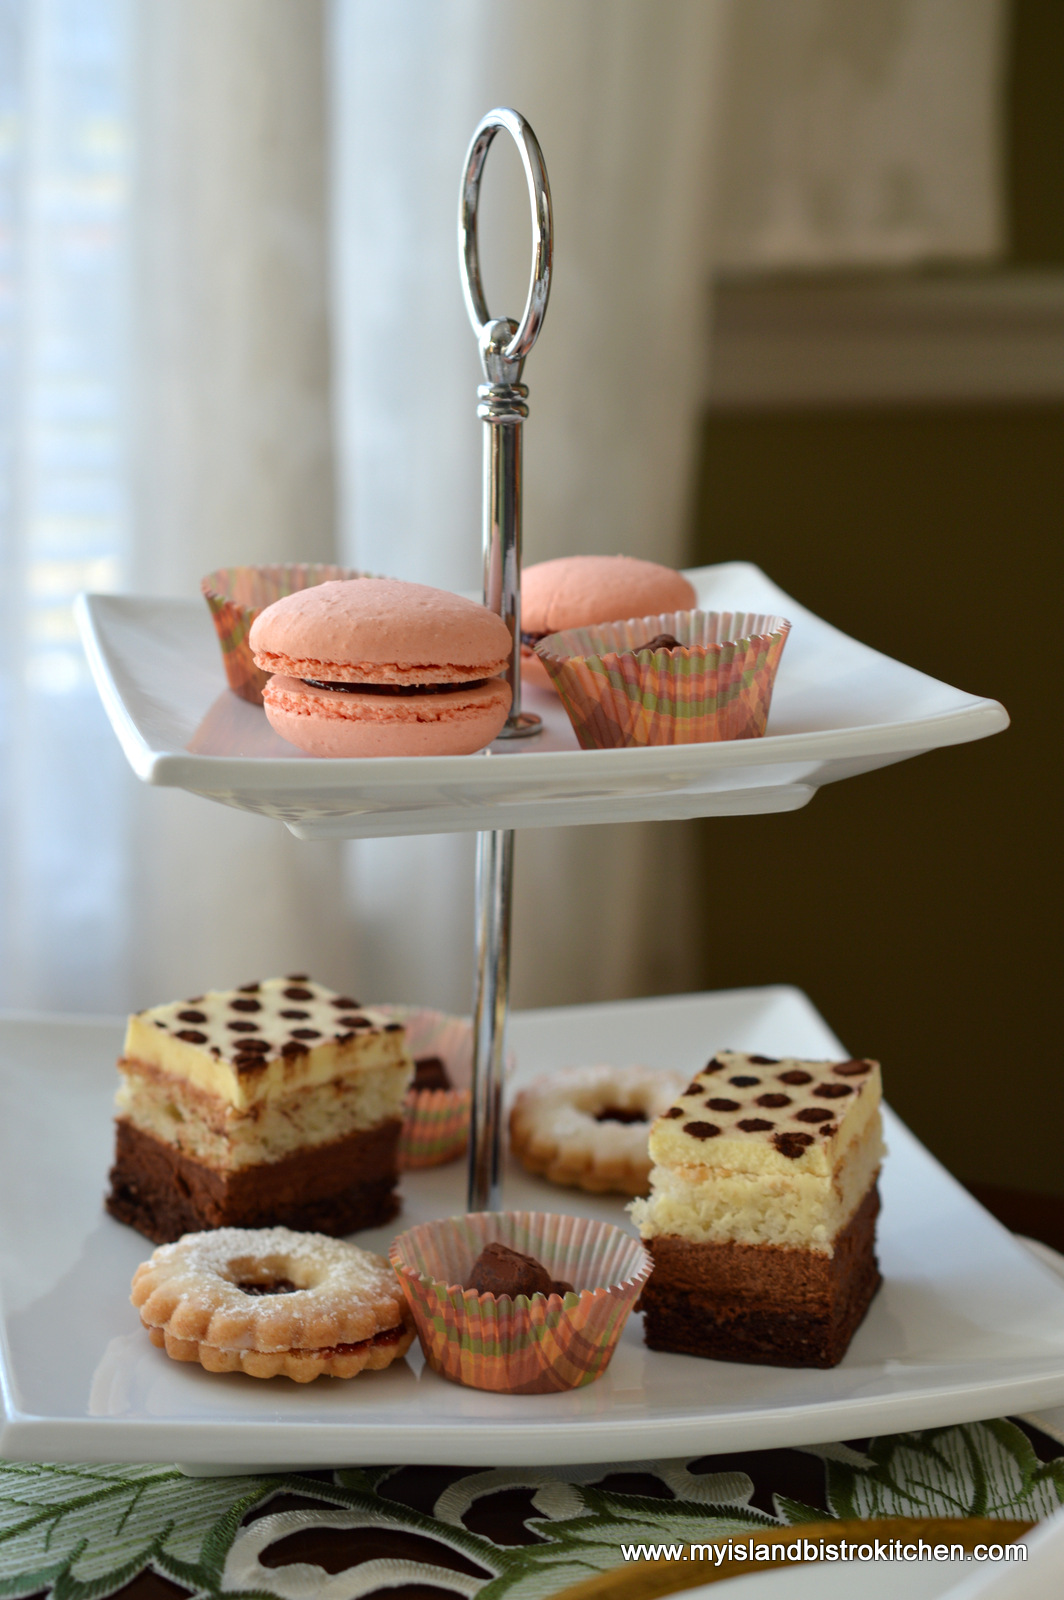
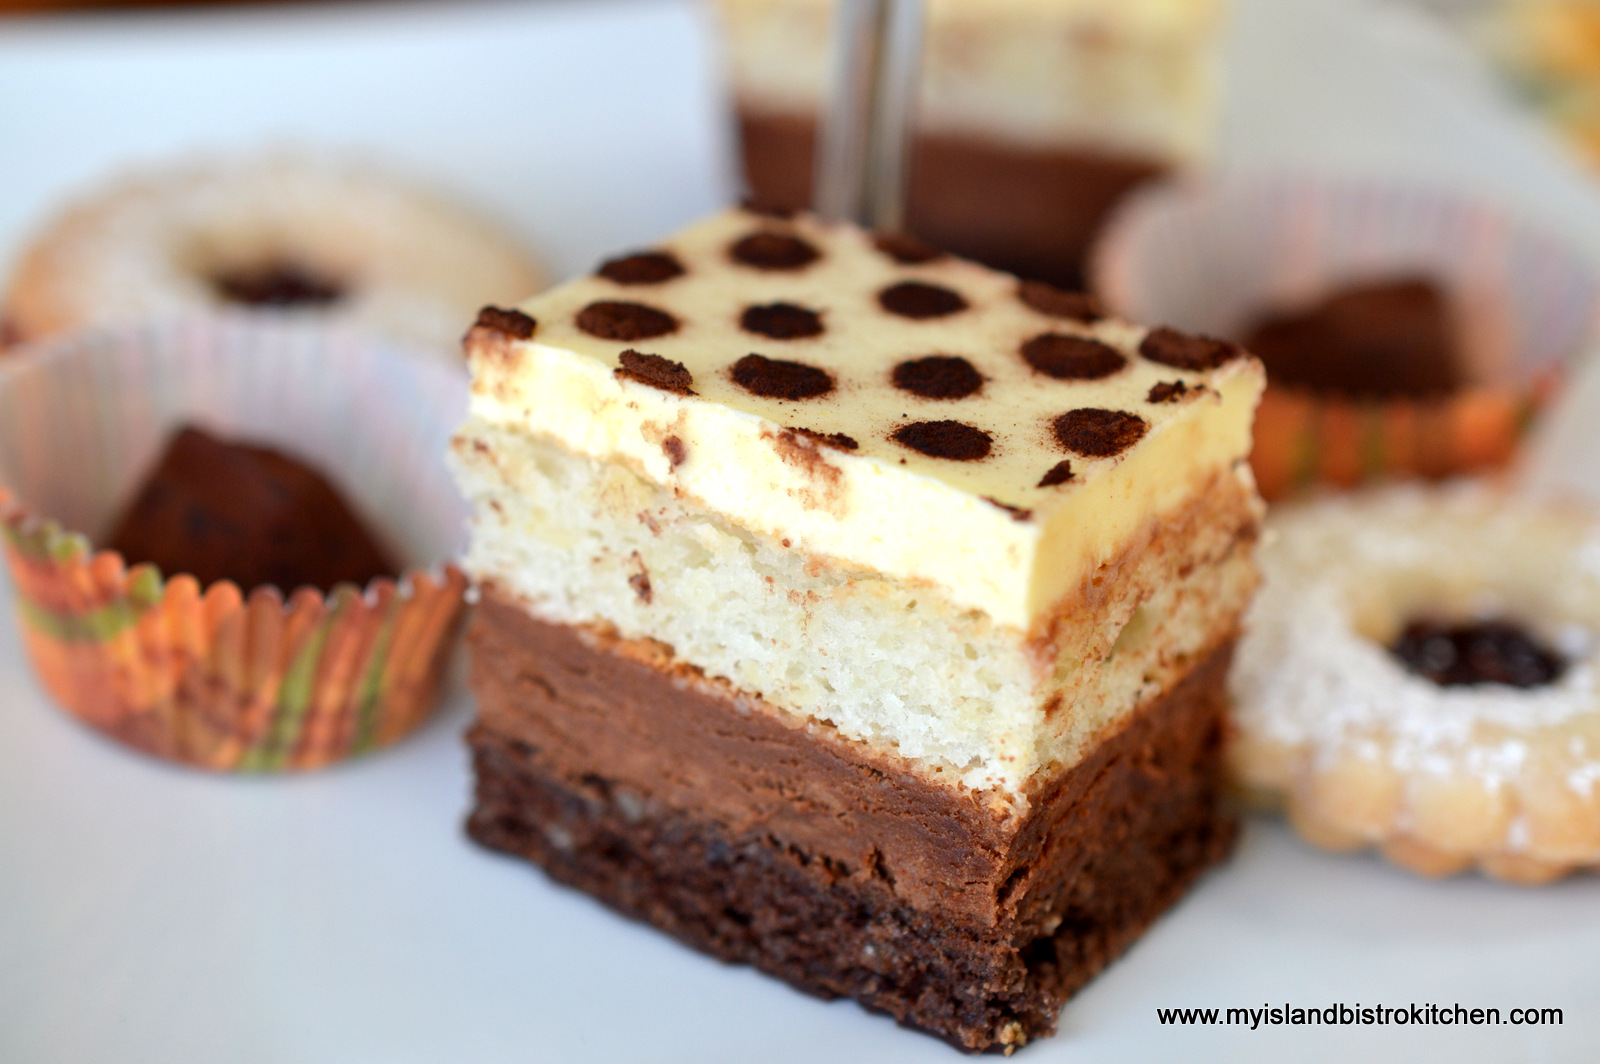
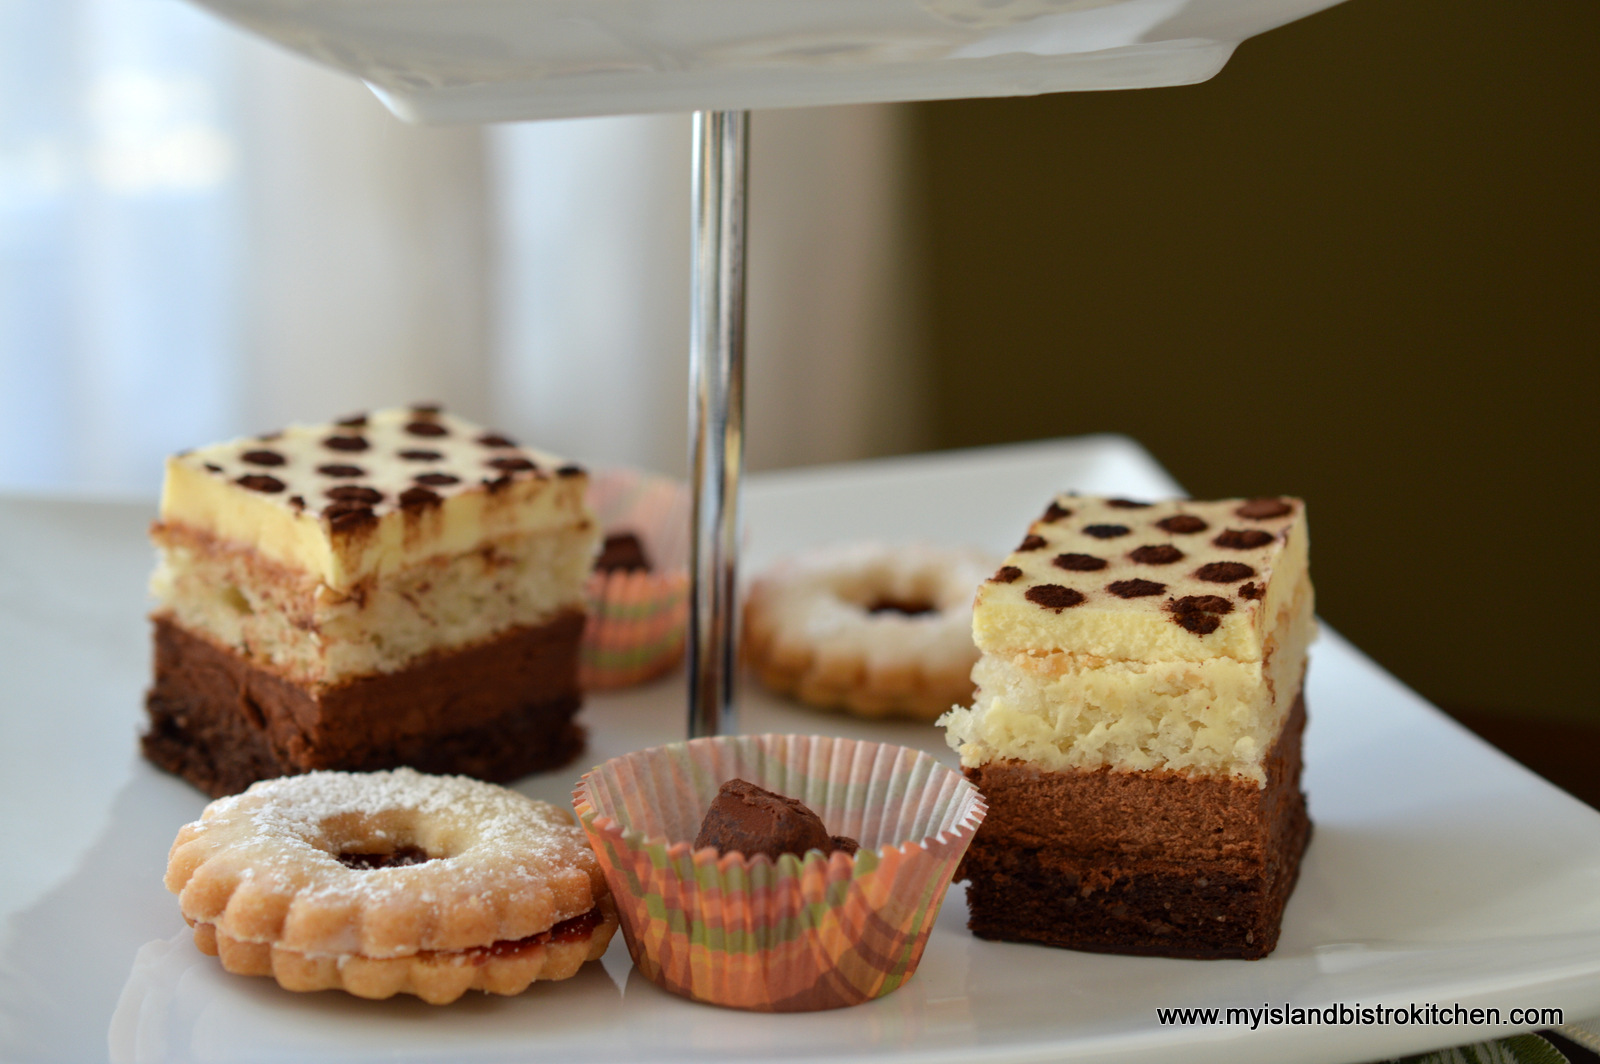
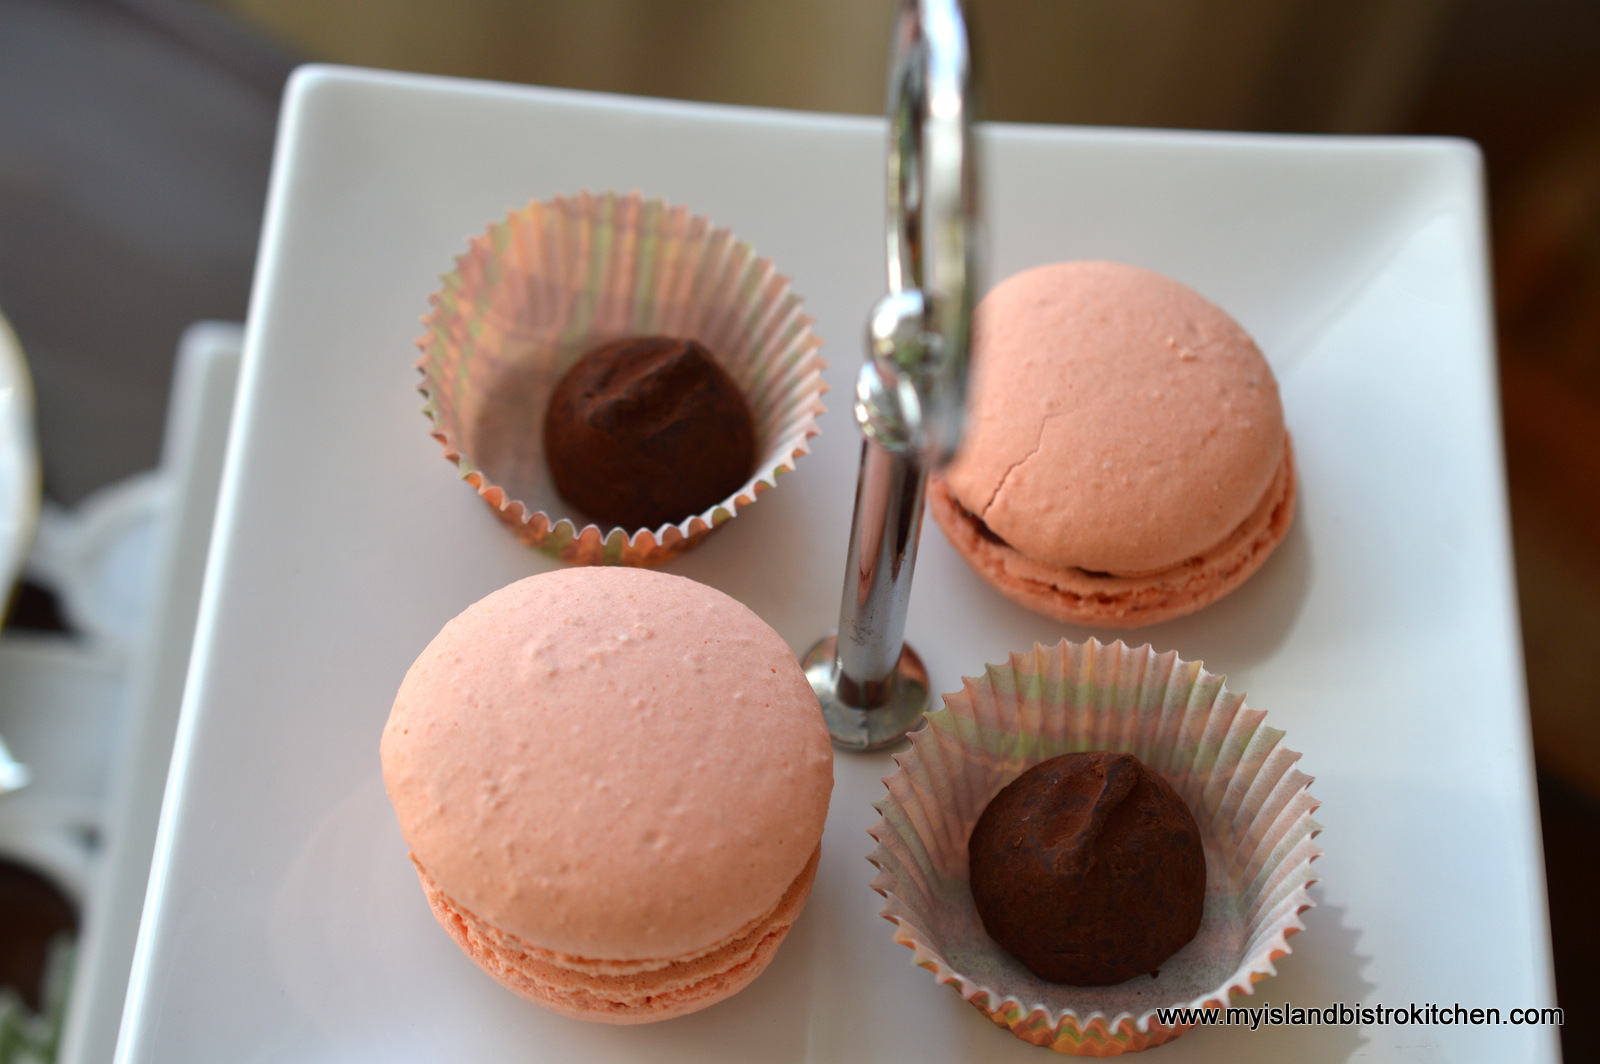
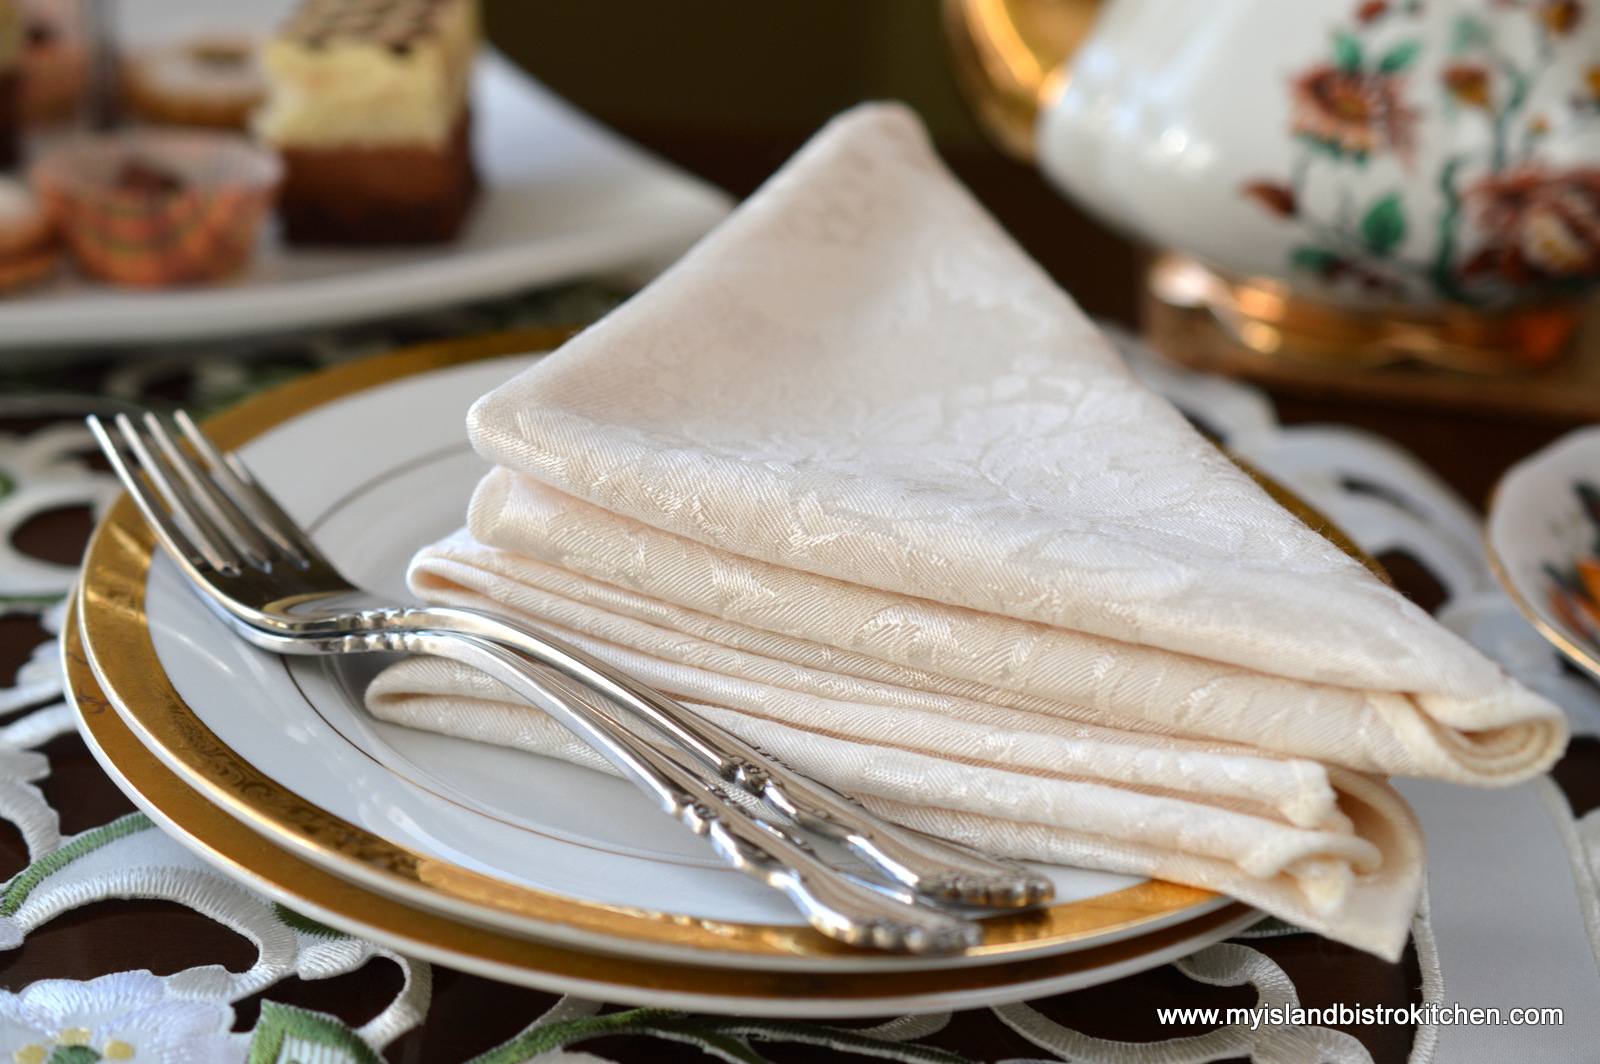
The fourth new discovery comes from Tony’s Bistro and Pâtisserie in Moncton, New Brunswick. I was recently overseas “to the mainland”, as many of us Islanders say, and on the recommendation of a colleague, went to Tony’s Bistro for lunch. It was difficult to pass by the two display cases filled with delectable sweet treats. While I normally prepare all the food for my afternoon teas, I thought it would be fun to have someone else’s sweets for a change. And, I was not disappointed! Eager to have a look at my choices? (Note: All food items on today’s tea table, with the exception of the chocolate truffles, came from Tony’s.)
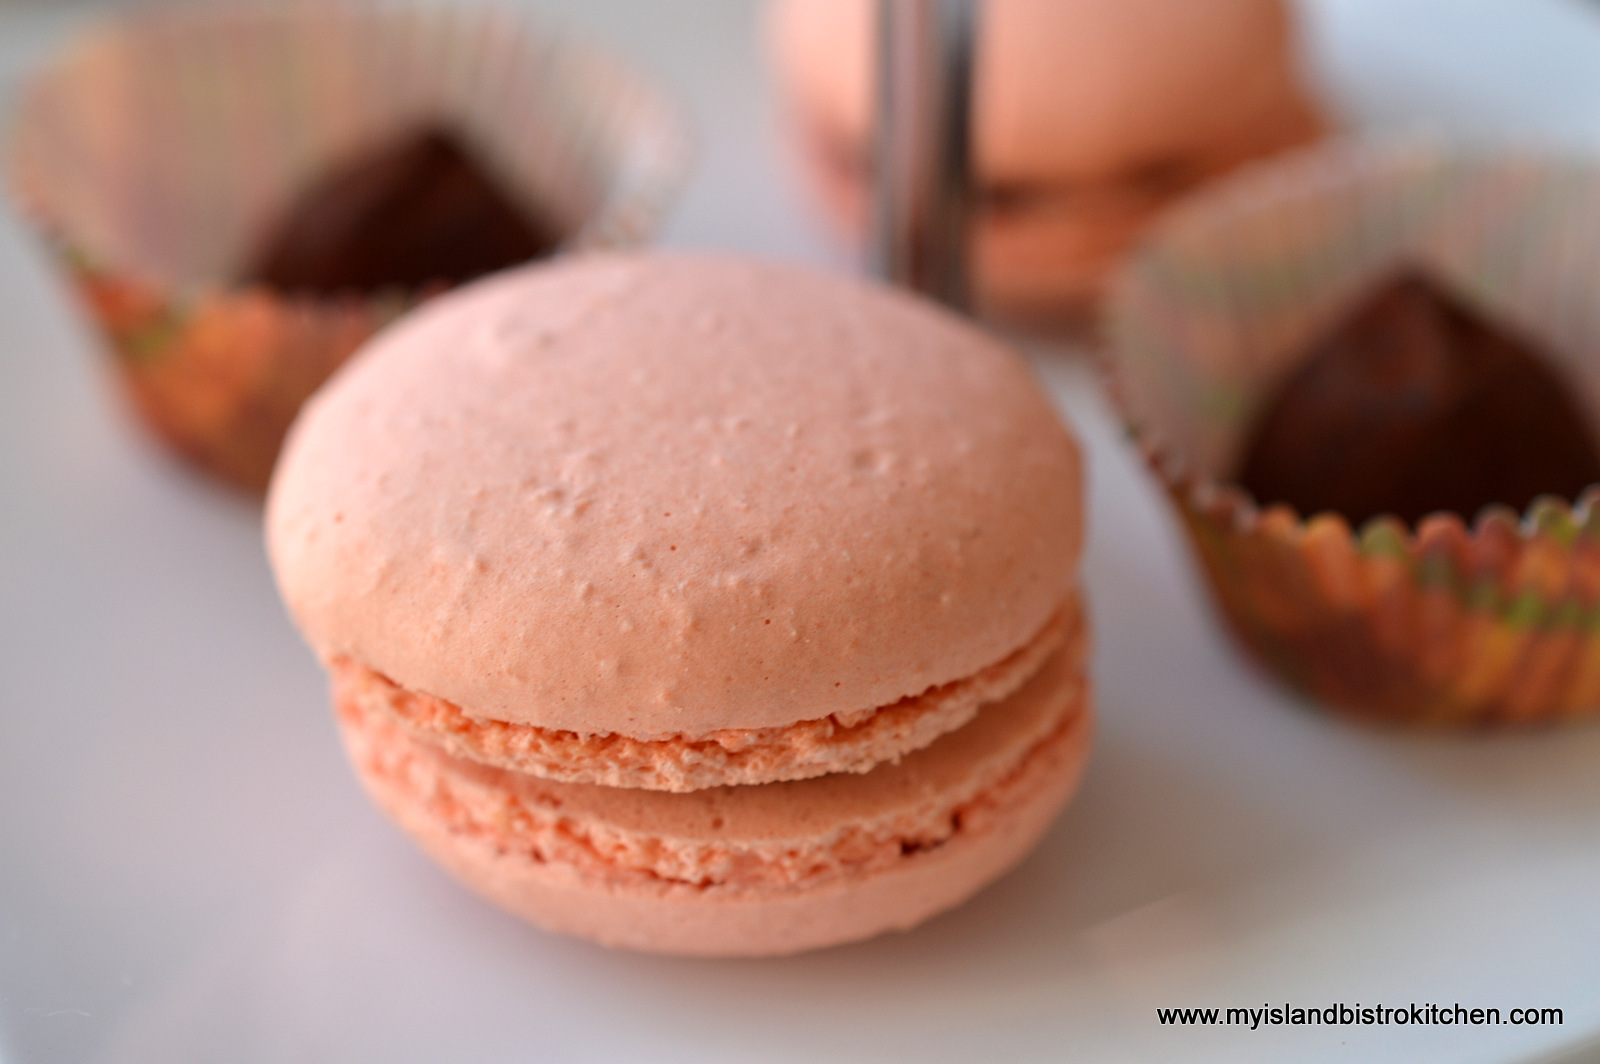
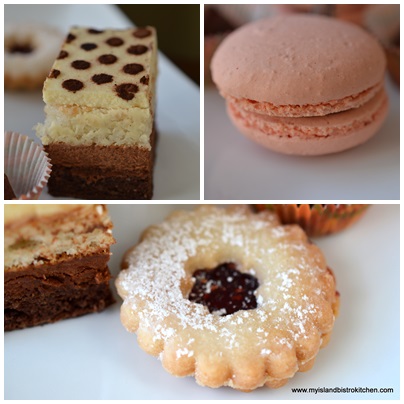
First the Raspberry Macarons. These are so light and airy with just the right touch of chewiness. Divine perfection.
Raspberry Macaron
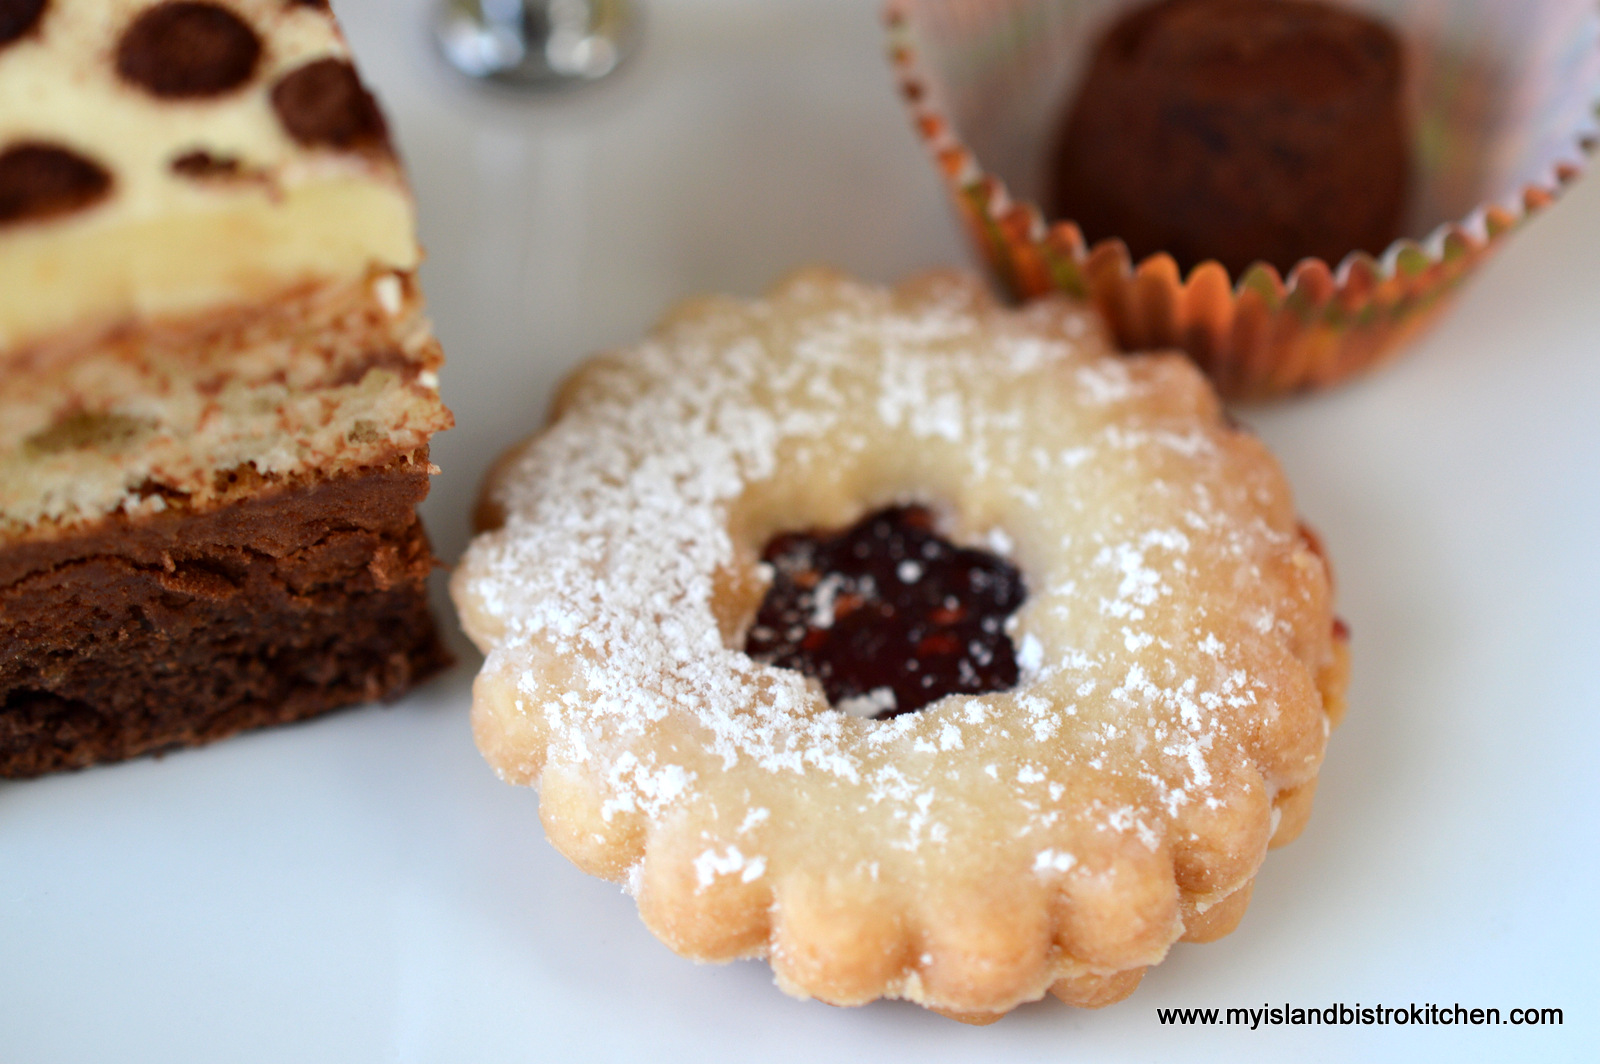
These crisp little raspberry-filled shortbreads had just the right amount of crunch.
Shortbread
And, last but not least, this delectable cake that no chocolate lover could resist!
So, if you are lucky enough to have a great French pâtisserie in your area, tea time can be very easy as you don’t have to bake! All you have to do is make a stop at your favorite pâtisserie and then add the location, dishes, fine company, and a good pot of tea. It’s also a good opportunity to try specialty items that you might not normally bake yourself.
Today’s tea selection is a classic, full-bodied black tea from King Cole, another New Brunswick company. My afternoon tea has a distinct New Brunswick influence today!
King Cole Tea in a Pretty China Cup
Now that the tea elements have been duly admired and photographed, it’s time to sit down for tea!
I hope you have enjoyed taking a peek at my afternoon tea. If you find yourself in Moncton, I recommend checking out Tony’s Bistro and Pâtisserie at 137 McLaughlin Drive.
————————
Thank you for visiting “the Bistro” today. There are lots of ways to connect with “the Bistro” through social media:
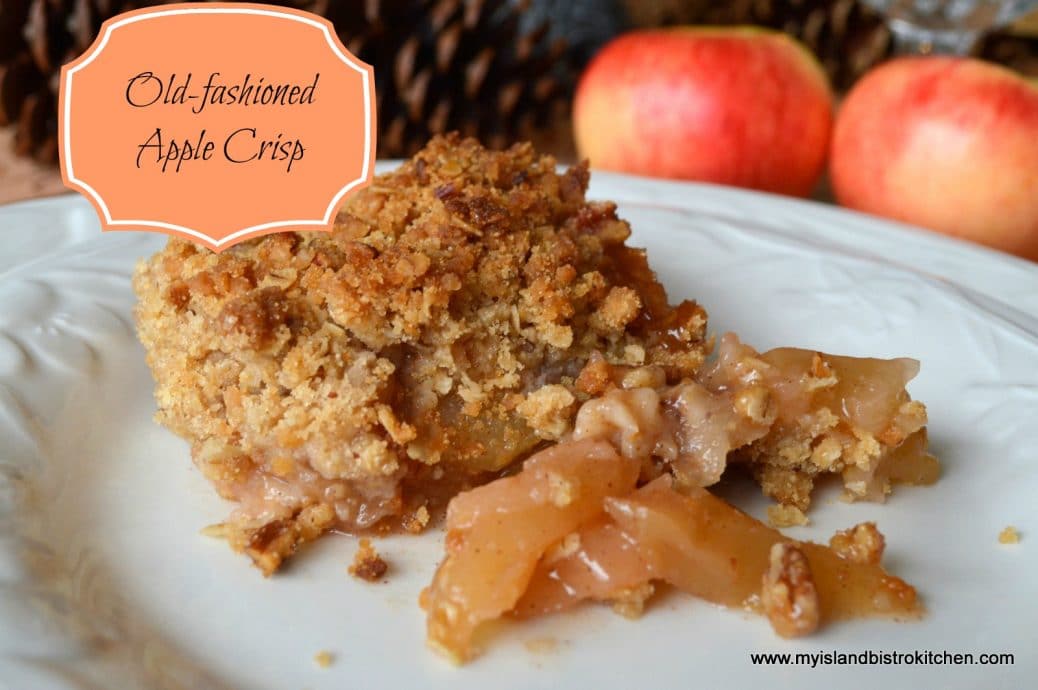
One of my all-time favorites is the traditional old-fashioned Apple Crisp dessert — the sweet apple flavour filling topped with a crisp, crunchy streusel. And, oh, the heavenly scent in the house when the apple crisp is baking! Continue reading Old-fashioned Apple Crisp→
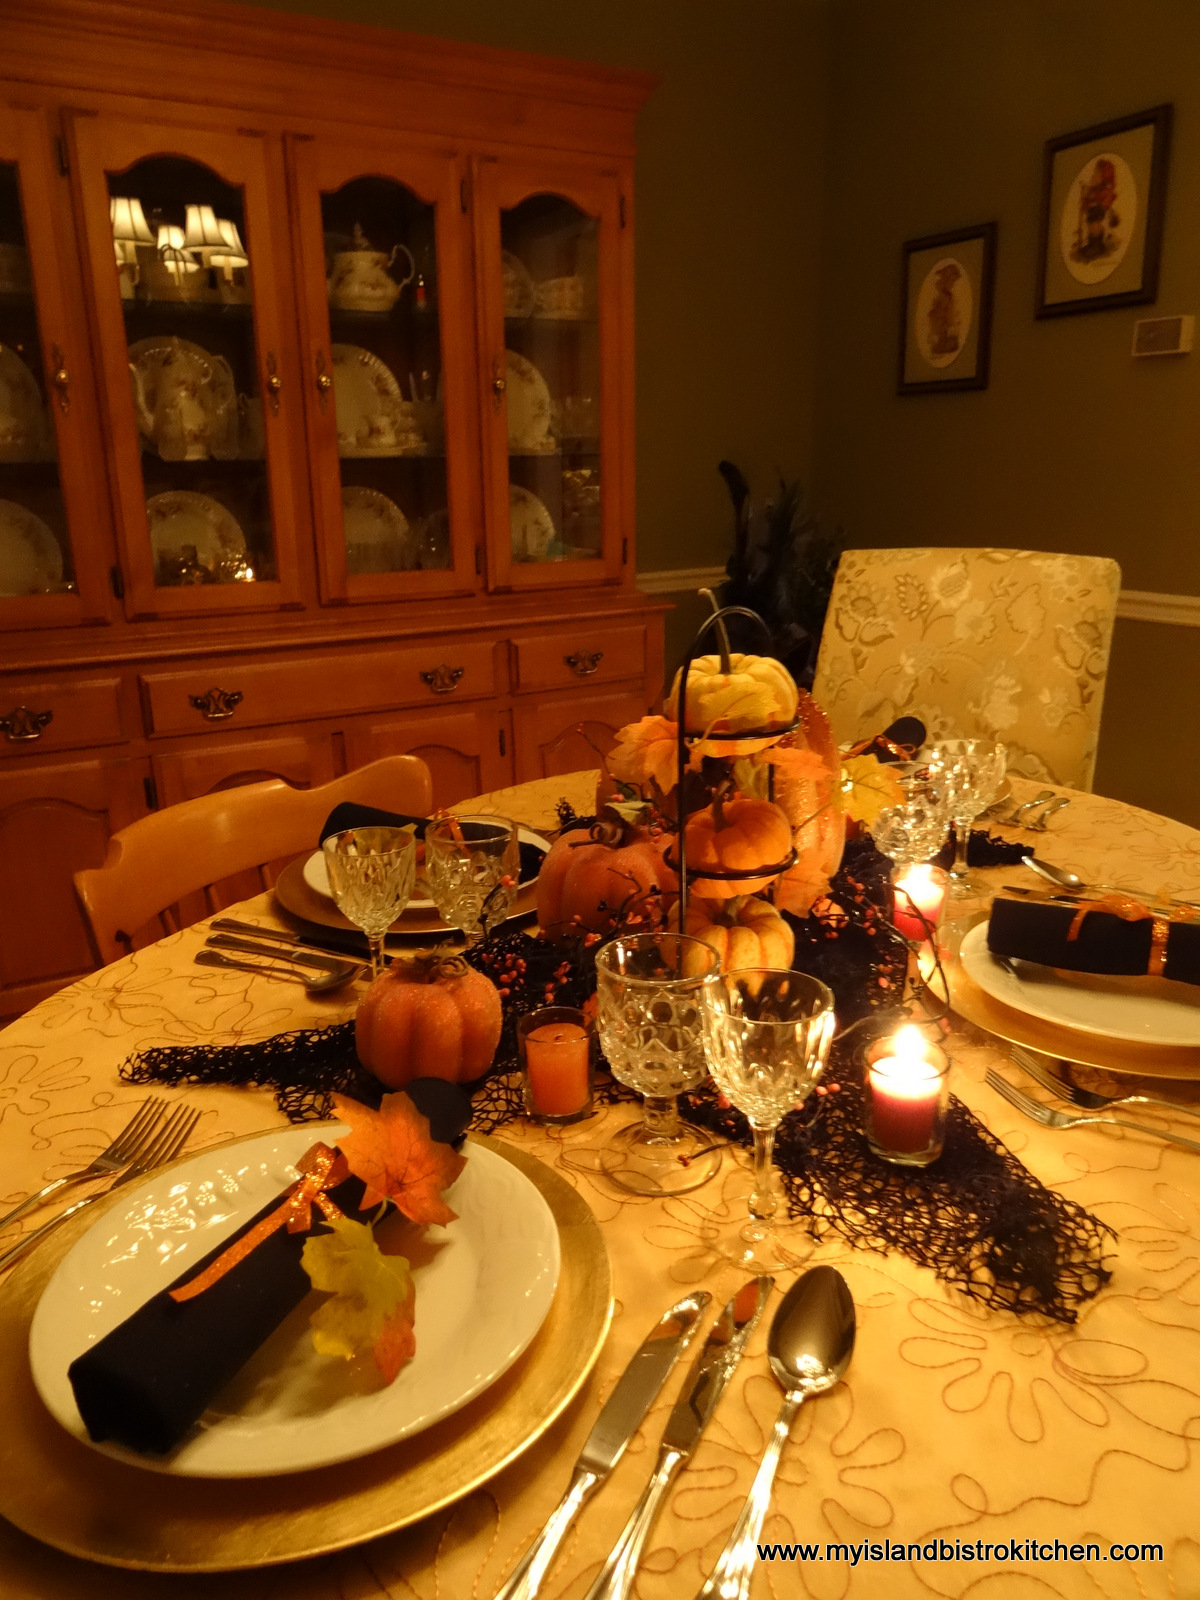
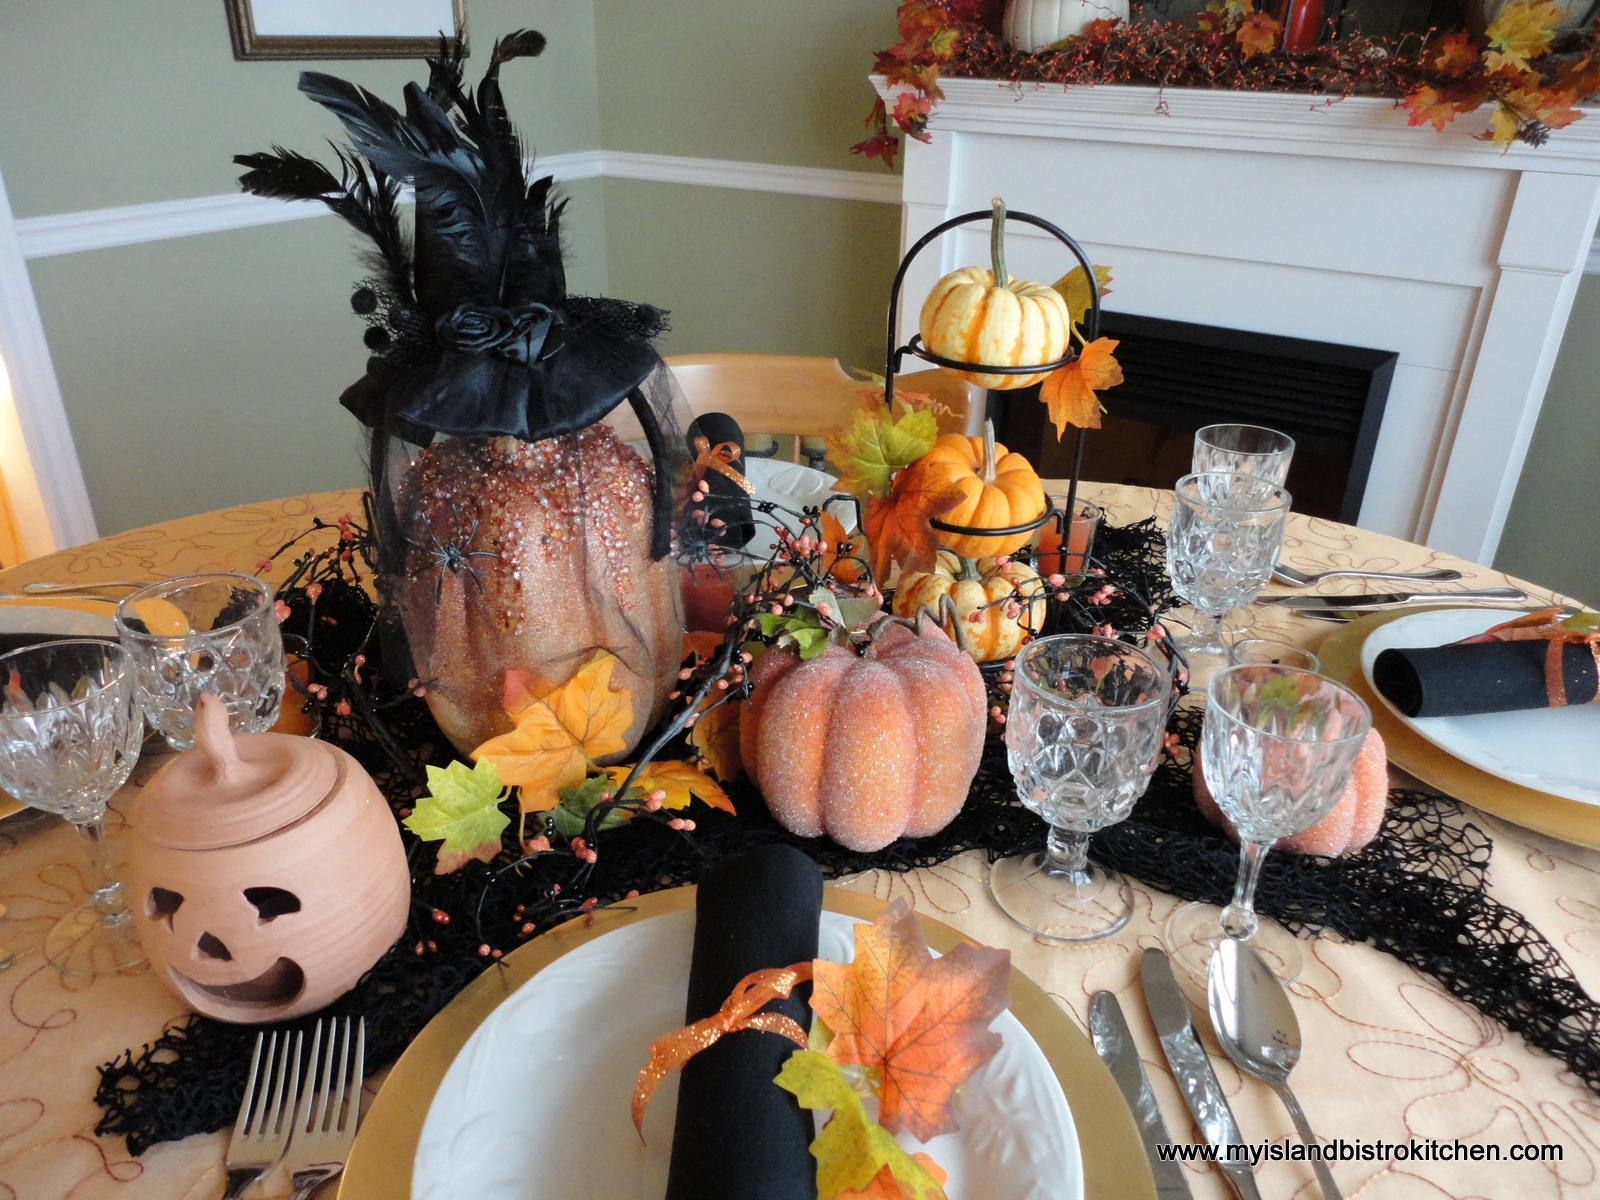
On this Halloween weekend, I am sharing my seasonal tablescape that has a distinctly pumpkin theme. I have chosen to use some good quality artificial decorations mixed in with some traditional ones that nature has provided.
Halloween Tablescape
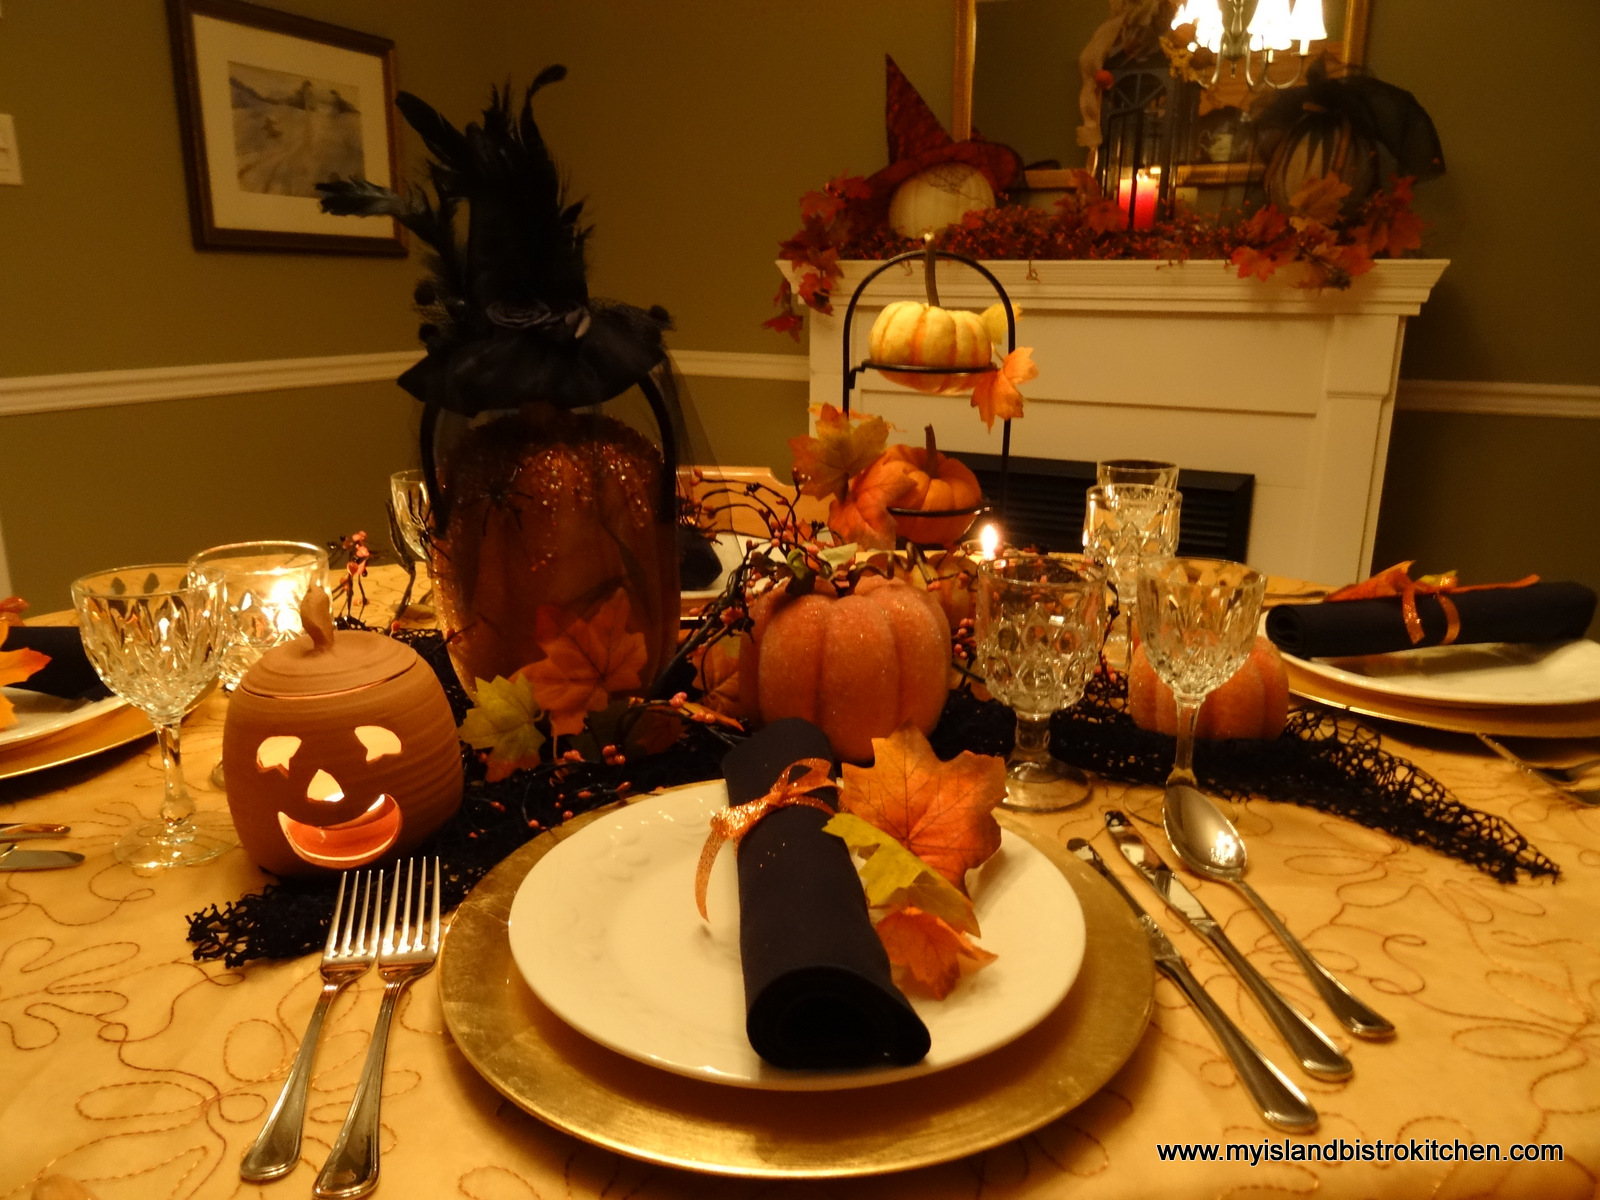
In keeping with the mood of the season, I have kept the lighting low and moody to give a golden glow to the dining room.
I have a little collection of fall and Halloween decorations and, wherever possible, I try to work with I have as opposed to going out and buying more. I have had the terracotta pumpkin below for years. It’s so much easier to get a Jack-o-Lantern this way than the mess of carving a real one!!!
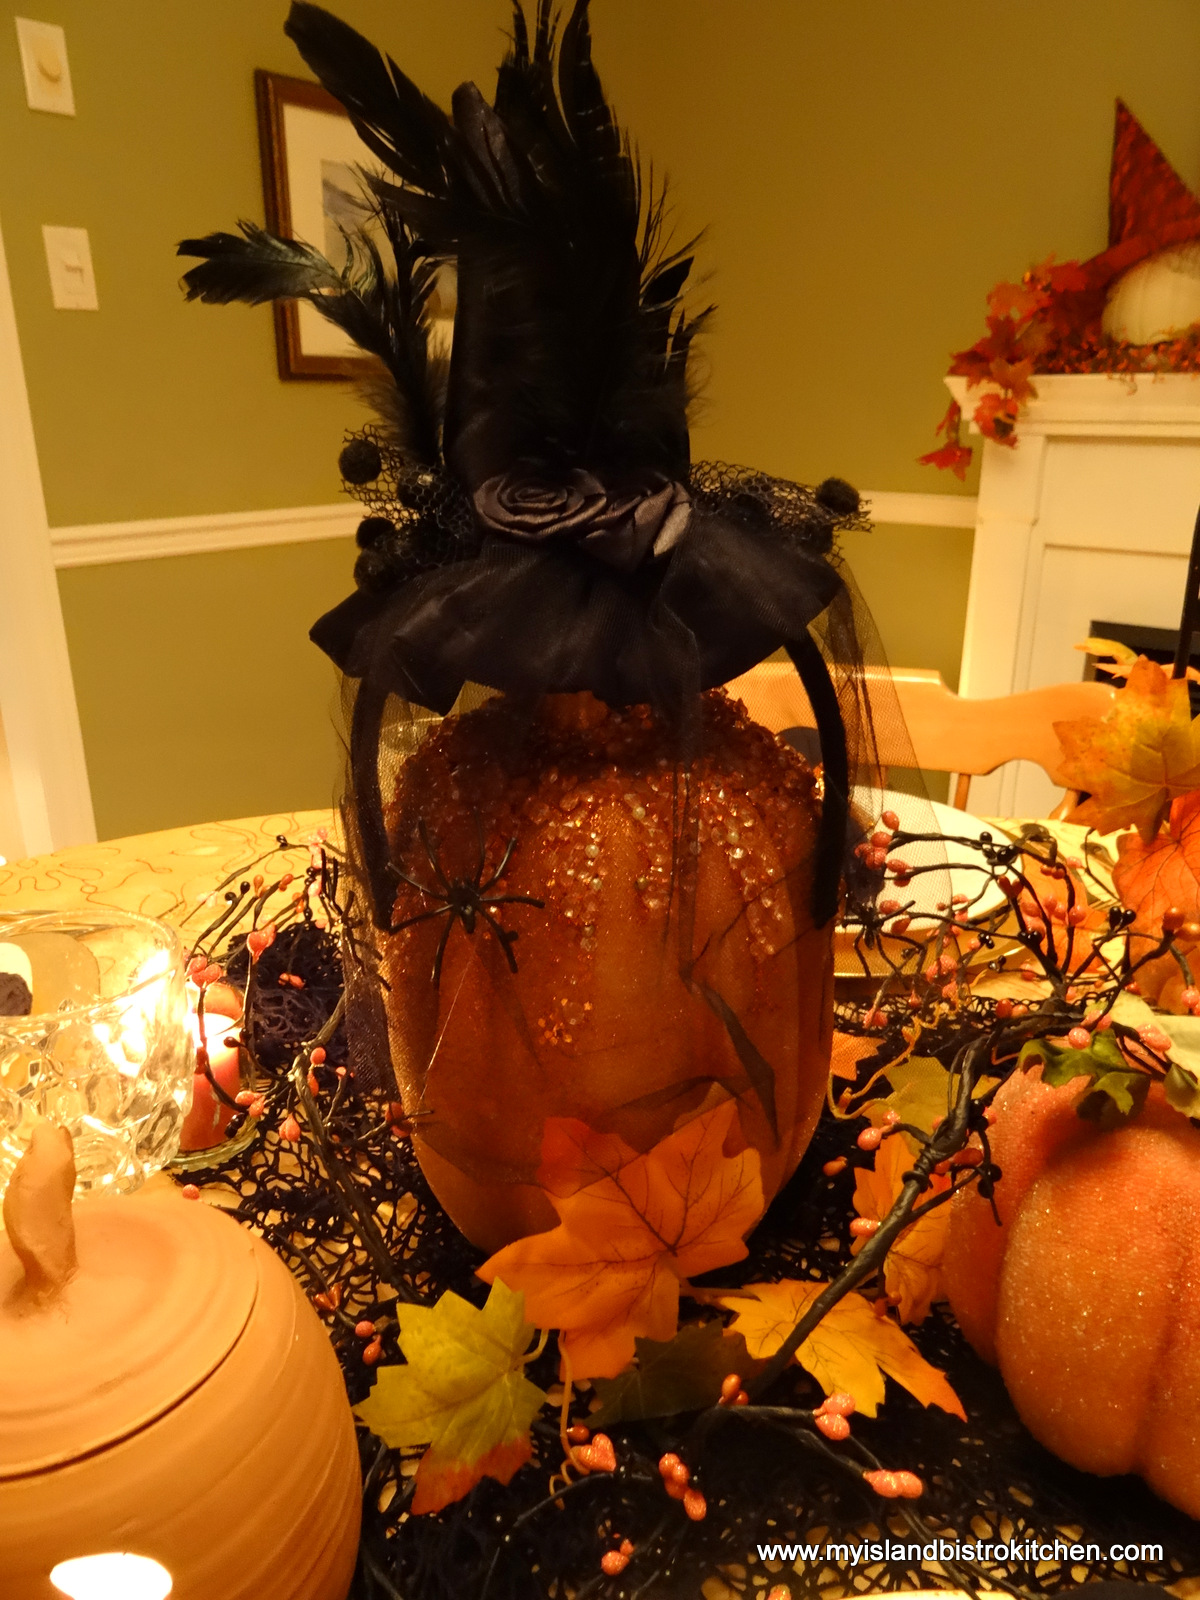
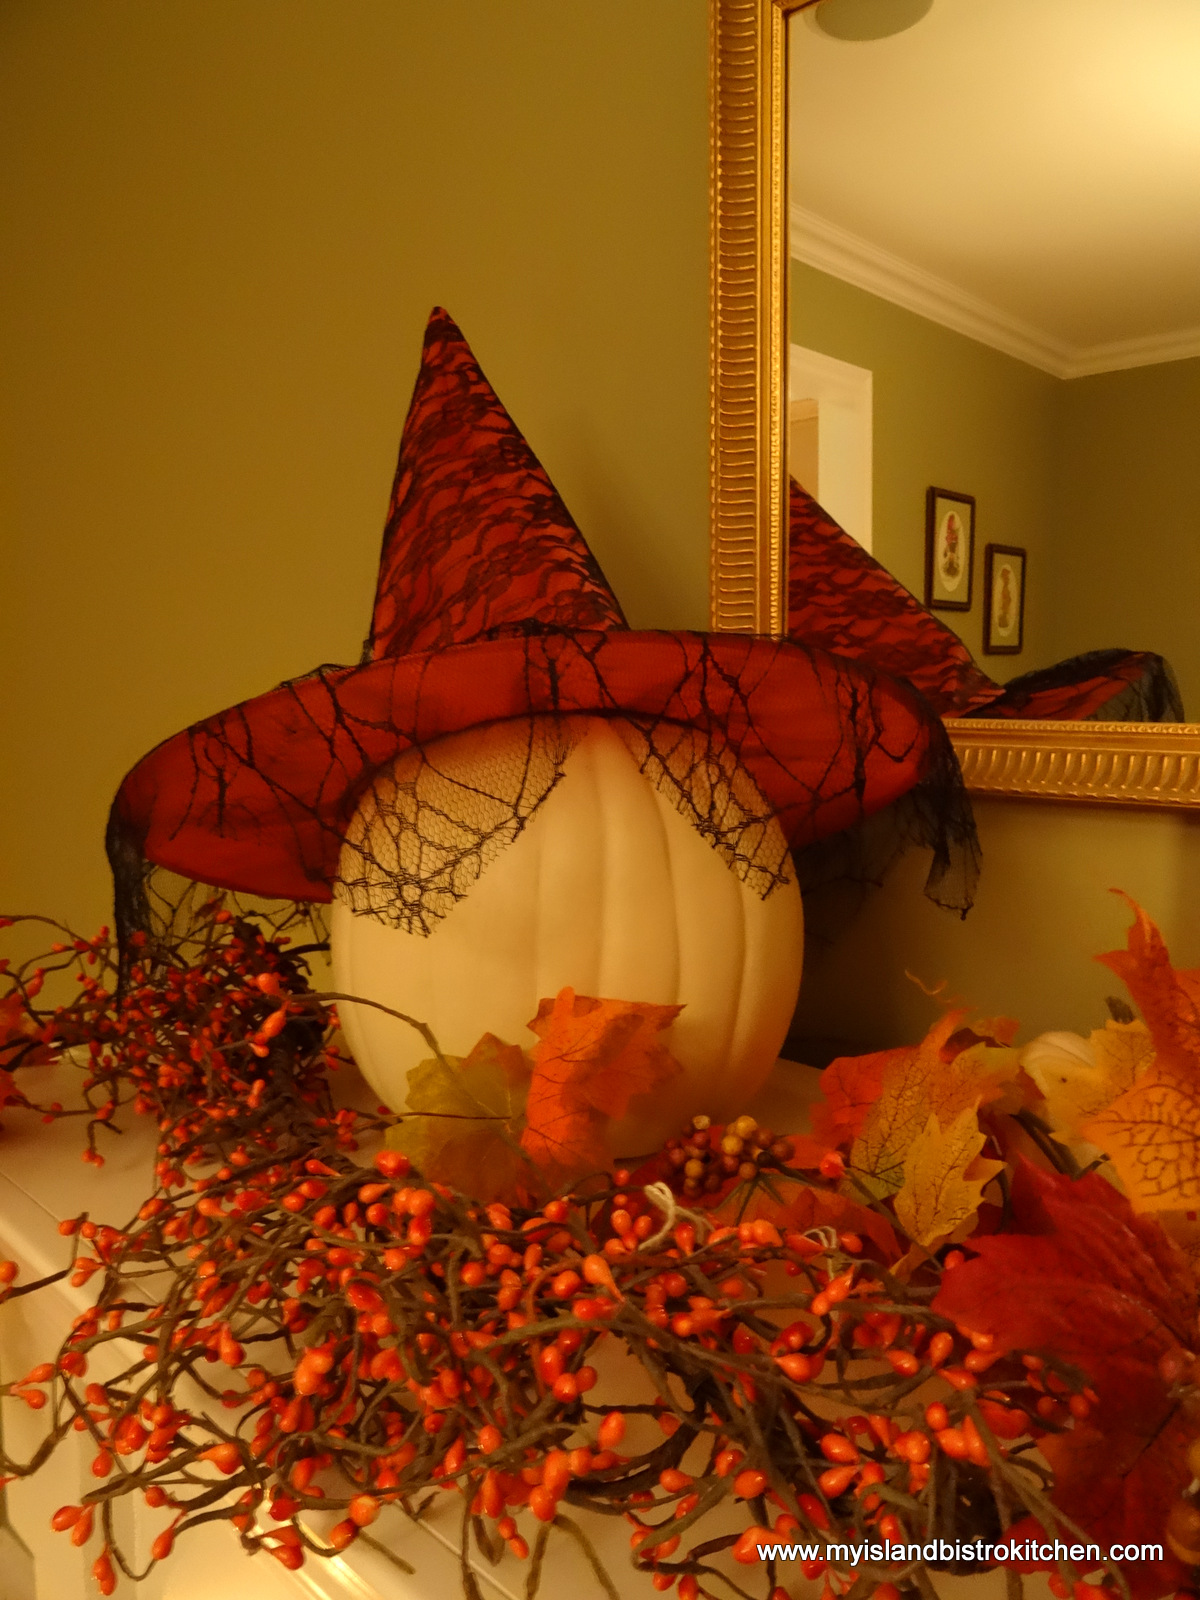
A glitzy pumpkin gets gussied up with a witch’s hat from the local dollar store. The headband/hat was a previous costume accessory.
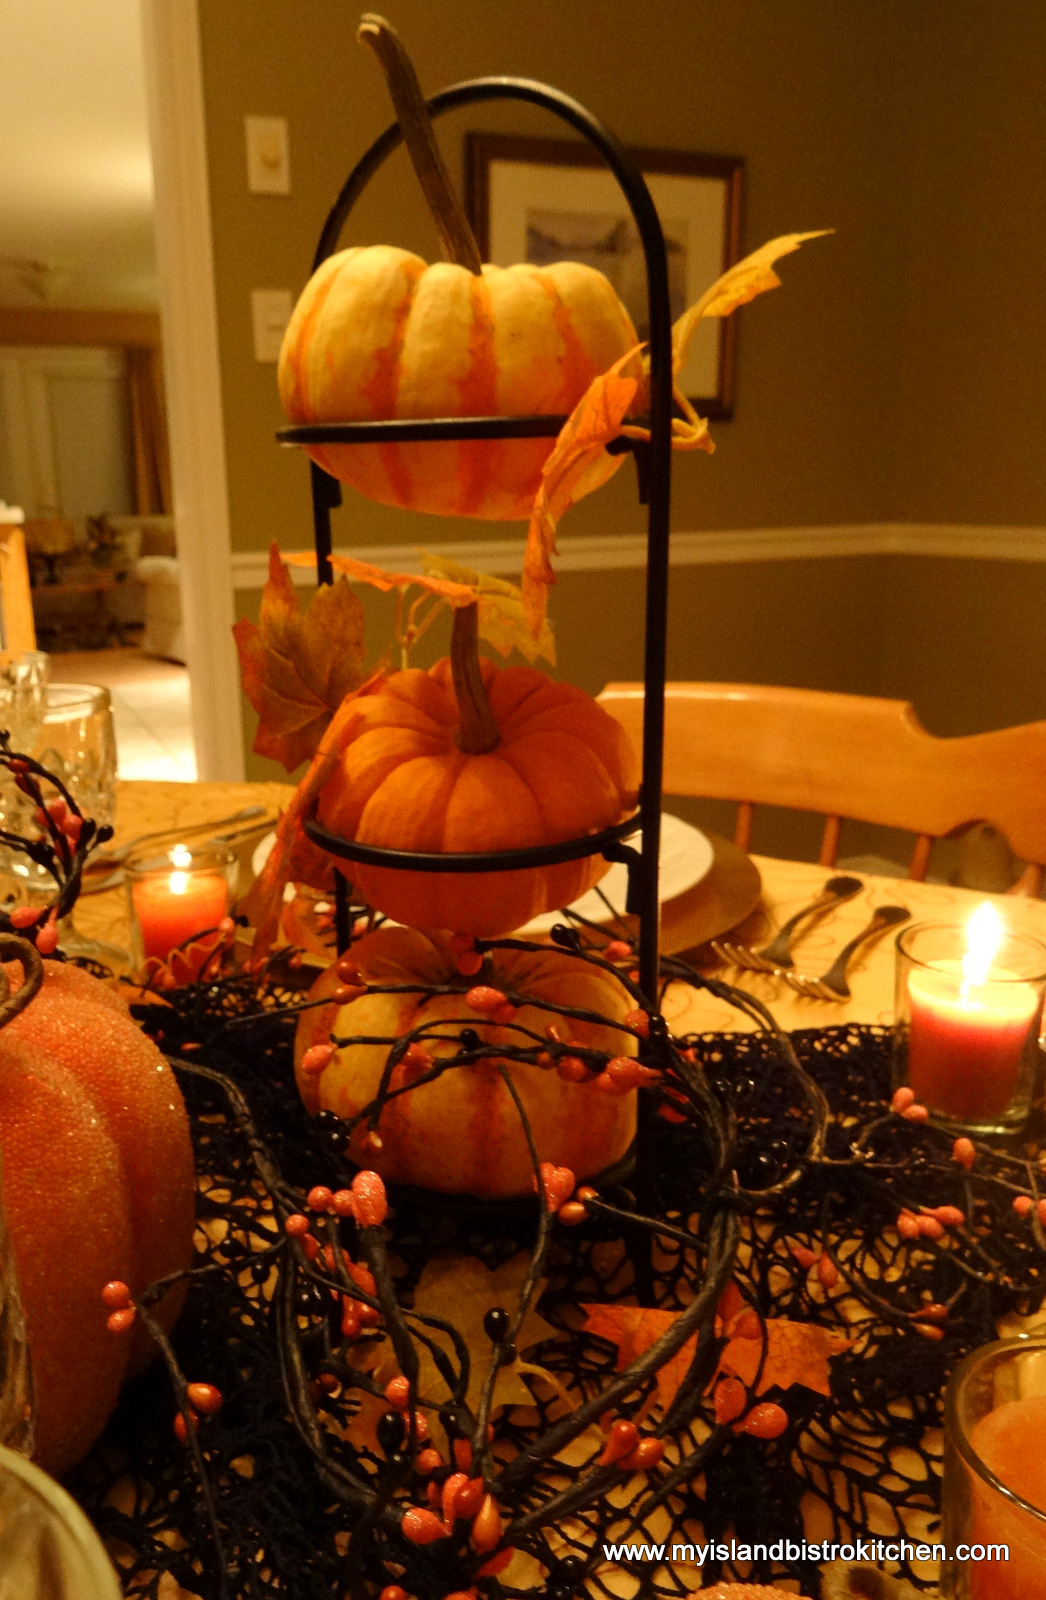
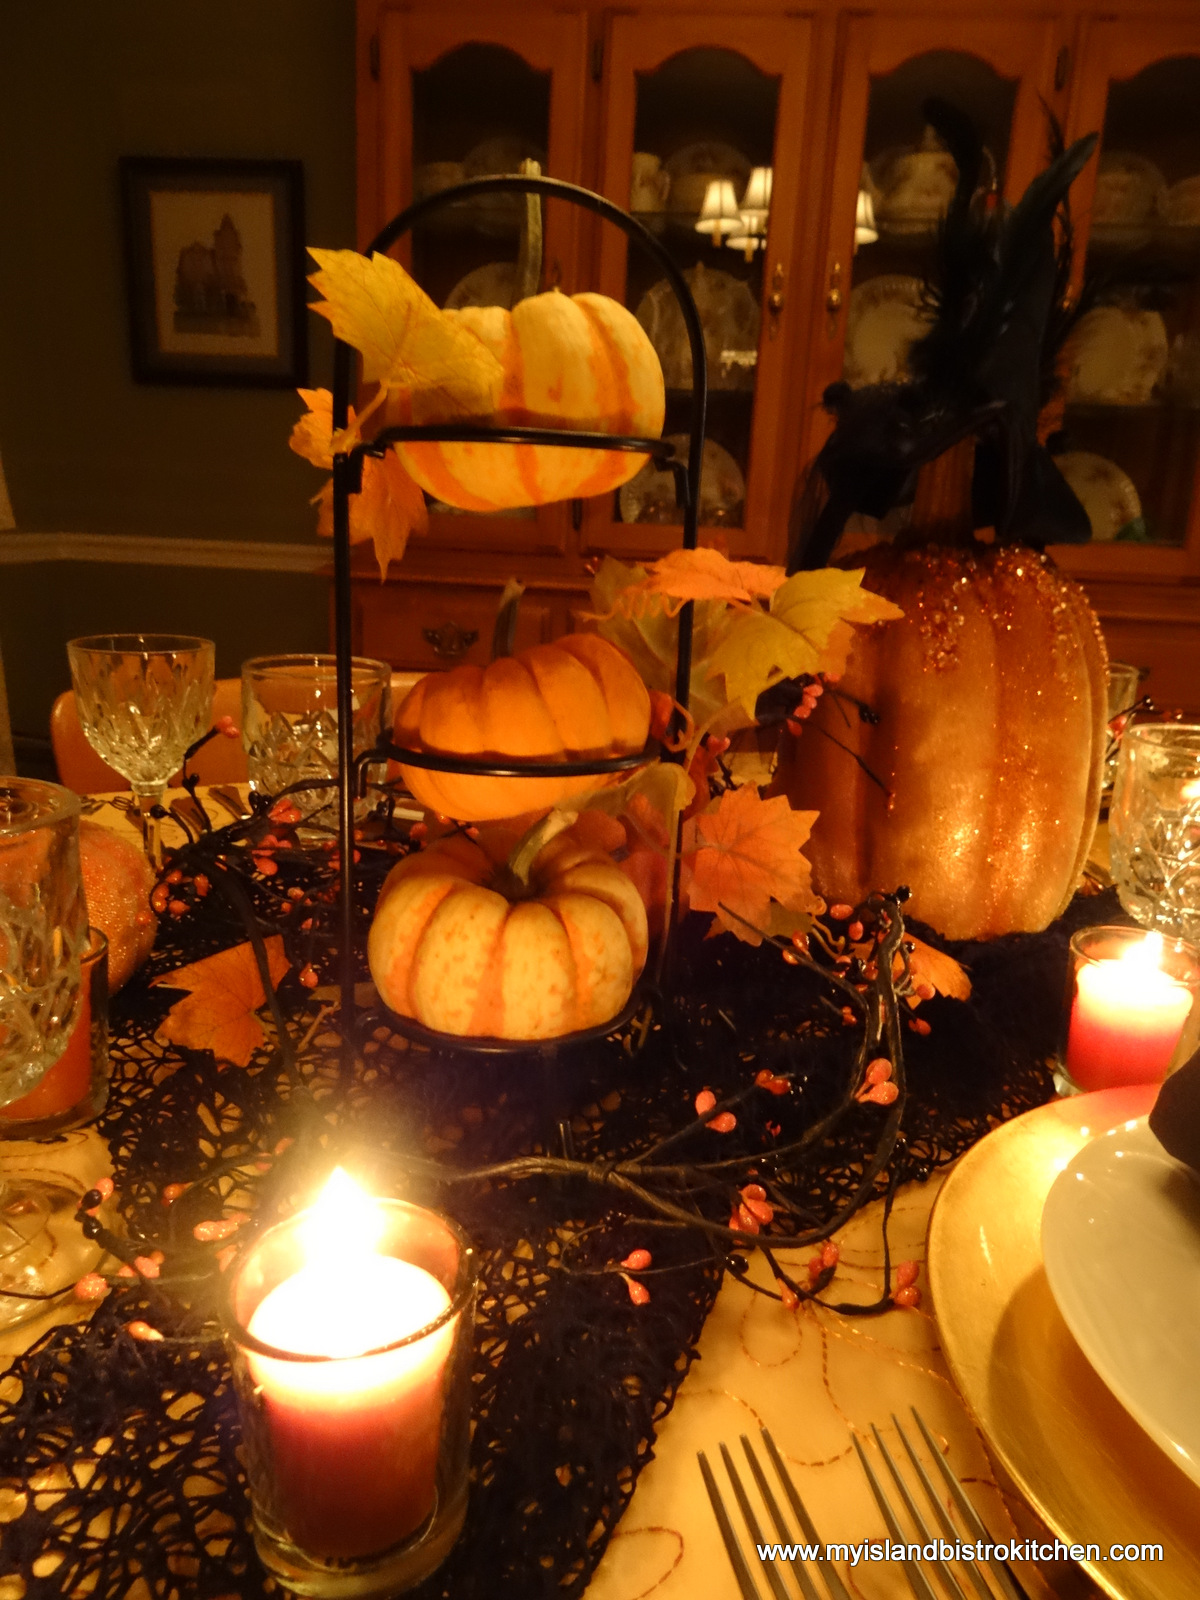
I found the little 3-tier server below at a local thrift store and it forms a nice tower for three mini pumpkins. It will also serve other purposes throughout the year.
When I am creating a tablescape like this, I try to vary the heights of the components as it adds interest and appeal to the eye.
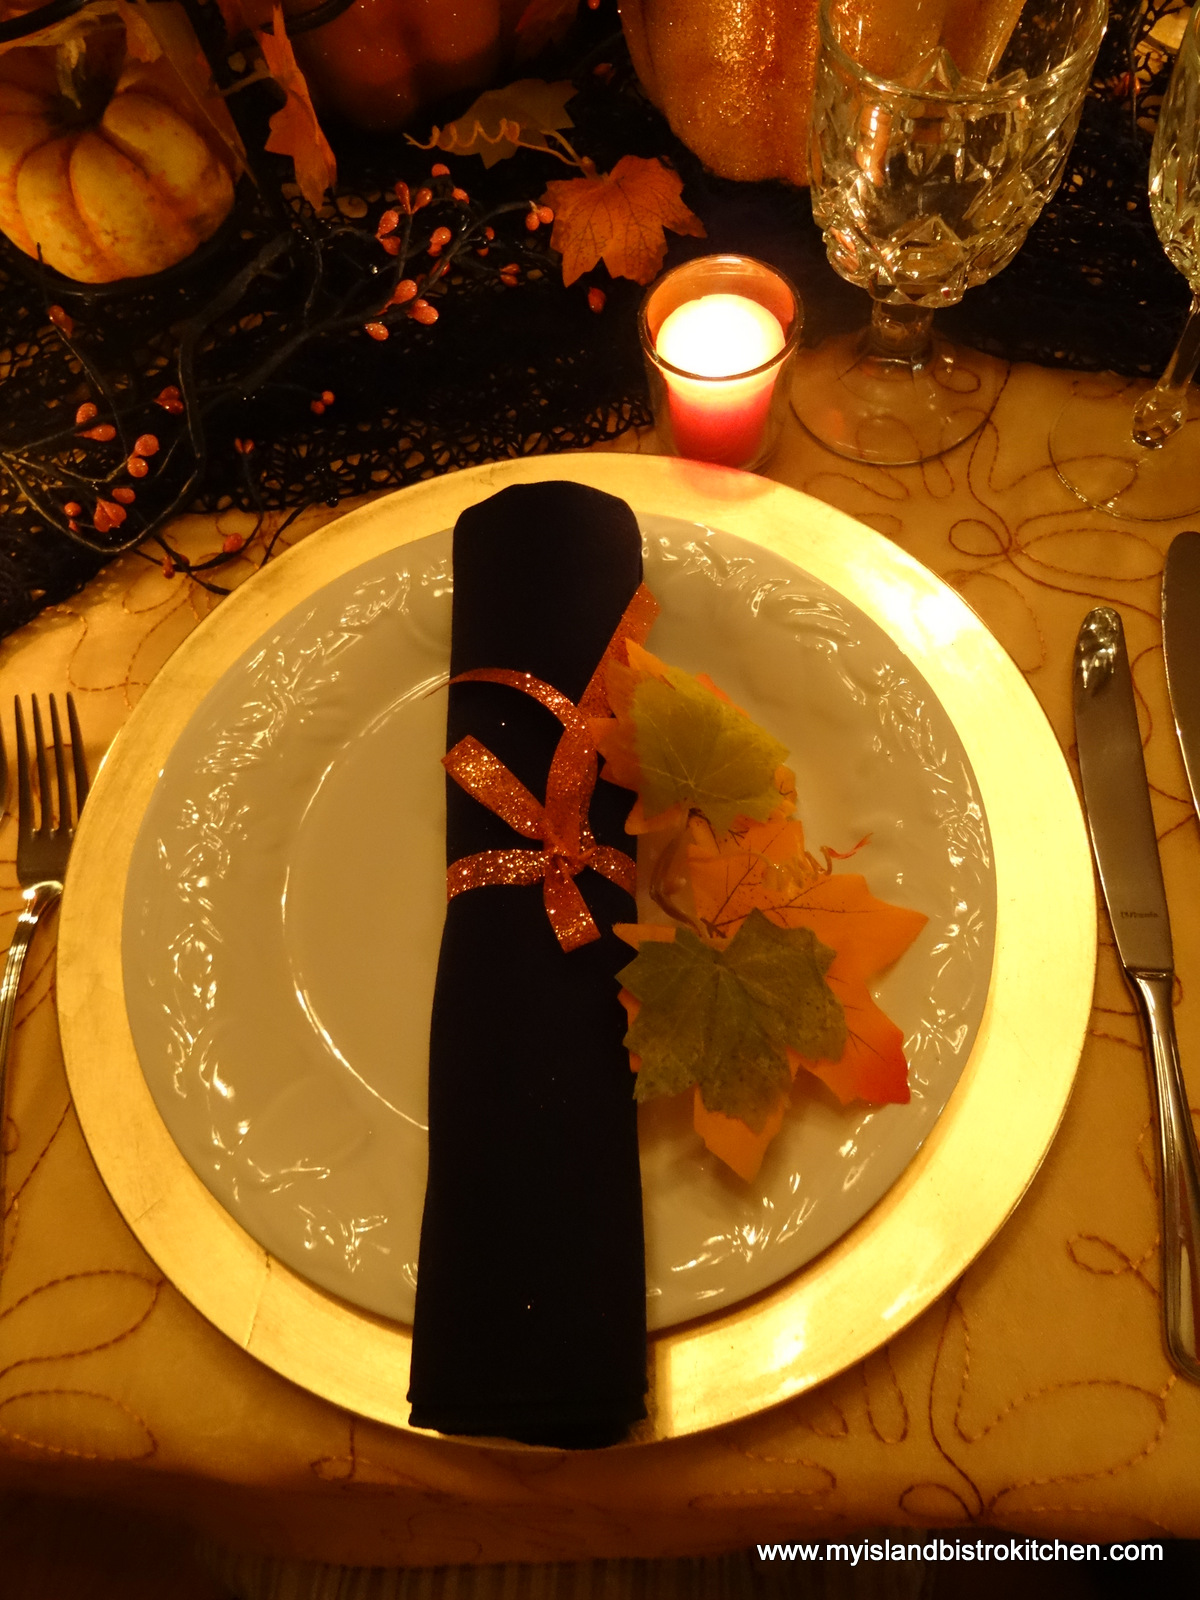
The color theme for the tablescape is orange, gold, ivory, and black. A piece of sheer orange curtain fabric over an ivory tablecloth makes an economical table covering without overtly screaming Halloween or competing with the focal point of the tablescape. A piece of black net fabric forms the base for the centerpiece display. The gold charger plates frame the white tableware, a good backdrop for the black napkins which are simply rolled and tied with glittery orange ribbon and accessorized with some colorful leaves.
Little orange votives tucked in through the tablescape add some extra drama to the scene. A number of years ago, I was able to get some good quality garlands of orange and black berries so they have been casually threaded in through the components of the centerpiece. The garlands are wired, making them easy to mold into areas needing some filler.
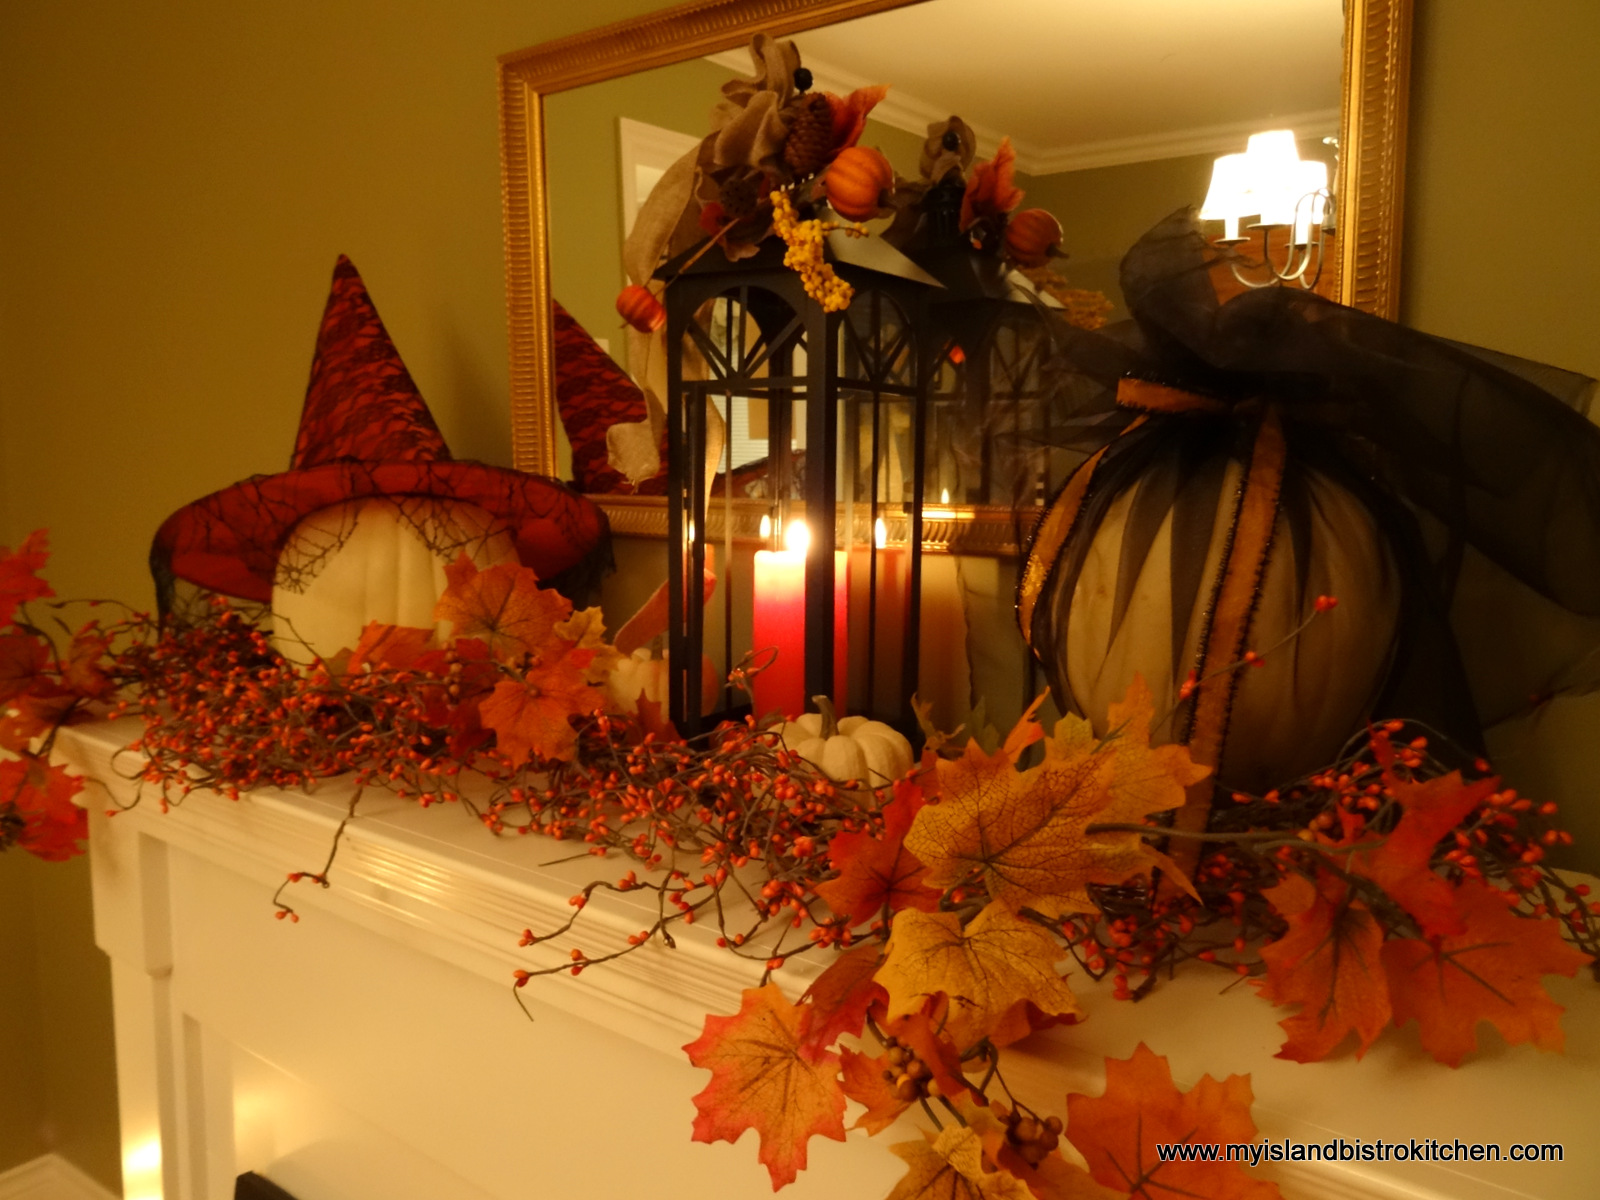
My fireplace mantle is decorated to compliment the table.
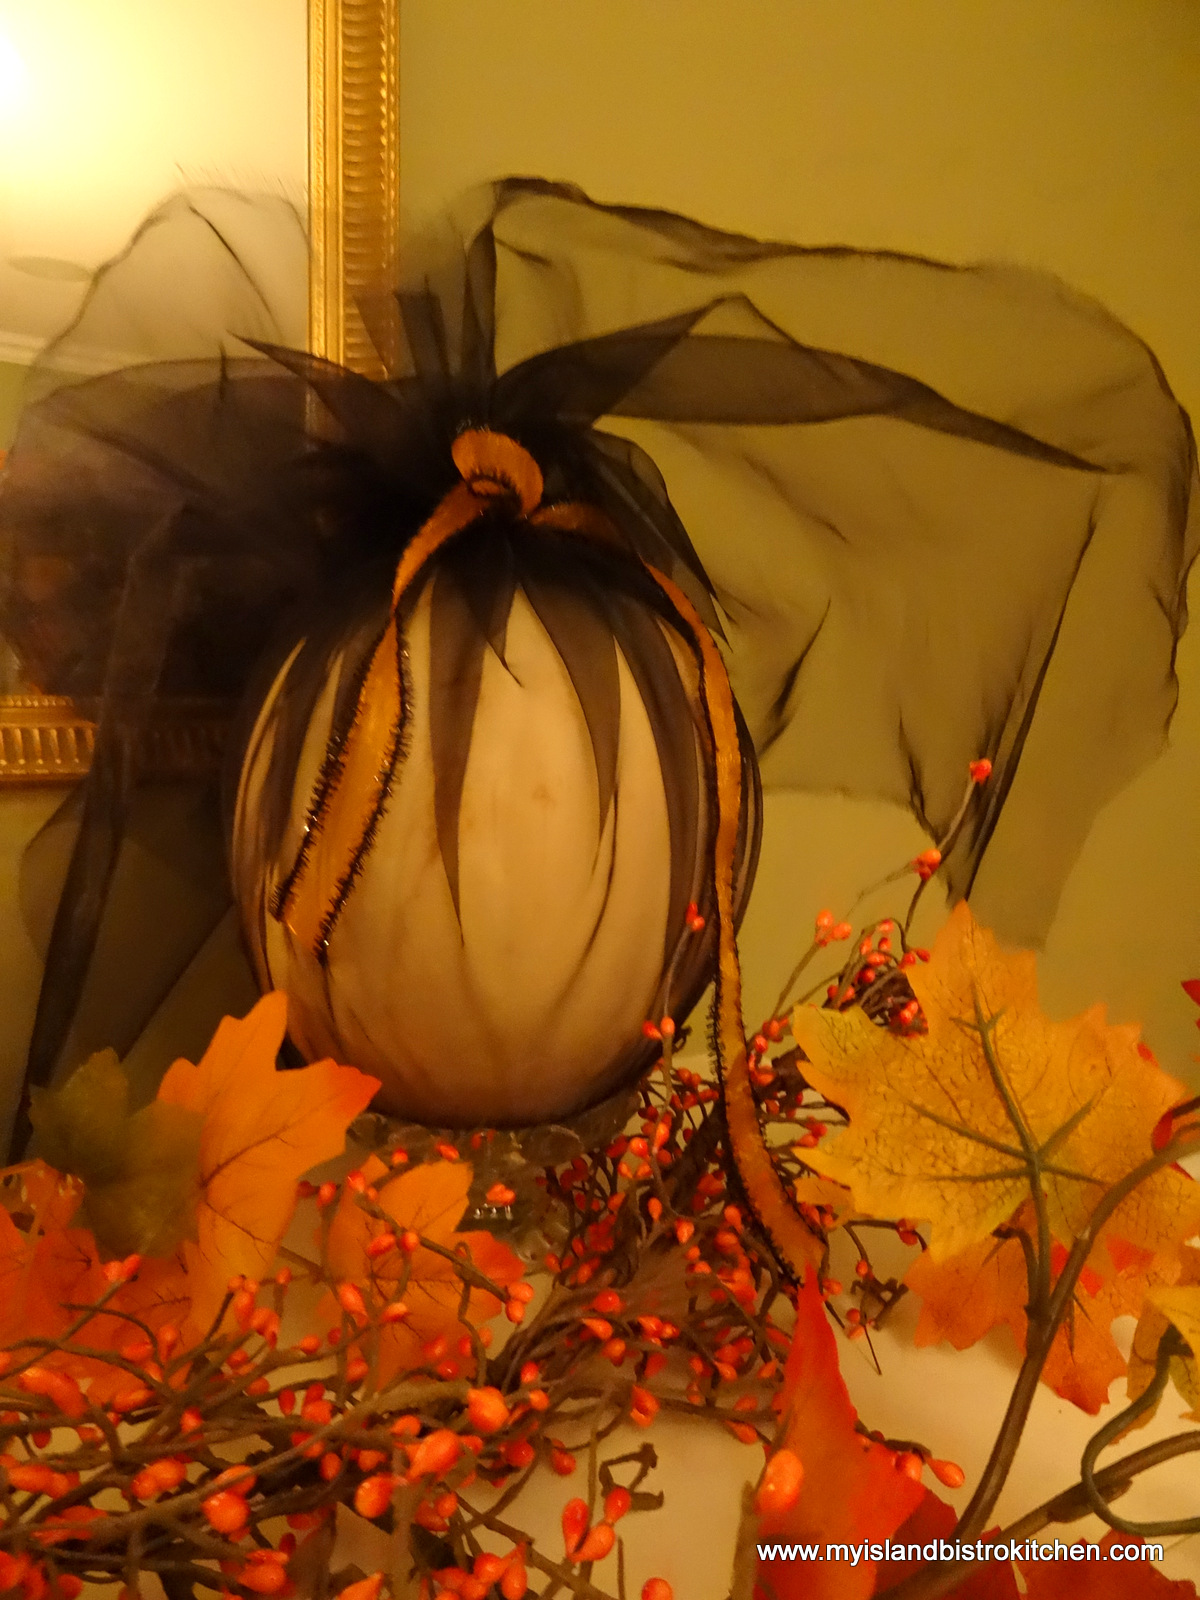
Framed behind garlands of orange berries and colored leaves, a white pumpkin dons a fancy witch’s hat.
The white pumpkin below is simply wrapped and tied in black organza, giving it a dramatic look by the simple folds in the fabric.
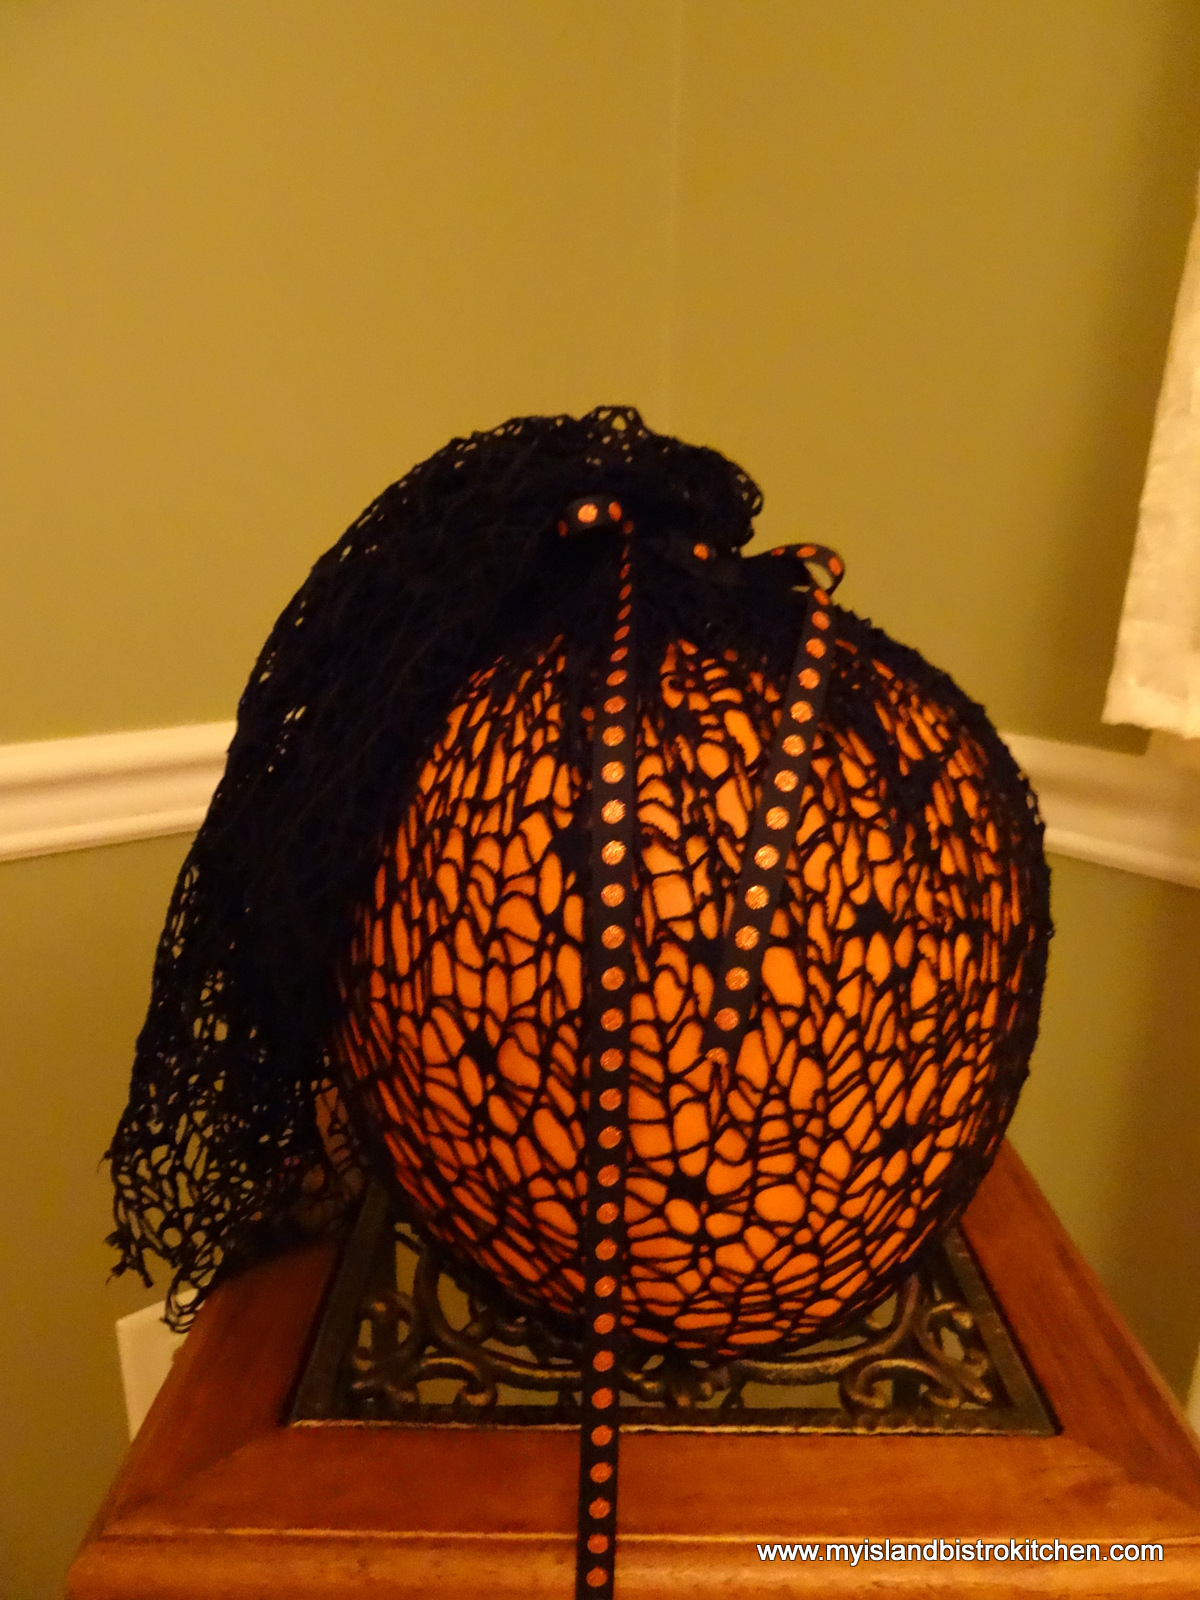
And, the orange pumpkin below is dressed in black spider web lace!
And, here is what the tablescape looked like in daylight…
Not nearly so dramatic but still colorful, nonetheless.
I hope you have enjoyed a glimpse into my Halloween festivities.
Thank you for visiting “the Bistro” today. There are lots of ways to connect with “the Bistro” through social media: