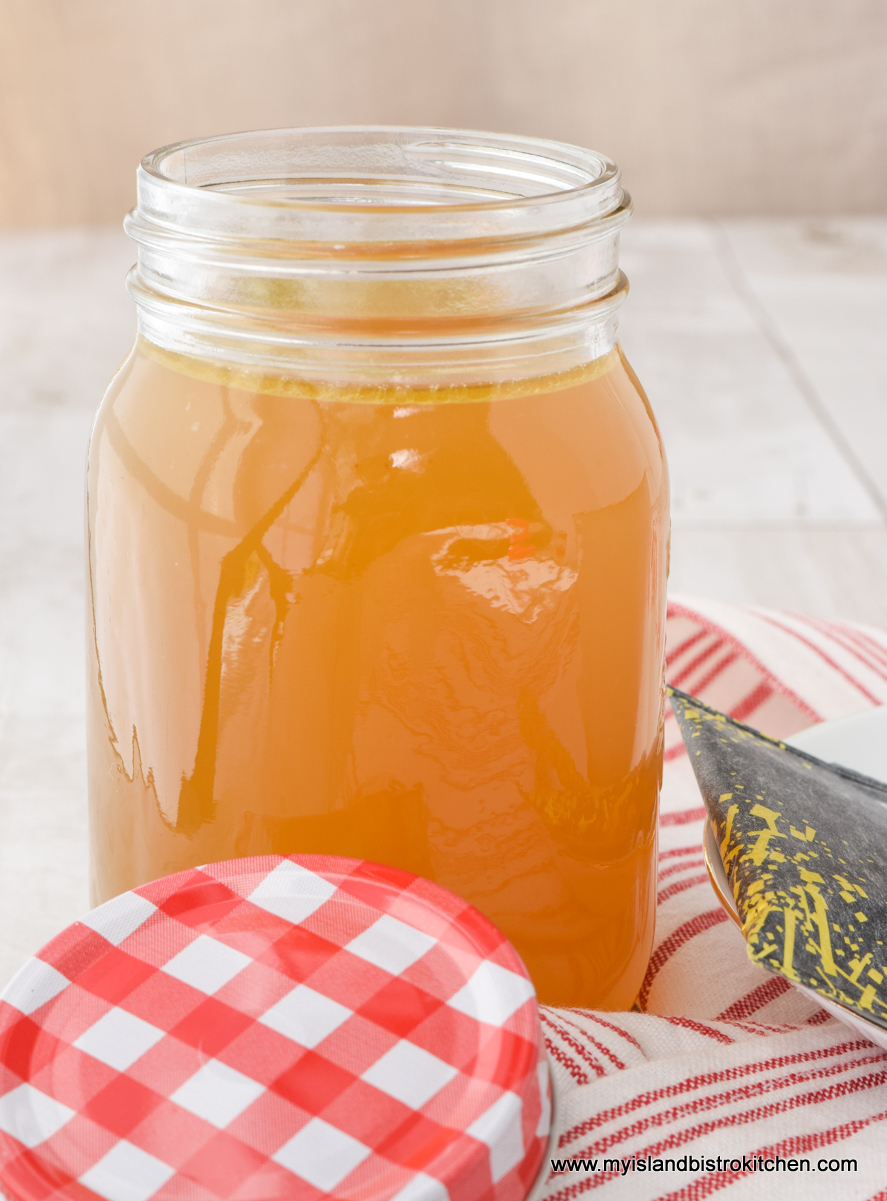
I am always dismayed (and disheartened) at how many people toss a turkey carcass after the turkey dinner. To me, that is such a waste as there is a lot of goodness in that turkey carcass and it makes great homemade turkey stock that can be used in many recipes. Continue reading Homemade Turkey Stock Recipe→
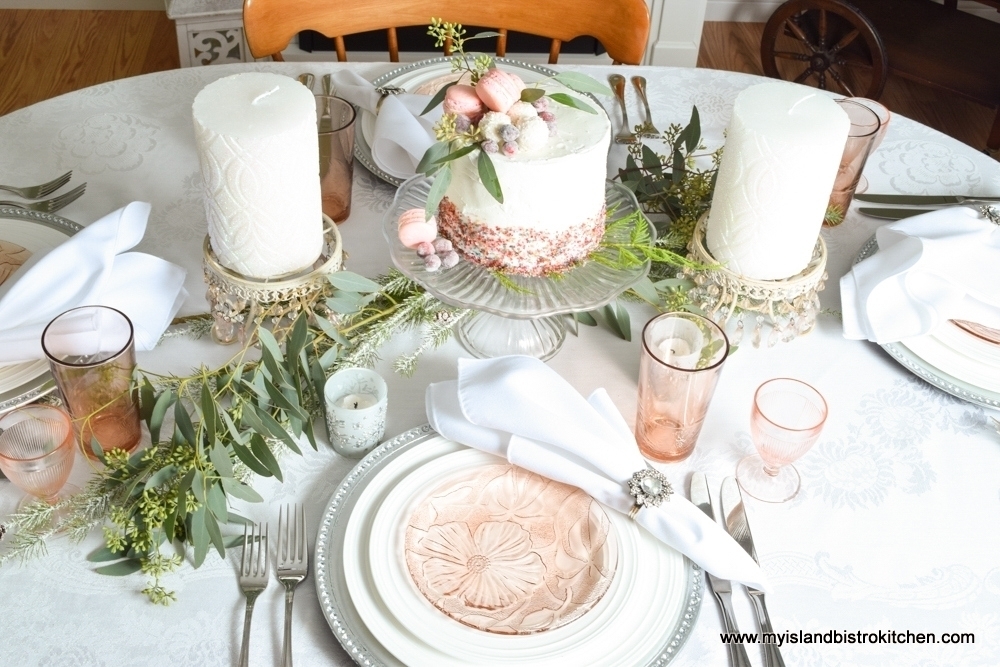
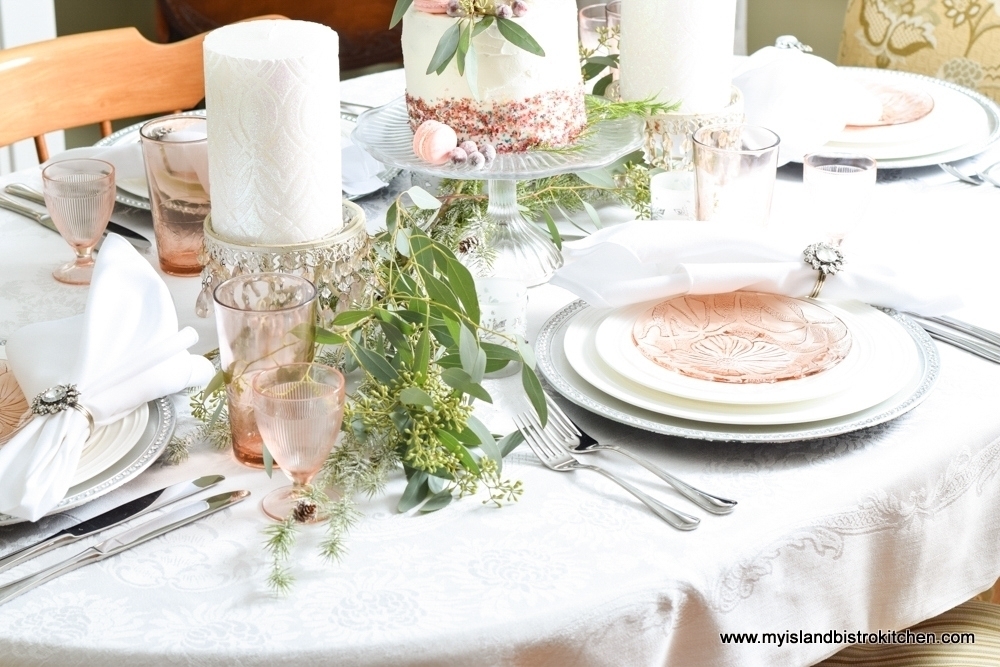
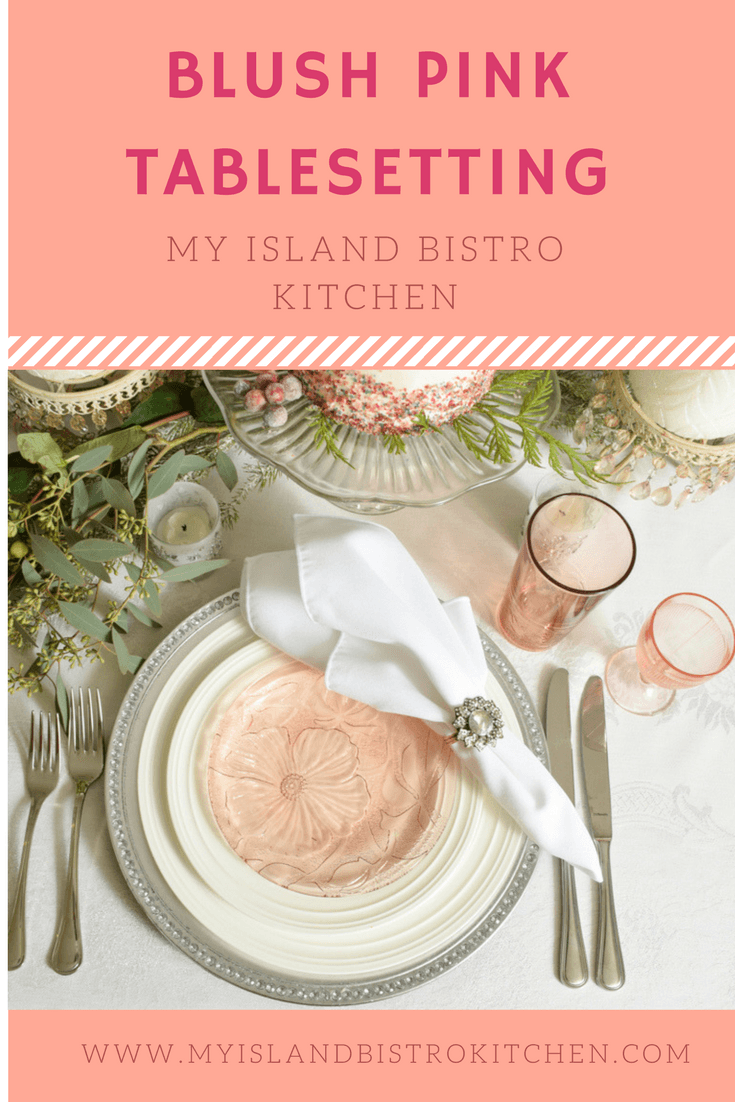
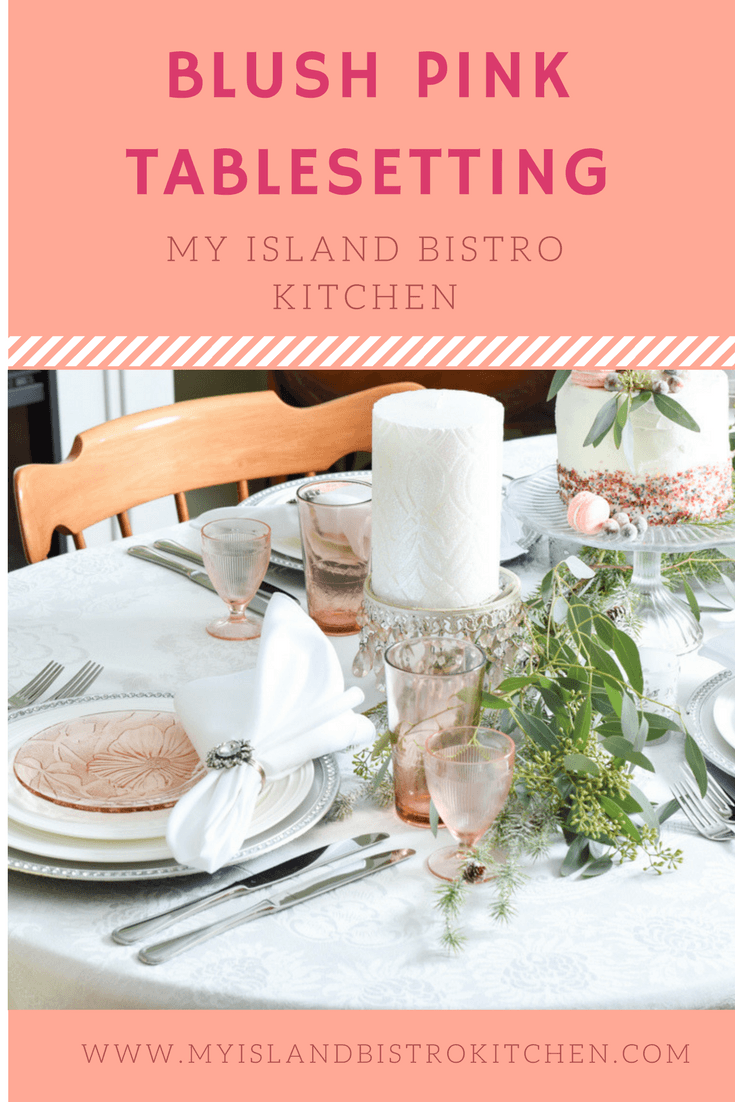
This holiday tablesetting focuses on the blush pink color. It’s a fresh look and a departure from the usual red-green-gold we often associate with the holiday period. There is nothing wrong with those colors but, sometimes, change is good.
Blush Pink Holiday Tablesetting
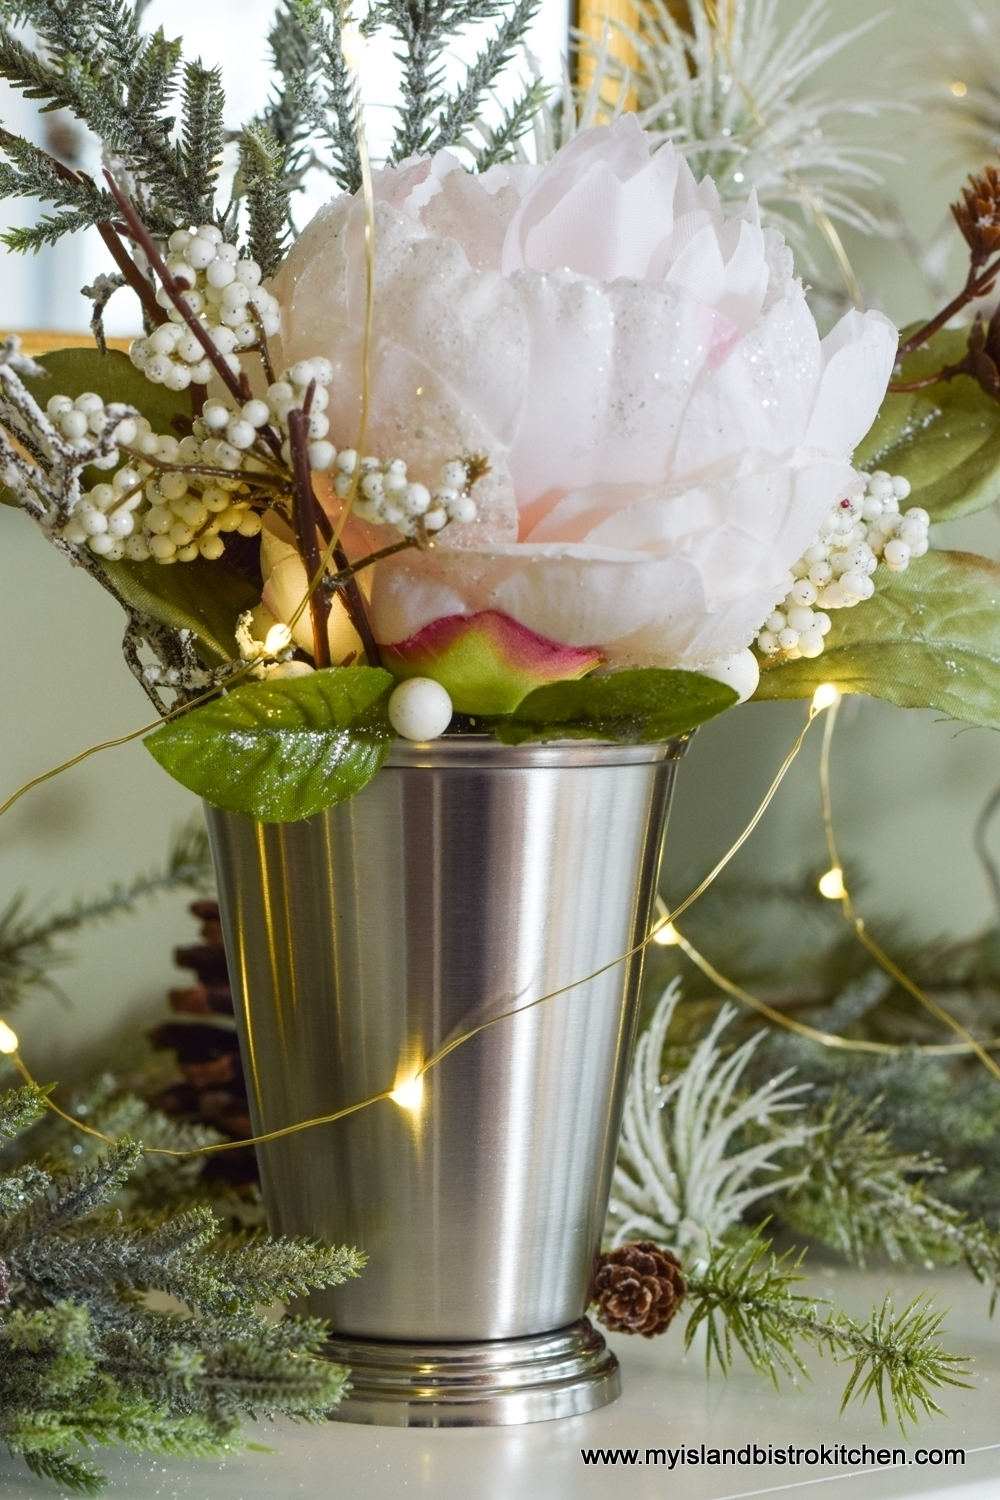
The inspiration for this tablesetting actually came from my dining room mantle design. I had these mint julep cups and thought they would look lovely with individual arrangements in them.
Blush Pink Dining Room Mantle
This year, I wanted my dining room décor to be in a fashion that didn’t scream Christmas but yet still had an understated Christmas look and feel to it. I found these lovely pale blush pink cabbage roses at Michael’s and, well, you see the result! They have the faintest dusting of glitter to give them a bit of a festive look and, voilà, blush pink became my color theme!
Blush Pink Arrangement
The addition of fairy lights makes the mantle come alive in evening and the lights, with such a fine wire string, give the illusion that they are suspended in mid air. When I am designing my dining room mantle for the holidays, I keep in mind what the design will look like in daylight and in the evening. It’s important that the design be constructed such that it works in different lighting situations.
I have never grown tired of the pale sage green wall color in my dining room – almost any accent colors, like blush and pink gold, look stunning in the room.
Fancy tablesettings do not need to cost a fortune! When I am designing tablesettings, I don’t rush out to buy all the elements. I first go through my “storehouse” to see what I have that will work. The tablesetting I am sharing today is composed mostly of items I already had. This makes a tablesetting interesting and less of a “cookie-cutter matchy-matchy” look. It’s more curated in that carefully selected items, coming from different designs and textures, are used.
Centerpiece
You’ve heard me say it in postings before – I like to work with a blank white canvas. It’s clean, simple, always elegant, always en vogue. I am using an antique white Irish linen tablecloth for my setting today.
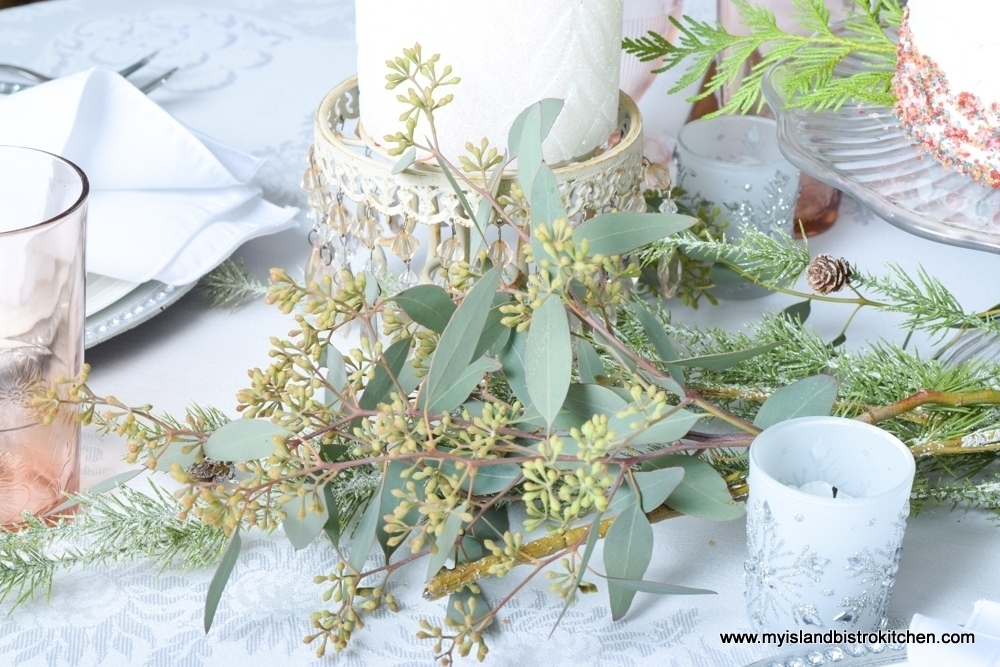
Let’s start with the base. I was able to find good quality artificial greenery this year – greens that actually look real! I used two of these stems at an angle along the length of my oval dining table.
Blush Pink Tablesetting
While I wanted to keep the table simple, I did add some fresh seasonal foliage, like seeded eucalyptus, to give some depth and texture. I often combine real and faux greenery to get the look I would not likely otherwise get if I used only real or all faux greens. Using some fresh natural foliage brings an element of the outdoors to the setting.
Seeded Eucalyptus
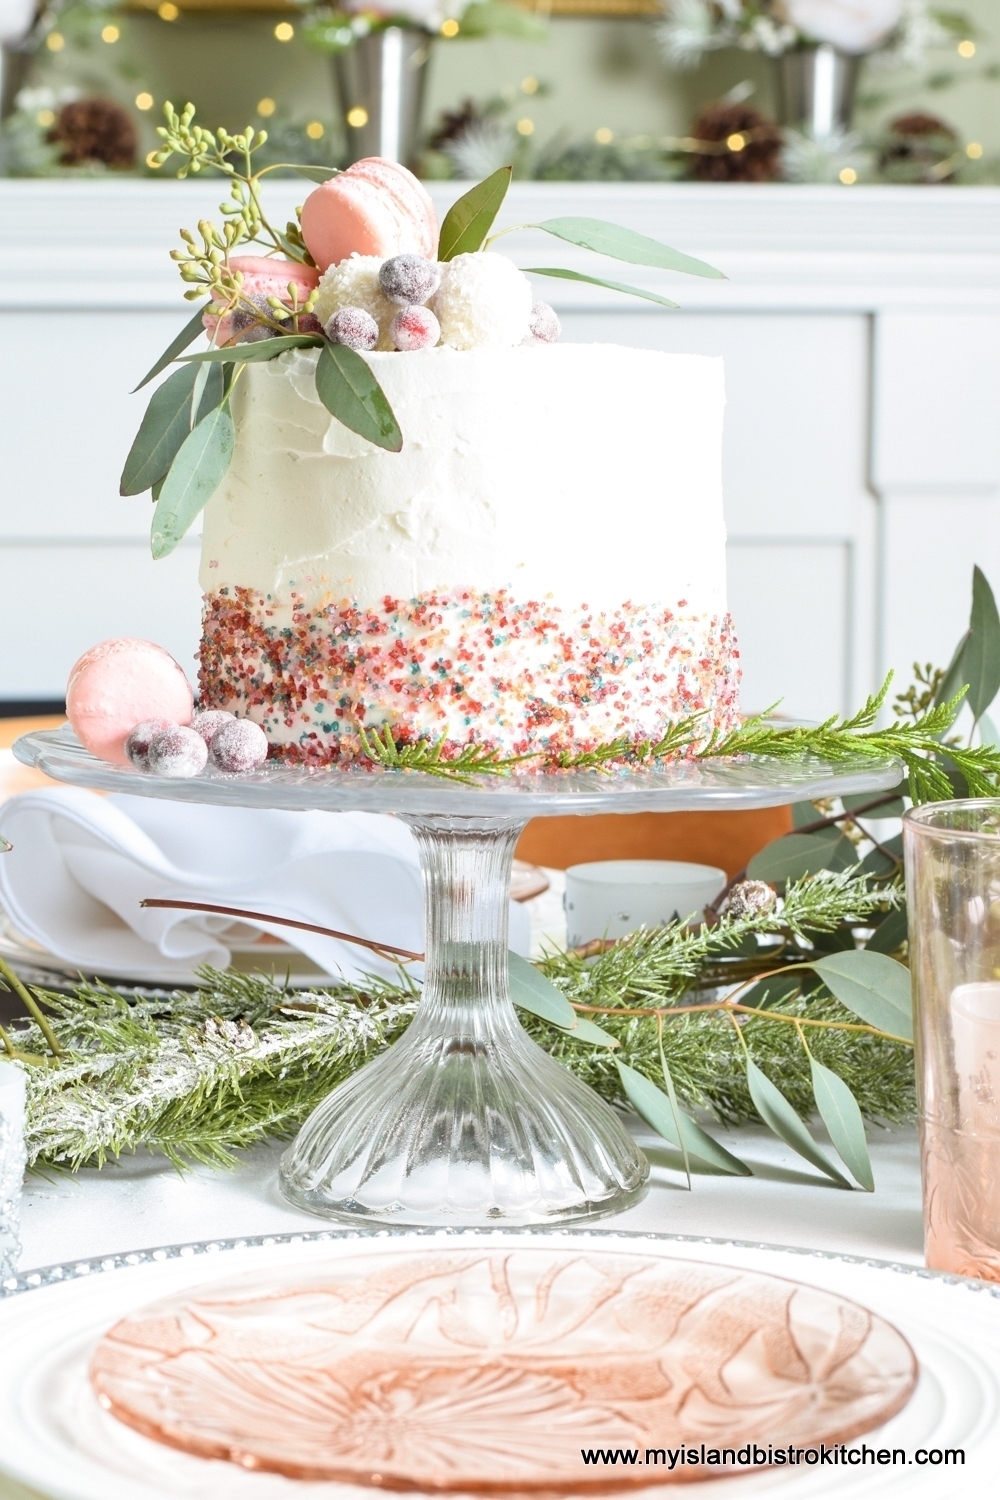
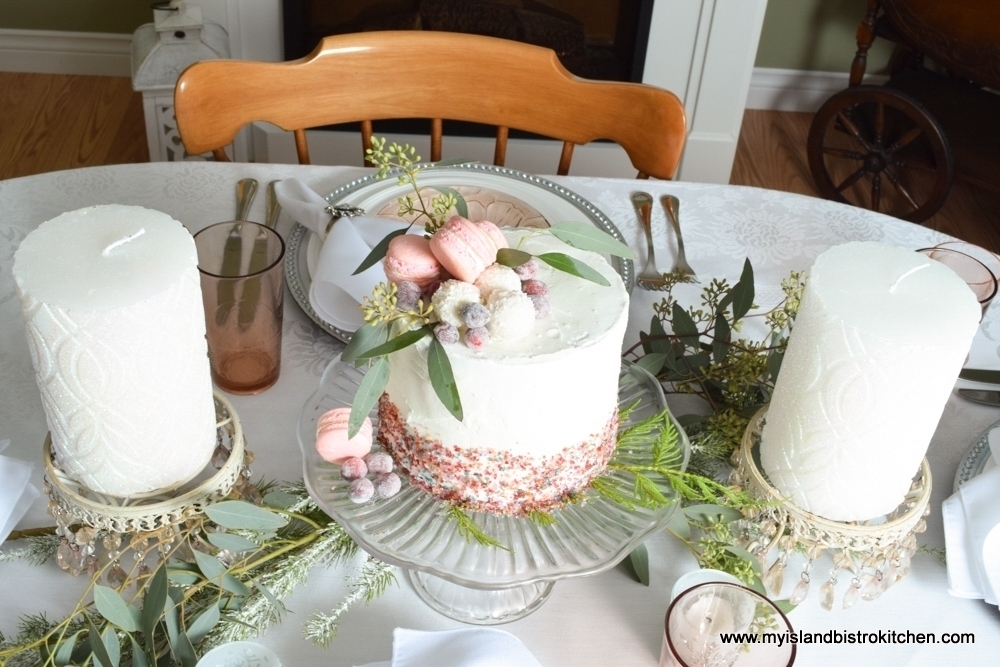
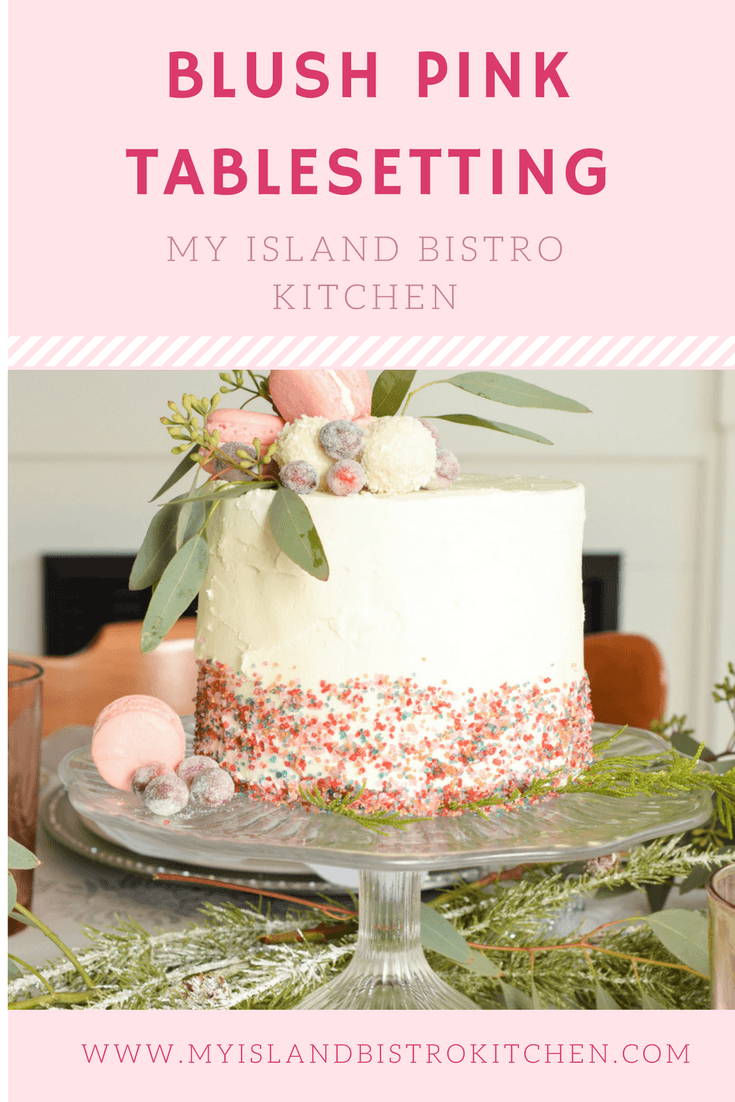
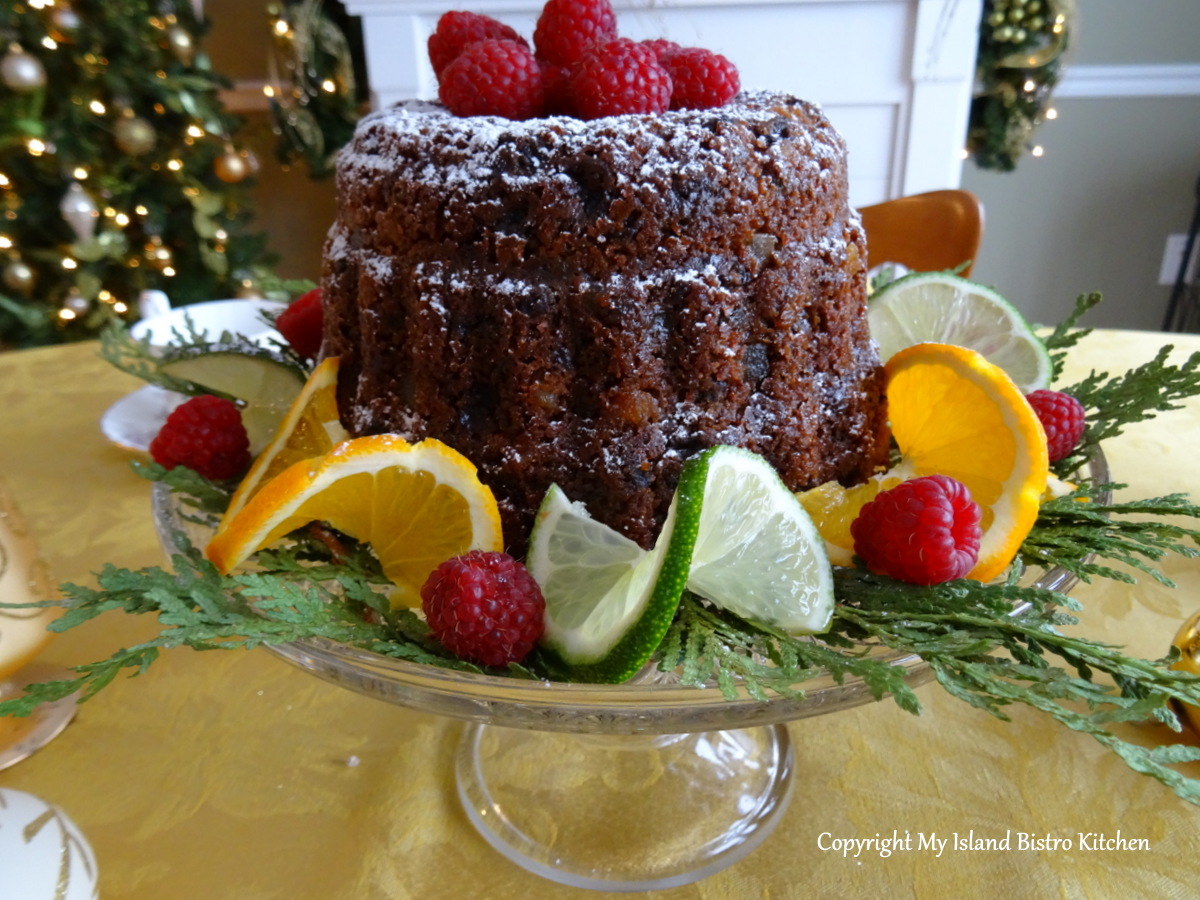
There is nothing to say the centerpiece can’t be edible! Why not make your guests salivate for dessert all through dinner! It makes a great conversation piece.
Festive Holiday Cake Centerpiece
Here, I have decorated a cake which will be dessert and I have given it center table prominence by displaying it on a glass pedestal cake plate. Using a glass plate (versus a solid color) lends an airy look to the tablescape.
The cake top is constructed from Ferrero Rocher Raffaello Coconut and Almond White Chocolate Truffles to simulate snowballs, soft pink French Macarons to tie in with the blush color theme, and sugared cranberries to add a frosty look and deep color to the cake top. A sprig of seeded eucalyptus adds the natural element. Any time colored sprinkles are added to a cake, as I have done here at the cake’s base, it means it’s a party cake!
Edible Cake Centerpiece
Two tall pillar candles flank the sides of the cake.
Holiday Tablesetting
I have had the antique-look ivory pillar candle stands for years.
Pink jeweled candlestands
The candle stands have blush pink jewels hanging from their bases so they tie in well with the color scheme.
Decorative pillar candlestands
I scattered a few little white and silver votives around the centerpiece. I like to use candles of different heights in my tablescapes because their varying heights of light lend depth to the scene and, of course, candlelight always gives softness and warmth to a tablesetting. The white pillar candles have some glitter on them which adds a bit of sparking and a festive look to the setting.
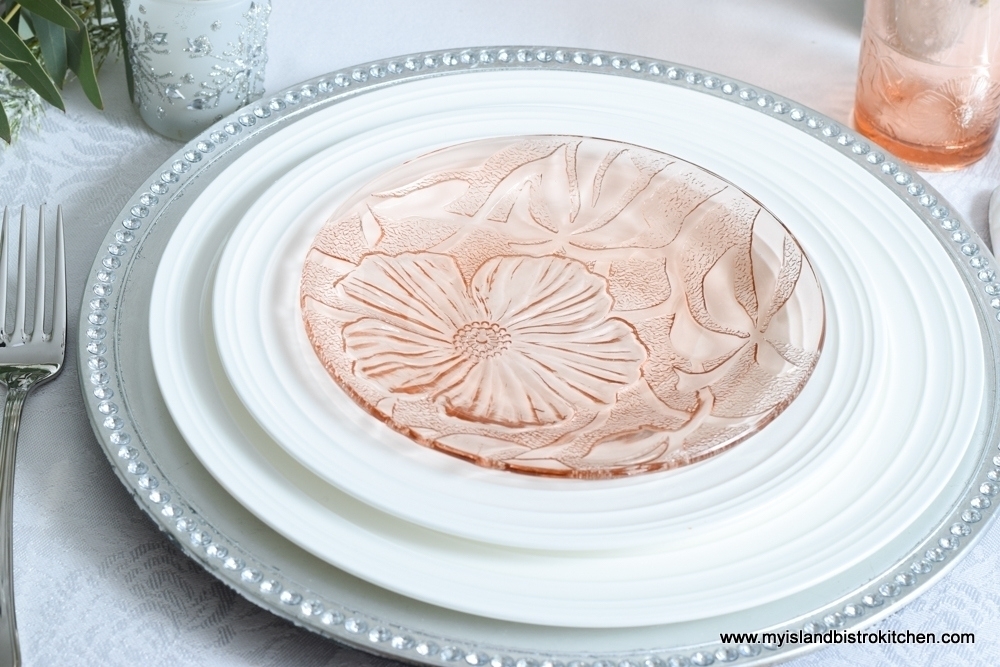
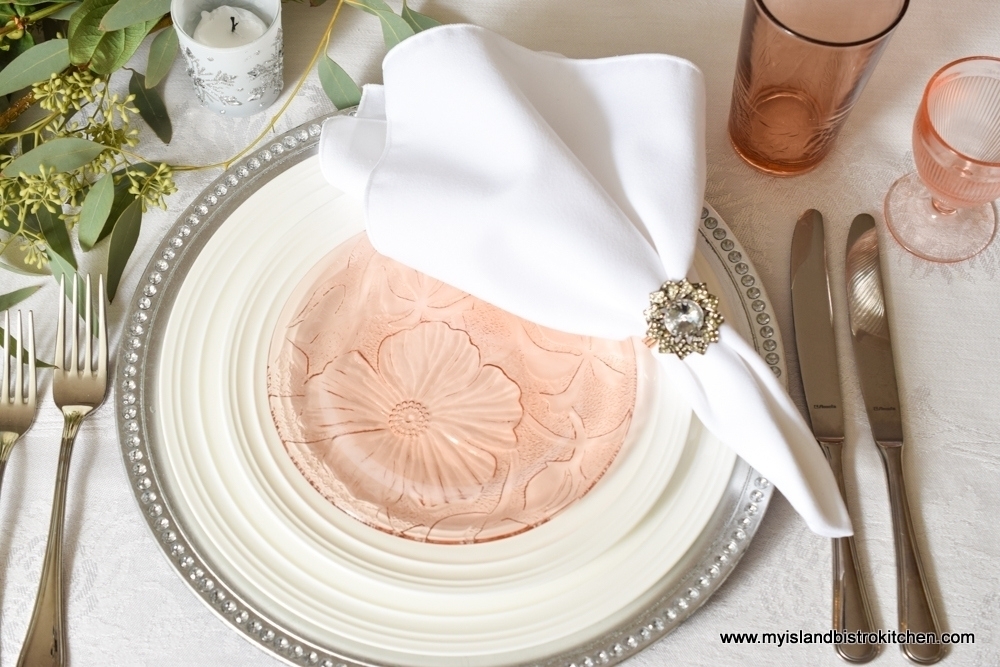
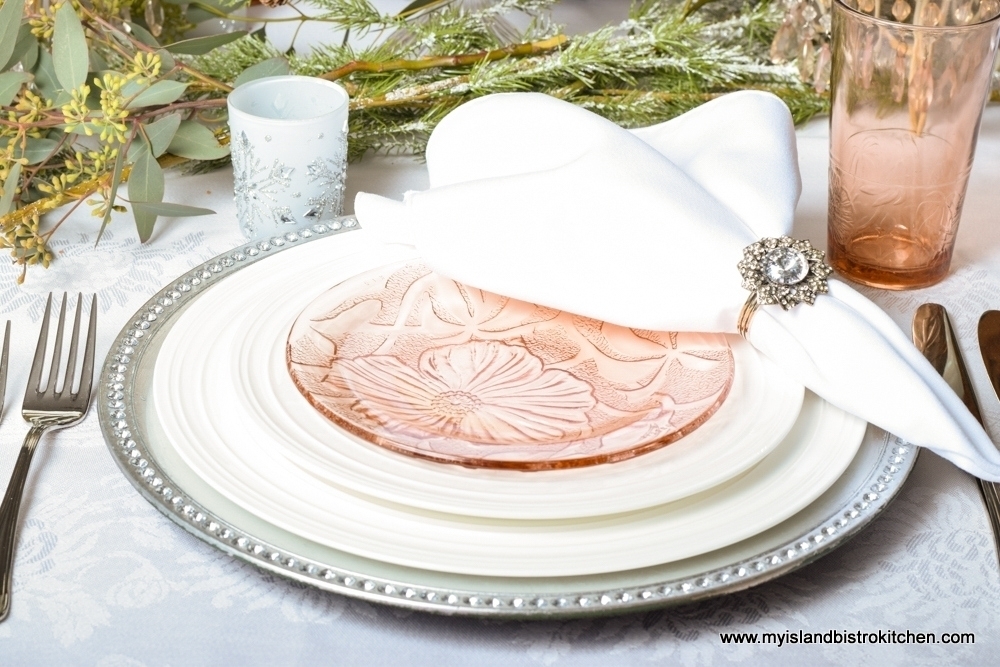
Placesettings
Blush Pink Placesetting
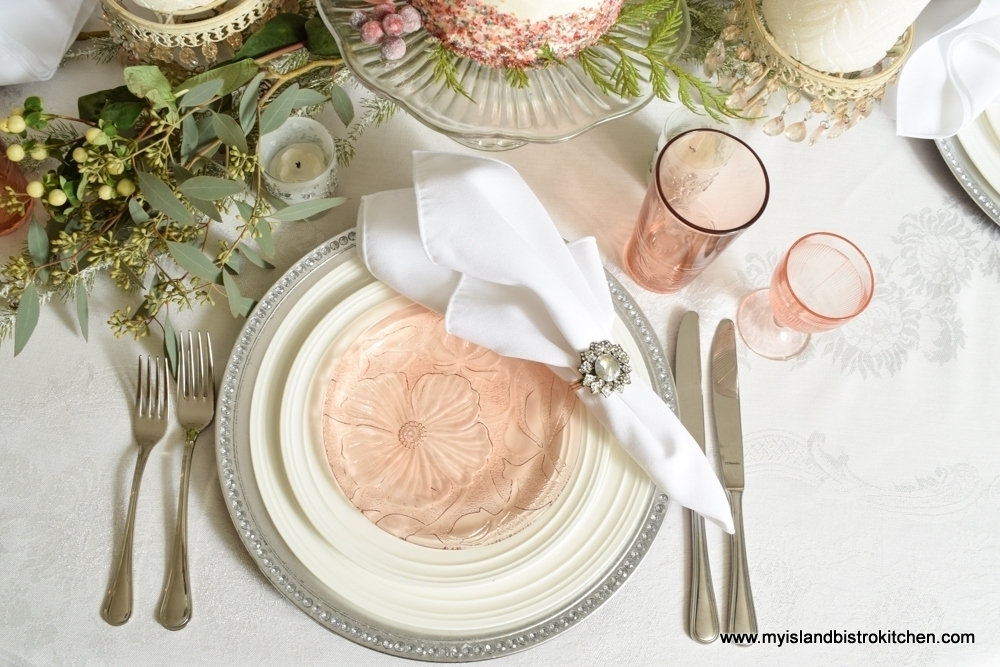
In keeping with the silver and blush theme, I am using my glitzy silver and rhinestone chargers to frame the white dinnerware. I am a huge fan of plain white dishes because food colors just pop, with no distractions, on white. To tie the blush scheme in to the placesettings, I am using pale salmon-pink colored glass salad plates. I have positioned these on slightly larger white supper/salad plates because the white underneath grounds the pale pink color and provides a background for the glass plates. These pink glass plates were bought years ago at a thrift shop.
Pink Glass Plates
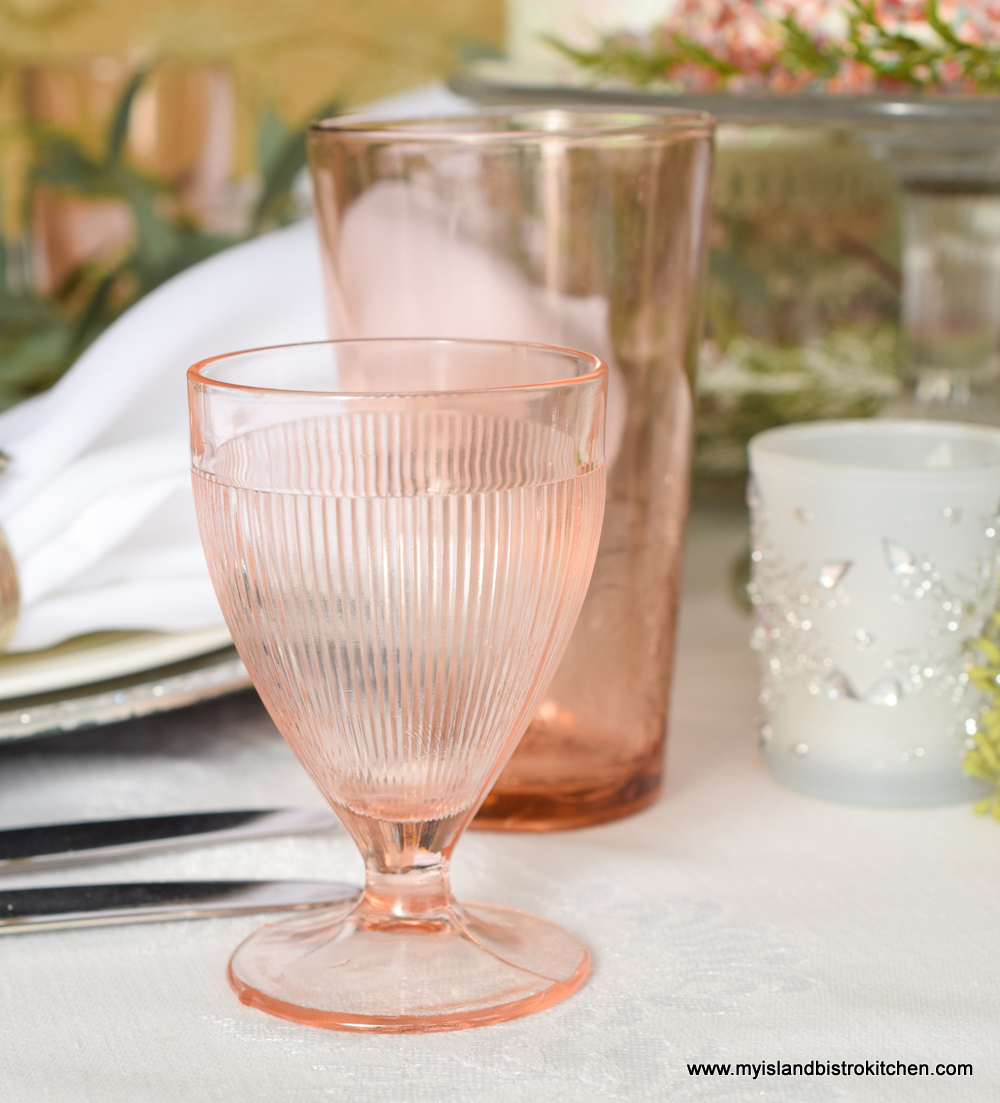
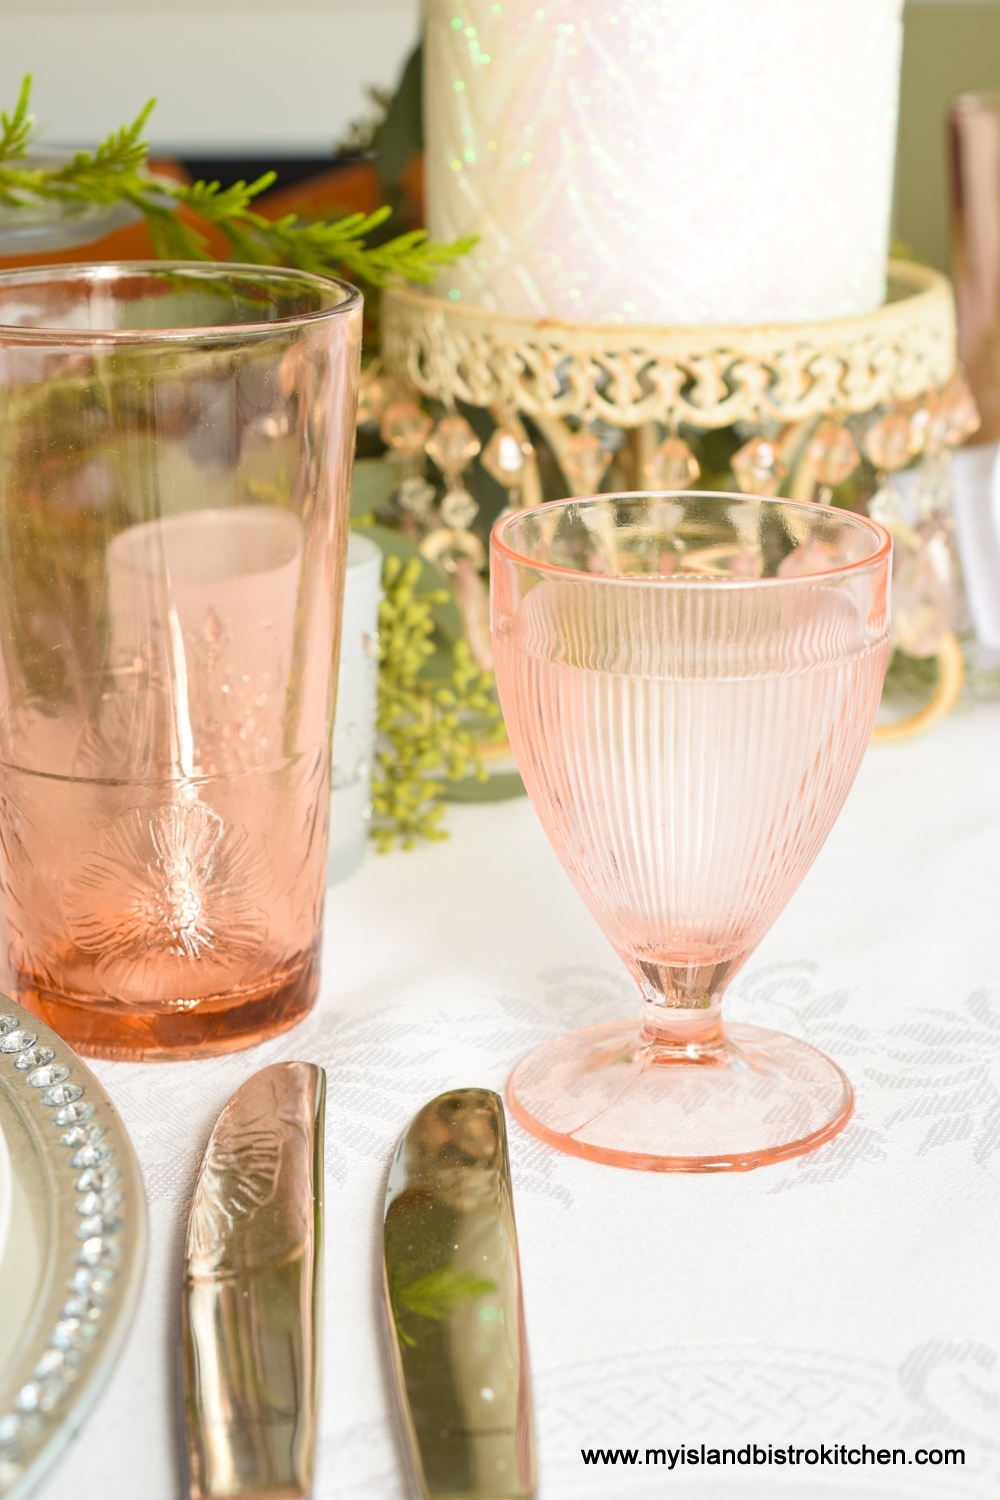
I have had these small pale pink antique pedestal glasses for years. I am not sure what their intended use was – if anyone knows for sure, please do let me know.
Antique Pink Glasses
I am using them here for wine glasses in much the same way as I would use stemless wine glasses. The pink water glasses were a thrift shop find a few years ago. Mixing and matching styles and color tones make the setting more unique and interesting.
Pink Glasses
To add some pizzazz and glamour to the placesettings, I have opted to thread white dinner napkins through glitzy rhinestone napkin rings. Using napkin rings is a quick easy way to present napkins and you really can’t do them wrong!
Napkin Threaded Through Rhinestone Napkin Ring
I am using very basic, classic flatware in this setting and, of course, the flatware is placed in the order in which it will be used for the meal.
Concluding Thoughts
I hope you have enjoyed a glimpse of my blush pink tablesetting. It does not scream Christmas like reds, greens, and golds do but it is a more gentle color scheme option that works for any holiday dinner. Other than some greenery and new candles, everything else in the tablesetting (excluding, obviously, the cake – it’s fresh!) was constructed from items I already had. Proof that you don’t have to spend a lot of money to create a beautiful holiday-themed table.
Blush Pink Placesetting
To view other holiday tablesettings from My Island Bistro Kitchen, click on the links below:
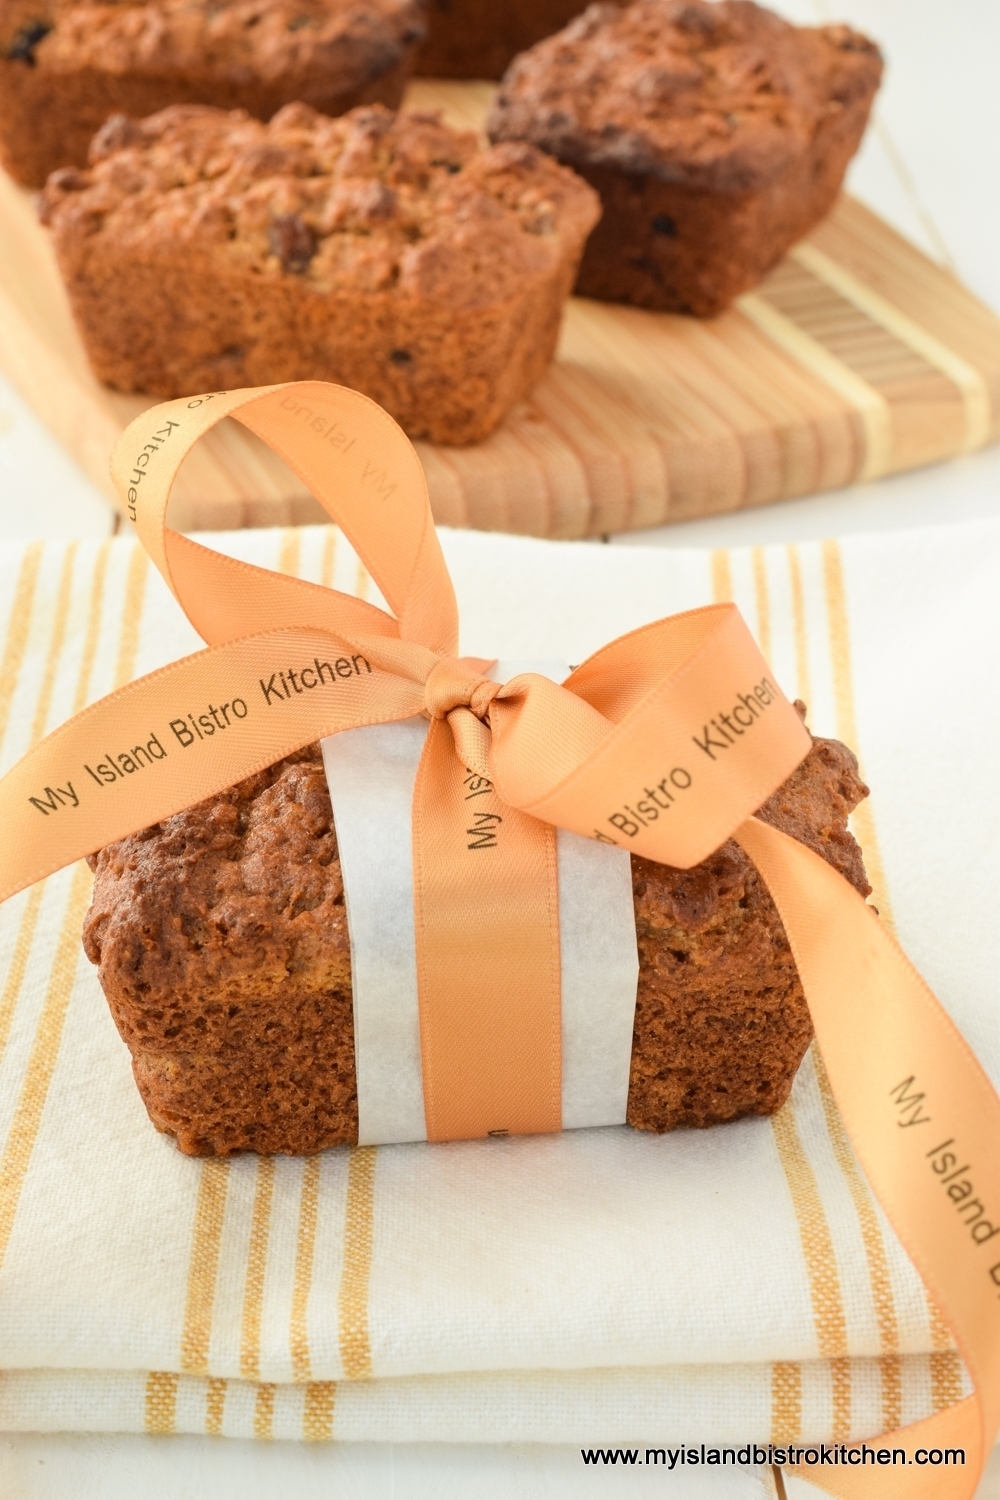
These Gluten-Free Pumpkin-Mincemeat Muffins or mini loaves are super tasty and it’s hard to tell they are gluten-free! I believe this is so because I use a mix of gluten-free flours that include almond and coconut flours which lend exceptional texture and flavour to baked goods. Continue reading Gluten-Free Pumpkin-Mincemeat Muffins→
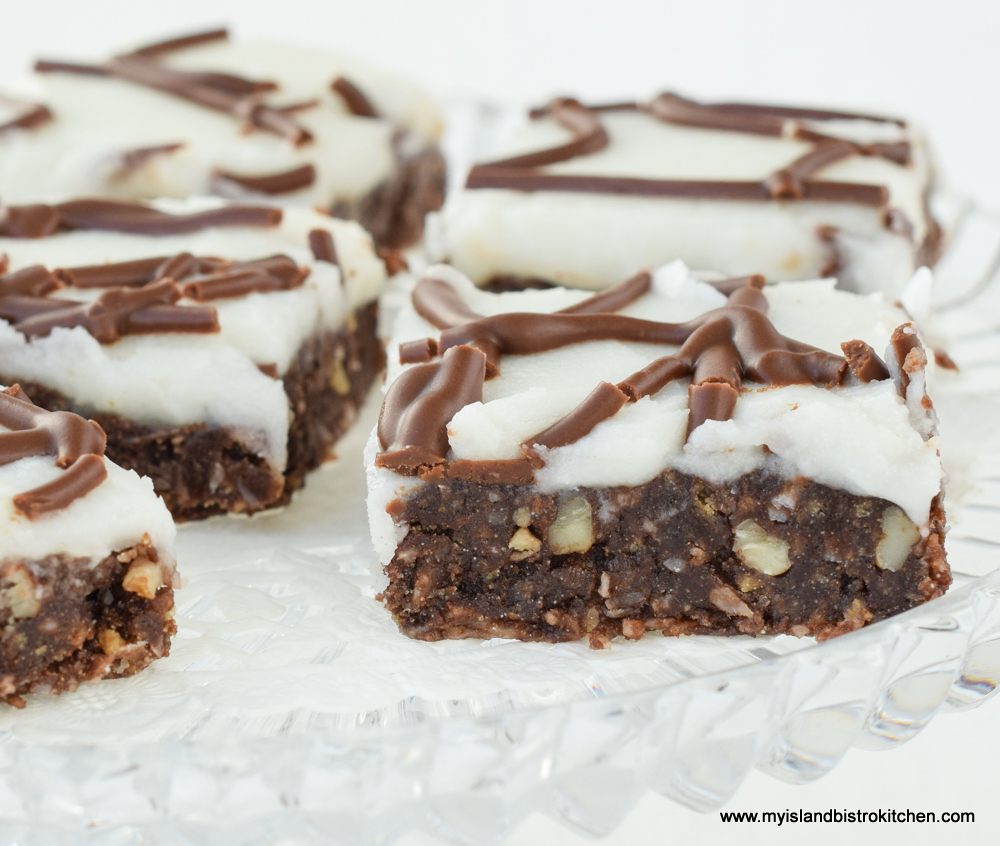
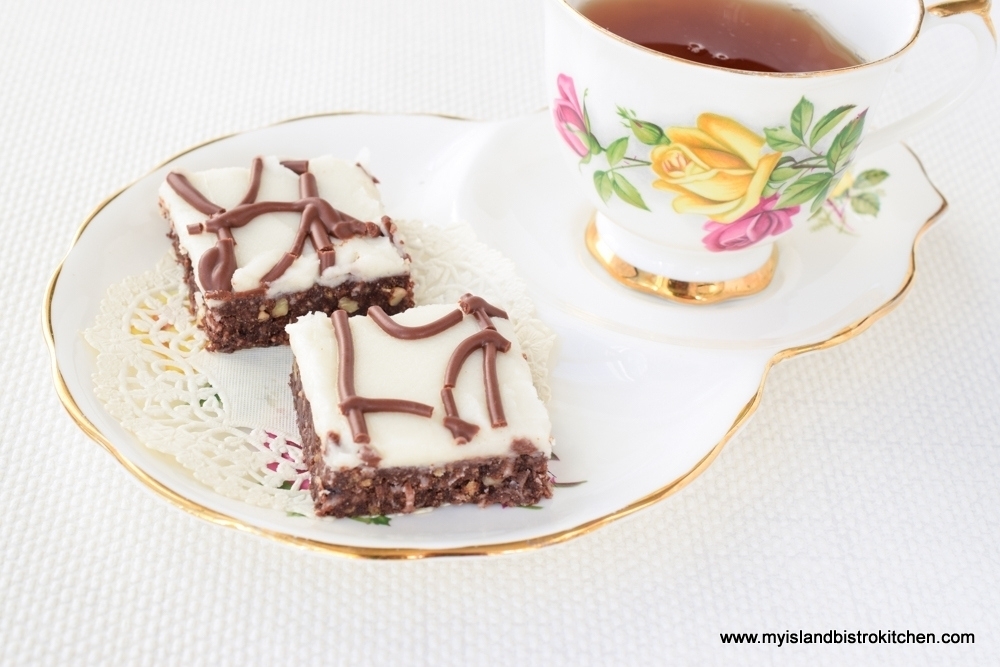
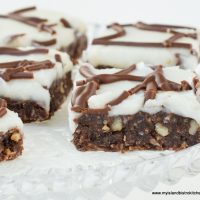
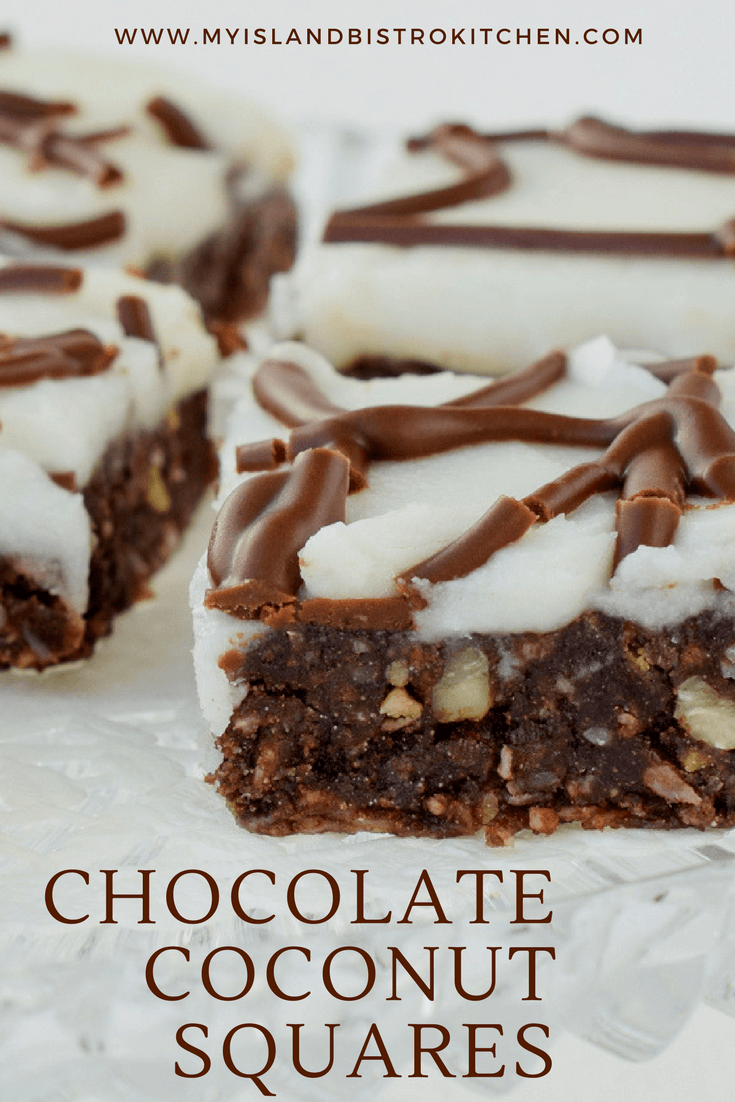
This no-bake chocolate coconut square is one of the easiest to make and it does not take a lot of ingredients. The recipe calls for graham wafer crumbs – to make this square gluten-free, use gluten-free graham style crumbs. There may be a number of brands of these crumbs available. I use the Kinnikinnick brand. In fact, the squares in the photos in this post are made with these gluten-free crumbs.
Chocolate Coconut Squares
This square is almost candy-bar quality. It is not a thick square but it is rich, moist, and very tasty! A great treat anytime and a sure favorite on any sweet tray.
Chocolate Coconut Squares
Unbaked Chocolate Coconut Square
Ingredients:
½ cup butter, softened at room temperature
2 tbsp brown sugar
2 tbsp granulated sugar
3 tbsp unsweetened cocoa
1 extra large egg, room temperature, beaten
1 tsp vanilla
2 cups graham wafer crumbs
1 cup shredded unsweetened coconut
½ cup chopped pecans
Method:
Line 9”x9” baking pan with parchment paper, leaving enough paper overhang that finished square can be lifted from the pan for easy icing and cutting.
Combine butter, sugars, and cocoa in medium-sized heavy bottomed saucepan. Cook over medium low heat until butters melt and ingredients are combined and heated. Stir frequently to prevent scorching. Do not boil.
Add the beaten egg and vanilla. Cook over medium low heat for 2-3 minutes, stirring constantly.
Remove from heat and add the graham wafer crumbs, coconut, and pecans. Stir to combine ingredients well.
Spread mixture evenly in prepared pan. Cool. Ice with buttercream icing (recipe follows). Cut into squares of desired size.
Icing
Ingredients:
2 cups sifted powdered sugar (aka icing sugar/confectioner’s sugar)
3 tbsp butter, softened at room temperature
2½ tbsp water
½ tsp almond flavoring
1 – oz square semi-sweet chocolate
1 tbsp butter, softened at room temperature
Method:
Combine the powdered sugar and butter in bowl of stand mixer. Mix on low speed to blend in butter. Add the water and almond flavoring and increase speed to medium-low to blend ingredients. Increase speed to high and beat an additional minute to ensure ingredients are well combined and icing is smooth. Additional water may be required to make icing of desired spreading consistency. If adding additional water, add by ½ teaspoon at a time.
Spread icing evenly over square. Melt the chocolate square and butter in small dish in microwave only until the ingredients have melted enough to be blended together. Drizzle in desired design over icing. Cut squares into desired size.
Line 9”x9” baking pan with parchment paper, leaving enough paper overhang that finished square can be lifted from the pan for easy icing and cutting.
Combine butter, sugars, and cocoa in medium-sized heavy bottomed saucepan. Cook over medium low heat until butters melt and ingredients are combined and heated. Stir frequently to prevent scorching. Do not boil.
Add the beaten egg and vanilla. Cook over medium low heat for 2-3 minutes, stirring constantly.
Remove from heat and add the graham wafer crumbs, coconut, and pecans. Stir to combine ingredients well.
Spread mixture evenly in prepared pan. Cool. Ice with buttercream icing (recipe follows). Cut into squares of desired size.
Icing
Combine the powdered sugar and butter in bowl of stand mixer. Mix on low speed to blend in butter. Add the water and almond flavoring and increase speed to medium-low to blend ingredients. Increase speed to high and beat an additional minute to ensure ingredients are well combined and icing is smooth. Additional water may be required to make icing of desired spreading consistency. If adding additional water, add by ½ teaspoon at a time.
Spread icing evenly over square. Melt the chocolate square and butter in small dish in microwave only until the ingredients have melted enough to be blended together. Drizzle in desired design over icing. Cut squares into desired size.
Yield: 1 – 9”x9” pan of squares
Recipe Notes
To make this square gluten-free, use gluten-free graham style crumbs.
[Copyright My Island Bistro Kitchen]
Enjoy these other squares, bars, and brownie recipes from My Island Bistro Kitchen:
If you have made this recipe and enjoyed it and/or wish to share it with your friends and family, please do so on social media but be sure to share the direct link to this posting from my website.
Connect with My Island Bistro Kitchen on Social Media
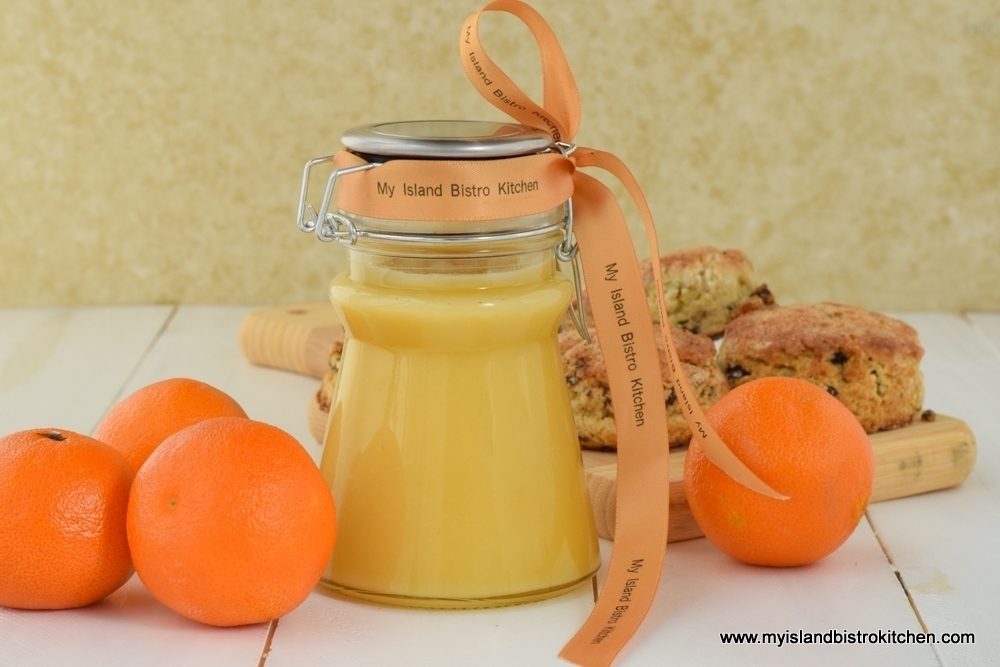
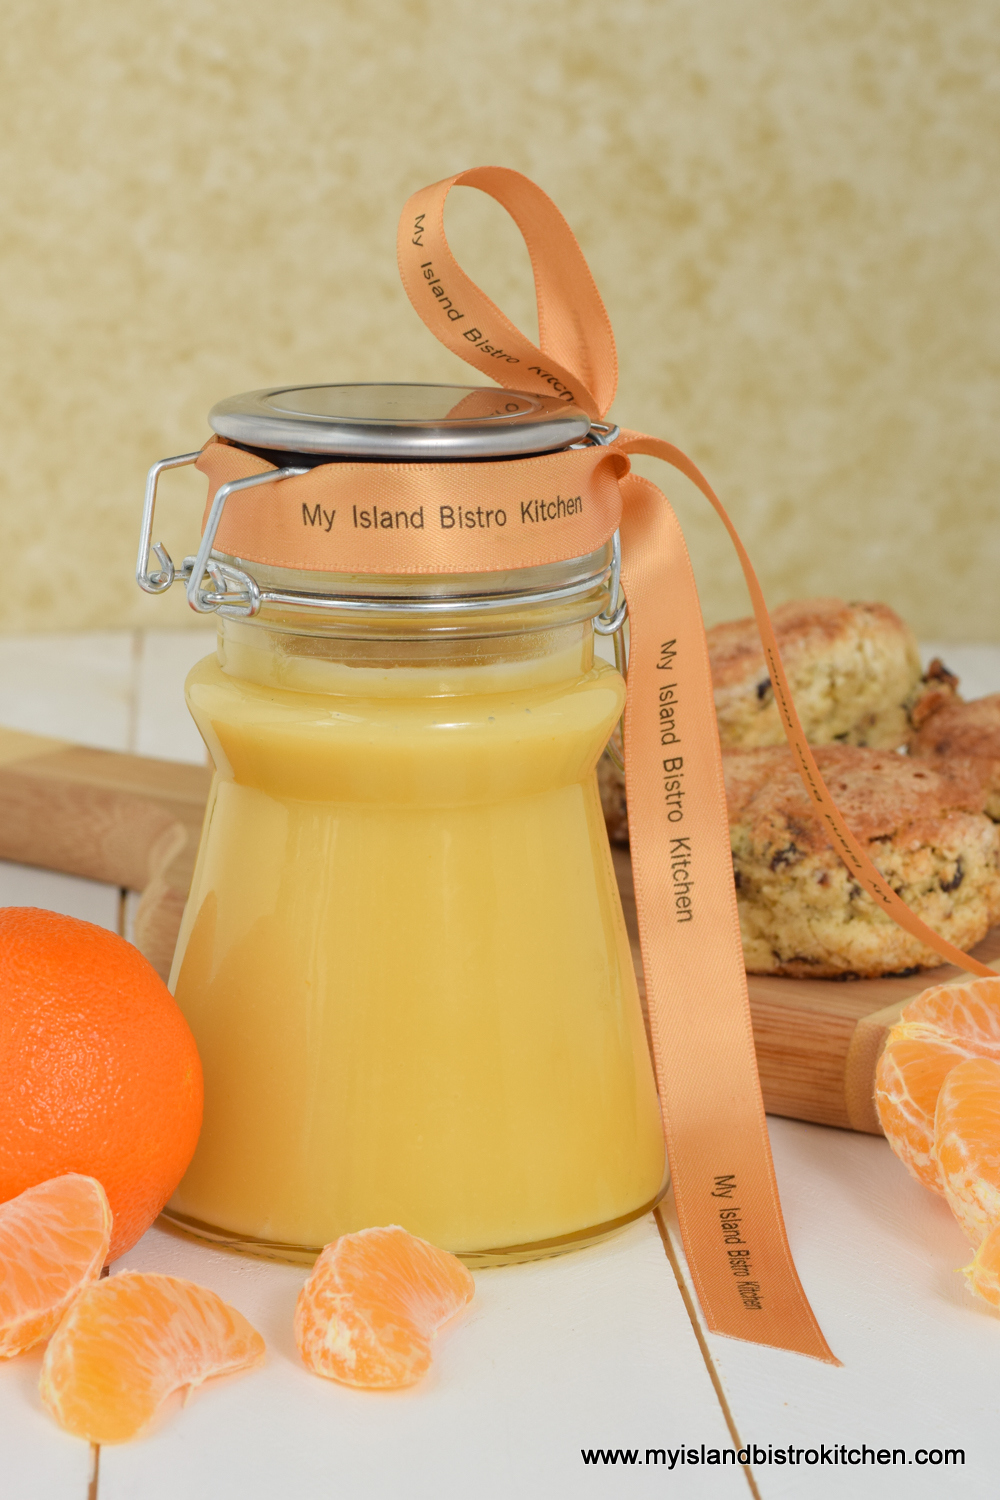
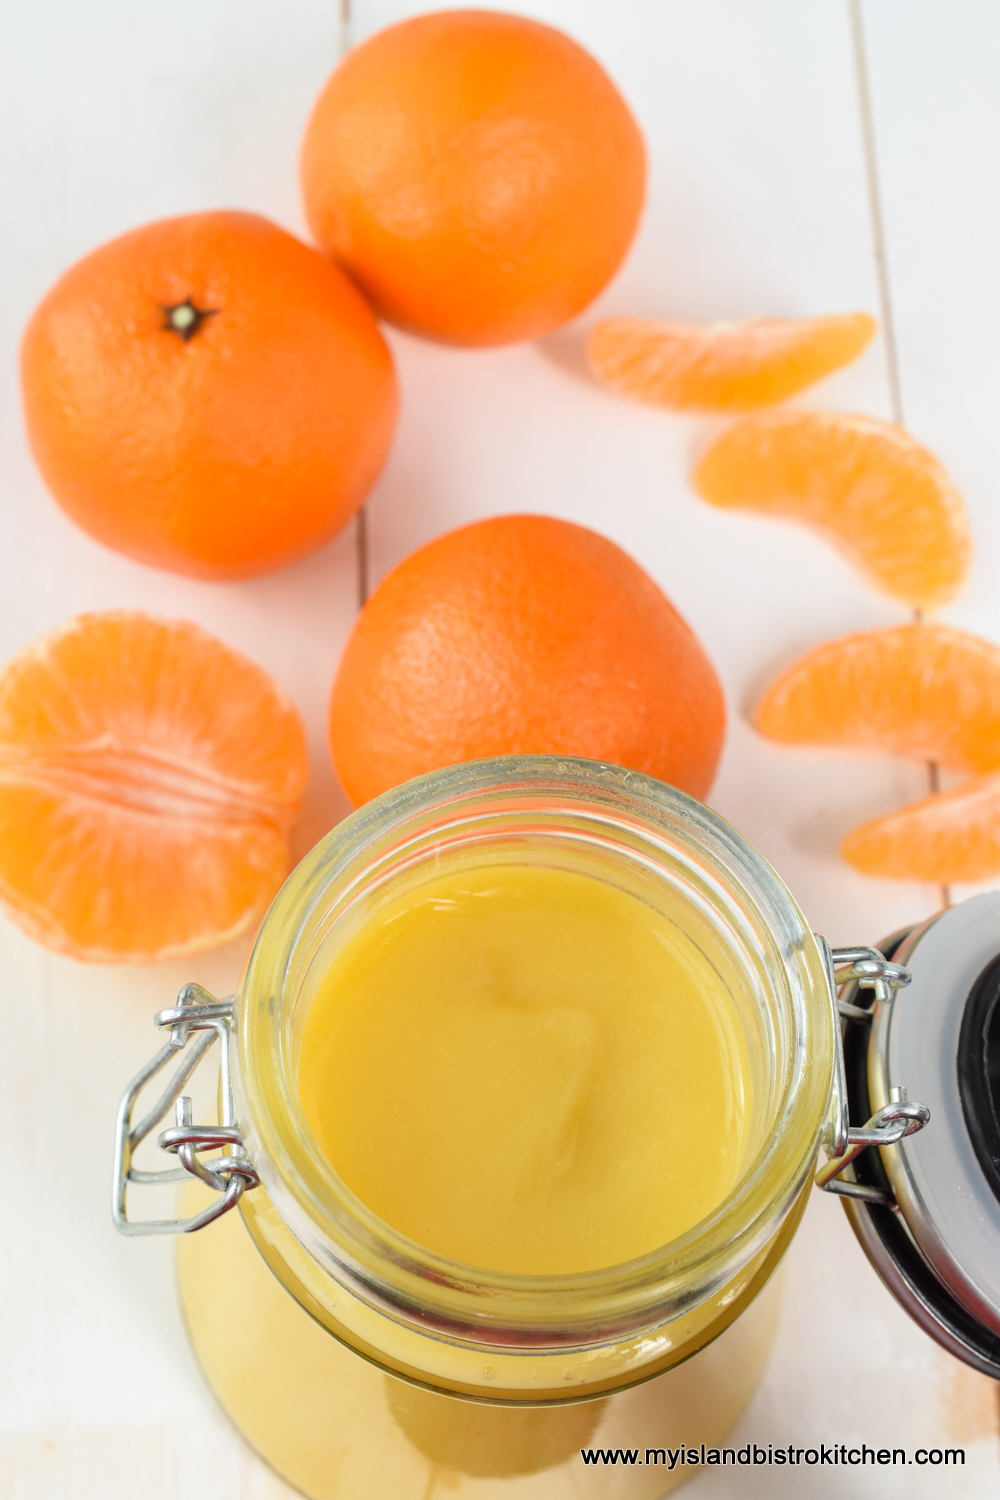
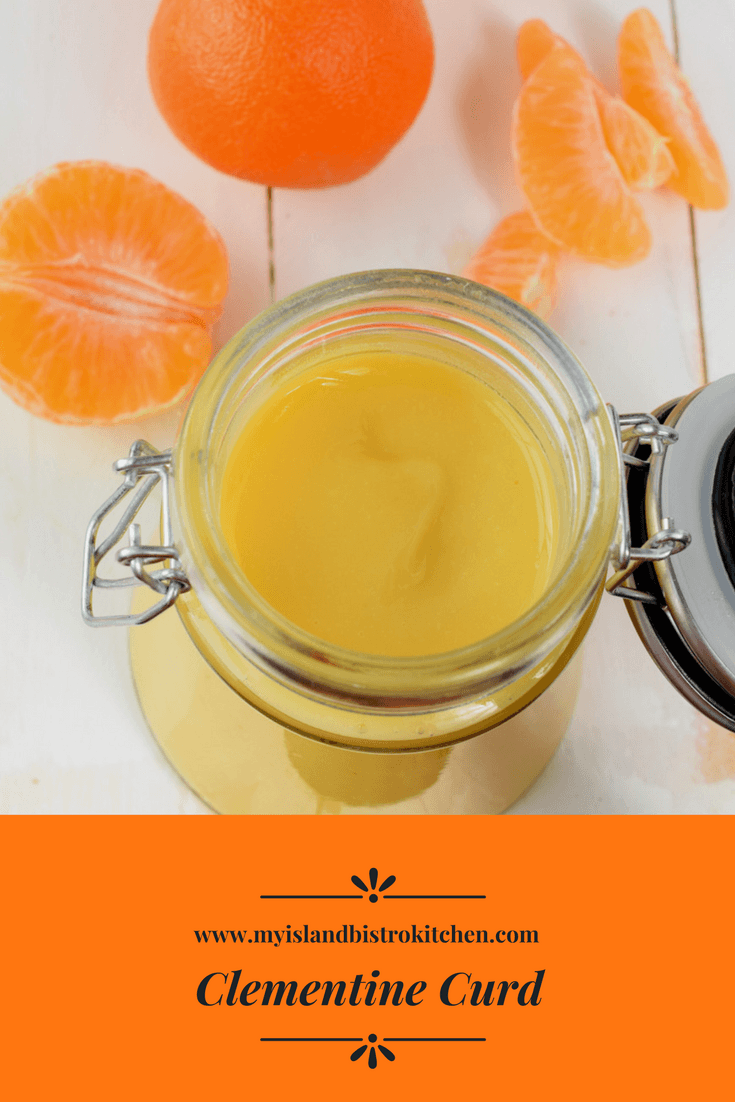
Christmas is an excellent time to make Clementine Curd when fresh clementines are readily available. While certainly lesser known than the traditional Lemon Curd, Clementine Curd is lovely in its own way.
Less sharp and “puckery” than Lemon Curd, Clementine Curd is almost identical in color to lemon curd (perhaps a slight bit paler) and still has a lovely citrus flavour.
Clementine Curd
Be prepared to devote some time and patience to making any curd. It cooks slowly over a pot of simmering (never boiling) water to reach its finished stage (170F on a candy thermometer). You may wish to read my previous postings on making lemon curd and rhubarb curd for hints and tips on make curd as the same techniques apply to the making of Clementine Curd.
Clementine Curd
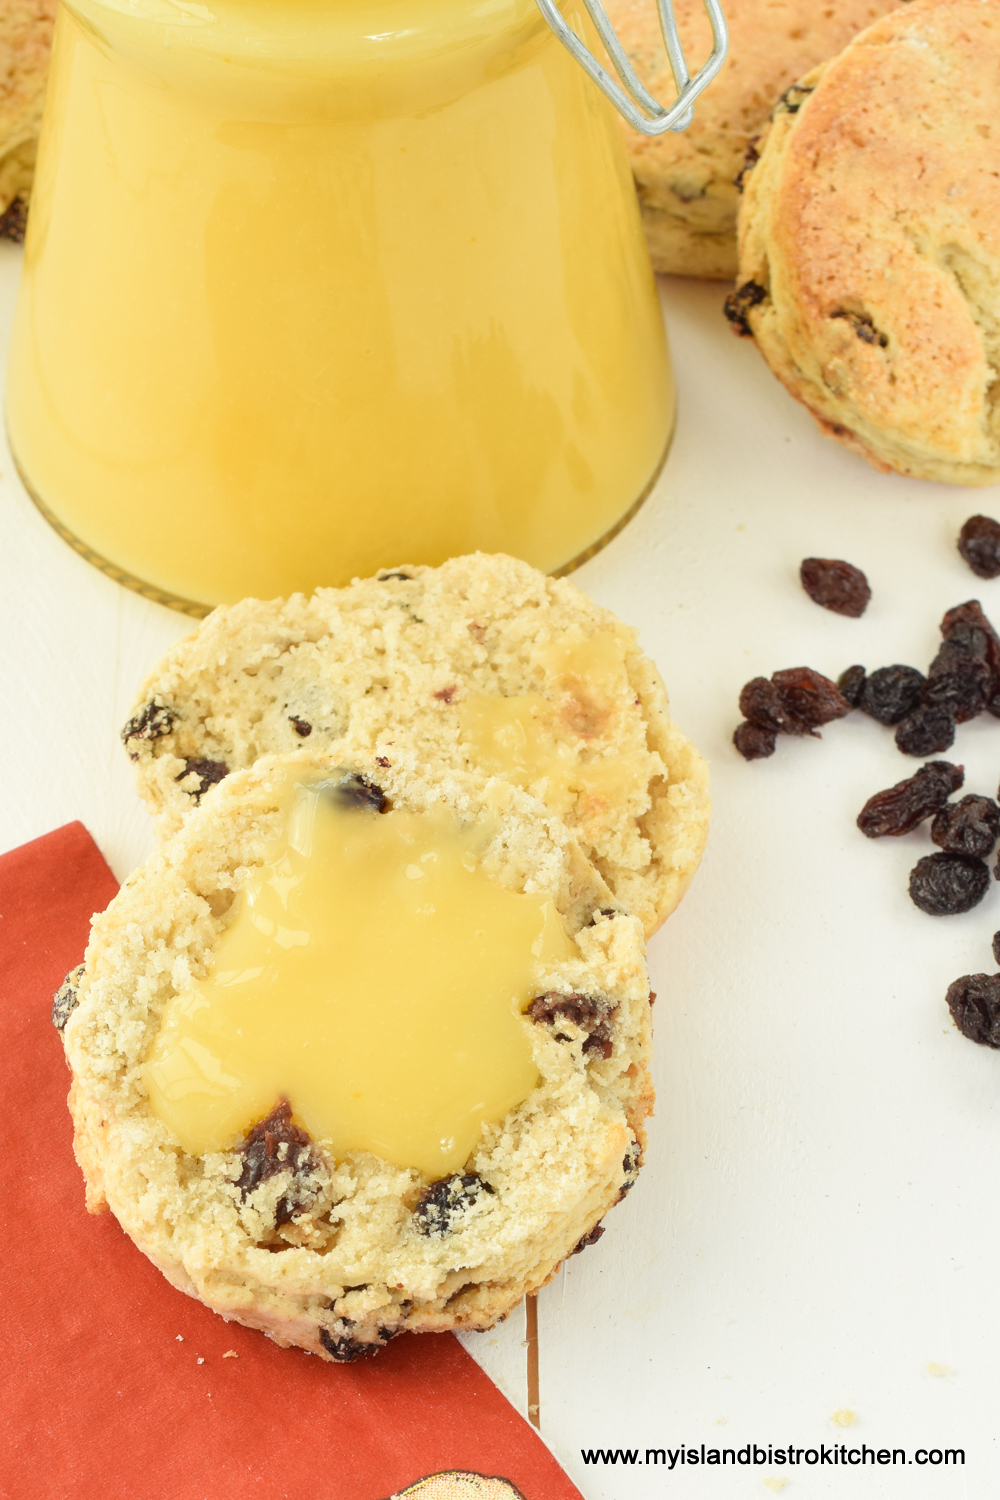
Use this Clementine Curd in the same way in which you would use Lemon Curd — as a spread on biscuits, scones, muffins, or toast; as a filling for cakes; in a parfait with Greek yogurt; or as a filling for tarts and cookies. Bottle the curd in a fancy jar and you have a lovely gift for someone, especially if you include a batch of homemade scones or biscuits with it.
Clementine Curd
[Printable recipe follows at end of posting]
Clementine Curd
Ingredients:
¾ cup caster* sugar or granulated sugar
2½ tsp clementine zest
7 tbsp freshly squeezed clementine juice, strained (apx. 5 clementines, depending on size)
2 extra-large egg yolks
1 large whole egg
3 tbsp unsalted butter at room temperature
Method:
In bottom of double boiler, bring about 2” of water to the simmer point (around 200°F). Maintain the water at this simmer point over medium-low heat. Place sugar in top of double boiler or heat-proof bowl. Mix in the clementine zest. Whisk the clementine juice into sugar.
In small bowl, lightly beat the 2 egg yolks and the whole egg together with a fork, just enough to break up the yolks and blend with the whole egg. Whisk the eggs into the sugar-clementine juice mixture. Add the soft butter. Place this pot or bowl over the simmering water. Stir the mixture continuously as it cooks until it is thickened and the temperature of the mixture registers 170°F on a candy thermometer. Be patient as this will take awhile. Make sure the water in the bottom of the boiler does not boil and stays only at the simmer point.
Remove curd from heat and strain through a mesh strainer to remove any of the egg white that may have coagulated as well as the clementine rind. Pour strained curd into a sterilized bottle. Place a piece of plastic wrap directly on the surface of the curd to prevent it from forming a skin on top. Cool at room temperature. Remove plastic wrap. Cover jar tightly and refrigerate for up to 1 week.
Yield: Apx. 1 cup
*caster sugar may also be known as fruit sugar, berry sugar, super fine sugar, or instant dissolving sugar.
Note: Altitude may affect the temperature at which the water reaches the simmering point. The important thing is that the water in the bottom of the double boiler does not boil or touch the top of the double boiler/heatproof bowl during the cooking of the curd.
In bottom of double boiler, bring about 2” of water to the simmer point (around 200°F). Maintain the water at this simmer point over medium-low heat. Place sugar in top of double boiler or heat-proof bowl. Mix in the clementine zest. Whisk the clementine juice into sugar.
In small bowl, lightly beat the 2 egg yolks and the whole egg together with a fork, just enough to break up the yolks and blend with the whole egg. Whisk the eggs into the sugar-clementine juice mixture. Add the soft butter. Place this pot or bowl over the simmering water. Stir the mixture continuously as it cooks until it is thickened and the temperature of the mixture registers 170°F on a candy thermometer. Be patient as this will take awhile. Make sure the water in the bottom of the boiler does not boil and stays only at the simmer point.
Remove curd from heat and strain through a mesh strainer to remove any of the egg white that may have coagulated as well as the clementine rind. Pour strained curd into a sterilized bottle. Place a piece of plastic wrap directly on the surface of the curd to prevent it from forming a skin on top. Cool at room temperature. Remove plastic wrap. Cover jar tightly and refrigerate for up to 1 week. Yield: Apx. 1 cup
Recipe Notes
*caster sugar may also be known as fruit sugar, berry sugar, super fine sugar, or instant dissolving sugar.
Note: Altitude may affect the temperature at which the water reaches the simmering point. The important thing is that the water in the bottom of the double boiler does not boil or touch the top of the double boiler/heatproof bowl during the cooking of the curd.
[Copyright My Island Bistro Kitchen]
If you have made this recipe and enjoyed it and/or wish to share it with your friends and family, please do so on social media but be sure to share the direct link to this posting from my website.
Connect with My Island Bistro Kitchen on Social Media
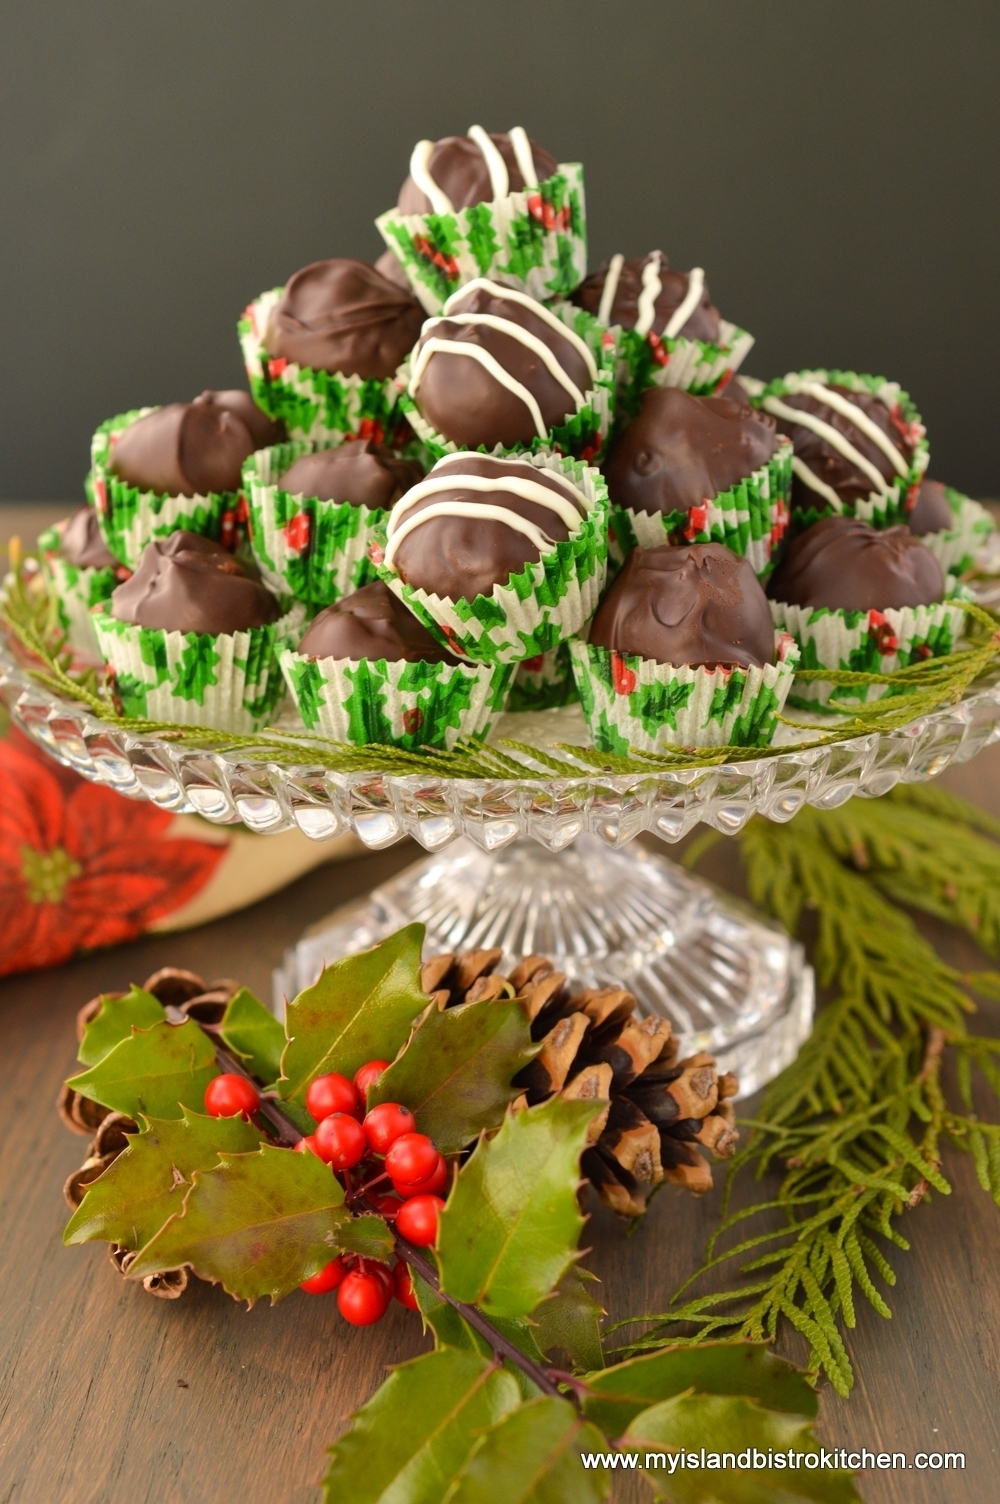
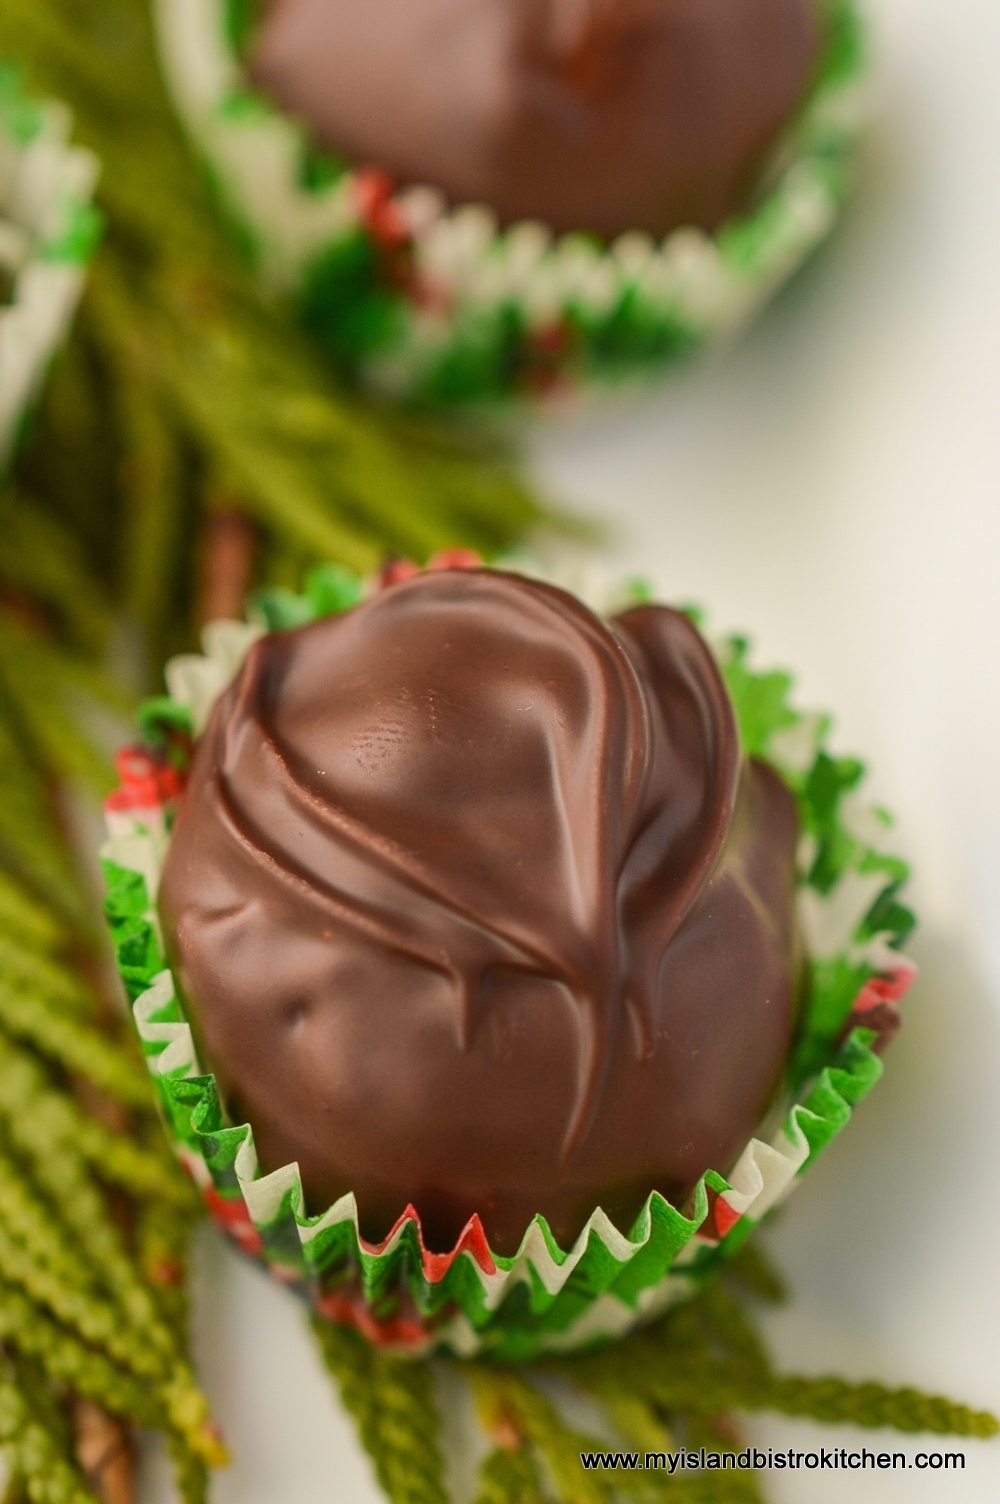
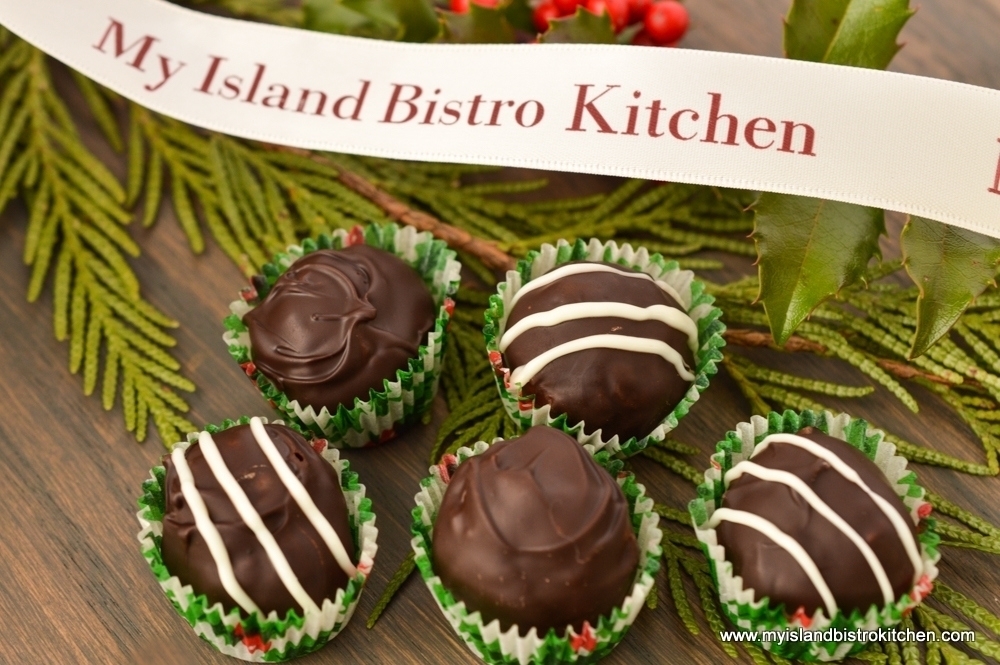
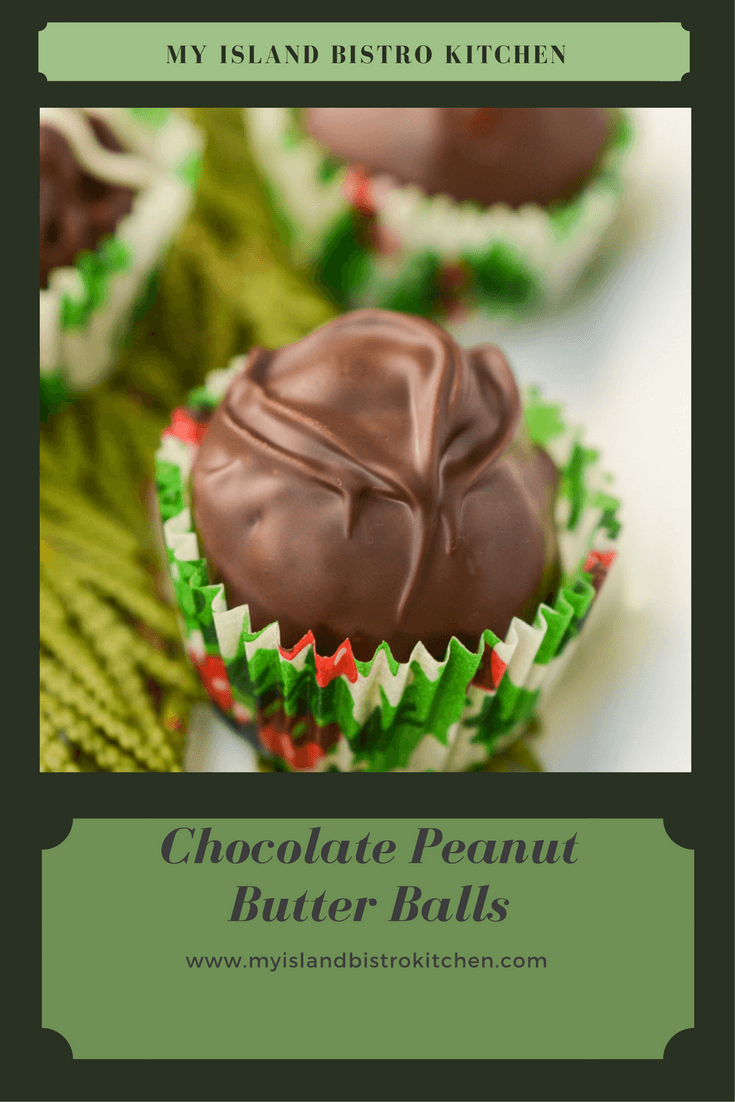
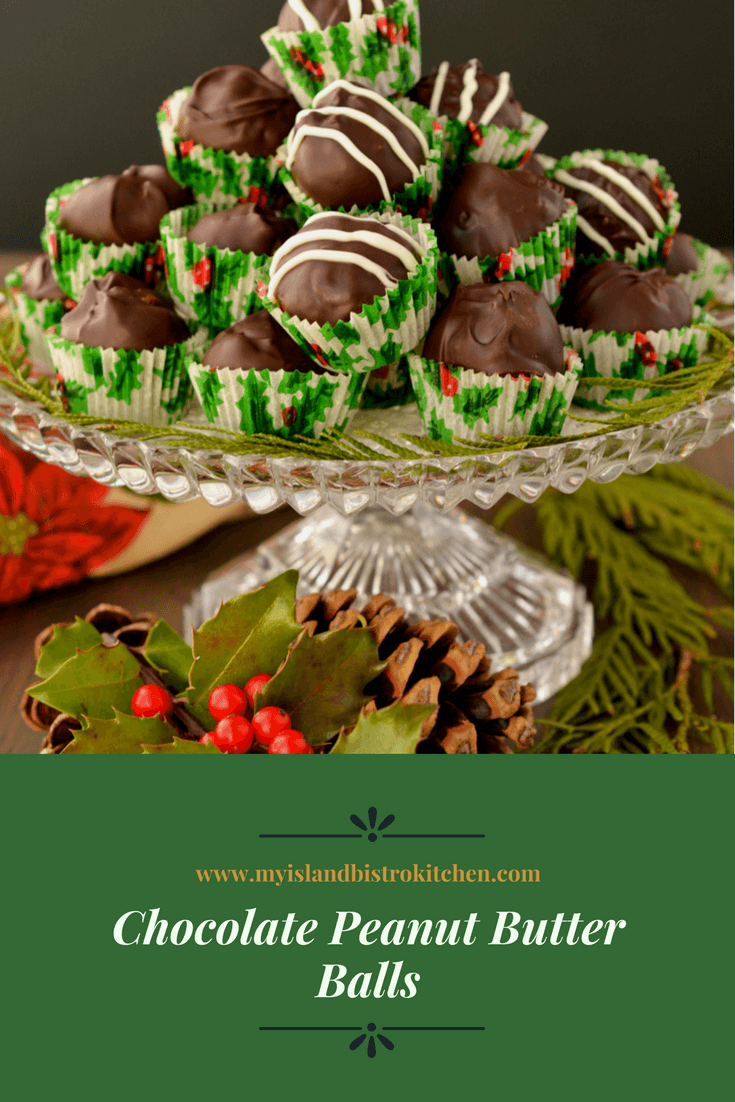
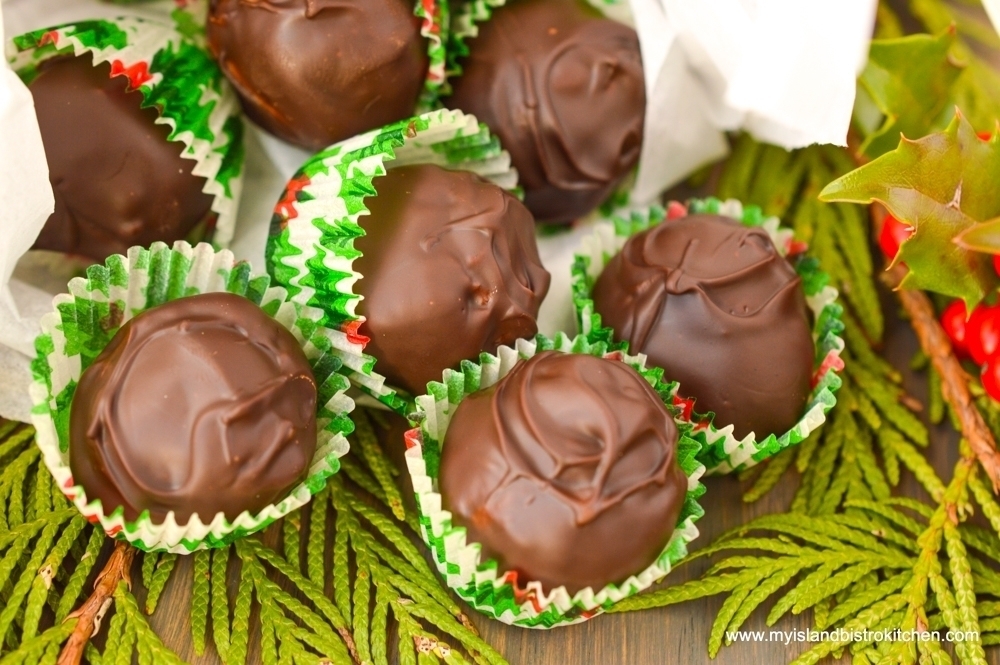
Chocolate Peanut Butter Balls are a Christmas treat in my neck of the woods and, for many, it isn’t Christmas unless there is a batch or two of these delectable homemade confections. They are one food item that just never seems to go out of style. And, they are addicting! Who can stop at just one!
Chocolate Peanut Butter Ball
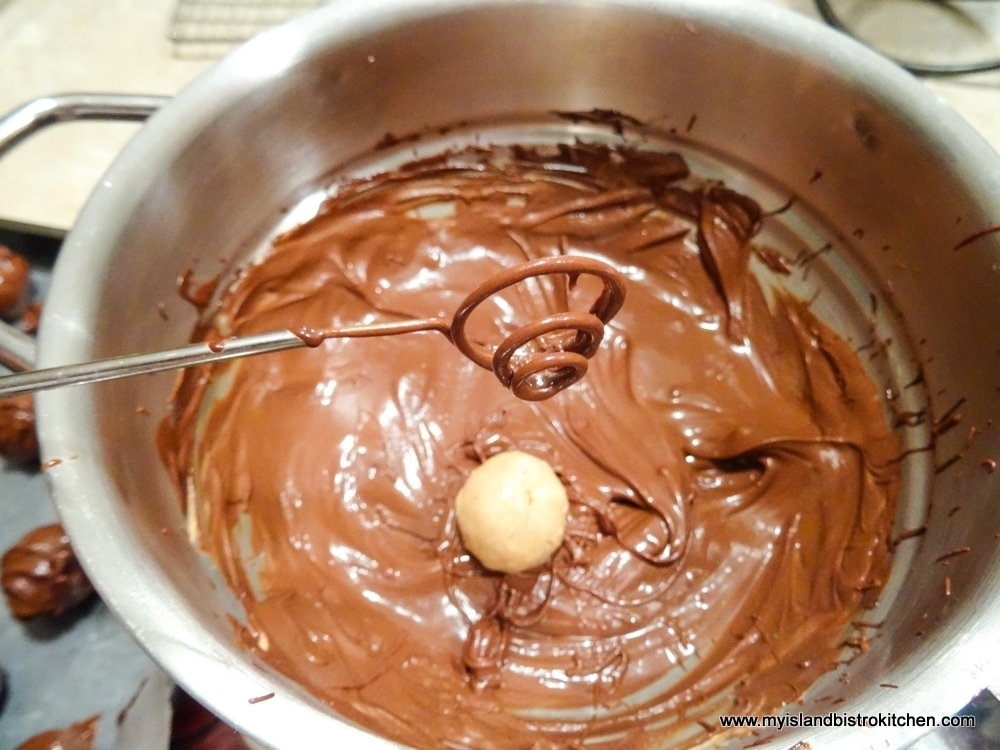
These balls are not difficult to make and only take very basic ingredients. They are, however, a bit time consuming to make because the peanut butter and butter must be melted then mixed in with the icing sugar (which you may know as confectioner’s sugar or powdered sugar) and crisp rice cereal. Then the balls need to be formed from the mixture, chilled, and then individually dipped in melted chocolate and chilled again. It’s critical that the icing sugar be sifted (and before it is measured). No matter how soft and fluffy the icing sugar may seem, there are always little lumps/clumps that will not mix in as well as if the sugar is sifted. Take the time to do this step.
Chocolate Peanut Butter Balls
It’s important that the balls not be formed too large as they will get larger in size when dipped in chocolate. The size to aim for would be the size of a chocolate truffle that would fit nicely inside a paper candy cup so form the mixture into ½” inch balls. They may look small at this stage but they’ll get bigger once dipped in chocolate. These confections are meant to be 1-2 bites and they are rich!
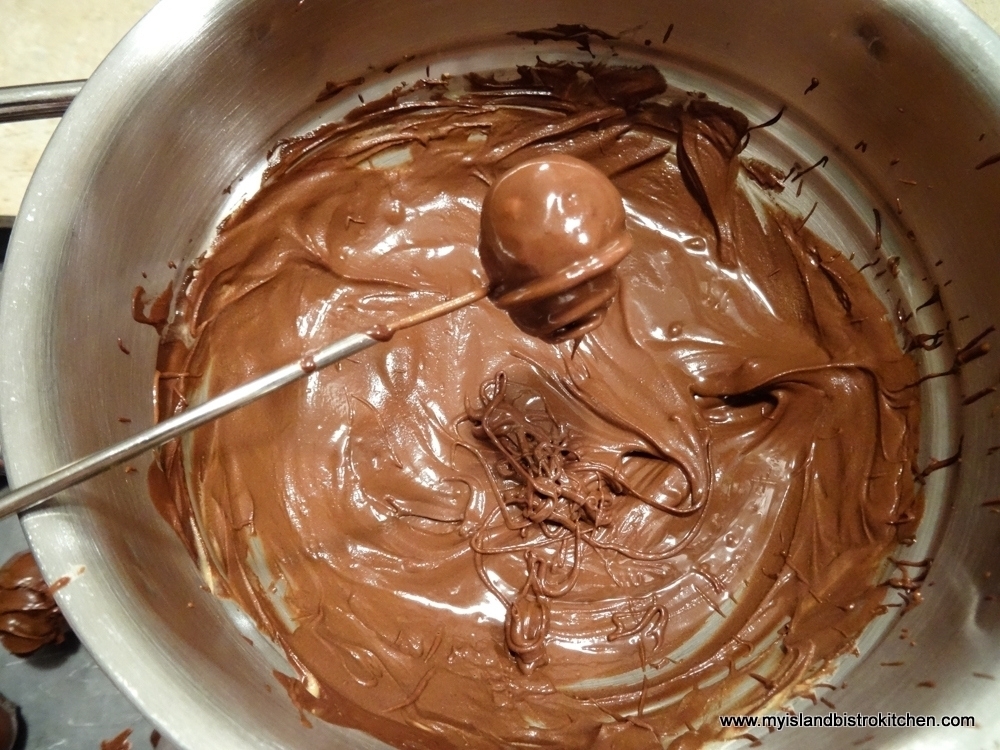
A teaspoon can be used to twirl the balls around in the chocolate and to swirl the tops; however, my preference is to use a spiral swirl candy dipper.
Spiral Swirl Candy Dipper
I find it is much more efficient, the excess chocolate can be dripped off the balls with a gentle tap or two of the swirl dipper tool on the side of the pot, and the tops of the balls are automatically swirled attractively when the balls drop from the candy dipper tool.
Using a spiral swirl candy dipper to coat chocolate peanut butter balls
Various kinds of chocolate can be used in which to dip the balls. Semi-sweet chocolate chips are the norm; however, white chocolate can be used as can peanut butter chips for the ultimate peanut butter flavor. Sometimes, I will mix the semi-sweet chocolate chips with the peanut butter chips and this makes a lovely coating as well. Melted chocolate in contrasting colors can be used, if desired, to decorate the tops of the balls.
Chocolate Peanut Butter Balls
Store the balls between layers of waxed paper in an airtight container in the refrigerator. These balls freeze well.
[Printable recipe follows at end of posting]
Chocolate Peanut Butter Balls
Ingredients:
1 cup smooth peanut butter
¼ cup + 1 tbsp butter
½ tsp vanilla
2¼ cups sifted icing sugar (apx. ½ pound)
1½ cups crisp rice cereal
10 oz semi-sweet chocolate chips, white chocolate, or peanut butter chips (or a combination of all three)
Method:
Line two large rimmed baking sheets with wax paper. Set aside.
Combine peanut butter and butter in small saucepan. Melt the butters over medium-low heat, stirring frequently to prevent scorching. Remove from heat and stir in vanilla.
In large heat-proof bowl, combine the icing sugar and rice cereal. Pour the melted peanut butter and butter mixture over the cereal and icing sugar. Mix ingredients with large spoon or hands until all of the icing sugar has been fully incorporated.
Pinch off bits of the mixture and form into ½” balls. Place balls on one of the prepared baking sheets. Refrigerate for about 30 minutes, or until firm.
Melt half of the chocolate in the top of a double boiler or heat proof bowl over a pot of simmering (not boiling) water. Using a teaspoon, or a spiral swirl candy dipper, dip the balls into the chocolate and swirl to coat. If using the spiral swirl dipper, gently tap the dipper tool on the side of the chocolate pot to remove any excess chocolate from the dipped balls. Transfer dipped balls to the second prepared baking sheet. Melt remaining chocolate as needed to complete the dipping process. Refrigerate for 30 minutes. Store balls between layers of wax paper in airtight container. Keep refrigerated or freeze for longer storage.
A tasty confection that combines peanut butter, butter, icing sugar, and crisp rice cereal formed into balls dipped in decadent chocolate
Course
Snack
Cuisine
American
My Island Bistro KitchenMy Island Bistro Kitchen
Ingredients
1cupsmooth peanut butter
1/4 cup + 1 tbspbutter
1/2tspvanilla
2 1/4cupssifted icing sugar (apx. 1/2 pound)
1 1/2cupscrisp rice cereal
10ozsemi-sweet chocolate, white chocolate, or peanut butter chips (or a combination of all three)
Instructions
Line two large rimmed baking sheets with wax paper. Set aside.
Combine peanut butter and butter in small saucepan. Melt the butters over medium-low heat, stirring frequently to prevent scorching. Remove from heat and stir in vanilla.
In large heat-proof bowl, combine the icing sugar and rice cereal. Pour the melted peanut butter and butter mixture over the cereal and icing sugar. Mix ingredients with large spoon or hands until all of the icing sugar has been fully incorporated.
Pinch off bits of the mixture and form into ½” balls. Place balls on one of the prepared baking sheets. Refrigerate for about 30 minutes, or until firm.
Melt half of the chocolate in the top of a double boiler or heat proof bowl over a pot of simmering (not boiling) water. Using a teaspoon, or a spiral swirl candy dipper, dip the balls into the chocolate and swirl to coat. If using the spiral swirl dipper, gently tap the dipper tool on the side of the chocolate pot to remove any excess chocolate from the dipped balls. Transfer dipped balls to the second prepared baking sheet. Melt remaining chocolate as needed to complete the dipping process. Refrigerate for 30 minutes. Store balls between layers of wax paper in airtight container. Keep refrigerated or freeze for longer storage.
Yield: Apx. 50-55 balls
Recipe Notes
Copyright My Island Bistro Kitchen
If you have made this recipe and enjoyed it and/or wish to share it with your friends and family, please do so on social media but be sure to share the direct link to this posting from my website.
Connect with My Island Bistro Kitchen on Social Media
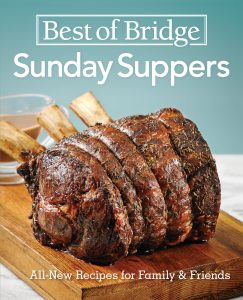
Thanks to the publishers at Robert Rose Inc., I have an extra copy of Best of Bridge Sunday Suppers to give away in conjunction with the review I just published on this cookbook.
Cookbook Giveaway Rules
These Official Rules govern the Cookbook giveaway. By participating or attempting to participate in the giveaway event, you will be deemed to have received, understood, and agreed to these Official Rules.
This cookbook giveaway event is exclusively for fans of My Island Bistro Kitchen’s Facebook page and who are Canadian residents (excluding Quebec residents). So, if you have not already become a fan of My Island Bistro Kitchen’s Facebook page, and if you wish to participate in the cookbook giveaway event, head on over to https://www.facebook.com/MyIslandBistroKitchen/ and click the “Like” button on the Facebook page, located just below the cover photograph, and then proceed with the following eligibility steps for the cookbook giveaway:
Click “Like” on the specific Facebook posting that details the cookbook giveaway.
Leave a comment on the posting indicating what your favorite Sunday supper is.
Share the Cookbook Giveaway post (make sure your privacy setting is set to “public” so I can verify that you shared the post).
Only individuals who have correctly completed the eligibility criteria above will be eligible for the cookbook draw.
Tag a Facebook friend on the posting and you will receive an extra bonus entry!
No purchase is necessary to participate.
This giveaway is open only to Canadian residents (excluding residents of Quebec) having a Canadian mailing address and who are fans of My Island Bistro Kitchen’s Facebook page. Entrants must be 19 years of age or older.
Only one (1) entry per person with the exception of those who tag a Facebook friend on their entry – those who tag a Facebook friend will receive one (1) extra bonus entry.
There is one (1) prize only to be won – one (1) copy of Best of Bridge Sunday Suppers cookbook with an approximate Canadian retail value of $29.95. The book for this giveaway has been provided by the cookbook’s publisher, Robert Rose Inc. The prize is non-transferable and non-exchangeable. It cannot be exchanged for money value. The prize offering is valid only during the specified allotted time as described in these Official Rules.
Odds of winning depend on the number of eligible entries received.
The submission entry period opens at 12:00 noon (AST) on December 14, 2017, and closes at 12 noon (AST) on December 17, 2017. Draw of winner will be made by 9:00pm (AST) on December 17, 2017.
All eligible entries received during the submission period will be gathered at the end of the submission period. One entrant will be randomly selected as a potential winner and notified through Facebook. In the event any potential winner does not respond to such notification within 48 hours of having been sent notification, declines the prize for any reason, or does not meet the requirements set forth in these Official Rules, the potential winner will be disqualified and an alternate potential winner may be randomly selected from among remaining eligible entries, or the prize may be cancelled.
Potential winner must correctly answer a mathematical skill-testing question to win.
Each entrant is responsible for monitoring his or her Facebook account for potential prize notification and receipt of other communications related to this cookbook giveaway.
Once the definitive winner has been determined to have successfully met all the eligibility criteria afore-mentioned, and claimed the prize, his or her name will be announced on My Island Bistro Kitchen’s Facebook page and, in order to receive the prize, the winner must agree to this publication announcement as a condition of winning.
Cookbook prize may not be awarded if an insufficient number of eligible entries is received. The determination of insufficient number of eligible entries will be at the sole discretion of My Island Bistro Kitchen.
In order to receive the cookbook, the winner must agree to provide My Island Bistro Kitchen with their Canadian mailing address to which the cookbook will be mailed. This information will be provided to Robert Rose Inc. by My Island Bistro Kitchen for the purposes of mailing the cookbook to the declared winner and the winner must agree to the sharing of their mailing address with Robert Rose Inc. for this purpose. The prize will not be replaced if lost, destroyed, mutilated, or stolen.
This giveaway event is in no way sponsored, endorsed, administered by, or associated with, Facebook. All entrants agree to release Facebook from any liability with respect to this giveaway event or its prize.
All entrants agree to be bound by the rules of this giveaway event and release My Island Bistro Kitchen and all parties associated with this giveaway event from any liability with respect to this giveaway event or of its prize.
All decisions by My Island Bistro Kitchen with regards to all aspects of this giveaway event are final.
If, for any reason, and in the opinion of My Island Bistro Kitchen, this giveaway event is not capable of running as planned or if it is adversely affected by computer virus, fraud, technical failures, or other causes beyond its control, My Island Bistro Kitchen reserves the right to cancel, modify, or suspend the giveaway event, at any time, and at the sole discretion of My Island Bistro Kitchen, without notice.
Title:Best of Bridge Sunday Suppers Author: Various Publication Date: 2017 Publisher: Robert Rose Inc. Cover: Hardcover Price: $29.95 Pages: 324
Robert Rose Inc. has offered me the opportunity to conduct a review of Best of Bridge Sunday Suppers.
This cookbook is a collection of standard home cooking recipes that would typify classic-style Sunday family suppers. The book has an attractive, sturdy hardcover and the pages are spiral bound making it easy for the book to stay open and the pages to lay flat for the recipe being made.
The book features a collection of 200 recipes spread out through 12 chapters: Salads, Soups, Big Roasts, Small Meats, On the Grill, Stews & Braises, Casseroles & Savory Pies, Pizzas & Pastas, Sides, Homemade Breads, Sauces & Condiments, and Desserts. At the beginning of each chapter, there is also a separate table of contents outlining the recipes (and their page numbers) found in that section of the book. There is also an alphabetical index at the back of the book.
Each recipe is accompanied by a one to two sentence lead-in about the recipe and many recipes offer tips and suggestions on ways to vary the recipe.
This book, like previous Best of Bridge books, uses capital letters in a font that I find too large and folksy. This makes the pages cluttery and difficult to read. Generally, the instructions for making the recipes are all lumped together in one or two very long paragraphs. This style of instruction-writing makes it difficult to follow the method. I find cookbooks that lay out the instructions in separate, step-by-step, paragraphs are more user friendly. Breaking down the steps of a recipe into separate short paragraphs eases anxiety and frustration as it is easier and quicker to find your place and progress in the instructions as you go about making the recipe.
I found the ingredients in the recipes are used in the instructions in the order in which they are listed and, generally speaking, most of the instructions are easily understandable. The recipes in the book call for, what I would consider to be, ordinary ingredients which makes it easy to shop for and to prepare the dishes. Most, if not all, ingredients would be found in standard supermarkets.
While, for the most part, exact quantities of ingredients are given, there are some recipes that are vague. For example, the recipe for Roasted Carrot and Sweet Potato Soup with Apple and Sage calls for one medium sweet potato. When I went to the supermarket, the potato bin had dozens of different sized potatoes – I had no idea what the recipe creator means by “medium-sized”. It would have been better to have given a weight measure of the potato required because there is a vast difference in sizes available and the size chosen will affect the texture and yield of the soup. As well, some recipes call for 1 onion – onions, too, come in different sizes so, for the benefit of more inexperienced cooks, it would be preferable if the ingredients specified if it is ¼ cup, ½ cup, or 1 cup of chopped onions. Providing exact measures helps to ensure successful cooking, particularly for novice cooks.
There are 32 color photos in the book and they are of good quality but there is obviously not a photo for each of the 200 recipes so less than 15% of the recipes are accompanied by a photograph. Including photos is so important in a cookbook as, not only do photos of mouth-watering food inspire people to try the recipes but the color photos also give a frame of reference of what the finished dish should look like. Including a large book of page after page of solid print is not very inviting or inspiring, particularly when the subject matter is food. Adding more photos would have broken up the monotony of page after page of large cluttery print.
Test-driving recipes
I tested one recipe out of the cookbook. Robert Rose Inc has given me permission to share the recipe and their photo for Roasted Carrot and Sweet Potato Soup with Apple and Sage to accompany my review of this cookbook. The recipe follows at the end of this review.
Roasted Carrot and Sweet Potato Soup with Apple and Sage
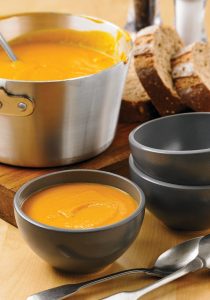
This soup combines an interesting mix of ingredients – carrots, sweet potato, onion, apple, chicken stock, apple juice or cider, sage, and cream. The instructions did not indicate what size of chunks the carrots and sweet potato needed to be for roasting. I cut them into 1” chunks. The method said to roast them for 20 minutes at 450°F. The potatoes were done in about that time and I had to remove them from the oven but the carrots took 55 minutes (and I have a true temperature oven). I have no idea what size or shape the recipe creator intended the carrots to be cut but, if I had cut them any smaller, they simply would have burned before being roasted fork-tender. I also had no idea what size the sweet potato was intended to be for the soup. I may have chosen a small versus medium potato but the recipe ingredients provided no frame of reference in terms of weight of the potato required.
The method said to bring ingredients “to a simmer. Reduce heat and simmer for 15-20 minutes or until everything is soft”. The recipe creator probably meant “bring to a boil”, not “simmer”; however, the published instructions were what they were so, especially for an inexperienced cook, the instructions in this regard were confusing. The instructions also did not indicate if the mixture was to be covered or not during the cooking process. I covered mine to reduce evaporation.
While the soup was a lovely orange color and tasty enough (though I think the addition of garlic could have enhanced the flavor), the soup was time-consuming and tedious to make – the vegetables had to roasted, the onion sautéed, the mixture simmered then blended, and finally re-heated with the addition of cream.
Concluding Thoughts
While I didn’t find the recipes overly innovative or inspiring, I would class the book as a compendium of traditional Sunday supper meals – a mix of salads, soups, mains, and desserts. I would suggest this book would be more of use to someone who has some experience cooking versus a novice since “judgment calls” based on experience are often required, especially in terms of amounts of some ingredients (like vegetables, onions, etc). The biggest issues I found with the book are the cluttery pages of uppercase font with the instructions jumbled into one to three long paragraphs as well as the lack of color photos to break up endless pages of text and to give a benchmark for what a finished dish should look like.
I found some of the instructions and terminology a bit bizarre. For example, the recipe for Sticky Carrots (p. 216) refers to a sauce as “goo”. I have never seen a recipe in a published cookbook use this type of terminology to refer to a food and, frankly, I find that unappetizing and off-putting. The first line in the instructions for this recipe say “Choose a saucepan in which the carrots can sit snugly in a single layer along the bottom (but don’t put them in the pan quite yet)”. Then, why mention this as a step if the step is not dealt with at that point?
The recipe for Basic Gravy (p. 266-267) suggests using lemon juice or wine in the gravy. In the instructions, it refers to using the lemon juice (or a splash of wine) if the gravy tastes “a little flat”. I’m not sure what is meant by “a little flat” and the recipe does not indicate how much wine or lemon juice is to be used and this useful detail would be the difference between a successful gravy or not. These kinds of ingredients and instructions prompt me to suggest that the book could have benefitted from some closer quality control.
Food plays a vital role in Christmas celebrations here in Prince Edward Island. I recently chatted with five Islanders who, in one way or another, have strong food connections. Read on to find out what foods these foodies most associate with Christmas and what foods, if they didn’t have them, it just would not be Christmas for them.
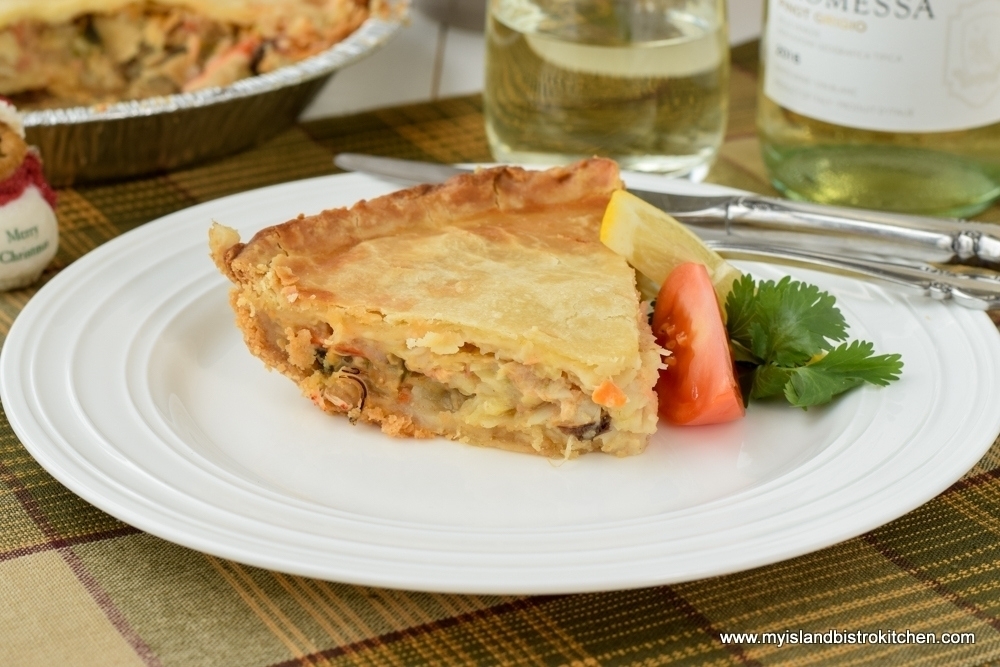
(With the exception of Premier Wade MacLauchlan’s Seafood Pie, all photos in this posting are from the food blogger’s own stock collection and are not of contributors’ specific recipes mentioned in this article.)
Wade MacLauchlan, Premier of Prince Edward Island
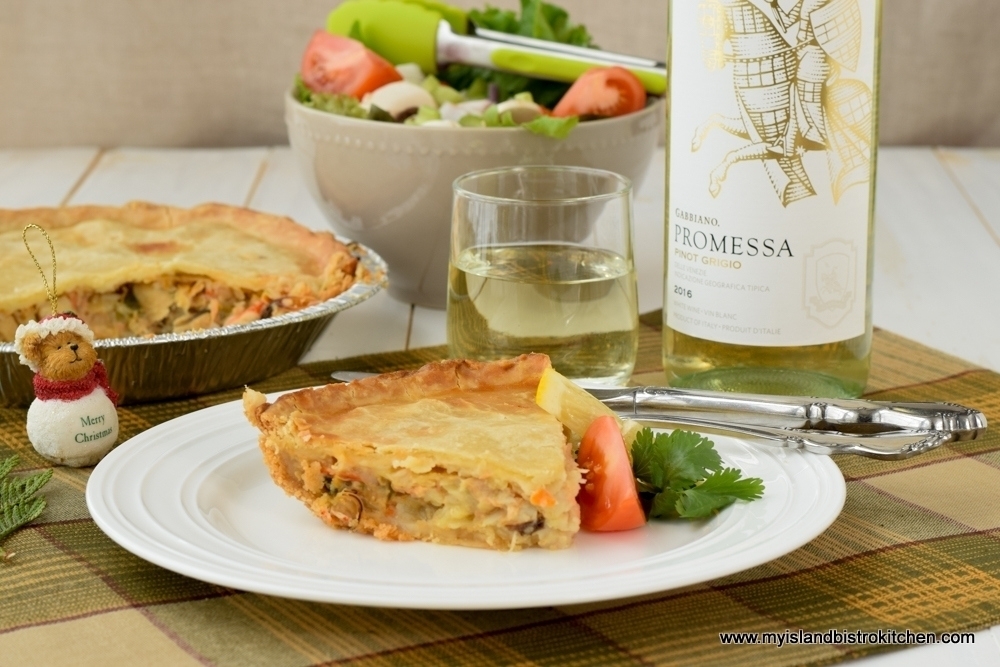
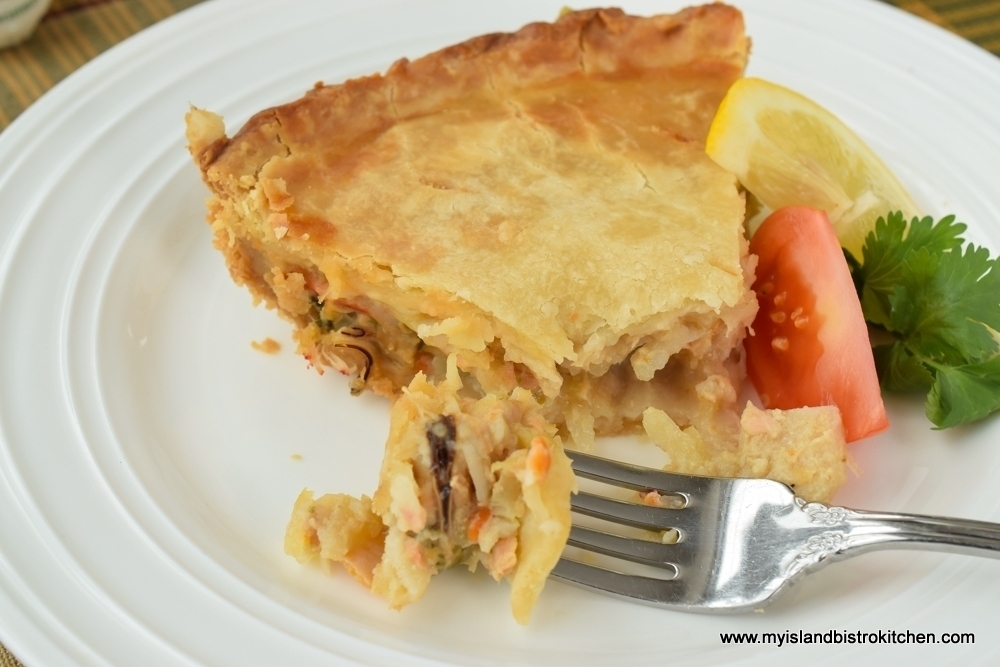
Food factors heavily into Premier Wade MacLauchlan’s Christmas festivities. The premier, a great cook himself, launches into seafood pie production in mid-December. He produces some 20 seafood pies filled with mussels, lobster, bar clams, scallops, and some fin fish like salmon, trout, or haddock.
Premier Wade MacLauchlan’s Seafood Pie
Premier MacLauchlan uses grated potatoes that have been cooked in seafood stock to make a heavy starchy paste which eliminates the need for flour as a thickener for the pie filling. The ingredients are combined and placed inside a double-crusted pastry and baked.
Premier Wade MacLauchlan’s Seafood Pie
When asked what he does with all the pies, he tells me he gives them away as gifts. And, for those who aren’t seafood lovers, he makes tourtière and says he usually makes between 6 and 10 of those each December.
Food also plays a part in a Solstice Sunrise Party that the premier has been hosting at his home for almost two decades. Held annually on the day of the winter solstice, the premier says he simply couldn’t stop it now even if he wanted to because the regulars would just show up anyway! Rising early to make 3-4 dozen muffins and to brew a couple of urns of coffee, the premier opens his doors at 7:30am and people start arriving to watch the sunrise together around 8:00am. It’s not uncommon for 75-80 people to attend. With a commanding view to the east and to the south out over Stanhope Bay, it’s a time for family, friends, and neighbours to visit and re-connect. Everyone brings food to contribute to the potluck event which is set up buffet style.
Christmas Day is spent with immediate family and, on Boxing Day, the larger extended MacLauchlan family gather at the premier’s home for a potluck brunch.
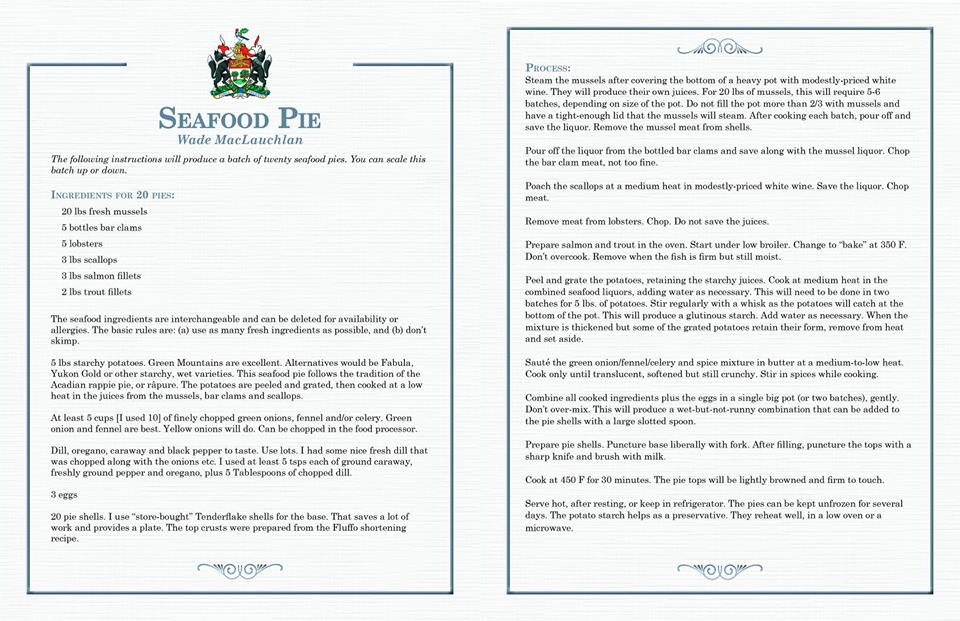
The premier has kindly shared his recipe for his Seafood Pie which is printed here with Wade MacLauchlan’s permission. The premier says, although the recipe yield is for 20 pies, the recipe is easily scalable.
Premier Wade MacLaughlan’s Seafood Pie Recipe
Premier Wade MacLauchlan’s Seafood Pie
Peter Bevan-Baker, Leader of the Green Party of Prince Edward Island
Communal family cooking has always played a significant part in Peter Bevan-Baker’s life starting when he was a lad growing up in Fortrose, just north of Inverness, in the Highlands of Scotland. The family would all prepare the Christmas dinner together, chopping vegetables and singing Christmas carols.
Member of the Legislature and Leader of the Green Party of PEI, Peter’s first and foremost memory of a food enjoyed at Christmas time is his late father’s vol-au-vent made with leftover turkey from Christmas dinner and served with Sauce Robert, a brown mustard sauce. Sometimes, the vol-au-vents would be served as nibbles but other times as the main for a meal when they would be served with “tatties and neeps”, the Scottish names for potatoes and turnips, respectively.
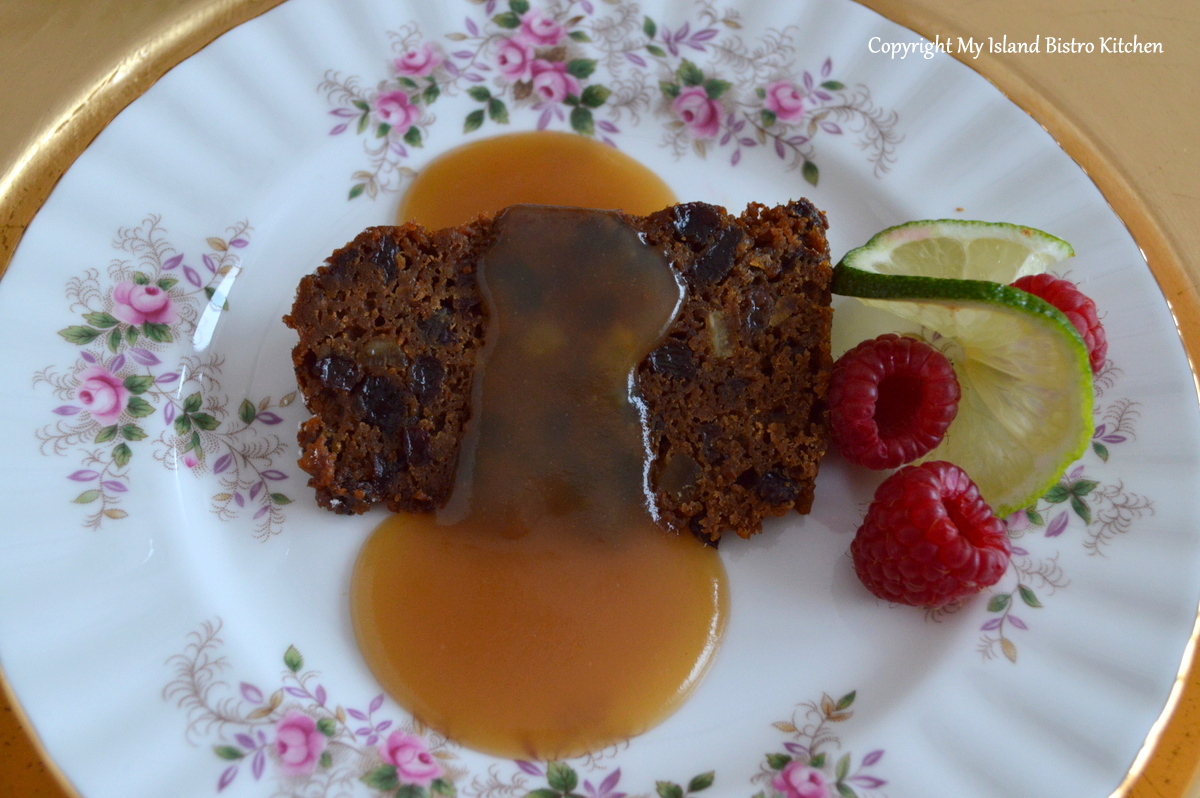
Plum Pudding
When asked what Christmas dinner dessert consisted of, Peter says it was always Christmas Pudding which he did not like at all! However, he says the arrival of the pudding at the dinner table was quite an elaborate ceremony. Everyone stood up and literally lifted the table off the floor to meet the pudding – it was a true salute to the Christmas pudding! Of course, some alcohol would be heated, poured over the pudding, and the pudding set aflame. Peter claims watching the pudding burn was the best part since he had no liking for the pudding! His father made a brandy butter to serve with the pudding. Peter says another great memory he has of Christmas as a young boy in the Scottish Highlands was visiting a rich family who lived in the area and who served Coca Cola at Christmas which was very special since it was not something he had at home.
Peter’s father was a great cook and modeled to his children that it was okay for men to be in the kitchen cooking. Today, Peter and his wife have four adult children (two of whom are chefs) and cooking remains very much a family event. Vol-au-vents will make an appearance over the holidays in keeping with his long-standing family tradition. While the family usually has a turkey dinner for Christmas, Peter says it will usually be with a contemporary twist of some sort that may include some dishes from other cultures.
Bill Martin, Mayor of Summerside and Owner of the Water Street Bakery
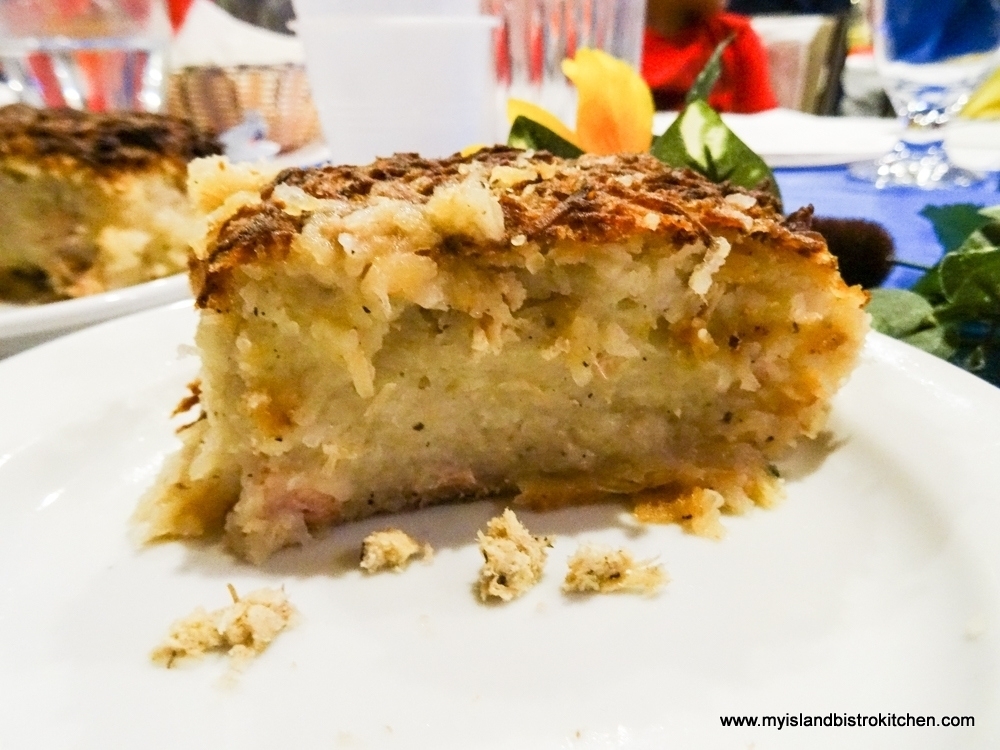
Mayor of the City of Summerside, Bill Martin has very fond memories of waking up on Christmas morning to the scent of meat pies baking. His mother, a Scottish war bride, had an absolute Christmas morning tradition and that involved homemade meat pies. The family enjoyed the meat pies, complete with homemade mustard pickles, after opening presents on Christmas morning. Mayor Martin continues that tradition today. He and his family enjoy Christmas breakfast of bacon, eggs, homefries, and toast along with the meat pie and mustard pickles. To this tradition, they have also added the Acadian dish, Rapure, a grated potato casserole.
Acadian Rapure
Mayor Martin and his wife have run the Water Street Bakery for the past 29 years. They make meat pies year-round now and, in December alone, they will make more than 2000 meat pies which are made with pork, chicken, turkey, potato, onion, and spices, all covered in a biscuit dough crust. These pies are in such demand during the Christmas period that the bakery has rented additional freezer space. In fact, on the first Saturday in December, they made 200 meat pies and sold 100 of them the same day. As a bakery owner, the other two most popular items that Martin says never go out of style are the chocolate-covered peanut butter balls and the cherry balls, both of which are available at the bakery only at Christmas which makes them more special treats.
Chocolate Peanut Butter Balls
Irwin MacKinnon, Executive Chef, Papa Joe’s Restaurant and PEI Chef of the Year 2017
Long-time executive chef at Charlottetown’s Papa Joe’s Restaurant and recently-named PEI Chef of the Year 2017, Chef Irwin MacKinnon says it would not be Christmas in his household without the “Jimmy Jams”. These delightful cookies have been made by ancestors on his mother’s side for years. Today, his mom is the principle baker of these Christmas treats that his children look forward to each Christmas. As MacKinnon describes them, Jimmy-Jams are two round shortbread cookies, about 1½“ – 2” in diameter, sandwiched together with plain white icing. Each sandwiched cookie is iced again on top and then decorated with rainbow-colored sprinkles.
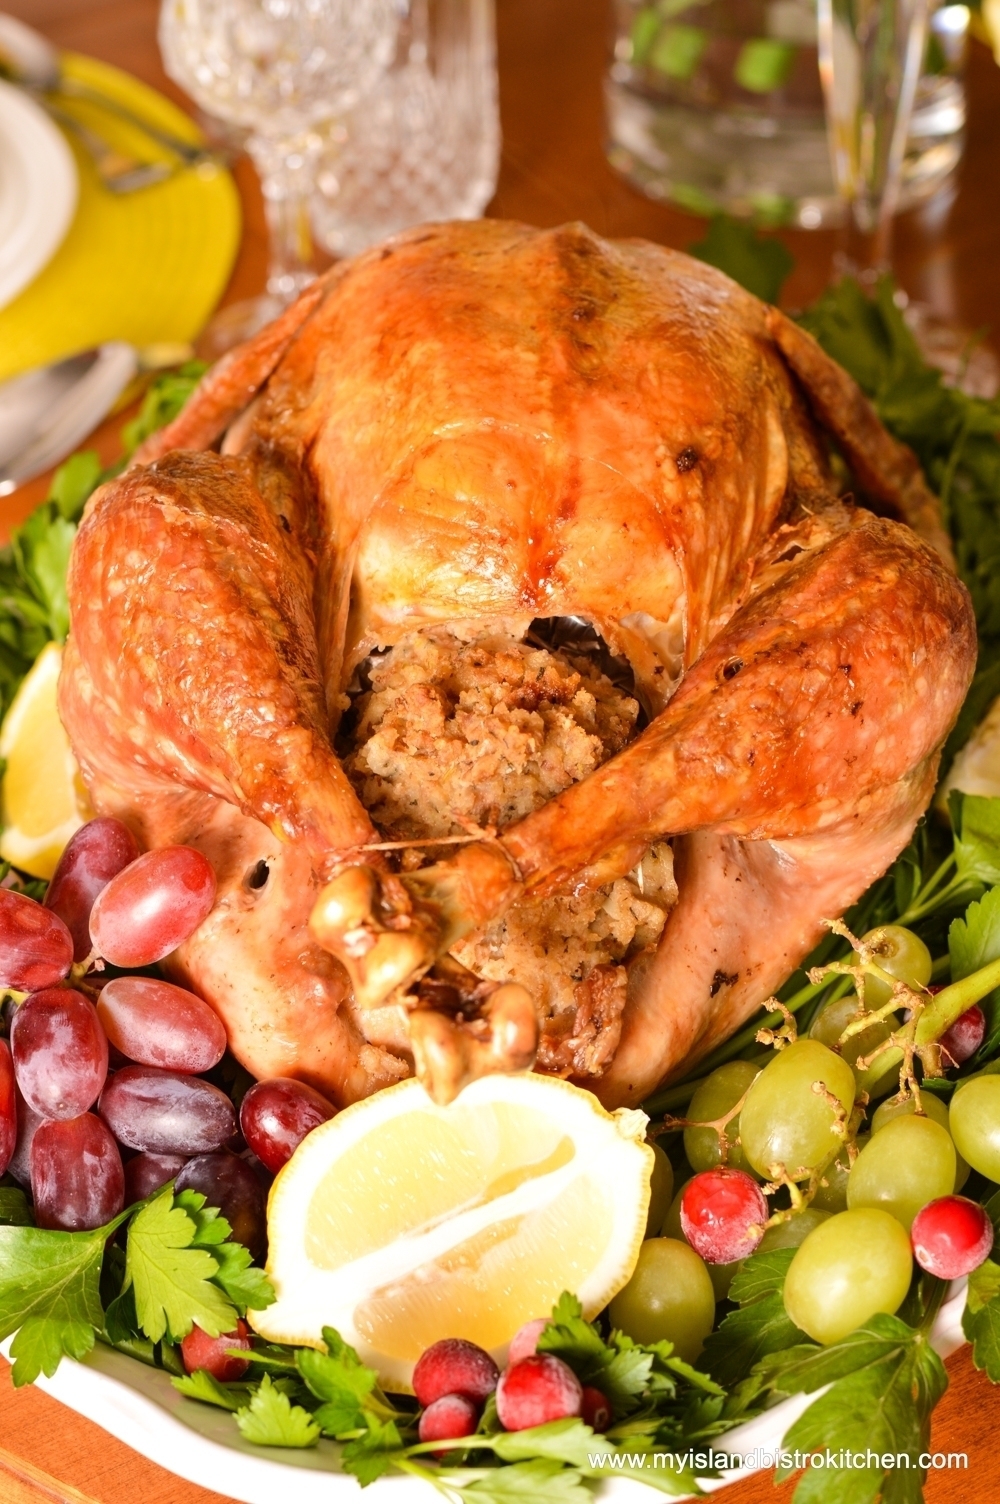
Everyone has his or her own version of the stuffing for the turkey and Chef MacKinnon discovered how important that tradition is when he and his wife married 25 years ago. On his side of the family, they make what he calls “Grammie’s Stuffing” which is bread-based and the ingredients are bound together by mashed potato and lots of butter and seasoned with onion, summer savory, and salt and pepper. A bit of brown sugar is added just to give a sweet tone. On his wife’s side of the family, they make the stuffing (dressing) completely opposite and Chef Irwin classes it as a potato stuffing made with mashed potatoes, onion cooked in butter, and seasoned with summer savory. This is baked in the oven and there is no bread in this version. If you are an Islander, you’ll get and appreciate the significance of family recipes for the turkey stuffing/dressing!
Roast Turkey
So, whose stuffing recipe will be on the Christmas table in the MacKinnon household this year? You guessed it – Irwin will be making his grammie’s stuffing recipe to go along with the fresh turkey from Larkin Brothers in New Glasgow. To this, he’ll include a wide variety of veggies that include potatoes, turnip, carrots, squash, and brussel sprouts.
For dessert, Chef Irwin’s mother-in-law’s plum pudding will grace the table complemented by Irwin’s rich brown sugar sauce made from a rue of butter and flour with caramelized brown sugar added. Chef Irwin says a slice of pudding topped with ice cream and a good drizzle of a glossy brown sugar sauce is the ultimate Christmas dinner dessert.
Since he cooks everyday for a living, I asked Chef Irwin if he lets someone else cook the Christmas dinner but he says it’s him that spearheads the dinner at home and one of his greatest joys is to cook for his own family. Other members of the family pitch in and bring contributions to the dinner as the family melds their different traditions from their blended families.
Glenda Burt, Chef, and former owner of The Home Place Restaurant in Kensington, PEI
For Chef Glenda Burt, the highlight of the Christmas dinner is the plum pudding and warm sauce. She says that, even though you might be “stuffed to the gills” from the main meal, there is always room for plum pudding! Glenda makes a rich toffee sauce to serve with her plum pudding, a sauce made with brown sugar, whipping cream, butter, and vanilla.
Plum Pudding
Glenda grew up in the family that originally owned Mary’s Bakery in Kensington so baking and candy making are certainly second nature to her. She has very fond memories of the chocolate, brown sugar, and divinity fudges that her mother made at Christmas and how they would appear in a plastic Christmas motif tri-sectioned dish on Christmas Eve. Homemade raisin bread toasted on Christmas morning is an annual tradition in the Burt household. Glenda doesn’t prepare a big Christmas Day breakfast because she says the whole day is spent eating; however, the raisin bread must be present to start the day off.
Other foods that will make their appearance over the holidays will be gingersnaps, dark fruitcake, meat pies (that Glenda says are pure comfort food) and, in deference to our Maritime culture, some kind of seafood which could be lobster in the shell or seafood chowder.
Chef Glenda is hosting her family Christmas on Boxing Day this year and she will be doing the cooking of the traditional Christmas dinner that will include roast turkey, stuffing, and veggies. Glenda will be serving her famous turnip casserole as well. This yummy dish is made with mashed turnip, a white sauce with Parmesan cheese, and topped with buttered bread crumbs. Of course, all the traditional fixins’ like homemade rolls, pickles, and beets will be on the table to complement the turkey dinner.
My thanks to Premier Wade MacLauchlan, Leader of the PEI Green Party Peter Bevan-Baker, Mayor Bill Martin, Chef Irwin MacKinnon, and Chef Glenda Burt for sharing their Christmas food traditions with me.
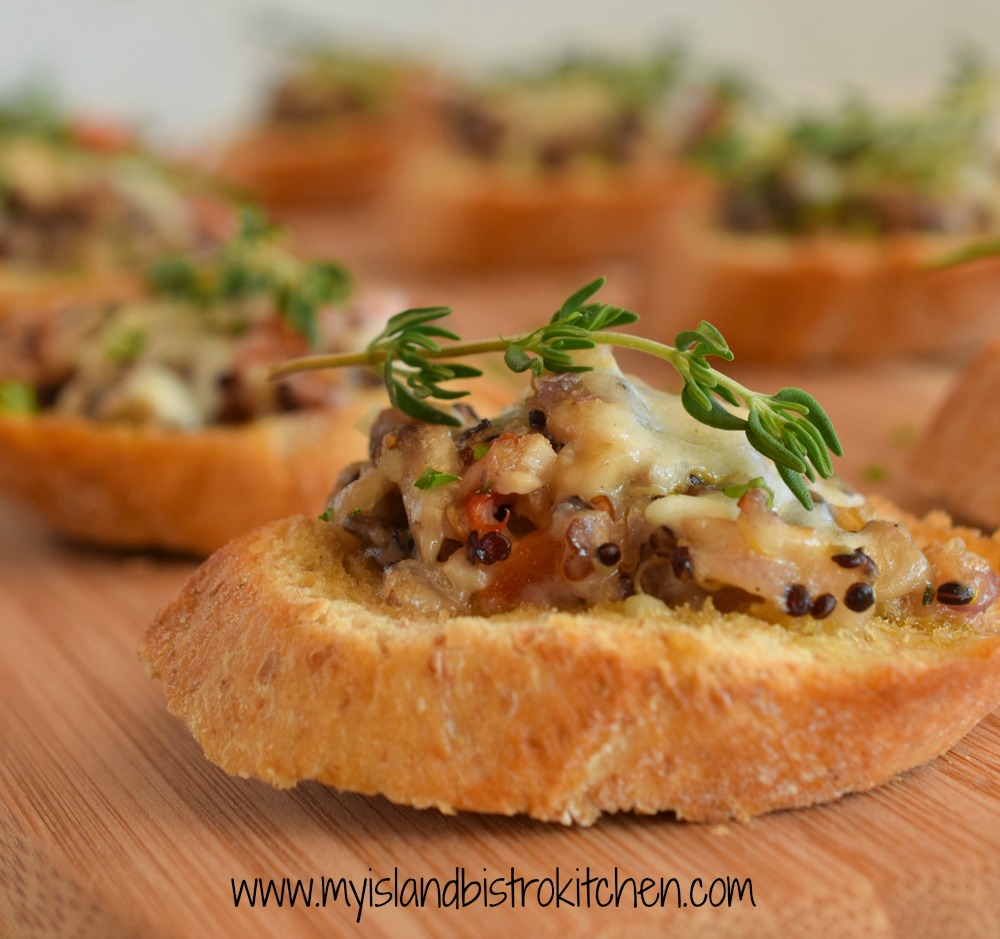
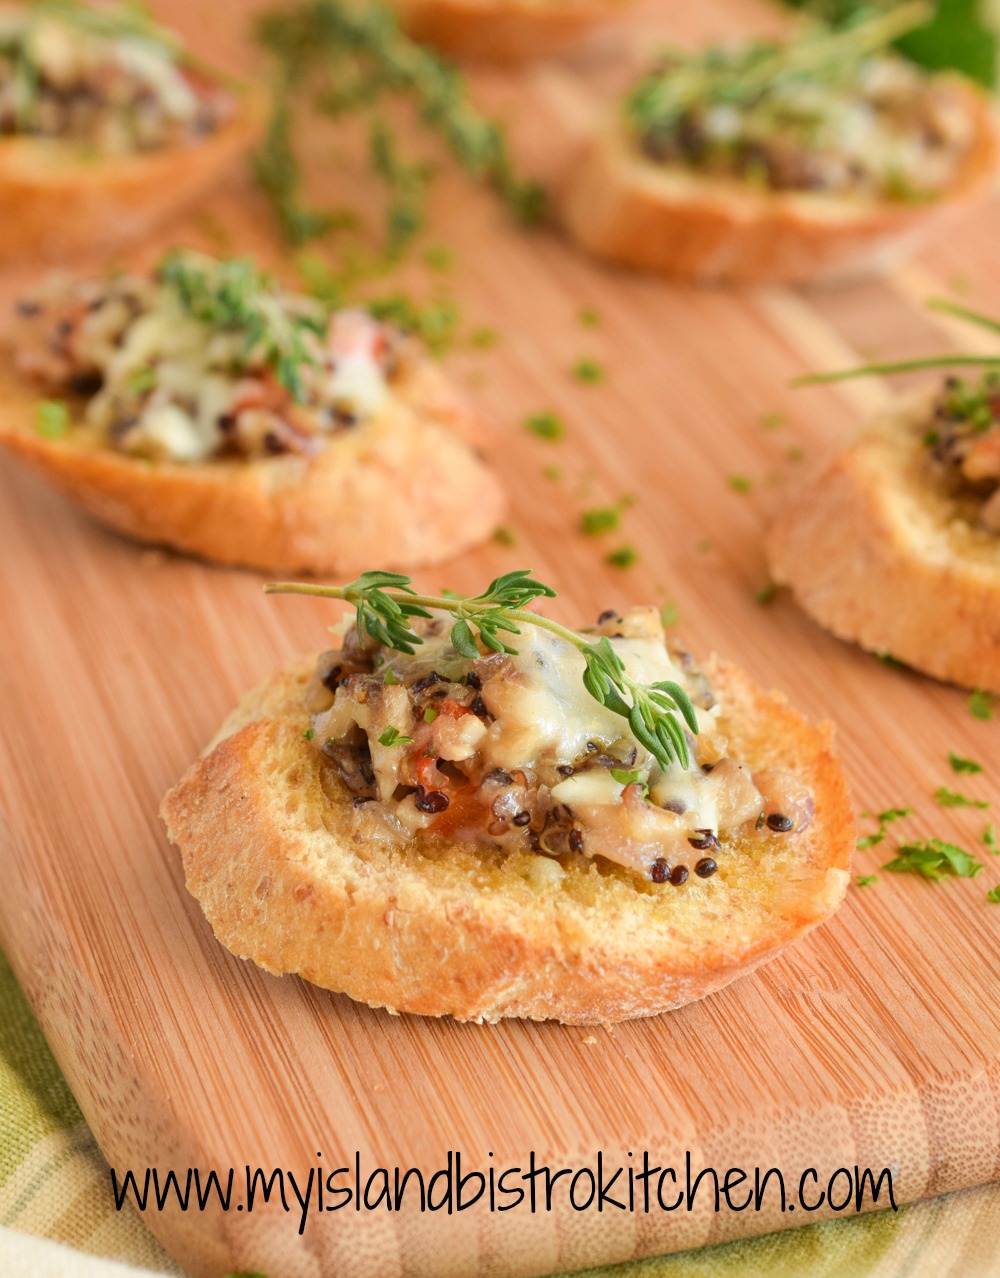
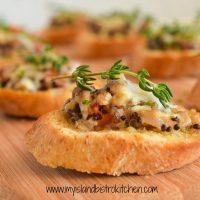
If you are like me, you are always on the hunt for tasty little appetizers or hors d’oeuvres to serve at functions.
Savory Mushroom and Quinoa Crostini
These savory little toasts are packed full of flavor. Red onion, garlic, mushrooms, and red pepper are sautéed in butter and seasoned with nutmeg, summer savory, and thyme. The seasoned and sautéed vegetables are combined with cooked quinoa added for texture and visual appeal along with Parmesan cheese for additional flavor. The ingredients are bound together with chicken stock, cream, and maple syrup to add a touch of sweetness.
Spooned on to olive-oiled baguette slices, each crostini is topped with grated cheddar cheese. For mine, I used a locally produced cheese – Appletree Smoked Cheddar Cheese produced in PEI by COWS Creamery.
Savory Mushroom and Quinoa Crostini Hors d’oeuvres
These hors d’oeuvres are easily made into a gluten-free version. Simply use a gluten-free baguette and ensure that all other ingredients are gluten-free. One important factor to keep in mind with hors d’oeuvres is to ensure that they can easily be eaten with grace by guests – that means no huge chunks of ingredients that can pull apart when chewed into. Hors d’oeuvres should be able to be eaten with the use of only one hand. While the mushrooms could be sliced, instead of chopped, for this hors d’oeuvre, they would need to be very small mushroom slices.
4 tsp chicken stock
2 tbsp heavy cream
2 tsp pure maple syrup
¼ cup cooked quinoa
4 tsp finely grated Parmesan cheese
Salt and pepper, to taste
¼ cup grated Cheddar cheese
Fresh herbs for garnish
1 French baguette
Olive Oil for brushing on baguette slices
Method:
Over medium heat, melt butter in saucepan. Add onions and garlic and sauté for 1 minute. Add the mushrooms and sauté for 3-4 minutes, stirring frequently. Add the red pepper, nutmeg, summer savory, and thyme. Sauté for an additional 1-2 minutes, stirring frequently.
In small bowl, combine the chicken stock, cream, and maple syrup. Add the quinoa, Parmesan cheese, and sautéed vegetables. Season with salt and pepper to taste and combine all ingredients well.
Slice baguette into 16 slices between ¼” and ½” thick. Brush each slice with small amount of olive oil. Divide mixture evenly between the 16 slices. Sprinkle with grated cheddar cheese. Place crostini on baking sheet and broil for 1-2 minutes or just until cheese has melted. Garnish with fresh herbs. Serve hot.
These easy-to-prepare savory little toasts are packed full of flavor. Featuring mushrooms, quinoa, cheese, and select seasonings, these tasty bites are sure to be a favorite hors d'oeuvre at your next gathering.
Over medium heat, melt butter in saucepan. Add onions and garlic and sauté for 1 minute. Add the mushrooms and sauté for 3-4 minutes, stirring frequently. Add the red pepper, nutmeg, summer savory, and thyme. Sauté for an additional 1-2 minutes, stirring frequently.
In small bowl, combine the chicken stock, cream, and maple syrup. Add the quinoa, Parmesan cheese, and sautéed vegetables. Season with salt and pepper to taste and combine all ingredients well.
Slice baguette into 16 slices about 1/2" thick. Brush each slice with small amount of olive oil. Divide mixture evenly between the 16 slices. Sprinkle with grated Cheddar cheese. Place slices on baking sheet and broil for 1-2 minutes or just until cheese has melted. Garnish with fresh herbs. Serve hot.
Recipe Notes
Copyright My Island Bistro Kitchen
Savory Mushroom and Quinoa Crostini
(Mostly) PEI and Maritime Food – Good Food for a Good Life!