
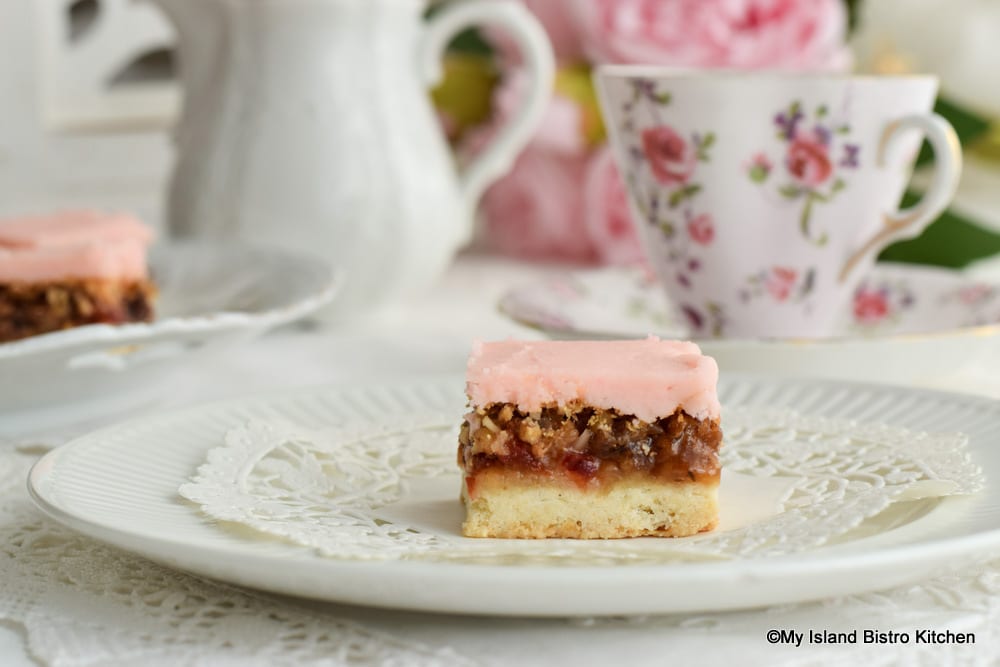
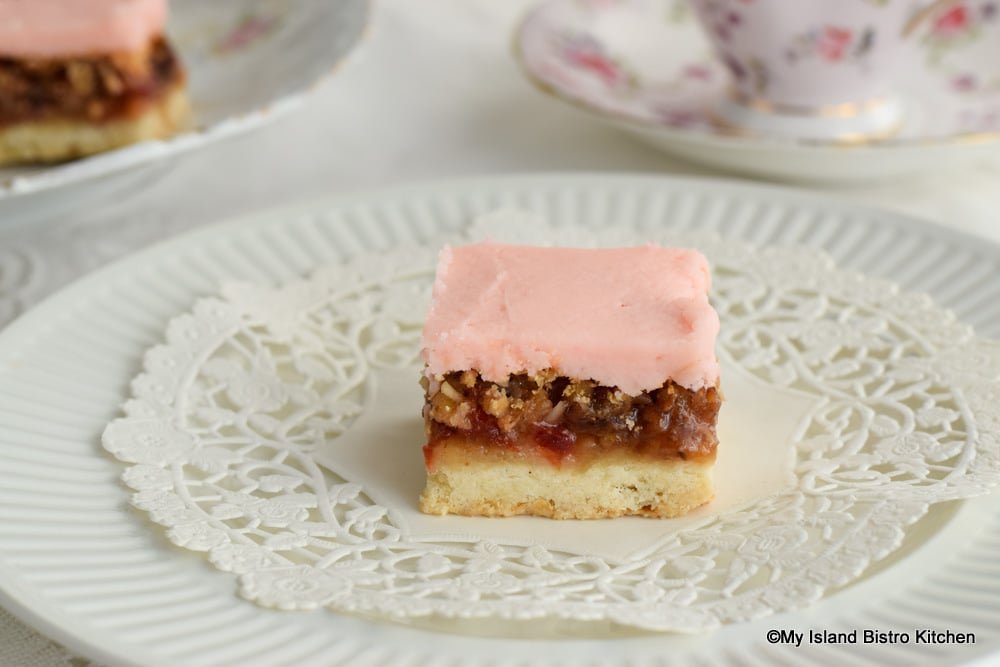
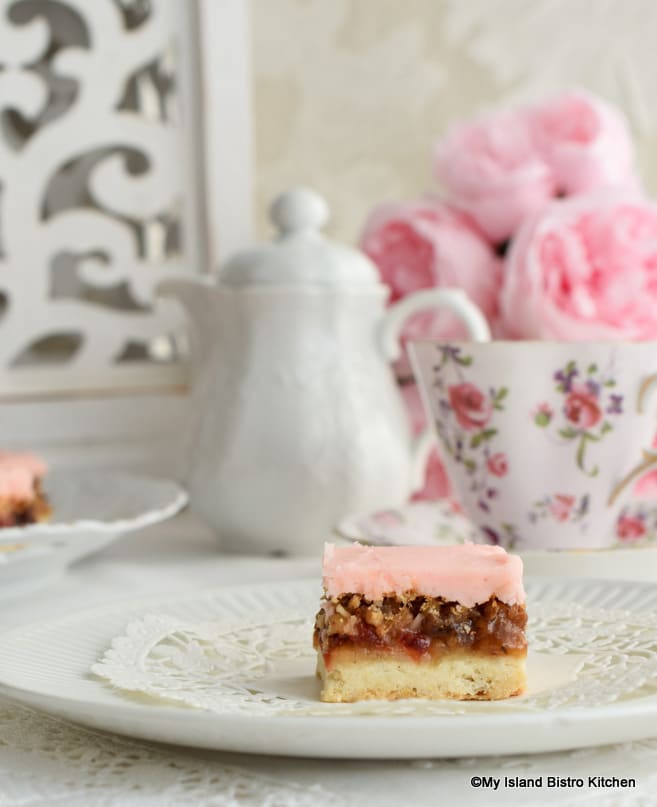
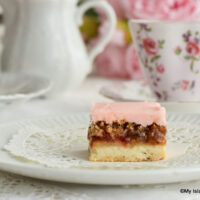
Always a favorite, this three-part square (shortbread base, topping, and icing), known simply as “Dream Square”, is a treat! Sometimes referred to as a vintage or retro square, I’m not sure it has ever been “shelved” long enough in history to put it in that category! This is a square that is, in my view, perennially in vogue.
There are many variations of the recipe for Dream Square and this is my version. With a buttery, tender shortbread crust, topped with a soft, rich, and slightly chewy filling of cherries, dates, pecans, and coconut, and iced with a delectable frosting, it’s easy to see why Dream Square is an enduring favorite.
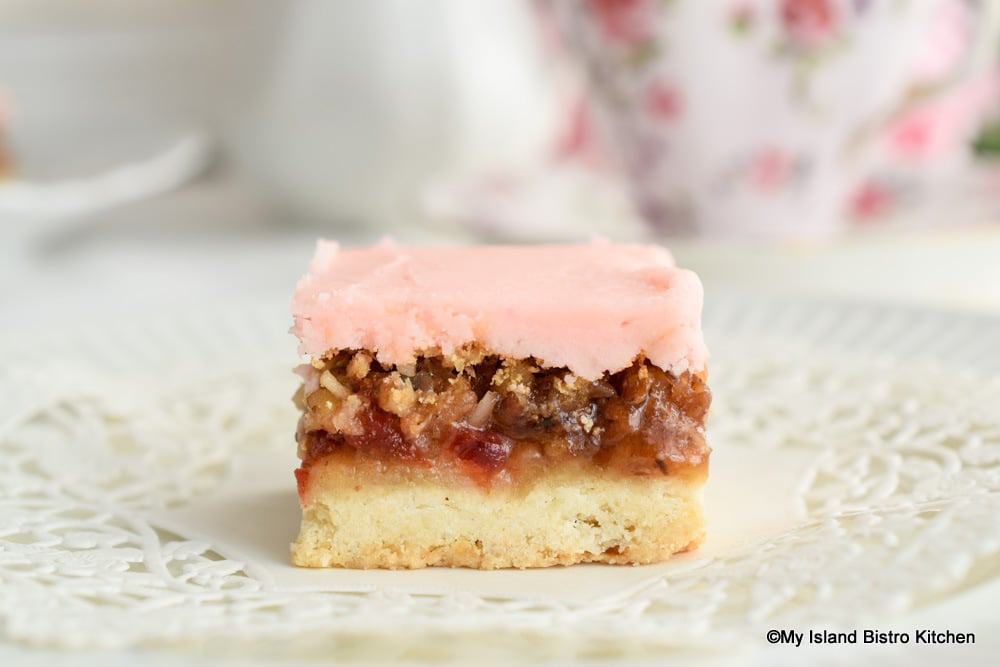
This square involves a base that is par-baked and cooled before the topping is added. It’s important not to overbake the base as it will be going back in the oven. Overbaking will cause it to be quite crumbly and chippy. Let the base cool completely to room temperature on a wire rack before adding the topping. The base typically takes 35-40 minutes to sufficiently cool. The purpose of this is to keep the topping from seeping into the base which is what could happen if the topping is spread on the base while it is still hot or quite warm. A small amount of seepage is expected from when the heat and the square topping ingredients meet up with the shortbread crust in the oven but not so much that the base cannot visually be identified separately from the topping.
The yummy topping is made with a mixture of eggs and brown sugar, flavoring, some flour for thickening, and the cherries, dates, nuts, and coconut. Because maraschino cherries are wet, they need to be well drained and dried before mixing them into the topping mixture. Otherwise, the extra moisture from the cherries will make the topping runny and a little too gooey and it won’t cut out intact and plate well.
I blot the whole cherries dry in paper towel (though an old tea towel would work, too). I then cut the cherries up and roll them up in paper towel to soak up the excess moisture. Sometimes, this has to be done a couple of times. Once the topping is mixed, it is spread over the cooled, parbaked crust and put in the oven for 25-28 minutes or just until the top is set and firm to the touch. Be sure to let the square cool completely before frosting and cutting.
To allow the icing to set on the square before cutting, I recommend placing the square in the refrigerator for about 35-45 minutes. I also find the square cuts better if it is at room temperature for about 15 minutes after refrigeration and if the knife is warm. Simply run the knife blade under hot water for a few seconds and dry it well on a tea towel before cutting the square. Repeat for the cutting of each row of squares.
This Dream Square plates well and can easily be picked up in the fingers and eaten, no fork required. This is a square that freezes quite well in an airtight container (that’s assuming, of course, that there are any left to freeze).
[Printable recipe follows at end of posting]
Decadent Dream Squares
Ingredients:
Shortbread Crust Base:
1½ cups all-purpose flour (or gluten-free one-to-one baking flour, if required)
1/3 cup granulated sugar
½ cup + 1 tbsp butter (cubed into about 1” pieces), at room temperature for about 15 minutes
Topping:
2 large eggs, room temperature, lightly fork beaten to break them up
1 1/8 cups brown sugar, packed
½ tsp pure vanilla extract
¼ tsp pure almond extract
2 tbsp + 1 tsp all-purpose flour (or gluten-free one-to-one baking flour, if required)
¾ tsp baking powder
2/3 cup chopped red maraschino cherries, well drained and blotted dry in paper towel
2/3 cup chopped pecans
1/3 cup chopped dates
½ cup sweetened shredded coconut
Icing:
6 tbsp butter, softened at room temperature
¼ tsp pure almond extract
1/8 tsp pure vanilla extract
1¾ cups + 2 tbsp (6.5 oz) sifted icing sugar (aka confectioner’s sugar or powdered sugar)
1½ – 2 tbsp water or milk
Method:
Pre-Prep:
Drain and chop cherries. Blot, or wrap, chopped cherries in paper towel to soak up excess moisture. Chop pecans and cut up dates. Measure coconut. Set cherries, nuts, dates and coconut aside.
Line 9”x9” baking pan with parchment paper, leaving enough paper overhang on sides to grip and lift baked square from pan for icing and cutting. Position oven rack in center of oven and preheat oven to 350°F.
For Shortbread Crust Base:
In bowl of stand mixer fitted with paddle attachment, mix flour and sugar together. With mixer set at medium speed, mix in the butter just until crumbly. A food processor may, alternatively, be used to make the base, pulsing the mixture for just a very few short bursts. Mixture will appear dry using either method.
Press mixture evenly into prepared pan. Prick base all over with tines of fork to allow steam to release as the base bakes and to eliminate air pockets from forming. As the base mixture will be dry, this is easiest done if the ends of the fork tines are held snugly between the index and middle fingers placed on the crust base as the fork is inserted and removed from the base. This will help keep the base intact while it is being docked with the fork tines.
Bake base 12-15 minutes, or just until edges of crust start to turn very pale golden in color and start to show signs of slightly pulling away from pan sides. Do not overbake or crust will be hard. Cool for about 35-40 minutes in pan on wire cooling rack before adding topping.
For Topping:
In bowl of stand mixer fitted with paddle attachment, beat the eggs lightly at medium-low speed. Increase speed slightly and beat in brown sugar, vanilla, and almond extract. Mix flour and baking powder together in small bowl. Reduce mixer speed to low and add the dry ingredients. Increase speed slightly and beat just until ingredients are combined and mixture is smooth.
Remove bowl from mixer stand and manually stir in the cherries, pecans, dates, and coconut. Mix only until ingredients are combined. Spread mixture over cooled shortbread base. Bake in center of oven rack in 350°F oven for about 25-28 minutes, or just until top is set and firm to the touch. Cool square completely in pan set on wire cooling rack before icing.
For Icing:
Place butter in bowl of stand mixer fitted with paddle attachment and beat at medium speed until creamy. Blend in the almond and vanilla extracts. Reduce mixer speed to low and gradually add the sifted icing sugar, about one-half cup at a time. Add the water (or milk), a couple of teaspoons at a time as the icing sugar is being blended in. If desired, add a smidgeon of pink food coloring gel to tint the icing soft pink. Increase speed to medium-low to blend ingredients then increase speed to high and beat an additional minute to ensure ingredients are well combined and icing is smooth. Additional milk or water may be required to make icing of desired spreading consistency. If adding additional milk or water, add by ½ teaspoon at a time. Icing should be of spreading consistency but not “soupy”.
Using the parchment paper overhang, lift square from pan and transfer to cutting board. Peel away the parchment paper. Spread icing evenly over cooled square. Refrigerate for about 45 minutes to set icing then bring square back to room temperature for about 15 minutes before cutting squares into desired size. Squares freeze well.
Yield: One 9”x9” pan of squares
Connect with My Island Bistro Kitchen on Social Media
Join the Facebook page for My Island Bistro Kitchen: https://www.facebook.com/MyIslandBistroKitchen/
Follow “the Bistro” on “X” (formerly Twitter): https://twitter.com/PEIBistro/
See the drool-worthy gallery of mouth-watering food photos from My Island Bistro Kitchen on Instagram: https://www.instagram.com/peibistro/
Follow “the Bistro” on Pinterest at https://www.pinterest.ca/peibistro/ and pin the Pinterest-ready photo at the end of this posting to your favorite Pinterest boards!
Decadent Dream Squares
Ingredients
Shortbread Crust Base:
- 1½ cups all-purpose flour (or gluten-free one-to-one baking flour, if required)
- 1/3 cup granulated sugar
- ½ cup + 1 tbsp butter (cubed into about 1” pieces), at room temperature for about 15 minutes
Topping:
- 2 large eggs, room temperature, lightly fork beaten to break them up
- 1 1/8 cups brown sugar, packed
- ½ tsp pure vanilla extract
- ¼ tsp pure almond extract
- 2 tbsp + 1 tsp all-purpose flour (or gluten-free one-to-one baking flour, if required)
- ¾ tsp baking powder
- 2/3 cup chopped red maraschino cherries, well drained and blotted dry in paper towel
- 2/3 cup chopped pecans
- 1/3 cup chopped dates
- ½ cup sweetened shredded coconut
Icing:
- 6 tbsp butter, softened at room temperature
- ¼ tsp pure almond extract
- 1/8 tsp pure vanilla extract
- 1¾ cups + 2 tbsp (6.5 oz) sifted icing sugar (aka confectioner’s sugar or powdered sugar)
- 1½ - 2 tbsp water or milk
Instructions
Pre-Prep:
-
Drain and chop cherries. Blot, or wrap, chopped cherries in paper towel to soak up excess moisture. Chop pecans and cut up dates. Measure coconut. Set cherries, nuts, dates and coconut aside.
-
Line 9”x9” baking pan with parchment paper, leaving enough paper overhang on sides to grip and lift baked square from pan for icing and cutting. Position oven rack in center of oven and preheat oven to 350°F.
For Shortbread Crust Base:
-
In bowl of stand mixer fitted with paddle attachment, mix flour and sugar together. With mixer set at medium speed, mix in the butter just until crumbly. A food processor may, alternatively, be used to make the base, pulsing the mixture for just a very few short bursts. Mixture will appear dry using either method.
-
Press mixture evenly into prepared pan. Prick base all over with tines of fork to allow steam to release as the base bakes and to eliminate air pockets from forming. As the base mixture will be dry, this is easiest done if the ends of the fork tines are held snugly between the index and middle fingers placed on the crust base as the fork is inserted and removed from the base. This will help keep the base intact while it is being docked with the fork tines.
-
Bake base 12-15 minutes, or just until edges of crust start to turn very pale golden in color and start to show signs of slightly pulling away from pan sides. Do not overbake or crust will be hard. Cool for about 35-40 minutes in pan on wire cooling rack before adding topping.
For Topping:
-
In bowl of stand mixer fitted with paddle attachment, beat the eggs lightly at medium-low speed. Increase speed slightly and beat in brown sugar, vanilla, and almond extract. Mix flour and baking powder together in small bowl. Reduce mixer speed to low and add the dry ingredients. Increase speed slightly and beat just until ingredients are combined and mixture is smooth.
-
Remove bowl from mixer stand and manually stir in the cherries, pecans, dates, and coconut. Mix only until ingredients are combined. Spread mixture over cooled shortbread base. Bake in center of oven rack in 350°F oven for about 25-28 minutes, or just until top is set and firm to the touch. Cool square completely in pan set on wire cooling rack before icing.
For Icing:
-
Place butter in bowl of stand mixer fitted with paddle attachment and beat at medium speed until creamy. Blend in the almond and vanilla extracts. Reduce mixer speed to low and gradually add the sifted icing sugar, about one-half cup at a time. Add the water (or milk), a couple of teaspoons at a time as the icing sugar is being blended in. If desired, add a smidgeon of pink food coloring gel to tint the icing soft pink. Increase speed to medium-low to blend ingredients then increase speed to high and beat an additional minute to ensure ingredients are well combined and icing is smooth. Additional milk or water may be required to make icing of desired spreading consistency. If adding additional milk or water, add by ½ teaspoon at a time. Icing should be of spreading consistency but not “soupy”.
-
Using the parchment paper overhang, lift square from pan and transfer to cutting board. Peel away the parchment paper. Spread icing evenly over cooled square. Refrigerate for about 45 minutes to set icing then bring square back to room temperature for about 15 minutes before cutting squares into desired size. Squares freeze well.
Recipe Notes
Yield: One 9”x9” pan of squares
[Copyright My Island Bistro Kitchen]
Pin Me To Pinterest!

You may also enjoy these other square and bar recipes from My Island Bistro Kitchen:
Classic Nanaimo Bars
Cranberry Shortbread Square
Pecan Shortbread Square
Sweet Marie Bars
Date Squares
Coconut Date and Cherry Square
Unbaked Chocolate Coconut Square
Old-fashioned Jam Squares
Decadent Chocolate Chip Squares
Vintage Rainbow Square
Marshmallow Squares
Gluten-free Brown Sugar Fudge Square