Perfect Peach Blueberry Crisp Recipe

Summer Dessert
Peach Blueberry Crisp

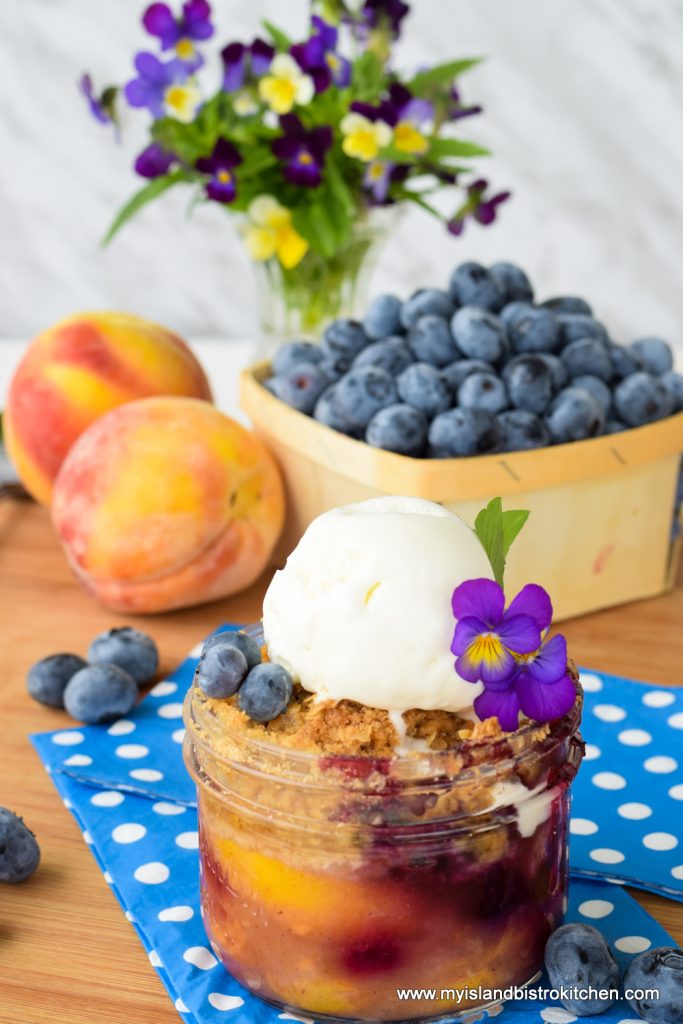
There are so many options for summertime desserts.  I try to use fresh fruits in desserts throughout the summer season and often look for combinations that will work well together.  Some fruits just naturally complement each other, like blueberries and peaches, for example. Together, they make a fabulous Peach Blueberry Crisp!

Summer Berries
PEI Blueberries

We eagerly await the arrival of the peaches from the Niagara region as this is not a fruit commonly grown on PEI (though I know of one farmer who has been testing them with our growing season and did have some crop in 2017).

Peaches
Peaches

I live not far from a high bush blueberry u-pick and, in August, we have a steady diet of these lovely berries.

Blueberries
High Bush Blueberries

After I have had lots of the peaches and berries on their own, I tend to start looking for other ways in which to use them.

Summer Crisp Dessert
Perfect Peach and Blueberry Crisp

For this dessert, I have combined the blueberries with the peaches to create this lovely summer crisp dessert.  Much as I love the traditional apple crisp (click here for my recipe), I have to say that I think this one might just edge out the apple crisp for my favorite.  The peach and blueberry flavours work very well together.  In order to keep the color of the filling from being too dark, I use peaches as the predominant fruit and a much lesser amount of the blueberries as the secondary fruit to tease the tastebuds.

Use peaches that are fully ripe. They will be easier to peel and slice if they are dipped into hot water then immediately into ice cold water.  Slice the peaches into wedges about ½” – ¾” thick. You want to see lovely identifiable slices of peaches in the filling for presentation.

Blueberries
High Bush Blueberries

I like the use of the high bush blueberries in this dessert because they are large enough that they give a real flavour burst when they meet the palate.

I use cornstarch for the filling thickener instead of flour.  I find, especially for light-colored fruits, the cornstarch will allow for a more clear/transparent filling than will flour which will sometimes create a more murky or cloudy filling. In my view, the cornstarch renders a more silky textured filling. The addition of some cinnamon and nutmeg makes this a very aromatic dessert. It smells simply divine when it is baking!

Summer Desserts
Peach Blueberry Crisp

The streusel topping is easy to make and just takes standard pantry ingredients.  Chopped pecans can be added to the topping but they are optional.

This dessert can be made in either a baking pan or a casserole that has an 8-cup capacity as this will allow the crisp to cook evenly and, hopefully, not bubble out during baking.  I do, however, place a foil-lined baking sheet either directly under the baking pan(s) or on the rack below to catch any drips that may occur during baking.

Peach Blueberry Crisp

This dessert can be made in individual oven-safe baking dishes as well.

Peach Blueberry Crisp

I often serve this dessert plain but it can be dressed up with a dollop of whipped cream or a scoop of vanilla ice cream.

Summer Dessert
Peach Blueberry Crisp

[Printable recipe follows at end of posting]

Peach and Blueberry Crisp

Ingredients:

Streusel Topping:
¾ cup all-purpose flour (to make it gluten-free, use an equal amount of gluten-free 1-to-1 baking flour)
¾ cup light brown sugar
¾ cup quick rolled oats (to make it gluten-free, use the small-flake gluten-free rolled oats)
½ tsp baking soda
½ tsp salt
¼ tsp cinnamon
½ cup cold butter (no substitutes)
1/3 cup chopped pecans (optional)

Filling:
2 lbs fresh peaches
1 cup high bush blueberries
1½ tbsp lemon juice
½ tsp vanilla
2 tbsp light brown sugar
2 tbsp granulated sugar
3 tbsp cornstarch
¾ tsp cinnamon
Pinch nutmeg
Pinch salt

Method:

Streusal Topping:
In medium-sized bowl, combine, the flour, brown sugar, rolled oats, baking soda, salt, and cinnamon.  Mix well.  Cut in the cold butter with a pastry blender until mixture is crumbly.  Add the chopped pecans if using.  Cover and refrigerate until peach and blueberry filling is prepared.

Filling:  
Place oven rack in center of oven and preheat oven to 375°F.

Score an “X” about an inch long into the bottom of each peach. Dip peaches in hot water for apx. 1 – 1½  minutes then immediately dip them into a bowl of ice water for 20-30 seconds to shock them and stop them from cooking. Peel peaches and slice each peach into wedges ½” – ¾ thick”. This should equal approximately 5 cups cut peaches. Sprinkle peaches with lemon juice and toss gently to coat the peaches. Sprinkle with vanilla. Add the blueberries. Stir gently.

In small bowl, mix the brown and white sugars with the cornstarch, cinnamon, and salt. Mix into the peaches and blueberries, being careful not to break down the peach wedges.

Grease 8-cup capacity casserole dish or baking pan (or 6 – 8 small individual oven-safe serving-sized baking dishes).  Transfer filling to baking dish.  Sprinkle evenly with the streusel topping.

Bake for approximately 30 minutes or until topping is browned and juices from filling are bubbling.  Remove from oven and let crisp stand for 30-35 minutes before serving.  Add a dollop of whipped cream or a scoop of vanilla ice cream, if desired.

Yield:  6 – 8 servings

Peach and Blueberry Crisp

This summer crisp features plump blueberries and sweet peaches covered with a delicious buttery streusel topping. Serve plain or with a dollop of whipped cream or a scoop of vanilla ice cream.
Course Dessert
Cuisine American
Keyword Blueberry and Peach Crisp, Peach Blueberry Crisp, Summer Dessert
Servings 8
My Island Bistro Kitchen My Island Bistro Kitchen

Ingredients

Streusel Topping:

  • ¾ cup all-purpose flour to make it gluten-free, use an equal amount of gluten-free 1-to-1 baking flour
  • ¾ cup light brown sugar
  • ¾ cup quick rolled oats to make it gluten-free, use the small-flake gluten-free rolled oats
  • ½ tsp baking soda
  • ½ tsp salt
  • ¼ tsp cinnamon
  • ½ cup cold butter no substitutes
  • 1/3 cup chopped pecans optional

Filling:

  • 2 lbs fresh peaches
  • 1 cup high bush blueberries
  • tbsp lemon juice
  • ½ tsp vanilla
  • 2 tbsp light brown sugar
  • 2 tbsp granulated sugar
  • 3 tbsp cornstarch
  • ¾ tsp cinnamon
  • Pinch nutmeg
  • Pinch salt

Instructions

Streusal Topping:

  1. In medium-sized bowl, combine, the flour, brown sugar, rolled oats, baking soda, salt, and cinnamon. Mix well. Cut in the cold butter with a pastry blender until mixture is crumbly. Add the chopped pecans if using. Cover and refrigerate until peach and blueberry filling is prepared.

Filling:

  1. Place oven rack in center of oven and preheat oven to 375°F.
  2. Score an “X” about an inch long into the bottom of each peach. Dip peaches in hot water for apx. 1 - 1½ minutes then immediately dip them into a bowl of ice water for 20-30 seconds to shock them and stop them from cooking. Peel peaches and slice each peach into wedges ½” - ¾ thick”. This should equal approximately 5 cups cut peaches. Sprinkle peaches with lemon juice and toss gently to coat the peaches. Sprinkle with vanilla. Add the blueberries. Stir gently.
  3. In small bowl, mix the brown and white sugars with the cornstarch, cinnamon, and salt. Mix into the peaches and blueberries, being careful not to break down the peach wedges.
  4. Grease 8-cup capacity casserole dish or baking pan (or 6 - 8 small individual oven-safe serving-sized baking dishes). Transfer filling to baking dish. Sprinkle evenly with the streusel topping.
  5. Bake for approximately 30 minutes or until topping is browned and juices from filling are bubbling. Remove from oven and let crisp stand for 30-35 minutes before serving. Add a dollop of whipped cream or a scoop of vanilla ice cream, if desired.

Recipe Notes

Yield: 6 - 8 servings


Pin Me To Pinterest!

Summer Dessert
Peach and Blueberry Crisp


Peach and Blueberry Crisp

Picnic Lunch in the Gazebo in St. Peter’s Bay, PEI

Picnic in the Gazebo at St. Peter's Bay, PEI
Picnic in the Gazebo at St. Peter’s Bay, PEI

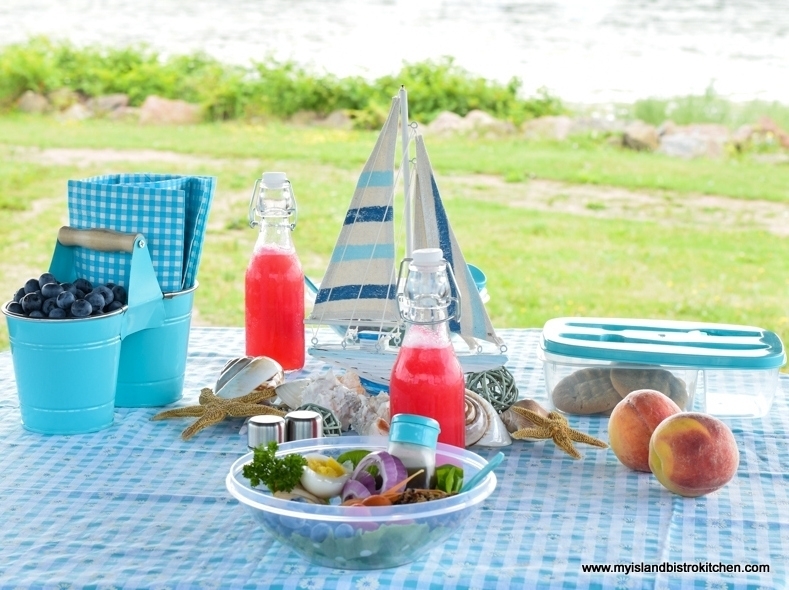
We thoroughly enjoy our home province of Prince Edward Island! Our special Island is small enough that we can get to know all parts of it quite well.  In summer, especially, we do a lot of day trips all around the Island.  Most times, for our day excursions, I pack a picnic lunch and we head off for the day.  Sometimes, I have a particular picnic destination in mind and have a good idea if there will be a park nearby that would be suitable for a picnic and, other times, it’s totally by chance where we land at picnic time. Apart from the opportunity to dine outdoors in our all-too-short summer season here on Canada’s Atlantic Coast, transporting our own meal means we can eat wherever we are whenever we are hungry without having to try and be at a certain location where there is a restaurant which may, or may not, be able to accommodate dietary needs.

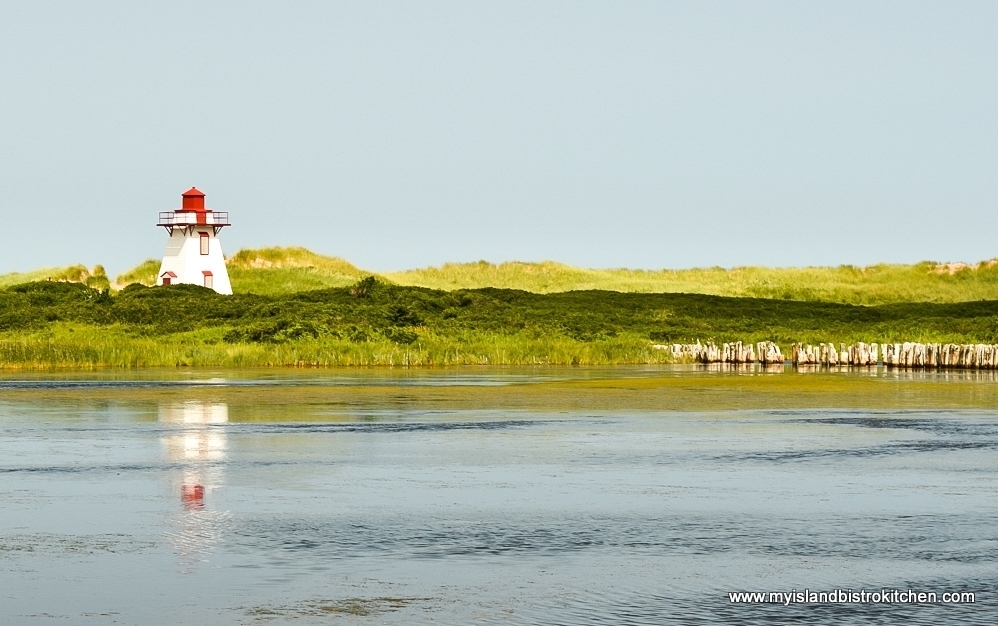
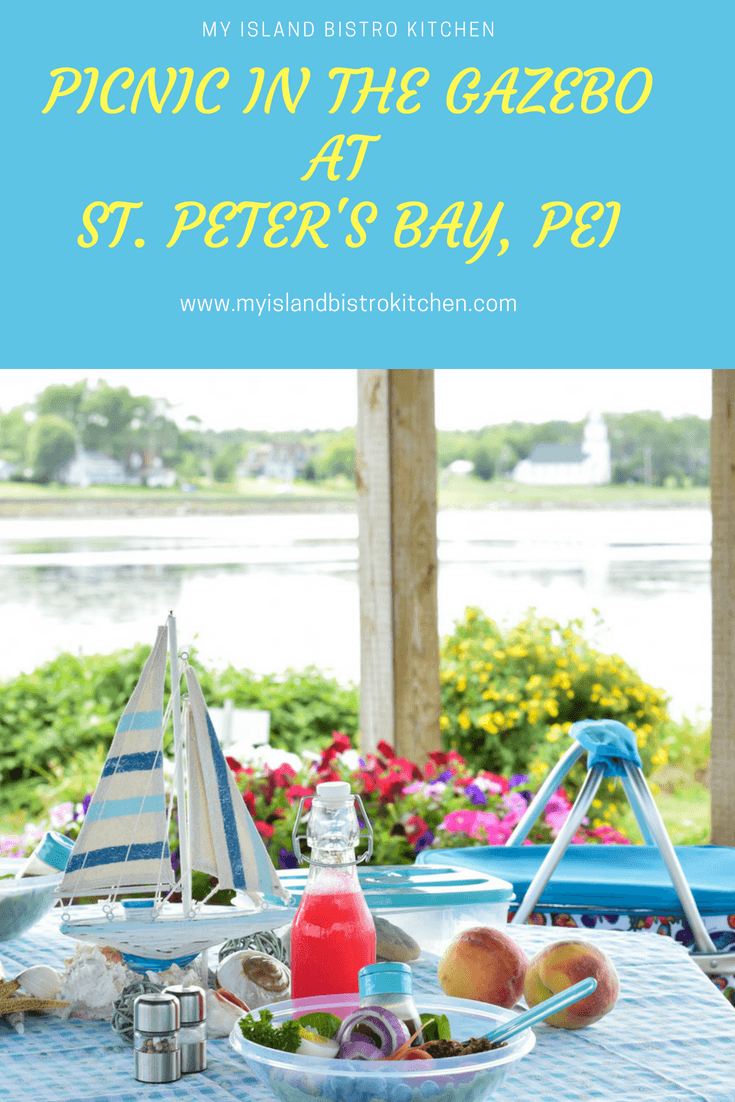
Our recent day trip took us to the north shore area of the eastern part of the Island.  I love PEI lighthouses – the iconic red and white structures are dotted here and there all around the coast of the Island.  I had been searching to find the St. Peter’s Bay Lighthouse for some time and was determined to find it this year.  So, this was our primary destination on this particular day trip.

St. Peter's Harbour Lighthouse, PEI
St. Peter’s Harbour Lighthouse, PEI

It wasn’t particularly easy to find this elusive lighthouse  but, with assistance of an acquaintance who provided directions, I was able to locate it.  Access is via a single lane red clay road with a canopy of trees.  The adventure was indeed worth it!

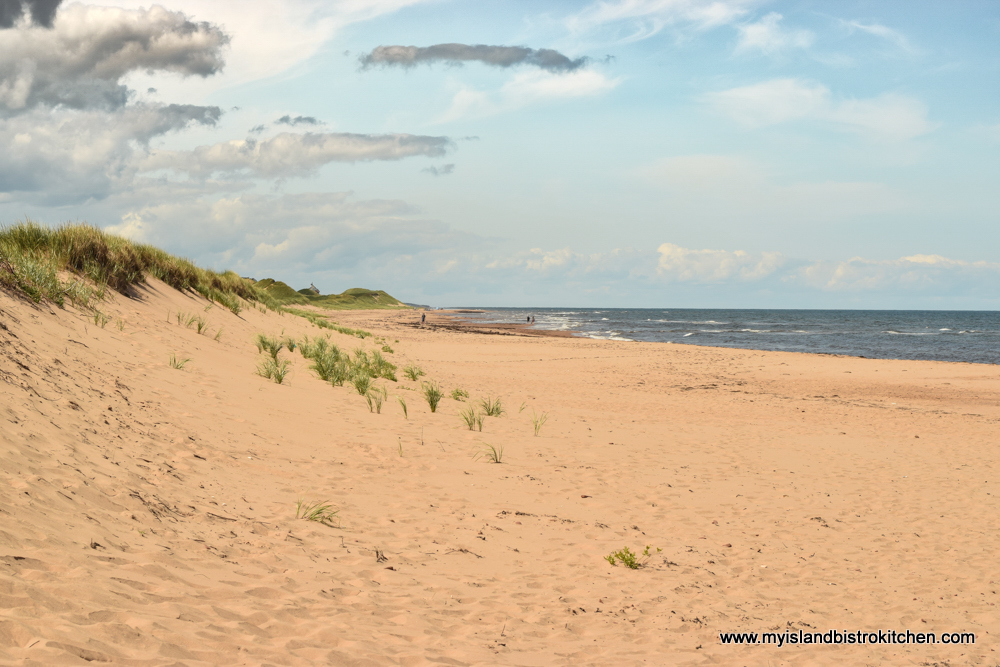
After we enjoyed the vista surrounding the lighthouse, not to mention the beautiful beach, we decided it was time to find a place to set out our picnic.

PEI North Shore Beach
Beach by St. Peter’s Bay Lighthouse, Morell, PEI

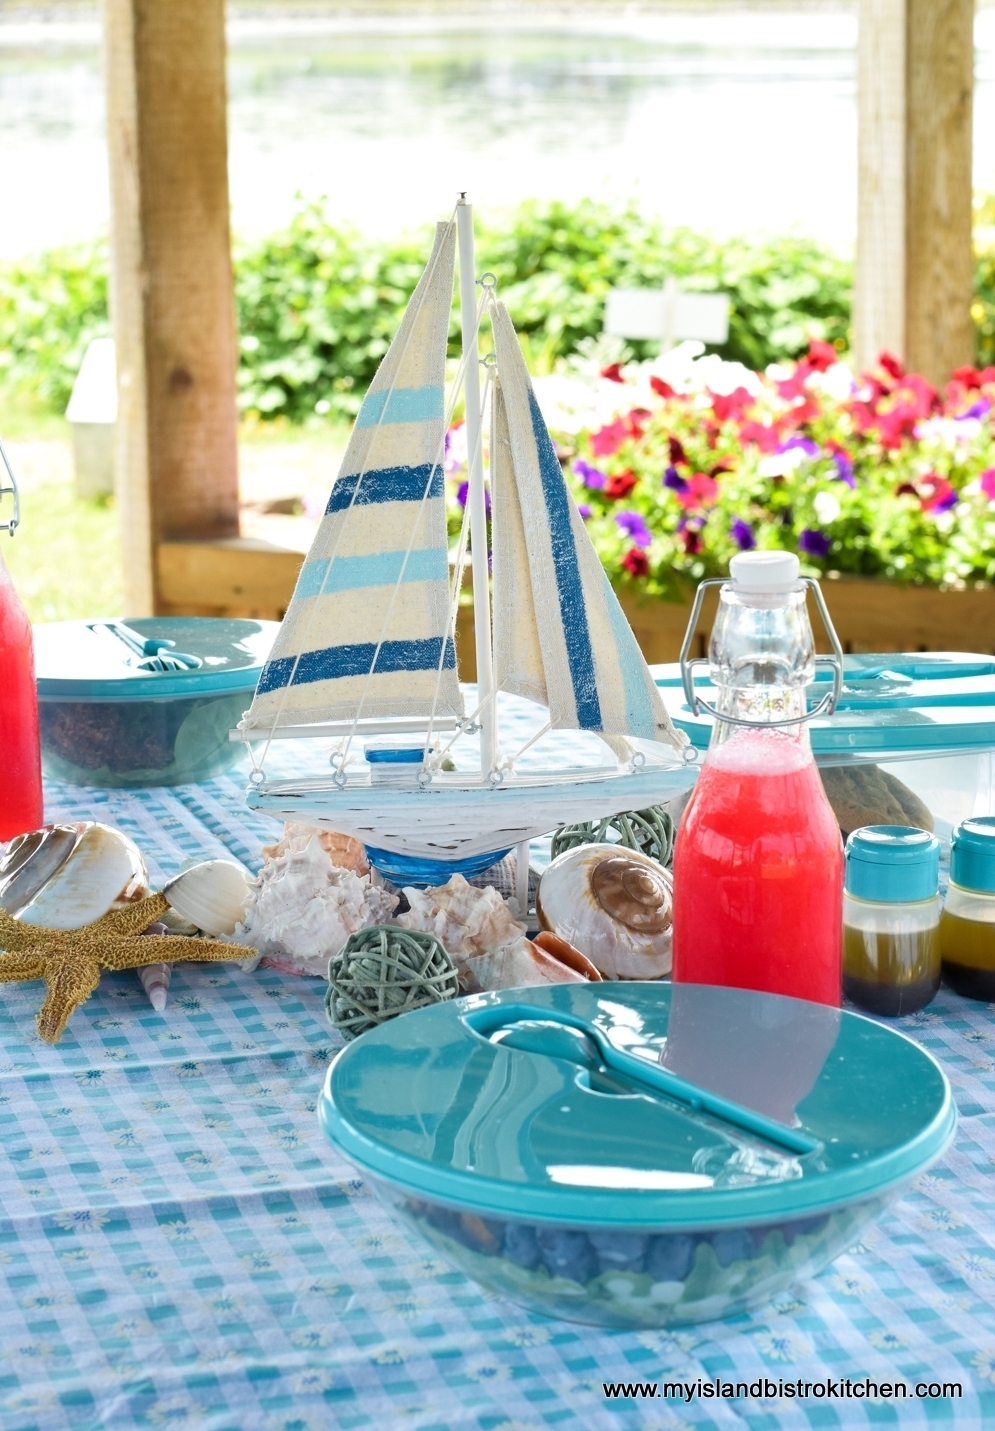
I knew of the small park by the water in nearby St. Peter’s Bay where I had had a picnic before (click here to view those photos).  What I didn’t recall was the lovely gazebo at this site. This find was a blessing since the temperature had soared to 28C by this time and it was way too hot to eat out in the open with no shelter!

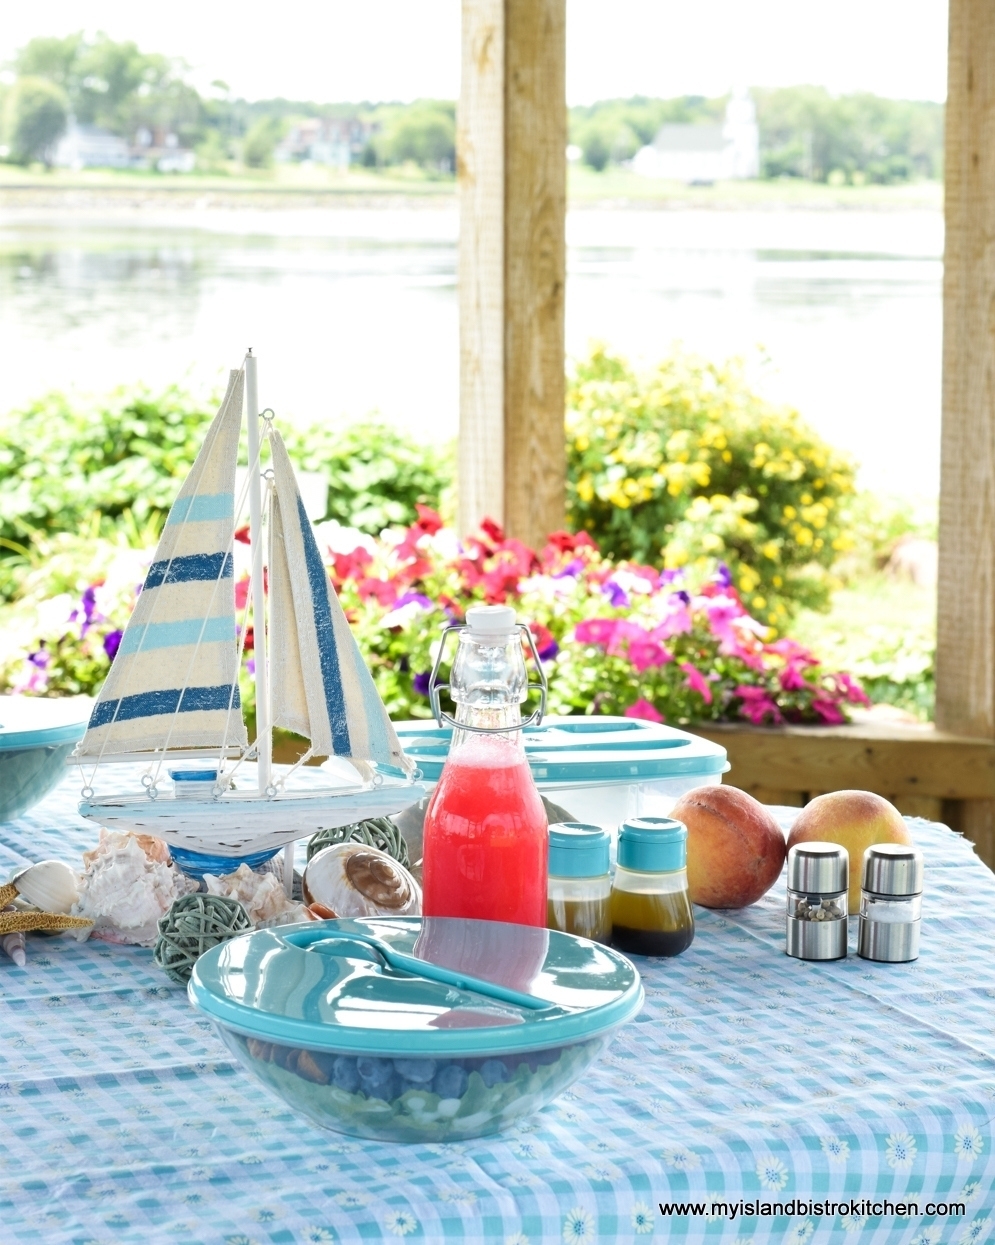
When we arrived, we found the large gazebo unoccupied so immediately went about setting out our picnic lunch.  Someone had planted beautiful flowers in boxes around the gazebo and that formed a ready backdrop that I could not have planned or hoped for. Bonus! See how gorgeous the flowers look in the photo below and how they fortuitously match my color scheme and complement the color of the lemonade!

Picnic in a Gazebo
Picnic in a Gazebo

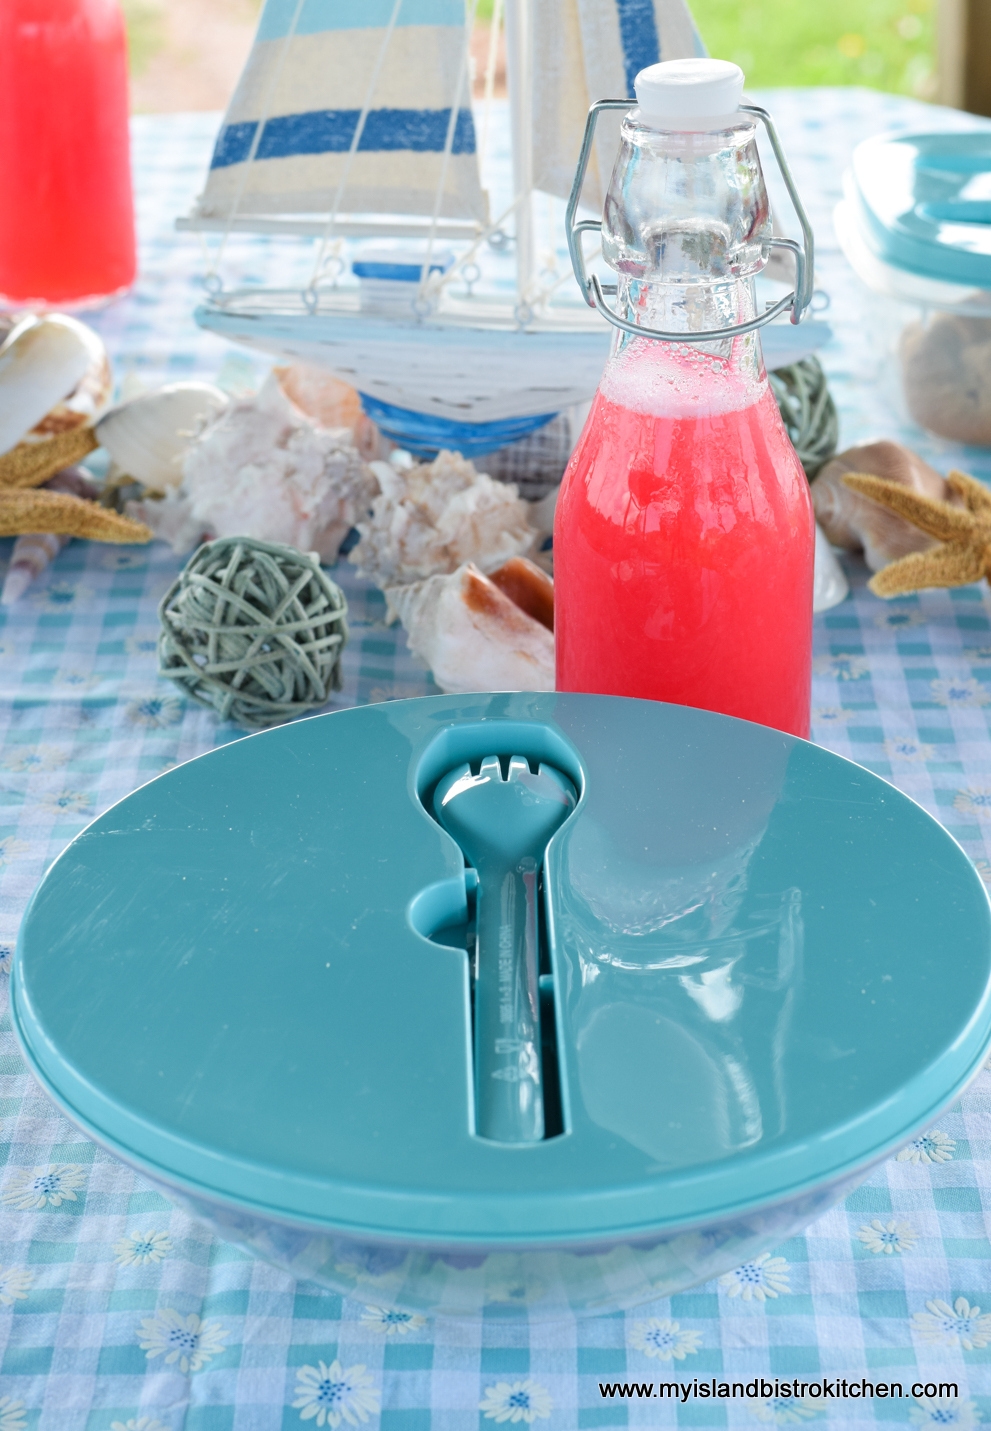
The color theme of my picnic was turquoise, always a summery color. The burst of hot pink in the drink certainly adds a punch of color!

Picnic Salad Bowls
Picnic Salad Bowls

I found the bowls, matching small salad dressing containers, and rectangular dishes at Walmart.  Not only are they all color-coordinated in turquoise blue but the dishes come with the needed cutlery built in, a real bonus because there is no need to remember to bring cutlery separately.

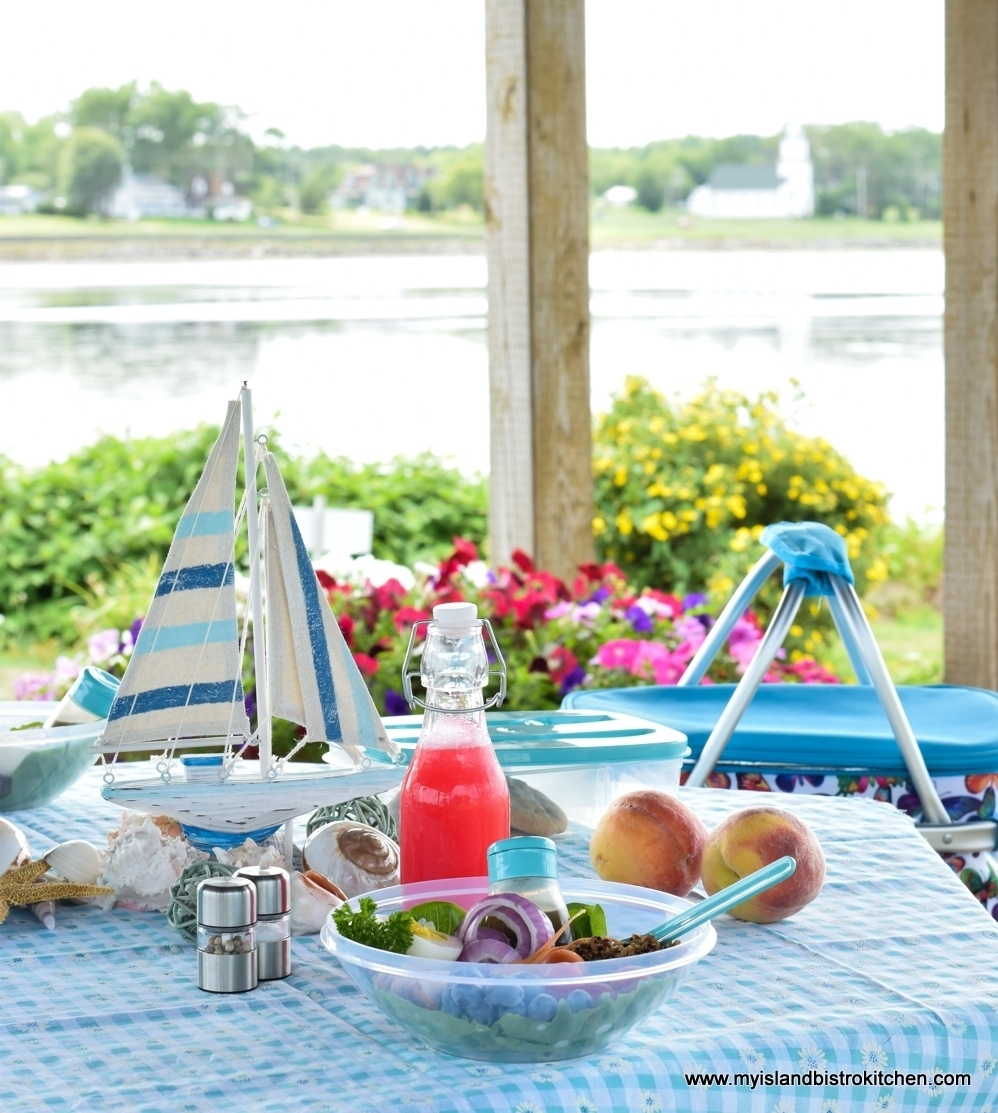
Turquoise-themed Picnic

The bowls match my insulated picnic basket.  A blue-checked tablecloth and checkered napkins, already part of my picnic arsenal, were found to match as well.

Turquoise and Blueberry Blue Details

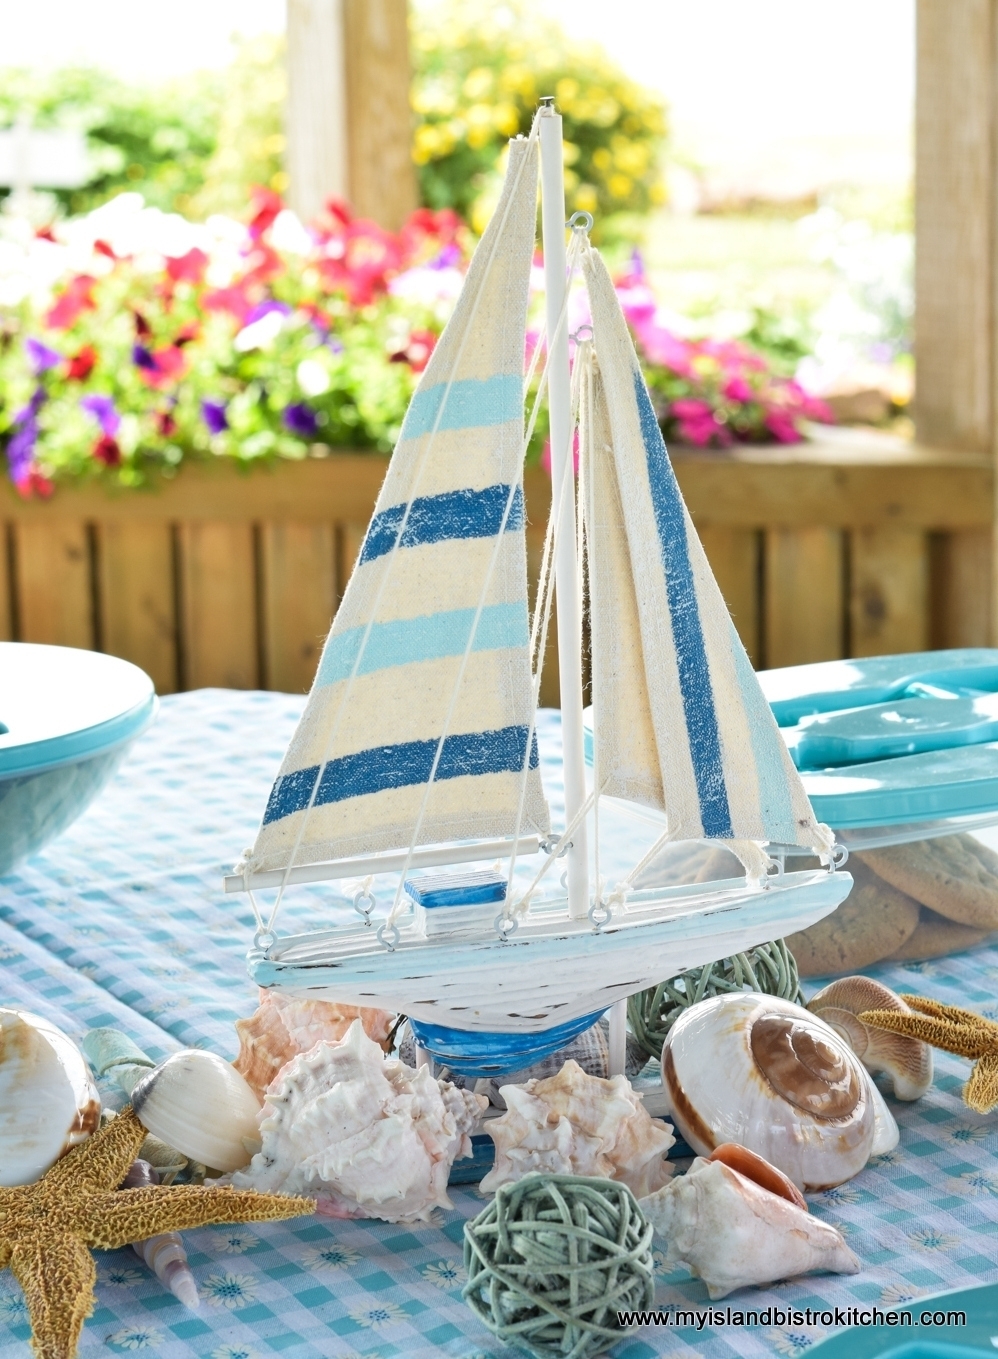
A small model sailboat in matching colors and a collection of shells formed the centerpiece for my tablescape. I figure if I am going to dine outside, I might as well go all the way and set the table attractively! It makes for a more fun and memorable picnic.

Sailboat and Shells Tablescape

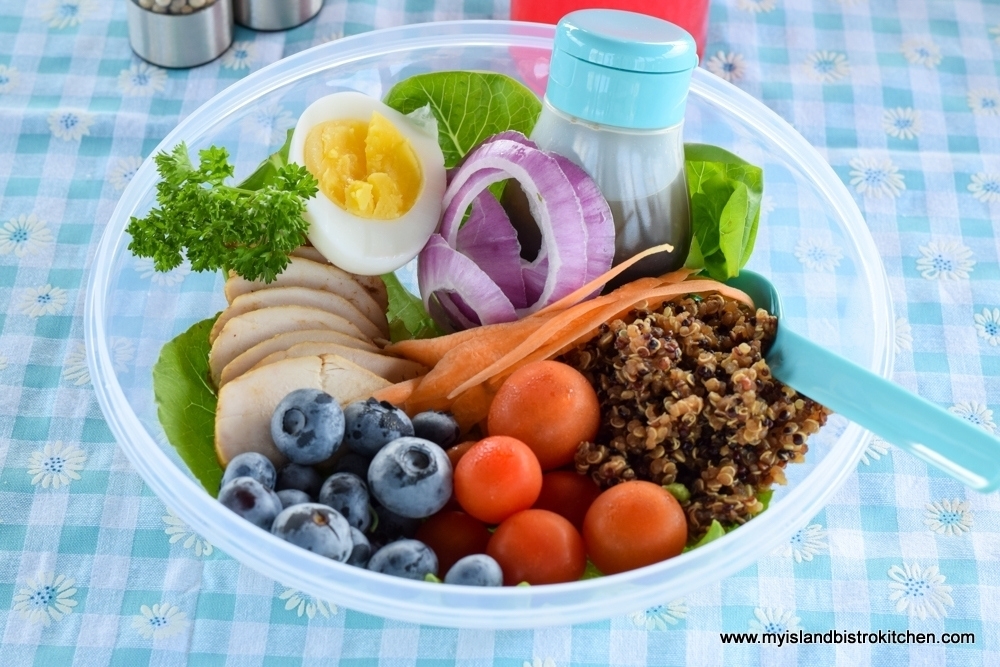
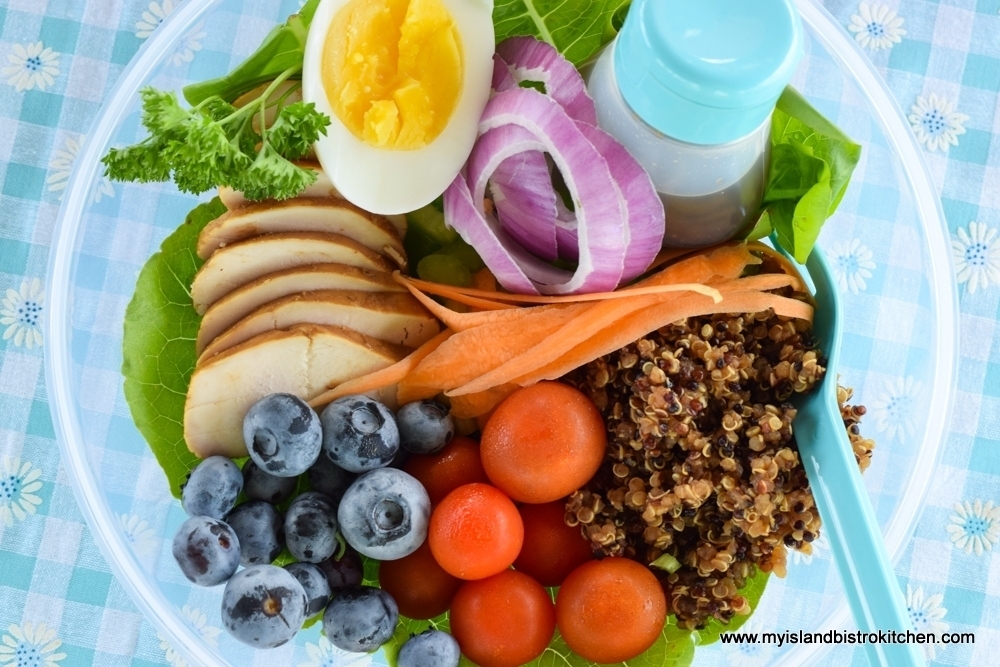
For lunch, I prepared my version of a picnic buddha bowl, ensuring it contained contents that would travel.  There is no one right way to make a buddha bowl but, typically, they contain some kind of grain (preferably high fibre), veggies and fruit, a protein source, and greens.  I began by layering the bowl with lettuce from our garden. Our garden has been a good producer this year so the cherry tomatoes, celery (it’s there but it’s hiding in the photo), and carrots are garden-fresh. The grain I chose to use was a tri-colored quinoa. To make the meal more substantial and to add some protein, I included a half hard boiled egg in each bowl. The addition of the red onion gives a flavor and color boost. I love how colorful and healthy this salad is!

Main Meal Picnic Salad

I often brine and roast boneless skinless chicken breasts for various uses and they are perfect sliced for a main meal salad or as added protein in a buddah bowl.

Picnic Salad
Picnic Salad

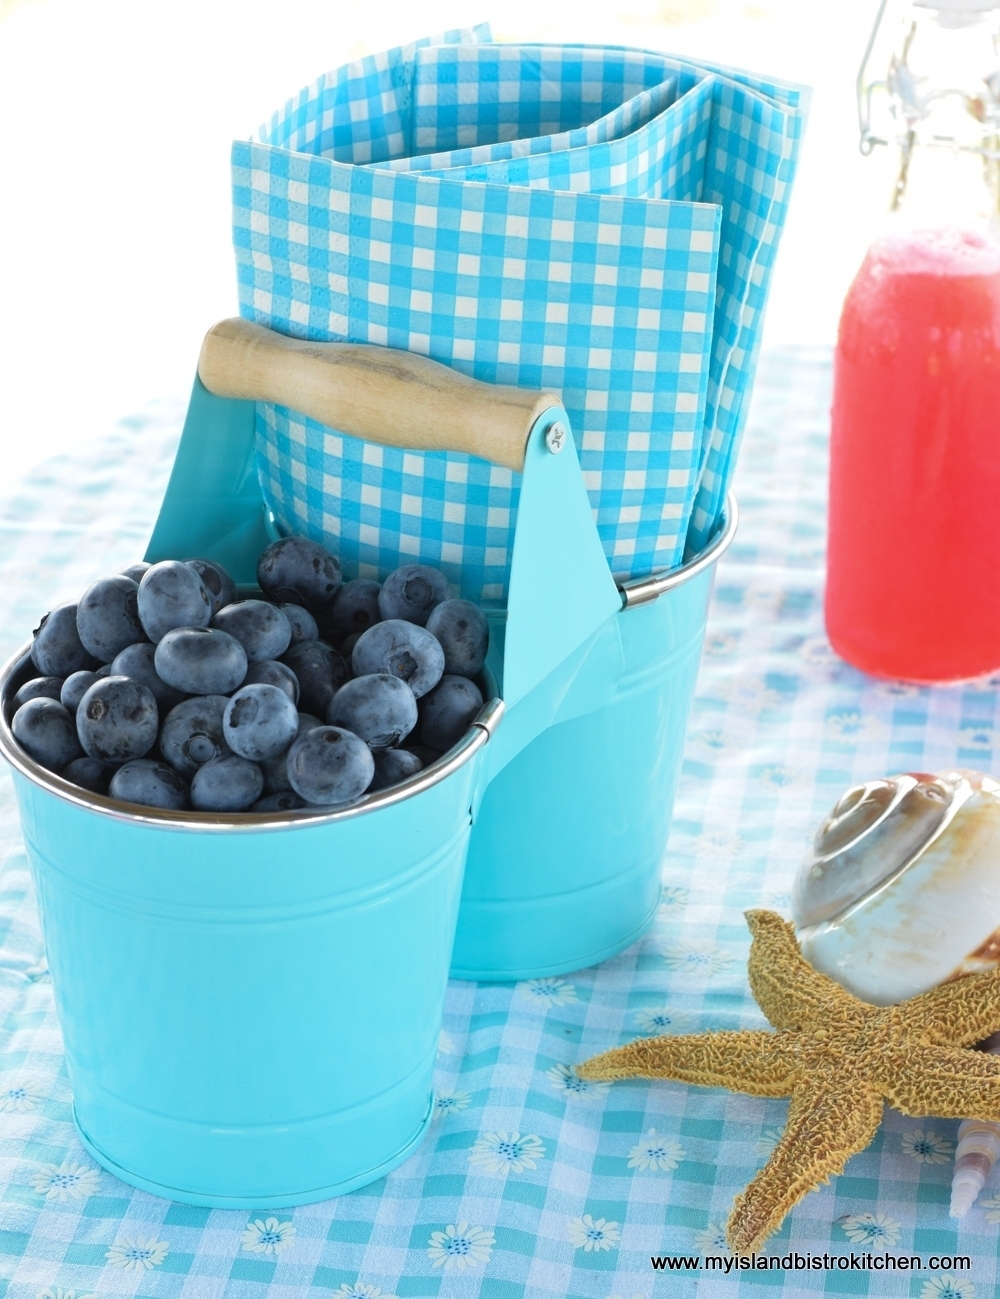
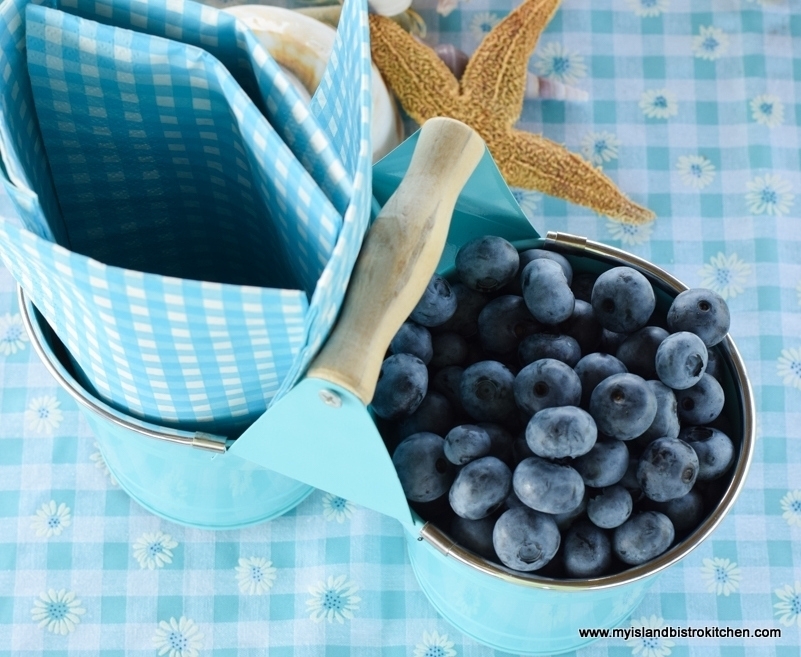
Some freshly picked blueberries from the Tryon Blueberries U-pick added a bit of color, texture, and sweetness to the salad.  A simple balsamic dressing was all that was needed to finish the salad.  This type of meal is great for a picnic.  The meal is completely prepped at home and contained in a bowl with the dressing added at the time of serving.  The meal travels well – I use several ice packs in my insulated picnic basket to keep the food good and cold.  At meal time, it is simply a matter of removing the cover from each diner’s bowl and the meal is ready to go. Clean-up is super easy because the covers pop back on to the bowls and the utensils fit inside the bowls so there are no messy plates and utensils.

These high bush blueberries are great snacking berries and I often pack them in my picnic basket when the berries are in season.  Today, their blue color matches my color scheme, too!

High Bush Blueberries

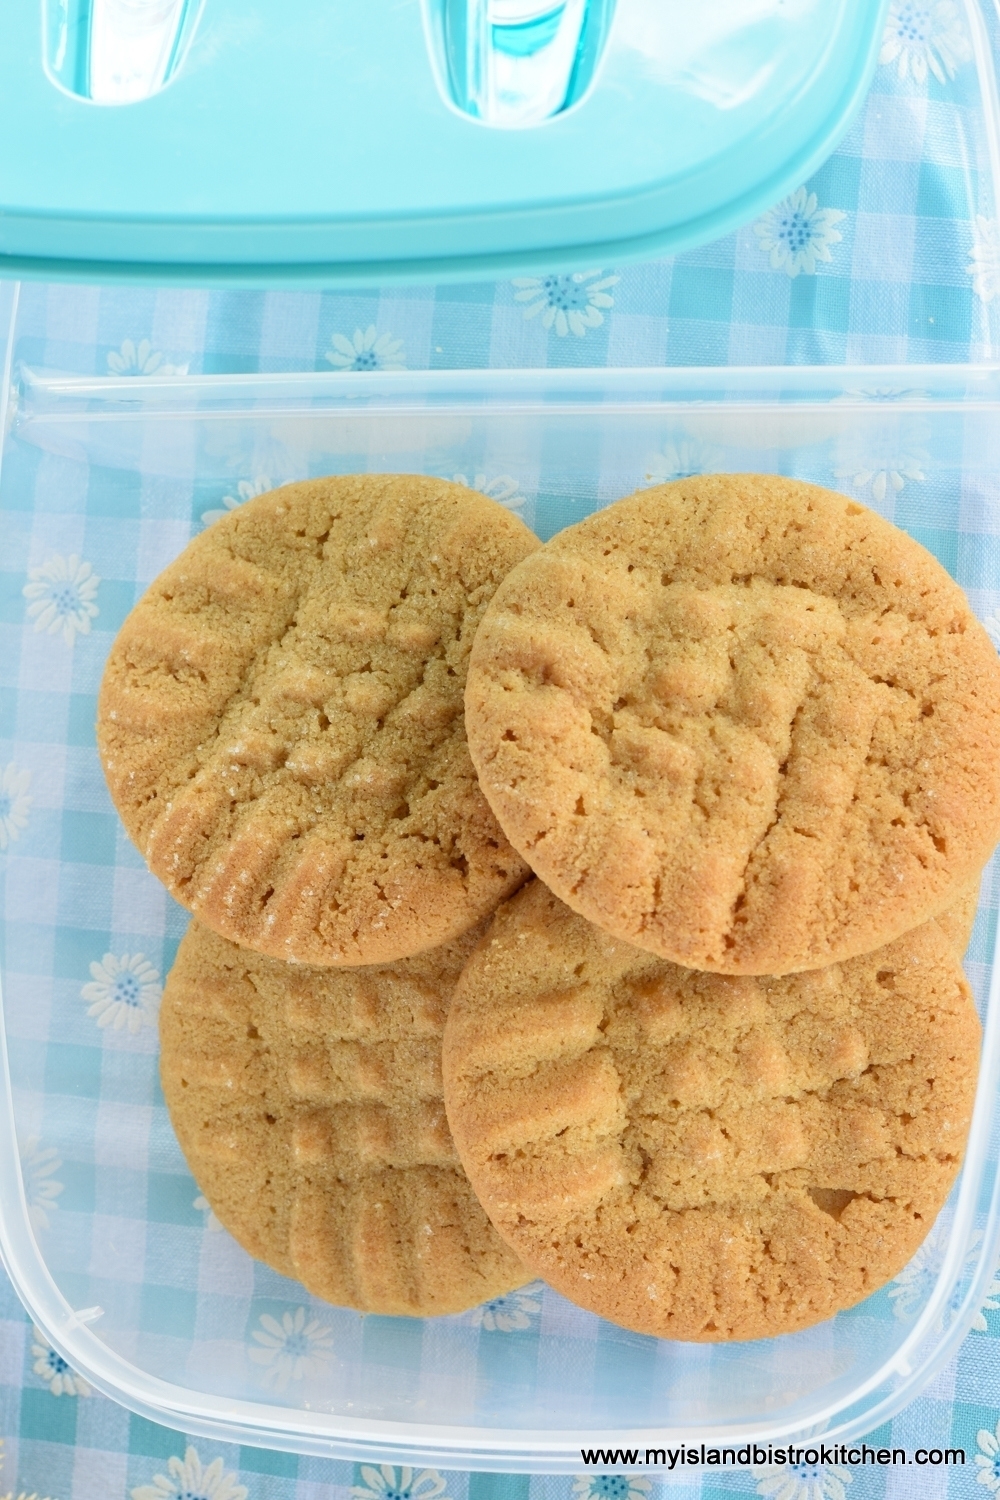
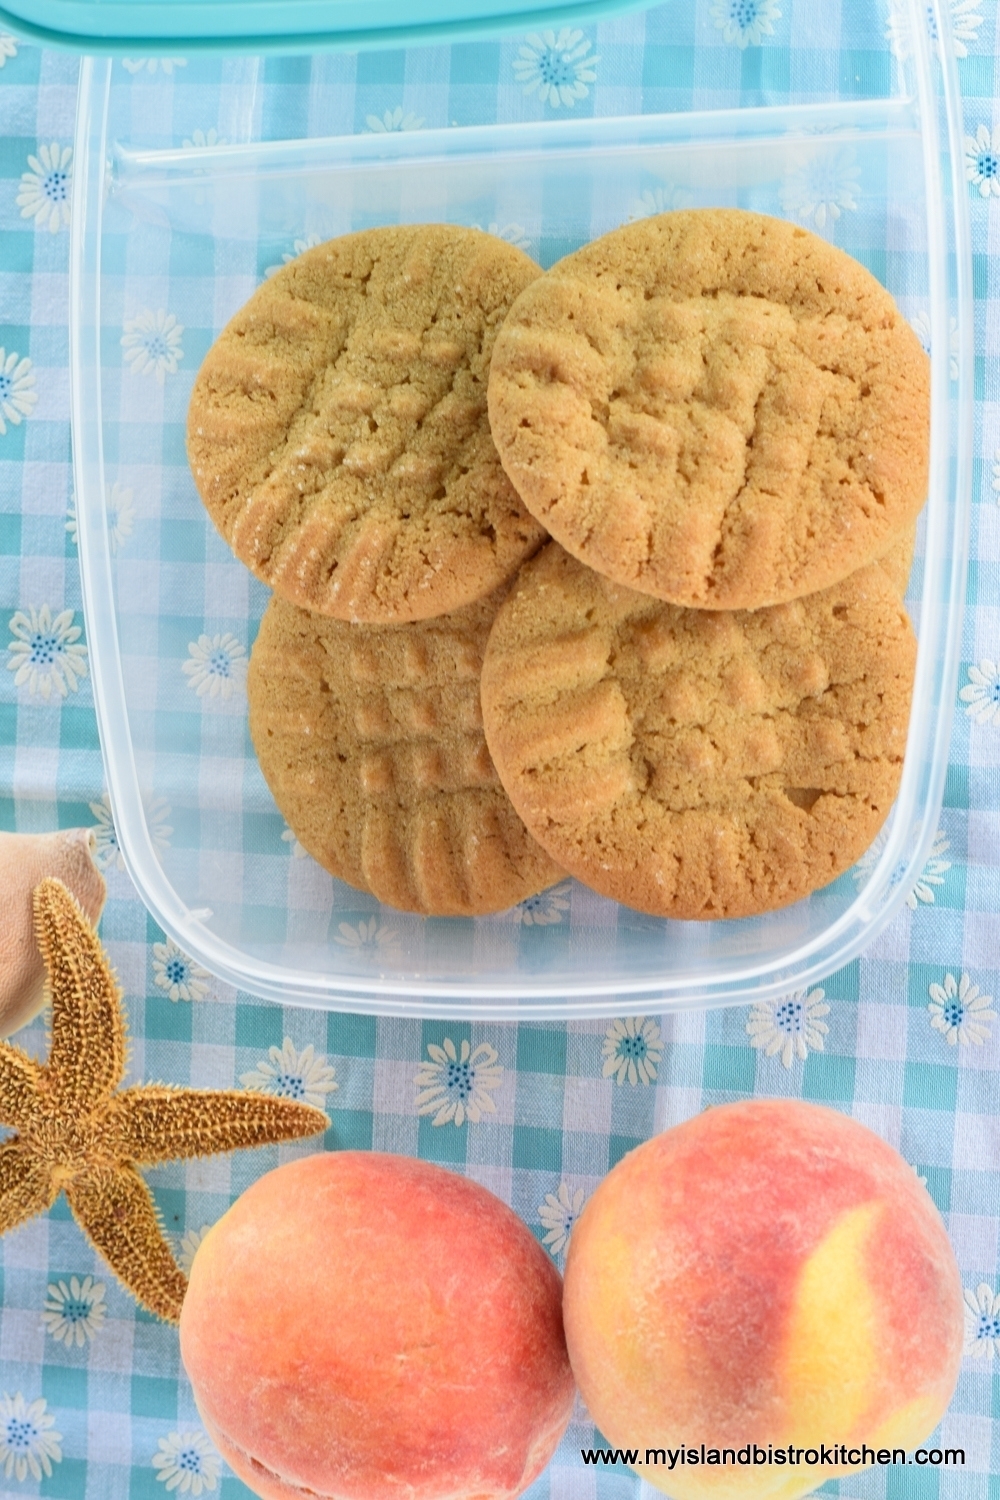
Peanut butter cookies are always a great stand-by picnic treat.  They are easy to make, easy to transport, and satisfy the sweet tooth.  For my recipe, click here.

Peanut Butter Cookies

Peaches are also a great fruit to take along on picnics. I love to incorporate the flavors of summer into my picnic menus.

Peaches and Cookies
Peaches and Cookies


I love the little bottles in the photo below.  When I made the rhubarb lemonade earlier in the summer, I froze some in these bottles to have it ready for picnics.  The bottles help to keep the food cool as we travel and they quickly finish thawing completely when removed from the cooler as the picnic is being laid out. This is a super tasty (and colorful) summer drink – you can access my recipe by clicking here.

Picnic in St. Peter's Bay, PEI
Picnic in St. Peter’s Bay, PEI

I hope you have enjoyed a peek into my picnic in the gazebo in St. Peter’s Bay, PEI! The Island has many picturesque places suitable for picnics and each comes with its own unique view.

Pin Me To Pinterest!

Picnic in St. Peter's Bay
Picnic in St. Peter’s Bay

For other picnic inspiration from My Island Bistro Kitchen, check out these:

Picnic by the Confederation Bridge in PEI
Sliders and Salad Sunday Picnic
A PEI Picnic in the Park
Casual Summer Picnic
A Canada Day Picnic in St. Peter’s Bay, PEI
A Casual Summer Afternoon Picnic
A Beach-Themed Picnic
A Pretty Pink Picnic
Canada Day Picnic
Oh Canada! A Picnic to Celebrate Canada Day
Labour Day Picnic by the PEI Seaside with Lobster Croissants on the Menu
A Plaid Picnic on the Verandah
Locovore’s Picnic – Food Day Canada 2016
Late Summer Charcuterie Picnic
Sunday Afternoon Wine and Cheese Picnic
Old Country Rose Afternoon Tea Picnic

Cooking Classes at The Table Culinary Studio in PEI

"Bounty of the Sea" Cooking Class at The Table Culinary Studio in New London, PEI
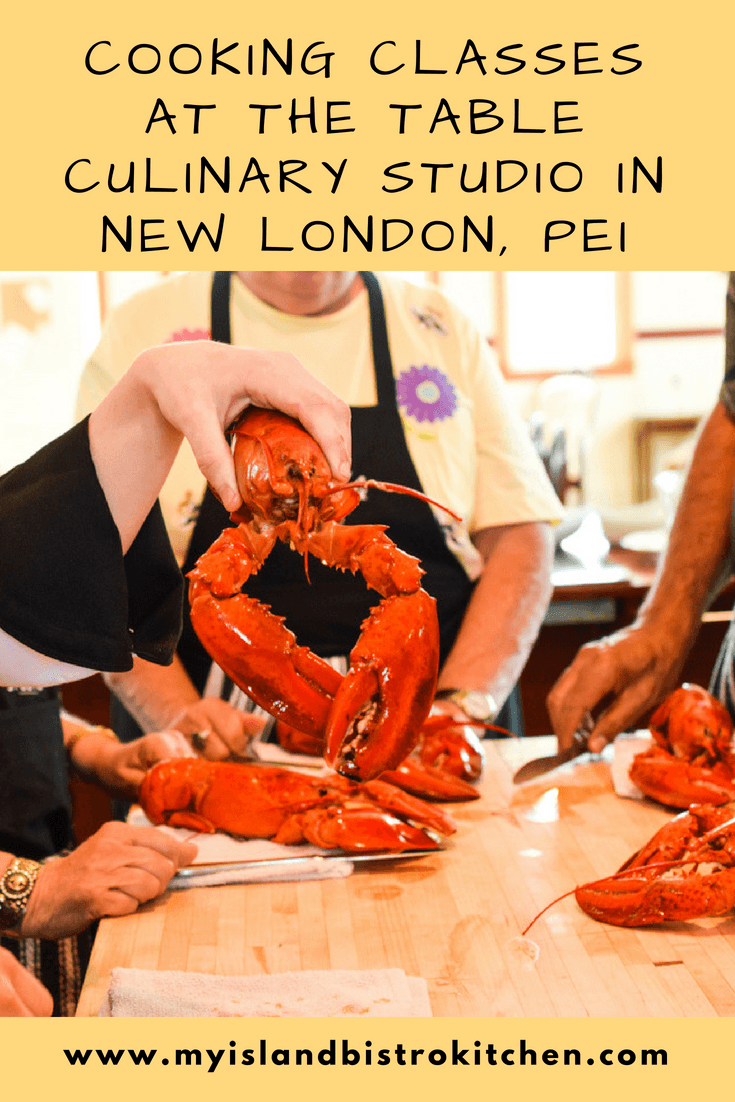
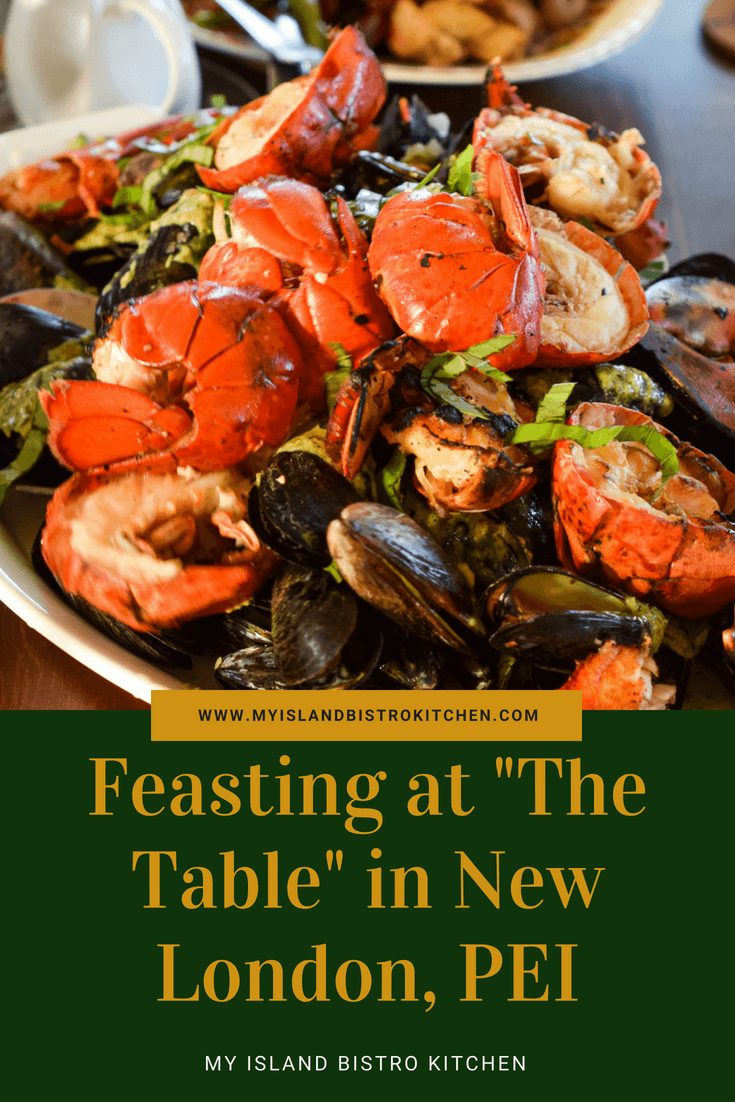
“Bounty of the Sea” Cooking Class at The Table Culinary Studio in New London, PEI

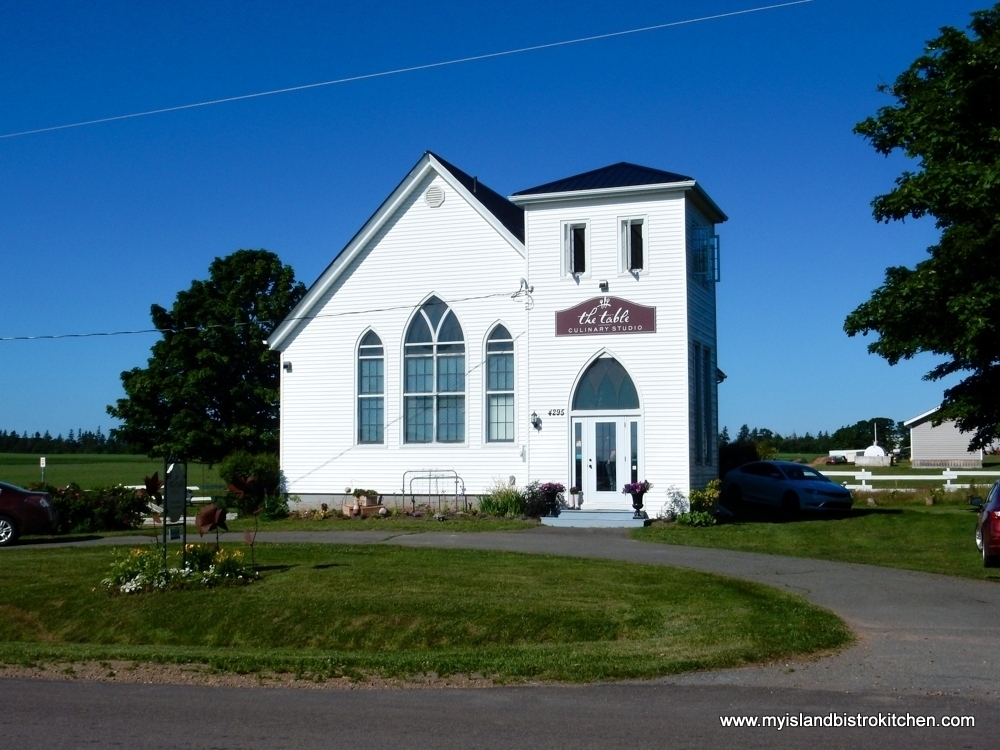
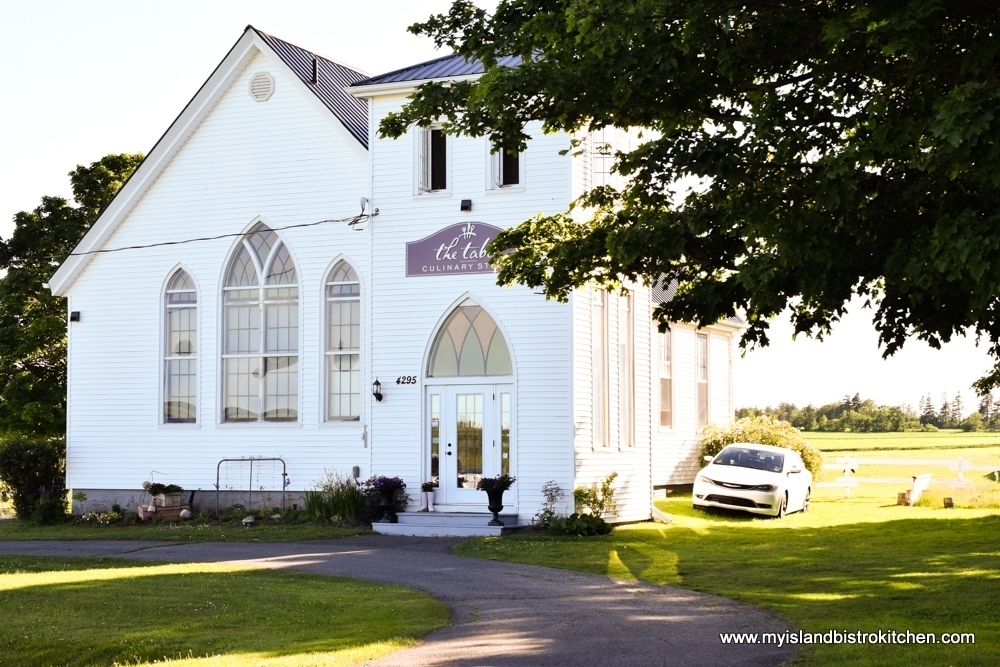
Tucked away on the Graham’s Road (Route 8), in the picturesque rural community of New London, Prince Edward Island, you will find The Table Culinary Studio that offers short (between 3.5 and 4.5 hours) cooking classes that focus primarily on cooking with fresh, local Island foods.  This experience is a great way to learn about the Island food culture.

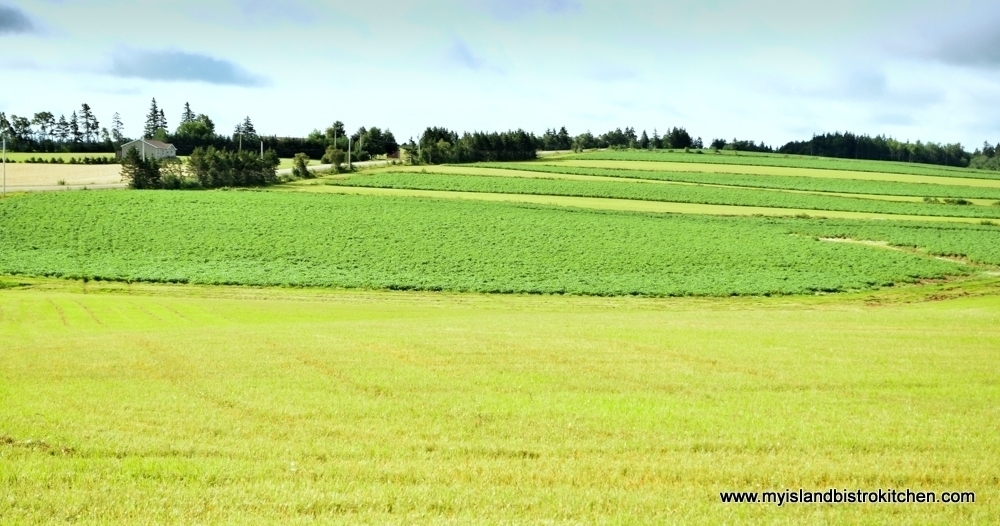
The Gently Rolling Hills of New London, PEI

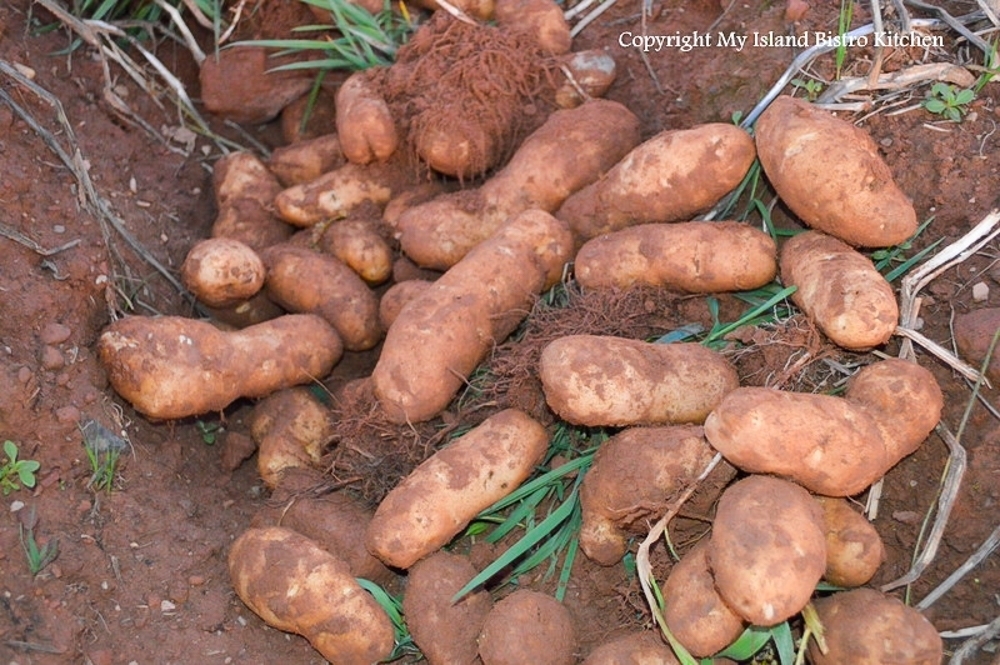
The rural setting is quintessential PEI. Fields in shades of green contrasted with the Island’s iconic red soil take visitors to the heart of some of the Island’s most fertile farm land.

Field of Potatoes in PEI's Red Soil
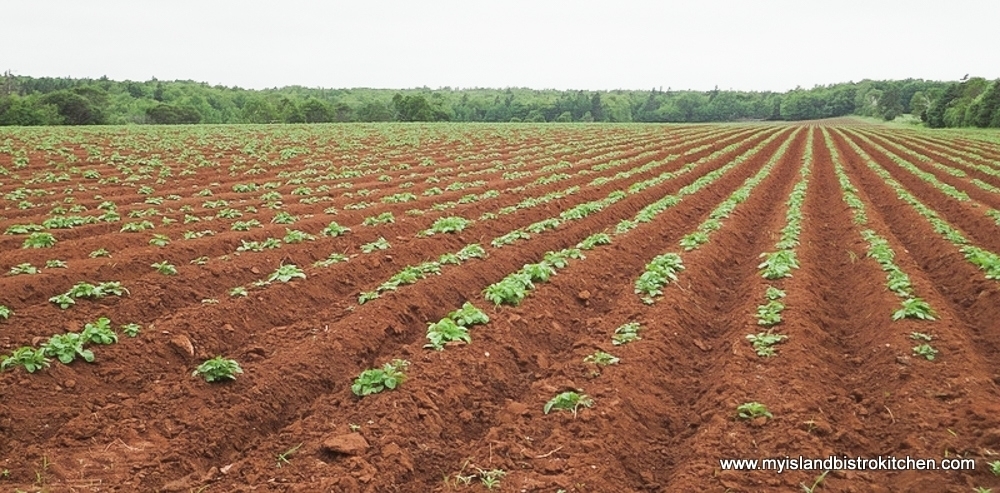
Field of Potatoes in PEI’s Red Soil

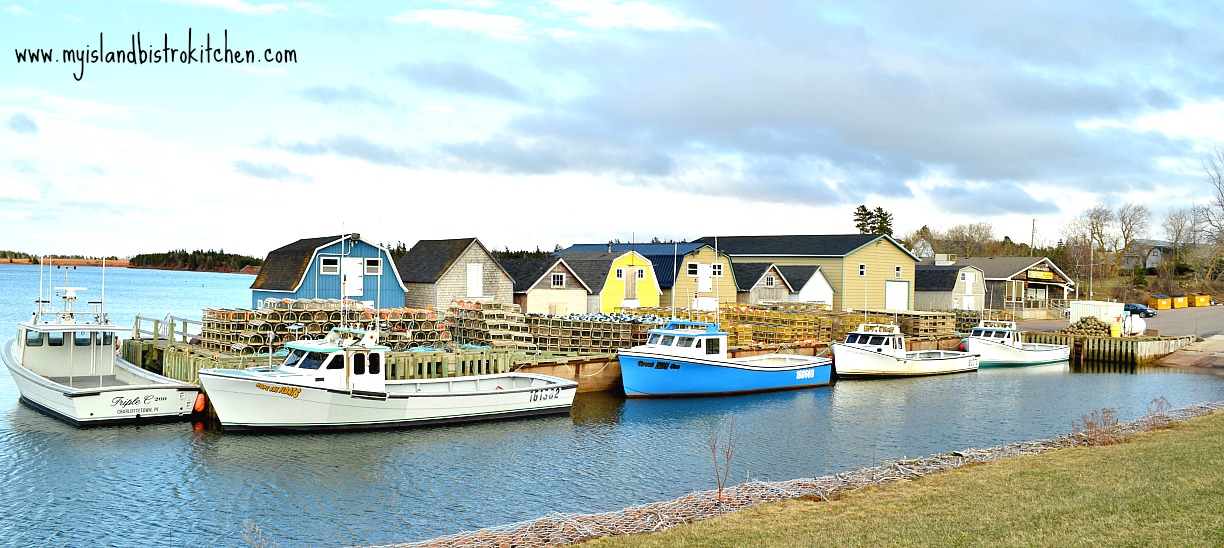
Just down the road is New London Harbour, home to a small lobster fishing fleet and the grounds for other seafood like oysters, quahogs, and mussels.  Not far away, quality food can be sourced from dairy and beef farms, organic farmers, beekeepers, cheesemakers, and garlic growers. Could there be a more authentic location for a PEI culinary studio!

New London Harbour
Lobster Boats at New London Harbour, PEI, Canada

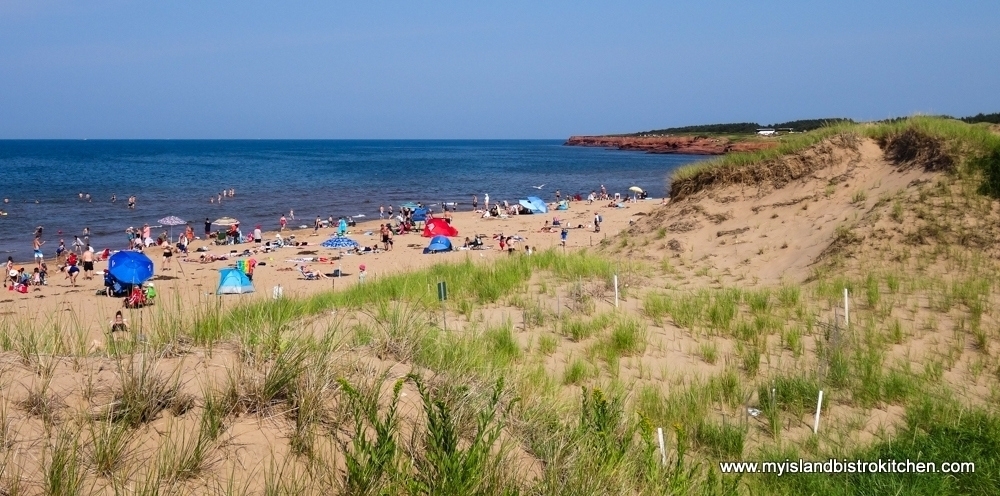
While it is no secret that PEI has lovely scenery to enjoy, spectacular beaches and golf courses, and many attractions to keep visitors busy exploring our Island, many come to the Island knowing that PEI offers great food from the land and sea.

Cavendish Beach, PEI

Our potatoes, oysters, mussels, and lobster, in particular, are shipped all over the world and these Island products are well known, respected, and sought after for their high quality.

PEI Potatoes
PEI Potatoes

So, what better way to experience the Island foods first hand than to take a short cooking class to learn more about them and how they can be prepared.

The Table Culinary Studio (formerly Annie’s Table) has been in operation since 2012, offering an array of short cooking classes on a myriad of topics.  Under new ownership in 2016, The Table, with owner/chef Derrick Hoare at the helm, continues with the tradition of engaging culinary aficionados in ways to prepare local Island foods such as lobster, oysters, mussels, scallops, beef, cheese, and so forth.  The focus is very much on using fresh local ingredients that are in season and, by extension, acquainting participants with the rich Island food culture.

The Table offers a number of hands-on cooking classes that include (at the time of writing) Bounty of the Sea, Black Gold (cured garlic), Farm to Table, Marilla’s Table, Hive to Table, Let Them Eat Beef, Oyster Obsession, Say Cheese, Vivacious Vegan, Applelicious, Artisan Bread, Gluten Free Gourmet, and Helping Hands.  The Table operates seasonally from May to October to coincide with the Island’s tourism season.  Several of the cooking classes involve field trips to farms and other local food producers to see, first-hand, how food is grown or produced and to pick up some local ingredients to bring back to The Table to be used in the class that follows.  This form of experiential tourism provides the opportunity for the learners to create wonderful memories of their vacation time in PEI, connect directly with PEI food producers, and to learn more about the Island’s food culture and the role that farming, fishing, and other food production play in the Island’s economy and way of life.

I recently participated in the “Bounty of the Sea” cooking class at The Table which is located within walking distance to the house in which famed Island authoress Lucy Maud Montgomery was born and not far by vehicle to the resort municipality of Cavendish.

Birthplace of authoress Lucy Maud Montgomery, New London, PEI

But, before I take you on the adventure with me, here is a brief description of the venue and what a cooking class is like at The Table.

The Table Culinary Studio, New London, PEI

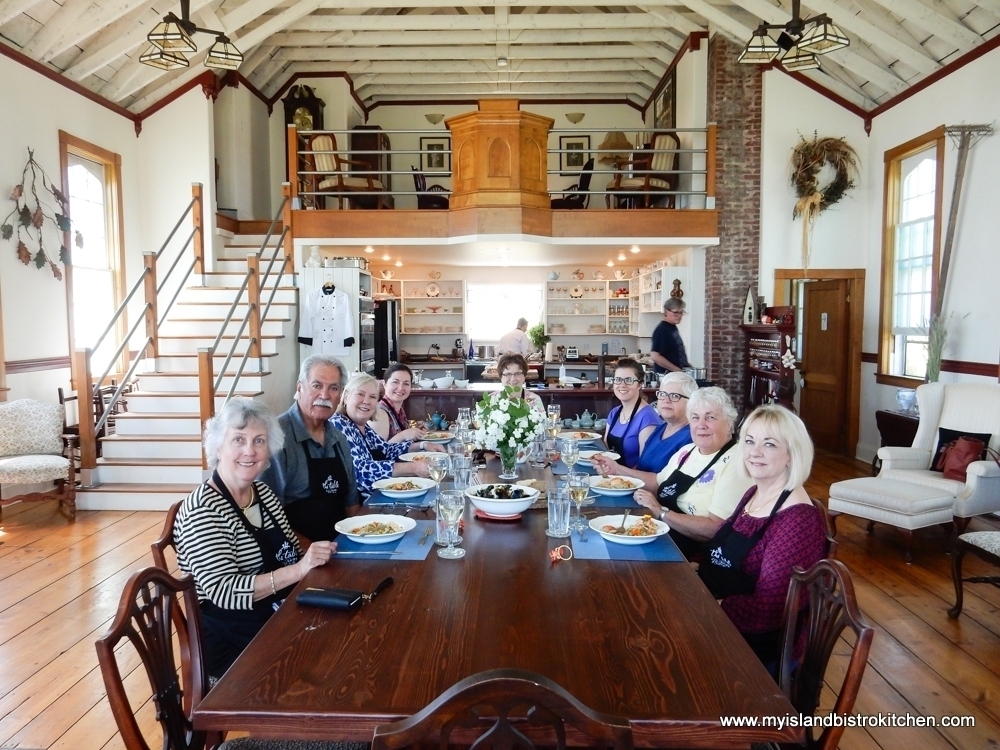
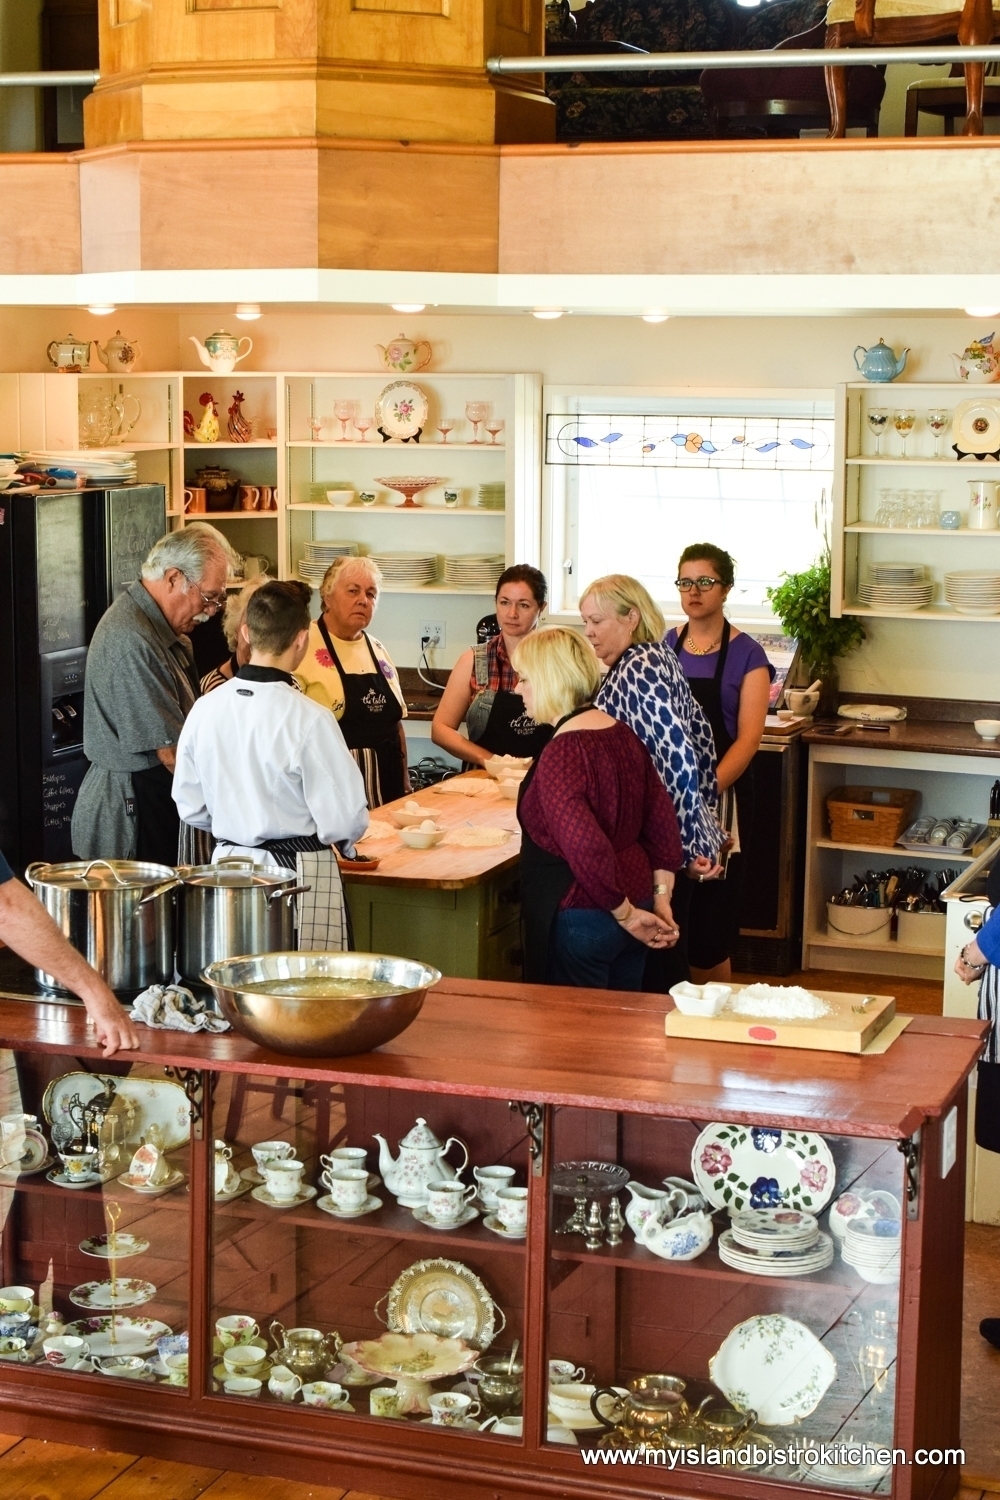
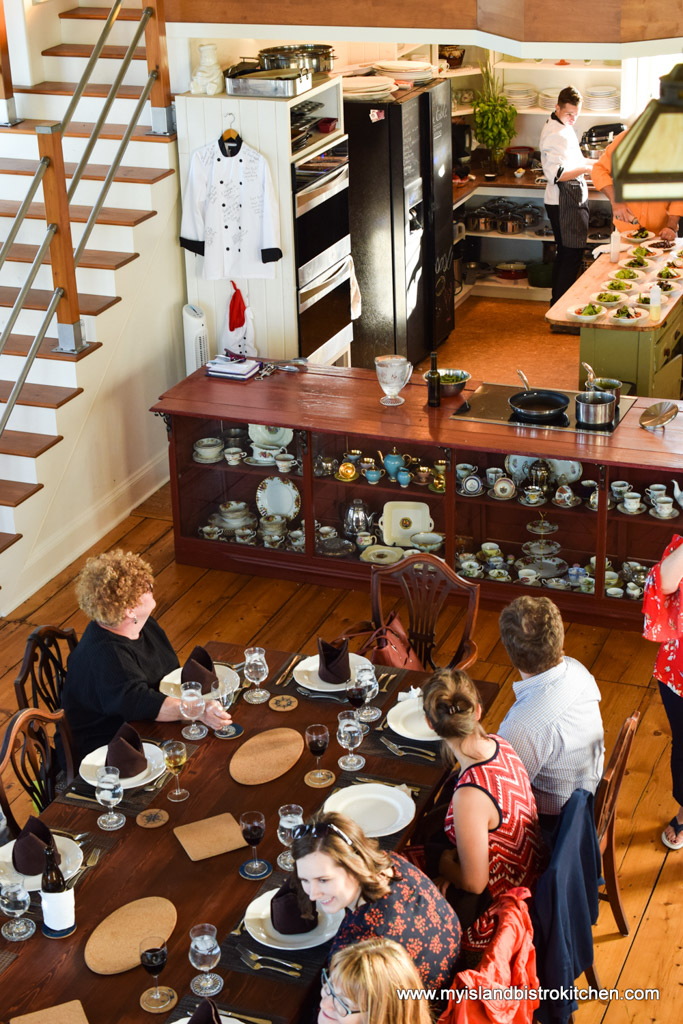
What makes this culinary studio unique is its venue.  It is located in a small white repurposed country church, very typical of so many seen in several Island communities.  Inside the church, the pews have been removed and, in their place, is a large harvest table where, in a few hours time, class participants will gather to enjoy the lavish spread of the morning’s cooking. The church’s altar has been elevated to a loft setting and the building is tastefully furnished.

Students Gather at the Harvest Table Following a Cooking Class at The Table Culinary Studio in New London, PEI

The original altar and choir loft locations have been transformed into an open teaching kitchen.

The Kitchen at The Table Culinary Studio, New London, PEI

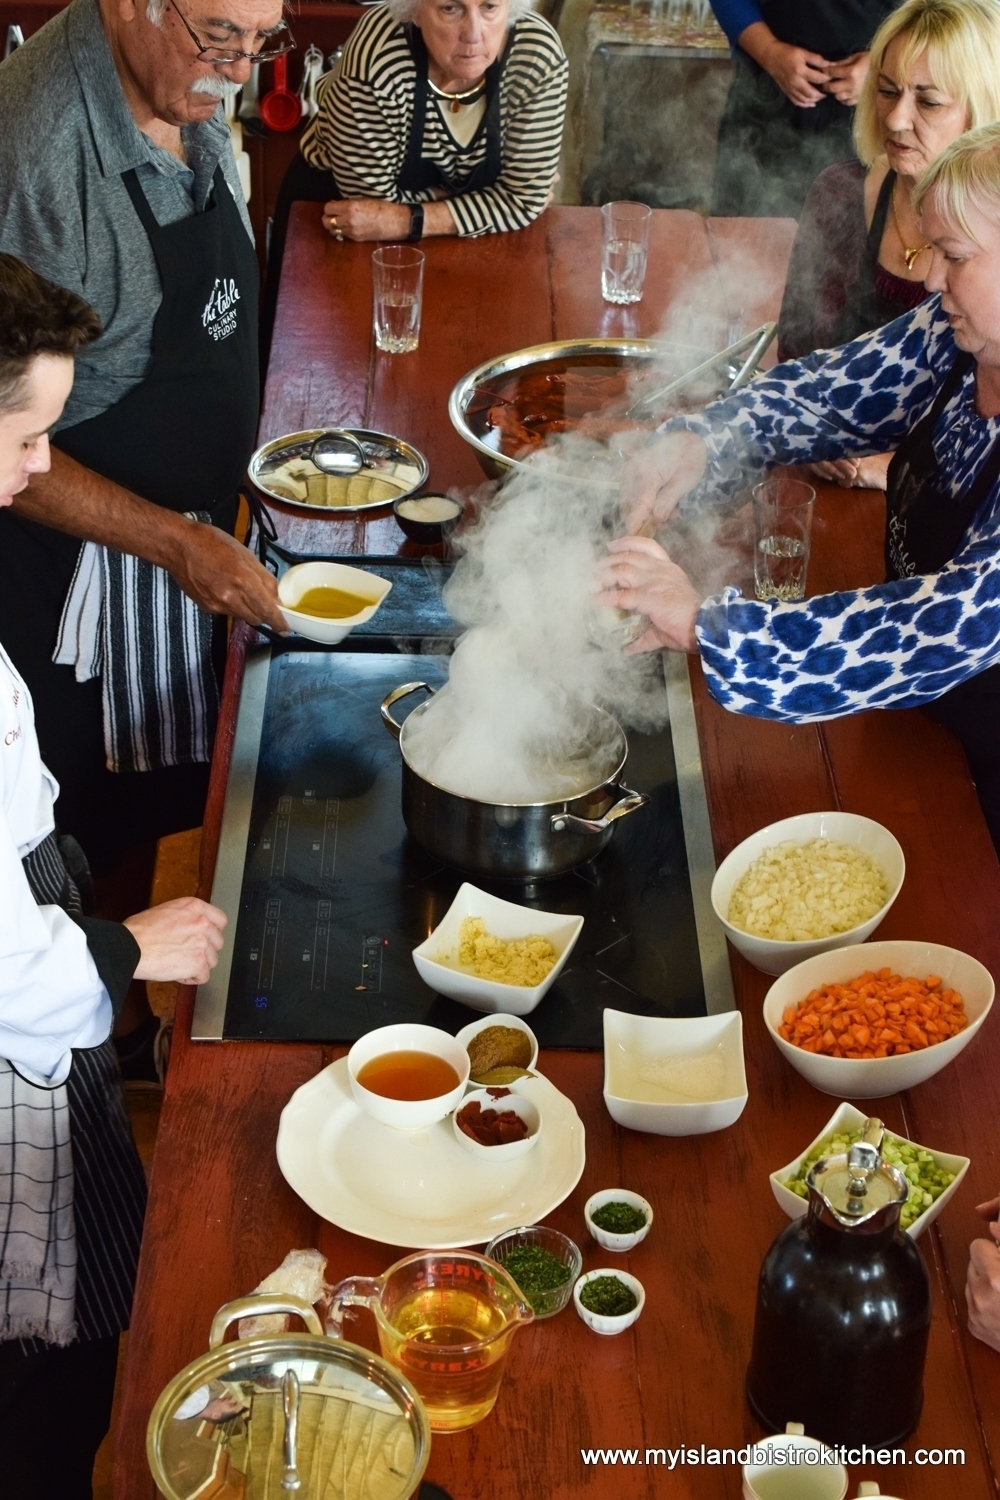
Class size is small and intimate – only a maximum of 10 participants per cooking class.  This ensures that each person has a front row view as the culinary team teaches the cooking or baking techniques in the open-style kitchen. It also allows for participants to be actively engaged and participating in the cooking or baking activities.

The Table Culinary Studio, New London, PEI

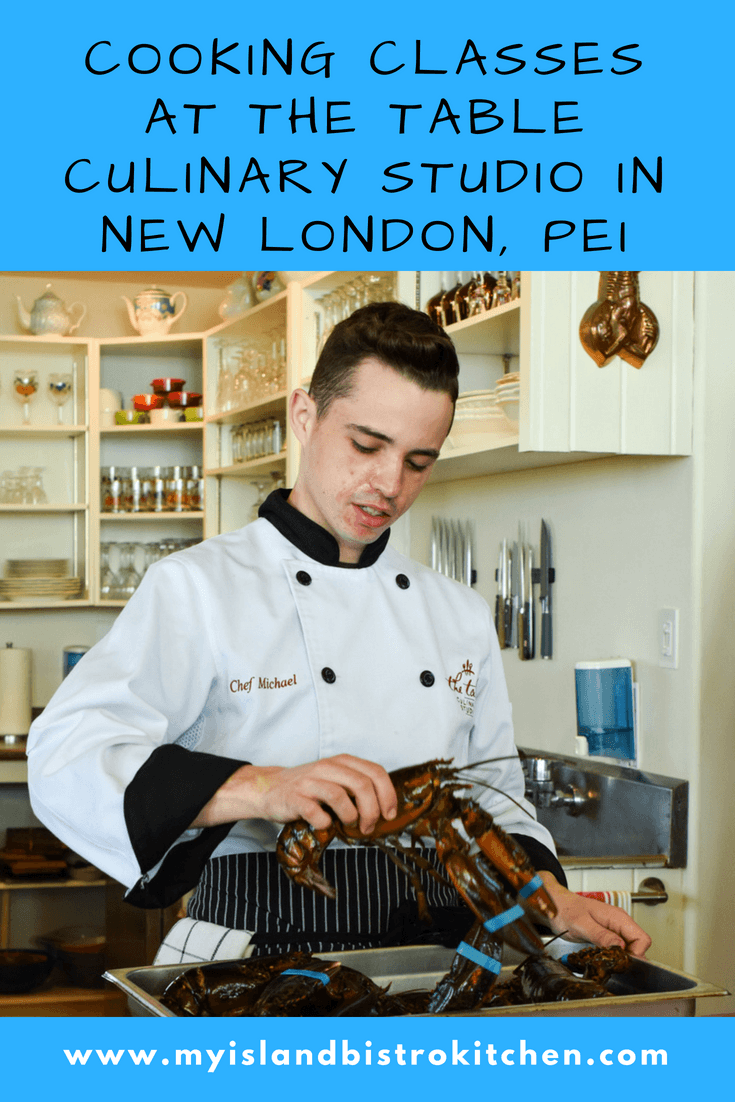
The culinary team consists of owner/chef Derrick Hoare, Executive Chef Michael Bradley, and Events Coordinator Christine Morgan. The atmosphere is unhurried and very sociable. Strangers become friends over the commonality of food. With a growing hunger for knowledge about where one’s food comes from and how it is grown, produced, or harvested, cooking classes appeal to most age demographics and skill levels. No need to worry if you are not an experienced or accomplished cook – the classes offer something for everyone, including a scrumptious meal after the class in the beautifully appointed old country church.

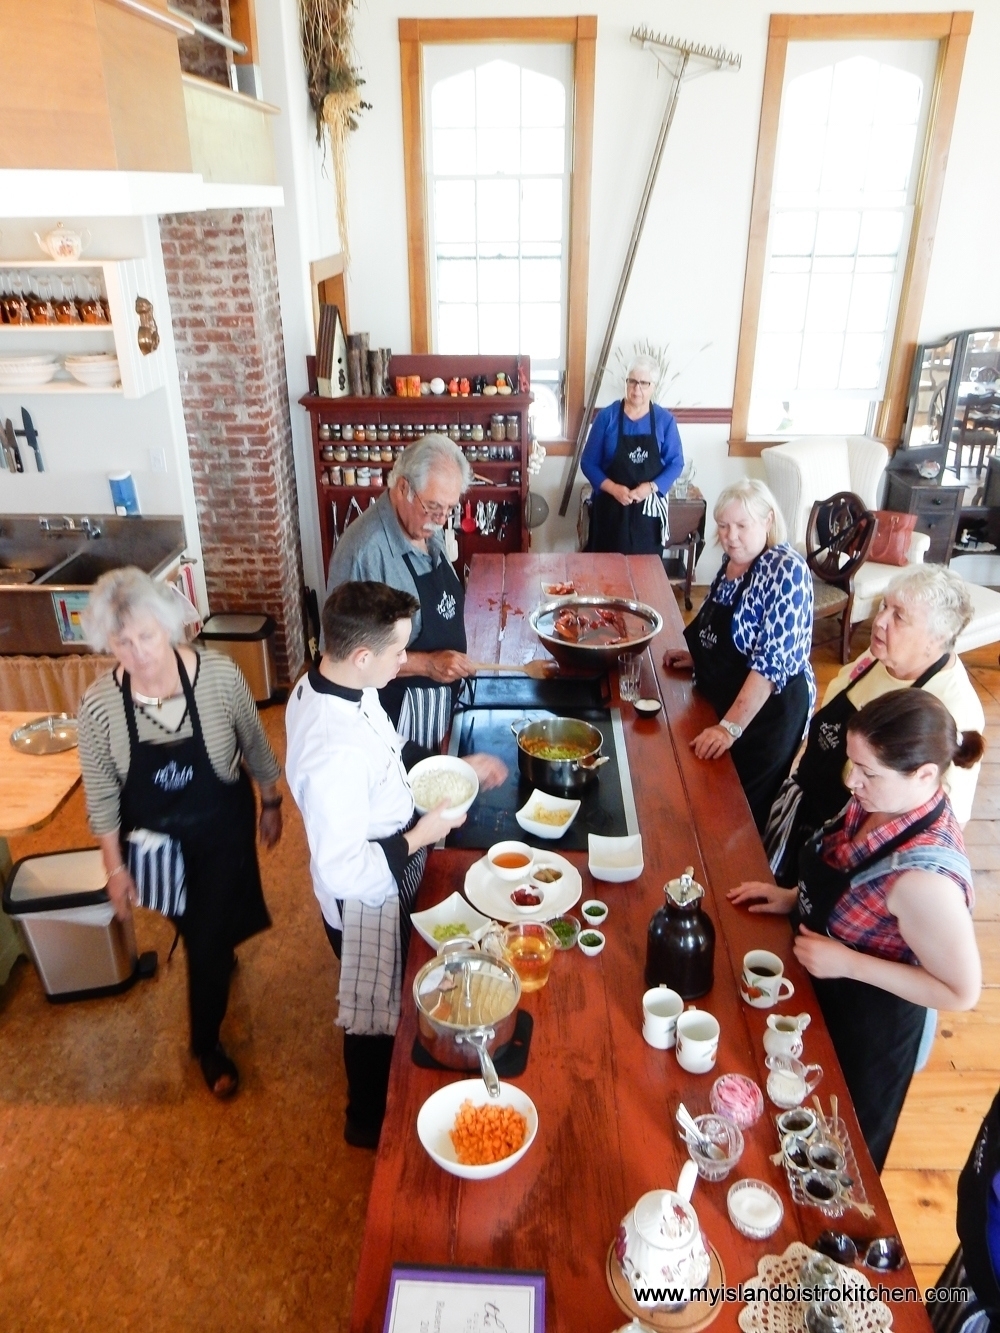
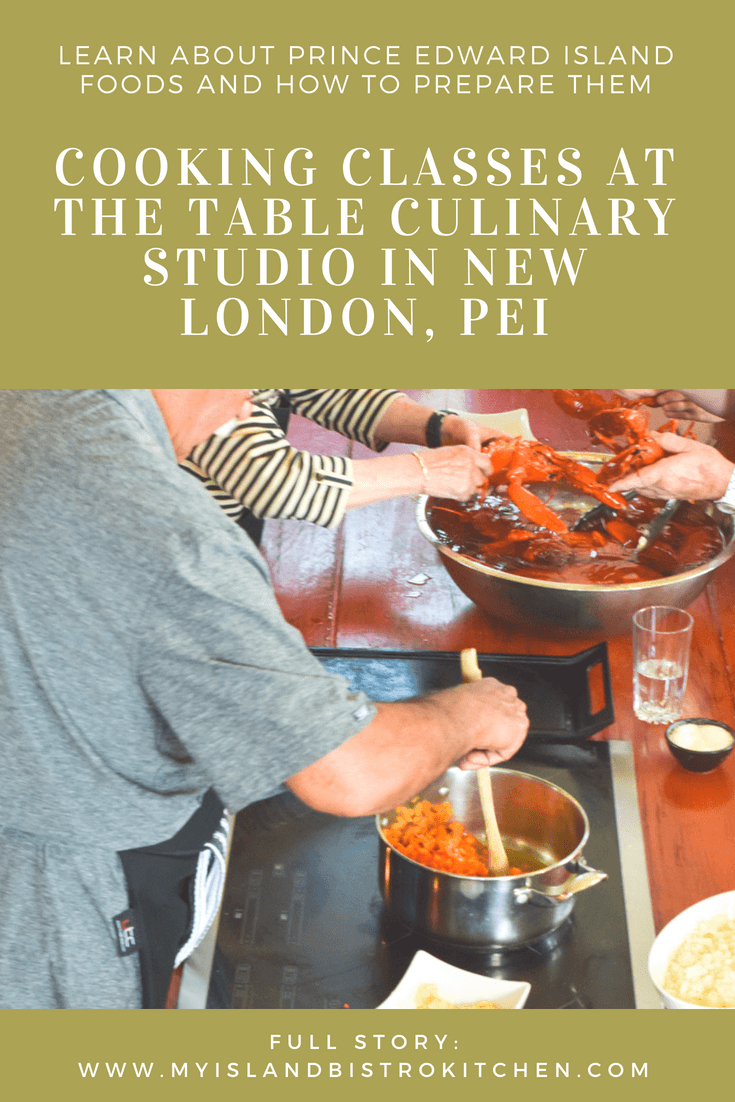
So, now on to my adventure as a participant in The Table’s “Bounty of the Sea” cooking class.  After morning coffee upon arrival, everyone got suited up with their aprons and side towels.

At The Table Culinary Studio in New London, PEI

The class began with Chef Derrick giving a brief talk on lobster fishing on PEI, recounting his own experiences going out on a fishing boat to learn, first-hand, about lobster fishing on the Island.  Chef Michael then gave a short biology lesson on how to identify the gender of a lobster.

Executive Chef Michael Bradley at The Table Culinary Studio in New London, PEI

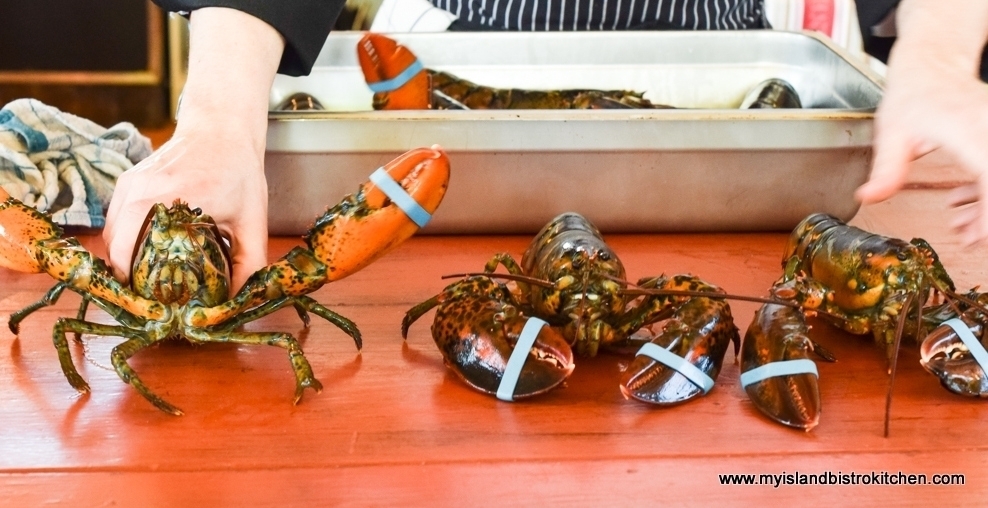
It’s a good thing those lobsters were banded because, if you find yourself in the unfortunate situation of having a finger caught in the claws of one, you are likely to end up with a broken finger – they’re strong!

Lobsters
Fiesty Lobsters

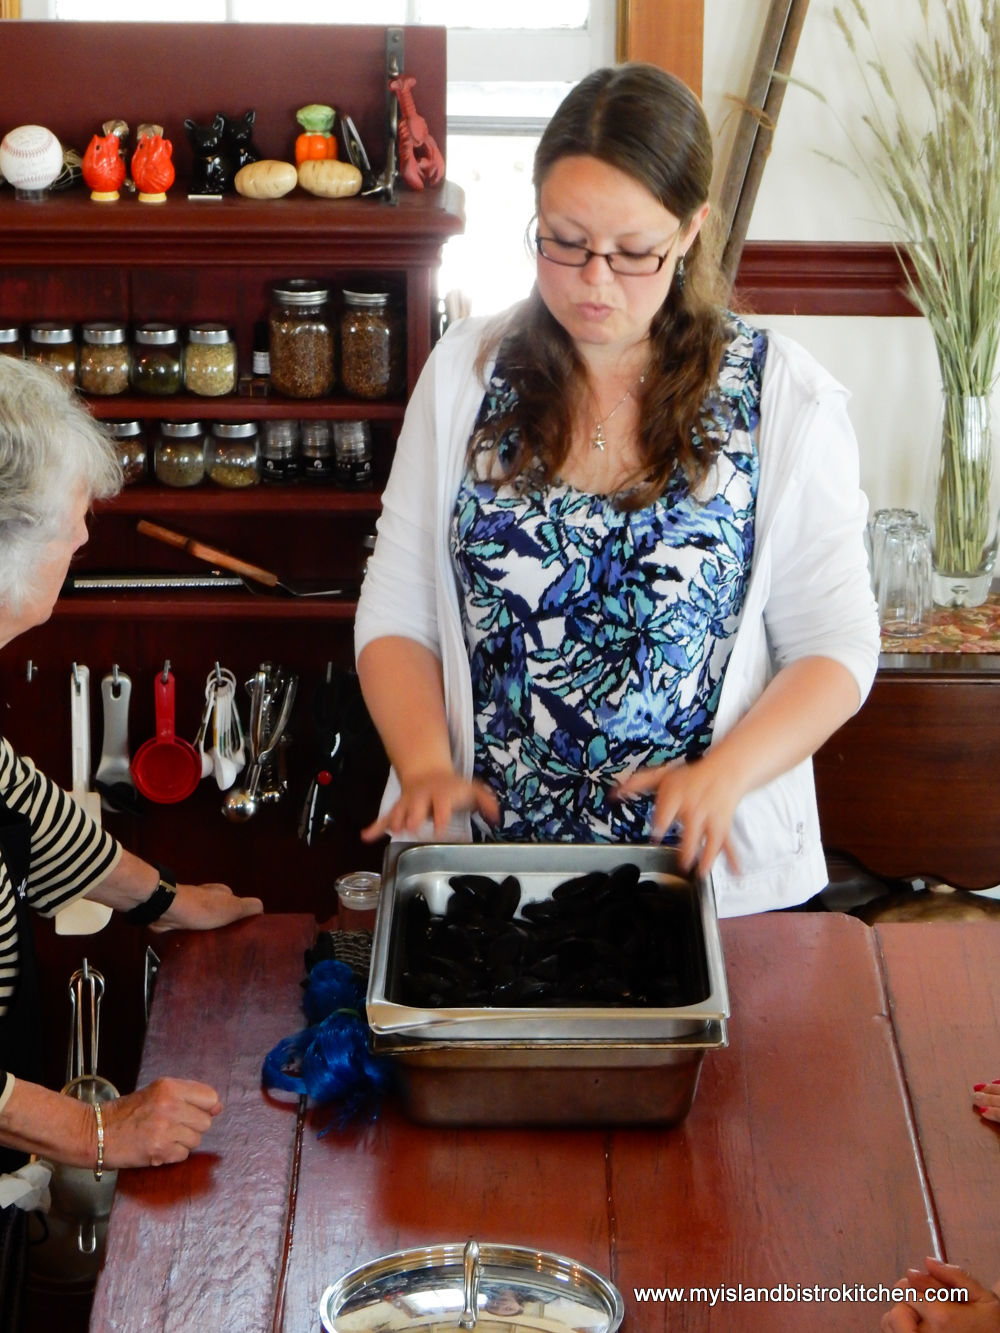
Everyone was given a lobster and instructed on how to carefully de-band them before placing them in hot water to be cooked.

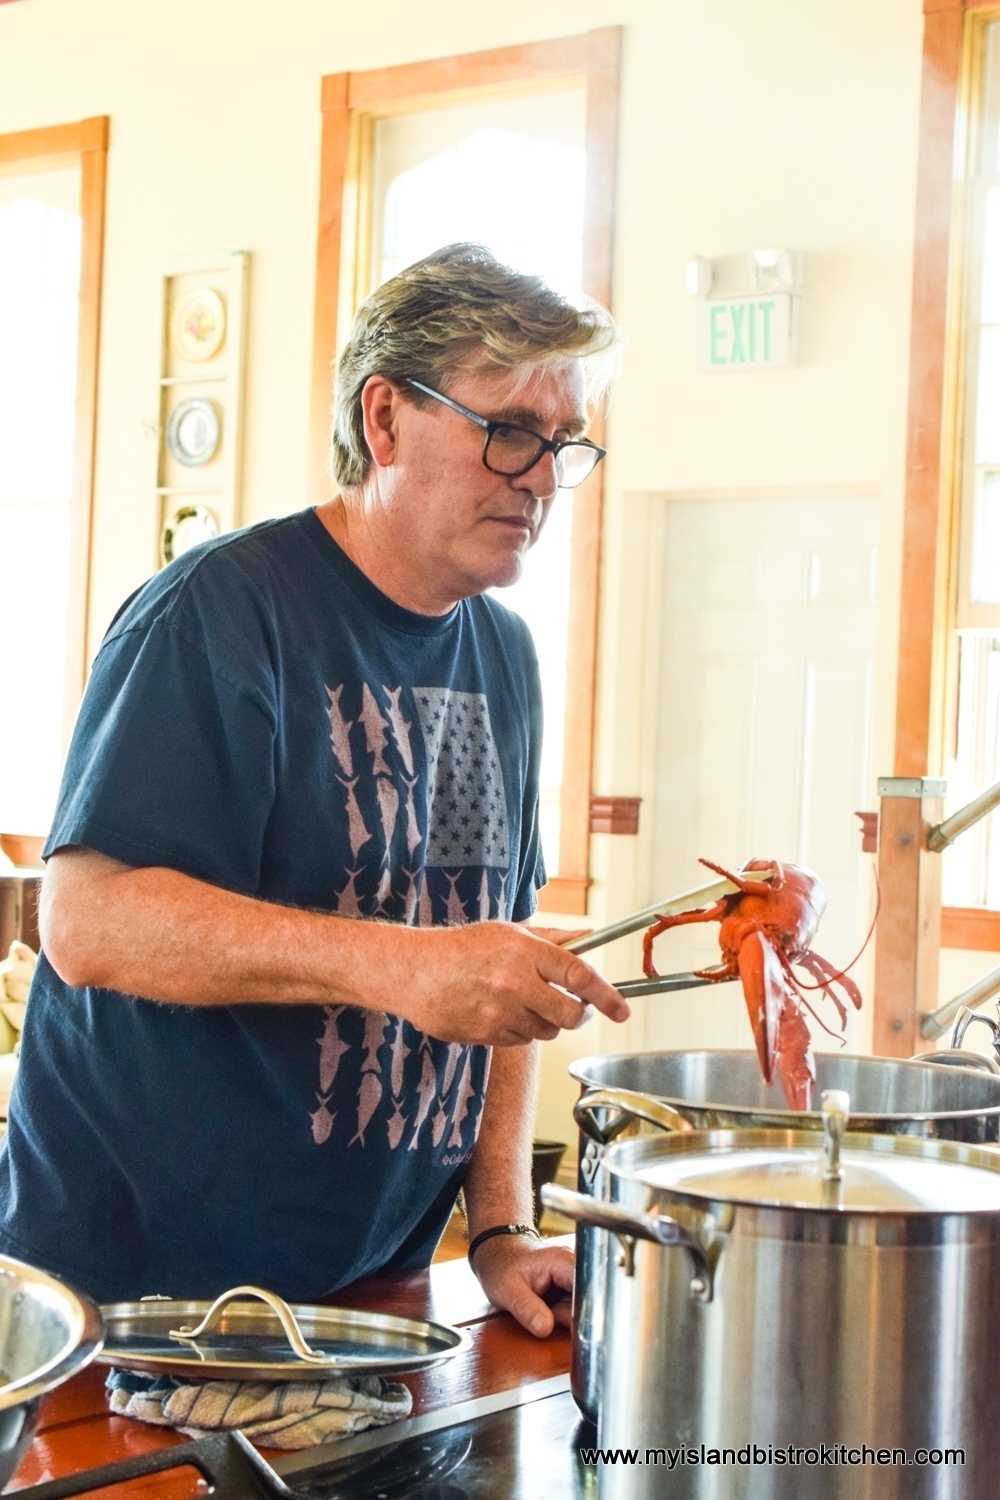
Chef Derrick kept a watchful eye on the lobsters so they were removed from the pot at just the right time.

Derrick Hoare, Owner/Chef at The Table Culinary Studio in New London, PEI

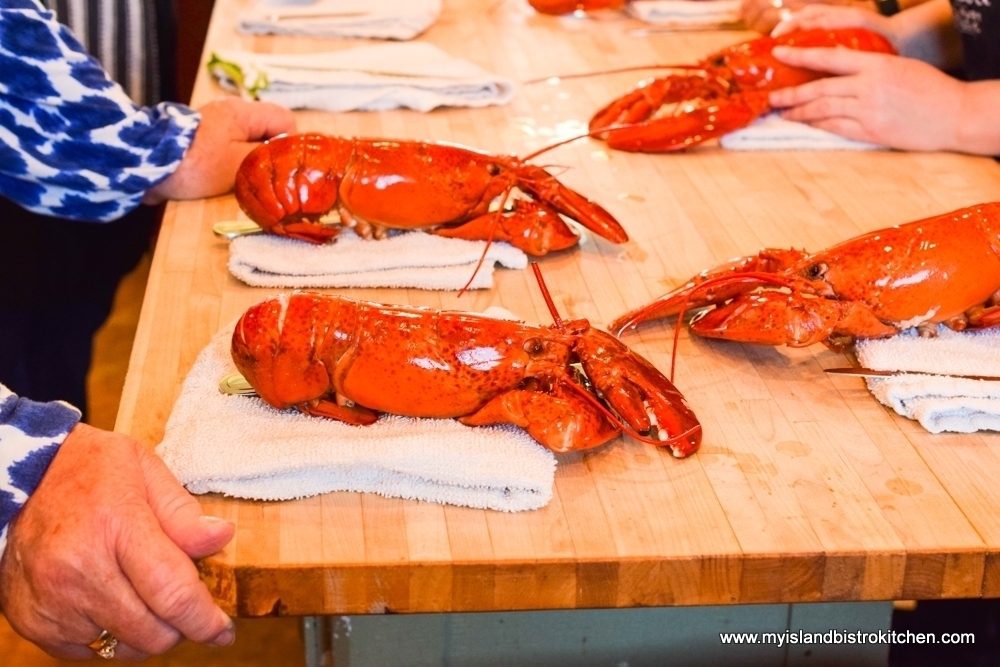
Next came the lesson on how to crack open a lobster.

Cooked Lobster
Cooked Lobster

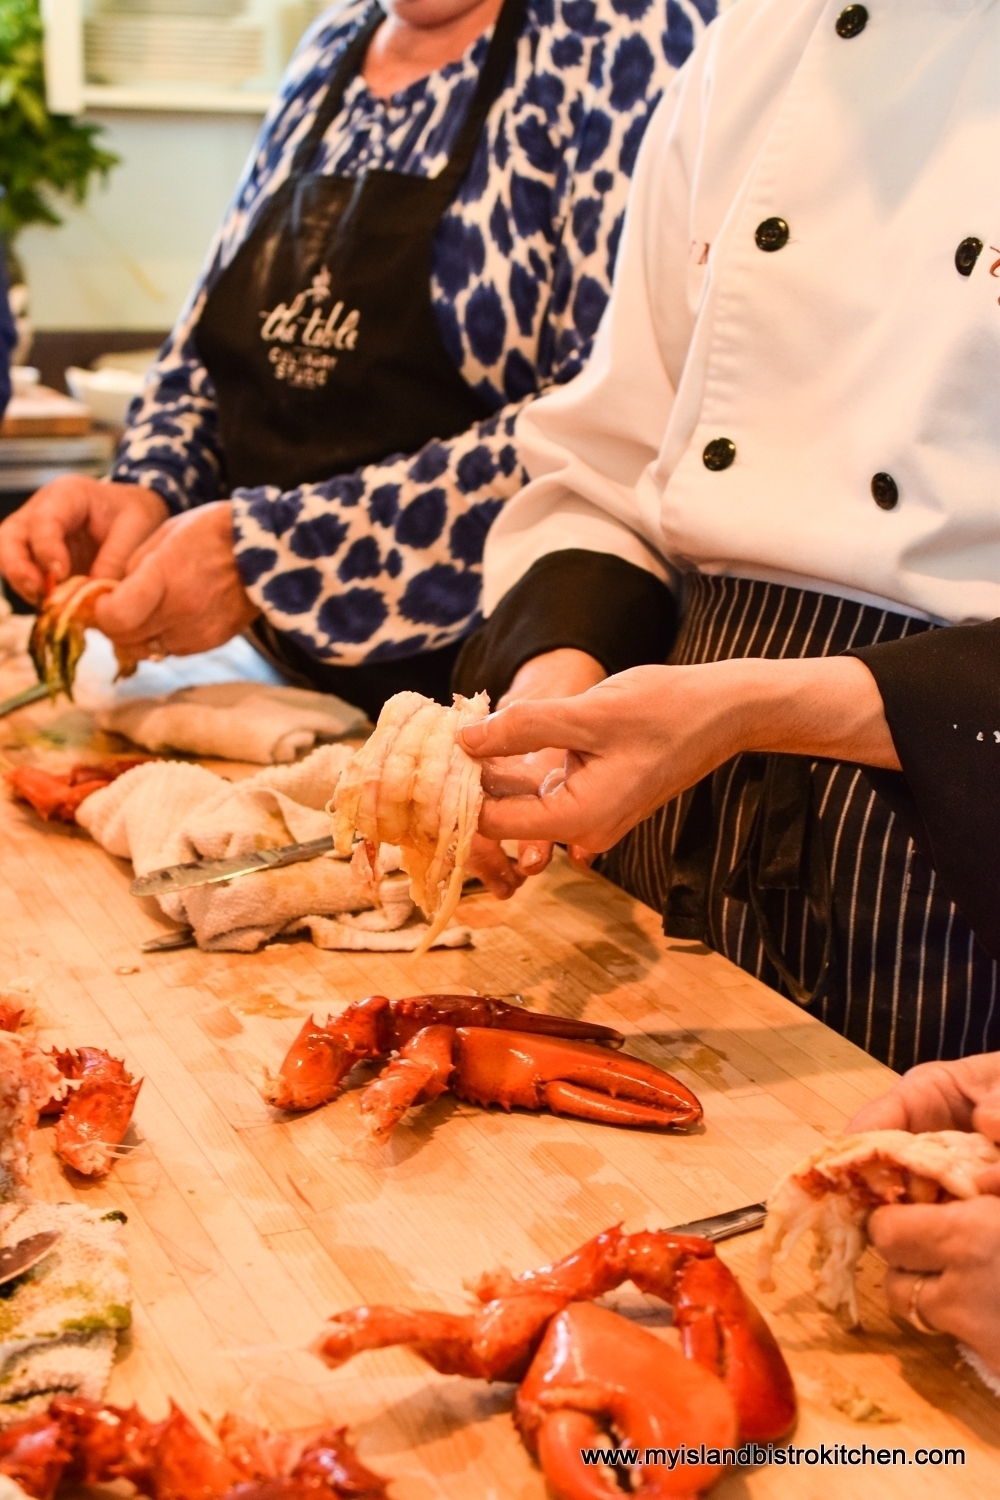
Chef Michael capably gave instructions as each student cracked open a lobster to reveal the succulent meat inside.

Meat from the Lobster

Yes, a basic table knife will do the trick!

Cracking Open Lobsters

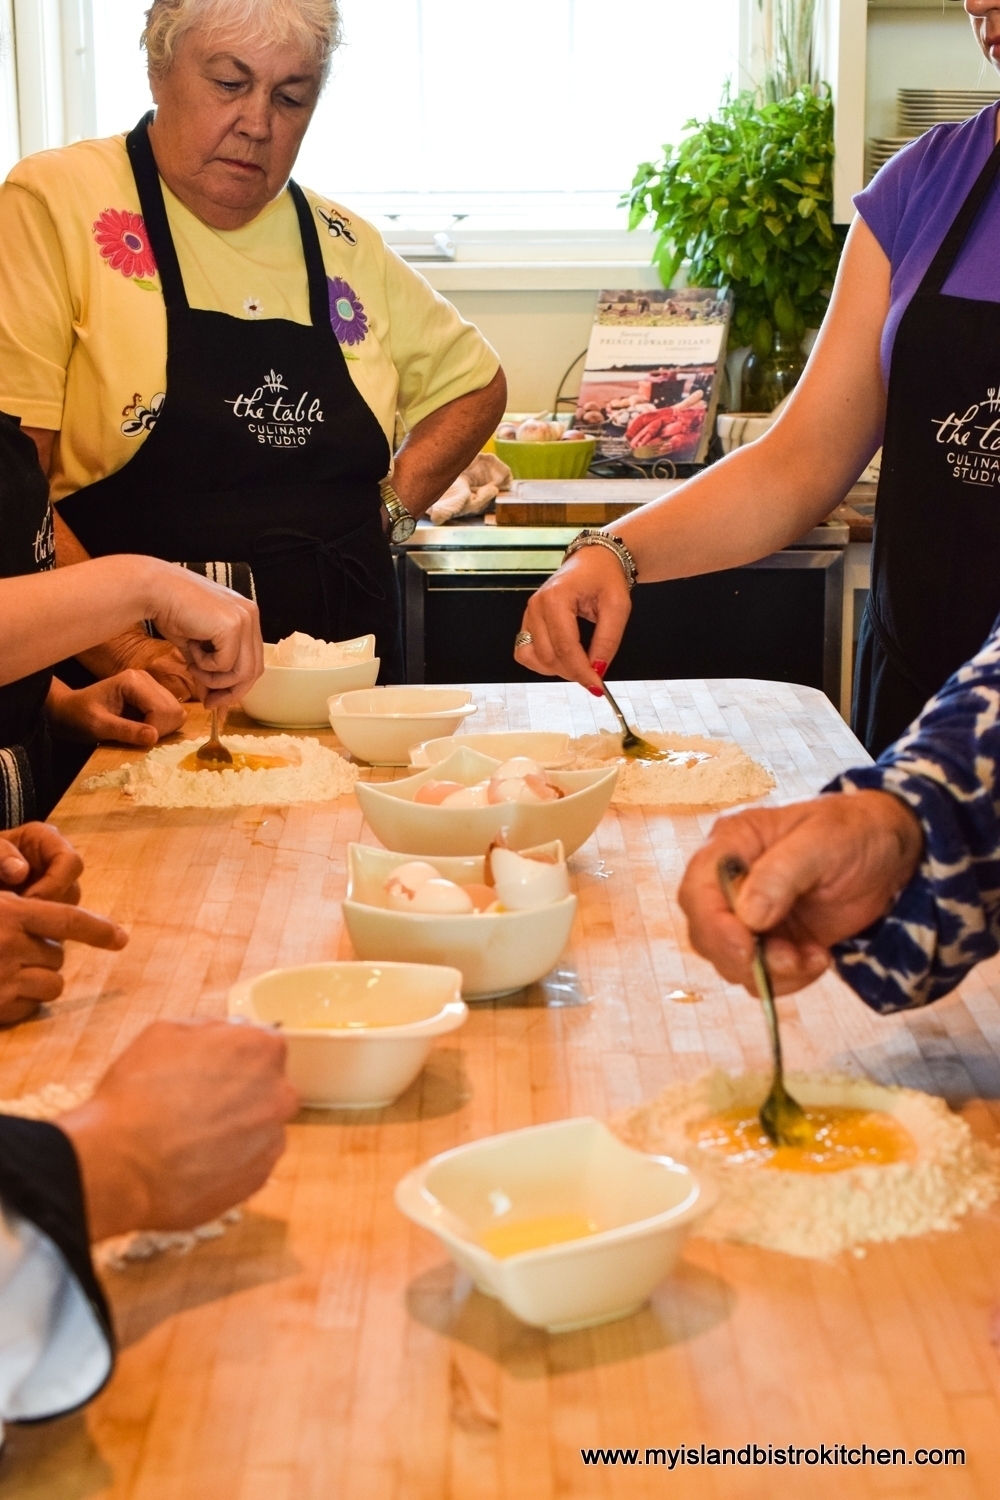
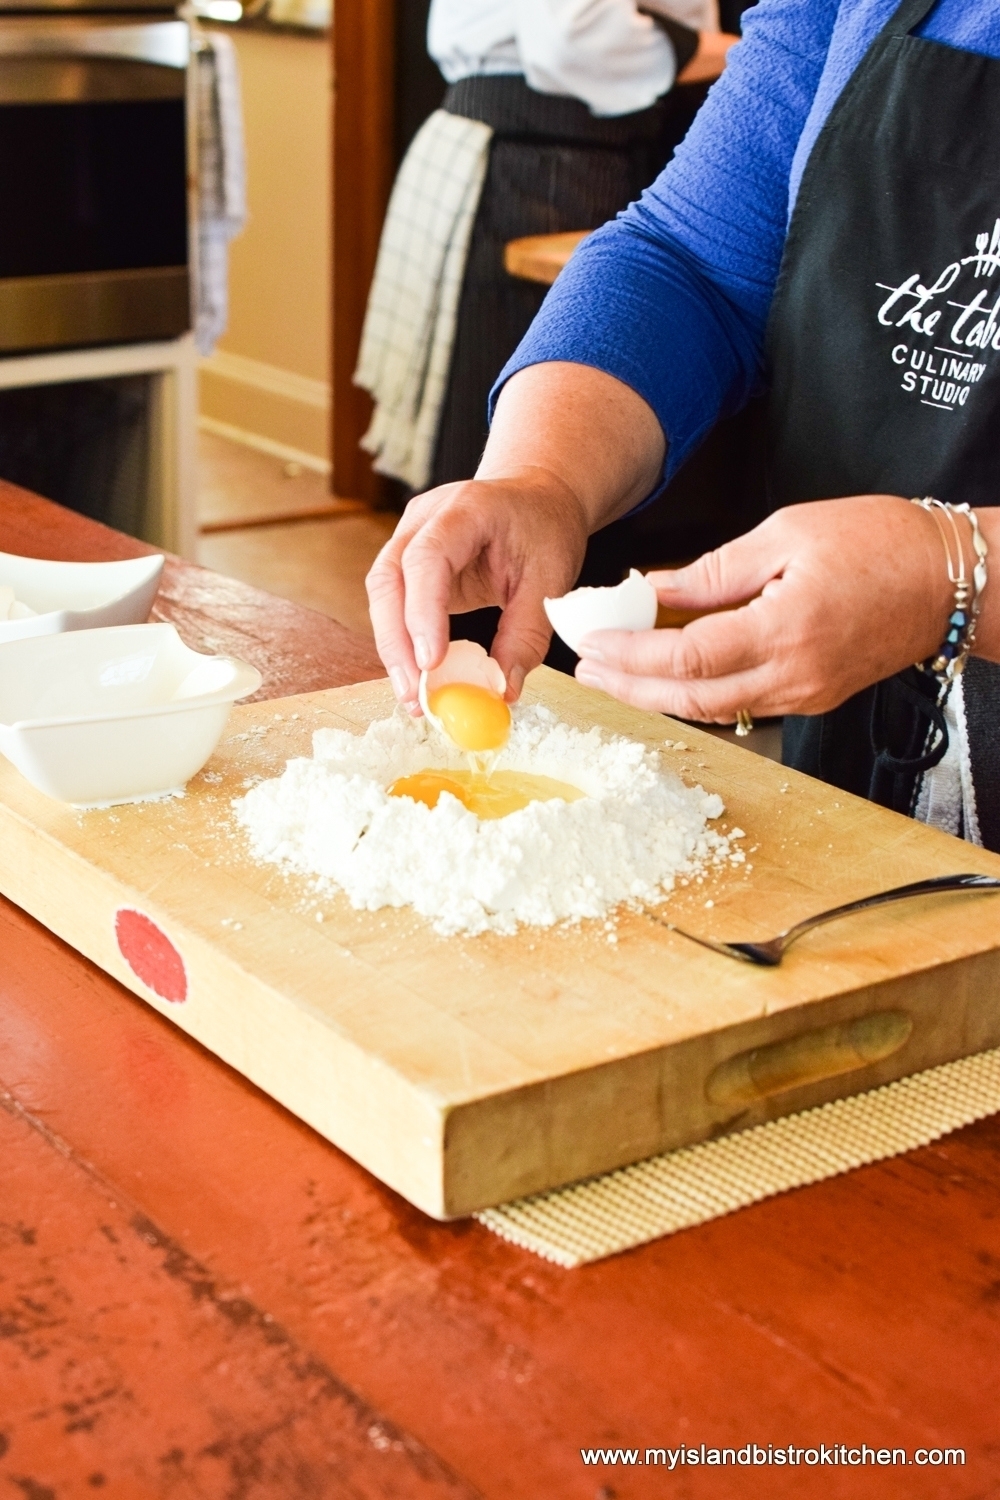
Having never made homemade pasta before, I was particularly interested in the procedure.

Making Homemade Pasta at The Table Culinary Studio in New London, PEI

The Table is very accommodating to class participants who have dietary restrictions.  On this day, there were two participants who were gluten-intolerant so a separate station on an adjacent workspace was set up for them to make the gluten-free pasta and Chef Michael alternated between the two groups giving information and instruction on pasta making.

Making Gluten-Free Pasta at The Table Culinary Studio in New London, PEI

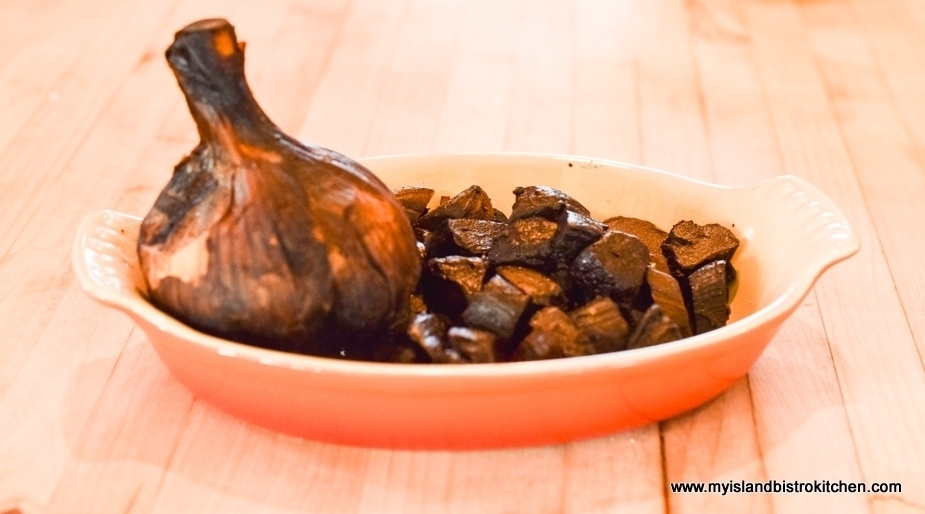
Black garlic from nearby Eureka Garlic, not far from Kensington, was used in the pasta to give a unique flavour.  If you have never tasted black garlic, it’s not nearly as garlicky as you might think – I personally think it tastes like a cross between a fig and a prune.  You can check out my story here on Eureka Garlic. The chopped black garlic was kneaded into the pasta dough.

Black Garlic from Eureka Garlic near Kensington, PEI


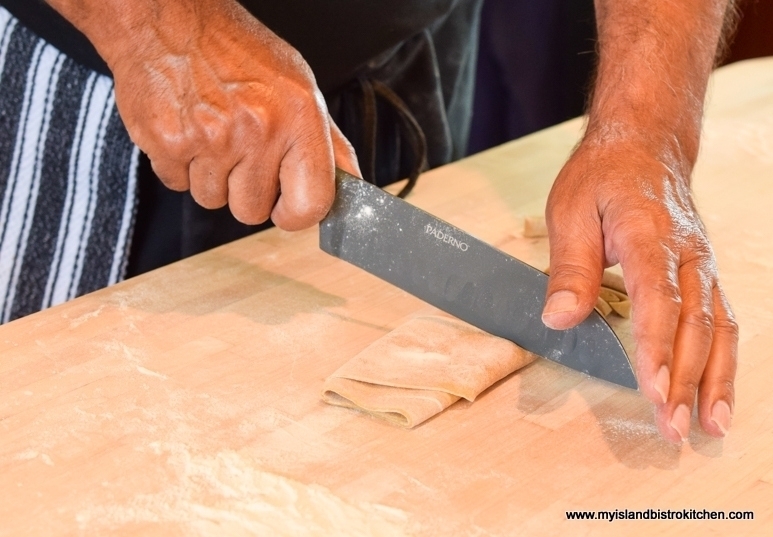
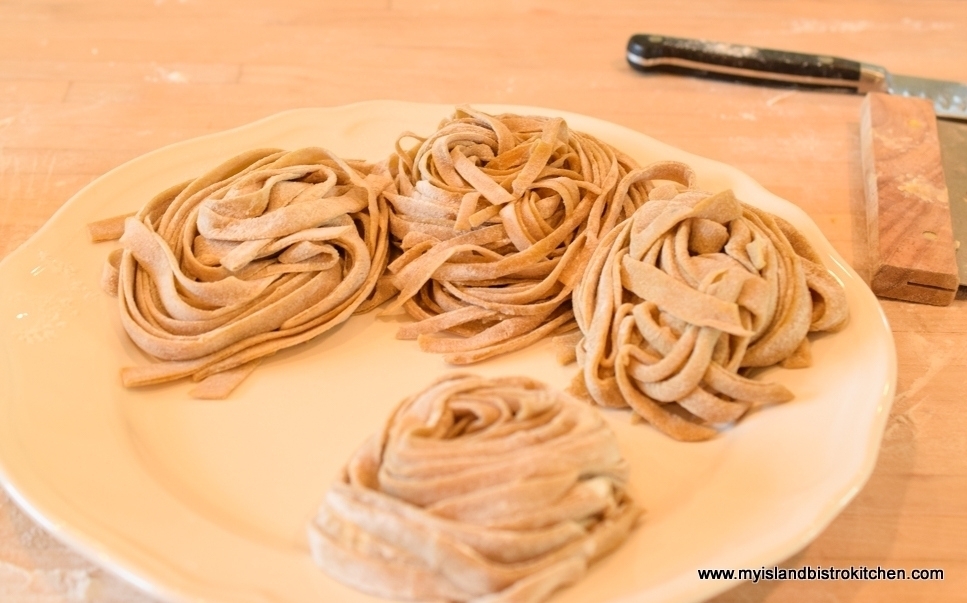
The pasta dough was cut and gathered into circles ready to be dropped into the cooking pot.

Cutting the Pasta Dough
Homemade Pasta Ready for Cooking

With the pasta made, we took a brief break from the food prep to listen to Christine explain how mussels are grown and harvested on PEI.

Christine Morgan Explains How PEI Mussels are Grown and Harvested

PEI mussels are world famous and they are shipped all over the world.   Mussels are a common food to serve at many events, year-round, on PEI. They are easy to prepare and ever-so-tasty dipped in melted butter!

Steamed PEI Mussels at The Table Culinary Studio in New London, PEI
Christine Morgan Serves Up Steamed PEI Mussels at The Table Culinary Studio in New London, PEI

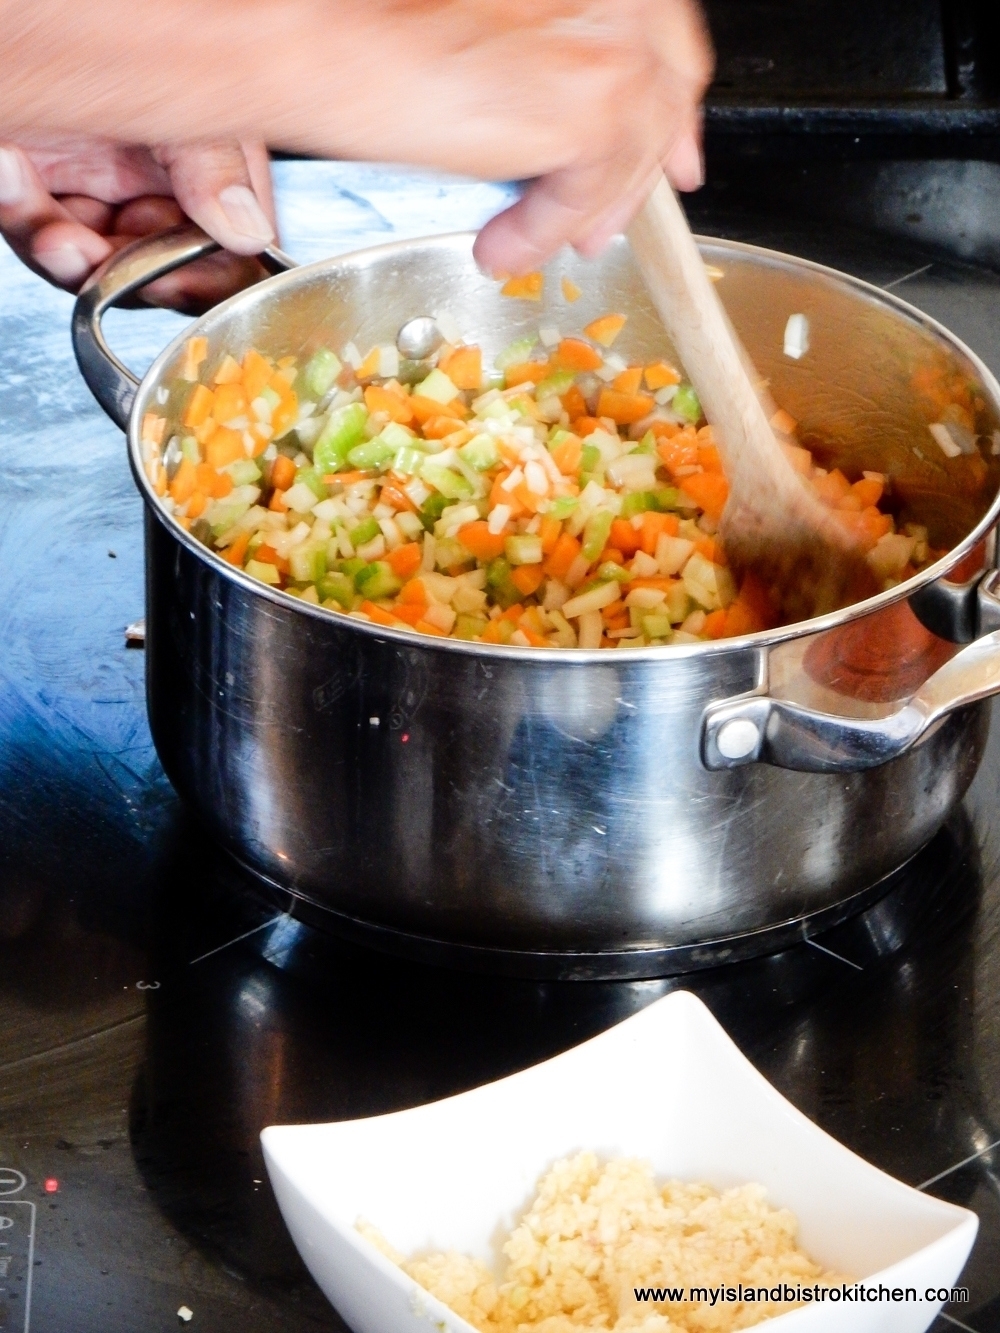
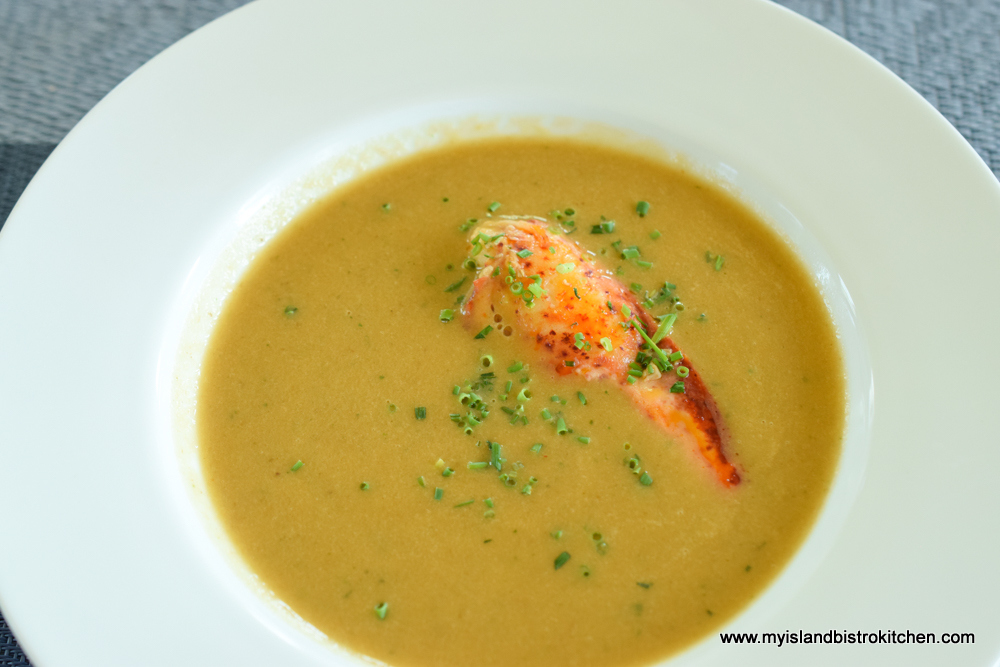
Chef Michael then guided the group in making Lobster Bisque.  Once the Mirepoix started cooking, you can only imagine how tantalizing the scent was as it wafted through the old church building.

Stirring the Mirepoix for the Lobster Bisque at The Table Culinary Studio, New London, PEI

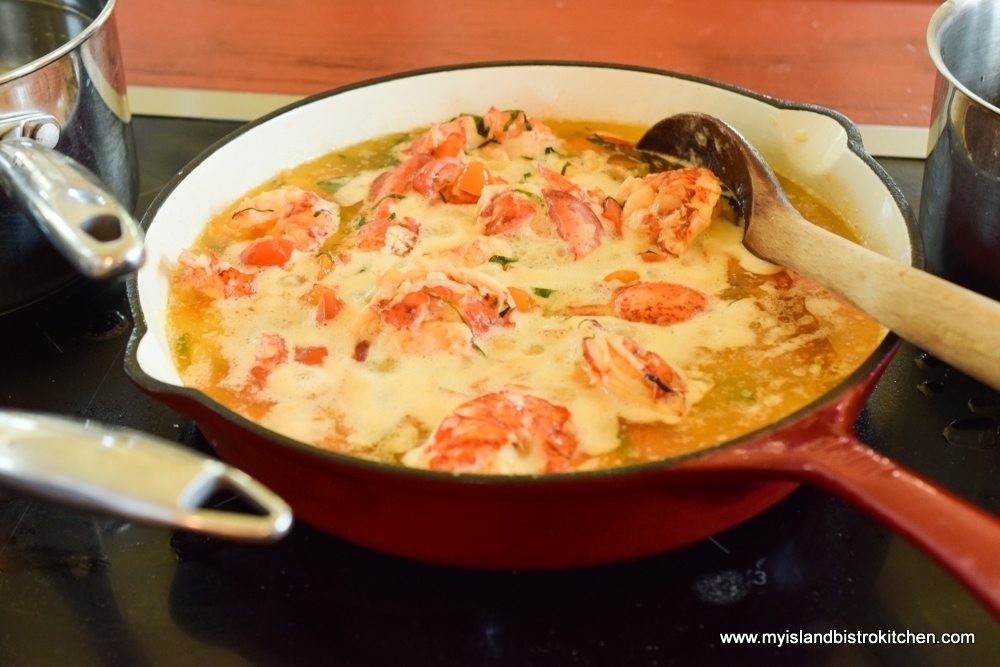
Ohhhh, that lobster is going to make a dandy lunch – can’t you just taste it!

Lobster Bisque in the Making at The Table Culinary Studio, New London, PEI

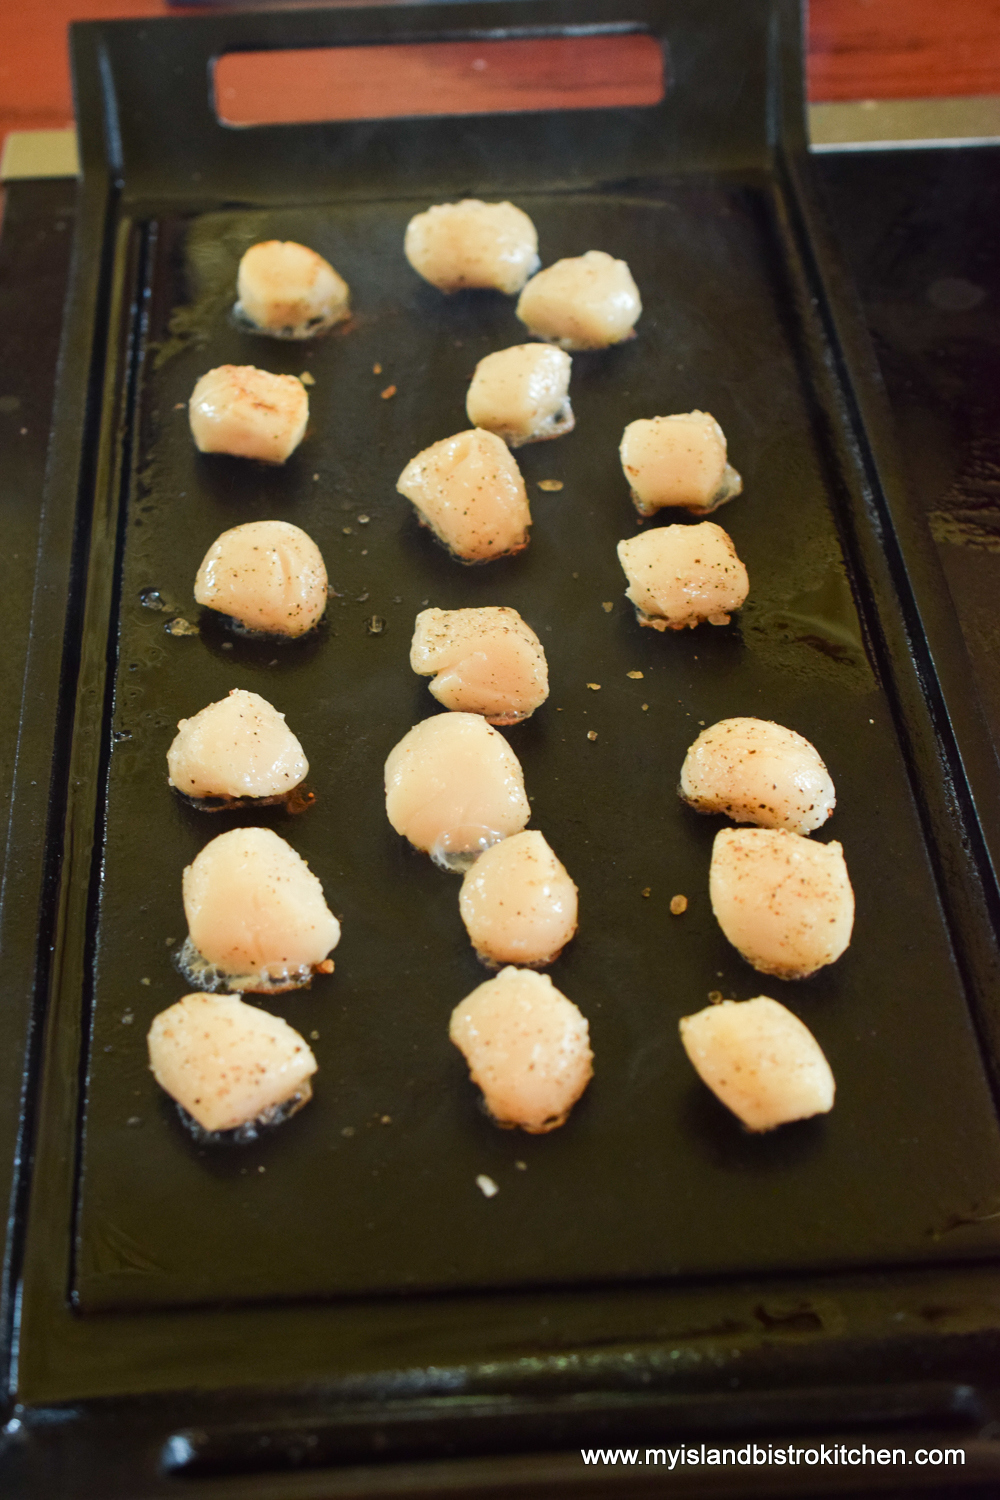
The third seafood that we learned to cook was scallops, those tasty little morsels!

Cooking Scallops at The Table Culinary Studio in New London, PEI

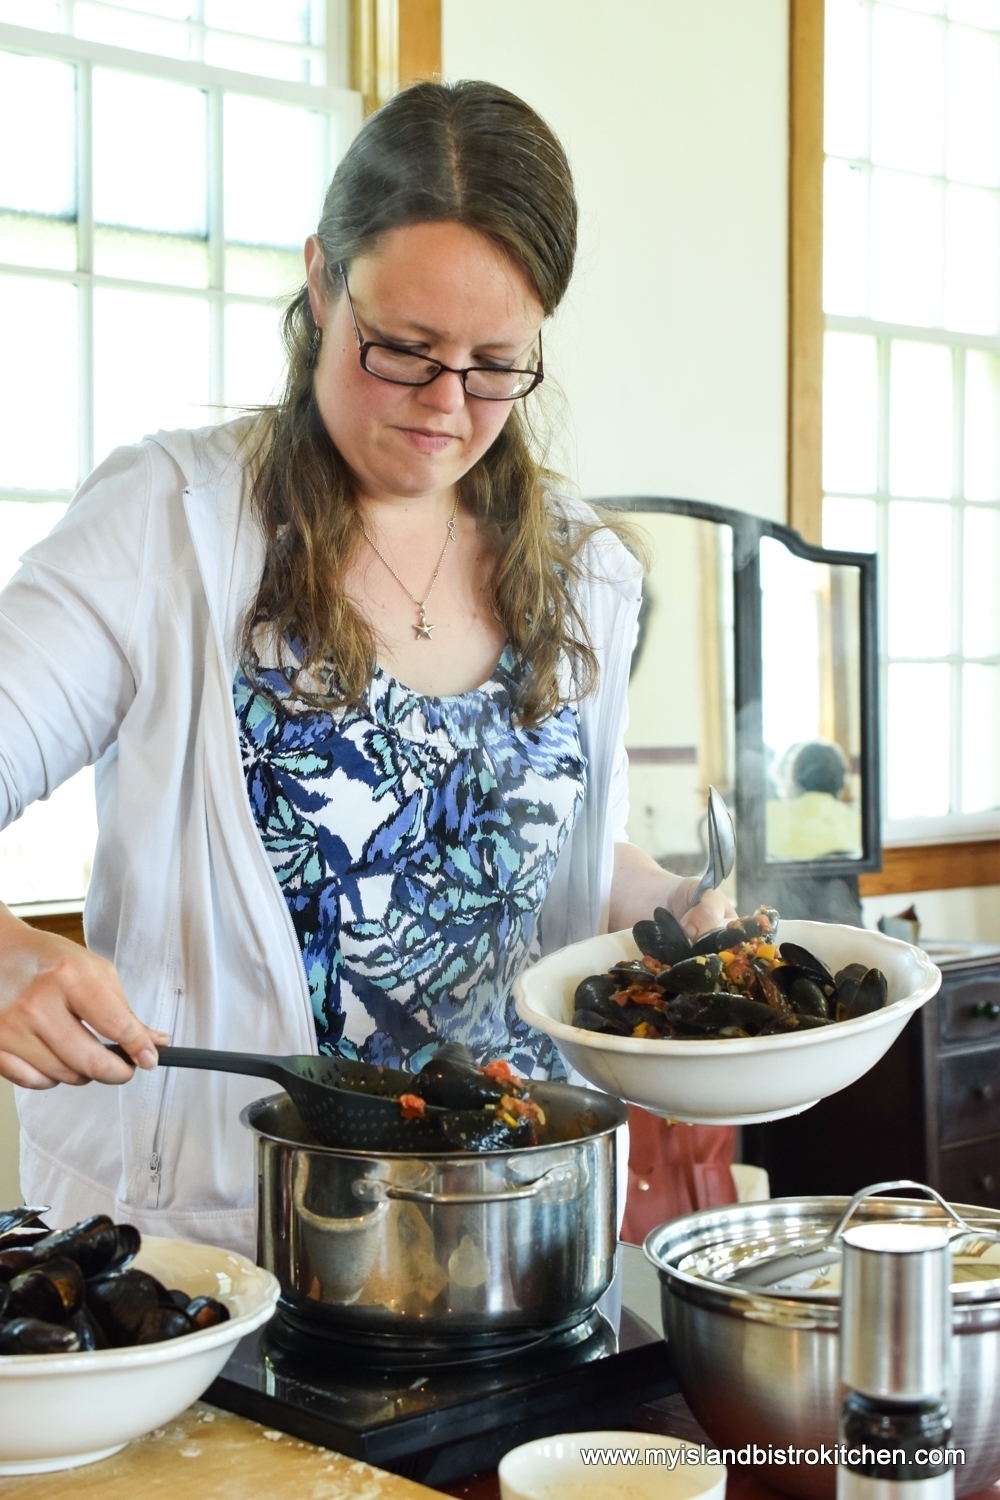
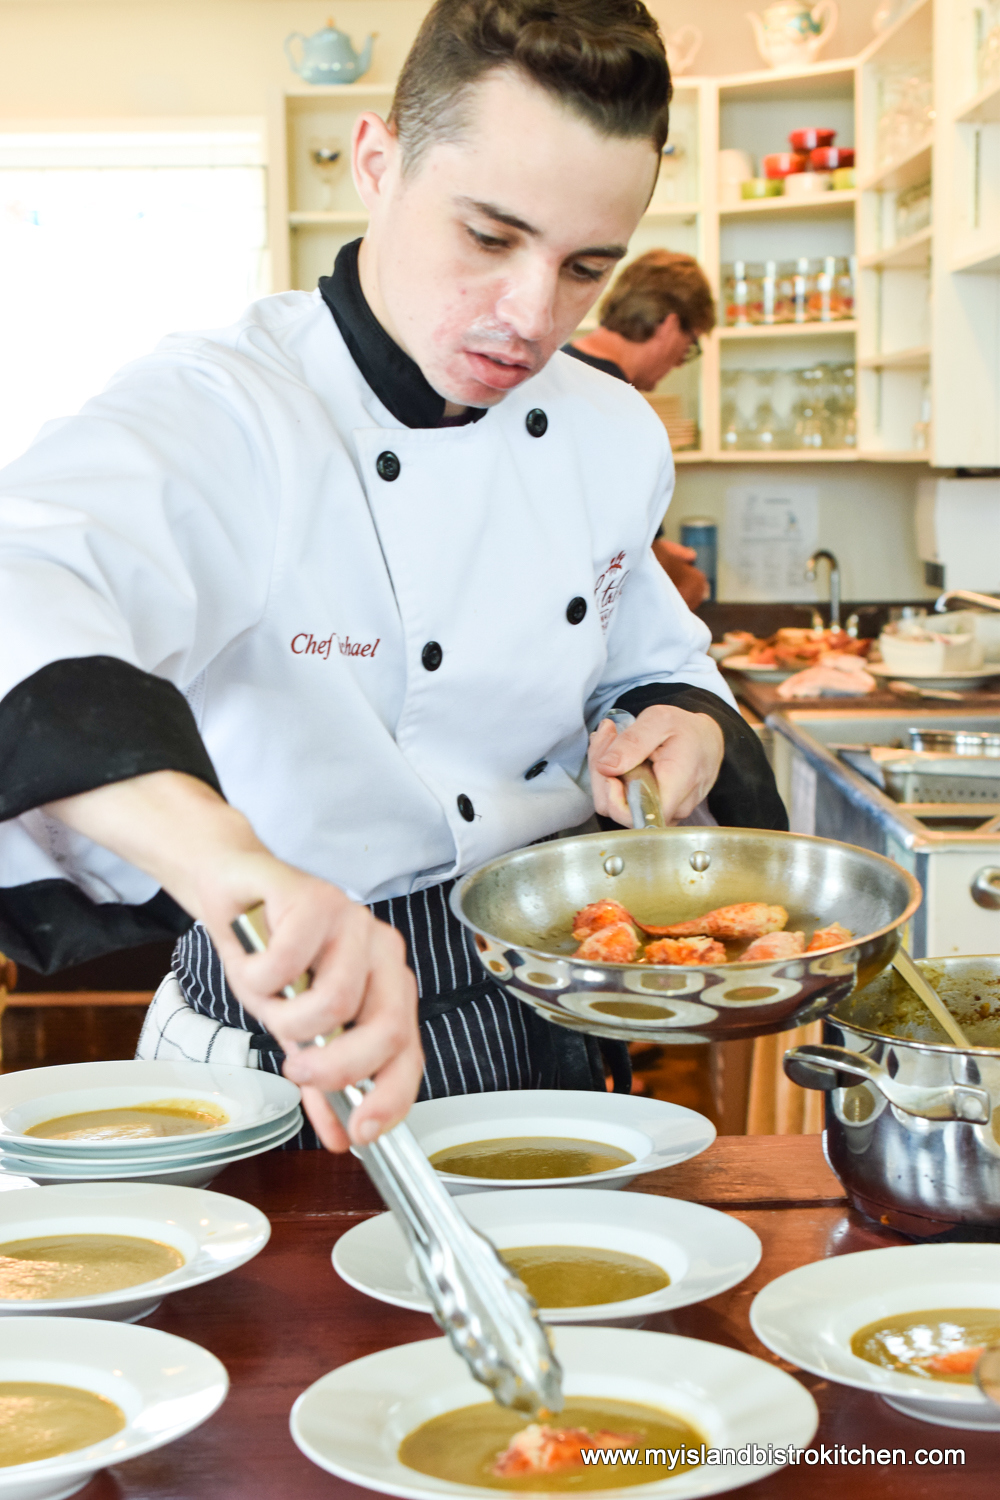
The morning went super fast and, before we knew it, it was time for lunch to be served by the culinary team.

Chef Michael Bradley of The Table Culinary Studio Preparing the Lobster Bisque for Serving
Chef Michael Bradley of The Table Culinary Studio Preparing the Bowls of Lobster Bisque for Serving

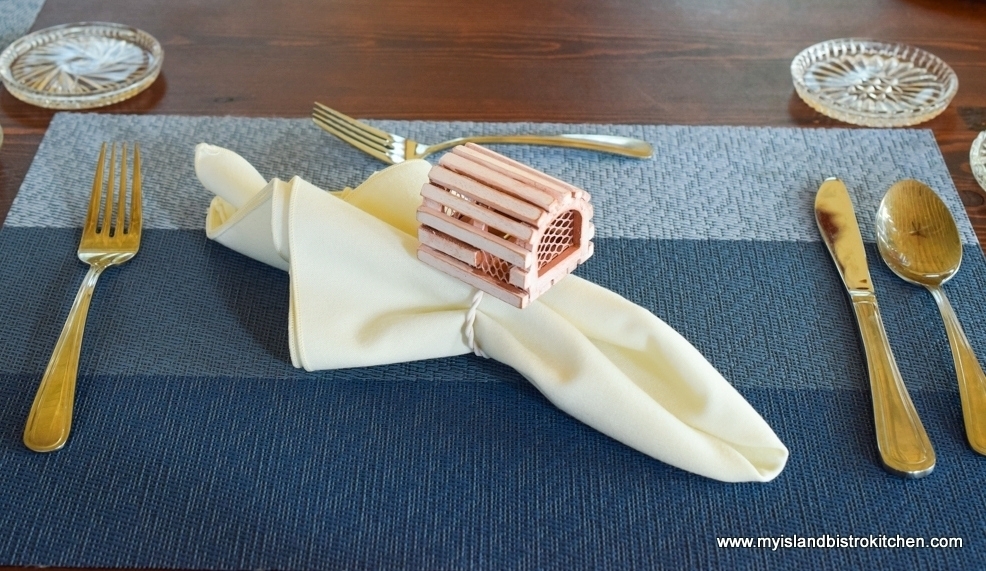
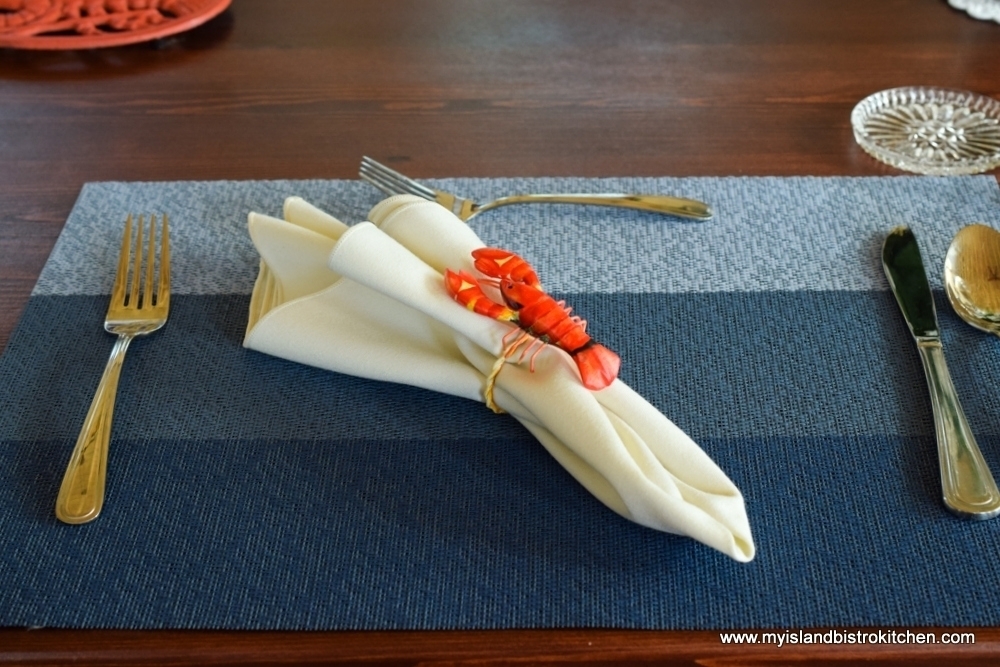
The table was beautifully set (those of you who follow my food blog regularly know how I love well-set tables).  The napkin at each place setting had either a small lobster trap or lobster napkin ring.

Place Setting at The Table Culinary Studio, New London, PEI

These napkin rings tied in well with the theme of the morning’s class – “Bounty of the Sea”.

Place Setting at The Table Culinary Studio, New London, PEI

How inviting does this look! Wouldn’t you love to sit in at this table!

At The Table Culinary Studio in New London, PEI

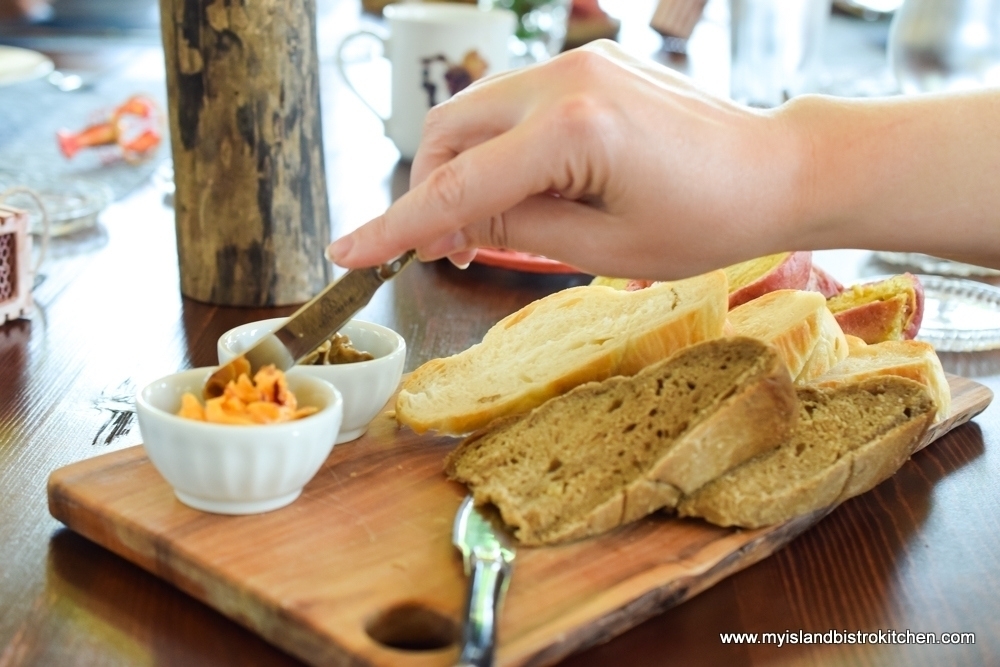
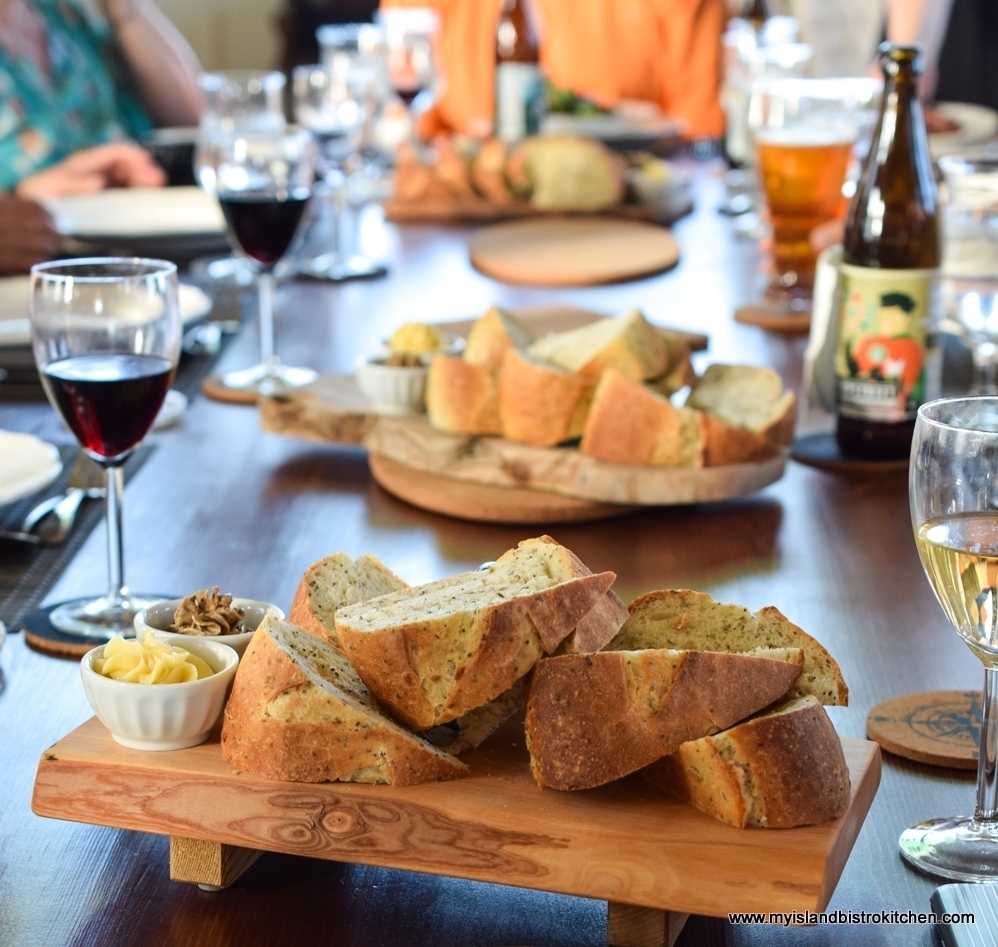
Fresh homemade sourdough bread was on the table.

Homemade Sourdough Bread

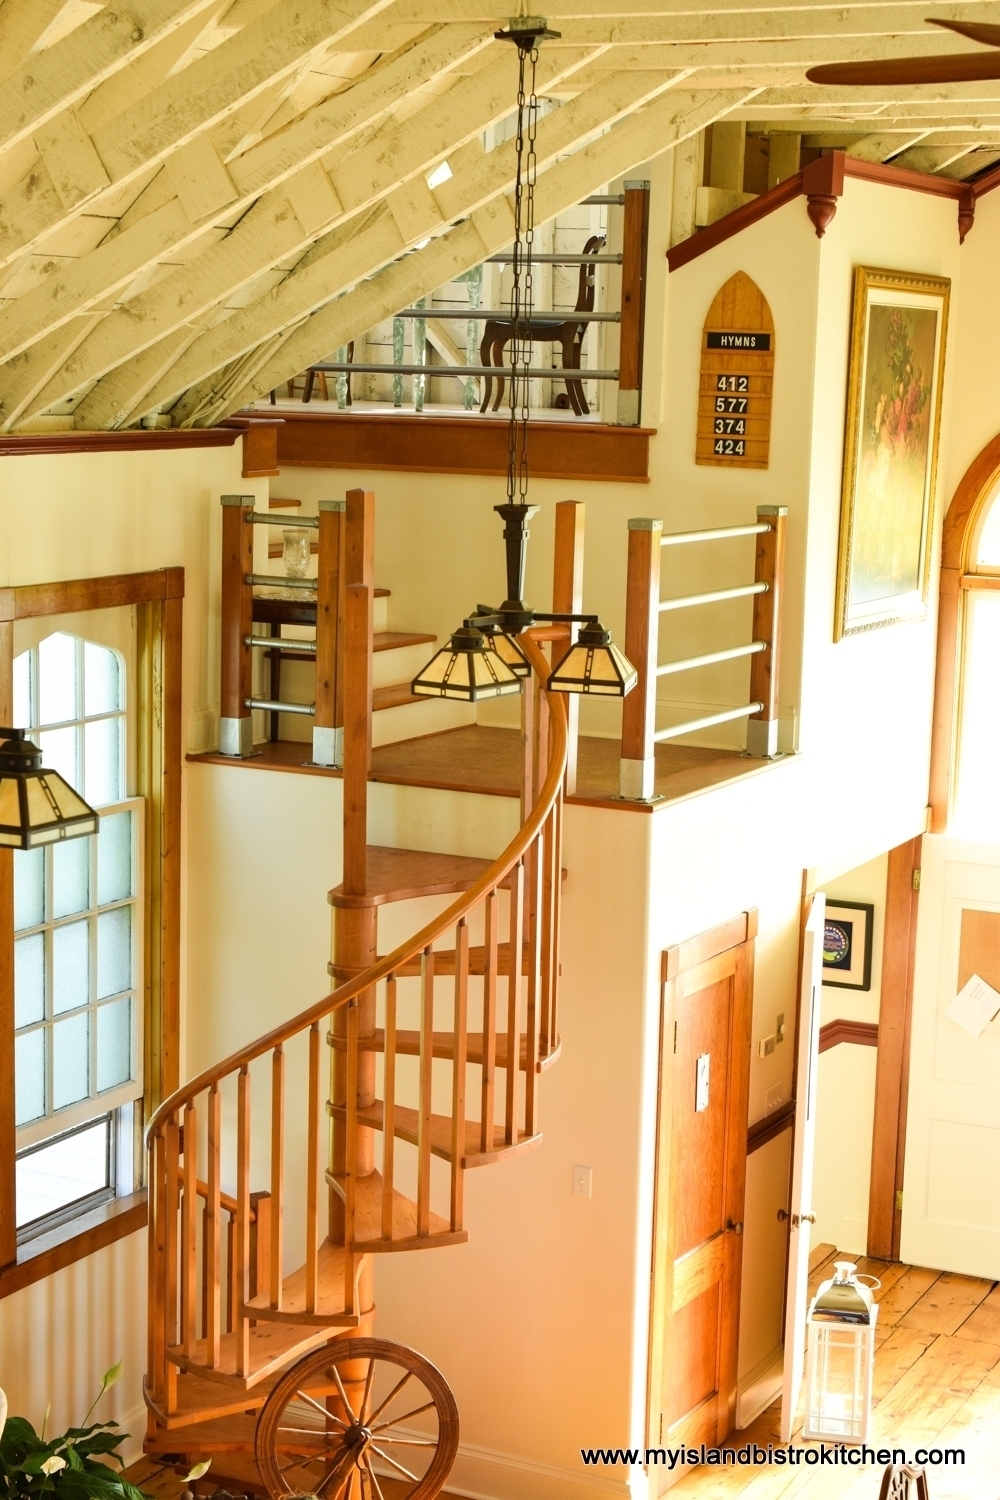
The landing at the top of the spiral staircase in the church provided a great vantage point for photography.

Spiral Staircase at The Table Culinary Studio, New London, PEI

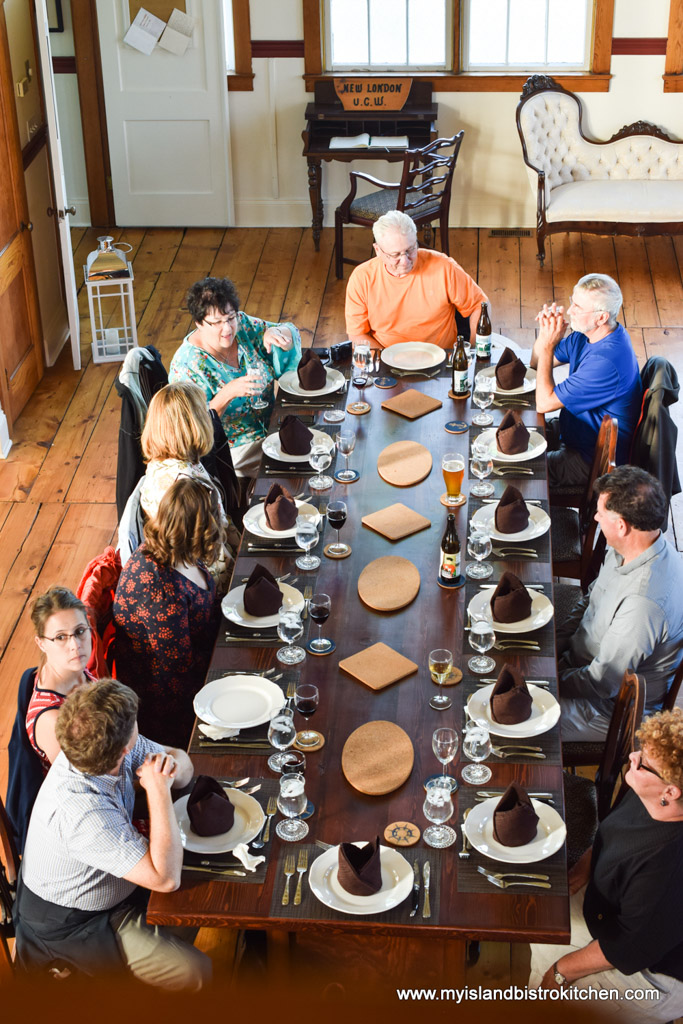
The group assembled at the big harvest table which is the focal point in the middle of the studio. This 12’ table was hand-crafted from old attic boards extracted from the house which The Table’s former owner restored just up the road at New London corner.

Class Lunch at The Table Culinary Studio in New London, PEI

How great does this lobster bisque look with that succulent lobster claw!  It tasted even better!

Lobster Bisque
Lobster Bisque

We were very anxious to taste the homemade pasta and it did not disappoint! The pasta in the photo below is gluten-free.

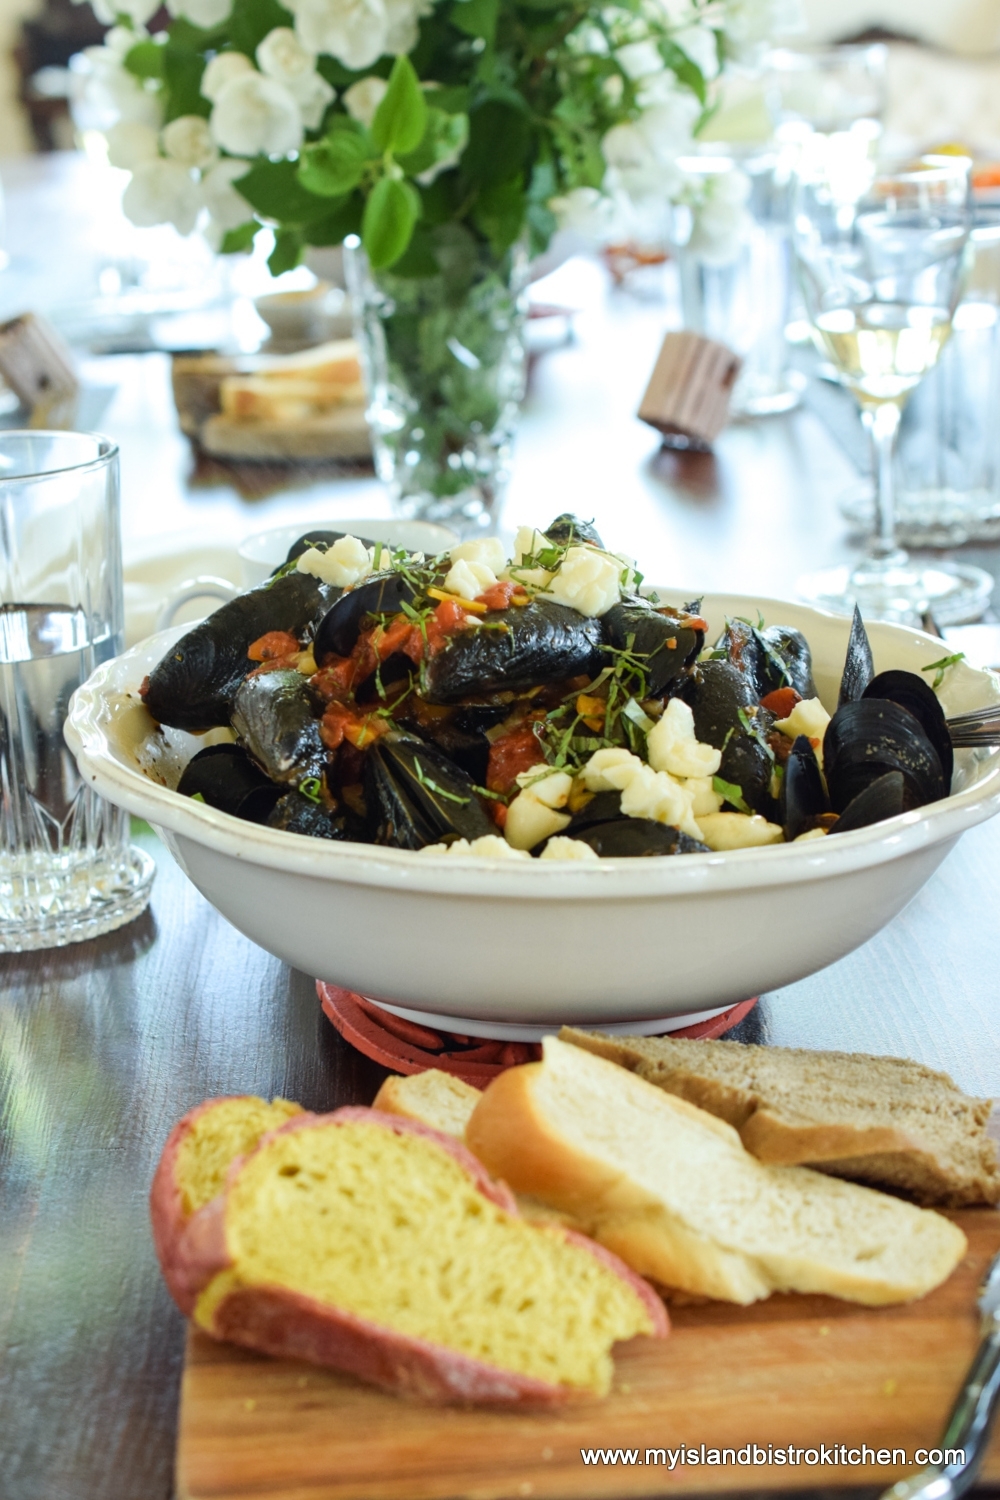
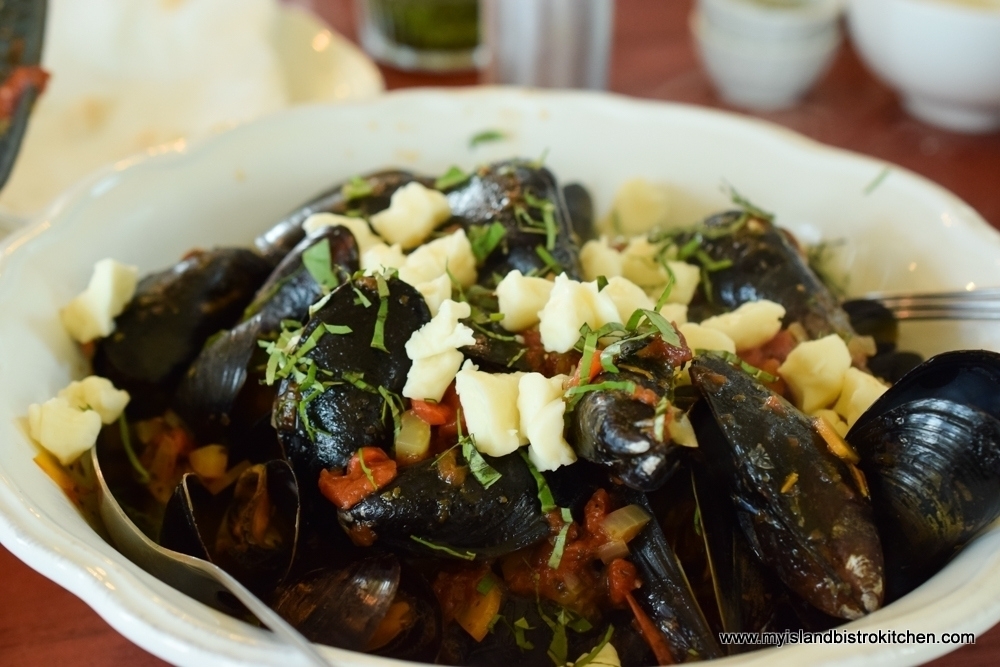
Homemade Pasta Topped with Lobster and Scallops at The Table Culinary Studio in New London, PEI

This was accompanied by big bowls of PEI mussels with squeaky cheese topping melting down through the mussels.  If you are a mussel lover, these are hard to resist!

PEI Mussels with Butter at The Table Culinary Studio in New London, PEI

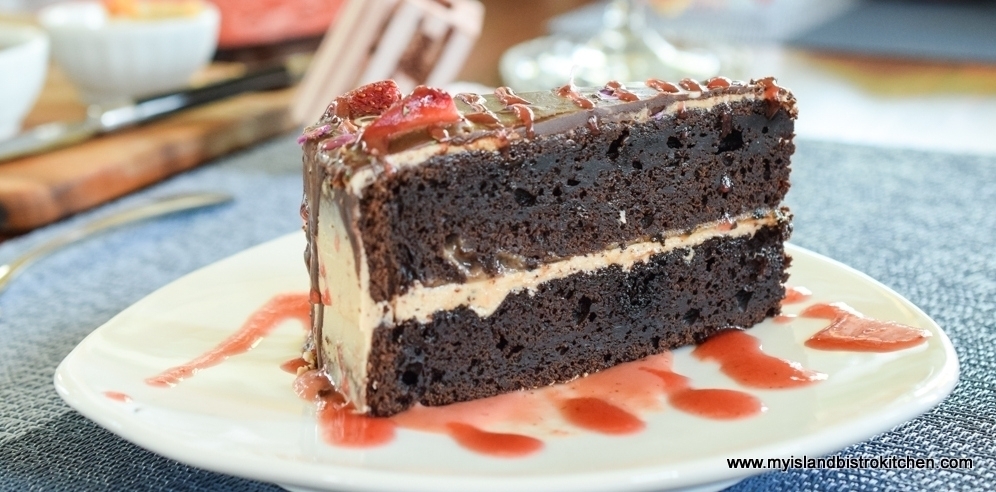
And as if we weren’t stuffed enough, out came dessert. The dessert in the photo below is a chocolate beet cake.

Chocolate Beet Cake at The Table Culinary Studio, New London, PEI

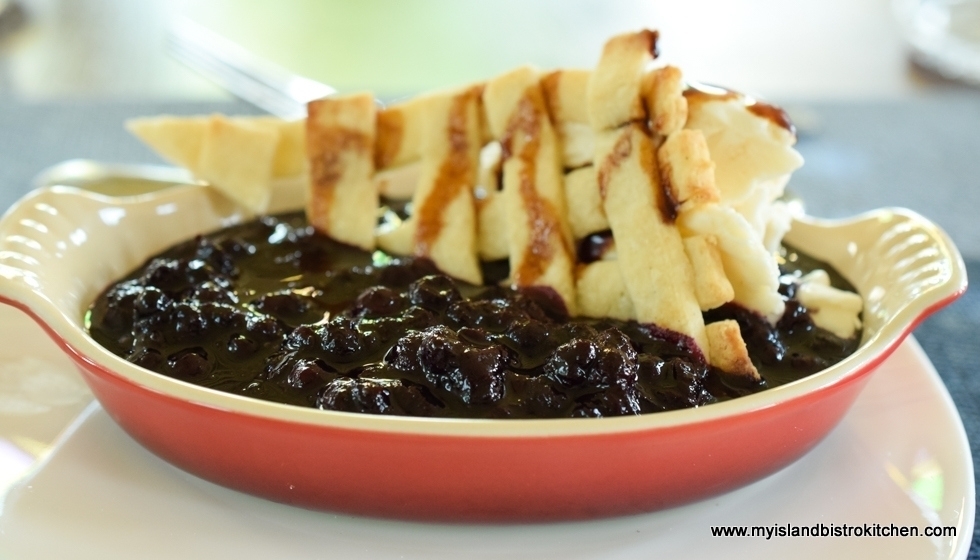
And, for the gluten-free dessert, it was a deconstructed blueberry pie which I can attest was simply yummy!

Gluten-free Deconstructed Blueberry Pie - The Table Culinary Studio, New London, PEI
Gluten-free Deconstructed Blueberry Pie – The Table Culinary Studio, New London, PEI

The Table is set with the right ingredients – small class size, fresh local Island foods, quality instruction, hands-on cooking, a shared meal, and a charming venue with a history of its own.  If you are looking for an authentic and affordable cooking experience to allow you to more deeply engage with the local food scene and pick up some cooking tips and skills, check out course offerings at The Table.  With the short half-day classes, visitors can have the best of both worlds – a cooking experience to learn more about local PEI foods in the morning followed by a delicious lunch and then the rest of the day free to explore other Island adventures and sights. For more information on cooking classes and prices, visit The Table Culinary Studio website at: http://www.thetablepei.ca/classes

The Table also offers fine dining in the evening (reservations required).  Click here to read my recent story on The Table’s North Shore Surf and Turf Dinner.

Pin Me To Pinterest!

Cooking Classes in PEI
Cooking Classes at The Table Culinary Studio in PEI
Cooking Classes in PEI
Cooking Classes at The Table Culinary Studio in New London, PEI
Cooking Classes in Prince Edward Island
Cooking Class at The Table Culinary Studio in New London, PEI

Connect with My Island Bistro Kitchen through the following social media channels:

Facebook – “My Island Bistro Kitchen”
Twitter – “PEIBistro”
Instagram – “peibistro”


My thanks to The Table Culinary Studio for the opportunity to experience their “Bounty of the Sea” cooking class and for the fine hospitality. My participation in the class was complimentary for the purpose of conducting a review of the “Bounty of the Sea” cooking class. However, this in no way influenced my opinions of the class experience. All opinions expressed in this review are purely my own.

Classic Peach Pie Recipe

Peach Pie
Classic Peach Pie

One of the things I most look forward to in summer is all the fresh produce. I especially love all the seasonal fruits and berries because they make grand pies and pastry making is one of my favorite baking activities.  In August, we eagerly await the wonderful peaches that come from the Niagara region – the baskets of large yellow/orange plump, juicy peaches. One of the first things I make with the fresh peaches is a classic peach pie.

Ontario Peaches
Peaches

Today, my feature recipe is the classic fresh peach pie, simply sublime when served with a scoop of fine vanilla ice cream.  This is a perfect end to a lovely summer dinner. It’s like summer sunshine in a pie!

Classic Peach Pie
Classic Peach Pie

This recipe calls for about 2 pounds of peaches so, depending on their size, this translates into about 6-7 good-sized peaches. Choose peaches that are ripe, have a slight “give” to them when their flesh is gently pressed, and are free from blemishes, cuts, and bruises.  The peaches will be easier to peel if they are placed in hot water for about a minute then immediately dipped into ice cold water to stop them from cooking and to cool them enough to handle as they are peeled.

Peaches
Peaches

Peaches are very juicy but all that juice can make for a very “soupy” pie.  A soupy pie presents problems cutting and plating it. It’s not very appetizing to see a pie that has broken apart and gone “splat” on a plate! But, there is a remedy to prevent the pie becoming too soupy.  I recommend draining the cut peaches in a colander for 10-12 minutes.  The ones I drained for this pie released 2/3 cup of peach juice, far too much for a slice of pie to stay intact when cut.  The peaches will still release more juice as the pie bakes. What I do is reserve 2½ – 3 tablespoons of the peach juice and put it in to the filling to keep the pie from becoming too dense and dry.  I find this is just the right amount to give the consistency and texture of pie I am seeking, still lovely and juicy but not too solid.

Classic Peach Pie
Classic Peach Pie

The pie is not difficult to make and does not take any uncommon ingredients.  I do add a bit of lemon juice (which helps to slow down the peaches from turning brown) and a small amount of almond flavouring along with some cinnamon and nutmeg.  The addition of some finely grated orange peel goes well with the peach flavour but does not mask or overtake it – after all, we want the natural peach flavour to be the star in this pie.  The peaches are plenty sweet on their own so don’t require much additional sweetener.  I do add a small amount of granulated and brown sugar but not a whole lot because the pie would be sickeningly sweet. The addition of a small amount of brown sugar lends some richness to the filling. I do not use all brown sugar in this recipe because it will result in the lovely peach color being diminished.  Hence, the reason why I use a combination of both white and brown sugars.

Peach Pie
Classic Peach Pie

I use cornstarch as the thickener in this pie as I find it results in a more translucent filling than does flour which can become pasty and cause certain pie fillings (especially light-colored ones like peach pie) to have a cloudy appearance. The drained peaches are mixed with the dry ingredients and the reserved peach juice.  I recommend letting the mixed filling sit for about 5 minutes to give the sugars time to break down and blend well into the filling. After the filling has set for 5 minutes, gently stir it being careful not to break apart the peach wedges. This will ensure the dry ingredients are well blended and distributed throughout the filling.

For my pastry recipe along with hints and tips on making pie pastry, click here.  This pie lends itself well to either a full top crust or a lattice top, whichever you prefer.  To make this pie gluten-free, click here for my gluten-free pastry recipe.  The photos of the pie in this posting are made with this tender, flaky, and flavorful gluten-free crust.

Peach Pie
Classic Peach Pie

Make sure the oven rack is placed in the lower third of the oven.  This helps the bottom crust to bake better and prevents the top crust from browning too quickly.  If, however, the crust starts to brown too fast, simply loosely tent the tin foil over the pie as it continues to bake.

Peach Pie
Classic Peach Pie


[Printable recipe follows at end of posting]

Peach Pie

Ingredients:

Pastry for a two-crust pie to fit 9” pie plate

Approximately 2 pounds fresh peaches (about 6 – 7 large peaches), peeled and sliced into wedges about ½” to ¾” thick [This should equal 4½ – 5 cups sliced ripe peaches]
1½ tbsp lemon juice

1/3 cup + 1 tbsp granulated sugar
¼ cup light brown sugar, lightly packed
¼ cup cornstarch
½ tsp cinnamon
¼ tsp nutmeg
1/8 tsp salt
¾ tsp finely grated orange peel
1/8 tsp almond flavouring
1 large egg, lightly beaten
2 tbsp butter

1½ – 2 tsp cane sugar (optional for decoration)

Method:

Score an “X” about an inch long into the bottom of each peach. Dip peaches in hot water for 1 minute then immediately dip them into a bowl of ice water for 20-30 seconds to shock them and stop them from cooking. Peel peaches.

Place colander over deep bowl.  Cut the peaches into halves or quarters.  Gently pull the sections apart and remove and discard the stones.  Cut the peaches into wedges, lengthwise, between ½” and ¾“ thick and place in colander.  Sprinkle peaches with lemon juice and toss very gently to coat with the juice to prevent the peaches from rapidly browning.  Let the peaches drip for about 10-12 minutes to remove excess juice that would make the pie “soupy”.  Reserve 2½ – 3 tbsp of the peach juice and discard any remaining juice. Transfer the peaches to a large bowl.

In separate bowl, combine the sugars, cornstarch, cinnamon, nutmeg, salt, and grated orange rind. Mix well. Add the dry ingredients to the peaches and toss very gently to coat the peaches.  Add the almond flavoring to the 2½ – 3 tablespoons of reserved peach juice and sprinkle over the peaches.  Stir gently to mix ingredients. Let stand for 5 minutes then stir carefully again to ensure all ingredients are incorporated and equally distributed. Be careful not to break apart the peach wedges.

Roll out pastry into a circle approximately 12” – 13” round and about 1/8“ thick. Transfer pastry to a lightly greased 9” pie plate, fitting the dough over the bottom and sides of the plate, ensuring there are no air pockets.  Trim pastry flush with edge of pie plate.  Roll out top crust to same thickness.

Brush the bottom crust in the pie plate with a light coating of the beaten egg to keep the crust from getting soggy.  Reserve the remainder of the egg.

Transfer the peach filling to the prepared pie plate fitted with the pastry dough. Cut the butter into chunks and distribute on top of the filling.

Add ¾ tsp water to remaining beaten egg.  Brush the bottom crust edge all around the pie plate lightly with the egg-water mixture. Place top pie crust over peach filling. Trim excess pastry from the pie plate around the pie plate edge.  Press the edge of the pastry all around the pie plate rim with tines of a fork to adhere the top crust to bottom crust. Cut a “X” (or 2-3 slits) about 2” long in center of top crust to allow steam to escape as the pie bakes.  For additional venting, prick the pie in several places with the tines of the fork.  Lightly brush egg wash over top crust of pie.  If desired, sprinkle with 1½ – 2 tsp cane sugar.

Place pie in refrigerator for 30 minutes to allow filling to settle and to chill pastry to reduce shrinkage while it bakes.

Place oven rack in bottom third of oven.  Preheat oven to 425°F.  Place chilled pie on tinfoil-lined baking sheet to catch any drips should filling bubble out as pie bakes.  Transfer chilled pie to oven.  Bake for 15 minutes then reduce oven temperature to 375°F.  Bake for about 45 minutes or until crust is baked and golden brown and pie shows signs that filling is bubbling.  Check pie after it has been in the oven for about 30-35 minutes – if top crust is browning too quickly, loosely tent pie with tin foil.

Remove pie from the oven and transfer to wire rack to cool completely (minimum of 4 hours for the filling to set) before cutting and serving with a scoop of fine vanilla ice cream.

Yield:  1 – 9” double-crusted pie

Peach Pie

This classic homemade peach pie is like summer in a pie with its fresh ripe peaches encased in tender flaky pastry. Serve the pie with your favorite vanilla ice cream.
Course Dessert
Cuisine American
Servings 8
My Island Bistro Kitchen My Island Bistro Kitchen

Ingredients

  • Pastry for a two-crust pie to fit 9” pie plate
  • Approximately 2 pounds fresh peaches about 6 - 7 large peaches, peeled and sliced into wedges about ½” to ¾” thick [This should equal 4½ - 5 cups sliced ripe peaches]
  • tbsp lemon juice
  • 1/3 cup + 1 tbsp granulated sugar
  • ¼ cup light brown sugar, lightly packed
  • ¼ cup cornstarch
  • ½ tsp cinnamon
  • ¼ tsp nutmeg
  • 1/8 tsp salt
  • ¾ tsp finely grated orange peel
  • 1/8 tsp almond flavouring
  • 1 large egg, lightly beaten
  • 2 tbsp butter
  • 1½ - 2 tsp cane sugar optional for decoration

Instructions

  1. Score an “X” about an inch long into the bottom of each peach. Dip peaches in hot water for 1 minute then immediately dip them into a bowl of ice water for 20-30 seconds to shock them and stop them from cooking. Peel peaches.
  2. Place colander over deep bowl. Cut the peaches into halves or quarters. Gently pull the sections apart and remove and discard the stones. Cut the peaches into wedges, lengthwise, between ½” and ¾“ thick and place in colander. Sprinkle peaches with lemon juice and toss very gently to coat with the juice to prevent the peaches from rapidly browning. Let the peaches drip for about 10-12 minutes to remove excess juice that would make the pie “soupy”. Reserve 2½ - 3 tbsp of the peach juice and discard any remaining juice. Transfer the peaches to a large bowl.
  3. In separate bowl, combine the sugars, cornstarch, cinnamon, nutmeg, salt, and grated orange rind. Mix well. Add the dry ingredients to the peaches and toss very gently to coat the peaches. Add the almond flavoring to the 2½ - 3 tablespoons of reserved peach juice and sprinkle over the peaches. Stir gently to mix ingredients. Let stand for 5 minutes then stir carefully again to ensure all ingredients are incorporated and equally distributed. Be careful not to break apart the peach wedges.
  4. Roll out pastry into a circle approximately 12” - 13” round and about 1/8“ thick. Transfer pastry to a lightly greased 9” pie plate, fitting the dough over the bottom and sides of the plate, ensuring there are no air pockets. Trim pastry flush with edge of pie plate. Roll out top crust to same thickness.
  5. Brush the bottom crust in the pie plate with a light coating of the beaten egg to keep the crust from getting soggy. Reserve the remainder of the egg.
  6. Transfer the peach filling to the prepared pie plate fitted with the pastry dough. Cut the butter into chunks and distribute on top of the filling.
  7. Add ¾ tsp water to remaining beaten egg. Brush the bottom crust edge all around the pie plate lightly with the egg-water mixture. Place top pie crust over peach filling. Trim excess pastry from the pie plate around the pie plate edge. Press the edge of the pastry all around the pie plate rim with tines of a fork to adhere the top crust to bottom crust. Cut a “X” (or 2-3 slits) about 2” long in center of top crust to allow steam to escape as the pie bakes. For additional venting, prick the pie in several places with the tines of the fork. Lightly brush egg wash over top crust of pie. If desired, sprinkle with 1½ - 2 tsp cane sugar.
  8. Place pie in refrigerator for 30 minutes to allow filling to settle and to chill pastry to reduce shrinkage while it bakes.
  9. Place oven rack in bottom third of oven. Preheat oven to 425°F. Place chilled pie on tinfoil-lined baking sheet to catch any drips should filling bubble out as pie bakes. Transfer chilled pie to oven. Bake for 15 minutes then reduce oven temperature to 375°F. Bake for about 45 minutes or until crust is baked and golden brown and pie shows signs that filling is bubbling. Check pie after it has been in the oven for about 30-35 minutes - if top crust is browning too quickly, loosely tent pie with tin foil.
  10. Remove pie from the oven and transfer to wire rack to cool completely (minimum of 4 hours for the filling to set) before cutting and serving with a scoop of fine vanilla ice cream.

Recipe Notes

Yield: 1 - 9” double-crusted pie


For other great pie recipes from My Island Bistro Kitchen, click on the links below:

Rustic Apple Pie
Blueberry Cream Cheese Pie
Raspberry Cream Cheese Pie
Strawberry-Rhubarb Pie
Squash Pie
Glazed Strawberry Pie
Rustic Rhubarb Pie
Coconut Cream Pie
Mock Cherry Pie
Gluten-free Apple Pie


How to Make Dill Pickles

Pickles
Dill Pickles

Dill pickles are one of the easiest pickles to make. Cold-packed into hot sterilized jars, this recipe transforms tiny 3” – 4” cucumbers into tangy pickles that, for any dill lover, are the quintessential pickles to accompany many sandwiches and burgers.

This recipe is sized with the smaller household in mind. Many don’t have large storage capacity for big batches of pickles such as our ancestors made and stored in their cold rooms or cellars. Yet other households are comprised of only one or two people so they don’t need large batches of pickles but still want to have a taste of homemade goodness that comes from home preserving.

Dill Pickles
Dill Pickles

Freshness Counts with Pickling Cucumbers!

As with any pickle recipe, freshness of ingredients is key. That means the cucumbers should, ideally, be processed the same day they are picked from the vine or, certainly, within 24 hours. Otherwise, the cucumbers start to lose their flavour and get soft and punky and, as we all know, dill pickles are meant to have crunch.

Use Pickling Vinegar

It is very important to use vinegar which is made especially for the pickling process. It will usually have 7% acidity, making it stronger than table vinegar. This helps to preserve the pickles longer. Most large grocery stores will stock this vinegar, especially around “pickling time” in late summer or fall. The container should state that it is “pickling vinegar”.

Pickling Vinegar

Use Pickling Salt, Not Table Salt, in Pickles

One of the biggest tips I have for pickling is to never use table salt in the pickling process. Always use proper pickling salt. This is a coarse salt specifically for pickling and it will be marked as such on the package label. Apart from it being way too salty for pickling, iodized table salt can cause some discoloration of the cucumbers and will likely form a cloudy brine. The brine should be bright and clear. Table salt, because of its fine texture is too easily absorbed into the cucumbers, resulting in overly salty pickles. I can always tell if someone has used table salt in making pickles just by simply looking at the bottles of pickles – the contents of those bottles just do not have an appetizing look to them.

Coarse/Pickling Salt

Preparing the Jars 

The jars should be examined to ensure they are free of cracks, chips, and nicks. They should then be washed, rinsed, and sterilized. I sterilize mine in a pot of boiling hot water on the stove. Use a jar lifter to place the jars, upright in the water, holding each one steady until it fills with water. Bring the water back to a boil, reduce the heat slightly to prevent boil-overs, and boil the jars gently for 10 minutes from this point. Turn the heat to simmer and leave the jars in the water until they are ready to be filled with the cucumbers. The jars must be kept hot because, once filled, they will be going into a hot water bath and cold jars meeting up with boiling water will crack.

Making the Brine

The process I use to make my dill pickles is quite simple. This involves making a simple brine of equal parts of pickling vinegar and water along with some pickling salt, a bit of sugar, and some pickling spices. To keep the brine clear, bundle the pickling spice into a double (or triple) layer of cheesecloth. Gather up this little sachet and tie with string. Once this brine has simmered for about 15 minutes, discard the spice sachet and bayleaf. The brine is then ready to be poured over the cucumbers.

Spice Sachet
Preparing the Spice Sachet
Pickling Spice Sachet

Preparing the Cucumbers and Filling the Jars

The small 3” – 4” dill-sized cucumbers can be left whole or they can be sliced in two (or even quartered) lengthwise or they can be sliced into “coins”. Just note that the pickles are likely to have more crunch if the cucumbers are left whole. Make sure to trim the blossom end of each cucumber by 1/8” – these blossom tips have enzymes that can lead to limp, punky pickles. Pricking each cucumber 3-4 times with the tines of a fork will help the vinegar brine penetrate the cucumbers better resulting in more flavorful pickles.

Dill Pickles
Dill Pickles

The point where you start to place ingredients into the jars is the point where it is necessary to work along quickly because the jars cannot be allowed to get cold before they go into the hot water bath. Ensuring all ingredients and pickling equipment are laid out before starting the process and following a set order will help this process move along quickly.  Further along in this posting, you will find an outline of the step-by-step sequence I follow to quickly get the jars filled while they are still hot and then into the hot water bath.

A slightly smashed garlic clove along with some mustard seed and a whole clove are first placed in the bottom of each jar. Where, in the jars, the small bunch of feathery dill fronds and the umbrella-shaped seed head of the dill plant are placed is a matter of personal preference. I like to place the dill fronds on one side of the jar and the seed head on the opposite side. These can, of course, be placed on the bottom of the jar or the feathery dill fronds on the bottom and the dill head on top of the cucumbers. The taste will be the same. However, if you like your jars to have a nice appearance that immediately signifies they are dill pickles, placing the fronds and dill head so they are visible will do the trick!

Ensure the cucumbers are tightly packed, compactly, into the jars but not so tight that they are squished. Once all the ingredients are placed in the jar, pour the hot brine into each jar, leaving ½” head space at the top of each jar.  A chopstick, or small non-metal spatula, is useful to remove any air bubbles that may appear and more of the brine may need to be added, as necessary, to bring it to about ½“ from the jar rim.

Add a Grape Leaf to Keep the Dills Crunchy

I add a grape leaf on top of the cucumbers in each jar. This is an old trick to keep the cucumbers crisp – the tannin-rich grape leaves have enzymes that help to keep the cucumbers crunchy. Some say, with the removal of the blossom ends of the cucumbers, it is not necessary to add the grape leaves to the jars but I have access to them so I add them and my dill pickles always turn out super crunchy.

Heat the Jar Lids and Metal Ring Bands

Always use brand new metal jar lids; never re-use them for pickling purposes as their seal is only meant for single use. Check the metal ring bands (which can be re-used multiple times) to ensure they have no dents or nicks in them and there is no rust. The jar lids are heated in hot simmering water, just until they are hot and the gaskets softened —  3 – 4 minutes should do it. Heating the lids too long or in rapidly boiling water will weaken the rubber on them causing them not to seal properly. Wipe each jar rim with a clean, damp cloth before applying the lids, rubber side down, to the jar tops. Tighten the metal ring bands, fingertip tight. At this point, the dills are ready, without delay, for their hot water bath.

Heating Jar Lids
Heating Jar Lids

The Hot Water Bath

Processing the jars of dills stabilizes the contents for longer shelf life. Make sure the hot water canner is ready to go with the boiling water in it by the time you fill the jars. Load the filled jars into the metal basket that comes with the canner. The jars should remain upright during the hot water bath process and they should not touch each other. Once the basket is lowered into the boiling water, ensure the water level is at least 1” above the jar tops. Add more boiling water, if necessary, to bring the water to this level.

I recommend following your canner manufacturer’s instructions for the canning process as the length of time the jars need to be processed will depend on the altitude of your locale. Here on PEI, I process my half-pint jars of dills for 10 minutes and I start the timing from the time the hot water returns to a full rolling boil after the basket of jars has been placed in the canner of hot water. Once the 10 minutes is up, remove the jars, one by one, with a jar lifter and place them on a wire rack to finish cooling completely.

Listen for the “pop” or “ping” sound as the bottles seal. Sometimes, this will take place almost immediately and sometimes it can take a few hours. The lids of properly sealed jars will curve downward. Let the jars rest, undisturbed, on the wire cooling rack for 12 hours. Then, let the sealed jars stand in a cool, dark place for 6 weeks before opening. This gives time for the dill flavour to develop fully.

Dill Pickles
Dill Pickles

The Sequence

To help organize your work to make these pickles, I offer the following suggested order for the sequence so that the steps happen when they should and the hot jars do not have a chance to cool before they are filled and placed in the hot water bath.

  1. Fill the hot water canner with hot tap water, place it on the stove, and start the heating process to get it to the boiling point. Starting with hot tap water will reduce the amount of time it takes to get the large canner of water to a boil. Make sure the water is at the boiling point before the wire basket of filled bottles is placed in the canner.
  2. Heat a pot of boiling water to sterilize the jars. Wash jars. Boil them gently for at least 10 minutes. Keep them, at simmer level, in the hot water until they are needed for filling.
  3. Wash and cut blossom ends from cucumbers and prick each with tines of a fork, 3-4 times.
  4. Gather spices for the jars and prepare garlic cloves.
  5. Start making the brine.
  6. Make a quick trip to the garden to pick the fresh dill heads and fronds.
  7. As the brine is nearing completion, remove the sterilized jars from the hot water and place the garlic, spices, dill fronds and dill head in each jar. Pack in the cucumbers.
  8. Heat lids in small pan of hot water. Boil extra water in case it is needed to top up hot water canner to 1” above jar tops.
  9. Pour brine over cucumbers, remove air bubbles with a chopstick (or small non-metal spatula), and top up with more brine, as necessary. Add the grape leaf to top of each jar. Wipe the jar rims with clean damp cloth.
  10. Place lids and metal ring bands on jars. Place jars in canner basket and lower into canner of hot water. Add any additional water necessary to bring water level to 1” above jar lids. Cover. Bring canner water back to full rolling boil. Start timing the canning time from this point.
  11. Have wire rack set out for bottles as they come out of the canner.

Note: The garlic clove is likely to turn a blue-green-gray color. Don’t be alarmed by this – it’s just the effect of the acid from the vinegar coming into contact with the garlic.

Dill Pickles
Dill Pickles
[Printable recipe follows at end of posting]

Dill Pickles

Ingredients:

2 lbs – 3” – 4” pickling cucumbers, freshly picked and washed

1 tbsp pickling salt
1¼ cups + 1 tbsp pickling vinegar
1¼ cups + 1 tbsp water
2 tbsp granulated sugar
½ tbsp pickling spice, gathered into double (or triple) layer of cheesecloth and tied into spice sachet
1 bay leaf

3 – 4 whole cloves
1 tsp mustard seed, divided equally among the jars
3 – 4 small garlic cloves, slightly smashed
Fresh dill heads, one per jar along with small bunches of feathery dill fronds
Grape leaves, medium-sized, 1 per jar

3 – 4 half-pint jars, lids, and metal ring bands (the number of jars needed will depend on the size of the cucumbers, whether they are sliced or left whole, and how compactly they are fit into the jars)
1 chopstick

Method:

Wash and trim 1/8“ from blossom end of each cucumber. Prick cucumbers 3-4 times with tines of a fork. Leave cucumbers whole or cut into two or four spears, lengthwise (or slice into “coins”). Fill the canner with hot tap water and heat to boiling point while making the brine. Begin sterilizing the jars in large pot of hot water to have them ready when brine is heated.

To make the brine, combine the pickling salt, vinegar, water, sugar, pickling spice sachet, and bay leaf in small stockpot. Bring to a boil over medium-high heat. Immediately reduce heat to low and cook brine, uncovered, for 15 minutes, stirring periodically. Remove from heat and discard pickling sachet and bay leaf.

Place 1 whole clove, ¼ to 1/3 teaspoon mustard seed (divide the teaspoon of seeds equally between number of jars used), and 1 small slightly smashed garlic clove in each hot, sterilized jar. Place a small bunch of feathery dill fronds along one side of the jar and one umbrella-shaped dill head on the opposite side of the jar. Fill the jars with the cucumbers, packing tightly (but not squashing them), and keeping the dill fronds and dill head in place against the sides of the jars.

Pour the hot brine into each jar, filling to within ½ inch from jar rim (head space). Use a chopstick (or small non-metal spatula) to remove any air bubbles that may have formed in the brine. Add more brine, if necessary, to bring it to ½“ from the jar rim. Add 1 grape leaf to top of each jar, pressing it below the surface of the brine, to keep cucumbers crisp. Wipe each jar rim with a clean, damp cloth. Seal the jars with heated lids. Screw on metal ring bands, fingertip tight.

Place jars in hot water bath basket, ensuring jars do not touch each other or fall over. Lower basket into canner of hot water. Ensure the water level is at least 1″ above the jar tops, adding more water as necessary. Cover with canner lid. Increase the heat to return the water to a rolling boil then decrease the heat to just keep the water at a rolling boil but not boiling over. Process half-pint jars in the hot water bath for 10 minutes, adjusting time for altitude. Start timing the processing from the point where a full rolling boil is reached after basket of jars has been added to the canner. Turn off heat and remove canner lid. Using a jar lifter, carefully remove the jars, one at a time, and transfer them to a wire rack to cool completely. Listen for the “pop” or “ping” sound as the bottles seal over the next few minutes or hours. The lids of properly sealed jars will curve downward. Let jars rest, undisturbed, on wire rack for 12 hours. For maximum dill flavour, let sealed jars stand in cool, dark place for 6 weeks before opening.

Yield:  Approximately 3- 4 half-pint jars

Dill Pickles

These easy-to-make dill pickles combine dill, garlic, and pickling spices to transform tiny cucumbers into crunchy pickles that, with their tangy flavour, are a great accompaniment to many sandwiches and burgers.
My Island Bistro Kitchen My Island Bistro Kitchen

Ingredients

  • 2 lbs – 3” - 4” pickling cucumbers, freshly picked and washed
  • 1 tbsp pickling salt
  • cups + 1 tbsp pickling vinegar
  • cups + 1 tbsp water
  • 2 tbsp granulated sugar
  • ½ tbsp pickling spice, gathered into double (or triple) layer of cheesecloth and tied into spice sachet
  • 1 bay leaf
  • 3 - 4 whole cloves
  • 1 tsp mustard seed, divided equally among the jars
  • 3 – 4 small garlic cloves, slightly smashed
  • Fresh dill heads, one per jar along with small feathery dill fronds
  • Grape leaves, medium-sized, 1 per jar
  • 3 – 4 half-pint jars lids, and metal ring bands (the number of jars needed will depend on the size of the cucumbers, whether they are sliced or left whole, and how compactly they are fit into the jars)
  • 1 chopstick (or small non-metal spatula)

Instructions

  1. Wash and trim 1/8“ from blossom end of each cucumber. Prick cucumbers 3-4 times with tines of a fork. Leave cucumbers whole or cut into two or four spears, lengthwise (or slice into “coins”). Fill the canner with hot tap water and heat to boiling point while making the brine. Begin sterilizing the jars in large pot of hot water to have them ready when brine is heated.
  2. To make the brine, combine the pickling salt, vinegar, water, sugar, pickling spice sachet, and bay leaf in small stockpot. Bring to a boil over medium-high heat. Immediately reduce heat to low and cook brine, uncovered, for 15 minutes, stirring periodically. Remove from heat and discard pickling sachet and bay leaf.
  3. Place 1 whole clove, ¼ to 1/3 teaspoon mustard seed (divide teaspoon of mustard seed equally between number of jars used), and 1 small slightly smashed garlic clove in each hot, sterilized jar. Place a small bunch of feathery dill fronds along one side of the jar and one umbrella-shaped dill head on the opposite side of the jar. Fill the jars with the cucumbers, packing tightly (but not squashing them), and keeping the dill fronds and dill head in place against the sides of the jars.

  4. Pour the hot brine into each jar, filling to within ½ inch from jar rim (head space). Use a chopstick (or small non-metal spatula) to remove any air bubbles that may have formed in the brine. Add more brine, if necessary, to bring it to ½“ from the jar rim. Add 1 grape leaf to top of each jar, pressing it below the surface of the brine, to keep cucumbers crisp. Wipe each jar rim with a clean, damp cloth. Seal the jars with heated lids. Screw on metal ring bands, fingertip tight.

  5. Place jars in hot water bath basket, ensuring jars do not touch each other or fall over. Lower basket into canner of hot water. Ensure the water level is at least 1" above the jar tops, adding more water as necessary. Cover with canner lid. Increase the heat to return the water to a rolling boil then decrease the heat to just keep the water at a rolling boil but not boiling over. Process half-pint jars in the hot water bath for 10 minutes, adjusting time for altitude. Start timing the processing from the point where a full rolling boil is reached after basket of jars has been added to the canner. At the end of the processing time, turn off heat and remove canner lid. Using a jar lifter, carefully remove the jars, one at a time, and transfer them to a wire rack to cool completely. Listen for the “pop” or “ping” sound as the bottles seal over the next few minutes or hours. The lids of properly sealed jars will curve downward. Let jars rest, undisturbed, on wire rack for 12 hours. For maximum dill flavour, let sealed jars stand in cool, dark place for 6 weeks before opening.

Recipe Notes

Yield: Approximately 3- 4 half-pint jars

Be sure to read blog posting that accompanies this recipe for more information on the procedure to make dill pickles.

For other great pickle, relish, and chow recipes from My Island Bistro Kitchen, click on the links below:

Mustard Pickles
Bread and Butter Pickles
Pickled Beets
Mustard Beans
Green Tomato Chow
Rhubarb Relish

Pin Me To Pinterest!

Dill Pickles
Dill Pickles

Sensational Strawberry Lemonade Recipe

Lemonade
Strawberry Lemonade

One of the wonderful things about lemonade is that it can be served simply as is or it can be flavoured with fruits in season such as I am doing today by making strawberry lemonade. How fabulous is that natural red color in the lemonade!

Lemonade
Strawberry Lemonade

This strawberry lemonade is great on a scorching hot day when you need to stay hydrated and crave a thirst-quenching drink.  The lemonade starts with the making of a simple syrup of water and sugar.  This gives the drink that lovely silky smooth texture which could not be gotten by simply combining sugar with cold water – no matter how much you stir it, sugar and cold water will never fully mix and you will be left with a grainy texture drink.  By boiling the sugar and water to make the syrup, you are sure the sugar is fully dissolved.  I find using super-fine sugar (which you may know as caster sugar, instant dissolving sugar, or berry sugar) is the best to use to make simple syrup although regular granulated sugar may also be used. Typically, a simple syrup for drinks is made with a 1:1 ratio of sugar to water.  However, I find that that is too much sugar for my taste in this lemonade so I use 1 cup of the superfine sugar to 1 1/2 cups water.

For this recipe, purée the strawberries, add some water to them along with freshly squeezed lemon juice and the simple syrup.  In order to get rid of the hundreds of little tiny strawberry seeds and to have a clear drink, the mixture will need to be strained through a very fine wire mesh sieve.  You’ll be amazed at how many seeds strawberries have!

Lemonade
Strawberry Lemonade over Ice

This is a delightful summertime drink served over ice and it has an absolutely fabulously rich colour that is all natural thanks to the ruby red strawberries.  To add a bit of fizz to the drink, mix half a glass with the lemonade and half with your favorite clear soda (lemon-lime is especially good). Add ice and garnish with a fresh strawberry and/or lemon wedge or wheel.

Lemonade
Strawberry Lemonade

This is often a drink I make to take along on picnic outings. It’s handy to have frozen because, as it thaws on the way to the picnic location, it also helps to keep the food cold.

[Printable recipe follows at end of posting]

Strawberry Lemonade

Ingredients:

1½ cup water
1 cup super-fine sugar (aka caster sugar or instant dissolving sugar)

1 cup freshly squeezed lemon juice
2 tbsp coarsely grated lemon rind

3 cups strawberries, sliced
2 cups water
Pinch salt

Method:

For the simple syrup:  In small saucepan, combine the 1 1/2 water and 1 cup sugar together.  Bring to a boil over medium heat, stirring constantly, until the sugar is completely dissolved.  Reduce heat to medium-low and boil gently for 3-4 minutes, stirring occasionally.  Remove from heat and cool to room temperature (apx. 30-40 minutes). Add the lemon juice and lemon rind. Let mixture stand for at least an hour (or up to three hours) to allow the flavors to blend.  Strain mixture twice through a fine mesh sieve to remove the lemon pulp and rind.  Discard the pulp and rind.

For the strawberry purée:  Place strawberries in large blender.  Purée until smooth.  Slowly add in the 2 cups of water, continuing to pulse/purée until mixture is smooth.  Slowly add the strained simple syrup with lemon juice and a pinch of salt.  Purée until all ingredients are well combined.  Strain mixture through very fine wire mesh sieve to remove the strawberry seeds.

To assemble:  Transfer lemonade to a large jug or bottle.  Chill.

To serve:  Stir the chilled lemonade. Fill a tall glass approximately one-half full of ice cubes and add the lemonade.  Garnish with a fresh strawberry or lemon wheel, if desired.  Another serving suggestion includes filling a glass half full of strawberry lemonade and topping with clear soda such as lemon-lime.

Lemonade will keep, covered, in the refrigerator for 3-4 days. Freezes well.

Yield:  Approximately 6½ – 7 cups

Strawberry Lemonade

This “summer in a bottle” lemonade makes the most of fresh in-season strawberries and is a colorful, refreshing, and thirst-quenching summertime sipper when served over ice.
Course Drinks
Cuisine American
Keyword Lemonade
Servings 8
My Island Bistro Kitchen My Island Bistro Kitchen

Ingredients

  • cup water
  • 1 cup super-fine sugar (aka caster sugar or instant dissolving sugar)
  • 1 cup freshly squeezed lemon juice
  • 2 tbsp coarsely grated lemon rind
  • 3 cups strawberries, sliced
  • 2 cups water
  • Pinch salt

Instructions

  1. For the simple syrup: In small saucepan, combine the 1½ water and 1 cup sugar together. Bring to a boil over medium heat, stirring constantly, until sugar is completely dissolved. Reduce heat to medium-low and boil gently for 3-4 minutes, stirring occasionally. Remove from heat and cool to room temperature (apx. 30-40 minutes). Add the lemon juice and lemon rind. Let mixture stand for at least an hour (or up to three hours) to allow the flavors to blend. Strain mixture twice through a fine mesh sieve to remove the lemon pulp and rind. Discard the pulp and rind.
  2. For the strawberry purée: Place strawberries in large blender. Purée until smooth. Slowly add in the 2 cups of water, continuing to pulse/purée until mixture is smooth. Slowly add the strained simple syrup with lemon juice and a pinch of salt. Purée until all ingredients are well combined. Strain mixture through very fine wire mesh sieve to remove the strawberry seeds.
  3. To assemble: Transfer lemonade to a large jug or bottle. Chill.
  4. To serve: Stir the chilled lemonade. Fill a tall glass approximately one-half full of ice cubes and add the lemonade. Garnish with a fresh strawberry or lemon wheel, if desired. Another serving suggestion includes filling a glass half full of strawberry lemonade and topping with clear soda such as lemon-lime.
  5. Lemonade will keep, covered, in the refrigerator for 3-4 days. Freezes well. Yields approximately 6 1/2 - 7 cups lemonade.


For other great Lemonade recipes from My Island Bistro Kitchen, click on the following links:

Lemonade
Blueberry Lemonade
Rhubarb Lemonade

Pin Me To Pinterest!

Lemonade
Strawberry Lemonade

Feasting at The Table in New London, PEI

  At The Table Culinary Studio in New London, PEI
At The Table Culinary Studio in New London, PEI

One of the things most of us enjoy about travel is the opportunity to sample foods local to a region.  It’s part of the charm of a place and makes for great vacation memories.  At one time, vacationers went to a destination, did some sightseeing, took in some typical tourist attractions (amusement parks, museums, beaches, etc.), and ate at whatever restaurant they happened upon at meal time. Today’s travelers, generally speaking, are more interested in diversified travel experiences than they are simply going to a place so they can check it off their bucket list of places they have been.  Many seek out adventures that allow them to participate in activities, experience the uniqueness and authenticity of a place, mingle with the locals, and learn more about local foods and ways to prepare them.

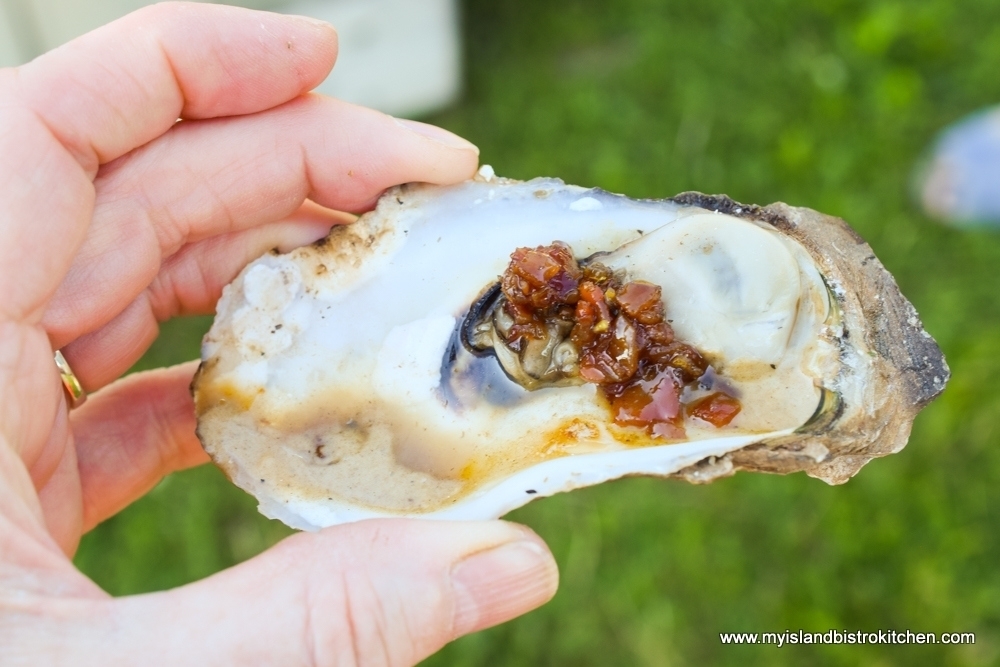
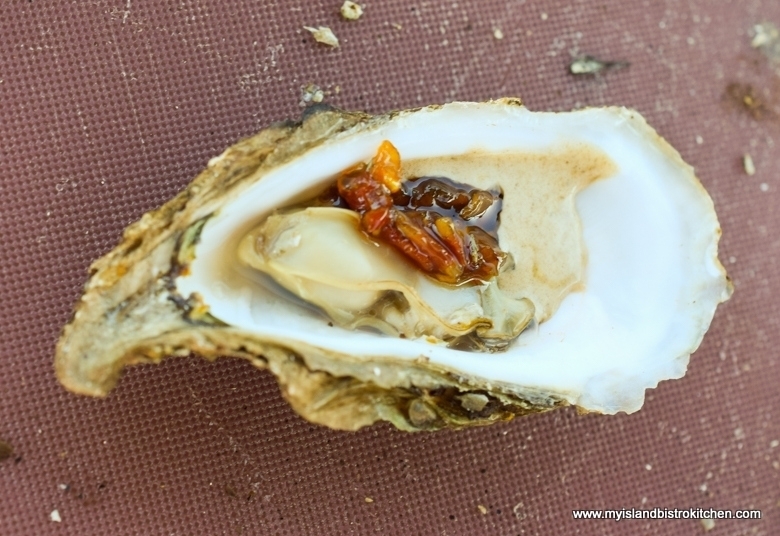
Grilled PEI Oysters Topped With A Black Garlic Cream Sauce and Bacon Jam (at The Table Culinary Studio, New London, PEI)

One of the best ways to learn about a place and its culture is through its local food.  In fact, many travelers choose destinations based on the local food scene, food festivals and events, unique dining experiences, and opportunities to participate in culinary classes. Many, therefore, seek out experiences that allow them to connect more fully with a region and what better way to do that than through food, especially if it is experiential cuisine where you learn something about the foods you are eating.

I was recently a guest at the North Shore Surf and Turf Dinner at The Table Culinary Studio which hosts themed communal-style dinners featuring Prince Edward Island foods throughout the summer months.  Today, I am going to share my dining experience at The Table with you.

The Table Culinary Studio, New London, PEI

The Table Culinary Studio is the successor of Annie’s Table Culinary Studio which was started by Annie Leroux in 2012.  You can click here for my story on Annie’s Table Culinary Studio.  Current owner, Derrick Hoare (himself a trained chef), had been a long-time summer resident on PEI for many years, was retiring from his career in the health care profession, and was looking for his next adventure.  He contemplated buying a traditional restaurant in PEI but decided that was not his style.  When Annie’s Table became available for sale, Derrick liked the concept Annie had begun so he bought the business which he began operating in 2016. In addition to keeping the tradition of offering short culinary courses, he added themed evening dining to the menu and renamed the business to The Table Culinary Studio.

Derrick Hoare, Owner/Chef at The Table Culinary Studio, New London, PEI

Set in the small rural community of New London, not far from the resort municipality of Cavendish (the hometown of the fictional Anne of Green Gables – you may have heard of her!), you will find The Table on Route 8 or, as the locals would simply say, the Grahams Road.

At The Table Culinary Studio in New London, PEI

With a backdrop of green fertile rolling countryside, The Table is located in a repurposed former United Church that is tastefully furnished with quality antiques.  Several of the elements of the decommissioned church have been incorporated into the décor, including the pulpit that now occupies a prominent position overlooking the dining hall.

Interior of the re-purposed country church that is now The Table Culinary Studio
Interior of the Re-purposed Country Church that is now The Table Culinary Studio

The entire venue is open concept so diners can watch the culinary team prepare the meal.  This unique dining experience will make you feel like you are more at an intimate dinner party with a private chef catering than at a restaurant.

People sitting at table watching chef at work in open concept kitchen
At The Table Culinary Studio, New London, PEI

Open seasonally, seven nights a week, for themed dinners that feature local Island foods that come from the land and the sea, The Table can accommodate up to 18 guests an evening, one seating only.  Tickets for the dinner must be reserved in advance  (by phone or email) and the menu for each evening is a set menu – you eat whatever is being prepared that night which takes the pressure off of studying a menu and trying to decide what to have. Drinks are at extra cost and are payable at the end of the evening along with the dinner.

The themed dinners range from the Traditional Island Feast to the Island Dinner Party to Isle and Fire to the North Shore Surf and Turf and all focus on fresh local foods harvested or fished nearby. Seating is at one long harvest table in the middle of the old church and food is served family style which is to say that the main meal, on large platters, arrives at the table and guests pass the platters around, serving themselves.  There are no individual tables.

At the Surf and Turf Dinner at The Table Culinary Studio in New London, PEI

It seems only fitting that communal dining would be the style of dining at The Table given that it is in a decommissioned church.  Communal dining dates back to biblical times – you know, the breaking of bread together.  The concept of individual tables for dining did not start until a long time after these origins.  Some may find it requires some stepping out of the comfort zone to attend a dinner with strangers all seated at the same table but, when you think about it, church and community potluck dinners have been around for ages and they are traditionally served at long communal tables where you don’t necessarily know the people seated around you.  We do a lot of cruising and have never requested a table for two in the ship’s dining room simply because we like to meet new people and inject some new conversation into meal times when traveling. So, sitting down to a meal alongside people I have not met before is quite comfortable and familiar for me. After all, the chances are that they are all food enthusiasts, too!

One of the lovely parts of this type of experiential dining is that you get to interact with those preparing the meal.  In contrast, if you go into a traditional style restaurant, you are seated, have limited contact with the wait staff, and most likely never see the chefs let alone have any direct contact with them.  At The Table, there are lots of opportunities to communicate directly with the owner/chef Derrick, executive chef Michael Bradley, oyster shucker George Dowdle, and The Table’s event planner, Christine Morgan. Together, this is the culinary team at The Table.

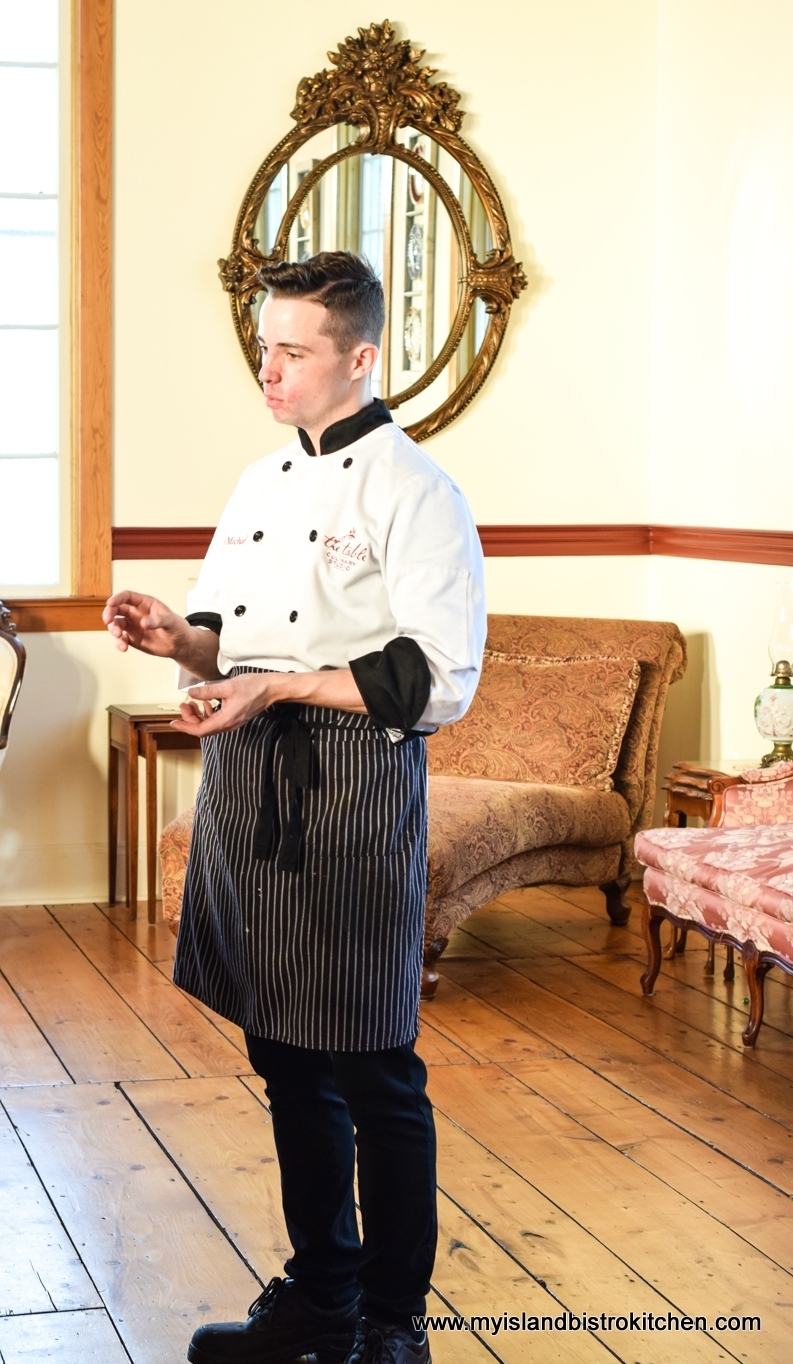
The Table benefits from having a talented and enthusiastic young chef. With over ten years of experience in professional kitchens, Chef Michael Bradley is a graduate of the Culinary Institute of Canada in Charlottetown.  Chef Michael has been at The Table from the beginning, starting as an intern and working his way up to become the executive chef.

Outdoor Reception at the Surf and Turf Dinner at The Table Culinary Studio, New London, PEI

I truly felt like I was at someone’s private dinner party.  It was a perfect sunny summer evening as guests arrived for the event which started on the side lawn of the church.  When I arrived, local aquaculturalist, George Dowdle, was busy shucking oysters that he had fished from the nearby Southwest River only hours before the dinner.

Guests soon became preoccupied with consuming the fresh raw oysters which were served with a choice of three sauces:  Asian Thai, Lemon Herb, and Pomegranate Herb.  It wasn’t long before everyone felt comfortable and at home with each other as the conversations quickly turned to discussions about the food.

Freshly shucked oysters at The Table Culinary Studio, New London, PEI
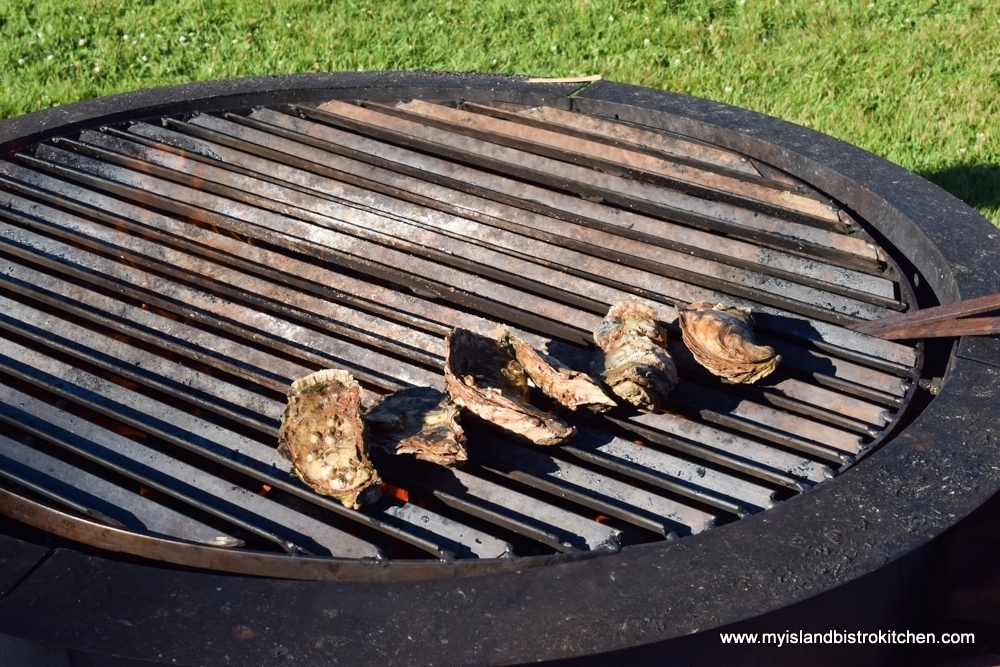
Freshly Shucked Oysters at The Table Culinary Studio, New London, PEI
PEI Oysters on the Grill at The Table Culinary Studio, New London, PEI

Not quite into slurping raw oysters? Chef Michael also has a unique way of serving grilled oysters. He first puts the oysters on the open fire grill to warm them up, then shucks them and tops them with a black garlic cream sauce and bacon jam, then puts them back on the grill to re-heat them.  Simply sublime!

PEI Oysters hot off the grill and served with black garlic cream sauce and bacon jam
PEI Oysters Hot off the Grill and Served with Black Garlic Cream Sauce and Bacon Jam

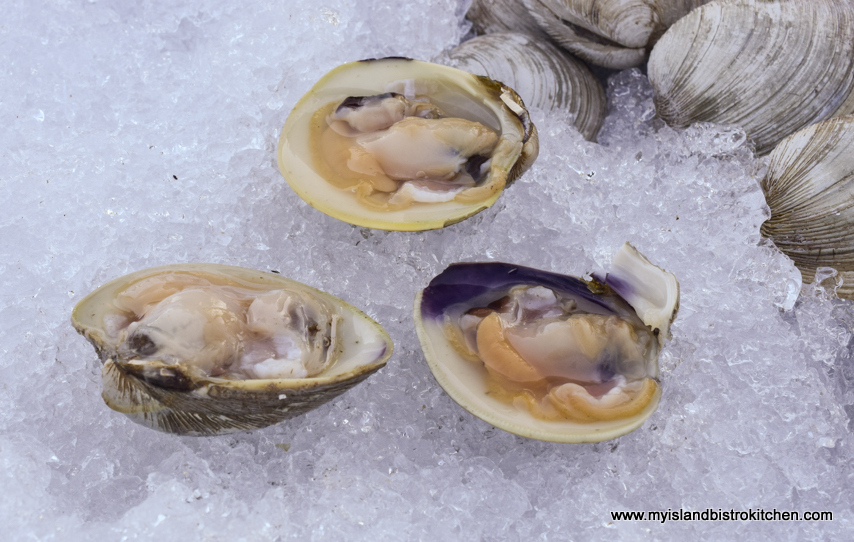
While clams sometimes take a back seat in popularity to mussels and oysters, The Table includes them as part of the meal.

PEI Clams (at The Table Culinary Studio, New London, PEI)

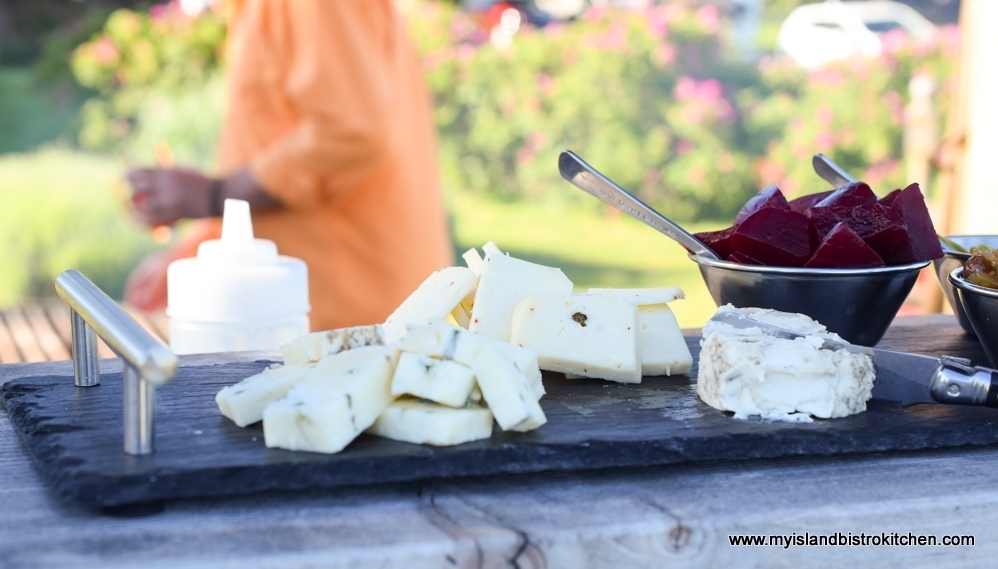
When we had our fill of oysters, out came the cheese and charcuterie trays.

Cheese Tray at The Table Culinary Studio, New London, PEI

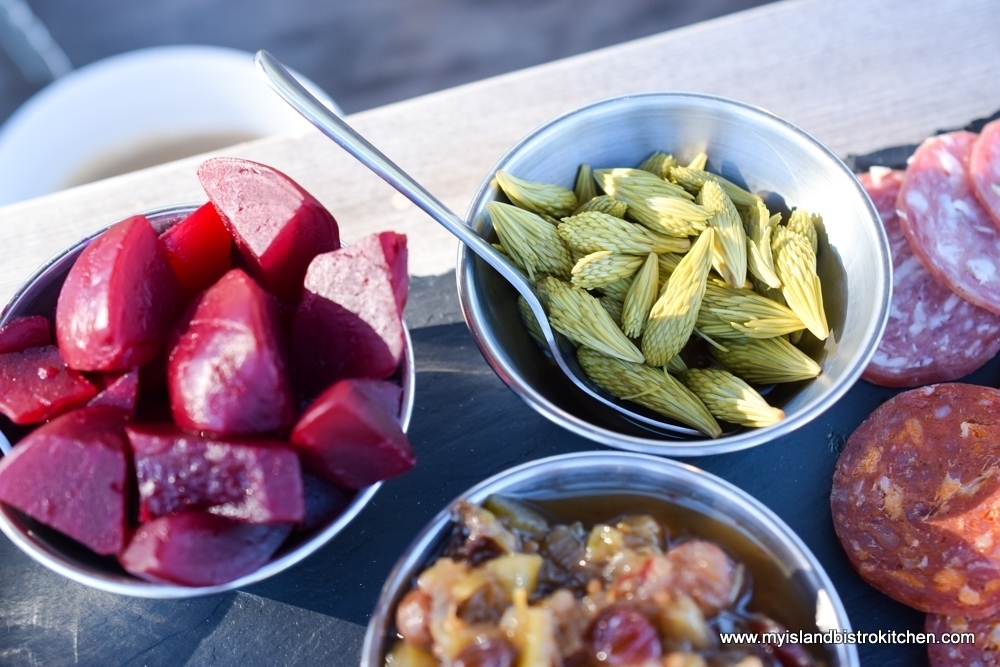
On this evening, The Table served their own homemade black garlic crackers alongside an assortment of cheeses from Ferme Isle St Jean in Rustico and Glasgow Glen Farm in New Glasgow. This was rounded out by pickled beets, pickled carrots, pickled spruce tips, and rhubarb chutney (all made in-house at The Table).

Condiments on the Charcuterie Tray at The Table Culinary Studio, New London, PEI

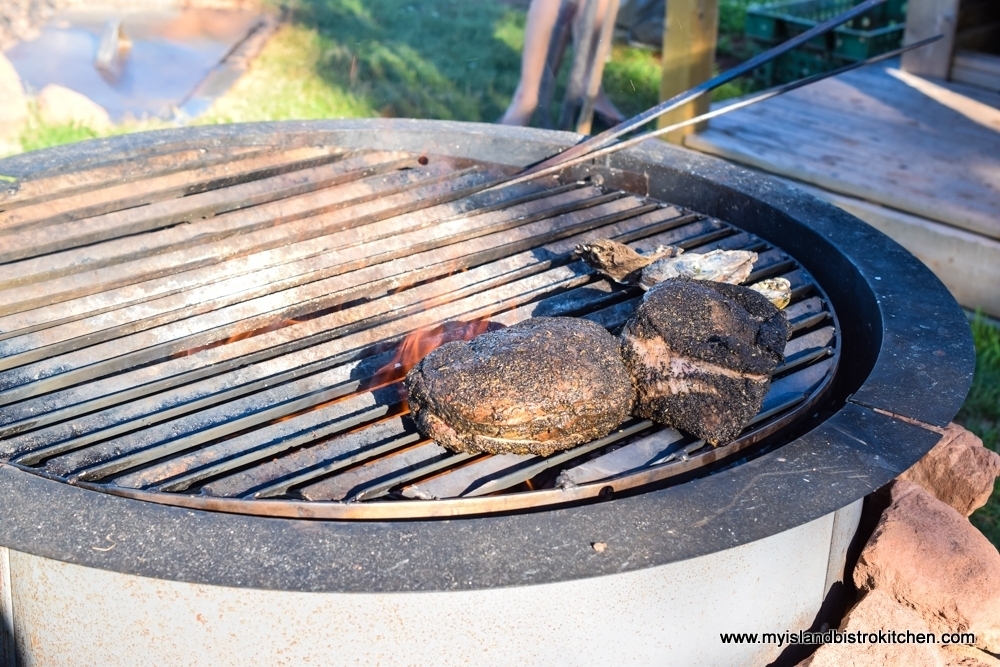
While guests were busy noshing on the appetizers, Chef Michael was preparing the sirloin tip roast with a black garlic espresso rub. Cooked over an open fire, you can only imagine how tantalizing the scent was!

Grilling the Sirloin Tip Beef Over an Open Fire at The Table Culinary Studio, New London, PEI

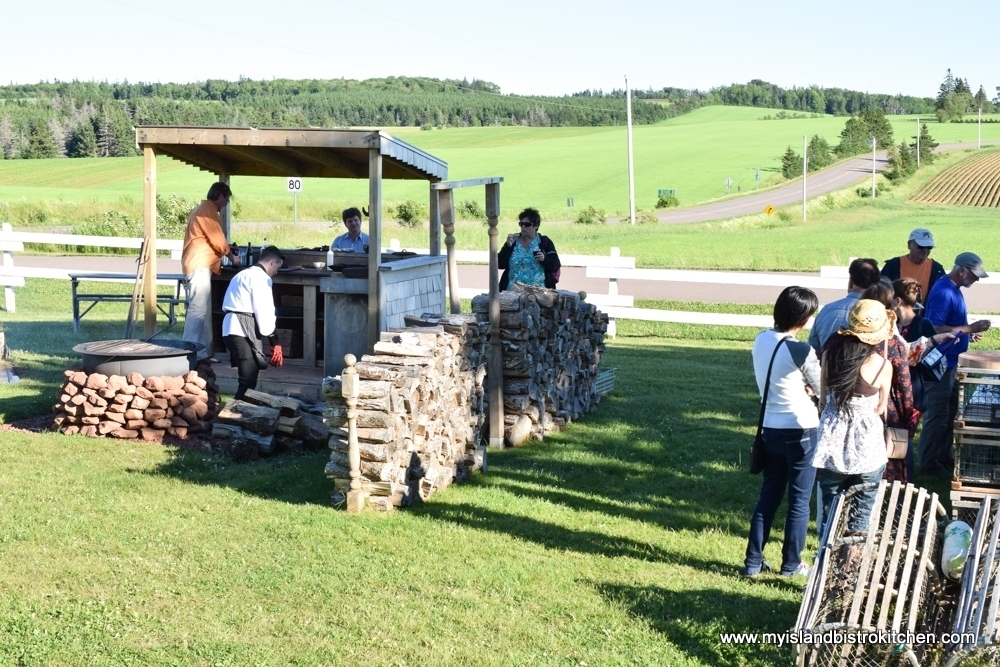
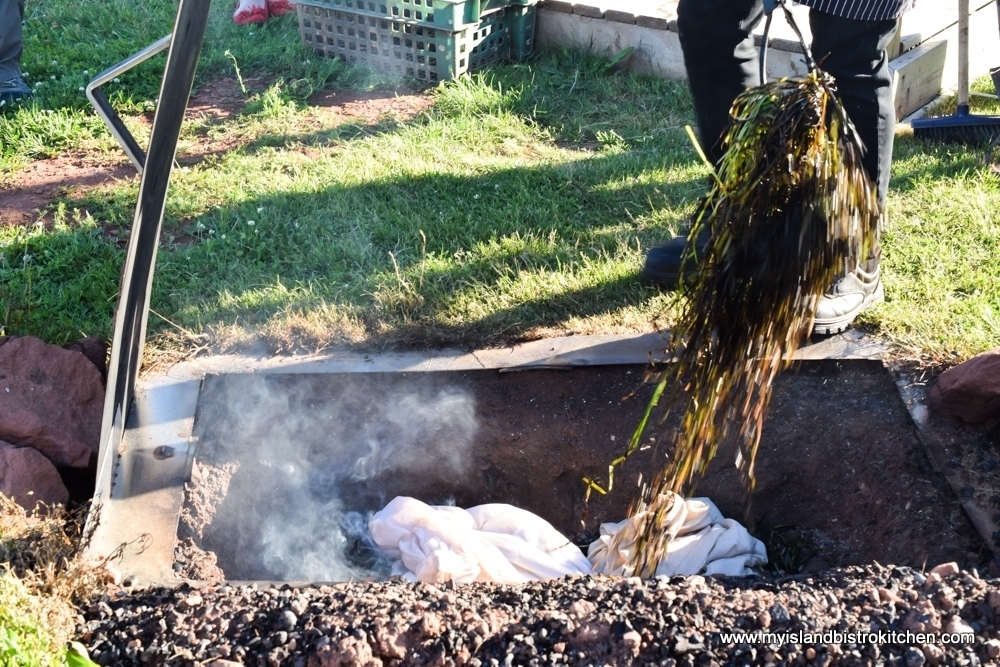
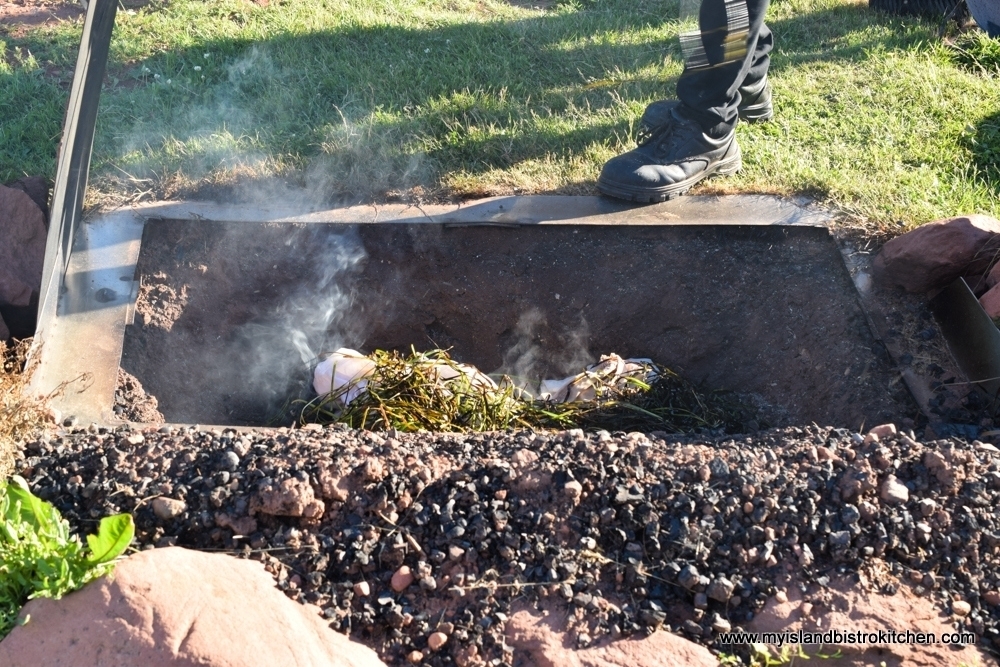
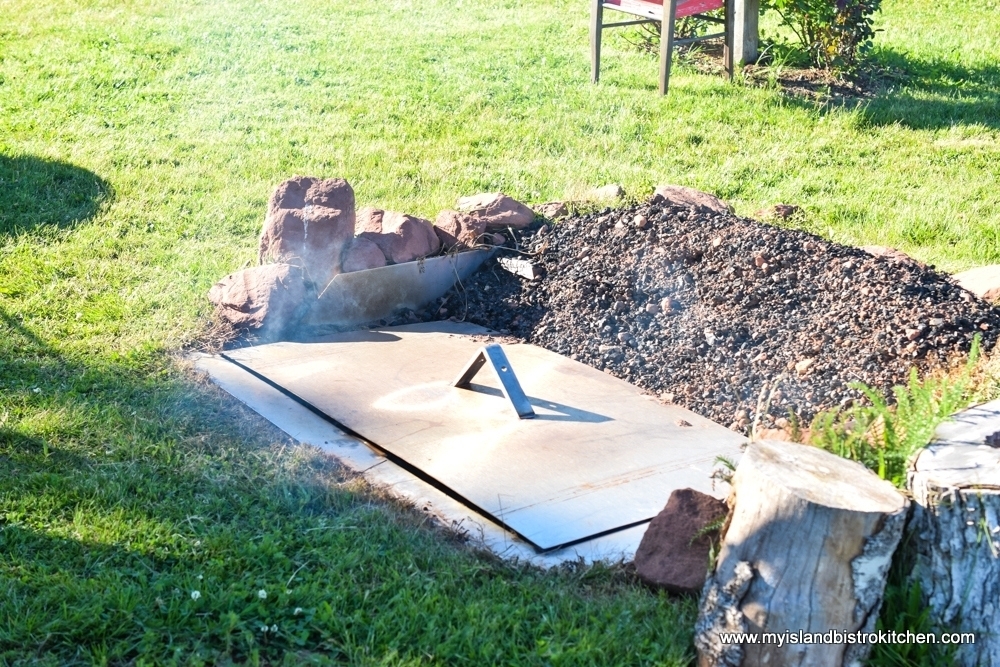
Then, Chef Michael demonstrated how they cook the mussels in a fire pit with seaweed and smoke. The mussels are placed in wet pillowcases which give the moisture the mussels need to open.

Placing bags of Mussels in the Fire Pit at The Table Culinary Studio, New London, PEI
Placing Bags of Mussels in the Fire Pit at The Table Culinary Studio, New London, PEI
Covering bags of PEI Mussels with Seaweed for Cooking in the Fire Pit at The Table Culinary Studio in New London, PEI
Covering Bags of PEI Mussels with Seaweed for Cooking in the Fire Pit at The Table Culinary Studio in New London, PEI
Fire Pit for Cooking Mussels at The Table Culinary Studio in New London, PEI

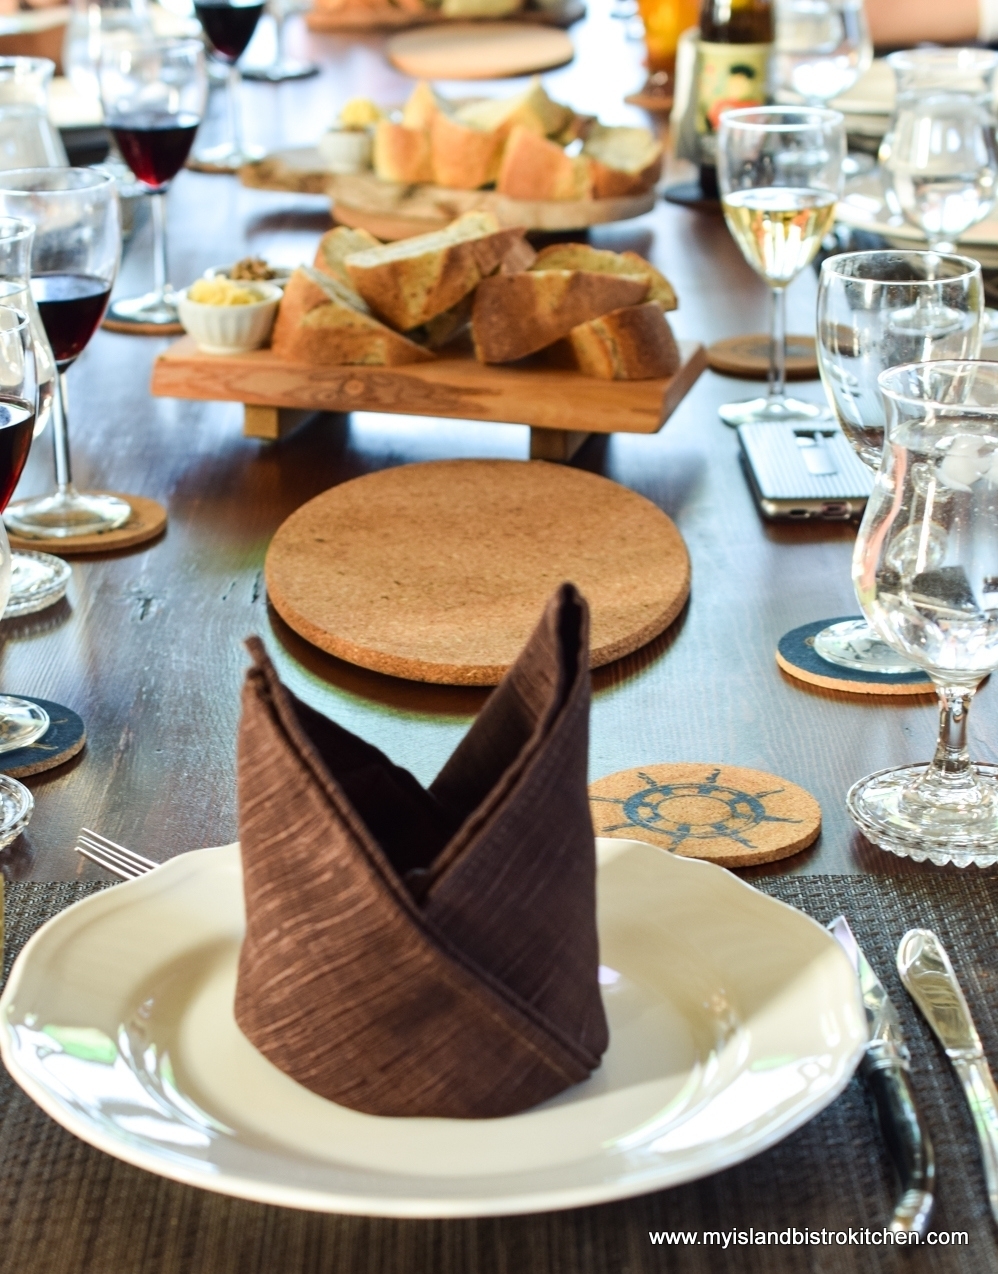
Guests leisurely made their way inside the church where the meal was served.  The big 12-foot long handmade harvest table occupies much of the space that once would have been filled with church pews.

The Table Culinary Studio, New London, PEI

By this time, guests were very comfortable in the company of each other and, since there were three Islanders present, the conversation soon turned to various aspects of how local foods are produced and farming and fishing, in general.  Food is such a commonality and ice breaker!

Dining at The Table Culinary Studio in New London, PEI

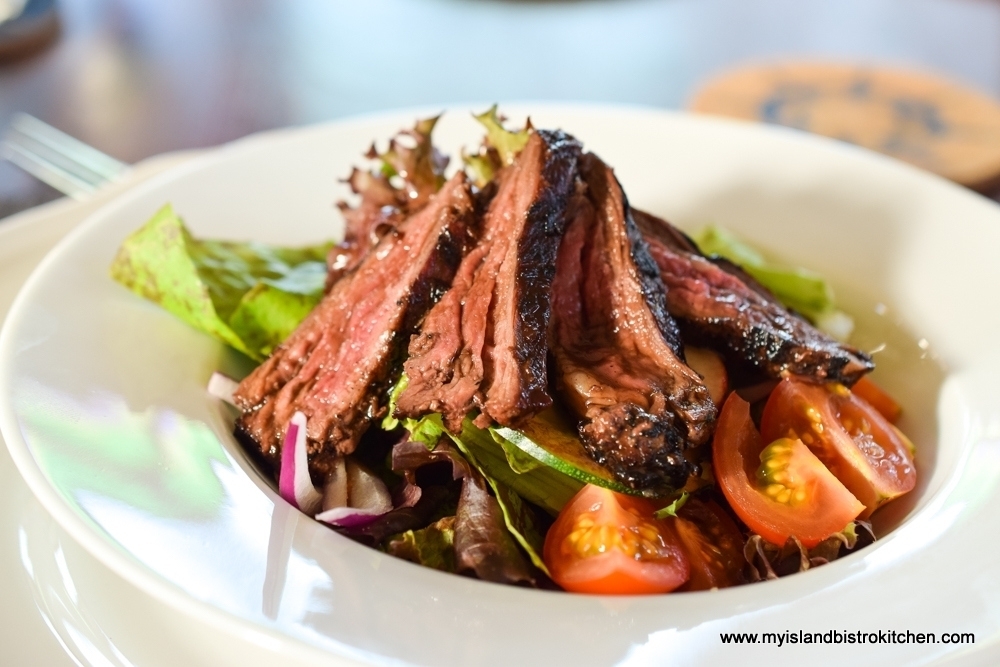
The meal began with a plated salad highlighted by the skirt steak from Atlantic Beef Products in Albany. The steak had been marinated in an onion garlic marinade.

Salad with skirt steak at The Table Culinary Studio in New London, PEI
Salad with Skirt Steak at The Table Culinary Studio in New London, PEI

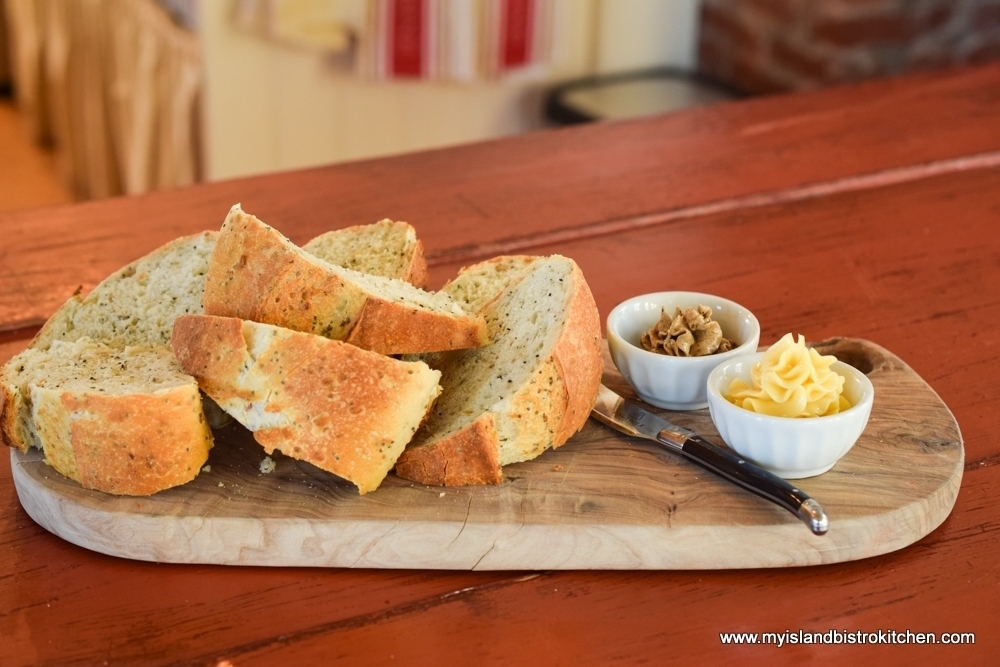
The boards of housemade sourdough bread were served with a black garlic spread as well as honey butter.

Bread Board at The Table Culinary Studio in New London, PEI

Before each course was presented, Chef Michael came tableside to explain what the course consisted of and how it was prepared.

Executive Chef, Michael Bradley, at The Table Culinary Studio in New London, PEI

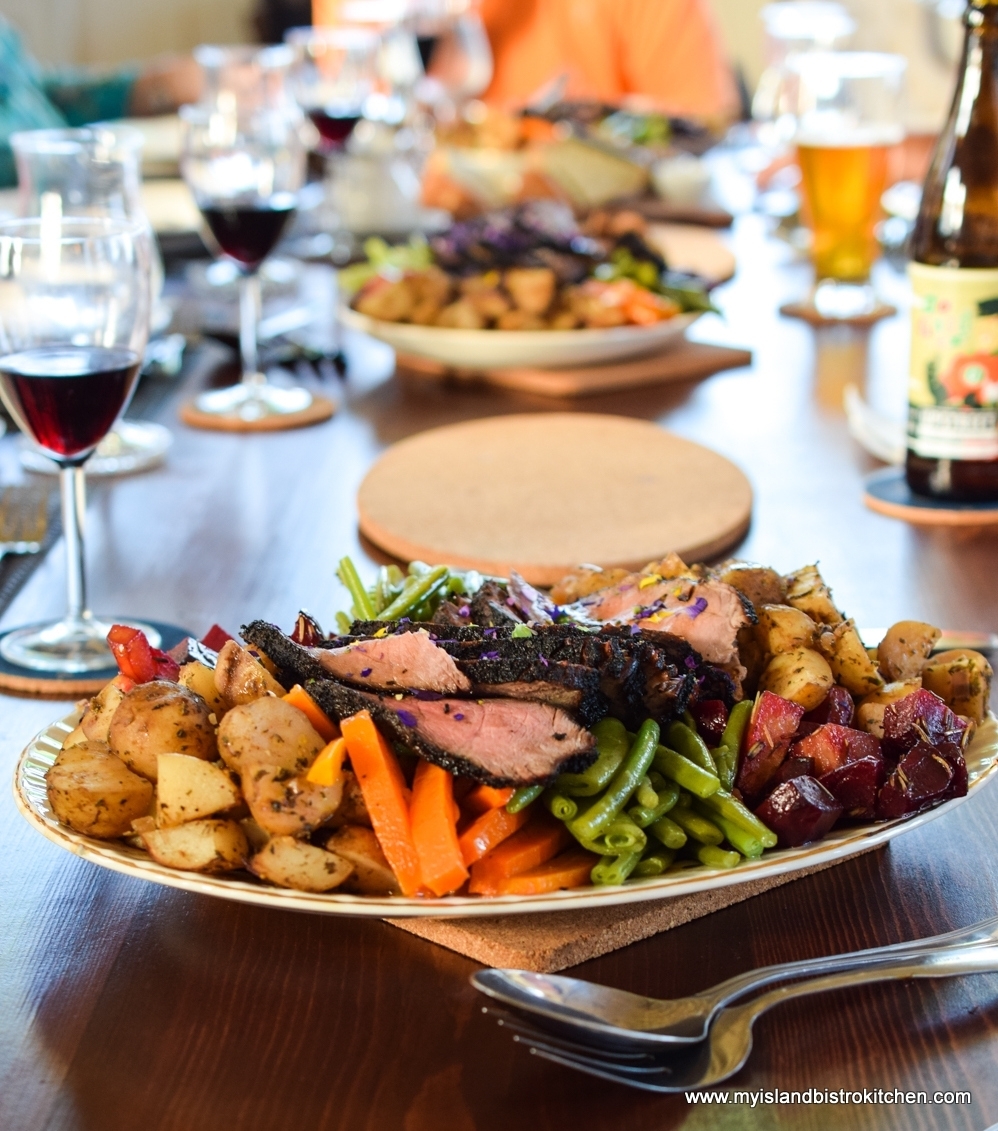
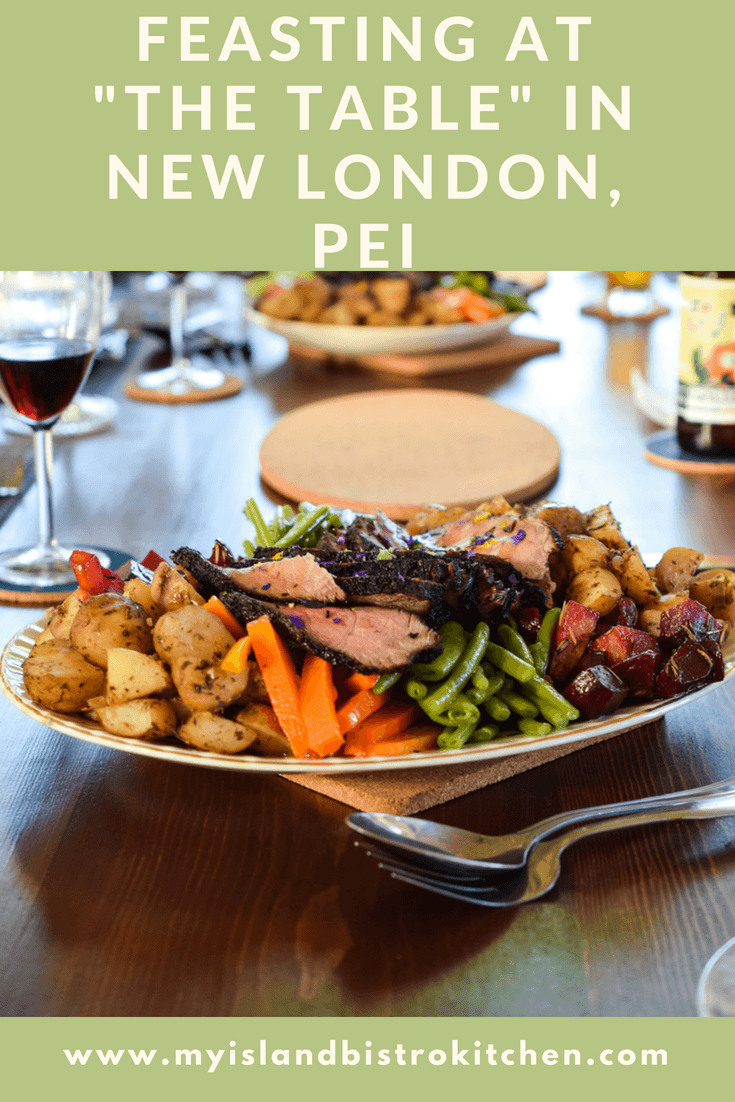
Next came huge platters of bountiful mixed seasonal vegetables with the fire-grilled sirloin tip roast.

Platters of Vegetables and Sirloin Tip Roast at The Table Culinary Studio, New London, PEI

The veggies (along with the salad greens) came from nearby Alexander Fresh Vegetables in Hope River. These were very attractively presented platters.

Platter of Vegetables and Sirloin Tip Roast at The Table Culinary Studio, New London, PEI

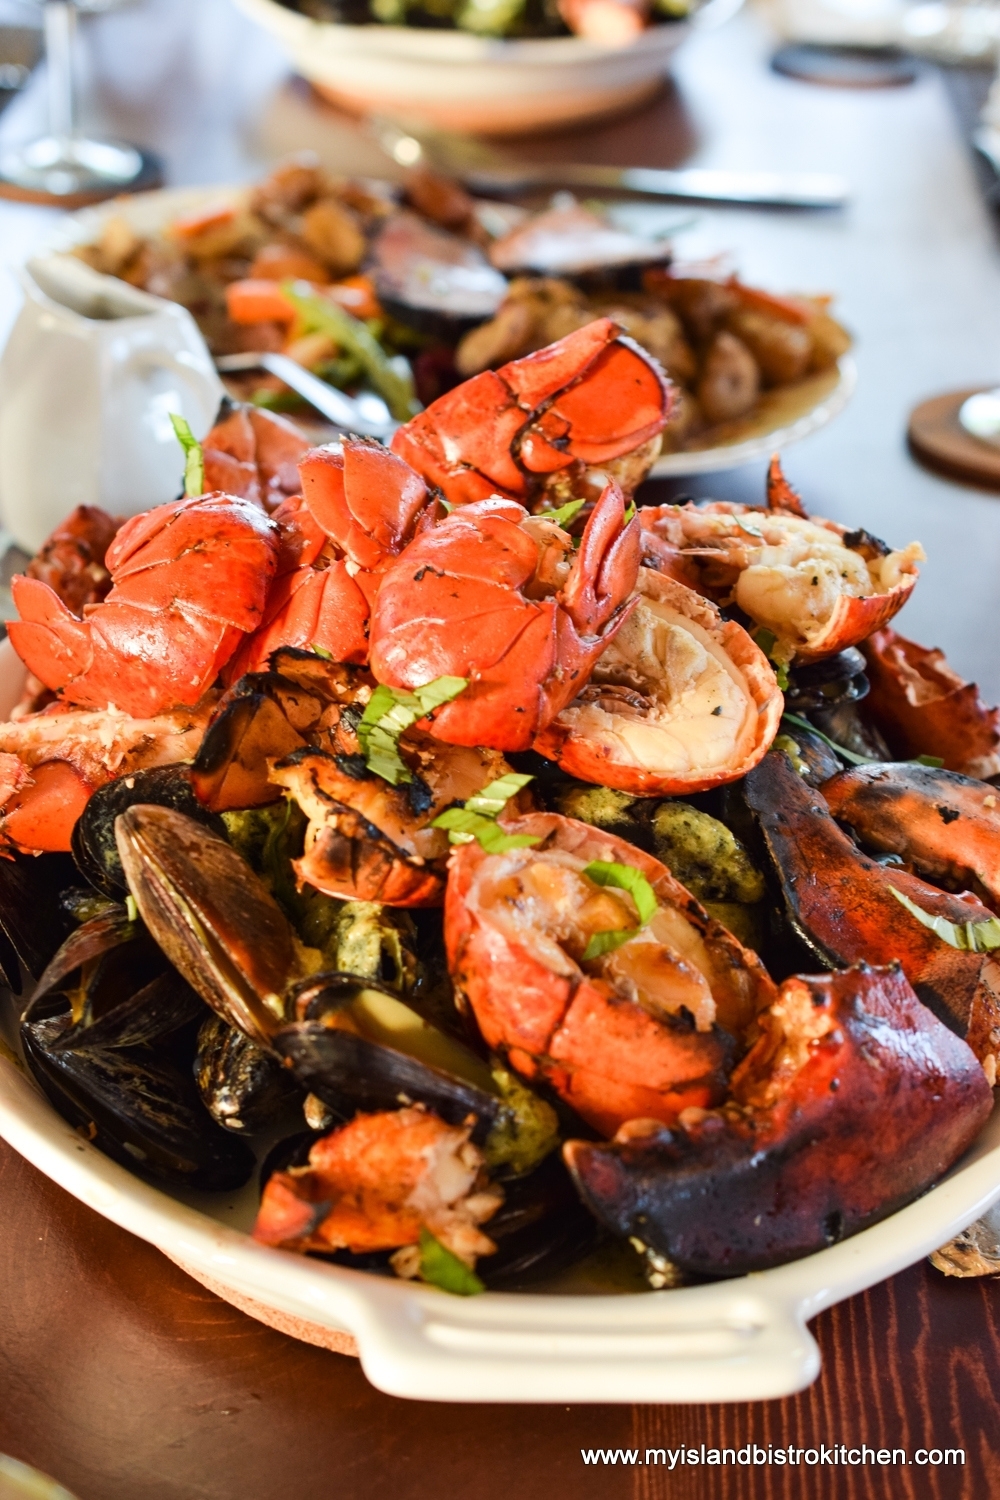
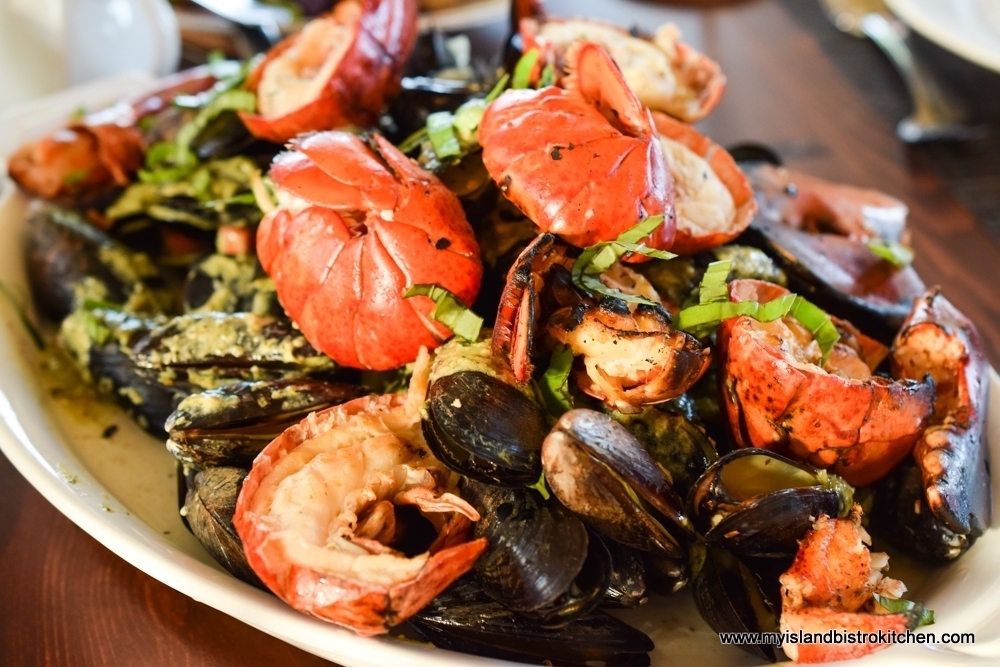
Then, the seafood platters arrived.  All those mussels that had been cooking in the fire pit emerged from the pillowcases and formed the base for lobster claws and tails.

Lobsters and Mussels at The Table Culinary Studio in New London, PEI

The lobster, fished from boats out of nearby French River Harbour, had been par-cooked with a garlic butter and then was finished on the grill outside.

The green sauce accompanying the mussels was a garden pesto cream sauce.

Lobster and Mussels at The Table Culinary Studio, New London, PEI

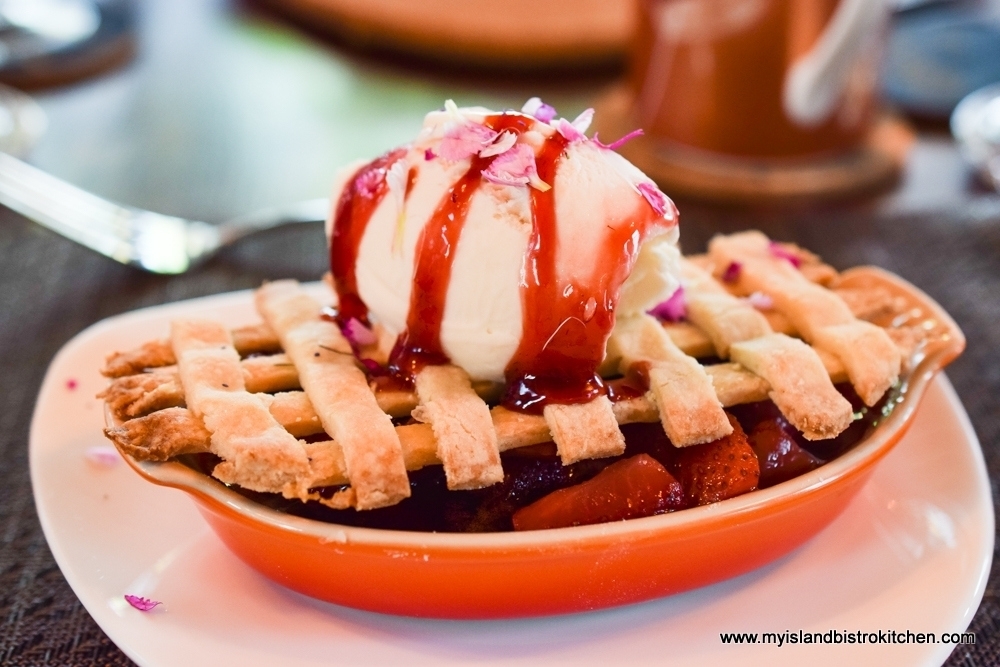
By this time, I was stuffed and thought I would just roll home but, wait, dessert was to come!  Dessert was a blood orange infused carrot cake with orange cream cheese icing. I didn’t get a photo of it because I was too busy enjoying the gluten-free option that was a deconstructed strawberry pie made with a strawberry balsamic reduction and gluten-free pastry lattice, all topped with lactose-free ice cream.

Gluten-Free Dessert at The Table Culinary Studio in New London, PEI.

The Table prides itself on using the best of what is fresh and local.  Most foods for their themed dinners come from under 10 km away and are farmed and fished by friends and neighbours. So, you know that when you dine at The Table, food will not have traveled thousands of miles before it has reached your plate. In fact, you can seek out the same food suppliers to purchase high quality local PEI products.

I asked Christine if they ever get families for their dinners.  She tells me, although 90% of their clientele are adults, parents are welcome to bring their children and they do often have families in attendance.  Patrons should note, however, that there is no children’s menu offered so the wee folk eat the same food as the adults.

What I have described above is the meal for the Surf and Turf dinner.  I inquired if the meal ingredients are identical for this particular dinner every night.  Christine informs me that the appetizers, vegetables, and dessert do vary by what is seasonally available.  So, if you are having the Surf and Turf dinner at The Table after having read this post, you’ll be aware that the meal ingredients may not be 100% identical to what I enjoyed in early July.

So, if you want to really immerse yourself in local PEI foods and have a totally relaxing evening in the beautiful countryside of Prince Edward Island while feasting on carefully prepared dishes in a unique setting, you should check out The Table Culinary Studio. If you have dietary restrictions, be sure to advise of that when making your reservation and, to the extent possible, the culinary team at The Table will do all they can to accommodate special dietary needs.

For more information on dining options at The Table, and to make reservations, check out their website at http://www.thetablepei.ca/dining .

Pin Me to Pinterest!

Dinner at The Table Culinary Studio in New London, PEI

My thanks to The Table Culinary Studio for the opportunity to experience their North Shore Surf and Turf Dinner and for the fine hospitality. My dinner at the The Table Culinary Studio was complimentary for the purpose of conducting a review of the North Shore Surf and Turf dinner. However, this in no way influenced my opinions of the dinner experience. All opinions expressed in this review are purely my own.