Chicken and Mushroom Crepes

Chicken and Mushroom Crepes with Cheese Sauce

Crepes filled with delectable fillings are one of my favorite meals. Chicken and Mushroom Crepes with Cheese Sauce are a real treat and a lot easier to make than one might think. At one time considered the fare of stylish restaurants and bistros, they can actually be very easily made at home.

I often make up a large batch of the crepes and freeze them, in between layers of plastic wrap, in a sealed freezer bag. If they are already made in advance, it does speed up meal preparation.

Crepes can be made with all-purpose flour or, if following a gluten-free diet, made with gluten-free 1-to-1 baking flour. In fact, the crepes in the photos in this posting are made with the 1-to-1 gluten-free flour and are very tasty and have a good soft texture. The crepe batter benefits from spending an hour in the refrigerator before being cooked. I find this gives greater structure to the crepe batter than cooking the crepes immediately after the ingredients are mixed together. The 1/4-cup measuring cup is a good size to use for the batter needed for each crepe.

A slope-sided non-stick 8″ skillet is perfect for making crepes.  Make sure the skillet is hot before adding batter and that only the minimal amount of butter is added to the pan. The best way to get thin crepes is to hold the 1/4-cup with the batter in one hand and the hot pan in the other. Pour the batter in to the pan while quickly tilting and swirling the pan to evenly distribute the batter. Cook the crepe until the gloss is gone from the top of the crepe and it starts to look a bit dry, small tiny bubbles begin to appear, and the edges of the crepe start to curl slightly. I use the tip of a fork to gently life the edge of the crepe, then I grab it with my fingers, and flip it over to the other side. The second side only needs about 15-20 seconds of cooking.  Have a couple of clean tea towels spread out on the counter and, as soon as each crepe is cooked, flip it out on to the tea towel. A small amount of additional butter may need to be added to the pan after every few crepes are cooked. This will ensure that the batter moves freely in the pan. Even though pan manufacturers claim pans to be non-stick, I find they benefit from the addition of a small amount of butter.

My recipe is a good use of leftover chicken (or turkey); however, if you are craving chicken crepes and don’t happen to have any leftover chicken, simply cook some chicken breasts especially for the crepes. It will take approximately one (1) pound of raw boneless, skinless chicken breasts to yield about two (2) cups of cooked cubed chicken.  When I am preparing the chicken breasts for cooking, I mix about 1/2 tsp liquid chicken bouillon with about a couple of tablespoons of water and drizzle it over the chicken. I will sprinkle a small amount of herbs and spices (e.g., dillweed, cumin, granulated garlic, or pretty much whatever strikes my fancy at the time) over the chicken, cover, and bake in the oven until done.  This adds some extra flavor to the chicken which can, otherwise, be a bit bland.

Chicken and Mushroom Crepes with Cheese Sauce

I recommend making this recipe in steps starting with the crepes, then the cheese sauce, and finally the filling.  I enhance the cheese sauce with the injection of some flavor boosters that include chicken stock, granulated garlic, paprika, and cayenne.  They do make a difference.  Those following a gluten-free diet will need to ensure that the chicken stock they use in this recipe is gluten-free.  If gluten-free chicken stock is unavailable, this sauce may be made entirely with milk though the flavor will obviously differ somewhat. The thickener in the sauce is all-purpose flour and, for those on a gluten-free diet, I have had great success using the gluten-free 1-to-1 flour as a thickener for this sauce.  While the sauce can be made entirely with grated cheddar cheese, I find it can be a bit too intense. Therefore, I use a blend of cheeses, my favorite being a mozzarella-provolone-parmesan mix .  With so many packages of pre-shredded cheeses on the market, it’s a quick and easy way to get a blend of cheeses for a recipe.

The filling is easy to make and only takes basic, simple ingredients that include two (2) aromatics (onion and celery), sliced button mushrooms and, of course, the cubed cooked chicken.  What holds this filling together is a portion of the cheese sauce. Don’t add so much cheese sauce that the filling becomes soupy – all that should be needed is about 1/2 cup of the sauce to bind the filling ingredients together.

To fill the crepes, simply divvy up the filling between the eight (8) crepes, placing the filling along the center line of each crepe. Gently fold one side of the crepe over the filling and roll again to form a cylinder.

Chicken and Mushroom Crepes with Cheese Sauce

If you want to plate the crepes, then I recommend baking them together in a baking pan (a 7″x11″ baking pan works well).  I like to bake my crepes in individual au gratin dishes like those in the photo below. I find they are great for presentation and they also ensure that each serving receives an equal amount of the cheese sauce. For presentation purposes, the crepes also look finished and undisturbed when brought to the table in their individual serving dishes.

Chicken and Mushroom Crepes with Cheese Sauce

[Printable recipe follows at end of posting]

Chicken and Mushroom Crepes with Cheese Sauce

Ingredients:

Crepes:
2 large eggs
1 cup flour (to make gluten-free, use 1 cup of 1-to-1 gluten-free flour)
1/8 tsp salt
1 cup whole milk
2 tbsp melted butter

Cheese Sauce:
¼ cup butter
¼ cup flour (to make gluten-free, use ¼ cup of 1-to-1 gluten-free flour)
Scant ½ tsp salt
½ tsp granulated garlic
Dash paprika
Dash cayenne
1 cup chicken stock
1 cup whole milk
1 cup grated cheese mixture (e.g., mozzarella, provolone, and parmesan)

Filling:
2 tbsp butter
½ cup onion, finely chopped
½ cup celery, finely chopped
1 cup button mushrooms, thinly sliced
2 cups cubed cooked chicken
Fresh herbs for garnish (e.g., parsley, chives, tarragon)

Method:

Step 1 – Make the crepes.  In large measuring cup or bowl and using an immersion blender, beat the eggs lightly.  Combine the flour and salt and beat in to the egg alternately with the milk, starting and ending with the flour (3 additions of flour and 2 additions of milk).  Beat in the melted butter and beat an additional 30 seconds, or until batter is smooth.  Cover with plastic wrap and refrigerate batter for 1 hour.

Over medium heat, melt apx. 1½ tsp butter in a 8” non-stick skillet with sloped sides. Using a ¼-cup measuring cup, scoop up batter. Pour the batter in to the heated skillet while quickly swirling and tilting the pan to ensure batter distributes evenly and completely over the bottom of the pan. Return pan to heat and cook crepe until top loses its gloss, tiny bubbles start to appear, and the edges of the crepe start to slightly curl. Gently lift an edge of the crepe away from the side of the pan with a tip of a fork and grab the crepe with fingers and flip it over.  Cook the second side of the crepe for 15-20 seconds. Flip the crepe onto a clean tea towel. Repeat for remaining crepes, adding small amounts of butter to the pan, if necessary, to keep the crepes from sticking to the pan.

Step 2 – Make the cheese sauce. In small bowl, combine and mix the flour, salt, granulated garlic, paprika, and cayenne.  In medium-sized saucepan, melt the butter over medium heat.  Stir in the flour mixture and cook until frothy.  Whisk in the chicken stock and milk.  Cook sauce, until thickened and smooth, stirring constantly to prevent scorching.  Stir in the cheese until melted.

Step 3 – Make the filling.  Preheat oven to 350°F.  In medium-sized skillet, melt butter over medium heat.  Add the onion and celery and sauté for 3-5 minutes, until onion becomes translucent, stirring frequently to prevent vegetables from burning.  Add the mushrooms and sauté for approximately 3-5 minutes.  Remove skillet from heat and add the diced cooked chicken.  Add approximately ½ cup of the cheese sauce to the vegetable-chicken mixture and stir to combine.

Step 4: Assemble the crepes.  Grease 4 individual au gratin dishes or one oblong baking pan (apx. 7”x11”) that will hold 8 filled crepes.  Divide the filling mixture between the 8 crepes by placing filling in the center of each crepe.  Gently fold crepe over filling and roll again into a cylinder shape and place in baking dish(es). If using au gratin dishes, place 2 filled crepes in each dish. Pour the remaining cheese sauce over crepes to cover, leaving both ends of the crepes uncovered.

Bake for 15-18 minutes, or until hot and bubbly. Remove from oven and, if desired, sprinkle with chopped fresh herbs.

Serving Suggestion: Serve with favorite green salad.

Yield:  4 servings, 2 crepes each

Chicken and Mushroom Crepes with Cheese Sauce

Yield: 4 servings

Serving Size: 2 crepes per serving

A delectable chicken and mushroom filling encased in a thin, soft-textured crepe and smothered in a rich cheesy sauce.

Ingredients

  • Crepes:
  • 2 large eggs
  • 1 cup flour (to make gluten-free, use 1 cup of 1-to-1 gluten-free flour)
  • 1/8 tsp salt
  • 1 cup whole milk
  • 2 tbsp melted butter
  • Cheese Sauce:
  • ¼ cup butter
  • ¼ cup flour (to make gluten-free, use ¼ cup of 1-to-1 gluten-free flour)
  • Scant ½ tsp salt
  • ½ tsp granulated garlic
  • Dash paprika
  • Dash cayenne
  • 1 cup chicken stock
  • 1 cup whole milk
  • 1 cup grated cheese mixture (e.g., mozzarella, provolone, and parmesan)
  • Filling:
  • 2 tbsp butter
  • ½ cup onion, finely chopped
  • ½ cup celery, finely chopped
  • 1 cup button mushrooms, thinly sliced
  • 2 cups cubed cooked chicken
  • Fresh herbs for garnish (e.g., parsley, chives, tarragon)

Instructions

  1. Step 1 - Make the crepes. In large measuring cup or bowl and using an immersion blender, beat the eggs lightly. Combine the flour and salt and beat in to the egg alternately with the milk, starting and ending with the flour (3 additions of flour and 2 additions of milk). Beat in the melted butter and beat an additional 30 seconds, or until batter is smooth. Cover with plastic wrap and refrigerate batter for 1 hour.
  2. Over medium heat, melt apx. 1½ tsp butter in a 8” non-stick skillet with sloped sides. Using a ¼-cup measuring cup, scoop up batter. Pour the batter in to the heated skillet while quickly swirling and tilting the pan to ensure batter distributes evenly and completely over the bottom of the pan. Return pan to heat and cook crepe until top loses its gloss, tiny bubbles start to appear, and the edges of the crepe start to slightly curl. Gently lift an edge of the crepe away from the side of the pan with a tip of a fork and grab the crepe with fingers and flip it over. Cook the second side of the crepe for 15-20 seconds. Flip the crepe onto a clean tea towel. Repeat for remaining crepes, adding small amounts of butter to the pan, if necessary, to keep the crepes from sticking to the pan.
  3. Step 2 - Make the cheese sauce. In small bowl, combine and mix the flour, salt, granulated garlic, paprika, and cayenne. In medium-sized saucepan, melt the butter over medium heat. Stir in the flour mixture and cook until frothy. Whisk in the chicken stock and milk. Cook sauce, until thickened and smooth, stirring constantly to prevent scorching. Stir in the cheese until melted.
  4. Step 3 - Make the filling. Preheat oven to 350°F. In medium-sized skillet, melt butter over medium heat. Add the onion and celery and sauté for 3-5 minutes, until onion becomes translucent, stirring frequently to prevent vegetables from burning. Add the mushrooms and sauté for approximately 3-5 minutes. Remove skillet from heat and add the diced cooked chicken. Add approximately ½ cup of the cheese sauce to the vegetable-chicken mixture and stir to combine.
  5. Step 4: Assemble the crepes. Grease 4 individual au gratin dishes or one oblong baking pan (apx. 7”x11”) that will hold 8 filled crepes. Divide the filling mixture between the 8 crepes by placing filling in the center of each crepe. Gently fold crepe over filling and roll again into a cylinder shape and place in baking dish(es). If using au gratin dishes, place 2 filled crepes in each dish. Pour the remaining cheese sauce over crepes to cover, leaving both ends of the crepes uncovered.
  6. Bake for 15-18 minutes, or until hot and bubbly. Remove from oven and, if desired, sprinkle with chopped fresh herbs.
  7. Serving Suggestion: Serve with favorite green salad.

Notes

Please read entire blog posting for additional details and hints on making the crepes that are not included in this recipe.

Schema/Recipe SEO Data Markup by Yummly Rich Recipes
https://myislandbistrokitchen.com/2017/02/26/chicken-and-mushroom-crepes-with-cheese-sauce/

If you like crepes, you may also enjoy this crepe recipe from My Island Bistro Kitchen as well:

Lobster and Asparagus Crepes

Pin Me To Pinterest!

Chicken and Mushroom Crepes


Chicken and Mushroom Crepes with Cheese Sauce

Connect with My Island Bistro Kitchen by:

Joining the Facebook page for My Island Bistro Kitchen:  https://www.facebook.com/MyIslandBistroKitchen/

Following “the Bistro” on Twitterhttps://twitter.com/PEIBistro/

Seeing the drool-worthy gallery of mouth-watering food photos from My Island Bistro Kitchen on Instagramhttps://www.instagram.com/peibistro/

Following “the Bistro” on Pinterest at https://www.pinterest.ca/peibistro/

(and you can pin the Pinterest-ready photo above to your favorite Pinterest boards)

Ham Lentil Soup Recipe

Today, I am sharing my newly-developed recipe for Ham Lentil Soup that is made from a leftover ham bone, broth, and ham.

If you are a regular follower of my food blog, by now you have likely figured out that I am a fan of leftovers and of foods that generate leftovers that can be used in other dishes.  One of my favorite comfort food meals is a boiled ham dinner.  I blogged about this back in 2013. I buy a large smoked pork picnic ham, place it in a big stockpot with lots of water and boil it for a good while then add the vegetables to make a meal-in-one-pot soup.  Easy-peasy and, oh, ever-so-tasty. However, these hams are almost always quite large and there is a lot of meat. After a couple of days of leftover ham with scalloped potatoes, sandwiches, and perhaps my Hawaiian Fiesta Casserole, I find it’s time to do something else with the ham and the flavorful broth in which it was boiled.

I’ve decided that all that good ham broth should not go to waste so I have developed a recipe to use the leftover ham broth and ham to make a tasty soup… a second soup, of sorts, from the same piece of meat.  Ham Lentil Soup is a good economical way to use leftovers.  You will need to refer back to my 2013 post for directions on cooking the ham in order to get the ham broth, so go ahead and click here for those instructions.  Make sure you use enough water to cook the ham so that you end up with 7 cups of ham broth and, remember, the water will reduce as the ham cooks so you will most likely need to top it up during the cooking process.

Ham Lentil Soup
Ham Lentil Soup

Now, this leftover Ham Lentil Soup could be made without the ham broth, instead using all chicken broth or vegetable broth. However, what would be missing would be the wonderful flavor of the natural ham broth. So, after I have removed the cooked ham from the stock pot, what I do is refrigerate the ham broth overnight. A layer of fat will form on the top of the broth. Skim all of that off and discard it.  Strain the broth through a cheesecloth lined strainer to remove any remaining whole bits of fat.  Place 7 cups of the ham broth along with the meaty ham bone striped of most of its meat, and the addition of several wonderful spices into a large stockpot. The bone has great flavor in it and the spices will enhance the ham broth and form a flavorful foundational base for the soup.  It’s the broth that makes this soup so it needs lots of flavor. After this broth has cooked slowly in a large stock pot under cover for about 45 minutes, it will have reduced down to about 4 cups or so. Strain this so you have a clear broth.

Then, get those aromatics cooking in the oil. Add the strained ham broth and top it up with 4 cups of vegetable broth so you have 8 cups of liquid.  The great part about this soup is that if you end up with more than 4 cups of strained ham broth, just add less vegetable broth or, conversely, if you have less than 4 cups of ham broth, top it up with more vegetable broth.  Follow the recipe for when to add the different vegetables and lentils that require different cooking times. If there is a vegetable you don’t like, simply replace it with an equal amount of a vegetable you prefer.

Ham Lentil Soup
Ham Lentil Soup

This is a great way to totally maximize the use of a large ham. When you get tired of it, dice up the leftover ham and use it in this soup. Anywhere from 1 1/2 to 2 cups of leftover ham will suffice for this recipe. It’s meant to be a brothy, not thick, soup. I have added some orange lentils to this soup for extra substance but also because lentils are a good source of dietary fiber, protein, and minerals. I have chosen orange lentils because they cook in a relatively short time, usually about 20-25 minutes. Don’t overcook the soup after adding the lentils or they will turn to mush. The lentils will still be flavorful but they will have lost their shape if cooked too long.

This Ham Lentil Soup is a good way to maximize and change up leftover ham and it also freezes well.

Ham Lentil Soup
Ham Lentil Soup

[Printable recipe follows at end of posting]

Ham Lentil Soup

Ingredients:

Step 1:
1 leftover meaty ham bone
7 cups liquid (ham stock, chicken or vegetable broth)
2 whole star anise
10 whole cloves
½ cinnamon stick (about 3”)
3 cardamon pods
5 whole peppercorns
1 large unpeeled garlic clove
2 whole allspice
2 bay leaves

Step 2:
2-3 tbsp vegetable oil
2/3 cup onion, chopped
2/3 cup celery, chopped (apx. 1 large stalk)
1/3 cup parsnip, diced
3 garlic cloves, minced
4 cups strained broth from Step 1 above
2 vegetable stock cubes
4 cups hot water
¾ cup carrots, diced
½ cup turnip, diced
1 bay leaf
1 tsp dried thyme
¾ tsp dried basil
½ tsp dried oregano
½ tsp marjoram
½ tsp summer savory
¼ tsp cloves
Pepper, to taste
4 oz (apx. ¾ cup) orange lentils, rinsed and drained
1 cup potato, diced
19 oz can white kidney beans, drained and rinsed
½ cup frozen corn
½ cup frozen peas
1½ – 2 cups cooked leftover ham, diced
Fresh parsley for garnish

Method:

Step 1: Place leftover ham bone in large stock pot. Add 7 cups liquid (either ham stock left over from boiling the picnic ham or, alternatively, use chicken or vegetable stock).  Add star anise, whole cloves, cinnamon stick, cardamom pods, peppercorns, garlic clove, allspice, and bay leaves. Cover and boil gently over medium-low heat for about 45 minutes. Remove from heat and strain through fine mesh strainer.  Discard bone and spices. Set broth aside. This should yield approximately 4 cups broth.

Step 2: Heat oil over medium heat in the large stock pot.  Add the onions, celery, and parsnip.  Sauté 1 minute, stirring constantly.  Add the garlic and sauté for an additional minute, stirring briskly.

Return strained broth from Step 1 to stock pot.  Dissolve 2 vegetable stock cubes in 4 cups hot water. Add to the strained broth. Bring to a boil.  Add carrots, turnip, and spices. Cover and cook over medium low heat for 15 minutes. Add the lentils.  Cook for 10 minutes then add the potato and drained kidney beans.  Cook for about 10 minutes then add the corn, peas, and cooked ham. Cook for about 10-15 minutes longer, or until vegetables are fork tender.

Yield:  Apx. 12 – 1-cup servings

Ham Lentil Soup

Yield: Apx. 12 - 1-cup servings

This flavorful ham lentil soup makes good use of leftover ham bone, broth, and ham along with a mixture of vegetables, spices, and lentils.

Ingredients

  • Step 1:
  • 1 leftover meaty ham bone
  • 7 cups liquid (ham stock, chicken or vegetable broth)
  • 2 whole star anise
  • 10 whole cloves
  • ½ cinnamon stick (about 3”)
  • 3 cardamon pods
  • 5 whole peppercorns
  • 1 large unpeeled garlic clove
  • 2 whole allspice
  • 2 bay leaves
  • Step 2:
  • 2-3 tbsp vegetable oil
  • 2/3 cup onion, chopped
  • 2/3 cup celery, chopped (apx. 1 large stalk)
  • 1/3 cup parsnip, diced
  • 3 garlic cloves, minced
  • 4 cups strained broth from Step 1 above
  • 2 vegetable stock cubes
  • 4 cups hot water
  • ¾ cup carrots, diced
  • ½ cup turnip, diced
  • 1 bay leaf
  • 1 tsp dried thyme
  • ¾ tsp dried basil
  • ½ tsp dried oregano
  • ½ tsp marjoram
  • ½ tsp summer savory
  • ¼ tsp cloves
  • Pepper, to taste
  • 4 oz (apx. ¾ cup) orange lentils, rinsed and drained
  • 1 cup potato, diced
  • 19 oz can white kidney beans, drained and rinsed
  • ½ cup frozen corn
  • ½ cup frozen peas
  • 1½ - 2 cups cooked leftover ham, diced
  • Fresh parsley for garnish

Instructions

  1. Step 1: Place leftover ham bone in large stock pot. Add 7 cups liquid (either ham stock left over from boiling the picnic ham or, alternatively, use chicken or vegetable stock). Add star anise, whole cloves, cinnamon stick, cardamom pods, peppercorns, garlic clove, allspice, and bay leaves. Cover and boil gently over medium-low heat for about 45 minutes. Remove from heat and strain through fine mesh strainer. Discard bone and spices. Set broth aside. This should yield approximately 4 cups broth.
  2. Step 2: Heat oil over medium heat in the large stock pot. Add the onions, celery, and parsnip. Sauté 1 minute, stirring constantly. Add the garlic and sauté for an additional minute, stirring briskly.
  3. Return strained broth from Step 1 to stock pot. Dissolve 2 vegetable stock cubes in 4 cups hot water. Add to the strained broth. Bring to a boil. Add carrots, turnip, and spices. Cover and cook over medium low heat for 15 minutes. Add the lentils. Cook for 10 minutes then add the potato and drained kidney beans. Cook for about 10 minutes then add the corn, peas, and cooked ham. Cook for about 10-15 minutes longer, or until vegetables are fork tender.

Notes

Please read entire blog post for additional information on making this soup.

Schema/Recipe SEO Data Markup by Yummly Rich Recipes
https://myislandbistrokitchen.com/2017/02/14/ham-lentil-soup-recipe/

Pin Me To Pinterest!

Ham and Lentil Soup
Ham and Lentil Soup


Ham and Lentil Soup
Ham and Lentil Soup

Whole Wheat Biscuits Recipe

Whole Wheat Biscuits

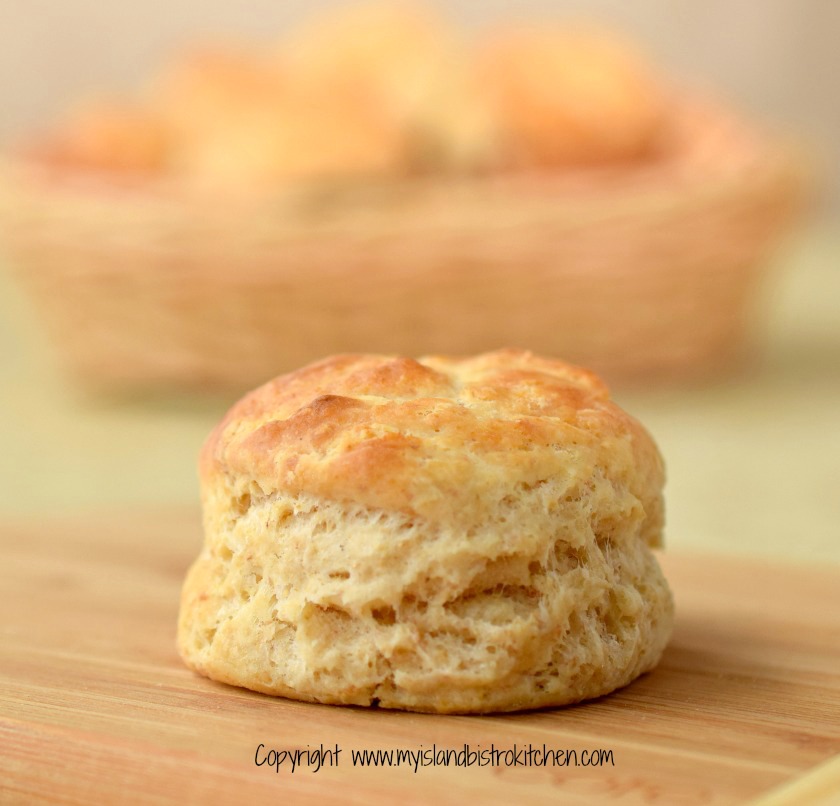
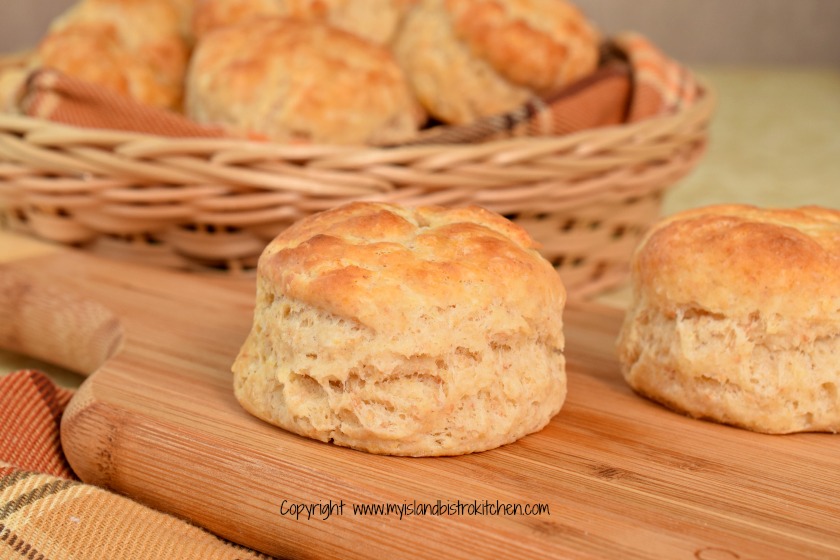
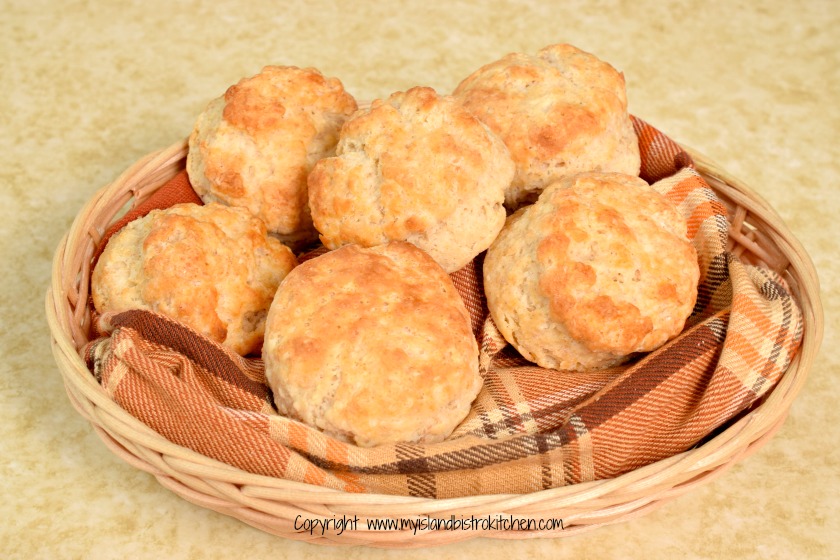
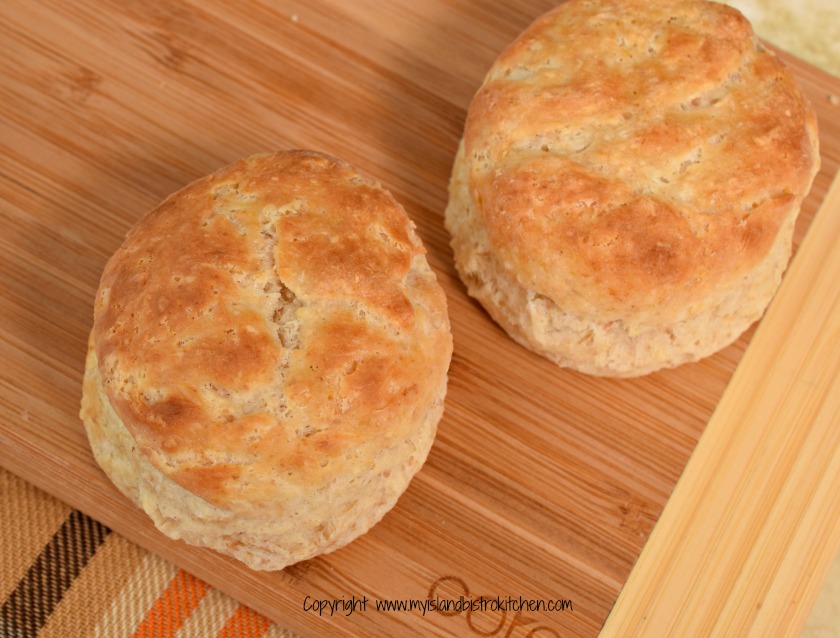
For me, one of the hallmarks of a wonderful homemade meal is a fresh batch of tender and flavorful whole wheat biscuits on the table! These are particularly good with baked beans (especially when the biscuits are slathered with molasses!) or, well, just about anything! Biscuits are a form of a quick bread so they don’t take long to whip up and, best of all, they only call for pantry staples like flour, baking powder, salt, butter, milk and sometimes a small amount of sugar.

Whole Wheat Biscuits

My recipe calls for a combination of flours – 1 1/4 cups of all-purpose flour and 3/4 cup whole wheat flour.  I find that using all whole wheat flour does not yield the tender texture that can be achieved by blending all-purpose flour with the whole wheat. Shortening or butter can be used as the fat for biscuits; however, nothing beats butter for flavor!

Whole Wheat Biscuits

These biscuits have a different flavor and texture than my standard white biscuits and these are made with buttermilk (or sour milk) instead of with whipping cream and whole milk (click here for the recipe for my white tea biscuits). They are two distinctly different types of biscuits. The whole wheat ones are slightly more “rustic” while the white biscuits are very refined. I tend to make the whole wheat biscuits to serve alongside a more rustic meal like beans, chili, and stews, for example. My regular “go-to” standard biscuits are the white tea biscuits and, for sure, they are the ones I use for afternoon teas because of their light, tender crumb.
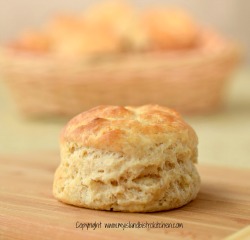
Whole Wheat Biscuit
Whole Wheat Biscuit

My hints for making biscuits are –

  • Use cold ingredients. In fact, it’s a good idea to put the flour mixture in the refrigerator for about an hour or so so that it is cold to start with.
  • Use cold butter or even frozen butter which is what I use. That cold butter will give  flaky tenderness to the biscuits.  The butter can be cut into the flour mixture with a pastry cutter but my preference is to hold a grater (with large holes) over the flour and grate the butter right into the flour. Stop and give the mixture a stir after grating some butter to integrate and distribute it and then keep on grating the rest of the butter. This helps to ensure that the butter gets incorporated right into the cold flour. If you grate the butter into a separate bowl, it will tend to clump together, especially as you transfer it to the flour mixture.
  • Only mix the liquid and dry ingredients as minimally as possible and do so gently and with a fork. Over-mixing will result in over-developing the flour’s gluten and yield tough biscuits. Just mix enough that the flour is incorporated and the batter starts to pull away from the sides of the bowl.
  • Let the batter rest in the bowl for 1-2 minutes. This allows the ingredients to settle (they need to get to know each other!).
  • Turn the batter out on to a lightly floured surface. Knead the mixture 8-10 times only. Do NOT over-knead as  over-working the dough will “stir up” the gluten in the flours and will yield dense, tough biscuits. After kneading, little bits of the butter should still be visible in the dough. With biscuits, you are not “blending” ingredients but, rather, are simply barely mixing them just enough so that the dough sticks together.
  • Use a rolling pin, or simply pat the dough to about 1″ thickness.  Use desired size of biscuit cutter. A good, general size cutter for biscuits is a 2″ cutter. Flour the cutter before cutting each biscuit and cut the biscuits as close together as possible to minimize the amount of dough that will have to be gathered up and patted down again for the next cutting – remember, the goal is to minimize the amount of “working the dough” that happens . Make sure the cutter is sharp-edged and do not twist the cutter when cutting out the biscuits.  Cut straight down into the dough. Twisting the cutter while cutting the biscuits can be a cause of biscuits unevenly rising and hence spreading during the baking process – that’s when they lose their shape and go downhill to the point that they may look like a ski slope!
  • Once the first cut of biscuits is made from the dough, gather up the remaining bits and pat it down to 1″ thickness and continue to cut out remaining biscuits. Again, resist the urge to knead the dough any more than absolutely necessary to pull it together.
  • Bake the biscuits in a hot oven (450F) until they start to turn golden brown on top, about 14-16 minutes, generally.

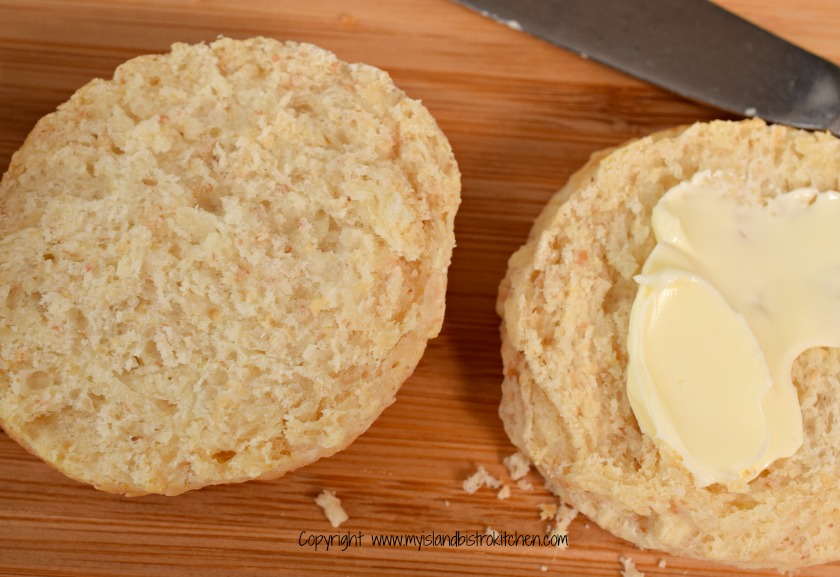
Biscuits are best served slightly warm so make them just before the meal.

Whole Wheat Biscuits

[Printable recipe follows at end of posting]

Whole Wheat Biscuits

Ingredients:
1¼ cups all-purpose flour
¾ cup whole wheat flour
4 tsp baking powder
1 tsp salt
1 tbsp granulated sugar
6 tbsp cold, unsalted butter, cut into small chunks
1 cup buttermilk or sour milk*

1-2 tbsp milk for brushing tops of biscuits

Method:
Preheat oven to 450°F.  Line baking sheet with parchment paper.

In large bowl, whisk together the flours, baking powder, salt, and sugar.

Grate cold (or frozen) butter over flour in bowl, or use a pastry cutter to cut in the butter until mixture resembles coarse crumbs.

Make a well in the center of the ingredients. Pour milk into well in dry ingredients.  Using a fork, mix ingredients together just until flour mixture is incorporated.  Do not overmix. Mixture will be a soft, moist batter.

Let batter rest in bowl for 1-2 minutes then turn out onto a floured surface.  Knead dough 8-10 times.  Do not over-knead.

Roll or pat dough to desired thickness, about 1” thick.  Using a 2” floured round cookie cutter, cut out biscuits, re-flouring cutter before cutting out each biscuit.  Gather up remaining dough, pat down to about 1” thick and cut out biscuits.

Using a small spatula, transfer the biscuits to prepared baking sheet, placing them about 1” to 1½ “ apart. Prick tops of biscuits with fork tines and lightly brush with milk, if desired. Bake for 14-16 minutes or until lightly browned on top. Remove from oven and let cool on baking sheet for 3-4 minutes then transfer to wire rack.

Biscuits may also be placed close together in a greased baking pan with sides. Baking the biscuits in this manner will yield soft-sided biscuits.

*To sour milk, place 1 tbsp white vinegar in a measuring cup. Add enough milk to make 1 cup.  Stir. Let stand for 5 minutes to sour.

Yield:  Apx. 12-13 – 2” biscuits

Whole Wheat Biscuits

Whole Wheat Biscuits Recipe

Yield: 12-13 - 2" biscuits

Delicious easy-to-make classic whole wheat biscuits that are tender and flavorful.

Ingredients

  • 1¼ cups all-purpose flour
  • ¾ cup whole wheat flour
  • 4 tsp baking powder
  • 1 tsp salt
  • 1 tbsp granulated sugar
  • 6 tbsp cold, unsalted butter, cut into small chunks
  • 1 cup buttermilk or sour milk*
  • 1-2 tbsp milk for brushing tops of biscuits

Instructions

  1. Preheat oven to 450°F. Line baking sheet with parchment paper.
  2. In large bowl, whisk together the flours, baking powder, salt, and sugar. Grate cold (or frozen) butter over flour in bowl, or use a pastry cutter to cut in the butter until mixture resembles coarse crumbs. Make a well in the center of the ingredients.
  3. Pour milk into well in dry ingredients. Using a fork, mix ingredients together just until flour mixture is incorporated. Do not overmix. Mixture will be a soft, moist batter. Let batter rest in bowl for 1-2 minutes then turn out onto a floured surface. Knead dough 8-10 times. Do not over-knead.
  4. Roll or pat dough to desired thickness, about 1” thick. Using a 2” floured round cookie cutter, cut out biscuits, re-flouring cutter before cutting out each biscuit. Gather up remaining dough, pat down to about 1” thick and cut out biscuits.
  5. Using a small spatula, transfer the biscuits to prepared baking sheet, placing them about 1” to 1½ “ apart. Prick tops of biscuits with fork tines and lightly brush with milk, if desired. Bake for 14-16 minutes or until lightly browned on top. Remove from oven and let cool on baking sheet for 3-4 minutes then transfer to wire rack. Biscuits may also be placed close together in a greased baking pan with sides. Baking the biscuits in this manner will yield soft-sided biscuits.
  6. *To sour milk, place 1 tbsp white vinegar in a measuring cup. Add enough milk to make 1 cup. Stir. Let stand for 5 minutes to sour.
Schema/Recipe SEO Data Markup by Yummly Rich Recipes
https://myislandbistrokitchen.com/2017/02/07/whole-wheat-biscuits-recipe/

You may also enjoy my tea biscuit recipe

Pin This Whole Wheat Biscuit Recipe To Pinterest!

Whole Wheat Biscuits


Whole Wheat Biscuits