PEI Lobster Frittata Recipe

Red baking dish filled with baked lobster frittata
PEI Oven-baked Lobster Frittata

Living in PEI, we are accustomed to high quality local seafood.  When lobster is in season, I try to make the most of it, enjoying it steamed and fresh from the shell with the tender meat dipped in melted butter.

Three steamed lobster on white tray with wedges of lemon and a small bowl of melted butter for dipping the lobster meat
Steamed Lobster in the Shell

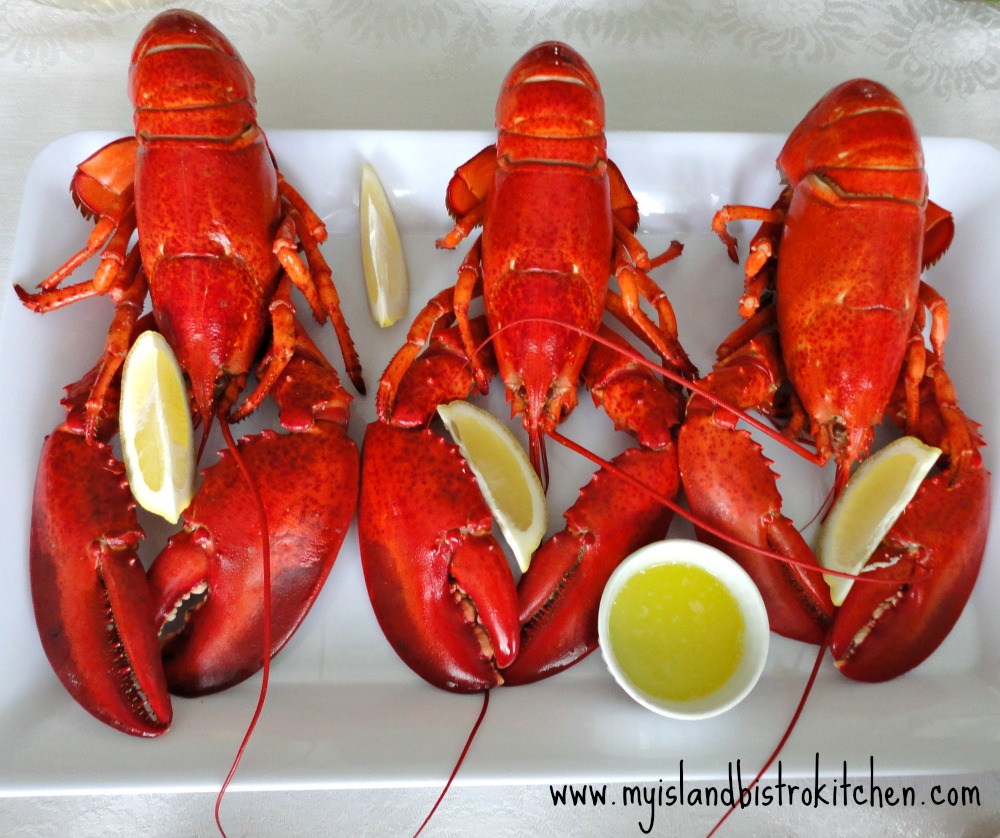
Once I have had a couple of good “feeds” of lobster with homemade potato salad and rolls, I start using the meat as an ingredient in other recipes like this easy-to-make oven-baked Lobster Frittata.

Baked lobster frittata with a side salad and a glass of white wine
Oven-baked Lobster Frittata

Frittata is an Italian dish that is a cross between a crustless quiche and an open-faced omelette, probably leaning more toward similarity with the quiche.  The main difference between a frittata and an omelette is that, for a frittata, the filling ingredients are cooked with the egg mixture versus being added just before an omelette is folded in half to finish cooking.

Traditionally, frittatas are made on the stovetop, either completely or, sometimes, they are partially cooked on the stove and then finished in the oven.  However, it is quite acceptable to completely bake the frittata in the oven which is the method I am using for the Lobster Frittata.

Close-up of a bite of lobster frittata on a fork
Baked Lobster Frittata

There are two main tips for making this frittata.  First, use cream, blend, or whole milk but never fat-reduced milk as it makes the frittata’s custard too runny and watery. The second tip is to pre-cook the vegetables to get rid of some of their liquid and also to ensure that they are sufficiently cooked. If they were added raw with the egg custard, they would not be sufficiently cooked in the same amount of time it takes to properly bake the frittata and they would release too much liquid into the egg custard.  Even with the pre-cooking, the vegetables will still have a lot of moisture in them. For this reason, I recommend transferring them from the sauté pan to a paper-towel lined bowl to sop up the excess moisture before they are added to the egg custard mixture.

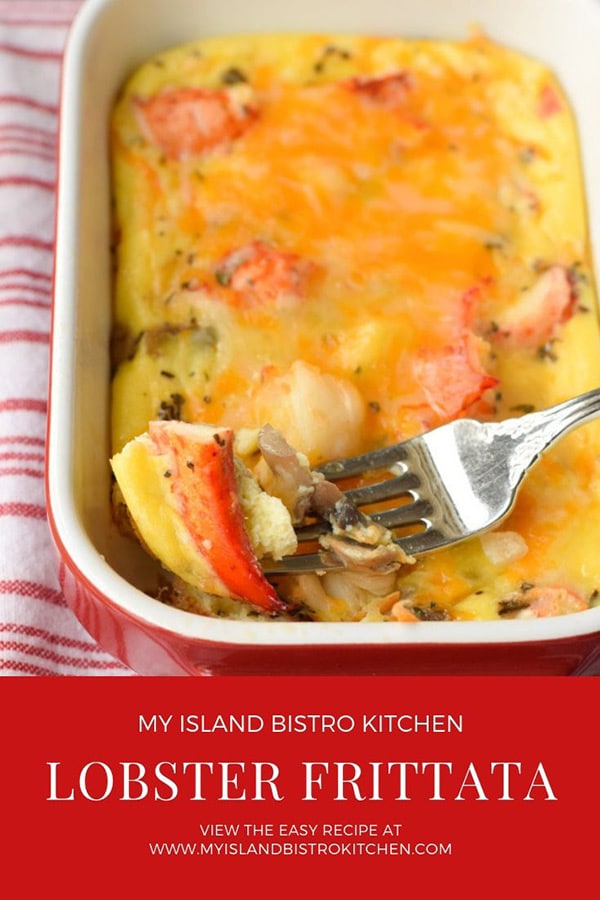
Frittata is a great brunch, lunch, dinner, or picnic fare, making it very versatile. It can be eaten hot from the oven or at room temperature. Serve with a side of toast, salad, homefries, or fresh fruit.

Baked Lobster Frittata with a side green salad
Baked Lobster Frittata

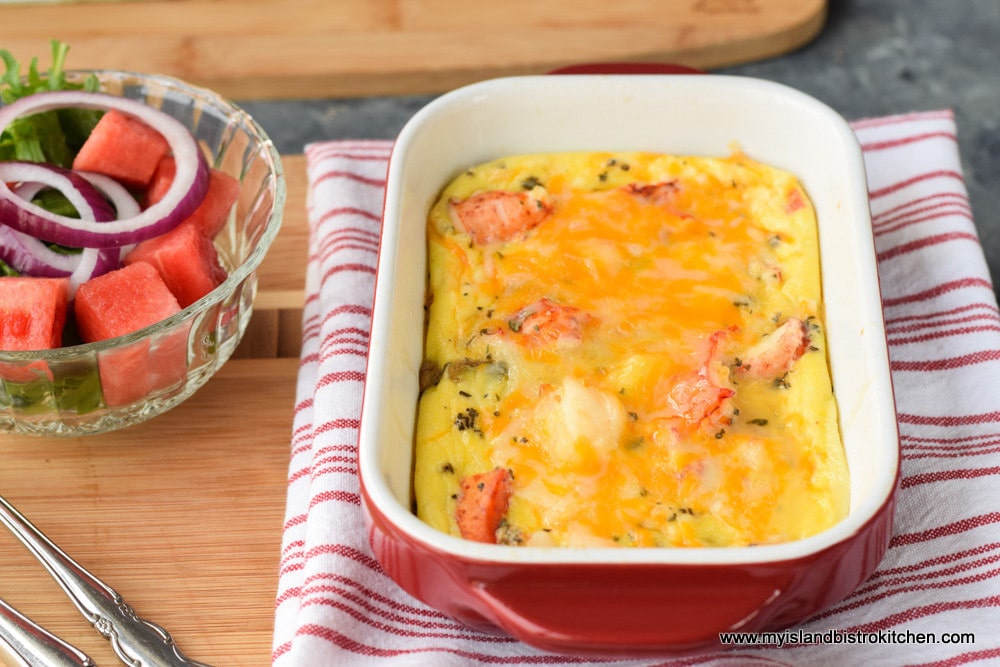
I use individual small 6″x4″ baking, or gratin, dishes for this recipe.  Oblong  baking dishes that have 1½ – 1¾ cups capacity work well for this recipe as the egg mixture will puff up somewhat and room needs to be allotted for that. If you don’t have individual baking dishes that are approximately 6”x4” inches, you could use one baking dish that would be large enough to hold the entire amount of ingredients.

Bake the frittatas on the middle rack in a preheated oven. It is important not to overbake frittata as it will become somewhat tough and leathery.  This Lobster Frittata takes between 18-22 minutes when baked in the dishes called for in the recipe.  When the frittata is perfectly baked, the eggs should be set and no longer runny.

[Printable recipe follows at end of posting]

Oven-baked Lobster Frittata

Ingredients:

4 large eggs
2½ tbsp cream
Salt and Pepper
¼ – ½ tsp Herbes de Provence

1 tbsp olive oil
3 tbsp onion, chopped
1 – 2 cloves garlic, minced
5-6 slices zucchini, halved or quartered
5-6 button mushrooms, sliced
3 tbsp red bell pepper, chopped

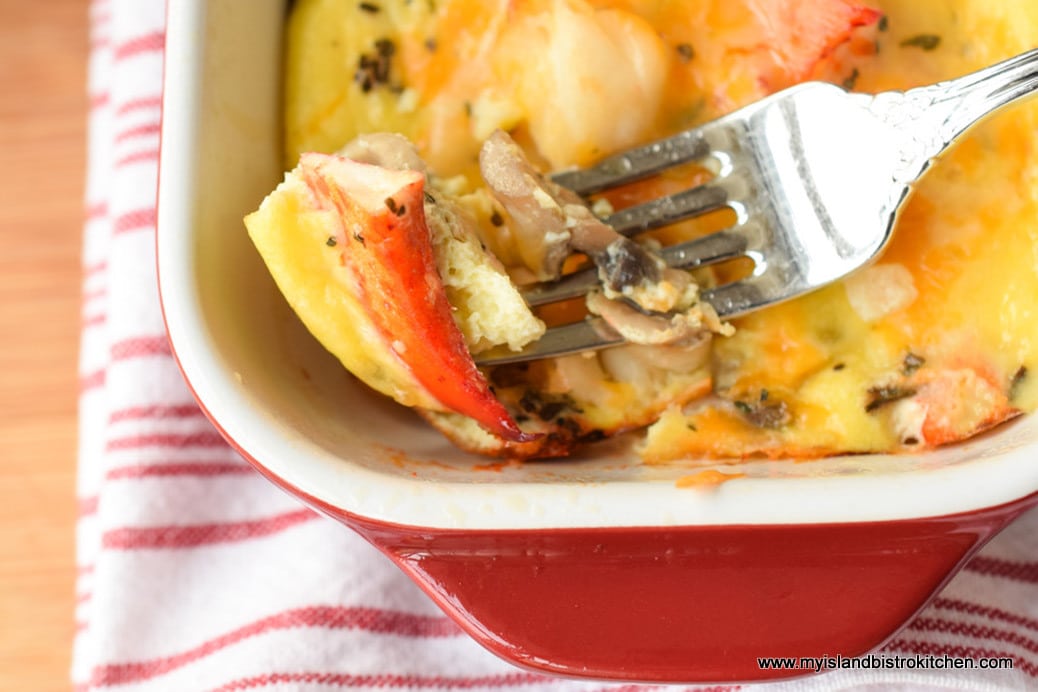
4 oz cooked lobster, coarsely chopped
2 tbsp finely grated Parmesan cheese
1/3 cup shredded sharp cheddar cheese

¼ cup shredded sharp cheddar cheese

Method:

Place oven rack in center of oven. Preheat oven to 350°F.

Heat oil in small skillet.  Sauté, over medium heat, the onions, garlic, zucchini, mushrooms, and red bell pepper for 4-6 minutes, until vegetables start to soften.  Transfer to small bowl double lined with paper towel to absorb the moisture from the sautéed vegetables.

Whisk the eggs just enough to break them up and mix the whites with the yolks.  Whisk in the cream. Season with salt and pepper and the Herbes de Provence.

Spray two 6”x4” baking dishes with cooking spray, each dish having 1½ – 1¾ cup capacity.  Divide the vegetables and lobster equally between the two dishes.  Sprinkle with the Parmesan cheese and first amount of cheddar cheese.  Pour egg mixture over the vegetables, lobster, and cheese, dividing equally between the two dishes.  Place on baking sheet and transfer to oven.  Bake for 18-22 minutes, or until frittatas are puffed up and just set in the center.  Add the remaining cheese for the last 2-3 minutes of baking.

Serve with a side salad, toast, fresh fruit, or homefries.

Yield: 2 servings

Oven-baked Lobster Frittata

This easy-to-make, oven-baked Lobster Frittata is perfect for brunch, lunch, dinner, or a picnic
Course Breakfast
Cuisine Italian
Keyword frittata, lobster, lobster frittata, oven-baked frittata
Servings 2
My Island Bistro Kitchen My Island Bistro Kitchen

Ingredients

  • 4 large eggs
  • tbsp cream
  • Salt and Pepper
  • ¼ - ½ tsp Herbes de Provence
  • 1 tbsp olive oil
  • 3 tbsp onion chopped
  • 1 – 2 cloves garlic minced
  • 5-6 slices zucchini halved or quartered
  • 5-6 button mushrooms sliced
  • 3 tbsp red bell pepper chopped
  • 4 oz cooked lobster coarsely chopped
  • 2 tbsp finely grated Parmesan cheese
  • 1/3 cup shredded sharp cheddar cheese
  • ¼ cup shredded sharp cheddar cheese

Instructions

  1. Place oven rack in center of oven. Preheat oven to 350°F.
  2. Heat oil in small skillet. Sauté, over medium heat, the onions, garlic, zucchini, mushrooms, and red bell pepper for 4-6 minutes, until vegetables start to soften. Transfer to small bowl double lined with paper towel to absorb the moisture from the sautéed vegetables.
  3. Whisk the eggs just enough to break them up and mix the whites with the yolks. Whisk in the cream. Season with salt and pepper and the Herbes de Provence.
  4. Spray two 6”x4” baking dishes with cooking spray, each dish having 1½ - 1¾ cup capacity. Divide the vegetables and lobster equally between the two dishes. Sprinkle with the Parmesan cheese and first amount of cheddar cheese. Pour egg mixture over the vegetables, lobster, and cheese, dividing equally between the two dishes. Place on baking sheet and transfer to oven. Bake for 18-22 minutes, or until frittatas are puffed up and just set in the center. Add the remaining cheese for the last 2-3 minutes of baking.
  5. Serve with a side salad, toast, fresh fruit, or homefries.

Pin Me To Pinterest!

Baked Lobster Frittata in red baking dish
Oven-baked Lobster Frittata


For other great lobster dish recipes from My Island Bistro Kitchen, click on the links below:

Lobster Cakes
Lobster and Asparagus Crepes
Lobster Club Sandwich
Lobster Eggs Benedict

Peanut Butter Coconut Energy Bites

White pedestal dish filled with Peanut Butter Coconut Energy Bites
Peanut Butter Coconut Energy Bites

Energy bites (sometimes called energy balls, power balls, protein balls, or bliss balls) are a super tasty and convenient on-the-go snack.

My recipe for Peanut Butter Coconut Energy Bites is easy to make. They require no cooking or baking  (provided, of course, that you buy the coconut already toasted and you don’t have to turn on the oven to toast coconut) — bonus !  Made with a blend of carefully selected ingredients that pair well together, these tasty treats provide a great energy boost, particularly mid-afternoon when energy typically starts to wane for many.

These energy bites freeze well and I regularly keep them on hand in my freezer so I have them ready for a snack anytime or as a portable treat to pop into a small container for the work lunch bag.

Peanut Butter Coconut Energy Bite in small plastic container
Peanut Butter Coconut Energy Bite Ready for the Lunch Bag

Energy bites are typically comprised of four sets of ingredients:

Main bulk/filler – this is most often rolled oats which also adds fibre to the energy bites. The oats give the energy bites body and structure.

Binder – dates are often used for this purpose since their texture and consistency lend them well to binding the other ingredients together, plus they have great flavor.  Other dried fruits such as prunes, figs, or apricots, may also be used.  Nut butters (e.g., peanut butter, almond butter, cashew butter, or hazelnut butter) are also great binding ingredients in addition to contributing flavour.

Liquid sweetener – The two most common sticky sweeteners used are typically maple syrup and honey though others, such as agave syrup, may also be used. Because they are liquid and not granular, they provide a smooth textured natural sweetener.

Add-ins – These are limited only by your creativity and taste preferences.  Common add-ins are flax and/or chia seeds (either whole or in ground form), mini chocolate chips, cocoa, coconut, crispy rice cereal, hemp hearts, protein powder, finely ground nuts, dried fruits, spices, etc.

So, now that we have discussed the basic composition of most energy bites, let’s move on to this post’s featured recipe.  Dates are the main “binder” in these Peanut Butter Coconut Energy Bites and are best blitzed in the food processor before other ingredients are added.  Depending on the size of the food processor bowl, the dates will either form a paste-like consistency (more likely if a small food processor is used) or clump together into a ball (if a large food processor is used).  Either consistency is fine as basically the goal is to break up the dates and smooth out their texture before pulsing with the other ingredients that don’t take as long to incorporate.  A small food processor, if you have one, is great for this first step but use the larger food processor for incorporating the ingredients together. Use the pulse feature on the machine as you mix the ingredients. The goal is to incorporate them, not crush or mash all the ingredients into a smooth paste.

Three Peanut Butter Energy Bites on White Marble Server
Peanut Butter Coconut Energy Bites

If the rolled oats are particularly large, it’s a good idea to blitz them separately 2-4 times in short bursts in a food processor before beginning to make the energy bites. Be careful, though, about processing them too much as the oats will quickly turn into oat flour which is not the consistency required for these energy bites. If the oats are over-processed, it will change the consistency of the energy bites.

This recipe calls for very finely ground nuts. This means their consistency should be like nut meal, almost to the point of being powder-like.  While ground nuts can be purchased pre-packaged, I buy the nuts whole and use an electric coffee grinder I have reserved for the purpose of grinding nuts.  The coffee grinder will quickly and easily turn the nuts into the desired nut “meal” more efficiently than a regular nut grinder which will not grind the nuts nearly so fine textured.

Some ingredients need to be added by hand at the end of the mixing process.  These include the crispy rice cereal, chocolate chips, toasted coconut, and hemp hearts.  These are the more fragile of the ingredients and are intended to be left intact in the balls. Incorporating them with the food processor would be likely to break them up and lose the texture and visual appearance they provide.

Close-up of interior of Peanut Butter Coconut Energy Bite
Peanut Butter Coconut Energy Bites

The energy bites can easily be made gluten free by using gluten-free rolled oats and, of course, ensuring all other ingredients called for in the recipe are gluten free.

If the mixture seems a bit too dry to form into balls, add small amounts of water, a teaspoon or two at a time, and quickly pulse the mixture in short bursts.  Be careful, though, about adding too much water as it can make the mixture too soft and moist.  Possible causes for the mixture to be a bit dry might be dates that are dry and/or the size/quality of rolled oats used.

I recommend chilling the mixture for about 20 minutes or so in the refrigerator to make it easier to form the balls.  I am a huge promoter of using digital scales when cooking or baking. For size consistency, and as a frame of reference for these energy bites, use about 28 grams of mixture per ball.

Close-up of Peanut Butter Coconut Energy Bite
Peanut Butter Coconut Energy Bite

These energy bites can be stored for up to five days in an airtight container in the refrigerator or frozen for up to three months for longer storage.  Place the balls in single layers between sheets of wax paper in the storage container.

[Printable recipe follows at end of post]

Peanut Butter Coconut Energy Bites

Ingredients:

5 oz honey dates (pitted), coarsely chopped

¾ cup quick rolled oats (gluten-free, if required)
½ cup smooth peanut butter
2½ tbsp honey
1 tbsp coconut oil, melted and cooled
1 tsp vanilla
¼ cup very finely ground peanuts
1 tbsp ground chia seeds
1½ tsp vanilla whey protein powder
1/8 tsp fine sea salt

½ cup crispy rice cereal (gluten-free, if required)
½ cup semi-sweet mini chocolate chips
¼ cup pre-toasted coconut
3 tbsp hemp hearts

Method:

Pulse dates in food processor until they form a paste or clump into a ball.  Add the rolled oats, peanut butter, honey, coconut oil, vanilla, ground peanuts, ground chia seeds, vanilla whey protein powder, and sea salt. Pulse mixture until ingredients are completely blended.

Mix in the crispy rice cereal, semi-sweet chocolate chips, toasted coconut, and hemp hearts by hand.  If mixture seems too dry, two to three teaspoons of water may be blended into ingredients.  Place mixture in the refrigerator for about 20 minutes to chill.

Roll mixture by hand into bite-sized balls.  For frame of reference, each ball should weigh approximately 28 grams.  Place balls on parchment lined baking sheet and freeze for 20-25 minutes to firmly set.  Store, in single layers separated by waxed paper, in airtight container for up to five days in the refrigerator or freeze up to three months for longer storage.

Yield:  Apx. 22 balls

Peanut Butter Coconut Energy Bites

These tasty Peanut Butter Coconut Energy Bites are filled with dates, rolled oats, peanut butter, ground nuts, toasted coconut, and chocolate chips. Makes a convenient on-the-go snack.
Course Snack
Cuisine Canadian
Keyword energy bites
Servings 22
My Island Bistro Kitchen My Island Bistro Kitchen

Ingredients

  • 5 oz honey dates pitted, coarsely chopped
  • ¾ cup quick rolled oats gluten-free, if required
  • ½ cup smooth peanut butter
  • tbsp honey
  • 1 tbsp coconut oil melted and cooled
  • 1 tsp vanilla
  • ¼ cup very finely ground peanuts
  • 1 tbsp ground chia seeds
  • tsp vanilla whey protein powder
  • 1/8 tsp fine sea salt
  • ½ cup crispy rice cereal gluten-free, if required
  • ½ cup semi-sweet mini chocolate chips
  • ¼ cup pre-toasted coconut
  • 3 tbsp hemp hearts

Instructions

  1. Pulse dates in food processor until they form a paste or clump into a ball. Add the rolled oats, peanut butter, honey, coconut oil, vanilla, ground peanuts, ground chia seeds, vanilla whey protein powder, and sea salt. Pulse mixture until ingredients are completely blended.
  2. Mix in the crispy rice cereal, semi-sweet chocolate chips, toasted coconut, and hemp hearts by hand. If mixture seems too dry, two to three teaspoons of water may be blended into ingredients. Place mixture in the refrigerator for about 20 minutes to chill.
  3. Roll mixture by hand into bite-sized balls. For frame of reference, each ball should weigh approximately 28 grams. Place balls on parchment lined baking sheet and freeze for 20-25 minutes to firmly set. Store, in single layers separated by waxed paper, in airtight container for up to five days in the refrigerator or freeze up to three months for longer storage.

Pin Me To Pinterest!

Peanut Butter Coconut Energy Bites
Peanut Butter Coconut Energy Balls


Peanut Butter Coconut Energy Bites


You may also enjoy this recipe from My Island Bistro Kitchen for no-bake Chocolate Almond Bliss Balls.