Lily of the Valley Afternoon Tea


Lily of the Valley
Lily of the Valley

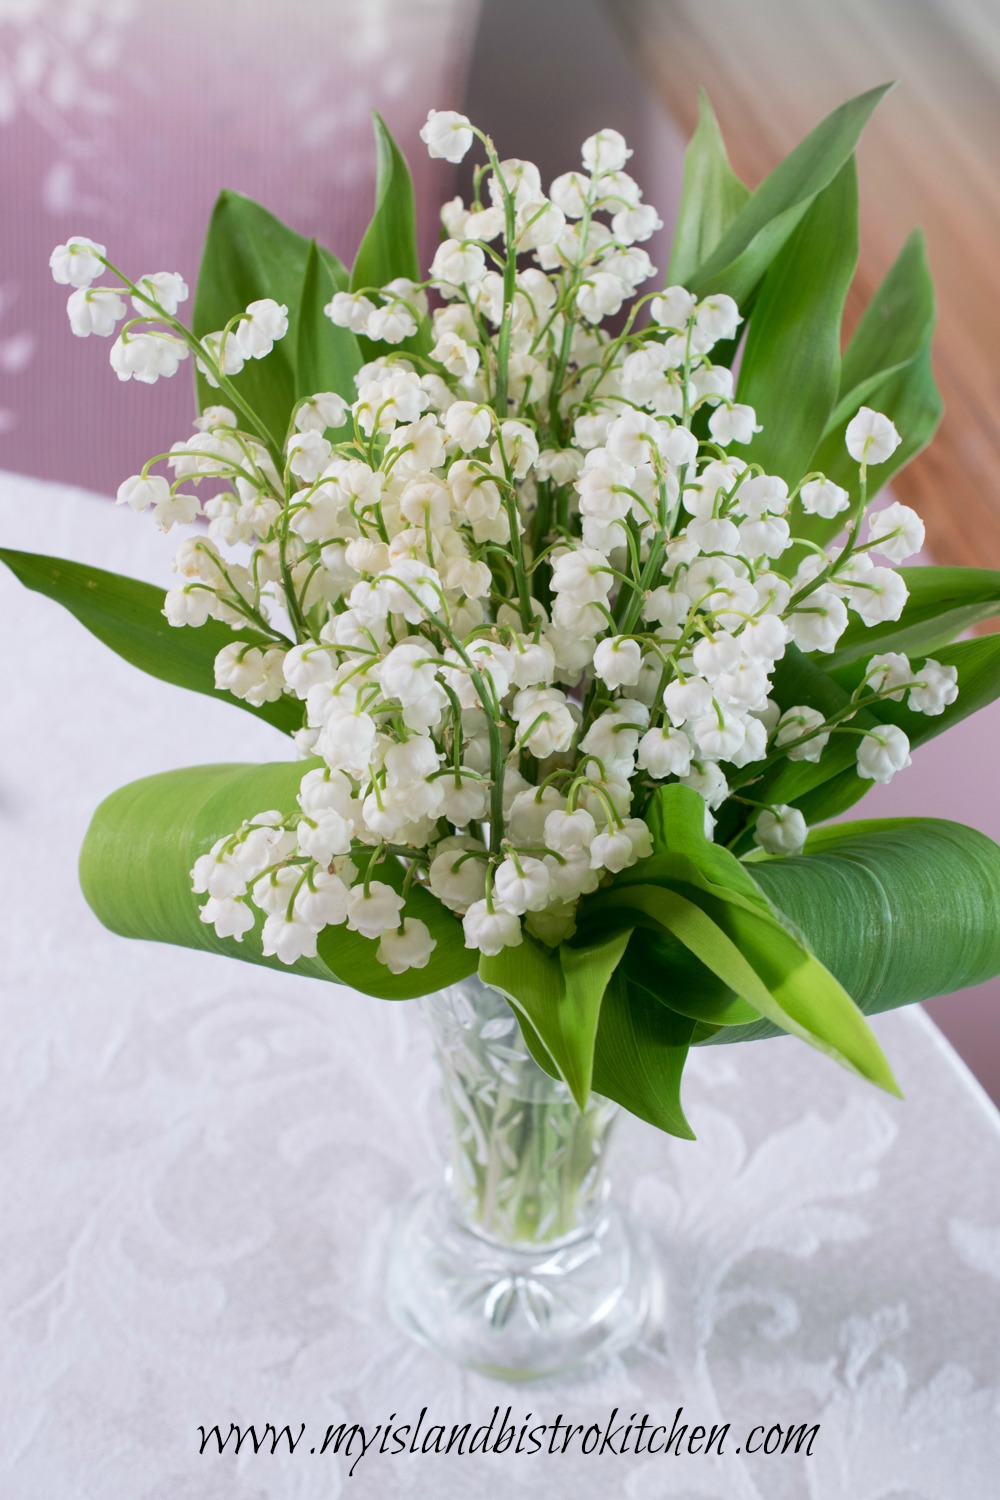
The sweet little Lily of the Valley, with its dainty bell-shaped flowers, has long been a favorite flower of mine. Many, many years ago, a very dear friend of mine had a cottage on the shores of Rosebank (now Stratford), PEI.  Every spring, I’d make the trek to the cottage to pick a couple of bouquets of these fragrant flowers and there would be a posy on the dining room table and another on my desk at work.  I was thrilled when the offer came for me to dig up a clump of the Lily of the Valley roots from the prolific crop by the cottage front step.  I transplanted them at our family home. A cottage and two house builds later and transplants of the lilies have occurred at each property, all derived from the same clump of lilies that came from the Rosebank cottage. When I see the lilies bloom each spring, particularly by the cottage front step, I am reminded of sweet memories of another cottage long ago and its owner who is no longer with us.

The birth flower of May, Lily of the Valley has various meanings and significance. Said to signify traits of humility, trustworthiness, chastity, sweetness, and purity, it is also believed to bring luck in love and mean the return of happiness. This, undoubtedly may be the reason why it is often used in wedding decorations and bridal bouquets. There have been some very famous brides who have incorporated Lily of the Valley into the composition of their bouquets. Kate Middleton, in her 2011 wedding to Prince William, included Lily of the Valley in her bouquet as did her late mother-in-law, Princess Diana, when she wed Prince Charles in 1981.

Lily of the Valley Afternoon Tea

I often feature different favorite flowers on my tea tables but I have never featured Lily of the Valley, primarily because it is a short season flower and it is always in bloom during a very busy time of the year for me. This, despite the fact that I have cups and saucers and plates that have Lily of the Valley designs.  So, this year, I decided I would make time for an afternoon tea that features Lily of the Valley and my themed cups and saucers.

Valley China Cup and Saucer

It’s not necessary to have matching cups and saucers on a tea table. In fact, I think it’s much more interesting to have a variety of China cups and saucers.

Adderley (England) Lily of the Valley Cup and Saucer

Not all afternoon teas have to have three distinct courses – scones, sandwiches, and sweets.  Today, my tea table has only two courses – sandwiches and a single dessert.  In keeping with the freshness of early summer on PEI, I have opted to go with open-faced sandwiches, providing three varieties — Island lobster, egg salad, and ham.

There are two different trays of sandwiches on the table – the ones with a white bread base (shown in the photo below) are gluten-free.

Gluten-free Open-faced Tea Sandwiches

And, of course, for tea sandwiches, the crusts must always be removed.

Open-faced Tea Sandwiches

The little purple pansy adds a burst of color to the ham sandwich and dresses it up for the table.

Open-faced Ham Tea Sandwich

Lobster is very common on PEI and lends itself well for presentation on an open-faced tea sandwich. Can’t you just taste that succulent lobster!

Open-faced Lobster Tea Sandwich

Egg salad makes a wonderful topping for open-faced tea sandwiches.  A burst of purple color from the pansy and the green alfalfa sprouts make these sandwiches stand out on the tray.  I picked up the fresh alfalfa sprouts at the Summerside Farmer’s Market. They were grown locally in Pleasant Valley at “Our Old Island Market Farm”. I frequent both the Charlottetown and Summerside Farmers Markets and I love to make new discoveries of products being produced by our Island farmers.

Open-faced Egg Salad Tea Sandwich

Curious as to what’s in the little white teapots? One of my favorite teas is Assam Banaspaty which I buy at David’s Tea in Charlottetown. That’s the blend in the individual teapots on today’s tea table.

Individual Tea Pots
Individual Tea Pots

Assam Banaspaty is a lovely rich, smooth tea from India. It has some honey notes with malty undertones. It boasts a lovely amber color. I like a spot of milk in my tea and Assam Banaspaty has enough tannins that it can take a splash of milk without the tea’s flavor being smothered. I’d class this as a robust tea yet it is suitable for all courses of an afternoon tea. I am, therefore, serving just one blend of tea at my afternoon tea today.

Assam Banaspaty Tea
Assam Banaspaty Tea

I like tea cups that carry the design to the inside of the cups. It makes them just a bit more interesting.

Assam Banaspaty Tea
Assam Banaspaty Tea

Rhubarb is in season in PEI around the same time as the Lily of the Valley bloom and, of course, one of my all-time favorite desserts is Rhubarb Custard Torte which graces my table for the dessert course today. Sometimes, it is nice to have a variety of dainty tea squares and cookies and, other times, a signature dessert like this torte make a splashy and ever-so-tasty statement.

Rhubarb Custard Torte

I hope you have enjoyed a little look into the offerings on my tea table today. Can’t you just smell the intoxicating scent of this bouquet of Lily of the Valley!

Lily of the Valley Bouquet
Lily of the Valley Themed Afternoon Tea

Gluten-Free Queen Elizabeth Cake

Gluten-free Queen Elizabeth Cake

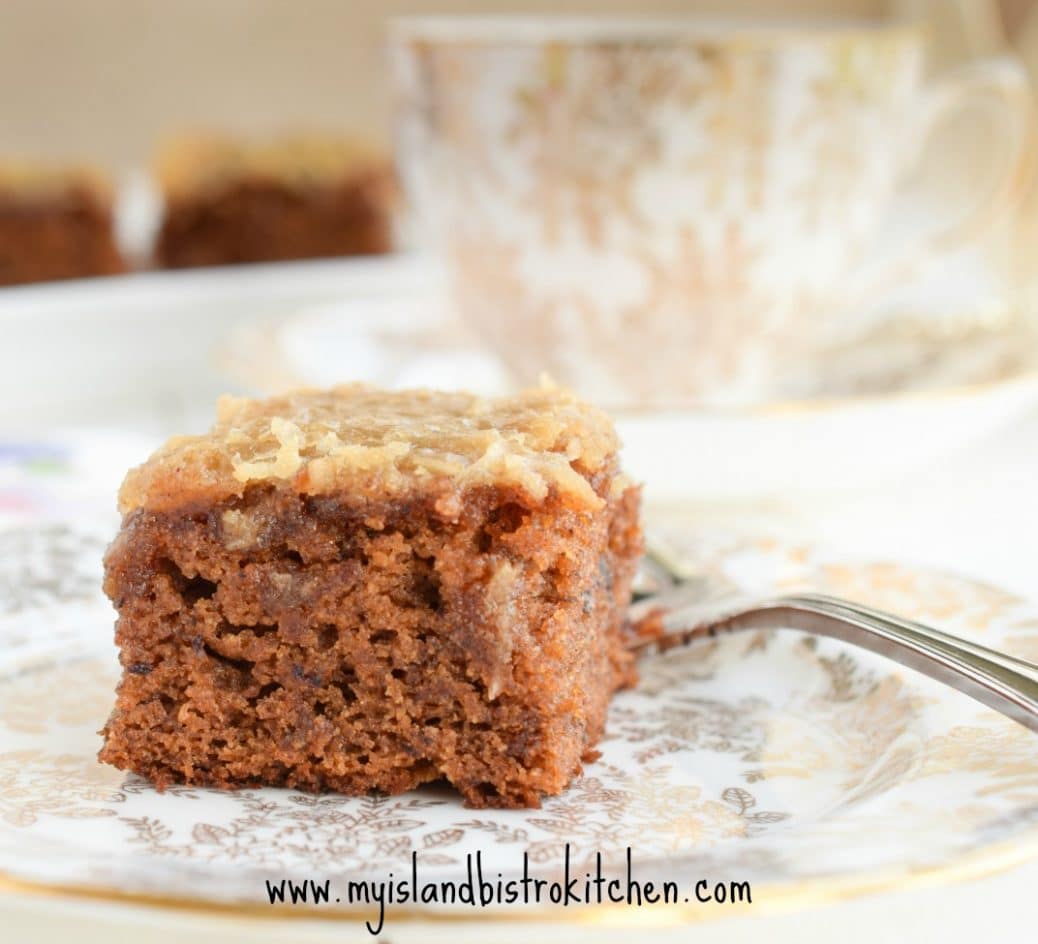
In an earlier posting, I shared my recipe for the regular gluten version of Queen Elizabeth Cake to coincide with Queen Elizabeth II’s actual birthday on April 21st.  Today, I have a special treat for my food blog followers who must follow a gluten-free diet! I have adapted my regular version of this cake to make it gluten-free.  It has passed my testing standards so I am pleased to share the recipe for this wonderfully moist and tasty Queen Elizabeth Cake that is made with very simple, basic ingredients. In fact, I’d even go so far as to suggest that it would be quite difficult to be able to tell that this version is gluten-free and, in my view, it certainly rivals its gluten version cousin in taste, texture, and overall quality.

I am timing the original publication of this gluten-free Queen Elizabeth Cake recipe with the annual Trooping of the Colour celebrations celebrated in London in June of each year. The Trooping of the Colour, a major military ceremony filled with pomp and pageantry, is often referred to as the Queen’s Birthday Parade. This tradition is said to have started in 1748 when then King George II decided to combine his birthday parade with the annual spring military parade in June because he apparently felt his actual November birthday was too cold to have a birthday parade. This tradition has endured since then, regardless when the reigning monarch’s actual birthday is and this event is considered the official celebration of the sovereign’s birthday. Held annually on a Saturday in June, the Queen attends, arriving by horse and carriage from Buckingham Palace and traveling along the Mall to the Horse Guard’s Parade behind Whitehall.

The colorful display of pageantry involves several hundred officers and men, horses, and bands.  The Queen takes the salute and inspects the troops dressed in ceremonial uniform.  “Colours” refers to the regimental flags of the various troops and the colours correspond to the colours and insignia of the uniforms of the soldiers of the different units. The colours (flags) served a purpose on the battlefields as they provided a rallying or gathering point for troops and hence the title “trooping of the colours”.

London Pagentry
London Pagentry

So, thus ends the brief history lesson!  Now, on to the Gluten-free Queen Elizabeth Cake, believed to have been named for either the Queen Mother or the reigning monarch, Queen Elizabeth II.  When I earlier shared my recipe for the gluten version of this cake, I conducted some research to try and determine the origins of the cake and its name. Click here to read the information I was able to find about the different stories about the naming of this cake.

The texture of the gluten-free Queen Elizabeth Cake, like the gluten version, is somewhat dense and owes its lovely moist texture to the cooked dates. The combination of coconut and almond flours with the gluten-free 1-to-1 baking flour are the key to this cake’s texture. The almond and coconut flours really do provide a pleasing flavor to the cake.

Gluten-free Queen Elizabeth Cake

The following hints may be of use when making this cake:

  • This is a single layer cake. Use an 8” square baking pan to ensure this cake has a good height. A 9” square pan may be used but the cake will lack depth and more closely resemble a square as opposed to a cake. I find gluten-free flours take more leavening than gluten flours do and, even at that, it can still be difficult to get baked goods to rise to the height of a similar recipe that calls for gluten flour products. Grease the pan or line it with parchment paper or greased tin foil. Leaving an overhang of extra parchment paper or tin foil over the edge of the pan will make it easier to lift the entire baked cake from the pan and facilitate its  cutting.
  • Let the date mixture cool completely at room temperature before incorporating it with the dry ingredients. If it is mixed with the dry ingredients while the mixture is either hot or warm, it may result in a “gummy” texture or soggy cake.
  • Mix the wet and dry ingredients using the rule of 3 parts dry and 2 parts wet ingredients, starting and ending with the dry ingredients.
  • Mix the ingredients well but don’t beat them as this may create a “tough crumb” cake.
  • Use cream to make the topping. I used 35% cream which gives a luxurious topping but 18% cream may also be used.
  • Start checking the cake for doneness at the point where the cake has been baking for 25 minutes then, if it is not baked, check it every 3-4 minutes after. The cake will be done when the cake tester, inserted into the center of the cake, comes out completely clean and dry.
  • When the cake tests almost baked (about 5 minutes before it is expected to come out of the oven), start making the topping. It needs to go on the warm cake that will go back in the oven for 3-4 minutes after the topping has been added.
  • The topping, like making homemade fudge, can set up really fast. Don’t leave it unattended. Stir the ingredients as they boil gently for the 3 minutes. Watch it carefully and, if you see if starting to “set up” and thicken really fast (even if it is before the 3 minutes of boiling is up), remove it from the stove and quickly stir in the vanilla and coconut. The mixture should be of the consistency that it can be poured from the saucepan and spread over the cake with a knife. If it becomes too thick, it will be too sugary and won’t be of spreading consistency. It will also become brittle and crack.

[Printable version of the recipe follows at end of posting]

Gluten-Free Queen Elizabeth Cake

Ingredients:

¾ cup dates, chopped (apx. 4¼ oz)
¾ tsp baking soda
¾ cup boiling water

¾ cup of 1-to-1 gluten free baking flour
1/3 cup almond flour
2½ tbsp coconut flour
1 tsp baking powder
1/8 tsp salt
¾ tsp cinnamon
¼ tsp nutmeg
Pinch allspice
¼ cup butter, softened at room temperature
2/3 cup granulated sugar
1 extra large egg
¼ tsp orange extract
¾ tsp vanilla

Topping:
2½ tbsp melted butter
½ cup brown sugar
2¼ tbsp cream
¾ tsp vanilla
½ cup shredded coconut

Method:
Cake:
Place dates and soda in medium-sized saucepan.  Add the boiling water. Simmer for about 4-5 minutes then cool completely at room temperature.

Position oven rack in centre of oven and preheat oven to 350°F.  Grease 8” baking pan or line with parchment paper (or even greased tin foil).

Sift 1-to-1 gluten free baking flour, almond flour, coconut flour, baking powder, salt, and spices together. Set aside.

In bowl of stand mixer, cream the butter and sugar.  Beat in the egg, orange extract, and vanilla. Transfer mixture to cooled dates. Stir well.

Transfer one-third of the sifted dry ingredients to the mixer bowl.  Beat in one-half of the wet ingredients. Add another third of the dry ingredients. Blend well. Mix in the remainder of the wet ingredients.  Finish by incorporating the remaining dry ingredients. Mix well to combine. Don’t overmix.

Spread batter evenly in prepared baking pan.  Transfer to preheated oven and bake for approximately 25-30 minutes or until a cake tester inserted into center of cake comes out clean. Remove the cake from the oven. Increase oven temperature to 400°F to prepare for browning of cake’s topping.

Topping:
About 5 minutes before the cake is due to be removed from the oven, begin to prepare the cake topping.  In medium-sized saucepan, melt the butter.  Blend in the brown sugar and cream. Bring to a boil over medium heat and boil for 3 minutes, stirring regularly to prevent scorching. Remove from heat and quickly stir in the vanilla and coconut. Pour and spread this mixture evenly over the warm cake and return it to the oven to brown slightly for 3-4 minutes. Remove cake from oven and place on wire rack to cool completely before cutting and serving.

Yield:  1 – 8” single layer cake

This cake is suitable as a snacking cake, dessert, tea cake, or even a picnic cake. The cake freezes well.

The Queen Elizabeth Cake pairs particularly well with a good cup of tea.  My recommendation for a tea pairing would be an Earl Grey blend.  The citrus notes in this black tea complement the sweetness of the cake. Earl Grey tea has a high concentration of tannins which makes it a suitable tea to cleanse the mouth after each bite of the cake so that each bite of this moist and flavorful cake is as equally tasty as the first!

Gluten-free Queen Elizabeth Cake on gold and white plate with matching cup and saucer and a gold and white teapot in the background
Gluten-free Queen Elizabeth Cake

Gluten-Free Queen Elizabeth Cake

Yield: 1 - 8" square single-layer cake

A moist and tasty gluten-free cake featuring dates, spices, and a toffee-like topping.

Ingredients

  • ¾ cup dates, chopped (apx. 4¼ oz)
  • ¾ tsp baking soda
  • ¾ cup boiling water
  • ¾ cup of 1-to-1 gluten free baking flour
  • 1/3 cup almond flour
  • 2½ tbsp coconut flour
  • 1 tsp baking powder
  • 1/8 tsp salt
  • ¾ tsp cinnamon
  • ¼ tsp nutmeg
  • Pinch allspice
  • ¼ cup butter, softened at room temperature
  • 2/3 cup granulated sugar
  • 1 extra large egg
  • ¼ tsp orange extract
  • ¾ tsp vanilla
  • Topping:
  • 2½ tbsp melted butter
  • ½ cup brown sugar
  • 2¼ tbsp cream
  • ¾ tsp vanilla
  • ½ cup shredded coconut

Instructions

  1. Cake:
  2. Place dates and soda in medium-sized saucepan. Add the boiling water. Simmer for about 4-5 minutes then cool completely at room temperature.
  3. Position oven rack in centre of oven and preheat oven to 350°F. Grease 8” baking pan or line with parchment paper (or even greased tin foil).
  4. Sift 1-to-1 gluten free baking flour, almond flour, coconut flour, baking powder, salt, and spices together. Set aside.
  5. In bowl of stand mixer, cream the butter and sugar. Beat in the egg, orange extract, and vanilla. Transfer mixture to cooled dates. Stir well.
  6. Transfer one-third of the sifted dry ingredients to the mixer bowl. Beat in one-half of the wet ingredients. Add another third of the dry ingredients. Blend well. Mix in the remainder of the wet ingredients. Finish by incorporating the remaining dry ingredients. Mix well to combine. Don’t overmix.
  7. Spread batter evenly in prepared baking pan. Transfer to preheated oven and bake for approximately 25-30 minutes or until a cake tester inserted into center of cake comes out clean. Remove the cake from the oven. Increase oven temperature to 400°F to prepare for browning of cake’s topping.
  8. Topping:
  9. About 5 minutes before the cake is due to be removed from the oven, begin to prepare the cake topping. In medium-sized saucepan, melt the butter. Blend in the brown sugar and cream. Bring to a boil over medium heat and boil for 3 minutes, stirring regularly to prevent scorching. Remove from heat and quickly stir in the vanilla and coconut. Pour and spread this mixture evenly over the warm cake and return it to the oven to brown slightly for 3-4 minutes. Remove cake from oven and place on wire rack to cool completely before cutting and serving.
Schema/Recipe SEO Data Markup by Yummly Rich Recipes
https://myislandbistrokitchen.com/2017/06/17/gluten-free-queen-elizabeth-cake/

This gluten-free Queen Elizabeth Cake features dates, spices, and a delectable toffee-like topping

Gluten-free Queen Elizabeth Cake

Lobster and Asparagus Crepes

Seafood Crepes
Asparagus and Lobster Crepes

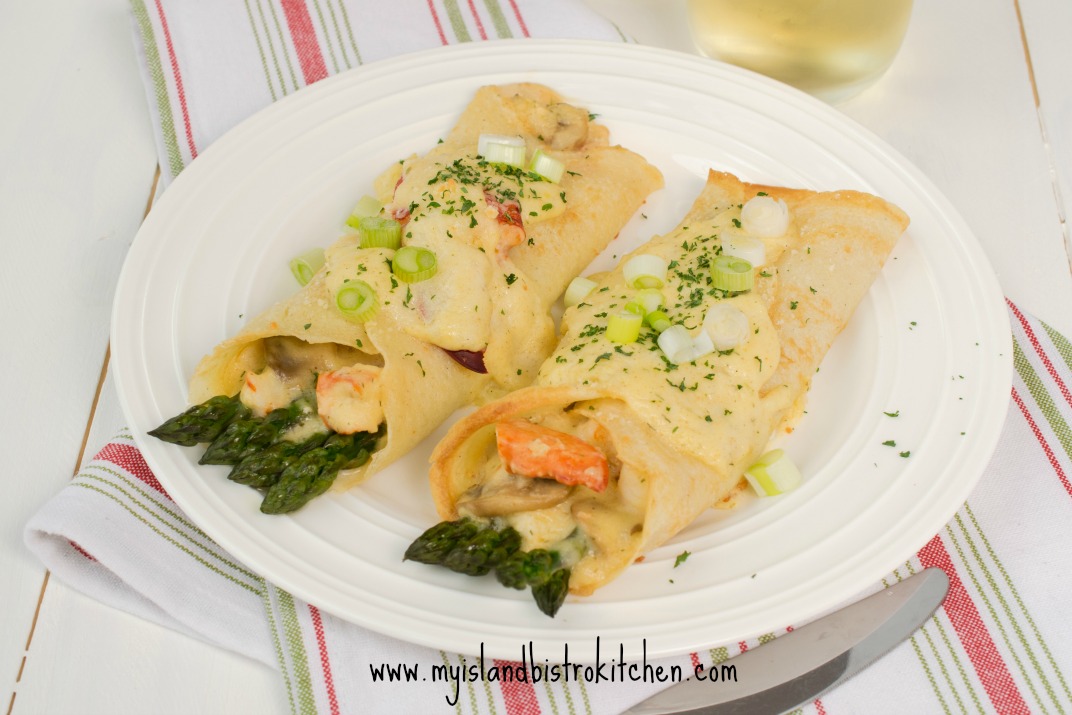
Springtime in Prince Edward Island on Canada’s east coast means it’s lobster season so it’s a great time to make these delectable lobster and asparagus crepes that combine two of the season’s special treats!

The lobster fishery is a significant industry on the Island and, according to the Fisheries and Oceans Canada website, “lobster is Canada’s most valuable seafood export and an iconic Canadian species exported around the world.” (http://www.dfo-mpo.gc.ca/fm-gp/sustainable-durable/fisheries-peches/lobster-homard-eng.htm).

Fresh PEI Lobster
Steamed Lobster in the Shell

The opening of the spring lobster season is a huge deal in PEI. On opening day — the day when fishers head out to sea with boats laden with traps — hundreds of Islanders gather at fishing ports around the province to see the fishers off. Naturally, mouths are watering for the first taste of lobster from the cold Atlantic waters, a taste that is usually satisfied a day or two after traps are set and the “first haul” of lobsters is brought ashore.

Preparing for Setting Day
Eve of Setting Day in the Fishing Village of North Rustico, PEI, Canada
Parade of Lobster Boats
Early Morning Gathering in French River, PEI, to Watch Parade of Lobster Boats on Setting Day

These are so worth the wait!

PEI Lobsters
Fresh Catch of the Day – PEI Lobsters

While I adore lobster straight out of the shell and served with homemade potato salad, I like creating recipes incorporating this tasty seafood as an ingredient.  Asparagus is the first vegetable of springtime on PEI and, for the crepes I am featuring in this posting, I am using asparagus as a complimentary ingredient to the lobster. The earthy undertones of the asparagus pair particularly well with lobster, especially when some mushrooms and a rich cheese sauce are added. Choose small mushrooms, either white button or the cremini variety, for this recipe.

For the filled crepe recipe, try to choose the freshest available  asparagus spears that are a uniform size. I tend to choose medium-sized spears. I find that spears that are pencil thin tend to cook up too quickly and become somewhat limp. Thick spears tend to have less flavor because they have gotten too old before they have been harvested. They may also have a somewhat unpleasant woody texture. The key thing to remember about steaming the asparagus is not to overcook it because it will go limp and loose its vibrant green color.

Fresh Asparagus

The crepes for this recipe may be made ahead (by a few hours or even a day or two) and stored between layers of plastic wrap in a tightly sealed bag in the refrigerator. Following the steps I have laid out for this recipe will help organize the process of preparing the filling and steaming the asparagus so that everything is timed to be ready at the same time for the crepe assembly.

I am quite lucky here on the Island as my local fish market, MR Seafoods,  in Charlottetown sells lobster already out of the shell which means they have done the work of removing the meat from the shell and then disposing of the shells. I find this is a quick and convenient way for me to get lobster meat for a recipe.

These crepes can be baked in au gratin dishes, a 7″x11″ baking pan or on a parchment-lined baking sheet which is the way the ones in the photos in this posting were baked. I wanted to ensure that the asparagus would remain intact and clearly visible when the crepes were plated so, by baking them on a rimmed cookie sheet, nothing disturbed the asparagus which could have happened if they were scrunched into a tight baking dish such as an au gratin.

Seafood Crepes
Lobster and Asparagus Crepes

As always, I recommend reading the recipe through a couple of times to ensure a good understanding of the method of preparation and that all the ingredients and cooking utensils and cookware needed to prepare the dish are available.

[Printable recipe follows at end of posting]

Lobster and Asparagus Crepes

Ingredients:

Crepes:
2 large eggs
1 cup flour (to make gluten-free, use 1 cup of 1-to-1 gluten-free flour)
1/8 tsp salt
1 cup whole milk
2 tbsp melted butter

Sauce:
¼ cup butter
1 shallot, finely minced (about 1 tbsp)
¼ cup flour (to make gluten-free, use ¼ cup of 1-to-1 gluten-free flour)
½ tsp granulated garlic
¼ tsp dried dill
1/8 tsp paprika
1/8 tsp nutmeg
1 cup chicken or vegetable stock
1 cup whole milk or half-and-half
2 extra-large egg yolks, lightly broken up with a fork
2 tbsp dry white wine or cooking sherry
1 cup grated cheese mixture (e.g., mozzarella, provolone, and parmesan)
Salt and pepper, to taste

Filling:
2-3 teaspoons butter
1 cup mushrooms, thinly sliced

8 oz cooked lobster meat, cut into small chunks
40 asparagus spears

Garnish:
3-4 green onions (white and light green parts only) and/or fresh herbs for garnish (optional)

Method:

Step 1 – Make the crepes.  In large measuring cup or bowl and using an immersion blender, beat the eggs lightly.  Combine the flour and salt and beat in to the egg alternately with the milk, starting and ending with the flour (3 additions of flour and 2 additions of milk).  Beat in the melted butter and beat an additional 30 seconds, or until batter is smooth.  Cover with plastic wrap and refrigerate batter for 1 hour.

Over medium heat, melt apx. 1½ tsp butter in a 8” non-stick skillet with sloped sides. Using a ¼-cup measuring cup, scoop up batter. Pour the batter in to the heated skillet while quickly swirling and tilting the pan to ensure batter distributes evenly and completely over the bottom of the pan. Return pan to heat and cook crepe until top loses its gloss, tiny bubbles start to appear, and the edges of the crepe start to slightly curl. Gently lift an edge of the crepe with the tip of a fork and grab the crepe with fingers and flip it over.  Cook the second side of the crepe for 15-20 seconds. Flip the crepe onto a clean tea towel. Repeat for remaining crepes, adding small amounts of butter to the pan, if necessary, to keep the crepes from sticking to the pan.

Step 2 – Make the sauce.  In medium-sized saucepan, melt the butter over medium heat.  Sauté the shallot until softened and transparent. In small bowl, whisk the flour, granulated garlic, dill, paprika, and nutmeg together. Stir flour mixture into the butter and shallot and cook until frothy.  Whisk in the chicken (or vegetable stock) and milk (or half-and-half).  Cook sauce, until mixture is smooth and heated (but not boiling) and is starting to thicken, stirring constantly to prevent scorching.  Stir 2-3 tablespoons of the hot mixture into the egg yolks then pour egg mixture into the sauce.  Cook over medium-low heat, stirring constantly until mixture is thickened.  Stir in white wine or cooking sherry.  Add the cheese mixture.  Continue to cook over low heat, stirring until mixture is smooth and cheese is melted.  Season with salt and pepper to taste. Remove approximately 3/4 cup of the sauce and set aside.

Step 3 – Make the filling.  Preheat oven to 350°F.  In medium-sized skillet, melt 2-3 teaspoons of butter over medium heat.  Add the mushrooms and sauté for 3-5 minutes, stirring frequently to prevent mushrooms from scorching.  While mushrooms are sautéing, steam the asparagus in a tall pot with a small amount of boiling water for approximately 2 minutes. Drain and immediately transfer the asparagus to a bowl of ice cold water to stop the cooking process. Swish the asparagus in the cold water for just a few seconds then drain in a colander. This will also help keep the asparagus its vibrant green color. Remove mushrooms from heat and combine with the lobster meat.  Add the reserved ¾ cup of sauce and stir gently to coat mushrooms and lobster meat.

Step 4: Assemble the crepes.  Line 9”x13” rimmed baking sheet with parchment paper.  Lay out 8 crepes on work surface.  Place 5 asparagus spears in the centre of each crepe, extending the asparagus tips by about ½” beyond the edge of the crepe.  Divide the lobster and mushroom filling mixture between the 8 crepes by placing filling down the center line of each crepe on top of the asparagus.  Gently fold crepe over filling, first one side and then overlapping the opposite side over the first. Using large pastry scraper or flat spatula, carefully transfer each crepe to the prepared baking sheet. Pour the remaining sauce over crepes to cover, leaving both ends of the crepes uncovered. Alternatively, the crepes may be baked in either 4 individual greased au gratin dishes or one oblong 7”x11” baking pan.  However, baking the crepes on a baking sheet allows the asparagus tips to stay perfectly intact and attractively visible when plated.

Bake for 15-18 minutes, or until hot and bubbly. Remove from oven and, if desired, sprinkle with chopped green onions and/or chopped fresh herbs such as parsley or chives.

Serving Suggestion: Serve with favorite green salad.

Yield:  4 servings, 2 crepes each

Lobster and Asparagus Crepes

Yield: 4 servings

Serving Size: 2 crepes per serving

Delectable crepes filled with fresh asparagus, succulent chunks of lobster, and sautéed mushrooms in a rich cheese sauce.

Ingredients

  • Crepes:
  • 2 large eggs
  • 1 cup flour (to make gluten-free, use 1 cup of 1-to-1 gluten-free flour)
  • 1/8 tsp salt
  • 1 cup whole milk
  • 2 tbsp melted butter
  • Sauce:
  • ¼ cup butter
  • 1 shallot, finely minced (about 1 tbsp)
  • ¼ cup flour (to make gluten-free, use ¼ cup of 1-to-1 gluten-free flour)
  • ½ tsp granulated garlic
  • ¼ tsp dried dill
  • 1/8 tsp paprika
  • 1/8 tsp nutmeg
  • 1 cup chicken or vegetable stock
  • 1 cup whole milk or half-and-half
  • 2 extra-large egg yolks, lightly broken up with a fork
  • 2 tbsp dry white wine or cooking sherry
  • 1 cup grated cheese mixture (e.g., mozzarella, provolone, and parmesan)
  • Salt and pepper, to taste
  • Filling:
  • 2-3 teaspoons butter
  • 1 cup mushrooms, thinly sliced
  • 8 oz cooked lobster meat, cut into small chunks
  • 40 asparagus spears
  • Garnish:
  • 3-4 green onions (white and light green parts only) and/or fresh herbs for garnish (optional)

Instructions

  1. Step 1 - Make the crepes. In large measuring cup or bowl and using an immersion blender, beat the eggs lightly. Combine the flour and salt and beat in to the egg alternately with the milk, starting and ending with the flour (3 additions of flour and 2 additions of milk). Beat in the melted butter and beat an additional 30 seconds, or until batter is smooth. Cover with plastic wrap and refrigerate batter for 1 hour.
  2. Over medium heat, melt apx. 1½ tsp butter in a 8” non-stick skillet with sloped sides. Using a ¼-cup measuring cup, scoop up batter. Pour the batter in to the heated skillet while quickly swirling and tilting the pan to ensure batter distributes evenly and completely over the bottom of the pan. Return pan to heat and cook crepe until top loses its gloss, tiny bubbles start to appear, and the edges of the crepe start to slightly curl. Gently lift an edge of the crepe with the tip of a fork and grab the crepe with fingers and flip it over. Cook the second side of the crepe for 15-20 seconds. Flip the crepe onto a clean tea towel. Repeat for remaining crepes, adding small amounts of butter to the pan, if necessary, to keep the crepes from sticking to the pan.
  3. Step 2 - Make the sauce. In medium-sized saucepan, melt the butter over medium heat. Sauté the shallot until softened and transparent. In small bowl, whisk the flour, granulated garlic, dill, paprika, and nutmeg together. Stir flour mixture into the butter and shallot and cook until frothy. Whisk in the chicken (or vegetable stock) and milk (or half-and-half). Cook sauce, until mixture is smooth and heated (but not boiling), and is starting to thicken, stirring constantly to prevent scorching. Stir 2-3 tablespoons of the hot mixture into the egg yolks then pour egg mixture into the sauce. Cook over medium-low heat, stirring constantly until mixture is thickened. Stir in white wine or cooking sherry. Add the cheese mixture. Continue to cook over low heat, stirring until mixture is smooth and cheese is melted. Season with salt and pepper to taste. Remove approximately 3/4 cup of the sauce and set aside.
  4. Step 3 - Make the filling. Preheat oven to 350°F. In medium-sized skillet, melt 2-3 teaspoons of butter over medium heat. Add the mushrooms and sauté for 3-5 minutes, stirring frequently to prevent mushrooms from scorching. While mushrooms are sautéing, steam the asparagus in a tall pot with a small amount of boiling water for approximately 2 minutes. Drain and immediately transfer the asparagus to a bowl of ice cold water to stop the cooking process. Swish the asparagus in the cold water for just a few seconds then drain in a colander. This will also help keep the asparagus its vibrant green color. Remove mushrooms from heat and combine with the lobster meat. Add the reserved ¾ cup of sauce and stir gently to coat mushrooms and lobster meat.
  5. Step 4: Assemble the crepes. Line 9”x13” rimmed baking sheet with parchment paper. Lay out 8 crepes on work surface. Place 5 asparagus spears in the centre of each crepe, extending the asparagus tips by about ½” beyond the edge of the crepe. Divide the lobster and mushroom filling mixture between the 8 crepes by placing filling down the center line of each crepe on top of the asparagus. Gently fold crepe over filling, first one side and then overlapping the opposite side over the first. Using large pastry scraper or flat spatula, carefully transfer each crepe to the prepared baking sheet. Pour the remaining sauce over crepes to cover, leaving both ends of the crepes uncovered. Alternatively, the crepes may be baked in either 4 individual greased au gratin dishes or one oblong 7”x11” baking pan. However, baking the crepes on a baking sheet allows the asparagus tips to stay perfectly intact and attractively visible when plated.
  6. Bake for 15-18 minutes, or until hot and bubbly. Remove from oven and, if desired, sprinkle with chopped green onions and/or chopped fresh herbs such as parsley or chives.

Notes

Serving Suggestion: Serve with favorite green salad

Schema/Recipe SEO Data Markup by Yummly Rich Recipes
https://myislandbistrokitchen.com/2017/06/05/lobster-and-asparagus-crepes/

Seafood Crepes
Lobster and Asparagus Crepes
Seafood Crepes

Lobster and Asparagus Crepes

Pin Me to Pinterest!

Lobster and Asparagus Crepes