Glamorous Gold Plated Christmas Tablesetting

Glamorous Gold Plated Christmas Tablesetting

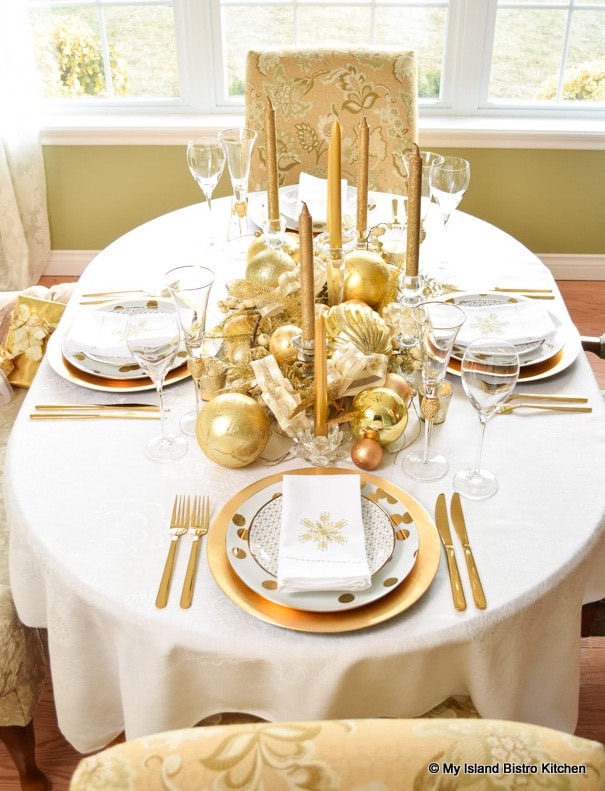
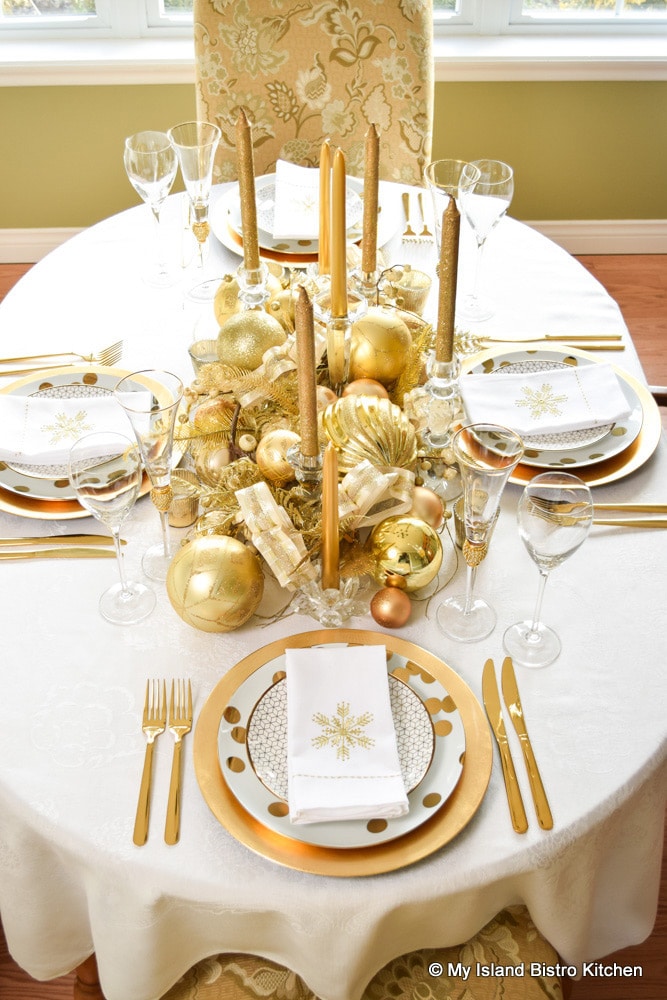
Christmas is, in my opinion, a time of the year when a tablesetting can be well glitzed and glammed up.  If you want to add opulence and glamour to a holiday tablesetting, go with gold.  It shines, it sparkles, it shimmers and glows in all kinds of light, and it has such warm tones. This is my Glamorous Gold Plated Christmas Tablesetting.

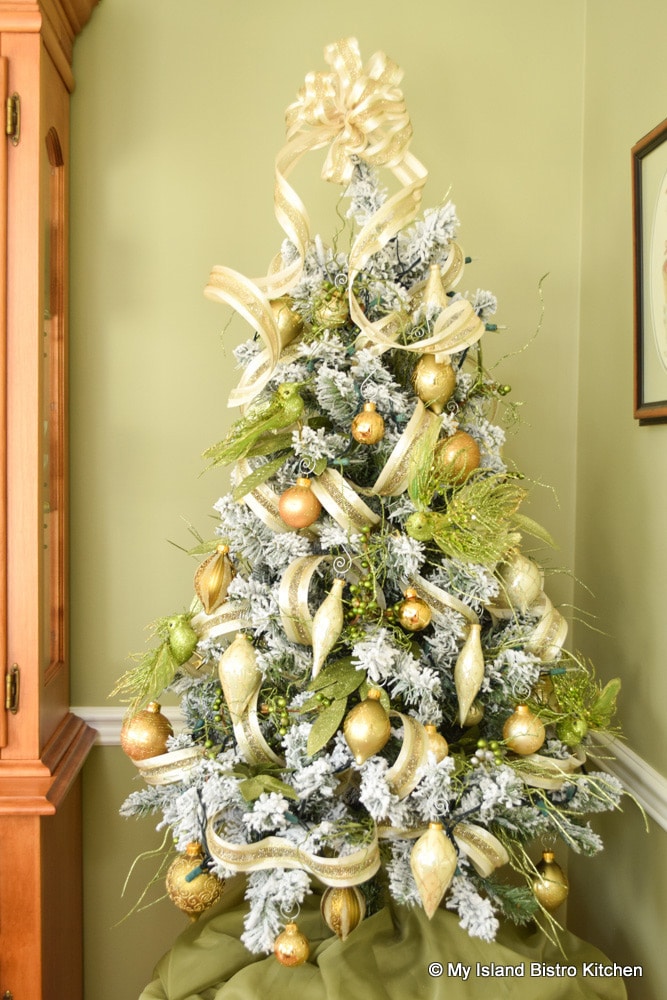
The Christmas color theme in my dining room is gold.  It appears on my tabletop tree and in my mantle design.  Therefore, for continuity, my table carries the same singular color theme.

The Backdrop

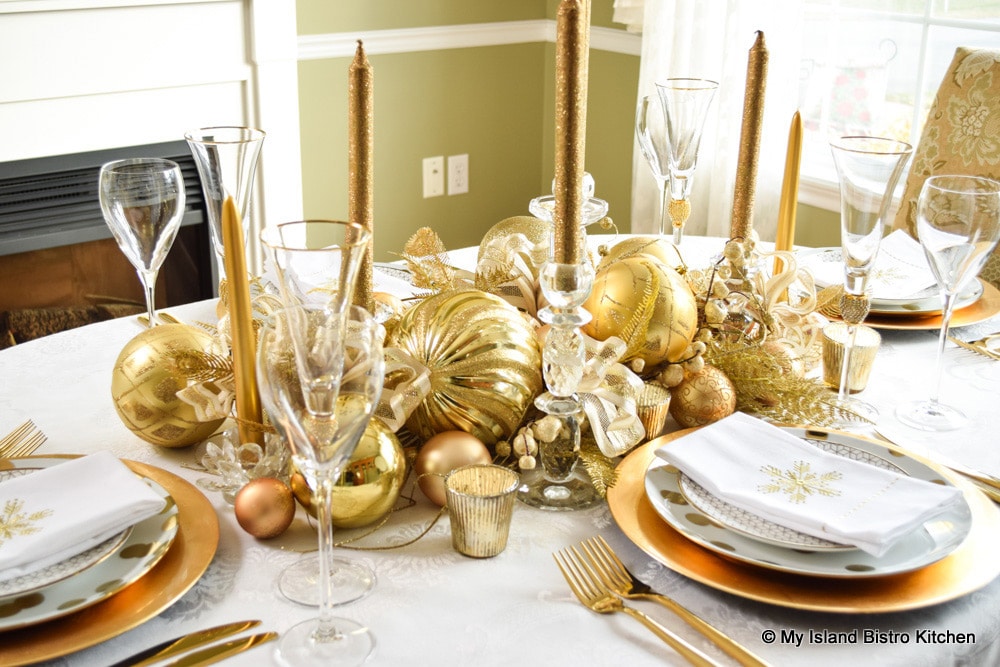
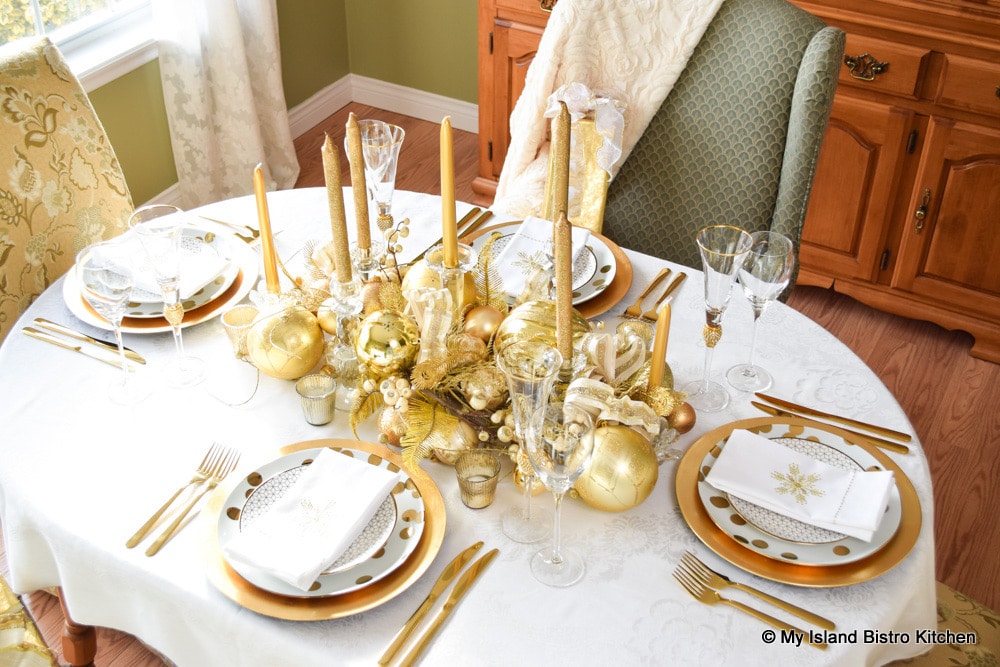
Basic white is most often the blank canvas I start with when constructing my tablesettings.  It’s neutral and, in the case of this gold-plated tablesetting, it provides a wonderful plain backdrop to let the metallics form the focal point of the table.  Had I left my maple table bare, the gold-colored centerpiece would not have stood out as dramatically as it does against the white backdrop. Conversely, had I used a patterned tablecloth, it would have been very busy and cluttery looking and the effect of the centerpiece would have been completely lost.

Gold Plated Christmas Tablesetting
Glamorous Gold-Plated Christmas Tablesetting

The Centerpiece

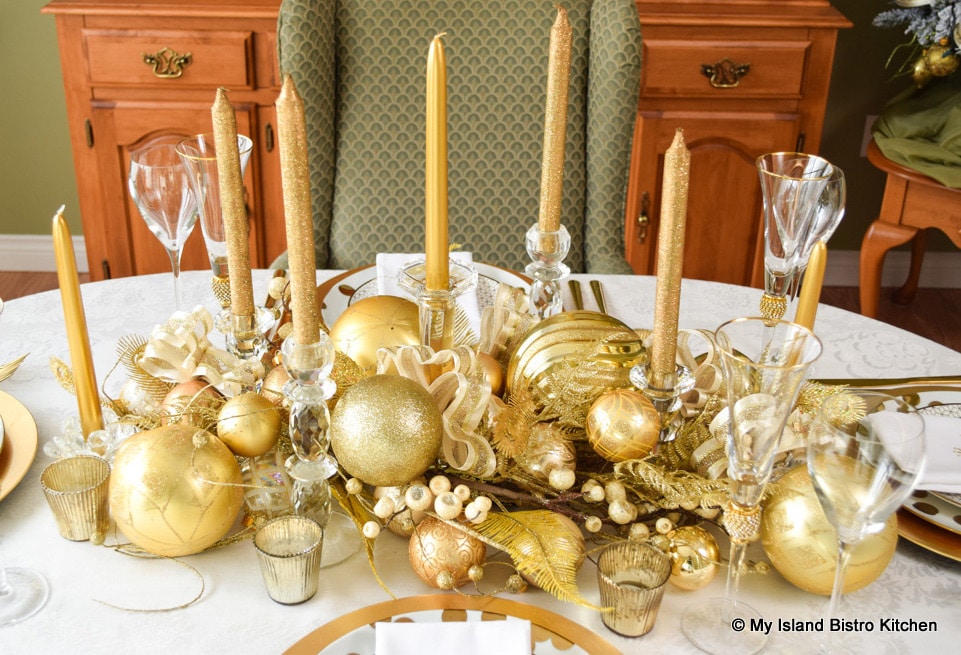
Nothing was bought new specifically for this centerpiece.  I have had all the Christmas balls, baubles, twigs, feathers, and berries for years and they have been used for many different purposes at previous holidays. So, I simply went shopping in my own storehouse!

When constructing the centerpiece, piece by piece, on the table, make sure it is completed before setting the individual place settings.  Otherwise, you would be reaching over high glassware, potentially knocking them over and it would just be plain awkward. And, of course, if there is glitter involved or greenery needles, those would find their way on to the plates and into the glasses where food and drink will be served. So, the individual placesettings would be the last aspect of the tablesetting to be completed.

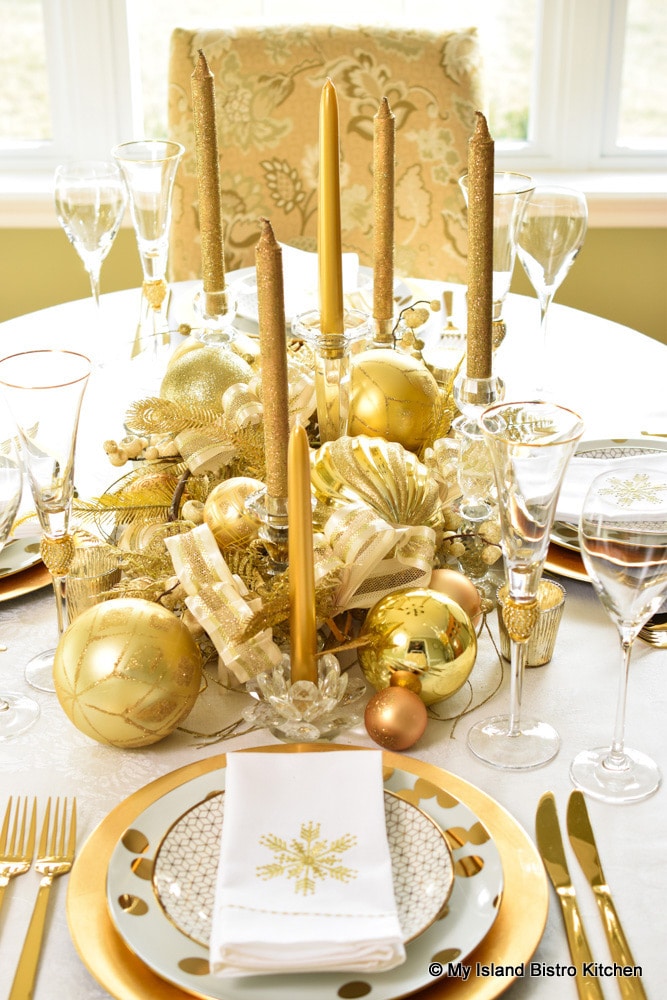
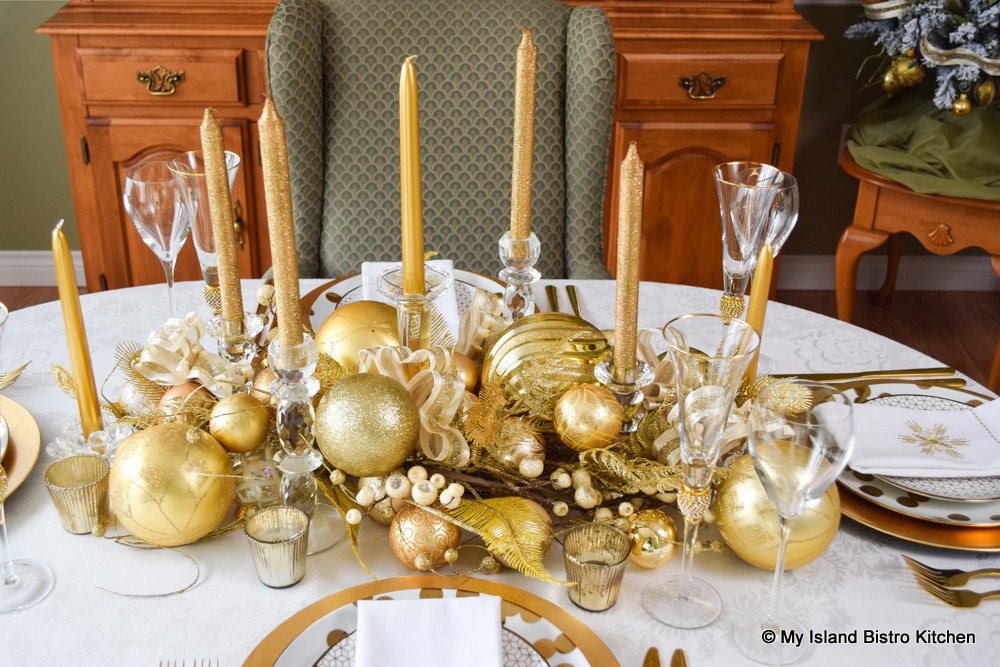
For this setting, I have chosen one large gold ball and then added three or four other different sized balls of a scale that will fit the size of my dining table.  This type of centerpiece is scalable meaning it can be made somewhat larger to suit a longer table. It is important to keep the elements in the centerpiece to scale both to the other components of the centerpiece as well as to the size of table itself.

Glamorous Gold Plated Christmas Tablesetting

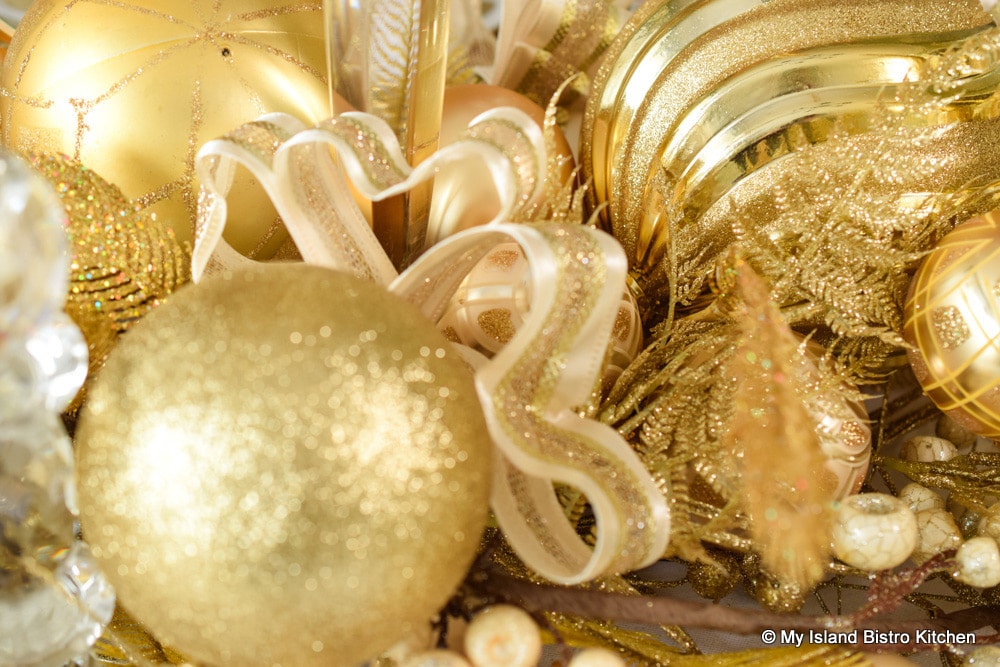
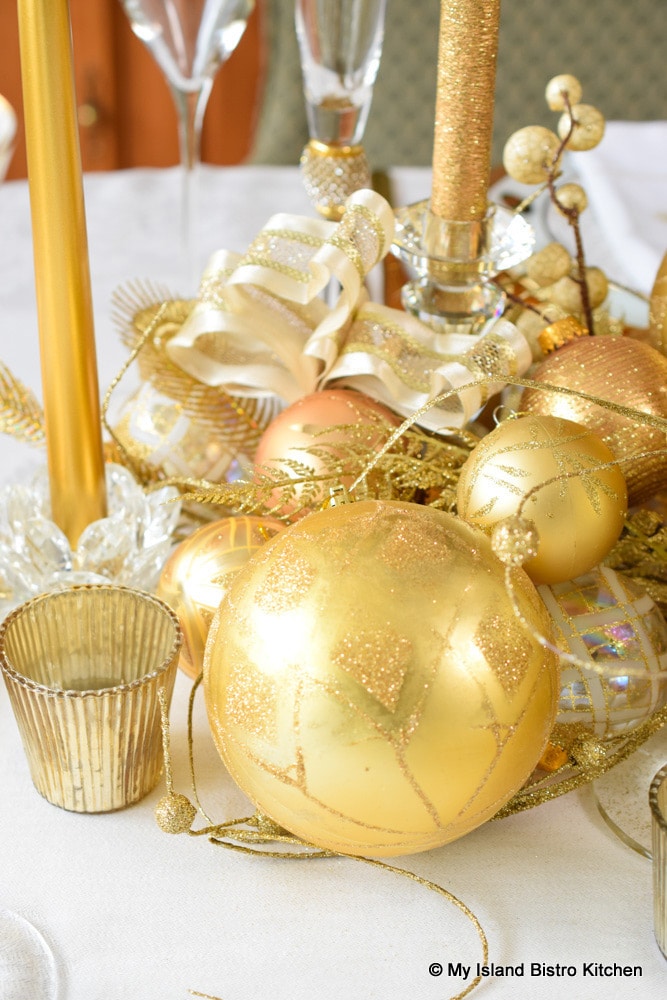
I have used balls/baubles with different textures with some having designs and others perfectly plain.  So, in the centerpiece, I have included balls that are plain satin-finished, glittery, pearlized,  and matte finish.  The balls are in various shades and hues of gold. This adds wonderful texture and interest to the centerpiece plus their finishes play well off each other and they all react to light differently.

Gold Christmas Table Centerpiece
Use a Variety of Balls in Various Textures and Shades of Gold in Centerpiece

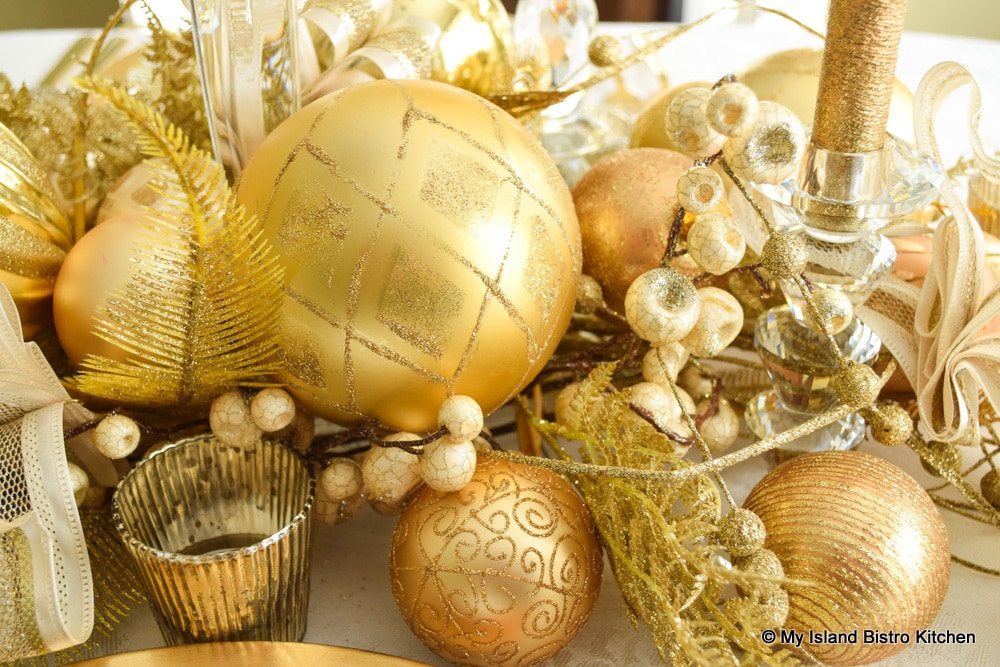
I had some gold twigs that I used to create a base for the balls.  To achieve the luxe look, I did not want to introduce any greenery or other color into the centerpiece, save for a bit of ivory in the berries and on ribbon.

The twigs serve the purpose of providing a nest for the balls so they do not roll out of place.  I then started with placement of the large ball, followed by the next sized balls, and so on until I achieved the aesthetic look I was going for, filling in any gaps with smaller balls.  Some gold-colored feathers and ivory berries were added for interest.  Finally, I strategically placed some pretty ribbon bows of ivory and glittery gold  in various places throughout the centerpiece arrangement. By doing this, I addressed any remaining gaps and made the centerpiece look full and luxurious.

Glamorous Gold Plated Christmas Tablesetting
Glamorous Gold-Plated Christmas Table Centerpiece

The ribbon corresponds with that on my dining room tabletop tree. Tabletop trees are so adorable and I find they are particularly suitable for dining rooms.

Tabletop Flocked Christmas Tree
Beribboned Tabletop Christmas Tree

Candles

As those of you who are regular visitors to my website will know, I am not a huge fan of taper candles. I find they are a bit precarious for my liking for use on dining tables. For that reason, I typically use the more stable pillar candles in tablesettings.  However, in this case, the table has a very elegant and glamorous theme so the tall, slender tapers do work better than the larger pillar candles. The tapers give height and elegance to the table and, because they are slender, they do not obstruct diners’ view of each other. And, of course, tapers burn down faster than pillars so they become even lower as the meal progresses.

Glamorous Gold Plated Christmas Table Centerpiece
Glamorous Gold-Plated Christmas Table Centerpiece

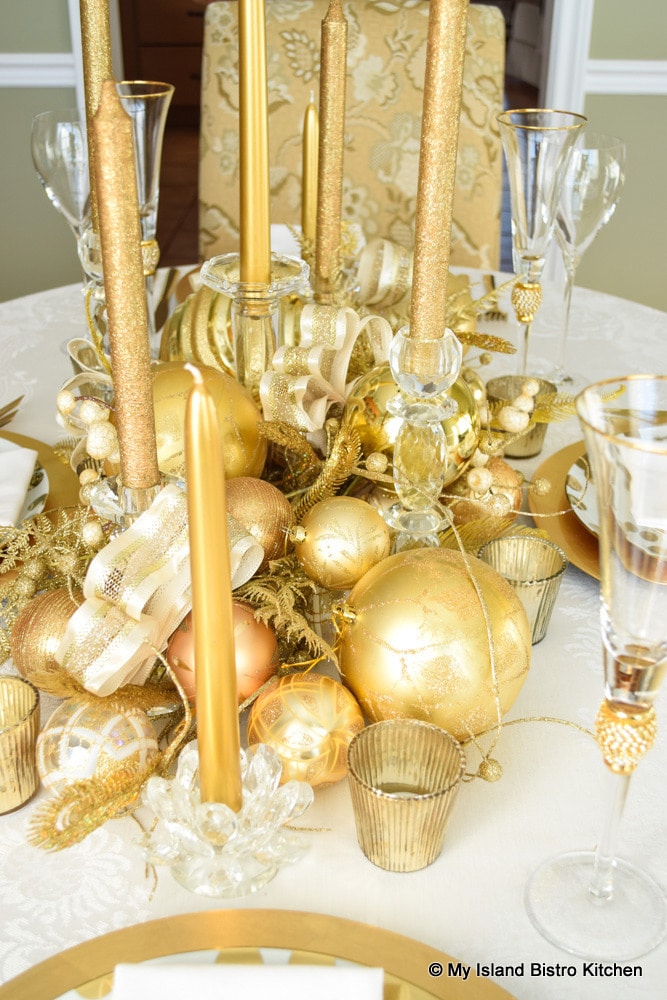
I have a collection of glass candlesticks in various shapes and sizes and many are cut glass with prisms that really do play well to light. This makes them really sparkle on a table, further adding glitz to the tablescape.  It is not necessary to have the candlesticks all matching and I do recommend using ones that vary in height as that contributes to layers of lighting when the candles are lit. Using clear glass candlesticks keeps the focus on the gold in the centerpiece and gives it an airy look. In other words, the candlesticks accent, and do not compete with, the gold centerpiece.

Glamorous Gold Plated Christmas Tablesetting
Cut Glass Candlesticks Reflect Light and Give an Airy Look to the Centerpiece

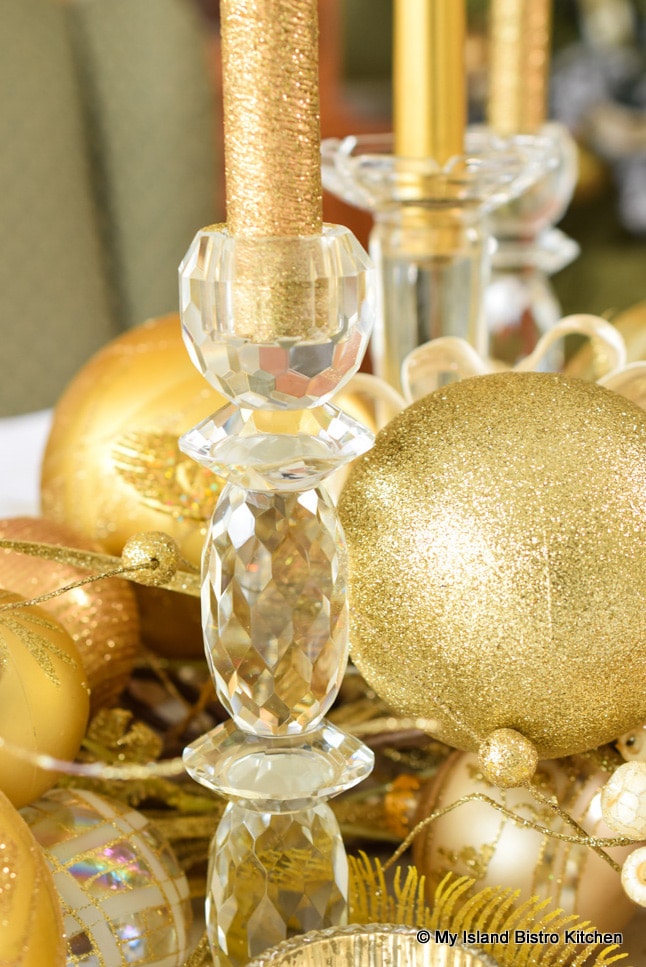
I have used two types of gold tapers in this centerpiece.  Some candles have a glittery finish while others have a polished, satin finish.  This adds interest to the centerpiece and does not make it look so matchy-matchy or that it all came out of a box, pre-assembled in a factory. These are the types of details that give a centerpiece a custom-designed look.

Gold-colored Christmas Tablesetting
Different Textured Tapers Add Interest to Table Centerpiece

Varying the height of the tapers as well as the candlesticks, also adds light from different levels  of the centerpiece.  If I can, I try to add about three layers of light to a centerpiece like this – high, medium, and low – so that the centerpiece is really glowing from all angles.  Of course, using an odd number of candles makes the centerpiece more pleasing to the eye.

Smaller gold-colored votives are nestled in around the edges of the centerpiece. To keep the votives clean and free from wax build-up inside,  I have used small tealights that are already encased in little tin holders.  They still add lots of light from the lowest level of the centerpiece. In the photo later on in this post that shows the dinnerware up close, the tea light in a votive can be seen.

Glamorous Gold Plated Christmas Tablesetting

I do not recommend using scented candles in a tablesetting as they can be quite overpowering and interfere with the enjoyment of the scent of a good meal. Also, anyone with scent allergies can find scented candles distressing. It’s important to always consider the comfort of dinner guests.

Linens

My fall-back for table linen is often a vintage Irish linen tablecloth which is what I have used in this setting.  I am not a fan of busy tablecloth designs or seasonally-themed ones. Tablecloths with Christmas designs, for example, may be pretty but they typically  require plain dinnerware so they are not too busy for the eye. Additionally, they can really only be used at Christmas and must be stored for the rest of the year.

My preference is to go with non-seasonal neutral tablecloths. If I want to have a seasonal design in table textile, I will usually opt for seasonally-themed napkins, like the cotton napkins with the gold snowflake motif shown in the photo below. Because the thread in the motif pattern is glittery, the napkins blend well with this tablesetting.

Christmas Table Placesetting
Snowflake Motif Napkins

I find the best way to fold napkins that have motifs is to use a simple flat fold.  Trying to fold this style of napkin into an intricate or fancy fold would result in the motif and its effect being lost.

Snowflake Motif Napkins

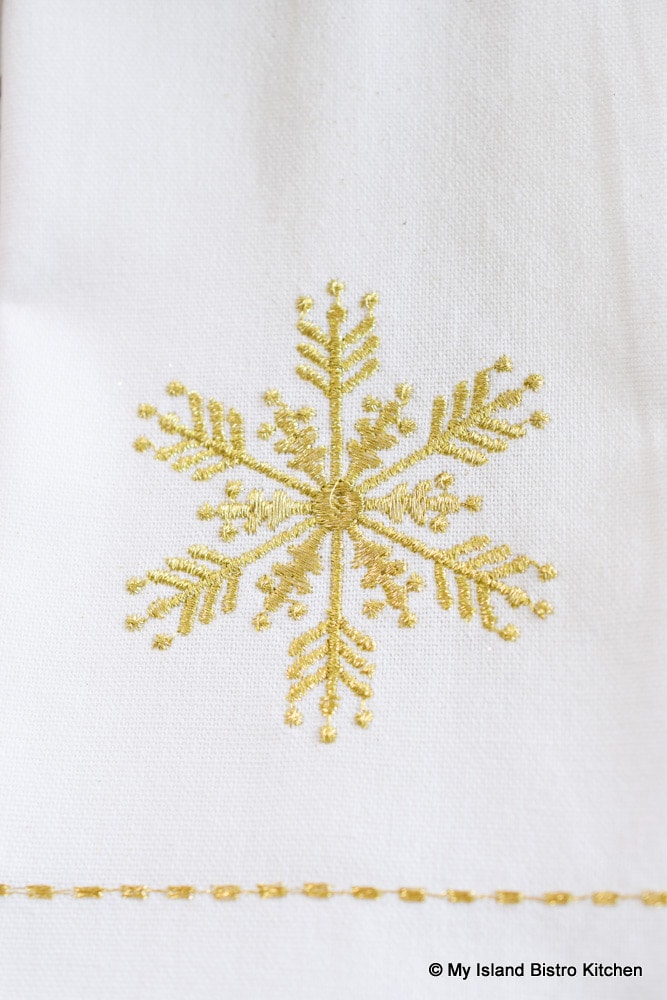
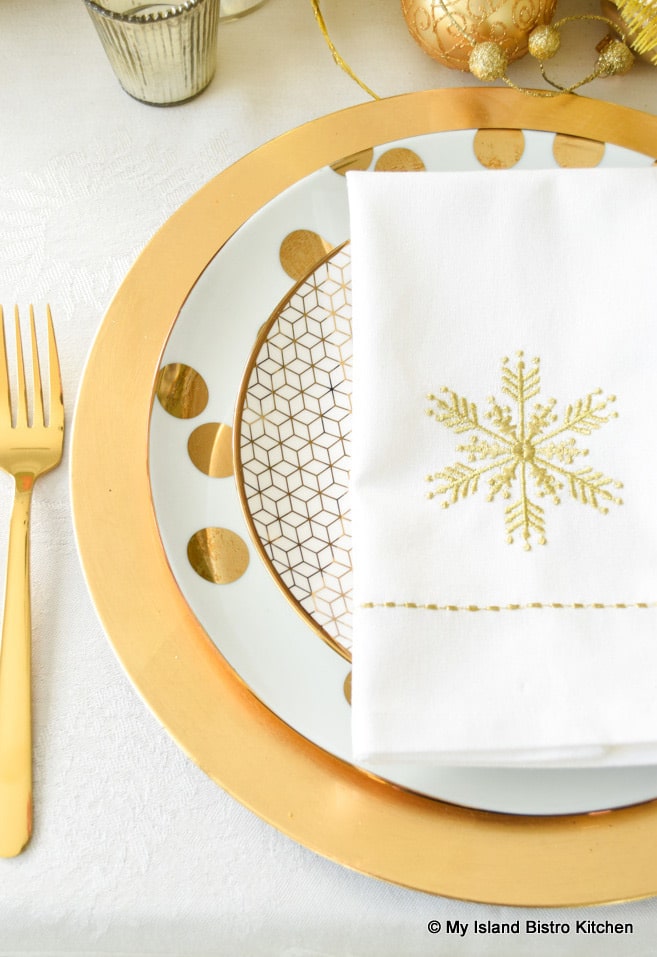
For that reason, I simply laid the flat-folded napkin over the salad plate so it becomes the focal point of each individual placesetting. Simple yet elegant.

Snowflake Motif Napkin

Dinnerware and Flatware

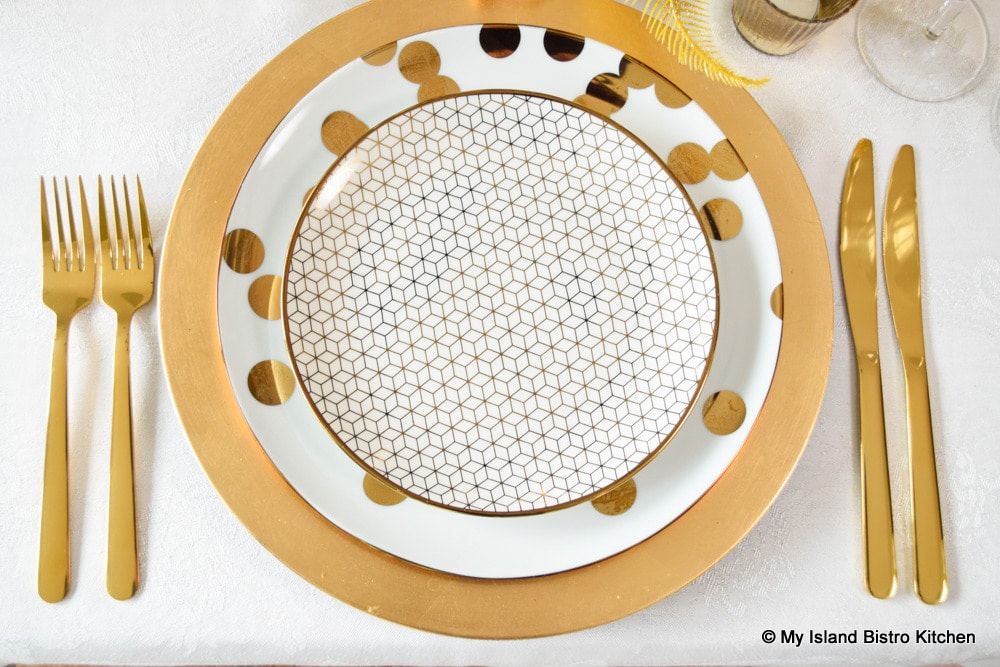
Plain gold charger plates frame each placesetting. The gold color connects the placesettings to the centerpiece. Chargers are an easy and simple way to glam up a tablesetting plus they serve a useful purpose in keeping the tablecloth clean should any food escape the dinnerware. We all know it happens from time to time!

Glamorous Gold Plated Christmas Tablesetting

I have chosen dinnerware with a significant amount of gold metallic color for this setting as it ties in with the gold theme and does not introduce another color. The contemporary metallic gold polka dot porcelain dinner plates add some pizzazz to each placesetting.  The gold-edged salad plates are in a coordinating design.  It is not always necessary (and sometimes it is too much) to have completely matching dinnerware. Mixing dinnerware designs is another great way to create a customized tablesetting look.

So long as the color scheme remains the same and the patterns do not clash, coordinating plates can contribute to a glamorous tablesetting. When mixing dinnerware patterns, it’s a good idea to have one plate with a fairly large design (like the polka dot dinnerplate) and the second plate to have a much smaller design (like the salad plate).

Luxe by Ciroa Gold Polka Dot Porcelain Dinner Plates
Gold Polka Dot Porcelain Dinner Plates and Coordinating Salad Plates

Because there is so much gold color on the table, I did not want to introduce silverware. I have, therefore, opted to use a very simple design of gold-colored stainless steel flatware. I think it is more pleasing to the eye as it holds and carries the gold theme. It is elegant in its simplicity of design.

Gold-colored Stainless Steel Flatware

Glassware

The super tall gold and rhinestone decorated champagne flutes add grand glitter and glam to this tablesetting giving it a totally festive look and feel. When you see glasses like this, you just know it’s party time!

Champagne Flutes
Sparkly Champagne Flutes

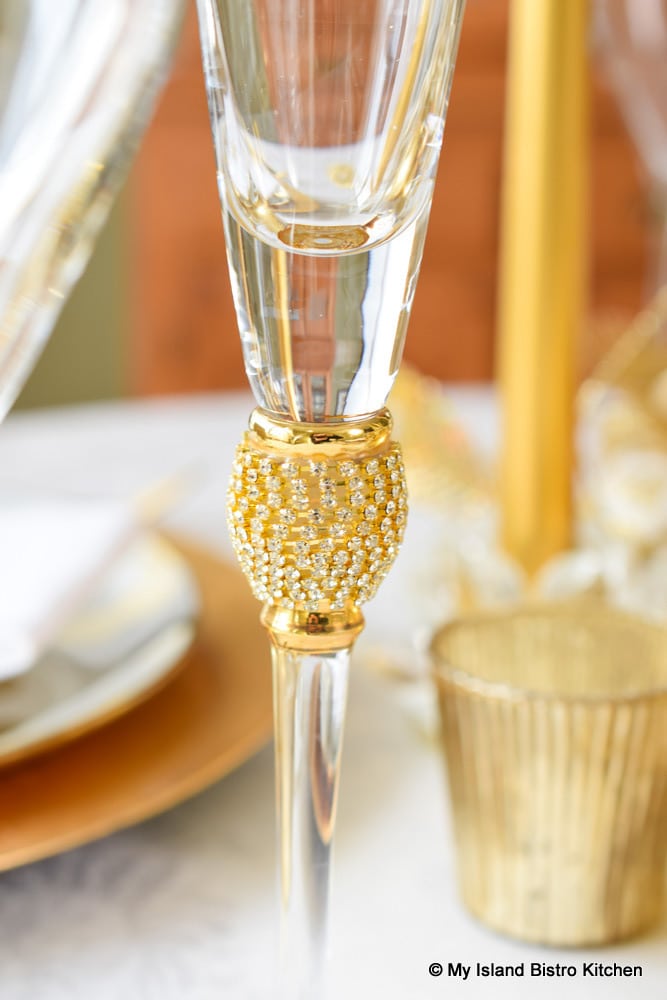
Because the flutes are very tall, I used my tallest wine glasses for proportion. They are about 9″ tall and are perfectly plain tulip-shaped stemware. Using tall stemware in this type of setting balances out the height of the tapers.

Glamorous Gold Plated Christmas Tablesetting

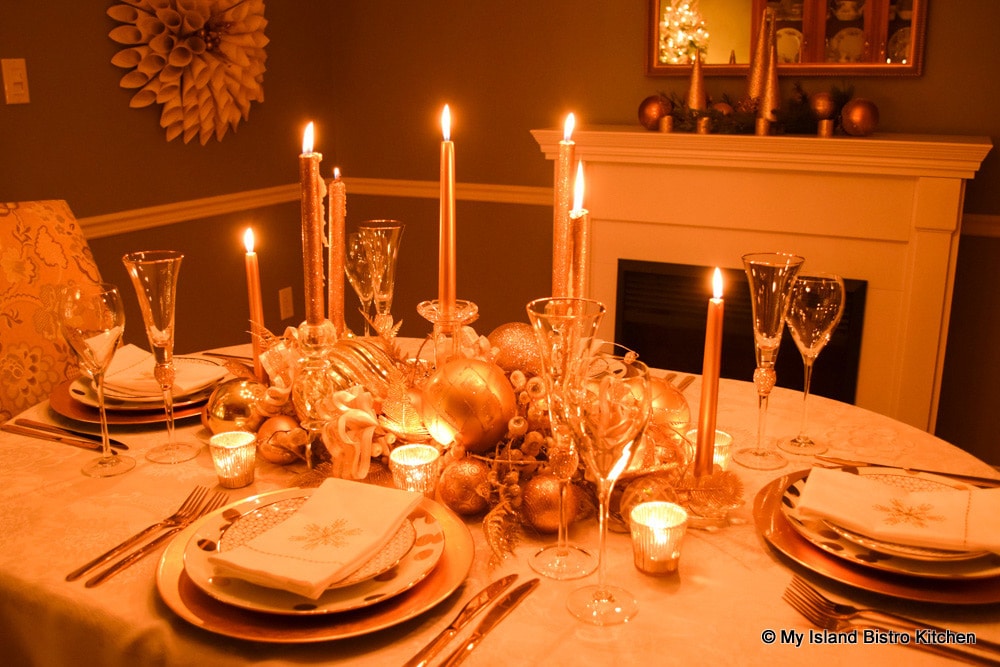
Consider How  the Table Looks in Different Lighting Situations

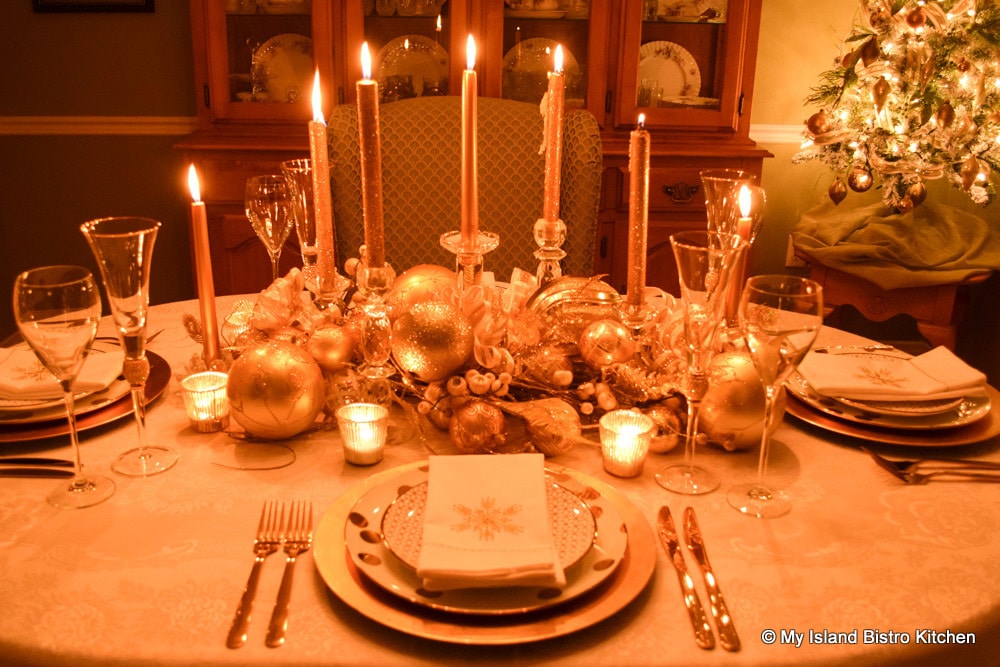
When constructing a tablesetting, it is important to consider how it looks in different lighting situations in which it will be used.  For example, if the dining event is in the evening, you want the table to sparkle in the candlelight. Notice how the tablesetting takes on a different hue and ambience with just the Christmas tree lights and the lit candles on the table.

Candlelight Tablesetting
Glamorous Gold Plated Christmas Tablesetting at Night

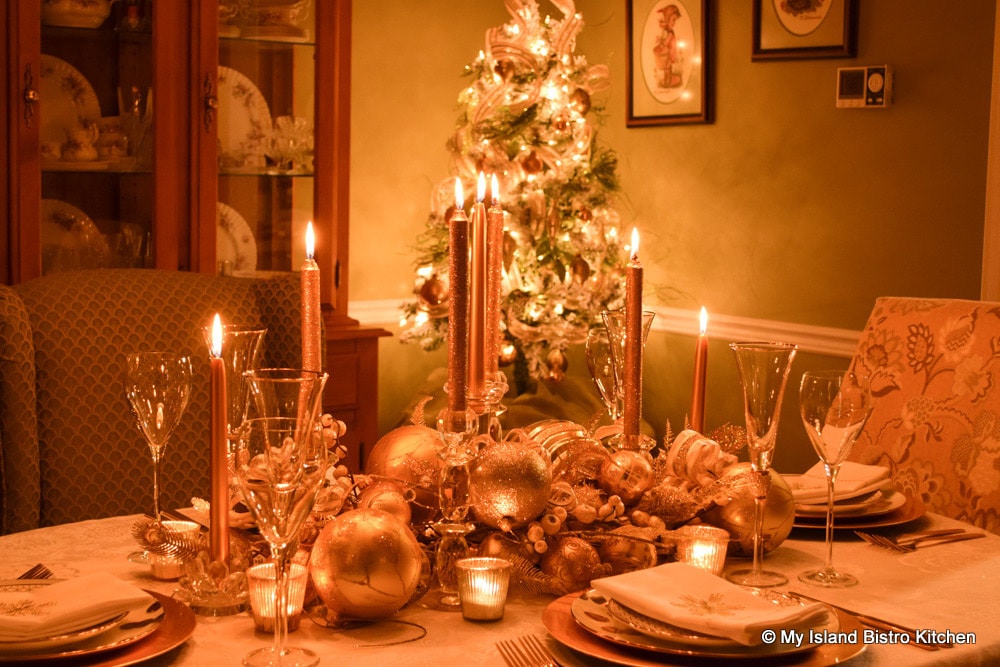
The tablesetting becomes much more dramatic when lit for evening dining. Layers of candlelight bathe the table in soft glowing light and the tea lights in the votives provide great highlights to the setting. It is best to avoid harsh overhead lighting of tablescapes that have bright gold or silver as it can be quite hard on the eye and distracting.

Christmas Candlelight Tablesetting
Glamorous Gold Plated Christmas Tablesetting at Night

This tablesetting will easily carry me through the entire holiday period up to and including New Year’s. There are no flowers to water or wilt and I can easily exchange my plain white dishes for the patterned dinnerware and use other glassware to change up the look without having to touch the centerpiece (unless, of course, it is to replace the candles that have melted their way down in the candlesticks).

Glamorous Gold Plated Christmas Tablesetting
Glamorous Gold Plated Christmas Tablesetting at Night

A beautifully set table sets the tone for a wonderful meal. Using a single color palette that looks polished and sophisticated helps to create an elegant and glamorous tablesetting.

Gold-themed Christmas Tablesetting
Glamorous Gold Plated Christmas Tablesetting

I hope you have enjoyed a glimpse into my custom-designed holiday tablesetting.

To view other Christmas-themed tablesettings from My Island Bistro Kitchen, click on the links below:

Snowmen and Snowballs Tablesetting
The Christmas Rose Tablesetting
Blush Pink Holiday Tablesetting
The Christmas Greens Holiday Tablesetting
Just Hear Those Sleigh Bells Jinglin’ Tablesetting
Twas The Night Before Christmas Tablesetting
The Warmth of the Christmas Light Tablesetting
A Tartan Holiday Tablesetting
Pretty Poincettia Tablesetting
Poinsettia Trio Tablesetting
The Holiday Table
The Pink and Green Holiday Table
Purple Tablesetting for the Holidays
Christmas at My Island Bistro Kitchen
Christmas Eve Tablesetting and Dinner
Cupcake Tablescape
Evergreens and Reindeer Christmas Tablescape

Connect with My Island Bistro Kitchen by:

Joining the Facebook page for My Island Bistro Kitchen:  https://www.facebook.com/MyIslandBistroKitchen/

Following “the Bistro” on Twitterhttps://twitter.com/PEIBistro/

Seeing the drool-worthy gallery of mouth-watering food photos from My Island Bistro Kitchen on Instagramhttps://www.instagram.com/peibistro/

Following “the Bistro” on Pinterest at https://www.pinterest.ca/peibistro/

(and you can pin the Pinterest-ready photo(s) below to your favorite Pinterest boards)

Red Wine Cranberry Pear Sauce

Red Wine Cranberry Pear Sauce

Homemade cranberry sauce is so easy to make and tastes fabulous.  This Red Wine Cranberry Pear Sauce has a wonderful blend of flavors that complement each other nicely.

Pears and cranberries pair well together with the sweetness of the pears balancing the tartness of the cranberries.  The addition of red wine adds a layer to the flavor profile of the sauce and, let’s just say, amps it up a bit!  However, even though red wine is a key ingredient in this sauce, more wine is not necessarily more in this case.  One-third cup of wine is adequate as adding too much wine can quickly overtake the cranberry flavor and become too strong and overpowering.

Red Wine Cranberry Pear Sauce

Essentially, this sauce begins with boiling water and sugar together, much in the same way as making a simple syrup.  Some red wine (any kind you would drink will do) is then added along with the cranberries, pear, citrus marmalade, and some pure maple syrup for an extra dash of sweetness.  Stirring the sauce as it cooks helps it to thicken so it is not watery.

During the last half of the cooking process, a pinch of cardamom, a piece of cinnamon stick, and a star anise pod are added for a boost of flavor.  The cinnamon stick and star anise are then discarded once the sauce comes off the stove as their function of infusing flavor into the sauce is complete.  Continue to stir the sauce as it cools because this will really help it thicken.

This sauce keeps in the refrigerator for up to five days.  It freezes very well so is great to have on hand in the freezer.

Red Wine Cranberry Pear Sauce

Cranberry Sauce complements any poultry dish.

Red Wine Cranberry Pear Sauce

With its stunning rich ruby-red color, this delectable sauce is a fine condiment to any holiday dinner.

Red Wine Cranberry Pear Sauce

Complete your next roast chicken or roast turkey dinner with this sauce as a condiment.

Red Wine Cranberry Pear Sauce
Red Wine Cranberry Pear Sauce with Roast Chicken

Make some extra and share this sauce as gifts with others.  A jar of this tasty sauce makes a fine host/hostess gift, too.

Red Wine Cranberry Pear Sauce
Cranberry Pear Sauce Is Great for Gift-giving

[Printable recipe follows at end of post]

Red Wine Cranberry Pear Sauce

Ingredients:

¾ cup granulated sugar
¼ cup brown sugar, lightly packed
2/3 cup water
1/3 cup red wine
2 cups cranberries, fresh or frozen
1 Bosc pear, peeled and cut into small pieces
2 tbsp citrus marmalade
2 tbsp maple syrup
Pinch cardamom
1½” chunk cinnamon stick
1 star anise

Method:

In medium-sized heavy-bottomed saucepan, bring sugars and water to boil over medium-high heat. Reduce heat to medium and boil, uncovered, for 5 minutes, stirring occasionally.

Add red wine, cranberries, chopped pear, marmalade, and maple syrup. Increase heat to medium-high to return mixture to boil then reduce heat to medium-low. Stir mixture frequently throughout the cooking process, for about 8 minutes. Then, add the cardamom, cinnamon stick, and star anise. Continue to cook mixture, uncovered, stirring frequently while cooking it for another 7-10 minutes, or until sauce thickens (it will thicken somewhat more as it is stirred during the cooling process).

Remove saucepan from heat and discard the chunk of cinnamon stick and the star anise. Stir sauce several times as it cools as this will help it to thicken.

Store sauce, tightly covered, in refrigerator for up to 5 days or freeze for longer storage. Serve sauce cold or at room temperature alongside roasted poultry.

Yield:  Apx. 2 cups

If you have made this recipe and enjoyed it and/or wish to share it with your friends and family, please do so on social media but be sure to share the direct link to this posting from my website.

For other cranberry sauce recipes from My Island Bistro Kitchen, click on the links below:

Zesty Cranberry-Orange Sauce
Cranberry Rhubarb Sauce
Cranberry Blueberry Sauce

Connect with My Island Bistro Kitchen by:

Joining the Facebook page for My Island Bistro Kitchen:  https://www.facebook.com/MyIslandBistroKitchen/

Following “the Bistro” on Twitterhttps://twitter.com/PEIBistro/

Seeing the drool-worthy gallery of mouth-watering food photos from My Island Bistro Kitchen on Instagramhttps://www.instagram.com/peibistro/

Following “the Bistro” on Pinterest at https://www.pinterest.ca/peibistro/

(and you can pin the Pinterest-ready photo(s) below to your favorite Pinterest boards)

Red Wine Cranberry Pear Sauce

This tasty Red Wine Cranberry Pear Sauce is easy to make and is a superb condiment to any poultry dish. A delicious and spirited twist to the Classic Cranberry Sauce.
Course Condiment
Cuisine Canadian
Keyword cranberry sauce, red wine cranberry pear sauce
My Island Bistro Kitchen My Island Bistro Kitchen

Ingredients

  • ¾ cup granulated sugar
  • ¼ cup brown sugar, lightly packed
  • 2/3 cup water
  • 1/3 cup red wine
  • 2 cups cranberries, fresh or frozen
  • 1 Bosc pear, peeled and cut into small pieces
  • 2 tbsp citrus marmalade
  • 2 tbsp maple syrup
  • Pinch cardamom
  • ” chunk cinnamon stick
  • 1 star anise

Instructions

  1. In medium-sized heavy-bottomed saucepan, bring sugars and water to boil over medium-high heat. Reduce heat to medium and boil, uncovered, for 5 minutes, stirring occasionally.
  2. Add red wine, cranberries, chopped pear, marmalade, and maple syrup. Increase heat to medium-high to return mixture to boil then reduce heat to medium-low. Stir mixture frequently throughout the cooking process, for about 8 minutes. Then, add the cardamom, cinnamon stick, and star anise. Continue to cook mixture, uncovered, stirring frequently while cooking it for another 7-10 minutes, or until sauce thickens (it will thicken somewhat more as it is stirred during the cooling process).
  3. Remove saucepan from heat and discard the chunk of cinnamon stick and the star anise. Stir sauce several times as it cools as this will help it to thicken.
  4. Store sauce, tightly covered, in refrigerator for up to 5 days or freeze for longer storage. Serve sauce cold or at room temperature alongside roasted poultry.

Recipe Notes

Yield: Apx. 2 cups


[Copyright My Island Bistro Kitchen]

PIN ME TO PINTEREST!

Cranberry Sauce

Snowmen and Snowballs Tablesetting

A number of years ago, I made these snowmen and, this year, thought they should be part of a casual holiday tablesetting that is aptly named “Snowmen and Snowballs“.  So, here they are, all dressed in their finery to preside over the dinner table!

Christmas Tablesetting
Snowmen and Snowballs Tablesetting

These two snowmen are positioned at opposite ends of the table because they can’t be trusted not to engage in a snowball fight!  As you can see, they’ve already been busy with all those snowballs you see on the table!

I am a big fan of using what I already have as opposed to buying new items for tablesettings. In fact, I will often re-purpose decorations and ornaments (especially ones I can’t otherwise find a place for!) by using them in my tablesettings. And, this is exactly what I have done with this tablesetting.

How adorable are these little snowmen votives that adorn each placesetting!

Christmas Tablesetting
Snowman Votive Candle

The napkins are a rosy-pink-red pinstripe on fabric that has a homespun texture.  They are very suitable for this casual tablesetting.  The napkins don’t shout Christmas but are quite  suitable for the season.  They are also napkins I use other times of the year.

I am using my standard white dinnerware and have framed it with a red plaid charger plate on top of a round green placemat. The combination gives a nod to the traditional red and green colors typically associated with Christmas.

Christmas Placesetting
Snowmen and Snowballs Placesetting

Because this is a fun, casual tablesetting, some liberties can be taken with the placement of elements of the placesetting. For example, because space is at a premium on this table, there really isn’t a lot of room for the cutlery on the sides of the placesetting. Therefore, I have casually laid the flatware at an angle on top of the plates as shown in the photo above.

How cute is this lumberjack snowman with his little red toque! This tablesetting is all about creating a vignette and a story and making it fun.

Christmas Tablesetting
The Lumberjack Snowman

I seriously think lumberjack snowman is eyeing up his partner-in-crime, the bird watcher, at the other end of the table and taunting him to a snowball fight! We’ll see if we can get through dinner without snowballs flying between these two!

Christmas Tablesetting
Birdwatcher Snowman

Around, and in between, the two snowmen, I have simply made a base of faux snow. I then just laid some faux greenery, along with some pine cones, mini white twinkle lights, and a string of snowball lights, on top of the snow. The battery-operated snowball lights do double duty in that they are part of the tablesetting story and they also add some unique lighting to the table. The snowballs look eye appealing, both in daylight and at night.

Christmas Tablesetting
Snowmen and Snowballs Tablesetting

I didn’t fuss too much with the placement of the greenery, red berries, and pine cones, all of which are needed to contrast the white snow.

Christmas Tablesetrting
Snowmen and Snowballs Tablesetting

This type of tablescape is a good option for anyone who is not comfortable creating a precise table centerpiece as there really is no right or wrong way to position the greenery.

Christmas Tablesetting
Snowmen and Snowballs Tablesetting

Some of today’s faux greenery is quite a good replica of the real greenery, pinecones, and berries. Plus, it is reusable, year after year.

Christmas Tablesetting
Snowmen and Snowballs Tablesetting

Using both the snowball lights and twinkle lights adds a layer of drama to the tablesetting, particularly for evening dining. Without the layers of lights, the whole center of the table would be quite dark in the evening even with ambient room lighting.

Christmas Tablesetting
Snowball Lights

It’s always important to think about how the tablesetting will look in different lighting situations for different dining experiences. This is especially true if the dining event is in the evening when no daylight will provide natural light in the room.  The snowball lights really pop and come to life after dark. With nothing more than the tree lights, the lit votives, and the snowball and twinkle lights, the table comes to life and provides a cozy, warm, and inviting dining experience.

Christmas Tablesetting
Snowmen and Snowballs Tablesetting

The little votive candles exude a warm, soft glow at each placesetting. I love the detail on these votives. They add a touch of whimsy to the tablesetting.

Christmas Tablesetting
Snowmen and Snowballs Tablesetting

Typically, I would seat guests around all sides of the table. However, no matter how I positioned the snowmen, someone was going to be looking at the back or side of one of the snowmen.  When constructing a tablescape, it is important to ensure that all guests, from all angles, have an equal view of the whole tablescape.

To ensure optimal visibility of all sides of the tablescape in the”Snowmen and Snowballs” tablesetting, a simple fix is to place two guests on each side of the table, leaving the ends vacant. This way, all guests have a full view of the entire tablescape/vignette.

Because the taller elements (the snowmen) are at the ends of the table and the center part is low profile, it is conducive to good dinner conversation among guests. Had I placed the snowmen in the center of the table, their height would have somewhat obstructed the view of diners of their dining companions.

Christmas Tablesetting
Snowmen and Snowballs Tablesetting

I hope you have enjoyed a peek of my whimsical “Snowmen and Snowballs” Tablesetting. This setting is proof that not all tablescapes have to have the focal points of interest dead in the center of the table.  Sometimes, the focal points can be at either end, or indeed, both ends of the table.  This works so long as there is a connector between the two such as the low-profile runner of greenery and snowball lights atop faux snow in this setting.

Connect with My Island Bistro Kitchen by:

Joining the Facebook page for My Island Bistro Kitchen:  https://www.facebook.com/MyIslandBistroKitchen/

Following “the Bistro” on Twitterhttps://twitter.com/PEIBistro/

Seeing the drool-worthy gallery of mouth-watering food photos from My Island Bistro Kitchen on Instagramhttps://www.instagram.com/peibistro/

Following “the Bistro” on Pinterest at https://www.pinterest.ca/peibistro/

(and you can pin the Pinterest-ready photo(s) below to your favorite Pinterest boards)

Of course, by subscribing to receive an email notification of new posts and recipes, you can be among the first to know when I publish a new post or recipe. Simply enter your name and email address in the Subscription block over on the right-hand side of my home page.

To view other holiday tablesettings from My Island Bistro Kitchen, click on the links below:

Blush Pink Holiday Tablesetting
Just Hear Those Sleigh Bells Jinglin’ Tablesetting
Glitz ‘n Glamour New Year’s Eve Tablesetting
The Warmth of the Christmas Light Tablesetting
Christmas Eve Tablesetting and Dinner
A Tartan Holiday Tablesetting
Pretty Poinsettia Tablesetting
Poinsettia Trio Tablesetting
The Holiday Table
The Pink and Green Holiday Table
Christmas at My Island Bistro Kitchen
Purple Tablesetting for the Holidays
Evergreens and Reindeer Christmas Tablesetting
Cupcake Tablescape
Twas The Night Before Christmas
The Christmas Rose Tablesetting

PIN ME TO PINTEREST!

Christmas Tablesetting

Cranberry and Eggnog Drop Cookies

These hearty Cranberry and Eggnog Cookies are good any time but they are especially good at Christmas. This is because they combine traditional flavors of the season – eggnog, dried cranberries, orange rind, pecans, and the warm spices we associate with Christmas – cinnamon, nutmeg, allspice, and cloves.

Drop Cookies
Cranberry and Eggnog Drop Cookies

Cranberry and Eggnog Drop Cookies are easy to make.  Make sure all the ingredients are at room temperature before making these cookies. I do NOT recommend softening the butter in the microwave for baked products as it changes the properties of the butter and liquifies it too much.  For butter at room temperature, I remove it from the refrigerator about an hour before I need it and dice the amount I need into about 1” cubes. This hastens the softening.

For other ingredients (e.g., eggs, milk, yogurt) for which a recipe calls for them to be at room temperature, I usually take them from the refrigerator about 30 minutes or so before using them in a recipe. Simply put, room temperature ingredients incorporate into most batters much better than do cold ingredients.

Christmas Drop Cookies
Cranberry and Eggnog Drop Cookies

Two baking sheets of these cookies can be baked at once with the oven racks positioned in the upper and lower third of the oven.  Rotate the cookie sheets and switch them between racks halfway through the baking to ensure even baking of all the cookies.  These cookies will have a tender texture and be somewhat soft and chewy if they are not overbaked.

I have given a baking time guide of 13-16 minutes.  However, some judgment on the part of the cook is required to determine the baking time for his or her oven because ovens are known for baking somewhat differently. The cookies are done when they are just barely set and the edges and the underneath sides just start to turn a light golden tan color.  Overbaking will result in a harder, crisper cookie.

These festive Cranberry and Eggnog Drop Cookies are hearty, wholesome cookies that freeze well and are perfect for holiday cookie exchanges.

Christmas Drop Cookies
Cranberry and Eggnog Drop Cookies

[Printable recipe follows at end of posting]

Cranberry and Eggnog Drop Cookies

Ingredients:

1 cup all-purpose flour
1 tsp baking powder
¾ tsp cinnamon
¼ tsp nutmeg
¼ tsp allspice
1/8 tsp cloves

1½ cups quick cooking rolled oats
¾ cup dried cranberries
1/3 cup chopped pecans

½ cup salted butter, room temperature
¾ cup brown sugar, firmly packed
1 large egg, room temperature, lightly beaten with fork
¼ cup eggnog, room temperature
1½ tsp finely grated orange rind
1 tsp pure vanilla

Method:

Position oven racks in upper and lower third of oven. Preheat oven to 350°F. Line two large baking sheets with parchment paper.

Sift the flour, baking powder, and spices together into a bowl. Set aside.

In separate bowl, combine the rolled oats, cranberries, and pecans. Set aside.

In bowl of stand mixer fitted with paddle attachment, cream the butter at medium speed. Gradually blend in the brown sugar and beat until light and fluffy, stopping to scrape sides of bowl with rubber spatula, as required. Add the egg, eggnog, grated orange rind, and vanilla. Beat until combined with butter and brown sugar.

Reduce speed to low and gradually add the sifted dry ingredients, Increase speed slightly and mix well until ingredients are incorporated.

Stir in the rolled oats, cranberries, and nut mixture until combined.

Drop dough by rounded tablespoonful onto prepared cookie sheets, leaving approximately 1½ – 2” between cookies. Bake 13-16 minutes (rotating and switching baking sheets between racks halfway through the baking), or until edges and bottoms of cookies are light golden tanned. Remove from oven and let cookies cool on baking sheets for 2-3 minutes before using a cookie lifter to transfer cookies to wire rack to cool completely.

Store cookies in airtight container at room temperature for up to 5 days or freeze for longer storage.

Yield: Approximately 2½ dozen

Connect with My Island Bistro Kitchen by:

Joining the Facebook page for My Island Bistro Kitchen:  https://www.facebook.com/MyIslandBistroKitchen/

Following “the Bistro” on Twitterhttps://twitter.com/PEIBistro/

Seeing the drool-worthy gallery of mouth-watering food photos from My Island Bistro Kitchen on Instagramhttps://www.instagram.com/peibistro/

Following “the Bistro” on Pinterest at https://www.pinterest.ca/peibistro/

(and you can pin the Pinterest-ready photo(s) below to your favorite Pinterest boards)

Cranberry and Eggnog Drop Cookies

These festive Cranberry and Eggnog Drop Cookies are hearty, wholesome cookies that are perfect for holiday cookie exchanges.
Course Snack
Cuisine Canadian
Keyword cookies,, cranberry,, eggnog
My Island Bistro Kitchen Barbara99

Ingredients

  • 1 cup all-purpose flour
  • 1 tsp baking powder
  • ¾ tsp cinnamon
  • ¼ tsp nutmeg
  • ¼ tsp allspice
  • 1/8 tsp cloves
  • cups quick cooking rolled oats
  • ¾ cup dried cranberries
  • 1/3 cup chopped pecans
  • ½ cup salted butter, room temperature
  • ¾ cup brown sugar, firmly packed
  • 1 large egg, room temperature, lightly beaten with fork
  • ¼ cup eggnog, room temperature
  • tsp finely grated orange rind
  • 1 tsp pure vanilla

Instructions

  1. Position oven racks in upper and lower third of oven. Preheat oven to 350°F. Line two large baking sheets with parchment paper.
  2. Sift the flour, baking powder, and spices together into a bowl. Set aside.
  3. In separate bowl, combine the rolled oats, cranberries, and pecans. Set aside.
  4. In bowl of stand mixer fitted with paddle attachment, cream the butter at medium speed. Gradually blend in the brown sugar and beat until light and fluffy, stopping to scrape sides of bowl with rubber spatula, as required. Add the egg, eggnog, grated orange rind, and vanilla. Beat until combined with butter and brown sugar.
  5. Reduce speed to low and gradually add the sifted dry ingredients, Increase speed slightly and mix well until ingredients are incorporated.
  6. Stir in the rolled oats, cranberries, and nut mixture until combined.
  7. Drop dough by rounded tablespoonful onto prepared cookie sheets, leaving approximately 1½ - 2” between cookies. Bake 13-16 minutes (rotating and switching baking sheets between racks halfway through the baking), or until edges and bottoms of cookies are light golden tanned. Remove from oven and let cookies cool on baking sheets for 2-3 minutes before using a cookie lifter to transfer cookies to wire rack to cool completely.

  8. Store cookies in airtight container at room temperature for up to 5 days or freeze for longer storage.

Recipe Notes

Yield: Approximately 2½ dozen


Copyright My Island Bistro Kitchen

PIN ME TO PINTEREST!

Christmas Drop Cookies
Cranberry and Eggnog Drop Cookies

The Bistro’s Scotch Cookies

Shortbread
Scotch Cookies

Scotch Cookies (sometimes called “Scotch Cakes”), close cousins of Shortbread, are a must-have Christmas tradition in many PEI households. They are a very common addition to holiday sweet plates. I am often asked if I have a recipe for Scotch Cookies and this is it.

The proportions of the main ingredients in these Scotch Cookies follow the holy grail ratio for traditional Scottish Shortbread – 1 part sugar, 2 parts butter, and 3 parts flour.  What differentiates Scotch Cookies from traditional Scottish Shortbread are the liberties taken with ingredients for Scotch Cookies and their decorations. In that way, I suppose one could refer to Scotch Cookies as a modernized version of traditional Shortbread.

Shortbread
Scotch Cookies

Texture of Scotch Cookies

If you have ever heard someone refer to a cookie as “short”, they mean it has a crumbly texture that melts in the mouth. This texture is achieved by producing a somewhat dry dough which comes from the high flour content in relation to the proportion of fat in the recipe. The use of icing sugar and addition of cornstarch, and only moisture that comes from the butter are also contributing factors. There will be a shortness and crispness to a well-made Scotch Cookie.

INGREDIENTS

Butter

Butter is considered an essential ingredient for which I do not recommend any substitutes in Scotch Cookies. Yes, use the good stuff in Scotch Cookies because you can taste the difference and pure butter is a main contributor to both flavor and the crumbly texture in these cookies.  The cookies may be made with either salted or unsalted butter.  If using unsalted butter, add ¼ teaspoon or a little more of salt to the dry ingredients.

Icing Sugar vs Granulated or Brown Sugar

While traditional Shortbread will typically be made using granulated sugar, I use icing sugar in my Scotch Cookies. Some of you may know icing sugar as powdered or confectioner’s sugar.  I find this sugar gives a much more light and tender crumb in the cookies than does traditional granulated or even brown sugar (called for in some recipes).  Make sure the icing sugar is sifted before measuring out the ½ cup called for in the recipe.

Additional Flavorings

Traditional Shortbread would not typically have any additional flavorings added – it’s basically just the sugar, butter, and flour in Shortbread.  However, I sometimes like to add just a small amount each of pure vanilla and almond flavoring in my Scotch Cookies.  These flavorings are entirely optional in this recipe.  If added, they should be in very small amounts – i.e., ¼ tsp and 1/8 tsp, respectively.  These cookies are meant to taste like butter and adding too much flavoring will interfere with that pure flavor so do exercise caution in how much is added.

Cornstarch

My recipe calls for 1/3 cup cornstarch to which I attribute the melt-in-your-mouth tender texture in the cookies. Mix it in with the flour before incorporating it into the butter/sugar mixture. Cornstarch works magic in combination with the other ingredients to create the “shortness” texture in the cookies.

Flour

Basic, all-purpose flour is fine to use in Scotch Cookies. No special flour is required.

No Leavening in Scotch Cookies

There is no leavening in Scotch Cookies which makes the dough great from which to cut shapes since the stiff, dry dough retains its shape during baking.

Shortbread
Scotch Cookies

MEASURING INGREDIENTS

When measuring the icing sugar and cornstarch, as well as the flour, make sure you use an accurate measure.  To measure, simply spoon the dry ingredients into the measuring cups without stirring, and then, with the flat side of a table knife, level off the excess.  Do not pack the dry ingredients into the cup, tap the measuring cup with the spoon to settle the dry ingredients into the cup, or tamp the cup on the counter to make room for more.  This will result in an inaccurate measure of the ingredients and may cause the dough to be overly dry if too much of these ingredients is used.

TEXTURE OF DOUGH AND CHILLING DOUGH

Shortbread/Scotch Cookie dough is considered a dry dough as no liquid is added, save for the moisture that comes from the butter.  The dough texture will be soft when mixed.  Placing it in the refrigerator for 15-20 minutes or so to chill will help it to firm up enough to roll out and cut out shapes.  The dough for Scotch Cookies should not be over-kneaded or worked as it will get the gluten in the flour all excited and stirred up resulting in tough cookies.  Just work it enough that the dough comes together and can be rolled out to about ¼“ thickness. The scraps of dough should be handled in the same manner until all the dough has been cut out in shapes. Minimal handling of the dough is one of the keys to tender Scotch Cookies.

I recommend dividing the dough in half and forming discs with each half.  It is a smaller amount of dough to work with at a time, especially for gathering up and re-working the dough for the remainder of the cookie cutting.

CUTTING OUT SCOTCH COOKIES

Scotch Cookies are intended to be small, dainty cookies, about two-bite size.

Because the dough is a dry dough, it does not spread during baking. It, therefore, lends itself well to being cut with any shape of cutter desired.  I recommend a cookie cutter of about 1¾ – 2” in diameter as a suitable size.

Shortbread
Scotch Cookies

BAKING THE SCOTCH COOKIES

I use insulated cookie sheets lined with parchment paper for baking my Scotch Cookies.  I find the insulated sheets give a bit more protection for the cookies from the heat. That is not to say that other cookie sheets do not work well.

The oven rack should be positioned in the center of the oven to allow good air circulation for the cookies to bake evenly. The cookies (of the size indicated in this recipe) are baked in a slow oven (300°F) for about 22-24 minutes. They will be almost the same color when baked as was the dough. They should not be brown on the edges or the underside side as they are meant to be very pale and delicate. Once removed from the oven, let the cookies rest 3-4 minutes on the baking sheet before transferring them to a wire rack to cool completely.

DECORATING SCOTCH COOKIES

A significant difference between Scotch Cookies and Shortbread is that Shortbread is left plain, unfrosted.  With Scotch Cookies, however, liberties can be taken to decorate them with a small dob of icing piped in the center of each cookie which may, if desired, be decorated with a small bit of very well drained maraschino cherry, a dragée, or quinns of choice as I have done in the photos here with the holly leaves and berries. The cookies can, of course, be left unfrosted, if desired.

Decorated Scotch Cookies
Scotch Cookies Decorated with Christmas Quinns

STORING SCOTCH COOKIES

Undecorated, the cookies can be stored in layers separated by wax paper in an airtight container in a cool location for about 4-5 days.  Alternatively, they can be frozen for longer storage.  If applying icing and decorations to the cookies, I recommend doing so just before serving.  This will ensure no damage occurs to the icing or decorations during storage plus the cookies are easier stored in layers, undecorated.

[Printable recipe follows at end of post]

The Bistro’s Scotch Cookies

Ingredients:

1 cup salted butter, room temperature
½ cup sifted icing sugar (aka confectioner’s sugar or powdered sugar)
¼ tsp vanilla (optional)
1/8 tsp almond flavoring (optional)
1½ cups all-purpose flour
1/3 cup cornstarch

Method:

In bowl of stand mixer fitted with paddle attachment, cream the butter at medium speed until it is light in color and very soft and smooth, about 3-4 minutes. Reduce the speed and gradually add the icing sugar, continuing to beat the mixture until blended and smooth, stopping to scrape the sides of the bowl with a rubber spatula if required. Beat in the vanilla and almond flavoring, if using.

Sift the flour and cornstarch together. With mixer set on low speed, add the dry ingredients and mix until all are incorporated, stopping to scrape the sides of the bowl with a rubber spatula as required. Mixture will be soft. Divide dough in half and form each half into a disc shape. Wrap discs separately in plastic wrap and chill in refrigerator for about 15-20 minutes, or just until dough becomes firm enough to roll out.

Position oven rack in center of oven and preheat oven to 300°F. Line cookie sheet(s) with parchment paper.

Remove dough from refrigerator and, on very lightly floured surface, roll each disc of dough evenly to approximately ¼“ thick. With lightly floured cookie cutter of choice about 1¾“ – 2” in diameter, cut out shapes and transfer cookies to prepared baking sheet. Gather and re-roll scraps of dough until all dough has been used up and cut out into shapes, being careful not to overwork dough. Place cookies about 1½” apart on the prepared baking sheet(s). Bake 22-24 minutes, or until cookies are just set. Cookies will be very light colored. Note that baking times will need to be adjusted if other sized cookie cutters are used.

Remove cookies from oven and leave on baking sheet for about 3-4 minutes before, using a flat cookie lifter, transferring them to wire rack to cool completely.

Cookies may be left plain or a small dab of icing may be piped on to center of each cookie and then, if desired, topped with a small bit of well-drained maraschino cherry, dragée or quinns of choice.

Yield:  Apx. 3 – 3½ dozen cookies. [Note that exact yield will depend on thickness to which dough is rolled and the size of cutter used.]

If you have made this recipe and enjoyed it and/or wish to share it with your friends and family, please do so on social media but be sure to share the direct link to this posting from my website.

Connect with My Island Bistro Kitchen by:

Joining the Facebook page for My Island Bistro Kitchen:  https://www.facebook.com/MyIslandBistroKitchen/

Following “the Bistro” on Twitterhttps://twitter.com/PEIBistro/

Seeing the drool-worthy gallery of mouth-watering food photos from My Island Bistro Kitchen on Instagramhttps://www.instagram.com/peibistro/

Following “the Bistro” on Pinterest at https://www.pinterest.ca/peibistro/

(and you can pin the Pinterest-ready photo(s) below to your favorite Pinterest boards)

PIN ME TO PINTEREST!
Shortbread
Scotch Cookies

PRINTABLE RECIPE:

The Bistro’s Scotch Cookies

These melt-in-the-mouth Scotch Cookies have a delectable buttery flavor and a tender light crumb.
Course Sweet Treats
Cuisine Canadian
Keyword Scotch Cakes, Scotch Cookies, shortbread
My Island Bistro Kitchen My Island Bistro Kitchen

Ingredients

  • 1 cup salted butter, room temperature
  • ½ cup sifted icing sugar (aka confectioner’s sugar or powdered sugar)
  • ¼ tsp vanilla (optional)
  • 1/8 tsp almond flavoring (optional)
  • cups all-purpose flour
  • 1/3 cup cornstarch

Instructions

  1. In bowl of stand mixer fitted with paddle attachment, cream the butter at medium speed until it is light in color and very soft and smooth, about 3-4 minutes. Reduce the speed and gradually add the icing sugar, continuing to beat the mixture until blended and smooth, stopping to scrape the sides of the bowl with a rubber spatula if required. Beat in the vanilla and almond flavoring, if using.
  2. Sift the flour and cornstarch together. With mixer set on low speed, add the dry ingredients and mix until all are incorporated, stopping to scrape the sides of the bowl with a rubber spatula as required. Mixture will be soft. Divide dough in half and form each half into a disc shape. Wrap discs separately in plastic wrap and chill in refrigerator for about 15-20 minutes, or just until dough becomes firm enough to roll out.
  3. Position oven rack in center of oven and preheat oven to 300°F. Line cookie sheet(s) with parchment paper.
  4. Remove dough from refrigerator and, on very lightly floured surface, roll each disc of dough evenly to approximately ¼“ thick. With lightly floured cookie cutter of choice about 1¾“ – 2” in diameter, cut out shapes and transfer cookies to prepared baking sheet. Gather and re-roll scraps of dough until all dough has been used up and cut out into shapes, being careful not to overwork dough. Place cookies about 1½” apart on the prepared baking sheet(s). Bake 22-24 minutes, or until cookies are just set. Cookies will be very light colored. Note that baking times will need to be adjusted if other sized cookie cutters are used.
  5. Remove cookies from oven and leave on baking sheet for about 3-4 minutes before, using a flat cookie lifter, transferring them to wire rack to cool completely.
  6. Cookies may be left plain or a small dab of icing may be piped on to center of each cookie and then, if desired, topped with a small bit of well-drained maraschino cherry, dragée or quinns of choice.

Recipe Notes

Yield: Apx. 3 – 3½ dozen cookies. [Note that exact yield will depend on thickness to which dough is rolled and the size of cutter used.]


(Copyright My Island Bistro Kitchen)