From my vintage files comes the recipe for this old-fashioned treat known as Rice Krispies Squares.
Continue reading RICE KRISPIES SQUARE RECIPE
From my vintage files comes the recipe for this old-fashioned treat known as Rice Krispies Squares.
Continue reading RICE KRISPIES SQUARE RECIPE
Today, I am sharing the recipe for Oh Henry Square from my vintage recipe files. This is a super easy square to make and there is no baking, or baking skills, required. There are many variations in recipes for this retro sweet treat. What follows is mine.
Continue reading Oh Henry Square Recipe
These Chinese Chews are super tasty – a little chewy and a little crunchy. Apart from basic pantry ingredients, the two key ingredients in Chinese Chews are dates and nuts.
This recipe is also versatile in that it can, instead of being formed into balls, be left as a square when it comes out of the oven and then, once it has cooled, sprinkled with icing sugar (aka powdered sugar or confectioner’s sugar) and cut into squares. Continue reading Chinese Chews Recipe
This No-bake Chocolate and Peanut Butter Marshmallow Square (sometimes called Confetti Square (owing to the confetti-colored marshmallows) is easy to make. It is great to make at the last minute, or if you have no baking experience, as it takes few ingredients and requires minimal effort to make. Super colorful, I think it could pass for candy! Continue reading Chocolate and Peanut Butter Marshmallow Square
I am into my vintage recipe files and have chosen the No-bake Peanut Butter Marshmallow Square recipe to share with you today. This retro square that many of us grew up with is known by a multitude of names including Confetti Square (owing to the confetti-colored marshmallows) and Butterscotch Marshmallow Square (owing to the butterscotch chips). Continue reading No-bake Peanut Butter Marshmallow Square
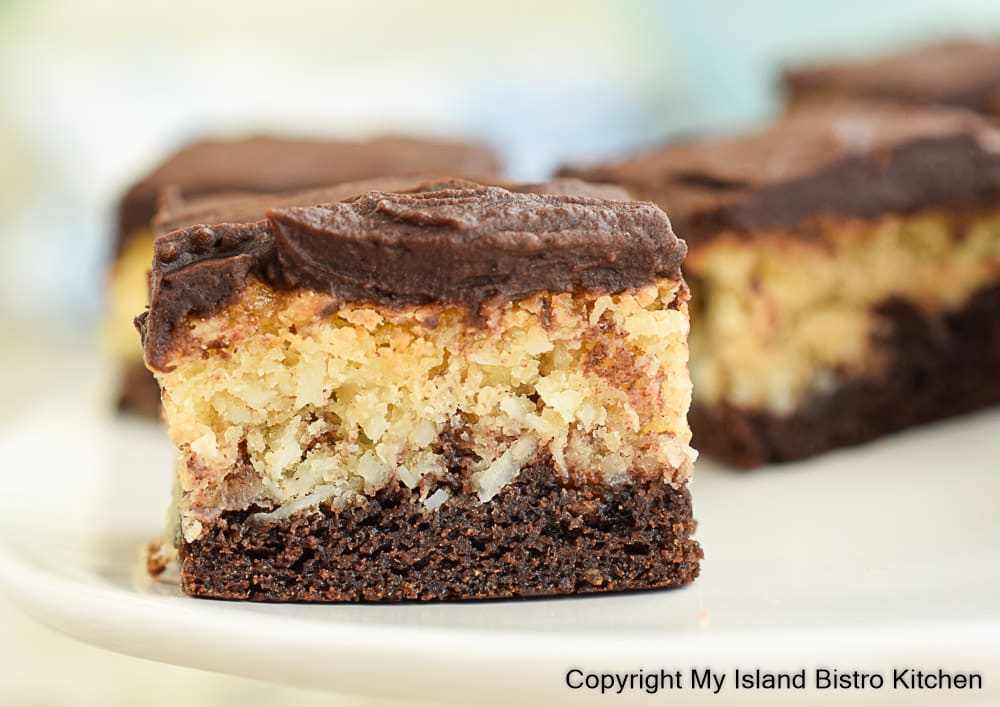
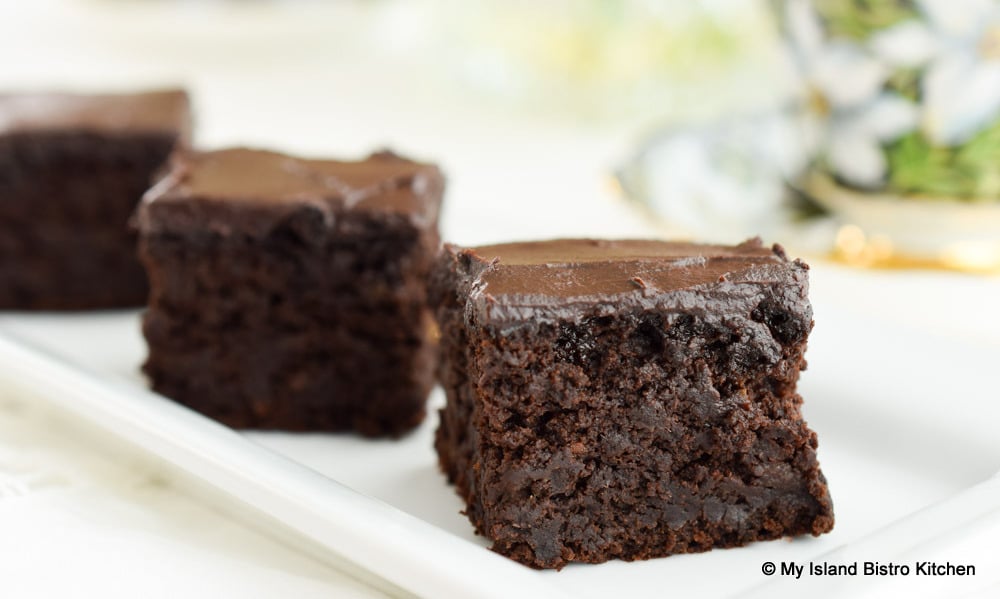
Who doesn’t love a sweet treat that can be made with just basic standard pantry ingredients and not require a shopping trip to the supermarket for supplies. These Double-Decker Chocolate and Coconut Brownies are just that kind of treat! Continue reading Double Decker Chocolate and Coconut Brownies
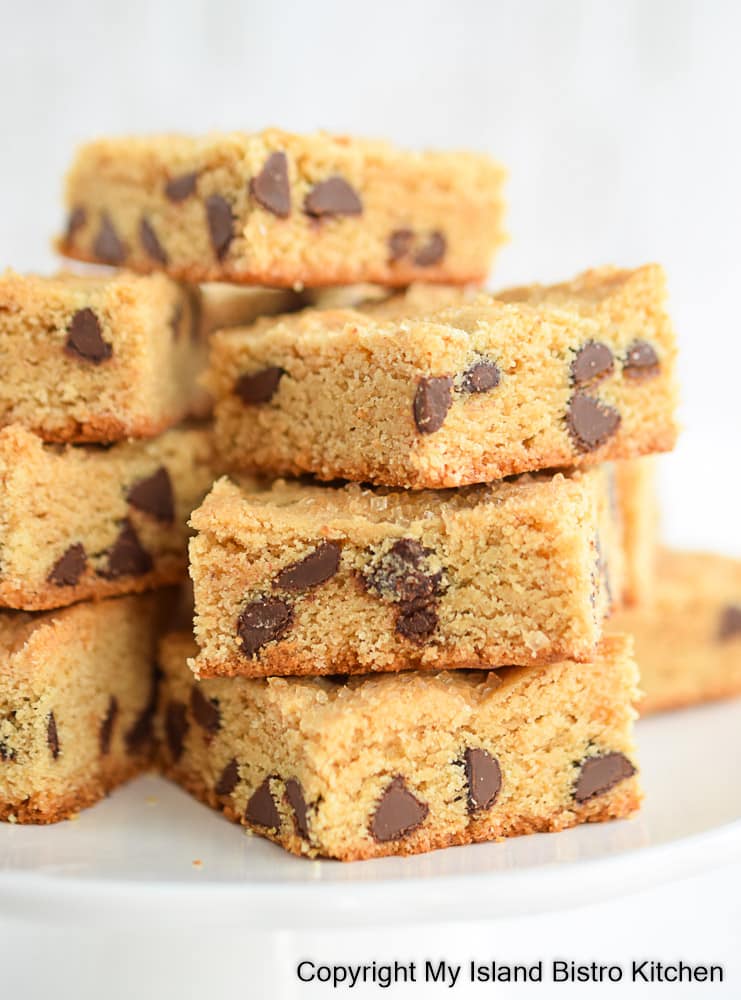
These easy-to-make one-bowl Peanut Butter and Chocolate Chip Blondies are moist, slightly chewy, and studded with chocolate chips. Topped with a sprinkling of turbinado sugar, they require no frosting. Continue reading Peanut Butter and Chocolate Chip Blondies
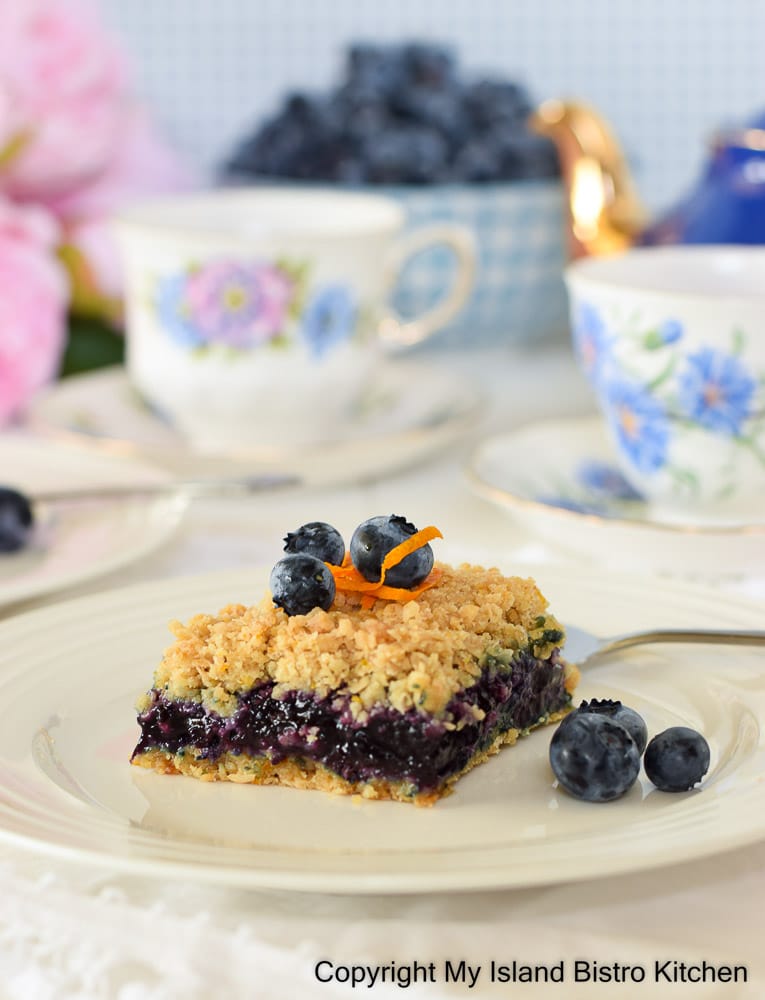
Modelled after, and made with the same method as, a traditional Date Square, this wholesome Orange-Scented Blueberry Oat Square features a delectable blueberry filling sandwiched between a sweet and buttery orange-scented oatmeal crumb base and topping. Continue reading Orange-scented Blueberry Oat Square
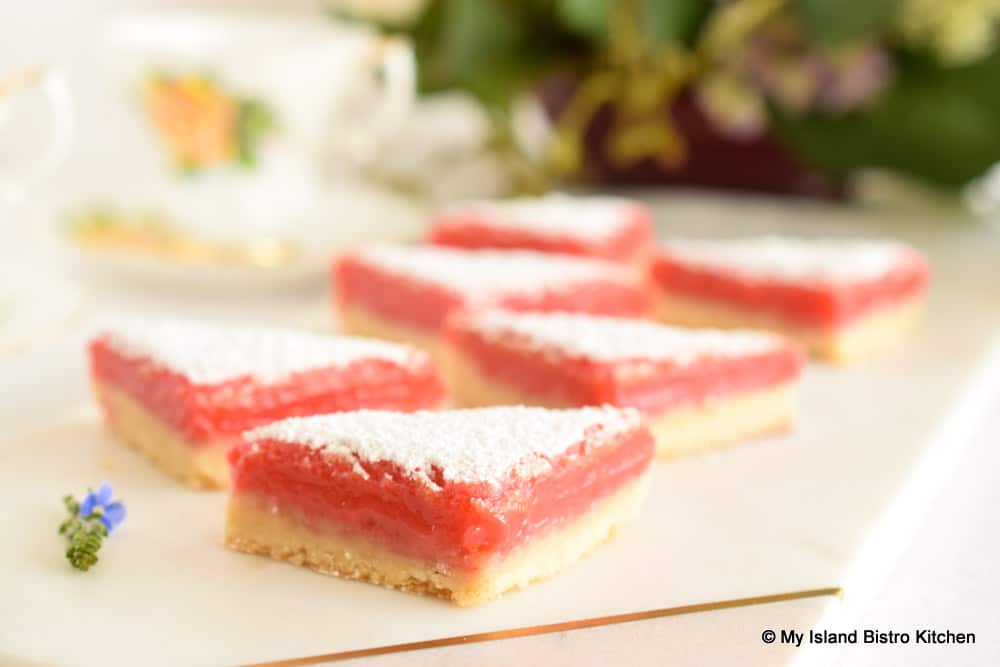
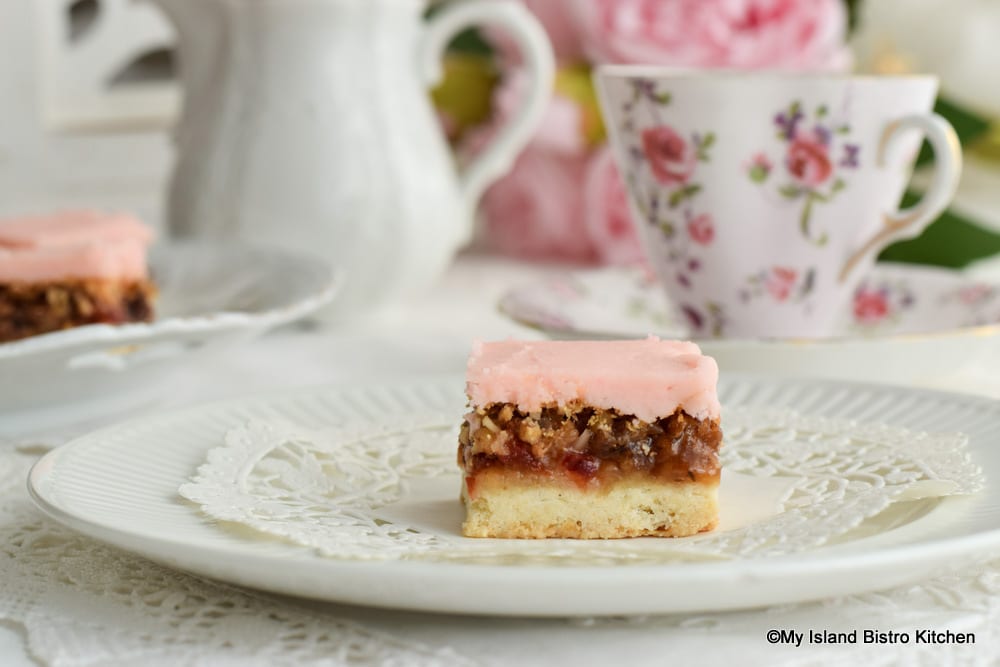
Two of the season’s best treats – strawberries and rhubarb – combine to make a luscious topping for Scrumptious Strawberry Rhubarb Bars with a rich buttery shortbread base. Continue reading Scrumptious Strawberry Rhubarb Bars
Who would ever think that the lowly black beans, known for their fibre and protein content, could be transformed into moist, fudgy, decadent, and super tasty brownies! But, it’s true and these Black Bean Mocha Brownies (now my new favorite) do not have the slightest taste of beans! Serve the brownies to folks and don’t tell them there are black beans in them and I seriously doubt they’d ever guess as much. With maple syrup, cocoa powder, coffee, and vanilla as flavor enhancers along with almond flour, you’d be hard pressed to find a hint of bean flavor in these brownies. Continue reading Black Bean Mocha Brownies
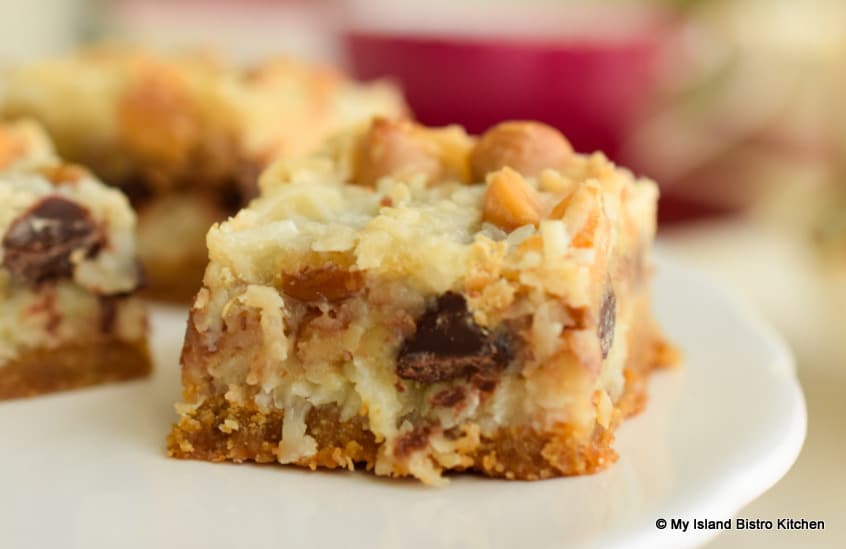
This is an oldie but always a goodie! This irresistible Hello Dolly Square is believed to have started circulating c. 1960s and may have been named in honor of the Hello Dolly musical of the same era. Continue reading Hello Dolly Square Recipe
Always a favorite, this three-part square (shortbread base, topping, and icing), known simply as “Dream Square”, is a treat! Sometimes referred to as a vintage or retro square, I’m not sure it has ever been “shelved” long enough in history to put it in that category! This is a square that is, in my view, perennially in vogue. Continue reading Decadent Dream Square Recipe

This lovely Cranberry Shortbread Square with a tender, buttery shortbread crust features cranberry sauce as an ingredient in the topping. The sauce adds lovely flavor and texture making the square rich and delectable. Continue reading Cranberry Shortbread Square Recipe
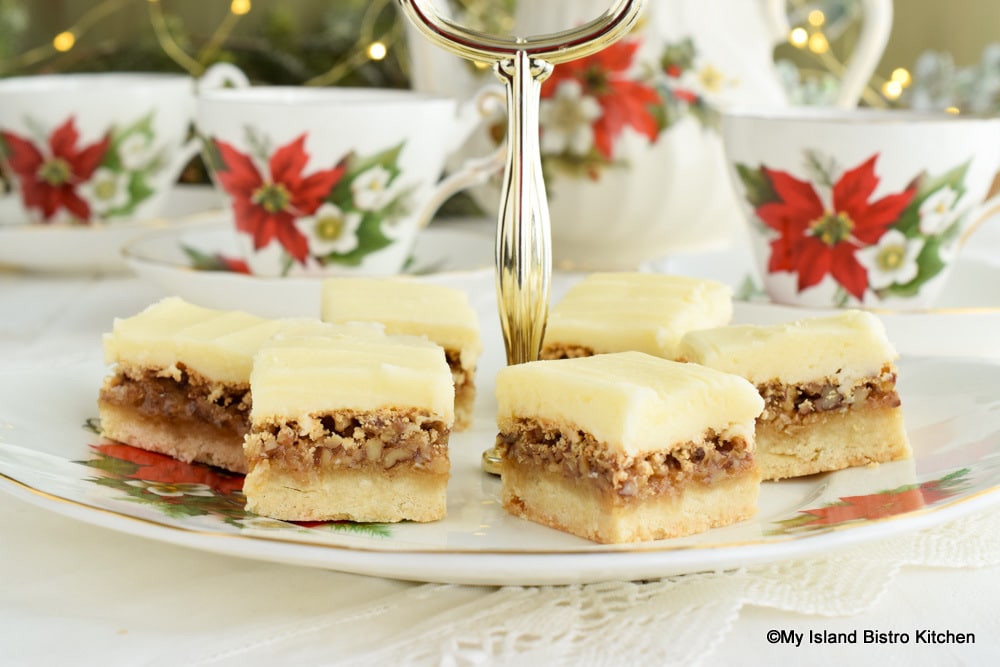
I call this type of square the “three-piece suit” of squares. That’s because there are three components to the square: 1) a tender, buttery shortbread crust; 2) a topping or filling; and 3) a buttery icing. This delectable Pecan Shortbread Square is always one that calls for a second piece! Continue reading Pecan Shortbread Square Recipe
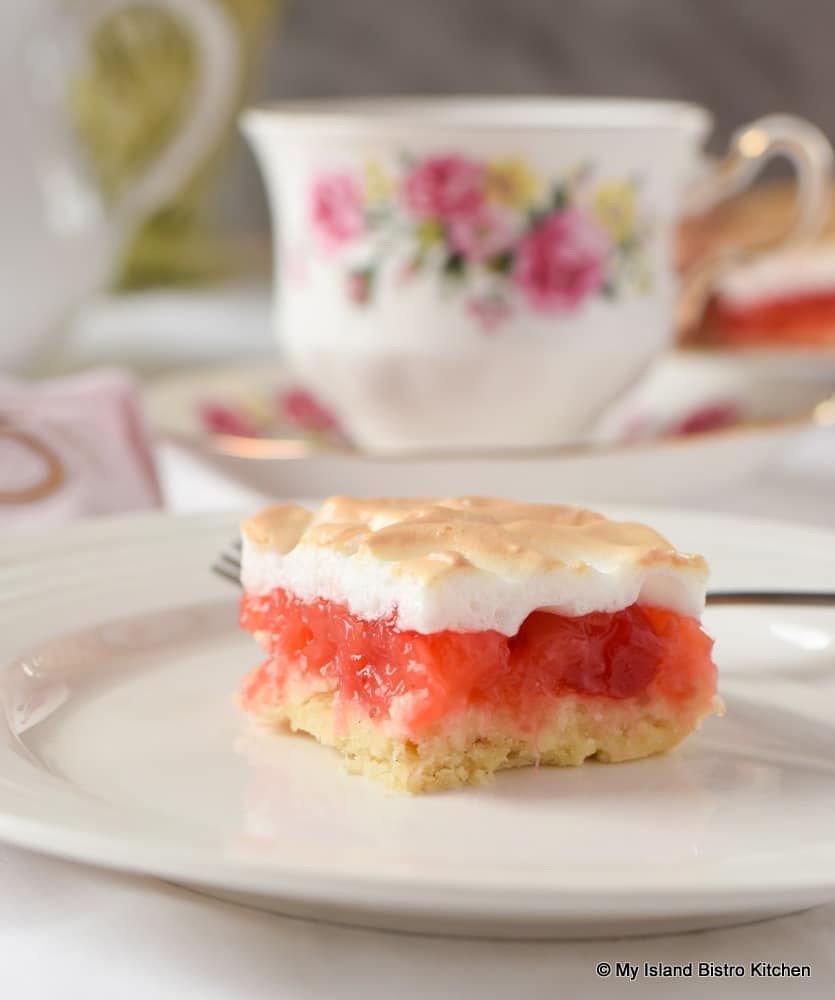
Today, I have dug deep into my vintage recipe file for this super tasty Rainbow Square. This is more of a dessert square than one that would be found on a tray of squares where each individual square could be picked up and eaten from the hand. This one is best served on a plate and eaten with a fork. It would fall into the “ooey-gooey” square category, in my opinion! Continue reading Vintage Rainbow Square Recipe

These Coconut Date and Cherry Squares are one of the easiest squares to make as there is only the one layer. Simply place the coconut, dates, cherries, and pecans in a large bowl. Stir in sweetened condensed milk and transfer mixture to a baking pan. How easy is that! Continue reading Coconut Date and Cherry Square
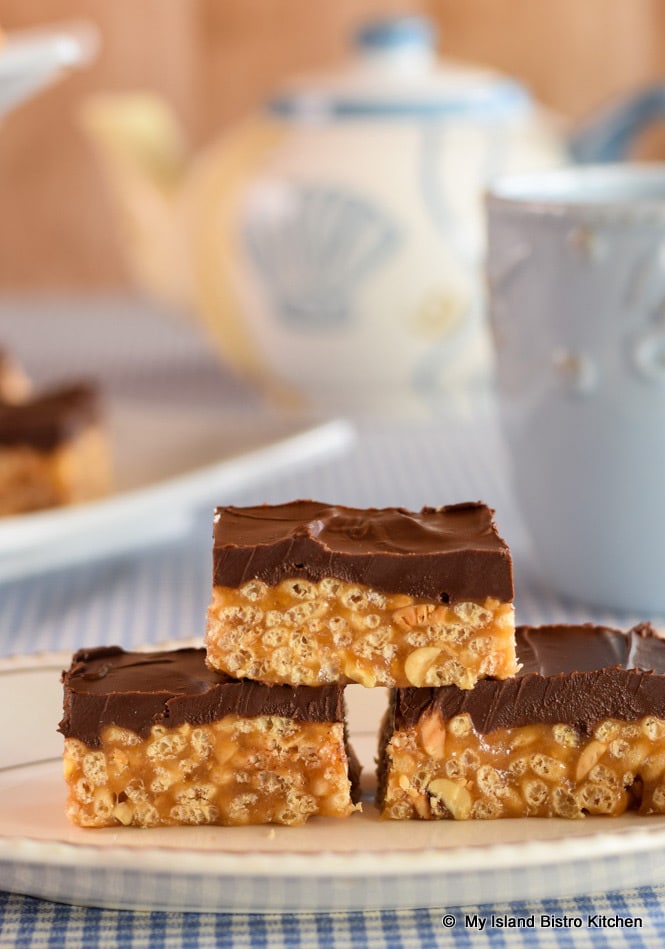
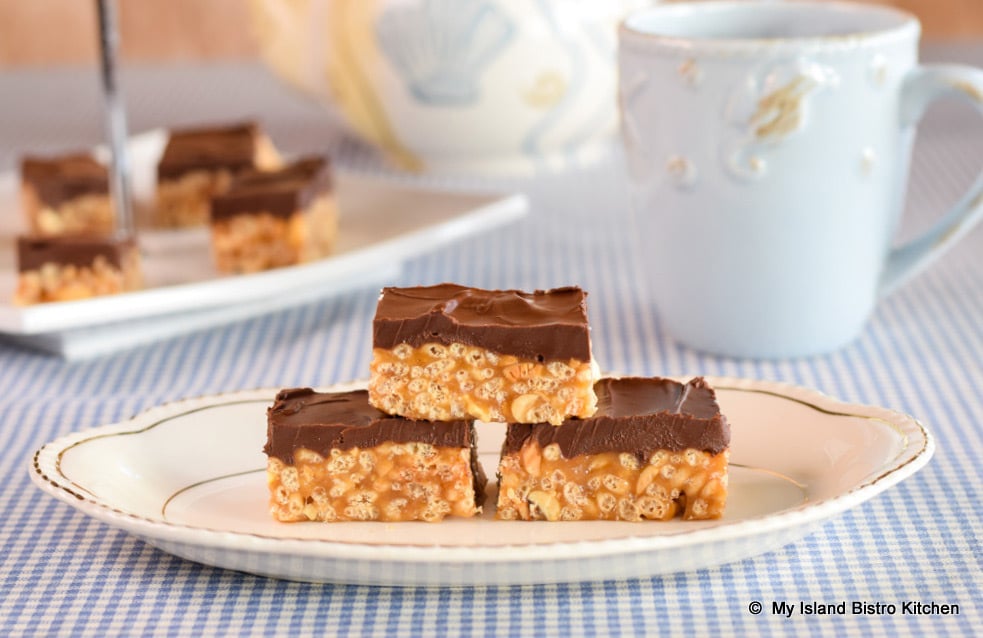
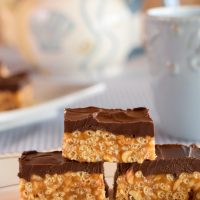
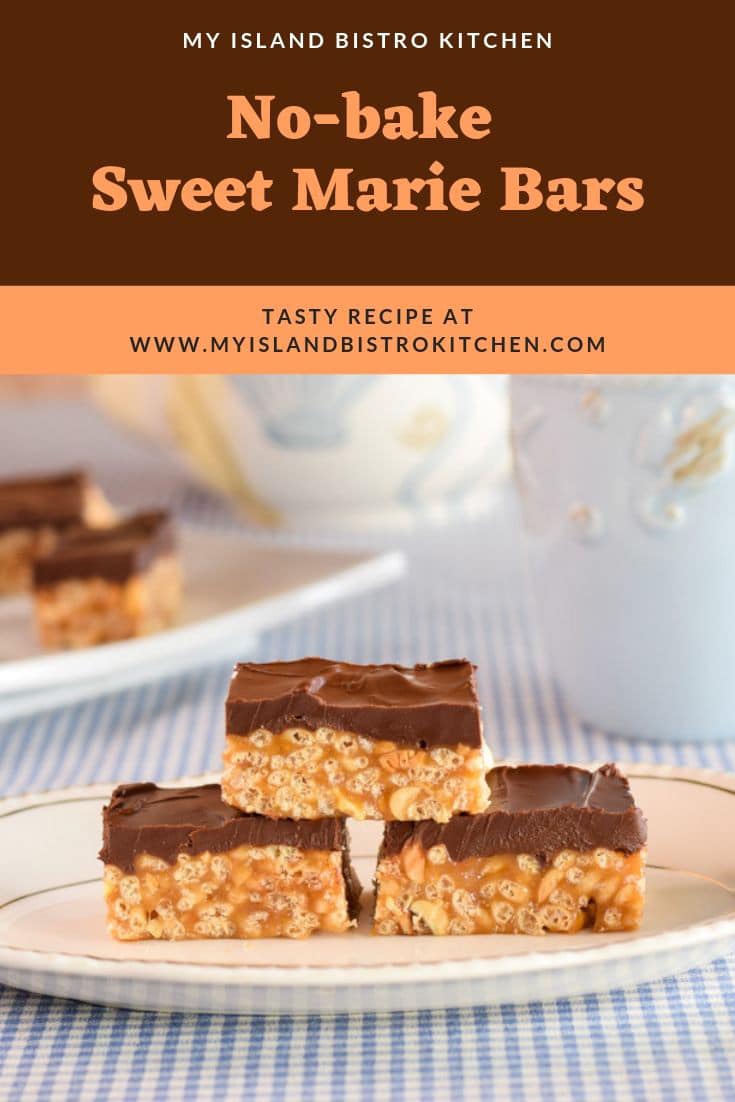
Everybody loves an easy square or bar to make that does not require careful watching as it bakes in the oven and that does not have to be frosted. Sweet Marie Bars fit nicely in that category. Taking only a few very basic ingredients, the result is one delectable treat that often finds its way on to sweet trays, particularly at Christmas.
Sweet Marie Bars have made their way into my picnic basket on more than one occasion since they are more like candy, in my opinion, than what we traditionally think of as squares or cookie bars.
This bar recipe has been around for a long time and is known by names other than Sweet Marie Bars. The core ingredients do not tend to change though the quantities may and, sometimes, the bars are iced with traditional frosting. I have seen them called Peanut Krispie Bars and a variation called Scotheroos that call for some butterscotch chips. There are probably other names for these bars and their variation(s). Regardless what they are called, they are one delectable treat any time of the year!
[Printable recipe follows]
Ingredients:
2 cups crispy rice cereal (e.g., Rice Krispies)
¾ cup salted peanuts
½ cup peanut butter
½ cup golden corn syrup
½ cup brown sugar, packed
1 tbsp butter
8 oz semi-sweet chocolate pieces or squares
¼ cup peanut butter
2 tsp butter
Method:
Line a 9”x9” square baking pan with tin foil and spray lightly with cooking spray (or grease with butter).
Stir the crispy rice cereal and salted peanuts together in a large heat-proof bowl (e.g., glass or stainless steel). Set aside.
In medium-sized, heavy-bottomed saucepan placed over low heat, combine the peanut butter, corn syrup, brown sugar, and butter. Stir until mixture is blended and heated. Do not boil.
Remove saucepan from heat and pour mixture over the cereal and peanut mixture. Stir to mix. Press mixture into prepared baking pan.
For topping, melt the chocolate in a microwave-safe bowl, a few seconds at a time. When chocolate is about half melted, stir in the peanut butter and butter. Continue to microwave in short bursts of seconds until chocolate is melted. Pour the topping over the square in pan and smooth with a knife or small flat metal spatula. Let cool completely to room temperature before lifting square from pan and cutting it into squares or bars of desired size. Square may cut out better if cooled square has been placed in the refrigerator for 15-20 minutes.
Yield: One (1) 9” pan of squares/bars
Yield: One (1) 9” pan of squares/bars
[Copyright My Island Bistro Kitchen]
Join the Facebook page for My Island Bistro Kitchen: https://www.facebook.com/MyIslandBistroKitchen/
Follow “the Bistro” on “X” (formerly Twitter): https://twitter.com/PEIBistro/
See the drool-worthy gallery of mouth-watering food photos from My Island Bistro Kitchen on Instagram: https://www.instagram.com/peibistro/
Follow “the Bistro” on Pinterest at https://www.pinterest.ca/peibistro/ and pin the Pinterest-ready photo at the end


These delightful no-bake bars are almost like candy! Bar none, these classic Nanaimo Bars are my all-time favorite bars. They consist of three layers: 1) a chocolate base consisting of graham wafer crumbs, nuts, cocoa, and coconut; 2) a soft yellow-colored custard-flavored filling made primarily with icing sugar and custard powder; and 3) a rich chocolate ganache topping. Continue reading Classic Nanaimo Bars
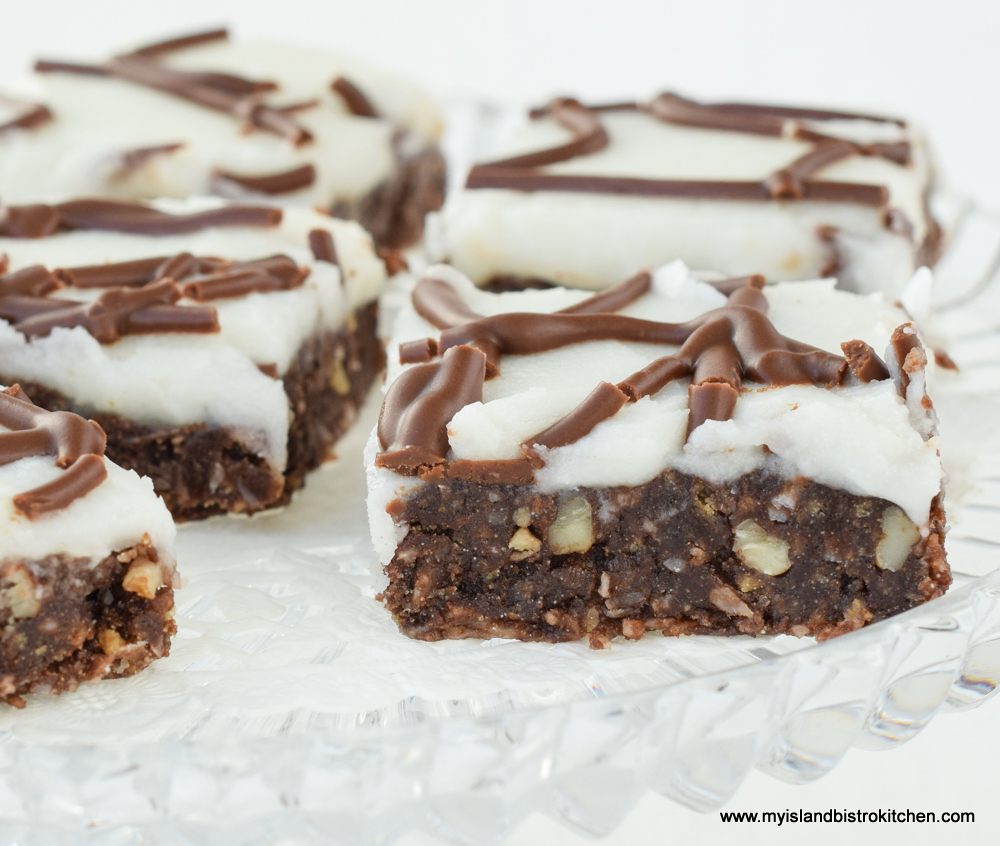
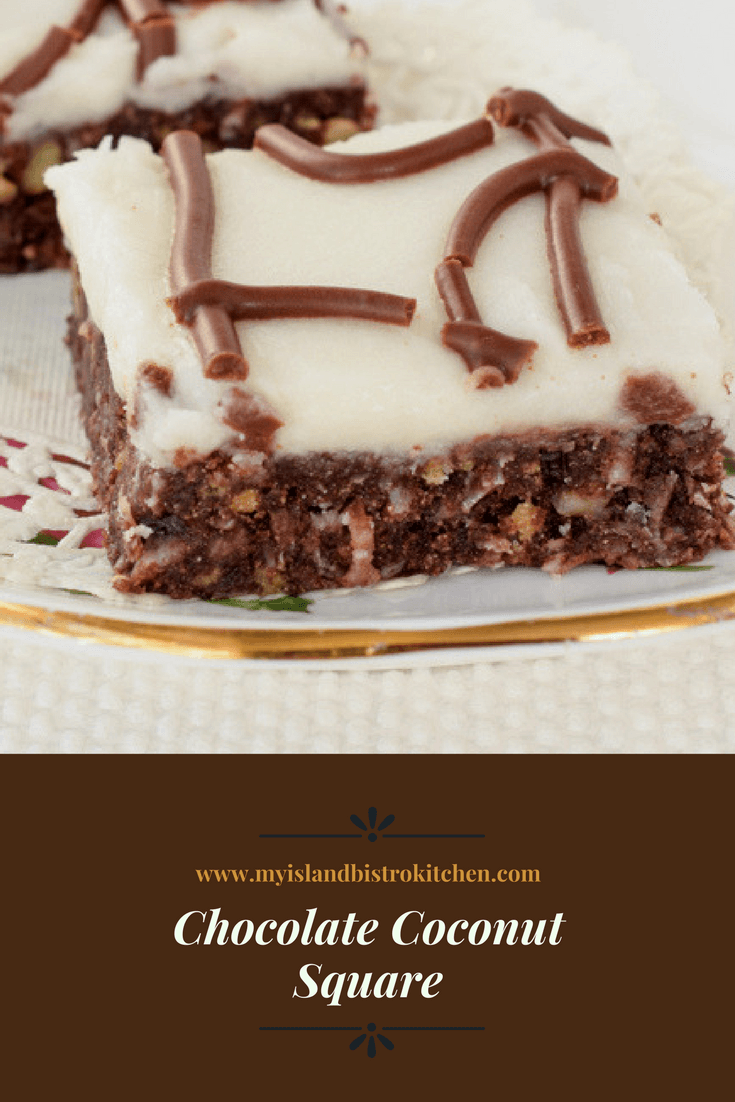
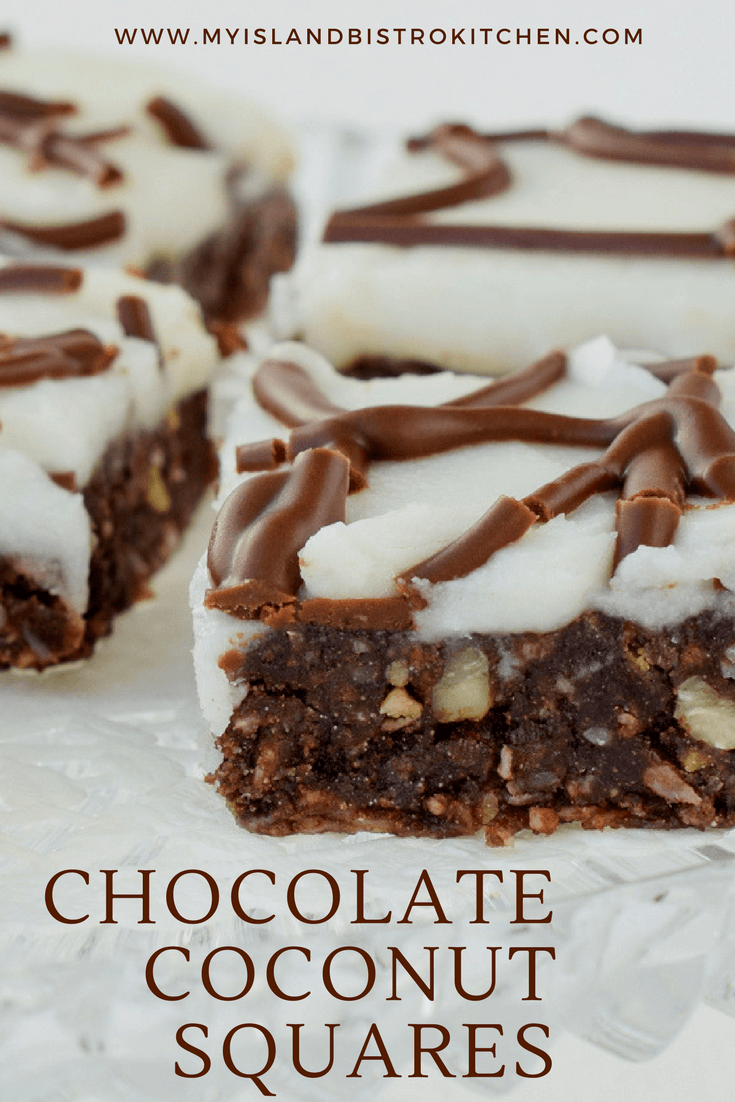
This no-bake chocolate coconut square is one of the easiest to make and it does not take a lot of ingredients. The recipe calls for graham wafer crumbs – to make this square gluten-free, use gluten-free graham style crumbs. There may be a number of brands of these crumbs available. I use the Kinnikinnick brand. In fact, the squares in the photos in this post are made with these gluten-free crumbs.
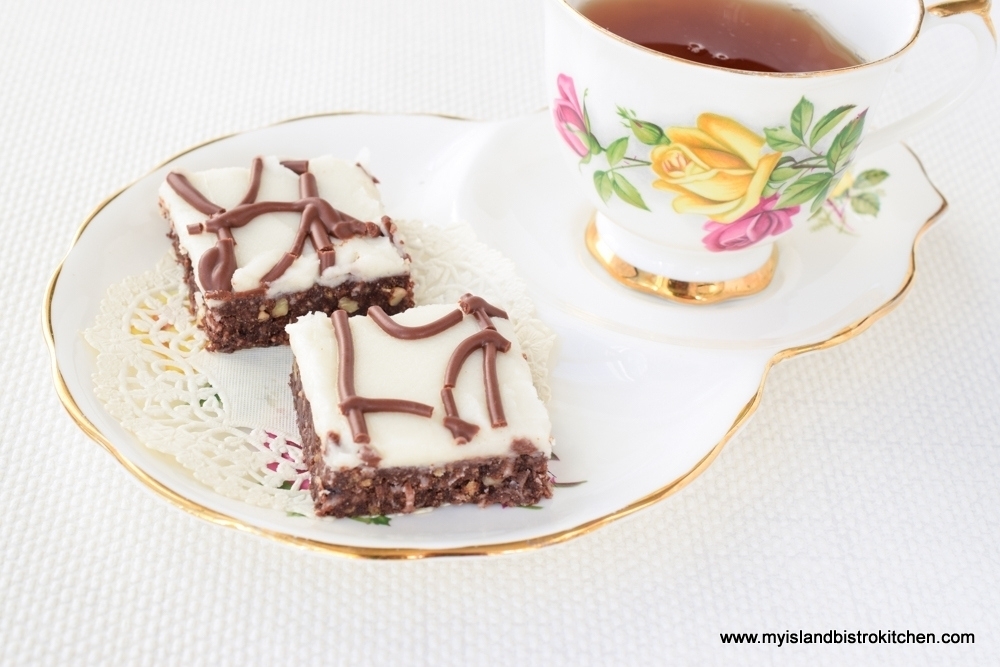
This square is almost candy-bar quality. It is not a thick square but it is rich, moist, and very tasty! A great treat anytime and a sure favorite on any sweet tray.

Ingredients:
½ cup butter, softened at room temperature
2 tbsp brown sugar
2 tbsp granulated sugar
3 tbsp unsweetened cocoa
1 extra large egg, room temperature, beaten
1 tsp vanilla
2 cups graham wafer crumbs
1 cup shredded unsweetened coconut
½ cup chopped pecans
Method:
Line 9”x9” baking pan with parchment paper, leaving enough paper overhang that finished square can be lifted from the pan for easy icing and cutting.
Combine butter, sugars, and cocoa in medium-sized heavy bottomed saucepan. Cook over medium low heat until butters melt and ingredients are combined and heated. Stir frequently to prevent scorching. Do not boil.
Add the beaten egg and vanilla. Cook over medium low heat for 2-3 minutes, stirring constantly.
Remove from heat and add the graham wafer crumbs, coconut, and pecans. Stir to combine ingredients well.
Spread mixture evenly in prepared pan. Cool. Ice with buttercream icing (recipe follows). Cut into squares of desired size.
Ingredients:
2 cups sifted powdered sugar (aka icing sugar/confectioner’s sugar)
3 tbsp butter, softened at room temperature
2½ tbsp water
½ tsp almond flavoring
1 – oz square semi-sweet chocolate
1 tbsp butter, softened at room temperature
Method:
Combine the powdered sugar and butter in bowl of stand mixer. Mix on low speed to blend in butter. Add the water and almond flavoring and increase speed to medium-low to blend ingredients. Increase speed to high and beat an additional minute to ensure ingredients are well combined and icing is smooth. Additional water may be required to make icing of desired spreading consistency. If adding additional water, add by ½ teaspoon at a time.
Spread icing evenly over square. Melt the chocolate square and butter in small dish in microwave only until the ingredients have melted enough to be blended together. Drizzle in desired design over icing. Cut squares into desired size.
Yield: 1 – 9”x9” pan of squares
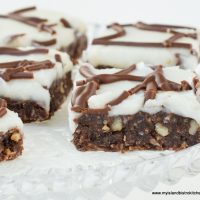
Easy-to-make unbaked chocolate coconut square is sure to appeal to any sweet tooth and make a fine addition to sweet trays
Combine butter, sugars, and cocoa in medium-sized heavy bottomed saucepan. Cook over medium low heat until butters melt and ingredients are combined and heated. Stir frequently to prevent scorching. Do not boil.
Spread icing evenly over square. Melt the chocolate square and butter in small dish in microwave only until the ingredients have melted enough to be blended together. Drizzle in desired design over icing. Cut squares into desired size.
Yield: 1 – 9”x9” pan of squares
To make this square gluten-free, use gluten-free graham style crumbs.
[Copyright My Island Bistro Kitchen]
Classic Nanaimo Bars
Hello Dolly Square
Decadent Dream Square
Cranberry Shortbread Square
Pecan Shortbread Square
Sweet Marie Bars
Decadent Chocolate Chip Square
Old-fashioned Jam Square
Marshmallow Square
Peanut Butter and Chocolate Chip Blondies
Date Squares
Orange-scented Blueberry Oat Square
Double Decker Chocolate and Coconut Brownies
Black Bean Mocha Brownies
Old-fashioned Brownies
Scrumptious Strawberry Rhubarb Bars
Join the Facebook page for My Island Bistro Kitchen: https://www.facebook.com/MyIslandBistroKitchen/
Follow “the Bistro” on “X” (formerly Twitter): https://twitter.com/PEIBistro/
See the drool-worthy gallery of mouth-watering food photos from My Island Bistro Kitchen on Instagram: https://www.instagram.com/peibistro/
Follow “the Bistro” on Pinterest at https://www.pinterest.ca/peibistro/ and pin the Pinterest-ready photo at the end
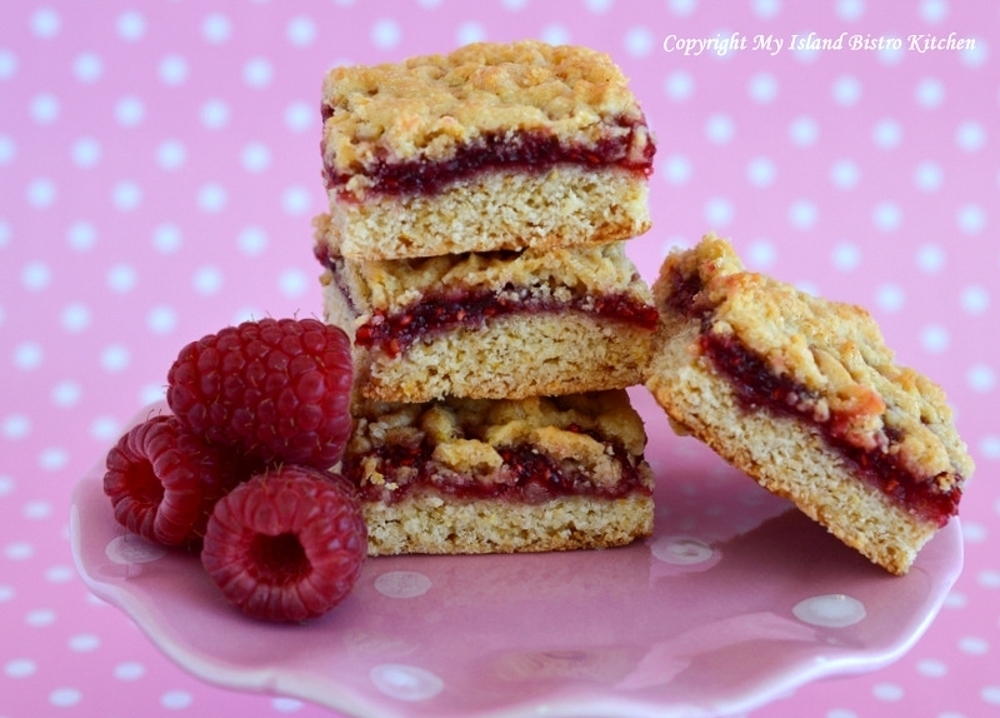
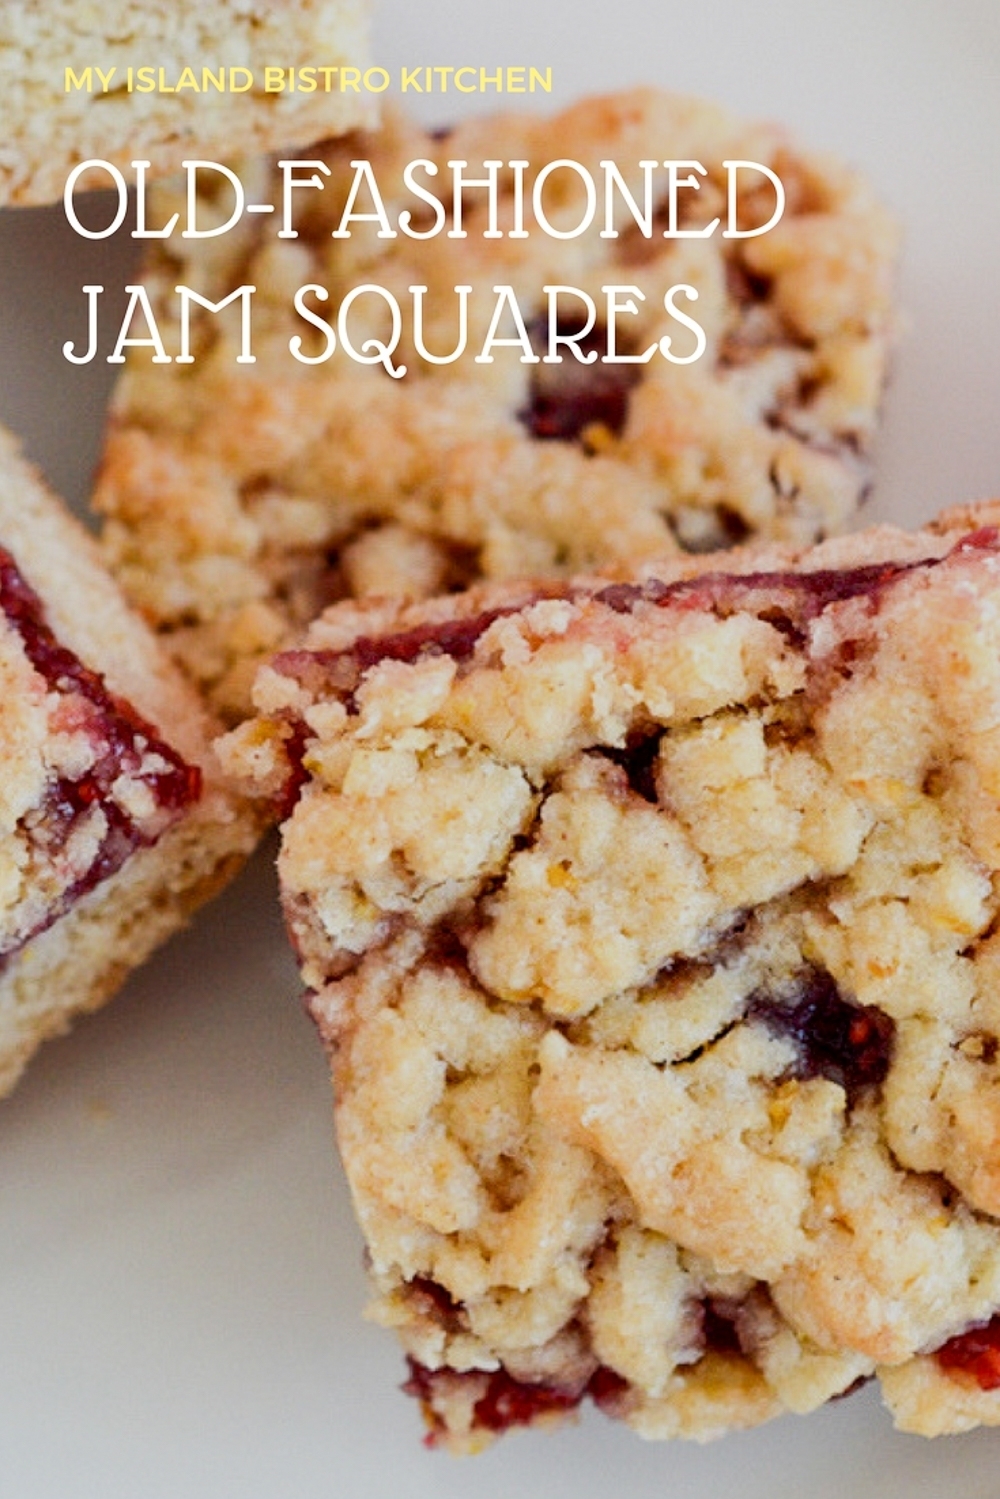
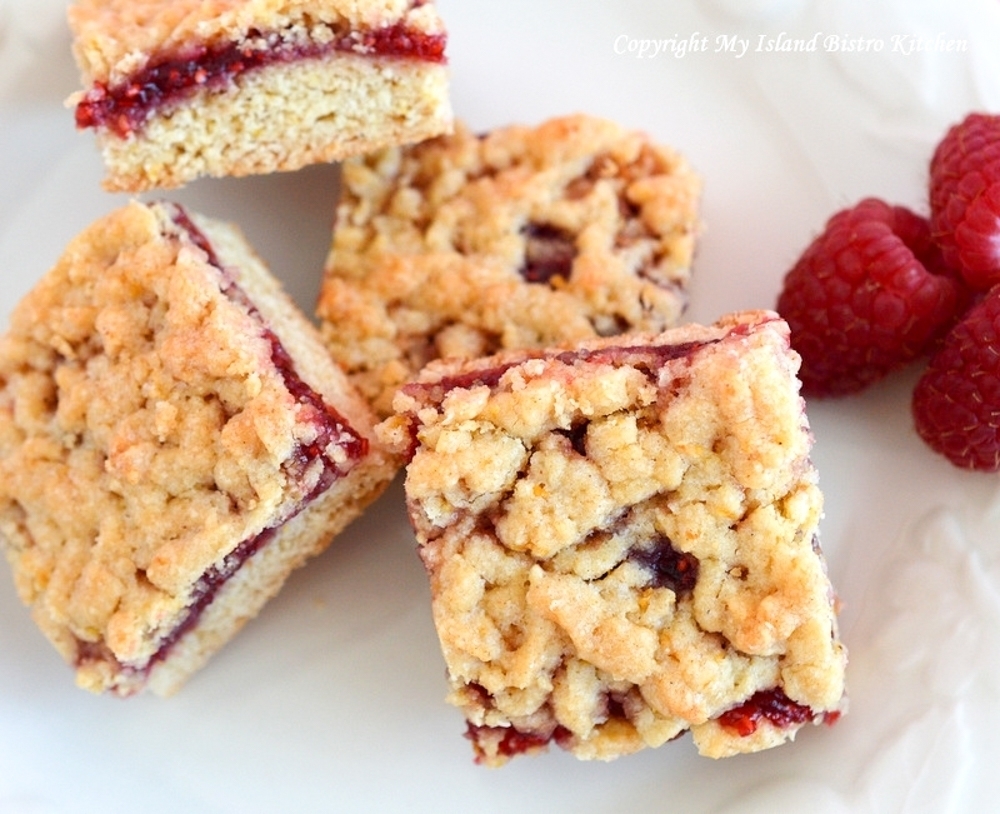
Jam Squares are an old-fashioned favourite that I grew up with. They are easy to make and only take common ingredients. While any kind of jam may be used, they are most showy when red jam, such as raspberry, is chosen. They are a treat at any time and look especially good on sweet trays for special events.
[Printable Recipe follows at end of posting]
Ingredients:
1/3 cup butter
1 egg
1 tsp vanilla
½ tsp almond flavoring
½ cup white sugar
1 cup + 2 tbsp all-purpose flour
1 tsp baking powder
¼ tsp salt
¼ tsp cinnamon
⅛ tsp cardamom
Finely grated rind of 1 lemon
½ cup raspberry jam
Method:
Preheat oven to 350°.
Assemble ingredients.
Prepare 8”x8” pan by lining with parchment paper.
With electric mixer, beat butter well in medium-sized bowl. Beat in egg, vanilla, and almond flavouring.
Sift sugar, flour, baking powder, salt, cinnamon, and cardamom together. Stir in grated lemon rind. Add to butter-egg mixture and blend thoroughly.
Shape dough into a small oblong shape. Cut off about one-third of the dough and place in freezer for 15 minutes.
Meanwhile, press remaining dough into prepared pan. Place pan in freezer for 15 minutes.
Remove both the reserved dough and the pan from the freezer. Evenly spread the ½ cup raspberry preserves over dough in pan.
Using a grater, grate the reserved dough evenly over the jam.
Bake for 35 minutes or until topping on square is lightly golden in color.
Let square cool completely in pan before removing and cutting into 16 squares.
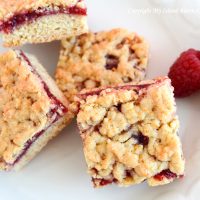
Jam Squares take only common ingredients. While any kind of jam may be used, they are most showy when red jam is chosen.
Copyright My Island Bistro Kitchen
Join the Facebook page for My Island Bistro Kitchen: https://www.facebook.com/MyIslandBistroKitchen/
Follow “the Bistro” on “X” (formerly Twitter): https://twitter.com/PEIBistro/
See the drool-worthy gallery of mouth-watering food photos from My Island Bistro Kitchen on Instagram: https://www.instagram.com/peibistro/
Follow “the Bistro” on Pinterest at https://www.pinterest.ca/peibistro/ and pin the Pinterest-ready photo