
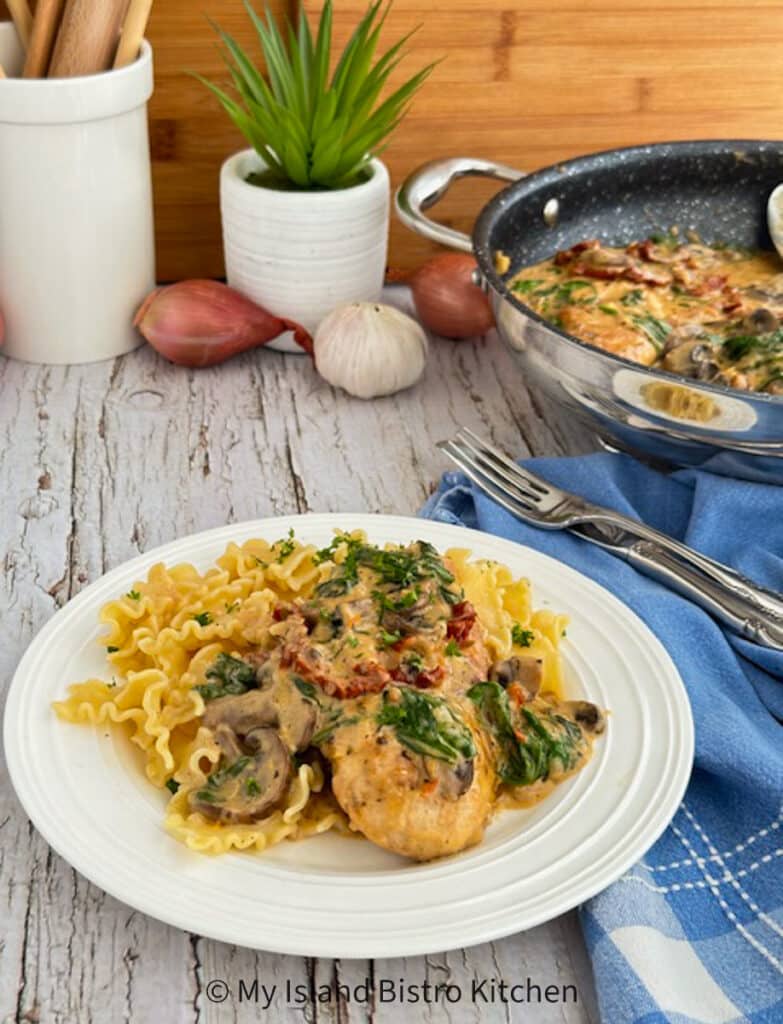
This Creamy Tuscan Chicken dish, in my opinion, certainly qualifies as a restaurant-quality entrée that can be made in one pan right in your own kitchen. The dish consists of boneless skinless chicken breasts combined with mushrooms, sun-dried tomatoes, and nutrient-rich spinach in a delectable creamy sauce. It’s packed with lovely flavor and is wonderful served with pasta, rice, or potato of choice.
When we hear of a main dish having the word “Tuscan” in its name, we can expect to see some Italian influence in the ingredients. It certainly does have some Italian flavors – think sun-dried tomatoes, Parmesan cheese, garlic, wine, and a rich creamy sauce, in particular. This dish is sometimes referred to as “Marry Me Chicken” presumably, because it is so darn tasty, it could lead to a marriage proposal by a suitor besotten with the wickedly fabulous dish!
While the recipe is not particularly difficult to make, there are steps, organization, and time involved. But, following my method, the steps are sequential which makes the work easier and more efficient. This is one of those dishes in which advance planning and doing the prep work upfront is essential – dry brining the chicken, all the measuring and chopping of ingredients, etc.
Equipment
In terms of equipment needed to make this meal, I recommend the following:
- Instant-read thermometer for confirming doneness of chicken
- Kitchen scales for weighing chicken, cheese, spinach, mushrooms, and sun-dried tomatoes
- Microplane or fine grater for grating Parmesan cheese
- Large skillet for cooking chicken pieces (a skillet or sauté pan at least 11” (28cm) or larger works well; alternatively, the chicken pieces can be cooked in batches or two medium-sized skillets used)
- A lettuce spinner is useful for washing and drying the spinach but not essential (the spinach can be washed and gently rolled in a tea towel or two to remove excess moisture)

Dry-Brining Chicken Breasts
When it comes to organizing the making of my Tuscan Chicken recipe, I recommend (as I do with all my stove-top chicken dishes) starting with some pre-prep work and the first step I recommend taking is dry brining the chicken breasts. This is a game changer, in my view, for ensuring tender, juicy, flavorful chicken.
The whole point of taking the time to brine chicken is to tenderize the meat, promote moisture retention, and deepen flavor. In the case of this Tuscan Chicken recipe, as well as others that use chicken cutlets, brining is very beneficial because the chicken breasts will be sliced in half, horizontally, to form thin cutlets. These thin pieces of chicken, unbrined, have a tendency to dry out quickly, particularly if they are cooked at a high temperature. This is where moisture retention is really desired because no one likes dry, rubbery, bland and flavorless chicken breasts.
There are two kinds of brines – wet and dry. A wet brine, of course, involves submerging the chicken pieces in a salted water mixture that may also contain additions such as aromatics, herbs, spices, sugar, etc. As the meat sits in the solution for a period of time, it will take on additional moisture and the flavor of the brine (if it has had additions to it). So, with a wet brine, you are adding moisture to the meat beyond what is naturally found in the chicken pieces. Well and good but, in some cases, added moisture is not desirable because it can dilute the natural chicken flavor as well as inhibit browning and caramelization of the chicken.
By contrast, a dry brine is simply just coarse, large crystal Kosher salt and nothing else, sprinkled evenly over each side of the chicken pieces and gently patted/rubbed into the meat. Do NOT use fine iodized table salt for this process as it will make the chicken way too salty. A “general” gauge of how much coarse Kosher salt to use is somewhere in the vicinity of 1 teaspoon per pound of chicken. In the case of this Tuscan Chicken recipe that calls for 1 pound of boneless, skinless chicken breasts, I use apx. ¼ teaspoon of Kosher salt on each side of the two chicken breasts (so, 1 teaspoon, in total). The chicken is then placed on a wire rack set over a rimmed baking sheet to catch any drips and ensure the chicken is not sitting in its own juices for a prolonged period. Placing the chicken on a wire rack allows for good air circulation for the brining process. The chicken is then placed, uncovered, in the refrigerator.
The dry brine does not add any extra moisture to what already exists naturally in the chicken so it does not dilute the authentic chicken flavor. What it does, however, is draw the existing moisture out of the chicken, bringing the moisture to the surface and, with sufficient time, that moisture breaks down the remaining coarse salt sitting on, or near, the chicken piece surface. That moisture then reabsorbs itself into, and disburses throughout, the chicken (essentially creating its own natural concentrated brining solution). This is what will tenderize the meat by breaking down tough muscle fibers. Like magic, this process will allow the chicken pieces to retain moisture during cooking.
Some will claim dry brining of chicken breasts can be done in as little as 30-60 minutes; however, my tests have revealed that is barely enough time for the slow-release Kosher salt to start to work and not enough time for it to fully penetrate the meat and really tenderize and flavor the whole chicken breast all the way through. At best, within that timeframe, you might see some moisture beads appearing on the surface of the chicken from the salt starting to draw out the natural moisture in the chicken but those beads need time to dissolve the coarse Kosher salt sitting on, or near, the surface of the chicken and let it be re-absorbed throughout the chicken pieces to do its tenderizing and flavoring work. Otherwise, if the chicken breasts were to be cooked at this point, the natural moisture has been removed from the chicken and not been re-absorbed into the meat resulting in a less than desirable outcome.
Essentially, in my opinion, dry brining for 30 minutes or so will do little more than season the outer edges of the chicken. I have found that at least 6-8 hours is needed to tenderize and deepen the flavor and I have left it as long as 18 hours with good results. I would not recommend leaving it beyond the 18-hour point because, well, there is no added benefit in doing so and the chicken may then take on a distinctive salty taste with being left too long. When the brining process ends, the chicken will appear to have a dry surface. This is desired for optimal golden browning of the chicken cutlets. If there are still water beads on the chicken breast surface, it is not done brining. So, my guide for how long I leave the chicken dry brining is this – no water beads are on the surface of the chicken piece and the chicken has a dry surface appearance.
Dry brining is super easy and not as messy as wet brining. Pat the whole chicken pieces dry with paper towel, then use about ¼ teaspoon of coarse Kosher salt sprinkled evenly on each side of each whole chicken piece. I sprinkle the salt from a distance of about 8”- 10” above the chicken to allow a more even distribution of the salt. Kosher salt is a slow-release type of salt and it will not make the chicken salty (unless it is left over 18 hours to brine). Just don’t add any more salt seasoning to the recipe itself and don’t rinse off the dry-brined chicken pieces before cooking.
Can this dish be made without the brining process? Yes, however, if you want lovely tender, juicy, and flavorful chicken, I highly recommend dry brining the pieces. This is because the thin chicken cutlets can quickly dry out during the cooking process and the dry brining helps with moisture retention.
Can a wet brine be used for the chicken in this recipe? Yes, it will certainly result in tender, juicy chicken pieces, too, but it will add more moisture to the chicken and, in the case of this dish, we want to promote lovely browned and caramelized chicken pieces and the dry brining gives a dry surface for that to occur whereas a wet brine will not.

Prepare Remaining Ingredients for Recipe
As the brining period is coming to an end and it is time to make the dish, set out the whipping cream to bring it to room temperature. Assemble and set out all ingredients needed for the recipe. Wash the spinach and dry it (preferably in a lettuce spinner and then gently and loosely roll it in a tea towel or two so you are not adding extra moisture that would dilute the lovely rich sauce). Chop the shallots, mince the garlic, slice the mushrooms, sliver the sun-dried tomatoes if the pieces are particularly large, grate the cheese, and measure out all ingredients. This will help make the cooking part of the process more efficient than having to stop, find, and prepare ingredients as you go.

This recipe yields four servings so two large boneless, skinless chicken breasts, each breast weighing about 8 ounces (225g), so about 1 pound (454g) in total, of chicken is required. After brining, place chicken breasts on a cutting board and slice each breast in half, horizontally, parallel to the cutting board. Place chicken pieces between parchment paper or plastic cling wrap, or in a sealed plastic bag. Then, use the smooth side of a meat mallet to gently pound each of the four pieces of chicken to a uniform thickness of 1/3” – ½” thick. This results in what is known as escalope, thin boneless chicken pieces ready for pan frying/searing. The action of pounding the chicken thinner to a uniform thickness will ensure all parts of each cutlet cook evenly and at the same time. This pounding action will also help tenderize the chicken pieces. Let chicken cutlets rest for approximately 10-15 minutes before proceeding with recipe. This allows the flour to better adhere to the chicken which is not ice cold and will also help with the browning process because the chicken, not being ice-cold, will not significantly cool down the olive oil-butter already heated in the pan. This allows the chicken to start browning immediately.
After being dredged in flour, cook the chicken pieces in a large skillet until they are golden brown and their internal temperature registers 165°F on an instant read thermometer. This should take about 3 minutes of cooking per side of chicken cutlet (depending, of course, on size and thickness of cutlets and the heat used) but please do rely on an instant read thermometer to determine actual doneness. Don’t crowd the chicken pieces in the pan. Work in batches, if necessary, or use two skillets. I use an 11” (28cm) skillet which works quite well. Once cooked, keep the chicken pieces warm while making the sauce. If your oven has a specific “warm” setting, this is an ideal environment. Alternatively, tent the chicken cutlets with tinfoil.
Add the shallots, mushrooms, and garlic to the pan, cooking them briefly, ensuring that neither shallots nor garlic scorch. Slide the ingredients to one side of the skillet. Remove the pan from the heat and add the white wine. Any kind of dry white wine that you would drink is fine for this recipe. Pinot Grigio, Sauvignon Blanc, or a Riesling are all good choices for this dish and will add a bit of acidity to the sauce while adding depth and complex flavor notes and reducing the heavy richness of the cream.
Return the pan to the heat and cook the wine until it has reduced to about half, scraping up any bits of fond from the bottom of the pan since those brown bits contain a wealth of flavor. As the wine reduces, most of the alcohol will cook off so the sauce will not have a heavy/distinctive wine taste. Add the chicken stock and seasonings. I add 1¾ teaspoons of cornstarch to the chicken stock to make the sauce just a wee bit thicker than what it would be relying solely on the whipping cream for thickener. Integrate the pan vegetables into the sauce and add the whipping cream, seasoning, and cheese.
This dish is traditionally made with heavy whipping cream (i.e., 35%-36%M.F.) which does make a lovely rich sauce. As such, I do not recommend any substitutes for it. I am a firm believer that, if a dish is worth making, use the good ingredients! Don’t skimp out and miss the full experience of the dish.
Return the cooked chicken cutlets to the pan and heat 1-2 minutes.
One of the main ingredients in this dish is spinach. Some shy away from dishes that contain spinach because they are not fans of that particular vegetable. I have to admit, it’s not one of my favorite veggies to eat on its own but I absolutely love it in this Tuscan Chicken dish! It’s a great way to get the benefits from the vegetable, disguised in a lovely sauce! Use fresh baby spinach in this recipe. You want lovely small tender spinach, not large, tough leaves. This dish presents best when small pieces of vibrant verdant green spinach are visible. Make sure to spin the spinach dry in a lettuce spinner or wash and then gently roll it dry in a tea towel or two so no excess moisture is added to the sauce.
I do not recommend using frozen spinach in this recipe as it typically contains a lot of water which is hard to effectively remove and which will dilute the creamy sauce and potentially make it watery. Add the spinach at the end of the dish preparation and only cook it for 1½ – 2 minutes, just until it has started to wilt.

What To Serve With Tuscan Chicken
Tuscan Chicken is a very versatile dish as it can be served with pasta, rice, or choice of potato. I find it’s particularly lovely with pasta as there will be enough sauce with each serving to coat each bite of pasta. Choose either a long pasta like linguini, fettuccine, or tagliatelle, or other suitably shaped pasta that will hold the sauce – e.g., broad egg noodles, penne, rotini, farfalle, or fusilli. Plate the chicken cutlets and spoon the sauce generously over top and enjoy!

CREAMY TUSCAN CHICKEN
Ingredients:
2 large boneless, skinless chicken breasts (apx. 1 lb/454g)
Apx. 1+ tsp coarse Kosher Salt
3-4 tbsp all-purpose flour
½ tsp garlic powder
½ tsp paprika
2 tbsp olive oil
2 tbsp butter
1 tbsp olive oil
1 tbsp butter
1/3 cup finely chopped shallots
3 – 5 minced garlic cloves, or to taste
¼ cup dry white wine
½ cup chicken stock (mixed with 1¾ tsp cornstarch)
½ tbsp Dijon mustard
1 tbsp dried Italian Seasoning
1 cup whipping cream (35% – 36%M.F.), room temperature [no substitutions]
½ oz (14g) finely grated Parmesan Cheese
4 oz (114g) baby spinach, washed and dried
5 oz (142g) white button mushrooms, sliced
3 oz (85g) sun-dried tomatoes in oil, drained and sliced into slivers
Equipment:
Kitchen scales for weighing chicken, cheese, spinach, mushrooms, and sun-dried tomatoes
A lettuce spinner is useful for washing and drying the spinach but not essential (washing and then rolling spinach in a clean tea towel or two will also work)
Microplane or fine grater for grating Parmesan cheese
Large skillet for cooking chicken pieces (a skillet or sauté pan at least 11” (28cm) or larger works well; alternatively, two medium-sized pans can be used or the chicken breasts cooked in batches)
Instant-read thermometer for confirming doneness of chicken
Method:
Pre-prep: Dry brine the whole chicken breasts: Evenly sprinkle about ¼ tsp of coarse Kosher salt on each side of the whole chicken breast, gently patting/rubbing the salt into the meat. Set chicken breasts on a wire rack set over a rimmed baking sheet and place, uncovered, in refrigerator for at least 6-8 hours or up to 18 hours to allow the salt to fully penetrate and tenderize the meat and deepen the flavor.
When ready to make the recipe, set out whipping cream to come to room temperature. Assemble and measure out all ingredients. Wash spinach. Spin dry spinach in a lettuce spinner and gently roll spinach in clean tea towel to remove excess moisture. Chop shallots, mince the garlic, slice the mushrooms, and coarsely slice the sun-dried tomatoes (if large) into slivers, and grate the Parmesan cheese.
Remove dry-brined chicken breasts from refrigerator and place on cutting board (do not rinse dry-brined chicken). With sharp chef’s knife, slice each chicken breast in half, horizontally, parallel to the cutting board. Place each piece of chicken between two pieces of plastic cling wrap or parchment paper (or in a sealed plastic bag). Using the smooth side of a meat mallet, gently pound each piece of chicken to a uniform thickness of 1/3”– ½” thick, being careful not to tear the chicken. Let chicken cutlets rest for about 10-15 minutes before proceeding with recipe.
Mix flour, garlic powder, and paprika in shallow dish. Dredge all sides of each chicken cutlet with the flour mix. Shake off excess flour and set chicken aside.
Heat 2 tablespoons of olive oil in large skillet (e.g., 28cm/11” pan) over medium-high heat. When hot and the oil is shimmering, add 2 tablespoons of butter. Once the butter has melted, add the chicken pieces, making sure not to crowd them in the pan. Work in batches, if necessary, or use two medium-sized skillets. Reduce heat if necessary to avoid scorching the chicken pieces. Cook the chicken pieces approximately 3 minutes per side (depending on their size and thickness as well as heat level), or until their internal temperature registers 165°F on an instant read thermometer. Remove the chicken pieces from the pan and place in heatproof dish. Cover. Place chicken in oven set to the “warm” or lowest setting or, alternatively, tent with tin foil to keep the chicken pieces warm.
Over medium-low heat, add 1 more tablespoon each of olive oil and butter to the pan and add the shallots and sliced mushrooms, cooking and stirring constantly for approximately 2 minutes. Add the sun-dried tomatoes and cook for about 1 minute before adding the minced garlic. Briskly stir mixture for about 20 seconds to ensure garlic and shallots do not scorch. Reduce heat, if necessary.
Remove skillet from heat and move pan contents to one side of pan. Add the white wine. Return skillet to stovetop and bring wine to a boil over medium heat, using a wooden spoon to scrape up any brown bits (fond) on the bottom of the pan. Reduce heat to medium low and let wine reduce to about half then add the chicken stock, into which the Dijon mustard and 1¾ tsp cornstarch have been whisked until smooth. Stir occasionally until mixture starts to thicken. Integrate the pan vegetables into the sauce. Add the Italian Seasoning and cook over medium low heat for apx. 1 minute. Slowly stir in the whipping cream and Parmesan cheese until blended and cream is heated and cheese is melted. Reduce heat to simmer and cook slowly over low heat for about 2 minutes, until sauce slightly thickens, stirring frequently.
Return the chicken cutlets to the pan and heat for about 1-2 minutes, coating chicken pieces with the sauce. Add the spinach, a handful at a time, and gently stir and cook mixture for 1½ – 2 minutes longer, just until spinach has slightly wilted. Do not overcook.
Serve immediately with pasta, rice, or favorite potato side dish.
Yield: 4 servings
If you have made this recipe and enjoyed it and/or wish to share it with your friends and family, please do so on social media but be sure to share the direct link to this posting from my website.

Connect with My Island Bistro Kitchen on Social Media
Join the Facebook page for My Island Bistro Kitchen: https://www.facebook.com/MyIslandBistroKitchen/
Follow “the Bistro” on “X” (formerly Twitter): https://twitter.com/PEIBistro/
See the drool-worthy gallery of mouth-watering food photos from My Island Bistro Kitchen on Instagram: https://www.instagram.com/peibistro/
Follow “the Bistro” on Pinterest at https://www.pinterest.ca/peibistro/ and pin the Pinterest-ready photo at the end of this posting to your favorite Pinterest boards!

Creamy Tuscan Chicken
Ingredients
- 2 large boneless, skinless chicken breasts (apx. 1 lb/454g)
- Apx. 1+ tsp coarse Kosher Salt
- 3-4 tbsp all-purpose flour
- ½ tsp garlic powder
- ½ tsp paprika
- 2 tbsp olive oil
- 2 tbsp butter
- 1 tbsp olive oil
- 1 tbsp butter
- 1/3 cup finely chopped shallots
- 3 – 5 minced garlic cloves, or to taste
- ¼ cup dry white wine
- ½ cup chicken stock (mixed with 1¾ tsp cornstarch)
- ½ tbsp Dijon mustard
- 1 tbsp dried Italian Seasoning
- 1 cup whipping cream (35% – 36%M.F.), room temperature [no substitutions]
- ½ oz (14g) finely grated Parmesan Cheese
- 4 oz (114g) baby spinach, washed and dried
- 5 oz (142g) white button mushrooms, sliced
- 3 oz (85g) sun-dried tomatoes in oil, drained and sliced into slivers
Instructions
-
Pre-prep: Dry brine the whole chicken breasts: Evenly sprinkle about ¼ tsp of coarse Kosher salt on each side of the whole chicken breast, gently patting/rubbing the salt into the meat. Set chicken breasts on a wire rack set over a rimmed baking sheet and place, uncovered, in refrigerator for at least 6-8 hours or up to 18 hours to allow the salt to fully penetrate and tenderize the meat and deepen the flavor.
-
When ready to make the recipe, set out whipping cream to come to room temperature. Assemble and measure out all ingredients. Wash spinach. Spin dry spinach in a lettuce spinner and gently roll spinach in clean tea towel to remove excess moisture. Chop shallots, mince the garlic, slice the mushrooms, and coarsely slice the sun-dried tomatoes (if large) into slivers, and grate the Parmesan cheese.
-
Remove dry-brined chicken breasts from refrigerator and place on cutting board (do not rinse dry-brined chicken). With sharp chef’s knife, slice each chicken breast in half, horizontally, parallel to the cutting board. Place each piece of chicken between two pieces of plastic cling wrap or parchment paper (or in a sealed plastic bag). Using the smooth side of a meat mallet, gently pound each piece of chicken to a uniform thickness of 1/3”– ½” thick, being careful not to tear the chicken. Let chicken cutlets rest for about 10-15 minutes before proceeding with recipe.
-
Mix flour, garlic powder, and paprika in shallow dish. Dredge all sides of each chicken cutlet with the flour mix. Shake off excess flour and set chicken aside.
-
Heat 2 tablespoons of olive oil in large skillet (e.g., 28cm/11” pan) over medium-high heat. When hot and the oil is shimmering, add 2 tablespoons of butter. Once the butter has melted, add the chicken pieces, making sure not to crowd them in the pan. Work in batches, if necessary, or use two medium-sized skillets. Reduce heat if necessary to avoid scorching the chicken pieces. Cook the chicken pieces approximately 3 minutes per side (depending on their size and thickness as well as level of heat used), or until their internal temperature registers 165°F on an instant read thermometer. Remove the chicken pieces from the pan and place in heatproof dish. Cover. Place chicken in oven set to the "warm" or lowest setting or, alternatively, tent with tin foil to keep the chicken pieces warm.
-
Over medium-low heat, add 1 more tablespoon each of olive oil and butter to the pan and add the shallots and sliced mushrooms, cooking and stirring constantly for approximately 2 minutes. Add the sun-dried tomatoes and cook for about 1 minute before adding the minced garlic. Briskly stir mixture for about 20 seconds to ensure garlic and shallots do not scorch. Reduce heat, if necessary.
-
Remove skillet from heat and move pan contents to one side of pan. Add the white wine. Return skillet to stovetop and bring wine to a boil over medium heat, using a wooden spoon to scrape up any brown bits (fond) on the bottom of the pan. Reduce heat to medium low and let wine reduce to about half then add the chicken stock, into which the Dijon mustard and 1¾ tsp cornstarch have been whisked until smooth. Stir occasionally until mixture starts to thicken. Integrate the pan vegetables into the sauce. Add the Italian Seasoning and cook over medium low heat for apx. 1 minute. Slowly stir in the whipping cream and Parmesan cheese until blended and cream is heated and cheese is melted. Reduce heat to simmer and cook slowly over low heat for about 2 minutes, until sauce slightly thickens, stirring frequently.
-
Return the chicken cutlets to the pan and heat for about 1-2 minutes, coating chicken pieces with the sauce. Add the spinach, a handful at a time, and gently stir and cook mixture for 1½ – 2 minutes longer, just until spinach has slightly wilted. Do not overcook.
-
Serve immediately with pasta, rice, or favorite potato side dish.
Recipe Notes
Yield: 4 servings
[Copyright My Island Bistro Kitchen]
NOTE: The oil drained from the sun-dried tomatoes may be used in place of the olive oil called for in the recipe; however, my tests revealed the olive oil gave a cleaner, less oily taste to the dish.
You May Also Enjoy These Other One-Pan Chicken Recipes From My Island Bistro Kitchen:
Chicken Francese
Creamy Chicken Florentine
Easy Chicken Marsala
PIN ME TO YOUR FAVORITE PINTEREST BOARDS!
