

Today, I am sharing my recipe for a classic dessert known as the French Lemon Tart (tarte au citron). This iconic tart features a silky-smooth tangy lemon filling which is placed in a buttery rich, tender, and slightly crisp Pâte Sucrée shell. Simply, this tart – a staple found in many French Patisseries – is an elegant and simplistic dessert that can be made in your own kitchen! It’s a lemon lover’s dream come true!
In the post that accompanies my recipe for a Strawberry-Rhubarb Tart, I explained the difference between tarts and pies and how to make Pâte Sucrée, a crisp, sweet almost-shortbread-like-texture pastry. Instead of repeating the same information in this post, I am directing readers to the post here. For those unfamiliar with making fruit curd tarts and Pâte Sucrée, I recommend taking a read or two of the afore-mentioned post.

Differences Between a French Lemon Tart and a Lemon Meringue Pie
While the flavor profile of a French Lemon Tart and a traditional Lemon Meringue Pie is very similar, there are some key differences. A Lemon Pie will contain a thickening agent (e.g., cornstarch) whereas a Lemon Tart will not. The texture is different in that the filling of a Lemon Pie will be somewhat fluid and soft while that of a Lemon Tart will be more solid and dense and, when cut out, the slices will be razor sharp (as shown in the photo above). Fruit curd tarts will also be thinner in depth than will lemon pies with their iconic “mile-high” meringue. Additionally, tarts are made with a sweet, crisp, and delicate pastry (Pâte Sucrée) whereas a Lemon Pie, by contrast, is made with a traditional flaky pie pastry crust. Tarts are made in fluted tart pans whereas pies are made in traditional pie plates with slanted sides.

Use a Proper Tart Pan for Making Fruit Curd Tarts
For this recipe, there are a couple of choices of pans that will accommodate the amount of filling – either a 9”x1” (22.9cm x 2.5cm) round fluted tart pan or a 13¾” x 4¼“x 1” (34.9cm x 10.8cm x 2.5cm) oblong fluted tart pan, both with removable bottoms. Alternatively, if individual, personal sized tarts are desired, smaller fluted tart pans in a variety of sizes are available and the pastry and filling can be divided between them. How many smaller versions this recipe will generate will depend entirely on the size of mini tart moulds used. They are a bit tedious to make but they are lovely for a special event such as for an afternoon tea.
Fluted-edged, two-part, metal pans with removable bottoms are used for fruit curd tarts, like this French Lemon Tart, for several reasons. First, their removable bottoms facilitate easy release of the tart from the pan ring. I set my finished and cooled tart on an inverted bowl and the ring of the pan drops off (I do grease each and every crease of the pan sides and bottom before fitting the dough into it). I then use a large bench scraper to transfer the tart from the pan bottom to a serving plate or to a board for easy slicing. I do not recommend slicing the tart in the pan as doing so is likely to scratch and damage the pan surface. Second, the flutes (or crevices) in the pan sides provide strength and structure to the delicate crisp crust and help to prevent it from breaking apart from the weight of the tart filling. The metal construction of these types of fluted tart pans provides good heat distribution for even baking of tart crusts. Lastly, of course, is the professional, aesthetically pleasing, appearance of the scallop-edged tart that is a hallmark signature look of a tart from a fine French patisserie.
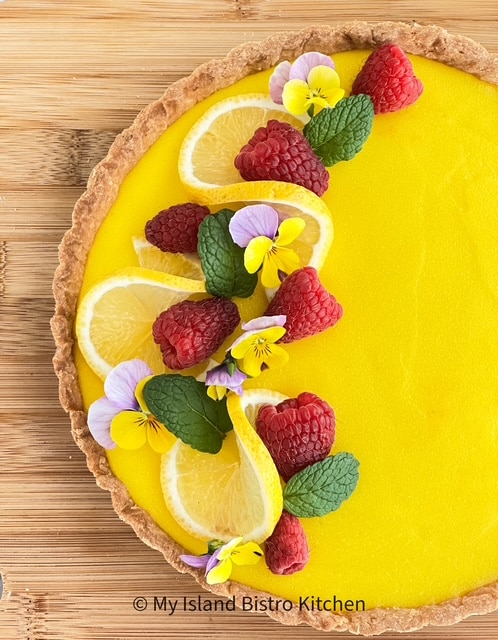
Garnishing and Serving French Lemon Tart
Traditionally, a classic French Lemon Tart would not be completely covered in a puffy meringue topping as is the case with a Lemon Pie, for example. The goal with a tart, is to be able to see the pretty filling which, of course, would be lost if covered with meringue. Additionally, the meringue would need to be in the oven for a lot longer period than this Lemon Tart will be in order for the meringue to be baked to a safe-to-consume temperature. As such, I do not recommend covering this tart with meringue. There will be egg whites left over from this recipe and they can be refrigerated for up to 3 days and put to another use such as making Meringues or French Macarons.
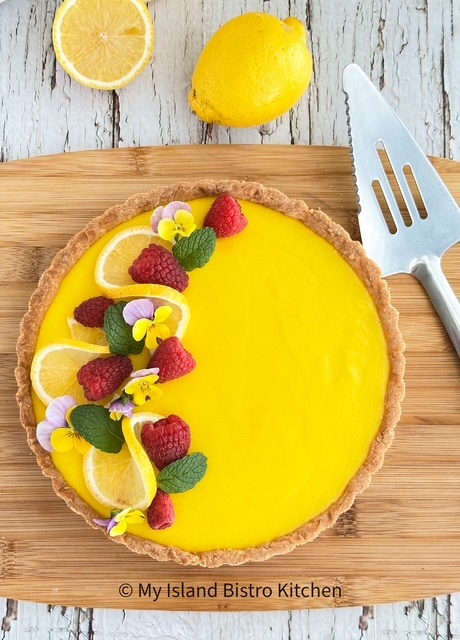
The tart can be served perfectly plain, dusted with icing sugar just at time of serving, or garnished with nuts, fruits, edible flowers, etc., to complement the tart filling. A dollop of whipped cream could garnish the top of each tart slice, if desired, or could rest beside it alongside fresh fruit and/or edible flowers, creating an aesthetic appeal.
In any event, keep the tart refrigerated and only garnish at time of serving. Dusting the tart with icing sugar (if desired – not a necessity) in advance of serving time will mean it will dissolve into the tart, creating a murky looking tart. As well, some fruits (e.g., strawberries or raspberries) may release their juices and stain the tart top, again spoiling the aesthetic appearance.

There are some steps and time involved with making the French Lemon Tart but I believe you will find the effort is rewarded with a sublimely delightful dessert with well-balanced citrus flavor that harmonizes sweetness and acidity perfectly.
French Lemon Tart
Pâte Sucrée Ingredients:
1 1/8 cups all-purpose flour (or gluten-free 1-to-1 or cup-for-cup baking flour, if required)
1/8 cup fine almond flour
1/3 cup sifted icing sugar (aka powdered sugar or confectioner’s sugar)
¼ tsp salt
½ cup cold unsalted butter, diced into ½“ pieces
1 cold egg yolk (egg white is not used so reserve for another purpose)
2 tbsp cold cream (at least 10%M.F.)
Filling Ingredients:
4 large whole eggs, room temperature
4 large egg yolks, room temperature (See Note 1 below re egg whites)
½ cup freshly squeezed and strained lemon juice (apx. 2-3 lemons, depending on size and quality)
2/3 cup + 1 tbsp caster sugar (aka instant dissolving sugar, super-fine sugar, or berry sugar)
1½ tbsp finely grated lemon zest
1/16 tsp salt
½ cup unsalted butter (room temperature), cubed
Equipment and Supplies Required:
9”x1” (22.9cm x 2.9cm) round fluted tart pan with removable bottom (or 13¾” x 4¼“x 1” (34.9cm x 10.8cm x 2.5cm) oblong fluted tart pan with removable bottom)
Lemon Squeezer for extracting lemon juice
Microplane for zesting lemon
Wire-edged Pastry Cutter
Rolling Pin
Small fine mesh sieve for straining lemon juice
Medium-sized fine mesh sieve for straining cooked filling
Candy or Instant Read Thermometer for testing doneness of filling
Pie weights or dry beans for blind baking pastry crust
Small saucepan for heating lemon juice, zest, sugar, and salt
Medium-sized saucepan for cooking filling ingredients
Parchment Paper
Offset Spatula
Large Bench Scraper for transferring tart from pan bottom to serving plate or board for slicing
Method:
Pastry:
Measure all-purpose flour, almond flour, icing sugar, and salt into medium-sized bowl. Combine with a whisk.
Toss the cold butter pieces into the dry ingredients to coat them. Using a wire-edged pastry cutter, cut the butter into the dry ingredients until mixture resembles the size and texture of coarse rolled oats.
In measuring cup, combine the egg yolk with the cream. Stir with fork or small whisk to break up yolk and blend with the cream. Slowly add this mixture to the dry ingredients, stirring with a fork. Mixture will be a shaggy texture at this point. Transfer mixture to a lightly floured work surface and, with hands, bring mixture together to form a disk shape about 5”- 6” in diameter. Do not overwork dough. Wrap dough disk tightly in plastic wrap and refrigerate for about 1 hour.
Grease a 9”x1” (22.9cm x 2.9cm) round fluted tart pan (or 13¾” x 4¼“x 1” (34.9cm x 10.8cm x 2.5cm) oblong fluted tart pan) ensuring each crevice in chosen pan is well greased.
On a lightly floured work surface, roll chilled dough to desired thickness and form into a circle, large enough to fit the tart pan (note that not all of the pastry may be required, depending on desired thickness of crust – see Note 2 below). Transfer pastry to tart pan, gently pushing the pastry down to fit into each of the pan’s fluted sides without stretching the pastry. Roll the rolling pin across the top of the tart pan to remove excess pastry and create a tidy edge flush with pan rim. Dock pastry bottom in several places with fork tines to prevent air pockets from forming while the crust bakes. Refrigerate shell for about 1 hour.
While pastry shell is chilling, position oven rack in lower third of oven and preheat oven to 350F.
Crumple and distress a piece of parchment paper large enough to mold around the inside of the tart pan, allowing enough overhang by which to grasp it to remove the beans or pie weights that will be placed in it for blind baking and which will be removed part way through the crust baking process. This crumpling/distressing procedure will weaken the parchment paper, allowing it to be more pliable for fitting into the tart pan. Depending on the quality of parchment paper, repeat with a second piece of distressed parchment paper, if necessary. The paper lining needs to be strong enough to hold the hot beans when they are being lifted from the tart shell part way through the baking.
Remove the tart shell from the refrigerator and place on a rimmed cookie sheet or pizza pan. Carefully fit the distressed parchment paper inside the tart shell. Repeat with the second layer of parchment paper, if necessary. Add ceramic pie weights or dry uncooked beans, filling the tart pan about 2/3 to ¾ full, ensuring the weights are evenly distributed and placed as far as possible up the sides of the tart pan.
Transfer tart shell to the oven and bake for 15 minutes. Remove shell from oven and carefully remove the parchment paper and pie weights together and transfer them to a heatproof bowl. Be very careful as the pie weights will be hot! As some of the earlier pierced holes in the shell bottom may have filled in during the baking process with the pie weights, further pierce the tart shell in several places, if necessary, to prevent it from forming air bubbles as it continues to bake. Return tart shell to oven and bake for another 18-20 minutes or until pastry has a dry appearance and is lightly golden brown. Cool shell completely in pan on wire rack before adding filling.
Filling:
Set out the eggs and butter to bring them to room temperature. Use the microplane to zest the lemon rind. Extract the juice from the lemons and strain the lemon juice to measure ½ cup. Measure all remaining ingredients.
Whisk the egg yolks and whole eggs together well in a medium-sized heavy bottomed saucepan (See Note 3 below). Set aside. Combine lemon juice, sugar, zest, and salt in a separate small saucepan over medium heat. Cook, stirring frequently, until the sugar has dissolved and small bubbles appear around the edge of the mixture. Do not boil. Remove the pan from the heat and slowly drizzle and whisk the hot mixture into the beaten eggs in the medium-sized pan. Be sure to do this slowly to avoid eggs coagulating.
Place saucepan over medium-low heat and cook until mixture reaches 170°F on a candy or instant-read thermometer. Stir frequently and adjust heat, if necessary, to prevent mixture from scorching.
When the filling is nearly ready, position oven rack in center of oven and preheat oven to 350°F.
Remove lemon filling from the heat and, to remove any stray bits of coagulated egg and ensure a perfectly silky smooth filling, strain mixture through a fine mesh sieve into large heatproof measuring cup or bowl. Stir in the butter until melted and combined with filling. Place tart pan containing the pastry on cookie sheet or pizza pan. Transfer filling to cooled pastry shell and level out and smooth filling with an offset spatula. Bake tart at 350°F for about 8-10 minutes to set. Cool tart completely on wire rack then refrigerate until set, approximately 3-4 hours, before serving.
Carefully remove outer ring of tart pan. Carefully sitting the tart pan on an inverted bowl may make it easier to remove the ring. Slide large bench scraper under tart to remove it from pan bottom and transfer to serving plate or tray or to a cutting board to slice. Slicing the tart in the pan may scratch and damage pan surface (a reason why these pans have removable bottoms to prevent this from occurring).
Top of tart may be decorated as desired or left plain. Dust tart top with icing (confectioner’s) sugar (see Note 4 below), if desired, just at time of serving. Slice tart into wedges and garnish with fresh blueberries or raspberries, lemon slices, edible flowers, and/or a dollop of whipped cream. Keep tart refrigerated until serving time. Tart will keep, refrigerated, for 2-3 days. Freezing tart may result in some deterioration of quality.
Yield: Apx. 8 slices
NOTE 1: The egg whites from the four egg yolks called for in the filling recipe and the one in the pastry recipe are not required for this recipe as full coverage meringue is not a typical/traditional topping for these types of fruit curd tarts. The egg whites can be refrigerated for up to 3 days and used for another purpose (e.g., Meringues, French Macarons, etc.)
NOTE 2: Not all of the pastry may be required for the tart as amount used will depend on personal preference for thickness of crust. Any leftover pastry may be tightly wrapped in plastic wrap, placed in an airtight freezer bag, labelled, and frozen for another purpose.
NOTE 3: If you don’t have a heavy bottomed saucepan in which to make the filling, the filling can be made in a heatproof bowl set over a pot of simmering water to ensure it does not scorch during cooking.
NOTE 4: If dusting top of tart with icing sugar (aka confectioner’s sugar), do not do so until just at time of serving as it may dissolve into the tart top creating a murky appearance. Leave any garnishing of the entire tart or individual wedges until time of serving as some fruits may release their juices and stain top of tart or create a wet appearance (in the case of using lemon slices as garnishes, for example)

If you have made this recipe and enjoyed it and/or wish to share it with your friends and family, please do so on social media but be sure to share the direct link to this posting from my website.
Connect with My Island Bistro Kitchen on Social Media
Join the Facebook page for My Island Bistro Kitchen: https://www.facebook.com/MyIslandBistroKitchen/
Follow “the Bistro” on “X” (formerly Twitter): https://twitter.com/PEIBistro/
See the drool-worthy gallery of mouth-watering food photos from My Island Bistro Kitchen on Instagram: https://www.instagram.com/peibistro/
Follow “the Bistro” on Pinterest at https://www.pinterest.ca/peibistro/ and pin the Pinterest-ready photo at the end of this posting to your favorite Pinterest boards!

French Lemon Tart
Ingredients
Pâte Sucrée Ingredients:
- 1 1/8 cups all-purpose flour (or gluten-free 1-to-1 or cup-for-cup baking flour, if required)
- 1/8 cup fine almond flour
- 1/3 cup sifted icing sugar (aka powdered sugar or confectioner’s sugar)
- ¼ tsp salt
- ½ cup cold unsalted butter, diced into ½“ pieces
- 1 cold egg yolk (egg white is not used so reserve for another purpose)
- 2 tbsp cold cream (at least 10%M.F.)
Filling Ingredients:
- 4 large whole eggs, room temperature
- 4 large egg yolks, room temperature (See Note 1 below re egg whites)
- ½ cup freshly squeezed and strained lemon juice (apx. 2-3 lemons, depending on size and quality)
- 2/3 cup + 1 tbsp caster sugar (aka instant dissolving sugar, super-fine sugar, or berry sugar)
- 1½ tbsp finely grated lemon zest
- 1/16 tsp salt
- ½ cup unsalted butter (room temperature), cubed
Instructions
Pastry:
-
Measure all-purpose flour, almond flour, icing sugar, and salt into medium-sized bowl. Combine with a whisk.
-
Toss the cold butter pieces into the dry ingredients to coat them. Using a wire-edged pastry cutter, cut the butter into the dry ingredients until mixture resembles the size and texture of coarse rolled oats.
-
In measuring cup, combine the egg yolk with the cream. Stir with fork or small whisk to break up yolk and blend with the cream. Slowly add mixture to the dry ingredients, stirring with a fork. Mixture will be a shaggy texture at this point. Transfer mixture to a lightly floured work surface and, with hands, bring mixture together to form a disk shape about 5”- 6” in diameter. Do not overwork dough. Wrap dough disk tightly in plastic wrap and refrigerate for about 1 hour.
-
Grease a 9”x1” (22.9cm x 2.9cm) round fluted tart pan (or 13¾" x 4¼“x 1” (34.9cm x 10.8cm x 2.5cm) oblong fluted tart pan) ensuring each crevice in chosen pan is well greased.
-
On a lightly floured work surface, roll chilled dough to desired thickness and form into a circle, large enough to fit the tart pan (note that not all of the pastry may be required, depending on desired thickness of crust – see Note 2 below). Transfer pastry to tart pan, gently pushing the pastry down to fit into each of the pan’s fluted sides without stretching the pastry. Roll the rolling pin across the top of the tart pan to remove excess pastry and create a tidy edge flush with pan rim. Dock pastry bottom in several places with fork tines to prevent air pockets from forming while the crust bakes. Refrigerate shell for about 1 hour.
-
While pastry shell is chilling, position oven rack in lower third of oven and preheat oven to 350°F.
-
Crumple and distress a piece of parchment paper large enough to mold around the inside of the tart pan, allowing enough overhang by which to grasp it to remove the beans or pie weights that will be placed in it for blind baking and which will be removed part way through the crust baking process. This crumpling/distressing procedure will weaken the parchment paper, allowing it to be more pliable for fitting into the tart pan. Depending on the quality of parchment paper, repeat with a second piece of distressed parchment paper, if necessary. The paper lining needs to be strong enough to hold the hot beans when they are being lifted from the tart shell part way through the baking.
-
Remove the tart shell from the refrigerator and place on a rimmed cookie sheet or pizza pan. Carefully fit the distressed parchment paper inside the tart shell. Repeat with the second layer of parchment paper, if necessary. Add ceramic pie weights or dry uncooked beans, filling the tart pan about 2/3 to ¾ full, ensuring the weights are evenly distributed and placed as far as possible up the sides of the tart pan.
-
Transfer tart shell to the oven and bake for 15 minutes. Remove shell from oven and carefully remove the parchment paper and pie weights together and transfer them to a heatproof bowl. Be very careful as the pie weights will be hot! As some of the earlier pierced holes in the shell bottom may have filled in during the baking process with the pie weights, further pierce the tart shell in several places, if necessary, to prevent it from forming air bubbles as it continues to bake. Return tart shell to oven and bake for another 18-20 minutes or until pastry has a dry appearance and is lightly golden brown. Cool shell completely in pan on wire rack before adding filling.
Filling:
-
Set out the eggs and butter to bring them to room temperature. Use the microplane to zest the lemon rind. Extract the juice from the lemons and strain the lemon juice to measure ½ cup. Measure all remaining ingredients.
-
Whisk the egg yolks and whole eggs together well in a medium-sized heavy bottomed saucepan (See Note 3 below). Set aside. Combine lemon juice, sugar, zest, and salt in a separate small saucepan over medium heat. Cook, stirring frequently, until the sugar has dissolved and small bubbles appear around the edge of the mixture. Do not boil. Remove the pan from the heat and slowly drizzle and whisk the hot mixture into the beaten eggs in the medium-sized pan. Be sure to do this slowly to avoid eggs coagulating.
-
Place saucepan over medium-low heat and cook until mixture reaches 170°F on a candy or instant-read thermometer. Stir frequently and adjust heat, if necessary, to prevent mixture from scorching.
-
When the filling is nearly ready, position oven rack in center of oven and preheat oven to 350°F.
-
Remove lemon filling from the heat and, to remove any stray bits of coagulated egg and ensure a perfectly silky smooth filling, strain mixture through a fine mesh sieve into large heatproof measuring cup or bowl. Stir in the butter until melted and combined with filling. Place tart pan containing the pastry on cookie sheet or pizza pan. Transfer filling to cooled pastry shell and level out and smooth filling with an offset spatula. Bake tart at 350°F for about 8-10 minutes to set. Cool tart completely on wire rack then refrigerate until set, approximately 3-4 hours, before serving.
-
Carefully remove outer ring of tart pan. Carefully sitting the tart pan on an inverted bowl may make it easier to remove the ring. Slide large bench scraper under tart to remove it from pan bottom and transfer to serving plate or tray or to a cutting board to slice. Slicing the tart in the pan may scratch and damage pan surface (a reason why these pans have removable bottoms to prevent this from occurring).
-
Top of tart may be decorated as desired or left plain. Dust tart top with icing (confectioner’s) sugar (see Note 4 below), if desired, just at time of serving. Slice tart into wedges and garnish with fresh blueberries or raspberries, lemon slices, edible flowers, and/or a dollop of whipped cream. Keep tart refrigerated until serving time. Tart will keep, refrigerated, for 2-3 days. Freezing tart may result in some deterioration of quality.
Recipe Notes
Yield: 8 servings
[Copyright My Island Bistro Kitchen]
NOTE 1: The egg whites from the 4 egg yolks called for in the filling recipe and the one in the pastry recipe are not required for this recipe as full coverage meringue is not a typical/traditional topping for these types of fruit curd tarts. The egg whites can be refrigerated for up to 3 days and used for another purpose (e.g., Meringues, French Macarons, etc.)
NOTE 2: Not all of the pastry may be required for the tart as amount used will depend on personal preference for thickness of crust. Any leftover pastry may be tightly wrapped in plastic wrap, placed in an airtight freezer bag, labelled, and frozen for another purpose.
NOTE 3: If you don’t have a heavy bottomed saucepan in which to make the filling, the filling can be made in a heatproof bowl set over a pot of simmering water to ensure it does not scorch during cooking.
NOTE 4: If dusting top of tart with icing sugar (aka confectioner’s sugar), do not do so until just at time of serving as it may dissolve into the tart top creating a murky appearance. Leave any garnishing of the entire tart or individual wedges until time of serving as some fruits may release their juices and stain top of tart or create a wet appearance (in the case of using lemon slices as garnishes, for example)

You may also enjoy these fruit curd tart recipes, too!
Strawberry Rhubarb Tart
Earl Grey Blueberry and Lemon Tart
PIN ME TO YOUR FAVORITE PINTEREST BOARDS!
