Sharper and with a tangier taste than lemon curd, lime curd (in its natural state) is a slightly duller color than the traditional lemon curd with which most people are probably more familiar. One would think lime curd would automatically have a lime green color but this is not the case as the juice from limes is actually a very pale bland color. I added just a touch of green gel icing coloring to brighten up the curd and give it a pretty lime green color, more consistent to what might be expected of the appearance of a lime curd. Continue reading Luscious Lime Curd Recipe→
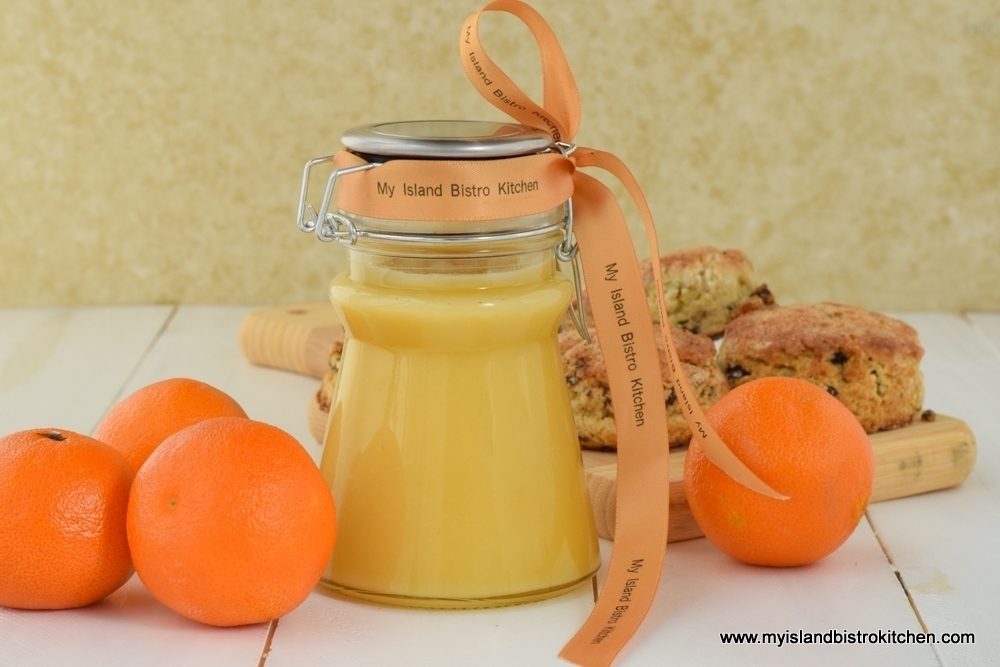
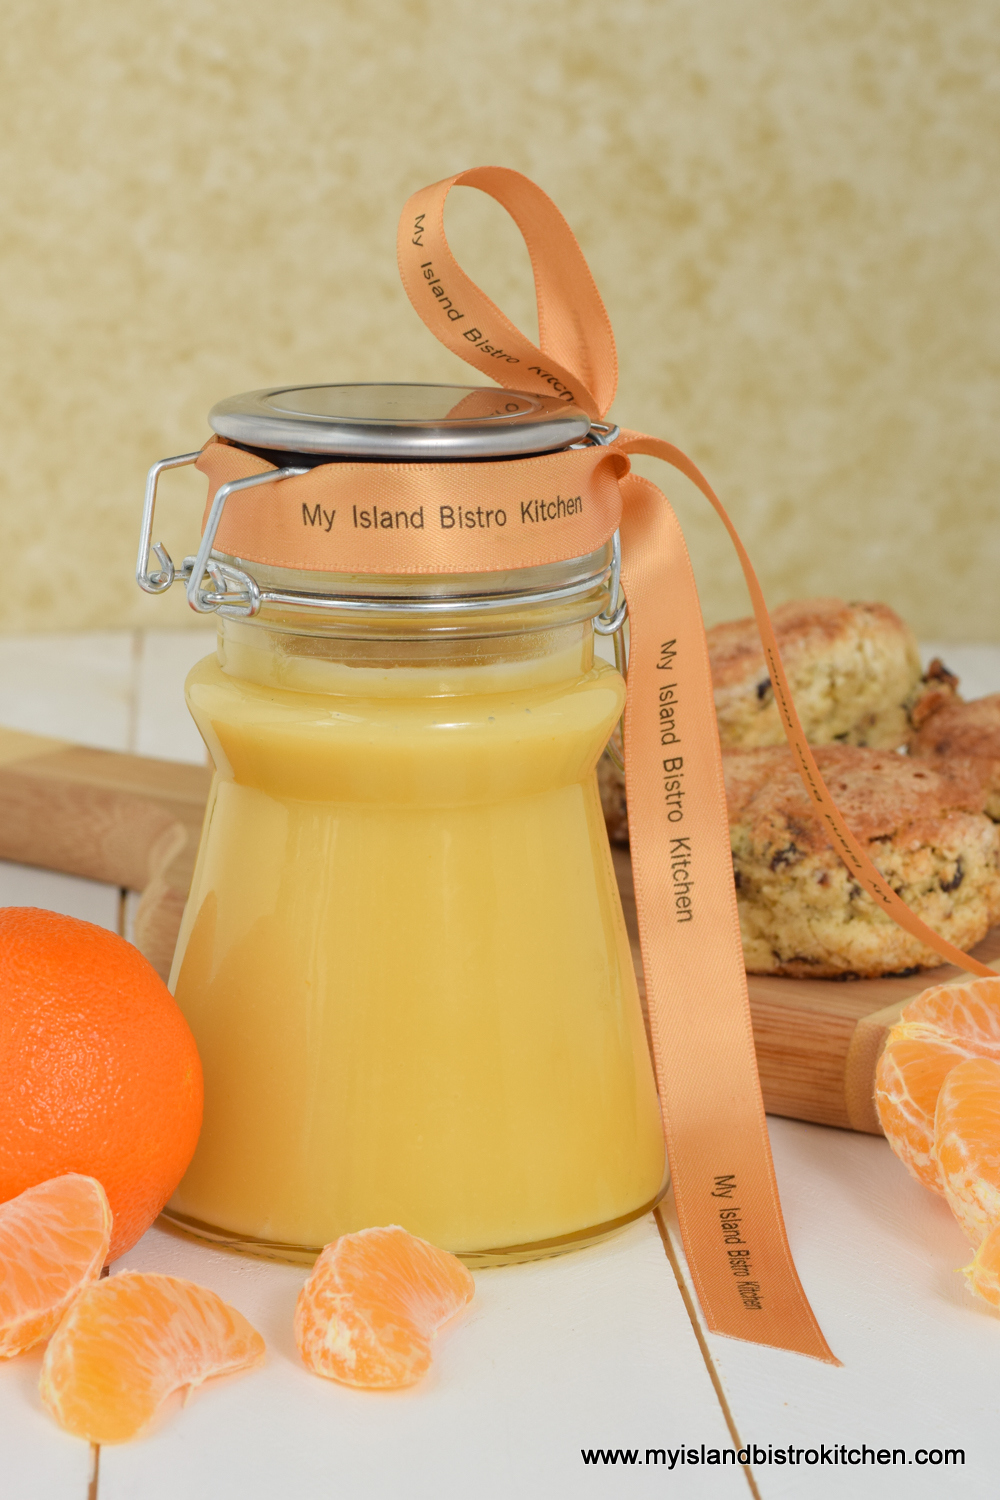
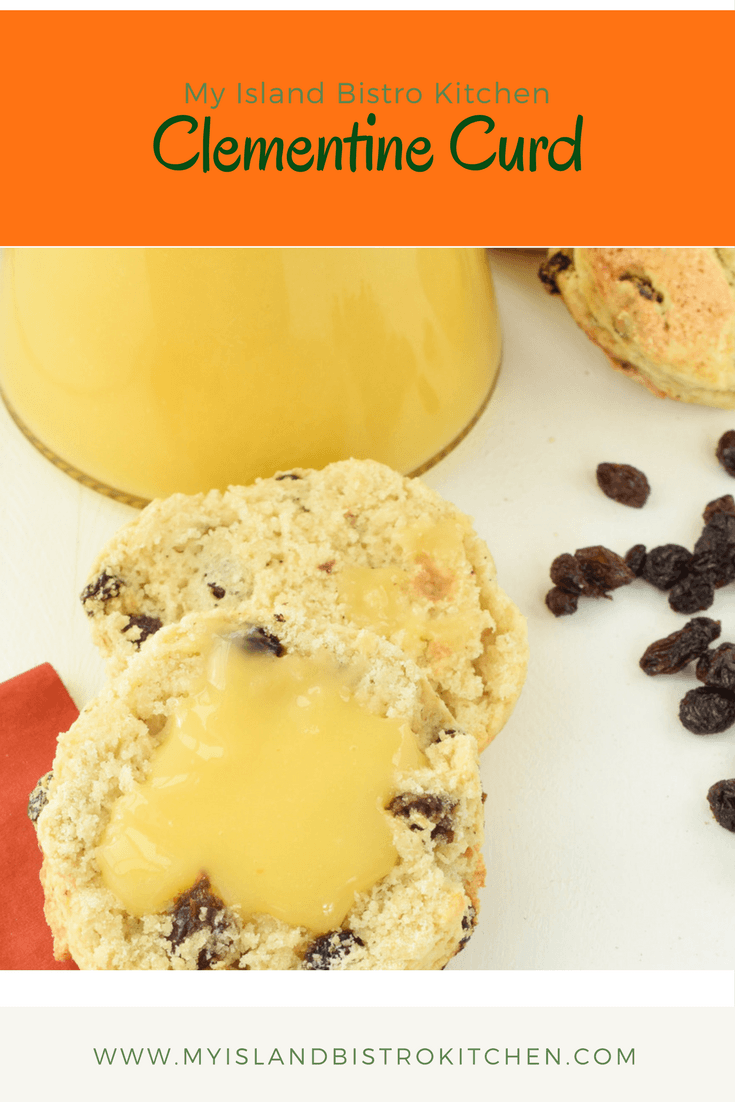
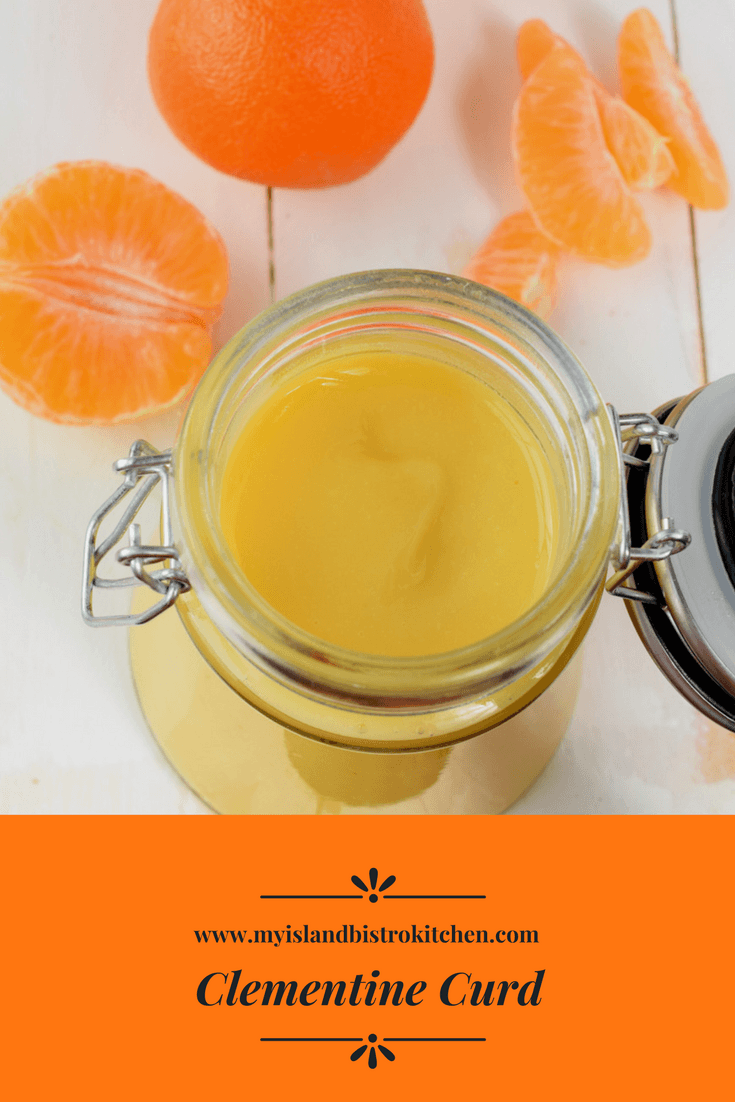
Christmas is an excellent time to make Clementine Curd when fresh clementines are readily available. While certainly lesser known than the traditional Lemon Curd, Clementine Curd is lovely in its own way.
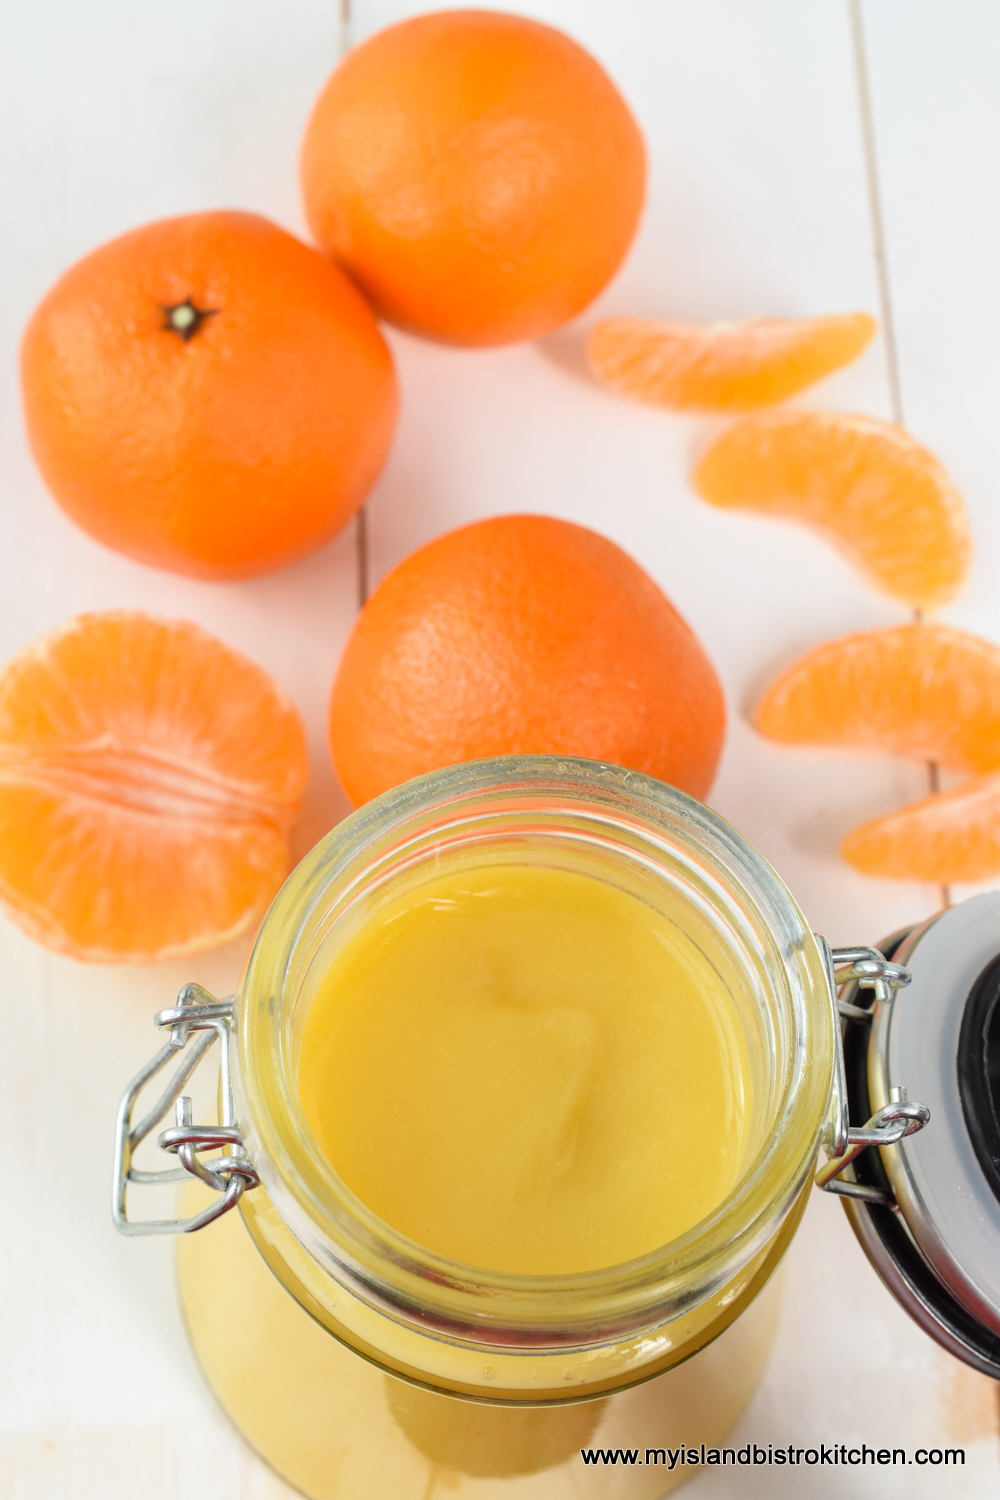
Less sharp and “puckery” than Lemon Curd, Clementine Curd is almost identical in color to lemon curd (perhaps a slight bit paler) and still has a lovely citrus flavour.
Clementine Curd
Be prepared to devote some time and patience to making any curd. It cooks slowly over a pot of simmering (never boiling) water to reach its finished stage (170F on a candy thermometer). You may wish to read my previous postings on making lemon curd and rhubarb curd for hints and tips on make curd as the same techniques apply to the making of Clementine Curd.
Clementine Curd
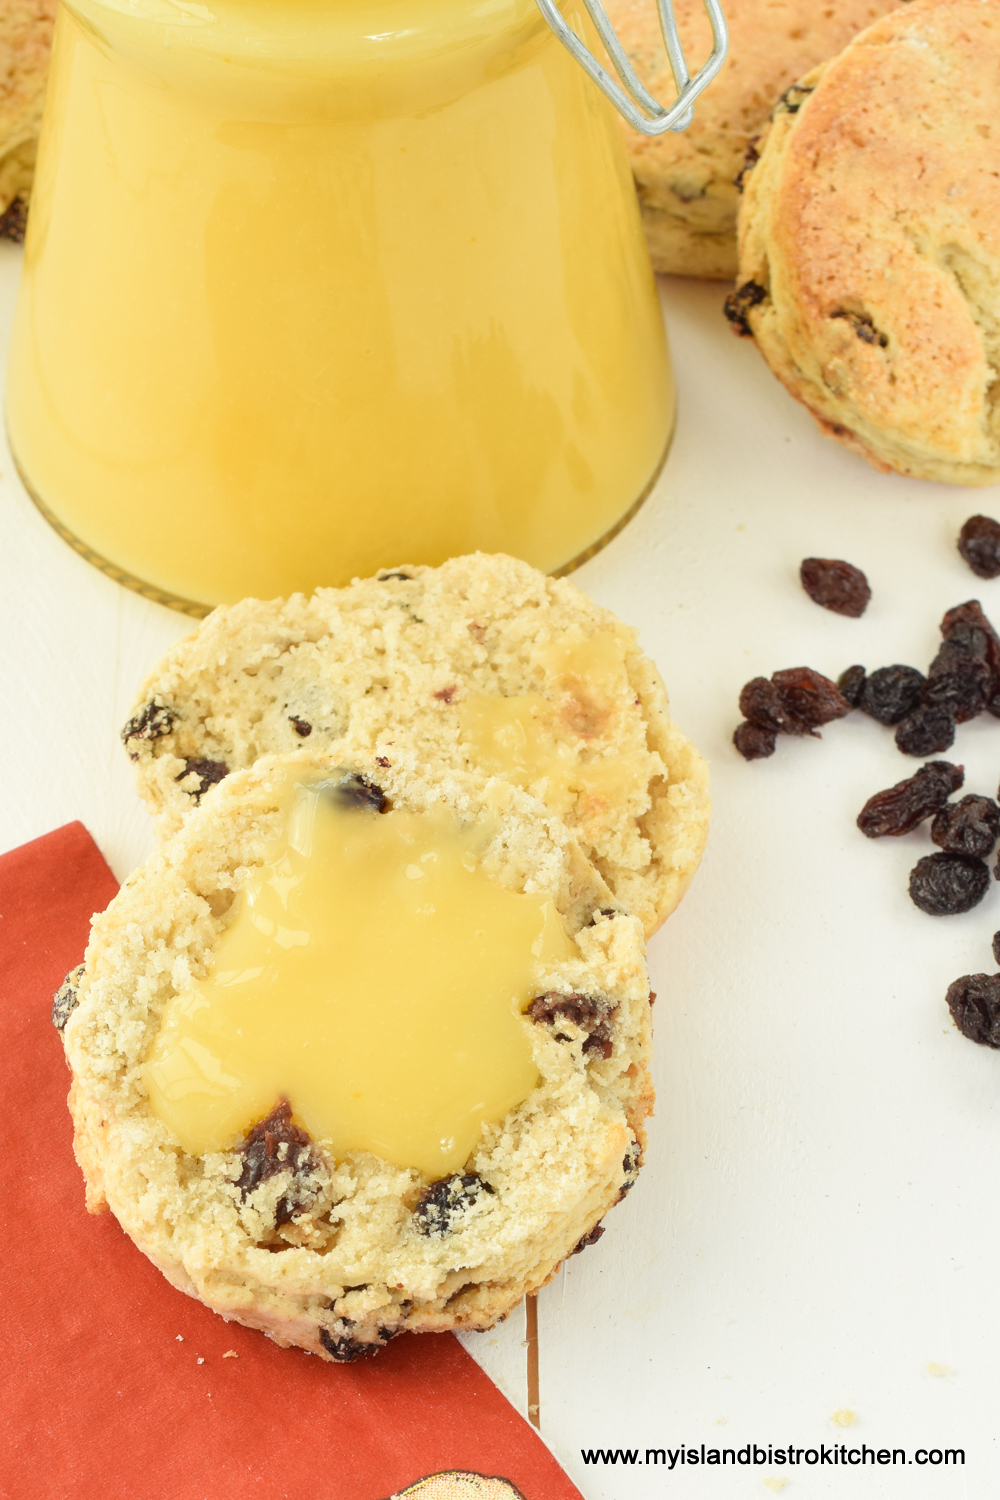
Use this Clementine Curd in the same way in which you would use Lemon Curd — as a spread on biscuits, scones, muffins, or toast; as a filling for cakes; in a parfait with Greek yogurt; or as a filling for tarts and cookies. Bottle the curd in a fancy jar and you have a lovely gift for someone, especially if you include a batch of homemade scones or biscuits with it.
Clementine Curd
[Printable recipe follows at end of posting]
Clementine Curd
Ingredients:
¾ cup caster* sugar or granulated sugar
2½ tsp clementine zest
7 tbsp freshly squeezed clementine juice, strained (apx. 5 clementines, depending on size)
2 extra-large egg yolks
1 large whole egg
3 tbsp unsalted butter at room temperature
Method:
In bottom of double boiler, bring about 2” of water to the simmer point (around 200°F). Maintain the water at this simmer point over medium-low heat. Place sugar in top of double boiler or heat-proof bowl. Mix in the clementine zest. Whisk the clementine juice into sugar.
In small bowl, lightly beat the 2 egg yolks and the whole egg together with a fork, just enough to break up the yolks and blend with the whole egg. Whisk the eggs into the sugar-clementine juice mixture. Add the soft butter. Place this pot or bowl over the simmering water. Stir the mixture continuously as it cooks until it is thickened and the temperature of the mixture registers 170°F on a candy thermometer. Be patient as this will take awhile. Make sure the water in the bottom of the boiler does not boil and stays only at the simmer point.
Remove curd from heat and strain through a mesh strainer to remove any of the egg white that may have coagulated as well as the clementine rind. Pour strained curd into a sterilized bottle. Place a piece of plastic wrap directly on the surface of the curd to prevent it from forming a skin on top. Cool at room temperature. Remove plastic wrap. Cover jar tightly and refrigerate for up to 1 week.
Yield: Apx. 1 cup
*caster sugar may also be known as fruit sugar, berry sugar, super fine sugar, or instant dissolving sugar.
Note: Altitude may affect the temperature at which the water reaches the simmering point. The important thing is that the water in the bottom of the double boiler does not boil or touch the top of the double boiler/heatproof bowl during the cooking of the curd.
In bottom of double boiler, bring about 2” of water to the simmer point (around 200°F). Maintain the water at this simmer point over medium-low heat. Place sugar in top of double boiler or heat-proof bowl. Mix in the clementine zest. Whisk the clementine juice into sugar.
In small bowl, lightly beat the 2 egg yolks and the whole egg together with a fork, just enough to break up the yolks and blend with the whole egg. Whisk the eggs into the sugar-clementine juice mixture. Add the soft butter. Place this pot or bowl over the simmering water. Stir the mixture continuously as it cooks until it is thickened and the temperature of the mixture registers 170°F on a candy thermometer. Be patient as this will take awhile. Make sure the water in the bottom of the boiler does not boil and stays only at the simmer point.
Remove curd from heat and strain through a mesh strainer to remove any of the egg white that may have coagulated as well as the clementine rind. Pour strained curd into a sterilized bottle. Place a piece of plastic wrap directly on the surface of the curd to prevent it from forming a skin on top. Cool at room temperature. Remove plastic wrap. Cover jar tightly and refrigerate for up to 1 week. Yield: Apx. 1 cup
Recipe Notes
*caster sugar may also be known as fruit sugar, berry sugar, super fine sugar, or instant dissolving sugar.
Note: Altitude may affect the temperature at which the water reaches the simmering point. The important thing is that the water in the bottom of the double boiler does not boil or touch the top of the double boiler/heatproof bowl during the cooking of the curd.
[Copyright My Island Bistro Kitchen]
If you have made this recipe and enjoyed it and/or wish to share it with your friends and family, please do so on social media but be sure to share the direct link to this posting from my website.
Connect with My Island Bistro Kitchen on Social Media
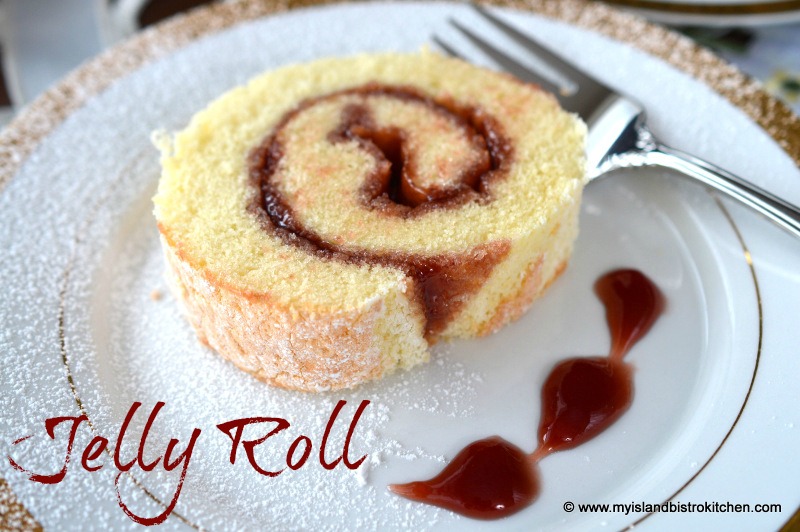
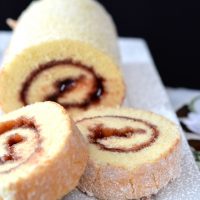
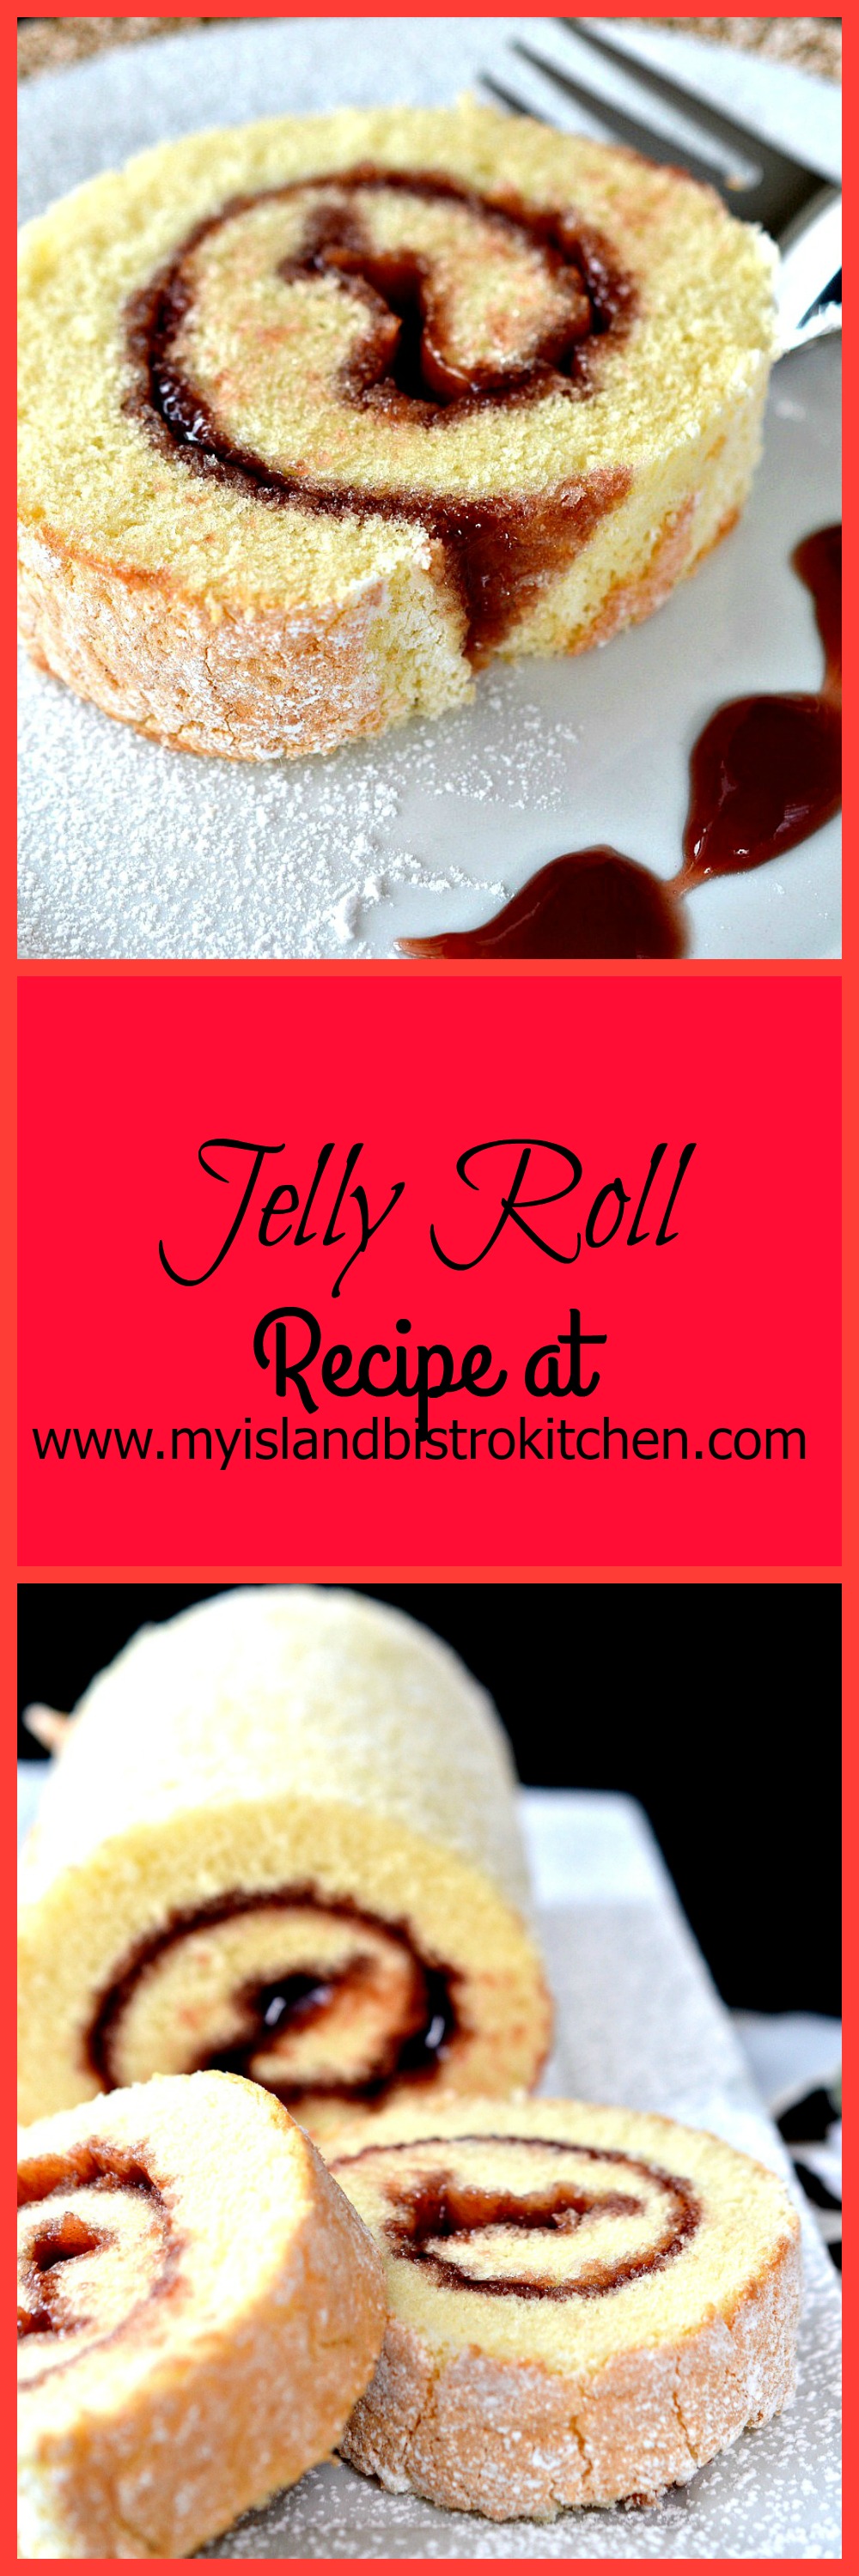
I grew up with jelly rolls being regularly made in my home. They’re a quick dessert, best eaten on the day they are made. This is because a jelly roll is really a sponge-type cake and, when the jam or jelly is spread on it, it tends to seep into the cake and after several hours can become somewhat soggy. Jelly rolls don’t take a lot of ingredients. So long as you have basic baking supplies and some jam or jelly, you can make a jelly roll.
Here are my tips for making jelly rolls:
1. Use cake and pastry flour as it gives a finer texture than all-purpose flour.
2. Don’t let the cake cool for too long before spreading it with jam or jelly as it may crack as you try to roll the jelly roll up. About 15-20 minutes cooling time is about right. If you put the jam or jelly on the cake when it is still too warm, though, it will cause it to seep into the cake too quickly, creating a soggy jelly roll.
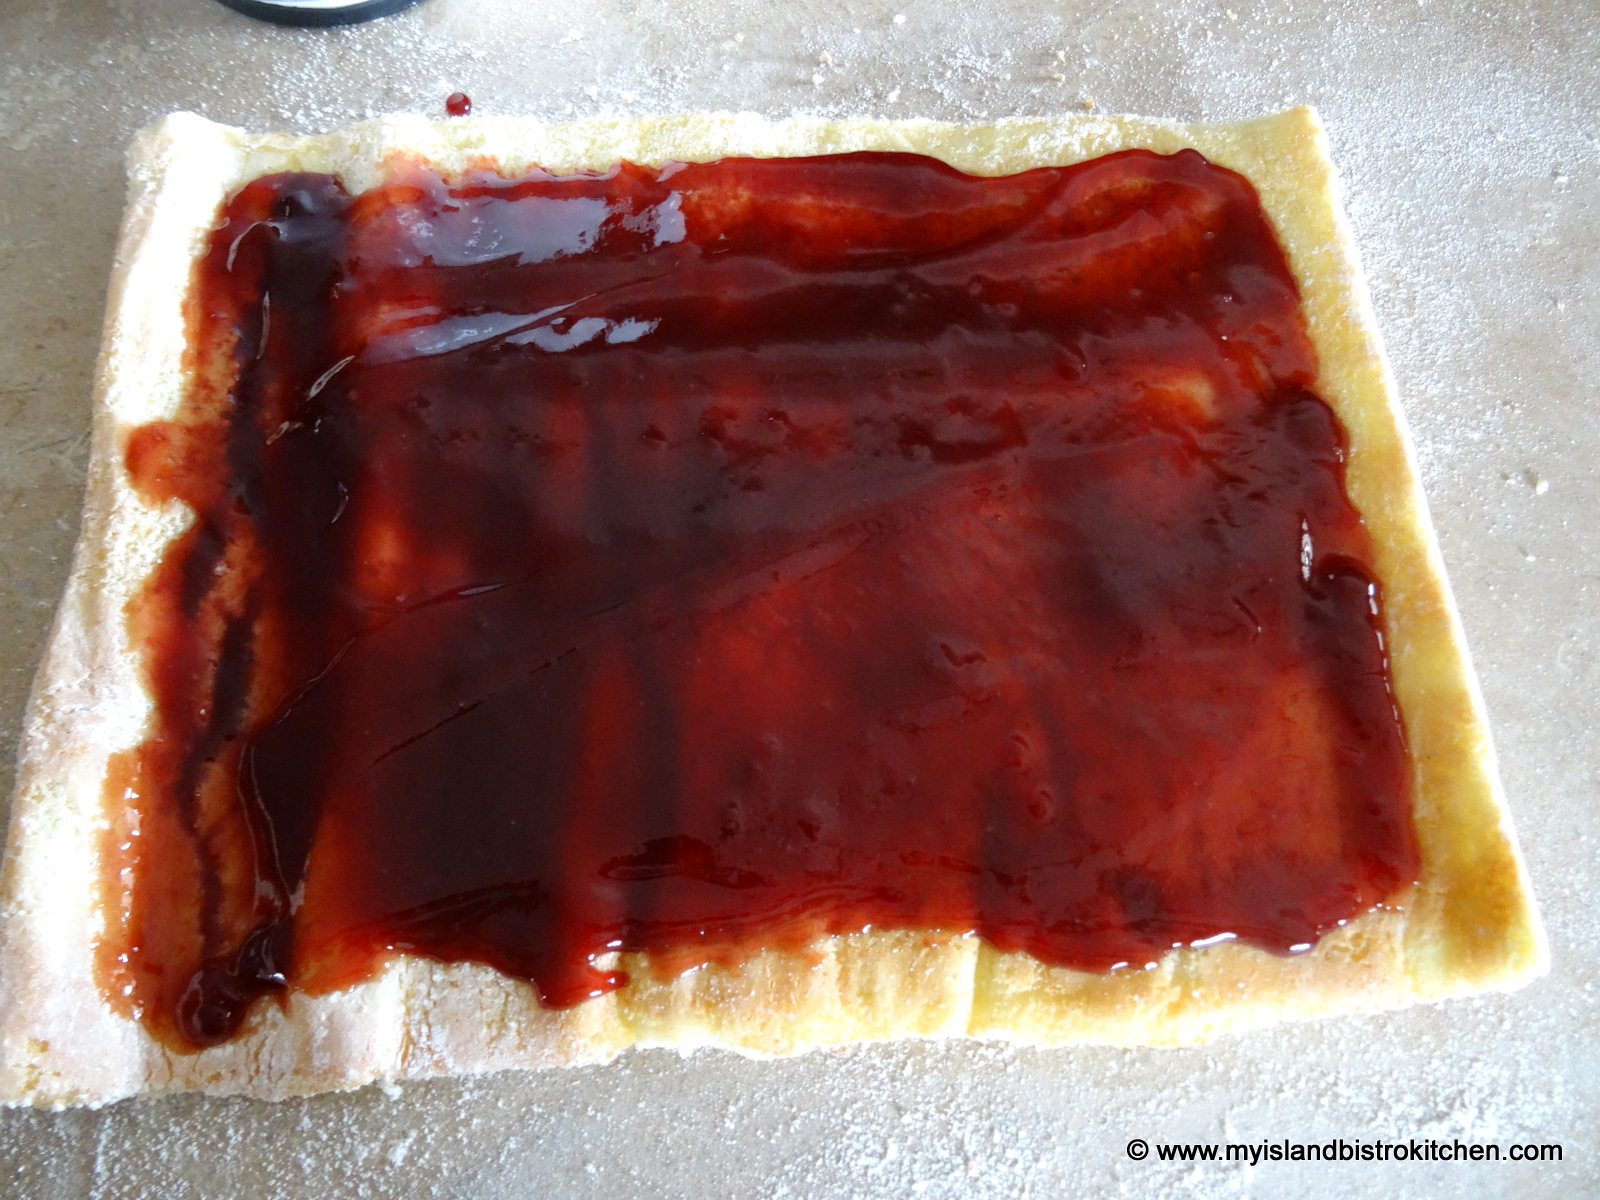
3. Use a good quality jam or jelly. If using jam, choose one that does not have big chunks of fruit in it; otherwise, it will make it more difficult to slice and plate presentation will not be optimal. I prefer colorful red jams and ones that are seedless – for example, seedless raspberry jam.
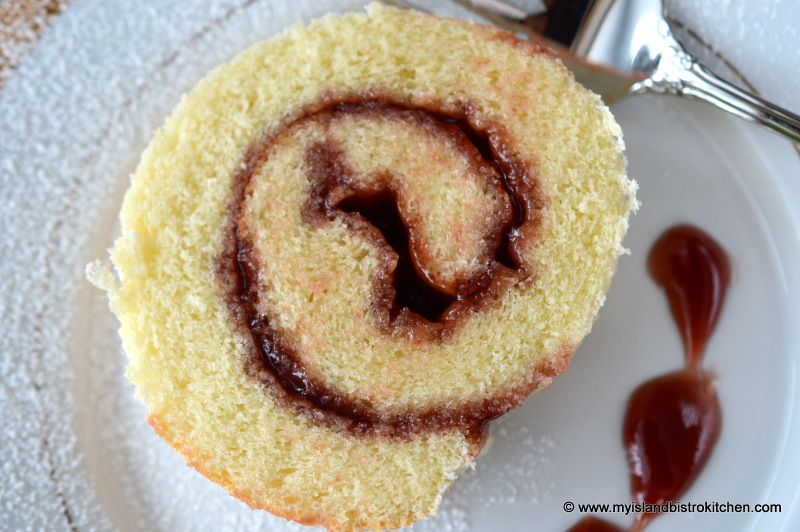
4. The jelly roll may be dusted with either granulated sugar or icing sugar. However, icing sugar stands up better than granulated sugar which tends to dissolve into the cake more quickly.
Jelly Roll
Ingredients:
1 cup + 3 tbsp cake and pastry flour
1¼ tsp baking powder
¼ tsp salt
4 large eggs
1 cup sugar
1 tsp vanilla
¼ tsp almond flavouring
2 tbsp cold water
¾ – 1 cup jam or jelly
Icing sugar for dusting
Method:
Preheat oven to 400°F.
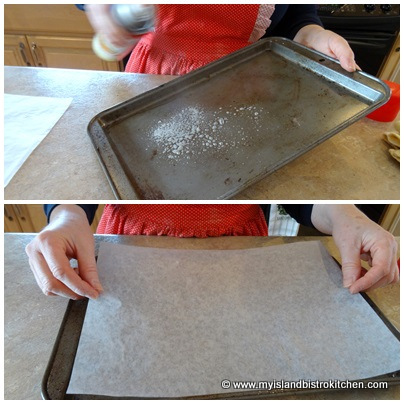
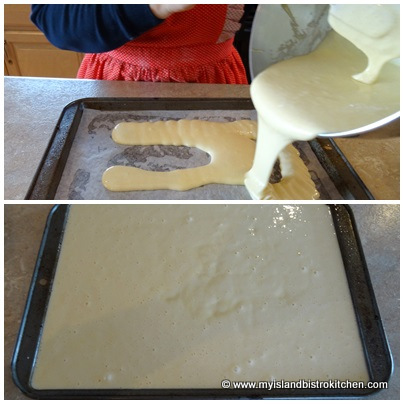
Grease, or spray cooking oil on 10”x15” rimmed baking sheet, ensuring sides are well-greased. Line bottom of pan with parchment paper. Lightly spray parchment paper with cooking oil.
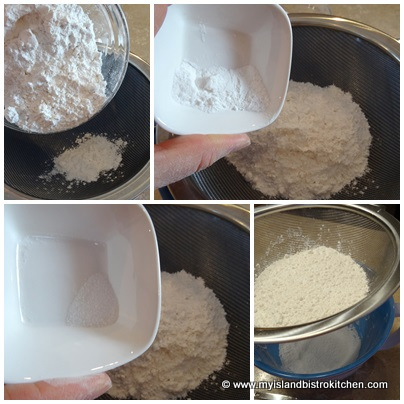
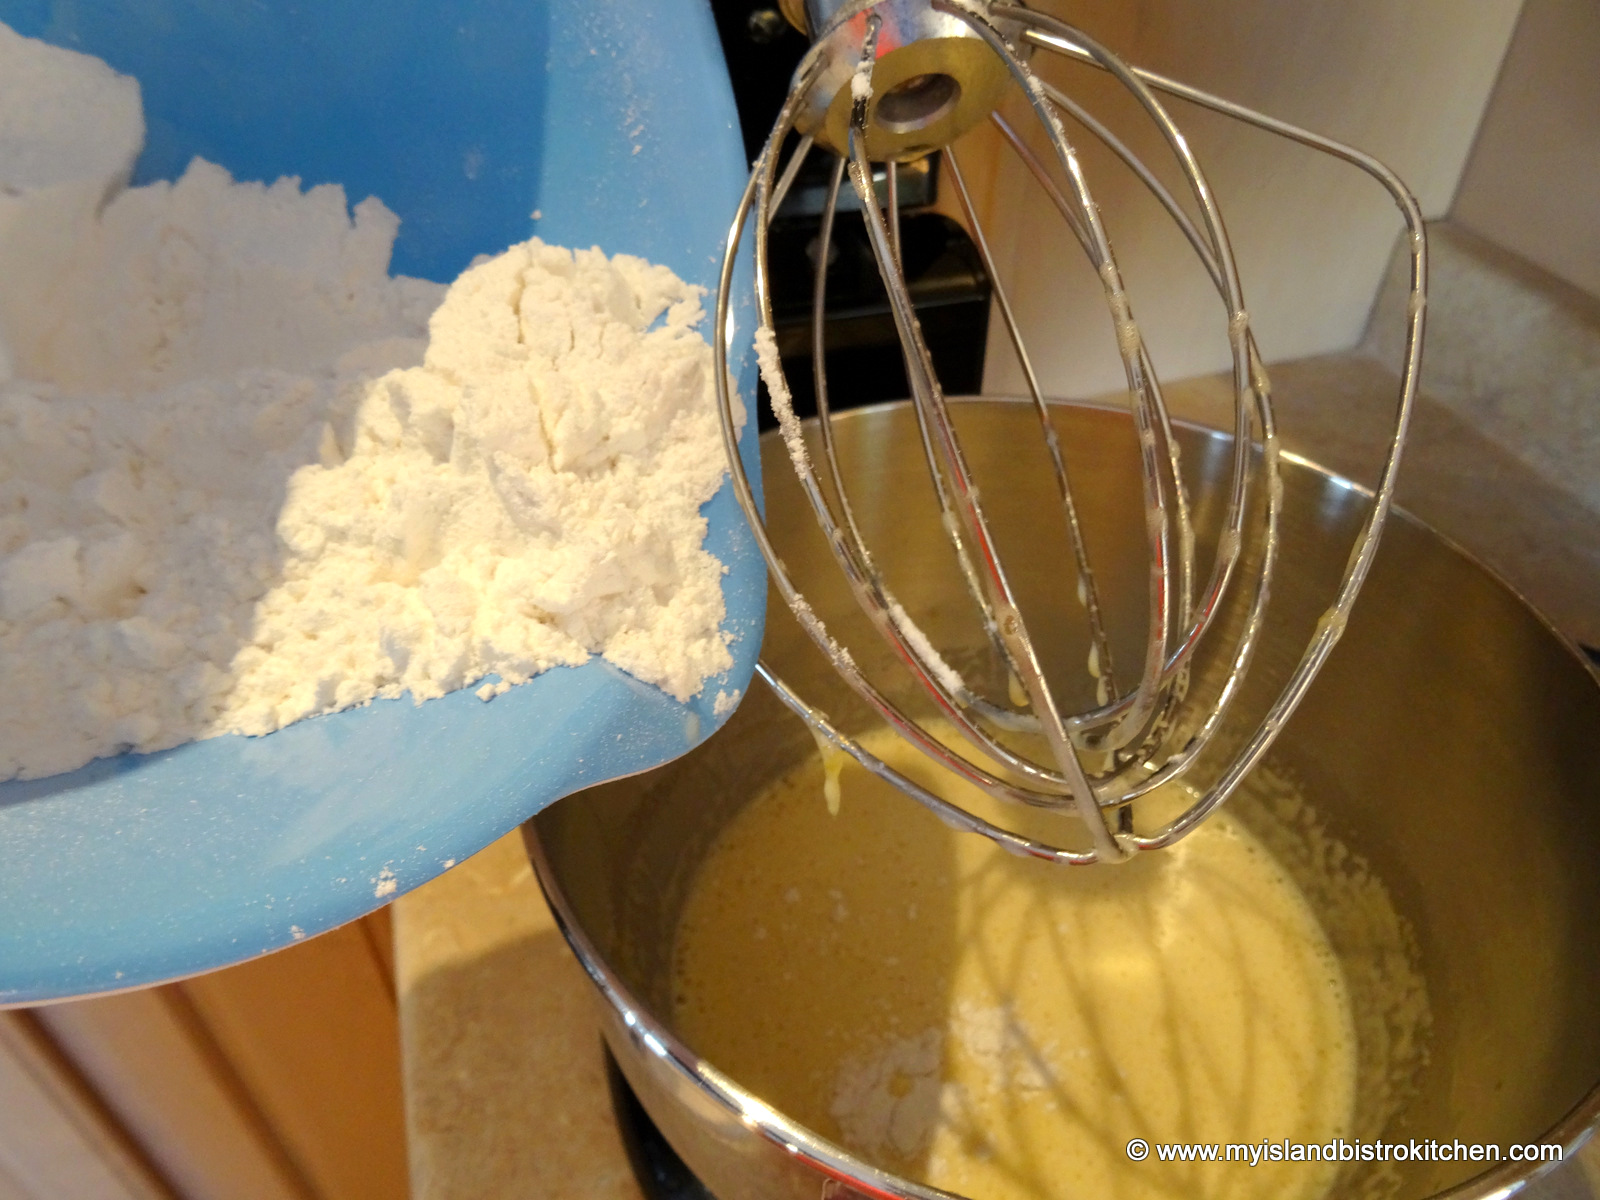
Sift flour, baking powder, and salt together. Set aside.
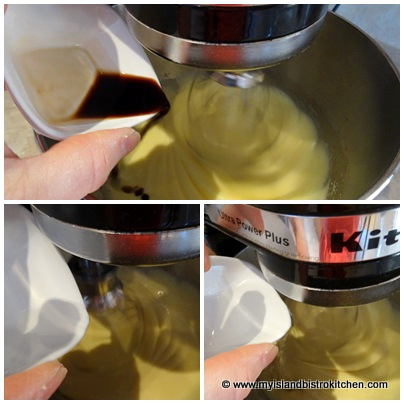
Beat eggs until frothy.
Slowly and steadily add the sugar and beat until light-colored and slightly thickened.
Beat in vanilla, almond flavouring, and water.
Add the sifted dry ingredients to the egg-sugar mixture. Stir just until incorporated.
Pour batter into prepared pan.
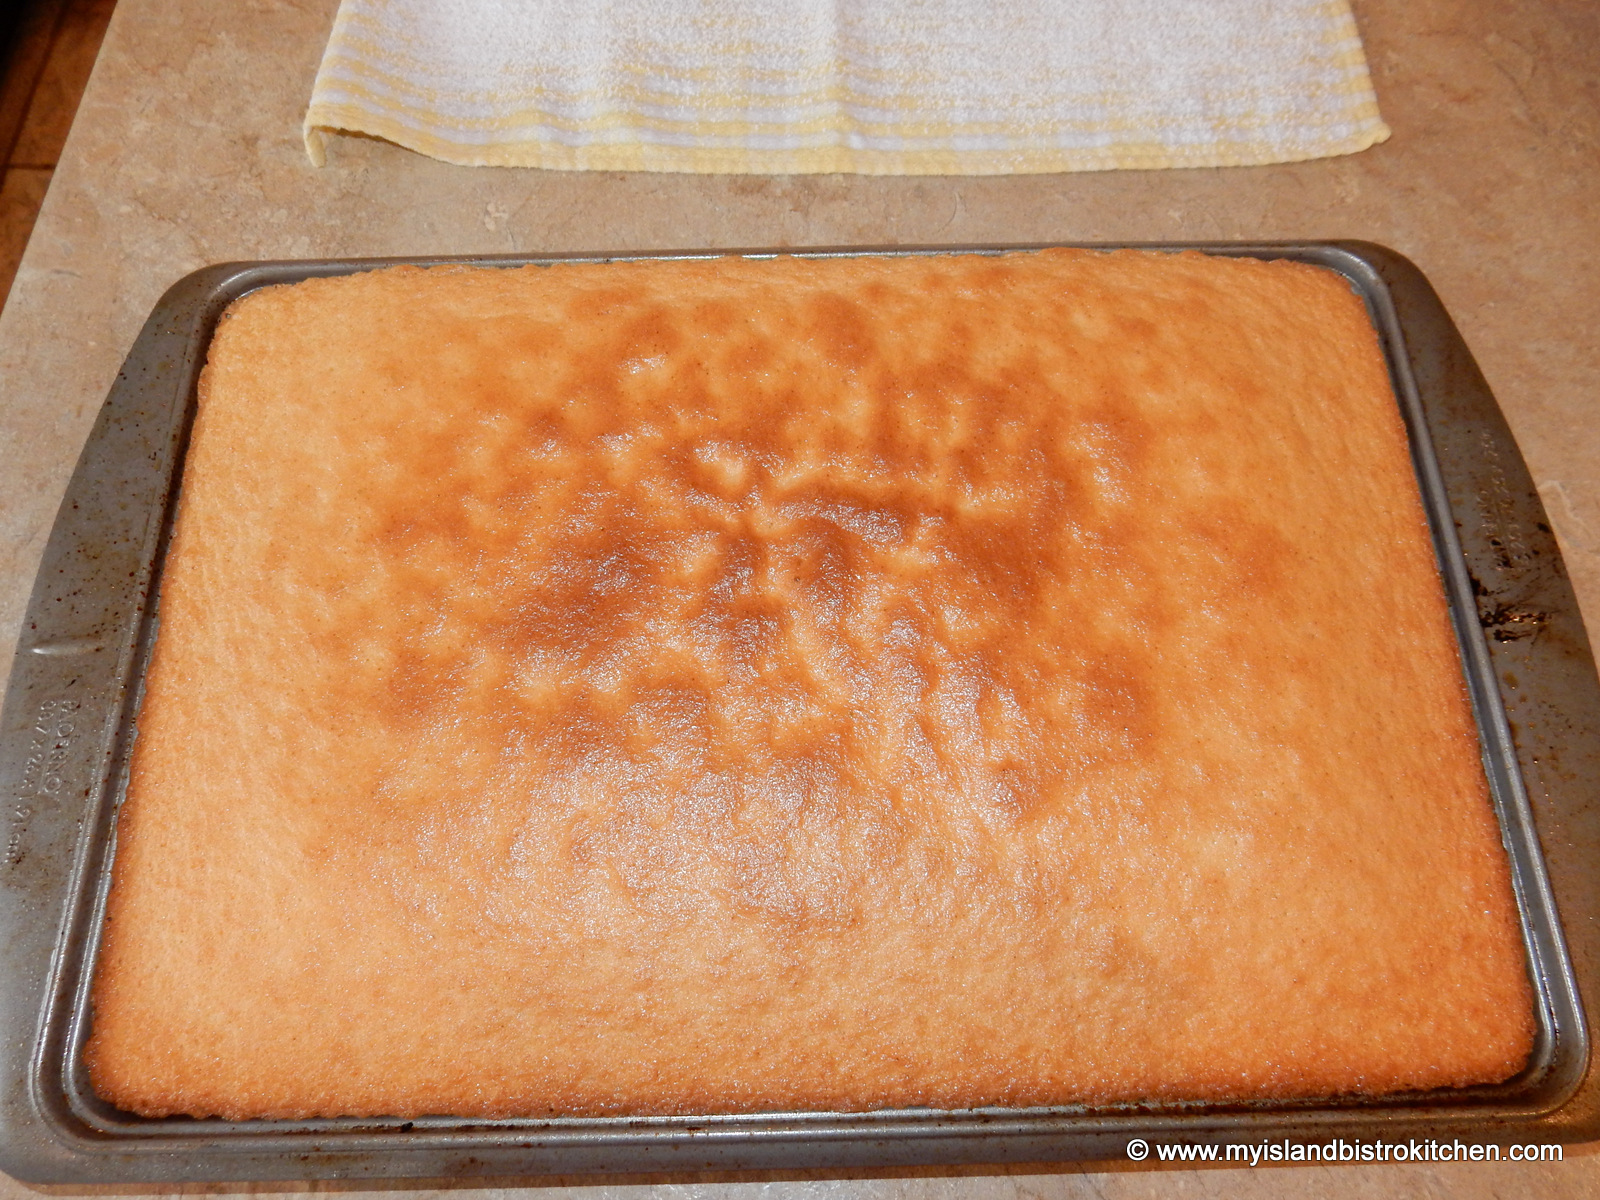
Bake 9-12 minutes or until cake tester inserted into cake comes out clean and cake springs back to a light touch. Do not overbake.
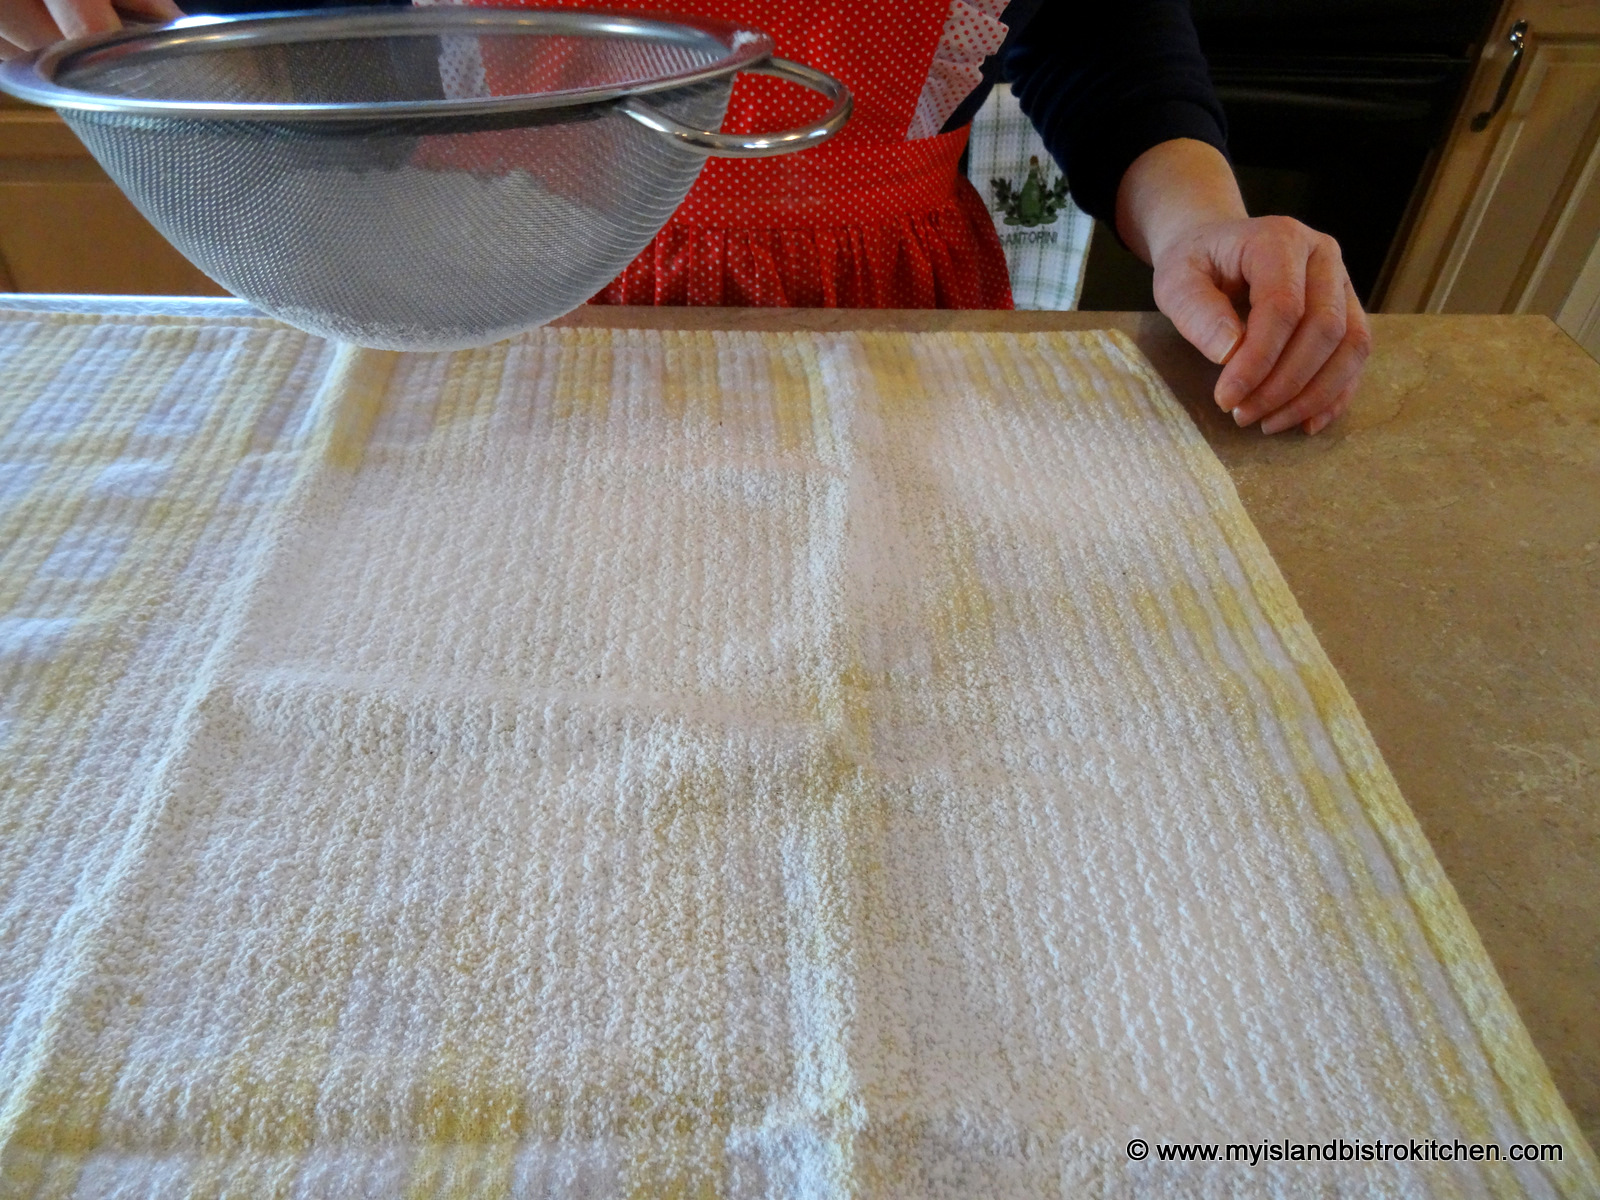
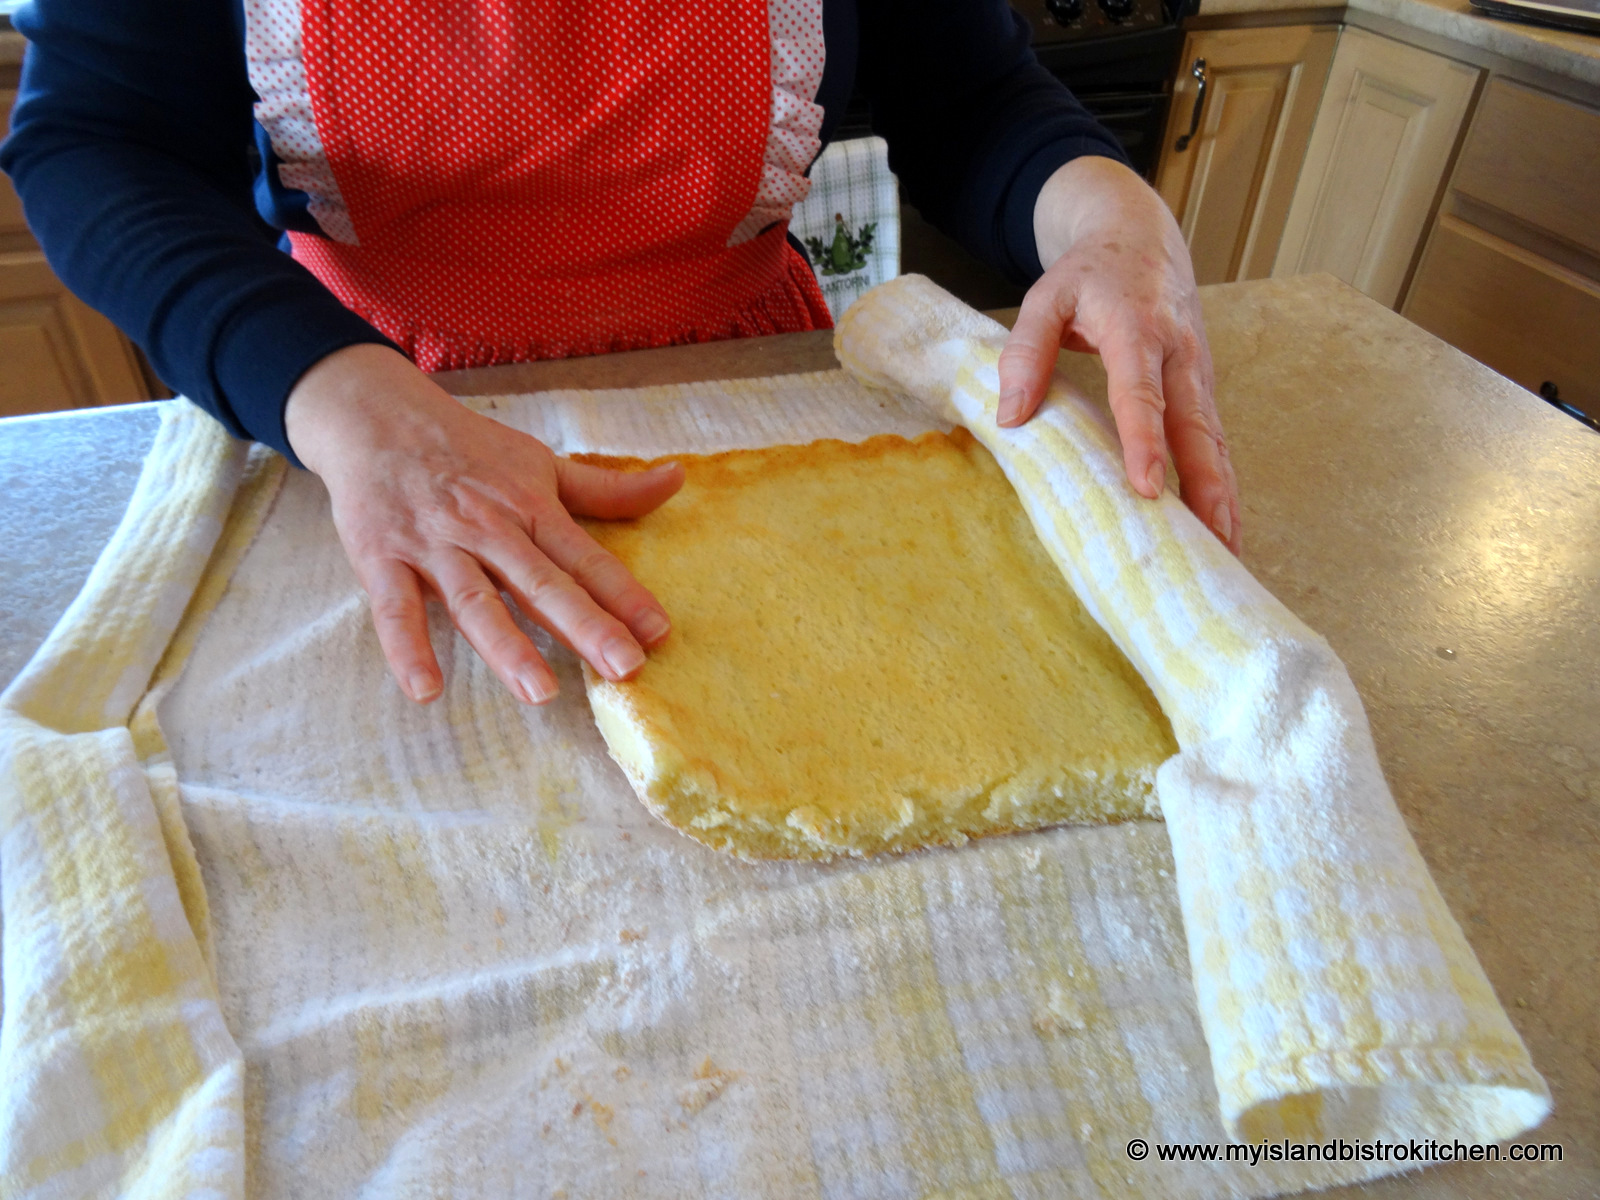
While cake is baking, lay a clean tea towel on counter and generously sprinkle with sifted icing sugar.
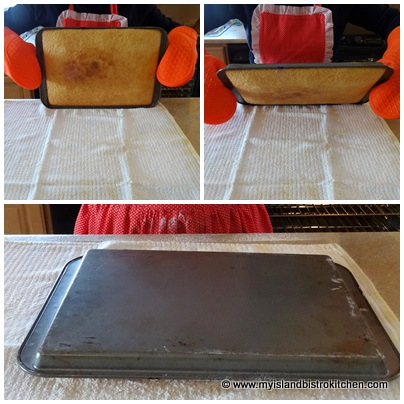
Remove cake from oven and run knife around all four edges to loosen cake from pan sides. Invert baked cake on sugar-dusted tea towel.
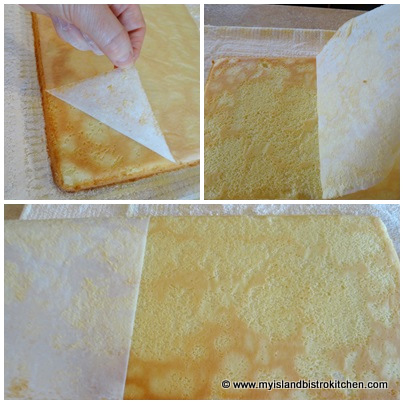
Peel off parchment paper, being careful not to tear cake.
Trim off outside edges of cake.
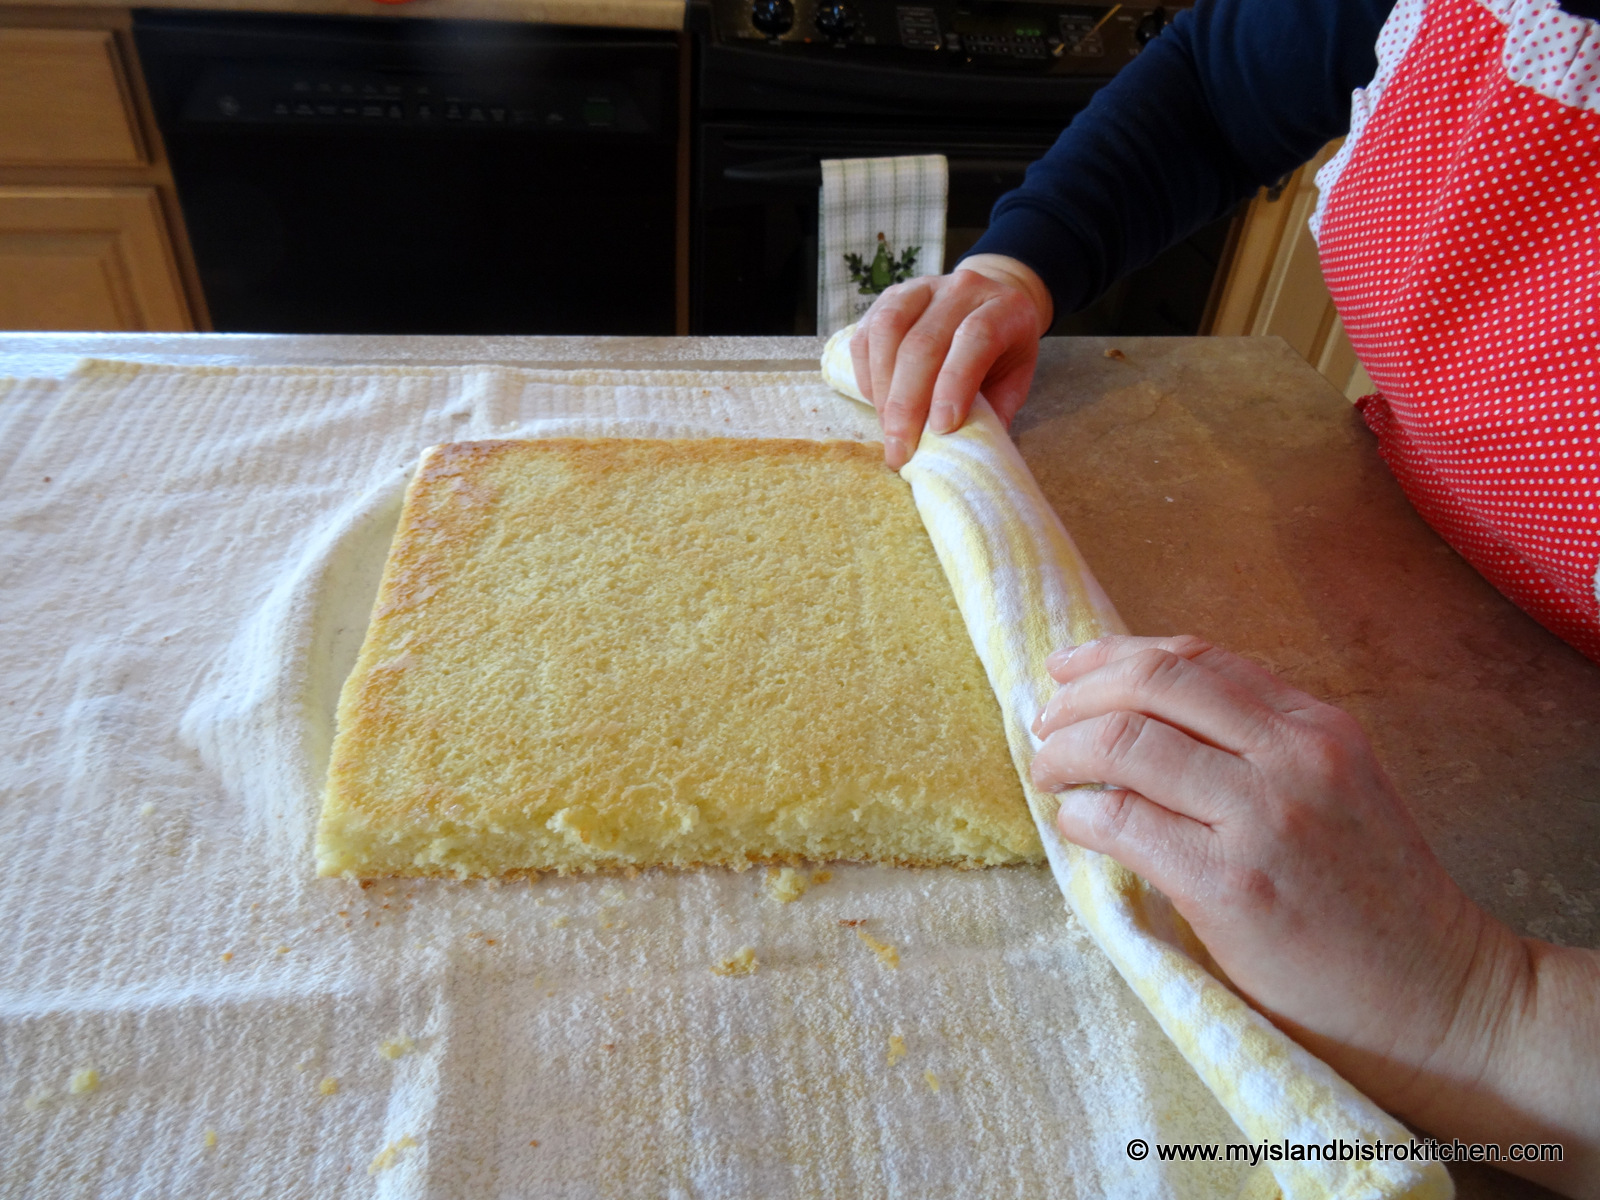
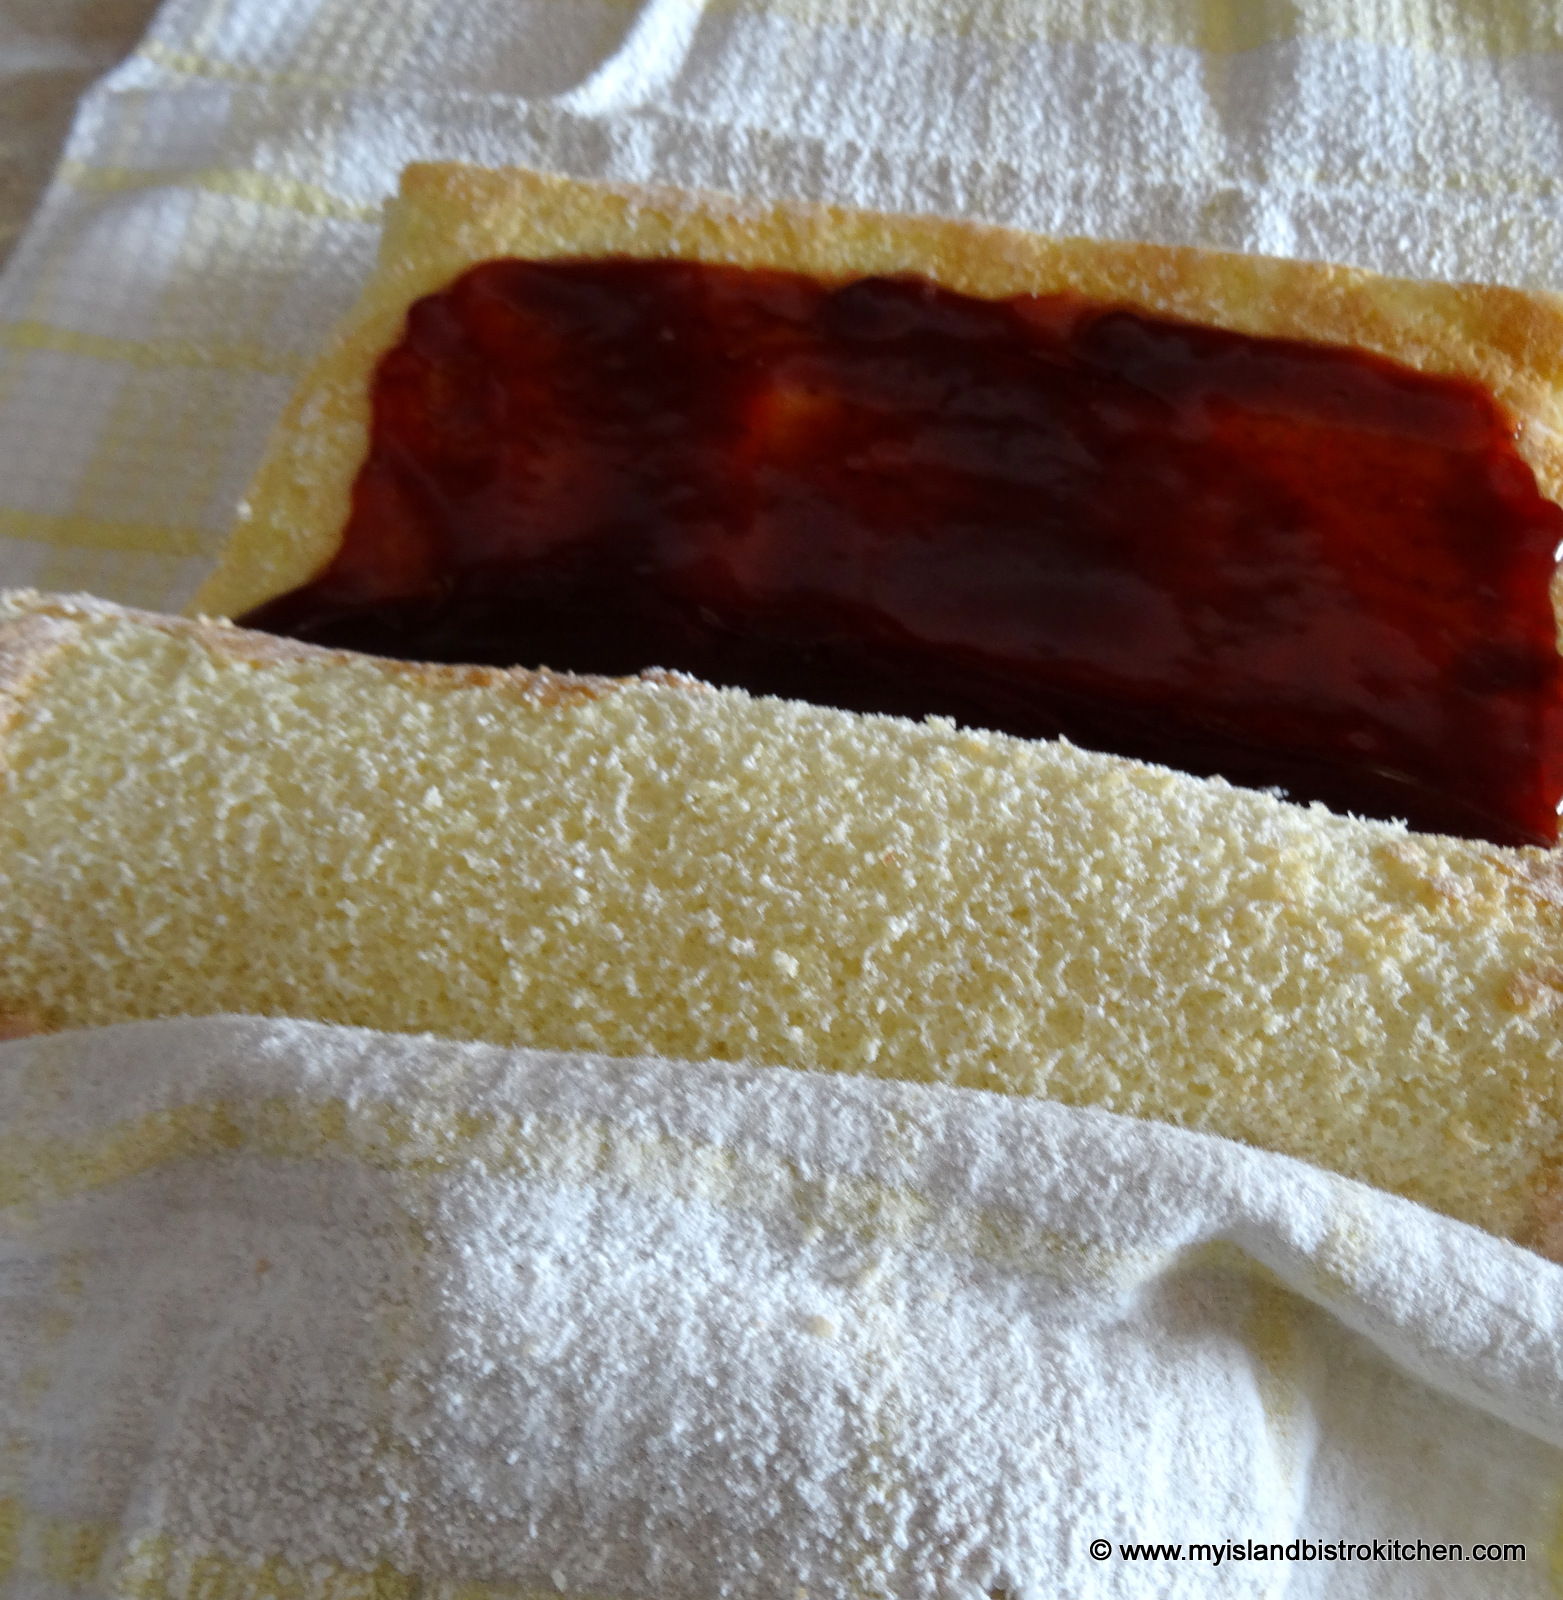
Rolling from the narrow end of the cake, roll up cake and tea towel together.
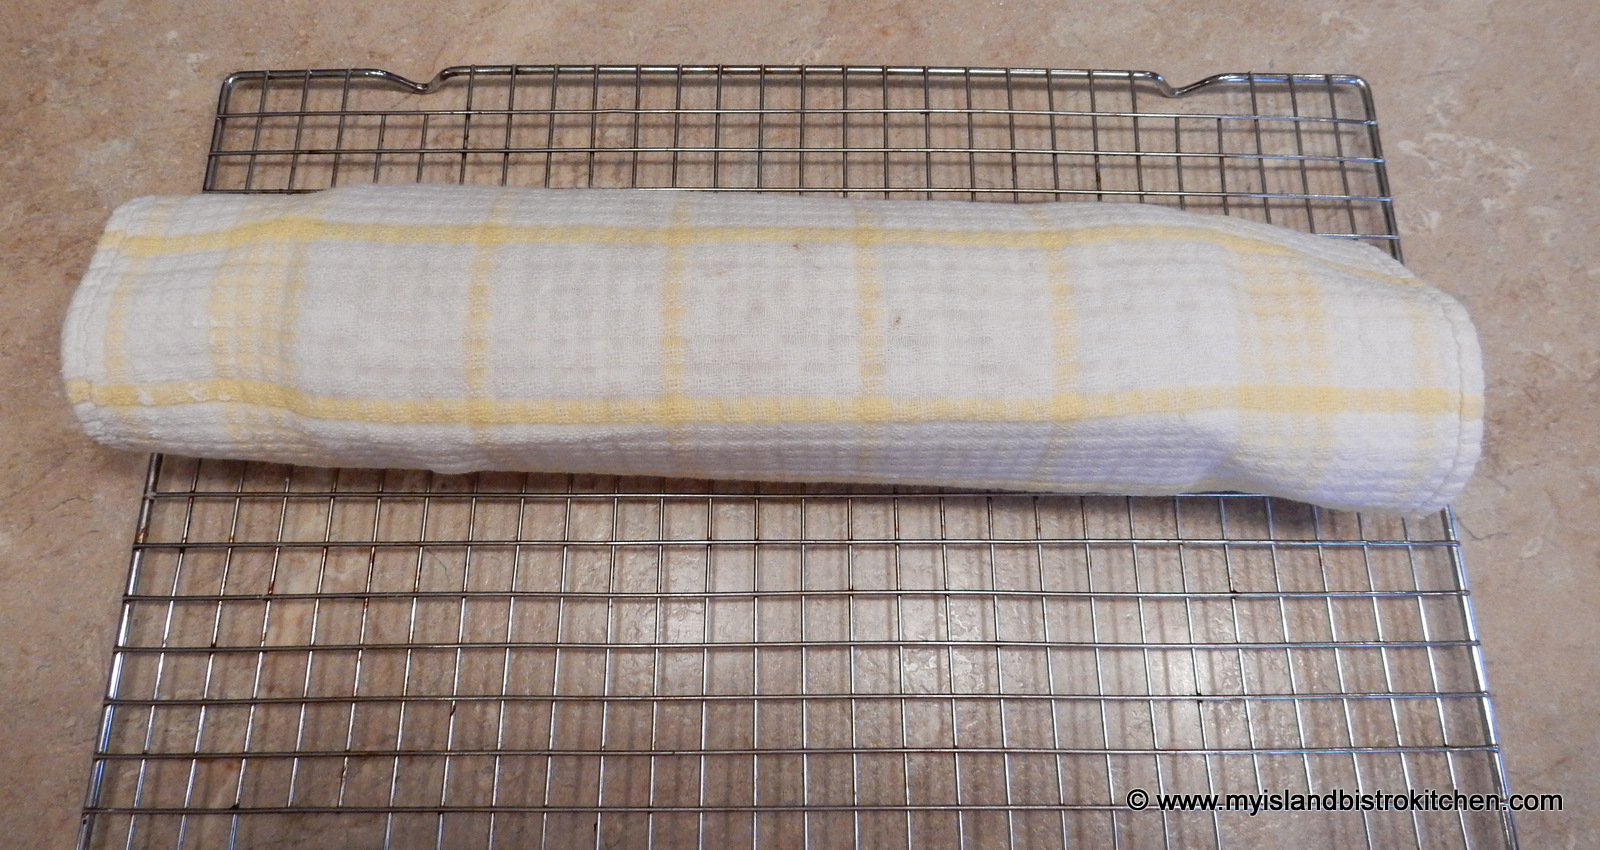
Transfer to wire rack and cool for about 15-20 minutes.
Carefully unroll the cake.
Spread cake with jam or jelly, leaving about ½” on sides of cake free of jam or jelly.
Using the tea towel as a guide, re-roll the filled cake.
Refrigerate for at least 30 minutes. Dust with icing sugar, cut, and serve.
Yield:Apx. 10-12 servings
If you have made this recipe and enjoyed it and/or wish to share it with your friends and family, please do so on social media but be sure to share the direct link to this posting from my website.
Connect with My Island Bistro Kitchen on Social Media
Follow “the Bistro” on Pinterest at https://www.pinterest.ca/peibistro/ and pin the Pinterest-ready photo found at the end of this post to your favorite Pinterest boards.
A Jelly Roll is an impressive dessert made with a thin sponge cake spread with a favorite jam or jelly and then rolled up, dusted with icing sugar, and sliced.
Course
Dessert
Keyword
jelly roll
Servings10
My Island Bistro KitchenMy Island Bistro Kitchen
Ingredients
1cup+ 3 tbsp cake flour
1¼tspbaking powder
¼tspsalt
4large eggs
1cupsugar
1tspvanilla
¼tspalmond flavouring
2tbspcold water
¾ - 1cupjam or jelly
Icing sugar for dusting
Instructions
Preheat oven to 400°F.
Grease, or spray cooking oil on 10”x15” rimmed baking sheet, ensuring sides are well-greased. Line bottom of pan with parchment paper. Lightly spray parchment paper with cooking oil.
Sift flour, baking powder, and salt together. Set aside.
Beat eggs until frothy. Slowly and steadily add the sugar and beat until light-colored and slightly thickened. Beat in vanilla, almond flavouring, and water.
Add the sifted dry ingredients to the egg-sugar mixture. Stir just until incorporated.
Pour batter into prepared pan. Bake 9-12 minutes or until cake tester inserted into cake comes out clean and cake springs back from a light touch. Do not overbake.
While cake is baking, lay a clean tea towel on counter and generously sprinkle with sifted icing sugar. Remove cake from oven and run knife around all four edges to loosen cake from pan sides. Invert baked cake on sugar-dusted tea towel. Peel off parchment paper being careful not to tear cake.
Trim off outside edges of cake. Rolling from the narrow end of the cake, roll up cake and tea towel together. Transfer to wire rack and cool for about 15 minutes. Carefully unroll the cake and spread with jam or jelly, leaving about ½” on sides of cake free of jam or jelly. Re-roll. Refrigerate for at least 30 minutes. Dust with icing sugar, cut, and serve.
Recipe Notes
Yield: Apx. 10-11 servings
NOTE: Be sure to read the accompanying blog post to this recipe as it contains tips for making the jelly roll successfully as well as step-by-step photos of the method used to make the jelly roll.
[Copyright My Island Bistro Kitchen]
Try one of these Jellies or Fruit Curds in your next Jelly Roll: