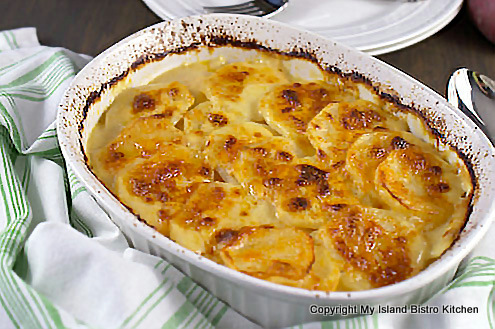
One of my very favorite ways to present potatoes is in the form of Scalloped Potatoes. A mixture of potatoes, onions, and milk along with a bit of seasoning and grated cheese make this a great comfort food dish any time of the year. My mother often made scalloped potatoes sometime on the weekend and made enough that we’d have leftovers for dinner a day or two later. To this day, I still believe that this is one dish that is better a day or two after it is made as the flavours really settle in. Continue reading Best Creamy Scalloped Potatoes Recipe→
When I have ham, I traditionally boil it and add all the veggies to the same pot in the last 30-40 minutes and let them cook in the broth. You can find my recipe for this comfort food meal here.
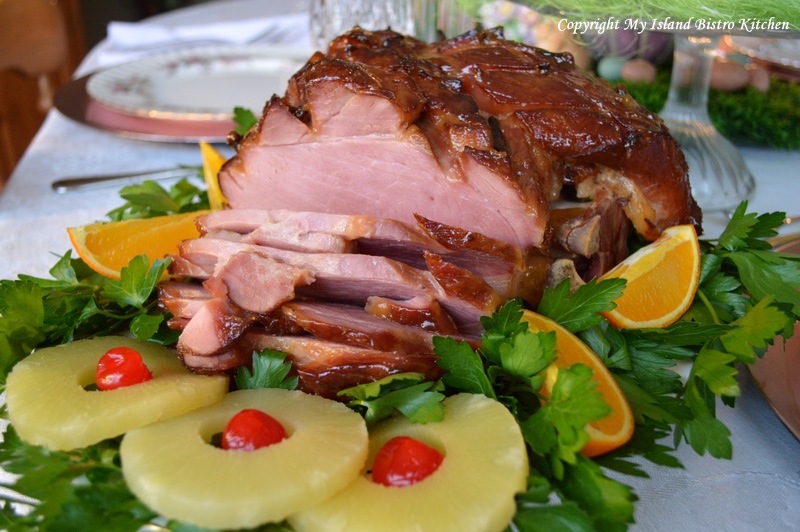
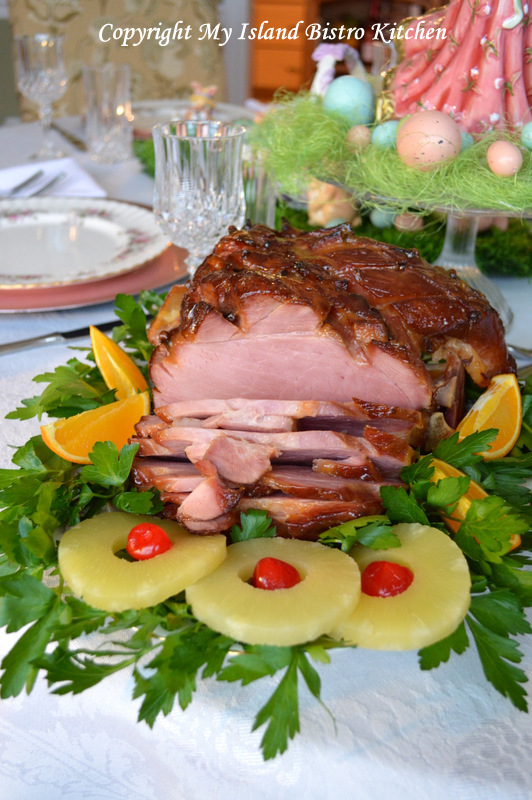
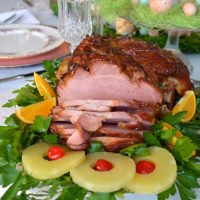
Baked Glazed Ham
However, sometimes, I like to make it a bit more special by baking and glazing the ham. Hams are very economical when bought on sale and they yield a good amount of meat if you are serving a crowd or wanting leftovers — I love leftovers because it means a few days of little meal prep!
Baked Glazed Ham
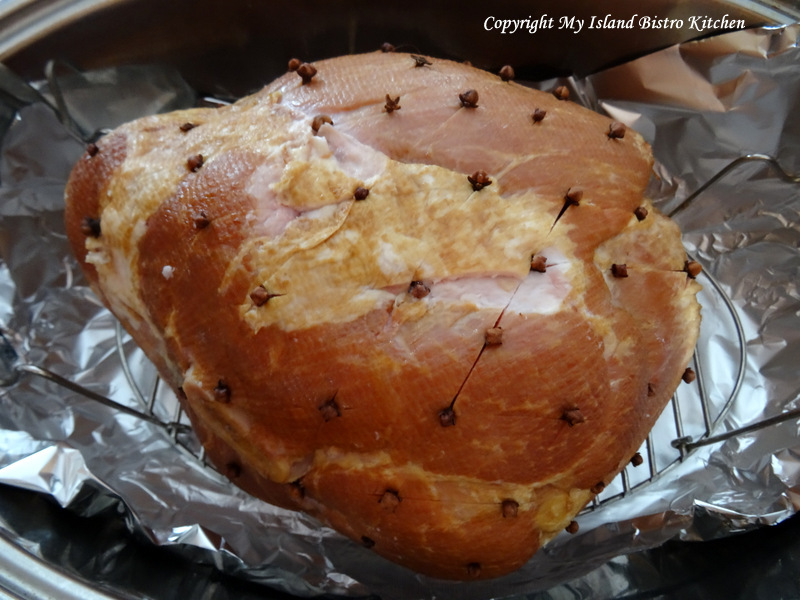
For this baked glazed ham, I started out with a cured ham (bone in). I scored the surface of the ham in a diamond pattern, cutting in between 1/8″ and 1/4″. At the intersection of each diamond, I inserted a whole clove.
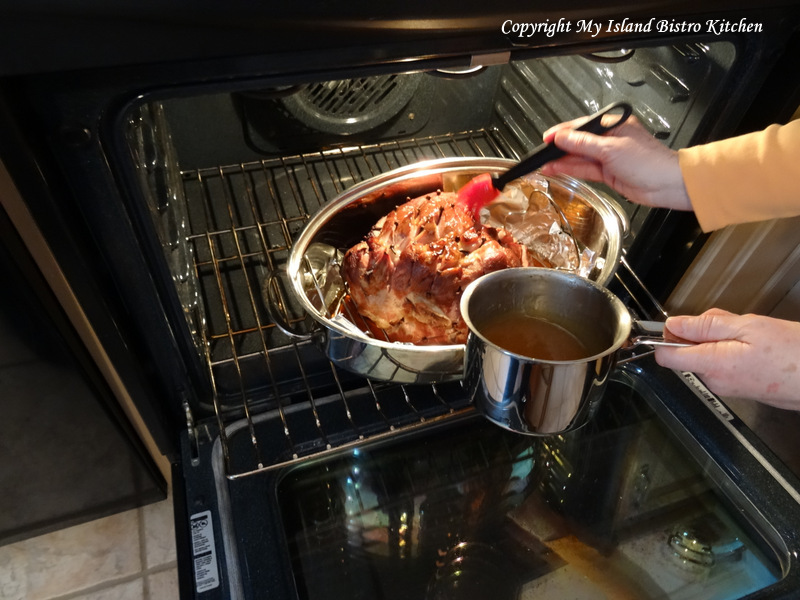
The oven was preheated to 325F and the large roaster was lined with tin foil to make clean up easier. The ham was placed on the roaster’s wire rack. I then poured 1 1/2 cups of root beer into the roaster, ensuring that the ham was not sitting in the root beer.
I brushed a very thin, light coating of the sweet and tasty glaze on the ham (recipe follows).
The cover was placed on the roaster and the baking began as the steam from the root beer infused the ham with additional flavor as it baked. About 50 minutes before I estimated the ham to be baked, I applied a thicker coating of the glaze, making sure it penetrated into the ham meat through the scored lines and I returned the ham to the oven to continue baking. About 25 minutes later, I reapplied the glaze. When the ham was cooked, I removed it from the oven and let it rest about 15 minutes before carving it. This makes it much easier to carve clean slices that stay whole.
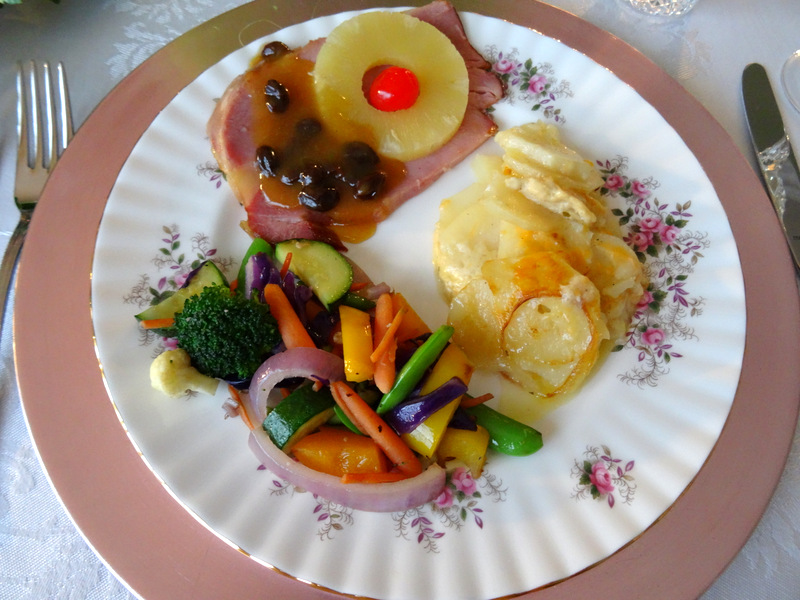
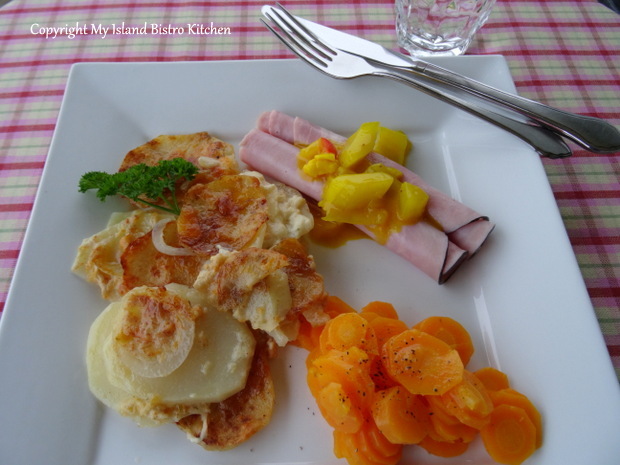
The ham was served with scalloped potatoes and a medley of stir-fried colorful vegetables.
Baked Glazed Ham Served with Scalloped Potatoes and Stir-fry Vegetable Medley
[Printable recipe follows at end of posting]
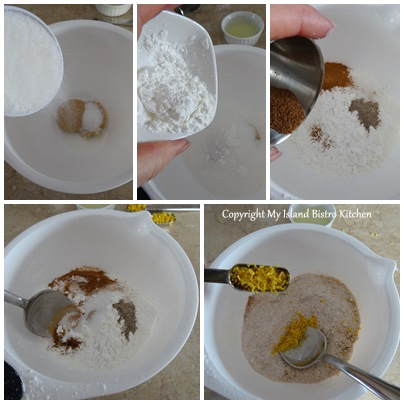
Glaze for Baked Ham
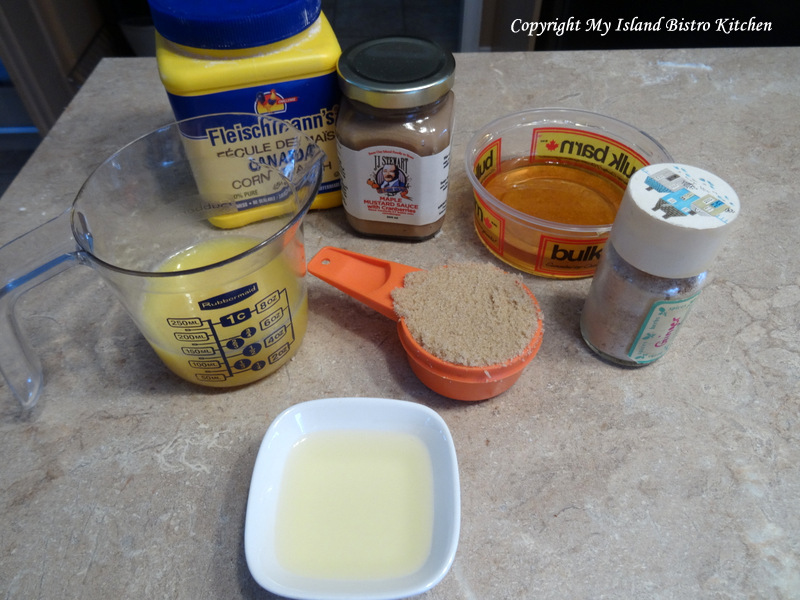
Ingredients:
1/4 cup orange juice
1 tbsp honey
3/4 tbsp mustard
1 tbsp pineapple juice
2 1/2 tbsp brown sugar
1/2 tbsp cornstarch
1/4 tsp ginger
Method:
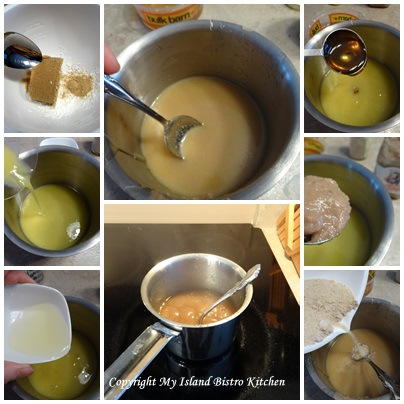
Assemble ingredients.
Combine brown sugar and cornstarch together. Add all remaining ingredients into a small saucepan. Stir in the brown sugar-cornstarch mixture. Bring to a boil over medium heat, stirring constantly until slightly thickened.
Brush very lightly over uncooked ham. About 50 minutes before ham is estimated to be baked, apply a thicker coat of the glaze to the ham, ensuring it penetrates into the diagonal cuts in the surface of the ham. About 25 minutes later, apply another coat of the glaze and return to oven to finish baking. Allow ham to rest for about 15 minutes before carving.
Take your baked ham to the next level with this easy-to-make sweet glaze
Course
Main Course
Cuisine
Canadian
Keyword
baked glazed ham
My Island Bistro KitchenMy Island Bistro Kitchen
Ingredients
¼cuporange juice
1tbsphoney
¾tbspmustard
1tbsppineapple juice
2½tbspbrown sugar
½tbspcornstarch
¼tspginger
Instructions
Assemble ingredients.
Combine brown sugar and cornstarch together. Add all remaining ingredients into a small saucepan. Stir in the brown sugar-cornstarch mixture. Bring to a boil over medium heat, stirring constantly until slightly thickened.
Brush very lightly over uncooked ham. About 50 minutes before ham is estimated to be baked, apply a thicker coat of the glaze to the ham, ensuring it penetrates into the diagonal cuts in the surface of the ham. About 25 minutes later, apply another coat of the glaze and return to oven to finish baking. Allow ham to rest for about 15 minutes before carving.
Do you ever have a craving for comfort foods? You know, the foods that are basic, nostalgic, or that you have a sentimental attachment to and that take you down memory lane. Some might even refer to these dishes as vintage. Maybe your mom made them for you when you were a child or you remember them from visits to grandma’s house. I’m talking about foods like macaroni and cheese, baked beans, scalloped potatoes, apple pie or crisp, homemade stews and “boiled dinners“, and baked bread. Cottage pie, rice pudding, roast chicken dinners, meatloaf with mashed potatoes, and fruit cobblers are other comfort foods commonly enjoyed in North American culture. There are many other dishes that bring us comfort, especially in the cold Canadian winters, so this list is not exhaustive and what constitutes comfort food may vary between cultures and regions of Canada.
These foods, in their traditional content, are by no means gourmet fare nor are they necessarily devoid of calories. They’re typically plain and simple stick-to-the-ribs kind of fare and they generate feelings of contentment and satisfaction … you feel warm and cozy when eating the meal. These kinds of dishes take basic, easy-to-find ingredients and are not usually difficult or complicated to make. They’re the kinds of foods that, when you walk into a home where they are being prepared, your appetite is immediately whetted and you harken back to early memories of enjoying those foods. They are hearty classics and endure over time, generation after generation. Yes, even the old tuna casserole is still considered a comfort food by many!
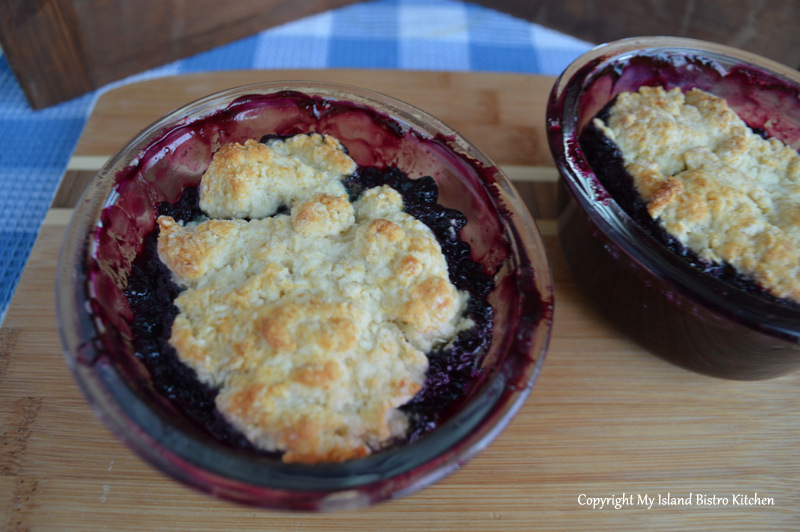
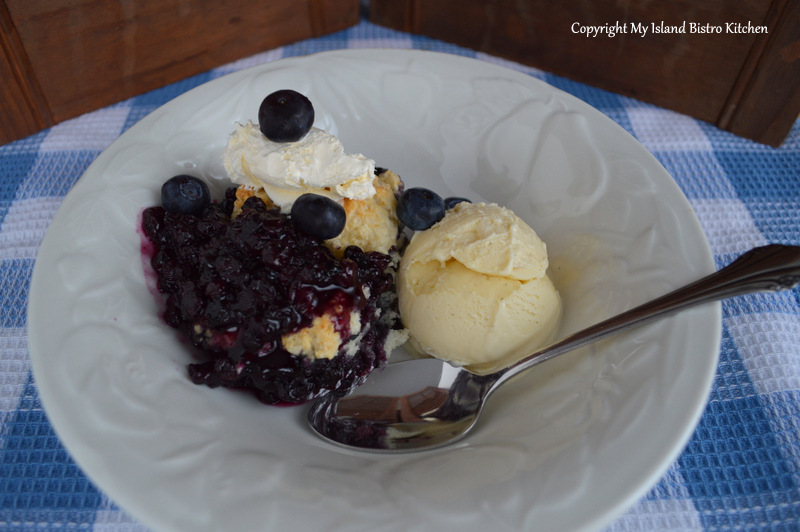
Today, I am sharing my recipe for Blueberry Grunt. I don’t know the origin of this dessert or how it got its name but it’s really just a baked fruit dessert – a slightly thickened fruit sauce on the bottom topped by a biscuit-like dumpling. This dessert is often made on the stove top where the dumplings are put in the pot on top of the bubbling blueberry sauce, covered and let simmer for about 15 minutes. However, my recipe calls for the dessert to be baked in the oven.
Baked Blueberry Grunt
My featured Island product in this recipe are the blueberries. Each summer, I pack away several bags of these sweet little Island-grown morsels for use in my favorite recipes like this one for Blueberry Grunt.
[Printable recipe follows at end of posting]
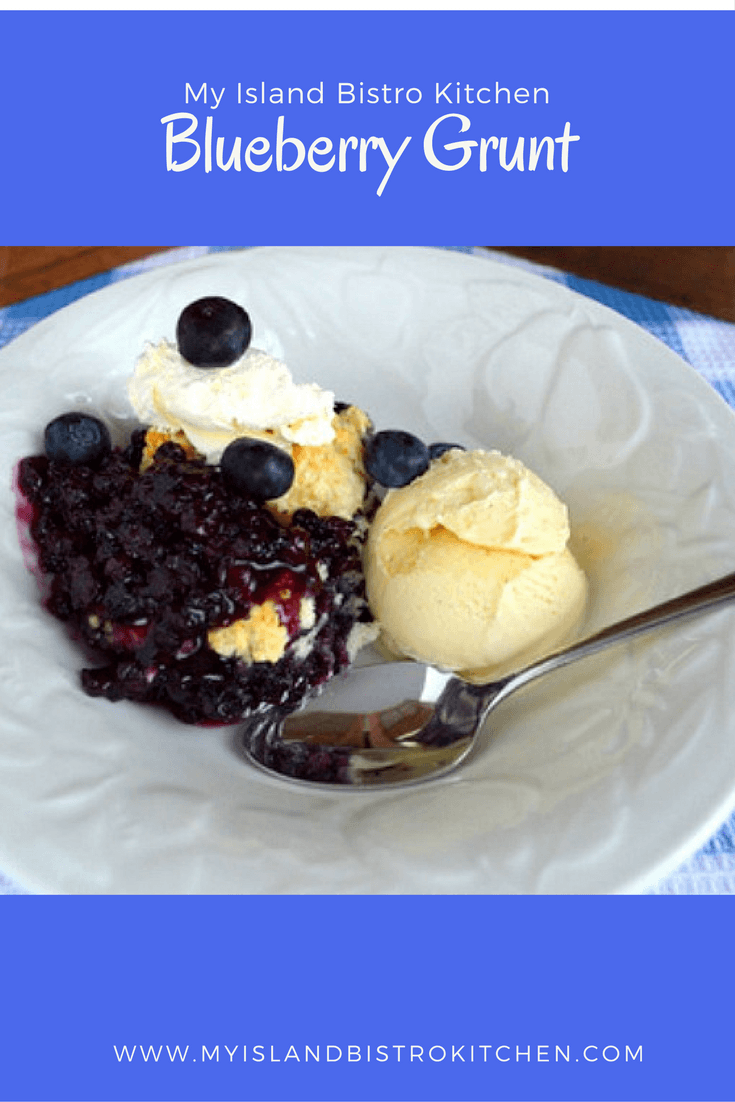
Blueberry Grunt
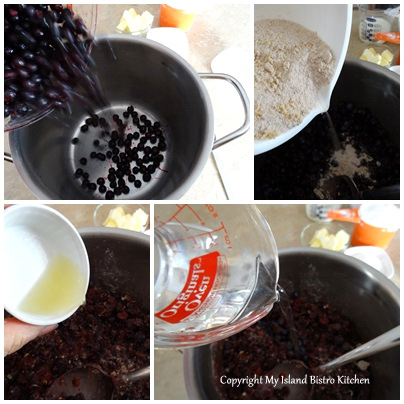
Ingredients:
4 cups blueberries, fresh or frozen
1/2 cup white sugar
2 tbsp brown sugar
1 tbsp + 1 tsp cornstarch
2 tsp lemon juice
1 1/2 tsp grated lemon rind
1/2 cup water
1/2 tsp cinnamon
1/4 tsp nutmeg
1/8 tsp cardamon
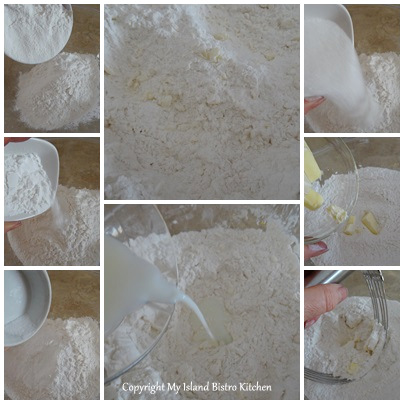
Topping:
2 cups flour
4 tsp baking powder
1/4 tsp salt
2 1/2 tbsp white sugar
1 cup milk
2 1/2 tbsp cold butter
Method:
Preheat oven to 400F.
In a small bowl, mix together the sugars, cornstarch, and spices. Stir in the grated lemon rind. Set aside.
In saucepan, combine blueberries and the sugar mixture. Add the lemon juice and water. Bring to a boil then reduce heat and simmer mixture for 5-6 minutes. Remove from heat.
Meanwhile, in a large bowl, combine flour, baking powder, salt and sugar. Cut in cold butter until mixture resembles coarse oatmeal. Add enough milk to make a soft dough mixture that will cling together.
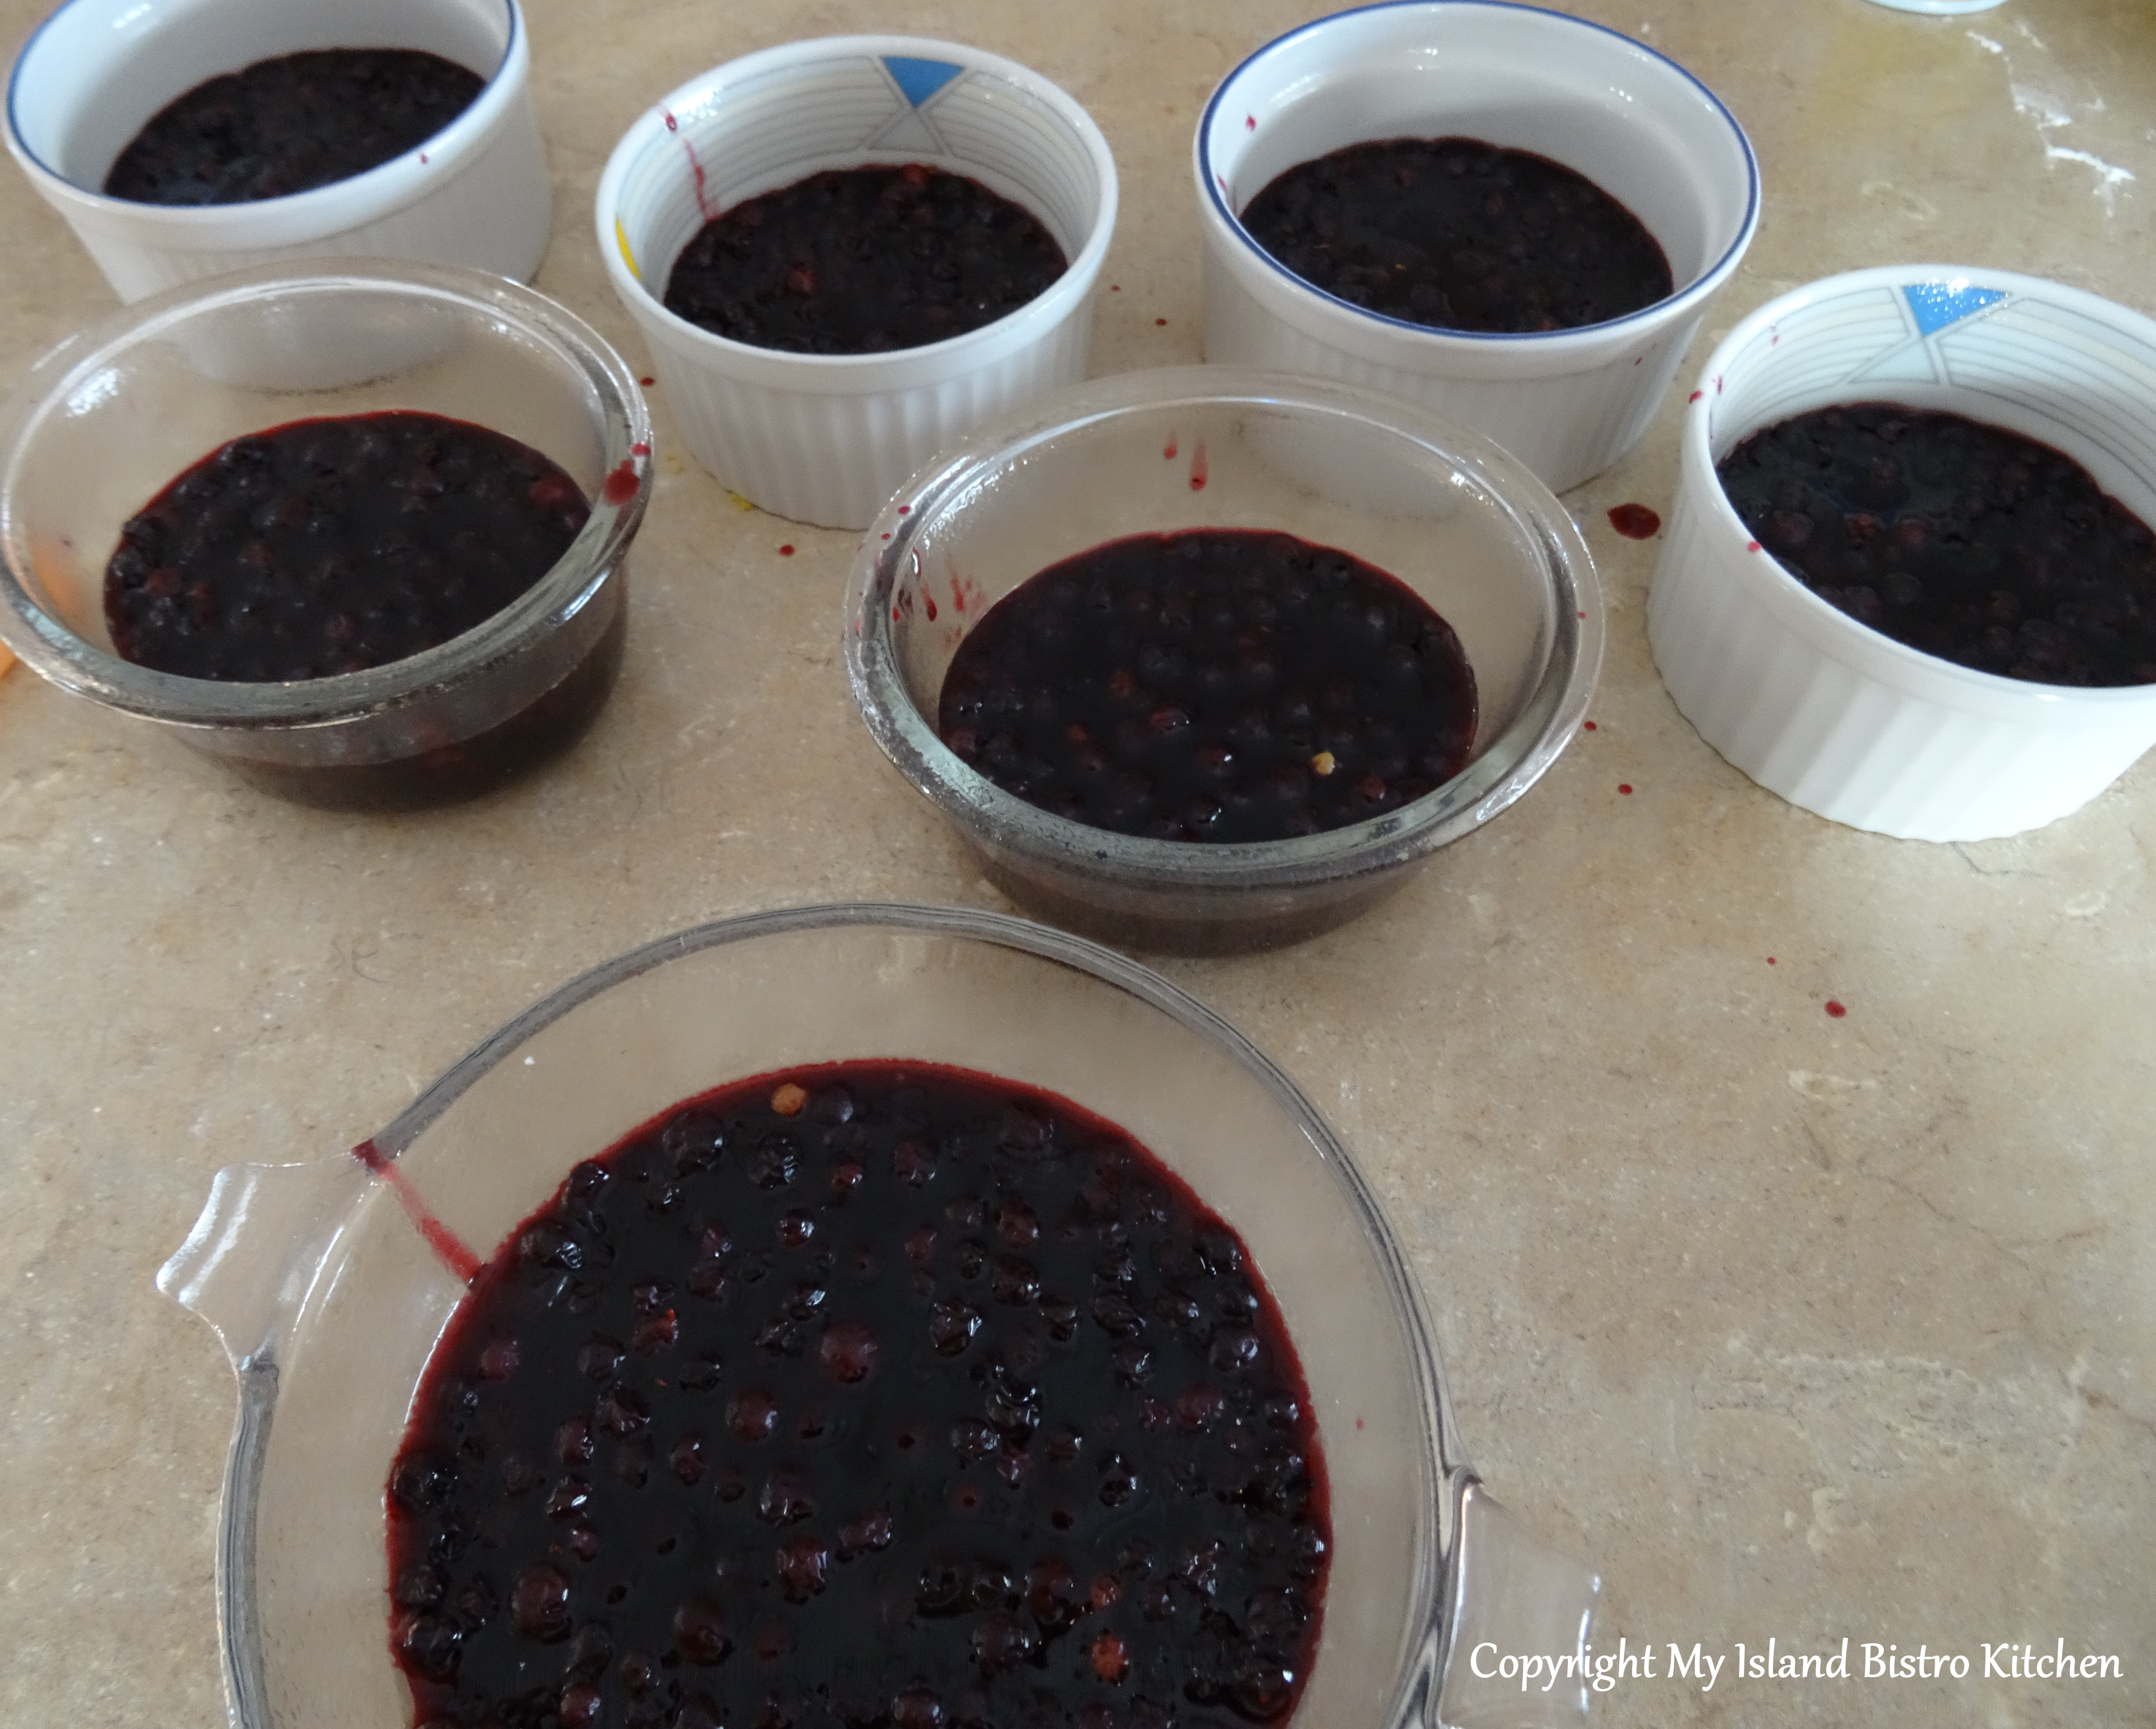
Grease a 1 1/2 or 2-quart baking dish or 8 individual ramekins. Spoon the blueberry mixture into baking dish(es).
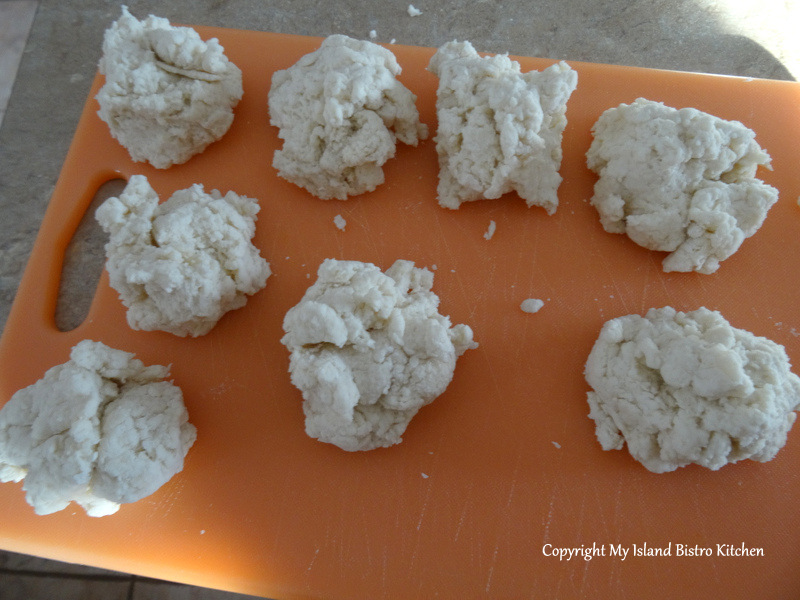
Divide the dumpling dough into 8 portions.
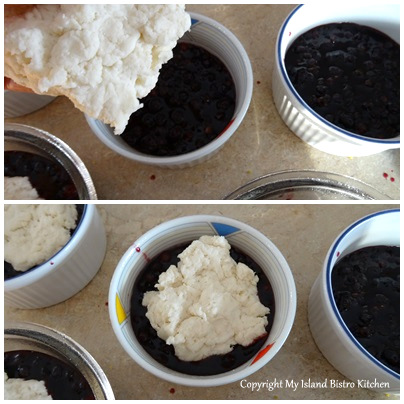
Place dumplings over blueberry mixture (close together if baking in one casserole or centered if using individual dishes).
Bake in 400F oven for about 20-25 minutes or until dumplings are done and lightly golden brown on top.
Serve hot or warm with a dollop of whipped cream or vanilla ice cream (or both!).
An easy to prepare comfort dessert, Blueberry Grunt consists basically of blueberries baked in a flavorful sauce under tea biscuit dumplings. Serve hot with vanilla ice cream and/or whipping cream.
Course
Dessert
Cuisine
Canadian
Keyword
blueberries, blueberry grunt
Servings8
My Island Bistro KitchenMy Island Bistro Kitchen
Ingredients
Blueberry Base:
4cupsblueberries, fresh or frozen
1/2cupwhite sugar
2tbspbrown sugar
1tbsp+ 1 tsp cornstarch
2tsplemon juice
1 1/2tspgrated lemon rind
1/2cupwater
1/2tspcinnamon
1/4tspnutmeg
1/8tspcardamom
Topping:
2cupsflour
4tspbaking powder
1/4tspsalt
2 1/2tbspwhite sugar
1cupmilk
2 1/2tbspcold butter
Instructions
Preheat oven to 400F.
In a small bowl, mix together the sugars, cornstarch, and spices. Stir in the grated lemon rind. Set aside.
In saucepan, combine blueberries and the sugar mixture. Add the lemon juice and water. Bring to a boil then reduce heat and simmer mixture for 5-6 minutes. Remove from heat.
Meanwhile, in a large bowl, combine flour, baking powder, salt and sugar. Cut in cold butter until mixture resembles coarse oatmeal. Add enough milk to make a soft dough mixture that will cling together.
Grease a 1 1/2 or 2-quart baking dish or 8 individual ramekins. Spoon the blueberry mixture into baking dish(es).
Divide the dumpling dough into 8 portions.
Place dumplings over blueberry mixture (close together if baking in one casserole or centered if using individual dishes).
Bake for about 20-25 minutes or until dumplings are done and lightly golden brown on top.
Serve hot with a dollop of whipped cream or vanilla ice cream (or both!).
Recipe Notes
Yield: 8 servings
[Copyright My Island Bistro Kitchen]
If you have made this recipe and enjoyed it and/or wish to share it with your friends and family, please do so on social media but be sure to share the direct link to this posting from my website.
Connect with My Island Bistro Kitchen on Social Media
Follow “the Bistro” on Pinterest at https://www.pinterest.ca/peibistro/ and pin the Pinterest-ready photo found at the end of this post to your favorite Pinterest boards.
You may also enjoy these other blueberry dessert recipes from My Island Bistro Kitchen:
[UPDATE TO THIS STORY: Since this story was published in 2013, Lori Robinson has switched from growing potatoes to grains on her farm and, as such, is no longer growing potatoes. The story, however, remains a good depiction of what goes in to getting potato seed in the ground and how the potato ends up on your dinner table.]
Part of my objective with this food blog is to showcase food products produced on PEI and the producers and farmers behind them. In this story, I will introduce you to Lori Robinson, a fifth generation PEI potato farmer. Lori is Farm Manager at Eric C. Robinson Inc. in Albany, PEI.
PEI Potato Farmer, Lori Robinson
I hope that this feature story will shed a little light on just where the bags of potatoes that you pick up at the supermarket come from or where the potatoes that go into making potato chips originate.
For the land mass size of our Province, PEI produces a lot of potatoes. According to the Prince Edward Island Potato Board, there were 89,000 acres of potatoes grown on PEI in 2013. The Board tells me there were approximately 45 varieties grown in commercial quantities and more than double that amount when those that are being grown in test plots or market gardens or for limited specialty markets are included. An economic impact study completed a little over a year ago determined that the potato industry is worth just over a billion dollars annually to the PEI economy directly and in spin-off effects.[1]
Individual potato farms on PEI range in size. The Robinson farm grows around 500 acres of potatoes annually in rotation with soybeans, barley, and forages. For the past five months, I have been following Lori from the time she planted the spuds in the ground back in May to their harvesting in October and ending with the washing and packaging process that is now, at the time of writing, underway at the farm.
Let’s begin by finding out what led Lori in her career choice to become a potato farmer. I think it would be fair to say that Lori grew up with potato farming in her bloodline. Her great, great grandfather began growing potatoes in Augustine Cove, PEI, in the early 1800s and successive generations have continued the tradition. She says her decision “to become a potato farmer was part tradition, part general interest in all things science based, and part desire to work with other members of her family in a family-owned and operated business in PEI”. By the time Lori was in her mid to late teens, she knew what her career path would be – she would study agriculture at university and become a farmer.
Lori holds a Bachelor of Science in Agriculture from the University of Guelph where she majored in Agriculture Business. While Lori will be the first to tell you her university degree did not specifically teach her much about growing potatoes (she learned that by doing), her education did teach her how to think critically, solve problems, and manage human and financial resources. These are all skills useful to today’s commercial farmers. Farming is much more than planting seed in the ground and waiting for the produce to grow.
In 2013, Lori grew 15 different varieties of potatoes. This year, 35% of their crop will be used to make potato chips at Frito Lay, 20% will be used for seed, and 45% will be for table stock – the ones that will make it on to our dinner tables. The seed potatoes will be used to plant the farm’s crop next year and also to sell to other potato growers. The potatoes in the large storage bin behind Lori in the photo below are next year’s Norland seed.
Today’s commercial potato farming is very scientific and controlled. Lori points out that “seed potatoes must be inspected in the field by Canadian Food Inspection Agency (CFIA) agents and then tested in an accredited laboratory to ensure that disease levels (viruses) are below a certain percentage before the seed receives certification to be replanted the following year”. It is interesting to note that seed potatoes can be used as table stock but table stock potatoes cannot be used as seed.
The Island spuds will travel. Lori’s farm sells both the seed potatoes and table stock in Canada and the United States while the “chipstock” (those used to make potato chips) will be sold in Canada and the United States as well as in Indonesia, Thailand, and Guatemala. You just never know where you might be eating an Island potato!
All professions have their challenges as well as their sources of satisfaction. Lori says her biggest challenge is finding an adequate number of staff to work on the farm and in their packing house. She currently employs 14 year-round, full time staff and 4-5 seasonal employees from late September to late June. In terms of job satisfaction as a potato farmer, Lori has this to say: “Harvesting a good crop of high-quality potatoes that I eventually see in our local Superstores provides me with a great sense of satisfaction. No two years in potato farming are ever alike. Many new challenges come up every year, every growing season. There is always something new to learn about farming. The need to overcome these challenges to remain successful and the desire to learn new things are what motivate me and make me passionate about my job as a potato farmer.”
Lori has been potato farming for 20 years, continuing on in a long line of successful potato farmers in her family. I asked her what she attributes the success of her potato farm to. She says her predecessors “recognized the importance of good land stewardship in order to achieve the balance between economic viability and environmental sustainability”. Lori has carried on these traditions and philosophy while adding a few of her own ideas along the way to maintain the success of their potato farming operation and carry it into the future.
Lori is very much a hands-on farmer. She actually gets on a tractor and works in the fields herself in the spring doing land preparation work that occurs prior to planting. On May 29, 2013, when I arrived at a huge long field waiting to be planted in North Carleton, PEI, I found Lori and her crew planting Dakota Pearl potatoes. That’s Lori up on the planter on the right-hand side checking to make sure things are working as intended.
The farm operates with 7 John Deere tractors, 1 planter, 2 sprayers, 7 tandem trucks, 2 windrowers, 1 harvester, and 3 telescopic pilers.
Farm sizes and farming methods and machinery have changed over the years for sure. I asked Lori what she sees as the biggest changes in potato farming over the years. For her, one change really stands out – input costs for potato farming continually increase while the price farmers receive for the potatoes is relatively unchanged from the days when her grandfather sold potatoes. She also says that a big change has been in the advancement of technology, mainly in the use of GPS for field operations. Lori also notes that, while the Robinson farm has remained relatively the same size since she started farming 20 years ago, most well-established farms on PEI have grown larger at the expense of a number of smaller farms going out of business due to financial strain or lack of a succession plan.
So, let’s look at the timeline of the potato season at the Robinson farm on PEI.
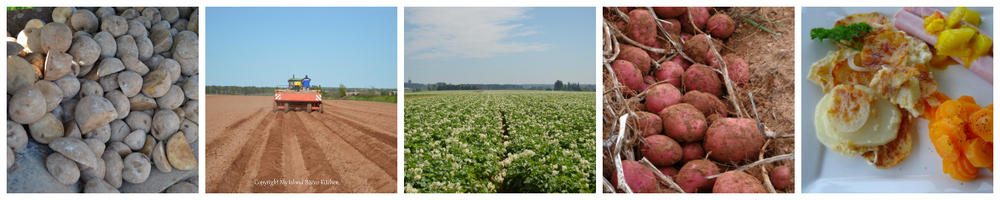
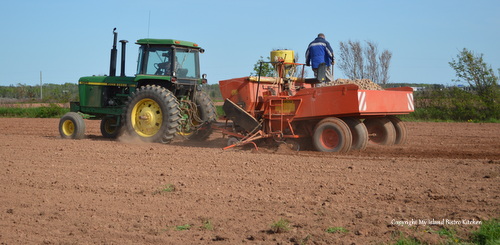
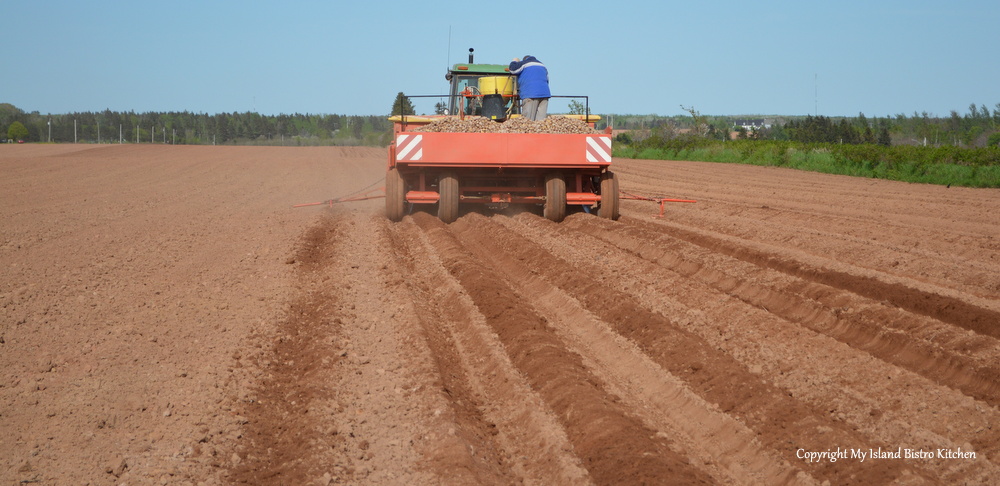
May 29, 2013 – Planting
Potato Seed
It all begins with the potato seed for this field of Dakota Pearl variety.
Loading the Planter with Seed
And, well-tilled fertile soil.
And a planter full of potato seed along with some fertilizer.
A good John Deere tractor helps, too!
Planting potatoes
And, the seed is in the ground!
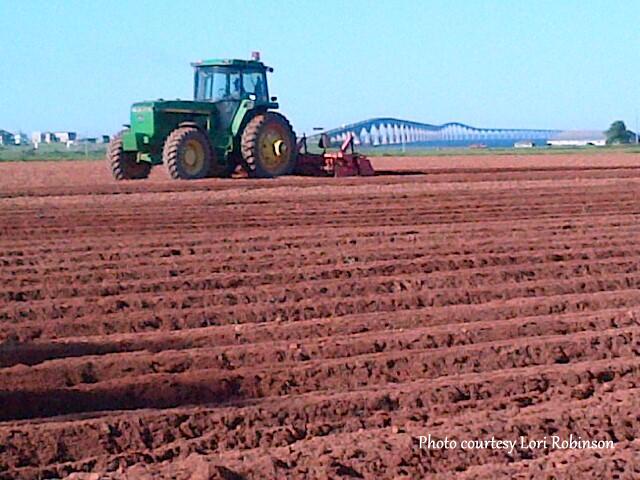
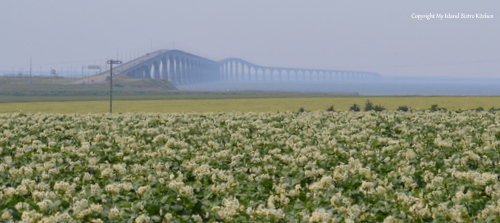
June 20, 2013 – Fertilizing and Hilling
Field work continues through the growing season to ensure a good crop of potatoes (yes, that’s the Confederation Bridge in the background and, yes, PEI soil really is that red!).
Fertilizing and Hilling the Potatoes
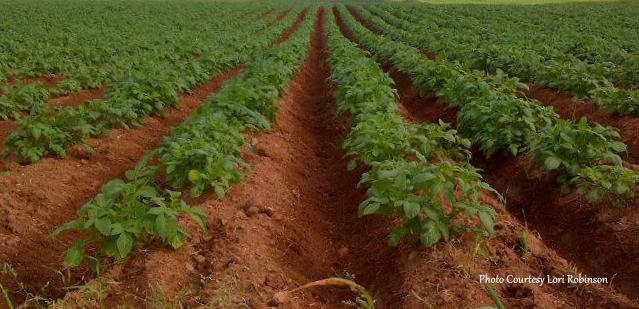
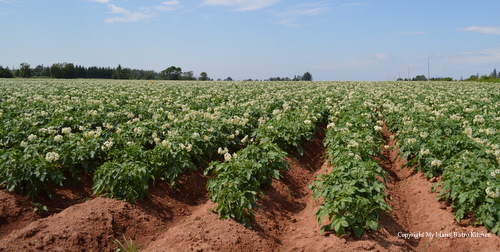
July 2, 2013 – Potato Plants Growing
By early July, there is evidence that the potato plants are growing well – look at that gorgeous emerald green color against the rich red soil of PEI!
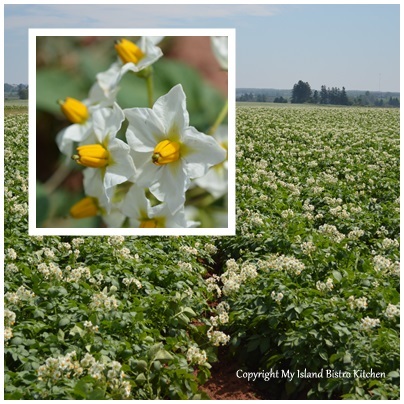
July 20, 2013 – Potato Blossoms
A drive by the field in mid-July reveals that the Dakota Pearls are out in blossom!
Potato Blossoms
The field is abloom with white blossoms that have tiny bright yellow centers.
This is a super long field!
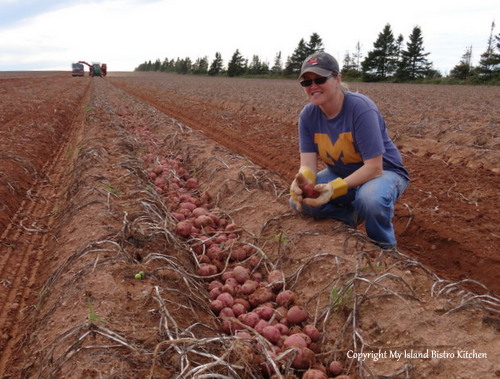
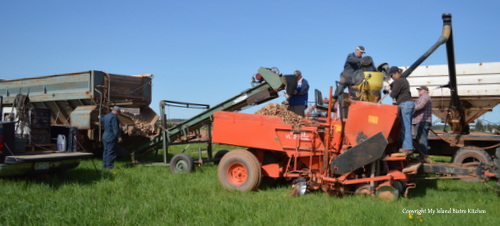
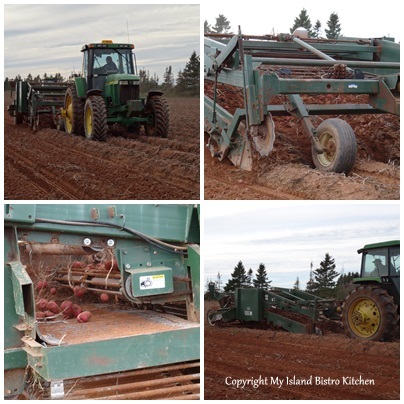
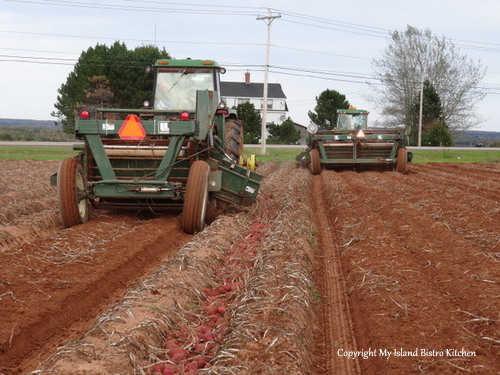
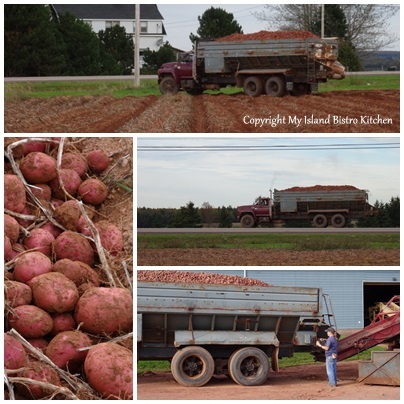
September 30, 2013 – Harvesting
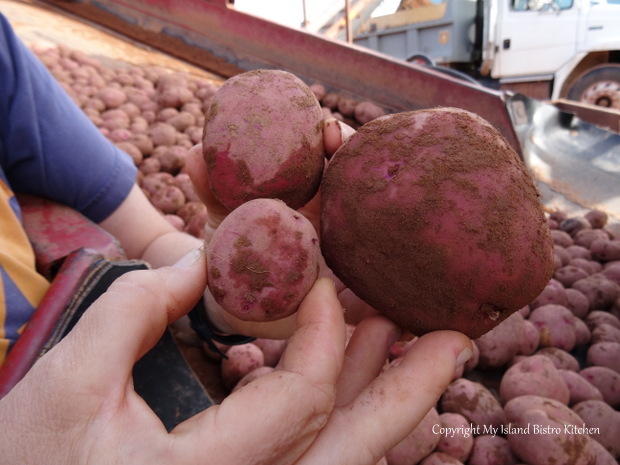
By September 30th, harvesting was underway on the Robinson farm. On this day, I found the crew harvesting the Norland variety (deep red-skinned potatoes) in Albany, not far from the Confederation Bridge.
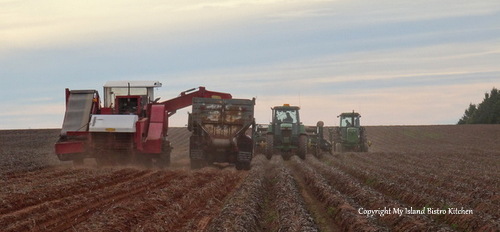
Two windrowers (one two-row and one four-row) were working the field in advance of the harvester, and moving the freshly-dug potatoes over into the drills where the harvester would pick them up while digging two more rows of potatoes itself at the same time.
This means that the harvester is picking up a total of eight rows of potatoes as it moves down the field.
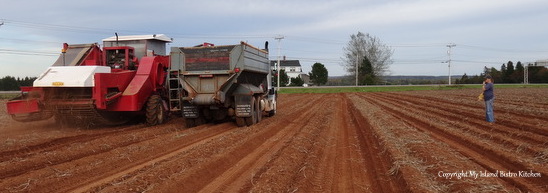
The harvest days are long and dependent upon good weather and, of course, no mechanical breakdowns.
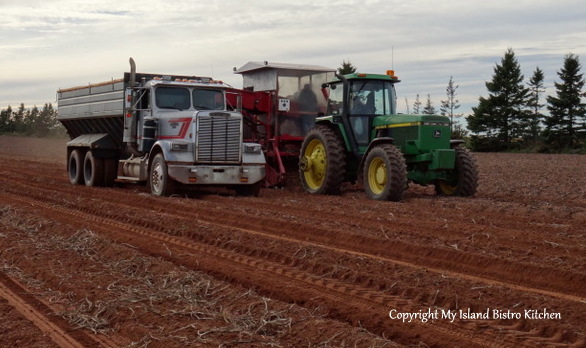
Once the truck is full of spuds, it heads to the warehouse and an empty truck comes alongside the harvester to be filled as they move in tandem down the long drills of potatoes.
Heading to the Warehouse
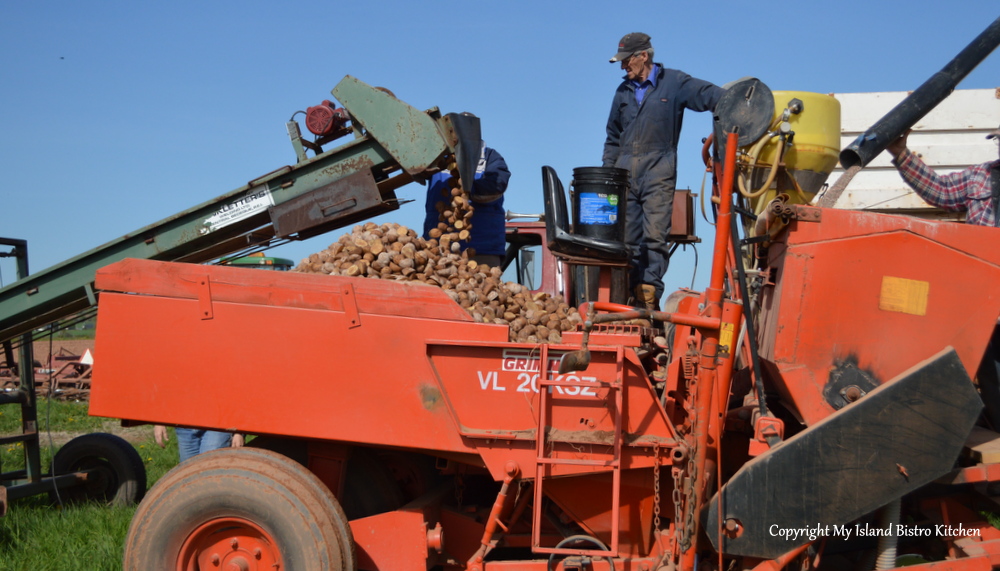
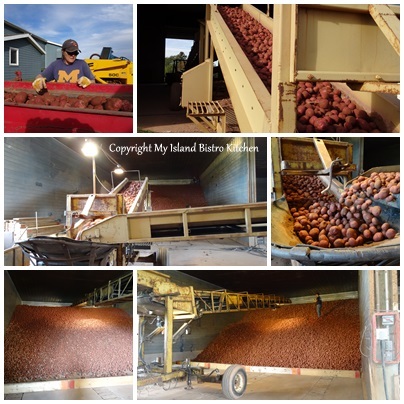
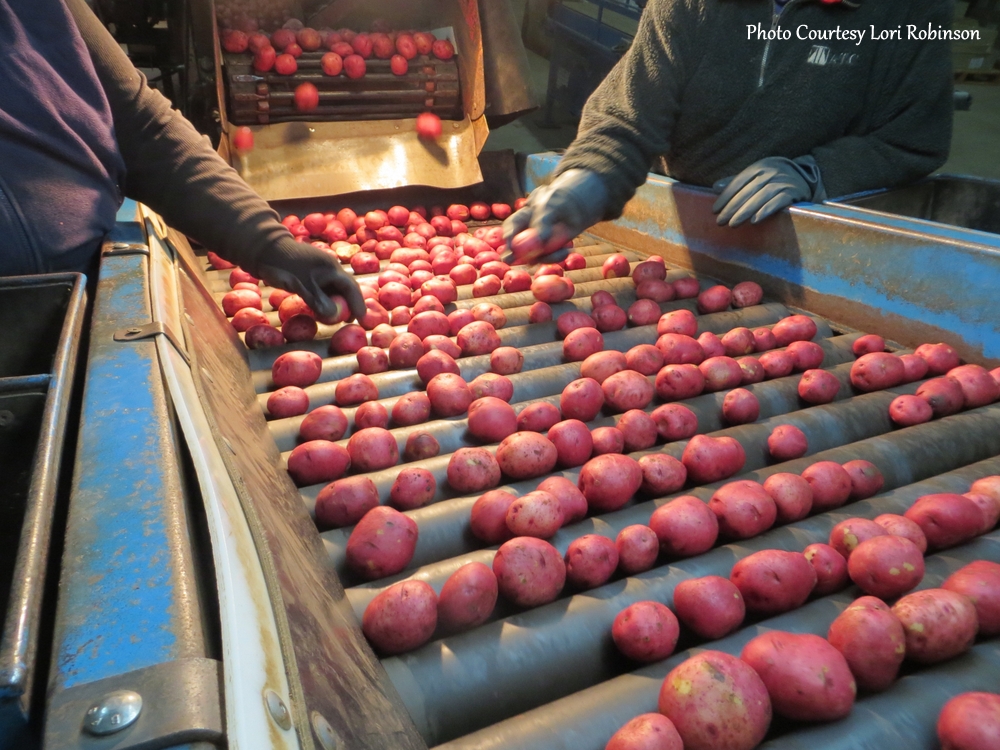
At the warehouse, the spuds are offloaded from the truck on to the conveyer belt that takes them into a small grading house just outside the warehouse where three employees remove any stones, plant particles, or damaged or spoiled potatoes.
From there, via conveyer belt to a bin piler, the potatoes make their way into a huge warehouse that is divided off into separate bins for the different varieties of potatoes.
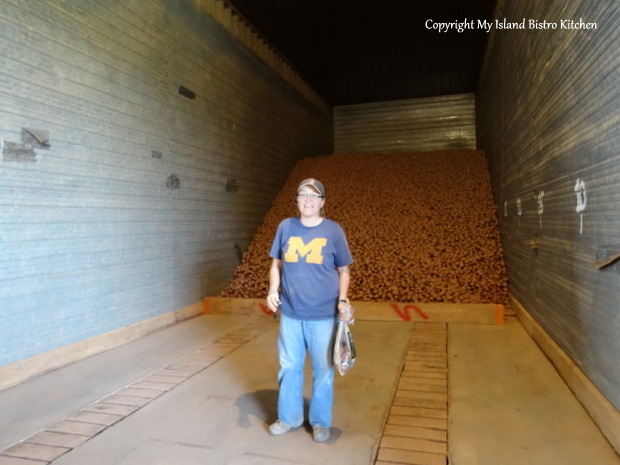
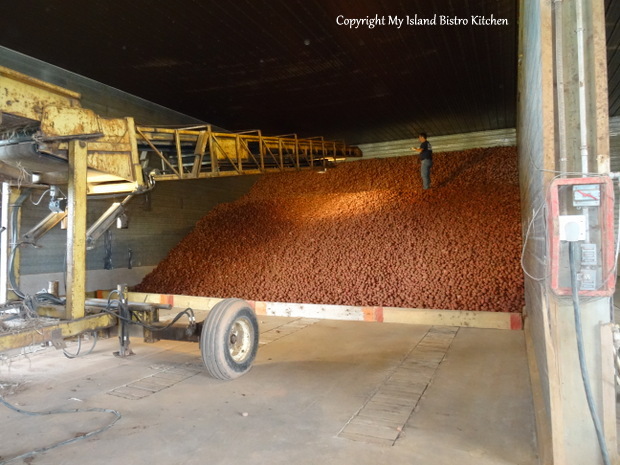
In the photo below, the man is standing on top of 1/2 million pounds of potatoes in order to insert a temperature probe down into the pile of potatoes to monitor any significant rises in temperature in the middle of the pile which would signal attention needed.
The warehouse is temperature-controlled to maintain the freshness and quality of the potatoes.
By the end of the first day of harvest, 3/4 million pounds of potatoes will have been dug and stored in the warehouse.
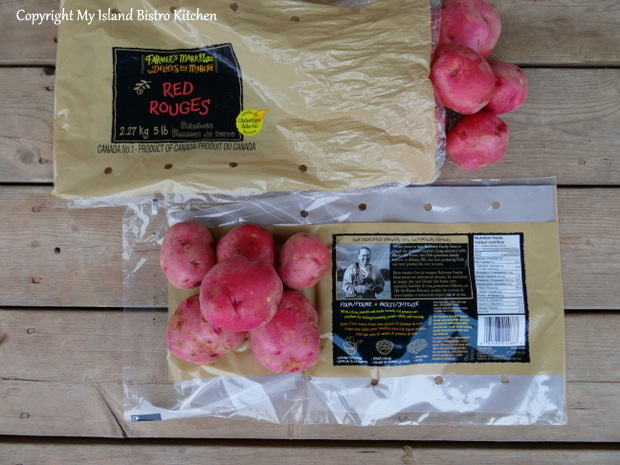
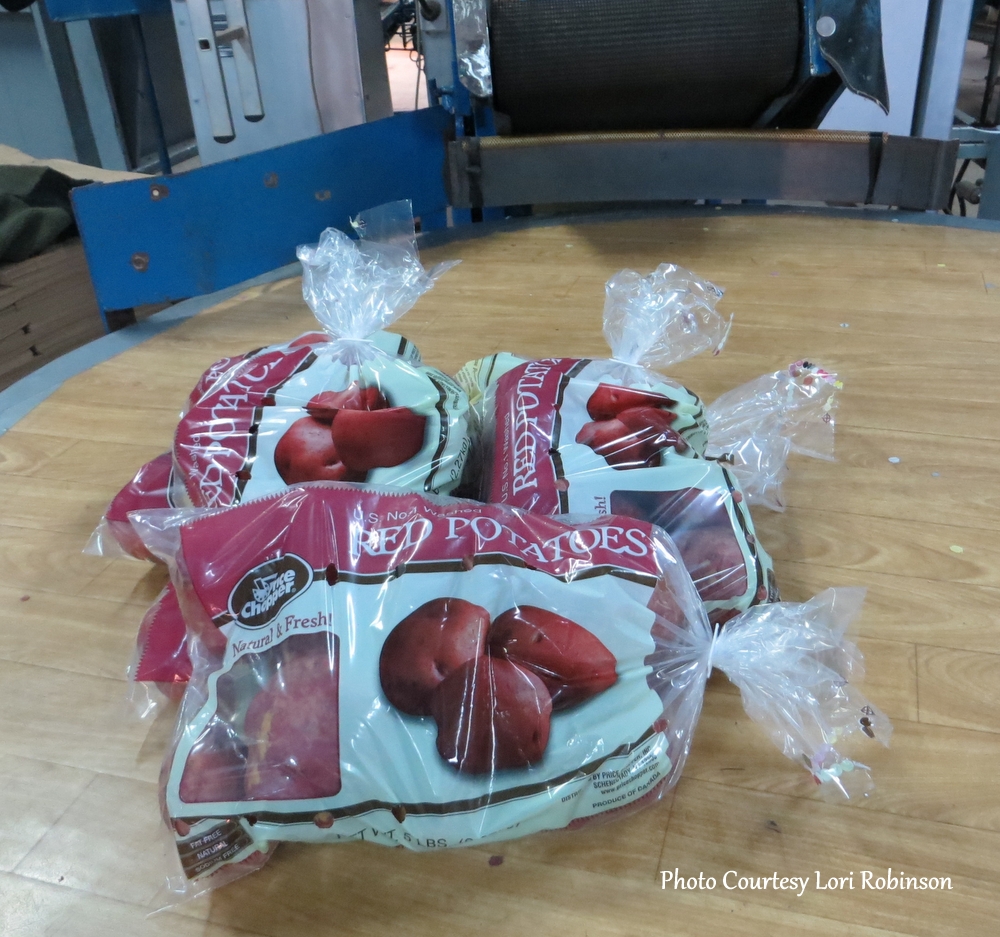
Three different sizes of the red potatoes dug on this day will be destined for different uses. The smallest on the lower left of the photo below are mainly sold for restaurant trade where they would be roasted or baked. The next size up are sold in 2 lb or 3 lb bags to grocery stores. Consumers would typically purchase these potatoes to use for roasting or baking at home. The largest of the three sizes are sold in 5 lb poly and 10 lb paper bags to grocery store chains in Canada and the United States for sale mostly as baking potatoes.
In the photo below you can see some of the freshly dug Norlands I brought home with me after my field visit. You’ll find the recipe I used them in at the end of this posting.
Early November, 2013
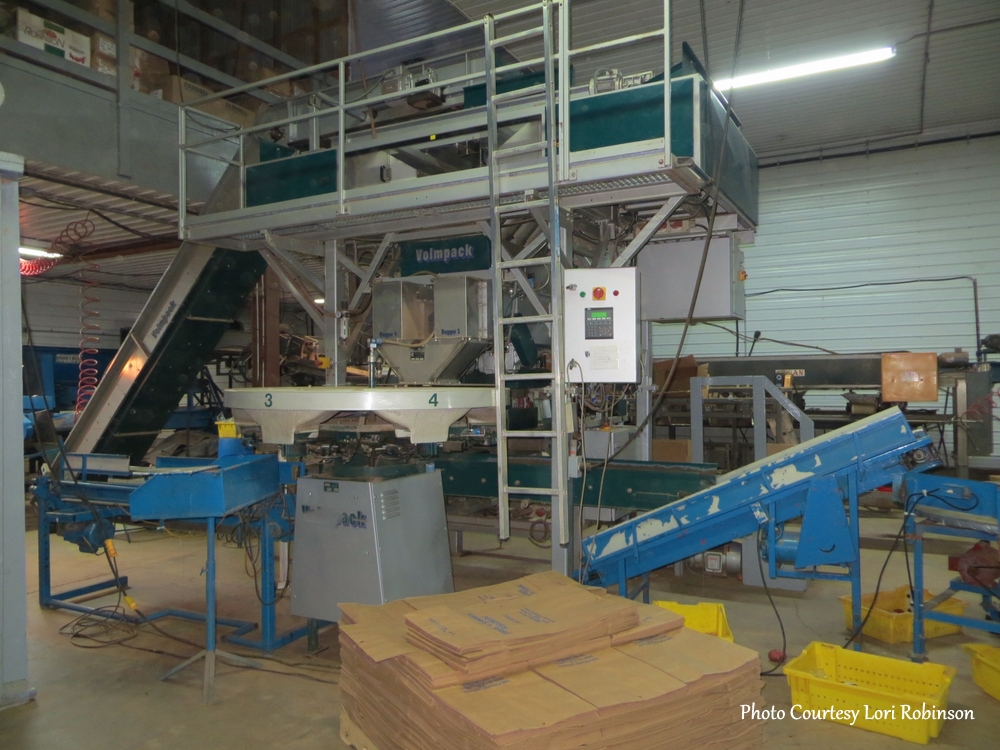
Before the potatoes make their way to market, they are graded, washed, and packaged on the farm.
Grading Potatoes
Bagger Machine
Once the potatoes are packaged, they are ready for shipping to markets.
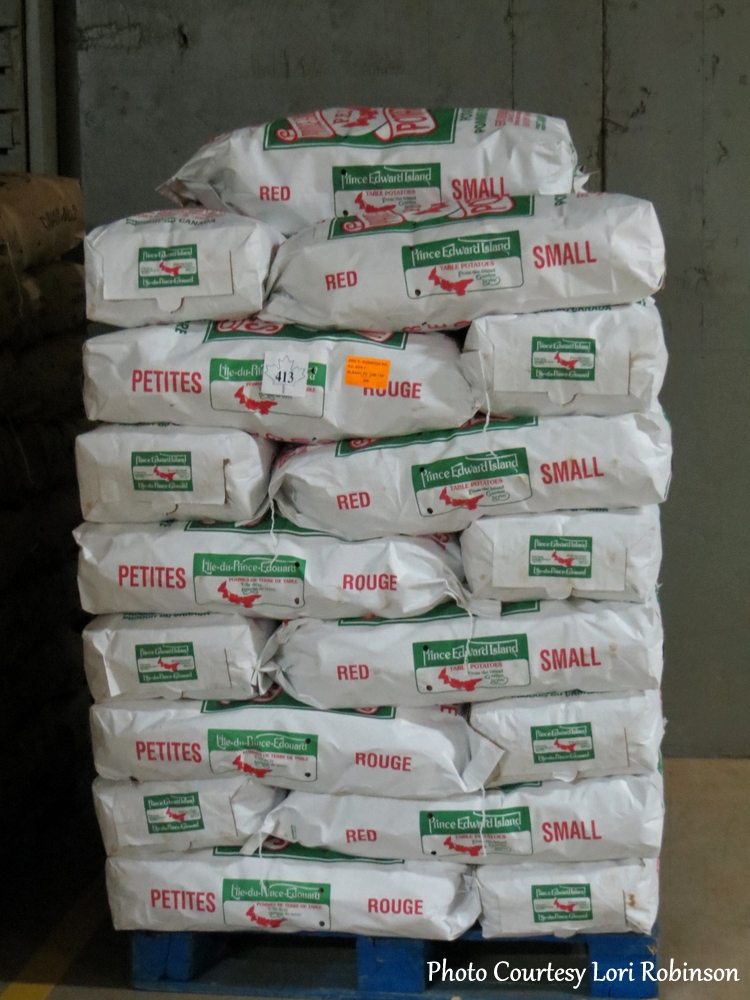
Pallet of Potatoes Graded, Washed, and Packed Ready for Shipping
Small Bags of Potatoes Ready for Grocery Stores
Working with potatoes day in and day out, I was curious as to Lori’s favourite potato dishes. She tells me her favourite way to serve potatoes is to simply toss some small red potatoes with olive oil and herbs and roast them in the oven. She also likes the potato lasagne recipe found on the Prince Edward Island Potatoes Website.
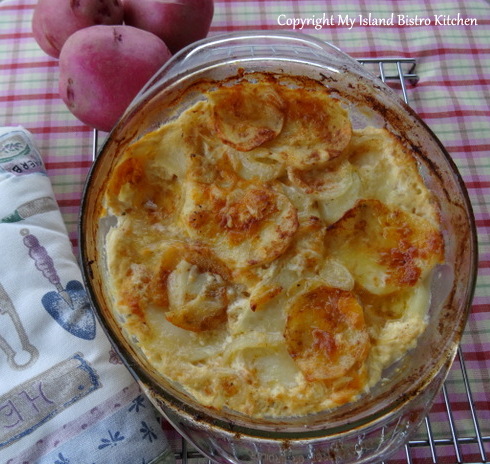
There is nothing like fresh produce straight from the rich red soil of PEI. The day I visited the Robinson farm during harvesting season in early October, I brought some of the Norlands home with me. These beautiful red-skinned variety potato with white flesh are a multi-use potato (they are good boiled, roasted, baked, in salads, and scalloped). I am presenting them here in my favourite old-fashioned scalloped potatoes recipe.
[1] Source: Prince Edward Island Potato Board, 30 October 2013
My Island Bistro Kitchen’s Old-fashioned Scalloped Potatoes
1¾ lbs. potatoes (about 3 medium-sized), peeled and sliced about 1/8” thick
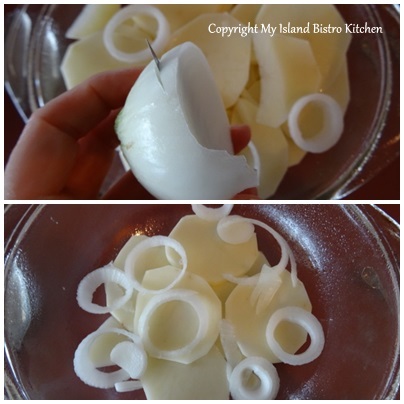
1 medium onion, sliced in rings
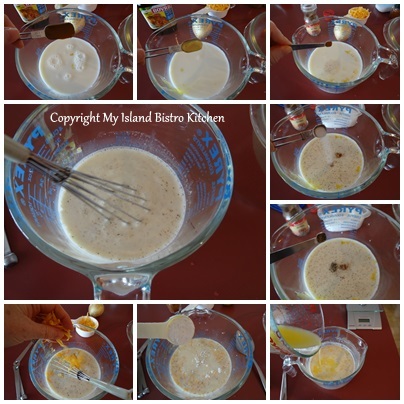
1½ cups milk
1 tsp liquid chicken bouillon
½ tsp Dijon mustard
2 tbsp flour or cornstarch
Pinch nutmeg
Salt and pepper, to taste
3 tbsp melted butter
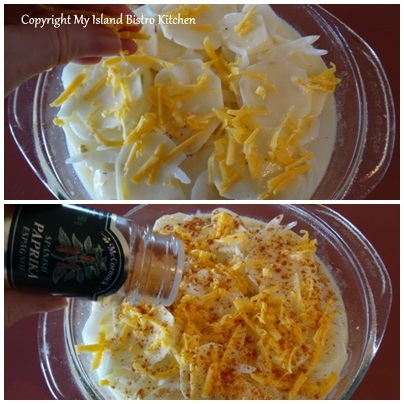
½ cup grated cheddar cheese
Paprika
Method:
Preheat oven to 350F.
Assemble ingredients.
Spray or grease a 1½-quart casserole.
Place a layer of sliced potatoes in casserole.
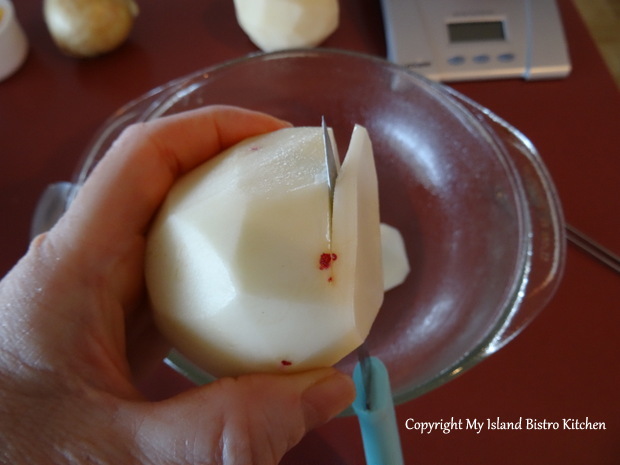
Slicing the red-eyed potato
Add a layer of sliced onions.
Repeat potato and onion layers to fill casserole.
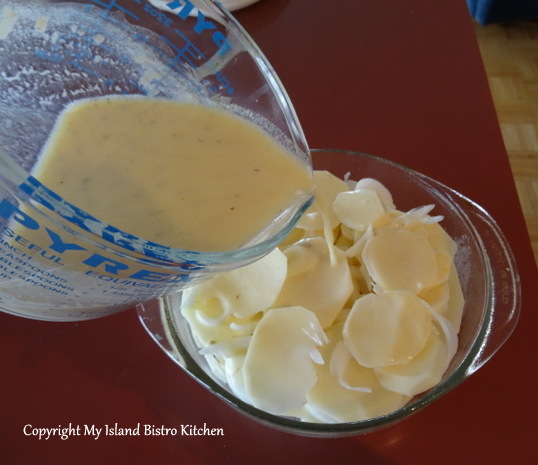
In microwaveable bowl, whisk together the milk, chicken bouillon, Dijon mustard, flour or cornstarch, nutmeg, salt, and pepper. Microwave for about a minute, then stir and add the melted butter and 2½ – 3 tbsp. grated cheese. Microwave 1-2 minutes, just until mixture is heated and starts to thicken slightly, stirring once or twice.
Pour warm sauce over the potatoes and onions in the casserole.
Sprinkle with remaining grated cheese and paprika.
Bake, covered, for about 1 hour. Remove cover and continue to bake until potatoes are fork tender, about 20 minutes, or so. Remove from oven and let sit 10-15 minutes before serving. Serves 4-6.
Serve with ham and your favorite side vegetable.
Scalloped Potatoes
Tips:
Using whole milk or a blend of whole milk and cream will make creamier scalloped potatoes.
Removing the cover during the latter part of the baking process will give the scalloped potatoes a nice crust on top.
Scalloped potatoes have a tendency to boil out of the casserole. To avoid a messy oven clean-up job, place a piece of tin foil on a large baking pan and set the casserole on it. Lightly spraying the tin foil will also make it easier to remove the casserole from the baking pan should the contents bubble out.
My thanks to Lori Robinson for allowing me to follow her potato operation over the past season and for answering my multitude of questions.
Thank you for visiting “the Bistro” today.
Be sure to visit my new Facebook page atMy Island Bistro Kitchen.You may also wish to follow me on twitter @PEIBistro and on Pinterest at “Island Bistro Kitchen”.
(Mostly) PEI and Maritime Food – Good Food for a Good Life!