
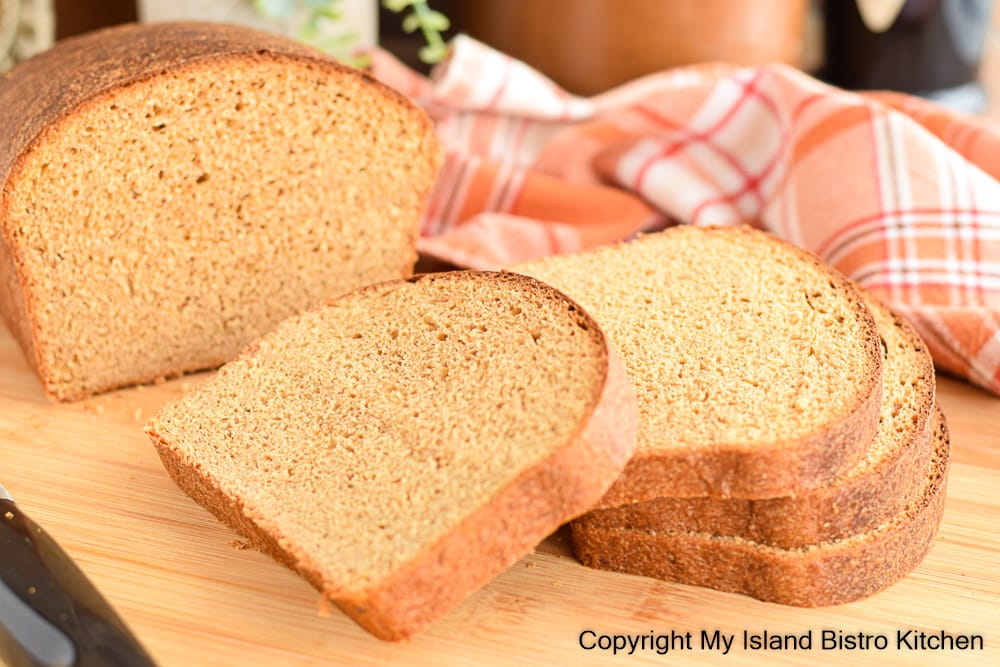
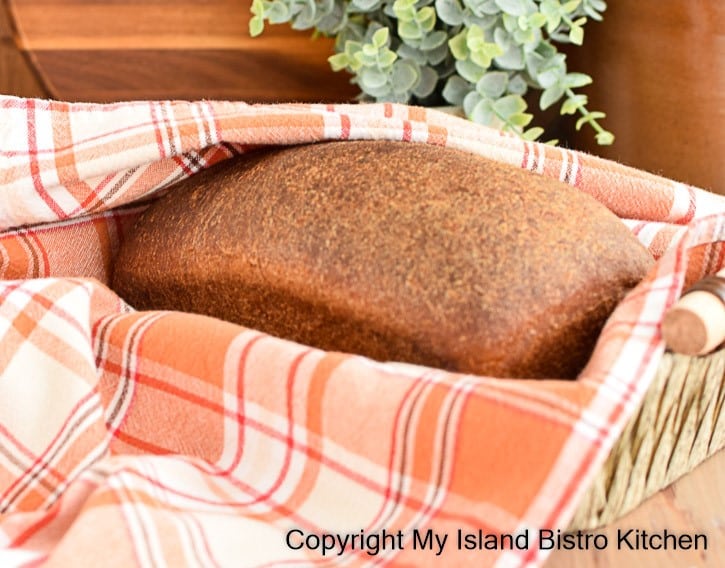
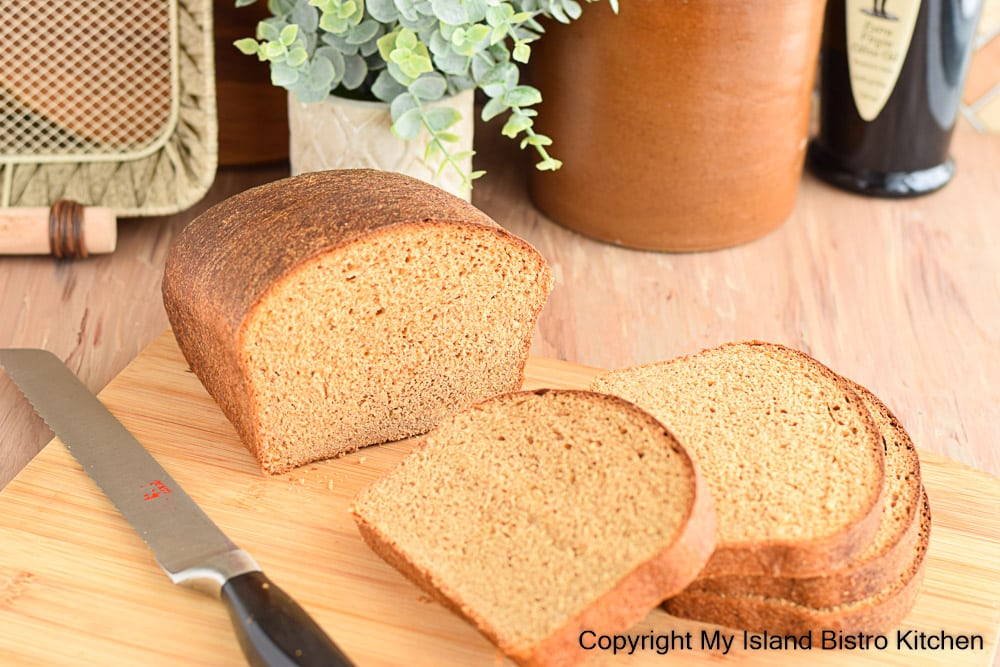
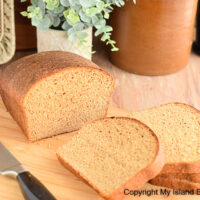
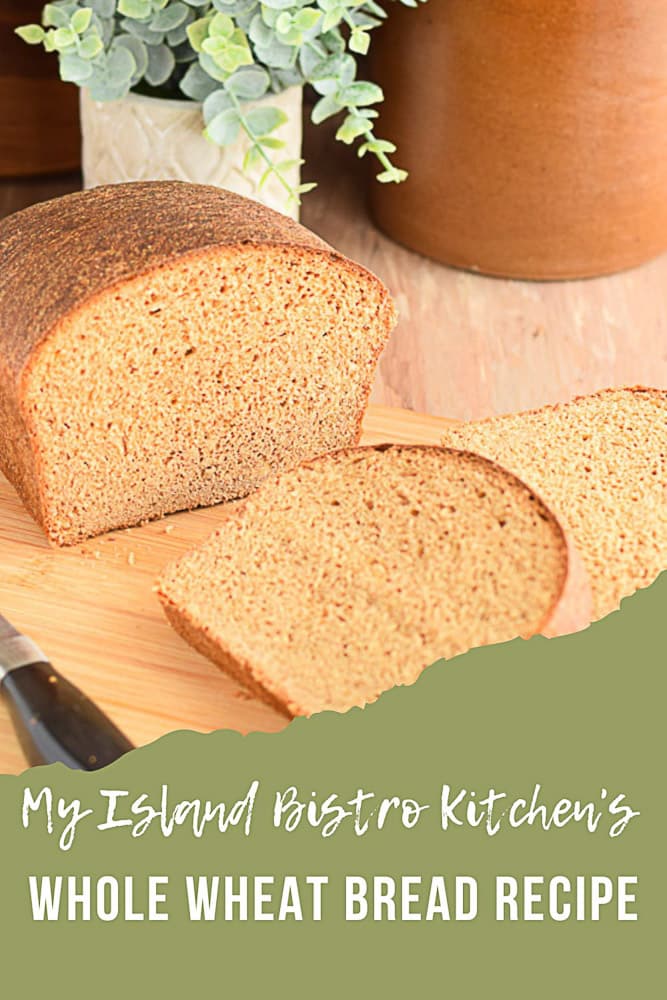
This wholesome and hearty Whole Wheat Bread has a lovely tender crumb. A versatile bread, it makes great sandwiches and toast and is a lovely accompaniment to many meals.
At the outset, I must state that this is not a 100% whole wheat bread. It’s closer to about a 65% whole wheat bread. To make it 100% whole wheat would result in a heavy, dense loaf of bread. By mixing in some white bread flour, it generates a lighter loaf.
While this bread can be made with all-purpose whole wheat and white flours, I highly recommend that specific bread flours for both the whole wheat and white flours be used in this recipe. Flour that has been milled especially for breadmaking will be so labeled on the packaging. Because bread flour has higher protein content than all-purpose flour, I find it gives a better rise and the baked bread has a more chewy, elastic crumb. In the post that accompanies my Raisin Bread recipe, I explain the importance of higher protein content in flour for bread-making and, rather than repeat the same information here, I will direct readers to that post which can be found by clicking here.
When it comes to measuring the flour for the bread, it is important that the flour be measured accurately so that you have the correct amount of flour needed. To measure, scoop up the flour with a spoon and sprinkle or shake it off the spoon into the measuring cup. Do not simply dump the flour by the spoonful into the cup or scoop the measuring cup itself into the container of flour. This will result in incorrect measurements. When the cup is well filled, use the flat side of a kitchen knife to smooth off the excess flour. Do not tap the side of the measuring cup or tamp or pack down the flour in the cup so more can be added. If you do that, you will have too much flour for this recipe and will run the risk of having a dry loaf.
In other postings with bread recipes, I have written extensively about breadmaking so won’t repeat the same information here. Instead, if you are new to breadmaking or wish to learn more of my breadmaking method(s), click on the recipe links below where greater explanation is given.
While my method for Whole Wheat Bread uses a stand mixer for part of the mixing and kneading of the dough, it is possible to mix and knead the dough entirely by hand. It will just take a bit longer. I like to let my mixer do the upfront early-stage work on mixing the dough as it saves on my wrists and arms. I would caution, unless you have a particularly heavy-duty stand mixer, kneading the dough entirely by mixer would be difficult with the amount of flour called for in this recipe. I know I would not put my KitchenAid Classic stand mixer through it. Firstly, with the amount of flour called for in the recipe (6½ – 6¾ cups), it would be difficult to get a good thorough knead of the dough and, secondly, it would be too hard on many standard mixers and could burn the machine’s motor out. So, do be cautious of those two factors when making a bread recipe that calls for a mixer to be used for part, or all, of the process.
As always, for successful results, I recommend the following:
1) Read and re-read the recipe before beginning to make the bread to ensure you have all the necessary ingredients and a full understanding of the method.
2) Set out and properly measure all ingredients before beginning the process of making bread.
3) Make the recipe using the ingredients called for in the recipe (no substitutions, omissions, or altered amounts unless suggested in the recipe itself or in this posting). Making alterations to a recipe can cause inconsistent results and the quality of the product may not be as intended. Sometimes, changing one ingredient (or its amount) in a recipe affects other ingredients which also have to be altered to accommodate the properties of a substitute ingredient. Unless I have tested a recipe with substitute ingredients not indicated in the recipe, I will be unable to offer any advice on what would work and would not and still give a satisfactory result. It is impossible for me to develop and test a recipe using every possible ingredient, or ratio of ingredients, that could potentially be used. Once I reach the stage where the recipe meets my standards and expectations, the developing and testing stop and that is the recipe I publish.
4) Use the method with which the recipe developer has created and tested the recipe. There are different methods of bread making. The one that has been used for this particular bread works as it has been tested multiple times with good results. Other methods might work but I have not tested them and can give no guidance or indication they will turn out the same quality of bread as this method does.
Whole Wheat Bread
Ingredients:
¾ cup scalded milk (no less than 2%M.F.)
1/3 cup shortening, room temperature
6 tbsp molasses
2 tsp salt
1 cup lukewarm water
½ cup water (110°F)
2 tsp granulated sugar
4 tsp active dry yeast
1 large egg, room temperature, beaten until frothy
4¼ cups whole wheat bread flour
Apx. 2¼ – 2½ cups white bread flour
2 – 3 tsp melted butter for brushing tops of hot loaves (optional)
Vegetable cooking oil
Equipment Needed: Instant read or candy thermometer.
Method:
Assemble and measure out all ingredients before beginning. Mix the entire 4¼ cups of whole wheat bread flour and 2¼ cups of the white bread flour together in a bowl. Set aside. Reserve the remaining ¼ cup of white bread flour called for in the recipe should it be needed while kneading the dough.
In saucepan, over medium-high heat, bring milk to the scalding point (180°F), stirring frequently to prevent milk from scorching. Do not boil the milk. Remove from heat and stir in the shortening, molasses, and salt until the shortening has melted. Add 1 cup lukewarm water. Let mixture cool to 100°F or a little less.
While the milk mixture is cooling, place ½ cup of warm water (110°F) in two-cup measuring cup or bowl. Stir in 2 teaspoons of granulated sugar until the sugar is dissolved. Sprinkle yeast over the water and quickly, but gently, stir in the yeast. Let yeast stand, undisturbed with no stirring, for about 10-12 minutes, or until yeast is foamy and bubbly.
Once the milk mixture has cooled to at least 100°F and yeast is foamy, beat egg until frothy in bowl of stand mixer fitted with whisk attachment. Stir down yeast. With mixer speed set to low, add the milk mixture and stirred-down yeast. Beat on medium-low speed for approximately 30 seconds. With mixer on lowest speed, gradually add 1 cup of flour until the flour is blended into wet ingredients. Increase speed to medium-high and beat 20-30 seconds.
Switch mixer attachment to dough hook and gradually, at lowest mixer speed, add approximately 4 cups of the flour mixture, about one cup at a time, until dough pulls away from the sides of the bowl. Beat on slow speed to blend ingredients then increase speed to medium and beat for 20-30 seconds after each flour addition. Scrape the bowl, as and if necessary, to ensure all ingredients are incorporated. Mixture will be very sticky at this point. (NOTE: If, at any time, the mixer starts to labour and struggle in this process, stop mixing in the flour by mixer and knead dough entirely by hand.)
Transfer mixture to greased work surface. With hands greased with a small amount of vegetable oil, begin kneading the dough by hand, continuing to add the remaining flour called for in the recipe, until the dough is smooth, elastic, and pliable, generally about 8-10 minutes. Periodically re-grease hands and work surface with the vegetable oil as necessary. When dough has been sufficiently kneaded, it should be tacky but should not be peeling away and staying on either hands or the work surface. If the dough is still sticking, knead in some (or all) of the reserved 1/4 cup of white bread flour. Form dough into a round shape. (Note: If you have a very large heavy-duty mixer, the dough could be completely kneaded by mixer; however, if you have a standard-sized household stand mixer, it will be difficult to get the dough perfectly kneaded in its entirety by mixer with the quantity of flour called for in this recipe and it will be hard on the mixer so is not recommended).
Grease a bowl large enough to allow the dough to double in size. Grease all sides of dough with vegetable oil to prevent it from drying out and transfer dough to prepared bowl. Cover the top of the bowl loosely with plastic wrap that has been sprayed with cooking oil. Cover bowl completely with a towel or lightweight blanket and place in warm, draft-free, location to allow the dough to rise until it doubles in size, about 1½ hours.
Prepare two 9”x5”x3” loaf pans by greasing pans (including rims) well.
When dough has risen to twice its original size, grease the work surface with vegetable oil. Deflate the dough by making a fist and punching down the dough in the bowl. Turn flattened dough out onto greased surface. Divide dough into two equal portions and, using a light touch, loosely form them each into a round or slightly oval shape, seam side down. Place dough shapes about 4” apart, cover with a tea towel, and let dough bench rest for about 12-15 minutes.
Shape each portion of rested dough into an oval loaf shape and place, seam side down, in prepared pans. Cover loaves loosely with a tea towel and place in warm, draft-free, location to rise again for about 1 – 1¼ hours, or until doubled in size.
About 20 minutes before bread is expected to be ready to be baked, position rack in center of oven and preheat oven to 375°F.
Transfer loaves to oven and bake for approximately 32-35 minutes, or until bread is nicely browned on top and loaves sound hollow when tapped. Immediately transfer bread from pans to wire racks to cool. If desired, gently brush tops of the hot bread with melted butter as soon as the loaves come out of the oven and are transferred to the wire cooling rack.
Cool bread completely before cutting and serving.
Yield: 2 loaves
NOTE 1: Bread flour is recommended for this recipe; however, regular whole wheat flour and all-purpose white flour may be substituted (cup-for-cup). Results may differ with substituted flours.
NOTE 2: Dough may be completely mixed and kneaded by hand for this recipe but it will take longer.
NOTE 3: Bulk fermentation and final proofing times given in the recipe are general guidelines only. The length of time for these processes is largely dependent on the temperature of the location – i.e., the dough is likely to rise faster in warmer environments than in cooler ones.
You may also enjoy these other homemade bread recipes from My Island Bistro Kitchen:
Homemade White Bread
Old-fashioned Raisin Bread
Rustic Oatmeal Bread (aka Porridge Bread)
If you have made this recipe and enjoyed it and/or wish to share it with your friends and family, please do so on social media but be sure to share the direct link to this posting from my website.
Whole Wheat Bread
Ingredients
- ¾ cup scalded milk (no less than 2%M.F.)
- 1/3 cup shortening, room temperature
- 6 tbsp molasses
- 2 tsp salt
- 1 cup lukewarm water
- ½ cup water (110°F)
- 2 tsp granulated sugar
- 4 tsp active dry yeast
- 1 large egg, room temperature, beaten until frothy
- 4¼ cups whole wheat bread flour
- Apx 2¼ - 2½ cups white bread flour
- 2 - 3 tsp melted butter for brushing tops of hot loaves (optional)
- Vegetable cooking oil
Instructions
-
Assemble and measure out all ingredients before beginning. Mix the entire 4¼ cups of whole wheat bread flour and 2¼ cups of the white bread flour together in a bowl. Set aside. Reserve the remaining ¼ cup of white bread flour called for in the recipe should it be needed while kneading the dough.
-
In saucepan, over medium-high heat, bring milk to the scalding point (180°F), stirring frequently to prevent milk from scorching. Do not boil the milk. Remove from heat and stir in the shortening, molasses, and salt until the shortening has melted. Add 1 cup lukewarm water. Let mixture cool to 100°F or a little less.
-
While the milk mixture is cooling, place ½ cup of warm water (110°F) in two-cup measuring cup or bowl. Stir in 2 teaspoons of granulated sugar until the sugar is dissolved. Sprinkle yeast over the water and quickly, but gently, stir in the yeast. Let yeast stand, undisturbed with no stirring, for about 10-12 minutes, or until yeast is foamy and bubbly.
-
Once the milk mixture has cooled to at least 100°F and yeast is foamy, beat egg until frothy in bowl of stand mixer fitted with whisk attachment. Stir down yeast. With mixer speed set to low, add the milk mixture and stirred-down yeast. Beat on medium-low speed for approximately 30 seconds. With mixer on lowest speed, gradually add 1 cup of flour until the flour is blended into wet ingredients. Increase speed to medium-high and beat 20-30 seconds.
-
Switch mixer attachment to dough hook and gradually, at lowest mixer speed, add approximately 4 cups of the flour mixture, about one cup at a time, until dough pulls away from the sides of the bowl. Beat on slow speed to blend ingredients then increase speed to medium and beat for 20-30 seconds after each flour addition. Scrape the bowl, as and if necessary, to ensure all ingredients are incorporated. Mixture will be very sticky at this point. (NOTE: If, at any time, the mixer starts to labour and struggle in this process, stop mixing in the flour by mixer and knead dough entirely by hand.)
-
Transfer mixture to greased work surface. With hands greased with a small amount of vegetable oil, begin kneading the dough by hand, continuing to add the remaining flour called for in the recipe, until the dough is smooth, elastic, and pliable, generally about 8-10 minutes. Periodically re-grease hands and work surface with the vegetable oil as necessary. When dough has been sufficiently kneaded, it should be tacky but should not be peeling away and staying on either hands or the work surface. If the dough is still sticking, knead in some (or all) of the reserved ¼ cup of white bread flour. Form dough into a round shape. (Note: If you have a very large heavy-duty mixer, the dough could be completely kneaded by mixer; however, if you have a standard-sized household stand mixer, it will be difficult to get the dough perfectly kneaded in its entirety by mixer with the quantity of flour called for in this recipe and it will be hard on the mixer so is not recommended).
-
Grease a bowl large enough to allow the dough to double in size. Grease all sides of dough with vegetable oil to prevent it from drying out and transfer dough to prepared bowl. Cover the top of the bowl loosely with plastic wrap that has been sprayed with cooking oil. Cover bowl completely with a towel or lightweight blanket and place in warm, draft-free, location to allow the dough to rise until it doubles in size, about 1½ hours.
-
Prepare two 9”x5”x3” loaf pans by greasing pans (including rims) well.
-
When dough has risen to twice its original size, grease the work surface with vegetable oil. Deflate the dough by making a fist and punching down the dough in the bowl. Turn flattened dough out onto greased surface. Divide dough into two equal portions and, using a light touch, loosely form them each into a round or slightly oval shape, seam side down. Place dough shapes about 4” apart, cover with a tea towel, and let dough bench rest for about 12-15 minutes.
-
Shape each portion of rested dough into an oval loaf shape and place, seam side down, in prepared pans. Cover loaves loosely with a tea towel and place in warm, draft-free, location to rise again for about 1 – 1¼ hours, or until doubled in size.
-
About 20 minutes before bread is expected to be ready to be baked, position rack in center of oven and preheat oven to 375°F.
-
Transfer loaves to oven and bake for approximately 32-35 minutes, or until bread is nicely browned on top and loaves sound hollow when tapped. Immediately transfer bread from pans to wire racks to cool. If desired, gently brush tops of the hot bread with melted butter as soon as the loaves come out of the oven and have been transferred to wire cooling rack.
-
Cool bread completely before cutting and serving.
Recipe Notes
Yield: 2 loaves
NOTE 1: Bread flour is recommended for this recipe; however, regular whole wheat flour and all-purpose white flour may be substituted (cup-for-cup). Results may differ with substituted flours.
NOTE 2: Dough may be completely mixed and kneaded by hand for this recipe but it will take longer.
NOTE 3: Bulk fermentation and final proofing times given in the recipe are general guidelines only. The length of time for these processes is largely dependent on the temperature of the location – i.e., the dough is likely to rise faster in warmer environments than in cooler ones.
[Copyright My Island Bistro Kitchen 2023]
Connect with My Island Bistro Kitchen on Social Media
Join the Facebook page for My Island Bistro Kitchen: https://www.facebook.com/MyIslandBistroKitchen/
Follow “the Bistro” on “X” (formerly Twitter): https://twitter.com/PEIBistro/
See the drool-worthy gallery of mouth-watering food photos from My Island Bistro Kitchen on Instagram: https://www.instagram.com/peibistro/
Follow “the Bistro” on Pinterest at https://www.pinterest.ca/peibistro/ and pin the Pinterest-ready photo at the end of this posting to your favorite Pinterest boards!
PIN ME TO PINTEREST FOR LATER!
Copyright My Island Bistro Kitchen 2023