
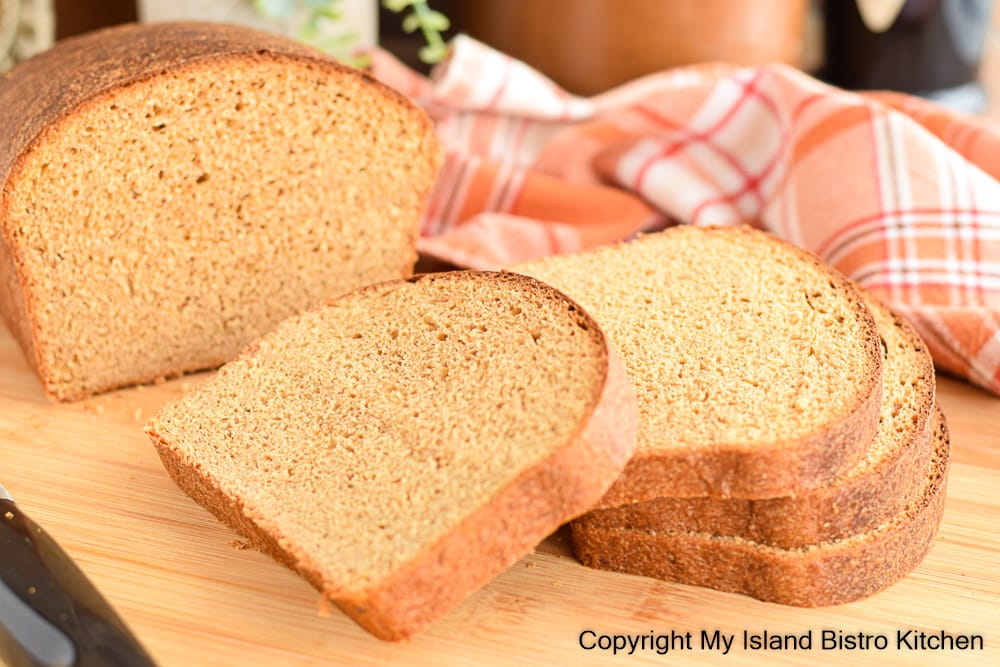
This wholesome and hearty Whole Wheat Bread has a lovely tender crumb. A versatile bread, it makes great sandwiches and toast and is a lovely accompaniment to many meals. Continue reading Whole Wheat Bread Recipe
Some may know this old-fashioned bread simply as “Porridge Bread” because of its rolled oat content. Rustic Oatmeal Bread is a hearty bread that has a soft, chewy texture. It’s ideal as a sandwich bread, makes fabulous toast, is great for French toast and, heck, it’s just fine slathered with butter or molasses! Continue reading Rustic Oatmeal Bread Recipe (aka Porridge Bread)
This old-fashioned homestyle Raisin Bread is made mostly in the traditional way of kneading by hand….with a little help at the front end from a stand mixer. Continue reading Old-fashioned Raisin Bread Recipe
I love making bread from scratch. I like working and kneading the dough, the smell of the dough as it rises, and especially as it bakes. No commercial potpourri could ever duplicate the wonderful scent of homemade bread baking in the oven! It just permeates the whole house and whets the appetite. We do have an electric bread machine in the family but it’s not the same. I find bread made in the machine is not too bad on the day it is made but, after that, I don’t care for it so much, finding it to be somewhat tough. My preference is to make bread the old-fashioned, traditional way. Today, I am sharing my recipe and technique for making homemade white bread.
I first made bread when I was about 15. Under the supervision of my grandmother, I produced my first batch of bread on a cold Saturday in winter. To say that Gram was somewhat proud that day would be a huge understatement! I grew up with homemade bread regularly being made by both my grandmother and mother so it comes rather naturally to me to make yeast breads and rolls. They are not hard to make but there is a technique to them and they are somewhat time-consuming as the process is ongoing for a good part of a day. Nevertheless the end result is so worth the time and effort.
Along with my recipe for white bread, I do have some tips to help achieve success in bread making. First, the temperature of the liquids for the bread is super important. For example, the temperature of the water for the yeast to raise should be lukewarm, generally around the 100°F – 110°F point. Any cooler, and the yeast may not rise; any hotter, and the yeast will be killed off. Unless you are a very experienced bread maker who, from years of experience and by instinct, can judge the liquid temperature for yeast, I recommend using a candy/food thermometer to get the temperature of the water just right. A small amount of sugar has to be added to the warm water in order to “feed” the yeast and encourage it to grow.
Some say, with today’s pasteurized milk, there is no need to scald the milk anymore. I do still scald it because I think it provides a nice warm environment in which to place the risen yeast and it is not such a shock for the warm yeast as if it was to be mixed with cold milk. Again, I recommend using a candy thermometer when scalding the milk to get it to the right temperature. As well, it is important to let the scalded milk mixture cool down to about 100°F as well; otherwise, if it is too hot when the yeast is poured into it, it may kill off the yeast and the bread won’t rise properly.
You’ll find that, with my recipe, I use my Kitchen Aid mixer fitted with the dough hook to help get the dough started and to incorporate some of the flour into the dough. I find this makes for a nice textured bread (not to mention, it takes less muscle). Once enough flour has been added that the dough starts to leave the sides of the bowl as the dough hook moves around the bowl, remove the bowl from the mixer and turn the dough out onto a floured surface and start working in the remaining flour. Only add as much flour to the dough as is necessary to create a smooth and elastic dough. Be patient when kneading the dough – it will take, on average, between 8 and 10 minutes.
As for the shape of the loaves, there are a couple of options. One is make two equally-sized balls and place them in the pan. This will generate the shape in the top photo below. The other is to shape the dough into an oval shape. This will achieve a shape like the loaf in the bottom photo below and it is commonly referred to as the sandwich loaf because, mostly, the slices will all be about the same height. This is in contrast to the two-part loaf where slices in the middle of the loaf where the two pieces are joined will be shorter. So, the shape of the loaf is a matter of preference and is largely determined by what you are going to use the bread for.
Some bakers place the dough in the oven with the door shut and oven light on to help it rise. My preference, however, is to create a nice, cozy little spot for the bread to rise. I start with a heating pad turned on the lowest setting. I place a lightweight blanket on top of the heating pad and then place the bowl with the dough in it on top of that. I fold the blanket over and around the bowl to create a snuggly warm, draught-free spot for the bread to rise. My heating pad’s lowest setting is barely warm but it does provide a consistent temperature for the bread to rise. Don’t use higher settings on the heating pad as it may cause the bread to start to ‘cook’ and could interfere with the natural rising process.
Ingredients:
2 cups scalded milk
3 tbsp butter or shortening, room temperature
½ tbsp salt
3 tbsp sugar
½ cup warm water
1 tsp sugar
1 tbsp dry yeast
4½ – 5 cups all-purpose flour
Method:
In medium-sized saucepan, scald milk. Remove from heat. Add butter, sugar, and salt. Stir until butter is melted. Let cool to 100°F.
Heat ½ cup water to 100°F to 110°F point. Stir in 1 tsp sugar. Sprinkle yeast granules over the water and quickly stir them gently into the water. Let stand, undisturbed, for about 10 minutes. Stir down the yeast mixture. Transfer to large bowl of stand mixer fitted with dough hook.
Add cooled milk mixture to yeast in bowl. Beat on low to incorporate ingredients then increase mixer speed to high and beat until mixture is smooth. Slowly add in flour, one cup at a time. Add flour until the mixture begins to pull away from the sides of the bowl.
Turn dough on to floured surface and mix in enough remaining flour to make a smooth, elastic dough. Knead 8-10 minutes until dough becomes smooth and very pliable and elastic.
Transfer dough to a large greased bowl. Place a small amount of oil on hands and lightly grease the top and sides of the dough. Cover bowl with plastic wrap.
Place bowl in warm area, covered with a towel or light blanket. Let rise until double in bulk, about 1½ hours or so.
Punch down dough.
Divide dough into two equal portions and shape into loaves. Place in greased 9”x5” loaf pans. Cover with tea towel and place in warm area to rise again for between 45 and 60 minutes.
Preheat oven to 350°F. Bake bread for 30-35 minutes until nicely browned on top and loaves sound hollow when tapped. Immediately transfer bread from pans to wire racks to cool. Grease tops of hot bread with butter, if desired.
While the milk is cooling, heat ½ cup water to 100°F to 110°F point. Stir in 1 tsp sugar. Sprinkle yeast granules over the water and quickly stir them gently into the water. Let stand, undisturbed, for about 10 minutes, until yeast rises and becomes frothy. Stir down the yeast mixture and add it to the lukewarm milk mixture. Transfer mixture to the large bowl of stand mixer fitted with dough hook attachment. Beat on low to incorporate ingredients then increase mixer speed to high and beat until mixture is smooth.
Preheat oven to 350°F. Bake bread for 35-40 minutes until nicely browned on top and loaves sound hollow when tapped. Immediately transfer bread from pans to wire racks to cool. Grease tops of hot bread with butter, if desired.
Yield: 2 loaves
Copyright My Island Bistro Kitchen 2014
Old-fashioned Raisin Bread
Rustic Oatmeal Bread (aka Porridge Bread)
Whole Wheat Bread
Thank you for visiting “the Bistro” today.
Be sure to visit my Facebook page at My Island Bistro Kitchen. You may also wish to follow me on twitter @PEIBistro, on Pinterest at “Island Bistro Kitchen”, and on Instagram at “PEIBistro”.