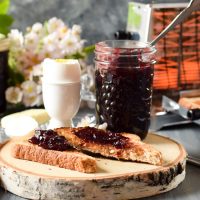
Homemade jam is such a wonderful treat. And, of course, there is the sense of accomplishment seeing the results of processing fruit into tasty jam. Today, I share my recipe for small batch Cherry Jam.
Many of my jam and jelly recipes are designed to be small batches for several reasons. Generations ago, many families were large in number so big batch jam making was the order of the day. In a large number of those cases, homes had cold rooms or cellars in which to store large quantities of pickles and jams for the rest of the year. Today, however, households generally tend to be much smaller and many, especially those living in apartments and condos, don’t have room to store big batches of pickles and jams.
I personally like to have a variety of jams and jellies to enjoy throughout the year and there is a limit to just how much of each I need and will use. Making small batches of 2-4 bottles of each kind gives me the variety I desire. If a greater quantity of jam is desired beyond what the single batch recipe yields, make two separate batches versus doubling the ingredients in one batch. Doubling may cause the jam not to set properly and you will have wasted all your product.
TIPS FOR SUCCESSFUL JAM MAKING
-
- Read and re-read the recipe to ensure complete understanding of the process and that you have all the necessary ingredients and equipment.
- Assemble all equipment and ingredients needed for the jam-making and canning processes.
- Use only proper canning glass jars. In Canada, the bottles are mostly sold under the brand name “Mason” and in the United States, I believe the common brand is “Ball”. Never use old bottles that a commercial product (e.g., instant coffee, pasta sauce, etc.) has been bought in as these are not suitable canning jars.
- Inspect the jars to ensure there are no chips or cracks in them. Wash the jars and lids in hot soapy water and rinse well.
- Inspect the screw bands and discard any that have dents or rust on them. Use only brand-new lids for canning. The lids give the jars the vacuum seal and are designed for single use only. Once they have been used, the rubber sealing compound is no longer considered effective for proper sealing so the lids should never be re-used. The screw bands, on the other hand, are reusable provided they have no dents or evidence of rust.
- There are various methods for sterilizing the bottles for the jam. I use the traditional method of boiling the jars in a pot of hot water on the stove. I recommend getting this process going before getting the jam underway and the bottles will remain in the hot water after they have been boiled 10 minutes and until the jam is ready to be bottled.
- The jars of hot jam need to be processed in a hot water bath to ensure that any microorganisms are destroyed and the jam is shelf-stable for several months. In simplistic terms, the heat from the boiling water bath prevents the growth of mold on the jam. Fill the canner about one-half full of hot tap water and start to bring it to the boiling stage to have ready when the jam is finished and ready for its hot water bath.
- As the jam is nearly at the setting stage, it’s also a good idea to get a kettle of boiling water ready in case extra is needed to top up the canner after the filled jars are added. The hot jars of jam need to immediately go into the hot water bath so, after the jam is bottled, there will be no time then to start boiling the canner water which can take a significant period of time. Jam-making really is a sequential process!
- I recommend the use of a candy thermometer for jam-making as I find, with knowing the temperature of set jam, it gives me a more accurate test of when the jam has reached the setting stage. If, however, you don’t have a thermometer, the chilling method of jam on a cold saucer may also be used to test the jam for setting stage (described in a Note on the recipe).
- Note that I recommend adding three to four extra half-pint jars to the pot with those being sterilized for the jam. The extra bottles do not, themselves, need to be sterilized as they will only be used to fill up extra space in the canner basket so those jars filled with jam do not topple over in the hot water process. Most canner baskets will hold 6 – 7 half-pint jars and, if a batch of jam has less quantity than that, the bottles will fall over unless the basket is filled with bottles. The empty jars should be hot going into the boiling water in the canner as, otherwise, the temperature change could cause the cold jars to crack when they are submerged into the boiling water. The easiest way I find to heat them is to simply put them in the pot with the jars being sterilized.
{Printable recipe follows at end of post}
Cherry Jam
Ingredients:
2 lbs sweet cherries, pitted, and cut into three to four pieces each
1½ cups granulated sugar
1½ tbsp lemon juice
2 tsp butter
Pinch salt
Scant ½ tsp pure almond extract
Supplies and Equipment Needed:
2 half-pint and 1 quarter-pint glass canning jars for the jam (plus 3 – 4 more half-pint-sized jars to take up extra space in the canner basket during the hot water process)
3 – two-piece lid and screw band sets (lids must be brand new and NOT previously used)
Small, heavy-bottomed stock pot for jam
Medium-sized pot for sterilizing jars
Small saucepan for heating jar lids
Water bath canner with basket
Jar lifter tongs
Wide-mouthed canning funnel
Ladle or heat-proof glass measuring cup
Chopstick or small non-metallic heat-proof spatula
Magnetic lid lifter
A timer
Method:
Wash jars and lids in hot soapy water. Rinse. Fill a large-sized pot about two-thirds full of hot tap water. Place the jars, upright, into the water. Ensure the jars are fully submerged, each jar filled with water, and that the water is at least an inch over the tops of the jars, adding more if necessary. Cover, bring to a boil, and boil gently for 10 minutes. Turn off heat and leave the jars in the hot water to have ready to fill once the jam finishes cooking.
Fill the canner about half full of hot tap water. Cover and bring to a boil to have it ready for processing of the filled jars.
While the jars are sterilizing and the water in the canner is heating, begin making the jam by washing cherries well, removing pits, and cutting each cherry into 3 – 4 pieces. Place cherries, sugar, lemon juice, butter, and salt in small stockpot over medium heat. Stir continuously until sugar is dissolved. Bring to a boil over medium-high heat. Lower heat to maintain a steady gentle boil, stirring often until mixture reads 220°F, sustained, on a candy thermometer (See Note 1 below for alternative testing method of jam’s setting point). Remove stockpot from heat and, using a spoon, skim off and discard any residual foam. Stir in almond extract.
Use jar lifter tongs to carefully remove two half pints and the quarter pint hot sterilized jars from the water, one at a time, emptying the water from the jars back into the pot. Drain jars well.
Remove a small amount of the hot water from the stockpot in which the jars were sterilized and place in small saucepan over simmering heat. Place the lids in the hot water to soften the rubber sealing compound. Do not boil the lids.
Using a ladle or a heat-proof glass measuring cup and a wide-mouthed canning funnel, pour jam into the hot sterilized jars, leaving about ¼” headroom in each jar to allow for expansion during the hot water processing. Remove any trapped air bubbles in the jars with a chopstick or small heatproof, non-metallic spatula. Wipe the jar rims with a clean damp cloth to remove any stickiness or jam particles that could prevent the lids from sealing properly to the jars.
Using a magnetic lid lifter, remove lids from the hot water and center the heated lids on jars so the sealing compound on the lid edges aligns with the jar rims. Fingertip tighten the ring/screw bands until resistance is encountered. Do not over-tighten.
Using jar lifter tongs, carefully place filled jars upright in wire basket positioned in the canner, ensuring jars do not touch each other or fall over. Add some of the hot empty jars, upright, to the basket to fill up space so the filled jars do not topple over. Let the empty jars fill with water from the canner as they are submerged. Ensure the water level is at least 1” above the tops of jars, adding more boiling water as necessary. Cover with canner lid. Increase the heat to return the water to a full rolling boil then decrease the heat to just keep the water at a moderately rolling boil but not boiling over. Process jars in the hot water bath for 10 minutes, adjusting time as and if necessary for altitude. Start timing the processing from the point at which a full rolling boil is reached after jars have been added to the canner. At the end of the processing time, turn off heat and remove canner lid.
Let jars sit in the hot water for 5 minutes then, using jar lifter tongs, carefully remove the jars filled with jam, one at a time, and transfer them to a heat-proof cutting board, that has been covered with a towel, to cool completely. Listen for the “pop” or “ping” sound as the bottles seal over the next few minutes or hours. The lids of properly sealed jars will curve downward. Let jars rest, undisturbed, on counter for 24 hours. Then, test each jar for proper sealing by pressing down on the center of each jar lid. If the lid is already pressed downward, and does not pop back up, it is properly sealed. Any jars that do not pass this test should be refrigerated and the jam used within a week or so. Store properly sealed jam bottles in cool, dark place. Refrigerate jam once jar has been opened.
Yield: Apx. 2 half-pint bottles and 1 quarter-pint bottle
NOTE 1: If a candy thermometer is not available, place 2-3 freezer-safe saucers in freezer. To determine if jam is set, place a small amount of jam on chilled saucer and slightly ‘tilt and swirl’ saucer around to distribute the jam. Let jam sit, untouched, for about a minute, then gently push your finger through the jam. If the jam holds its shape (i.e., does not immediately run back together after the finger has been removed from the jam), it is set and ready to bottle. If not, continue to cook mixture, repeating the “chill” test about every 3 minutes or so (always removing the pot from the heat while conducting the chill test) until the jam passes the “chill” test.
NOTE 2: The small ½-cup (quarter-pint) jar does not actually need the full 10 minutes of hot water canning. However, to remove it partway through, at the 5-minute point in the boiling process, would disturb the rolling boil and timing and thus interfere with the proper canning of the larger half-pint jars so, there are a couple of options. The first is to let the small jar remain in the hot water bath with the half-pint jars for the full 10-minute period. The second option is not to process the tiny jar in the hot water and to, instead, use it as the “tasting jar”, consuming the jam within a couple of days. However, if the desire is to can the entire batch of jam into the small ½-cup (quarter-pint) jars, then process the basket of them for 5 minutes, instead of 10. These tiny bottles make great gifts, especially if they are accompanied by fresh scones!

Connect with My Island Bistro Kitchen on Social Media
Join the Facebook page for My Island Bistro Kitchen: https://www.facebook.com/MyIslandBistroKitchen/
Follow “the Bistro” on “X” (formerly Twitter): https://twitter.com/PEIBistro/
See the drool-worthy gallery of mouth-watering food photos from My Island Bistro Kitchen on Instagram: https://www.instagram.com/peibistro/
Follow “the Bistro” on Pinterest at https://www.pinterest.ca/peibistro/ and pin the Pinterest-ready photo at the end of this posting to your favorite Pinterest boards!
You may also enjoy these other jam and jelly recipes from My Island Bistro Kitchen:
Jams
Strawberry Rhubarb Freezer Jam
Blueberry and Grand Marnier Jam
Gooseberry Jam
Zucchini Jam
Pumpkin Jam
Raspberry Jam
Jelly
Crabapple Jelly
Strawberry Rhubarb Jelly
Rhubarb Jelly
Marmalade
Green Tomato Marmalade
Rhubarb Marmalade
Peach Marmalade
Cherry Jam
Ingredients
- 2 lbs sweet cherries, pitted, and cut into three to four pieces each
- 1½ cups granulated sugar
- 1½ tbsp lemon juice
- 2 tsp butter
- Pinch salt
- Scant ½ tsp pure almond extract
Instructions
-
Wash jars and lids in hot soapy water. Rinse. Fill a large-sized pot about two-thirds full of hot tap water. Place the jars, upright, into the water. Ensure the jars are fully submerged, each jar filled with water, and that the water is at least an inch over the tops of the jars, adding more, if necessary. Cover, bring to a boil, and boil gently for 10 minutes. Turn off heat and leave the jars in the hot water to have ready to fill once the jam finishes cooking.
-
Fill the canner about half full of hot tap water. Cover and bring to a boil to have it ready for processing of the filled jars.
-
While the jars are sterilizing and the water in the canner is heating, begin making the jam by washing cherries well, removing pits, and cutting each cherry into 3 - 4 pieces. Place cherries, sugar, lemon juice, butter, and salt in small stockpot over medium heat. Stir continuously until sugar is dissolved. Bring to a boil over medium-high heat. Lower heat to maintain a steady gentle boil, stirring often until mixture reads 220°F, sustained, on a candy thermometer (See Note 1 below for alternative testing method of jam’s setting point). Remove stockpot from heat and, using a spoon, skim off and discard any residual foam. Stir in almond extract.
-
Use jar lifter tongs to carefully remove two half pints and the quarter pint hot sterilized jars from the water, one at a time, emptying the water from the jars back into the pot. Drain jars well.
-
Remove a small amount of the hot water from the stockpot in which the jars were sterilized and place in small saucepan over simmering heat. Place the lids in the hot water to soften the rubber sealing compound. Do not boil the lids.
-
Using a ladle or a heat-proof glass measuring cup and a wide-mouthed canning funnel, pour jam into the hot sterilized jars, leaving about ¼” headroom in each jar to allow for expansion during the hot water processing. Remove any trapped air bubbles in the jars with a chopstick or small heatproof, non-metallic spatula. Wipe the jar rims with a clean damp cloth to remove any stickiness or jam particles that could prevent the lids from sealing properly to the jars.
-
Using a magnetic lid lifter, remove lids from the hot water and center the heated lids on jars so the sealing compound on the lid edges aligns with the jar rims. Fingertip tighten the ring/screw bands until resistance is encountered. Do not over-tighten.
-
Using jar lifter tongs, carefully place filled jars upright in wire basket positioned in the canner, ensuring jars do not touch each other or fall over. Add some of the hot empty jars, upright, to the basket to fill up space so the filled jars do not topple over. Let the empty jars fill with water from the canner as they are submerged. Ensure the water level is at least 1” above the tops of jars, adding more boiling water as necessary. Cover with canner lid. Increase the heat to return the water to a full rolling boil then decrease the heat to just keep the water at a moderately rolling boil but not boiling over. Process jars in the hot water bath for 10 minutes, adjusting time as and if necessary for altitude. Start timing the processing from the point at which a full rolling boil is reached after jars have been added to the canner. At the end of the processing time, turn off heat and remove canner lid.
-
Let jars sit in the hot water for 5 minutes then, using jar lifter tongs, carefully remove the jars filled with jam, one at a time, and transfer them to a heat-proof cutting board, that has been covered with a towel, to cool completely. Listen for the “pop” or “ping” sound as the bottles seal over the next few minutes or hours. The lids of properly sealed jars will curve downward. Let jars rest, undisturbed, on counter for 24 hours. Then, test each jar for proper sealing by pressing down on the center of each jar lid. If the lid is already pressed downward, and does not pop back up, it is properly sealed. Any jars that do not pass this test should be refrigerated and the jam used within a week or so. Store properly sealed jam bottles in cool, dark place. Refrigerate jam once jar has been opened.
Recipe Notes
Yield: Apx. 2 half-pint bottles and 1 quarter-pint bottle
NOTE 1: If a candy thermometer is not available, place 2-3 freezer-safe saucers in freezer. To determine if jam is set, place a small amount of jam on chilled saucer and slightly ‘tilt and swirl’ saucer around to distribute the jam. Let jam sit, untouched, for about a minute, then gently push your finger through the jam. If the jam holds its shape (i.e., does not immediately run back together after the finger has been removed from the jam), it is set and ready to bottle. If not, continue to cook mixture, repeating the “chill” test about every 3 minutes or so (always removing the pot from the heat while conducting the chill test) until the jam passes the “chill” test.
NOTE 2: The small ½-cup (quarter-pint) jar does not actually need the full 10 minutes of hot water canning. However, to remove it partway through, at the 5-minute point in the boiling process, would disturb the rolling boil and timing and thus interfere with the proper canning of the larger half-pint jars so, there are a couple of options. The first is to let the small jar remain in the hot water bath with the half-pint jars for the full 10-minute period. The second option is not to process the tiny jar in the hot water and to, instead, use it as the “tasting jar”, consuming the jam within a couple of days. However, if the desire is to can the entire batch of jam into the small ½-cup (quarter-pint) jars, then process the basket of them for 5 minutes, instead of 10. These tiny bottles make great gifts, especially if they are accompanied by fresh scones!
[Copyright My Island Bistro Kitchen]
PIN ME TO PINTEREST