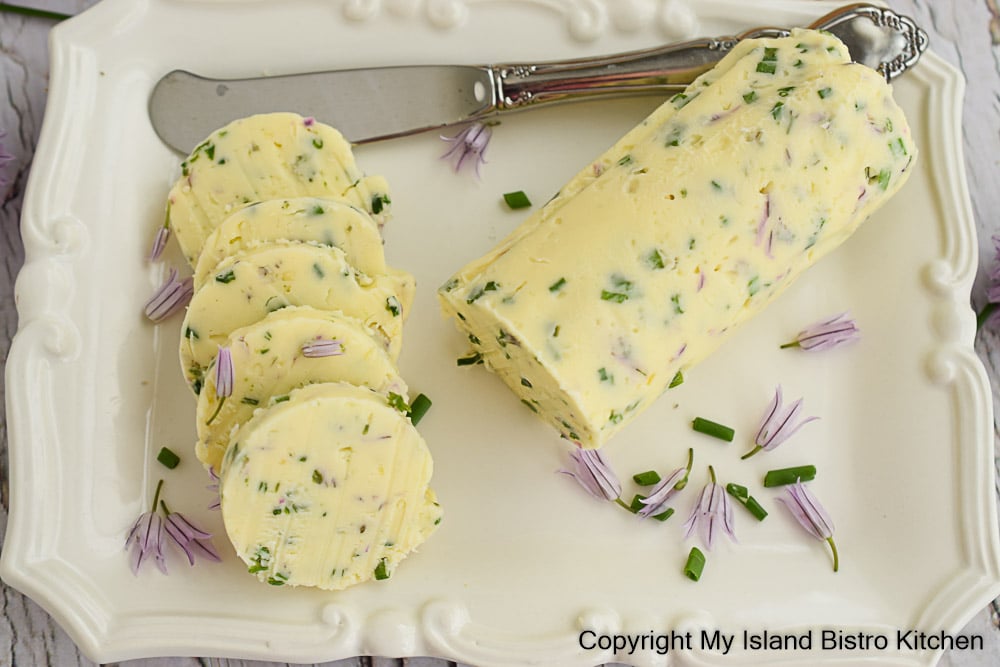
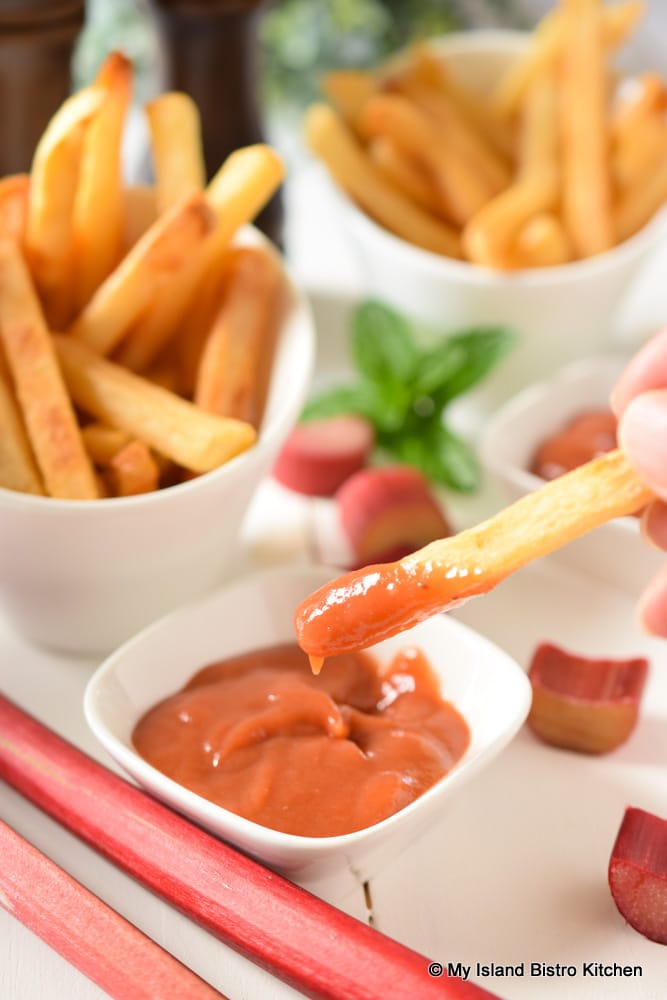
Homemade Rhubarb Tomato Ketchup is Perfect with French Fries
I am always looking for ways to use rhubarb as it’s one of my favorite ingredients to cook with and to eat. It’s a versatile ingredient and I have discovered, when combined with tomatoes, it makes a tasty Rhubarb Tomato Ketchup. Use this condiment just as you would a typical tomato-based ketchup. Continue reading Homemade Rhubarb Tomato Ketchup→
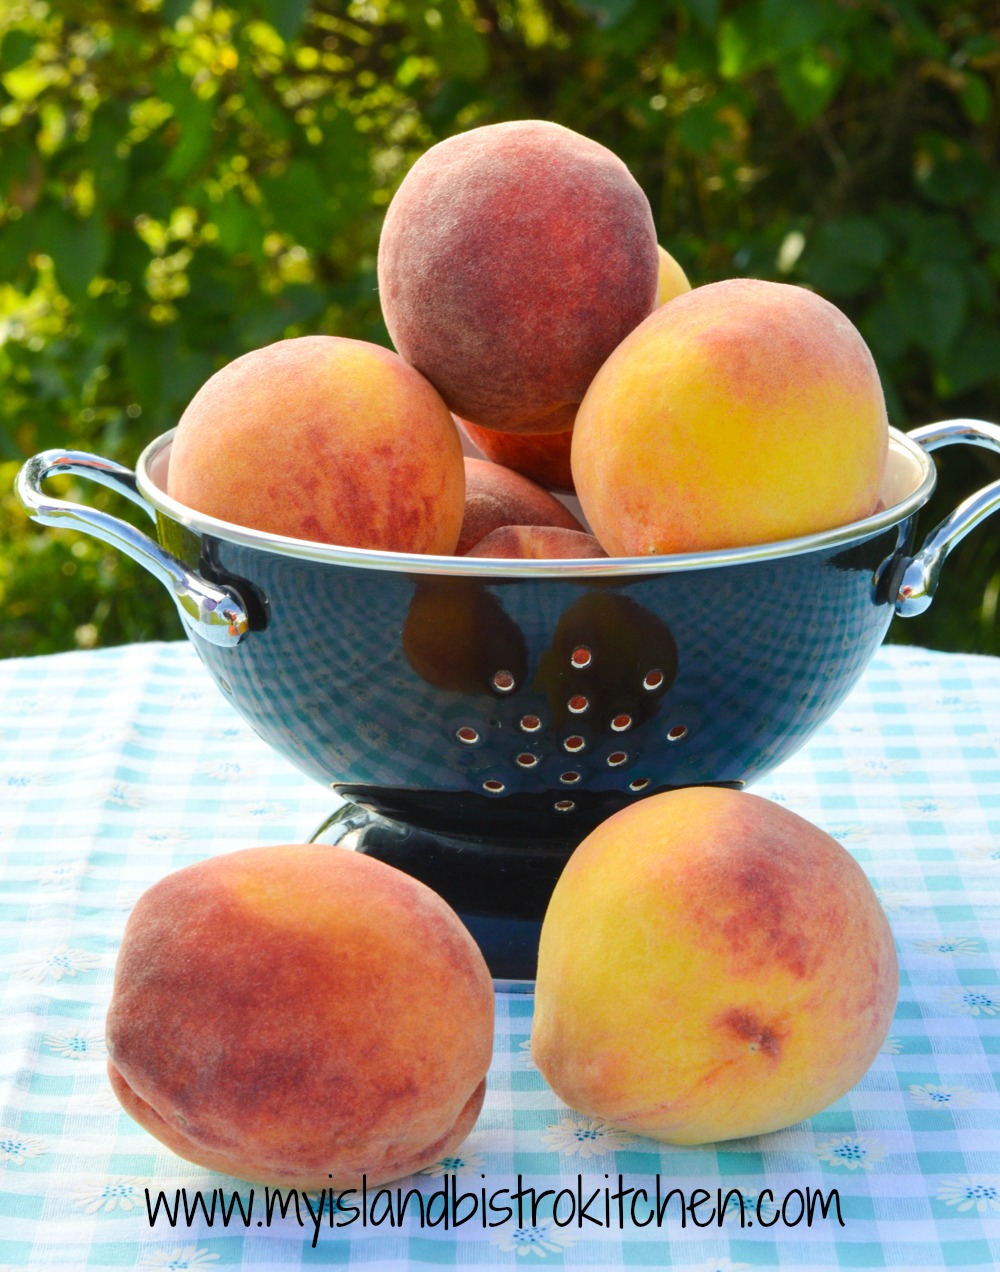
I like to use fresh produce when it is in season. It has so much more flavor than buying the same product when it is out of season. There are certain dishes that super fresh produce is essential and Fresh Peach Salsa is one of them. Versatile, this salsa can, of course, be used as a dip for tortilla chips and it can also be used as a topping for cooked fish, pork chops, or chicken breasts and for a number of other uses as well.
Peach Salsa
There are two types of salsa – Fresh and processed (bottled). Fresh salsa is meant to be used shortly after it has been mixed up. Ingredients in a fresh salsa are raw and the juices that emanate from the fruit and vegetables will be water thin. The ingredients will have vibrant flavor and the vegetables and fruits will hold their shape and be crisp, never soggy or dull. This is in contrast to a processed salsa where the ingredients will be cooked and the salsa will have a thicker consistency, almost sauce-like in texture. A cooked salsa will have a longer shelf life than the fresh salsa.
This colorful fresh Peach Salsa is super showy and very tasty.
Fresh Peach Salsa
The great thing about the salsa is that the seasonings can be adjusted according to one’s personal taste. For my recipe, I have purposely gone gentle on the amount of Jalapeño pepper used as well as the garlic and ginger. My recommendation is, as always, to initially make the recipe the way the recipe developer has intended. Then, taste the salsa and, if it does not have sufficient “heat” for your taste, add a bit more seasoning – but just add a bit at a time, tasting as you go. As the old saying goes, you can always add more seasoning but, once it’s in the dish, you can’t remove it.
Peach Salsa
Peaches
Use ripe but still firm fresh peaches, peeled, pitted, and chopped into ¼” pieces. If the peaches are too ripe, they’ll break down too much in the salsa and add too much liquid. You want the peaches to hold their shape.
Peaches
Tomato
Use plum tomatoes (aka the Roma variety) for this salsa. Plum tomatoes are a firm variety with fewer seeds and less juice than most other varieties. Plum tomatoes will hold their shape when diced and won’t add unnecessary juice to the salsa. There will still be some seeds in plum tomatoes so be sure to remove them and the juicy sac that surrounds the seeds then cut the tomato into ¼” pieces. Fresh Peach Salsa is meant to be a clean salsa, free of seeds.
Fresh Plum Tomatoes
Peppers
Adding a bit of sweet red pepper to Peach Salsa adds color and flavor. Of course, there has to be some Jalapeño pepper added, too. This is a hot chile pepper so, unless you like really hot and spicy food, I recommend the “less is more” practice. I add between 1½ – 2 teaspoons of very finely chopped Jalapeño pepper to this salsa. This, of course, can be varied with more or less according to personal taste preference.
Onion
Red or green onion may be used in the Peach Salsa. The red onion will add a more pungent flavor than will the more subtle green onion. I also think its burgundy/eggplant color adds an interesting hue to the salsa. With fresh salsa, color, vibrancy, and texture are key.
Cilantro
Fresh cilantro is a must for this salsa. I generally use between ¼ and 1/3 cup of the chopped herb. More, or less, may be used according to taste.
Fresh Cilantro
I grow Cilantro in my backyard chef’s garden every year. It’s a great addition to salads and fresh salsa. Cilantro will resemble flat-leaf parsley in appearance but it has a distinctively different flavor. Cilantro’s unique taste is often described as having a citrus undertone. It will add a burst of flavor and is a common ingredient in salsa.
Cilantro
Lime Juice
Always use freshly squeezed lime juice in a fresh salsa – it’s just so much fresher and better tasting than the commercially bottled version.
The lime juice performs double duty in the Peach Salsa. First, the acid in the juice helps to keep the peaches from turning brown quickly. Second, it gives wonderful citrus flavor to this fresh salsa.
Seasonings
Some garlic salt and ground ginger are sufficient to season this salsa since the primary ingredients take care of generating the flavor. Adding ½ teaspoon of sugar adds just a touch of sweetness to balance the Jalapeño pepper and lime juice.
Add some fresh chopped parsley for additional color and subtle flavoring.
Making the Salsa
Easy-peasy describes the method for making fresh Peach Salsa. Once all the ingredients are chopped they, and the seasonings, are simply mixed together in a bowl. Letting the salsa sit for about 15 minutes or so at room temperature allows the flavors to “mix and mingle” and deepen their relationship 🙂 Refrigerate the salsa, covered, for about 15 minutes to chill slightly before serving.
Ways to Enjoy Fresh Peach Salsa
The traditional way to serve this salsa is to simply surround the bowl of salsa with tortilla chips for dipping.
A work-around for those concerned about the sanitation of guests “double dipping” (and there is always at least one who dips the tortilla chip more than once into the salsa) at a gathering is to serve the salsa in individual serving dishes like the small glass ones in the photo below. Guests simply pick up a personal-sized dish of salsa and double-dip the tortilla chips into the salsa to their heart’s content.
This fresh Peach Salsa is also a lovely addition spooned over cooked fish, pork chops or, as I have done here, oven-roasted chicken breasts served on a bed of rice.
Peach Salsa on Chicken Breast
The colorful salsa dresses up, or completes, a plain piece of meat, fish, or poultry and adds a burst of flavor and texture along with eye appeal.
Peach Salsa tops Roasted Chicken Breast
This mild salsa can also be spread over tortilla chips, topped with shredded mozzarella cheese, and placed in the oven at 400°F just until the cheese is melted. A perfectly delightful treat served hot with a dob of sour cream.
Fresh Peach Salsa on Tortilla Chips
Some other ways you might use this salsa: • Topping for tacos • Spooned over scrambled eggs or an omelette • Added as a condiment on burgers • Added to a grilled cheese sandwich • Mixed with sour cream as a topping for baked potatoes • Stirred into tuna or chicken salad • Served over rice as a side dish • Mixed with sour cream and use as a chip dip • Mixed with cold cooked quinoa for a side dish to meat, fish, or poultry
Fresh Peach Salsa
You will find a multitude of uses for this versatile, colorful, and flavorful Peach Salsa.
[Printable recipe follows at end of posting]
Fresh Peach Salsa
Ingredients:
2 medium-sized peaches, peeled, pitted, and diced small 1 medium-sized plum tomato, cored and seeds removed, diced 1/3 cup sweet red pepper, diced 2½ tbsp red onion, diced small (or green onion sliced thin) ¼ cup fresh cilantro, chopped 1½ tbsp freshly squeezed lime juice 1 – 2 tsp Jalapeño pepper, stem and ribs removed, seeded, and minced) ½ tsp granulated sugar ¼ tsp garlic salt 1/8 tsp ground ginger ½ tbsp chopped fresh parsley Fine sea salt, to taste
Tortilla chips for serving (optional)
Method:
Combine all ingredients in bowl. Let stand at room temperature for 15 minutes then cover tightly with plastic wrap and refrigerate for apx. 15 minutes before serving.
Serve as a dip with tortilla chips or spoon over fish, chicken, or pork.
Yield: Apx. 2½ – 3 cups Salsa (depending on size of peaches and tomato)
This easy-to-make Fresh Peach Salsa is the perfect summer condiment to serve with tortilla chips or as a topping to cooked chicken, pork, or fish.
Course Condiment
Keyword peach salsa, peaches, salsa
My Island Bistro KitchenMy Island Bistro Kitchen
Ingredients
2medium-sized peaches, peeled, pitted, and diced small
1medium-sized plum tomato, cored and seeds removed, diced
1/3cupsweet red pepper, diced
2½tbspred onion, diced small (or green onion sliced thin)
¼cupfresh cilantro, chopped
1½tbspfreshly squeezed lime juice
1-2 tsp Jalapeño pepper, stem and ribs removed, seeded, and minced
½tspgranulated sugar
¼tspgarlic salt
1/8tspground ginger
½tbspchopped fresh parsley
Fine sea salt, to taste
Tortilla chips for serving (optional)
Instructions
Combine all ingredients in bowl. Let stand at room temperature for 15 minutes then cover tightly with plastic wrap and refrigerate for apx. 15 minutes before serving.
Serve as a dip with tortilla chips or spoon over fish, chicken, or pork.
Recipe Notes
Yield: Apx. 2½ - 3 cups Salsa (depending on size of peaches and tomato)
And, of course, by subscribing to receive an email notification of new posts and recipes, you can be among the first to know when I publish a new post or recipe. Simply enter your name and email address in the Subscription block over on the right-hand side of my home page.
Chives, a perennial plant related to onions, are one of the season’s earliest gems. I generally cut back part of the patch to keep the chives producing all season long. But, letting some of the chives reach the flower blossom stage has its perks, too.
Chives
As they mature, chives will produce long stems that become somewhat hard and tough. Those stems produce fabulous lavender-hued edible blossoms. Those are the blossoms that I harvest to make chive vinegar. It just seems so wasteful not to make good use of them. And, when you see the color of the vinegar, you’ll understand why this is a prized commodity in my pantry.
Chive Blossoms
Chive vinegar is super easy to make and it will have a subtle onion essence. All that is required is about 80-100 chive blossoms that are pesticide free and 1½ cups of a good quality colorless, neutral, unflavored vinegar such as white wine vinegar or champagne vinegar. No special equipment and no special skillsets are required.
Snip the chive blossoms just below their heads. I generally leave about a 1” stem on just a few of the blossoms for a little extra flavor. Swish and wash the blossoms in a bowl of cool water then dry them in a salad spinner.
Chive Blossoms
Lay the blossoms, single layer, on a tea towel and let them air dry for about an hour or so. Use a meat pounder mallet to slightly crush the blossoms to hasten the release of their flavor.
Stuff the blossoms into a 2-cup glass jar and add the vinegar. Use the end of a wooden spoon to reposition the blossoms, if necessary, to make room for all of the vinegar.
Steeping Chive Blossoms in Vinegar
Do not use a metal lid to cover the jar as it can react with the vinegar. Instead, use a double layer of plastic wrap to cover the jar and secure the wrap with an elastic band. Store the jar in a cool dark place for a couple of weeks to let the chives infuse the vinegar with flavor and for the vinegar to turn the most stunning shade imaginable.
Every couple of days, give the jar a gentle shake or two to move the vinegar in and around the chive blossoms. The color of the vinegar will develop very quickly but, like its flavor, will deepen the longer you let the chive blossoms steep in the vinegar.
Once the infusion period is up, strain the vinegar from the blossoms. You can use either a wet cheesecloth lined fine wire mesh sieve or you can line the sieve with a paper coffee filter. Decant the vinegar into a sterilized bottle that has a non-metallic lid such as a rubber stopper (as shown in the photo below) or a cork. Store away from light.
Homemade Chive Vinegar
Use chive vinegar in any way or recipe you would use any vinegar.
For example, it makes a fantastic vinaigrette, especially for those main meal summer salads.
Vinaigrette Made with Homemade Chive Vinegar
A light drizzle of the chive vinegar over a potato salad adds an extra punch of flavor.
Homemade Potato Salad Drizzled with Chive Vinegar
The vinegar can also be used in marinades, tossed with roasted veggies or over French fries, or for quick pickling of cucumber or red onion. This vinegar also makes a lovely host/hostess gift from your kitchen. Just look at the fabulous color of the vinegar and it’s all natural from the chive blossoms. No artificial coloring has been used.
Chive Vinegar as a Host or Hostess Gift
[Printable recipe follows at end of post]
Chive Vinegar
Ingredients:
Apx. 80-100 chive blossoms, including a few buds 1½ cups white wine vinegar or champagne vinegar
Method:
Snip blossoms from chive plants, just beneath the blossom heads. If desired, leave about 1” stem on a few of the blossoms for extra flavor. Wash blossoms in large bowl of cold water and spin dry in salad spinner. Transfer blossoms to tea towel to air dry for about an hour or so.
Use a meat pounder mallet to lightly crush the blossoms and buds to release their flavor.
Transfer blossoms and buds to a 2-cup glass jar. Fill with vinegar. Using the end of a wooden spoon, push down and redistribute the blossoms to make room for the vinegar.
Cover the jar with plastic wrap secured with a rubber band. Do not use a metal lid which can react with the vinegar. Place the jar in a dark, cool location and let it steep for 2 weeks to allow the flavor and color of the chive vinegar to develop. Over the two weeks, periodically give the bottle a gentle shake or two to redistribute contents.
Strain the steeped vinegar through a wet cheesecloth-lined fine wire mesh sieve (or line the sieve with a paper coffee filter). Discard the old blossoms and buds. Decant the vinegar into a sterilized bottle that has a non-metallic lid such as a rubber stopper or cork.
And, of course, by subscribing to receive an email notification of new posts and recipes, you can be among the first to know when I publish a new post or recipe. Simply enter your name and email address in the Subscription block over on the right-hand side of my home page.
Chive-infused vinegar is easy to make and is a wonderful addition to the cook's pantry. Use it just as you would any vinegar. Especially good in vinaigrettes and marinades and tossed with French fries and roasted vegetables.
Course Condiment
Keyword chives, homemade chive vinegar
My Island Bistro KitchenMy Island Bistro Kitchen
Ingredients
Apx. 80-100 chive blossoms, including a few buds
1½cupswhite wine vinegar or champagne vinegar
Instructions
Snip blossoms from chive plants, just beneath the blossom heads. If desired, leave about 1” stem on a few of the blossoms for extra flavor. Wash blossoms in large bowl of cold water and spin dry in salad spinner. Transfer blossoms to tea towel to air dry for about an hour or so.
Use a meat pounder mallet to lightly crush the blossoms and buds to release their flavor.
Transfer blossoms and buds to a 2-cup glass jar. Fill with vinegar. Using the end of a wooden spoon, push down and redistribute the blossoms to make room for the vinegar.
Cover the jar with plastic wrap secured with a rubber band. Do not use a metal lid which can react with the vinegar. Place the jar in a dark, cool location and let it steep for 2 weeks to allow the flavor and color of the chive vinegar to develop. Over the two weeks, periodically give the bottle a gentle shake or two to redistribute contents.
Strain the steeped vinegar through a wet cheesecloth-lined fine wire mesh sieve (or line the sieve with a paper coffee filter). Discard the old blossoms and buds. Decant the vinegar into a sterilized bottle that has a non-metallic lid such as a rubber stopper or cork.
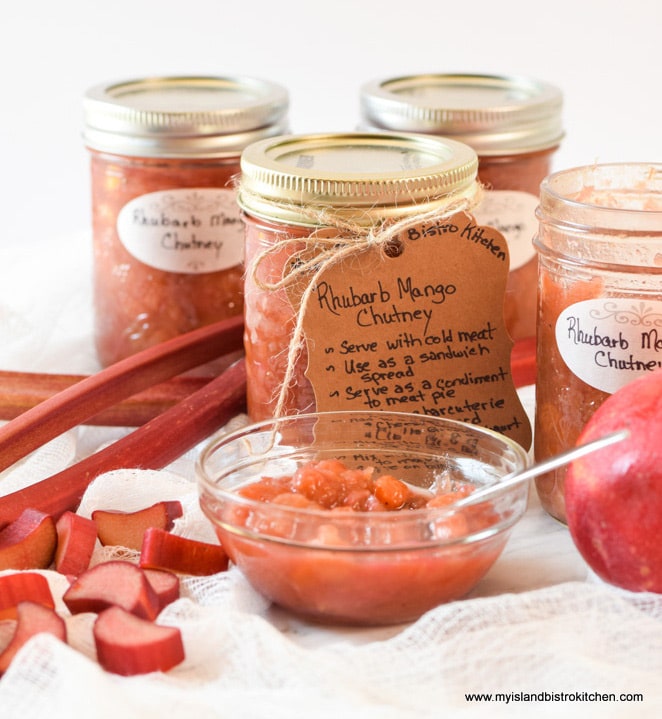
This Rhubarb and Mango Chutney is a mildly spicy condiment. Combining the tart rhubarb with the sweet fresh mango and a variety of spices produces a fabulous flavour combination that teeters between the sweet and savory.
Rhubarb and Mango Chutney
Chutney, with origins in India, differs from a relish that tends to be sweeter. A chutney will also have a more chunky texture with pieces of fruit. Chutney tends to lean more toward the savory side of the culinary scale.
Rhubarb and Mango Chutney
A versatile condiment, chutney can be used in sandwiches either as a spread on its own or mixed with mayonnaise. It’s a great snack or easy hors d’oeuvre when presented on a cracker with some cheese (e.g., goat cheese, Brie, or cream cheese) and some deli meat.
Rhubarb and Mango Chutney tops Deli Meat and Goat Cheese on Cracker
It complements cold meats like beef, pork, and poultry and is wonderful on a charcuterie board.
Rhubarb and Mango Chutney as a Condiment on a Charcuterie and Cheese Board
This Rhubarb and Mango Chutney is also tasty when mixed with some Greek yogurt and used as a dip for fresh veggies. I like to use it as a side to my chicken pot pie and beef pot pie and serve it as a burger condiment. The possibilities for the use of the chutney is limited only by your imagination.
Rhubarb and Mango Chutney on Charcuterie, Cheese, and Fruit Board
This recipe for sweet, tart, and slightly spicy Rhubarb and Mango Chutney is not difficult to make but it does take some time. A couple of stock pots as well as a hot water canner to process the jars of chutney will also be required.
Rhubarb and Mango Chutney
[Printable recipe follows at end of posting]
Rhubarb Mango Chutney
Ingredients: 4½ cups rhubarb (apx. 1 lb 3 oz), chopped into ¼“ pieces ½ cup red onion, finely chopped ¾ cup light brown sugar ½ cup white sugar ½ cup minus 1 tbsp apple cider vinegar ½ tsp fine sea salt 1/16 tsp coriander 1-2 garlic cloves, minced 1/8 tsp ground ginger 1/8 tsp cayenne 1/8 tsp nutmeg 1 tbsp olive oil
1 mango, peeled and chopped into ¼“ pieces (apx. 1 1/3 cups) 2/3 cup golden raisins
Method: Place rhubarb, onion, sugars, vinegar, salt, dry spices, and olive oil in medium-sized stock pot. Stir over medium heat until sugar dissolves. Make the spice sachet by combining the star anise, mustard seed, whole allspice and cloves, and cinnamon stick into center of small square of double or triple layer of cheesecloth (depending on how open the weave of the cheesecloth is). Draw edges of cheesecloth together to make a sachet and tie with heavy thread. Add the spice sachet to the pot. Bring mixture to a boil over medium-high heat, stirring frequently, then reduce heat to low and simmer for 15 minutes. Add the mango and raisins and continue to simmer about 25 minutes longer, or until mixture thickens, stirring occasionally.
While the chutney is cooking, fill a large pot of water, about ¾ full. Place 4 half-pint jars (see Note 1 below) and 1 quarter-pint jar (see Note 2 below), upright, into the water. Ensure the jars are fully submerged, each jar filled with water, and that the water is at least an inch over the tops of the jars. Cover, bring to a boil, and boil for 10 minutes. Turn off heat and leave the jars in the hot water while the chutney finishes cooking.
Meanwhile, fill the canner about one-third to one-half full of water. Cover and bring to a boil to have it ready for the filled jars.
When the chutney is cooked, use a jar lifter to remove the hot jars from the water. Discard the spice sachet in the chutney. Using a glass measuring cup and a canning funnel, transfer chutney into sterilized jars, leaving about ¼” headroom in each jar. Wipe the jar rims with a clean cloth. Seal jars with heated lids and fingertip-tightened ring bands.
Place filled jars in hot water bath wire basket, ensuring jars do not touch each other or fall over. Carefully lower basket into canner of hot water. Some empty jars may need to be added to the basket to fill up space so the filled jars do not fall over. Let the empty jars fill with water from the canner as they are submerged. Ensure the water level is at least 1” above the tops of jars, adding more boiling water as necessary. Cover with canner lid. Increase the heat to return the water to a rolling boil then decrease the heat to just keep the water at a rolling boil but not boiling over. Process jars in the hot water bath for 10 minutes, adjusting time for altitude. Start timing the processing from the point where a full rolling boil is reached after basket of jars has been added to the canner. At the end of the processing time, turn off heat and remove canner lid. Wait until the water stops boiling (approximately 3-5 minutes) then, using a jar lifter, carefully remove the jars, one at a time, and transfer them to a wire rack to cool completely. Listen for the “pop” or “ping” sound as the bottles seal over the next few minutes or hours. The lids of properly sealed jars will curve downward. Let jars rest, undisturbed, on wire rack for 12 hours. Store in cool, dark place. Refrigerate chutney once opened.
Note 1: You may want to sterilize an additional half-pint jar to have it ready to fill in case the recipe yields more than exactly 4½ cups of chutney. Many factors can vary the amount of chutney produced – e.g., amount of water in the rhubarb, ripeness of the mango, temperature at which the chutney was cooked, how long it was simmered, how much it was stirred during the cooking process, and how much liquid in the chutney may have evaporated, or not.
Note 2: I generally do not process the tiny quarter-pint jar in the hot water bath because it does not need the full 10 minutes that the half-pint jars require and I prefer not to take the cover off the canner to extract the small half-cup jar mid-way through the timing of the hot water bath. Instead, I let the small jar cool at room temperature then refrigerate it and eat its contents within a day or so because it’s hard not to taste freshly-made chutney! I call this my “tasting jar”.
The combination of tart rhubarb and sweet mango mixed with a variety of spices results in a Rhubarb Mango Chutney that can be enjoyed as a condiment in many different ways with meat, cheese, and charcuterie boards.
Course Side Dish
Cuisine Canadian
Keyword chutney, rhubarb and mango chutney
My Island Bistro KitchenMy Island Bistro Kitchen
Ingredients
4½cupsrhubarb(apx. 1 lb 3 oz), chopped into ¼“ pieces
½cupred onion,finely chopped
¾cuplight brown sugar
½cupwhite sugar
½cupminus 1 tbsp apple cider vinegar
½tspfine sea salt
1/16tspcoriander
1-2garlic cloves,minced
1/8tspground ginger
1/8tspcayenne
1/8tspnutmeg
1tbspolive oil
1mango,peeled and chopped into ¼“ pieces (apx. 1 1/3 cups)
2/3cupgolden raisins
Spice Sachet:
1star anise
1/8tspmustard seed
2whole allspice
3whole cloves
3” piece cinnamon stick
Instructions
Place rhubarb, onion, sugars, vinegar, salt, dry spices, and olive oil in medium-sized stock pot. Stir over medium heat until sugar dissolves. Make the spice sachet by combining the star anise, mustard seed, whole allspice and cloves, and cinnamon stick into center of small square of double or triple layer of cheesecloth (depending on how open the weave of the cheesecloth is). Draw edges of cheesecloth together to make a sachet and tie with heavy thread. Add the spice sachet to the pot. Bring mixture to a boil over medium-high heat, stirring frequently, then reduce heat to low and simmer for 15 minutes. Add the mango and raisins and continue to simmer about 25 minutes longer, or until mixture thickens, stirring occasionally.
While the chutney is cooking, fill a large pot of water, about ¾ full. Place 4 half-pint jars (see Note 1 below) and 1 quarter-pint jar (see Note 2 below), upright, into the water. Ensure the jars are fully submerged, each jar filled with water, and that the water is at least an inch over the tops of the jars. Cover, bring to a boil, and boil for 10 minutes. Turn off heat and leave the jars in the hot water while the chutney finishes cooking.
Meanwhile, fill the canner about one-third to one-half full of water. Cover and bring to a boil to have it ready for the filled jars.
When the chutney is cooked, use a jar lifter to remove the hot jars from the water. Discard the spice sachet in the chutney. Using a glass measuring cup and a canning funnel, transfer chutney into sterilized jars, leaving about ¼” headroom in each jar. Wipe the jar rims with a clean cloth. Seal jars with heated lids and fingertip-tightened ring bands.
Place filled jars in hot water bath wire basket, ensuring jars do not touch each other or fall over. Carefully lower basket into canner of hot water. Some empty jars may need to be added to the basket to fill up space so the filled jars do not fall over. Let the empty jars fill with water from the canner as they are submerged. Ensure the water level is at least 1” above the tops of jars, adding more boiling water as necessary. Cover with canner lid. Increase the heat to return the water to a rolling boil then decrease the heat to just keep the water at a rolling boil but not boiling over. Process jars in the hot water bath for 10 minutes, adjusting time for altitude. Start timing the processing from the point where a full rolling boil is reached after basket of jars has been added to the canner. At the end of the processing time, turn off heat and remove canner lid. Wait until the water stops boiling (approximately 3-5 minutethen, using a jar lifter, carefully remove the jars, one at a time, and transfer them to a wire rack to cool completely. Listen for the “pop” or “ping” sound as the bottles seal over the next few minutes or hours. The lids of properly sealed jars will curve downward. Let jars rest, undisturbed, on wire rack for 12 hours. Store in cool, dark place. Refrigerate chutney once opened.
Recipe Notes
Yield:Apx. 4½ cups (4 half-pint jars and 1 quarter-pint jar)
Note 1: You may want to sterilize an additional half-pint jar to have it ready to fill in case the recipe yields more than exactly 4½ cups of chutney. Many factors can vary the amount of chutney produced – e.g., amount of water in the rhubarb, ripeness of the mango, temperature at which the chutney was cooked, how long it was simmered, how much it was stirred during the cooking process, and how much liquid in the chutney may have evaporated, or not.
Note 2: I generally do not process the tiny quarter-pint jar in the hot water bath because it does not need the full 10 minutes that the half-pint jars require and I prefer not to take the cover off the canner to extract the small half-cup jar mid-way through the timing of the hot water bath. Instead, I let the small jar cool at room temperature then refrigerate it and eat its contents within a day or so because it’s hard not to taste freshly-made chutney! I call this my “tasting jar”.
Pin Me To Pinterest!
(Mostly) PEI and Maritime Food – Good Food for a Good Life!