Tag Archives: how to make green tomato chow

Green Tomato Chow

By now, most gardeners probably have tomatoes spilling out of their gardens.

Do you have an abundance of green tomatoes you’re wondering what to do with?  Today, I am sharing my recipe for Green Tomato Chow (recipe follows at end of posting), a tasty condiment that makes good use of green tomatoes.
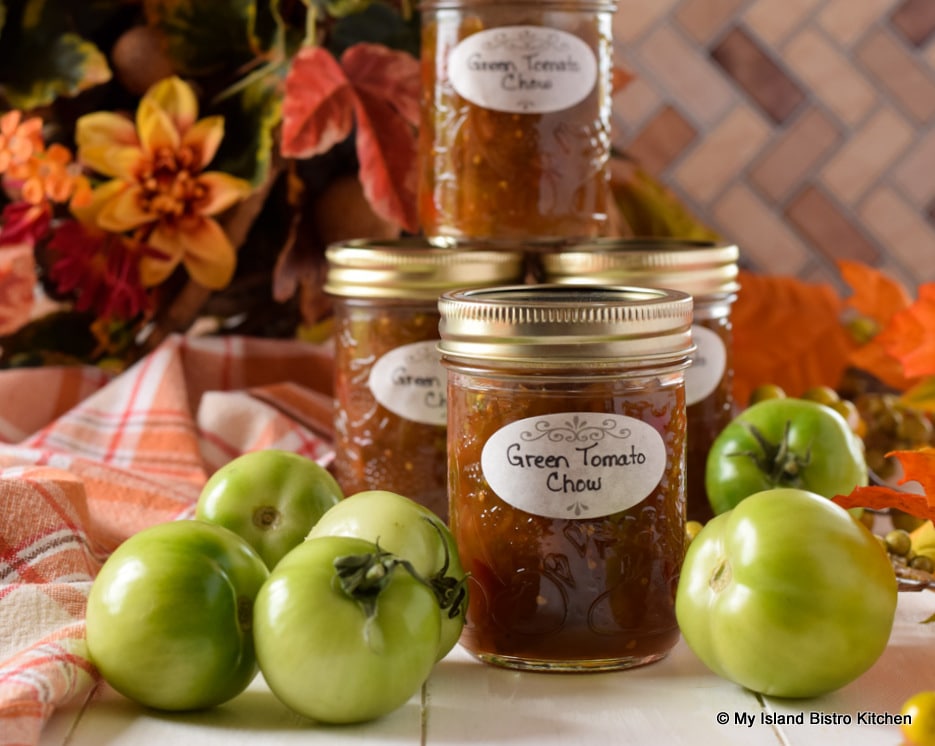
Bottles of Green Tomato Chow Surrounded by Green Tomatoes
Green Tomato Chow
Green Tomato Chow


I grew up with chow being made every fall. It’s a great condiment to serve with cold meats, baked beans, stews, casseroles, chicken and meat pies, hot chicken/beef/turkey dinners, and, of course, if you are a Maritimer, with fish cakes.

Green Tomato Chow with Fish Cakes, Baked Beans, and a Homemade Biscuit

Chow is not difficult to make but, like any pickling and preserving, it can be a bit time-consuming since the vegetables have to be cut up and soaked for several hours (either all day or all night), then slowly simmered until cooked.  Making chow is not something that can be rushed.

Green Tomato Chow
Green Tomato Chow

The first thing you need to do is gather up all the ingredients and equipment you will need. Chow is basically nothing more than green tomatoes, onions, celery, red pepper, vinegar, sugar, and spices along with some pickling salt.  No out of the ordinary ingredients. A list of equipment and utensils needed to make the chow can be found further down in this post.

You can use regular white vinegar for this recipe but I recommend using the pickling vinegar which is stronger.

Any kind of green tomatoes will make good chow. The ones I’ve used are just the basic garden variety of tomatoes.  It’s usually a case of whatever green tomatoes are available in the garden!

Some cooks cut the tomatoes crosswise into slices.  I cut mine into chunks. Either works.  You don’t, however, want to chop the vegetables up too finely as it will start to resemble more of a relish than a chow.

Cut up the onions, celery, and red pepper.

Place all the vegetables into a large bowl.

The vegetables need to be soaked for 7-8 hours in a salt brine.  Be sure to use pickling salt, not regular table salt (see my posting on mustard pickles for explanation).  It’s important to ensure that the salt is completely dissolved in water before pouring it over the vegetables.  You will need enough salted cold water to completely cover the vegetables to soak.  I use a ratio of 1/2 cup pickling salt to 4 cups of water.

Pour the salt brine over the vegetables and set the mixture aside to soak for 7 – 8 hours.

Drain the vegetables into a large colander.

Under cold running water, quickly rinse the vegetables to remove any salt residue.  Swish the vegetables around to ensure that all are rinsed off.

You’ll want to get as much water drained out of the vegetables as possible so let them sit in the colander for 1 to 1 1/2 hours. You may want to carefully stir the vegetables around in the colander periodically during this period to ensure better drainage.

Meanwhile, prepare the spice sachet.  I make a small cheesecloth sachet by doubling, or even folding the open weave cheesecloth over 3-4 times, and then placing the pickling spice mixture in the centre.  The sides of the cheesecloth are then gathered up and tied with kitchen string or very strong thread. The whole spices need to be corralled in a sachet as, well, it’s not a very pleasant experience to unexpectedly bite into a whole clove in the chow, for example!  I buy a pickling spice mix at my local bulk foods store.  If you can’t find a product labelled “pickling spice” in your area, you can always make your own.  In my mustard pickle posting I give an explanation of spices typically included in a pickling spice mix. This sachet will get dropped into the stockpot and infuse flavor into the chow base as the chow cooks.

Into a large stockpot, place the sugars, spices, and vinegar.  Stir well.

Drop in the spice sachet and bring mixture to a boil.

Add the drained vegetables and return mixture to a boil, then immediately reduce heat to medium-low.

Cook until vegetables are cooked, somewhat translucent, and the mixture is slightly thickened. Stir mixture occasionally to make sure it is not sticking to the bottom of the pot.

While the chow is cooking, start the bottle sterilization process.  Again, refer to my mustard pickle posting for details on this and the proper canning jars to use.

Once the chow is cooked and thickened, remove it from the heat and remove and discard the pickling spice sachet.  Bottle the chow while it is hot into the hot, sterilized bottles.  With clean, damp cloth, wipe  each jar rim to remove any sticky chow residue. Seal immediately with heated lids. Screw on jar bands just until resistance is met.

Process filled jars immediately in a hot water bath. I process my half-pint jars for 10 minutes (at a rolling boil) but you should refer to the canner manufacturer’s directions for the proper time for your local altitude. Cool the jars, undisturbed, on the counter for 24 hours and then store them in cool, dark place. Let chow age for at least 2 weeks before serving.

Green Tomato Chow
Green Tomato Chow


Chow making, like pickling, is a process and takes time. Make sure you read through the recipe several times before making the recipe to ensure understanding of the process and sequencing involved.

You will need the following equipment to make this chow:

Digital Scales for weighing tomatoes
7 pint-sized glass canning jars
7 – two-piece lid and screw band sets (lids must be brand new and not previously used)
Cheesecloth for making spice sachet and kitchen string for tying sachet

Large measuring cup or bowl for mixing salt water brine
Large bowl for soaking vegetables in salt water brine
Large colander for draining vegetables
Large heavy-bottomed stock pot for cooking chow
Large pot for sterilizing jars
Small saucepan for heating jar lids
Water bath canner with basket
Jar lifter tongs
Wide-mouthed canning funnel
Ladle or heat-proof glass measuring cup
Chopstick or small heat-proof spatula
Magnetic lid lifter
A timer

Green Tomato Chow

Ingredients:

3 lbs green tomatoes, chopped into chunks
3¼ cups onions, chopped
1 cup celery, sliced
½ cup sweet red pepper, diced
Apx. 1 cup pickling salt

Combine all ingredients into a large bowl. Using the ratio of ½ cup pickling salt to 4 cups cold water, cover ingredients completely with salted water. Add as much salted water as necessary to cover the vegetables. For this amount of vegetables, you will likely need at least 1 cup pickling salt dissolved in 8 cups water. Make sure the pickling salt is thoroughly dissolved in the water before pouring over vegetables. Let vegetables soak at room temperature for 7-8 hours. Drain vegetables in large colander. Quickly rinse vegetables with cold water to remove any traces of salted water residue on vegetables. Let vegetables drain in colander for 1 to 1½ hours, gently stirring the vegetables periodically for better drainage.

4 cups pickling vinegar
3 cups brown sugar, lightly packed
1 cup granulated sugar
1½ – 2 tbsp pickling spice tied into a small pickling spice sachet made with cheesecloth
¼ tsp tumeric
¼ tsp dry mustard

Method:

Combine vinegar, sugars, and spices into a large stockpot. Bring to a boil, stirring occasionally. Add the drained vegetables and bring to a boil over medium heat. Reduce heat to medium-low and cook mixture slowly for1 to 1½ hours until vegetables are cooked, somewhat translucent, and mixture is slightly thickened. Stir periodically.

While chow mixture is cooking, start the bottle sterilization process. Wash jars and lids in hot soapy water. Quickly wash the lids and do not let them stay in the hot dish water as, once heated enough to soften the rubber sealing compound and then cooled, they are no longer effective. Rinse jars and lid. (The lids will be heated to soften the rubber sealing compound at the time of bottling.)

Fill a large-sized pot about two-thirds full of hot tap water. Place the jars, upright, into the water. Ensure the jars are fully submerged, each jar filled with water, and that the water is at least an inch over the tops of the jars, adding more if necessary. Cover, bring to a boil, and boil gently for 10 minutes. Reduce heat to simmer and leave the jars in the hot water to have ready to fill once the chow is ready for bottling.

Fill the canner a good half full of hot tap water. Cover and bring to a boil to have it ready for processing of the filled jars. Once it comes to a full boil, reduce heat to keep the water gently boiling.

When the chow is ready to be bottled, use jar lifter tongs to carefully remove the hot sterilized jars from the water, one at a time, emptying the water from the jars back into the pot. Drain jars well.

Remove a small amount of the hot water from the stockpot in which the jars were sterilized and place in small saucepan over simmering heat. Place the lids in the hot water for just a few minutes to soften the rubber sealing compound. Do not boil the lids.

Boil a kettle of water to have ready to top up water in the canner, if needed, once the filled jars are added.

Remove and discard spice sachet from chow. Using a ladle, or a heat-proof glass measuring cup, and a wide-mouthed canning funnel, fill the hot sterilized jars with the chow, leaving about 1/2” headroom in each jar to allow for expansion during the hot water processing. Remove any trapped air bubbles in the jars with a chopstick or small heatproof spatula. Wipe the jar rims with a clean damp cloth to remove any stickiness that could prevent the lids from sealing properly to the jars.

Using a magnetic lid lifter, remove lids from the hot water and center the heated lids on jars so the sealing compound on the lid edges aligns with the jar rims. Fingertip tighten the ring/screw bands until resistance is encountered. Do not over-tighten.

Using jar lifter tongs, carefully place filled jars upright in the canner’s wire basket positioned in the canner, ensuring jars do not touch each other or fall over. Ensure the water level is at least 1” above the tops of jars, adding more boiling water as necessary. Cover with canner lid. Increase the heat to return the water to a full rolling boil then decrease the heat to just keep the water at a moderately rolling boil but not boiling over. Process jars in the hot water bath for 10 minutes, adjusting time as and if necessary, for higher altitudes. Start timing the processing from the point at which a full rolling boil is reached after filled jars have been added to the canner. At the end of the processing time, turn off heat and remove canner lid.

Let jars sit in the hot water for 5 minutes then, using jar lifter tongs, carefully remove the jars filled with chow, upright and one at a time, and transfer them to a heat-proof cutting board, that has been covered with a towel, to cool completely. Listen for the “pop” or “ping” sound as the bottles seal over the next few minutes or hours. The lids of properly sealed jars will curve downward.

Let jars rest, undisturbed, on counter for 24 hours. Cover jars with towel to keep light out. Then, after 24 hours, test each jar for proper sealing by pressing down on the center of each jar lid. If the lid is already pressed downward, and does not pop back up, it is properly sealed. Any jars that do not pass this test should be refrigerated and the chow used within a week or so. Store properly sealed chow bottles in cool, dark place. Refrigerate chow once jar has been opened.

For best flavor, let chow age for at least 2 weeks before serving.

Yield:  Apx. 6 – 7 half-pint jars.

If you have made this recipe and enjoyed it and/or wish to share it with your friends and family, please do so on social media but be sure to share the direct link to this posting from my website.

Green Tomato Chow

This Green Tomato Chow is a sweet yet slightly tangy condiment. Lovely served with many meals, it is superb served with fish cakes.

Course Condiment
Cuisine Canadian
Keyword chow, Green Tomato Chow
My Island Bistro Kitchen Barbara99

Ingredients

  • 3 lbs green tomatoes, chopped into chunks
  • cups onions, chopped
  • 1 cup celery, sliced
  • ½ cup sweet red pepper, diced
  • Apx. 1 cup pickling salt
  • Combine all ingredients into a large bowl. Using the ratio of ½ cup pickling salt to 4 cups cold water, cover ingredients completely with salted water. Add as much salted water as necessary to cover the vegetables. For this amount of vegetables, you will likely need at least 1 cup pickling salt dissolved in 8 cups water. Make sure the pickling salt is thoroughly dissolved in the water before pouring over vegetables. Let vegetables soak at room temperature for 7-8 hours. Drain vegetables in large colander. Quickly rinse vegetables with cold water to remove any traces of salted water residue on vegetables. Let vegetables drain in colander for 1 to 1½ hours. Gently stir the vegetables periodically for better drainage.
  • 4 cups pickling vinegar
  • 3 cups brown sugar, lightly packed
  • 1 cup granulated sugar
  • 1½ - 2 tbsp pickling spice tied into a small pickling spice sachet made with cheesecloth
  • ¼ tsp tumeric
  • ¼ tsp dry mustard

Instructions

  1. Combine vinegar, sugars, and spices into a large stockpot. Bring to a boil over medium heat, stirring occasionally. Add the drained vegetables and bring just to the boiling point. Reduce heat to medium-low and cook mixture, uncovered, slowly for 1 to 1½ hours, until vegetables are cooked, somewhat translucent, and mixture is slightly thickened. Stir periodically.

  2. While chow mixture is cooking, start the bottle sterilization process. Wash jars and lids in hot soapy water. Quickly wash the lids and do not let them stay in the hot dish water as, once heated enough to soften the rubber sealing compound and then cooled, they are no longer effective. Rinse jars and lids. (The lids will later be heated to soften the rubber sealing compound at the time of bottling.)

  3. Fill a large-sized pot about two-thirds full of hot tap water. Place the jars, upright, into the water. Ensure the jars are fully submerged, each jar filled with water, and that the water is at least an inch over the tops of the jars, adding more if necessary. Cover, bring to a boil, and boil gently for 10 minutes. Reduce heat to simmer and leave the jars in the hot water to have ready to fill once the chow is ready for bottling.

  4. Fill the canner a good half full of hot tap water. Cover and bring to a boil to have it ready for processing of the filled jars. Once it comes to a full boil, reduce heat to keep the water gently boiling.
  5. When the chow is ready to be bottled, use jar lifter tongs to carefully remove the hot sterilized jars from the water, one at a time, emptying the water from the jars back into the pot. Drain jars well.
  6. Remove a small amount of the hot water from the stockpot in which the jars were sterilized and place in small saucepan over simmering heat. Place the lids in the hot water for a few minutes to soften the rubber sealing compound. Do not boil the lids.

  7. Boil a kettle of water to have ready to top up water in the canner, if needed, once the filled jars are added.
  8. Remove and discard spice sachet from chow. Using a ladle, or a heat-proof glass measuring cup, and a wide-mouthed canning funnel, fill the hot sterilized jars with the chow, leaving about 1/2” headroom in each jar to allow for expansion during the hot water processing. Remove any trapped air bubbles in the jars with a chopstick or small heatproof spatula. Wipe the jar rims with a clean damp cloth to remove any stickiness that could prevent the lids from sealing properly to the jars.

  9. Using a magnetic lid lifter, remove lids from the hot water and center the heated lids on jars so the sealing compound on the lid edges aligns with the jar rims. Fingertip tighten the ring/screw bands until resistance is encountered. Do not over-tighten.
  10. Using jar lifter tongs, carefully place filled jars upright in the canner's wire basket positioned in the canner, ensuring jars do not touch each other or fall over. Ensure the water level is at least 1” above the tops of jars, adding more boiling water as necessary. Cover with canner lid. Increase the heat to return the water to a full rolling boil then decrease the heat to just keep the water at a moderately rolling boil but not boiling over. Process jars in the hot water bath for 10 minutes, adjusting time as and if necessary, for higher altitudes. Start timing the processing from the point at which a full rolling boil is reached after jars have been added to the canner. At the end of the processing time, turn off heat and remove canner lid.

  11. Let jars sit in the hot water for 5 minutes then, using jar lifter tongs, carefully remove the jars filled with chow, upright and one at a time, and transfer them to a heat-proof cutting board, that has been covered with a towel, to cool completely. Listen for the “pop” or “ping” sound as the bottles seal over the next few minutes or hours. The lids of properly sealed jars will curve downward. Let jars rest, undisturbed, on counter for 24 hours. Cover jars with towel to keep light out. Then, after 24 hours, test each jar for proper sealing by pressing down on the center of each jar lid. If the lid is already pressed downward, and does not pop back up, it is properly sealed. Any jars that do not pass this test should be refrigerated and the chow used within a week or so. Store properly sealed chow bottles in cool, dark place. Refrigerate chow once jar has been opened.
  12. For best flavor, let chow age for at least 2 weeks before serving.

Recipe Notes

Yield:  Apx. 6 – 7 half-pint jars. Exact yield will depend on how much the chow is cooked down.

Green Tomato Chow
Green Tomato Chow


Did you Know?

You can join the Facebook page for My Island Bistro Kitchen:  https://www.facebook.com/MyIslandBistroKitchen/

Follow “the Bistro” on Twitter:  https://twitter.com/PEIBistro/

See the drool-worthy gallery of mouth-watering food photos from My Island Bistro Kitchen on Instagram: https://www.instagram.com/peibistro/

Follow “the Bistro” on Pinterest at https://www.pinterest.ca/peibistro/

For other great pickle and relish recipes from My Island Bistro Kitchen, click on the links below:

Mustard Pickles
Dill Pickles
Bread and Butter Pickles
Rhubarb Relish
Mustard Beans 
Pickled Beets
Rhubarb and Mango Chutney

Pin Me To Pinterest!

Chow

Homemade Green Tomato Chow


Thank you for visiting “the Bistro” today.

This post was last updated on September 16, 2022