Tag Archives: rolls

Billowy Soft Hot Cross Buns

Pan of Easter Rolls
Hot Cross Buns

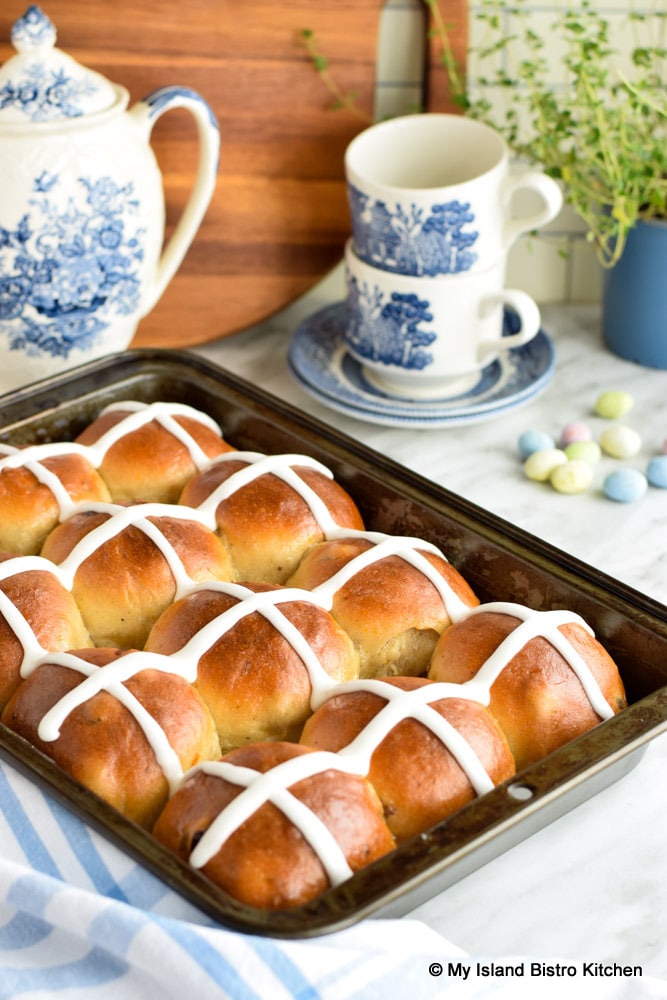
Hot Cross Buns are made with a yeasted enriched dough that is fragrant with warm spices. Usually, dried fruit is added. These buns are an Easter tradition in many homes. Traditionally eaten on Good Friday, and marking the end of Lent, Hot Cross Buns, with their signature cross on the top, carry the symbolism of the crucifixion of Jesus. Continue reading Billowy Soft Hot Cross Buns

Mouthwatering Homemade Dinner Rolls

Cloth-lined basket filled with huge puffy dinner rolls
Homemade Dinner Rolls

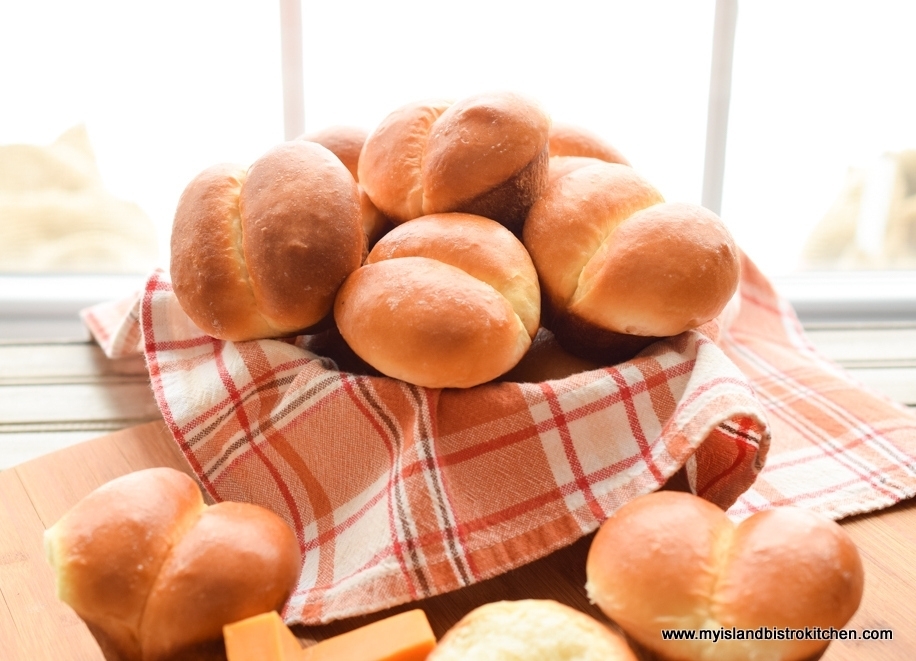
It’s hard to beat the tantalizing scent of homemade bread or dinner rolls baking in the oven.  It’s even harder to pass up the wonderful flavor of freshly made warm bread or rolls slathered with a generous spread of pure butter.  Do I have your attention yet?

Big batch of puffy homemade dinner rolls on a bread board set against a black backdrop
Mouthwatering Homemade Dinner Rolls

Some time ago, I shared my recipe for pull-apart pan rolls.  These are rolls that are baked all in one pan and they are simply pulled apart.  With the exception of those that line the outside edge of the baking pan, pan rolls do not have crusty sides.

Pan Rolls
Pan Rolls

Dinner rolls, baked in muffin cup pans, on the other hand, have a crust on them.

Close up photo of a large puffy golden-brown dinner roll on a bread board
Mouthwatering Homemade Dinner Rolls

Rolls do take a little bit of time to make but the end result is so worth the wait.   Ingredients for making rolls are simple and basic.  Milk, sugar, salt, butter, eggs, water, yeast, and flour.  As humble and plain as they may be, each of those ingredients plays an important role. The milk and butter produce a tender crumb; the sugar feeds the yeast, adds sweetness to the dough, and helps to create the lovely golden brown crust; the butter adds a soft, tender texture and flavor; the salt also adds flavor; and the eggs tenderize the dough, bind ingredients together, and add both flavor and richness.

Some rolls are made with water instead of milk.  Rolls made with milk will have a softer crust, finer crumb, and a more golden-brown color than those made with water.

A large homemade dinner roll split in half with a slather of butter and a slice of cheese on a bread board
Homemade Dinner Rolls

Let’s take the roll-making process, step by step.

Scalding the Milk and Preparing the Liquid Mixture

For this recipe, I recommend using 2% milk. Fat-free milk will not yield as rich and tender textured rolls.  It is important to scald the milk as this will result in light-textured rolls that will rise better than if unscalded milk is used.  This is because the scalding process will kill off, or deactivate, a whey protein in the milk that weakens gluten.  Without the gluten staying intact, it is likely the rolls will be very dense, heavy, and possibly somewhat doughy.  The texture we’re aiming for is a light, airy, and fluffy roll, almost weightless.

Homemade dinner roll split in two, slathered with butter and a chunk of cheddar cheese. Rolls, bottle of wine, and butter in background
Homemade Dinner Rolls

The scalded milk mixed with sugar, salt, and butter, however, must be cooled down to the temperature of the  water used to proof the yeast (explained in the next section).  The room temperature eggs should not be added to the milk-sugar-salt-butter mixture until that mixture has cooled down to 110°F (standard yeast rising temperature). This is because eggs added to hot liquid will cause them to start cooking. For this reason, begin the roll-making process by scalding the milk to 180°F, adding the sugar, salt, and butter, and letting the mixture cool down to 110°F.  Letting it get too cold will be too much of a shock for the warm yeast to which it will be mixed and may cause it to interfere with the successful rising of the dough. Mixing it hot with the yeast will kill the yeast and the dough, subsequently, will not rise.

Yeast

There are several different kinds of yeast and it’s important to use the specific one called for in a recipe.  For this Dinner Rolls recipe, use active dry yeast – no substitutes.  This will be clearly marked on the package, bottle, or bin (if you are buying it from a bulk food store).  Active dry yeast is a dormant kind of yeast that requires that it be rehydrated and “proofed” before being combined with the other ingredients. The yeast, for the benefit of those unfamiliar with baking with yeast, will resemble small granules or beads.
4-cup measuring cup with rising yeast inside
Proofing Yeast

Proofing means the yeast is added to warm water sweetened with sugar to feed the yeast and allowed to sit, untouched, for 10-12 minutes until it “blooms” as shown in the photo above. For lack of a better description, I would say that bloomed yeast somewhat resembles beer foam.
Measuring cup with proofed yeast
Yeast that has been Proofed

This is your assurance that the yeast is active and will make the dough rise.  If this does not occur, it means the yeast is inactive and will not cause the dough to rise.  Discard it in this case and try a new batch of yeast. It is not worth wasting the flour and other ingredients if the yeast has not bloomed as the dough will not rise.

I recommend a good candy thermometer, or digital food thermometer, be used to test the liquid temperatures.  Yeast needs the sugar to feed it but it needs to “bloom” in warm water.  If the water is not warm enough, the yeast will not activate and bloom; if the water is too hot, it will kill the yeast.  Around 110°F to 115°F is a good water temperature.  I start out with water at 115°F, knowing that the addition of the sugar and a stir of the spoon will drop the temperature just a bit. The yeast is sprinkled over the warm water and gently, but quickly, stirred into the water.  Once it has risen and become frothy (meaning it has “bloomed“), stir it down before combining with other ingredients.

Flour

Standard all-purpose flour is perfectly fine for this recipe.  Measure out the 7 cups called for in the recipe.  However, note that the dough may not require all 7 cups. I generally use about 6⅔ cups, mixing in just enough flour that the dough is still tacky but not peeling off on the surface when kneaded.

Mixing and Kneading the Dough

My Dinner Roll recipe can be made completely by hand or partially, or even fully, by a heavy-duty stand mixer.  The traditional way of making the rolls is to add the flour to the yeast and liquid ingredients and mix the dough completely by hand.  I have the Classic Kitchen Aid stand mixer model and I use it, fitted with the dough hook, for part of the process, completing the remainder by hand.

If you have one of the larger stand mixer models, it is possible to use the dough hook attachment and completely have the dough kneaded by machine.  I don’t find, for the quantity of flour, called for in this recipe, that I can adequately get a good knead done of the dough in my regular size mixer.  For that reason, I mix up to four cups of the flour called for in the recipe by mixer and then I transfer the dough to a lightly floured surface and add the remaining flour by hand, kneading the dough at the same time.

Kneading develops the gluten that gives the dough its structure and elasticity as well as encourages proper rising of the dough. Using the mixer for at least part of the mixing process cuts down on the amount of kneading required by hand.

To knead the dough by hand, fold the dough in half toward you.  Use the heels of your hands to push the dough down and away from you. Slowly move the dough as you turn the dough by quarter turns while continuing to knead the dough in a rocking motion until it is smooth, elastic, and pliable.

Dough for rolls is softer than bread dough so it will seem a bit more sticky or tacky.  I would caution about adding too much flour as that will result in dry rolls.  Add only enough flour that the dough does not stick and stay on the counter when it is kneaded.  It should appear as though it would stick but then it peels away without leaving any dough on the surface.  The dough should feel smooth, elastic, and pliable when fully kneaded.

It’s hard to say exactly how long to knead the dough.  If you use the mixer for the first part, then hand kneading should take approximately 5-6 minutes.  If you are completely mixing and kneading the dough entirely by hand, it can take up to 8-10 minutes to get all the flour incorporated and a smooth, elastic dough. If you are kneading the dough entirely by mixer, beat it until the dough starts to pull away from the sides of the bowl.

First Rising  – Letting the Dough Rise (aka First Proofing or Bulk Fermentation) and Rest

Once the dough has been mixed, grease it all over to prevent it from drying out.  Place the dough into a bowl large enough that the dough can rise to double in bulk.  Cover the bowl loosely with plastic wrap that has been sprayed with cooking oil.

It is very important that the dough be provided with a warm, draft-free place in which to rise.  I put a towel or lightweight blanket over the plastic wrap and surround the bowl with a cozy blanket. I’d liken this to creating an incubator for the dough. This first rising process (sometimes referred to as the first proofing of the dough or bulk fermentation) will probably take 1¼  – 1½ hours.

However, that said, this is only a time guideline.  Go by the look of the dough – has it increased by double its original size?  That’s the simple test because several factors can influence the amount of time it takes for yeast dough to rise, including the room temperature and humidity.  You can also stick two fingers, up to about a couple of inches into the center of the dough.  If the imprint remains after the fingers are removed, the dough is ready to be punched down.  If not, cover the dough and let it continue to rise.

Risen yeast roll dough inside pink bowl
Roll Dough Risen to Double its Size

Once the dough has risen to double its size, use a fist and punch down the dough in the bowl. This is a good exercise if you have frustration to get rid of!  This action, though, releases the yeast’s gas bubbles and will help produce a finer textured crumb in the rolls.

Fist in center of risen dinner roll dough punching it down inside a pink bowl
Punching Down Risen Dough

Turn the dough out onto a greased surface and divide the dough into four equal parts, forming each into a loose circle.

Four rough circles of dough on beige counter
Roll Dough Resting Before Being Shaped into Dinner Rolls

Cover the rolls with tea towels to prevent the dough from drying out and let the dough rest for 15 minutes (it’s exhausted from the knock-out fight it just had with your fist!).  Essentially, this relaxes the dough and makes it easier to shape the rolls.

Shaping the Rolls

There are various shapes into which this dough can be formed.  It can be a single roll per muffin cup, two oval-shaped chunks of dough, or even three for cloverleaf-shaped rolls.  I typically form my rolls into “doubles”, meaning I use two equal amounts of dough per muffin cup.

Now, having made rolls for years, I do not normally measure out the weight of each chunk of dough for each roll.  I usually just, from experience, “eyeball” the size of dough needed. However, if you want to have absolutely perfectly sized rolls, the best way is to weigh the dough.  Each chunk of dough should weigh approximately 1 ounce if double rolls are being formed.

To shape the rolls, gather the edges of each chunk of dough toward the underneath center, gently pulling and stretching the dough as you go to make sure it is smooth and taut on the top of the roll, and shaping the roll into a slightly oval egg shape.

Place two oval shapes of dough, side by side, in each muffin cup that has been adequately greased.  Make sure the top surface of the muffin tin has been greased as well as these rolls do puff up and will, otherwise, stick to the pan top.

Two oval-shaped pieces of yeast dough placed in muffin cup
Rolls Shaped and in Muffin Cups

Second Rising (aka the Final Proofing Stage)

Cover the rolls with a tea towel and, again, place them in a draft free area to rise.  There is no need to put a blanket over them at this stage. I usually set my rolls on the counter and let them rise until they are double in size.  This can take upwards of 1 hour to 1¼ hours. Again, this is a guide only as room temperature and/or humidity will affect rising time.  When the rolls have risen to be twice the size they were when they were put in the pan, they are ready for the oven.  Almost there!

Baking the Rolls

About 15 minutes before the rolls are ready to be baked, preheat the oven to 400°F.  However, as soon as the rolls go in the oven, drop the oven temperature back to 375°F.  Bake the rolls about 15 minutes. If the rolls in the back of the oven start to brown too much, turn the pans around in the oven part-way through the baking.

If desired, and to give a glossy look to the rolls, brush the hot rolls with softened butter.  You can also use a piece of wax paper to rub the rolls with butter instead of using a brush.    Let the rolls rest in the muffin cups for about 5 minutes to set then carefully transfer them to a wire rack.

Lots of dinner rolls with butter, cheese, peach jam, and wine on a bread board
Homemade Dinner Rolls


[Printable recipe follow at end of posting]

My Island Bistro Kitchen’s Mouthwatering Dinner Rolls

Ingredients:

1¾ cups milk (2%)
½ cup granulated sugar
2 tsp salt
¼ cup butter, softened at room temperature

2 large eggs, room temperature, lightly beaten

½ cup warm water (115°F)
2 tsp granulated sugar
2 tbsp active dry yeast

Apx. 6⅔ – 7 cups all-purpose flour

Spray cooking oil
Vegetable oil for greasing dough and bowl
Shortening for greasing muffin cups

Softened butter for buttering tops of rolls

Method:

In medium-sized saucepan, over medium-high heat, bring milk to the scalding point (180°F), stirring frequently to prevent milk from scorching.  Do not boil the milk. Remove from heat and stir in the sugar, salt, and butter.  Stir until butter has melted.  Let mixture cool to 110°F then whisk in the lightly beaten eggs.

While milk mixture is cooling, place the ½ cup warm water (115°F) in large 4-cup measuring cup or bowl.  Stir 2 tsp sugar into the warm water until sugar is dissolved.  Sprinkle yeast over the water and quickly, but gently, stir in the yeast.  Let stand 10-12 minutes until yeast is risen and foamy.

In bowl of stand mixer fitted with dough hook, combine the liquid ingredients with the yeast along with 2 cups of the flour gradually added. Beat on slow speed to blend ingredients then increase speed to medium (I use the “6” setting on my KitchenAid Classic mixer) and beat for 1 minute. Scrape the bowl to ensure all ingredients are incorporated.  Again, with mixer on slow speed, gradually add 2 more cups of flour. Increase speed to medium and beat mixture for 1 minute.  Transfer mixture to a lightly floured surface, using some of the remaining flour.  Begin kneading the dough by hand, continuing to add more flour until the dough is smooth, elastic, and pliable, about 5-6 minutes.  Dough should still feel tacky but will not stick to hands or peel on to surface. This is a softer dough than bread dough so be careful about adding too much additional flour. (Note: If you have a very large mixer, the dough can be completely kneaded by mixer; however, if you have a standard-sized Classic Kitchen Aid mixer, for example, it will be difficult to get the dough perfectly kneaded by machine with the quantity of flour called for in this recipe).

Grease a bowl large enough to allow the dough to double in size.  Grease all sides of dough with vegetable oil to prevent it from drying out and transfer dough to prepared bowl.  Cover the bowl loosely with plastic wrap that has been sprayed with cooking oil. Cover bowl completely with a towel or lightweight blanket and place in warm, draft-free location to rise until dough doubles in size, about 1¼ – 1½ hours.

Using either shortening or vegetable oil, grease the work surface.  Punch down dough in bowl with fist and turn dough out onto greased surface.  Divide dough into four equal portions. Form dough into large round shapes and let rest, covered with tea towels, for 15 minutes.

Meanwhile, grease 28 muffin cups with shortening, ensuring the top surfaces around each muffin cup are also greased.

Cut off small chunks of dough with sharp knife.  For frame of reference, dough chunks should weigh approximately 1 ounce for double-shaped rolls.  To shape the rolls, gather the edges of each chunk of dough toward the underneath center, gently pulling and stretching the dough as you go to make sure it is smooth and taut on the top of the roll, and shaping the roll into a slightly oval egg shape. Place two ovals, side by side, in each muffin cup.

Cover rolls with tea towels and place in warm, draft-free location to rise to double in size, about 1 – 1¼ hours.

About 15 minutes before rolls are ready to be baked, preheat oven to 400°F. Transfer rolls to oven and immediately decrease temperature to 375°F. Bake rolls for approximately 15 minutes, or until rolls are golden brown on the top and hollow sounding when tapped with fingers. If the rolls at the back of the oven start browning too fast, rotate pans once during the baking. Gently brush tops of hot rolls with butter as soon as they come out of the oven. Let cool in pans for approximately 5 minutes to set then transfer rolls to wire rack to cool.

Yield:  Apx. 2⅓ dozen rolls


Basket of large homemade dinner rolls by a window
My Island Bistro Kitchen’s Homemade Dinner Rolls


My Island Bistro Kitchen’s Mouthwatering Dinner Rolls

Mouthwatering homemade dinner rolls have a lovely puffy loft and a fine tender crumb with a soft golden-brown crust.
Course Bread
Cuisine Canadian
Keyword Dinner Rolls
Servings 28
My Island Bistro Kitchen My Island Bistro Kitchen

Ingredients

  • cups milk (2%)
  • ½ cup granulated sugar
  • 2 tsp salt
  • ¼ cup butter, softened at room temperature
  • 2 large eggs, room temperature, lightly beaten
  • ½ cup warm water (115°F)
  • 2 tsp granulated sugar
  • 2 tbsp active dry yeast
  • Apx. 6⅔ – 7 cups all-purpose flour
  • Spray cooking oil
  • Vegetable oil for greasing dough and bowl
  • Shortening for greasing muffin cups
  • Softened butter for buttering tops of rolls

Instructions

  1. In medium-sized saucepan, over medium-high heat, bring milk to the scalding point (180°F), stirring frequently to prevent milk from scorching. Do not boil the milk. Remove from heat and stir in the sugar, salt, and butter. Stir until butter has melted. Let mixture cool to 110°F then whisk in the lightly beaten eggs.
  2. While milk mixture is cooling, place the ½ cup warm water (115°F) in large 4-cup measuring cup or bowl. Stir 2 tsp sugar into the warm water until sugar is dissolved. Sprinkle yeast over the water and quickly, but gently, stir in the yeast. Let stand 10-12 minutes until yeast is risen and foamy.
  3. In bowl of stand mixer fitted with dough hook, combine the liquid ingredients with the yeast along with 2 cups of the flour gradually added. Beat on slow speed to blend ingredients then increase speed to medium (I use the “6” setting on my KitchenAid Classic mixer) and beat for 1 minute. Scrape the bowl to ensure all ingredients are incorporated. Again, with mixer on slow speed, gradually add 2 more cups of flour. Increase speed to medium and beat mixture for 1 minute. Transfer mixture to a lightly floured surface, using some of the remaining flour. Begin kneading the dough by hand, continuing to add more flour until the dough is smooth, elastic, and pliable, about 5-6 minutes. Dough should still feel tacky but will not stick to hands or peel on to surface. This is a softer dough than bread dough so be careful about adding too much additional flour. (Note: If you have a very large mixer, the dough can be completely kneaded by mixer; however, if you have a standard-sized Classic Kitchen Aid mixer, for example, it will be difficult to get the dough perfectly kneaded by machine with the quantity of flour called for in this recipe).
  4. Grease a bowl large enough to allow the dough to double in size. Grease all sides of dough with vegetable oil to prevent it from drying out and transfer dough to prepared bowl. Cover the bowl loosely with plastic wrap that has been sprayed with cooking oil. Cover bowl completely with a towel or lightweight blanket and place in warm, draft-free location to rise until dough doubles in size, about 1¼ - 1½ hours.
  5. Using either shortening or vegetable oil, grease the work surface. Punch down dough in bowl with fist and turn dough out onto greased surface. Divide dough into four equal portions. Form dough into large round shapes and let rest, covered with tea towels, for 15 minutes.
  6. Meanwhile, grease 28 muffin cups with shortening, ensuring the top surfaces around each muffin cup are also greased.
  7. Cut off small chunks of dough with sharp knife. For frame of reference, dough chunks should weigh approximately 1 ounce for double-shaped rolls. To shape the rolls, gather the edges of each chunk of dough toward the underneath center, gently pulling and stretching the dough as you go to make sure it is smooth and taut on the top of the roll, and shaping the roll into a slightly oval egg shape. Place two ovals, side by side, in each muffin cup.
  8. Cover rolls with tea towels and place in warm, draft-free location to rise to double in size, about 1 – 1¼ hours.
  9. About 15 minutes before rolls are ready to be baked, preheat oven to 400°F. Transfer rolls to oven and immediately decrease temperature to 375°F. Bake rolls for approximately 15 minutes, or until rolls are golden brown on the top and hollow sounding when tapped with fingers. If the rolls at the back of the oven start browning too fast, rotate pans once during the baking. Gently brush tops of hot rolls with butter as soon as they come out of the oven. Let cool in pans for approximately 5 minutes to set then transfer rolls to wire rack to cool.

Recipe Notes

Yield: Apx. 2⅓ dozen rolls NOTE: Be sure to read the accompanying blog post to this recipe as it gives tips and additional explanation for the technique for making rolls.

For other bread and roll recipes from My Island Bistro Kitchen, click on the links below:

Homemade White Bread
Pull-apart Pan Rolls

Pin Me To Pinterest!

Mouthwatering Dinner Rolls

Pan Rolls

Pan Rolls
Pan Rolls

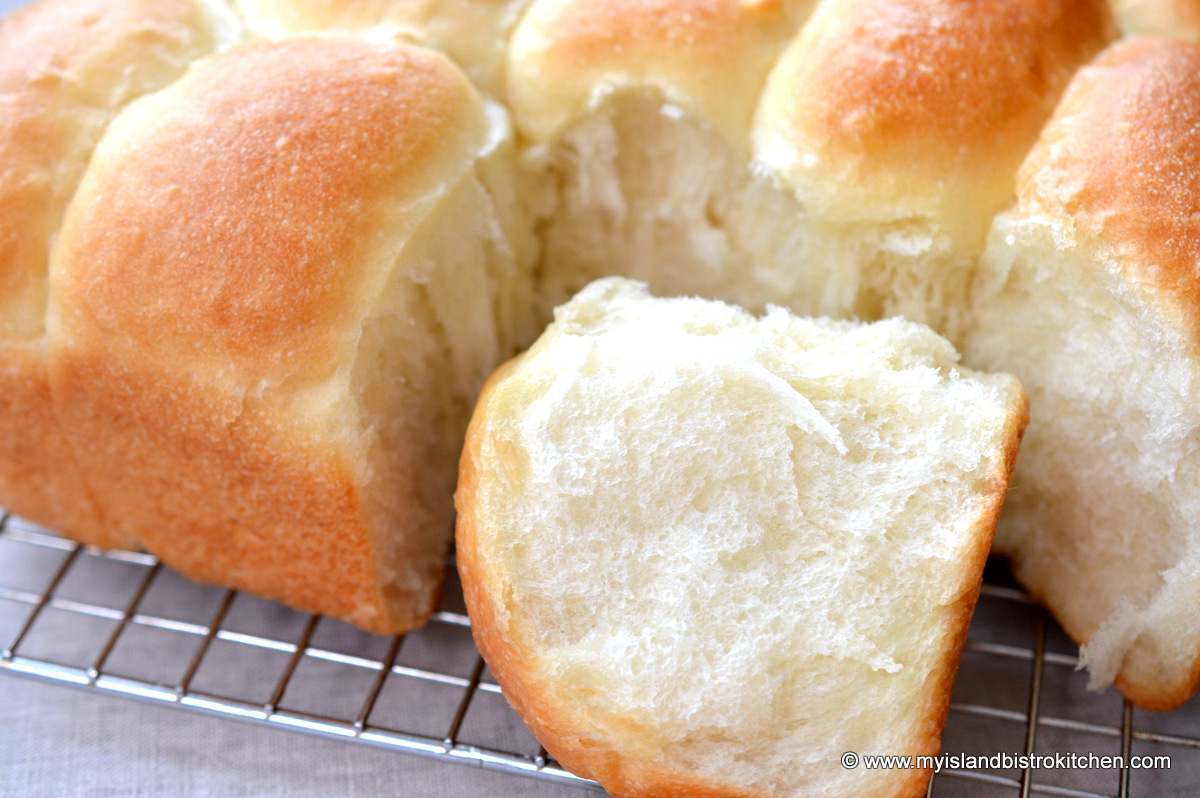
There is something so homey and cozy about homemade bread and rolls!  And, of course, the scent throughout the house of them baking makes the taste buds jump in anticipation of a hot roll, or slice of bread, fresh from the oven and slathered in melting butter.

Today, I am sharing a recipe for traditional pan rolls, so named because they are all bunched together in a baking pan as opposed to shaped individually and baked in muffin tins.  These rolls are easy to make and take a minimum amount of ingredients, all of which are commonplace.  While pan rolls don’t have the picture-perfect appearance of a roll baked in a muffin tin, they more than make up for it with their superb taste and texture.

These are also a good choice for anyone who is not so fond of crust since most of the rolls in the pan will have soft sides; only those on the outside edges of the pan will have crusts.

Pan Rolls
Pan Rolls

I do have some general tips for making successful pan rolls.

1.  Water temperature for the yeast is very important.  I find 100°F is a good general temperature to use.  If the water is too cool, the yeast won’t rise and, if it is too hot, it will kill the yeast.  A food thermometer is a handy tool to use when gauging the temperature of liquid for bread and rolls.

2.  Let the yeast rise for about 7-10 minutes, until it is nice and foamy and be sure to stir it down before adding it to the batter.

3.  The dough for this recipe is a soft dough.  Resist the urge to add too much flour as it will make dry rolls.  Only add enough flour that the dough pulls away from the sides of the mixing bowl.

4. There is no need to hand-knead this dough. Fit a stand mixer with a dough hook and let the machine do all the kneading.

5. Placing the bowl with the bread dough on a heating pad set on the low setting will provide a warm base for the dough to rise.  Make sure the dough is covered with greased plastic wrap. This makes it much easier to remove than, say, a tea towel which may stick to the dough. Snuggle a lightweight wrap in around the bowl to create a draft-free incubator for the bread to rise.

6.  Greasing your hands will facilitate the shaping of each roll.

7. Baking times are approximate.  Rolls should be a nice golden brown color on top and have a hollow sound when lightly tapped with fingers. Rotating the pan once during the baking process helps to ensure that all rolls are equally browned.

Pan Rolls

Ingredients:

¾ tbsp active dry yeast
¾ tsp sugar
½ cup warm water (100°F)

2 eggs, beaten
¼ cup sugar
¼ cup vegetable oil
1¼ cup warm water (100°F)
½ tsp salt
Apx. 4½ cups all-purpose flour

Method:

In one-cup measuring cup, stir ¾ tsp sugar into ½ cup warm water until dissolved. Sprinkle yeast over the water and quickly, but gently, stir in the yeast.

Let stand 7-10 minutes until yeast is foamy and has risen to top of cup.

Meanwhile, with whisk attachment, beat the eggs in bowl of stand mixer. Beat in the sugar, oil, warm water, and salt.

Stir down the yeast and add to liquid mixture in bowl. Stir just to mix.

Replace whisk attachment with dough hook. Add the flour gradually, a cup at a time, and beat 3-5 minutes on medium speed (I use the “6” setting on my KitchenAid mixer.), scraping the bowl often to ensure all ingredients are incorporated.

When enough flour has been added, the dough should pull away from the sides of the bowl. This is a meant to be a soft dough so be careful about adding too much additional flour. If necessary, add about 1 – 2 tablespoons at a time and only enough that the dough pulls away from the sides of the bowl. (Note the dough in the photos below is not yellow; the coloring is due to incandescent overhead lighting above the work station.)

Transfer dough to large greased bowl and cover with greased plastic wrap and a tea towel.

Loosely wrap a light-weight blanket around bowl. Place in warm, draft-free place to rise. A heating pad on low setting makes a warm base for the dough to rise.

DSC08597

Let dough rise until double in bulk – about 1 to 1¼ hours.

Punch down dough.

Turn dough on to lightly floured work surface. Cut off chunks of dough into 24 equal-sized pieces and form into the size and shape of an egg.

Place in greased 9”x13” pan.

Cover with greased plastic wrap and a tea towel and return to warm place to rise again until double in size, about 45 minutes to 1 hour.


Bake in preheated 375°F oven for about 15 minutes, rotating pan once during the baking, until rolls are golden brown on the top and hollow sounding when tapped with fingers.

Transfer rolls from pan to wire rack to cool. Brush hot rolls with butter.

Yield: 24 rolls

Pan Rolls

These easy-to-make delectable pan rolls are sure to complement any meal. With great flavor and tender texture, all that's needed is a slather of butter!
Course Bread
Keyword rolls
My Island Bistro Kitchen My Island Bistro Kitchen

Ingredients

  • ¾ tbsp active dry yeast
  • ¾ tsp sugar
  • ½ cup warm water (100°F)
  • 2 eggs, beaten
  • ¼ cup sugar
  • ¼ cup vegetable oil
  • cup warm water (100°F)
  • ½ tsp salt
  • Apx. 4½ cups all-purpose flour

Instructions

  1. In one-cup measuring cup, stir ¾ tsp sugar into ½ cup warm water until dissolved. Sprinkle yeast over the water and quickly, but gently, stir in the yeast. Let stand 7-10 minutes until yeast is foamy and has risen to top of cup.
  2. Meanwhile, with whisk attachment, beat the eggs in bowl of stand mixer. Beat in the sugar, oil, warm water, and salt. Stir down the yeast and add to liquid mixture in bowl. Stir just to mix.
  3. Replace whisk attachment with dough hook. Add the flour gradually, a cup at a time and beat 3-4 minutes on medium speed (I use the “6” setting on my KitchenAid mixer.), scraping the bowl often to ensure all ingredients are incorporated. When enough flour has been added, the dough should pull away from the sides of the bowl. This is a soft dough so be careful about adding too much additional flour. If necessary, add about 1 tablespoon at a time and only enough that the dough pulls away from the sides of the bowl.
  4. Transfer dough to large greased bowl and cover with greased plastic wrap and a tea towel. Loosely wrap a light-weight blanket around bowl. Place in warm, draft-free place to rise. A heating pad on low setting makes a warm base for the dough to rise. Let dough rise until double in bulk – about 1 to 1¼ hours.
  5. Unwrap bowl and punch down dough. Turn dough on to lightly floured work surface. Cut off chunks of dough into 24 equal-sized pieces and form into the size and shape of an egg. Place in greased 9”x13” pan. Cover with greased plastic wrap and a tea towel and return to warm place to rise again until double in size, about 45 minutes to 1 hour.
  6. Bake in preheated 375°F oven for about 15 minutes, rotating pan once during the baking, until rolls are golden brown on the top and hollow sounding when tapped with fingers. Brush hot rolls with butter. Transfer to wire rack to cool.

Recipe Notes

Yield: 24 rolls

Join My Island Bistro Kitchen on Facebook

Follow “the Bistro’s” tweets on Twitter

Follow “the Bistro” on Pinterest

Follow “the Bistro” on Instagram

Pin Me To Pinterest!

Rolls
Pan Rolls