Ever wonder about the history of old vintage recipes? I so wish that accurate records existed about the origins of some of the old nostalgic recipes like the one for Queen Elizabeth Cake, for example.
This is one recipe that has some history to it but just how much is fact and how much is fable, myth, or folklore is up for certain debate.
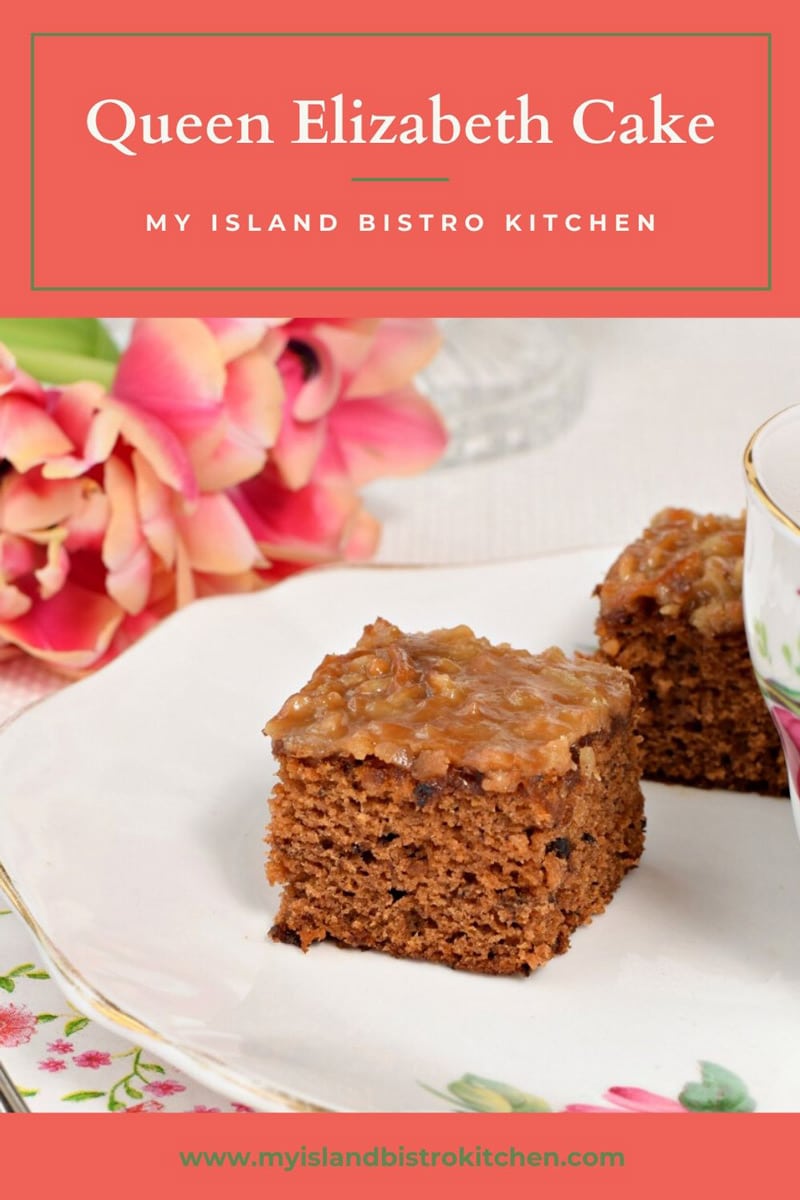
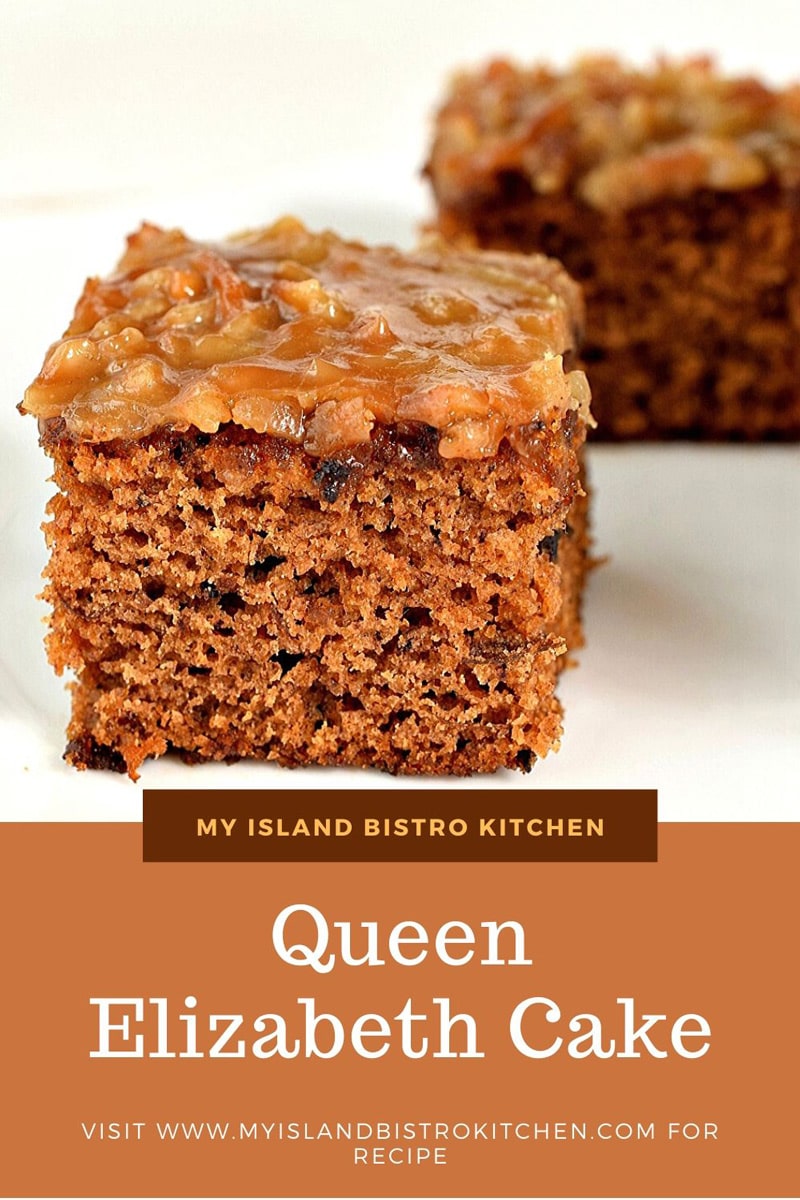
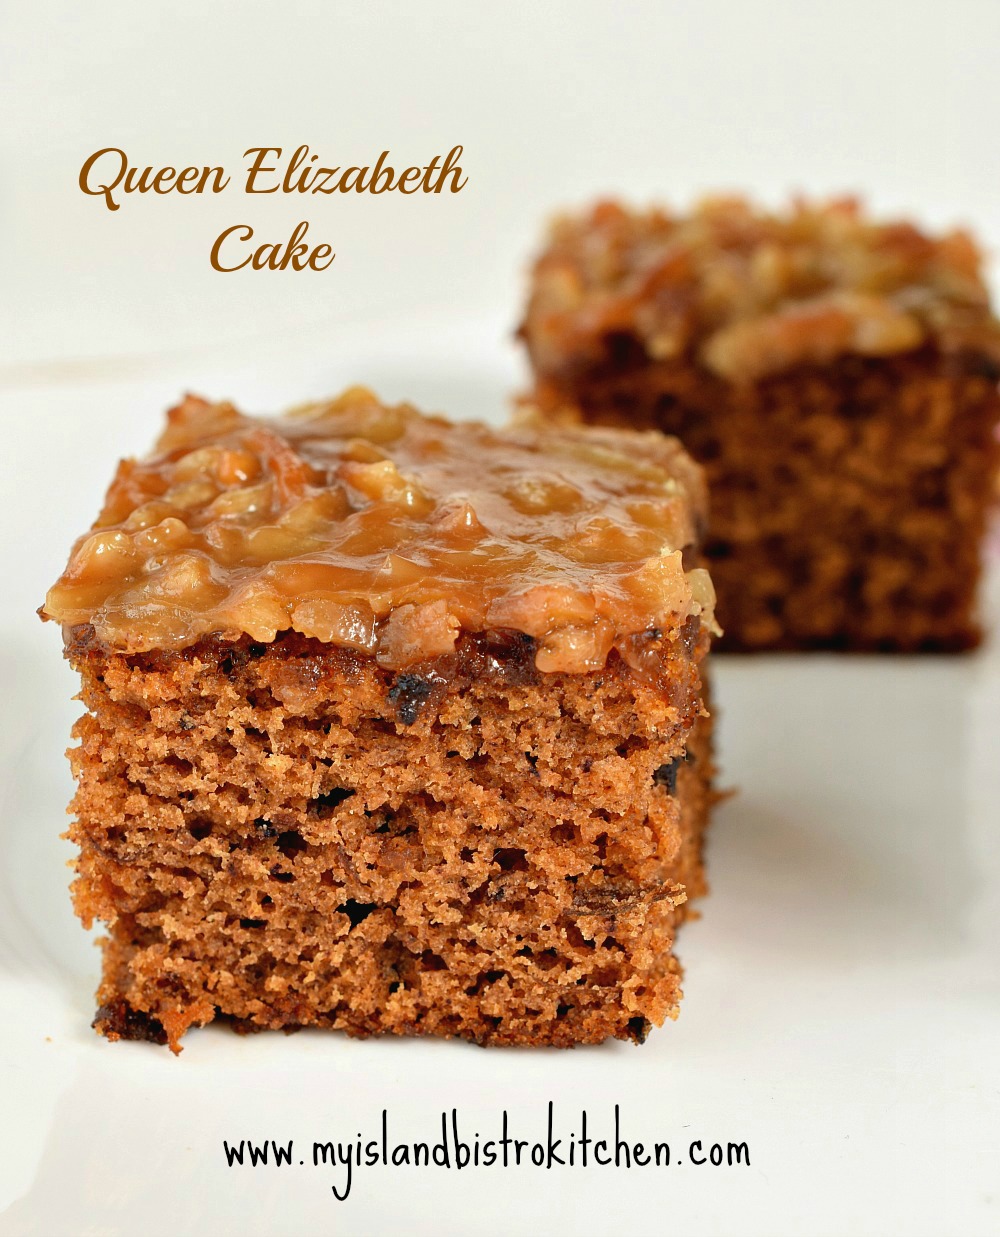
Queen Elizabeth Cake is, next to a plain white vanilla or simple chocolate cake, probably one of the most basic, nondescript cakes you could come by. Made with a simple batter with some dates and mild spices mixed in, its glory comes from the topping made of butter, brown sugar, cream, vanilla, and coconut that almost borders on toffee. Yes, this will remind you of a cold version of sticky date pudding.
Now, sometimes, you may see this referred to as Queen Elizabeth “Square” versus “Cake”. However, I think it most closely resembles a cake more so than a square. This is because the texture is light and tender, the crumb an even grain, and the body of the cake has a springiness to the touch. This is in contrast to what defines a typical square (or bars) – i.e., a dense texture and chewy consistency. I would class this cake as a hearty, substantial cake.

So, just where and when did Queen Elizabeth Cake originate? This is where fact and fiction intertwine and become somewhat blurry. I did quite a bit of research on this cake. One intriguing story is that it is Her Majesty Queen Elizabeth II’s own recipe from which she made cakes herself and sold them for charitable purposes. This claim suggests the recipe originated in Buckingham Palace after the 1953 Coronation. I could find no information or evidence to substantiate this claim and neither could I find any reference to this history on the Buckingham Palace website.
In the June 1953 issue of the Canadian magazine, Chatelaine, a recipe for Queen Elizabeth II Cake was published. Chatelaine’s April 20, 2016, online posting which shared a photo of the 1953 published recipe claims it “was created specifically for the Queen’s Coronation” but gives no indication of who the actual creator was or any detail about how or why the specific ingredients were chosen.
Other information suggests the cake may have been created much earlier to commemorate Queen Elizabeth, the Queen Mother’s popularity and her historic visit with her husband, King George VI, to Canada in 1939.
Yet, other information suggests the cake was appearing in local community cookbooks in the 1940s when it was known as “Princess Elizabeth Cake” and there is suggestion that the name may have been changed to “Queen Elizabeth Cake” after the 1953 Coronation of Her Majesty Queen Elizabeth II.
So, all this to say, I could not definitively, with any degree of accuracy, determine the exact origins of this cake. I do personally recall childhood memories of this cake appearing at community and church events in the 1960s and 1970s in the part of Prince Edward Island in which I grew up. Plates of sweets inevitably always had this cake on it, although I believe it was referred to as Queen Elizabeth “Square”. I am reasonably certain of the specific ladies who would, most likely, have been the makers of this cake but they have, unfortunately, all passed on, taking with them whatever memories they may have had associated with the Queen Elizabeth Cake/Square.

Granted, I’ll admit the Queen Elizabeth Cake is not the most attractive cake but, boy oh boy, do the flavor, moist texture, and the kicker topping more than make up for it! This is one cake that, as the old saying goes, you ought not judge the book by the cover! While this is not a cake that my mother made, she does have it in a handwritten recipe “scribbler” that was started in 1963. There is no indication on the handwritten recipe whose it was or where it came from. It cryptically lists the ingredients but contains no method, baking pan size, or baking temperature. This is typical because cooks, in years gone by, simply knew how to pull together a cake and, from whomever the recipe was gotten, it was probably baked in the cook’s wood stove oven (I’ll never know how they regulated the temperature in those). My mother says the cake was probably popular because it needed no frosting/icing since the topping is the “dressing” on the cake.

I have taken the basic recipe, adapted some of the ingredients and proportions, added some additional flavoring and spices (the recipe I adapted this one from had no spices listed) and tested the recipe out using different baking pan sizes, writing down the instructions as I worked. What has resulted is this recipe for one of the most tasty tray/slab cakes imaginable given that it is made with such simple, basic kitchen staple ingredients.
Some tips on making Queen Elizabeth Cake:
- You may think there isn’t enough batter for a 9”x13” cake but there is – there is 1 teaspoon each of baking powder and soda so this cake will rise to a nice height in this size of pan. I tested it first in a 9″x9″ pan but found the cake was too tall in it.
- The pan may be greased or it may be lined with parchment paper (or even greased tin foil). If using either of the latter, make sure you leave enough paper or tin foil overhang which can be used as “handles” to lift the cake out of the pan. Hint – This method makes both the cutting and removal of the cake from the pan easier than doing so while it is still in the pan.
- Let the date mixture cool completely at room temperature. Adding it to the dry ingredients while it is either hot or warm can make for a “gummy” texture or soggy cake.
- Mix the wet and dry ingredients using the rule of 3 parts dry and 2 parts wet ingredients, starting and ending with the dry ingredients.
- Mix the ingredients well but don’t beat them as this may create a “tough crumb” cake.
- Use cream to make the topping. I used 18% cream but 35% cream will create an even more luxurious topping (but also add a few more calories!).
- Start checking the cake for doneness at the point where the cake has been baking for 30 minutes then, if it is not baked, check it every 4-5 minutes after. The cake will be done when the cake tester, inserted into the center of the cake, comes out completely clean and dry.
- When the cake tests almost baked (about 5 minutes before it is expected to come out of the oven), start making the topping. It needs to go on the warm cake that will go back in the oven for 3-4 minutes after the topping has been added.
- The topping is a little bit like making candy. It can set up really fast. Don’t leave it unattended. Stir the ingredients as they boil gently for the 3 minutes. Watch it carefully – if you see if starting to “set up” and thicken really fast (even if it is before the 3 minutes of boiling is up), remove it from the stove and stir in the vanilla and coconut. The mixture should be of the consistency that it can be poured from the saucepan and spread over the cake with a knife. If it becomes too thick, it will be too sugary and won’t be of spreading consistency.
Splendid, no matter its history or how it’s served, this cake pairs particularly well with a spot of tea…. perhaps Earl Grey blend. This is a smooth black tea that has citrus notes that complement the sweetness of the cake. With its high concentration of tannins, it’s also a great tea to cleanse the mouth after each bite of the cake so that every bite of this moist and flavorful cake tastes as good as the first one!

[Printable Recipe Follows at end of Posting]
Queen Elizabeth Cake
Ingredients:
1 cup dates, chopped
1 tsp soda
1 cup boiling water
1½ cups all-purpose flour
1 tsp baking powder
¼ tsp salt
1 tsp cinnamon
¼ tsp nutmeg
Pinch allspice
¼ cup butter
1 cup granulated sugar
1 extra large egg, lightly beaten
¼ tsp orange extract
1 tsp vanilla
Topping:
3 tbsp melted butter
2/3 cup brown sugar
3 tbsp cream (18%)
½ tsp vanilla
2/3 cup shredded coconut
Method:
Cake:
Place dates and soda in medium-sized saucepan. Add the boiling water. Simmer for about 4-5 minutes then cool completely at room temperature.
Position oven rack in centre of oven and preheat oven to 350°F. Grease 9”x13” baking pan or line with parchment paper (or even greased tin foil).
Sift flour, baking powder, salt, and spices together. Set aside.
In bowl of stand mixer, cream the butter and sugar. Beat in the egg, orange extract, and vanilla. Transfer mixture to cooled dates. Stir well.
Transfer one-third of the sifted dry ingredients to the mixer bowl. Beat in one-half of the wet ingredients. Add another third of the dry ingredients. Blend well. Mix in the remainder of the wet ingredients. Finish by incorporating the remaining dry ingredients. Mix well to combine. Don’t overmix.
Spread batter evenly in prepared baking pan. Transfer to preheated oven and bake for approximately 30-40 minutes, until a cake tester inserted into center of cake comes out clean. Remove the cake from the oven.
Topping:
About 5 minutes before the cake is due to be removed from the oven, begin to prepare the cake topping. In medium-sized saucepan, melt the 3 tablespoons of butter. Blend in the brown sugar and cream. Bring to a boil over medium heat and boil for 3 minutes, stirring regularly to prevent scorching. Remove from heat and quickly stir in the vanilla and coconut. Pour and spread this mixture evenly over the warm cake and return it to the oven to brown slightly for 3-4 minutes. Remove cake from oven and place on wire rack to cool completely before cutting and serving.
This cake freezes well.
Yield: 1 – 9”x13” single layer cake
If you have made this recipe and enjoyed it and/or wish to share it with your friends and family, please do so on social media but be sure to share the direct link to this posting from my website.
Connect with My Island Bistro Kitchen on Social Media
Join the Facebook page for My Island Bistro Kitchen: https://www.facebook.com/MyIslandBistroKitchen/
Follow “the Bistro” on “X” (formerly Twitter): https://twitter.com/PEIBistro/
See the drool-worthy gallery of mouth-watering food photos from My Island Bistro Kitchen on Instagram: https://www.instagram.com/peibistro/
Follow “the Bistro” on Pinterest at https://www.pinterest.ca/peibistro/ and pin the Pinterest-ready photo found at the end of this post to your favorite Pinterest boards.
For my Gluten-free version of Queen Elizabeth Cake, click here.
This moist and flavorful cake is made with dates and spices and features a delectable toffee-like topping
Ingredients
- 1 cup dates, chopped
- 1 tsp soda
- 1 cup boiling water
- 1½ cups all-purpose flour
- 1 tsp baking powder
- ¼ tsp salt
- 1 tsp cinnamon
- ¼ tsp nutmeg
- Pinch allspice
- ¼ cup butter
- 1 cup granulated sugar
- 1 extra large egg, lightly beaten
- ¼ tsp orange extract
- 1 tsp vanilla
- Topping:
- 3 tbsp melted butter
- 2/3 cup brown sugar
- 3 tbsp cream (18%)
- ½ tsp vanilla
- 2/3 cup shredded coconut
Instructions
- Cake:
- Place dates and soda in medium-sized saucepan. Add the boiling water. Simmer for about 4-5 minutes then cool completely at room temperature.
- Position oven rack in centre of oven and preheat oven to 350°F. Grease 9”x13” baking pan or line with parchment paper (or even greased tin foil).
- Sift flour, baking powder, salt, and spices together. Set aside.
- In bowl of stand mixer, cream the butter and sugar. Beat in the egg, orange extract, and vanilla. Transfer mixture to cooled dates. Stir well.
- Transfer one-third of the sifted dry ingredients to the mixer bowl. Beat in one-half of the wet ingredients. Add another third of the dry ingredients. Blend well. Mix in the remainder of the wet ingredients. Finish by incorporating the remaining dry ingredients. Mix well to combine. Don’t overmix.
- Spread batter evenly in prepared baking pan. Transfer to preheated oven and bake for approximately 30-40 minutes, until a cake tester inserted into center of cake comes out clean. Remove the cake from the oven.
- Topping:
- About 5 minutes before the cake is due to be removed from the oven, begin to prepare the cake topping. In medium-sized saucepan, melt the 3 tablespoons of butter. Blend in the brown sugar and cream. Bring to a boil over medium heat and boil for 3 minutes, stirring regularly to prevent scorching. Remove from heat and quickly stir in the vanilla and coconut. Pour and spread this mixture evenly over the warm cake and return it to the oven to brown slightly for 3-4 minutes. Remove cake from oven and place on wire rack to cool completely before cutting and serving.
- [Copyright My Island Bistro Kitchen]
Notes
Please refer to entire blog posting for hints and tips on making this cake.


PIN ME TO PINTEREST!