Okay, so my recipe is actually eight layers, but who is counting when the meal is as tasty as this one is!
Seven-layer dinner (sometimes called “Shipwreck”) is really little more than a full dinner in a casserole and baked in the oven. I grew up (as I am sure many of you have) with this vintage meal served on a regular basis. The seven main ingredients are: 1) onions, 2) meat, 3) potatoes, 4) celery, 5) carrot, 6) peas, and 7) rice. Sometimes, it’s a six-layer dinner depending on what veggies I have on hand and sometimes it might be eight or nine layers thick. I like to add parsnip because it adds a level of sweetness. Sometimes, I will slice turnip very thinly and add it as well. Frozen corn also works in addition to the frozen peas or instead of. In that regard, it is almost a potluck dish!
It has probably been named “Shipwreck” because it can be made with pretty much any vegetables you happen to have on hand as well as different kinds of meats, such as ground beef or sausage and it is also an economical way to stretch the meat content. In many households, it can be made with what is on hand without having to go shopping and it doesn’t take any kind of exotic or hard-to-find ingredients. This is an old-fashioned hearty meal. Have you noticed that many of these old “stand-by” meals are becoming popular again?
On a regular basis, I tend to cook with a fair bit of seasonings and spices. However, this is one dish that I never add anything to it other than salt and pepper and the onion for flavour.
In my home, I grew up with this recipe being made with ground beef (we never used any other kind of meat in it). The beef I used for this casserole is 100% Island beef and was purchased at KJL Meats, a local butcher shop in Charlottetown, PEI.
This is a great meal to make when you have little time for meal preparation and clean-up because all the veggies, the rice, and the meat cook together in the one casserole so there are no pots and pans to wash (bonus!) other than the dish it bakes in. And, your kitchen will smell divine when this is baking in the oven! If there happens to be any leftover, this meal carries over well and, in fact, the flavours seem to become even richer the next day when it is reheated.
Seven-Layer Dinner
Ingredients:
1 medium onion
2 medium-sized potatoes, thinly sliced (about 1/8 inch thick)
½ – ¾ pound extra lean ground beef
½ cup celery
1/3 cup parsnips, thinly sliced (about 1/16 inch thick)
1 cup carrots, thinly sliced
½ cup frozen peas
scant ½ cup Minute Rice
1 can tomato soup
1 soup can of water
Method:
Assemble ingredients.
Grease 2-quart casserole. Peel and slice onions to make first layer of casserole.
Add the layer of sliced potatoes and sprinkle with salt and pepper.
Add the layer of ground beef. Sprinkle with salt and pepper.
Add celery, parsnips, carrots, and frozen peas. Sprinkle with salt and pepper.
Sprinkle ingredients with rice. Cover casserole ingredients with can of tomato soup. Pour one soup can of water over top of ingredients (or, if you wish, you can mix the soup and water together and pour as one over the casserole ingredients).
Cover and bake at 350F for 1 ½ – 2 hours until vegetables are tender.
Serves 4-6
It is hard to plate this meal attractively but its taste more than makes up for its lack of presentation!
Suggested Serving: Serve with homemade mustard pickles and whole grain artisan bread.
If you have made this recipe and enjoyed it and/or wish to share it with your friends and family, please do so on social media but be sure to share the direct link to this posting from my website.
Connect with My Island Bistro Kitchen on Social Media
Follow “the Bistro” on Pinterest at https://www.pinterest.ca/peibistro/ and pin the Pinterest-ready photo found at the end of this post to your favorite Pinterest boards.
Spritz cookies are dainty-shaped cookies that are crisp and buttery. They are made by pushing soft cookie dough through a cookie press which is a cylinder fitted with a decorative disk that has patterned holes through which the dough is “squirted” or pressed into shapes. Typically, cookie presses come with many different decorative disks – mine has probably 20 or more.
These cookies are popular at Christmas, special occasions, and are very suitable for afternoon teas as they can be made in so many different shapes and colors and can be further embellished with icing, colored sugar, miniature gumdrops, or dragées.
My recipe for Lemon Spritz Cookies is buttery rich and delicate. I like the flavour burst of lemon juice and zest in these petite cookies.
This recipe does best when the dough is chilled for 24 hours to allow the egg yolk to get fully incorporated and absorbed into the other ingredients. Unlike most liquids, such as water or milk, for example, eggs take a lot more time to become incorporated into the dry ingredients. When the dough comes out of the refrigerator, it will be too hard to push through the cookie press so let the dough sit at room temperature for about an hour or so until it becomes pliable enough that it can be formed into a roll that can be inserted into the cookie press cylinder. You’ll notice this recipe has no baking powder or soda. This is because that would cause the cookies to raise which, in turn, would result in them losing their shape and design that makes them spritz cookies.
Add the flour, salt, and cardamom to creamed mixture, stirring until well combined.
Cover dough tightly with plastic wrap and place in refrigerator for 24 hours.
Remove dough from refrigerator and let sit at room temperature for apx. 1 hour. Form dough into a roll that will fit inside the cookie press cylinder. Insert dough roll into the cookie press.
Line cookie sheets with parchment paper. Follow manufacturer’s directions for your cookie press to form the cookies into decorative shapes. Decorate with colored sugar, if desired. Bake at 400F for 7-8 minutes. Watch the cookies closely as their high butter content and small size means they will burn easily and quickly. Let cookies cool on baking sheets for 2-3 minutes then transfer them to wire racks to finish cooling.
Thank you for visiting “the Bistro” today. There are lots of ways to connect with “the Bistro” through social media:
Join My Island Bistro Kitchen on Facebook
Follow the Bistro’s tweets on twitter @PEIBistro
Find the Bistro on Pinterest at “Island Bistro Kitchen”
Follow along on Instagram at “peibistro”
I first had a rudimentary version of Cottage Pie (although I didn’t know that’s what it was) many years ago as a small child at Camp Segunakadeck (Seggie) on the south shore of PEI. I came home from summer camp raving about this yummy dish and trying to describe it to my mother. As a seven or eight-year old, my descriptions of culinary delights would not have been enough for even a seasoned professional chef to be able to concoct some resemblance of the meal. The description would have went something like this…there was hamburg and ‘stuff’ on the bottom and mashed potatoes on the top and it was made in a large pan. Many years later when I would recall my camping experience, I was always reminded of this dish which I have since come to realize was likely a very basic and simplistic version of Cottage Pie. Continue reading Savory Cottage Pie→
Today, I am sharing my favorite recipe for Honey Garlic Spareribs. This is a recipe I have been making for many years. Serve with rice or baked potato and, if desired, a side vegetable. Continue reading Honey Garlic Spareribs→
Blood Orange and Rhubarb Sauce over Halibut Steak served with Herb-Roasted Miniature Potatoes and Steamed Root Vegetables
Every Spring, I freeze bags and bags of rhubarb for recipes to be made through the remainder of the year. I am always looking for new ways to serve this versatile vegetable. Today, I am using it in this Blood Orange and Rhubarb Sauce for fish. Continue reading Blood Orange and Rhubarb Sauce for Halibut Steaks→
This old-fashioned Boiled Ham Dinner is a meal that is so familiar to me that it never occurred to me that some don’t even know what a “boiled dinner” is. So, today, I am going to demystify and explain the “boiled dinner” as I know it. Continue reading Boiled Ham Dinner – Old-fashioned Comfort Food!→
Double Chocolate Chip Drop Cookies Made with Stout
Well, for my Cookie of the Month for March, I tried to find out if there is a cookie recipe that traces its origins to Ireland or, alternatively, a cookie that is particularly popular on the Emerald Isle. However, I had no luck in tracking down any (maybe it was lack of Irish luck!)
I decided to create a special recipe and give it a distinctly Irish flavour using stout in honour of St. Patrick’s Day on March 17th. As you know, whenever possible, I like to feature Island products in my cooking and baking. At the time of writing, PEI does have a brewing company that produces stout – The Island Brewing Company produces Gahan Sydney Street Stout. However, it is apparently a limited edition and is not available in local liquor stores year-round — at least I couldn’t track down any. So, instead, I opted to use Montreal-brewed St. Ambroise Oatmeal Stout because it boasts hints of espresso and chocolate.
I knew I was going to be making a chocolate cookie with a hint of coffee flavour so a stout with both chocolate and coffee flavour could only enhance the cookie’s taste. Like any ingredient, moderation is the trick. My goal was to flavour the cookie with the stout and bring out the chocolate flavour – I wasn’t aiming for a beer-tasting cookie. Therefore, I used only 1 1/2 tablespoons of stout as part of the liquid ingredients.
This recipe calls for both butter and shortening in the ingredients and I recommend both be used. For more information on why some cookie recipes call for both types of fat, click here.
For the chocolate, I chose to use semi-sweet squares of chocolate because I find the flavour a bit more intense than powdered cocoa. Using some brewed coffee gives these cookies a distinct mocha flavour. For interest, color, and texture, I used swirled milk and white chocolate chips.
This dough does well when it is chilled and allowed to “rest” for 24 hours after mixing and before baking the cookies. The purpose of letting the dough “rest” is to allow the liquid ingredients, including the egg, to get fully incorporated and absorbed into the other ingredients. The “resting” period makes for a drier and firmer cookie dough and this controls its spread while baking so you don’t end up with a really flat cookie.
Refrigerating the cookie dough also allows the fat content in the dough to firm up, and cold, firm butter/shortening takes longer to melt in the oven. This delay in melting gives the cookies a chance to rise up instead of immediately spreading out. As a result, the cookies begin to bake, create structure, and are able to hold their shape before the butter, in particular, breaks down and flattens and spreads them out. I do not recommend skipping the dough chilling step for these cookies.
If the dough is particularly hard when it comes out of the refrigerator to the point that it can’t be scooped or spooned without chibbling it, let it rest at room temperature for 10 – 15 minutes. Do not, however, bring the dough completely back to room temperature and soften as that will defeat the objective of having the butter and shortening firm up in the dough before the cookies enter the hot oven and start spreading out.
I like the drop cookies to be soft and somewhat chewy and, of course, the key to that texture is to slightly underbake the cookies – bake these no more than 10-12 minutes at 350F and let them cool on the baking sheet for 2-3 minutes before moving them to a wire rack to finish cooling.
My Island Bistro Kitchen’s Double Chocolate Chip Drop Cookies
Ingredients:
1/2 cup butter, softened
1/4 cup shortening, softened
1/2 cup brown sugar
1/3 cup white sugar
1 egg
2 tbsp. cold brewed coffee
1 1/2 tbsp stout
2 tbsp milk
1 tsp vanilla
2 1/2 squares of semi-sweet chocolate, melted
2 cups flour
1/2 tsp. salt
1/2 tsp baking soda
1/2 tsp baking powder
1 cup chocolate chips
Method:
Assemble ingredients.
Cream butter and shortening.
Add brown and white sugars. Beat until light and fluffy. Add egg and beat until blended.
In separate bowl, or large measuring cup, mix coffee, stout, milk, and vanilla. Stir to combine. Add to mixture. Mix well.
Add melted chocolate and mix to blend.
Combine dry ingredients. Add to mixture and stir just until flour is incorporated.
Stir in chocolate chips. Cover bowl with plastic wrap and refrigerate dough for 24 hours.
Line baking sheets with parchment paper. Drop by cookie scoop or spoonfuls onto baking sheet, leaving about 2 inches between the cookies. Bake at 350F oven for 10-12 minutes. Let cookies cool on baking sheet for 2-3 minutes then transfer them to a wire rack to finish cooling.
These make a fine treat for St. Patrick’s Day (but are just as good any time of the year!)
My Island Bistro Kitchen's Double Chocolate Chip Drop Cookies
These Double Chocolate Chip Drop Cookies are both tasty and showy. Flavoured with a wee bit of stout. A treat anytime but especially good for a St. Patrick's Day treat!
Course
Snack
My Island Bistro KitchenMy Island Bistro Kitchen
Ingredients
1/2cupbuttersoftened
1/4cupshorteningsoftened
1/2cupbrown sugar
1/3cupwhite sugar
1egg
2tbsp.cold brewed coffee
1 1/2tbspstout
2tbspmilk
1tspvanilla
2 1/2squares of semi-sweet chocolatemelted
2cupsflour
1/2tsp.salt
1/2tspbaking soda
1/2tspbaking powder
1cupchocolate chips
Instructions
Assemble ingredients.
Cream butter and shortening.
Add brown and white sugars. Beat until light and fluffy. Add egg and beat until blended.
In separate bowl, or large measuring cup, mix coffee, stout, milk, and vanilla. Stir to combine. Add to mixture. Mix well.
Add melted chocolate and mix to blend.
Combine dry ingredients. Add to mixture and stir just until flour is incorporated.
Stir in chocolate chips. Cover bowl with plastic wrap and refrigerate dough for 24 hours.
Line baking sheets with parchment paper. Drop by cookie scoop or spoonfuls onto baking sheet, leaving about 2 inches between the cookies. Bake at 350F oven for 10-12 minutes. Let cookies cool on baking sheet for 2-3 minutes then transfer them to a wire rack to finish cooling.
Recipe Notes
[Copyright My Island Bistro Kitchen]
If you have made this recipe and enjoyed it and/or wish to share it with your friends and family, please do so on social media but be sure to share the direct link to this posting from my website.
Connect with My Island Bistro Kitchen on Social Media
Follow “the Bistro” on Pinterest at https://www.pinterest.ca/peibistro/ and pin the Pinterest-ready photo found at the end of this post to your favorite Pinterest boards.
There are so many ways to serve a sandwich other than just throwing two pieces of bread and some filling together. One of my favorite ways to serve sandwiches is to make them into panini. I bought a Bella panini grill a couple of years ago and I have certainly gotten use out of it.
Panini is nothing more than bread or rolls, some kind of spread, and a filling which usually involves some variety of deli meat and cheese. Often, a vegetable such as tomato is added as well. The sandwich is then heated in a sandwich press or panini grill where it is pressed flat and toasted.
If you are lucky enough to be near a bakery or a supermarket that makes a variety of breads and rolls, you are likely to find ones suitable for use in panini grills. Rolls identified simply as panini rolls or Ciabiata, Focaccia, or baguettes are all suitable for use in these types of sandwiches. Here in Charlottetown, the Atlantic Superstore has a good variety of rolls that they sell individually. You can, of course, use any plain bread you wish but the sandwich will be more interesting if made with some type of artisan bread or rolls.
Today, I am going to share with you how I make a Ham, Cheese, & Tomato Panini.
First, I have chosen puffy oval-shaped rolls that were simply labelled “Panini Rolls” at the Superstore and I split them in half, horizontally.
Panini Rolls
I sliced tomato rather thinly and sprinkled it with about 1/2 tsp. Cranberry Pear White Balsamic Vinegar from the Liquid Gold store here in Charlottetown. If you have been following my blog, you will recall the feature story I did last summer on this store and their fabulous balsamic vinegars and olive oils. I then sprinkled the tomatoes with some fresh ground pepper and sea salt and set them aside while I prepared the rest of the sandwich.
Marinating Tomatoes in Cranberry-Pear Balsamic Vinegar
To make the mayonnaise spread, I combined 1 tbsp maple syrup with 1 1/2 tbsp mayonnaise, 1 tsp. Dijon mustard, and a pinch each of basil and chives. I then added 1 green onion, thinly sliced.
Mixing Mayonnaise Spread
Using a good quality extra virgin olive oil (I used Liquid Gold’s Arbosana), I brushed olive oil over all the outside edges of the rolls. This is one of the occasions where you want to use the very best quality olive oil you can find because the taste really does come through.
Brushing the rolls with olive oil
I flipped the rolls over and spread the mayonnaise on each of the interior sides of the rolls. On one side of the roll, I started building the sandwich, starting first with a good quality Black Forest deli ham that was sliced very thin.
I then added the marinated tomatoes
Adding the marinated tomatoes
and another slice of ham
and, finally, added the grated cheese.
Adding grated cheese
You can use any of your favorite cheeses in this sandwich – I happened to have some Italiano mixture (mozzarella, asiago, smoked provolone, and parmesan) in the fridge so that’s what I used.
I then put the top part of the roll on the sandwich and transferred it to the heated panini grill.
I pressed and held down the top of the panini grill for about 20 seconds or so.
Panini Grill
I grilled the sandwich on the medium setting for probably about 4-5 minutes, essentially just long enough for the sandwich to be heated, the cheese melted, and the roll to have a nice crisp crust. Since each brand of grill will differ slightly, you will want to follow the manufacturer’s instructions for grilling panini and do some testing with your particular grill.
I sliced the panini diagonally and served it with carrot and celery sticks.
Ham, Cheese, & Tomato Panini
1 medium-sized tomato
1/2 tsp. Liquid Gold Cranberry Pear White Balsamic Vinegar
Fresh ground pepper and sea salt
1 tbsp maple syrup
1 1/2 tbsp mayonnaise
1 tsp Dijon mustard
pinch dried basil
pinch dried chives
1 small green onion, thinly sliced (white and light green parts only)
2 oz. deli-style Black Forest ham, thinly sliced
1 oz. grated Italian blend cheese
2 panini rolls of choice
1 – 1 1/2 tbsp extra virgin olive oil
Directions:
Slice tomato thinly. Drizzle with 1/2 tsp. Cranberry Pear White Balsamic Vinegar, freshly ground pepper, and sea salt. Set aside to marinate as you prepare remainder of ingredients.
In small bowl, combine the maple syrup, mayonnaise, Dijon mustard, herbs, and green onion. Mix well.
Split panini roll in half, horizontally. Brush virgin olive oil on all outside edges of roll. Flip rolls over and spread mayonnaise mixture on both interior sides of roll. Lay slice of ham on one side of roll. Add the marinated tomatoes. Add second layer of ham. Sprinkle with grated cheese. Place top of roll over layers of sandwich. Transfer to heated panini maker and grill according to manufacturer’s instructions.
Makes 2 panini.
Thank you for visiting “the Bistro” today. There are lots of ways to connect with “the Bistro” through social media:
Join My Island Bistro Kitchen on Facebook
Follow the Bistro’s tweets on twitter @PEIBistro
Find the Bistro on Pinterest at “Island Bistro Kitchen”
Follow along on Instagram at “peibistro”
Belgian Dessert Waffle with Fresh Strawberries, Whipped Cream, and Chocolate Sauce
The first time I had Belgian waffles was in Ogunquit, Maine, a long time ago. We used to vacation there and we found a wonderful little café that opened only for breakfast and their specialty was the Belgian waffle served with huge, fresh Maine blueberries. Naturally, a Belgian waffle maker had to be purchased so we could make them at home because waffles are, in fact, quite easy to make and just take standard baking ingredients!
Waffles are very versatile. They can be a breakfast food, eaten at brunch, lunch, for dessert or even as a main course for dinner, depending on the topping. There is nothing like creamed chicken atop a puffy Belgian waffle for good old-fashioned comfort food!
I love fresh berries, especially strawberries and blueberries, on waffles. Good drizzled with pure maple syrup, a rich chocolate sauce is also an option and a real treat for waffles. So, why not take a lowly basic waffle and dress it up for a tasty meal at any time of day.
Waffle Ingredients
Belgian Waffles
Ingredients: 1 cup all-purpose flour 1/2 tbsp baking powder 1/4 tsp baking soda pinch salt 1 cup milk 1/2 tsp vanilla 2 medium-sized eggs, separated 2 tbsp melted butter Separate the eggs. Beat the egg whites stiff. Set aside.
In separate bowl, mix the egg yolks and all remaining ingredients.
With electric mixer, beat until well-blended.
Gently fold the egg whites into the flour and milk mixture. Fold just until they are incorporated. This will yield a light, fluffy waffle.
Heat waffle maker and cook waffles according to manufacturer’s directions.
To serve, add sliced fruit, a dollop of whipped cream, and drizzle with your favorite syrup or topping. Dust with confectioner’s sugar, if desired.
Perfectly puffy Belgian Waffles with Strawberries are a fabulous treat especially with a dollop of whipped cream and drizzled with chocolate syrup
Course
Breakfast
Cuisine
Canadian
Keyword
Belgian Waffles, waffles
Servings4
My Island Bistro KitchenMy Island Bistro Kitchen
Ingredients
1cupall-purpose flour
1/2tbspbaking powder
1/4tspbaking soda
pinchsalt
1cupmilk
1/2tspvanilla
2medium-sized eggs, separated
2tbspmelted butter
Instructions
Separate the eggs. Beat the egg whites stiff. Set aside.
In separate bowl, mix the egg yolks and all remaining ingredients. With electric mixer, beat until well-blended.
Gently fold the egg whites into the flour and milk mixture. Fold just until they are incorporated. This will yield a light, fluffy waffle.
Heat waffle maker and cook waffles according to manufacturer's directions.
To serve, add sliced fruit, a dollop of whipped cream, and drizzle with your favorite syrup or topping. Dust with confectioner's sugar, if desired.
Recipe Notes
Yield: Apx. 3-4 waffles
[Copyright My Island Bistro Kitchen]
If you have made this recipe and enjoyed it and/or wish to share it with your friends and family, please do so on social media but be sure to share the direct link to this posting from my website.
Connect with My Island Bistro Kitchen on Social Media
Follow “the Bistro” on Pinterest at https://www.pinterest.ca/peibistro/ and pin the Pinterest-ready photo found at the end of this post to your favorite Pinterest boards.
Happy Valentine’s Day, everyone! Be sure to use the occasion to show special appreciation for those you love. One of the most ultimate ways to pamper a loved one on any day (and not just on Valentine’s) is by preparing and serving him or her breakfast in bed.
Valentine’s Day Breakfast in Bed Tray
This is a very simple breakfast menu I have selected for the bed tray: Freshly squeezed orange juice, fresh fruit cup sprinkled with coconut, heart-shaped Irish Cream French Toast with pure Canadian maple syrup, and a wee pot of tea. (Recipe for the French Toast follows at end of posting)
There is nothing like fresh-squeezed orange juice to start the day! The little juice jug was a find at a thrift shop. Bed trays have limited space so I’m always on the look-out for items that will be suitable for this purpose. I have opted to make the event special by serving the juice in a stemmed glass.
I have selected fruit with different colors and textures and dressed the fruit cup with some coconut and orange zest. The glass pedestal dessert dish is perfect for serving fresh fruit because it allows the colors of the fruit to show through giving color to the tray.
I sprinkled the French toast with confectioner’s sugar and added a dollop or two of whipped cream. My heart-shaped cookie cutter didn’t have as deep a cut in the center as I would have liked; consequently, the heart-shape isn’t as prominent or doesn’t show up as well in the photographs. I added the fan-cut strawberry to give both color and flavour.
What dresses up the food is the presentation. Yes, it’s all about the presentation! I covered the tray with a couple of my best quality white napkins and folded the third, using a “blingy” napkin ring as napkin jewelry. Out came the wee Sadler teapot I found in a second-hand shop last summer. From my teacup collection, I selected one that is predominantly pink since my color theme for this bed tray is pink and red.
Every bed tray should be adorned with a small bouquet of fresh flowers. I thoroughly enjoy having access to Island greenhouse-grown tulips over the winter. I drove out to Vanco Farms in Mount Albion to specifically select these pink and red tulips, knowing they would be perfect on this tray! I think the pink and red make a stunning color combination!
And, of course, adding a lovely card and a gift will make a special someone’s Valentine’s Day just a tad more special!
My Island Bistro Kitchen’s Irish Cream French Toast
2 eggs
3 tbsp milk
2 tsp Irish Cream Liqueur (follow link at bottom of posting for my recipe for homemade Irish Cream Liqueur)
1/2 tbsp orange juice
1/4 tsp vanilla
1/4 tsp cinnamon
pinch cardamom
1/2 tsp freshly grated orange rind
With whisk, beat eggs lightly. Add remainder of ingredients in order given. Whisk to combine. Pour mixture into a flat pan or pie plate. Dip each bread slice into the mixture, turning to coat both sides.
Melt 1 tsp. butter in skillet. Transfer dipped bread to hot skillet. Over medium heat, fry bread till browned. Flip bread to brown other side. Transfer to serving plate. Sprinkle with confectioner’s sugar and add a dollop of whipped cream, if desired. Serve warm with maple syrup.
Thank you for visiting “the Bistro” today. There are lots of ways to connect with “the Bistro” through social media:
Join My Island Bistro Kitchen on Facebook
Follow the Bistro’s tweets on twitter @PEIBistro
Find the Bistro on Pinterest at “Island Bistro Kitchen”
Follow along on Instagram at “peibistro”
Shrove Tuesday is often commonly referred to as “Pancake Day” or “Pancake Tuesday”. Shrove Tuesday always falls on the Tuesday before Ash Wednesday which signifies the beginning of Lent, a 40-day period leading to Easter in the Christian calendar. Continue reading Pancakes for Shrove Tuesday→
These Old-fashioned Sugar Cookies are one of the plainest cookies yet they have endured throughout time and are often counted among the favorites in many families. The cookies are aptly named given the amount of sugar in them in proportion to the amounts of other ingredients. Despite the amount of sugar in most sugar cookie recipes, they are not really an overly sweet or rich cookie.Continue reading Old Fashioned Sugar Cookies→
While some will argue that Shortbread is not a cookie per se, I chose to include it in my Cookie of the Month series I ran a few years ago and, at the time of original writing, featured it for January given that is the month Robert Burns Day is celebrated. There are so many recipes and versions (and opinions!) of Shortbread and what follows is mine. Continue reading Shortbread Recipe→
Pork Loin Roast with Pomegranate, Red Wine, and Black Garlic Sauce served with Potato Croquettes and Roasted Root Vegetables
If you have been following my postings, you will recall my January 12, 2013, entry using black garlic in a sauce over sea scallops. My latest culinary escapade finds it is a suitable flavouring for sauces for meat as well. Below you will find the recipe I created for a pomegranate, red wine, and black garlic sauce to accompany a marinated pork loin roast. It serves 2-3.
As I described in my earlier posting on black garlic, don’t expect any traditional garlic flavour from this fermented version which is very sweet and tastes more like a fig or a prune than it does garlic. I like pomegranate molasses but it can sometimes be hard to find as many of the traditional supermarkets in my area don’t tend to carry it. However, if you can locate a grocer who sells Middle Eastern food in your area, you are most likely able to find the molasses there. The marinade itself is very traditional but the sauce I have created for drizzling over the roast pork loin slices is a somewhat sweet sauce with a rich burgundy color which, of course, comes from the combination of the pomegranate molasses, red wine, and black garlic. It makes a fine pairing, both in taste and visually, with the roast pork.
Pork Loin Roast with Pomegranate, Red Wine, and Black Garlic Sauce
Ingredients:
3/4 lb pork loin roast
Marinade
2 tbsp soya sauce
1 clove garlic, minced
1 1/2 tbsp brown sugar
1 tbsp olive oil
1/8 tsp ginger
1/2 tbsp white wine vinegar
1 tsp shallot, finely minced
salt and pepper to taste
Mix all ingredients and place in dish. Place roast in marinade and turn once to coat. Cover and place in refrigerator for 3-4 hours, turning occasionally to baste.
Preheat oven to 425F. Place roast on rack in small roaster. Roast, uncovered, for 15 minutes. Reduce temperature to 325F and continue to roast, covered, until internal temperature of roast registers 150-160F on meat thermometer. Remove from oven and let stand, covered for 10-15 minutes before slicing and serving with Pomegranate, Red Wine, and Black Garlic Sauce (recipe below).
Mixing the soya sauce, oil, white wine vinegar, and garlic for the marinade
Adding brown sugar, ginger, salt, pepper, and shallots to the marinade
Marinating the Pork Roast and Preparing it for Roasting
Pomegranate, Red Wine, and Black Garlic Sauce
1 tsp butter
1 tbsp shallots, finely minced
2 cloves black garlic, sliced or fork-mashed
1 1/2 tbsp pomegranate molasses
1/4 cup chicken stock
1/2 tbsp balsamic vinegar
1/4 cup red wine
1 tbsp brown sugar
1/16 tsp cardamon
1 tbsp orange juice
1 tsp cornstarch
Melt butter in saucepan. Add shallots and sauté for 2-3 minutes. Add black garlic. Stir and sauté for apx. 30 seconds.
Add pomegranate molasses, chicken stock, balsamic vinegar, red wine, brown sugar, and cardamon. Stir over medium heat just until mixture reaches boiling point. Reduce heat to low.
Mix cornstarch into orange juice. Add some of the hot mixture to the orange juice and cornstarch mixture to temper it. Add the mixture to the pot. Stir over medium-low heat until thickened.
Slice roast into 1/4″ thick slices and plate. Drizzle warm sauce over pork.
Making the Pomegranate, Red Wine, and Black Garlic Sauce
Making the Sauce for the Pork Roast
Sliced Pork Loin Roast Served with Pomegranate, Red Wine, and Black Garlic Sauce
I served the pork loin roast with potato croquettes and roasted root vegetables which were lightly tossed with a maple syrup and balsamic vinegar dressing.
Pork Loin Roast with Pomegranate, Red Wine, and Black Garlic Sauce
A moist and tender pork roast is marinated, roasted, and served with a delectable sauce made with pomegranate, red wine, and black garlic.
Course
Main Course
Keyword
pork, pork roast
Servings3
My Island Bistro KitchenMy Island Bistro Kitchen
Ingredients
3/4lbpork loin roast
Marinade
2tbspsoya sauce
1clovegarlic, minced
1 1/2tbspbrown sugar
1tbspolive oil
1/8tspginger
1/2tbspwhite wine vinegar
1tspshallot, finely minced
salt and pepper to taste
Pomegranate, Red Wine, and Black Garlic Sauce
1tspbutter
1tbspshallots, finely minced
2clovesblack garlic, sliced or fork-mashed
1 1/2tbsppomegranate molasses
1/4cupchicken stock
1/2tbspbalsamic vinegar
1/4cupred wine
1tbspbrown sugar
1/16tspcardamon
1tbsporange juice
1tspcornstarch
Instructions
Marinade:
Mix all marinade ingredients and place in dish large enough to accommodate the meat. Place meat in marinade and turn once to coat. Cover and place in refrigerator for 3-4 hours, turning occasionally to baste.
Preheat oven to 425°F. Place roast on rack in small roaster. Roast, uncovered, for 15 minutes. Reduce temperature to 325°F and continue to roast, covered, until internal temperature of roast registers 150-160F on meat thermometer. Remove from oven and let stand, covered for 10-15 minutes before slicing and serving with Pomegranate, Red Wine, and Black Garlic Sauce.
Pomegranate, Red Wine, and Black Garlic Sauce:
Melt butter in saucepan. Add shallots and sauté for 2-3 minutes. Add black garlic. Stir and sauté for apx. 30 seconds.
Add pomegranate molasses, chicken stock, balsamic vinegar, red wine, brown sugar, and cardamon. Stir over medium heat just until mixture reaches boiling point. Reduce heat to low.
Mix cornstarch into orange juice. Add some of the hot mixture to the orange juice and cornstarch mixture to temper it. Add the mixture to the saucepan. Stir over medium-low heat until thickened.
Slice roast into 1/4" thick slices and plate. Drizzle warm sauce over pork.
Recipe Notes
Yield:2-3 servings
Marinated Pork Loin Roast with Pomegranate, Red Wine, and Black Garlic Sauce
Ever heard of black garlic? What do you think of when you hear the term?
Fermented Black Garlic Bulbs
Black garlic is not a variety of garlic grown. Rather, it is regular garlic bulbs that have gone through a fermentation process. Fermenting garlic to turn it into black garlic is truly food transformation. I say that because black garlic in no way tastes, looks like, or has the same consistency as the traditional hard white garlic we use to give garlic flavour to dishes.
To find out more about black garlic, I travelled to Kensington, PEI, where I paid a visit to garlic grower, Al Picketts, of Eureka Garlic.
Eureka Garlic, Kensington, PEI
Al has been growing garlic for 12 years. In 2012, he grew 42,000 plants and this year, with the cloves already in the ground since October, Al has increased his crop to 46,380 plants which will be harvested in July-August, 2013. He grows eight types of garlic and 78 varieties in those types. Yes, Al knows a thing or two about garlic!
Garlic Bulbs Drying
Al’s main business is in selling seed garlic but, in November, 2011, he began the fermentation process to turn garlic into black garlic. Al has been working with the Bio Food Tech Center in Charlottetown as he perfects his fermentation process and product. While Al keeps his exact fermentation process a carefully-guarded secret, he did show me a recycled refrigerator that he insulates well, heats with a water heater, and uses as an incubator of sorts for the fermentation process.
Incubator for Fermenting Black Garlic
Inside this incubator are stacks of covered plastic storage boxes containing hundreds of garlic bulbs fermenting. He tells me it takes about three weeks in controlled temperature for the fermentation to occur. The top right photo below shows a garlic bulb in the early stages of fermentation and the one in the lower right photo is a completely fermented bulb. The photo on the left below shows different colored bulbs in the plastic containers; these are bulbs at different stages of the fermentation process as they change and deepen in color.
Black Garlic in Various Stages of Fermentation
When fermented, the cloves will be a dark chocolate brown color – almost black — and very soft. This is not the kind of garlic you could put through a garlic press and it does not mince well. But, oh, it does have its own unique flavour! The cloves can be carefully sliced or mashed with a fork and added to recipes.
Black Garlic Bulb and Clove
When Al offered me a taste of the black garlic, straight up, I must admit I was trying to prepare my tastebuds for a somewhat pungent, strong garlic flavour. But, one of the most surprising things about black garlic is the taste. I would describe it as somewhat sweet, no discernible garlic taste, and being a cross between a prune and a fig in taste, color, and texture. So, if you are looking to use it as you would regular garlic, don’t expect any garlic flavour in the dish as black garlic has a sweet, fruity taste. Black garlic, however, brings its own unique subtle flavour to dishes like soups, sauces, and seafood and is often used in Asian cooking. The black color does not change when cooked so you need to prepare for that color in your dish. There are not a lot of black foods and some might suggest they would not be appetizing. However, I find the contrast of the black garlic on white fish, for example, to be quite dynamic and appealing.
Black Garlic Color and Texture
Black garlic is a relatively new local food item and the jury is still out as to whether it is a food fad or if it may well become a food trend. Could it be garlic’s new cavier? Promoters claim it may be the next superfood, citing its health benefits — it reportedly boasts twice as many antioxidants as raw garlic. That said, I couldn’t find any scientific research studies completed on black garlic that would state conclusively what its specific health benefits are.
So, if it doesn’t taste like garlic why, then, use it? I would say because it offers another flavouring and complexity to many dishes. I have used it on pizza and in seafood dishes and I plan to try it next with pork.
Al tells me that black garlic can be stored at room temperature – no refrigeration required – for several months. He says it can also be stored in the freezer and, when you want to use it, just remove as many cloves as needed and mash them with a fork or slice them with a knife – there is no need to thaw them first.
Al sells his black garlic for $30/pound. On Prince Edward Island, it is available directly from Al at his farm “Eureka Garlic” on the corner of Routes 2 and 233 in Kensington (902)836-5180.
Black Garlic Packaged for Sale
As you know, when I visit a local producer, I bring home their product and make a recipe featuring the food item. The recipe below, for scallops, is how I used black garlic with seafood and I found the result really tasty (yes, I’ve made this dish more than once already!). The black garlic does not mask the scallop flavour and yet it accents the seafood well. This recipe serves two.
Black Garlic on Fresh Scallops
Scallops in Black Garlic
14 scallops
3 T butter
Fresh ground pepper
4 cloves black garlic, sliced
¼ cup white wine
½ T balsamic vinegar
1 tsp freshly squeezed lemon juice
1 tsp dried chives
Pinch dillweed
1 tsp parsley
Ingredients
Melt 2 T butter in small skillet. Over medium-high heat, sear the scallops 2-3 minutes per side until lightly golden in color. Transfer scallops to plate and keep warmed.
Searing ScallopsBlack Garlic
Add 1 additional tablespoon of butter to skillet. Add the black garlic and sauté for 30-45 seconds. Add pepper to taste. Add white wine, balsamic vinegar, and lemon juice. Stir over medium-low heat 1-2 minutes until sauce reduces. Add herbs and heat for about 30 seconds.
Adding Black Garlic
To serve, plate the warm scallops and spoon the black garlic sauce over the seafood. Serve with potato or rice and a side of vegetables.
Serves 2
Scallops with Black Garlic Served with Potato Cake and Vegetables
Thank you for visiting “the Bistro” today. There are lots of ways to connect with “the Bistro” through social media:
Join My Island Bistro Kitchen on Facebook
Follow the Bistro’s tweets on twitter @PEIBistro
Find the Bistro on Pinterest at “Island Bistro Kitchen”
Follow along on Instagram at “peibistro”
This year seemed to be a particularly good year for growing pumpkins on the Island. Everywhere I looked I saw fields, bins, and wagons full of the bright orange pumpkins which are members of the gourd family.
Trailer Loads of Pumpkins at Kool Breeze Farm in Wilmot Valley, near Summerside, PEI
Bins of Pumpkins at Kool Breeze Farm
Funny how we can’t wait to display them on our doorsteps and in fall displays but, once the end of November arrives, we don’t want to see pumpkins hanging around as thoughts turn to Christmas decorating.
Pumpkins at Compton’s Vegetable Stand, St. Eleanors, near Summerside, PEI
Field of Pumpkins, Marshfield, PEI
So, wondering what to do with those pumpkins instead of throwing them into the compost bin? Why not make a batch of old-fashioned pumpkin jam. This isn’t an altogether common jam you are likely to find on many supermarket shelves. Yet, it is a very tasty, economical, and versatile jam that only takes four ingredients — pumpkin, sugar, crushed pineapple, and jello. This is a jam that my grandmother used to make every fall for her brother yet I don’t recall it ever being on her own pantry shelves and I’m not sure why.
The jam has a wonderful bright orange-yellow color. In fact, I think it is more like a marmalade than a jam. Regardless, it is very tasty on toast, biscuits, as a filling for cookies, and as a dollop on warm vanilla custard.
Pumpkin Jam on Biscuits
Pumpkin Jam as a Filling for Thumbprint Cookies
To make the jam, select a pumpkin that is more oblong than round in shape. I visited my local vegetable stand and they told me these are “jamming” pumpkins.
Pumpkin for Jam
Cut the pumpkin open and remove and discard the seeds and pulp.
Split Pumpkin Ready to be Seeded
Cut the pumpkin flesh into finely diced pieces and place in pot.
Diced Pumpkin
Add the sugar to the diced pumpkin and let the mixture sit overnight. The sugar will draw the juice out of the pumpkin.
Adding Sugar to the Diced Pumpkin
In the morning, drain and reserve the juice from the pumpkin.
Draining the Juice from the Pumpkin
Boil the juice for 20 minutes over medium heat to form a syrup.
Syrup for Pumpkin Jam
Add the drained pumpkin to the hot syrup.
Adding Pumpkin to Hot Syrup
Over medium heat, cook the pumpkin until it starts to become transparent, approximately 20-30 minutes.
Cooking the Jam
Add the can of crushed pineapple and its juice to the jam.
Adding the Crushed Pineapple to the Pumpkin Jam
Add the jello to the jam.
Adding the Jello to the Pumpkin Jam
Bring jam to a boil over medium heat.
Cooked Pumpkin Jam
Meanwhile, sterilize the jars.
Fill the sterilized jars.
Bottling Pumpkin Jam
Place warmed lids on the hot jam bottles to seal and fingertip-tighten the rims to the bottles.
Placing Lids on Jam Jars
Store this jam in the refrigerator for approximately 1 month and enjoy it fresh as a treat when pumpkins are in season.
Pumpkin Jam
Thank you for visiting “the Bistro” today. There are lots of ways to connect with “the Bistro” through social media:
Join My Island Bistro Kitchen on Facebook
Follow the Bistro’s tweets on twitter @PEIBistro
Find the Bistro on Pinterest at “Island Bistro Kitchen”
Follow along on Instagram at “peibistro”
Cut, peel, remove and discard seeds and pulp of pumpkin. Cut pumpkin into small diced pieces.
Place diced pumpkin in large pot. Add sugar. Soak overnight.
Drain pumpkin in colander, reserving juice.
Return reserved juice to pot and boil for 20 minutes over medium heat.
Add the drained pumpkin to the hot syrup. Cook over medium heat until pumpkin pieces start to become translucent, about 20-30 minutes.
Add the crushed pineapple and its juice to the mixture. Stir.
Sprinkle the jello over the mixture. Stir and bring mixture to a boil over medium heat.
Sterilize the jars either by using the sanitizer setting on the dishwasher or by placing the jars in boiling hot water.
Fill sterilized jars, leaving approximately 1/4" head room at jar top. Heat lids and place on jars. Fingertip tighten rims to jars.
Store this jam in the refrigerator for apx. 1 month and enjoy it fresh as a treat when pumpkins are in season.
Potato Vodka Made by Prince Edward Distillery, Hermanville, PEI
PEI has long been known for growing world-class potatoes – they are, after all, our primary cash crop, injecting more than one billion dollars annually into the Island economy, directly and through spin-offs[i]. We all know potatoes as a vegetable on dinner tables and are familiar with them boiled, mashed, baked, as French fries and potato chips, and as the key ingredient in scalloped potatoes. But, would you think of potatoes as a main ingredient in a beverage? Well, there are a couple of industrious and innovative women who have figured out a new use for PEI spuds. Julie Shore and Arla Johnson own and operate Prince Edward Distillery where potato vodka is their flagship product.
Road Map from Charlottetown to Hermanville, location of Prince Edward Distillery
Drive east from the Island’s capital city of Charlottetown along the northeastern shore of the Island and you will find Hermanville, a small rural district not far from the town of Souris in the eastern end of PEI. Late this past summer, I travelled to Hermanville to visit Prince Edward Distillery to find out about this potato vodka. In addition to learning how potato vodka is made, I learned the Distillery is diversifying its operation. They are now producing gin, rye whiskey, rum, and a bourbon-style corn whiskey that sells under the label of IC Shore and that’s in addition to the potato vodka and wild blueberry vodka. Also new this year (2012) are their decadent rum cakes made locally with the Distillery’s Merchantman 1897 rum.
Products Made at Prince Edward Distillery, Hermanville, PEI
The story of Julie and Arla’s arrival on PEI is similar to several others who have come to the Island and made it their home. They came to PEI on holiday in 1997, fell in love with the Island, and decided to move here. Leaving their jobs behind – Julie as a dental hygiene sales representative and Arla as a psychologist – they built an Inn (Johnson Shore Inn) in Hermanville in 1999, down a long, secluded, and narrow, unpaved lane that leads to a spectacular unobstructed view of the Gulf of St. Lawrence. However, they soon discovered the tourist, and by extension the innkeeper’s, season is short in rural PEI (usually late May to the end of September). That extra time on her hands got Julie thinking about the business her ancestors had been in, pre-prohibition, in North Carolina – distilling apple brandy and bourbon. Living in the land of potatoes, Julie had the idea to set up a distillery to produce potato vodka. Thus, in 2007, Prince Edward Distillery was born with the first batch of potato vodka running from the still’s spigot in 2008.
Rum, Whiskey, and Rye Produced at Prince Edward Distillery
Julie is the master distiller. In 2011, the Distillery produced 10,000 bottles of the six different liquors the Distillery produces. Apart from her ancestral history of distilling (she’ll tell you distilling is in her blood!), I asked Julie if she had to have special training to be a distiller. She tells me she has taken a distilling course at Cornell University and yeast-making courses in Montreal and France. She and Arla travel the world over visiting distilleries and learning more about the art of fine distilling. Visit their onsite retail outlet and look at the large map on the wall that points out the impressive world travels Julie and Arla have journeyed.
Julie says the best variety of potatoes for potato vodka is Russet Burbank. These spuds are the highest starch potato grown on the Island and the starch content is important for the yeast to work in the fermentation process. The Distillery buys approximately 50,000 pounds of locally-grown potatoes, on an annual basis, to use as the base for potato vodka. Julie explains that it takes about 18 pounds of potatoes to produce one 750 ml bottle of the potato vodka so, as you can imagine, it takes a lot of spuds to yield any amount of vodka. While potato vodka is not unheard of, it is more rare since 99% of vodkas on the market are grain-based. That’s probably because, as Julie says, potato vodka is difficult to distill due to the fact that potatoes are approximately 80% water, have to be cooked, and it takes such a volume of the raw ingredient (potatoes) to produce the final product.
Prince Edward Distillery’s Potato VodkaTour of Prince Edward Distillery
Making potato vodka is very labour intensive. The potatoes are ground and cooked to break down their starch into fermentable sugars so that fermentation will occur with the addition of yeast (wait till you hear what is done with the leftover mash from the potatoes and who the benefactors are!). The mixture is fermented for four days in 1000-gallon tanks to form alcohol.
German-made Holstein Copper Vertical Still at Prince Edward Distillery
Using a 680-litre German-made Holstein copper vertical still that Julie had imported from Germany and capably assembled herself (since it came in parts and didn’t come with an instruction book), this fermentation mixture is distilled three times to remove impurities, achieve a neutrality of the alcohol, and to get the perfect alcohol content for the vodka. Julie tells me it takes 10-14 days to produce a batch of vodka from start to finish, raw product (potatoes) to bottling.
The Distillery has enjoyed sweet success and very early in its operation. Their products rank among the best. Just a year after producing their first vodka for market, the potato vodka won gold in the 2009 San Francisco World Spirits Competition and, in the same year, the wild blueberry vodka won silver in the UK International Spirits Challenge in London, England. Yes, our locally-produced Island wines and spirits can match any on the market!
Prince Edward Distillery supports local producers, buying and using locally-produced potatoes, grains, and blueberries in their liquor production. The Distillery employs between 4-6 full time employees and 1 part-time employee on a seasonal basis. Currently, their products are sold in PEI and Nova Scotia markets. However, they are exploring markets farther afield.
Prince Edward Distillery’s Spirit Outlet at Peakes Quay in Charlottetown, PEI
This past summer, the Distillery decided to open a spirits outlet shop at Peakes Quay on the Charlottetown waterfront, a popular tourist attraction of small shops and not far from the seaport where dozens of cruise ships dock each year. In addition to the Peakes Quay location (open seasonally), the Distillery’s products are available at the onsite retail shop in Hermanville and in PEI and Nova Scotia liquor stores.
So, about that mash I mentioned earlier – the left-over potato product after the liquid has been extracted for the vodka. Well, behind the distillery may well be what many have dubbed as the most cheerful hogs on the Island! Yes, that’s right, hogs or, more specifically, Heritage Berkshire pigs which Julie raises on the mash. She says there are lots of nutrients left in the potato mash so why throw it out when she can raise pigs on it!
Heritage Berkshire Pigs Raised on Mash at Prince Edward Distillery
The Distillery is open daily, May – October, for tours and taste-testing; from October – May, it is open by appointment or by chance. A tour of the Distillery and taste-testing of two spirits costs $10. (or, if you simply want to taste any spirit, it is $3./taste). For more information on the Prince Edward Distillery, visit their website, call them at 902-687-2586, or, better still (pun intended!), take the scenic northeastern shoreline route to Hermanville and visit the Distillery at 9985, Route 16.
Prince Edward Distillery, Hermanville, PEI
Whimsical T-Shirts at Prince Edward Distillery
True to tradition, when I visit a local producer, I bring home their product and create a recipe with it. I decided to create a Vodka Tomato Sauce for pasta using Prince Edward Distillery’s potato vodka. I find the vodka actually goes well with tomatoes and draws out the tomato flavour and makes it pop without adding a competing flavour to the dish. The key, of course, is not to over-do it – less is often more and the idea is that the vodka enhance and contribute to the taste of the sauce, not overpower it. My recipe creation follows.
Farfalle Pasta in Tomato Vodka Sauce
Thank you for visiting “the Bistro” today. There are lots of ways to connect with “the Bistro” through social media:
Join My Island Bistro Kitchen on Facebook
Follow the Bistro’s tweets on twitter @PEIBistro
Find the Bistro on Pinterest at “Island Bistro Kitchen”
Follow along on Instagram at “peibistro”
[i] Source of Statistics: Prince Edward Island Potato Board, 23 October 2012
Tomato Vodka Pasta Sauce
By Barbara99
Published: November 15, 2012
Yield:
Prep:10 mins
Cook:50 mins
Ready In:60 mins
A rich, flavourful tomato sauce suitable for various types of pasta
Remembrance Day Service at the cenotaph in front of Province House, Charlottetown, PEI, Canada [11 November 2012]Every year on November 11th we pause to remember the sacrifices and achievements of those who valiantly and selflessly served our country in times of war and conflict, and in peacekeeping missions around the world. We remember those who gave the ultimate sacrifice – their lives for their country so future generations could have a better, more secure life. We think about their achievements and the role they played in forming Canada’s nationhood. We thank them for the peace, freedom, and human rights we enjoy in Canada today.
Those of us who have been fortunate enough never to have known or experienced war have opportunities to demonstrate our respect and gratitude for, and remembrance of, these acts of bravery and sacrifice. For example, we wear a poppy on the left breast, close to the heart to signify remembrance of the lives lost.
Poppy
Thousands of people across the country will attend Remembrance Day ceremonies in their local communities where they will respectfully observe a moment’s silence at 11am on the 11th day of the 11th month to mark the time the Armistice was signed to end WWI. Wreaths will be laid in commemoration.
Remembrance Day Wreath
One of the most well-known poems about war was written in May, 1915, by Lt. Col. John McCrae, a Canadian Medical Officer in WWI. While stationed near Ypres, Belgium, where some of the most horrific and bloodiest fighting of WWI occurred, he was motivated to write about the death he saw around him and of the prolific red poppies growing amidst the devastation of war in the Flanders area of western Belgium. His poem, “In Flanders Fields” has become synonymous with Remembrance Day in Canada and Lt. Col. McCrae is often credited with being the catalyst that led to the poppy being identified as the symbol of remembrance of the blood shed by soldiers who were casualties of battle.
“In Flanders Fields”
On this Remembrance Day, I am going to focus my food blog feature story on war cake, a wartime dessert that is still made and served in several Island households today.
War Cake
As a small child I well remember my grandmother making war cake and this was long after WWII had ended. I loved her war cake! It is such a simple raisin-spice cake that is characterized by the absence of eggs and milk — ingredients that would have been scarce during wartime. This cake is sometimes referred to as “boiled raisin cake” because raisins form the main content and the majority of the ingredients are boiled, then cooled, before they are mixed with flour and baking soda and then baked in the oven. Because of food shortages during war time, many foods were rationed.
Ration Books, Cards, and Stickers
Born of necessity, homemakers during wartime became resourceful, frugal, adaptable, and creative in order to feed their families. Cooking tended to be very basic. Women were known to have saved their ration stickers so they could buy the raisins and sugar that the war cake recipe called for – thus war cake would have been a very prized commodity.
War cake was made for consumption on the home front but many also made the cakes in tin cans and packed them in socks, mittens, and underwear they were shipping overseas for their loved ones serving in the war. Imagine the excitement when a soldier would have received this package from home and discovered a mother’s or sister’s war cake inside! Amazingly, with the slow mail and ship service during WWI and WWII, there is evidence these cakes were received as the soldiers would refer to them in their letters home, letters that would have looked much like the July 7, 1914, letter in the photograph below.
Letter from a soldier written from “Somewhere in France” on July 7, 1914. In the letter, the soldier encloses two pansies as “souvenirs from France”, one flower each for the young lady he was writing to and her mother. All these years later, the pressed pansies have still retained their color and are intact.Old War Cake Recipes
In my research for this story, I examined many recipes for war cake and found similarities amongst them all. Some were very sketchy in terms of amount of ingredients to be put in the batter and many were almost totally devoid of any directions. While the amounts of the ingredients may vary slightly, all of the recipes I reviewed were essentially the same in ingredient content. All called for big, sticky raisins (you may know these as “Lexia” raisins), a variety of spices of the cook’s choice, either brown or white sugar or a combination of both, shortening or lard, boiling water, flour, and soda. One thing I noted was the significant amount of sugar that the recipes called for – i.e., two cups per cake. Sugar was one item that was commonly rationed during wartime and a cake taking two cups of sugar would certainly have been considered a luxurious dessert, I am sure. Flavour may vary from cake to cake based on spices used in the batter. The choice of spices varies but typically consisted of cinnamon, nutmeg, and cloves, as a minimum, with ginger frequently appearing in recipes. I added mace and cardamom to my cake to give it a bit more flavour (recipe follows at end).
Ingredients for War Cake
I am told these cakes were often made with lard (as opposed to butter) for a couple of reasons. First, lard has a longer shelf life than butter would have had and, for cakes being sent overseas to the soldiers, it would have been a long journey for the cakes to reach Europe so shelf life of the cakes was an important factor. Second, butter was often scarce during wartime because there were no big herds of cattle on local farms so butter would have been used sparingly, even for those living on farms and churning their own. Lard, on the other hand, would have been much more readily available, particularly on farms. I found a couple of recipes that indicated either butter or shortening could be used in the recipe; however, butter was called for in a much lesser quantity than the shortening, if the latter was used instead. For example, I found one recipe that called for 2 tablespoons of butter or 1 cup of shortening which demonstrates how judiciously butter would have been used, if at all.
While its ingredients are simple, war cake takes some time to make. All of the ingredients, except the flour and soda, are boiled on the stove for 5 minutes. Then it is important to let the boiled raisin mixture cool to room temperature as the mixture will thicken naturally on its own as it cools. This will normally take 4-5 hours. If the flour and soda are added into a mixture that is too hot, the result is likely to be a gummy cake. When the raisin mixture is cooled, the flour and soda are stirred in and the mixture turned into the baking pan. My grandmother made her war cake in a loaf pan; however, traditionally, war cake seems to have been made in some kind of a round pan – usually a tube pan or, in the case of overseas shipping during war time, in tin cans. War cake is a very dense cake which makes it sometimes difficult to get the center of the cake baked without drying out the outside edges. It is also a heavier type cake which makes it somewhat prone to falling in the center. A tube (or Bundt pan, if you have one) removes the baking uncertainty and helps the cake to bake more evenly.
War Cake Baked in a Bundt Pan
War cakes take, on average, about an hour to bake. The old recipes I reviewed didn’t even mention baking the cake let alone at what temperature (in fact, one recipe simply said “to thicken” but didn’t elaborate on what thickening agent was to be used!). These recipes predate our modern electronic ovens! While some suggest baking the cake at 350F, I thought that might be a bit high so I baked my war cake at 335F for one hour. Because there are no eggs or milk in the cake for moistness, it is very easy to overbake the cake and end up with a dry product. Hence, it is important to time the baking carefully and to use a cake tester starting at about the 45-minute point. If the cake starts to darken on the top or edges too quickly, simply place a piece of tin foil loosely over the top. Adding a small pan of water to the lower shelf in the oven while baking the cake will also help to keep the cake moist.
Including a Small Pan of Hot Water on the Bottom Shelf of the Oven Helps to Keep the Cake Moist During Baking
Because of the texture of the cake, it may seem soft on the top and not baked; however, if a cake tester comes out of the cake clean, it’s time to remove it from the oven before it dries out.
War cake is a “stick to the ribs” substantial, hearty kind of cake. It goes particularly well with a nice cup of tea.
War Cake and Tea
In keeping with the traditional way war cake was served, I have photographed the cake plain, just as it would have been eaten during wartime.
Sliced War Cake
War cake was not traditionally iced. However, it would be lovely served with a dollop of whipped cream or vanilla or maple ice cream. It could also be dressed with a brown sugar sauce or, to make a plain cake really decadent, why not serve all three – ice cream, brown sugar sauce, and whipped cream!
War Cake on a Tea Table
War Cake
Regardless where you are in the world, if you have any wartime memories (either your own or those passed down to you from your ancestors) of war cake made for consumption on the home front or to send to the soldiers fighting the war, I would love to hear about them. War cake is a part of wartime culinary history.
Here are some photographs of the Remembrance Day Ceremony at the cenotaph in downtown Charlottetown, PEI, this morning.
Remembrance Day in Charlottetown, PEI [11 November 2012]Lest We Forget
Hon. Robert W.J. Ghiz, Premier of the Province of Prince Edward Island lays a wreath on behalf of the people of the Island at the Remembrance Day Service in Charlottetown, PEI [11 November 2012]Small Child Watches as a Veteran lays a Wreath at the Remembrance Day Service in Charlottetown, PEI ]11 November 2012]
Remembrance Day 2012
Veterans Laying Wreaths at Remembrance Day Service in Charlottetown, PEI [11 November 2012]At the Charlottetown Cenotaph – Remembrance Day 2012
Flag Flies at Half-Mast on Remembrance Day, Charlottetown, PEI [11 November 2012]
An old-fashioned cake made with large sticky raisins and a mixture of spices. Common cake during war time.
Course
Cake
Cuisine
Canadian
Keyword
war cake
Servings12
My Island Bistro KitchenMy Island Bistro Kitchen
Ingredients
3/4cupshortening
2cupsbrown sugar, lightly packed
1poundlarge, sticky raisins
1tspsalt
1tspcinnamon
1tspnutmeg
1/2tspcloves
1/4tspginger
1/8tspmace
1/8tspcardamon
2cupsboiling water
3cupsall-purpose flour
2tspsoda
Instructions
Assemble ingredients.
Place the shortening, brown sugar, raisins, salt, spices, and boiling water into a large saucepan. Over medium-high heat, bring mixture to a boil. Reduce heat to medium or slightly lower and boil mixture for five minutes. Remove from heat and set saucepan on cooling rack. Let mixture cool to room temperature (4-5 hours), stirring occasionally.
In bowl, whisk the flour and baking soda together. Set aside.
Grease large tube or Bundt pan.
When raisin mixture has cooled completely, add the flour and baking soda. Stir until dry ingredients have been completely mixed into the raisin mixture.
Spoon mixture into greased pan. Add a small pan of hot water to lower shelf in oven for moisture while cake is baking. Bake cake on middle rack in 335°F preheated oven. If cake starts to brown on the top too quickly, loosely place a piece of tin foil on top of cake. Bake apx. 1 hour but begin to test cake for doneness, using a cake tester, at the 45-minute point as cake can dry out very quickly.
Remove cake from oven and place pan on cooling rack for 10 minutes then remove from pan. Allow cake to cool completely before cutting.
Recipe Notes
[Copyright My Island Bistro Kitchen]
Connect with My Island Bistro Kitchen on Social Media
Follow “the Bistro” on Pinterest at https://www.pinterest.ca/peibistro/ and pin the Pinterest-ready photo at the end of this posting to your favorite Pinterest boards!
One crop we grow really well on this Island is potatoes. Our PEI spuds are world-class quality and often win awards on the national stage. According to statistics obtained through the Prince Edward Island Potato Board, 86,500 acres of potatoes were grown on the Island in 2012. An economic impact study was completed in 2012 showing that the potato industry contributes over one billion dollars annually to the PEI economy, either directly or through spin-off effects. Now, that’s no small potatoes!!!
Last spring, I was looking for a potato operation and a potato field that I could follow from planting through to harvesting specifically for this blog post entry. It’s one thing to go into the supermarket and purchase a bag of potatoes but it is quite another to know where the potatoes come from and to watch them grow and I thought my readers would be interested to see some photographs of potato growing and harvesting on PEI. One evening in mid-May, I was heading from Summerside to Charlottetown “through the 225” as the locals refer to one of the shortcut routes between the two cities, when I came across this rather large and odd-looking black machine pulling into a huge field.
Filler Machine Loads Seed Potatoes Into Potato Planter in Warren Grove, PEI [19 May 2012]Of course, curiosity got the best of me and I did a u-turn fairly quickly and drove into the field where I discovered four tractors and machines were working at preparing the soil, fertilizing, and planting the field with potatoes. Lots of John Deere equipment moving in that field on a Saturday evening in May!
Preparing to Plant Russet Burbank Potatoes in Warren Grove, PEI [19 May 2012]Well, I thought this was just very fortuitous timing! I had found my field to follow!!! It turns out the field in Warren Grove, near North River on the outskirts of Charlottetown, PEI, was being planted by Smith Farms of Newton, near Kinkora, in the central part of the Island.
Robert, the man driving the big John Deere tractor that was hauling the rather ominous looking black machine, was very willing to explain what the machine was. I learned it is called the “filler machine” – it brings the cut potato seed from the warehouse to the field where it is then loaded into the planter. I asked if it would be okay if I took some photographs of the machine as it filled the planter. Robert explained that I’d have to be quick if I wanted to get a picture of it as it speedily fills the planter that backs in under it. Quick isn’t the word for it – it’s more like ‘in a blink of an eye’ and then the planter pulls away from the filler machine and off it goes down the field to plant the spuds.
Planting Potatoes in Warren Grove, PEI [19 May 2012]According to the Prince Edward Island Potato Board, there are over 100 varieties of potatoes grown in PEI but the majority of the acreage is made up of the top 30 varieties. The most common variety, Russet Burbank (which is what this field in Warren Grove was planted with), accounts for about 50% of the potato acreage grown on PEI. The Russet is a multipurpose variety used at local processing plants to make frozen French fries as well as for food service and retail bags of table potatoes (because of its slender shape, the Russet makes a great choice for baked potatoes, in particular). The Potato Board tells me that other common varieties grown on the Island include Superior (an early round white table variety), Goldrush (a long russet skin table variety), Yukon Gold (a yellow flesh table variety), Norland (a red skin, white flesh table variety), and Atlantic (a round white variety use to make potato chips.)
The Potato Board says, over the past three years, PEI seed and table potatoes have been shipped to over 30 countries besides Canada and the United States. No matter where you are, chances are you may have sampled PEI potatoes! The next time you are in your local supermarket, be sure to check the bags of potatoes to see if they may have come from the rich and fertile red soil of PEI, Canada.
Bags of PEI Potatoes in Retail Store
On June 25th, I found the field was lined with neat rows of bright green leafy plants. The potatoes were growing well!
Potatoes Starting to Grow – 25 June 2012
Over the next several weeks I would periodically drive by the field to see if the delicate white potato blossoms would appear. Sure enough, on August 8th, I found they were out in blossom.
Potatoes Blossoms [8 August 2012]
Russet Burbanks in Blossom [8 August 2012]In mid-October, it was time to harvest the potatoes. I followed the windrowers and potato harvester in the field and spoke with Andrew Smith who told me these potatoes are destined for Cavendish Farms, a processing plant in New Annan, PEI, which makes frozen French Fries. As you can see by the long slender length of these Russets, they are well-suited for French Fries!
Harvesting the Russet Burbank Potatoes in Warren Grove, PEI [17 October 2012]There were literally dozens and dozens of seagulls following the harvester, looking for “left-over” potatoes in the field!
How many workplaces have a gorgeous backdrop of fall foliage like this one does! And, I was lucky enough to spend part of an afternoon in this workplace, following the harvesting equipment. There is nothing like the smell of fresh PEI soil turning up spuds on a crisp, sunny October afternoon!
Potato Harvesting in Warren Grove [17 October 2012]Potato Harvesting in Full Swing in PEI [17 October 2012]
Potato Harvesting in PEI [17 October 2012]The windrowers dig several rows of potatoes at once and move the potatoes over into one row. This field had two windrowers working in it. The harvester then comes along, also digging several rows at the same time, and picks up all the potatoes left by the windrowers. This process speeds up the harvesting. Andrew told me that when he moves the harvester down the length of the field after the two windrowers have first gone through, he is picking up potatoes from 11 drills, transferring them to the truck that drives alongside the harvester! The truck then transports the potatoes to the warehouse.
Windrowing and Digging in the Evening [17 October 2012]PEI weather is often unpredictable in fall (sometimes quite rainy) so potato farmers have to work with the weather which often means they dig potatoes late into the evening to ensure the crop gets out of the ground.
Potato Harvesting at Night [17 October 2012] I debated what I would make to showcase the Russet Burbank potatoes that came out of the Warren Grove field. I settled on a potato puff. The Russets are a lovely white flesh potato with a somewhat dry texture that makes them a good choice for this dish. This is a suitable side dish that pairs particularly well with chicken, beef, or pork.
Duchess Potatoes Made with PEI Russet Burbank Potatoes
My thanks to Smith Farms of Newton, PEI, for allowing me to follow their potato planting and harvest cycle this year.
Thank you for visiting “the Bistro” today. There are lots of ways to connect with “the Bistro” through social media:
Join My Island Bistro Kitchen on Facebook
Follow the Bistro’s tweets on twitter @PEIBistro
Find the Bistro on Pinterest at “Island Bistro Kitchen”
Follow along on Instagram at “peibistro”
Roasted Marinara Sauce with Sun-dried Tomato Pork Sausage on Halloween Pasta
I was looking for a meal to serve that would have a Halloween theme when I came across these wonderful orange and black Italian-made farfalle pasta. I bought the pasta not knowing how I would prepare and serve it. It just looked so fun and season-appropriate that I couldn’t pass the pasta by! Served with locally-made sun-dried tomato and pork sausage tossed in a rich and flavourful homemade marinara sauce, and topped with freshly grated Parmigiano Reggiano cheese, this pasta dish was a real hit. Add a freshly toasted garlic and cheese roll and a glass of red wine, and this meal is easily dressed up.
Italian-made Durum Wheat Semolina Farfalle Pasta
I am very lucky as we have a great butcher shop in Charlottetown, KJL Meats, co-located with the Riverview Country Market on Riverside Drive. Using locally-produced pork , they make several varieties of wonderful sausages onsite. The variety I chose for this dish was sun-dried tomato and I was not disappointed – it was really good! They tell me their sausages are all natural with no additives or preservatives. I also dropped by our local “Liquid Gold” store and picked up two new products (will soon need extra cupboards to store all these oils and balsamic vinegars in!) — a bottle of oregano white balsamic vinegar and one of organic Tuscan Herb infused olive oil were added to my growing collection! Both were used in the marinara sauce and I also cooked the sausage in a small amount of the Tuscan olive oil. Freshness matters and I find their products are super-fresh.
My recipe for the marinara sauce is my own creation. Don’t be put off by the number of ingredients — it takes them all to make the flavour. I like to roast the vegetables for the sauce because it gives them a distinct and rich flavour that I would classify as “full-bodied” in any dish. After they are roasted, I break them up loosely with a potato masher. There is no need to worry about getting them crushed completely at this point since that will occur later during the purée stage. All that needs to happen at this point is that they are crushed enough to allow their juices and flavours to permeate the sauce while it cooks. I like to use the immersion blender to purée the sauce in the stock pot. I tend to like the sauce a bit on the chunky side so I don’t purée it completely smooth but that is a matter of personal taste. If you don’t have an immersion blender, a food processor or blender can, of course, be used – just make sure you let the mixture cool before placing it in the processor or blender. The sauce takes a bit of time to make but it is good (and the house smells divine in the process!). This recipe makes about 3 1/2 cups but it is easily doubled. The sauce also freezes really well which makes meal preparation quick and easy on a busy evening. I cooked the sun-dried tomato pork sausage, then sliced it into thin slices (about 1/8th inch thick) before tossing it in the sauce and serving it over the pasta. The sausage could also be removed from the casing and scrambled fried instead of being sliced.
This was a fun dish to create and even more fun to eat, particularly with the orange and black Halloween pasta!
Halloween Pasta Served with Roasted Marinara Sauce
If you have made this recipe and enjoyed it and/or wish to share it with your friends and family, please do so on social media but be sure to share the direct link to this posting from my website.
Connect with My Island Bistro Kitchen on Social Media
Follow “the Bistro” on Pinterest at https://www.pinterest.ca/peibistro/ and pin the Pinterest-ready photo at the end of this posting to your favorite Pinterest boards!
Roasted Marinara Sauce
By Barbara99
Published: October 30, 2012
Yield:3 1/2 cups
A rich, thick, flavourful tomato sauce that is a great accompaniment to pasta or pizza
Preheat oven to 450 degrees. Cut vegetables into 1/2" - 1" pieces. Slice the parsnip slightly thinner. Place in a bowl and drizzle with olive oil, tossing to coat vegetables. Place on tin foil lined baking sheet. Sprinkle with sea salt and freshly ground pepper. Roast for about 40 minutes until vegetables are slightly fork tender and edges of vegetables start to char slightly. Peel garlic. Transfer vegetables and garlic to stock pot and, with a potato masher, loosely break up the vegetable chunks.
Add remainder of ingredients. Over medium-high heat, bring mixture to boil. Reduce heat and simmer over low heat for 45-50 minutes, stirring occasionally.
Remove from heat and discard bay leaf. Using an immersion blender, purée sauce to desired consistency. (Alternatively, let mixture cool and transfer to food processor to purée.)
Toss with pasta (and meat, if using) or use as pizza sauce. Freezes well.
[Copyright My Island Bistro Kitchen]


 Grease 2-quart casserole. Peel and slice onions to make first layer of casserole.
 Add the layer of sliced potatoes and sprinkle with salt and pepper.
 Add the layer of ground beef. Sprinkle with salt and pepper.
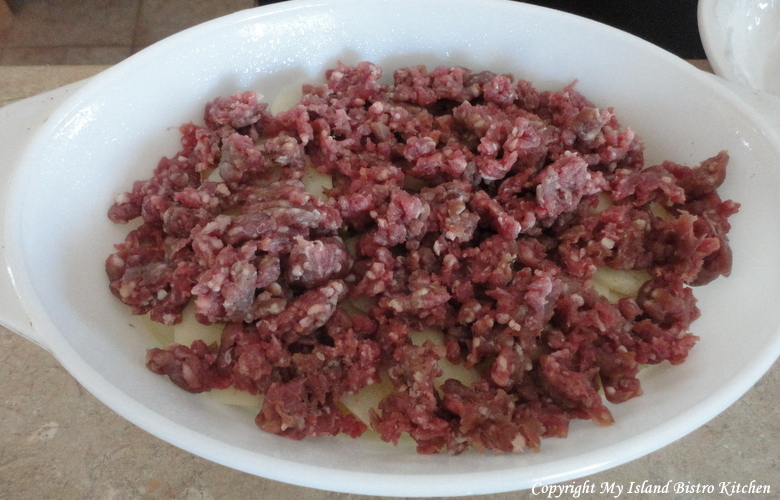 Add celery, parsnips, carrots, and frozen peas. Sprinkle with salt and pepper.
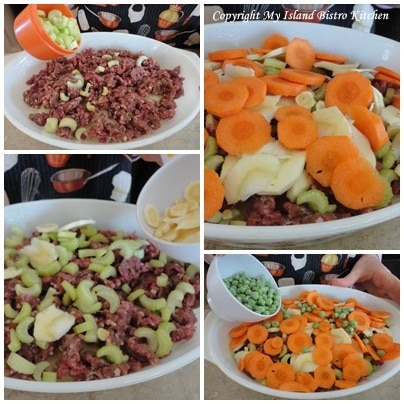 Sprinkle ingredients with rice. Cover casserole ingredients with can of tomato soup. Pour one soup can of water over top of ingredients (or, if you wish, you can mix the soup and water together and pour as one over the casserole ingredients).
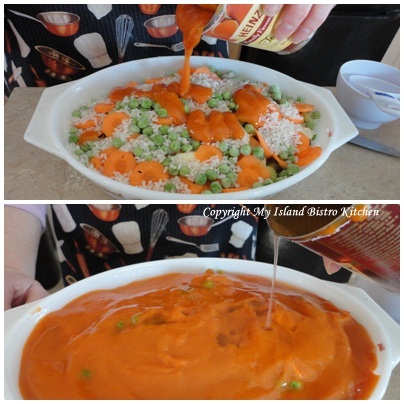 Cover and bake at 350F for 1 ½ – 2 hours until vegetables are tender.
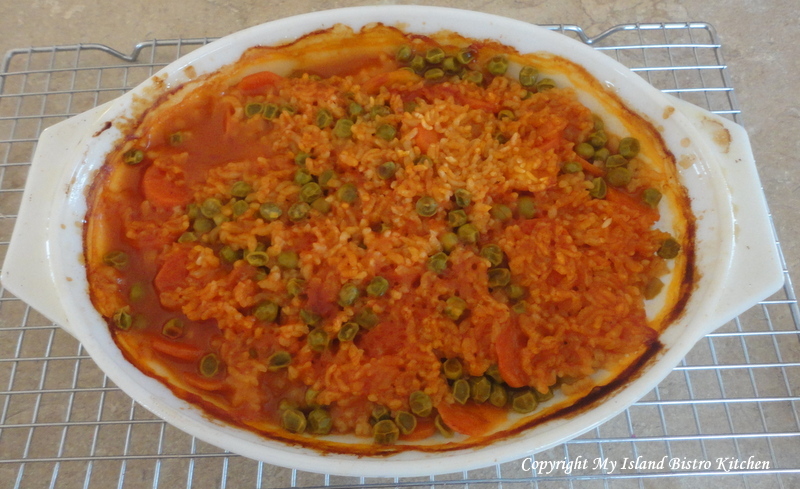 It is hard to plate this meal attractively but its taste more than makes up for its lack of presentation!
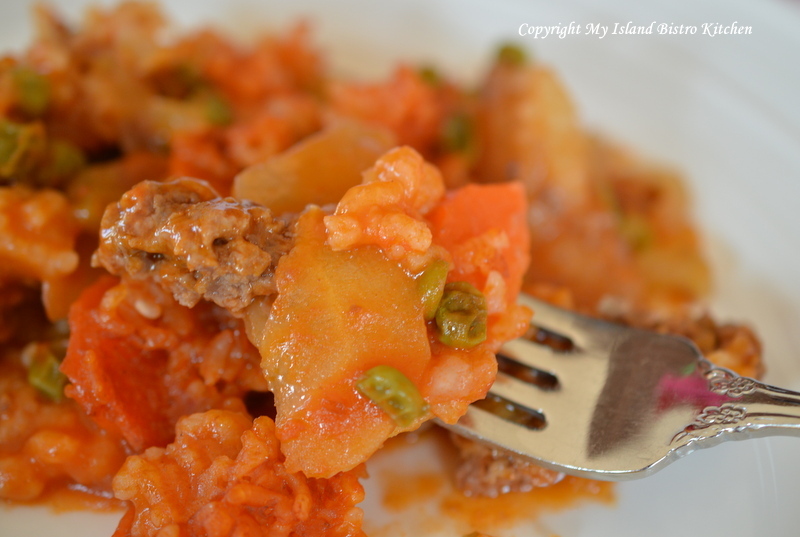 Suggested Serving: Serve with homemade mustard pickles and whole grain artisan bread.
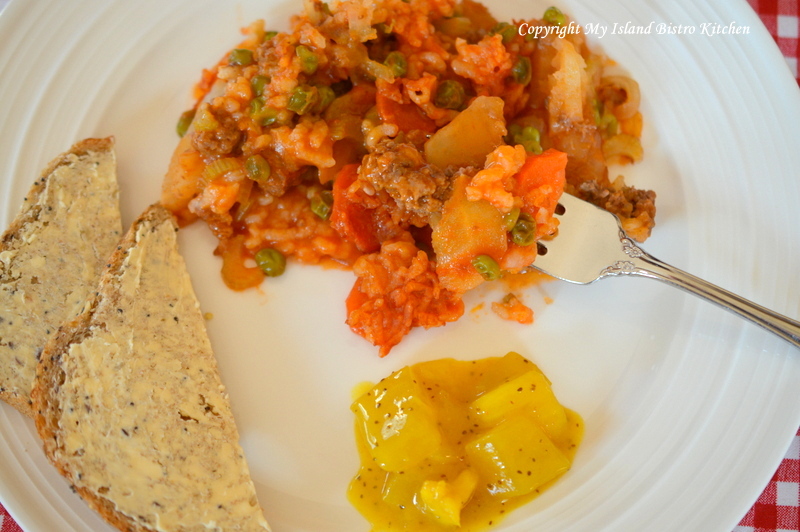

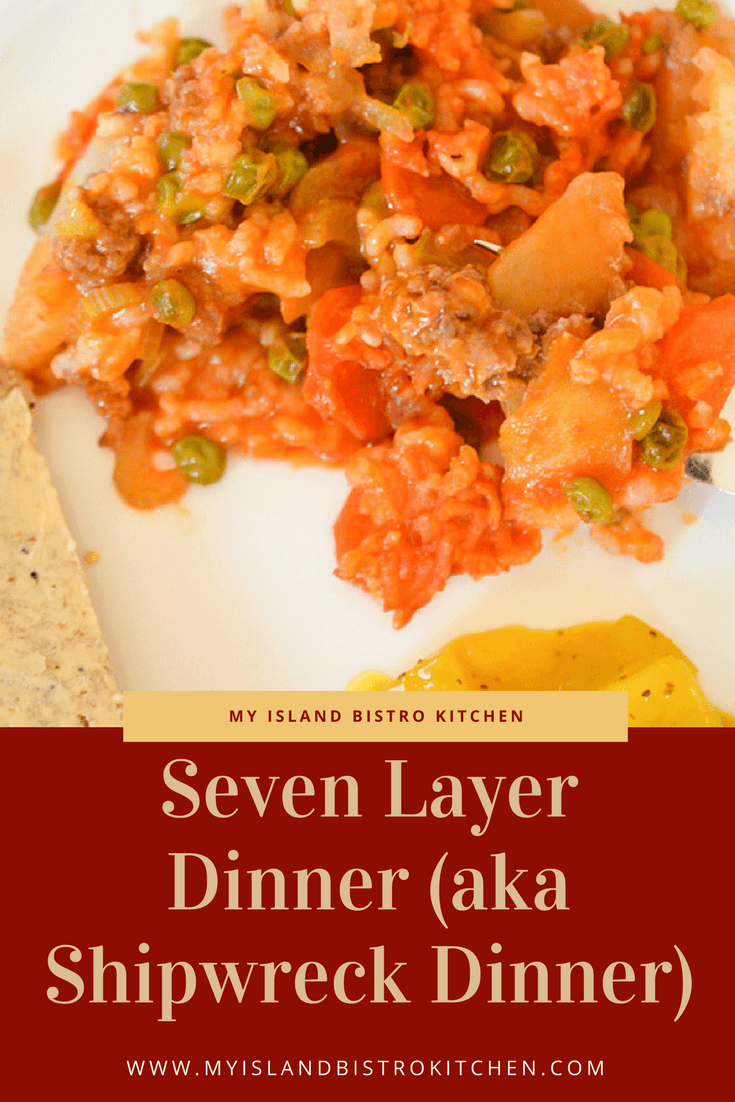


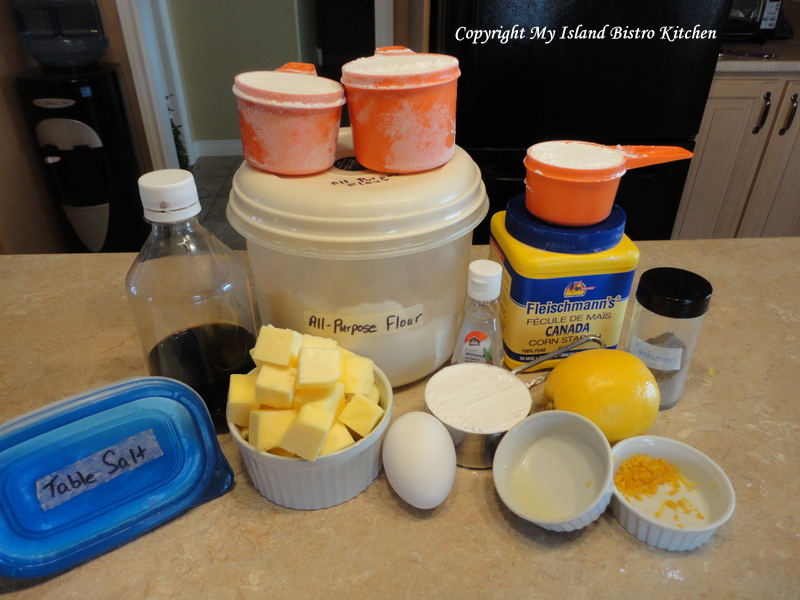
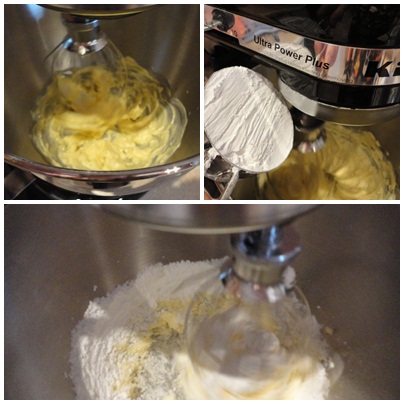
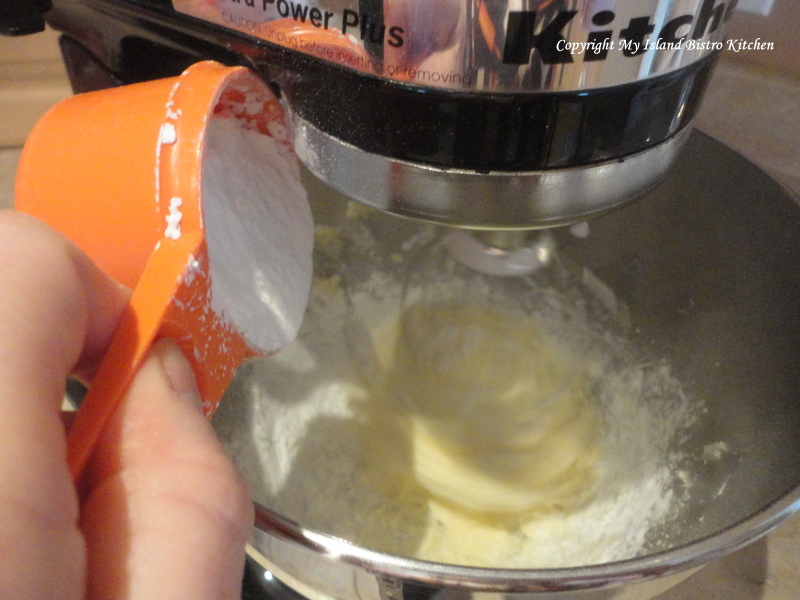
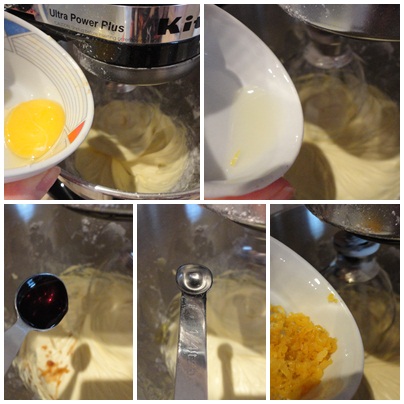
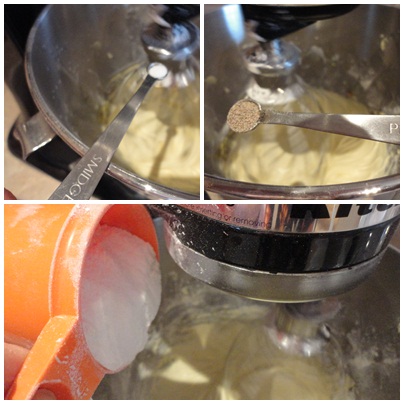
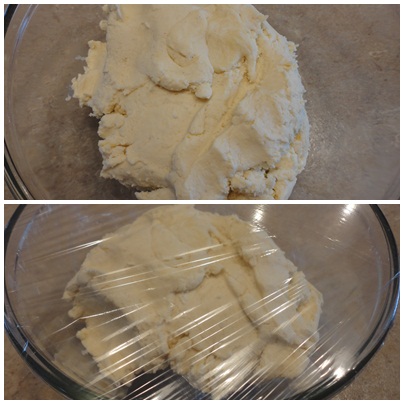


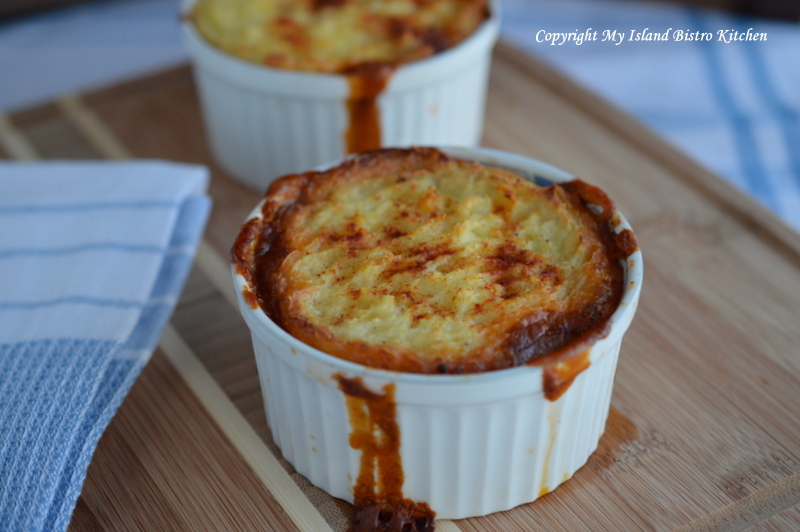
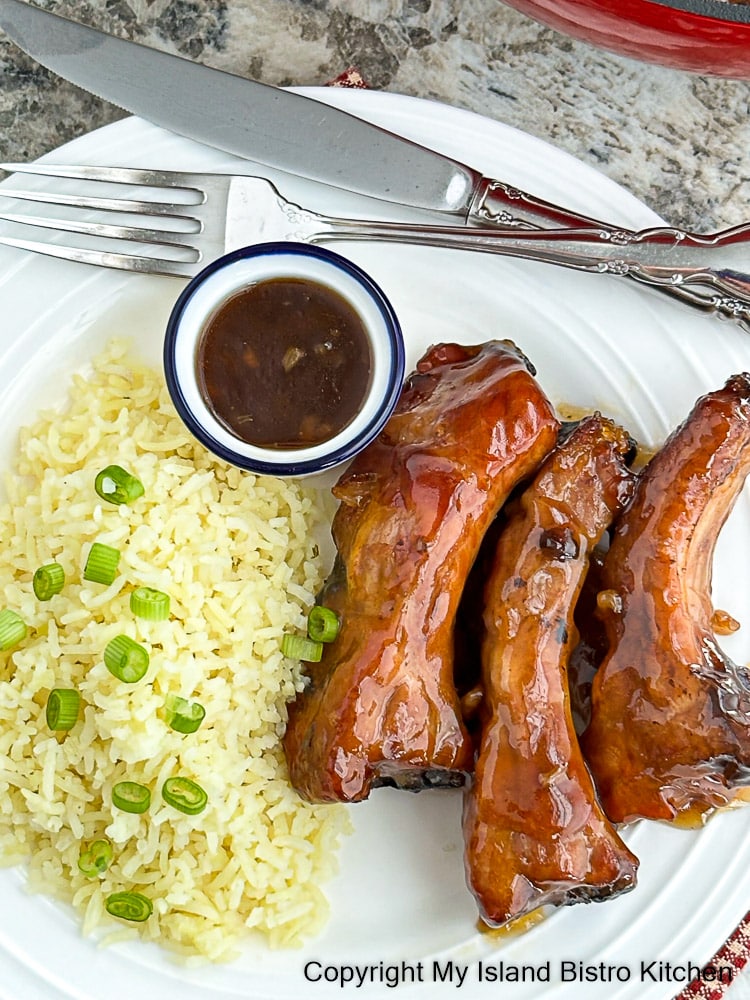
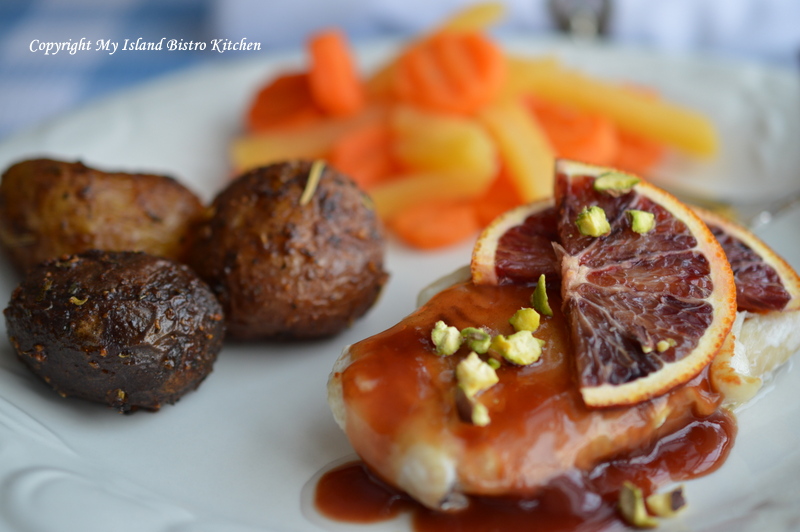
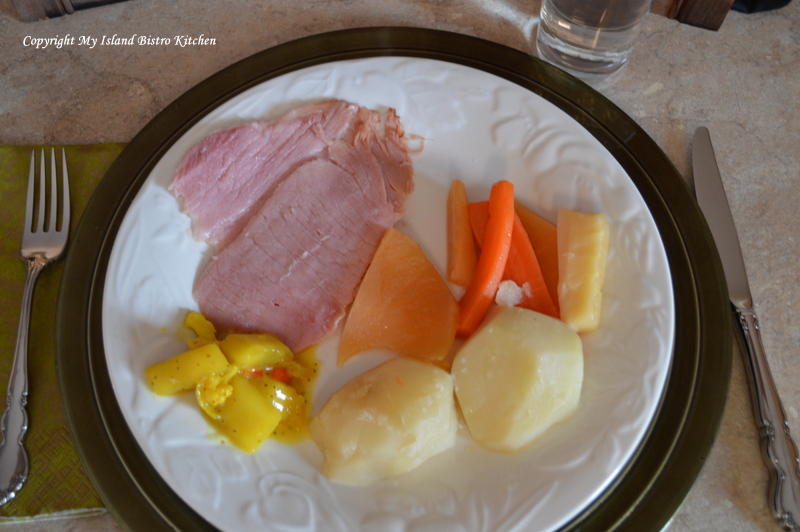
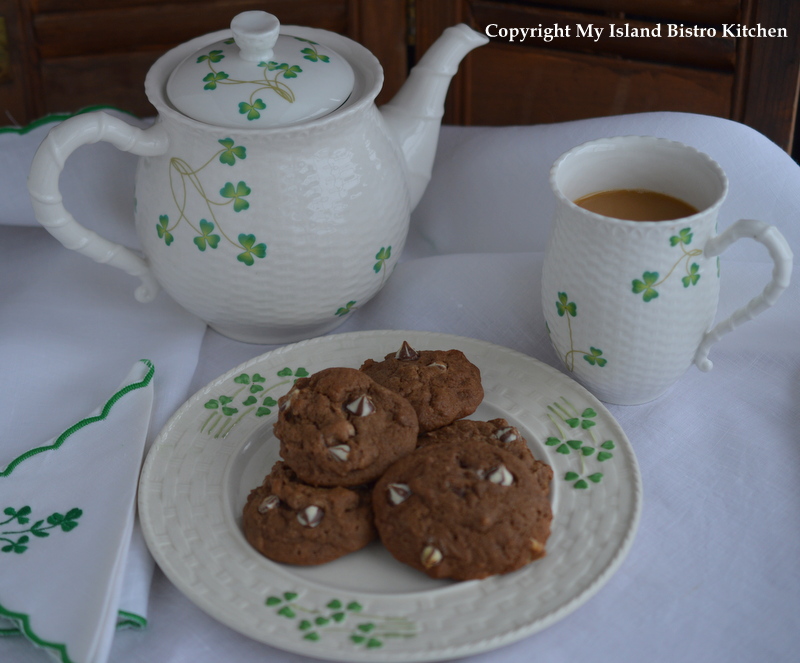

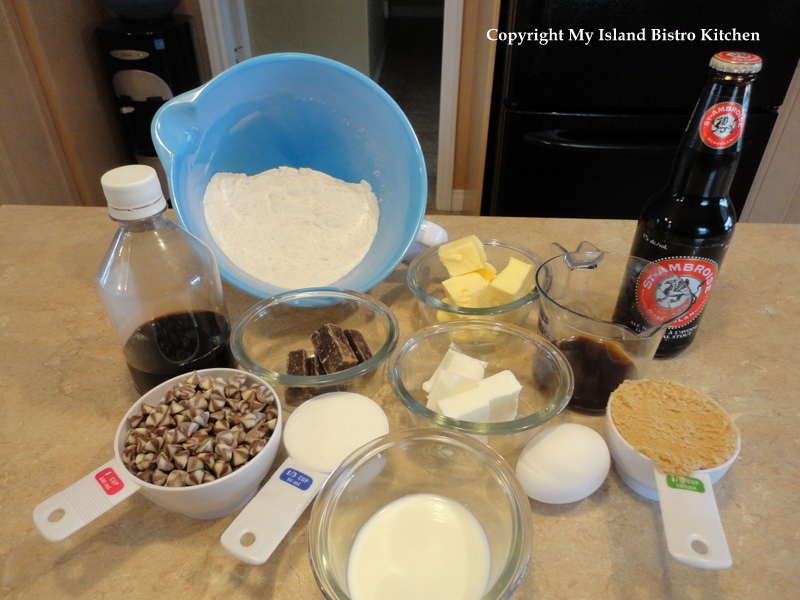
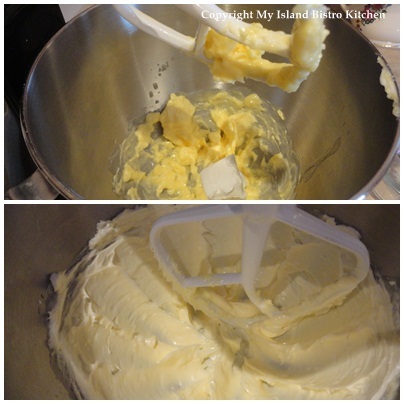
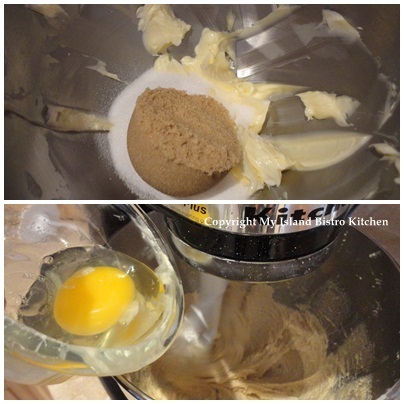
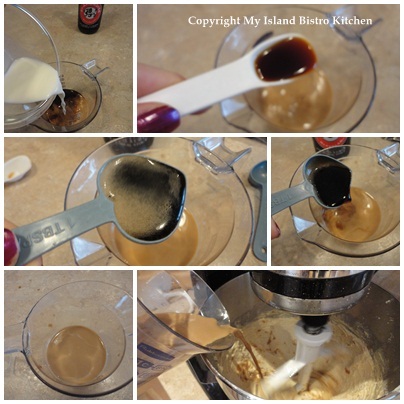
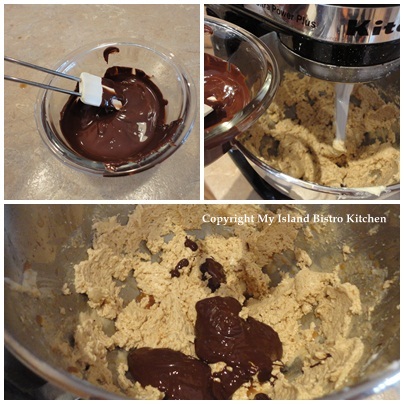
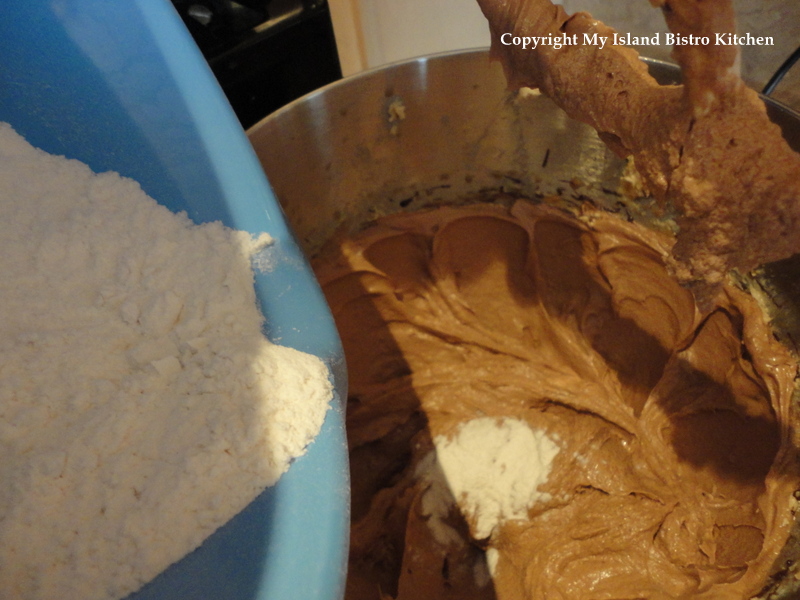
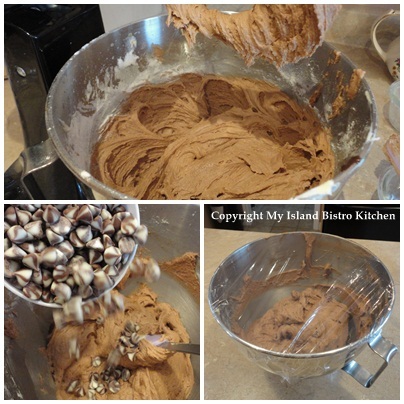
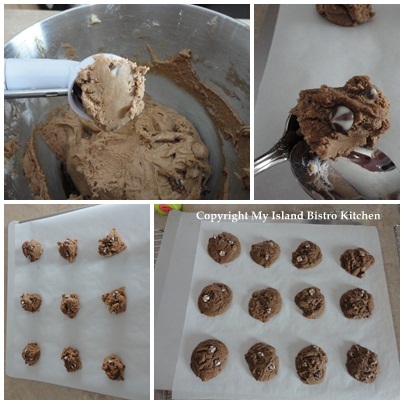

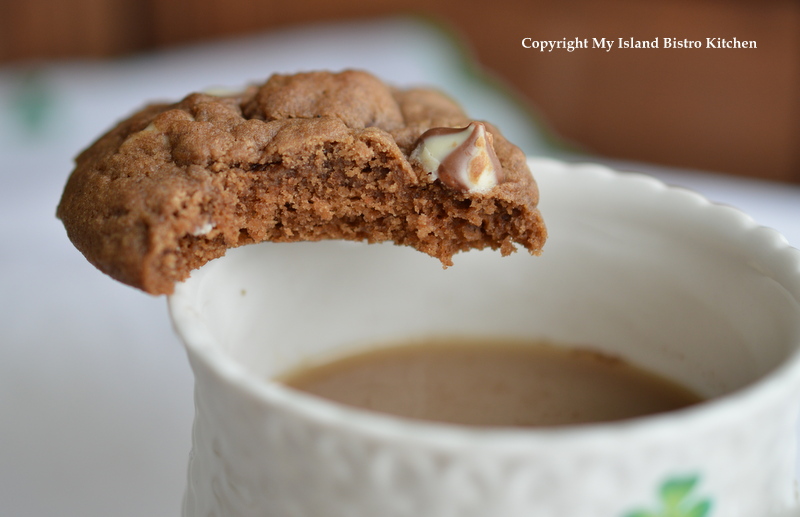


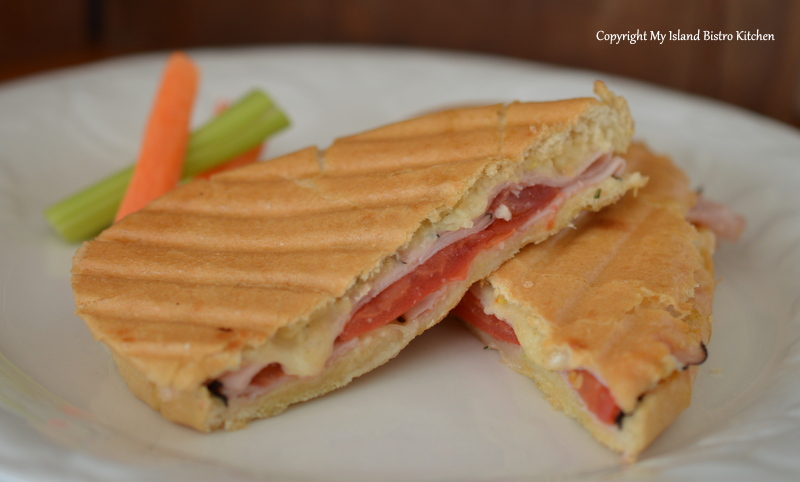

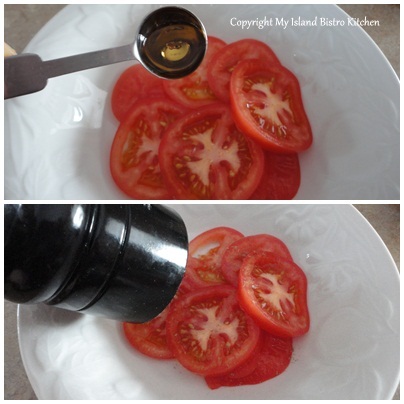
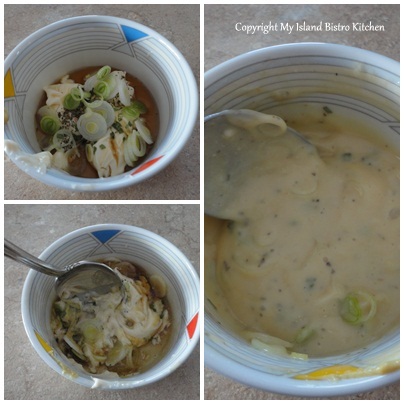
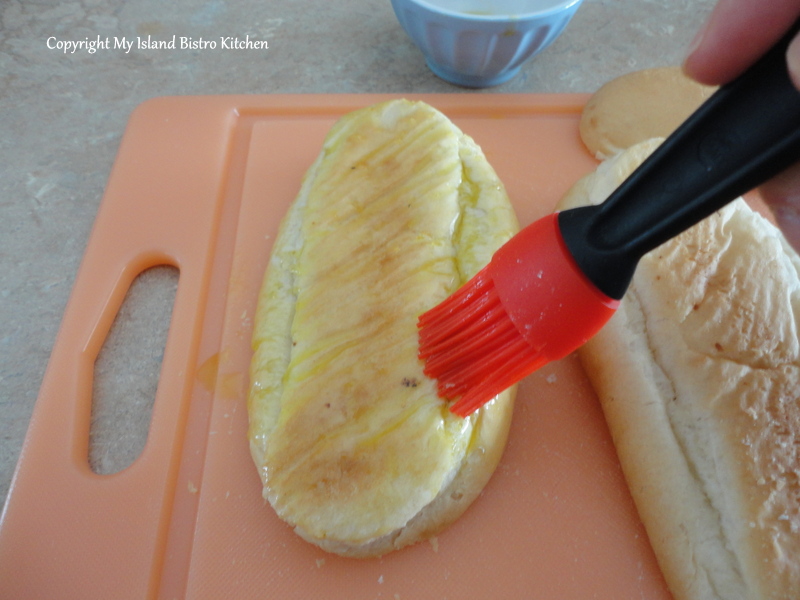
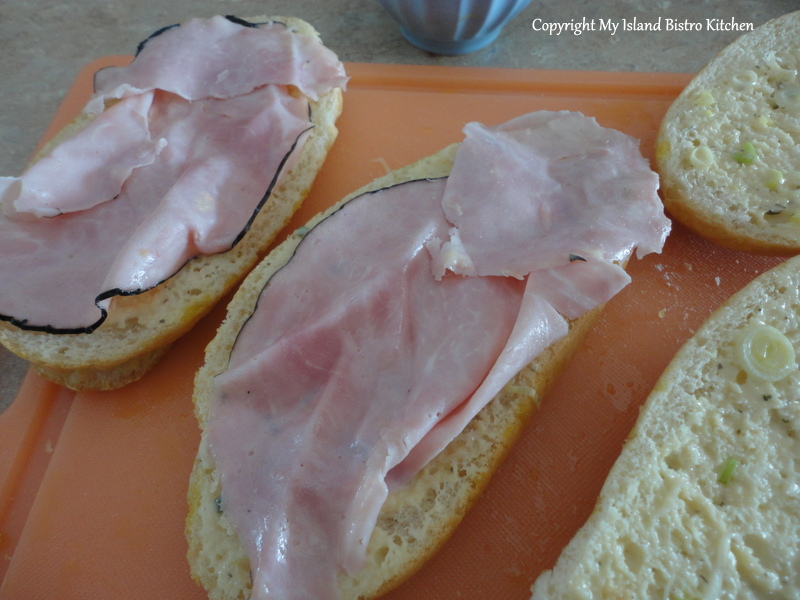
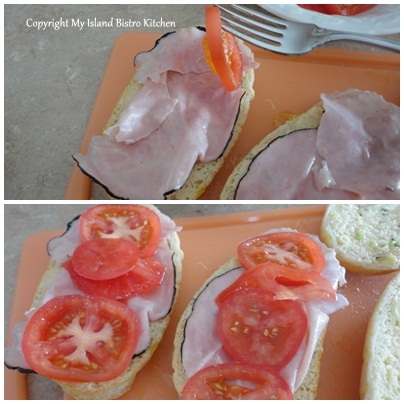
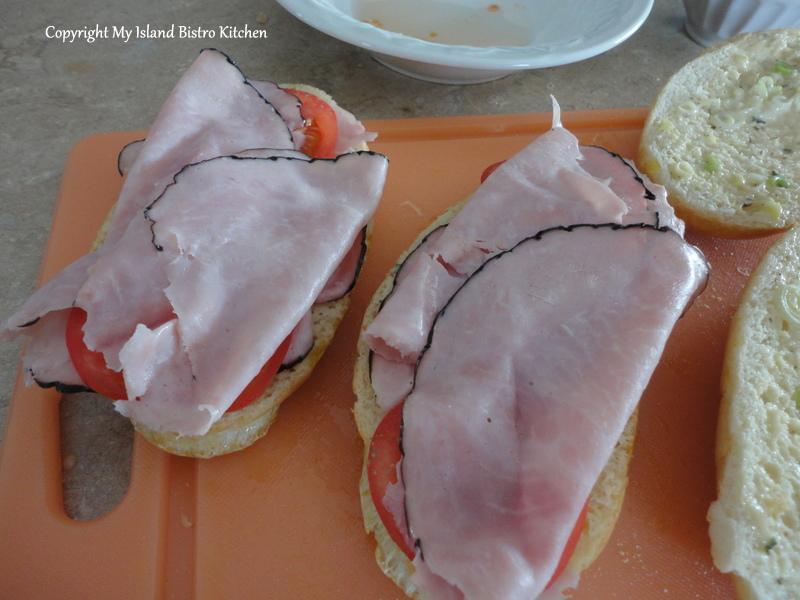
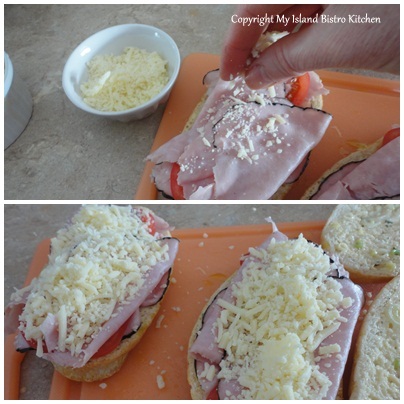

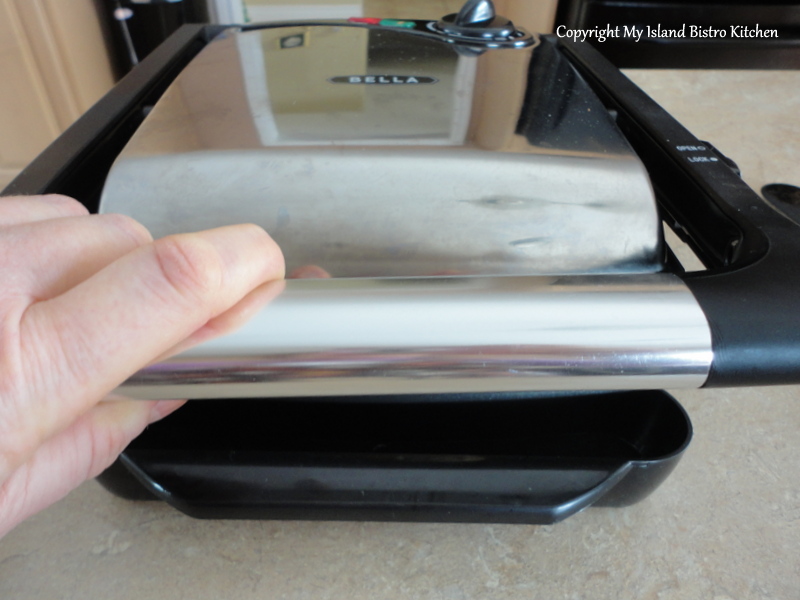


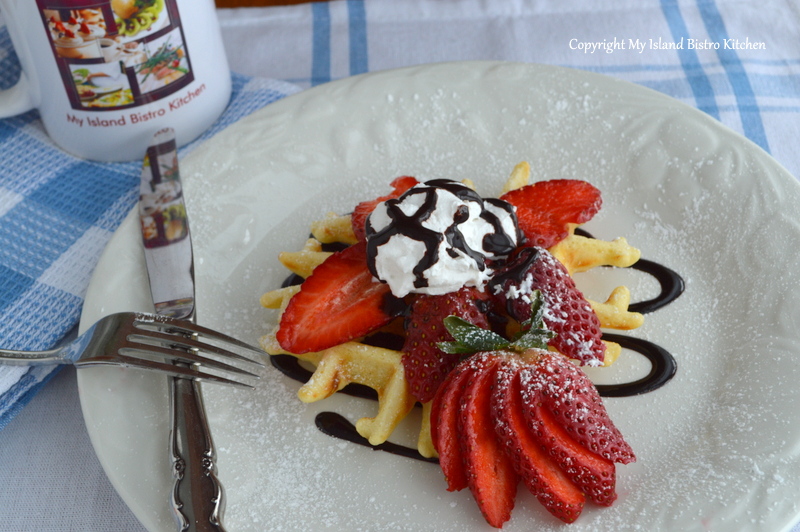
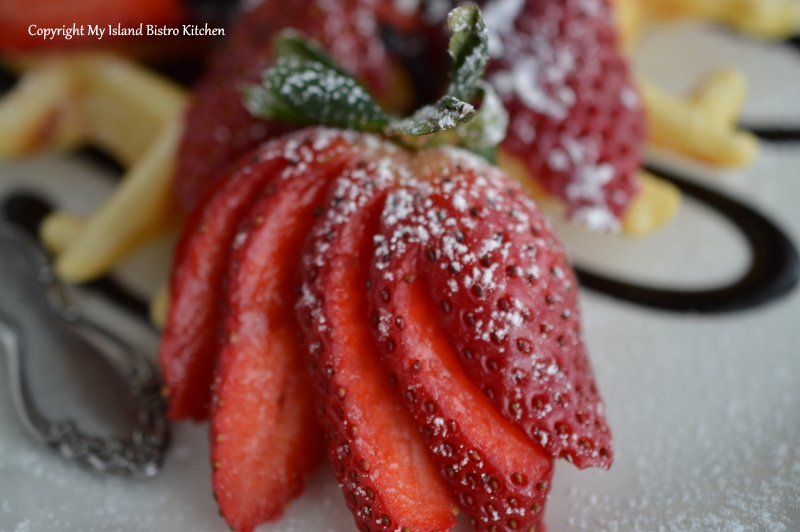
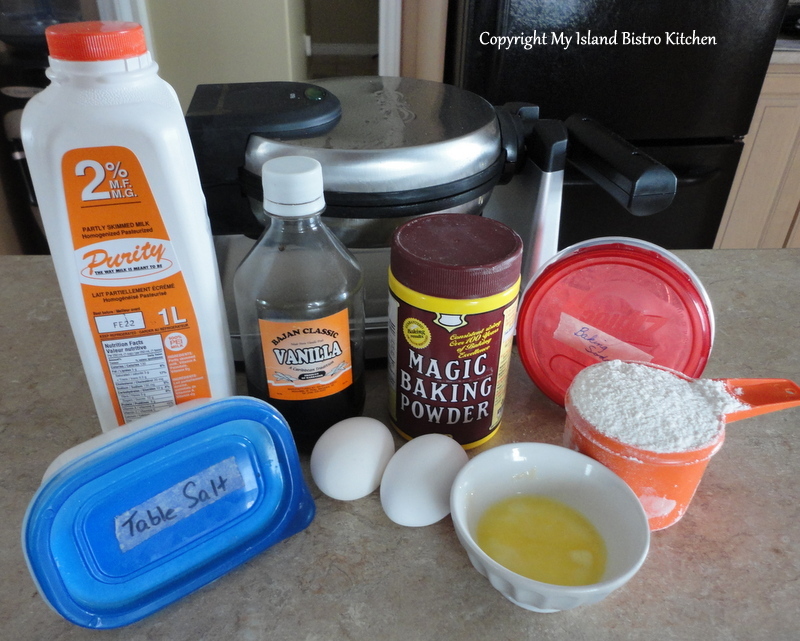
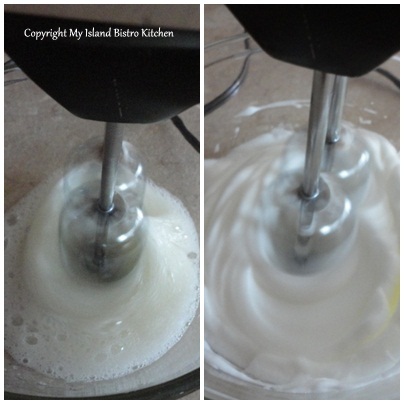
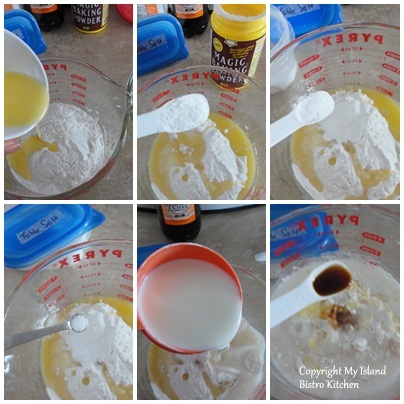
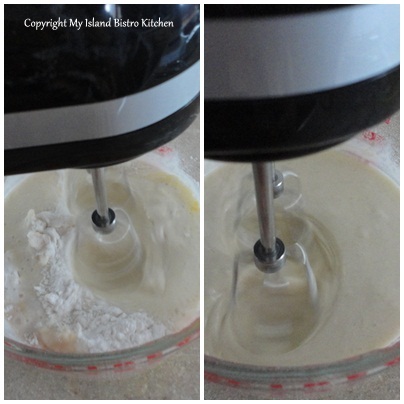
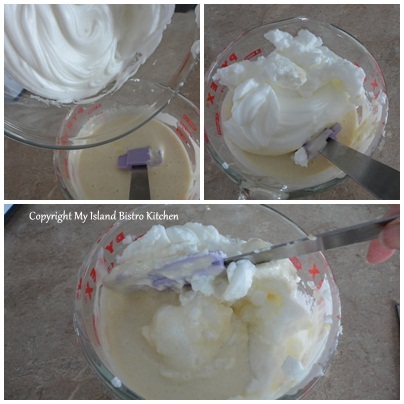

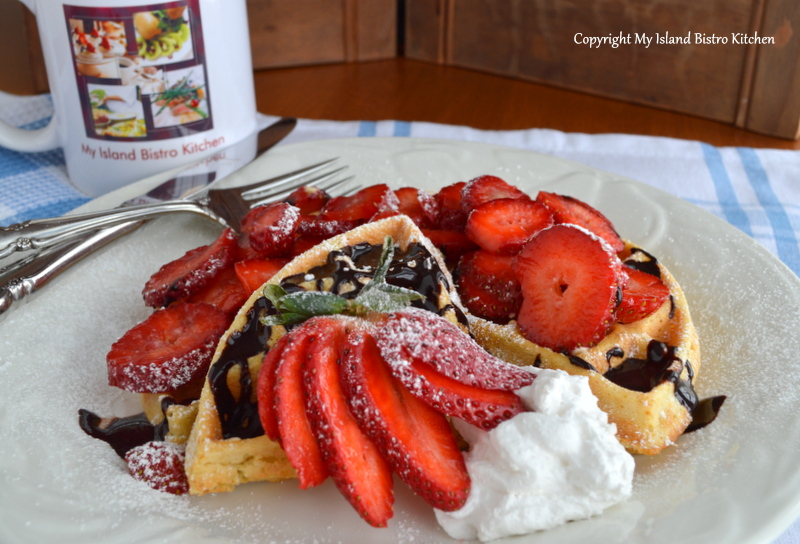


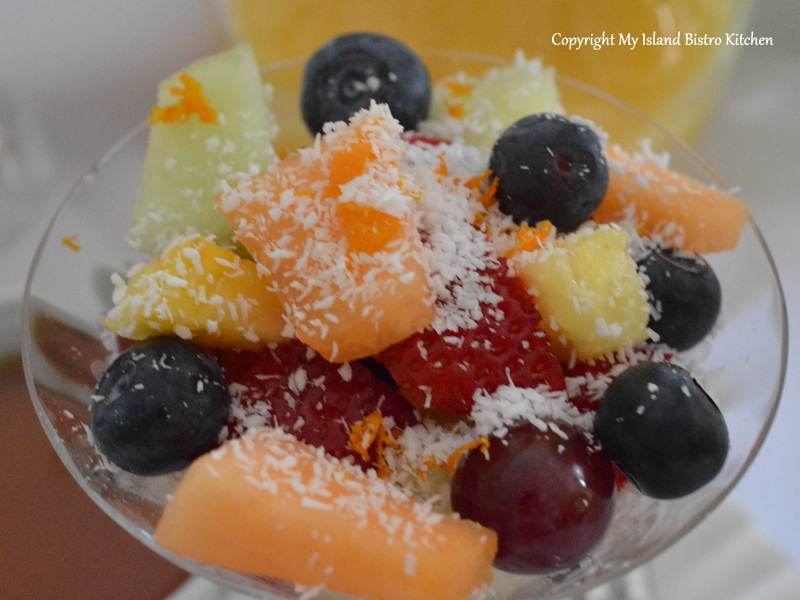


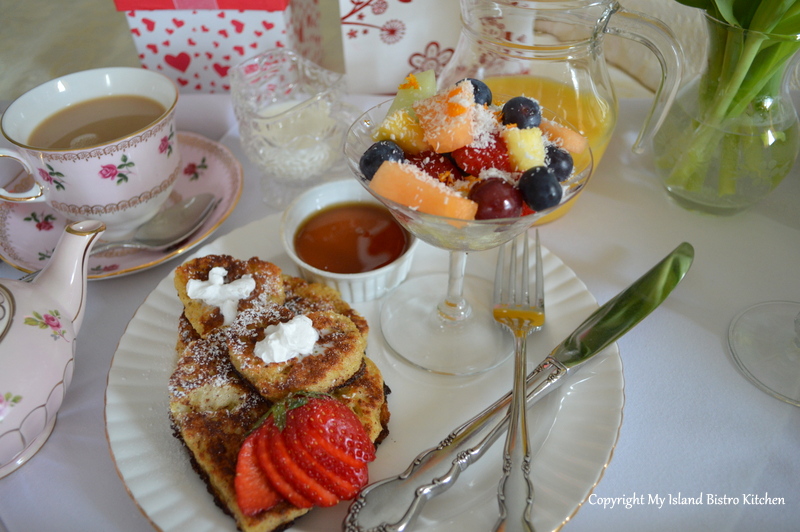


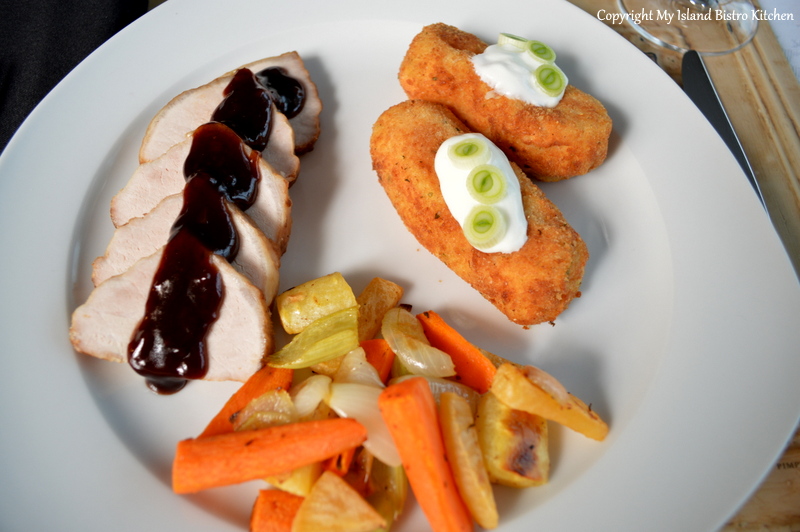
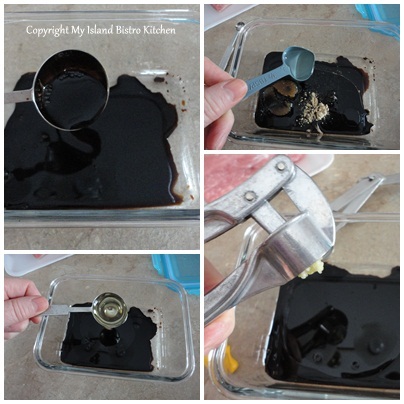
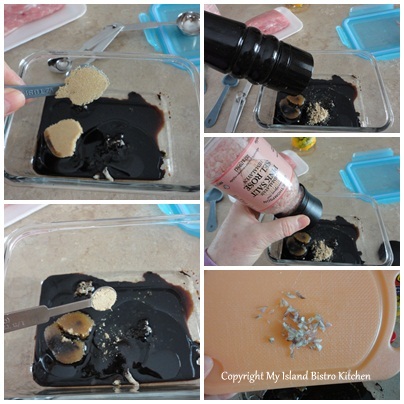
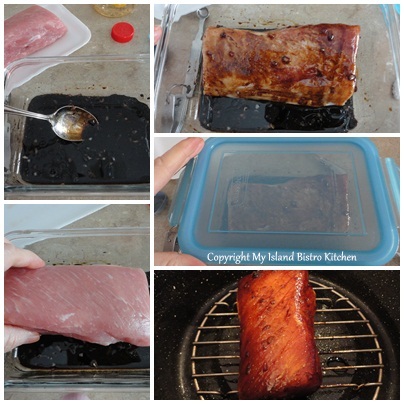
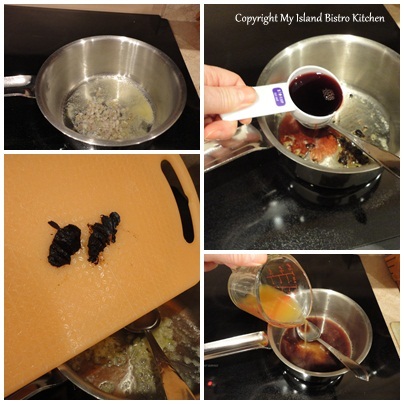
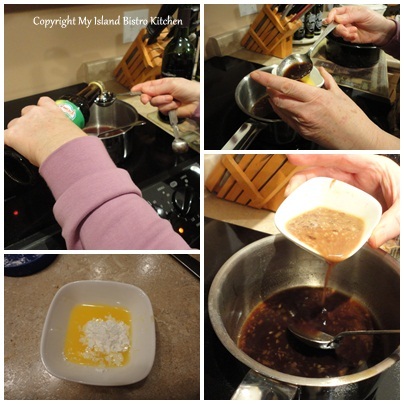
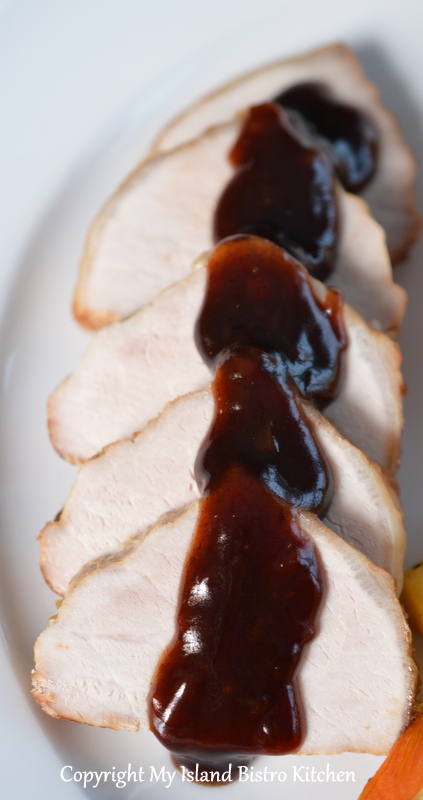

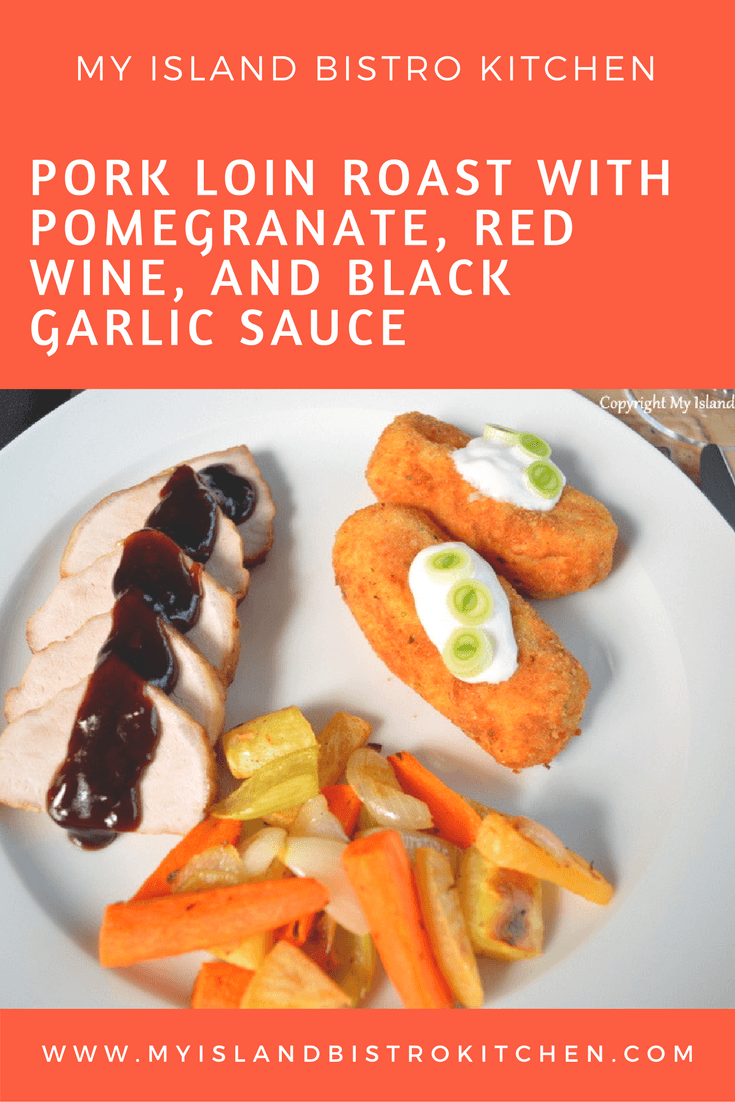
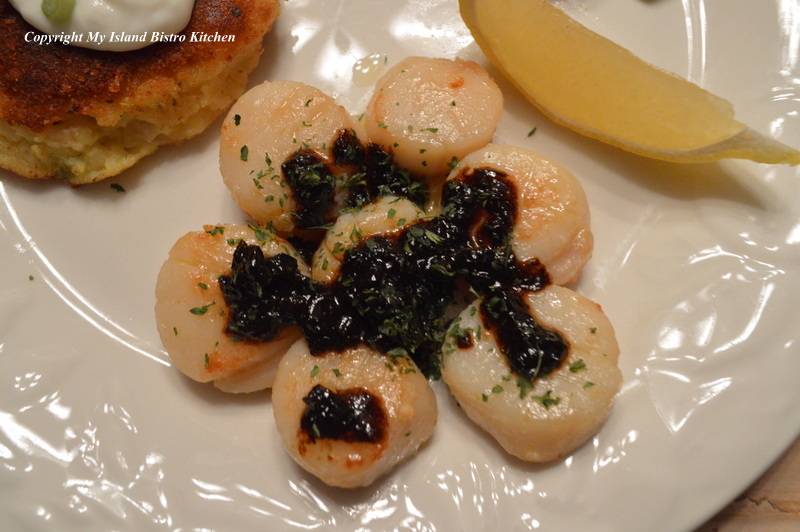
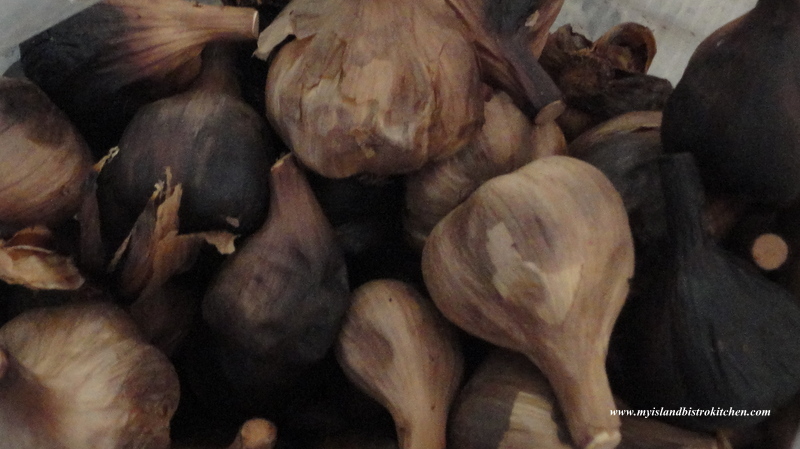

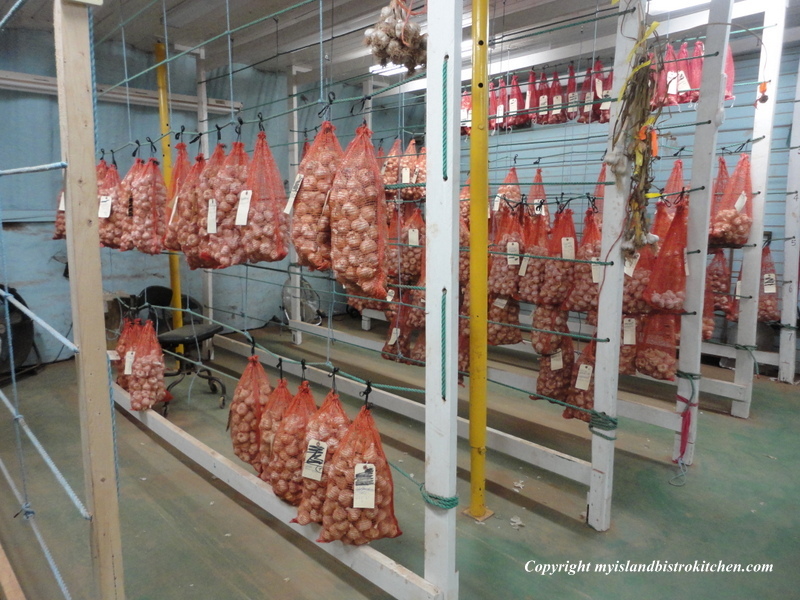
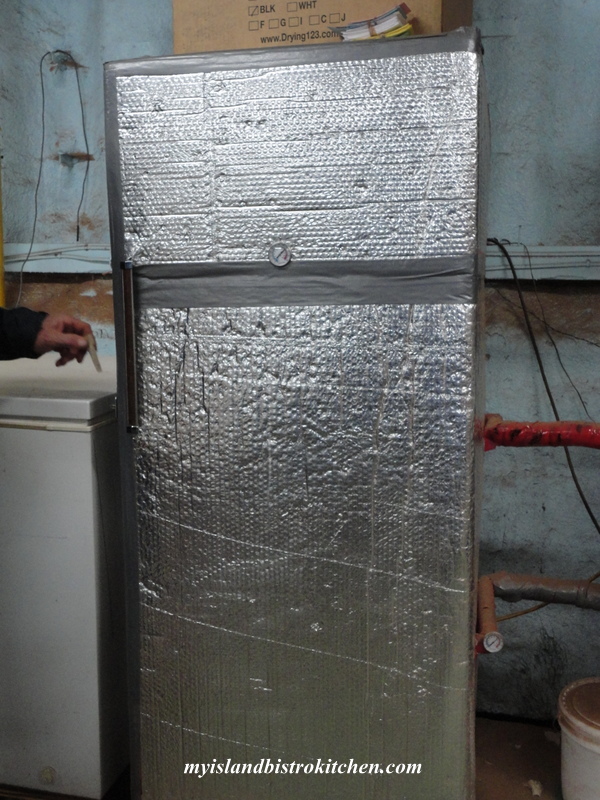
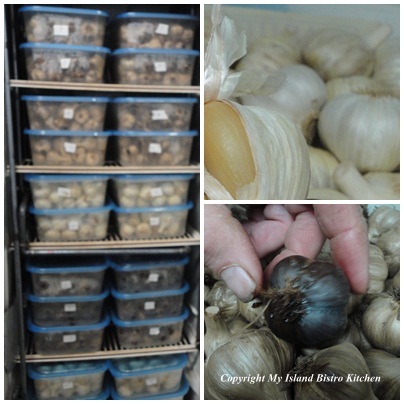
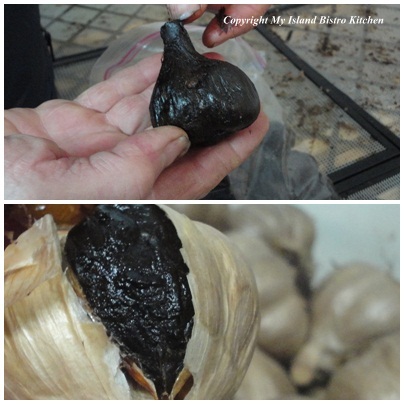
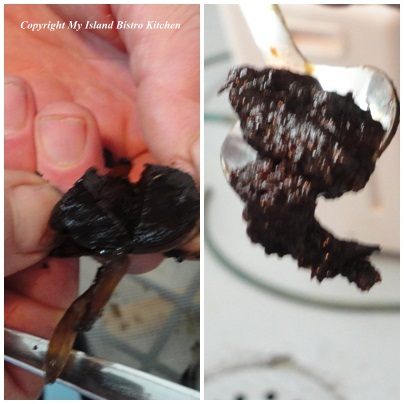
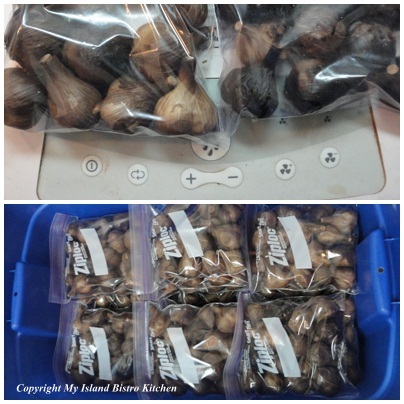
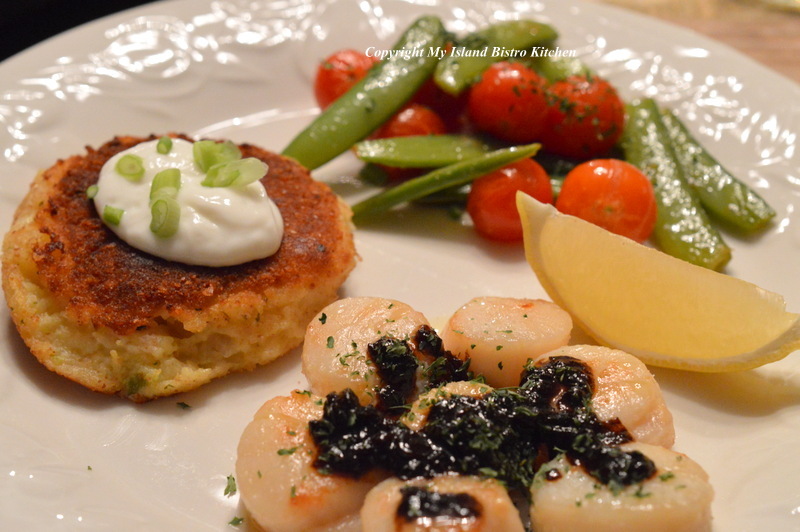
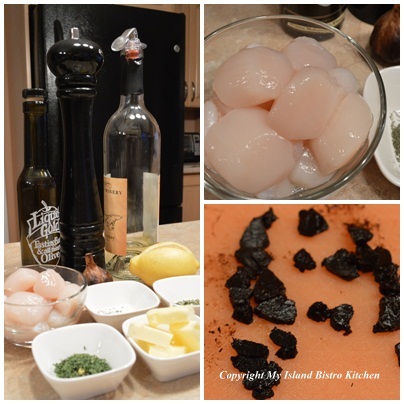
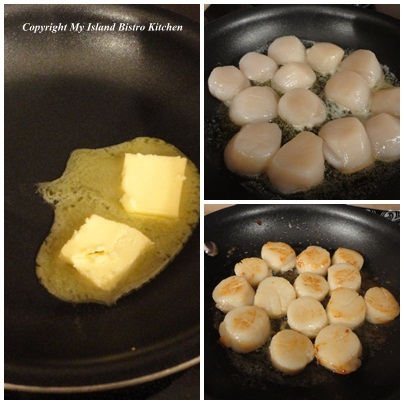
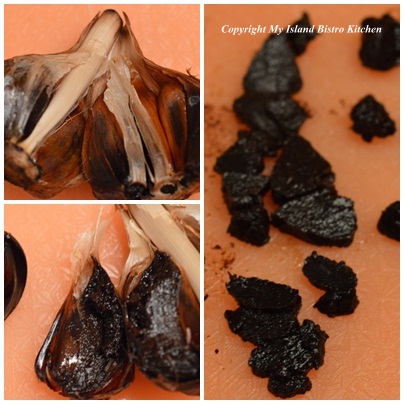
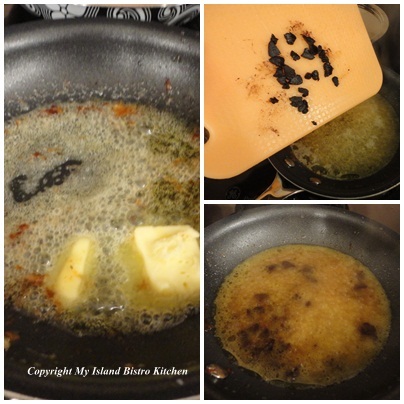
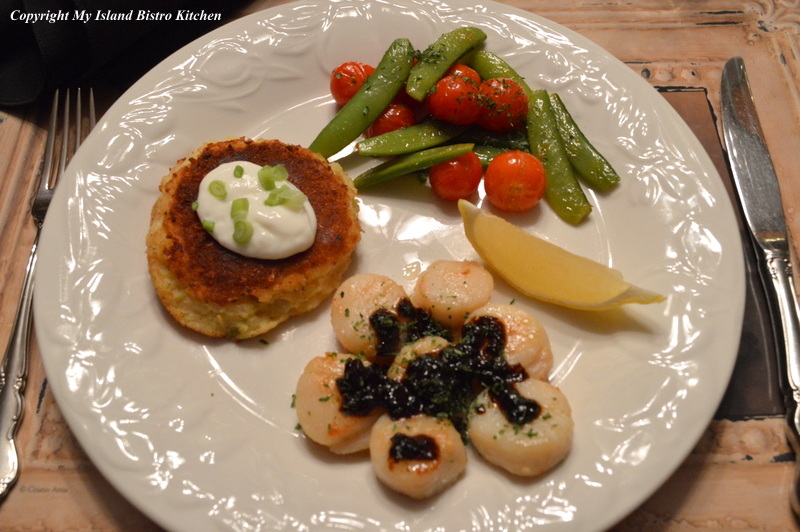


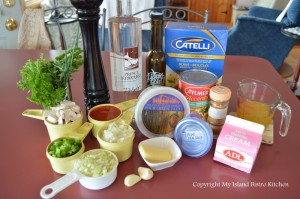 Heat oil and butter in large pot. Add onion, celery, green pepper, mushrooms, and garlic. Sauté 2-3 minutes over medium heat.
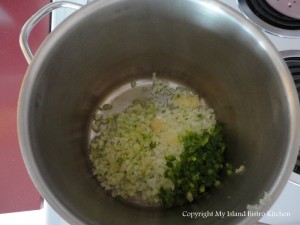 Add diced tomatoes, salt, and pepper. Simmer over low heat 5-7 minutes.
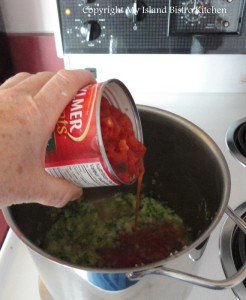 Whisk the corn starch with the cooled chicken stock until smooth.
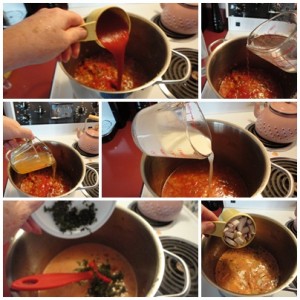 Stir tomato sauce, vodka, and chicken stock/cornstarch into mixture. Simmer 18-20 minutes, until slightly thickened.
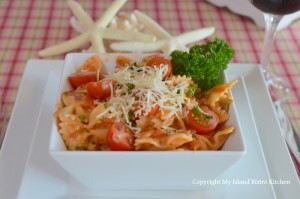 Stir in whipping cream, oregano, basil, chives, cayenne, red pepper flakes, and parsley. Simmer 7-10 minutes.


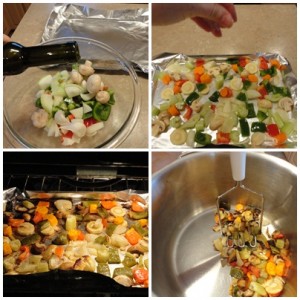 Preheat oven to 450 degrees. Cut vegetables into 1/2" - 1" pieces. Slice the parsnip slightly thinner. Place in a bowl and drizzle with olive oil, tossing to coat vegetables. Place on tin foil lined baking sheet. Sprinkle with sea salt and freshly ground pepper. Roast for about 40 minutes until vegetables are slightly fork tender and edges of vegetables start to char slightly. Peel garlic. Transfer vegetables and garlic to stock pot and, with a potato masher, loosely break up the vegetable chunks.
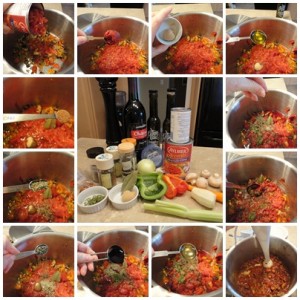 Add remainder of ingredients. Over medium-high heat, bring mixture to boil. Reduce heat and simmer over low heat for 45-50 minutes, stirring occasionally.
 Remove from heat and discard bay leaf. Using an immersion blender, purée sauce to desired consistency. (Alternatively, let mixture cool and transfer to food processor to purée.)
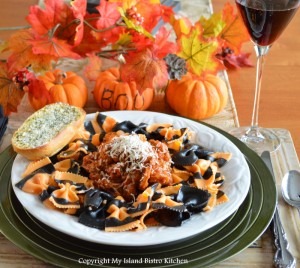 Toss with pasta (and meat, if using) or use as pizza sauce. Freezes well.
[Copyright My Island Bistro Kitchen]
Toss with pasta (and meat, if using) or use as pizza sauce. Freezes well.
[Copyright My Island Bistro Kitchen]