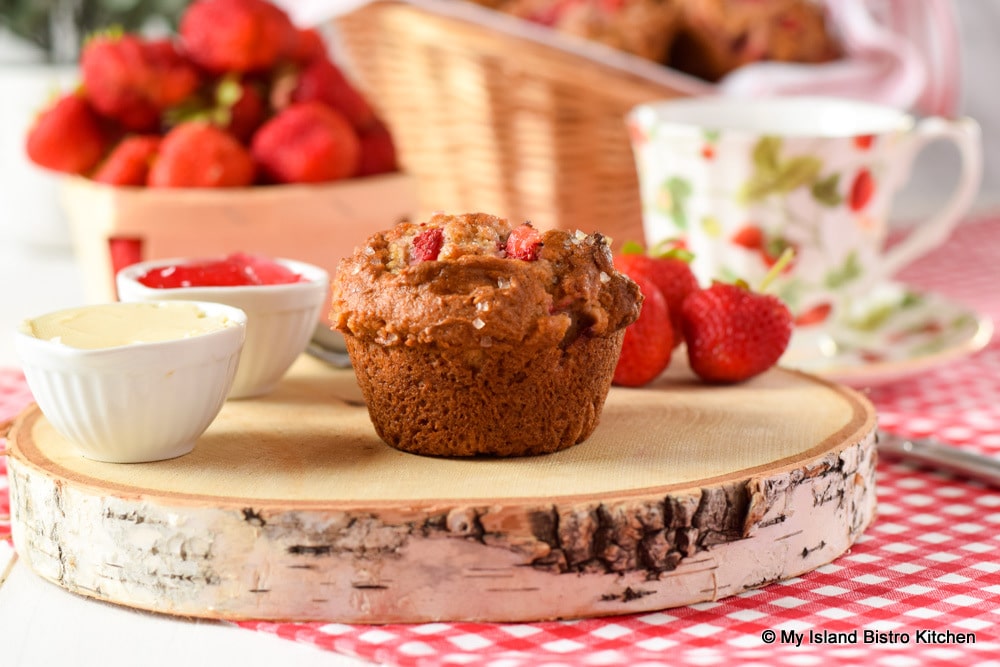
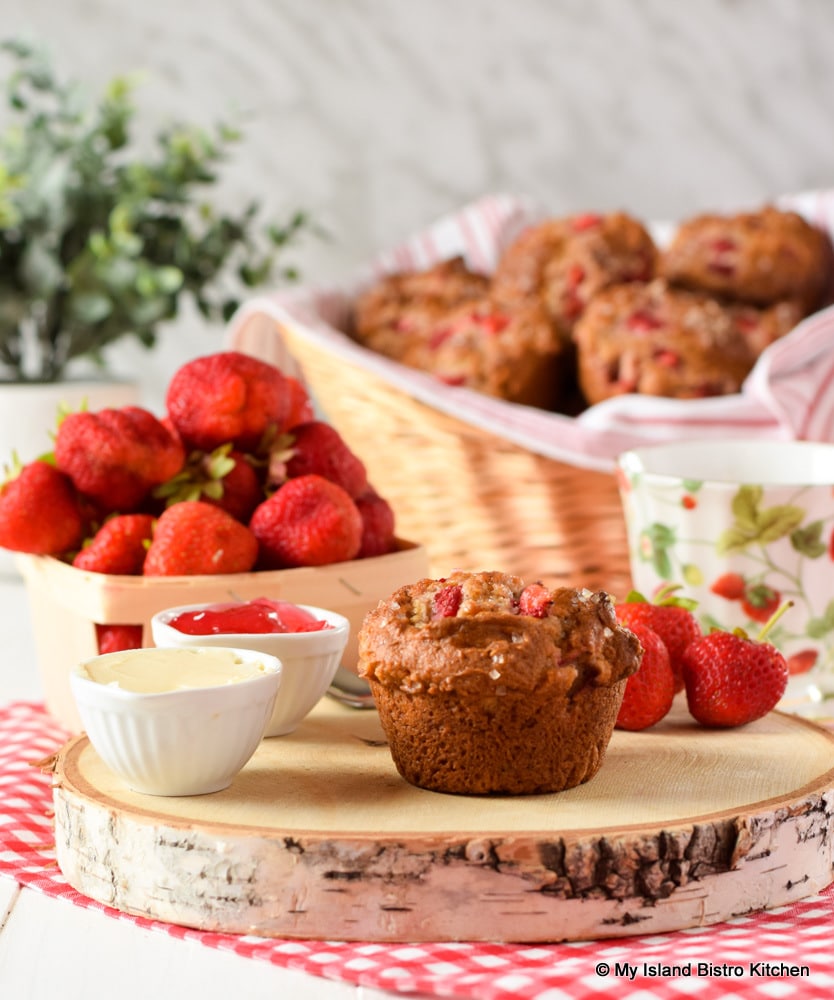
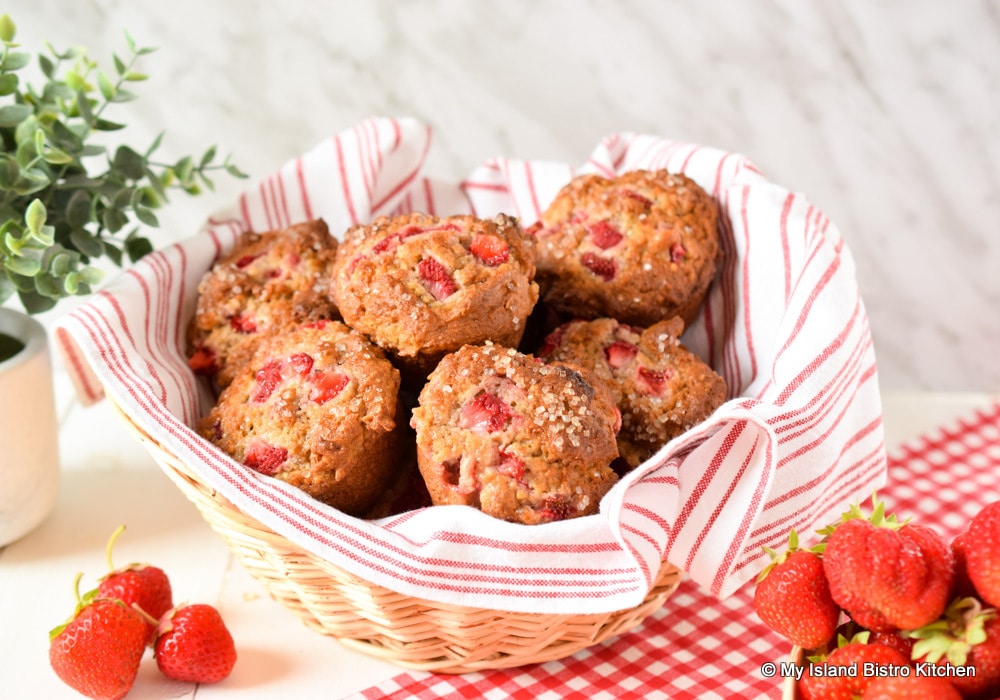
Achieving a recipe for gluten-free muffins that closely replicates wheat-based muffins can be a challenge. The good news is, however, that it is indeed possible as demonstrated by these tasty deli-style gluten-free strawberry muffins.
Gluten-free Strawberry Muffins
A large part of the challenge surrounds the right blend of gluten-free flours and starches and then finding the right combination and amount of wet ingredients since, as you probably know if you bake gluten-free, each gluten-free flour reacts differently to liquid ingredients. So, while the list of ingredients in my gluten-free muffin recipes may appear long, each ingredient is necessary when a tasty muffin is desired. Of course, I am always aiming to achieve a nicely dome-shaped muffin and one that has a lovely muffin-like texture, much the same as you would expect a muffin to be like when made with wheat flour.
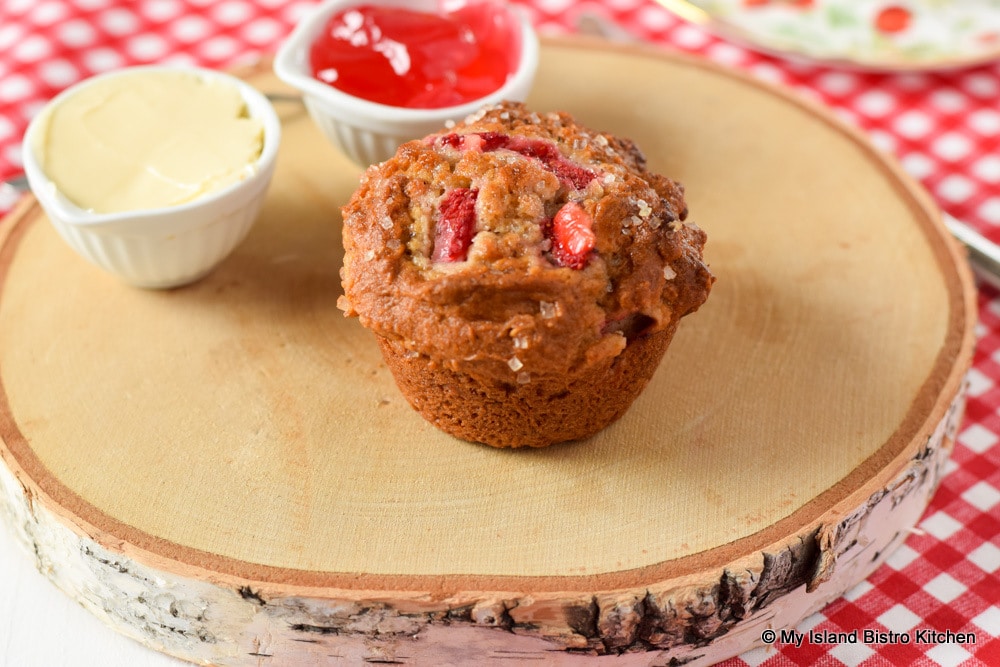
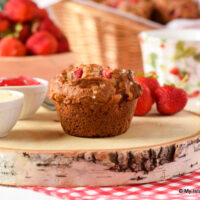
Gluten-free Strawberry Muffin
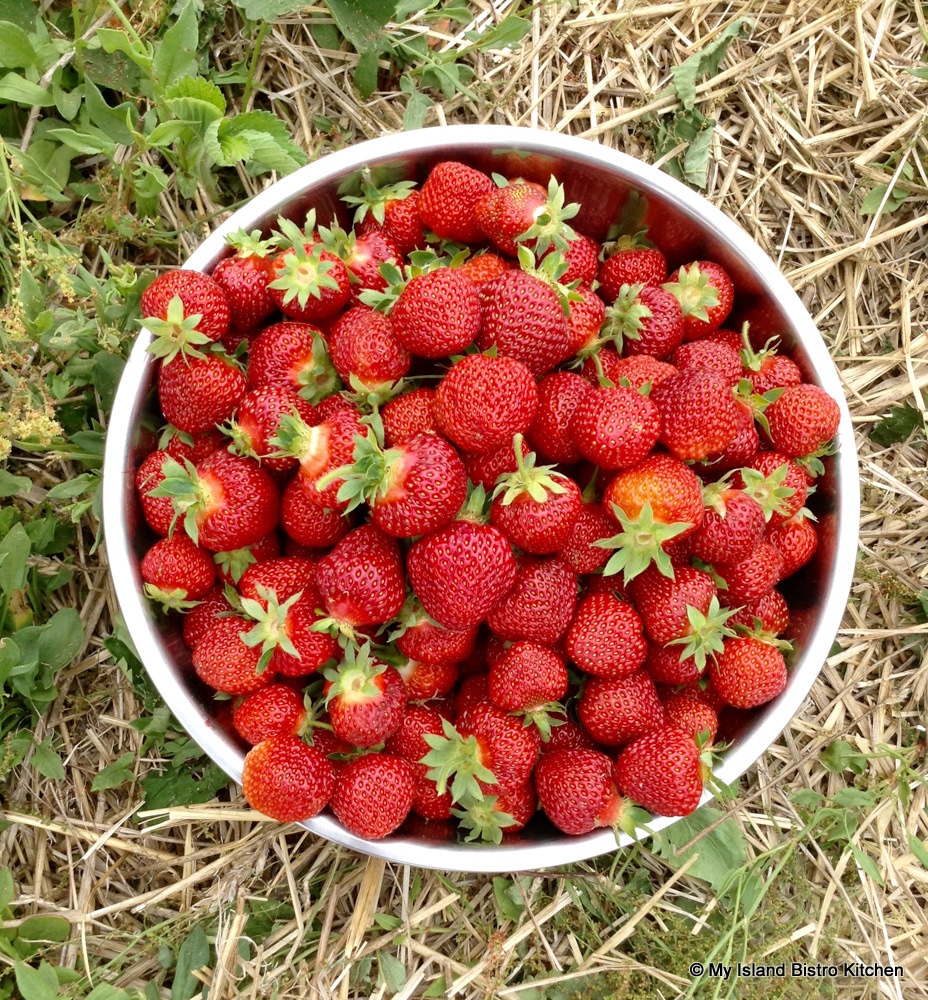
Today, fresh locally grown strawberries are my featured ingredients in muffins. The berries provide a lovely little burst of wonderful flavor in the muffins. I hope you enjoy them as much as I do!
Freshly Picked Strawberries
At the bottom of this posting, you will also find links to several other gluten-free muffin recipes I have developed.
Gluten-free Strawberry Muffins
[Printable recipe follows at end of post]
Gluten Free Strawberry Muffins
Ingredients:
¾ cup sorghum flour 1/3 cup gluten-free quick cooking rolled oats ¼ cup brown rice flour ¼ cup almond flour ¼ cup gluten-free oat flour 2½ tbsp potato starch 2 tbsp ground chia seeds 1 tbsp + ¾ tsp tapioca starch 1¾ tsp xanthan gum 1 tbsp baking powder ½ tsp baking soda ½ tsp salt ½ tsp cardamom 1/8 tsp ground nutmeg
½ cup light brown sugar, lightly packed 2 large eggs, room temperature, lightly beaten ¼ cup coconut oil 2 tbsp pure maple syrup (no artificial substitutions) 1½ tsp pure vanilla ½ cup Greek-style vanilla yogurt (or ¼ cup plain vanilla yogurt + ¼ cup sour cream) 2 tbsp whole milk mixed with ¼ tsp lemon juice (let sit 5 minutes before using)
1½ cups fresh strawberries, diced (apx. 8 oz)
3 – 4 tsp turbinado sugar (optional)
Method:
Set out the eggs, yogurt, and whole milk to bring them to room temperature. If using solid coconut oil, melt and cool it completely before proceeding with recipe.
Preheat oven to 475°F.
Prepare 12 muffin cups (each at least ½-cup capacity) by spraying each muffin cup with cooking spray or greasing individually.
Whisk the flours, rolled oats, starches, ground chia seeds, xanthan gum, baking powder, baking soda, salt, and spices together in a large bowl. Make a well in the center of the dry ingredients. Set aside.
In separate medium-sized bowl, or large measuring cup, whisk together the brown sugar, eggs, coconut oil, maple syrup, and vanilla. Stir in the yogurt and milk.
Pour wet ingredients into well in dry ingredients. With large spoon, mix ingredients together just until dry ingredients are fully incorporated. Do not overmix. Gently fold in 1 cup of the diced strawberries. Batter will appear very thick, stiff, and somewhat dry at this point. This is normal for this recipe.
Spoon batter into prepared muffin cups, filling each cup to the rim. Sprinkle remaining ½ cup of diced strawberries over the muffins and sprinkle each muffin with a few grains of turbinado sugar, if desired. Transfer muffins to pre-heated oven and immediately reduce oven temperature to 400°F. Bake for apx. 20 minutes, or until muffins are just firm to the touch and a cake tester inserted into center of a muffin comes out clean. Do not overbake or muffins will be dry. Remove from oven and let muffins rest in pan for 5 minutes then gently remove from pan and transfer to wire rack to cool completely.
Yield: 12 standard-sized muffins
Connect with My Island Bistro Kitchen on Social Media
Follow “the Bistro” on Pinterest at https://www.pinterest.ca/peibistro/ and pin the Pinterest-ready photo at the end of this posting to your favorite Pinterest boards!
2tbsppure maple syrup (no artificial substitutions)
1½tsppure vanilla
½cupGreek-style vanilla yogurt (or ¼ cup plain vanilla yogurt + ¼ cup sour cream)
2tbspwhole milk mixed with ¼ tsp lemon juice (let sit 5 minutes before using)
1½cupsfresh strawberries, diced (apx. 8 oz)
3 - 4tspturbinado sugar (optional)
Instructions
Set out the eggs, yogurt, and whole milk to bring them to room temperature. If using solid coconut oil, melt and cool it completely before proceeding with recipe.
Preheat oven to 475°F.
Prepare 12 muffin cups (each at least ½-cup capacity) by spraying each muffin cup with cooking spray or greasing individually.
Whisk the flours, rolled oats, starches, ground chia seeds, xanthan gum, baking powder, baking soda, salt, and spices together in a large bowl. Make a well in the center of the dry ingredients. Set aside.
In separate medium-sized bowl, or large measuring cup, whisk together the brown sugar, eggs, coconut oil, maple syrup, and vanilla. Stir in the yogurt and milk.
Pour wet ingredients into well in dry ingredients. With large spoon, mix ingredients together just until dry ingredients are fully incorporated. Do not overmix. Gently fold in 1 cup of the diced strawberries. Batter will appear very thick, stiff, and somewhat dry at this point. This is normal for this recipe.
Spoon batter into prepared muffin cups, filling each cup to the rim. Sprinkle remaining ½ cup of diced strawberries over the muffins and sprinkle each muffin with a few grains of turbinado sugar, if desired. Transfer muffins to pre-heated oven and immediately reduce oven temperature to 400°F. Bake for apx. 20 minutes, or until muffins are just firm to the touch and a cake tester inserted into center of a muffin comes out clean. Do not overbake or muffins will be dry. Remove from oven and let muffins rest in pan for 5 minutes then gently remove from pan and transfer to wire rack to cool completely.
Recipe Notes
Yield:12 standard-sized muffins
PIN ME TO PINTEREST!
For other Gluten-free Muffin Recipes from My Island Bistro Kitchen, click on the links below:
Tasty homemade macaroni and cheese that is both gluten-free and lactose-free is indeed possible! Gluten-free pasta has come a long way in its quality and I find the variety of lactose-free products is now reasonably extensive. I have created this recipe for Gluten-free and Lactose-free Macaroni and Cheese specifically to accommodate diets where both gluten and lactose intolerance are issues. Continue reading Gluten Free and Lactose Free Macaroni and Cheese→
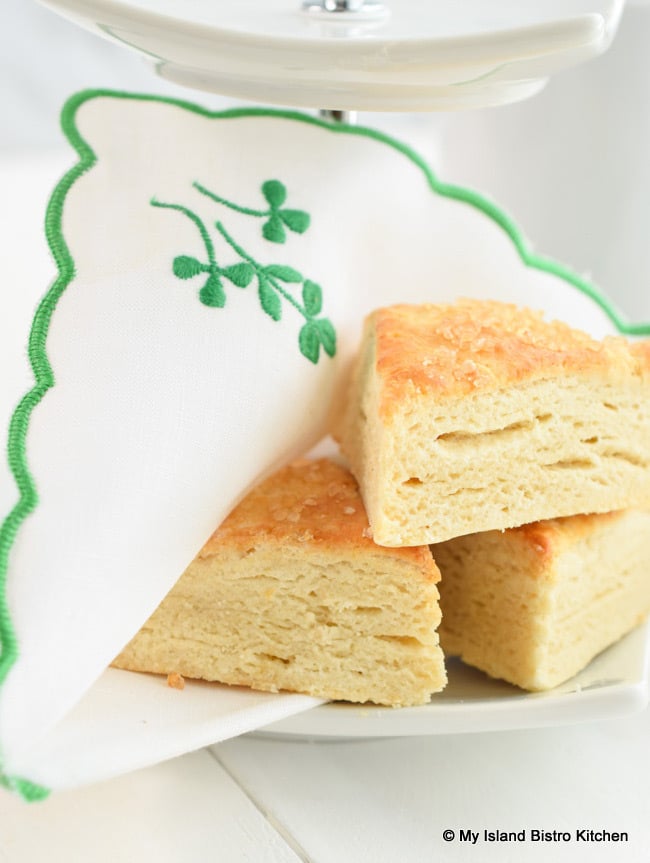
It can be a challenge to develop quality gluten-free baked products, especially if one compares them to their wheat-based counterparts. However, the good news is quality gluten-free baked goods are possible! I hope you find these gluten-free scones proof of that. Continue reading Gluten-free Scones Recipe→
I am not a fan of muffins that have a cake-type texture. I like the muffins, whether wheat-based or gluten-free, to be deli-or café-style, hearty, and generously sized. That’s exactly how I have created these tasty Gluten-free Blueberry Zucchini Muffins to be! Continue reading Gluten-free Blueberry Zucchini Muffins→
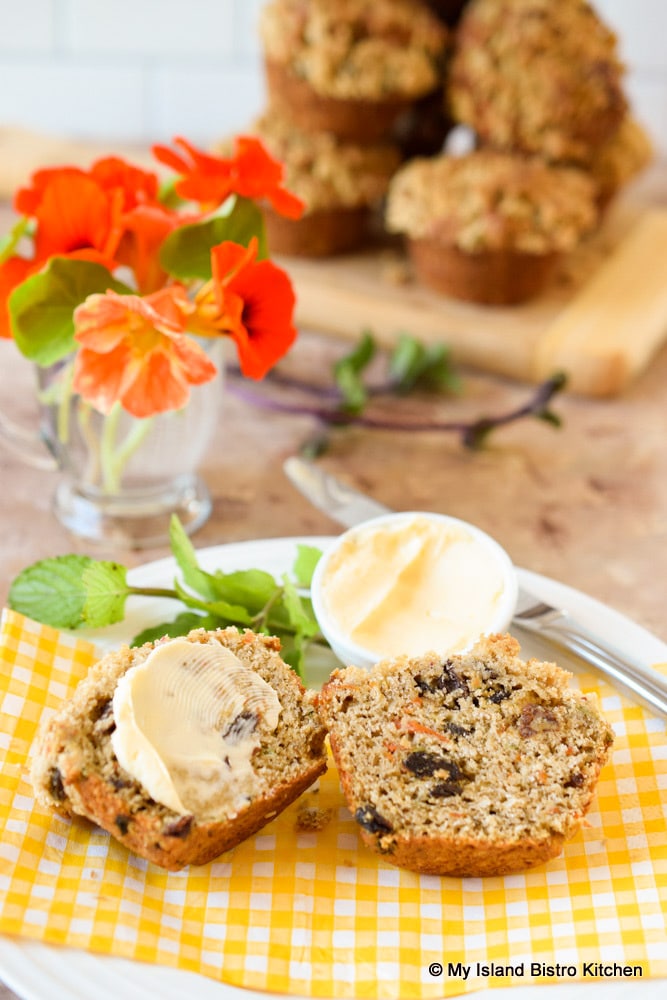
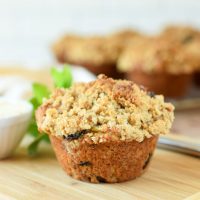
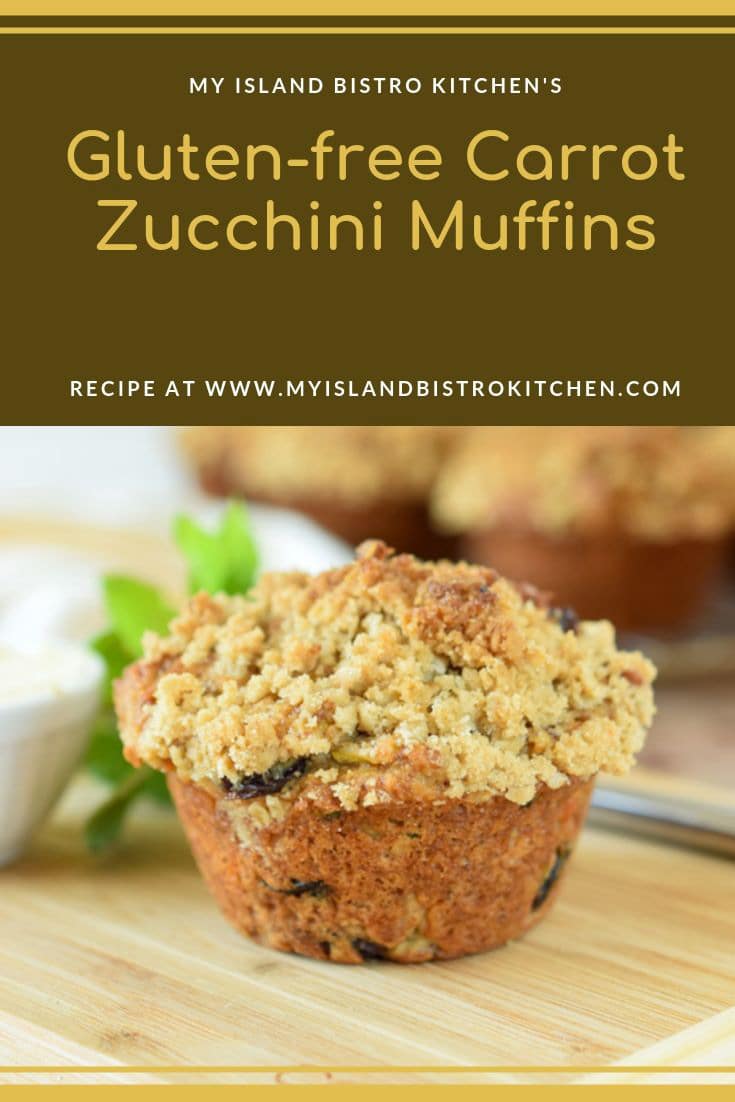
These Carrot Zucchini Muffins are so packed full of flavor! Even though they are gluten free, that should not be construed that any one who is not celiac or gluten-sensitive cannot eat them. In fact, I would be very surprised if anyone could guess they are gluten free!
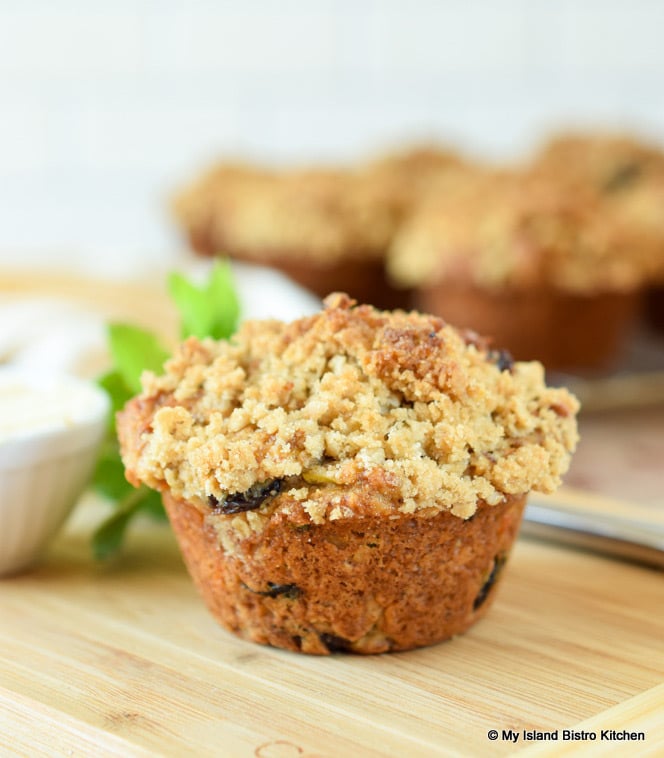
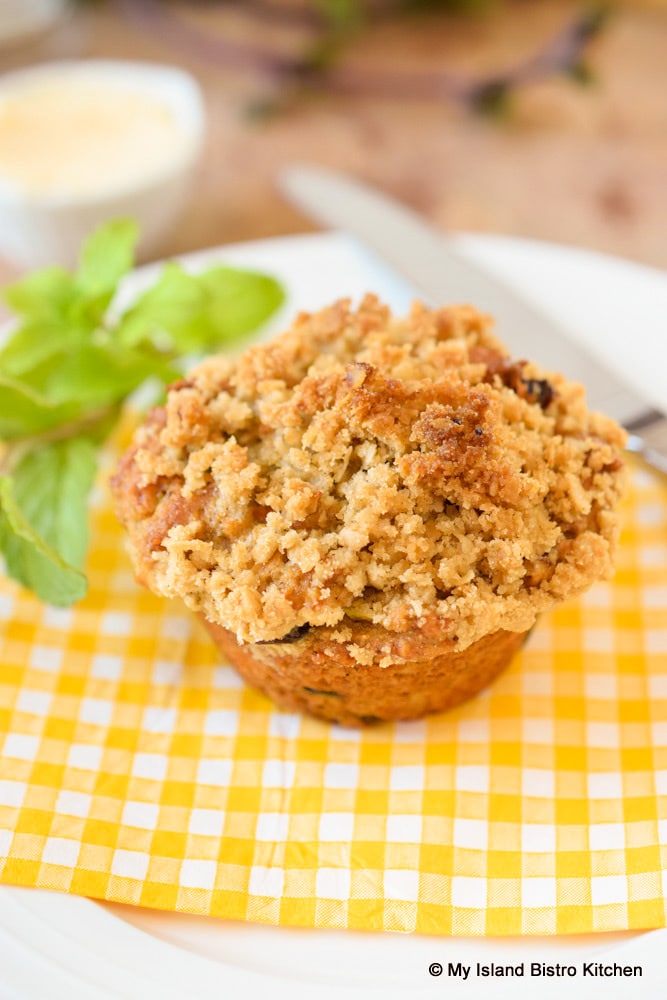
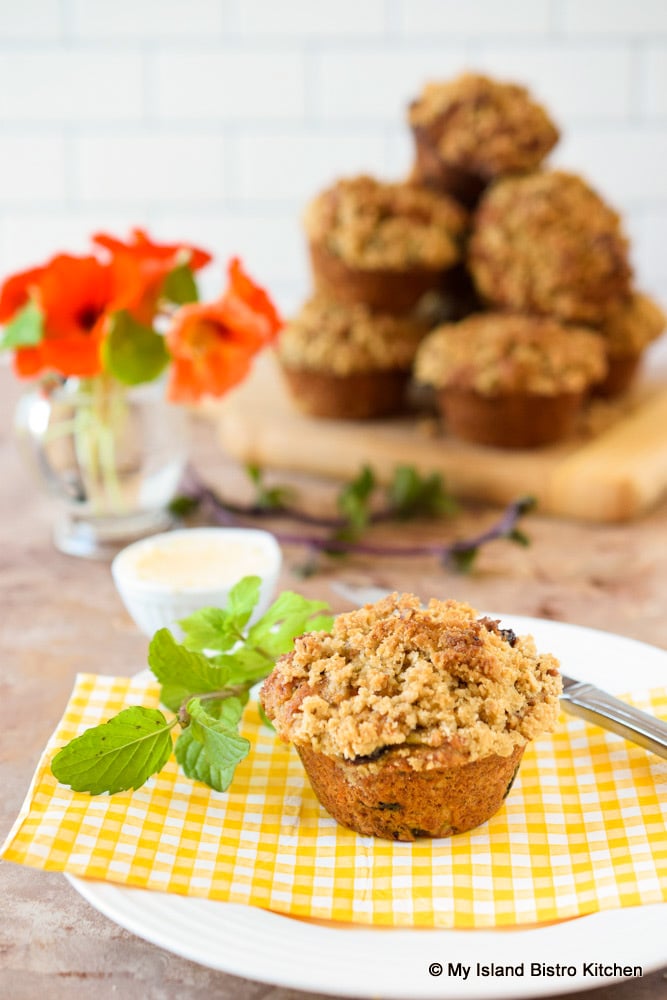
The muffins rise and dome beautifully into just the right contoured shape for a perfect muffin. Adding the streusel topping is such a treat on these muffins. It not only dresses them up and adds texture but it makes the muffins ever so tasty by adding additional flavor.
Gluten-free Carrot Zucchini Muffins with Streusel Topping
When I started developing gluten-free muffins, I soon discovered that, in order for them to closely replicate wheat-based muffins and have that deli quality I so desire in muffins, the gluten-free version takes a mixture of flours and starches. Simply using a gluten-free all-purpose flour or the cup-for-cup/1-to-1 flour will not substitute well for these muffins. The thing about gluten-free flours is that they each have their own unique properties and, for the most part, they cannot be substituted, cup-for-cup, for other flours. Nor, can an ingredient be left out without affecting the success of the baked good. Some flours, for example, absorb more liquid than others and that affects the amount of liquid ingredients required in a recipe.
Gluten-free Carrot Zucchini Muffins
From experience, I can say it takes several attempts at perfecting gluten-free baking with speciality flours. However, I have done that work for you, testing, and re-testing several times, each recipe I develop and publish to ensure it can be made with success in the kitchens of others, provided the baker follows my directions exactly, makes no ingredient substitutions, or leaves no ingredient out. Every ingredient (except maybe the spices) contributes to the batter consistency and texture of the finished product.
Gluten-free Carrot Zucchini Muffins
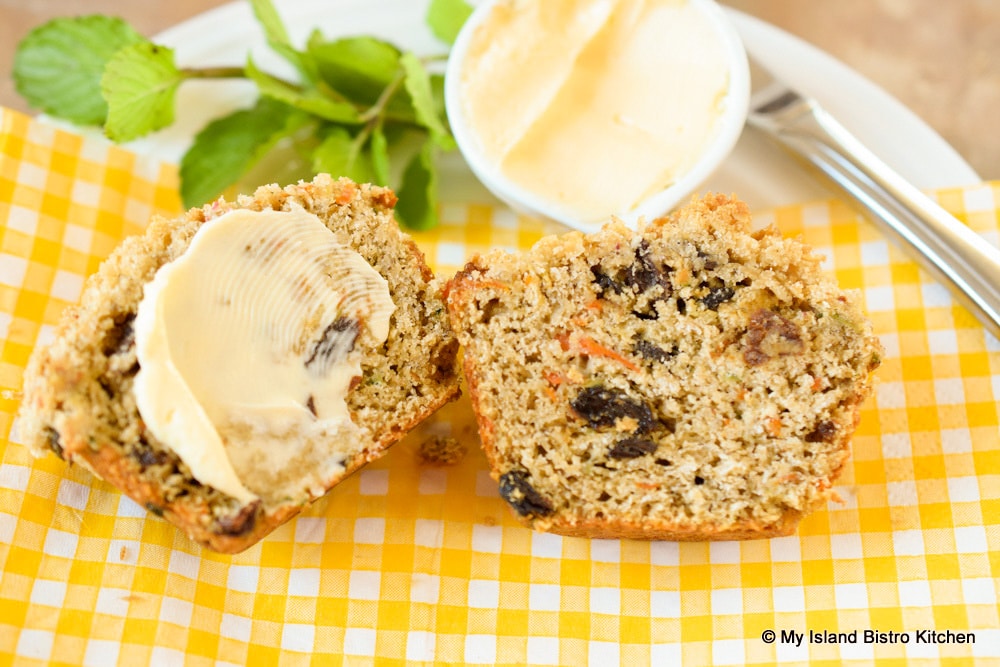
The Carrot Zucchini Muffins are a great way to add (hide!) vegetables into a muffin. Apart from their wonderful flavor, these two vegetables also add moisture to the batter.
Gluten-free Carrot Zucchini Muffins
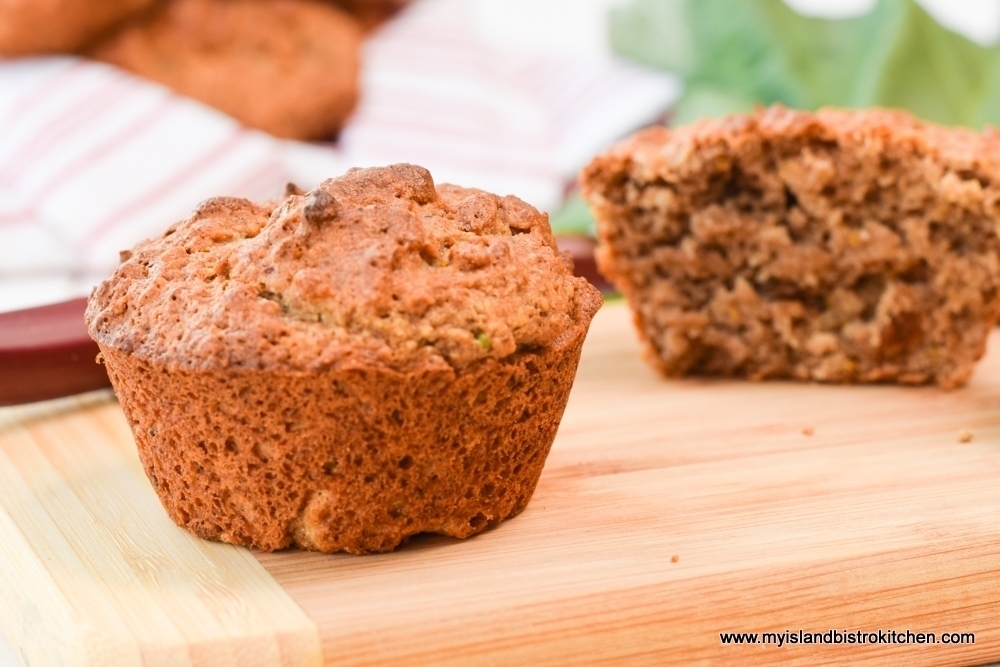
The texture of these Carrot Zucchini Muffins is moist and tender and the interior of the muffins show a somewhat coarse yet uniform interior crumb with small irregular air holes, characteristic of a well-constructed muffin.
[Printable recipe follows at end of posting]
Gluten Free Carrot Zucchini Muffins
Ingredients:
2/3 cup sorghum flour ½ cup gluten-free quick cooking rolled oats ¼ cup brown rice flour ¼ cup coconut flour ¼ cup + 2 tbsp oat flour 2½ tbsp potato starch 2 tbsp ground chia seeds 1 tbsp + ¾ tsp tapioca starch 1½ tsp xanthan gum 1 tbsp baking powder ½ tsp baking soda ½ tsp salt 1 tsp cinnamon 1/8 tsp ground nutmeg 1/8 tsp allspice Pinch cloves
½ cup light brown sugar 2 large eggs, room temperature, lightly beaten 1/3 cup coconut oil 2 tbsp pure maple syrup 1½ tsp vanilla ½ cup Greek style vanilla yogurt 2 tbsp whole milk ¾ cup shredded zucchini ¾ cup grated carrot
¾ cup raisins
Streusel Topping:
¼ cup sorghum flour ¼ cup brown sugar, packed 3 tbsp quick-cooking rolled oats 1/8 tsp cinnamon 2 tbsp cold butter
Method:
Set out the eggs, yogurt, and milk to bring them to room temperature. If using solid coconut oil, melt and let it cool to room temperature before proceeding with recipe. Shred the zucchini and grate the carrot.
Preheat oven to 475°F.
Prepare 12 muffin cups (each at least ½-cup capacity) by spraying each muffin cup with cooking spray or greasing individually.
Prepare streusel topping by combining the flour, brown sugar, rolled oats, and cinnamon together. Cut in the cold butter until mixture is crumbly. Set aside.
Combine flours, rolled oats, starches, ground chia seeds, xanthan gum, baking powder, soda, salt, and spices together in a large bowl. Whisk ingredients well to combine. Make a well in the center of the dry ingredients. Set aside.
In separate medium-sized bowl or large measuring cup, whisk together the brown sugar, eggs, coconut oil, maple syrup, and vanilla. Stir in the yogurt, milk, zucchini, and carrots.
Pour wet ingredients into well in dry ingredients. With large spoon, mix ingredients together just until dry ingredients are fully incorporated. Do not overmix. Fold in raisins.
Spoon batter into prepared muffin cups, filling almost to the rim of each cup. Sprinkle streusel mixture over tops of muffins. Transfer muffins to pre-heated oven and immediately reduce oven temperature to 400°F. Bake for apx. 20 minutes, or until muffins are just firm to the touch and a cake tester inserted into center of a muffin comes out clean. Do not overbake or muffins will be dry. Remove from oven and let muffins rest in pans for 5 minutes then gently remove from pan and transfer to wire rack to cool completely.
(and you can pin the Pinterest-ready photo(s) below to your favorite Pinterest boards)
Of course, by subscribing to receive an email notification of new posts and recipes, you can be among the first to know when I publish a new post or recipe. Simply enter your name and email address in the Subscription block over on the right-hand side of my home page.
Set out the eggs, yogurt, and milk to bring them to room temperature. If using solid coconut oil, melt and let it cool to room temperature before proceeding with recipe. Shred the zucchini and grate the carrot.
Preheat oven to 475°F.
Prepare 12 muffin cups (each at least ½-cup capacity) by spraying each muffin cup with cooking spray or greasing individually.
Prepare streusel topping by combining the flour, brown sugar, rolled oats, and cinnamon together. Cut in the cold butter until mixture is crumbly. Set aside.
Combine flours, rolled oats, starches, ground chia seeds, xanthan gum, baking powder, soda, salt, and spices together in a large bowl. Whisk ingredients well to combine. Make a well in the center of the dry ingredients. Set aside.
In separate medium-sized bowl or large measuring cup, whisk together the brown sugar, eggs, coconut oil, maple syrup, and vanilla. Stir in the yogurt, milk, zucchini, and carrots.
Pour wet ingredients into well in dry ingredients. With large spoon, mix ingredients together just until dry ingredients are fully incorporated. Do not overmix. Fold in raisins.
Spoon batter into prepared muffin cups, filling almost to the rim of each cup. Sprinkle streusel mixture over tops of muffins. Transfer muffins to pre-heated oven and immediately reduce oven temperature to 400°F. Bake for apx. 20 minutes, or until muffins are just firm to the touch and a cake tester inserted into center of a muffin comes out clean. Do not overbake or muffins will be dry. Remove from oven and let muffins rest in pans for 5 minutes then gently remove from pan and transfer to wire rack to cool completely.
Making gluten-free muffins can have its challenges! Getting the right blend of flours, enough rising power to achieve the perfect contoured muffin tops, and the right balance of liquid to dry ingredients, and that’s all before getting a great flavour and texture. Good news, though, I have perfected a great flour blend for these Banana Date Muffins and have worked out the necessary ratios of wet to dry ingredients to accommodate the properties of gluten-free flours! Continue reading Gluten-free Banana Date Muffins→
Today, I am sharing my recipe for a real old-fashioned type of dessert – Rhubarb Pudding Cake. The cake is “self-saucing” which means that the delectable sauce forms underneath the simple cake batter as the cake bakes. It’s an “all-in-one” pudding and cake! It may not be the most extravagant looking dessert but it sure is mighty tasty! If you are a rhubarb lover, you will love this dessert. Continue reading Old-fashioned Rhubarb Pudding Cake→
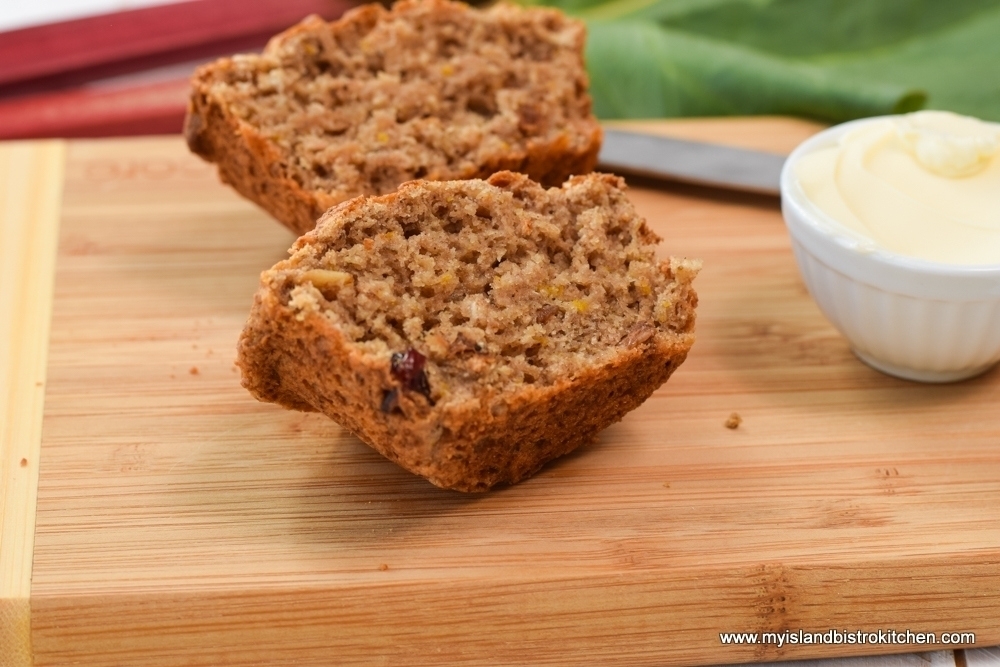
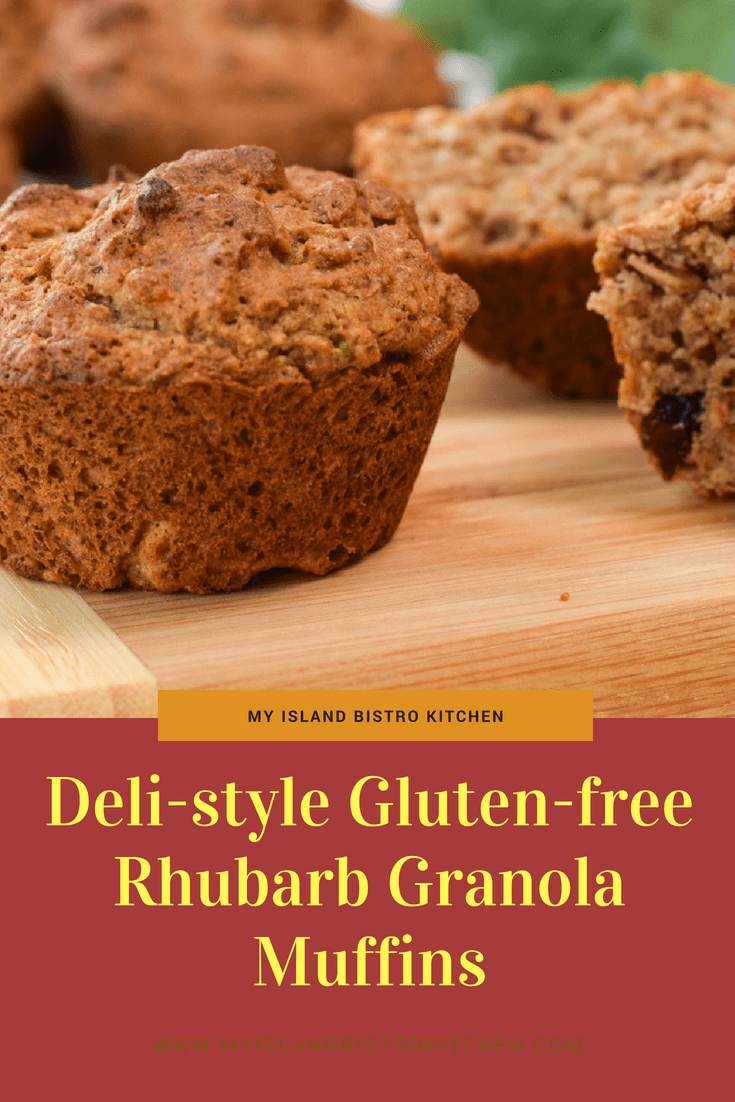
I love the produce our garden generates and its earliest treat is rhubarb. It is so versatile and I make lots of recipes using rhubarb. Today, a treat for my gluten-free diet followers — a new recipe for deli-style gluten-free Rhubarb Granola Muffins.
Deli-style Gluten-free Rhubarb Granola Muffins
There are many recipes for rhubarb muffins but many of them call for chopped rhubarb. Rhubarb has a lot of water content and cooks fast when used in chopped form in baking goods. This extra water content can cause some baked goods to turn out soggy, particularly in the areas where the rhubarb chunks land. To combat this problem, for this recipe, I cook the rhubarb then mash, or purée, it with a hand-held immersion blender. I then use the mashed/puréed rhubarb as part of the liquid content in the muffin batter. So, I still get rhubarb muffins but without the wet soggy spots.
When I make muffins, I like them to be deli- or café-style which is to say I’m looking for muffins that are a reasonable size, are hearty, have a lovely texture with a coarse crumb (not cake-like), and are filled with flavour.
Deli-style Gluten-free Rhubarb Granola Muffins
Muffins are, for lack of a better way of putting it, little individual quick breads. We all know that, appearance-wise, the perfect muffin should bear a slightly domed top that has a bit of firmness to it. There are a combination of factors that will contribute to that desired result — the right amount of leavening, the consistency of the batter, and the oven temperature.
Deli-style Gluten-free Rhubarb Granola Muffins
Rhubarb is, by nature, tart. However, it is important not to over-do the sugar content in the muffins because too much sugar will create a cake-like texture and the moist, open tender crumb, which is a hallmark feature of muffins, will be lost and you will end up with a product that more closely resembles a cupcake. A batter that is too runny will pose the risk of muffins that will rise to form stiff mountain peaks. Adding some Greek yogurt to the batter is one way to thicken it up and reduce this risk. Of course, the addition of the right proportions of leavening (baking powder and baking soda) are key. Having the muffins go into a really hot oven to start them baking is also key to getting a lovely gentle dome on the muffin tops. Using the high temperature allows the outside of the muffin to quickly set while still allowing the inside to continue to rise.
Since I have been developing gluten-free muffins, one thing I have discovered is that I end up with better quality, deli-style muffins when I use a blend of gluten-free flours versus, say, one all-purpose flour or only the one-to-one gluten free flour. Each gluten-free flour has its own unique qualities and properties and the right blend will provide structure, texture, and flavour to the muffins. The addition of granola to these muffins adds texture, flavour, and bulk to the muffins, making them more hearty and filling.
Deli-style Gluten-free Rhubarb Granola Muffins
[Printable recipe follows at end of posting]
Gluten Free Rhubarb Granola Muffins
Ingredients:
3½ oz rhubarb, chopped into ½ inch pieces 1½ tbsp orange juice
1 cup one-to-one gluten-free flour 2 tbsp potato starch ¼ cup gluten-free oat flour ¼ cup almond flour ¼ cup coconut flour ¾ tsp xanthan gum ¼ cup gluten-free quick oats 5½ tsp baking powder ½ tsp baking soda ½ tsp salt 1½ tbsp ground chia seeds 1¾ tsp cinnamon ¼ tsp cloves ½ tsp nutmeg 1/8 tsp ginger ¼ tsp allspice 2 tsp finely grated orange rind 2/3 cup granola
2/3 cup light brown sugar, lightly packed 2 extra-large eggs, room temperature, lightly beaten ¼ cup coconut oil, melted and cooled 1½ tsp vanilla 1½ tbsp orange juice ½ cup whole milk 2 tbsp pure maple syrup 1/3 cup cooled rhubarb purée 2 tbsp Greek style coconut yogurt or sour cream 1½ tsp rose water (optional)
Method:
In small sauce pan, combine the rhubarb and orange juice. Cook over medium-low heat until rhubarb is softened. Cool slightly then, using the back of a large spoon, mash up the rhubarb or, alternatively, use a handheld immersion blender to purée the rhubarb. Set aside to cool completely.
Preheat oven to 450°F.
Prepare 12 muffin cups (each ½-cup capacity) by spraying each muffin cup with cooking spray or greasing individually.
Combine flours, xanthan gum, quick oats, baking powder, soda, salt, ground chia seeds, spices, and grated orange rind together in a large bowl. Whisk ingredients well to combine. Stir in granola. Make a well in the center of the dry ingredients. Set aside.
In separate medium-sized bowl or large measuring cup, whisk together the brown sugar, eggs, coconut oil, vanilla, orange juice, milk, maple syrup, Greek yogurt or sour cream, and rose water (if using). Whisk ingredients well. Stir in cooled rhubarb purée.
Pour wet ingredients into well in dry ingredients. With large spoon, mix ingredients together just until dry ingredients are fully incorporated. Do not overmix.
Spoon batter into prepared muffin cups, filling almost to the rim of each cup. Transfer to pre-heated oven and immediately reduce oven temperature to 400°F. Bake for 20-22 minutes, or until muffins are just firm to the touch and a cake tester inserted into center of a muffin comes out clean. Do not overbake or muffins will be dry. Remove from oven and let muffins rest in pans for 5-7 minutes then gently remove from pan and transfer to wire rack to cool completely. Muffins freeze well.
Recipe Notes
Link to granola recipe: https://myislandbistrokitchen.com/2016/03/08/the-bistros-great-nut-free-granola/
For other gluten-free muffin recipes from My Island Bistro Kitchen, click on the links below:
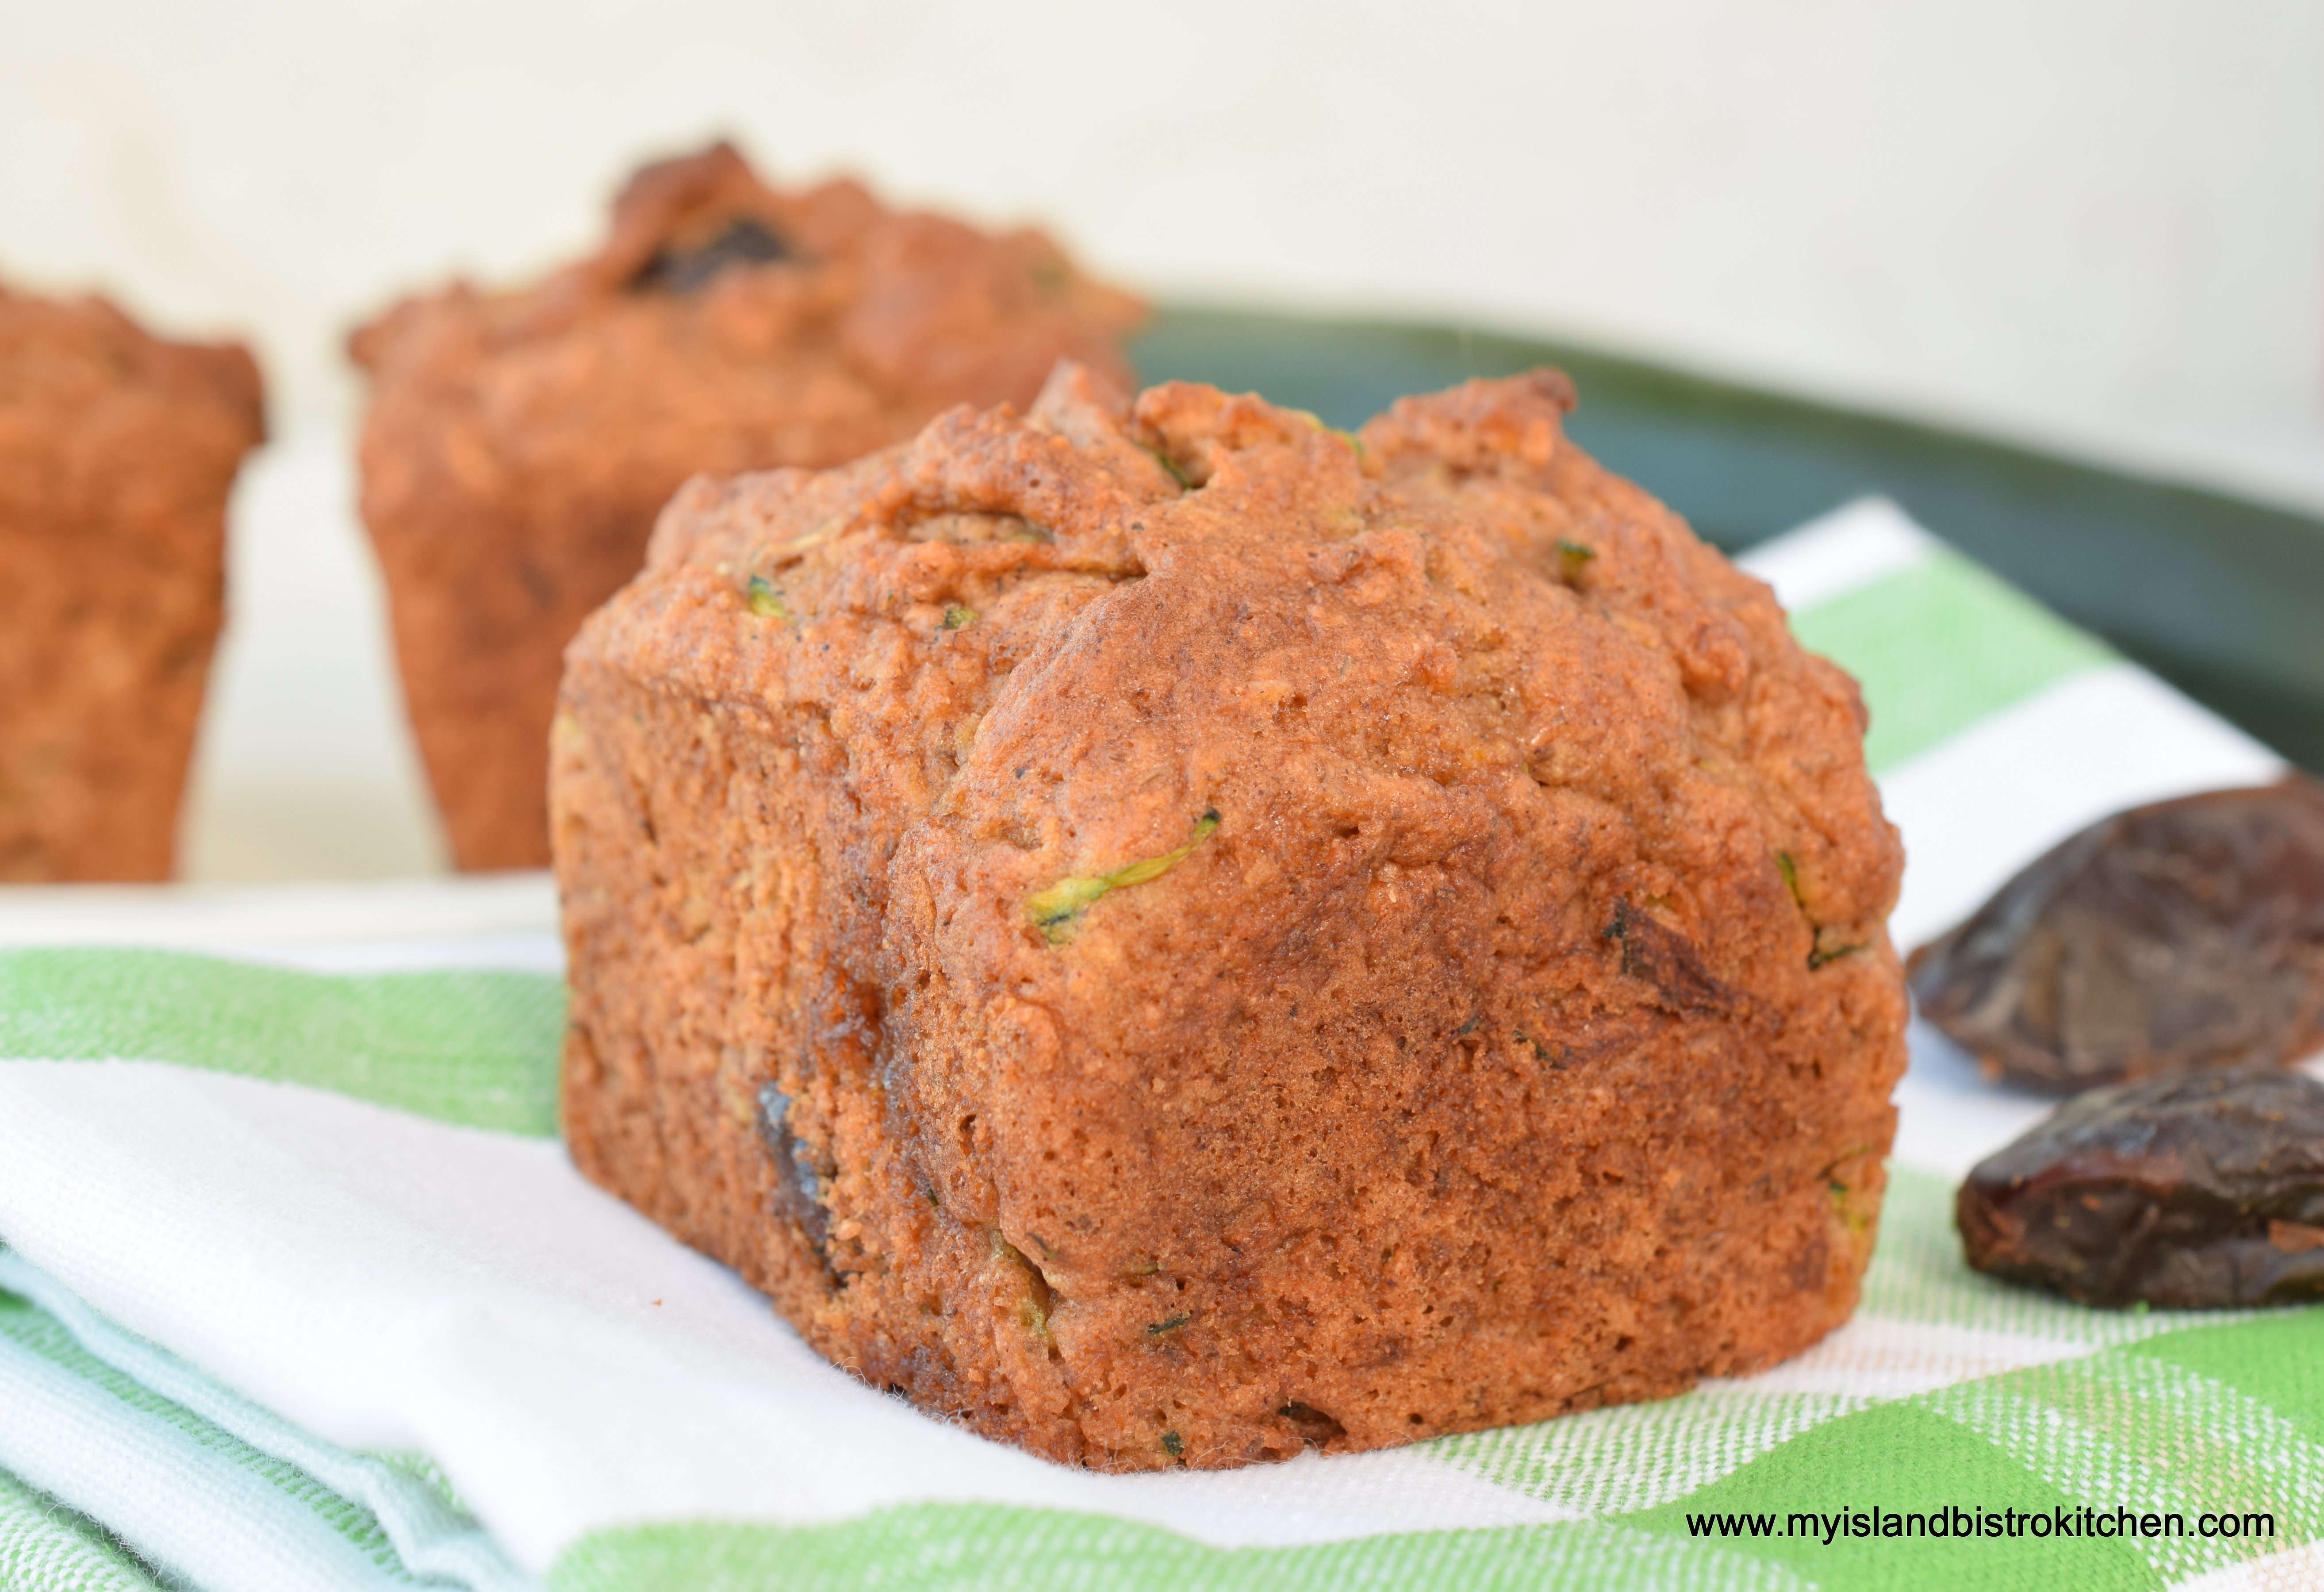
These Gluten-Free Zucchini Date Muffins will rival any traditional wheat-based muffins! They sport a lovely gently domed top that is the hallmark of a perfect muffin shape, they are packed full of flavor, and they have a lovely tender, moist crumb. Continue reading The Ultimate Gluten-Free Zucchini Date Muffins→
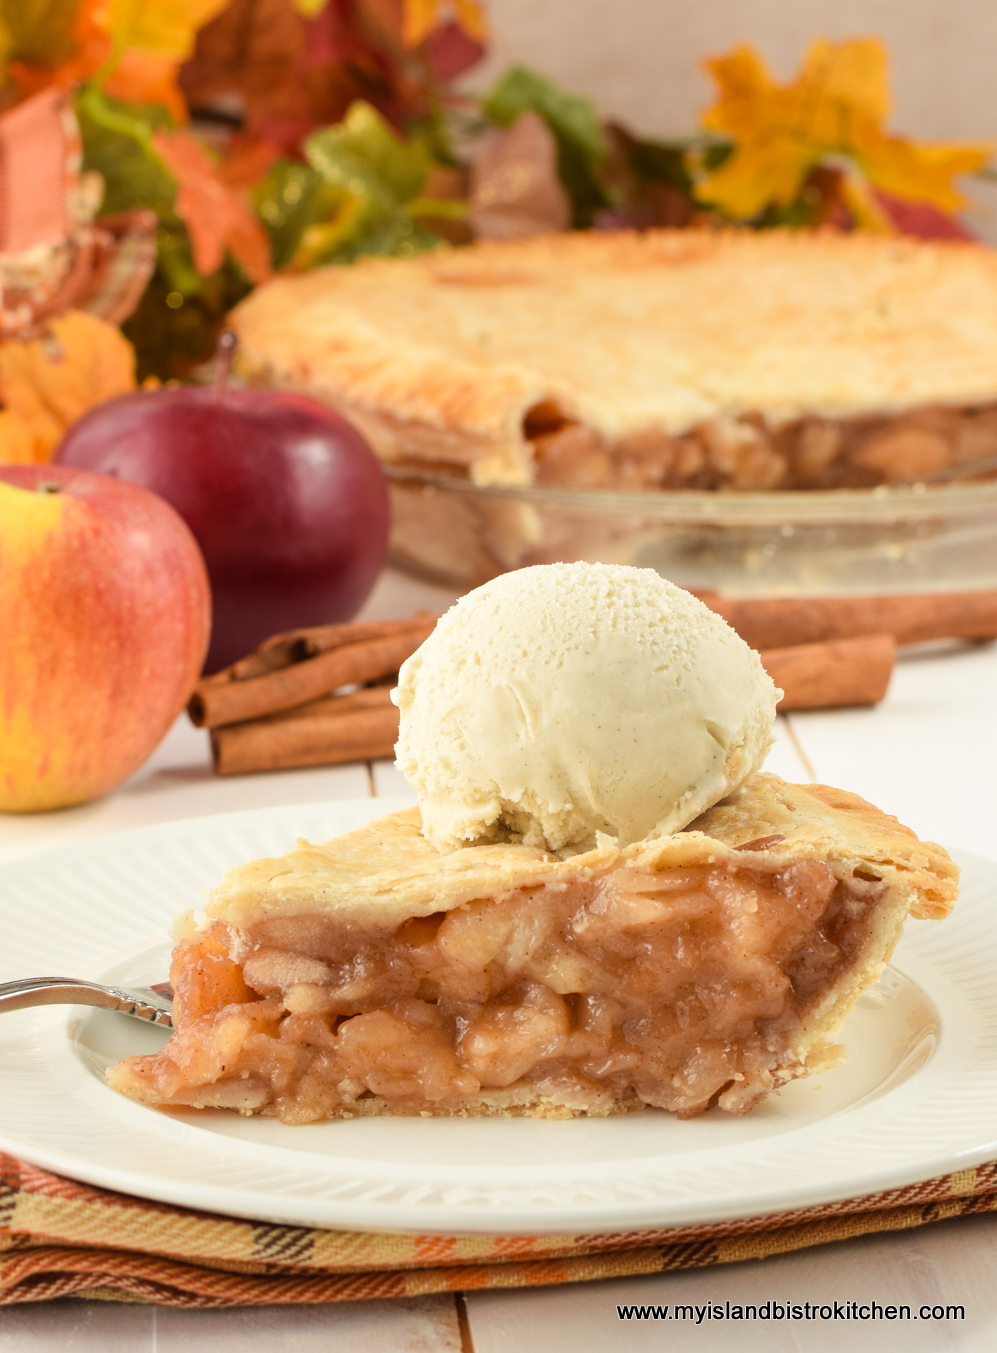
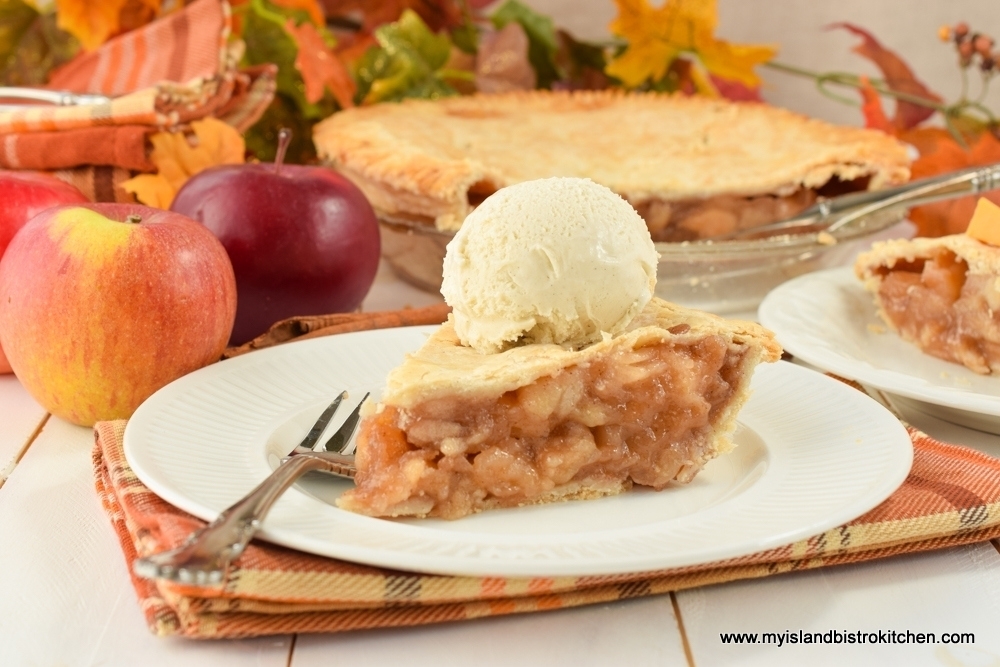
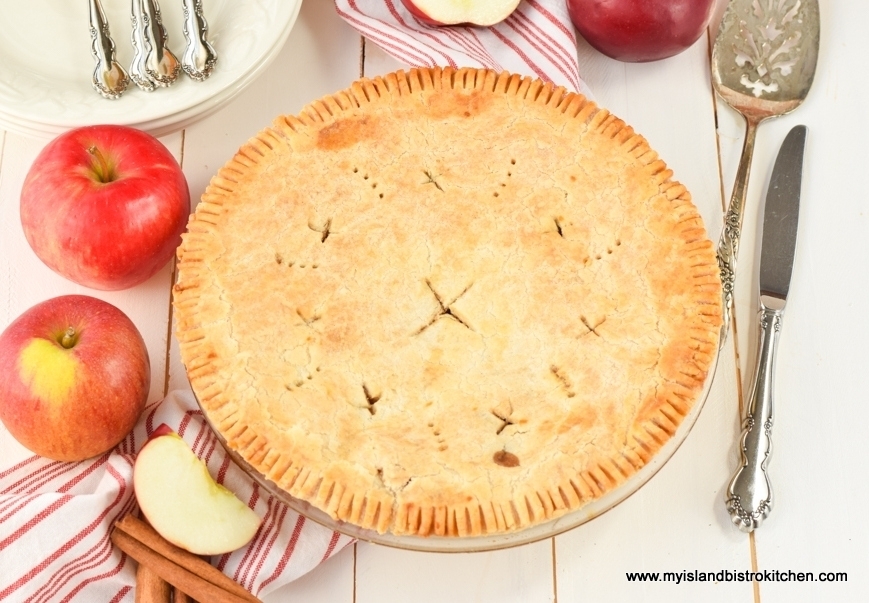
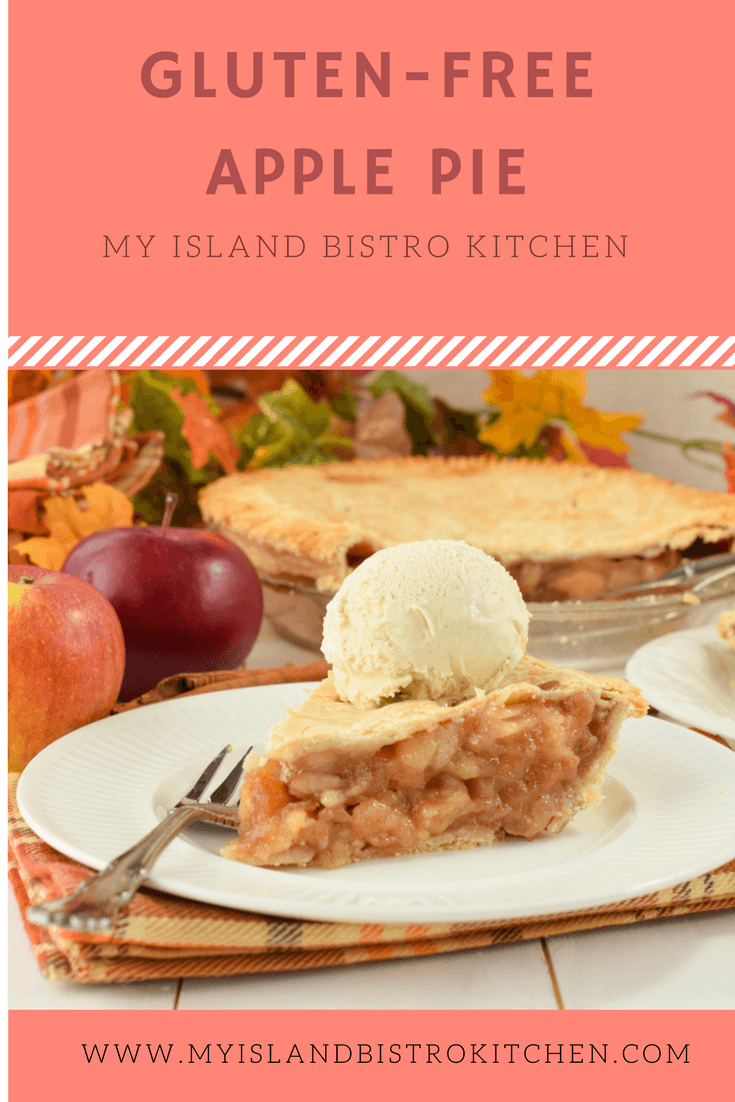
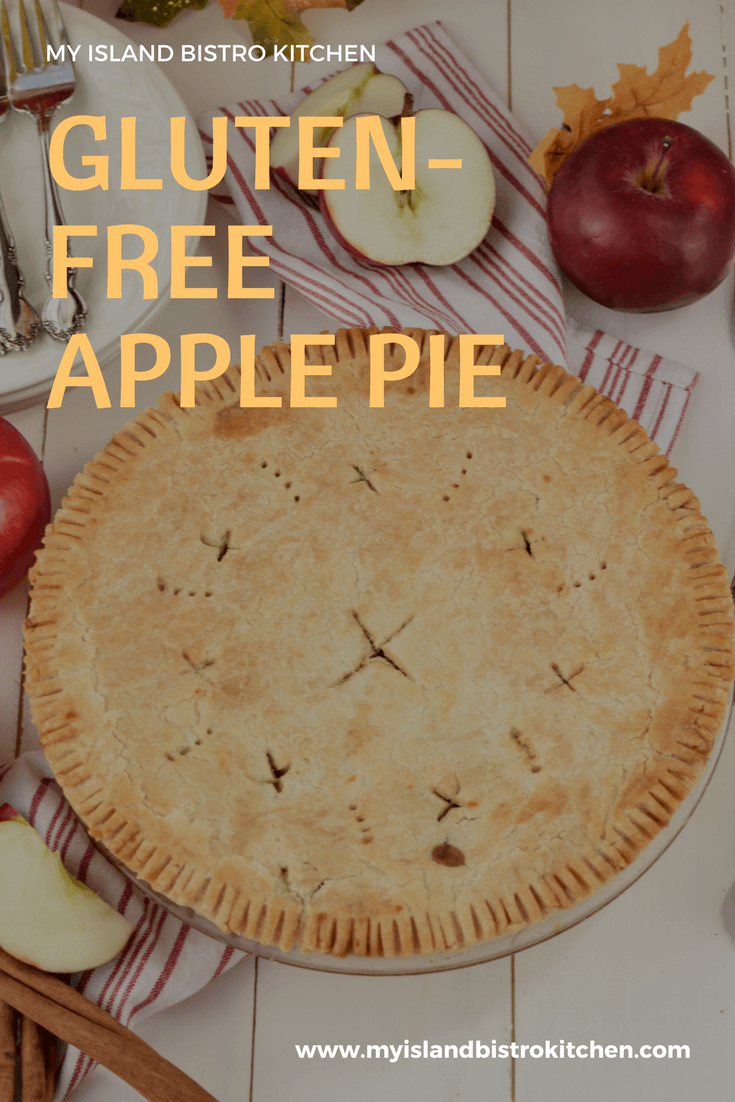
I earlier posted my recipe for Rustic Apple Pie. This apple pie recipe differs from that one in two ways. First, this one is gluten free. Yes, even the lovely tender, flaky crust is gluten free. Second, the filling is pre-cooked before being added to the pie.
Gluten-free Apple Pie
For those following a gluten-free diet, they know how difficult it can sometimes be to find a pie pastry that closely resembles a wheat flour version. I love making pastry and enjoy a lot of quiches and pies. It pains me that those on a gluten-free diet cannot enjoy the same foods simply because they don’t have a good gluten-free pastry recipe. So, I have developed this pie pastry recipe that, in my opinion, rivals any gluten version (and, in fact, is better than many I have been served). When I first started developing gluten-free pastry, I figured it would not roll out, would crumble into bits, be hard as a rock, and/or would not transfer, in one piece, to the pie plate. However, I have adapted the basic pastry recipe I have been using for years and I could not be more pleased with it. Serve this pastry to someone not on a gluten-free diet and I think they would be hard-pressed to know it’s gluten free!
Gluten-free Apple Pie
So, let’s start with some hints and tips on making the pastry, many of which apply to any pastry, gluten or gluten free.
The Pastry
First, all ingredients must be cold – super cold. Yes, even the flour should be chilled for 30-40 minutes in the refrigerator. I use a one-to-one gluten-free flour in this recipe. I have been having great success with Bob’s Red Mills 1-to-1 gluten-free flour in my baking and find it has better flavor than gluten-free all-purpose flour and has the texture in baked goods more closely resembling a wheat-based flour.
There are various schools of thought on the type of fat to use in pastry — butter, lard, or shortening. Using all butter in pastry will give a wonderful flavor and a lovely tanned crust. It can, however, be a bit finnicky to work with because it softens very easy and can quickly be over-blended with the flour. If overworked, a tough crust is likely. While lard is easy to work with and will give layers of flakiness in the pastry, it lacks the flavour that butter gives. Using shortening will yield a nice tender crust but, like lard, has little flavor. As with butter, shortening softens extremely easy as it is being worked with so, if the dough is overworked, it will yield a tough crust.
I find the best combination of fats to provide flakiness, tenderness, flavour, and structure to pastry is to use one part lard and one part butter. I coarsely chop/cube the butter and lard into the flour then take my pastry cutter and blend the fats to the consistency of large peas. There is no need to mash it or blend it finely.
For liquid, I combine vinegar, egg, and water to equal 2/3 cup – all ingredients to be super cold. Not all of this liquid may be required. It’s important to use only enough of the liquid that the dry ingredients are incorporated and will cling together and the dough forms a ball. Don’t add too much liquid or you will end up with a gummy mess that will yield a tough pastry. I don’t use a food processor to make the pastry as I find it is too easy to overprocess the dough. Mixing the pastry by hand gives more control and, I find, a flakier crust.
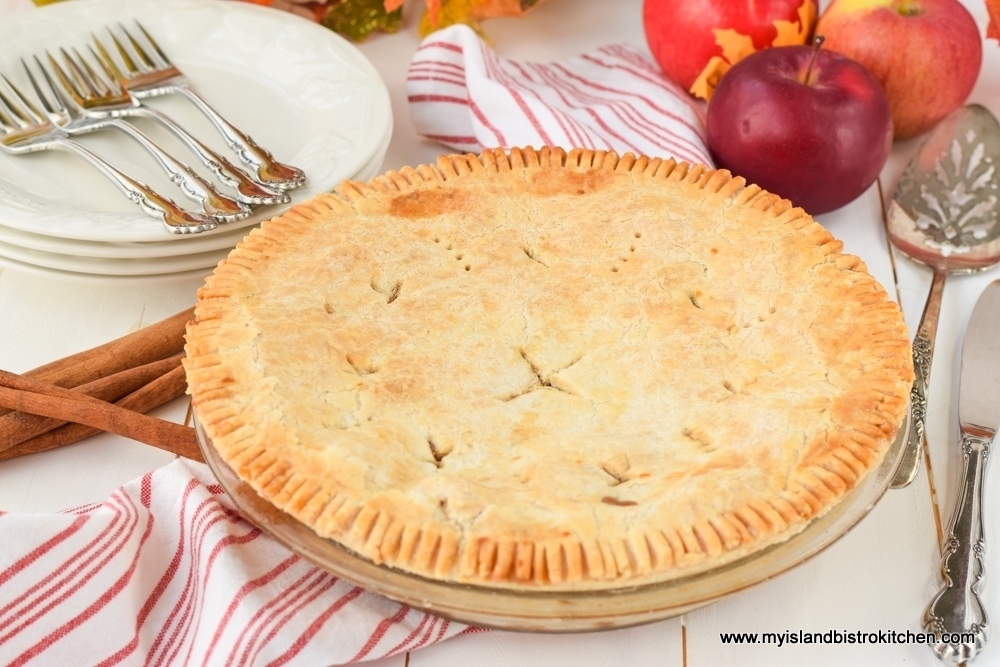
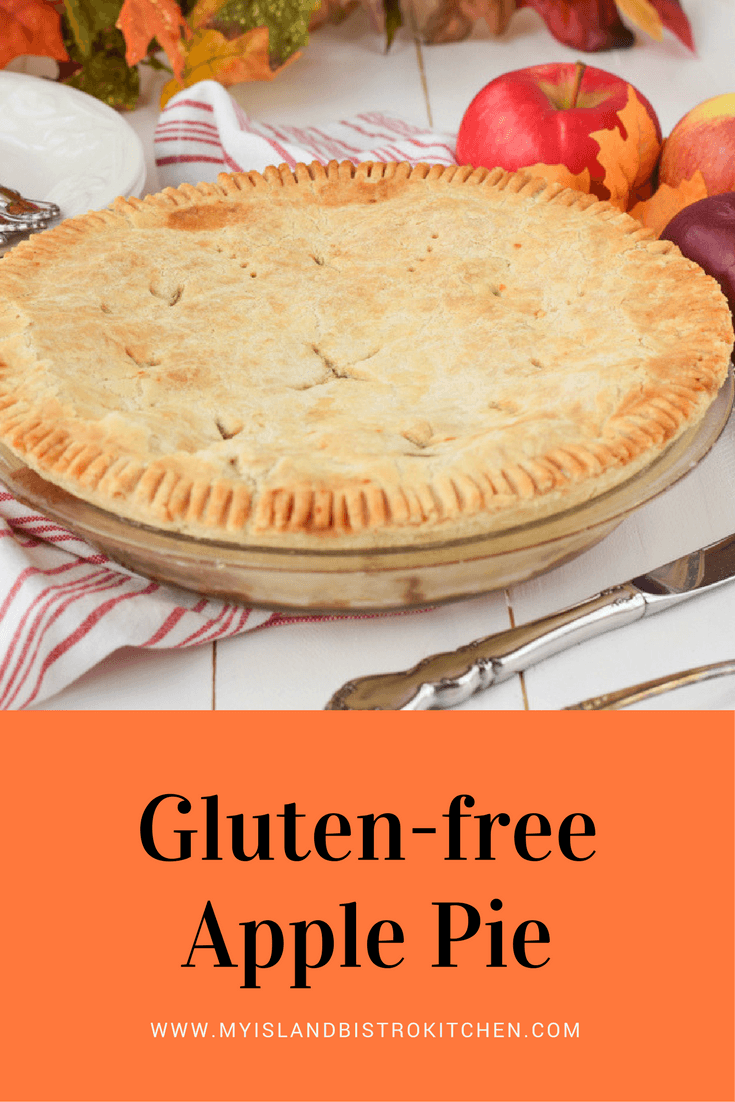
Gluten-free pastry has a different texture and consistency than wheat-based pastry. The most noticeable difference is the lack of elasticity that wheat-based pastry has from the gluten in it. To ensure the safe transferal of pastry from counter to pie plate in one piece, I recommend rolling out the pastry between two sheets of parchment paper. Once the pastry has been rolled to the desired thickness, generally somewhere between 1/16” about 1/8” thickness, simply remove the top sheet of parchment, slide your hand under the bottom sheet and carefully lift the pastry, flip it over into the pie plate, and peel off the parchment paper. A tip is to lightly flour the bottom piece of parchment and the top of the pastry. This will make the task of peeling off the parchment paper easier. Fit the dough snugly into the plate and trim pastry flush with pie plate edge. I don’t like thick pie crusts so you’ll notice, from the photos, that I roll my pastry quite thin. That’s a matter of personal preference so, if you like a thicker crust, by all means, go ahead and roll the pastry a little bit thicker.
Gluten-free Apple Pie
Roll the pastry for the top crust the same as for the bottom crust but make sure there is no wrinkle in the parchment paper as this will form a wrinkle imprint in the pastry as the pastry is being rolled out. This is less of a concern for the bottom pastry crust but, for presentation purposes, is an issue for the top crust. For this reason, I recommend starting with a new piece of parchment when rolling out the top crust pastry.
Don’t forget to dampen the outside rim of the bottom pie pastry before placing the top pastry over the filling. The pastry edge needs to be dampened lightly with water which will seal the two crusts together.
Gluten-free Apple Pie
The Filling
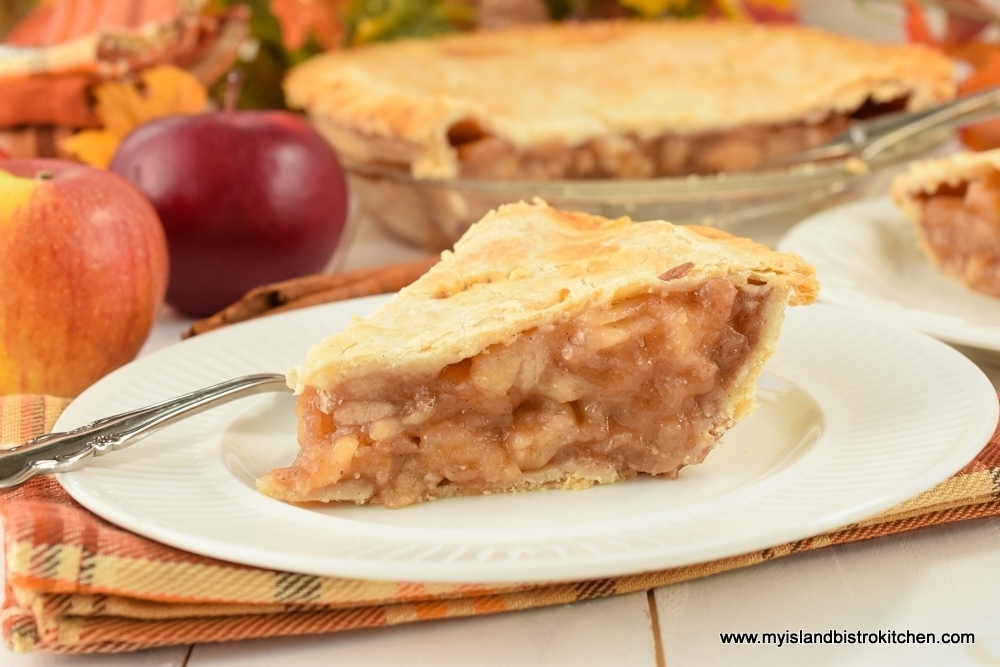
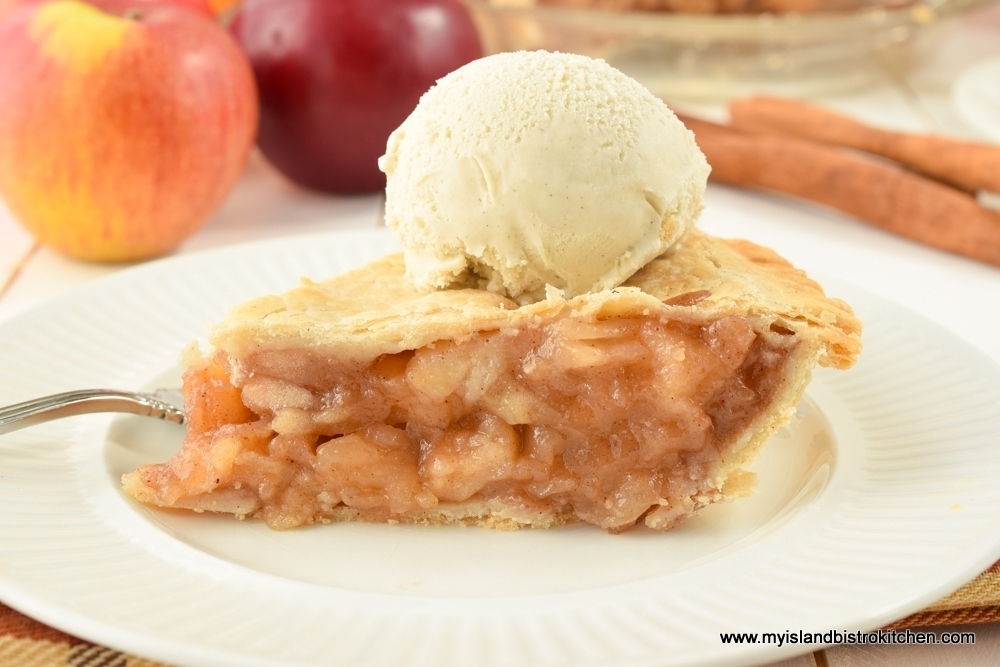
My traditional apple pie recipe calls for uncooked apples mixed with spices and sugar. That version will yield a pie where the layers of apples stay intact and totally visible once the pie is baked and sliced. For this apple pie recipe, however, I am pre-cooking the apples by sautéing them in butter, then mixing in the sugar, spices, and cornstarch while they sauté. The result is a filling that resembles the consistency of a can of apple pie filling (only this homemade version is, in my opinion, much better!).
Gluten-free Apple Pie
There are advantages to this method of making the filling. First, juices from the apples are released during the sautéing process and are thickened before going in to the pie. I find there is less chance of the pie boiling out significantly because the juices have already been released and thickened before going into the pie. Second, it is easier to arrange the filling in the pie because the apples have softened a bit. Whereas for raw apples there can be gaps in the filling, there are generally none with a pre-cooked filling.
The trick to this method is to not overcook the apples because, remember, they will continue to cook as the pie bakes. You still want to be able to see the apples (not applesauce) in the filling. For this reason, it’s important to use apples that have a crisp, firm texture so they can stand up to the sautéing and baking and still hold shape when the pie is sliced. My favorites are Spartans, Cortland, Pippins, Honeycrisp, and Lobo. I usually use a combination of at least three (and sometimes more) different varieties. Using a mix of apple varieties will give better flavor, especially if a blend of tart and sweet apples is used. Slice the apples at least ¼” thick for this filling.
I use mostly brown sugar combined with a small amount of granulated sugar for this recipe. Brown sugar will give a richer flavor and deeper color to the filling. Choosing spices for an apple pie filling is always subjective. Some use just cinnamon while others will add nutmeg. I like a blend of spices in my apple pies so have chosen cinnamon, nutmeg, and allspice for this recipe. A splash of brandy (optional) will also enhance the flavor of the pie but, note, just a small splash! Either flour or cornstarch can be used to thicken the filling. Cornstarch, however, will tend to yield a more clear filling than will flour.
Gluten-free Apple Pie
Preparing the Pie for the Oven
After the top pie pastry has been placed over the filling, the edges of the top and bottom pastries need to be pressed together to seal in the filling. There are various ways the pie edges can be joined. I tend to go with the simple pressing of the bottom and top pastry with the tines of a fork. I think this is also the easiest method to ensure the pie cuts out with the edges intact. Other methods, such as crimping, are raised up and can burn more quickly during baking and are also at risk of breaking off as the pie is cut.
Gluten-free Apple Pie
It’s important that the top pie pastry be vented for baking. Otherwise, the crusts may be soggy from too much steam trapped in the pie. It may also cause the top crust to leave the filling and puff up, leaving a hollow space between crust and filling. This will cause the crust to break when the pie is sliced and, for presentation purposes, the pie slice will not be visually pleasing when plated.
Use a sharp-tipped paring knife to cut criss-crosses in the pie pastry starting in the center with a slightly large “X” and then adding smaller ones all around the circumference of the pie. I also use the tines of a fork to prick the pie pastry in various places in the top crust pastry for added venting.
Brushing a very light coating of an egg-milk wash on the top crust will yield a crust with more “tan”. A sprinkle of granulated sugar may also be added but note this may cause the top crust to brown fast and before the pie is baked. If this happens, tent the pie loosely with tin foil.
I recommend placing the pie in the refrigerator for approximately 30 minutes or so before baking. This will chill the pastry and reduce chance of it shrinking significantly while baking.
Fruit pies have a tendency to boil out during baking, even if they are well vented and the filling pre-cooked, so I recommend placing the pie on a tinfoil-lined rimmed baking sheet. If the pie does boil out, you won’t be faced with an oven cleaning job.
Baking the Pie
Preheat the oven to 425°F and bake the pie at this temperature for 10 minutes then reduce the heat to 375°F and bake for approximately 40 minutes or until the crust is lightly tanned and juice from the pie is bubbling slightly through vented holes.
Transfer the pie to a cooling rack and allow it cool completely before cutting. This allows the filling to settle so it stays intact (instead of running) when the pie is cut.
Serving the Pie
This pie benefits from a few hours of refrigeration after it has cooled completely at room temperature. The chilled pie is easier to cut and the filling stays in place.
Gluten-free Apple Pie
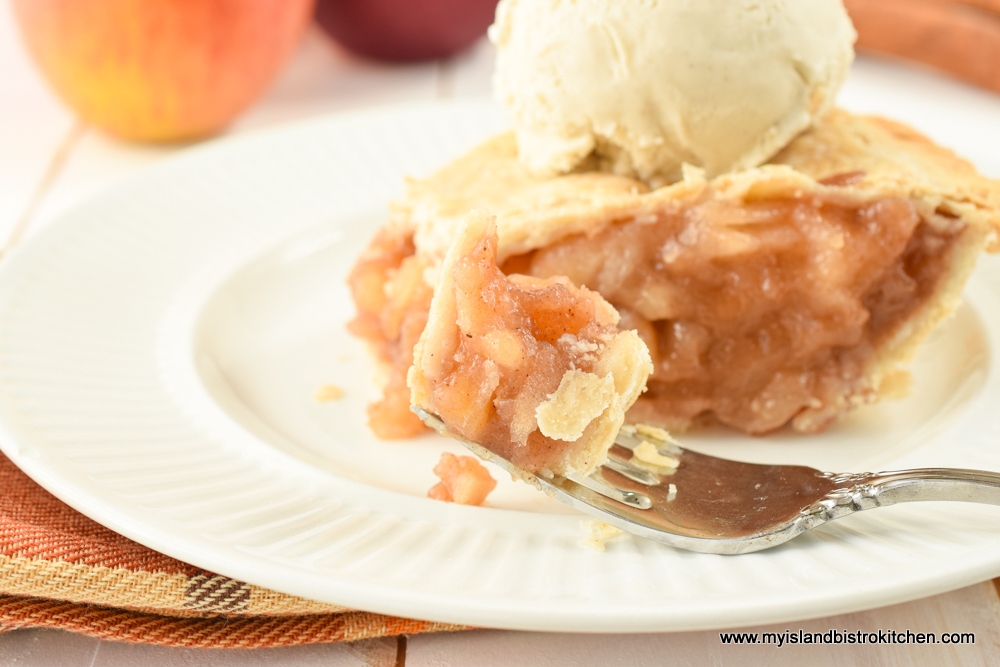
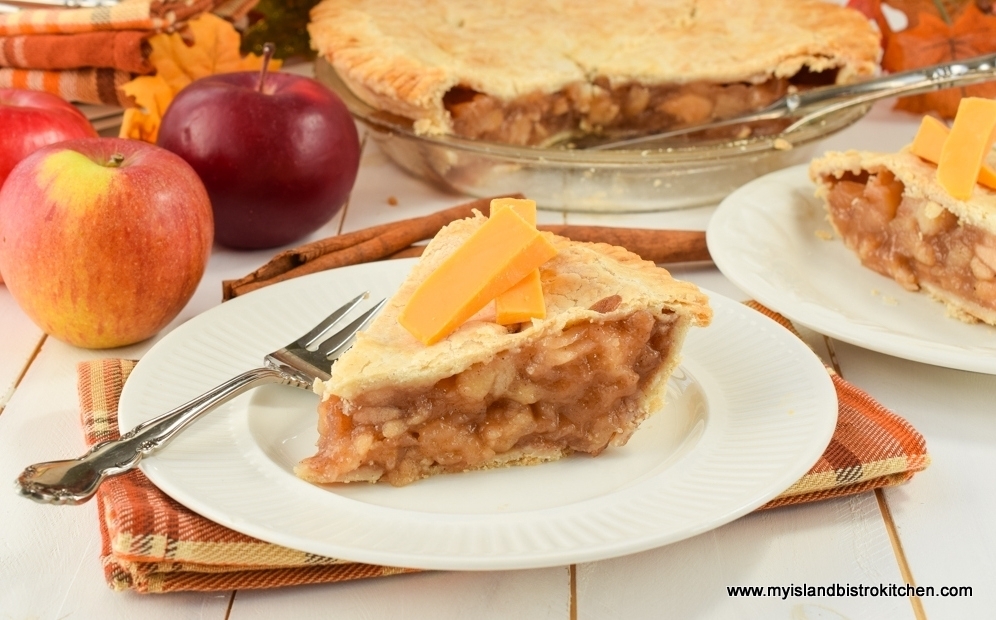
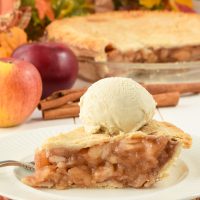
The most common ways to serve apple pie are plain, with cheddar cheese, or with vanilla ice cream.
Gluten-free Apple Pie
This gluten-free apple pie is a tasty treat indeed!
Gluten-free Apple Pie
[Printable recipe follows at end of posting]
Gluten-free Apple Pie
Filling
Ingredients: 2/3 cup brown sugar, lightly packed ¼ cup granulated sugar 1 tsp cinnamon ½ tsp nutmeg 1/8 tsp allspice 1/8 tsp salt 3 tbsp cornstarch
2-3 tbsp butter
2½ lbs apples, peeled, cored, and sliced into ¼” thick slices (about 8 medium-large sized apples) 1 tbsp lemon juice 1 tbsp brandy (optional)
Method: In small bowl, whisk together the brown and white sugars, spices, salt, and cornstarch. Set aside.
Prepare apples and sprinkle with lemon juice and brandy (optional). With large wooden spoon, gently toss apples to coat with the lemon juice and brandy.
In large saucepan, melt butter over medium-high heat. Reduce heat to medium low and add the apples. Sauté for 5 minutes, stirring gently and frequently.
Stir in the sugar-spice-cornstarch mixture. Cook for 4 minutes, stirring gently and frequently. Remove from heat and cool filling completely.
While filling is cooling, prepare the pastry.
Pastry for 1 double-crusted 9” pie
2 cups (276g) gluten-free 1-to-1 flour ½ tsp salt 1½ tsp sugar
¼ cup cold butter (76g) ¼ cup cold lard (76g)
1 large egg (reserve apx 1 tsp of the yolk for the egg wash) 1 tsp white vinegar Enough water to make 2/3 cup liquid
1-2 tsp milk Method:
In medium-sized bowl, whisk the flour, salt, and sugar together. Cut the butter and lard into chunks and add to the flour. With a pastry cutter, cut the butter and lard into the flour until the fats resemble the size of large peas.
In a measuring cup, whisk the egg and vinegar together. Add enough cold water to measure 2/3 cup. Add the egg-vinegar-water mixture to the flour, small amounts at a time, and mix with a fork. Add only enough water that the dough clings together and can be formed into a ball.
Divide the dough in half. Form disk shapes with each piece. Place disks in the refrigerator for about 10-12 minutes to chill. Remove one disk from the refrigerator and place between two sheets of parchment paper. Roll pastry to desired thickness, generally between 1/16”and 1/8” thickness. Peel the top piece of parchment from the rolled out pastry. Slide hand under parchment that has the rolled pastry and carefully flip it into a 9” pie plate that has been lightly sprayed with cooking spray or greased. Cut off excess dough so pastry is flush with the pie plate edge. Place pie shell in refrigerator for 15-20 minutes to chill. Remove second disk of pastry from refrigerator.
Prepare pastry for the top crust in the same manner as for the bottom crust. Remove pie shell from refrigerator and arrange cooled pie filling in prepared cold shell. Brush edges of bottom crust along pie plate edge with a bit of water to moisten. Transfer pastry to the top of pie filling. Trim excess pastry from the pie plate edge. Press the edge of the pastry all around the pie plate rim with tines of fork to adhere top crust to bottom crust. Cut slits in top of pie pastry to allow steam to escape as pie bakes. For additional venting, prick the pie in several places with tines of a fork.
In small bowl, lightly beat the reserved egg yolk with 1-2 tsp milk. With a pastry brush, lightly brush the pie with the egg-milk mixture. Sprinkle with granulated sugar.
Place pie in refrigerator for 30 minutes to allow filling to settle and to chill pastry to reduce shrinkage while it bakes.
Preheat oven to 425°F.
Transfer pie to oven. Bake at 425°F for 10 minutes then reduce heat to 375°F. Bake for another 40 minutes then test with fork inserted into slit in center of pie to determine if apples are cooked. Apples should be fork-tender when pie is done. If not done, return pie to oven and check every 5 minutes until apples are fork tender. If pie browns too quickly before it is cooked, loosely tent pie with tin foil. Remove pie from oven and transfer to cooling rack.
A lightly spiced cooked apple pie filling sandwiched between a tender, flaky, and flavorful gluten-free pie crust.
Course Dessert
Cuisine American
Servings6
My Island Bistro KitchenMy Island Bistro Kitchen
Ingredients
2/3cupbrown sugar, lightly packed
1/4cupgranulated sugar
1tspcinnamon
1/2tspnutmeg
1/8tspallspice
1/8tspsalt
3tbspcornstarch
2-3tbspbutter
2 1/2 lbsapples, peeled, cored, and sliced into 1/4" thick slices (about 8 medium-large sized apples)
1tbsplemon juice
1tbspbrandy (optional)
Gluten-Free Pastry for 1 double-crusted 9" pie
2cups (276g)gluten-free 1-to-1 flour
1/2tspsalt
1 1/2 tspgranulated sugar
1/4cup (76g)cold butter
1/4cup (76g)cold lard
1large egg (reserve apx 1 tsp of the yolk for the egg wash)
1tspwhite vinegar
Enough cold water to make 2/3 cup liquid
1-2tspmilk
Instructions
Filling: In small bowl, whisk together the brown and white sugars, spices, salt, and cornstarch. Set aside.
Prepare apples and sprinkle with lemon juice and brandy (optional). With large wooden spoon, gently toss apples to coat with the lemon juice and brandy.
In large saucepan, melt butter over medium-high heat. Reduce heat to medium low and add the apples. Sauté for 5 minutes, stirring gently and frequently.
Stir in the sugar-spice-cornstarch mixture. Cook for 4 minutes, stirring gently and frequently. Remove from heat and cool filling completely.
While filling is cooling, prepare the pastry.
Gluten-free Pastry for 1 Double-crusted Pie
In medium-sized bowl, whisk the flour, salt, and sugar together. Cut the butter and lard into chunks and add to the flour. With a pastry cutter, cut the butter and lard into the flour until the fats resemble the size of large peas.
In a measuring cup, whisk the egg and vinegar together. Add enough cold water to measure 2/3 cup. Add the egg-vinegar-water mixture to the flour, small amounts at a time, and mix with a fork. Add only enough water that the dough clings together and can be formed into a ball.
Divide the dough in half. Form disk shapes with each piece. Place disks in the refrigerator for about 10-12 minutes to chill. Remove one disk from the refrigerator and place between two sheets of parchment paper. Roll pastry to desired thickness, generally between 1/16”and 1/8” thickness. Peel the top piece of parchment from the rolled out pastry. Slide hand under parchment that has the rolled pastry and carefully flip it into a 9” pie plate that has been lightly sprayed with cooking spray or greased. Cut off excess dough so pastry is flush with the pie plate edge. Place pie shell in refrigerator for 15-20 minutes to chill. Remove second disk of pastry from refrigerator.
Prepare pastry for the top crust in the same manner as for the bottom crust. Remove pie shell from refrigerator and arrange cooled pie filling in prepared cold shell. Brush edges of bottom crust along pie plate edge with a bit of water to moisten. Transfer pastry to the top of pie filling. Trim excess pastry from the pie plate edge. Press the edge of the pastry all around the pie plate rim with tines of fork to adhere top crust to bottom crust. Cut slits in top of pie pastry to allow steam to escape as pie bakes. For additional venting, prick the pie in several places with tines of a fork.
In small bowl, lightly beat the reserved egg yolk with 1-2 tsp milk. With a pastry brush, lightly brush the pie with the egg-milk mixture. Sprinkle with granulated sugar.
Place pie in refrigerator for 30 minutes to allow filling to settle and to chill pastry to reduce shrinkage while it bakes.
Preheat oven to 425°F.
Transfer pie to oven. Bake at 425°F for 10 minutes then reduce heat to 375°F. Bake for another 40 minutes then test with fork inserted into slit in center of pie to determine if apples are cooked. Apples should be fork-tender when pie is done. If not done, return pie to oven and check every 5 minutes until apples are fork tender. If pie browns too quickly before it is cooked, loosely tent pie with tin foil. Remove pie from oven and transfer to cooling rack.
Recipe Notes
[Copyright My Island Bistro Kitchen]
If you have made this recipe and enjoyed it and/or wish to share it with your friends and family, please do so on social media but be sure to share the direct link to this posting from my website.
Connect with My Island Bistro Kitchen on Social Media
Follow “the Bistro” on Pinterest at https://www.pinterest.ca/peibistro/ and pin the Pinterest-ready photo found at the end of this post to your favorite Pinterest boards.
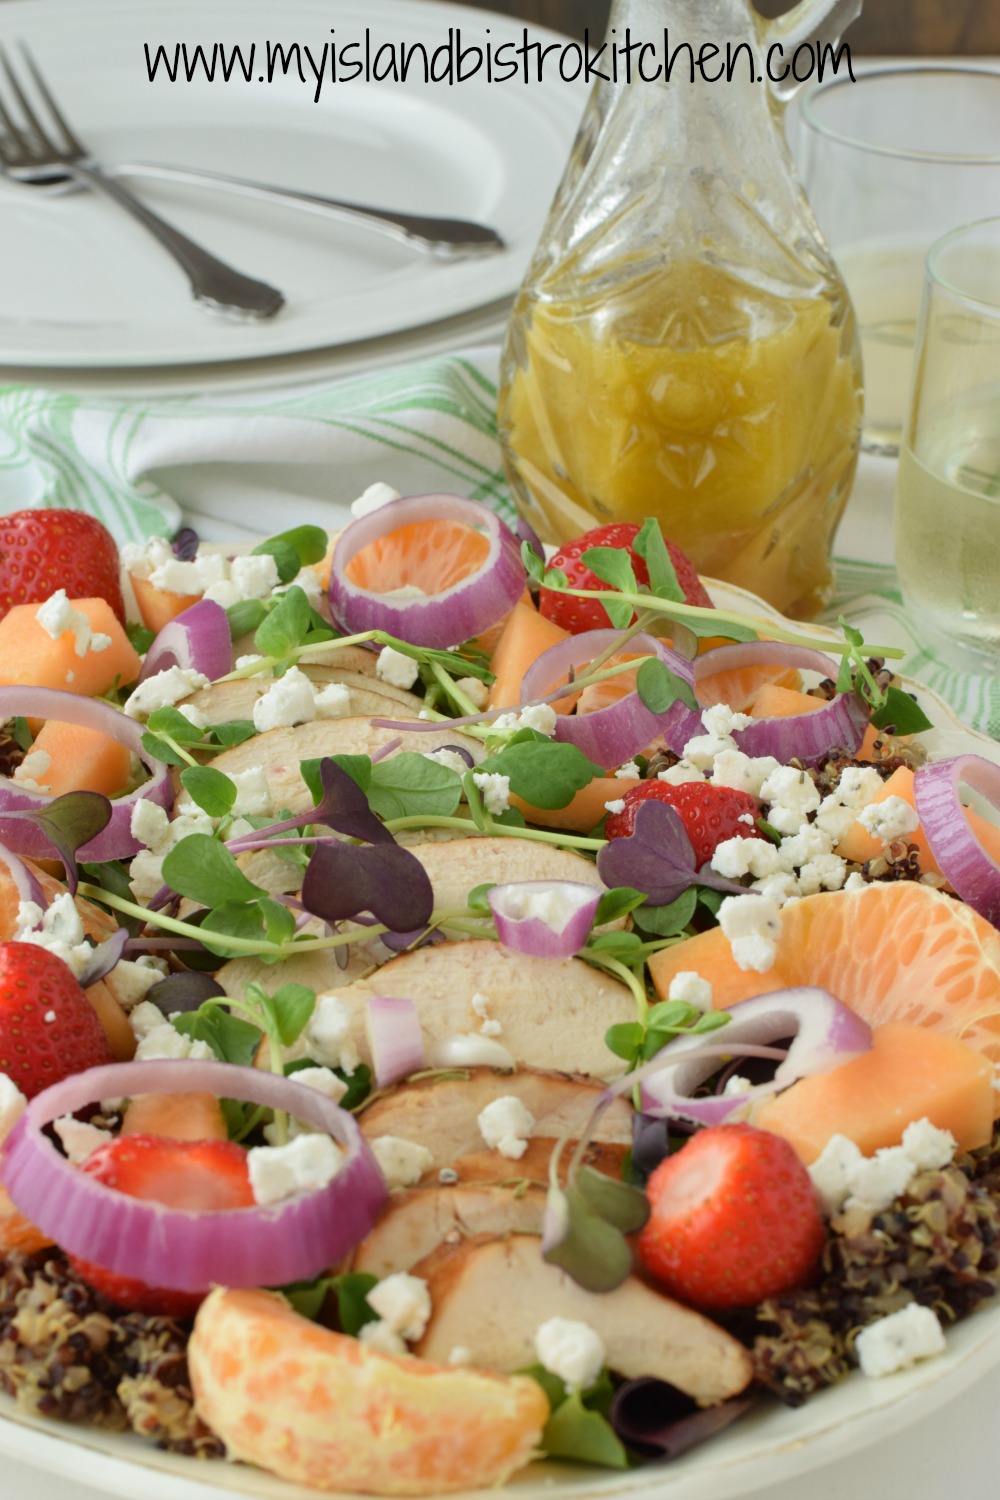
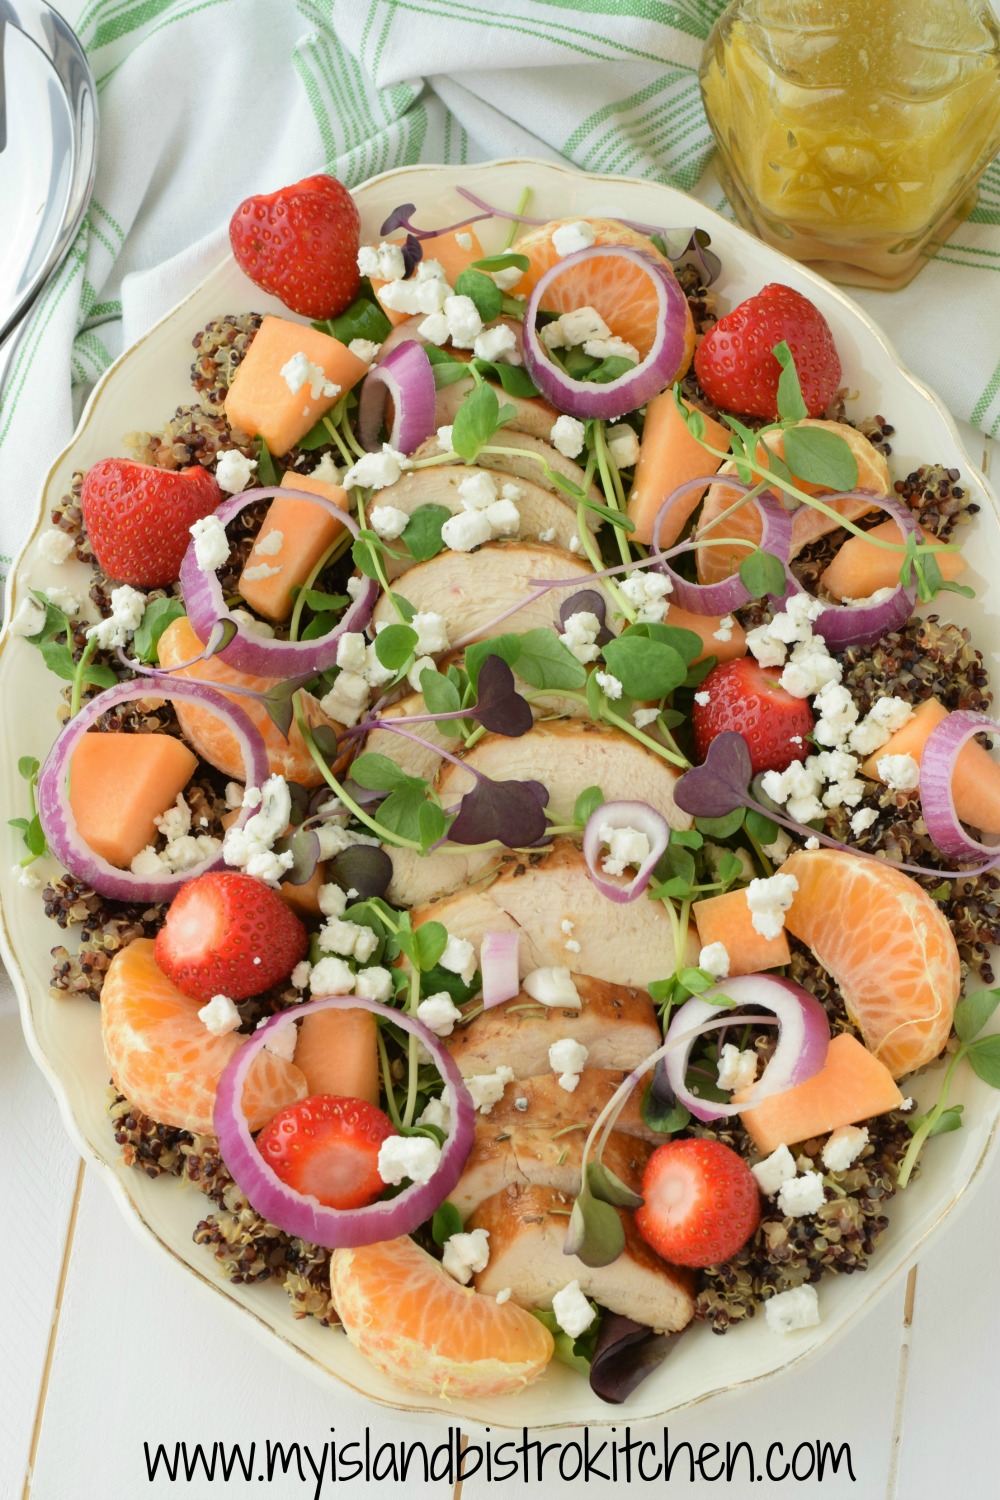
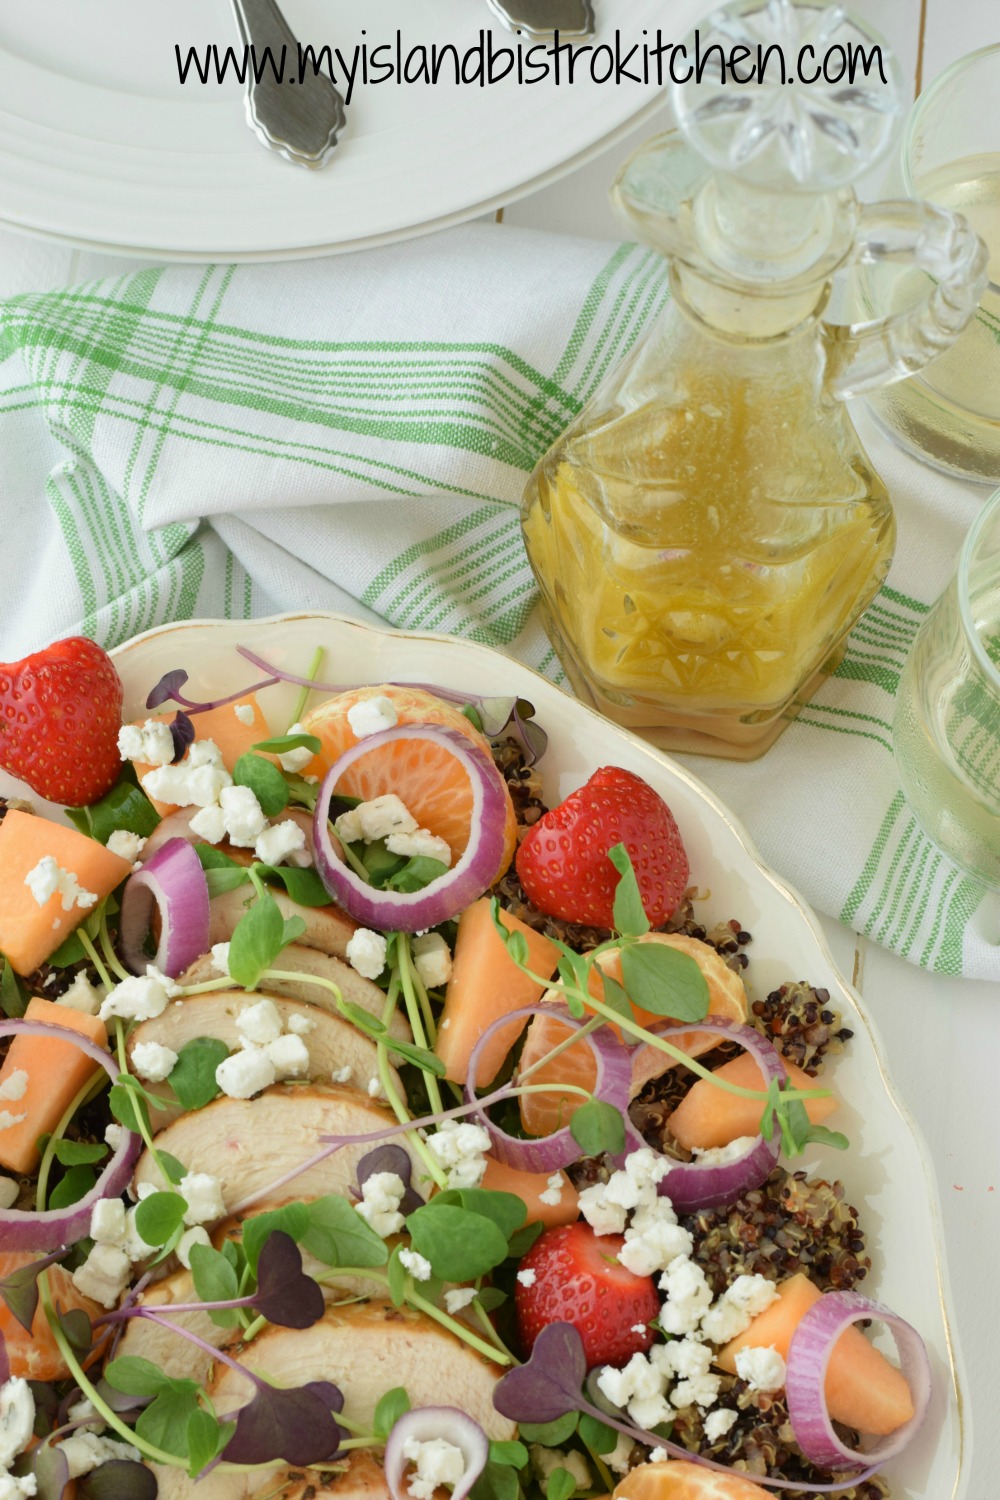
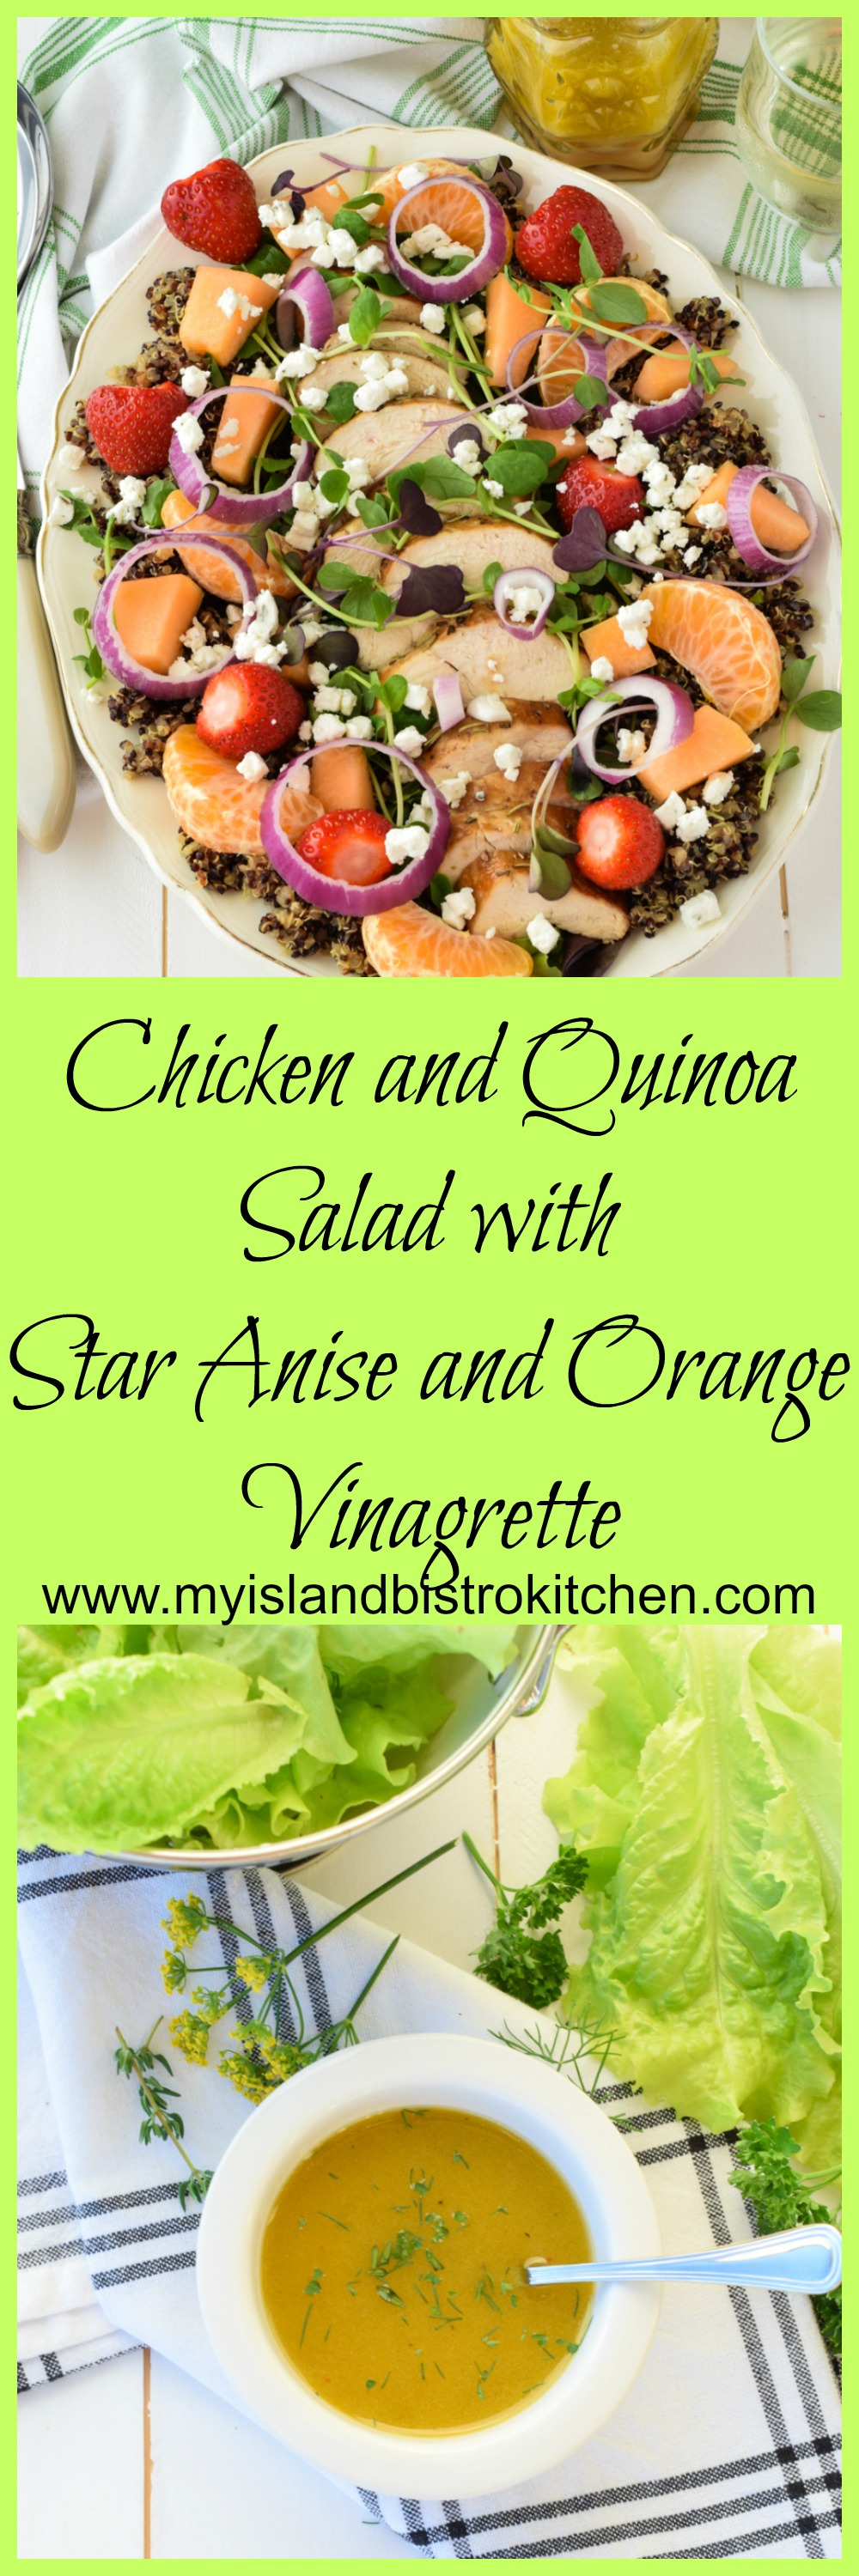
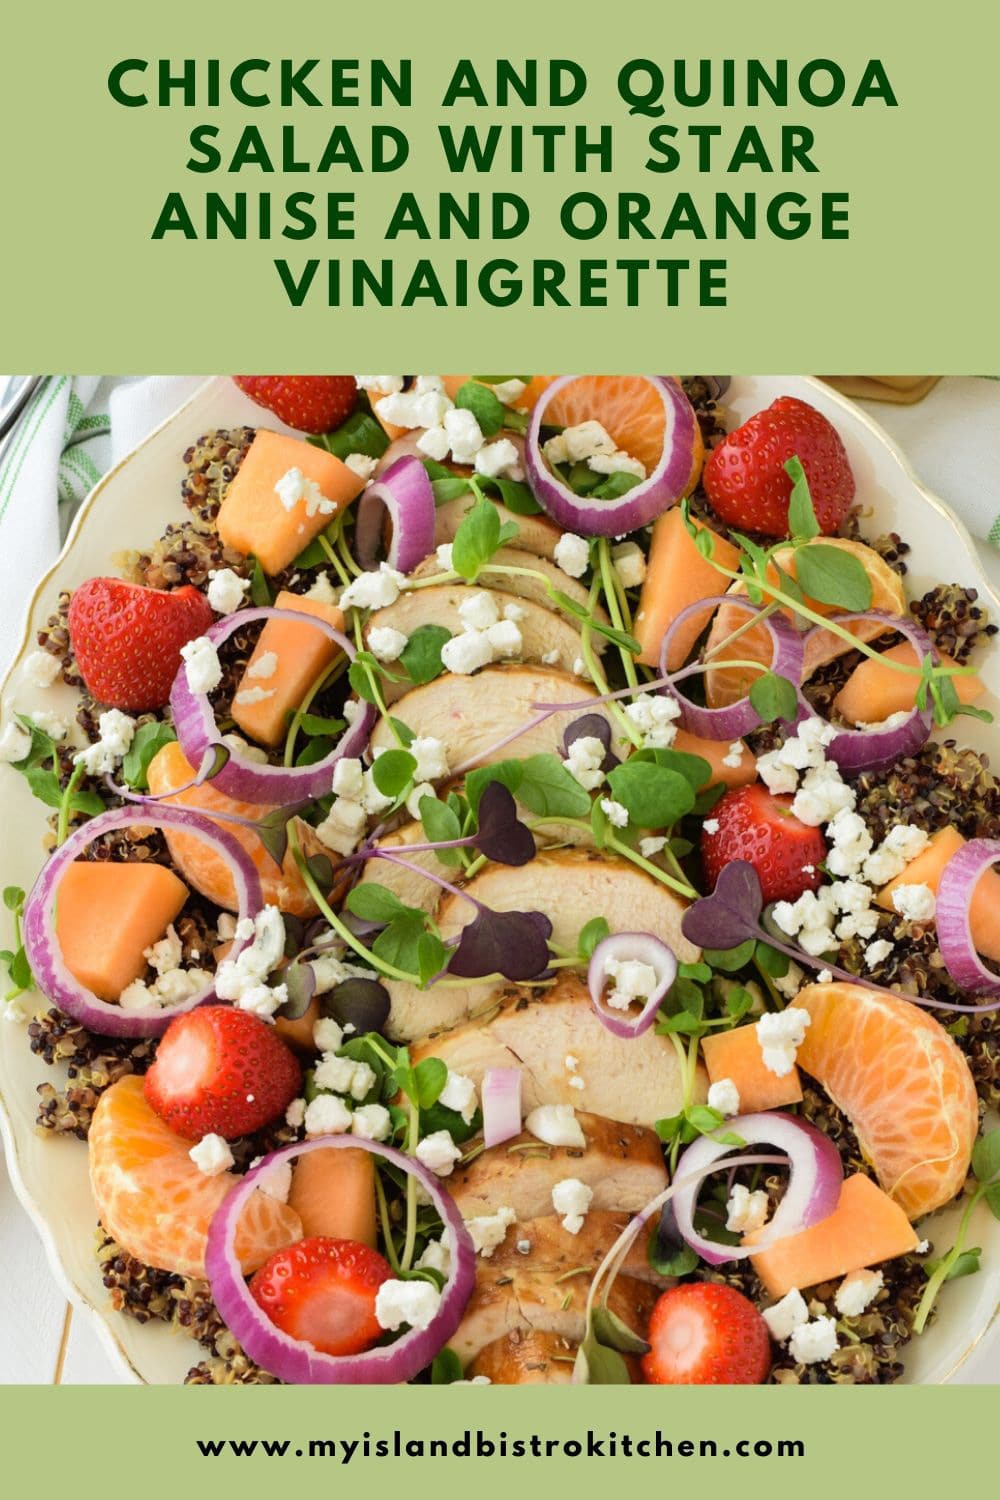
Chicken and Quinoa Salad with Star Anise and Orange Vinaigrette
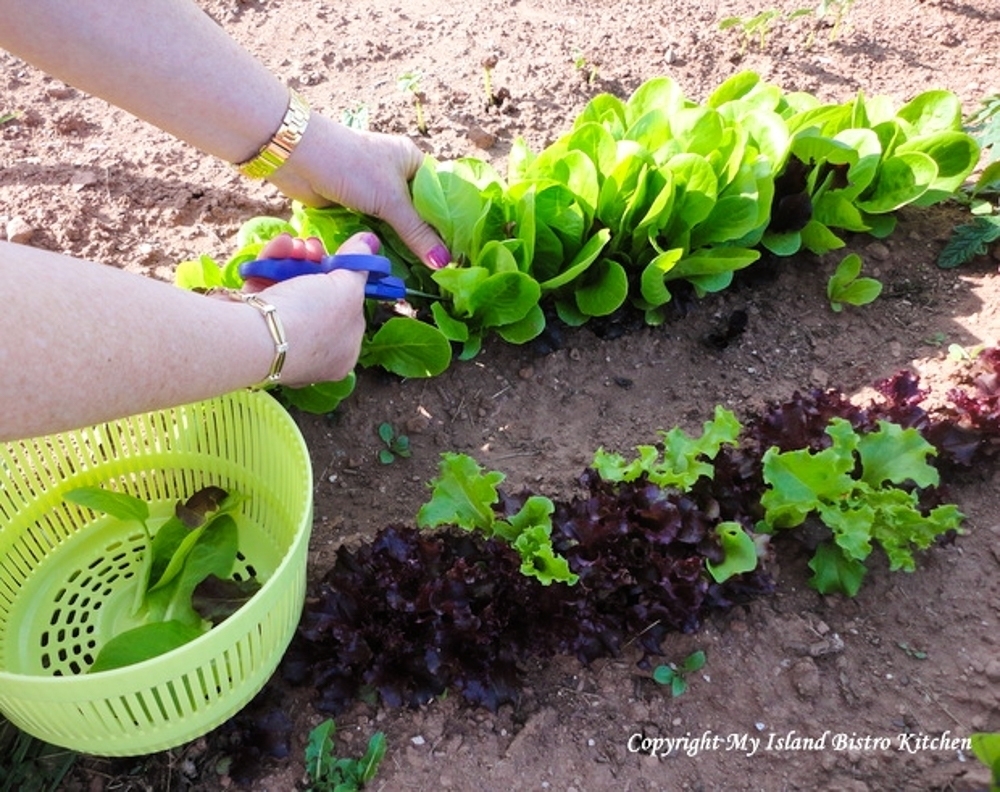
We grow a garden and live out of it in the summer. Lots of different varieties of lettuce are grown and so salads are an almost daily part of our menu. On hot summer days, I love to make what I call a main meal salad like this Chicken and Quinoa Salad with Star Anise and Orange Vinaigrette.
Lettuce from our Garden
I simply take a meat platter and lay a layer of mixed greens down the center bordered by a row of quinoa along both sides of the lettuce bed. I often marinate and cook chicken breasts then slice them for salads as I have done here. I use whatever fruit I have on hand or that is in season to make a colorful and healthy salad. It could be strawberries, mango, melons, oranges or mandarins, blueberries, peaches, raspberries, and so forth. Add some red onion rings, crumbled feta cheese, and top with crunchy pea and radish shoots and you have a very colorful, appetizing, and healthy dinner.
Chicken and Quinoa Salad with Star Anise and Orange Vinagrette
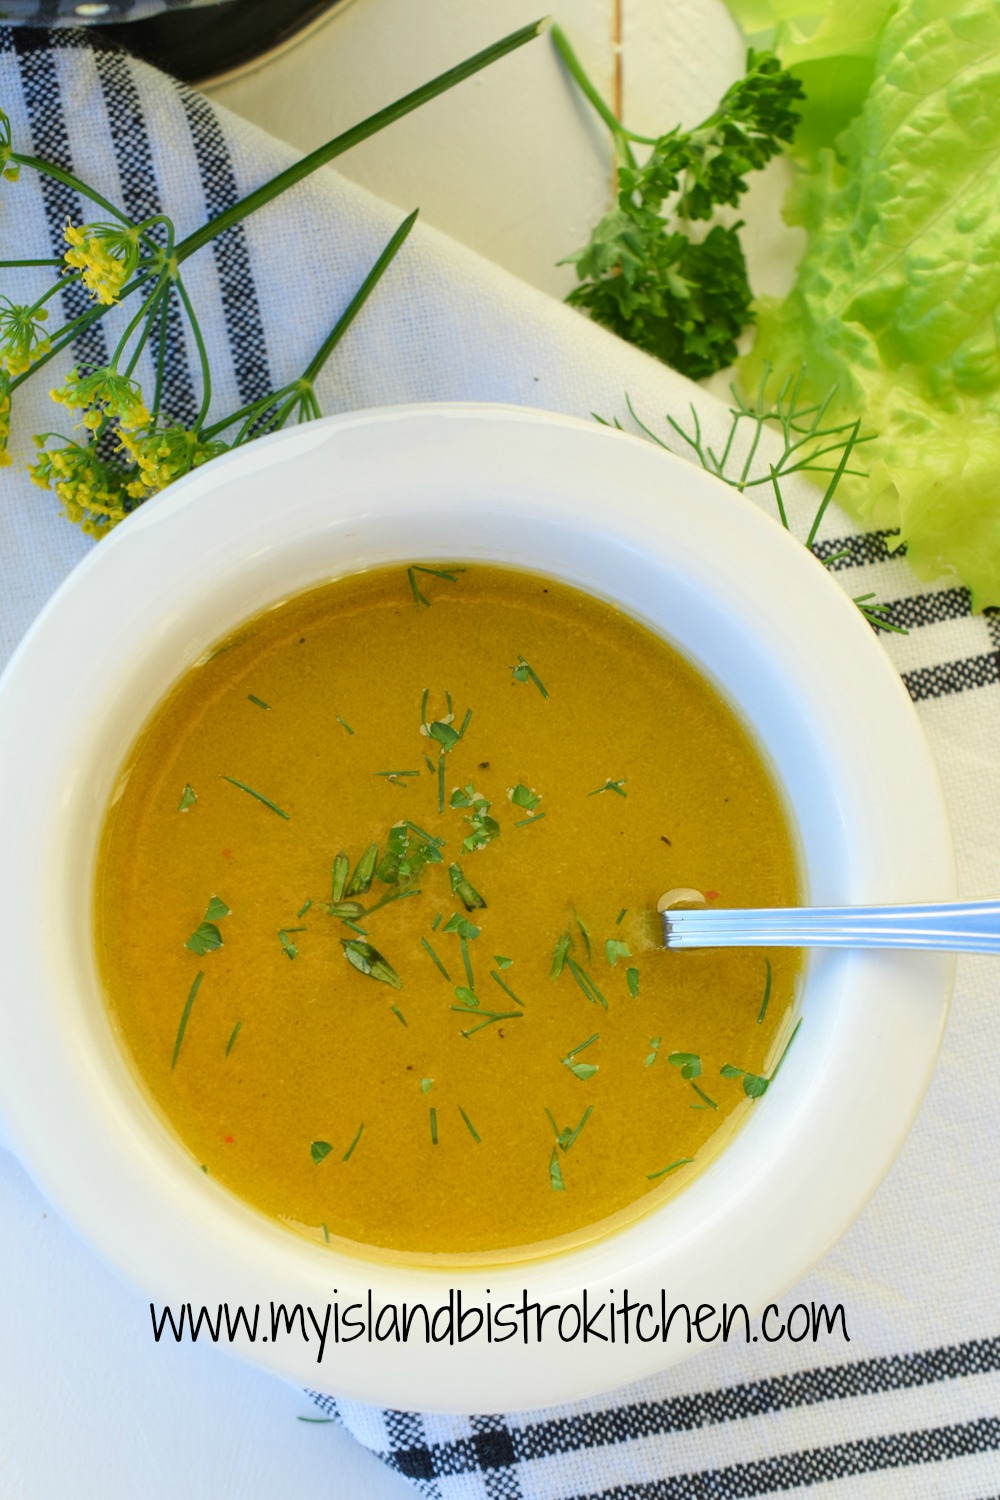
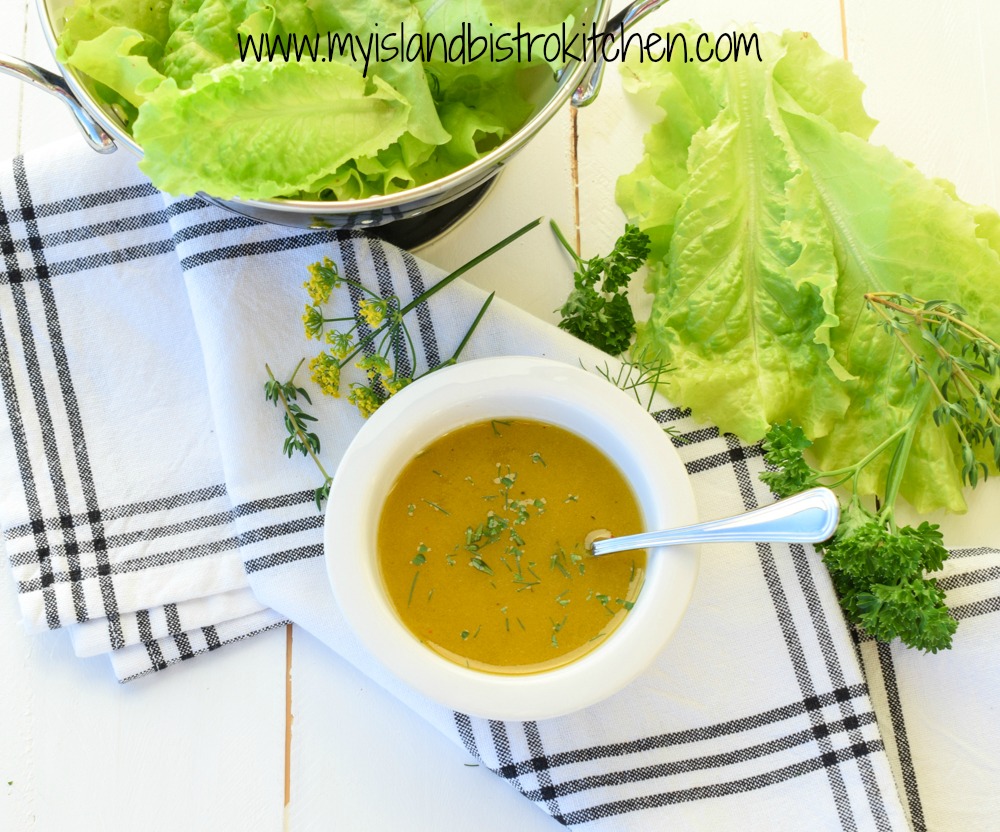
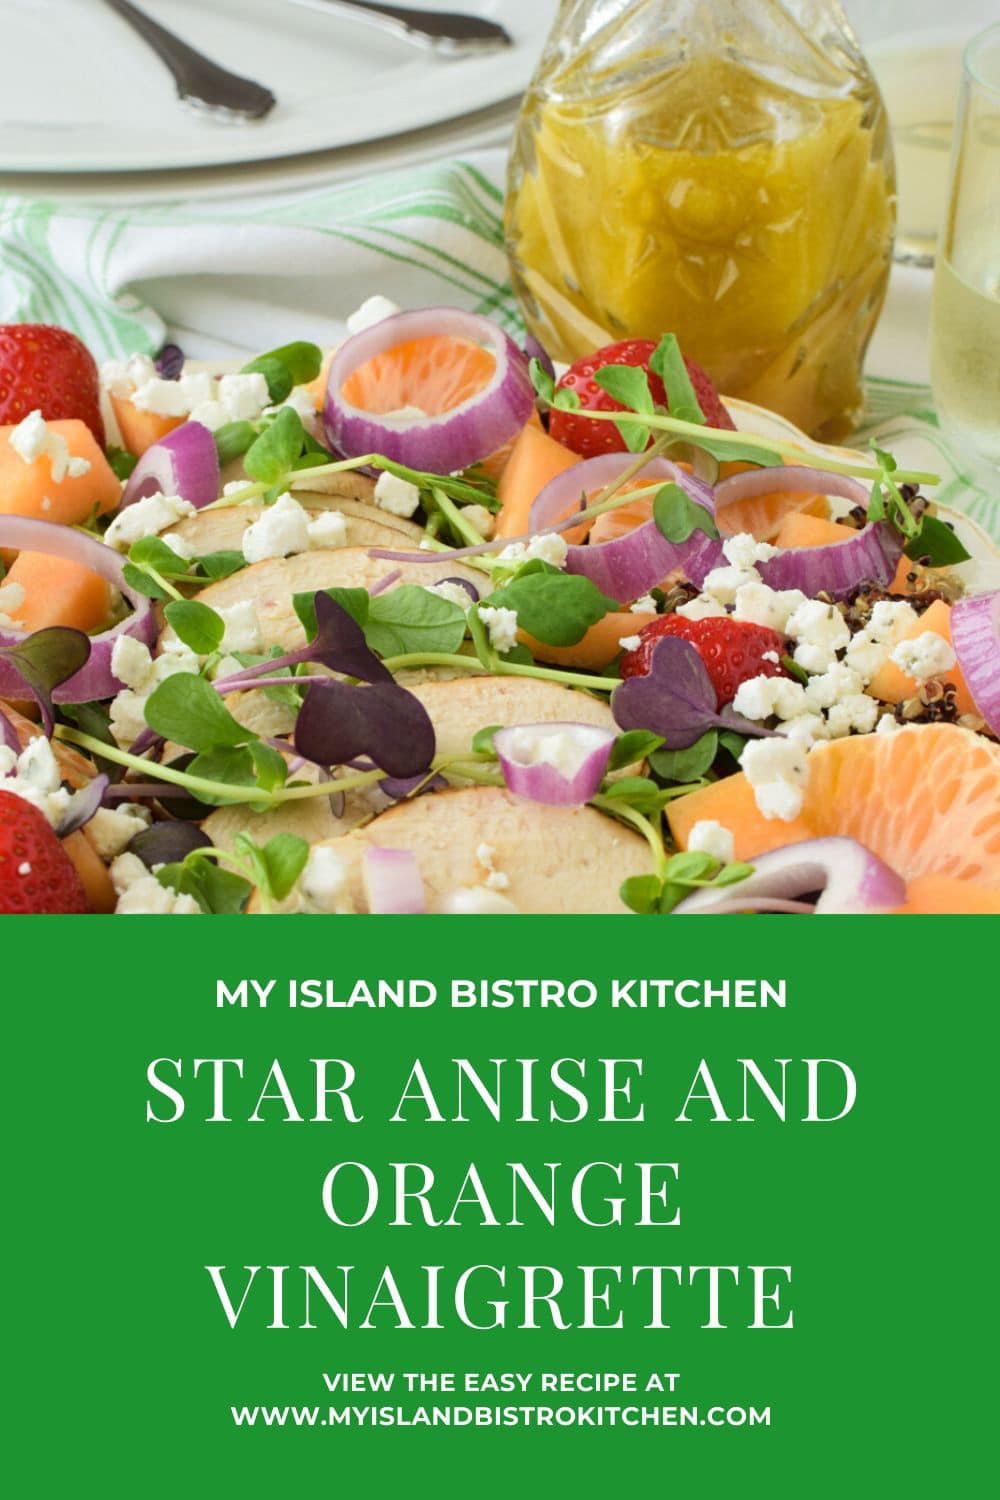
What makes the salad super tasty is the vinaigrette.
Star Anise and Orange Vinaigrette
For this recipe, start with 3 tablespoons of orange juice and bring it to a boil over medium heat. Reduce the heat and add a small star anise pod and simmer for 2-3 minutes. Remove from heat and let the juice cool. This allows the star anise to infuse the juice with a lovely subtle layer of licorice flavor. Discard the star anise and mix the vinaigrette ingredients in a small jar and shake vigorously. If adding fresh herbs, only add them at the time of serving as, otherwise, they become quite limp and wilted.
Star Anise and Orange Vinaigrette
Now, I don’t tend to measure the ingredients for the salad itself. I go to the garden and pick a couple of handfuls of different kinds of lettuce. For a main meal serving for two, I cook 1/2 cup of quinoa and a large chicken breast. For the fruits, just add as many of each kind as you like and the same for the pea and radish shoots. I don’t grow these shoots – I get them from Just A Little Farm in Bonshaw. You can click here to read the story I wrote about this farm. Jessica grows the most amazing produce and her pea and radish shoots are so lovely crisp and fresh!
Chicken and Quinoa Salad with Star Anise and Orange Vinaigrette
This recipe will yield a generous main meal for two or, if serving as a starter, it could serve 4-6.
[Printable Recipe Follows at end of Posting]
Orange and Star Anise Vinaigrette
Ingredients: 3 tbsp orange juice 1 small star anise pod ¼ cup olive oil 1 tbsp red wine vinegar 2 tsp Dijon mustard 2 tsp liquid honey ¼ tsp garlic salt Salt and pepper, to taste Fresh herbs (e.g., parsley, thyme, dill), chopped
Method:
In small saucepan, bring orange juice to boiling point over medium heat. Reduce heat to simmer and add the star anise pod. Simmer for 2-3 minutes. Remove from heat and cool completely, allowing the star anise to infuse the orange juice. Remove and discard star anise after orange juice has cooled.
Combine all ingredients, except the fresh herbs, in a small jar. Shake vigorously. Add the chopped herbs at time of serving.
Chicken and Quinoa Salad with Star Anise and Orange Vinaigrette
Yield: Scant 1/2 cup
A tasty vinaigrette with subtle undertones of licorice flavor. Perfect accompaniment to any salad but especially good with Chicken and Quinoa Salad
Ingredients
3 tbsp orange juice
1 small star anise pod
¼ cup olive oil
1 tbsp red wine vinegar
2 tsp Dijon mustard
2 tsp liquid honey
¼ tsp garlic salt
Salt and pepper, to taste
Fresh herbs (e.g., parsley, thyme, dill), chopped
Instructions
In small saucepan, bring orange juice to boiling point over medium heat. Reduce heat to simmer and add the star anise pod. Simmer for 2-3 minutes. Remove from heat and cool completely, allowing the star anise to infuse the orange juice. Remove and discard star anise after orange juice has cooled.
Combine all ingredients, except the fresh herbs, in a small jar. Shake vigorously. Add the chopped herbs at time of serving.
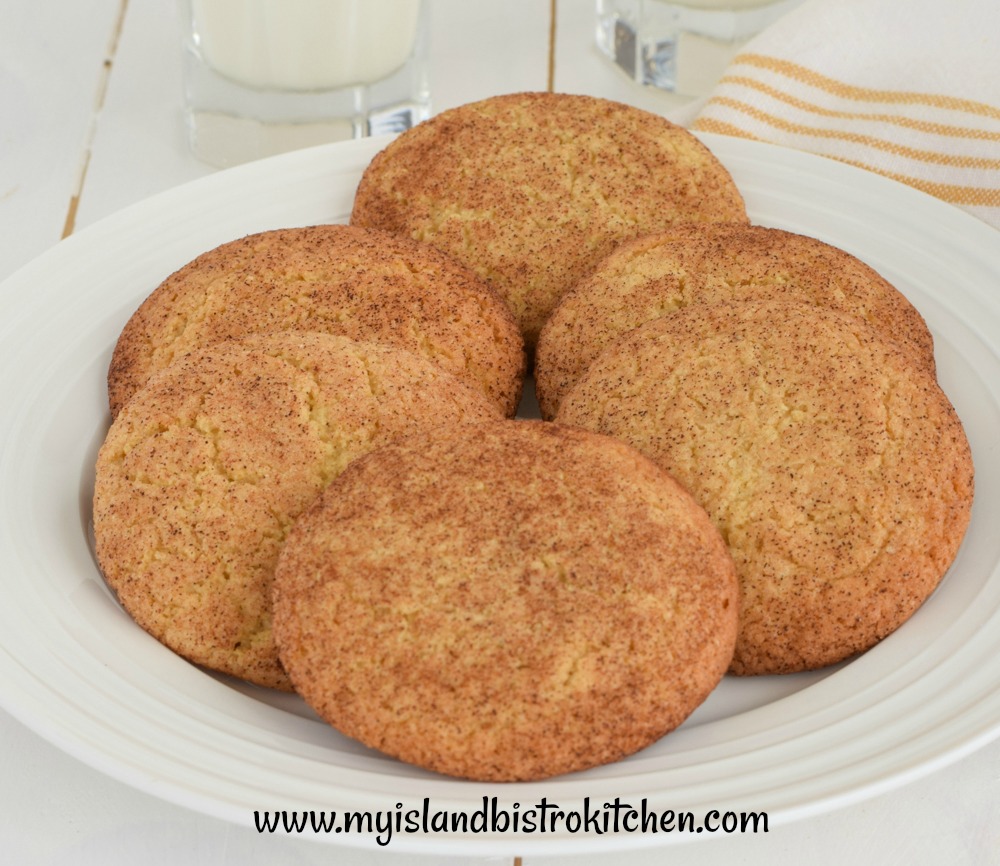
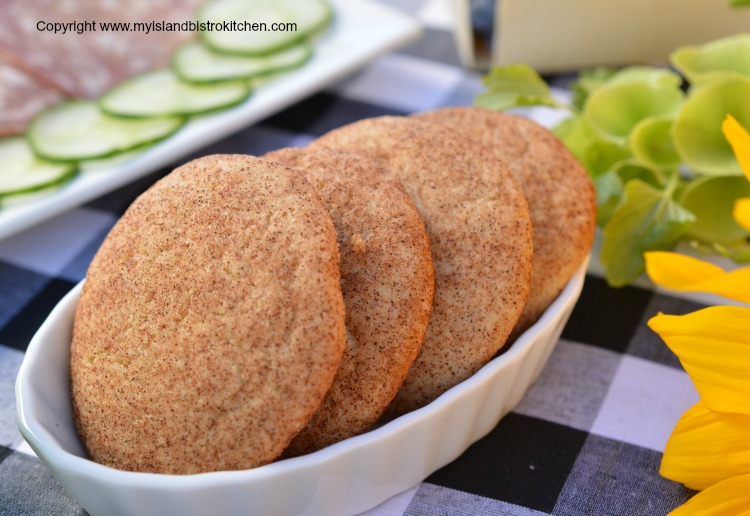
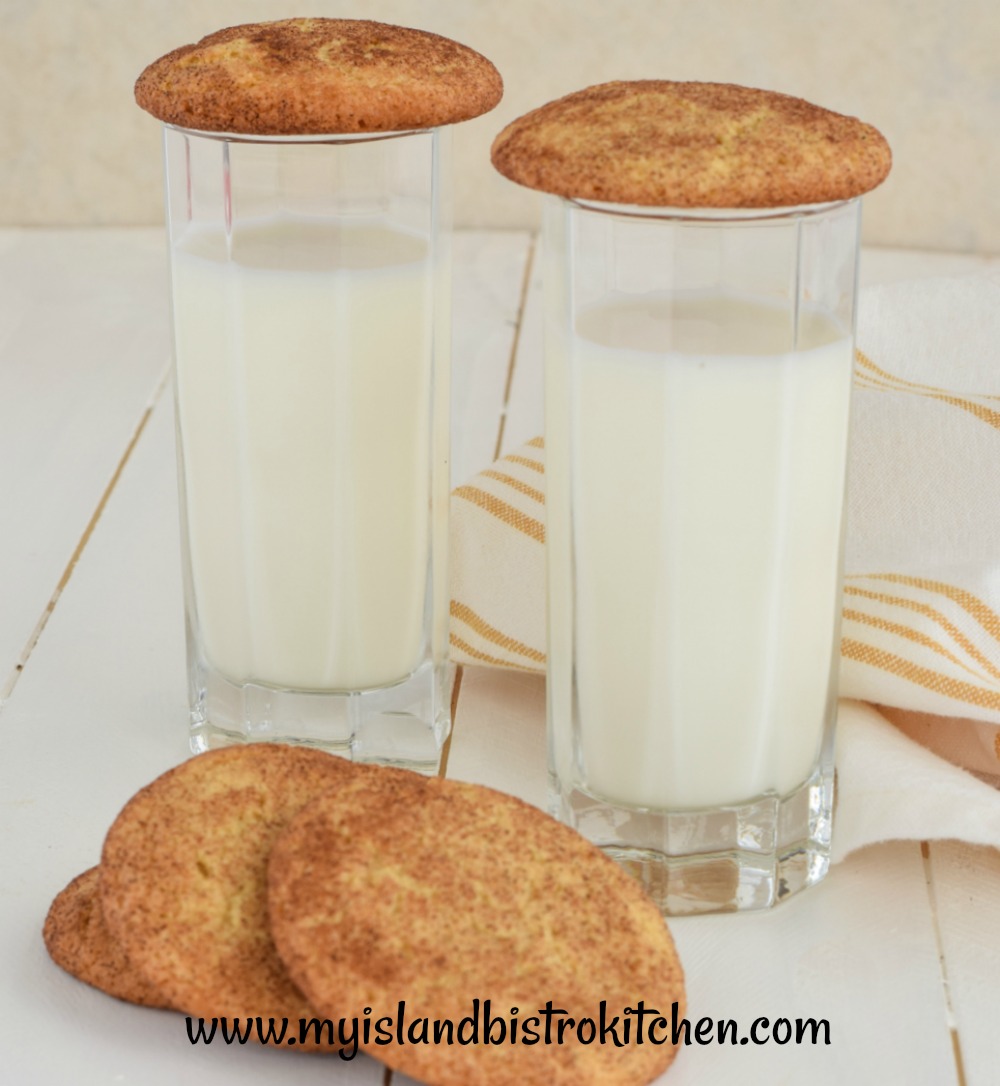
If you like cookies that are super tasty but not overly sweet then you will like these gluten free snickerdoodle cookies. They sport a lovely soft crumb texture and have superb flavor with the cardamon and nutmeg in the cookies and then the cinnamon-sugar mixture in which they are rolled.
I have been doing a lot of recipe development and testing for gluten free baked goods and have developed several cookie recipes that are suitable for those that have gluten sensitivity or intolerance. In my view, there is no need for those following a gluten-free diet to be deprived of some fine tasting baked products.
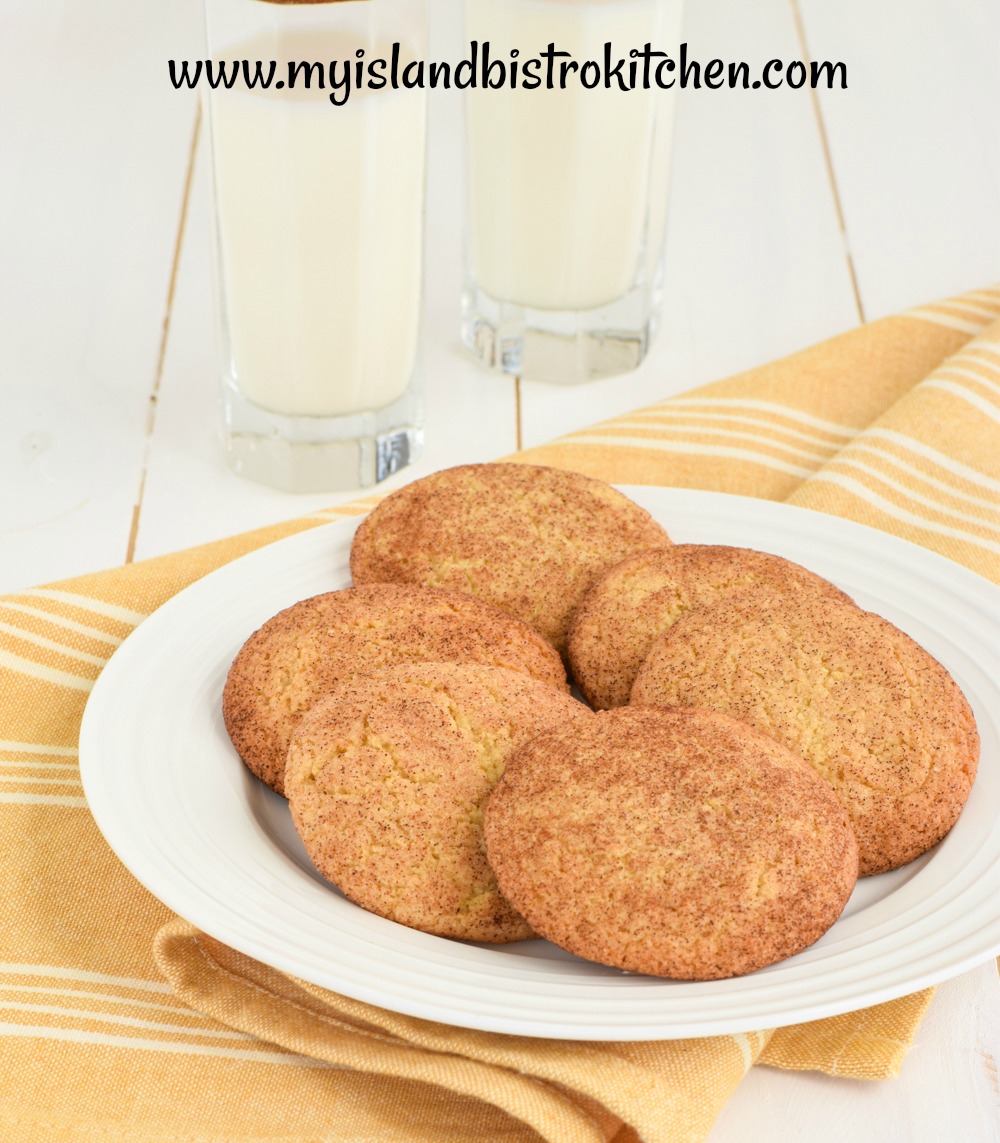
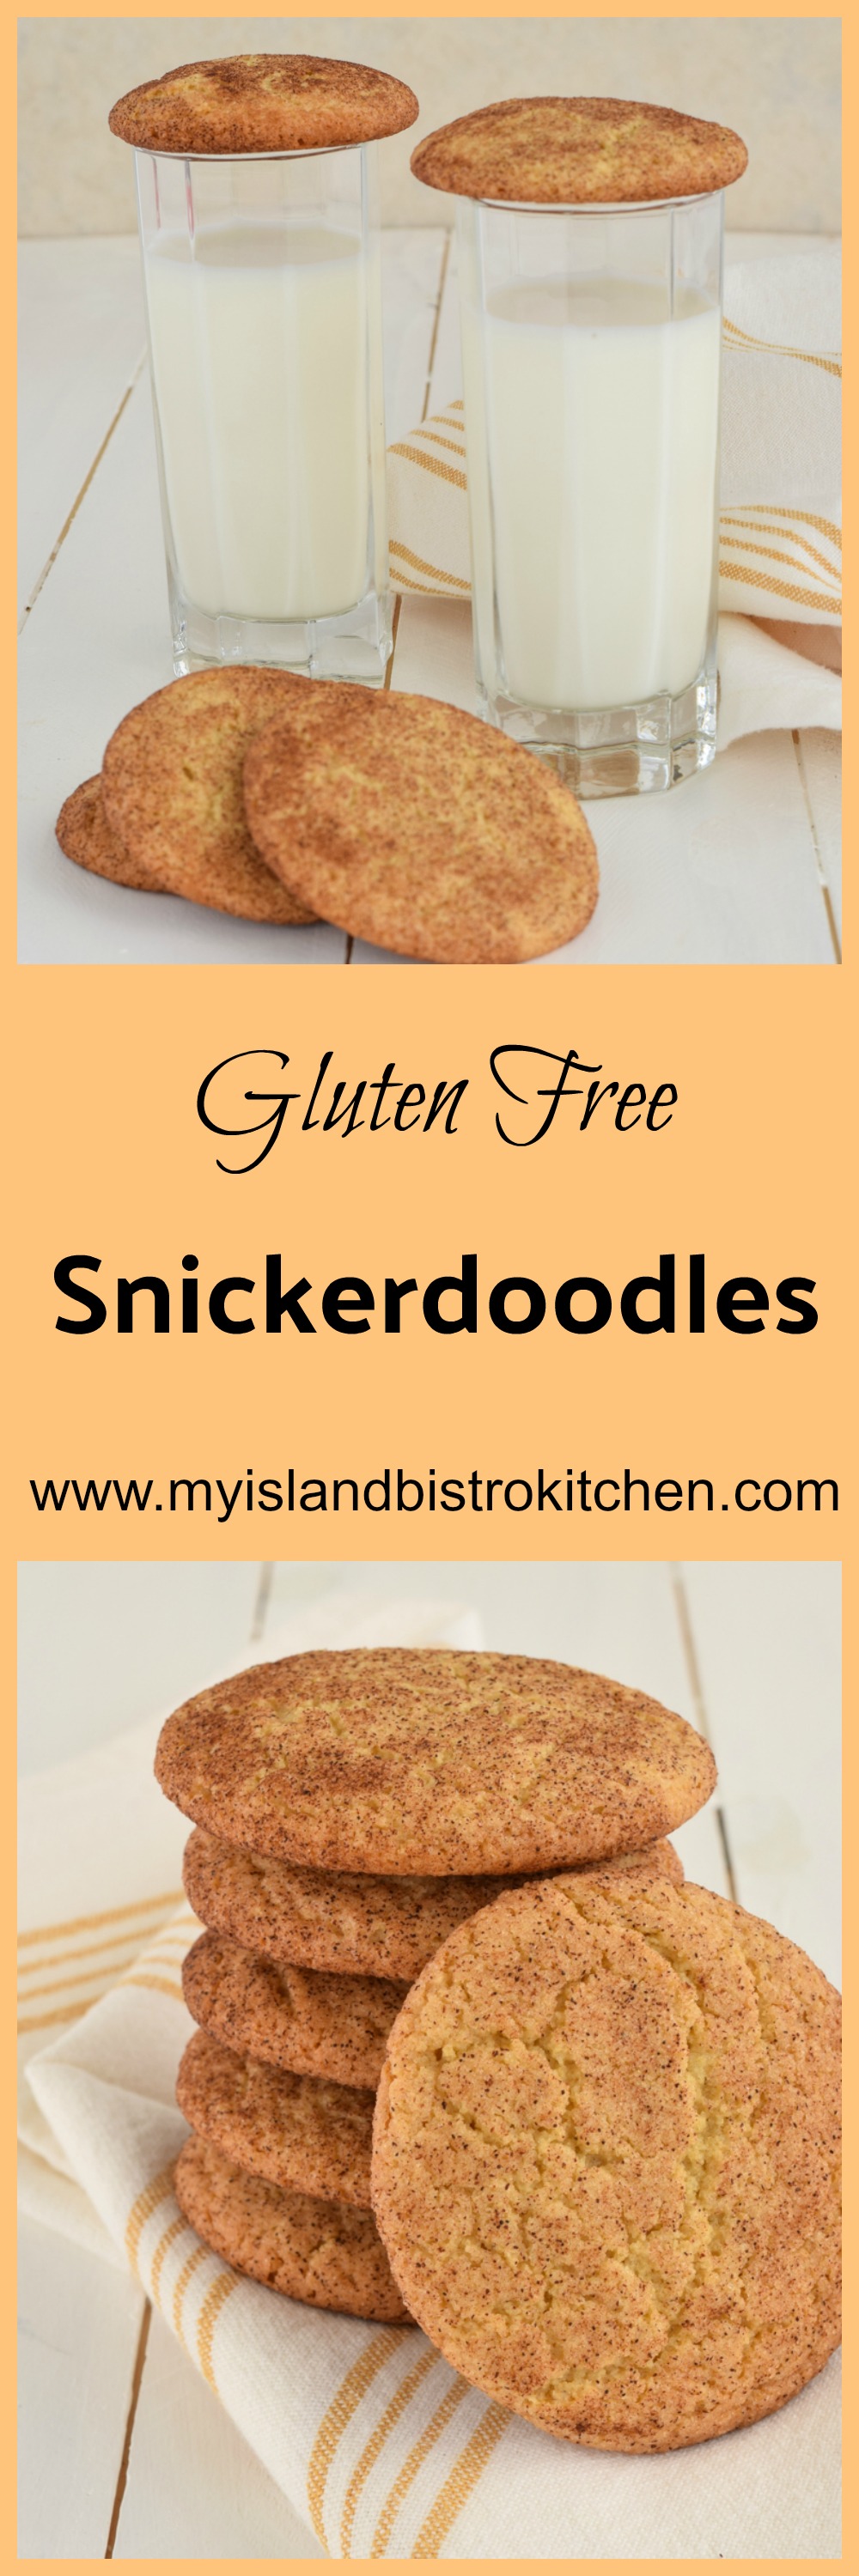
Gluten Free Snickerdoodle Cookies
This snickerdoodle cookie recipe does not take any unusual or difficult-to-find ingredients. It calls for gluten free all-purpose flour and a small amount of almond flour. The almond flour adds both flavor and a lovely texture to baked products. It is not an inexpensive flour, by any means, but fortunately not a lot of it is needed to achieve great results.
When using gluten free flours and xanthan gum, it is very important that they be combined very well before incorporating them into the batter. I recommend sifting these products along with the leavening and any spices together into a large bowl and then whisk them really well.
The snickerdoodle cookie dough will be very soft when all ingredients are mixed in. Cover the dough and place it in the refrigerator for 40-60 minutes to allow it to firm up so it will be easier to form the cookie balls.
Gluten Free Snickerdoodle Cookies
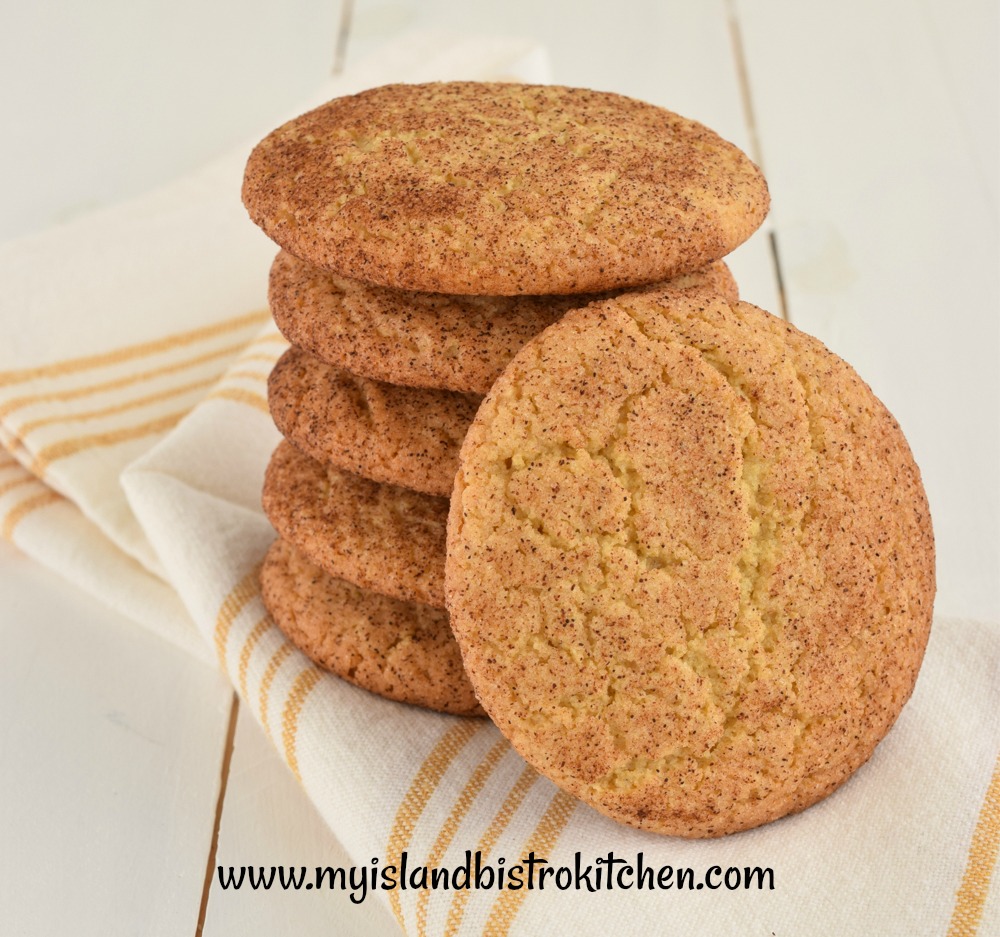
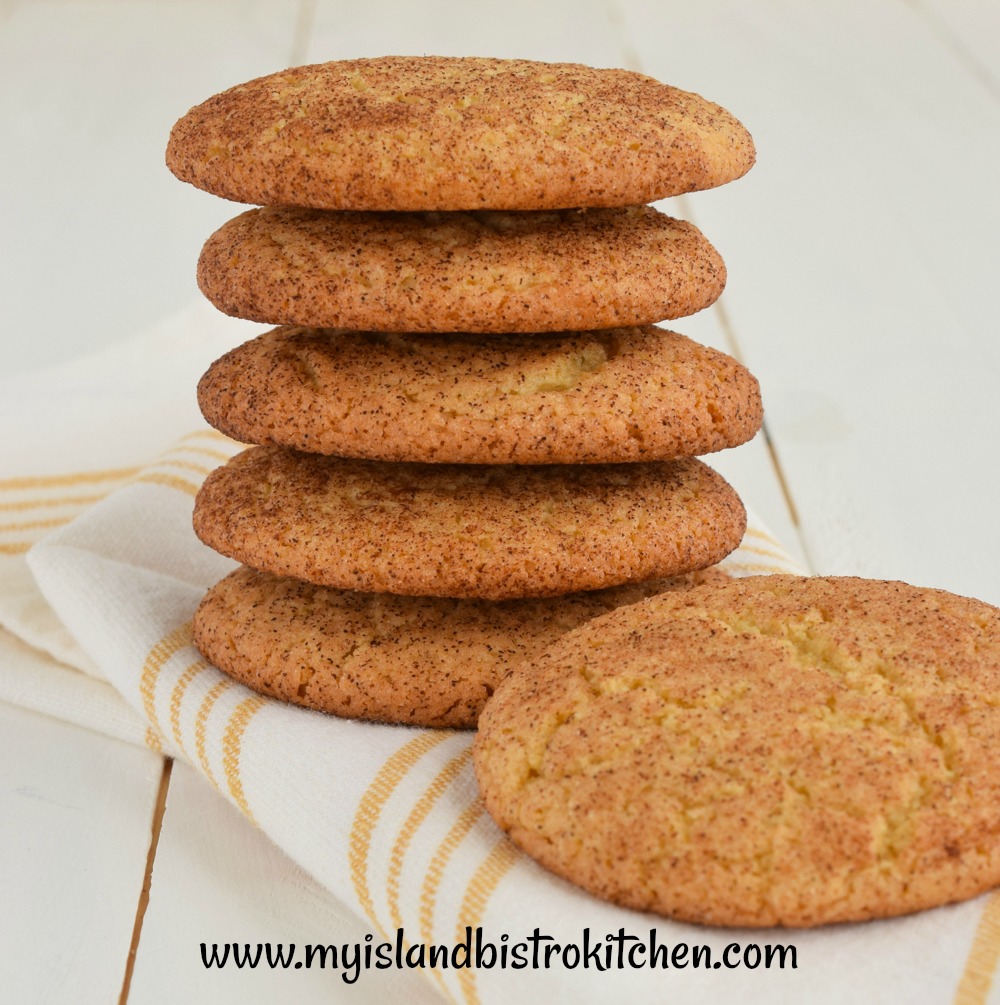
I’m a big fan of digital scales for my kitchen work. I like the look of uniform cookies so I often use the scales to ensure that the same amount of dough goes into each cookie. I use approximately 20grams, or about 3/4 ounce, of dough for each cookie. Roll the cookie balls in the cinnamon-sugar mixture and place them on the prepared cookie sheets (parchment lined), spacing them at least 2 1/2 inches apart. Do not flatten the cookie balls – they will automatically flatten as they bake. These cookies usually bake in about 10 minutes. Snickerdoodles are great picnic cookies as they travel well.
Gluten Free Snickerdoodle Cookies
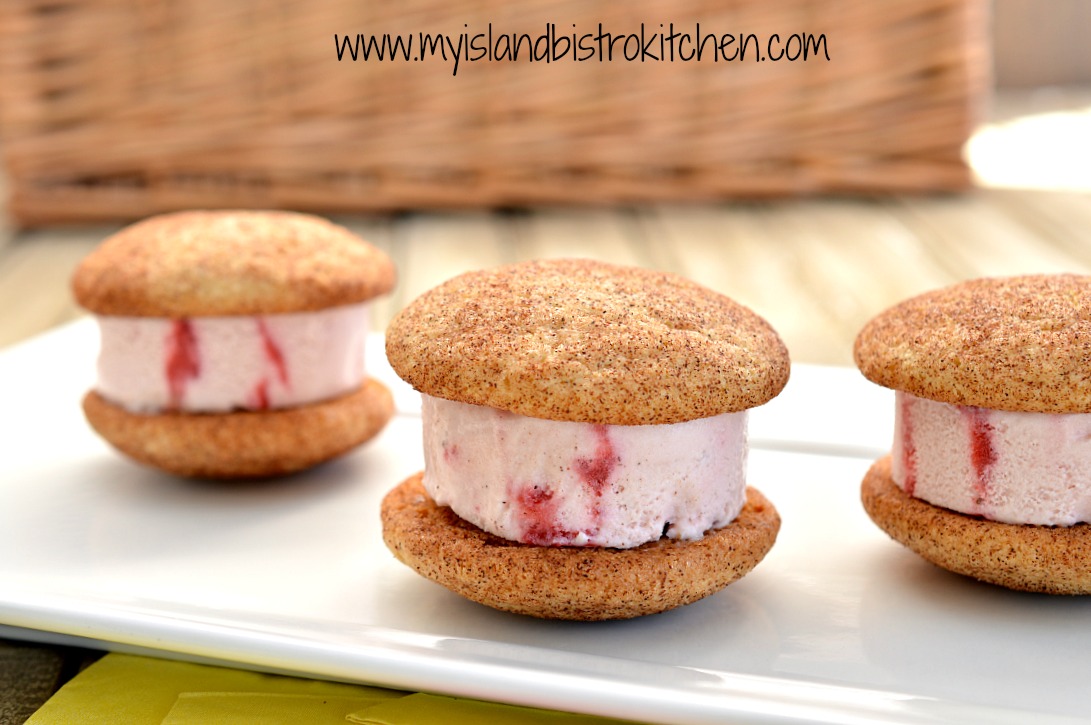
Because of their soft texture, they are an ideal choice for homemade ice cream sandwiches.
Snickerdoodle Ice Cream Sandwiches
And, of course, they are always a popular choice for the cookie jar or lunch box. These cookies freeze really well and are great to have on hand.
[Printable recipe follows at end of posting]
Gluten-free Snickerdoodle Cookies
Ingredients:
½ cup butter, softened at room temperature 6 tbsp granulated sugar 6 tbsp brown sugar 1 extra-large egg ½ tsp vanilla ¼ tsp almond flavoring ¼ tsp lemon flavoring
1 1/3 cup gluten-free all-purpose flour ¼ cup almond flour ¼ tsp xanthan gum ¼ tsp salt ½ tsp baking powder ½ tsp baking soda ½ tsp cream of tartar ¼ tsp cardamom 1/8 tsp nutmeg
1 tbsp granulated sugar 1 tsp cinnamon
Method:
Preheat oven to 375°F. Line two cookie sheets with parchment paper. Set aside.
In bowl of stand mixer, cream butter with 6 tbsp granulated sugar and 6 tbsp brown sugar. Beat in the egg and vanilla along with the almond and lemon flavorings.
In separate bowl, sift together the next 9 dry ingredients then whisk the mixture several times to ensure the ingredients are well incorporated. Mix into creamed mixture until well blended. Cover and place dough in refrigerator for 40-60 minutes to firm. Shape into balls using about 20g, or about .75 oz, of dough. Mix the remaining tablespoon of sugar with the cinnamon in small bowl. Roll cookie balls in sugar mixture and place on prepared cookie sheets, spacing cookies at least 2½ inches apart. Do not flatten cookie balls. Bake for approximately 10-12 minutes. Remove from oven and let cool on cookie sheet for 3-4 minutes then transfer to wire rack to cool completely. These cookies freeze well.
Yield: Apx. 2 dozen
These cookies are supremely good with a glass of cold milk.
A gluten free version of an old-fashioned favorite cookie, lightly spiced with cardamon and nutmeg, and rolled in cinnamon sugar. A cookie jar favorite for sure!
Ingredients
½ cup butter, softened at room temperature
6 tbsp granulated sugar
6 tbsp brown sugar
1 extra-large egg
½ tsp vanilla
¼ tsp almond flavoring
¼ tsp lemon flavoring
1 1/3 cup gluten-free all-purpose flour
¼ cup almond flour
¼ tsp xanthan gum
¼ tsp salt
½ tsp baking powder
½ tsp baking soda
½ tsp cream of tartar
¼ tsp cardamom
1/8 tsp nutmeg
1 tbsp granulated sugar
1 tsp cinnamon
Instructions
Preheat oven to 375°F. Line two cookie sheets with parchment paper. Set aside.
In bowl of stand mixer, cream butter with 6 tbsp granulated sugar and 6 tbsp brown sugar. Beat in the egg and vanilla along with the almond and lemon flavorings.
In separate bowl, sift together the next 9 dry ingredients then whisk the mixture several times to ensure the ingredients are well incorporated. Mix into creamed mixture until well blended. Cover and place dough in refrigerator for 40-60 minutes to firm. Shape into balls using about 20g, or about .75 oz, of dough. Mix the remaining tablespoon of sugar with the cinnamon in small bowl. Roll cookie balls in sugar mixture and place on prepared cookie sheets, spacing cookies at least 2½ inches apart. Do not flatten cookie balls. Bake for approximately 10-12 minutes. Remove from oven and let cool on cookie sheet for 3-4 minutes then transfer to wire rack to cool completely. These cookies freeze well.
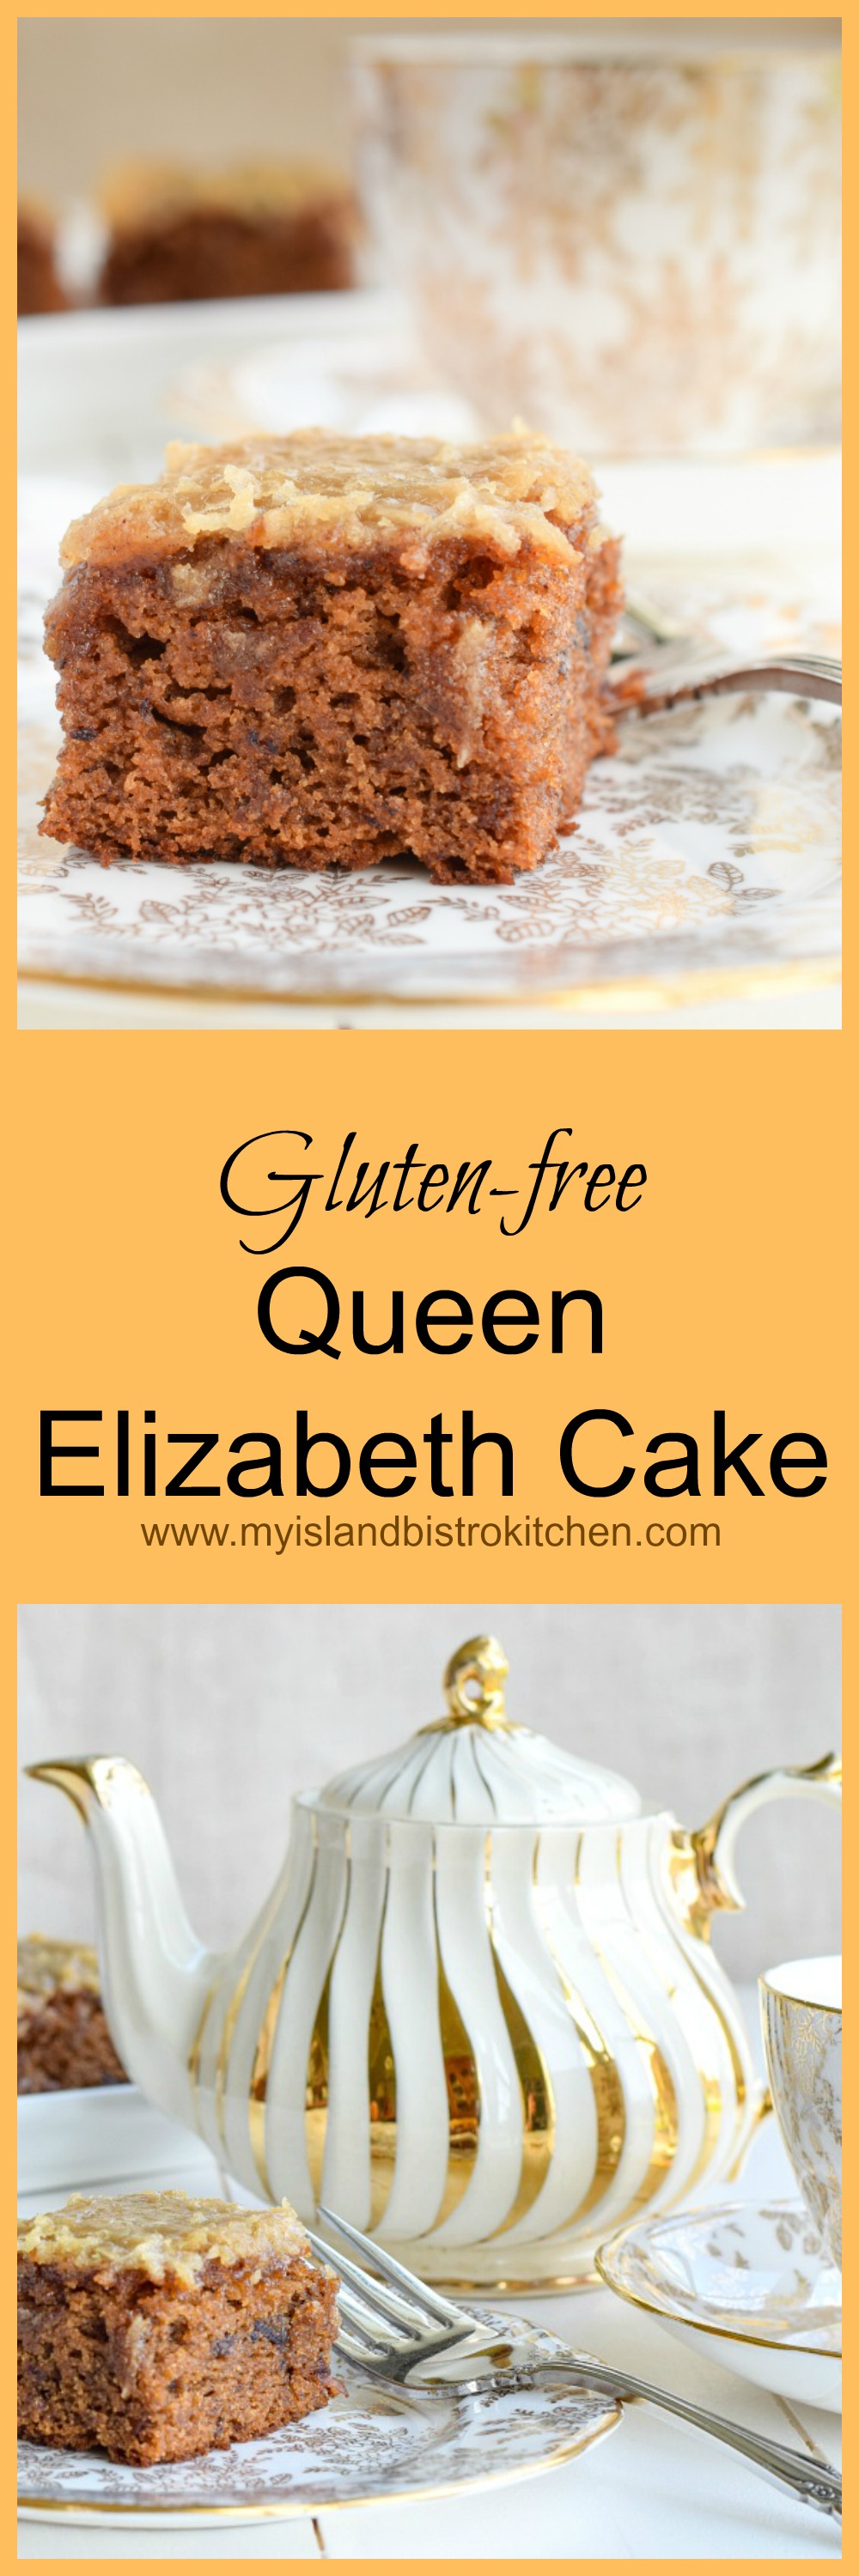
In an earlier posting, I shared my recipe for the regular gluten version of Queen Elizabeth Cake to coincide with Queen Elizabeth II’s actual birthday on April 21st. Today, I have a special treat for my food blog followers who must follow a gluten-free diet! I have adapted my regular version of this cake to make it gluten-free. It has passed my testing standards so I am pleased to share the recipe for this wonderfully moist and tasty Queen Elizabeth Cake that is made with very simple, basic ingredients. In fact, I’d even go so far as to suggest that it would be quite difficult to be able to tell that this version is gluten-free and, in my view, it certainly rivals its gluten version cousin in taste, texture, and overall quality.
I am timing the original publication of this gluten-free Queen Elizabeth Cake recipe with the annual Trooping of the Colour celebrations celebrated in London in June of each year. The Trooping of the Colour, a major military ceremony filled with pomp and pageantry, is often referred to as the Queen’s Birthday Parade. This tradition is said to have started in 1748 when then King George II decided to combine his birthday parade with the annual spring military parade in June because he apparently felt his actual November birthday was too cold to have a birthday parade. This tradition has endured since then, regardless when the reigning monarch’s actual birthday is and this event is considered the official celebration of the sovereign’s birthday. Held annually on a Saturday in June, the Queen attends, arriving by horse and carriage from Buckingham Palace and traveling along the Mall to the Horse Guard’s Parade behind Whitehall.
The colorful display of pageantry involves several hundred officers and men, horses, and bands. The Queen takes the salute and inspects the troops dressed in ceremonial uniform. “Colours” refers to the regimental flags of the various troops and the colours correspond to the colours and insignia of the uniforms of the soldiers of the different units. The colours (flags) served a purpose on the battlefields as they provided a rallying or gathering point for troops and hence the title “trooping of the colours”.
London Pagentry
So, thus ends the brief history lesson! Now, on to the Gluten-free Queen Elizabeth Cake, believed to have been named for either the Queen Mother or the reigning monarch, Queen Elizabeth II. When I earlier shared my recipe for the gluten version of this cake, I conducted some research to try and determine the origins of the cake and its name. Click here to read the information I was able to find about the different stories about the naming of this cake.
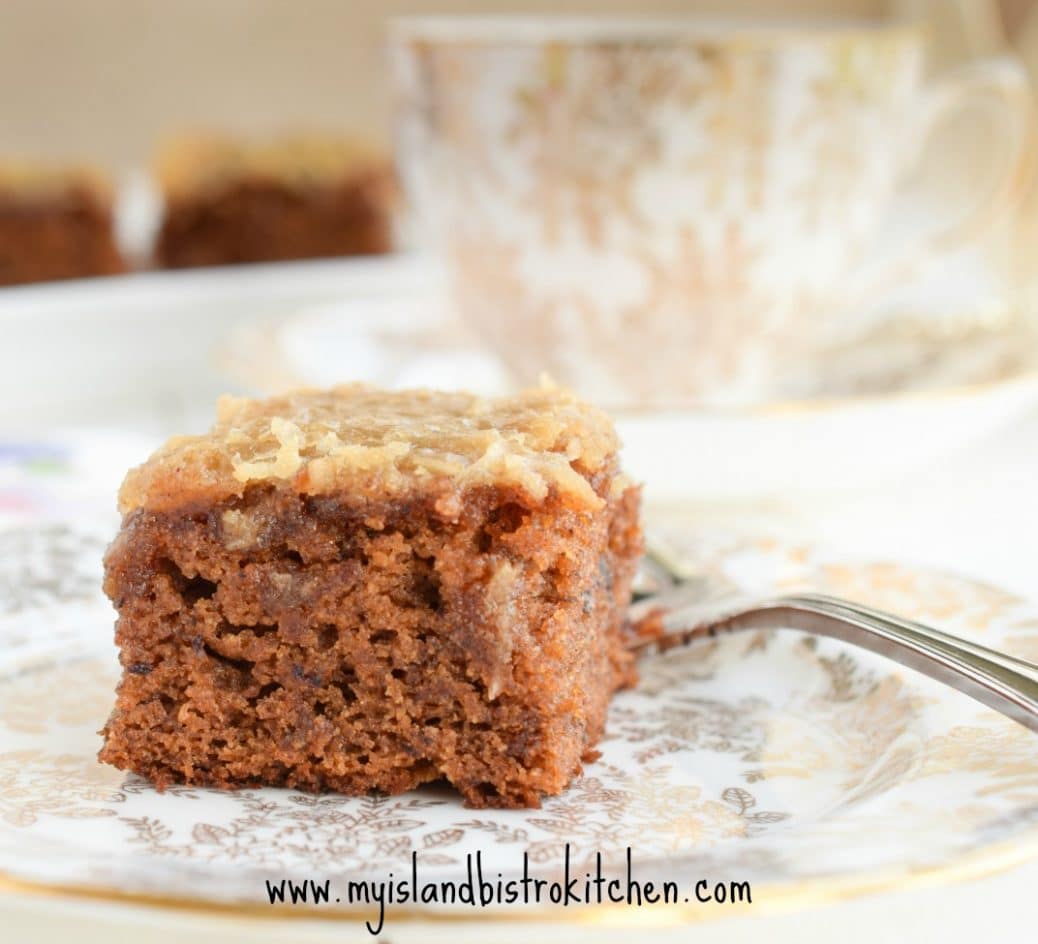
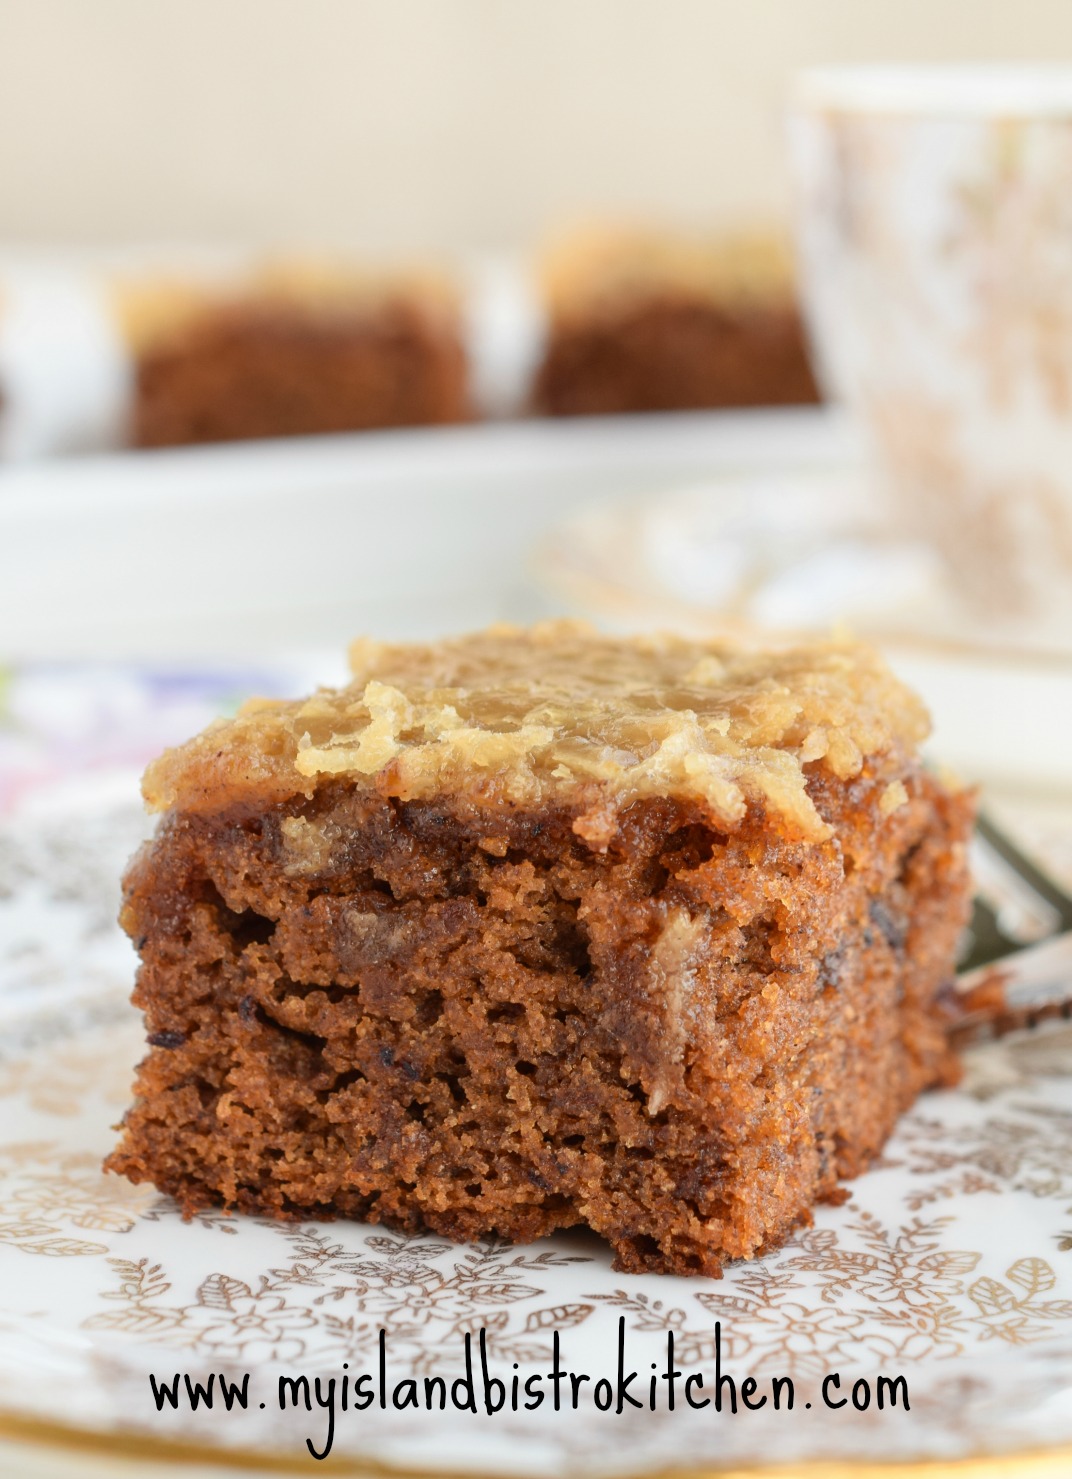
The texture of the gluten-free Queen Elizabeth Cake, like the gluten version, is somewhat dense and owes its lovely moist texture to the cooked dates. The combination of coconut and almond flours with the gluten-free 1-to-1 baking flour are the key to this cake’s texture. The almond and coconut flours really do provide a pleasing flavor to the cake.
Gluten-free Queen Elizabeth Cake
The following hints may be of use when making this cake:
This is a single layer cake. Use an 8” square baking pan to ensure this cake has a good height. A 9” square pan may be used but the cake will lack depth and more closely resemble a square as opposed to a cake. I find gluten-free flours take more leavening than gluten flours do and, even at that, it can still be difficult to get baked goods to rise to the height of a similar recipe that calls for gluten flour products. Grease the pan or line it with parchment paper or greased tin foil. Leaving an overhang of extra parchment paper or tin foil over the edge of the pan will make it easier to lift the entire baked cake from the pan and facilitate its cutting.
Let the date mixture cool completely at room temperature before incorporating it with the dry ingredients. If it is mixed with the dry ingredients while the mixture is either hot or warm, it may result in a “gummy” texture or soggy cake.
Mix the wet and dry ingredients using the rule of 3 parts dry and 2 parts wet ingredients, starting and ending with the dry ingredients.
Mix the ingredients well but don’t beat them as this may create a “tough crumb” cake.
Use cream to make the topping. I used 35% cream which gives a luxurious topping but 18% cream may also be used.
Start checking the cake for doneness at the point where the cake has been baking for 25 minutes then, if it is not baked, check it every 3-4 minutes after. The cake will be done when the cake tester, inserted into the center of the cake, comes out completely clean and dry.
When the cake tests almost baked (about 5 minutes before it is expected to come out of the oven), start making the topping. It needs to go on the warm cake that will go back in the oven for 3-4 minutes after the topping has been added.
The topping, like making homemade fudge, can set up really fast. Don’t leave it unattended. Stir the ingredients as they boil gently for the 3 minutes. Watch it carefully and, if you see if starting to “set up” and thicken really fast (even if it is before the 3 minutes of boiling is up), remove it from the stove and quickly stir in the vanilla and coconut. The mixture should be of the consistency that it can be poured from the saucepan and spread over the cake with a knife. If it becomes too thick, it will be too sugary and won’t be of spreading consistency. It will also become brittle and crack.
[Printable version of the recipe follows at end of posting]
Gluten-Free Queen Elizabeth Cake
Ingredients:
¾ cup dates, chopped (apx. 4¼ oz) ¾ tsp baking soda ¾ cup boiling water
¾ cup of 1-to-1 gluten free baking flour 1/3 cup almond flour 2½ tbsp coconut flour 1 tsp baking powder 1/8 tsp salt ¾ tsp cinnamon ¼ tsp nutmeg Pinch allspice ¼ cup butter, softened at room temperature 2/3 cup granulated sugar 1 extra large egg ¼ tsp orange extract ¾ tsp vanilla
Topping: 2½ tbsp melted butter ½ cup brown sugar 2¼ tbsp cream ¾ tsp vanilla ½ cup shredded coconut
Method: Cake: Place dates and soda in medium-sized saucepan. Add the boiling water. Simmer for about 4-5 minutes then cool completely at room temperature.
Position oven rack in centre of oven and preheat oven to 350°F. Grease 8” baking pan or line with parchment paper (or even greased tin foil).
Sift 1-to-1 gluten free baking flour, almond flour, coconut flour, baking powder, salt, and spices together. Set aside.
In bowl of stand mixer, cream the butter and sugar. Beat in the egg, orange extract, and vanilla. Transfer mixture to cooled dates. Stir well.
Transfer one-third of the sifted dry ingredients to the mixer bowl. Beat in one-half of the wet ingredients. Add another third of the dry ingredients. Blend well. Mix in the remainder of the wet ingredients. Finish by incorporating the remaining dry ingredients. Mix well to combine. Don’t overmix.
Spread batter evenly in prepared baking pan. Transfer to preheated oven and bake for approximately 25-30 minutes or until a cake tester inserted into center of cake comes out clean. Remove the cake from the oven. Increase oven temperature to 400°F to prepare for browning of cake’s topping.
Topping: About 5 minutes before the cake is due to be removed from the oven, begin to prepare the cake topping. In medium-sized saucepan, melt the butter. Blend in the brown sugar and cream. Bring to a boil over medium heat and boil for 3 minutes, stirring regularly to prevent scorching. Remove from heat and quickly stir in the vanilla and coconut. Pour and spread this mixture evenly over the warm cake and return it to the oven to brown slightly for 3-4 minutes. Remove cake from oven and place on wire rack to cool completely before cutting and serving.
Yield: 1 – 8” single layer cake
This cake is suitable as a snacking cake, dessert, tea cake, or even a picnic cake. The cake freezes well.
The Queen Elizabeth Cake pairs particularly well with a good cup of tea. My recommendation for a tea pairing would be an Earl Grey blend. The citrus notes in this black tea complement the sweetness of the cake. Earl Grey tea has a high concentration of tannins which makes it a suitable tea to cleanse the mouth after each bite of the cake so that each bite of this moist and flavorful cake is as equally tasty as the first!
A moist and tasty gluten-free cake featuring dates, spices, and a toffee-like topping.
Ingredients
¾ cup dates, chopped (apx. 4¼ oz)
¾ tsp baking soda
¾ cup boiling water
¾ cup of 1-to-1 gluten free baking flour
1/3 cup almond flour
2½ tbsp coconut flour
1 tsp baking powder
1/8 tsp salt
¾ tsp cinnamon
¼ tsp nutmeg
Pinch allspice
¼ cup butter, softened at room temperature
2/3 cup granulated sugar
1 extra large egg
¼ tsp orange extract
¾ tsp vanilla
Topping:
2½ tbsp melted butter
½ cup brown sugar
2¼ tbsp cream
¾ tsp vanilla
½ cup shredded coconut
Instructions
Cake:
Place dates and soda in medium-sized saucepan. Add the boiling water. Simmer for about 4-5 minutes then cool completely at room temperature.
Position oven rack in centre of oven and preheat oven to 350°F. Grease 8” baking pan or line with parchment paper (or even greased tin foil).
Sift 1-to-1 gluten free baking flour, almond flour, coconut flour, baking powder, salt, and spices together. Set aside.
In bowl of stand mixer, cream the butter and sugar. Beat in the egg, orange extract, and vanilla. Transfer mixture to cooled dates. Stir well.
Transfer one-third of the sifted dry ingredients to the mixer bowl. Beat in one-half of the wet ingredients. Add another third of the dry ingredients. Blend well. Mix in the remainder of the wet ingredients. Finish by incorporating the remaining dry ingredients. Mix well to combine. Don’t overmix.
Spread batter evenly in prepared baking pan. Transfer to preheated oven and bake for approximately 25-30 minutes or until a cake tester inserted into center of cake comes out clean. Remove the cake from the oven. Increase oven temperature to 400°F to prepare for browning of cake’s topping.
Topping:
About 5 minutes before the cake is due to be removed from the oven, begin to prepare the cake topping. In medium-sized saucepan, melt the butter. Blend in the brown sugar and cream. Bring to a boil over medium heat and boil for 3 minutes, stirring regularly to prevent scorching. Remove from heat and quickly stir in the vanilla and coconut. Pour and spread this mixture evenly over the warm cake and return it to the oven to brown slightly for 3-4 minutes. Remove cake from oven and place on wire rack to cool completely before cutting and serving.
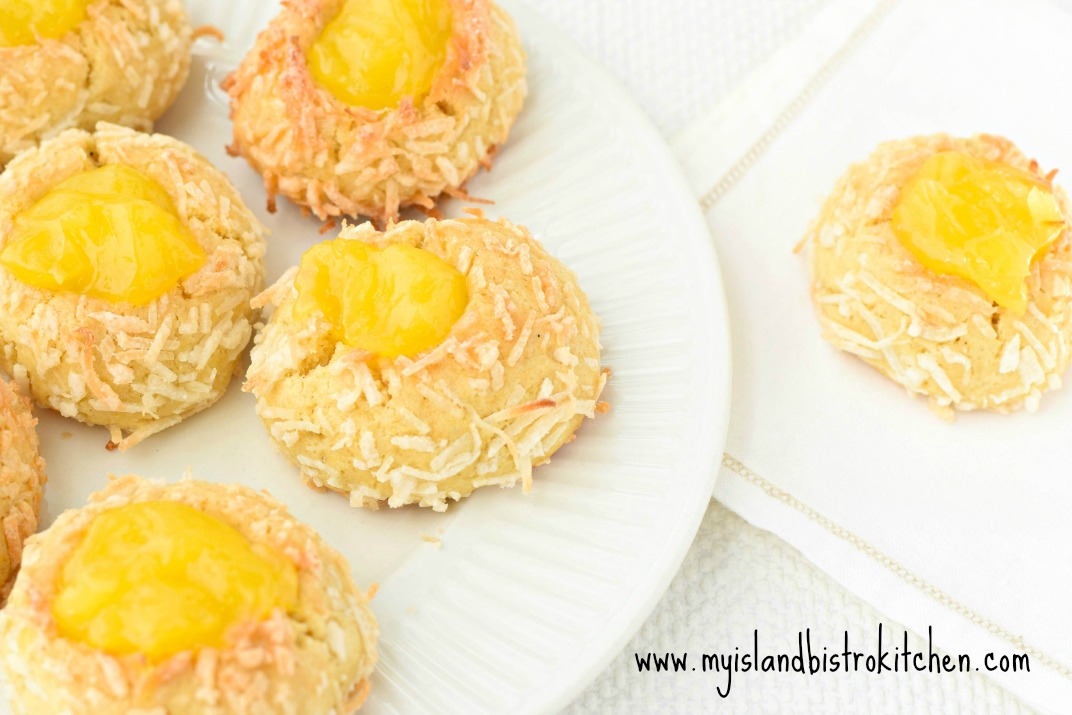
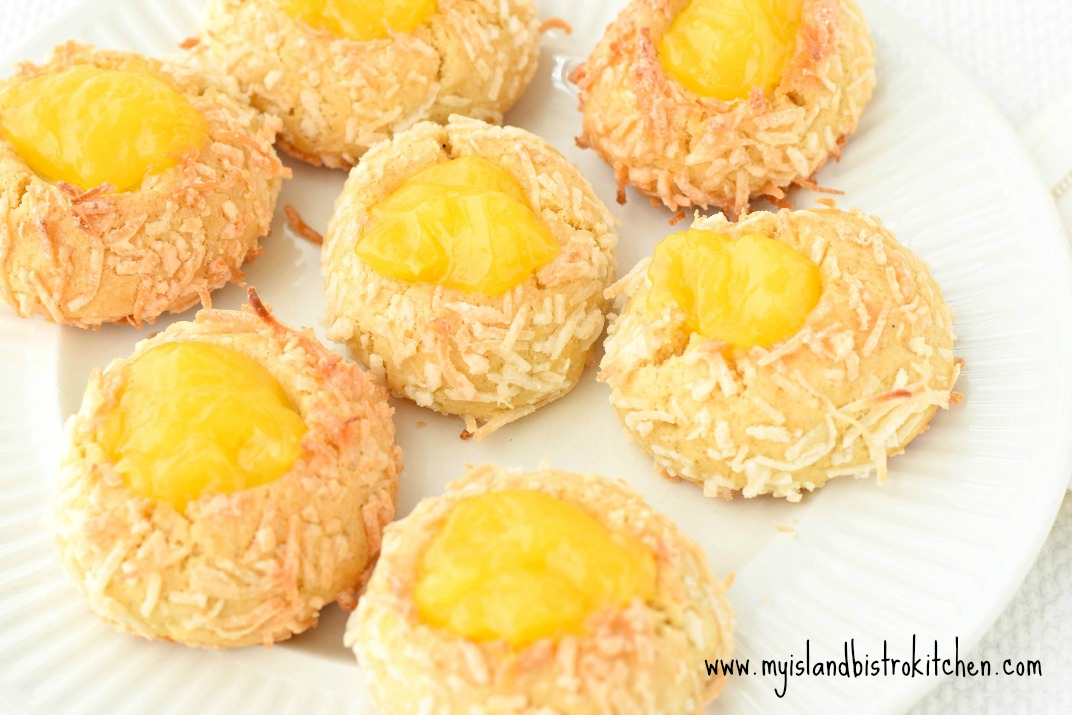
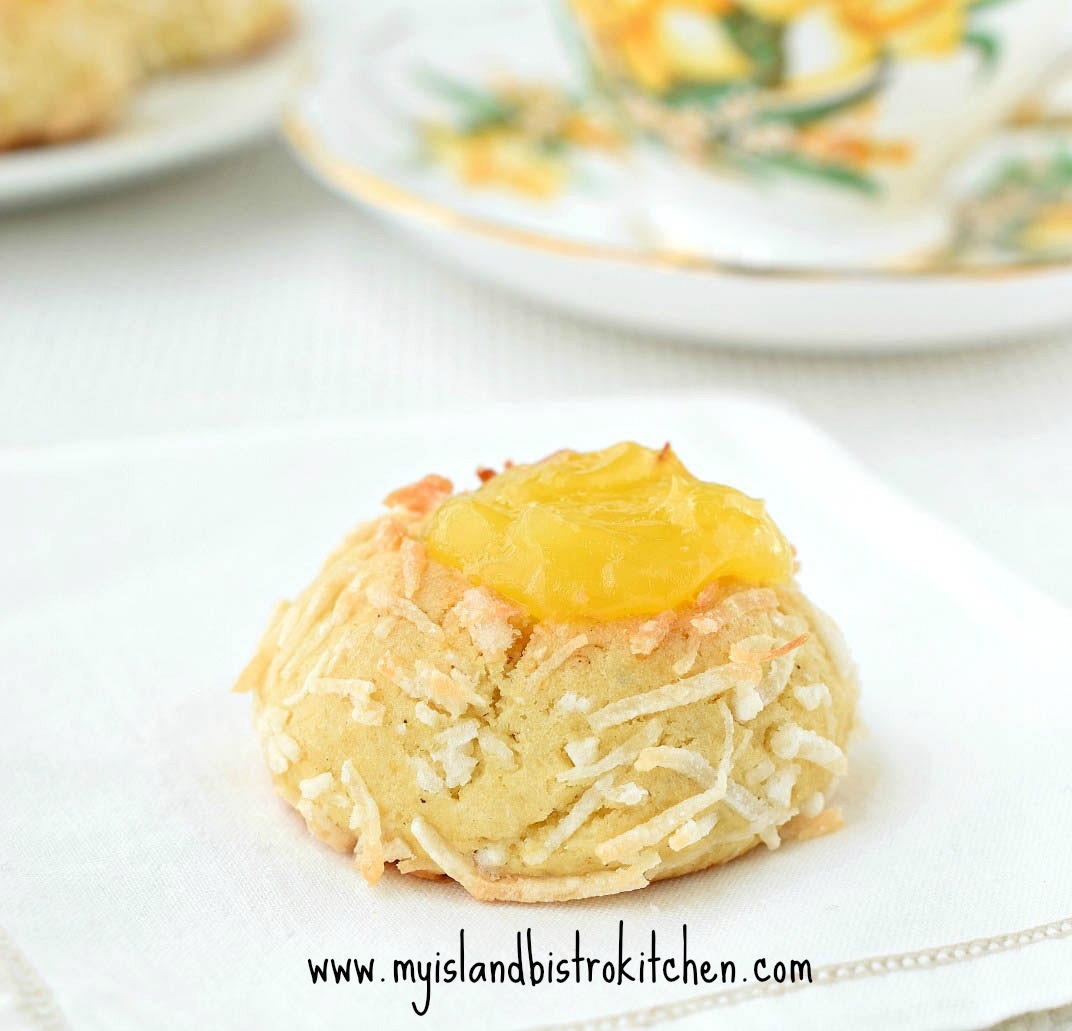
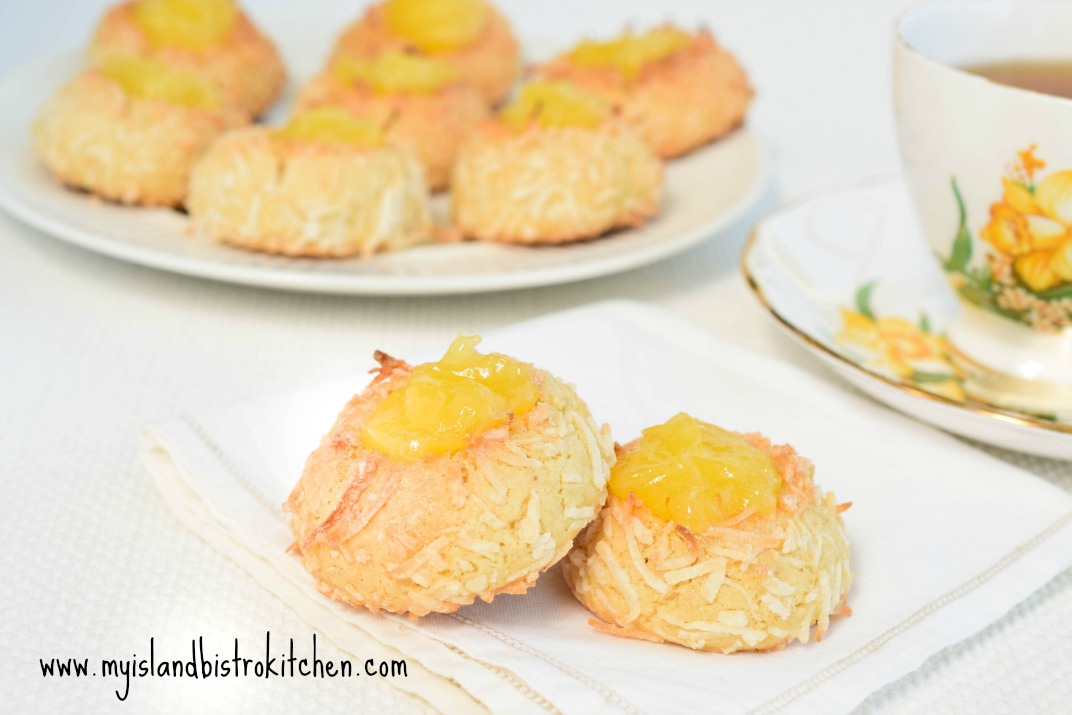
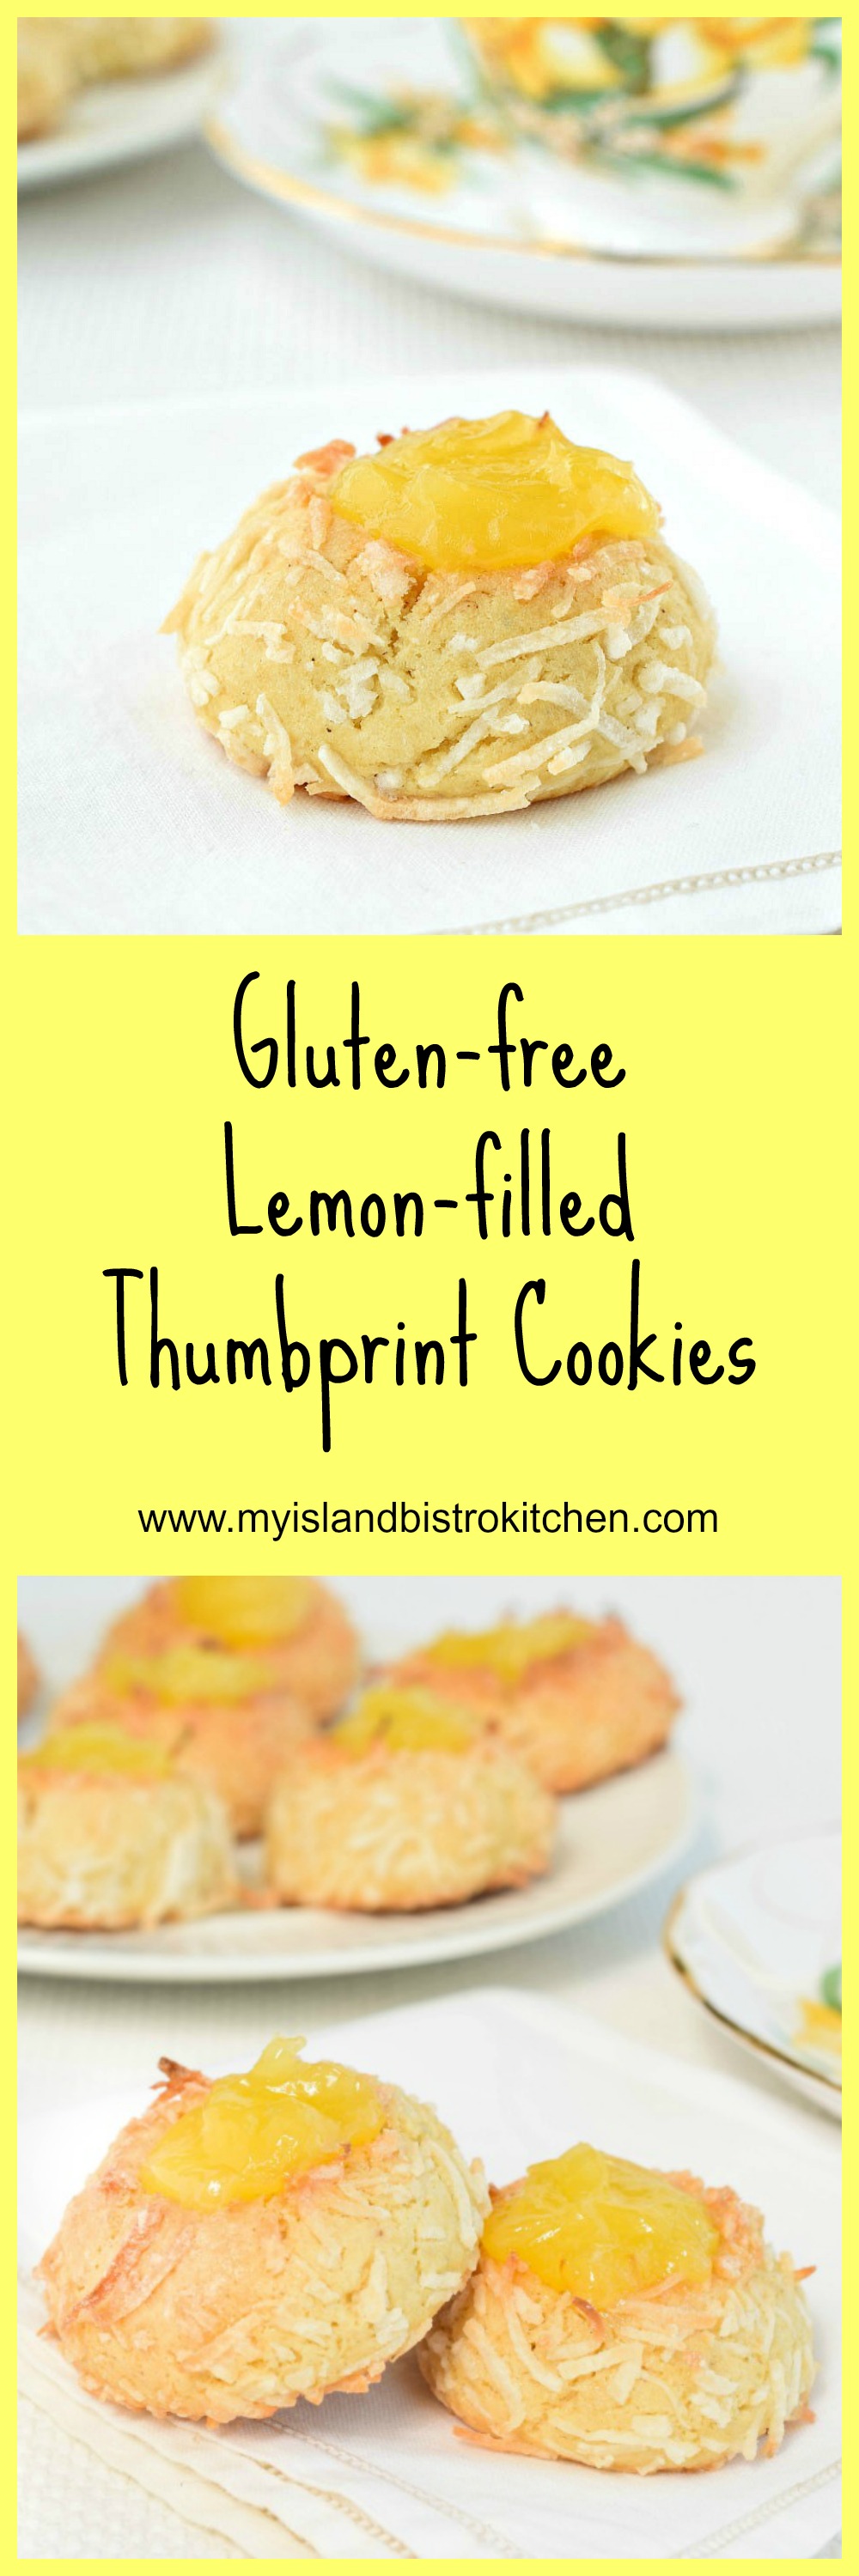
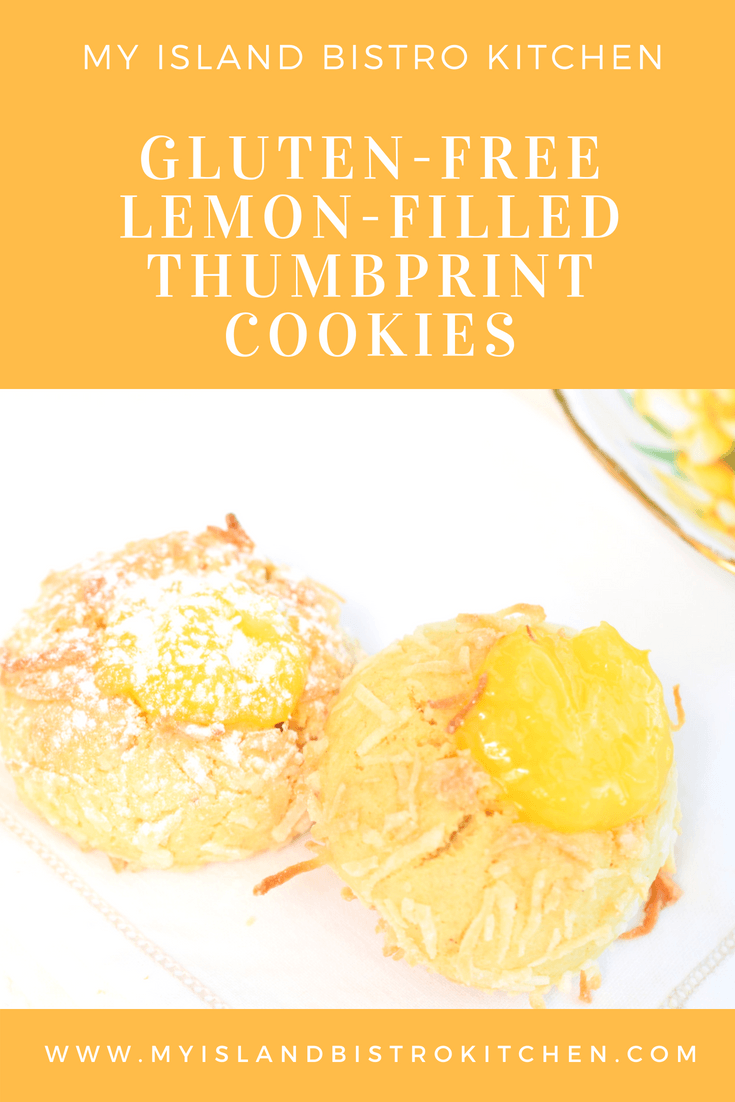
There are different versions of thumbprint cookies. Some are rolled in crushed nuts, others in granulated sugar, and still others in coconut. Some are filled with jam and others with lemon curd. I use lemon curd as the filling and roll my thumbprint cookies in coconut to complement the coconut flour used in these gluten-free cookies. The coconut toasts lovely as the cookies bake.
I find that using only a gluten-free all-purpose flour in baking results in a somewhat underwhelming flavor for my taste. That’s why I often add some almond and/or coconut flour to my baked products. Either or both contribute flavor and I think produce better textured products.
As I tested this newly-developed recipe, I found that a hint of cardamon gives a subtle and pleasing flavor to the cookies. Somewhere between a one-quarter teaspoon and a half teaspoon is about the right amount so….either a heaping 1/4 teaspoon or a scant 1/2 teaspoon of cardamon will work. The cardamon pairs well with the lemon curd used as a filling/topping on the thumbprints.
Gluten-free Lemon-filled Thumbprint Cookies
Because some gluten-free flours, like coconut flour for example, absorb a lot of liquid, I use one whole extra-large egg as well as the yolk from one large egg to ensure there is enough moisture in the cookie dough. I generally have three different sizes of eggs in my refrigerator (extra large, large, and medium), especially when I am doing gluten-free baking. This is because sometimes two extra-large eggs would be too much but more than one is needed. That’s when I use either large or medium-sized eggs to supplement the egg content in gluten-free baking or, sometimes as in the case with these cookies, I just use a certain size of egg yolk because that is all that is needed. Save the white from the large egg in this recipe as it will be needed to make the egg wash in which to dip each ball before rolling in coconut. This egg wash adheres the coconut to the cookies.
Gluten-free Lemon-filled Thumbprint Cookies
The cookie dough benefits from being chilled for about 30 minutes in the refrigerator before being formed into balls that are about 1″ in diameter. This allows the dough to firm up and makes the shaping of the cookie balls easier. For these cookies, I use 3/4 oz of dough. I recommend the use of a digital kitchen scale to weigh out portions of the dough to ensure uniformity of size in cookies. You can, of course, “eyeball” the amount of dough for each ball but, if you want perfectly uniform cookies, I recommend weighing the dough, at least for the first 2-3 cookie balls to get a sense of how much dough is needed for each cookie.
Gluten-free Lemon-filled Thumbprint Cookies
These cookies have a soft tender crumb and are not too sweet. The lemon curd adds tremendous flavor and texture to the cookies. Click here for my recipe for the lemon curd. To make the indent in each cookie for the curd, use either the tip of your thumb, the round end of a wooden spoon, or the round bowl of a ¼ tsp measuring spoon. Gently press an indent into the center of each cookie, pressing about half-way down through the cookie. Bake the cookies and, as soon as they come out of the oven, immediately fill each cookie with about 1 teaspoonful of lemon curd. If lemon curd is not to your taste, simply use your favorite jam as the filling.
Gluten-free Lemon-filled Thumbprint Cookies
Ingredients:
½ cup butter ½ cup granulated sugar 1 extra large egg 1 large egg yolk (save the egg white for the egg wash) 1 tsp vanilla ¼ tsp almond flavoring
1 cup all-purpose gluten-free flour ½ cup almond flour ¼ cup coconut flour 1¾ tsp xanthan gum 1/8 tsp baking soda ¼ tsp baking powder ¼ tsp salt Scant ½ tsp cardamom
3 oz flaked coconut 1 large egg white beaten with 1 tbsp water
Apx. ½ cup lemon curd
Method:
Line baking sheet with parchment paper.
Using the paddle attachment in the bowl of stand mixer, cream the butter. Gradually add the sugar. Beat well. Add the egg and extra egg yolk. Beat. Mix in the vanilla and almond flavoring.
In separate bowl, combine the flours, xanthan gum, baking soda, baking powder, salt, and cardamom. Whisk together very well. Blend into the butter-sugar-egg mixture. Mix well. Cover bowl with plastic wrap and chill dough for 30 minutes in refrigerator.
Preheat oven to 350°F. Place coconut in one small bowl and the beaten egg white and water mixture into a second bowl. Pinch off pieces of the dough and roll into balls, approximately 1” in diameter (if you weigh the dough, each piece should weigh ¾ oz.) Dip each cookie ball in the egg white wash then roll in the coconut. Place cookies on prepared baking sheet, arranging them about 2” apart. Using thumb tip, end of wooden spoon, or the round bowl of a ¼ tsp measuring spoon, gently press an indent into the center of each cookie. Bake for 20-22 minutes. Immediately fill each cookie with about 1 teaspoonful of lemon curd as soon as the cookies come out of the oven. If indents are not clearly defined in each cookie, gently reform them using one of the afore-mentioned methods. Transfer cookies to wire rack to cool completely. Store in airtight container. If desired, add a light dusting of confectioner’s sugar to the cookies just at the time of serving.
Yield: Apx. 22 cookies
Note: Jam of choice may be substituted for the lemon curd, if desired.
A delightful gluten-free cookie with a soft tender crumb and a decadent topping of lemon curd.
Ingredients
½ cup butter
½ cup granulated sugar
1 extra large egg
1 large egg yolk (save the egg white for the egg wash)
1 tsp vanilla
¼ tsp almond flavoring
1 cup all-purpose gluten-free flour
½ cup almond flour
¼ cup coconut flour
1¾ tsp xanthan gum
1/8 tsp baking soda
¼ tsp baking powder
¼ tsp salt
Scant ½ tsp cardamom
3 oz flaked coconut
1 large egg white beaten with 1 tbsp water
Apx. ½ cup lemon curd
Instructions
Line baking sheet with parchment paper.
Using the paddle attachment in the bowl of stand mixer, cream the butter. Gradually add the sugar. Beat well. Add the egg and extra egg yolk. Beat. Mix in the vanilla and almond flavoring.
In separate bowl, combine the flours, xanthan gum, baking soda, baking powder, salt, and cardamom. Whisk together very well. Blend into the butter-sugar-egg mixture. Mix well. Cover bowl with plastic wrap and chill dough for 30 minutes in refrigerator.
Preheat oven to 350°F. Place coconut in one small bowl and the beaten egg white and water mixture into a second bowl. Pinch off pieces of the dough and roll into balls, approximately 1” in diameter (if you weigh the dough, each piece should weigh ¾ oz.) Dip each cookie ball in the egg white wash then roll in the coconut. Place cookies on prepared baking sheet, arranging them about 2” apart. Using thumb tip, end of wooden spoon, or the round bowl of a ¼ tsp measuring spoon, gently press an indent into the center of each cookie. Bake for 20-22 minutes. Immediately fill each cookie with about 1 teaspoonful of lemon curd as soon as the cookies come out of the oven. If indents are not clearly defined in each cookie, gently reform them using one of the afore-mentioned methods. Transfer cookies to wire rack to cool completely. Store in airtight container.
Notes
Note: Jam of choice may be substituted for the lemon curd, if desired.
Recipe for Lemon Curd here: https://myislandbistrokitchen.com/2017/04/14/luscious-lemon-curd/
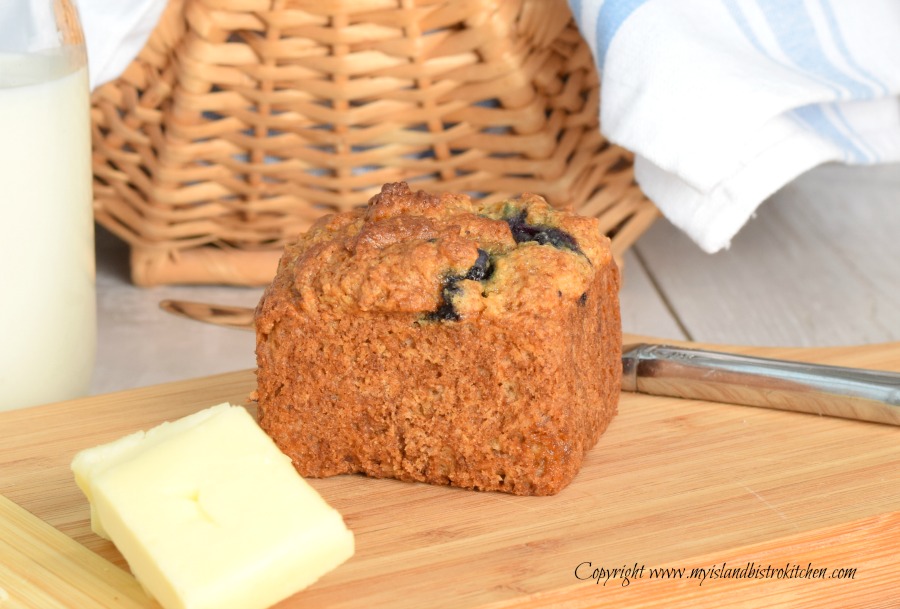
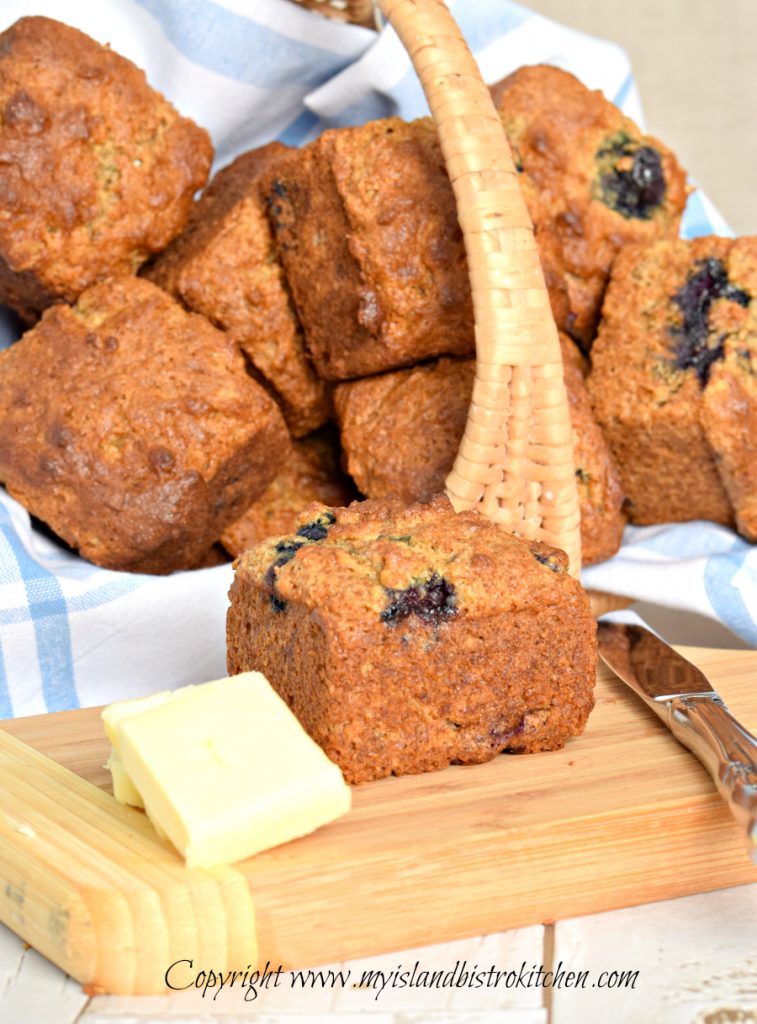
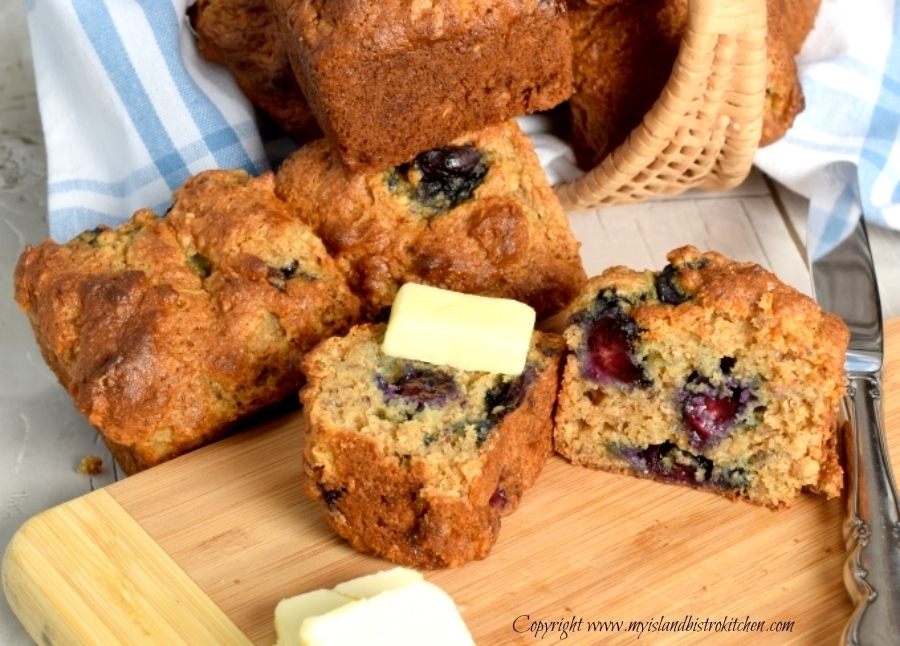
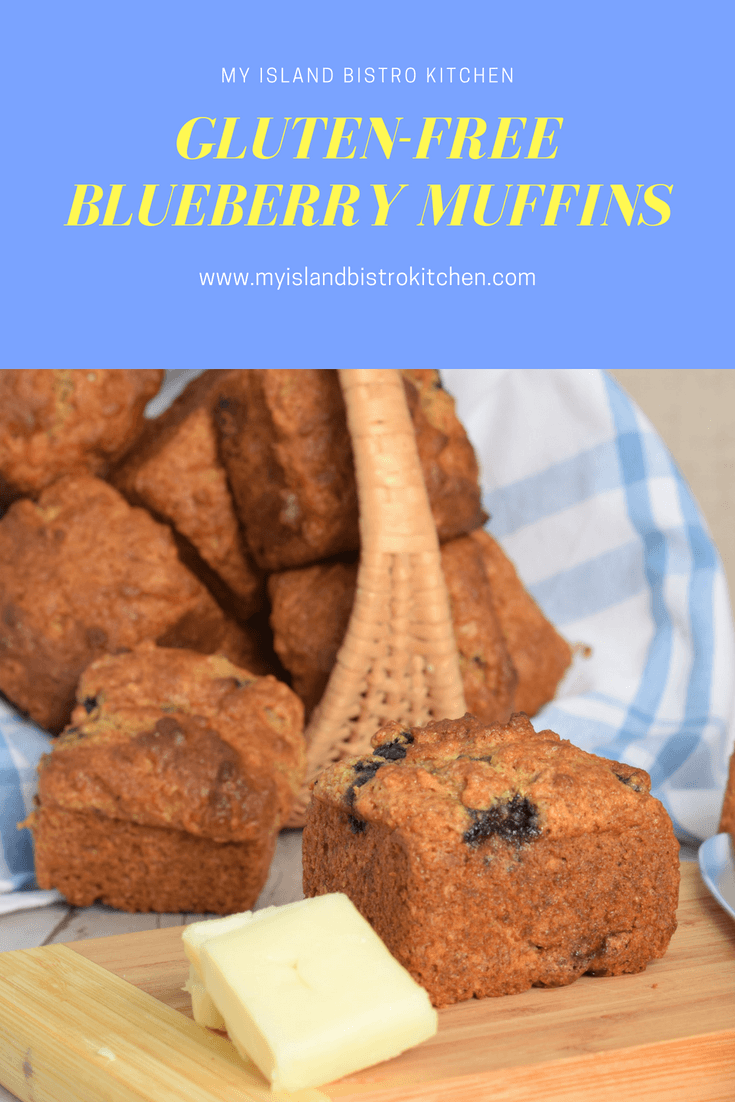
Blueberry muffins are a favorite and, while I have a “go-to” recipe for blueberry muffins that calls for regular gluten flour, I did not have one that was gluten-free. So, I set about developing one of my own and this is the result. My aim was to create a bistro, or deli-style, muffin and I am pleased with the end result.
I have discovered several things about gluten-free muffin making. First, some gluten-free flours have a “grainy”, or an almost “gritty”, texture to them and this will come through in the baked item. Some flours can result in, what I would describe as, gummy texture products. Hence, not all gluten-free flours yield good textured muffins. And, in my view, some gluten-free flours just don’t have a pleasing taste. Second, I find gluten-free flours seem to react differently than gluten flours to leavening. And, third, it often takes more ingredients and flavor boosters to end up with a tasty muffin that, as closely as possible, replicates a regular muffin. The remedies? It often takes a combination of more than one gluten-free flour to arrive at a satisfactory result. I add more leavening to my gluten-free muffins than I would usually add to gluten muffins to get that lovely gentle dome shape on the top that is so desired in muffin making. I bump up the spices and other flavorings (e.g., orange juice, maple syrup, orange rind, and applesauce) to get deep appetizing flavor.
The Bistro’s Gluten-free Blueberry Muffins
My favorite gluten-free flours to use in muffins are a combination of coconut flour, almond flour, and gluten-free oat flour. I use these in combination with gluten-free all-purpose flour. I find that, if I use just the gluten-free all-purpose flour for the recipe’s entire flour content, the muffins often lack sufficient structure, flavor, and I sometimes detect a grainy/gritty texture. Adding a combination of other flours with different textures tends to solve this problem for me. The coconut and almond flours add beautiful flavor to baked foods. The addition of some potato starch and xanthan gum also helps with structure and crumb texture. With the availability of bulk food stores, it is easy and convenient to purchase just the amounts of specialty flours and starches called for in recipes rather than having to buy large, expensive bags of them. It’s also a better way to ensure fresher product.
My gluten-free blueberry muffin recipe calls for either eggnog, almond milk, or whole milk. I have tested this recipe with all three products and had equally good results but must say that the eggnog makes the richest muffins with the most pleasing and complex flavor. However, to make the muffins dairy-free, by all means, use almond milk – it works very well. The recipe calls for maple syrup and plain works fine. I had some lavender and chai infused maple syrup on hand and, since the lavender plays well with blueberries, it added a layer of pleasing flavor complexity. Some recipes just do require a layering of flavors and, sometimes, one might think that such a small amount of an ingredient called for could be left out of the recipe with no notice; however, I believe all called-for ingredients in a recipe contribute to the end result, even if they are just playing small supporting roles and are not the main star of the recipe.
This recipe for blueberry muffins makes one dozen muffins and the muffin cup size should be one-half cup capacity. I like to use my square muffin tins for many muffin recipes. Apart from simply liking the shape, the square muffins are easy to wrap, store, and freeze. Several times a year, I go on a muffin-making frolic, making different kinds of muffins for the freezer. I will bag up different varieties and freeze them so they are quick and easy to pull out for weekday coffeebreaks at work. If a muffin does not freeze well, it will not get added to my repertoire of batch-making muffins. These blueberry muffins freeze very well.
To get the desired dome-shaped muffin, the muffins need to start out in a relatively high oven temperature – i.e., 450F. Using the high temperature to begin the baking process allows the outside of the muffin to quickly set while still allowing the inside to continue to rise. This also gives that nice soft muffin top. As soon as I place the muffins in the oven, I drop the temperature back to 400F.
The Bistro’s Gluten-free Blueberry Muffins
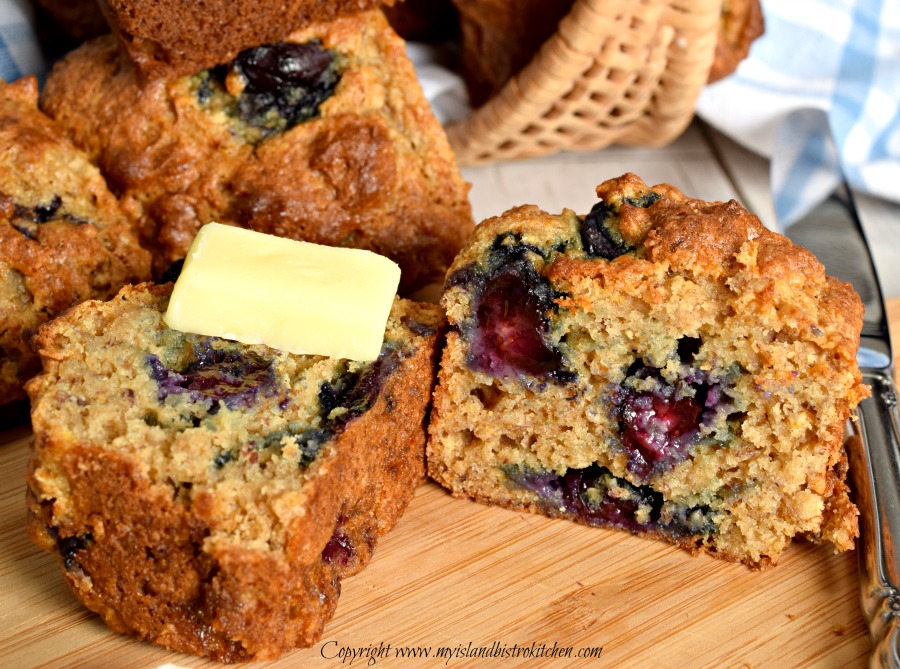
The texture of a good muffin should have a loose, coarse interior crumb, like those shown in the photograph above. Do not overmix muffin batter as this will cause the muffins to be tough, rubbery, and somewhat heavy. Stir only until the dry ingredients are just barely incorporated. In fact, in muffins in which I am adding fruit (which gets added last, using the “folding” technique), I don’t completely incorporate all the dry ingredients to the wet because, when the fruit is folded in, the dry ingredients will get further incorporated then. The batter should be lumpy, not smooth.
Muffins will quickly dry out if they are overbaked. I have found, in my oven, that about 20 minutes bakes these muffins perfectly but, as every oven is a bit different, I suggest checking the muffins at about the 16-17 minute mark and, just as soon as they spring back to a light finger touch, insert a cake tester or toothpick into the center of a muffin – if it comes out clean, the muffins are done. Let the baked muffins rest in the baking tin for 5-7 minutes, then transfer them to a wire rack to finish cooling.
The Bistro’s Gluten-free Blueberry Muffins
[Printable recipe follows at end of posting]
The Bistro’s Gluten-free Blueberry Muffins
Ingredients: 1 cup gluten-free all-purpose flour 1/3 cup coconut flour 1/3 cup almond flour ¼ cup gluten-free oat flour 2 tbsp potato starch 1½ tsp xanthan gum ¼ cup gluten-free large flake rolled oats 5½ tsp baking powder ½ tsp baking soda ½ tsp salt ½ tsp cinnamon ¼ tsp nutmeg ¼ tsp allspice 1½ tbsp ground flax seed 2/3 cup brown sugar, lightly packed 1 tbsp finely grated orange rind
2 large eggs (room temperature), lightly beaten 2/3 cup eggnog, almond milk, or whole milk ½ cup vegetable oil ¼ cup orange juice 1½ tsp vanilla 2 tbsp maple syrup, plain or flavor-infused (e.g., lavender and chai) 1/3 cup applesauce
1 cup blueberries, fresh or frozen
Method:
Preheat oven to 450°F.
Use muffin tins with cups that have ½-cup holding capacity. Prepare muffin tins by greasing or spraying each muffin cup with cooking oil, ensuring the top of the muffin tin is also well greased.
In large bowl, combine the dry ingredients and grated orange rind by whisking very well. Make a well in the middle of the dry ingredients and set aside.
In separate bowl, or large measuring cup, whisk together the lightly beaten eggs, eggnog (or almond or whole milk), oil, orange juice, vanilla, maple syrup, and applesauce.
Pour wet ingredients into well in the dry ingredients. Combine just until dry ingredients are barely incorporated. Do not overmix. Gently fold in the blueberries.
Spoon batter into prepared muffin tins, filling almost to the muffin cup rim. Let batter sit for 5 minutes before baking.
Transfer muffins to oven and immediately reduce heat to 400°F. Bake 18-20 minutes or until muffins are just firm to the touch and a cake tester inserted into the center of a muffin comes out clean.
Let muffins rest in muffin cups for 5-7 minutes then gently remove from pan and transfer to wire rack to cool completely.
These flavor-packed deli-style gluten-free blueberry muffins are light and moist with a tender crumb.Hard to believe they are gluten free!
Ingredients
1 cup gluten-free all-purpose flour
1/3 cup coconut flour
1/3 cup almond flour
¼ cup gluten-free oat flour
2 tbsp potato starch
1½ tsp xanthan gum
¼ cup gluten-free large flake rolled oats
5½ tsp baking powder
½ tsp baking soda
½ tsp salt
½ tsp cinnamon
¼ tsp nutmeg
¼ tsp allspice
1½ tbsp ground flax seed
2/3 cup brown sugar, lightly packed
1 tbsp finely grated orange rind
2 large eggs (room temperature), lightly beaten
2/3 cup eggnog, almond milk, or whole milk
½ cup vegetable oil
¼ cup orange juice
1½ tsp vanilla
2 tbsp maple syrup, plain or flavor-infused (e.g., lavender and chai)
1/3 cup applesauce
1 cup blueberries, fresh or frozen
Instructions
Preheat oven to 450°F.
Use muffin tins with cups that have ½-cup holding capacity. Prepare muffin tins by greasing or spraying each muffin cup with cooking oil, ensuring the top of the muffin tin is also well greased.
In large bowl, combine the dry ingredients and grated orange rind by whisking very well. Make a well in the middle of the dry ingredients and set aside.
In separate bowl, or large measuring cup, whisk together the lightly beaten eggs, eggnog (or almond or whole milk), oil, orange juice, vanilla, maple syrup, and applesauce.
Pour wet ingredients into well in the dry ingredients. Combine just until dry ingredients are barely incorporated. Do not overmix. Gently fold in the blueberries.
Spoon batter into prepared muffin tins, filling almost to the muffin cup rim. Let batter sit for 5 minutes before baking.
Transfer muffins to oven and immediately reduce heat to 400°F. Bake 18-20 minutes or until muffins are just firm to the touch and a cake tester inserted into the center of a muffin comes out clean.
Let muffins rest in muffin cups for 5-7 minutes then gently remove from pan and transfer to wire rack to cool completely.
Notes
Please be sure to read the entire blog posting that accompanies this recipe as it contains several tips and hints on making gluten-free muffins.
Crepes filled with delectable fillings are one of my favorite meals. Chicken and Mushroom Crepes with Cheese Sauce are a real treat and a lot easier to make than one might think. At one time considered the fare of stylish restaurants and bistros, they can actually be very easily made at home. Continue reading Chicken and Mushroom Crepes→
If you like brown sugar fudge, you’ll love this Gluten-free Brown Sugar Fudge Square, even if you aren’t gluten-intolerant or on a grain-restrictive diet! With a cake-type base, it’s the fudge icing that makes this square and takes it from plain to yummy. It’s like having cake and candy at the same time!
I use 1-to-1 gluten-free baking flour along with a small amount of coconut flour in this square. The coconut flour blends well with the shredded coconut in the recipe and gives the square extra flavor. Super easy square to make.
Gluten-free Brown Sugar Fudge Square
The slightly tricky part is making the icing as it will “set up” very fast. Make sure you have all the ingredients pre-measured and at hand when you start to make the icing. It’s essential that the icing sugar be sifted to remove any lumps as there won’t be any time to work out any lumps when beating the icing sugar into the hot butter-sugar mixture. Once the icing starts to thicken, work quickly to spread it over the square.
This square freezes beautifully and is great to have on hand when you just need to have something sweet!
Gluten-free Brown Sugar Fudge Square
[Printable version of recipe follows at end of posting]
Gluten-free Brown Sugar Fudge Square
Ingredients:
Square ½ cup minus 1 tbsp butter, softened at room temperature 1 cup brown sugar, lightly packed 1 extra-large egg (at room temperature for 20 minutes) ½ tsp pure vanilla 1 cup 1-to-1 gluten-free baking flour 2 tbsp coconut flour 1 tsp baking powder pinch salt 1/3 cup milk ½ cup shredded coconut
Icing 3 tbsp butter, softened at room temperature ¾ cup brown sugar, lightly packed 3 tbsp cream 1 cup sifted icing sugar 1 tsp vanilla
Walnut halves for decoration (optional)
Method:
Preheat oven to 350°F. Grease or, alternatively, line 9” square baking pan with tin foil and spray with cooking oil.
Square: Cream butter and sugar together. Add the egg and beat well to combine with butter-sugar mixture. Beat in vanilla.
Sift the 1-to-1 gluten-free flour, coconut flour, baking powder, and salt together. Add the dry ingredients and milk to the creamed mixture in three parts (3 parts dry and 2 parts wet) starting and ending with the dry ingredients. Beat for 1 minute longer on medium speed. Fold in the shredded coconut. Spread batter evenly in prepared pan.
Bake for 30-32 minutes or until cake tester inserted into center of square comes out clean. Remove square from oven and place on wire rack to cool completely.
Icing: When square has cooled, make the icing by combining the butter and brown sugar in a saucepan over medium heat. Stir until both have melted/dissolved. Add the cream. Bring mixture to a boil. Reduce heat and simmer for 2 minutes, stirring occasionally. Remove from heat and, with an electric hand mixer, beat in the icing sugar until mixture starts to thicken. Immediately stir in the vanilla and, working quickly (as this icing will “set up” very fast), spread the icing evenly over square. Score cutting lines on square and, if desired, place one walnut half on each individual square. Let icing set completely before cutting squares.
An old-fashioned fudge square made with gluten-free flour and topped with brown sugar fudge icing.
Ingredients
Square
½ cup minus 1 tbsp butter, softened at room temperature
1 cup brown sugar, lightly packed
1 extra-large egg (at room temperature for 20 minutes)
½ tsp pure vanilla
1 cup 1-to-1 gluten-free baking flour
2 tbsp coconut flour
1 tsp baking powder
pinch salt
1/3 cup milk
½ cup shredded coconut
Icing
3 tbsp butter, softened at room temperature
¾ cup brown sugar, lightly packed
3 tbsp cream
1 cup sifted icing sugar
1 tsp vanilla
Walnut halves for decoration (optional)
Instructions
Preheat oven to 350°F. Grease or, alternatively, line 9” square baking pan with tin foil and spray with cooking oil.
Square: Cream butter and sugar together. Add the egg and beat well to combine with butter-sugar mixture. Beat in vanilla.
Sift the 1-to-1 gluten-free flour, coconut flour, baking powder, and salt together. Add the dry ingredients and milk to the creamed mixture in three parts (3 parts dry and 2 parts wet) starting and ending with the dry ingredients. Beat for 1 minute longer on medium speed. Fold in the shredded coconut. Spread batter evenly in prepared pan.
Bake for 30-32 minutes or until cake tester inserted into center of square comes out clean. Remove square from oven and place on wire rack to cool completely.
Icing: When square has cooled, make the icing by combining the butter and brown sugar in a saucepan over medium heat. Stir until both have melted/dissolved. Add the cream. Bring mixture to a boil. Reduce heat and simmer for 2 minutes, stirring occasionally. Remove from heat and, with an electric hand mixer, beat in the icing sugar until mixture starts to thicken. Immediately stir in the vanilla and, working quickly (as this icing will “set up” very fast), spread the icing evenly over square. Score cutting lines on square and, if desired, place one walnut half on each individual square. Let icing set completely before cutting squares.
These easy-to-make gluten-free Earl Grey Cranberry-Orange Shortbread cookies are brimming with flavor. The ground Earl Grey tea leaves lend a subtle hint of tea flavor as well as add wonderful specks of interest in the cookies. The addition of the dried cranberries and grated orange rind make these very flavorful and tasty cookies.
Gluten-Free Earl Grey Cranberry-Orange Shortbread
I have been having very good success using 1-to-1 gluten-free baking flour, such as Bob’s Red Mill, for my gluten-free baking. The addition of finely ground almonds adds both flavor and a layer of tenderness to the shortbread crumb.
Gluten-Free Earl Grey Cranberry-Orange Shortbread
I use my old coffee grinder to grind the loose tea leaves very finely. This releases their essence which, in turn, infuses the dough with the tea aromatic. Use dried, not fresh or frozen, cranberries for these cookies and make sure they are chopped quite finely.
The dough will be quite soft so form it into a round log shape, wrap it tightly in plastic wrap or waxed paper, and refrigerate it for 2-3 hours before slicing and baking. Refrigerating the dough helps to firm it up enough so that, when sliced with a sharp knife, the slices cut cleanly. Empty cardboard paper towel rolls make great cylinder “sleeves” in which to chill the cookie dough because they help to keep the round shape. Simply slit open the paper towel roll, place the wrapped cookie log inside the “sleeve”, draw the edges of the cylinder together, and secure with tape. Rotate the cookie dough log a couple of times during the chilling process to distribute its weight and help to keep the round shape.
These cookies are a great addition to the menu of anyone on a gluten-free diet. In fact, anyone can enjoy these cookies, regardless whether they have a sensitivity or intolerance to gluten or not – I’ll bet you’d never guess they’re made with gluten-free flour!
Gluten-Free Earl Grey Cranberry-Orange Shortbread
[Printable recipe follows at end of posting]
Gluten-Free Earl Grey Cranberry-Orange Shortbread
Ingredients:
½ cup unsalted butter, softened at room temperature ½ cup sifted icing sugar (aka confectioner’s or powdered sugar) ¾ tsp finely grated orange rind 1/2 tsp pure vanilla 1/8 tsp almond flavoring
¾ cup 1-to-1 gluten-free baking flour ¼ cup finely-ground almonds 1½ tbsp cornstarch ¼ tsp salt ¾ tsp finely ground Earl Grey tea leaves
¼ cup finely chopped dried cranberries
Method:
Cream butter and sugar together until smooth. Beat in orange rind, vanilla, and almond flavoring.
Whisk flour, ground almonds, cornstarch, salt and ground tea leaves together. Blend dry ingredients into creamed mixture until just combined. Stir in cranberries.
Form dough into log approximately 1½” in diameter. Wrap tightly in wax paper or plastic wrap. Slit open an empty paper towel cardboard cylinder and place cookie log in cylinder. Draw cylinder sides together and secure with masking tape. Refrigerate cookie log for 2-3 hours, turning roll every hour or so to distribute the weight of the log and to keep the shape round. (Unbaked cookie logs may be stored for 2-3 days in the refrigerator before baking, provided they are stored in sealed plastic bags or airtight containers.)
Preheat oven to 325°F. Line baking sheets with parchment paper. With a sharp knife, slice cookie log into ¼” thick slices. Place cookies on prepared baking sheets, spacing the cookies about 1½” apart. Bake for 20-21 minutes, or until edges of cookies start to tint golden brown, rotating baking sheet half way through the baking. Let cookies cool on sheets for 3-4 minutes and then transfer to wire rack to finish cooling completely.
Store in airtight container at room temperature for up to 2 weeks or freeze for longer storage.
A flavorful gluten-free shortbread cookie infused with a hint of Earl Grey tea and flavored with grated orange rind and dried cranberries.
Ingredients
½ cup unsalted butter, softened at room temperature
½ cup sifted icing sugar (aka confectioner’s or powdered sugar)
¾ tsp finely grated orange rind
1/2 tsp pure vanilla
1/8 tsp almond flavoring
¾ cup 1-to-1 gluten-free baking flour
¼ cup finely-ground almonds
1½ tbsp cornstarch
¼ tsp salt
¾ tsp finely ground Earl Grey tea leaves
¼ cup finely chopped dried cranberries
Instructions
Cream butter and sugar together until smooth. Beat in orange rind, vanilla, and almond flavoring.
Whisk flour, ground almonds, cornstarch, salt and ground tea leaves together. Blend dry ingredients into creamed mixture until just combined. Stir in cranberries.
Form dough into log approximately 1½” in diameter. Wrap tightly in wax paper or plastic wrap. Slit open an empty paper towel cardboard cylinder and place cookie log in cylinder. Draw cylinder sides together and secure with masking tape. Refrigerate cookie log for 2-3 hours, turning roll every hour or so to distribute the weight of the log and to keep the shape round. (Unbaked cookie logs may be stored for 2-3 days in the refrigerator before baking, provided they are stored in sealed plastic bags or airtight containers.)
Preheat oven to 325°F. Line baking sheets with parchment paper. With a sharp knife, slice cookie log into ¼” thick slices. Place cookies on prepared baking sheets, spacing the cookies about 1½” apart. Bake for 20-21 minutes, or until edges of cookies start to tint golden brown, rotating baking sheet half way through the baking. Let cookies cool on sheets for 3-4 minutes and then transfer to wire rack to finish cooling completely.
Store in airtight container at room temperature for up to 2 weeks or freeze for longer storage.
If you have made this recipe and enjoyed it and/or wish to share it with your friends and family, please do so on social media but be sure to share the direct link to this posting from my website.
Connect with My Island Bistro Kitchen on Social Media