Pork Loin Roast with Pomegranate, Red Wine, and Black Garlic Sauce served with Potato Croquettes and Roasted Root Vegetables
If you have been following my postings, you will recall my January 12, 2013, entry using black garlic in a sauce over sea scallops. My latest culinary escapade finds it is a suitable flavouring for sauces for meat as well. Below you will find the recipe I created for a pomegranate, red wine, and black garlic sauce to accompany a marinated pork loin roast. It serves 2-3.
As I described in my earlier posting on black garlic, don’t expect any traditional garlic flavour from this fermented version which is very sweet and tastes more like a fig or a prune than it does garlic. I like pomegranate molasses but it can sometimes be hard to find as many of the traditional supermarkets in my area don’t tend to carry it. However, if you can locate a grocer who sells Middle Eastern food in your area, you are most likely able to find the molasses there. The marinade itself is very traditional but the sauce I have created for drizzling over the roast pork loin slices is a somewhat sweet sauce with a rich burgundy color which, of course, comes from the combination of the pomegranate molasses, red wine, and black garlic. It makes a fine pairing, both in taste and visually, with the roast pork.
Pork Loin Roast with Pomegranate, Red Wine, and Black Garlic Sauce
Ingredients:
3/4 lb pork loin roast
Marinade
2 tbsp soya sauce 1 clove garlic, minced 1 1/2 tbsp brown sugar 1 tbsp olive oil 1/8 tsp ginger 1/2 tbsp white wine vinegar 1 tsp shallot, finely minced salt and pepper to taste Mix all ingredients and place in dish. Place roast in marinade and turn once to coat. Cover and place in refrigerator for 3-4 hours, turning occasionally to baste.
Preheat oven to 425F. Place roast on rack in small roaster. Roast, uncovered, for 15 minutes. Reduce temperature to 325F and continue to roast, covered, until internal temperature of roast registers 150-160F on meat thermometer. Remove from oven and let stand, covered for 10-15 minutes before slicing and serving with Pomegranate, Red Wine, and Black Garlic Sauce (recipe below).
Mixing the soya sauce, oil, white wine vinegar, and garlic for the marinade
Adding brown sugar, ginger, salt, pepper, and shallots to the marinade
Marinating the Pork Roast and Preparing it for Roasting
Pomegranate, Red Wine, and Black Garlic Sauce
1 tsp butter 1 tbsp shallots, finely minced 2 cloves black garlic, sliced or fork-mashed 1 1/2 tbsp pomegranate molasses 1/4 cup chicken stock 1/2 tbsp balsamic vinegar 1/4 cup red wine 1 tbsp brown sugar 1/16 tsp cardamon 1 tbsp orange juice 1 tsp cornstarch
Melt butter in saucepan. Add shallots and sauté for 2-3 minutes. Add black garlic. Stir and sauté for apx. 30 seconds.
Add pomegranate molasses, chicken stock, balsamic vinegar, red wine, brown sugar, and cardamon. Stir over medium heat just until mixture reaches boiling point. Reduce heat to low.
Mix cornstarch into orange juice. Add some of the hot mixture to the orange juice and cornstarch mixture to temper it. Add the mixture to the pot. Stir over medium-low heat until thickened.
Slice roast into 1/4″ thick slices and plate. Drizzle warm sauce over pork.
Making the Pomegranate, Red Wine, and Black Garlic Sauce
Making the Sauce for the Pork Roast
Sliced Pork Loin Roast Served with Pomegranate, Red Wine, and Black Garlic Sauce
I served the pork loin roast with potato croquettes and roasted root vegetables which were lightly tossed with a maple syrup and balsamic vinegar dressing.
Pork Loin Roast with Pomegranate, Red Wine, and Black Garlic Sauce
A moist and tender pork roast is marinated, roasted, and served with a delectable sauce made with pomegranate, red wine, and black garlic.
Course Main Course
Keyword pork, pork roast
Servings3
My Island Bistro KitchenMy Island Bistro Kitchen
Ingredients
3/4lbpork loin roast
Marinade
2tbspsoya sauce
1clovegarlic, minced
1 1/2tbspbrown sugar
1tbspolive oil
1/8tspginger
1/2tbspwhite wine vinegar
1tspshallot, finely minced
salt and pepper to taste
Pomegranate, Red Wine, and Black Garlic Sauce
1tspbutter
1tbspshallots, finely minced
2clovesblack garlic, sliced or fork-mashed
1 1/2tbsppomegranate molasses
1/4cupchicken stock
1/2tbspbalsamic vinegar
1/4cupred wine
1tbspbrown sugar
1/16tspcardamon
1tbsporange juice
1tspcornstarch
Instructions
Marinade:
Mix all marinade ingredients and place in dish large enough to accommodate the meat. Place meat in marinade and turn once to coat. Cover and place in refrigerator for 3-4 hours, turning occasionally to baste.
Preheat oven to 425°F. Place roast on rack in small roaster. Roast, uncovered, for 15 minutes. Reduce temperature to 325°F and continue to roast, covered, until internal temperature of roast registers 150-160F on meat thermometer. Remove from oven and let stand, covered for 10-15 minutes before slicing and serving with Pomegranate, Red Wine, and Black Garlic Sauce.
Pomegranate, Red Wine, and Black Garlic Sauce:
Melt butter in saucepan. Add shallots and sauté for 2-3 minutes. Add black garlic. Stir and sauté for apx. 30 seconds.
Add pomegranate molasses, chicken stock, balsamic vinegar, red wine, brown sugar, and cardamon. Stir over medium heat just until mixture reaches boiling point. Reduce heat to low.
Mix cornstarch into orange juice. Add some of the hot mixture to the orange juice and cornstarch mixture to temper it. Add the mixture to the saucepan. Stir over medium-low heat until thickened.
Slice roast into 1/4" thick slices and plate. Drizzle warm sauce over pork.
Recipe Notes
Yield:2-3 servings
Marinated Pork Loin Roast with Pomegranate, Red Wine, and Black Garlic Sauce
Ever heard of black garlic? What do you think of when you hear the term?
Fermented Black Garlic Bulbs
Black garlic is not a variety of garlic grown. Rather, it is regular garlic bulbs that have gone through a fermentation process. Fermenting garlic to turn it into black garlic is truly food transformation. I say that because black garlic in no way tastes, looks like, or has the same consistency as the traditional hard white garlic we use to give garlic flavour to dishes.
To find out more about black garlic, I travelled to Kensington, PEI, where I paid a visit to garlic grower, Al Picketts, of Eureka Garlic.
Eureka Garlic, Kensington, PEI
Al has been growing garlic for 12 years. In 2012, he grew 42,000 plants and this year, with the cloves already in the ground since October, Al has increased his crop to 46,380 plants which will be harvested in July-August, 2013. He grows eight types of garlic and 78 varieties in those types. Yes, Al knows a thing or two about garlic!
Garlic Bulbs Drying
Al’s main business is in selling seed garlic but, in November, 2011, he began the fermentation process to turn garlic into black garlic. Al has been working with the Bio Food Tech Center in Charlottetown as he perfects his fermentation process and product. While Al keeps his exact fermentation process a carefully-guarded secret, he did show me a recycled refrigerator that he insulates well, heats with a water heater, and uses as an incubator of sorts for the fermentation process.
Incubator for Fermenting Black Garlic
Inside this incubator are stacks of covered plastic storage boxes containing hundreds of garlic bulbs fermenting. He tells me it takes about three weeks in controlled temperature for the fermentation to occur. The top right photo below shows a garlic bulb in the early stages of fermentation and the one in the lower right photo is a completely fermented bulb. The photo on the left below shows different colored bulbs in the plastic containers; these are bulbs at different stages of the fermentation process as they change and deepen in color.
Black Garlic in Various Stages of Fermentation
When fermented, the cloves will be a dark chocolate brown color – almost black — and very soft. This is not the kind of garlic you could put through a garlic press and it does not mince well. But, oh, it does have its own unique flavour! The cloves can be carefully sliced or mashed with a fork and added to recipes.
Black Garlic Bulb and Clove
When Al offered me a taste of the black garlic, straight up, I must admit I was trying to prepare my tastebuds for a somewhat pungent, strong garlic flavour. But, one of the most surprising things about black garlic is the taste. I would describe it as somewhat sweet, no discernible garlic taste, and being a cross between a prune and a fig in taste, color, and texture. So, if you are looking to use it as you would regular garlic, don’t expect any garlic flavour in the dish as black garlic has a sweet, fruity taste. Black garlic, however, brings its own unique subtle flavour to dishes like soups, sauces, and seafood and is often used in Asian cooking. The black color does not change when cooked so you need to prepare for that color in your dish. There are not a lot of black foods and some might suggest they would not be appetizing. However, I find the contrast of the black garlic on white fish, for example, to be quite dynamic and appealing.
Black Garlic Color and Texture
Black garlic is a relatively new local food item and the jury is still out as to whether it is a food fad or if it may well become a food trend. Could it be garlic’s new cavier? Promoters claim it may be the next superfood, citing its health benefits — it reportedly boasts twice as many antioxidants as raw garlic. That said, I couldn’t find any scientific research studies completed on black garlic that would state conclusively what its specific health benefits are.
So, if it doesn’t taste like garlic why, then, use it? I would say because it offers another flavouring and complexity to many dishes. I have used it on pizza and in seafood dishes and I plan to try it next with pork.
Al tells me that black garlic can be stored at room temperature – no refrigeration required – for several months. He says it can also be stored in the freezer and, when you want to use it, just remove as many cloves as needed and mash them with a fork or slice them with a knife – there is no need to thaw them first.
Al sells his black garlic for $30/pound. On Prince Edward Island, it is available directly from Al at his farm “Eureka Garlic” on the corner of Routes 2 and 233 in Kensington (902)836-5180.
Black Garlic Packaged for Sale
As you know, when I visit a local producer, I bring home their product and make a recipe featuring the food item. The recipe below, for scallops, is how I used black garlic with seafood and I found the result really tasty (yes, I’ve made this dish more than once already!). The black garlic does not mask the scallop flavour and yet it accents the seafood well. This recipe serves two.
Black Garlic on Fresh Scallops
Scallops in Black Garlic
14 scallops
3 T butter
Fresh ground pepper
4 cloves black garlic, sliced
¼ cup white wine
½ T balsamic vinegar
1 tsp freshly squeezed lemon juice
1 tsp dried chives
Pinch dillweed
1 tsp parsley
Ingredients
Melt 2 T butter in small skillet. Over medium-high heat, sear the scallops 2-3 minutes per side until lightly golden in color. Transfer scallops to plate and keep warmed.
Searing ScallopsBlack Garlic
Add 1 additional tablespoon of butter to skillet. Add the black garlic and sauté for 30-45 seconds. Add pepper to taste. Add white wine, balsamic vinegar, and lemon juice. Stir over medium-low heat 1-2 minutes until sauce reduces. Add herbs and heat for about 30 seconds.
Adding Black Garlic
To serve, plate the warm scallops and spoon the black garlic sauce over the seafood. Serve with potato or rice and a side of vegetables.
Serves 2
Scallops with Black Garlic Served with Potato Cake and Vegetables
Thank you for visiting “the Bistro” today. There are lots of ways to connect with “the Bistro” through social media:
Join My Island Bistro Kitchen on Facebook Follow the Bistro’s tweets on twitter @PEIBistro Find the Bistro on Pinterest at “Island Bistro Kitchen” Follow along on Instagram at “peibistro”
This year seemed to be a particularly good year for growing pumpkins on the Island. Everywhere I looked I saw fields, bins, and wagons full of the bright orange pumpkins which are members of the gourd family.
Trailer Loads of Pumpkins at Kool Breeze Farm in Wilmot Valley, near Summerside, PEI
Bins of Pumpkins at Kool Breeze Farm
Funny how we can’t wait to display them on our doorsteps and in fall displays but, once the end of November arrives, we don’t want to see pumpkins hanging around as thoughts turn to Christmas decorating.
Pumpkins at Compton’s Vegetable Stand, St. Eleanors, near Summerside, PEI
Field of Pumpkins, Marshfield, PEI
So, wondering what to do with those pumpkins instead of throwing them into the compost bin? Why not make a batch of old-fashioned pumpkin jam. This isn’t an altogether common jam you are likely to find on many supermarket shelves. Yet, it is a very tasty, economical, and versatile jam that only takes four ingredients — pumpkin, sugar, crushed pineapple, and jello. This is a jam that my grandmother used to make every fall for her brother yet I don’t recall it ever being on her own pantry shelves and I’m not sure why.
The jam has a wonderful bright orange-yellow color. In fact, I think it is more like a marmalade than a jam. Regardless, it is very tasty on toast, biscuits, as a filling for cookies, and as a dollop on warm vanilla custard.
Pumpkin Jam on Biscuits
Pumpkin Jam as a Filling for Thumbprint Cookies
To make the jam, select a pumpkin that is more oblong than round in shape. I visited my local vegetable stand and they told me these are “jamming” pumpkins.
Pumpkin for Jam
Cut the pumpkin open and remove and discard the seeds and pulp.
Split Pumpkin Ready to be Seeded
Cut the pumpkin flesh into finely diced pieces and place in pot.
Diced Pumpkin
Add the sugar to the diced pumpkin and let the mixture sit overnight. The sugar will draw the juice out of the pumpkin.
Adding Sugar to the Diced Pumpkin
In the morning, drain and reserve the juice from the pumpkin.
Draining the Juice from the Pumpkin
Boil the juice for 20 minutes over medium heat to form a syrup.
Syrup for Pumpkin Jam
Add the drained pumpkin to the hot syrup.
Adding Pumpkin to Hot Syrup
Over medium heat, cook the pumpkin until it starts to become transparent, approximately 20-30 minutes.
Cooking the Jam
Add the can of crushed pineapple and its juice to the jam.
Adding the Crushed Pineapple to the Pumpkin Jam
Add the jello to the jam.
Adding the Jello to the Pumpkin Jam
Bring jam to a boil over medium heat.
Cooked Pumpkin Jam
Meanwhile, sterilize the jars.
Fill the sterilized jars.
Bottling Pumpkin Jam
Place warmed lids on the hot jam bottles to seal and fingertip-tighten the rims to the bottles.
Placing Lids on Jam Jars
Store this jam in the refrigerator for approximately 1 month and enjoy it fresh as a treat when pumpkins are in season.
Pumpkin Jam
Thank you for visiting “the Bistro” today. There are lots of ways to connect with “the Bistro” through social media:
Join My Island Bistro Kitchen on Facebook Follow the Bistro’s tweets on twitter @PEIBistro Find the Bistro on Pinterest at “Island Bistro Kitchen” Follow along on Instagram at “peibistro”
Cut, peel, remove and discard seeds and pulp of pumpkin. Cut pumpkin into small diced pieces.
Place diced pumpkin in large pot. Add sugar. Soak overnight.
Drain pumpkin in colander, reserving juice.
Return reserved juice to pot and boil for 20 minutes over medium heat.
Add the drained pumpkin to the hot syrup. Cook over medium heat until pumpkin pieces start to become translucent, about 20-30 minutes.
Add the crushed pineapple and its juice to the mixture. Stir.
Sprinkle the jello over the mixture. Stir and bring mixture to a boil over medium heat.
Sterilize the jars either by using the sanitizer setting on the dishwasher or by placing the jars in boiling hot water.
Fill sterilized jars, leaving approximately 1/4" head room at jar top. Heat lids and place on jars. Fingertip tighten rims to jars. Store this jam in the refrigerator for apx. 1 month and enjoy it fresh as a treat when pumpkins are in season.
Potato Vodka Made by Prince Edward Distillery, Hermanville, PEI
PEI has long been known for growing world-class potatoes – they are, after all, our primary cash crop, injecting more than one billion dollars annually into the Island economy, directly and through spin-offs[i]. We all know potatoes as a vegetable on dinner tables and are familiar with them boiled, mashed, baked, as French fries and potato chips, and as the key ingredient in scalloped potatoes. But, would you think of potatoes as a main ingredient in a beverage? Well, there are a couple of industrious and innovative women who have figured out a new use for PEI spuds. Julie Shore and Arla Johnson own and operate Prince Edward Distillery where potato vodka is their flagship product.
Road Map from Charlottetown to Hermanville, location of Prince Edward Distillery
Drive east from the Island’s capital city of Charlottetown along the northeastern shore of the Island and you will find Hermanville, a small rural district not far from the town of Souris in the eastern end of PEI. Late this past summer, I travelled to Hermanville to visit Prince Edward Distillery to find out about this potato vodka. In addition to learning how potato vodka is made, I learned the Distillery is diversifying its operation. They are now producing gin, rye whiskey, rum, and a bourbon-style corn whiskey that sells under the label of IC Shore and that’s in addition to the potato vodka and wild blueberry vodka. Also new this year (2012) are their decadent rum cakes made locally with the Distillery’s Merchantman 1897 rum.
Products Made at Prince Edward Distillery, Hermanville, PEI
The story of Julie and Arla’s arrival on PEI is similar to several others who have come to the Island and made it their home. They came to PEI on holiday in 1997, fell in love with the Island, and decided to move here. Leaving their jobs behind – Julie as a dental hygiene sales representative and Arla as a psychologist – they built an Inn (Johnson Shore Inn) in Hermanville in 1999, down a long, secluded, and narrow, unpaved lane that leads to a spectacular unobstructed view of the Gulf of St. Lawrence. However, they soon discovered the tourist, and by extension the innkeeper’s, season is short in rural PEI (usually late May to the end of September). That extra time on her hands got Julie thinking about the business her ancestors had been in, pre-prohibition, in North Carolina – distilling apple brandy and bourbon. Living in the land of potatoes, Julie had the idea to set up a distillery to produce potato vodka. Thus, in 2007, Prince Edward Distillery was born with the first batch of potato vodka running from the still’s spigot in 2008.
Rum, Whiskey, and Rye Produced at Prince Edward Distillery
Julie is the master distiller. In 2011, the Distillery produced 10,000 bottles of the six different liquors the Distillery produces. Apart from her ancestral history of distilling (she’ll tell you distilling is in her blood!), I asked Julie if she had to have special training to be a distiller. She tells me she has taken a distilling course at Cornell University and yeast-making courses in Montreal and France. She and Arla travel the world over visiting distilleries and learning more about the art of fine distilling. Visit their onsite retail outlet and look at the large map on the wall that points out the impressive world travels Julie and Arla have journeyed.
Julie says the best variety of potatoes for potato vodka is Russet Burbank. These spuds are the highest starch potato grown on the Island and the starch content is important for the yeast to work in the fermentation process. The Distillery buys approximately 50,000 pounds of locally-grown potatoes, on an annual basis, to use as the base for potato vodka. Julie explains that it takes about 18 pounds of potatoes to produce one 750 ml bottle of the potato vodka so, as you can imagine, it takes a lot of spuds to yield any amount of vodka. While potato vodka is not unheard of, it is more rare since 99% of vodkas on the market are grain-based. That’s probably because, as Julie says, potato vodka is difficult to distill due to the fact that potatoes are approximately 80% water, have to be cooked, and it takes such a volume of the raw ingredient (potatoes) to produce the final product.
Prince Edward Distillery’s Potato VodkaTour of Prince Edward Distillery
Making potato vodka is very labour intensive. The potatoes are ground and cooked to break down their starch into fermentable sugars so that fermentation will occur with the addition of yeast (wait till you hear what is done with the leftover mash from the potatoes and who the benefactors are!). The mixture is fermented for four days in 1000-gallon tanks to form alcohol.
German-made Holstein Copper Vertical Still at Prince Edward Distillery
Using a 680-litre German-made Holstein copper vertical still that Julie had imported from Germany and capably assembled herself (since it came in parts and didn’t come with an instruction book), this fermentation mixture is distilled three times to remove impurities, achieve a neutrality of the alcohol, and to get the perfect alcohol content for the vodka. Julie tells me it takes 10-14 days to produce a batch of vodka from start to finish, raw product (potatoes) to bottling.
The Distillery has enjoyed sweet success and very early in its operation. Their products rank among the best. Just a year after producing their first vodka for market, the potato vodka won gold in the 2009 San Francisco World Spirits Competition and, in the same year, the wild blueberry vodka won silver in the UK International Spirits Challenge in London, England. Yes, our locally-produced Island wines and spirits can match any on the market!
Prince Edward Distillery supports local producers, buying and using locally-produced potatoes, grains, and blueberries in their liquor production. The Distillery employs between 4-6 full time employees and 1 part-time employee on a seasonal basis. Currently, their products are sold in PEI and Nova Scotia markets. However, they are exploring markets farther afield.
Prince Edward Distillery’s Spirit Outlet at Peakes Quay in Charlottetown, PEI
This past summer, the Distillery decided to open a spirits outlet shop at Peakes Quay on the Charlottetown waterfront, a popular tourist attraction of small shops and not far from the seaport where dozens of cruise ships dock each year. In addition to the Peakes Quay location (open seasonally), the Distillery’s products are available at the onsite retail shop in Hermanville and in PEI and Nova Scotia liquor stores.
So, about that mash I mentioned earlier – the left-over potato product after the liquid has been extracted for the vodka. Well, behind the distillery may well be what many have dubbed as the most cheerful hogs on the Island! Yes, that’s right, hogs or, more specifically, Heritage Berkshire pigs which Julie raises on the mash. She says there are lots of nutrients left in the potato mash so why throw it out when she can raise pigs on it!
Heritage Berkshire Pigs Raised on Mash at Prince Edward Distillery
The Distillery is open daily, May – October, for tours and taste-testing; from October – May, it is open by appointment or by chance. A tour of the Distillery and taste-testing of two spirits costs $10. (or, if you simply want to taste any spirit, it is $3./taste). For more information on the Prince Edward Distillery, visit their website, call them at 902-687-2586, or, better still (pun intended!), take the scenic northeastern shoreline route to Hermanville and visit the Distillery at 9985, Route 16.
Prince Edward Distillery, Hermanville, PEI
Whimsical T-Shirts at Prince Edward Distillery
True to tradition, when I visit a local producer, I bring home their product and create a recipe with it. I decided to create a Vodka Tomato Sauce for pasta using Prince Edward Distillery’s potato vodka. I find the vodka actually goes well with tomatoes and draws out the tomato flavour and makes it pop without adding a competing flavour to the dish. The key, of course, is not to over-do it – less is often more and the idea is that the vodka enhance and contribute to the taste of the sauce, not overpower it. My recipe creation follows.
Farfalle Pasta in Tomato Vodka Sauce
Thank you for visiting “the Bistro” today. There are lots of ways to connect with “the Bistro” through social media:
Join My Island Bistro Kitchen on Facebook Follow the Bistro’s tweets on twitter @PEIBistro Find the Bistro on Pinterest at “Island Bistro Kitchen” Follow along on Instagram at “peibistro”
[i] Source of Statistics: Prince Edward Island Potato Board, 23 October 2012
Tomato Vodka Pasta Sauce
By Barbara99 Published: November 15, 2012
Yield:
Prep:10 mins
Cook:50 mins
Ready In:60 mins
A rich, flavourful tomato sauce suitable for various types of pasta
Remembrance Day Service at the cenotaph in front of Province House, Charlottetown, PEI, Canada [11 November 2012]Every year on November 11th we pause to remember the sacrifices and achievements of those who valiantly and selflessly served our country in times of war and conflict, and in peacekeeping missions around the world. We remember those who gave the ultimate sacrifice – their lives for their country so future generations could have a better, more secure life. We think about their achievements and the role they played in forming Canada’s nationhood. We thank them for the peace, freedom, and human rights we enjoy in Canada today.
Those of us who have been fortunate enough never to have known or experienced war have opportunities to demonstrate our respect and gratitude for, and remembrance of, these acts of bravery and sacrifice. For example, we wear a poppy on the left breast, close to the heart to signify remembrance of the lives lost.
Poppy
Thousands of people across the country will attend Remembrance Day ceremonies in their local communities where they will respectfully observe a moment’s silence at 11am on the 11th day of the 11th month to mark the time the Armistice was signed to end WWI. Wreaths will be laid in commemoration.
Remembrance Day Wreath
One of the most well-known poems about war was written in May, 1915, by Lt. Col. John McCrae, a Canadian Medical Officer in WWI. While stationed near Ypres, Belgium, where some of the most horrific and bloodiest fighting of WWI occurred, he was motivated to write about the death he saw around him and of the prolific red poppies growing amidst the devastation of war in the Flanders area of western Belgium. His poem, “In Flanders Fields” has become synonymous with Remembrance Day in Canada and Lt. Col. McCrae is often credited with being the catalyst that led to the poppy being identified as the symbol of remembrance of the blood shed by soldiers who were casualties of battle.
“In Flanders Fields”
On this Remembrance Day, I am going to focus my food blog feature story on war cake, a wartime dessert that is still made and served in several Island households today.
War Cake
As a small child I well remember my grandmother making war cake and this was long after WWII had ended. I loved her war cake! It is such a simple raisin-spice cake that is characterized by the absence of eggs and milk — ingredients that would have been scarce during wartime. This cake is sometimes referred to as “boiled raisin cake” because raisins form the main content and the majority of the ingredients are boiled, then cooled, before they are mixed with flour and baking soda and then baked in the oven. Because of food shortages during war time, many foods were rationed.
Ration Books, Cards, and Stickers
Born of necessity, homemakers during wartime became resourceful, frugal, adaptable, and creative in order to feed their families. Cooking tended to be very basic. Women were known to have saved their ration stickers so they could buy the raisins and sugar that the war cake recipe called for – thus war cake would have been a very prized commodity.
War cake was made for consumption on the home front but many also made the cakes in tin cans and packed them in socks, mittens, and underwear they were shipping overseas for their loved ones serving in the war. Imagine the excitement when a soldier would have received this package from home and discovered a mother’s or sister’s war cake inside! Amazingly, with the slow mail and ship service during WWI and WWII, there is evidence these cakes were received as the soldiers would refer to them in their letters home, letters that would have looked much like the July 7, 1914, letter in the photograph below.
Letter from a soldier written from “Somewhere in France” on July 7, 1914. In the letter, the soldier encloses two pansies as “souvenirs from France”, one flower each for the young lady he was writing to and her mother. All these years later, the pressed pansies have still retained their color and are intact.Old War Cake Recipes
In my research for this story, I examined many recipes for war cake and found similarities amongst them all. Some were very sketchy in terms of amount of ingredients to be put in the batter and many were almost totally devoid of any directions. While the amounts of the ingredients may vary slightly, all of the recipes I reviewed were essentially the same in ingredient content. All called for big, sticky raisins (you may know these as “Lexia” raisins), a variety of spices of the cook’s choice, either brown or white sugar or a combination of both, shortening or lard, boiling water, flour, and soda. One thing I noted was the significant amount of sugar that the recipes called for – i.e., two cups per cake. Sugar was one item that was commonly rationed during wartime and a cake taking two cups of sugar would certainly have been considered a luxurious dessert, I am sure. Flavour may vary from cake to cake based on spices used in the batter. The choice of spices varies but typically consisted of cinnamon, nutmeg, and cloves, as a minimum, with ginger frequently appearing in recipes. I added mace and cardamom to my cake to give it a bit more flavour (recipe follows at end).
Ingredients for War Cake
I am told these cakes were often made with lard (as opposed to butter) for a couple of reasons. First, lard has a longer shelf life than butter would have had and, for cakes being sent overseas to the soldiers, it would have been a long journey for the cakes to reach Europe so shelf life of the cakes was an important factor. Second, butter was often scarce during wartime because there were no big herds of cattle on local farms so butter would have been used sparingly, even for those living on farms and churning their own. Lard, on the other hand, would have been much more readily available, particularly on farms. I found a couple of recipes that indicated either butter or shortening could be used in the recipe; however, butter was called for in a much lesser quantity than the shortening, if the latter was used instead. For example, I found one recipe that called for 2 tablespoons of butter or 1 cup of shortening which demonstrates how judiciously butter would have been used, if at all.
While its ingredients are simple, war cake takes some time to make. All of the ingredients, except the flour and soda, are boiled on the stove for 5 minutes. Then it is important to let the boiled raisin mixture cool to room temperature as the mixture will thicken naturally on its own as it cools. This will normally take 4-5 hours. If the flour and soda are added into a mixture that is too hot, the result is likely to be a gummy cake. When the raisin mixture is cooled, the flour and soda are stirred in and the mixture turned into the baking pan. My grandmother made her war cake in a loaf pan; however, traditionally, war cake seems to have been made in some kind of a round pan – usually a tube pan or, in the case of overseas shipping during war time, in tin cans. War cake is a very dense cake which makes it sometimes difficult to get the center of the cake baked without drying out the outside edges. It is also a heavier type cake which makes it somewhat prone to falling in the center. A tube (or Bundt pan, if you have one) removes the baking uncertainty and helps the cake to bake more evenly.
War Cake Baked in a Bundt Pan
War cakes take, on average, about an hour to bake. The old recipes I reviewed didn’t even mention baking the cake let alone at what temperature (in fact, one recipe simply said “to thicken” but didn’t elaborate on what thickening agent was to be used!). These recipes predate our modern electronic ovens! While some suggest baking the cake at 350F, I thought that might be a bit high so I baked my war cake at 335F for one hour. Because there are no eggs or milk in the cake for moistness, it is very easy to overbake the cake and end up with a dry product. Hence, it is important to time the baking carefully and to use a cake tester starting at about the 45-minute point. If the cake starts to darken on the top or edges too quickly, simply place a piece of tin foil loosely over the top. Adding a small pan of water to the lower shelf in the oven while baking the cake will also help to keep the cake moist.
Including a Small Pan of Hot Water on the Bottom Shelf of the Oven Helps to Keep the Cake Moist During Baking
Because of the texture of the cake, it may seem soft on the top and not baked; however, if a cake tester comes out of the cake clean, it’s time to remove it from the oven before it dries out.
War cake is a “stick to the ribs” substantial, hearty kind of cake. It goes particularly well with a nice cup of tea.
War Cake and Tea
In keeping with the traditional way war cake was served, I have photographed the cake plain, just as it would have been eaten during wartime.
Sliced War Cake
War cake was not traditionally iced. However, it would be lovely served with a dollop of whipped cream or vanilla or maple ice cream. It could also be dressed with a brown sugar sauce or, to make a plain cake really decadent, why not serve all three – ice cream, brown sugar sauce, and whipped cream!
War Cake on a Tea Table
War Cake
Regardless where you are in the world, if you have any wartime memories (either your own or those passed down to you from your ancestors) of war cake made for consumption on the home front or to send to the soldiers fighting the war, I would love to hear about them. War cake is a part of wartime culinary history.
Here are some photographs of the Remembrance Day Ceremony at the cenotaph in downtown Charlottetown, PEI, this morning.
Remembrance Day in Charlottetown, PEI [11 November 2012]Lest We Forget
Hon. Robert W.J. Ghiz, Premier of the Province of Prince Edward Island lays a wreath on behalf of the people of the Island at the Remembrance Day Service in Charlottetown, PEI [11 November 2012]Small Child Watches as a Veteran lays a Wreath at the Remembrance Day Service in Charlottetown, PEI ]11 November 2012]
Remembrance Day 2012
Veterans Laying Wreaths at Remembrance Day Service in Charlottetown, PEI [11 November 2012]At the Charlottetown Cenotaph – Remembrance Day 2012
Flag Flies at Half-Mast on Remembrance Day, Charlottetown, PEI [11 November 2012]
An old-fashioned cake made with large sticky raisins and a mixture of spices. Common cake during war time.
Course Cake
Cuisine Canadian
Keyword war cake
Servings12
My Island Bistro KitchenMy Island Bistro Kitchen
Ingredients
3/4cupshortening
2cupsbrown sugar, lightly packed
1poundlarge, sticky raisins
1tspsalt
1tspcinnamon
1tspnutmeg
1/2tspcloves
1/4tspginger
1/8tspmace
1/8tspcardamon
2cupsboiling water
3cupsall-purpose flour
2tspsoda
Instructions
Assemble ingredients.
Place the shortening, brown sugar, raisins, salt, spices, and boiling water into a large saucepan. Over medium-high heat, bring mixture to a boil. Reduce heat to medium or slightly lower and boil mixture for five minutes. Remove from heat and set saucepan on cooling rack. Let mixture cool to room temperature (4-5 hours), stirring occasionally.
In bowl, whisk the flour and baking soda together. Set aside.
Grease large tube or Bundt pan.
When raisin mixture has cooled completely, add the flour and baking soda. Stir until dry ingredients have been completely mixed into the raisin mixture.
Spoon mixture into greased pan. Add a small pan of hot water to lower shelf in oven for moisture while cake is baking. Bake cake on middle rack in 335°F preheated oven. If cake starts to brown on the top too quickly, loosely place a piece of tin foil on top of cake. Bake apx. 1 hour but begin to test cake for doneness, using a cake tester, at the 45-minute point as cake can dry out very quickly.
Remove cake from oven and place pan on cooling rack for 10 minutes then remove from pan. Allow cake to cool completely before cutting.
One crop we grow really well on this Island is potatoes. Our PEI spuds are world-class quality and often win awards on the national stage. According to statistics obtained through the Prince Edward Island Potato Board, 86,500 acres of potatoes were grown on the Island in 2012. An economic impact study was completed in 2012 showing that the potato industry contributes over one billion dollars annually to the PEI economy, either directly or through spin-off effects. Now, that’s no small potatoes!!!
Last spring, I was looking for a potato operation and a potato field that I could follow from planting through to harvesting specifically for this blog post entry. It’s one thing to go into the supermarket and purchase a bag of potatoes but it is quite another to know where the potatoes come from and to watch them grow and I thought my readers would be interested to see some photographs of potato growing and harvesting on PEI. One evening in mid-May, I was heading from Summerside to Charlottetown “through the 225” as the locals refer to one of the shortcut routes between the two cities, when I came across this rather large and odd-looking black machine pulling into a huge field.
Filler Machine Loads Seed Potatoes Into Potato Planter in Warren Grove, PEI [19 May 2012]Of course, curiosity got the best of me and I did a u-turn fairly quickly and drove into the field where I discovered four tractors and machines were working at preparing the soil, fertilizing, and planting the field with potatoes. Lots of John Deere equipment moving in that field on a Saturday evening in May!
Preparing to Plant Russet Burbank Potatoes in Warren Grove, PEI [19 May 2012]Well, I thought this was just very fortuitous timing! I had found my field to follow!!! It turns out the field in Warren Grove, near North River on the outskirts of Charlottetown, PEI, was being planted by Smith Farms of Newton, near Kinkora, in the central part of the Island.
Robert, the man driving the big John Deere tractor that was hauling the rather ominous looking black machine, was very willing to explain what the machine was. I learned it is called the “filler machine” – it brings the cut potato seed from the warehouse to the field where it is then loaded into the planter. I asked if it would be okay if I took some photographs of the machine as it filled the planter. Robert explained that I’d have to be quick if I wanted to get a picture of it as it speedily fills the planter that backs in under it. Quick isn’t the word for it – it’s more like ‘in a blink of an eye’ and then the planter pulls away from the filler machine and off it goes down the field to plant the spuds.
Planting Potatoes in Warren Grove, PEI [19 May 2012]According to the Prince Edward Island Potato Board, there are over 100 varieties of potatoes grown in PEI but the majority of the acreage is made up of the top 30 varieties. The most common variety, Russet Burbank (which is what this field in Warren Grove was planted with), accounts for about 50% of the potato acreage grown on PEI. The Russet is a multipurpose variety used at local processing plants to make frozen French fries as well as for food service and retail bags of table potatoes (because of its slender shape, the Russet makes a great choice for baked potatoes, in particular). The Potato Board tells me that other common varieties grown on the Island include Superior (an early round white table variety), Goldrush (a long russet skin table variety), Yukon Gold (a yellow flesh table variety), Norland (a red skin, white flesh table variety), and Atlantic (a round white variety use to make potato chips.)
The Potato Board says, over the past three years, PEI seed and table potatoes have been shipped to over 30 countries besides Canada and the United States. No matter where you are, chances are you may have sampled PEI potatoes! The next time you are in your local supermarket, be sure to check the bags of potatoes to see if they may have come from the rich and fertile red soil of PEI, Canada.
Bags of PEI Potatoes in Retail Store
On June 25th, I found the field was lined with neat rows of bright green leafy plants. The potatoes were growing well!
Potatoes Starting to Grow – 25 June 2012
Over the next several weeks I would periodically drive by the field to see if the delicate white potato blossoms would appear. Sure enough, on August 8th, I found they were out in blossom.
Potatoes Blossoms [8 August 2012]
Russet Burbanks in Blossom [8 August 2012]In mid-October, it was time to harvest the potatoes. I followed the windrowers and potato harvester in the field and spoke with Andrew Smith who told me these potatoes are destined for Cavendish Farms, a processing plant in New Annan, PEI, which makes frozen French Fries. As you can see by the long slender length of these Russets, they are well-suited for French Fries!
Harvesting the Russet Burbank Potatoes in Warren Grove, PEI [17 October 2012]There were literally dozens and dozens of seagulls following the harvester, looking for “left-over” potatoes in the field!
How many workplaces have a gorgeous backdrop of fall foliage like this one does! And, I was lucky enough to spend part of an afternoon in this workplace, following the harvesting equipment. There is nothing like the smell of fresh PEI soil turning up spuds on a crisp, sunny October afternoon!
Potato Harvesting in Warren Grove [17 October 2012]Potato Harvesting in Full Swing in PEI [17 October 2012]
Potato Harvesting in PEI [17 October 2012]The windrowers dig several rows of potatoes at once and move the potatoes over into one row. This field had two windrowers working in it. The harvester then comes along, also digging several rows at the same time, and picks up all the potatoes left by the windrowers. This process speeds up the harvesting. Andrew told me that when he moves the harvester down the length of the field after the two windrowers have first gone through, he is picking up potatoes from 11 drills, transferring them to the truck that drives alongside the harvester! The truck then transports the potatoes to the warehouse.
Windrowing and Digging in the Evening [17 October 2012]PEI weather is often unpredictable in fall (sometimes quite rainy) so potato farmers have to work with the weather which often means they dig potatoes late into the evening to ensure the crop gets out of the ground.
Potato Harvesting at Night [17 October 2012] I debated what I would make to showcase the Russet Burbank potatoes that came out of the Warren Grove field. I settled on a potato puff. The Russets are a lovely white flesh potato with a somewhat dry texture that makes them a good choice for this dish. This is a suitable side dish that pairs particularly well with chicken, beef, or pork.
Duchess Potatoes Made with PEI Russet Burbank Potatoes
My thanks to Smith Farms of Newton, PEI, for allowing me to follow their potato planting and harvest cycle this year.
Thank you for visiting “the Bistro” today. There are lots of ways to connect with “the Bistro” through social media:
Join My Island Bistro Kitchen on Facebook Follow the Bistro’s tweets on twitter @PEIBistro Find the Bistro on Pinterest at “Island Bistro Kitchen” Follow along on Instagram at “peibistro”
Roasted Marinara Sauce with Sun-dried Tomato Pork Sausage on Halloween Pasta
I was looking for a meal to serve that would have a Halloween theme when I came across these wonderful orange and black Italian-made farfalle pasta. I bought the pasta not knowing how I would prepare and serve it. It just looked so fun and season-appropriate that I couldn’t pass the pasta by! Served with locally-made sun-dried tomato and pork sausage tossed in a rich and flavourful homemade marinara sauce, and topped with freshly grated Parmigiano Reggiano cheese, this pasta dish was a real hit. Add a freshly toasted garlic and cheese roll and a glass of red wine, and this meal is easily dressed up.
Italian-made Durum Wheat Semolina Farfalle Pasta
I am very lucky as we have a great little meat shop in Charlottetown, KJL Meats, co-located with the Riverview Country Market on Riverside Drive. Using locally-produced pork , they make several varieties of wonderful sausages onsite. The variety I chose for this dish was sun-dried tomato and I was not disappointed – it was really good! They tell me their sausages are all natural with no additives or preservatives. I also dropped by our local “Liquid Gold” store and picked up two new products (will soon need extra cupboards to store all these oils and balsamic vinegars in!) — a bottle of oregano white balsamic vinegar and one of organic Tuscan herb infused olive oil were added to my growing collection! Both were used in the marinara sauce and I also cooked the sausage in a small amount of the Tuscan olive oil. Freshness matters and I find their products are super-fresh.
My recipe for the marinara sauce is my own creation. Don’t be put off by the number of ingredients — it takes them all to make the flavour. I like to roast the vegetables for the sauce because it gives them a distinct and rich flavour that I would classify as “full-bodied” in any dish. After they are roasted, I break them up loosely with a potato masher. There is no need to worry about getting them crushed completely at this point since that will occur later during the purée stage. All that needs to happen at this point is that they are crushed enough to allow their juices and flavours to permeate the sauce while it cooks. I like to use the immersion blender to purée the sauce in the stock pot. I tend to like the sauce a bit on the chunky side so I don’t purée it completely smooth but that is a matter of personal taste. If you don’t have an immersion blender, a food processor or blender can, of course, be used – just make sure you let the mixture cool before placing it in the processor or blender. The sauce takes a bit of time to make but it is good (and the house smells divine in the process!). This recipe makes about 3 1/2 cups but it is easily doubled. The sauce also freezes really well which makes meal preparation quick and easy on a busy evening. I cooked the sun-dried tomato pork sausage, then sliced it into thin slices (about 1/8th inch thick) before tossing it in the sauce and serving it over the pasta. The sausage could also be removed from the casing and scrambled fried instead of being sliced.
This was a fun dish to create and even more fun to eat, particularly with the orange and black Halloween pasta!
Halloween Pasta Served with Roasted Marinara Sauce
Thank you for visiting “the Bistro” today. There are lots of ways to connect with “the Bistro” through social media:
Join My Island Bistro Kitchen on Facebook Follow the Bistro’s tweets on twitter @PEIBistro Find the Bistro on Pinterest at “Island Bistro Kitchen” Follow along on Instagram at “peibistro”
Roasted Marinara Sauce
By Barbara99 Published: October 30, 2012
Yield:3 1/2 cups
A rich, thick, flavourful tomato sauce that is a great accompaniment to pasta or pizza
Preheat oven to 450 degrees. Cut vegetables into 1/2" - 1" pieces. Slice the parsnip slightly thinner. Place in a bowl and drizzle with olive oil, tossing to coat vegetables. Place on tin foil lined baking sheet. Sprinkle with sea salt and freshly ground pepper. Roast for about 40 minutes until vegetables are slightly fork tender and edges of vegetables start to char slightly. Peel garlic. Transfer vegetables and garlic to stock pot and, with a potato masher, loosely break up the vegetable chunks.
Add remainder of ingredients. Over medium-high heat, bring mixture to boil. Reduce heat and simmer over low heat for 45-50 minutes, stirring occasionally.
Remove from heat and discard bay leaf. Using an immersion blender, purée sauce to desired consistency. (Alternatively, let mixture cool and transfer to food processor to purée.)
Toss with pasta (and meat, if using) or use as pizza sauce. Freezes well.
One of the most common fall flavors in many Prince Edward Island households surrounds pickle, chow, and relish-making. I love the smell of fresh mustard pickles in the house – not so much the mess, the tedious job of peeling and cutting up the cucumbers, and the “distressing” task of peeling strong pickling onions – an activity sure to bring a tear to the eye! In many Island households, a meal of any kind is not complete unless there are mustard pickles on the table. So, for most of us true cooks, we endure the process knowing the end result is worth the effort.Continue reading How To Make Mustard Pickles→
On my last day of summer vacation, I went to boot camp – culinary boot camp, that is — at the Culinary Institute of Canada in Charlottetown, PEI. Sixteen people formed the group for the full day “Island Flavours” boot camp. We were a mixed group that came from PEI, Halifax, NS, Montreal, QC, and Waterloo, ON. It was a packed day of activity (and work!) but it was fun!
Now in their 4th year of operation, the boot camps (which started as a pilot project), are offered from May to October. Some are one-half day events while others are full day camps. A variety of bootcamps are offered that include half-day events such as Healthy Eating 101 and Chocolate and Wine. Full day boot camps include Lobster 101, Local Flavours, Seafood 101, Thrills on the Grill, and Seasonal Desserts. Half day camps start at $129 + GST/per person and full days range from $199 to $269 + GST/per person.
Asked why the Culinary Institute, a teaching school for training professional chefs, started the seasonal culinary boot camps, Chef Instructor Jeff McCourt who teaches most of the camps, says the initiative began with “the onset of culinary tourism and, being a school already, they [the Culinary Institute) are fulfilling a short-term education component.” Culinary tourism is one of the latest vacation trends. Whether it is simply choosing interesting, unique, and memorable regional dining options where you are vacationing, attending foodie events (like the PEI Shellfish Festival happening in Charlottetown this weekend, for example) or food conferences, or participating in culinary boot camps at acclaimed cooking schools like the Culinary Institute of Canada, including food-related activities on holidays is a great way to sample local cuisine, try new food products, meet people who share culinary interests, and/or learn new cooking methods and techniques.
Lindsay Arsenault, Boot Camp Coordinator, says one of their most popular culinary boot camps is the Kids Camp, a 4-day summer camp where youth from ages 7-17 are taught basic life skills about food – where food comes from and how to prepare basic meals and they even move on to more advanced food preparation. In this camp, the youth also get to spend a day on a farm, plant a row of potatoes, pick seasonal berries, and then return to the kitchen to learn how to make jam. The camp concludes with the youth preparing a buffet for their parents. Since its inception, the Kids Camp has become so popular that it is not uncommon for the Institute to have waiting lists for these camps. Says 10-year old Michael MacEwen, of Tea Hill, PEI, who is a “seasoned three-year veteran” of the Kids Camp, “I go to the camp every year because it’s fun, you learn how to cook “really good food” from “real” chefs, you get a chef’s outfit, and they are happy to adjust the recipes for me to be gluten-free. I go back every year because there is always something new to learn.”
Lindsay tells me the boot camps are gaining a positive reputation as shore excursions for cruise passengers visiting the port of Charlottetown. Currently, Oceania and Regent Seven Seas cruise lines have started offering the Boot Camps as shore excursions for passengers. The Culinary Institute has customized their boot camps to accommodate cruise ship visits and time lines. This is a wonderful opportunity for those passengers to taste authentic Island food, experience the Culinary Institute and cooking in a professional atmosphere, and go home with great Island recipes as a souvenir of their PEI port visit. As someone who is a frequent cruiser and a foodie, I know this is one shore excursion that would match my tastes! I also learned, from Lindsay, that some organizations have taken their employees to the Culinary Institute and used the boot camps as team building events. Now, that’s an innovative (and fun) way to bring work teams together!
Attending culinary boot camp is also an opportunity to explore future career options. At the boot camp I attended, a dad from Montreal brought his Grade 11 daughter to the Island specifically to attend a couple of boot camps as she is planning a career as a chef. This opportunity allowed her to experience a large industrial-sized teaching kitchen, work alongside a professional chef, and to decide if this is the cooking school she might attend full time when she finishes high school. The day before this boot camp, Alison and her dad, Stephen, spent a day with the chef. This is essentially a customized day of personalized attention where the participant(s) work with the chef on a particular subject of their choosing – in Alison and Stephen’s case, they chose to focus on preparing seafood. Alison’s comments after her culinary experience were very positive and there was no question that she thoroughly enjoyed it.
The boot camps can accommodate a maximum of 16 participants and Lindsay tells me that, on average, their boot camps are comprised of 50/50 Islanders and tourists. On the day I attended, we had a number of family groups participating – Alison and her Dad, Stephen, from Montreal, the six-member Simmons/Tummon family from Waterloo, ON, who were back for their second boot camp in as many years, and a mom (Debbie) and her son (Anthony) from Charlottetown. Debbie told me this boot camp was her Christmas gift to her son and she decided to join him for the day in what was her sixth boot camp in three years. Asked why she had enrolled in six boot camps, Debbie said, “it allows me to try different things. I probably wouldn’t have made the food we made in the camp if I found them in a recipe book but, after participating in the culinary boot camps, I am more inclined to be more venturesome in cooking.” The Simmons/Tummon family – mom, dad, two sons and two daughters aged 15-22, told me their attendance was a Christmas gift from an Island relative (neat idea). Dad, Shawn, told me they enjoy the camps – “the girls like to cook and the boys like doing different things”. I thought it was fabulous to see these families spending quality time together, enjoying themselves, and learning different cooking techniques. Two other women drove from Halifax, NS, specifically to take this boot camp as an extended weekend get-away.
So, now I’m going to share with you my impressions after attending the full day offering of “Local Flavours”, a new boot camp for 2012. For those of you regularly following my blog, you’ll figure my choice of “Local Flavours” was an obvious one given my blog focuses primarily on Island food products.
The focus of the “Island Flavors” boot camp is on cooking with ingredients that come from the land as well as the waters around PEI. After dividing the 16 participants into four groups and assigning each group their recipes, the day started out with participants boarding a small tour bus, along with Chef Instructor Jeff McCourt, to go on a shopping expedition for ingredients for the recipes to be made later in the day.
The Culinary Institute of Canada, Charlottetown, PEI
Chef McCourt handed each group $15 to buy fresh produce to enhance the recipes (note the main ingredients – fish, meat, cream, butter, etc., were all provided by the Culinary Institute and included in the boot camp fee). Heading along historic Water Street and passing over the Hillsborough Bridge to Stratford, our first stop took us to Balderston’s Farm Market.
Balderston’s Farm Market, Stratford, PEI
Participants deliberated over what fresh produce to buy and, once selections were made, everyone was back on the bus and on the way back across the Bridge to the Riverview Country Market which sells both fresh produce and meats. More purchases were made.
Riverview Country Market, Charlottetown, PEI
The last stop was at the Liquid Gold Tasting Bar and All Things Olive shop on lower Queen Street where everyone enjoyed tasting the many different kinds of imported quality olive oils and balsamic vinegars. Yes, more purchases!
Liquid Gold Tasting Bar and All Things Olive, Charlottetown, PEI
Back at the Culinary Institute, participants were outfitted in their official Culinary Boot Camp chef jackets and hats and then it was downstairs to the large kitchen facility. Each group assembled and started making their assigned recipes.
Getting Outfitted with Chef Jackets
Participating in this kind of culinary activity gives participants the opportunity to see and work inside a huge, industrial-sized kitchen. And, I think some of my Paderno stock pots and pans are huge – un-huh – the Culinary Institute has pots so large that they are on floor stands – they make my pots look like little measuring cups! There was one frying pan that I declare was at least three times the size of my largest one! I wondered if I’d need a hydraulic lift to move it!
The Teaching Kitchen at the Culinary Institute of Canada, Charlottetown, PEI
The day was long but passed by very quickly because it was so busy. Each group was intent on their work. This is very much a hands-on culinary event. Don’t expect to sit back, relax, and be entertained by watching someone demonstrate how something is done. Ah, no. You work in these boot camps! It’s learning by doing. That said, there were times throughout the day that Chef McCourt did gather all participants around for specific demonstrations – for example, he showed how to butcher a 30-pound halibut and how filleting is done and steaks cut. Both Chef McCourt and his assistant, Colleen Neilly, were very accommodating and answered any questions participants had and were very willing to show participants how to do things.
Chef Jeff McCourt Demonstrates How to Butcher a Halibut and Cut it into Steaks and Fillets
The basic recipes were provided but participants had the creative flexibility as to how they wanted to “dress them up”. For example, our group opted to prepare the halibut with a Cajun blackened spice rub and plate it over grilled yellow tomatoes and red peppers (bought at Balderston’s earlier in the morning), served alongside herb-roasted beets and chopped Chorizo sausage (purchased at Riverview Country Market). The recipes our group made were Potato and Lobster Cakes, Broiled Oysters (yes, I had my first oyster – but not raw!), Pan-fried Halibut, and Vienna Truffle Tortes (that we dressed with blueberries from Balderston’s).
Potato and Lobster Cakes – One of the Recipes Made During “Local Flavours” Culinary Boot Camp
I found it particularly interesting to visit the other groups around the kitchen and to watch how they chose to prepare their assigned dishes. At the end of the day, we had to plate and present our dishes and spread them out altogether in buffet style. It was simply astonishing and amazing to see the superb quality of the finished products that looked (and tasted) so professionally prepared.
Vienna Truffle Tortes with Fresh PEI Wild BlueberriesBroiled Oysters with Mignonette – One of the Recipes Participants Make During the “Local Flavours” Boot Camp at The Culinary Institute of Canada
Then, it was time to sample the fruits of our labour. After filling our plates, it was upstairs to the Lucy Maud Dining Room to enjoy our meal in style. The Lucy Maud Dining Room is the Culinary Institute’s teaching restaurant and it has one of the most commanding water views as it is situated just at the entrance to the Charlottetown Harbour.
This was simply a fabulous day and experience. For the foodie and at-home chef, this is a rare opportunity to work alongside a professional chef in a large, fully-equipped kitchen (yes, their walk-in refrigerators are as large as my walk-in clothes closet!) and learn food preparation techniques from the professionals. At the end of the boot camp, participants walk away with a monogrammed boot camp chef’s jacket to keep, a booklet of recipes that were prepared during the day, great memories of a busy yet fun day, and inspiration and motivation to try new ways of preparing ordinary local foods.
A Sampling of Dishes Made During “Local Flavours” Culinary Boot Camp
So, whether it’s a treat for yourself, a gift for those hard-to-buy-for folks who happen to be foodies (I’m thinking what a great wedding present one of these camps would be for newlyweds), an innovative team-building activity for your work group, or an activity to do with a group of friends or family members, a one-half or full day at the Culinary Institute’s boot camps is a great food activity and a sure way to have a memorable time. Oh, and the extraordinary buffet meal as the finale is pretty darn good, too!
Wonderful Dishes Made with Fresh PEI Products During “Local Flavours” Culinary Boot Camp
Still can’t get over the fact that we accomplished all this in one day!
The Finale Buffet at the end of the day at the “Local Flavours” Culinary Boot Camp
What a feast!
“Local Flavours” Finale Buffet – Culinary Boot Camp
And, it all tasted so incredibly good!
“The Fruits of the Labour” – Buffet at the conclusion of the “Local Flavours” Boot Camp at the Culinary Institute of Canada
For more information about the Culinary Institute of Canada’s boot camps, visit their website at https://www.hollandcollege.com/bootcamps/bootcamps/culinary/full-day-camps.
To whet your appetite, below is a sample of the kind of recipes participants experience cooking in one of these boot camps – this one from the “Local Flavours” boot camp. Shared here, with the kind permission of the Culinary Institute of Canada’s Boot Camps, is the recipe for Chef Jeff’s Seafood Chowder. This is a dandy chowder that has won awards at the PEI Shellfish Festival (and Lindsay tells me, more than once it has won!). This makes a very large pot of chowder but the recipe is easily halved or quartered as I did when I made it at home. The wonderful thing about seafood chowder is that it can be served as an appetizer in a smaller portion or, with a larger serving, as a main meal because most chowders are quite filling – and this one certainly is! The other great thing about seafood chowder is that, so long as you make up your quantity, you can use any selection of seafood you like and leave out any you do not care for. When I made the recipe at home, I didn’t have any Vermouth so I substituted Chardonnay which worked out fine. The other thing I would caution is to start “gently” with the Tabasco Sauce using only a few drops of it, then taste it and add more (if necessary) to your liking as, using too much of this hot sauce can quickly spoil a chowder beyond repair.
Jeff’s PEI Seafood Chowder
Jeff's PEI Seafood Chowder
By Barbara99 Published: September 16, 2012
Yield:12 Servings
Prep:30-45 mins
Cook:30-45 mins
Ready In:60 mins
A smooth, creamy,and tasty seafood chowder filled with a variety of seafood.
In a hot pot, add the butter and onions. Sweat mixture until translucent. Add garlic and continue to saute until golden brown.
Add the potato, Vermouth, milk, and cream. Cook over medium heat, careful not to scorch the bottom, for approximately 20 minutes until the potato is cooked.
Puree the chowder base in a blender and season with salt and pepper. Return mixture to pot.
Use desired seafood and retain all juice from its cooking process. Add to the chowder base.
Add the diced, cooked potato for texture and season again. Serve and garnish with chopped chives.
It’s late August and wild blueberry season on PEI. These wonderful little indigo-colored berries grow wild in certain parts of the Island – in particular, in the Tignish area in the Western part of the Province and in the Morell-St. Peter’s area in the Eastern end of PEI. While it may be wild blueberry season for most people, for the folks at PEI Juice Works Ltd. which produce wild blueberry juice, it’s wild blueberry season year-round. Today, I’m in Bloomfield, near Alberton, PEI, in the Western part of the Island, visiting the PEI Juice Works Ltd. production plant. My tour guide for the day is Ryan Bradley, Vice-President of Sales and Marketing.
Juice Works Logo
Fresh PEI Wild Blueberries Arrive on PEI Juice Works Ltd.’s Loading Dock…ready to be processed into Wild Blueberry Juice
As I arrive mid-morning, a local farmer from Tignish, about a half hour away, has just arrived with a truckload of fresh wild blueberries for processing and is backed up to the loading dock unloading large containers of berries. One taste of these sweet little wild blueberries and there is no comparison to the larger cultivated ones that, while they have great presentation, I find so often lack flavour. No doubt about it, wild blueberries are tastier and sweeter than the cultivated high bush variety and, as an added bonus, they also have a much higher antioxidant profile.
Crate of Wild Blueberries, Fresh from the Field
PEI Juice Works Ltd. began producing juice from wild blueberries just two years ago when four shareholders from the agricultural sector decided to do something with the wild blueberries growing in their area to add value to them other than shipping them as raw food to be used or processed into a product elsewhere. The production facility is located in the Bloomfield Industrial Park just outside Alberton and presently employs seven staff year-round. The company has worked closely with Bio Food Tech in Charlottetown to develop the proprietary process PEI Juice Works Ltd. uses and Ryan tells me that Bio Food Tech set up a small scale plant in their lab to test and help PEI Juice Works Ltd. get the best wild blueberry juice product possible. The food production industry is heavily regulated and food safety standards are strictly adhered to by PEI Juice Works Ltd. In fact, on my visit, I could only view their production facility from a window as only authorized personnel are allowed in the room where the juice is being produced.
PEI Juice Works Ltd. Production Facility and Test Kitchen
Two Flavours of PEI Juice Works Ltd. Wild Blueberry Juice
Currently, the company produces two flavour blends of their signature wild blueberry juice – Wild Blueberry and Tart Cherry and Wild Blueberry and Rhubarb. Ryan tells me that their most popular flavour is Wild Blueberry and Tart Cherry (and it’s my favourite, too!). He tells me there is over one pound of wild blueberries in every 375ml bottle they produce and the product contains no preservatives – so it is the goodness of an all-natural product! When you think of how small the low bush wild blueberries are, that’s a lot of blueberries! Their product comes in one-size, a 375ml bottle, that has a two-year shelf life, unopened. After opening, the product will maintain its quality for about three weeks, refrigerated. Ryan tells me the juice can be drunk cold or at room temperature but he says the flavour will be more intense if it is consumed cold. PEI Juice Works Ltd. recommends a daily serving size of 2 oz/60ml of the wild blueberry juice which is about ¼ cup. Following this recommended serving, one 375 ml bottle will last you just about a week.
Wild Blueberry JuiceRecommended 2oz/60ml Serving Size of Wild Blueberry Juice Per DayPEI Juice Works Ltd. Warehouse
To the extent possible, PEI Juice Works Ltd. uses local product. In this way, it provides a ready market for local Island wild blueberry growers. In the off-season, PEI Juice Works Ltd. buys its supply of wild blueberries from a sorting facility to which local growers have sold their crops and where the berries have been quick frozen. So, how is wild blueberry juice made? Ryan tells me PEI Juice Works Ltd. uses an ancient European process that was originally developed by Mennonites in Eastern Europe over 100 years ago. This involves a heat process to break down the skin membrane of the wild blueberries that will release the dark, rich pigments that give the juice both its color and flavour. The solids are then separated and filtered out and the blending of other fruits – either the cherries or rhubarb – then occurs. For consumer safety, the product is pasteurized and bottled, hot, which gives it its two-year shelf life.
Currently, the juices are sold in all four Atlantic Provinces (check the “Where to Buy” section of the PEI Juice Works Ltd. website for locations in those areas) and the 375ml bottles retail for around $10. each. However, no worries if you are not in the Atlantic Provinces because, through FoodiePages, you can now order PEI Juice Works Ltd. products online. The company is currently exploring markets around the world and have participated in trade shows and trade missions at home and farther afield. In February, 2012, they attended a food show in Japan and, in March, were at the Canadian Health Products Show in Vancouver, BC. In September, they are travelling to China as part of the PEI Premier’s trade mission.
The farmer delivering the wild blueberry shipment to PEI Juice Works Ltd. on this day graciously agreed to allow me to follow him to his blueberry field to see how they harvest the crop because I think it is important to see where our foods come from and how they are harvested.
Wild Blueberry Harvesting Process
I learned a fact I did not know before and that is that a wild low bush blueberry field will only yield a maximum harvest every second year so the field they are harvesting today will not be harvested again until the year after next. Wild blueberries, of course, cannot be planted so are completely dependent on Mother Nature as to where the wild blueberry barrens are and the fruit they yield. I asked if, this year being a very dry year on the Island with very little rain, provided good growing conditions for wild blueberries. The farmer told me that it is not and he showed me some berries that, in fact, just dried up and did not yield useable fruit because of the dry conditions. Using the machine in the photograph above, the farmer can harvest over one acre of fruit per day. It is from this field that today’s production of PEI Juice Works Ltd. wild blueberry juice is being made. It doesn’t get any fresher than that!
In recent years, there have been a number of studies conducted around the world with regards to the health benefits of wild blueberries, often dubbed a superfruit, which have steadily been gaining a reputation for their health benefits. Wild blueberries are low in fat and sodium and provide a good source of fibre and both Vitamins C and K. While research and testing on the health benefits of wild blueberries continue on an ongoing basis, the berries and their products, such as wild blueberry juice, are reported to have positive health benefits. High in antioxidants, wild blueberry juice is reported to have properties that may improve cognitive function, lower blood pressure and cholesterol, reduce inflammation, inhibit urinary tract infections, and combat diseases like cancer, heart disease, stroke, and memory loss. There is even some research that suggests wild blueberry juice may slow the aging process! So, with the chances of improved memory and learning functions, slowing down the aging process, and combating a number of other diseases, what’s not to like about wild blueberry juice!
Visit the Juice Works website to find out more about their blueberry juice products.
While the wild blueberry juice is wonderful to drink on its own I decided to try some recipes using the juice as an ingredient. The first recipe is for Steamed Mussels with Blueberry Vinaigrette. You can find the recipe for this appetizer on the Saltscapes magazine website. Traditionally, on PEI, we serve steamed mussels with melted butter; however, this recipe sees the mussels drizzled with a blueberry vinaigrette which can also be used as a dressing on a green garden salad or on a watermelon, goat cheese, and basil salad. For the vinaigrette, I chose PEI Juice Works’ Wild Blueberry and Rhubarb Juice and I also used PEI-produced maple syrup. Adding the syrup gave the dressing a touch of sweetness and it paired well with the mussels in the appetizer and the watermelon in the salad.
Steamed Mussels with Blueberry Vinaigrette
Steamed Mussels served with Blueberry Vinaigrette
To make the watermelon, goat cheese, and basil salad, I simply cubed watermelon, added some crumbled goat cheese, red onion, and a sprinkle of fresh basil and parsley. Since we had a bumper crop of cherry tomatoes in our garden this year, I included some of those as well. Drizzled with a wild blueberry vinaigrette, this is a refreshing and colorful summer salad.
Watermelon, Goat Cheese, and Basil Salad Drizzled with a Wild Blueberry Vinaigrette
My third recipe is one I developed — a Blueberry Juice Sangria (recipe follows).
My Island Bistro Kitchen’s Blueberry Sangria
I hope you will try PEI Juice Works Ltd. wild blueberry juices. They are a tasty product, good for you, and made right here in Prince Edward Island. It’s a true flavour of the Island!
My Island Bistro Kitchen's Blueberry Sangria
By Barbara99 Published: August 29, 2012
Yield: (3-4 Servings)
Prep:1 hr 30 mins
A refreshing drink made with PEI Juice Works' Wild Blueberry Juice
Okay, so I must admit the thought of baking and cooking with something I have always considered a perfume can be a bit daunting but with lavender being the trendy new culinary herb, I thought why not be a bit venturesome. But can I use just any lavender for culinary purposes? To find out, I paid a visit to The Five Sisters of Lavender Lane – aptly named because there are five sisters involved with the growing, harvesting, and production of the lavender products.
The Five Sisters of Lavender Lane, Kelly’s Cross, PEI, CanadaLavender Farm in Kelly’s Cross, PEI
Through the scenic rolling hills of Kelly’s Cross in rural PEI, on the Island’s South side, I find PEI’s only lavender farm. In 1999, Carol Cook bought the farm and, in 2001, planted her first 100 lavender plants to see how they would ‘weather the winter’ on the Island. They did well and, today, there are over an estimated 3000 plants of two varieties (Hidcote and Munstead) grown on the farm.
Rows of Heavenly-scented Lavender at the lavender farm of The Five Sisters of Lavender Lane, Kelly’s Cross, PE
Carol tells me that starting lavender from seed is not necessarily a guarantee of success. Instead, her preference is to start new plants by propagating from cuttings. This is where a long stem of lavender attached to the mother plant is buried under some soil and left to grow its own roots. The following year it can be cut from the mother plant and, voila, a new lavender plant is started. Another option is to take a cutting from a plant, cut it on an angle, dip it in a root boost starter product, and place it in a sandy soil mixture to take root.
Most of us know lavender as a perfume and potpourri product. However, lavender is actually an herb of the mint family and certain varieties of it are known as culinary herbs. These are primarily the Hidcote and Munstead varieties. Lavender is often considered to be similar to thyme, rosemary, and sage and it can, in fact, be substituted for rosemary in many recipes. If you have ever cooked with Herbes de Provence, chances are you have already tasted lavender since it is a common ingredient in this herb mix along with the typical mixture of thyme, rosemary, and savory.
Lavender is one of the more aromatic herbs and some say it bears citrus notes or even a hint of pine. The lavender buds (the stage just before the plants blossom into full open flower) possess a higher oil content and have the most intense taste. They tend to have a stronger, minty flavour and, when used in cooking or baking will be more pungent and have “more bite” to them. When crushed or ground, the lavender buds have a sweeter, milder flavour. While the leaves, stems, buds, and flowers can all be used for culinary purposes, the flower buds are said to give the most flavour.
Lavender Buds on the left; Lavender Flowers on the right
In PEI, harvesting of lavender occurs in mid-July. When at their bud stage, the beautiful purple/mauve buds are removed from their tall spikes, washed, and spread on screens to dry. They are then ready to be used in various products. It is possible to get a second, smaller harvest from the same plants late in August or early September. The photographs below were taken at the lavender farm on July 10, 2012, the day before they began harvesting. I can only imagine the wonderful scent there must have been during the harvesting process!
The Day Before the Harvesting of the Lavender at The Five Sisters of Lavender Lane
The Five Sisters of Lavender Lane only sell their culinary lavender in the small gift shop at their farm in Kelly’s Cross and it is not uncommon for local chefs to stop by to pick up their supply for their restaurants. If you are cooking with lavender, just make sure that it is the culinary variety you are using and that it has been grown organically, pesticide-free. Besides the culinary lavender, the farm also produces and sells a number of other lavender products onsite including perfumed products. This year, they are currently experimenting with the production of lavender extract which can be used in culinary products in the same way that vanilla, almond, or lemon extract is used.
Lavender is a strong herb so my advice is less is more and to exercise caution in the amount you use in a recipe. If you use too much, it will not be a pleasant taste because it may seem like you are eating soap or that you used perfume in the dish. I find a lot of recipes call for 1-2 tablespoons of lavender and that is way too excessive in any recipe for my taste. When trying a recipe with lavender, I start with a very modest amount and, if I find it is not enough, I will slightly increase the amount the next time I make the recipe until I get it to the point that it pleases my palette. Like any herb, you want it to accent the dish, not predominate and overpower it. Rule of thumb is that, if you are using dried lavender, use one-half what you would use fresh. Because it is not very pleasant to bite into a whole lavender bud, the herb is often ground in a spice grinder or coffee grinder. It is very important to carefully read a recipe that calls for lavender to determine when the amount of the herb the recipe calls for gets measured – i.e., is it before or after the lavender is ground or crushed. If the recipe calls, for example, for 1 tsp. lavender buds finely ground, first measure the whole buds as the teaspoon measure and then grind them as, otherwise, the flavour will be too strong if you were to use 1 tsp finely ground lavender in the recipe.
Lavender is now the trendy herb not only in baked goods like cookies, scones, and sweet breads but in ice cream, in vinaigrettes, in rice, on chicken and lamb, in jams, jellies, and honey, and in drinks such as herbal teas and lemonade. I have done a lot of experimenting with cooking and baking with lavender this summer and I am lucky because I live not far from the lavender farm where I can get my supply of quality culinary lavender. Not long ago, I prepared an evening tea featuring lavender – a Lavender Blueberry Banana Bread, lavender scones with homemade lemon curd, and Swedish Teacakes filled with the curd.
An Evening Lavender TeaRoasted Beet Salad
On Sunday evening I made an entire meal with lavender as the focus. For the salad course, I started with a roasted beet and goat cheese salad on garden greens. To roast the beets, I coated them with olive oil then sprinkled some fresh thyme, lemon verbena, basil, dried lavender buds, and a bit of minced garlic on them. I wrapped the beets in tin foil and roasted them at 400C for about 1 hour, till they were fork tender. I then sliced the beets and laid them on a bed of lettuce freshly picked from our garden, added some orange sections, and tossed some goat cheese and pecans on the top. I made a simple citrus-based vinaigrette to drizzle over the salad. The beets had a nice roasted flavour to them, not strong in any herb flavour, which is the taste I was aiming for.
Lavender Chicken Breasts in Champagne Sauce served with fresh green and yellow string beans and blue, red, and white fingerlings
For the main course, I chose a recipe from Sharon Shipley’s “The Lavender Cookbook” for Lavender Chicken Breasts in Champagne Sauce. This was delicious. The chicken breasts were marinated in lemon juice, thyme, and ground lavender buds then cooked in a skillet with a wonderful mushroom and champagne sauce.
For dessert, I wrapped my homemade Lavender-Honey-Vanilla Ice Cream in a dessert crepe and drizzled it with raspberry coulis made with fresh PEI raspberries picked near Hunter River. The ice cream, my feature recipe for this posting, is also good with a hot fudge sauce or drizzled with a good quality chocolate or raspberry balsamic vinegar that has been reduced to syrup stage.
Lavender-Honey-Vanilla Ice Cream in Crepe, drizzled in Raspberry Coulis
The lavender farm at the Five Sisters of Lavender Lane is located at 1433 Route 246 in Kelly’s Cross, PEI. Check out their website at http://www.fivesistersoflavenderlane.com/ or call them at 902-658-2203.
Thank you for visiting “the Bistro” today. There are lots of ways to connect with “the Bistro” through social media:
Join My Island Bistro Kitchen on Facebook Follow the Bistro’s tweets on twitter @PEIBistro Find the Bistro on Pinterest at “Island Bistro Kitchen” Follow along on Instagram at “peibistro”
In double boiler, over medium heat, heat the whipping cream, half-and-half, milk, honey, sugar, lavender, and vanilla beans and pod. Stir occasionally and heat mixture until small bubbles start to appear around edge of mixture, about 10-12 minutes.
Remove from heat, cover, and let steep for 30 minutes to allow the lavender flavour to infuse the warm milk mixture.
Strain mixture through a fine mesh sieve into a clean bowl. Discard remains in sieve and return strained mixture to a clean double boiler and heat to the scalding point, stirring to prevent the mixture from curdling or sticking to the bottom of the pot.
In a medium-sized bowl, whisk egg yolks and salt together. Whisk in vanilla. Add ¾ cup of the hot milk mixture to the eggs and whisk to blend. Pour this mixture into the custard in the double boiler. Cook over medium heat, stirring constantly until mixture thickens to consistency that it will coat the back of a wooden spoon. Do not boil. Be patient as this takes time.
Strain mixture through sieve into a clean bowl. Cool completely then chill, covered, in refrigerator for at least 3 hours or more (can be chilled up to 24 hours). Freeze custard in ice cream maker according to manufacturer’s directions. Transfer ice cream to an airtight container and place plastic wrap directly on the surface of the ice cream. Cover and place in freezer for at least 4-6 hours to harden completely.
There is nothing quite like the scent of newly picked strawberries straight from the field! It’s a hallmark of Summer, particularly in climates with short growing seasons such as that on PEI. Some years, we are lucky to get a couple of weeks out of the “strawberry season” but, this year, weather conditions have permitted it to be extended to about a month.
Fresh From the Field PEI Strawberries
I remember when I was growing up, the early morning take-offs to the nearby U-pick berry field so we would be in the line-up for its 6:00am opening for fear of not being in time to get the best “pickings” of berries. Out would come the big, huge plastic bowls, hats, and bug spray and off to the field we’d go to get berries for eating, for jamming and, of course, “to put away” which meant crushing and freezing them for uses throughout the year. There was no such thing as imported strawberries in the Winter from other countries as there is today….although I’ll argue those don’t have the flavour our local ones do! Indeed, there would always be the “reviews” as to the quality of the berries – “they were so large, they had no flavour”, “they were so small, they were “poor” this year and not worth picking”, or “they had too hard a core in the center” – and, of course, the weather was never quite right for their growing no matter the conditions! It seemed there was no “perfect” berry! Yet, people picked pounds and pounds and buckets of them every year. Going to the berry field was somewhat of a social event because that’s where everybody in nearby communities congregated in early July to get those berries!
I don’t freeze a lot of berries and take up freezer space with them but I do purée some for specific recipes I know I am likely to make throughout the year. I freeze them in recipe-specific proportions and label them with the recipe name. I like to make strawberry jam – sometimes I think more for the wonderful scent in the kitchen when it is cooking than for the need to have several bottles of jam available – although that’s a nice side benefit! When I make my jams, I use smaller bottles – i.e., the 1-cup and ½-cup sizes. These are ideal sizes for sharing and gift-giving and, let’s face it, who minds getting a treat of homemade jam. Even if you make your own, isn’t it always nice to taste another cook’s jam?
I like strawberry jam on toast, scones, as a dollop on warm custard and, yes, even in my dark fruitcake that I make in the Fall. But, one of the most marvelous ways to enjoy strawberry jam is on fresh homemade biscuits still warm from the oven. For some reason, the flavour of strawberry jam always seems more true when the jam is served on a plain tea biscuit along with a nice cup of freshly brewed tea. Perhaps this is why, of all the varieties of jams available, strawberry is typically the quintessential variety found on traditional afternoon tea tables.
Strawberry Jam Ingredients
The recipe I used to make strawberry jam this year comes from Anna Olson of the food network. This recipe does not make a large batch of jam – it yields approximately 6 cups. It is a fairly sweet jam and I think the amount of sugar could be reduced by ½ cup to 3½ cups (instead of 4 cups the recipe calls for). However, degree of jam sweetness is one of personal preference and much depends on the variety of strawberries being used and how much natural sugar the berries already contain. This is not a super-thick jam and it does not use pectin. I found I had to boil it longer than the recipe directions said. In fact, I boiled it near an hour to get it thick enough for my liking. The flavour is really good and authentic. One thing I do is use a potato masher to crush up some, but not all, of the berries because I like some chunks of berries in my jam but not so many that it makes it difficult to spread.
Preparing Ingredients for Strawberry Jam
Making Strawberry Jam
Bottles of PEI Strawberry Jam
One of my favourite pastimes is to relax and enjoy an afternoon tea. No better way than with a cuppa, fresh tea biscuits, and newly made strawberry jam. It’s a great way to enjoy the fruits of jam-making labour!
Fresh Strawberry Jam on Tea Biscuits
Thank you for visiting “the Bistro” today. There are lots of ways to connect with “the Bistro” through social media:
Join My Island Bistro Kitchen on Facebook Follow the Bistro’s tweets on twitter @PEIBistro Find the Bistro on Pinterest at “Island Bistro Kitchen” Follow along on Instagram at “peibistro”
Sangria is really nothing more than a wine punch. It is typically associated with Spain, Portugal, and Mexico but is also popular now in other areas of the world as well, particularly as a summer time drink. While it can be made with white or rosé wines, classic sangria is made with red wine. A small amount of brandy is also a common ingredient. Chopped fruit — often citrus — is also a usual ingredient and what you add to it basically consists of what you have available. Lemonade or orange juice can also be added and the addition of a sweetener, such as sugar or honey, is included in the list of ingredients, too. These ingredients get mixed together and left for an hour or two to allow the flavours to blend. Sangria can be drunk without the addition of a carbonated soda but adding lemon-lime soda, Sprite, 7-Up, or gingerale, certainly adds fizz and spark to the drink and I think makes it more refreshing.
Sangria – A Refreshing Summer Drink
Mix the sangria in a lovely glass pitcher so that you can enjoy the deep burgundy-red color of the drink as well as the mixture of fruits floating in the punch. I like to serve this beverage over ice in tall pedestal flutes.
Glass of Island Sangria
Thank you for visiting “the Bistro” today. There are lots of ways to connect with “the Bistro” through social media:
Join My Island Bistro Kitchen on Facebook Follow the Bistro’s tweets on twitter @PEIBistro Find the Bistro on Pinterest at “Island Bistro Kitchen” Follow along on Instagram at “peibistro”
Pour wine, orange juice, and brandy in to a glass pitcher. Add sugar and salt. Stir.
Add chopped fruit. Let stand for at least an hour at room temperature to let flavours blend. Then, refrigerate for 30-60 minutes to cool. Add the carbonated soda at time of serving. Serve over ice in pedestal flutes. Enjoy!
Over the years, many Island homes, particularly those in the country (including mine) have had (and many still do) a rhubarb patch. The tiny shoots of the perennial rhubarb plants poking through the earth are always considered a harbinger of Spring and a welcome one at that. After many long Winter months in Northeastern Canada, it’s always good to see this sign of life in the corner of the garden. In fact, some local groups on PEI host fund-raising “Rhubarb Socials” each June at which they serve desserts made with rhubarb so it appears the lowly rhubarb has gained some social status!
Rhubarb Signifies Spring
A number of years ago, I suggested planting a rhubarb crown (rhizomes) in the corner of our cottage garden. The idea was not met with grand enthusiasm but, nonetheless, I went to the garden center and landed home with two rhubarb crowns which did get planted (I knew they would once they were onsite!). Well, now that rhubarb is just the greatest thing ever planted! It grew alright – in fact, we now have more of a rhubarb “bush” than a patch! Some stalks are about 18” tall. Local supermarkets are currently selling rhubarb for $3.99/lb (Cdn $). In fact, I saw some at a local farm stand last Saturday where they were selling for $4.95 and they were not overly fresh either. Sometimes, we take for granted the value of what we have in our backyard gardens. In fact, in Spring 2011, I planted two rhubarb crowns in the backyard of my suburban home. I’m pleased to say they are doing very well – long, strong stalks (ribs) with huge triangular-shaped leaves. I can’t remove any stalks from these plants this year but, next year, I can harvest one-third of the produce and, the following year, as much as is available since the rhubarb will be well established by then.
In PEI, we harvest rhubarb from early-mid May until mid-June. Harvest when stalks are long and still slender as thicker stalks tend to be older and, therefore, tougher and more stringy. To harvest, grasp the rhubarb stalk down close to its root base and give it a good tug to pull it out of the ground. Immediately cut off and discard the bottom whitish part of each stalk. The early Spring stalks are the most tender and yield greater juiciness.
If you are buying rhubarb at a farm market or grocery store, look for stalks that look dry, have crispness to them and are not limp, soft, wilted, or showing signs of turning brown at the ends.
Rhubarb is available in many varieties and shades of color that range from green to stalks that are red-green speckled or graduated in color from red to green, to deep crimson red. When purchasing a rhubarb crown for your garden or when buying rhubarb stalks, I recommend looking for varieties that have a deep red color. They will have the most flavour and give the richest pink color to recipes. Stalks that are primarily green are less flavourful and do not add appealing color to culinary dishes. As a rough, general guideline, 1 pound of raw rhubarb will yield approximately 4 cups chopped.
There has long been a debate over whether rhubarb is a fruit or a vegetable. It is often referred to as the “pie plant” because one of the most common and recognizable uses of it is in rhubarb pie and we tend to think of dessert pies as being made with fruit, not vegetables. Rhubarb is generally considered to be a vegetable notwithstanding that, in 1947, a New York court decided that, since it was primarily used as fruit in the US, rhubarb would be considered a fruit for the purposes of regulations and duties. So, while rhubarb is often treated as a fruit in many culinary dishes, botanically and by general consensus, it appears to be more accepted as a vegetable.
Regardless whether it is a fruit or a vegetable (we’ll leave that to botanists and other scientists to make the definitive call on that), it is a very versatile ingredient in many recipes. From jams, marmalades, sauces, chutneys, and drinks to pies, tortes, puddings, muffins, and ice cream, there are an endless number of recipes in which to use rhubarb. While I don’t fancy it raw, it is not uncommon to find our young glasscutter hopping off the mower to head over to our rhubarb patch to grab a rhubarb stalk to snack on! Guess he must like the sour, tart taste better than I do!
Rhubarb freezes very well and we freeze a number of bags each Spring. Chopped and frozen in recipe-specific portions and labelled accordingly, rhubarb is then available to us year-round to use in our favourite recipes.
From a nutritional standpoint, rhubarb is a source of Vitamin C, calcium, potassium, and dietary fibre. Because rhubarb largely consists of water (one source claims it is 95% water), it has no cholesterol, fat, or sodium. However, because rhubarb is so tart, it needs sweetening so, adding other ingredients such as sugar, or combining it with fruits such as strawberries, apples, etc., will obviously alter the cholesterol, fat, and/or sodium content of the dish you make using rhubarb.
I have a multitude of favourite rhubarb recipes but one of my all-time favourites is this Rhubarb Marmalade (recipe follows). Combined with three citrus fruits, it has a tart, fresh taste and, best of all, it is the first of my jamming and preserving processes of the season. I use this rich-colored and flavourful marmalade on toast, biscuits, scones, and I particularly like a dollop of it on a warm cream custard.
Time to bring out the jam pots and bottles and capture some of this Springtime goodness before the rhubarb gets too old and tough to use. If you do try this recipe, please be sure to leave me a comment about your impressions of it.
Jamming and preserving season is officially underway!
Rhubarb Marmalade
Rhubarb Marmalade
Ingredients:
8 cups rhubarb, thinly sliced into pieces between 1/8″ and 1/4″ thick) 4¼ cups sugar 1 large orange (or 1½ small oranges) ½ pink grapefruit ½ small lemon
Method:
Chop rhubarb into thin slices. Set aside.
Wash the orange, grapefruit, and lemon well.
Peel orange, grapefruit, and lemon. Chop the pulp, remove and discard any seeds, and place pulp in bowl. Scrape the pith from the fruit peelings and discard. Chop the peel into small pieces. Set aside.
In a large pot, place the rhubarb and sugar. Add the citrus pulp and peel. Bring to a boil over medium high temperature, stirring to prevent scorching. Immediately lower the temperature and cook, uncovered, at a slow gentle boil until mixture thickens and reaches a sustained temperature of 217°F on a candy thermometer (see Note 1 below for alternative testing method). Stir mixture regularly to prevent scorching. Be patient, this can take an hour or so.
Rhubarb Marmalade Ingredients
While the marmalade is cooking, fill a large pot of water, about ¾ full. Place 7 half-pint jars, upright, into the water. Ensure the jars are fully submerged, each jar filled with water, and that the water is at least an inch over the tops of the jars. Cover, bring to a boil, and boil for 10 minutes. Turn off heat and leave the jars in the hot water while the marmalade finishes cooking.
Meanwhile, fill the canner about one-third to one-half full of water. Cover and bring to a boil to have it ready for the filled jars.
When the marmalade is cooked, use a jar lifter to remove the hot jars from the water. Using a canning funnel, pour marmalade into sterilized jars, leaving about ¼” headroom in each jar. Wipe the jar rims with a clean cloth. Seal jars with heated lids and fingertip-tightened ring bands.
Place jars in hot water bath wire basket, ensuring jars do not touch each other or fall over. Carefully lower basket into canner of hot water. Ensure the water level is at least 1” above the tops of jars, adding more boiling water as necessary. Cover with canner lid. Increase the heat to return the water to a rolling boil then decrease the heat to just keep the water at a rolling boil but not boiling over. Process half-pint jars in the hot water bath for 10 minutes, adjusting time for altitude. Start timing the processing from the point where a full rolling boil is reached after basket of jars has been added to the canner. At the end of the processing time, turn off heat and remove canner lid. Wait 4-5 minutes, until the water stops boiling then, using a jar lifter, carefully remove the jars, one at a time, and transfer them to a wire rack to cool completely. Listen for the “pop” or “ping” sound as the bottles seal over the next few minutes or hours. The lids of properly sealed jars will curve downward. Let jars rest, undisturbed, on wire rack for 12 hours. Store in cool, dark place. Refrigerate marmalade once opened.
Boiling the Marmalade
Yield: Apx. 7 half-pint jars
NOTE 1: If you don’t have a candy thermometer, place 2-3 freezer-safe saucers in freezer. To test for doneness of the marmalade, place a small amount of marmalade on chilled saucer and swirl saucer around. Let marmalade sit, untouched, for about a minute, then gently push your finger through the marmalade. If the marmalade holds its shape (i.e., does not immediately run back together after the finger has been removed from the marmalade), it is set and ready to bottle. If not, continue to cook mixture, repeating the “chill” test about every 3 minutes or so (always removing the pot from the heat while conducting the chill test) until the marmalade passes the “chill” test. Do not overcook as it will result in a very thick marmalade, dark in color.
Note 2: After jars have completely cooled, if there are any on which the lids have not curved downward, refrigerate them and use within one month.
Thank you for visiting “the Bistro” today. There are lots of ways to connect with “the Bistro” through social media:
Join My Island Bistro Kitchen on Facebook Follow the Bistro’s tweets on twitter @PEIBistro Find the Bistro on Pinterest at “Island Bistro Kitchen” Follow along on Instagram at “peibistro”
My Island Bistro Kitchen’s Maple Syrup Baked Beans
Growing up, Baked Beans was a traditional Saturday night supper in our household. While I haven’t continued the Saturday night tradition, I do frequently have Baked Beans on the menu. Continue reading Maple Syrup Baked Beans→
This is my favorite Macaroni and Cheese recipe. It uses the fine cheddar cheeses produced right here on Prince Edward Island at the COWS Creamery.
My Island Bistro Kitchen’s Macaroni and Cheese
When I think of “comfort food”, one of the first that comes to mind is Macaroni and Cheese. So simple to make and it does not take any wild or unusual ingredients.
My preference of cheese for this dish is that made by COWS Creamery right here in PEI, actually not far from where I reside. Their cheeses have been award winners for years now, attesting to their fine quality made, of course, possible by the high quality herds of dairy cattle here on the Island.
While I have made and tested this recipe with other cheeses and have found the results to be very good, no question. However, if you have ever had it made with COWS Creamery Extra Old Cheddar Cheese, and their Avonlea Clothbound Cheddar Cheese, I suspect you will agree with me that these two cheeses take Macaroni and Cheese to a higher level.
I serve Macaroni and Cheese (which freezes well, by the way) with a green salad and homemade biscuits, fresh from the oven and slathered with good PEI churned butter. (This is not a sponsored post, by the way, and I don’t work for, or have shares in, COWS Creamery, nor have I been paid for this post. I just simply really like their products.)
Pin Me To Pinterest!
Macaroni and Cheese
My Island Bistro Kitchen's Macaroni and Cheese
By Barbara99 Published: March 28, 2012
Yield:4-5 Servings
Prep:25 mins
Cook:30 mins
Ready In:55 mins
A rich, flavorful macaroni and cheese dish using Cows Creamery Cheddar Cheese
In large pot, bring water to boil. Add salt, oil, liquid chicken bouillon, garlic, and macaroni. (I like to add some garlic and chicken bouillon to the water so it will flavor the pasta when it is cooking. This provides a subtle taste without overpowering or competing with the cheese which would be the case if the ingredients were added into the cheese sauce.)
Cook macaroni, uncovered, for about 10 minutes, stirring occasionally to prevent macaroni from sticking to pot. Drain in colander. Return macaroni to pot.
Melt butter in saucepan. Add milk. Combine flour, salt, pepper, nutmeg, cayenne, and dry mustard. Whisk into milk and butter mixture. Cook over medium heat, stirring until mixture is smooth and starts to thicken.
Add cheeses and stir until melted and blended
Pour cheese sauce over macaroni and stir until well combined. Turn into a greased 2-quart casserole or divide into greased ramekin dishes for individual servings.
Bake, uncovered, in 350F oven for 20-30 minutes.
Serve with a green salad and fresh homemade biscuits.
I recently paid a visit to Cows Creamery at its factory location on the outskirts of Charlottetown, PEI, where I was met by my two tour guides, Yvonne and Andrea. As I soon learned, Cows is a whole lot more than its renowned premium quality ice cream.
With humble beginnings back in 1983, Cows has evolved into a large diversified operation that produces, along with its iconic ice cream, three varieties of cheddar cheese as well as its newest dairy product, creamery butter. You’ll also find this company producing several food items such as chocolate-covered potato chips plus a line of novelty items (including its whimsical cow-inspired clothing line). For the purposes of this field trip, however, my focus was on the dairy side of Cows’ operations.
Cows Ice Cream
"Wowie Cowie" Ice Cream at Cows Creamery
Cows began producing and selling one variety of ice cream (vanilla) on the Cavendish Boardwalk in 1983. It wasn’t long before customers soon started associating Cows with premium-quality ice cream. A short while later, Cows opened their first ice cream shop in downtown Charlottetown and you can still find it there on the corner of Queen and Grafton Streets, just across from the Confederation Centre of the Arts.
Cows Ice Cream Shop in Downtown Charlottetown, PEI
Over the years, Cows added and operated, on a seasonal basis, several more outlets – Peakes Wharf in Charlottetown, Gateway Village at the foot of the Confederation Bridge in Borden-Carleton, and on “The Confederation” ferry that runs, May-October, between PEI and NS. Of course, their new creamery near Charlottetown also sells ice cream year-round in the retain outlet. Cows has also added several off-Island locations that include Historic Properties in Halifax, NS; Whistler, BC; Banff, AB; and Niagara-on-the-Lake, ON.
Today, Cows produces some 32 flavours (yes, 32!) of high-end premium ice cream with catchy names like my favourite, “Wowie Cowie”. All the ice cream is made in their PEI creamery using milk produced on PEI dairy farms and as many locally-produced ingredients (e.g., berries) as possible.
Cows Ice Cream Production Room
The ice cream is then shipped to their various retail outlets in PEI and across the country.
Cows Ice Cream - Prince Edward Island
On the day of my late afternoon March visit, the ice cream operation was not in production mode. However, their retail outlet was selling the delectable ice cream! Cows ice cream is served in their tasty signature waffle cones that are hand-made in each store. One bite and you know this is no ordinary ice cream cone. It is so good that it could almost be described as a specialized dessert crisp cookie in and of itself! The silky smooth ice cream holds its shape in the cone and does not melt too quickly like other brands made with less premium quality ingredients.
Single scoop (waffle cone included) is competitively priced at $3.75 + tax (at time of writing in March 2012) with other high-end ice creams.
The best way I can describe Cows ice cream is that it’s an experience unto itself, right down to the tip of the cone! For me, Cows ice cream is the benchmark against which all other ice creams get rated and I’ve found no other commercial brand to date that tops it. Just a word of caution, though, their ice cream is downright addictive!
Cheddar Cheese
Cows Cheese
Cows Creamery expanded its production line in 2006 when it started making cheddar cheese. Today, their cheese line includes three varieties: Avonlea Clothbound Cheddar (the strongest and most robust of the three); Cows Creamery Extra Old Cheddar, and Cows Creamery Applewood Smoked 2 Year Old Cheddar.
Cows Creamery Extra Old Cheddar and Avonlea Clothbound Cheddar
Just as with their ice cream, Cows makes their cheese using milk that comes from small rural local dairy farms around PEI. Not only does this mean they are using fresh, quality ingredients but they are also supporting local dairy producers. The cheeses are made using the English method and, in fact, my tour guides told me their recipe has its roots in the Orkney Islands, north of Scotland. The cheeses are all-natural products made from unpasteurized milk with no color added. So, if your vision is of a bright orange cheese, you won’t find that at Cows. What you will find, though, is a natural-colored cheese with full-bodied authentic cheese flavour.
I must admit I have never been a fan of old cheese, preferring instead the much more subtle flavours offered by mild and, on occasion, medium cheeses. I was somewhat reluctant to try Cows cheese for the reason that other “old” cheese varieties I have tried in the past always tasted stale to me and had what I can only describe as a distasteful flavour. However, lesson learned – never be afraid to try new things and discover how accepting your palette might be to new and different tastes. Cows’ cheeses are indeed good. So good, in fact, the cheeses have already won several prestigious awards in Canada and the US. Manufactured at their Charlottetown Creamery, the 20-pound cheese wheels are shipped to distributors all over North America. Look, or ask for, Cows cheeses in local specialty cheese shops, farm markets, or grocery deli counters in your area. On PEI, Cows’ pre-packaged cheese can be found at local supermarkets, at the Farmers Market in Charlottetown and, of course, in the retail outlet of the Cows Creamery near Charlottetown, PEI.
I asked my tour guides what the primary intended uses of these cheeses would be since they only manufacture old cheese varieties – i.e., are they meant for snacking cheeses, cooking, etc. They suggested that the cheeses can simply be eaten on their own or used in salads, soups, casseroles, on burgers, or in grilled cheese sandwiches so these are very versatile products.
As per my usual practice when I visit a local producer, I like to take their product and use it in a recipe. I decided I’d put Cows cheeses to the real test and make “Mac ‘n Cheese” (recipe follows at end of this blog). The reason I chose Mac ‘n Cheese is because the pasta (a rather tasteless food item on its own) would not compete in taste with the cheese. This would allow the cheese to “star” without being masked by other strong flavours and I would find out if I liked Cows old cheddar. What I did was use 1 cup each of Cows Creamery Extra Old Cheddar and Avonlea Clothbound Cheddar. Well! Let’s just say, I can probably never be satisfied with Mac ‘n Cheese made with any other cheese in the future! The result was a rich, full-bodied cheese-flavoured Mac ‘n Cheese experience. As mentioned above, Cows cheeses are naturally colored which means they are a very pale neutral (yellowish) color so, if you are accustomed to seeing a rich orange-colored macaroni dish, this will not give you that. However, I think you’ll find the robust, true cheese flavour will more than make up for any lack of deep color.
Creamery Butter
Cows Sea-Salted Creamery Butter
In the summer of 2011, Cows introduced their newest product — butter sold in ½-pound packages and available unsalted or sea-salted. Just as with their ice cream and cheese products, their butter is of premium quality with 84% butter fat versus 80% found in regular butters. I have tried the sea-salted and it is one fine butter…particularly spread on fresh buttermilk biscuits straight out of the oven!
Cows Creamery Butter can be purchased on PEI at the Cows Creamery in Charlottetown as well as at the Co-op on Walker Avenue. Off-Island, it can be found at Pete’s Frootique in Halifax and Bedford, NS, as well as in various stores in Ontario and in the Vancouver, BC, area.
Novelty Items
Cows Whimsical T-Shirts
In 1985, Cows introduced a whimsical line of clothing for their staff to wear. They soon discovered that customers wanted to buy the staff clothing! As a result, Cows began selling T-shirts and sweatshirts that bore images based on puns related to cows or farming. This line has expanded to include a whole line of souvenir items and clothing.
Cows’ logo and images are very unique and recognizable. In fact, a few years ago, I was strolling down a very crowded street in Freeport, ME, when I came upon a couple sporting Cows T-shirts – you can identify these T-shirts in a crowd anywhere!
Cows Advertisement at the Charlottetown Airport
Visitors arriving on PEI by air can expect to find, as they step into the terminal at the Charlottetown Airport, a large statue of a black and white shiny cow advertising “Cows” products. Particularly during peak tourism season, it is not uncommon to find people posing for photographs with the cow as the backdrop. This is probably the most photographed cow on PEI (or anywhere, for that matter)!
Factory Tours
Cows opened their new creamery facility just outside Charlottetown in 2009. They offer tours that start with a video in their theatre room, followed by a stop by the T-shirt printing shop where you can watch the Cows images being transferred on to clothing. Your next stop on the tour will take you by the infamous ice cream making room where you can watch this delectable treat being made. From there, you’ll see the large wheels of cheese undergoing the aging process. The last stop on the tour would, no doubt, be a huge hit – the tasting room where you’ll sample the ice cream made on the premises. Tour prices (as of March 2012) are: Adults $6.00; Children $4.00; and Children Under 2 years of age are admitted free. The tours run May 15 – October 15 and are available off-season by appointment only.
PEI has no shortage of good quality locally-produced food products available. The great thing about Cows Creamery products (apart from their obvious high quality) is that they are produced right here on Prince Edward Island. As a home kitchen chef and food blogger, I have a lot of time and respect for companies, such as Cows, that use local products in their manufacturing and, in turn, support local producers. As anyone who knows me well will attest, I like to use the freshest ingredients possible and premium-quality products in my cooking and baking. It doesn’t get any fresher than buying from local producers and manufacturers.
My Island Bistro Kitchen's Macaroni and Cheese
By Barbara99 Published: March 21, 2012
Yield:4-5 Servings
Prep:25 mins
Cook:30 mins
Ready In:55 mins
A rich, flavorful macaroni and cheese dish using Cows Creamery Cheese
In large pot, bring water to boil. Add salt, oil, liquid bouillon, garlic, and macaroni. I like to add some garlic and chicken bouillon to the water so it will flavor the pasta when it is cooking. This provides a subtle taste without overpowering or competing with the cheese which would be the case if the ingredients were added into the cheese sauce. Cook, uncovered, for 10 minutes, stirring occasionally to prevent macaroni from sticking to pot. Drain in colander. Return macaroni to pot.
Melt butter in saucepan. Add milk. Combine flour, salt, pepper, nutmeg, cayenne, and dry mustard. Whisk into milk and butter mixture. Cook over medium heat until mixture starts to thicken.
Add cheeses and stir until melted and blended.
Pour cheese sauce over macaroni and stir until well combined. Turn into a greased 2-quart casserole or divide into greased ramekin dishes for individual servings. Bake, uncovered, in 350F oven for 20-30 minutes.
Serve with a fresh green salad and homemade biscuits.
Growing up in PEI, it was customary in our home to always have at least one “feed” of smelts sometime during the winter.
Smelts are a winter catch and, therefore, a winter meal in many households on PEI. Sport fishers set up camp on the frozen waterways around the Island. By setting up camp, I mean they haul little buildings, locally referred to as “smelt shacks” out onto the ice. It is from the ‘comfort’ of these tiny rustic shelters that they fish for smelts, typically using spears or nets, to catch the tiny fish below the ice surface. These fish are tiny, in general, measuring about 5 ”- 7” long. Continue reading Smelts – A Prince Edward Island Winter Meal→
(Mostly) PEI and Maritime Food – Good Food for a Good Life!

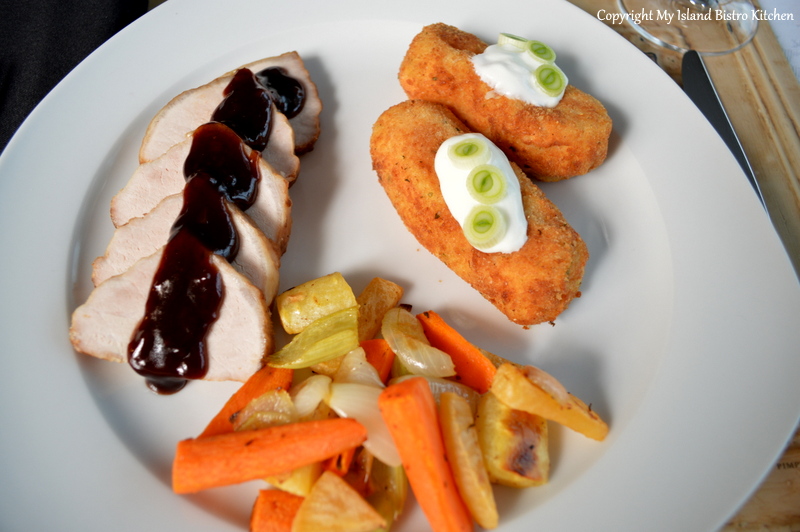
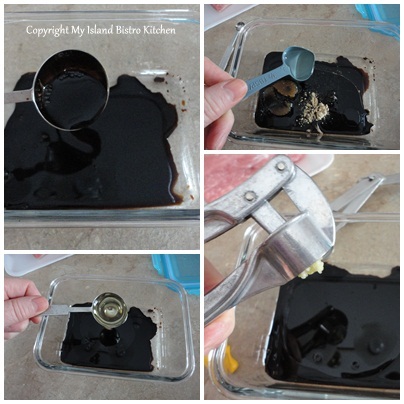
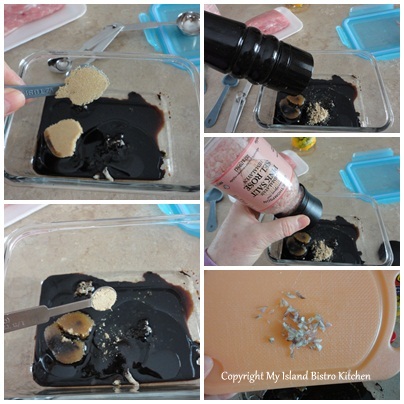
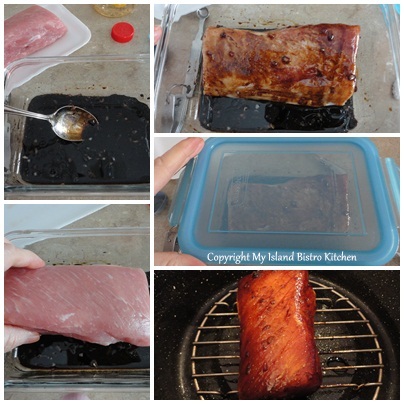
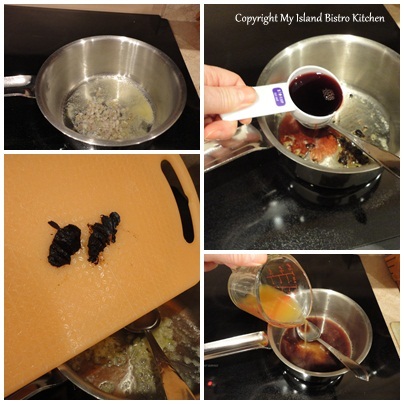
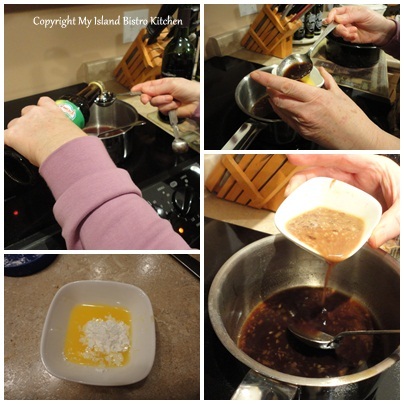
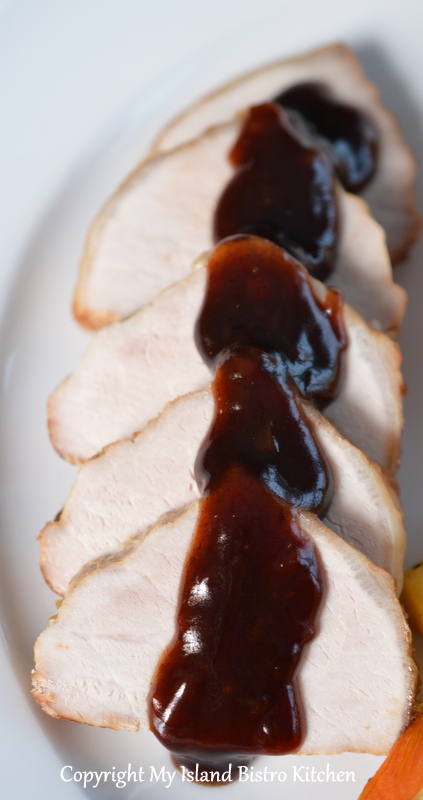

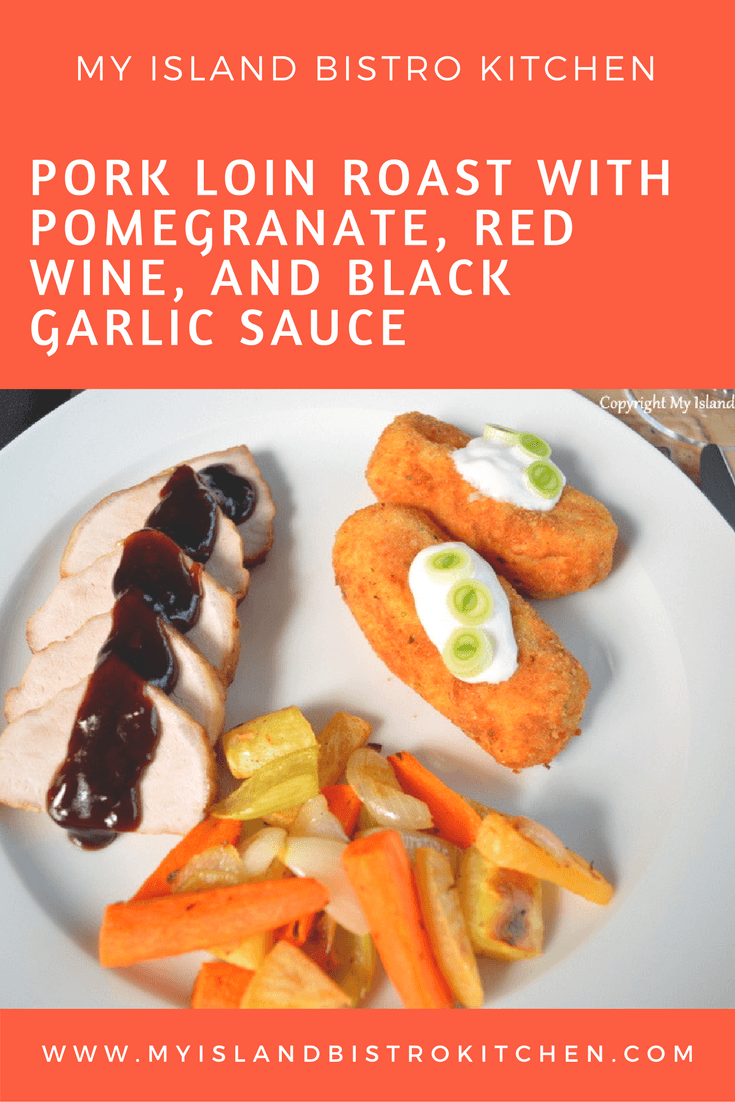
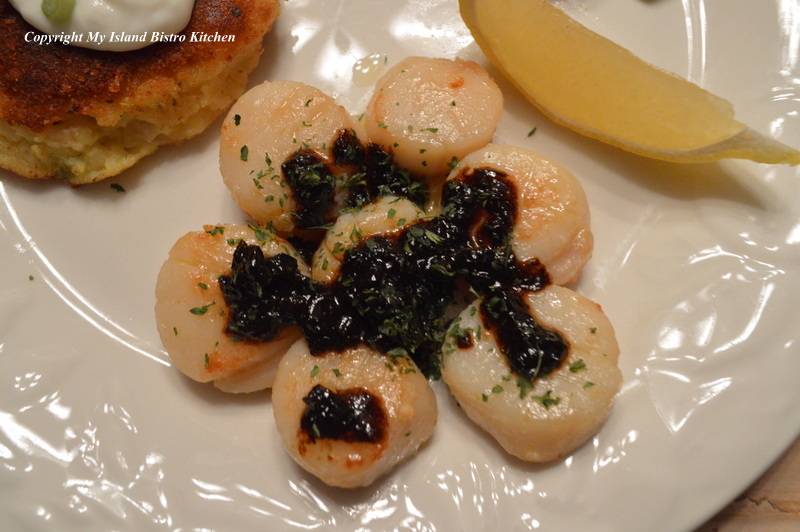
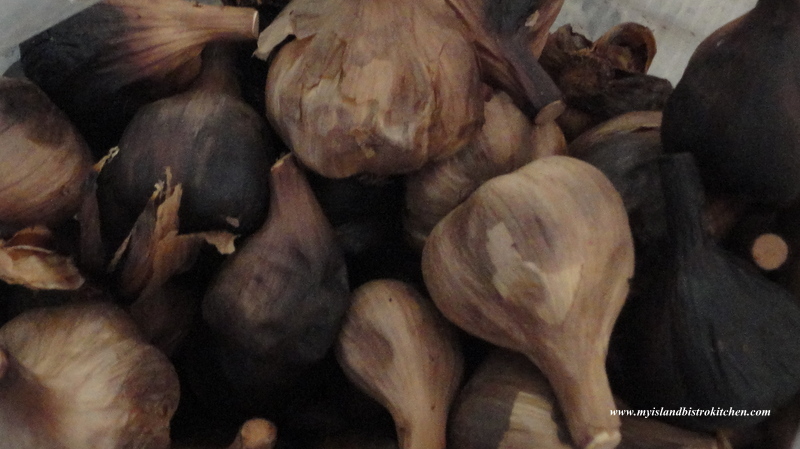

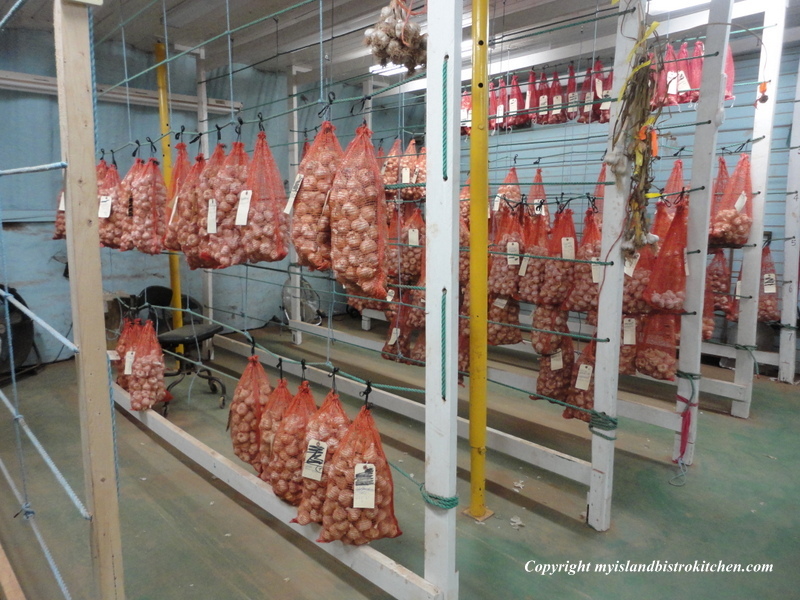
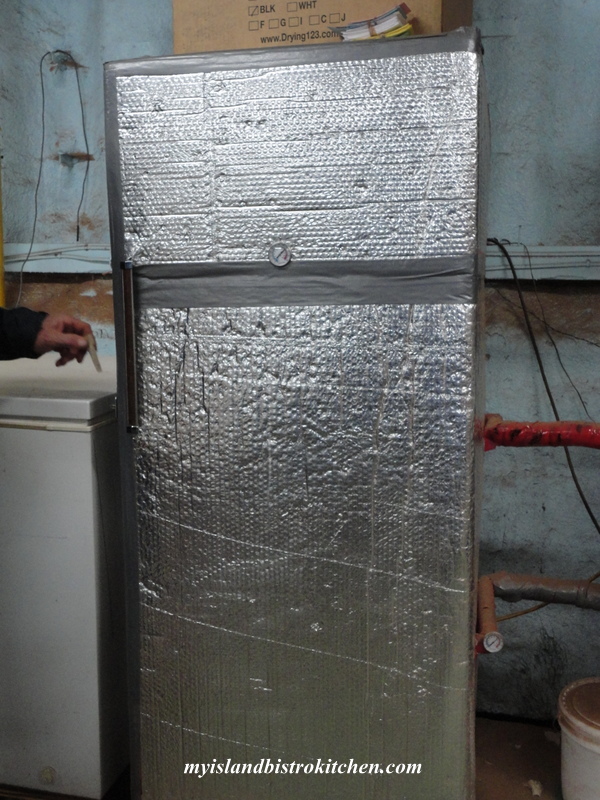
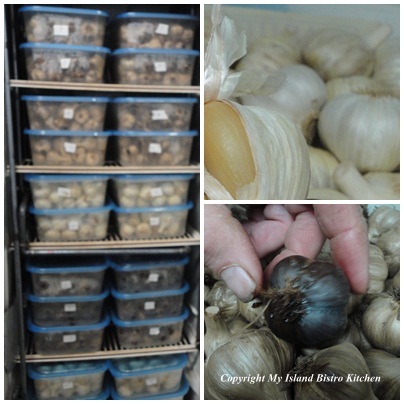
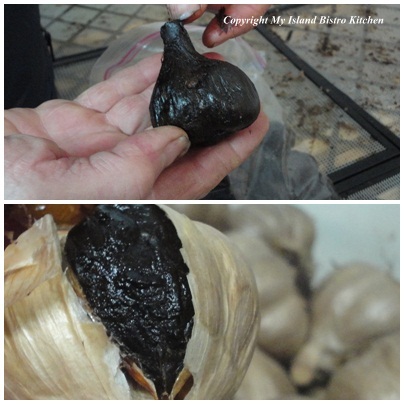
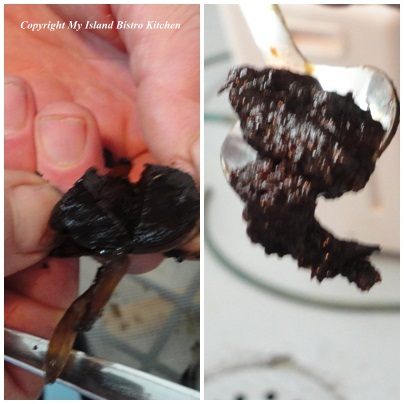
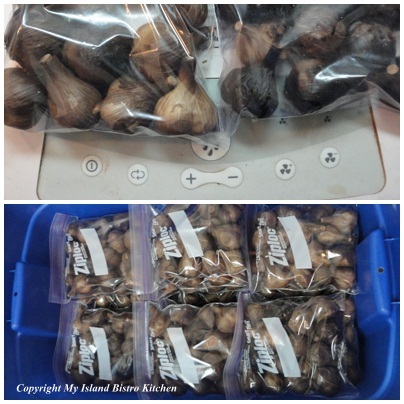
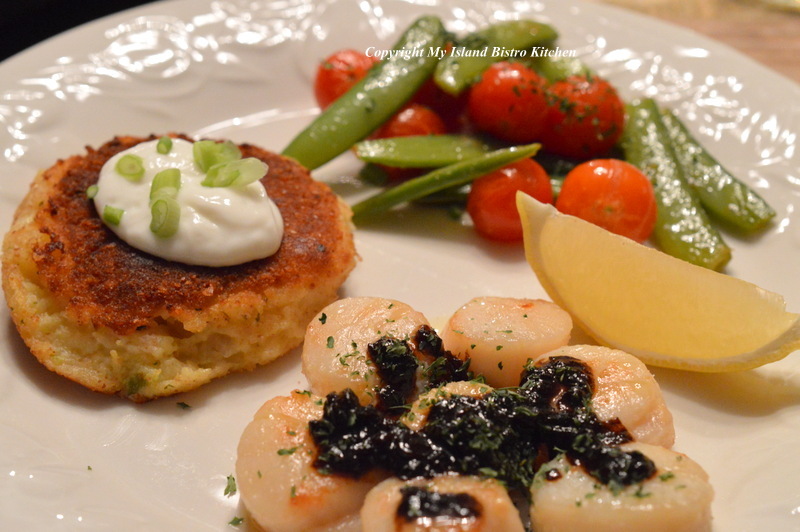
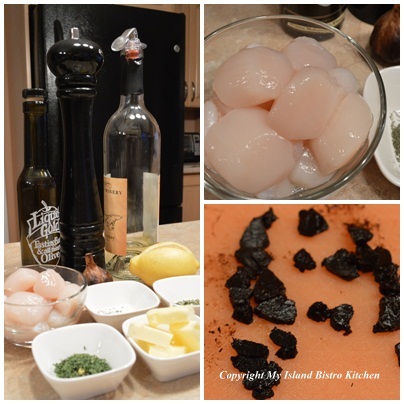
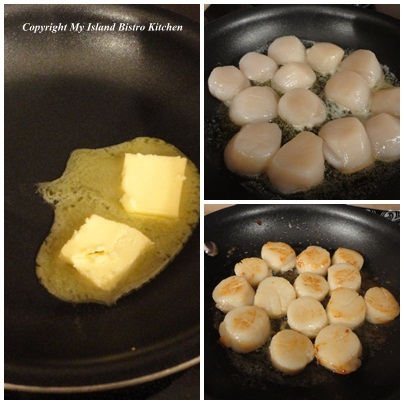
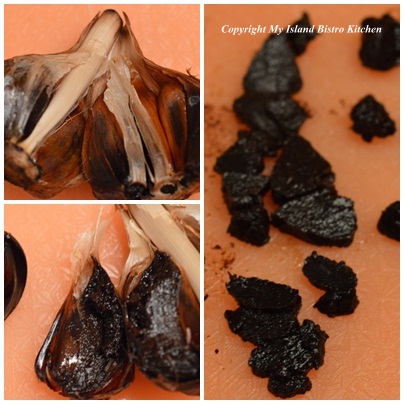
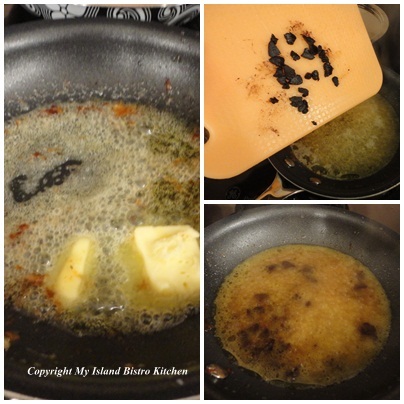
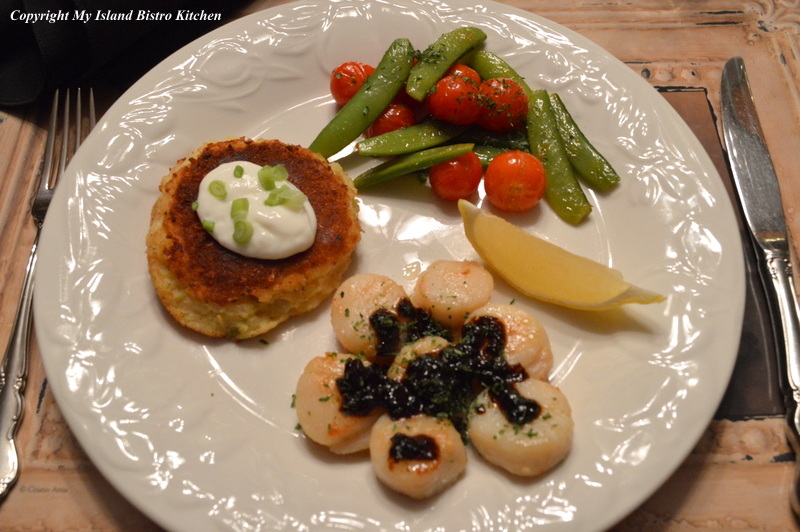


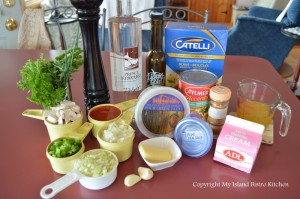 Heat oil and butter in large pot. Add onion, celery, green pepper, mushrooms, and garlic. Sauté 2-3 minutes over medium heat.
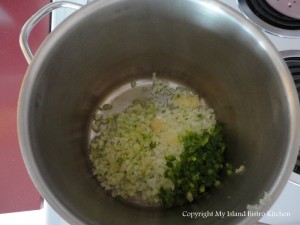 Add diced tomatoes, salt, and pepper. Simmer over low heat 5-7 minutes.
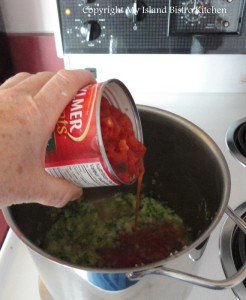 Whisk the corn starch with the cooled chicken stock until smooth.
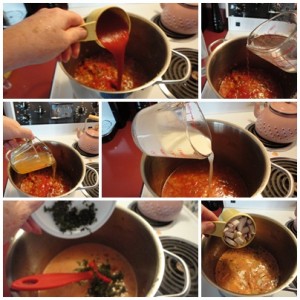 Stir tomato sauce, vodka, and chicken stock/cornstarch into mixture. Simmer 18-20 minutes, until slightly thickened.
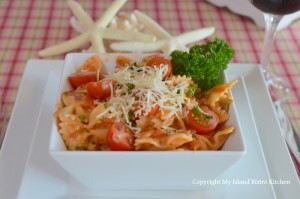 Stir in whipping cream, oregano, basil, chives, cayenne, red pepper flakes, and parsley. Simmer 7-10 minutes.


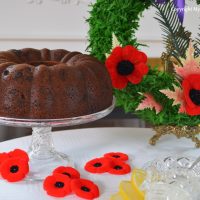


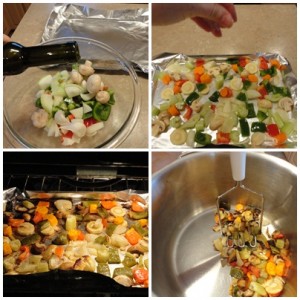 Preheat oven to 450 degrees. Cut vegetables into 1/2" - 1" pieces. Slice the parsnip slightly thinner. Place in a bowl and drizzle with olive oil, tossing to coat vegetables. Place on tin foil lined baking sheet. Sprinkle with sea salt and freshly ground pepper. Roast for about 40 minutes until vegetables are slightly fork tender and edges of vegetables start to char slightly. Peel garlic. Transfer vegetables and garlic to stock pot and, with a potato masher, loosely break up the vegetable chunks.
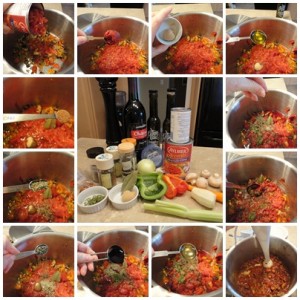 Add remainder of ingredients. Over medium-high heat, bring mixture to boil. Reduce heat and simmer over low heat for 45-50 minutes, stirring occasionally.
 Remove from heat and discard bay leaf. Using an immersion blender, purée sauce to desired consistency. (Alternatively, let mixture cool and transfer to food processor to purée.)
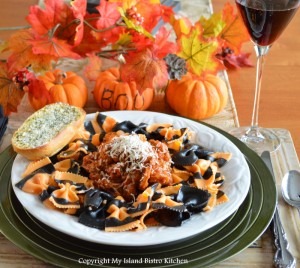 Toss with pasta (and meat, if using) or use as pizza sauce. Freezes well.
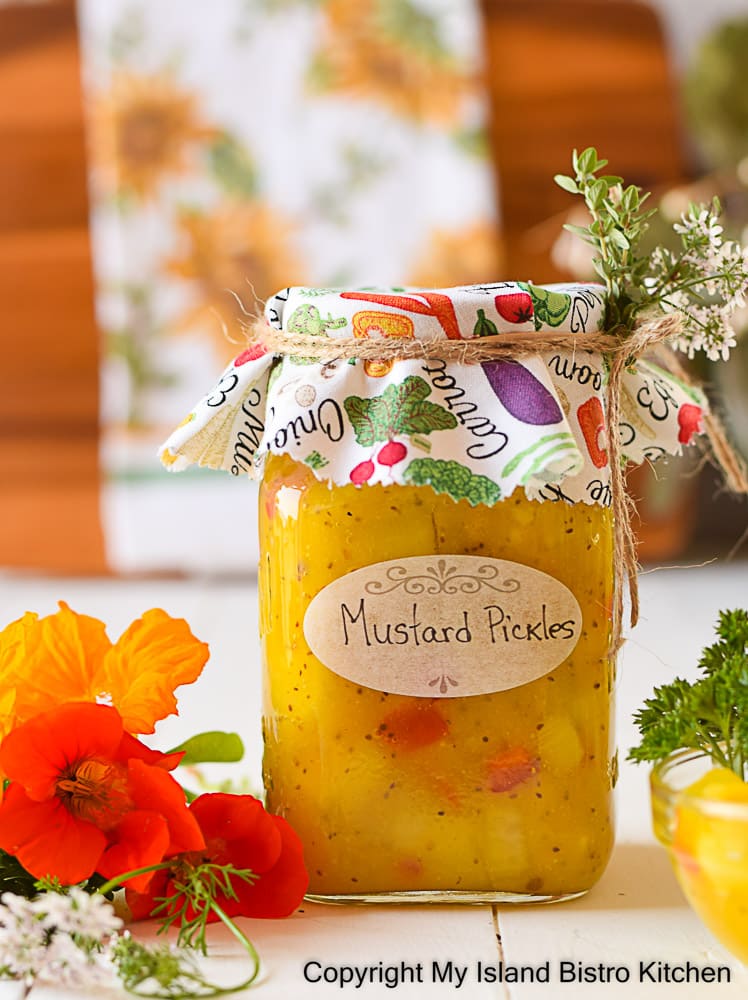

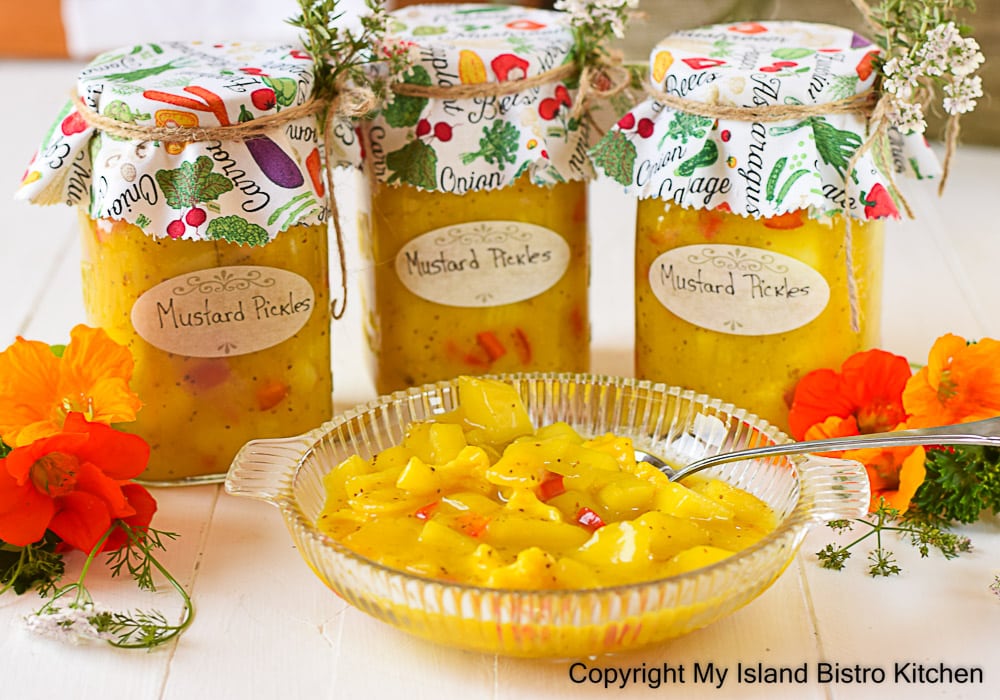


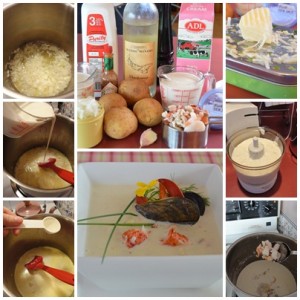 In a hot pot, add the butter and onions. Sweat mixture until translucent. Add garlic and continue to saute until golden brown.
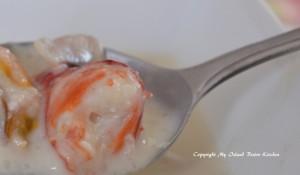 Use desired seafood and retain all juice from its cooking process. Add to the chowder base.
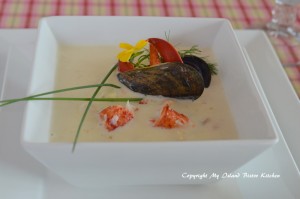 Add the diced, cooked potato for texture and season again. Serve and garnish with chopped chives.


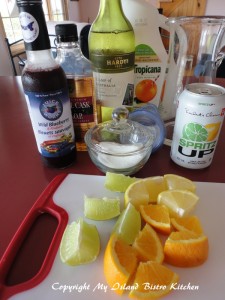 Assemble all ingredients.
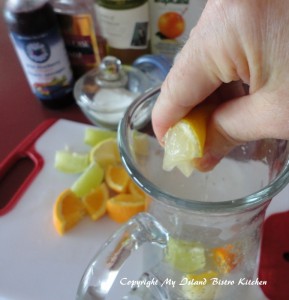 Chop lime, lemon, and orange into quarters. Into medium-sized glass pitcher, hand-squeeze fruit. Drop in the fruit. Add blueberries, if using.
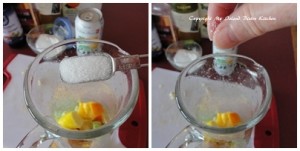 Add sugar and a small sprinkle of fine sea salt. Let sit, at room temperature, for about 30 minutes to release juices from the fruit.
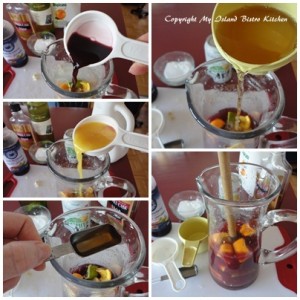 Add blueberry and orange juices, wine, and brandy. Stir. Refrigerate for at least 1 hour to chill.
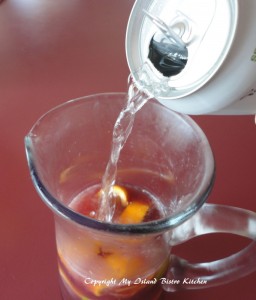 Add soda at time of serving.
 Serve chilled, over ice, in tall glasses and garnish with a slice of orange or lemon. Enjoy!


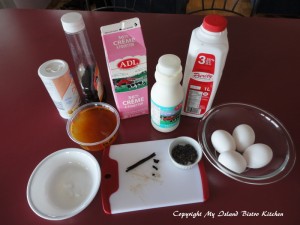 In double boiler, over medium heat, heat the whipping cream, half-and-half, milk, honey, sugar, lavender, and vanilla beans and pod. Stir occasionally and heat mixture until small bubbles start to appear around edge of mixture, about 10-12 minutes.
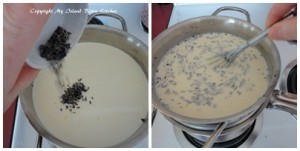 Remove from heat, cover, and let steep for 30 minutes to allow the lavender flavour to infuse the warm milk mixture.
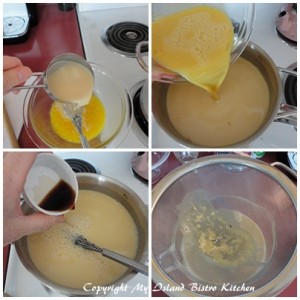 Strain mixture through a fine mesh sieve into a clean bowl. Discard remains in sieve and return strained mixture to a clean double boiler and heat to the scalding point, stirring to prevent the mixture from curdling or sticking to the bottom of the pot.
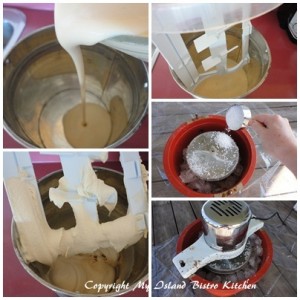 In a medium-sized bowl, whisk egg yolks and salt together. Whisk in vanilla. Add ¾ cup of the hot milk mixture to the eggs and whisk to blend. Pour this mixture into the custard in the double boiler. Cook over medium heat, stirring constantly until mixture thickens to consistency that it will coat the back of a wooden spoon. Do not boil. Be patient as this takes time.
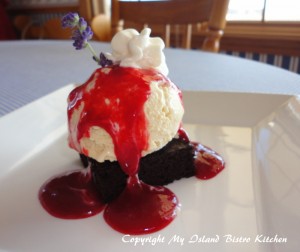 Strain mixture through sieve into a clean bowl. Cool completely then chill, covered, in refrigerator for at least 3 hours or more (can be chilled up to 24 hours). Freeze custard in ice cream maker according to manufacturer’s directions. Transfer ice cream to an airtight container and place plastic wrap directly on the surface of the ice cream. Cover and place in freezer for at least 4-6 hours to harden completely.


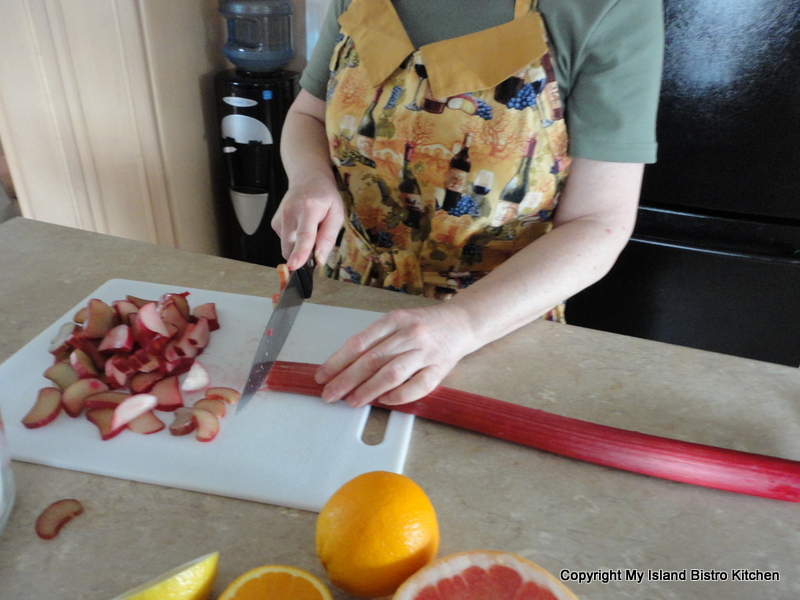
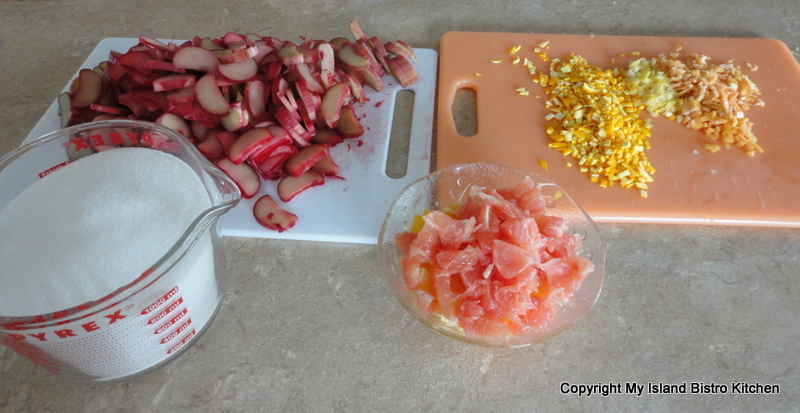
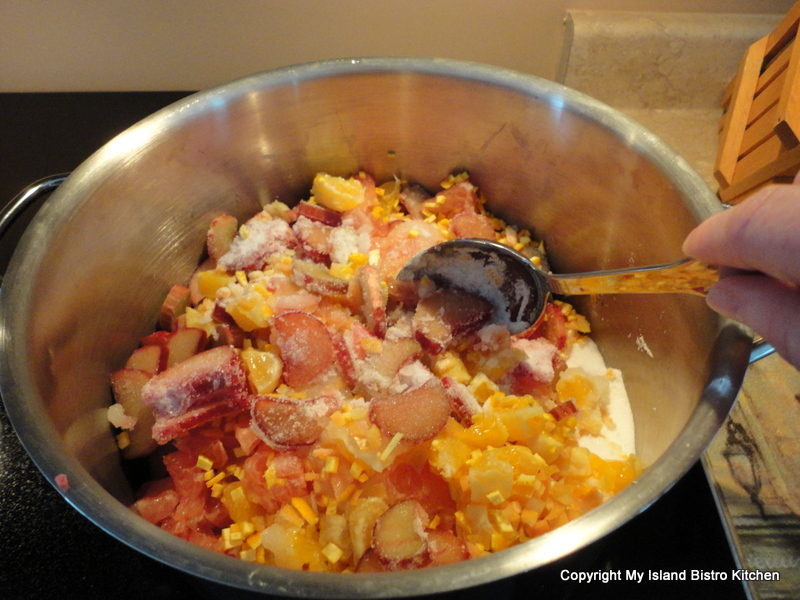
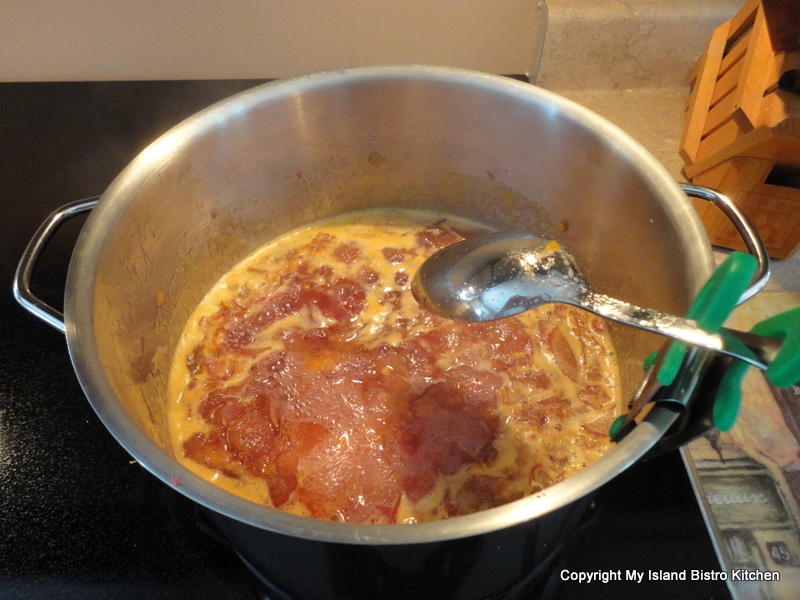
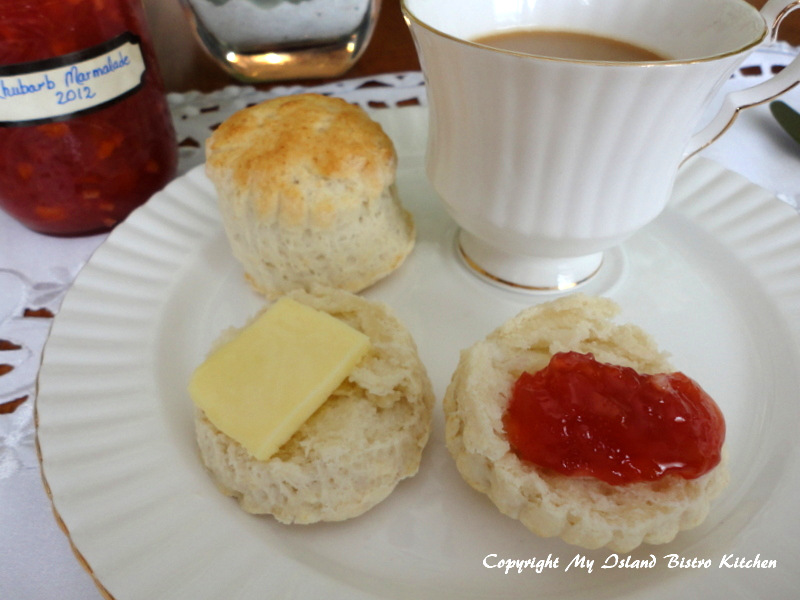


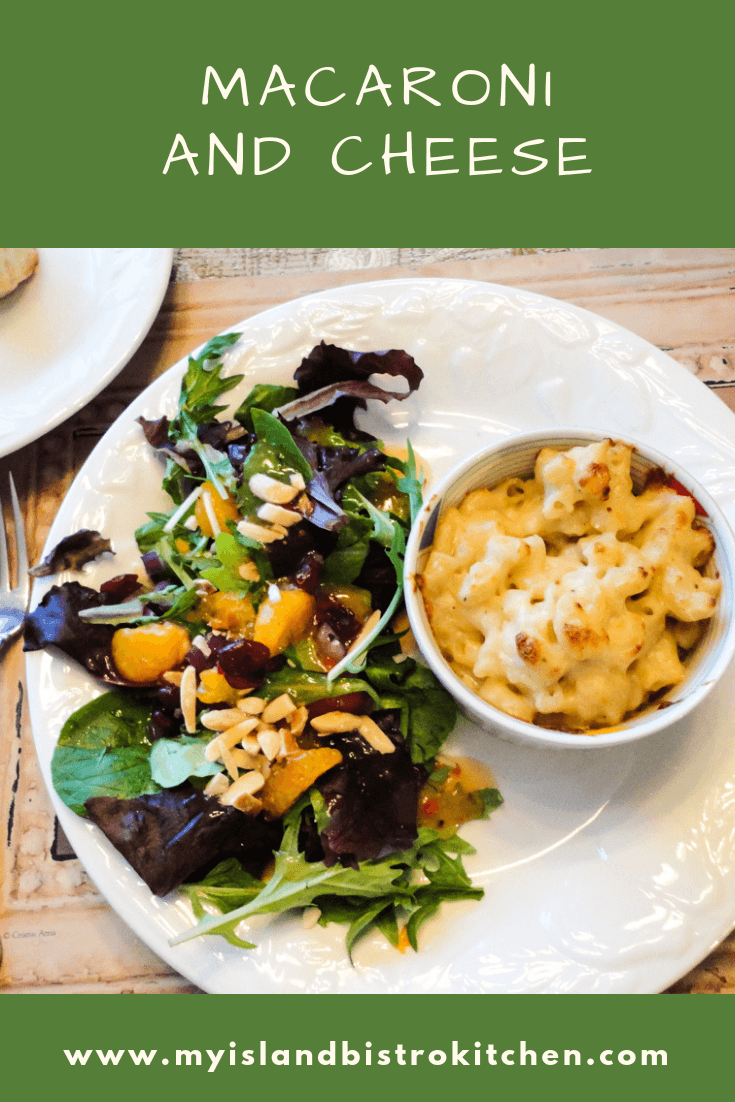
 Melt butter in saucepan. Add milk. Combine flour, salt, pepper, nutmeg, cayenne, and dry mustard. Whisk into milk and butter mixture. Cook over medium heat, stirring until mixture is smooth and starts to thicken.
 Add cheeses and stir until melted and blended
 Pour cheese sauce over macaroni and stir until well combined. Turn into a greased 2-quart casserole or divide into greased ramekin dishes for individual servings.