
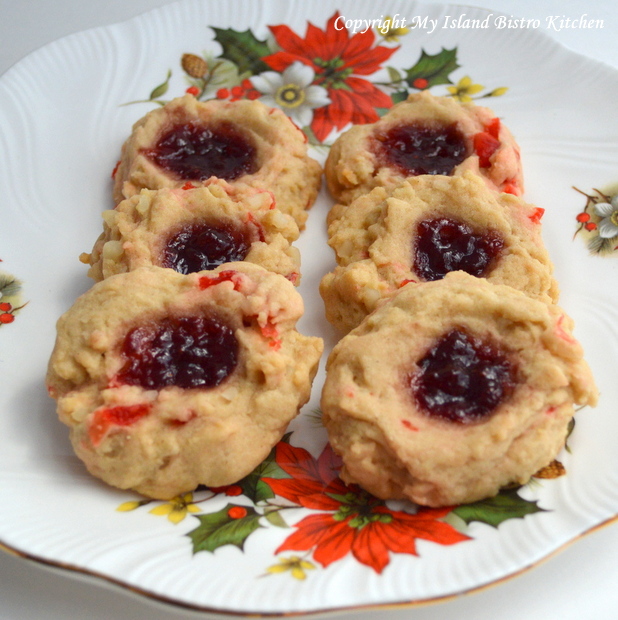
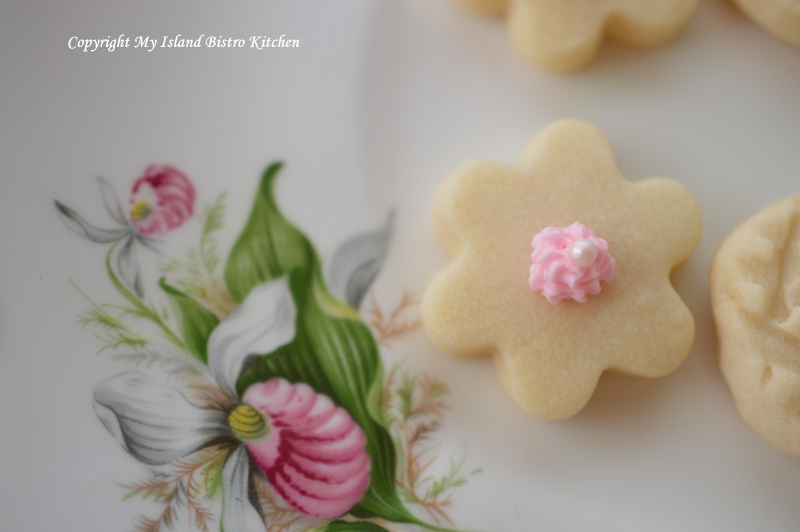
Today, I am sharing an old family favourite – Brown Sugar Jam-Filled Cookies. Continue reading Brown Sugar Jam-Filled Cookies

Today, I am sharing an old family favourite – Brown Sugar Jam-Filled Cookies. Continue reading Brown Sugar Jam-Filled Cookies

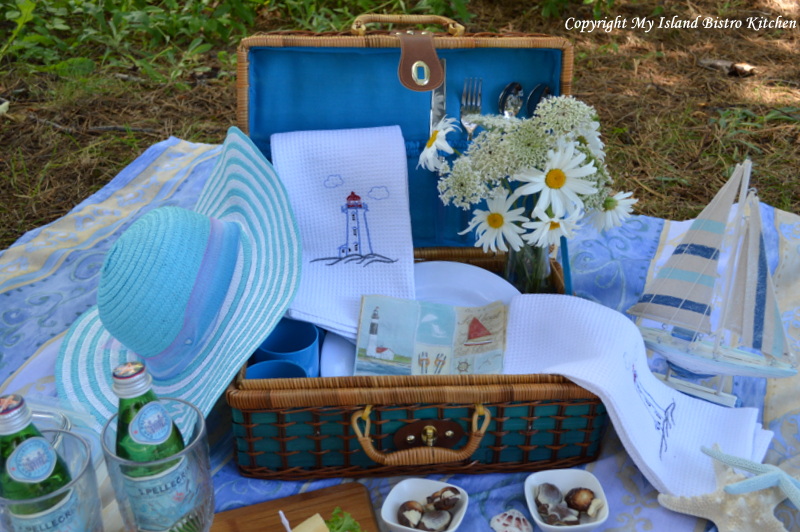
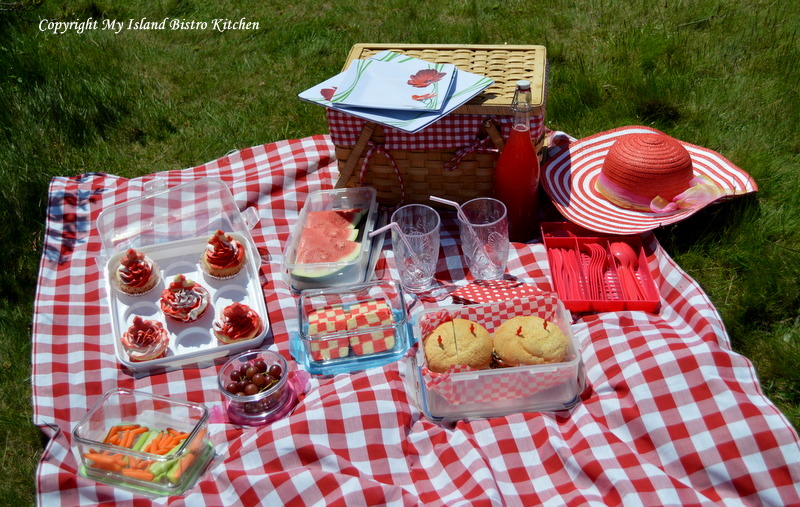
Ever heard of the expression “the best laid plans of mice and men often go astray”? Well, that was somewhat my case today.
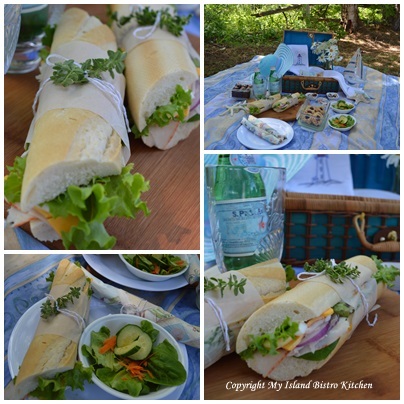
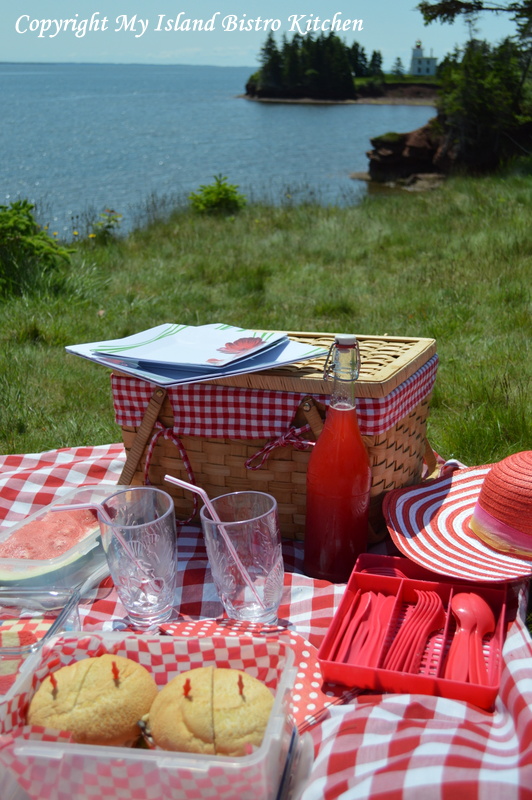
It’s been a hot, dry summer so far on PEI, and today was forecast to be 31C and very humid. I had been planning a beach picnic for some time and last evening rolled out the plans for the day and began preparations. This morning, while it seemed a little breezy, I didn’t think it was particularly windy so off we set for a mid-day picnic on the beach. However, when we arrived at our destination, the whitecaps were rolling in to shore at a reasonably good clip. Suffice it to say it was breezy and it was going to be difficult (read ‘impossible’ and ‘frustrating’) to hold things in place for a picnic on the beach.

So, I had a “Plan B” ready just in case, for some reason, a beach location would not be suitable – good thing to do when the food has all been prepared! So, my beach picnic became a beach-“themed” picnic in a calm location not many yards from the beach where we could still hear the waves rolling in to shore.
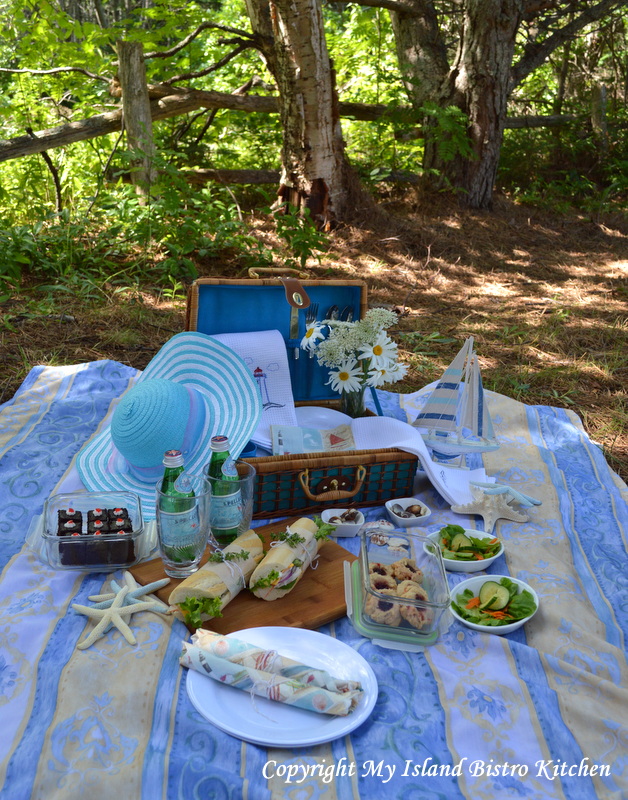
On the menu for the picnic:
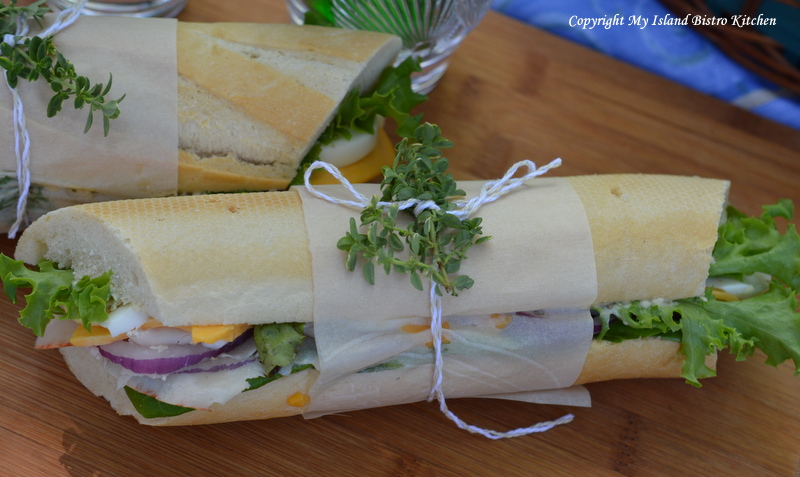
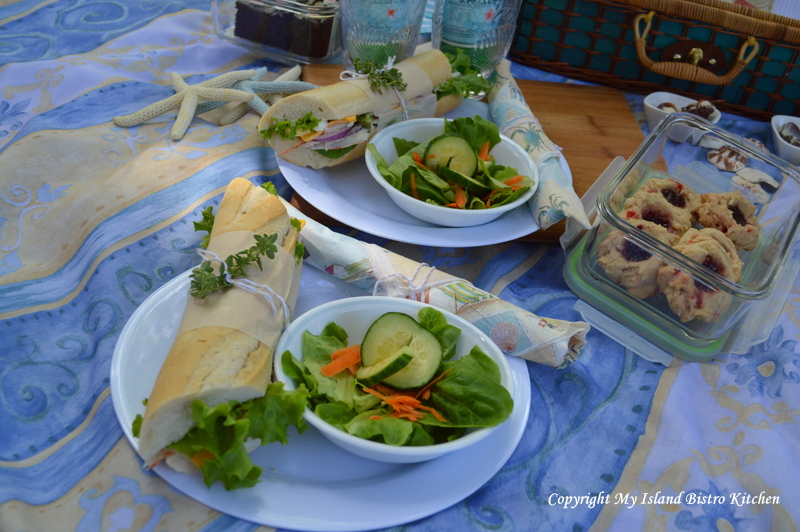
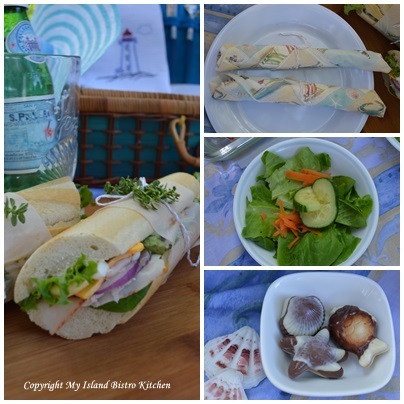
Turkey, Egg, and Cheese Baguettes (recipe follows)
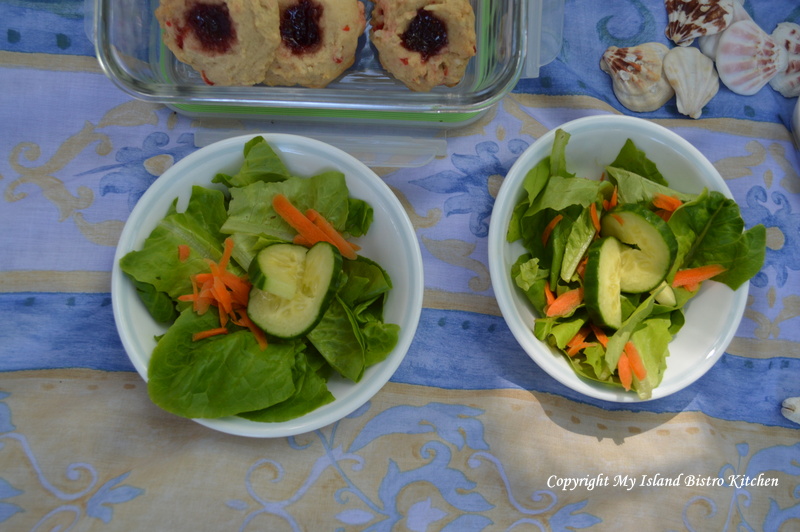
Green Salad
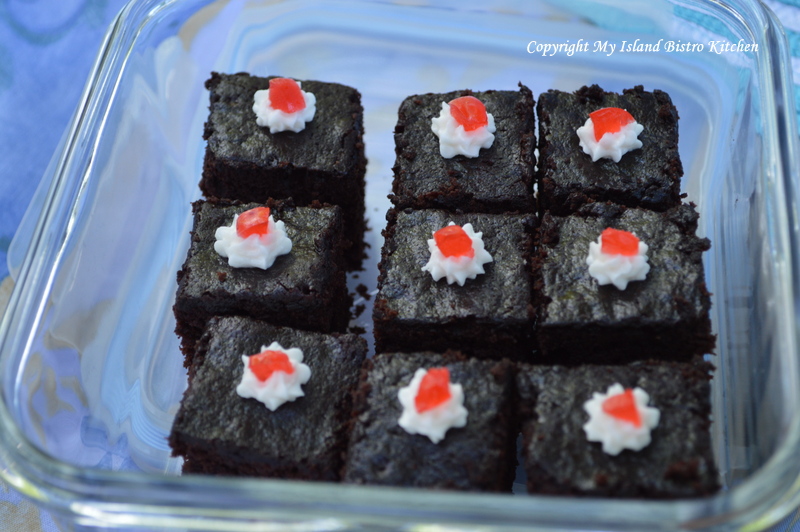
Brownies
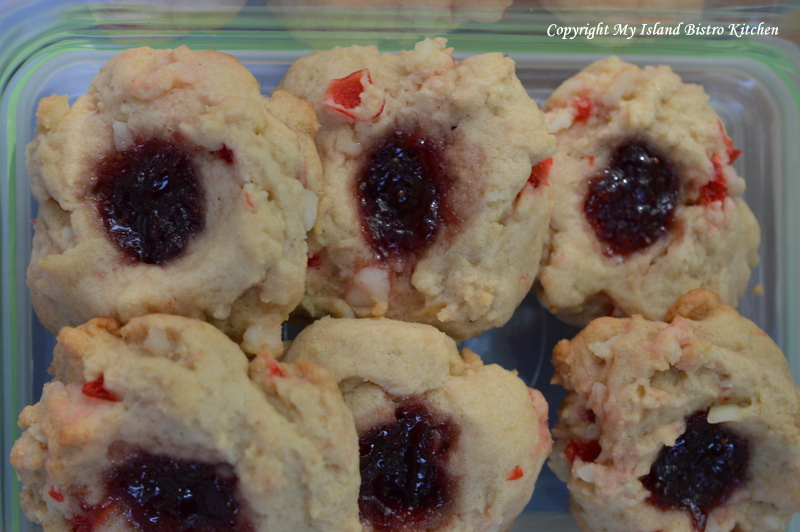
Brown Sugar Jelly-filled Cookies
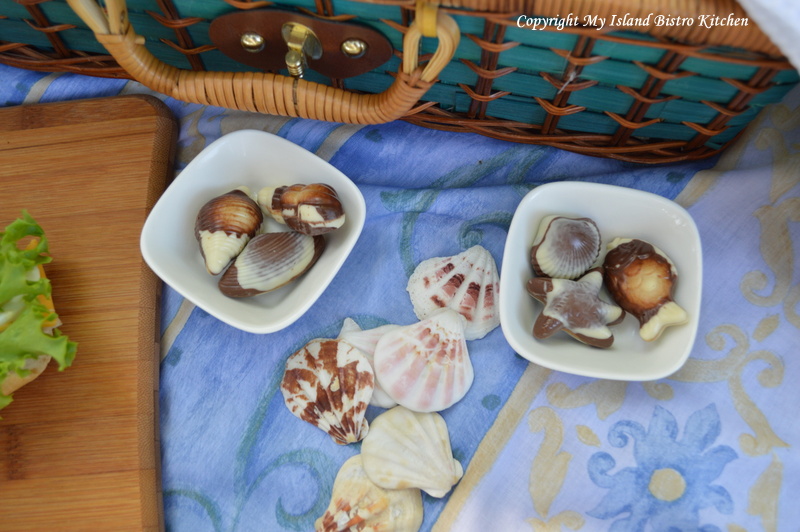
Seashell Chocolates
So, let’s assemble the elements of the picnic and see what is in the picnic basket.
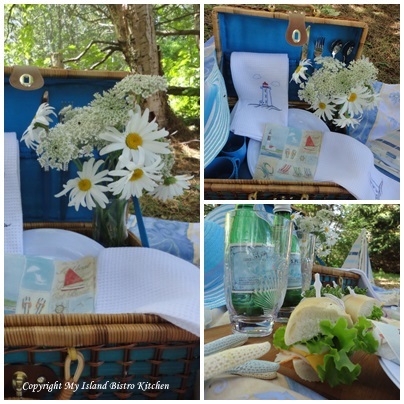
I like to wrap the cutlery in napkins. This can be done ahead of time and it’s also a great way to remember to bring along the napkins!
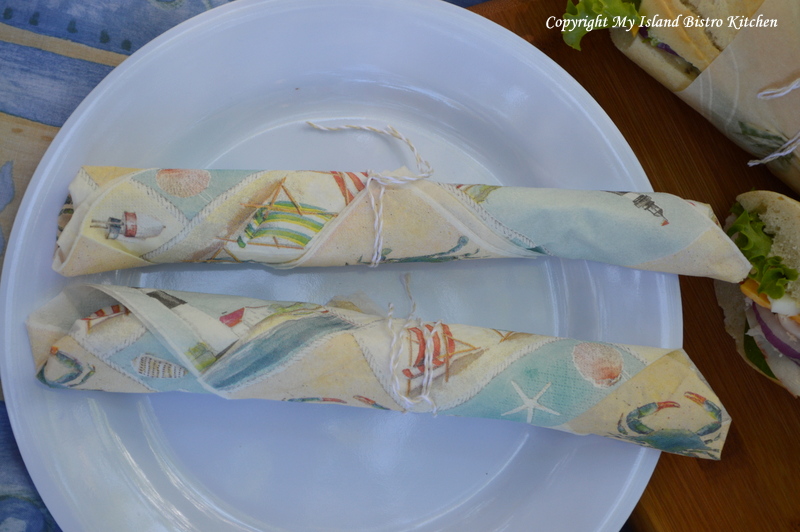
The highlight of today’s picnic were the baguettes – they were really tasty and very filling!
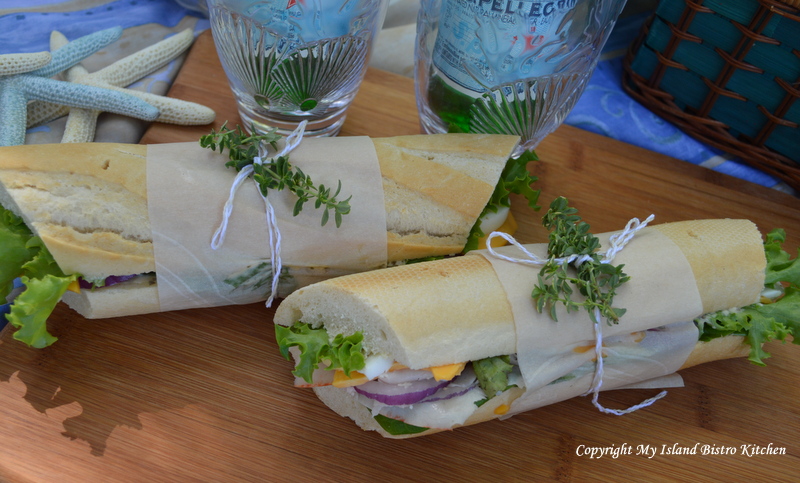
These looked extra special wrapped in parchment paper and dressed with a string bow and a sprig of lemon thyme from my herb garden.
We have lots of fresh leafy lettuce in the garden these days and salads always taste better with produce freshly picked. It doesn’t get any more local than the backyard garden!
Food always seems to taste so much better outside and there is no reason why a picnic can’t be as stylish as a table setting. All you need is a pretty tablecloth, a posy of wild flowers, a few props, some tasty food and you have an instant picnicscape.
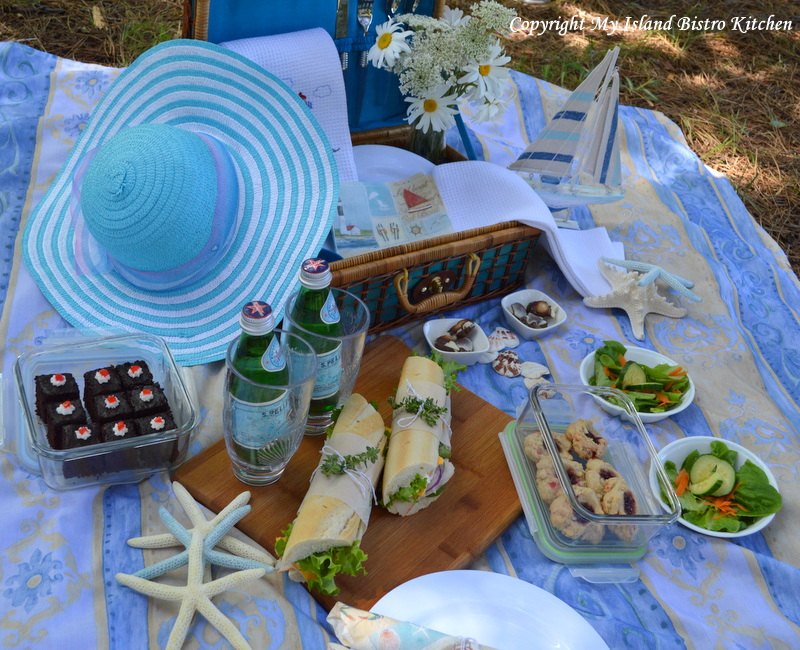
I live near water so a lot of my inspiration for tablescapes and picnics comes from the sea.
A tasty lunch! Are you hungry yet?
Brownies are the quintessential picnic food!
But Brown Sugar Jam-filled Cookies are good too!
And sea-inspired chocolates are a great way to finish off the picnic!
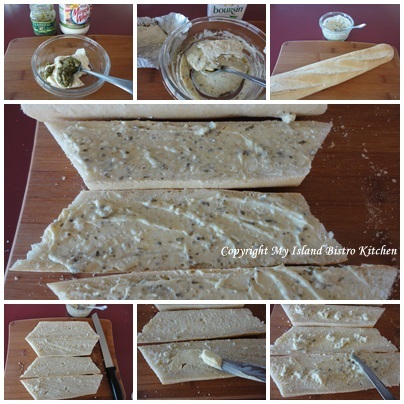
Here is my recipe for Turkey, Egg, and Cheese Baguettes:
3-4 tbsp. mayonnaise
1 – 1 1/2 tbsp Basil Pesto
1 1/2 – 2 tbsp soft goat cheese
Shaved turkey breast
Lettuce
Red Onion
Sliced Cheddar Cheese
2 sliced hard-boiled eggs
1 baguette
Butter
Directions:
Cut baguette in two or three pieces, depending on length of baguette. Slice baguette pieces in half, lengthwise. Butter both sides of the sliced baguette pieces.
Mix mayonnaise, pesto, and goat cheese. Spread on both sides of baguette.
On one side of bread, add a layer of lettuce, followed by the shaved turkey breast, red onion, cheese slices, hard-boiled egg slices, and second layer of lettuce. Place second slice of bread on top.
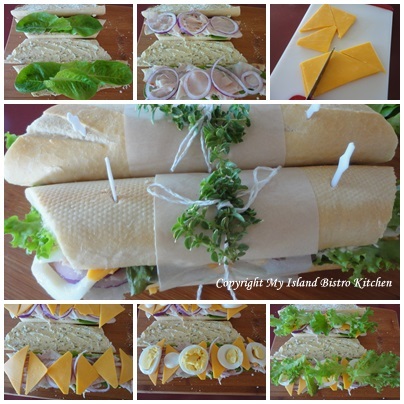
Wrap in parchment paper and tie with string. It may be necessary to use toothpicks to help hold the filled baguette together, particularly if you are going to be traveling a distance with them.
Yield: 2-3 servings
So, even if you live in a big city and dream of being near a beach or water, you can still have a beach-themed picnic inland wherever you are, as I have done here.
I hope you have enjoyed coming along on my picnic today.
Thank you for visiting “the Bistro” today. There are lots of ways to connect with “the Bistro” through social media:
Join My Island Bistro Kitchen on Facebook
Follow the Bistro’s tweets on twitter @PEIBistro
Find the Bistro on Pinterest at “Island Bistro Kitchen”
Follow along on Instagram at “peibistro”

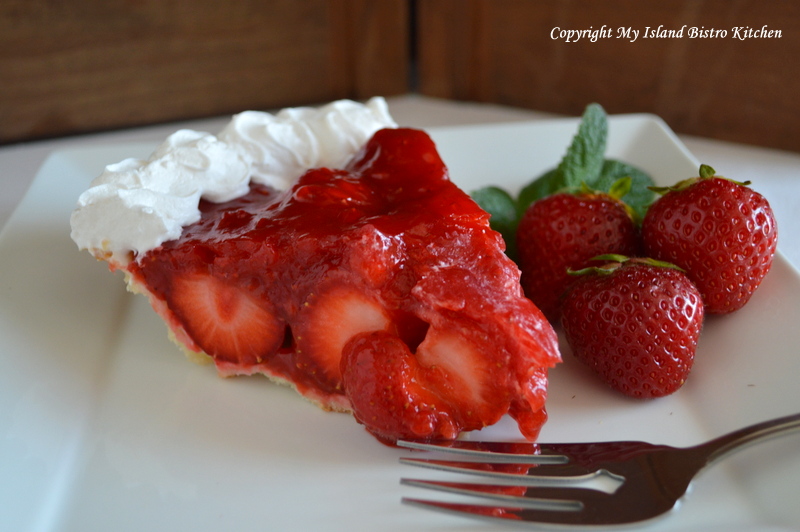
There are so many things I like about summer in Prince Edward Island but one of my very favorite things is Glazed Strawberry Pie made with fresh, locally-grown Island berries. After I have had a couple of “feeds” of plain berries, sugar, and milk, I am ready for them in other recipes. One of those recipes always has to be fresh strawberry pie. Continue reading Glazed Strawberry Pie

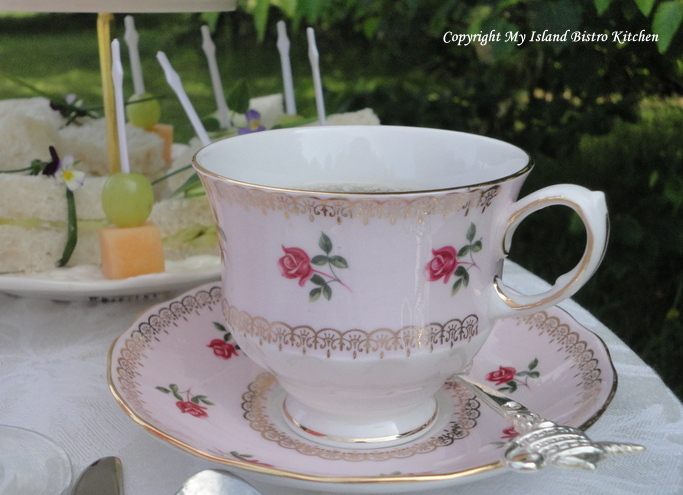
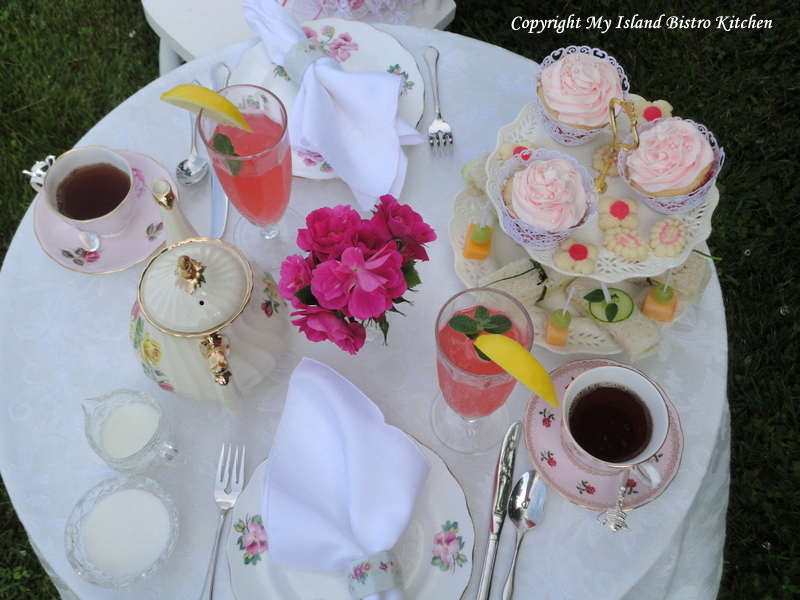
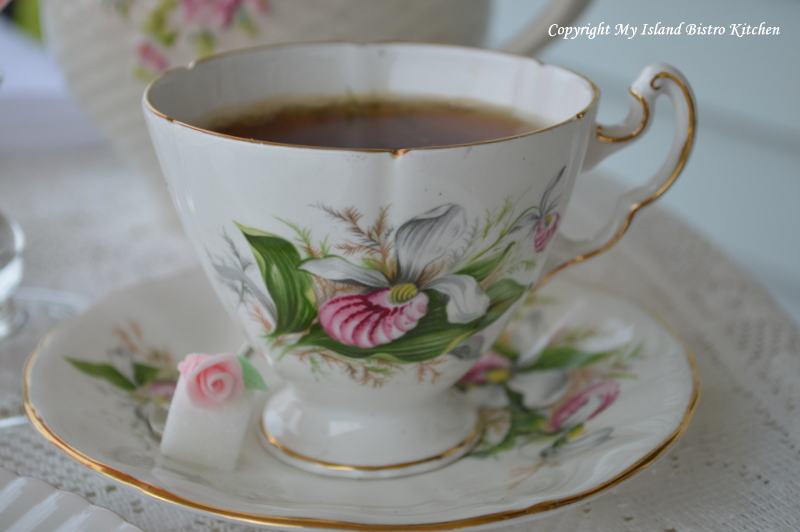
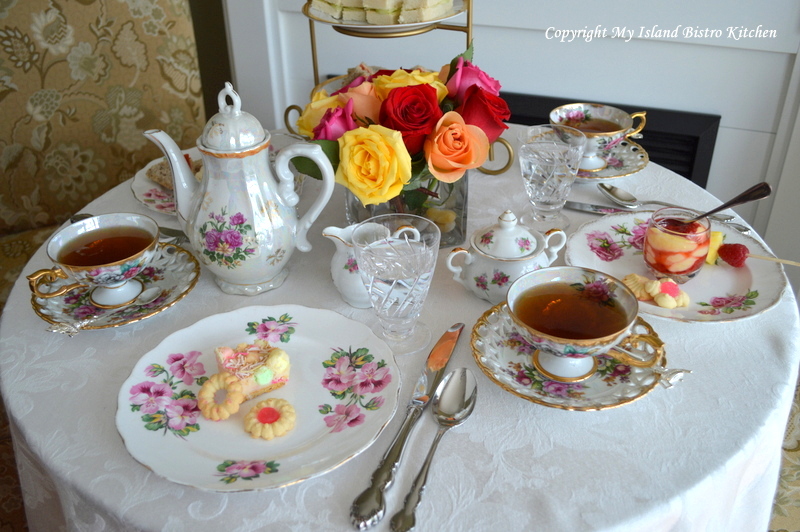
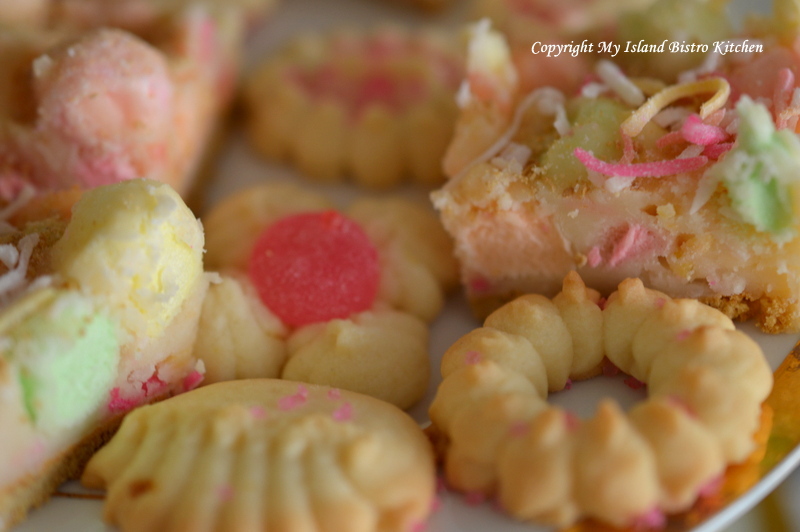
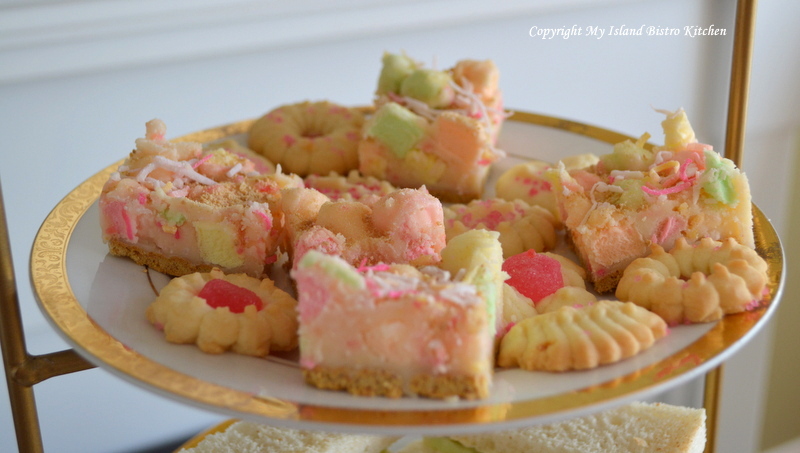
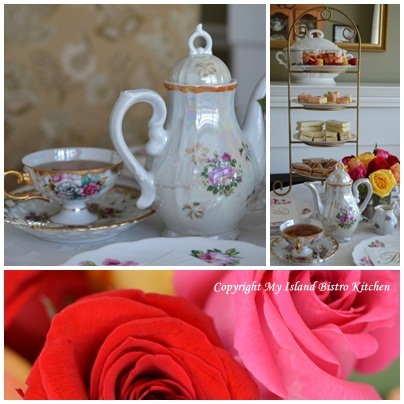
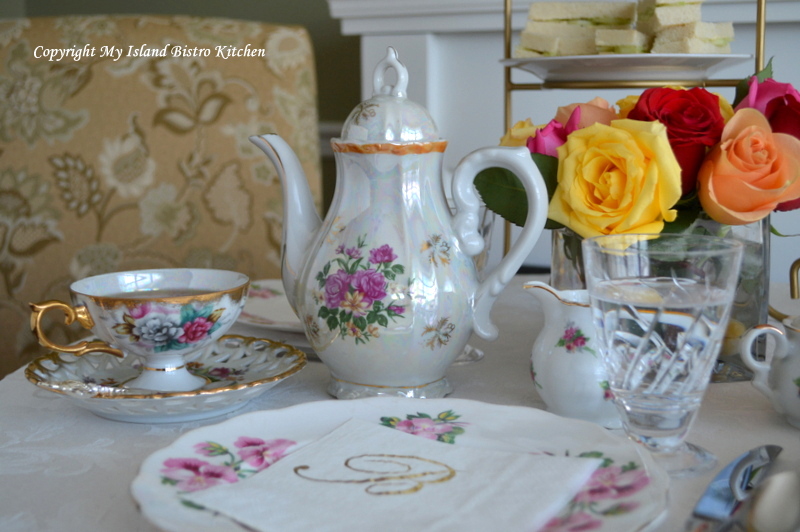
I love afternoon tea any time of the year. However, I especially like a good cup of tea, dainty sandwiches, and of course, a sweet or two, outside on a warm and calm day in the summer. Here on PEI, where we are surrounded by water, it is hard to find a day where there is not a breeze blowing. However, last Saturday was such a day when the temperatures were soaring slightly past the 30C mark with hardly a breeze! It was a good day for a summer tea under the shade of some big old trees.
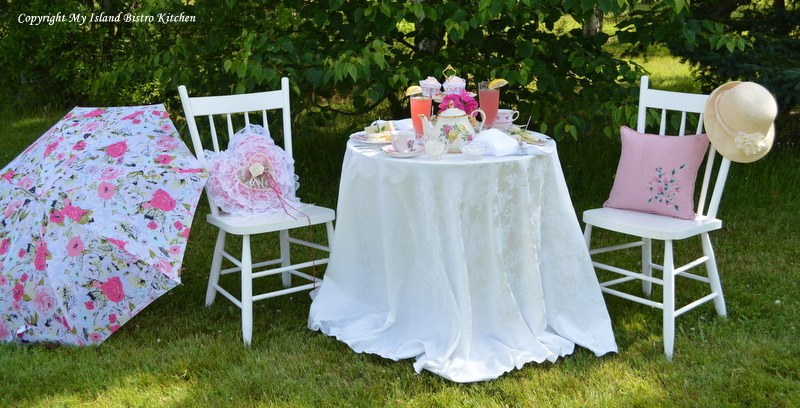
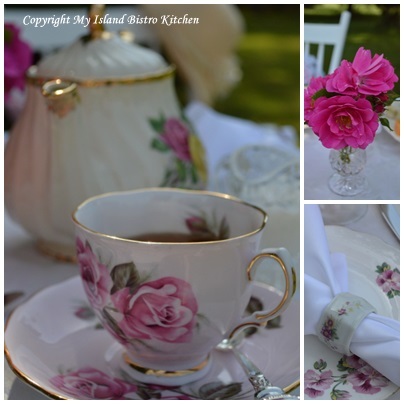
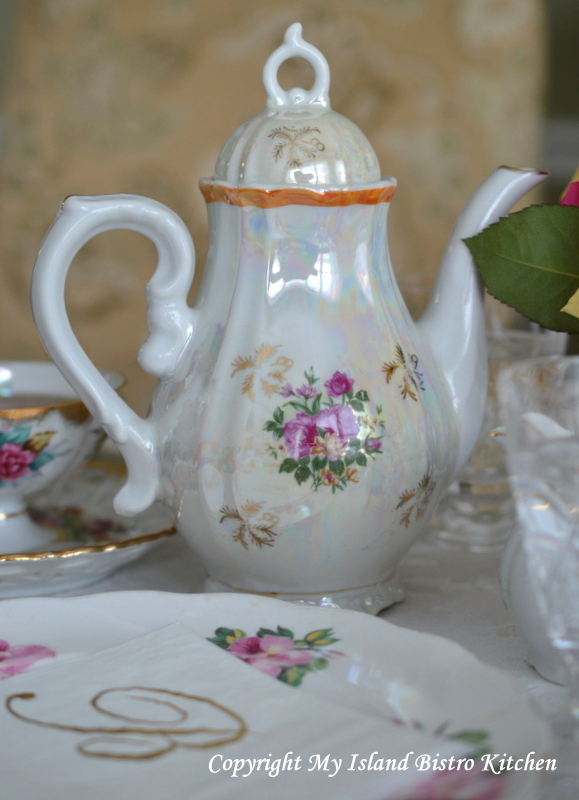
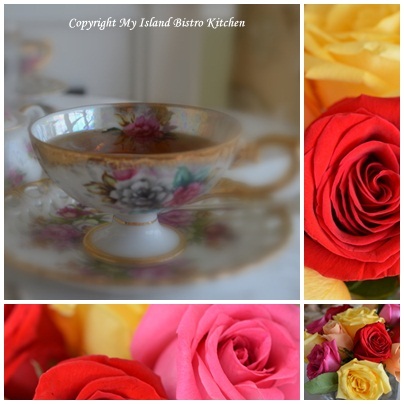
My inspiration for my teascapes comes from many sources, often from the season of the year, flowers in bloom, or a particular food item that I envision on a tea table. My Old Country Rose Tea was inspired by an old rose tree we planted at the back door of the cottage 20 years ago. It blooms profusely and every year we think it may just break apart or stop blooming but each year, it produces a bountiful profusion of beautiful deep rose-colored roses. These roses are the kind that the blooms only last a day or two. Our Atlantic winters are not kind and, being so close to the Northumberland Strait, salt spray is also an element our trees, shrubs, and bushes must contend with. So, today’s teascape began with a small bouquet of roses from outside the back door.

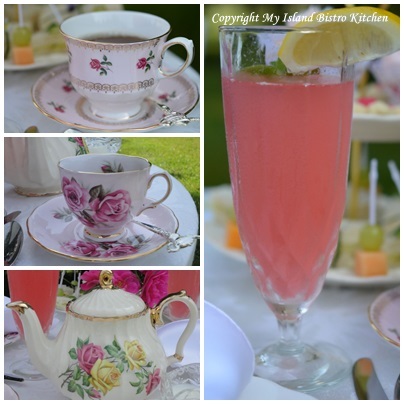
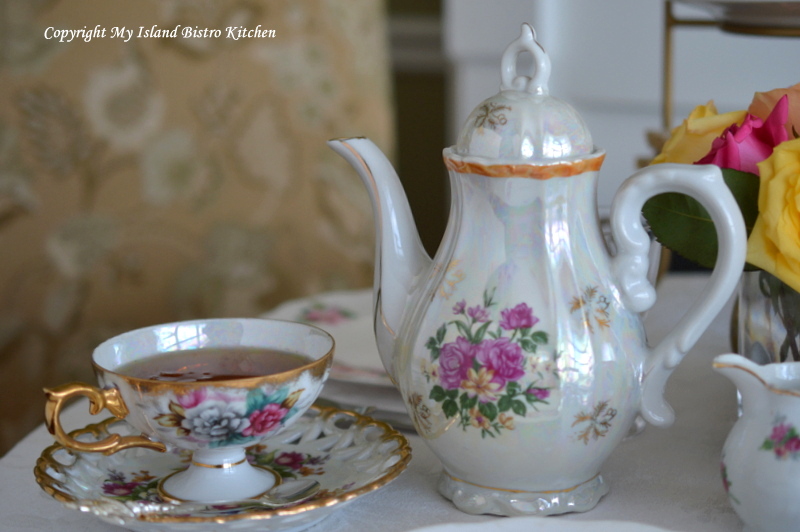
I looked through my collection of teapots to find one that would be suitable and selected this Sadler that seems very summery.
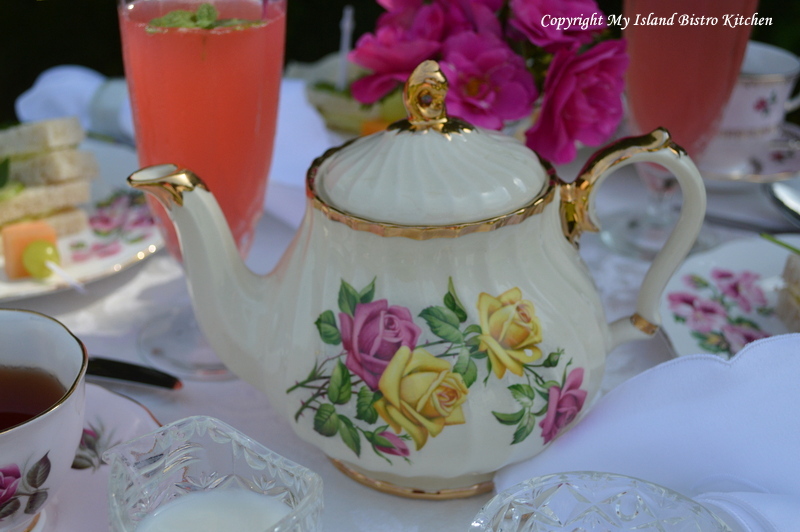
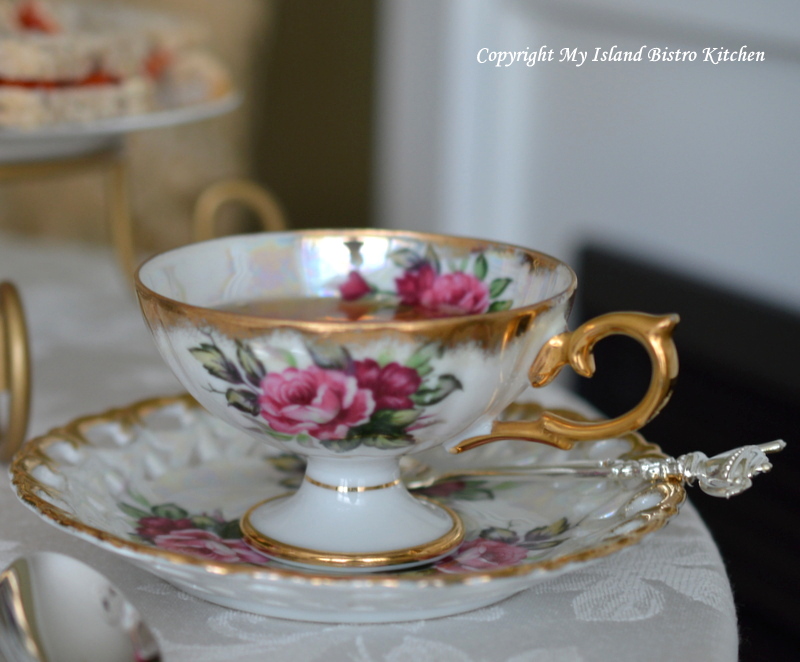
The teacups I chose featured roses as well.
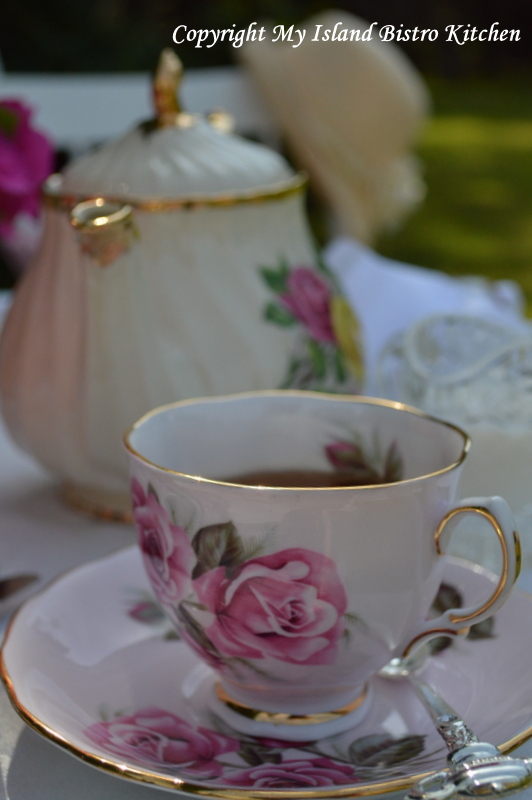
Why does tea always seem to taste better in a china cup and saucer?
Teacups are too pretty not to be used. I look for ways and opportunities to use and enjoy them rather than storing them away.
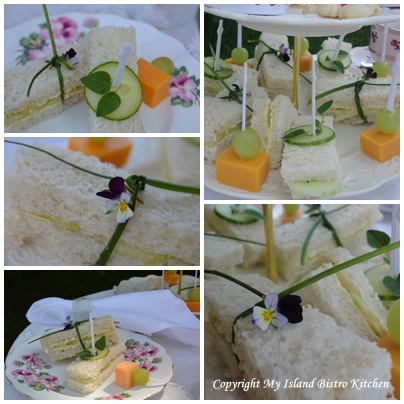
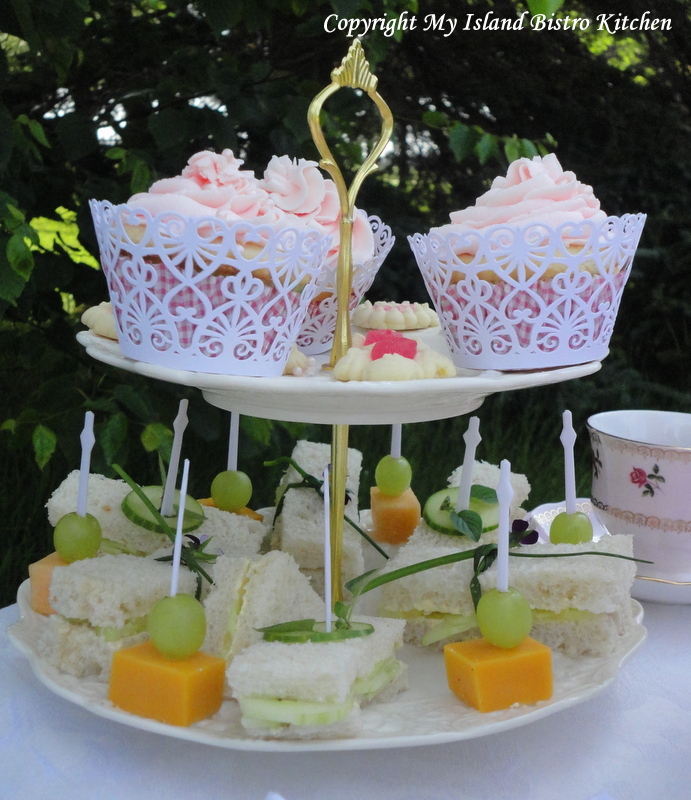
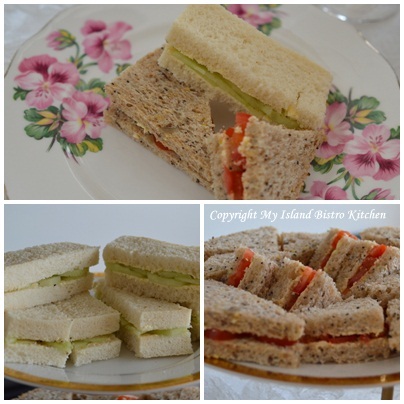
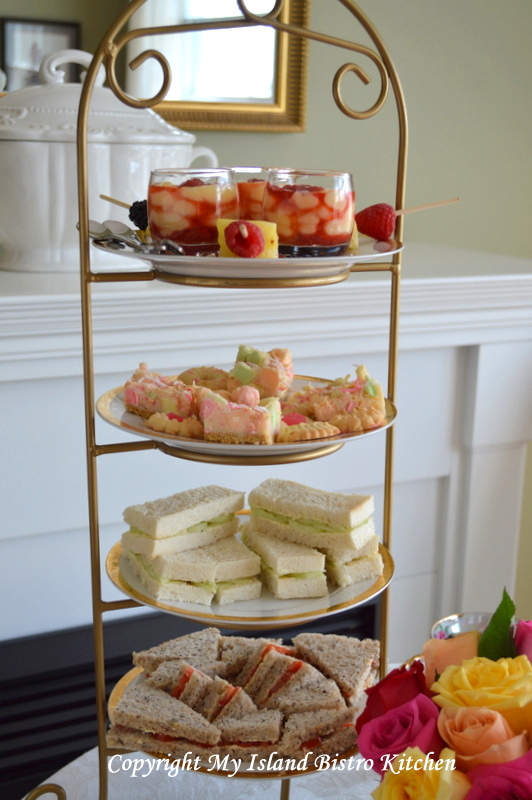
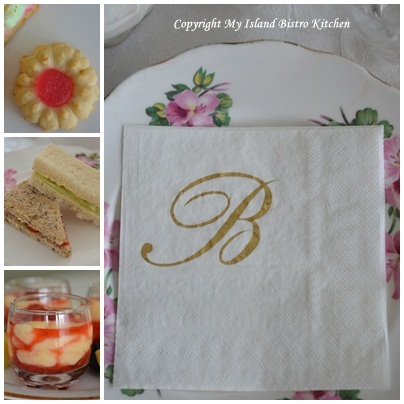
Because it was so hot, I chose to serve cool and refreshing cucumber sandwiches.
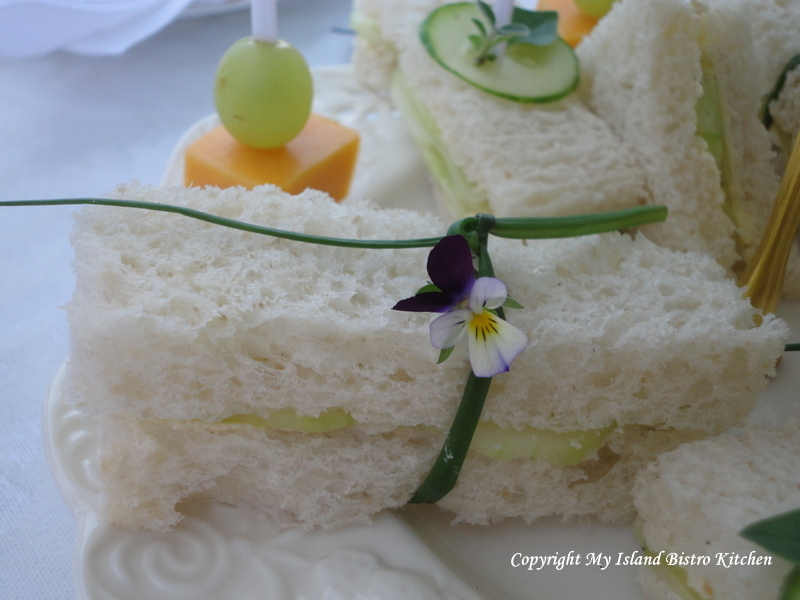
I love to decorate food with flowers….just make sure they are the edible kind!
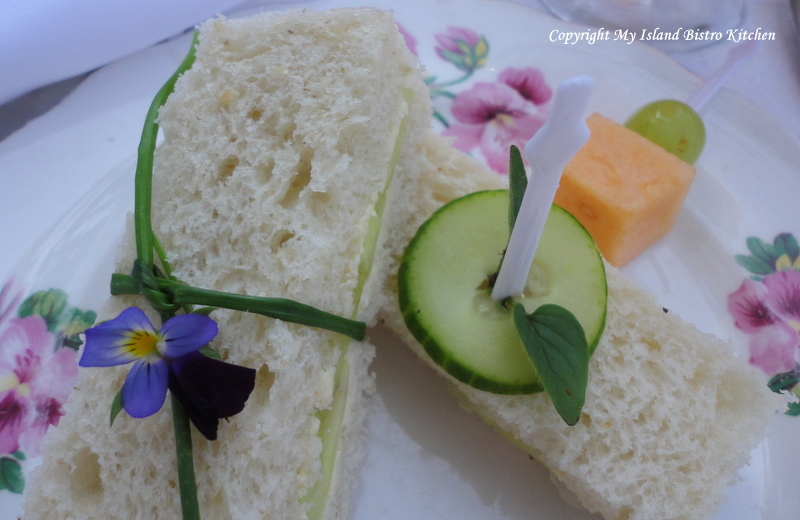
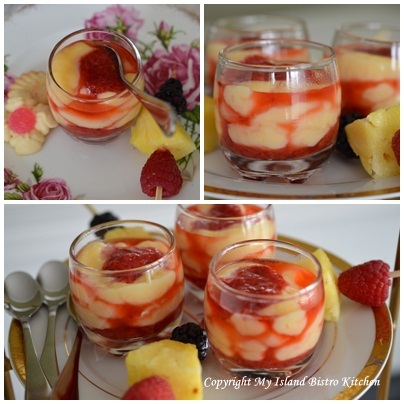
Add cubes of melon, cheese, and some grapes.
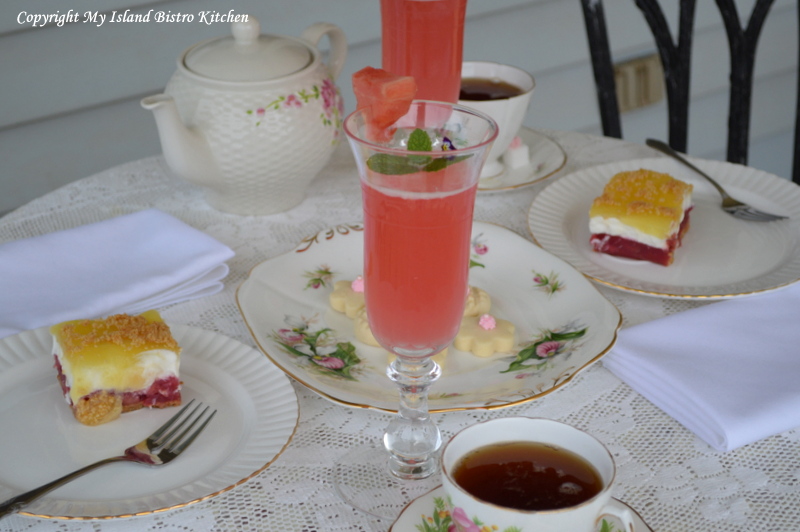
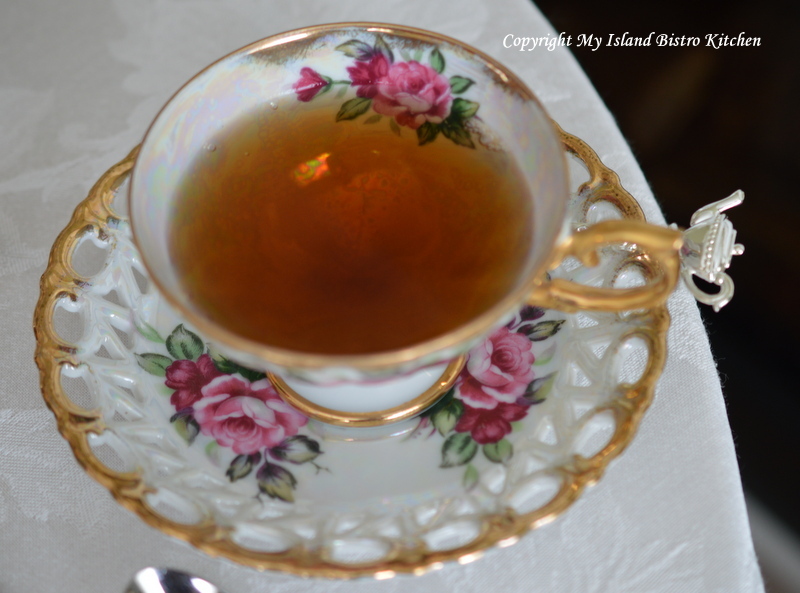
This year, I made several bottles of Rhubarb Cordial so served some of this refreshing drink as well as Assam tea.
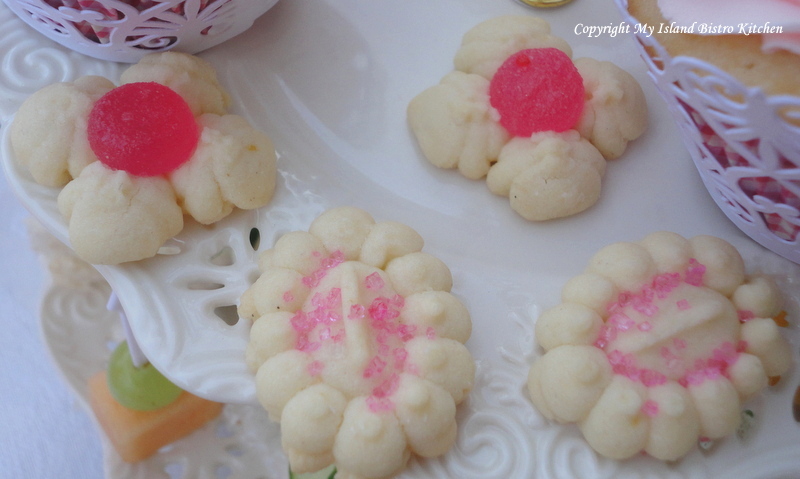
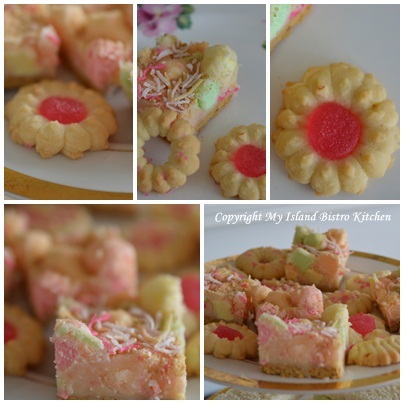
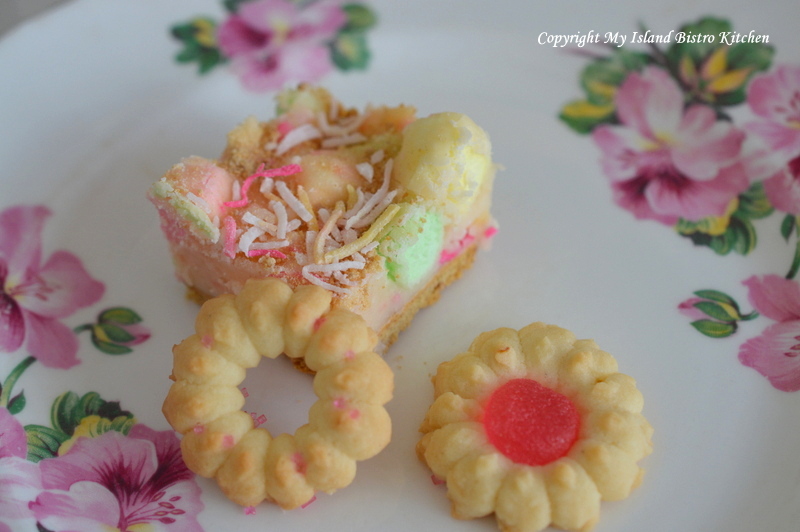
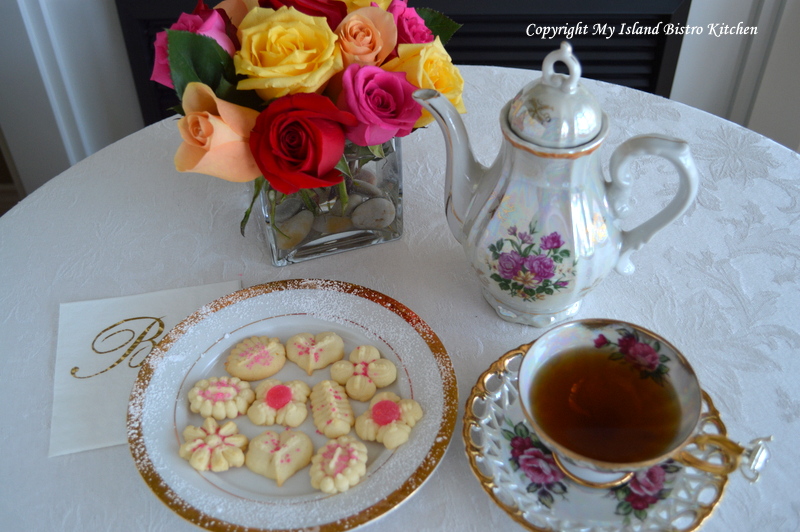
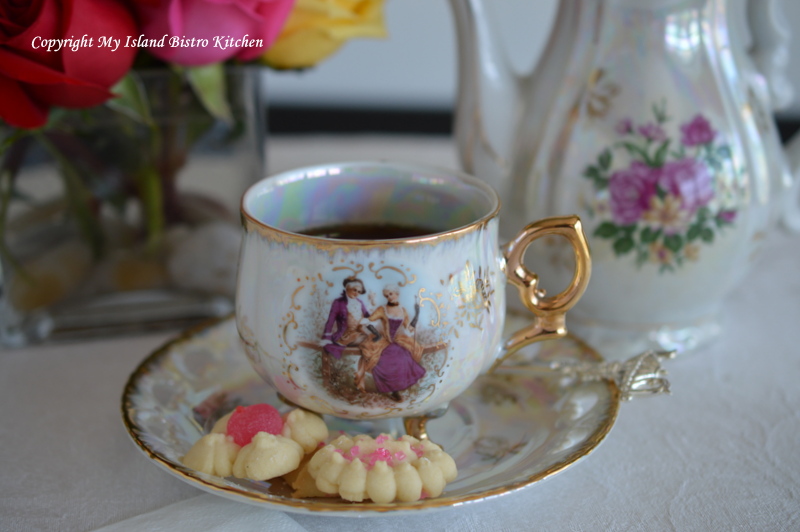
Naturally, there had to be something for the sweet tooth. I made another batch of my Lemon Spritz Shortbread Cookies (my April 2013 “Cookie of the Month”) because they remind me so much of summer and are so light tasting.
And, for the finale, vanilla cupcakes iced in rich buttercream icing.

Cupcakes are a simple and more informal way to serve cake at an event.
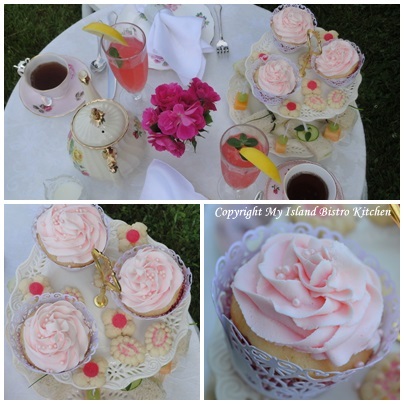
And, when it was all assembled, this is what the tiered tea tray looked like.
And, here is an overview of the tea table.
I hope you have enjoyed a glimpse into my early summer tea.
Thank you for visiting “the Bistro” today. There are lots of ways to connect with “the Bistro” through social media:
Join My Island Bistro Kitchen on Facebook
Follow the Bistro’s tweets on twitter @PEIBistro
Find the Bistro on Pinterest at “Island Bistro Kitchen”
Follow along on Instagram at “peibistro”

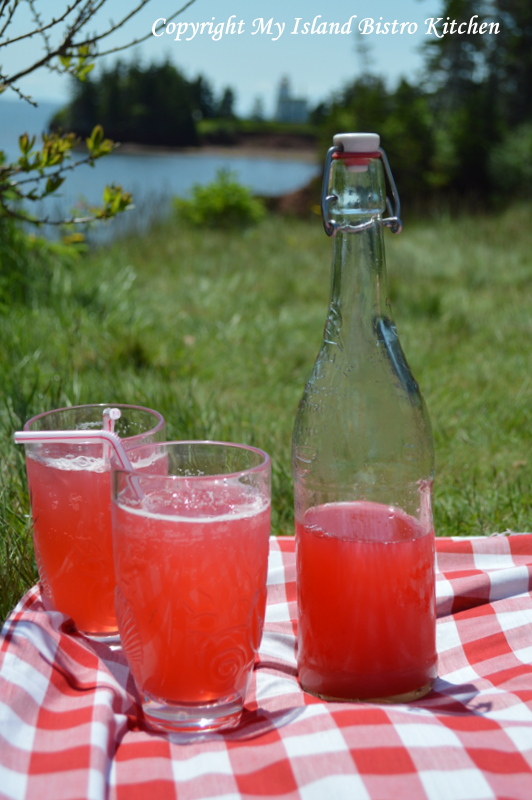
Happy Birthday, Canada! Let’s celebrate with a picnic!
In keeping with the colors of the Canadian flag, as you can see, my color theme for the Canada Day picnic is red and white.

Prince Edward Island may be the smallest province in Canada but it boasts being the “Cradle of the Canadian Confederation” because Charlottetown, the capital city, was the location for the first meeting of the Fathers of Confederation in 1864 as they laid the groundwork for Canada to become its own country on July 1, 1867. The Maritime Colonies (now Prince Edward Island, Nova Scotia, and New Brunswick) were meeting in Charlottetown in early September, 1864, to discuss the possibility of Maritime Union. Representatives from Upper and Lower Canada (present-day Ontario and Quebec), upon hearing of this meeting, journeyed down the St. Lawrence River to Charlottetown to pitch the idea of a Canadian Union. The individuals who attended this historic meeting became known as the Fathers of Confederation.
As these Fathers of Confederation landed at the Charlottetown Harbour, they disembarked and headed up Great George Street to what is now known as Province House where the meetings were held to discuss the possibility of Canadian Confederation. The photograph below of Province House is taken from Great George Street and depicts what the Fathers would have seen as they made their way from the waterfront to this now historic site.

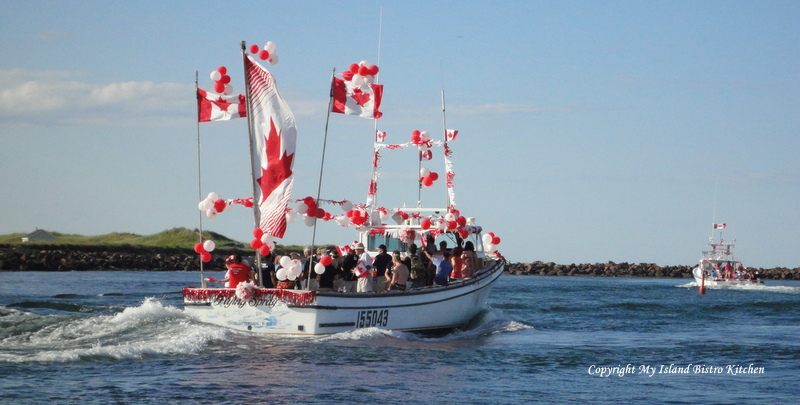
There are many celebrations happening across the Island and across Canada, to celebrate the birth of our nation. One of the most colorful celebrations on PEI is the parade of fishing boats out of North Rustico Harbour, on the North side of the Island. The photographs below are from the 2012 parade but, this being an annual event, a similar one will take place this year as well.
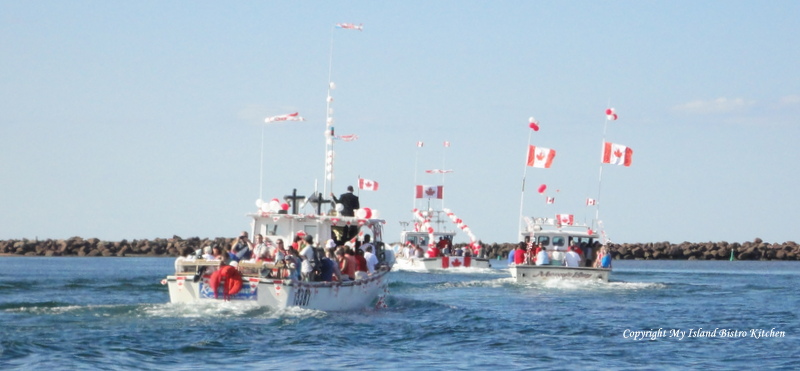
The parade of fishing boats is quite a spectacular event that always draws a large crowd as dozens of fishing boats from North Rustico and neighbouring harbours are decorated in red and white and sail out of the harbour with Canadian flags waving in the breeze. If you are on the Island on Canada Day and have never attended this event, I recommend it as a must-see festivity for Canada Day as it shows true Canadian spirit.
This year, I am on the South side of the Island, having chosen the National Historic Site of Port-la-Joye/Fort Amherst that overlooks beautiful Charlottetown Harbour, as the scenic location for a Canada Day picnic as our celebration of Canada’s birthday.
Port-la-Joye/Fort Amherst is located in Rocky Point, PEI. In the background of the photo below, you can see the Blockhouse Point Lighthouse, established in 1851, the second oldest lighthouse on the shores of PEI. This lighthouse is on the west side of the entrance to Charlottetown Harbour and guides ships entering the Harbour. Many ships come and go past this historic lighthouse, including dozens of cruise ships that make Charlottetown one of their port stops.
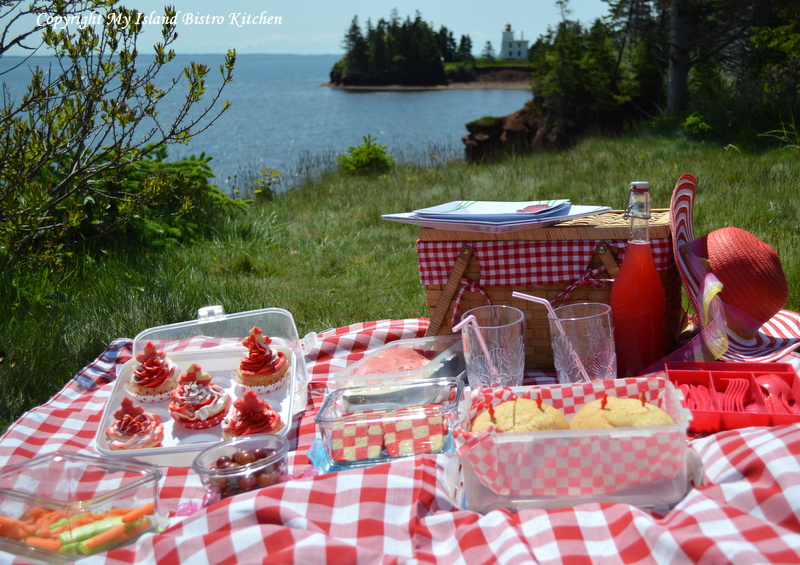
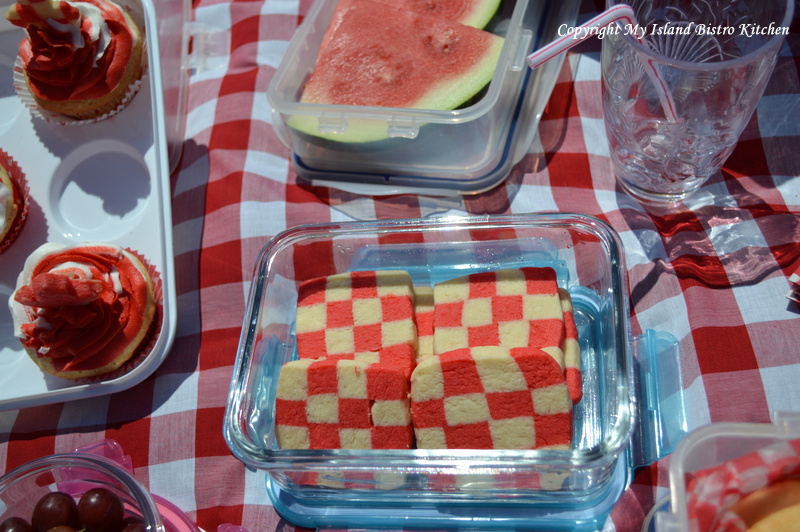
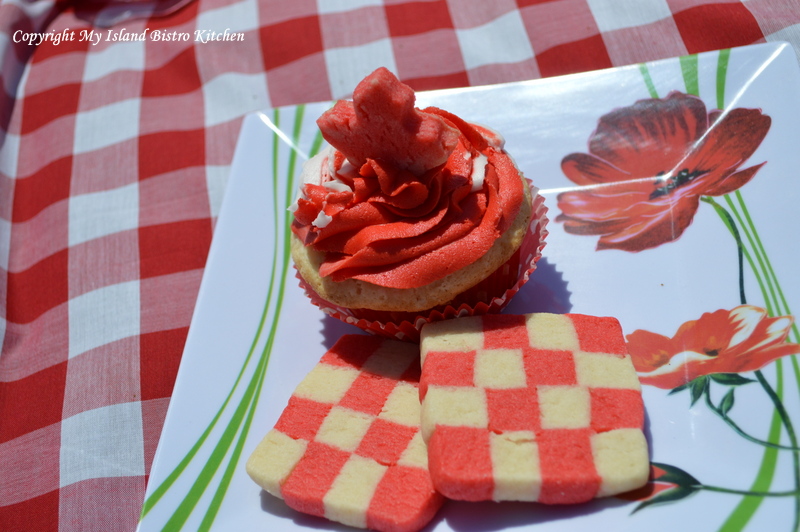
Here is the menu for the picnic: Rhubarb Cordial, Kaiser Roll sandwiches, fresh veggies, grapes, watermelon, checkerboard sugar cookies, and vanilla cupcakes dressed in red and white buttercream icing and topped with miniature maple-leaf shaped sugar cookies.
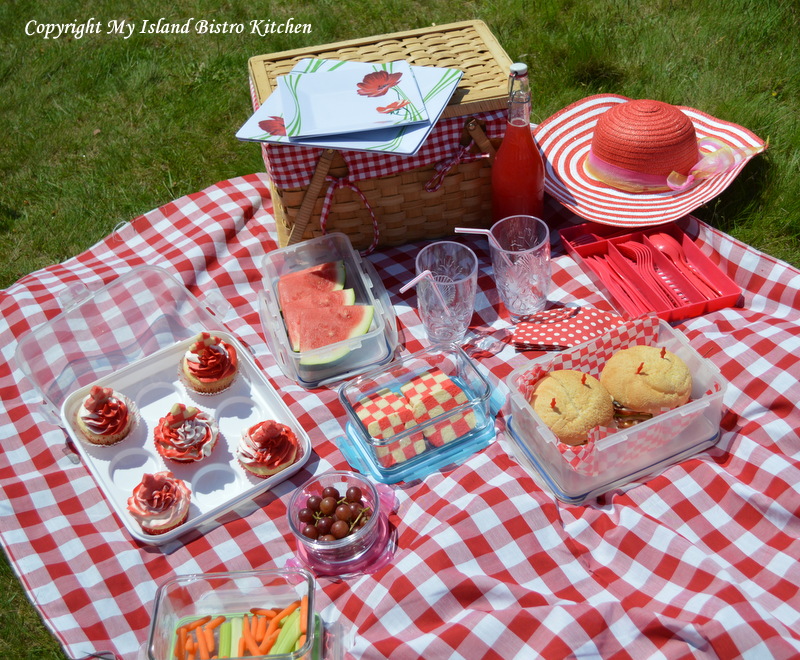
I love the country look and feel of checkered tablecloths. My antique picnic basket just happened to be lined with red checkered fabric so it fit right into the color theme.
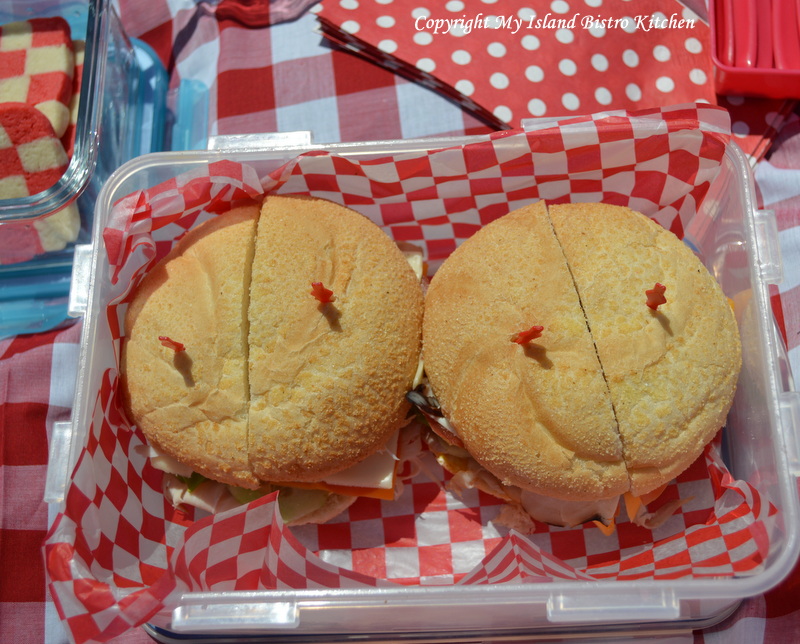
For the sandwiches, I chose good quality Kaiser rolls and filled them with tasty ingredients. I started with a spread of mustard on one half of the roll and mayo on the other half. On the bottom half of the roll, I then added several pieces of shaved Tuscan ham, followed by a layer of cucumber slices, a slice of cheddar cheese, leaf lettuce, sliced tomato, a slice of Havarti cheese, and topped it off with shaved turkey breast.
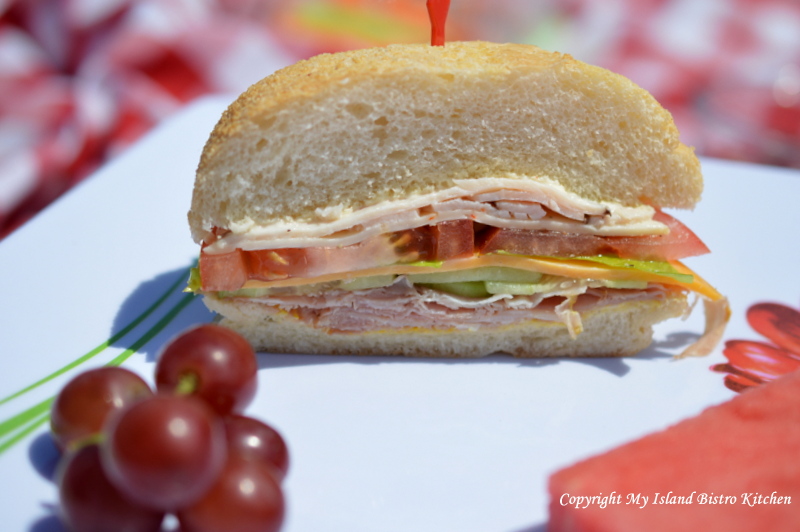
Because this is a rather thick roll, I held it all together with piks to make it easier to handle.
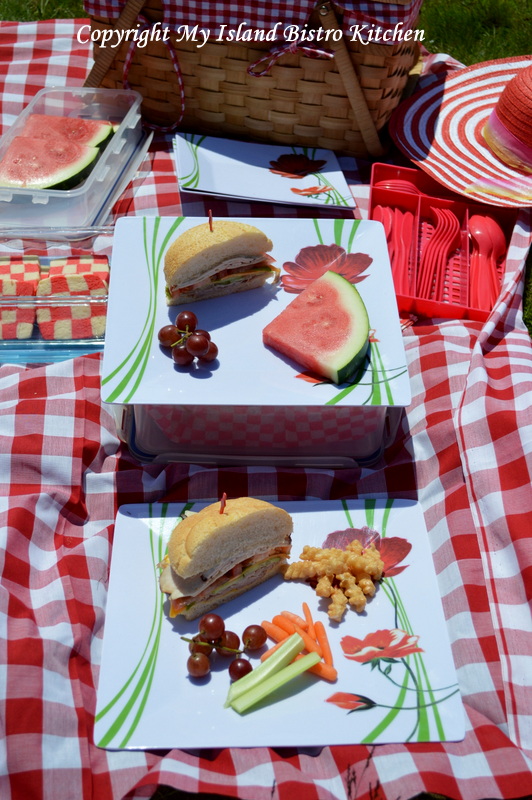
Plastic picnicware has improved greatly over the past few years. Some, like the ones in the photograph above, even have the look of fine dinnerware. These durable and colorful plates actually just came from a local dollar store. Using unbreakable dinnerware for picnics makes the occasion much more relaxed for everybody as there are no worries about breakage.
For beverage, I selected my Rhubarb Cordial to which I added fizzy lemon-lime soda. The red color fit right in and the refreshing taste is unbeatable on a warm summer day.
Of course, every picnic menu has to have something for the sweet tooth. I selected two offerings, the first being checkerboard sugar cookies – always a show-stopper and conversation piece.
Cupcakes always make a fitting end to any picnic, especially when they are laden with lots of tasty buttercream icing.
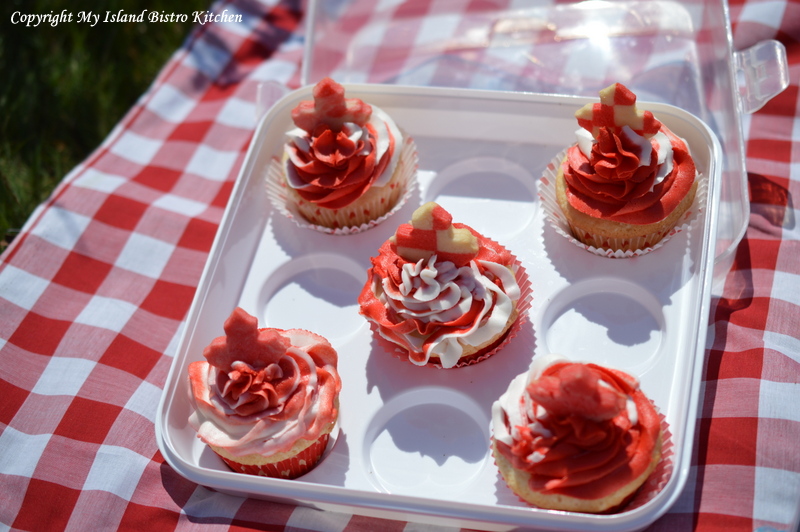
And the cupcakes are always better when they come with an extra treat of a tiny sugar cookie shaped like a maple leaf.

These would surely put anyone in the Canada Day spirit, don’t you think!
I hope you have enjoyed coming along on our Canada Day picnic.
Thank you for visiting “the Bistro” today.
There are lots of ways to connect with “the Bistro” through social media:
Join My Island Bistro Kitchen on Facebook
Follow the Bistro’s tweets on twitter @PEIBistro
Find the Bistro on Pinterest at “Island Bistro Kitchen”
Follow along on Instagram at “peibistro”

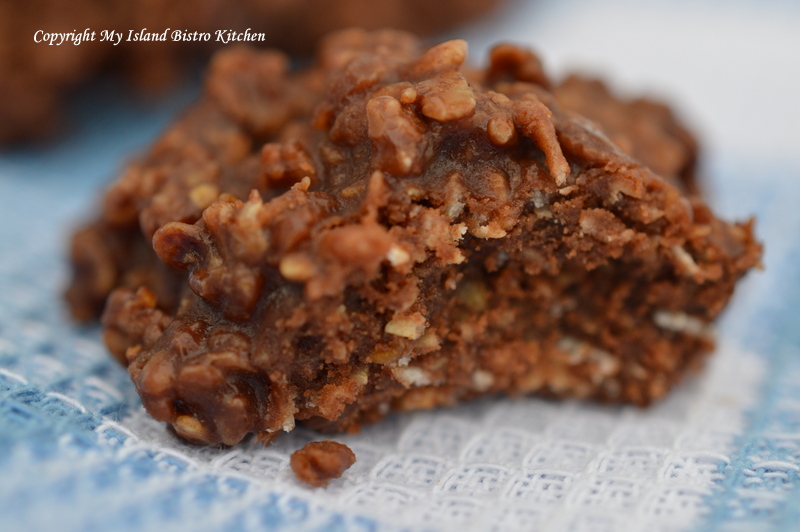
Oh, these bring back sweet childhood memories! I grew up knowing these as “Spider Cookies” though they are known by a host of other names, too. Sometimes, they are simply called “Uncooked Chocolate Cookies”. Regardless their name, they are simple to make and very tasty; in fact, I’d say they are a close neighbour to candy. Continue reading Spider Cookies Recipe

Oh, those lazy, hazy hot days of summer! They sure can work up a thirst. One of the most refreshing summertime drinks in my repertoire is Rhubarb Cordial. Not only is it refreshing, but it is tasty and a very showy drink with its bright orange/red color. Continue reading Rhubarb Cordial


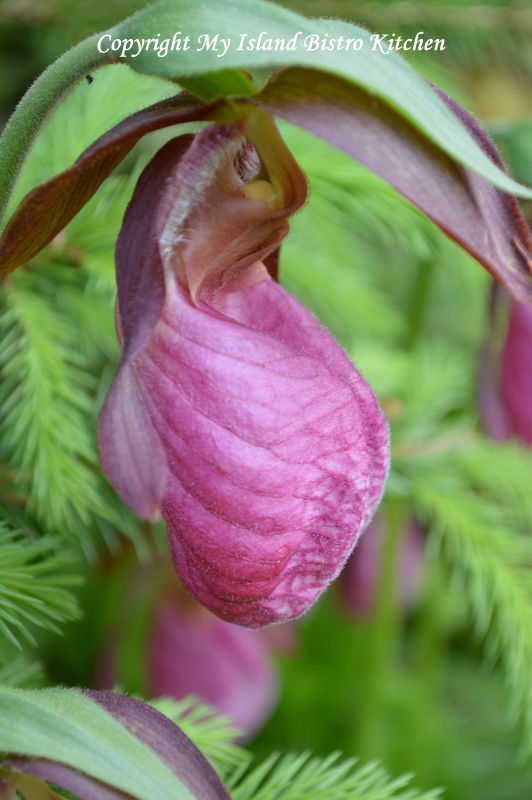
June brings a plethora of flowers to bloom on Prince Edward Island. None are more exquisite than the Lady’s Slipper, so named because its petals form a shape that resembles a slipper. This member of the orchid family blooms on the Island in late May – June in moist, wooded areas, often under spruce, beechwood, or pine trees.
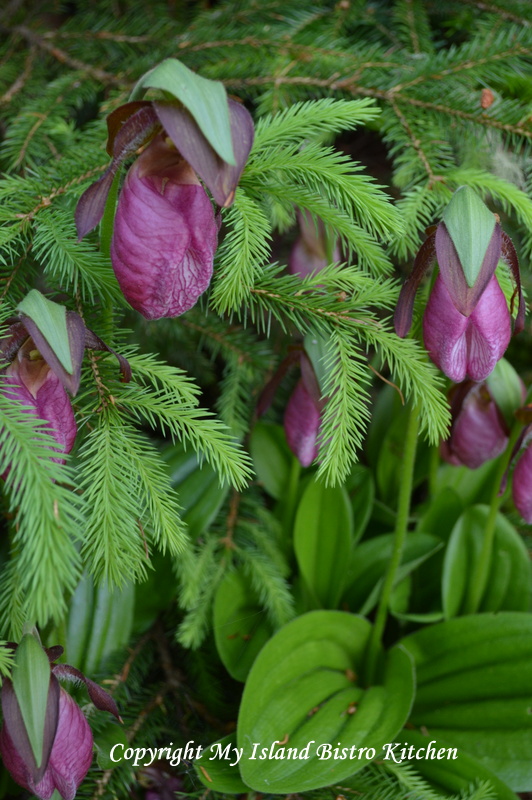
The Lady’s Slipper was adopted as the Island’s provincial flower on April 24, 1947.
If you come across these beautiful orchids that bloom in both pink and white in PEI, please just admire and enjoy them in their natural surroundings or take some photographs of them. Please do not pick these natural flowers as that will affect their seed for continued growth on the Island. They also do not transplant well and generally do not survive outside their natural habitat. All the more reason why they should just be enjoyed where they are found.

The close-up photograph below shows the petals of the Lady’s Slipper. I think the shape resembles an animal of some sort!
A few months ago, at a flea market, I came across a lovely plate with the Lady’s Slipper on it. It is by Royal Adderley of England. I bought the cake plate and moved along a few tables where I discovered a matching cup and saucer from a different vendor. Of course, those purchases set my mind to thinking about an afternoon tea featuring the Lady’s Slipper china.
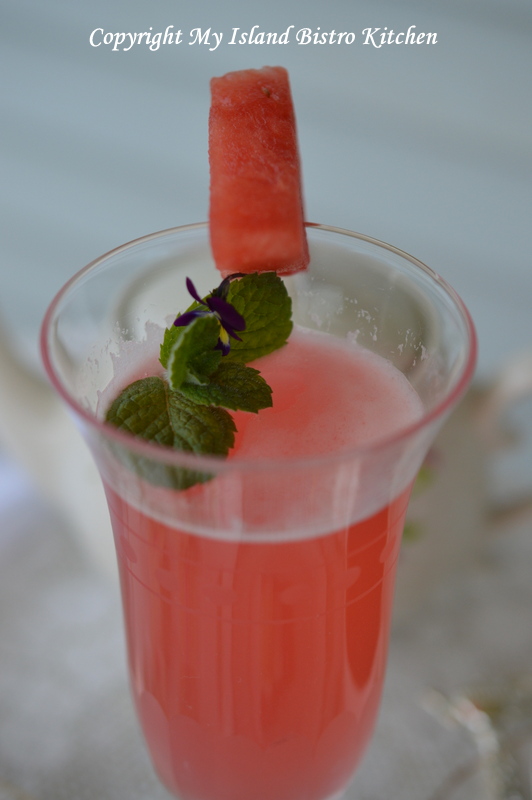
For the menu, I wanted to also feature some local, seasonal food product. Rhubarb is still available on the Island so my choice was to start with a refreshing Rhubarb Cordial and serve a Rhubarb Torte with a good quality Assam tea.
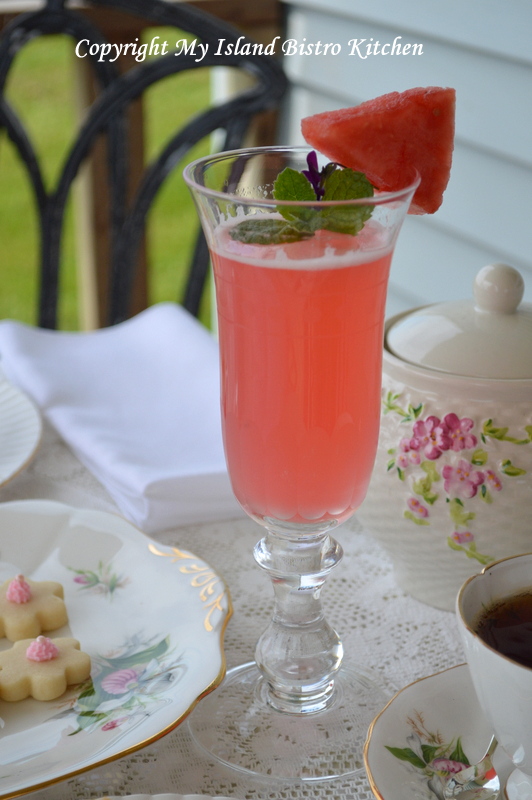
Rhubarb Cordial makes a wonderful, refreshing drink on a hot summer’s day. I garnished the drink with a wedge of watermelon, a sprig of mint from our herb garden, and a tiny pansy.
The “pièce de résistance” is the luscious Rhubarb Torte. Our rhubarb season will soon be drawing to a close but I just had to have one more rhubarb dessert before that happens. Of course, I have bags of it stored away in my freezer to enjoy throughout the year.
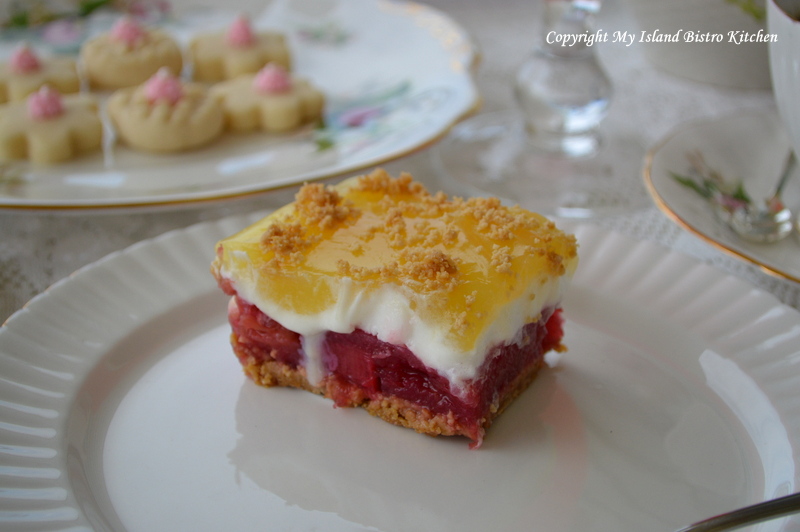
This torte features a graham wafer crumb base, followed by rhubarb sauce, smothered in whipped cream and marshmallows, and topped with vanilla pudding. It’s as showy and colorful as it is tasty! I love how the pudding on top looks translucent.

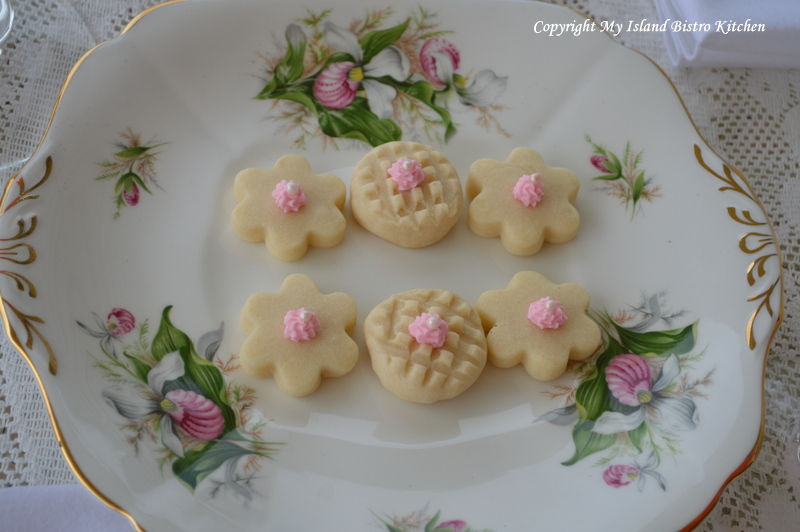
These tiny shortbread cookies, decorated in pink, just seemed the fitting addition for the Lady’s Slipper plate.
The photo below shows the detail in the plate design.
And the matching cup and saucer is filled with Assam tea.
The Rhubarb Cordial and the Rhubarb Torte make for a colorful tea table!
Thank you for visiting “the Bistro” today. There are lots of ways to connect with “the Bistro” through social media:
Join My Island Bistro Kitchen on Facebook
Follow the Bistro’s tweets on twitter @PEIBistro
Find the Bistro on Pinterest at “Island Bistro Kitchen”
Follow along on Instagram at “peibistro”


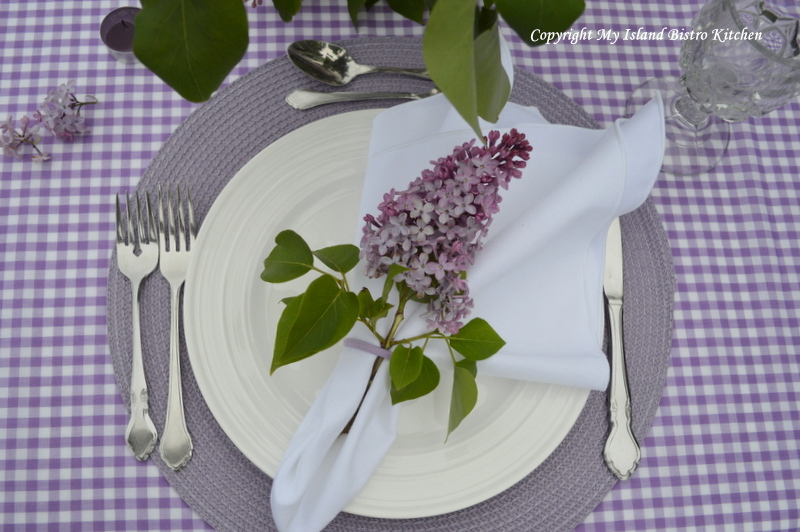
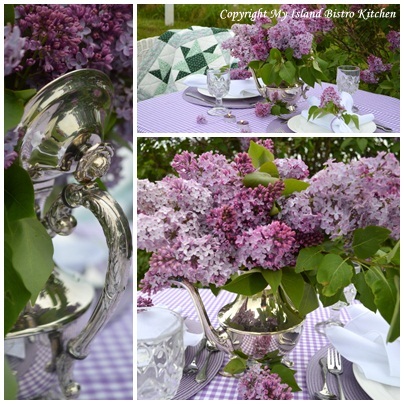
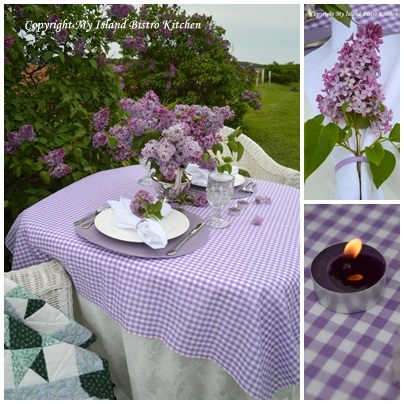
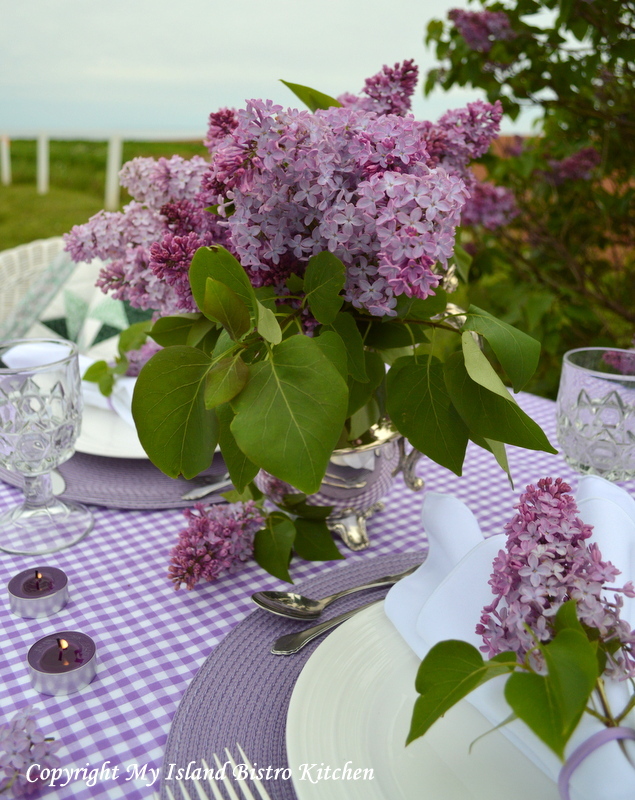
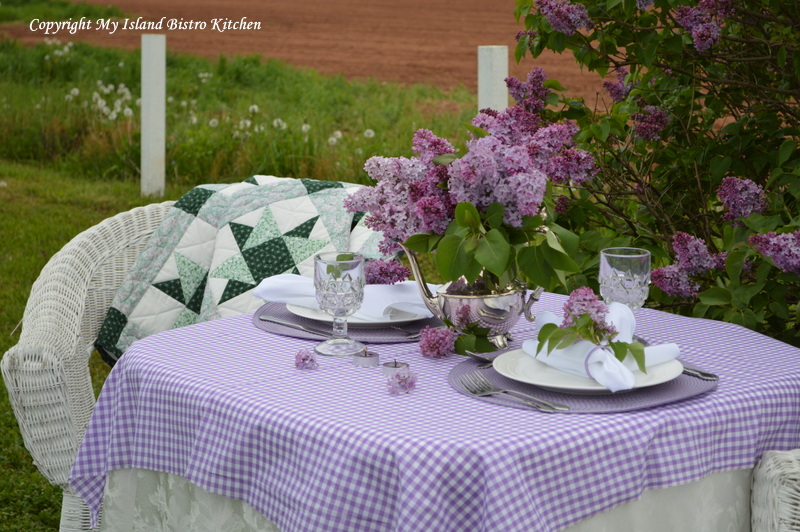
I adore lilacs! I love their scent, color, and shape. I will admit they do have a very strong scent so I rarely bring them indoors. So, that causes me to use them in tablescapes for Al fresco dining. Lilacs are always something I look forward to in June.
We have a number of lilac trees and they make a wonderful backdrop for a June dinner. In the background, you’ll notice the red soil, characteristic of Prince Edward Island! This field has just been planted with potatoes.
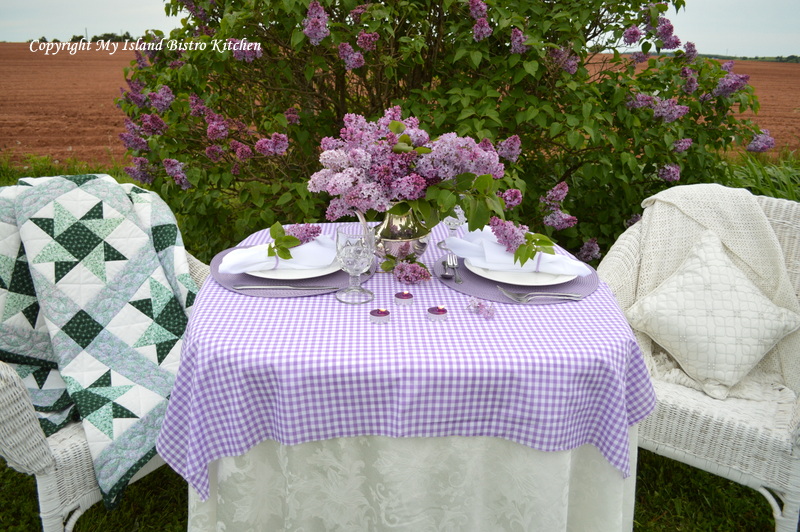
Although it doesn’t show in the photo above, there is mauve in the quilt on the chair. Purple and all its shades, tints, and hues – yes, my favorite color! The quilt, entirely hand-quilted, was made by my mother.
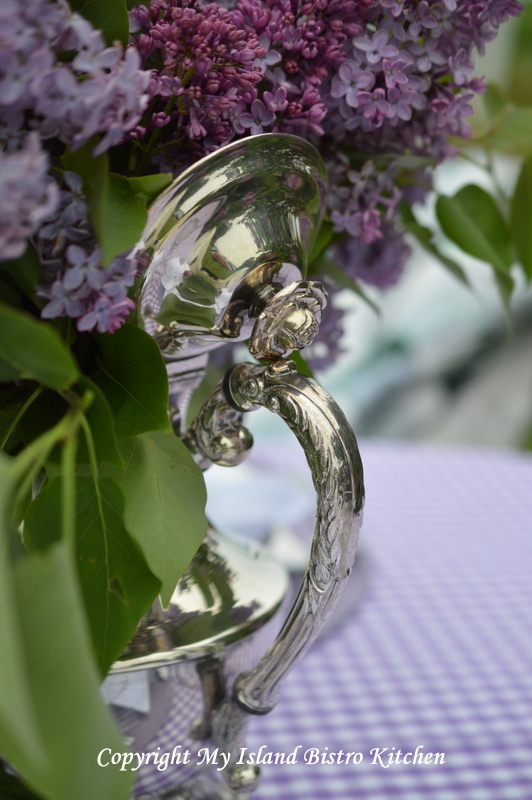
I have an old silver coffeepot that has seen better days so I have re-purposed it and it now makes a ready vase for flowing flowers such as lilacs.
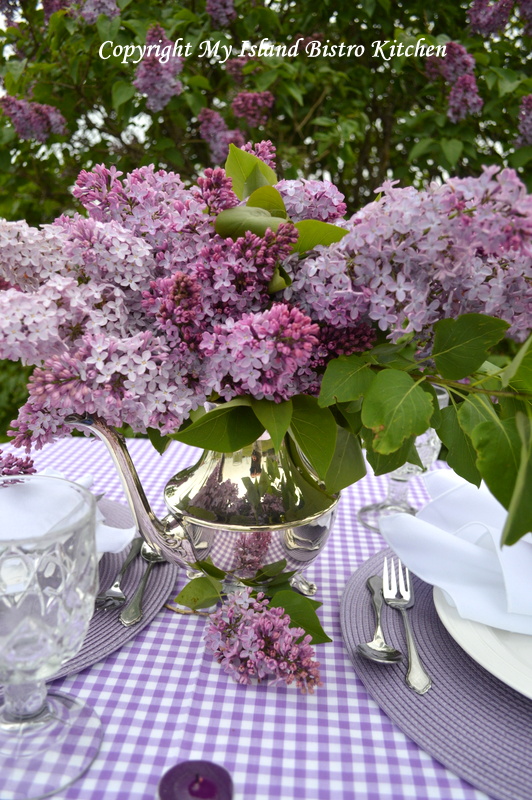
Lilacs do not require a lot of arranging since nature has pretty much arranged them beautifully in bunches on the tree already!

Some day in the winter, I will look at these photos and try and remember it really was warm enough to dine Al fresco in PEI!
The old coffeepot has such lovely detail on it that it was a shame not to find another purpose for it.
I have always liked checked tableclothes. This mauve one just seemed the perfect match for the lilacs.

When you like a color, it’s never hard to find matching accessories around the house, like the purple tealights and mauve placemats.
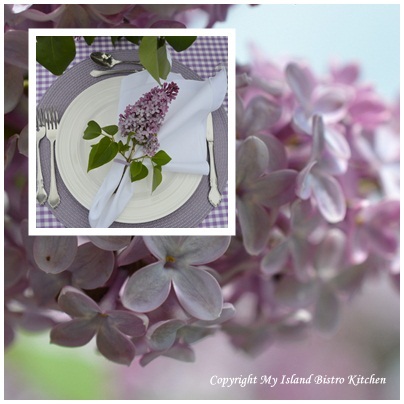
For the napkin, I loosely gathered the fabric, used a mauve hair elastic (yes a new one!), and inserted a lilac stem into the fold.
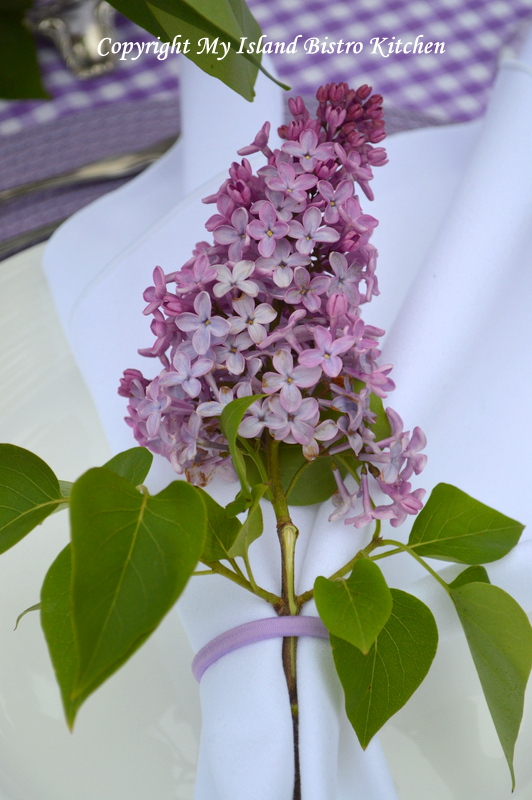
Lilacs don’t last long. They are here and gone before we know it.
These are just a standard lilac, no particular variety. Last year, I planted two French lilac trees and was surprised to see both bloom this year.
The bumblebees love the lilacs and are frequent visitors to our trees!

Thank you for visiting “the Bistro” today. There are lots of ways to connect with “the Bistro” through social media:
Join My Island Bistro Kitchen on Facebook
Follow the Bistro’s tweets on twitter @PEIBistro
Find the Bistro on Pinterest at “Island Bistro Kitchen”
Follow along on Instagram at “peibistro”


It’s the beginning of the season of wedding receptions, summer dinner events, get-togethers, and banquets. I thought this might be a good time to post an article on dining and guest etiquette. Many of us, at one time or another, have probably found ourselves at a dinner event, sat down to a somewhat crowded table with heavily laden place settings that displayed more cutlery and glassware than imaginable and wondered, hmmm, which bread plate was ours – the one on the left or on the right of the place setting. Or, perhaps you have wondered what to do if your neighbour to the left has started to use your bread and butter plate thinking it was his or hers. Maybe you have deliberated over which utensil to use. Perhaps you have wondered if it is proper to tilt or pick up a soup bowl to get the last drop of that yummy soup. For answers to these and other guest and dining etiquette questions, I contacted Tina Lesyk, Banquet and Catering Coordinator at The Culinary Institute of Canada in Charlottetown, PEI. I first introduced you to Tina in May 2012 when I posted a feature on how to properly set a table.
The purpose of learning and practicing proper table manners is to feel comfortable at any table, not insult your host or hostess and, in the case of business functions, it is essential for professional success. Let’s face it, no one wants to embarrass him or herself in these social situations. Follow the basic guidelines outlined below and you’ll be well on your way to being a model dinner guest in any setting, whether that be at a dinner in a private home, in a restaurant, or at a formal or state dinner. For a description and explanation of the elements of place settings, please see my earlier posting “Let’s Set the Table”.
First, let’s begin with some general tips on dining and guest etiquette.
General Dining Etiquette
– The old rule still holds true – elbows off the table when food is present.
– You should sit in the chair so that your back does not actually touch the back of the chair – this forces you to sit up straight.
– Everyone, leave the tech gadgets away from the table. Out of respect for the host/hostess and other guests, put cell phones on vibrate. If you absolutely must take a call during dinner, never answer the phone at the table in the presence of the host/hostess and other guests. Excuse yourself and move to another room to discretely take the call. The same applies to making a telephone call.
– Never use a toothpick while at the table. Picking food out of your teeth in front of fellow guests and the host or hostess is not appropriate conduct.
– If you drop a piece of cutlery on the floor, leave it there; do not retrieve it. If you are in a restaurant, signal to the waiter to bring you a replacement. If at a private event at someone’s house, ask your host/hostess for a replacement.
– If you find you have taken a bite of food that has a piece of gristle or small bone in it, do not make a big scene or draw attention about it. As discretely as possible, remove the item with your fork (the utensil it went into the mouth with) and set it to the side of your plate.
– If you have a severe food allergy, advise your host/hostess in advance of the function.
– If you are served a food that you do not like and cannot eat, make no mention of it; rather, simply go through the motions of moving the food around the plate.
– Never push the plate away from you when you have finished eating and do not stack up plates, utensils, and so forth, from your place setting – you may think you are helping but this gets in the way of the servers’ techniques for clearing tables.
– Applying lipstick, combing hair, and so forth are considered grooming activities, inappropriate for the dining table.
Napkins
The purpose of the napkin is to protect clothing by acting as a shield or guard for spills and, if necessary, to dab the fingers and mouth, and remove traces of food particles from the outside of the mouth.
– Remove the napkin from the place setting and place it on your lap immediately upon being seated at the table.
– For a normal-sized napkin, completely unfold the napkin and place it on your lap. It is not considered appropriate (and there is no need) to “shake” a napkin out of its fold. Simply, and very discretely, unfold the napkin.
– If the napkin is exceptionally large, fold it in half and, with the fold of the napkin facing you, place it on your lap.
– The napkin always goes on the lap and is never tucked into the collar and used as a bib.
– The napkin remains on your lap during the entire meal. If you need to temporarily leave the table during the meal, loosely bunch up the napkin and place it to the left of your plate. When you return to the table, re-place the napkin on your lap. At one time, the general rule was to place the napkin on the seat of your chair during a temporary absence from the table. However, there are a couple of issues with this that suggest an alternative location for the napkin may be preferable. First, the napkin may have food particles on it that will stain an upholstered chair and may also stain your clothing or leave crumbs on the chair when you return to the seat. Second, given the sole use of a napkin is to dab the mouth, many do not want to use that napkin for that purpose after it has laid on the seat of a chair that is used for, uh, sitting on the derrière. One never knows how clean those chairs are! Now, when bunching up the napkin that has stains or food particles on it, you will want to loosely fold the napkin in such a way that the stains/food particles are not visible when you temporarily leave the napkin on the table during your absence; leave the napkin, clean side up. You will also want to make sure your napkin does not touch the elements of the place settings of your neighbors to the left and to the right.
– A napkin is not a tissue or handkerchief so avoid using it to blow your nose (Note – you should excuse yourself from the table before blowing your nose).
– At the end of the meal, loosely bunch up the napkin and place it to the left side of your place setting, not on the dirty plate. A paper napkin, however, could be left on the [dirty] plate since the napkin will be discarded anyway.
Cutlery
– If the cutlery is already on the table, begin using the utensils placed farthest away from the plate (assuming there is more than one fork and knife at the place setting). If there is no cutlery at the place setting when you sit down at the table, this means the host/hostess will bring the necessary utensils with each course of the meal.
– Never gesture or point with a piece of cutlery.
Proper Ways to Hold Cutlery While Eating
There are two main styles – American and European.
American
Normally, with this style, you hold the fork in the hand you write with. For demonstration purposes, I will describe the procedure for someone who is right-handed.
Hold the fork in your left hand and the knife in the right.
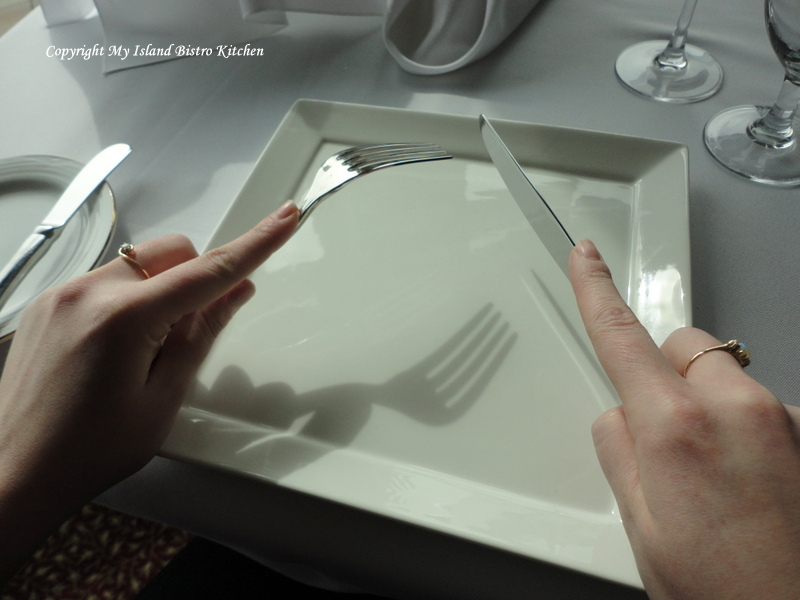
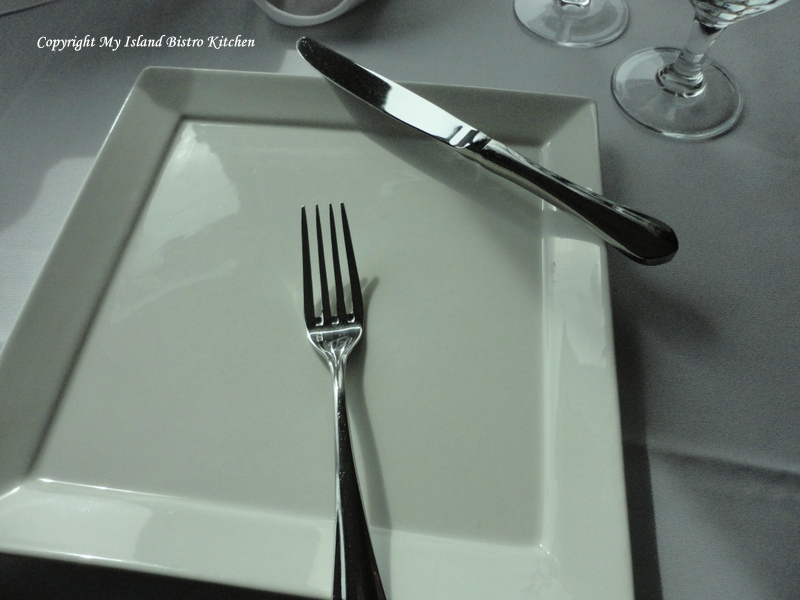
With fork tines facing down, gently spear the food with the fork to hold it in place as you cut the food. Once a bite-sized piece has been cut, rest the knife diagonally across the upper right edge of the plate. Switch the fork to your right hand and, with tines facing up, pick up the food and transfer it to the mouth.
If there is a pause in eating a course during the meal (e.g., to take a sip of water or briefly leave the table), there is a way to signal to the wait staff that you have not yet finished eating. Lay the fork, tines facing up, as shown in the photo below and place the knife, diagonally on the upper right-hand corner of the plate. Note that, once the knife has been picked up from the table, it should not touch the table again during the meal.
At the conclusion of the course, place the knife and fork together (fork tines up), parallel to each other at about the 4:30 clock position on the plate to signal to the wait staff that you have finished eating.

European
With this style, the fork remains in the left hand and the knife in the right for the entire meal. Food that needs to be cut is speared gently with the fork and cut with the knife held in the right hand. The knife is used to push food onto the back of the fork. The food is then transferred to the mouth with the fork, tines facing down, held in the left hand.
If there is a significant pause during the course, the fork and knife are placed on the plate as shown in the photo below.
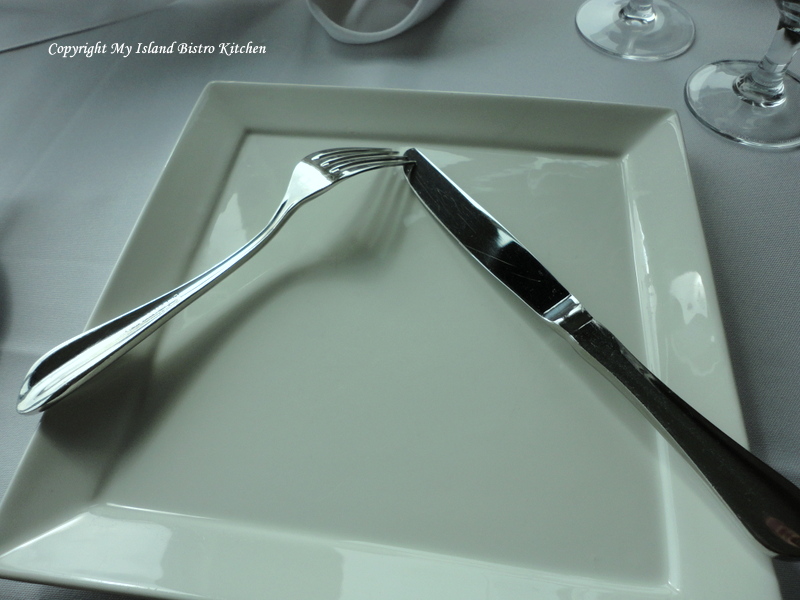
At the conclusion of the course, place the knife and fork together (fork tines facing down) at about the 4:30 clock position on the plate to signal to the wait staff that you have finished eating. This would be the same as the American style with the only difference being that the fork tines would face downward toward the plate.
Which is mine?
– Follow this easy trick for remembering which bread and butter plate and which glass is yours: With your left hand, touch the tip of your first finger to your thumb. You will see it makes a lowercase “b” shape; “b” stands for “bread” – it goes on the left of the place setting, aligning with your left hand. Now, do the same thing with the first finger and thumb of your right hand. This makes a lowercase “d” shape. The “d” stands for “drink” and drinks go the right of the place setting, aligning with your right hand.
– If you find your neighbour has already starting using your bread and butter plate, discretely ask your host/hostess (if at a private dinner party) or your server at an event to bring you another.
Bread and Rolls
– Break bread and rolls with your fingers (as opposed to cutting with a knife). The knife is provided for buttering the bread or roll, not cutting it.
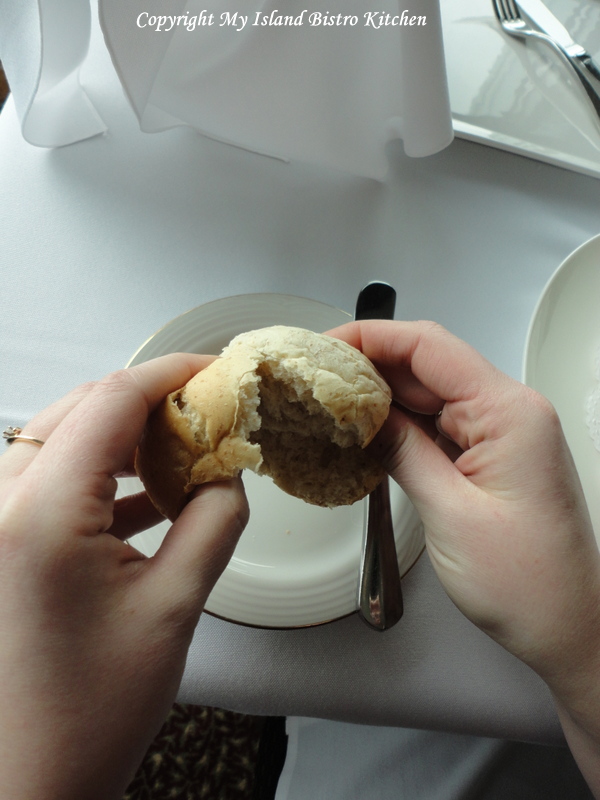
– If the bread or roll is served cold, take the butter pod and place it on to the bread and butter plate provided and butter each piece/bite of the broken bread or roll at a time as you eat each bite.
– If the bread or roll arrives warm at the table, break it apart and butter each broken section all at once to let the butter melt.
Soup
– The appropriate way to consume soup is to scoop it away from you as you will be less likely to spill or splash it on yourself.
– Do not place the entire bowl of the soup spoon in the mouth. Rather, sip the soup from the spoon.
– It goes without saying that there should be no ‘slurping’ noise during the soup-eating process!
– If the soup is too hot to comfortably consume, wait for it to cool. It is never considered proper etiquette to blow on the soup or stir it vigorously to cool it.
– It is inappropriate to dip bread in the soup as a way to gather up the soup – this is what a soup spoon is for.
– It is acceptable to tip the bowl ever so slightly away from you to scoop up the last bit of soup.
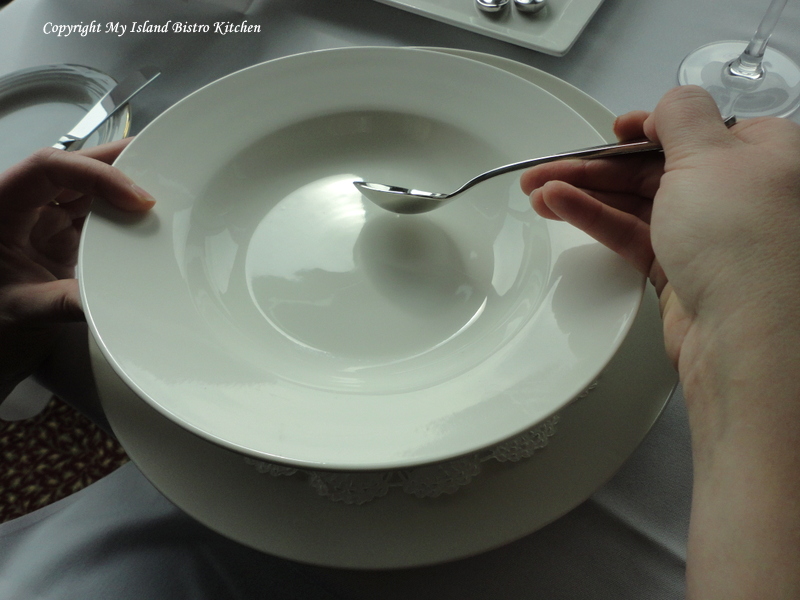
– It is not appropriate to lift the bowl up and hold it close to the mouth as you consume the soup.
– If the soup bowl has been served on a server plate, place the spoon on the server plate once you have finished the soup. If there is no server plate provided, leave the spoon in the bowl.
Wine
– If you are not a wine drinker, or do not want any wine with the meal, there are two ways to handle the situation when wine is being served: 1) discretely place your hand on top of the wine glass as the server approaches you with the wine. This will signal to the server that you do not wish to partake; or 2) simply let the server pour the wine and just do not drink it. The key is always discretion – you don’t want to make an issue of anything or draw attention to yourself.
– The proper way to hold a wine glass is by the stem so that your hand does not warm the wine or that fingerprints get left on the goblet itself, making it look smudgy. Holding the glass by the stem is also considered to give you better control when moving the wine in the glass and tasting it.
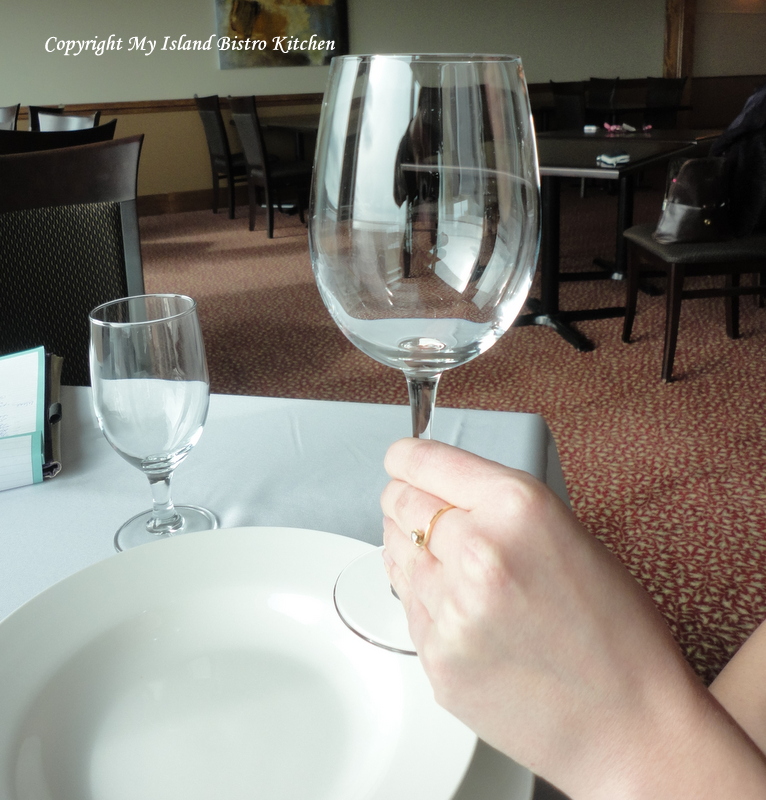
– Monitor your consumption – if several wines are being served throughout the meal, it is completely acceptable etiquette not to finish every glass. Intoxication does not make a good dinner guest.
Starting to Eat
– Wait for everyone at the table to be served before starting to eat. This applies to each course of the meal. If you are at a private dinner, it is proper etiquette to wait until the host/hostess picks up his or her fork before starting to eat unless, of course, the host/hostess tells you to start while he or she is still continuing with the dinner preparations and serving other guests.
– If food bowls, platters, etc., are being passed around the table for guests to serve themselves and one is starting with you (i.e., you pick up the bowl or platter directly in front of your place setting), offer it first to the person on your left while holding it for him/her to serve him/herself. Then serve yourself and pass the item to the person on your right. Always send everything to the right around the table and never directly pass items to guests across the table.
– Never intercept food being passed. For example, if someone asks for the basket of rolls to be passed, do not sneak a roll from the basket as it is going by you. Rather, after the requester has been served, ask for the item to be passed back to you.
Salt and Pepper Shakers
– Salt and pepper shakers should always travel in a set together even if someone ask for just the salt or pepper to be passed to him or her. This is because the next person looking for them will find them together, not orphaned here and there somewhere on the table and end up having two people passing them from different directions along to the requester. When someone ask you to pass him or her the salt and pepper, set them down on the table in front of the requester. This is the preferred method as there is less chance of dropping the items or upsetting them as could happen if they were transferred hand to hand.
– It is considered proper etiquette to always taste the food before seasoning it or you may insult the chef/host/hostess who has prepared the food – theory being that the chef has already properly seasoned the dish before serving it.
Special Food Items
Ever wonder what foods must be eaten with a fork and knife and which ones are acceptable to be eaten with the fingers? Here are some of the more common foods which are acceptable to be eaten with the fingers:
Asparagus (unless covered in a sauce)
Crispy bacon (ever chase a piece of crispy bacon with a fork around the plate as you try to capture it or cut it with a knife and the bacon lands on your neighbour’s plate?)
Oysters (probably the only, or one of very few, foods that can be acceptably eaten with a ‘slurping’ sound!)
Corn on the Cob
Pizza
Crostini
Artichokes
Chicken Wings
Ribs
Shrimp
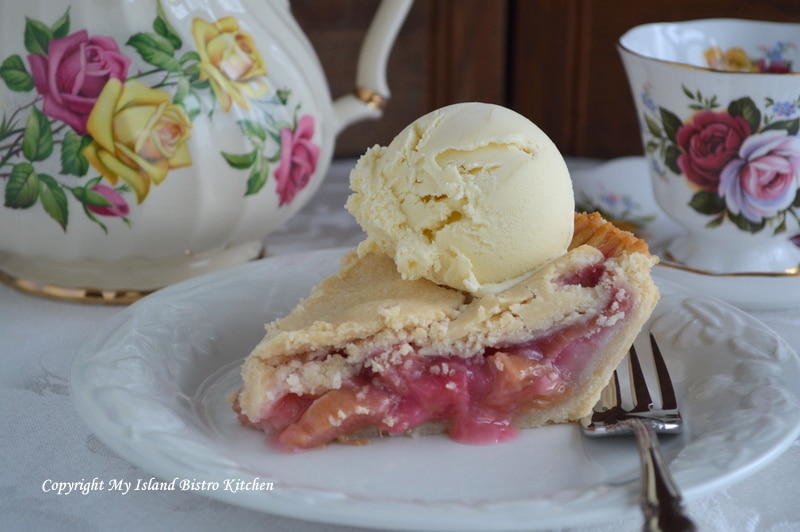
Cookie served with a dessert (the cookie is considered a finger food)
Dinner Conversation
– Stay with topics that are neutral and of general interest, non-conflictual in nature – the old advice about avoiding discussions on politics and religion still holds true. The last thing you want to do is to instigate, or become engaged in, a heated discussion that leaves everyone around the table uncomfortable or at odds with each other.
– Do not discuss food allergies, health issues, or bad experiences with food. The fact that you may be lactose intolerant, have irritable bowel syndrome, or once got violently sick from eating shellfish, or have had food poisoning, does not make these subjects suitable table topics. As they say, that’s way too much information and detail, particularly at a dinner table where food is being served. Nothing can zap an appetite faster than to have a dinner guest regaling at length the graphic details of a bad food experience.
My thanks again to Tina Lesyk for taking the time to chat with me about proper guest etiquette and to share her extensive knowledge on the topic. We certainly haven’t covered every aspect of dining etiquette but, hopefully, we have covered the main points. Happy dining!
Thank you for visiting “the Bistro” today. There are lots of ways to connect with “the Bistro” through social media:
Join My Island Bistro Kitchen on Facebook
Follow the Bistro’s tweets on twitter @PEIBistro
Find the Bistro on Pinterest at “Island Bistro Kitchen”
Follow along on Instagram at “peibistro”

The rhubarb is at its prime on PEI right now and, of course, I am busy making the usual repertoire of my favorite recipes while the rhubarb stalks are at their best. Used too early before they have some maturity and the stalks won’t have much flavour; left too long and they go woody and lose their flavour.
It’s always a spring-time boost when I start to see the rhubarb shoots poking their way through the ground and, within a short period of time, they grow into very large plants. We have two rhubarb crowns and, with leaves, they measure a little more than three feet tall with stalks that are about 20-22″ long. It doesn’t take many to make a rhubarb pie! For the pie below, I used 2 1/2 stalks. Continue reading Rustic Rhubarb Pie Recipe

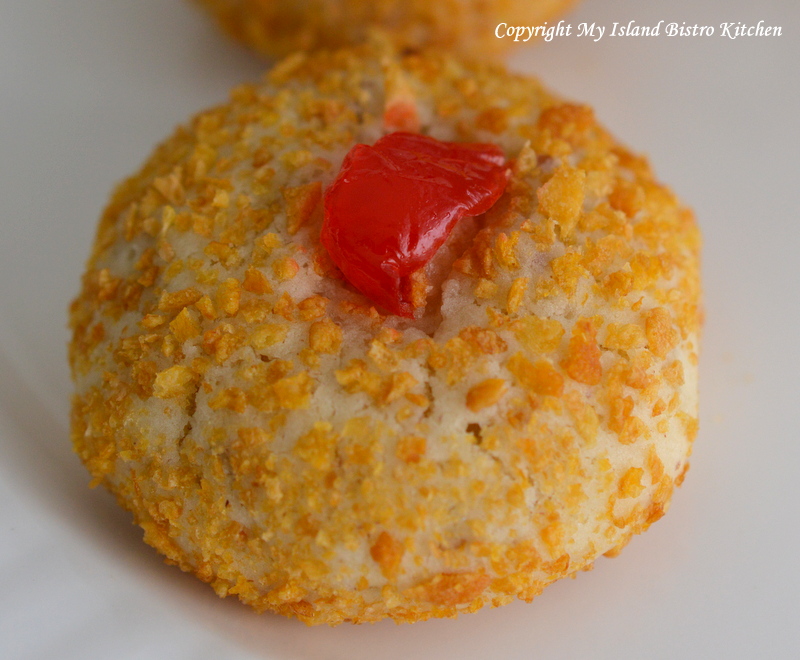
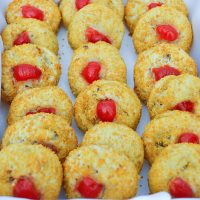
My Mother often made Cherry Wink Cookies when I was a small child so they have been a family favorite for many years. They are not difficult to make and don’t take any hard-to-find or unusual ingredients.
[Printable recipe follows at end of posting]
Ingredients:
3/4 cup shortening or butter, softened at room temperature
1 cup white sugar
2 eggs, unbeaten, room temperature
4 tbsp milk, room temperature
1 tsp vanilla
2 1/4 cups all-purpose flour
1 tsp baking powder
1/2 tsp soda
1/2 tsp salt
1 cup chopped dates
3/4 cup chopped pecans
apx. 2 1/2 – 3 cups cornflakes
apx. 15 maraschino cherries, blotted dry in paper towel, and cut into quarters
Method:
Preheat oven to 375F.
In bowl of stand mixer, cream shortening or butter. Add sugar and cream until light and fluffy. Add eggs, one at a time, and beat well after each addition. Beat in milk and vanilla.
In separate bowl, combine flour, baking powder, soda, and salt. Whisk together to blend. Mix in the dates and pecans. Add to creamed mixture and stir until well combined.
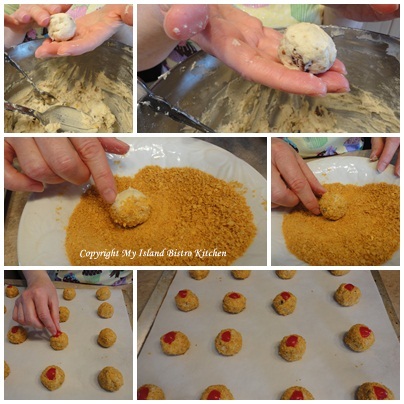
Crush cornflakes crumbs by placing in a sealed ziplock bag and crushing with a rolling pin.
Transfer crumbs to shallow bowl. Shape dough into small balls. Roll each cookie ball in the crumbs to coat. Place on parchment-lined baking sheets. Top each cookie with piece of cherry.
 Bake for 10-12 minutes. Do not overbake. Let cool on cookie sheet for 2 minutes then transfer to wire rack to finish cooling.
Makes approximately 4 dozen cookies.
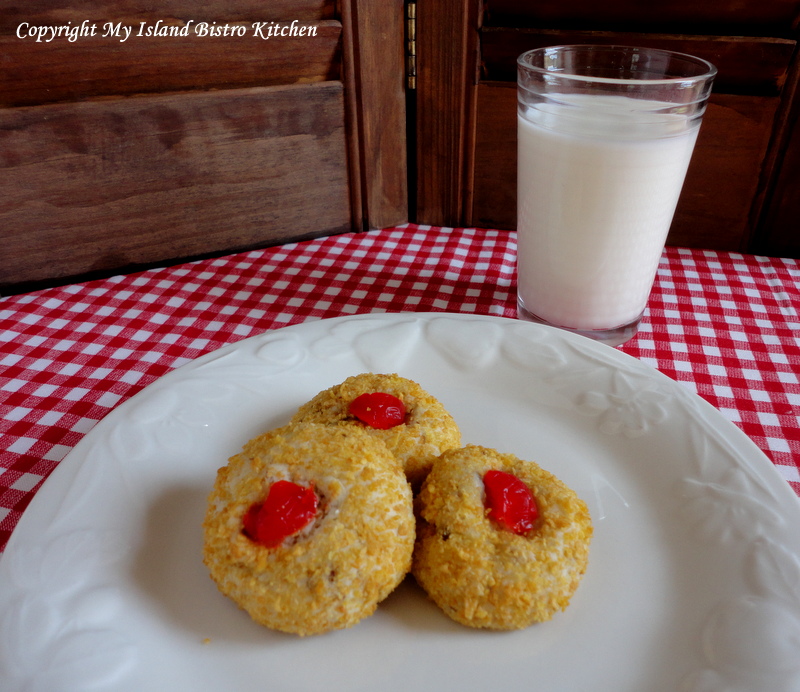
These cookies go especially well with a glass of cold milk!

…and one is never enough!
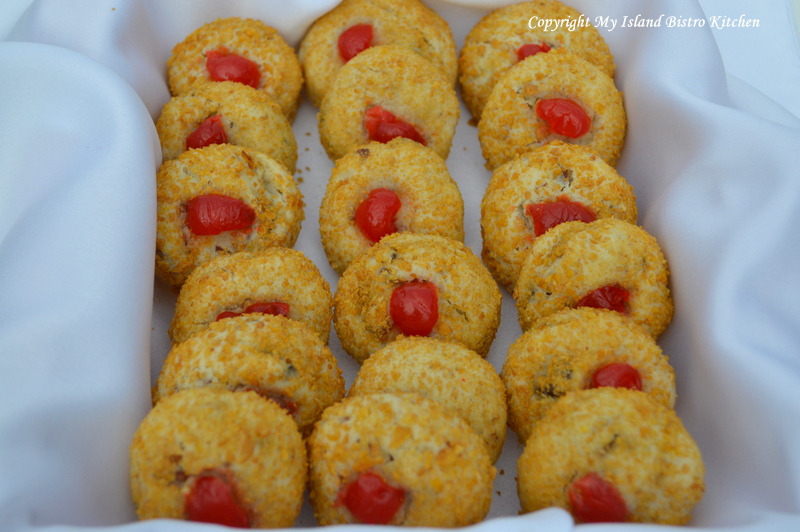
A box of these cookies makes a wonderful, tasty gift!
What are your memories of cherry winks?
Yield: Apx. 4 dozen cookies.
[Copyright My Island Bistro Kitchen]
Join the Facebook page for My Island Bistro Kitchen: https://www.facebook.com/MyIslandBistroKitchen/
Follow “the Bistro” on “X” (formerly Twitter): https://twitter.com/PEIBistro/
See the drool-worthy gallery of mouth-watering food photos from My Island Bistro Kitchen on Instagram: https://www.instagram.com/peibistro/
Follow “the Bistro” on Pinterest at https://www.pinterest.ca/peibistro/ and pin the Pinterest-ready photo above to your favorite Pinterest boards.


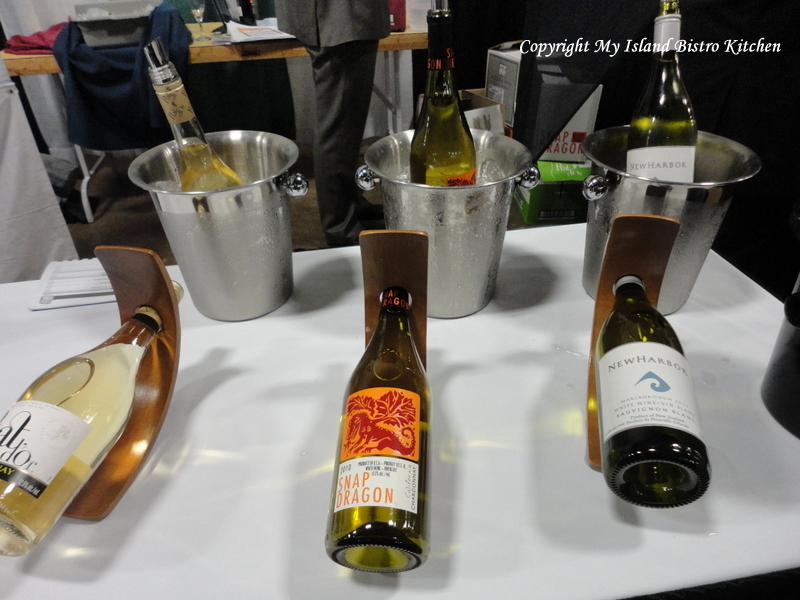
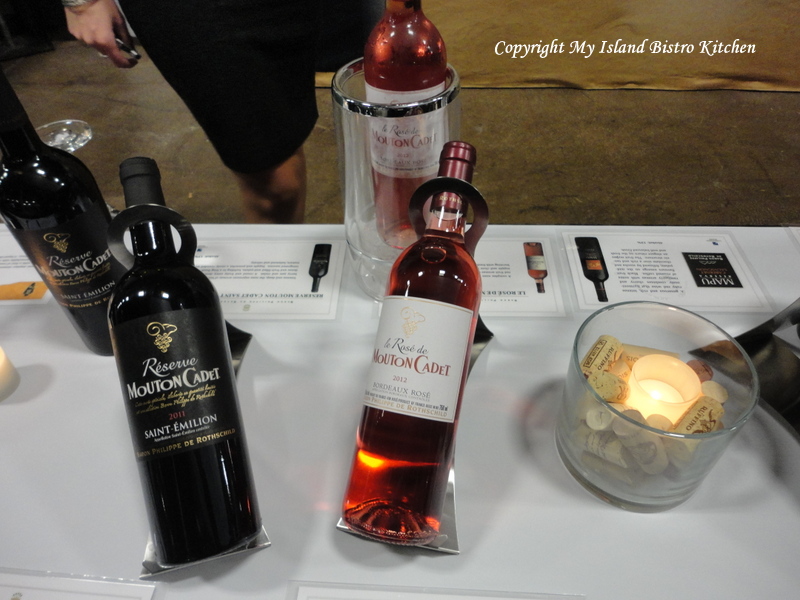
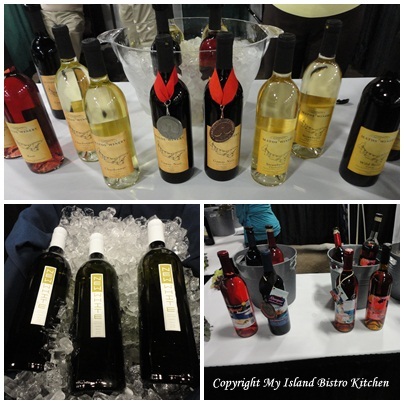
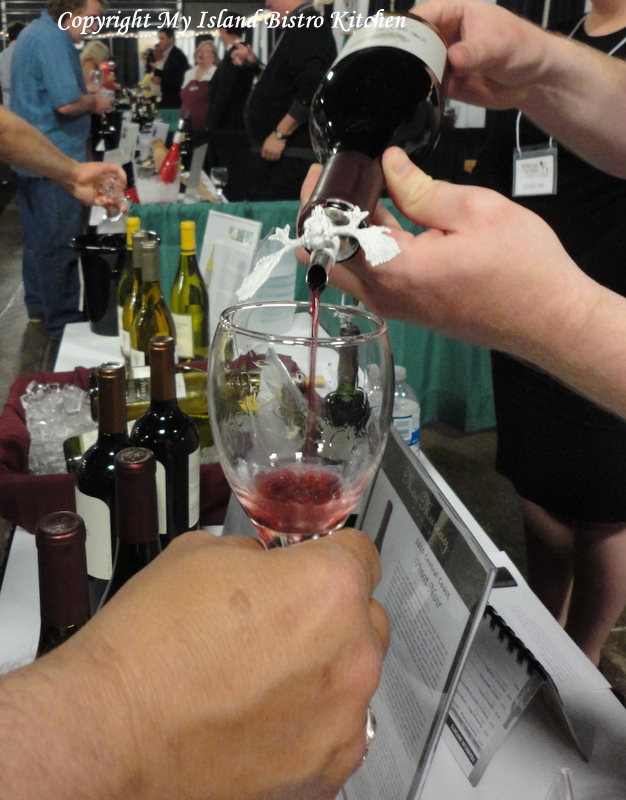
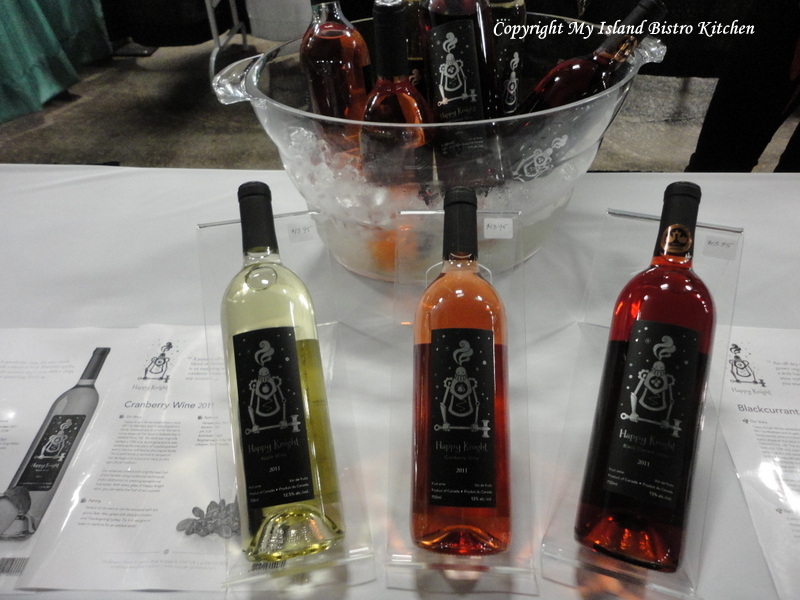
The New Festival of Wines Prince Edward Island is a signature springtime event on the Island. Now in its 19th year, this is the first time the PEI Liquor Control Commission has hired a private event management company, Versatile Management Group, to manage the Festival. Versatile has pulled out all the stops to make this a high-end event.

This year, there are 39 booths providing samples of 225 wines from twelve different countries. Many of these wines are new to PEI and are not currently sold in local liquor stores. These wines will, however, be available for sale at the onsite Wine Boutique during the Festival. The New Festival of Wines also includes a juried wine competition where six judges, blind testing, chose the top wines and runners-up in five categories. These wines are also available for sampling during the event.

If you are a wine connoisseur, or simply a lover of fine wines, you will not want to miss this premier event. The Grand Tasting event allows patrons to explore and sample new wines and learn more about them. For wineries or their agents, it’s a chance to introduce and present their wines. Says Jennifer Caseley of Versatile Management Group, “depending on sales at the event’s Wine Boutique, those wines may eventually be listed products at local liquor stores“.
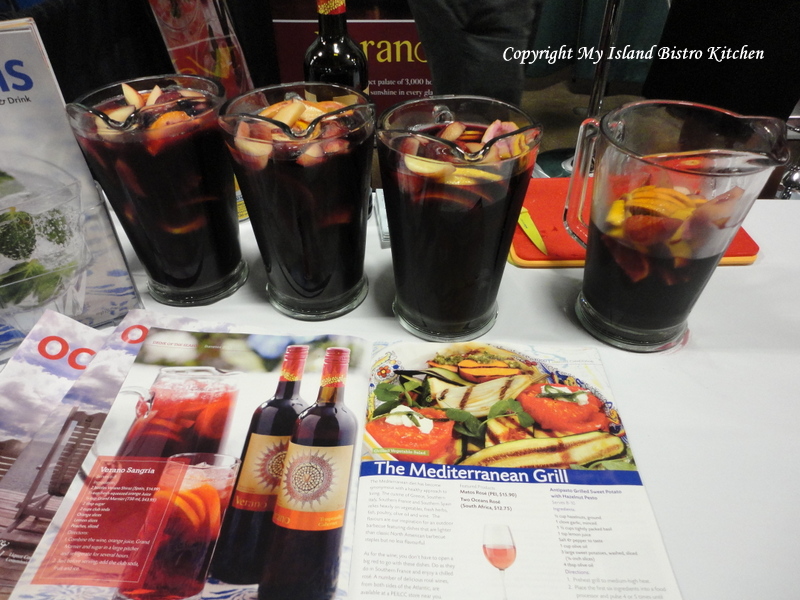
Yes, even Sangria made an appearance at this year’s Grand Tasting event! In addition to samples, Verano Wines also shared their recipe for this tasty Spanish drink.
Look for attractively displayed booths at the event.
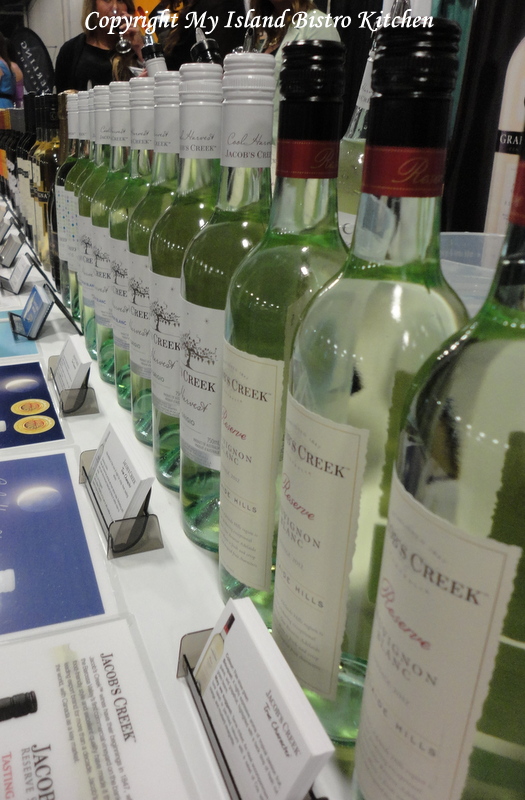
Each year, a wine-producing country is selected to have its wines featured for the event. This year, it is France, one of the oldest and most renown wine-producers in the world. That doesn’t mean that there won’t be wines from other wine-producing countries – they are there too.
And, of course, our three Island wineries are participating as well – be sure to seek out the Matos, Newman, and Rossignol booths as you make your rounds at the Festival.
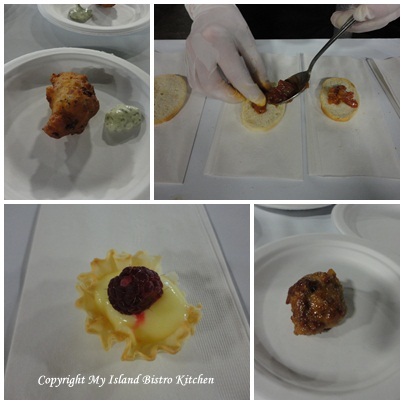
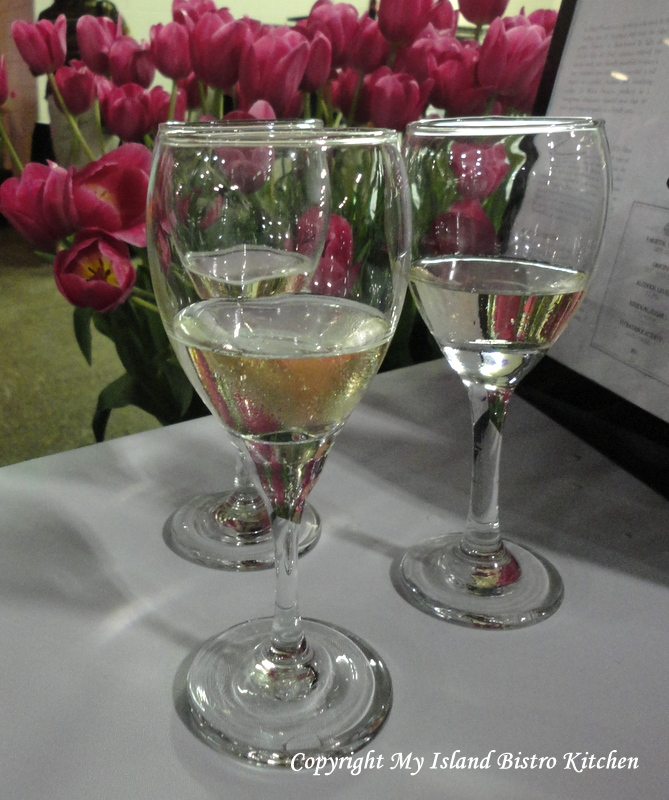
On PEI, it’s almost inconceivable to have an event of any kind without food! There is a whole new food element to this year’s Festival. As you walk into the event, you are greeted with a Raspberry Point oyster from the PEI International Shellfish Festival and along with a glass of champagne.

Be sure to hang on to the wineglass and carry it with you throughout the evening as you will need it to sample wines as you tour the booths.

Each evening, there are food stations set up inside the venue. These stations serve four different appetizers. Last evening, Chef Andrew Smith of “Top of the Park” Restaurant at the Red Shores Racetrack and Casino created BBQ Pulled Chicken Bruschetta, House Spiced Turkey Meatballs, Seafood Fritters, and Lemon Curd Filled Phyllo Cups for patrons. This evening, Chef Jane Crawford from the Red Water Rustic Grille will tempt palettes with four tasty appetizers as well.
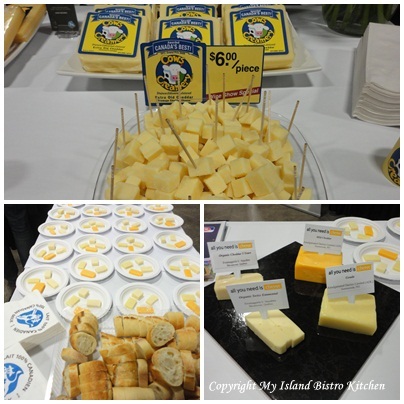
What would wine be without cheese! The Dairy Farmers of Canada along with PEI’s award-winning Cows Creamery, are serving samples of their fine cheeses that pair so well with wine. This afternoon, there is an ancillary event (separate tickets required) sponsored by the Dairy Farmers of Canada and PEI’s Rossignol Winery that will focus on the art of wine and cheese pairings.
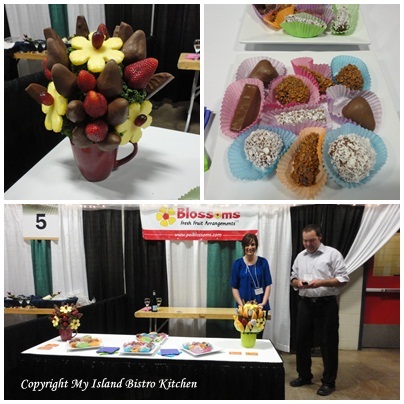
Be sure to also check out Blossoms’ booth. Blossoms is a new local business on the Island that specializes in making fresh fruit bouquets. Their colourful and tasty offerings of chocolate dipped strawberries and other fruits were making a hit at the Festival last evening.
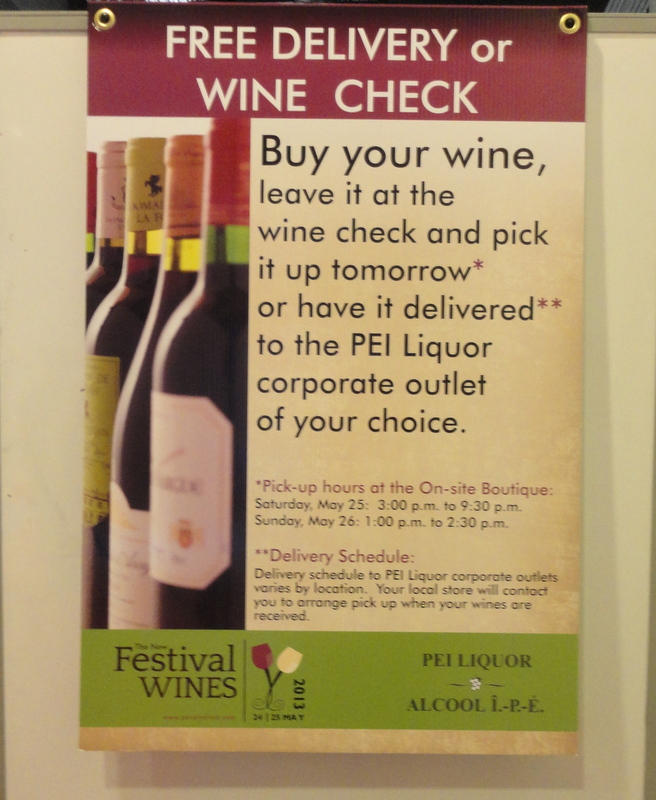
Organizers have thought of all the details! They even offer a wine check so patrons do not have to carry around heavy bottles of wine they have purchased at the Wine Boutique. Their purchases may be shipped for pick-up at any one of the PEI Liquor Control Commission’s 18 corporate retail outlets across the Island.
This two-day extravaganza is held at the Charlottetown Civic Centre on Kensington Road on May 24-25, 2013. Tickets to the Grand Tasting event are $44. per person (taxes incl) – note you must be 19 and over to attend the Festival. The event can accommodate over 1000 guests per evening and tickets are also available day-of at the Civic Centre box office. The Festival’s hours of operation today are from 7:00pm – 11:00pm. The Wine Boutique, run by the PEI Liquor Control Commission and from which wines may be purchased, operates from 3:00pm – 10:30pm today. Tickets are not required to enter the Wine Boutique.
A complimentary shuttle service is available to transport patrons between the Civic Centre and the downtown area. This service runs from 6:00pm – 11:00pm this evening. Please enjoy the Festival but do drink responsibly and use the provided shuttle service or a designated driver or taxi.
Thank you for visiting “the Bistro” today. There are lots of ways to connect with “the Bistro” through social media:
Join My Island Bistro Kitchen on Facebook
Follow the Bistro’s tweets on twitter @PEIBistro
Find the Bistro on Pinterest at “Island Bistro Kitchen”
Follow along on Instagram at “peibistro”

June 2019 Update: Tim Dixon, mentioned in this blog post, is no longer producing asparagus for sale.

Yesterday, I paid a visit to Tim Dixon in North Tryon, PEI. Amongst other crops grown on the family farm, Tim grows a small acreage of asparagus which he markets to Island restaurants and also sells at the farm gate.
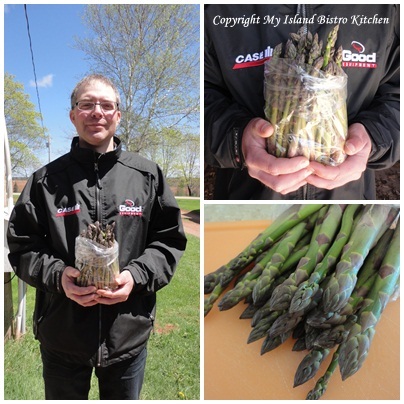
Below is a photo of an asparagus spear just about ready to be harvested.

Tim has been growing asparagus since 2000 and presently has acreage that yields between 500-700 pounds of this spring vegetable annually. I asked Tim why he decided to grow asparagus and he tells me he was looking to diversify his crop planting and was also looking for a market niche.
There are several varieties of asparagus but the bulk of Tim’s crop is the Jersey Giant variety. The asparagus is planted in springtime and is grown from crowns planted 1 foot deep in the rich red soil not far from the Tryon River. It usually takes a couple of years for the asparagus from a crown to be fully ready to be harvested.
Despite its Mediterranean origins and liking heat, Tim says asparagus is a hardy plant that only requires a light discing in the spring, a coating of manure, and some weed control. Tim says winter kill is not an issue for asparagus and a crown will generally produce spears for about 15 years.
Asparagus is one of the first vegetables of spring on PEI. Harvesting usually begins around Victoria Day in mid-May and continues until the end of June/first of July. When the spears are 6”-8” tall, Tim hand-picks them by snapping the spears off the stock, not cutting them. He tells me that the rule of thumb for harvesting asparagus is to pick for one week in the first year after planting, then 2 weeks the next, 3 weeks in year 3, up to 6 weeks of harvesting for mature asparagus.
Tim says the local community is very supportive and neighbours are amongst his best customers. On the farm, he sells both 1-pound and 2-pound bags of fresh asparagus. I asked him if he knew how his neighbours were preparing the asparagus and he says, typically, many steam or sauté the spears.
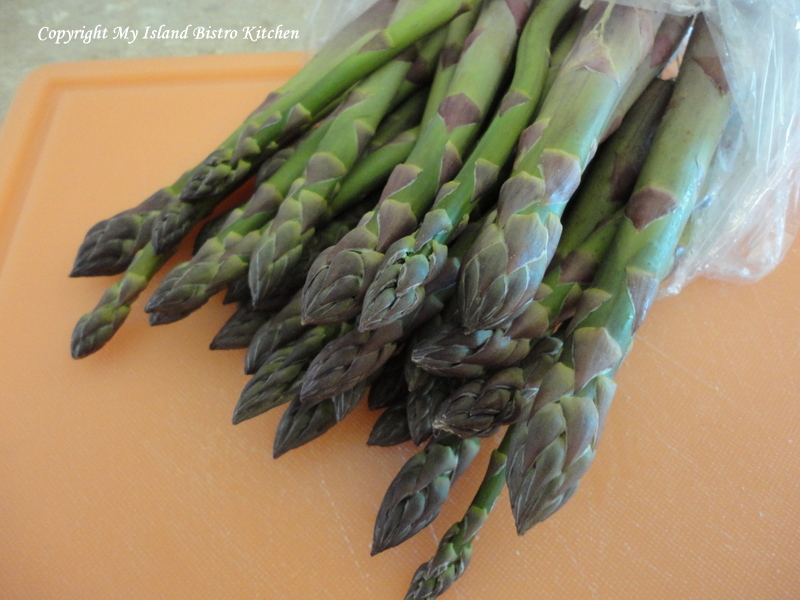
A standard-sized portion serving is 5 spears. Asparagus plates well because of its long, slender, vivid green spears and pointed flower heads that can range in color from dark green to tints of deep purple. It adds presentation, texture, and flavour to a meal. Asparagus has an earthy, unique taste and pairs well with poultry, seafood, and pasta. There are endless ways to prepare asparagus. One of my favourite ways to prepare asparagus is to mist it with a good quality olive oil, sprinkle it with freshly ground pepper, sea salt, and finely grated parmesan cheese and then barbeque it in a veggie basket over the open flame.
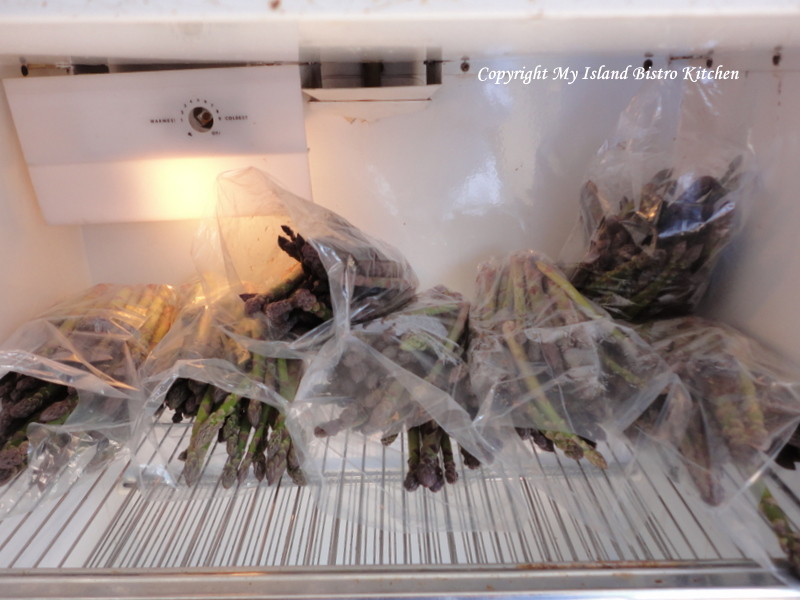
For maximum freshness, this vegetable is best used within 2-3 days of picking; however, asparagus will last up to near a week if stored in an open-ended plastic bag in the refrigerator. Wrap the woody ends of the spears in a damp paper towel to prolong their freshness. Be sure to trim off the woody ends before cooking.
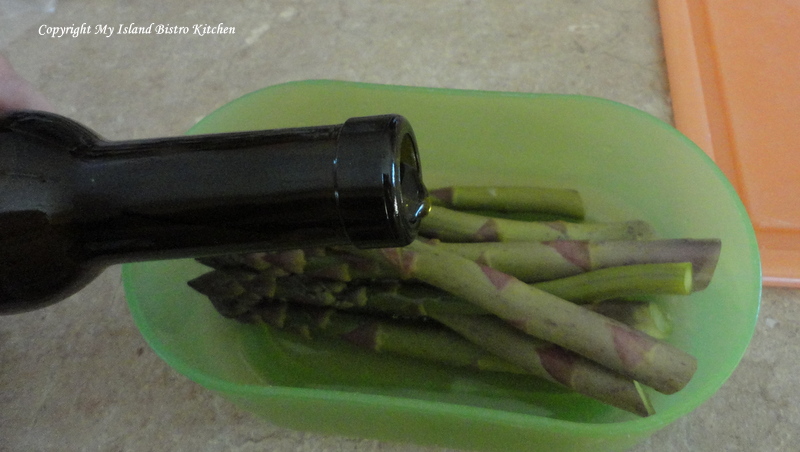
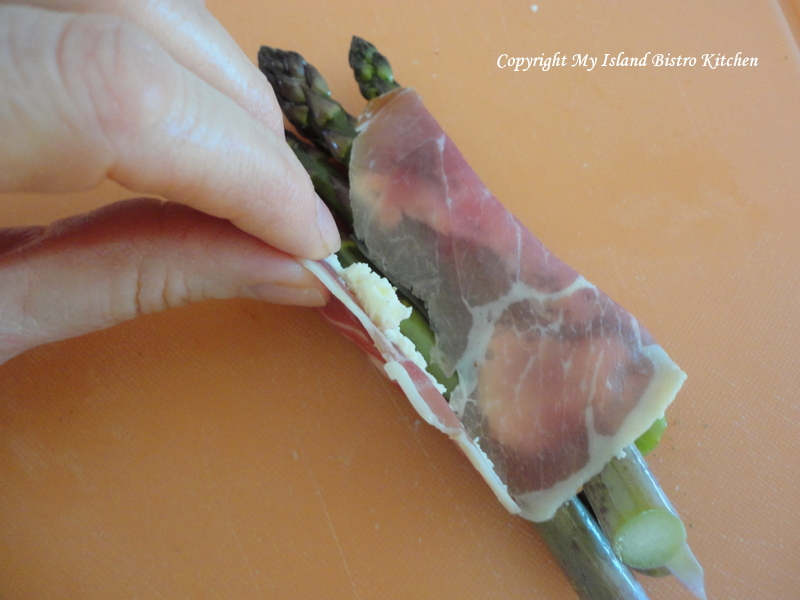
My feature recipe today for asparagus is very simple. I tossed the spears with a light drizzle of Liquid Gold’s Arbequina extra virgin olive oil. Make sure you use a high quality olive oil for this dish.
For each serving I used a super-thin slice of prosciutto onto which I carefully spread a thin layer of spiced garlic and herb soft goat cheese. Be very gentle and careful with this step as prosciutto is very delicate and breaks apart easily.
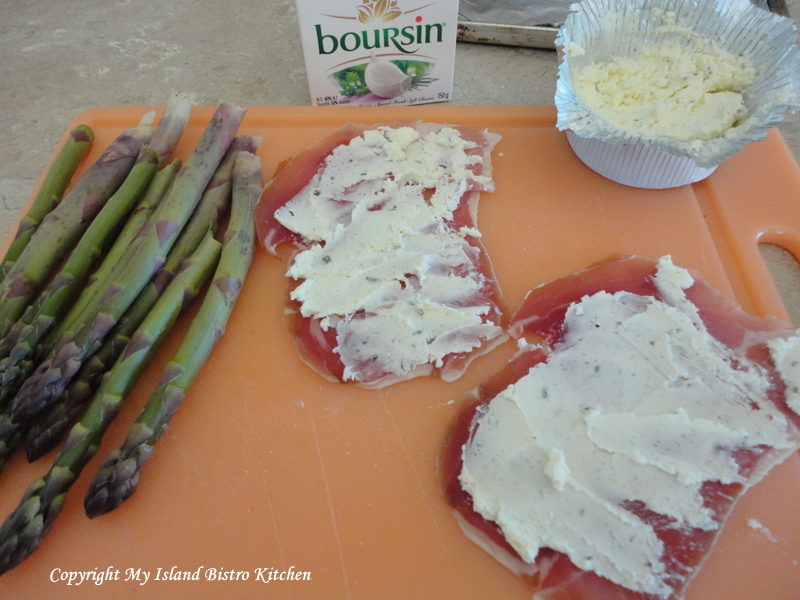
Bundle together five spears and place them on the prosciutto slice. Sprinkle with freshly ground pepper and sea salt.
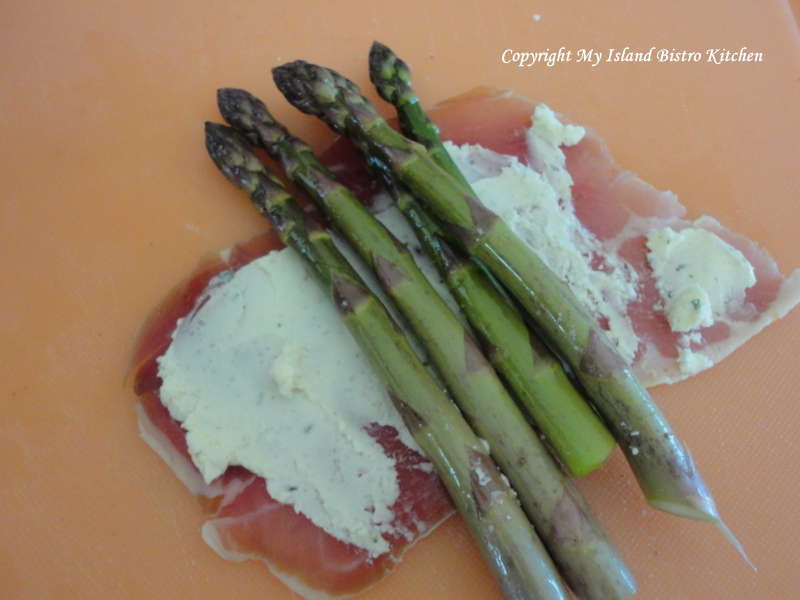
Gently wrap the prosciutto around the asparagus spears.
Transfer each bundle to a lightly greased baking sheet.
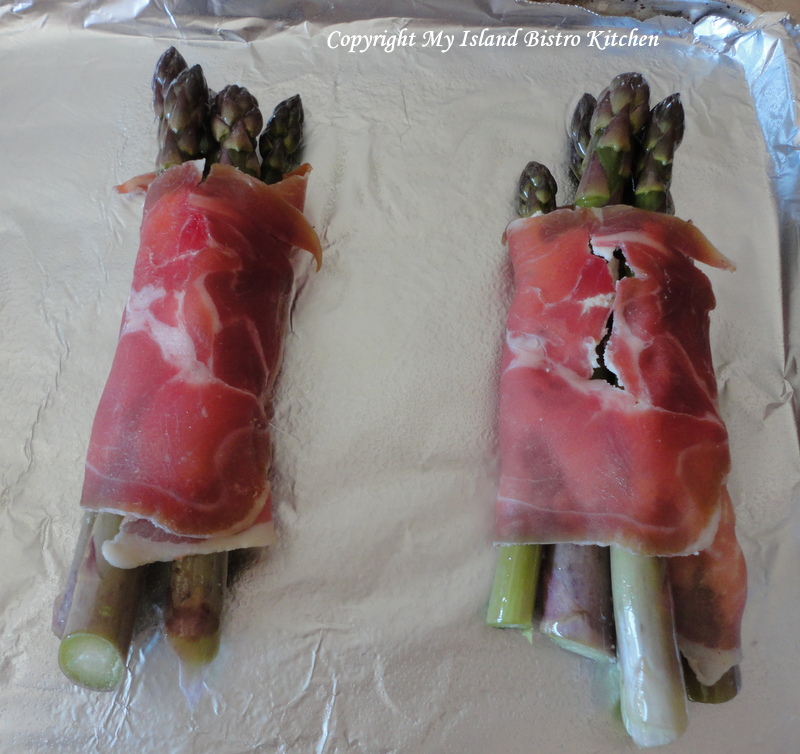
Bake at 375F for about 15 minutes.
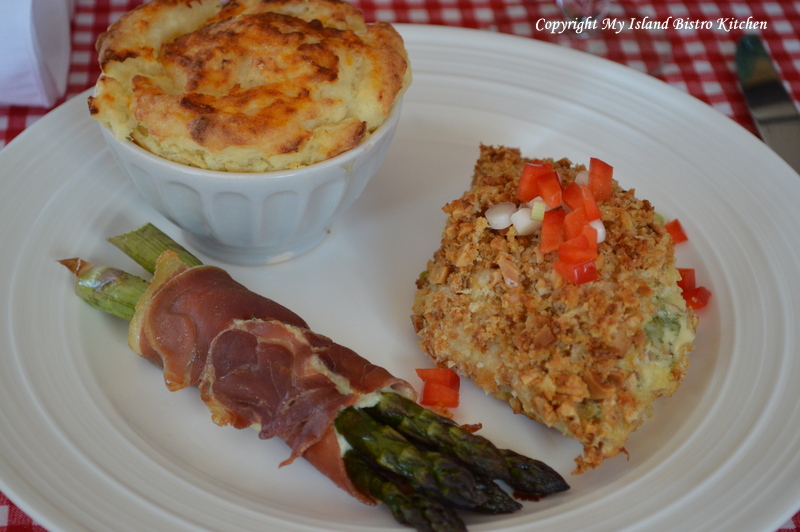
I served the asparagus bundles with an almond-crusted stuffed chicken breast and duchess potatoes.
The Dixon Farm is located at 140 North Tryon Cross Road in North Tryon, PEI. To make arrangements to buy fresh Island asparagus, visit the farm or contact Tim Dixon by phone at 902-432-4771 or by email at dixonfarms1@live.com. Be sure to visit Tim’s website to learn more about the Dixon Farm.
Thank you for visiting “the Bistro” today. There are lots of ways to connect with “the Bistro” through social media:
Join My Island Bistro Kitchen on Facebook
Follow the Bistro’s tweets on twitter @PEIBistro
Find the Bistro on Pinterest at “Island Bistro Kitchen”
Follow along on Instagram at “peibistro”

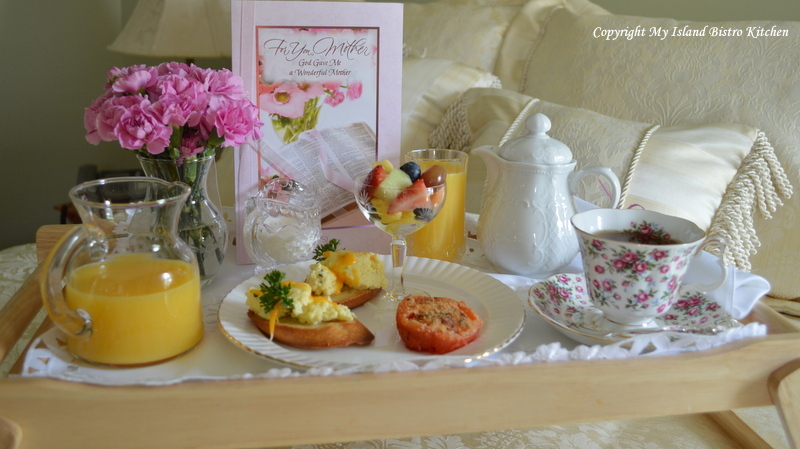
Happy Mother’s Day to all Moms!

What mom doesn’t like to be pampered on Mother’s Day and what says pampering more than breakfast in bed! Dress up an ordinary bed tray with a lovely napkin or pretty placemat and prepare a scrumptious breakfast for Mom.
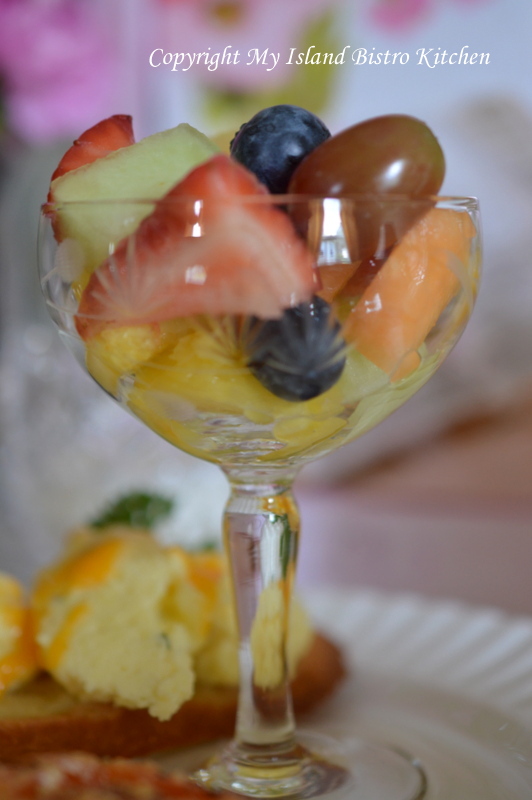
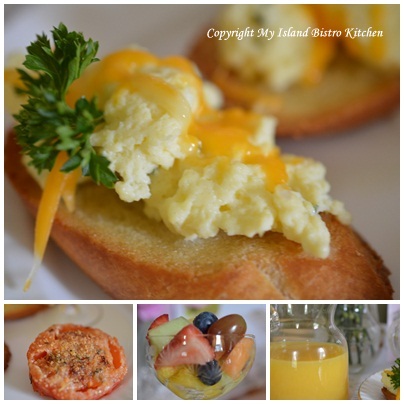
The Menu: Start with a fresh fruit cup presented in the prettiest, daintiest pedestal dessert dish. Choose a variety of fruits of different colors, shapes, and textures.
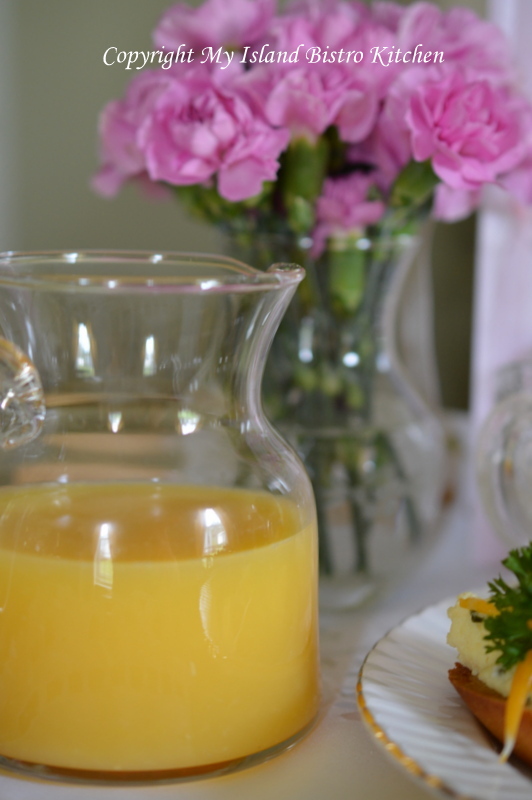
Fresh squeezed orange juice adds an element of sophistication to the breakfast tray.

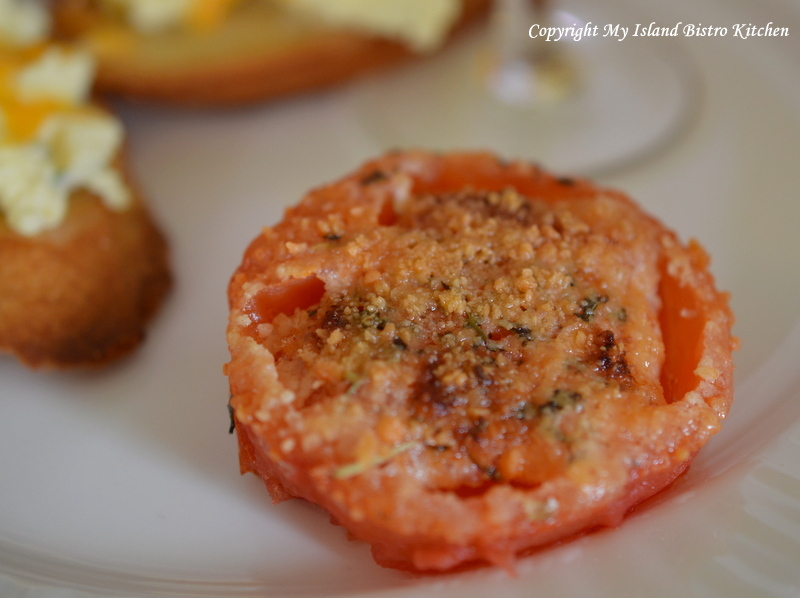
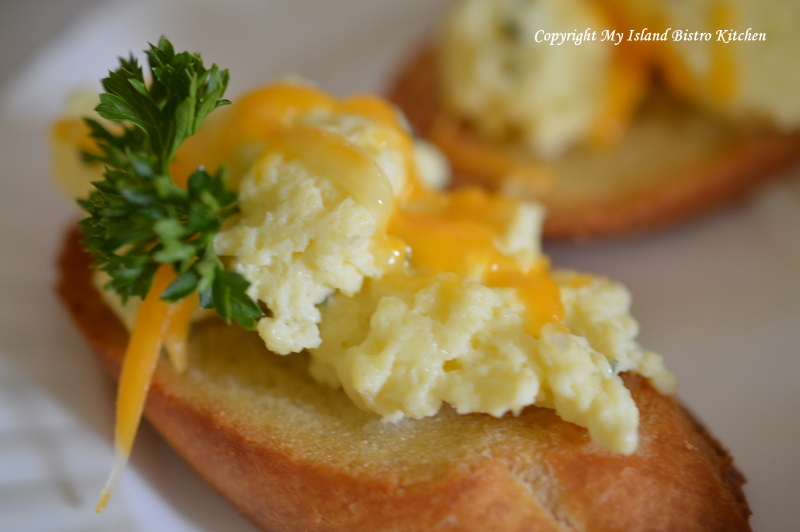
For the main course, I chose to serve scrambled eggs on crostini with a roasted Parmesan tomato half. The roasted tomato is so simple to make. Simply cut a tomato in half. A sprinkle of Italian seasoning, salt, pepper, and a shake of Parmesan cheese is all it takes to season the tomatoes. Drizzle each half tomato with a good quality olive oil – I used Liquid Gold’s Organic Tuscan Herb Infused Olive Oil. Roast the tomato on a lightly greased baking sheet in a 450F oven for about 10 minutes, just until tomato is heated and the Parmesan starts to turn golden in color.
How yummy does this tomato look!
A few herbs and a topping of grated cheddar cheese take scrambled eggs to a whole new level, particularly when served on a tasty crostini.
Look for lots of color to add to the breakfast tray. Color makes the tray look so much more vibrant, interesting, and appealing.
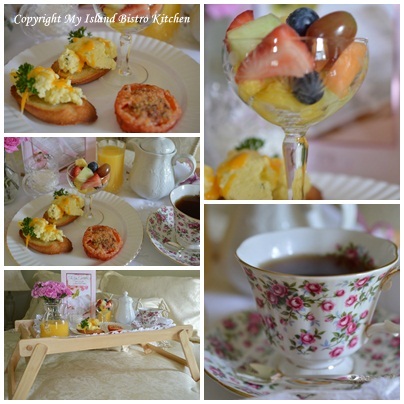
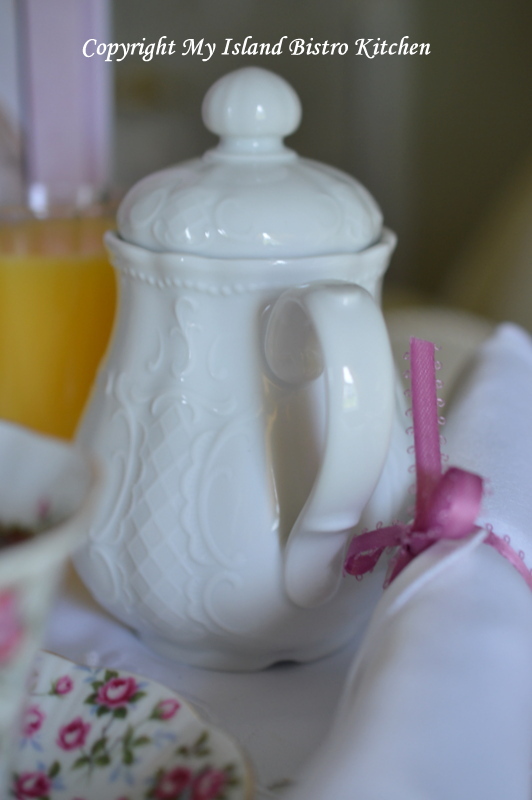
I like these petite individual-sized teapots. They are very versatile and don’t take up much room on a bed tray.
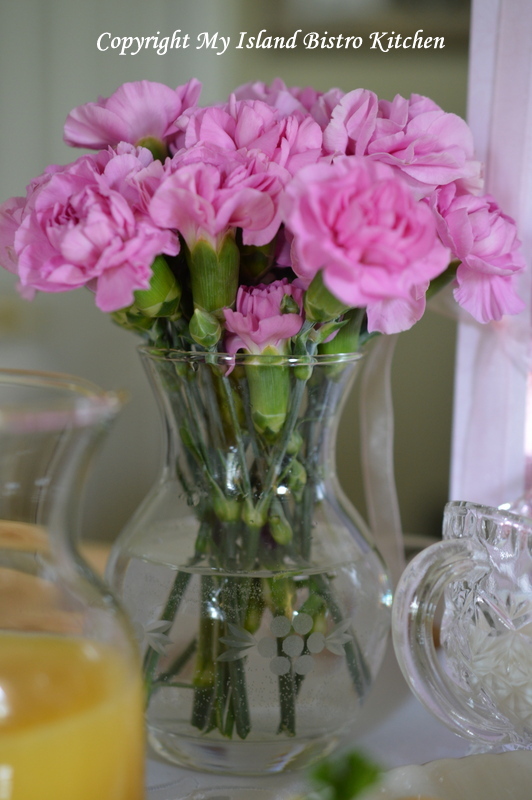
Fresh flowers are a must for any special breakfast in bed tray. Miniature carnations are very suitable for bed trays. Everything should be to scale in order for it to fit on the tray.
Lastly, you’ll want to add the finishing touch of a lovely and carefully chosen Mother’s Day Card.

A beautiful card for a beautiful Mom!

It’s all about Mom on Mother’s Day. It’s not always the big, fancy gifts that touch the heart. Most often, it is something like the care and attention that goes into planning something special, like breakfast in bed and, most importantly spending time together, that means the most.
Thank you for visiting “the Bistro” today. There are lots of ways to connect with “the Bistro” through social media:
Join My Island Bistro Kitchen on Facebook
Follow the Bistro’s tweets on twitter @PEIBistro
Find the Bistro on Pinterest at “Island Bistro Kitchen”
Follow along on Instagram at “peibistro”

I love afternoon tea. It’s such a peaceful, tranquil, and genteel experience. It’s the perfect way to celebrate Mother’s Day. Today, I share photos from my Mother’s Day Afternoon Tea. Enjoy!
On the tea menu: Cucumber and tomato sandwiches, strawberry custard, shortbread, and rainbow marshmallow square. Tea Pairing: New English Teas’ English Afternoon Tea (Coventry, England).
Cool and refreshing cucumber sandwiches.

Tomato sandwiches on thinly sliced artisan bread.

Smooth and creamy strawberry custard and fresh fruit skewers.
I love these colorful and tasty treats, particularly when served in these petite dishes!

Dainty spritz shortbread and rainbow marshmallow squares satisfy the sweet tooth!
Love the pastel shades which are suitable for springtime tea events.
I love how these colors blend attractively on the plate.
Teatime treats are typically petite and dainty.
Teacups and teapot are Japanese porcelain.
Tableware does not need to all match perfectly for a tea table. It just needs to blend well and the pieces compliment each other. Having different patterns creates interest and doesn’t look so matchy-matchy.
These are marvelously-designed delicate cups on pedestals. They look very grand, stately, and elegant, don’t you think!
Love the filigree trim on the saucers.
This slim-line teapot looks very stately and in command on the tea table.
A mixed bouquet of roses is a great compromise when I can’t decide on one particular color theme!
Although by no means the only floral option, roses tend to be perennial favorites for tea table accents.
This four-tier stand is a great space saver, particularly for small tea tables.
While my favorite plates are white because the food shows up so splendidly on them, I like the floral on these plates for a tea table.
Beautiful roses!

I hope you have enjoyed a glimpse into my Mother’s Day Afternoon Tea. It was grand fun.
Happy Mother’s Day To All Moms!
Thank you for visiting “the Bistro” today. There are lots of ways to connect with “the Bistro” through social media:
Join My Island Bistro Kitchen on Facebook
Follow the Bistro’s tweets on twitter @PEIBistro
Find the Bistro on Pinterest at “Island Bistro Kitchen”
Follow along on Instagram at “peibistro”

The opening of the spring lobster season on Prince Edward Island is always an event.
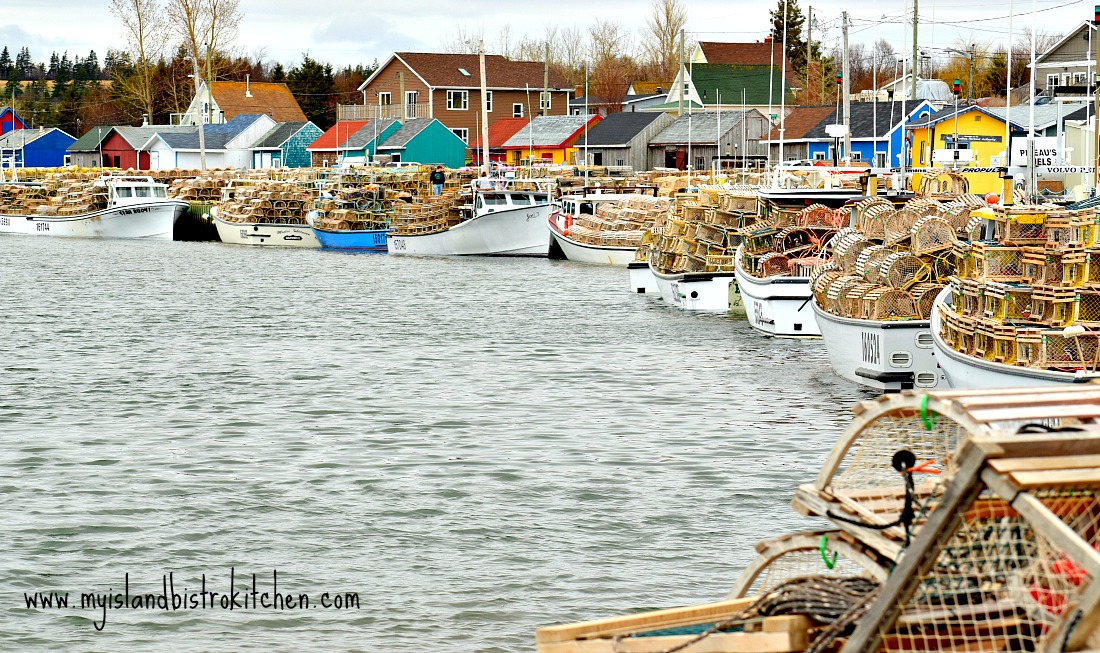
Fishing boats, laden with lobster traps like those in the photo above, depart wharves around the Island in the very early morning to set their traps. This is called “Setting Day” and marks the official opening of the spring lobster fishing season. It is not uncommon for people in the local fishing communities to head to their local wharves or nearby beaches to see the fishing boats off.

It’s a sight to see a parade of boats, heavy laden with traps, heading out at sunrise from a wharf.

Several communities also have church services known as the “Blessing of the Fleet” services on the Sunday before setting day. These are sometimes held inside nearby local churches but, most frequently, they are held on the wharves of the fishing ports.
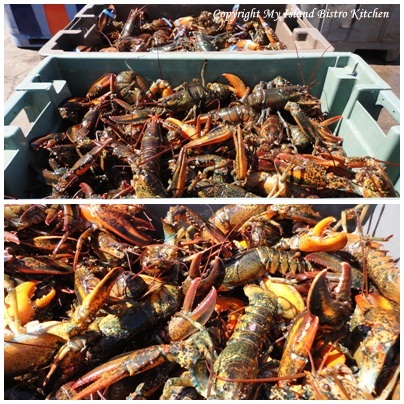
“Landing Day” follows Setting Day and is the day the first catches of the season land on the wharves. Daily catches occur for the duration of the lobster season. The photos below were taken at North Lake Harbour, PEI on June 1, 2012; however, the same scene would be playing out at many harbours across PEI.
![Lobster Fishing Boats Filled With Their Day's Catch Returning to Port at North Lake, PEI [June 1, 2012]](https://myislandbistrokitchen.com/wp-content/uploads/2013/04/DSC04908.jpg)
![Lobster Fishing Boats, North Lake, PEI [June 1, 2012]](https://myislandbistrokitchen.com/wp-content/uploads/2013/04/page-1-Boats-in-North-Lake-001.jpg)
![Unloading the Day's Catch at North Lake Harbour [June 1, 2012]](https://myislandbistrokitchen.com/wp-content/uploads/2013/04/page-2-Boats-in-North-Lake.jpg)
Boats at rest after their day’s work fetching the catch.
![North Lake Harbour, PEI [June 1, 2012]](https://myislandbistrokitchen.com/wp-content/uploads/2013/04/DSC04926-001.jpg)
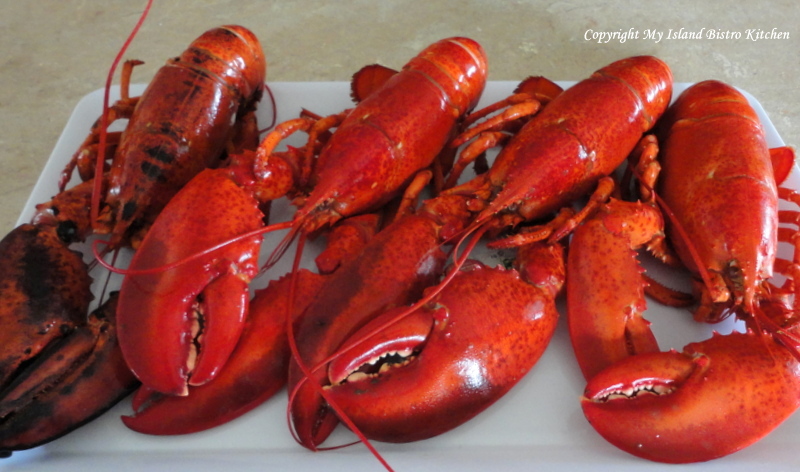
Many Islanders will enjoy lobster straight from the shell for their first “feed” of the season. For many, it is a tradition to have fresh lobster on the first day of the catch. This is one of the benefits of living on an Island – we have plenty of fresh seafood. Many (including myself) will argue that lobster from the spring fishery is better than lobster fished later in the summer from waters that have warmed up over the season (even though lobster from the later catch is very good, too). I don’t know why it is but lobster from the cold waters that surround the Island always does seem to taste better and I think even has a better texture meat.
I remember the first time I was on a Caribbean cruise many years ago, ordering lobster from the dinner menu. My taste buds were salivating for what I knew to be lobster taste. Oh my! It didn’t taste like lobster at all as I know it. That’s when I discovered the difference in taste of lobster that comes out of cold water and that out of very warm waters! I never ordered lobster from a cruise ship menu again. I wait for the good PEI lobster at home!
The ironic part of this is that I never liked lobster when I was growing up. In fact, when the family would be chowing down on lobster, my mother always roasted me a chicken (maybe a wee bit spoiled)! However, they convinced me to try a bite of it when I was probably about 18 years old and I’ve never looked back and have more than made up for it since! I love lobster by itself and in just about any other recipe imaginable!
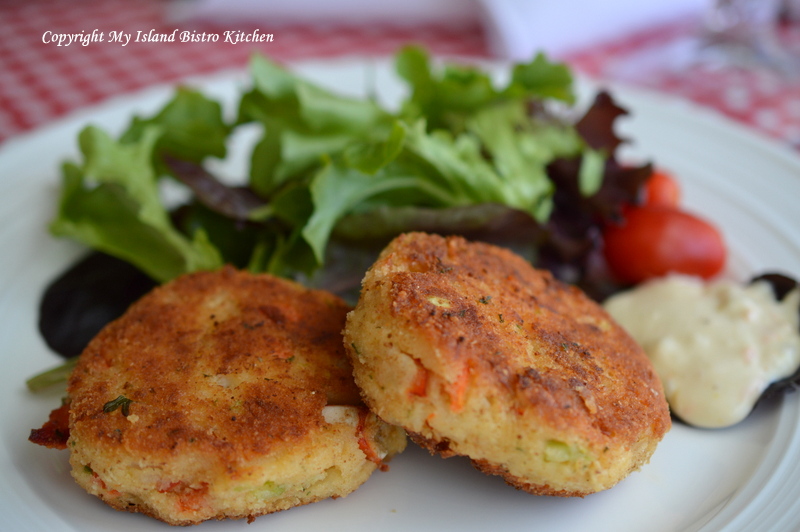
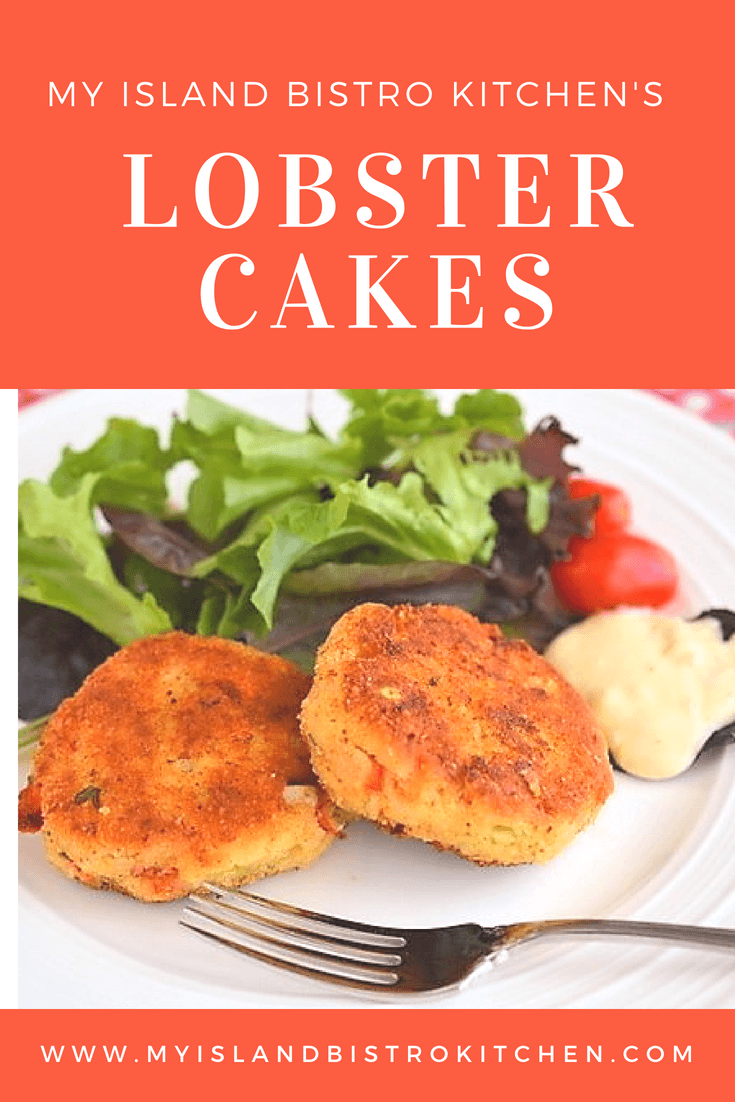
So, today, I am sharing my recipe for Lobster Cakes to celebrate the opening of the PEI lobster fishery season.

Ingredients:
2 cups warm mashed potatoes (about 2-3 medium-large sized potatoes)
1 large egg, beaten
1 tbsp tartar sauce
1 tsp Dijon mustard
2 oz grated cheddar cheese
½ tsp parsley
1/4 – 1/2 tsp garlic powder (optional)
¼ tsp dried dillweed
Freshly ground pepper, to taste
1½ – 2 tbsp onion, finely chopped
2 tbsp celery, finely chopped
2 tbsp red pepper, finely chopped
8 oz. cooked lobster meat (fresh or frozen), cut into bite-sized chunks
½ – 1 cup fine bread crumbs
Apx. ¾ cup finely ground bread crumbs for coating lobster patties
2+ tbsp vegetable oil
Method:
Place warm mashed potatoes in large bowl. Add beaten egg and mix well. Add tartar sauce and Dijon mustard.
Stir in grated cheddar cheese.
Add parsley, garlic powder, dillweed, and pepper. Stir in onion, celery, and red pepper.
Lastly, add the lobster and mix well. Add just enough of the first amount of bread crumbs so the mixture will hold together and can be formed into patties.
Using a ¼ cup measuring cup, scoop up mixture and form into round patties. In shallow bowl, place the second amount of bread crumbs. Coat each patty in the bread crumbs until completely covered on all sides. Place on wax-paper lined baking sheet and chill for 1 hour to allow flavours to blend and for patties to become firm so they won’t break apart when cooked.
Preheat oven to 375F.
Heat oil in non-stick skillet over medium-high heat. When oil is hot, reduce heat to medium and cook the lobster cakes 2-3 minutes on each side, until golden brown. Transfer browned cakes to greased baking sheet. Bake in oven 6-7 minutes to finish the cooking process.
Serve lobster cakes, 2 per person, hot with your favorite tartar sauce and a side green salad.

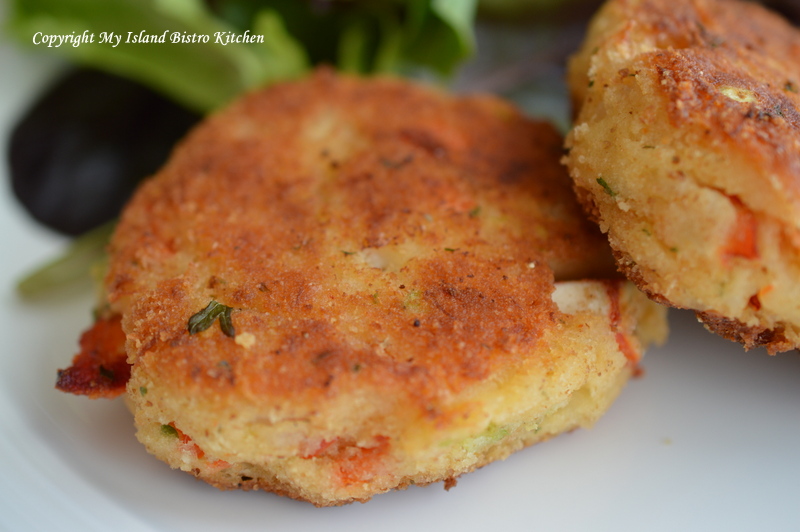
These cakes freeze well, uncooked. Cakes may be cooked directly from frozen state, adding a few more minutes to the cooking process or they may be thawed in the refrigerator for several hours before cooking.
Yield: Apx. 1 dozen cakes
Join the Facebook page for My Island Bistro Kitchen: https://www.facebook.com/MyIslandBistroKitchen/
Follow “the Bistro” on “X” (formerly Twitter): https://twitter.com/PEIBistro/
See the drool-worthy gallery of mouth-watering food photos from My Island Bistro Kitchen on Instagram: https://www.instagram.com/peibistro/
Follow “the Bistro” on Pinterest at https://www.pinterest.ca/peibistro/ and pin the Pinterest-ready photo found at the end of this post to your favorite Pinterest boards.

Serve lobster cakes, 2 per person, hot with your favorite tartar sauce and a side green salad.
These cakes freeze well, uncooked. Cakes may be cooked directly from frozen state, adding a few more minutes to the cooking process or they may be thawed in the refrigerator for several hours before cooking.
Yield: Apx. 1 dozen cakes
[Copyright My Island Bistro Kitchen]
[This post was last updated on April 30, 2024]


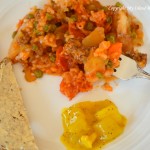
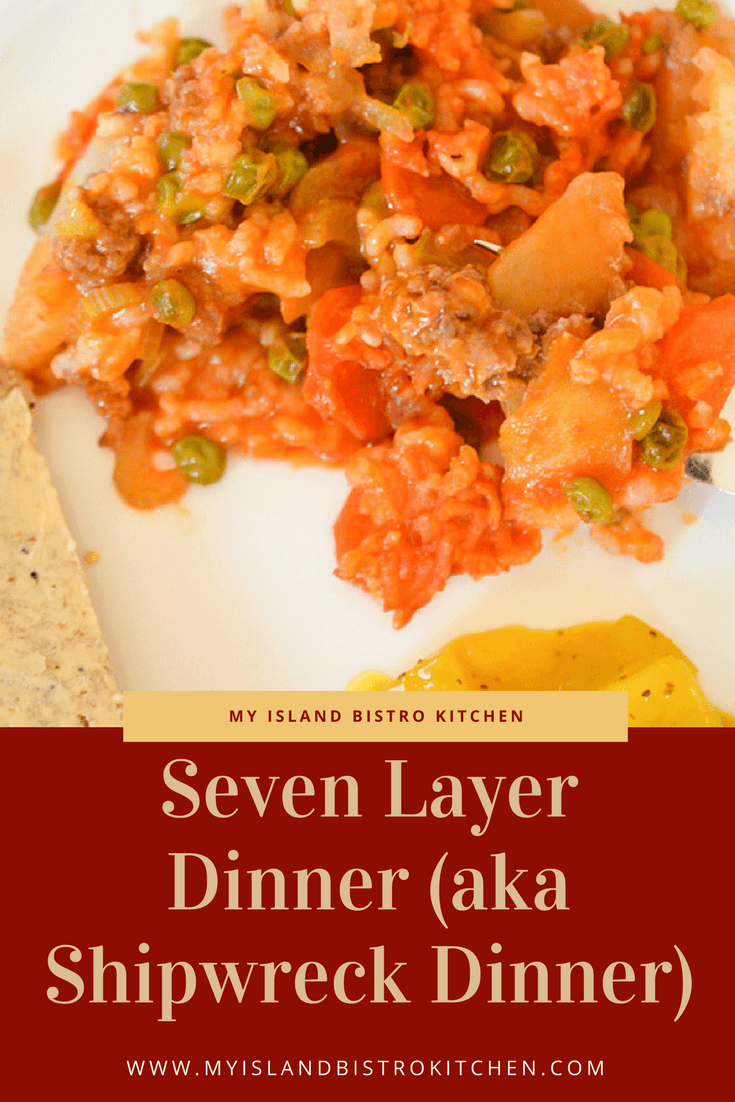
Okay, so my recipe is actually eight layers, but who is counting when the meal is as tasty as this one is!
Seven-layer dinner (sometimes called “Shipwreck”) is really little more than a full dinner in a casserole and baked in the oven. I grew up (as I am sure many of you have) with this vintage meal served on a regular basis. The seven main ingredients are: 1) onions, 2) meat, 3) potatoes, 4) celery, 5) carrot, 6) peas, and 7) rice. Sometimes, it’s a six-layer dinner depending on what veggies I have on hand and sometimes it might be eight or nine layers thick. I like to add parsnip because it adds a level of sweetness. Sometimes, I will slice turnip very thinly and add it as well. Frozen corn also works in addition to the frozen peas or instead of. In that regard, it is almost a potluck dish!
It has probably been named “Shipwreck” because it can be made with pretty much any vegetables you happen to have on hand as well as different kinds of meats, such as ground beef or sausage and it is also an economical way to stretch the meat content. In many households, it can be made with what is on hand without having to go shopping and it doesn’t take any kind of exotic or hard-to-find ingredients. This is an old-fashioned hearty meal. Have you noticed that many of these old “stand-by” meals are becoming popular again?
On a regular basis, I tend to cook with a fair bit of seasonings and spices. However, this is one dish that I never add anything to it other than salt and pepper and the onion for flavour.
In my home, I grew up with this recipe being made with ground beef (we never used any other kind of meat in it). The beef I used for this casserole is 100% Island beef and was purchased at KJL Meats, a local butcher shop in Charlottetown, PEI.
This is a great meal to make when you have little time for meal preparation and clean-up because all the veggies, the rice, and the meat cook together in the one casserole so there are no pots and pans to wash (bonus!) other than the dish it bakes in. And, your kitchen will smell divine when this is baking in the oven! If there happens to be any leftover, this meal carries over well and, in fact, the flavours seem to become even richer the next day when it is reheated.
Ingredients:
1 medium onion
2 medium-sized potatoes, thinly sliced (about 1/8 inch thick)
½ – ¾ pound extra lean ground beef
½ cup celery
1/3 cup parsnips, thinly sliced (about 1/16 inch thick)
1 cup carrots, thinly sliced
½ cup frozen peas
scant ½ cup Minute Rice
1 can tomato soup
1 soup can of water
Method:
Assemble ingredients.
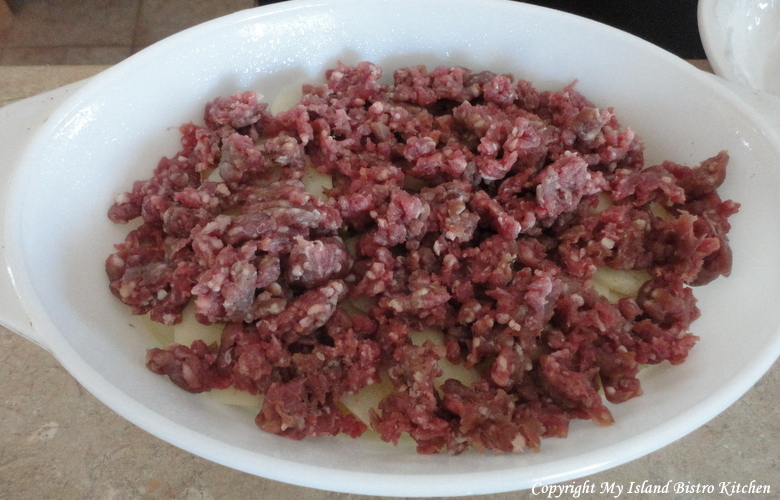
 Grease 2-quart casserole. Peel and slice onions to make first layer of casserole.
 Add the layer of sliced potatoes and sprinkle with salt and pepper.
 Add the layer of ground beef. Sprinkle with salt and pepper.
 Add celery, parsnips, carrots, and frozen peas. Sprinkle with salt and pepper.
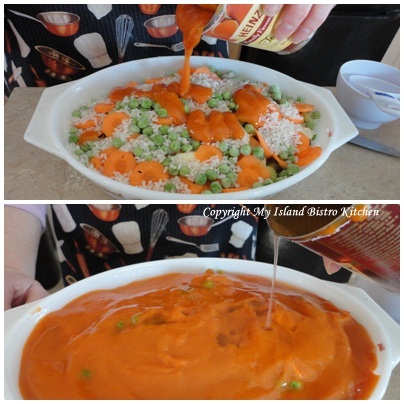
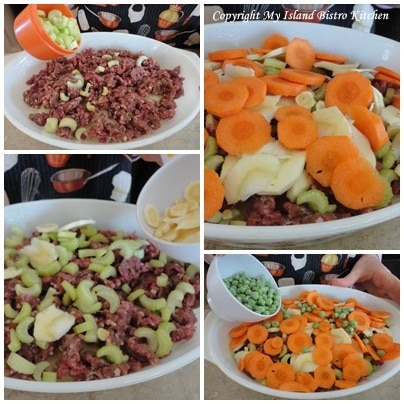 Sprinkle ingredients with rice. Cover casserole ingredients with can of tomato soup. Pour one soup can of water over top of ingredients (or, if you wish, you can mix the soup and water together and pour as one over the casserole ingredients).
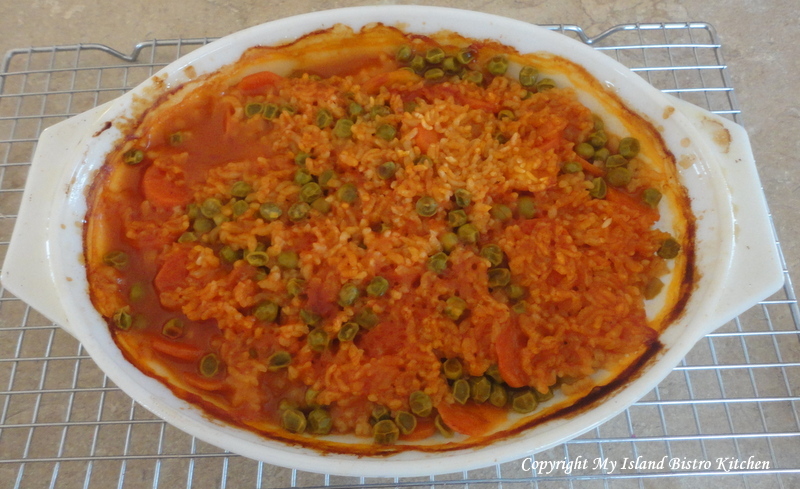
 Cover and bake at 350F for 1 ½ – 2 hours until vegetables are tender.
Serves 4-6
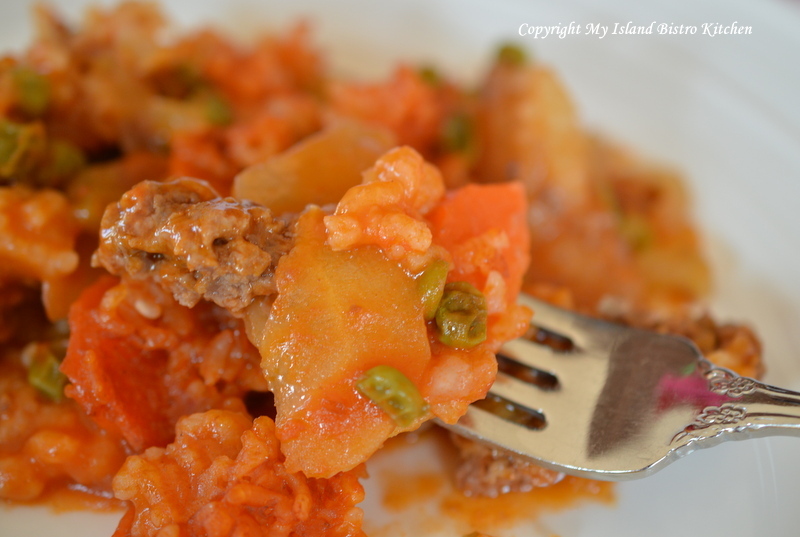
 It is hard to plate this meal attractively but its taste more than makes up for its lack of presentation!
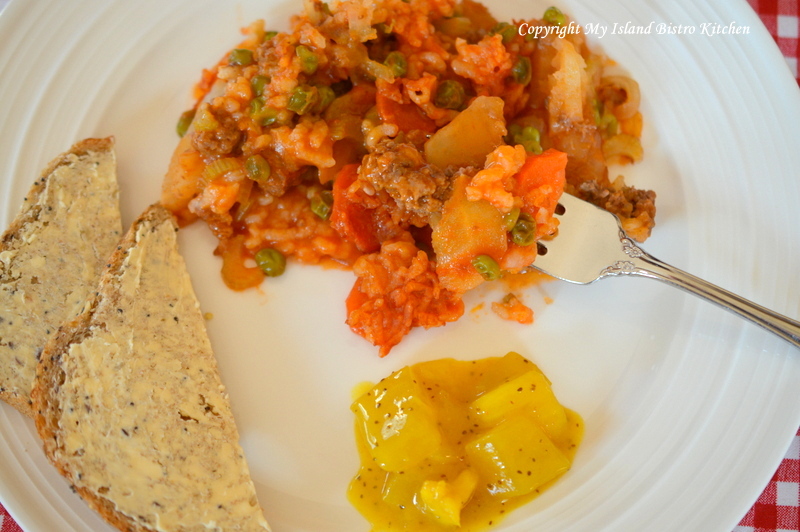
 Suggested Serving: Serve with homemade mustard pickles and whole grain artisan bread.
Join the Facebook page for My Island Bistro Kitchen: https://www.facebook.com/MyIslandBistroKitchen/
Follow “the Bistro” on “X” (formerly Twitter): https://twitter.com/PEIBistro/
See the drool-worthy gallery of mouth-watering food photos from My Island Bistro Kitchen on Instagram: https://www.instagram.com/peibistro/
Follow “the Bistro” on Pinterest at https://www.pinterest.ca/peibistro/ and pin the Pinterest-ready photo found at the end of this post to your favorite Pinterest boards.
Serves 4-6
Suggested Serving: Serve with homemade mustard pickles and whole grain artisan bread.
[Copyright My Island Bistro Kitchen]


For the third consecutive year, April has represented Burger Love on Prince Edward Island. Yes, that’s right, love of beef burgers! This year, 31 restaurants across the Island paid a $600 entry fee to cover advertising and promotion costs to participate in the month-long celebration of Island beef. PEI Burger Love has certainly created a hype and brought patrons to a number of Island restaurants to sample the array of gourmet beef burgers that chefs have created specially for the event. Make no mistake about it, these are not your average hamburgers. These are gourmet burgers that require a hefty appetite to do them justice.
PEI Burger Love, created by Fresh Media, is carried out in partnership with Prince Edward Island Cattle Producers, PEI Department of Agriculture and Forestry, PEI Flavours, PEI Potato Board, and the PEI Restaurant Association. The formation of this collaborative group has brought heightened awareness to PEI’s beef industry.
In its inaugural year in 2011, a total of 14 Island restaurants participated with 5500 burgers being served in the month of April. Last year, 22 restaurants signed on and, collectively, sold over 16,000 burgers in just one month. I suspect, by the time, the event ends on April 30th, the number of beef burgers consumed on PEI in the month of April, 2013, will have surpassed 2012 figures.
For the month of April, one would be hard-pressed to go anywhere on the Island without hearing some talk about PEI Burger Love. In workplaces, on the street, and just about anywhere, one could hear Islanders enthusiastically talking about and describing the burgers they had already tried and the ones still on their list. Social media has been used extensively in this awareness campaign and burgers have suddenly become the hottest and most photographed subjects around! Servers would bring burgers to the tables and, all of a sudden, cameras and cell phones appeared and started clicking! Photographs of burgers have been everywhere, including on twitter and on Facebook. This year, for the first time, PEI Burger Love engaged nine individuals, one of whom was me, to use blogging as a platform to further advertise the Burger Love campaign.
Overall, I believe Islanders have embraced this campaign and have had a lot of fun with it. It has not been uncommon throughout the month to see groups of as many as 20 heading to the local restaurants at any day at noon to try out the burgers. Even local businesses got in on the action. Staff of Century 21 Colonial Realty in Charlottetown, for example, select one restaurant a week, call ahead with their burger order, and then their entire team of real estate agents show up en masse with a video camera in tow. Joel Ives says they have been doing this since Burger Love began and find it’s a fun activity for their team while supporting local at the same time. Says Joel, “Our business is about being local – local homes, local businesses, and being in the community. We do our best to support local initiatives. When PEI Burger Love came out, we thought we could have some fun with it by going as a group to eat lunch together, have some laughs, and make some fun videos. Since all of our agents are busy doing their own thing, it is great that we can book off one lunch a week during the [Burger Love] campaign to get together.” You can check out the Century 21 fun videos here to see how one local business has embraced PEI Burger Love.
Diners are engaged in Burger Love fever too as they head to local dining establishments to order up the creative burgers. They can rate the burgers they eat by voting online for their favorite and win great prizes in the process as well as help crown the most popular burger in the 2013 Burger Love campaign.
April is traditionally a slower month for local restaurants because the tourist season hasn’t yet started but, this year, participating restaurants are hopping busy as burger lovers converge on their establishments to sample the many burger options. Linda Dickie, Food and Beverage Director at Mavor’s Restaurant in the Confederation Centre of the Arts, says they chose to participate in PEI Burger Love because they like to support local whenever possible and it brings awareness to the restaurant. According to Linda, Mavors sold 1700 burgers in the first couple of weeks of the campaign with the highest single day servings of 210 burgers!
Chef James Oja, who owns and operates The Big Orange Lunchbox restaurant in downtown Charlottetown, is a first-time participant in PEI Burger Love. He says the annual PEI Burger Love campaign “generates a busy month giving restaurants that participate a little warm-up for summer”. Chef Oja claims Island beef is the best beef in Atlantic Canada and that his “supplier, Bluefield Natural Products, provides superior beef that is richer in iron, antioxidants, flavour, and texture”.
As I mentioned earlier, I was one of nine guest bloggers for PEI Burger Love this year and my assignment was to sample four of the burgers and blog about them. Now, I thought four burgers was a lot to consume in a little over a week. However, Connor Jay set himself the challenge to eat all 31 burgers….and he did… in just 14 days! Averaging two a day plus three on two different days, he proudly says there was one day that he ate two of these huge burgers within two hours! Asked why he decided to set out to eat all 31 burgers, Connor says he thought “it would be something fun to do and would be a great way to experience the Island“. He says he “loves the PEI Burger Love campaign and thought eating all 31 [burgers] would be a great opportunity to get other friends involved in it and that it would inspire them to go grab a burg“. I am also aware of a workplace where employees would order a couple of burgers from each of 3-4 restaurants for lunch each Friday in April, bring them back to their workplace, and cut them into quarters so that co-workers could have the opportunity to sample as many of the burgers as possible.
Other than the requirement to use 100% Island beef in the burgers, chefs had unfettered licence to dress the burgers with whatever toppings they wanted and to prepare and present them as creatively as they wished. Suffice it to say that Island chefs rose to the challenge and created some mighty fine culinary creations with unique flavour combinations.
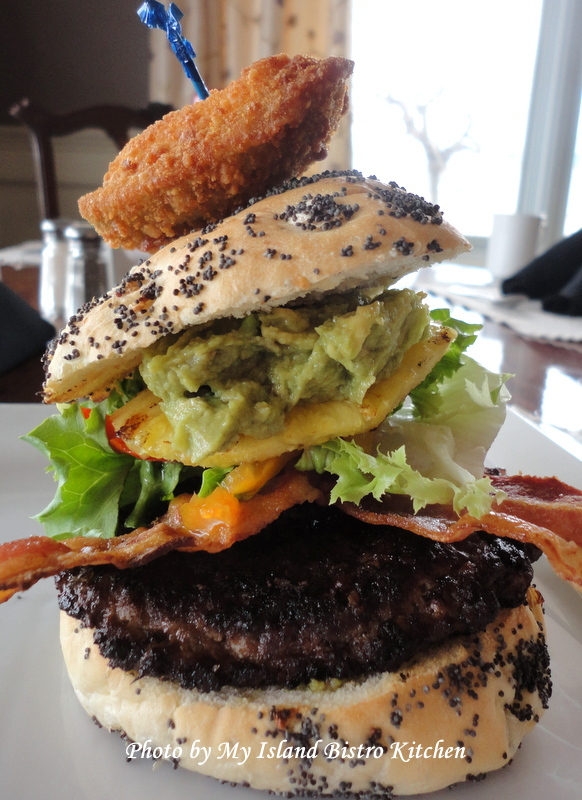
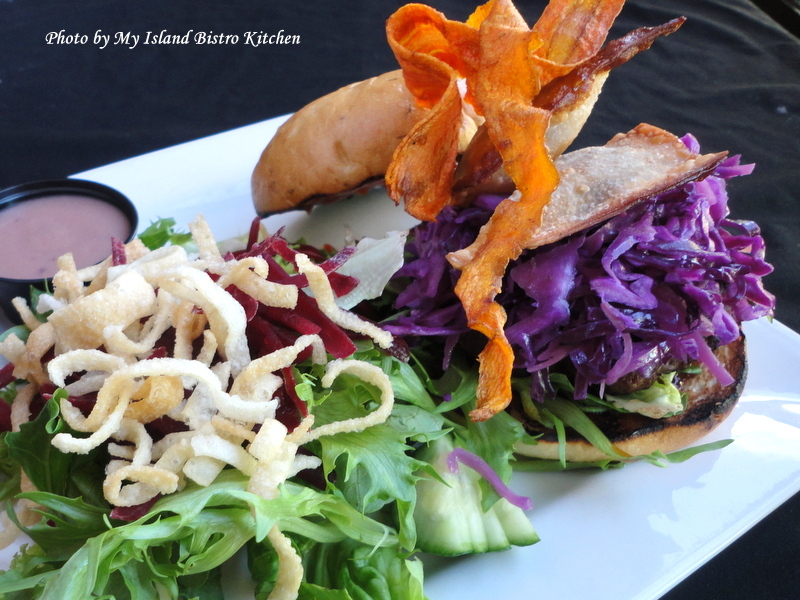
The meat in the burgers generally ranged in size from 6 oz to 9 oz and was prepared in different ways – some burgers were charred over an open flame while others were grilled or sautéed. Toppings ranged from candied bacon (yes, oh là là!) to nachos and salsa, coleslaw, bacon jam, Jalapeno peppers, various renditions of aioli, Portobello mushrooms, guacamole, and onions encased in wontons or presented as beer-battered onion rings, and just about anything else you could imagine going into these tall burgers. Then, there were the many variations of buns encasing all this goodness. One burger even had two grilled cheese sandwiches holding it in place instead of a traditional bun! And, of course, each restaurant creatively named their burger. Here are photographs of the four burgers I was assigned to sample as part of my blog assignment:
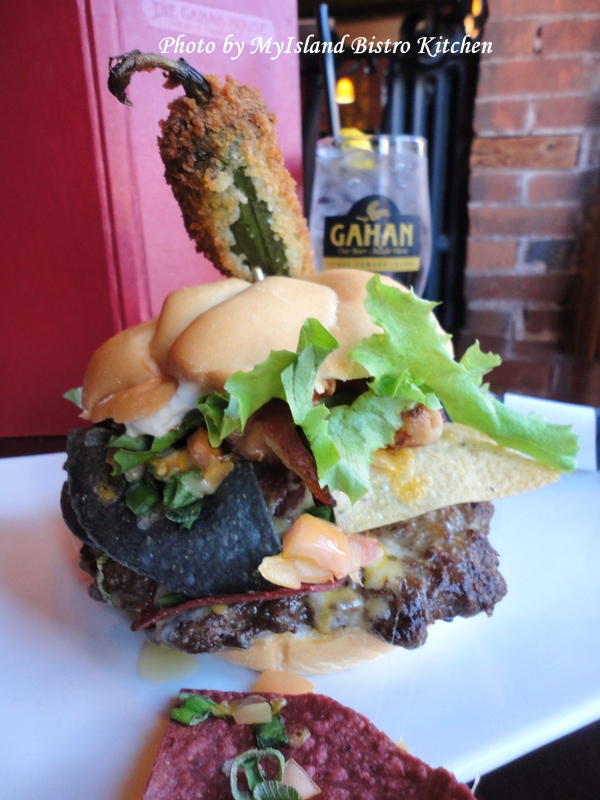
From the Gahan House in Charlottetown, PEI, comes the “Not’cha Burger” that features Tortilla chips, salsa, spicy cheese dip, and Jalapeno mayo to accessorize the beef burger.
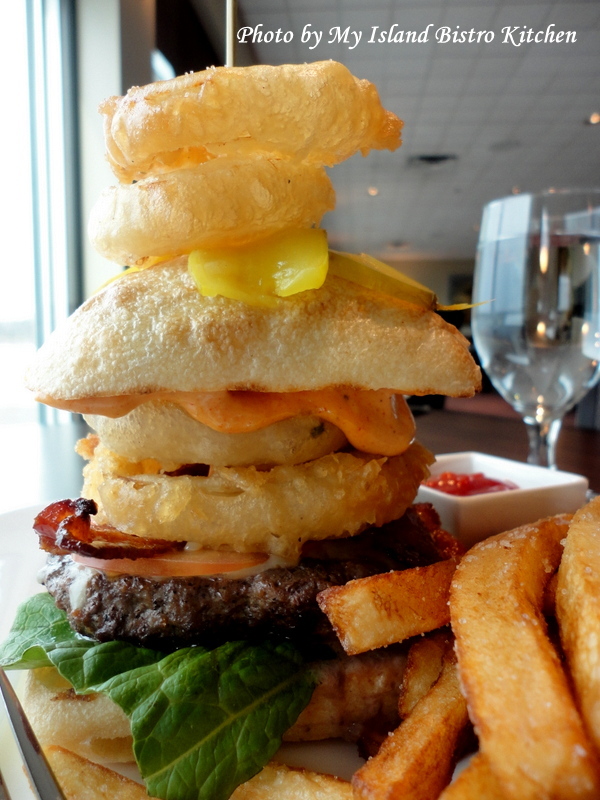
The “Canadian Legend Burger” was created by the Lucy Maud Dining Room, a teaching restaurant in the Culinary Institute of Canada. It features a gouda-stuffed burger accessorized with smoked tomato aioli, confit cherry tomato, bacon jam, candied bacon, and the best onion rings I have ever tasted.
The Prince William Dining Room of the Loyalist Inn in Summerside, PEI, presented the “Big Kuhuna Burger” that featured smoked bacon, banana peppers, a grilled pineapple ring, and guacamole.
The Old Triangle in downtown Charlottetown created the “Mr. Miyagi Burger” that included Hoisin BBQ sauce, Asian slaw, and caramelized onion wontons.
As you can see, these are huge, well accessorized burgers! If I had one suggestion for organizers for future PEI Burger Love campaigns it would be to consider also offering smaller versions (perhaps even slider size) for those who don’t have large appetites but yet who want to try out the burgers.
The gourmet burgers, on average, are in the $12-$14 range (burger only).
The Prince Edward Island Cattle Producers Association reports being pleased with the campaign. The Association gets great exposure for its industry and, as representative Rinnie Bradley says, they “are a small industry compared to dairy or potatoes so it has been difficult to get our message out to the general public that we are important to the Island’s economy. From truckers, to feed mills, vets, farm machine shops, to processing facilities and meat shops, the beef industry contributes significantly to our economy directly and indirectly.” Bradley says “PEI Burger Love 2013 has surpassed our expectations to date. We are very pleased that so many restaurants have signed on and that several new participants decided to include Island beef on their menus. We hope Islanders and visitors alike will get out and enjoy the amazing burgers, and seek out Island beef for their meals at home.”
So, Islanders, only 6 days left to get out and try some of these gourmet burgers before PEI Burger Love 2013 ends. This is a great way to show support for the local beef industry as well as the many Island restaurants which have chosen to participate in this campaign to promote Island beef. There is a burger out there for everyone’s taste!
POSTCRIPT (May 8, 2013):
The statistics are in for the 2013 Burger Love Campaign. A total of 46,204 beef burgers were sold in 31 participating restaurants during the month-long event in April. This translates into 21,917 pounds of beef consumed during this time period. Sales for the burgers during the month of April are estimated at $580,008.62. Voters selected “The Smokin’ Fox” from Phinley’s Diner in Stratford, just across the bridge from Charlottetown, PEI, as their “Most Loved Burger 2013”.
Not bad, PEI, not bad at all!

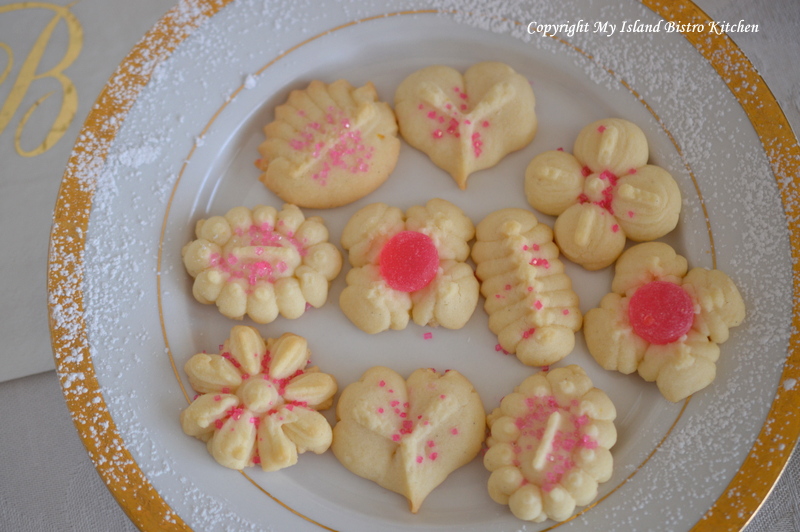
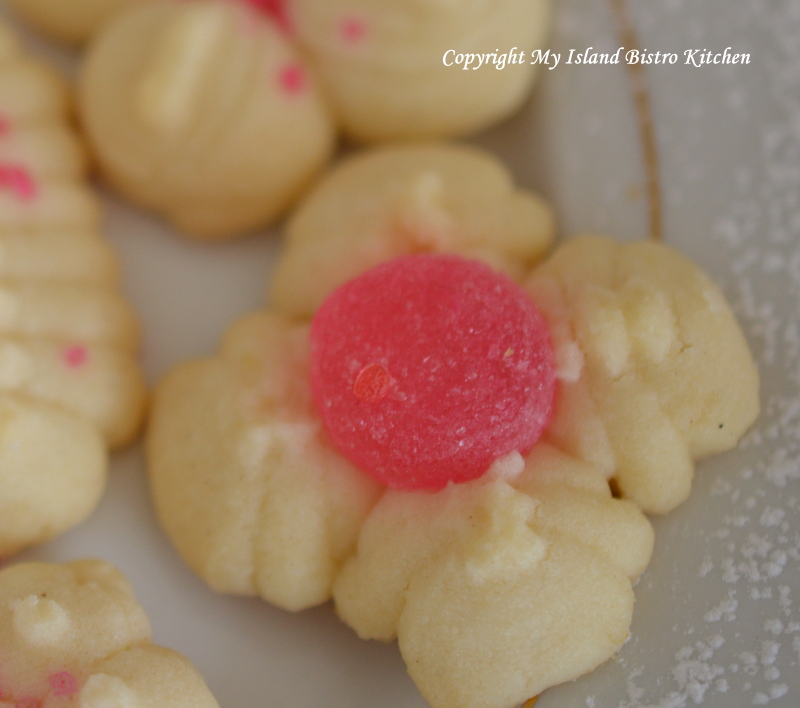
Spritz cookies are dainty-shaped cookies that are crisp and buttery. They are made by pushing soft cookie dough through a cookie press which is a cylinder fitted with a decorative disk that has patterned holes through which the dough is “squirted” or pressed into shapes. Typically, cookie presses come with many different decorative disks – mine has probably 20 or more.
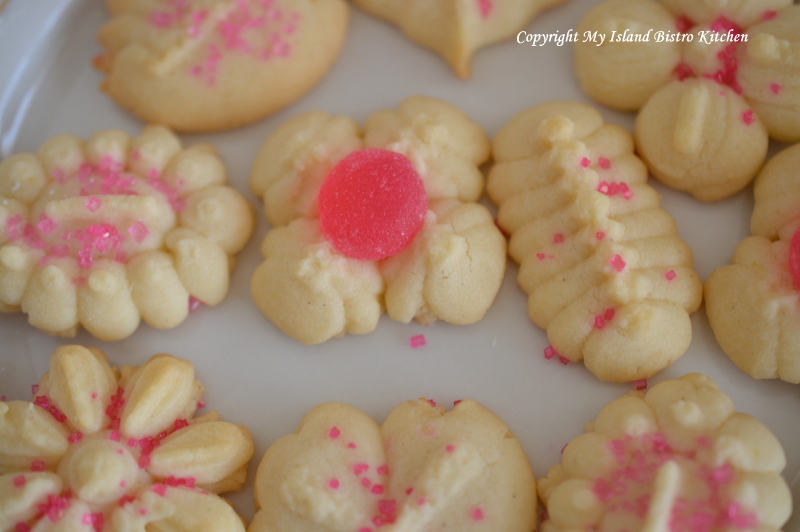
These cookies are popular at Christmas, special occasions, and are very suitable for afternoon teas as they can be made in so many different shapes and colors and can be further embellished with icing, colored sugar, miniature gumdrops, or dragées.
My recipe for Lemon Spritz Cookies is buttery rich and delicate. I like the flavour burst of lemon juice and zest in these petite cookies.
This recipe does best when the dough is chilled for 24 hours to allow the egg yolk to get fully incorporated and absorbed into the other ingredients. Unlike most liquids, such as water or milk, for example, eggs take a lot more time to become incorporated into the dry ingredients. When the dough comes out of the refrigerator, it will be too hard to push through the cookie press so let the dough sit at room temperature for about an hour or so until it becomes pliable enough that it can be formed into a roll that can be inserted into the cookie press cylinder. You’ll notice this recipe has no baking powder or soda. This is because that would cause the cookies to raise which, in turn, would result in them losing their shape and design that makes them spritz cookies.
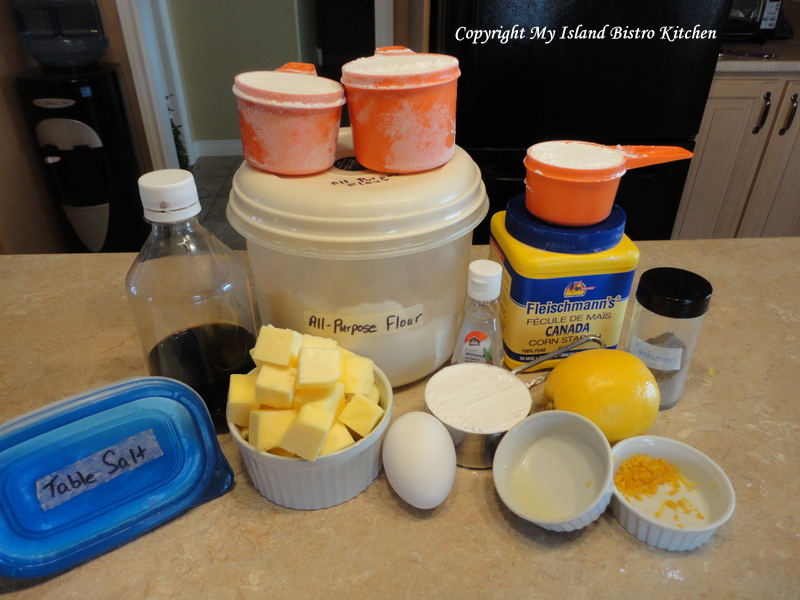
Lemon Spritz Cookies
1 cup butter, softened
½ cup icing sugar
½ cup cornstarch
1 egg yolk
½ tsp lemon juice
½ tsp vanilla
¼ tsp almond flavouring
1 tsp finely grated lemon zest
1 2/3 cup flour
smidgeon salt
pinch cardamom
Method:
Assemble ingredients.
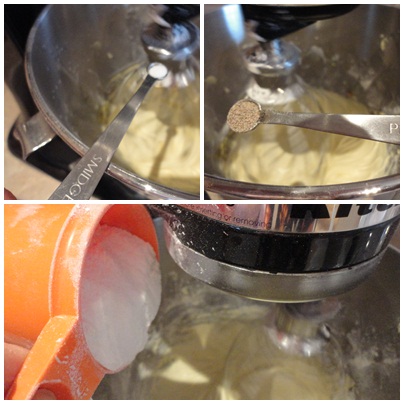
Cream butter and icing sugar.
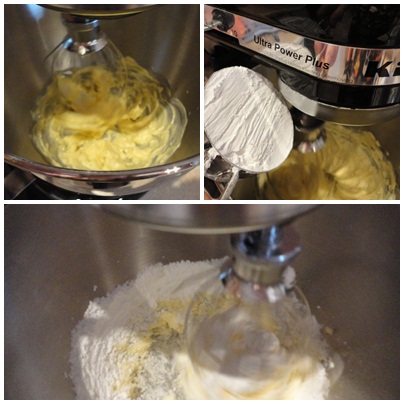
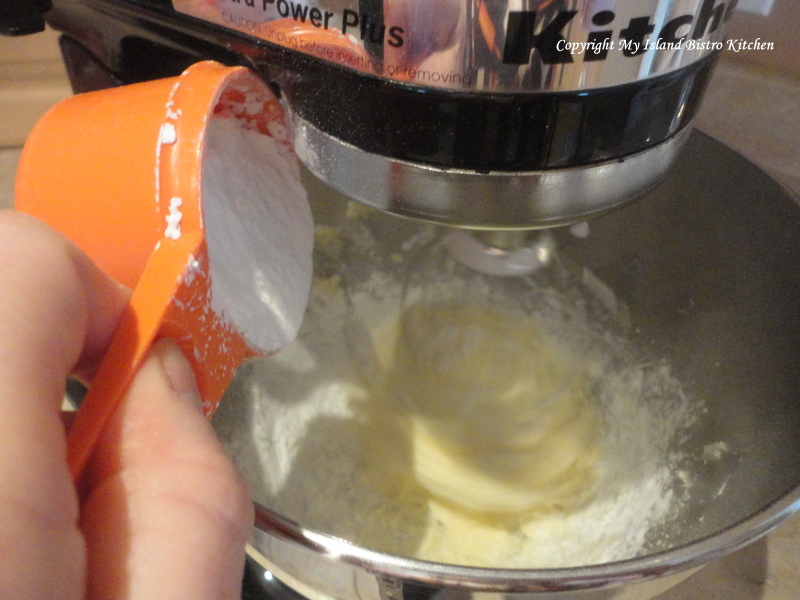
Blend in cornstarch.
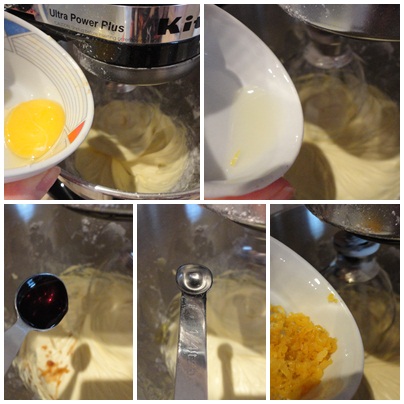
Add egg yolk, lemon juice, vanilla, almond flavouring, and lemon zest.
Add the flour, salt, and cardamom to creamed mixture, stirring until well combined.
Cover dough tightly with plastic wrap and place in refrigerator for 24 hours.
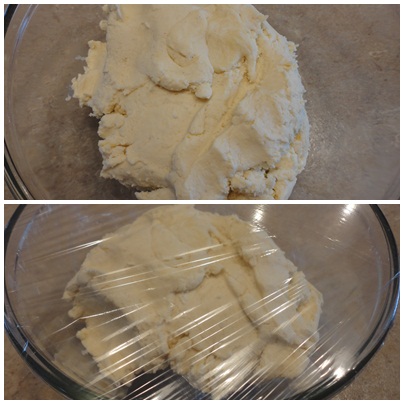
Remove dough from refrigerator and let sit at room temperature for apx. 1 hour. Form dough into a roll that will fit inside the cookie press cylinder. Insert dough roll into the cookie press.
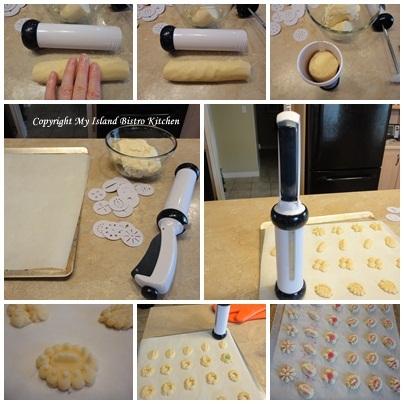
Line cookie sheets with parchment paper. Follow manufacturer’s directions for your cookie press to form the cookies into decorative shapes. Decorate with colored sugar, if desired. Bake at 400F for 7-8 minutes. Watch the cookies closely as their high butter content and small size means they will burn easily and quickly. Let cookies cool on baking sheets for 2-3 minutes then transfer them to wire racks to finish cooling.
Thank you for visiting “the Bistro” today. There are lots of ways to connect with “the Bistro” through social media:
Join My Island Bistro Kitchen on Facebook
Follow the Bistro’s tweets on twitter @PEIBistro
Find the Bistro on Pinterest at “Island Bistro Kitchen”
Follow along on Instagram at “peibistro”