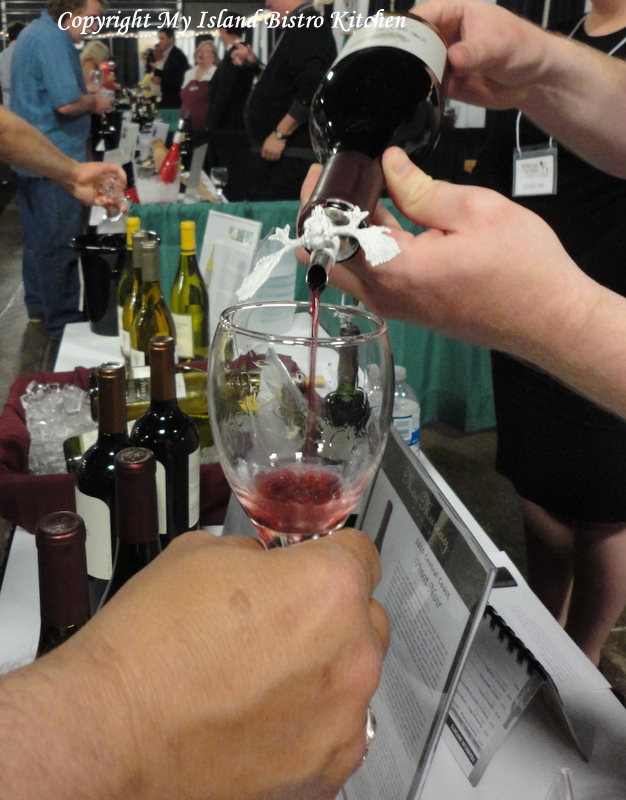
The New Festival of Wines Prince Edward Island is a signature springtime event on the Island. Now in its 19th year, this is the first time the PEI Liquor Control Commission has hired a private event management company, Versatile Management Group, to manage the Festival. Versatile has pulled out all the stops to make this a high-end event.
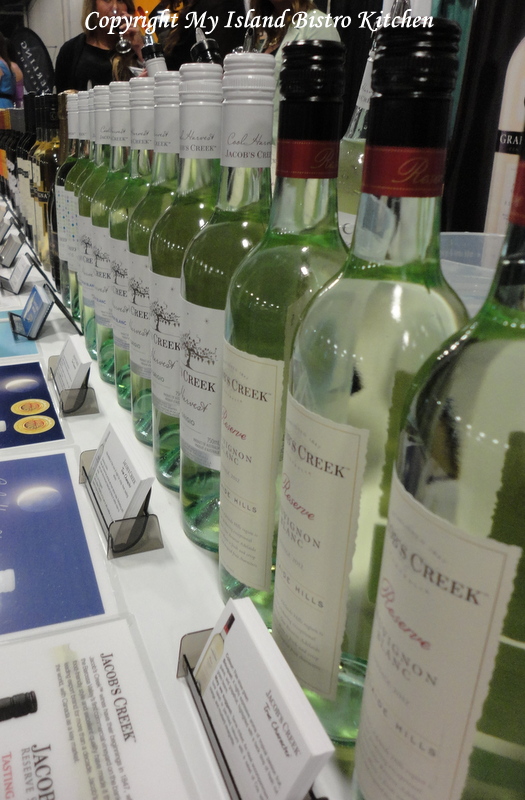
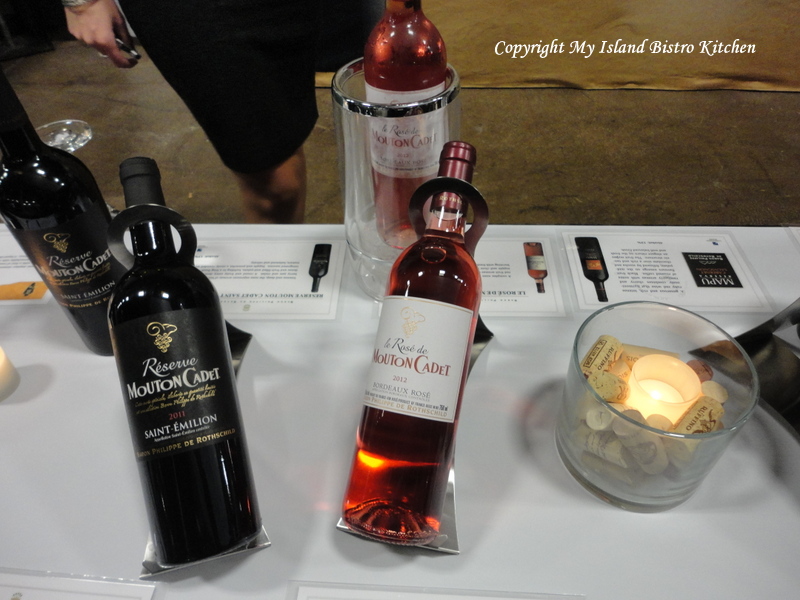
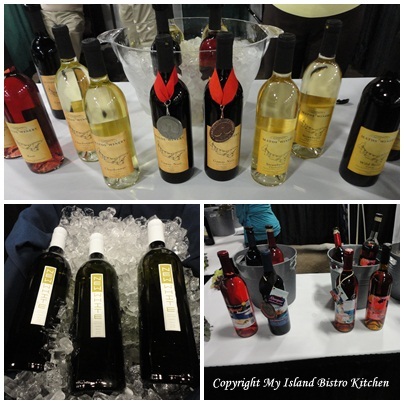
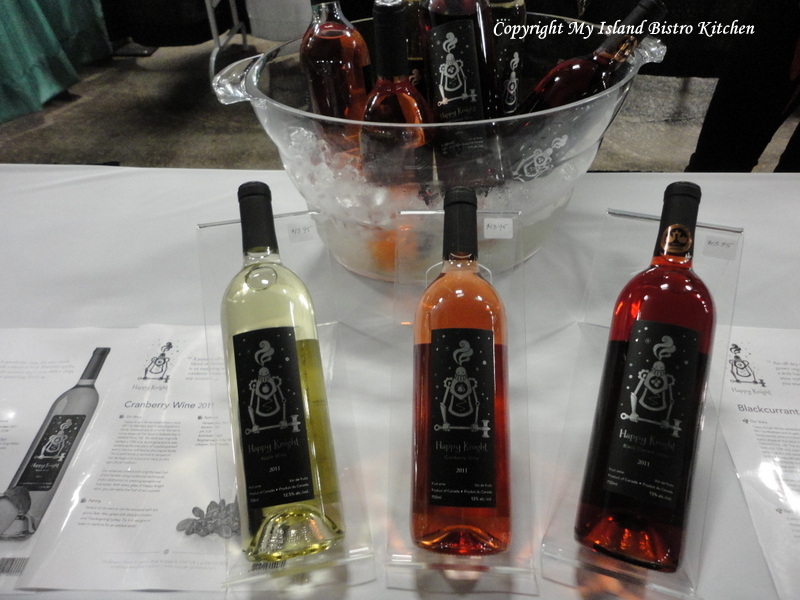
This year, there are 39 booths providing samples of 225 wines from twelve different countries. Many of these wines are new to PEI and are not currently sold in local liquor stores. These wines will, however, be available for sale at the onsite Wine Boutique during the Festival. The New Festival of Wines also includes a juried wine competition where six judges, blind testing, chose the top wines and runners-up in five categories. These wines are also available for sampling during the event.
If you are a wine connoisseur, or simply a lover of fine wines, you will not want to miss this premier event. The Grand Tasting event allows patrons to explore and sample new wines and learn more about them. For wineries or their agents, it’s a chance to introduce and present their wines. Says Jennifer Caseley of Versatile Management Group, “depending on sales at the event’s Wine Boutique, those wines may eventually be listed products at local liquor stores“.
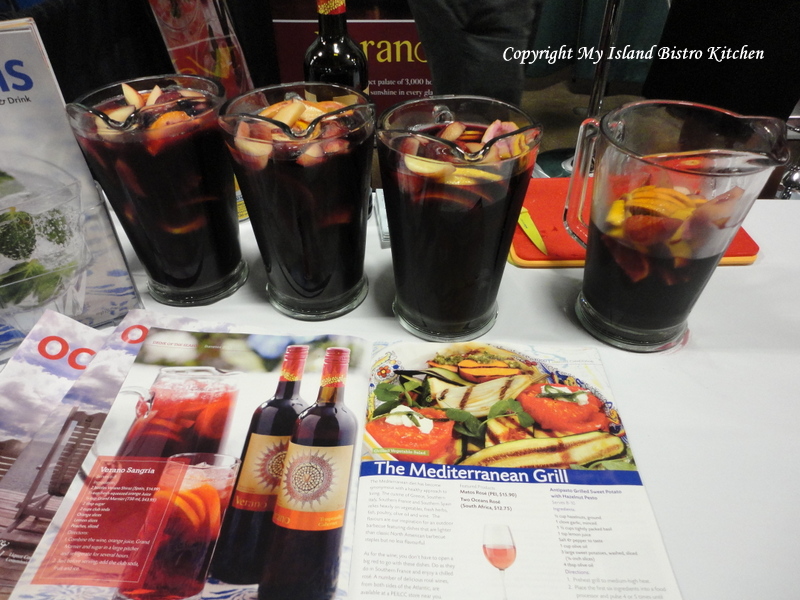
Yes, even Sangria made an appearance at this year’s Grand Tasting event! In addition to samples, Verano Wines also shared their recipe for this tasty Spanish drink.
Sangria
Look for attractively displayed booths at the event.
Each year, a wine-producing country is selected to have its wines featured for the event. This year, it is France, one of the oldest and most renown wine-producers in the world. That doesn’t mean that there won’t be wines from other wine-producing countries – they are there too.
And, of course, our three Island wineries are participating as well – be sure to seek out the Matos, Newman, and Rossignol booths as you make your rounds at the Festival.
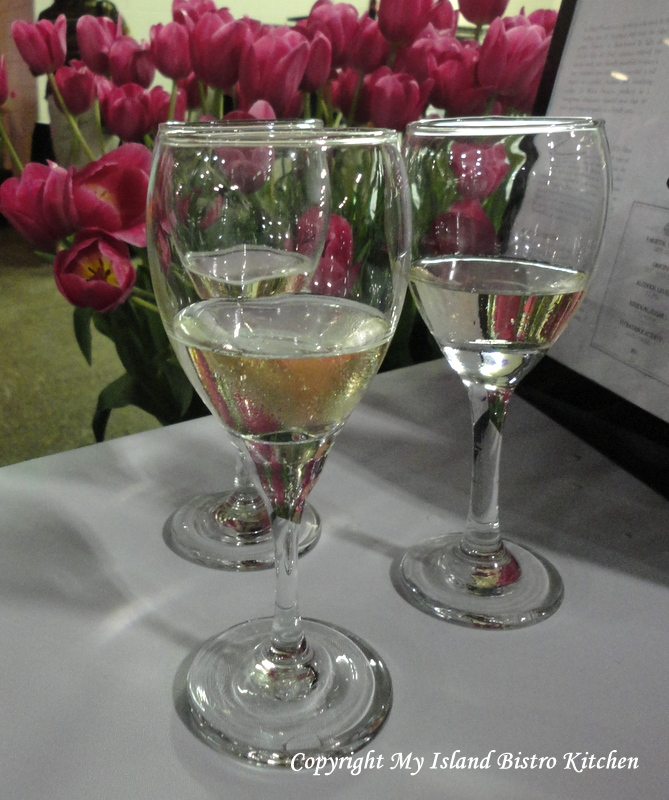
On PEI, it’s almost inconceivable to have an event of any kind without food! There is a whole new food element to this year’s Festival. As you walk into the event, you are greeted with a Raspberry Point oyster from the PEI International Shellfish Festival and along with a glass of champagne.
Be sure to hang on to the wineglass and carry it with you throughout the evening as you will need it to sample wines as you tour the booths.
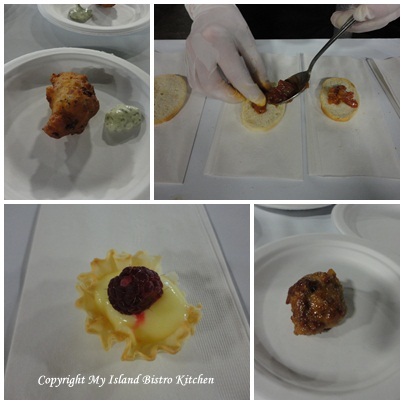
Each evening, there are food stations set up inside the venue. These stations serve four different appetizers. Last evening, Chef Andrew Smith of “Top of the Park” Restaurant at the Red Shores Racetrack and Casino created BBQ Pulled Chicken Bruschetta, House Spiced Turkey Meatballs, Seafood Fritters, and Lemon Curd Filled Phyllo Cups for patrons. This evening, Chef Jane Crawford from the Red Water Rustic Grille will tempt palettes with four tasty appetizers as well.
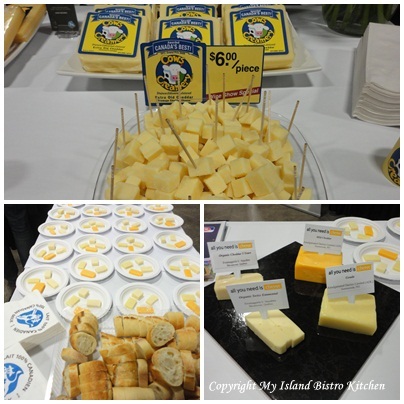
What would wine be without cheese! The Dairy Farmers of Canada along with PEI’s award-winning Cows Creamery, are serving samples of their fine cheeses that pair so well with wine. This afternoon, there is an ancillary event (separate tickets required) sponsored by the Dairy Farmers of Canada and PEI’s Rossignol Winery that will focus on the art of wine and cheese pairings.
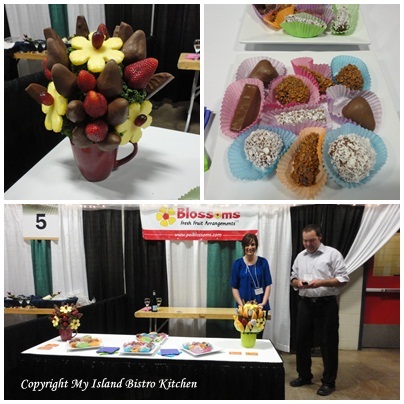
Be sure to also check out Blossoms’ booth. Blossoms is a new local business on the Island that specializes in making fresh fruit bouquets. Their colourful and tasty offerings of chocolate dipped strawberries and other fruits were making a hit at the Festival last evening.
Organizers have thought of all the details! They even offer a wine check so patrons do not have to carry around heavy bottles of wine they have purchased at the Wine Boutique. Their purchases may be shipped for pick-up at any one of the PEI Liquor Control Commission’s 18 corporate retail outlets across the Island.
This two-day extravaganza is held at the Charlottetown Civic Centre on Kensington Road on May 24-25, 2013. Tickets to the Grand Tasting event are $44. per person (taxes incl) – note you must be 19 and over to attend the Festival. The event can accommodate over 1000 guests per evening and tickets are also available day-of at the Civic Centre box office. The Festival’s hours of operation today are from 7:00pm – 11:00pm. The Wine Boutique, run by the PEI Liquor Control Commission and from which wines may be purchased, operates from 3:00pm – 10:30pm today. Tickets are not required to enter the Wine Boutique.
A complimentary shuttle service is available to transport patrons between the Civic Centre and the downtown area. This service runs from 6:00pm – 11:00pm this evening. Please enjoy the Festival but do drink responsibly and use the provided shuttle service or a designated driver or taxi.
Thank you for visiting “the Bistro” today. There are lots of ways to connect with “the Bistro” through social media:
Join My Island Bistro Kitchen on Facebook Follow the Bistro’s tweets on twitter @PEIBistro Find the Bistro on Pinterest at “Island Bistro Kitchen” Follow along on Instagram at “peibistro”
June 2019 Update: Tim Dixon, mentioned in this blog post, is no longer producing asparagus for sale.
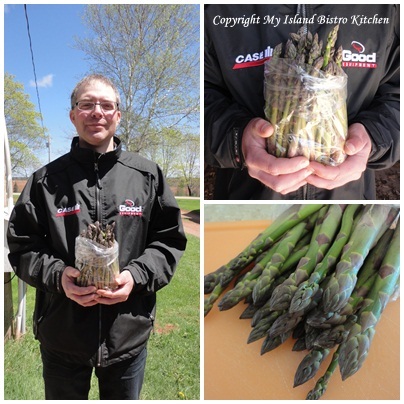
Yesterday, I paid a visit to Tim Dixon in North Tryon, PEI. Amongst other crops grown on the family farm, Tim grows a small acreage of asparagus which he markets to Island restaurants and also sells at the farm gate.
Tim Dixon with freshly picked asparagus from his North Tryon, PEI, Farm
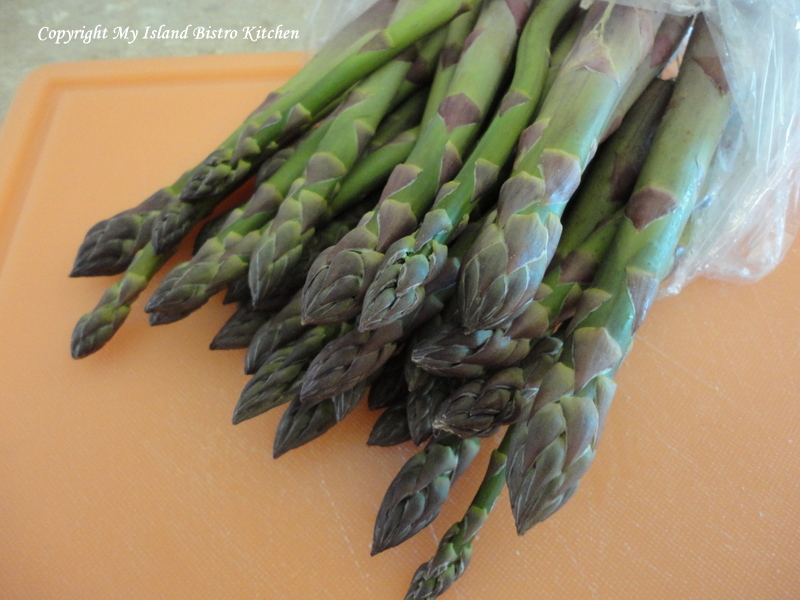
Below is a photo of an asparagus spear just about ready to be harvested.
Asparagus Spear
Tim has been growing asparagus since 2000 and presently has acreage that yields between 500-700 pounds of this spring vegetable annually. I asked Tim why he decided to grow asparagus and he tells me he was looking to diversify his crop planting and was also looking for a market niche.
There are several varieties of asparagus but the bulk of Tim’s crop is the Jersey Giant variety. The asparagus is planted in springtime and is grown from crowns planted 1 foot deep in the rich red soil not far from the Tryon River. It usually takes a couple of years for the asparagus from a crown to be fully ready to be harvested.
Despite its Mediterranean origins and liking heat, Tim says asparagus is a hardy plant that only requires a light discing in the spring, a coating of manure, and some weed control. Tim says winter kill is not an issue for asparagus and a crown will generally produce spears for about 15 years.
Asparagus is one of the first vegetables of spring on PEI. Harvesting usually begins around Victoria Day in mid-May and continues until the end of June/first of July. When the spears are 6”-8” tall, Tim hand-picks them by snapping the spears off the stock, not cutting them. He tells me that the rule of thumb for harvesting asparagus is to pick for one week in the first year after planting, then 2 weeks the next, 3 weeks in year 3, up to 6 weeks of harvesting for mature asparagus.
Tim says the local community is very supportive and neighbours are amongst his best customers. On the farm, he sells both 1-pound and 2-pound bags of fresh asparagus. I asked him if he knew how his neighbours were preparing the asparagus and he says, typically, many steam or sauté the spears.
Fresh Asparagus
A standard-sized portion serving is 5 spears. Asparagus plates well because of its long, slender, vivid green spears and pointed flower heads that can range in color from dark green to tints of deep purple. It adds presentation, texture, and flavour to a meal. Asparagus has an earthy, unique taste and pairs well with poultry, seafood, and pasta. There are endless ways to prepare asparagus. One of my favourite ways to prepare asparagus is to mist it with a good quality olive oil, sprinkle it with freshly ground pepper, sea salt, and finely grated parmesan cheese and then barbeque it in a veggie basket over the open flame.
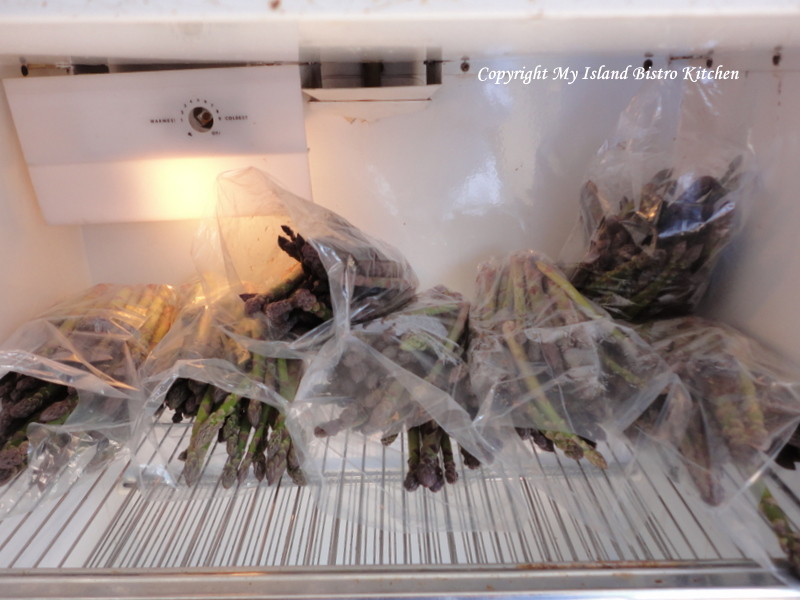
For maximum freshness, this vegetable is best used within 2-3 days of picking; however, asparagus will last up to near a week if stored in an open-ended plastic bag in the refrigerator. Wrap the woody ends of the spears in a damp paper towel to prolong their freshness. Be sure to trim off the woody ends before cooking.
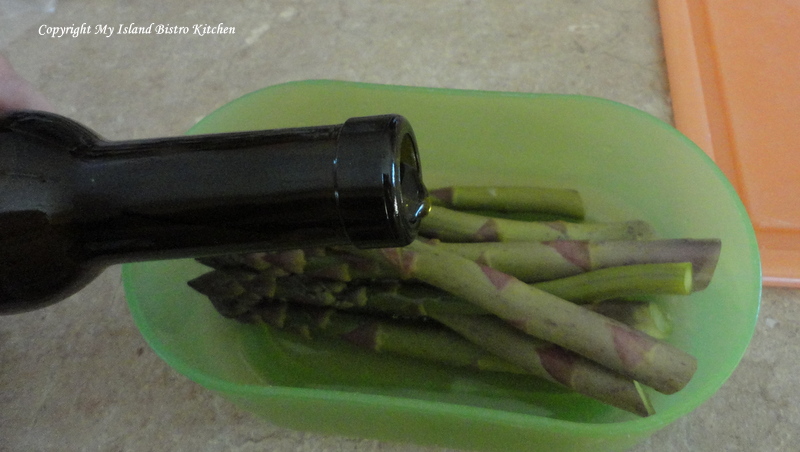
My feature recipe today for asparagus is very simple. I tossed the spears with a light drizzle of Liquid Gold’s Arbequina extra virgin olive oil. Make sure you use a high quality olive oil for this dish.
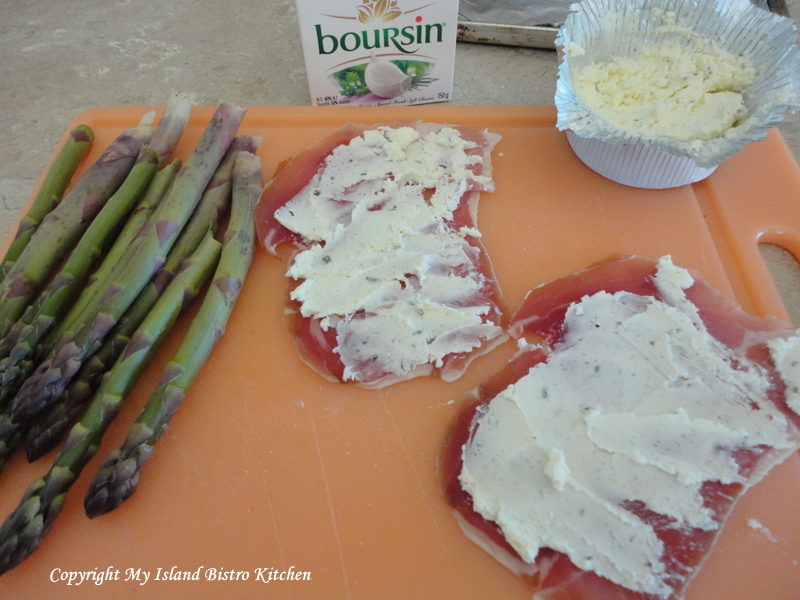
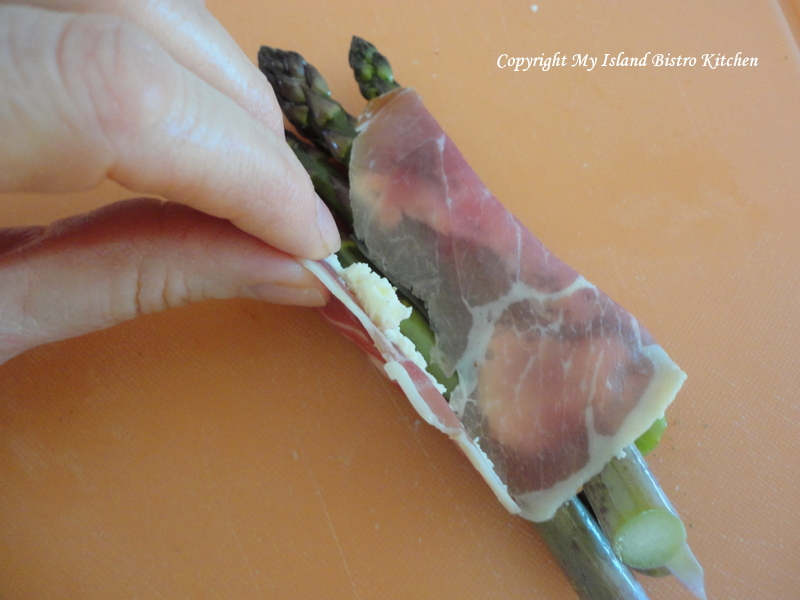
For each serving I used a super-thin slice of prosciutto onto which I carefully spread a thin layer of spiced garlic and herb soft goat cheese. Be very gentle and careful with this step as prosciutto is very delicate and breaks apart easily.
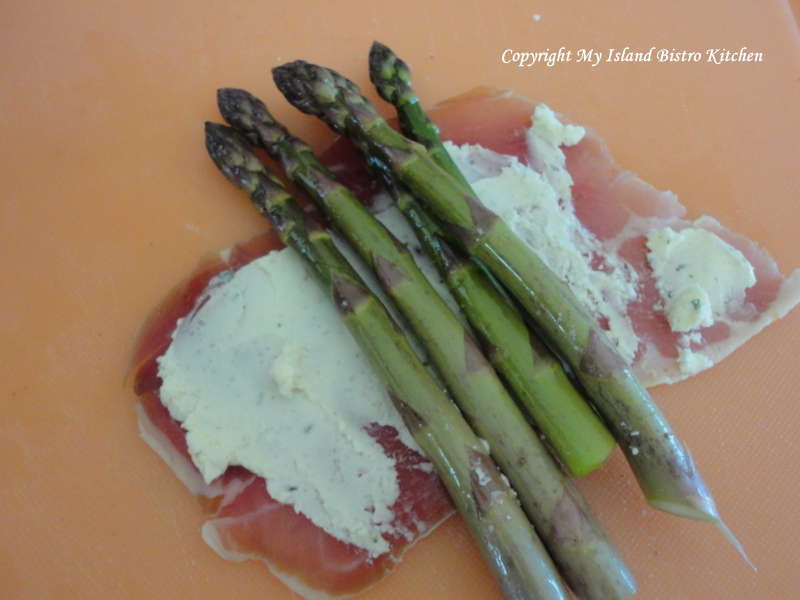
Bundle together five spears and place them on the prosciutto slice. Sprinkle with freshly ground pepper and sea salt.
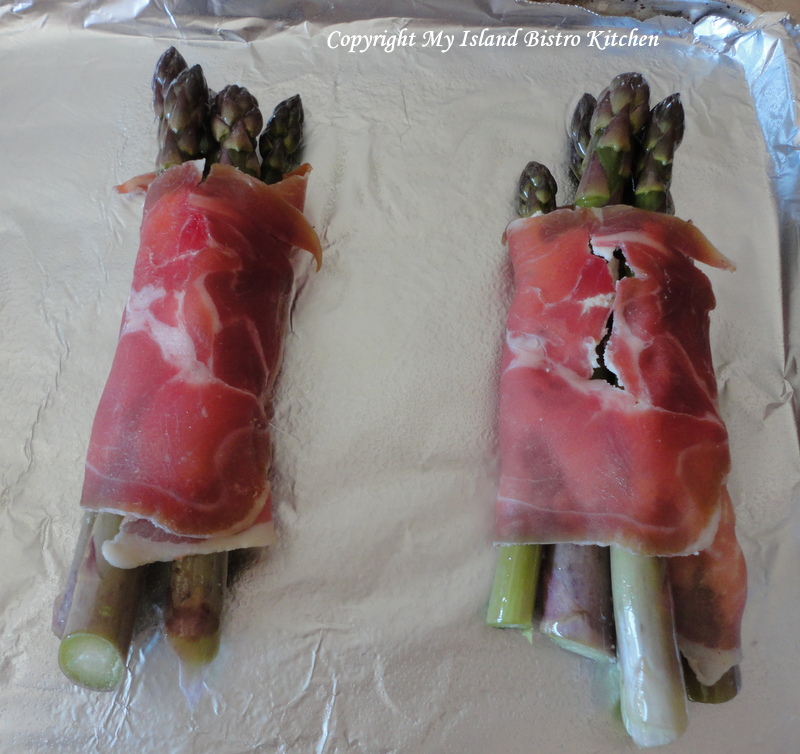
Gently wrap the prosciutto around the asparagus spears.
Transfer each bundle to a lightly greased baking sheet.
Bake at 375F for about 15 minutes.
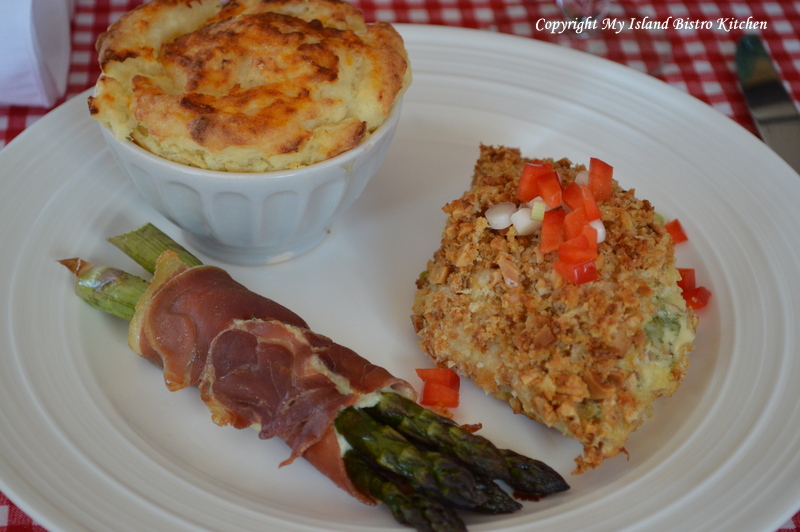
I served the asparagus bundles with an almond-crusted stuffed chicken breast and duchess potatoes.
The Dixon Farm is located at 140 North Tryon Cross Road in North Tryon, PEI. To make arrangements to buy fresh Island asparagus, visit the farm or contact Tim Dixon by phone at 902-432-4771 or by email at dixonfarms1@live.com. Be sure to visit Tim’s website to learn more about the Dixon Farm.
Thank you for visiting “the Bistro” today. There are lots of ways to connect with “the Bistro” through social media:
Join My Island Bistro Kitchen on Facebook Follow the Bistro’s tweets on twitter @PEIBistro Find the Bistro on Pinterest at “Island Bistro Kitchen” Follow along on Instagram at “peibistro”
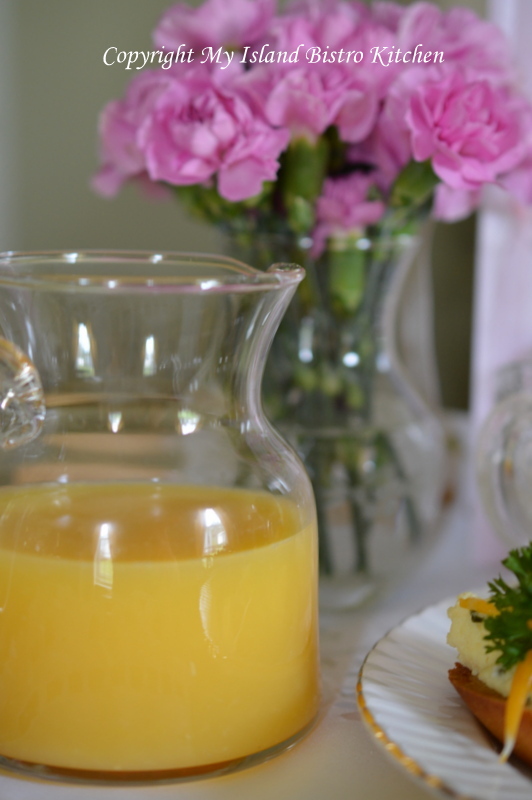
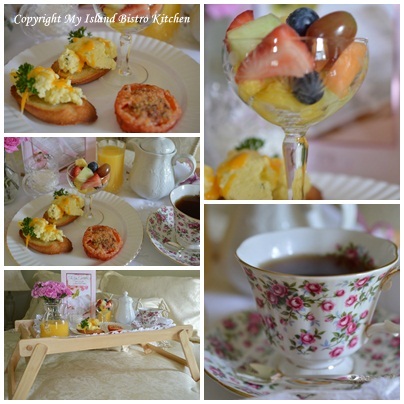
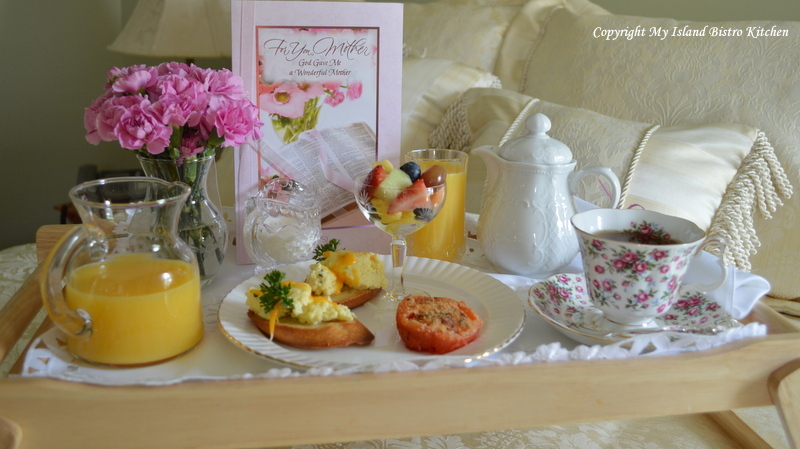
What mom doesn’t like to be pampered on Mother’s Day and what says pampering more than breakfast in bed! Dress up an ordinary bed tray with a lovely napkin or pretty placemat and prepare a scrumptious breakfast for Mom.
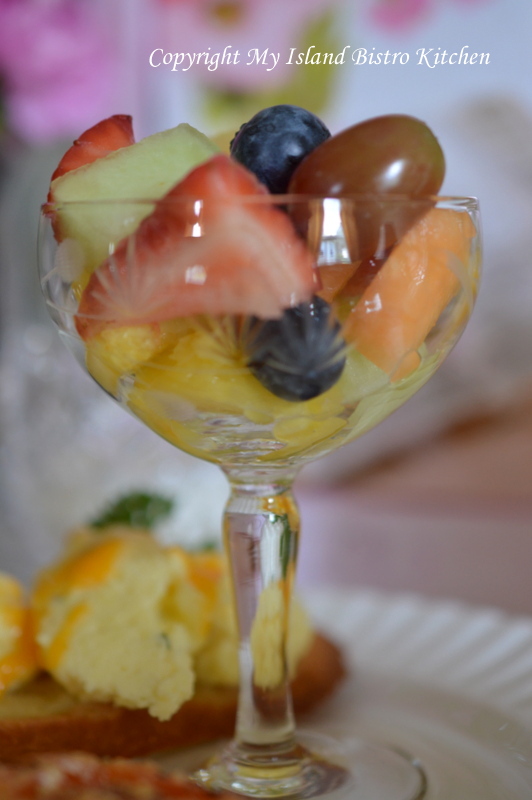
The Menu: Start with a fresh fruit cup presented in the prettiest, daintiest pedestal dessert dish. Choose a variety of fruits of different colors, shapes, and textures.
Fresh squeezed orange juice adds an element of sophistication to the breakfast tray.
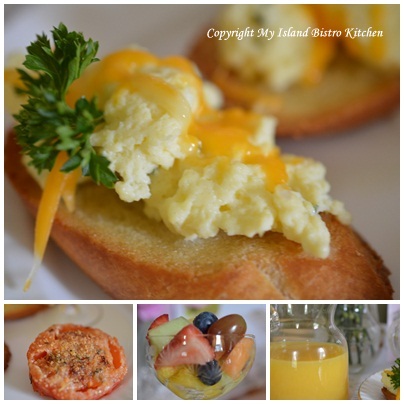
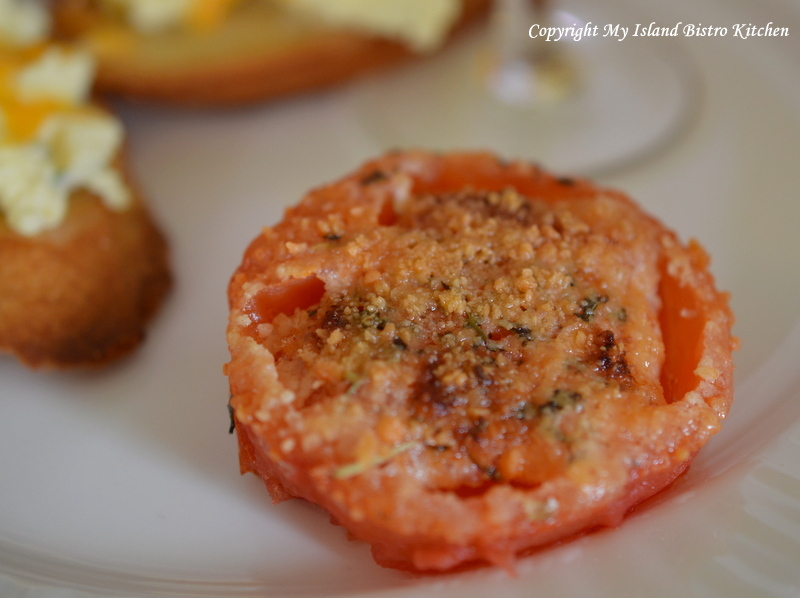
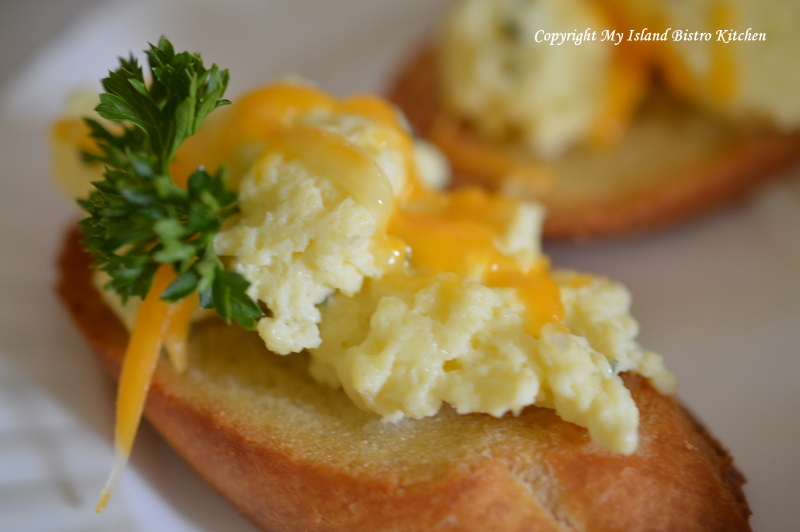
For the main course, I chose to serve scrambled eggs on crostini with a roasted Parmesan tomato half. The roasted tomato is so simple to make. Simply cut a tomato in half. A sprinkle of Italian seasoning, salt, pepper, and a shake of Parmesan cheese is all it takes to season the tomatoes. Drizzle each half tomato with a good quality olive oil – I used Liquid Gold’s Organic Tuscan Herb Infused Olive Oil. Roast the tomato on a lightly greased baking sheet in a 450F oven for about 10 minutes, just until tomato is heated and the Parmesan starts to turn golden in color.
How yummy does this tomato look!
A few herbs and a topping of grated cheddar cheese take scrambled eggs to a whole new level, particularly when served on a tasty crostini.
Look for lots of color to add to the breakfast tray. Color makes the tray look so much more vibrant, interesting, and appealing.
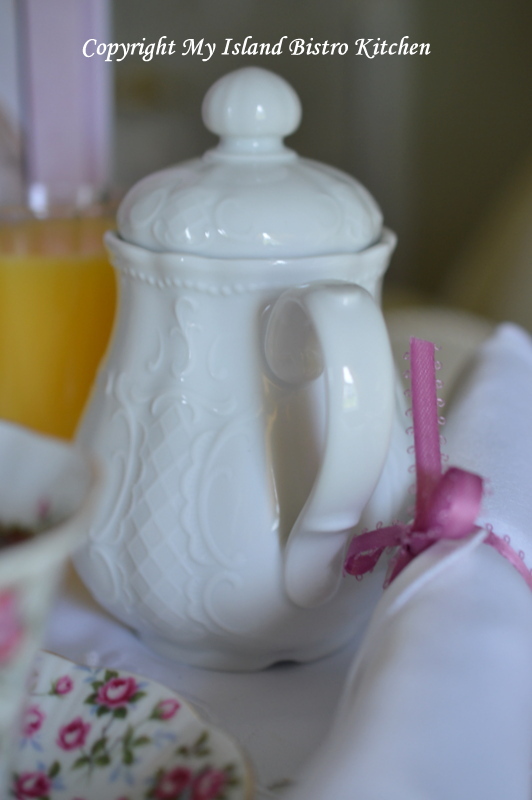
I like these petite individual-sized teapots. They are very versatile and don’t take up much room on a bed tray.
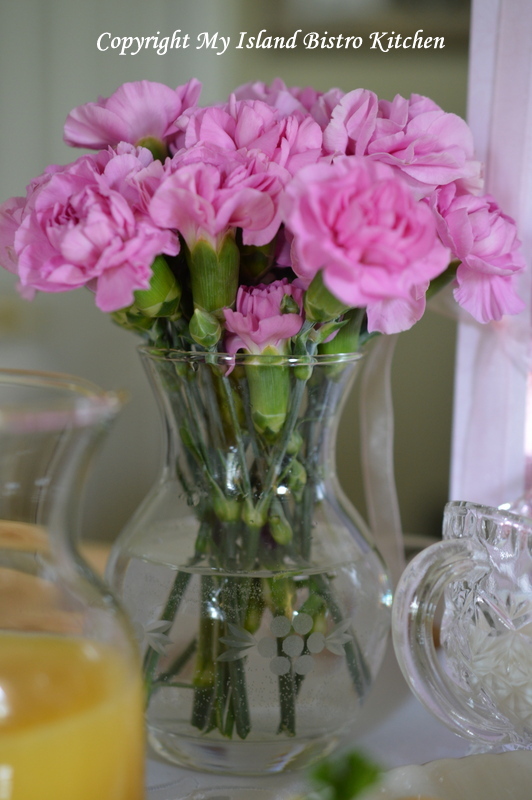
Fresh flowers are a must for any special breakfast in bed tray. Miniature carnations are very suitable for bed trays. Everything should be to scale in order for it to fit on the tray.
Lastly, you’ll want to add the finishing touch of a lovely and carefully chosen Mother’s Day Card.
A beautiful card for a beautiful Mom!
It’s all about Mom on Mother’s Day. It’s not always the big, fancy gifts that touch the heart. Most often, it is something like the care and attention that goes into planning something special, like breakfast in bed and, most importantly spending time together, that means the most.
Thank you for visiting “the Bistro” today. There are lots of ways to connect with “the Bistro” through social media:
Join My Island Bistro Kitchen on Facebook Follow the Bistro’s tweets on twitter @PEIBistro Find the Bistro on Pinterest at “Island Bistro Kitchen” Follow along on Instagram at “peibistro”
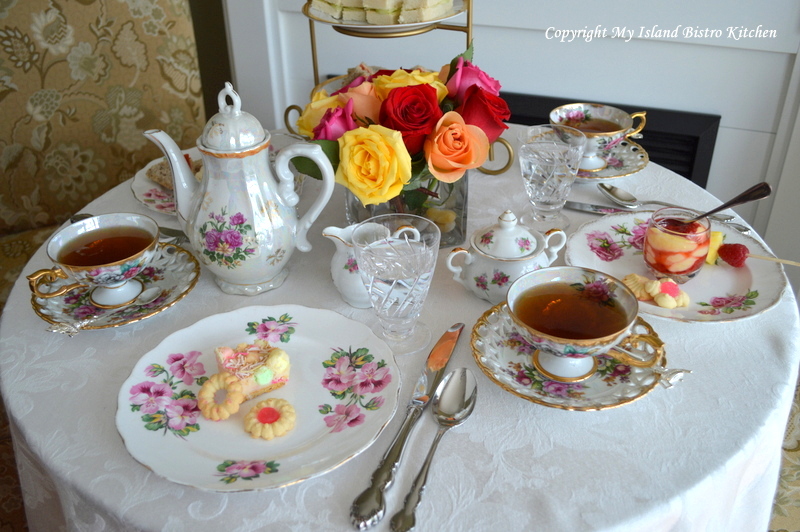
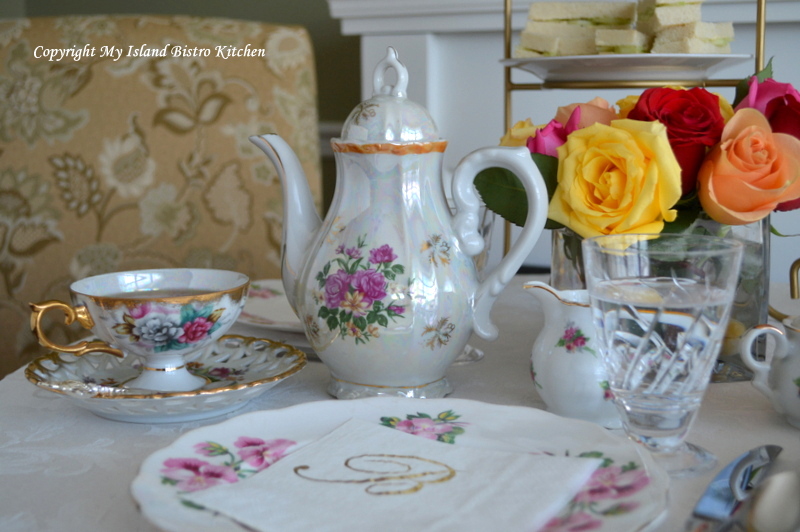
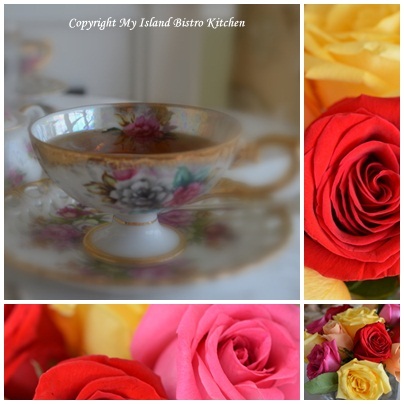
I love afternoon tea. It’s such a peaceful, tranquil, and genteel experience. It’s the perfect way to celebrate Mother’s Day. Today, I share photos from my Mother’s Day Afternoon Tea. Enjoy!
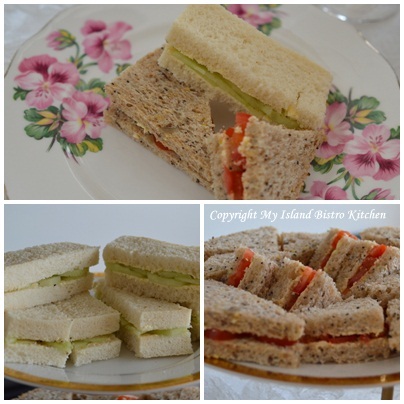
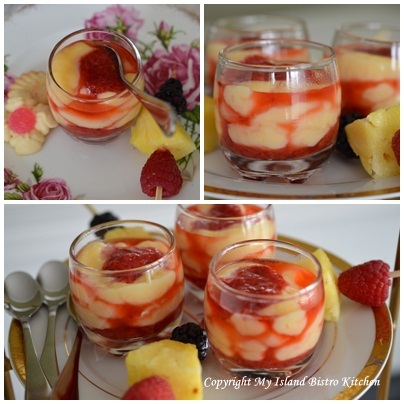
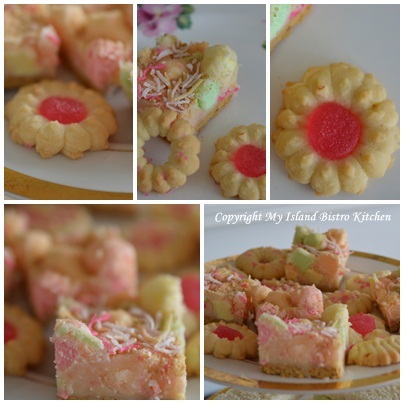
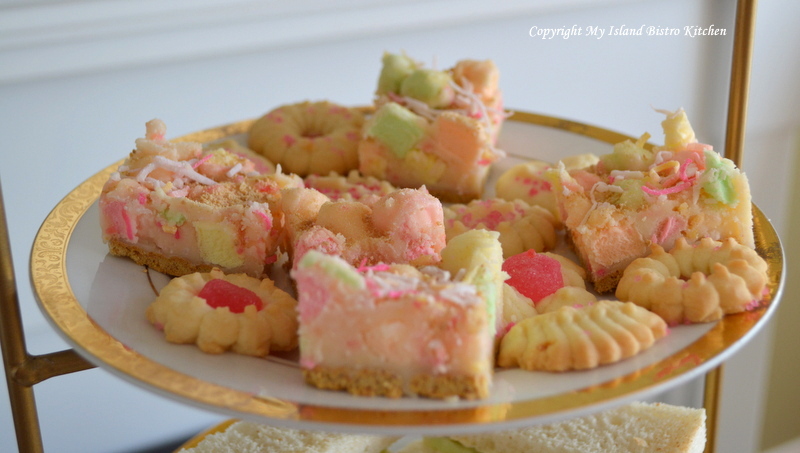
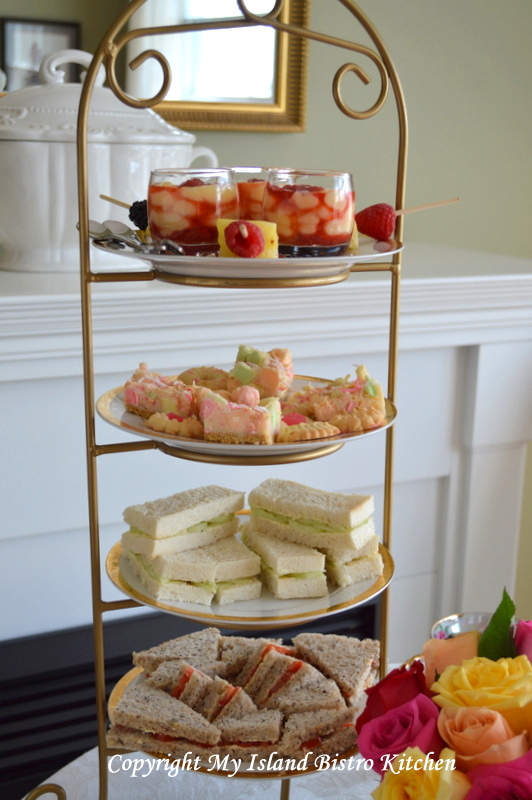
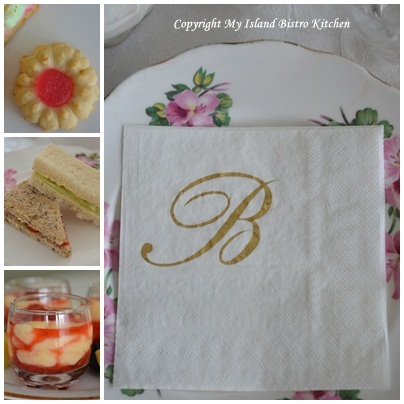
On the tea menu: Cucumber and tomato sandwiches, strawberry custard, shortbread, and rainbow marshmallow square. Tea Pairing: New English Teas’ English Afternoon Tea (Coventry, England).
Cucumber and Tomato Sandwiches
Cool and refreshing cucumber sandwiches.
Tomato sandwiches on thinly sliced artisan bread.
Smooth and creamy strawberry custard and fresh fruit skewers.
Strawberry Custard
I love these colorful and tasty treats, particularly when served in these petite dishes!
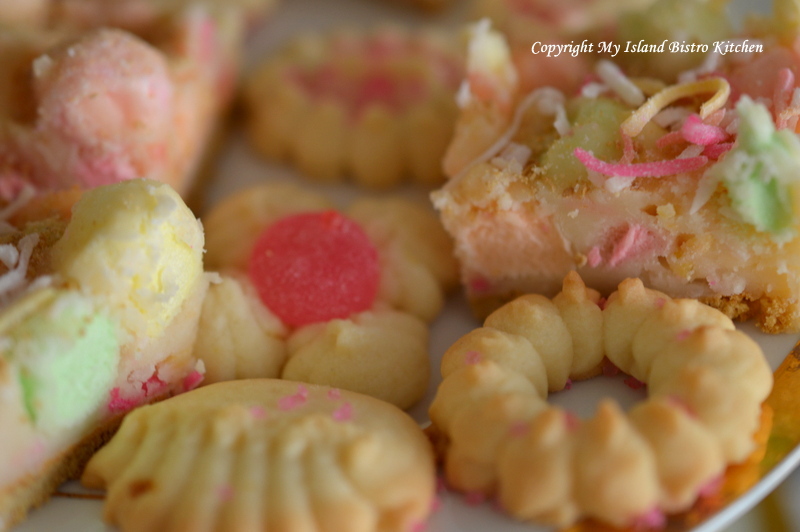
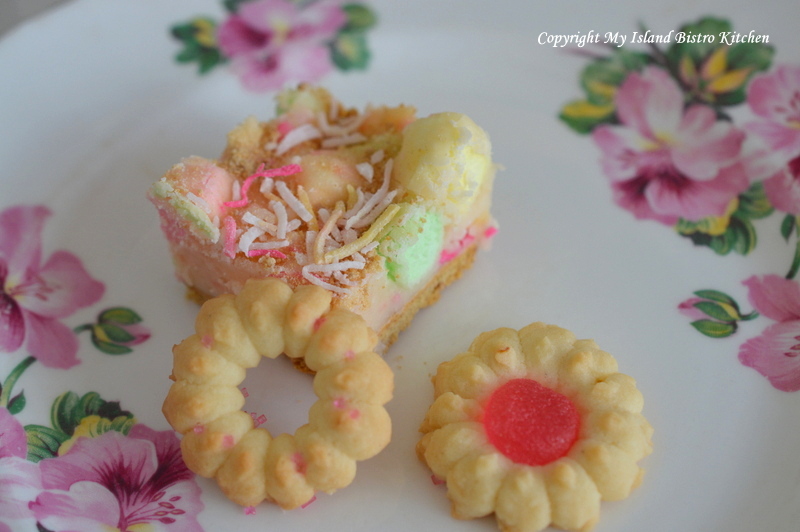
Dainty spritz shortbread and rainbow marshmallow squares satisfy the sweet tooth!
Love the pastel shades which are suitable for springtime tea events.
I love how these colors blend attractively on the plate.
Teatime treats are typically petite and dainty.
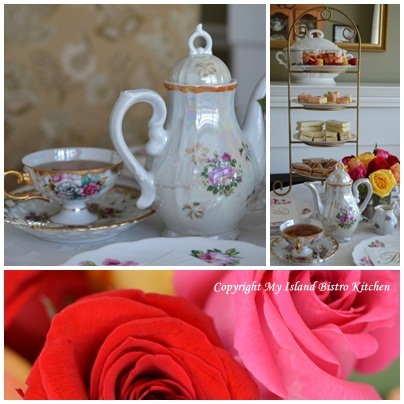
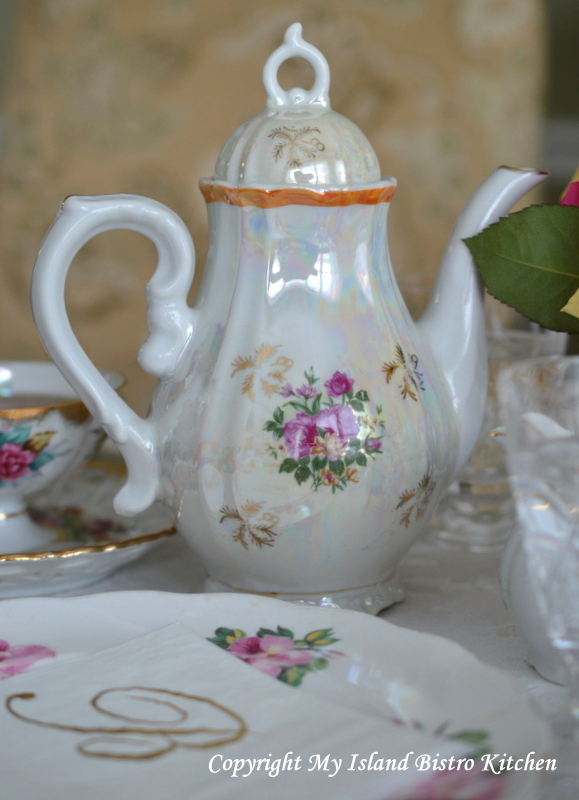
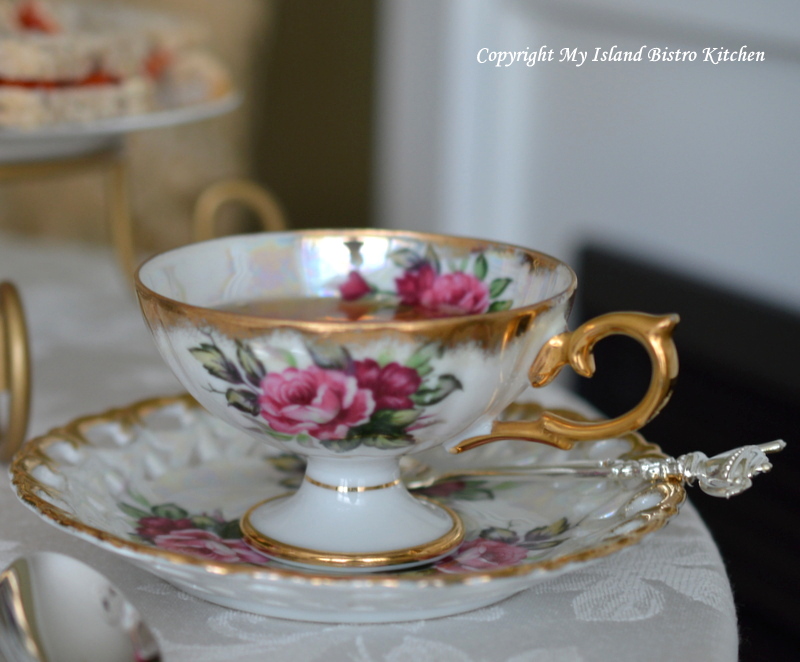
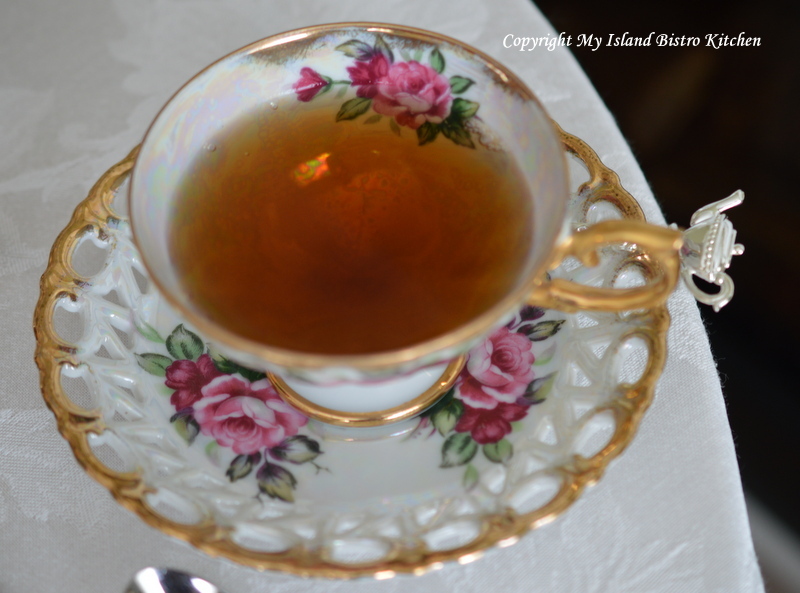
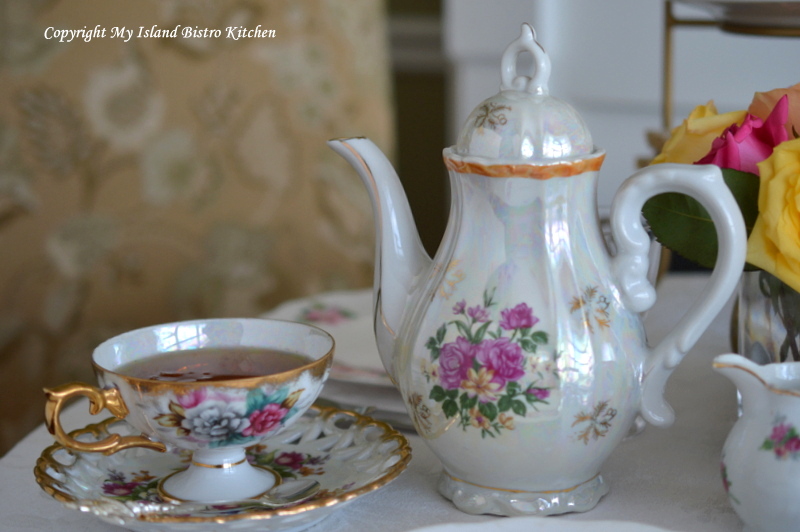
Teacups and teapot are Japanese porcelain.
Tableware does not need to all match perfectly for a tea table. It just needs to blend well and the pieces compliment each other. Having different patterns creates interest and doesn’t look so matchy-matchy.
These are marvelously-designed delicate cups on pedestals. They look very grand, stately, and elegant, don’t you think!
Love the filigree trim on the saucers.
This slim-line teapot looks very stately and in command on the tea table.
A mixed bouquet of roses is a great compromise when I can’t decide on one particular color theme!
Although by no means the only floral option, roses tend to be perennial favorites for tea table accents.
This four-tier stand is a great space saver, particularly for small tea tables.
While my favorite plates are white because the food shows up so splendidly on them, I like the floral on these plates for a tea table.
Beautiful roses!
I hope you have enjoyed a glimpse into my Mother’s Day Afternoon Tea. It was grand fun.
Happy Mother’s Day To All Moms!
Thank you for visiting “the Bistro” today. There are lots of ways to connect with “the Bistro” through social media:
Join My Island Bistro Kitchen on Facebook Follow the Bistro’s tweets on twitter @PEIBistro Find the Bistro on Pinterest at “Island Bistro Kitchen” Follow along on Instagram at “peibistro”
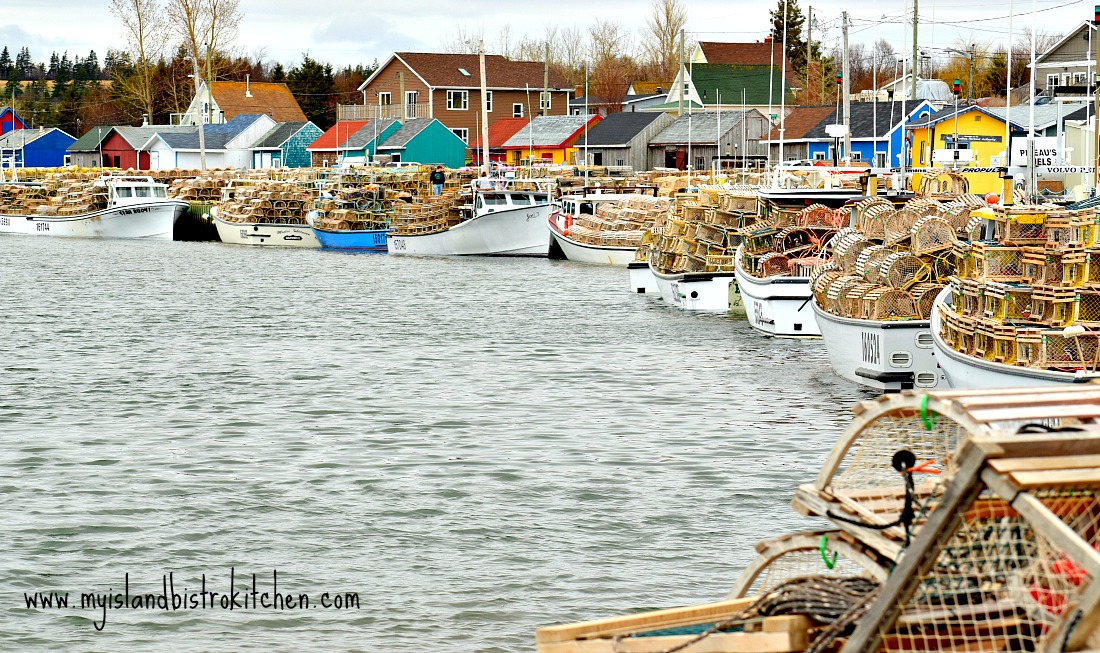
The opening of the spring lobster season on Prince Edward Island is always an event.
Eve of Setting Day in the Fishing Village of North Rustico, PEI, Canada
Fishing boats, laden with lobster traps like those in the photo above, depart wharves around the Island in the very early morning to set their traps. This is called “Setting Day” and marks the official opening of the spring lobster fishing season. It is not uncommon for people in the local fishing communities to head to their local wharves or nearby beaches to see the fishing boats off.
Early Morning Gathering in French River, PEI, to Watch Parade of Lobster Boats on Setting Day
It’s a sight to see a parade of boats, heavy laden with traps, heading out at sunrise from a wharf.
Heading out to Drop off the Lobster Traps on Setting Day
Several communities also have church services known as the “Blessing of the Fleet” services on the Sunday before setting day. These are sometimes held inside nearby local churches but, most frequently, they are held on the wharves of the fishing ports.
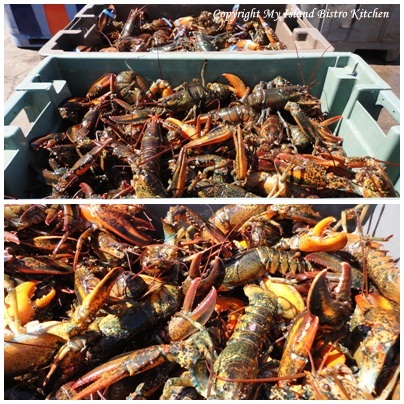
“Landing Day” follows Setting Day and is the day the first catches of the season land on the wharves. Daily catches occur for the duration of the lobster season. The photos below were taken at North Lake Harbour, PEI on June 1, 2012; however, the same scene would be playing out at many harbours across PEI.
Lobster Fishing Boats Filled With Their Day’s Catch Returning to Port at North Lake, PEI [June 1, 2012]
Lobster Fishing Boats, North Lake, PEI [June 1, 2012]Unloading the Day’s Catch at North Lake Harbour, PEI [June 1, 2012]And, here are the “goods”!
“The Prized Cargo” – Fresh PEI Lobster!
Boats at rest after their day’s work fetching the catch.
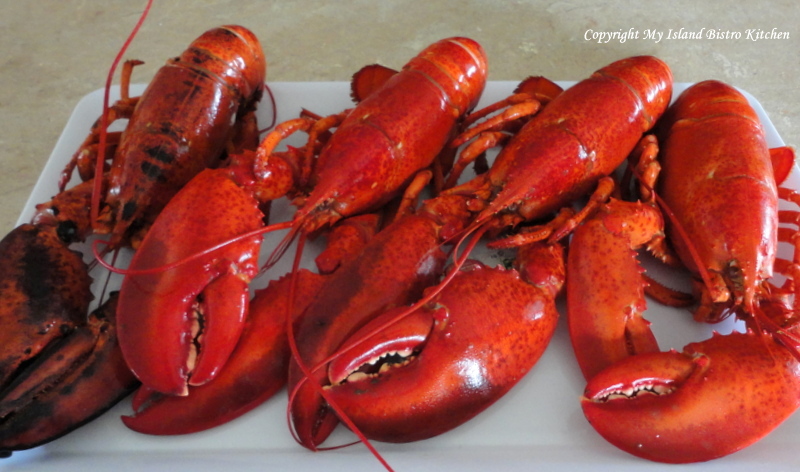
North Lake Harbour, PEI [June 1, 2012]And, once they are cooked, look at the fabulous rich color of these freshly caught PEI lobsters!
Cooked Lobsters
Many Islanders will enjoy lobster straight from the shell for their first “feed” of the season. For many, it is a tradition to have fresh lobster on the first day of the catch. This is one of the benefits of living on an Island – we have plenty of fresh seafood. Many (including myself) will argue that lobster from the spring fishery is better than lobster fished later in the summer from waters that have warmed up over the season (even though lobster from the later catch is very good, too). I don’t know why it is but lobster from the cold waters that surround the Island always does seem to taste better and I think even has a better texture meat.
I remember the first time I was on a Caribbean cruise many years ago, ordering lobster from the dinner menu. My taste buds were salivating for what I knew to be lobster taste. Oh my! It didn’t taste like lobster at all as I know it. That’s when I discovered the difference in taste of lobster that comes out of cold water and that out of very warm waters! I never ordered lobster from a cruise ship menu again. I wait for the good PEI lobster at home!
The ironic part of this is that I never liked lobster when I was growing up. In fact, when the family would be chowing down on lobster, my mother always roasted me a chicken (maybe a wee bit spoiled)! However, they convinced me to try a bite of it when I was probably about 18 years old and I’ve never looked back and have more than made up for it since! I love lobster by itself and in just about any other recipe imaginable!
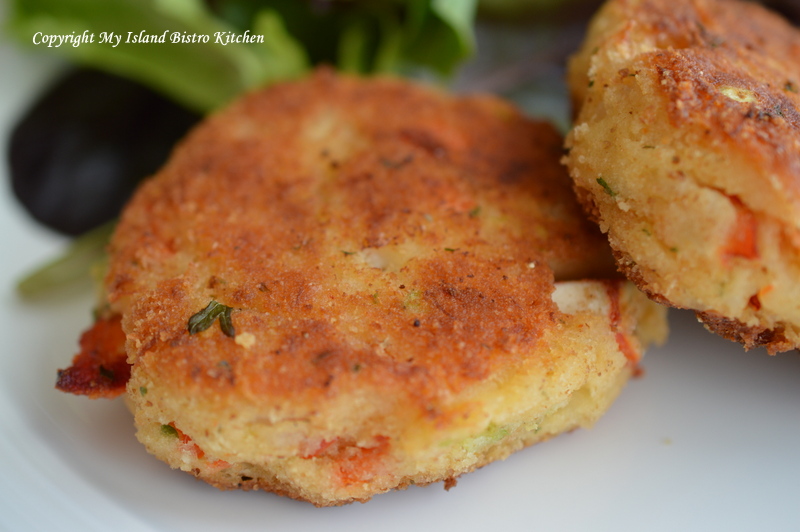
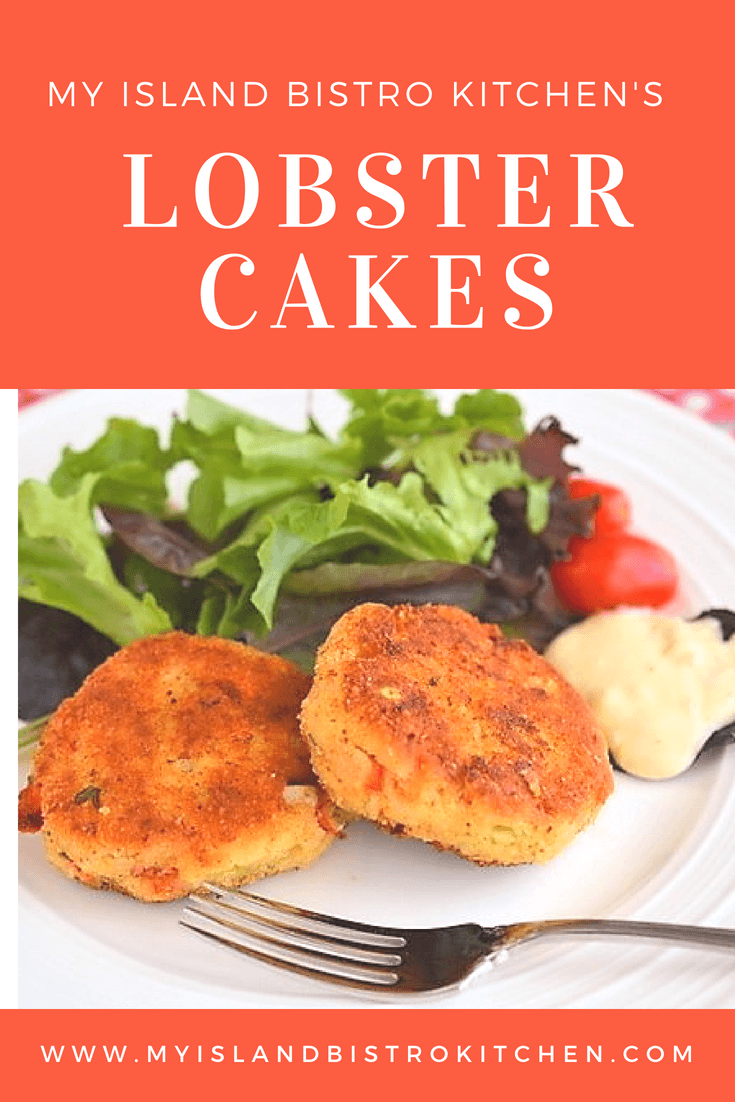
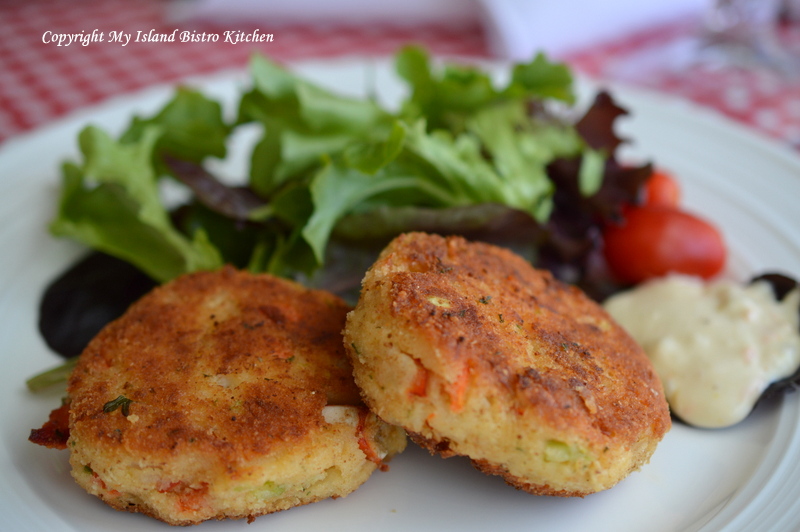
So, today, I am sharing my recipe for Lobster Cakes to celebrate the opening of the PEI lobster fishery season.
8 oz. cooked lobster meat (fresh or frozen), cut into bite-sized chunks ½ – 1 cup fine bread crumbs
Apx. ¾ cup finely ground bread crumbs for coating lobster patties 2+ tbsp vegetable oil
Method:
Place warm mashed potatoes in large bowl. Add beaten egg and mix well. Add tartar sauce and Dijon mustard.
Stir in grated cheddar cheese.
Add parsley, garlic powder, dillweed, and pepper. Stir in onion, celery, and red pepper.
Lastly, add the lobster and mix well. Add just enough of the first amount of bread crumbs so the mixture will hold together and can be formed into patties.
Using a ¼ cup measuring cup, scoop up mixture and form into round patties. In shallow bowl, place the second amount of bread crumbs. Coat each patty in the bread crumbs until completely covered on all sides. Place on wax-paper lined baking sheet and chill for 1 hour to allow flavours to blend and for patties to become firm so they won’t break apart when cooked.
Preheat oven to 375F.
Heat oil in non-stick skillet over medium-high heat. When oil is hot, reduce heat to medium and cook the lobster cakes 2-3 minutes on each side, until golden brown. Transfer browned cakes to greased baking sheet. Bake in oven 6-7 minutes to finish the cooking process.
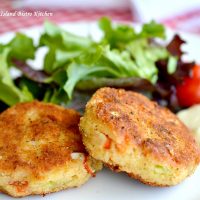
Serve lobster cakes, 2 per person, hot with your favorite tartar sauce and a side green salad.
Lobster Cakes with Citrus Aioli
These cakes freeze well, uncooked. Cakes may be cooked directly from frozen state, adding a few more minutes to the cooking process or they may be thawed in the refrigerator for several hours before cooking.
Yield: Apx. 1 dozen cakes
If you have made this recipe and enjoyed it and/or wish to share it with your friends and family, please do so on social media but be sure to share the direct link to this posting from my website.
Connect with My Island Bistro Kitchen on Social Media
Follow “the Bistro” on Pinterest at https://www.pinterest.ca/peibistro/ and pin the Pinterest-ready photo found at the end of this post to your favorite Pinterest boards.
8oz.cooked lobster meat (fresh or frozen), cut into bite-sized chunks
½ - 1cupfine bread crumbs
Apx. ¾ cup finely ground bread crumbs for coating lobster patties
2+tbspvegetable oil
Instructions
Place warm mashed potatoes in large bowl. Add beaten egg and mix well. Add tartar sauce and Dijon mustard.
Stir in grated cheddar cheese.
Add parsley, garlic powder, dillweed, and pepper. Stir in onion, celery, and red pepper.
Lastly, add the lobster meat and mix well. Add just enough of the first amount of bread crumbs so the mixture will hold together and can be formed into patties.
Using a ¼ cup measuring cup, scoop up mixture and form into round patties. In shallow bowl, place the second amount of bread crumbs. Coat each patty in the bread crumbs until completely covered on all sides. Place on wax-paper lined baking sheet and chill for 1 hour to allow flavours to blend and for patties to become firm so they won't break apart when cooked.
Preheat oven to 375F.
Heat oil in non-stick skillet over medium-high heat. When oil is hot, reduce heat to medium and cook the lobster cakes 2-3 minutes on each side, until golden brown. Transfer browned cakes to greased baking sheet. Bake in oven 6-7 minutes to finish the cooking process.
Serve lobster cakes, 2 per person, hot with your favorite tartar sauce and a side green salad.
Recipe Notes
These cakes freeze well, uncooked. Cakes may be cooked directly from frozen state, adding a few more minutes to the cooking process or they may be thawed in the refrigerator for several hours before cooking.
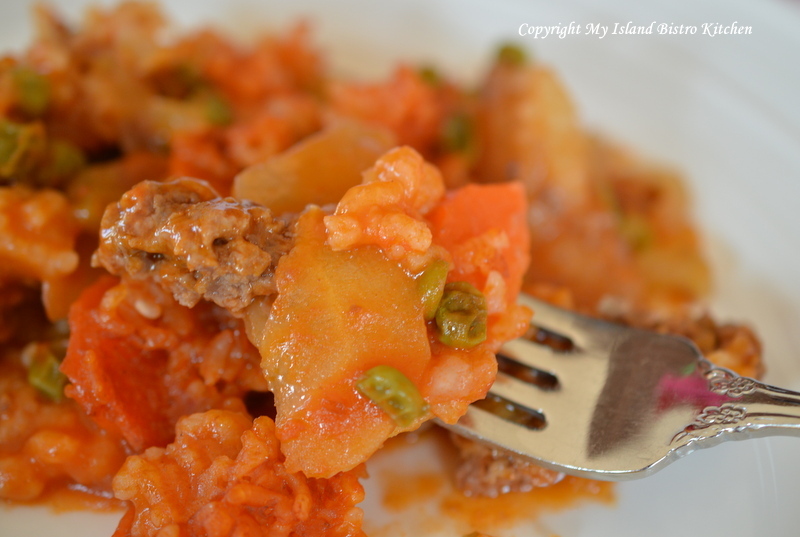
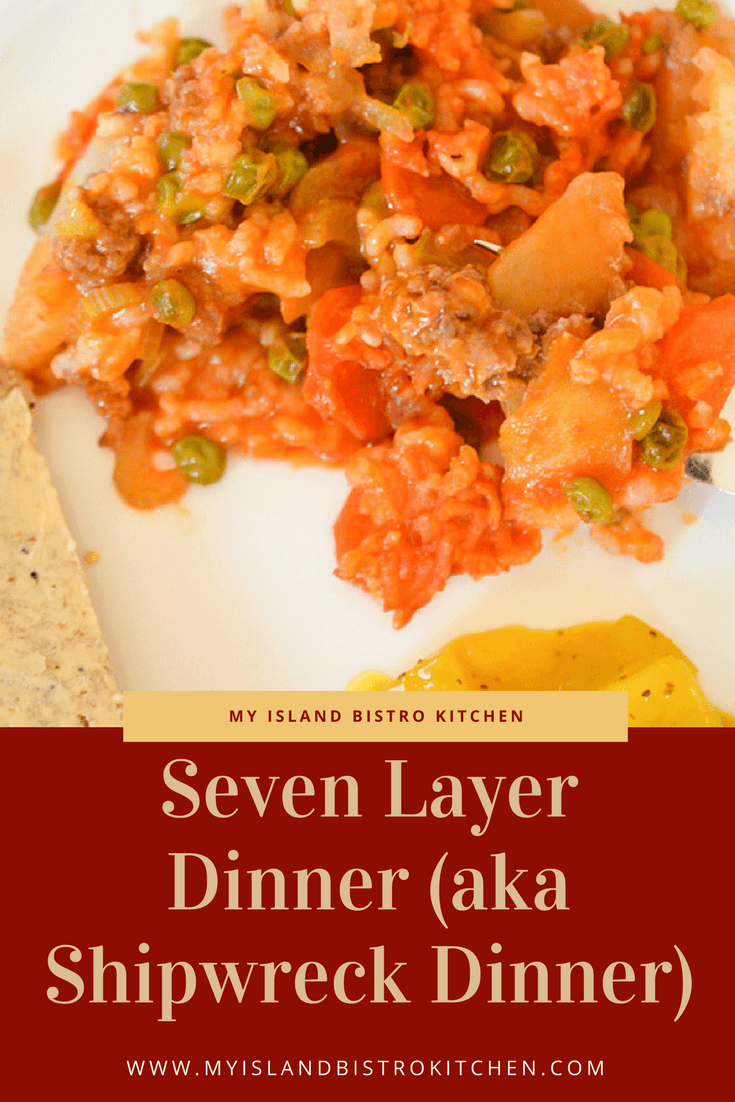
Okay, so my recipe is actually eight layers, but who is counting when the meal is as tasty as this one is!
Seven-layer dinner (sometimes called “Shipwreck”) is really little more than a full dinner in a casserole and baked in the oven. I grew up (as I am sure many of you have) with this vintage meal served on a regular basis. The seven main ingredients are: 1) onions, 2) meat, 3) potatoes, 4) celery, 5) carrot, 6) peas, and 7) rice. Sometimes, it’s a six-layer dinner depending on what veggies I have on hand and sometimes it might be eight or nine layers thick. I like to add parsnip because it adds a level of sweetness. Sometimes, I will slice turnip very thinly and add it as well. Frozen corn also works in addition to the frozen peas or instead of. In that regard, it is almost a potluck dish!
It has probably been named “Shipwreck” because it can be made with pretty much any vegetables you happen to have on hand as well as different kinds of meats, such as ground beef or sausage and it is also an economical way to stretch the meat content. In many households, it can be made with what is on hand without having to go shopping and it doesn’t take any kind of exotic or hard-to-find ingredients. This is an old-fashioned hearty meal. Have you noticed that many of these old “stand-by” meals are becoming popular again?
On a regular basis, I tend to cook with a fair bit of seasonings and spices. However, this is one dish that I never add anything to it other than salt and pepper and the onion for flavour.
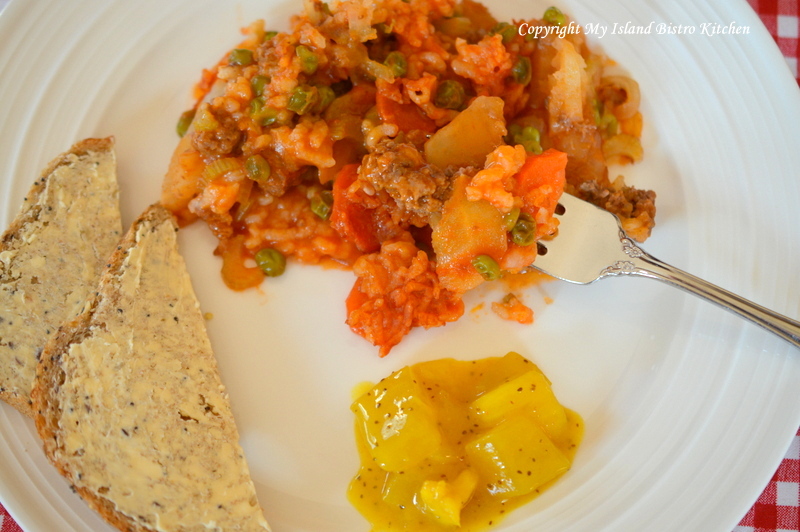
In my home, I grew up with this recipe being made with ground beef (we never used any other kind of meat in it). The beef I used for this casserole is 100% Island beef and was purchased at KJL Meats, a local butcher shop in Charlottetown, PEI.
This is a great meal to make when you have little time for meal preparation and clean-up because all the veggies, the rice, and the meat cook together in the one casserole so there are no pots and pans to wash (bonus!) other than the dish it bakes in. And, your kitchen will smell divine when this is baking in the oven! If there happens to be any leftover, this meal carries over well and, in fact, the flavours seem to become even richer the next day when it is reheated.
Seven-Layer Dinner
Ingredients:
1 medium onion 2 medium-sized potatoes, thinly sliced (about 1/8 inch thick) ½ – ¾ pound extra lean ground beef ½ cup celery 1/3 cup parsnips, thinly sliced (about 1/16 inch thick) 1 cup carrots, thinly sliced ½ cup frozen peas scant ½ cup Minute Rice 1 can tomato soup 1 soup can of water
Method:
Assemble ingredients.
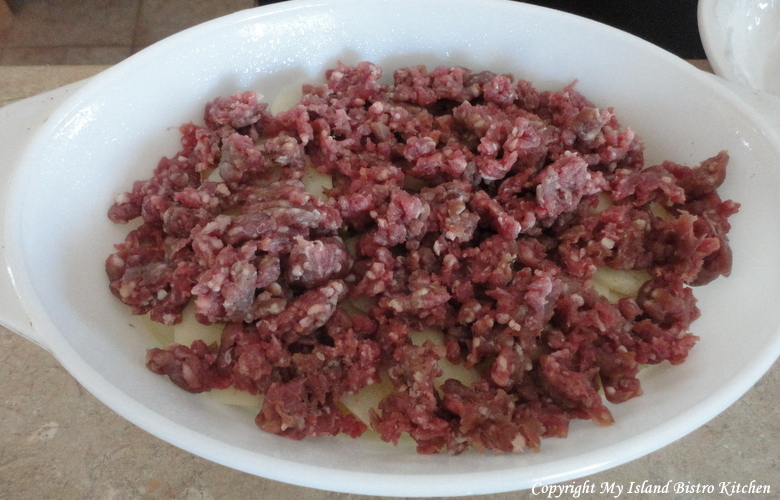
Grease 2-quart casserole. Peel and slice onions to make first layer of casserole.
Add the layer of sliced potatoes and sprinkle with salt and pepper.
Add the layer of ground beef. Sprinkle with salt and pepper.
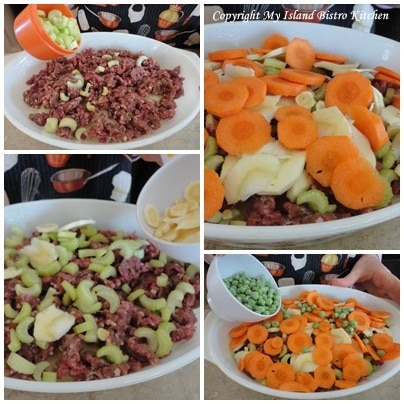
Add celery, parsnips, carrots, and frozen peas. Sprinkle with salt and pepper.
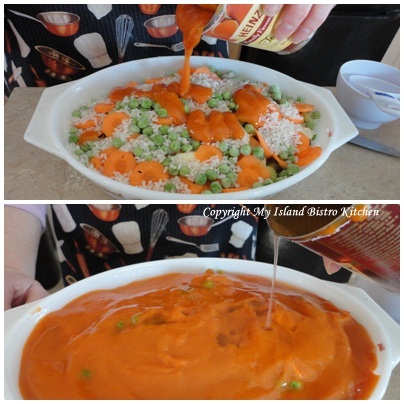
Sprinkle ingredients with rice. Cover casserole ingredients with can of tomato soup. Pour one soup can of water over top of ingredients (or, if you wish, you can mix the soup and water together and pour as one over the casserole ingredients).
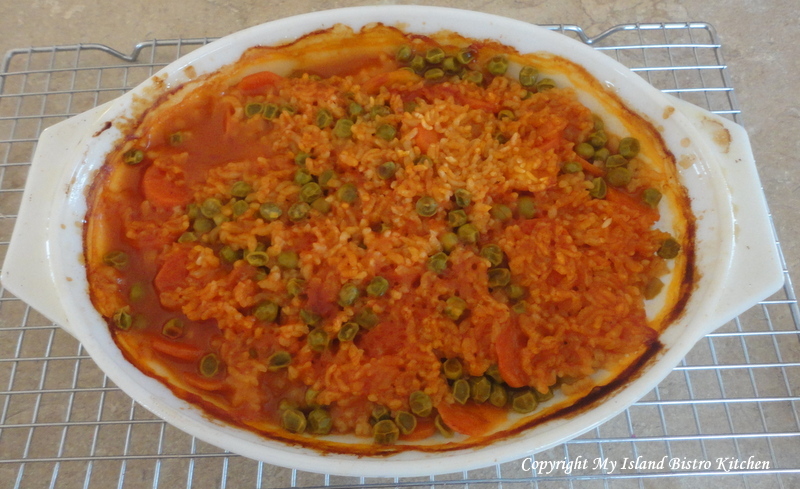
Cover and bake at 350F for 1 ½ – 2 hours until vegetables are tender.
Serves 4-6
It is hard to plate this meal attractively but its taste more than makes up for its lack of presentation!
Suggested Serving: Serve with homemade mustard pickles and whole grain artisan bread.
If you have made this recipe and enjoyed it and/or wish to share it with your friends and family, please do so on social media but be sure to share the direct link to this posting from my website.
Connect with My Island Bistro Kitchen on Social Media
Follow “the Bistro” on Pinterest at https://www.pinterest.ca/peibistro/ and pin the Pinterest-ready photo found at the end of this post to your favorite Pinterest boards.
“The Canadian Legend” Burger from the Lucy Maud Dining Room at the Culinary Institute of Canada, Charlottetown, PEI
For the third consecutive year, April has represented Burger Love on Prince Edward Island. Yes, that’s right, love of beef burgers! This year, 31 restaurants across the Island paid a $600 entry fee to cover advertising and promotion costs to participate in the month-long celebration of Island beef. PEI Burger Love has certainly created a hype and brought patrons to a number of Island restaurants to sample the array of gourmet beef burgers that chefs have created specially for the event. Make no mistake about it, these are not your average hamburgers. These are gourmet burgers that require a hefty appetite to do them justice.
Partnerships Forged to Support Initiative
PEI Burger Love, created by Fresh Media, is carried out in partnership with Prince Edward Island Cattle Producers, PEI Department of Agriculture and Forestry, PEI Flavours, PEI Potato Board, and the PEI Restaurant Association. The formation of this collaborative group has brought heightened awareness to PEI’s beef industry.
PEI Burger Love Grows in Popularity
In its inaugural year in 2011, a total of 14 Island restaurants participated with 5500 burgers being served in the month of April. Last year, 22 restaurants signed on and, collectively, sold over 16,000 burgers in just one month. I suspect, by the time, the event ends on April 30th, the number of beef burgers consumed on PEI in the month of April, 2013, will have surpassed 2012 figures.
For the month of April, one would be hard-pressed to go anywhere on the Island without hearing some talk about PEI Burger Love. In workplaces, on the street, and just about anywhere, one could hear Islanders enthusiastically talking about and describing the burgers they had already tried and the ones still on their list. Social media has been used extensively in this awareness campaign and burgers have suddenly become the hottest and most photographed subjects around! Servers would bring burgers to the tables and, all of a sudden, cameras and cell phones appeared and started clicking! Photographs of burgers have been everywhere, including on twitter and on Facebook. This year, for the first time, PEI Burger Love engaged nine individuals, one of whom was me, to use blogging as a platform to further advertise the Burger Love campaign.
Overall, I believe Islanders have embraced this campaign and have had a lot of fun with it. It has not been uncommon throughout the month to see groups of as many as 20 heading to the local restaurants at any day at noon to try out the burgers. Even local businesses got in on the action. Staff of Century 21 Colonial Realty in Charlottetown, for example, select one restaurant a week, call ahead with their burger order, and then their entire team of real estate agents show up en masse with a video camera in tow. Joel Ives says they have been doing this since Burger Love began and find it’s a fun activity for their team while supporting local at the same time. Says Joel, “Our business is about being local – local homes, local businesses, and being in the community. We do our best to support local initiatives. When PEI Burger Love came out, we thought we could have some fun with it by going as a group to eat lunch together, have some laughs, and make some fun videos. Since all of our agents are busy doing their own thing, it is great that we can book off one lunch a week during the [Burger Love] campaign to get together.” You can check out the Century 21 fun videos here to see how one local business has embraced PEI Burger Love.
Diners are engaged in Burger Love fever too as they head to local dining establishments to order up the creative burgers. They can rate the burgers they eat by voting online for their favorite and win great prizes in the process as well as help crown the most popular burger in the 2013 Burger Love campaign.
Timing is Everything
April is traditionally a slower month for local restaurants because the tourist season hasn’t yet started but, this year, participating restaurants are hopping busy as burger lovers converge on their establishments to sample the many burger options. Linda Dickie, Food and Beverage Director at Mavor’s Restaurant in the Confederation Centre of the Arts, says they chose to participate in PEI Burger Love because they like to support local whenever possible and it brings awareness to the restaurant. According to Linda, Mavors sold 1700 burgers in the first couple of weeks of the campaign with the highest single day servings of 210 burgers!
Chef James Oja, who owns and operates The Big Orange Lunchbox restaurant in downtown Charlottetown, is a first-time participant in PEI Burger Love. He says the annual PEI Burger Love campaign “generates a busy month giving restaurants that participate a little warm-up for summer”. Chef Oja claims Island beef is the best beef in Atlantic Canada and that his “supplier, Bluefield Natural Products, provides superior beef that is richer in iron, antioxidants, flavour, and texture”.
Just How Many Burgers Can You Eat?
As I mentioned earlier, I was one of nine guest bloggers for PEI Burger Love this year and my assignment was to sample four of the burgers and blog about them. Now, I thought four burgers was a lot to consume in a little over a week. However, Connor Jay set himself the challenge to eat all 31 burgers….and he did… in just 14 days! Averaging two a day plus three on two different days, he proudly says there was one day that he ate two of these huge burgers within two hours! Asked why he decided to set out to eat all 31 burgers, Connor says he thought “it would be something fun to do and would be a great way to experience the Island“. He says he “loves the PEI Burger Love campaign and thought eating all 31 [burgers] would be a great opportunity to get other friends involved in it and that it would inspire them to go grab a burg“. I am also aware of a workplace where employees would order a couple of burgers from each of 3-4 restaurants for lunch each Friday in April, bring them back to their workplace, and cut them into quarters so that co-workers could have the opportunity to sample as many of the burgers as possible.
What’s in a Gourmet PEI Burger Love Burger?
Other than the requirement to use 100% Island beef in the burgers, chefs had unfettered licence to dress the burgers with whatever toppings they wanted and to prepare and present them as creatively as they wished. Suffice it to say that Island chefs rose to the challenge and created some mighty fine culinary creations with unique flavour combinations.
The meat in the burgers generally ranged in size from 6 oz to 9 oz and was prepared in different ways – some burgers were charred over an open flame while others were grilled or sautéed. Toppings ranged from candied bacon (yes, oh là là!) to nachos and salsa, coleslaw, bacon jam, Jalapeno peppers, various renditions of aioli, Portobello mushrooms, guacamole, and onions encased in wontons or presented as beer-battered onion rings, and just about anything else you could imagine going into these tall burgers. Then, there were the many variations of buns encasing all this goodness. One burger even had two grilled cheese sandwiches holding it in place instead of a traditional bun! And, of course, each restaurant creatively named their burger. Here are photographs of the four burgers I was assigned to sample as part of my blog assignment:
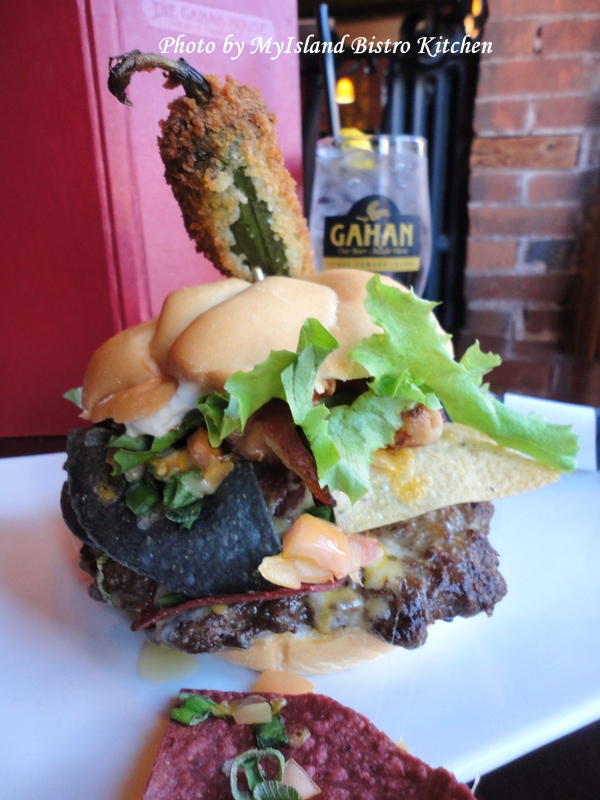
From the Gahan House in Charlottetown, PEI, comes the “Not’cha Burger” that features Tortilla chips, salsa, spicy cheese dip, and Jalapeno mayo to accessorize the beef burger.
“Not’cha Burger”, Gahan House, Charlottetown, PEI
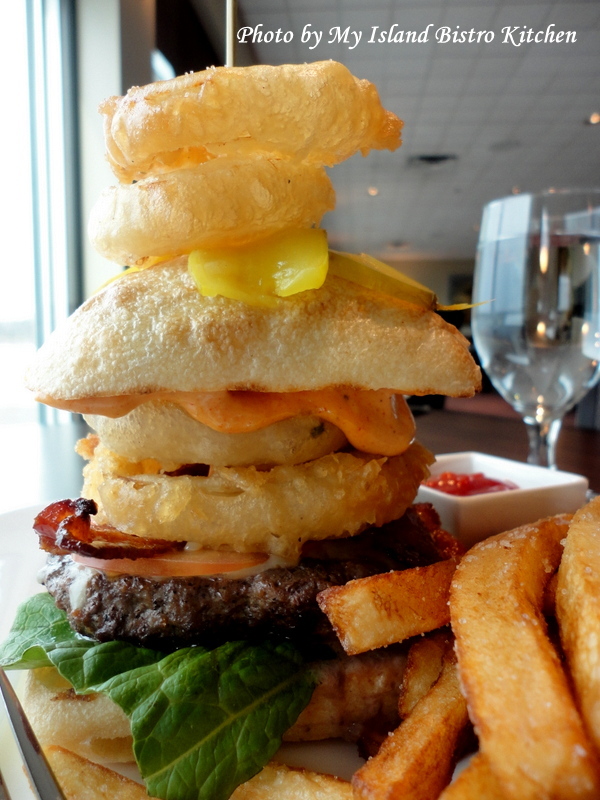
The “Canadian Legend Burger” was created by the Lucy Maud Dining Room, a teaching restaurant in the Culinary Institute of Canada. It features a gouda-stuffed burger accessorized with smoked tomato aioli, confit cherry tomato, bacon jam, candied bacon, and the best onion rings I have ever tasted.
The “Canadian Legend Burger” at the Lucy Maud Dining Room of the Culinary Institute of Canada, Charlottetown, PEI
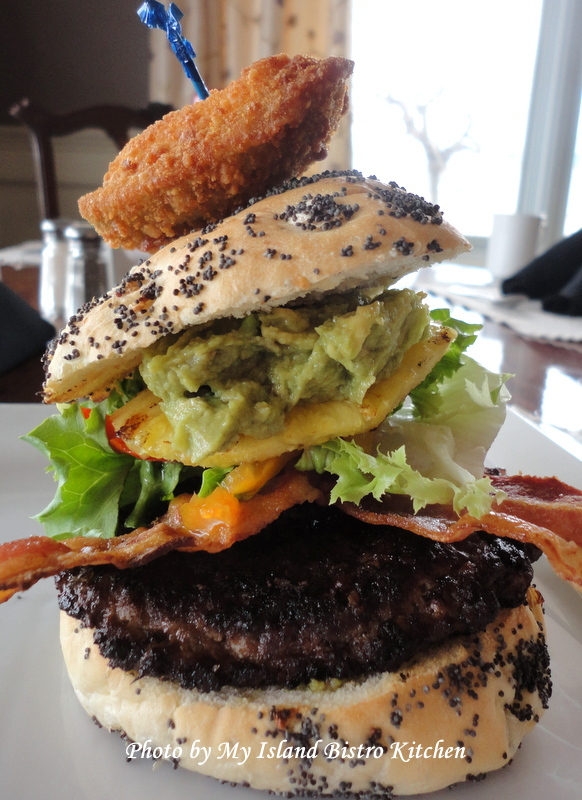
The Prince William Dining Room of the Loyalist Inn in Summerside, PEI, presented the “Big Kuhuna Burger” that featured smoked bacon, banana peppers, a grilled pineapple ring, and guacamole.
The “Big Kahuna Burger” from the Prince William Dining Room of the Loyalist Inn, Summerside, PEI
The Old Triangle in downtown Charlottetown created the “Mr. Miyagi Burger” that included Hoisin BBQ sauce, Asian slaw, and caramelized onion wontons.
The “Mr. Miyagi Burger” from The Old Triangle in Charlottetown, PEI
As you can see, these are huge, well accessorized burgers! If I had one suggestion for organizers for future PEI Burger Love campaigns it would be to consider also offering smaller versions (perhaps even slider size) for those who don’t have large appetites but yet who want to try out the burgers.
The gourmet burgers, on average, are in the $12-$14 range (burger only).
PEI Burger Love Surpasses Expectations
The Prince Edward Island Cattle Producers Association reports being pleased with the campaign. The Association gets great exposure for its industry and, as representative Rinnie Bradley says, they “are a small industry compared to dairy or potatoes so it has been difficult to get our message out to the general public that we are important to the Island’s economy. From truckers, to feed mills, vets, farm machine shops, to processing facilities and meat shops, the beef industry contributes significantly to our economy directly and indirectly.” Bradley says “PEI Burger Love 2013 has surpassed our expectations to date. We are very pleased that so many restaurants have signed on and that several new participants decided to include Island beef on their menus. We hope Islanders and visitors alike will get out and enjoy the amazing burgers, and seek out Island beef for their meals at home.”
So, Islanders, only 6 days left to get out and try some of these gourmet burgers before PEI Burger Love 2013 ends. This is a great way to show support for the local beef industry as well as the many Island restaurants which have chosen to participate in this campaign to promote Island beef. There is a burger out there for everyone’s taste!
POSTCRIPT (May 8, 2013):
The statistics are in for the 2013 Burger Love Campaign. A total of 46,204 beef burgers were sold in 31 participating restaurants during the month-long event in April. This translates into 21,917 pounds of beef consumed during this time period. Sales for the burgers during the month of April are estimated at $580,008.62. Voters selected “The Smokin’ Fox” from Phinley’s Diner in Stratford, just across the bridge from Charlottetown, PEI, as their “Most Loved Burger 2013”.
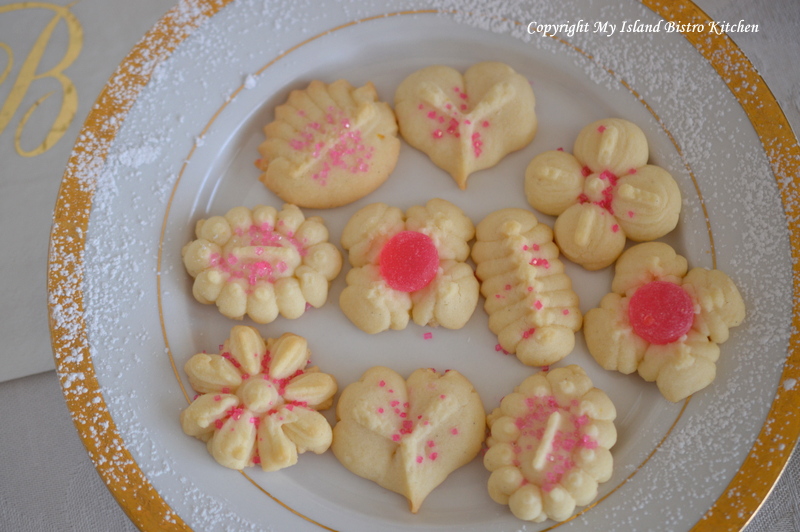
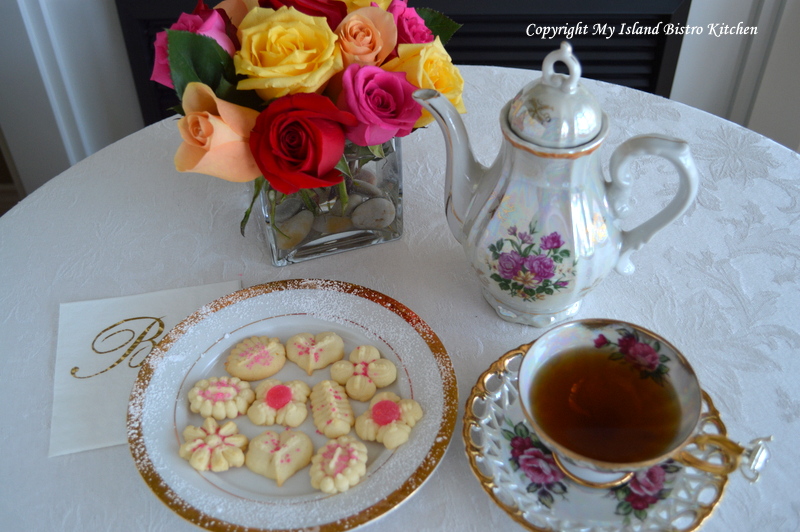
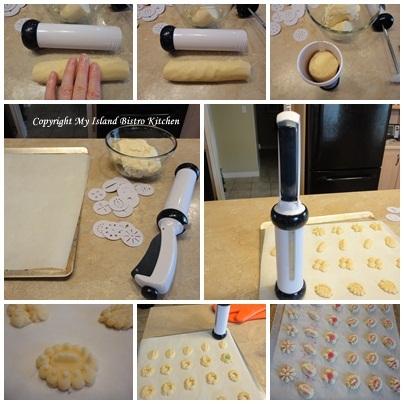
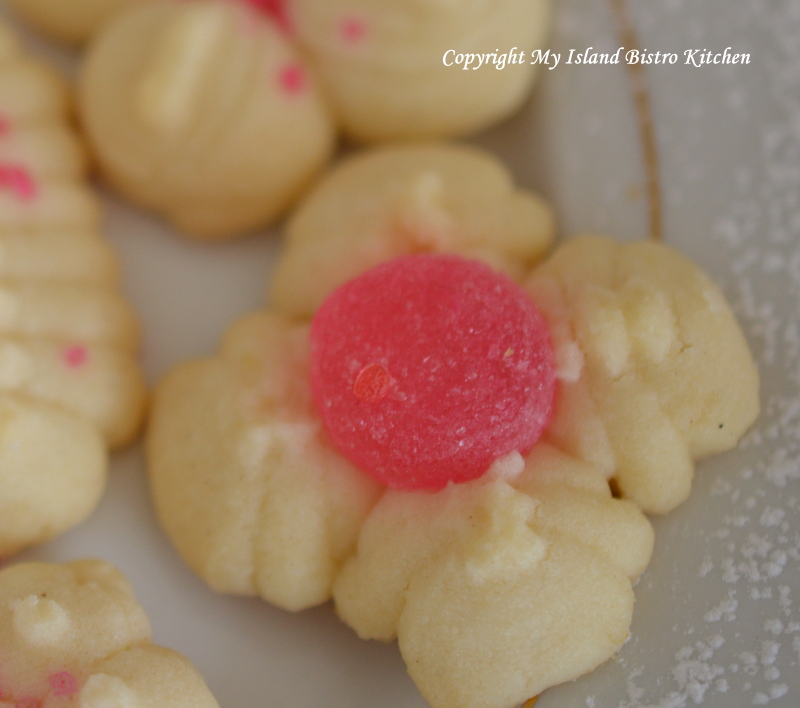
Spritz cookies are dainty-shaped cookies that are crisp and buttery. They are made by pushing soft cookie dough through a cookie press which is a cylinder fitted with a decorative disk that has patterned holes through which the dough is “squirted” or pressed into shapes. Typically, cookie presses come with many different decorative disks – mine has probably 20 or more.
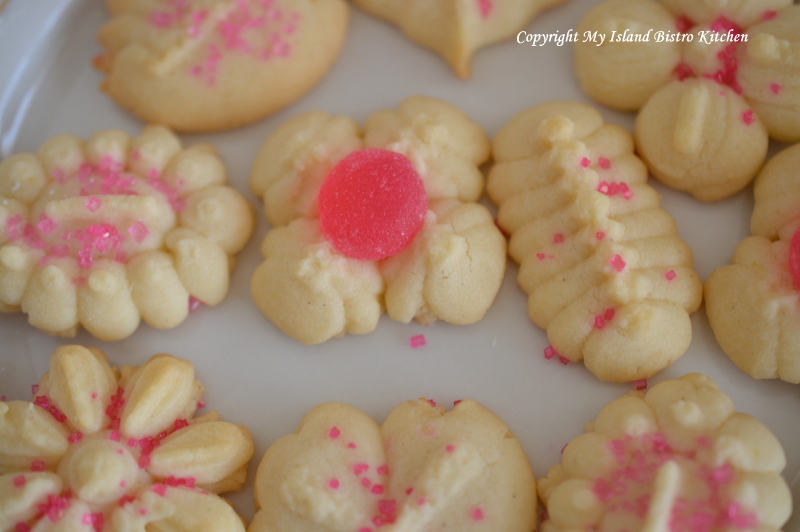
These cookies are popular at Christmas, special occasions, and are very suitable for afternoon teas as they can be made in so many different shapes and colors and can be further embellished with icing, colored sugar, miniature gumdrops, or dragées.
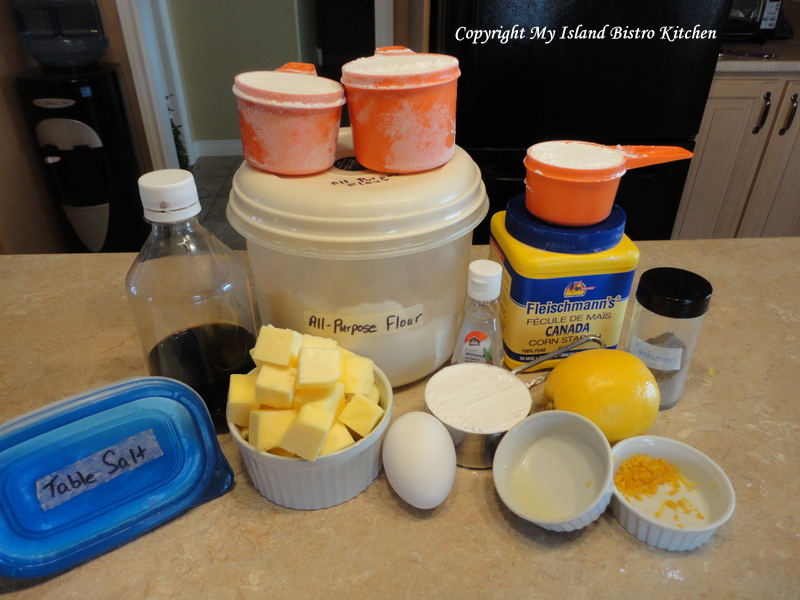
My recipe for Lemon Spritz Cookies is buttery rich and delicate. I like the flavour burst of lemon juice and zest in these petite cookies.
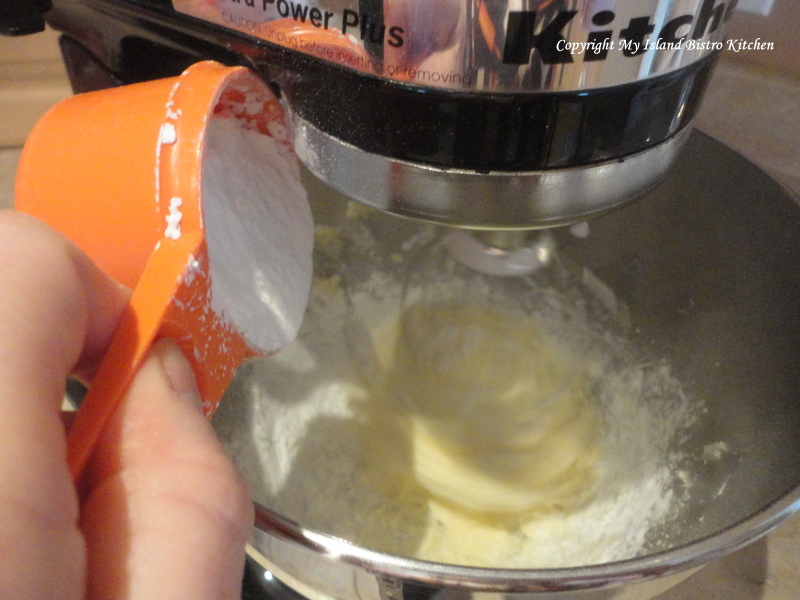
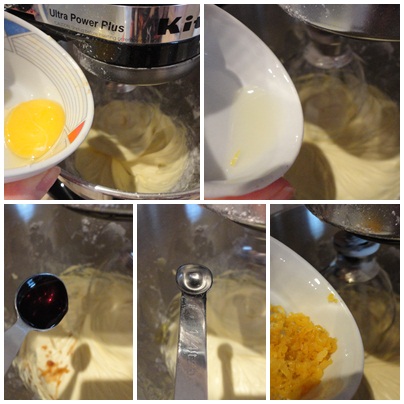
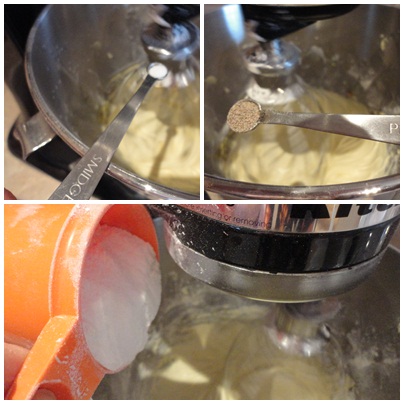
This recipe does best when the dough is chilled for 24 hours to allow the egg yolk to get fully incorporated and absorbed into the other ingredients. Unlike most liquids, such as water or milk, for example, eggs take a lot more time to become incorporated into the dry ingredients. When the dough comes out of the refrigerator, it will be too hard to push through the cookie press so let the dough sit at room temperature for about an hour or so until it becomes pliable enough that it can be formed into a roll that can be inserted into the cookie press cylinder. You’ll notice this recipe has no baking powder or soda. This is because that would cause the cookies to raise which, in turn, would result in them losing their shape and design that makes them spritz cookies.
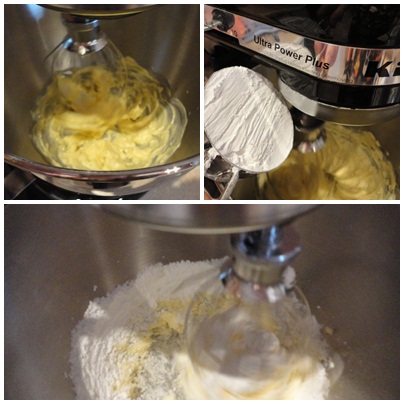
Add the flour, salt, and cardamom to creamed mixture, stirring until well combined.
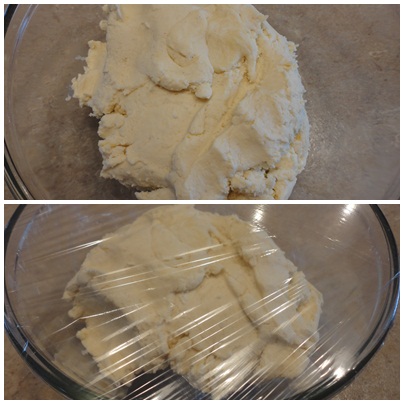
Cover dough tightly with plastic wrap and place in refrigerator for 24 hours.
Remove dough from refrigerator and let sit at room temperature for apx. 1 hour. Form dough into a roll that will fit inside the cookie press cylinder. Insert dough roll into the cookie press.
Line cookie sheets with parchment paper. Follow manufacturer’s directions for your cookie press to form the cookies into decorative shapes. Decorate with colored sugar, if desired. Bake at 400F for 7-8 minutes. Watch the cookies closely as their high butter content and small size means they will burn easily and quickly. Let cookies cool on baking sheets for 2-3 minutes then transfer them to wire racks to finish cooling.
Thank you for visiting “the Bistro” today. There are lots of ways to connect with “the Bistro” through social media:
Join My Island Bistro Kitchen on Facebook Follow the Bistro’s tweets on twitter @PEIBistro Find the Bistro on Pinterest at “Island Bistro Kitchen” Follow along on Instagram at “peibistro”
I first had a rudimentary version of Cottage Pie (although I didn’t know that’s what it was) many years ago as a small child at Camp Segunakadeck (Seggie) on the south shore of PEI. I came home from summer camp raving about this yummy dish and trying to describe it to my mother. As a seven or eight-year old, my descriptions of culinary delights would not have been enough for even a seasoned professional chef to be able to concoct some resemblance of the meal. The description would have went something like this…there was hamburg and ‘stuff’ on the bottom and mashed potatoes on the top and it was made in a large pan. Many years later when I would recall my camping experience, I was always reminded of this dish which I have since come to realize was likely a very basic and simplistic version of Cottage Pie. Continue reading Savory Cottage Pie→
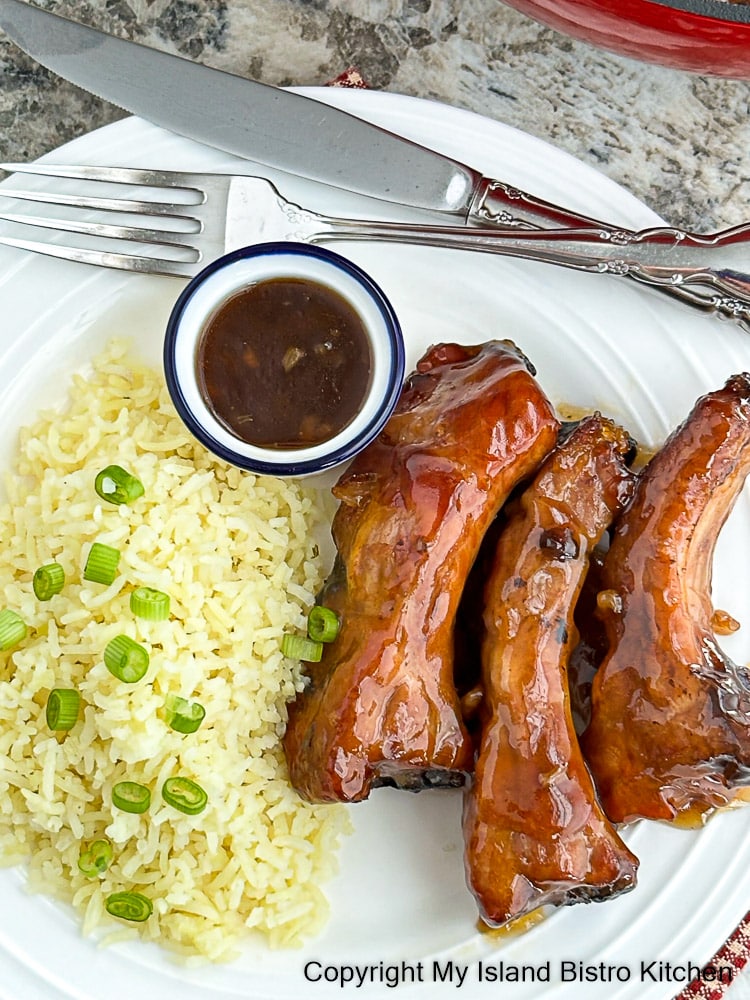
Today, I am sharing my favorite recipe for Honey Garlic Spareribs. This is a recipe I have been making for many years. Serve with rice or baked potato and, if desired, a side vegetable. Continue reading Honey Garlic Spareribs→
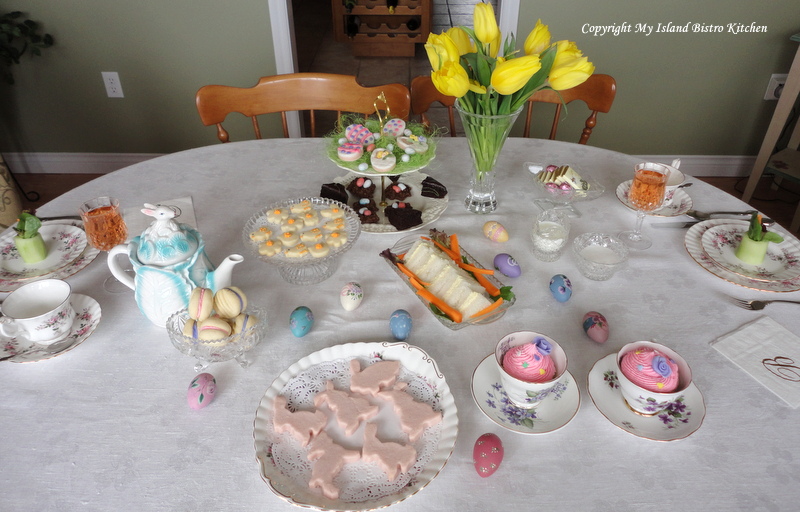
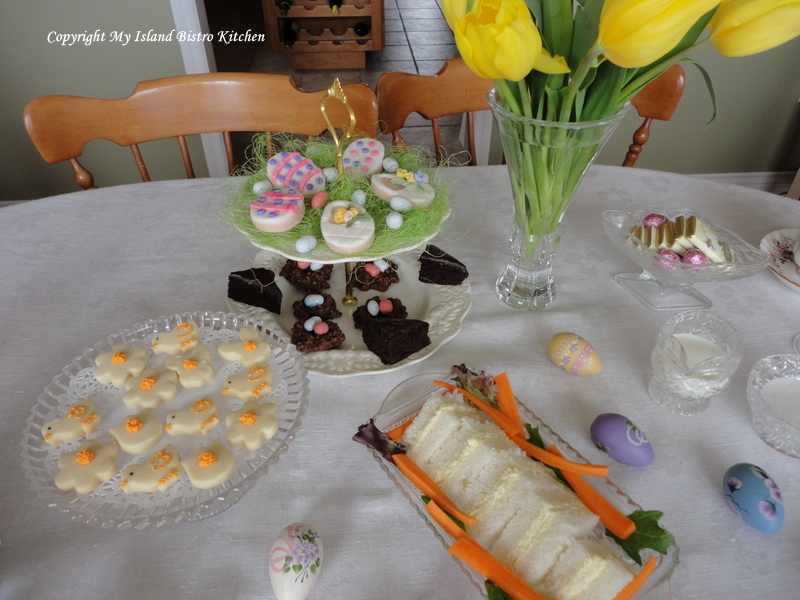
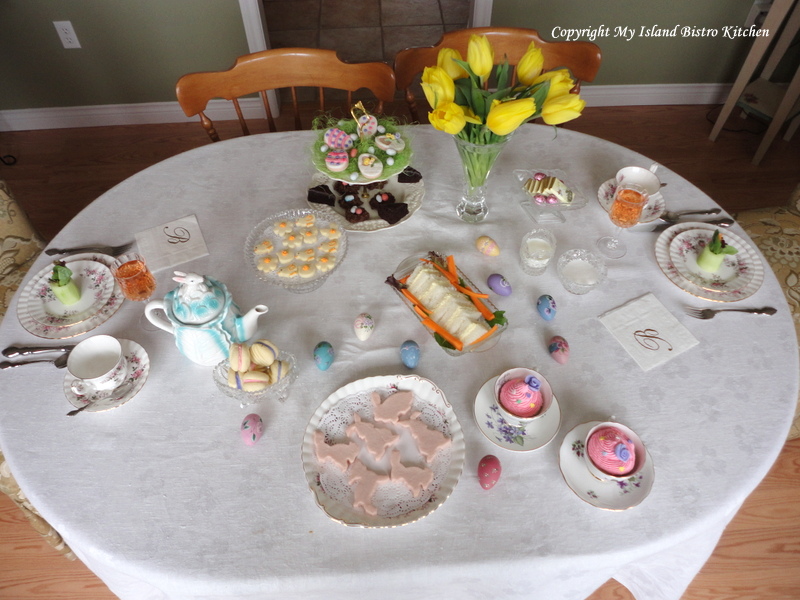
By now, you have probably concluded that I like afternoon teas! So, today, I share photos from my Easter Tea.
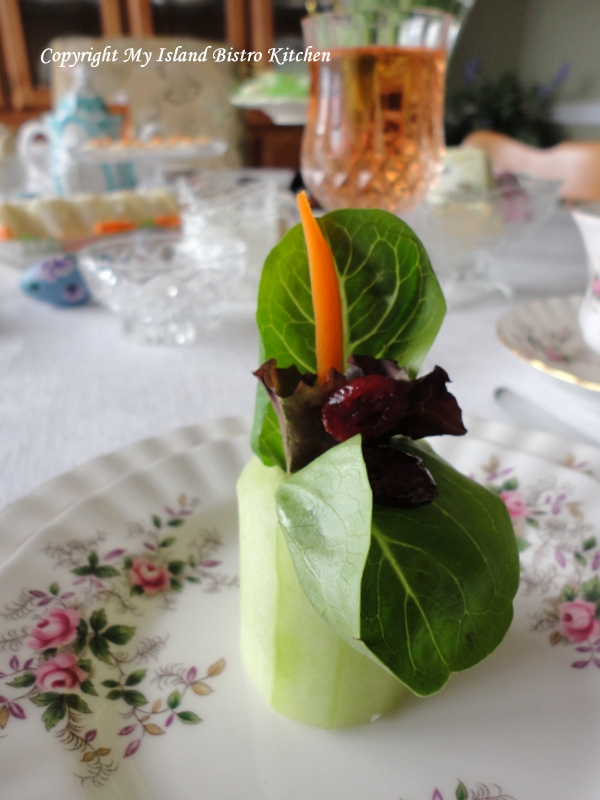
Let’s begin with a stylized salad served in a hollowed-out cucumber cup.
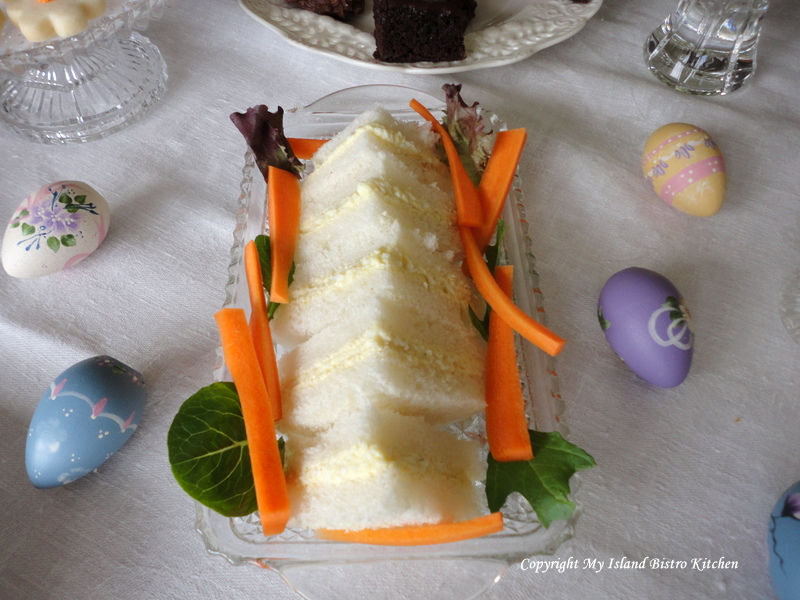
And, of course, the most logical tea sandwiches for Easter would be made with egg salad and garnished with carrot sticks.
The little Easter eggs scattered on the table are actually little wooden eggs I hand-painted some years ago when I was doing a lot of decorative painting.
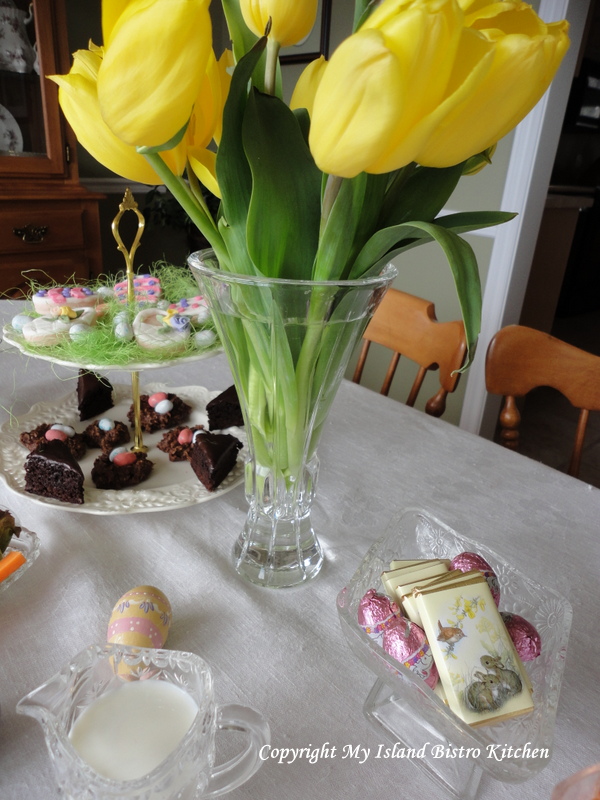
I love the bright, cheerful colors of Easter but what would Easter be without something chocolate!
The bright yellow tulips are from the Vanco Tulip Farm in Mt. Albion, PEI.
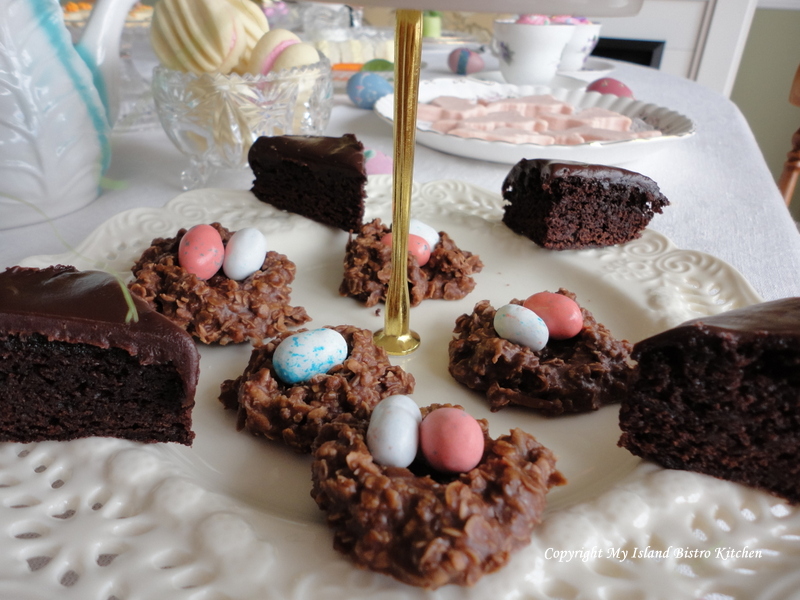
Love these little chocolate nests filled with tiny miniature Easter eggs! The fudge brownies were pretty awesome, too!
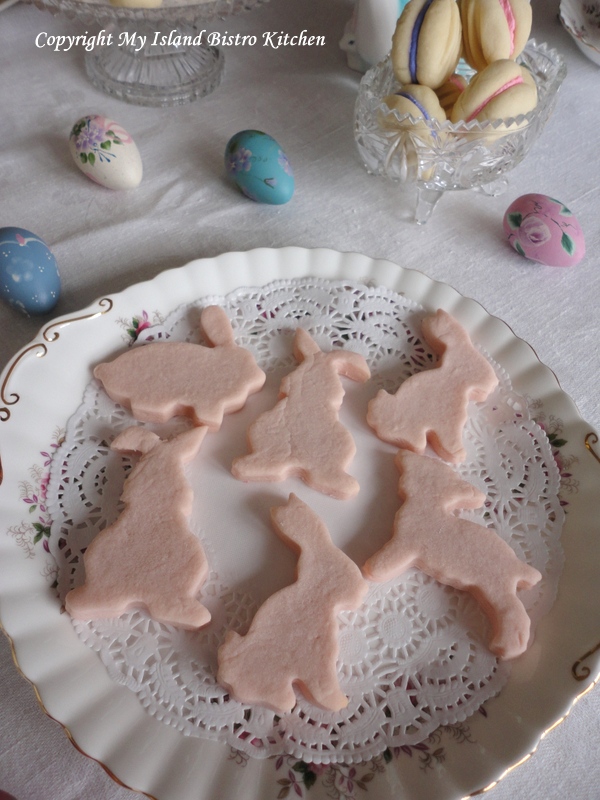
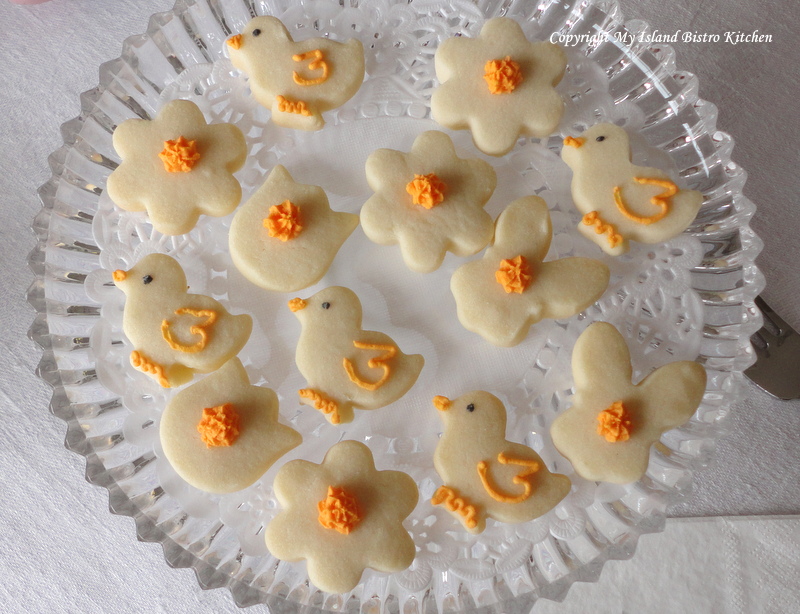
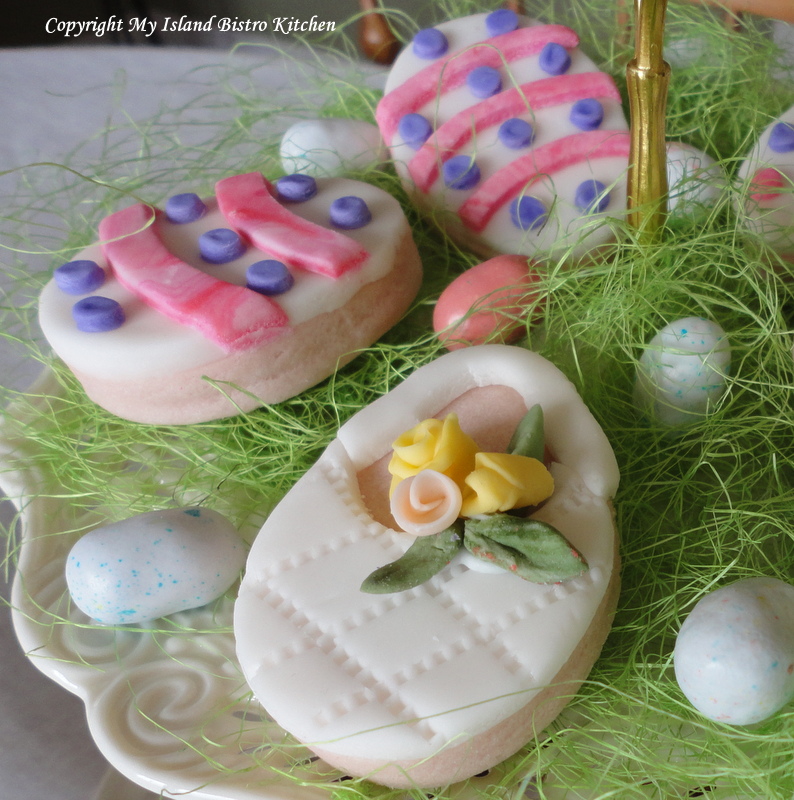
Seasonal cookie shapes of pink bunnies and lambs also found their way on to the Easter tea table along with melting moments sandwiched together with bright-colored buttercream icing.
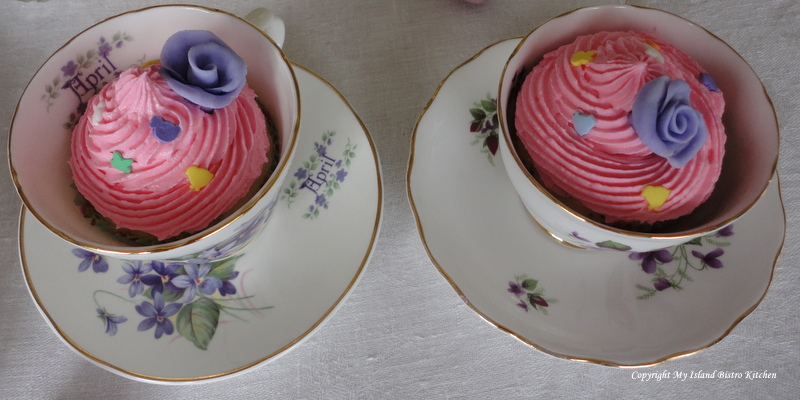
I am always looking for creative uses for my teacup collection. Here, I have used them to serve brightly-colored Easter cupcakes.
Dainty little Scotch cookies decorated for the Easter season.
Decorating seasonal cookies is one of my passions – can you tell?
Fun and whimsical! Certain conversation pieces, for sure!
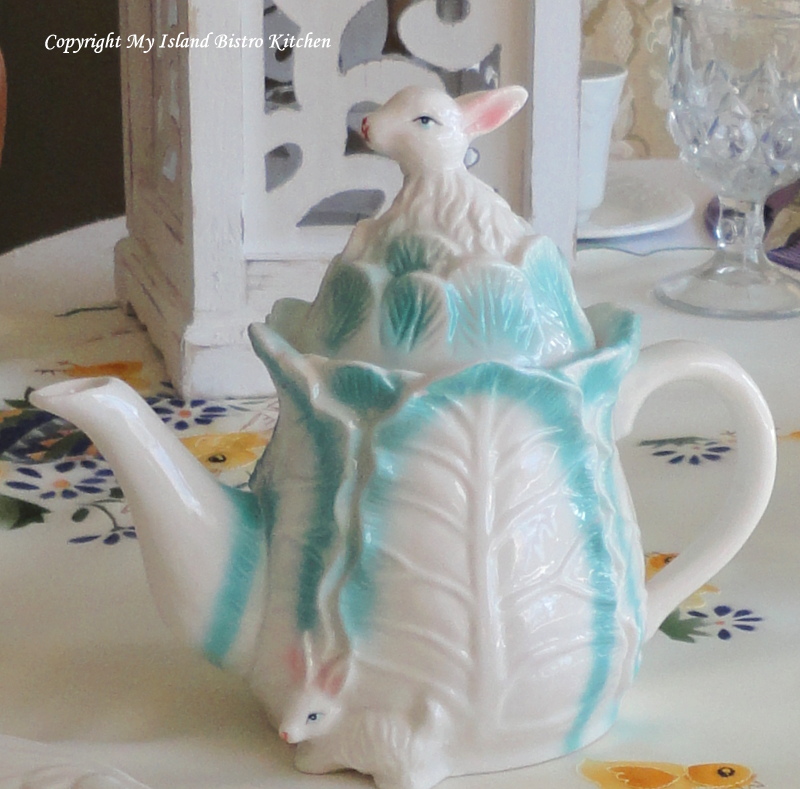
I realized, too late, that I had forgotten to take a close-up of my Easter teapot on the tea table. Fortunately, I had another photograph of it so here is photo of my “Little Lamb Teapot”.
And, when it’s all put together, this is what it looked like.
I hope you have enjoyed these photos of my Easter Tea. Thank you for visiting my blog today. I hope you are enjoying this Easter season.
Thank you for visiting “the Bistro” today. There are lots of ways to connect with “the Bistro” through social media:
Join My Island Bistro Kitchen on Facebook Follow the Bistro’s tweets on twitter @PEIBistro Find the Bistro on Pinterest at “Island Bistro Kitchen” Follow along on Instagram at “peibistro”
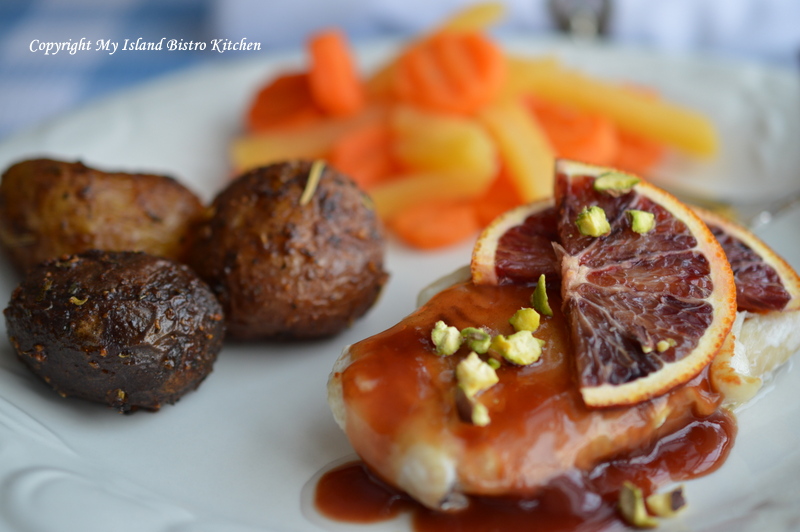
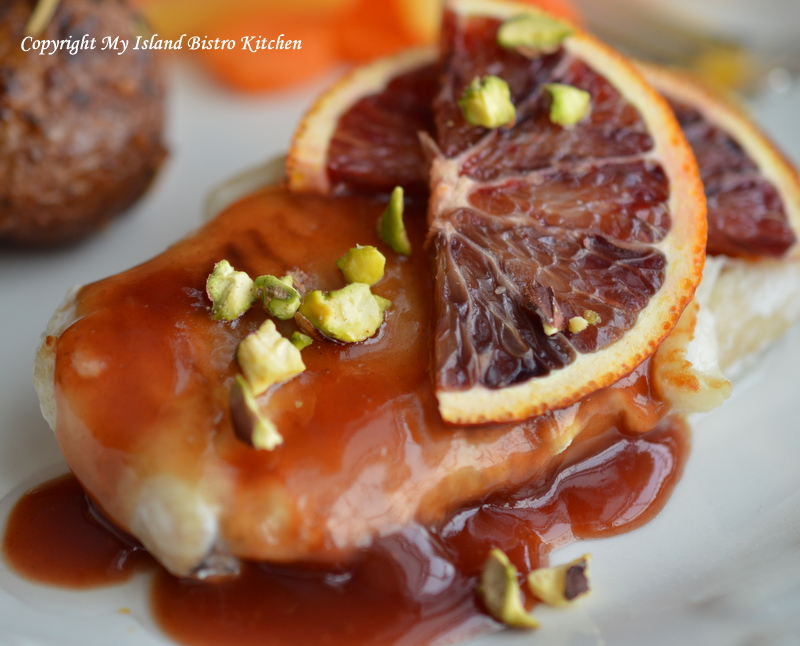
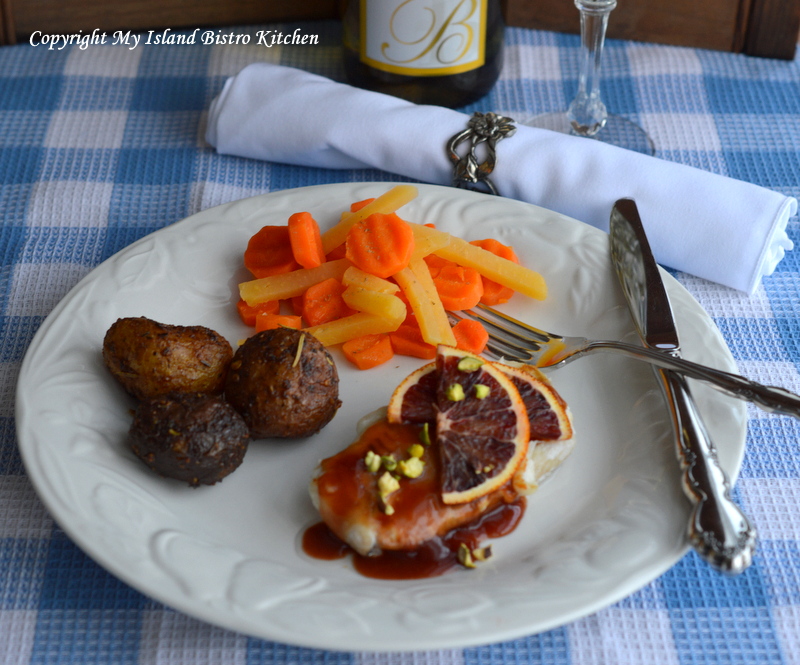
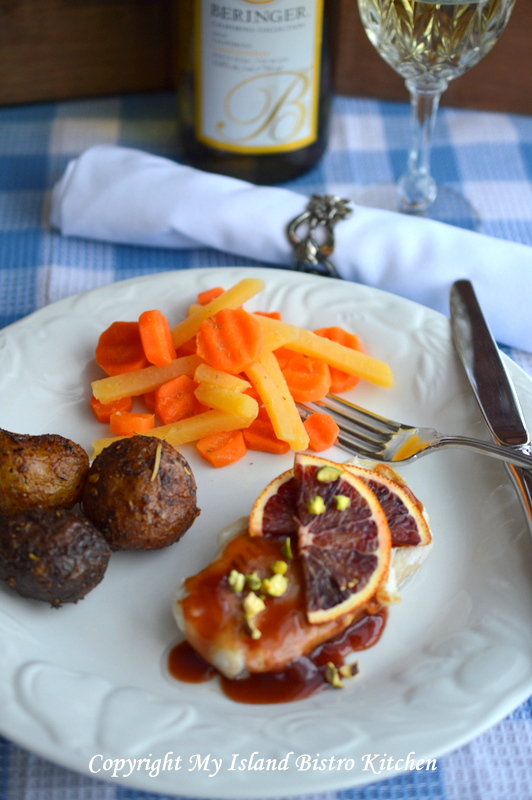
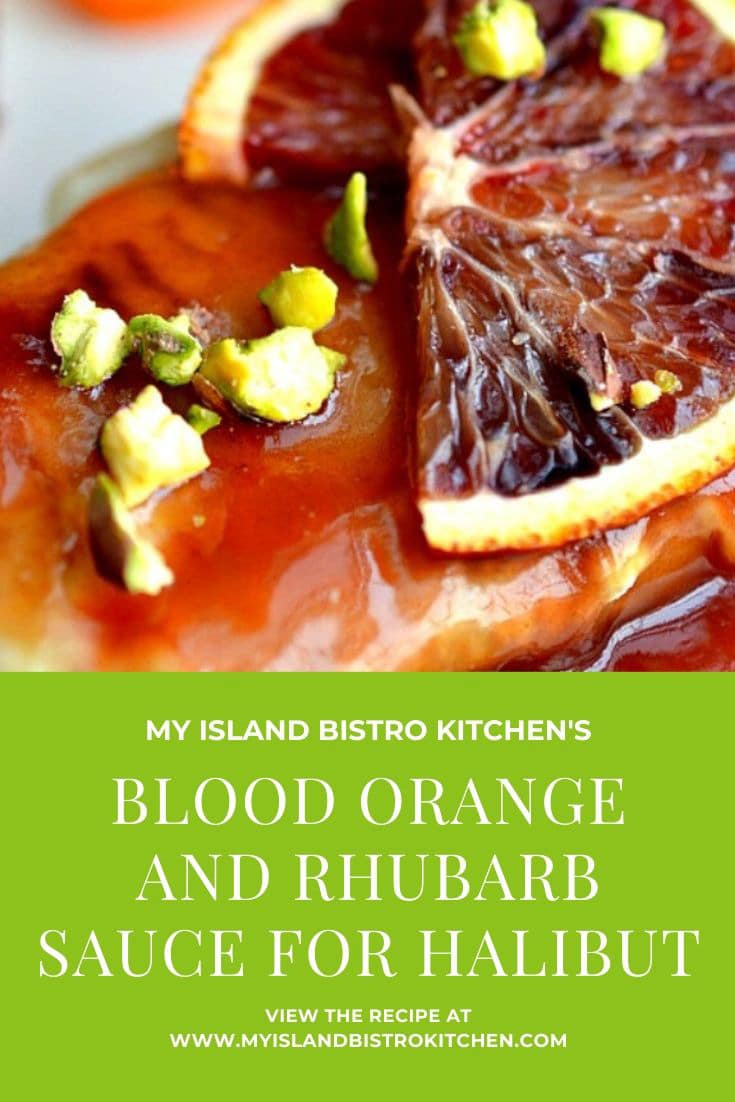
Blood Orange and Rhubarb Sauce over Halibut Steak served with Herb-Roasted Miniature Potatoes and Steamed Root Vegetables
Every Spring, I freeze bags and bags of rhubarb for recipes to be made through the remainder of the year. I am always looking for new ways to serve this versatile vegetable. Today, I am using it in this Blood Orange and Rhubarb Sauce for fish.
Living on an island on the East Coast of Canada, fish is readily available. Sometimes, I like to eat the fish plain, just pan-seared or oven-baked but, other times, I like it dressed up a bit. Rhubarb and citrus make a nice combination and citrus sauces go well with seafood so my sauce creation includes both rhubarb and citrus fruit.
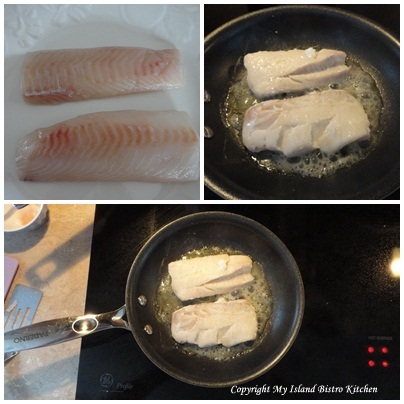
I thought it was time to use up some of the remaining frozen rhubarb (or maybe I just needed to have a Spring food because our winter is getting very tiresome). You can use any kind of white fish with this sauce – my choice was the halibut steak because it had enough thickness to it that it would hold together to plate well for presentation and not break into pieces.
I love the rich red-colored sauce as a contrast to the white fish. I hope you enjoy.
Blood Orange and Rhubarb Sauce for Halibut Steaks
Ingredients:
1 cup rhubarb, fresh or frozen, chopped into 1/2″ pieces 2 tbsp sugar ¼ cup water
Juice of 2 blood oranges (about 2/3 cup juice)
1 tbsp butter 1 shallot, finely minced (about ¼ cup or a little less) 1 clove garlic, finely minced 1 tbsp balsamic vinegar 1 tbsp pomegranate molasses 2 tsp liquid chicken bouillon concentrate mixed in ½ cup hot water 1½ tsp blood orange zest ¼ tsp sage ¼ tsp ginger 1½ – 2 tsp cornstarch mixed in 1 tbsp cold water to make thickening paste
Method:
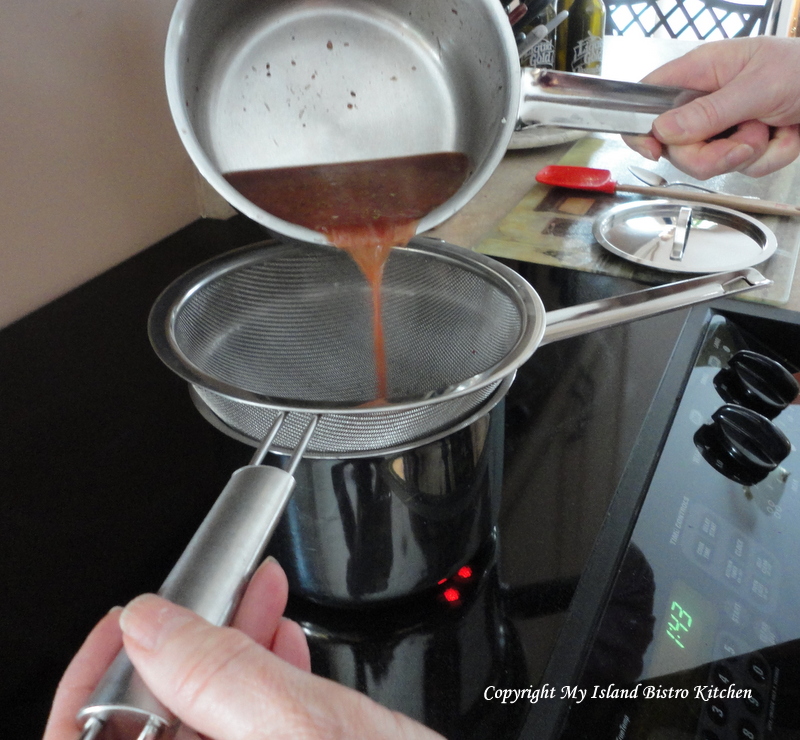
In saucepan, place the rhubarb, sugar, and ¼ cup water. Cook over medium-low heat for about 10 minutes, until rhubarb has softened. Push the rhubarb through a sieve to release the juice. You should have about 1/3 cup of rhubarb juice. Discard rhubarb pulp. Set juice aside.
Meanwhile, grate 1 1/2 tsp zest from one blood orange. Squeeze juice from 2 medium-sized blood oranges and strain through sieve to remove any pith and stones. In small saucepan, over medium-low heat, reduce the orange juice to about half. You should have about 1/3 cup of juice after this process.
In clean saucepan, melt the butter and sauté the shallot and minced garlic for 3-4 minutes until shallot is translucent.
Add the rhubarb and orange juices, balsamic vinegar, pomegranate molasses, chicken stock, orange zest, sage, and ginger. Bring to a boil over medium-low heat.
Remove from heat and strain through fine sieve into clean saucepan to remove any pieces of garlic and onion. This will make a clean, smooth sauce. Return mixture to low heat.
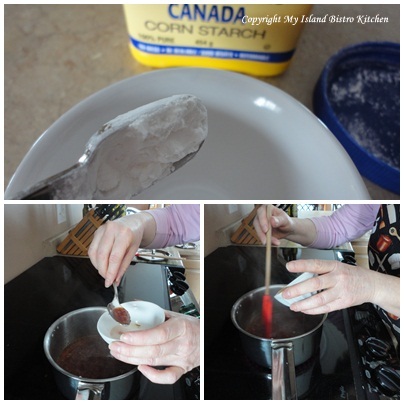
Mix cornstarch with water to make a paste. Add about 1 tbsp of the hot liquid from the sauce to temper the paste so it will not go lumpy when added to the hot mixture. Add to saucepan mixture and stir or whisk until thickened to consistency desired.
Makes enough sauce for 3-4 servings.
To serve:
Pan-sear or oven-bake halibut steaks till fish flakes easily. Plate the fish and pour 1-2 tbsp sauce over each steak. Garnish with chopped pistachio nuts, if desired, and blood orange slices.
I served the fish with a medley of yellow, red, and blue herb-roasted miniature potatoes, steamed carrots and turnip, and paired this meal with Beringer’s Chardonnay (CA).
Blood orange juice and rhubarb combine their flavors to make a wonderful sauce for white fish such as halibut.
Course Main Course
Keyword fish, seafood
My Island Bistro KitchenBarbara99
Ingredients
1cuprhubarb, fresh or frozen, (chopped into ½“ pieces
2tbspsugar
¼cupwater
Juice of 2 blood oranges (about 2/3 cup juice)
1tbspbutter
1shallot, finely minced (about ¼ cup or a little less)
1clovegarlic, finely minced
1tbspbalsamic vinegar
1tbsppomegranate molasses
2tspliquid chicken bouillon concentrate mixed in ½ cup hot water
1½tspblood orange zest
¼tspdried sage
¼tspground ginger
1½ - 2tspcornstarch mixed in 1 tbsp cold water to make thickening paste
Instructions
In saucepan, place the rhubarb, sugar, and ¼ cup water. Cook over medium-low heat for about 10 minutes, until rhubarb has softened. Push the rhubarb through a sieve to release the juice. This should yield about 1/3 cup rhubarb juice. Discard rhubarb pulp. Set juice aside.
Meanwhile, grate 1½ tsp zest from one blood orange. Squeeze juice from 2 medium-sized blood oranges and strain through sieve to remove any pith and stones. In small saucepan, over medium-low heat, reduce the orange juice to about half. This should yield about 1/3 cup of juice after this process.
In clean saucepan, melt the butter and sauté the shallot and garlic for 3-4 minutes, until shallot is translucent. Add the rhubarb and orange juices, balsamic vinegar, pomegranate molasses, chicken stock, orange zest, sage, and ginger. Bring to a boil over medium-low heat. Remove from heat and strain through fine sieve into clean saucepan to remove any pieces of garlic and onion. This will make a clean, smooth sauce. Return mixture to low heat.
Mix cornstarch with water to make a paste. Add about 1 tbsp of the hot liquid from the sauce to temper the paste so it will not go lumpy when added to the hot mixture. Add to saucepan mixture and stir or whisk until thickened to consistency desired.
Recipe Notes
Yield: Makes enough sauce for 3-4 servings.
To serve:Pan-sear or oven-bake halibut steaks till fish flakes easily. Plate the fish and pour 1-2 tbsp sauce over each steak. Garnish with chopped pistachio nuts, if desired, and blood orange slices.
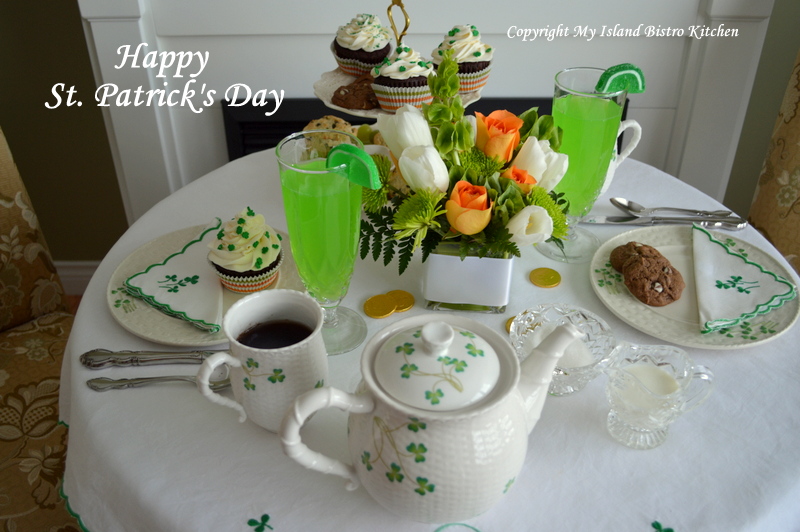
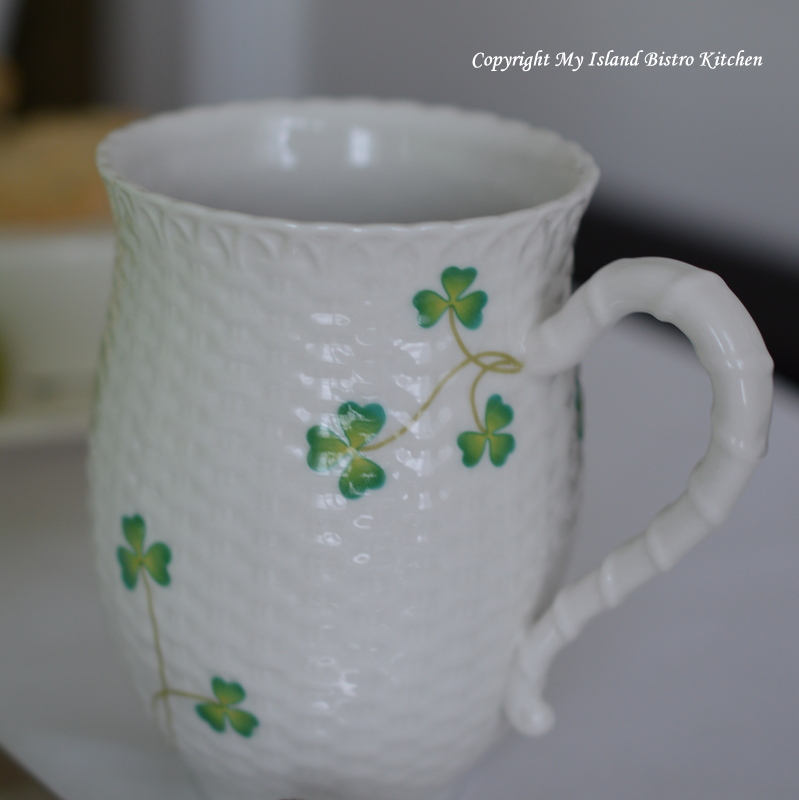
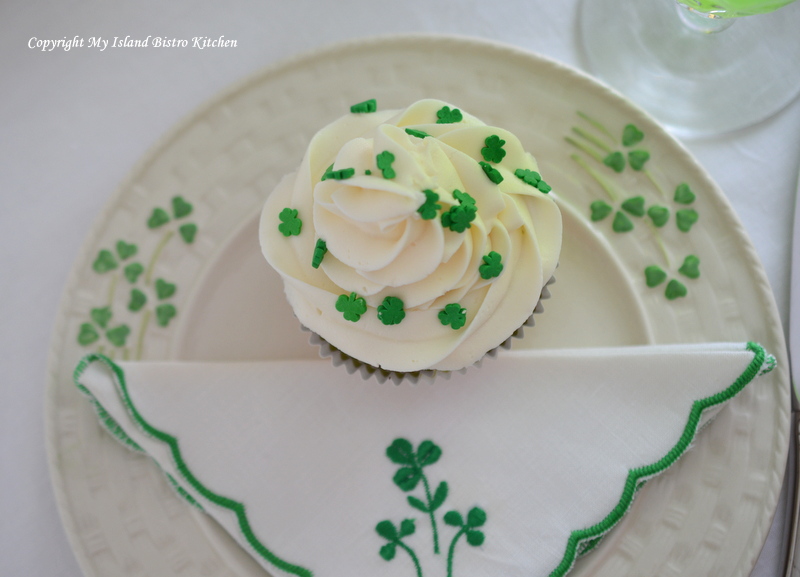
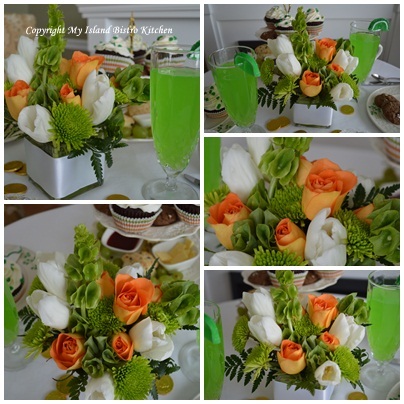
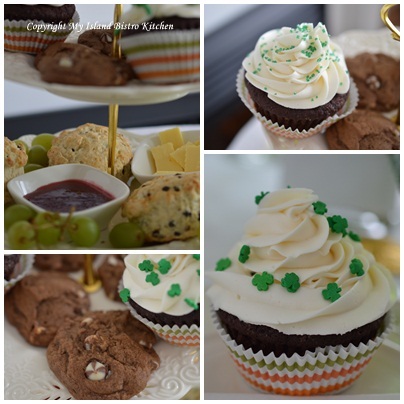
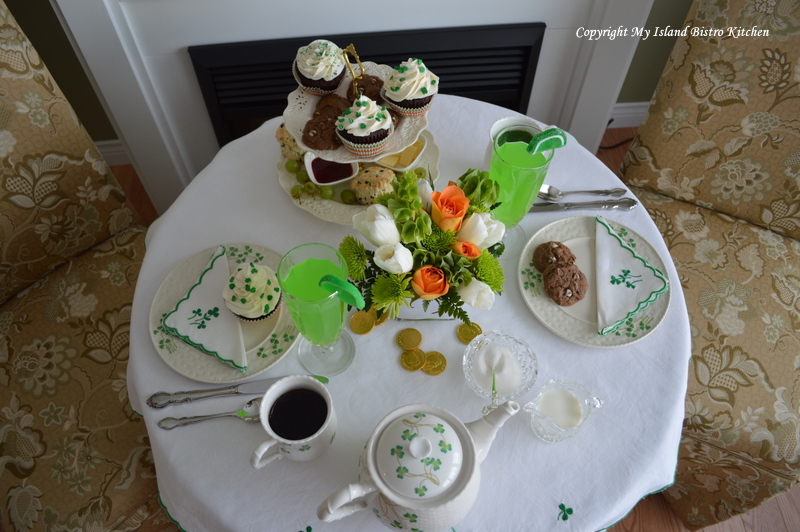
Happy St. Patrick’s Day, everyone! Today, I am sharing photos from my St. Patrick’s Day Afternoon Tea.
St. Patrick’s Day Afternoon Tea Setting
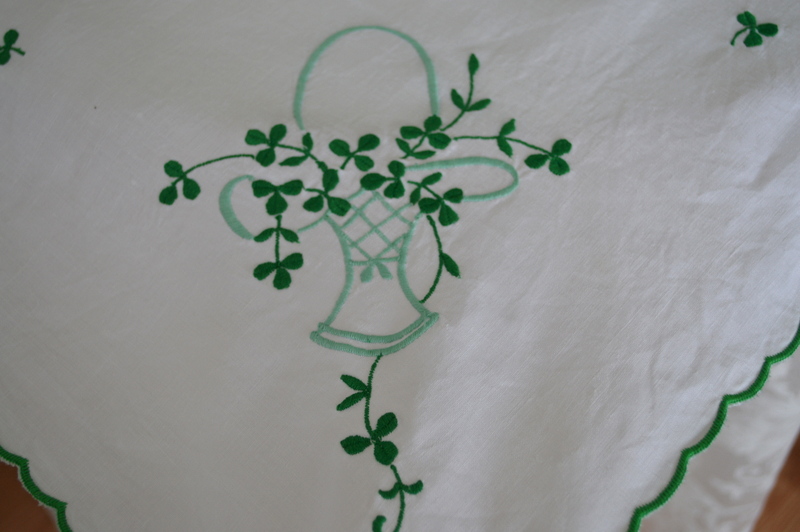
I love this little square tablecloth and matching napkins. I bought them some years ago at the Blarney Castle on a visit to Ireland. It has been a tradition since to display this cloth on St. Patrick’s Day and it always evokes great memories of my visit to the Emerald Isle.
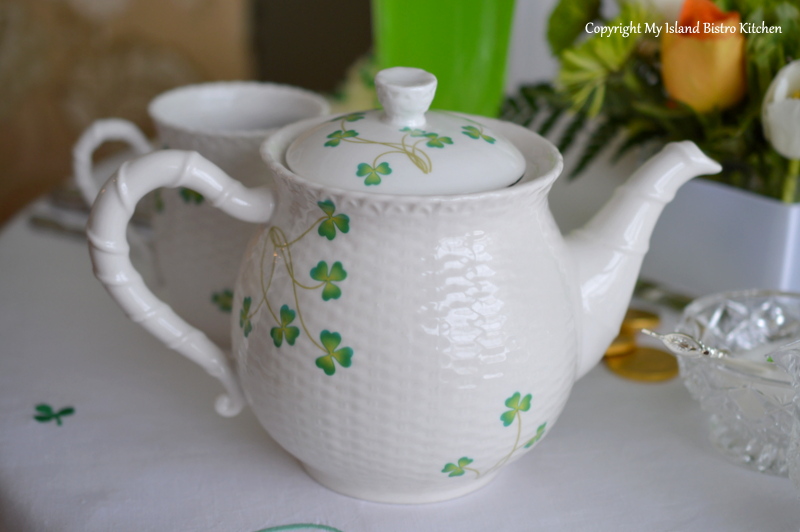
Of course, it’s also a time for me to bring out my small collection of Irish-themed dishes.
The tea offering from the teapot was English Afternoon Tea.
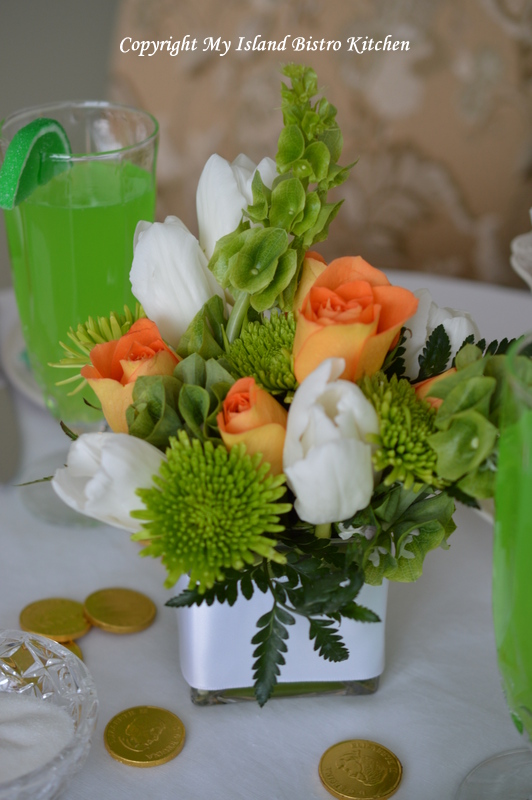
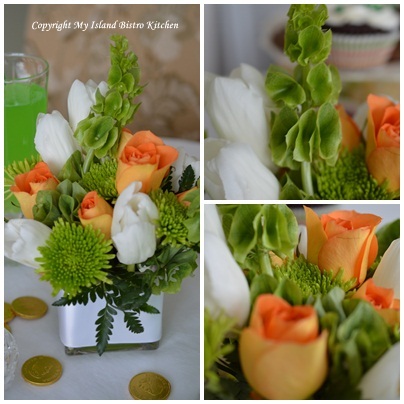
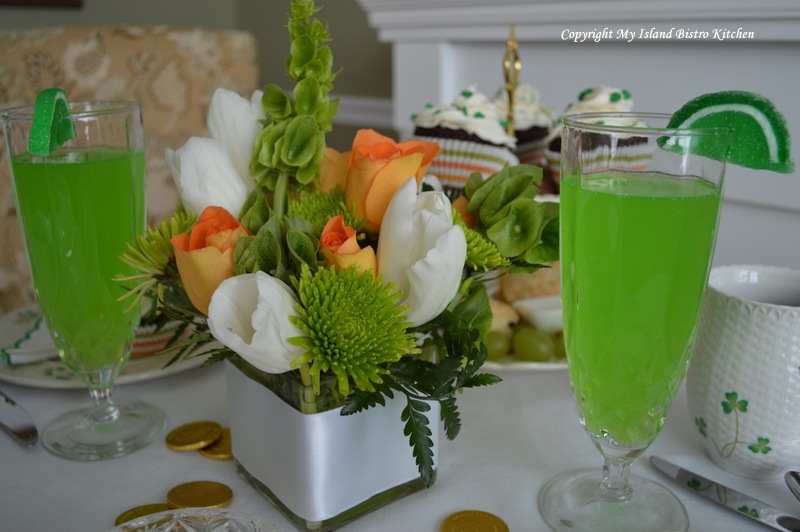
My choice of tea table flowers centered around the colors in the Irish flag – the green mums and Bells of Ireland, the orange roses, and the white tulips which, of course, came from our local PEI tulip growers – Vanco Tulip Farm in Mt. Albion, PEI.
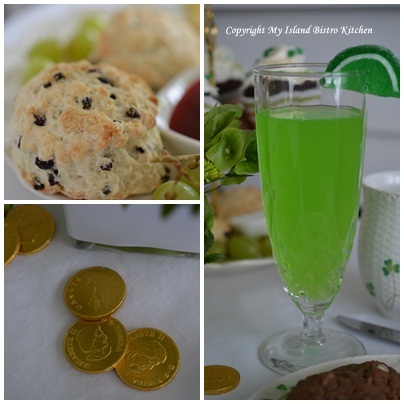
I love these Canadian “loonie” chocolate coins!
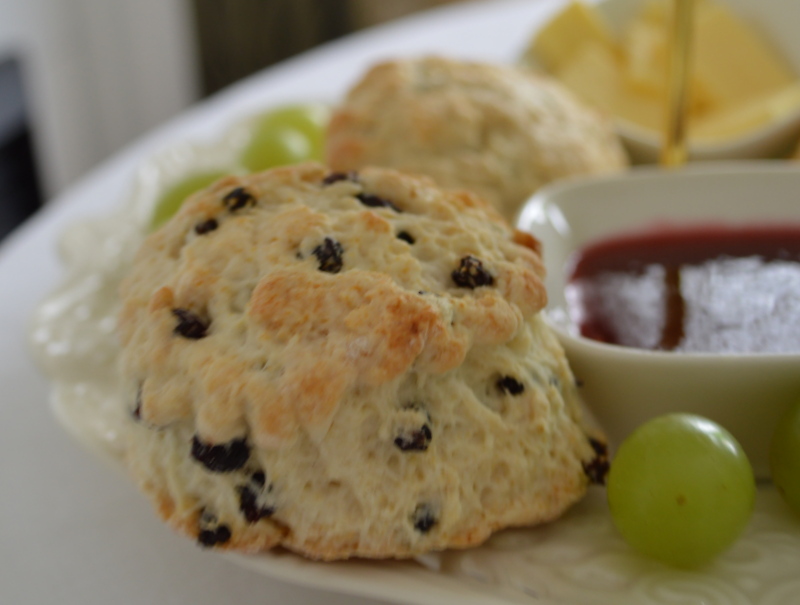
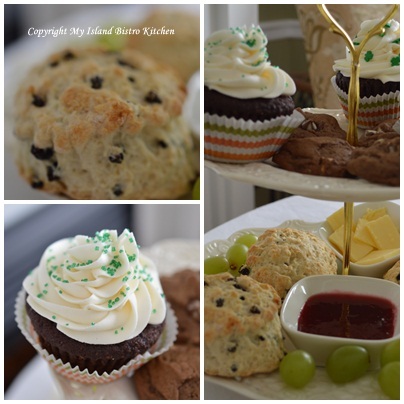
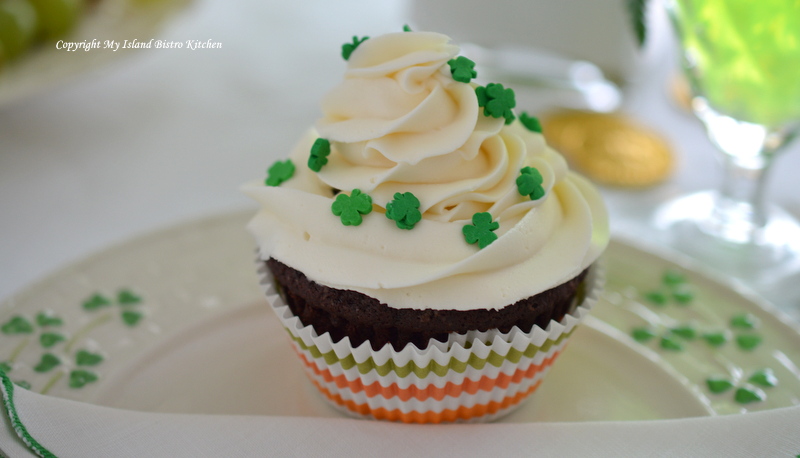
On the tea tray menu – Currant scones with homemade raspberry jam, chocolate cupcakes (flavored with a bit of Irish stout, filled with whiskey-flavored chocolate ganache, and frosted with Bailey’s Irish Cream-flavoured icing), and chocolate drop cookies. The cookies are my March 2013 Cookie of the Month.
These scones are delicately rich!
And, my seedless raspberry jam only makes them that much more delectable!
And, of course, there would have to be a green beverage on the table.
The scones may have been good but the cupcakes were the “icing on the cake”, so to speak!
I like the white and milk chocolate swirled chips in these chocolate drop cookies.
The green color always makes for a bright, colorful, and cheery table!
I hope you have enjoyed a glimpse into my version of an afternoon tea to celebrate St. Patrick’s Day. I’ll leave you with this Irish blessing:
May you always have walls for the winds, a roof for the rain, tea beside the fire, laughter to cheer you, those you love near you, and all your heart might desire.
Thank you for visiting “the Bistro” today. There are lots of ways to connect with “the Bistro” through social media:
Join My Island Bistro Kitchen on Facebook Follow the Bistro’s tweets on twitter @PEIBistro Find the Bistro on Pinterest at “Island Bistro Kitchen” Follow along on Instagram at “peibistro”
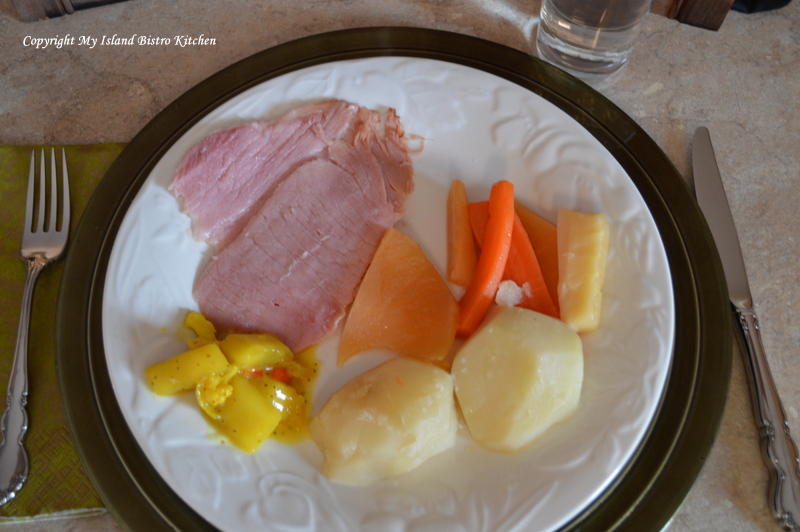
This old-fashioned boiled ham dinner is a meal that is so familiar to me that it never occurred to me that some don’t even know what a “boiled dinner” is. So, today, I am going to demystify and explain the “boiled dinner” as I know it. Continue reading Boiled Ham Dinner – Old-fashioned Comfort Food!→
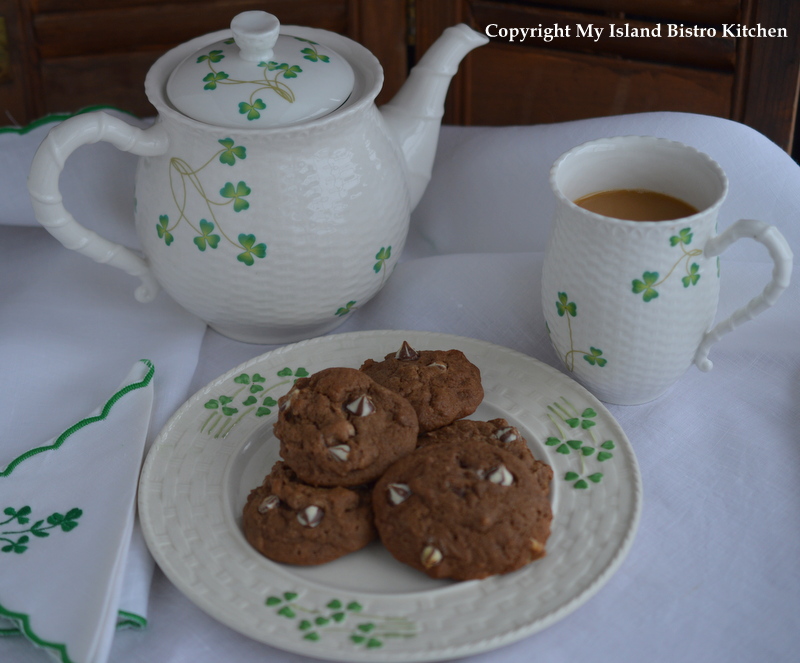
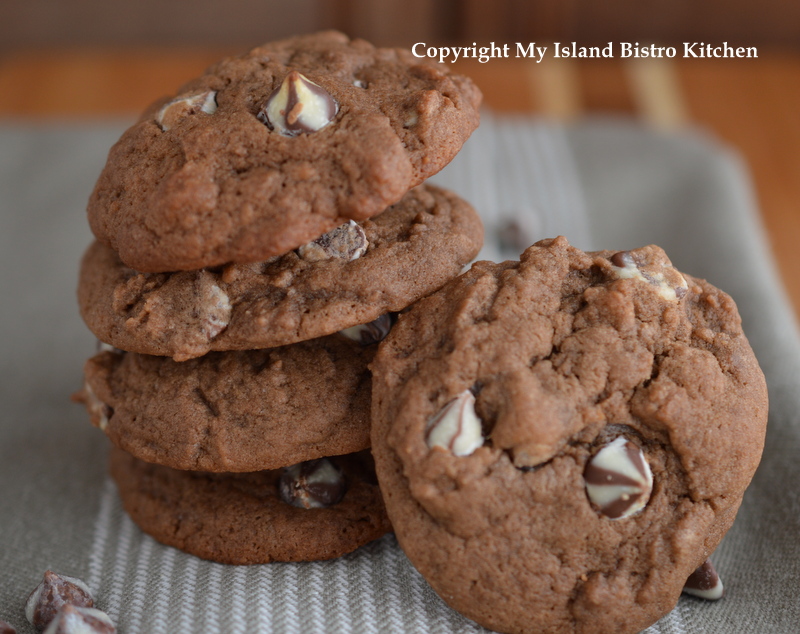
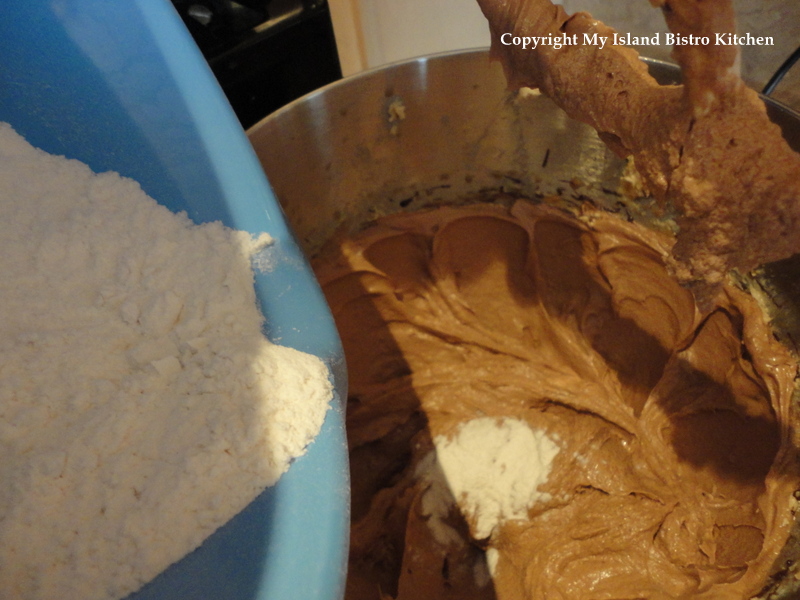
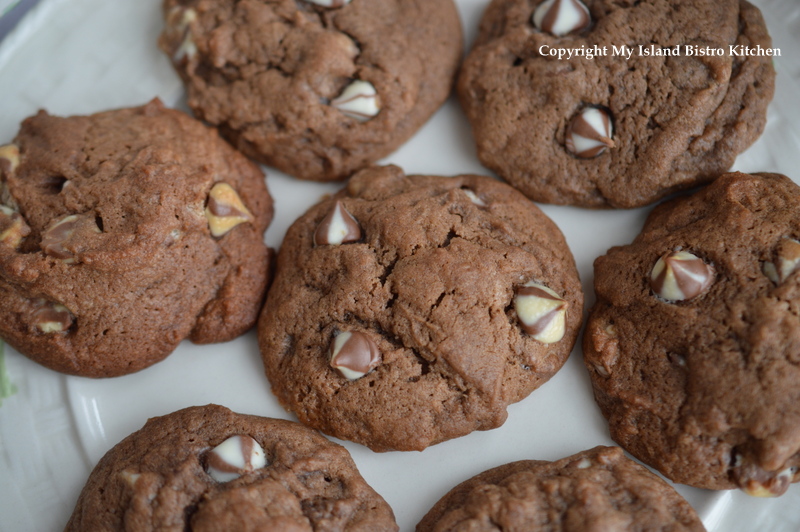
Double Chocolate Chip Drop Cookies Made with Stout
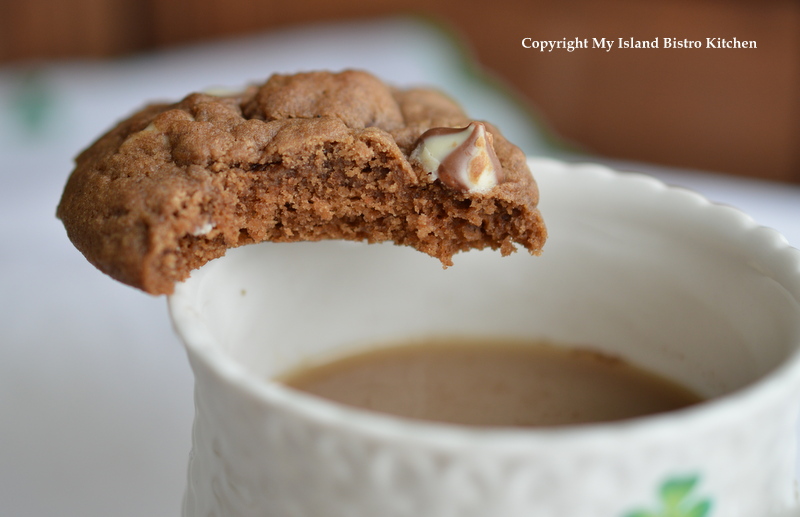
Well, for my Cookie of the Month for March, I tried to find out if there is a cookie recipe that traces its origins to Ireland or, alternatively, a cookie that is particularly popular on the Emerald Isle. However, I had no luck in tracking down any (maybe it was lack of Irish luck!)
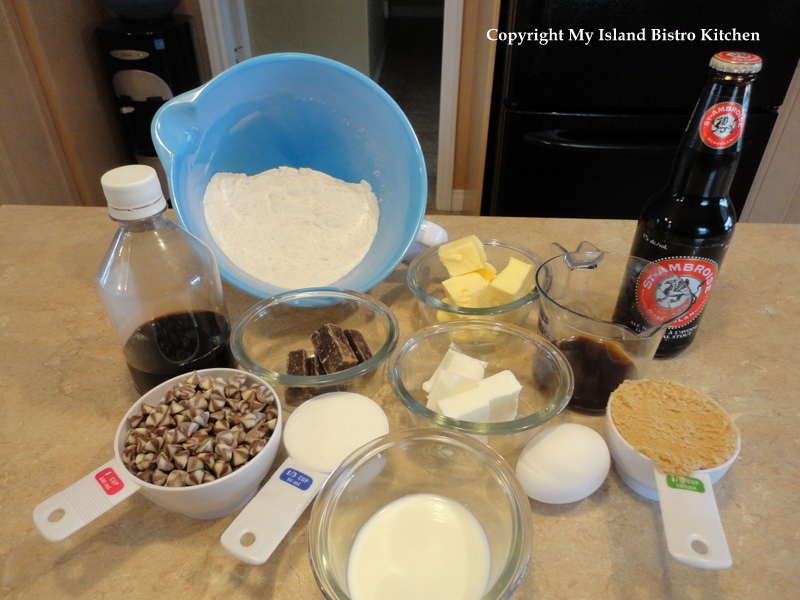
I decided to create a special recipe and give it a distinctly Irish flavour using stout in honour of St. Patrick’s Day on March 17th. As you know, whenever possible, I like to feature Island products in my cooking and baking. At the time of writing, PEI does have a brewing company that produces stout – The Island Brewing Company produces Gahan Sydney Street Stout. However, it is apparently a limited edition and is not available in local liquor stores year-round — at least I couldn’t track down any. So, instead, I opted to use Montreal-brewed St. Ambroise Oatmeal Stout because it boasts hints of espresso and chocolate.
I knew I was going to be making a chocolate cookie with a hint of coffee flavour so a stout with both chocolate and coffee flavour could only enhance the cookie’s taste. Like any ingredient, moderation is the trick. My goal was to flavour the cookie with the stout and bring out the chocolate flavour – I wasn’t aiming for a beer-tasting cookie. Therefore, I used only 1 1/2 tablespoons of stout as part of the liquid ingredients.
This recipe calls for both butter and shortening in the ingredients and I recommend both be used. For more information on why some cookie recipes call for both types of fat, click here.
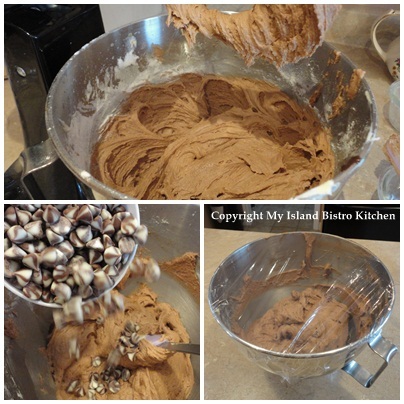
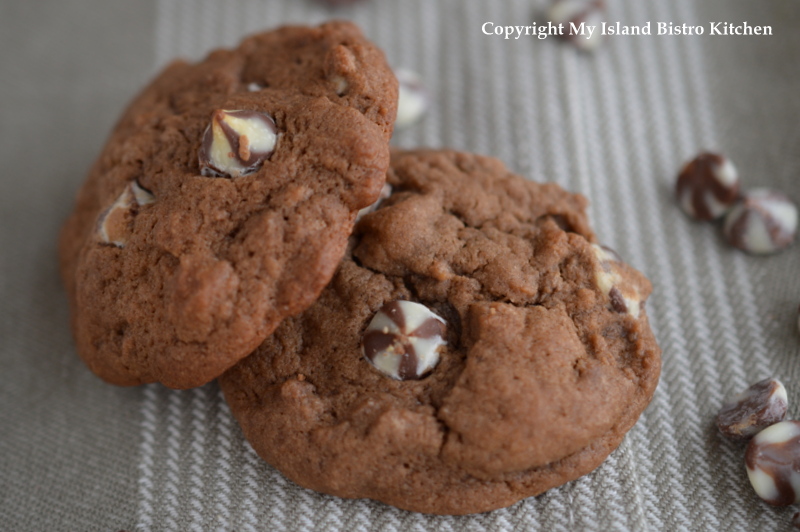
For the chocolate, I chose to use semi-sweet squares of chocolate because I find the flavour a bit more intense than powdered cocoa. Using some brewed coffee gives these cookies a distinct mocha flavour. For interest, color, and texture, I used swirled milk and white chocolate chips.
This dough does well when it is chilled and allowed to “rest” for 24 hours after mixing and before baking the cookies. The purpose of letting the dough “rest” is to allow the liquid ingredients, including the egg, to get fully incorporated and absorbed into the other ingredients. The “resting” period makes for a drier and firmer cookie dough and this controls its spread while baking so you don’t end up with a really flat cookie.
Refrigerating the cookie dough also allows the fat content in the dough to firm up, and cold, firm butter/shortening takes longer to melt in the oven. This delay in melting gives the cookies a chance to rise up instead of immediately spreading out. As a result, the cookies begin to bake, create structure, and are able to hold their shape before the butter, in particular, breaks down and flattens and spreads them out. I do not recommend skipping the dough chilling step for these cookies.
If the dough is particularly hard when it comes out of the refrigerator to the point that it can’t be scooped or spooned without chibbling it, let it rest at room temperature for 10 – 15 minutes. Do not, however, bring the dough completely back to room temperature and soften as that will defeat the objective of having the butter and shortening firm up in the dough before the cookies enter the hot oven and start spreading out.
I like the drop cookies to be soft and somewhat chewy and, of course, the key to that texture is to slightly underbake the cookies – bake these no more than 10-12 minutes at 350F and let them cool on the baking sheet for 2-3 minutes before moving them to a wire rack to finish cooling.
My Island Bistro Kitchen’s Double Chocolate Chip Drop Cookies
Ingredients:
1/2 cup butter, softened 1/4 cup shortening, softened 1/2 cup brown sugar 1/3 cup white sugar 1 egg 2 tbsp. cold brewed coffee 1 1/2 tbsp stout 2 tbsp milk 1 tsp vanilla 2 1/2 squares of semi-sweet chocolate, melted 2 cups flour 1/2 tsp. salt 1/2 tsp baking soda 1/2 tsp baking powder 1 cup chocolate chips
Method:
Assemble ingredients.
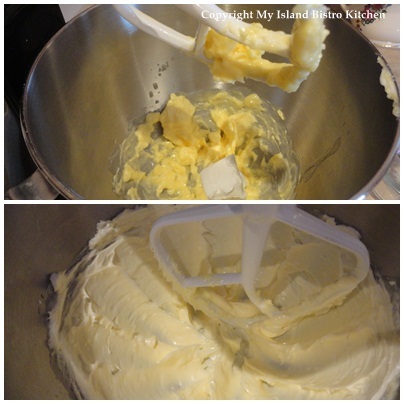
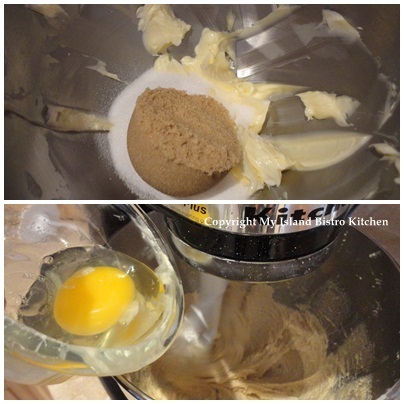
Cream butter and shortening.
Add brown and white sugars. Beat until light and fluffy. Add egg and beat until blended.
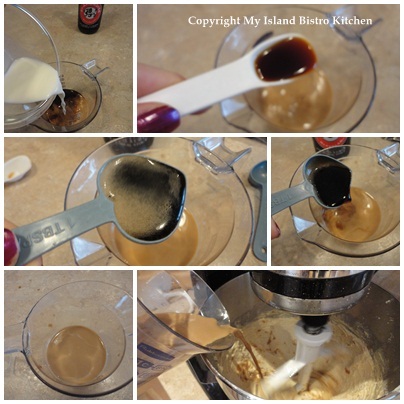
In separate bowl, or large measuring cup, mix coffee, stout, milk, and vanilla. Stir to combine. Add to mixture. Mix well.
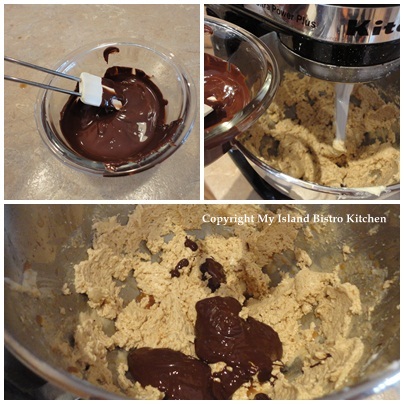
Add melted chocolate and mix to blend.
Combine dry ingredients. Add to mixture and stir just until flour is incorporated.
Stir in chocolate chips. Cover bowl with plastic wrap and refrigerate dough for 24 hours.
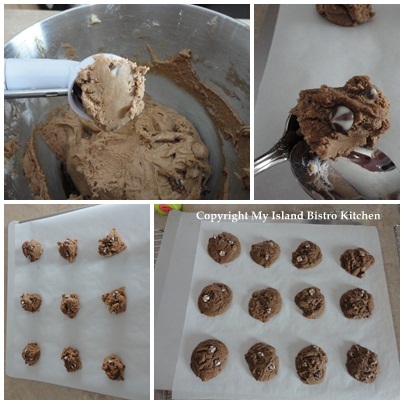
Line baking sheets with parchment paper. Drop by cookie scoop or spoonfuls onto baking sheet, leaving about 2 inches between the cookies. Bake at 350F oven for 10-12 minutes. Let cookies cool on baking sheet for 2-3 minutes then transfer them to a wire rack to finish cooling.
These make a fine treat for St. Patrick’s Day (but are just as good any time of the year!)
My Island Bistro Kitchen's Double Chocolate Chip Drop Cookies
These Double Chocolate Chip Drop Cookies are both tasty and showy. Flavoured with a wee bit of stout. A treat anytime but especially good for a St. Patrick's Day treat!
Course Snack
My Island Bistro KitchenMy Island Bistro Kitchen
Ingredients
1/2cupbuttersoftened
1/4cupshorteningsoftened
1/2cupbrown sugar
1/3cupwhite sugar
1egg
2tbsp.cold brewed coffee
1 1/2tbspstout
2tbspmilk
1tspvanilla
2 1/2squares of semi-sweet chocolatemelted
2cupsflour
1/2tsp.salt
1/2tspbaking soda
1/2tspbaking powder
1cupchocolate chips
Instructions
Assemble ingredients.
Cream butter and shortening.
Add brown and white sugars. Beat until light and fluffy. Add egg and beat until blended.
In separate bowl, or large measuring cup, mix coffee, stout, milk, and vanilla. Stir to combine. Add to mixture. Mix well.
Add melted chocolate and mix to blend.
Combine dry ingredients. Add to mixture and stir just until flour is incorporated.
Stir in chocolate chips. Cover bowl with plastic wrap and refrigerate dough for 24 hours.
Line baking sheets with parchment paper. Drop by cookie scoop or spoonfuls onto baking sheet, leaving about 2 inches between the cookies. Bake at 350F oven for 10-12 minutes. Let cookies cool on baking sheet for 2-3 minutes then transfer them to a wire rack to finish cooling.
Recipe Notes
[Copyright My Island Bistro Kitchen]
If you have made this recipe and enjoyed it and/or wish to share it with your friends and family, please do so on social media but be sure to share the direct link to this posting from my website.
Connect with My Island Bistro Kitchen on Social Media
Follow “the Bistro” on Pinterest at https://www.pinterest.ca/peibistro/ and pin the Pinterest-ready photo found at the end of this post to your favorite Pinterest boards.
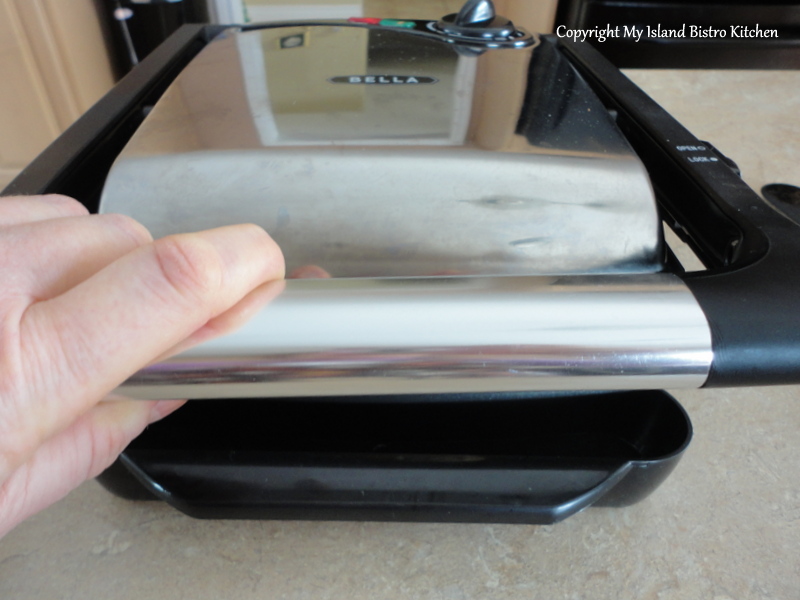
There are so many ways to serve a sandwich other than just throwing two pieces of bread and some filling together. One of my favorite ways to serve sandwiches is to make them into panini. I bought a Bella panini grill a couple of years ago and I have certainly gotten use out of it.
Panini is nothing more than bread or rolls, some kind of spread, and a filling which usually involves some variety of deli meat and cheese. Often, a vegetable such as tomato is added as well. The sandwich is then heated in a sandwich press or panini grill where it is pressed flat and toasted.
If you are lucky enough to be near a bakery or a supermarket that makes a variety of breads and rolls, you are likely to find ones suitable for use in panini grills. Rolls identified simply as panini rolls or Ciabiata, Focaccia, or baguettes are all suitable for use in these types of sandwiches. Here in Charlottetown, the Atlantic Superstore has a good variety of rolls that they sell individually. You can, of course, use any plain bread you wish but the sandwich will be more interesting if made with some type of artisan bread or rolls.
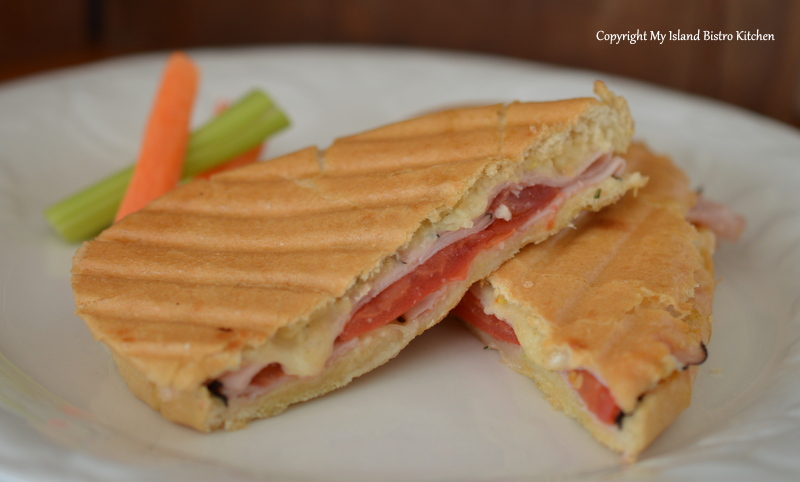
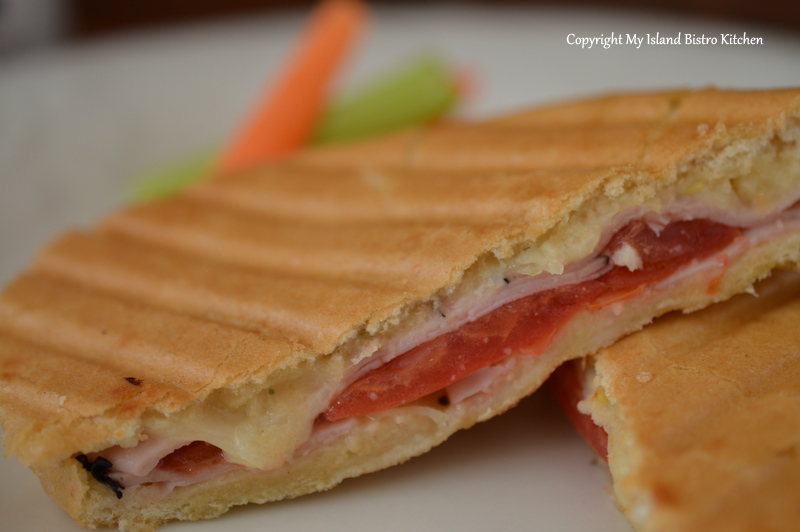
Today, I am going to share with you how I make a Ham, Cheese, & Tomato Panini.
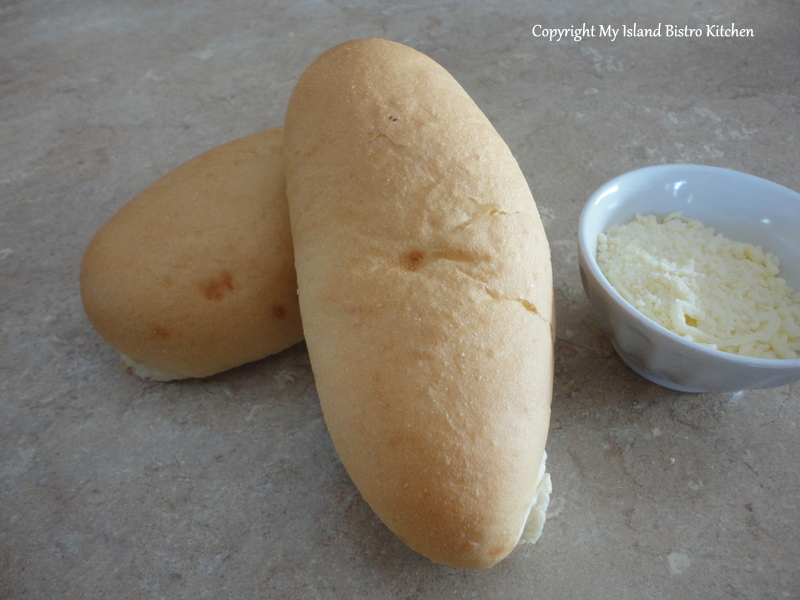
First, I have chosen puffy oval-shaped rolls that were simply labelled “Panini Rolls” at the Superstore and I split them in half, horizontally.
Panini Rolls
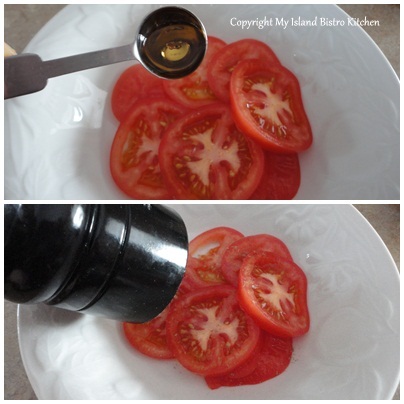
I sliced tomato rather thinly and sprinkled it with about 1/2 tsp. Cranberry Pear White Balsamic Vinegar from the Liquid Gold store here in Charlottetown. If you have been following my blog, you will recall the feature story I did last summer on this store and their fabulous balsamic vinegars and olive oils. I then sprinkled the tomatoes with some fresh ground pepper and sea salt and set them aside while I prepared the rest of the sandwich.
Marinating Tomatoes in Cranberry-Pear Balsamic Vinegar
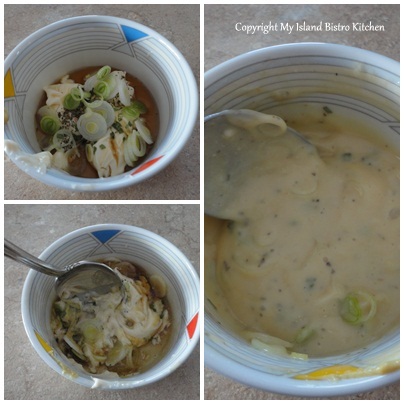
To make the mayonnaise spread, I combined 1 tbsp maple syrup with 1 1/2 tbsp mayonnaise, 1 tsp. Dijon mustard, and a pinch each of basil and chives. I then added 1 green onion, thinly sliced.
Mixing Mayonnaise Spread
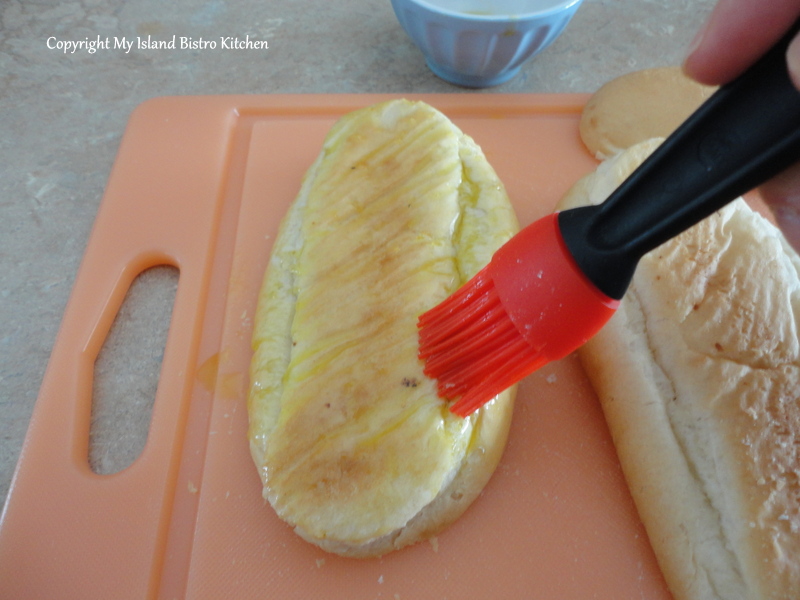
Using a good quality extra virgin olive oil (I used Liquid Gold’s Arbosana), I brushed olive oil over all the outside edges of the rolls. This is one of the occasions where you want to use the very best quality olive oil you can find because the taste really does come through.
Brushing the rolls with olive oil
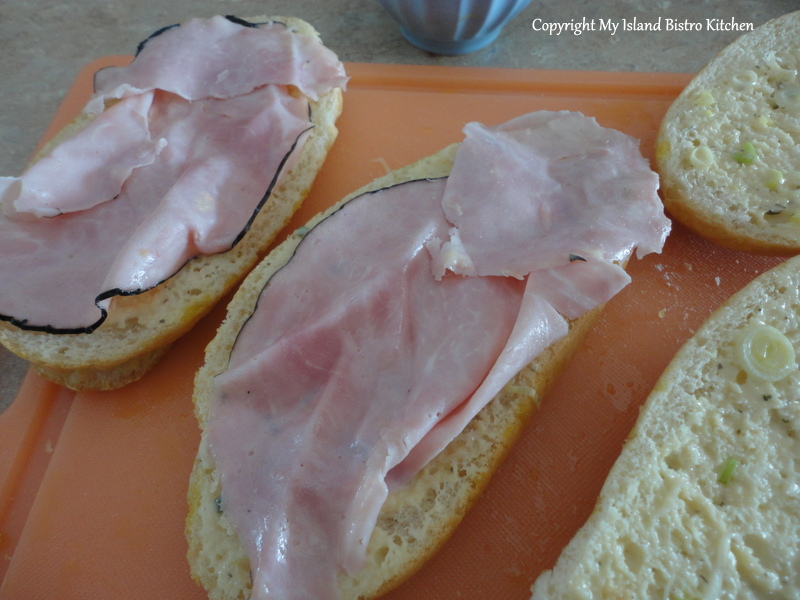
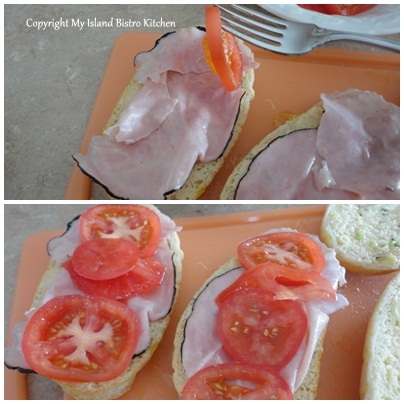
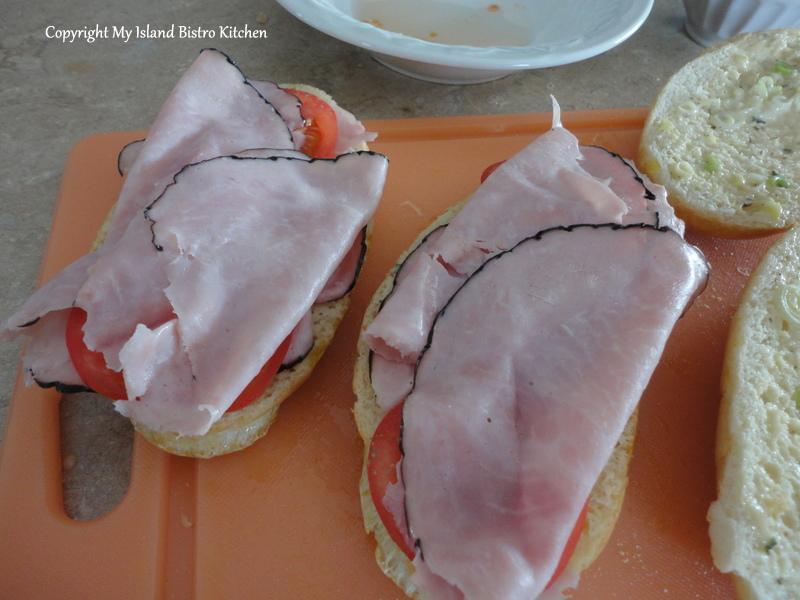
I flipped the rolls over and spread the mayonnaise on each of the interior sides of the rolls. On one side of the roll, I started building the sandwich, starting first with a good quality Black Forest deli ham that was sliced very thin.
I then added the marinated tomatoes
Adding the marinated tomatoes
and another slice of ham
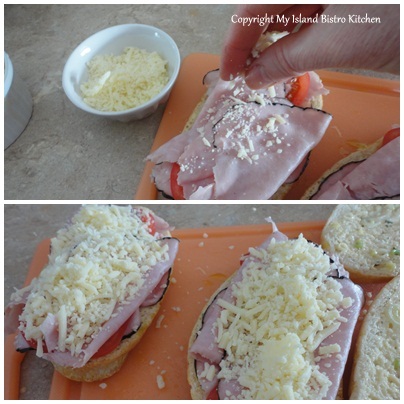
and, finally, added the grated cheese.
Adding grated cheese
You can use any of your favorite cheeses in this sandwich – I happened to have some Italiano mixture (mozzarella, asiago, smoked provolone, and parmesan) in the fridge so that’s what I used.
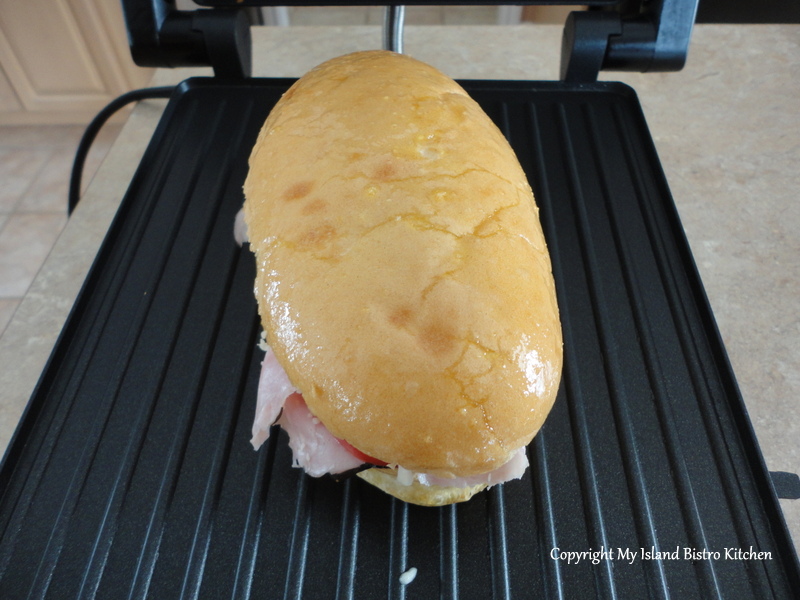
I then put the top part of the roll on the sandwich and transferred it to the heated panini grill.
I pressed and held down the top of the panini grill for about 20 seconds or so.
Panini Grill
I grilled the sandwich on the medium setting for probably about 4-5 minutes, essentially just long enough for the sandwich to be heated, the cheese melted, and the roll to have a nice crisp crust. Since each brand of grill will differ slightly, you will want to follow the manufacturer’s instructions for grilling panini and do some testing with your particular grill.
I sliced the panini diagonally and served it with carrot and celery sticks.
Ham, Cheese, & Tomato Panini
1 medium-sized tomato
1/2 tsp. Liquid Gold Cranberry Pear White Balsamic Vinegar
Fresh ground pepper and sea salt
1 tbsp maple syrup
1 1/2 tbsp mayonnaise
1 tsp Dijon mustard
pinch dried basil
pinch dried chives
1 small green onion, thinly sliced (white and light green parts only)
2 oz. deli-style Black Forest ham, thinly sliced
1 oz. grated Italian blend cheese
2 panini rolls of choice
1 – 1 1/2 tbsp extra virgin olive oil
Directions:
Slice tomato thinly. Drizzle with 1/2 tsp. Cranberry Pear White Balsamic Vinegar, freshly ground pepper, and sea salt. Set aside to marinate as you prepare remainder of ingredients.
In small bowl, combine the maple syrup, mayonnaise, Dijon mustard, herbs, and green onion. Mix well.
Split panini roll in half, horizontally. Brush virgin olive oil on all outside edges of roll. Flip rolls over and spread mayonnaise mixture on both interior sides of roll. Lay slice of ham on one side of roll. Add the marinated tomatoes. Add second layer of ham. Sprinkle with grated cheese. Place top of roll over layers of sandwich. Transfer to heated panini maker and grill according to manufacturer’s instructions.
Makes 2 panini.
Thank you for visiting “the Bistro” today. There are lots of ways to connect with “the Bistro” through social media:
Join My Island Bistro Kitchen on Facebook Follow the Bistro’s tweets on twitter @PEIBistro Find the Bistro on Pinterest at “Island Bistro Kitchen” Follow along on Instagram at “peibistro”
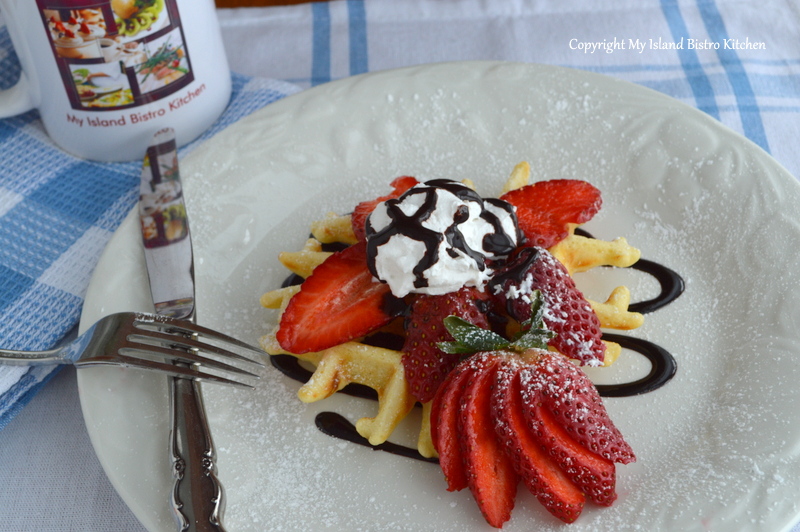
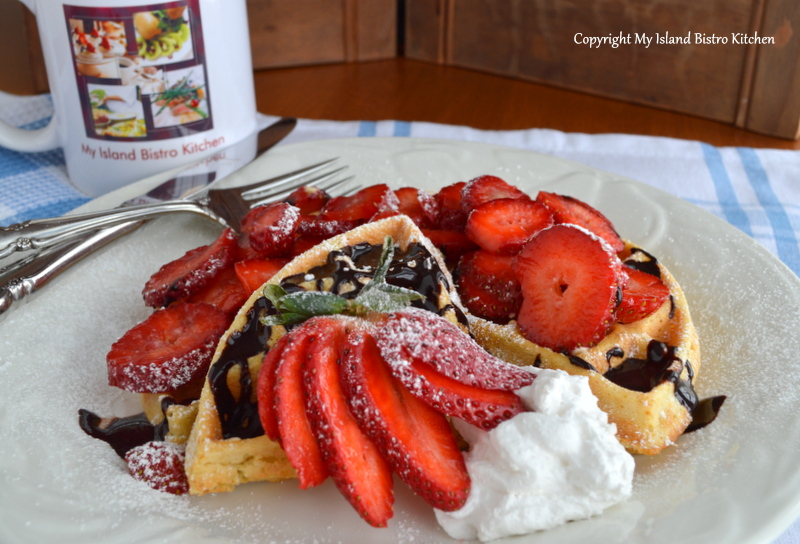
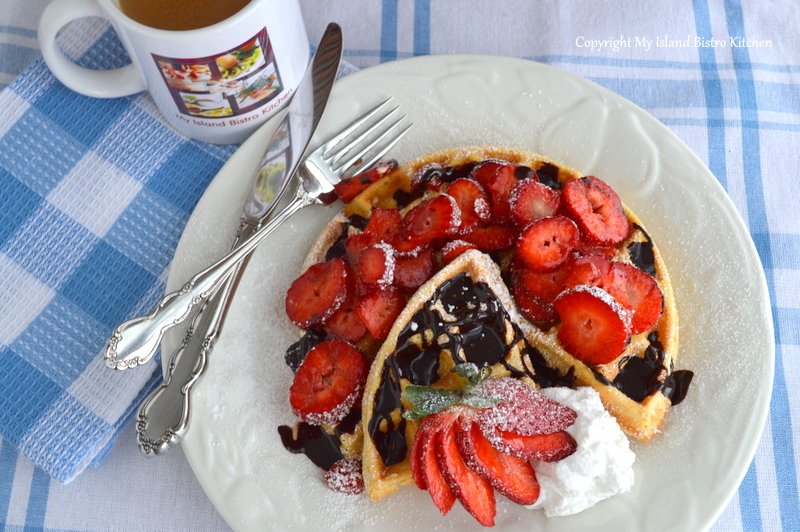
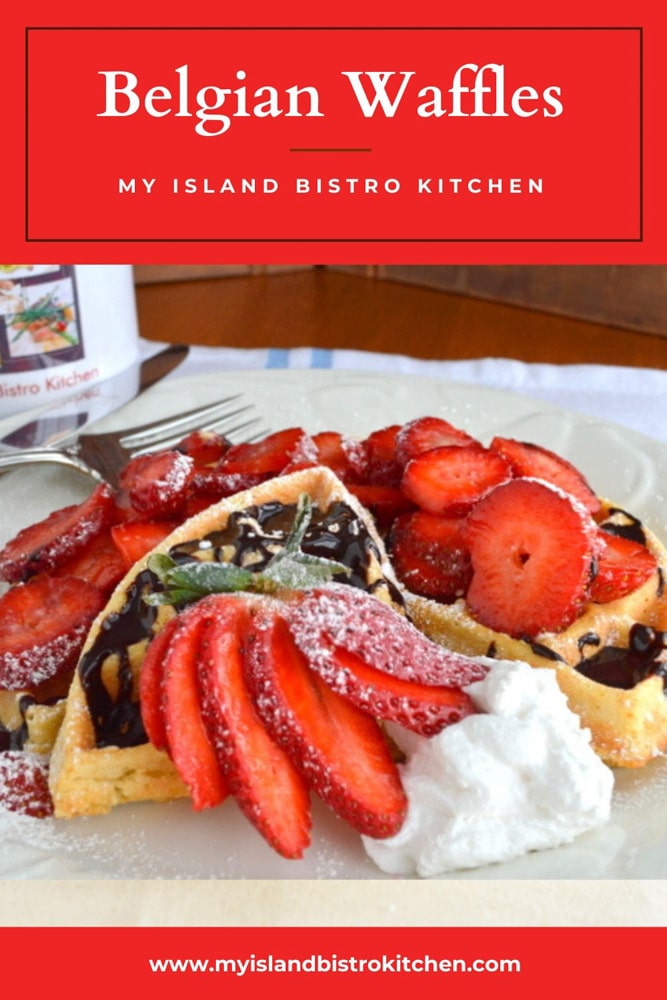
Belgian Dessert Waffle with Fresh Strawberries, Whipped Cream, and Chocolate Sauce
The first time I had Belgian waffles was in Ogunquit, Maine, a long time ago. We used to vacation there and we found a wonderful little café that opened only for breakfast and their specialty was the Belgian waffle served with huge, fresh Maine blueberries. Naturally, a Belgian waffle maker had to be purchased so we could make them at home because waffles are, in fact, quite easy to make and just take standard baking ingredients!
Waffles are very versatile. They can be a breakfast food, eaten at brunch, lunch, for dessert or even as a main course for dinner, depending on the topping. There is nothing like creamed chicken atop a puffy Belgian waffle for good old-fashioned comfort food!
I love fresh berries, especially strawberries and blueberries, on waffles. Good drizzled with pure maple syrup, a rich chocolate sauce is also an option and a real treat for waffles. So, why not take a lowly basic waffle and dress it up for a tasty meal at any time of day.
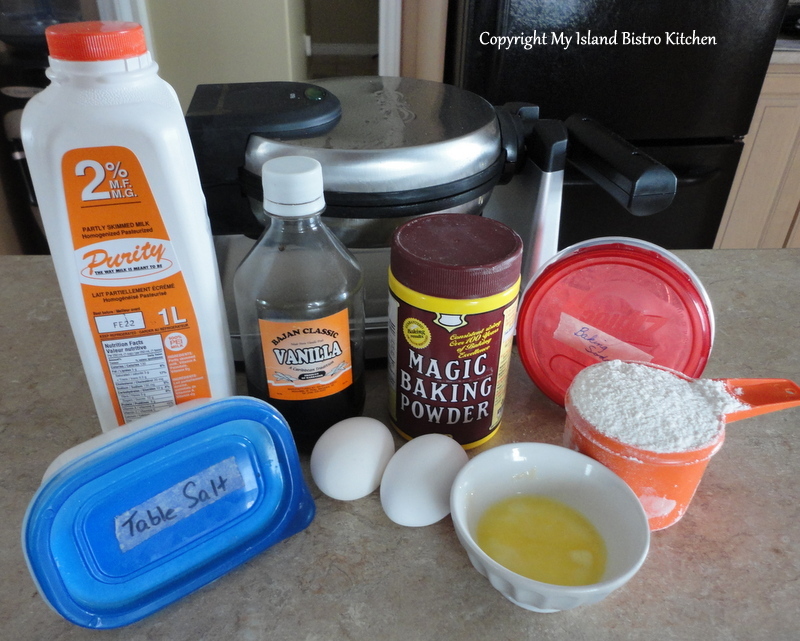
Waffle Ingredients
Belgian Waffles
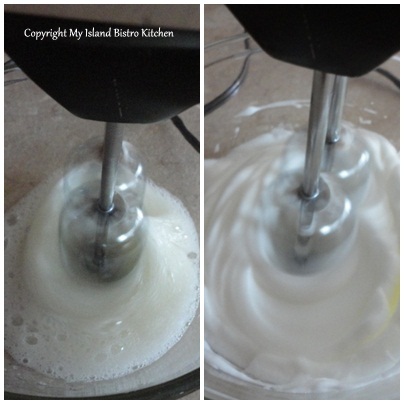
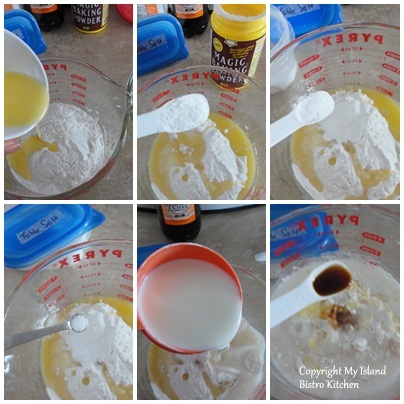
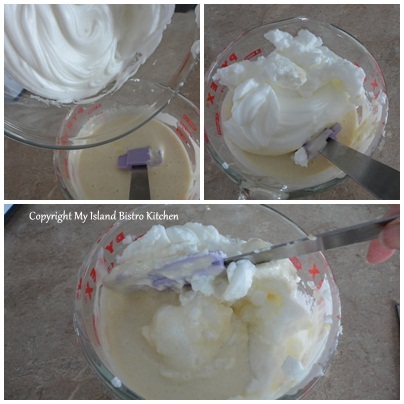
Ingredients: 1 cup all-purpose flour 1/2 tbsp baking powder 1/4 tsp baking soda pinch salt 1 cup milk 1/2 tsp vanilla 2 medium-sized eggs, separated 2 tbsp melted butter Separate the eggs. Beat the egg whites stiff. Set aside.
In separate bowl, mix the egg yolks and all remaining ingredients.
With electric mixer, beat until well-blended.
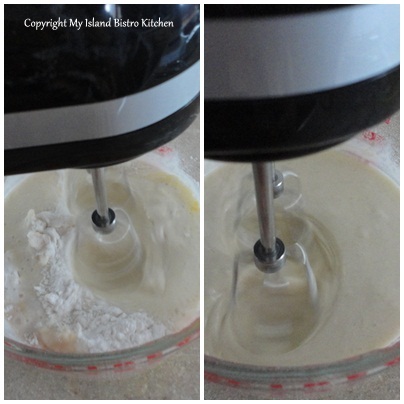
Gently fold the egg whites into the flour and milk mixture. Fold just until they are incorporated. This will yield a light, fluffy waffle.
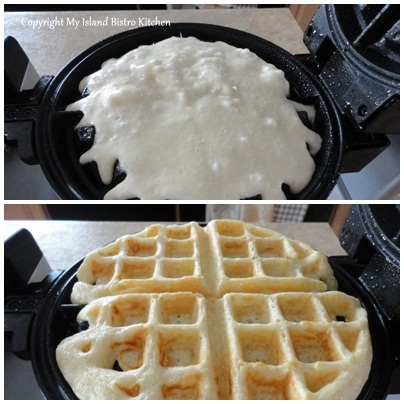
Heat waffle maker and cook waffles according to manufacturer’s directions.
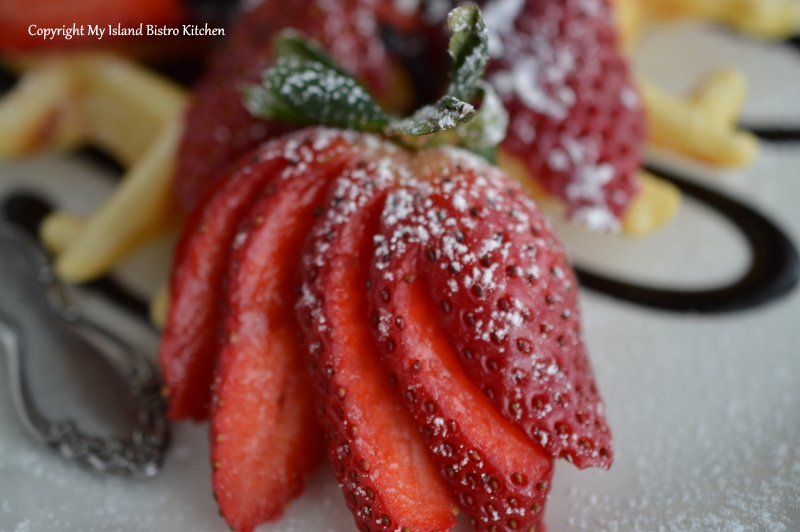
To serve, add sliced fruit, a dollop of whipped cream, and drizzle with your favorite syrup or topping. Dust with confectioner’s sugar, if desired.
Perfectly puffy Belgian Waffles with Strawberries are a fabulous treat especially with a dollop of whipped cream and drizzled with chocolate syrup
Course Breakfast
Cuisine Canadian
Keyword Belgian Waffles, waffles
Servings4
My Island Bistro KitchenMy Island Bistro Kitchen
Ingredients
1cupall-purpose flour
1/2tbspbaking powder
1/4tspbaking soda
pinchsalt
1cupmilk
1/2tspvanilla
2medium-sized eggs, separated
2tbspmelted butter
Instructions
Separate the eggs. Beat the egg whites stiff. Set aside.
In separate bowl, mix the egg yolks and all remaining ingredients. With electric mixer, beat until well-blended.
Gently fold the egg whites into the flour and milk mixture. Fold just until they are incorporated. This will yield a light, fluffy waffle.
Heat waffle maker and cook waffles according to manufacturer's directions.
To serve, add sliced fruit, a dollop of whipped cream, and drizzle with your favorite syrup or topping. Dust with confectioner's sugar, if desired.
Recipe Notes
Yield: Apx. 3-4 waffles
[Copyright My Island Bistro Kitchen]
If you have made this recipe and enjoyed it and/or wish to share it with your friends and family, please do so on social media but be sure to share the direct link to this posting from my website.
Connect with My Island Bistro Kitchen on Social Media
Follow “the Bistro” on Pinterest at https://www.pinterest.ca/peibistro/ and pin the Pinterest-ready photo found at the end of this post to your favorite Pinterest boards.
Happy Valentine’s Day, everyone! Be sure to use the occasion to show special appreciation for those you love. One of the most ultimate ways to pamper a loved one on any day (and not just on Valentine’s) is by preparing and serving him or her breakfast in bed.
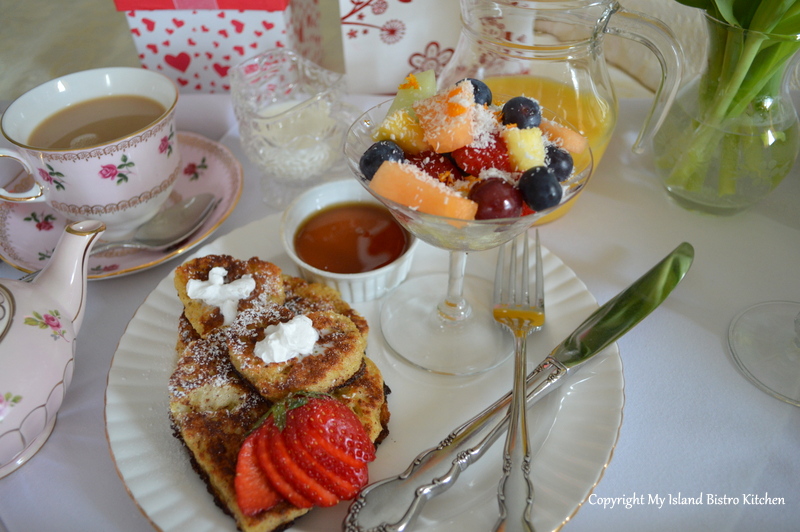
Valentine’s Day Breakfast in Bed Tray
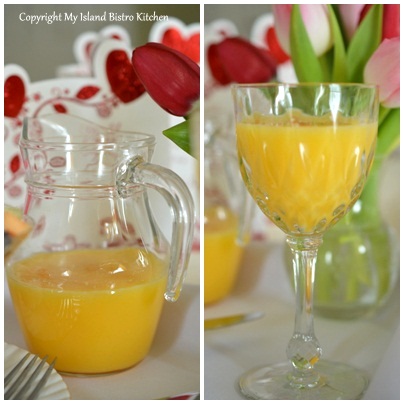
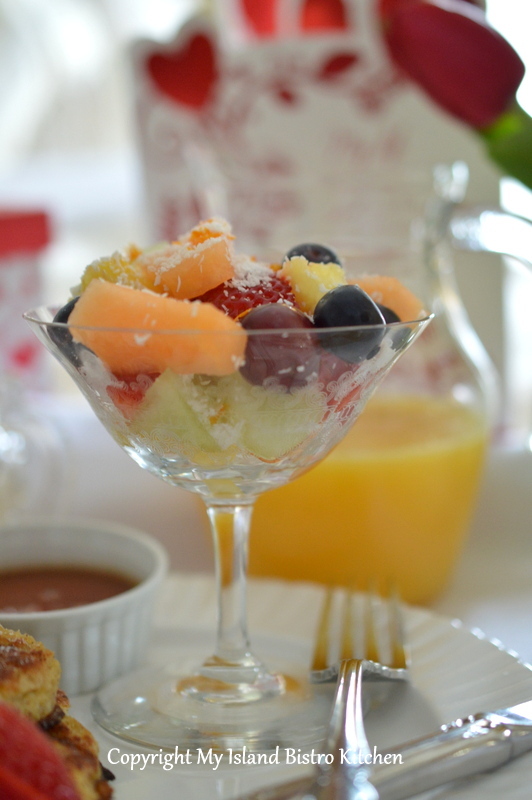
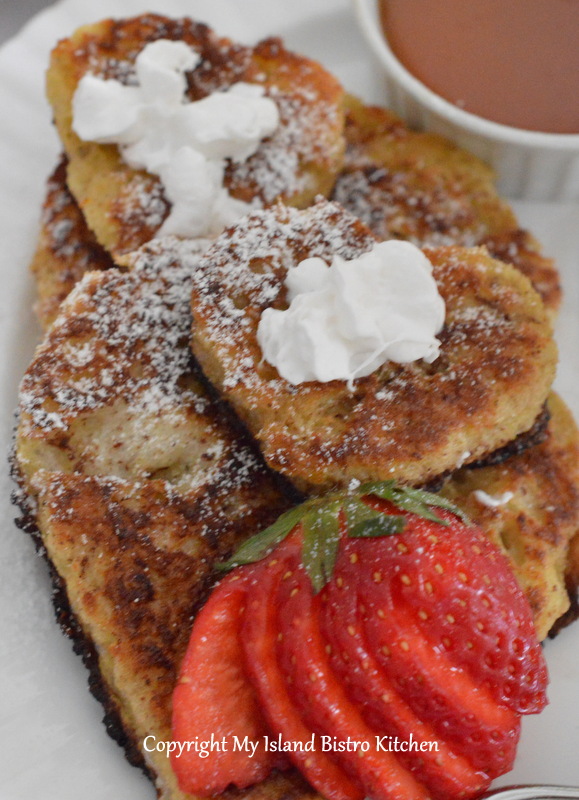
This is a very simple breakfast menu I have selected for the bed tray: Freshly squeezed orange juice, fresh fruit cup sprinkled with coconut, heart-shaped Irish Cream French Toast with pure Canadian maple syrup, and a wee pot of tea. (Recipe for the French Toast follows at end of posting)
There is nothing like fresh-squeezed orange juice to start the day! The little juice jug was a find at a thrift shop. Bed trays have limited space so I’m always on the look-out for items that will be suitable for this purpose. I have opted to make the event special by serving the juice in a stemmed glass.
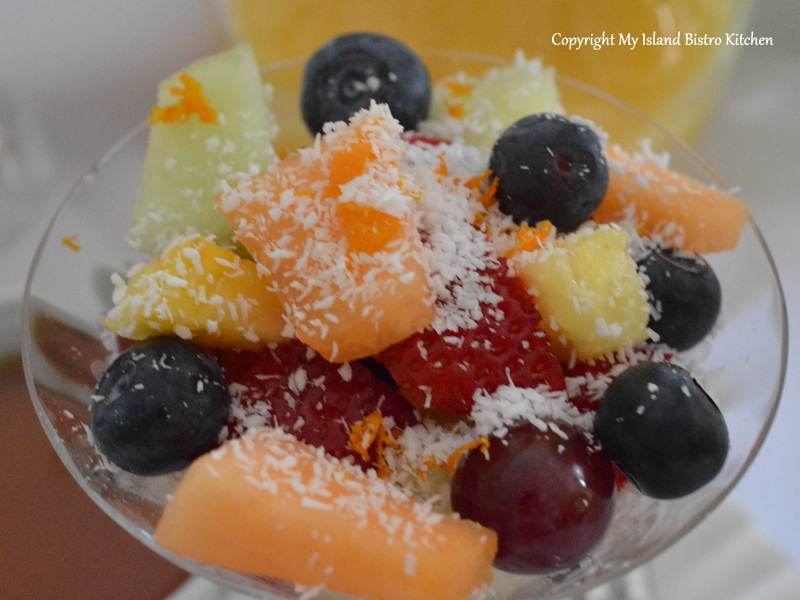
I have selected fruit with different colors and textures and dressed the fruit cup with some coconut and orange zest. The glass pedestal dessert dish is perfect for serving fresh fruit because it allows the colors of the fruit to show through giving color to the tray.
I sprinkled the French toast with confectioner’s sugar and added a dollop or two of whipped cream. My heart-shaped cookie cutter didn’t have as deep a cut in the center as I would have liked; consequently, the heart-shape isn’t as prominent or doesn’t show up as well in the photographs. I added the fan-cut strawberry to give both color and flavour.
What dresses up the food is the presentation. Yes, it’s all about the presentation! I covered the tray with a couple of my best quality white napkins and folded the third, using a “blingy” napkin ring as napkin jewelry. Out came the wee Sadler teapot I found in a second-hand shop last summer. From my teacup collection, I selected one that is predominantly pink since my color theme for this bed tray is pink and red.
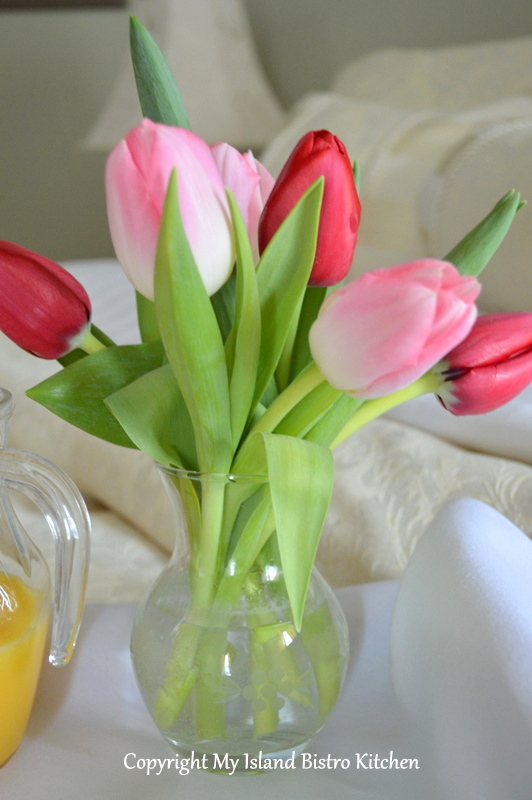
Every bed tray should be adorned with a small bouquet of fresh flowers. I thoroughly enjoy having access to Island greenhouse-grown tulips over the winter. I drove out to Vanco Farms in Mount Albion to specifically select these pink and red tulips, knowing they would be perfect on this tray! I think the pink and red make a stunning color combination!
And, of course, adding a lovely card and a gift will make a special someone’s Valentine’s Day just a tad more special!
My Island Bistro Kitchen’s Irish Cream French Toast
2 eggs 3 tbsp milk 2 tsp Irish Cream Liqueur (follow link at bottom of posting for my recipe for homemade Irish Cream Liqueur) 1/2 tbsp orange juice 1/4 tsp vanilla 1/4 tsp cinnamon pinch cardamom 1/2 tsp freshly grated orange rind
With whisk, beat eggs lightly. Add remainder of ingredients in order given. Whisk to combine. Pour mixture into a flat pan or pie plate. Dip each bread slice into the mixture, turning to coat both sides.
Melt 1 tsp. butter in skillet. Transfer dipped bread to hot skillet. Over medium heat, fry bread till browned. Flip bread to brown other side. Transfer to serving plate. Sprinkle with confectioner’s sugar and add a dollop of whipped cream, if desired. Serve warm with maple syrup.
Thank you for visiting “the Bistro” today. There are lots of ways to connect with “the Bistro” through social media:
Join My Island Bistro Kitchen on Facebook Follow the Bistro’s tweets on twitter @PEIBistro Find the Bistro on Pinterest at “Island Bistro Kitchen” Follow along on Instagram at “peibistro”
ove Tuesday is often commonly referred to as “Pancake Day” or “Pancake Tuesday”. Shrove Tuesday always falls on the Tuesday before Ash Wednesday which signifies the beginning of Lent, a 40-day period leading to Easter in the Christian calendar. Continue reading Pancakes for Shrove Tuesday→
These Old-fashioned Sugar Cookies are one of the plainest cookies yet they have endured throughout time and are often counted amongst the favorites in many families. The cookies are aptly named given the amount of sugar in them in proportion to the amounts of other ingredients. Despite the amount of sugar in most sugar cookie recipes, they are not really an overly sweet or rich cookie. Continue reading Old Fashioned Sugar Cookies→
(Mostly) PEI and Maritime Food – Good Food for a Good Life!


![Lobster Fishing Boats Filled With Their Day's Catch Returning to Port at North Lake, PEI [June 1, 2012]](https://myislandbistrokitchen.com/wp-content/uploads/2013/04/DSC04908.jpg)
![Lobster Fishing Boats, North Lake, PEI [June 1, 2012]](https://myislandbistrokitchen.com/wp-content/uploads/2013/04/page-1-Boats-in-North-Lake-001.jpg)
![Unloading the Day's Catch at North Lake Harbour [June 1, 2012]](https://myislandbistrokitchen.com/wp-content/uploads/2013/04/page-2-Boats-in-North-Lake.jpg)
![North Lake Harbour, PEI [June 1, 2012]](https://myislandbistrokitchen.com/wp-content/uploads/2013/04/DSC04926-001.jpg)