These Coconut Date and Cherry Squares are one of the easiest squares to make as there is only the one layer. Simply place the coconut, dates, cherries, and pecans in a large bowl. Stir in sweetened condensed milk and transfer mixture to a baking pan. How easy is that! Continue reading Coconut Date and Cherry Square→
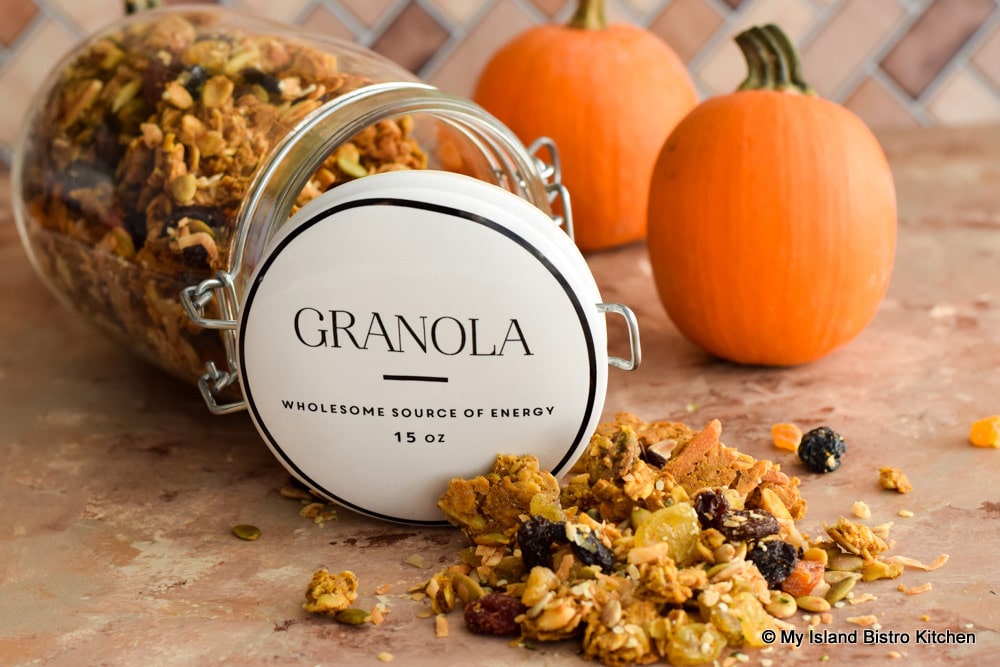
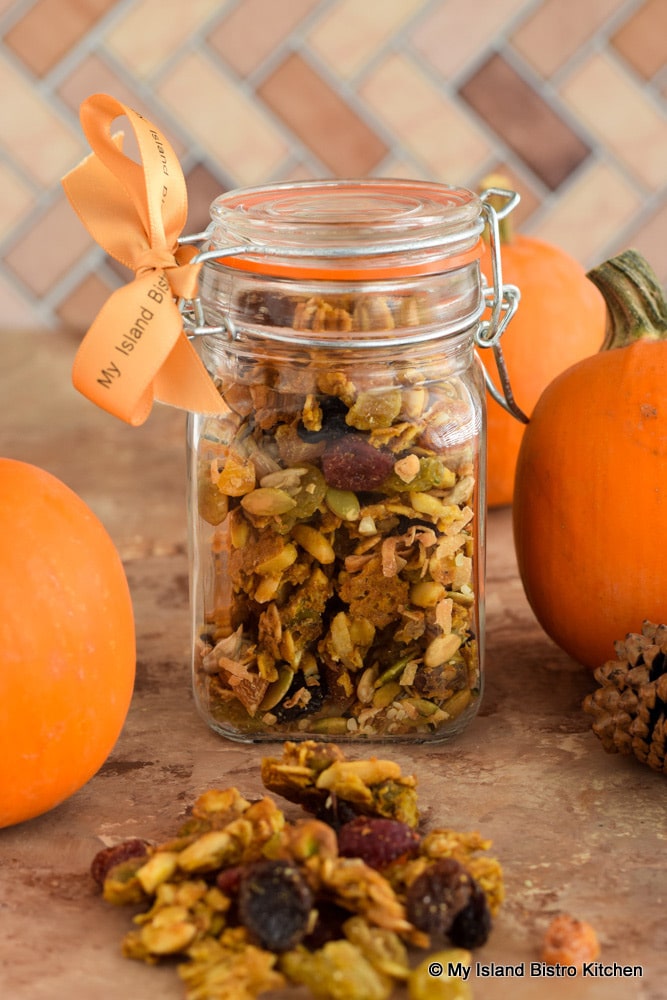
Oh, the divine tantalizing scent in the house when this homemade Pumpkin Spice Granola is baking in the oven! The combination of pumpkin purée and warm spices like cinnamon, nutmeg, allspice, cloves, and ginger make this a winner! If you want a clean, healthy breakfast cereal, or snack food, free of preservatives and additives, this granola is for you.
This is chunky style granola which means binding agents are needed to clump and hold the ingredients together. In this granola, that includes pumpkin purée, applesauce, maple syrup, and the mother of all food glue, an egg white beaten till frothy. I do add a couple of tablespoons of oat flour to this recipe and I have labeled it as an optional ingredient. This means the granola is fine without it but the oat flour does, along with the ground flax and chia seeds, give something extra for the syrup to cling to and it does help bind the ingredients together. If you don’t have oat flour and wish to add it, you can simply toss some rolled oats into a small food processor, or even a coffee grinder, and grind them into fine flour.
In addition to the binding ingredients, the other thing that is necessary to keep the granola clumpy and chunky is not to stir it while it bakes and to leave it in the pan, undisturbed, for approximately 30 minutes after it comes out of the oven. This helps the granola crisp up and then it can be broken into desired size chunks.
Pumpkin Spice Granola served with Greek yogurt and fresh pear
Typically, I don’t add nuts or whole seeds to my granola but a pumpkin-flavored granola just seemed to call for them. Any favorite nuts or seeds can be used. Slivered almonds and pistachios pair well with the pumpkin so those are my choices for this granola. I do include these nuts in with the rolled oat mixture that gets baked in the oven. The pumpkin and sunflower seeds, on the other hand, are very small and delicate. As such, they are very susceptible to easily burning. My preference is to buy these seeds already roasted and add them along with the raisins and dried fruit after the rolled oats mixture has been baked. I recommend the same thing with coconut, preferring to buy it already toasted as it can burn very quickly, ruining the flavor of the granola.
Bulk food stores are great places to buy ingredients for granola as one can buy just the amounts needed instead of buying a big bag of one ingredient and only using 1/3 cup of it with no plans for the rest of the bag’s contents. The great thing about granola is, once you have a good recipe for the syrup and spices, you can swap out any of the dried fruits, seeds, and nuts so long as you replace them and keep the new substitute(s) in the same quantity/weight. So, if you don’t like raisins, for example, simply swap them out for the same quantity of another dried fruit like cherries, cranberries, apricots, etc.
Pumpkin Spice Granola
Add the dried fruits and raisins after the rolled oat mixture has baked and cooled. Adding these before the baking process will turn the fruits into hard, tough little nuggets which are not pleasant to eat.
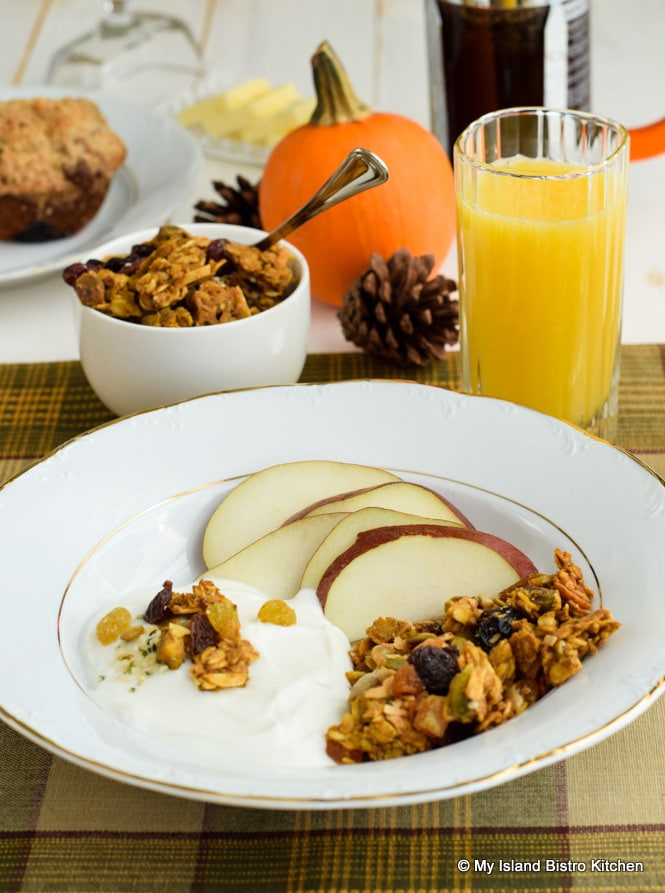
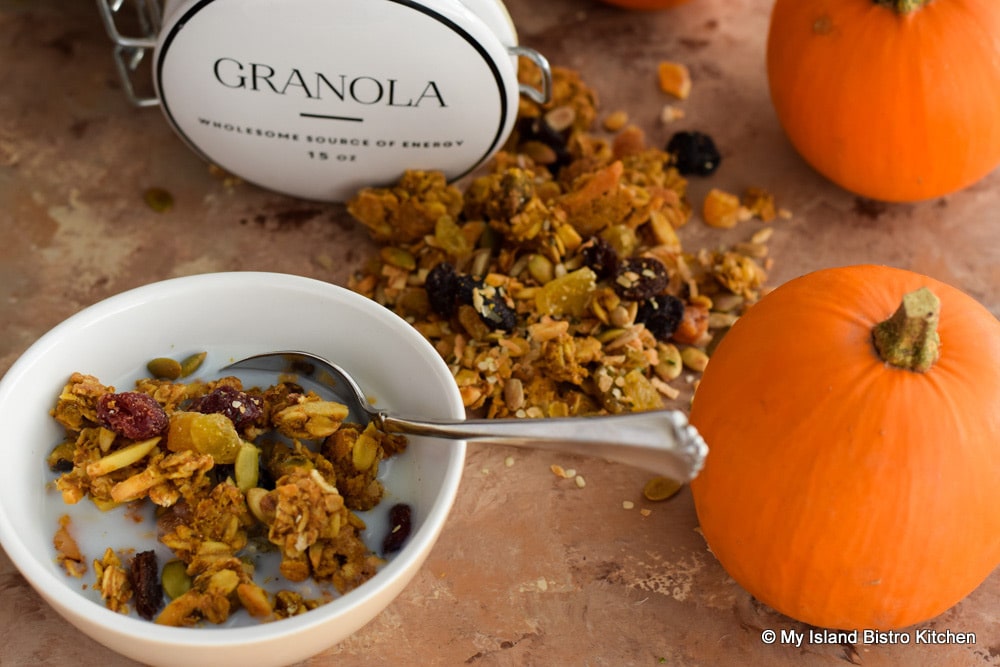
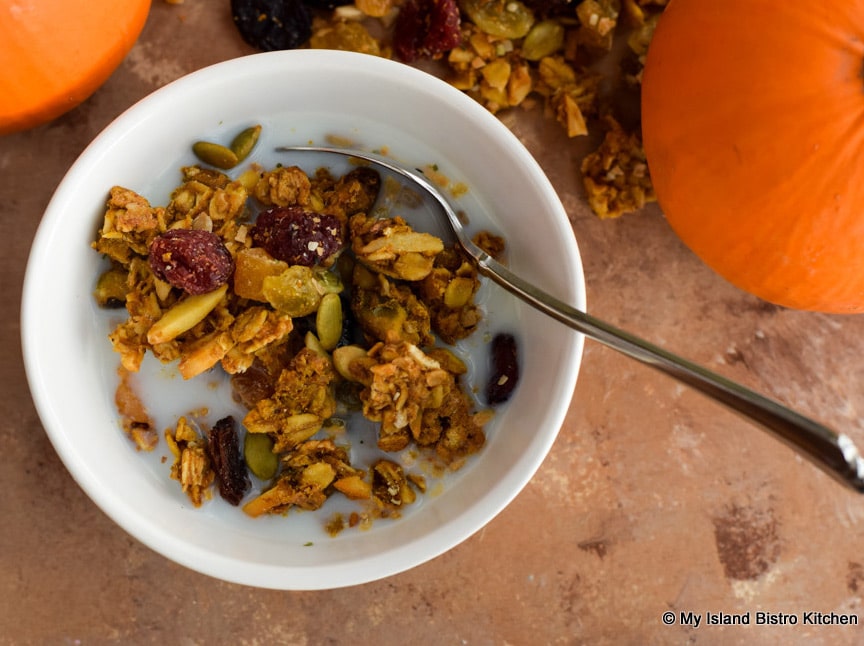
This granola is a staple in my freezer. There are so many different ways in which it can be used. I use it on its own as a cereal and, sometimes, I’ll top oatmeal or a cold cereal with it.
Pumpkin Spice Granola
It’s also great to serve alongside (or on top of) Greek yogurt and some fresh fruit.
Pumpkin Spice Granola
Toss some of the Pumpkin Spice Granola on top of a salad to add some extra crunch and texture. Or, simply eat it, as is, as a snack.
Pumpkin Spice Granola
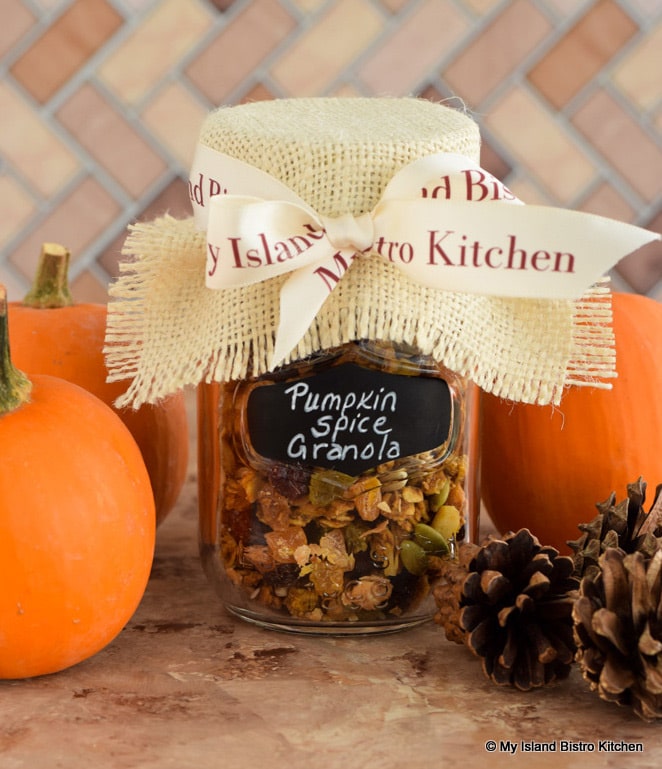
Of course, homemade Pumpkin Spice Granola makes a great gift, too. Package it attractively in a small cellophane bag or in a glass jar.
Pumpkin Spice Granola
Add a ribbon and it makes a nifty host/hostess gift or small remembrance for someone. I love to give consumable gifts as they don’t clutter up anyone’s life and who doesn’t love a treat from someone else’s kitchen!
Pumpkin Spice Granola Makes a Great Gift
[Printable recipe follows at end of post]
Pumpkin Spice Granola
Ingredients:
½ cup pumpkin purée (not pumpkin pie filling) 1/3 cup + 1 tbsp pure maple syrup 1/3 cup coconut oil, liquid state 2 tbsp applesauce 2 tbsp light brown sugar 2 tsp pure vanilla 1¼ tsp cinnamon ½ tsp nutmeg ½ tsp allspice ¼ tsp cloves 1/8 tsp ginger 1/8 tsp mace (optional) ½ tsp fine sea salt
3 cups old-fashioned large flake rolled oats ½ cup slivered almonds ½ cup shelled pistachios 2 tbsp oat flour (optional) 2 tbsp ground flaxseed 2 tbsp ground chia seeds
1 extra-large egg white
2/3 cup golden raisins ½ cup sultana raisins ½ cup dried mixed fruit (e.g., cranberries, cherries, blueberries) 1/3 cup diced dried apricots ¼ cup hemp hearts ½ cup roasted pumpkin seeds 1/3 cup roasted sunflower seeds ½ cup toasted coconut flakes
Method:
In small saucepan, combine the pumpkin purée, maple syrup, coconut oil, applesauce, brown sugar, and vanilla. Stir over medium-low heat until mixture is well blended and heated. Do not boil. Stir in spices and sea salt. Cool for about 20 minutes.
While the syrup is cooling, combine rolled oats, almonds, pistachios, oat flour, ground flax and chia seeds in large bowl. In separate large bowl, combine raisins, dried mixed fruit, apricots, hemp hearts, pumpkin and sunflower seeds, and toasted coconut flakes. Set aside.
Preheat oven to 300°F. Line large rimmed baking sheet with foil. Spray lightly with cooking oil.
Beat egg white until frothy.
Pour cooled syrup over rolled oats mixture. Stir in the frothy egg white to coat the rolled oats mixture.
Spread oat mixture evenly in a single layer on prepared baking sheet. Pat down with the back of a spatula. Bake for 35-40 minutes, or until oats are a deep caramel color and start to get crispy and fragrant. Do not stir mixture during the baking. If granola starts to brown quickly, rotate the baking sheet in the oven and/or reduce the heat. Remove pan from oven and cool granola in pan for about 30 minutes. Break granola into desired sized pieces and add to the large bowl containing the dried fruit and seeds. Stir to combine all ingredients.
Store granola in airtight container at room temperature for 5-7 days or store in freezer for longer use.
(and you can pin the Pinterest-ready photo(s) below to your favorite Pinterest boards)
Of course, by subscribing to receive an email notificationof new posts and recipes, you can be among the first to know when I publish a new post or recipe. Simply enter your name and email address in the Subscription block over on the right-hand side of my home page.
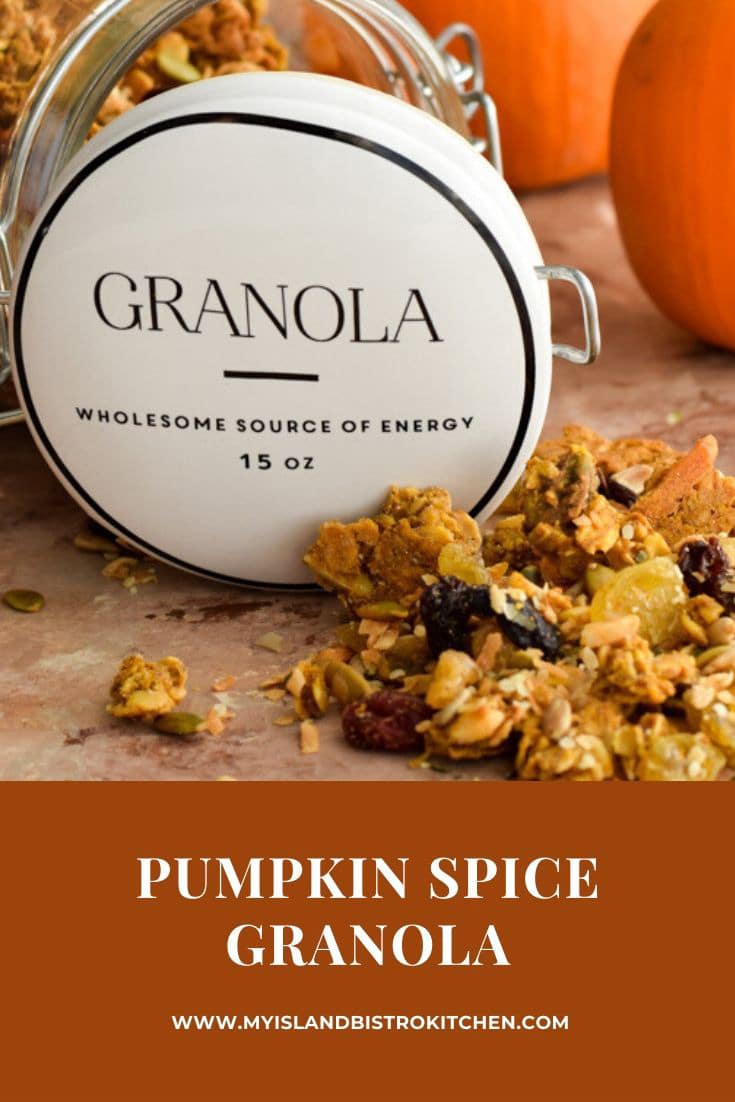
Perfectly flavored with warm autumnal spices, this chunky style Pumpkin Spice Granola has great flavor and texture. Perfect for breakfast, snacking, and gift giving.
Course Breakfast
Cuisine Canadian
Keyword granola, pumpkin spice granola
My Island Bistro KitchenMy Island Bistro Kitchen
Ingredients
½cuppumpkin purée (not pumpkin pie filling)
1/3cup+ 1 tbsp pure maple syrup
1/3cupcoconut oil, liquid state
2tbspapplesauce
2tbsplight brown sugar
2tsppure vanilla
1¼tspcinnamon
½tspnutmeg
½tspallspice
¼tspcloves
1/8tspginger
1/8tspmace (optional)
½tspfine sea salt
3cupsold-fashioned large flake rolled oats [gluten-free if required]
½cupslivered almonds
½cupshelled pistachios
2tbspoat flour (optional) [gluten-free, if required]
2tbspground flaxseed
2tbspground chia seeds
1extra-large egg white
2/3cupgolden raisins
½cupsultana raisins
½cupdried mixed fruit (e.g., cranberries, cherries, blueberries)
1/3cupdiced dried apricots
¼cuphemp hearts
½cuproasted pumpkin seeds
1/3cuproasted sunflower seeds
½cuptoasted coconut flakes
Instructions
In small saucepan, combine the pumpkin purée, maple syrup, coconut oil, applesauce, brown sugar, and vanilla. Stir over medium-low heat until mixture is well blended and heated. Do not boil. Stir in spices and sea salt. Cool for about 20 minutes.
While the syrup is cooling, combine rolled oats, almonds, pistachios, oat flour, ground flax and chia seeds in large bowl.
In separate large bowl, combine raisins, dried mixed fruit, apricots, hemp hearts, pumpkin and sunflower seeds, and toasted coconut flakes. Set aside.
Preheat oven to 300°F. Line large rimmed baking sheet with foil. Spray lightly with cooking oil.
Beat egg white until frothy.
Pour cooled syrup over rolled oats mixture. Stir in the frothy egg white to coat the rolled oats mixture.
Spread oat mixture evenly in a single layer on prepared baking sheet. Pat down with the back of a spatula. Bake for 35-40 minutes, or until oats are a deep caramel color and start to get crispy and fragrant. Do not stir mixture during the baking. If granola starts to brown quickly, rotate the baking sheet in the oven and/or reduce the heat. Remove pan from oven and cool granola in pan for about 30 minutes. Break granola into desired sized pieces and add to the large bowl containing the dried fruit and seeds. Stir to combine all ingredients.
Store granola in airtight container at room temperature for 5-7 days or store in freezer for longer use.
Recipe Notes
Yield: Apx. 2½ pounds
For Other Great Granola Recipes From My Island Bistro Kitchen, click on the links below:
So, we all know how beautiful a decorated roast turkey on a platter looks and many of us associate this with the ideal Thanksgiving. The reality is, however, that many households are small and either don’t need, or want, a large turkey. The responsibility of getting a turkey properly cooked can be somewhat daunting. Yet, who among us does not want to celebrate Thanksgiving in a somewhat traditional manner and have the heavenly scent of turkey roasting in the oven.
To show how the traditional elements can be incorporated into a small-scale Thanksgiving dinner, I have prepared a dinner for two. This meal is easily scalable meaning it can be multiplied to serve the number of guests you have.
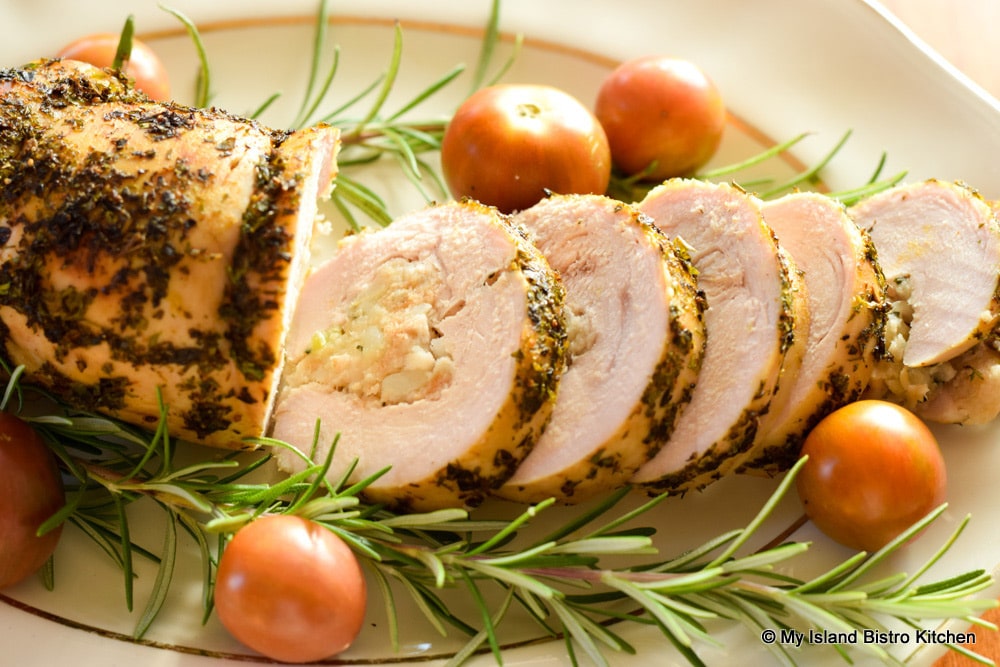
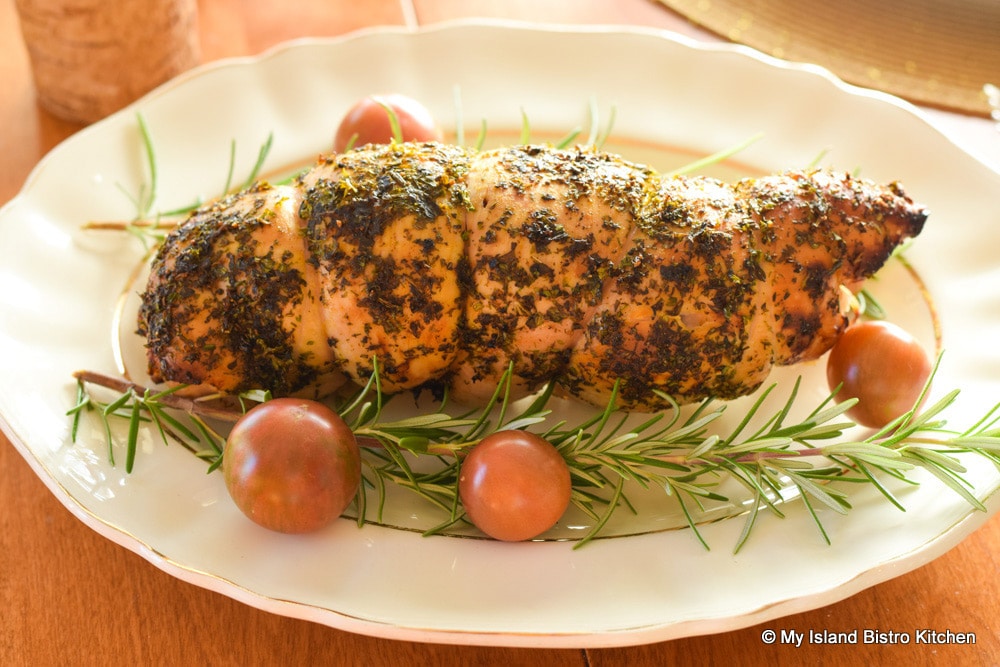
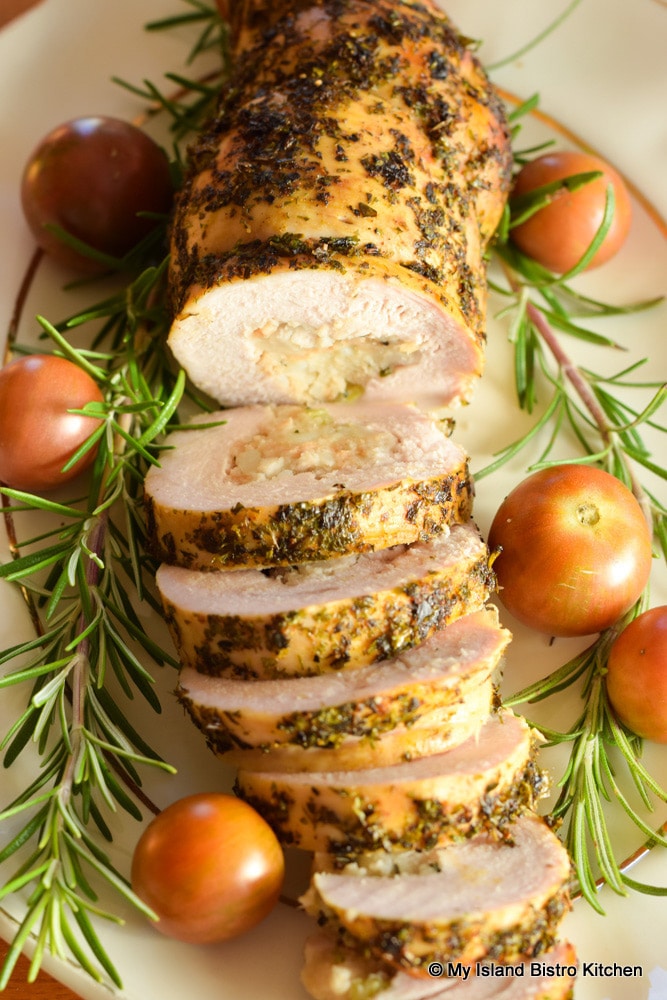
I still wanted turkey but I wanted something manageable in size and meat that would cook quickly and without having to have a large roaster. That’s where fresh boneless turkey breasts come in. They are available in all sizes, ranging from the small 1-pounders. These cook quickly, especially in a convection oven, and you still get the same wonderful scent in the house as the turkey breast roasts. The other benefit to a boneless turkey breast is that it is all pure meat. There is no large carcass to deal with and the meat slices so perfectly for stylish plating.
Stuffed Roasted Turkey Breast
I brine my chicken and turkey. It makes such a difference to the flavor and texture of the meat. All I do to brine a fresh turkey breast is let it sit for a few hours submerged in a salt-water brine. After brining, I pound it somewhat thin, roll some of my stuffing into the breast, and tie it securely. I then brush the entire meat with melted butter mixed with olive oil and sprinkle it lightly with paprika. I head to the garden and pick some fresh parsley, rosemary, dill, oregano, and thyme (or whatever blend of herbs I happen to have at the time). Chopped really fine, these herbs are then sprinkled over the meat which is set on a rack in a small roasting pan.
Roasted Turkey Breast
I am a huge proponent of using a meat thermometer. This ensures my meat is always cooked properly and stays tender and juicy. I cook the turkey breast in my convection oven till it tests done on the meat thermometer. After the turkey comes out of the oven, I loosely tent it with tinfoil for about 20 minutes or so before proceeding to carve it. Comes out perfectly cooked and juicy every time. Easy-peasy.
Sliced Stuffed Turkey Breast
For gravy lovers, the downside to roasting turkey breast is that there are virtually no drippings from the meat which can be used to make gravy. This is easily enough remedied, however, by making the gravy using poultry stock which is what I have done here from some homemade turkey stock I had in the freezer.
Stuffed Roasted Turkey Breast with Pan Gravy
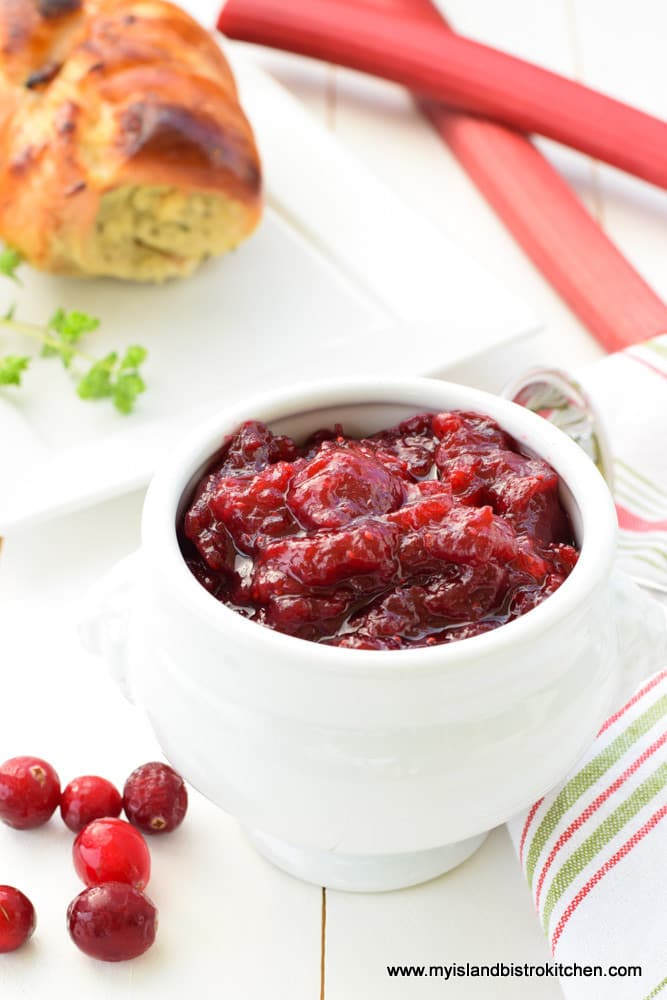
Whether it’s a meal for 2 or 22, I always recommend doing as much of the prep work ahead of time as possible. In this case, I made the Rhubarb-Cranberry Sauce the day before and refrigerated it. This is my newest cranberry sauce and it combines two wonderful flavors beautifully. Either fresh or frozen cranberries and rhubarb can be used for the sauce. It has the most glorious jewel-toned color and fabulous flavor. The sauce pairs particularly well with turkey.
Cranberry Rhubarb Sauce
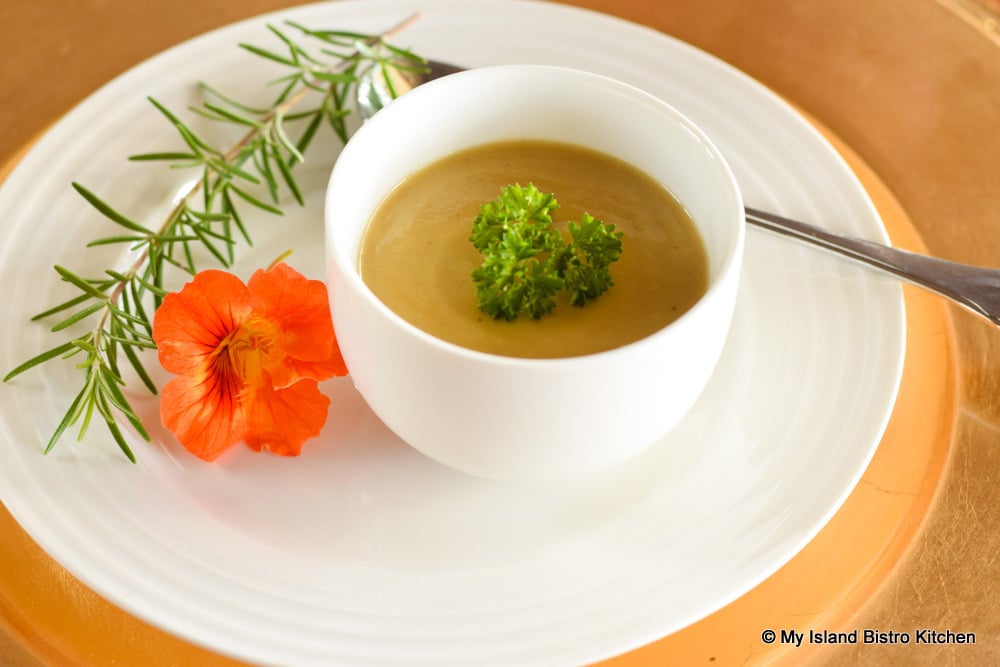
For the soup course, I am also featuring my newest soup recipe, Roasted Parsnip and Pear Soup. For Thanksgiving, I try to use seasonal produce like parsnips and pears. This soup freezes well so can be made ahead, thawed, and reheated in the microwave. Or, a batch of it can be made specifically for Thanksgiving and the leftover frozen.
Roasted Parsnip and Pear Soup
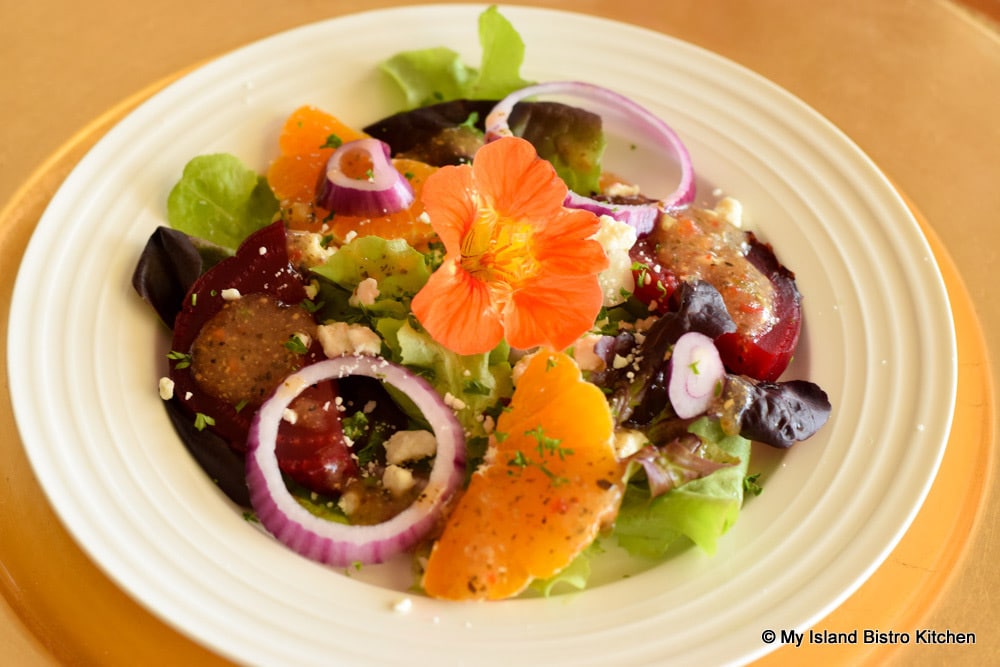
For the salad course, I have gone with a really simple salad, most of which came from our backyard garden – fresh lettuce, beets, red onion, and nasturtium flowers. I roasted the beets (though they could be boiled instead). So, on a bed of lettuce, I placed slices of beets and added some mandarin orange sections and slices of red onion. This was topped with crumbled feta cheese and the salad was served with a simple vinaigrette and topped with a colorful and edible nasturtium.
Roasted Beets and Mandarin Orange Salad
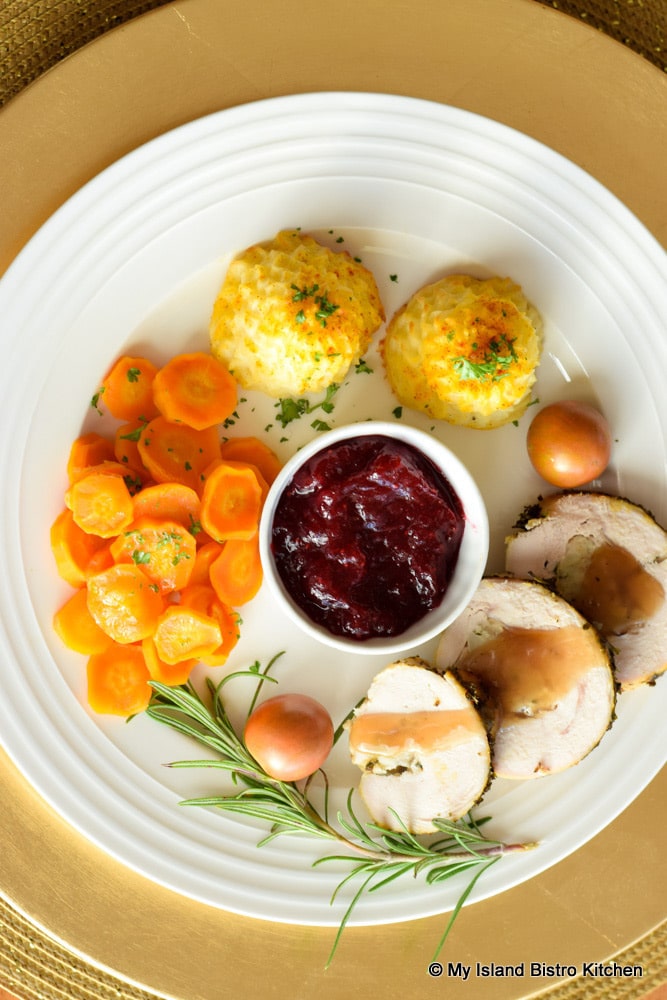
Because I have included both a soup and salad course, it is not necessary to have a number of different vegetables on the plate. Here, I have included the decadent Duchess Potatoes and colorful carrots which, though basic, add a wonderful pop of color to the plate.
Plated Thanksgiving Dinner
My wine pairing with this Thanksgiving Dinner is a 2016 Riesling from Thirty Bench Winemakers in the Niagara Peninsula. A Reisling is a good choice as it has lots of palate-refreshing acidity along with a slight touch of sweetness to balance and complement the variety of flavors in the dinner.
For dessert, it’s Squash Pie. I always maintain that, while similar to pumpkin, squash pie has a richer, deeper flavour.
Squash Pie
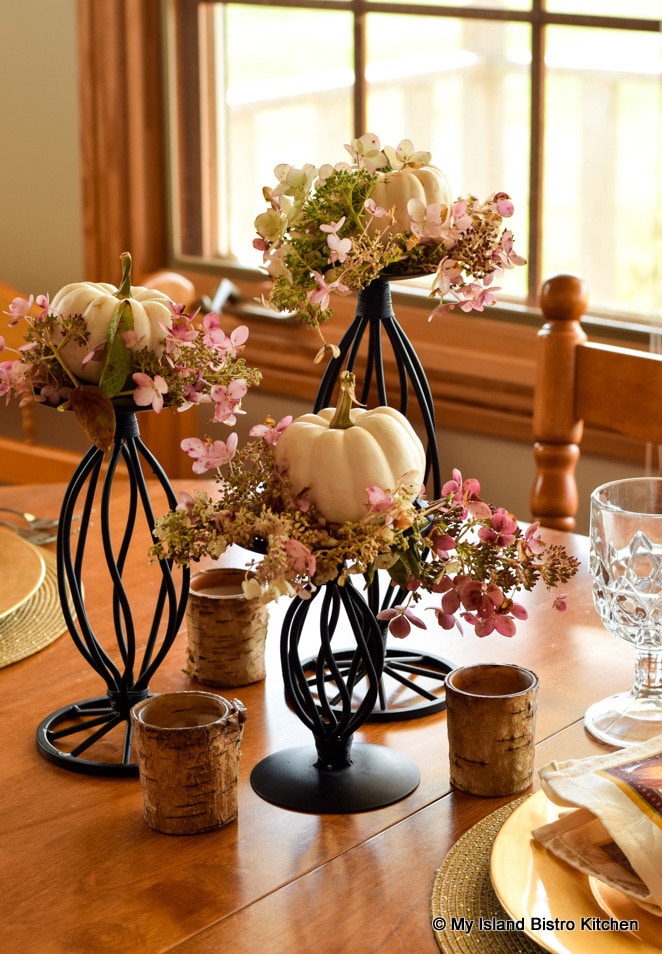
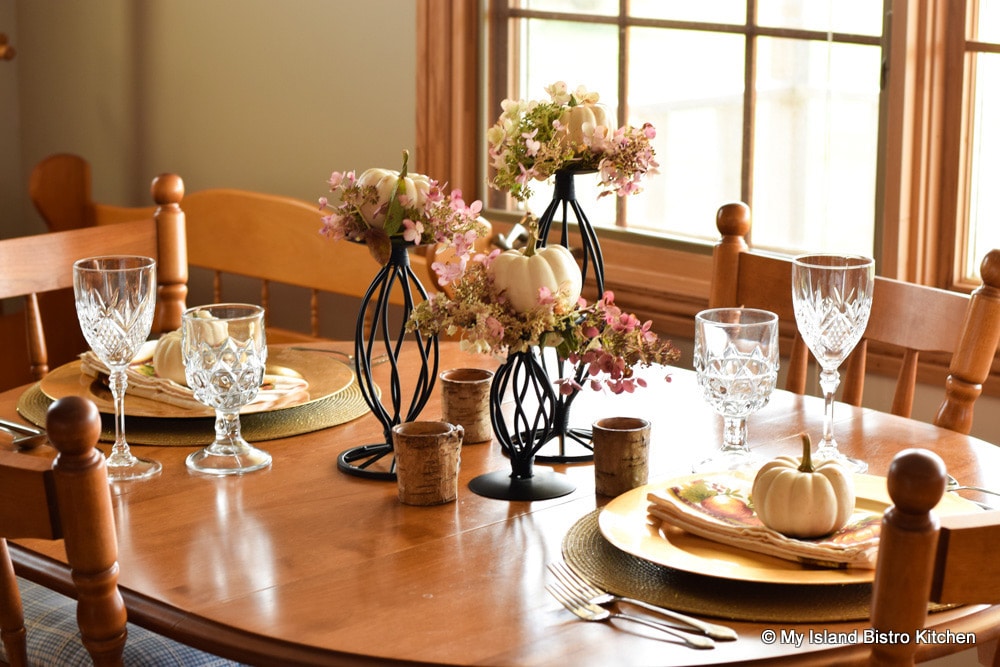
I have opted for a very simple tablesetting and I have used items I already own in its construction. Miniature white pumpkins were placed on three candlesticks of varying heights. Some hydrangea plucked from my hedge formed a colorful, yet soft-colored, base for the pumpkins. I used three small votives at the base of the arrangement to give a glow of soft light.
Thanksgiving Centerpiece
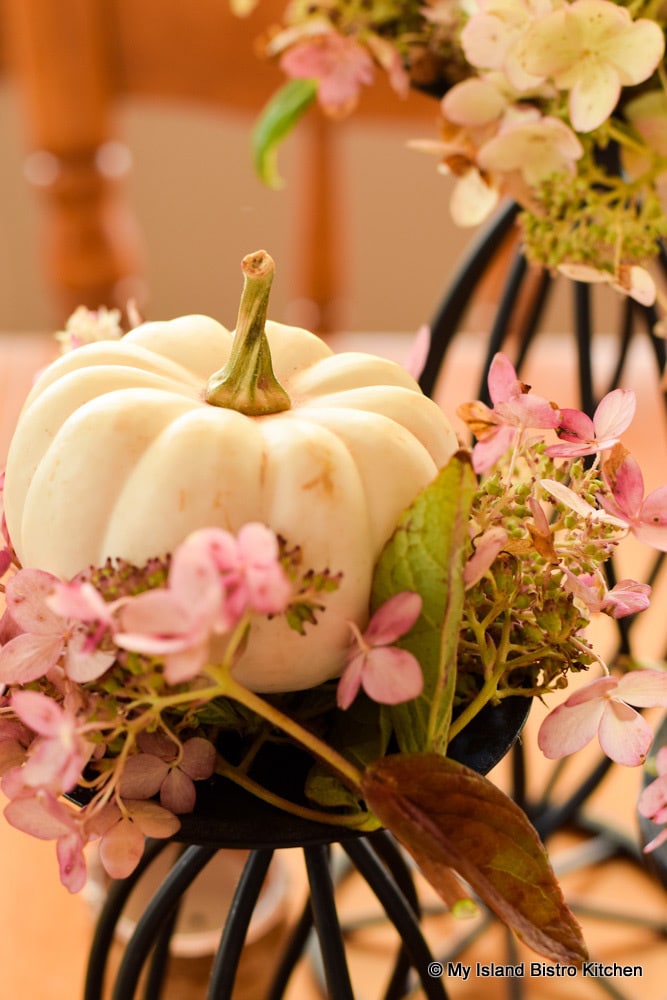
Here’s a closer peek.
Thanksgiving Centerpiece
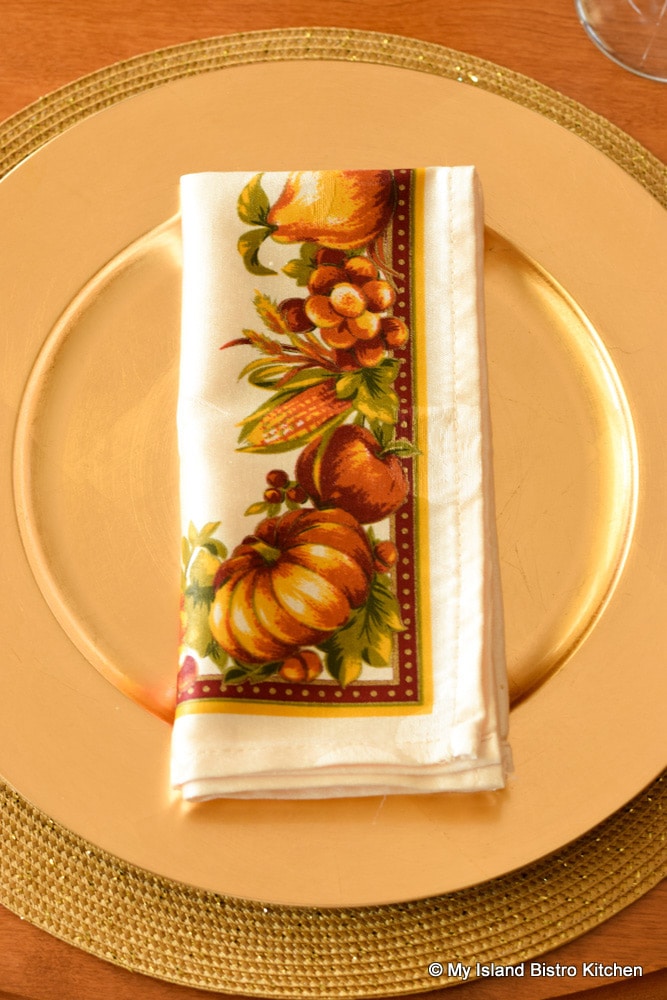
I intentionally left the tabletop bare because the deep maple wood provides a warm looking canvas for an autumn meal. Each placesetting was framed with gold charger plates sitting on gold-colored round placemats. This keeps the tablesetting muted but yet has the warm tones of fall.
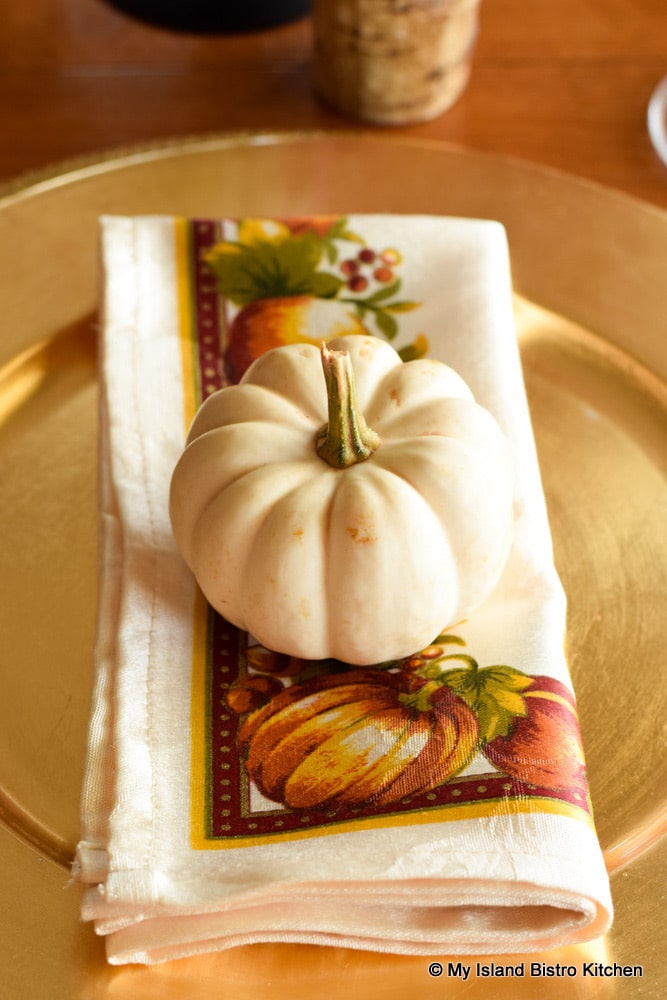
To draw the connection of the pumpkin-focused centerpiece down to the placesettings, I simply placed a small pumpkin atop the napkin at each place.
Thanksgiving Placesetting
When the napkins have a lot of colorful border design on them, like these, it is sometimes best to just fold them flat on the plate so that the design is visible. Otherwise, the design may be lost in a napkin fold and not be as effective.
Thanksgiving Napkin
Glassware does not need to match. Here, I have chosen two different vintage pieces from my collection for the wine and water glasses. The tablesetting is clean, simple, and uncluttered. Best of all, it only took a few minutes to create, used items I already had, and the tiny pumpkins cost me less than $4.
Thanksgiving Tablesetting for Two
I am a big fan of using white dinnerware as it goes with everything and food always looks so appetizing on a white background.
Roast Turkey Dinner
So, regardless the size of your household, there are options to preparing a tasty Thanksgiving Dinner that still includes the elements we expect to see in a Thanksgiving dinner.
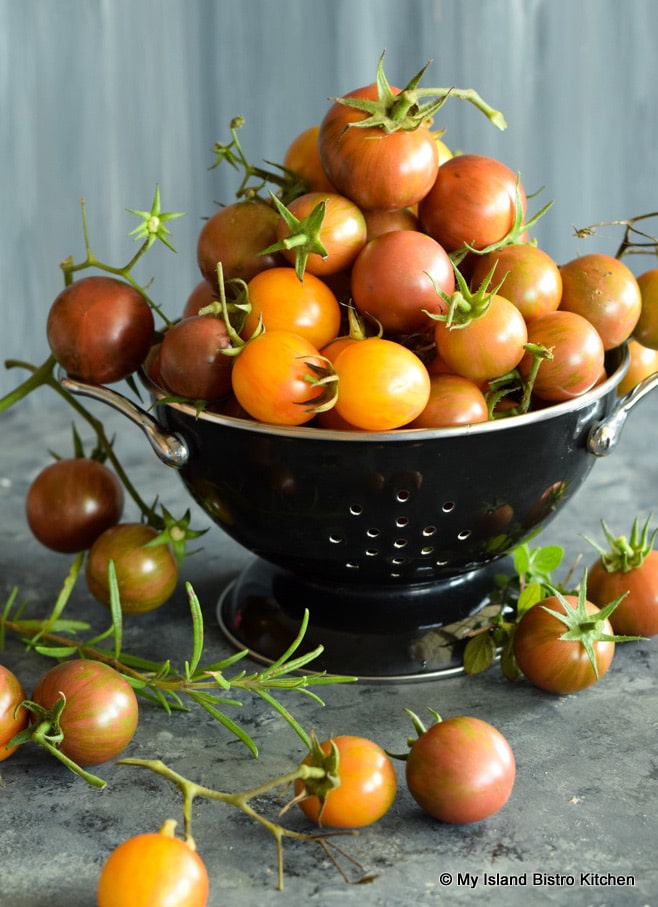
Every year, we grow cherry tomatoes in the garden. They are prolific producers and there is no way we can use up the pounds and pounds of tomatoes they produce. This time of the year, they can’t even be given away because it seems everybody has an over-abundance of them in their gardens. So, what to do with them? Turn them into a rich, thick, and flavorful Roasted Cherry Tomato Sauce! Continue reading Roasted Cherry Tomato Sauce→
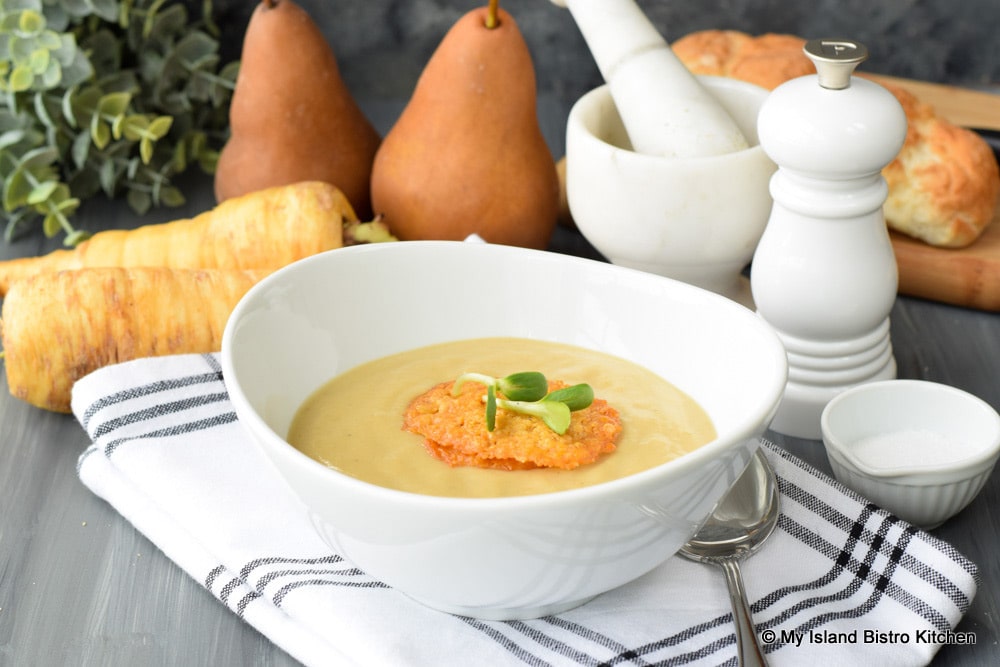
Today’s featured recipe from my kitchen is Roasted Parsnip and Pear Soup. The combination of the somewhat nutty flavor of the parsnips pairs well with the sweetness of the Bosc Pears. They balance each other well in this savory soup. Continue reading Roasted Parsnip and Pear Soup Recipe→
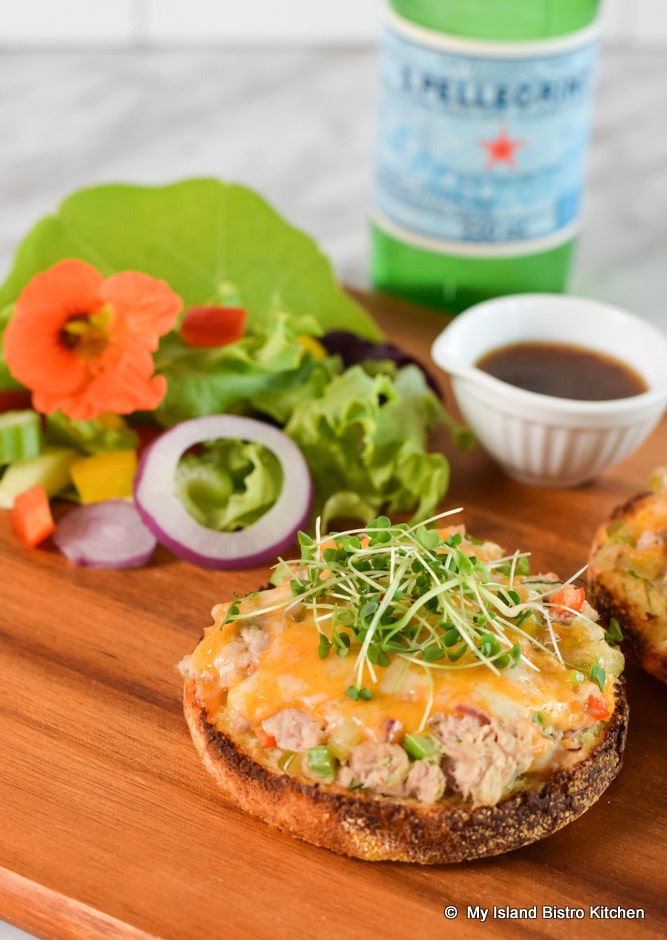
When I want a quick and easy light meal, I will often make these Classic Tuna Melts. They are super easy to make and are wonderfully tasty. It’s amazing what can be done with a simple can of tuna and a few staple ingredients! Continue reading Classic Tuna Melts Recipe→
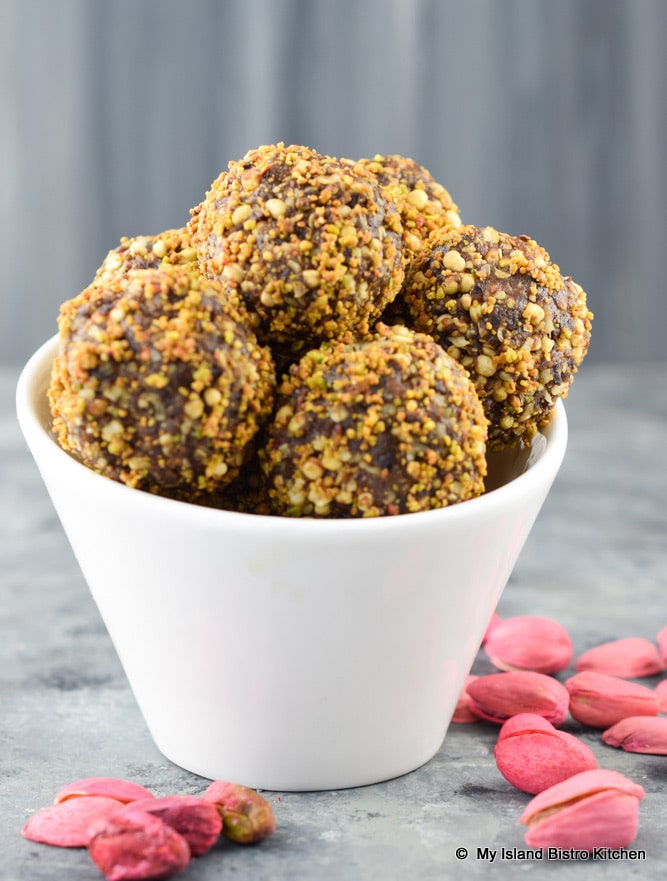
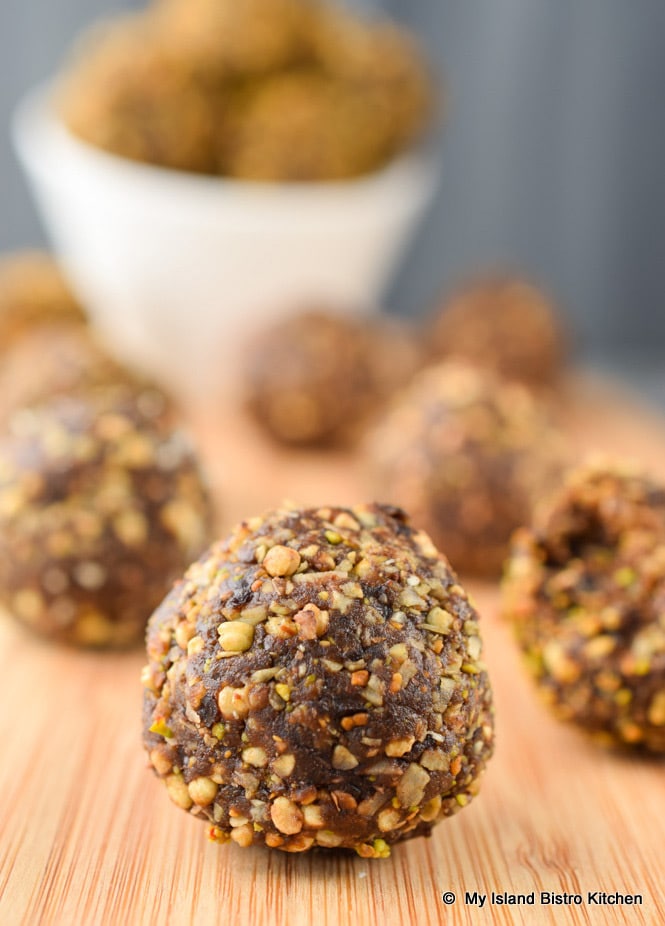
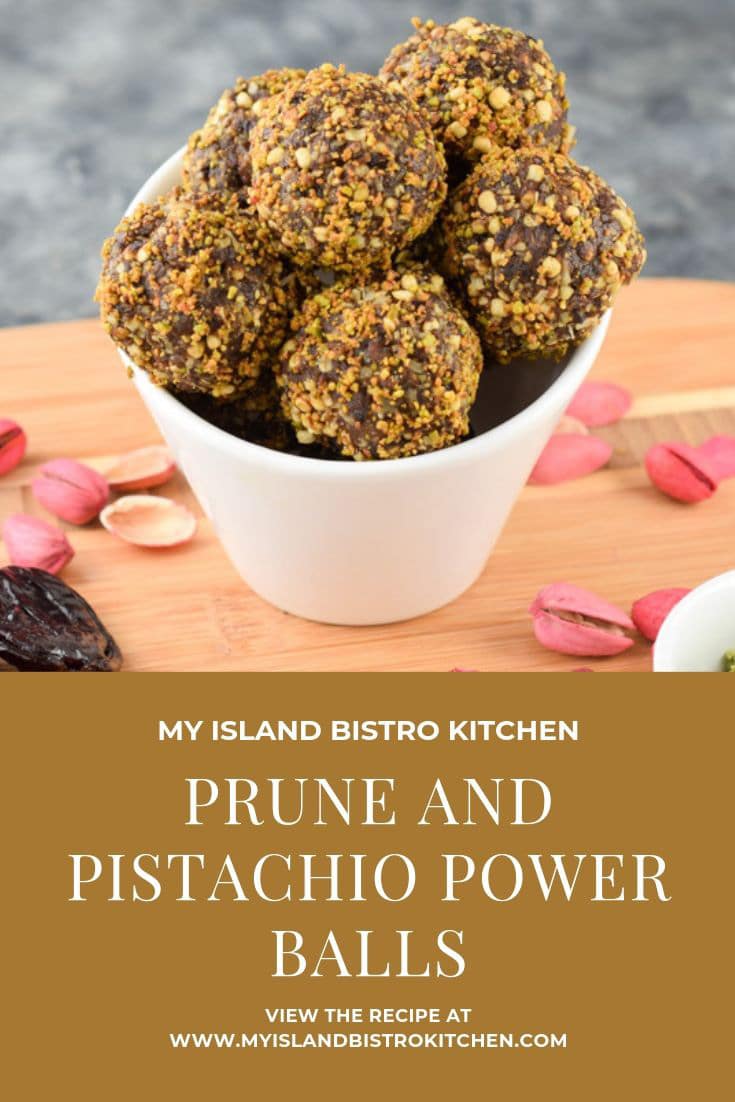
Power balls (sometimes called energy balls, energy bites, or bliss balls) are a super tasty, portable, and convenient on-the-go snack. They are great for the lunch bags and they are the perfect pre- or post-workout snack.
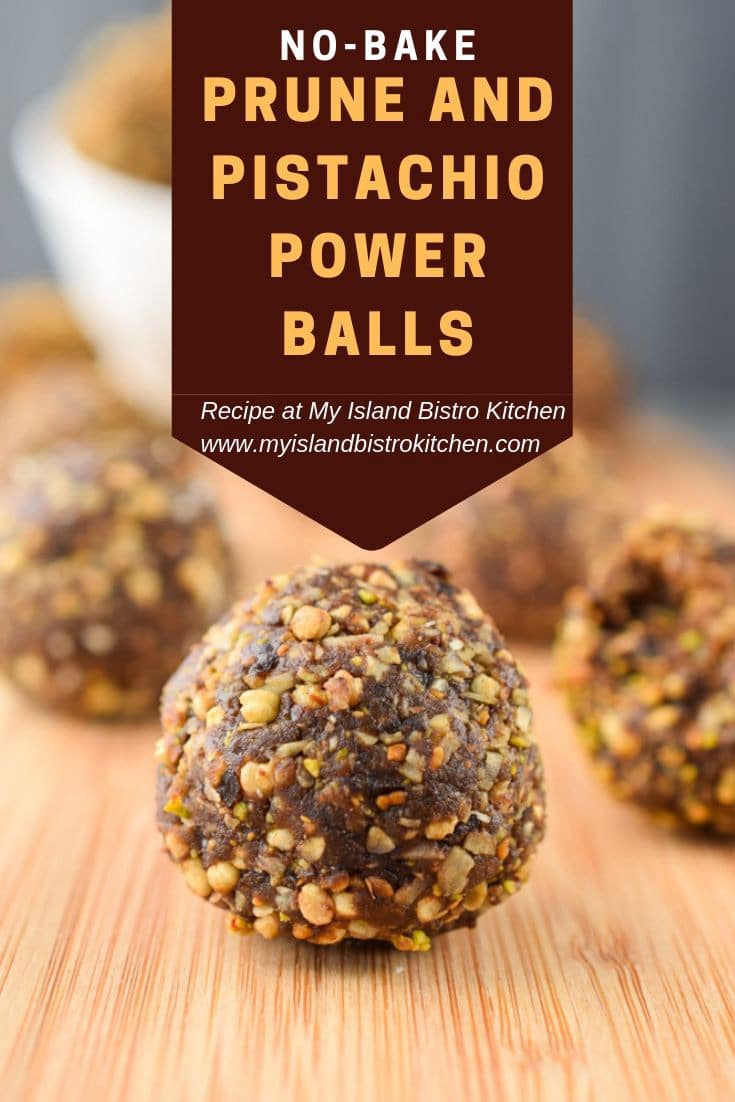
Made with a blend of carefully selected ingredients, these tasty Prune and Pistachio Power Balls provide a great energy boost, particularly during the mid-afternoon slump when energy typically starts to wane for many.
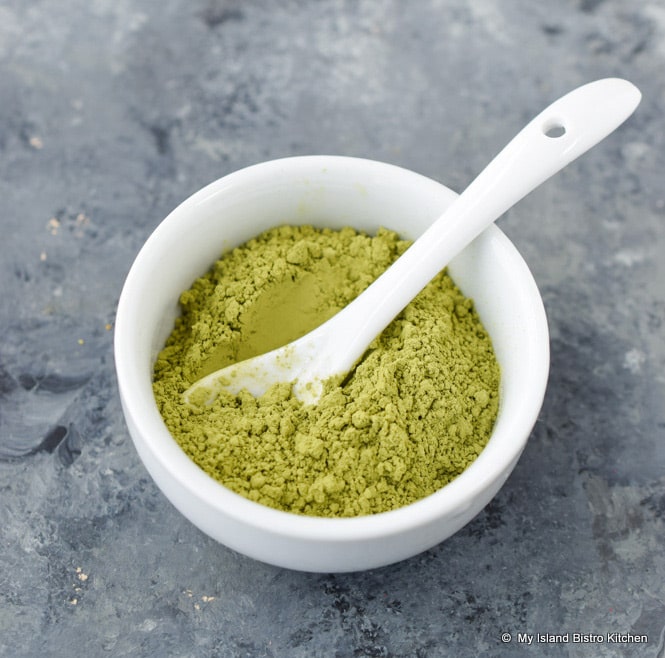
Apart from the usual pantry staples, I bought all of the ingredients for the balls at my local bulk food store. It’s an ideal store for recipes like this one that call for small amounts of ingredients, such as green tea matcha powder, that some people might not have in their cupboards.
Green Tea Matcha Powder
It saves money, too, since you only need to buy what the specific recipe calls for and, in some cases, the ingredients might not be ones the home cook would use up if an entire package or bottle had to be purchased.
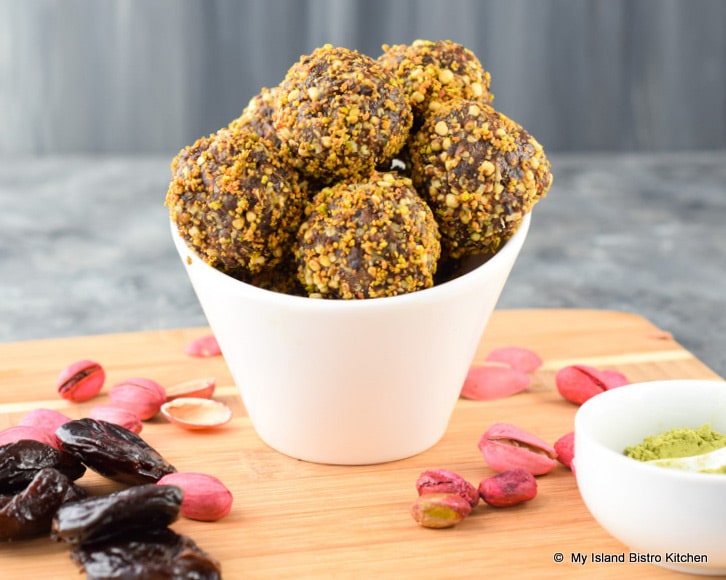
Prune and Pistachio Power Balls
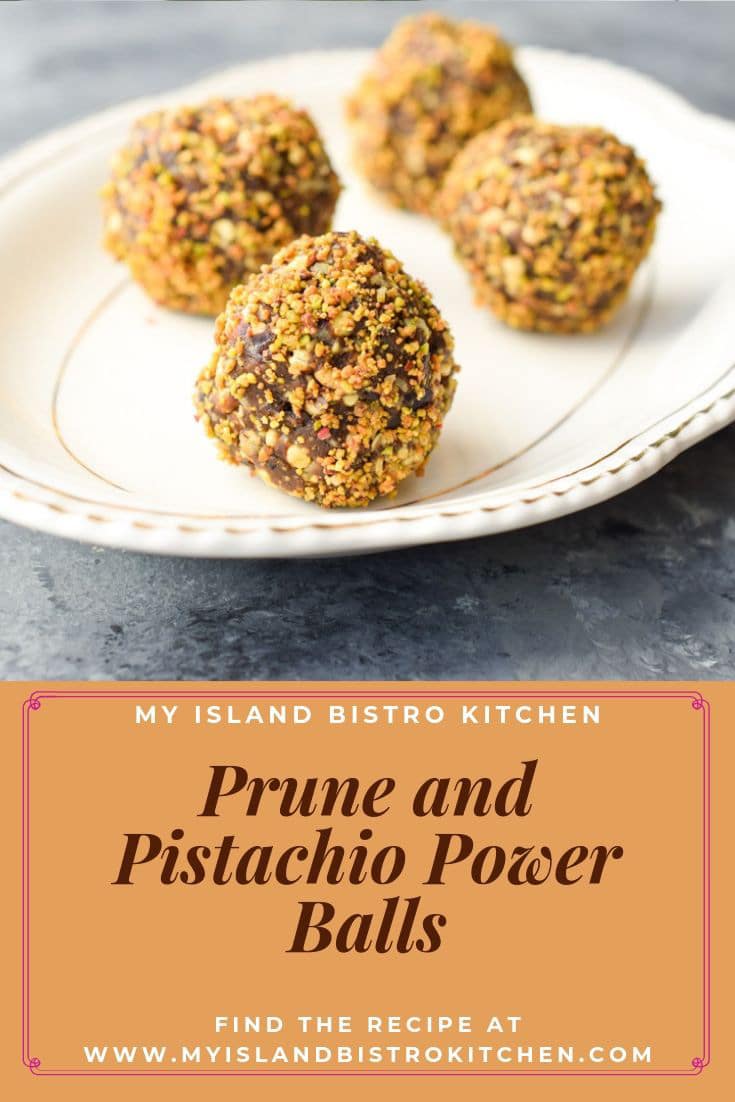
These power balls freeze well and are great to have in the freezer for on-the-go snacks. Check out my posting for Peanut Butter Coconut Energy Bites for an explanation of the four main sets of ingredients typically found in these types of balls. In that posting, you will also find my tips for making energy balls.
Prune and Pistachio Power Balls
[Printable Recipe Follows at end of Posting]
Prune and Pistachio Power Balls
Ingredients:
6 oz dried prunes, coarsely chopped (apx 1 cup chopped) ½ cup quick rolled oats (gluten-free, if required) 1/3 cup sunflower butter ½ cup pistachios, shelled and finely ground (apx. 4 oz unshelled) 1 tbsp ground chia seeds 1 tbsp cocoa 2 tsp chocolate whey protein powder 1½ tsp green tea matcha powder pinch fine sea salt 2 tbsp maple syrup 1 tbsp coconut oil 1 tsp vanilla 2/3 cup puffed quinoa cereal ½ cup sweetened shredded coconut
Additional finely chopped pistachios for rolling balls (optional)
Method:
Pulse prunes in food processor until they become paste-like or clump into a ball. Add the rolled oats, sunflower butter, pistachios, ground chia seeds, cocoa, chocolate whey protein powder, green tea matcha powder, salt, maple syrup coconut oil, and vanilla. Pulse mixture until ingredients are completely blended.
Add the puffed quinoa cereal and coconut and pulse just until combined. If mixture seems too dry, two to three teaspoons of water may be blended into ingredients. Place mixture in the refrigerator for about 20 minutes to chill.
Roll mixture by hand into bite-sized balls. For frame of reference, each ball should weigh approximately 27 grams. Roll balls in finely chopped pistachio nuts, if desired. Place balls on parchment-lined baking sheet and freeze for 20-25 minutes to firmly set. Store balls, in single layers separated by waxed paper, in airtight container for up to five days in the refrigerator or freeze up to three months for longer storage.
Yield: Apx. 18 balls
If you have made this recipe and enjoyed it and/or wish to share it with your friends and family, please do so on social media but be sure to share the direct link to this posting from my website.
Prune and Pistachio Power Balls make a convenient on-the-go portable snack. These little balls of power are also the perfect pre- or post-workout snack.
Course Snack
Keyword energy balls, energy bites, power balls
Servings18
My Island Bistro KitchenMy Island Bistro Kitchen
Ingredients
6ozdried prunes, coarsely chopped (apx 1 cup chopped)
½cupquick rolled oats (gluten-free, if required)
1/3cupsunflower butter
½cuppistachios, shelled and finely ground (apx. 4 oz unshelled)
1tbspground chia seeds
1tbspcocoa
2tspchocolate whey protein powder
1½tspgreen tea matcha powder
pinchfine sea salt
2tbspmaple syrup
1tbspcoconut oil
1tspvanilla
2/3cuppuffed quinoa cereal
½cupsweetened shredded coconut
Additional finely chopped pistachios for rolling balls (optional)
Instructions
Pulse prunes in food processor until they become paste-like or clump into a ball. Add the rolled oats, sunflower butter, pistachios, ground chia seeds, cocoa, chocolate whey protein powder, green tea matcha powder, salt, maple syrup coconut oil, and vanilla. Pulse mixture until ingredients are completely blended.
Add the puffed quinoa cereal and coconut and pulse just until combined. If mixture seems too dry, two to three teaspoons of water may be blended into ingredients. Place mixture in the refrigerator for about 20 minutes to chill.
Roll mixture by hand into bite-sized balls. For frame of reference, each ball should weigh approximately 27 grams. Roll balls in finely chopped pistachio nuts, if desired. Place balls on parchment-lined baking sheet and freeze for 20-25 minutes to firmly set. Store balls, in single layers separated by waxed paper, in airtight container for up to five days in the refrigerator or freeze up to three months for longer storage.
I like to use fresh produce when it is in season. It has so much more flavor than buying the same product when it is out of season. There are certain dishes that super fresh produce is essential and Fresh Peach Salsa is one of them. Versatile, this salsa can, of course, be used as a dip for tortilla chips and it can also be used as a topping for cooked fish, pork chops, or chicken breasts and for a number of other uses as well. Continue reading Fresh Peach Salsa Recipe→
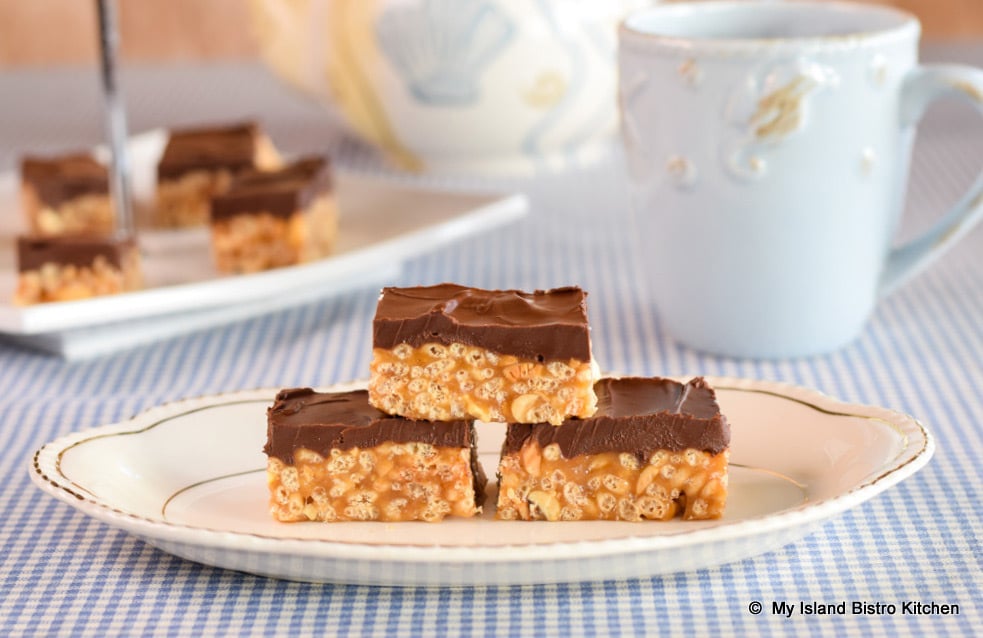
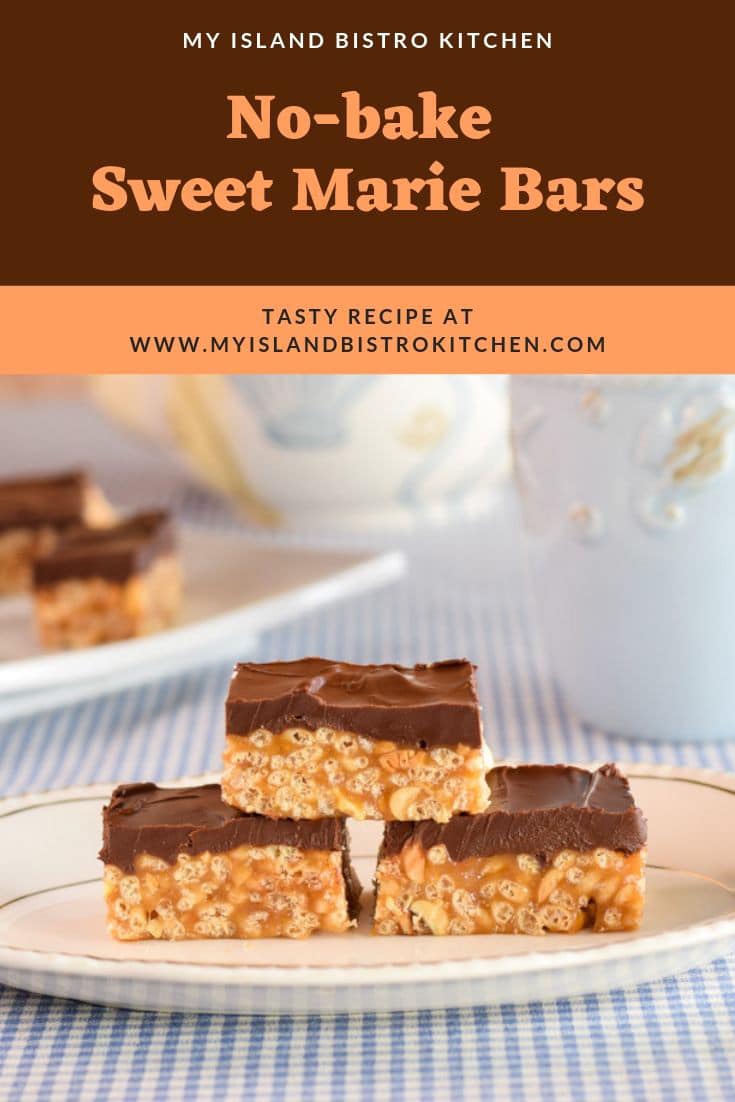
Everybody loves an easy square or bar to make that does not require careful watching as it bakes in the oven and that does not have to be frosted. Sweet Marie Bars fit nicely in that category. Taking only a few very basic ingredients, the result is one delectable treat that often finds its way on to sweet trays, particularly at Christmas.
Sweet Marie Bars have made their way into my picnic basket on more than one occasion since they are more like candy, in my opinion, than what we traditionally think of as squares or cookie bars.
This bar recipe has been around for a long time and is known by names other than Sweet Marie Bars. The core ingredients do not tend to change though the quantities may and, sometimes, the bars are iced with traditional frosting. I have seen them called Peanut Krispie Bars and a variation called Scotheroos that call for some butterscotch chips. There are probably other names for these bars and their variation(s). Regardless what they are called, they are one delectable treat any time of the year!
½ cup peanut butter ½ cup golden corn syrup ½ cup brown sugar, packed 1 tbsp butter
8 oz semi-sweet chocolate pieces or squares ¼ cup peanut butter 2 tsp butter
Method:
Line a 9”x9” square baking pan with tin foil and spray lightly with cooking spray (or grease with butter).
Stir the crispy rice cereal and salted peanuts together in a large heat-proof bowl (e.g., glass or stainless steel). Set aside.
In medium-sized, heavy-bottomed saucepan placed over low heat, combine the peanut butter, corn syrup, brown sugar, and butter. Stir until mixture is blended and heated. Do not boil.
Remove saucepan from heat and pour mixture over the cereal and peanut mixture. Stir to mix. Press mixture into prepared baking pan.
For topping, melt the chocolate in a microwave-safe bowl, a few seconds at a time. When chocolate is about half melted, stir in the peanut butter and butter. Continue to microwave in short bursts of seconds until chocolate is melted. Pour the topping over the square in pan and smooth with a knife or small flat metal spatula. Let cool completely to room temperature before lifting square from pan and cutting it into squares or bars of desired size. Square may cut out better if cooled square has been placed in the refrigerator for 15-20 minutes.
Easy-to-make no-bake bars that combine peanut butter and crispy rice cereal into a base topped with melted chocolate and peanut butter.
Course Snack
Keyword bars, nobake bars, nobake squares, Sweet Marie Bars
My Island Bistro KitchenMy Island Bistro Kitchen
Ingredients
2cupscrispy rice cereal (e.g., Rice Krispies)
¾cupsalted peanuts
½cuppeanut butter
½cupgolden corn syrup
½cupbrown sugar, packed
1tbspbutter
8ozsemi-sweet chocolate pieces or squares
¼cuppeanut butter
2tspbutter
Instructions
Line a 9”x9” square baking pan with tin foil and spray lightly with cooking spray (or grease with butter).
Stir the crispy rice cereal and salted peanuts together in a large heat-proof bowl (e.g., glass or stainless steel). Set aside.
In medium-sized, heavy-bottomed saucepan placed over low heat, combine the peanut butter, corn syrup, brown sugar, and butter. Stir until mixture is blended and heated. Do not boil.
Remove saucepan from heat and pour mixture over the cereal and peanut mixture. Stir to mix. Press mixture into prepared baking pan.
For topping, melt the chocolate in a microwave-safe bowl, a few seconds at a time. When chocolate is about half melted, stir in the peanut butter and butter. Continue to microwave in short bursts of seconds until chocolate is melted. Pour the topping over the square in pan and smooth with a knife or small flat metal spatula. Let cool completely to room temperature before lifting square from pan and cutting it into squares or bars of desired size. Square may cut out better if cooled square has been placed in the refrigerator for 15-20 minutes.
Recipe Notes
Yield:One (1) 9” pan of squares/bars
[Copyright My Island Bistro Kitchen]
If you have made this recipe and enjoyed it and/or wish to share it with your friends and family, please do so on social media but be sure to share the direct link to this posting from my website.
Connect with My Island Bistro Kitchen on Social Media
Chives, a perennial plant related to onions, are one of the season’s earliest gems. I generally cut back part of the patch to keep the chives producing all season long. But, letting some of the chives reach the flower blossom stage has its perks, too, and one of those perks is Chive Vinegar. Continue reading Homemade Chive Vinegar Recipe→
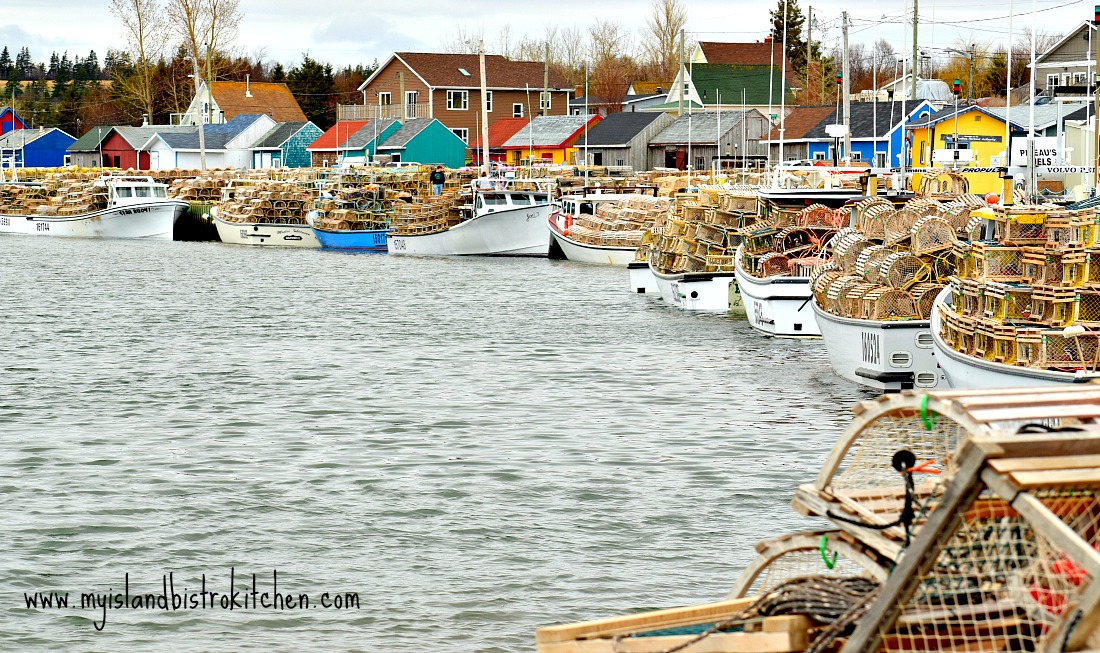
Eve of Setting Day in the Fishing Village of North Rustico, PEI, Canada
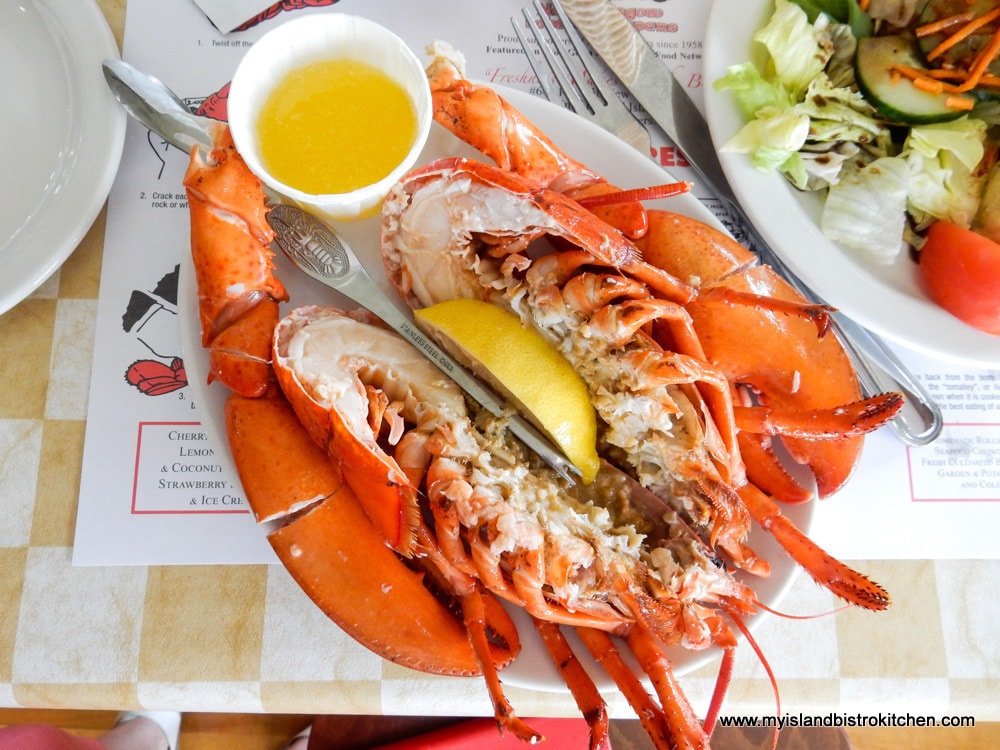
Living where we do, here in PEI, we have access to fresh local lobster and we make the most of it! The lobster fishery plays a major part in PEI’s economy and many people work in one of the many facets of this industry.
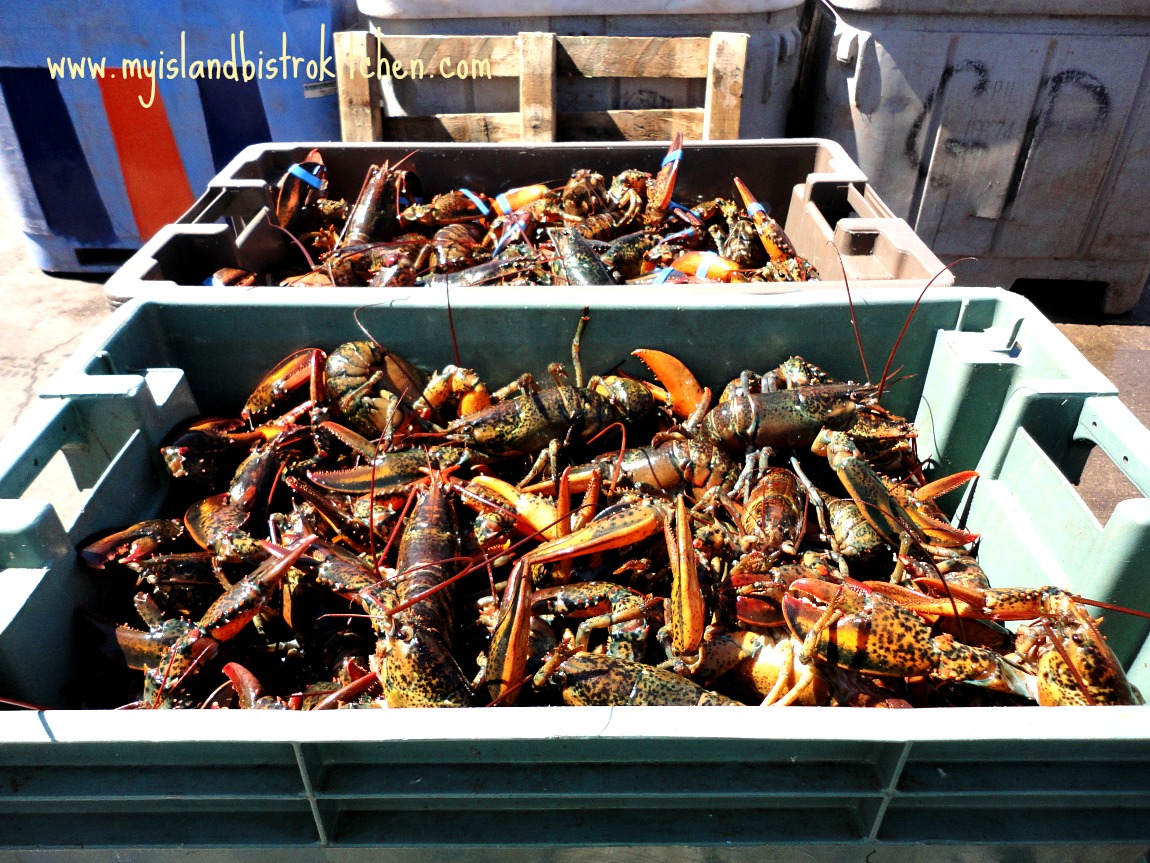
Fresh Catch of the Day – PEI Lobsters
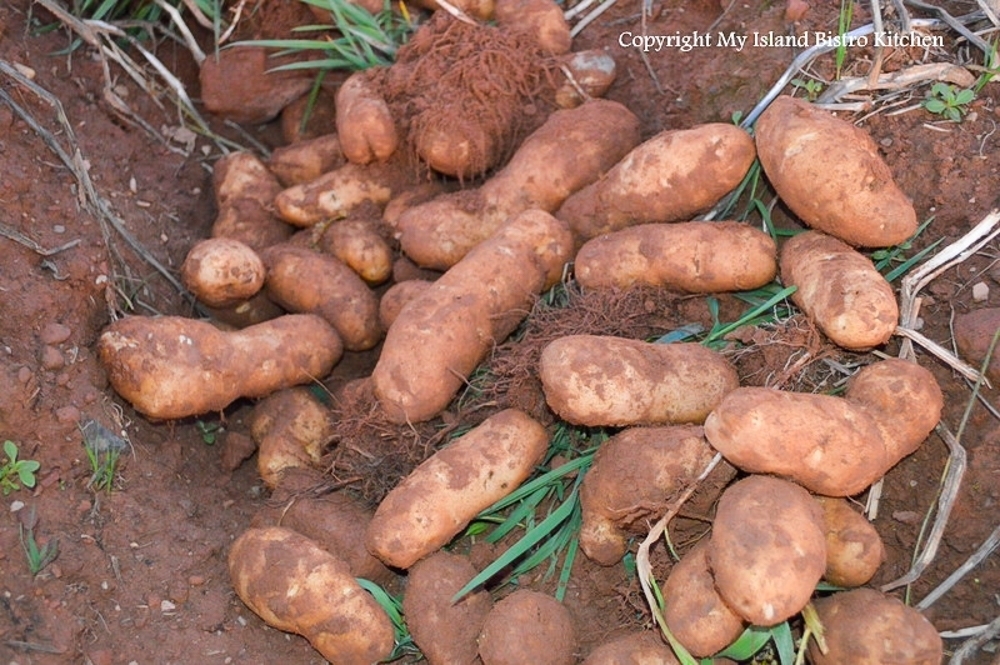
We are blessed on the Island with great food from the waters that surround our Island and from the rich red soil of our fertile land.
PEI Potatoes
Combining foods from the sea and land, my recipe for Lobster Chowder features fresh lobster and potatoes, both foods for which PEI is known. Some creamed corn, milk, cream, and a flavorful lobster stock make this a rich, decadent, and delectable chowder. Follow the step-by-step preparation and cooking directions to create a lobster chowder feast. Continue reading PEI Lobster Chowder Recipe→
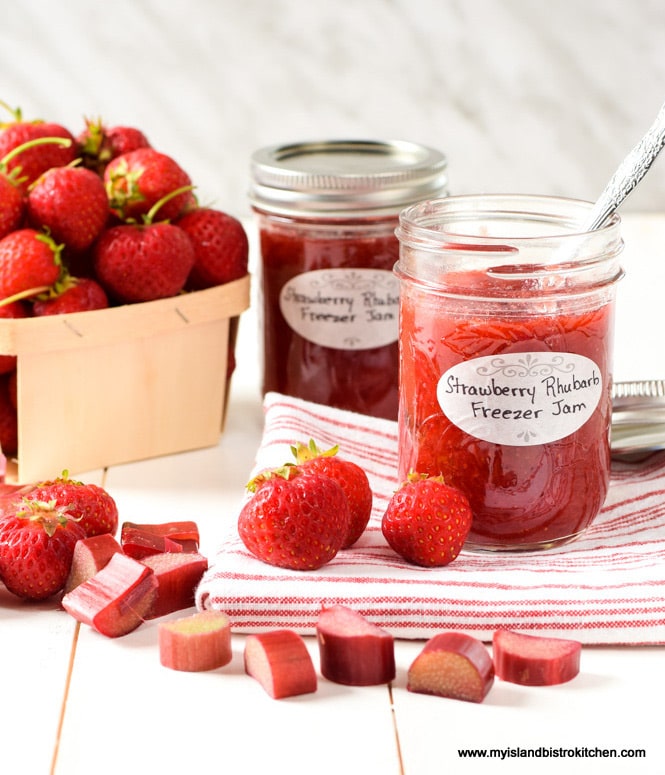
This Strawberry Rhubarb Freezer Jam boasts wonderful flavour and is very quick and easy to make. Because it is to stored in the freezer, it does not require a long cooking time or the hot water canning process. Continue reading Strawberry Rhubarb Freezer Jam Recipe→
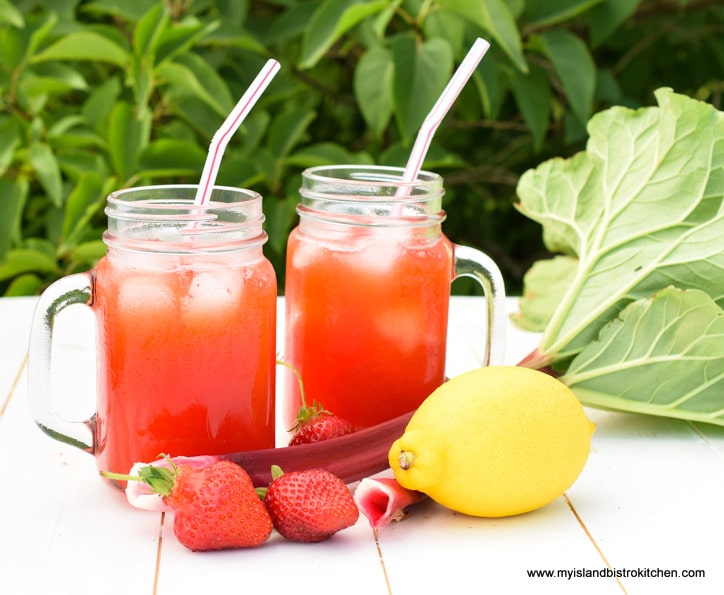
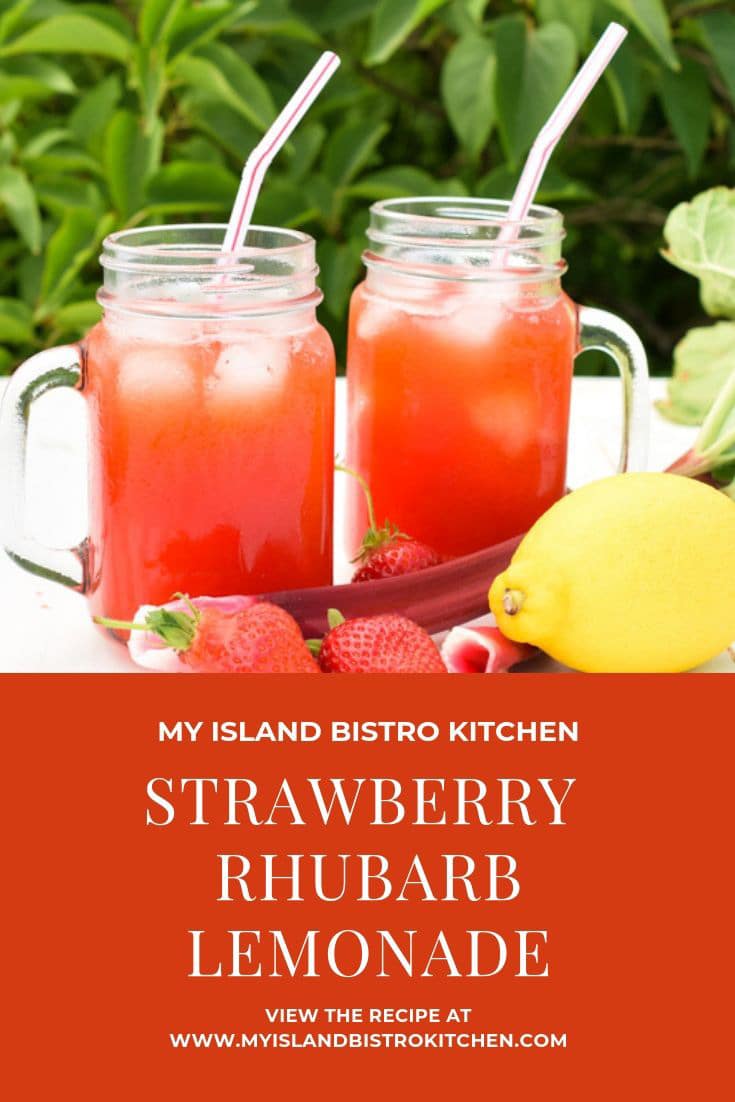
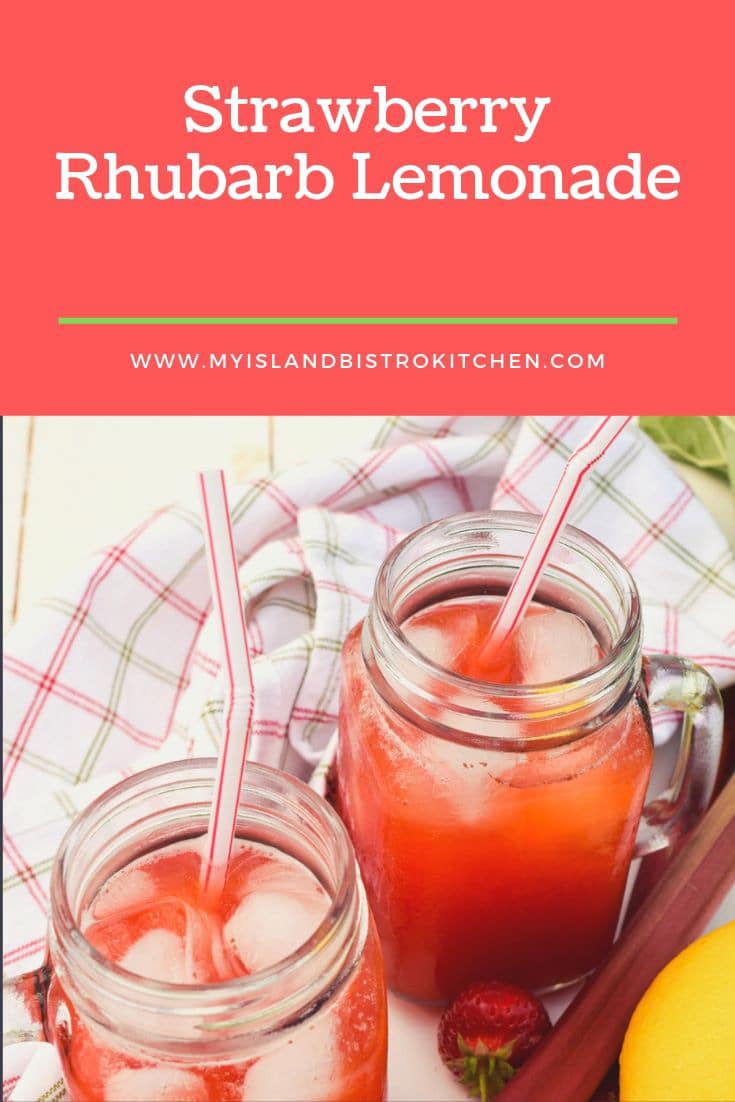
When the summer days are hot and thirst takes over, a tall glass of refreshing lemonade is just what is called for. Strawberry and rhubarb are always a winning flavour combination and they team up to make a wonderful Strawberry and Rhubarb Lemonade. There is no need for any addition of coloring in this drink as the deep red strawberries and bright red rhubarb impart their own shades into this colorful drink.
Strawberry Rhubarb Lemonade
This is one of those drinks I make when the strawberries and rhubarb are in season because this lemonade freezes very well in an airtight container. This makes it a great drink to have on hand for those hot summer days.
Strawberry Rhubarb Lemonade
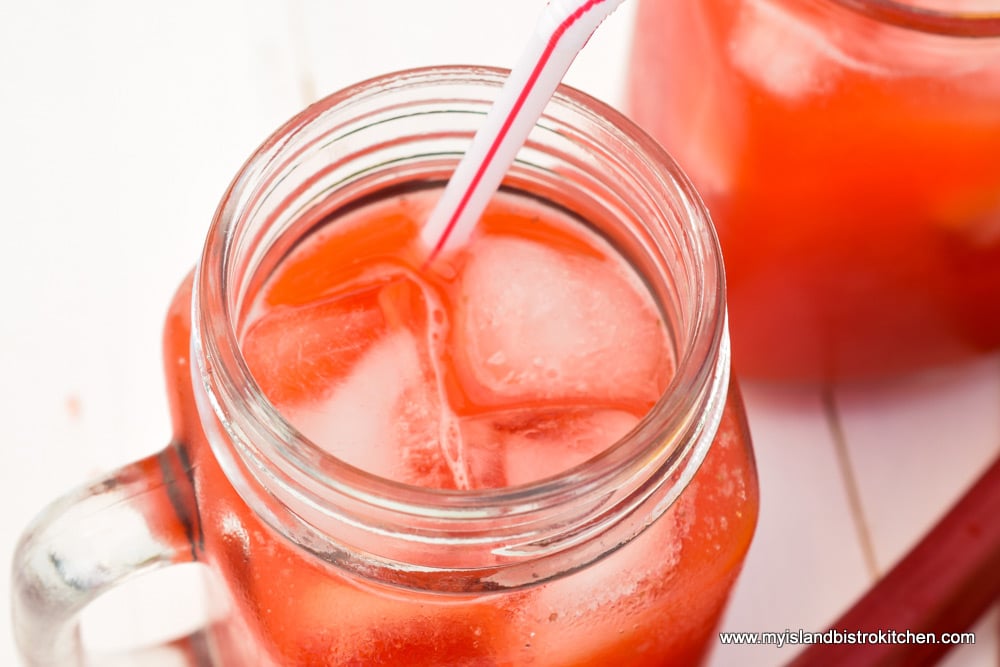
Serve the lemonade plain over ice or half fill a glass with the lemonade and top it up with your favorite clear soda. If so inclined, an ounce of your favorite libation may be added to the lemonade.
[Printable recipe follows at end of post]
Strawberry Rhubarb Lemonade
Ingredients:
1½ cups water 1 cup super-fine sugar (aka caster sugar or instant dissolving sugar)
1 cup freshly squeezed lemon juice 2 tbsp coarsely grated lemon rind
¾ lb rhubarb, chopped into 1” chunks 1 cup water 1/3 cup super-fine sugar
2 cups fresh strawberries, sliced 1¼ cups water Pinch salt
Method:
For the simple syrup: In small saucepan, combine the 1½ cups water and 1 cup sugar together. Bring to a boil over medium heat, stirring constantly, until sugar is completely dissolved. Reduce heat to medium-low and boil gently for 3-4 minutes, stirring occasionally. Remove from heat and cool to room temperature (apx. 30-40 minutes). Add the lemon juice and lemon rind. Let mixture stand for at least an hour (or up to three hours) to allow the flavor to develop. Strain mixture twice through a fine mesh sieve to remove the lemon pulp and rind. Discard the pulp and rind.
For the rhubarb and strawberry juice: Combine the rhubarb, 1 cup of water and sugar in a large pot. Cover and bring to a boil then reduce heat to medium-low and cook for approximately 5 minutes. Add the strawberries and 1¼ cups water along with a pinch of salt. Cover and cook for about 5 minutes longer, or until rhubarb and strawberries are softened. Remove from heat and let stand for about 20 minutes. Use a food masher to loosely mash and break down the pulp. Place a large fine wire mesh sieve over a heatproof bowl. Line the sieve with a double layer of dampened cheesecloth. Pour the rhubarb and strawberry mixture into the sieve, letting the juice drip through. Use the back of a large spoon to very gently press the pulp in order to extract as much of the juice from the fruit as possible. Discard solids.
To assemble: In large jug or bottle, combine the simple syrup with the strained rhubarb and strawberry juice. Stir well. Chill.
To serve: Stir the chilled lemonade. Fill a glass approximately one-half full of ice cubes and add the lemonade. Garnish with a lemon wheel or fresh strawberry, if desired.
Additional Serving Suggestions:
Fill glass one-half full of lemonade. Top with sparkling water or clear soda such as lemon-lime, sprite, or grapefruit. Finish with ice cubes and a sprig of fresh mint.
Add 1 oz of your favorite libation to a glass half-filled with ice cubes. Top with lemonade. Garnish with lemon wedge and strawberry.
Lemonade will keep, covered, in the refrigerator for 3-4 days. Freezes well in airtight container.
Yield: Approximately 5-6 cups, depending on water content in fruit
With a perfect blend of sweet strawberries and tart rhubarb, this Strawberry Rhubarb Lemonade is a refreshing and thirst-quenching summertime sipper.
Servings6
My Island Bistro KitchenMy Island Bistro Kitchen
Ingredients
1½cupswater
1cupsuper-fine sugar(aka caster sugar or instant dissolving sugar)
1cupfreshly squeezed lemon juice
2tbspcoarsely grated lemon rind
¾lbrhubarb,chopped into 1” chunks
1cupwater
1/3cupsuper-fine sugar
2cupsfresh strawberries,sliced
1¼cupswater
Pinchsalt
Instructions
For the simple syrup: In small saucepan, combine the 1½ cups water and 1 cup sugar together. Bring to a boil over medium heat, stirring constantly, until sugar is completely dissolved. Reduce heat to medium-low and boil gently for 3-4 minutes, stirring occasionally. Remove from heat and cool to room temperature (apx. 30-40 minutes). Add the lemon juice and lemon rind. Let mixture stand for at least an hour (or up to three hours to allow the flavor to develop. Strain mixture twice through a fine mesh sieve to remove the lemon pulp and rind. Discard the pulp and rind.
For the rhubarb and strawberry juice: Combine the rhubarb, 1 cup of water and sugar in a large pot. Cover and bring to a boil then reduce heat to medium-low and cook for approximately 5 minutes. Add the strawberries and 1¼ cups water along with a pinch of salt. Cover and cook for about 5 minutes longer, or until rhubarb and strawberries are softened. Remove from heat and let stand for about 20 minutes. Use a food masher to loosely mash and break down the pulp. Place a large fine wire mesh sieve over a heatproof bowl. Line the sieve with double layer of dampened cheesecloth. Pour the rhubarb and strawberry mixture into the sieve, letting the juice drip through. Use the back of a large spoon to very gently press the pulp in order to extract as much of the juice from the fruit as possible. Discard solids.
To assemble: In large jug or bottle, combine the simple syrup with the strained rhubarb and strawberry juice. Stir well. Chill.
To serve: Stir the chilled lemonade. Fill a glass approximately one-half full of ice cubes and add the lemonade. Garnish with a lemon wheel or fresh strawberry, if desired.
Additional Serving Suggestions:
Fill glass one-half full of lemonade. Top with sparkling water or clear soda such as lemon-lime, sprite, or grapefruit. Finish with ice cubes and a sprig of fresh mint.
Add 1 oz of your favorite libation to a glass half-filled with ice cubes. Top with lemonade. Garnish with lemon wedge and strawberry.
Lemonade will keep, covered, in the refrigerator for 3-4 days. Freezes well in airtight container.
Recipe Notes
Yield: Approximately 5-6 cups, depending on water content in fruit
Pin Me To Pinterest!
Strawberry Rhubarb Lemonade
For other great lemonade recipes from My Island Bistro Kitchen, click on the links below:
There is much folklore over the origins of Eton Mess, a parfait-like dessert that is named for the prestigious English college in Berkshire, England, across the River Thames from Windsor. Continue reading Strawberry Eton Mess Dessert→
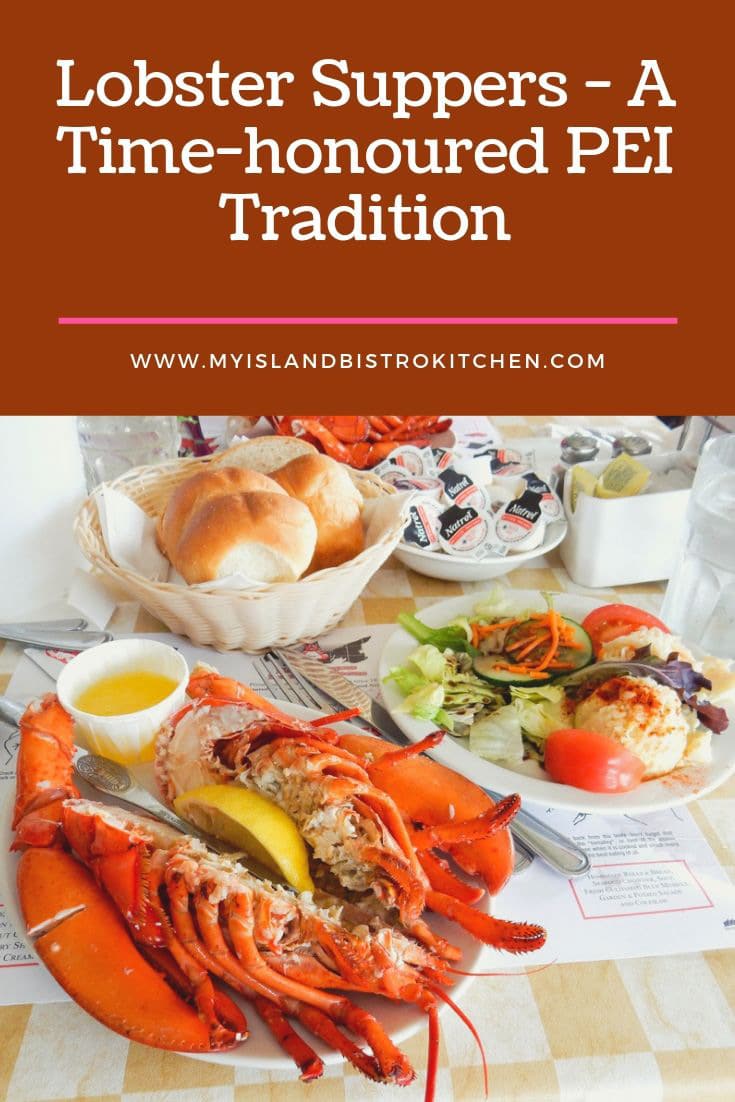
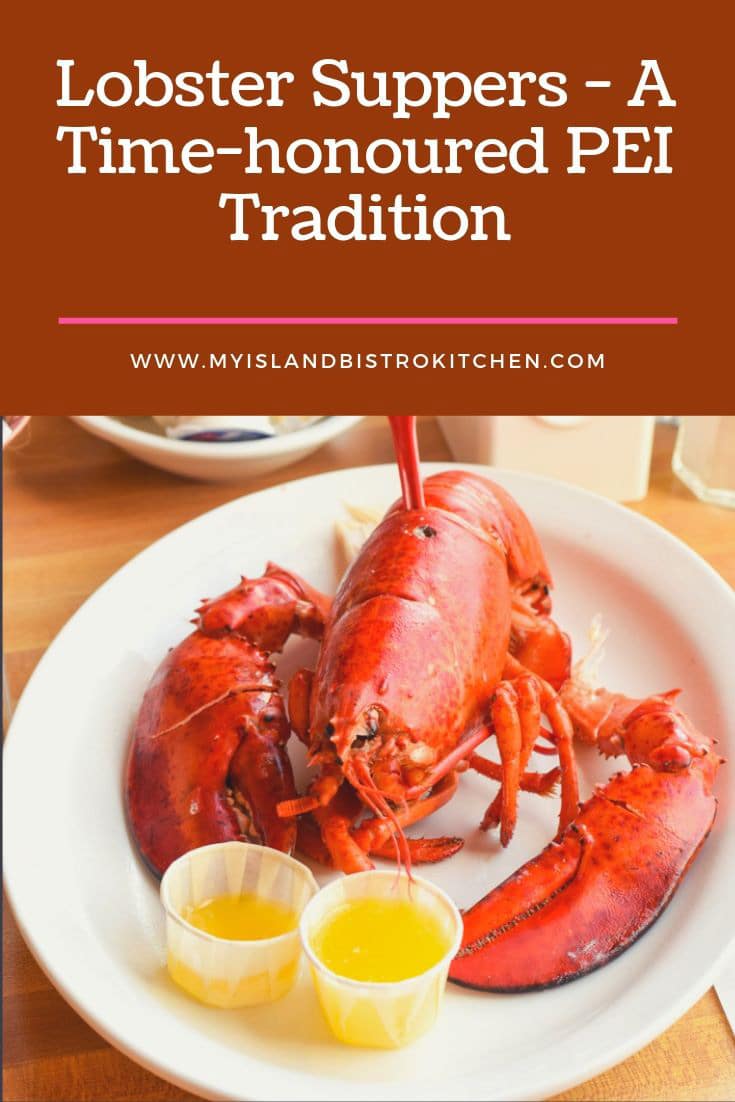
People visit Prince Edward Island, Canada’s smallest province, for all kinds of reasons but many will tell you it’s for the beautiful beaches, stunning scenery, fine golf courses, and fabulous food – ahhhhh, yes, the food and, more specifically, the seafood. Most people, when PEI is mentioned, will immediately say that we are known for our high-quality seafood, including mussels, oysters, and lobster.
For many years, the Island has been known for its “lobster suppers”. That is to say, they are restaurant venues that specialize in serving meals where lobster tends to be the star. As anyone who has eaten at a traditional PEI lobster supper will attest, they are the full meal deal. For the most part, these lobster suppers are traditionally served in big community halls or large restaurant facilities. Over the years, there have been several lobster supper enterprises come and go but, at the time of writing, two have endured for decades and they are really only about a 10-15 minute drive from each other. With such a rich long history, I recently sat down with the general managers from both the New Glasgow Lobster Suppers and the Fisherman’s Wharf Lobster Suppers to find out how these suppers started and why they have enjoyed such enduring popularity.
New Glasgow Lobster Suppers – New Glasgow, PEI
New Glasgow Lobster Suppers, New Glasgow, PEI, Canada
Nestled in the heart of the rolling hills of rural New Glasgow along the scenic River Clyde and not far from North Rustico and Cavendish, the New Glasgow Lobster Suppers (NGLS) have been operating since 1958. This makes them the longest running lobster suppers on the Island. When I asked general manager, Carl Nicholson, to explain their long success, he said it’s due to their freshness of product (lobsters are cooked daily) with all rolls, pies, and salads made daily on the premises. He also said that, since the suppers began, they have only had two managers, including himself, so there is an element of consistency in operation. With decades of experience behind them, they’ve clearly found the secret to staying in business.
How New Glasgow Lobster Suppers happened to start is, itself, an interesting story. A group of young farmers in the area, known as the Junior Farmers Group, decided they wanted some kind of community centre. The group of young farmers in their twenties and thirties came together and bought a small canteen from the Covehead Racetrack for $210 and moved it to New Glasgow. In June, 1958, to pay for this building, they held a fundraising event that happened to have lobster for supper and a dance afterward. The princely sum of $1.50 got you supper and the dance. The building, small and primitive by any standards, had no kitchen facilities and only had make-shift tables made from saw horses with old doors on top and there were no chairs, just benches.
A kitchen and washrooms were added in 1962 and the group continued to serve one lobster supper per year until 1964 when they started serving the suppers once a week during July and August. They gradually increased service to two days a week on Wednesdays and Saturdays. By 1967, lobster suppers were served five days per week and a cook was hired. As business grew, they expanded the kitchen and hired their first manager in 1969. As their current manager, Carl, says, “it is a true testament to sustainability [of the lobster suppers], only growing and expanding as demand grew and they were able to pay for each expansion”.
By 1972, six local couples bought out the shares of the other Junior Farmers who had been part of the initial enterprise and, in 1973, they added on a big extension to the building to accommodate the growing lobster supper demand. The original building is still within the walls of the current structure. A grand opening was held in 1974 when then-PEI Premier Alex Campbell brought along Prime Minister Pierre Trudeau and Margaret Trudeau who happened to be on the Island at the time. Mrs. Trudeau cut the ribbon to officially open the newly-expanded New Glasgow Lobster Suppers.
Over the years, various changes have occurred and, since 1980, two of the original six families – the MacRaes and Nicholsons – have run the suppers, now making it a third generation run family business.
One thing that has not changed at New Glasgow Lobster Suppers is their deeply-rooted connection to the local community and their family-oriented work environment. The operation now sees members from the third generation of families working in the restaurant. Grandchildren are now working where their grandparents got their start in the working world. A seasonal employer of over 100 people, New Glasgow has provided summer employment for many local people over its long history with many funding their education through working summers at the lobster suppers. It is not uncommon to hear of judges, lawyers, and other professionals having had their first job washing dishes or waiting on tables at the New Glasgow Lobster Suppers.
What’s for Dinner?
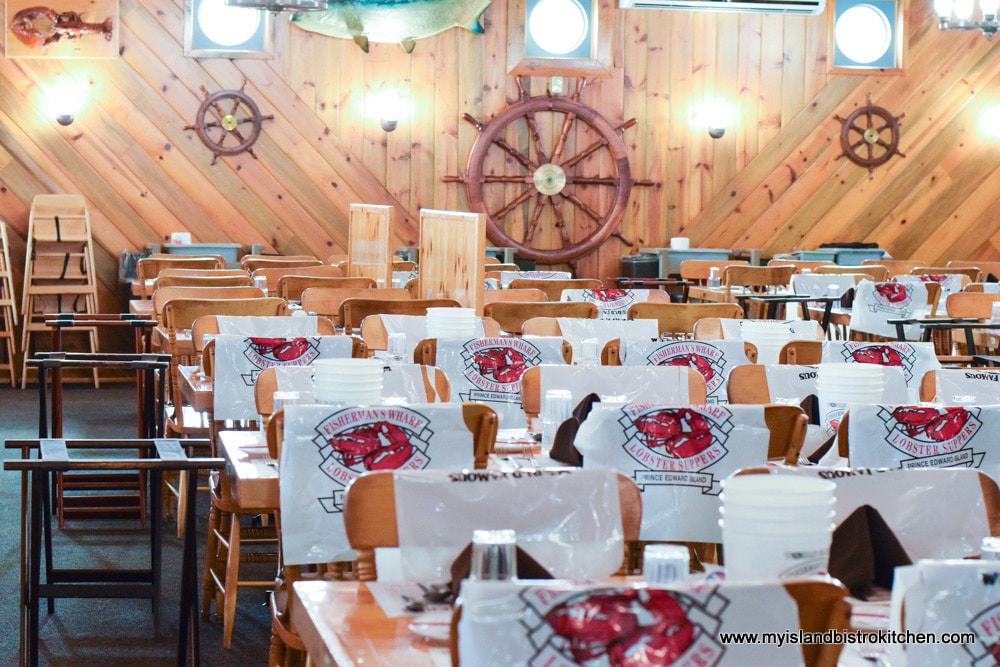
Dinners are served in a large banquet style hall that has a seating capacity of 500.
Interior of New Glasgow Lobster Suppers in New Glasgow, PEI, Canada
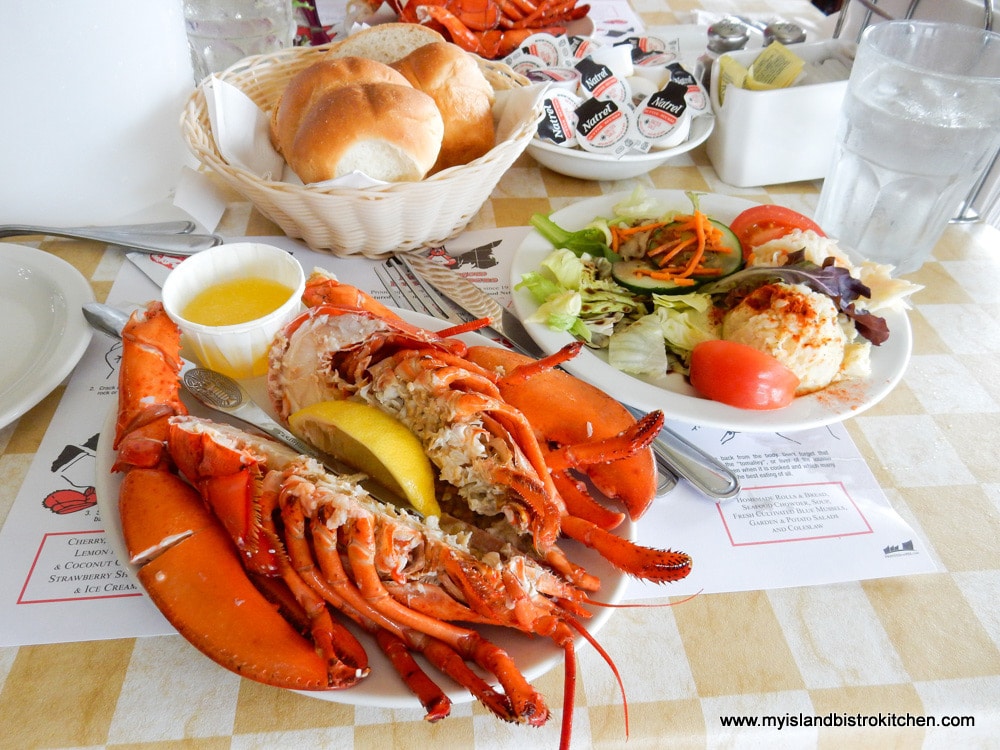
Patrons order their entrée and pay for their dinners upon arrival and then are escorted to a table by a hostess. Lobster dinners are priced based on the size of the lobster (1 lb – 4 lb lobsters are available). Tables for different sized groups are available, starting with tables for two. Don’t expect a quiet, intimate romantic dining experience as these suppers are casual and are modeled after a church or community hall supper.
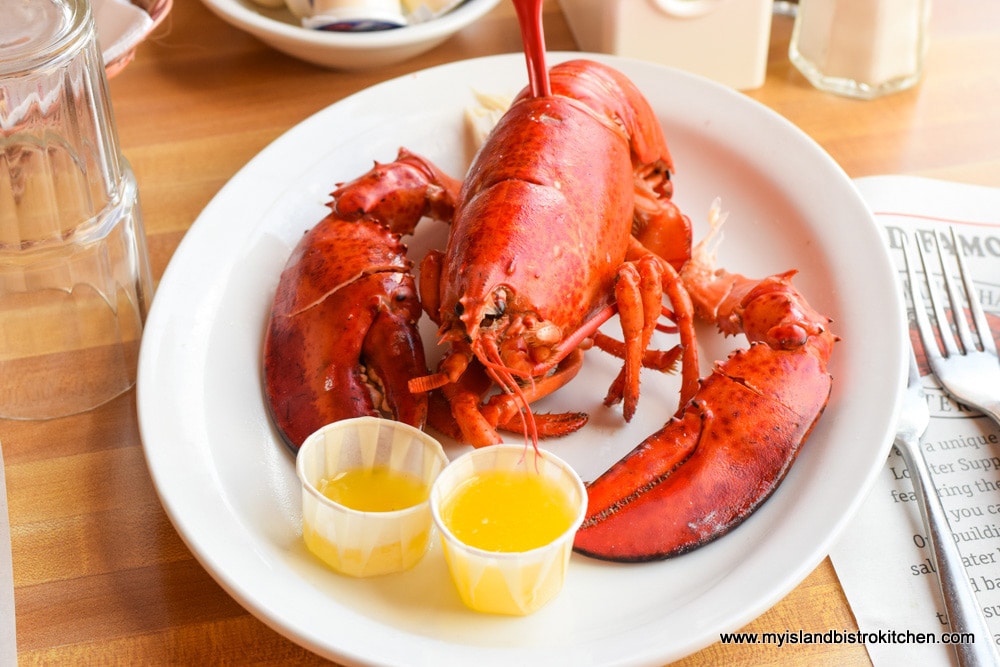
Lobster in the shell at New Glasgow Lobster Suppers, PEI
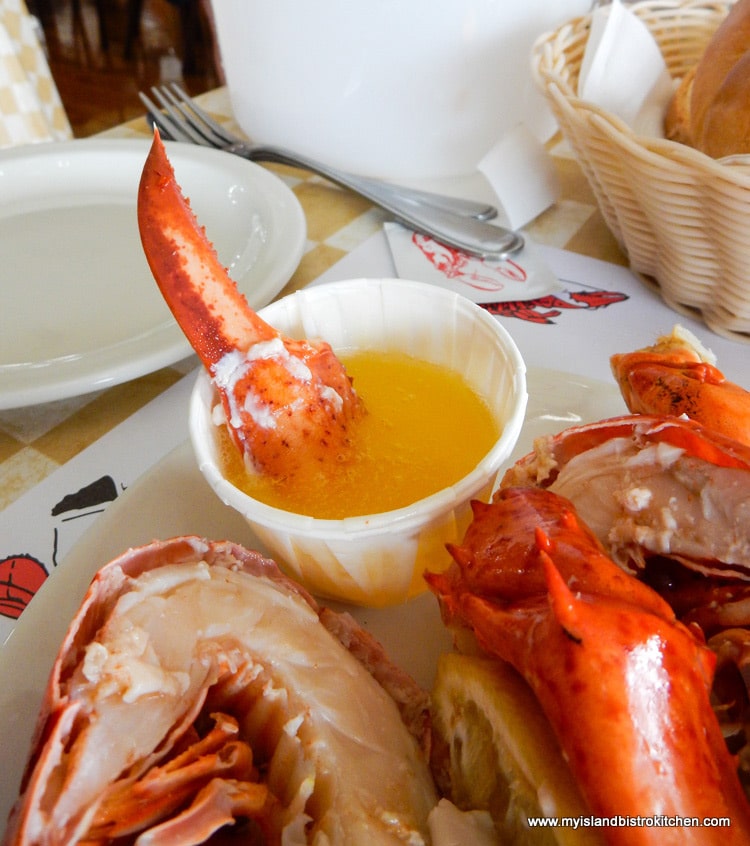
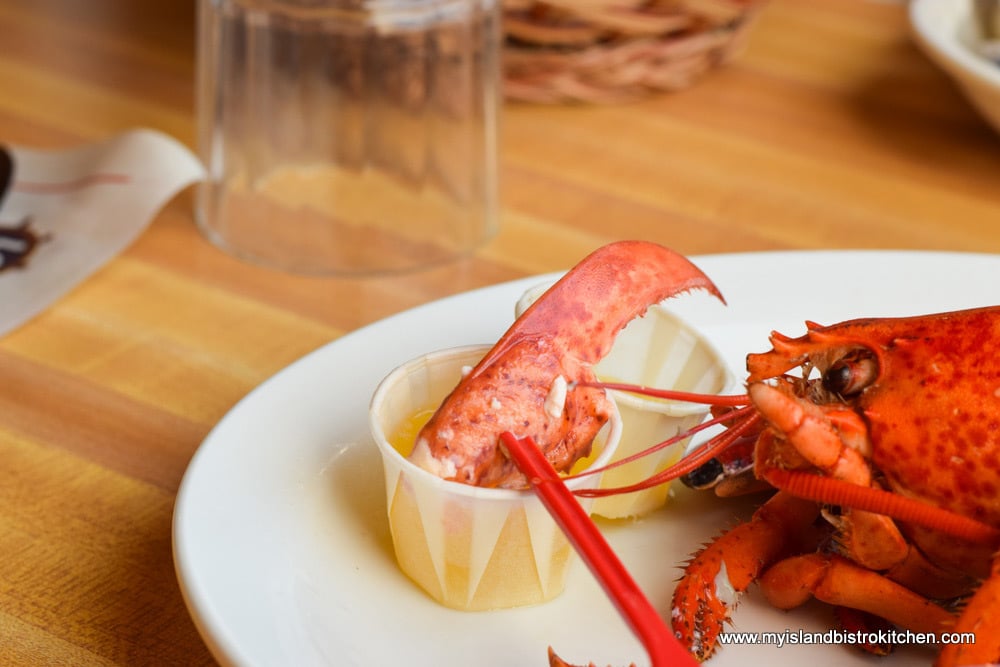
Primarily, the number one entrée will be lobster served in the shell, hot or cold, with lots of melted butter for dipping that succulent lobster.
Dipping lobster claw in melted butter at New Glasgow Lobster Suppers, PEI
However, if lobster is not your thing, a number of alternative entrée options, including chicken, steak, pasta, haddock, scallops, ham, and salmon, are available.
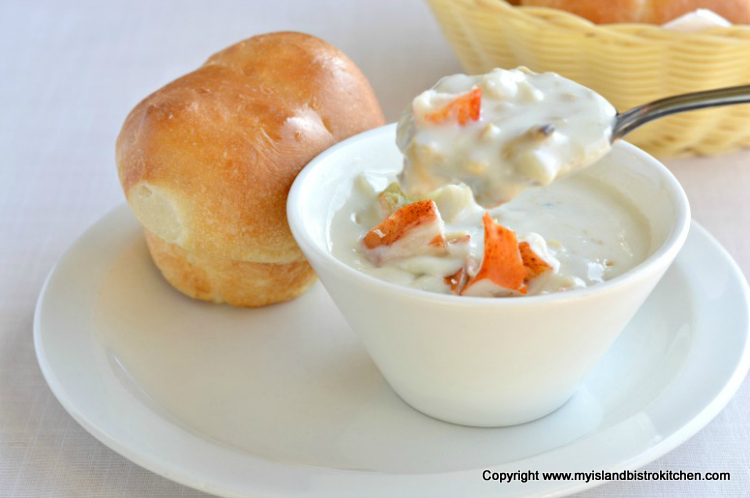
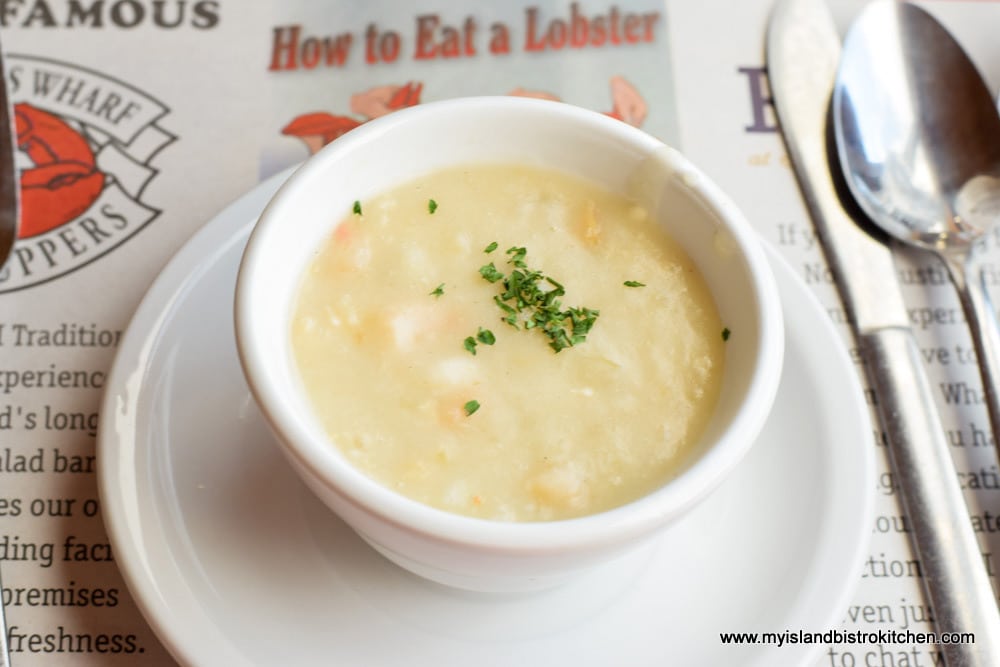
Seafood Chowder from the New Glasgow Lobster Suppers in New Glasgow, PEI
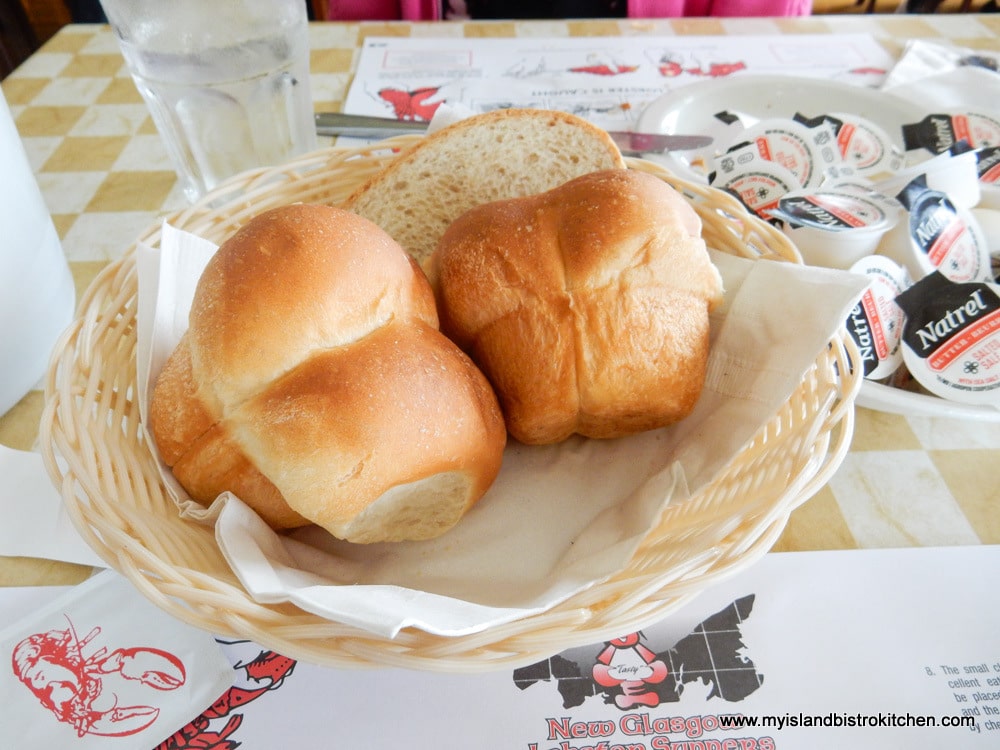
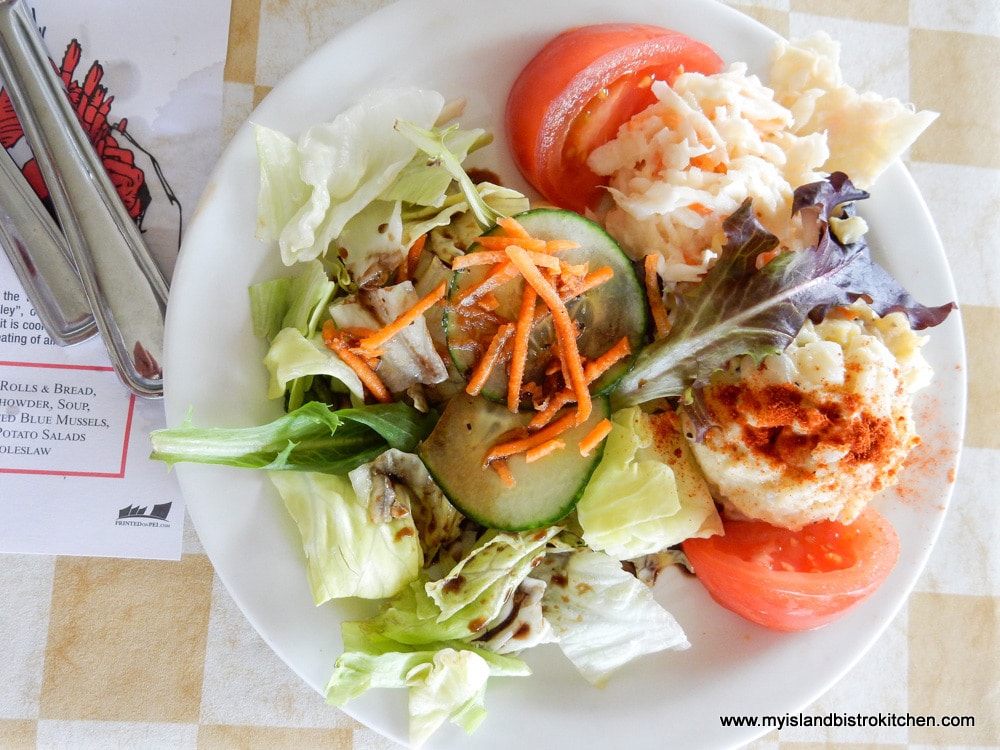
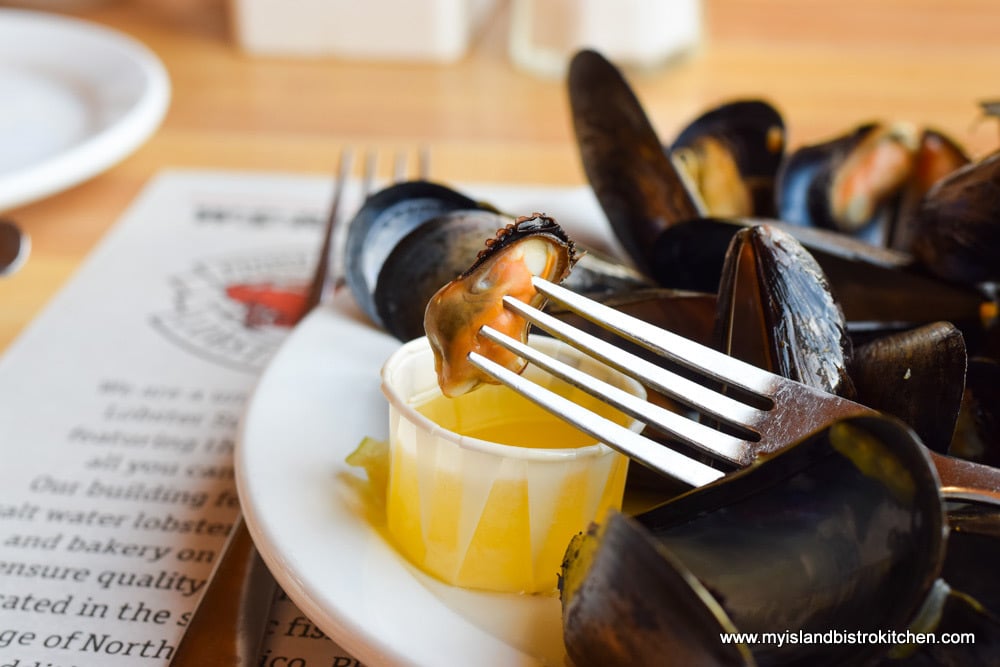
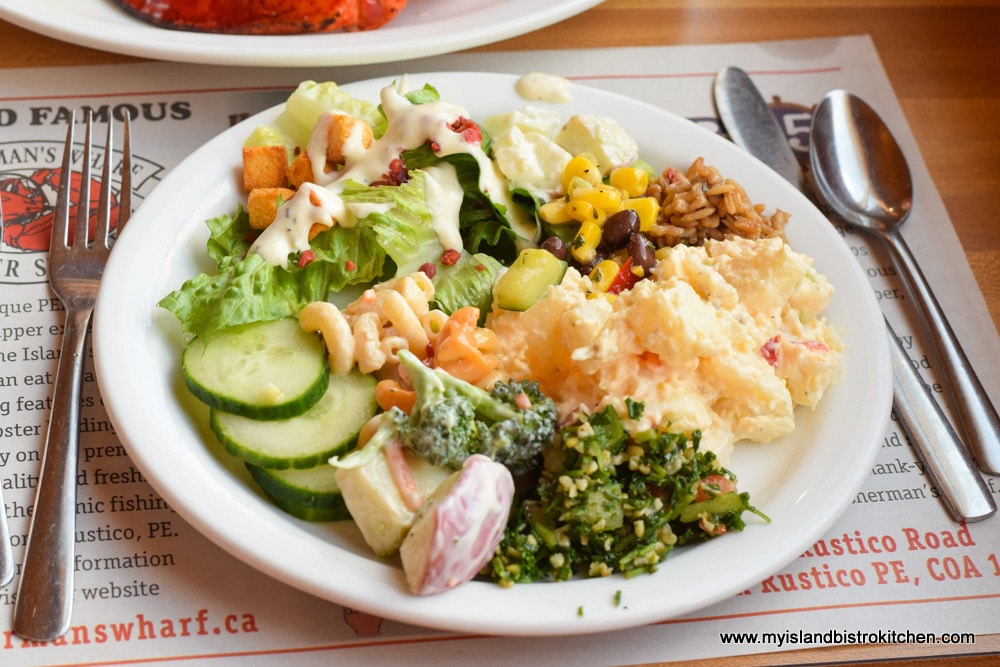
All meals include appetizers of chowder or soup, steamed PEI mussels, and large puffy homemade rolls and sliced bread; salad plate (coleslaw, potato salad, and green garden salad); desserts consisting mainly of homemade pies; and non-alcoholic beverages. The facility is licenced and there are additional charges for alcoholic beverages.
Homemade rolls and bread at New Glasgow Lobster Suppers, PEI
Dinner is a plated meal brought to the table by your server and the servers are very obliging to photograph you dressed in your plastic bib and all ready to tuck into an amazing meal. Gratuity is extra and at the patron’s discretion.
Plates of lobster and salads at New Glasgow Lobster Suppers in New Glasgow, PEI
Several of the restaurant’s staff have worked with the organization for years, returning year after year, a testament to how grounded New Glasgow Lobster Suppers and their staff are in the local community. At time of writing, the same baker has been making all the pies onsite at New Glasgow Lobster Suppers since 1976, often arriving at 5am. Pastry is homemade onsite and the Suppers are well-known for their lemon pie with the mile-high meringue. It’s not uncommon for the baker to turn out 60 lemon pies on any given day….and that’s just one kind of pie available! They make a mighty fine coconut cream pie, too.
Coconut Cream Pie at New Glasgow Lobster Suppers
The restaurant accommodates special dietary restrictions such as gluten-free and vegan diets; however, it is always advisable to call ahead of your visit to discuss your particular dietary needs. A children’s menu is available making New Glasgow Lobster Suppers a family-friendly dining experience.
PEI has two lobster seasons with a break in between. The first season runs from May – June and the second from August – October. To ensure a continuous supply of fresh lobster, New Glasgow Lobster Suppers has a salt-water holding tank with capacity to hold 20,000 lbs of lobster onsite at a time and is replenished throughout the season. New Glasgow Lobster Suppers buys thousands of pounds of lobster when the spring lobster season opens. While different sizes of lobster are available, their most popular is the 1 lb lobster dinner. On average, they’ll crack open around 50,000 lbs of lobster a season. And, of course, there are the world-famous PEI mussels that are served as an appetizer and the suppers will go through about 70,000 pounds of those in a season!
Lobster, rolls, and salad plate at New Glasgow Lobster Suppers
When asked what, in his opinion, sets New Glasgow Lobster Suppers apart from other similar suppers, Carl says it’s a combination of their focus on quality and freshness of food, consistency of product, and the local, friendly wait staff and table service they provide. And, he says, at the heart of it, it’s about two of the original six families working in business alongside their employees and everybody working together. Everyone, regardless of their employment status, pitches in with the work that makes New Glasgow Lobster Suppers the experience it is to their patrons.
Salad Plate at New Glasgow Lobster Suppers
A visit to New Glasgow Lobster Suppers is a time-honored tradition for many Islanders and tourists alike. Carl tells me a man was recently paying for his meal and he informed Carl that this year’s annual visit was his 40th meal at New Glasgow Lobster Suppers. Operating seasonally from mid-May until early October, the restaurant is open seven days a week from 4pm until 8pm (8:30pm in July and August). When you go, keep an eye out for spotting celebrities. Prime ministers, famous hockey players, and movie filmmakers, actors, and directors are known to have dined at the New Glasgow Lobster Suppers.
New Glasgow Lobster Suppers is located at 605 Route 258, in New Glasgow, PEI. For more information, visit their website
Fisherman’s Wharf Lobster Suppers – North Rustico, PEI
Fisherman’s Wharf Lobster Suppers, North Rustico, PEI
There is something quaint and charming about a small rural PEI town that has a working fishing harbour. North Rustico, which also has a fine beach, has long been a treasured location for tourists, artists, and Islanders. In close proximity to the resort municipality of Cavendish, North Rustico swells in size with visitors in the summer. In the heart of the town is a large restaurant establishment known as “Fisherman’s Wharf” that sits just on the edge of the harbour. That’s where my stop today has found me chatting with general manager, Troy Howatt, and current owner, Amy MacPherson, who along with her husband, Forbes, now owns and operates the Fisherman’s Wharf Lobster Suppers.
Eve of Setting Day in the Fishing Village of North Rustico, PEI, Canada
These lobster suppers began operating in 1980 when the original owner, Albert Dow, purchased a small existing restaurant on the same location as Fisherman’s Wharf sits today. So the story goes, Mr. Dow would see the sightseeing buses from Charlottetown pass by and wondered where they were heading and, more to the point, where they would be dining on their excursion. It wasn’t long until those big red double-decker buses were stopping at Dow’s restaurant that began serving cafeteria-style lunches for the bus tour industry. Back in the early 1980s, the buffet lunch, including lobster, cost only $9.99.
Apart from the increase in price for the dinners, other changes have occurred at Fisherman’s Wharf over the years including an expansion of facilities to increase serving capacity. This, of course, requires a large staff which now numbers over 100 seasonal employees. The restaurant enjoys great staff loyalty as several staff members have worked at Fisherman’s Wharf for many years, including one server who has been with the restaurant since it began in 1980. Troy, himself, has worked at Fisherman’s Wharf since 1986, working his way up to become the general manager.
What’s for Dinner?
Dinners are served in a restaurant setting that has a seating capacity of 500 (two dining rooms). As with New Glasgow Lobster Suppers, patrons order and pay for their meal before eating and are then seated by a host(ess). The ambiance has a distinctive rustic, nautical theme in keeping with its close proximity to the harbour. Individuals are seated at wooden tables that seat four or six.
Dining table at Fisherman’s Wharf Lobster Suppers, North Rustico, PEI
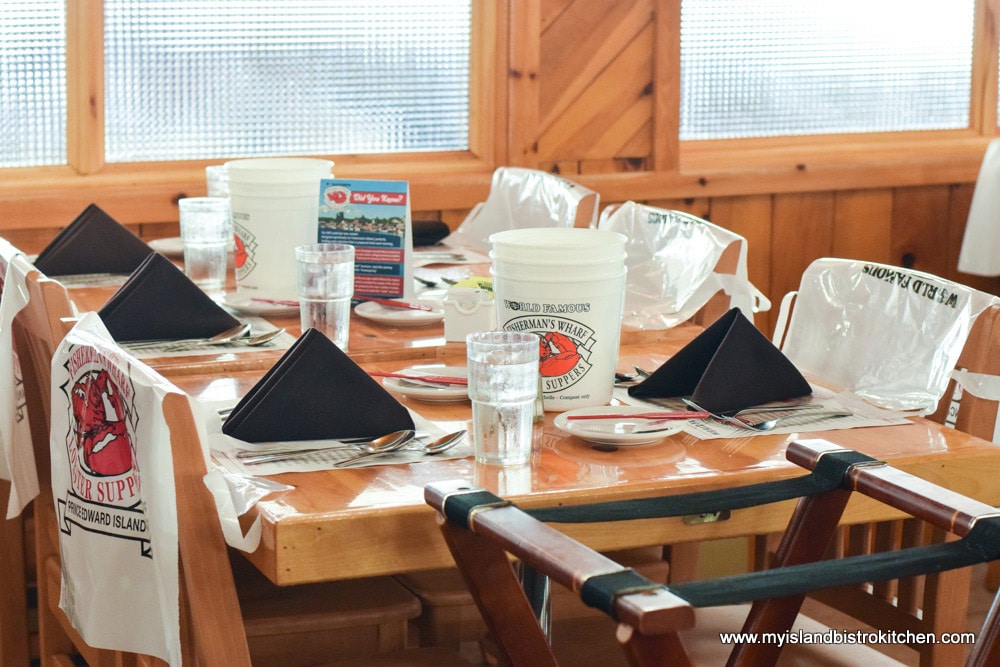
The suppers have maintained their self-serve buffet style that was in operation when the suppers first began serving the motor coach market which is still a major part of their clientele. It is not uncommon, as was the case during my visit, to see a large motor coach pull up to the door and unload a large group of tourists for a traditional Fisherman’s Wharf lobster supper. When you see a block of tables with bibs on the chair backs, it’s a sign that a bus tour is imminently expected.
Lobster Bibs Awaiting Diners at Fisherman’s Wharf Lobster Suppers, North Rustico, PEI
Obviously, lobster is the most popular entrée.
Lobster in the shell served with melted butter at Fisherman’s Wharf Lobster Suppers, North Rustico, PEI, Canada
It’s the customer’s choice to have the lobster served, in the shell, hot or cold, and, yes, there will be lots of melted butter for dipping the juicy, plump chunks of lobster.
Dipping Lobster Claw in Melted Butter at Fisherman’s Wharf Lobster Suppers, North Rustico, PEI
There are plenty of alternative meal options available for those who are not lobster fans. Steak, scallops, breaded shrimp, snow crab, haddock, and rotisserie chicken are entrée options.
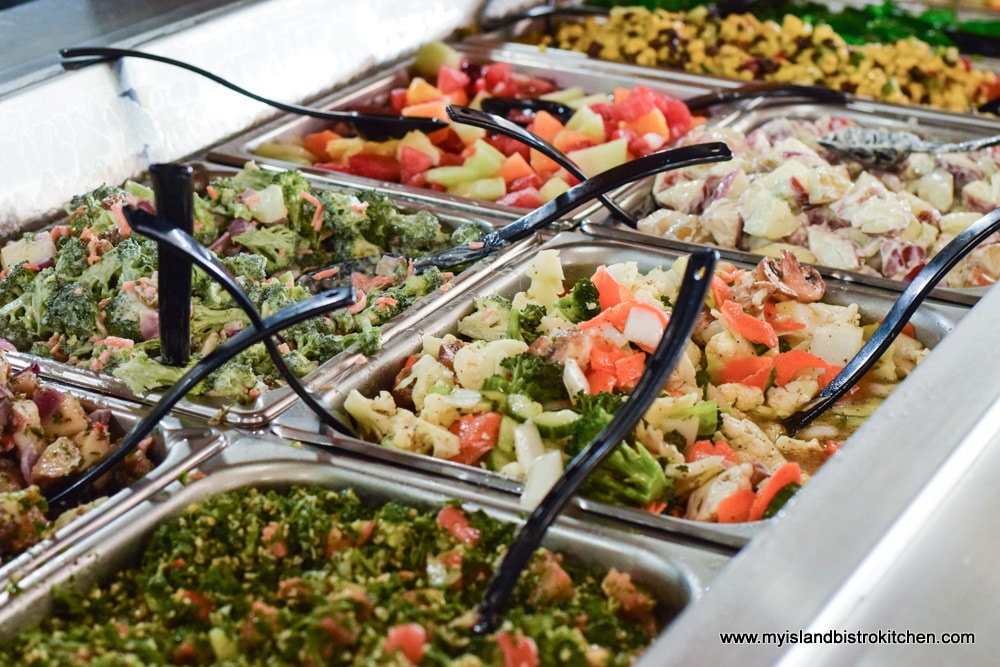
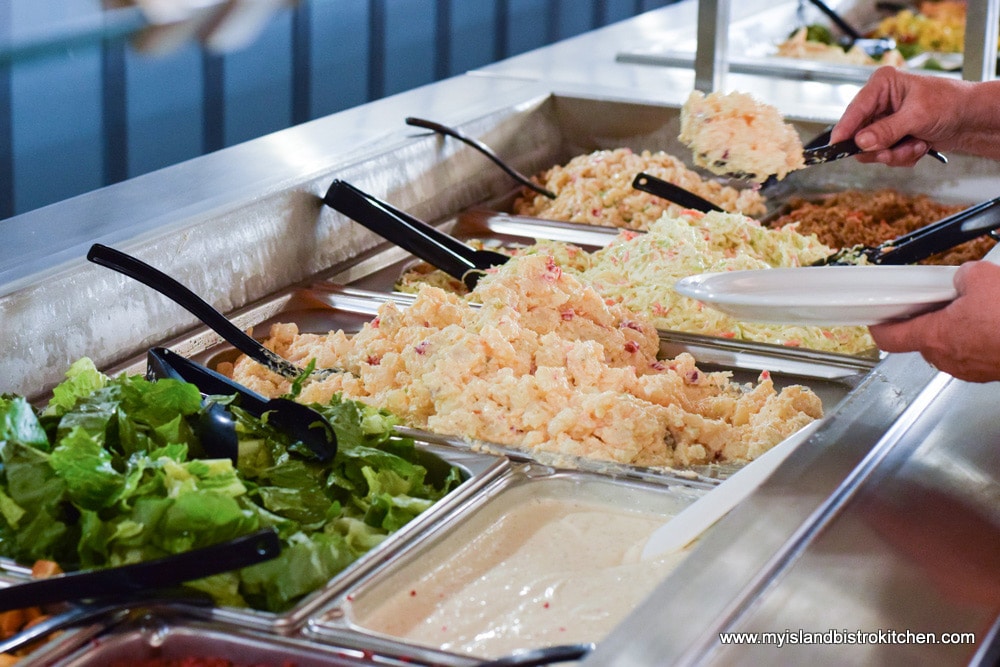
Small Segment of the 60-foot long Salad Bar at Fisherman’s Wharf Lobster Suppers in North Rustico, PEI
All meals include access to the 60-foot salad bar that, in addition to being comprised of some 30 salads, also includes seafood chowder, and mussels.
Bowl of Seafood Chowder at Fisherman’s Wharf Lobster Suppers, North Rustico, PEI
Yes, those tasty PEI steamed mussels are included, too!
Steamed PEI mussels dipped in melted butter at Fisherman’s Wharf Lobster Suppers
Warm homemade rolls are delivered to your table by your server who will also serve the lobster or other entrée of choice.
Basket of warm homemade rolls at Fisherman’s Wharf Lobster Suppers
Other than that, the meal is basically self-serve at your leisure.
Plate of different salads at Fisherman’s Wharf Lobster Suppers
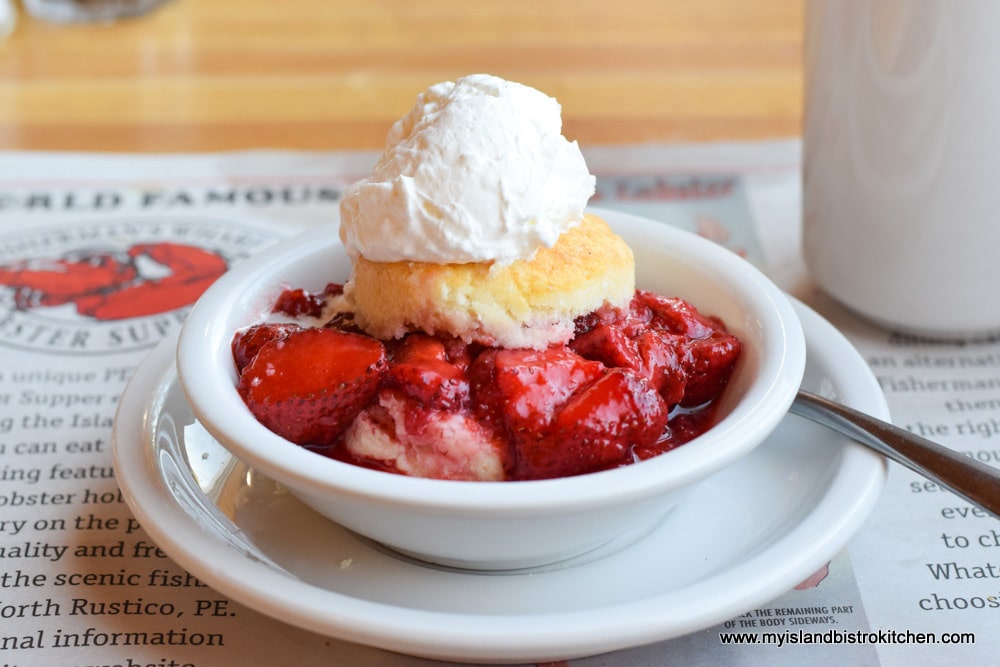
A wide variety of homemade desserts is also available and non-alcoholic beverages are included in the meal price. The facility is licenced and there are additional charges for alcoholic beverages. Gratuity is not automatically included with the meal price and is at the patron’s discretion.
Strawberry Shortcake at Fisherman’s Wharf Lobster Suppers in North Rustico, PEI
Fisherman’s Wharf accommodates special dietary restrictions such as gluten-free and vegan diets. To discuss specific dietary needs, it is always a good idea to call ahead of your visit. A children’s menu is available so the whole family can enjoy a meal together.
Lobsters are purchased through Island seafood wholesalers and are held until needed in the onsite lobster holding facility that is filled with sea water piped from the harbour. This allows the lobsters to maintain their fresh sea quality and taste. Various sizes of lobster are available and the most popular size is the 1½ pound lobster though they do get requests for lobsters as large as 3-4 pounds. On average, 650-750 lobsters will be cracked a day in peak tourism season and one guy cracks open every one of them, single-handedly. I have seen him at work and those hands just fly to make short of the work!
Troy says, in his opinion, what sets Fisherman’s Wharf Lobster Suppers apart from others is their state-of-the-art kitchen and their 60-foot long salad bar which has such a huge variety, there is something for everyone.
Segment of 60-foot long salad bar at Fisherman’s Wharf Lobster Suppers
A visit to North Rustico would not be complete without a stop for a meal at Fisherman’s Wharf Lobster Suppers. Open daily from mid-May until early October, the restaurant serves meals from 12 noon until 8:30pm (note that hours may be reduced in the shoulder seasons). You never know who you will see at Fisherman’s Wharf Lobster Suppers. Several celebrities including those from the film industry, the hockey fame world, and politicians have been spotted dining at the restaurant.
Fisherman’s Wharf Lobster Suppers is located at 7230 Rustico Road in North Rustico, PEI. Visit their website for more information.
Tips for Dining at a PEI Lobster Supper
Dining at one of the Island’s Lobster Suppers is a unique experience. Here are my tips for making the most of it:
There is no need to dress up. These are casual dining venues. Plastic lobster bibs are available and are recommended as, even though the lobsters have been cracked open by the kitchen staff, the meat can be a bit juicy to pull out the of the shell….then there is that lovely dripping melted butter….enough said!
Expect casual surroundings. You won’t be seated at tables with people you do not know but neither is it a quiet, intimate dining experience.
Pace yourself and don’t over-indulge in food! This is the biggest tip of all. There is A LOT of food coming your way at an Island lobster supper. It’s easy to get carried away with the unlimited mussels, fresh rolls, and seafood chowder that start out the meal and to fill up on those. Save room for the lobster (or alternative entrée) and the desserts. You’ll want to sample everything.
Plan to spend time at the supper and enjoy the experience. These are not fast food outlets and the meals comprise a lot of food and courses.
In peak season (July and August), there may be some line-ups (especially over the 5pm – 7pm timeframe) so be patient. It gives time to work up a needed appetite for what awaits you.
Don’t expect à la carte menus to be available. The meals are set menu so there is no ordering of special or particular side dishes or customizing a meal.
If you have never been to a PEI lobster supper, it can be daunting when you arrive at the check-in desk and need to make a snap decision on what entrée to order or whether you want your lobster hot or cold and so forth. It’s a good idea to check out the lobster supper’s website before arrival so you have an idea of what you plan to order.
While both New Glasgow Lobster Suppers and Fisherman’s Wharf Lobster Suppers can accommodate dietary restrictions, it’s always advisable to call them ahead of your visit to discuss specific dietary concerns and needs. This will help ensure a pleasant dining experience for everyone in the party.
Summary
Food at an Island lobster supper is plain, downhome hearty fare that is simply prepared. The lobster is served straight from the shell with no additions or sauces added to it. This allows the pure authentic taste of the lobster to be enjoyed. The potato salads will be homemade and be just like most Islanders know potato salad to be and that they, themselves, make at home.
I always recommend visitors to PEI experience an authentic and traditional lobster supper during their visit – in fact, I suggest they visit both New Glasgow Lobster Suppers and Fisherman’s Wharf Lobster Suppers. While there are certainly similarities between them, there are some differences. The most notable is that New Glasgow Lobster Suppers offers a completely plated meal brought to your table and served to you by your server while Fisherman’s Wharf Lobster Suppers offers a 60-foot long salad-plus bar and patrons largely serve themselves with the exception of the main entrée itself. Fisherman’s Wharf serves their lobster suppers all day starting at 12 noon while New Glasgow starts their dinner service at 4:00pm.
No matter whether you choose one or both lobster suppers, one thing is for sure, you won’t leave hungry. Just make sure you arrive with a hearty appetite and elasticized waistbands are recommended! Then, don the plastic bib and tuck into a hearty and tasty authentic PEI lobster supper. It’s sure to be an unforgetable meal and a great memory of a PEI visit. Once you’ve had a meal at one of our Island lobster suppers, I think it will be quite apparent why they’ve stood the test of time and have been in business for decades.
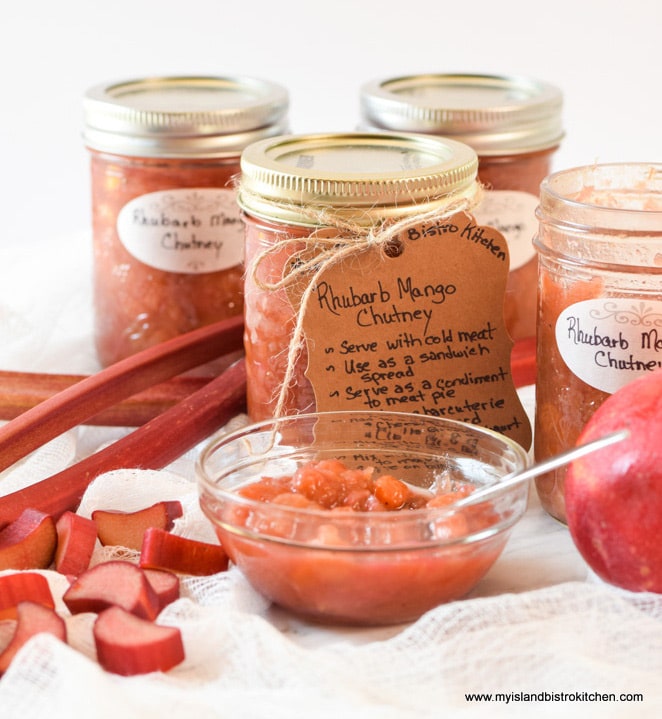
This Rhubarb and Mango Chutney is a mildly spicy condiment. Combining the tart rhubarb with the sweet fresh mango and a variety of spices produces a fabulous flavour combination that teeters between the sweet and savory. Continue reading Rhubarb and Mango Chutney→
Jamming and preserving season here in PEI starts with rhubarb, one of the first treats from the garden. The two crowns of rhubarb in our garden produce lots of rhubarb for use when it is in season and to freeze for later enjoyment.
Rhubarb Patch of Two Crowns
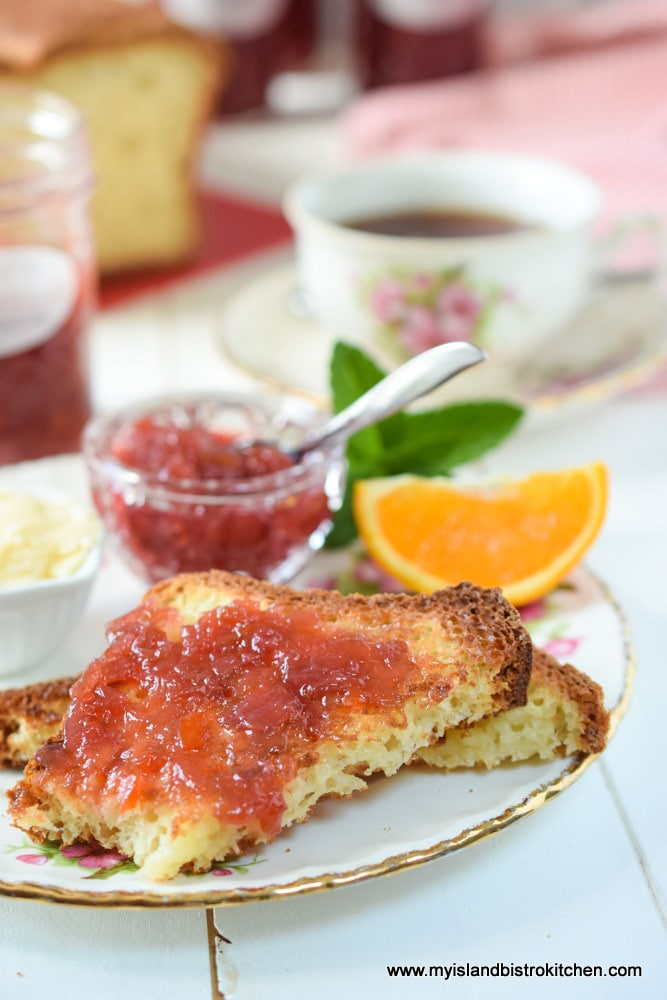
One of the first things I make with rhubarb as soon as it is ready is this wonderful Rhubarb Marmalade I have been making for years. The marmalade only takes five ingredients – rhubarb, granulated sugar, an orange, half a pink grapefruit, and half of a lemon. The color of the rhubarb marmalade is a lovely deep shade and its flavour is fresh and slightly tart. Continue reading Rhubarb Marmalade Recipe→
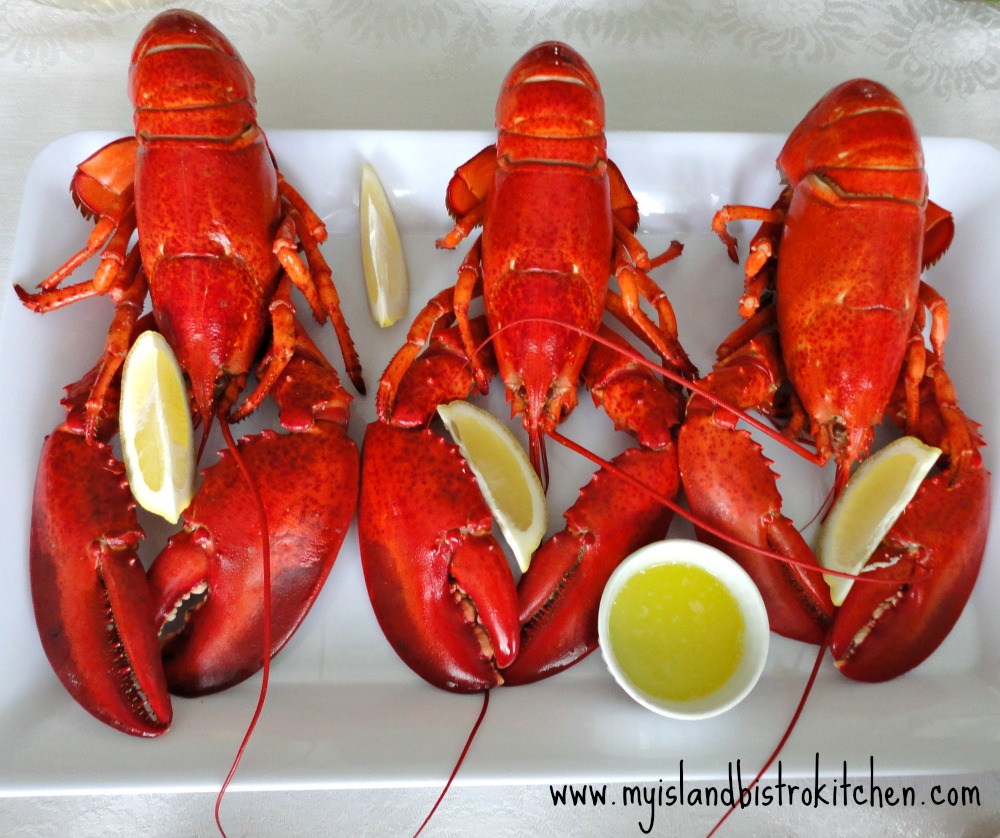
Living in PEI, we are accustomed to high quality local seafood. When lobster is in season, I try to make the most of it, enjoying it steamed and fresh from the shell with the tender meat dipped in melted butter.
Steamed Lobster in the Shell
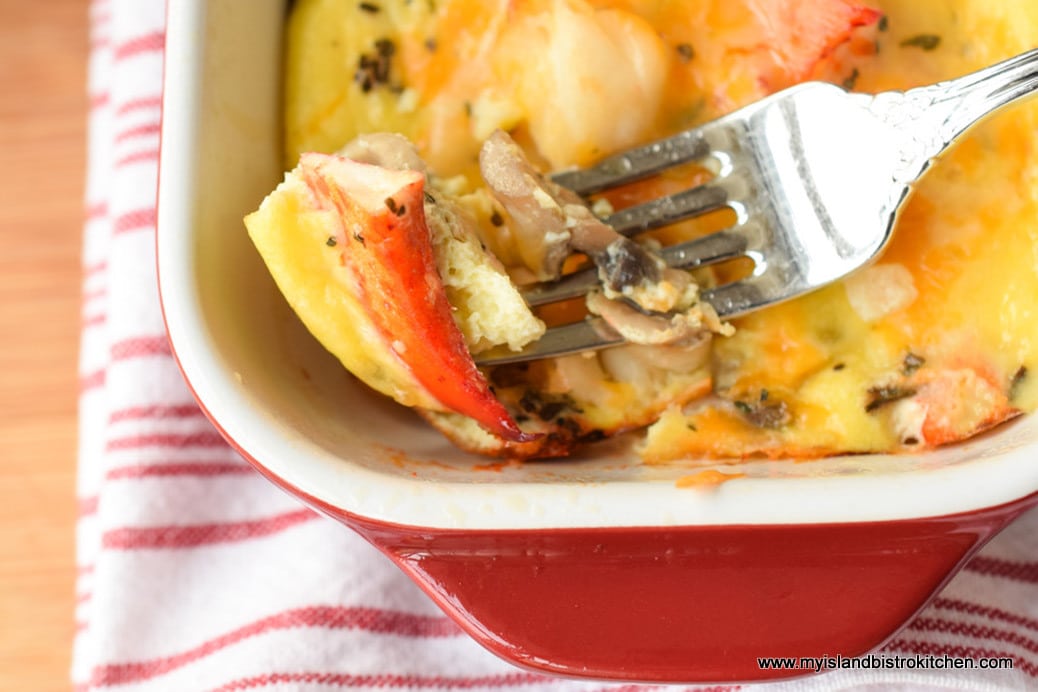
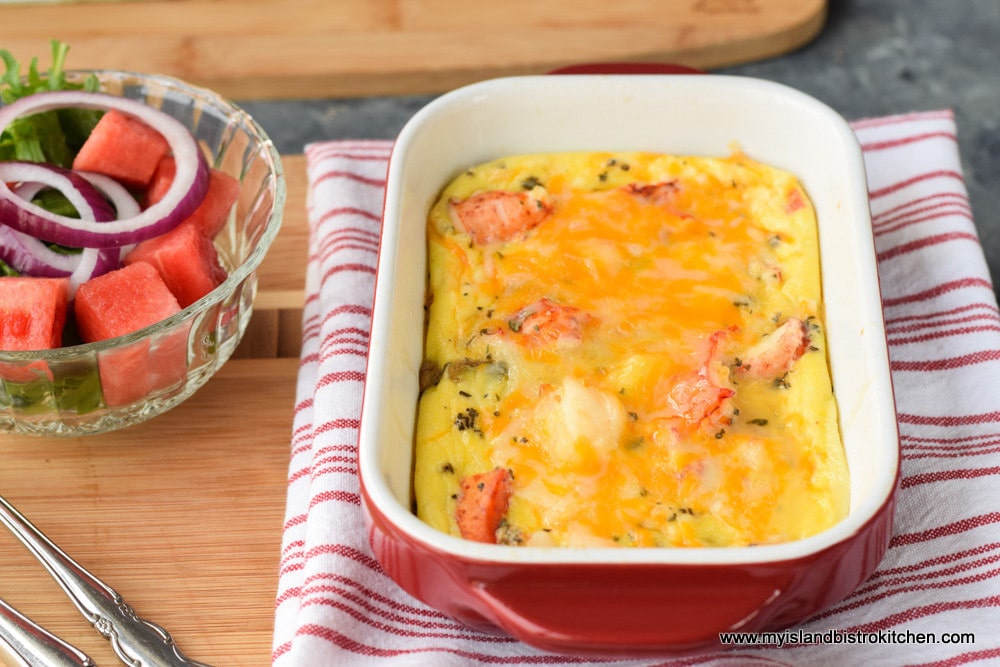
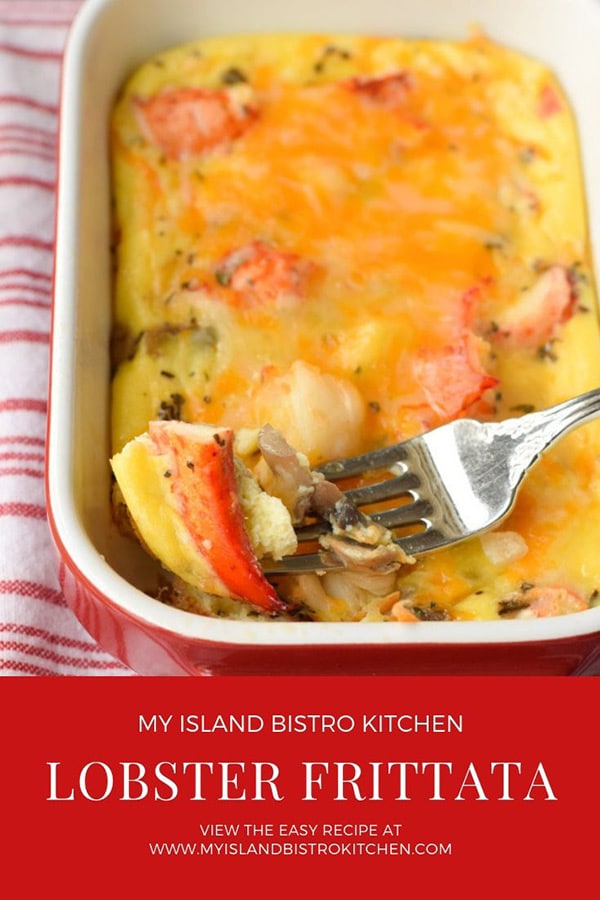
Once I have had a couple of good “feeds” of lobster with homemade potato salad and rolls, I start using the meat as an ingredient in other recipes like this easy-to-make oven-baked Lobster Frittata.
Oven-baked Lobster Frittata
Frittata is an Italian dish that is a cross between a crustless quiche and an open-faced omelette, probably leaning more toward similarity with the quiche. The main difference between a frittata and an omelette is that, for a frittata, the filling ingredients are cooked with the egg mixture versus being added just before an omelette is folded in half to finish cooking.
Traditionally, frittatas are made on the stovetop, either completely or, sometimes, they are partially cooked on the stove and then finished in the oven. However, it is quite acceptable to completely bake the frittata in the oven which is the method I am using for the Lobster Frittata.
Baked Lobster Frittata
There are two main tips for making this frittata. First, use cream, blend, or whole milk but never fat-reduced milk as it makes the frittata’s custard too runny and watery. The second tip is to pre-cook the vegetables to get rid of some of their liquid and also to ensure that they are sufficiently cooked. If they were added raw with the egg custard, they would not be sufficiently cooked in the same amount of time it takes to properly bake the frittata and they would release too much liquid into the egg custard. Even with the pre-cooking, the vegetables will still have a lot of moisture in them. For this reason, I recommend transferring them from the sauté pan to a paper-towel lined bowl to sop up the excess moisture before they are added to the egg custard mixture.
Frittata is a great brunch, lunch, dinner, or picnic fare, making it very versatile. It can be eaten hot from the oven or at room temperature. Serve with a side of toast, salad, homefries, or fresh fruit.
Baked Lobster Frittata
I use individual small 6″x4″ baking, or gratin, dishes for this recipe. Oblong baking dishes that have 1½ – 1¾ cups capacity work well for this recipe as the egg mixture will puff up somewhat and room needs to be allotted for that. If you don’t have individual baking dishes that are approximately 6”x4” inches, you could use one baking dish that would be large enough to hold the entire amount of ingredients.
Bake the frittatas on the middle rack in a preheated oven. It is important not to overbake frittata as it will become somewhat tough and leathery. This Lobster Frittata takes between 18-22 minutes when baked in the dishes called for in the recipe. When the frittata is perfectly baked, the eggs should be set and no longer runny.
[Printable recipe follows at end of posting]
Oven-baked Lobster Frittata
Ingredients:
4 large eggs 2½ tbsp cream Salt and Pepper ¼ – ½ tsp Herbes de Provence
1 tbsp olive oil 3 tbsp onion, chopped 1 – 2 cloves garlic, minced 5-6 slices zucchini, halved or quartered 5-6 button mushrooms, sliced 3 tbsp red bell pepper, chopped
4 oz cooked lobster, coarsely chopped 2 tbsp finely grated Parmesan cheese 1/3 cup shredded sharp cheddar cheese
¼ cup shredded sharp cheddar cheese
Method:
Place oven rack in center of oven. Preheat oven to 350°F.
Heat oil in small skillet. Sauté, over medium heat, the onions, garlic, zucchini, mushrooms, and red bell pepper for 4-6 minutes, until vegetables start to soften. Transfer to small bowl double lined with paper towel to absorb the moisture from the sautéed vegetables.
Whisk the eggs just enough to break them up and mix the whites with the yolks. Whisk in the cream. Season with salt and pepper and the Herbes de Provence.
Spray two 6”x4” baking dishes with cooking spray, each dish having 1½ – 1¾ cup capacity. Divide the vegetables and lobster equally between the two dishes. Sprinkle with the Parmesan cheese and first amount of cheddar cheese. Pour egg mixture over the vegetables, lobster, and cheese, dividing equally between the two dishes. Place on baking sheet and transfer to oven. Bake for 18-22 minutes, or until frittatas are puffed up and just set in the center. Add the remaining cheese for the last 2-3 minutes of baking.
Serve with a side salad, toast, fresh fruit, or homefries.
Place oven rack in center of oven. Preheat oven to 350°F.
Heat oil in small skillet. Sauté, over medium heat, the onions, garlic, zucchini, mushrooms, and red bell pepper for 4-6 minutes, until vegetables start to soften. Transfer to small bowl double lined with paper towel to absorb the moisture from the sautéed vegetables.
Whisk the eggs just enough to break them up and mix the whites with the yolks. Whisk in the cream. Season with salt and pepper and the Herbes de Provence.
Spray two 6”x4” baking dishes with cooking spray, each dish having 1½ - 1¾ cup capacity. Divide the vegetables and lobster equally between the two dishes. Sprinkle with the Parmesan cheese and first amount of cheddar cheese. Pour egg mixture over the vegetables, lobster, and cheese, dividing equally between the two dishes. Place on baking sheet and transfer to oven. Bake for 18-22 minutes, or until frittatas are puffed up and just set in the center. Add the remaining cheese for the last 2-3 minutes of baking.
Serve with a side salad, toast, fresh fruit, or homefries.
If you have made this recipe and enjoyed it and/or wish to share it with your friends and family, please do so on social media but be sure to share the direct link to this posting from my website.
Connect with My Island Bistro Kitchen on Social Media
Follow “the Bistro” on Pinterest at https://www.pinterest.ca/peibistro/ and pin the Pinterest-ready photo found at the end of this post to your favorite Pinterest boards.
For other great lobster dish recipes from My Island Bistro Kitchen, click on the links below:
Energy bites (sometimes called energy balls, power balls, protein balls, or bliss balls) are a super tasty and convenient on-the-go snack.
My recipe for Peanut Butter Coconut Energy Bites is easy to make. They require no cooking or baking (provided, of course, that you buy the coconut already toasted and you don’t have to turn on the oven to toast coconut) — bonus ! Made with a blend of carefully selected ingredients that pair well together, these tasty treats provide a great energy boost, particularly mid-afternoon when energy typically starts to wane for many. Continue reading Peanut Butter Coconut Energy Bites→
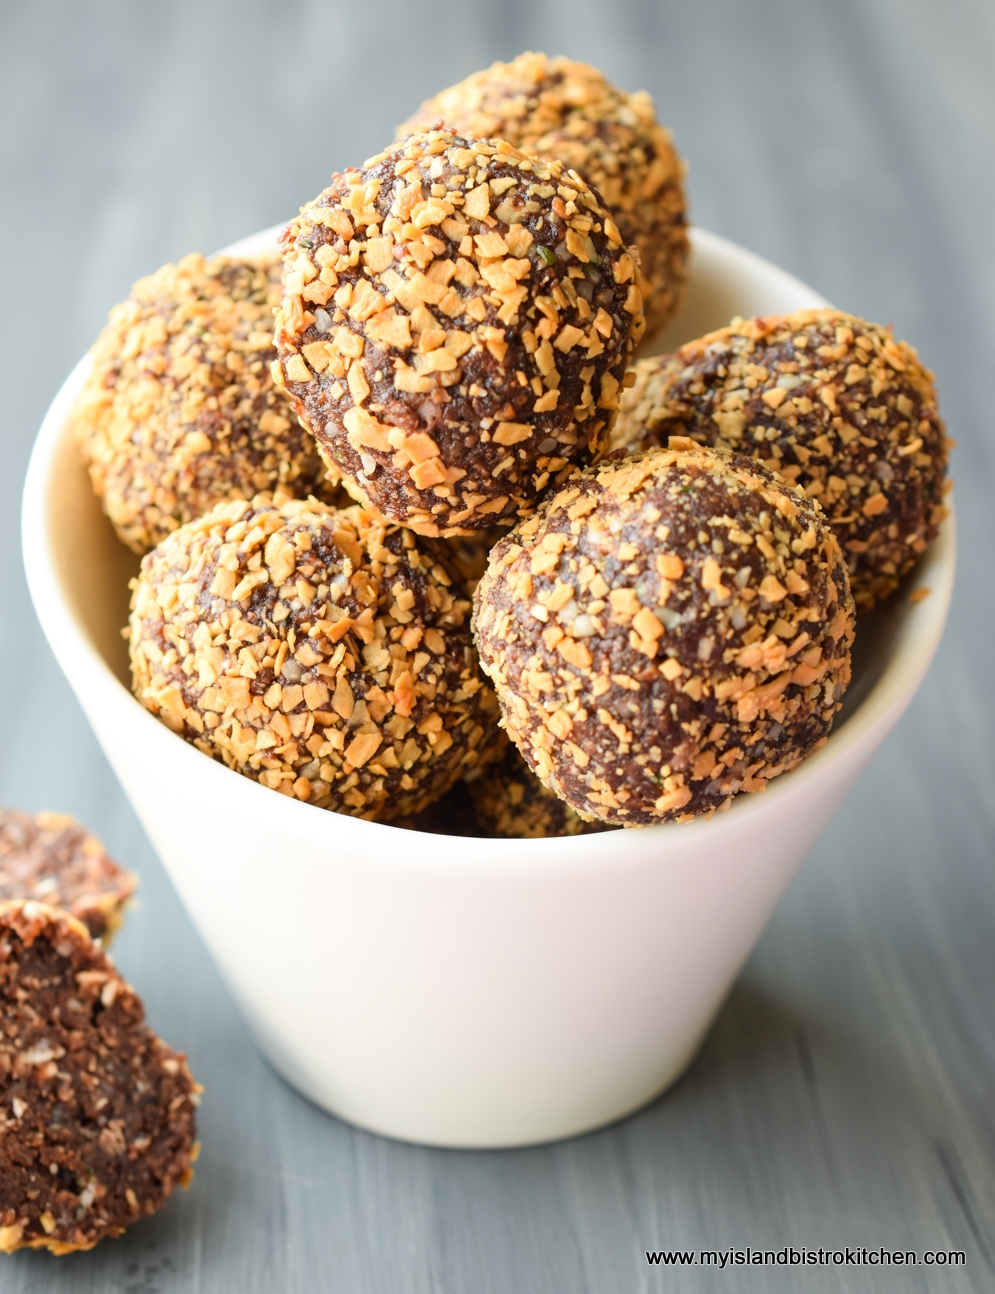
Sometimes called energy balls, power balls, protein balls, or bliss balls, these trendy snacks are tasty little morsels. The recipe I am sharing today is for No-bake Chocolate Almond Bliss Balls, so named because they are, well, blissfully divine! Continue reading No-bake Chocolate Almond Bliss Balls→
(Mostly) PEI and Maritime Food – Good Food for a Good Life!