
I love making bread from scratch. I like working and kneading the dough, the smell of the dough as it rises, and especially as it bakes. No commercial potpourri could ever duplicate the wonderful scent of homemade bread baking in the oven! It just permeates the whole house and whets the appetite. We do have an electric bread machine in the family but it’s not the same. I find bread made in the machine is not too bad on the day it is made but, after that, I don’t care for it so much, finding it to be somewhat tough. My preference is to make bread the old-fashioned, traditional way. Today, I am sharing my recipe and technique for making homemade white bread. Continue reading Homemade White Bread
Category Archives: Recipes
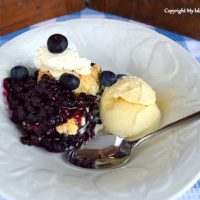
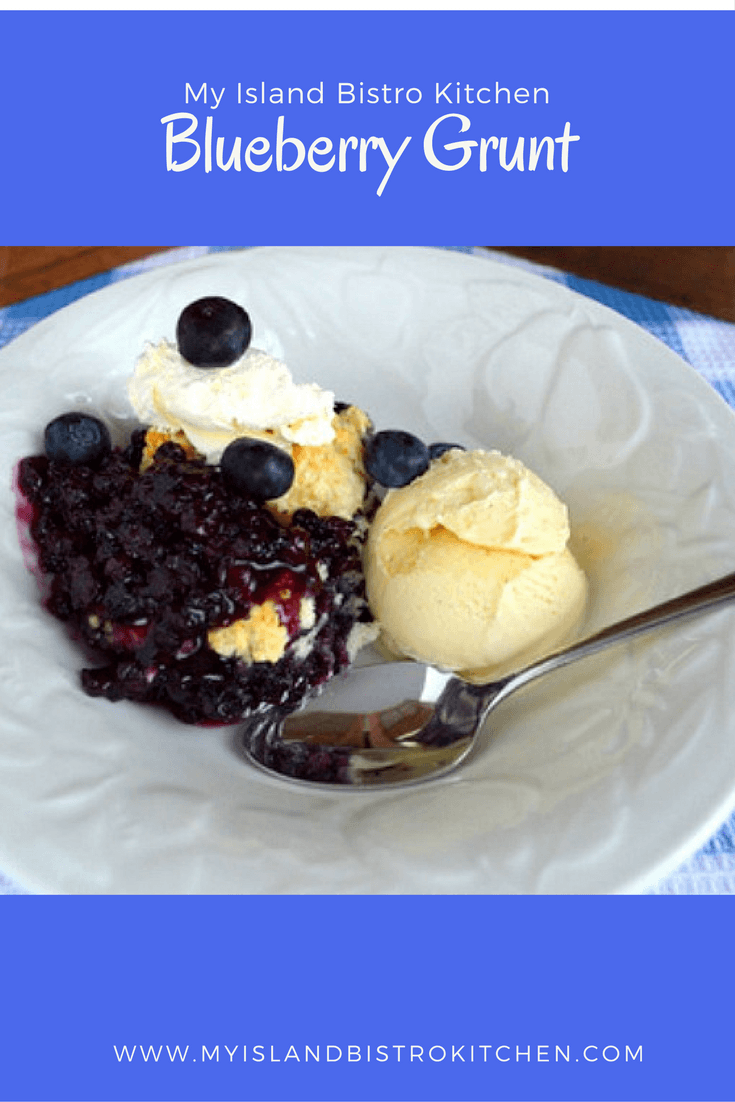
Blueberry Grunt

Do you ever have a craving for comfort foods? You know, the foods that are basic, nostalgic, or that you have a sentimental attachment to and that take you down memory lane. Some might even refer to these dishes as vintage. Maybe your mom made them for you when you were a child or you remember them from visits to grandma’s house. I’m talking about foods like macaroni and cheese, baked beans, scalloped potatoes, apple pie or crisp, homemade stews and “boiled dinners“, and baked bread. Cottage pie, rice pudding, roast chicken dinners, meatloaf with mashed potatoes, and fruit cobblers are other comfort foods commonly enjoyed in North American culture. There are many other dishes that bring us comfort, especially in the cold Canadian winters, so this list is not exhaustive and what constitutes comfort food may vary between cultures and regions of Canada.
These foods, in their traditional content, are by no means gourmet fare nor are they necessarily devoid of calories. They’re typically plain and simple stick-to-the-ribs kind of fare and they generate feelings of contentment and satisfaction … you feel warm and cozy when eating the meal. These kinds of dishes take basic, easy-to-find ingredients and are not usually difficult or complicated to make. They’re the kinds of foods that, when you walk into a home where they are being prepared, your appetite is immediately whetted and you harken back to early memories of enjoying those foods. They are hearty classics and endure over time, generation after generation. Yes, even the old tuna casserole is still considered a comfort food by many!
Today, I am sharing my recipe for Blueberry Grunt. I don’t know the origin of this dessert or how it got its name but it’s really just a baked fruit dessert – a slightly thickened fruit sauce on the bottom topped by a biscuit-like dumpling. This dessert is often made on the stove top where the dumplings are put in the pot on top of the bubbling blueberry sauce, covered and let simmer for about 15 minutes. However, my recipe calls for the dessert to be baked in the oven.

My featured Island product in this recipe are the blueberries. Each summer, I pack away several bags of these sweet little Island-grown morsels for use in my favorite recipes like this one for Blueberry Grunt.
[Printable recipe follows at end of posting]
Blueberry Grunt
Ingredients:
4 cups blueberries, fresh or frozen
1/2 cup white sugar
2 tbsp brown sugar
1 tbsp + 1 tsp cornstarch
2 tsp lemon juice
1 1/2 tsp grated lemon rind
1/2 cup water
1/2 tsp cinnamon
1/4 tsp nutmeg
1/8 tsp cardamon
Topping:
2 cups flour
4 tsp baking powder
1/4 tsp salt
2 1/2 tbsp white sugar
1 cup milk
2 1/2 tbsp cold butter
Method:
Preheat oven to 400F.
In a small bowl, mix together the sugars, cornstarch, and spices. Stir in the grated lemon rind. Set aside.
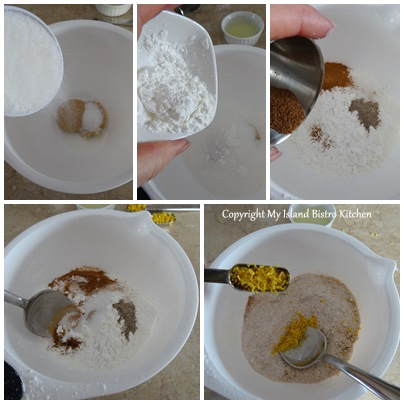
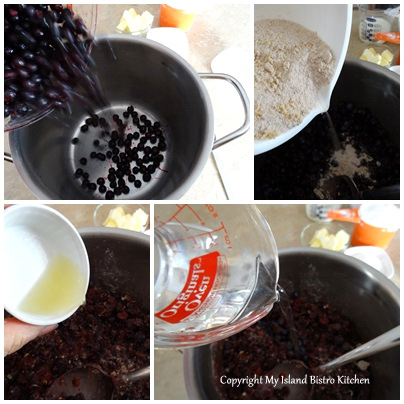
In saucepan, combine blueberries and the sugar mixture. Add the lemon juice and water. Bring to a boil then reduce heat and simmer mixture for 5-6 minutes. Remove from heat.
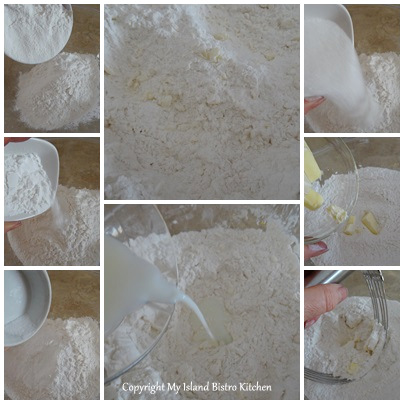
Meanwhile, in a large bowl, combine flour, baking powder, salt and sugar. Cut in cold butter until mixture resembles coarse oatmeal. Add enough milk to make a soft dough mixture that will cling together.
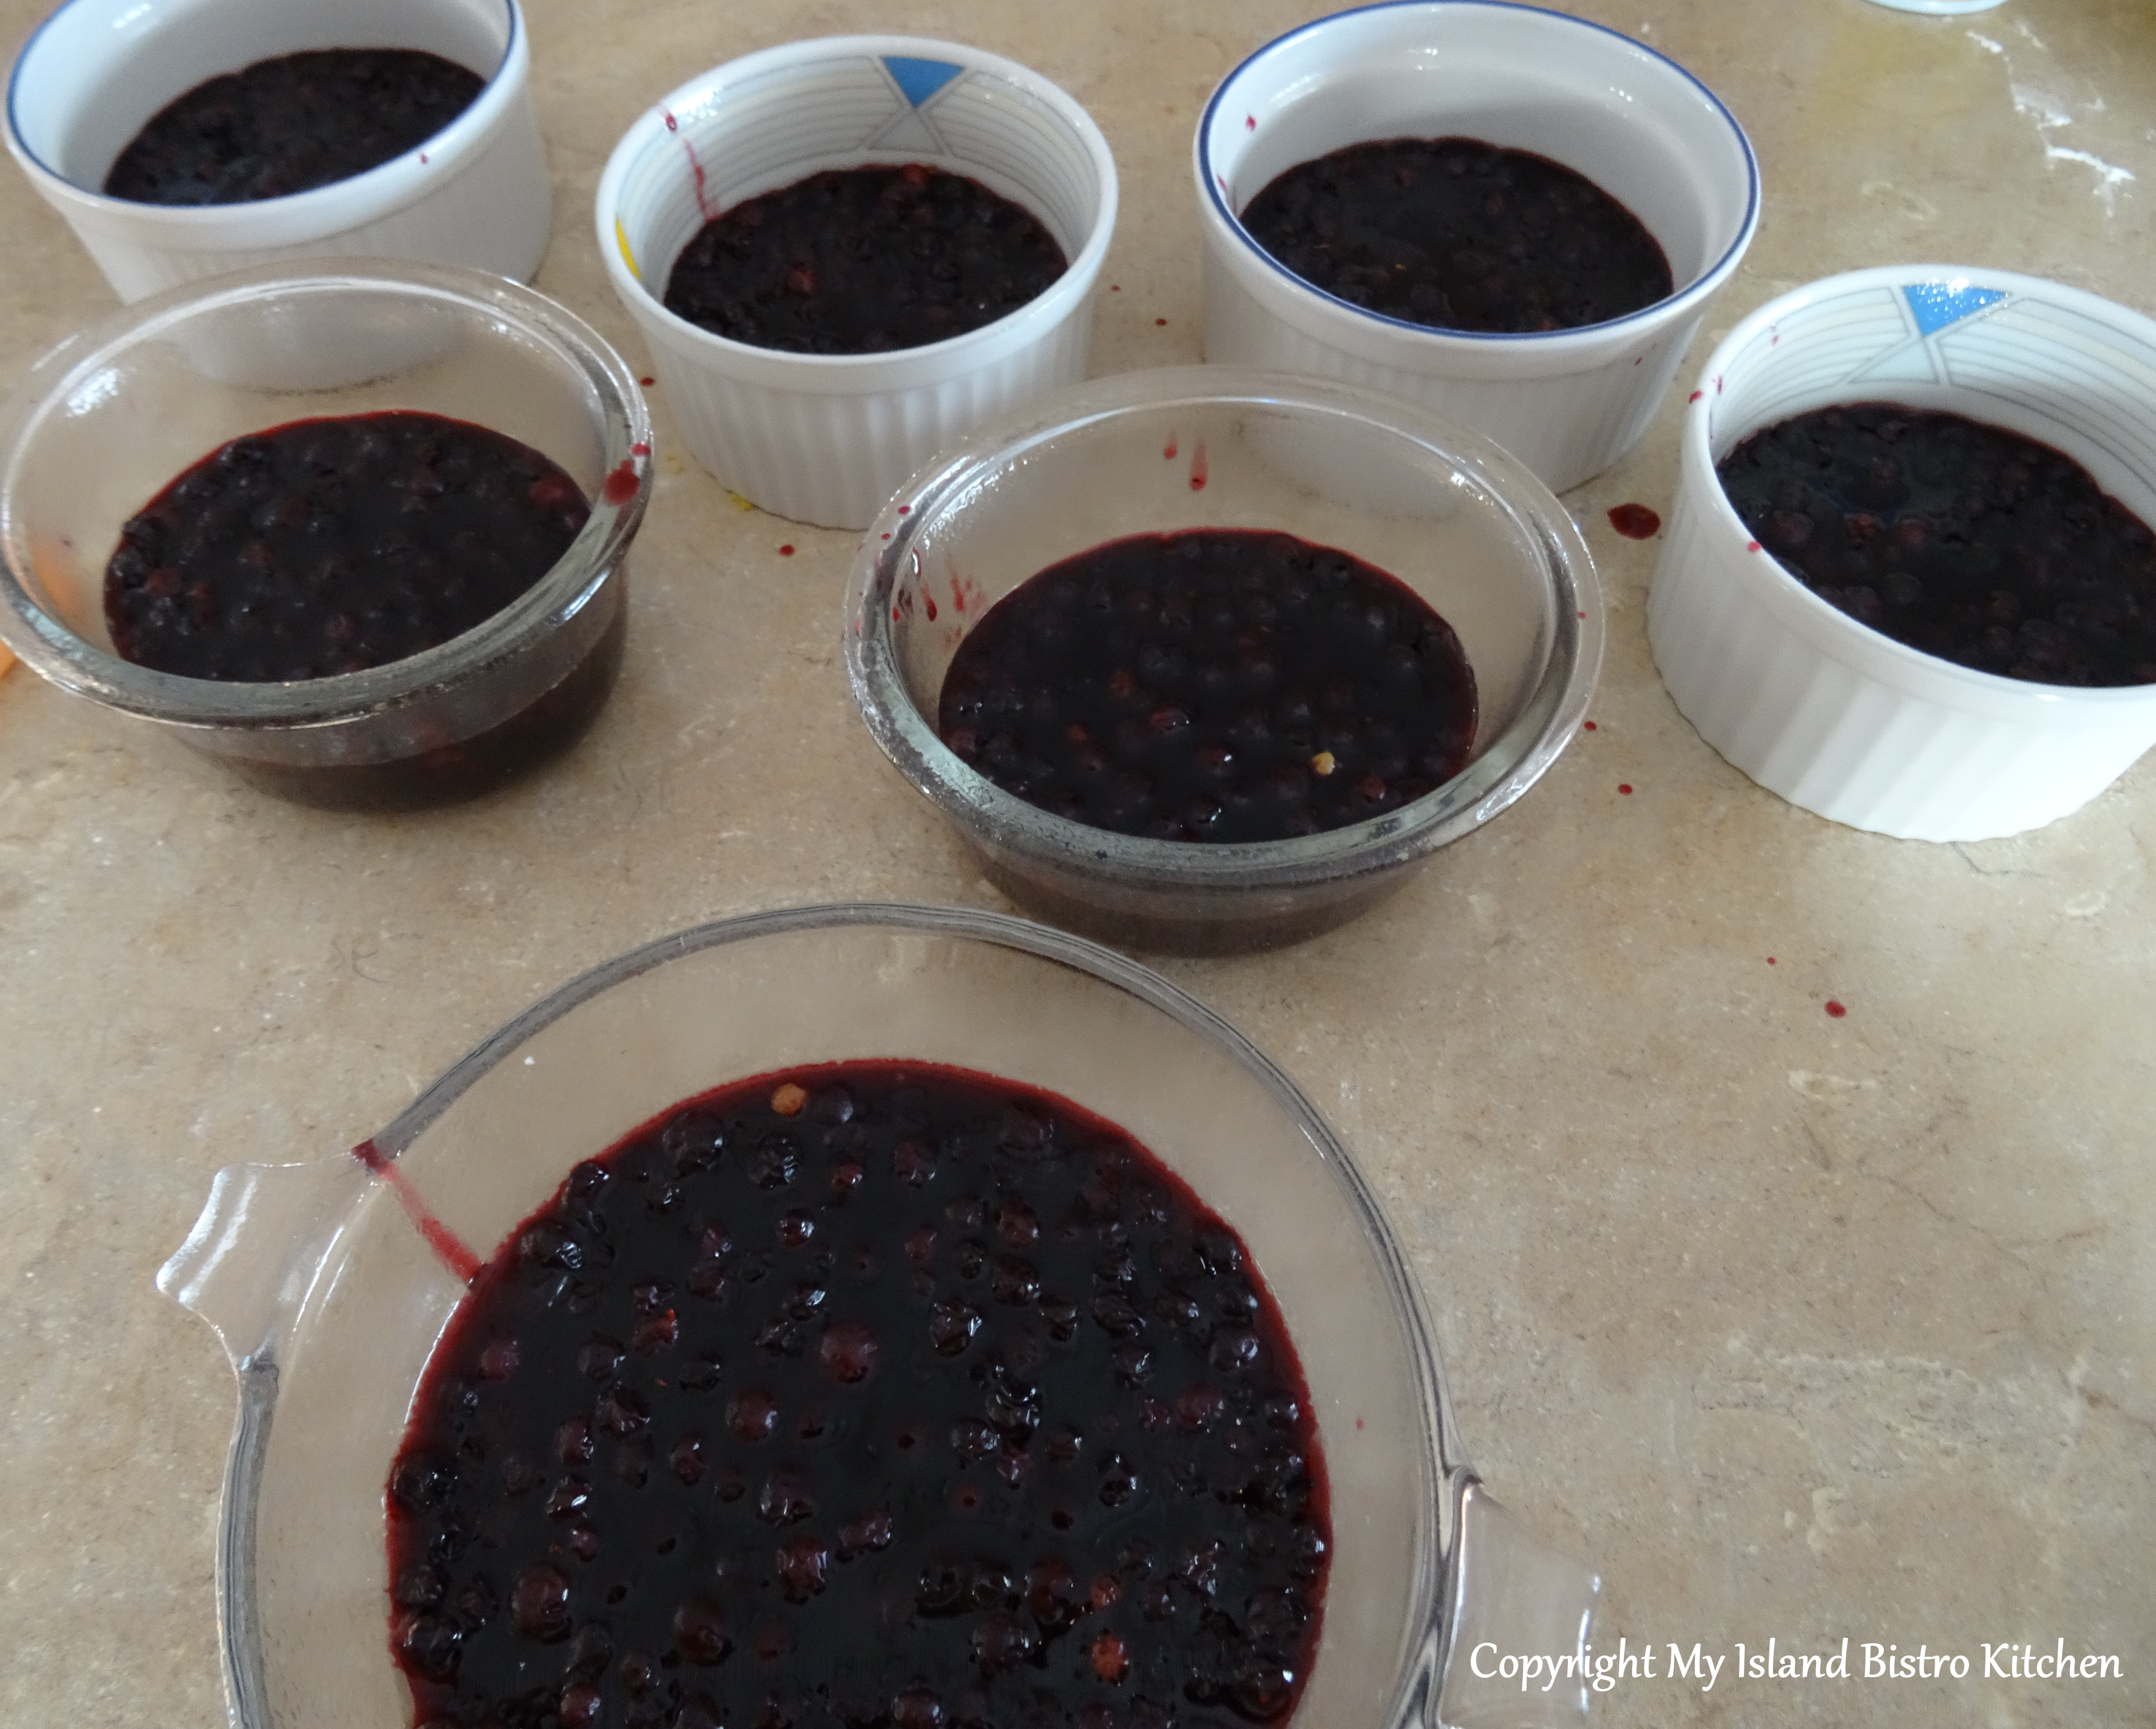
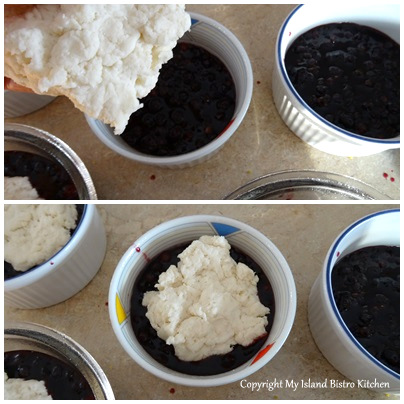
Grease a 1 1/2 or 2-quart baking dish or 8 individual ramekins. Spoon the blueberry mixture into baking dish(es).
Divide the dumpling dough into 8 portions.
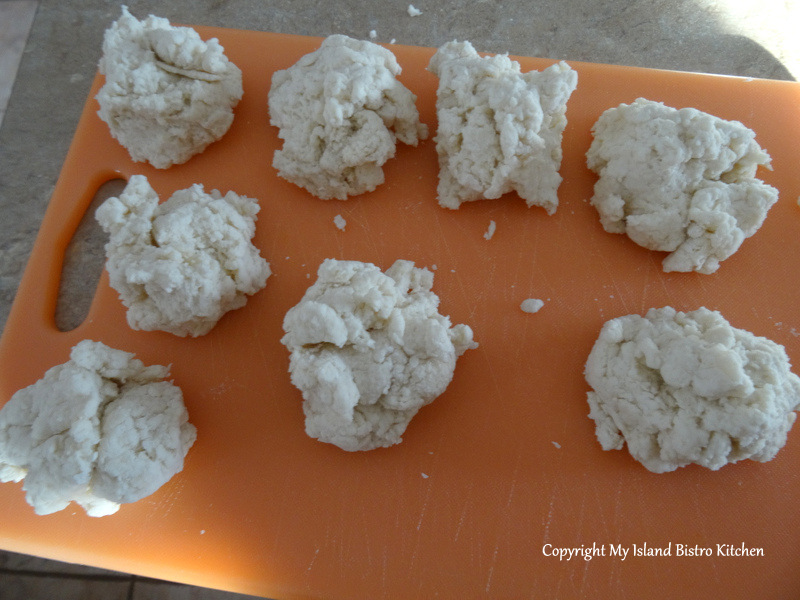
Place dumplings over blueberry mixture (close together if baking in one casserole or centered if using individual dishes).
Bake in 400F oven for about 20-25 minutes or until dumplings are done and lightly golden brown on top.
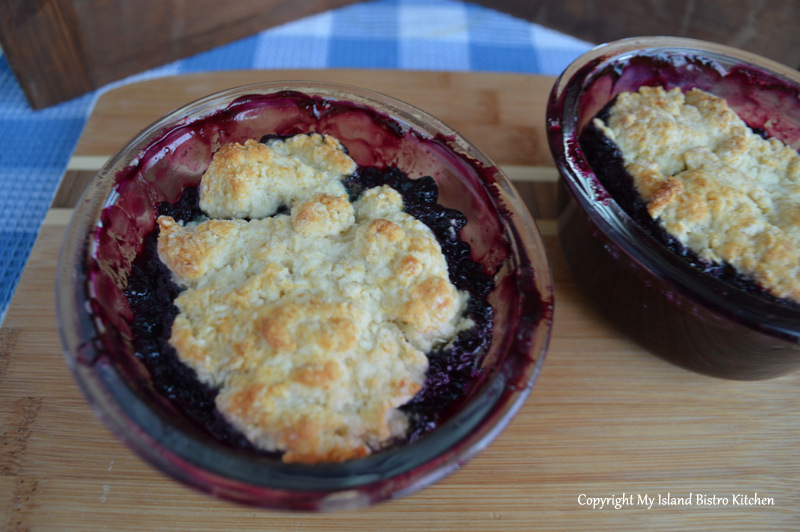
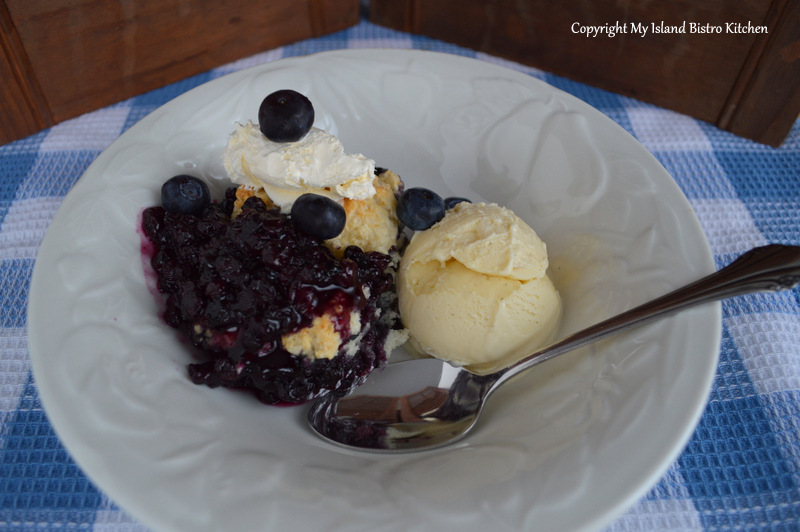
Serve hot or warm with a dollop of whipped cream or vanilla ice cream (or both!).
Serves: 8
What are your favorite comfort foods?
Blueberry Grunt
An easy to prepare comfort dessert, Blueberry Grunt consists basically of blueberries baked in a flavorful sauce under tea biscuit dumplings. Serve hot with vanilla ice cream and/or whipping cream.
Servings 8
Ingredients
Blueberry Base:
- 4 cups blueberries, fresh or frozen
- 1/2 cup white sugar
- 2 tbsp brown sugar
- 1 tbsp + 1 tsp cornstarch
- 2 tsp lemon juice
- 1 1/2 tsp grated lemon rind
- 1/2 cup water
- 1/2 tsp cinnamon
- 1/4 tsp nutmeg
- 1/8 tsp cardamom
Topping:
- 2 cups flour
- 4 tsp baking powder
- 1/4 tsp salt
- 2 1/2 tbsp white sugar
- 1 cup milk
- 2 1/2 tbsp cold butter
Instructions
- Preheat oven to 400F.
- In a small bowl, mix together the sugars, cornstarch, and spices. Stir in the grated lemon rind. Set aside.
- In saucepan, combine blueberries and the sugar mixture. Add the lemon juice and water. Bring to a boil then reduce heat and simmer mixture for 5-6 minutes. Remove from heat.
- Meanwhile, in a large bowl, combine flour, baking powder, salt and sugar. Cut in cold butter until mixture resembles coarse oatmeal. Add enough milk to make a soft dough mixture that will cling together.
- Grease a 1 1/2 or 2-quart baking dish or 8 individual ramekins. Spoon the blueberry mixture into baking dish(es).
- Divide the dumpling dough into 8 portions.
- Place dumplings over blueberry mixture (close together if baking in one casserole or centered if using individual dishes).
- Bake for about 20-25 minutes or until dumplings are done and lightly golden brown on top.
- Serve hot with a dollop of whipped cream or vanilla ice cream (or both!).
Recipe Notes
Yield: 8 servings
[Copyright My Island Bistro Kitchen]
If you have made this recipe and enjoyed it and/or wish to share it with your friends and family, please do so on social media but be sure to share the direct link to this posting from my website.
Connect with My Island Bistro Kitchen on Social Media
Join the Facebook page for My Island Bistro Kitchen: https://www.facebook.com/MyIslandBistroKitchen/
Follow “the Bistro” on “X” (formerly Twitter): https://twitter.com/PEIBistro/
See the drool-worthy gallery of mouth-watering food photos from My Island Bistro Kitchen on Instagram: https://www.instagram.com/peibistro/
Follow “the Bistro” on Pinterest at https://www.pinterest.ca/peibistro/ and pin the Pinterest-ready photo found at the end of this post to your favorite Pinterest boards.
You may also enjoy these other blueberry dessert recipes from My Island Bistro Kitchen:
Blueberry Buckle
Blueberry Bread Pudding
Blueberry Cream Cheese Pie
Peach Blueberry Crisp
Mini Blueberry Bundt Cakes
Orange-scented Blueberry Oat Square
PIN ME TO PINTEREST!
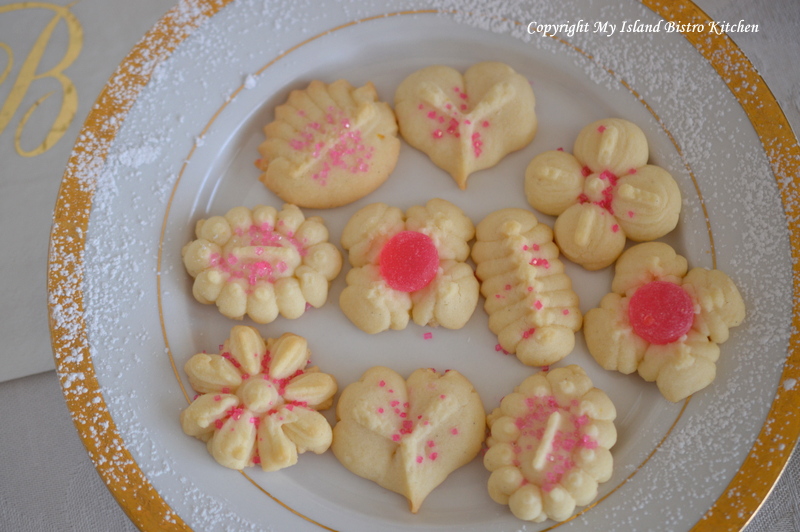
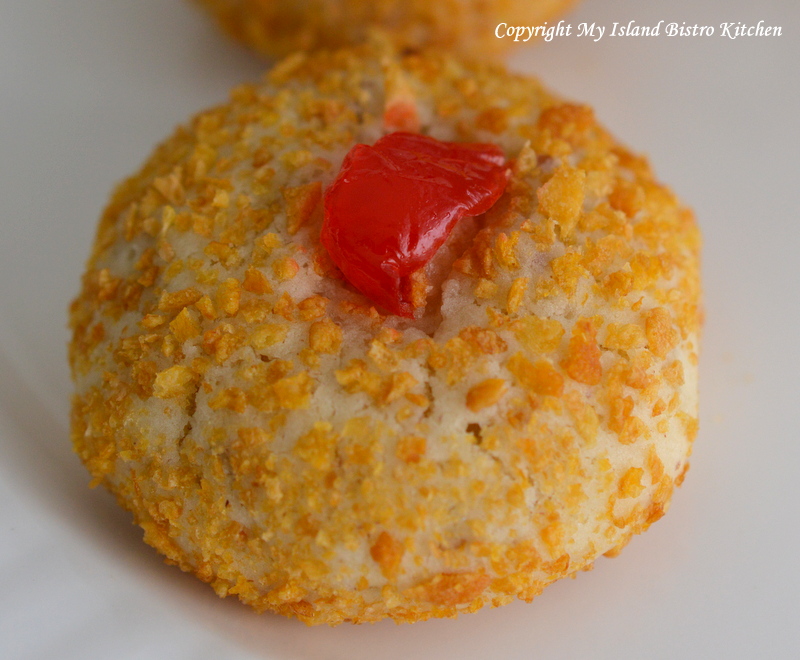
2013 “Cookie of the Month” Year-end Round-up
Those who regularly follow my blog will recall that I made the commitment back in January 2013 to post one cookie recipe a month for the entire year. So, for ease of retrieval, I thought I would do a year-end round-up of all 12 cookies.
In January, just in time for Robbie Burns Day, I shared my recipe for Shortbread.

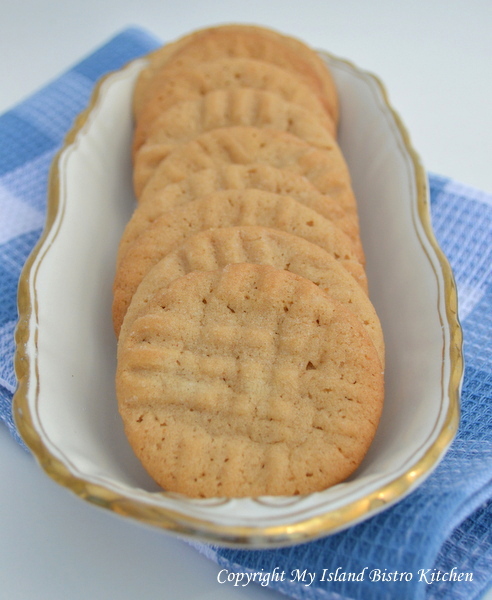
In February, with sweet Valentine’s Day, old-fashioned Sugar Cookies topped the list.

In March, Double Chocolate Chip Drop Cookies, made with a hint of stout, were ready for St. Patrick’s Day.

In April, thoughts turned to lighter, more spring-like, fare like these Lemon Spritz Shortbread Cookies.
In May, old-fashioned Cherry Winks proved they are still a perennial favorite.
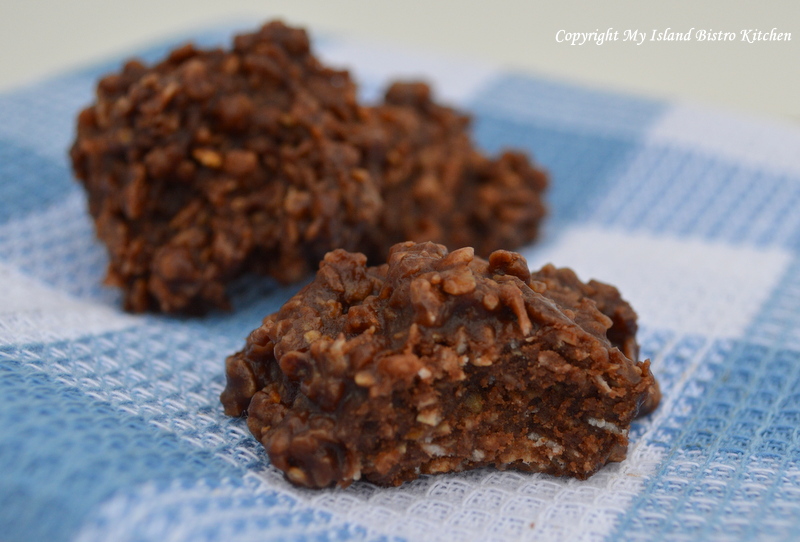
In June, the no-bake Spider Cookies proved they are just as much a favorite today as they were when I was growing up!
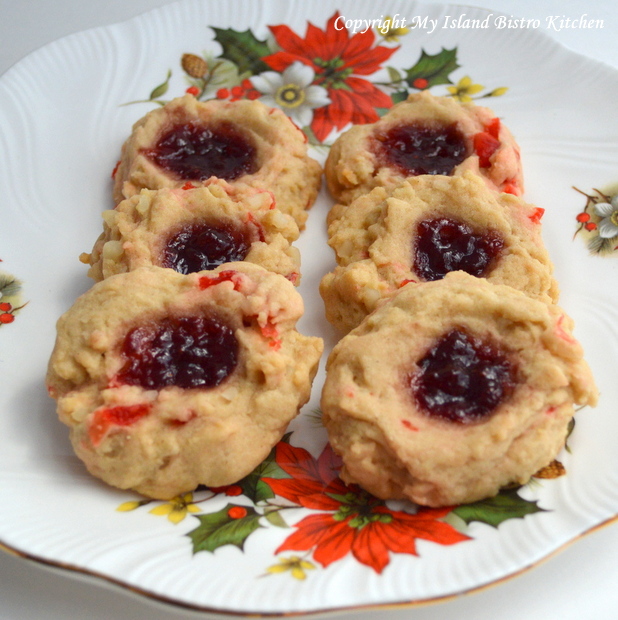
In July, as we celebrated “Christmas in July”, the Brown Sugar Jam-Filled Cookies brought back memories of the kinds of cookies often found in grandma’s cookie jar.
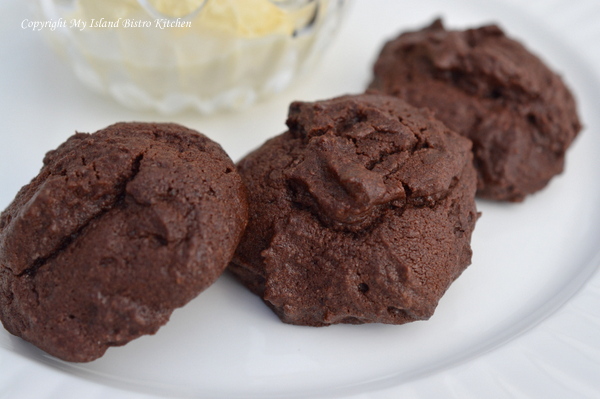
In August, Chocolate Drop Cookies, were a hit with the chocolate lovers!
In September, crisp and light-textured Peanut Butter Cookies made it on to the cookie of the month roster.
In October, the substantial and tasty raisin-filled Plum Puff Cookies heralded the fall season.

In November, when the days turned cooler and thoughts turned to the sweet smell of cooking with spices, the old-fashioned icebox Gingersnaps made their debut.

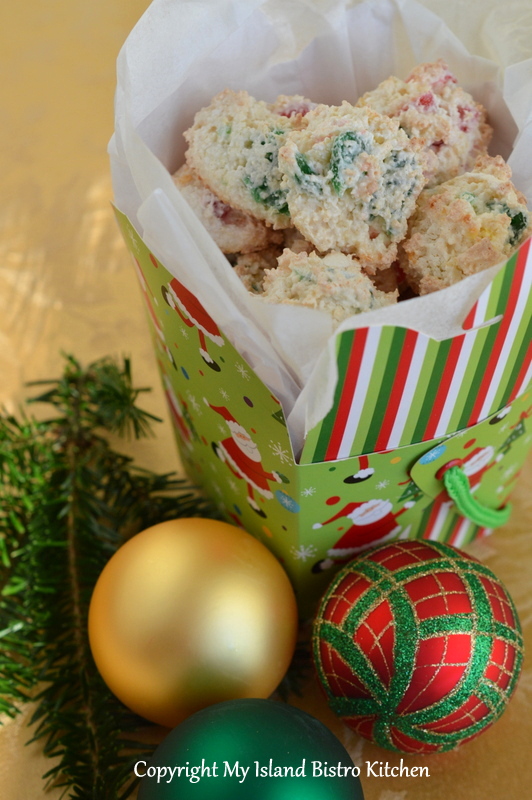
In December, these Coconut Cherry Macaroons made a fine addition to trays of sweets and to gift boxes.
I hope you have enjoyed some of my favorite cookie recipes. Do you have a favorite cookie?
Barbara
Thank you for visiting “the Bistro” today.
Be sure to visit my Facebook page at My Island Bistro Kitchen. You may also wish to follow me on twitter @PEIBistro, on Pinterest at “Island Bistro Kitchen”, and on Instagram at “PEIBistro”.
Chewy Coconut Cherry Macaroons
These delightful Coconut Cherry Macaroons have been a longtime favorite recipe in our family. Continue reading Chewy Coconut Cherry Macaroons
Plum Pudding Recipe and Symbolism
Today’s posting is all about plum pudding, or as some refer to it simply as the Christmas pudding, the traditional Christmas dinner dessert in many Prince Edward Island households. Continue reading Plum Pudding Recipe and Symbolism
Stepping Outside the Breadbox: Meet Creative Chef Ilona Daniel

The chef profession is changing and evolving, probably faster than ever before in history. No longer are chefs hidden away in their kitchens. Today, many are taking the profession and their career to unheard-of heights. TV cooking shows, culinary events like PEI’s Fall Flavors, the popularity of cookbooks written by accomplished chefs, and chefs who engage and interact with fans via social media have all contributed to giving many chefs celebrity status. One of those is Chef Ilona Daniel. If you are a foodie on Prince Edward Island, chances are that you are familiar with Chef Ilona. This is a chef who has had a multi-faceted career to date and is not afraid to think (and step) outside the box – in fact, I’d go so far as to say Chef Ilona doesn’t even know there is a box!
Following her educational experience at McMaster University, Ilona thought she was heading to law school when suddenly her life took a turn in another direction. If it hadn’t been for her taking the leap of faith to follow her passion and calling, chances are Ilona might not have become a chef.
Ilona grew up in Hamilton, Ontario, and learned the pleasure of fine cooking by standing at the kitchen counter by the stove as she watched her mom prepare meals. Cooking was an integral part of her entire being in her formative years and she attributes her mom as having a big influence on her love of cooking.
A chef now for 12 years, Ilona’s first job as a teenager was working in a burger joint at the age of 16. Even then, whether she knew it or not, her life’s path was already being charted in the food industry. After making the decision that law school was not her destiny, Ilona studied at the Canadian Food and Wine Institute in Niagara, Ontario. After completing her studies in Niagara, she was awarded a full scholarship for the Applied Degree in Culinary Operations at the Culinary Institute of Canada in Charlottetown, PEI, and was in the first graduating class from the two-year program. Like many others who have found their way to PEI, Ilona fell in love with the Island and decided to make it her home.

Since graduating from culinary school, Chef Ilona has had an incredibly varied career. She has been the Head Chef at the Stanhope Beach Resort, Interim Chef at Sims and Off Broadway Restaurants, Founding Chef at the Brickhouse, Executive Chef to the Lieutenant-Governor of PEI at Fanningbank, Executive Chef of Holland College’s Culinary Boot Camps, Resident Food Scene Writer for G Magazine, and Culinary Instructor at the PC Cooking School at the local Superstore. And, that’s not all. This fall, she was the Culinary Expert for the PEI2014 Roadshow that travelled across Canada to promote the planned events in PEI in 2014 to celebrate the 150th anniversary of the Charlottetown Conference that led to the creation of Canada. Perhaps you may have seen Chef Ilona on one of several morning TV shows. Most recently, Chef Ilona has started her own Catering and Consulting Business — Tribe Fresh Cookery. This is a gal who likes to be busy!

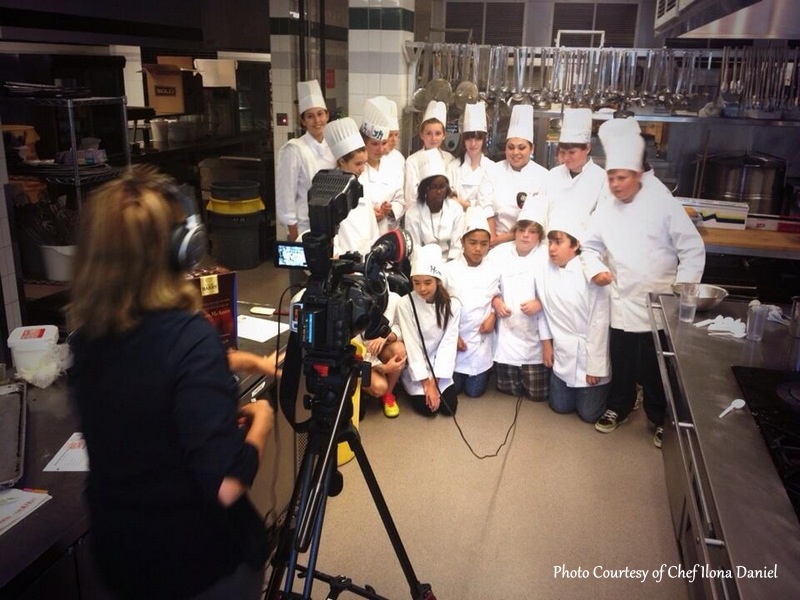
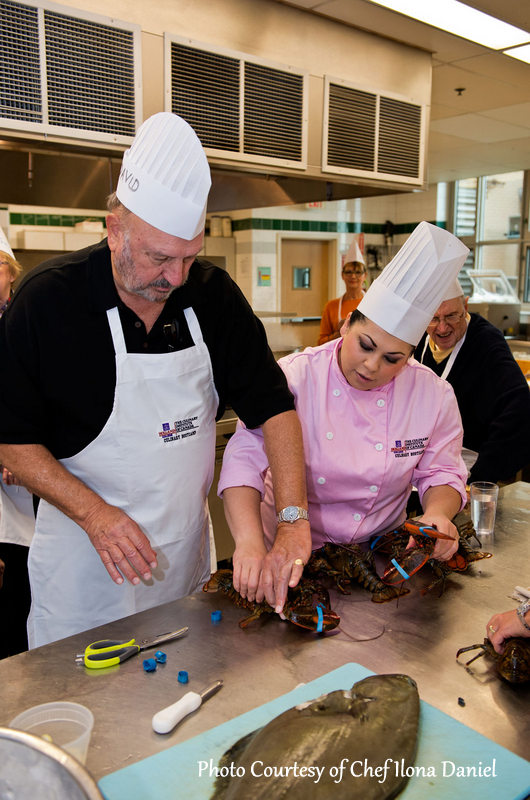
Out of this impressive resume, I asked Chef Ilona which job was the most interesting. Her response was starting her own business because she is building it from the ground up. Her most challenging job was working at the Stanhope Beach Resort because it was a seasonal operation so it meant every year was starting all over again with new staff to be trained quickly. The job that surprised her the most was being Executive Chef to PEI’s Lieutenant-Governor. In this role, she prepared food for many events and functions that included a number of award ceremonies to honour Islanders who were making a difference to their communities. This allowed her to see what a generous and giving community PEI really is. While in this role, Ilona became the first chef at Fanningbank to use social media to tell the story of what food was being prepared for their Honours and for events. Chef Ilona says her most fulfilling job has been her role as Executive Chef of the Culinary Boot Camps. Chef Ilona particularly enjoys the Kids Camps where they are shown how to grow vegetables and make their own food. It’s an opportunity to influence the next generation to eat well.
Chef Ilona’s philosophy in cooking is to “cook with love and don’t be afraid to be different”. She says “there are Chefs whose food can be executed but not necessarily made with passion”. She does not follow trends but rather follows her heart and takes the road less traveled. Her belief is that food should be natural and real. As she says, “good food inspires conversation and doesn’t have to be complicated; use the best local ingredients executed with flawless technique and care about what you are doing”.
I asked Chef Ilona what inspires the recipes and menus she creates. First, she says she needs to know who her audience is. She makes a point of respecting any dietary concerns they may have and is excited to be creative to cook interesting and tasty foods that meet their dietary requirements.

Second, she likes to play on nostalgia, conjuring up memories like the tantalizing scent of apple pie, for example, that will lead to good conversation which goes hand-in-hand with dining. Third, she respects the cultural roots of the region and is creative when cooking with the foods local to the region.

With so many prepared, frozen, and ready-to-go meals on the market today, I asked Chef Ilona why there seems to have been a resurgence in home cooking in the past few years. She believes it is attributable to a number of health issues, including highly publicized food-born illnesses that were caused by contaminated food. This has caused consumers to be more concerned about buying modified foods that are full of preservatives and, instead, they are becoming more health-conscious and so are turning to making their own meals.
What’s next for Chef Ilona? She tells me she is working on a cookbook and exploring the possibility of filming some TV cooking shows. In the short-term, she is busy getting her Catering and Consulting business up and running. Ever thinking outside the box, Chef Ilona is offering what she calls “Kitchen Party Cooking Classes”. This is where she will come to your home and teach you and a small group of friends how to interactively cook a particular dish – e.g., sushi, gourmet pizza, pies, etc. This is way to engage foodies and get them participating in food preparation, all in the comfort of their own home. What a great idea for a girls night out, a bachelorette party, or just a get-together for no other reason other than good conversation and food. If you are interested in having Chef Ilona cater to your event or customize a Kitchen Party Cooking Class, contact her at 902-316-0993 or by email at chef.ilona.daniel@gmail.com
Before we ended our chat, I asked Chef Ilona to answer some short snapper questions:
1. What is the one kitchen tool/gadget you can’t live without?
Can’t pick just one – have the “fast five” – Chef’s knife, small serrated paring knife, a Swiss peeler, a microplane, and a good quality cutting board.
2. What is your all time favorite food?
Pizza – any kind!
3. What is the one non-culinary factoid about Chef Ilona that people might not know about?
I’m a hippie at heart – I like nature and will actually, “stop and smell the roses.”
4. What do you do when you are not cooking?
I like reading, nature hikes, listening to music, and going to concerts.
5. What is your favorite recipe featuring an Island product? Care to share it?
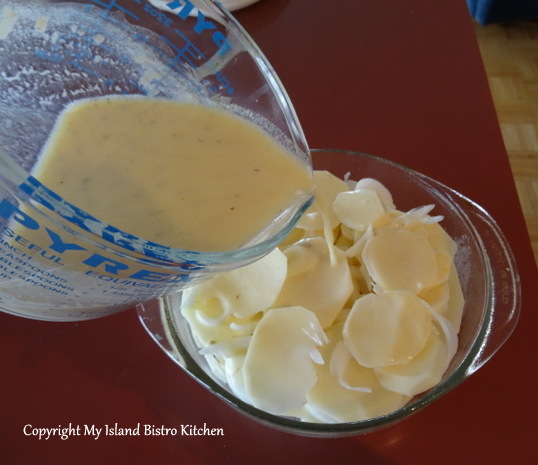
Swedish Potato Casserole. It uses PEI potatoes and PEI-produced Cows Creamery cheese. (Recipe follows)
Swedish Potato Casserole
3 tbsp fresh thyme
2 tsp mace (or nutmeg)
6 eggs, beaten
3 cups Whipping Cream
½ cup flour
1 tbsp kosher salt
2 lb grated Yukon Gold Potatoes
2 cups Cows Aged Cheddar, grated
As you preheat your oven to 375 (use convection baking if you have that option), preheat your 4-6 quart baking dish with 4-6 tbsp butter in the oven.
Whisk thoroughly, the first 6 ingredients together(approximately 3 minutes). Stir in the potatoes. Pour mixture into the hot casserole dish. QUICKLY top with cheese, and place back into oven immediately.
Bake for 45 minutes.

Keep an eye on this rising celebrity chef as she progresses in her career. Chef Ilona is very creative, brimming with ideas and personality, and she’s going places in her chosen career!
Thank you for visiting “the Bistro” today.
Be sure to visit my Facebook page at My Island Bistro Kitchen. You may also wish to follow me on twitter @PEIBistro, on Pinterest at “Island Bistro Kitchen”, and on Instagram at PEIBistro.
Gingersnaps
Today, I am sharing my recipe for old-fashioned Gingersnaps. These wafer-thin, crisp cookies are flavoured with ginger, cinnamon, and cloves, all scents that make the kitchen smell divine when they are baking. Continue reading Gingersnaps
From Field to Table: Potato Growing and Harvesting in Prince Edward Island
[UPDATE TO THIS STORY: Since this story was published in 2013, Lori Robinson has switched from growing potatoes to grains on her farm and, as such, is no longer growing potatoes. The story, however, remains a good depiction of what goes in to getting potato seed in the ground and how the potato ends up on your dinner table.]
Part of my objective with this food blog is to showcase food products produced on PEI and the producers and farmers behind them. In this story, I will introduce you to Lori Robinson, a fifth generation PEI potato farmer. Lori is Farm Manager at Eric C. Robinson Inc. in Albany, PEI.
I hope that this feature story will shed a little light on just where the bags of potatoes that you pick up at the supermarket come from or where the potatoes that go into making potato chips originate.
For the land mass size of our Province, PEI produces a lot of potatoes. According to the Prince Edward Island Potato Board, there were 89,000 acres of potatoes grown on PEI in 2013. The Board tells me there were approximately 45 varieties grown in commercial quantities and more than double that amount when those that are being grown in test plots or market gardens or for limited specialty markets are included. An economic impact study completed a little over a year ago determined that the potato industry is worth just over a billion dollars annually to the PEI economy directly and in spin-off effects.[1]
Individual potato farms on PEI range in size. The Robinson farm grows around 500 acres of potatoes annually in rotation with soybeans, barley, and forages. For the past five months, I have been following Lori from the time she planted the spuds in the ground back in May to their harvesting in October and ending with the washing and packaging process that is now, at the time of writing, underway at the farm.
Let’s begin by finding out what led Lori in her career choice to become a potato farmer. I think it would be fair to say that Lori grew up with potato farming in her bloodline. Her great, great grandfather began growing potatoes in Augustine Cove, PEI, in the early 1800s and successive generations have continued the tradition. She says her decision “to become a potato farmer was part tradition, part general interest in all things science based, and part desire to work with other members of her family in a family-owned and operated business in PEI”. By the time Lori was in her mid to late teens, she knew what her career path would be – she would study agriculture at university and become a farmer.
Lori holds a Bachelor of Science in Agriculture from the University of Guelph where she majored in Agriculture Business. While Lori will be the first to tell you her university degree did not specifically teach her much about growing potatoes (she learned that by doing), her education did teach her how to think critically, solve problems, and manage human and financial resources. These are all skills useful to today’s commercial farmers. Farming is much more than planting seed in the ground and waiting for the produce to grow.
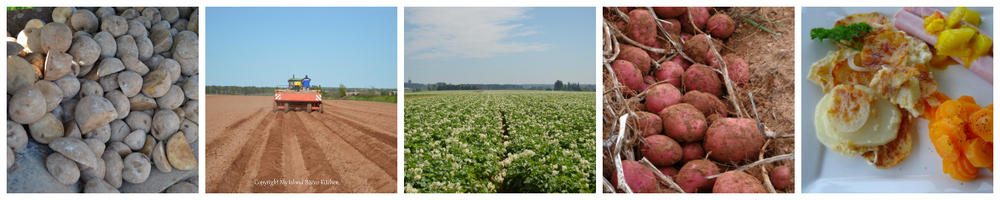
In 2013, Lori grew 15 different varieties of potatoes. This year, 35% of their crop will be used to make potato chips at Frito Lay, 20% will be used for seed, and 45% will be for table stock – the ones that will make it on to our dinner tables. The seed potatoes will be used to plant the farm’s crop next year and also to sell to other potato growers. The potatoes in the large storage bin behind Lori in the photo below are next year’s Norland seed. 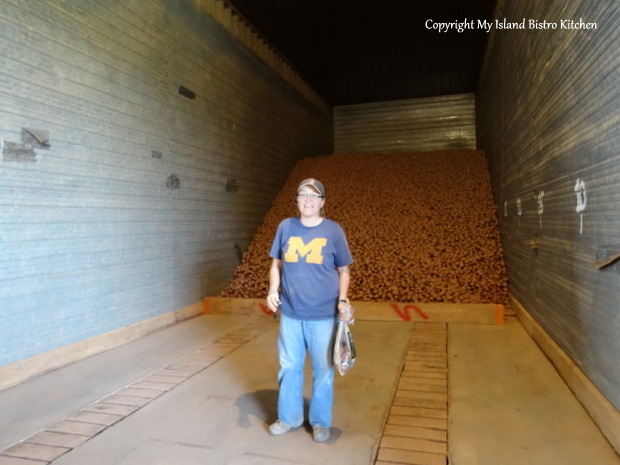
Today’s commercial potato farming is very scientific and controlled. Lori points out that “seed potatoes must be inspected in the field by Canadian Food Inspection Agency (CFIA) agents and then tested in an accredited laboratory to ensure that disease levels (viruses) are below a certain percentage before the seed receives certification to be replanted the following year”. It is interesting to note that seed potatoes can be used as table stock but table stock potatoes cannot be used as seed.
The Island spuds will travel. Lori’s farm sells both the seed potatoes and table stock in Canada and the United States while the “chipstock” (those used to make potato chips) will be sold in Canada and the United States as well as in Indonesia, Thailand, and Guatemala. You just never know where you might be eating an Island potato!
All professions have their challenges as well as their sources of satisfaction. Lori says her biggest challenge is finding an adequate number of staff to work on the farm and in their packing house. She currently employs 14 year-round, full time staff and 4-5 seasonal employees from late September to late June. In terms of job satisfaction as a potato farmer, Lori has this to say: “Harvesting a good crop of high-quality potatoes that I eventually see in our local Superstores provides me with a great sense of satisfaction. No two years in potato farming are ever alike. Many new challenges come up every year, every growing season. There is always something new to learn about farming. The need to overcome these challenges to remain successful and the desire to learn new things are what motivate me and make me passionate about my job as a potato farmer.”
Lori has been potato farming for 20 years, continuing on in a long line of successful potato farmers in her family. I asked her what she attributes the success of her potato farm to. She says her predecessors “recognized the importance of good land stewardship in order to achieve the balance between economic viability and environmental sustainability”. Lori has carried on these traditions and philosophy while adding a few of her own ideas along the way to maintain the success of their potato farming operation and carry it into the future.
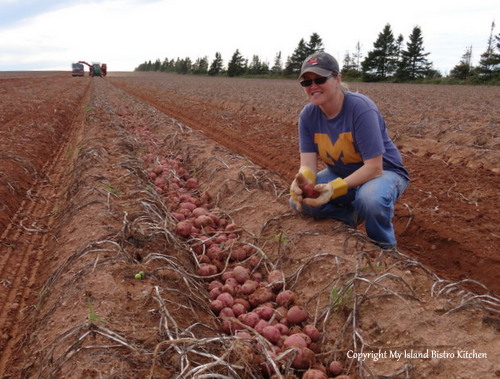
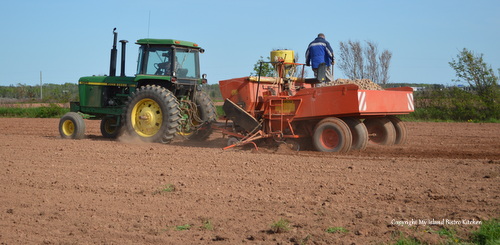
Lori is very much a hands-on farmer. She actually gets on a tractor and works in the fields herself in the spring doing land preparation work that occurs prior to planting. 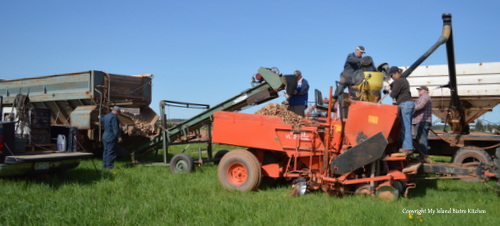 On May 29, 2013, when I arrived at a huge long field waiting to be planted in North Carleton, PEI, I found Lori and her crew planting Dakota Pearl potatoes. That’s Lori up on the planter on the right-hand side checking to make sure things are working as intended.
The farm operates with 7 John Deere tractors, 1 planter, 2 sprayers, 7 tandem trucks, 2 windrowers, 1 harvester, and 3 telescopic pilers.
Farm sizes and farming methods and machinery have changed over the years for sure. I asked Lori what she sees as the biggest changes in potato farming over the years. For her, one change really stands out – input costs for potato farming continually increase while the price farmers receive for the potatoes is relatively unchanged from the days when her grandfather sold potatoes. She also says that a big change has been in the advancement of technology, mainly in the use of GPS for field operations. Lori also notes that, while the Robinson farm has remained relatively the same size since she started farming 20 years ago, most well-established farms on PEI have grown larger at the expense of a number of smaller farms going out of business due to financial strain or lack of a succession plan.
So, let’s look at the timeline of the potato season at the Robinson farm on PEI.
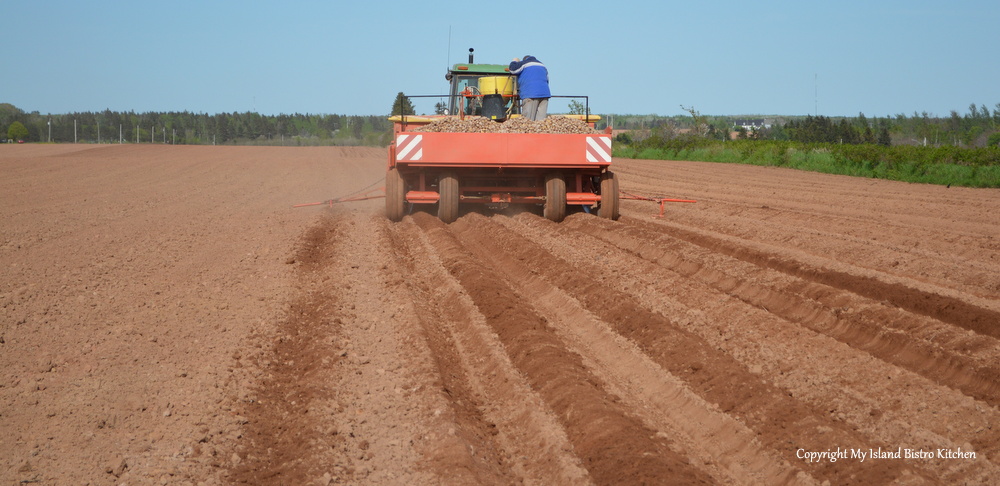
May 29, 2013 – Planting

It all begins with the potato seed for this field of Dakota Pearl variety.

And, well-tilled fertile soil.

And a planter full of potato seed along with some fertilizer.
A good John Deere tractor helps, too!
And, the seed is in the ground!
June 20, 2013 – Fertilizing and Hilling
Field work continues through the growing season to ensure a good crop of potatoes (yes, that’s the Confederation Bridge in the background and, yes, PEI soil really is that red!).

July 2, 2013 – Potato Plants Growing
By early July, there is evidence that the potato plants are growing well – look at that gorgeous emerald green color against the rich red soil of PEI!

July 20, 2013 – Potato Blossoms
A drive by the field in mid-July reveals that the Dakota Pearls are out in blossom!
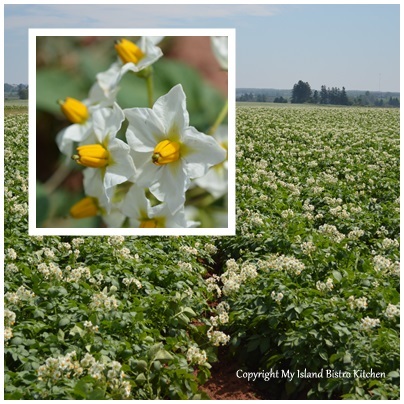
The field is abloom with white blossoms that have tiny bright yellow centers.

This is a super long field! 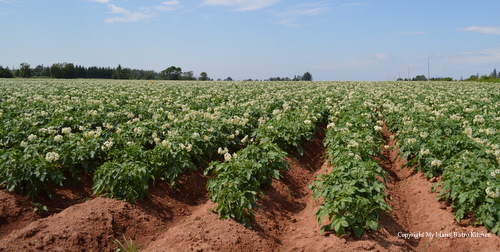
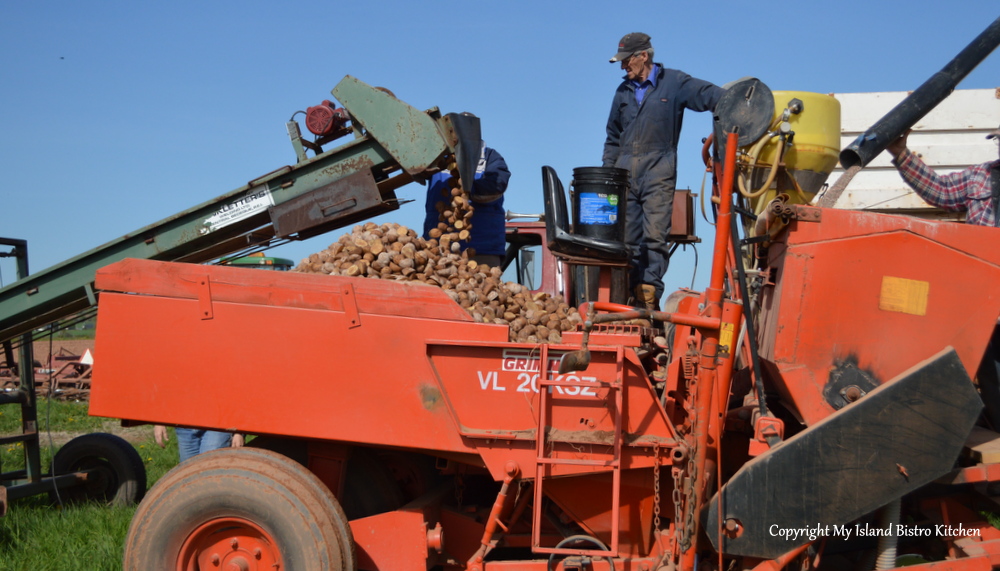
September 30, 2013 – Harvesting
By September 30th, harvesting was underway on the Robinson farm. On this day, I found the crew harvesting the Norland variety (deep red-skinned potatoes) in Albany, not far from the Confederation Bridge.
Two windrowers (one two-row and one four-row) were working the field in advance of the harvester, and moving the freshly-dug potatoes over into the drills where the harvester would pick them up while digging two more rows of potatoes itself at the same time. 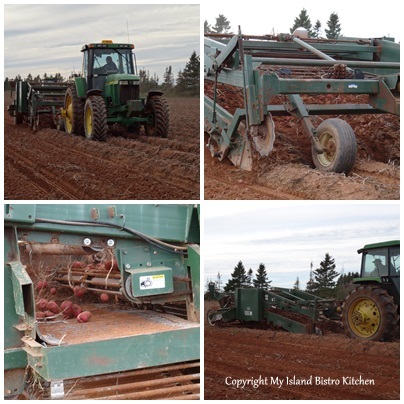
This means that the harvester is picking up a total of eight rows of potatoes as it moves down the field.
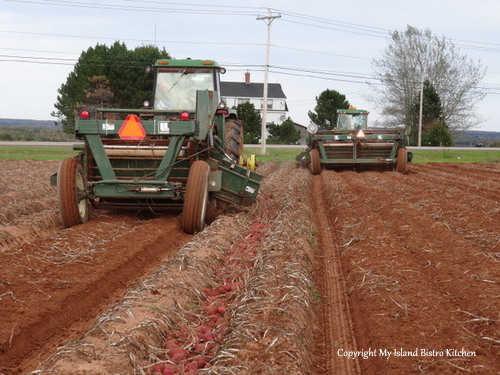
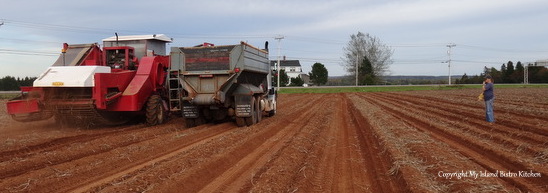
The harvest days are long and dependent upon good weather and, of course, no mechanical breakdowns.
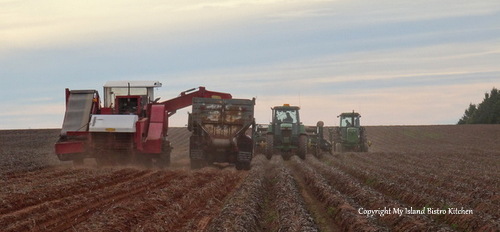
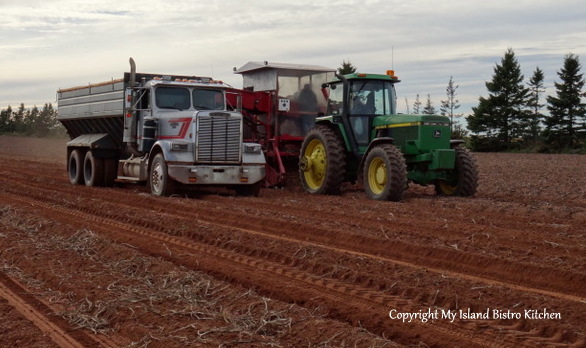
Once the truck is full of spuds, it heads to the warehouse and an empty truck comes alongside the harvester to be filled as they move in tandem down the long drills of potatoes.
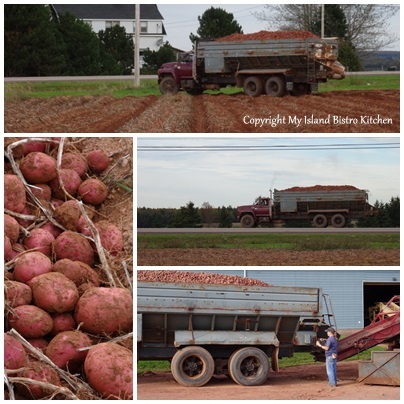
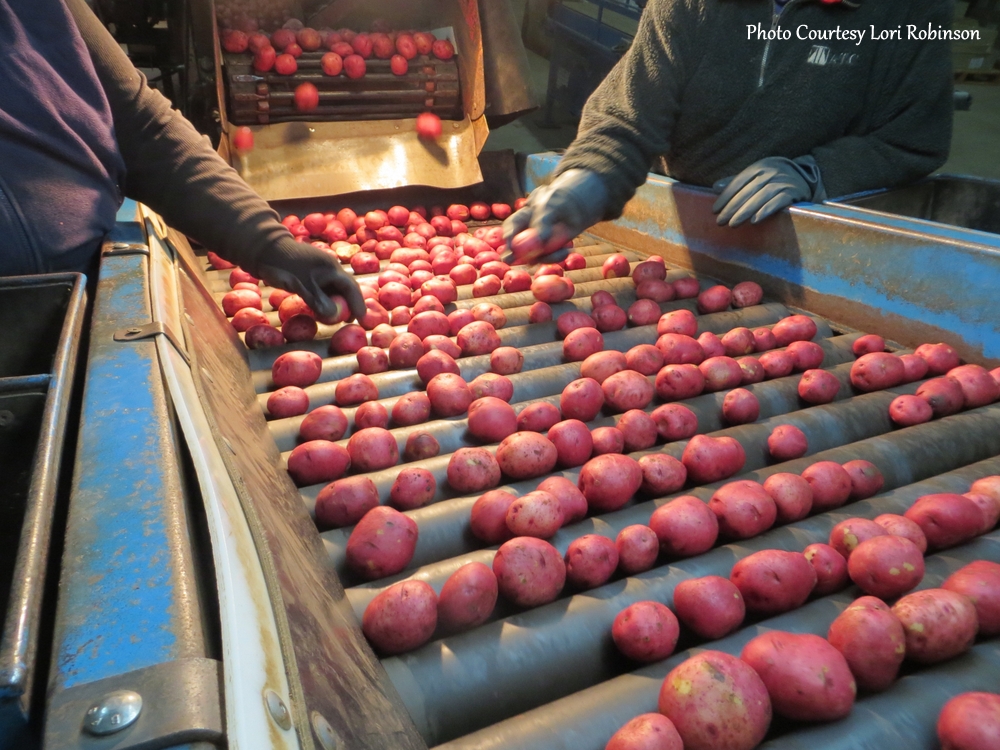
At the warehouse, the spuds are offloaded from the truck on to the conveyer belt that takes them into a small grading house just outside the warehouse where three employees remove any stones, plant particles, or damaged or spoiled potatoes.

From there, via conveyer belt to a bin piler, the potatoes make their way into a huge warehouse that is divided off into separate bins for the different varieties of potatoes.
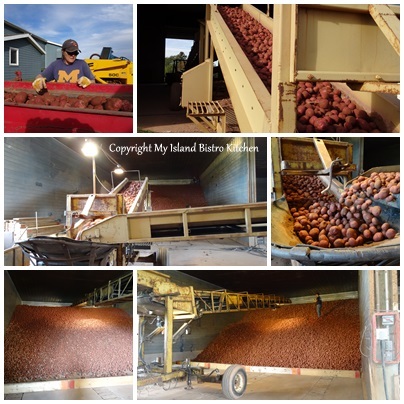
In the photo below, the man is standing on top of 1/2 million pounds of potatoes in order to insert a temperature probe down into the pile of potatoes to monitor any significant rises in temperature in the middle of the pile which would signal attention needed.
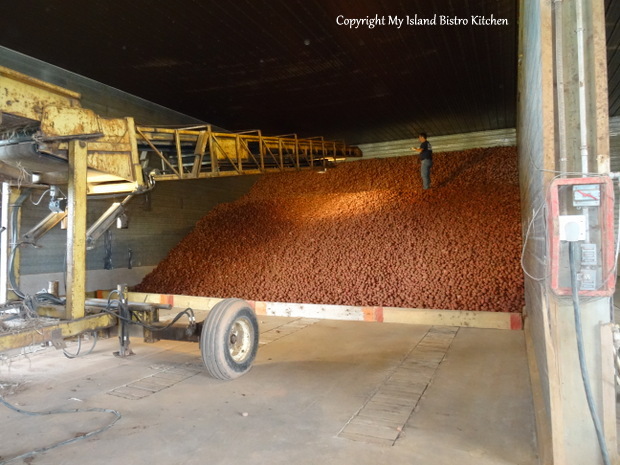
The warehouse is temperature-controlled to maintain the freshness and quality of the potatoes.

By the end of the first day of harvest, 3/4 million pounds of potatoes will have been dug and stored in the warehouse.
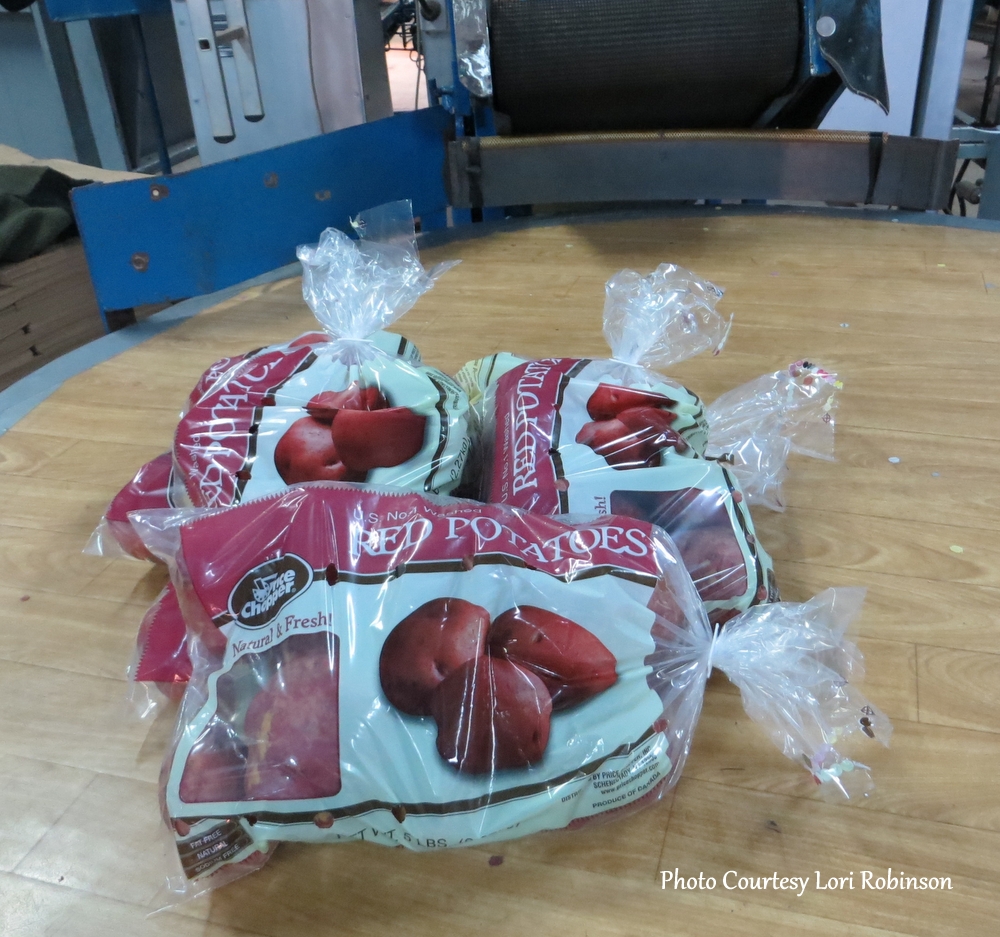
Three different sizes of the red potatoes dug on this day will be destined for different uses. The smallest on the lower left of the photo below are mainly sold for restaurant trade where they would be roasted or baked. The next size up are sold in 2 lb or 3 lb bags to grocery stores. Consumers would typically purchase these potatoes to use for roasting or baking at home. The largest of the three sizes are sold in 5 lb poly and 10 lb paper bags to grocery store chains in Canada and the United States for sale mostly as baking potatoes.
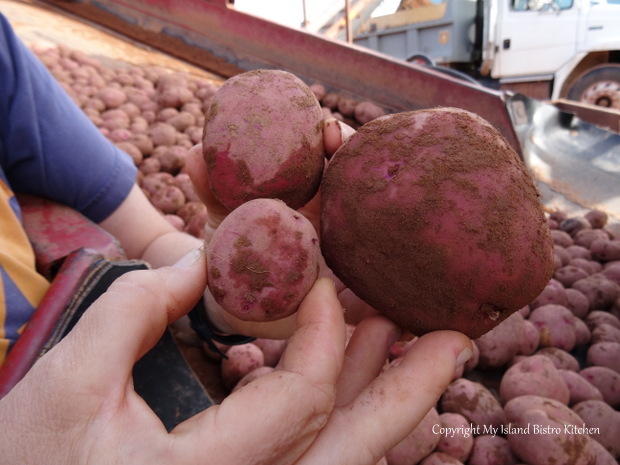
In the photo below you can see some of the freshly dug Norlands I brought home with me after my field visit. You’ll find the recipe I used them in at the end of this posting.
Early November, 2013
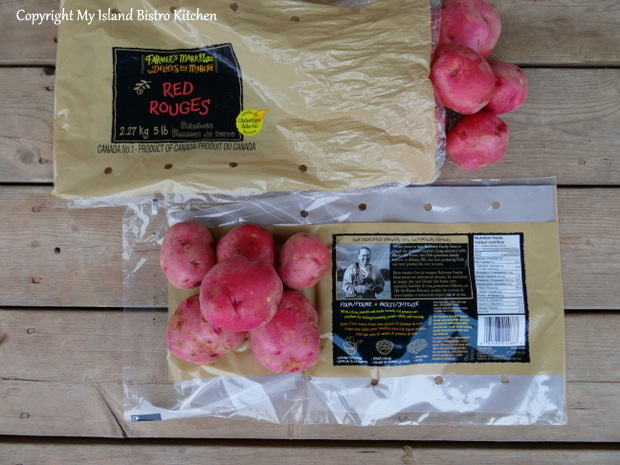
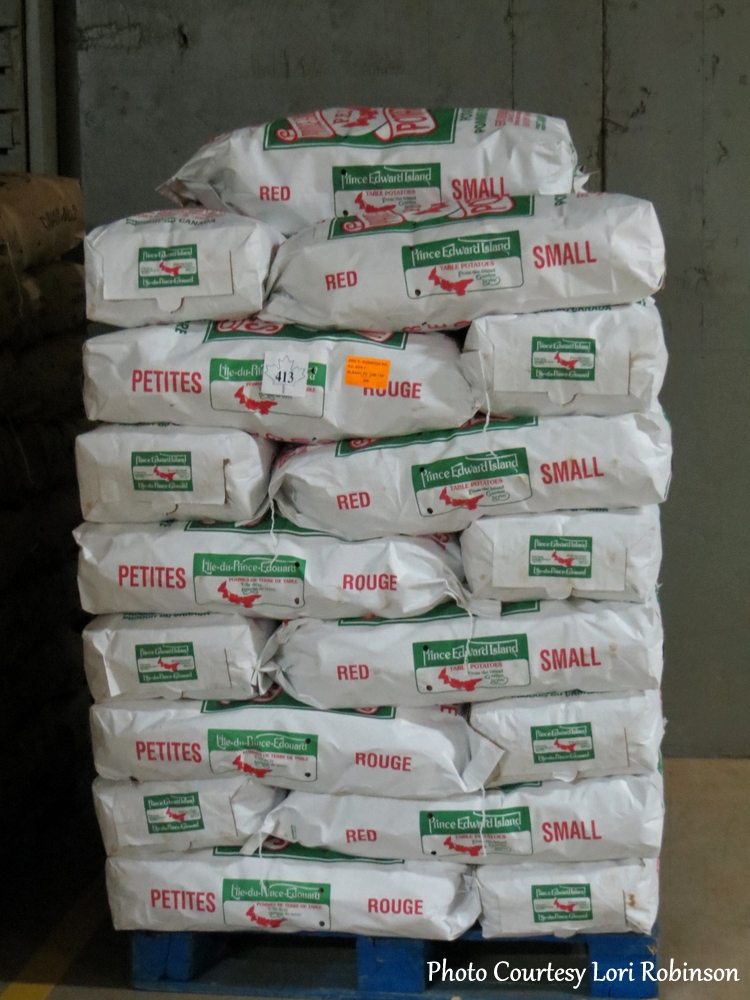
Before the potatoes make their way to market, they are graded, washed, and packaged on the farm.

Once the potatoes are packaged, they are ready for shipping to markets.
Working with potatoes day in and day out, I was curious as to Lori’s favourite potato dishes. She tells me her favourite way to serve potatoes is to simply toss some small red potatoes with olive oil and herbs and roast them in the oven. She also likes the potato lasagne recipe found on the Prince Edward Island Potatoes Website.
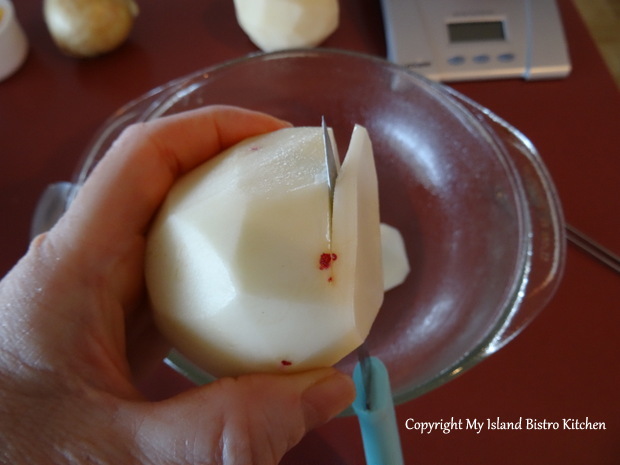
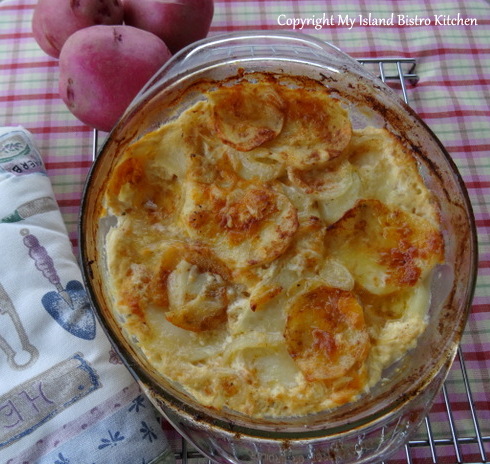
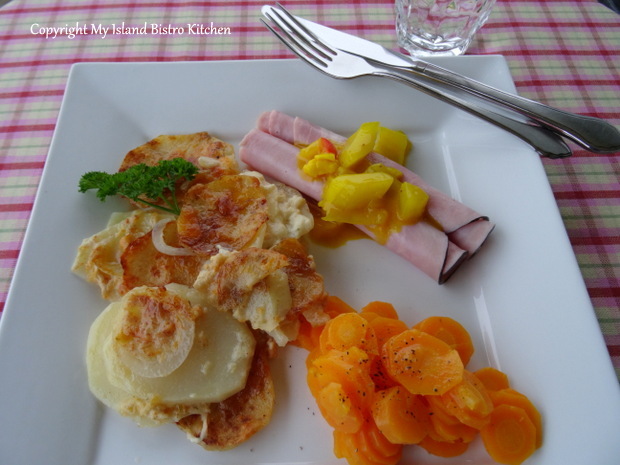
There is nothing like fresh produce straight from the rich red soil of PEI. The day I visited the Robinson farm during harvesting season in early October, I brought some of the Norlands home with me. These beautiful red-skinned variety potato with white flesh are a multi-use potato (they are good boiled, roasted, baked, in salads, and scalloped). I am presenting them here in my favourite old-fashioned scalloped potatoes recipe.
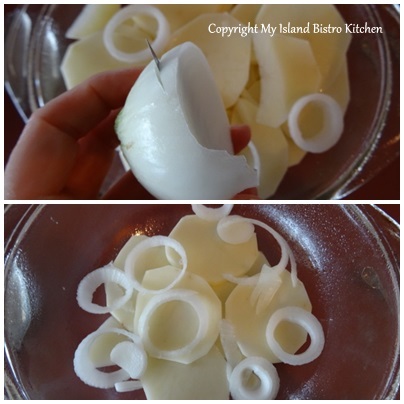
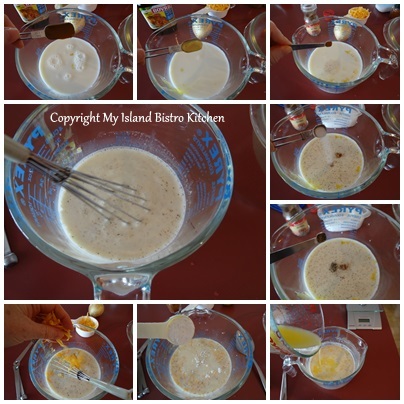
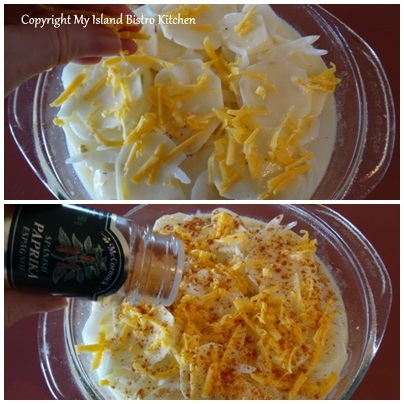
My Island Bistro Kitchen’s Old-fashioned Scalloped Potatoes
1¾ lbs. potatoes (about 3 medium-sized), peeled and sliced about 1/8” thick
1 medium onion, sliced in rings
1½ cups milk
1 tsp liquid chicken bouillon
½ tsp Dijon mustard
2 tbsp flour or cornstarch
Pinch nutmeg
Salt and pepper, to taste
3 tbsp melted butter
½ cup grated cheddar cheese
Paprika
Method:
Preheat oven to 350F.
Assemble ingredients.

Spray or grease a 1½-quart casserole.
Place a layer of sliced potatoes in casserole.
Add a layer of sliced onions.
Repeat potato and onion layers to fill casserole.
In microwaveable bowl, whisk together the milk, chicken bouillon, Dijon mustard, flour or cornstarch, nutmeg, salt, and pepper. Microwave for about a minute, then stir and add the melted butter and 2½ – 3 tbsp. grated cheese. Microwave 1-2 minutes, just until mixture is heated and starts to thicken slightly, stirring once or twice.
Pour warm sauce over the potatoes and onions in the casserole.
Sprinkle with remaining grated cheese and paprika.
Bake, covered, for about 1 hour. Remove cover and continue to bake until potatoes are fork tender, about 20 minutes, or so. Remove from oven and let sit 10-15 minutes before serving. Serves 4-6.
Serve with ham and your favorite side vegetable.
Tips:
Using whole milk or a blend of whole milk and cream will make creamier scalloped potatoes.
Removing the cover during the latter part of the baking process will give the scalloped potatoes a nice crust on top.
Scalloped potatoes have a tendency to boil out of the casserole. To avoid a messy oven clean-up job, place a piece of tin foil on a large baking pan and set the casserole on it. Lightly spraying the tin foil will also make it easier to remove the casserole from the baking pan should the contents bubble out.
My thanks to Lori Robinson for allowing me to follow her potato operation over the past season and for answering my multitude of questions.
Thank you for visiting “the Bistro” today.
Be sure to visit my new Facebook page at My Island Bistro Kitchen. You may also wish to follow me on twitter @PEIBistro and on Pinterest at “Island Bistro Kitchen”.
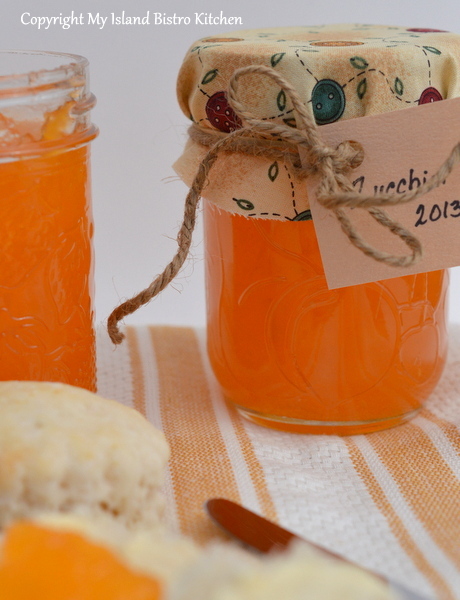
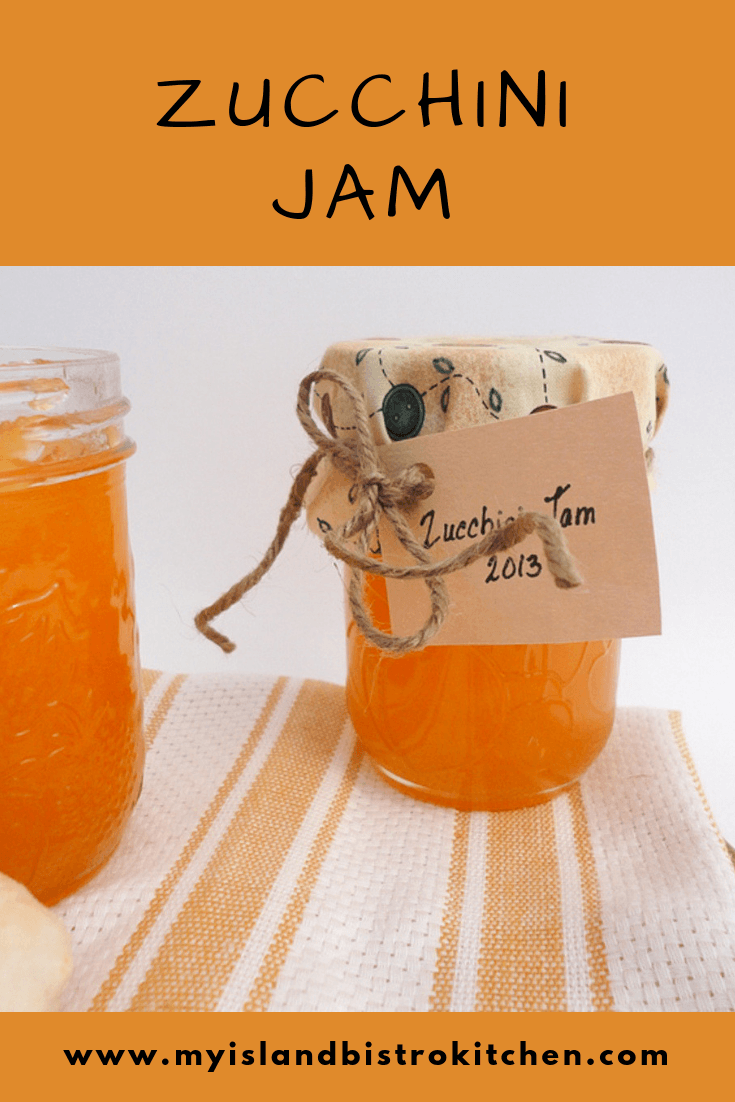
Zucchini Jam
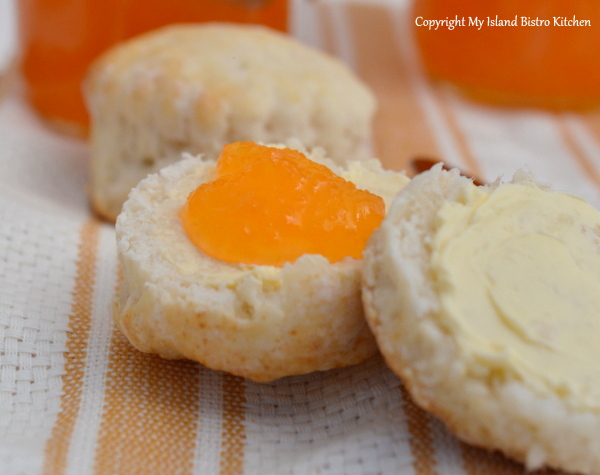
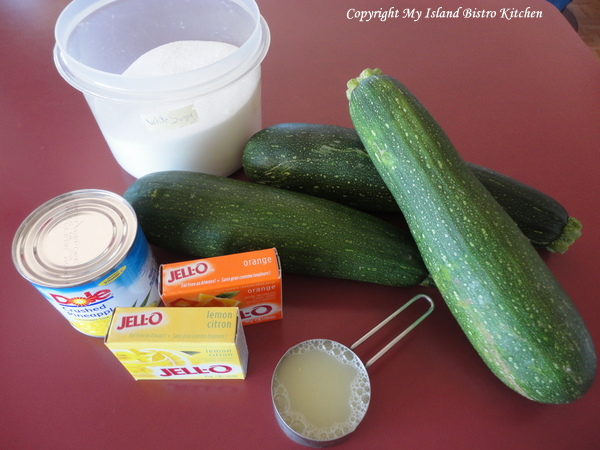
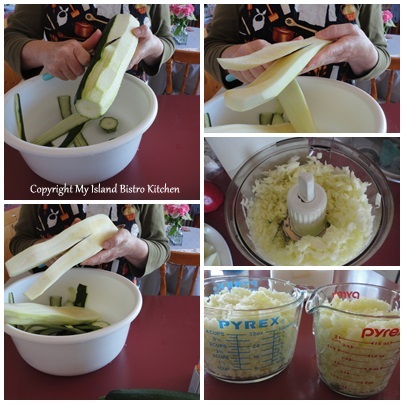
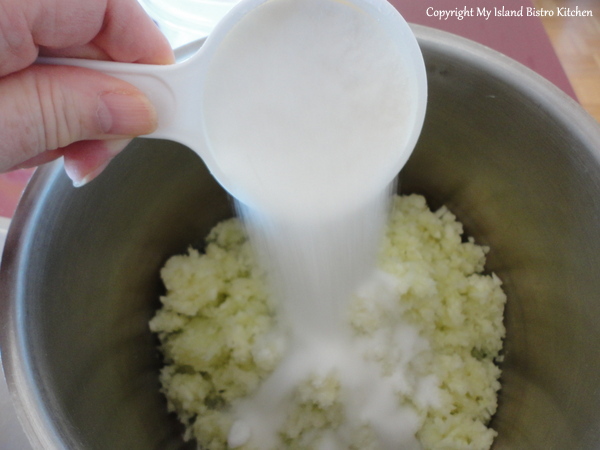
Zucchini is one vegetable that seems to grow prolifically. Come fall and many gardeners have an abundance of zucchini they don’t know what to do with. Zucchini is actually a very versatile veggie that can be used in cakes, cookies, muffins, and jams. I like to keep grated zucchini frozen and ready for use in various tasty baking products over the winter. Another recipe I like to use zucchini in is this one for zucchini jam. It is quite easy to make and is a great spread on toast, biscuits, or as a dollop on vanilla custard. Its bright orange color makes it a showy jam.
Zucchini Jam
Ingredients:
6 cups grated zucchini (peel and seed zucchini before grating)
5 cups sugar
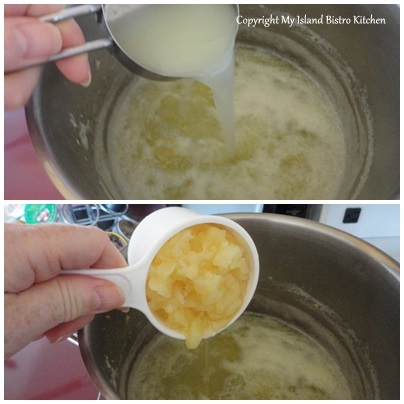
1 cup crushed pineapple, with juice
1 tbsp lime juice
3 tbsp lemon juice
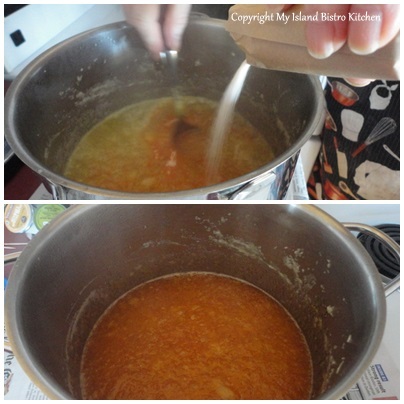
1 (85g) orange jello
1 (85g) lemon jello
Directions:
Assemble ingredients.
Peel and seed zucchini. Grate enough zucchini to make 6 cups, loosely packed.
Place zucchini and sugar in pot and boil, uncovered, over medium heat for 15 minutes, stirring occasionally.
Stir in pineapple and the lemon and lime juices. Bring to a boil. Boil, uncovered, 5-6 minutes, stirring occasionally. Skim off, and discard, any foam that may form.
Add jellos, stirring until incorporated and jellos are dissolved.
Pour into hot sterilized jars, leaving ¼” headroom on top of each jar. Seal.

Process the jam in a hot water bath, following the directions provided with your hot water canner.
Yield: Apx. 7-8 half pints
Pin Me To Pinterest
Did you Know?
You can join the Facebook page for My Island Bistro Kitchen: https://www.facebook.com/MyIslandBistroKitchen/
Follow “the Bistro” on Twitter: https://twitter.com/PEIBistro/
See the drool-worthy gallery of mouth-watering food photos from My Island Bistro Kitchen on Instagram: https://www.instagram.com/peibistro/
Follow “the Bistro” on Pinterest at https://www.pinterest.ca/peibistro/
(and you can pin the Pinterest-ready photo above to your favorite Pinterest boards)
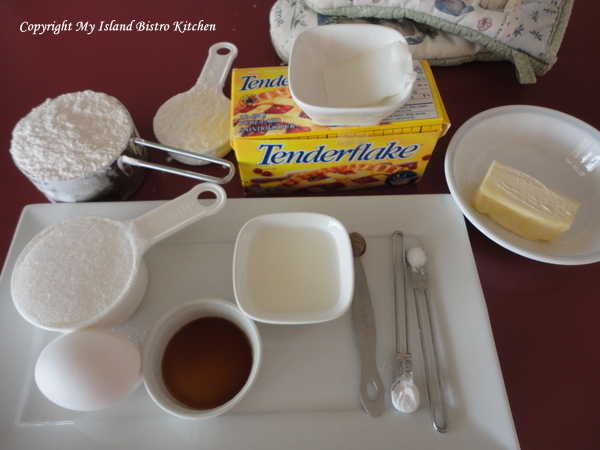
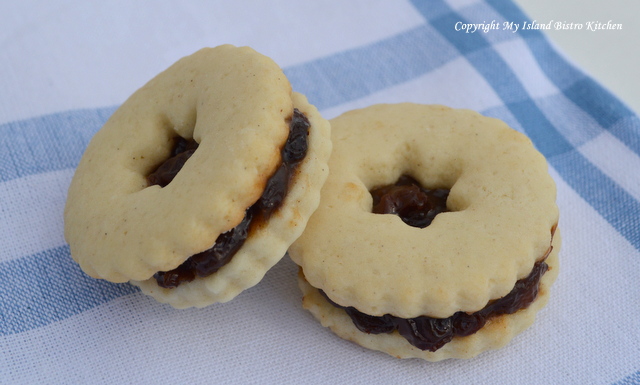
Plum Puff Cookies
Plum Puff Cookies
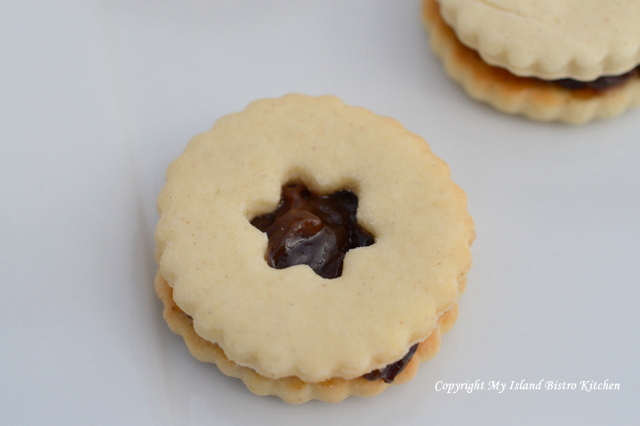
Plum Puff Cookies are hearty cookies because each one is actually two cookies sandwiched together with a tasty raisin filling. These cookies can also be filled with your favorite jam, date , or even lemon, filling.
Cookie Ingredients:
¼ cup butter
½ tbsp lard
½ cup sugar
1 egg, beaten
2 tbsp milk
½ tsp vanilla
1¼ cups flour
1/8 tsp salt
¼ tsp soda
1/8 tsp cardamon
Method:
Assemble ingredients.
Preheat oven to 350F.
Beat butter and lard together. Add sugar. Beat until light and fluffy. Add egg, milk, and vanilla.
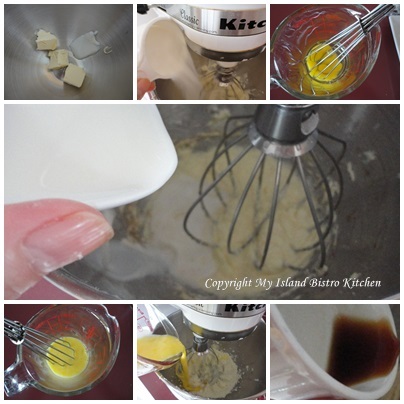
Sift flour, salt, soda, and cardamom together. Stir into wet ingredients and mix just until incorporated.

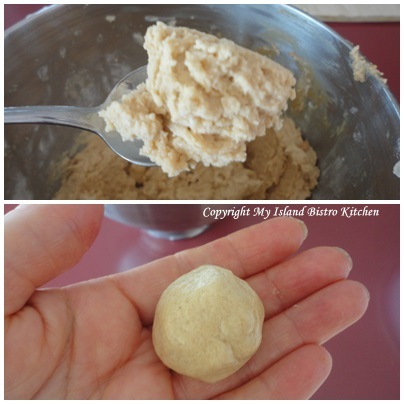
Knead dough into ball. If dough is soft, place in refrigerator for 30-40 minutes.
On a lightly floured surface, roll dough to about 1/8” thickness. Divide dough in half. Using a 2 – 2½” linzer round crinkle cookie cutter, cut out one half of the dough into solid circles. Cut remaining dough into the same size circles but fit the linzer cookie cutter with desired cut-out for cookie centers. (Note: If you don’t have a linzer cookie cutter, simply use any cookie cutter shape you have and then use a smaller cookie cutter to cut out the centers of half of the cookies.)
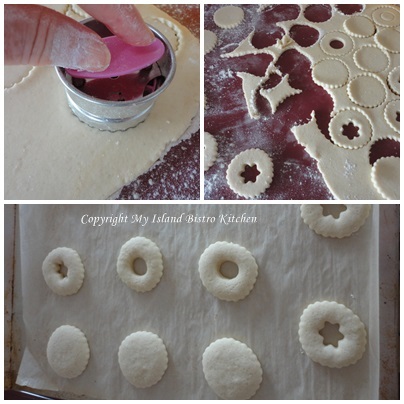
Place cookies, about 1½” – 2” apart, on parchment-lined baking sheet. Bake on center rack in oven for 10-12 minutes. Let cool on rack for 2-3 minutes then transfer to cooling rack.
When cookies have cooled completely, spread cooled raisin filling (recipe follows) on flat side of each solid cookie, then top with the flat side of a cookie that has center cut out.
Yield: 2-dozen sandwich cookies
Filling Ingredients:
1 cup raisins
1 tbsp flour
½ cup sugar
½ cup water
½ tsp vanilla
Pinch of cinnamon
Smidgeon of salt
Combine all ingredients in saucepan. Over medium-low heat, cook raisin mixture until thickened.
An old-fashioned wholesome cookie.

Thank you for visiting “the Bistro” today.
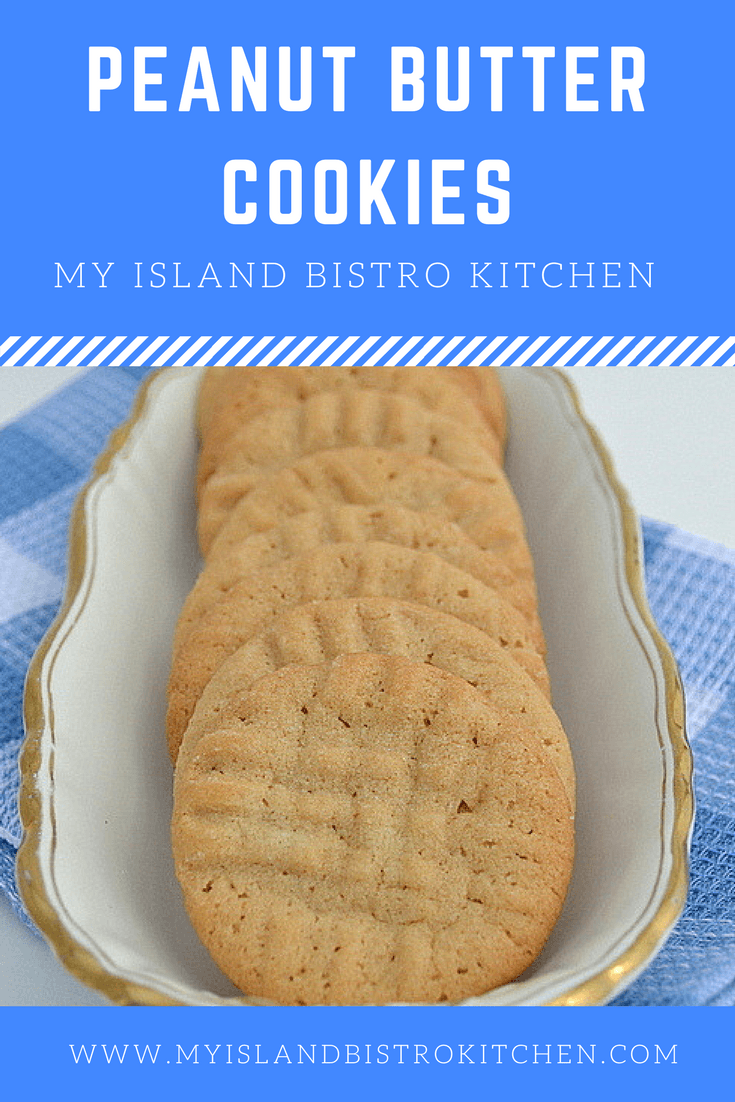
Peanut Butter Cookies
Peanut Butter Cookies are an old favourite and, over the years, many a cookie jar has been filled with them.
These cookies take very few ingredients and nothing out of the ordinary that would not be in most cupboards. Either smooth or crunchy peanut butter may be used – whichever is your preference – in the cookies. In order to keep the cookies a bit soft, watch the baking time, checking them at the 10-minute point.
Peanut Butter Cookies
Ingredients:
¼ cup shortening
¼ cup butter
½ cup brown sugar
½ cup white sugar
½ cup peanut butter
1 egg, well-beaten
1 tsp vanilla
1 cup flour
1 tsp soda
1/8 tsp salt
Method:
Assemble ingredients. Line baking sheets with parchment paper.
Position oven rack in center of oven and preheat oven to 350F.
Cream shortening, and butter together. Beat in brown and white sugars until fluffy.
Mix in peanut butter.
Add egg and vanilla.
Sift flour, soda, and salt together. Add to wet ingredients and mix just until dry ingredients are incorporated.
If dough is very soft, refrigerate for 30-40 minutes. Shape dough into small balls about 1” in diameter. Place on baking sheet about 2 ½” – 3” apart as these cookies spread.
With fork dipped in sugar, press down cookies in a traditional criss-cross pattern with the tines of the fork.

Bake on center rack in oven for 10-12 minutes. Cool on baking sheet for 2-3 minutes then transfer to cooling rack.

Yield: 3½ – 4 dozen

Peanut Butter Cookies
Classic peanut butter cookies have been a cookie jar favorite for years and these melt-in-your-mouth cookies take very few ingredients and are easy to make.
Ingredients
- ¼ cup shortening
- ¼ cup butter
- ½ cup brown sugar
- ½ cup white sugar
- ½ cup peanut butter
- 1 egg, well-beaten
- 1 tsp vanilla
- 1 cup flour
- 1 tsp soda
- 1/8 tsp salt
Instructions
Assemble ingredients. Line baking sheets with parchment paper.
- Position oven rack in center of oven and preheat oven to 350°F.
- In bowl of stand mixer, cream shortening and butter together. Beat in brown and white sugars until fluffy.
- Mix in peanut butter.
- Add egg and vanilla.
- Sift flour, soda, and salt together. Add to bowl mixture and mix just until dry ingredients are incorporated.
- If dough is very soft, refrigerate for 30-40 minutes. Shape dough into small balls about 1” in diameter. Place prepared baking sheet about 2½” – 3” apart as these cookies spread.
- With fork dipped in sugar, press down cookies in a traditional criss-cross pattern with the tines of the fork.
- Bake for approximately 10-12 minutes. Cool on baking sheet for 2-3 minutes then transfer to cooling rack.
Recipe Notes
Yield: 3½ - 4 dozen
Thank you for visiting “the Bistro” today.
Lobster-stuffed Cherry Tomatoes
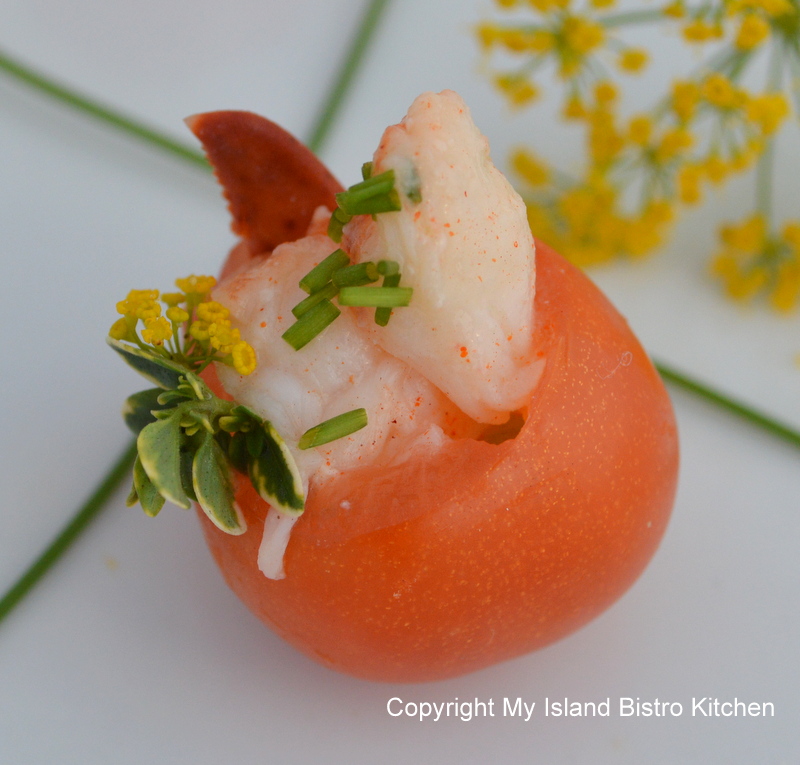
Our garden produced hundreds of tiny cherry tomatoes this summer. It’s always a challenge as to what to do with them and it seems everyone I know also has an abundance of them, too. Cherry tomatoes make great bases for appetizers or hors d’oeurves. They are particularly tasty when filled with lobster salad! This weekend, there is a huge shellfish festival in Charlottetown, PEI, so I thought this was an appropriate time to post a recipe using one of my favorite shellfish, lobster.
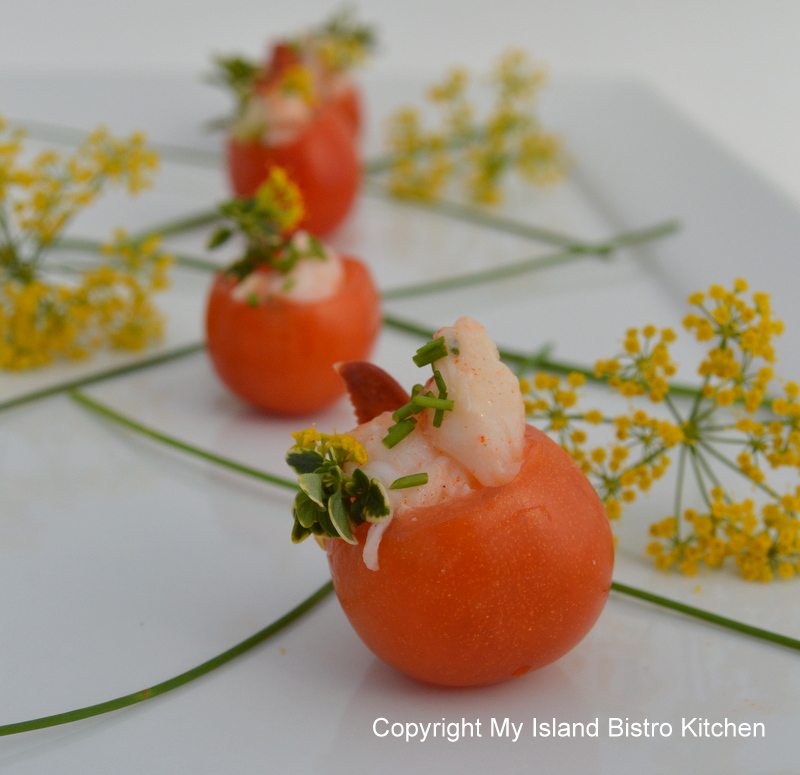
I used the same lobster salad recipe as I used for the filling in the lobster croissants that were featured for my labour day picnic. The only thing I did differently was to chop the lobster into smaller pieces so the salad would fit into the cherry tomatoes.
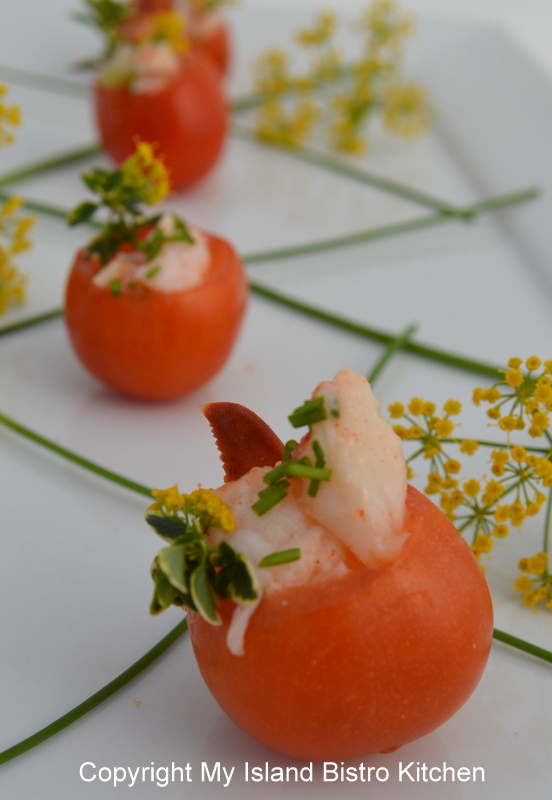
To assemble, slice off the stem end of the tomato. With a small coffee spoon, carefully hollow out and discard the seeds and juicy pulp of the tomatoes. Fill with lobster salad. Garnish with fresh herbs such as chives, thyme, and/or dill.

Thank you for visiting “the Bistro” today.
Be sure to visit my new Facebook page at My Island Bistro Kitchen. You may also wish to follow me on twitter @PEIBistro and on Pinterest at “Island Bistro Kitchen”.
Butter Tarts – A Quintessential Canadian Dessert

Butter Tarts that melt in your mouth. Is there anything better? There are as many recipes for Butter Tarts as there are bakers and pastry chefs making them. Essentially, these are the basic, core ingredients that will normally be common to all Butter Tart recipes: Brown sugar, eggs, butter (absolutely no substitutes), and usually some kind of syrup (e.g., maple, corn, or both). The ingredients may vary in different amounts from recipe to recipe and this will impact the flavor and texture of the filling. Continue reading Butter Tarts – A Quintessential Canadian Dessert
Grilled Peach Salad with Peach Balsamic Vinaigrette
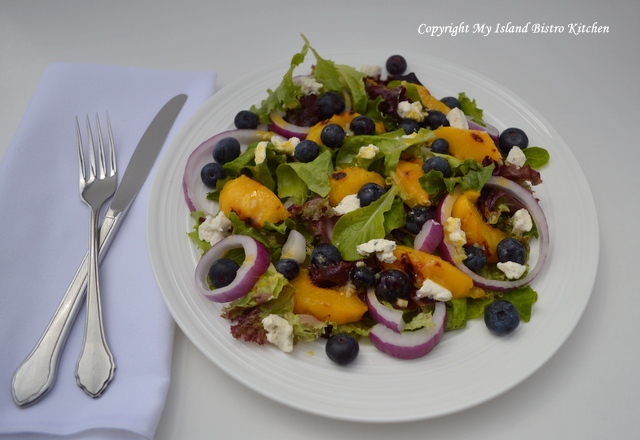
We have eaten a lot of salads from our garden produce this summer and I must admit I am starting to get a bit tired of the traditional green salad with tomatoes, cucumber, etc. The peaches have been divine this late summer so, for a change, I decided to grill them and make a fruit salad on fresh garden greens.
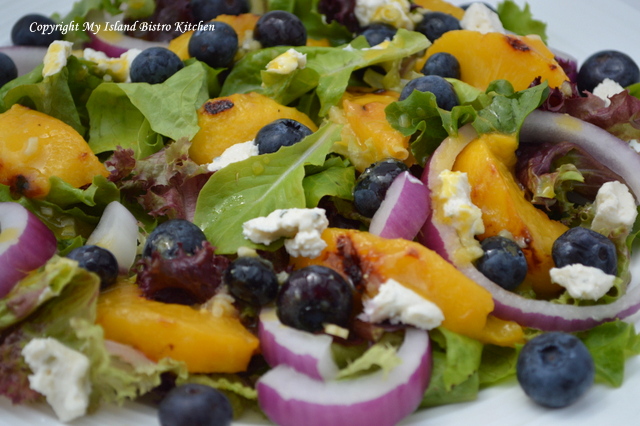
This is a tasty salad with the grilled peaches, fresh blueberries, red onion rings, and feta cheese on a bed of mixed greens. I topped it off with a peach balsamic vinaigrette made with peach balsamic vinegar and mandarin-infused olive oil from the Liquid Gold store here in Charlottetown.
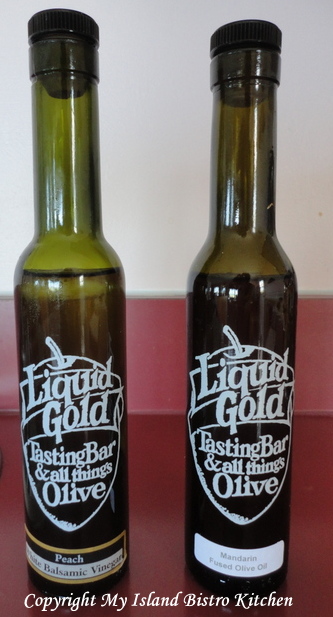
To grill the peaches, I cut each in half, removed the stone, and brushed both sides of the peaches with the mandarin- infused olive oil. Make sure the grill is greased as well.
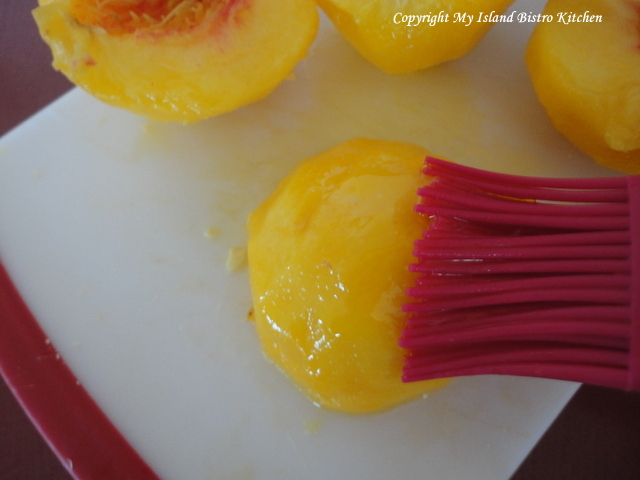
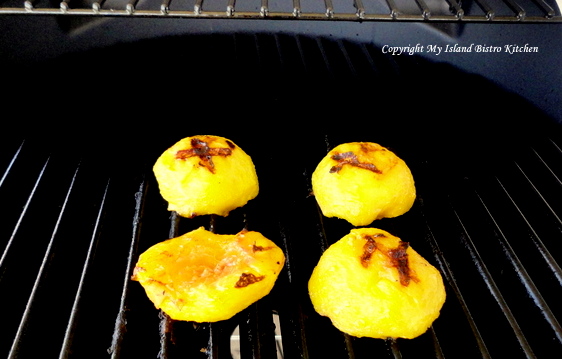
On a pre-heated grill (medium-high), the peaches only take 2-3 minutes, each side (use tongs to turn the fruit). Don’t overcook the fruit as it will become too soft and mushy. Grilling fresh fruit brings out the deep flavor of the fruit and intensifies the sweet taste. Plus, the grill marks on the peaches, enhance the presentation.
For salad for two:
mixed greens
2 grilled peaches
blueberries
red onion rings
feta cheese
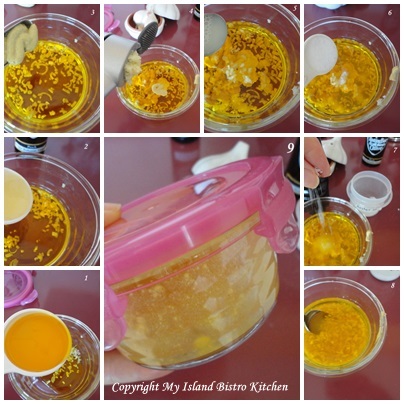
To make the dressing:
1/4 cup mandarin-infused olive oil
2 tbsp peach balsamic vinegar
4 tsp Dijon mustard
1 tsp minced garlic
1 green onion, finely sliced
2 tsp fresh lemon juice
2 tsp sugar
pepper, to taste
Kosher salt, to taste
Mix all ingredients together. Shake well. Drizzle over salad when ready to serve.
To assemble salad:
Make a bed of mixed greens on each plate. Place sliced grilled peaches on greens. Add red onion rings. Sprinkle with blueberries and feta cheese. Drizzle with Peach Balsamic Vinaigrette.

Thank you for visiting “the Bistro” today.
Be sure to visit my new Facebook page at My Island Bistro Kitchen. You may also wish to follow me on twitter @PEIBistro and on Pinterest at “Island Bistro Kitchen”.
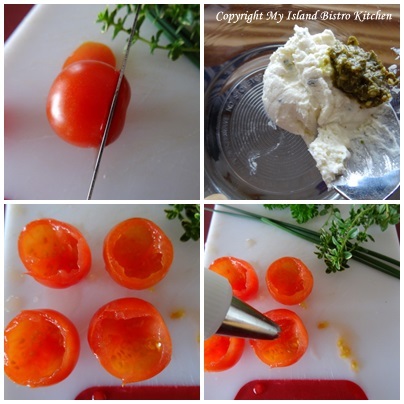
Cheese and Basil Pesto Stuffed Cherry Tomatoes
We have a bumper crop of cherry tomatoes in our garden this year. It’s always a challenge as to what to do with them because, let’s face it, there are only so many salads and cherry tomatoes one can eat. I have taken some to work colleagues, given some to neighbours, and still the tomato plants keep multiplying these Tiny Tim tomatoes. Here is one of my favorite ways to stuff cherry tomatoes for hors d’oeuvres or appetizers.

To be frank, I don’t really use a precise recipe for these tasty little morsels. Mix up some soft cheese such as boursin garlic herb – probably a couple of tablespoonfuls for the four tomatoes you see below. To that, add about 1/2 tsp of basil pesto and mix it together. Cut top of each tomato and scoop out tomato pulp leaving just the tomato shell. Using a small spoon or pastry bag with decorator tip, fill each tomato with cheese-basil mixture. Garnish with fresh herbs such as thyme, parsley, dill, and/or chives.
I like to serve these on a bed of parsley in small tasting spoons. It dresses them up.
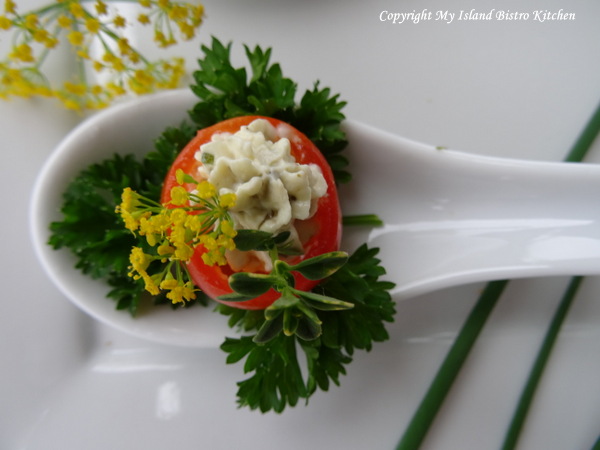
They are as colorful in presentation as they are tasty.
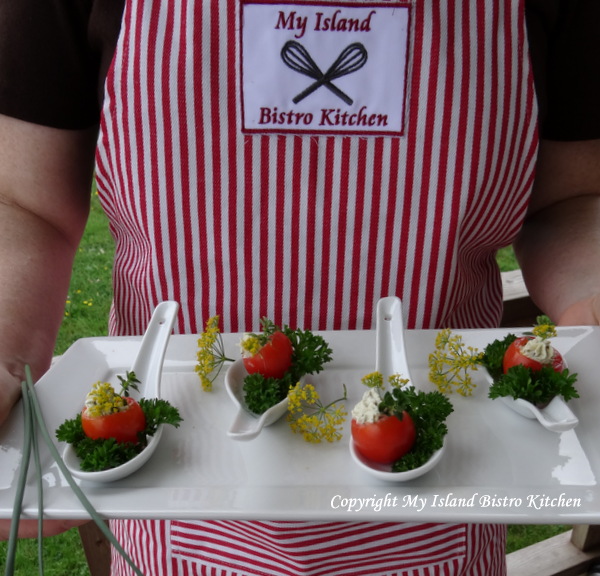
Thank you for visiting “the Bistro” today. There are lots of ways to connect with “the Bistro” through social media:
Join My Island Bistro Kitchen on Facebook
Follow the Bistro’s tweets on twitter @PEIBistro
Find the Bistro on Pinterest at “Island Bistro Kitchen”
Follow along on Instagram at “peibistro”
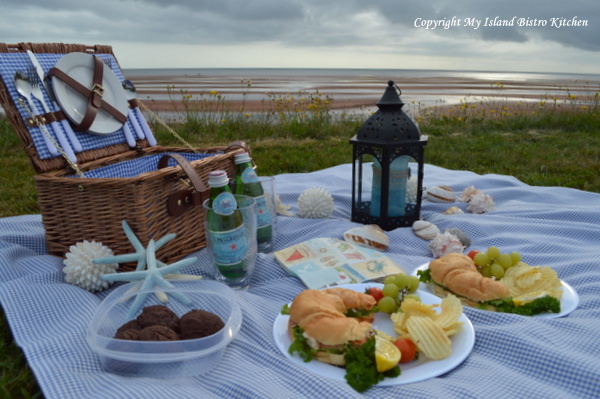
Labour Day Picnic by the PEI Seaside with Lobster Croissants on the Menu
I’ve had a great summer of picnics this year! Haven’t gone on this many picnics in many years. I had forgotten how much fun and relaxed al fresco dining can be. This posting will feature my Labour Day Weekend Picnic but, first, a little trip down memory lane.
One of my favorite summertime memories involves a picnic. I was visiting a neighbour playmate and we were probably about 8 or 9 years old. We took a notion one hot summer day that we would have a picnic by the little stream across the road from my friend’s place. The two of us stood by the friend’s mother at the kitchen counter as she whipped up some gourmet peanut butter and jelly sandwiches, placed them in an old tin school lunchbox, filled a thermos with Kool-aid (anybody remember Kool-aid?), and sent us off on our big adventure to the picnic by the stream. Off we went across the little country road, down through the cow pasture to a little stream which, at its deepest point was probably all of 4″ or 5″ deep. We situated ourselves, had our picnic, and probably returned to the house all in the span of about 15 minutes, no doubt ready for another activity! Yet, we had been on a picnic adventure and made a memory. That was back in the days when kids played outside all day and found numerous ways to amuse themselves and none of them involved cell phones or computers.
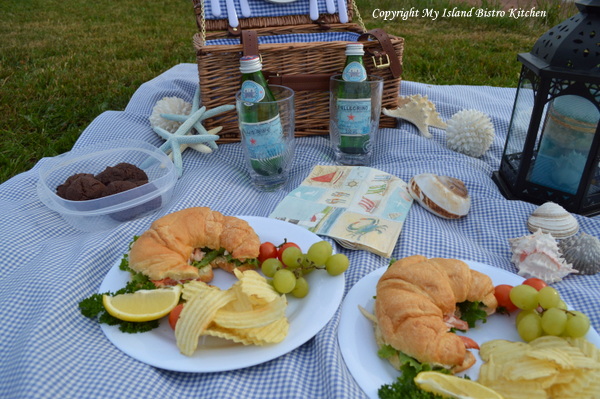
I will admit my picnic adventures have progressed and become a bit more sophisticated. There are so many options for picnic foods, particularly when it comes to sandwiches – there are traditional sandwiches with any number of different kinds of breads as options, wraps, baguettes, different kinds of rolls, bagels, etc. For my picnic by the sea today, I have chosen croissants. They are tasty and have a nice, soft texture. Because I live near the water and close to a small fishing village that has a fresh seafood market open daily in the summer, lobster was a logical choice for a croissant filling. The late summer fishing season has opened in Victoria-by-the-Sea on the south shore of PEI so buying lobster at the seafood market means the lobster is really, really fresh. Take a look at this 1 1/2+ pound lobster that I took home with me to make the filling for the croissants!
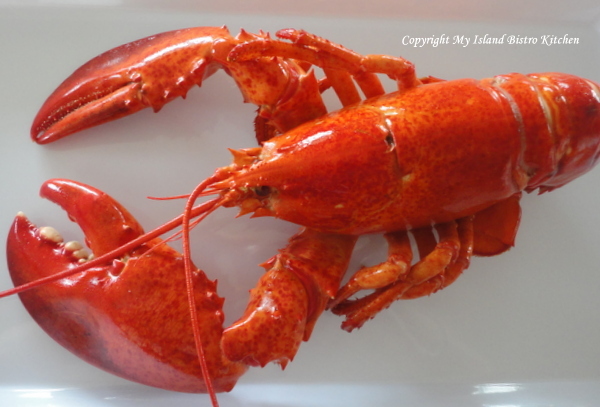
I don’t really have a defined recipe for lobster filling for sandwiches or croissants. I chop the lobster meat into fairly large chunks as I like to see good-sized pieces of lobster in a lobster roll or croissant — no mashed-up or shredded pieces of lobster meat will do for me!
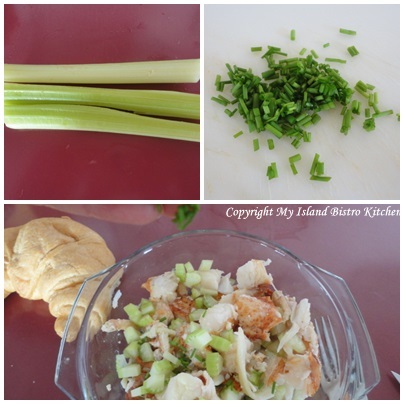
I add a bit of celery, some pepper, some fresh chopped chives, a splash of fresh lemon juice, and some homemade mayonnaise – just enough to hold the meat together and give it flavour. That’s it, nothing more as I don’t like anything that detracts from that rich lobster flavour.
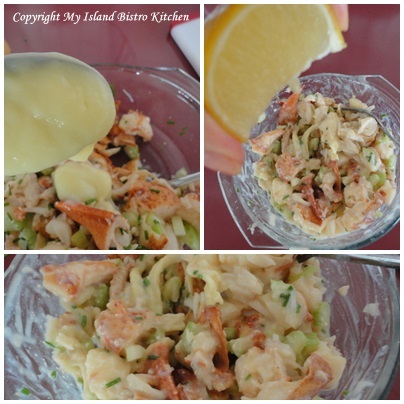
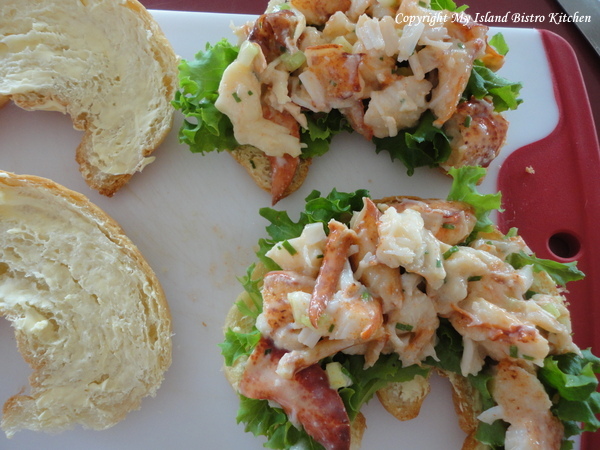
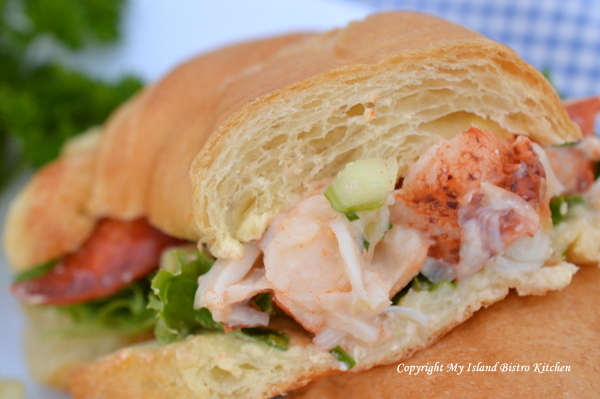
I buttered the croissants, added a bed of fresh lettuce from our garden and then heaped on the lobster filling. Yes, it was very yummy!
A little closer look….
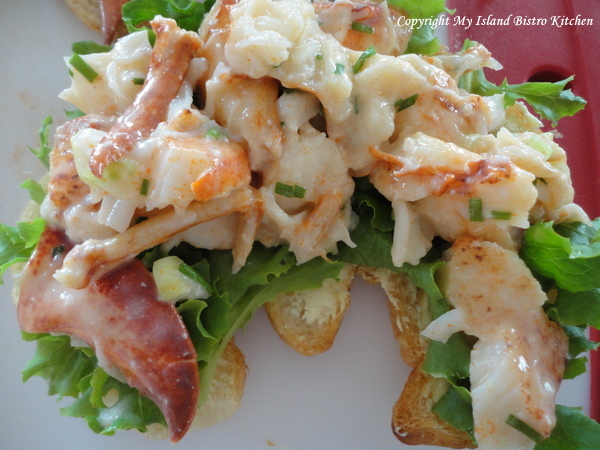
And, this is what I mean about wanting to see nice big pieces of lobster in the sandwich. Isn’t it mouthwatering and colorful!
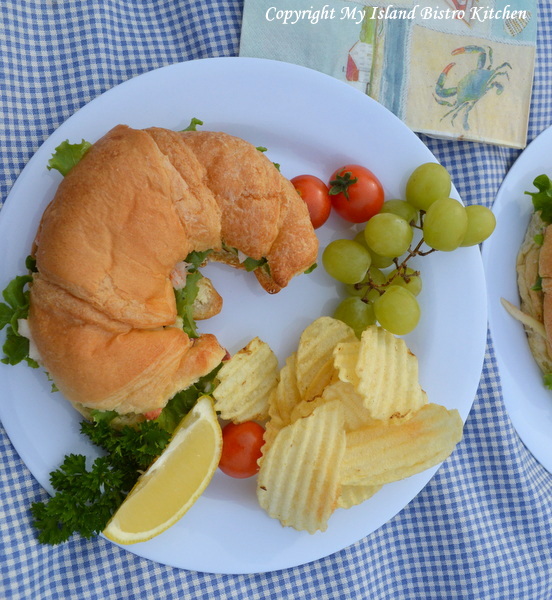
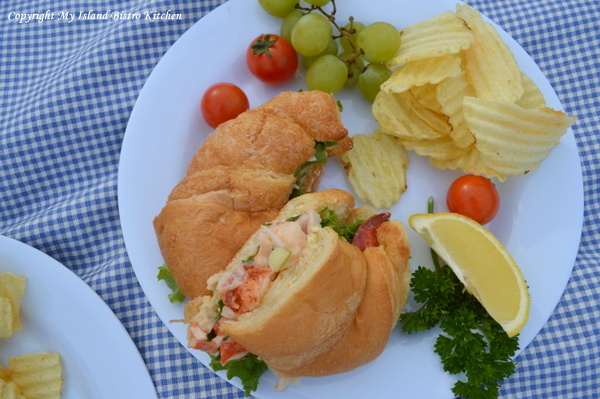
Add some potato chips and picnic fare doesn’t get much better than this, particularly when the picnic location is beside the water. With something as special as lobster, the menu does not have to be extensive. Let the lobster star all on its own!
Croissants are so easy to handle and eat…particularly when filled with lobster 🙂
My August Cookie of the Month was the chocolate drop cookie. They were dessert.
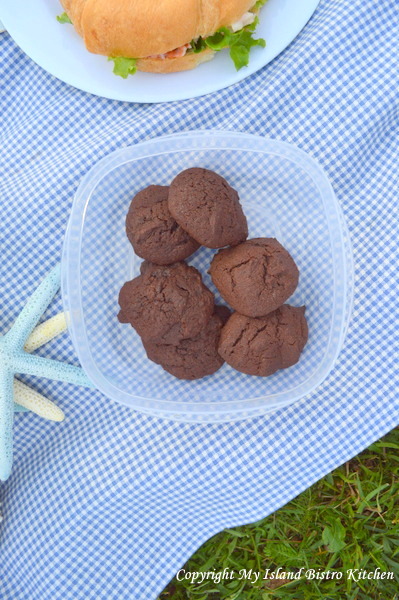
I added some fresh fruit – this time, some green grapes – and the picnic basket was ready to go.
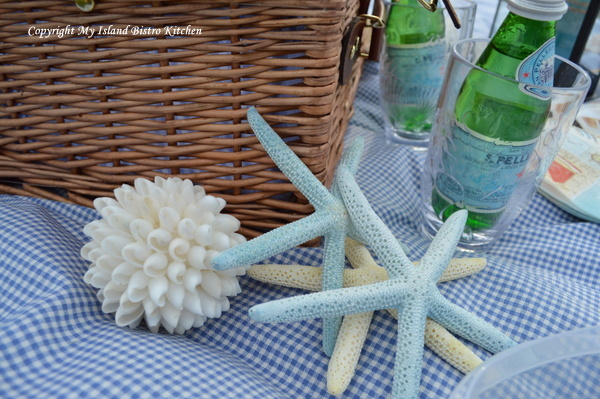
I always like to take along some props to dress up the picnic spread, regardless whether it is at a picnic table or on the ground as is the case here by the beach. It doesn’t matter whether I am in my dining room setting a formal table or outside, I like to think of setting the stage for a feast for the eye as well as for the stomach. A few props really can make an ordinary picnic a bit more special.
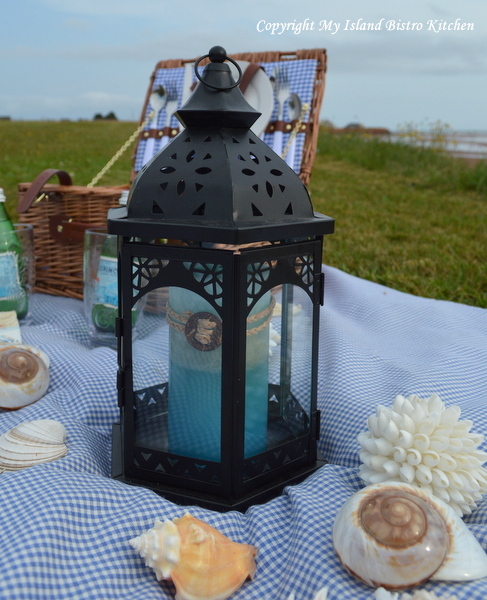
For my seaside picnic, all it took was a blue-checked cloth, a stylish matching wicker picnic basket, a lantern with a blue candle, and some seashells and starfish, to dress up the dining experience.
I love the patterns in the pink-red sandbars on PEI. Our Island beaches are extraordinary – on the south side, they tend to be more the pink-red color you see in the photo below while, on the north side, the sand is more of a soft pink color. This is definitely a dining room with a water view!

However, the sky began to look somewhat ominous so we thought we had better hurry up and eat in case a rain shower came along and spoiled the picnic.
I hope you have enjoyed some of the scenes from our seaside picnic that featured PEI lobster. Enjoy your Labour Day weekend.
Thank you for visiting “the Bistro” today. There are lots of ways to connect with “the Bistro” through social media:
Join My Island Bistro Kitchen on Facebook
Follow the Bistro’s tweets on twitter @PEIBistro
Find the Bistro on Pinterest at “Island Bistro Kitchen”
Follow along on Instagram at “peibistro”
A Visit to Burns Poultry Farm in Freetown, PEI
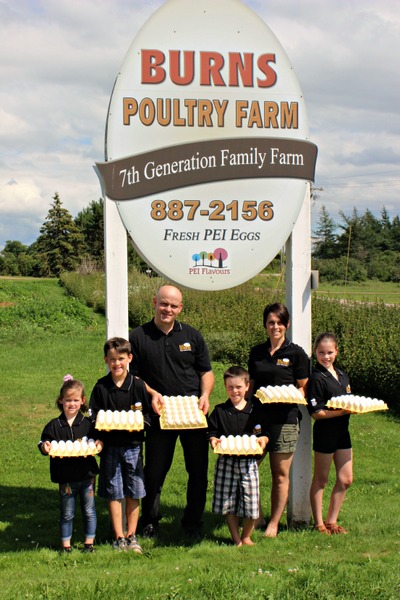
(Photo: Lynda MacSwain. Submitted by Wendy Burns with permission.)
I have a keen interest in where the food I eat is produced. Recently, I visited Burns Poultry Farm in Freetown, PEI, to find out about egg production. There are five active registered egg-producing poultry farms on PEI, one of which is the Burns farm.
Before seeing the egg grading process in action, I sat down with Wendy Burns to find out about their poultry farm. Wendy’s husband, Nathan, is a 7th generation egg farmer on PEI so the Burns family knows a thing or two about egg production! Wendy and Nathan bought the poultry farm from Nathan’s parents in 2001. Wendy remarks that, from the time he was very young, Nathan had a keen interest in poultry farming and knew what his future vocation was going to be! Wendy manages the office, the accounting, and payroll while Nathan tends to the feed formulations, egg production, and egg grading.
The couple met while attending Nova Scotia Agricultural College, from which they both graduated – Nathan from the Agricultural Engineering Program and Wendy with a Bachelor of Science in Agriculture. In addition to being parents to four active growing children, this couple has transformed their egg farm into a very efficient family business. They have expanded existing barns; built a new barn for the laying hens; added a bigger generator with an automatic switch that kicks in if the farm is without power for 5 seconds; expanded their cooler capacity; invested in a new egg packer that packs eggs each day from their laying barns; upgraded their water systems to provide ozonated water for the hens which aids in their digestion; purchased a Pulsefog machine to disinfect the barns faster and more efficiently; and installed a state-of-the-art grading machine into their newly-renovated, federally-inspected egg grading station.

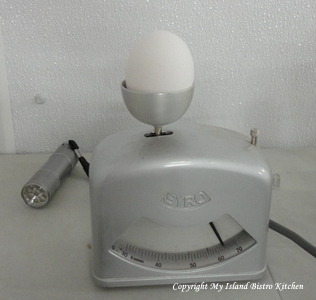
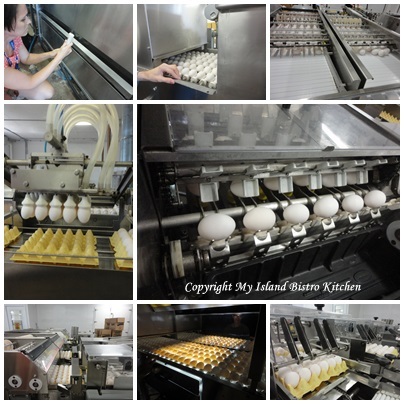
The Burns family holds quota for about 32,000 laying hens and they have three equally-sized barns that house the flock. With over 90% of the hens laying one egg per day, it is a lot of eggs to gather. Every time an egg is handled or moved, it increases the potential for damage or cracks. Wendy explains that, with their efficient collection system, it is possible for a hen to lay an egg and the egg not be touched by a human hand until the consumer takes it out of the carton or the restaurant chef cracks the egg on the grill. This is because the Burns’ have an “in-line” system that transfers the eggs from the barns via a conveyer belt to the grading station.
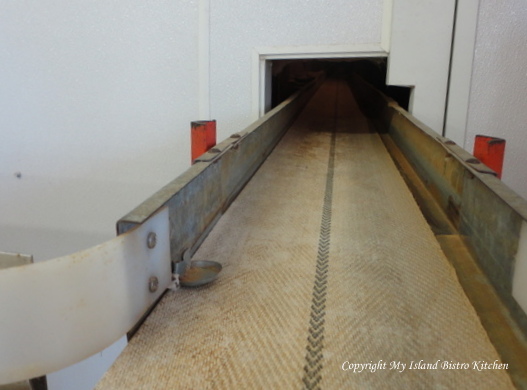
The system the Burns have installed is all computerized so it allows the eggs to come from the barns, be counted, washed, candled, graded, packed, and in their cooler in approximately 15 minutes. Now, that’s what I call farm-fresh eggs!
I wasn’t able to go inside the barns where the hens are housed so I did not see any of the laying hens. This is because of their on-farm food safety program and biosecurity protocol. Wendy says “the goal is to maintain a consistent, undisturbed environment for the birds because deviations from their normal habitat could affect their well-being and, consequently, egg production”. On a daily basis, only Nathan and two workers are permitted inside the barns. A walk-through of each barn is done twice per day and each row of hens is checked to ensure the birds have enough water and feed and that their environment is comfortable. Nathan also checks the barns each evening after all the feedings are finished to ensure all is well before lights out. Wendy explains that the only other person permitted to enter the barns is the inspector from the Egg Farmers of Canada. “The inspector makes several site visits each year where the birds are counted and swabs are taken for testing to ensure there are no diseases present”, explains Wendy. The inspector also audits their Start-Clean/Stay-Clean records to ensure all protocols follow the guidelines of their On Farm Food Safety Program.

Wendy was able to tell me about their flock. At the time of my visit, the hens were all one breed – Lohmanns. They all lay white eggs but Wendy says that the farm placed some brown egg layers in the grow barn last cycle and those hens will begin to lay brown eggs in September. The highest expense in the operation is the feed. The Burns monitor feed consumption to ensure the hens are getting adequate nutrition. The hens need different levels of nutrients, such as calcium and protein, at different ages. This ensures bird health is maintained and the hens produce the best quality of eggs possible.
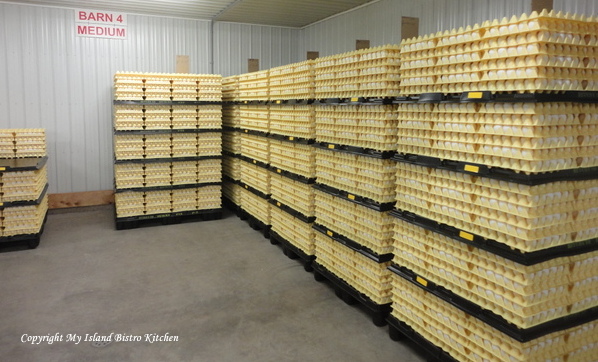
It takes 18-19 weeks for a chick to become a laying hen. The chicks arrive in batches of about 12,000, two or three times a year. Wendy says that it is always an exciting day on the farm, as you can imagine, with four young children seeing 12,000 baby chicks arriving all at once! The Burns have three production barns that house the hens, each containing a flock of hens of a certain age – i.e., 20 weeks apart in age. This means their farm can ensure a steady supply of high-quality fresh eggs for customers year round.
I asked Wendy what determines the different sizes of eggs. She tells me that it is the weight of the egg that will determine if it is a small, medium, large, or extra large egg. Younger hens typically lay smaller eggs and the average egg size increases as the hens age. Generally, medium, large, and extra large eggs are packed for the fresh shell egg market while the other sizes are sent off for industrial use – for example, dried for cake mixes, frozen, liquid whole egg, or whites only. No eggs, regardless of size, are wasted.
Eggs are a supply-managed commodity. The egg industry is heavily regulated and the Burns must comply with the regulations of the Egg Farmers of Canada and the Canadian Food Inspection Agency, in terms of housing the hens, cage density, sanitation programs, welfare of the birds, and pest control. There is a lot of record-keeping involved in the operation of an egg farm and egg-grading station. All food safety-based programs are in place to ensure the safest possible supply of eggs for consumers.
Wendy tells me that the “Best Before” date of graded eggs is six (6) weeks from the date they are graded. She also explains that washing the eggs, which is an obvious necessity, reduces the shelf life of eggs as it removes the natural sealant that the hens leave on the eggs when they are laid.
I asked Wendy what their biggest challenge is as egg farmers. She says she has concerns over the possibility that, at some point, supply management of the egg industry could be disbanded. This is the Canadian system that regulates quota and, consequently, egg production. If that was to happen, anybody could build a barn and start large-scale egg production, with no food safety procedures, no testing protocol, or no rules. As Wendy explains, “currently, registered egg producers pay levies that pay for their food safety protocols, testing, and ensure there is no surplus of eggs on the market which could impact negatively on their chance of a fair return for their investments and hard work.” As Wendy says, “being a regulated producer is a big investment but it provides stability without relying on government dollars as it is producer-funded”.
As for their greatest source of satisfaction as egg farmers, Wendy says she and Nathan work well together and the couple enjoy being their own boss. They like the challenge that comes with no two days being the same on the farm. Wendy tells me she really enjoys the lifestyle of living and working on the farm as it allows her to be home with her children before they catch the school bus and greet them when they return home in the afternoon.
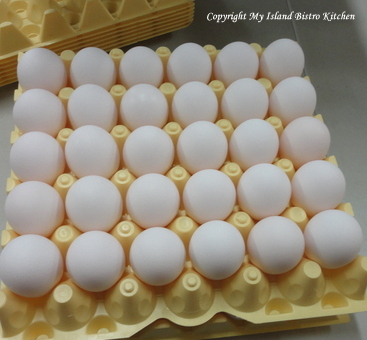
The day I visited the Burns farm, they were busy with their egg grading which takes place once a week. By the end of the day, they would have graded approximately 55,000 eggs for market!
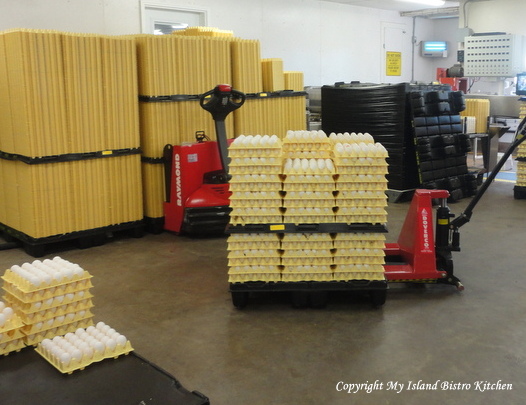
The number of eggs graded is determined by what the farm can sell as graded product. On days when no grading is taking place, the eggs are packed on to plastic trays by a farm packer machine, loaded on to pallets, and refrigerated. Eggs that are surplus to fresh markets are sold as industrial product.

The farm employs three individuals full-time on a year-round basis and six individuals on a part-time basis.
So, some interesting egg trivia I learned:
– egg shells are made up mostly of calcium – the better the quality of egg shell, the less likelihood there will be of cracked eggs.
– the color of the egg shell (white or brown) is determined by the genetics of the hen, not by diet.
– the color of the egg yolk is determined by what grains the hens are fed (yes, there really is a difference in the color of egg yolks — paler yolks result when paler grains are fed, such as barley or wheat, and a richer yolk color results when corn is in the feed)

– according to the Egg Farmers of PEI Website, Island egg farmers produced 3,304,300 dozen eggs in 2012 and about 50% of those were consumed by Islanders! That’s a lot of eggs!
Nathan and Wendy are marketing their eggs through ADL Foods. The public may purchase the eggs on-site at the ADL Foods Retail Outlet in Reads Corner on Highway 1A in Summerside. ADL Foods also sells Burns Poultry Farm’s eggs by the box to many Island restaurants so, chances are, if you have eaten an egg at an Island restaurant that gets its eggs from ADL Foods, you may have eaten an egg produced by this 7th generation PEI family farm.
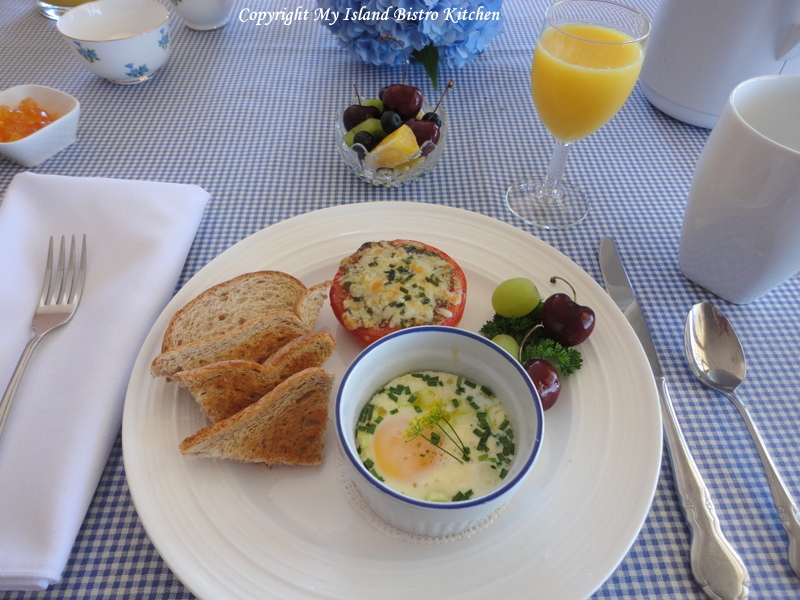
I used Burns’ eggs in the following recipe for Baked Eggs with Basil Pesto and Cheese.
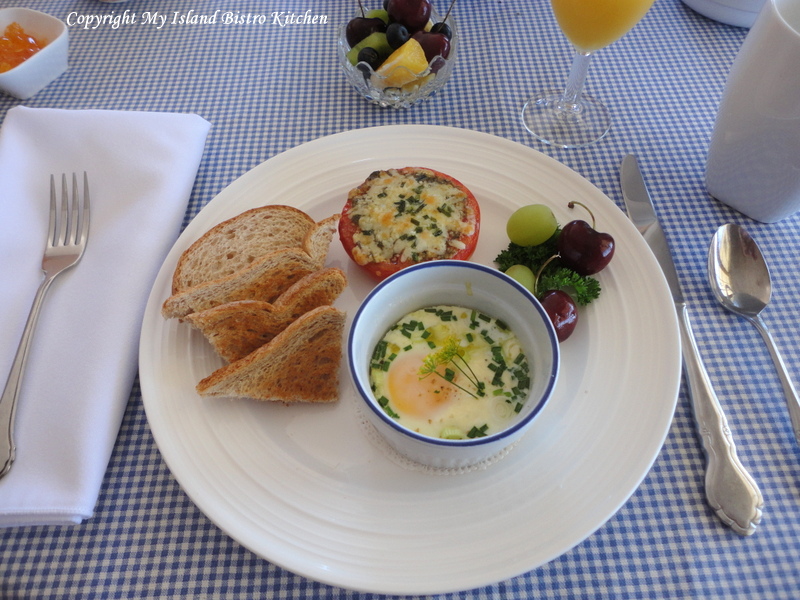
Baked Eggs with Basil Pesto and Cheese
Ingredients:
2 large eggs
3 tsp basil pesto
4 tsp grated Parmesan cheese
2 tbsp milk or cream
1 green onion, sliced
Fresh chives, chopped
Salt and pepper, to taste
2-3 tsp Boursin Garlic and Fine Herbs cheese, or your favorite feta cheese
Method:
Assemble ingredients.
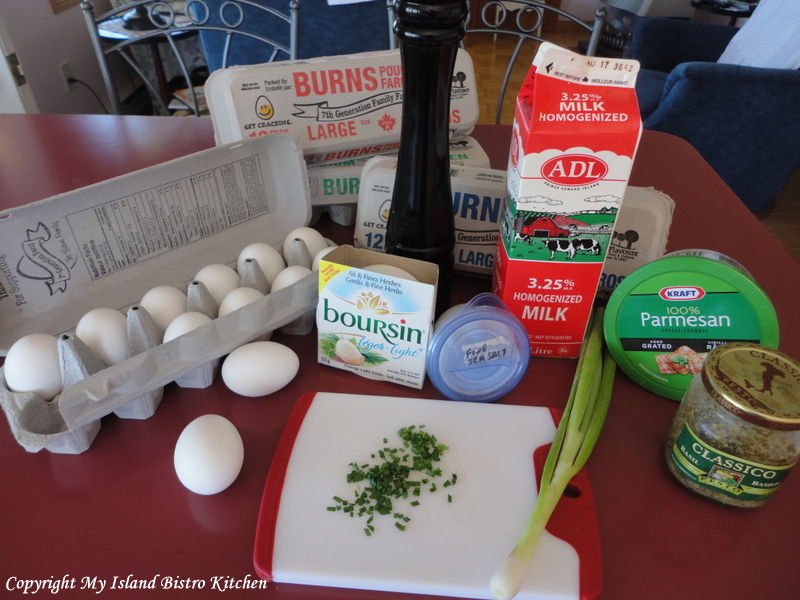
Preheat oven to 325C.
Spray two ramekins dishes with cooking spray. Place 1 ½ tsp pesto in bottom of each dish and swirl it around so bottom of ramekin are covered with pesto. Sprinkle 1 – 2 tsp parmesan cheese on top of pesto. Crack one egg into each ramekin without breaking the yolk. Add 1 tbsp milk or cream to each dish. Sprinkle each with sliced green onions and fresh chives. Add salt and pepper to taste. Top with 1 to 1 ½ tsp soft cheese.
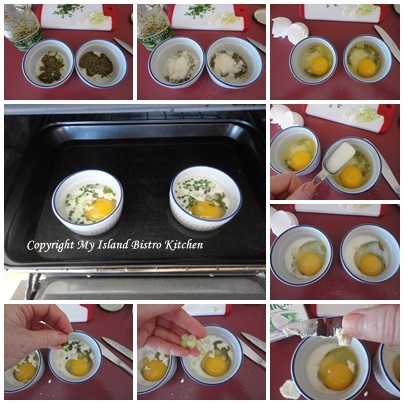
Place ramekins in oven-proof baking pan. Fill up pan with boiling water until it reaches the half-way point on the sides of the ramekins.
Bake eggs for 10-20 minutes, depending on whether you like eggs runny, medium, or well done.
Serves: 2
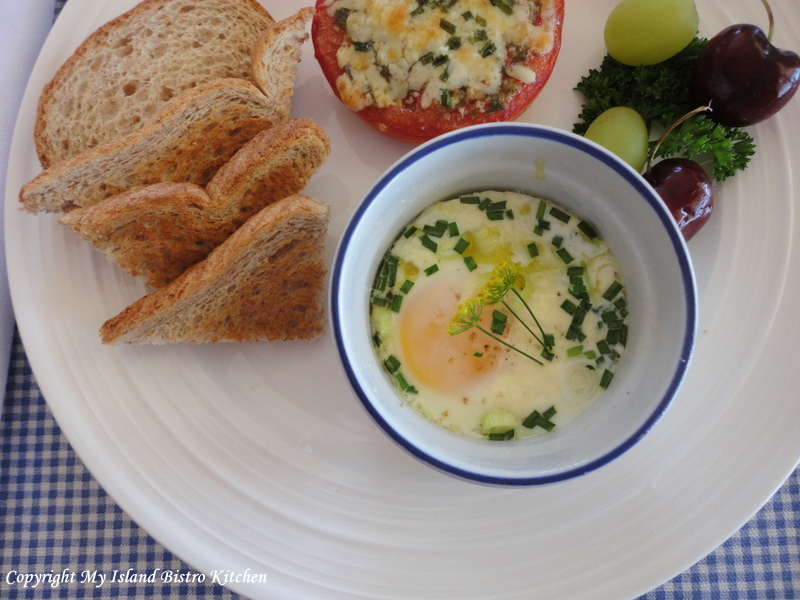
This egg dish is perfect for a special weekend morning breakfast or brunch or even for a light supper.
My thanks to Nathan and Wendy Burns for taking time out of a busy day to meet with me and explain the egg production process at their farm.

Baked Eggs with Basil Pesto and Cheese
This egg dish is perfect for a special weekend morning breakfast or brunch or even for a light supper.
Servings 2
Ingredients
- 2 large eggs
- 3 tsp basil pesto
- 4 tsp grated Parmesan cheese
- 2 tbsp milk or cream
- 1 green onion, sliced
- Fresh chives, chopped
- Salt and pepper, to taste
- 2-3 tsp Boursin Garlic and Fine Herbs cheese, or your favorite feta cheese
Instructions
- Assemble ingredients.
- Preheat oven to 325C.
- Spray two ramekins dishes with cooking spray. Place 1½ tsp pesto in bottom of each dish and swirl it around so bottom of ramekin are covered with pesto. Sprinkle 2 tsp parmesan cheese on top of pesto in each ramekin. Crack one egg into each ramekin without breaking the yolk. Add 1 tbsp milk or cream to each dish. Sprinkle each with sliced green onions and fresh chives. Add salt and pepper to taste. Top with 1 to 1½ tsp soft cheese.
- Place ramekins in oven-proof baking pan. Fill up pan with boiling water until it reaches the half-way point on the sides of the ramekins.
- Bake eggs for 10-20 minutes, depending on whether you like eggs runny, medium, or well done.
Recipe Notes
Serves: 2
Thank you for visiting “the Bistro” today. There are lots of ways to connect with “the Bistro” through social media:
Join My Island Bistro Kitchen on Facebook
Follow the Bistro’s tweets on twitter @PEIBistro
Find the Bistro on Pinterest at “Island Bistro Kitchen”
Follow along on Instagram at “peibistro”
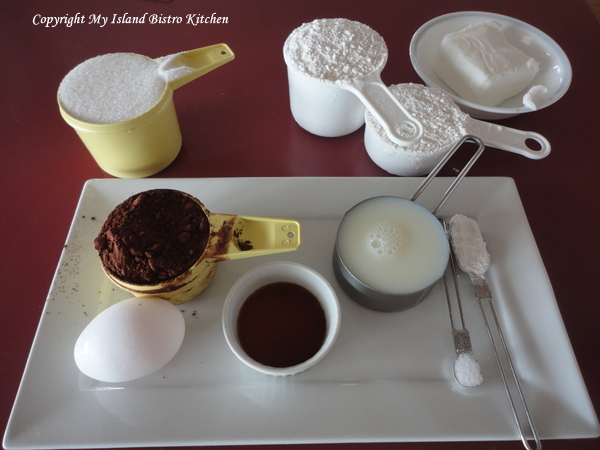
Chocolate Drop Cookies

I have always been a chocolate lover. These chocolate cookies were ones my Mother often made when I was a child. I like the rich chocolate flavour and somewhat chewy center they have. These cookies don’t take any uncommon ingredients or ones most bakers wouldn’t have in their cupboards. Of course, using the best cocoa you can find will make for a richer, more flavourful cookie.
They are very easy to make and, being drop cookies, there is no rolling the dough and cutting out shapes and no need for any icing. Simply scoop up some dough with a teaspoon and use another to slide the dough off the spoon and on to the cookie sheet. These cookies can be dressed up with 1/2 cup of either chopped nuts, dates, raisins, or even chocolate chips. However, I don’t add any extras to them as I like the smooth texture and flavour they have on their own without any further additions.
[Printable recipe follows at end of posting]
Chocolate Drop Cookies
1/2 cup shortening, softened
1 cup white sugar
1 egg
1 tsp vanilla
1/2 cup milk
1 1/2 cups flour
1/2 cup cocoa
1 tsp baking powder
1/4 tsp salt
Method:
Preheat oven to 375F.
With electric mixer, beat shortening and sugar together until light and fluffy (1-2 minutes). Beat in egg, vanilla, and milk.
Into separate bowl, sift together the flour, cocoa, baking powder, and salt. Add to wet ingredients and stir just until dry ingredients are incorporated.
Drop by teaspoonfuls onto parchment-lined baking sheet.
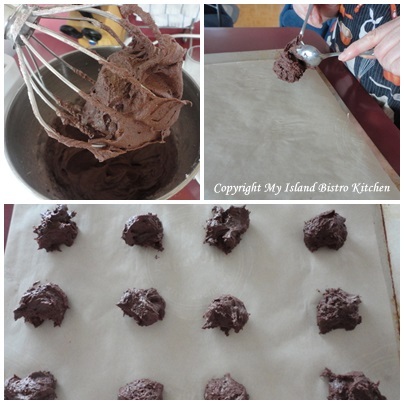
Bake 10-11 minutes. Do not overbake or cookies will be dry.
Yield: Apx. 3 dozen
These cookies are good any time and make good lunch box treats as well as picnic basket fare. They are especially good with a dish of vanilla ice cream!


Chocolate Drop Cookies
Chocolate lovers will love these easy-to-make rich Chocolate Drop Cookies with their slightly chewy interior
Ingredients
- 1/2 cup shortening, softened
- 1 cup white sugar
- 1 egg
- 1 tsp vanilla
- 1/2 cup milk
- 1 1/2 cups flour
- 1/2 cup cocoa
- 1 tsp baking powder
- 1/4 tsp salt
Instructions
- Preheat oven to 375F. Line baking sheet with parchment paper.
- With electric mixer, beat shortening and sugar together until light and fluffy (1-2 minutes). Beat in egg, vanilla, and milk.
- Into separate bowl, sift together the flour, cocoa, baking powder, and salt. Add to creamed mixture and stir just until dry ingredients are incorporated.
- Drop by teaspoonfuls onto prepared baking sheet.
- Bake 10-11 minutes. Do not overbake or cookies will be dry. Let cookies rest on baking sheet for 3-4 minutes then transfer to wire rack to cool completely.
Recipe Notes
Yield: Apx. 3 dozen
Pin Me To Pinterest!

Thank you for visiting “the Bistro” today. There are lots of ways to connect with “the Bistro” through social media:
Join My Island Bistro Kitchen on Facebook
Follow the Bistro’s tweets on twitter @PEIBistro
Find the Bistro on Pinterest at “Island Bistro Kitchen”
Follow along on Instagram at “peibistro”
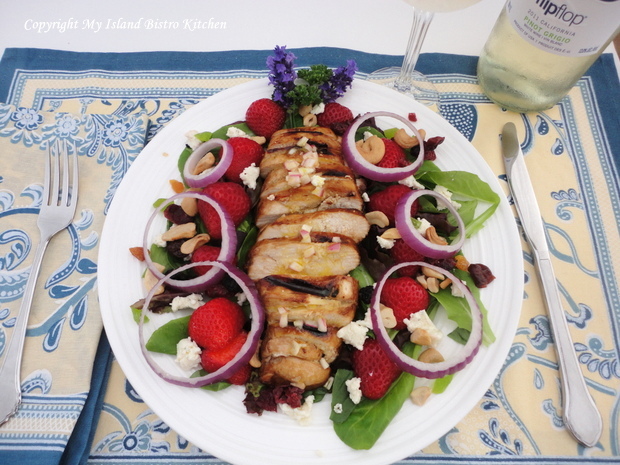
Grilled Chicken, Strawberry, and Feta Cheese Salad

With warm summer evenings, it’s nice to have a go-to recipe for an easy-to-prepare, light yet filling, entrée. One of my favorite summertime evening meals is warm grilled chicken served over a strawberry, feta cheese, and green salad and drizzled with a good balsamic vinaigrette.
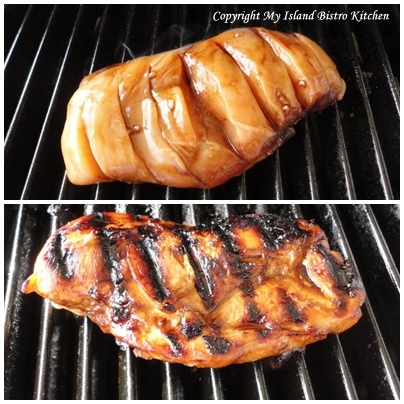
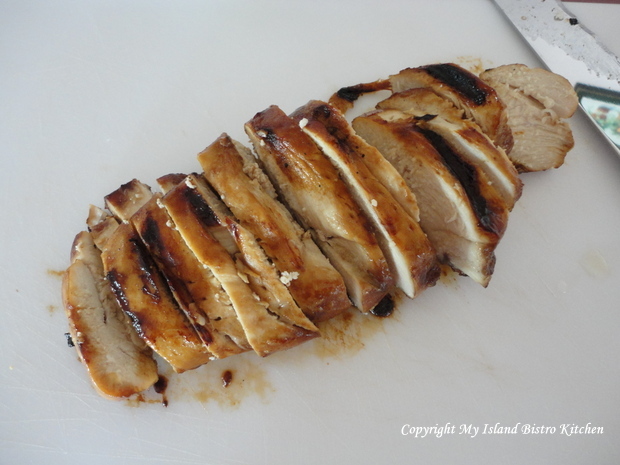
The option is yours to choose to marinade the boneless, skinless chicken breasts or not. I usually do and I don’t follow a precise recipe for the marinade but these are the usual ingredients: brown sugar, olive oil, balsamic vinegar, garlic, minced onion, soya sauce, salt, and pepper. As for quantities of each ingredient, I don’t actually measure them out and add more or less, depending on how many chicken breasts I am marinating. I make several horizontal cuts in the chicken breasts to allow the marinade to permeate through the meat. Place the chicken breasts in a ziplok bag, mix together the marinade and pour it into the bag, making sure the entire chicken breasts are covered. Zip up the bag and place it in the fridge for several hours (I usually aim for between 2 and 4 hours). Heat up the grill and cook the chicken breasts until they are done.
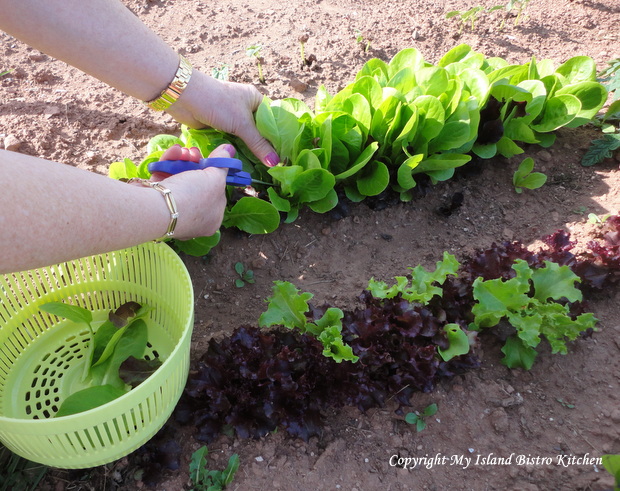
One of the pleasures of summer is having our own garden. We eat a lot of salads and there is nothing better than running to the garden right before meal time and gathering a medley of fresh lettuce as well as some herbs from our little herb garden.
Slice the warm grilled chicken breast horizontally into slices about ¼” thick.
Cover the plate with a medley of greens. Transfer the cut-up chicken breast to centre of the plate on top of the lettuce bed. Slice up and add some fresh strawberries and red onion rings. Sprinkle with feta cheese and a few nuts such as cashews or sunflower seeds (or both!). Add a balsamic vinaigrette and voila, a tasty and light dinner. Serve with baguette slices and a refreshing glass of your favorite white wine. Here I have selected “flipflop”, a California Pinot Grigio which made a fine accompaniment to a summer salad.
My recipe for the vinaigrette follows. Of course, you know the secret to a really good vinaigrette – the best quality of olive oil and balsamic vinegar you can find. Because we have a “Liquid Gold Tasting Bar & All Things Olive” store in Charlottetown, I buy their olive oil and vinegar products because they are superior and fresh quality.
Peach and Mandarin Balsamic Vinaigrette
¼ cup Mandarin-infused olive oil
2 tbsp peach white balsamic vinegar
4 tsp Dijon mustard
1 tsp minced garlic
1 small green onion or 1 – 2 tsp finely chopped red onion
2 tsp freshly-squeezed lemon juice
1 ½ – 2 tsp sugar, to taste
Freshly ground pepper
Kosher salt, to taste
Mix and shake all ingredients together until well mixed. Drizzle over salad at time of serving.
Thank you for visiting “the Bistro” today. There are lots of ways to connect with “the Bistro” through social media:
Join My Island Bistro Kitchen on Facebook
Follow the Bistro’s tweets on twitter @PEIBistro
Find the Bistro on Pinterest at “Island Bistro Kitchen”
Follow along on Instagram at “peibistro”
Brown Sugar Jam-Filled Cookies
Today, I am sharing an old family favourite – Brown Sugar Jam-Filled Cookies. Continue reading Brown Sugar Jam-Filled Cookies
