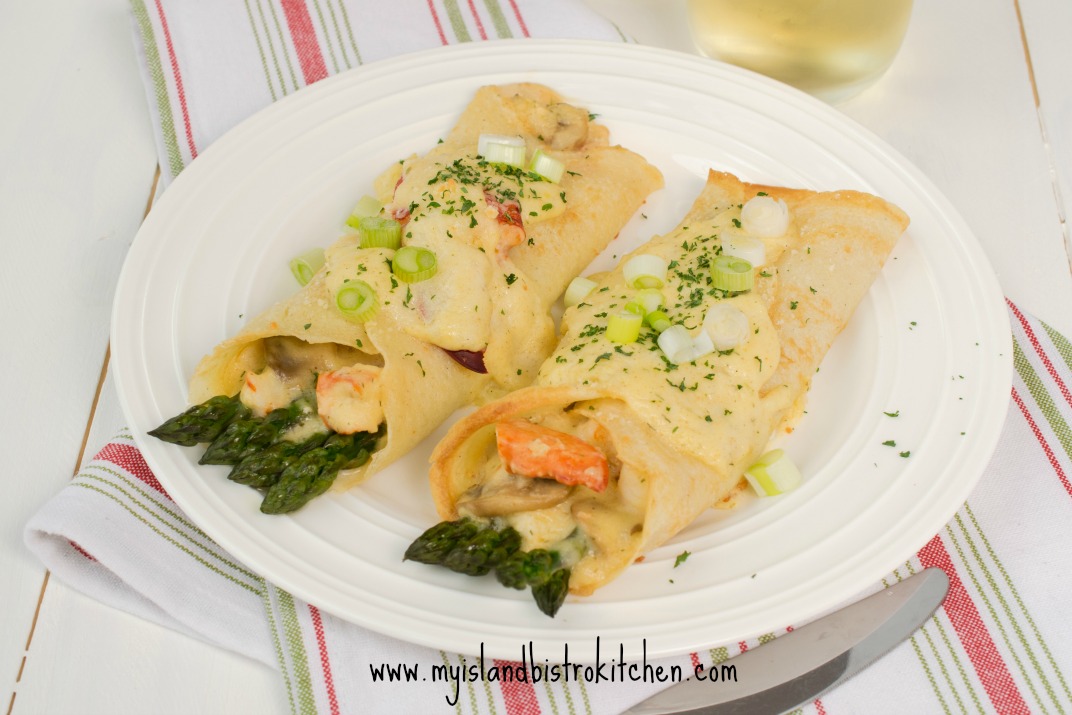
Springtime in Prince Edward Island on Canada’s east coast means it’s lobster season so it’s a great time to make these delectable lobster and asparagus crepes that combine two of the season’s special treats! Continue reading Lobster and Asparagus Crepes→
Setting Day on Prince Edward Island can only mean one thing…..it heralds the opening of the spring lobster fishery and a fresh feed of PEI lobster from the cold waters that surround our Atlantic Canada region will follow soon after! Continue reading Setting Day on Prince Edward Island Can Only Mean One Thing→
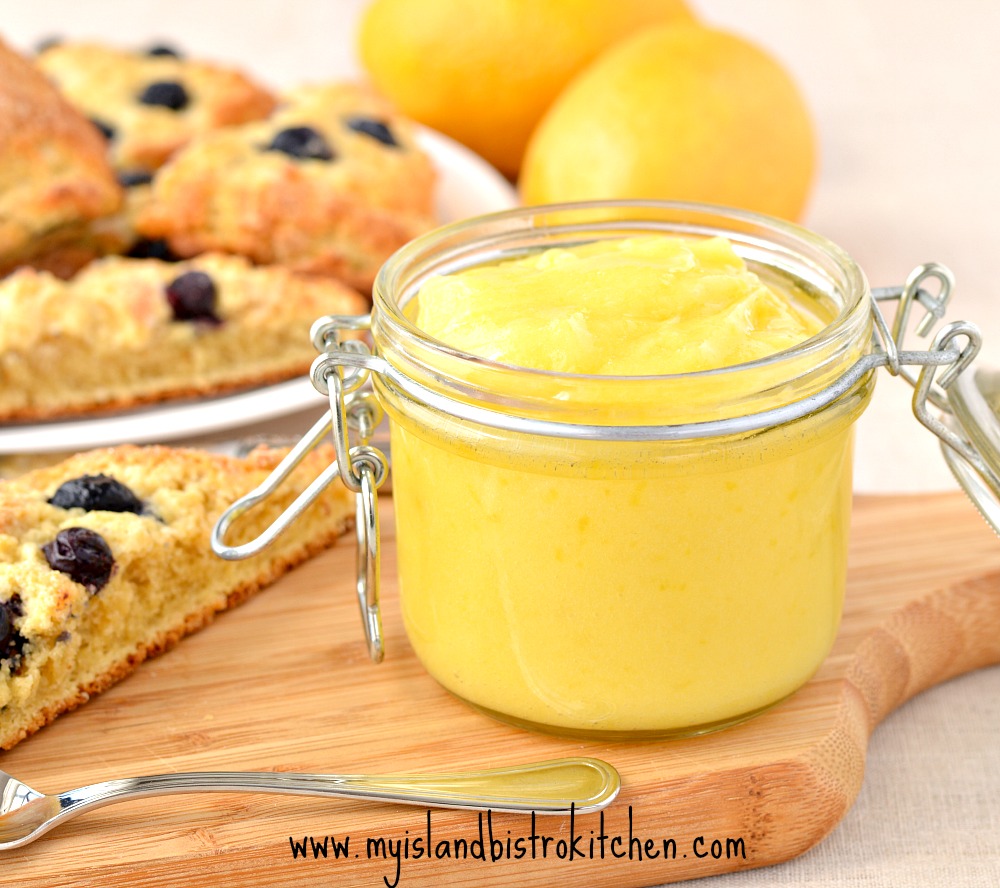
I adore lemon curd – luscious lemon curd – that wonderful balance of lemon’s acidity and tartness with the sweetness of sugar. I love it so much that it’s a staple in my refrigerator. Continue reading Luscious Lemon Curd→
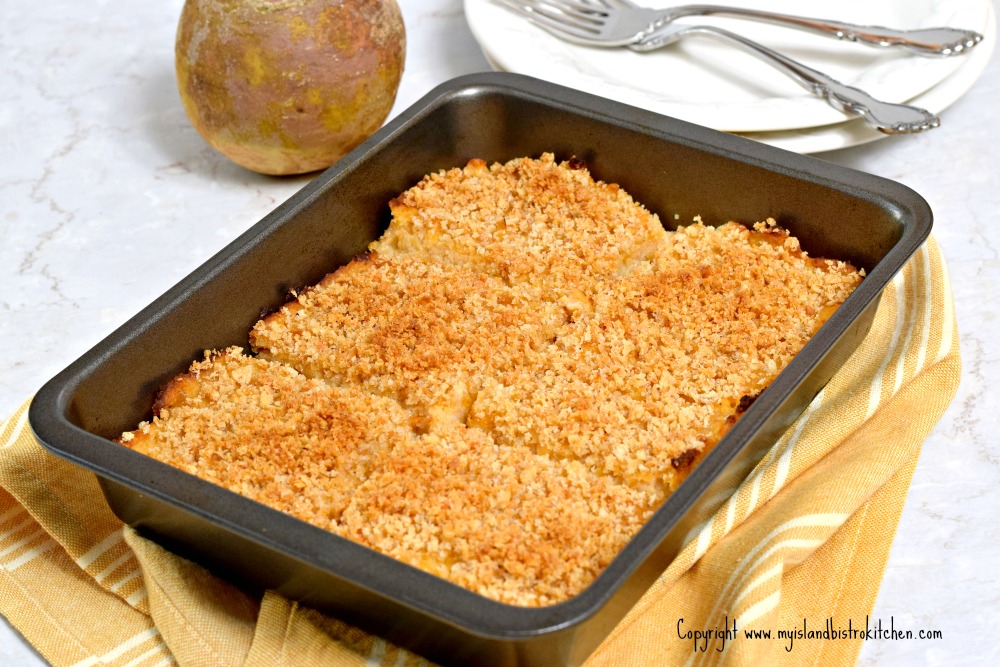
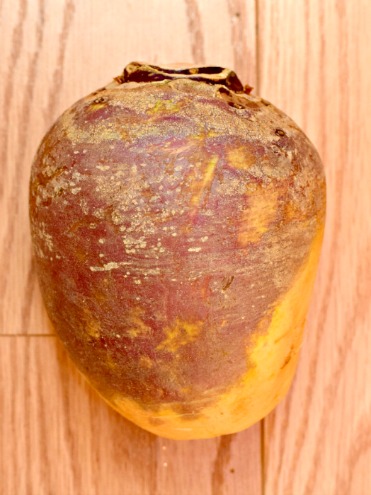
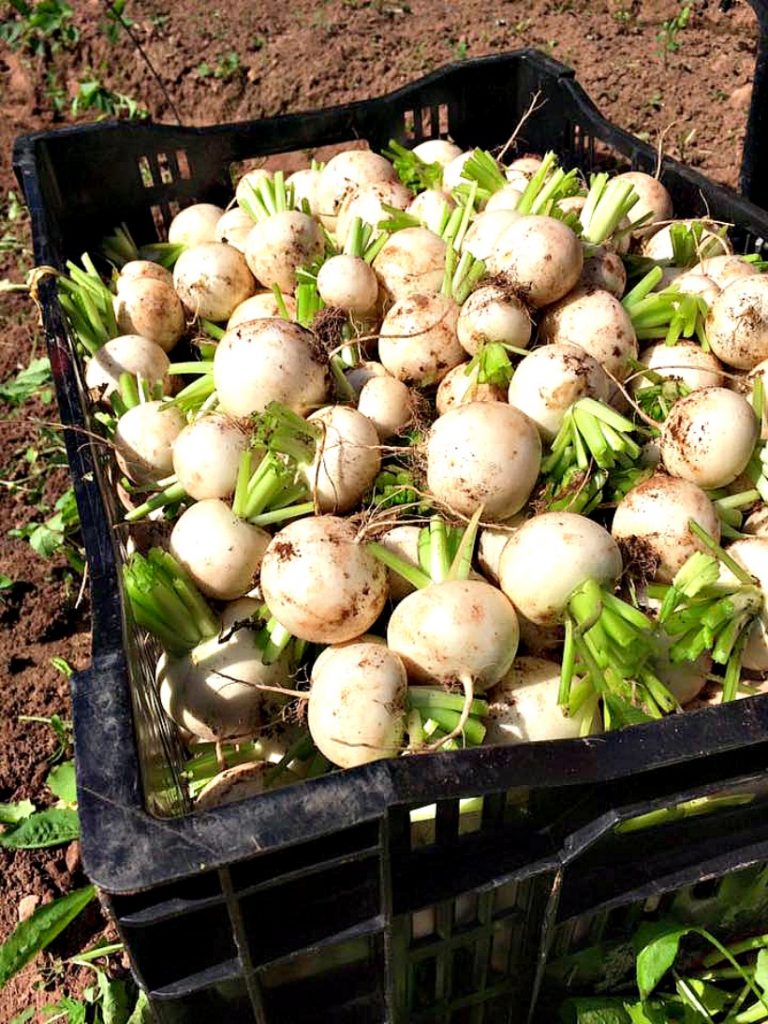
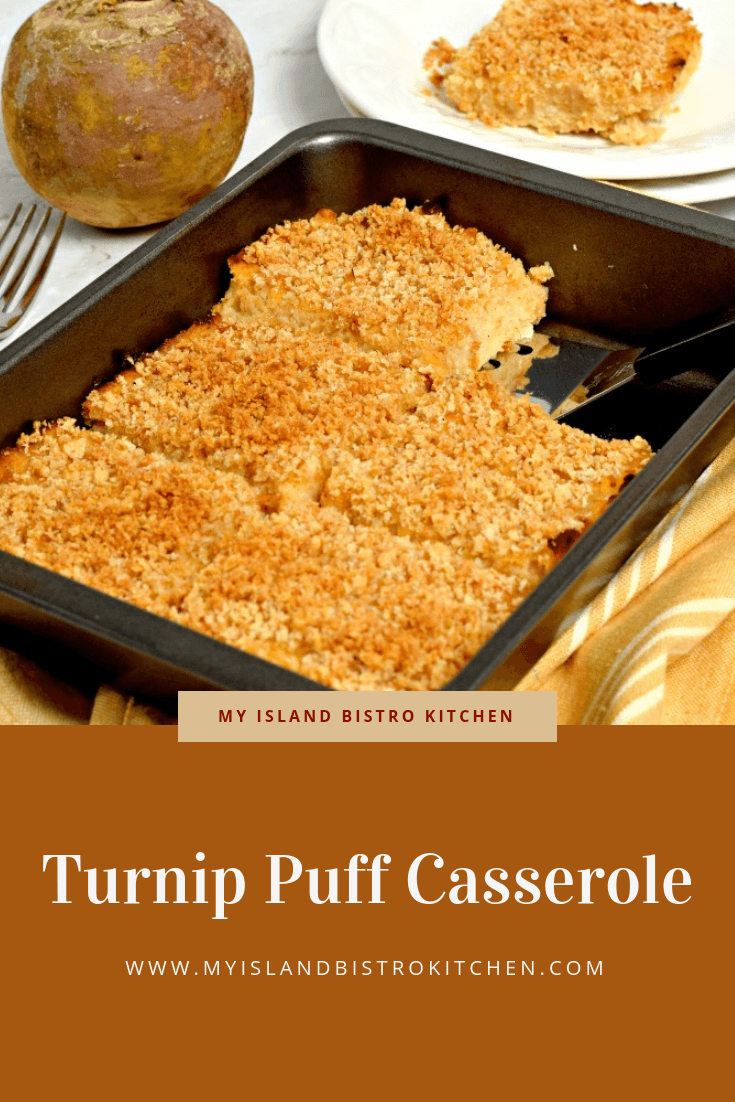
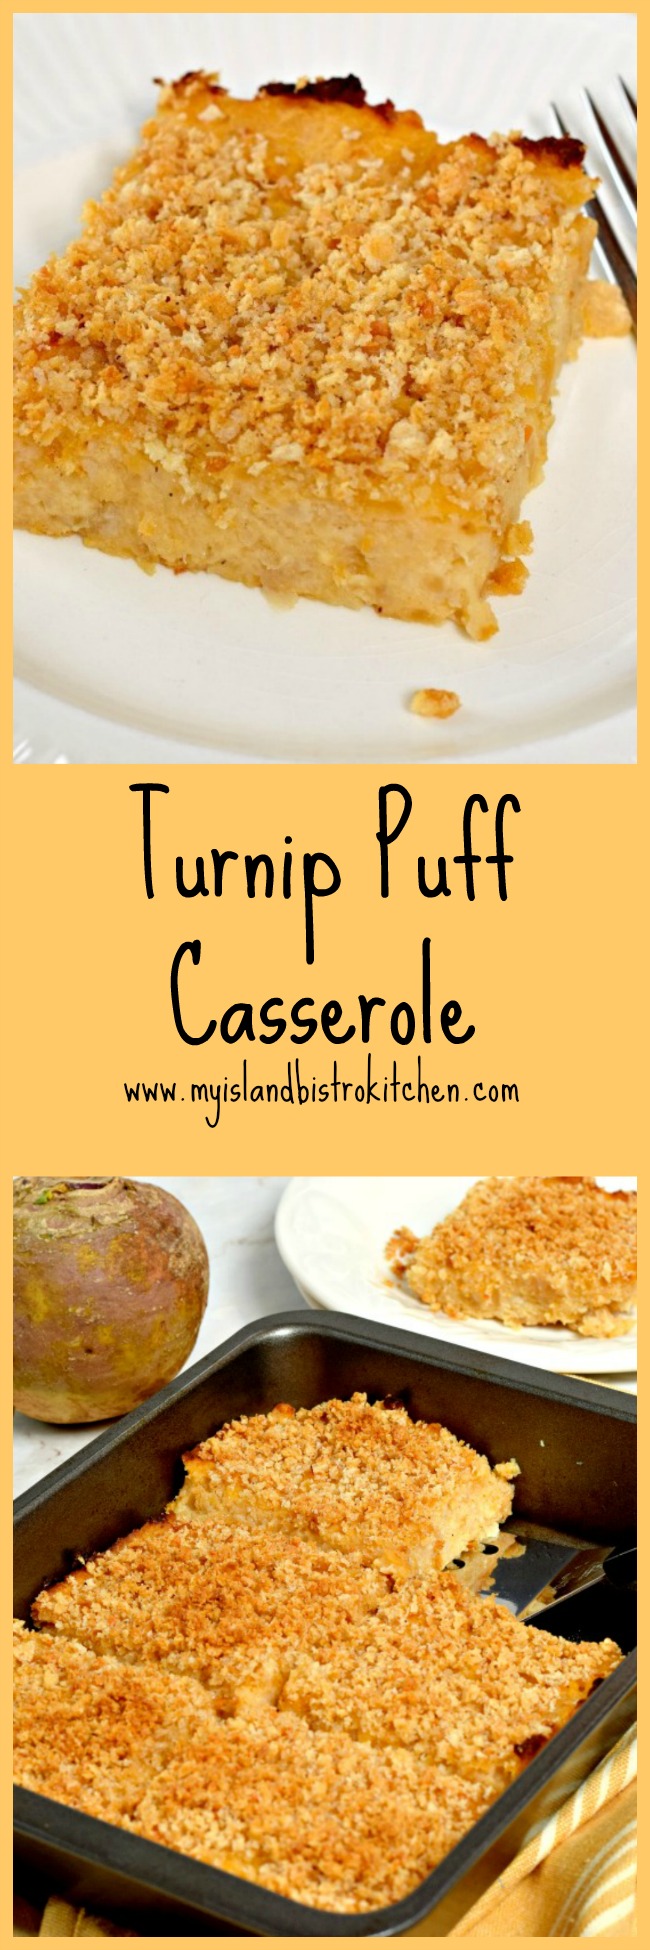
This turnip puff casserole is really a rutabaga puff casserole because, in fact, it is actually made with rutabaga, not turnip. However, all my life, I have known the root vegetable in the photo below as a “turnip”. Besides, I think turnip puff casserole sounds better than rutabaga puff casserole!
Rutabaga
Now, even though turnips and rutabagas are kissing cousins in the mustard plant family, there are some key differences between the two.
Turnips (Photo Courtesy Just a Little Farm, Bonshaw, PEI)
Turnips (shown in the photo above) are much smaller than rutabagas. They are usually anywhere from 2″ – 4″ in diameter compared to the much larger rutabagas that are typically 6″ or even more in diameter.
Rutabagas are much sweeter and turnips more bitter. Rutabagas have yellow flesh whereas turnips have white flesh. Rutabagas will have thicker outer skins than turnips and their exterior color will have a purple top and yellowy-beige bottom whereas turnips will have a white or white/purple outer skin. Rutabagas require much longer to grow and are more tolerant to cold than are turnips which is why you will often see turnips advertised as “summer” turnips. Because of their tolerance for the cold, rutabagas are often referred to as a “cold crop” and my grandparents always claimed the rutabagas (that they referred to as turnips) were no good until there had been a good frost before they were harvested. In fact, my grandmother always said the earlier they were harvested in the fall, the more bitter they were which is why, in the fall, she always added a small amount of sugar to the cooked rutabaga as she mashed it.
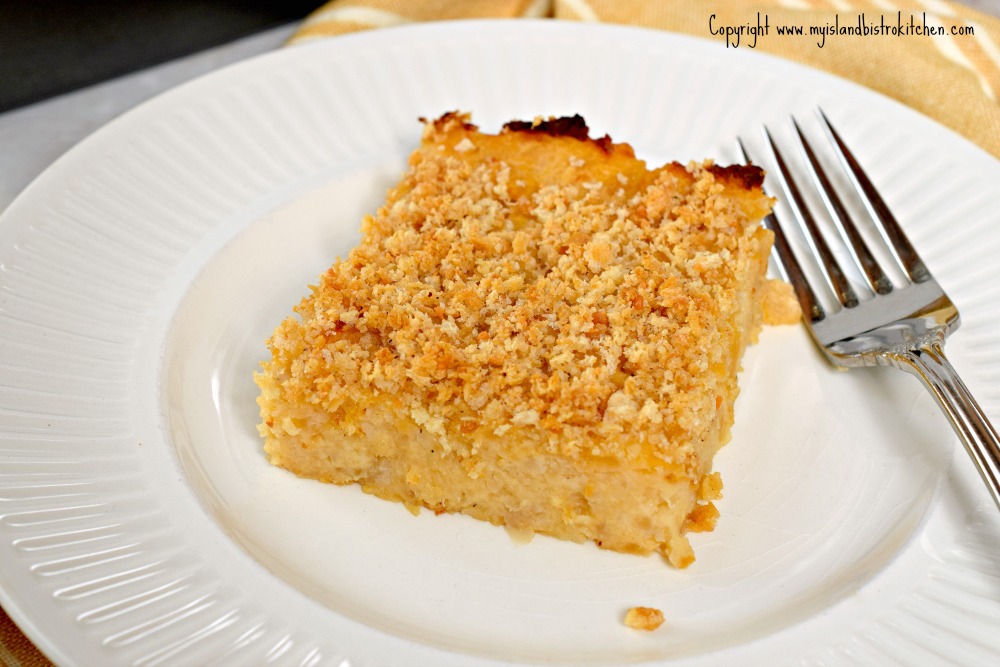
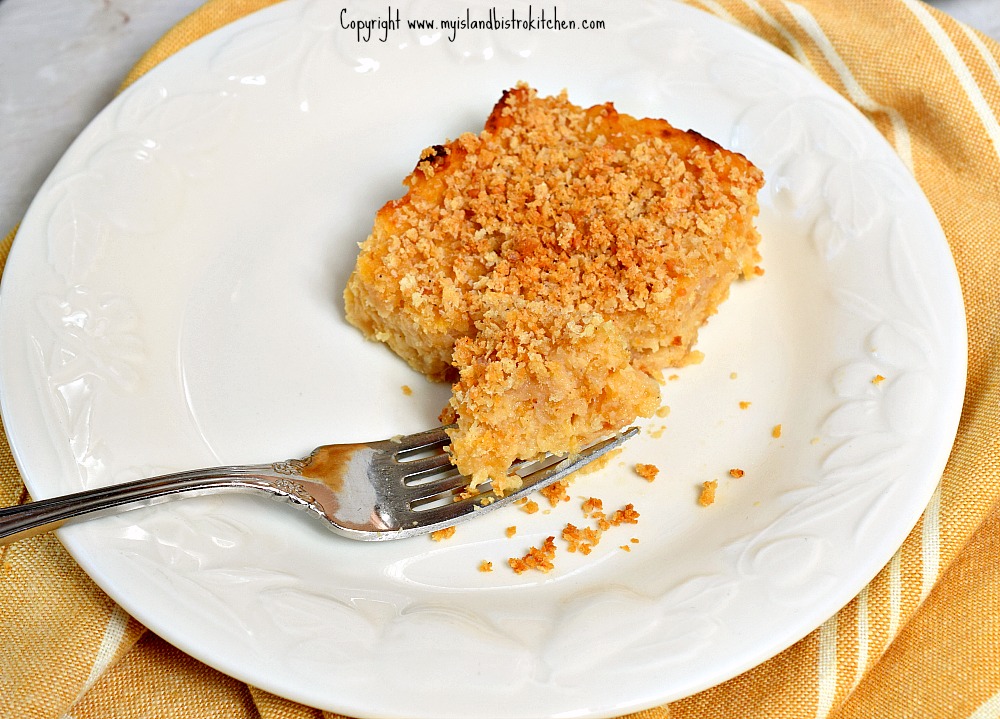
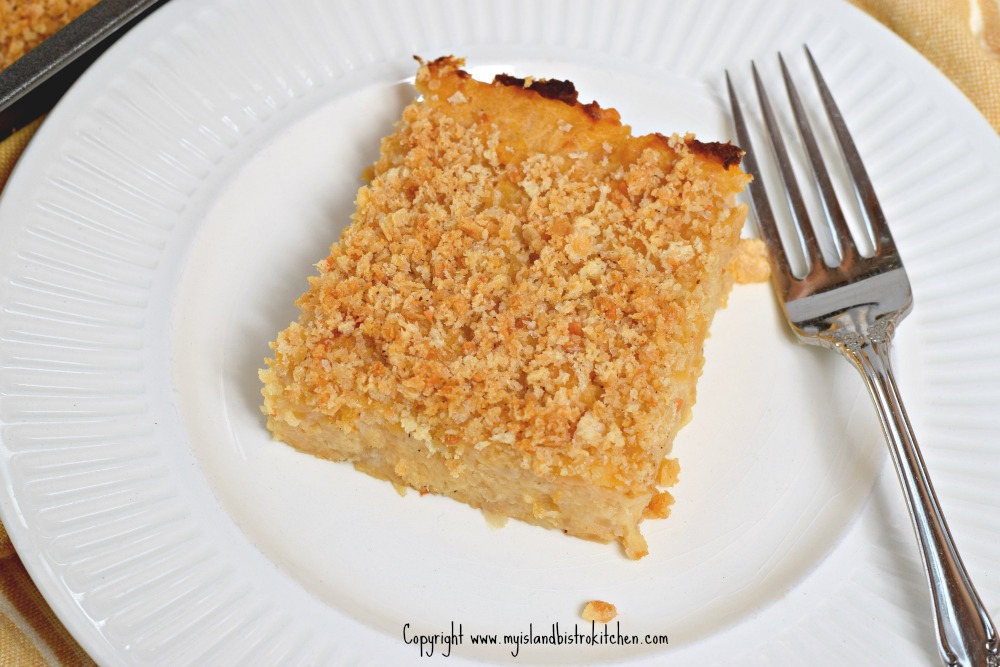
We often serve the golden-colored mashed rutabaga as a side vegetable to many meals but, sometimes (especially for special occasions), it’s nice to kick this side dish up a notch which is what I do when I make this turnip puff casserole. A rutabaga weighing approximately 1 lb, 7 oz will be required for this recipe. To the cooked rutabaga that is mashed really well to the texture of purée, I add some applesauce and brown sugar for sweetener, some onion to make it just a little bit savory, along with some cheese to boost the flavor. A hint of nutmeg and garlic provide additional flavor. An egg is added to bind the ingredients together and baking powder is added for leavening – hence the “puff” part of this side dish.
Turnip Puff Casserole
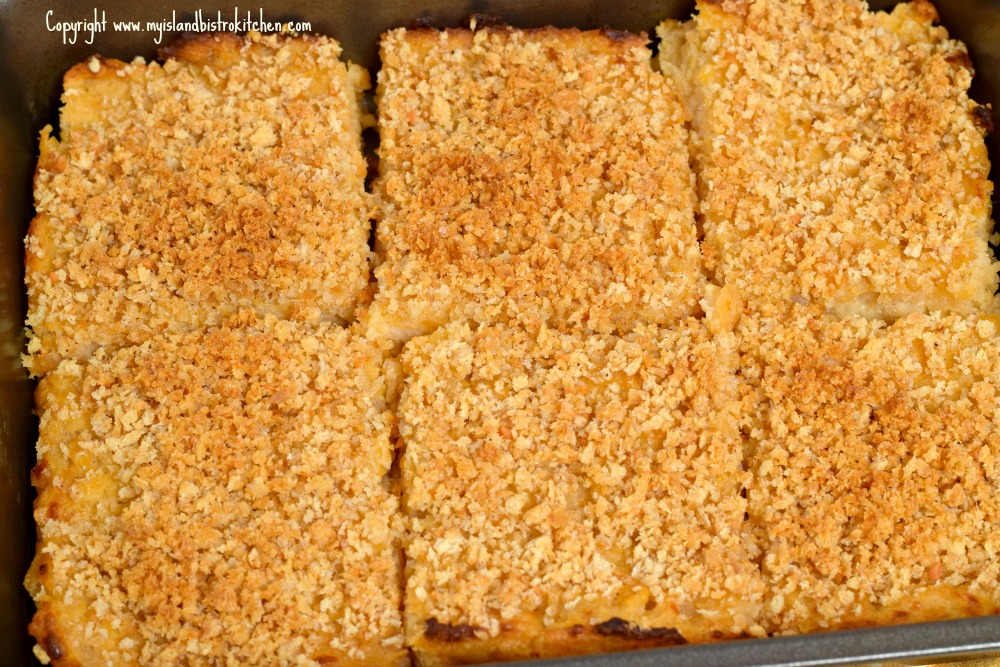
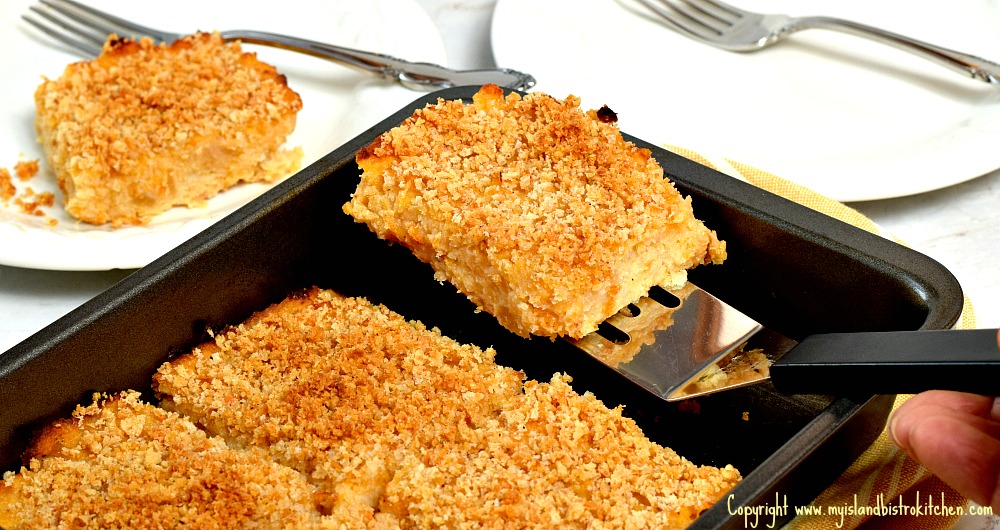
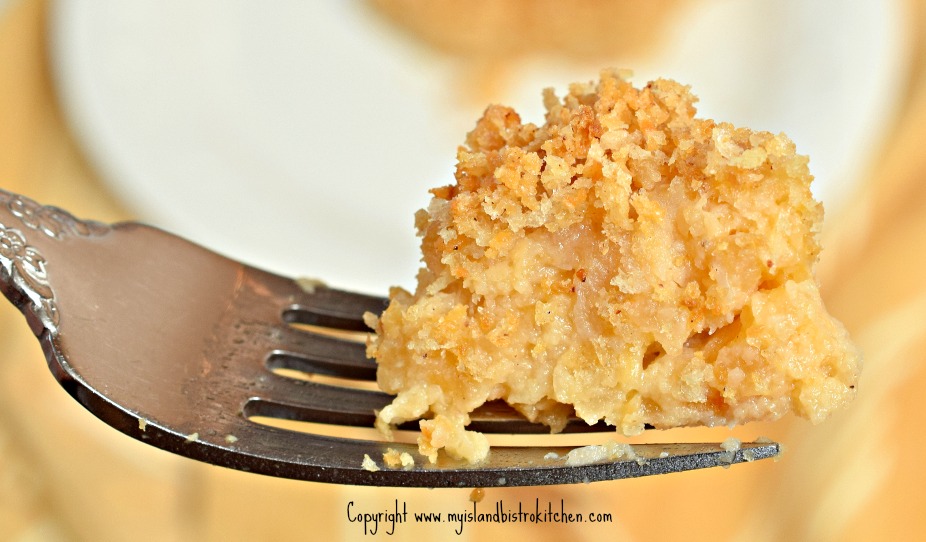
Now, I call this a “casserole” and, for photo demonstration purposes, have photographed a piece of it as a stand-alone on a plate. However, this is not a casserole I would make as a main meal entrée. Rather, it is a vegetable side dish so, instead of serving a scoop of mashed rutabaga with dinner, I cut out pieces of this casserole and serve it alongside other vegetables such as potatoes, carrots, and peas.
Turnip Puff Casserole
A casserole or baking pan with about a 1.5-quart capacity (or slightly less) is required for this casserole. I find the 6″x8″ baking pan that I have for my toaster oven works perfectly. I would not use a deep casserole dish for this recipe as it would not cut out well for serving purposes so use a shallow baking pan. This recipe will provide six standard-sized serving portions, the size shown in the photographs. If you are serving several other side vegetables for a dinner, or serving this buffet-style, smaller pieces may suffice…..but it’s tasty so don’t be surprised if there are requests for second helpings!
Turnip Puff Casserole
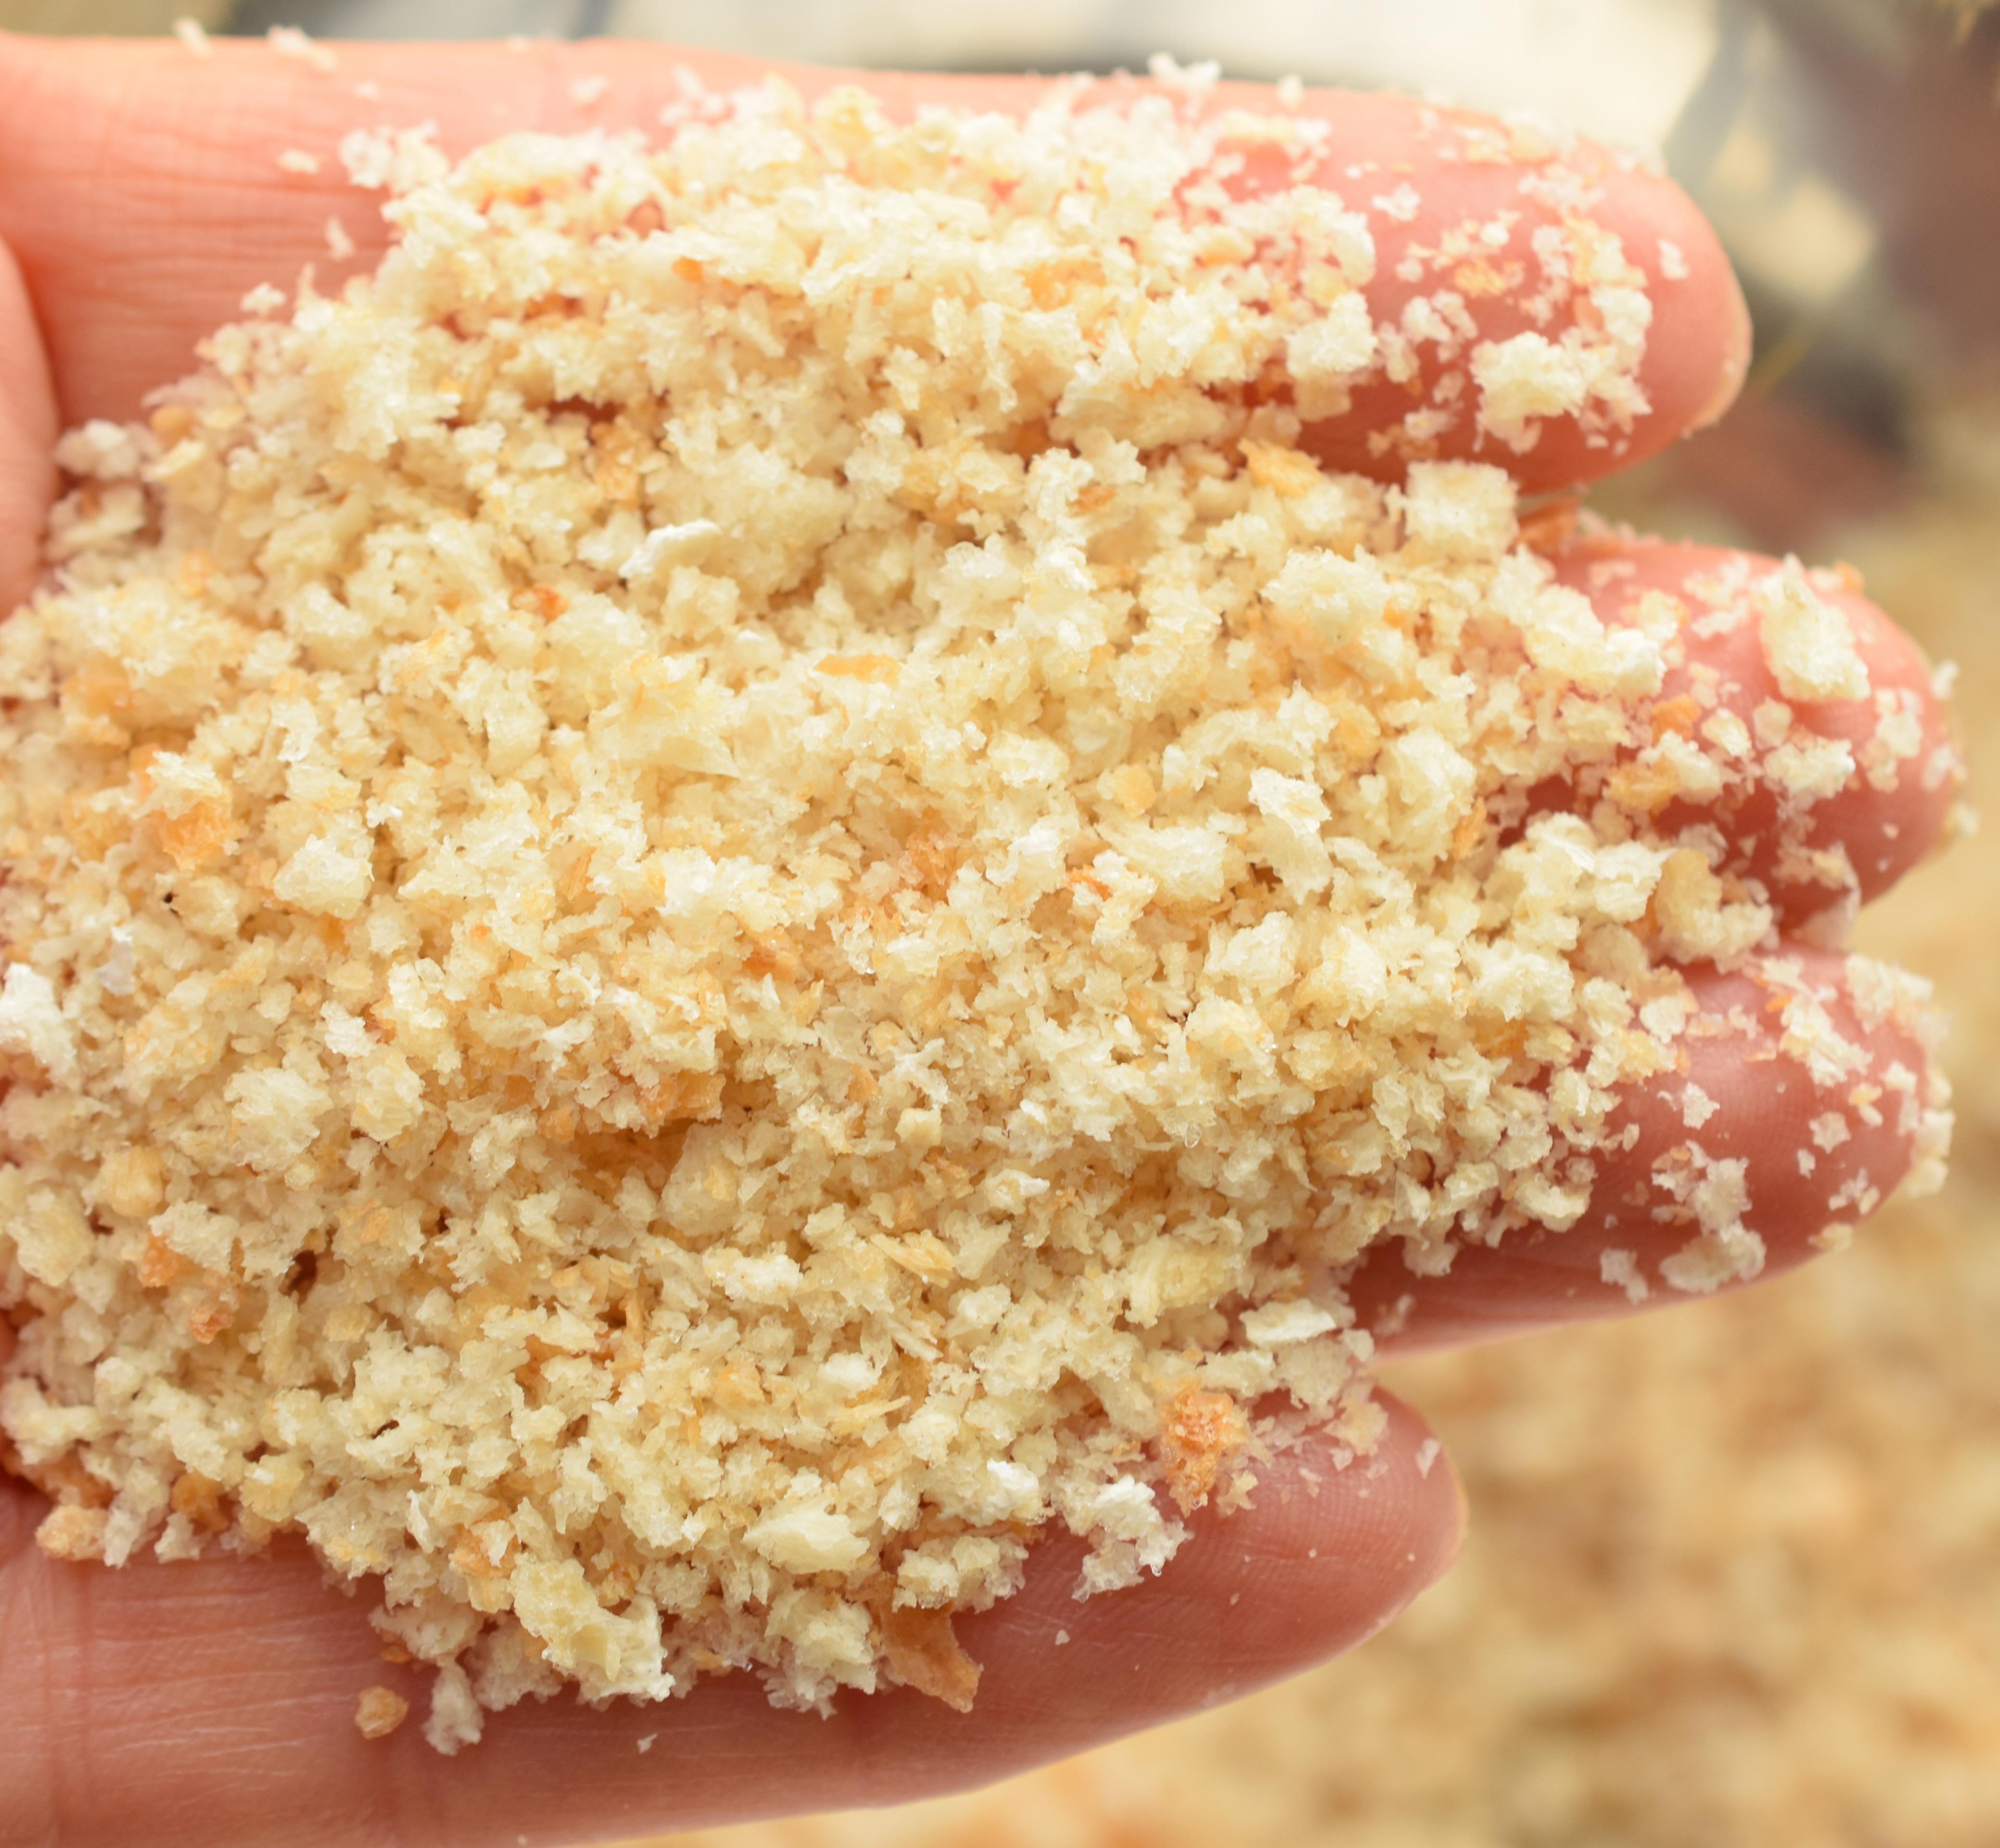
For the breadcrumb topping, I use crumbs that are not super fine as are found in commercial boxes or bags of crumbs. These are ones I crumb (in the food processor) from bread crusts and they are the consistency as shown in the photo below – not super-fine but not overly chunky.
Bread Crumbs
Bake this casserole in the oven for 30-35 minutes, just until the breadcrumb topping is lightly browned. Let stand for about 10 minutes before cutting into squares and serving.
Turnip Puff Casserole
This recipe is easily adapted to be gluten-free — simply replace the breadcrumbs called for in the recipe with those that are gluten-free and use gluten-free all purpose flour.
Turnip Puff Casserole
While this dish may be served at any time of the year, it is especially good at Easter, Thanksgiving, and Christmas with roast poultry, beef, or pork. This casserole may be made several hours in advance and refrigerated until needed.
½ cup fine bread crumbs
2 tsp finely grated Parmesan cheese
Pinch nutmeg
1½ tbsp melted butter
Method:
Preheat oven to 350°F. Grease a 6”x8” baking pan.
In medium-sized saucepan, combine the mashed rutabaga, applesauce, grated onion, butter, and egg. Mix well.
In small bowl, combine the brown sugar, nutmeg, garlic salt, baking powder, flour, Parmesan and cheddar cheese, and salt and pepper, to taste. Stir well into the rutabaga mixture. Transfer to prepared baking pan.
In small bowl, combine the bread crumbs, Parmesan cheese, and nutmeg with the melted butter. Sprinkle crumbs over rutabaga mixture. Bake, uncovered, for approximately 30-35 minutes, until lightly browned.
Serve hot as a side dish to any hot meal in which turnip/rutabaga would typically be served.
Yield: Apx. 6 servings
If you have made this recipe and enjoyed it and/or wish to share it with your friends and family, please do so on social media but be sure to share the direct link to this posting from my website.
Connect with My Island Bistro Kitchen on Social Media
Follow “the Bistro” on Pinterest at https://www.pinterest.ca/peibistro/ and pin the Pinterest-ready photo found at the end of this post to your favorite Pinterest boards.
1 tbsp all-purpose flour (or gluten-free all purpose flour)
2 tbsp finely grated Parmesan cheese
2 tbsp finely grated cheddar cheese
Salt and Pepper, to taste
½ cup fine bread crumbs
2 tsp finely grated Parmesan cheese
Pinch nutmeg
1½ tbsp melted butter
Instructions
Preheat oven to 350°F. Grease a 6”x8” baking pan.
In medium-sized saucepan, combine the mashed rutabaga, applesauce, grated onion, butter, and egg. Mix well.
In small bowl, combine the brown sugar, nutmeg, garlic salt, baking powder, flour, Parmesan and cheddar cheese, and salt and pepper, to taste. Stir well into the rutabaga mixture. Transfer to prepared baking pan.
In small bowl, combine the bread crumbs, Parmesan cheese, and nutmeg with the melted butter. Sprinkle crumbs over rutabaga mixture. Bake, uncovered, for approximately 30-35 minutes, until lightly browned. Serve hot as a side dish to any hot meal in which turnip/rutabaga would typically be served.
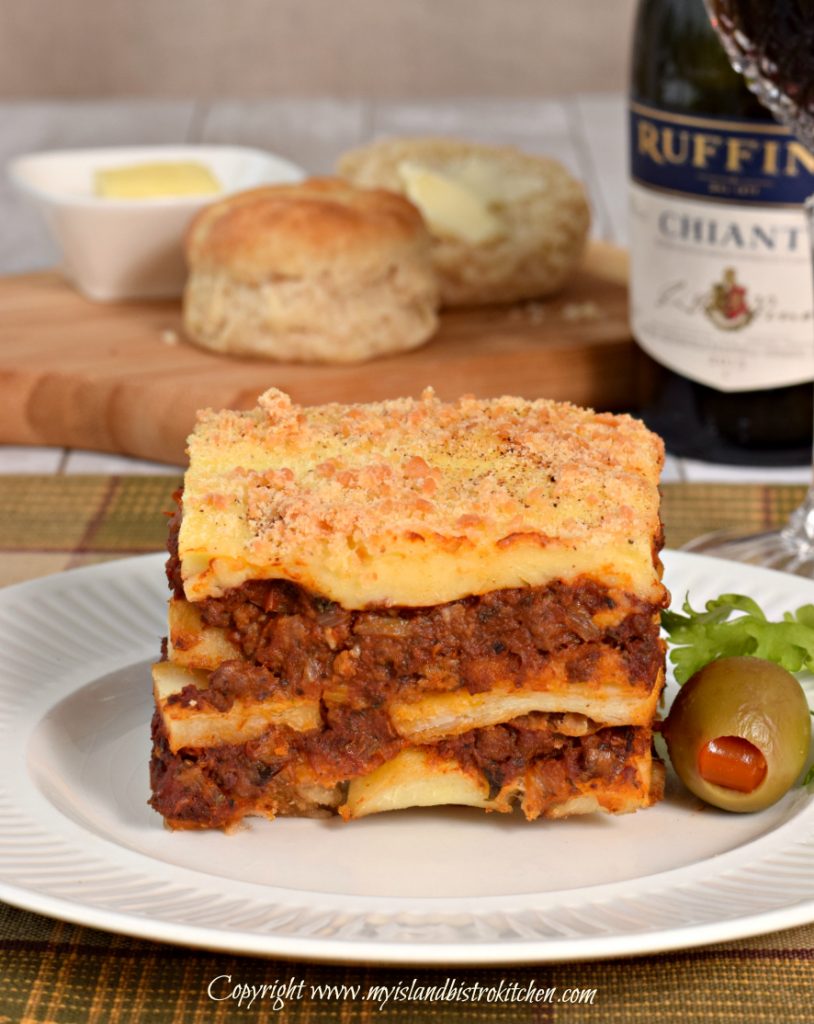
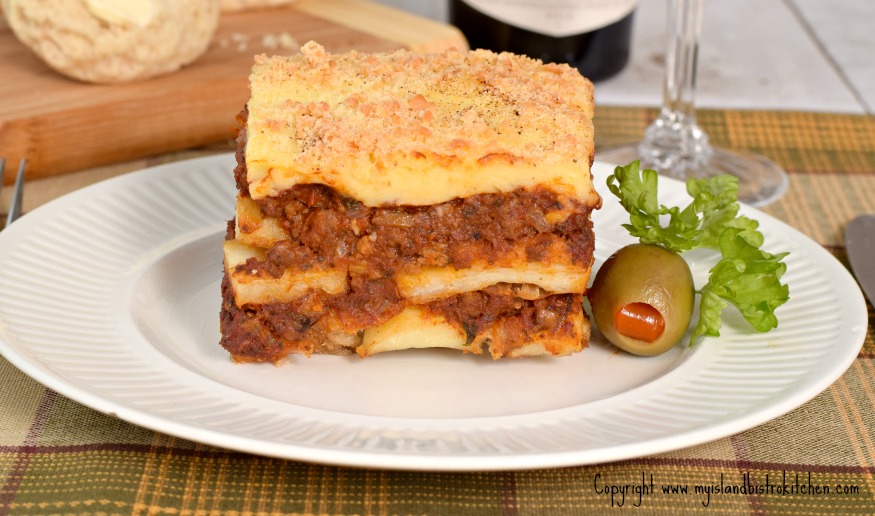
I have been invited by www.thinkbeef.ca to participate, as one of ten food bloggers from across Canada, in the Rethink Beef Global Recipe Swap Campaign to promote recipes using ground beef. Each blogger was asked to develop a recipe (using ground beef) that is inspired by his or her cultural background or a culinary adventure experienced. Each blogger was paired with another and the two exchanged their own recipe for the other to try. This posting involves showcasing my own recipe as well as a recipe from my swap partner, Jason Lee, who writes the blog, “Shut Up and Eat”.
Moussaka
I frequently use ground beef in recipes and am never at a loss to come up with meal ideas to use this versatile meat. The recipe I have chosen is Moussaka. This is a one-dish meal typically characterized by ground meat, eggplant, and tomato sauce with a white sauce on top. So, I will begin with a discussion on why I chose Moussaka to feature ground beef, followed by some hints and tips on making this Greek-inspired dish, and will end with my experience cooking my recipe swap partner’s Beef and Coriander Dumplings inspired by his Chinese heritage. This posting has two recipes from two different cultures but both use ground beef as the main ingredient. Continue reading Rethink Beef Global Recipe Swap Campaign: Moussaka→
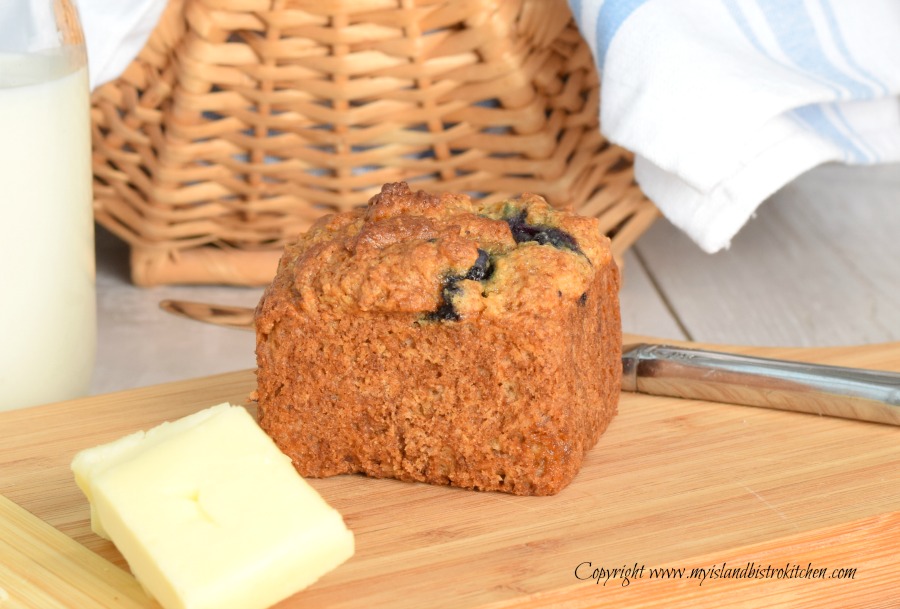
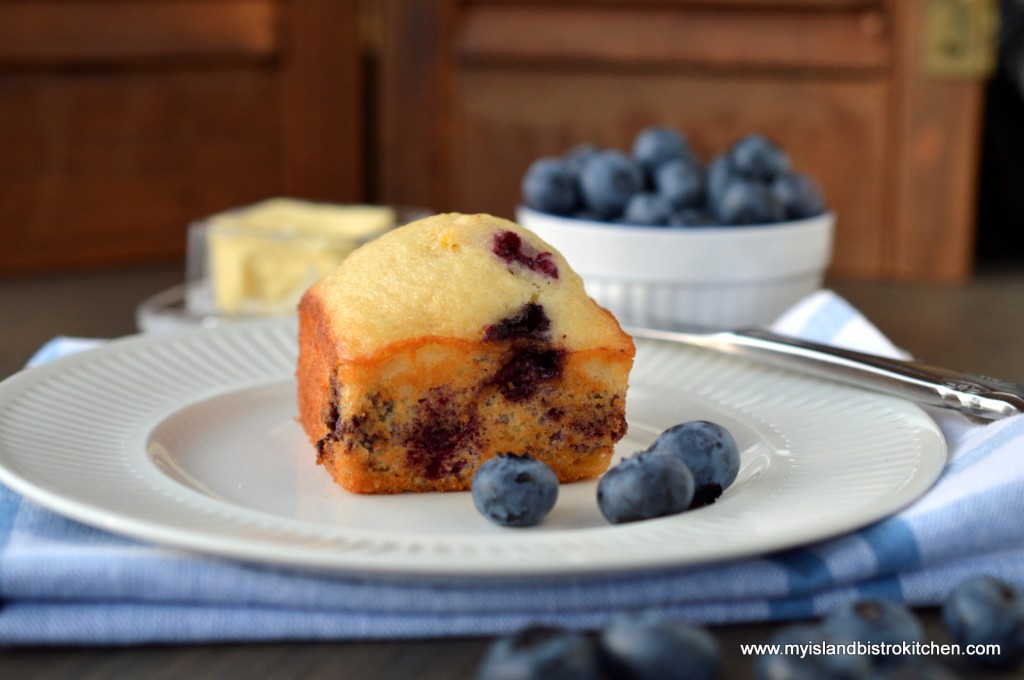
Blueberry muffins are a favorite and, while I have a “go-to” recipe for blueberry muffins that calls for regular gluten flour, I did not have a recipe for Gluten-free Blueberry Muffins. So, I set about developing one of my own and this is the result. My aim was to create a bistro, or deli-style, muffin and I am pleased with the end result. Continue reading Gluten-free Blueberry Muffins→
Crepes filled with delectable fillings are one of my favorite meals. Chicken and Mushroom Crepes with Cheese Sauce are a real treat and a lot easier to make than one might think. At one time considered the fare of stylish restaurants and bistros, they can actually be very easily made at home. Continue reading Chicken and Mushroom Crepes→
Today, I am sharing my newly-developed recipe for Ham Lentil Soup that is made from a leftover ham bone, broth, and ham. Continue reading Ham Lentil Soup Recipe→
I am a huge fan of cooking with the intent of having leftovers for several meals. It’s great to have cold leftover turkey, ham, or roast beef but, after a couple of days, well, it can get a little monotonous. I don’t like to throw out food so the alternative is to find other creative ways to use the leftovers and stretch the food budget. Sometimes, as in the case of a large family, perhaps the leftovers don’t span far enough unless they are used in a way that extends them.
So, whether it’s a case of having leftover meat you’re tired of or not having enough left to plate as straight cold meat slices to make another meal, my recipe for Beef Pot Pie will be the answer for leftover roast beef. Just make sure you make an extra 1 1/3 cups of gravy when preparing that roast beef dinner so you will have enough gravy to make this recipe. Continue reading The Bistro’s Beef Pot Pie→
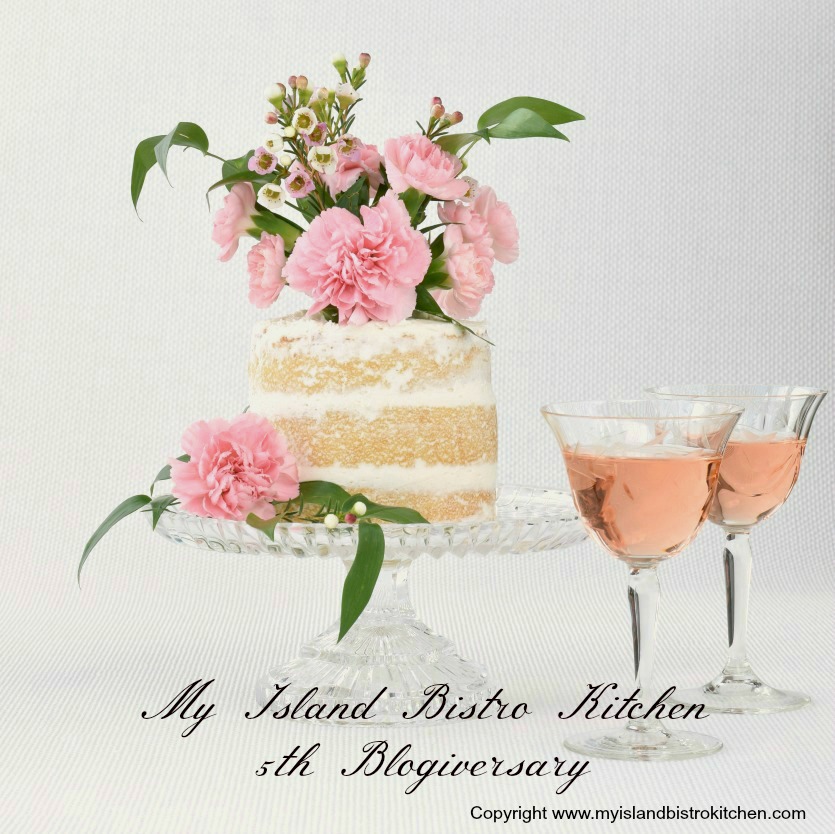
Five years ago today, January 18, 2012, I established my food blog, My Island Bistro Kitchen. Where did those five years go – they have just flown by! Time flies when you’re having fun, they say! So, today, I celebrate my 5th blogiversary!
I attempt to keep the recipes I develop and share real — nothing too wild and wacky. I am mindful of the different levels of culinary skills and food budgets that followers may have. While I do try to provide some newer, upscale recipes, it has been my experience over the past five years that the most popular recipes tend to be the traditional dishes that call for common ingredients and are not overly complicated or time-consuming to make. Where possible, I try to use locally produced food ingredients from right here in Prince Edward Island. And, for added interest, I continue to include stories about Island food producers and local culinary events.
To celebrate my five-year anniversary, I have made a cake and decorated it in the trendy “naked cake” style. Naked cake means that very little, if any, frosting is used on the sides of the cake allowing much of the cake itself to be visible. In fact, even less frosting is used on one of these cakes than I would normally use to crumb coat a cake I would completely cover with frosting! The absence of a lot of frosting allows the texture, color, and filling in the cake to show. This is a style currently favored by many brides, probably for its romantic and casual look and feel. This style also looks very nostalgic and has a vintage air about it.
Naked cakes are very non-pretentious and, in my opinion, do not require a lot of cake decorating skill. If you can spread butter on bread, you can decorate a naked cake! Perfection is not a goal in the application of minimal frosting that characterizes this style of cake! The rustic look allows a cake topper to stand out and be the focal point because there is no fancy frosting or a cake covered in piped roses or frosting ruffles to compete for the limelight. Garnishes for these types of cakes usually involve real or natural elements such as berries, fruit, or as I have done with this cake, fresh flowers. Sometimes, chocolate or caramel is drizzled over the top and down the sides of the cake.
Cakes decorated in this style have a very natural look to them. In fact, with dark-colored cakes and a slim swipe of white frosting, I think they almost look a bit like birch bark. When used on lighter toned cakes, the effect can resemble a white wash look.
This is a good type of decorating to use if the cake is for someone who does not like a lot of frosting that is the hallmark of traditionally-decorated celebratory cakes. In fact, some naked cakes sport only frosting on the top of the cake and in between the layers. Now, those are real naked cakes!
The disadvantage of this style of decorating is that the cake can dry out rather quickly. When completely frosted, the frosting acts as a seal, to help keep the cake moist. Without complete coverage of frosting, care must be taken that the cake does not dry out. I recommend frosting the cake just before serving or, if it must be done in advance, store it in an airtight cake storer/caddy.
The “naked cake” is not a new style as it has been around for a few years now but it is a cake decorating style that has gained traction and this trend shows no signs of disappearing any time soon. While it is not a style for everyone’s taste, it is an option to add variety to cake decorating.
Thank you to those faithful followers of My Island Bistro Kitchen food blog who have been with me from the start. Thanks also to those who have joined along the way. If you are new to “the Bistro”, a hearty warm welcome! I hope all will continue to follow “the Bistro” into the future as I have more great recipes in the hopper and under construction and some stories in the plans!
To view other cakes and cupcakes that have been part of my earlier blogiversaries, click on the links below.
I am a big believer in meal planning and follow it regularly. I recommend meal planning for several reasons:
Eliminates last minute meal planning – that’s when you leave work with no idea what’s for dinner and, suddenly, as you pass a supermarket with a deli or prepared food section or a fast food outlet and, well, you know the story – that becomes dinner.
Saves money and reduces food waste – have a plan in mind for using leftover meat such as ham, turkey, or roast beef. For example, use the leftover meat in sandwiches, casseroles, and/or soups. These are great ways to stretch the food dollar and eliminate food waste.
Healthier way to eat – You will eat less pre-packaged foods that often have way too many preservatives, additives, and other unhealthy ingredients. Meal planning means you are in control, to the extent possible, of what is in your food.
Less stress – Once you have a plan in place for meals for the week, you don’t have to stress each day over what to make for meals.
The keys to good meal planning are:
Make meals with ingredients you know your family will like – doesn’t have to be fancy, new, or creative. Sometimes, the old faithful comfort foods are the best.
Make the meal plan on the weekend and formulate the shopping list BEFORE you go to the supermarket and then stick to the plan, avoiding distractions of already-prepared or frozen entrées that supermarkets display to tempt shoppers.
Make your To-Do list for the meal preparation for the week – for example, if you are making baked beans on Saturday, get those beans soaking overnight on Friday evening.
Read each recipe carefully to ensure you will have all the ingredients and that the method is easy to understand and do-able in the time in which you have to do the food preparation.
Watch the supermarket sales flyers. Know your favorite dishes and buy ingredients for them when they are on sale. You’ll be more likely to stick to a meal plan if you already have most or all of the ingredients for a recipe on hand.
Plan around what’s in season. One of my favorite soups is cream of cauliflower which freezes well (provided whole milk, not fat-reduced, is used). I make several batches of this soup each fall when the locally-grown cauliflower is in season. I would not make it, however, in January with imported cauliflower that has traveled thousands of miles for days and is highly priced. Good meal planning needs to take place, on an ongoing basis, throughout the year.
Here is my suggested meal plan for the upcoming week, focusing primarily on dinners with some suggestions for a couple of lunches making the most of a boiled picnic ham. I’ve provided a list of the main ingredients that, for the most part, would probably involve a shopping trip to the supermarket for most. However, as always, read each recipe thoroughly and carefully to create your own shopping list as I have not listed what I consider to be “staple” items like milk, butter, eggs, spices, etc. Click on the green hotlinks to access the recipes.
MONDAY
Blueberry Muffins – These are great breakfast or coffee break muffins and they freeze very well. Nice treat to start off the week! Shopping List: Blueberries (fresh or frozen), orange juice, orange rind
Blueberry Muffins
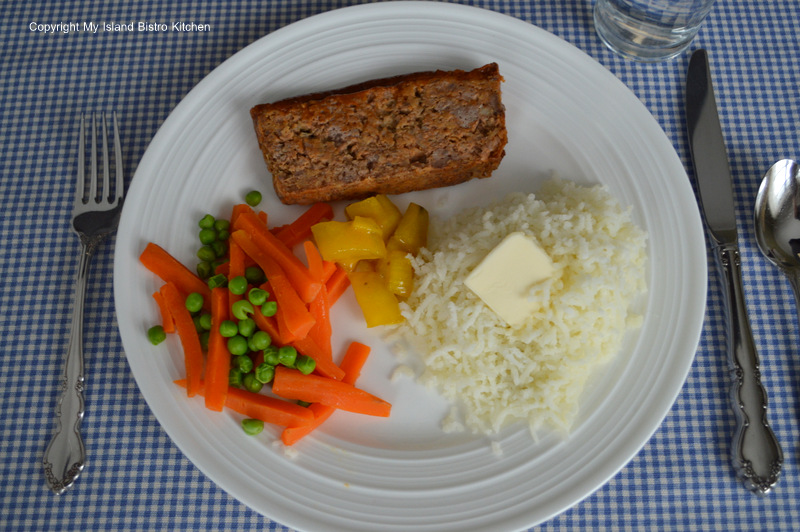
Dinner:Meatloaf
Serve with mashed or riced potatoes and your favorite side of veggies. Homemade mustard pickles go great with meatloaf!
Shopping List: Ground beef, onion, prepared mustard, tomato soup, dry onion soup mix, graham wafer crumbs, fine bread crumbs, garlic powder, vegetables of choice
Meatloaf with Riced Potatoes and Mixed Vegetables
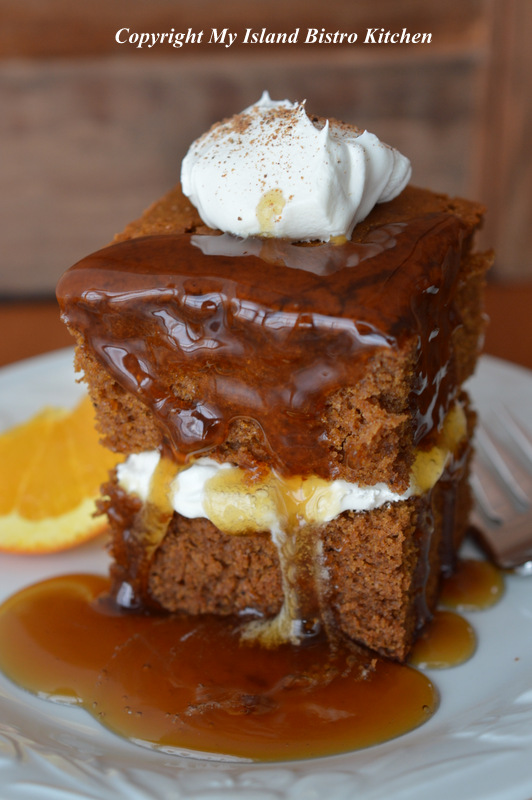
Dessert: Gingerbread
At least once every winter, I have to have a dose of this yummy comfort food! Drizzle with brown sugar sauce for an extra-special treat! Shopping List: Applesauce, molasses, coffee
Gingerbread with Whipped Cream and Brown Sugar Sauce
TUESDAY
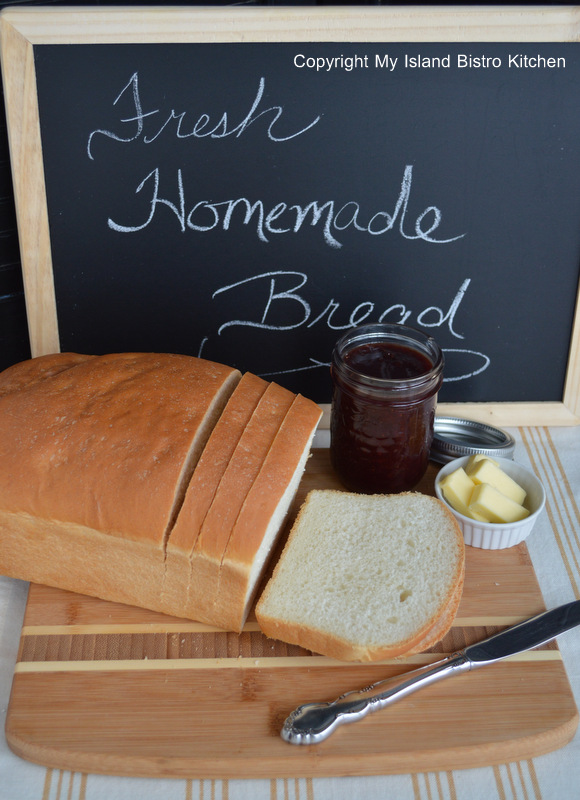
Homemade White Bread – This is always such a treat! This bread will be super good with the ham sandwiches this week! Shopping List: All-purpose flour, dry yeast, milk, butter/shortening
Homemade White Bread
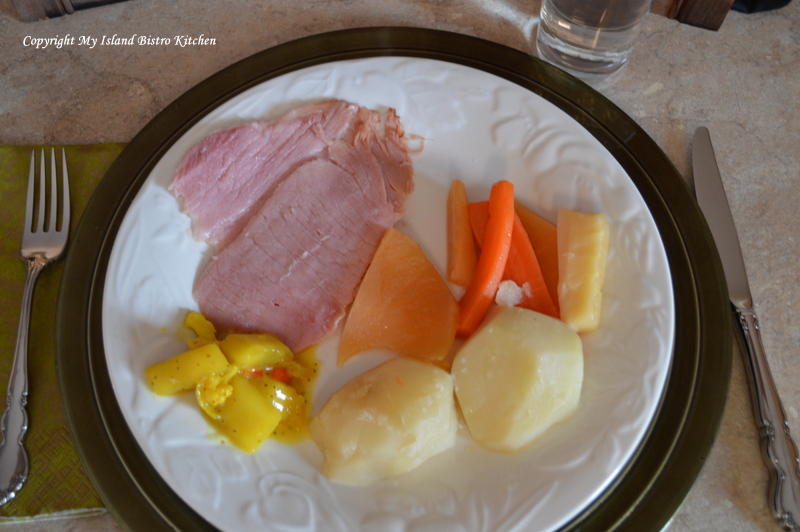
Dinner: Old-fashioned Boiled Ham Dinner – This is truly dinner-in-a-pot and is my definition of “comfort food”! The meat and vegetables are all cooked in the same broth in the same pot. Make sure you cook enough veggies for Wednesday night as this always tastes even better the second day. Easy to heat the vegetables in the microwave and, poof, you have two nights’ meals prepared in one effort. You’ll want those mustard pickles or mustard beans with this dinner! Shopping List: Smoked pork picnic shoulder (ham), parsnips, carrots, rutabaga (turnip), potatoes
Boiled Ham DInner
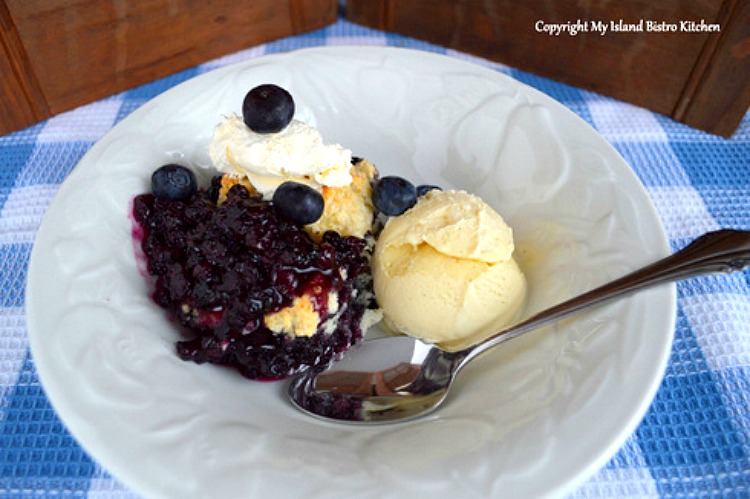
Dessert:Blueberry Grunt
This is such an incredibly yummy dessert – serve it with your favorite vanilla ice cream! Shopping List: Blueberries (fresh or frozen) and lemon rind, vanilla ice cream
Blueberry Grunt
WEDNESDAY
Lunch: Ham Sandwiches made with homemade white bread! Don’t forget the mustard!
Dinner: Leftover boiled ham dinner from Tuesday.
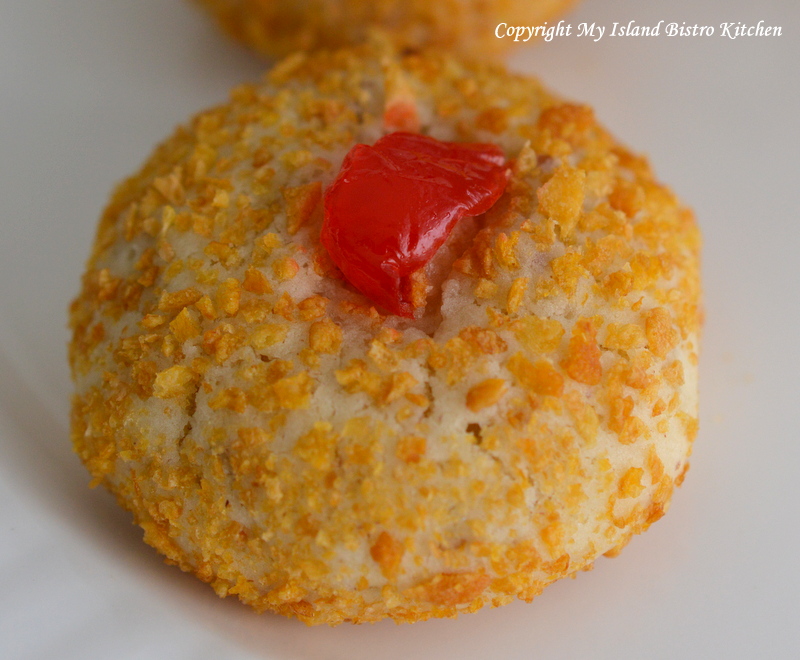
Dessert:Cherry Wink Cookies Shopping List: Dates, cornflake crumbs, maraschino cherries
Shopping List: Sweet pickle relish, Dijon mustard, maple syrup, celery, red pepper, mayonnaise, Havarti cheese
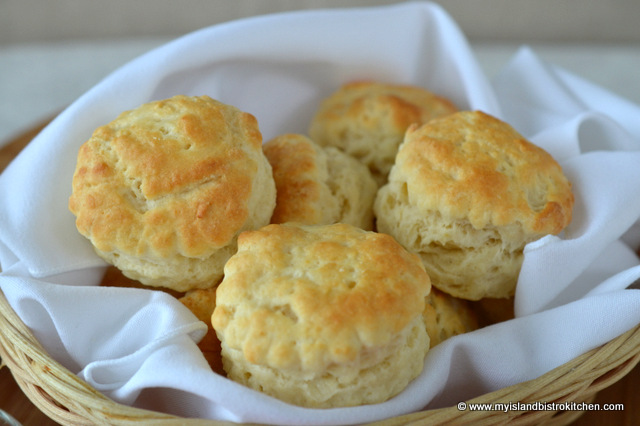
Dinner:Hawaiian Fiesta Casserole – this is a great way to use up left-over cooked ham and stretch its use. Serve these with those tasty biscuits and perhaps a green salad! Shopping List: Rice, cream of celery soup, sour cream, liquid chicken bouillon, broccoli, canned pineapple chunks, Parmesan cheese, fine bread crumbs, leftover cooked ham, and ingredients for a green salad and dressing
Dinner:Mac ‘n Cheese with a green salad and homemade tea biscuits Shopping List: Elbow macaroni, liquid chicken bouillon, cheddar cheese, Parmesan cheese, salad ingredients and dressing
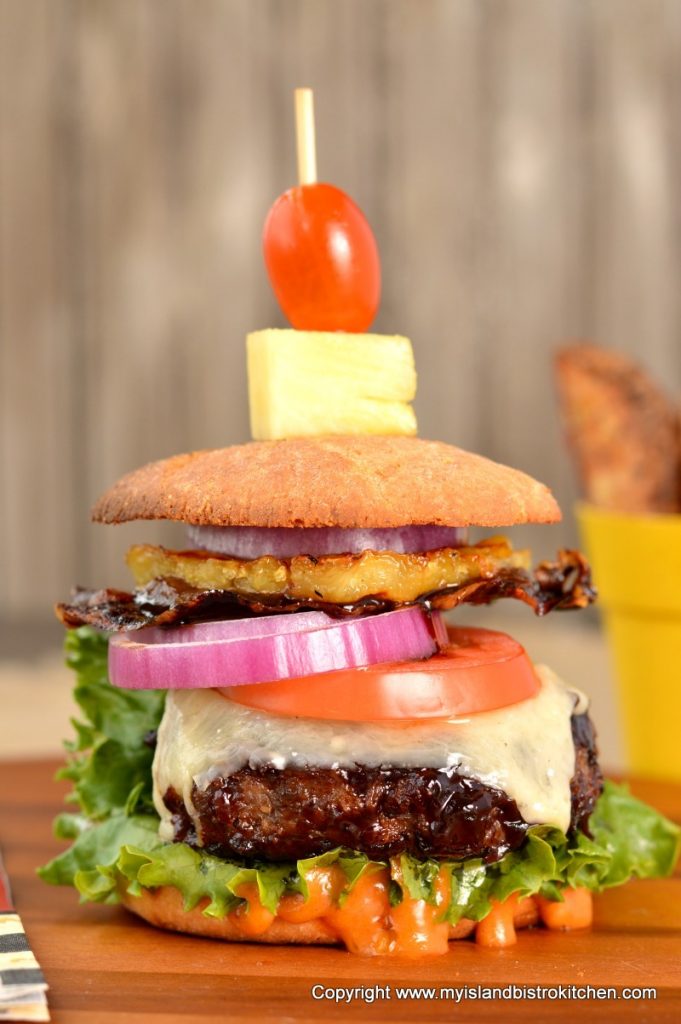
Dinner: Bistro Burgers with Home Fries Shopping List: Ground chuck, mayonnaise, maple syrup, ketchup, rhubarb relish, Dijon mustard, sour cream, onion salt, Parmesan cheese, Blueberry BBQ sauce, dry onion soup mix, bread crumbs, Cheddar cheese slices, red onion, tomato, prosciutto, fresh pineapple, bread and butter pickles, hamburger rolls, potatoes (for home fries)
“The Bistro Burger”
Dessert: Leftover Coconut Cream Pie
Meal planning can be a challenge, especially with high food prices, ingredient availability (particularly in winter for fresh local ingredients) and, of course, for those who are busy and time-challenged. However, with having a plan in place and establishing a routine for meal preparation, it is a way to eat better, save money, reduce food waste, and eliminate the stress of last-minute meal preparation that can sometimes result in unhealthy food choices. For those with children, it’s a good way to help them make good food choices and engage them in meal preparation by assigning them tasks to help with the work of making meals.
For my Week 2 Meal Plan, click here.
For my Week 3 Meal Plan, click here.
For my Week 4 Meal Plan, click here.
For my Week 5 Meal Plan, click here.
For my Week 6 Meal Plan, click here.
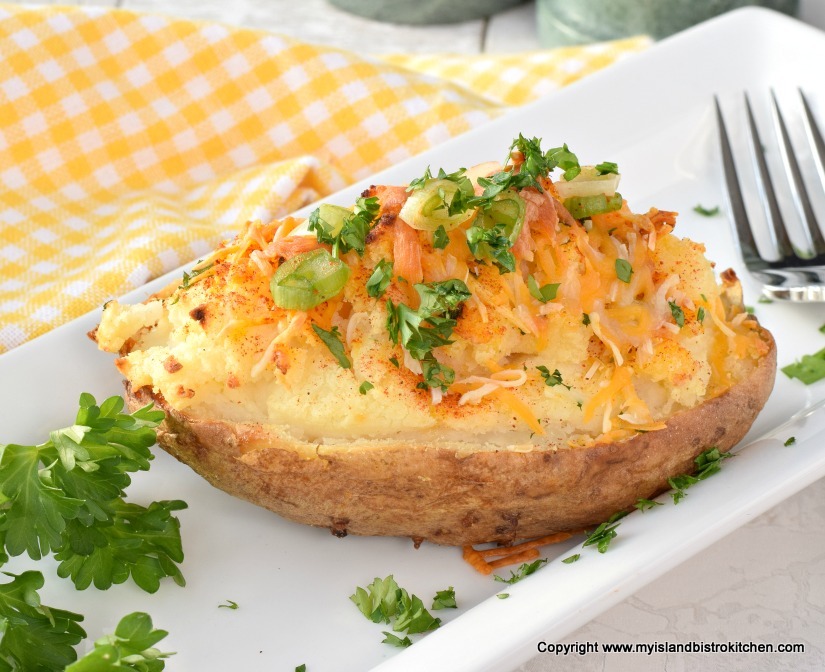
When you live in Prince Edward Island, Canada, where potatoes are one of the main agricultural crops, you find lots of ways to serve potatoes. Twice-baked Potatoes, or stuffed baked potatoes, are one of my all-time favorites. I make up big batches of these and freeze them so they are always on hand, ready to be popped in the oven for dinner. Continue reading Twice-baked Potatoes Recipe→
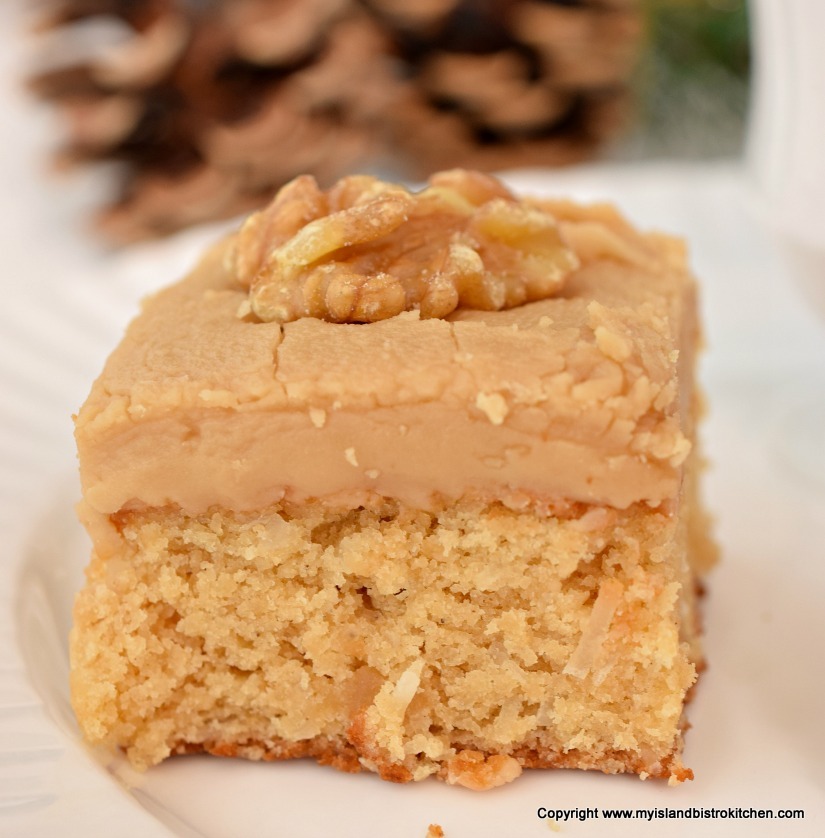
If you like brown sugar fudge, you’ll love this Gluten-free Brown Sugar Fudge Square! With a cake-type base, it’s the fudge icing that makes this square and takes it from plain to yummy. It’s like having cake and candy at the same time! Continue reading Gluten-free Brown Sugar Fudge Square→
Turkey Chowder is the perfect way to use up leftover turkey. It’s a welcome tummy-warming and tasty chowder for cold winter days and is a real treat after skiing, a long winter walk, snowshoeing, or coasting on the snow-covered hills. Serve with warm rolls or biscuits straight from the oven for an extra special treat. Continue reading Turkey Chowder Recipe→
These gluten-free melting moments cookies prove that being on a gluten-free diet does not mean one has to compromise on favorite sweet treats!
I use a 1-to-1 gluten-free baking flour, such as Bob’s Red Mills brand, for these cookies. I also add a small amount of very finely ground almonds to the batter as this lends a tenderness to the cookie crumb which justifies the name of the cookies because they do melt in the mouth!
Gluten-free Melting Moments
These cookies are very easy to make. Mix up the dough. Pinch off small amounts of the dough and form into small balls. Place on parchment-lined baking sheets and flatten with the tines of a fork. Bake. It’s really no more complicated than that!
Gluten-free Melting Moment Cookie
[Printable recipe follows at end of posting]
Gluten-Free Melting Moments
Ingredients:
½ cup butter, softened at room temperature
¼ cup icing sugar (aka confectioner’s sugar or powdered sugar)
¼ tsp pure vanilla
½ cup 1-to-1 gluten-free baking flour
¼ cup finely ground almonds
¼ cup cornstarch
Method:
Preheat oven to 325°F. Line baking sheets with parchment paper.
Cream butter. Add the icing sugar and cream well with the butter. Mix in vanilla.
In separate bowl, whisk the flour, ground almonds, and cornstarch together. Add to the creamed mixture and blend until well incorporated.
Form dough into small round balls (apx. 5/8 oz dough per ball). Place balls on prepared baking sheets, about 2“ apart, and flatten each ball with the tines of a fork. Decorate with small bits of maraschino cherries, if desired.
Bake for approximately 15-18 minutes, just until edges of cookies start to tint a golden tan color. Don’t over-bake. Let cool on baking sheet for 2-3 minutes then transfer cookies to wire rack to cool completely.
These melt-in-your-mouth gluten-free melting moments cookies have a tender crumb and delicate butter and almond flavor.
Ingredients
½ cup butter, softened at room temperature
¼ cup icing sugar (aka confectioner’s sugar or powdered sugar)
¼ tsp pure vanilla
½ cup 1-to-1 gluten-free baking flour
¼ cup finely ground almonds
¼ cup cornstarch
Instructions
Preheat oven to 325°F. Line baking sheets with parchment paper
Cream butter. Add the icing sugar and cream well with the butter. Mix in vanilla.
In separate bowl, whisk the flour, ground almonds, and cornstarch together. Add to the creamed mixture and blend until well incorporated.
Form dough into small round balls (apx. 5/8 oz dough per ball). Place balls on prepared baking sheets, about 2“ apart, and flatten each ball with the tines of a fork. Decorate with small bits of maraschino cherries, if desired.
Bake for approximately 15-18 minutes, just until edges of cookies start to tint a golden tan color. Don’t over-bake. Let cool on baking sheet for 2-3 minutes then transfer cookies to wire rack to cool completely.
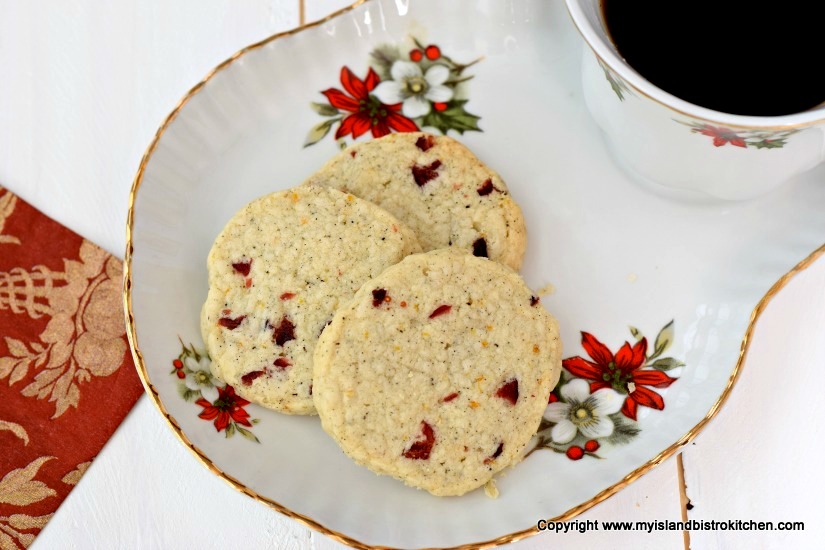
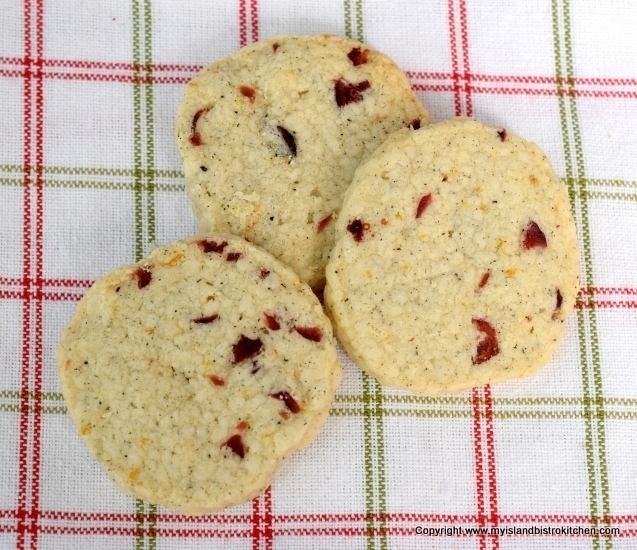
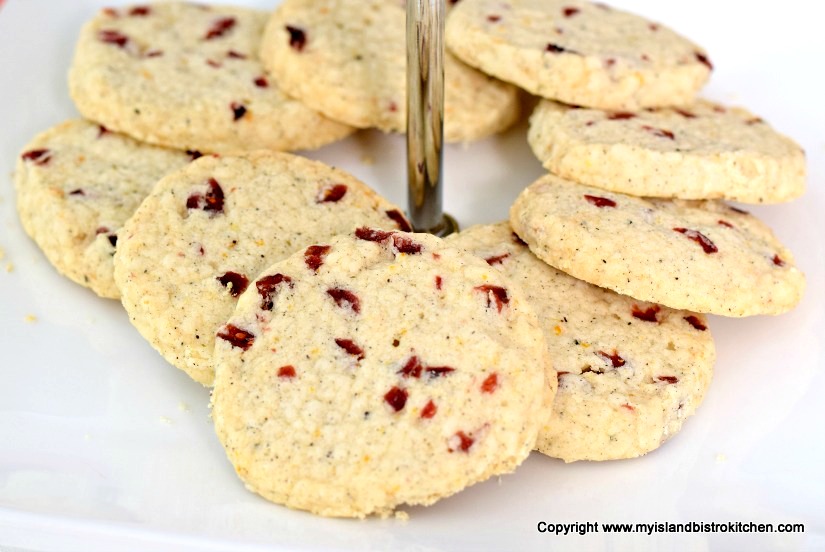
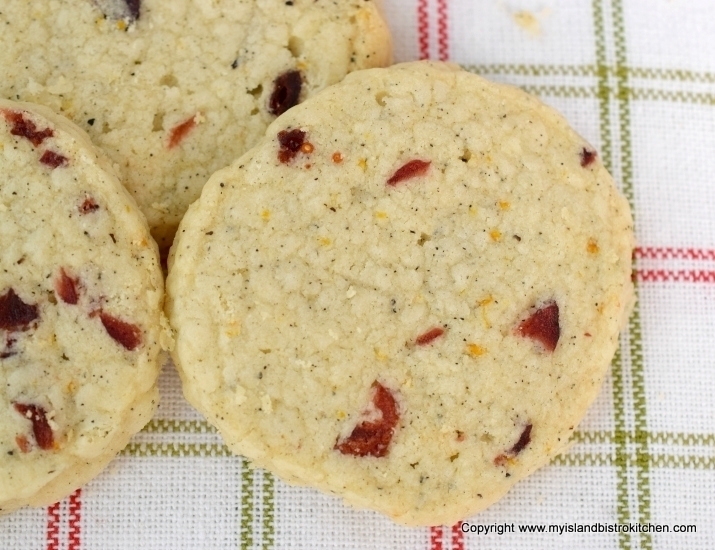
These easy-to-make Gluten-free Earl Grey Cranberry-Orange Shortbread cookies are brimming with flavor. The ground Earl Grey tea leaves lend a subtle hint of tea flavor as well as add wonderful specks of interest in the cookies. The addition of the dried cranberries and grated orange rind make these very flavorful and tasty cookies.
Gluten-Free Earl Grey Cranberry-Orange Shortbread
I have been having very good success using gluten-free baking flour, such as Bob’s Red Mill, Namaste, and Cup4Cup, for my gluten-free baking. The addition of the fine almond flour adds both flavor and a layer of tenderness to the shortbread crumb.
Gluten-Free Earl Grey Cranberry-Orange Shortbread
I use an old coffee grinder to grind the loose tea leaves very finely. This releases their essence which, in turn, infuses the dough with the tea aromatic. Use dried, not fresh or frozen, cranberries for these cookies and make sure they are chopped quite finely.
The dough will be quite soft so form it into a round log shape, wrap it tightly in plastic wrap or waxed paper, and refrigerate it for 2-3 hours before slicing and baking. Refrigerating the dough helps to firm it up enough so that, when sliced with a sharp knife, the slices cut cleanly. Empty cardboard paper towel rolls make great cylinder “sleeves” in which to chill the cookie dough because they help to keep the round shape. Simply slit open the paper towel roll, place the wrapped cookie log inside the “sleeve”, draw the edges of the cylinder together, and secure with tape. Rotate the cookie dough log a couple of times during the chilling process to distribute its weight and help to keep the round shape.
These cookies are a great addition to the menu of anyone on a gluten-free diet. In fact, anyone can enjoy these cookies, regardless whether they have a sensitivity or intolerance to gluten or not – I’ll bet you’d never guess they’re made with gluten-free flour!
Gluten-Free Earl Grey Cranberry-Orange Shortbread
[Printable recipe follows at end of posting]
Gluten-Free Earl Grey Cranberry-Orange Shortbread
Ingredients:
½ cup unsalted butter, softened at room temperature
½ cup sifted icing sugar (aka confectioner’s or powdered sugar)
¾ tsp finely grated orange rind
1/2 tsp pure vanilla
1/8 tsp almond flavoring
¾ cup gluten-free baking flour (e.g., Bob’s Red Mill, Namaste, or Cup4Cup)
¼ cup fine almond flour
1½ tbsp cornstarch
¼ tsp salt
¾ tsp finely ground Earl Grey tea leaves
¼ cup finely chopped dried cranberries
Method:
Cream butter and sugar together until smooth. Beat in orange rind, vanilla, and almond flavoring.
Whisk flours, cornstarch, salt, and ground tea leaves together. Blend dry ingredients into creamed mixture until just combined. Stir in cranberries.
Form dough into log approximately 1½” in diameter. Wrap tightly in wax paper or plastic wrap. Slit open an empty paper towel cardboard cylinder and place cookie log in cylinder. Draw cylinder sides together and secure with masking tape. Refrigerate cookie log for 2-3 hours, turning roll every hour or so to distribute the weight of the log and to keep the shape round. (Unbaked cookie logs may be stored for 2-3 days in the refrigerator before baking, provided they are stored in sealed plastic bags or airtight containers.)
Preheat oven to 325°F. Line baking sheets with parchment paper. With a sharp knife, slice cookie log into ¼” thick slices. Place cookies on prepared baking sheets, spacing the cookies about 1½” apart. Bake for 20-21 minutes, or until edges of cookies start to tint golden brown, rotating baking sheet half way through the baking. Let cookies cool on sheets for 3-4 minutes and then transfer to wire rack to finish cooling completely.
Store in airtight container at room temperature for up to 2 weeks or freeze for longer storage.
These gluten-free Earl Grey Cranberry-Orange Shortbread cookies are infused with a hint of tea and flavored with grated orange rind and dried cranberries.
My Island Bistro KitchenMy Island Bistro Kitchen - Barbara
Ingredients
½cupunsalted butter, softened at room temperature
½cupsifted icing sugar (aka confectioner’s or powdered sugar)
¾tspfinely grated orange rind
1/2tsppure vanilla
1/8tspalmond flavoring
¾cupgluten-free baking flour (e.g., Bob's Red Mill, Namaste, or Cup4Cup)
¼cupfine almond flour
1½tbspcornstarch
¼tspsalt
¾tspfinely ground Earl Grey tea leaves
¼cupfinely chopped dried cranberries
Instructions
Cream butter and sugar together until smooth. Beat in orange rind, vanilla, and almond flavoring.
Whisk flours, cornstarch, salt, and ground tea leaves together. Blend dry ingredients into creamed mixture until just combined. Stir in cranberries.
Form dough into log approximately 1½” in diameter. Wrap tightly in wax paper or plastic wrap. Slit open an empty paper towel cardboard cylinder and place cookie log in cylinder. Draw cylinder sides together and secure with masking tape. Refrigerate cookie log for 2-3 hours, turning roll every hour or so to distribute the weight of the log and to keep the shape round. (Unbaked cookie logs may be stored for 2-3 days in the refrigerator before baking, provided they are stored in sealed plastic bags or airtight containers.)
Preheat oven to 325°F. Line baking sheets with parchment paper. With a sharp knife, slice cookie log into ¼” thick slices. Place cookies on prepared baking sheets, spacing the cookies about 1½” apart. Bake for 20-21 minutes, or until edges of cookies start to tint golden brown, rotating baking sheet half way through the baking. Let cookies cool on sheets for 3-4 minutes and then transfer to wire rack to finish cooling completely.
Store in airtight container at room temperature for up to 2 weeks or freeze for longer storage.
Recipe Notes
[Copyright My Island Bistro Kitchen]
Yield: Approximately 24 cookies
If you have made this recipe and enjoyed it and/or wish to share it with your friends and family, please do so on social media but be sure to share the direct link to this posting from my website.
Connect with My Island Bistro Kitchen on Social Media
This Carrot Pudding is an old-fashioned steamed pudding made with very plain, simple ingredients – it doesn’t get much more plain than grated carrots and shredded potato! Continue reading Steamed Carrot Pudding Recipe→
One of my all-time favorite soups is made with the most unlikely vegetable – cauliflower. I first had this soup on a cold, rainy night in a small café in Mahone Bay, Nova Scotia, many years ago. We were looking for light fare and cauliflower was the soup of the day. I must admit, the thoughts of cauliflower in soup was not at all appealing to me but the menu was limited so this is what was ordered. Continue reading Roasted Cream of Cauliflower Soup→
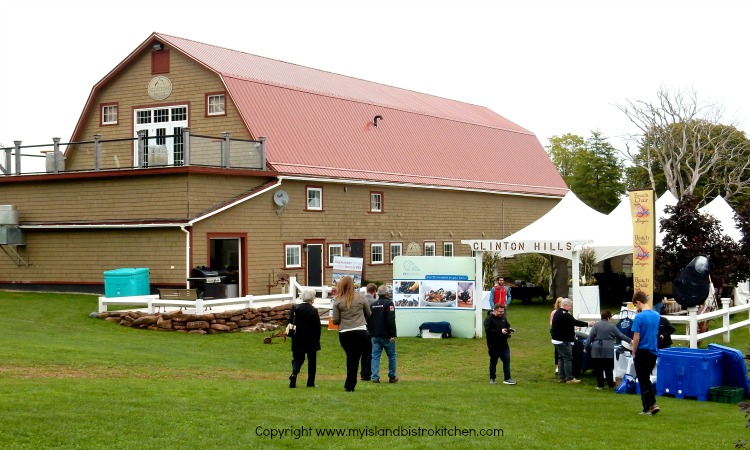
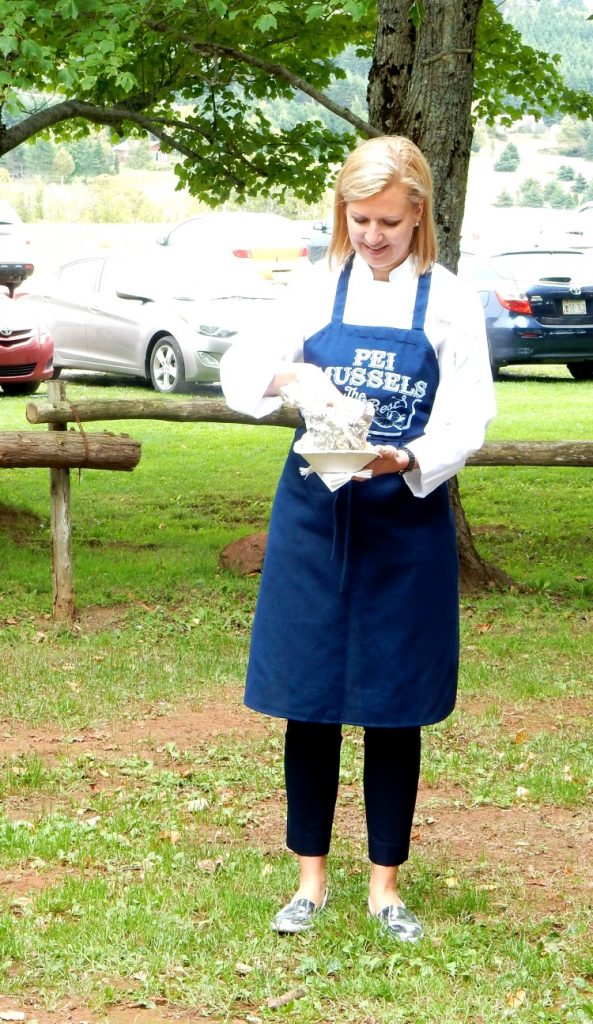
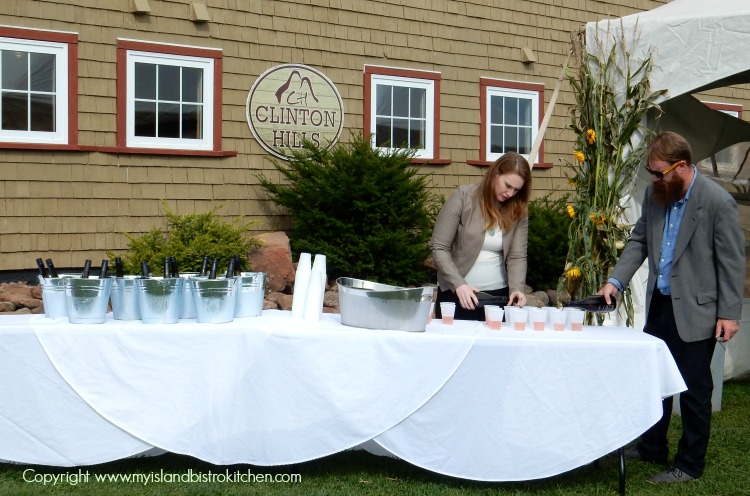
On a lovely Sunday afternoon on a hill in beautiful Clinton, PEI, the 2016 PEI Fall Flavours Culinary Festival came to a conclusion with a finale event featuring one of PEI’s finest shellfish – mussels.
The photo below shows an example of the mussel sock in which mussels grow.
Mussels in the Sock in Which They are Grown
According to the PEI Mussel Industry Council of PEI, the Island produces about 45 million pounds of mussels each year. This translates into approximately 80% of the entire mussel production in Canada. So, it is only fitting that an Island culinary festival would dedicate an entire event to featuring mussels.
Clinton Hills, PEI
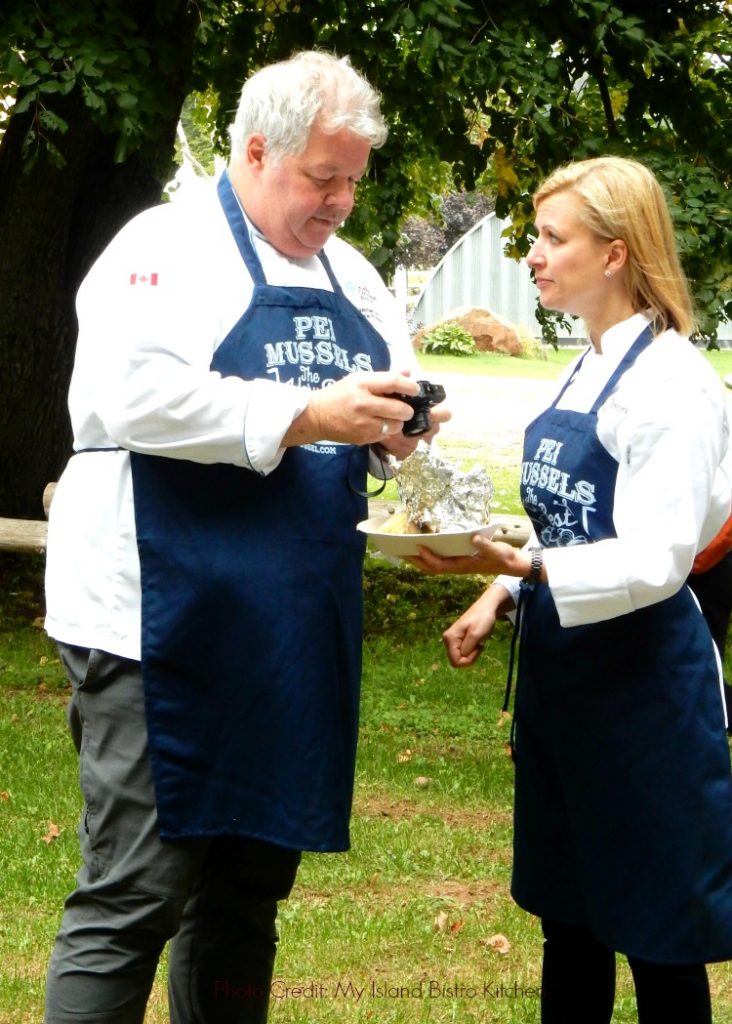
The Clinton Hills venue, frequently used for wedding receptions, proved to be a great location for this function which was hosted by guest celebrity chefs Anna and Michael Olson who are no strangers to the PEI Fall Flavours Culinary Festival. Anna and Michael have been a part of the Festival for many years and often host two to three signature events at the Festival each year.
Chefs Anna and Michael Olson
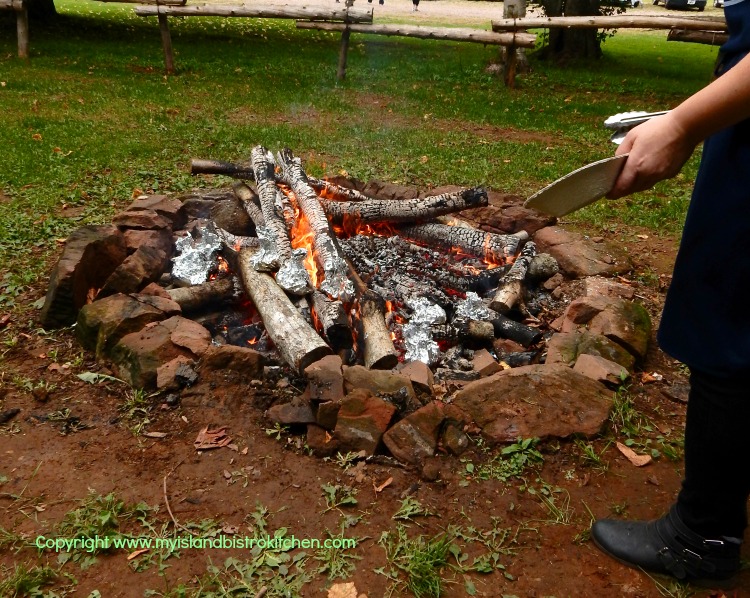
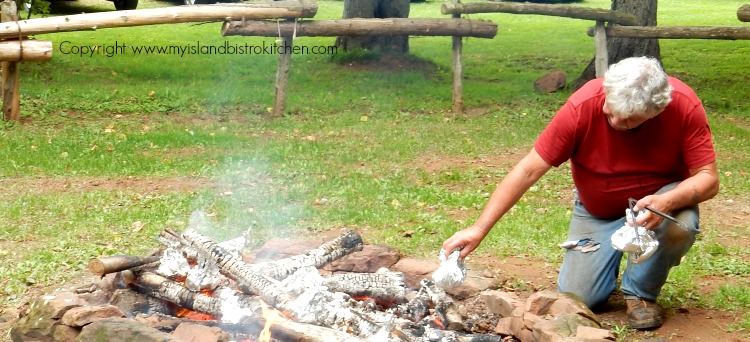
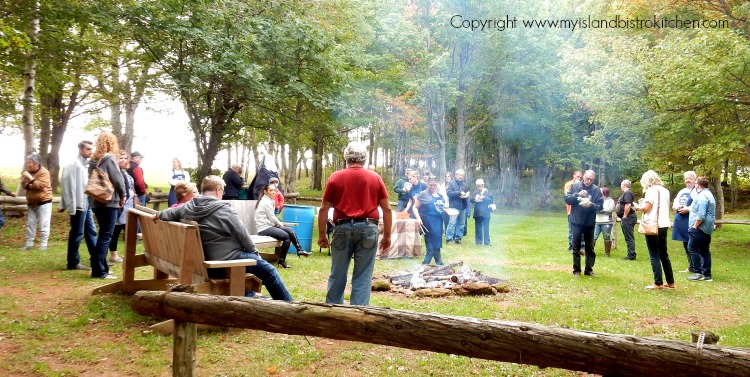
The event began with a large campfire upon which the mussels were steamed.
Steaming Mussels on an Open Fire
Yes, those tightly wrapped tinfoil packets contain mussels.
Tending the Fire
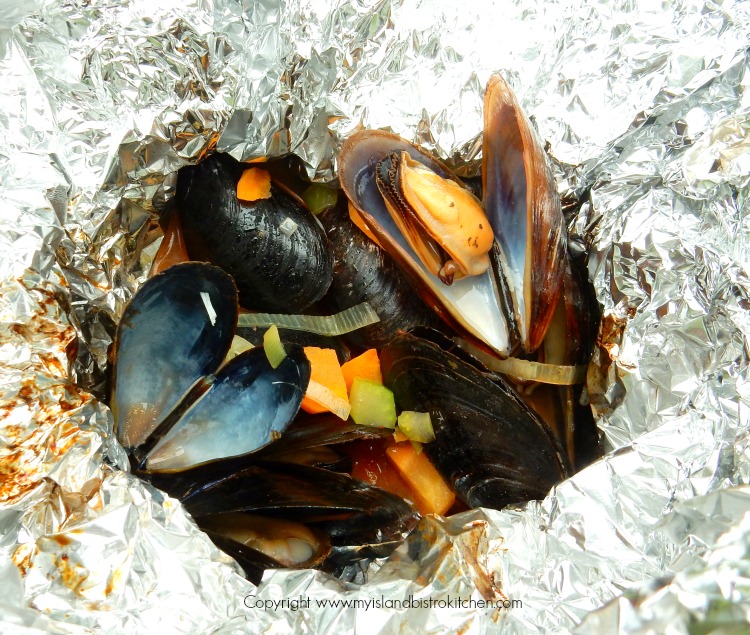
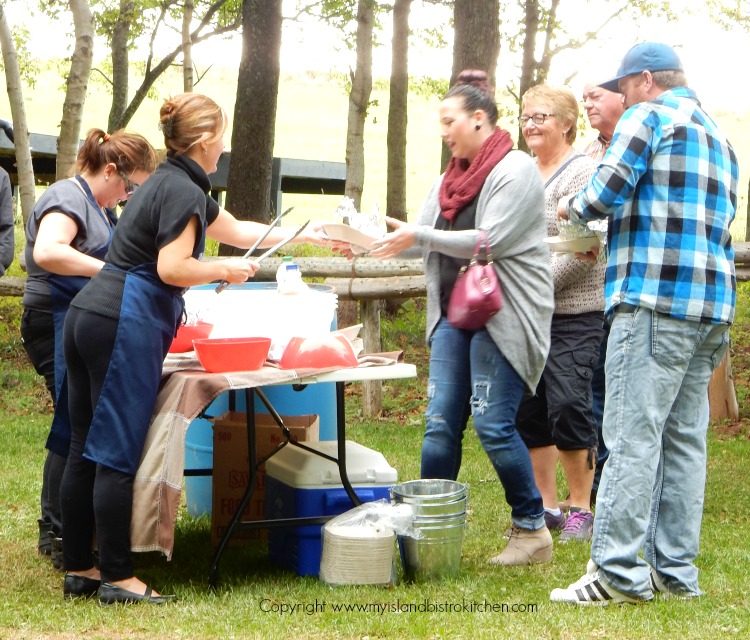
Everything always tastes better cooked over an open fire! Opening up the tinfoil packets revealed these tasty treats. Three options were available: Mussels steamed in white wine, orange juice, or a Caesar mix, all with aromatics added.
Steamed PEI Mussels
Mussels and corn on the cob are a great combo!
Mussels and Corn on the Cob
Chef Anna is checking out the yummy mussels.
Chef Anna Olson
Serving up the Steamed Mussels and Corn on the Cob
Even chefs, like the rest of us foodies, just have to photograph their food before consuming it!
Chef Anna and Chef Michael Olson
Around the campfire….
Around the Campfire
Any good party on PEI will have lively music. The strolling musicians were Mark Haines (fiddle) and Brad Fremlin (accordian).
Island Musicians Mark Haines (left) and Brad Fremlin (right)
Island Musician, Mark Haines
After enjoying the mussels and corn by the campfire, folks moved over to the large tent just outside the event barn.
Mussels on the Hill Event at Clinton Hills, PEI (2016)
Nova Scotia’s Benjamin Bridge Winery was the 2016 wine sponsor for the PEI Fall Flavours Culinary Festival. They were pouring their famous Nova 7 wine. One of the great things about culinary festivals is the opportunity to discover new products. I discovered the Nova 7 wine at the PEI Fall Flavours Culinary Festival events in 2015 when Benjamin Bridge was also the wine sponsor. This wine is an aromatic light-bodied effervescent wine with a beautiful salmon or light coral color. Look for appealing aromatics with lovely floral and fruit notes in this wine. The Nova 7 is a very versatile wine, perfect for sipping or for pairing with a variety of foods, including seafood which made it a suitable accompaniment to the mussel dishes served at this event.
Benjamin Bridge’s Nova 7 Wine
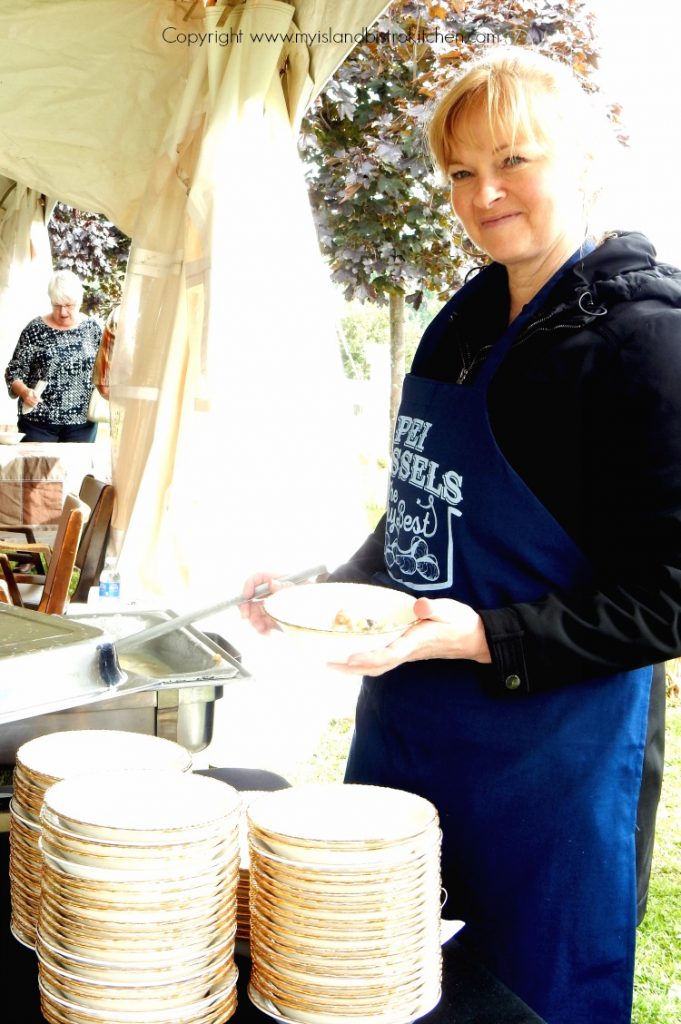
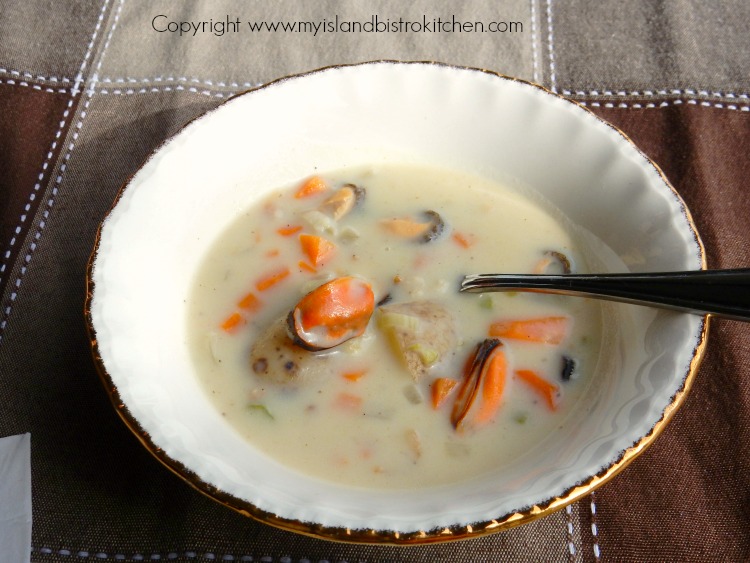
Making my rounds inside the tent, I started with a bowl of delectable homemade mussel chowder.
Mussel Chowder
Mussel Chowder
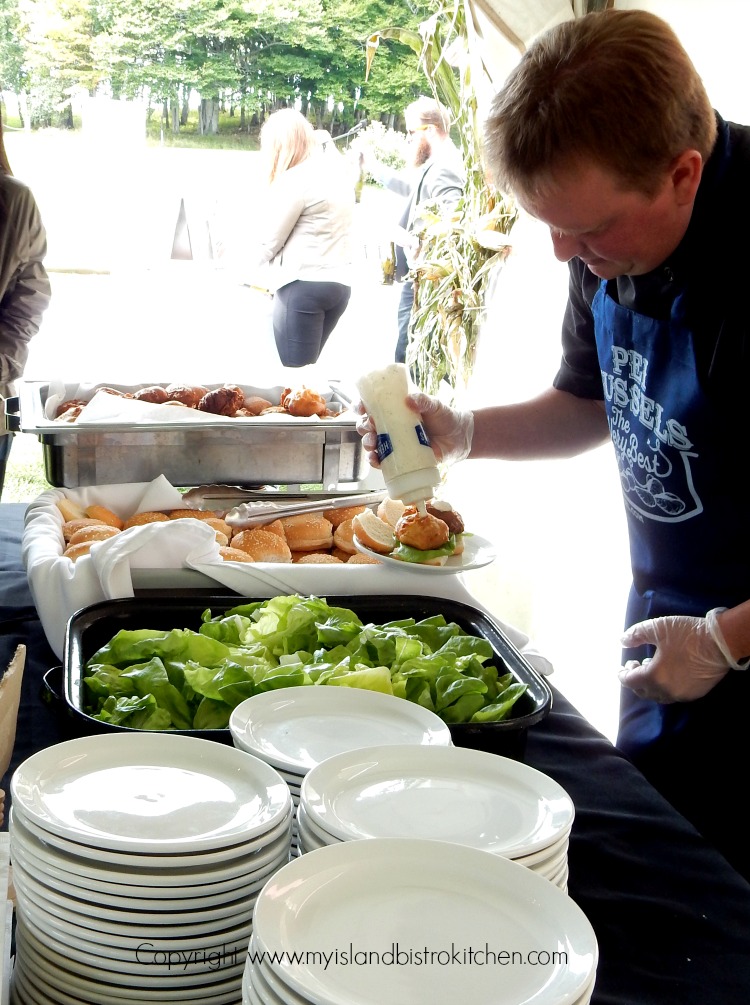
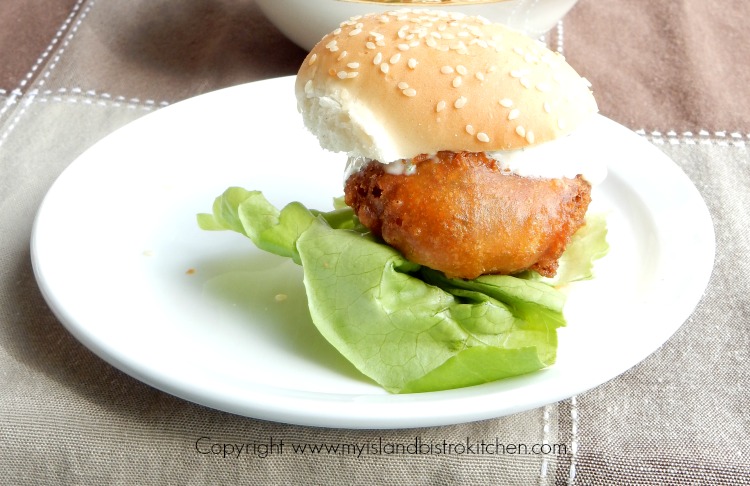
This was followed by yummy mussel fritters served in slider rolls.
Serving Mussel Fritters
I had not had mussel fritters before and these were super tasty!
Mussel Fritters
Mussel Fritters in Slider Rolls
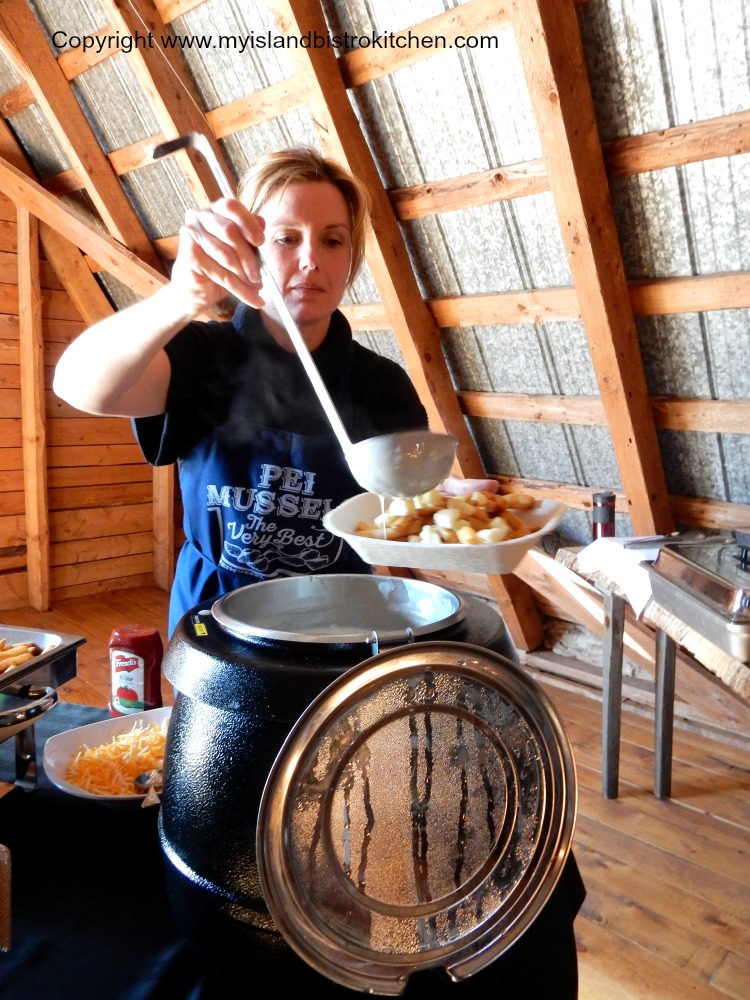
Upstairs in the main event barn, lobster poutine was being served. This was one event where you wanted to make sure you left the diet at home!
Mussel Poutine
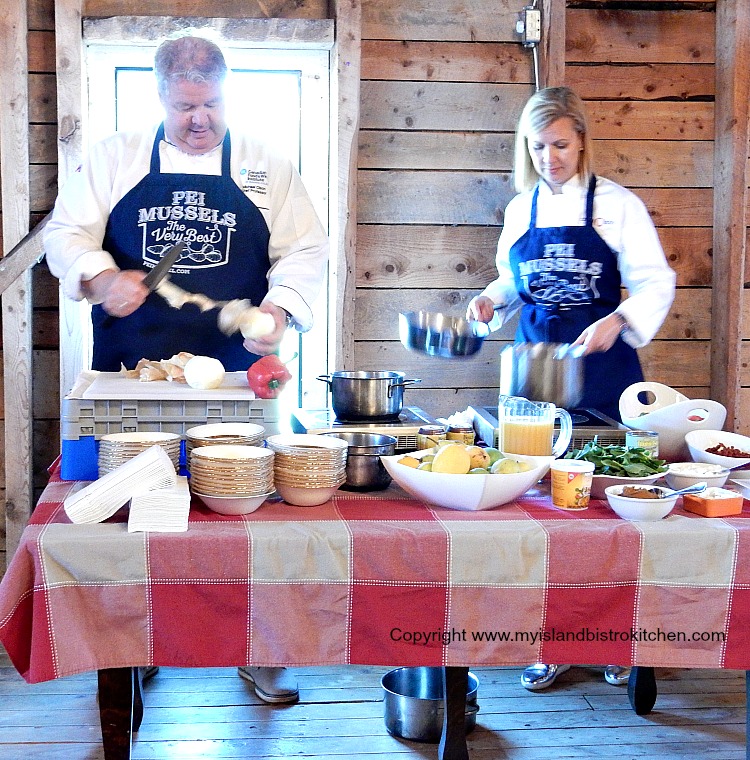
Anna and Michael did a demo of their favorite ways to steam mussels and adding aromatics to enhance the flavor of these tasty morsels. I like when the event also has a learning component to it.
Chefs Anna and Michael Olson at Clinton Hills, PEI (2016)
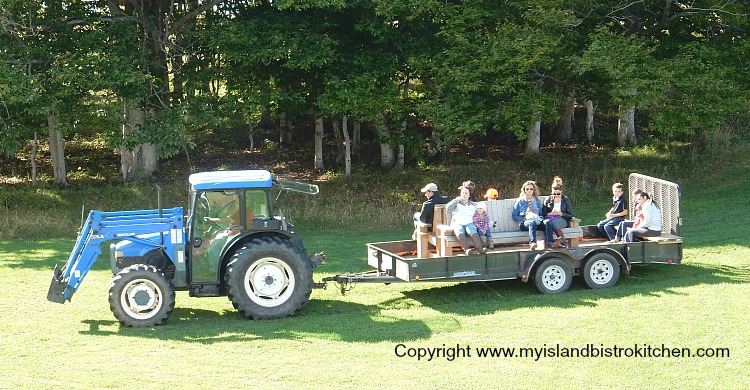
Wagon rides around the farm were available throughout the afternoon. This was a rather stylish wagon ride with its benches!
Hayride at Clinton Hills
If you are a foodie, then I recommend a trip to PEI in September when the whole month is dedicated to culinary events featuring one or more of the Island’s fine foods. It’s a great way to learn about the foods of PEI, try some new foods or new and different ways to serve them, and hear some great local musicians.
To read stories I have written about other PEI Fall Flavours Culinary Festival events, follow these links:
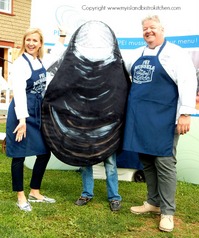
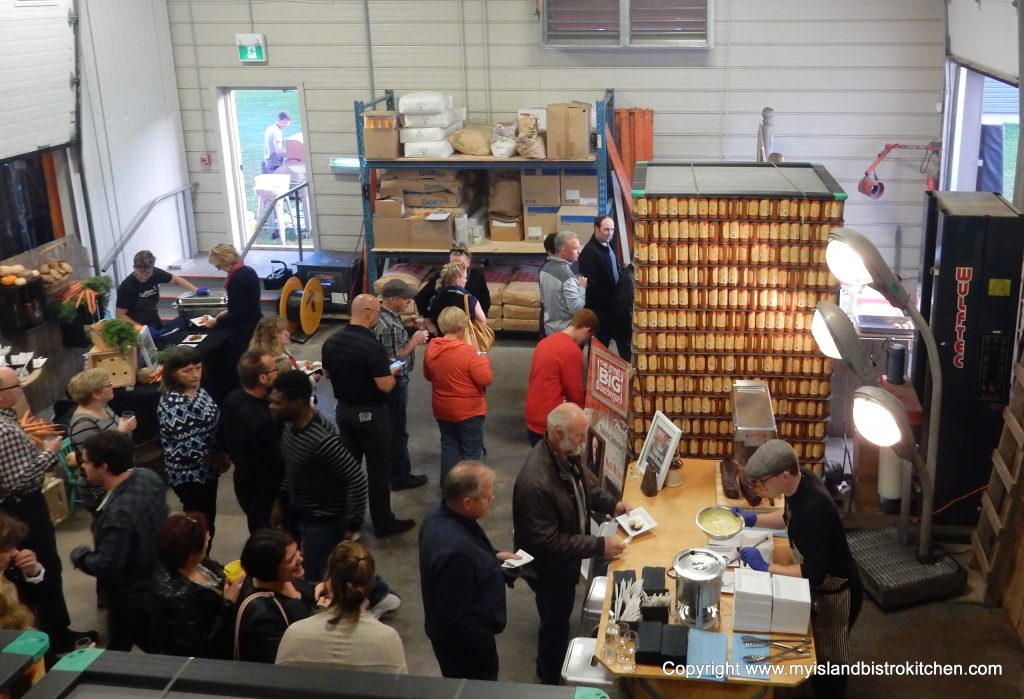
One of the 2016 signature events for the PEI Fall Flavours Culinary Festival was the Great Big Barbeque. Hosted by celebrity chef, Mark McEwan, this event was held at the PEI Brewing Company in Charlottetown.
Chef Mark McEwan
The Great Big Barbeque was a roving feast with food stations set up around the perimeter of the brewery as well as on the second level.
Roving Among the Food Stations at PEI’s Great Big Barbeque
In total, there were nine different food stations each featuring a local Island Chef with a signature dish.
Benjamin Bridge Winery, the 2016 Festival wine sponsor, greeted each patron with a glass of their Nova 7 wine.
Benjamin Bridge Wine
The PEI Brewing Company was kept busy serving small mugs of their handcrafted Gahan Ale straight from the tank. You can read the story I previously wrote about this brewery by clicking here.
Gahan Ale fresh from the tank at the PEI Brewing Company
Locally brewed beer from the PEI Brewing Company
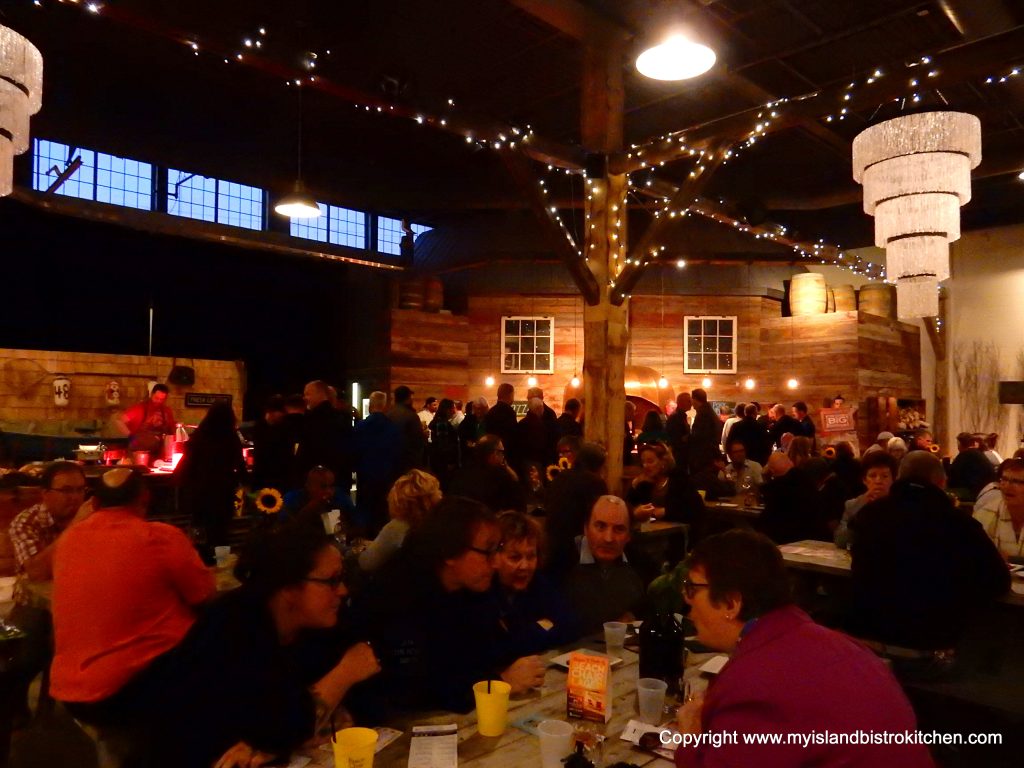
The main event hall was set up with picnic tables. From here, patrons circulated around the food stations in the order of their choosing.
The Great Big Barbeque at the PEI Brewing Company, Charlottetown, PEI
The Adam MacGregor Band provided lively entertainment for the evening.
Adam MacGregor Band Performing at PEI’s Great Big Barbeque
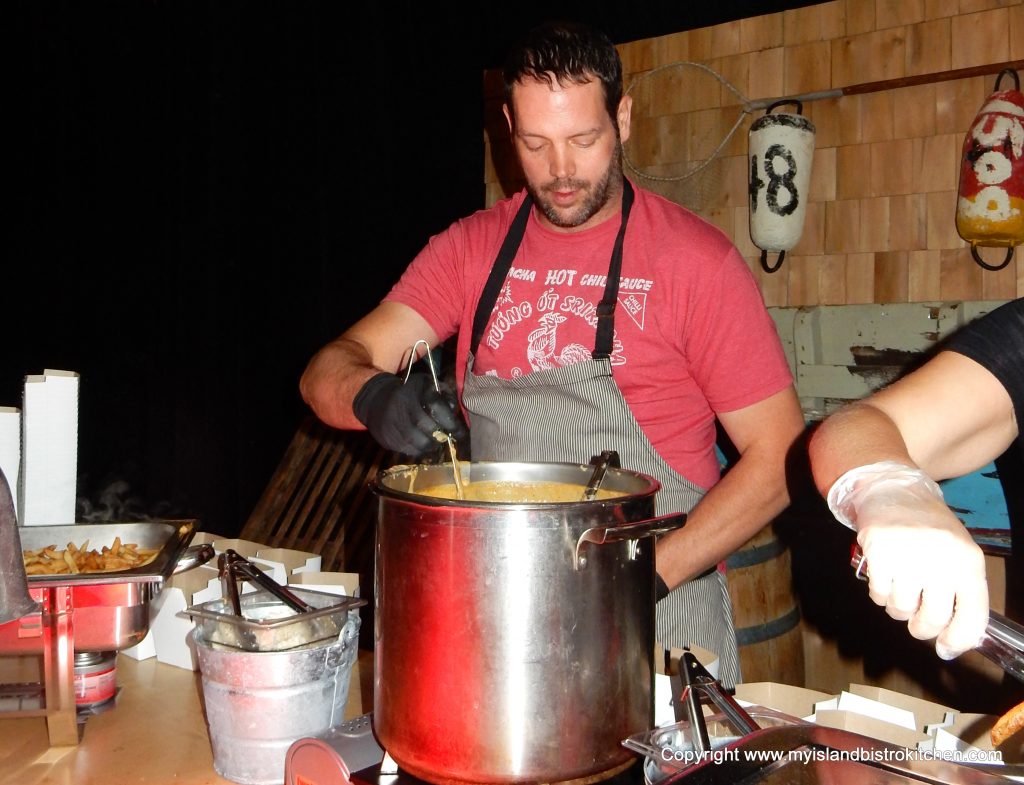
Station #1 – PEI Seafood Chowder
Chef Kyle Panton (Simms Corner Steakhouse and Oyster Bar) was kept busy dishing out his award-winning seafood chowder which he served in small glass jars.
Chef Kyle Panton
The chowder was accompanied by homemade biscuits, always a winning combo.
Homemade Biscuits
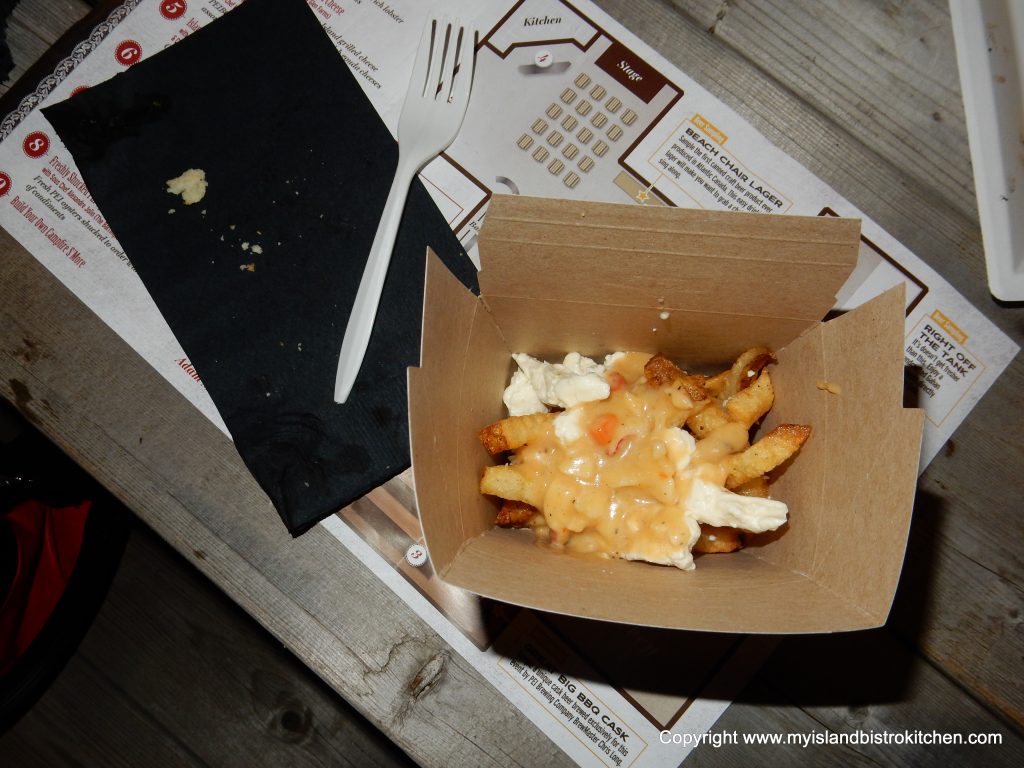
Station #2 – Lobster Poutine
Chef Brad MacDonald (The Brickhouse Kitchen and Bar) served up a dish featuring Island lobster and potatoes in the form of lobster poutine – hand-cut fries with a lobster veloute and melted cheese curds.
Serving up Lobster Poutine
Lobster Poutine
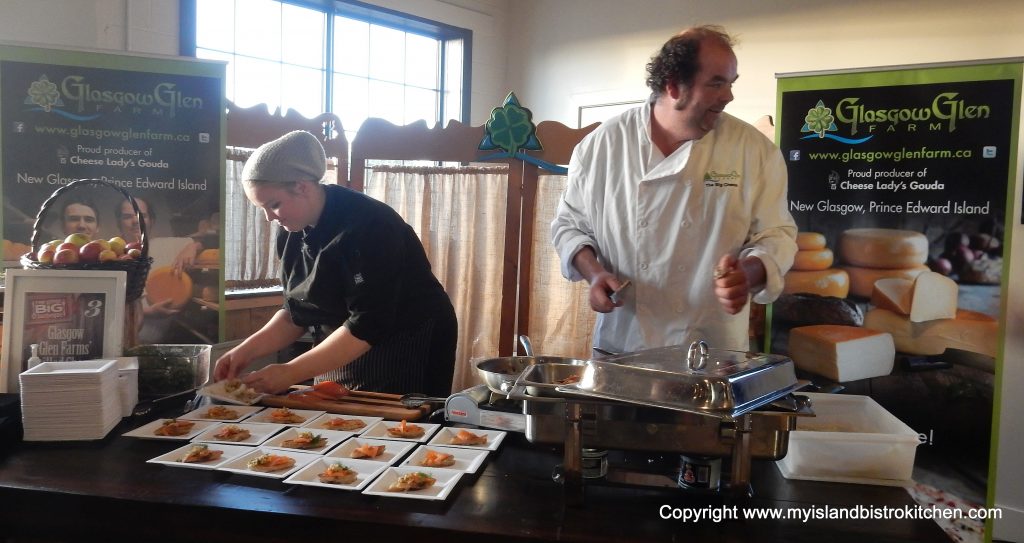
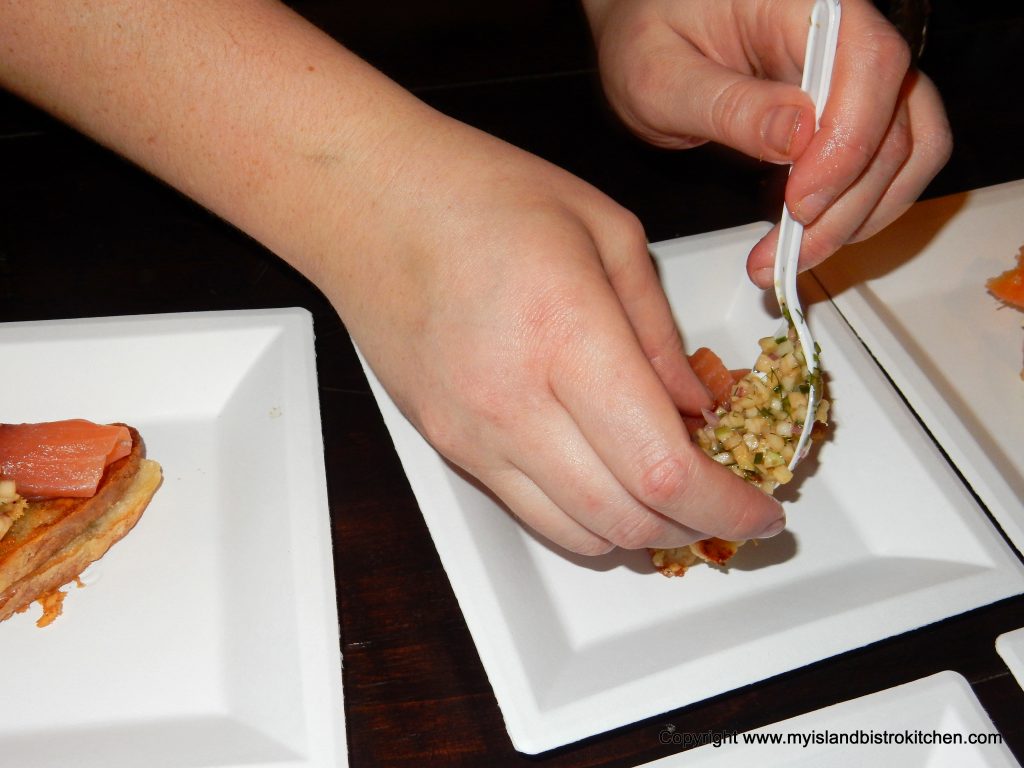
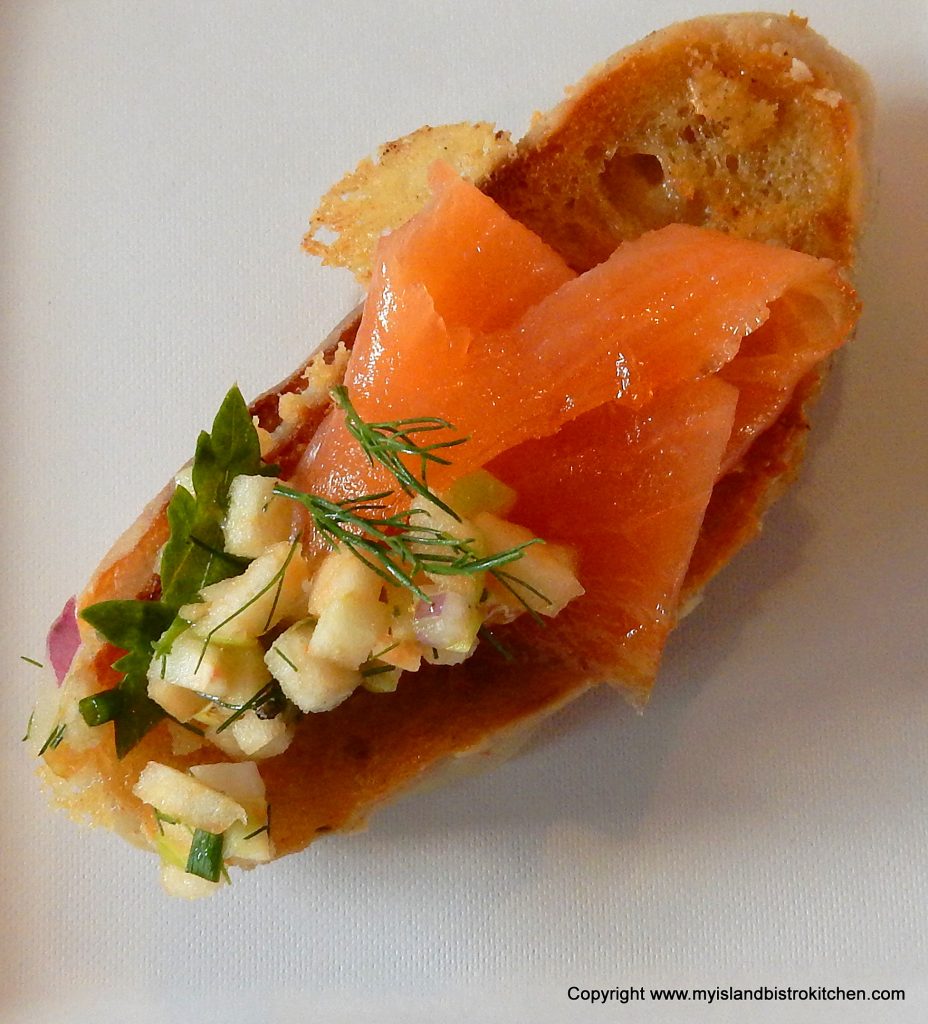
Station #3 – Glasgow Glen Farm’s Grilled Cheese
Jeff McCourt, chef and cheesemaker, from Glasgow Glen Farm in New Glasgow served an open-faced grilled Gouda cheese sandwich with smoked salmon and apple slaw on baguette slices.
Open-faced Grilled Gouda Cheese Sandwich with Smoked Salmon and Apple Slaw on Baguette Slices
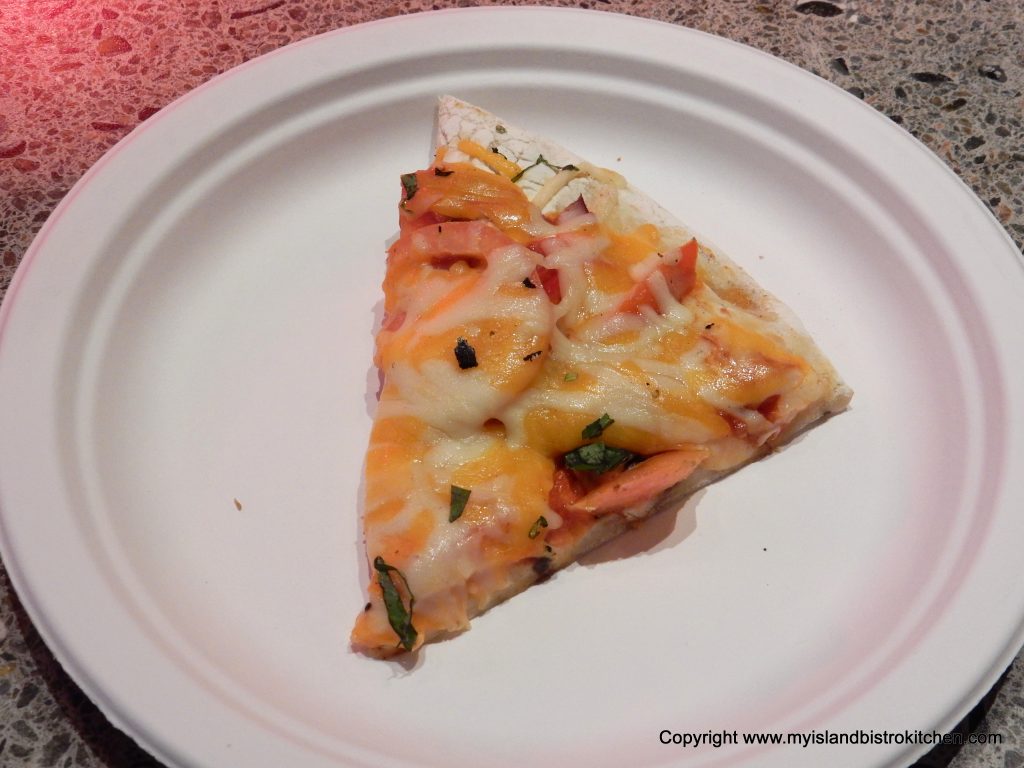
Station #4 – PEI Brewing Company Wood Fire Pizza
The brewery has a wood fire brick oven which was kept hopping with fresh made-to-order pizzas.
Wood-fired Pizza
Wood-fired Pizza
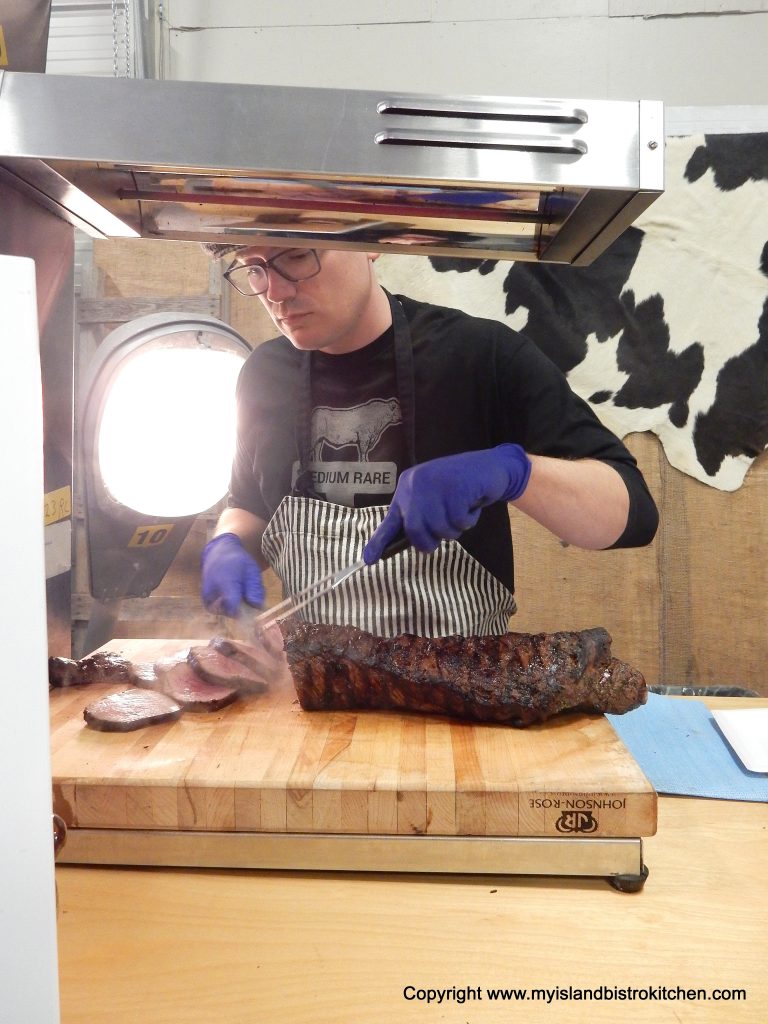
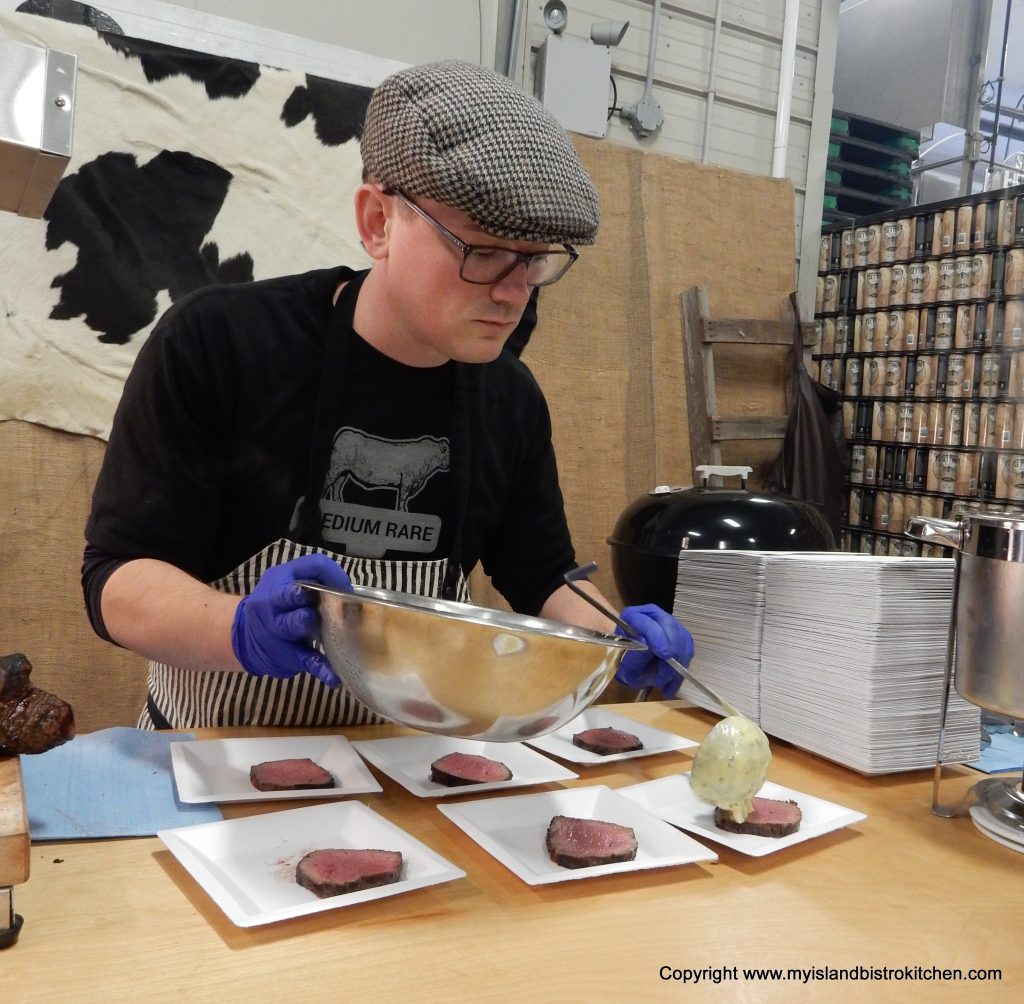
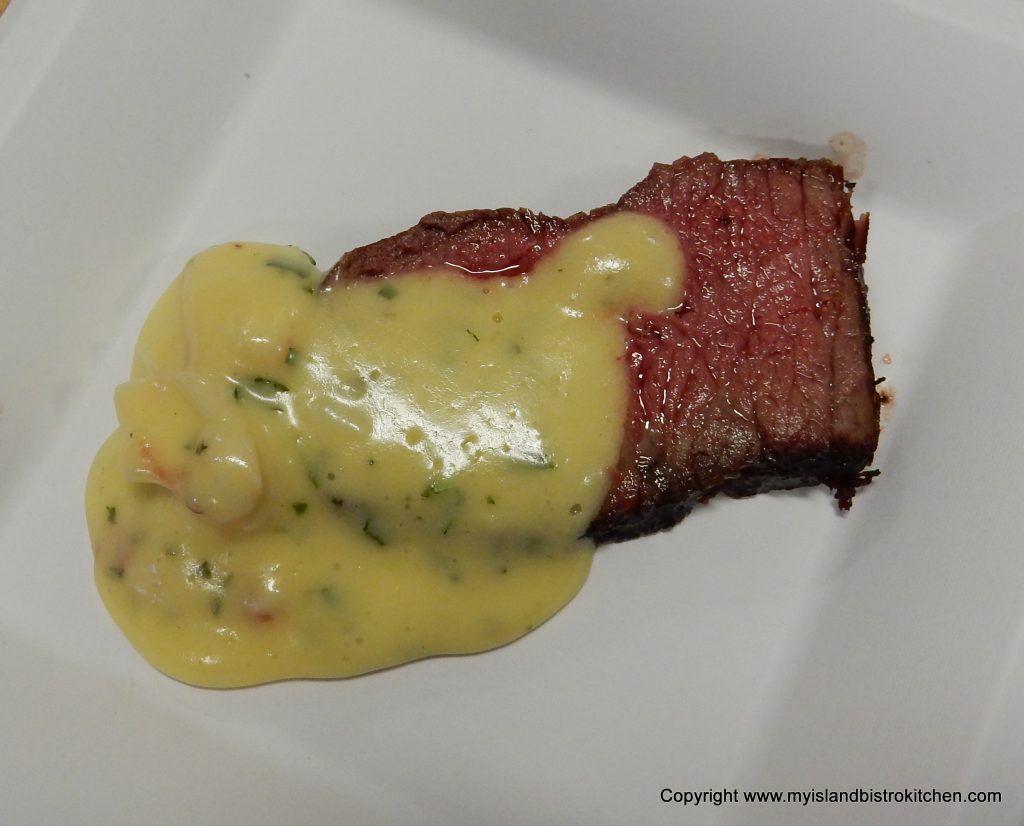
Station #5 – Island Striploin with Lobster Béarnaise
Chefs Cody Wallace (Fishbones Oyster Bar and Seafood Grill) and Jordan Dennis (Sobeys West Royalty) teamed up to present grilled PEI beef striploin with lobster béarnaise.
PEI Beef Striploin with Lobster Béarnaise
PEI Beef Striploin with Lobster Béarnaise
PEI Beef Striploin with Lobster Béarnaise
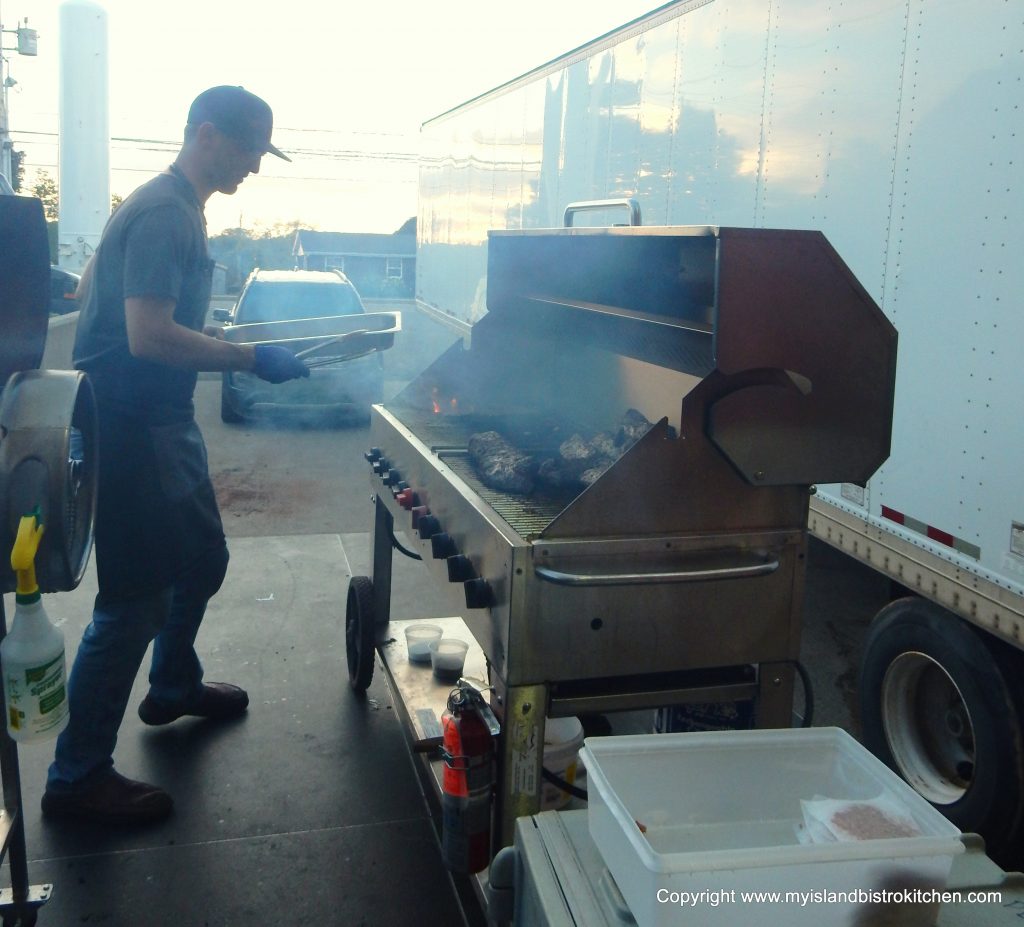
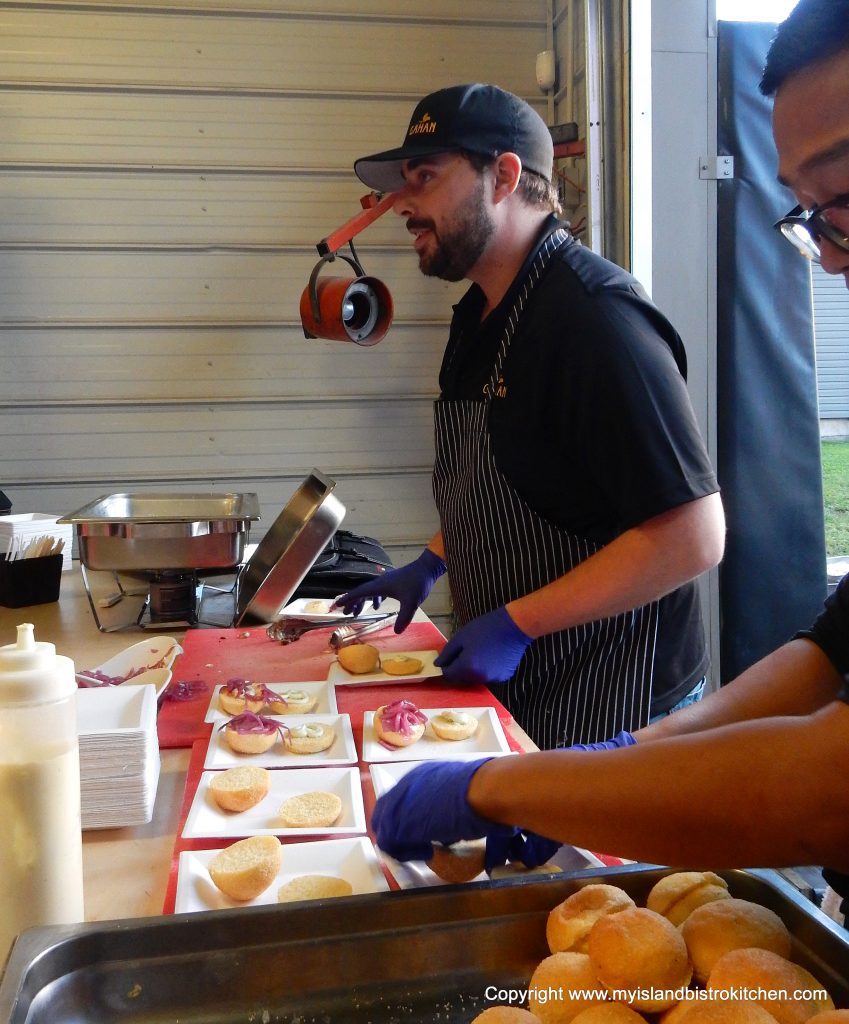
Station #6 – Island Beef Burger
The barbeques were kept busy grilling the slider beef burgers which Chef Brock MacDonald (The Gahan House) presented on cornbread brioche with avocado mayo, pickled red onions, and peppercorn blue cheese.
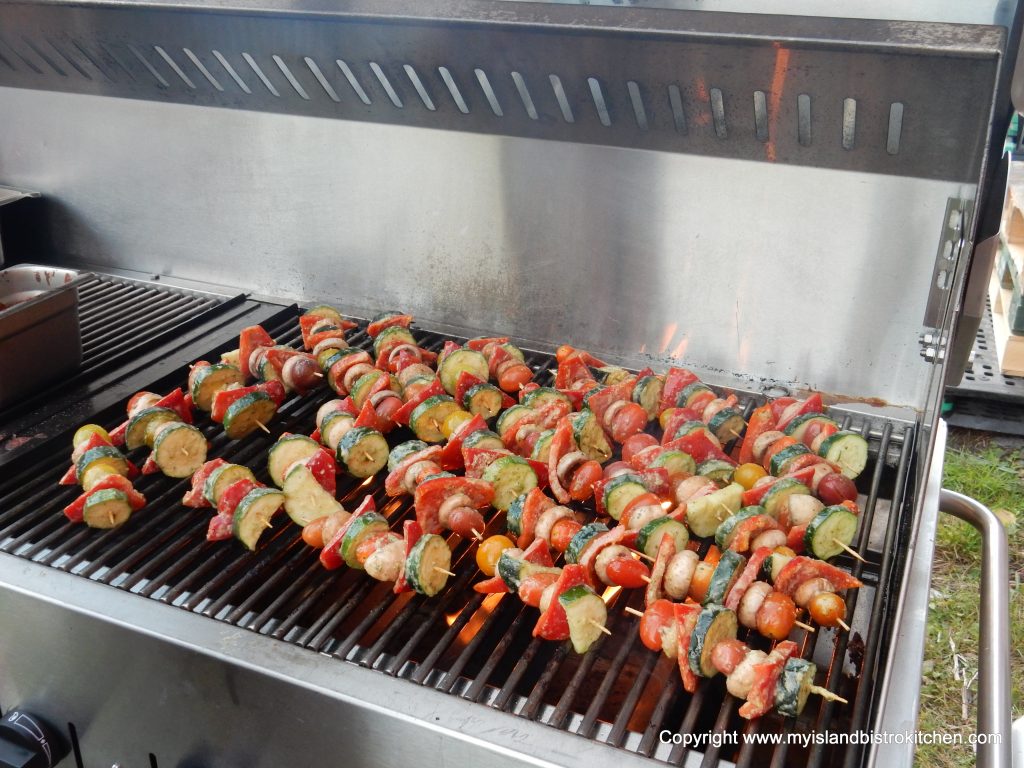
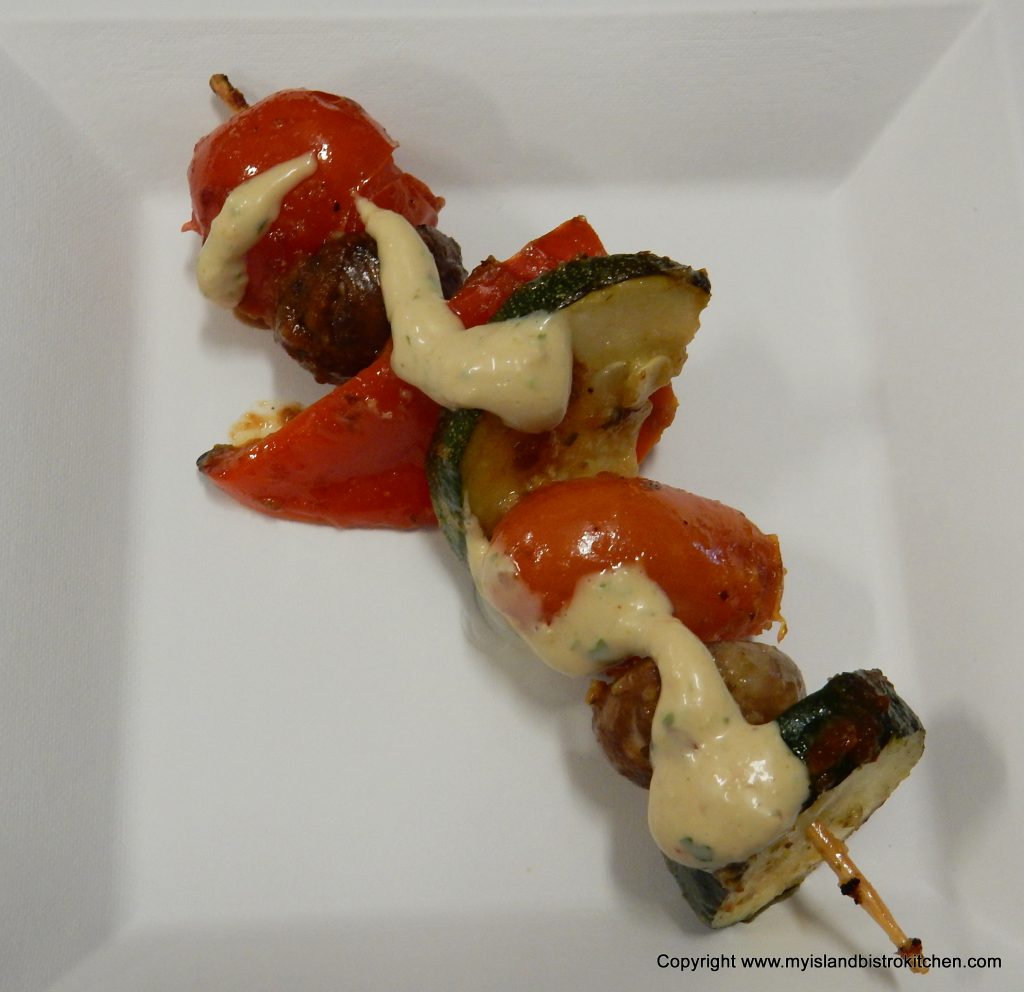
Station #7 – Marinated BBQ Kabobs
A huge barbeque at the brewery’s side door was filled with veggie kabobs consisting of zucchini, peppers, mushrooms, and tomatoes grilled in a smoky Gahan Iron Bridge Brown Ale BBQ sauce. These were the creation of Chef Andrew Cotton (Merchantman Fresh Seafood and Oyster Bar).
Veggie Kabobs
Veggie Kabobs in a Smoky Gahan Iron Bridge Brown Ale BBQ Sauce
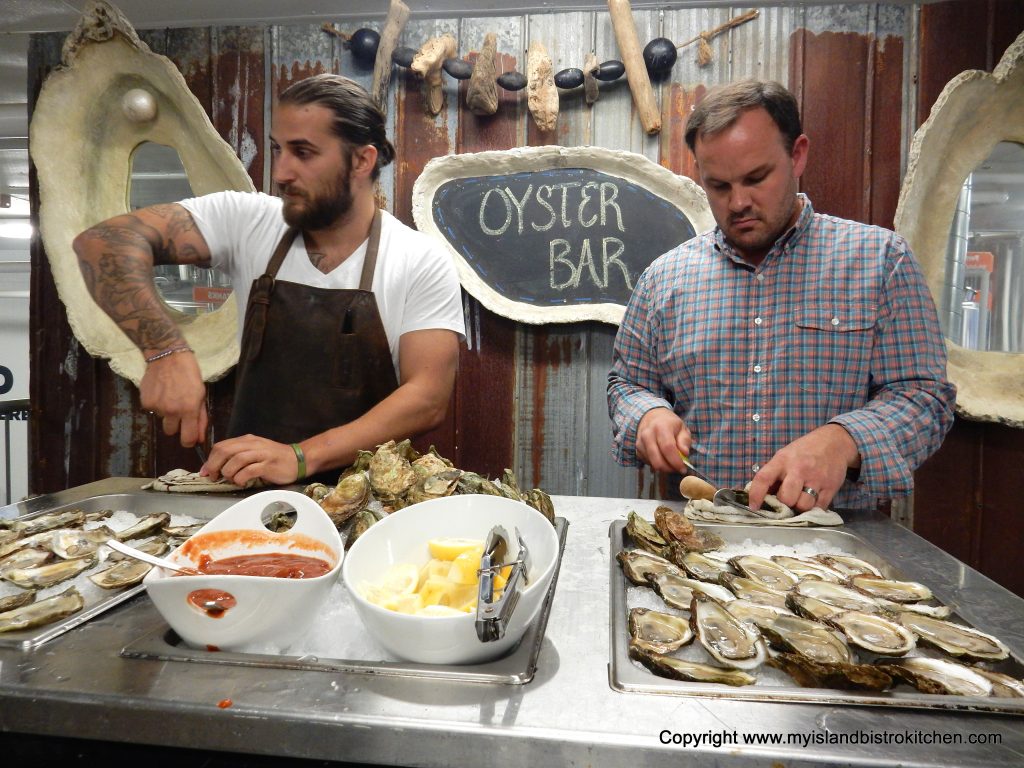
Station #8 – Freshly Shucked PEI Oysters
Sous Chef Alexandre Jolin (The Barrington Steakhouse and Oyster Bar) ensured lots of PEI oysters were shucked and ready for patrons.
Shucking the PEI Oysters
Raw PEI Oysters Ready for Slurping!
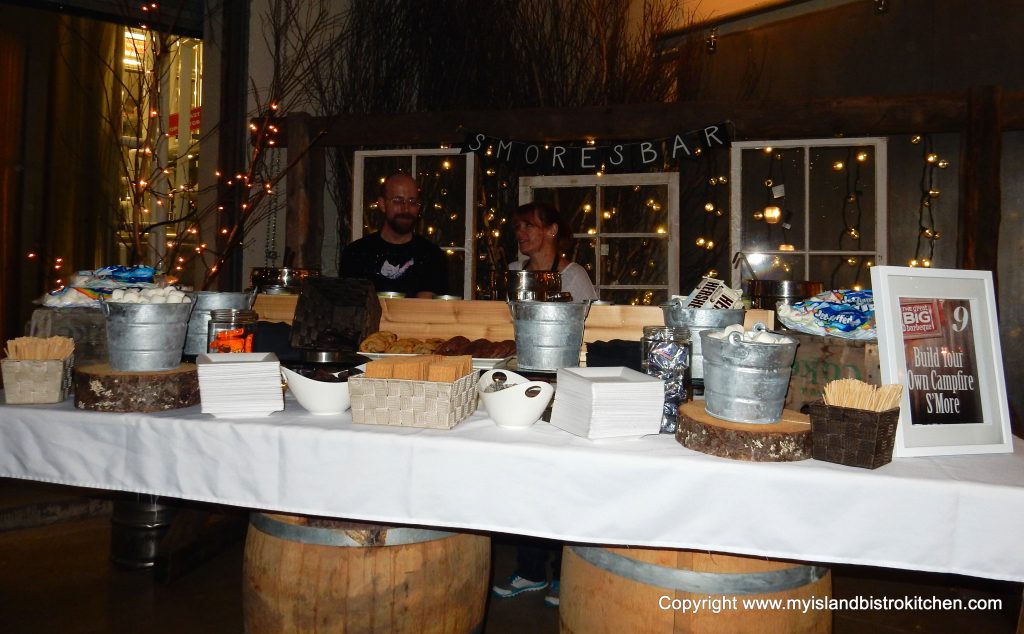
Station # 9 – S’Mores Dessert Bar
This bar was set up so patrons could toast their own marshmallows to make S’Mores.
S’Mores Dessert Bar
This was a lively and interactive event and the brewery was an ideal location for this casual barbeque. It was great to see so many local Island chefs featured. We have a lot of great things happening on the food scene on PEI and the barbeque offered the opportunity to sample many of them.
Follow these links for stories I have written on other PEI Fall Flavours Culinary Events: