Category Archives: General

Gluten-free Brown Sugar Fudge Square

Gluten-free Brown Sugar Fudge Square

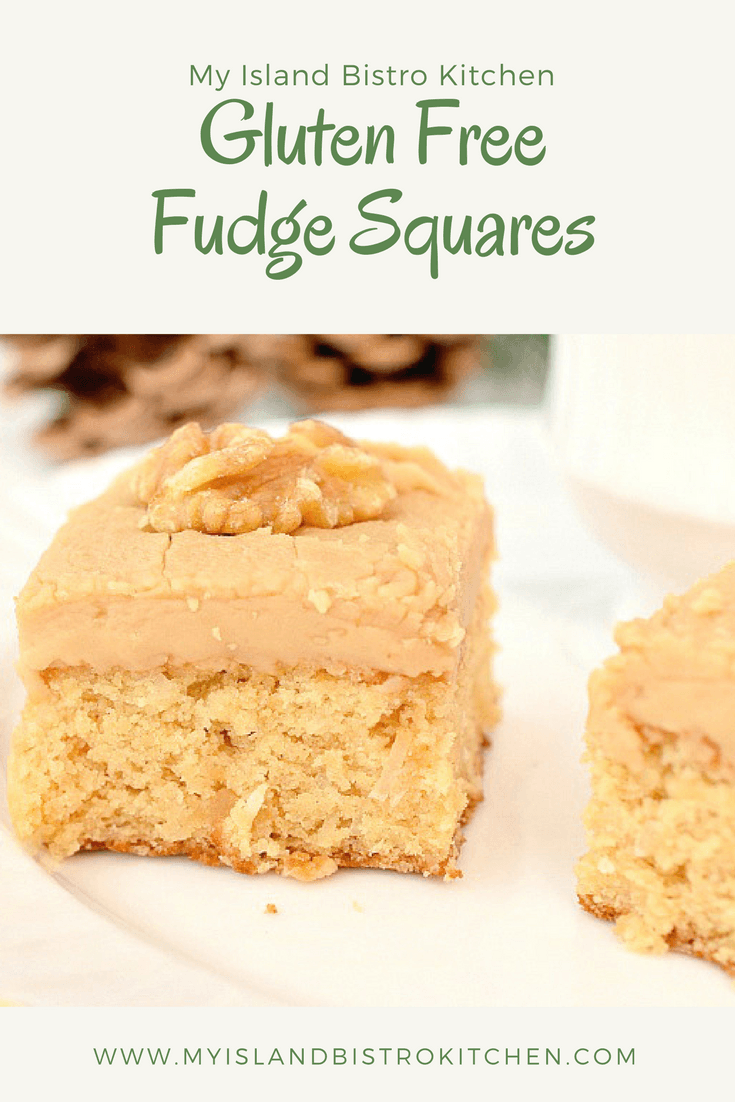
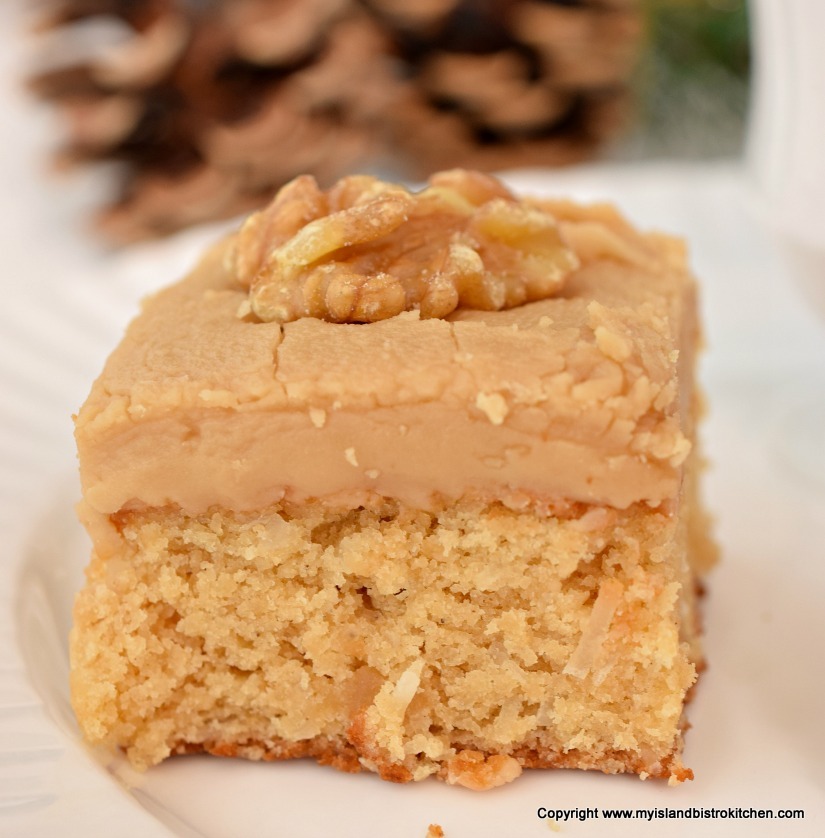
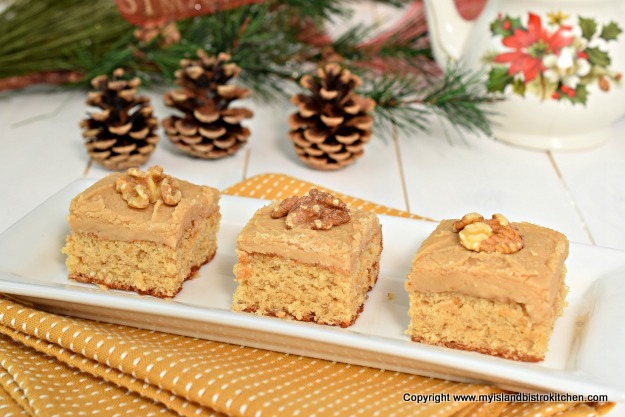
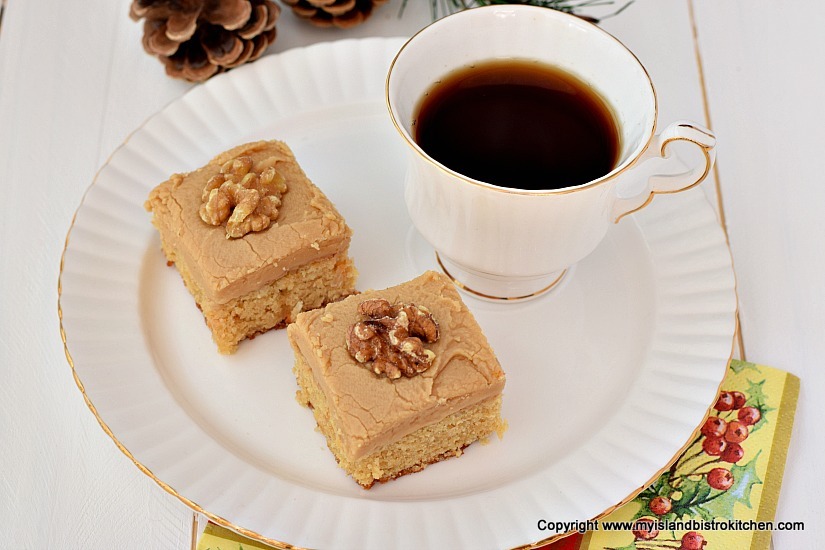
If you like brown sugar fudge, you’ll love this Gluten-free Brown Sugar Fudge Square, even if you aren’t gluten-intolerant or on a grain-restrictive diet! With a cake-type base, it’s the fudge icing that makes this square and takes it from plain to yummy. It’s like having cake and candy at the same time!

I use 1-to-1 gluten-free baking flour along with a small amount of coconut flour in this square.  The coconut flour blends well with the shredded coconut in the recipe and gives the square extra flavor.  Super easy square to make.

Gluten-free Brown Sugar Fudge Square

The slightly tricky part is making the icing as it will “set up” very fast.  Make sure you have all the ingredients pre-measured and at hand when you start to make the icing.  It’s essential that the icing sugar be sifted to remove any lumps as there won’t be any time to work out any lumps when beating the icing sugar into the hot butter-sugar mixture. Once the icing starts to thicken, work quickly to spread it over the square.

This square freezes beautifully and is great to have on hand when you just need to have something sweet!

Gluten-free Brown Sugar Fudge Square

[Printable version of recipe follows at end of posting]

Gluten-free Brown Sugar Fudge Square

Ingredients:

Square
½ cup minus 1 tbsp butter, softened at room temperature
1 cup brown sugar, lightly packed
1 extra-large egg (at room temperature for 20 minutes)
½ tsp pure vanilla
1 cup 1-to-1 gluten-free baking flour
2 tbsp coconut flour
1 tsp baking powder
pinch salt
1/3 cup milk
½ cup shredded coconut

Icing
3 tbsp butter, softened at room temperature
¾ cup brown sugar, lightly packed
3 tbsp cream
1 cup sifted icing sugar
1 tsp vanilla

Walnut halves for decoration (optional)

Method:

Preheat oven to 350°F. Grease or, alternatively, line 9” square baking pan with tin foil and spray with cooking oil.

Square:  Cream butter and sugar together.  Add the egg and beat well to combine with butter-sugar mixture.  Beat in vanilla.

Sift the 1-to-1 gluten-free flour, coconut flour, baking powder, and salt together.  Add the dry ingredients and milk to the creamed mixture in three parts (3 parts dry and 2 parts wet) starting and ending with the dry ingredients.  Beat for 1 minute longer on medium speed. Fold in the shredded coconut.  Spread batter evenly in prepared pan.

Bake for 30-32 minutes or until cake tester inserted into center of square comes out clean.  Remove square from oven and place on wire rack to cool completely.

Icing:  When square has cooled, make the icing by combining the butter and brown sugar in a saucepan over medium heat.  Stir until both have melted/dissolved.  Add the cream.  Bring mixture to a boil.  Reduce heat and simmer for 2 minutes, stirring occasionally.  Remove from heat and, with an electric hand mixer, beat in the icing sugar until mixture starts to thicken.  Immediately stir in the vanilla and, working quickly (as this icing will “set up” very fast), spread the icing evenly over square.  Score cutting lines on square and, if desired, place one walnut half on each individual square. Let icing set completely before cutting squares.

Yield: One 9” pan of squares

Gluten-free Brown Sugar Fudge Square

Gluten-free Brown Sugar Fudge Square

Yield: 1 - 9" pan of squares

An old-fashioned fudge square made with gluten-free flour and topped with brown sugar fudge icing.

Ingredients

  • Square
  • ½ cup minus 1 tbsp butter, softened at room temperature
  • 1 cup brown sugar, lightly packed
  • 1 extra-large egg (at room temperature for 20 minutes)
  • ½ tsp pure vanilla
  • 1 cup 1-to-1 gluten-free baking flour
  • 2 tbsp coconut flour
  • 1 tsp baking powder
  • pinch salt
  • 1/3 cup milk
  • ½ cup shredded coconut
  • Icing
  • 3 tbsp butter, softened at room temperature
  • ¾ cup brown sugar, lightly packed
  • 3 tbsp cream
  • 1 cup sifted icing sugar
  • 1 tsp vanilla
  • Walnut halves for decoration (optional)

Instructions

  1. Preheat oven to 350°F. Grease or, alternatively, line 9” square baking pan with tin foil and spray with cooking oil.
  2. Square: Cream butter and sugar together. Add the egg and beat well to combine with butter-sugar mixture. Beat in vanilla.
  3. Sift the 1-to-1 gluten-free flour, coconut flour, baking powder, and salt together. Add the dry ingredients and milk to the creamed mixture in three parts (3 parts dry and 2 parts wet) starting and ending with the dry ingredients. Beat for 1 minute longer on medium speed. Fold in the shredded coconut. Spread batter evenly in prepared pan.
  4. Bake for 30-32 minutes or until cake tester inserted into center of square comes out clean. Remove square from oven and place on wire rack to cool completely.
  5. Icing: When square has cooled, make the icing by combining the butter and brown sugar in a saucepan over medium heat. Stir until both have melted/dissolved. Add the cream. Bring mixture to a boil. Reduce heat and simmer for 2 minutes, stirring occasionally. Remove from heat and, with an electric hand mixer, beat in the icing sugar until mixture starts to thicken. Immediately stir in the vanilla and, working quickly (as this icing will “set up” very fast), spread the icing evenly over square. Score cutting lines on square and, if desired, place one walnut half on each individual square. Let icing set completely before cutting squares.
  6. Copyright My Island Bistro Kitchen
Schema/Recipe SEO Data Markup by Yummly Rich Recipes
https://myislandbistrokitchen.com/2016/12/29/gluten-free-brown-sugar-fudge-square/

Pin Me To Pinterest!

Fudge Squares

Gluten Free Fudge Squares

Turkey Chowder Recipe

Turkey Chowder is the perfect way to use up leftover turkey.  It’s a welcome tummy-warming and tasty chowder for cold winter days and is a real treat after skiing, a long winter walk, snowshoeing, or coasting on the snow-covered hills. Serve with warm rolls or biscuits straight from the oven for an extra special treat. Continue reading Turkey Chowder Recipe

Gluten-free Melting Moments Cookies

Gluten-free Melting Moments

These gluten-free melting moments cookies prove that being on a gluten-free diet does not mean one has to compromise on favorite sweet treats!

I use a 1-to-1 gluten-free baking flour, such as Bob’s Red Mills brand, for these cookies.  I also add a small amount of very finely ground almonds to the batter as this lends a tenderness to the cookie crumb which justifies the name of the cookies because they do melt in the mouth!

Gluten-free Melting Moments

These cookies are very easy to make. Mix up the dough. Pinch off small amounts of the dough and form into small balls. Place on parchment-lined baking sheets and flatten with the tines of a fork. Bake. It’s really no more complicated than that!

Gluten-free Melting Moment Cookie

[Printable recipe follows at end of posting]

Gluten-Free Melting Moments

Ingredients:
½ cup butter, softened at room temperature
¼ cup icing sugar (aka confectioner’s sugar or powdered sugar)
¼ tsp pure vanilla
½ cup 1-to-1 gluten-free baking flour
¼ cup finely ground almonds
¼ cup cornstarch

Method:

Preheat oven to 325°F.  Line baking sheets with parchment paper.

Cream butter.  Add the icing sugar and cream well with the butter.  Mix in vanilla.

In separate bowl, whisk the flour, ground almonds, and cornstarch together. Add to the creamed mixture and blend until well incorporated.

Form dough into small round balls (apx. 5/8 oz dough per ball).  Place balls on prepared baking sheets, about 2“ apart, and flatten each ball with the tines of a fork.  Decorate with small bits of maraschino cherries, if desired.

Bake for approximately 15-18 minutes, just until edges of cookies start to tint a golden tan color. Don’t over-bake. Let cool on baking sheet for 2-3 minutes then transfer cookies to wire rack to cool completely.

Yield:  Apx. 1½ dozen cookies

Gluten-free Melting Moments

Gluten-free Melting Moments Cookies

Yield: Apx. 1 1/2 dozen

These melt-in-your-mouth gluten-free melting moments cookies have a tender crumb and delicate butter and almond flavor.

Ingredients

  • ½ cup butter, softened at room temperature
  • ¼ cup icing sugar (aka confectioner’s sugar or powdered sugar)
  • ¼ tsp pure vanilla
  • ½ cup 1-to-1 gluten-free baking flour
  • ¼ cup finely ground almonds
  • ¼ cup cornstarch

Instructions

  1. Preheat oven to 325°F. Line baking sheets with parchment paper
  2. Cream butter. Add the icing sugar and cream well with the butter. Mix in vanilla.
  3. In separate bowl, whisk the flour, ground almonds, and cornstarch together. Add to the creamed mixture and blend until well incorporated.
  4. Form dough into small round balls (apx. 5/8 oz dough per ball). Place balls on prepared baking sheets, about 2“ apart, and flatten each ball with the tines of a fork. Decorate with small bits of maraschino cherries, if desired.
  5. Bake for approximately 15-18 minutes, just until edges of cookies start to tint a golden tan color. Don’t over-bake. Let cool on baking sheet for 2-3 minutes then transfer cookies to wire rack to cool completely.
Schema/Recipe SEO Data Markup by Yummly Rich Recipes
https://myislandbistrokitchen.com/2016/12/22/gluten-free-melting-moments-cookies/

Pin Me To Pinterest:

Gluten Free Melting Moments
Gluten-free Melting Moments

For other tasty gluten-free cookie recipes, click on the links below:

Gluten Free Lemon-Filled Thumbprint Cookies
Gluten Free Snickerdoodles
Gluten-free Earl Grey Cranberry-Orange Shortbread

Gluten-Free Earl Grey Cranberry-Orange Shortbread

Gluten-Free Shortbread
Gluten-Free Earl Grey Cranberry-Orange Shortbread

These easy-to-make gluten-free Earl Grey Cranberry-Orange Shortbread cookies are brimming with flavor. The ground Earl Grey tea leaves lend a subtle hint of tea flavor as well as add wonderful specks of interest in the cookies.  The addition of the dried cranberries and grated orange rind make these very flavorful and tasty cookies.

Gluten-free Shortbread
Gluten-Free Earl Grey Cranberry-Orange Shortbread

I have been having very good success using 1-to-1 gluten-free baking flour, such as Bob’s Red Mill, for my gluten-free baking.  The addition of finely ground almonds adds both flavor and a layer of tenderness to the shortbread crumb.

Gluten-Free Shortbread
Gluten-Free Earl Grey Cranberry-Orange Shortbread

I use my old coffee grinder to grind the loose tea leaves very finely. This releases their essence which, in turn, infuses the dough with the tea aromatic. Use dried, not fresh or frozen, cranberries for these cookies and make sure they are chopped quite finely.

The dough will be quite soft so form it into a round log shape, wrap it tightly in plastic wrap or waxed paper, and refrigerate it for 2-3 hours before slicing and baking. Refrigerating the dough helps to firm it up enough so that, when sliced with a sharp knife, the slices cut cleanly. Empty cardboard paper towel rolls make great cylinder “sleeves” in which to chill the cookie dough because they help to keep the round shape. Simply slit open the paper towel roll, place the wrapped cookie log inside the “sleeve”, draw the edges of the cylinder together, and secure with tape. Rotate the cookie dough log a couple of times during the chilling process to distribute its weight and help to keep the round shape.

These cookies are a great addition to the menu of anyone on a gluten-free diet. In fact, anyone can enjoy these cookies, regardless whether they have a sensitivity or intolerance to gluten or not – I’ll bet you’d never guess they’re made with gluten-free flour!

Gluten-free Shortbread
Gluten-Free Earl Grey Cranberry-Orange Shortbread

[Printable recipe follows at end of posting]

Gluten-Free Earl Grey Cranberry-Orange Shortbread

Ingredients:

½ cup unsalted butter, softened at room temperature
½ cup sifted icing sugar (aka confectioner’s or powdered sugar)
¾ tsp finely grated orange rind
1/2 tsp pure vanilla
1/8 tsp almond flavoring

¾ cup 1-to-1 gluten-free baking flour
¼ cup finely-ground almonds
1½ tbsp cornstarch
¼ tsp salt
¾ tsp finely ground Earl Grey tea leaves

¼ cup finely chopped dried cranberries

Method:

Cream butter and sugar together until smooth.  Beat in orange rind, vanilla, and almond flavoring.

Whisk flour, ground almonds, cornstarch, salt and ground tea leaves together.  Blend dry ingredients into creamed mixture until just combined.  Stir in cranberries.

Form dough into log approximately 1½” in diameter.  Wrap tightly in wax paper or plastic wrap. Slit open an empty paper towel cardboard cylinder and place cookie log in cylinder.  Draw cylinder sides together and secure with masking tape.  Refrigerate cookie log for 2-3 hours, turning roll every hour or so to distribute the weight of the log and to keep the shape round. (Unbaked cookie logs may be stored for 2-3 days in the refrigerator before baking, provided they are stored in sealed plastic bags or airtight containers.)

Preheat oven to 325°F. Line baking sheets with parchment paper. With a sharp knife, slice cookie log into ¼” thick slices.  Place cookies on prepared baking sheets, spacing the cookies about 1½” apart.  Bake for 20-21 minutes, or until edges of cookies start to tint golden brown, rotating baking sheet half way through the baking.  Let cookies cool on sheets for 3-4 minutes and then transfer to wire rack to finish cooling completely.

Store in airtight container at room temperature for up to 2 weeks or freeze for longer storage.

Yield:  Approximately 24 cookies

Gluten-Free Earl Grey Cranberry-Orange Shortbread

Yield: Apx. 24 cookies

A flavorful gluten-free shortbread cookie infused with a hint of Earl Grey tea and flavored with grated orange rind and dried cranberries.

Ingredients

  • ½ cup unsalted butter, softened at room temperature
  • ½ cup sifted icing sugar (aka confectioner’s or powdered sugar)
  • ¾ tsp finely grated orange rind
  • 1/2 tsp pure vanilla
  • 1/8 tsp almond flavoring
  • ¾ cup 1-to-1 gluten-free baking flour
  • ¼ cup finely-ground almonds
  • 1½ tbsp cornstarch
  • ¼ tsp salt
  • ¾ tsp finely ground Earl Grey tea leaves
  • ¼ cup finely chopped dried cranberries

Instructions

  1. Cream butter and sugar together until smooth. Beat in orange rind, vanilla, and almond flavoring.
  2. Whisk flour, ground almonds, cornstarch, salt and ground tea leaves together. Blend dry ingredients into creamed mixture until just combined. Stir in cranberries.
  3. Form dough into log approximately 1½” in diameter. Wrap tightly in wax paper or plastic wrap. Slit open an empty paper towel cardboard cylinder and place cookie log in cylinder. Draw cylinder sides together and secure with masking tape. Refrigerate cookie log for 2-3 hours, turning roll every hour or so to distribute the weight of the log and to keep the shape round. (Unbaked cookie logs may be stored for 2-3 days in the refrigerator before baking, provided they are stored in sealed plastic bags or airtight containers.)
  4. Preheat oven to 325°F. Line baking sheets with parchment paper. With a sharp knife, slice cookie log into ¼” thick slices. Place cookies on prepared baking sheets, spacing the cookies about 1½” apart. Bake for 20-21 minutes, or until edges of cookies start to tint golden brown, rotating baking sheet half way through the baking. Let cookies cool on sheets for 3-4 minutes and then transfer to wire rack to finish cooling completely.
  5. Store in airtight container at room temperature for up to 2 weeks or freeze for longer storage.
  6. Copyright My Island Bistro Kitchen
Schema/Recipe SEO Data Markup by Yummly Rich Recipes
https://myislandbistrokitchen.com/2016/12/20/gluten-free-earl-grey-cranberry-orange-shortbread/

If you have made this recipe and enjoyed it and/or wish to share it with your friends and family, please do so on social media but be sure to share the direct link to this posting from my website.

Connect with My Island Bistro Kitchen on Social Media

Join the Facebook page for My Island Bistro Kitchen:  https://www.facebook.com/MyIslandBistroKitchen/

Follow “the Bistro” on “X” (formerly Twitter)https://twitter.com/PEIBistro/

See the drool-worthy gallery of mouth-watering food photos from My Island Bistro Kitchen on Instagramhttps://www.instagram.com/peibistro/

Follow “the Bistro” on Pinterest at https://www.pinterest.ca/peibistro/ and pin the Pinterest-ready photo at the end

Pin These Gluten-Free Earl Grey Cranberry-Orange Shortbread Cookies To Pinterest!
Gluten Free Earl Grey Cranberry-Orange Shortbread


Gluten-Free Shortbread
Gluten-Free Earl Grey Cranberry-Orange Shortbread
Looking for more great gluten-free cookie recipes?  Check out these from My Island Bistro Kitchen:

Melting Moments
Snickerdoodles
Lemon-Filled Thumbprint Cookies

Roasted Cream of Cauliflower Soup

Cauliflower Soup
Roasted Cream of Cauliflower Soup

One of my all-time favorite soups is made with the most unlikely vegetable – cauliflower. I first had this soup on a cold, rainy night in a small café in Mahone Bay, Nova Scotia, many years ago. We were looking for light fare and cauliflower was the soup of the day. I must admit, the thoughts of cauliflower in soup was not at all appealing to me but the menu was limited so this is what was ordered. What came to the table was, without a doubt, one of the most palate-pleasing soups I’ve ever had! Rich and creamy with a sprinkle of nutmeg on top and served with a multi-grain bread, this became a soup that I just had to figure out how to make on my own.  So I set about figuring out just what ingredients would have been used to enhance the somewhat blah cauliflower. My recipe is a good replica of that first cauliflower soup I so enjoyed.

Cauliflower Soup
Roasted Cream of Cauliflower Soup

Over the years, I’ve worked on my recipe for the soup. The first thing I do is roast the cauliflower that I sprinkle with nutmeg.  Of all the spices, I find nutmeg complements the cauliflower best. Roasting vegetables deepens their flavor and this, of course, contributes to the overall flavor of the soup. To make life simpler, rather than say the recipe calls for one head of cauliflower (which comes in different sizes), or x cups of florets, I’ve measured the exact weight of cauliflower my recipe takes for optimal results.  This measurement is taken after the main core stalk of the cauliflower has been removed and discarded. For roasting, I break off chunks of the florets instead of breaking off each individual floret.  The small florets would burn in the roasting process and there is a difference between roasting and burnt offerings! It’s important to stir and turn the cauliflower every 10-12 minutes as it roasts to prevent burning and to ensure even roasting of all sides of the florets.  I also find that loosely mashing the roasted cauliflower with a potato masher makes the vegetable easier to purée evenly.

I use a combination of leeks, onion, and garlic to flavor the soup. The addition of a small amount of fresh fennel does add a layer of flavor complexity to this soup but its addition is optional. When I am making this soup at a time when I have fresh fennel in the garden, I use it but I would not buy an expensive fennel bulb out of season for the small amount the recipe calls for.

The base for this soup is chicken stock. I use the liquid chicken bouillon concentrate to make the stock but homemade or canned/boxed stock can certainly be used.

Cool both the cauliflower and the soup mixture to room temperature before puréeing it. I recommend puréeing the mixture in small batches to ensure the mixture is very smooth and free of any lumps or chunks of cauliflower, leeks, or onions.

I also recommend the milk be at room temperature for about 20-30 minutes or so before blending it into the puréed cauliflower mixture to avoid the milk curdling. Use whole milk, not fat-reduced or skim, for this soup – it’s meant to be luxurious, velvety, and soothing to the palate. In fact, a small amount of cream can be substituted for part of the milk in the recipe. This soup freezes well (yes, it really does) but whole milk or a blend of milk/cream needs to be used when freezing cream-based soups successfully. Soups made with fat-reduced or skim milk do not freeze and reheat well as the ingredients tend to separate.

Once the milk is added (slowly) to the puréed mixture, it’s important not to boil it – all it needs is a slow, gentle heating to the point that the cheese will melt.  My recipe calls for a blend of three flavorful cheeses – cheddar, mozzarella, and parmesan.  I buy the bag of pre-shredded cheese with this mixture in it and these three cheeses do complement, not only each other well, but the cauliflower, too.  Stir the soup over low heat just until the cheeses have all melted and blended into the soup. Never boil this soup.

The soup may be served in small appetizer-sized portions for the soup course of a dinner or, in larger portions as a main meal for lunch or a light supper.  Serve this gorgeous-colored soup with homemade biscuits, crusty rolls, rustic or French bread.

Cream of Cauliflower Soup
Roasted Cream of Cauliflower Soup

Roasted Cream of Cauliflower Soup

Ingredients:

1¼ lb cauliflower florets, chopped into chunks of about 7-9 florets   (weighed after large core stalk removed)
2-3 tbsp olive oil
½ tsp ground nutmeg
Salt and pepper

3 tbsp butter
2/3 cup sliced leeks (white and light green parts only)
1/3 cup onion, finely chopped
¾ oz fresh fennel, finely minced (optional)
2 cloves garlic, minced
3 tbsp flour

2¼ cups chicken stock
2 cups whole milk (at room temperature for 20-30 minutes)
Salt and pepper, to taste

1 cup shredded three-cheese blend (cheddar, mozzarella, and Parmesan cheeses)

Method:

Preheat oven to 400°F.

Line a large rimmed baking sheet with tin foil and spray with cooking oil.

In large bowl, toss the cauliflower florets, oil, nutmeg, salt, and pepper.  Spread cauliflower in single layer on prepared baking sheet.  Roast for approximately 40-45 minutes or until cauliflower is very soft, stirring and turning the cauliflower every 10-12 minutes for even roasting.  Cool slightly.  Break florets into small pieces and mash loosely with a potato masher to break down the florets for easier puréeing.

In medium-sized stock pot, melt the butter.  Sauté the leeks, onion, fennel, and garlic over medium heat until leeks and fennel are softened (but not browned), about 7-8 minutes. Sprinkle the flour over the mixture and stir to blend. Slowly whisk in the chicken stock. Bring to a boil, stirring constantly. Reduce heat and simmer 2-3 minutes or until mixture is thickened, stirring constantly. Remove from heat and cool to room temperature.  Purée cooled mixture along with the cauliflower in small batches in food processor or blender until smooth.

Return puréed mixture to stockpot and, over medium-low heat, slowly stir or whisk in the milk.  Add salt and pepper to taste. When mixture is heated (do not boil), stir in 1 cup of three-cheese blend.  Heat, stirring constantly, just until cheese is melted (do not boil).

Ladle into soup bowls and garnish with roasted cauliflower florets.

Yield: 6-7 servings

Roasted Cream of Cauliflower Soup

Yield: 6-7 servings

A rich and velvety-textured cream-based soup made with roasted cauliflower and a blend of three cheeses.

Ingredients

  • 1¼ lb cauliflower florets, chopped into chunks of about 7-9 florets (weighed after large core stalk removed)
  • 2-3 tbsp olive oil
  • ½ tsp ground nutmeg
  • Salt and pepper
  • 3 tbsp butter
  • 2/3 cup sliced leeks (white and light green parts only)
  • 1/3 cup onion, finely chopped
  • ¾ oz fresh fennel, finely minced (optional)
  • 2 cloves garlic, minced
  • 3 tbsp flour
  • 2¼ cups chicken stock
  • 2 cups whole milk (at room temperature for 20-30 minutes)
  • Salt and pepper, to taste
  • 1 cup shredded three-cheese blend (cheddar, mozzarella, and parmesan cheeses)

Instructions

  1. Preheat oven to 400°F.
  2. Line a large rimmed baking sheet with tin foil and spray with cooking oil.
  3. In large bowl, toss the cauliflower florets, oil, nutmeg, salt, and pepper. Spread cauliflower in single layer on prepared baking sheet. Roast for approximately 40-45 minutes or until cauliflower is very soft, stirring and turning the cauliflower every 10-12 minutes for even roasting. Cool slightly. Break florets into small pieces and mash loosely with a potato masher to break down the florets for easier puréeing.
  4. In medium-sized stock pot, melt the butter. Sauté the leeks, onion, fennel, and garlic over medium heat until leeks and fennel are softened (but not browned), about 7-8 minutes. Sprinkle the flour over the mixture and stir to blend. Slowly whisk in the chicken stock. Bring to a boil, stirring constantly. Reduce heat and simmer 2-3 minutes or until mixture is thickened, stirring constantly. Remove from heat and cool to room temperature. Purée cooled mixture along with the cauliflower in small batches in food processor or blender until smooth.
  5. Return puréed mixture to stockpot and, over medium-low heat, slowly stir or whisk in the milk. Add salt and pepper to taste. When mixture is heated (do not boil), stir in 1 cup of three-cheese blend. Heat, stirring constantly, just until cheese is melted (do not boil).
  6. Ladle into soup bowls and garnish with roasted cauliflower florets.
Schema/Recipe SEO Data Markup by Yummly Rich Recipes
https://myislandbistrokitchen.com/2016/11/09/roasted-cream-of-cauliflower-soup/

Did you Know?

You can join the Facebook page for My Island Bistro Kitchen:  https://www.facebook.com/MyIslandBistroKitchen/

Follow “the Bistro” on Twitterhttps://twitter.com/PEIBistro/

See the drool-worthy gallery of mouth-watering food photos from My Island Bistro Kitchen on Instagramhttps://www.instagram.com/peibistro/

Follow “the Bistro” on Pinterest at https://www.pinterest.ca/peibistro/

(and you can pin any of the Pinterest-ready photos below to your favorite Pinterest boards)

Of course, by subscribing to receive an email notification of new posts and recipes, you can be among the first to know when I publish a new post or recipe. Simply enter your name and email address in the Subscription block over on the right-hand side of my home page.

Pin this Cauliflower Soup to Pinterest!

Cauliflower Soup

Cauliflower Soup

For the recipe for the biscuits in the photos, click here.

Famous Island Shellfish Featured at PEI Mussels on the Hill Event

On a lovely Sunday afternoon on a hill in beautiful Clinton, PEI, the 2016 PEI Fall Flavours Culinary Festival came to a conclusion with a finale event featuring one of PEI’s finest shellfish – mussels.

The photo below shows an example of the mussel sock in which mussels grow.

Mussel Sock
Mussels in the Sock in Which They are Grown

According to the PEI Mussel Industry Council of PEI, the Island produces about 45 million pounds of mussels each year. This translates into approximately 80% of the entire mussel production in  Canada. So, it is only fitting that an Island culinary festival would dedicate an entire event to featuring mussels.

Clinton Hills, PEI
Clinton Hills, PEI

The Clinton Hills venue, frequently used for wedding receptions, proved to be a great location for this function which was hosted by guest celebrity chefs Anna and Michael Olson who are no strangers to the PEI Fall Flavours Culinary Festival. Anna and Michael have been a part of the Festival for many years and often host two to three signature events at the Festival each year.

Chef Anna Olson and Chef Michael Olson
Chefs Anna and Michael Olson

The event began with a large campfire upon which the mussels were steamed.

Steaming Mussels on an Open Fire

Yes, those tightly wrapped tinfoil packets contain mussels.

Campfire
Tending the Fire

Everything always tastes better cooked over an open fire! Opening up the tinfoil packets revealed these tasty treats. Three options were available: Mussels steamed in white wine, orange juice, or a Caesar mix, all with aromatics added.

PEI Mussels
Steamed PEI Mussels

Mussels and corn on the cob are a great combo!

Mussels and Corn on the Cob

Chef Anna is checking out the yummy mussels.

Chef Anna Olson
Chef Anna Olson
Serving up the Steamed Mussels and Corn on the Cob

Even chefs, like the rest of us foodies, just have to photograph their food before consuming it!

Chef Anna and Chef Michael Olson

Around the campfire….

Around the Campfire
Around the Campfire

Any good party on PEI will have lively music. The strolling musicians were Mark Haines (fiddle) and Brad Fremlin (accordian).

Island Musicians Mark Haines (left) and Brad Fremlin (right)
Island Musician, Mark Haines

After enjoying the mussels and corn by the campfire, folks moved over to the large tent just outside the event barn.

Clinton Hills, PEI
Mussels on the Hill Event at Clinton Hills, PEI (2016)

The PEI Brewing Company was serving some of their award winning beer.

PEI Beer
PEI Brewing Company Beer

Nova Scotia’s Benjamin Bridge Winery was the 2016 wine sponsor for the PEI Fall Flavours Culinary Festival.  They were pouring their famous Nova 7 wine. One of the great things about culinary festivals is the opportunity to discover new products. I discovered the Nova 7 wine at the PEI Fall Flavours Culinary Festival events in 2015 when Benjamin Bridge was also the wine sponsor.  This wine is an aromatic light-bodied  effervescent wine with a beautiful salmon or light coral color. Look for appealing aromatics with lovely floral and fruit notes in this wine. The Nova 7 is a very versatile wine, perfect for sipping or for pairing with a variety of foods, including seafood which made it a suitable accompaniment to the mussel dishes served at this event.

Nova Scotia Wine
Benjamin Bridge’s Nova 7 Wine

Making my rounds inside the tent, I started with a bowl of delectable homemade mussel chowder.

Mussel Chowder
Mussel Chowder
Chowder
Mussel Chowder

This was followed by yummy mussel fritters served in slider rolls.

Serving Mussel Fritters

I had not had mussel fritters before and these were super tasty!

Mussels
Mussel Fritters

Mussel Fritters in Slider Rolls

Upstairs in the main event barn, lobster poutine was being served. This was one event where you wanted to make sure you left the diet at home!

Poutine
Mussel Poutine

Anna and Michael did a demo of their favorite ways to steam mussels and adding aromatics to enhance the flavor of these tasty morsels. I like when the event also has a learning component to it.

Chefs Anna and Michael Olson at Clinton Hills, PEI (2016)

Wagon rides around the farm were available throughout the afternoon. This was a rather stylish wagon ride with its benches!

Hayride
Hayride at Clinton Hills

If you are a foodie, then I recommend a trip to PEI in September when the whole month is dedicated to culinary events featuring one or more of the Island’s fine foods. It’s a great way to learn about the foods of PEI, try some new foods or new and different ways to serve them, and hear some great local musicians.

To read stories I have written about other PEI Fall Flavours Culinary Festival events, follow these links:

PEI Shellfish Festival (2012)
Farm Day in the City (2012)
Savour Victoria (2012)
Toes, Taps, and Taters (2013)
Lobster Party on the Beach (2013)
Applelicious (2013)
The Great Island Grilled Cheese Challenge (2013)
Feast of the Fathers (2014)
Lamb Luau at Crowbush Cove (2014)
Feast and Frolic Dinner (PEI International Shellfish Festival) (2014)
Beef and Blues (2014)
A Taste of New Glasgow (2015)
Beef ‘n Blues (2015)
Chef on Board (2015)
Cooking with Chefs Anna & Michael Olson in Brudenell, PEI (2015)
Le Festin acadien avec homard/Acadian Feast with Lobster (2016)
The Great Big Barbeque (2016)

Pin to Pinterest!

PEI Fall Flavors Culinary Festival
Chefs Anna and Michael Olson at PEI’s Mussels on the Hill Culinary Event

PEI’s Great Big Barbeque

One of the 2016 signature events for the PEI Fall Flavours Culinary Festival was the Great Big Barbeque.  Hosted by celebrity chef, Mark McEwan, this event was held at the PEI Brewing Company in Charlottetown.

Chef Mark McEwan
Chef Mark McEwan

The Great Big Barbeque was a roving feast with food stations set up around the perimeter of the brewery as well as on the second level.

Roving Among the Food Stations at PEI's Great Big Barbeque
Roving Among the Food Stations at PEI’s Great Big Barbeque

In total, there were nine different food stations each featuring a local Island Chef with a signature dish.

Benjamin Bridge Winery, the 2016 Festival wine sponsor, greeted each patron with a glass of their Nova 7 wine.

Wine
Benjamin Bridge Wine

The PEI Brewing Company was kept busy serving small mugs of their handcrafted Gahan Ale straight from the tank. You can read the story I previously wrote about this brewery by clicking here.

PEI Brewing Company
Gahan Ale fresh from the tank at the PEI Brewing Company
Beer
Locally brewed beer from the PEI Brewing Company

The main event hall was set up with picnic tables.  From here, patrons circulated around the food stations in the order of their choosing.

The Great Big Barbeque at the PEI Brewing Company, Charlottetown, PEI

The Adam MacGregor Band provided lively entertainment for the evening.

Adam MacGregor Band Performing at PEI's Great Big Barbeque
Adam MacGregor Band Performing at PEI’s Great Big Barbeque

Station #1 – PEI Seafood Chowder

Chef Kyle Panton (Simms Corner Steakhouse and Oyster Bar) was kept busy dishing out his award-winning seafood chowder which he served in small glass jars.

Seafood Chowder
Chef Kyle Panton

The chowder was accompanied by homemade biscuits, always a winning combo.

Biscuits
Homemade Biscuits

Station #2 – Lobster Poutine

Chef Brad MacDonald (The Brickhouse Kitchen and Bar) served up a dish featuring Island lobster and potatoes in the form of lobster poutine – hand-cut fries with a lobster veloute and melted cheese curds.

Serving up Lobster Poutine
Poutine
Lobster Poutine

Station #3 – Glasgow Glen Farm’s Grilled Cheese

Jeff McCourt, chef and cheesemaker, from Glasgow Glen Farm in New Glasgow served an open-faced grilled Gouda cheese sandwich with smoked salmon and apple slaw on baguette slices.

Grilled Cheese Sandwich
Glasglow Glen Farm’s Open-faced Grilled Gouda Cheese Sandwich
Adding the Apple Relish
Adding the Apple Slaw
Grilled Cheese Sandwich
Open-faced Grilled Gouda Cheese Sandwich with Smoked Salmon and Apple Slaw on Baguette Slices

Station #4 – PEI Brewing Company Wood Fire Pizza

The brewery has a wood fire brick oven which was kept hopping with fresh made-to-order pizzas.

Wood-fired Brick Oven
Wood-fired Pizza
Pizza
Wood-fired Pizza

Station #5 – Island Striploin with Lobster Béarnaise

Chefs Cody Wallace (Fishbones Oyster Bar and Seafood Grill) and Jordan Dennis (Sobeys West Royalty) teamed up to present grilled PEI beef striploin with lobster béarnaise.

Steak with Lobster Sauce
PEI Beef Striploin with Lobster Béarnaise
Beef Striploin
PEI Beef Striploin with Lobster Béarnaise
Beef Striploin
PEI Beef Striploin with Lobster Béarnaise

Station #6 – Island Beef Burger

The barbeques were kept busy grilling the slider beef burgers which Chef Brock MacDonald (The Gahan House) presented on cornbread brioche with avocado mayo, pickled red onions, and peppercorn blue cheese.

Station #7 – Marinated BBQ Kabobs

A huge barbeque at the brewery’s side door was filled with veggie kabobs consisting of zucchini, peppers, mushrooms, and tomatoes grilled in a smoky Gahan Iron Bridge Brown Ale BBQ sauce. These were the creation of Chef Andrew Cotton (Merchantman Fresh Seafood and Oyster Bar).

Kabobs
Veggie Kabobs
Kabobs
Veggie Kabobs in a Smoky Gahan Iron Bridge Brown Ale BBQ Sauce

Station #8 – Freshly Shucked PEI Oysters

Sous Chef Alexandre Jolin (The Barrington Steakhouse and Oyster Bar) ensured lots of PEI oysters were shucked and ready for patrons.

Oyster Shucking
Shucking the PEI Oysters
Oysters
Raw PEI Oysters Ready for Slurping!

Station # 9 – S’Mores Dessert Bar

This bar was set up so patrons could toast their own marshmallows to make S’Mores.

S'Mores Dessert Bar
S’Mores Dessert Bar

This was a lively and interactive event and the brewery was an ideal location for this casual barbeque. It was great to see so many local Island chefs featured. We have a lot of great things happening on the food scene on PEI and the barbeque offered the opportunity to sample many of them.

Follow these links for stories I have written on other PEI Fall Flavours Culinary Events:

PEI Shellfish Festival (2012)
Farm Day in the City (2012)
Savour Victoria (2012)
Toes, Taps, and Taters (2013)
Lobster Party on the Beach (2013)
Applelicious (2013)
The Great Island Grilled Cheese Challenge (2013)
Feast of the Fathers (2014)
Lamb Luau at Crowbush Cove (2014)
Feast and Frolic Dinner (PEI Int’l Shellfish Festival) (2014)
Beef and Blues (2014)
A Taste of New Glasgow (2015)
Beef ‘n Blues (2015)
Chef on Board (2015)
Cooking with Chefs Anna & Michael Olson in Brudenell, PEI (2015)
Le Festin acadien avec homard/Acadian Feast with Lobster (2016)

Pin Me to Pinterest!

Barbeque
PEI’s Great Big Barbeque

PEI Fall Flavors Event: Le Festin acadien avec homard

September heralds the beginning of the annual PEI Fall Flavours Culinary Festival and what better way to start it off than with a feast featuring lobster and Acadian fare!  Le Festin acadien avec homard  event was held on September 2, 2016, in conjunction with the annual Evangeline Area Agricultural Exhibition and Acadian Festival in Abram-Village in the western part of Prince Edward Island.

The PEI Fall Flavours Culinary Festival features signature events hosted by celebrity chefs and the main events feature one or more of the Island’s locally-produced foods.  If you follow the links at the bottom of this posting, you will find stories and photos from past events that featured Island beef, lamb, lobster, potatoes, etc. I especially like the events that feature both regional fare and entertainment and “Le Festin acadien avec homard” scored high on both counts.  For visitors to PEI (and many do come in September especially for the Fall Flavours Culinary Festival), it’s an opportunity to learn about local culture and sample locally-produced foods.

PEI’s Acadian population in Abram-Village sure knows how to throw a good party with great food and lively entertainment.  A quartet of talented local musicians comprised of Louise Arsenault (fiddle), Hélène Bergeron (keyboard/guitar/stepdancer), Caroline Bernard (singer/keyboard/guitar), and Rémi Arsenault (bass) provided toe-tapping Acadian music throughout the evening.

PEI Musicians Performing at Le Festin acadien avec homard event, Abram-Village, PEI, 2016
Musicians Performing at “Le Festin acadien avec homard” Fall Flavours event, Abram-Village, PEI, 2016

The event was hosted by celebrity chef, Anna Olson, who is no stranger to the PEI Fall Flavours Culinary Festival as she and her husband, Michael, return to the Island annually to participate in the culinary events.

Chef Anna Olson
Chef Anna Olson at “Le Festin acadien avec homard” Fall Flavours Event, Abram-Village, PEI, 2016

Anna hosts three cooking programs on Food Network Canada:  “Bake with Anna Olson“, “Fresh with Anna Olson“, and “Sugar“. Ever the good sport, Anna was put through her paces before MC Georges Arsenault declared she had passed the test to be made an honorary Acadian.  She learned some French and she was taught some stepdancing moves!

Chef Anna Olson
Chef Anna Olson

Here was the menu for the dinner:

Menu for 2016 Le Festin acadien avec homard

Upon arrival in the dining hall, guests were greeted with a complimentary glass of Benjamin Bridge’s Nova 7 wine.

Benjamin-Bridge Wine
Benjamin Bridge Wine

Benjamin Bridge Winery from Gaspereau Valley, Nova Scotia, was this year’s Festival Wine Sponsor as it was in 2015 when I discovered their delightful Nova 7 wine. The Nova 7 is a beautiful light-bodied  effervescent wine with a gorgeous pinkish color, and appealing aromatics with lovely floral and fruit notes. It’s a great wine for sipping or for pairing with a wide range of foods from seafood to spicy foods to desserts. It made a fine accompaniment to the foods served at this dinner.

Benjamin Bridge Wine
Benjamin Bridge Nova 7 Wine

Fresh steamed mussels were served as hors d’oeuvres. According to the Mussel Industry Council of PEI, the Island produces about 45 million pounds of mussels each year. This translates into approximately 80% of the entire mussel production in  Canada. In fact, fresh PEI mussels are shipped to the USA and as far away as Hong Kong, Japan, and Kuwait. It’s very common at PEI gatherings to serve steamed mussels.

PEI Mussels
Steamed PEI Mussels

The dinner was held in a large community hall and served, family style, at long tables.

PEI Fall Flavors Culinary Festival event
“Le Festin acadien avec homard” PEI Fall Flavours Culinary Festival event 2016 in Abram-Vilage, PEI

Servers, in traditional Acadian attire, brought the prepared dishes to each table.

PEI Fall Flavors Culinary Festival
“Le Festin acadien avec homard” PEI Fall Flavours Culinary Festival Event, Abram-Village, PEI, 2016

Guests then passed the dishes, from one to another, around the table, serving themselves.

Lobster Dinner
Serving lobster at “Le Festin acadien avec homard” in Abram-Village, PEI

The four-course dinner began with a bowl of Chicken Fricot, also known as chicken soup. This is a very popular Acadian dish.

Chicken Soup
Chicken Fricot, a popular Acadian soup

The Fricot contains very few ingredients and I believe it is the summer savory that gives this brothy soup its wonderful tasty flavor.  Made only with chicken, onion, potatoes, water, summer savory, salt, and pepper, it’s hard to believe just how tasty this soup really is! It was especially good with the French biscuits that were in baskets on the tables! French biscuits (Galettes blanches) are a cross between a yeast roll and a traditional tea biscuit.

Biscuits
French Biscuits

The second course consisted of two long-time Acadian favorites: Râpure and Acadian Meat Pie.

Acadian Meat Pie and Râpure
Acadian Meat Pie (left) and Râpure (right)

Both are made with simple easy-to-come-by ingredients.  The Râpure is made with pork and/or chicken, onions, potatoes (both mashed and raw grated), eggs, summer savory, coriander, salt and pepper.  The ingredients are mixed together, placed in a greased baking dish and baked in the oven.

Traditionally,  Acadian meat pie was made with pork. Today, however, it is common to have a mixture of meats in the pie – pork, beef, chicken, and/or hare, for example. Again, the ingredients for the pie filling are very basic – the meat, onion, summer savory, cloves, salt and pepper, and some flour for thickening.  The filling is encased in pie pastry and baked in the oven. Molasses is often served with the meat pie. Meat pies are common fare for Acadians on Christmas Eve although, on PEI, the pies are commonly now eaten throughout the year as well.

The third course was Island lobster in the shell served with homemade potato salad.

Shellfish
PEI Lobster

It’s very traditional on PEI to serve potato salad with lobster and this salad was a true old-fashioned homemade PEI potato salad full of flavor.

Salad
Potato Salad

And, for dessert, fresh blueberry pie made with in-season local berries.

Pie
Blueberry Pie

This was a fantastic evening of fabulous food and lively music. I thoroughly enjoyed this event and it was an opportunity for me to try some Acadian foods I had not had before.

Follow these links for other stories I have written on previous Fall Flavours Culinary Festival events:

PEI Shellfish Festival (2012)
Farm Day in the City (2012)
Savour Victoria (2012)
Toes, Taps, and Taters (2013)
Lobster Party on the Beach (2013)
Applelicious (2013)
The Great Island Grilled Cheese Challenge (2013)
Feast of the Fathers (2014)
Lamb Luau at Crowbush Cove (2014)
Feast and Frolic Dinner (PEI Int’l Shellfish Festival) (2014)
Beef and Blues (2014)
A Taste of New Glasgow (2015)
Beef ‘n Blues (2015)
Chef on Board (2015)
Cooking with Chefs Anna & Michael Olson in Brudenell, PEI (2015)

Pin Me to Pinterest!

Lobster
PEI Lobster served at “Le Festin acadien avec homard” PEI Fall Flavors Culinary Festival

Thanksgiving Tablescape

Autumn Tablescape
Thanksgiving Tablesetting

Thanksgiving brings wonderful opportunities for a variety of tablesettings.  The rich colors of autumn provide an endless supply of inspiration for decorating the table. In this tablescape (which does not have to be reserved solely for the Thanksgiving holiday), I am using Victorian English Pottery “Pheasant Woodland” dinnerware that has a distinctive fall theme. It’s one that can be used throughout the entire autumn season.

Fall Dinnerware
Victorian English Pottery Dinnerware

Like a lot of English transferware, this pattern tells a story and has earthy colors; however, I also recognize that it is a busy pattern.  In order for the dinnerware to stand out on the table, it benefits from the use of solid-colored charger plates to frame and “ground” each place setting.  Busy-patterned dinnerware also looks best on solid-colored placemats or tablecloth. When I am using this type of dinnerware, I want it to stand out on the table so I ensure that other elements on the table, including the table covering, don’t compete with it for attention.

To add a punch of color, I have used my plaid napkins encased in natural-toned napkin rings. The orange in the napkins ties in with the shades on the pheasants in the dinnerware pattern. Placing the napkin on the side of the plate (as opposed to across the top of the bowl) allows the dinnerware pattern to be displayed for maximum impact.

Again, because the pattern of the dinnerware is quite busy, I have kept the centerpiece relatively simple – a traditional-styled fall-themed arrangement in the centre flanked by two pillar candles on glass candlesticks. The use of the glass candlesticks keeps the focus on the centerpiece.

Thanksgiving Centerpiece

The colors in the centerpiece correspond to the color scheme of the dinnerware. With this classic style of tablesetting, it is important to maintain the colors of the dinnerware in other elements of the table – for example, the centerpiece, candles, napkins, and charger plates.

The leaf-etched neutral-colored candles blend with the color of the centerpiece urn and the background in the dinnerware.

The candles and their placement add symmetry to a classic tabletop centerpiece. So, only three items in the centerpiece – two candles and the floral centerpiece – to keep it clutter-free.  This is particularly important if the table is not large. I wanted to see some clean white space on the table.

In keeping with the style of this dinnerware, I have used some of my vintage glassware which also blends with the candlesticks. Clear glassware adds life and sparkle to a tablesetting and also gives it an airy look and feel.

I hope you have enjoyed a glimpse of my Thanksgiving tablesetting.

Pin Me to Pinterest!

Victorian English Pottery Pheasant Woodland Dinnerware
Thanksgiving Tablesetting

To view the Bistro’s other Thanksgiving tablesettings, follow these links:

Thanksgiving Tablesetting

Happy Thanksgiving!

Blueberry Lemonade Recipe

Lemonade
Blueberry Lemonade

Lemonade is a wonderful refreshing drink on a hot summer’s day.  Sometimes I like just plain old-fashioned lemonade and, other times, I like to flavor it using whatever berries are currently in season.  My latest lemonade creation uses high bush blueberries to make blueberry lemonade concentrate.  Fill a glass about one third full of the concentrate and top it up with lemon-lime soda for a tasty drink. You can, of course, top up the concentrate with lemon-flavored sparkling water instead of the soda. Continue reading Blueberry Lemonade Recipe

Blueberry Cream Cheese Pie Recipe

Blueberry Pie
Blueberry Cream Cheese Pie

There are many ways to make blueberry pie but I have found that this is one of the tastiest. It’s also a great alternative to anyone who is not overly fond of double-crusted pies as this one is all about the filling!

Now, I love blueberries but sometimes I find they need a little help with a flavour boost.  That’s why I have created this recipe for a blueberry filling that adds a gentle amount of cinnamon and nutmeg along with some orange juice and orange rind.  To add a bit of depth and complexity to the flavor, I add a couple of tablespoons of Grand Marnier liqueur after the filling has cooked and been removed from the heat.  This is an optional ingredient but a lovely flavor addition to the pie if you have the liqueur on hand.

As with any food, it is important to know what flavor combinations work and will complement each other.  Cinnamon and nutmeg are two spices that go well with blueberries and, of course, blueberry and orange have long been a successful flavor combo. The other thing that is important is not to add in too many different flavors (or too much of any one additional flavor) as that can confuse the palate, detract from the authentic blueberry flavor, and not have the desired result.  Sometimes less really is more!

The blueberries I used in this recipe are locally-grown here on PEI. Over the past few years, a number of high bush blueberry u-picks have begun operating around the Island.   These are the lovely, large plump blueberries which are very easy to pick off bushes so no need to get down on hands and knees to find them. They grown in clusters on the vine, almost like grapes and are quick, easy, and clean to pick. When these blueberries are in season in August and early September, we always have them fresh.  The berries freeze well and this pie can certainly be made with the frozen berries so it can be enjoyed at any time throughout the year.

Summer Berries
PEI Blueberries

This is one of the those pies that is best eaten the day it is made so plan to make the pie early in the morning, let it chill for the afternoon, and enjoy it with a dollop of whipped cream as a special dessert treat for dinner.

Blueberry and Grand Marnier Pie
Blueberry Cream Cheese Pie

[printable recipe follows at end of posting]

Blueberry Cream Cheese Pie

Ingredients:

9” baked pie shell, cooled

6 oz. cream cheese, softened
3 tbsp sugar
1½ tbsp milk
½ tsp vanilla

¾ cup granulated sugar
3½ tbsp cornstarch
Dash salt
¼ tsp cinnamon
1/8 tsp nutmeg
1 tsp finely grated orange rind
12 oz. high bush blueberries (apx. 2½ cups)
2 tsp orange juice
2 tbsp Grand Marnier liqueur
½ tbsp butter

1 cup whipping cream
1 tsp. vanilla
2 tbsp sugar

Method:

In small bowl, beat the cream cheese, sugar, milk, and vanilla. Spread over bottom of baked and cooled pie shell. Refrigerate for at least one hour.

In small bowl, combine the sugar, cornstarch, salt, cinnamon, nutmeg, and grated orange rind together.  In medium-sized saucepan, combine the blueberries, orange juice, and cornstarch-sugar-spice mixture.  Cook and stir over medium-low heat until mixture is thickened.  Remove from heat and stir in Grand Marnier liqueur and butter.  Let mixture cool to room temperature then spread over chilled cream cheese base.  Refrigerate for at least one hour to allow pie to set.

Beat whipping cream and vanilla until soft peaks form then slowly beat in the sugar. Add a dollop of the whipped cream to each individual pie serving or, alternatively, completely cover chilled pie with the whipped cream. Refrigerate until use.  Pie is best eaten the day it is made.  (Note: Cool Whip can be substituted for the whipped cream, if desired.)

Yield:  One 9” pie.

If you have made this recipe and enjoyed it and/or wish to share it with your friends and family, please do so on social media but be sure to share the direct link to this posting from my website.

Connect with My Island Bistro Kitchen on Social Media

Join the Facebook page for My Island Bistro Kitchen:  https://www.facebook.com/MyIslandBistroKitchen/

Follow “the Bistro” on “X” (formerly Twitter)https://twitter.com/PEIBistro/

See the drool-worthy gallery of mouth-watering food photos from My Island Bistro Kitchen on Instagramhttps://www.instagram.com/peibistro/

Follow “the Bistro” on Pinterest at https://www.pinterest.ca/peibistro/ and pin the Pinterest-ready photo at the end of this posting to your favorite Pinterest boards!

For my pastry recipe along with hints and tips on making pastry, click here.
Pin Me to Pinterest!
Blueberry Cream Cheese Pie


Blueberry and Grand Marnier Pie
Blueberry Cream Cheese Pie

Blueberry Cream Cheese Pie Recipe

Yield: One 9" pie

A luscious and decadent blueberry cream cheese pie that combines high bush blueberries with cinnamon, nutmeg and orange liqueur flavorings

Ingredients

  • 9” baked pie shell, cooled
  • 6 oz. cream cheese, softened
  • 3 tbsp sugar
  • 1½ tbsp milk
  • ½ tsp vanilla
  • ¾ cup granulated sugar
  • 3½ tbsp cornstarch
  • Dash salt
  • ¼ tsp cinnamon
  • 1/8 tsp nutmeg
  • 1 tsp finely grated orange rind
  • 12 oz. high bush blueberries (apx. 2½ cups)
  • 2 tsp orange juice
  • 2 tbsp Grand Marnier liqueur
  • ½ tbsp butter
  • 1 cup whipping cream
  • 1 tsp. vanilla
  • 2 tbsp sugar

Instructions

  1. In small bowl, beat the cream cheese, sugar, milk, and vanilla. Spread over bottom of baked and cooled pie shell. Refrigerate for at least one hour.
  2. In small bowl, combine the sugar, cornstarch, salt, cinnamon, nutmeg, and grated orange rind together. In medium-sized saucepan, combine the blueberries, orange juice, and cornstarch-sugar-spice mixture. Cook and stir over medium-low heat until mixture is thickened. Remove from heat and stir in Grand Marnier liqueur and butter. Let mixture cool to room temperature then spread over chilled cream cheese base. Refrigerate for at least one hour to allow pie to set.
  3. Beat whipping cream and vanilla until soft peaks form then slowly beat in the sugar. Add a dollop of the whipped cream to each individual pie serving or, alternatively, completely cover chilled pie with the whipped cream. Refrigerate until use. Pie is best eaten the day it is made. (Note: Cool Whip can be substituted for the whipped cream, if desired.)
  4. [Copyright My Island Bistro Kitchen]
Schema/Recipe SEO Data Markup by Yummly Rich Recipes
https://myislandbistrokitchen.com/2016/08/28/blueberry-cream-cheese-pie-recipe/

For more great blueberry recipes from My Island Bistro Kitchen, click on these links:

Blueberry and Grand Marnier Jam

Blueberry Bread Pudding with Grand Marnier Sauce

Blueberry Barbeque Sauce

Blueberry Muffins

Blueberry Grunt

Blueberry Buckle

Blueberry Buttermilk Pancakes

Picnic by the Confederation Bridge in PEI

A PEI Picnic
Picnic by the Confederation Bridge

Picnics are a favorite summertime activity for us. We like to do a lot of daytripping around our province discovering and revisiting all that our wonderful Island has to offer.  Prince Edward Island has many great locations that are suitable for picnics.  Our picnic last weekend took us to a scenic location near the Confederation Bridge in Borden-Carleton.

Bridge between PEI and New Brunswick
Confederation Bridge

This bridge transcends the Northumberland Strait linking PEI with New Brunswick. At 12.9km (8 miles) in length, the bridge is the longest bridge in the world that crosses ice-covered water. Our Island winters can be quite harsh and the Strait is covered in thick ice for several months of the year. Building a bridge to withstand these conditions was no easy feat.

Before the bridge opened to traffic on May 31, 1997, the only ways on and off PEI were by ferry or air.  Ferry service does still operate seasonally in the Eastern part of the Province at Wood Islands where ferries transport vehicular traffic between PEI and Nova Scotia.

The Confederation Bridge curves partway across the Strait and has a high navigational span that allows large ships to pass under the bridge.  It’s pretty cool to see the large cruise ships going under the bridge!

Because the Confederation Bridge is an iconic element of PEI, it makes a fitting backdrop for a summertime Island picnic.

Summer Picnic in PEI
Bridge View

So, now that the stage has been set for the location, back to the picnic……I have chosen to go with a black and white theme and I’m a big fan of checkered fabric – checks just seem to speak of picnics. I have chosen to use my plain black dinner napkins and have wrapped the cutlery inside the napkins. This is easy to do before leaving home and it keeps the items together.  To give the classy black napkins a more casual look for a picnic, I have tied each napkin with narrow twine.

To add a punch of color to the table, I selected small bright yellow sunflowers paired with Bells of Ireland.  Whether I am setting the table for an event at home or on the road, I like to see a well set table! These flowers were locally grown at Island Meadow Farm in York, PEI.  They grow the most amazing array of flowers and I like to use them in my summer tablesettings.

Summer Flowers
Sunflowers and Bells of Ireland

Picnics are meant to be casual fare so, while I always try to have a main, a side, some fruit, something sweet, and a beverage, I often like to include some finger/snacking foods as I have done today.  Let’s start with the PEI mussels in the shell. These are steamed mussels to which I have added some red and orange pepper, celery, and red onion. A light dressing of a red wine vinaigrette makes these tasty little morsels.

Mussels
PEI Mussels

Cold cuts, cherry tomatoes, and cucumber are always good nibbling foods (and they add great color to the table).

Cold Cut Tray
The Nibbling Tray

DSC_0026

I wrapped peach wedges inside basil leaves and prosciutto (seen in the photo below). These little picnic hors d’oeuvres add color, texture, and flavor to the menu. They go particularly well with Gouda cheese.

Picnic Hors d'oeuvres
Peaches in Prosciutto

I have chosen small tomato quiches for the main in today’s picnic. The great thing about quiches is that they can be served, hot, warm, or cold and, when cold, are great travelers for the picnic basket.

Quiche
Tomato Quiche

And, for a side, I opted for a quinoa salad with a balsamic vinaigrette dressing. To the quinoa I added peppers, corn, celery, red onion, and kale from our garden. Packing the salad into small Mason jars is an easy way to transport salads on a picnic.

Salad in a Mason Jar
Quinoa Salad

Plates are not always necessary for picnics.  Here, I have used small breadboards which work equally well and they are easy to pack.

Picnic
The Picnic Lunch

I popped by the Tryon Blueberries U-Pick in North Tryon on my way and picked a box of these amazing high-bush blueberries.  I live on these berries when they are in season on the Island!

Summer Berries
PEI Blueberries

And, for the sweet tooth, I took along some of my homemade snickerdoodle cookies.

Cookies
Snickerdoodle Cookies

And, as an extra special treat, we enjoyed Belgian chocolates that we brought home from a wonderful visit to Brugge, Belgium. If you ever have the chance to visit Brugge, I highly recommend it. You can view photos of my visit to Brugge over on my travel blog, Island Shore Traveler, by clicking here.

Chocolates
Belgian Chocolates

I like to choose foods and elements to the picnic that are colorful and that blend well together.

Picnic Time
A PEI Summer Picnic

I hope you have enjoyed a little “taste” of my picnic by the bridge.

PEI Picnic
Picnic by the Bridge

Pin me to Pinterest!

PEI Picnic
Picnic by the Confederation Bridge, PEI

Blueberry and Grand Marnier Jam Recipe

Blueberry Jam
Blueberry and Grand Marnier Jam

Today, I am sharing my recipe for Blueberry and Grand Marnier Jam!  Blueberry and orange are a great flavor combo so why not add a little kick to the jam by adding an orange-flavored liqueur. This does add a level of richness and flavor complexity to the jam. Continue reading Blueberry and Grand Marnier Jam Recipe

Locovore’s Picnic – Food Day Canada 2016

Summer Picnic
Picnic at Fort Amherst, PEI

As I write this post on July 30th, 2016, I am celebrating Food Day Canada with a picnic featuring local Prince Edward Island food products.  Food Day Canada is a day set aside to celebrate all the wonderful foods that we, as Canadians, enjoy. Continue reading Locovore’s Picnic – Food Day Canada 2016

Strawberry Rhubarb Popsicles Recipe

Fruit Popsicles
Strawberry Rhubarb Popsicles

One of the quintessential summertime treats would have to be popsicles!  They’re cool and refreshing and there are so many flavor combinations.

The one thing I find about homemade popsicles is that it is difficult to get them to freeze rock hard like the commercial varieties.  One method I use is to add unflavored gelatin to the mix. While it won’t freeze as hard as store-bought ones which probably have all kinds of stabilizers added to them, adding gelatin does extend the life of the popsicles a wee bit before they melt. It also helps to hold the ingredients together.

Homemade Popsicles
Strawberry and Rhubarb Summertime Treats

One of my favorite flavor combos is strawberry and rhubarb. I use rhubarb juice (made from cooking the rhubarb and extracting its juice) in a lot of recipes, including this one.

To make this an adult treat, try serving the popsicle in a wine glass and adding a sparkling or rosé wine such as pinot noir rosé.

Rosé Wine with Popsicles
Strawberry Rhubarb Popsicles

Combining two great summer flavors, these are the perfect treat to cool off with this season.

Strawberry Rhubarb Popsicles
Homemade Popsicles

[Printable recipe follows at end of post]

Strawberry Rhubarb Popsicles

Ingredients:
½ cup granulated sugar
½ cup water

4½ cups rhubarb, chopped into ½” pieces (apx. 1 lb. 2 oz)
2 tbsp granulated sugar
1 cup water

4½ oz strawberries
2 tbsp granulated sugar
½ tbsp strawberry balsamic vinegar
Dash salt
½ tbsp lemon juice
1 tbsp Epicure Summer Berry Dip Mix (optional)

1 tbsp unflavored gelatin dissolved in 3 tbsp of the rhubarb juice
¼ cup boiling water

1/3-cup popsicle molds (enough for 9-10 popsicles)

Method:

In small saucepan, combine the first amount of sugar and water to make a simple syrup.  Bring to a boil then reduce heat to medium low and boil gently for 3 minutes.  Remove from heat and cool completely.

After simple syrup has cooled, cook the rhubarb and second amount of sugar in 1 cup water for about 7-10 minutes or until rhubarb is soft and mushy.  Strain through a fine mesh sieve. Discard the pulp. This should yield approximately 1½ cups rhubarb juice.

Purée the strawberries and stir in 2 tbsp sugar.

Dissolve the gelatin in 3 tbsp of the rhubarb juice.  Add ¼ cup boiling water.  Stir 1-2 minutes until the gelatin is completely dissolved.

In large measuring cup, combine the simple syrup, rhubarb juice, puréed strawberries, strawberry balsamic vinegar, salt, lemon juice, Summer Berry Dip Mix (optional), and gelatin.  Stir well.  Distribute mixture evenly between 9-10 popsicle molds.  Insert popsicle sticks and covers that came with the popsicle molds and place in freezer to freeze completely.  If using wooden popsicle sticks, freeze the mixture for approximately 1 hours until thick and slushy, then insert the wooden sticks and return popsicles to freezer to freeze completely.

Yield:  Apx. 9-10 popsicles

Popsicles in Wine
Strawberry Rhubarb Popsicles in Wine

Strawberry Rhubarb Popsicles

Yield: 9-10 popsicles

Serving Size: 1/3 cup

Blend of strawberries and rhubarb combine to make flavorful and refreshing popsicles, the perfect summertime treat for hot summer days.

Ingredients

  • ½ cup granulated sugar
  • ½ cup water
  • 4½ cups rhubarb, chopped into ½” pieces (apx. 1 lb. 2 oz)
  • 2 tbsp granulated sugar
  • 1 cup water
  • 4½ oz strawberries
  • 2 tbsp granulated sugar
  • ½ tbsp strawberry balsamic vinegar
  • Dash salt
  • ½ tbsp lemon juice
  • 1 tbsp Epicure Summer Berry Dip Mix (optional)
  • 1 tbsp unflavored gelatin dissolved in 3 tbsp of the rhubarb juice
  • ¼ cup boiling water

Instructions

  1. In small saucepan, combine the first amount of sugar and water to make a simple syrup. Bring to a boil then reduce heat to medium low and boil gently for 3 minutes. Remove from heat and cool completely.
  2. After simple syrup has cooled, cook the rhubarb and second amount of sugar in 1 cup water for about 7-10 minutes or until rhubarb is soft and mushy. Strain through a fine mesh sieve. Discard the pulp. This should yield approximately 1½ cups rhubarb juice.
  3. Purée the strawberries and stir in 2 tbsp sugar.
  4. Dissolve the gelatin in 3 tbsp of the rhubarb juice. Add ¼ cup boiling water. Stir 1-2 minutes until the gelatin is completely dissolved.
  5. In large measuring cup, combine the simple syrup, rhubarb juice, puréed strawberries, strawberry balsamic vinegar, salt, lemon juice, Summer Berry Dip Mix (optional), and gelatin. Stir well. Distribute mixture evenly between 9-10 popsicle molds. Insert popsicle sticks and covers that came with the popsicle molds and place in freezer to freeze completely. If using wooden popsicle sticks, freeze the mixture for approximately 1 hours until thick and slushy, then insert the wooden sticks and return popsicles to freezer to freeze completely.
Schema/Recipe SEO Data Markup by Yummly Rich Recipes
https://myislandbistrokitchen.com/2016/07/27/strawberry-rhubarb-popsicles/

Fruit Popsicles

PIN ME TO PINTEREST!

Strawberry Rhubarb Popsicles on ice

Strawberry Slush

Slush
Strawberry Slush

Strawberry Slush is my newest summer drink creation and it has quickly become a favorite!  Strawberries take center stage in this beverage but there is also a mix of other fruit juices that include rhubarb, pineapple, lemon and orange juices, and some pink lemonade.  The addition of Epicure’s “Summer Berry” sweet dip mix deepens the flavor and adds some interesting speckles throughout the slush. Because I know Epicure products may not be available everywhere, I have included this as an optional addition as the slush will still taste quite fine without it. My recipe calls for gin and any brand may be used. Continue reading Strawberry Slush

Seafood Chowder from the Cavendish Beach Area of PEI

Seafood chowder is a very popular dish in Prince Edward Island and many Island restaurants include it on their menus.  I just completed reviews of five (5) fabulous seafood chowders from restaurants in the Green Gables Resort Region (Cavendish, Prince Edward Island).  Head on over to the Cavendish Beach website to read my guest post about these mouth-watering chowders from North Rustico, Stanley Bridge, Cavendish, and New Glasgow.

To whet your appetite, here are photos of each chowder:

From the Blue Mussel Café in North Rustico, PEI

Blue Mussel's Seafood Chowder
Seafood Chowder from the Blue Mussel Café in North Rustico, PEI

From Chez Yvonne Restaurant in Cavendish, PEI

Chez Yvonne Restaurant's Seafood Chowder
Seafood Chowder from Chez Yvonne Restaurant, Cavendish, PEI

From Carr’s Oyster Bar in Stanley Bridge, PEI

Carr's Seafood Chowder
Seafood Chowder from Carr’s Oyster Bar in Stanley Bridge, PEI

From the PEI Preserve Company in New Glasgow, PEI

PEI Preserve Company's Seafood Chowder
Seafood Chowder from the PEI Preserve Company in New Glasgow, PEI

From the New Glasgow Lobster Suppers in New Glasgow, PEI

New Glasgow Lobster Suppers' Seafood Chowder
Seafood Chowder from the New Glasgow Lobster Suppers in New Glasgow, PEI

Are you drooling yet?

What’s on Tap at Upstreet Craft Brewing?

The craft beer brewing industry continues to grow thanks to consumers with a thirst for traditional hand-crafted beer and a demand for unique locally-made artisanal products. While not a huge industry on PEI, craft breweries are starting to emerge….and with remarkable success.  As Upstreet Craft Brewing in Charlottetown, PEI, celebrates its first birthday, I thought it was time I paid a visit so I recently journeyed “upstreet” to meet Joey Seaman, one of the owners, for a tour and chat about the brewery.

Upstreet Craft Brewing
Upstreet Craft Brewing Co-owner Joey Seaman

I began by asking Joey where the name “Upstreet” came from.  He says that upstreet, means “anywhere but where you are” and, colloquially, if you are downtown and someone asks where you’re going, chances are you might say “I’m heading up the street” and, since the location of the brewery is ‘just up the street’ from downtown Charlottetown, it became the name of the brewery.

Upstreet Craft Brewing began operation in June 2015 when three friends, who were long-time hobby home beer brewers, decided to take the leap, leave the security of their careers, and co-found a craft brewery in their hometown.  This trio – Joey Seaman, Mike Hogan, and Mitch Cobb — have turned their hobby and passion into a growing success story.

Owners of Upstreet Craft Brewing
Upstreet Craft Brewing Owners Joey Seaman, Mitch Cobb, and Mike Hogan

The three partners are very hands-on at the brewery.  Mike is the beer engineer who brews all the beer while Mitch looks after general management and operations and Joey takes care of sales.

Upstreet Craft Brewing
Upstreet Craft Brewing’s Brew Engineer, Mike Hogan

The brewery currently has 19 employees and is a beehive of activity.

Craft beer is brewed in the traditional way in small batches using 4 main ingredients – barley, hops, yeast, and water. One of the trademarks of a craft brewery is that it offers the opportunity to experiment with ingredients and flavors because small batches of the beer can be produced. This is in contrast to industry giants that produce huge quantities of the same beers year in and year out.  Craft breweries, on the other hand, are small enough that they can keep experimenting and come up with fresh new flavours that keeps customers returning.  They can also produce small quantities of seasonal beers that are likely only to be purchased during a short period. Upstreet is currently brewing six batches of beer, four times a week. This translates into about 10,000 litres of beer a week.  The brewery has built a strong local customer base that has meant Upstreet is presently at maximum capacity. To double their capacity and meet growing demand, the brewery just recently added two more fermentation tanks and they still can’t fully meet demand. In fact, at the time of writing, they have a wait list of 15 restaurants/bars wanting to sell their beer.

Upstreet Craft Brewing
Filling the Kegs with Beer at Upstreet Craft Brewing

The brewery produces four mainstay flagship beers – Rhuby Social (Strawberry Rhubarb Witbier), Commons Czech Style Pilsner, Do Good-er (an American pale ale), and White Noize (a white IPA).  Joey says their most popular beer is the Commons Pilsner which he describes as a clean crisp beer.

In addition, the brewery has brewed over 10 different beers, including seasonal brews, in the first year of operation.  This includes specialty flavors like Imperial Pumpkin Ale brewed last autumn and Vanilla Cranberry Stout during the Christmas holiday season.

You won’t find canned beer at Upstreet. Instead, they use tall slim brown bottles that give a classic feel to the Upstreet beer experience.

Each bottle is labeled with an eye-catching unique label that contains information to educate the consumer on the beer product and experience.  So, look for a beer profile on each bottle that will tell you the level of hoppiness and a description of the color and flavour.

Check under each bottle cap for a unique PEI colloquial saying –  great conversation pieces! The owners solicited submissions from the public of typical PEI sayings and received over 2000 suggestions in 48 hours – yes, we Islanders have lots of colloquial sayings!

As many readers will know, a growing sector of the alcoholic beverage industry is pairing foods with the different beverages. Many will be aware of food and wine pairings but there is also a burgeoning trend to pair craft beer with good food.  The label on each bottle of Upstreet beer will also give a good food pairing suggestion, the type of event in which it might be enjoyed and even a suggestion for best listening tunes by which to enjoy the beer. For example:

  • White Noize, a strong beer, would pair well with a hearty chili that might be enjoyed after a day of skiing and while listening to some chill beats.
  • Rhuby Social, a tart and refreshing beer, would compliment spicy Asian foods and is a beer that could become a patio favorite while listening to the classics. Last fall, I attended a beer and food pairing event that was part of the PEI Fall Flavours Culinary Festival. Celebrity chefs Anna and Michael Olson recommended Upstreet’s Rhuby Social be paired with seafood such as PEI mussels, clams, and white fish.
  • Commons Pilsner would go well at a beach day event with Island seafood while listening to acoustic campfire jams.
  • The Do Good-er, the brewery’s “go-to” house party beer, would be a good choice for a BBQ while listening to some rock.

In addition to their bottled beers, the Brewery also sells growlers at the brewery. And, of course, they also sell and deliver kegs of beer to restaurants and bars and there are over 30 venues in Prince Edward Island and Nova Scotia currently carrying the Upstreet products.

Inside the cooler at Upstreet Craft Brewing

Joey says that, while their patrons come from all walks of life, he finds the largest growing market for craft beer is the female population who tend to like the dark beers and those that would be classed as bold, hoppy beers.  New and creative flavours of beer may be contributors to that trend.

Upstreet Craft Brewing
Taproom at Upstreet Craft Brewing

The brewery is not only a production facility. It, like many craft breweries, has a taproom onsite. The taproom, which can accommodate about 90 people, is a mix of industrial and eclectic décor. Be sure to check out the bar counter repurposed from an old elm tree that had to be taken down in the city.

Joey Seaman pours a glass of beer in Upstreet Craft Brewing's Taproom
Joey Seaman pours a glass of beer in Upstreet Craft Brewing’s Taproom

While Upstreet does not have a full-fledged restaurant per se on site, it does have a chef as part of the team and the taproom does offer snack foods and tapas/small plates with a menu that changes according to season. However, don’t look for table service at Upstreet – in keeping with the casual atmosphere, you simply go to the bar to place both your drink and food order.

Upstreet Craft Brewing is very community minded. The brewery offers its taproom as a community space for locals to come and hang out. In fact, several groups meet at the brewery to socialize, including a group of local knitters! The brewery also hosts adult coloring nights and other community events and there is always a good selection of board games for patrons to enjoy over a glass of cold beer. In addition, the brewery offers a venue for local musicians to share their musical talents with patrons. The brewery is also a strong supporter of the local arts, music, and culture scene and, in fact, a percentage from the sale of every bottle of Do-Good-er beer goes to a “do good” fund to support local arts and culture.

The brewery, located at 41 Allen Street in Charlottetown, PEI, is open 7 days a week, noon to midnight.

Upstreet Craft Brewing, Charlottetown, PEI

As is my tradition when I visit a local producer, I develop a recipe or two using their product.

PEI Mussels
PEI Mussels Steamed in Rhuby Social Beer from Upstreet Craft Brewing

Click here for the link to my recipe for steaming PEI mussels in Upstreet Craft Brewing’s Rhuby Social beer and here for the link to my recipe for Rhubarb and Beer Barbeque Sauce, also using Rhuby Social beer.

Beer Barbeque Sauce
Rhubarb and Beer Barbeque Sauce Made with Rhuby Social Beer from Upstreet Craft Brewing


Pin Me On Pinterest!

Craft Brewing
Upstreet Craft Brewing, Charlottetown, PEI