Green Tomato Marmalade Recipe

Marmalade
Green Tomato Marmalade

Green Tomato Marmalade is not an altogether common variety of marmalade. It’s not the “garden” variety of typical marmalades likely to be found on many supermarket shelves, or at least not in my neck of the woods anyway.  That, in my view, makes Green Tomato Marmalade all the more special because it’s more unique and exclusive!

Marmalade
Green Tomato Marmalade

But, wait, in another sense, Green Tomato Marmalade is very much a “garden” variety of marmalade in that it is a great way to make use of the usual abundance of green tomatoes many gardeners end up with in their gardens in late summer or early fall and are wondering what they can do with them so they aren’t wasted.

Variations of green tomato jam and marmalade have been around for years.  I expect many homemakers of years ago made one or the other (either the jam or marmalade) because they would have likely had lots of tomatoes in the garden so it was an economical ingredient to use and to have as a spread for bread or biscuits over the winter.  Those homemakers were frugal and resourceful as there were no big supermarkets with a large selection of jams and marmalades we see today and, in some cases, families were large and did not have a lot of money. So, consequently, they figured out ways to feed their families economically, making good use of food they grew themselves.

Green Tomato Marmalade
Green Tomato Marmalade on Toast

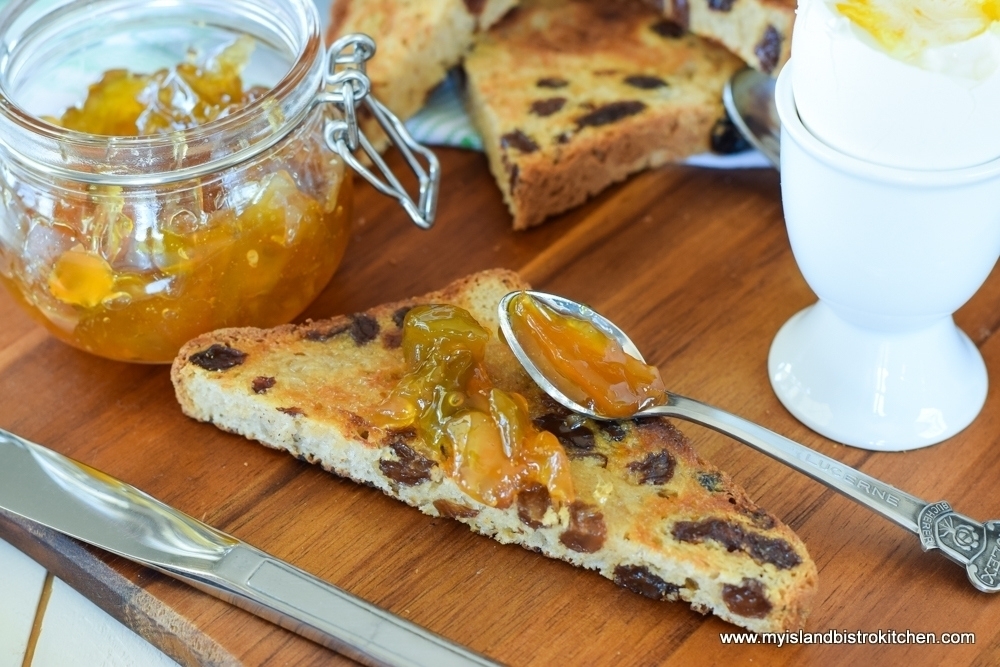
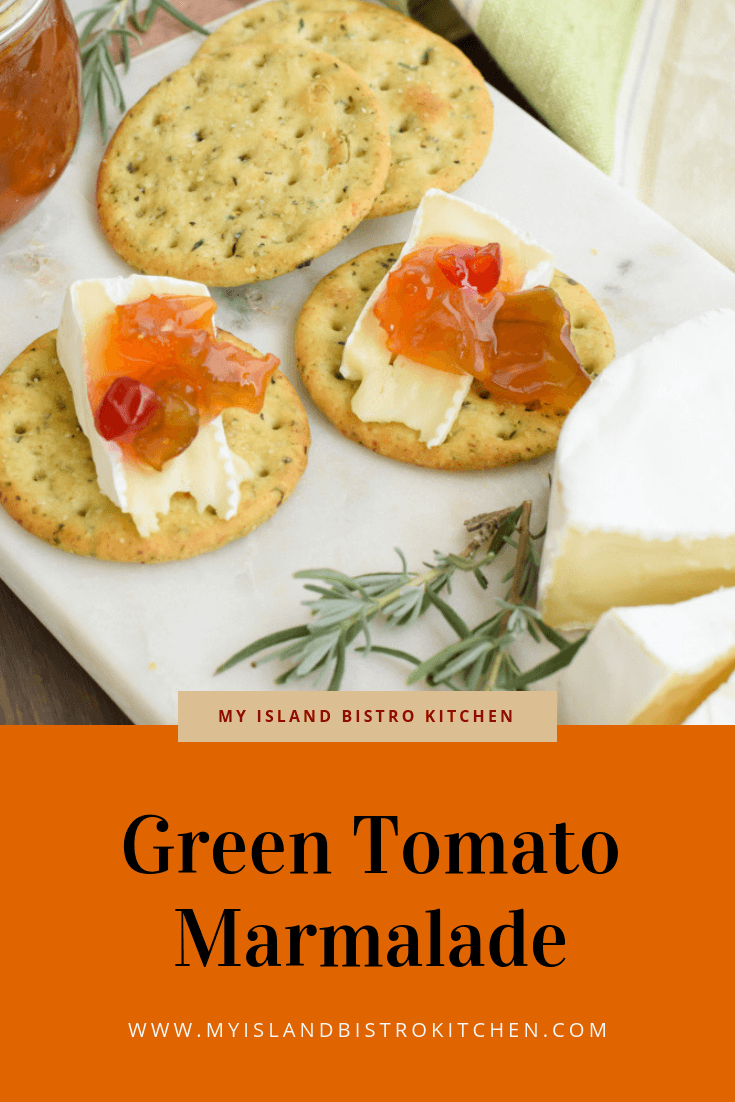
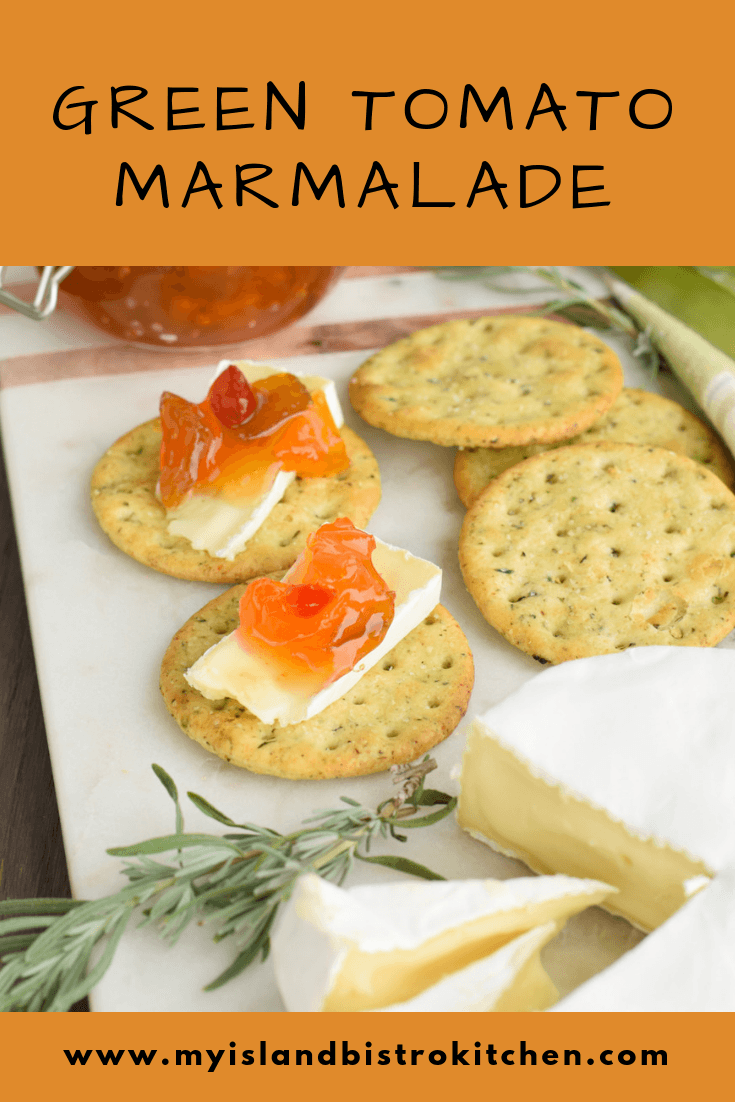
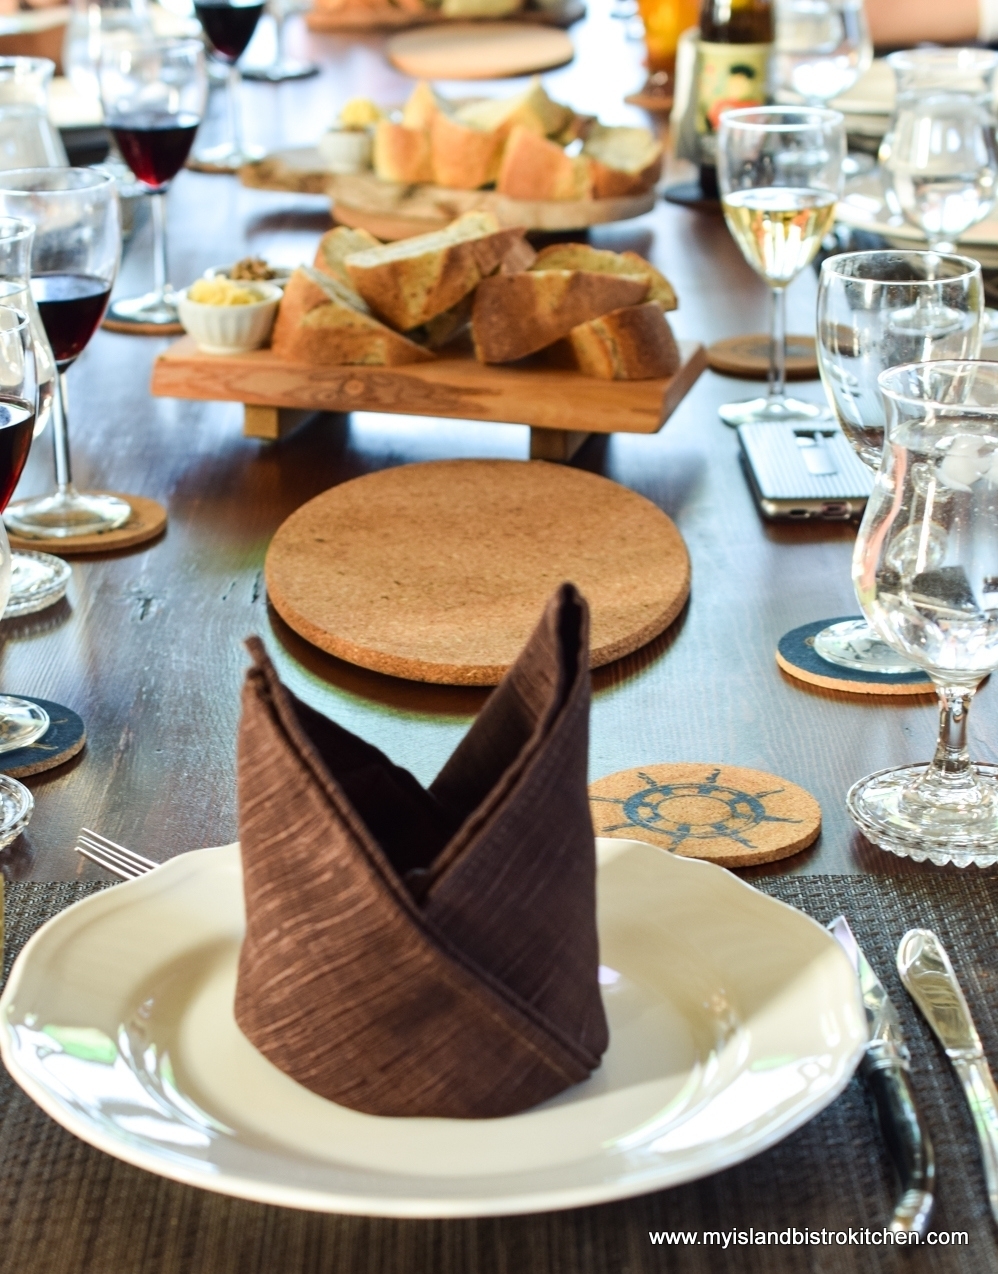
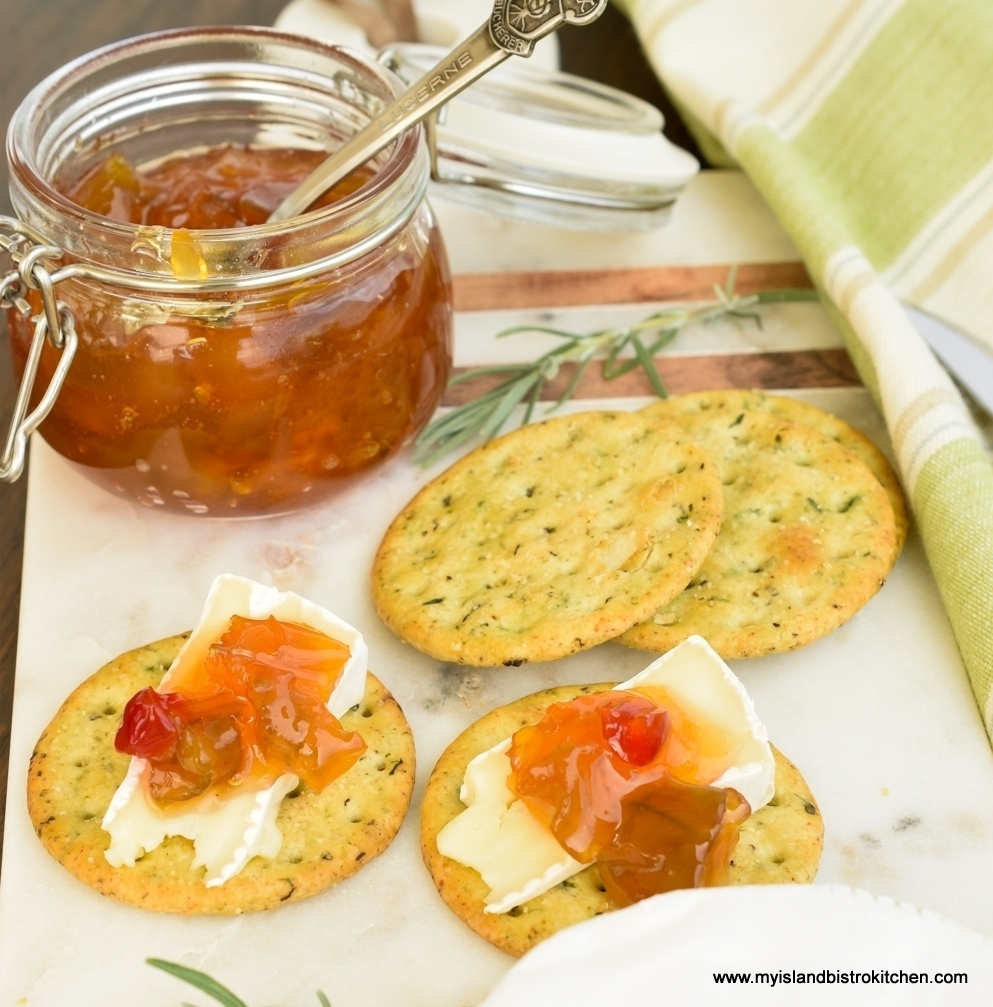
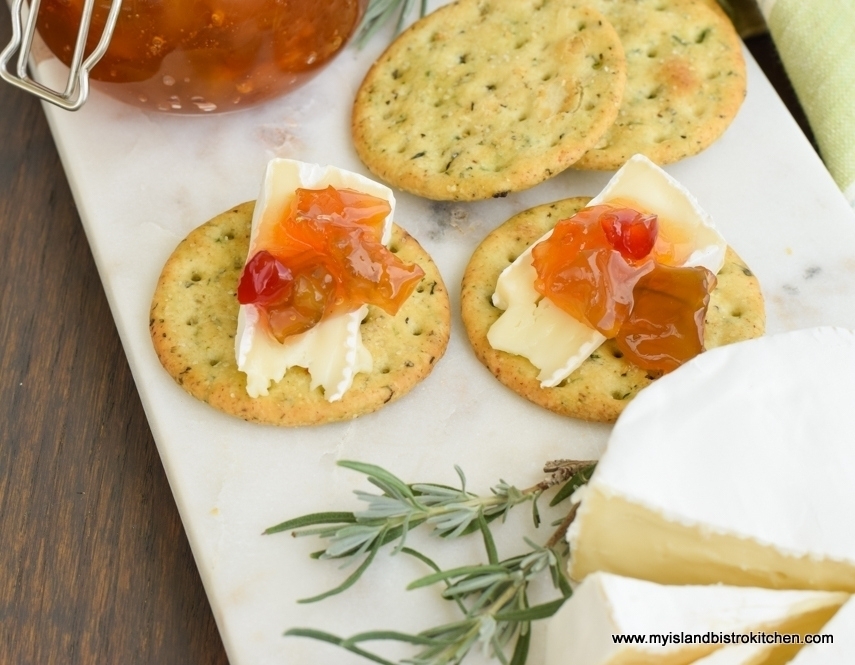
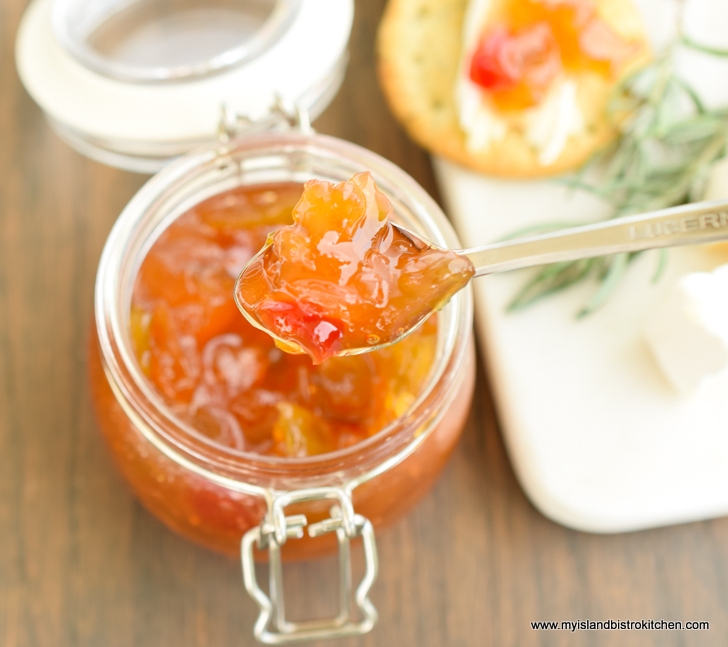
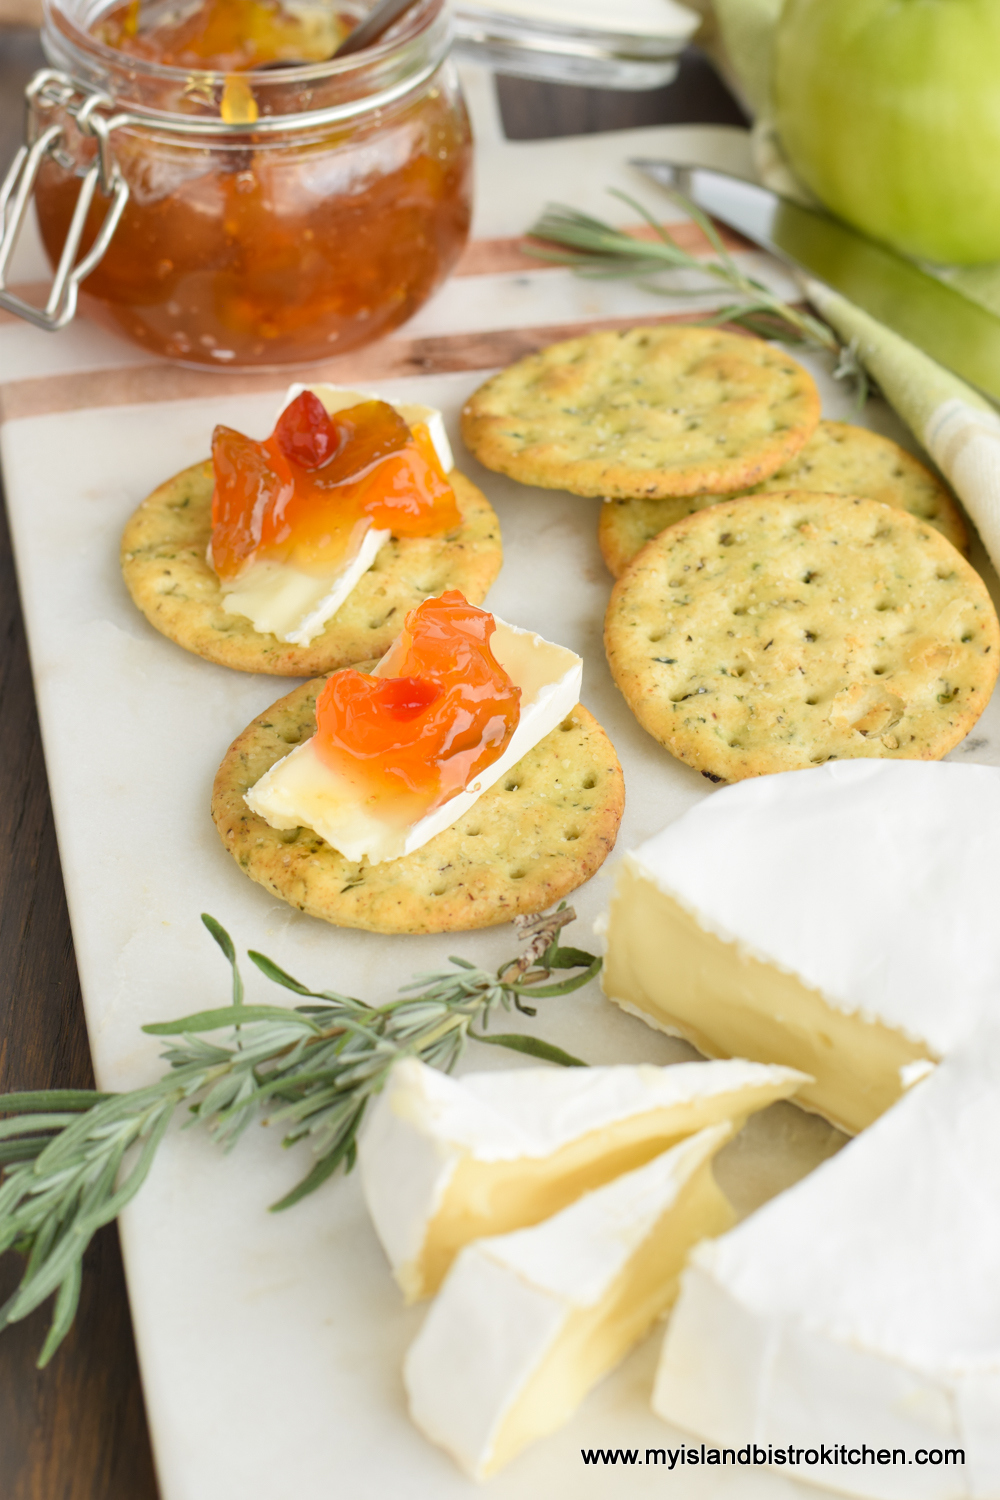
Green Tomato Marmalade is one of those food items I would class as “don’t knock it till you’ve tried it”.  This marmalade is both sweet and savory, making it a versatile product to have on the pantry shelf.  Combining the green tomatoes with citrus flavours (orange and lemon) and some crushed pineapple for sweetness balance and texture, this marmalade is versatile and can be used just as one would use orange marmalade, for example – spread on toast, biscuits, and scones.  Green Tomato Marmalade can also be eaten as a savory condiment with cheese, charcuterie, and cracker boards.

Green Tomato Marmalade
Green Tomato Marmalade with Brie and Crackers

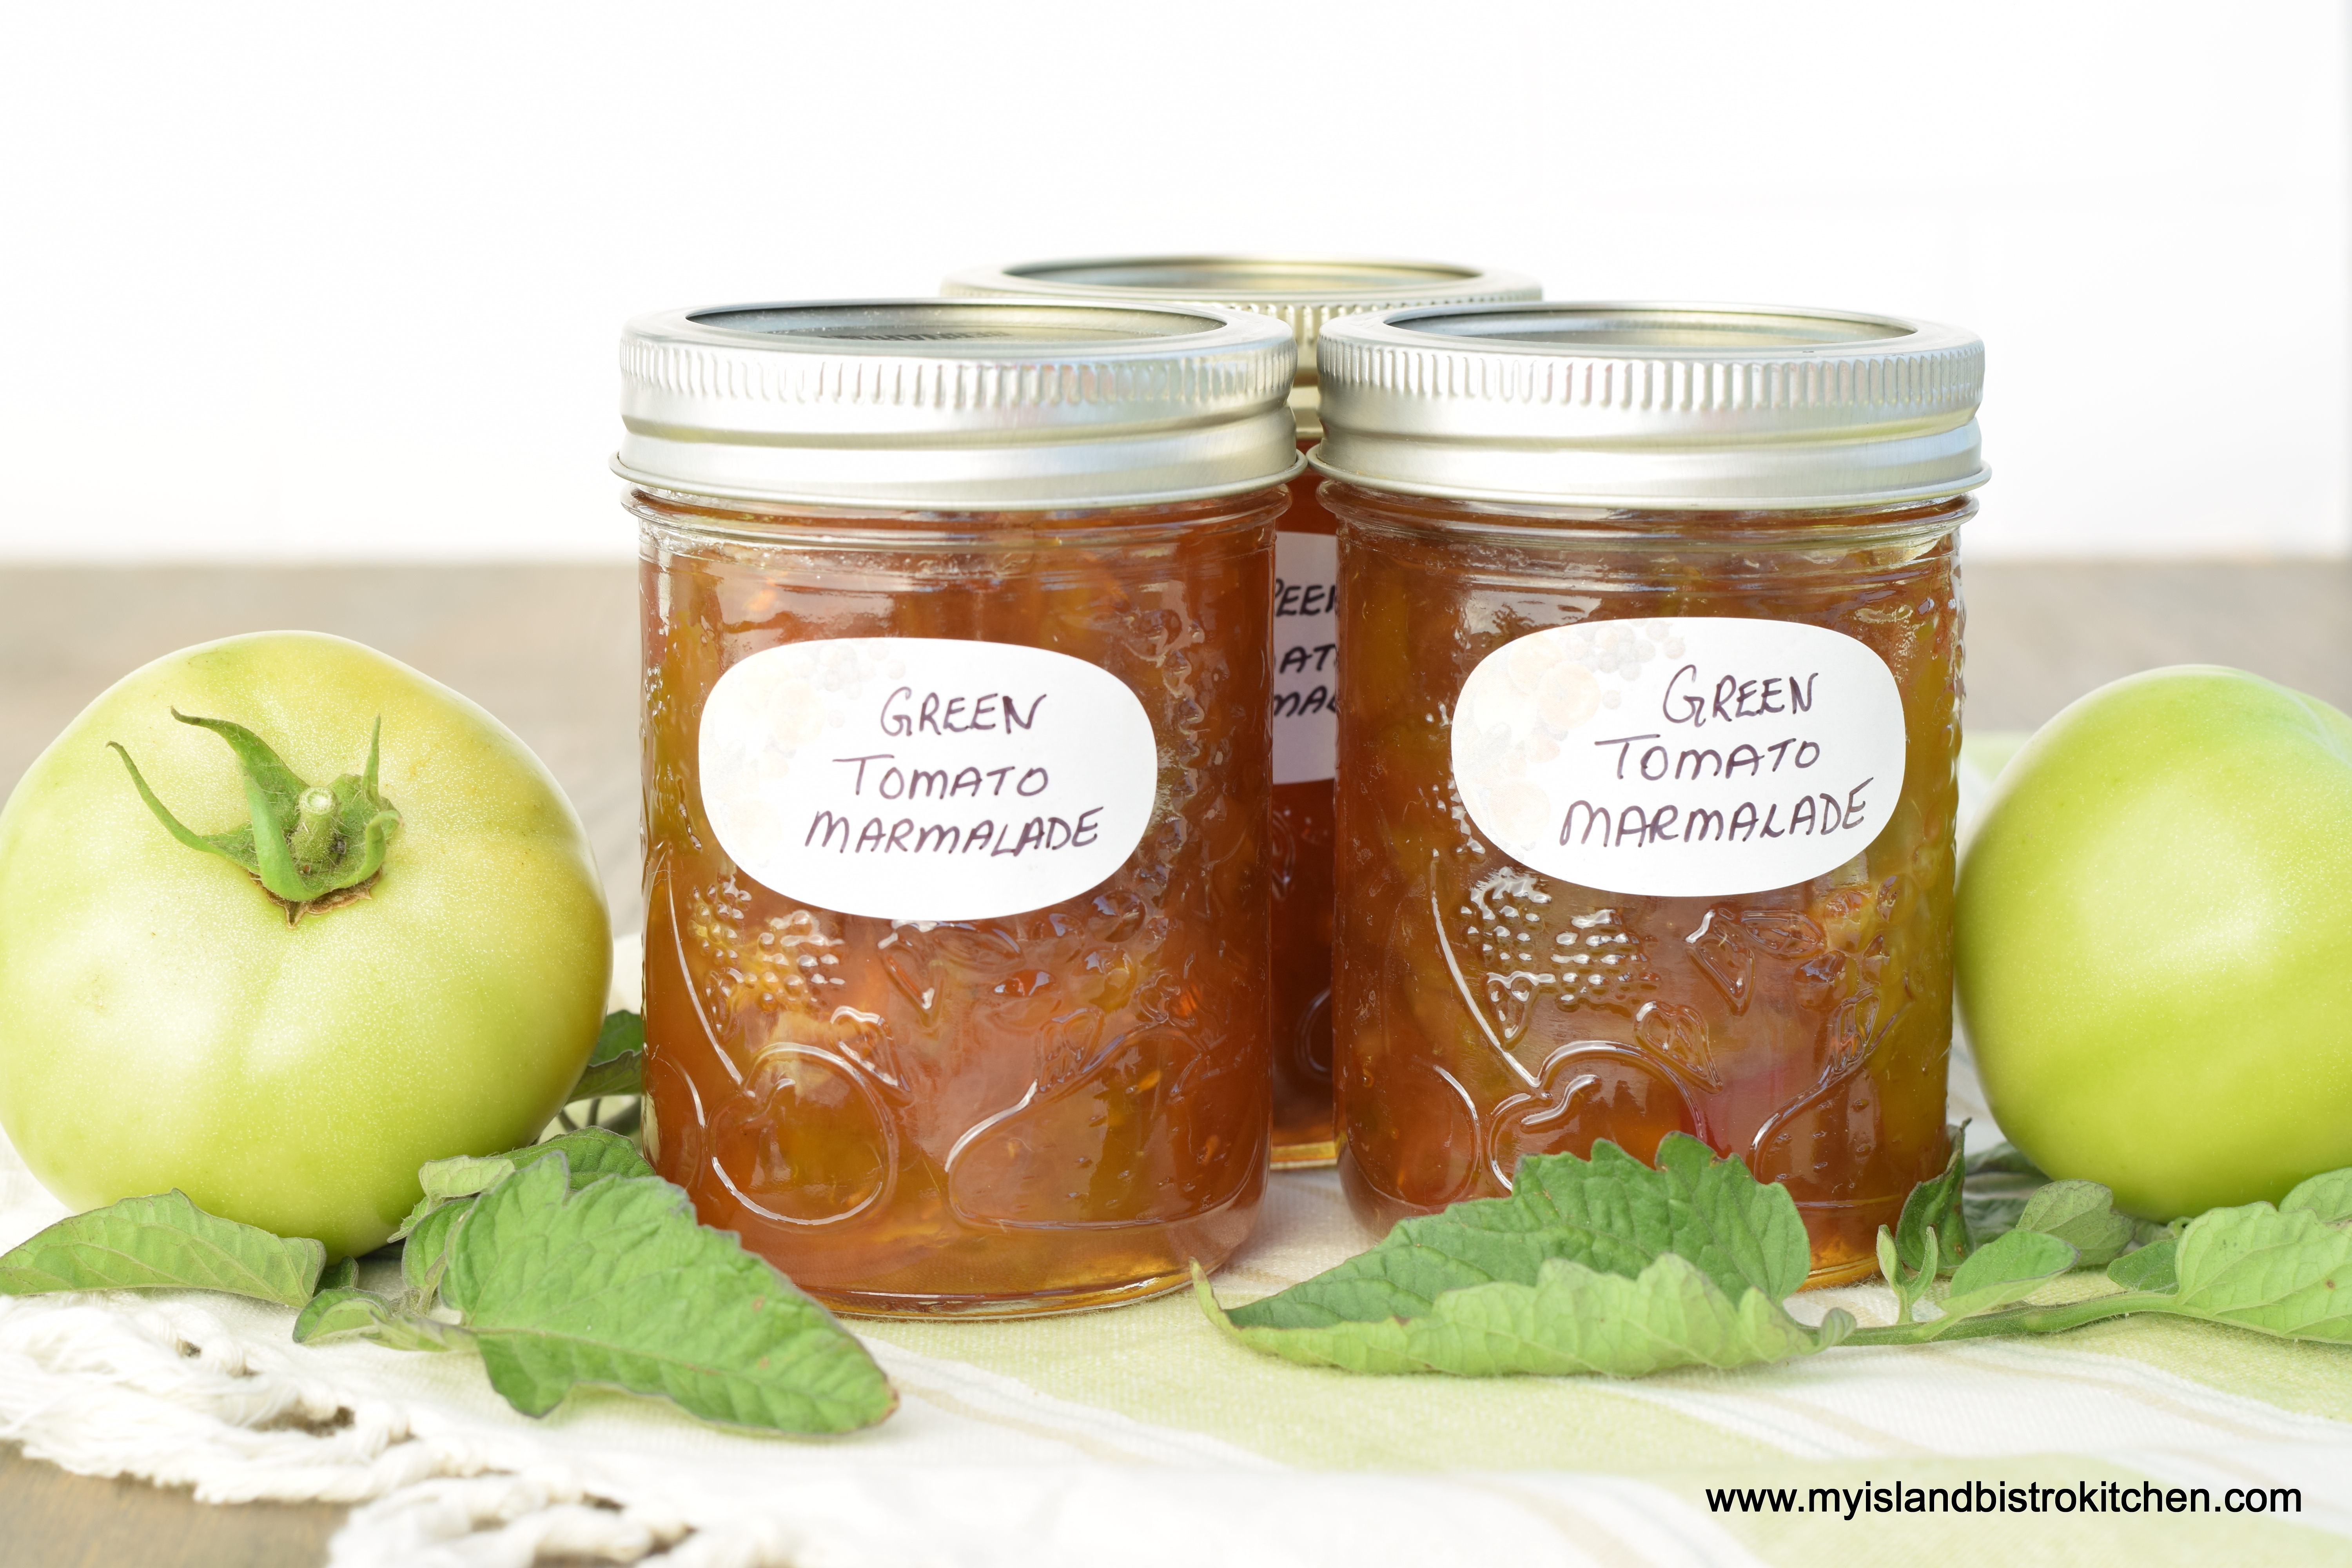
Almost any variety of medium/large tomatoes can be used for this marmalade. Tiny Tims variety or grape tomatoes, however, do not work well in this recipe because they are way too small to work with and are full of seeds.

Tomatoes
Green Tomatoes

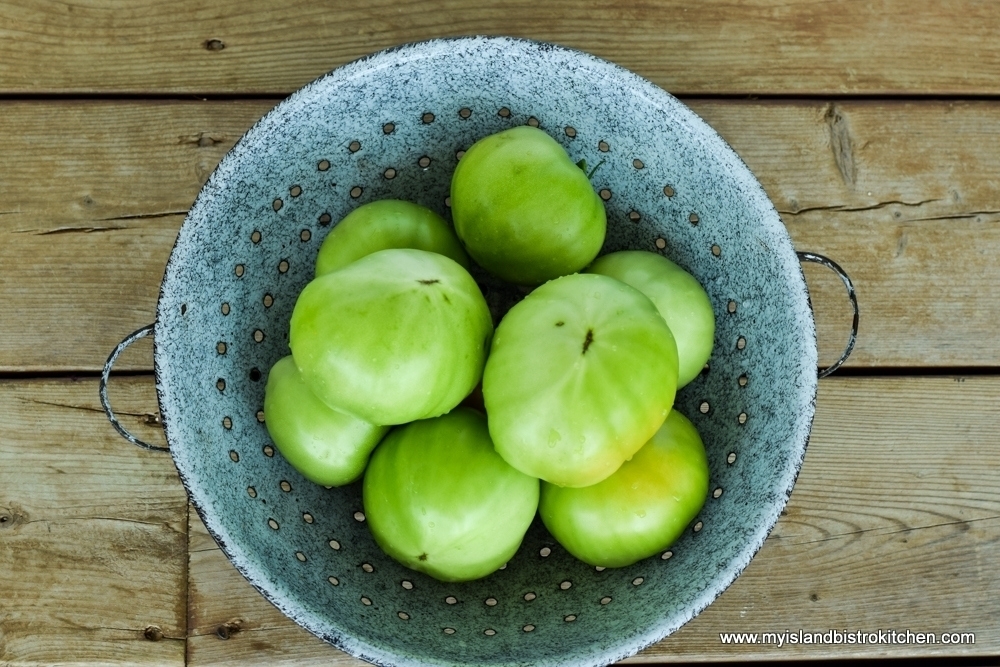
My advice would be to try to find a variety that does not have a lot of seeds as the tomatoes will yield more tomato meat per pound for the marmalade and the tomatoes will be a lot easier to prepare.  This is because the seeds and the watery/gelatinous sack that are inside the tomatoes need to be removed for this marmalade.  Leaving them in will result in two things: 1) Too much water in the marmalade causing issues getting it to jell; and 2) tomatoes are tremendously seedy and all those seeds just simply do not look appetizing in the finished product and are a nightmare for anyone who cannot digest seeds well. The odd few seeds may make their way in to the marmalade and are not, generally, a problem for most but the intent is to remove as many seeds as possible from the tomatoes.

Green Tomatoes
Green Tomato Wedges

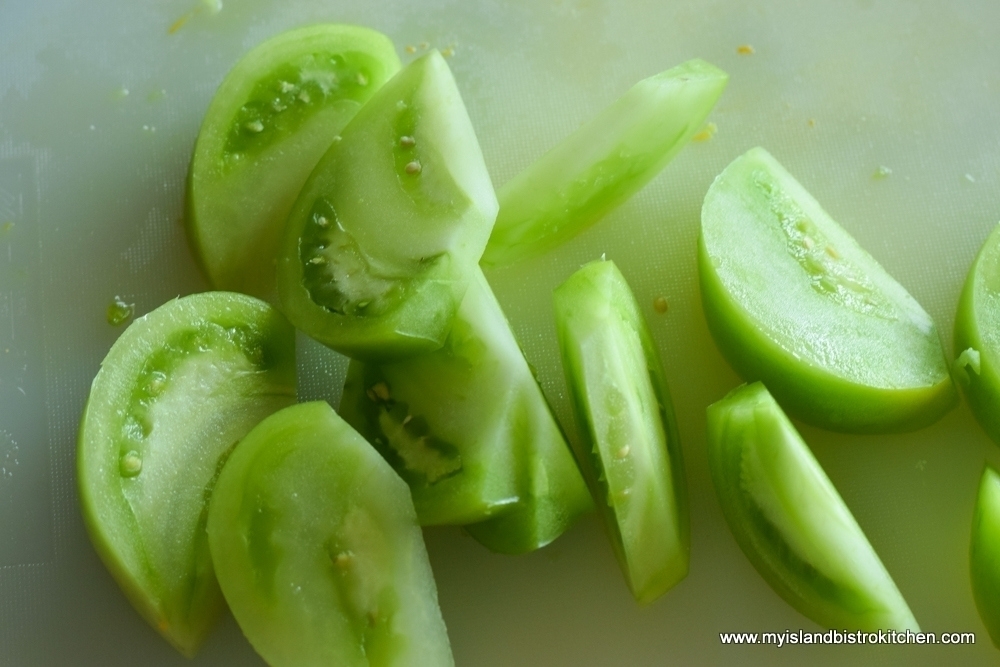
Cut each tomato in half, then each half into several wedges.  Scoop, or cut, out and discard the watery gelatinous sack and its seeds.

Green Tomatoes
Preparing Tomatoes for Green Tomato Marmalade

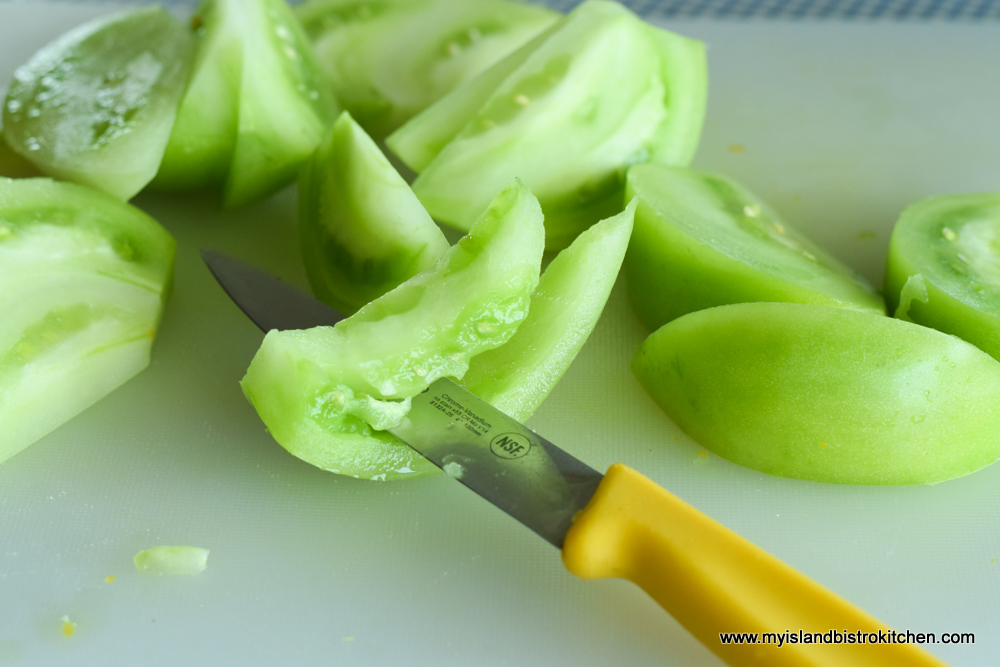
Cut up the remaining tomato pieces into small, bite-sized chunks.  These don’t need to be minced, by any means, but they need to be small enough to get cooked properly and to look appealing when spread on toast or biscuits.

Chopped Green Tomatoes
Chopped Green Tomatoes for Marmalade

The addition of lemon and orange (and their zests) is what, in my opinion, makes this a marmalade as marmalades traditionally contain citrus fruit.  This recipe calls for a small amount of crushed pineapple.  This adds an element of sweetness, flavour, and texture.  There is no need to drain the pineapple in a sieve or colander but, instead, use a slotted spoon to scoop the pineapple out of the can and let some of the juice drip off for a few seconds before measuring the pineapple.  There will still be juice in the pineapple and up to a couple of tablespoons of juice will be fine.  Any more and, like the watery part of tomatoes, it would add too much liquid to the marmalade content, potentially causing issues getting it to jell. Adding a small piece of cinnamon stick injects a subtle hint of cinnamon to the marmalade. However, it is not recommended to leave the cinnamon stick in the marmalade for the entire cooking process because it can result in too intense and excessive cinnamon flavour which is not the intent with this marmalade.

Marmalade
Green Tomato Marmalade

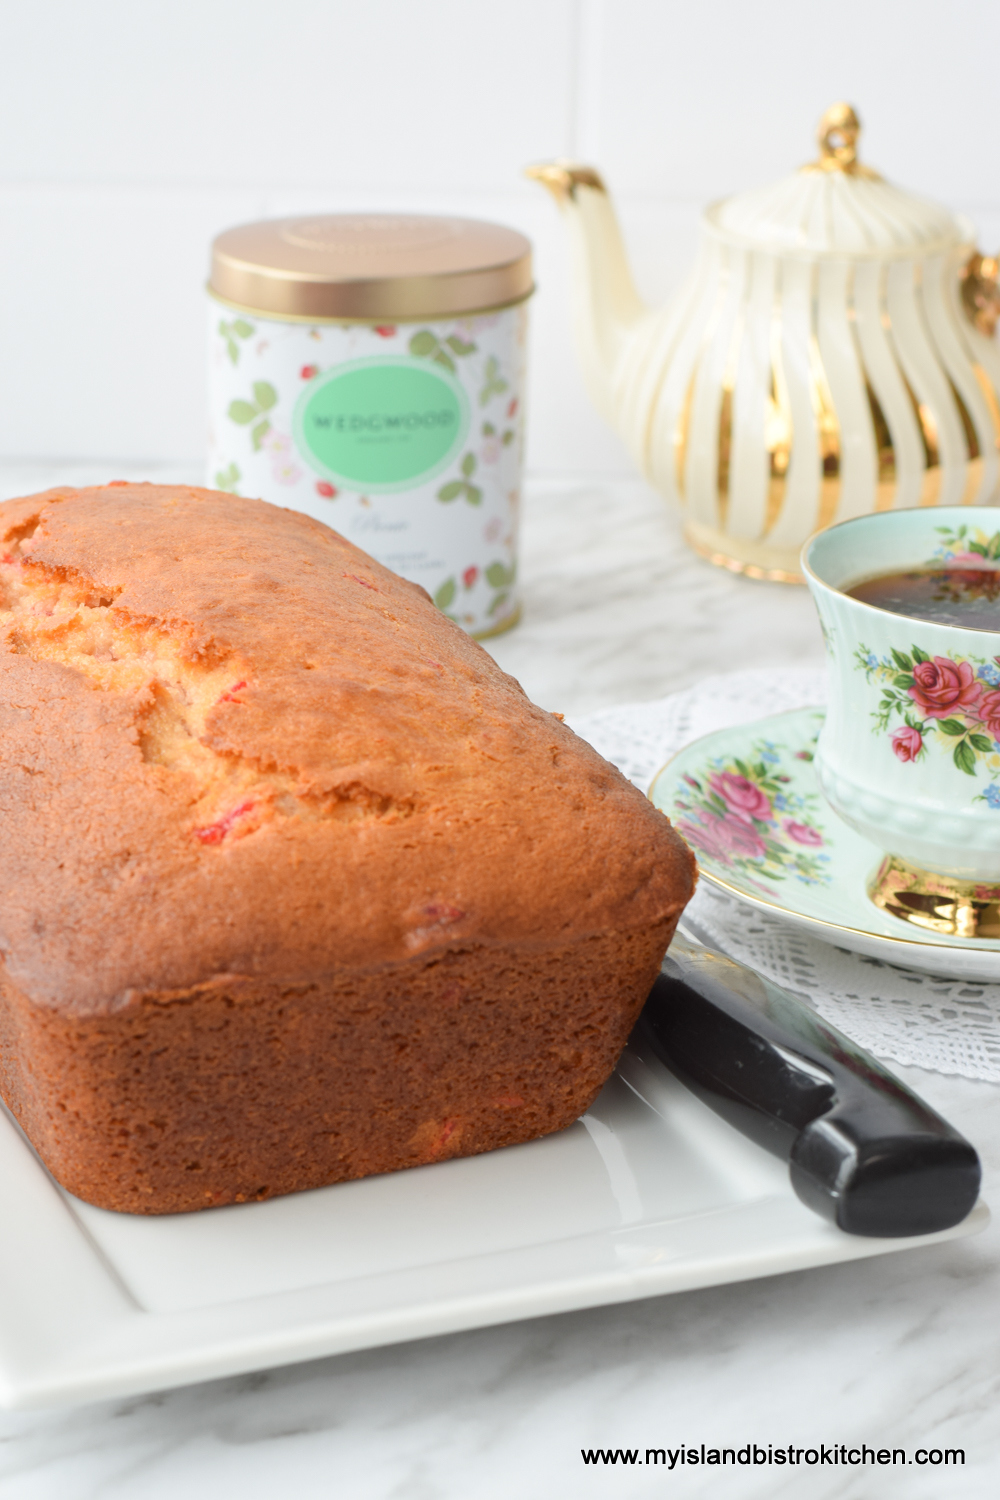
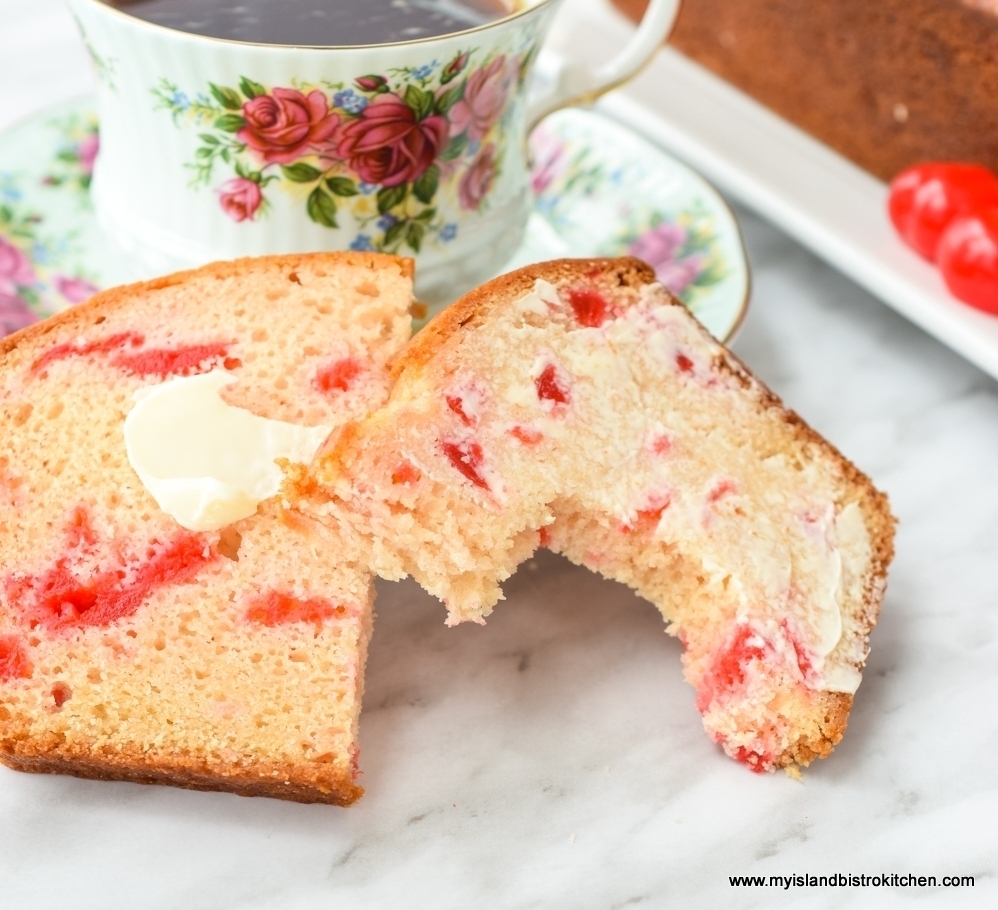
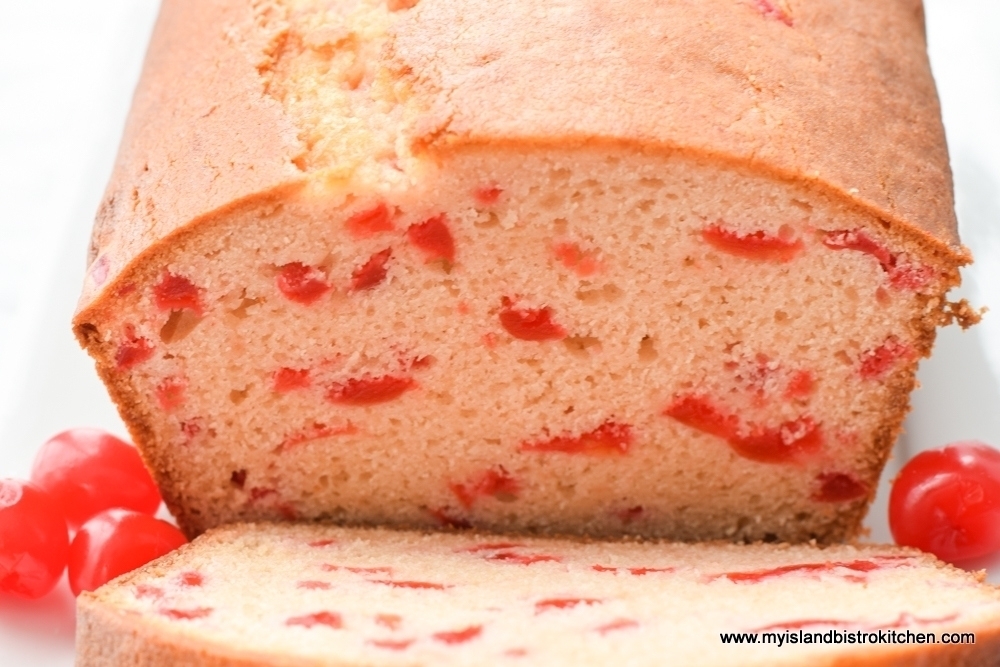
Care must be taken to ensure the marmalade does not scorch as it slowly cooks.  With the sugar content, scorching is always a risk.  Once a jam or marmalade has scorched, there is no fixing it and it’s a batch destined for the green compost cart.  Stirring the marmalade fairly regularly as it cooks will help it to thicken and prevent scorching (as will keeping it at a low boil and using a heavy bottomed stock pot).  It’s all about heat control. If desired, a few cut up red maraschino cherries can be added for color at the end of the cooking process.

Patience is required to make marmalade – it takes time for it to set, which can be upwards of two hours.  Getting the marmalade at the right jelling stage is the key part of marmalade making.  Temperatures for finished marmalade can range from 217°F to 222°F  and the temperature at which the marmalade is taken off the stove will determine how runny or thick it is. Undercooking the marmalade will result in a very runny product while overcooking it will make it too thick and sticky to spread on anything and it will become very dark in color.  I boil my marmalade slowly until it reaches a sustained temperature of 220°F on the candy thermometer. I find, at that stage, it has a lovely thick, yet still spreadable consistency. Marmalade is meant to be thicker than jam but still needs to be spreadable.

Marmalade
Green Tomato Marmalade

I could not get along without my candy/food thermometer for accurately checking food temperature.  If, however, you do not have a candy thermometer, a “wrinkle” test of the marmalade on a cold saucer can also be used to test the marmalade for doneness (see notes at the end of the recipe below for how to conduct this test).

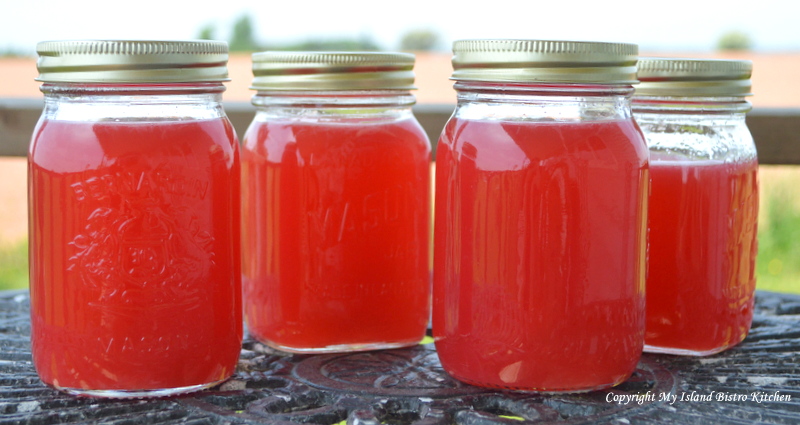
Half-pint bottles, like those shown in the photo at the beginning of this posting, are perfectly sized for marmalade. The bottles must be washed in hot, soapy water and rinsed thoroughly before being sterilized in boiling water for 10 minutes.  Fill the sterilized jars with the marmalade to within ¼“ of the jar rim.  Seal with the heated lids secured with the bands that came with the jars.  Process the half-pint bottles in a hot water bath for 10 minutes to give them shelf stability for several months – if the Green Tomato Marmalade lasts that long! (Note the marmalade in the tiny jelly jars in the photos below have been transferred, for cracker board presentation purposes, from the half-pint bottles in which they were bottled and processed in the hot water bath – they were not processed in these jelly jars which I have not tested in a hot water bath process.)

Marmalade
Green Tomato Marmalade

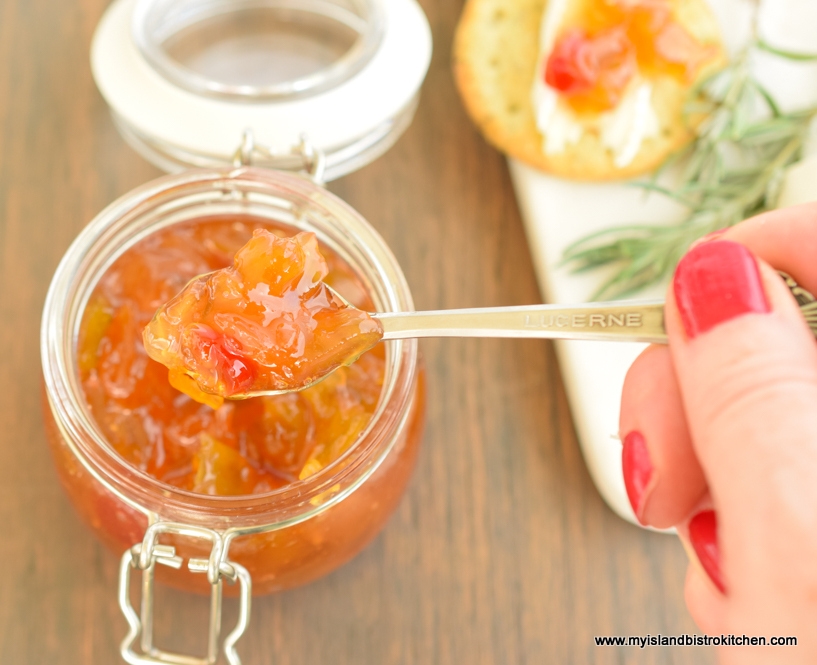
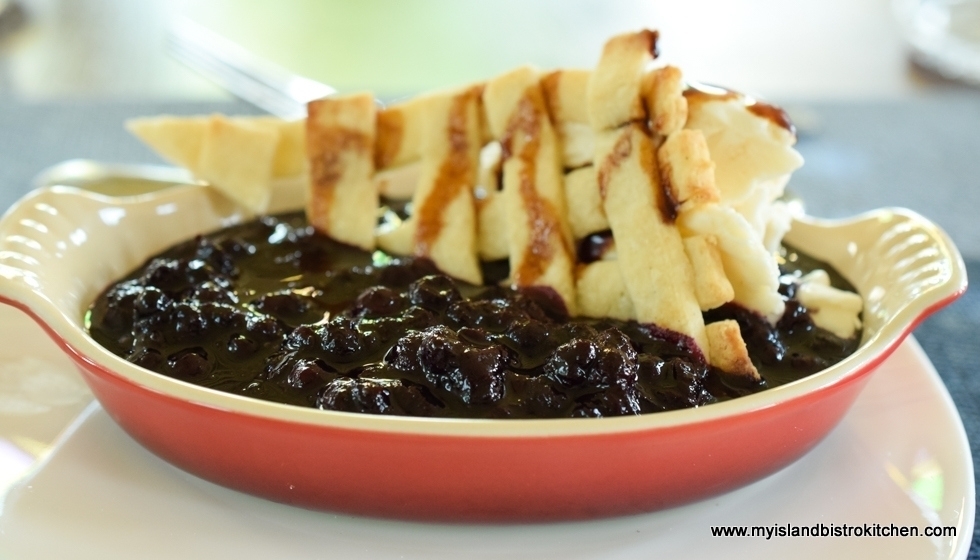
The lemons, orange, and crushed pineapple turn the bright green tomatoes into a superb marmalade of glorious golden amber color. Don’t expect this marmalade to taste like tomatoes as might be expected.  Rather, it has a surprisingly sweet and savory blend of flavours that make it a tasty and luxurious marmalade for which a multitude of creative uses can be found.

Give it a try!

Green Tomato Marmalade

Ingredients:

4 lbs green tomatoes, cored, seeded, and diced or cut into small chunks (should equal apx. 9½ – 10 cups cut up)
2½ lbs granulated sugar
1½ lemons, chopped + zest
1 orange, chopped + zest
10 oz crushed pineapple with some of its juice
2” piece of cinnamon stick
4 oz maraschino cherries, chopped (optional)

Method:

Wash tomatoes.  Cut into sections and remove the stem end, core, seeds, and the watery/gelatinous sack around the seeds.  Dice, or cut the tomato pieces into small chunks. Place in large bowl and add the sugar.  Let stand for three hours to draw the juice from the tomatoes and allow the sugar to dissolve.  Stir two to three times.

Wash the lemons and orange well.  Zest the lemons and oranges.  Remove any seeds and cut lemons and orange into small pieces.

Transfer tomato–sugar mixture and the liquid to a medium-sized stock pot. Add the chopped lemons and orange and the zest, along with the crushed pineapple.  Add the piece of cinnamon stick. Bring to a boil over medium high temperature, stirring to prevent scorching.  Immediately lower the temperature and cook, uncovered, at a slow gentle boil until mixture reads 220°F, sustained, on a candy thermometer*.  Stir mixture regularly to prevent scorching. Be patient, this can take upwards of 2 hours. Remove the cinnamon stick after about an hour.  When marmalade has reached its temperature, remove from heat and stir in the maraschino cherries, if using.

While the marmalade is cooking, fill a large pot of water, about ¾ full.  Place 6 half-pint jars, upright, into the water.  Ensure the jars are fully submerged, are each filled with water, and that the water is at least an inch over the tops of the jars.  Cover, bring to a boil, and boil for 10 minutes. Turn off heat and leave the jars in the hot water while the marmalade finishes cooking.

Meanwhile, fill the canner about one-third to one-half full of water. Cover and bring to a boil to have it ready for the filled jars.

When the marmalade is cooked, use a jar lifter to remove the hot jars from the water.  Using a canning funnel, pour marmalade into sterilized jars, leaving about ¼” headroom in each jar.  Wipe the jar rims with a clean cloth. Seal jars with heated lids and fingertip-tightened ring bands.

Place jars in hot water bath wire basket, ensuring jars do not touch each other or fall over. Carefully lower basket into canner of hot water. Ensure the water level is at least 1” above the tops of jars, adding more boiling water as necessary. Cover with canner lid. Increase the heat to return the water to a rolling boil then decrease the heat to just keep the water at a rolling boil but not boiling over. Process half-pint jars in the hot water bath for 10 minutes, adjusting time for altitude. Start timing the processing from the point where a full rolling boil is reached after basket of jars has been added to the canner. At the end of the processing time, turn off heat and remove canner lid. Using a jar lifter, carefully remove the jars, one at a time, and transfer them to a wire rack to cool completely. Listen for the “pop” or “ping” sound as the bottles seal over the next few minutes or hours. The lids of properly sealed jars will curve downward.  Let jars rest, undisturbed, on wire rack for 12 hours. Store in cool, dark place. Refrigerate marmalade once opened.

Yield:  Apx. 6 half-pint bottles

*If you don’t have a candy thermometer, place 2-3 freezer-safe saucers in freezer. To test for doneness, place a small amount of marmalade on chilled saucer and swirl saucer around. Let marmalade sit, untouched, for about a minute, then gently push your finger through the marmalade.  If the marmalade holds its shape (i.e., does not immediately run back together after the finger has been removed from the marmalade), it is set and ready to bottle.  If not, continue to cook mixture, repeating the “chill” test about every 3 minutes or so (always removing the pot from the heat while conducting the chill test) until the marmalade passes the “chill” test.  Do not overcook as it will result in a very thick marmalade, dark in color.

Green Tomato Marmalade

Lemons, orange, and crushed pineapple turn green tomatoes into a glorious golden amber-colored sweet and savory spread for toast, biscuits, scones, or crackers.

Cuisine American
My Island Bistro Kitchen My Island Bistro Kitchen

Ingredients

  • 4 lbs green tomatoes cored, seeded, and diced or cut into small chunks (should equal apx. 9½ - 10 cups cut up)
  • lbs granulated sugar
  • lemons chopped + zest
  • 1 orange chopped + zest
  • 10 oz crushed pineapple with some of its juice
  • 2 ” piece of cinnamon stick
  • 4 oz maraschino cherries chopped (optional)

Instructions

  1. Wash tomatoes. Cut into sections and remove the stem end, core, seeds, and the watery/gelatinous sack around the seeds. Dice, or cut the tomato pieces into small chunks. Place in large bowl and add the sugar. Let stand for three hours to draw the juice from the tomatoes and allow the sugar to dissolve. Stir two to three times.
  2. Wash the lemons and orange well. Zest the lemons and oranges. Remove any seeds and cut lemons and orange into small pieces.
  3. Transfer tomato–sugar mixture and the liquid to a medium-sized stock pot. Add the chopped lemons and orange and the zest, along with the crushed pineapple. Add the piece of cinnamon stick. Bring to a boil over medium high temperature, stirring to prevent scorching. Immediately lower the temperature and cook, uncovered, at a slow gentle boil until mixture reads 220°F, sustained, on a candy thermometer*. Stir mixture regularly to prevent scorching. Be patient, this can take upwards of 2 hours. Remove the cinnamon stick after about an hour. When marmalade has reached its temperature, remove from heat and stir in the maraschino cherries, if using.
  4. While the marmalade is cooking, fill a large pot of water, about ¾ full. Place 6 half-pint jars, upright, into the water. Ensure the jars are fully submerged, are each filled with water, and that the water is at least an inch over the tops of the jars. Cover, bring to a boil, and boil for 10 minutes. Turn off heat and leave the jars in the hot water while the marmalade finishes cooking.

  5. Meanwhile, fill the canner about one-third to one-half full of water. Cover and bring to a boil to have it ready for the filled jars.
  6. When the marmalade is cooked, use a jar lifter to remove the hot jars from the water. Using a canning funnel, pour marmalade into sterilized jars, leaving about ¼” headroom in each jar. Wipe the jar rims with a clean cloth. Seal jars with heated lids and fingertip-tightened ring bands.
  7. Place jars in hot water bath wire basket, ensuring jars do not touch each other or fall over. Carefully lower basket into canner of hot water. Ensure the water level is at least 1” above the tops of jars, adding more boiling water as necessary. Cover with canner lid. Increase the heat to return the water to a rolling boil then decrease the heat to just keep the water at a rolling boil but not boiling over. Process half-pint jars in the hot water bath for 10 minutes, adjusting time for altitude. Start timing the processing from the point where a full rolling boil is reached after basket of jars has been added to the canner. At the end of the processing time, turn off heat and remove canner lid. Using a jar lifter, carefully remove the jars, one at a time, and transfer them to a wire rack to cool completely. Listen for the “pop” or “ping” sound as the bottles seal over the next few minutes or hours. The lids of properly sealed jars will curve downward.  Let jars rest, undisturbed, on wire rack for 12 hours. Store in cool, dark place. Refrigerate marmalade once opened.
  8. Yield: Apx. 6 half-pint bottles
  9. *If you don’t have a candy thermometer, place 2-3 freezer-safe saucers in freezer. To test for doneness, place a small amount of marmalade on chilled saucer and swirl saucer around. Let marmalade sit, untouched, for about a minute, then gently push your finger through the marmalade. If the marmalade holds its shape (i.e., does not immediately run back together after the finger has been removed from the marmalade), it is set and ready to bottle. If not, continue to cook mixture, repeating the “chill” test about every 3 minutes or so (always removing the pot from the heat while conducting the chill test) until the marmalade passes the “chill” test. Do not overcook as it will result in a very thick marmalade, dark in color.

Recipe Notes

After marmalade has completely cooled, if there are any jars on which the lids have not curved downward, refrigerate those jars and use the marmalade within a month.

For more great jam, jelly, and maramalade recipes from My Island Bistro Kitchen, click on the links below:

Peach Marmalade
Rhubarb Marmalade
Crabapple Jelly
Blueberry and Grand Marnier Jam
Gooseberry Jam
Zucchini Jam
Pumpkin Jam 

Pin Me To Pinterest!

Marmalade
Green Tomato Marmalade

Breakfast Picnic on the Beach

Picnic
Breakfast on the Beach

When we think of picnics, we most often think of lunch time or dinner events. Rarely, do we think of a breakfast picnic and yet it’s probably one of the easiest picnic meals to pack!

Breakfast Picnic on the Beach

Recently, I suggested we pack up a continental breakfast and head to the beach for a morning picnic.  We had just been to a nearby blueberry U-pick so, naturally, blueberries were included in the picnic.

Blueberries
High Bush Blueberries

The menu was simple.  Orange juice, Greek yogurt topped with homemade granola and fresh blueberries, homemade muffins, peaches, and coffee.

Breakfast Picnic
Breakfast Picnic Fare

I love these little multi-purpose jelly jars.  They are perfect for yogurt parfaits!

Yogurt Parfaits
Yogurt Breakfast Parfaits

A breadboard makes an easily transportable platform upon which to set the food. I find, with beach picnics and an uneven sand base, it can be a bit of a challenge to keep the food from tipping over and spilling. However, the breadboard provides a stable, level surface eliminating the problem.

Breakfast Picnic
Continental Breakfast at the Beach

All that needs to be added is the quintessential coffee!  I have a small thermos/coffee butler that holds exactly two cups of coffee and is great for these types of events.

Breakfast Picnic
Breakfast Picnic at the Beach

I love my wicker picnic baskets and this one came equipped with the plates, mugs, and cutlery.

Picnic Basket
Wicker Picnic Basket

Let’s take a peek inside the picnic basket!

Breakfast Picnic
Breakfast in a Basket

A good book for one and the morning newspaper for the other found their way to the picnic, too! No need to take along lawn chairs – an old blanket and a couple of comfy pillows will suffice.

Breakfast on the Beach
Breakfast is Read!

Our summers are short here in Prince Edward Island so we make the most of the lovely fine days and our close proximity to the beach. What better way to savour the last days of summer than to pack a breakfast picnic and head to the beach to enjoy breakfast with a view like this! Self-imposed time-outs can be a good thing!

Beach
PEI Beach


Pin Me To Pinterest!

Chill Out with Great Ice Cream in PEI

Strawberry Rhubarb Ice Cream

It’s hard to think of summer without thinking of ice cream.  Those hot, sultry summer days just seem to beg for an ice cream fix.

Here, on PEI, we have no shortage of ice cream venues to choose from.  Whether you are a soft-serve ice cream fan or a hard ice cream aficionado, you’ll find lots to choose from.  After a summer of research (full disclosure – the waistline may have been harmed by this initiative!), here’s the scoop on my favorite places on the Island for hard ice cream and for soft-serve ice cream. Readers will note that opinions expressed are my own based on personal experience at all venues mentioned below.  None of the establishments knew I was sampling their products for this review. This is not a sponsored post and I received no compensation in any form for my reviews.

My review is broken down into two parts – hard ice cream and soft-serve ice cream. Readers will note that I was not reviewing every product sold by dairy bars and ice cream parlours. Rather I was reviewing two very specific products – hard ice cream and soft-serve ice cream. This to say that, for example, a dairy bar that specializes in, or is most known for, its soft-serve ice cream, may also serve other frozen products such as hard ice cream, too. In that example, if I was reviewing their soft-serve product, that’s all I was reviewing from that particular dairy bar.  Likewise, if a business is known primarily for its hard ice cream but also sells, for example, frozen yogurt or sherbet, I only reviewed their hard ice cream product(s). Of those I sampled in 2018, what follows were my top favorites.

For Best Hard Ice Cream

Two locations that specialize in the production of the traditional hard ice cream stood out for me:

COWS Inc.

Creamery Location: 12 Milky Way (397 Capital Drive), Charlottetown, PEI
(11 Canadian locations + 1 in Beijing, China)

COWS Creamery, PEI
COWS Creamery, PEI

Churning out delectable flavours since 1983, the flagship creamery is located on the aptly-named “Milky Way” just off of one of the famous roundabouts outside Charlottetown.  This venue is open year-round so locals do not have to go through withdrawal due to seasonal closures (phew!).  Other COWS locations, however, may be seasonal.

The Truck That Says It All!

Apart from the high-quality ice cream (yup, 16% butter fat), COWS is legendary for its creative and unique ice cream flavour names often involving a play on words related to anything “cow” – like Cownadian Maple, Fluff ‘n Udder, Messie Bessie, and Moo Crunch, for example.

COWS Ice Cream Flavours

When I visit a COWS location, I go in with the best intentions to try a new flavour but, once I’m standing in front of the display case, I inevitably choose “Wowie Cowie”, a delectable concoction of vanilla ice cream, English toffee marble, chocolate flakes, and Moo Crunch.  Ice cream is available in dishes or cones but their handmade waffle cones are hard to pass up! In my view, the cones are part of the “udderly” wonderful COWS ice cream experience!

COWS' Wowie Cowie Ice Cream
COWS’ Wowie Cowie Ice Cream

There is no indoor seating at this COWS location though there are some nearby picnic tables outside.  Some COWS locations may have indoor seating available. Tours of the creamery at this location are also available.

Scooping COWS Ice Cream

One of the things that makes COWS ice cream extra special is that it is available exclusively at COWS stores so heading to a COWS outlet just makes the experience that much extra special because you know you can’t buy it at the local supermarket.  You can check out the story I earlier wrote on COWS here.

Holman’s Ice Cream Parlour

286 Fitzroy Street, Summerside, PEI

Holman's Ice Cream Parlour, Summerside, PEI
Holman’s Ice Cream Parlour, Summerside, PEI

The newbies on the Island ice cream scene, this family-owned and operated ice cream parlour opened its doors in 2016 and is quickly earning a reputation for high quality homemade ice cream.

Located in a heritage home, known as the Holman Homestead, in Summerside, this ice cream parlour has fast become a favorite stop for ice cream aficionados.  Much of the charm of the historical property has been maintained and gives an air of stepping back in time to a vintage ice cream parlour.

Holman's Ice Cream Parlour, Summerside, PEI
Holman’s Ice Cream Parlour, Summerside, PEI

The premium homemade hard ice cream, manufactured on the premises, is made with all-natural ingredients.  Several flavours of ice cream are available – my favorite is the Salted Caramel though I have heard rave reviews of their Cookies and Cream variety.

Ice Cream
“Salted Caramel” Ice Cream – Holman’s Ice Cream Parlour, Summerside, PEI

Ice cream is available in cones or dishes but, as you walk up the sidewalk toward the house, you can catch the tantalizing waft of the waffle cones being made – it’s hard not have one of those cones and they don’t disappoint!

At Holman's Ice Cream Parlour, Summerside, PEI
At Holman’s Ice Cream Parlour, Summerside, PEI

The parlour also offers sundaes, banana splits, and soda fountain floats made with their homemade ice cream.

Ice Cream Sundae at Holman's Ice Cream Parlour, Summerside, PEI
Ice Cream Sundae at Holman’s Ice Cream Parlour, Summerside, PEI

They also make sherbets and have at least one variety of ice cream made with sheep’s milk.  Service is provided by friendly staff.  Eat inside or, on lovely weather days, enjoy the ice cream in the garden.  The ice cream from Holman’s is made all the more special because it is only available at their Ice Cream Parlour and you won’t find it in the frozen dairy section of any supermarket.  Open seasonally.  (Hint – In my view, it’s worth the drive to Summerside just to have an ice cream at Holman’s!  Just sayin’, this might have happened on more than one occasion….for research purposes, of course, you know….just sayin’…..)

For Best Soft-Serve Ice Cream

Two locations that are known primarily for their soft-serve ice cream particularly caught my attention.

Sunny’s Dairy Bar – New Discovery 2018

559 Water Street, Summerside, PEI

Ice Cream Dairy Bar
Sunny’s Dairy Bar, Summerside, PEI

This dairy bar came recommended to me by a couple of folks who thought I should check it out.  Can soft-serve ice cream really be all that different from one place to another? Yes, it can and Sunny’s proves it!

Opened in 2011, in the west end of Summerside, this is a traditional style dairy bar in that you place your order at the window and take your ice cream back to your vehicle or to the Green Shore Park across the street.  There is no indoor seating.

This dairy bar was a new discovery for me this year and I will be back!  I opted for a Hot Fudge Sundae, my all-time favorite. The ice cream was the creamiest and richest I have ever had and the hot fudge topping was, well …. sublime!

Hot Fudge Sundae at Sunny's Dairy Bar, Summerside, PEI
Hot Fudge Sundae at Sunny’s Dairy Bar, Summerside, PEI

Sunny’s has a long list of ice cream treats on its menu, too numerous to mention here.  Portion sizes are very generous.  I ordered a small sundae and, as can be seen in the photo, it is a very generous helping! Open seasonally, this is definitely a place to check out for ice cream in Summerside!

Frosty Treat Dairy Bar

Two (2) locations – Original at 109 Victoria Street West and new one in 2018 at 25010 Veteran’s Memorial Highway, both in Kensington, PEI

Frosty Treat Dairy Bar #1 in Kensington, PEI

A long-time favorite with Islanders, this traditional-style dairy bar is well known for its catchy TV ads “Don’t Drive By! Drive In!” For many Islanders, it will come as no surprise as to why Frosty Treat made my list of “go-to” places for yummy ice cream in PEI.  Frosty Treat has been synonymous with great soft-serve ice cream for many years and the frequent line-ups at the dairy bar window on hot summer days and evenings attest to this.

This popular ice cream bar serves up creamy soft-serve ice cream that will satisfy any craving for soft swirly ice cream.  Other ice cream treats are also available on Frosty’s menu.

Frosty Treat has been a summer tradition for us for many years.  Their Hot Fudge Sundae, in particular, is a perennial favorite. Open seasonally.

Hot Fudge Sundae from Frosty Treat Dairy Bar, Kensington, PEI

If you are in the Kensington area, “don’t drive by, drive in” to one of the Frosty Treat locations for a cool ice cream treat.

Frosty Treat #2 Location in Kensington, PEI

Special Mention

Somerset Ice Cream Bar – New Discovery 2018

2 Somerset Street, Kinkora, PEI

Somerset Dairy Bar, Kinkora, PEI

Located in the small rural village of Kinkora, midway between Charlottetown and Summerside, the Somerset Ice Cream Bar opened for business in summer 2018.  What makes this ice cream bar unique, and what earned it a special mention in this article, is that its owner and operator is a young entrepreneur, still in high school (yes, you read that right)!

Soft-serve Ice Cream
Ice Cream from Somerset Dairy Bar, Kinkora, PEI

Many cones of generous-sized portions of creamy swirled soft-serve ice cream were served out of this new dairy bar this past summer.  In traditional dairy bar style, orders are placed at the window.  There is no indoor seating but there are benches on the deck around the dairy bar and limited picnic table seating. Open seasonally.

If you are traveling Rte 225 between Summerside and Charlottetown, make it a plan to stop for a tasty treat at this ice cream bar.

So, this is what the waistline could handle this summer!  Again readers will note that some of these establishments also serve other types of ice cream and ice cream related treats.  However, the purpose of my exercise this summer was to simply find great establishments that specialized in, or were best known for, either hard ice cream or soft-serve ice cream.  Others may have differing opinions on my choices but, based on my personal experience on the days I visited the venues, I had great ice cream and service at each of these five (5) venues this year.  In my view, you can’t go wrong with an ice cream treat from any of these five (5) venues. All establishments have active social media accounts (and some have websites) that you can check out for more information and hours and season of operation.

Strawberry Rhubarb Ripple Ice Cream

Pin Me To Pinterest!


Perfect Peach Blueberry Crisp Recipe

Summer Dessert
Peach Blueberry Crisp

There are so many options for summertime desserts.  I try to use fresh fruits in desserts throughout the summer season and often look for combinations that will work well together.  Some fruits just naturally complement each other, like blueberries and peaches, for example. Together, they make a fabulous Peach Blueberry Crisp! Continue reading Perfect Peach Blueberry Crisp Recipe

Picnic Lunch in the Gazebo in St. Peter’s Bay, PEI

Picnic in the Gazebo at St. Peter's Bay, PEI
Picnic in the Gazebo at St. Peter’s Bay, PEI

We thoroughly enjoy our home province of Prince Edward Island! Our special Island is small enough that we can get to know all parts of it quite well.  In summer, especially, we do a lot of day trips all around the Island.  Most times, for our day excursions, I pack a picnic lunch and we head off for the day.  Sometimes, I have a particular picnic destination in mind and have a good idea if there will be a park nearby that would be suitable for a picnic and, other times, it’s totally by chance where we land at picnic time. Apart from the opportunity to dine outdoors in our all-too-short summer season here on Canada’s Atlantic Coast, transporting our own meal means we can eat wherever we are whenever we are hungry without having to try and be at a certain location where there is a restaurant which may, or may not, be able to accommodate dietary needs.

Our recent day trip took us to the north shore area of the eastern part of the Island.  I love PEI lighthouses – the iconic red and white structures are dotted here and there all around the coast of the Island.  I had been searching to find the St. Peter’s Bay Lighthouse for some time and was determined to find it this year.  So, this was our primary destination on this particular day trip.

St. Peter's Harbour Lighthouse, PEI
St. Peter’s Harbour Lighthouse, PEI

It wasn’t particularly easy to find this elusive lighthouse  but, with assistance of an acquaintance who provided directions, I was able to locate it.  Access is via a single lane red clay road with a canopy of trees.  The adventure was indeed worth it!

After we enjoyed the vista surrounding the lighthouse, not to mention the beautiful beach, we decided it was time to find a place to set out our picnic.

PEI North Shore Beach
Beach by St. Peter’s Bay Lighthouse, Morell, PEI

I knew of the small park by the water in nearby St. Peter’s Bay where I had had a picnic before (click here to view those photos).  What I didn’t recall was the lovely gazebo at this site. This find was a blessing since the temperature had soared to 28C by this time and it was way too hot to eat out in the open with no shelter!

When we arrived, we found the large gazebo unoccupied so immediately went about setting out our picnic lunch.  Someone had planted beautiful flowers in boxes around the gazebo and that formed a ready backdrop that I could not have planned or hoped for. Bonus! See how gorgeous the flowers look in the photo below and how they fortuitously match my color scheme and complement the color of the lemonade!

Picnic in a Gazebo
Picnic in a Gazebo

The color theme of my picnic was turquoise, always a summery color. The burst of hot pink in the drink certainly adds a punch of color!

Picnic Salad Bowls
Picnic Salad Bowls

I found the bowls, matching small salad dressing containers, and rectangular dishes at Walmart.  Not only are they all color-coordinated in turquoise blue but the dishes come with the needed cutlery built in, a real bonus because there is no need to remember to bring cutlery separately.

Turquoise-themed Picnic

The bowls match my insulated picnic basket.  A blue-checked tablecloth and checkered napkins, already part of my picnic arsenal, were found to match as well.

Turquoise and Blueberry Blue Details

A small model sailboat in matching colors and a collection of shells formed the centerpiece for my tablescape. I figure if I am going to dine outside, I might as well go all the way and set the table attractively! It makes for a more fun and memorable picnic.

Sailboat and Shells Tablescape

For lunch, I prepared my version of a picnic buddha bowl, ensuring it contained contents that would travel.  There is no one right way to make a buddha bowl but, typically, they contain some kind of grain (preferably high fibre), veggies and fruit, a protein source, and greens.  I began by layering the bowl with lettuce from our garden. Our garden has been a good producer this year so the cherry tomatoes, celery (it’s there but it’s hiding in the photo), and carrots are garden-fresh. The grain I chose to use was a tri-colored quinoa. To make the meal more substantial and to add some protein, I included a half hard boiled egg in each bowl. The addition of the red onion gives a flavor and color boost. I love how colorful and healthy this salad is!

Main Meal Picnic Salad

I often brine and roast boneless skinless chicken breasts for various uses and they are perfect sliced for a main meal salad or as added protein in a buddah bowl.

Picnic Salad
Picnic Salad

Some freshly picked blueberries from the Tryon Blueberries U-pick added a bit of color, texture, and sweetness to the salad.  A simple balsamic dressing was all that was needed to finish the salad.  This type of meal is great for a picnic.  The meal is completely prepped at home and contained in a bowl with the dressing added at the time of serving.  The meal travels well – I use several ice packs in my insulated picnic basket to keep the food good and cold.  At meal time, it is simply a matter of removing the cover from each diner’s bowl and the meal is ready to go. Clean-up is super easy because the covers pop back on to the bowls and the utensils fit inside the bowls so there are no messy plates and utensils.

These high bush blueberries are great snacking berries and I often pack them in my picnic basket when the berries are in season.  Today, their blue color matches my color scheme, too!

High Bush Blueberries

Peanut butter cookies are always a great stand-by picnic treat.  They are easy to make, easy to transport, and satisfy the sweet tooth.  For my recipe, click here.

Peanut Butter Cookies

Peaches are also a great fruit to take along on picnics. I love to incorporate the flavors of summer into my picnic menus.

Peaches and Cookies
Peaches and Cookies


I love the little bottles in the photo below.  When I made the rhubarb lemonade earlier in the summer, I froze some in these bottles to have it ready for picnics.  The bottles help to keep the food cool as we travel and they quickly finish thawing completely when removed from the cooler as the picnic is being laid out. This is a super tasty (and colorful) summer drink – you can access my recipe by clicking here.

Picnic in St. Peter's Bay, PEI
Picnic in St. Peter’s Bay, PEI

I hope you have enjoyed a peek into my picnic in the gazebo in St. Peter’s Bay, PEI! The Island has many picturesque places suitable for picnics and each comes with its own unique view.

Pin Me To Pinterest!

Picnic in St. Peter's Bay
Picnic in St. Peter’s Bay

For other picnic inspiration from My Island Bistro Kitchen, check out these:

Picnic by the Confederation Bridge in PEI
Sliders and Salad Sunday Picnic
A PEI Picnic in the Park
Casual Summer Picnic
A Canada Day Picnic in St. Peter’s Bay, PEI
A Casual Summer Afternoon Picnic
A Beach-Themed Picnic
A Pretty Pink Picnic
Canada Day Picnic
Oh Canada! A Picnic to Celebrate Canada Day
Labour Day Picnic by the PEI Seaside with Lobster Croissants on the Menu
A Plaid Picnic on the Verandah
Locovore’s Picnic – Food Day Canada 2016
Late Summer Charcuterie Picnic
Sunday Afternoon Wine and Cheese Picnic
Old Country Rose Afternoon Tea Picnic

Cooking Classes at The Table Culinary Studio in PEI

"Bounty of the Sea" Cooking Class at The Table Culinary Studio in New London, PEI
“Bounty of the Sea” Cooking Class at The Table Culinary Studio in New London, PEI

Tucked away on the Graham’s Road (Route 8), in the picturesque rural community of New London, Prince Edward Island, you will find The Table Culinary Studio that offers short (between 3.5 and 4.5 hours) cooking classes that focus primarily on cooking with fresh, local Island foods.  This experience is a great way to learn about the Island food culture.

The Gently Rolling Hills of New London, PEI

The rural setting is quintessential PEI. Fields in shades of green contrasted with the Island’s iconic red soil take visitors to the heart of some of the Island’s most fertile farm land.

Field of Potatoes in PEI's Red Soil
Field of Potatoes in PEI’s Red Soil

Just down the road is New London Harbour, home to a small lobster fishing fleet and the grounds for other seafood like oysters, quahogs, and mussels.  Not far away, quality food can be sourced from dairy and beef farms, organic farmers, beekeepers, cheesemakers, and garlic growers. Could there be a more authentic location for a PEI culinary studio!

New London Harbour
Lobster Boats at New London Harbour, PEI, Canada

While it is no secret that PEI has lovely scenery to enjoy, spectacular beaches and golf courses, and many attractions to keep visitors busy exploring our Island, many come to the Island knowing that PEI offers great food from the land and sea.

Cavendish Beach, PEI

Our potatoes, oysters, mussels, and lobster, in particular, are shipped all over the world and these Island products are well known, respected, and sought after for their high quality.

PEI Potatoes
PEI Potatoes

So, what better way to experience the Island foods first hand than to take a short cooking class to learn more about them and how they can be prepared.

The Table Culinary Studio (formerly Annie’s Table) has been in operation since 2012, offering an array of short cooking classes on a myriad of topics.  Under new ownership in 2016, The Table, with owner/chef Derrick Hoare at the helm, continues with the tradition of engaging culinary aficionados in ways to prepare local Island foods such as lobster, oysters, mussels, scallops, beef, cheese, and so forth.  The focus is very much on using fresh local ingredients that are in season and, by extension, acquainting participants with the rich Island food culture.

The Table offers a number of hands-on cooking classes that include (at the time of writing) Bounty of the Sea, Black Gold (cured garlic), Farm to Table, Marilla’s Table, Hive to Table, Let Them Eat Beef, Oyster Obsession, Say Cheese, Vivacious Vegan, Applelicious, Artisan Bread, Gluten Free Gourmet, and Helping Hands.  The Table operates seasonally from May to October to coincide with the Island’s tourism season.  Several of the cooking classes involve field trips to farms and other local food producers to see, first-hand, how food is grown or produced and to pick up some local ingredients to bring back to The Table to be used in the class that follows.  This form of experiential tourism provides the opportunity for the learners to create wonderful memories of their vacation time in PEI, connect directly with PEI food producers, and to learn more about the Island’s food culture and the role that farming, fishing, and other food production play in the Island’s economy and way of life.

I recently participated in the “Bounty of the Sea” cooking class at The Table which is located within walking distance to the house in which famed Island authoress Lucy Maud Montgomery was born and not far by vehicle to the resort municipality of Cavendish.

Birthplace of authoress Lucy Maud Montgomery, New London, PEI

But, before I take you on the adventure with me, here is a brief description of the venue and what a cooking class is like at The Table.

The Table Culinary Studio, New London, PEI

What makes this culinary studio unique is its venue.  It is located in a small white repurposed country church, very typical of so many seen in several Island communities.  Inside the church, the pews have been removed and, in their place, is a large harvest table where, in a few hours time, class participants will gather to enjoy the lavish spread of the morning’s cooking. The church’s altar has been elevated to a loft setting and the building is tastefully furnished.

Students Gather at the Harvest Table Following a Cooking Class at The Table Culinary Studio in New London, PEI

The original altar and choir loft locations have been transformed into an open teaching kitchen.

The Kitchen at The Table Culinary Studio, New London, PEI

Class size is small and intimate – only a maximum of 10 participants per cooking class.  This ensures that each person has a front row view as the culinary team teaches the cooking or baking techniques in the open-style kitchen. It also allows for participants to be actively engaged and participating in the cooking or baking activities.

The Table Culinary Studio, New London, PEI

The culinary team consists of owner/chef Derrick Hoare, Executive Chef Michael Bradley, and Events Coordinator Christine Morgan. The atmosphere is unhurried and very sociable. Strangers become friends over the commonality of food. With a growing hunger for knowledge about where one’s food comes from and how it is grown, produced, or harvested, cooking classes appeal to most age demographics and skill levels. No need to worry if you are not an experienced or accomplished cook – the classes offer something for everyone, including a scrumptious meal after the class in the beautifully appointed old country church.

So, now on to my adventure as a participant in The Table’s “Bounty of the Sea” cooking class.  After morning coffee upon arrival, everyone got suited up with their aprons and side towels.

At The Table Culinary Studio in New London, PEI

The class began with Chef Derrick giving a brief talk on lobster fishing on PEI, recounting his own experiences going out on a fishing boat to learn, first-hand, about lobster fishing on the Island.  Chef Michael then gave a short biology lesson on how to identify the gender of a lobster.

Executive Chef Michael Bradley at The Table Culinary Studio in New London, PEI

It’s a good thing those lobsters were banded because, if you find yourself in the unfortunate situation of having a finger caught in the claws of one, you are likely to end up with a broken finger – they’re strong!

Lobsters
Fiesty Lobsters

Everyone was given a lobster and instructed on how to carefully de-band them before placing them in hot water to be cooked.

Chef Derrick kept a watchful eye on the lobsters so they were removed from the pot at just the right time.

Derrick Hoare, Owner/Chef at The Table Culinary Studio in New London, PEI

Next came the lesson on how to crack open a lobster.

Cooked Lobster
Cooked Lobster

Chef Michael capably gave instructions as each student cracked open a lobster to reveal the succulent meat inside.

Meat from the Lobster

Yes, a basic table knife will do the trick!

Cracking Open Lobsters

Having never made homemade pasta before, I was particularly interested in the procedure.

Making Homemade Pasta at The Table Culinary Studio in New London, PEI

The Table is very accommodating to class participants who have dietary restrictions.  On this day, there were two participants who were gluten-intolerant so a separate station on an adjacent workspace was set up for them to make the gluten-free pasta and Chef Michael alternated between the two groups giving information and instruction on pasta making.

Making Gluten-Free Pasta at The Table Culinary Studio in New London, PEI

Black garlic from nearby Eureka Garlic, not far from Kensington, was used in the pasta to give a unique flavour.  If you have never tasted black garlic, it’s not nearly as garlicky as you might think – I personally think it tastes like a cross between a fig and a prune.  You can check out my story here on Eureka Garlic. The chopped black garlic was kneaded into the pasta dough.

Black Garlic from Eureka Garlic near Kensington, PEI


The pasta dough was cut and gathered into circles ready to be dropped into the cooking pot.

Cutting the Pasta Dough
Homemade Pasta Ready for Cooking

With the pasta made, we took a brief break from the food prep to listen to Christine explain how mussels are grown and harvested on PEI.

Christine Morgan Explains How PEI Mussels are Grown and Harvested

PEI mussels are world famous and they are shipped all over the world.   Mussels are a common food to serve at many events, year-round, on PEI. They are easy to prepare and ever-so-tasty dipped in melted butter!

Steamed PEI Mussels at The Table Culinary Studio in New London, PEI
Christine Morgan Serves Up Steamed PEI Mussels at The Table Culinary Studio in New London, PEI

Chef Michael then guided the group in making Lobster Bisque.  Once the Mirepoix started cooking, you can only imagine how tantalizing the scent was as it wafted through the old church building.

Stirring the Mirepoix for the Lobster Bisque at The Table Culinary Studio, New London, PEI

Ohhhh, that lobster is going to make a dandy lunch – can’t you just taste it!

Lobster Bisque in the Making at The Table Culinary Studio, New London, PEI

The third seafood that we learned to cook was scallops, those tasty little morsels!

Cooking Scallops at The Table Culinary Studio in New London, PEI

The morning went super fast and, before we knew it, it was time for lunch to be served by the culinary team.

Chef Michael Bradley of The Table Culinary Studio Preparing the Lobster Bisque for Serving
Chef Michael Bradley of The Table Culinary Studio Preparing the Bowls of Lobster Bisque for Serving

The table was beautifully set (those of you who follow my food blog regularly know how I love well-set tables).  The napkin at each place setting had either a small lobster trap or lobster napkin ring.

Place Setting at The Table Culinary Studio, New London, PEI

These napkin rings tied in well with the theme of the morning’s class – “Bounty of the Sea”.

Place Setting at The Table Culinary Studio, New London, PEI

How inviting does this look! Wouldn’t you love to sit in at this table!

At The Table Culinary Studio in New London, PEI

Fresh homemade sourdough bread was on the table.

Homemade Sourdough Bread

The landing at the top of the spiral staircase in the church provided a great vantage point for photography.

Spiral Staircase at The Table Culinary Studio, New London, PEI

The group assembled at the big harvest table which is the focal point in the middle of the studio. This 12’ table was hand-crafted from old attic boards extracted from the house which The Table’s former owner restored just up the road at New London corner.

Class Lunch at The Table Culinary Studio in New London, PEI

How great does this lobster bisque look with that succulent lobster claw!  It tasted even better!

Lobster Bisque
Lobster Bisque

We were very anxious to taste the homemade pasta and it did not disappoint! The pasta in the photo below is gluten-free.

Homemade Pasta Topped with Lobster and Scallops at The Table Culinary Studio in New London, PEI

This was accompanied by big bowls of PEI mussels with squeaky cheese topping melting down through the mussels.  If you are a mussel lover, these are hard to resist!

PEI Mussels with Butter at The Table Culinary Studio in New London, PEI

And as if we weren’t stuffed enough, out came dessert. The dessert in the photo below is a chocolate beet cake.

Chocolate Beet Cake at The Table Culinary Studio, New London, PEI

And, for the gluten-free dessert, it was a deconstructed blueberry pie which I can attest was simply yummy!

Gluten-free Deconstructed Blueberry Pie - The Table Culinary Studio, New London, PEI
Gluten-free Deconstructed Blueberry Pie – The Table Culinary Studio, New London, PEI

The Table is set with the right ingredients – small class size, fresh local Island foods, quality instruction, hands-on cooking, a shared meal, and a charming venue with a history of its own.  If you are looking for an authentic and affordable cooking experience to allow you to more deeply engage with the local food scene and pick up some cooking tips and skills, check out course offerings at The Table.  With the short half-day classes, visitors can have the best of both worlds – a cooking experience to learn more about local PEI foods in the morning followed by a delicious lunch and then the rest of the day free to explore other Island adventures and sights. For more information on cooking classes and prices, visit The Table Culinary Studio website at: http://www.thetablepei.ca/classes

The Table also offers fine dining in the evening (reservations required).  Click here to read my recent story on The Table’s North Shore Surf and Turf Dinner.

Pin Me To Pinterest!

Cooking Classes in PEI
Cooking Classes at The Table Culinary Studio in PEI
Cooking Classes in PEI
Cooking Classes at The Table Culinary Studio in New London, PEI
Cooking Classes in Prince Edward Island
Cooking Class at The Table Culinary Studio in New London, PEI

Connect with My Island Bistro Kitchen through the following social media channels:

Facebook – “My Island Bistro Kitchen”
Twitter – “PEIBistro”
Instagram – “peibistro”


My thanks to The Table Culinary Studio for the opportunity to experience their “Bounty of the Sea” cooking class and for the fine hospitality. My participation in the class was complimentary for the purpose of conducting a review of the “Bounty of the Sea” cooking class. However, this in no way influenced my opinions of the class experience. All opinions expressed in this review are purely my own.

Classic Peach Pie Recipe

Peach Pie
Classic Peach Pie

One of the things I most look forward to in summer is all the fresh produce. I especially love all the seasonal fruits and berries because they make grand pies and pastry making is one of my favorite baking activities.  In August, we eagerly await the wonderful peaches that come from the Niagara region – the baskets of large yellow/orange plump, juicy peaches. One of the first things I make with the fresh peaches is a Classic Peach Pie. Continue reading Classic Peach Pie Recipe

Feasting at The Table in New London, PEI

  At The Table Culinary Studio in New London, PEI
At The Table Culinary Studio in New London, PEI

One of the things most of us enjoy about travel is the opportunity to sample foods local to a region.  It’s part of the charm of a place and makes for great vacation memories.  At one time, vacationers went to a destination, did some sightseeing, took in some typical tourist attractions (amusement parks, museums, beaches, etc.), and ate at whatever restaurant they happened upon at meal time. Today’s travelers, generally speaking, are more interested in diversified travel experiences than they are simply going to a place so they can check it off their bucket list of places they have been.  Many seek out adventures that allow them to participate in activities, experience the uniqueness and authenticity of a place, mingle with the locals, and learn more about local foods and ways to prepare them.

Grilled PEI Oysters Topped With A Black Garlic Cream Sauce and Bacon Jam (at The Table Culinary Studio, New London, PEI)

One of the best ways to learn about a place and its culture is through its local food.  In fact, many travelers choose destinations based on the local food scene, food festivals and events, unique dining experiences, and opportunities to participate in culinary classes. Many, therefore, seek out experiences that allow them to connect more fully with a region and what better way to do that than through food, especially if it is experiential cuisine where you learn something about the foods you are eating.

I was recently a guest at the North Shore Surf and Turf Dinner at The Table Culinary Studio which hosts themed communal-style dinners featuring Prince Edward Island foods throughout the summer months.  Today, I am going to share my dining experience at The Table with you.

The Table Culinary Studio, New London, PEI

The Table Culinary Studio is the successor of Annie’s Table Culinary Studio which was started by Annie Leroux in 2012.  You can click here for my story on Annie’s Table Culinary Studio.  Current owner, Derrick Hoare (himself a trained chef), had been a long-time summer resident on PEI for many years, was retiring from his career in the health care profession, and was looking for his next adventure.  He contemplated buying a traditional restaurant in PEI but decided that was not his style.  When Annie’s Table became available for sale, Derrick liked the concept Annie had begun so he bought the business which he began operating in 2016. In addition to keeping the tradition of offering short culinary courses, he added themed evening dining to the menu and renamed the business to The Table Culinary Studio.

Derrick Hoare, Owner/Chef at The Table Culinary Studio, New London, PEI

Set in the small rural community of New London, not far from the resort municipality of Cavendish (the hometown of the fictional Anne of Green Gables – you may have heard of her!), you will find The Table on Route 8 or, as the locals would simply say, the Grahams Road.

At The Table Culinary Studio in New London, PEI

With a backdrop of green fertile rolling countryside, The Table is located in a repurposed former United Church that is tastefully furnished with quality antiques.  Several of the elements of the decommissioned church have been incorporated into the décor, including the pulpit that now occupies a prominent position overlooking the dining hall.

Interior of the re-purposed country church that is now The Table Culinary Studio
Interior of the Re-purposed Country Church that is now The Table Culinary Studio

The entire venue is open concept so diners can watch the culinary team prepare the meal.  This unique dining experience will make you feel like you are more at an intimate dinner party with a private chef catering than at a restaurant.

People sitting at table watching chef at work in open concept kitchen
At The Table Culinary Studio, New London, PEI

Open seasonally, seven nights a week, for themed dinners that feature local Island foods that come from the land and the sea, The Table can accommodate up to 18 guests an evening, one seating only.  Tickets for the dinner must be reserved in advance  (by phone or email) and the menu for each evening is a set menu – you eat whatever is being prepared that night which takes the pressure off of studying a menu and trying to decide what to have. Drinks are at extra cost and are payable at the end of the evening along with the dinner.

The themed dinners range from the Traditional Island Feast to the Island Dinner Party to Isle and Fire to the North Shore Surf and Turf and all focus on fresh local foods harvested or fished nearby. Seating is at one long harvest table in the middle of the old church and food is served family style which is to say that the main meal, on large platters, arrives at the table and guests pass the platters around, serving themselves.  There are no individual tables.

At the Surf and Turf Dinner at The Table Culinary Studio in New London, PEI

It seems only fitting that communal dining would be the style of dining at The Table given that it is in a decommissioned church.  Communal dining dates back to biblical times – you know, the breaking of bread together.  The concept of individual tables for dining did not start until a long time after these origins.  Some may find it requires some stepping out of the comfort zone to attend a dinner with strangers all seated at the same table but, when you think about it, church and community potluck dinners have been around for ages and they are traditionally served at long communal tables where you don’t necessarily know the people seated around you.  We do a lot of cruising and have never requested a table for two in the ship’s dining room simply because we like to meet new people and inject some new conversation into meal times when traveling. So, sitting down to a meal alongside people I have not met before is quite comfortable and familiar for me. After all, the chances are that they are all food enthusiasts, too!

One of the lovely parts of this type of experiential dining is that you get to interact with those preparing the meal.  In contrast, if you go into a traditional style restaurant, you are seated, have limited contact with the wait staff, and most likely never see the chefs let alone have any direct contact with them.  At The Table, there are lots of opportunities to communicate directly with the owner/chef Derrick, executive chef Michael Bradley, oyster shucker George Dowdle, and The Table’s event planner, Christine Morgan. Together, this is the culinary team at The Table.

The Table benefits from having a talented and enthusiastic young chef. With over ten years of experience in professional kitchens, Chef Michael Bradley is a graduate of the Culinary Institute of Canada in Charlottetown.  Chef Michael has been at The Table from the beginning, starting as an intern and working his way up to become the executive chef.

Outdoor Reception at the Surf and Turf Dinner at The Table Culinary Studio, New London, PEI

I truly felt like I was at someone’s private dinner party.  It was a perfect sunny summer evening as guests arrived for the event which started on the side lawn of the church.  When I arrived, local aquaculturalist, George Dowdle, was busy shucking oysters that he had fished from the nearby Southwest River only hours before the dinner.

Guests soon became preoccupied with consuming the fresh raw oysters which were served with a choice of three sauces:  Asian Thai, Lemon Herb, and Pomegranate Herb.  It wasn’t long before everyone felt comfortable and at home with each other as the conversations quickly turned to discussions about the food.

Freshly shucked oysters at The Table Culinary Studio, New London, PEI
Freshly Shucked Oysters at The Table Culinary Studio, New London, PEI
PEI Oysters on the Grill at The Table Culinary Studio, New London, PEI

Not quite into slurping raw oysters? Chef Michael also has a unique way of serving grilled oysters. He first puts the oysters on the open fire grill to warm them up, then shucks them and tops them with a black garlic cream sauce and bacon jam, then puts them back on the grill to re-heat them.  Simply sublime!

PEI Oysters hot off the grill and served with black garlic cream sauce and bacon jam
PEI Oysters Hot off the Grill and Served with Black Garlic Cream Sauce and Bacon Jam

While clams sometimes take a back seat in popularity to mussels and oysters, The Table includes them as part of the meal.

PEI Clams (at The Table Culinary Studio, New London, PEI)

When we had our fill of oysters, out came the cheese and charcuterie trays.

Cheese Tray at The Table Culinary Studio, New London, PEI

On this evening, The Table served their own homemade black garlic crackers alongside an assortment of cheeses from Ferme Isle St Jean in Rustico and Glasgow Glen Farm in New Glasgow. This was rounded out by pickled beets, pickled carrots, pickled spruce tips, and rhubarb chutney (all made in-house at The Table).

Condiments on the Charcuterie Tray at The Table Culinary Studio, New London, PEI

While guests were busy noshing on the appetizers, Chef Michael was preparing the sirloin tip roast with a black garlic espresso rub. Cooked over an open fire, you can only imagine how tantalizing the scent was!

Grilling the Sirloin Tip Beef Over an Open Fire at The Table Culinary Studio, New London, PEI

Then, Chef Michael demonstrated how they cook the mussels in a fire pit with seaweed and smoke. The mussels are placed in wet pillowcases which give the moisture the mussels need to open.

Placing bags of Mussels in the Fire Pit at The Table Culinary Studio, New London, PEI
Placing Bags of Mussels in the Fire Pit at The Table Culinary Studio, New London, PEI
Covering bags of PEI Mussels with Seaweed for Cooking in the Fire Pit at The Table Culinary Studio in New London, PEI
Covering Bags of PEI Mussels with Seaweed for Cooking in the Fire Pit at The Table Culinary Studio in New London, PEI
Fire Pit for Cooking Mussels at The Table Culinary Studio in New London, PEI

Guests leisurely made their way inside the church where the meal was served.  The big 12-foot long handmade harvest table occupies much of the space that once would have been filled with church pews.

The Table Culinary Studio, New London, PEI

By this time, guests were very comfortable in the company of each other and, since there were three Islanders present, the conversation soon turned to various aspects of how local foods are produced and farming and fishing, in general.  Food is such a commonality and ice breaker!

Dining at The Table Culinary Studio in New London, PEI

The meal began with a plated salad highlighted by the skirt steak from Atlantic Beef Products in Albany. The steak had been marinated in an onion garlic marinade.

Salad with skirt steak at The Table Culinary Studio in New London, PEI
Salad with Skirt Steak at The Table Culinary Studio in New London, PEI

The boards of housemade sourdough bread were served with a black garlic spread as well as honey butter.

Bread Board at The Table Culinary Studio in New London, PEI

Before each course was presented, Chef Michael came tableside to explain what the course consisted of and how it was prepared.

Executive Chef, Michael Bradley, at The Table Culinary Studio in New London, PEI

Next came huge platters of bountiful mixed seasonal vegetables with the fire-grilled sirloin tip roast.

Platters of Vegetables and Sirloin Tip Roast at The Table Culinary Studio, New London, PEI

The veggies (along with the salad greens) came from nearby Alexander Fresh Vegetables in Hope River. These were very attractively presented platters.

Platter of Vegetables and Sirloin Tip Roast at The Table Culinary Studio, New London, PEI

Then, the seafood platters arrived.  All those mussels that had been cooking in the fire pit emerged from the pillowcases and formed the base for lobster claws and tails.

Lobsters and Mussels at The Table Culinary Studio in New London, PEI

The lobster, fished from boats out of nearby French River Harbour, had been par-cooked with a garlic butter and then was finished on the grill outside.

The green sauce accompanying the mussels was a garden pesto cream sauce.

Lobster and Mussels at The Table Culinary Studio, New London, PEI

By this time, I was stuffed and thought I would just roll home but, wait, dessert was to come!  Dessert was a blood orange infused carrot cake with orange cream cheese icing. I didn’t get a photo of it because I was too busy enjoying the gluten-free option that was a deconstructed strawberry pie made with a strawberry balsamic reduction and gluten-free pastry lattice, all topped with lactose-free ice cream.

Gluten-Free Dessert at The Table Culinary Studio in New London, PEI.

The Table prides itself on using the best of what is fresh and local.  Most foods for their themed dinners come from under 10 km away and are farmed and fished by friends and neighbours. So, you know that when you dine at The Table, food will not have traveled thousands of miles before it has reached your plate. In fact, you can seek out the same food suppliers to purchase high quality local PEI products.

I asked Christine if they ever get families for their dinners.  She tells me, although 90% of their clientele are adults, parents are welcome to bring their children and they do often have families in attendance.  Patrons should note, however, that there is no children’s menu offered so the wee folk eat the same food as the adults.

What I have described above is the meal for the Surf and Turf dinner.  I inquired if the meal ingredients are identical for this particular dinner every night.  Christine informs me that the appetizers, vegetables, and dessert do vary by what is seasonally available.  So, if you are having the Surf and Turf dinner at The Table after having read this post, you’ll be aware that the meal ingredients may not be 100% identical to what I enjoyed in early July.

So, if you want to really immerse yourself in local PEI foods and have a totally relaxing evening in the beautiful countryside of Prince Edward Island while feasting on carefully prepared dishes in a unique setting, you should check out The Table Culinary Studio. If you have dietary restrictions, be sure to advise of that when making your reservation and, to the extent possible, the culinary team at The Table will do all they can to accommodate special dietary needs.

For more information on dining options at The Table, and to make reservations, check out their website at http://www.thetablepei.ca/dining .

Pin Me to Pinterest!

Dinner at The Table Culinary Studio in New London, PEI

My thanks to The Table Culinary Studio for the opportunity to experience their North Shore Surf and Turf Dinner and for the fine hospitality. My dinner at the The Table Culinary Studio was complimentary for the purpose of conducting a review of the North Shore Surf and Turf dinner. However, this in no way influenced my opinions of the dinner experience. All opinions expressed in this review are purely my own.

Old-fashioned Rhubarb Pudding Cake

Rhubarb Pudding Cake
Old-fashioned Rhubarb Pudding Cake

Today, I am sharing my recipe for a real old-fashioned type of dessert – Rhubarb Pudding Cake. The cake is “self-saucing” which means that the delectable sauce forms underneath the simple cake batter as the cake bakes. It’s an “all-in-one” pudding and cake! It may not be the most extravagant looking dessert but it sure is mighty tasty! If you are a rhubarb lover, you will love this dessert. Continue reading Old-fashioned Rhubarb Pudding Cake

Deli-style Gluten-Free Rhubarb Granola Muffins

I love the produce our garden generates and its earliest treat is rhubarb.  It is so versatile and I make lots of recipes using rhubarb.  Today, a treat for my gluten-free diet followers — a new recipe for Deli-style Gluten-free Rhubarb Granola Muffins. Continue reading Deli-style Gluten-Free Rhubarb Granola Muffins

Island Summer Blush Cocktail

Island Summer Blush Cocktail

My newly-created Island Summer Blush Cocktail is packed full of flavours that speak of springtime and early summer — rhubarb, lime, clementine, elderflower liqueur, and fizzy Prosecco.

Island Summer Blush Cocktail

One of the key ingredients in this drink is my homemade rhubarb cordial.  I have been making this cordial for many years and I continually find new ways to use it.  We have a good-sized patch of rhubarb and, each spring, I make batches of this cordial and, what I don’t use at the time, I freeze for use at other times of the year.  Click here for my rhubarb cordial recipe.

Rhubarb Cordial
Rhubarb Cordial

My choice of elderflower liqueur was inspired by the royal wedding of Prince Harry and Meghan Markle on May 19, 2018. Prior to the wedding, it was announced that the flavours of the wedding cake would be lemon and elderflower.  I combined those two flavours and developed my own recipe for a lemon and elderflower cake, the recipe for which you can find by clicking here. I then thought I would create a cocktail, using elderflower liqueur, to commemorate the royal event and thus was born the Island Summer Blush Cocktail.

Island Summer Blush Cocktail

Elderflower liqueur is made with the delicate starry white elderflower blossoms. It has complex notes and a somewhat seductive fragrance.  I would describe this liqueur as a layered fusion of floral, tropical, and citrus notes. It certainly has exotic character and  reminds me of a floral summer bouquet with fruity notes.  Its light, floral profile makes it a great match for sharper flavours like rhubarb and citrus fruits. It marries well with sparkling wines and lends itself to a multitude of cocktail concoctions.

Island Summer Blush Cocktail

This cocktail is easy to make. Simply combine the rhubarb cordial (no substitutes), clementine and lime juices, and elderflower liqueur in a cocktail shaker. Fill the shaker with ice cubes then shake the mixture for 15-20 seconds or until condensation forms on the outside of the shaker indicating the mixture is super cold.  Strain the mixture into your fancy glass of choice then add the Prosecco.  Carefully tilt the glass slightly and slowly pour in the grenadine along the side of the glass. The grenadine should sink to the bottom of the glass giving the cocktail that lovely layered look.  Garnish with a wedge of clementine.

Island Summer Blush Cocktail

The beautiful natural color of this cocktail reminds me of a blushing bride so, made with my Island rhubarb, flavoured with the elderflower flavour made trendy by the 2018 royal wedding, this is my Island Summer Blush Cocktail.  A perfect spring and summer cocktail to leisurely enjoy.

Island Summer Blush Cocktail

[Printable recipe follows at end of posting]

Island Summer Blush Cocktail

Ingredients:

1.5 oz Rhubarb Cordial
1 oz freshly squeezed clementine juice (about 2 clementines)
½ oz Elderflower Liqueur
1 tsp freshly squeezed lime juice
2 oz Prosecco
2 tsp Grenadine

Method:

Pour Rhubarb Cordial, clementine juice, Elderflower Liqueur, and lime juice into shaker and fill with ice cubes.  Shake for about 15-20 seconds then strain into glass.  Top with Prosecco.  Tip glass slightly and slowly pour Grenadine in down the side of the glass.  Garnish with a clementine wedge. Serve immediately.

Serves:  1

Island Summer Blush Cocktail

This Island Summer Blush Cocktail is a beautiful balance of sharp and sweet flavours. With a blend of rhubarb cordial, elderflower liqueur, citrus fruit juices, grenadine, and Prosecco, this is a lovely cocktail to especially enjoy in summer.

Course Drinks
Cuisine American
Servings 1
My Island Bistro Kitchen My Island Bistro Kitchen

Ingredients

  • 1.5 oz Rhubarb Cordial
  • 1 oz freshly squeezed clementine juice (about 2 clementines)
  • ½ oz Elderflower Liqueur
  • 1 tsp freshly squeezed lime juice
  • 2 oz Prosecco
  • 2 tsp Grenadine

Instructions

  1. Pour Rhubarb Cordial, clementine juice, Elderflower Liqueur, and lime juice into shaker and fill with ice cubes. Shake for about 15-20 seconds then strain into glass. Top with Prosecco. Tip glass slightly and slowly pour Grenadine in down the side of the glass. Garnish with a clementine wedge. Serve immediately.

Recipe Notes


For my recipe for Rhubarb Cordial, follow this link: https://myislandbistrokitchen.com/2013/06/24/rhubarb-cordial/


Pin Me to Pinterest!

Island Summer Blush Cocktail

Lemon Elderflower Cake Recipe

Lemon Elderflower Cake

The inspiration for this springtime Lemon Elderflower Cake was drawn from the announcement of the lemon and elderflower flavours for the May 2018 wedding cake of Prince Harry and Meghan Markle. I suspect, after this wedding, that elderflower will be the trendy new flavour for many recipes – either of the eating or drinking kind.

When I had the idea to make this cake, I questioned whether I could find elderflower liqueur (which is what I wanted to use) anywhere on PEI.  However, a visit to a local liquor store revealed that they had had numerous requests to bring in elderflower liqueur in the past couple of months to the point that they decided to carry it to see if it was a product that would sell.  I am told the bottles of St. Germain Elderflower Liqueur from France are selling well. I suspect people are curious about the flavour of elderflower, especially after it was announced as one of the flavours for the royal wedding cake.

Elderflower liqueur, made with the starry white elderflower blossoms, is rather difficult to describe. It has a somewhat seductive fragrance that I would describe as a layered fusion of floral and citrus notes perhaps from the lemon and grapefruit family. I think I can also detect hints of summer fruits like pears and peaches. It certainly has exotic character and would remind me of a floral summer bouquet with notes of fruit.

Lemon Elderberry Cake

Nothing says springtime more than a lemon cake. I have blended freshly squeezed lemon juice with the flavour of elderflower liqueur to layer some flavour into a basic white cake and transform it into a tasty homemade Lemon Elderflower Cake. This is a true old-fashioned homemade cake that has a dense texture and moist crumb.

Lemon Elderflower Cake

I have chosen to fill the cake layers with decadent lemon curd. I make this curd regularly and it makes a dandy cake filling.  For the icing, I have taken my standard buttercream recipe and flavoured it with the elderflower liqueur to tie the flavour of the icing and cake together.

Lemon Elderberry Cake
Lemon Elderberry Cake filled with lemon curd and smothered in elderberry-flavoured buttercream icing

This batter is sufficient for either two standard layer cake pans, either 8” or 9” in diameter.  However, for the cake in the photos, I used 6” round pans and layered three of them together.  The recipe will yield four 6” cakes but four is too high for the cake to cut easily and stay together well enough to plate attractively.  Save the fourth cake for a future use – it is divinely lovely served with crushed strawberries, ice cream, and a dollop of whipped cream. Just sayin’!   What follows is the method for a three-tier 6” cake.  If you choose to make the cake in either 8” or 9” round pans, just be aware that the baking times may need to be adjusted slightly from what the recipe indicates for the 6” cakes. With variances in ovens, I always recommend checking the cakes for doneness five minutes before the recipe indicates the cakes should be baked then checking them every five minutes thereafter until a cake tester inserted into the center of the cakes comes out clean – the true indicator that the cakes are baked.

I chose not to color the batter yellow with gel food coloring.  I purposely left the cake white because I wanted the bright yellow lemon curd to stand out between the layers of the cake.  If, however, it takes a yellow color to make the cake look like a lemon cake for you, by all means, add small amounts of yellow gel food coloring until you get the desired intensity of color.

Lemon Elderberry Cake

I am a huge proponent of the insulated baking strips placed around the cake pans to keep the cakes from baking unevenly and forming a dome as they bake. These strips come under various brand names. Mine are from Wilton and I swear by them.  Simply soak them in water for a few minutes then squeeze out the water and wrap a strip around each cake pan just before it goes in the oven.  I find the cakes bake much more evenly and there is less waste when it comes to leveling the cakes to prepare them for stacking together to form a tiered cake.  Some small amount of leveling is likely still going to be necessary but not nearly as much as baking the cakes without the insulated strips.

It was not so long ago that all the rage in cake decorating was the use of fondant.  Every one was anxious for the satiny smooth perfect finish.  Then, the naked cake appeared on the scene and it had very little icing, giving a more rustic and casual look to a cake.  While the naked cakes are still popular, particularly for folks who don’t want a lot of sugar icing, the current trend (at time of writing) is that tasty old-fashioned buttercream icing is back in style and piled on the cake in no particular fashion. This is great for people who are not particularly skilled with cake decorating because it is perfectly acceptable to have imperfections and uneven spreading of the icing. It’s meant to look homemade and casual.

When filling a cake with lemon curd or jam, it is advisable to pipe a ring of icing all around each layer of cake before adding the filling.  This will create a dam to prevent the filling from seeping through the icing on the side of the cake.  Pipe the icing ring about ½ inch in from the cake edge then spread the filling inside the dam.

Lemon Elderflower Cake

I also strongly recommend crumb coating the cake with a thin layer of the icing and then placing it in the refrigerator for 25-30 minutes to set.  This will seal the cake and make the final layer of icing crumb- free.

Fresh Freesia, Wax Flowers, and Italian Ruscus Adorn the top of Lemon Elderberry Cake

In keeping with a spring theme, I chose to decorate this cake with fresh bright yellow-colored freesia, some small wax flowers, and some Italian ruscus.

Yellow Freesia, Pink Wax Flowers, and Italian Ruscus Cake Topper for Lemon Elderberry Cake

[Printable recipe follows at end of posting]

Lemon Elderflower Cake

Ingredients:

¾ cup butter, room temperature
1¾ cups + 1 tbsp granulated sugar
2 large eggs, room temperature
4 large egg whites, room temperature
¼ cup freshly squeezed lemon juice, strained
1 tbsp finely grated lemon rind
1 tsp vanilla

3 cups cake flour
4 tsp baking powder
½ tsp baking soda
½ tsp salt

¾ cup + 2 tbsp milk
2 tbsp Elderflower liqueur

Icing:
¾ cup butter, room temperature
¾ cup shortening, room temperature
¾ tsp almond flavouring
¾ tsp vanilla
2 tbsp water
3 tbsp Elderflower Liqueur
1½ lbs icing sugar, sifted
Dash of salt (optional)

½ – 2/3 cup Lemon Curd

Method:

Cake:  Preheat oven to 350°F.  Line four 6”x2” pans with parchment circles on the bottoms and line the sides of each pan with a long continuous strip of parchment paper. Spray pans lightly with cooking spray to hold the parchment in place. Spray parchment-lined pans lightly with cooking spray.

In bowl of stand mixer fitted with paddle attachment, cream butter then slowly add the sugar.  Beat until mixture is light and fluffy.  Add the whole eggs, one at a time, beating well after each addition.  Repeat with the egg whites, adding one at a time.  Add the lemon juice, grated lemon rind, and vanilla. Beat well.

Sift the cake flour, baking powder, baking soda, and salt together.  In a one-cup measuring cup, combine the milk and Elderflower Liqueur.  Add the dry ingredients to the creamed butter-sugar mixture alternately with the liquid ingredients in three additions, starting and ending with the dry ingredients, and beating well after each addition.  Beat one additional minute on medium speed.

Transfer batter equally among the pans and bake for approximately 30-35 minutes, or until cake tester inserted into center of cakes comes out clean. It is recommended to check cakes the first time around the 25-minute baking point, then check them every five minutes until they test done. Cool cakes on wire cake racks for 10 minutes before removing from pans. Cool completely before frosting cakes.

Icing:  In bowl of stand mixer fitted with paddle attachment, cream the butter and shortening together until blended and creamy.  Beat in the almond flavouring, vanilla, water, and liqueur.  Gradually add the icing sugar, a cup at a time, beating well after each addition.

Assembly:  Use three of the four cakes.  Reserve fourth for another use. Level each cake to the same height.  Brush off loose crumbs from each cake. Place one cake on cake plate or cake stand.  Spoon about ¾ cup icing into icing bag fitted with round tip.  Pipe a circle of icing around cake edge, about ½“ in from the outside edge, to form a dam.  Spoon lemon curd inside the dam.  Place second layer of cake over filling and repeat with icing circle and lemon curd filling.  Crumb coat the cake with a thin layer of the icing (this will look messy and that’s okay).  Place cake in refrigerator to set for 25-30 minutes then remove and ice the cake with a thicker layer of icing.  Decorate as desired.  Refrigerate until use. (Freeze any leftover icing for a future use.)

Yield:  One 3-layer 6” cake (or one  8” or 9”  2-layer cake)

Note:  The baking times given are for the 6” cakes.  This cake may be made in two 8” or 9” round pans; however, baking times may need to be adjusted.

Lemon Elderflower Cake

Made with real lemon and a hint of elderberry liqueur, this Lemon Elderberry Cake is deliciously moist with its lemon curd filling and elderberry-flavoured buttercream icing.

Course Dessert
Cuisine American
Servings 10
My Island Bistro Kitchen My Island Bistro Kitchen

Ingredients

Cake:

  • ¾ cup butter room temperature
  • cups + 1 tbsp granulated sugar
  • 2 large eggs room temperature
  • 4 large egg whites room temperature
  • ¼ cup freshly squeezed lemon juice strained
  • 1 tbsp finely grated lemon rind
  • 1 tsp vanilla
  • 3 cups cake flour
  • 4 tsp baking powder
  • ½ tsp baking soda
  • ½ tsp salt
  • ¾ cup + 2 tbsp milk
  • 2 tbsp Elderflower Liqueur

Icing:

  • ¾ cup butter room temperature
  • ¾ cup shortening room temperature
  • ¾ tsp almond flavouring
  • ¾ tsp vanilla
  • 2 tbsp water
  • 3 tbsp Elderflower Liqueur
  • lbs icing sugar sifted
  • Dash of salt optional
  • ½ - 2/3 cup Lemon Curd

Instructions

Cake:

  1. Preheat oven to 350°F. Line four 6”x2” pans with parchment circles on the bottoms and line the sides of each pan with a long continuous strip of parchment paper. Spray pans lightly with cooking spray to hold the parchment in place. Spray parchment-lined pans lightly with cooking spray.
  2. In bowl of stand mixer fitted with paddle attachment, cream butter then slowly add the sugar. Beat until mixture is light and fluffy. Add the whole eggs, one at a time, beating well after each addition. Repeat with the egg whites, adding one at a time. Add the lemon juice, grated lemon rind, and vanilla. Beat well.
  3. Sift the cake flour, baking powder, baking soda, and salt together. In a one-cup measuring cup, combine the milk and Elderflower Liqueur. Add the dry ingredients to the creamed butter-sugar mixture alternately with the liquid ingredients in three additions, starting and ending with the dry ingredients, and beating well after each addition. Beat one additional minute on medium speed.

  4. Transfer batter equally among the pans and bake for approximately 30-35 minutes, or until cake tester inserted into center of cakes comes out clean. It is recommended to check cakes the first time around the 25-minute baking point, then check them every five minutes until they test done. Cool cakes on wire cake racks for 10 minutes before removing from pans. Cool completely before frosting cakes.

Icing:

  1. In bowl of stand mixer fitted with paddle attachment, cream the butter and shortening together until blended and creamy. Beat in the almond flavouring, vanilla, water, and liqueur. Gradually add the icing sugar, a cup at a time, beating well after each addition.

Assembly:

  1. Use three of the four cakes. Reserve fourth for another use. Level each cake to the same height. Brush off loose crumbs from each cake. Place one cake on cake plate or cake stand. Spoon about ¾ cup icing into icing bag fitted with round tip. Pipe a circle of icing around cake edge, about ½“ in from the outside edge, to form a dam. Spoon lemon curd inside the dam. Place second layer of cake over filling and repeat with icing circle and lemon curd filling. Crumb coat the cake with a thin layer of the icing (this will look messy and that’s okay). Place cake in refrigerator to set for 25-30 minutes then remove and ice the cake with a thicker layer of icing. Decorate as desired. Refrigerate until use. (Freeze any leftover icing for a future use.)

Recipe Notes

Note: The baking times given are for the 6” cakes. This cake may be made in two 8” or 9” round pans; however, baking times may need to be adjusted.


Pin Me to Pinterest!

Lemon Elderflower Cake

Chicken and Mushroom Vol-au-vent Recipe

Creamed Chicken
Chicken and Mushroom Vol-au-vent

One of my favorite recipes is Chicken and Mushroom Vol-au-vent. Some may know this as “creamed chicken”.  I actually make up a large batch of this delectable dish and freeze it in serving-sized portions.  It makes a quick and easy meal when all that has to be done is bake the frozen patty shells, heat up the creamed mixture, and toss a green salad. Continue reading Chicken and Mushroom Vol-au-vent Recipe

Chocolate Biscuit Cake

If you are a chocolate lover, this Chocolate Biscuit Cake is for you!  What’s not to love about cookies and chocolate bar chunks encased in a rich ganache then smothered with a decadent chocolate ganache glaze!

Biscuit Cake
Chocolate Biscuit Cake


I am giving alternate instructions for making a gluten-free version of the cake and want to point out, at the offset, if you are making the gluten-free version, ensure that all ingredients called for in the recipe (not just the cookies and chocolate bars) are, in fact, gluten free.

The Chocolate Biscuit Cake is said to be a favorite teatime treat of Her Majesty Queen Elizabeth II. It’s also said to be a favorite of Prince William who chose it as his groom’s cake at his April 2011 wedding to Katherine Middleton.  There are many versions and recipes for this cake which is sometimes referred to as “refrigerator cake” because it is a no-bake cake that is set by refrigeration.


Biscuit Cake
Chocolate Biscuit Cake

Traditionally, the cake is made with biscuits (the British term for what is known as “cookies” in North America). The sturdy, crisp Digestive cookies are the traditional ingredients. These would be found in the cookie aisles of the larger supermarkets, under brand names such as McVities, Christie, and others. The label on the package will say “Digestives”. The Digestives are very plain-flavored and thin.

Digestive Biscuits
McVitie’s Digestive Biscuits

Sometimes, rich tea biscuits may also be added to the cake and they will be labeled as “Rich Tea Biscuits”. They are similar to the Digestives, just a little bit sweeter.

Rich Tea Biscuits
McVitie’s Rich Tea Biscuits

I wanted to make my version of the Chocolate Biscuit Cake gluten free and could not find any gluten-free commercially-made Digestive cookies locally.  So, I improvised, knowing I’d need a “sturdy” cookie that would not become soggy or break apart in the cake as the warm ganache was added. I took my gluten-free Snickerdoodle recipe (click here for that recipe), halved it, using a medium egg instead of the extra-large egg the recipe calls for, omitted the nutmeg and cardamom, and did not roll the cookies in the spice-sugar mixture.  I made the cookies the night before making the cake, baked them an extra 2 minutes to crisp them up, and left them on the counter overnight. This resulted in a hard, crisp, sturdy cookie that could hold its own in the cake. I weighed out the cookies to get 8 oz and it took 13 of the Snickerdoodles which were made the size indicated in my recipe.

Cookies
Gluten Free Snickerdoodle Cookies

It’s really important to use crisp, not soft and chewy, cookies in this recipe as the cookies have to be able to stand up to being tossed with the chocolate ganache and packed into the pan without being broken into unrecognizable crumbs or becoming soggy.  They are meant to give a crunchy texture to the cake. Break up the cookies by hand, not by food processor, into bite-sized chunks. Using a food processor will chop them up too fine and result in crumbs.  You want to see actual chunks of cookies (er, biscuits!) in the cake. The photo below shows the size of the cookie chunks I used in the cake.


Chopped Cookies for Biscuit Cake

The photo below demonstrates how the cookies and chocolate bar chunks are visible in the finished cake.

Biscuit Cake
Chocolate Biscuit Cake

I used crisp and crunchy Butterfinger chocolate bars in the recipe instead of using all cookies for the ingredients.  I chose the Butterfinger bars because their label said they were gluten-free and also because I really like this bar and it is crunchy enough to remain intact in the cake. This added extra flavour and crunch and made the cake just a bit more interesting. If, however, you wish not to add chocolate bars to the cake, simply replace the 6 oz called for with that weight of additional cookies, either more Digestives or some Rich Tea Biscuits (or, for the gluten-free version, more gluten-free Snickerdoodles).

A good quality dark chocolate is needed for this recipe because it is a huge ingredient in the cake and ganache glaze and you really taste the properties of the chocolate in the ganache – don’t compromise on this ingredient.  If you are making a gluten-free version of the cake, be sure to check the package label on the chocolate to ensure that it contains no trace of wheat because, as I discovered, some packages do say the chocolate contains, may contain, or may have been in contact with wheat.

Biscuit Cake
Chocolate Biscuit Cake

Biscuit Cake is traditionally made with golden syrup which I could not source locally so I substituted amber corn syrup with success.  I also added one medium-sized egg as a binder for the ingredients. Not all Biscuit Cakes call for an egg as an ingredient but I think it adds to, and helps stabilize, the texture of the ganache in the cake.

Adding the chocolate liqueur is optional but it really does add a dimension of deeper flavour.  If you’re going to have an extravagant “death by chocolate” cake experience, you might as well go all the way!

Chocolate Biscuit Cake

Some Biscuit Cake recipes call for additional ingredients like raisins, nuts, and dried fruit. I don’t add those to my cake because, to me, that’s taking away from a Biscuit Cake and moving it more to a non-baked fruit cake. And, I don’t think the cake needs these ingredients – this, of course, is a personal preference.

The easiest pan to use for this recipe is the 6” round springform pan (3” deep) because it makes it so easy to unmold the cake. Line the bottom and sides of the pan with parchment paper to facilitate the removal of the cake from the pan.  I recommend using a separate circle of parchment for the pan bottom and one long continuous strip of parchment to go around the sides of the pan. This is recommended over simply cutting a large piece of parchment paper and squashing it into the pan which will result in uneven nooks, crannies, and wrinkles into which the batter can escape. This will cause the cake to have an uneven appearance when unmolded.

If you don’t have a small springform pan, other pans (e.g., a non-springform 6” round pan (3” deep) or a 6”x9”x3″ loaf pan) can be used.  However, the pan will need to be lined such that the liner gives “handles” with which to lift the cake from the pan since the sides of the pan will not spring open for easy removal. For example, you might line the pan with plastic wrap, leaving enough excess that it could be used to lift the cake from the pan.  The cake mixture is likely to have cooled enough by this point that it is safe to pack it into a plastic wrap lined pan. However, if in doubt, I’d suggest lining the plastic wrapped pan with parchment paper so the cake is not in direct contact with the plastic wrap.


Chocolate Biscuit Cake

My preference, when preparing the chocolate ganache for the cake itself, is to use a double boiler or, if you don’t have one, a heatproof bowl over a pot of simmering water. I find this gives greater control and less risk of scorching the ingredients which could occur if heated over direct heat. It’s important to let this ganache cool for about 10 minutes before mixing it into the cookie and chocolate bar mixture because a really hot mixture will melt the chocolate on the Butterfinger bars thus losing that texture and it may cause even the most sturdy of cookies to become soggy. Cover the pan with plastic wrap secured with an elastic band. Refrigerate the cake for at least 3 hours to let it set, then unmold it to a serving plate.

The chocolate for the ganache glaze is chopped a bit finer than that needed for the ganache in the cake. The reason it needs to be a bit smaller is because the hot whipping cream mixture is used to melt the chocolate, off heat, and smaller pieces will melt easier and faster.  The chocolate does not, however, need to be chopped super fine for this. After the hot whipping cream has been poured over the chocolate and let stand for 3-5 minutes, give the mixture a good stir.  To make the ganache silky smooth, I recommend using a hand-held immersion blender. After letting the ganache sit for 12-15 minutes to cool slightly so it does not melt the cake, simply pour it over the top of the cake, letting the glaze run down the sides. Don’t worry about getting the ganache glaze perfectly smooth on the sides – it’s not fondant and imperfections are perfectly fine on this cake! Using an offset spatula or a dinner knife, spread the ganache so it covers the top and sides of the cake. Refrigerate for at least an hour before cutting and serving the cake.

Serve this delectable cake with just the plain ganache glaze or decorate as desired.

Chocolate Biscuit Cake

While it may sound like a stretch to be able to get 12 servings from a 6” cake, this Chocolate Biscuit Cake is very rich so small pieces per serving will suffice!

Chocolate Biscuit Cake

What a delightful decadent treat!

Biscuit Cake
Chocolate Biscuit Cake

[Printable recipe follows at end of post]

Chocolate Biscuit Cake

Cake:
8 oz high quality dark chocolate, coarsely chopped
8 oz Digestive cookies (such as McVities) or, to make the cake gluten-free, 8 oz of My Island Bistro Kitchen’s Gluten-free Snickerdoodle cookies, broken into chunks by hand
6 oz Butterfinger Bars, broken or chopped into chunks

½ cup butter (no substitutes)
3 tbsp whipping cream (35%M.F.)
½ cup amber corn syrup
1 medium-sized egg, lightly beaten
2 tbsp chocolate liqueur (optional)

Chocolate Ganache Glaze:
6 oz dark chocolate, coarsely chopped
2/3 cup whipping cream (35%M.F.)
2 tbsp butter (no substitutes)
1½ tbsp chocolate liqueur (optional)

Method:
Cake:  Prepare 6” springform pan (3” deep) by lining bottom with a circle of parchment paper and lining the sides of the pan with a long continuous strip of parchment paper.

Coarsely chop the chocolate. Set aside.

In large, heatproof bowl, break up the cookies, by hand, into bite-sized chunks.  Do the same for the Butterfinger bars, using a knife, if necessary to break up the crisp bars. Gently toss the cookies and chocolate bars together.

On cooktop, in top of double boiler over simmering water, melt the butter.  When the butter is about half melted, whisk in the whipping cream, corn syrup, and slightly beaten egg.  Stir in the 8 oz of coarsely chopped chocolate until it is melted.  Remove from heat and stir in the chocolate liqueur.  Cool for approximately 10 minutes.

Pour the slightly cooled chocolate mixture over the broken cookies and chocolate bar chunks.  Stir gently until the mixture is coated with chocolate, trying not to further break up the cookies and bars.

Transfer mixture to the prepared pan and gently pack mixture into the pan.  Using an offset spatula, or a dinner knife, smooth the top of the cake as best possible.  Cover pan with plastic wrap secured with an elastic band. Refrigerate for at least 3 hours.

Prepare Chocolate Ganache Glaze as follows.

Chocolate Ganache Glaze: Chop the 6 oz dark chocolate into small chunks and place in a heatproof bowl.

In small, heavy-bottomed saucepan, over medium heat, bring the whipping cream and butter just to the boiling point, stirring to prevent scorching.  Pour the hot cream over the chocolate pieces, tilting and swirling the bowl to ensure all the chocolate is covered with the cream.  Add the chocolate liqueur.  Let stand 3-5 minutes to allow the hot cream to melt the chocolate. Stir. Using a hand-held immersion blender, blend the mixture just until all the chocolate is smooth and no chocolate chunks remain.

Let ganache stand for 12-15 minutes. Meanwhile, unmold cake and transfer to serving plate. Pour the slightly cooled ganache over the cake, letting the ganache drip down the sides.  Use an offset spatula, or knife, spread the ganache over top and sides of cake. Refrigerate for about an hour to set.

Serve cake plain or decorate as desired.

Yield:  Apx. 12 servings

Chocolate Biscuit Cake

A decadent no-bake cake that features crumbled biscuits (cookies) and chocolate bar chunks in a rich chocolate ganache
Course Dessert
Servings 12
My Island Bistro Kitchen My Island Bistro Kitchen

Ingredients

Cake:

  • 8 oz high quality dark chocolate coarsely chopped
  • 8 oz Digestive cookies such as McVities or, to make the cake gluten-free, 8 oz of My Island Bistro Kitchen’s Gluten-free Snickerdoodle cookies, broken into chunks by hand
  • 6 oz Butterfinger Bars broken or chopped into chunks
  • ½ cup butter no substitutes
  • 3 tbsp whipping cream 35%M.F.
  • ½ cup amber corn syrup
  • 1 medium-sized egg lightly beaten
  • 2 tbsp chocolate liqueur optional

Chocolate Ganache Glaze:

  • 6 oz dark chocolate coarsely chopped
  • 2/3 cup whipping cream 35%M.F.
  • 2 tbsp butter no substitutes
  • tbsp chocolate liqueur optional

Instructions

Cake:

  1. Prepare 6” springform pan (3” deep) by lining bottom with a circle of parchment paper and lining the sides of the pan with a long continuous strip of parchment paper.
  2. Coarsely chop the chocolate. Set aside.
  3. In large, heatproof bowl, break up the cookies, by hand, into bite-sized chunks. Do the same for the Butterfinger bars, using a knife, if necessary to break up the crisp bars. Gently toss the cookies and chocolate bars together.
  4. On cooktop, in top of double boiler over simmering water, melt the butter. When the butter is about half melted, whisk in the whipping cream, corn syrup, and slightly beaten egg. Stir in the 8 oz of coarsely chopped chocolate until it is melted. Remove from heat and stir in the chocolate liqueur. Cool for approximately 10 minutes.
  5. Pour the slightly cooled chocolate mixture over the broken cookies and chocolate bar chunks. Stir gently until the mixture is coated with chocolate, trying not to further break up the cookies and bars.
  6. Transfer mixture to the prepared pan and gently pack mixture into the pan. Using an offset spatula, or a dinner knife, smooth the top of the cake as best possible. Cover pan with plastic wrap secured with an elastic band. Refrigerate for at least 3 hours.
  7. Prepare Chocolate Ganache Glaze as follows.

Chocolate Ganache Glaze:

  1. Chop the 6 oz dark chocolate into small chunks and place in a heatproof bowl.
  2. In small, heavy-bottomed saucepan, over medium heat, bring the whipping cream and butter just to the boiling point, stirring to prevent scorching. Pour the hot cream over the chocolate pieces, tilting and swirling the bowl to ensure all the chocolate is covered with the cream. Add the chocolate liqueur. Let stand 3-5 minutes to allow the hot cream to melt the chocolate. Stir. Using a hand-held immersion blender, blend the mixture just until all the chocolate is smooth and no chocolate chunks remain.
  3. Let ganache stand for 12-15 minutes. Meanwhile, unmold cake and transfer to serving plate. Pour the slightly cooled ganache over the cake, letting the ganache drip down the sides. Use an offset spatula, or knife, spread the ganache over top and sides of cake. Refrigerate for about an hour to set.
  4. Serve cake plain or decorate as desired.

Recipe Notes

Be sure to read the accompanying blog post to this recipe as it gives hints and tips on making this Chocolate Biscuit Cake

Click this link for My Island Bistro Kitchen's GF Snickerdoodle Cookie recipe: Gluten Free Snickerdoodle Cookie Recipe

[Copyright My Island Bistro Kitchen]

If you have made this recipe and enjoyed it and/or wish to share it with your friends and family, please do so on social media but be sure to share the direct link to this posting from my website.

Connect with My Island Bistro Kitchen on Social Media

Join the Facebook page for My Island Bistro Kitchen:  https://www.facebook.com/MyIslandBistroKitchen/

Follow “the Bistro” on “X” (formerly Twitter)https://twitter.com/PEIBistro/

See the drool-worthy gallery of mouth-watering food photos from My Island Bistro Kitchen on Instagramhttps://www.instagram.com/peibistro/

Follow “the Bistro” on Pinterest at https://www.pinterest.ca/peibistro/ and pin the Pinterest-ready photo found at the end of this post to your favorite Pinterest boards.

PIN ME TO PINTEREST!
Chocolate Biscuit Cake


Biscuit Cake
Chocolate Biscuit Cake


Chocolate Biscuit Cake

Cherry Loaf Recipe

Cherry Loaf
Cherry Loaf

This Cherry Loaf recipe is as pretty as it is tasty, speckled with maraschino cherries that, themselves, lend great flavour to the loaf.

Quick breads, leavened with baking powder, and sometimes soda, are an easy alternative to muffins – but, they’re born of the same family!  They are quick to make (because there is no yeast involved) and are great additions to breakfast, brunch, and coffeebreaks.

There are two methods for making quick breads.

Creaming Method – This method calls for the solid fat product (shortening, butter, or margarine) to be softened at room temperature for 25-30 minutes (not microwaved which can change its properties and can cause it to quickly become liquefied). The fat is then beaten/creamed, either by hand if you are prepared to devote some elbow grease to the process, or by electric mixer on low speed. The sugar is then added and creamed with the fat product until the mixture is a pale or light colour and the texture is airy or fluffy. This “creaming’ process whips air into the batter which allows air pockets (or bubbles) to form (and expand during baking) that, in addition to leavening agents such as baking powder and soda, help the cake or loaf to rise.

The room temperature eggs are then added, one at a time.  Adding the eggs, with this technique, allows them time to, individually and slowly, mix in well with the creamed fat and sugar mixture and limit the possibility of them curdling.  The watery eggs and the fat product don’t naturally mix well, or bind, together (same principle as trying to mix water and oil together).  If all the eggs called for in the recipe are added all at once, they become more than what the fat-sugar mixture can handle at the same time and the ingredients separate and look curdled or scrambled. Adding the eggs slowly allows them to be better incorporated with the fat-sugar mixture.

With the creamed method, the liquid ingredients are combined together in one bowl or measuring cup and the dry ingredients are whisked together in a separate bowl.  The dry ingredients are added to the creamed mixture alternately with the wet ingredients, beginning and ending with the dry ingredients (three additions of dry to two additions of wet ingredients). While the stand mixer should be fitted with the paddle attachment for the creaming method, it’s important not to over-beat the batter once the flour and liquid ingredients have been added because that will cause gluten to form and a loaf with a tough crumb is likely to result. Beat only until all the ingredients are incorporated and the batter is smooth.

This method will yield a moist texture loaf with a fine crumb (lots of tiny holes of fairly uniform size), reminiscent of a  dense cake texture.

Cherry Loaf
Slice of Cherry Loaf

Muffin Method – This method calls for the dry ingredients to be whisked together well in one bowl.  All the liquid ingredients are mixed in a separate bowl with oil or a fat that has been liquefied (and, often, the sugar is mixed in with the liquid ingredients).  The liquid ingredients are then simply added to the dry ingredients and stirred together just until the ingredients are barely combined.

Because no creaming of butter and sugar is involved in this method, the loaf will not have the added advantage of the air pockets being formed by this process to help the loaf to rise. In this method, the loaf will rely solely on leavening agents (baking powder, soda) to rise. The batter will often be lumpy  which is okay (it will even out on its own during baking) and it’s important not to overmix the batter trying to get it smooth as this will activate the development of gluten that will result in a tough crumb.

For this method, stir the mixture by hand because an electric mixer will overmix the batter. This method will often yield a slightly drier texture (than the creaming method does) with a larger, coarser crumb in the loaf, closely resembling the texture of muffins, hence the name “muffin method”.

The muffin method is commonly used to mix up waffles and pancakes as well.

Cherry Loaf
Cherry Loaf

My recipe for Cherry Loaf uses the creamed method because I want a delicate, refined texture in this particular loaf.

Cherry Loaf
Cherry Loaf

All ingredients should be at room temperature for about 25-30 minutes before mixing the batter.  The ingredients blend better if they are at room temperature. If you think of nice soft butter or shortening being hit with cold eggs or milk, it’s obvious that the ingredients will simply clump together rather than blend in well. The result will be a loaf that does not have the best texture possible.

There is a choice of fat product in this loaf – either shortening, butter, or margarine will yield a good loaf.  Butter, however, will obviously give the most flavor 😉

This loaf calls for maraschino cherries.  These are the best option for this loaf because they are soft and beautifully bright colored.  Dried cherries are too chewy and coarse and will not create the lovely red-dotted speckles throughout the loaf.  Maraschino cherries, however, are wet and if they are not blotted dry, they will add too much excess moisture to the loaf.  I recommend blotting the cherries with a paper towel, cutting them, and blotting them again.  The idea is not to dry them out but, rather, to remove the excess moisture.

Cherry Loaf
Cherry Loaf

[Printable recipe follows at end of posting]

Cherry Loaf

Ingredients:

1/3 cup shortening, butter, or margarine
¾ cup granulated sugar
¼ cup brown sugar, lightly packed
2 large eggs, room temperature

2/3 cup milk, room temperature
1½ tbsp orange juice, room temperature
2½ tbsp maraschino cherry juice, room temperature
1 tsp vanilla
¼ tsp almond flavouring

2¼ cups all-purpose flour
2 tsp baking powder
¼ tsp baking soda
¼ tsp salt
¾ cup maraschino cherries, well-drained, blotted dry, and coarsely chopped

Method:

Bring shortening, butter, or margarine, eggs, milk, and orange and maraschino cherry juices to room temperature approximately 25-30 minutes before preparing batter.

Remove cherries from their juice and, using paper towel, blot them dry.  Cut up cherries and blot again on paper towel to remove the excess moisture. Set aside.

Preheat oven to 350°F.  Grease 9”x5”x3” loaf pan.

In 1-cup measuring cup, or small bowl, combine the milk, orange juice, cherry juice, vanilla, and almond flavouring. Stir to mix.

In medium-sized bowl, combine the flour, baking powder, baking soda, and salt. Whisk together well.

In bowl of stand mixer fitted with paddle attachment and on low speed, cream the shortening, butter, or margarine well.  Gradually add the granulated sugar, then the brown sugar.  Increase mixer speed to medium and beat until ingredients are pale-colored and mixture has an airy/fluffy texture. Stop mixer, as necessary, to scrape bowl with rubber spatula to ensure the ingredients are evenly incorporated.

Add the eggs, one at a time, beating well after each addition and using the spatula, as necessary, to scrape sides of bowl.

Add the flour mixture alternately with the milk mixture, starting and ending with the dry ingredients (three additions of dry ingredients with two additions of wet ingredients).  Periodically scrape sides of bowl with spatula to ensure all ingredients are combined. Do not overmix.

Remove bowl from mixer stand and stir in the cherries by hand, just until they are blended in.

Transfer batter to prepared pan and, using a knife, smooth the top of the loaf.  Bake for approximately 1 hour or until cake tester inserted into center of loaf comes out clean. If loaf starts to brown, it may be loosely tented with tin foil after about 45 minutes of baking; ensure loaf top is completely set before allowing the tin foil to touch it as it will peel off the top of the loaf. Let loaf rest in pan for 10 minutes then turn out on to wire rack to cool completely before cutting.

Yield:  One loaf, 14 slices (sliced approximately ½” thick)

Notes:  Loaf is best made the day before it is needed.  Let cool completely on wire rack then place in airtight plastic bag and store in refrigerator overnight to allow the flavours time to blend and the loaf to soften.  Loaf freezes well.

Cherry Loaf

This flavourful cherry loaf is an easy-to-make moist quick bread that is speckled with colorful maraschino cherries

Course Snack
Cuisine American
Servings 14
My Island Bistro Kitchen My Island Bistro Kitchen

Ingredients

  • 1/3 cup shortening, butter, or margarine
  • 3/4 cup granulated sugar
  • 1/4 cup brown sugar, lightly packed
  • 2 large eggs, room temperature
  • 2/3 cup milk, room temperature
  • 1 1/2 tbsp orange juice, room temperature
  • 2 1/2 tbsp maraschino cherry juice, room temperature
  • 1 tsp vanilla
  • 1/4 tsp almond flavouring
  • 2 1/4 cups all-purpose flour
  • 2 tsp baking powder
  • 1/4 tsp baking soda
  • 1/4 tsp salt
  • 3/4 cup maraschino cherries, well-drained, blotted dry, and coarsely chopped

Instructions

  1. Bring shortening, butter, or margarine, eggs, milk, and orange and maraschino cherry juices to room temperature approximately 25-30 minutes before preparing batter.
  2. Remove cherries from their juice and, using paper towel, blot them dry. Cut up cherries and blot again on paper towel to remove the excess moisture. Set aside.
  3. Preheat oven to 350°F. Grease 9”x5”x3” loaf pan.
  4. In 1-cup measuring cup, or small bowl, combine the milk, orange juice, cherry juice, vanilla, and almond flavouring. Stir to mix.
  5. In medium-sized bowl, combine the flour, baking powder, baking soda, and salt. Whisk together well.
  6. In bowl of stand mixer fitted with paddle attachment and on low speed, cream the shortening, butter, or margarine well. Gradually add the granulated sugar, then the brown sugar. Increase mixer speed to medium and beat until ingredients are pale-colored and mixture has an airy/fluffy texture. Stop mixer, as necessary, to scrape bowl with rubber spatula to ensure the ingredients are evenly incorporated.
  7. Add the eggs, one at a time, beating well after each addition and using the spatula, as necessary, to scrape sides of bowl.
  8. Add the flour mixture alternately with the milk mixture, starting and ending with the dry ingredients (three additions of dry ingredients with two additions of wet ingredients). Periodically scrape sides of bowl with spatula to ensure all ingredients are combined. Do not overmix.
  9. Remove bowl from mixer stand and stir in the cherries by hand, just until they are blended in.
  10. Transfer batter to prepared pan and, using a knife, smooth the top of the loaf. Bake for approximately 1 hour or until cake tester inserted into center of loaf comes out clean. If loaf starts to brown, it may be loosely tented with tin foil after about 45 minutes of baking; ensure loaf top is completely set before allowing the tin foil to touch it as it will peel off the top of the loaf. Let loaf rest in pan for 10 minutes then turn out on to wire rack to cool completely before cutting.

Recipe Notes

Notes: Loaf is best made the day before it is needed. Let cool completely on wire rack then place in airtight plastic bag and store in refrigerator overnight to allow the flavours time to blend and the loaf to soften. Loaf freezes well.


[Copyright My Island Bistro Kitchen]

For other quick bread recipes from My Island Bistro Kitchen, click on the links below:

Classic Banana Bread
Orange Date and Spice Loaf
Cranberry Orange Eggnog Loaf
Blueberry Quick Bread
Green Tomato Quick Bread
Strawberry Rhubarb Quick Bread
Cinnamon Sweet Bread
Glazed Lemon Pecan Sweet Bread

If you have made this recipe and enjoyed it and/or wish to share it with your friends and family, please do so on social media but be sure to share the direct link to this posting from my website.

Connect with My Island Bistro Kitchen on Social Media

Join the Facebook page for My Island Bistro Kitchen:  https://www.facebook.com/MyIslandBistroKitchen/

Follow “the Bistro” on “X” (formerly Twitter)https://twitter.com/PEIBistro/

See the drool-worthy gallery of mouth-watering food photos from My Island Bistro Kitchen on Instagramhttps://www.instagram.com/peibistro/

Follow “the Bistro” on Pinterest at https://www.pinterest.ca/peibistro/ and pin the Pinterest-ready photo found at the end of this post to your favorite Pinterest boards.

Pin Me To Pinterest!
Cherry Loaf
Cherry Loaf


(Mostly) PEI and Maritime Food – Good Food for a Good Life!