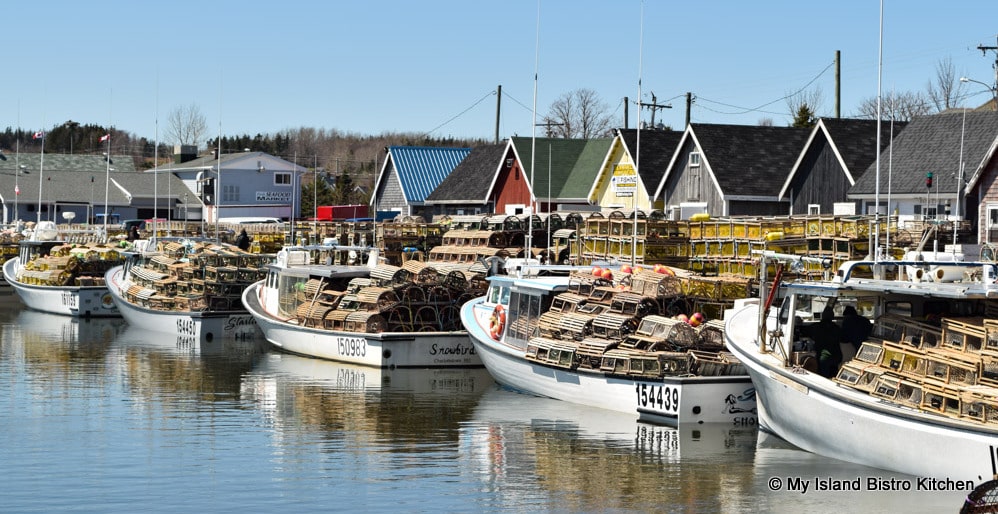
Living in PEI, we have access to fresh locally-fished lobster during the Island’s two lobster fishing seasons, commonly known as the spring and fall fisheries.
Lobster Fishing Boats Loaded with Traps for Setting Day, North Rustico, PEI
The first season begins in May and goes until the end of June. The second season runs from August to October.
Lobster Fishing Boat Loaded with Traps, French River, PEI
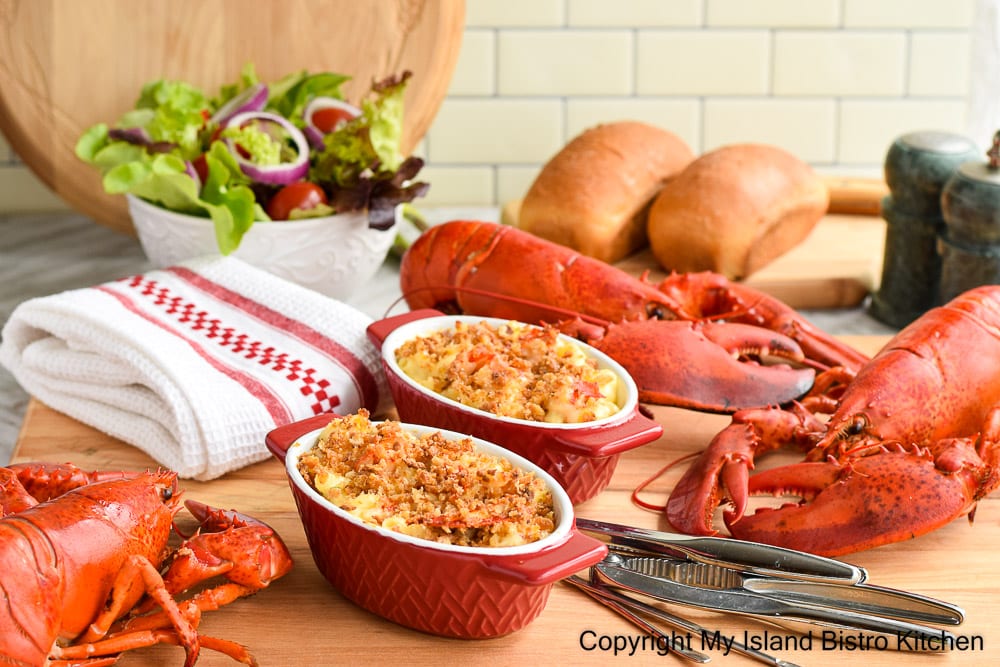
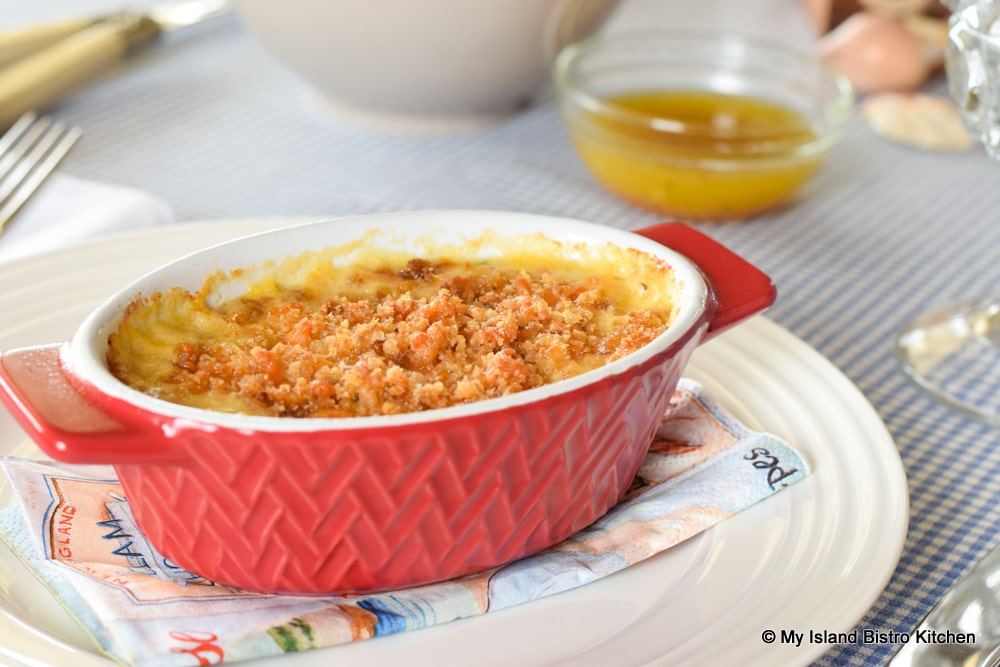
After a few good “feeds” of lobster straight from the shell, I am ready to incorporate lobster as an ingredient in other dishes such as in this tasty Lobster Macaroni and Cheese. This is not your usual weeknight Mac ‘n Cheese dish. Rather, I refer to it as a more extravagant grown-up version of an old family classic. Continue reading Lobster Macaroni and Cheese Recipe→
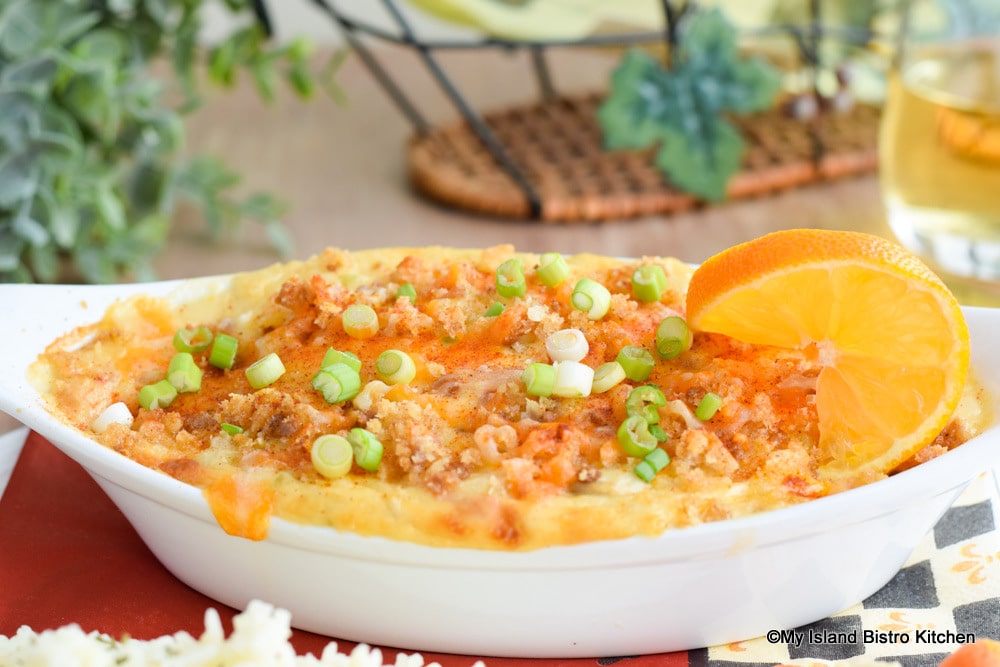
When you live on an Island where fishing is one of the main industries, it means you have access to wonderful fresh seafood. Yes, we are spoiled! Here in Prince Edward Island, where I reside, I make good use of seafood in my diet and in my recipe creations as I have done here with my Seafood Bubbly Bake. Continue reading My Island Bistro Kitchen’s Seafood Bubbly Bake→
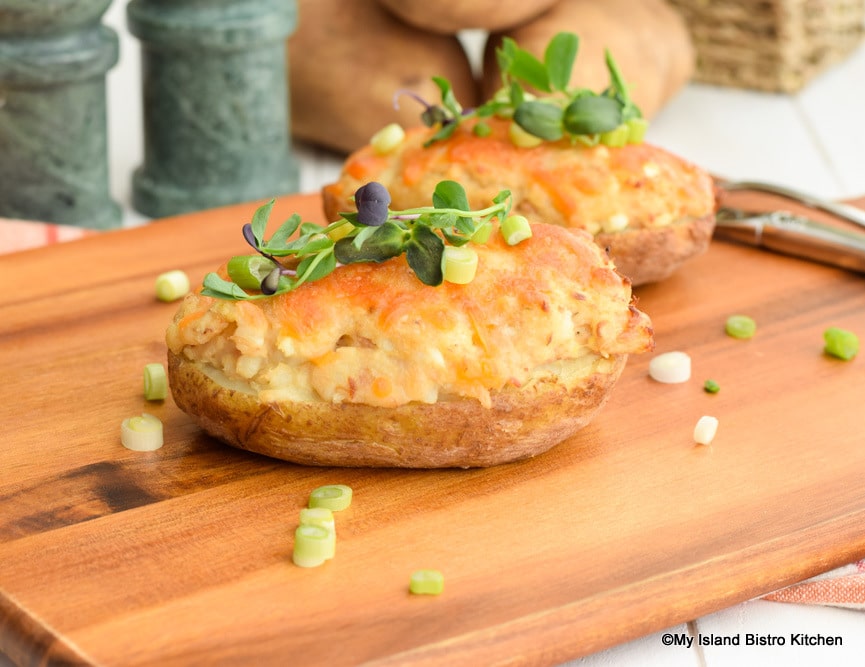
These tasty Tuna Stuffed Potatoes are the full meal deal. With a filling of potato, tuna, egg, and cheese, all encased in potato shells, these twice-baked potatoes make a great lunch all on their own. Continue reading Tuna Stuffed Potatoes Recipe→
At least once a week, I have fish. Haddock is a favorite and while I like it simply pan-fried in butter, sometimes I like to dress it up and, on those occasions, I make Baked Haddock au Gratin. Continue reading Baked Haddock au Gratin Recipe→
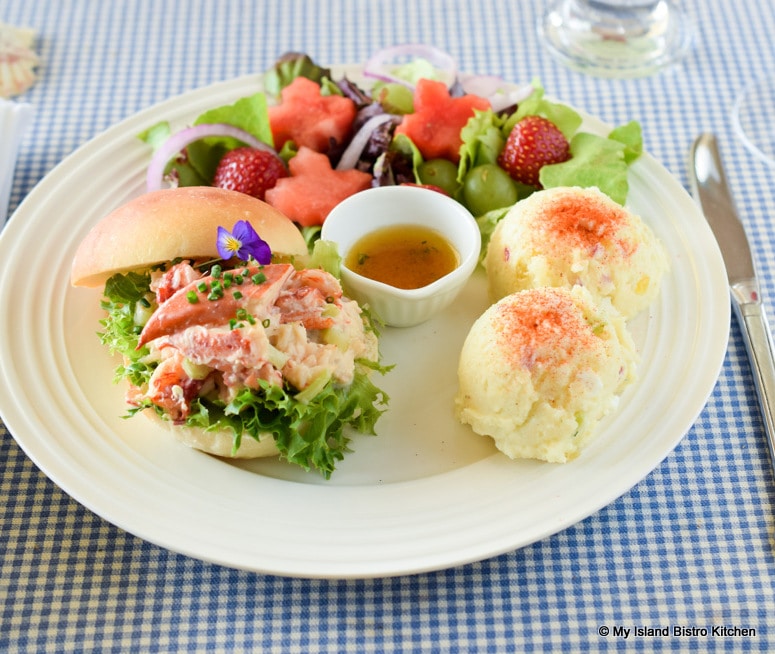
I am often asked for my recipe for lobster rolls and, I have to say, mine is fairly basic. I don’t mess with a good thing by adding any wonky or unusual ingredients. I want the lobster to be the star and nothing to interfere with it. I go with the basics – lobster meat, celery, lemon juice, Dijon mustard, salad dressing or mayonnaise, and salt and pepper. Sometimes, I will add a finely chopped green onion to the filling but that’s about it.
My cooking is sometimes inspired by my travels. Often, before traveling, I will do some research to find out what foods and dishes are local to the area so I know what dishes to try when visiting those places or what foods to look for to bring back as mementos of the visit. Continue reading Creamy Scallop Carbonara Recipe→
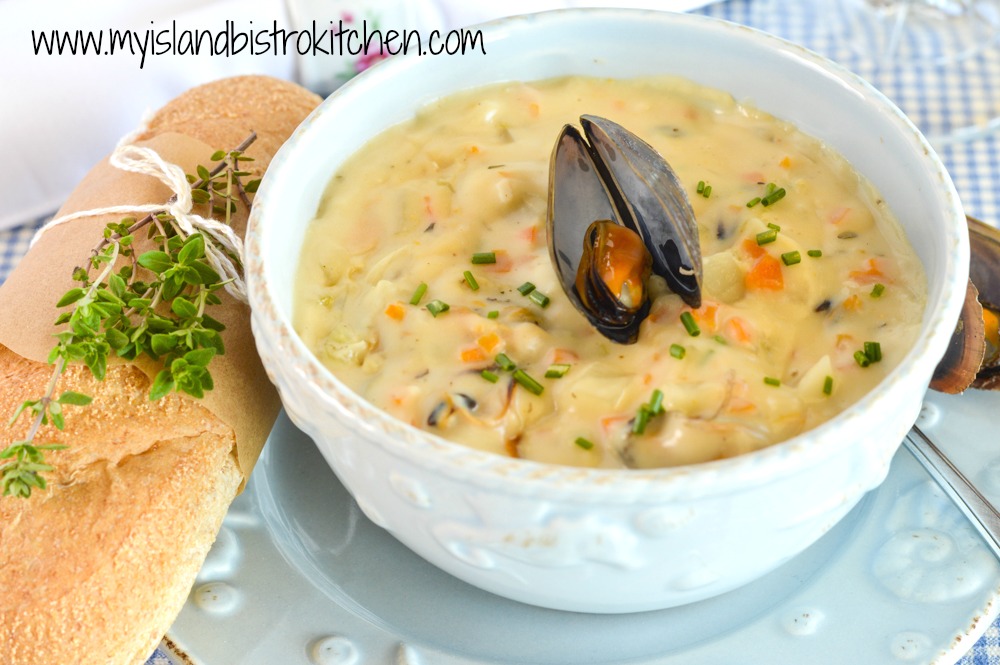
Mussels are a favorite shellfish of mine and, while I love them steamed in various different broths, today I am presenting them in the form of Mussel Chowder and I’m sharing my own personal recipe. Continue reading My Island Bistro Kitchen’s PEI Mussel Chowder→
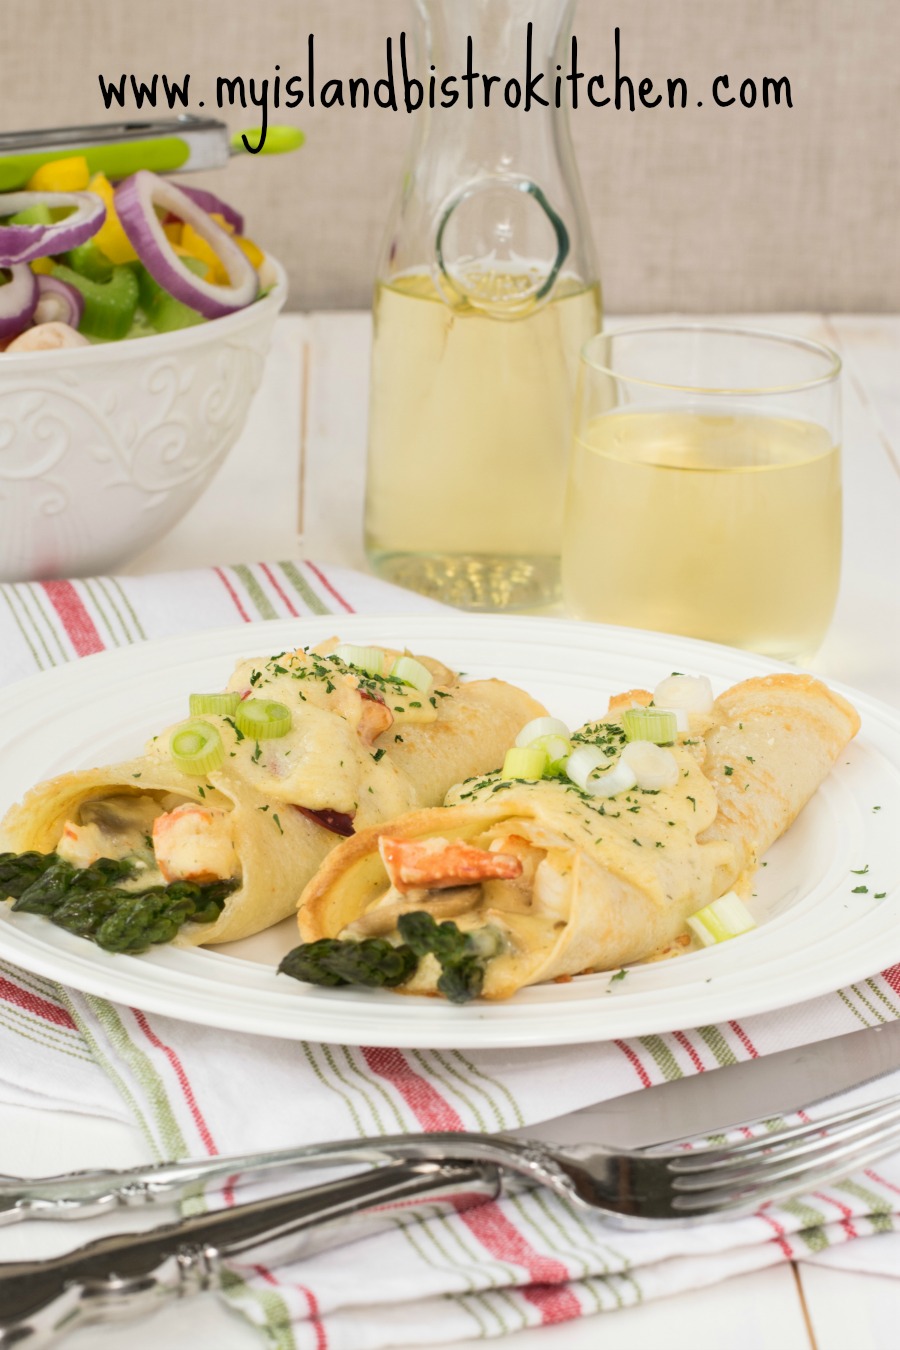
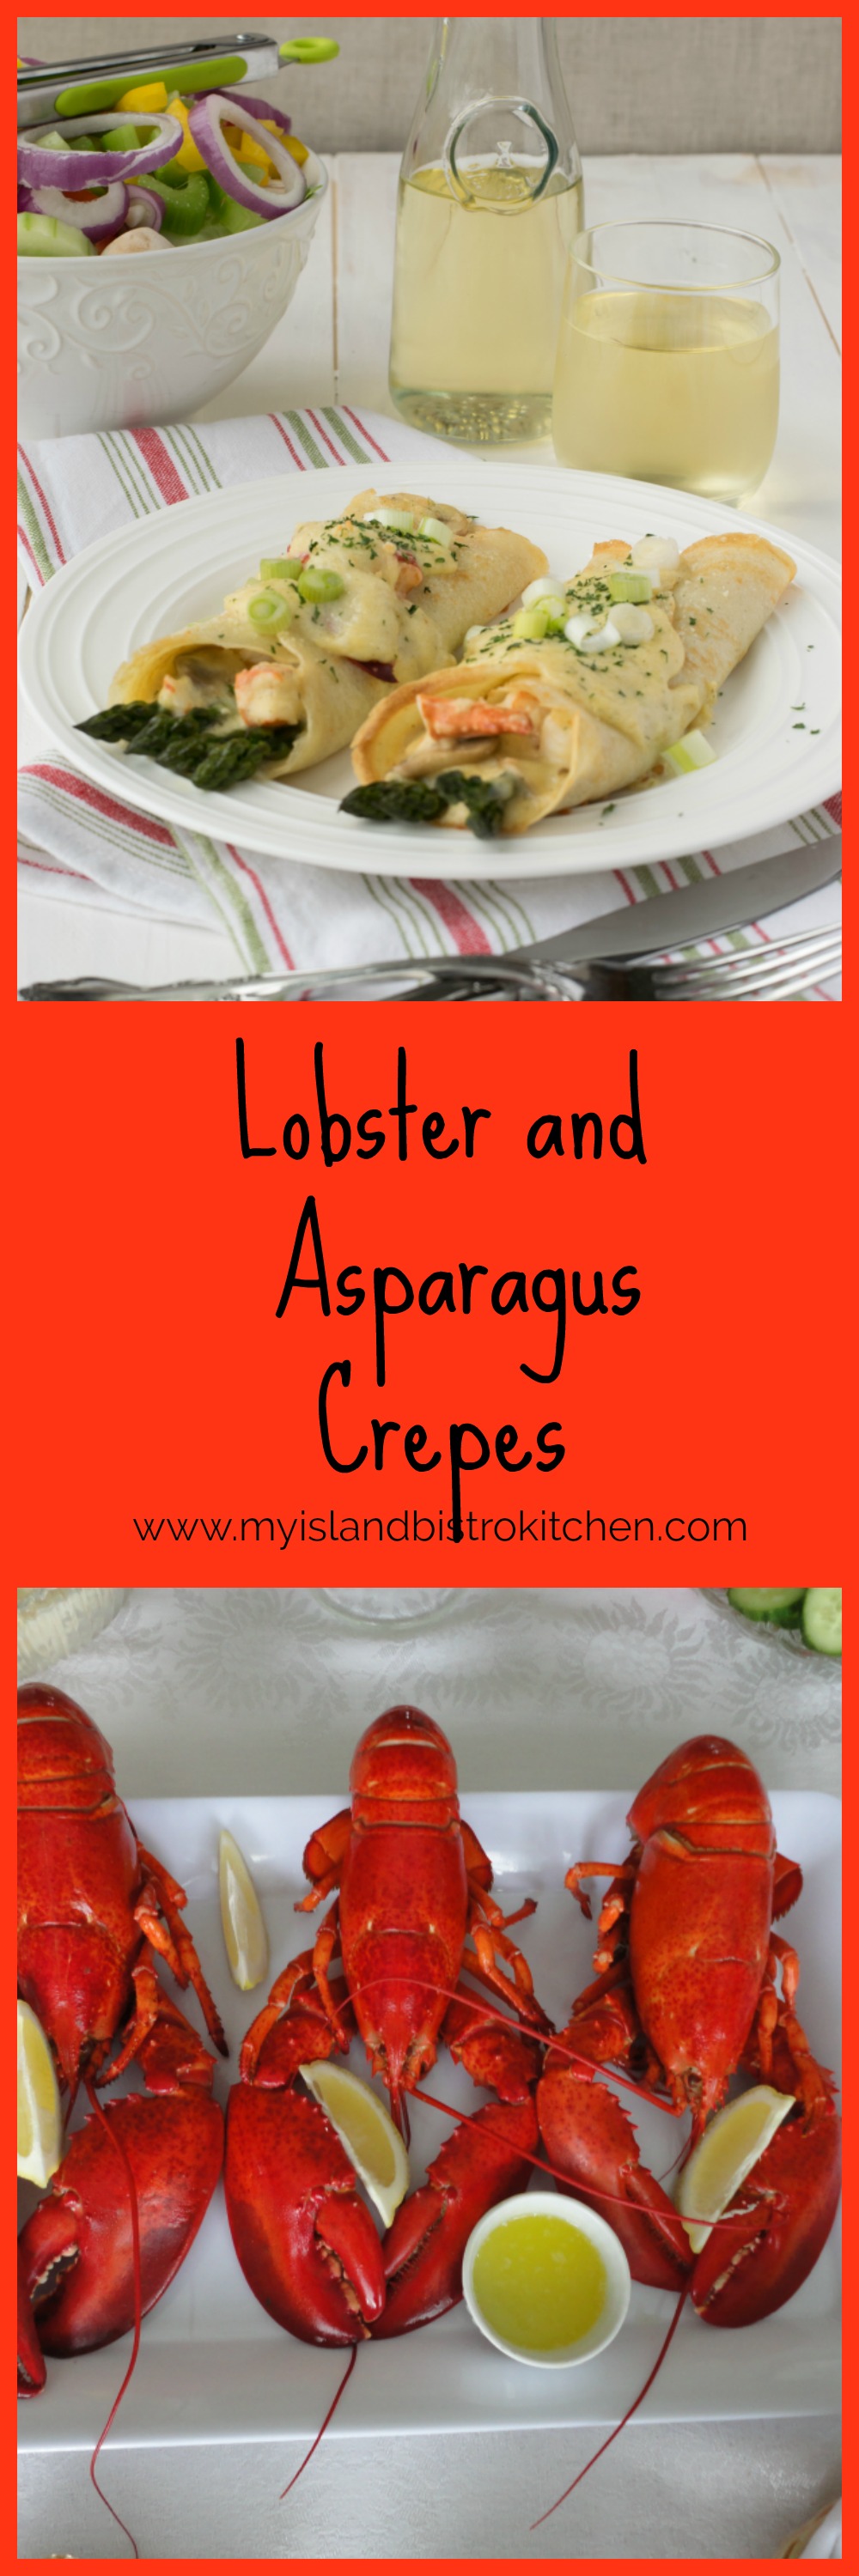
Springtime in Prince Edward Island on Canada’s east coast means it’s lobster season so it’s a great time to make these delectable lobster and asparagus crepes that combine two of the season’s special treats!
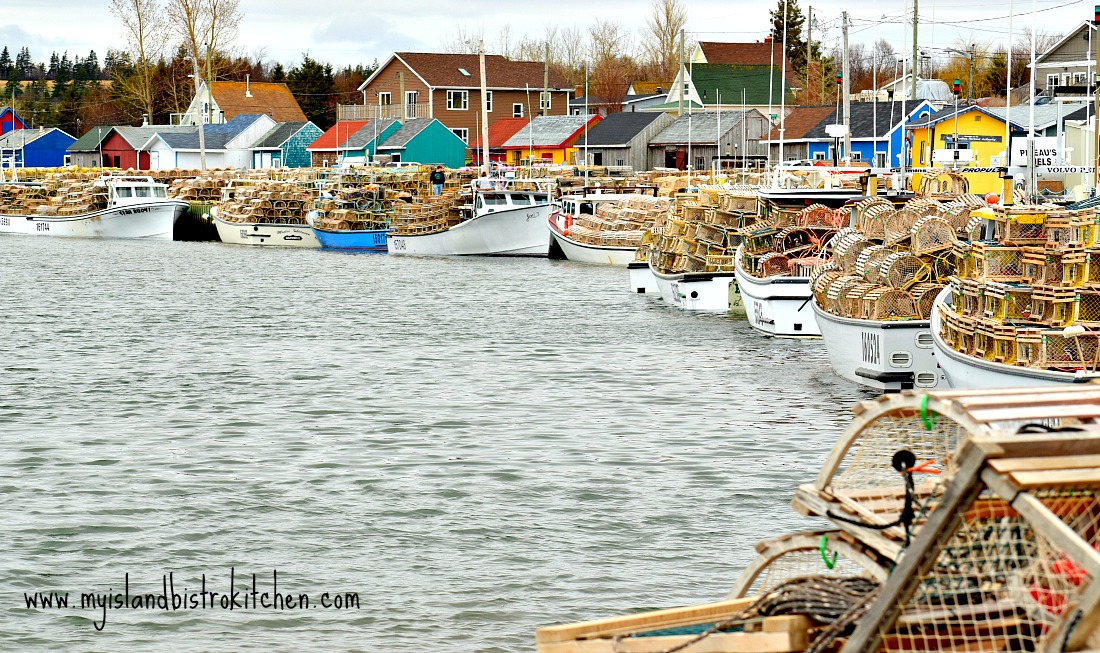
The opening of the spring lobster season is a huge deal in PEI. On opening day — the day when fishers head out to sea with boats laden with traps — hundreds of Islanders gather at fishing ports around the province to see the fishers off. Naturally, mouths are watering for the first taste of lobster from the cold Atlantic waters, a taste that is usually satisfied a day or two after traps are set and the “first haul” of lobsters is brought ashore.
Eve of Setting Day in the Fishing Village of North Rustico, PEI, CanadaEarly Morning Gathering in French River, PEI, to Watch Parade of Lobster Boats on Setting Day
These are so worth the wait!
Fresh Catch of the Day – PEI Lobsters
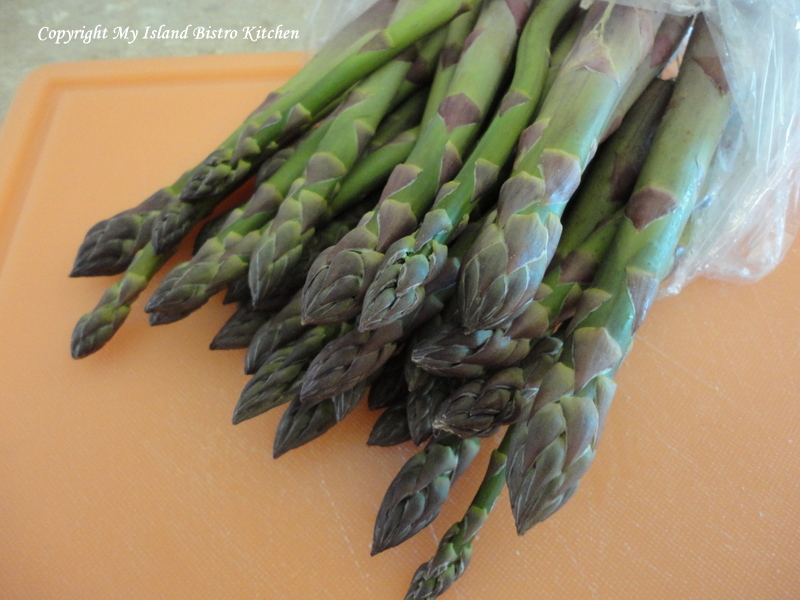
While I adore lobster straight out of the shell and served with homemade potato salad, I like creating recipes incorporating this tasty seafood as an ingredient. Asparagus is the first vegetable of springtime on PEI and, for the crepes I am featuring in this posting, I am using asparagus as a complimentary ingredient to the lobster. The earthy undertones of the asparagus pair particularly well with lobster, especially when some mushrooms and a rich cheese sauce are added. Choose small mushrooms, either white button or the cremini variety, for this recipe.
For the filled crepe recipe, try to choose the freshest available asparagus spears that are a uniform size. I tend to choose medium-sized spears. I find that spears that are pencil thin tend to cook up too quickly and become somewhat limp. Thick spears tend to have less flavor because they have gotten too old before they have been harvested. They may also have a somewhat unpleasant woody texture. The key thing to remember about steaming the asparagus is not to overcook it because it will go limp and loose its vibrant green color.
Fresh Asparagus
The crepes for this recipe may be made ahead (by a few hours or even a day or two) and stored between layers of plastic wrap in a tightly sealed bag in the refrigerator. Following the steps I have laid out for this recipe will help organize the process of preparing the filling and steaming the asparagus so that everything is timed to be ready at the same time for the crepe assembly.
I am quite lucky here on the Island as my local fish market, MR Seafoods, in Charlottetown sells lobster already out of the shell which means they have done the work of removing the meat from the shell and then disposing of the shells. I find this is a quick and convenient way for me to get lobster meat for a recipe.
These crepes can be baked in au gratin dishes, a 7″x11″ baking pan or on a parchment-lined baking sheet which is the way the ones in the photos in this posting were baked. I wanted to ensure that the asparagus would remain intact and clearly visible when the crepes were plated so, by baking them on a rimmed cookie sheet, nothing disturbed the asparagus which could have happened if they were scrunched into a tight baking dish such as an au gratin.
Lobster and Asparagus Crepes
As always, I recommend reading the recipe through a couple of times to ensure a good understanding of the method of preparation and that all the ingredients and cooking utensils and cookware needed to prepare the dish are available.
[Printable recipe follows at end of posting]
Lobster and Asparagus Crepes
Ingredients:
Crepes: 2 large eggs 1 cup flour (to make gluten-free, use 1 cup of 1-to-1 gluten-free flour) 1/8 tsp salt 1 cup whole milk 2 tbsp melted butter
Sauce: ¼ cup butter 1 shallot, finely minced (about 1 tbsp) ¼ cup flour (to make gluten-free, use ¼ cup of 1-to-1 gluten-free flour) ½ tsp granulated garlic ¼ tsp dried dill 1/8 tsp paprika 1/8 tsp nutmeg 1 cup chicken or vegetable stock 1 cup whole milk or half-and-half 2 extra-large egg yolks, lightly broken up with a fork 2 tbsp dry white wine or cooking sherry 1 cup grated cheese mixture (e.g., mozzarella, provolone, and parmesan) Salt and pepper, to taste
Filling: 2-3 teaspoons butter 1 cup mushrooms, thinly sliced
8 oz cooked lobster meat, cut into small chunks 40 asparagus spears
Garnish: 3-4 green onions (white and light green parts only) and/or fresh herbs for garnish (optional)
Method:
Step 1 – Make the crepes. In large measuring cup or bowl and using an immersion blender, beat the eggs lightly. Combine the flour and salt and beat in to the egg alternately with the milk, starting and ending with the flour (3 additions of flour and 2 additions of milk). Beat in the melted butter and beat an additional 30 seconds, or until batter is smooth. Cover with plastic wrap and refrigerate batter for 1 hour.
Over medium heat, melt apx. 1½ tsp butter in a 8” non-stick skillet with sloped sides. Using a ¼-cup measuring cup, scoop up batter. Pour the batter in to the heated skillet while quickly swirling and tilting the pan to ensure batter distributes evenly and completely over the bottom of the pan. Return pan to heat and cook crepe until top loses its gloss, tiny bubbles start to appear, and the edges of the crepe start to slightly curl. Gently lift an edge of the crepe with the tip of a fork and grab the crepe with fingers and flip it over. Cook the second side of the crepe for 15-20 seconds. Flip the crepe onto a clean tea towel. Repeat for remaining crepes, adding small amounts of butter to the pan, if necessary, to keep the crepes from sticking to the pan.
Step 2 –Make the sauce. In medium-sized saucepan, melt the butter over medium heat. Sauté the shallot until softened and transparent. In small bowl, whisk the flour, granulated garlic, dill, paprika, and nutmeg together. Stir flour mixture into the butter and shallot and cook until frothy. Whisk in the chicken (or vegetable stock) and milk (or half-and-half). Cook sauce, until mixture is smooth and heated (but not boiling) and is starting to thicken, stirring constantly to prevent scorching. Stir 2-3 tablespoons of the hot mixture into the egg yolks then pour egg mixture into the sauce. Cook over medium-low heat, stirring constantly until mixture is thickened. Stir in white wine or cooking sherry. Add the cheese mixture. Continue to cook over low heat, stirring until mixture is smooth and cheese is melted. Season with salt and pepper to taste. Remove approximately 3/4 cup of the sauce and set aside.
Step 3 – Make the filling. Preheat oven to 350°F. In medium-sized skillet, melt 2-3 teaspoons of butter over medium heat. Add the mushrooms and sauté for 3-5 minutes, stirring frequently to prevent mushrooms from scorching. While mushrooms are sautéing, steam the asparagus in a tall pot with a small amount of boiling water for approximately 2 minutes. Drain and immediately transfer the asparagus to a bowl of ice cold water to stop the cooking process. Swish the asparagus in the cold water for just a few seconds then drain in a colander. This will also help keep the asparagus its vibrant green color. Remove mushrooms from heat and combine with the lobster meat. Add the reserved ¾ cup of sauce and stir gently to coat mushrooms and lobster meat.
Step 4:Assemble the crepes. Line 9”x13” rimmed baking sheet with parchment paper. Lay out 8 crepes on work surface. Place 5 asparagus spears in the centre of each crepe, extending the asparagus tips by about ½” beyond the edge of the crepe. Divide the lobster and mushroom filling mixture between the 8 crepes by placing filling down the center line of each crepe on top of the asparagus. Gently fold crepe over filling, first one side and then overlapping the opposite side over the first. Using large pastry scraper or flat spatula, carefully transfer each crepe to the prepared baking sheet. Pour the remaining sauce over crepes to cover, leaving both ends of the crepes uncovered. Alternatively, the crepes may be baked in either 4 individual greased au gratin dishes or one oblong 7”x11” baking pan. However, baking the crepes on a baking sheet allows the asparagus tips to stay perfectly intact and attractively visible when plated.
Bake for 15-18 minutes, or until hot and bubbly. Remove from oven and, if desired, sprinkle with chopped green onions and/or chopped fresh herbs such as parsley or chives.
Serving Suggestion: Serve with favorite green salad.
Delectable crepes filled with fresh asparagus, succulent chunks of lobster, and sautéed mushrooms in a rich cheese sauce.
Ingredients
Crepes:
2 large eggs
1 cup flour (to make gluten-free, use 1 cup of 1-to-1 gluten-free flour)
1/8 tsp salt
1 cup whole milk
2 tbsp melted butter
Sauce:
¼ cup butter
1 shallot, finely minced (about 1 tbsp)
¼ cup flour (to make gluten-free, use ¼ cup of 1-to-1 gluten-free flour)
½ tsp granulated garlic
¼ tsp dried dill
1/8 tsp paprika
1/8 tsp nutmeg
1 cup chicken or vegetable stock
1 cup whole milk or half-and-half
2 extra-large egg yolks, lightly broken up with a fork
2 tbsp dry white wine or cooking sherry
1 cup grated cheese mixture (e.g., mozzarella, provolone, and parmesan)
Salt and pepper, to taste
Filling:
2-3 teaspoons butter
1 cup mushrooms, thinly sliced
8 oz cooked lobster meat, cut into small chunks
40 asparagus spears
Garnish:
3-4 green onions (white and light green parts only) and/or fresh herbs for garnish (optional)
Instructions
Step 1 - Make the crepes. In large measuring cup or bowl and using an immersion blender, beat the eggs lightly. Combine the flour and salt and beat in to the egg alternately with the milk, starting and ending with the flour (3 additions of flour and 2 additions of milk). Beat in the melted butter and beat an additional 30 seconds, or until batter is smooth. Cover with plastic wrap and refrigerate batter for 1 hour.
Over medium heat, melt apx. 1½ tsp butter in a 8” non-stick skillet with sloped sides. Using a ¼-cup measuring cup, scoop up batter. Pour the batter in to the heated skillet while quickly swirling and tilting the pan to ensure batter distributes evenly and completely over the bottom of the pan. Return pan to heat and cook crepe until top loses its gloss, tiny bubbles start to appear, and the edges of the crepe start to slightly curl. Gently lift an edge of the crepe with the tip of a fork and grab the crepe with fingers and flip it over. Cook the second side of the crepe for 15-20 seconds. Flip the crepe onto a clean tea towel. Repeat for remaining crepes, adding small amounts of butter to the pan, if necessary, to keep the crepes from sticking to the pan.
Step 2 - Make the sauce. In medium-sized saucepan, melt the butter over medium heat. Sauté the shallot until softened and transparent. In small bowl, whisk the flour, granulated garlic, dill, paprika, and nutmeg together. Stir flour mixture into the butter and shallot and cook until frothy. Whisk in the chicken (or vegetable stock) and milk (or half-and-half). Cook sauce, until mixture is smooth and heated (but not boiling), and is starting to thicken, stirring constantly to prevent scorching. Stir 2-3 tablespoons of the hot mixture into the egg yolks then pour egg mixture into the sauce. Cook over medium-low heat, stirring constantly until mixture is thickened. Stir in white wine or cooking sherry. Add the cheese mixture. Continue to cook over low heat, stirring until mixture is smooth and cheese is melted. Season with salt and pepper to taste. Remove approximately 3/4 cup of the sauce and set aside.
Step 3 - Make the filling. Preheat oven to 350°F. In medium-sized skillet, melt 2-3 teaspoons of butter over medium heat. Add the mushrooms and sauté for 3-5 minutes, stirring frequently to prevent mushrooms from scorching. While mushrooms are sautéing, steam the asparagus in a tall pot with a small amount of boiling water for approximately 2 minutes. Drain and immediately transfer the asparagus to a bowl of ice cold water to stop the cooking process. Swish the asparagus in the cold water for just a few seconds then drain in a colander. This will also help keep the asparagus its vibrant green color. Remove mushrooms from heat and combine with the lobster meat. Add the reserved ¾ cup of sauce and stir gently to coat mushrooms and lobster meat.
Step 4: Assemble the crepes. Line 9”x13” rimmed baking sheet with parchment paper. Lay out 8 crepes on work surface. Place 5 asparagus spears in the centre of each crepe, extending the asparagus tips by about ½” beyond the edge of the crepe. Divide the lobster and mushroom filling mixture between the 8 crepes by placing filling down the center line of each crepe on top of the asparagus. Gently fold crepe over filling, first one side and then overlapping the opposite side over the first. Using large pastry scraper or flat spatula, carefully transfer each crepe to the prepared baking sheet. Pour the remaining sauce over crepes to cover, leaving both ends of the crepes uncovered. Alternatively, the crepes may be baked in either 4 individual greased au gratin dishes or one oblong 7”x11” baking pan. However, baking the crepes on a baking sheet allows the asparagus tips to stay perfectly intact and attractively visible when plated.
Bake for 15-18 minutes, or until hot and bubbly. Remove from oven and, if desired, sprinkle with chopped green onions and/or chopped fresh herbs such as parsley or chives.
Notes
Serving Suggestion: Serve with favorite green salad
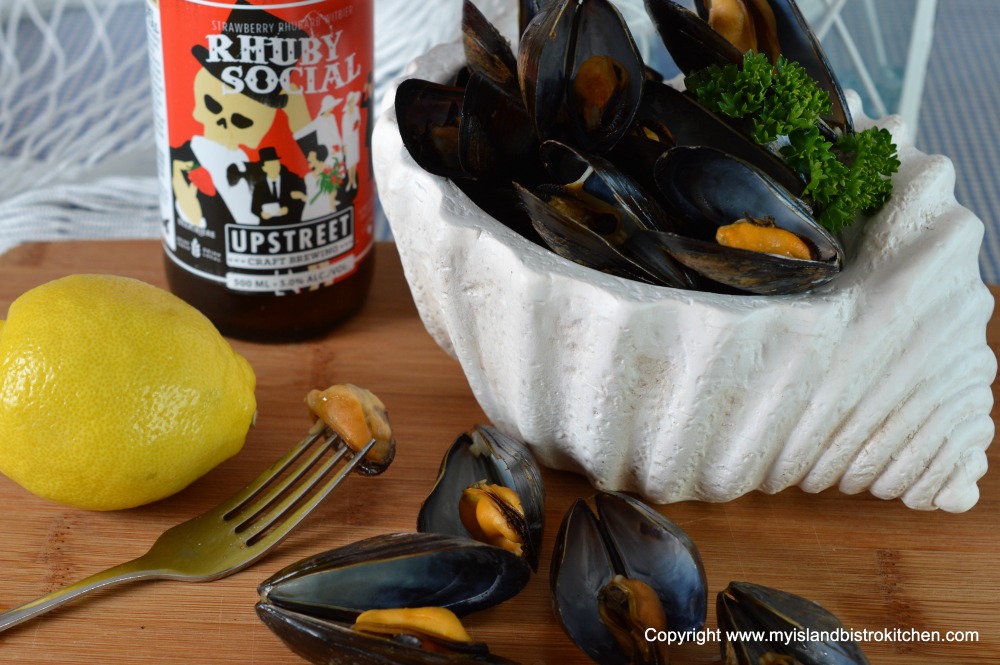
PEI Mussels Steamed in Rhuby Social Beer from Upstreet Craft Brewing
My recipe for steamed mussels calls for some aromatics to build a flavor base in which to steam the tasty little morsels. Aromatic cooking involves some type of fat or oil – I’m using butter in this recipe – combined with some aromatic vegetables and herbs. In this case, I am using onion, celery, and garlic along with some fresh thyme. The combination of a fat product and heat help to release the wonderful aromas of ingredients and infuse dishes with fabulous flavors. Ever walk into the tantalizing scent of a kitchen where onions and garlic are cooking in oil or butter? That’s aromatics at work.
Preparing this flavor base at the beginning of the cooking process adds depth and complexity to the dish. Since mussels cook rapidly, chop the vegetables up somewhat fine as they need to release their flavors quickly in order to add flavor to the dish.
The fresh mussels should be rinsed under cold water before they are cooked. If any of the shells don’t close up after this rinsing, tap the shells lightly. If they still don’t close, discard them. Any “beard” on the mussels also needs to be removed.
Once the vegetables have been sautéed and released their flavors, it’s time to add a small amount of lemon juice and some beer to the mixture. The lemon juice adds fresh, crisp notes to the broth. This helps to balance the seafood qualities of the broth once the mussels are added. Beer adds both depth and complexity of flavor to the mussels which should be steamed in a very small amount of liquid. If too much liquid is used, it will dilute the flavor altogether. It’s the steam, not the amount of liquid, that cooks the mussels. In this recipe, I have chosen to use a craft beer that has been brewed right here on Prince Edward Island at Upstreet Craft Brewing in Charlottetown (click here for my story on this brewery). The strawberry and rhubarb flavored “Rhuby Social” witbier with its slight tartness pairs particularly well with seafood.
It’s important not to overcook the mussels as they will become tough. I find that 5-7 minutes is usually sufficient; however, the amount of steaming time depends on several factors including how many (and the size of the) mussels in the pot, the weight of the pot, and amount of heat over which they are steamed. The ultimate test of doneness is a peek inside the pot to see if the shells have opened. It’s very important that, at the end of the steaming process, any shells that have not opened be discarded. If a shell has to be pried open, it is not considered safe for consumption.
These mussels can be eaten with bread dipped in the steaming broth. Simply strain the broth to remove the vegetables and herbs. Alternatively, they can be eaten dipped in melted butter or even with a simple splash of freshly squeezed lemon juice.
(Printable recipe follows at end of posting)
PEI Mussels Steamed in Beer
Ingredients: 2 lbs. PEI mussels, rinsed and beards removed
1 tbsp butter 1/3 cup onion, chopped 2-3 cloves garlic, minced 4” piece of celery with leaves, chopped ½ tsp salt 2 sprigs fresh thyme 2 tsp lemon juice 1 cup Upstreet Craft Brewing’s “Rhuby Social” Beer
Method: In medium-sized stock pot, melt the butter over medium-high heat. Add the onion, garlic, celery and salt. Sauté, stirring briskly, just until onion has softened and has started to become transparent. Add the thyme, lemon juice, and beer. Increase the heat to high and bring liquid to a boil. Add the mussels. Cover and steam the mussels for approximately 5-7 minutes, or until the mussel shells have opened. Remove pot from heat and let mussels stand in broth for 1-2 minutes.
Remove mussels from broth with a slotted spoon and discard any shells that have not opened. If desired, strain the broth and use for dipping bread to enjoy with the mussels. Alternatively, melt butter in which to dip the mussels.
Yield: Apx. 2 servings
If you have made this recipe and enjoyed it and/or wish to share it with your friends and family, please do so on social media but be sure to share the direct link to this posting from my website.
Connect with My Island Bistro Kitchen on Social Media
PEI Mussels steamed in an aromatic beer broth. Dip the mussels in melted butter for the ultimate treat.
Ingredients
2 lbs. PEI mussels, rinsed and beards removed
1 tbsp butter
1/3 cup onion, chopped
2-3 cloves garlic, minced
4” piece of celery with leaves, chopped
½ tsp salt
2 sprigs fresh thyme
2 tsp lemon juice
1 cup Upstreet Craft Brewing’s “Rhuby Social” Beer
Instructions
In medium-sized stock pot, melt the butter over medium-high heat. Add the onion, garlic, celery and salt. Sauté, stirring briskly, just until onion has softened and has started to become transparent. Add the thyme, lemon juice, and beer. Increase the heat to high and bring liquid to a boil. Add the mussels. Cover and steam the mussels for approximately 5-7 minutes, or until the mussel shells have opened. Remove pot from heat and let mussels stand in broth for 1-2 minutes.
Remove mussels from broth with a slotted spoon and discard any shells that have not opened. If desired, strain the broth and use for dipping bread to enjoy with the mussels. Alternatively, melt butter in which to dip the mussels.
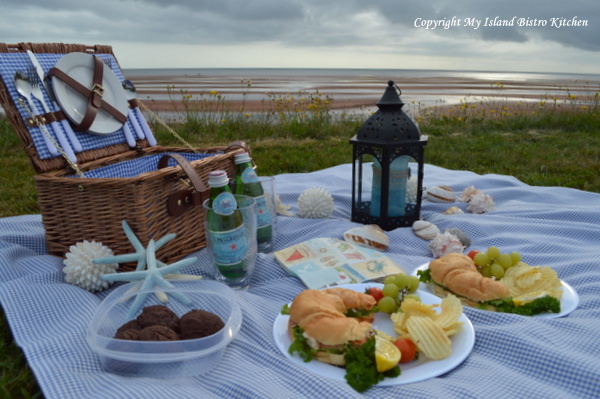
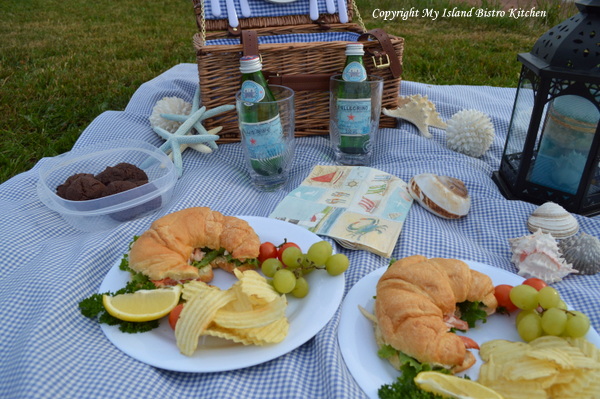
I’ve had a great summer of picnics this year! Haven’t gone on this many picnics in many years. I had forgotten how much fun and relaxed al fresco dining can be. This posting will feature my Labour Day Weekend Picnic but, first, a little trip down memory lane.
One of my favorite summertime memories involves a picnic. I was visiting a neighbour playmate and we were probably about 8 or 9 years old. We took a notion one hot summer day that we would have a picnic by the little stream across the road from my friend’s place. The two of us stood by the friend’s mother at the kitchen counter as she whipped up some gourmet peanut butter and jelly sandwiches, placed them in an old tin school lunchbox, filled a thermos with Kool-aid (anybody remember Kool-aid?), and sent us off on our big adventure to the picnic by the stream. Off we went across the little country road, down through the cow pasture to a little stream which, at its deepest point was probably all of 4″ or 5″ deep. We situated ourselves, had our picnic, and probably returned to the house all in the span of about 15 minutes, no doubt ready for another activity! Yet, we had been on a picnic adventure and made a memory. That was back in the days when kids played outside all day and found numerous ways to amuse themselves and none of them involved cell phones or computers.
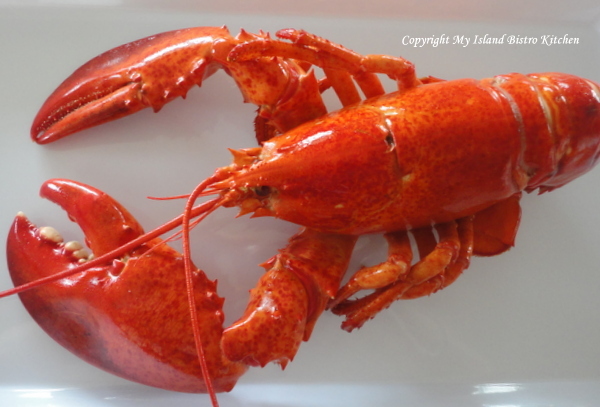
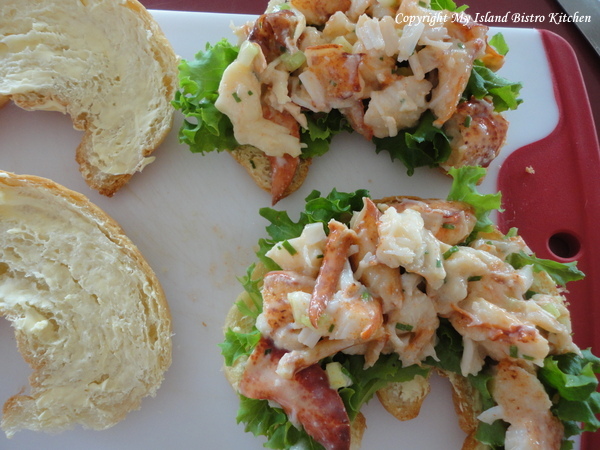
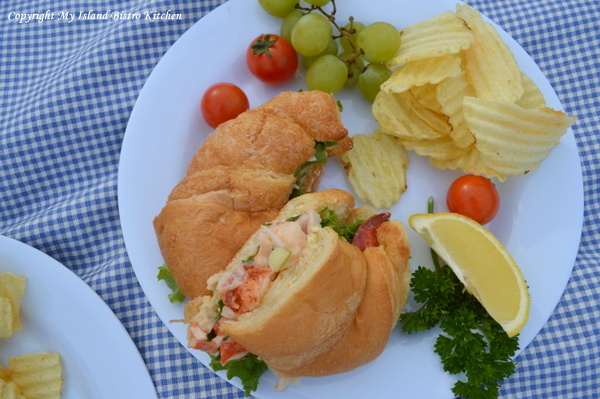
I will admit my picnic adventures have progressed and become a bit more sophisticated. There are so many options for picnic foods, particularly when it comes to sandwiches – there are traditional sandwiches with any number of different kinds of breads as options, wraps, baguettes, different kinds of rolls, bagels, etc. For my picnic by the sea today, I have chosen croissants. They are tasty and have a nice, soft texture. Because I live near the water and close to a small fishing village that has a fresh seafood market open daily in the summer, lobster was a logical choice for a croissant filling. The late summer fishing season has opened in Victoria-by-the-Sea on the south shore of PEI so buying lobster at the seafood market means the lobster is really, really fresh. Take a look at this 1 1/2+ pound lobster that I took home with me to make the filling for the croissants!
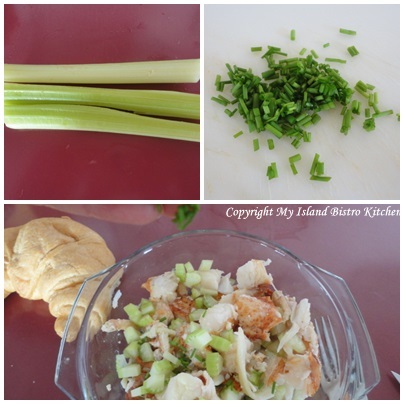
I don’t really have a defined recipe for lobster filling for sandwiches or croissants. I chop the lobster meat into fairly large chunks as I like to see good-sized pieces of lobster in a lobster roll or croissant — no mashed-up or shredded pieces of lobster meat will do for me!
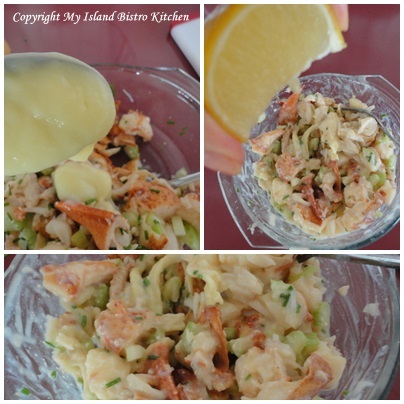
I add a bit of celery, some pepper, some fresh chopped chives, a splash of fresh lemon juice, and some homemade mayonnaise – just enough to hold the meat together and give it flavour. That’s it, nothing more as I don’t like anything that detracts from that rich lobster flavour.
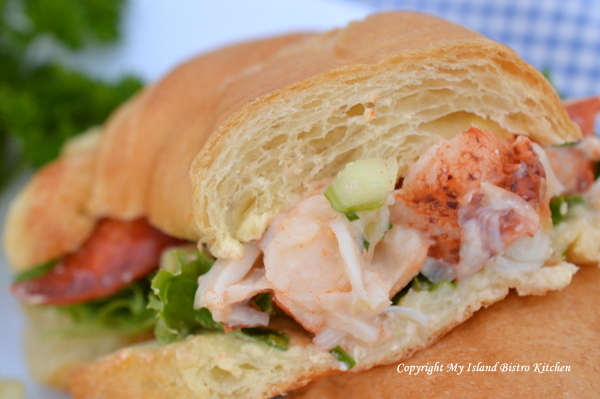
I buttered the croissants, added a bed of fresh lettuce from our garden and then heaped on the lobster filling. Yes, it was very yummy!
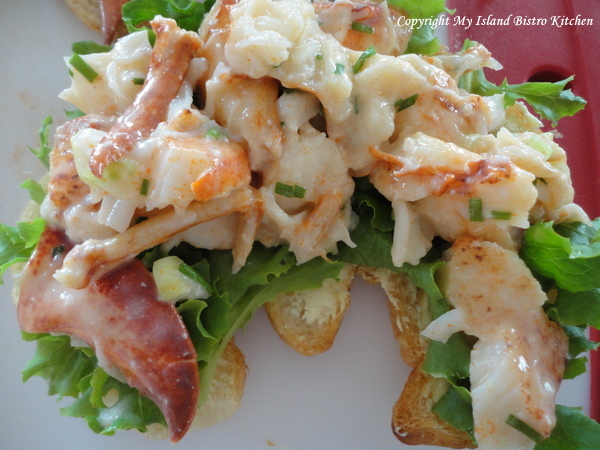
A little closer look….
And, this is what I mean about wanting to see nice big pieces of lobster in the sandwich. Isn’t it mouthwatering and colorful!
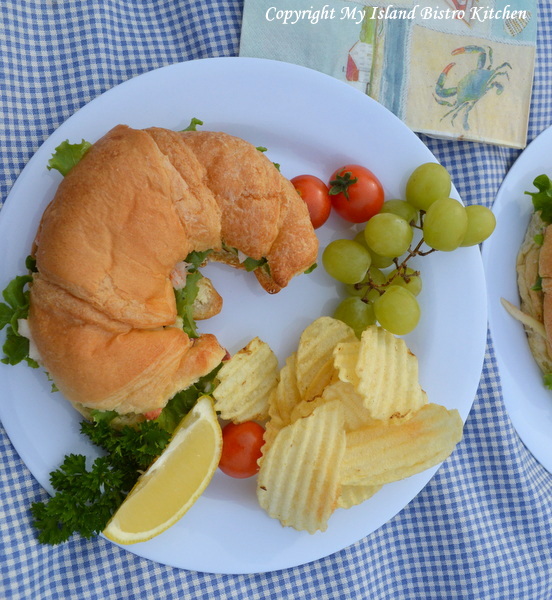
Add some potato chips and picnic fare doesn’t get much better than this, particularly when the picnic location is beside the water. With something as special as lobster, the menu does not have to be extensive. Let the lobster star all on its own!
Croissants are so easy to handle and eat…particularly when filled with lobster 🙂
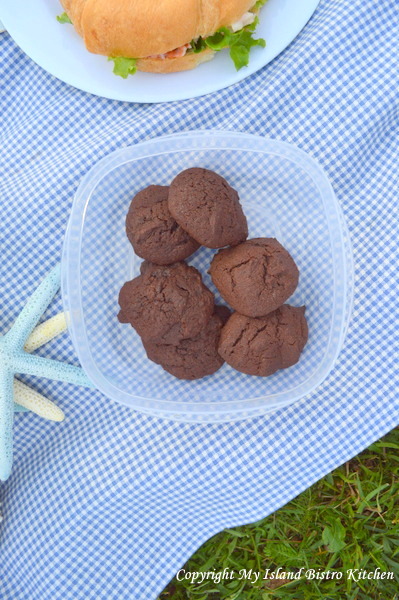
I added some fresh fruit – this time, some green grapes – and the picnic basket was ready to go.
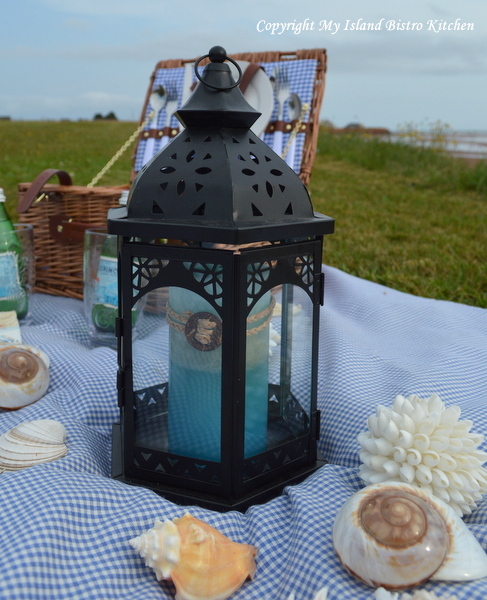
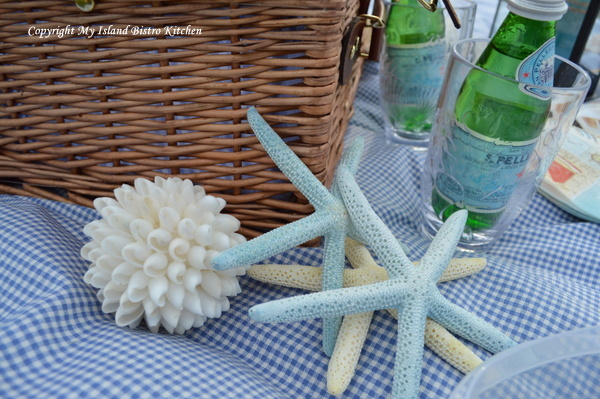
I always like to take along some props to dress up the picnic spread, regardless whether it is at a picnic table or on the ground as is the case here by the beach. It doesn’t matter whether I am in my dining room setting a formal table or outside, I like to think of setting the stage for a feast for the eye as well as for the stomach. A few props really can make an ordinary picnic a bit more special.
For my seaside picnic, all it took was a blue-checked cloth, a stylish matching wicker picnic basket, a lantern with a blue candle, and some seashells and starfish, to dress up the dining experience.
I love the patterns in the pink-red sandbars on PEI. Our Island beaches are extraordinary – on the south side, they tend to be more the pink-red color you see in the photo below while, on the north side, the sand is more of a soft pink color. This is definitely a dining room with a water view!
However, the sky began to look somewhat ominous so we thought we had better hurry up and eat in case a rain shower came along and spoiled the picnic.
I hope you have enjoyed some of the scenes from our seaside picnic that featured PEI lobster. Enjoy your Labour Day weekend.
Thank you for visiting “the Bistro” today. There are lots of ways to connect with “the Bistro” through social media:
Join My Island Bistro Kitchen on Facebook Follow the Bistro’s tweets on twitter @PEIBistro Find the Bistro on Pinterest at “Island Bistro Kitchen” Follow along on Instagram at “peibistro”
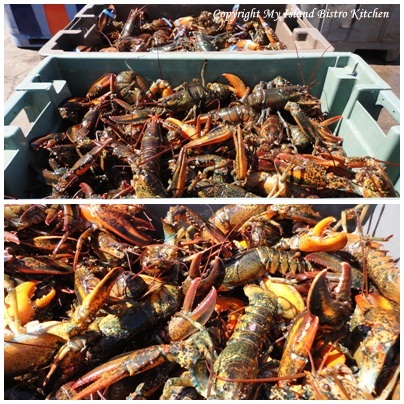
The opening of the spring lobster season on Prince Edward Island is always an event. Fishing boats, laden with lobster traps like those in the photos below, depart wharves around the Island in the very early morning to set their traps, often going several miles out to sea. This is called “setting day” and it is not uncommon for people in the local fishing communities to head to their local wharves to see the fishing boats off. Setting day 2013 was yesterday, April 29th. I didn’t make it to a wharf yesterday or today but I am sharing some photographs I took during fishing season 2012.
Lobster Fishing Boat Loaded for Traps to be Set on “Setting Day”, Victoria-by-the-Sea, PEI, May 6, 2012
Lobster Fishing Boats Loaded for Traps to be Set on “Setting Day”, Victoria-by-the-Sea, PEI, May 6, 2012
Lobster Fishing Boat Loaded for Traps to be Set on “Setting Day”, Victoria-by-the-Sea, PEI, May 6, 2012
Several communities also have church services known as the “Blessing of the Fleet” services on the Sunday before setting day. These are sometimes held inside nearby local churches but, most frequently, they are held on the wharves of the fishing ports.
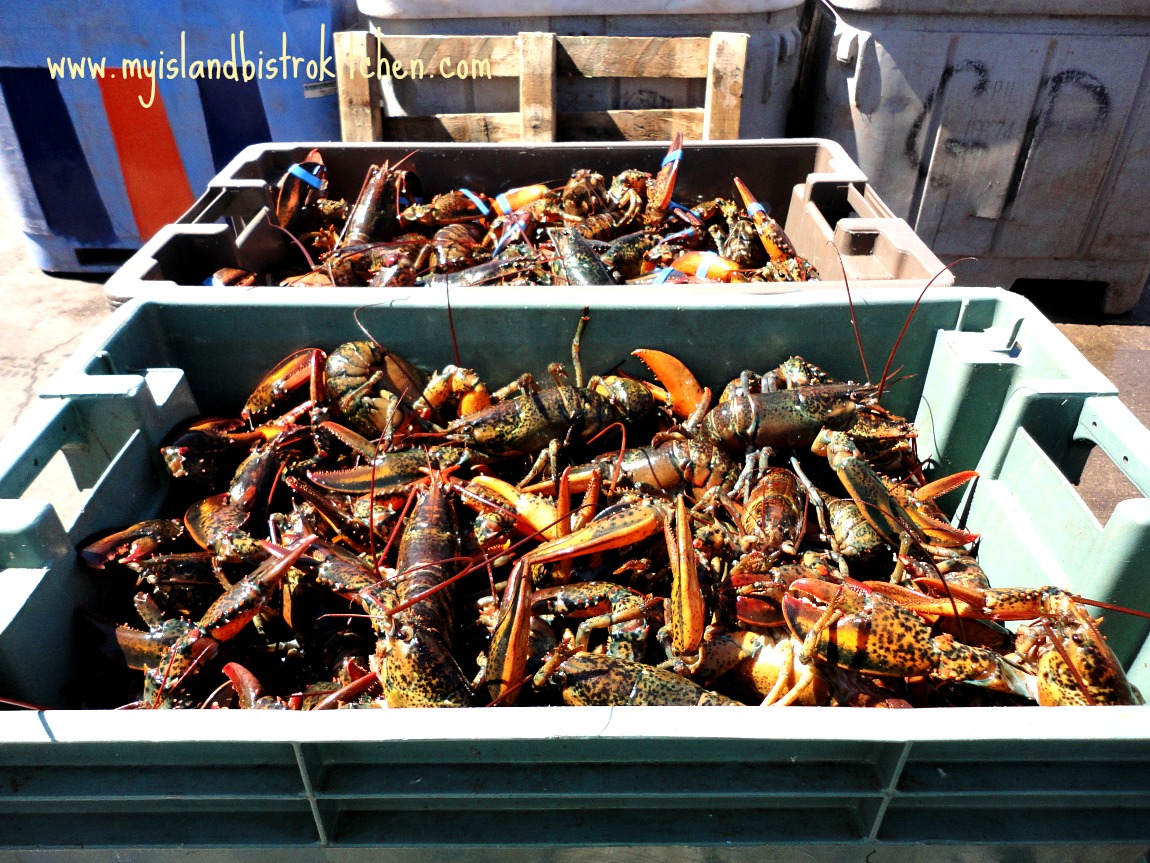
Today was the first day of the season that fishers could check their set traps and bring in their catches. The photos below were taken at North Lake Harbour, PEI on June 1, 2012; however, the same scene would be playing out today at many harbours across PEI.
Lobster Fishing Boats Filled With Their Day’s Catch Returning to Port at North Lake, PEI [June 1, 2012]
Lobster Fishing Boats, North Lake, PEI [June 1, 2012]Unloading the Day’s Catch at North Lake Harbour, PEI [June 1, 2012]And, here are the “goods”!
“The Prized Cargo” – Fresh PEI Lobster!
Boats at rest after their day’s work fetching the catch.
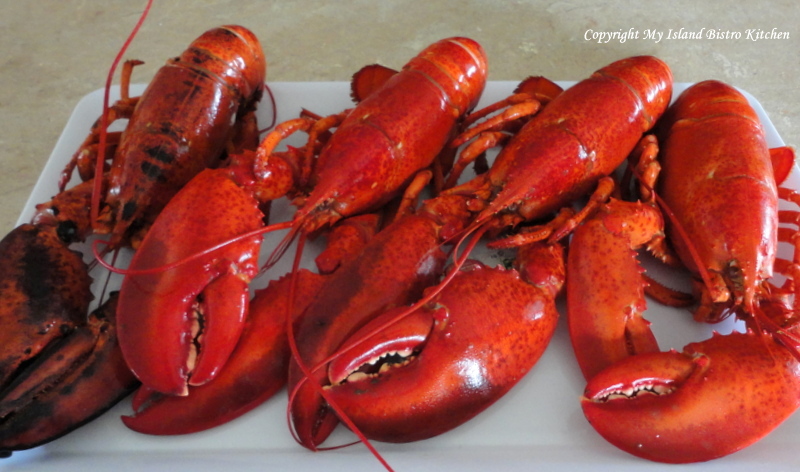
North Lake Harbour, PEI [June 1, 2012]And, once they are cooked, look at the fabulous rich color of these freshly caught PEI lobsters!
Cooked Lobsters
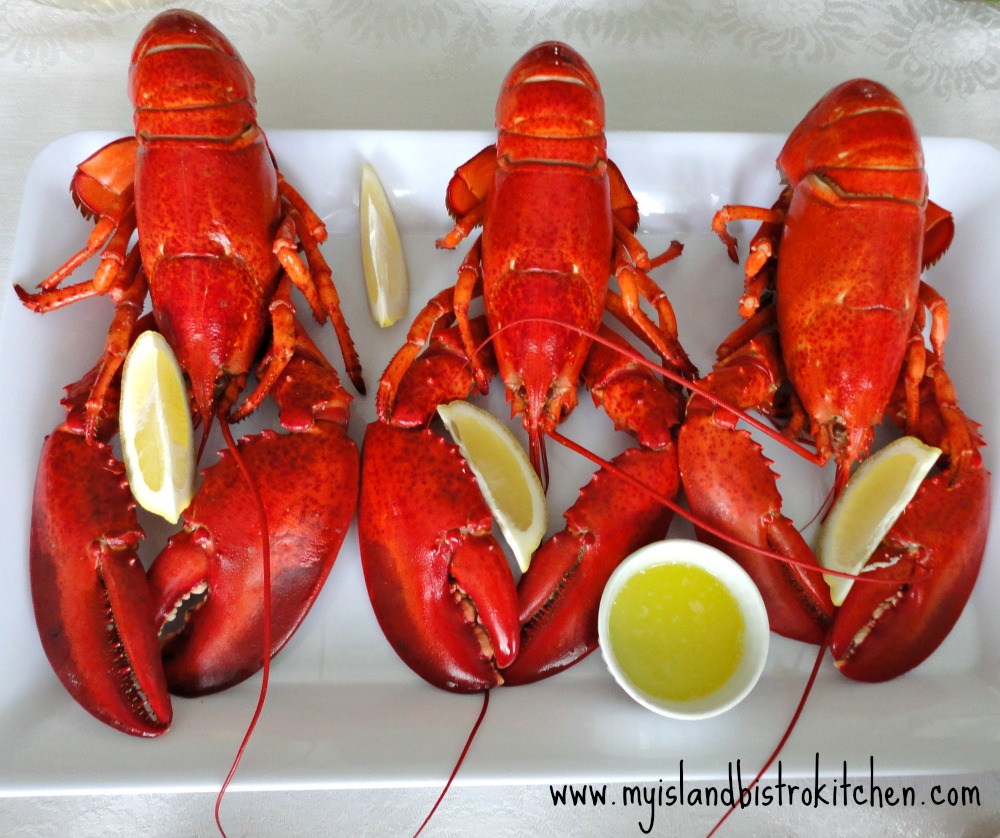
Many Islanders will be dining on fresh lobster for supper this evening. For many, it is a tradition to have fresh lobster on the first day of the catch. This is one of the benefits of living on an Island – we have plenty of fresh seafood. Many (including myself) will argue that lobster from the spring fishery is better than lobster fished later in the summer from waters that have warmed up over the season (even though lobster from the later catch is very good, too). I don’t know why it is but lobster from the cold Atlantic water always does seem to taste better and I think even has a better texture meat.
I remember the first time I was on a Caribbean cruise many years ago, ordering lobster from the dinner menu. My taste buds were salivating for what I knew to be lobster taste. Oh my! It didn’t taste like lobster at all as I know it. That’s when I discovered the difference in taste of lobster that comes out of cold water and that out of very warm waters! I never ordered lobster from a cruise ship menu again. I wait for the good PEI lobster at home! The ironic part of this is that I never liked lobster when I was growing up. In fact, when the family would be chowing down on lobster, my mother always roasted me a chicken! However, they convinced me to try a bite of it when I was probably about 18 years old and I’ve never looked back and have more than made up for it since! I love lobster by itself and in just about any other recipe imaginable!
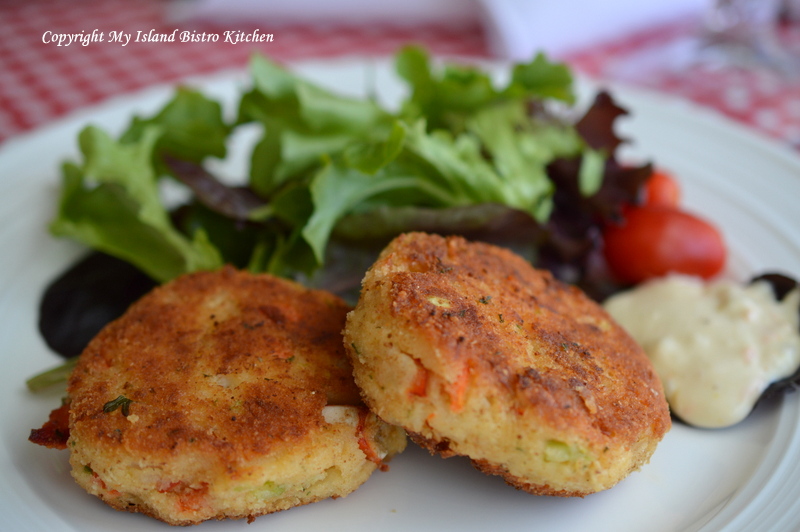
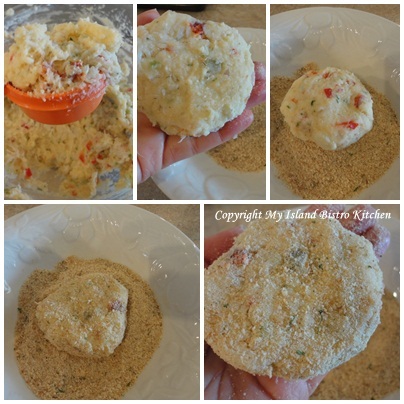
So, tonight, I am dining on Lobster Cakes to celebrate the opening of the 2013 PEI lobster fishery season and am sharing my recipe with you.
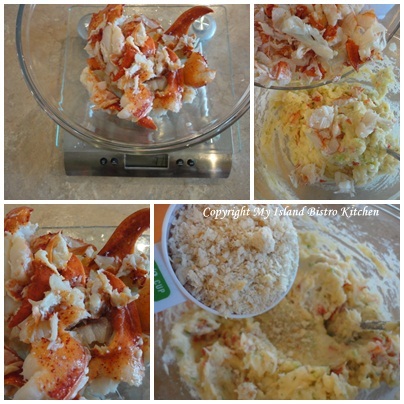
7 – 8 oz. cooked lobster (fresh or frozen), cut into bite-sized chunks
½ – 1 cup bread crumbs
Apx. ¾ cup finely ground seasoned bread crumbs for dredging lobster patties
1 – 2 tbsp oil
Method:
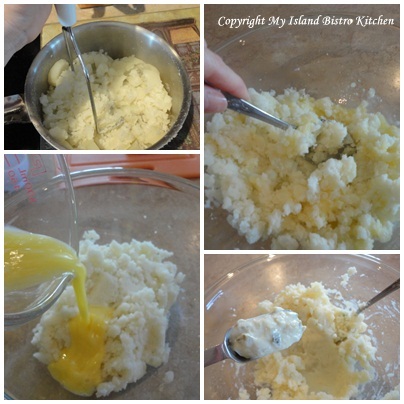
Place warm mashed potatoes in large bowl. Add beaten egg and mix well. Add tartar sauce.
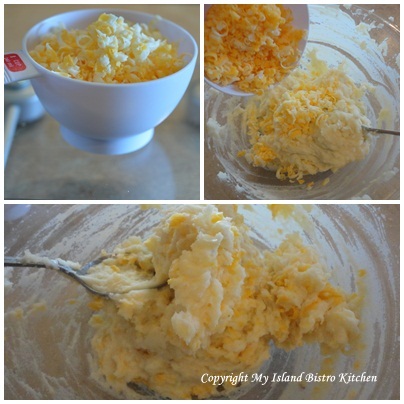
Stir in grated cheddar cheese.
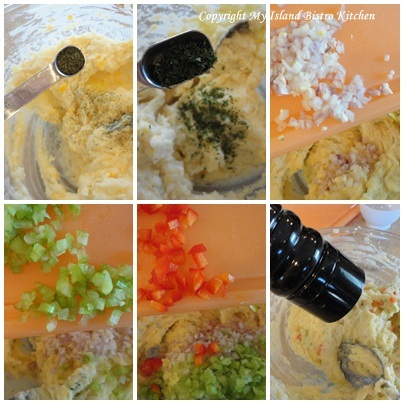
Add dillweed, parsley, and pepper. Stir in scallions, celery, and red pepper.
Lastly, add the lobster and mix well. Add just enough of the first amount of bread crumbs so the mixture will hold together and can be formed into patties.
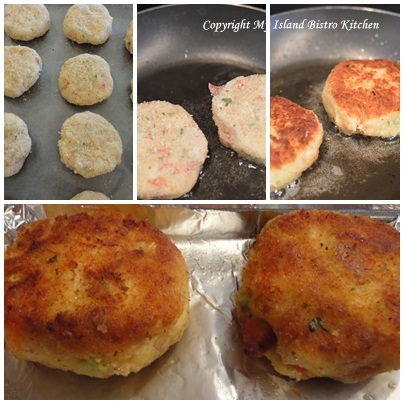
Using ¼ cup measuring cup, scoop up mixture and form into round patties. In shallow bowl, place the seasoned bread crumbs. Dredge each patty in the bread crumbs until completely covered on all sides. Place on wax-paper lined baking sheet and chill for 1 hour to allow flavours to blend and for patties to become firm so they won’t break apart when sautéed.
Preheat oven to 375F.
Heat oil in non-stick skillet over medium-high heat. When oil is hot, reduce heat to medium and sauté lobster cakes 2-3 minutes on each side, until golden brown. Transfer browned cakes to greased baking sheet. Bake in oven 6-7 minutes to finish the cooking process and allow cakes to become firm so they will hold together.
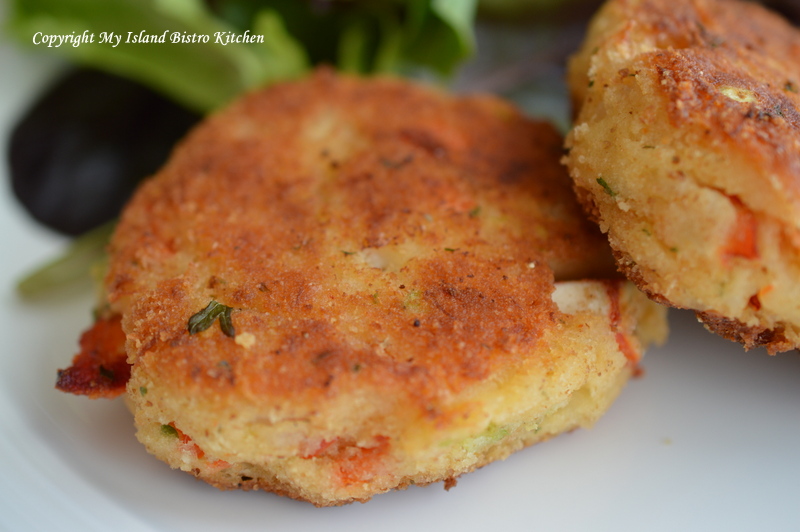
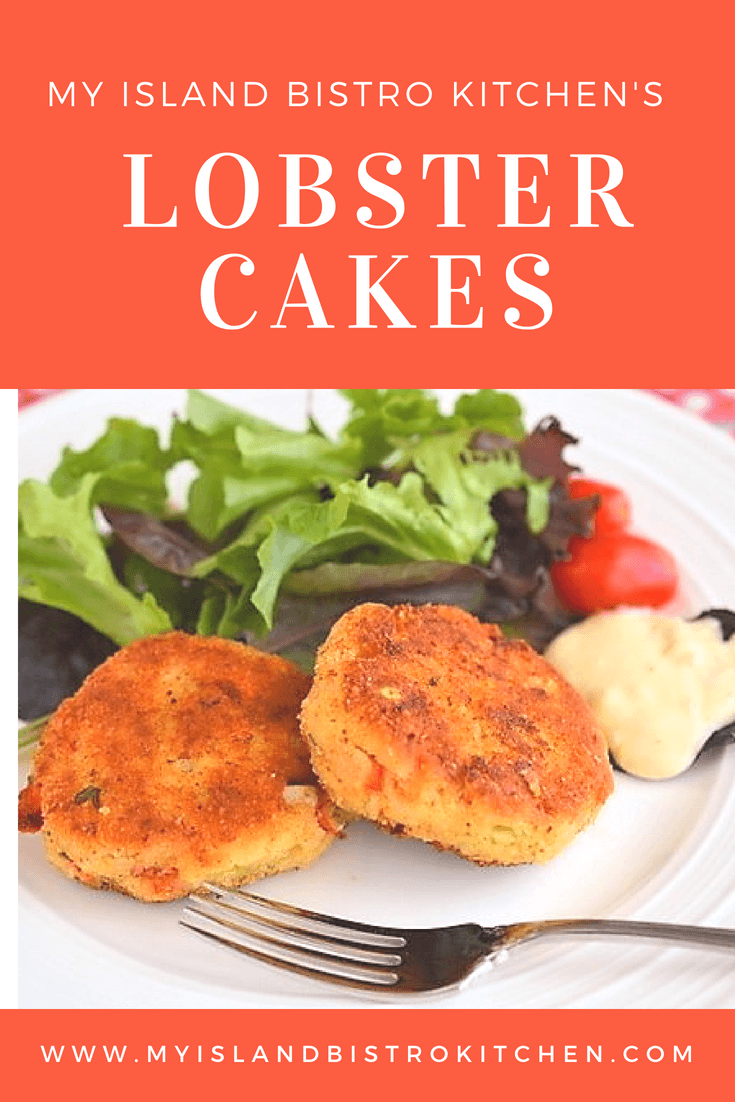
Serve lobster cakes, 2 per person, hot with citrus aioli or your favorite tartar sauce and a side of green salad.
Lobster Cakes with Citrus Aioli
These cakes freeze well, uncooked. When ready to serve, simply remove cakes from freezer and thaw. Sauté and bake as described above.
Yield: Apx. 1 dozen cakes
Thank you for visiting “the Bistro” today. There are lots of ways to connect with “the Bistro” through social media:
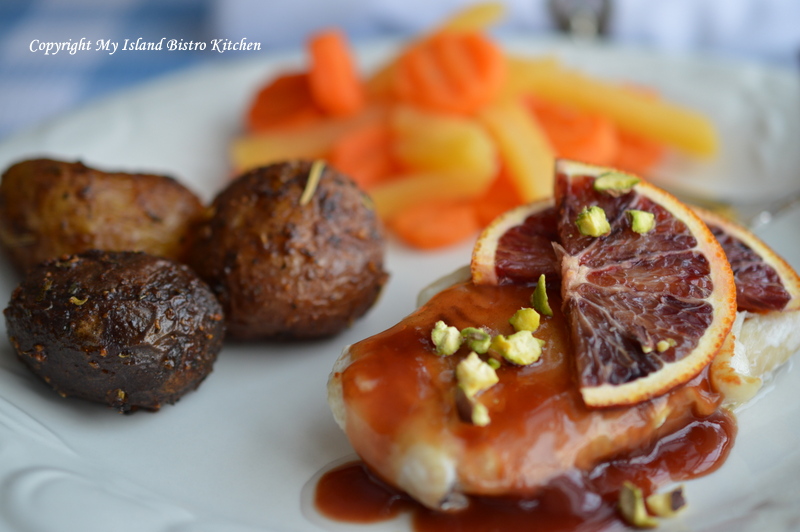
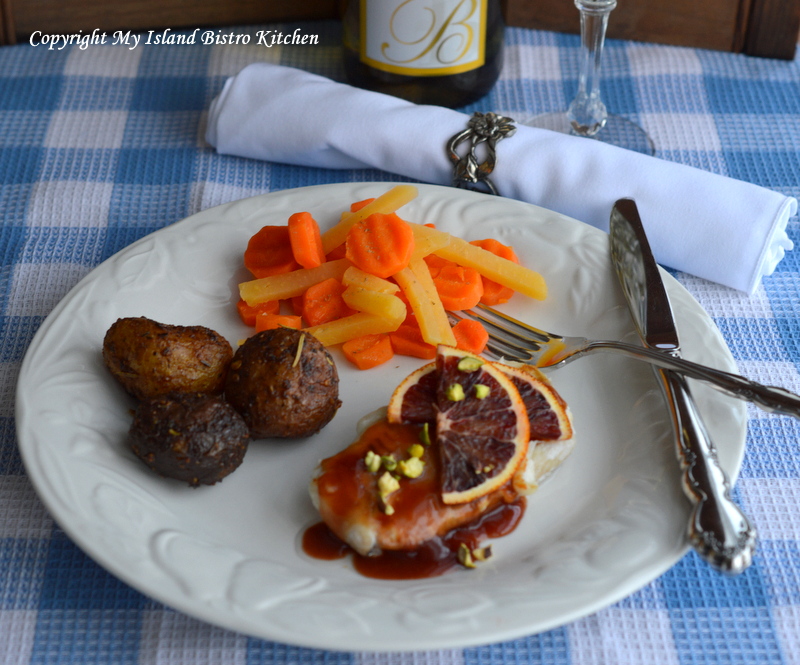
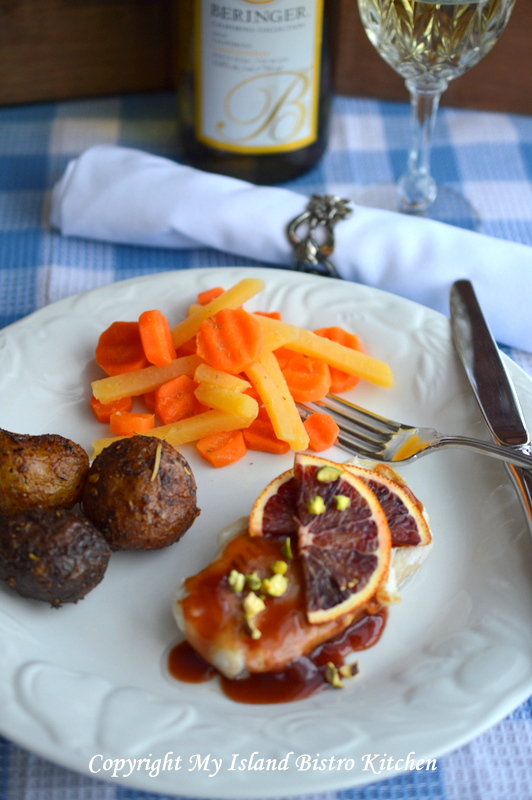
Blood Orange and Rhubarb Sauce over Halibut Steak served with Herb-Roasted Miniature Potatoes and Steamed Root Vegetables
Every Spring, I freeze bags and bags of rhubarb for recipes to be made through the remainder of the year. I am always looking for new ways to serve this versatile vegetable. Today, I am using it in this Blood Orange and Rhubarb Sauce for fish.
Living on an island on the East Coast of Canada, fish is readily available. Sometimes, I like to eat the fish plain, just pan-seared or oven-baked but, other times, I like it dressed up a bit. Rhubarb and citrus make a nice combination and citrus sauces go well with seafood so my sauce creation includes both rhubarb and citrus fruit.
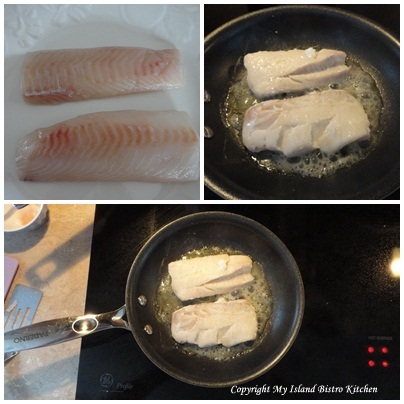
I thought it was time to use up some of the remaining frozen rhubarb (or maybe I just needed to have a Spring food because our winter is getting very tiresome). You can use any kind of white fish with this sauce – my choice was the halibut steak because it had enough thickness to it that it would hold together to plate well for presentation and not break into pieces.
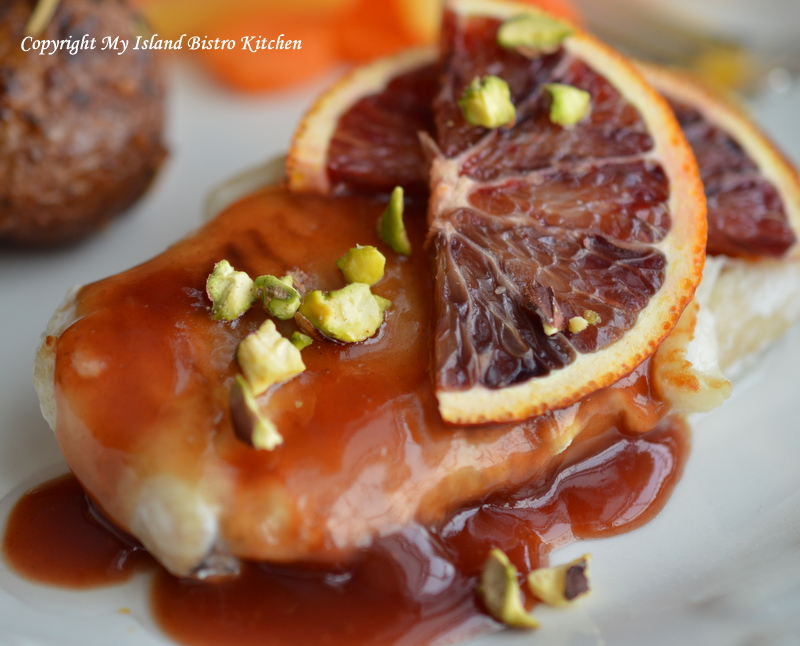
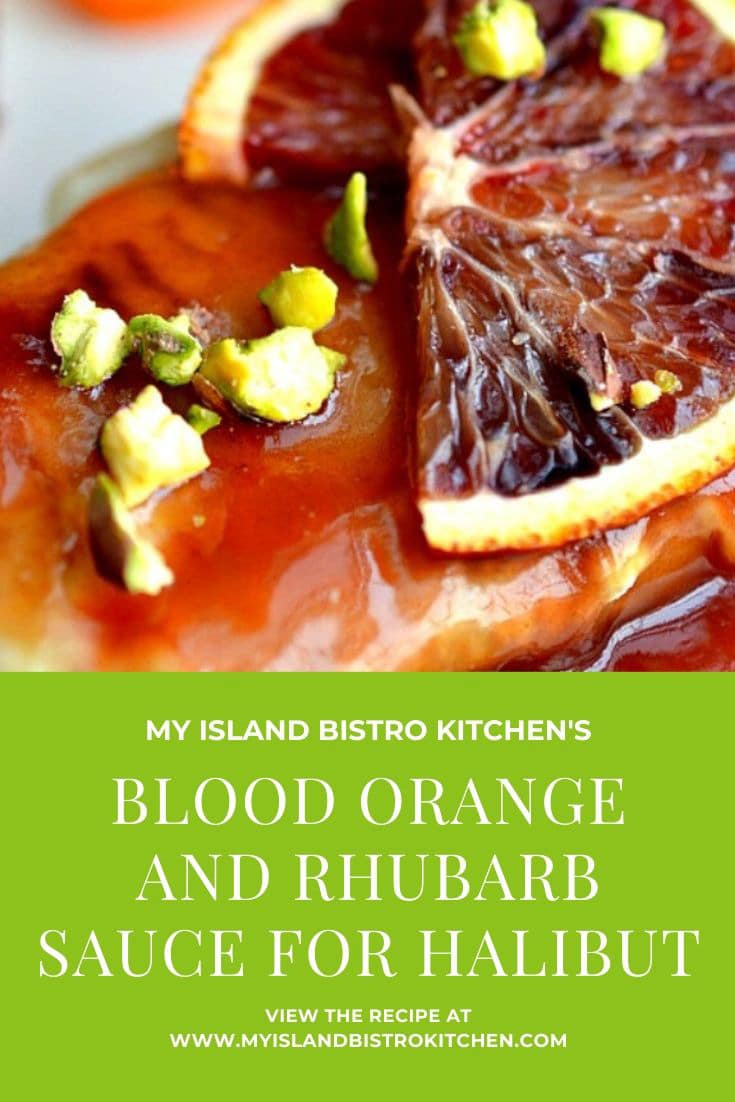
I love the rich red-colored sauce as a contrast to the white fish. I hope you enjoy.
Blood Orange and Rhubarb Sauce for Halibut Steaks
Ingredients:
1 cup rhubarb, fresh or frozen, chopped into 1/2″ pieces 2 tbsp sugar ¼ cup water
Juice of 2 blood oranges (about 2/3 cup juice)
1 tbsp butter 1 shallot, finely minced (about ¼ cup or a little less) 1 clove garlic, finely minced 1 tbsp balsamic vinegar 1 tbsp pomegranate molasses 2 tsp liquid chicken bouillon concentrate mixed in ½ cup hot water 1½ tsp blood orange zest ¼ tsp sage ¼ tsp ginger 1½ – 2 tsp cornstarch mixed in 1 tbsp cold water to make thickening paste
Method:
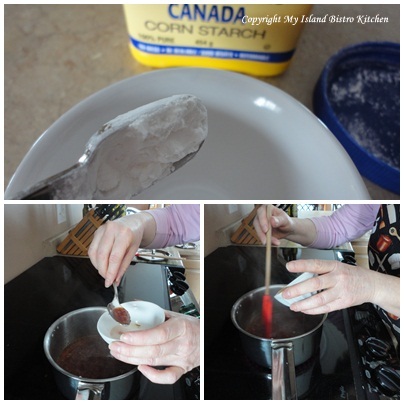
In saucepan, place the rhubarb, sugar, and ¼ cup water. Cook over medium-low heat for about 10 minutes, until rhubarb has softened. Push the rhubarb through a sieve to release the juice. You should have about 1/3 cup of rhubarb juice. Discard rhubarb pulp. Set juice aside.
Meanwhile, grate 1 1/2 tsp zest from one blood orange. Squeeze juice from 2 medium-sized blood oranges and strain through sieve to remove any pith and stones. In small saucepan, over medium-low heat, reduce the orange juice to about half. You should have about 1/3 cup of juice after this process.
In clean saucepan, melt the butter and sauté the shallot and minced garlic for 3-4 minutes until shallot is translucent.
Add the rhubarb and orange juices, balsamic vinegar, pomegranate molasses, chicken stock, orange zest, sage, and ginger. Bring to a boil over medium-low heat.
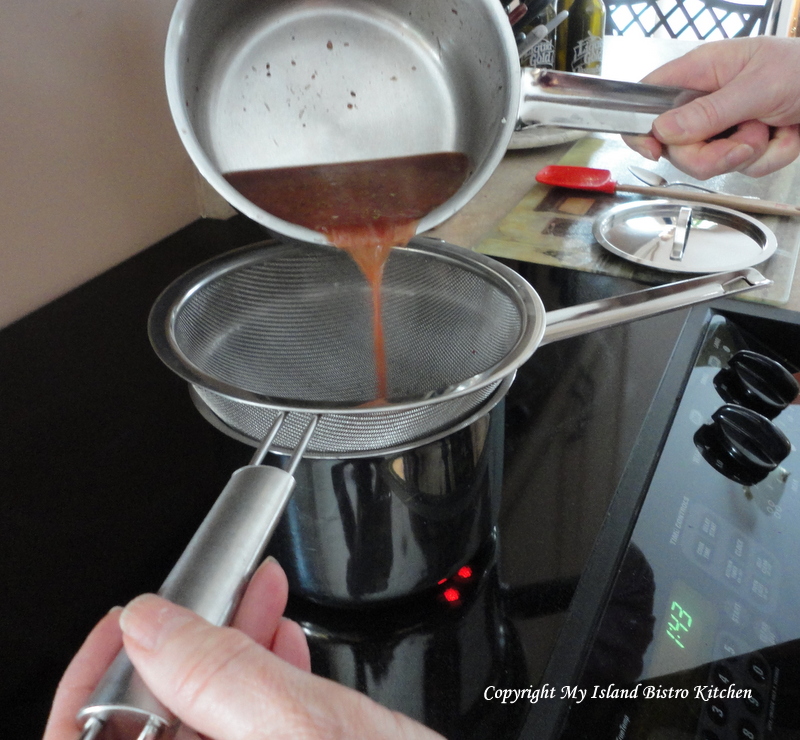
Remove from heat and strain through fine sieve into clean saucepan to remove any pieces of garlic and onion. This will make a clean, smooth sauce. Return mixture to low heat.
Mix cornstarch with water to make a paste. Add about 1 tbsp of the hot liquid from the sauce to temper the paste so it will not go lumpy when added to the hot mixture. Add to saucepan mixture and stir or whisk until thickened to consistency desired.
Makes enough sauce for 3-4 servings.
To serve:
Pan-sear or oven-bake halibut steaks till fish flakes easily. Plate the fish and pour 1-2 tbsp sauce over each steak. Garnish with chopped pistachio nuts, if desired, and blood orange slices.
I served the fish with a medley of yellow, red, and blue herb-roasted miniature potatoes, steamed carrots and turnip, and paired this meal with Beringer’s Chardonnay (CA).
Blood orange juice and rhubarb combine their flavors to make a wonderful sauce for white fish such as halibut.
Course Main Course
Keyword fish, seafood
My Island Bistro KitchenBarbara99
Ingredients
1cuprhubarb, fresh or frozen, (chopped into ½“ pieces
2tbspsugar
¼cupwater
Juice of 2 blood oranges (about 2/3 cup juice)
1tbspbutter
1shallot, finely minced (about ¼ cup or a little less)
1clovegarlic, finely minced
1tbspbalsamic vinegar
1tbsppomegranate molasses
2tspliquid chicken bouillon concentrate mixed in ½ cup hot water
1½tspblood orange zest
¼tspdried sage
¼tspground ginger
1½ - 2tspcornstarch mixed in 1 tbsp cold water to make thickening paste
Instructions
In saucepan, place the rhubarb, sugar, and ¼ cup water. Cook over medium-low heat for about 10 minutes, until rhubarb has softened. Push the rhubarb through a sieve to release the juice. This should yield about 1/3 cup rhubarb juice. Discard rhubarb pulp. Set juice aside.
Meanwhile, grate 1½ tsp zest from one blood orange. Squeeze juice from 2 medium-sized blood oranges and strain through sieve to remove any pith and stones. In small saucepan, over medium-low heat, reduce the orange juice to about half. This should yield about 1/3 cup of juice after this process.
In clean saucepan, melt the butter and sauté the shallot and garlic for 3-4 minutes, until shallot is translucent. Add the rhubarb and orange juices, balsamic vinegar, pomegranate molasses, chicken stock, orange zest, sage, and ginger. Bring to a boil over medium-low heat. Remove from heat and strain through fine sieve into clean saucepan to remove any pieces of garlic and onion. This will make a clean, smooth sauce. Return mixture to low heat.
Mix cornstarch with water to make a paste. Add about 1 tbsp of the hot liquid from the sauce to temper the paste so it will not go lumpy when added to the hot mixture. Add to saucepan mixture and stir or whisk until thickened to consistency desired.
Recipe Notes
Yield: Makes enough sauce for 3-4 servings.
To serve:Pan-sear or oven-bake halibut steaks till fish flakes easily. Plate the fish and pour 1-2 tbsp sauce over each steak. Garnish with chopped pistachio nuts, if desired, and blood orange slices.
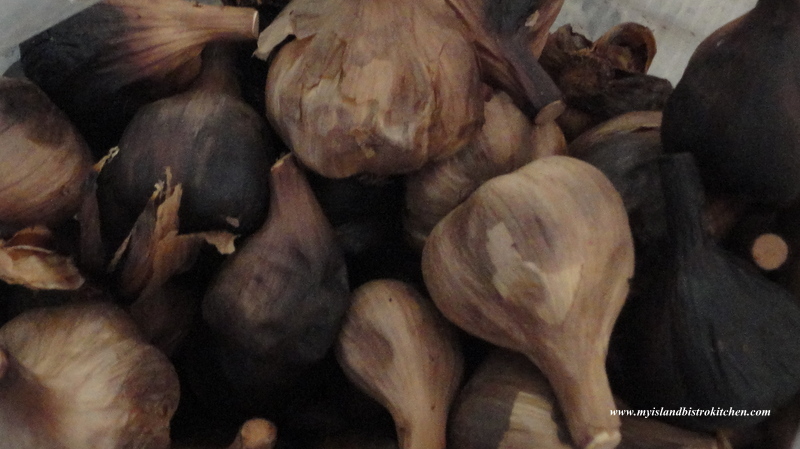
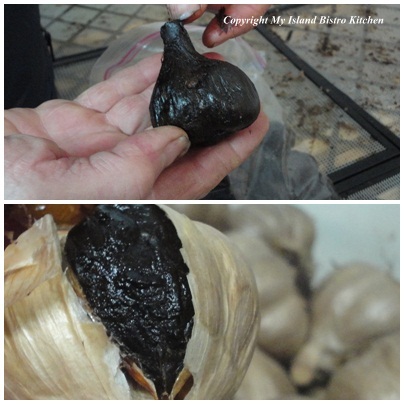
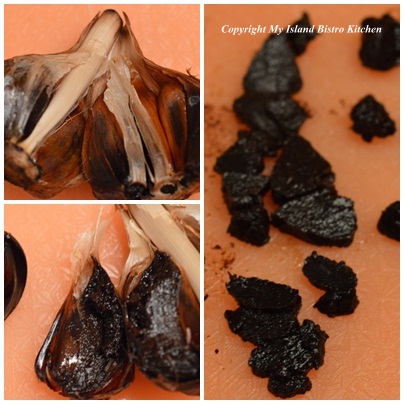
Ever heard of black garlic? What do you think of when you hear the term?
Fermented Black Garlic Bulbs
Black garlic is not a variety of garlic grown. Rather, it is regular garlic bulbs that have gone through a fermentation process. Fermenting garlic to turn it into black garlic is truly food transformation. I say that because black garlic in no way tastes, looks like, or has the same consistency as the traditional hard white garlic we use to give garlic flavour to dishes.
To find out more about black garlic, I travelled to Kensington, PEI, where I paid a visit to garlic grower, Al Picketts, of Eureka Garlic.
Eureka Garlic, Kensington, PEI
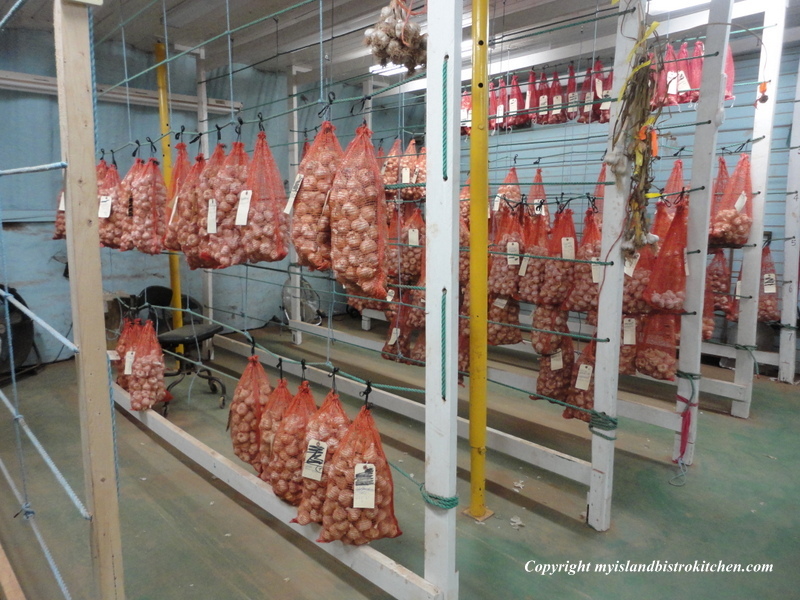
Al has been growing garlic for 12 years. In 2012, he grew 42,000 plants and this year, with the cloves already in the ground since October, Al has increased his crop to 46,380 plants which will be harvested in July-August, 2013. He grows eight types of garlic and 78 varieties in those types. Yes, Al knows a thing or two about garlic!
Garlic Bulbs Drying
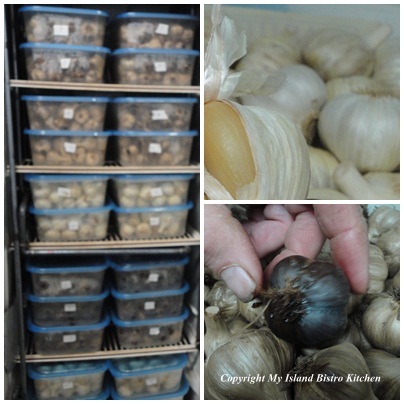
Al’s main business is in selling seed garlic but, in November, 2011, he began the fermentation process to turn garlic into black garlic. Al has been working with the Bio Food Tech Center in Charlottetown as he perfects his fermentation process and product. While Al keeps his exact fermentation process a carefully-guarded secret, he did show me a recycled refrigerator that he insulates well, heats with a water heater, and uses as an incubator of sorts for the fermentation process.
Incubator for Fermenting Black Garlic
Inside this incubator are stacks of covered plastic storage boxes containing hundreds of garlic bulbs fermenting. He tells me it takes about three weeks in controlled temperature for the fermentation to occur. The top right photo below shows a garlic bulb in the early stages of fermentation and the one in the lower right photo is a completely fermented bulb. The photo on the left below shows different colored bulbs in the plastic containers; these are bulbs at different stages of the fermentation process as they change and deepen in color.
Black Garlic in Various Stages of Fermentation
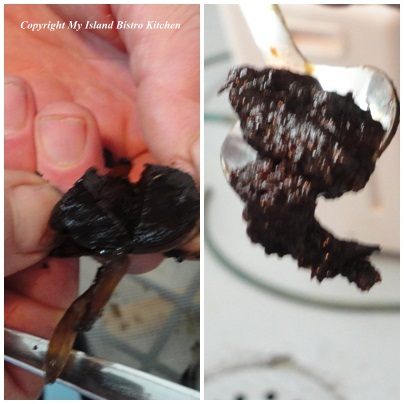
When fermented, the cloves will be a dark chocolate brown color – almost black — and very soft. This is not the kind of garlic you could put through a garlic press and it does not mince well. But, oh, it does have its own unique flavour! The cloves can be carefully sliced or mashed with a fork and added to recipes.
Black Garlic Bulb and Clove
When Al offered me a taste of the black garlic, straight up, I must admit I was trying to prepare my tastebuds for a somewhat pungent, strong garlic flavour. But, one of the most surprising things about black garlic is the taste. I would describe it as somewhat sweet, no discernible garlic taste, and being a cross between a prune and a fig in taste, color, and texture. So, if you are looking to use it as you would regular garlic, don’t expect any garlic flavour in the dish as black garlic has a sweet, fruity taste. Black garlic, however, brings its own unique subtle flavour to dishes like soups, sauces, and seafood and is often used in Asian cooking. The black color does not change when cooked so you need to prepare for that color in your dish. There are not a lot of black foods and some might suggest they would not be appetizing. However, I find the contrast of the black garlic on white fish, for example, to be quite dynamic and appealing.
Black Garlic Color and Texture
Black garlic is a relatively new local food item and the jury is still out as to whether it is a food fad or if it may well become a food trend. Could it be garlic’s new cavier? Promoters claim it may be the next superfood, citing its health benefits — it reportedly boasts twice as many antioxidants as raw garlic. That said, I couldn’t find any scientific research studies completed on black garlic that would state conclusively what its specific health benefits are.
So, if it doesn’t taste like garlic why, then, use it? I would say because it offers another flavouring and complexity to many dishes. I have used it on pizza and in seafood dishes and I plan to try it next with pork.
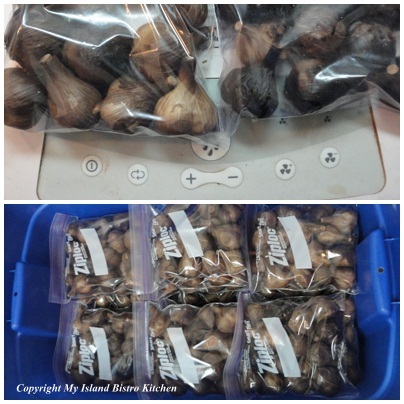
Al tells me that black garlic can be stored at room temperature – no refrigeration required – for several months. He says it can also be stored in the freezer and, when you want to use it, just remove as many cloves as needed and mash them with a fork or slice them with a knife – there is no need to thaw them first.
Al sells his black garlic for $30/pound. On Prince Edward Island, it is available directly from Al at his farm “Eureka Garlic” on the corner of Routes 2 and 233 in Kensington (902)836-5180.
Black Garlic Packaged for Sale
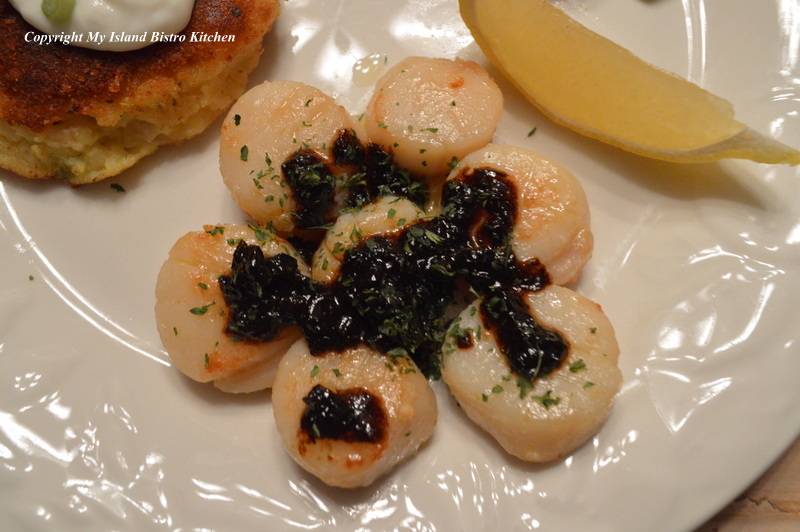
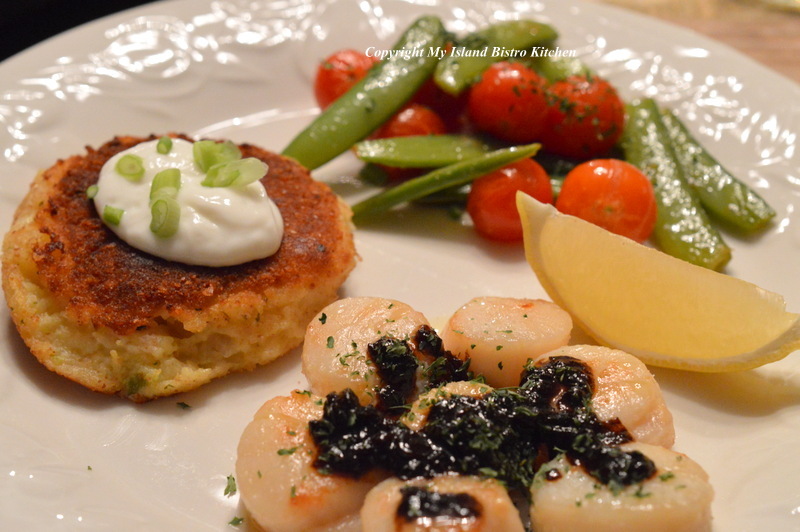
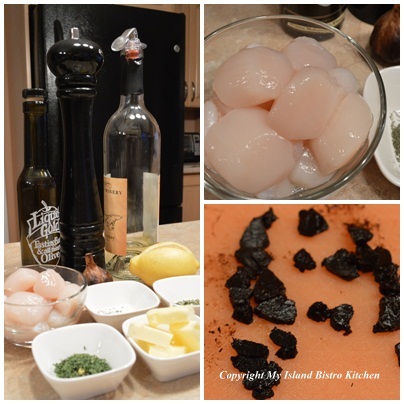
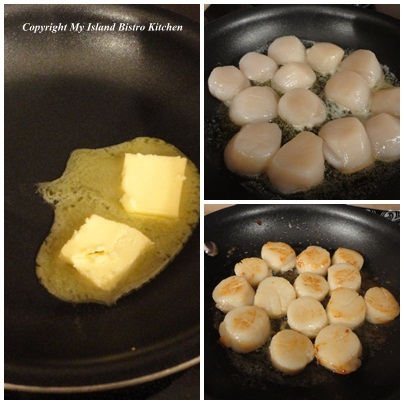
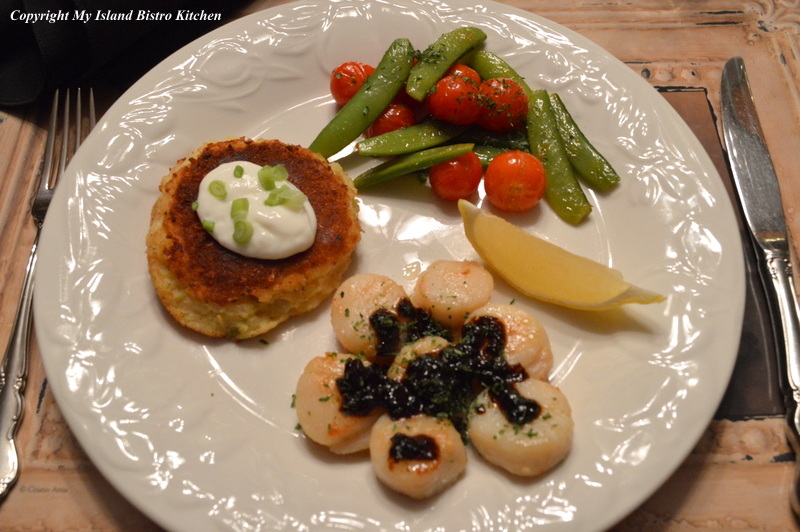
As you know, when I visit a local producer, I bring home their product and make a recipe featuring the food item. The recipe below, for scallops, is how I used black garlic with seafood and I found the result really tasty (yes, I’ve made this dish more than once already!). The black garlic does not mask the scallop flavour and yet it accents the seafood well. This recipe serves two.
Black Garlic on Fresh Scallops
Scallops in Black Garlic
14 scallops
3 T butter
Fresh ground pepper
4 cloves black garlic, sliced
¼ cup white wine
½ T balsamic vinegar
1 tsp freshly squeezed lemon juice
1 tsp dried chives
Pinch dillweed
1 tsp parsley
Ingredients
Melt 2 T butter in small skillet. Over medium-high heat, sear the scallops 2-3 minutes per side until lightly golden in color. Transfer scallops to plate and keep warmed.
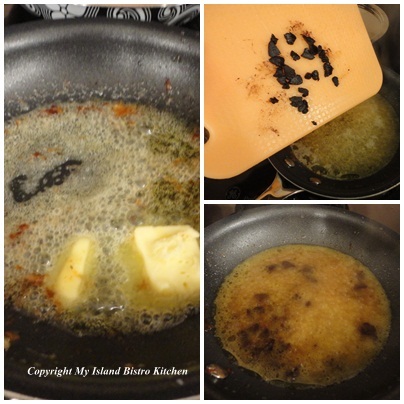
Searing ScallopsBlack Garlic
Add 1 additional tablespoon of butter to skillet. Add the black garlic and sauté for 30-45 seconds. Add pepper to taste. Add white wine, balsamic vinegar, and lemon juice. Stir over medium-low heat 1-2 minutes until sauce reduces. Add herbs and heat for about 30 seconds.
Adding Black Garlic
To serve, plate the warm scallops and spoon the black garlic sauce over the seafood. Serve with potato or rice and a side of vegetables.
Serves 2
Scallops with Black Garlic Served with Potato Cake and Vegetables
Thank you for visiting “the Bistro” today. There are lots of ways to connect with “the Bistro” through social media:
Join My Island Bistro Kitchen on Facebook Follow the Bistro’s tweets on twitter @PEIBistro Find the Bistro on Pinterest at “Island Bistro Kitchen” Follow along on Instagram at “peibistro”
On my last day of summer vacation, I went to boot camp – culinary boot camp, that is — at the Culinary Institute of Canada in Charlottetown, PEI. Sixteen people formed the group for the full day “Island Flavours” boot camp. We were a mixed group that came from PEI, Halifax, NS, Montreal, QC, and Waterloo, ON. It was a packed day of activity (and work!) but it was fun!
Now in their 4th year of operation, the boot camps (which started as a pilot project), are offered from May to October. Some are one-half day events while others are full day camps. A variety of bootcamps are offered that include half-day events such as Healthy Eating 101 and Chocolate and Wine. Full day boot camps include Lobster 101, Local Flavours, Seafood 101, Thrills on the Grill, and Seasonal Desserts. Half day camps start at $129 + GST/per person and full days range from $199 to $269 + GST/per person.
Asked why the Culinary Institute, a teaching school for training professional chefs, started the seasonal culinary boot camps, Chef Instructor Jeff McCourt who teaches most of the camps, says the initiative began with “the onset of culinary tourism and, being a school already, they [the Culinary Institute) are fulfilling a short-term education component.” Culinary tourism is one of the latest vacation trends. Whether it is simply choosing interesting, unique, and memorable regional dining options where you are vacationing, attending foodie events (like the PEI Shellfish Festival happening in Charlottetown this weekend, for example) or food conferences, or participating in culinary boot camps at acclaimed cooking schools like the Culinary Institute of Canada, including food-related activities on holidays is a great way to sample local cuisine, try new food products, meet people who share culinary interests, and/or learn new cooking methods and techniques.
Lindsay Arsenault, Boot Camp Coordinator, says one of their most popular culinary boot camps is the Kids Camp, a 4-day summer camp where youth from ages 7-17 are taught basic life skills about food – where food comes from and how to prepare basic meals and they even move on to more advanced food preparation. In this camp, the youth also get to spend a day on a farm, plant a row of potatoes, pick seasonal berries, and then return to the kitchen to learn how to make jam. The camp concludes with the youth preparing a buffet for their parents. Since its inception, the Kids Camp has become so popular that it is not uncommon for the Institute to have waiting lists for these camps. Says 10-year old Michael MacEwen, of Tea Hill, PEI, who is a “seasoned three-year veteran” of the Kids Camp, “I go to the camp every year because it’s fun, you learn how to cook “really good food” from “real” chefs, you get a chef’s outfit, and they are happy to adjust the recipes for me to be gluten-free. I go back every year because there is always something new to learn.”
Lindsay tells me the boot camps are gaining a positive reputation as shore excursions for cruise passengers visiting the port of Charlottetown. Currently, Oceania and Regent Seven Seas cruise lines have started offering the Boot Camps as shore excursions for passengers. The Culinary Institute has customized their boot camps to accommodate cruise ship visits and time lines. This is a wonderful opportunity for those passengers to taste authentic Island food, experience the Culinary Institute and cooking in a professional atmosphere, and go home with great Island recipes as a souvenir of their PEI port visit. As someone who is a frequent cruiser and a foodie, I know this is one shore excursion that would match my tastes! I also learned, from Lindsay, that some organizations have taken their employees to the Culinary Institute and used the boot camps as team building events. Now, that’s an innovative (and fun) way to bring work teams together!
Attending culinary boot camp is also an opportunity to explore future career options. At the boot camp I attended, a dad from Montreal brought his Grade 11 daughter to the Island specifically to attend a couple of boot camps as she is planning a career as a chef. This opportunity allowed her to experience a large industrial-sized teaching kitchen, work alongside a professional chef, and to decide if this is the cooking school she might attend full time when she finishes high school. The day before this boot camp, Alison and her dad, Stephen, spent a day with the chef. This is essentially a customized day of personalized attention where the participant(s) work with the chef on a particular subject of their choosing – in Alison and Stephen’s case, they chose to focus on preparing seafood. Alison’s comments after her culinary experience were very positive and there was no question that she thoroughly enjoyed it.
The boot camps can accommodate a maximum of 16 participants and Lindsay tells me that, on average, their boot camps are comprised of 50/50 Islanders and tourists. On the day I attended, we had a number of family groups participating – Alison and her Dad, Stephen, from Montreal, the six-member Simmons/Tummon family from Waterloo, ON, who were back for their second boot camp in as many years, and a mom (Debbie) and her son (Anthony) from Charlottetown. Debbie told me this boot camp was her Christmas gift to her son and she decided to join him for the day in what was her sixth boot camp in three years. Asked why she had enrolled in six boot camps, Debbie said, “it allows me to try different things. I probably wouldn’t have made the food we made in the camp if I found them in a recipe book but, after participating in the culinary boot camps, I am more inclined to be more venturesome in cooking.” The Simmons/Tummon family – mom, dad, two sons and two daughters aged 15-22, told me their attendance was a Christmas gift from an Island relative (neat idea). Dad, Shawn, told me they enjoy the camps – “the girls like to cook and the boys like doing different things”. I thought it was fabulous to see these families spending quality time together, enjoying themselves, and learning different cooking techniques. Two other women drove from Halifax, NS, specifically to take this boot camp as an extended weekend get-away.
So, now I’m going to share with you my impressions after attending the full day offering of “Local Flavours”, a new boot camp for 2012. For those of you regularly following my blog, you’ll figure my choice of “Local Flavours” was an obvious one given my blog focuses primarily on Island food products.
The focus of the “Island Flavors” boot camp is on cooking with ingredients that come from the land as well as the waters around PEI. After dividing the 16 participants into four groups and assigning each group their recipes, the day started out with participants boarding a small tour bus, along with Chef Instructor Jeff McCourt, to go on a shopping expedition for ingredients for the recipes to be made later in the day.
The Culinary Institute of Canada, Charlottetown, PEI
Chef McCourt handed each group $15 to buy fresh produce to enhance the recipes (note the main ingredients – fish, meat, cream, butter, etc., were all provided by the Culinary Institute and included in the boot camp fee). Heading along historic Water Street and passing over the Hillsborough Bridge to Stratford, our first stop took us to Balderston’s Farm Market.
Balderston’s Farm Market, Stratford, PEI
Participants deliberated over what fresh produce to buy and, once selections were made, everyone was back on the bus and on the way back across the Bridge to the Riverview Country Market which sells both fresh produce and meats. More purchases were made.
Riverview Country Market, Charlottetown, PEI
The last stop was at the Liquid Gold Tasting Bar and All Things Olive shop on lower Queen Street where everyone enjoyed tasting the many different kinds of imported quality olive oils and balsamic vinegars. Yes, more purchases!
Liquid Gold Tasting Bar and All Things Olive, Charlottetown, PEI
Back at the Culinary Institute, participants were outfitted in their official Culinary Boot Camp chef jackets and hats and then it was downstairs to the large kitchen facility. Each group assembled and started making their assigned recipes.
Getting Outfitted with Chef Jackets
Participating in this kind of culinary activity gives participants the opportunity to see and work inside a huge, industrial-sized kitchen. And, I think some of my Paderno stock pots and pans are huge – un-huh – the Culinary Institute has pots so large that they are on floor stands – they make my pots look like little measuring cups! There was one frying pan that I declare was at least three times the size of my largest one! I wondered if I’d need a hydraulic lift to move it!
The Teaching Kitchen at the Culinary Institute of Canada, Charlottetown, PEI
The day was long but passed by very quickly because it was so busy. Each group was intent on their work. This is very much a hands-on culinary event. Don’t expect to sit back, relax, and be entertained by watching someone demonstrate how something is done. Ah, no. You work in these boot camps! It’s learning by doing. That said, there were times throughout the day that Chef McCourt did gather all participants around for specific demonstrations – for example, he showed how to butcher a 30-pound halibut and how filleting is done and steaks cut. Both Chef McCourt and his assistant, Colleen Neilly, were very accommodating and answered any questions participants had and were very willing to show participants how to do things.
Chef Jeff McCourt Demonstrates How to Butcher a Halibut and Cut it into Steaks and Fillets
The basic recipes were provided but participants had the creative flexibility as to how they wanted to “dress them up”. For example, our group opted to prepare the halibut with a Cajun blackened spice rub and plate it over grilled yellow tomatoes and red peppers (bought at Balderston’s earlier in the morning), served alongside herb-roasted beets and chopped Chorizo sausage (purchased at Riverview Country Market). The recipes our group made were Potato and Lobster Cakes, Broiled Oysters (yes, I had my first oyster – but not raw!), Pan-fried Halibut, and Vienna Truffle Tortes (that we dressed with blueberries from Balderston’s).
Potato and Lobster Cakes – One of the Recipes Made During “Local Flavours” Culinary Boot Camp
I found it particularly interesting to visit the other groups around the kitchen and to watch how they chose to prepare their assigned dishes. At the end of the day, we had to plate and present our dishes and spread them out altogether in buffet style. It was simply astonishing and amazing to see the superb quality of the finished products that looked (and tasted) so professionally prepared.
Vienna Truffle Tortes with Fresh PEI Wild BlueberriesBroiled Oysters with Mignonette – One of the Recipes Participants Make During the “Local Flavours” Boot Camp at The Culinary Institute of Canada
Then, it was time to sample the fruits of our labour. After filling our plates, it was upstairs to the Lucy Maud Dining Room to enjoy our meal in style. The Lucy Maud Dining Room is the Culinary Institute’s teaching restaurant and it has one of the most commanding water views as it is situated just at the entrance to the Charlottetown Harbour.
This was simply a fabulous day and experience. For the foodie and at-home chef, this is a rare opportunity to work alongside a professional chef in a large, fully-equipped kitchen (yes, their walk-in refrigerators are as large as my walk-in clothes closet!) and learn food preparation techniques from the professionals. At the end of the boot camp, participants walk away with a monogrammed boot camp chef’s jacket to keep, a booklet of recipes that were prepared during the day, great memories of a busy yet fun day, and inspiration and motivation to try new ways of preparing ordinary local foods.
A Sampling of Dishes Made During “Local Flavours” Culinary Boot Camp
So, whether it’s a treat for yourself, a gift for those hard-to-buy-for folks who happen to be foodies (I’m thinking what a great wedding present one of these camps would be for newlyweds), an innovative team-building activity for your work group, or an activity to do with a group of friends or family members, a one-half or full day at the Culinary Institute’s boot camps is a great food activity and a sure way to have a memorable time. Oh, and the extraordinary buffet meal as the finale is pretty darn good, too!
Wonderful Dishes Made with Fresh PEI Products During “Local Flavours” Culinary Boot Camp
Still can’t get over the fact that we accomplished all this in one day!
The Finale Buffet at the end of the day at the “Local Flavours” Culinary Boot Camp
What a feast!
“Local Flavours” Finale Buffet – Culinary Boot Camp
And, it all tasted so incredibly good!
“The Fruits of the Labour” – Buffet at the conclusion of the “Local Flavours” Boot Camp at the Culinary Institute of Canada
For more information about the Culinary Institute of Canada’s boot camps, visit their website at https://www.hollandcollege.com/bootcamps/bootcamps/culinary/full-day-camps.
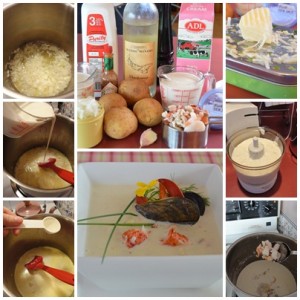
To whet your appetite, below is a sample of the kind of recipes participants experience cooking in one of these boot camps – this one from the “Local Flavours” boot camp. Shared here, with the kind permission of the Culinary Institute of Canada’s Boot Camps, is the recipe for Chef Jeff’s Seafood Chowder. This is a dandy chowder that has won awards at the PEI Shellfish Festival (and Lindsay tells me, more than once it has won!). This makes a very large pot of chowder but the recipe is easily halved or quartered as I did when I made it at home. The wonderful thing about seafood chowder is that it can be served as an appetizer in a smaller portion or, with a larger serving, as a main meal because most chowders are quite filling – and this one certainly is! The other great thing about seafood chowder is that, so long as you make up your quantity, you can use any selection of seafood you like and leave out any you do not care for. When I made the recipe at home, I didn’t have any Vermouth so I substituted Chardonnay which worked out fine. The other thing I would caution is to start “gently” with the Tabasco Sauce using only a few drops of it, then taste it and add more (if necessary) to your liking as, using too much of this hot sauce can quickly spoil a chowder beyond repair.
Jeff’s PEI Seafood Chowder
Jeff's PEI Seafood Chowder
By Barbara99 Published: September 16, 2012
Yield:12 Servings
Prep:30-45 mins
Cook:30-45 mins
Ready In:60 mins
A smooth, creamy,and tasty seafood chowder filled with a variety of seafood.
In a hot pot, add the butter and onions. Sweat mixture until translucent. Add garlic and continue to saute until golden brown.
Add the potato, Vermouth, milk, and cream. Cook over medium heat, careful not to scorch the bottom, for approximately 20 minutes until the potato is cooked.
Puree the chowder base in a blender and season with salt and pepper. Return mixture to pot.
Use desired seafood and retain all juice from its cooking process. Add to the chowder base.
Add the diced, cooked potato for texture and season again. Serve and garnish with chopped chives.
It’s late August and wild blueberry season on PEI. These wonderful little indigo-colored berries grow wild in certain parts of the Island – in particular, in the Tignish area in the Western part of the Province and in the Morell-St. Peter’s area in the Eastern end of PEI. While it may be wild blueberry season for most people, for the folks at PEI Juice Works Ltd. which produce wild blueberry juice, it’s wild blueberry season year-round. Today, I’m in Bloomfield, near Alberton, PEI, in the Western part of the Island, visiting the PEI Juice Works Ltd. production plant. My tour guide for the day is Ryan Bradley, Vice-President of Sales and Marketing.
Juice Works Logo
Fresh PEI Wild Blueberries Arrive on PEI Juice Works Ltd.’s Loading Dock…ready to be processed into Wild Blueberry Juice
As I arrive mid-morning, a local farmer from Tignish, about a half hour away, has just arrived with a truckload of fresh wild blueberries for processing and is backed up to the loading dock unloading large containers of berries. One taste of these sweet little wild blueberries and there is no comparison to the larger cultivated ones that, while they have great presentation, I find so often lack flavour. No doubt about it, wild blueberries are tastier and sweeter than the cultivated high bush variety and, as an added bonus, they also have a much higher antioxidant profile.
Crate of Wild Blueberries, Fresh from the Field
PEI Juice Works Ltd. began producing juice from wild blueberries just two years ago when four shareholders from the agricultural sector decided to do something with the wild blueberries growing in their area to add value to them other than shipping them as raw food to be used or processed into a product elsewhere. The production facility is located in the Bloomfield Industrial Park just outside Alberton and presently employs seven staff year-round. The company has worked closely with Bio Food Tech in Charlottetown to develop the proprietary process PEI Juice Works Ltd. uses and Ryan tells me that Bio Food Tech set up a small scale plant in their lab to test and help PEI Juice Works Ltd. get the best wild blueberry juice product possible. The food production industry is heavily regulated and food safety standards are strictly adhered to by PEI Juice Works Ltd. In fact, on my visit, I could only view their production facility from a window as only authorized personnel are allowed in the room where the juice is being produced.
PEI Juice Works Ltd. Production Facility and Test Kitchen
Two Flavours of PEI Juice Works Ltd. Wild Blueberry Juice
Currently, the company produces two flavour blends of their signature wild blueberry juice – Wild Blueberry and Tart Cherry and Wild Blueberry and Rhubarb. Ryan tells me that their most popular flavour is Wild Blueberry and Tart Cherry (and it’s my favourite, too!). He tells me there is over one pound of wild blueberries in every 375ml bottle they produce and the product contains no preservatives – so it is the goodness of an all-natural product! When you think of how small the low bush wild blueberries are, that’s a lot of blueberries! Their product comes in one-size, a 375ml bottle, that has a two-year shelf life, unopened. After opening, the product will maintain its quality for about three weeks, refrigerated. Ryan tells me the juice can be drunk cold or at room temperature but he says the flavour will be more intense if it is consumed cold. PEI Juice Works Ltd. recommends a daily serving size of 2 oz/60ml of the wild blueberry juice which is about ¼ cup. Following this recommended serving, one 375 ml bottle will last you just about a week.
Wild Blueberry JuiceRecommended 2oz/60ml Serving Size of Wild Blueberry Juice Per DayPEI Juice Works Ltd. Warehouse
To the extent possible, PEI Juice Works Ltd. uses local product. In this way, it provides a ready market for local Island wild blueberry growers. In the off-season, PEI Juice Works Ltd. buys its supply of wild blueberries from a sorting facility to which local growers have sold their crops and where the berries have been quick frozen. So, how is wild blueberry juice made? Ryan tells me PEI Juice Works Ltd. uses an ancient European process that was originally developed by Mennonites in Eastern Europe over 100 years ago. This involves a heat process to break down the skin membrane of the wild blueberries that will release the dark, rich pigments that give the juice both its color and flavour. The solids are then separated and filtered out and the blending of other fruits – either the cherries or rhubarb – then occurs. For consumer safety, the product is pasteurized and bottled, hot, which gives it its two-year shelf life.
Currently, the juices are sold in all four Atlantic Provinces (check the “Where to Buy” section of the PEI Juice Works Ltd. website for locations in those areas) and the 375ml bottles retail for around $10. each. However, no worries if you are not in the Atlantic Provinces because, through FoodiePages, you can now order PEI Juice Works Ltd. products online. The company is currently exploring markets around the world and have participated in trade shows and trade missions at home and farther afield. In February, 2012, they attended a food show in Japan and, in March, were at the Canadian Health Products Show in Vancouver, BC. In September, they are travelling to China as part of the PEI Premier’s trade mission.
The farmer delivering the wild blueberry shipment to PEI Juice Works Ltd. on this day graciously agreed to allow me to follow him to his blueberry field to see how they harvest the crop because I think it is important to see where our foods come from and how they are harvested.
Wild Blueberry Harvesting Process
I learned a fact I did not know before and that is that a wild low bush blueberry field will only yield a maximum harvest every second year so the field they are harvesting today will not be harvested again until the year after next. Wild blueberries, of course, cannot be planted so are completely dependent on Mother Nature as to where the wild blueberry barrens are and the fruit they yield. I asked if, this year being a very dry year on the Island with very little rain, provided good growing conditions for wild blueberries. The farmer told me that it is not and he showed me some berries that, in fact, just dried up and did not yield useable fruit because of the dry conditions. Using the machine in the photograph above, the farmer can harvest over one acre of fruit per day. It is from this field that today’s production of PEI Juice Works Ltd. wild blueberry juice is being made. It doesn’t get any fresher than that!
In recent years, there have been a number of studies conducted around the world with regards to the health benefits of wild blueberries, often dubbed a superfruit, which have steadily been gaining a reputation for their health benefits. Wild blueberries are low in fat and sodium and provide a good source of fibre and both Vitamins C and K. While research and testing on the health benefits of wild blueberries continue on an ongoing basis, the berries and their products, such as wild blueberry juice, are reported to have positive health benefits. High in antioxidants, wild blueberry juice is reported to have properties that may improve cognitive function, lower blood pressure and cholesterol, reduce inflammation, inhibit urinary tract infections, and combat diseases like cancer, heart disease, stroke, and memory loss. There is even some research that suggests wild blueberry juice may slow the aging process! So, with the chances of improved memory and learning functions, slowing down the aging process, and combating a number of other diseases, what’s not to like about wild blueberry juice!
Visit the Juice Works website to find out more about their blueberry juice products.
While the wild blueberry juice is wonderful to drink on its own I decided to try some recipes using the juice as an ingredient. The first recipe is for Steamed Mussels with Blueberry Vinaigrette. You can find the recipe for this appetizer on the Saltscapes magazine website. Traditionally, on PEI, we serve steamed mussels with melted butter; however, this recipe sees the mussels drizzled with a blueberry vinaigrette which can also be used as a dressing on a green garden salad or on a watermelon, goat cheese, and basil salad. For the vinaigrette, I chose PEI Juice Works’ Wild Blueberry and Rhubarb Juice and I also used PEI-produced maple syrup. Adding the syrup gave the dressing a touch of sweetness and it paired well with the mussels in the appetizer and the watermelon in the salad.
Steamed Mussels with Blueberry Vinaigrette
Steamed Mussels served with Blueberry Vinaigrette
To make the watermelon, goat cheese, and basil salad, I simply cubed watermelon, added some crumbled goat cheese, red onion, and a sprinkle of fresh basil and parsley. Since we had a bumper crop of cherry tomatoes in our garden this year, I included some of those as well. Drizzled with a wild blueberry vinaigrette, this is a refreshing and colorful summer salad.
Watermelon, Goat Cheese, and Basil Salad Drizzled with a Wild Blueberry Vinaigrette
My third recipe is one I developed — a Blueberry Juice Sangria (recipe follows).
My Island Bistro Kitchen’s Blueberry Sangria
I hope you will try PEI Juice Works Ltd. wild blueberry juices. They are a tasty product, good for you, and made right here in Prince Edward Island. It’s a true flavour of the Island!
My Island Bistro Kitchen's Blueberry Sangria
By Barbara99 Published: August 29, 2012
Yield: (3-4 Servings)
Prep:1 hr 30 mins
A refreshing drink made with PEI Juice Works' Wild Blueberry Juice
Growing up in PEI, it was customary in our home to always have at least one “feed” of smelts sometime during the winter.
Smelts are a winter catch and, therefore, a winter meal in many households on PEI. Sport fishers set up camp on the frozen waterways around the Island. By setting up camp, I mean they haul little buildings, locally referred to as “smelt shacks” out onto the ice. It is from the ‘comfort’ of these tiny rustic shelters that they fish for smelts, typically using spears or nets, to catch the tiny fish below the ice surface. These fish are tiny, in general, measuring about 5 ”- 7” long. Continue reading Smelts – A Prince Edward Island Winter Meal→
(Mostly) PEI and Maritime Food – Good Food for a Good Life!


![Lobster Fishing Boats Filled With Their Day's Catch Returning to Port at North Lake, PEI [June 1, 2012]](https://myislandbistrokitchen.com/wp-content/uploads/2013/04/DSC04908.jpg)
![Lobster Fishing Boats, North Lake, PEI [June 1, 2012]](https://myislandbistrokitchen.com/wp-content/uploads/2013/04/page-1-Boats-in-North-Lake-001.jpg)
![Unloading the Day's Catch at North Lake Harbour [June 1, 2012]](https://myislandbistrokitchen.com/wp-content/uploads/2013/04/page-2-Boats-in-North-Lake.jpg)
![North Lake Harbour, PEI [June 1, 2012]](https://myislandbistrokitchen.com/wp-content/uploads/2013/04/DSC04926-001.jpg)


 In a hot pot, add the butter and onions. Sweat mixture until translucent. Add garlic and continue to saute until golden brown.
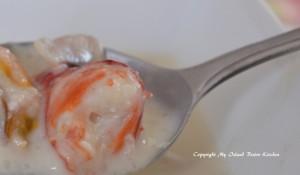 Use desired seafood and retain all juice from its cooking process. Add to the chowder base.
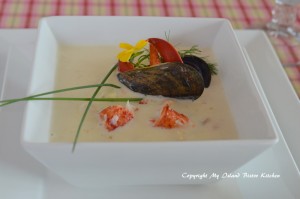 Add the diced, cooked potato for texture and season again. Serve and garnish with chopped chives.


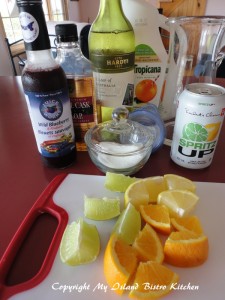 Assemble all ingredients.
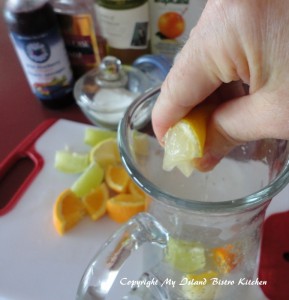 Chop lime, lemon, and orange into quarters. Into medium-sized glass pitcher, hand-squeeze fruit. Drop in the fruit. Add blueberries, if using.
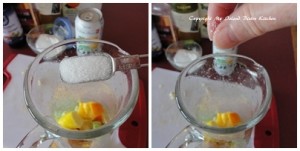 Add sugar and a small sprinkle of fine sea salt. Let sit, at room temperature, for about 30 minutes to release juices from the fruit.
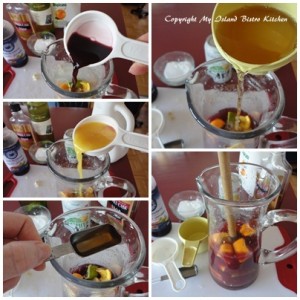 Add blueberry and orange juices, wine, and brandy. Stir. Refrigerate for at least 1 hour to chill.
 Add soda at time of serving.
 Serve chilled, over ice, in tall glasses and garnish with a slice of orange or lemon. Enjoy!