Ever wonder about the history of old vintage recipes? I so wish that accurate records existed about the origins of some of the old nostalgic recipes like the one for Queen Elizabeth Cake, for example. Continue reading Queen Elizabeth Cake Recipe

Ever wonder about the history of old vintage recipes? I so wish that accurate records existed about the origins of some of the old nostalgic recipes like the one for Queen Elizabeth Cake, for example. Continue reading Queen Elizabeth Cake Recipe

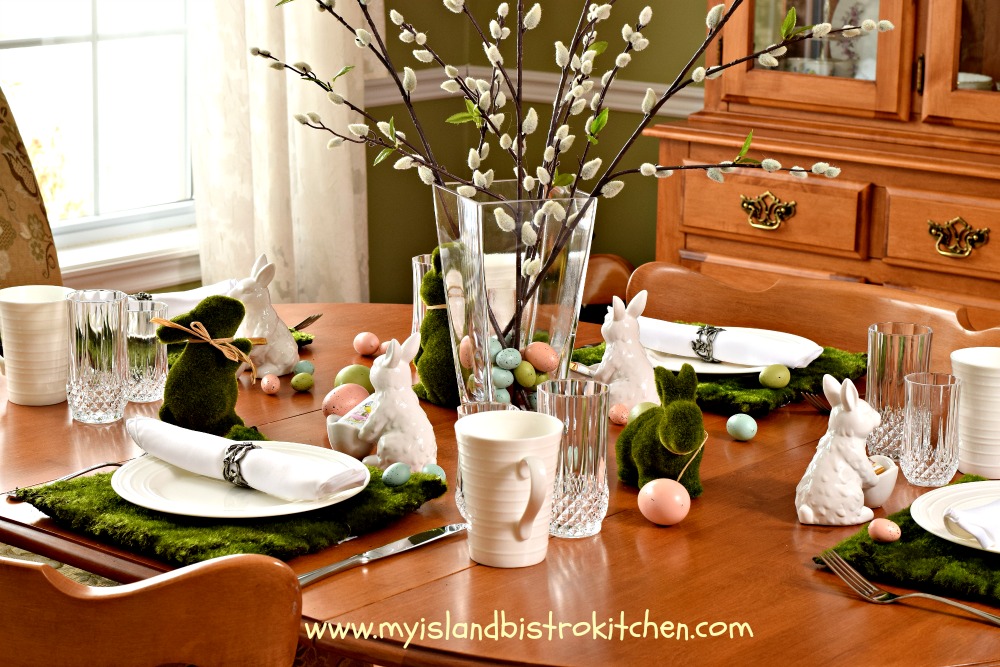
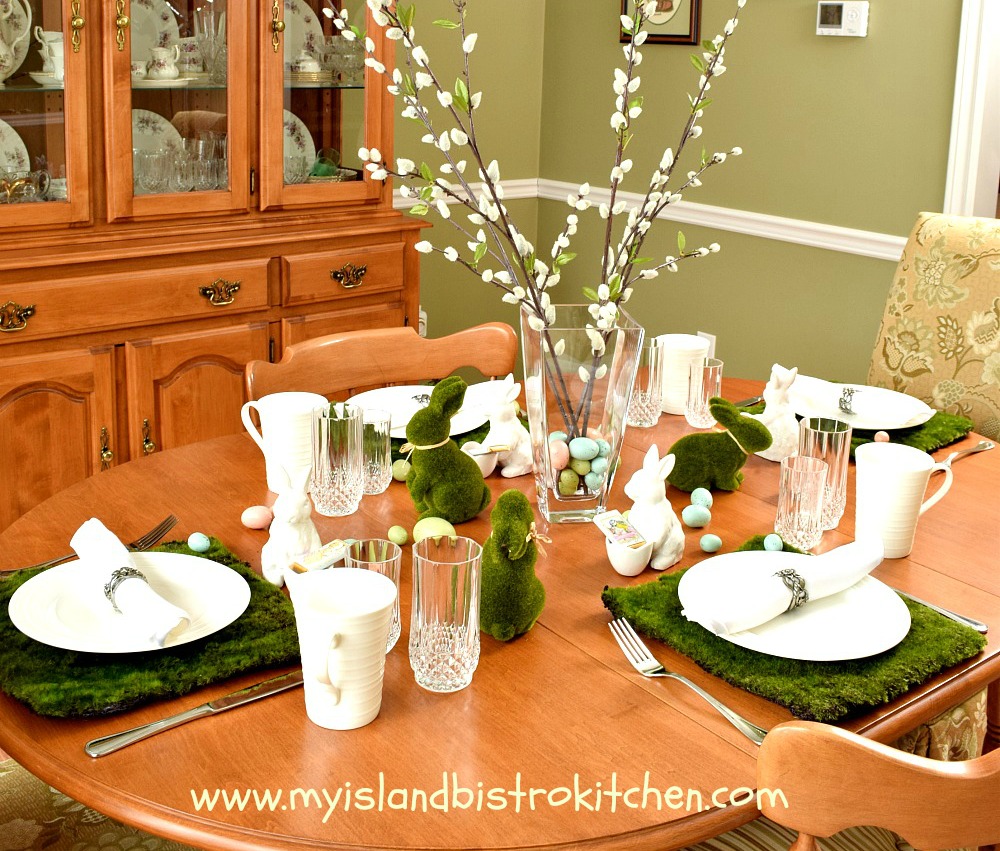
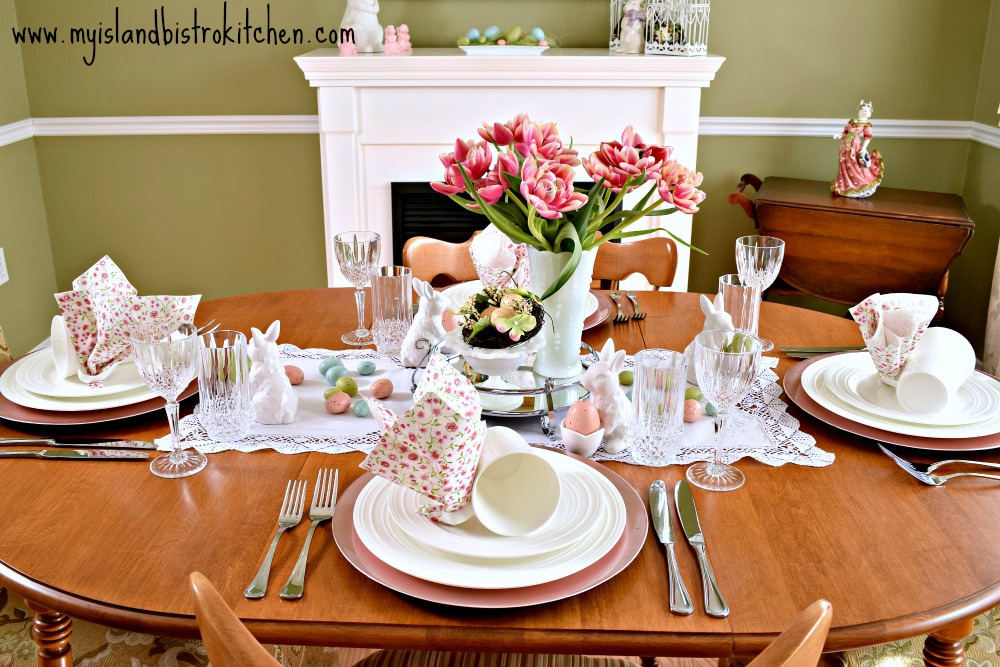
It’s all about whimsy, springtime, and bunnies in this earthy-themed tablesetting for Easter morning breakfast.
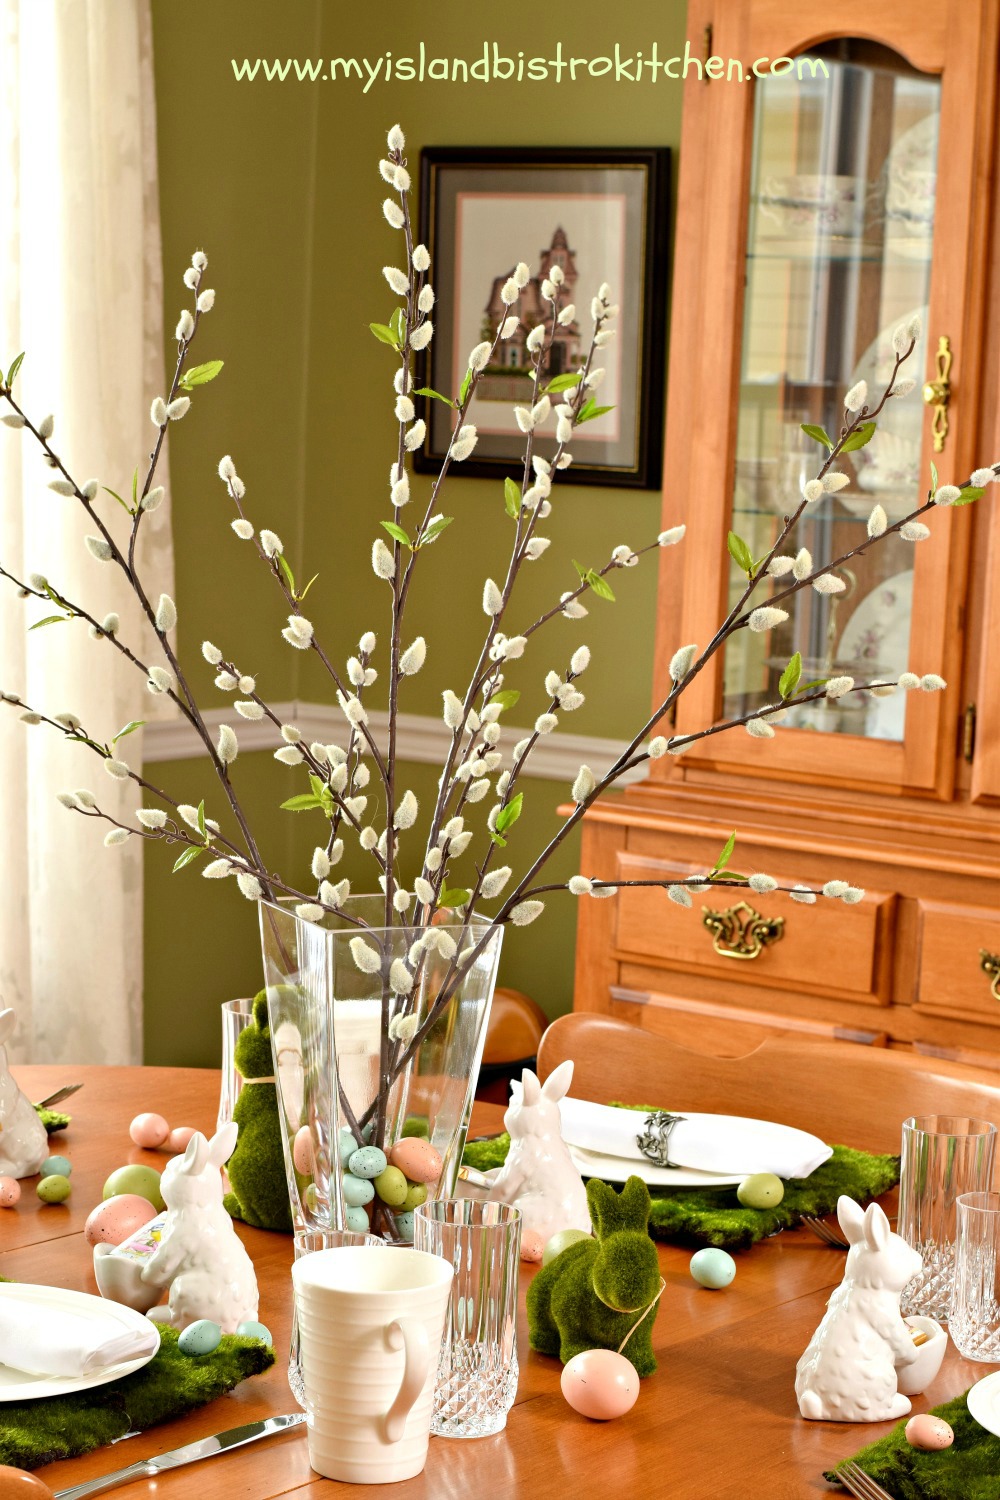
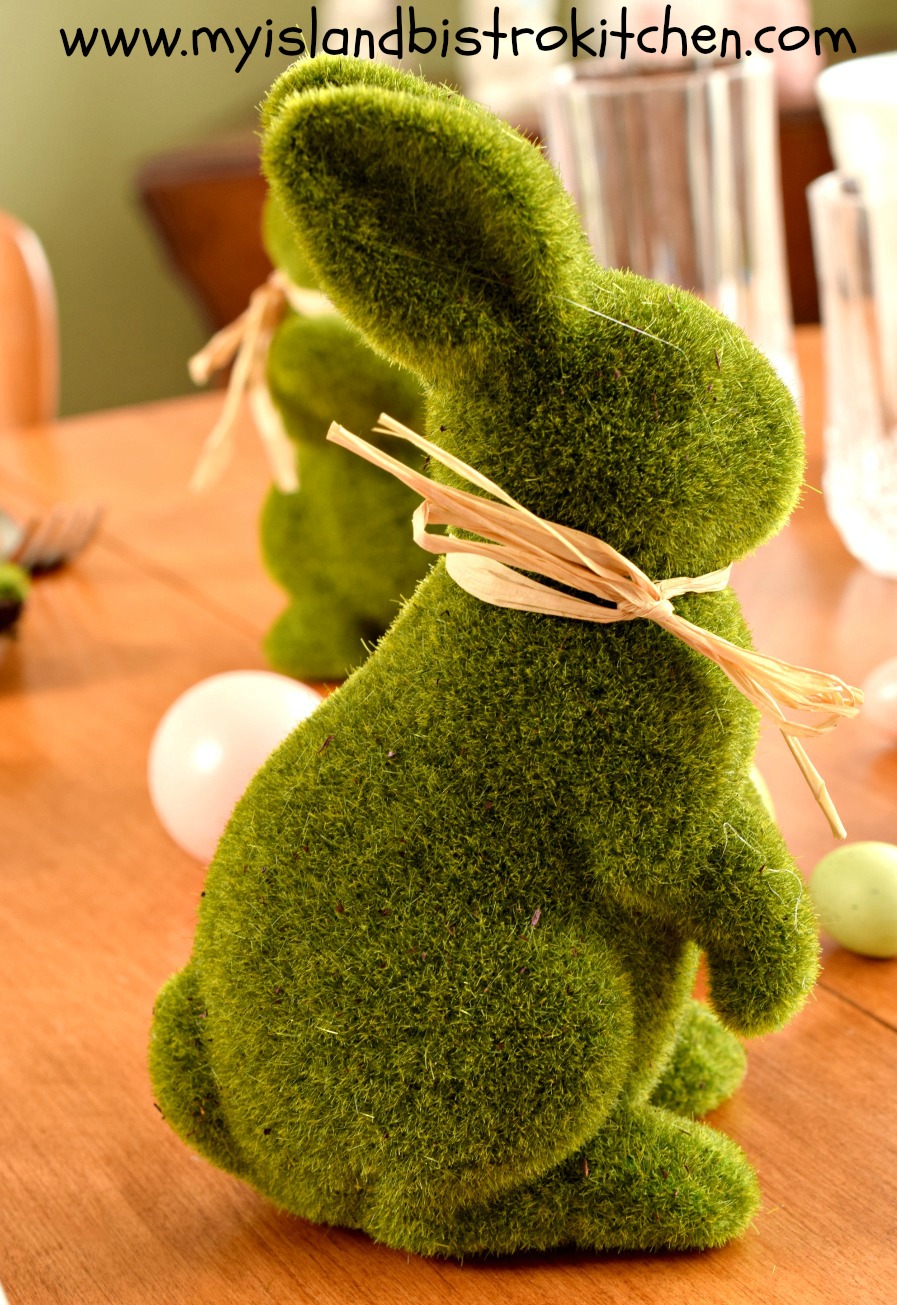
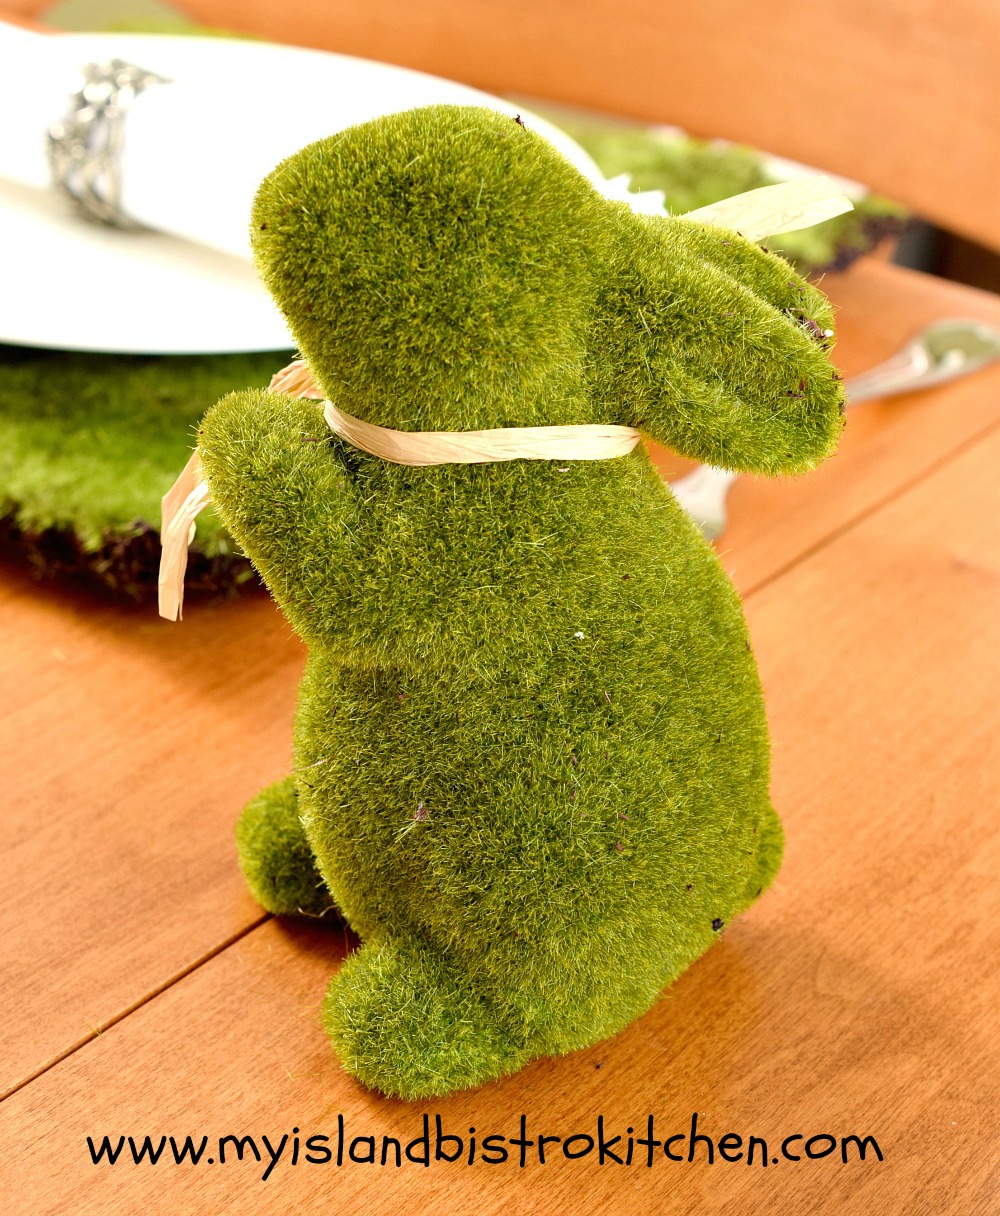
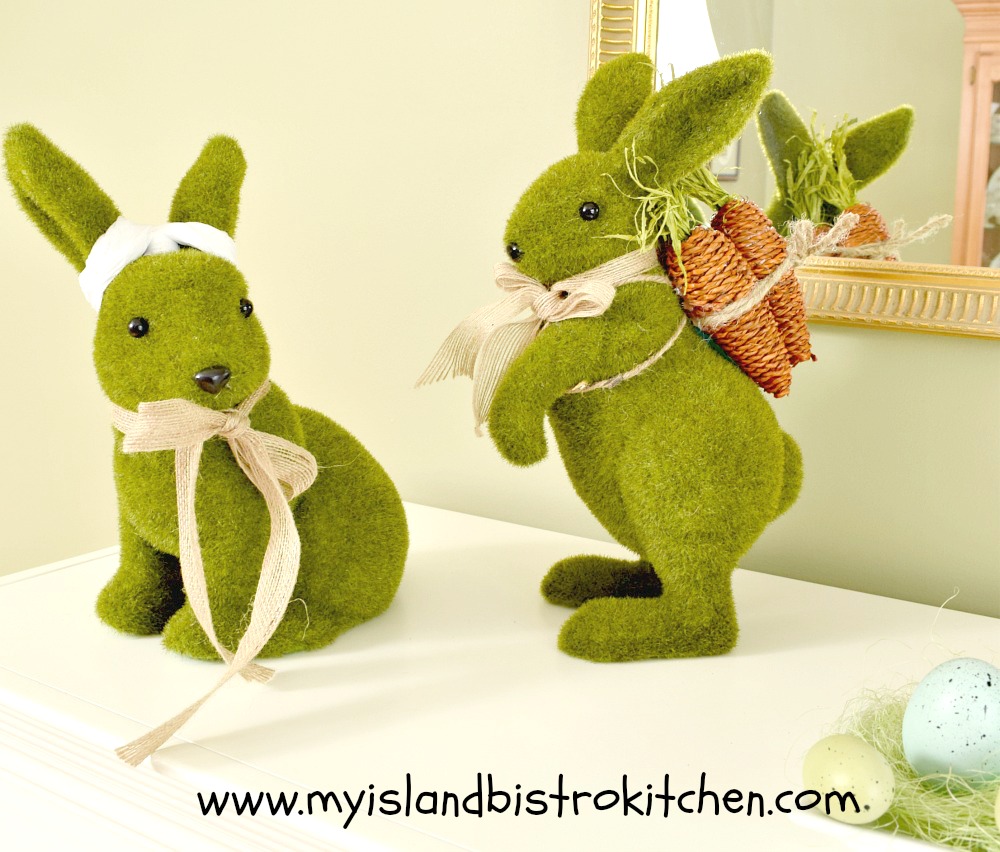
Simple stalks of pussywillows are casually contained in a glass vase and secured by colorful Easter eggs at their base. Easter eggs are strewn about the table in and among whimsical little green moss bunnies. I really think the trio of green bunnies is on an Easter egg hunt!
These little fellas are so cute!
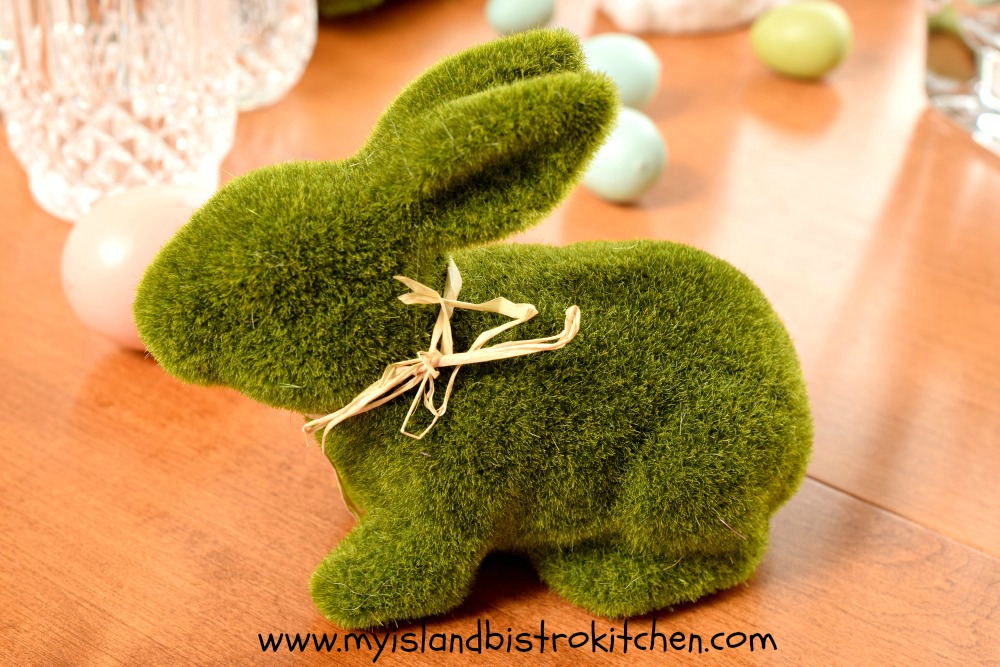
The green faux-moss bunnies are kind of a refreshing change from the traditional pastel colored bunnies.
In a departure from traditional placemats, I have used squares of imitation moss. The white dinnerware pops atop the green moss mats. White dinnerware works for any occasion and really is a good investment. I’ve used very plain flatware in keeping with the informal tablesetting.
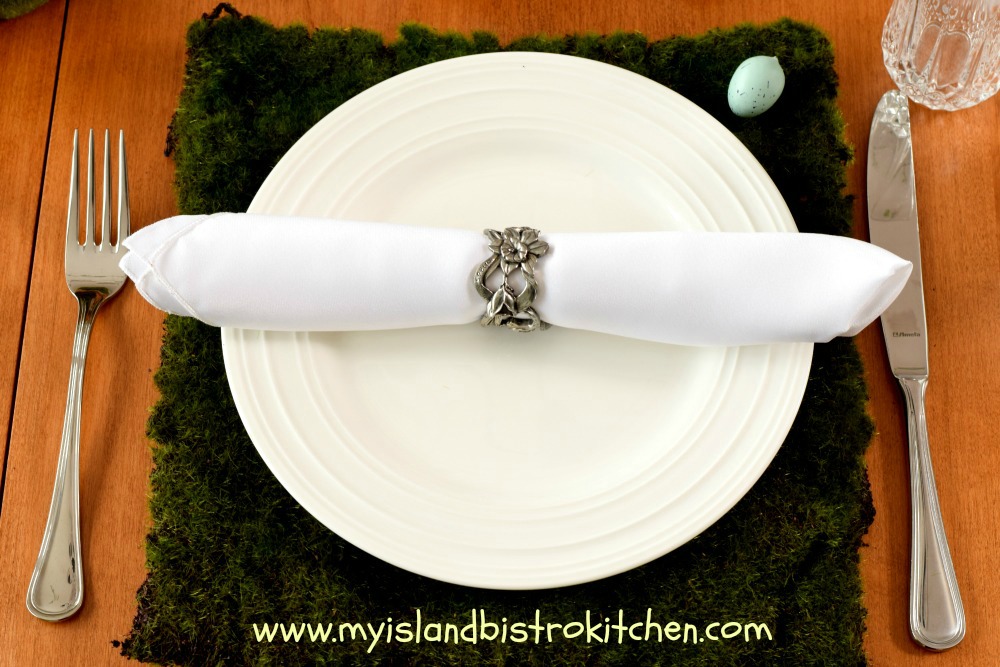
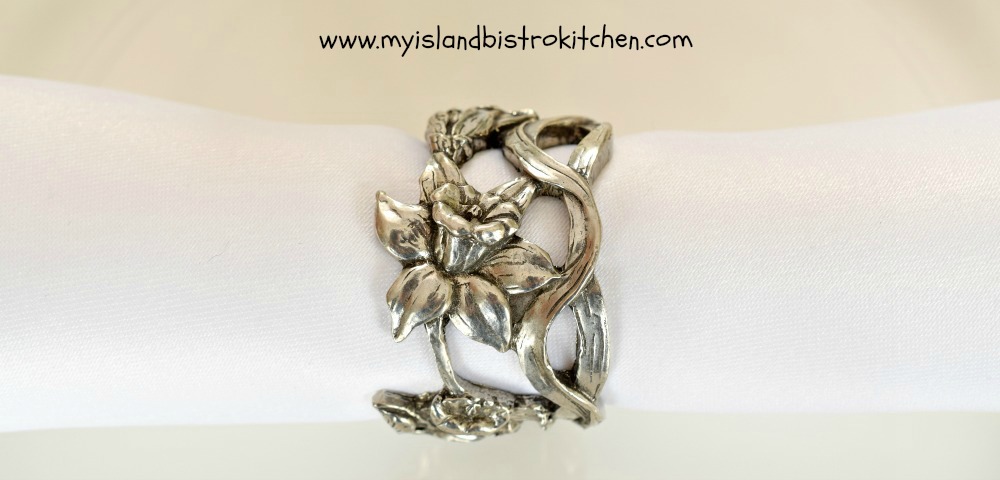
Simple napkin rolls are held in place with pewter napkin rings that feature springtime daffodils. These were made by Seagull Pewter in Pugwash, Nova Scotia.
This setting is meant to be fun and informal.
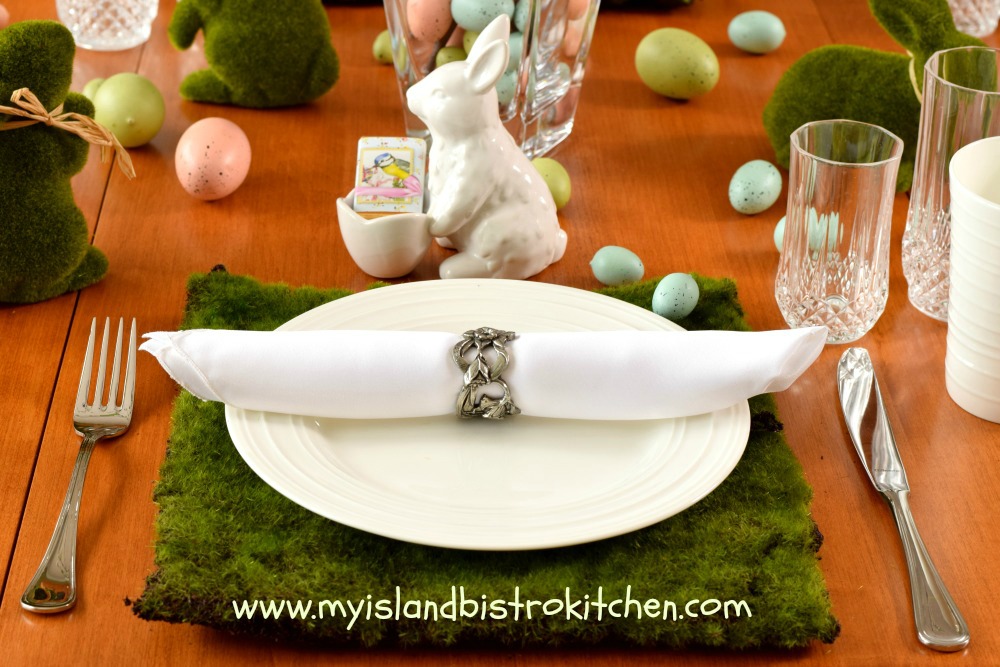
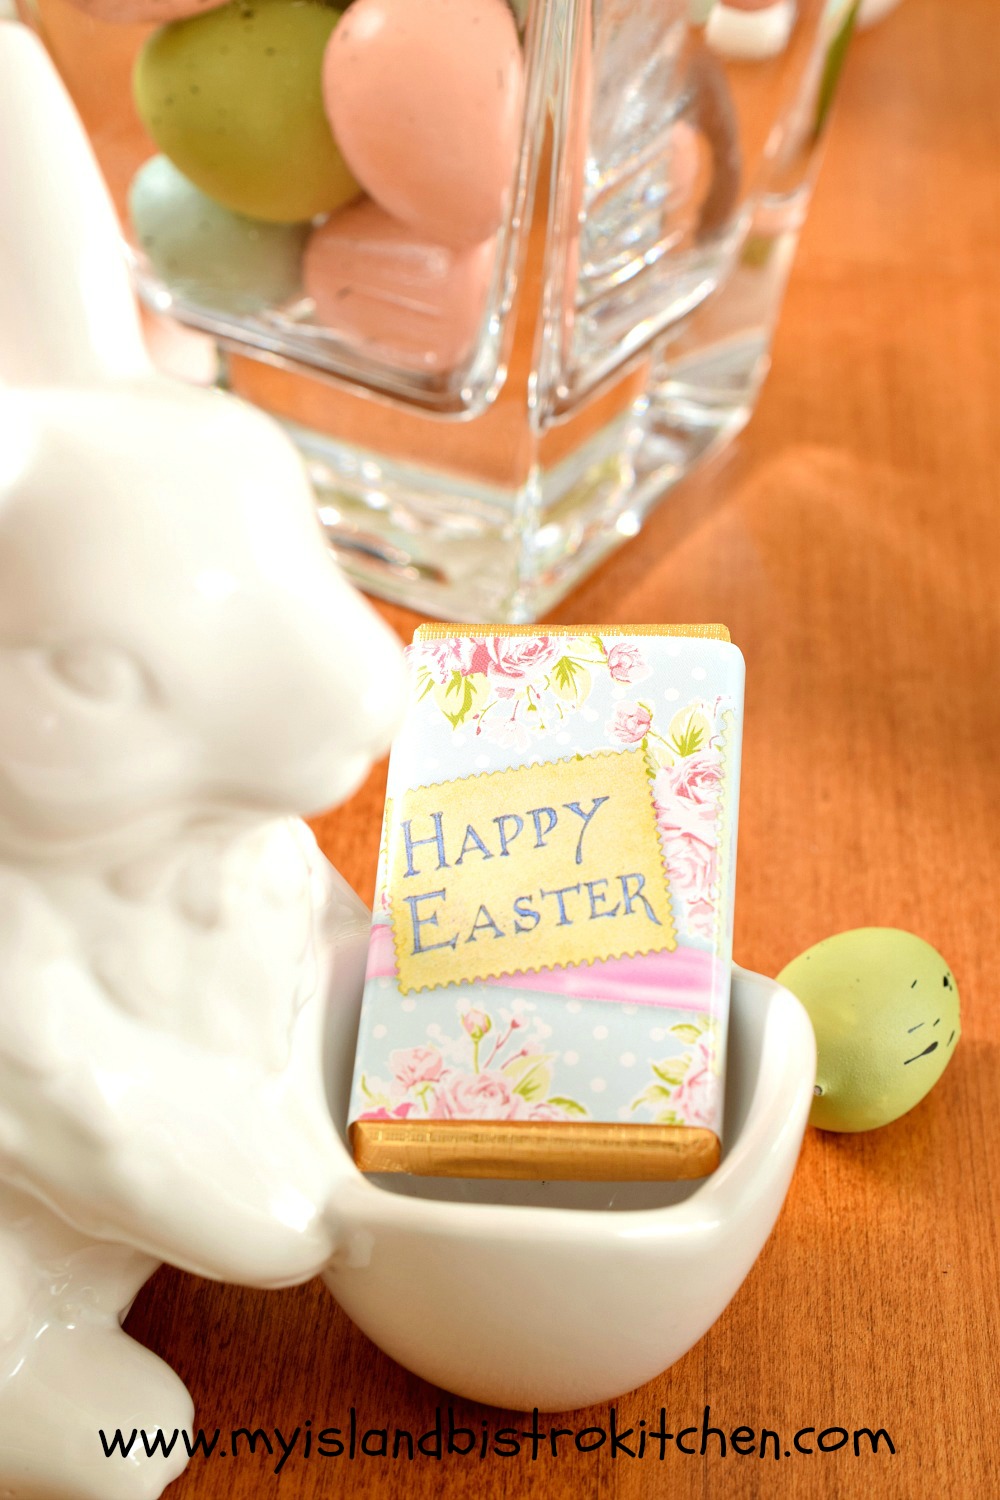
The bunny eggcups keep the bunny theme going.
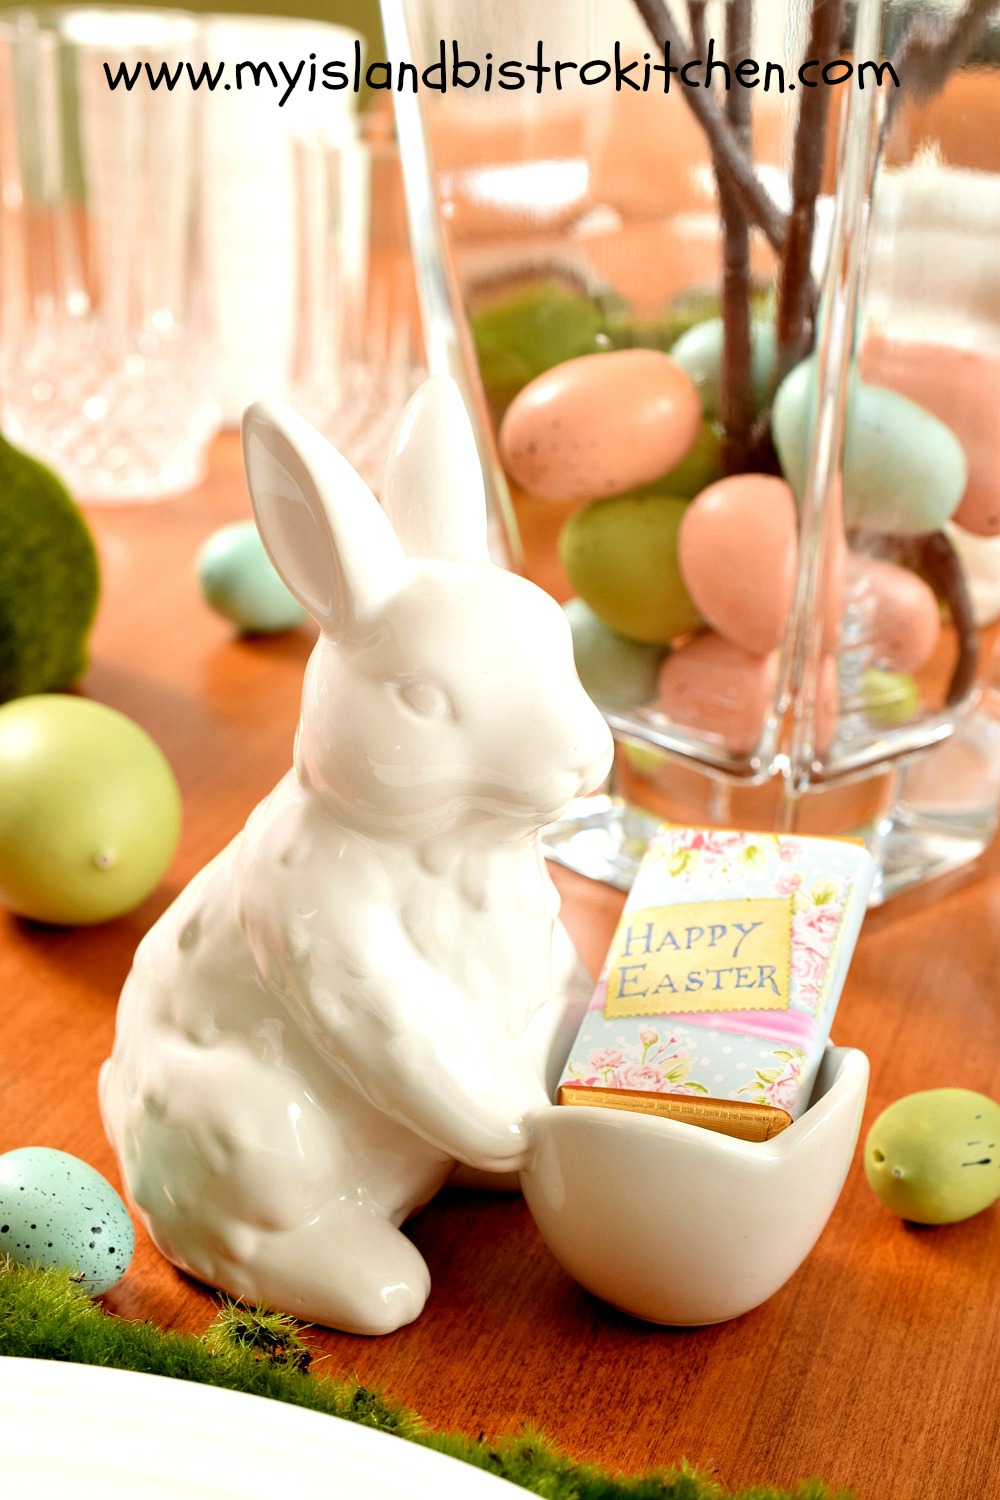
Little Easter chocolate bars adorn each cup but are easily set aside and replaced with a boiled egg, if desired, at breakfast. Who says you can’t have chocolate for a breakfast treat!
I have added a couple of larger faux moss-covered whimsical bunnies to my dining room mantle to coordinate the theme throughout the room.
Joyeous Easter!
For more Easter-themed tablesetting inspiration, click on the links below:
Tulip Time Tablescape
Tulip Clusters Springtime Tablescape
Tip Toe Through the Tulips Easter Tablesetting
Springtime Yellow Tablescape
Peter Cottontail Tablesetting for Easter
Easter Tablesetting
A Casual Tablescape for Easter Brunch
Easter Breakfast Tablesetting

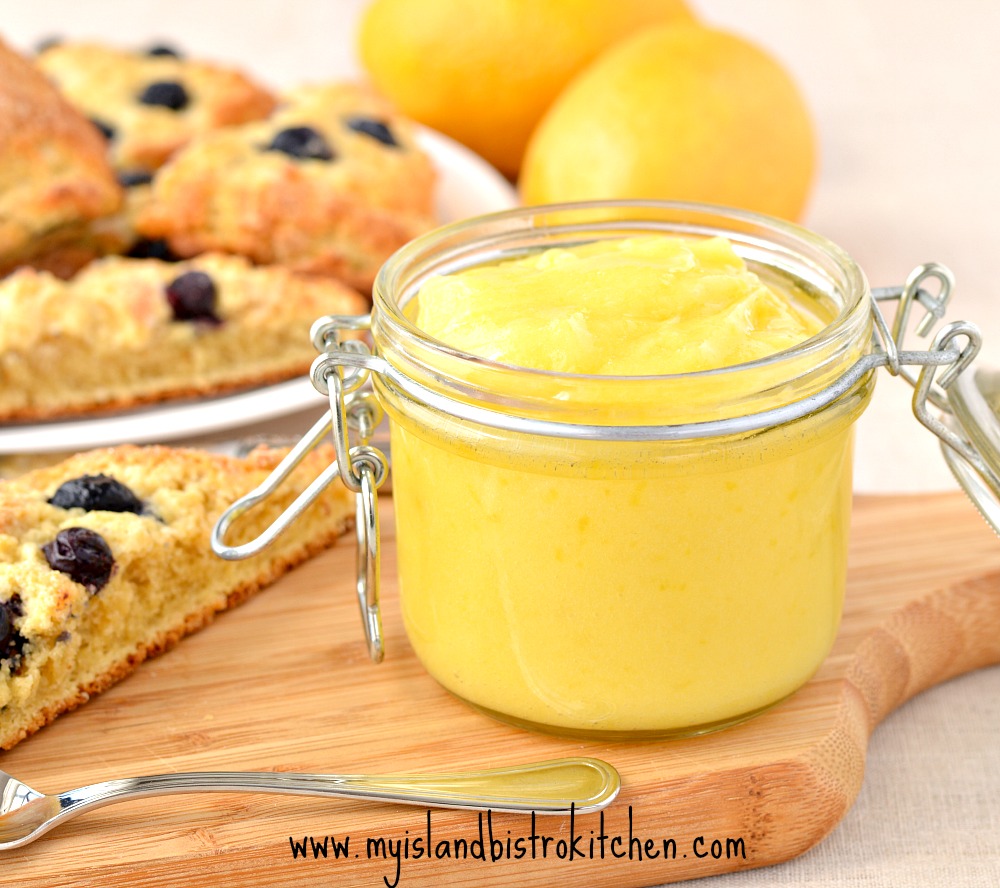
I adore lemon curd – luscious lemon curd – that wonderful balance of lemon’s acidity and tartness with the sweetness of sugar. I love it so much that it’s a staple in my refrigerator. Continue reading Luscious Lemon Curd

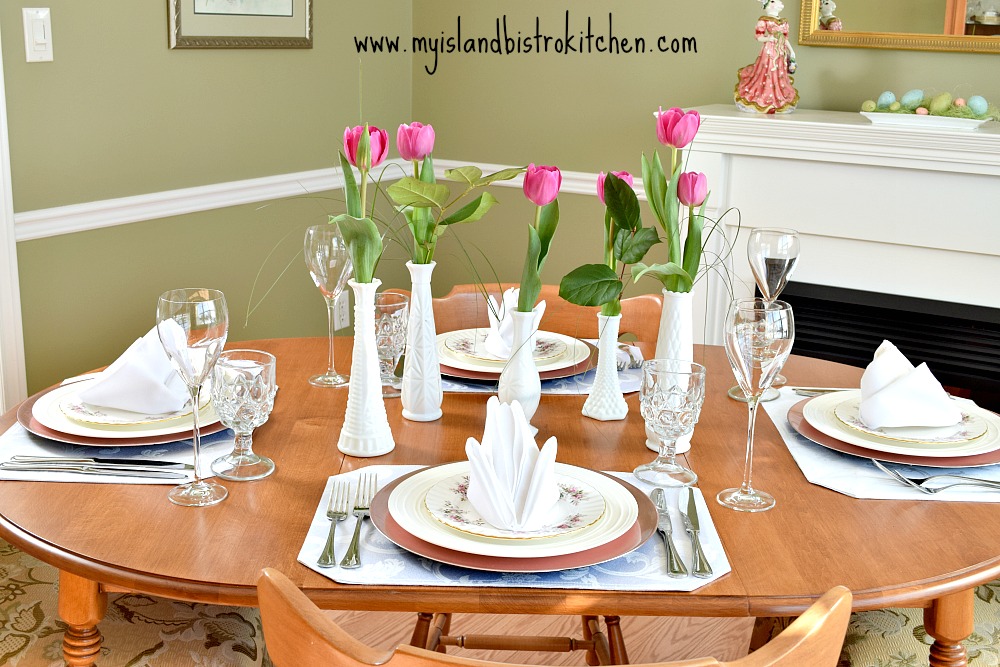
2019 Update: As of January 2019, Vanco Farm mentioned in this posting is no longer operating its tulip retail outlet at their greenhouse operation in Mount Albion, PEI. Their fabulous tulips are still available, though, at various locations throughout PEI, including major supermarkets and florist shops.
Living in Atlantic Canada, it’s not unheard of to still have snow in April. That’s one reason why I like to use springtime elements in my tablesettings beginning as early as possible – if I can’t see spring outside, I can at least create a spring zone in my dining room which is what I’ve done with this tablesetting.
I love paying a visit to the retail outlet at Vanco Farm greenhouses in Mount Albion, PEI, a short drive from Charlottetown. They grow fabulous tulips all winter long in their big greenhouses. If you haven’t already read the story I wrote about Vanco’s tulip-growing operation, click here.
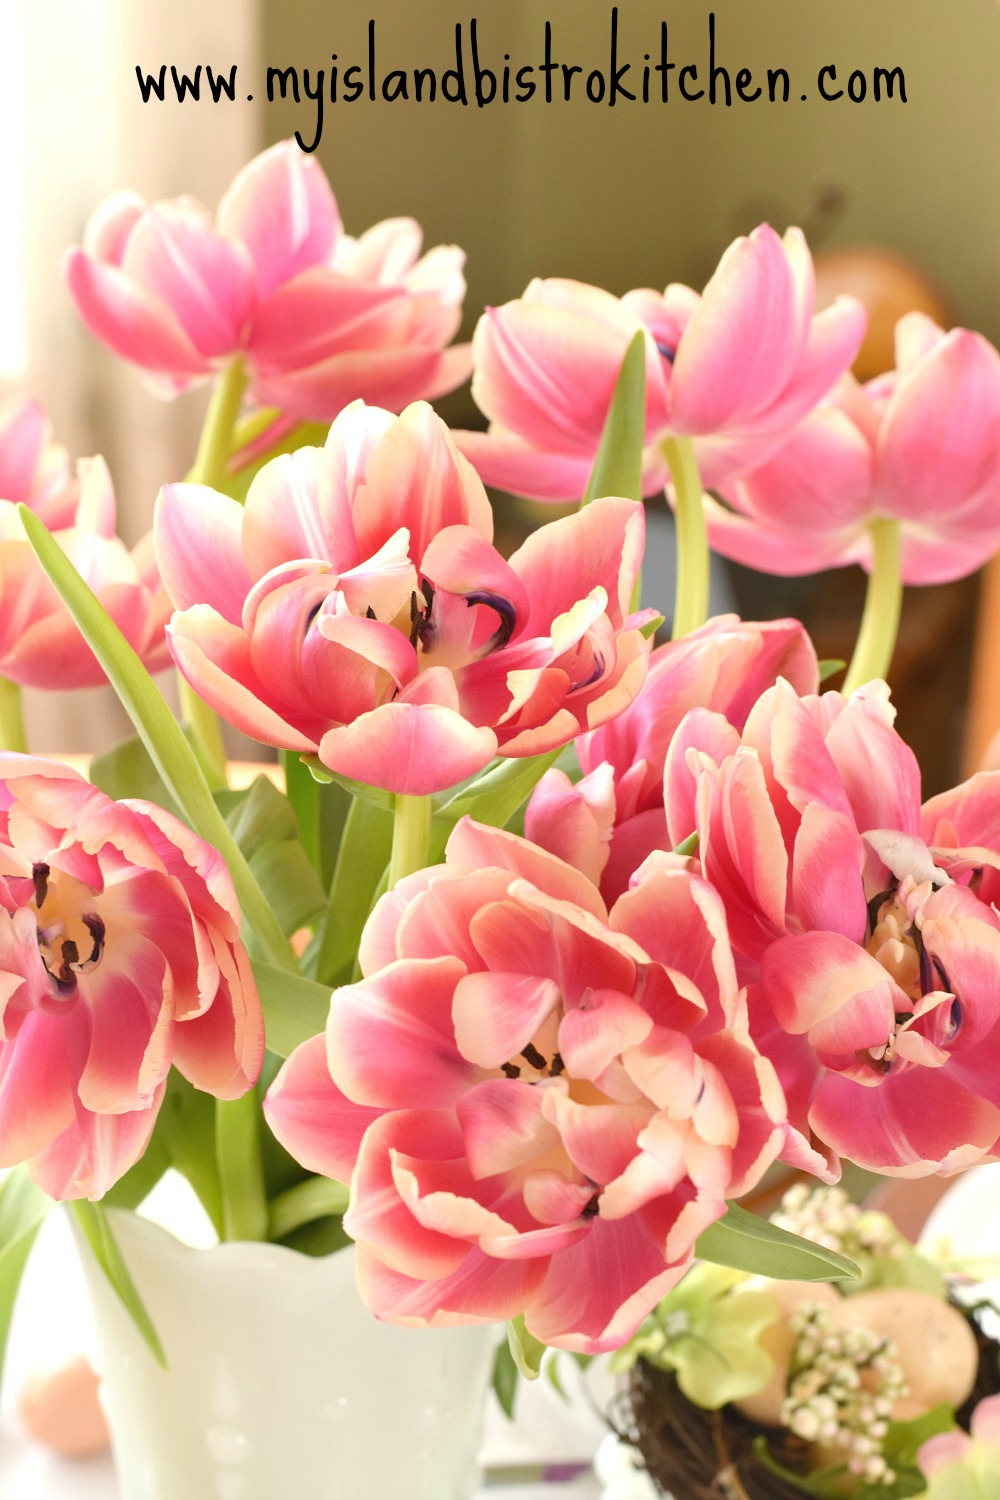
Sometimes, I have a particular color scheme in mind when I make the drive to Vanco’s. Other times, however, I go with an open mind in search of a color or type of tulip that will inspire my creativity in developing a tablescape. This is what occurred with this tablesetting.
When I arrived at the greenhouses, they had these spectacular double flowered tulips in a coral pink shade with a soft ivory/pale yellow edge. They resemble peonies because they are packed with layers of petals. They were too delightful to pass up so they became the focal point of this Easter tablesetting and inspired the color theme.

If you are a regular reader of my food blog, you will recall that I sometimes like to corral the elements of my tablescape into a container such as a basket or tray. This keeps the table clean and nondistracting. This is also a good choice if you plan on removing the centerpiece from the table during the meal and replacing it with a ham or turkey on a platter. It’s much easier to pick up one container off the table than several individual items.
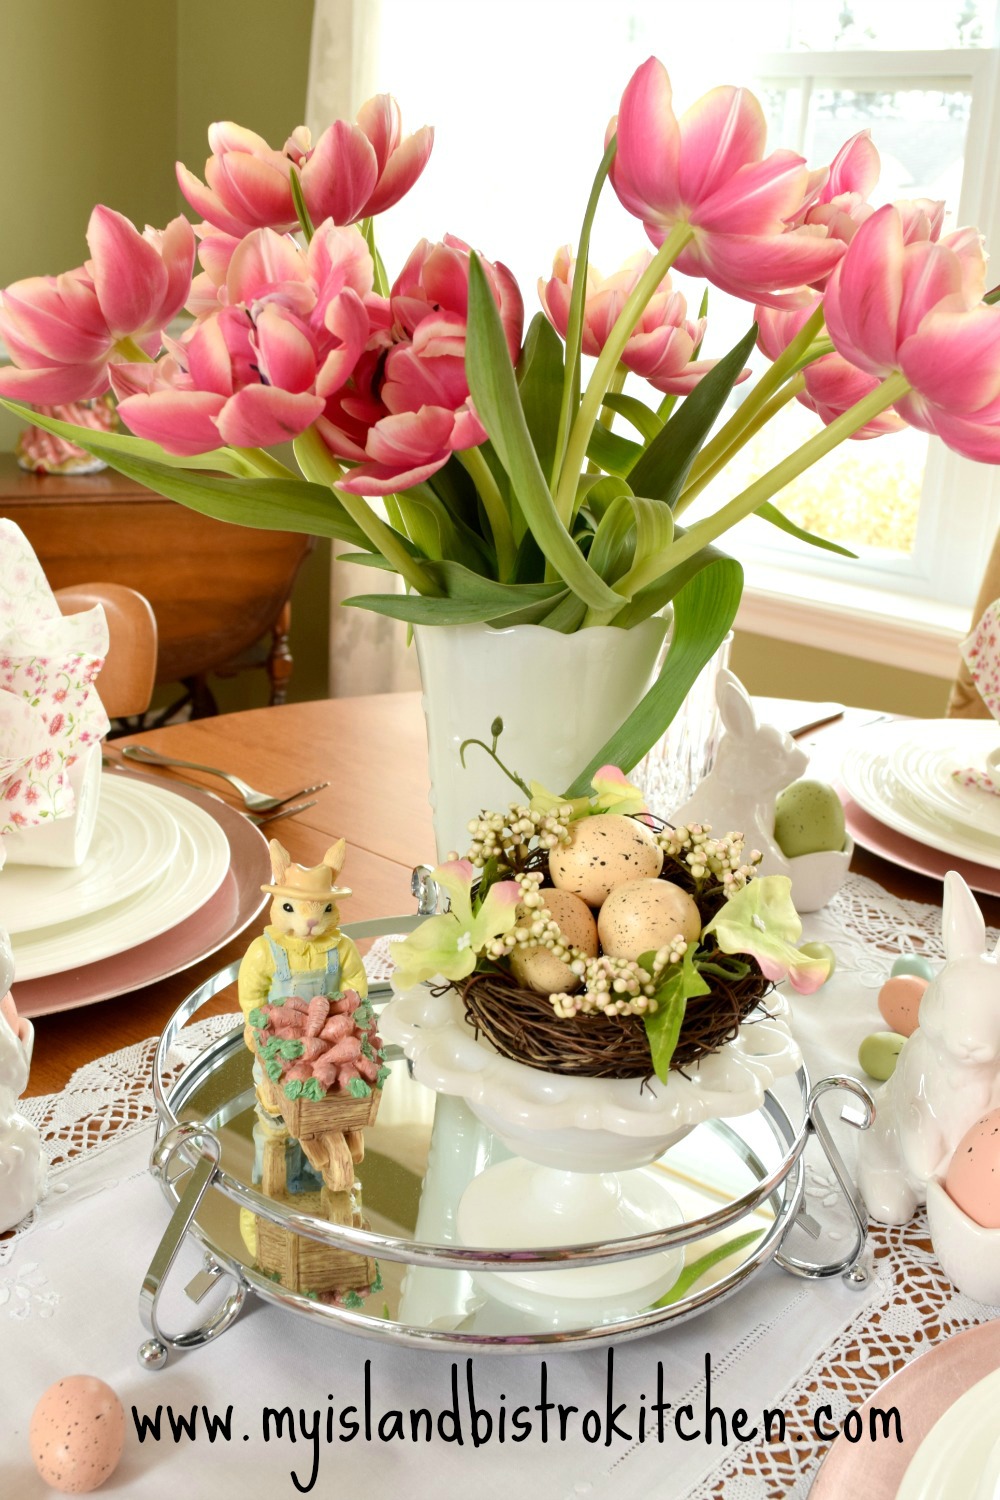
What I have used today for the base of the centerpiece is actually a silver mirrored bathroom vanity tray — I’m a big fan of repurposing items I have around the house.
To keep the focus on the flowers, I have used a white milk glass vase. This conceals all the tulip stems so they are not competing for the eye’s attention and the colorful tulip blooms just pop above the white vase. The plain white vase also coordinates well with the dinnerware.
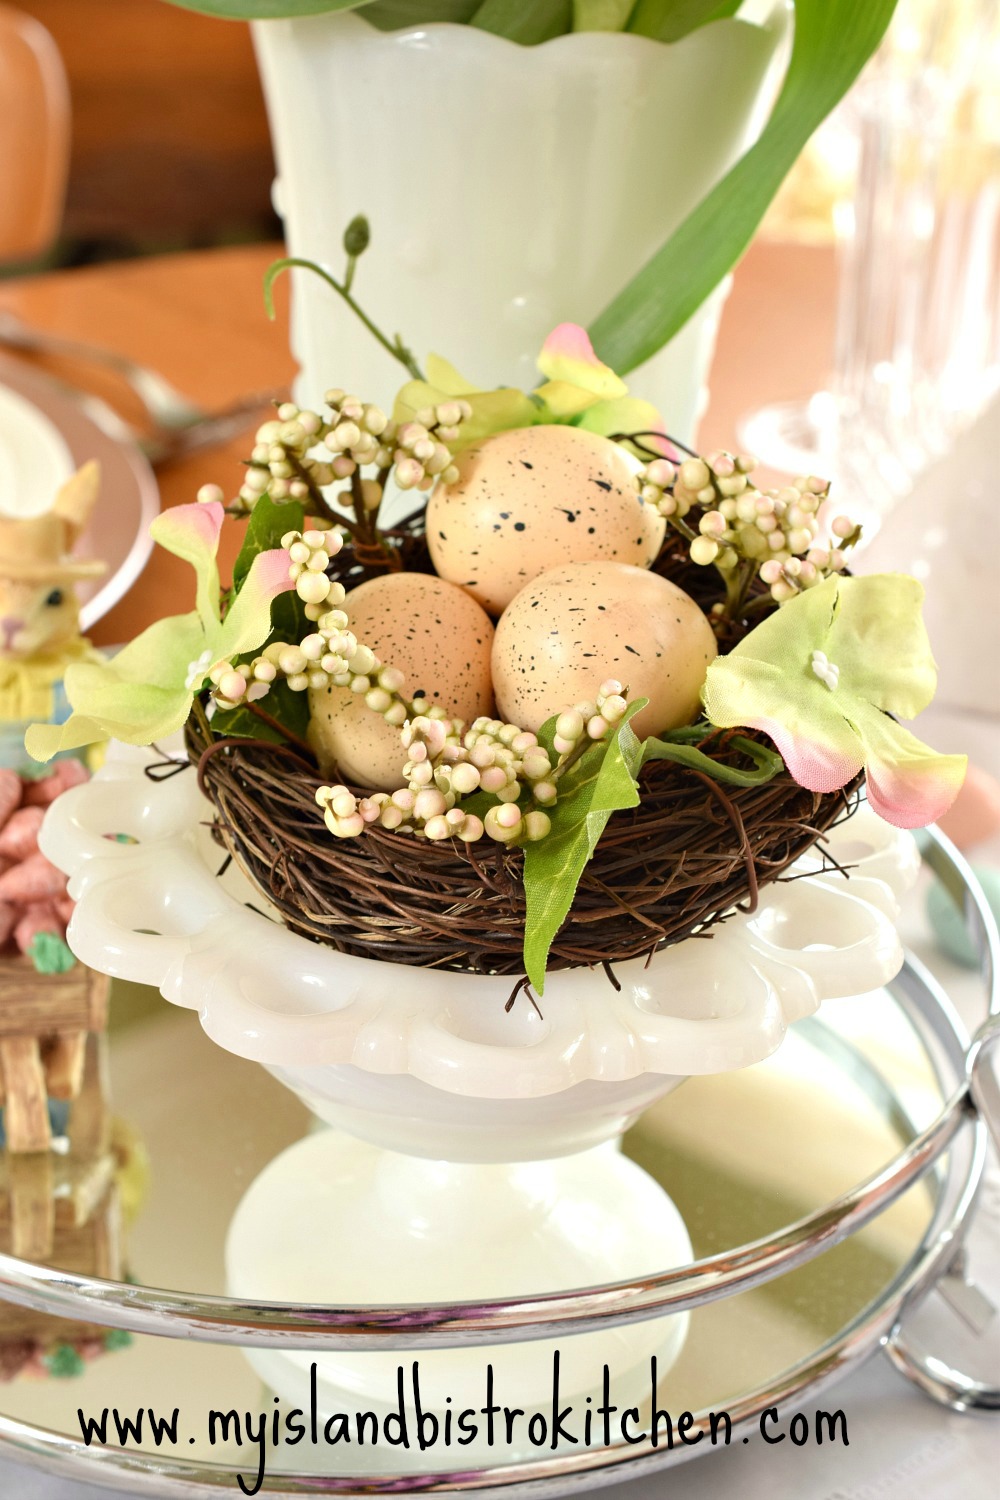
To add some interest to the centerpiece, I’ve also placed a bird’s nest on a small companion piece of white milk glass and added a small Easter figurine. Adding elements that connect and enhance each other is a trademark of effective tablescape creations.
The little bunnies, like the one in the photo below, are actually egg cups but I use them to hold decorative eggs, small chocolate bars, or even flowers in tablesettings other than those prepared for breakfast.
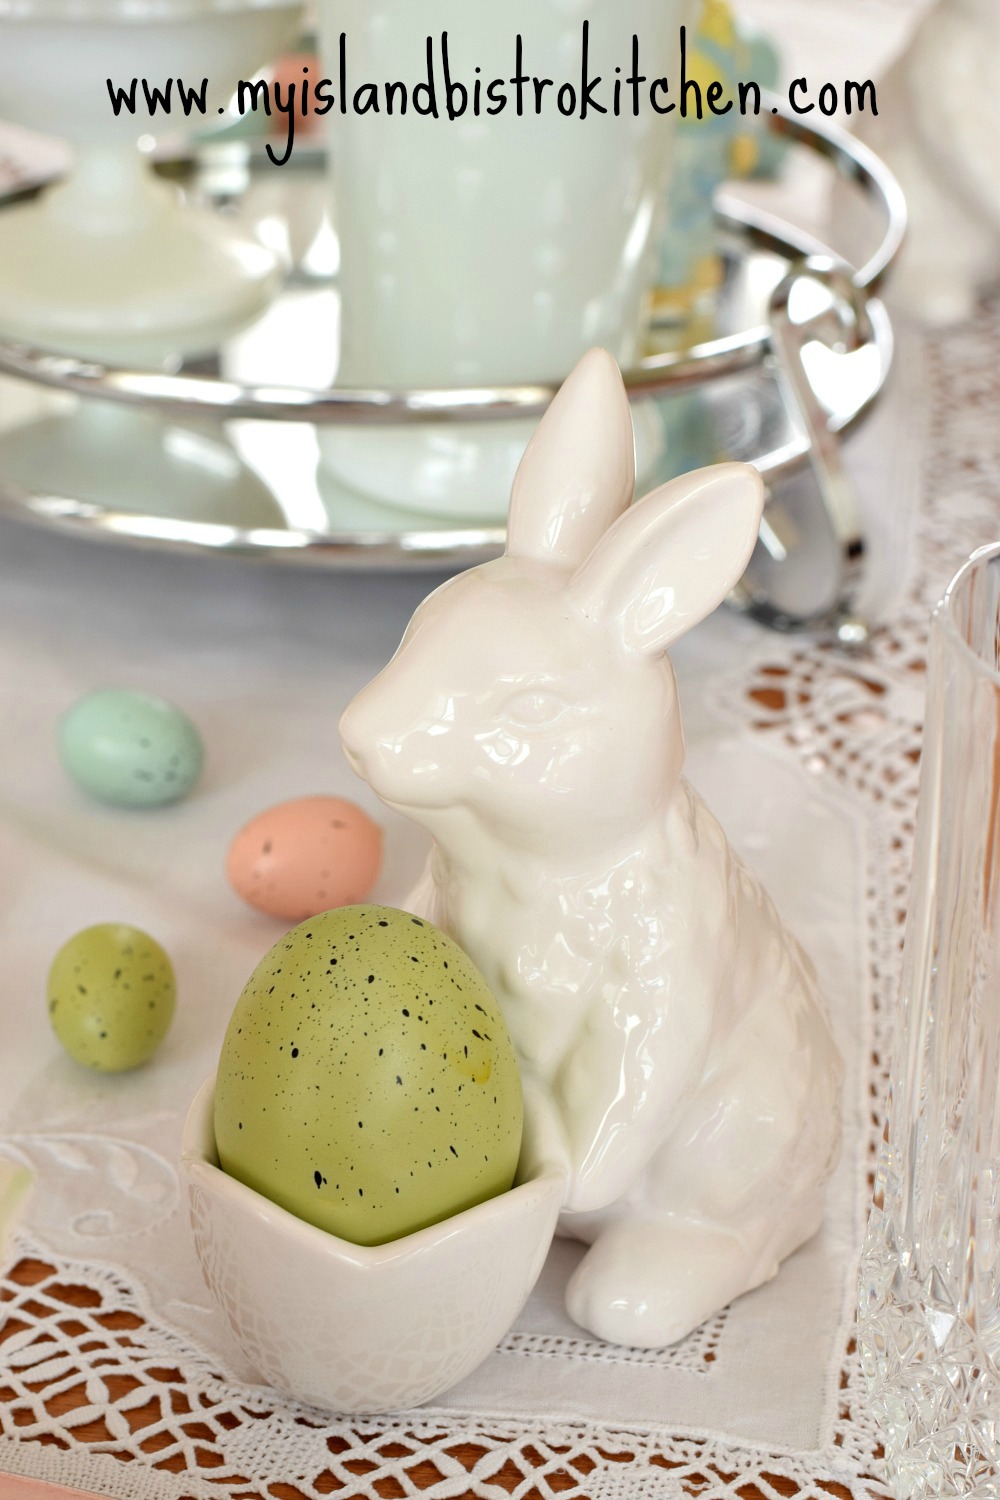
If desired, add some colorful Easter eggs casually strewn about the table to complete the seasonal tablescape.
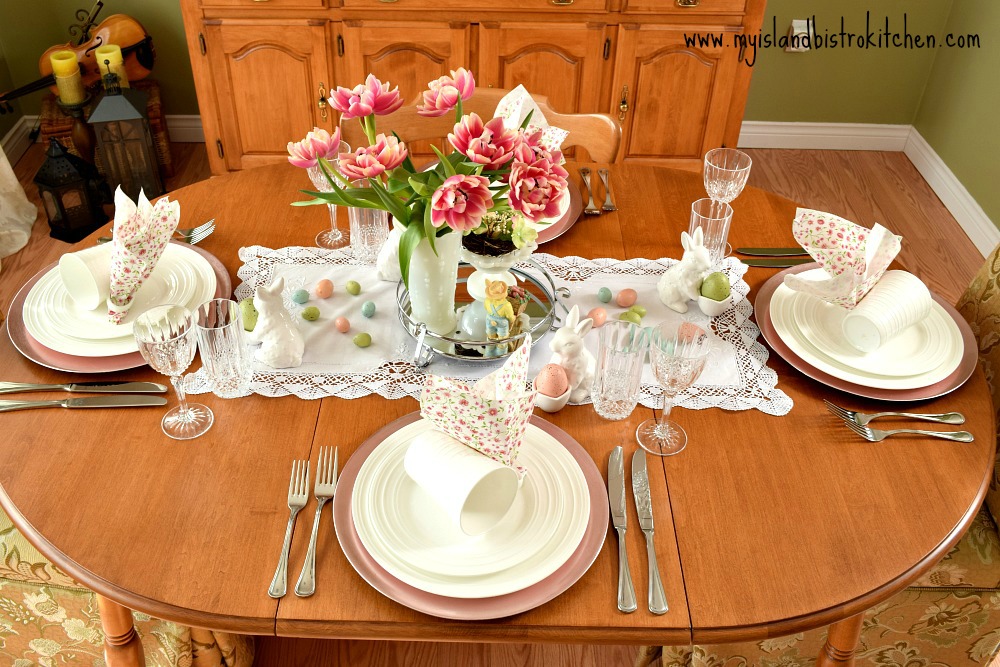
If you can only afford one set of dinnerware, I recommend buying plain white in the best quality you can afford. White is so completely versatile. I maintain you can’t set a poor looking table if you go with white dishes! There are so many styles, shapes, textures, and colors of white dinnerware. There are blue whites, grey whites, beige whites, and brilliant whites. I have three sets of white dishes and none of them are the same shade or made of the same material. The ones in this tablesetting are made of porcelain and are a contemporary design.

With white dinnerware, it can be paired with solid or patterned colors for table linens and the look is easily changed completely, sometimes by simply switching up the charger plates. And, the best part of white dishes is that food looks really appetizing against the white background. In today’s setting, I have used basic pale pink/mauve charger plates to frame each placesetting and to give the air of a well set table.
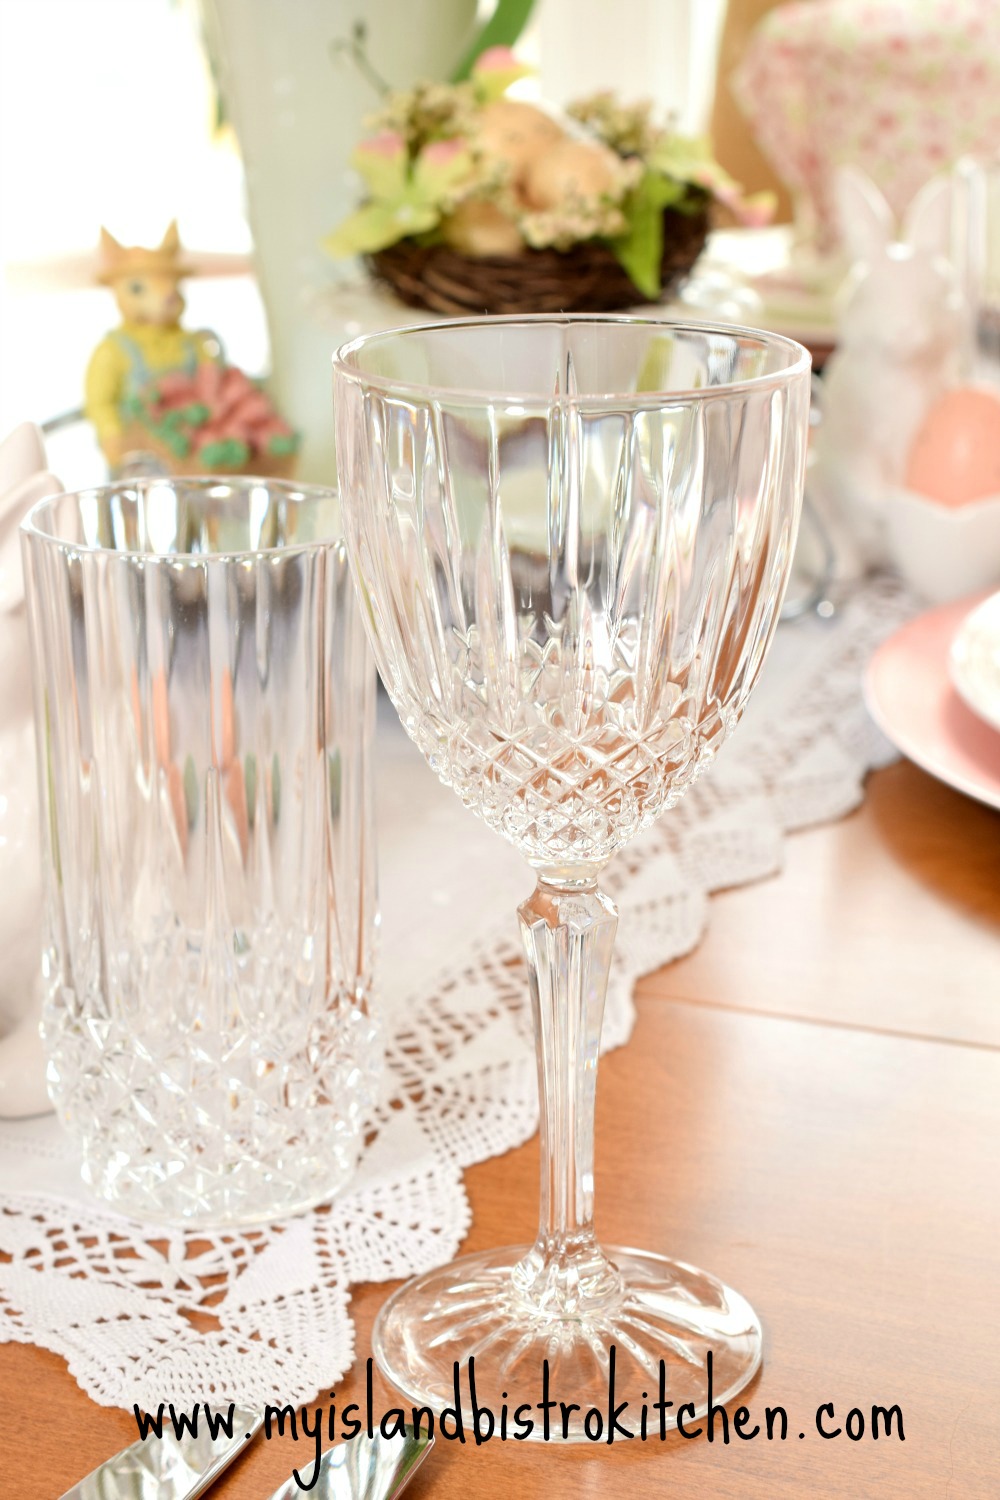
For glassware, I have chosen some pieces of cut glass to add some sparkle to the table.
I rarely use paper napkins in a tablesetting. However, these matched perfectly so I used them for that reason and also because they are stiff enough to be able to stand in the design I have chosen for them. Cloth napkins, particularly my large dinner napkins, would have been unlikely to have had the same effect.

Because this is a casual tablesetting, I have opted to place the mugs atop the plates, allowing them to form a leaning post for the napkins. This gives a great pop of color to the white placesettings and also keeps each placesetting clean and simple. This is a casual tablesetting so it works. I would not, however, choose this arrangement if I was setting a very formal table.
The only table linen I have chosen to use in this setting is a short runner made of handmade Belgian lace that I brought home from a visit to Bruges. Using minimal linen on the table keeps the look airy and casual.
For other Easter and springtime tablescape inspiration, click on the links below:
Tulip Clusters Springtime Tablescape
Tip Toe Through the Tulips Easter Tablesetting
Springtime Yellow Tablescape
Peter Cottontail Tablesetting for Easter
Easter Tablesetting
A Casual Tablescape for Easter Brunch

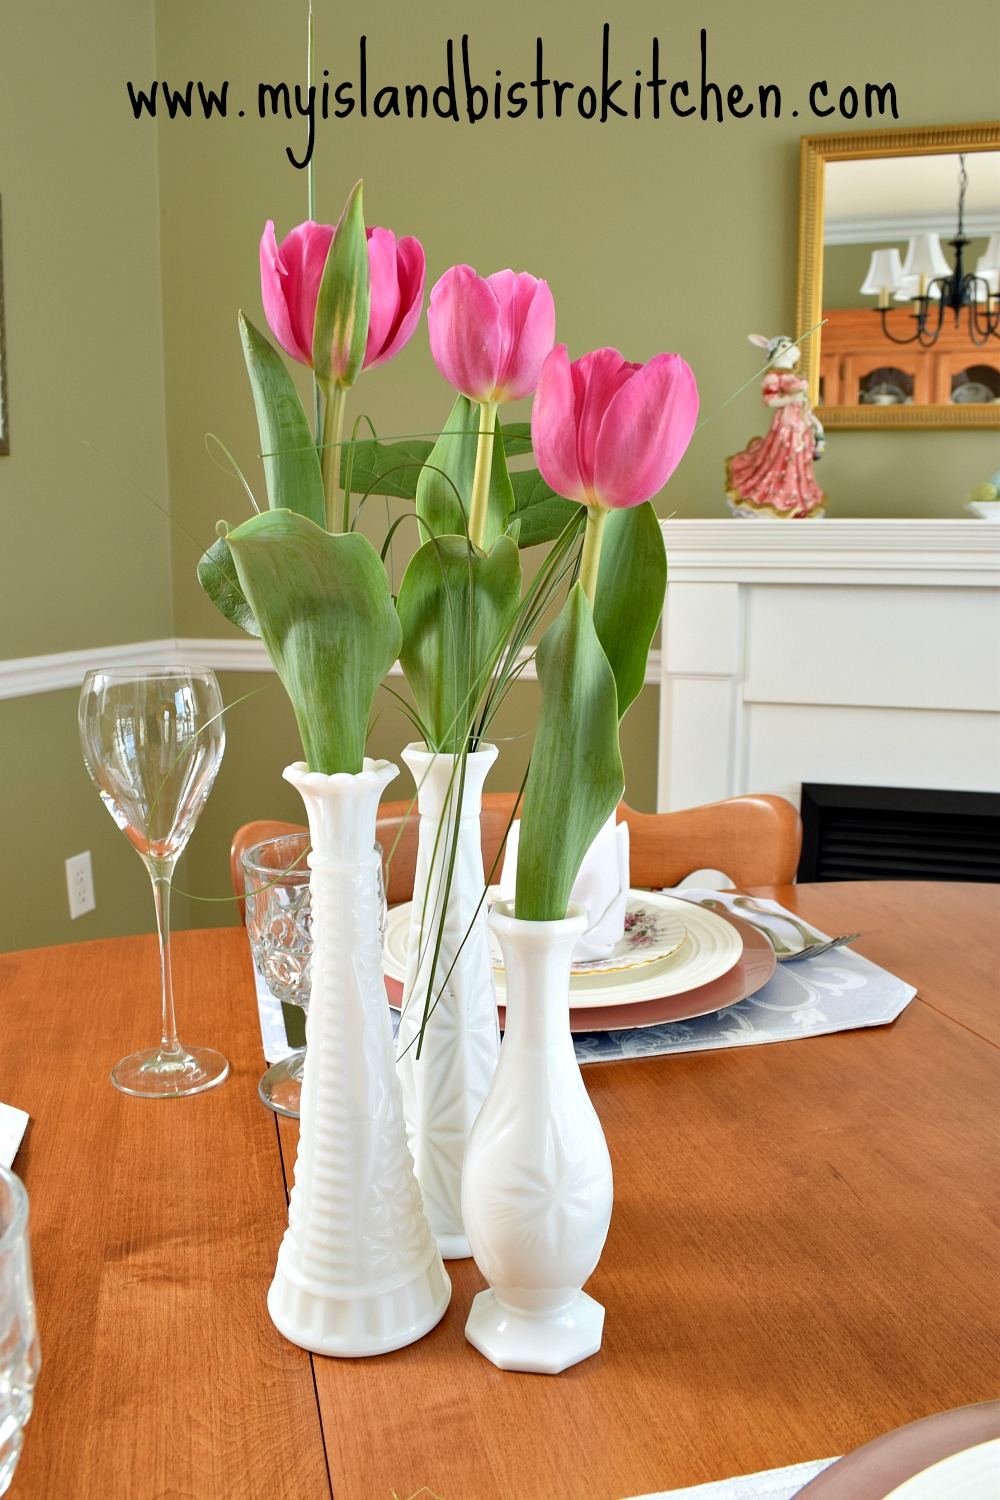
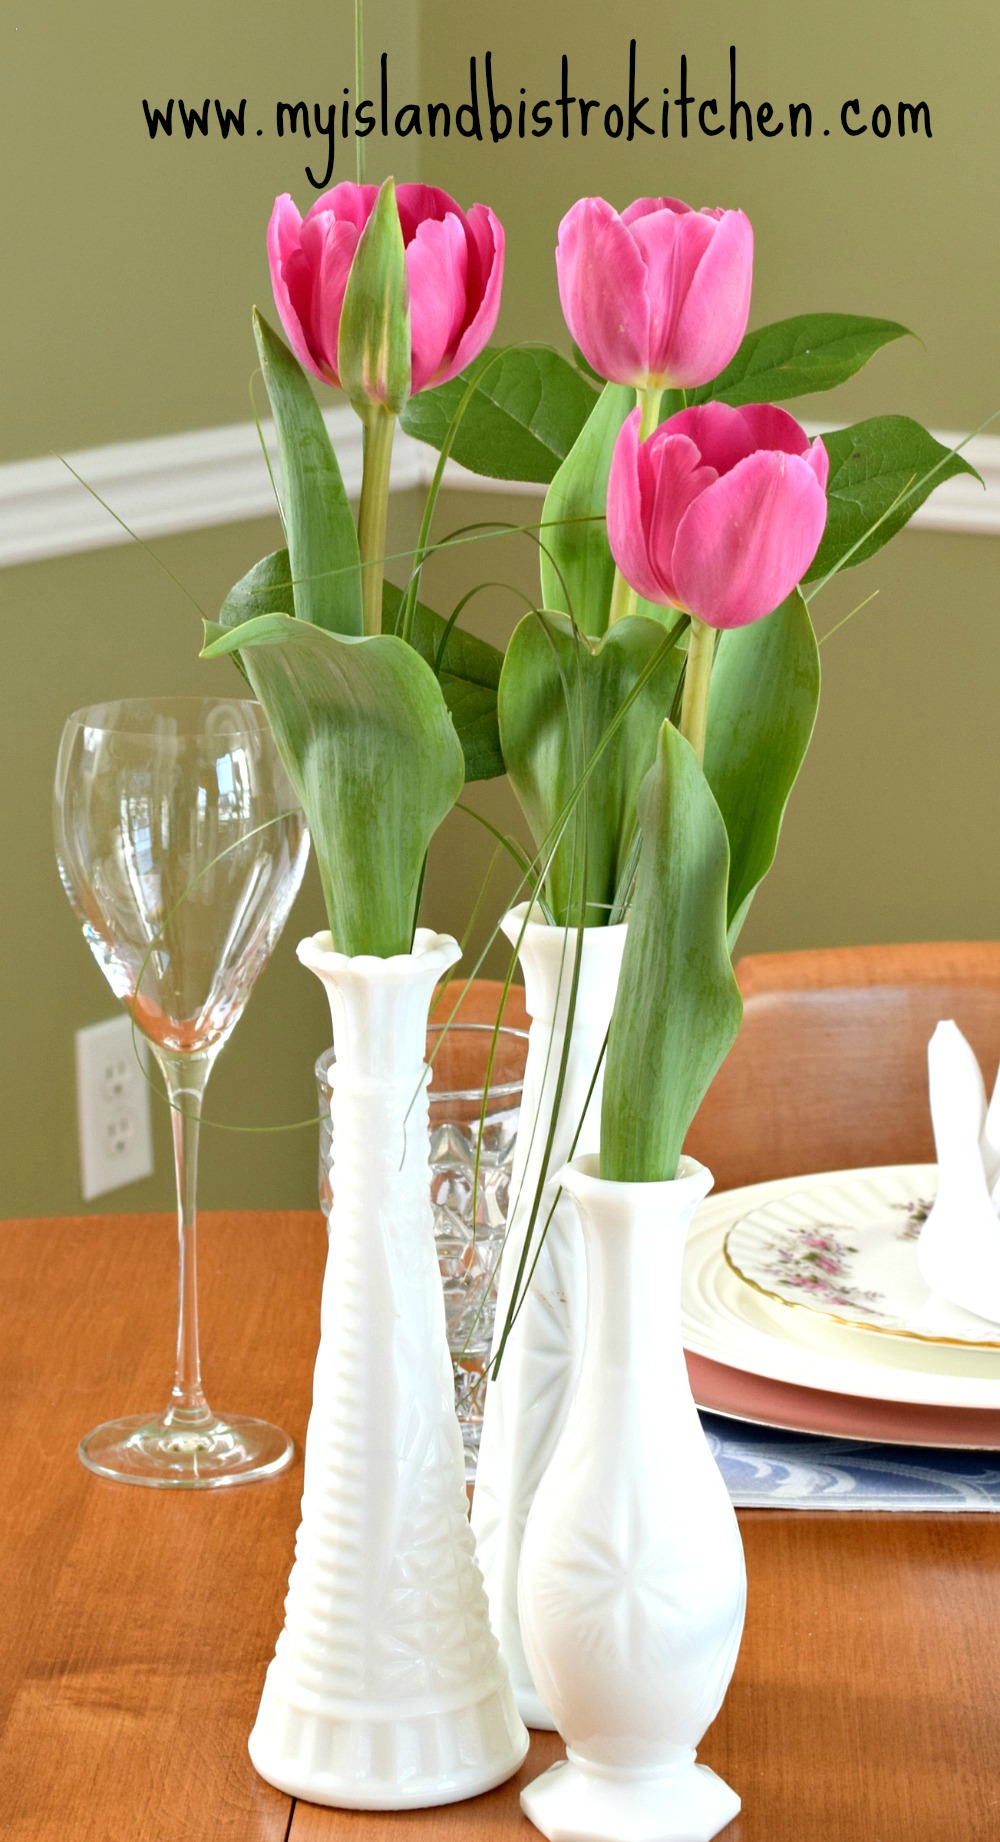
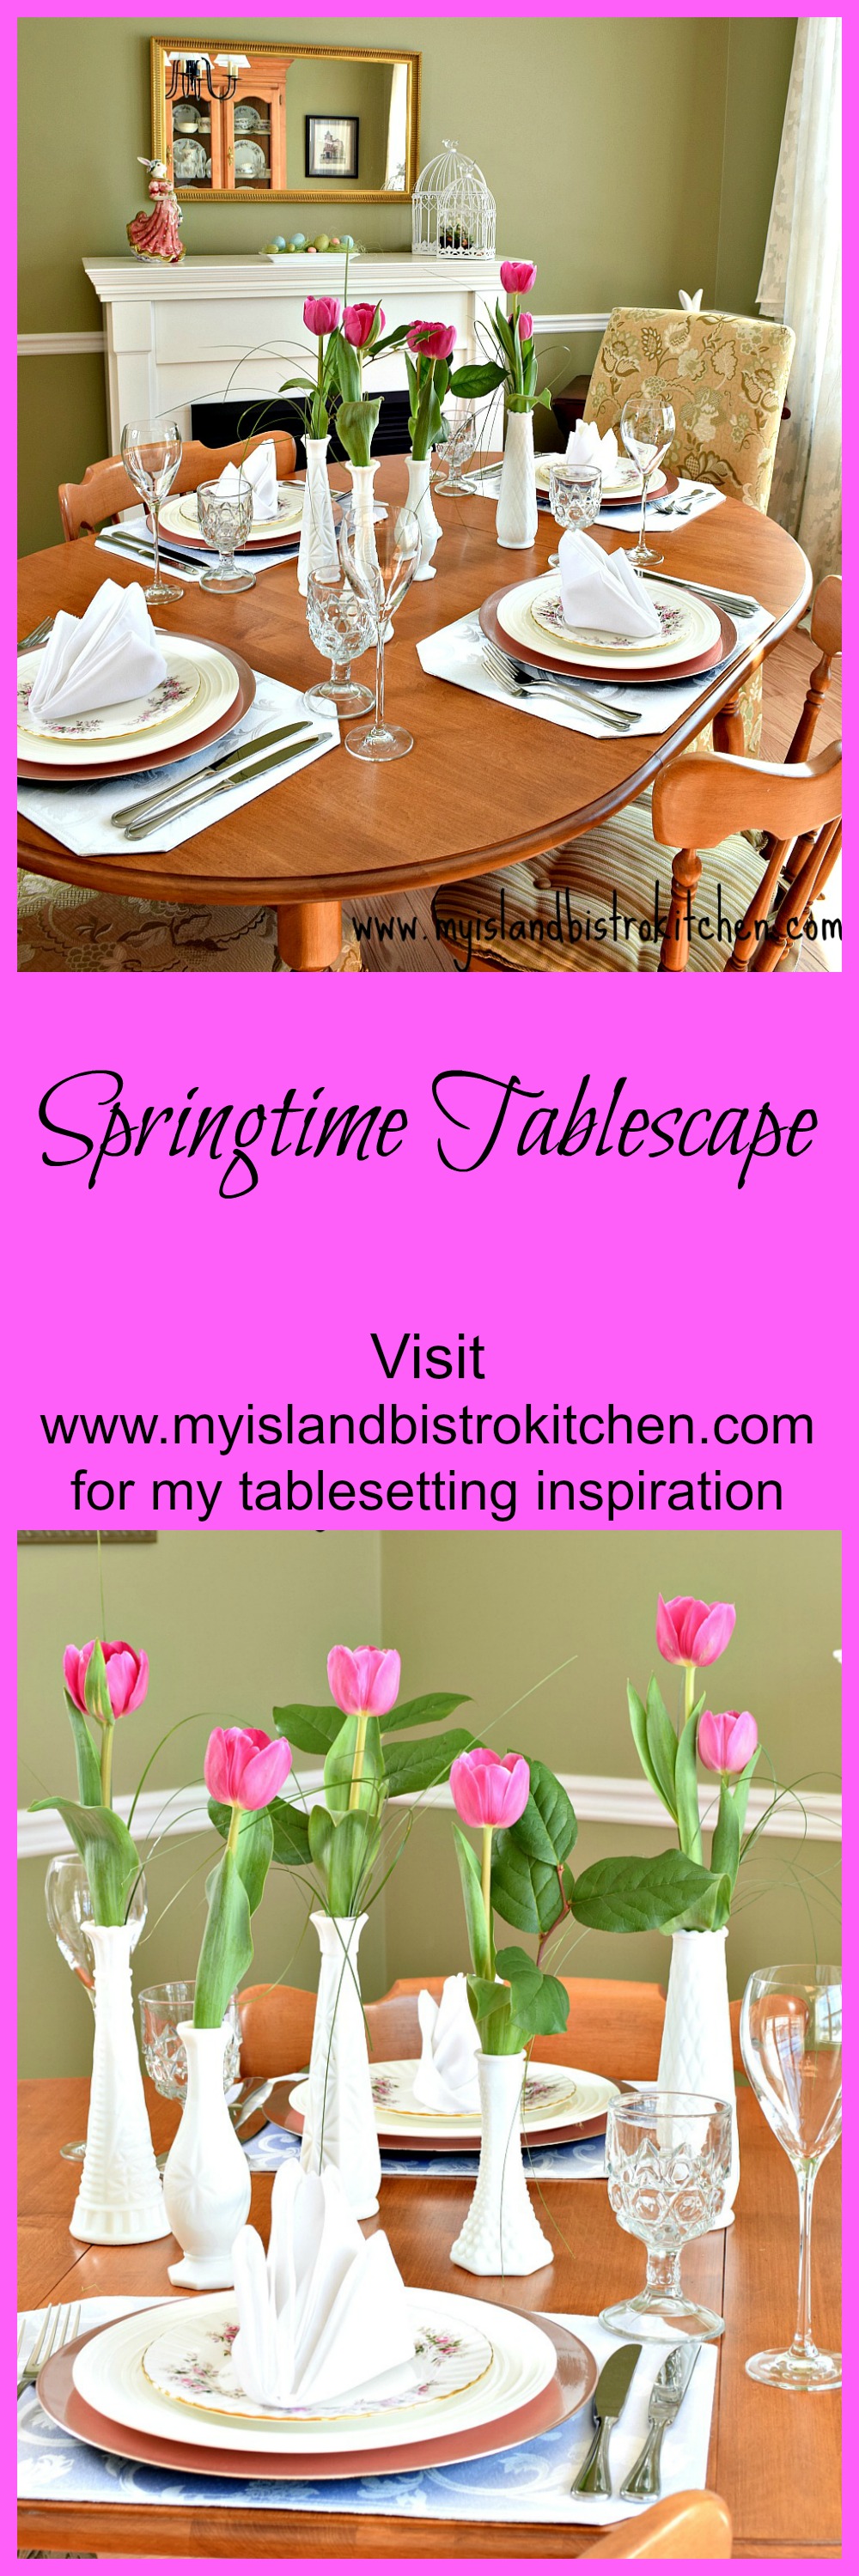
If you are looking for a tablesetting that is casual and contemporary, consider using single flowers in individual vases as opposed to the traditional floral centerpiece. This is an easy-to-do tablescape for anyone, even those who are not knacky with floral design. If you can fill a vase with water and place a flower in it, you can do this tablescape!
White milk glass has seen a resurgence in popularity in recent years and remains, at time of writing, quite trendy. It’s clean, unobtrusive, and nondistracting on the table. One of the things I like best about milk glass is that it’s opaque meaning the flower stems are not visible. The other great thing about milk glass is that it’s inexpensive and often available at thrift shops for very little money. In addition, it’s easy to mix and match milk glass shapes, sizes, and textures and still have the tablescape work and look aesthetically pleasing.
In this setting, I have used a mixture of heights and designs of milk glass bud vases because this makes for a more interesting tablescape design. Always opt for an odd number of vases versus even numbers as this is more pleasing to the eye.

The vases can be interspersed along the center of the table as shown in the photo above.
Or, as demonstrated in the following photo, they can be grouped into clusters of two and three and strategically placed in the center of the table.
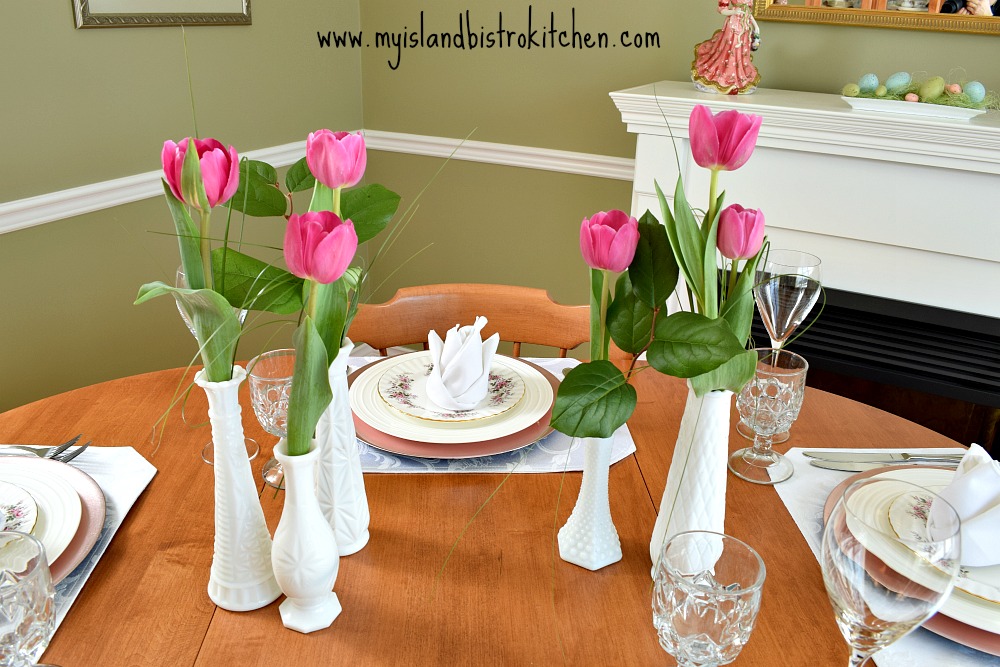
The vases can also all be clustered close together in the center for a real concentrated burst of color making this a very versatile style of tablescape.
With this type of tablescape, it’s easy to adjust the number of vases according to the size of the table. For example, if the table seats 12 or 16, add more clusters of vases here and there down the length of the table.
I have chosen tulips for this design because it’s springtime and I love tulips! However, any single bloom flowers will work – roses, Gerbers, daisies, carnations, etc. Two blooms can be added in one or two of the vases but try to keep the whole setting informal, simplistic, and not too contrived or equally balanced. It’s also attractive if the heights of the tulips are varied, too.
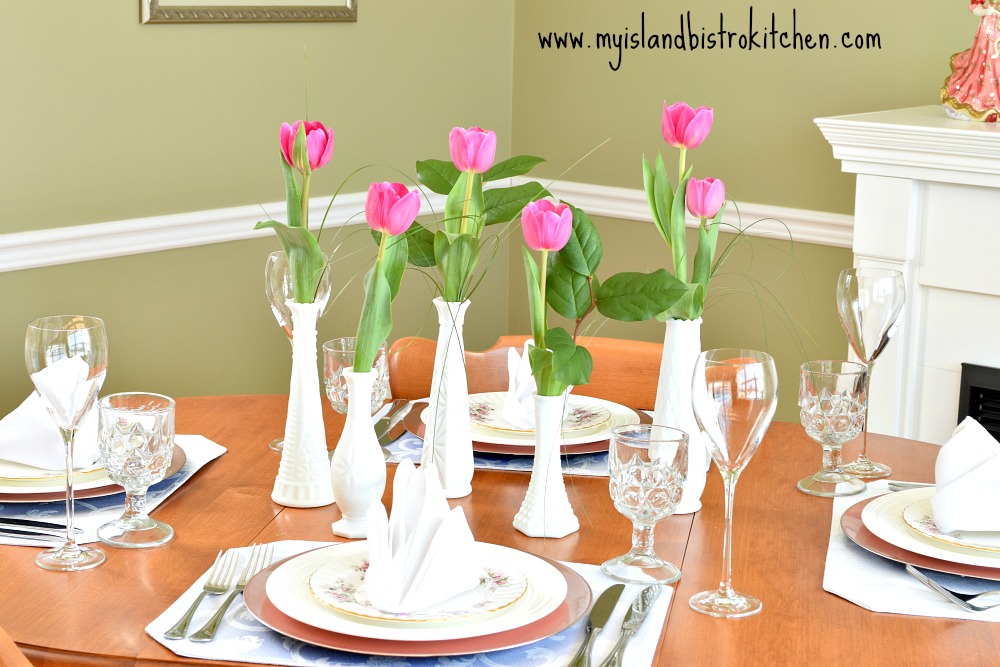
To add more interest and some visual weight to the look, I have added a small sprig of salal to a couple of the vases, but not them all. Adding salal to every vase is starting to cross over into the zone of trying to have every vase identical. Also, adding some wispy bear grass adds texture and interest so long as not too much is added.
The tulips were greenhouse-grown here on Prince Edward Island at Vanco Farms in Mount Albion. Click here to read the story I wrote a few years ago on their tulip production.
For unity, I recommend going with all one color of flower for all the vases as it’s less distracting to the eye and looks more coordinated.
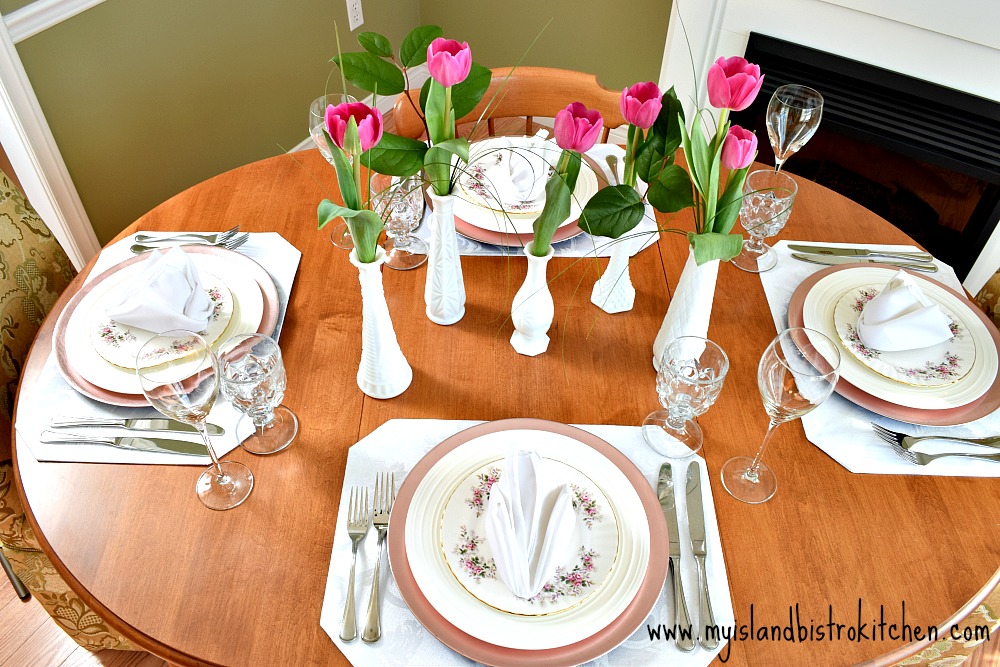
In modern, contemporary and casual tablesettings, it’s very common to forego tablecloths and, as shown in this setting, to let the wood of the table be visible. It gives a lighter, more airy, and less fussy look to the table than if a full tablecloth was used. I have opted to use basic white placemats simply to “ground” each individual placesetting.
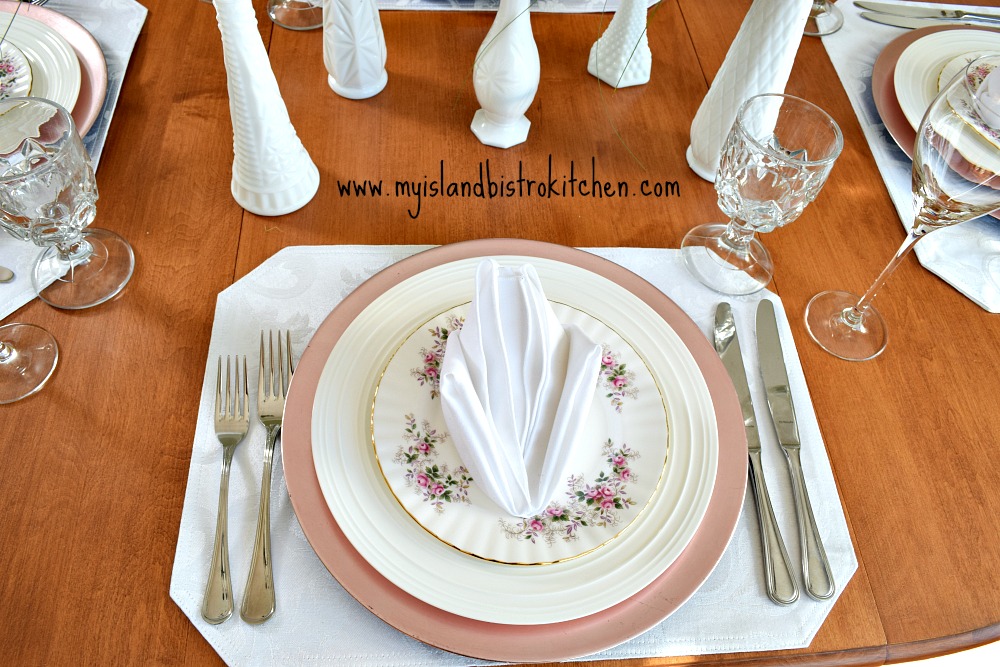
I’m a big fan of high-quality plain white napkins because they go with almost anything. In this setting, I have chosen the pure elegance napkin fold and placed it in the center of each plate. Because the top plate in the setting is patterned, the plain white napkin keeps the setting more simplistic and less distracting than if a patterned napkin was used. This napkin fold dresses up the setting, giving it a wee bit of height. Placing the napkin on the plate keeps each place setting neat and tidy.
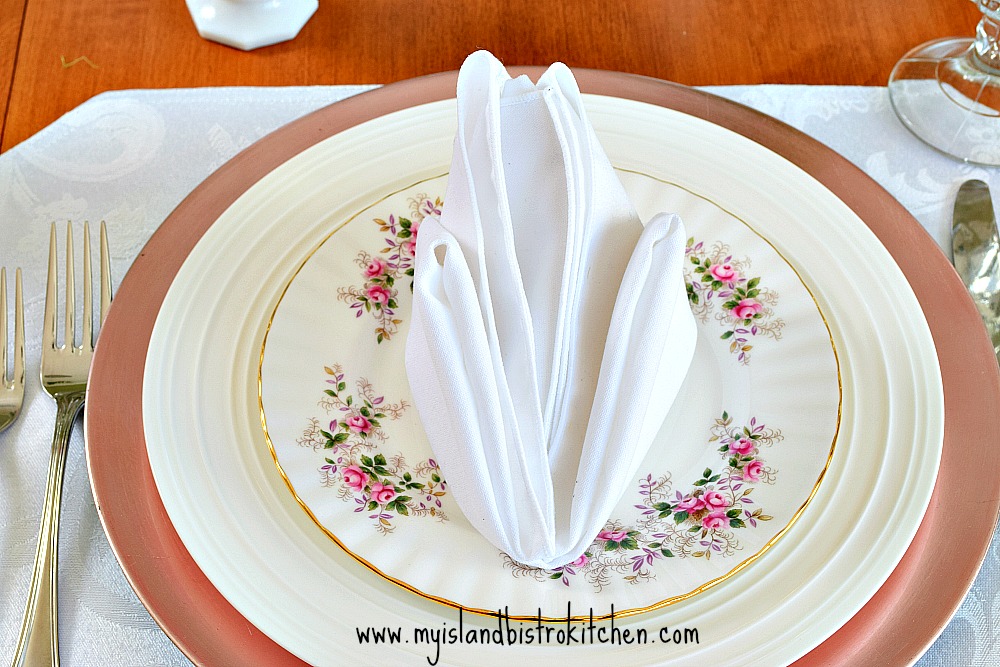
I advocate for the use of white dinnerware because it shows food to its best. However, I also like to set a pretty table with my formal Royal Albert “Lavender Rose” china. But, sometimes, the china can be a bit formal for the occasion. In these situations, I pair pieces of my china with my white porcelain everyday dinnerware as I have done here.
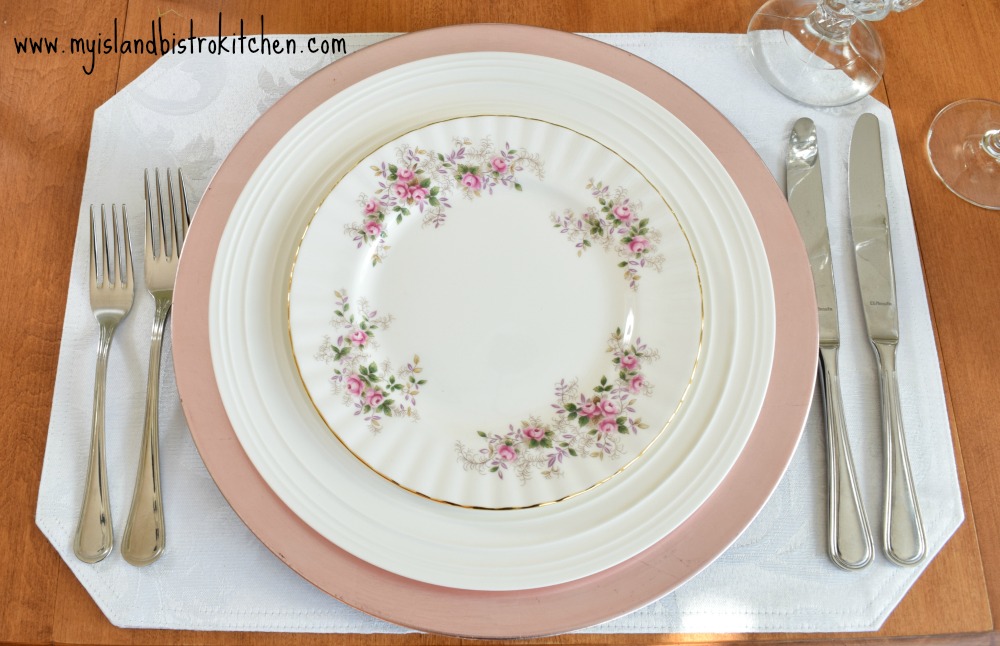
Pale pink charger plates have been used to frame each setting topped with the white dinner plate and then the Lavender Rose salad plate on top. This salad plate gives color to the setting and the colors match the tulips. By mixing the plain white with the patterned china, it makes for a more interesting setting without becoming overly formal.
The wine glasses I have selected for this setting are quite tall. They have a simple sleek shape, almost reminiscent of the tulip shape. These work well with a contemporary/modern tablesetting.
Because I have gone with a more casual contemporary look for this setting, I have used a simple design of flatware. I have not included the dessert fork and spoon because those can be placed on the table along with the dessert course. Foregoing them in the initial setting helps to keep the look of the table clean and simple, particularly when there are five vases as opposed to one single floral centerpiece.

I hope you have enjoyed viewing this springtime tablesetting! It’s great to see bright cheery colors after a long winter!
For other springtime and Easter tablesettings, click on the following links:
Tip Toe Through the Tulips Easter Tablesetting
Springtime Yellow Tablescape
Peter Cottontail Tablesetting for Easter
Easter Tablesetting
A Casual Tablescape for Easter Brunch

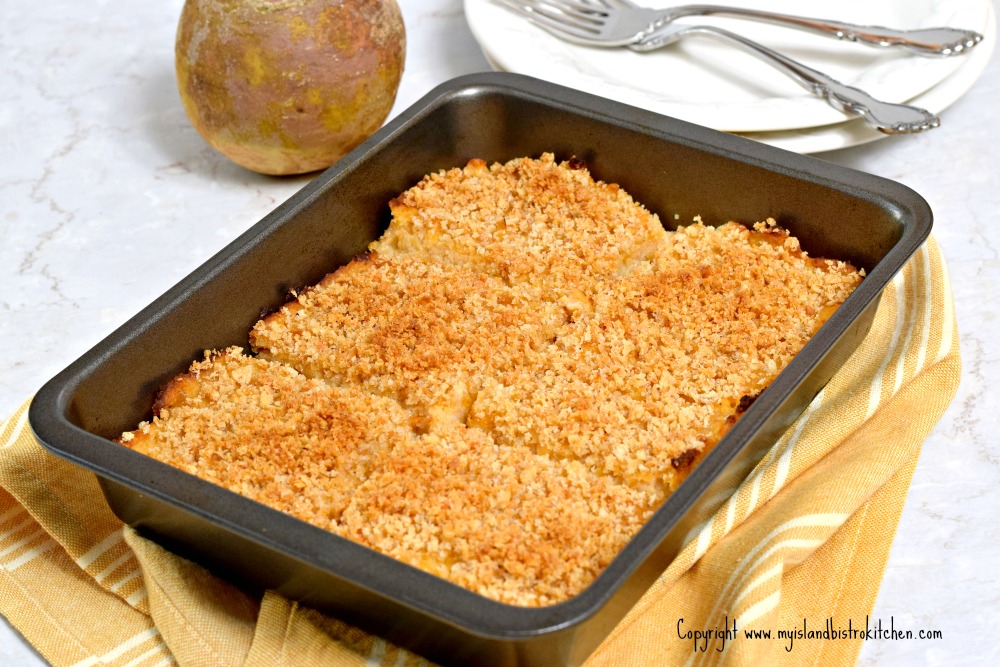
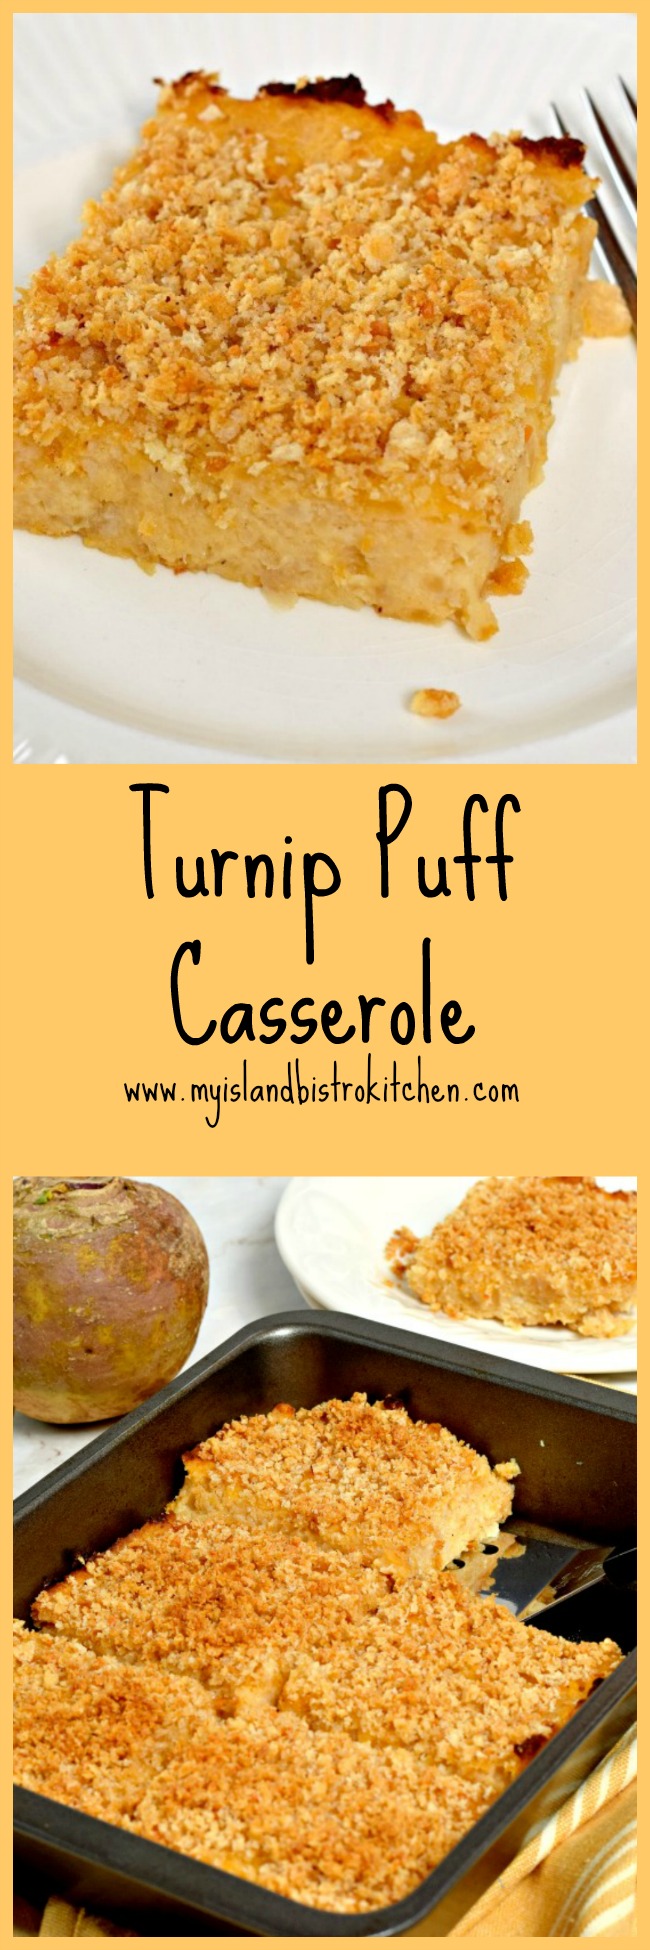
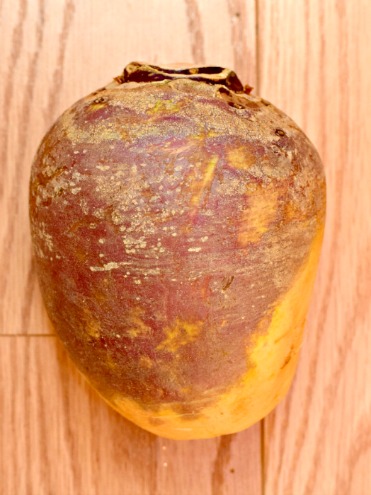
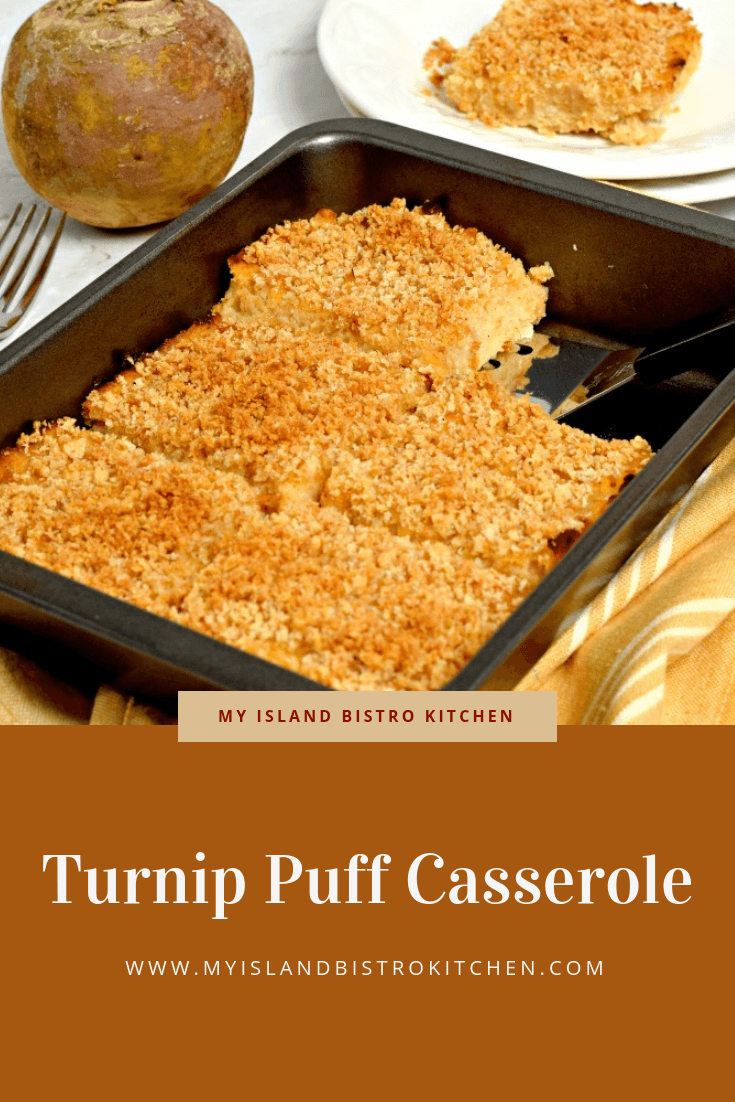
This turnip puff casserole is really a rutabaga puff casserole because, in fact, it is actually made with rutabaga, not turnip. However, all my life, I have known the root vegetable in the photo below as a “turnip”. Besides, I think turnip puff casserole sounds better than rutabaga puff casserole!
Now, even though turnips and rutabagas are kissing cousins in the mustard plant family, there are some key differences between the two.
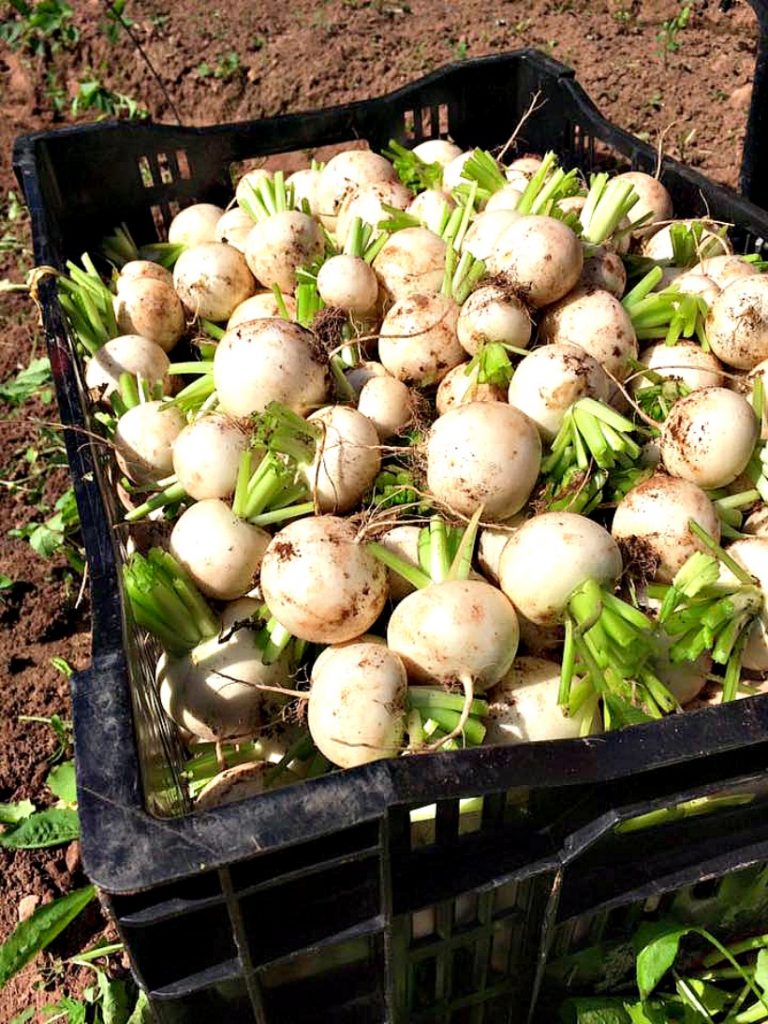
Turnips (shown in the photo above) are much smaller than rutabagas. They are usually anywhere from 2″ – 4″ in diameter compared to the much larger rutabagas that are typically 6″ or even more in diameter.
Rutabagas are much sweeter and turnips more bitter. Rutabagas have yellow flesh whereas turnips have white flesh. Rutabagas will have thicker outer skins than turnips and their exterior color will have a purple top and yellowy-beige bottom whereas turnips will have a white or white/purple outer skin. Rutabagas require much longer to grow and are more tolerant to cold than are turnips which is why you will often see turnips advertised as “summer” turnips. Because of their tolerance for the cold, rutabagas are often referred to as a “cold crop” and my grandparents always claimed the rutabagas (that they referred to as turnips) were no good until there had been a good frost before they were harvested. In fact, my grandmother always said the earlier they were harvested in the fall, the more bitter they were which is why, in the fall, she always added a small amount of sugar to the cooked rutabaga as she mashed it.
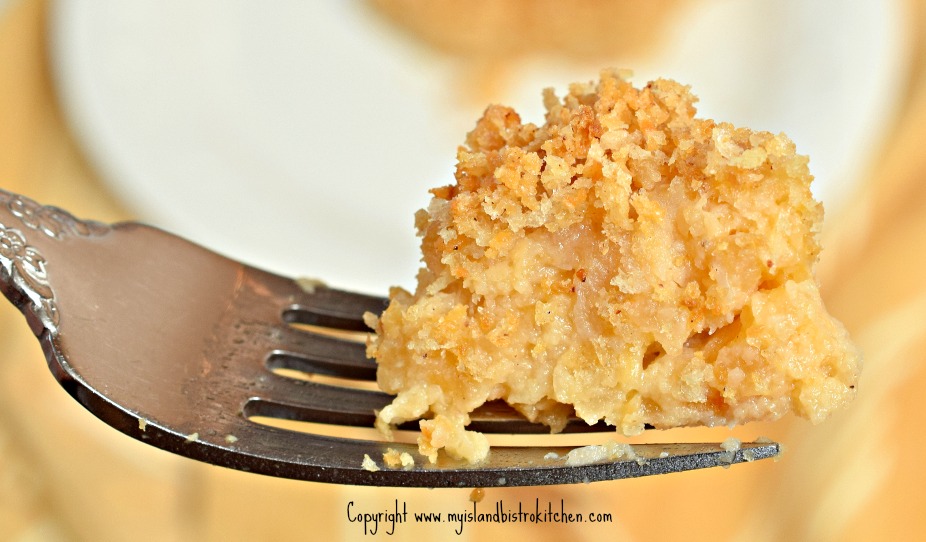
We often serve the golden-colored mashed rutabaga as a side vegetable to many meals but, sometimes (especially for special occasions), it’s nice to kick this side dish up a notch which is what I do when I make this turnip puff casserole. A rutabaga weighing approximately 1 lb, 7 oz will be required for this recipe. To the cooked rutabaga that is mashed really well to the texture of purée, I add some applesauce and brown sugar for sweetener, some onion to make it just a little bit savory, along with some cheese to boost the flavor. A hint of nutmeg and garlic provide additional flavor. An egg is added to bind the ingredients together and baking powder is added for leavening – hence the “puff” part of this side dish.
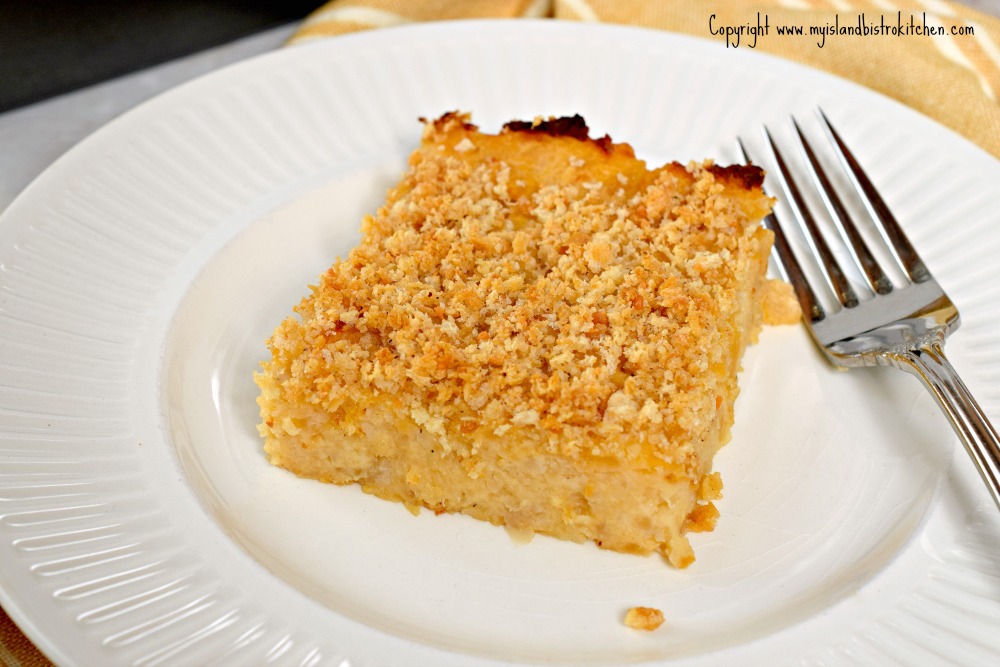
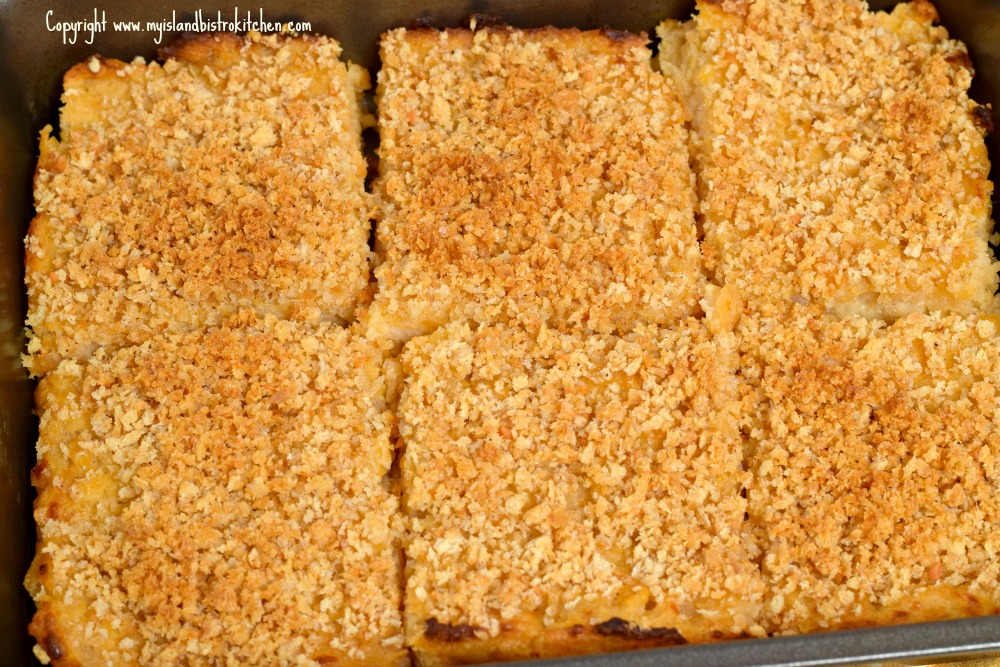
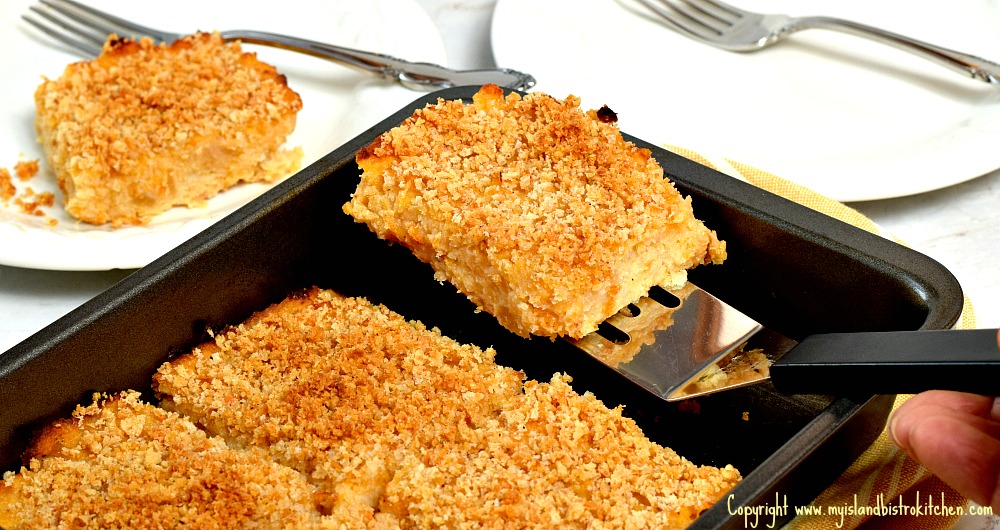
Now, I call this a “casserole” and, for photo demonstration purposes, have photographed a piece of it as a stand-alone on a plate. However, this is not a casserole I would make as a main meal entrée. Rather, it is a vegetable side dish so, instead of serving a scoop of mashed rutabaga with dinner, I cut out pieces of this casserole and serve it alongside other vegetables such as potatoes, carrots, and peas.
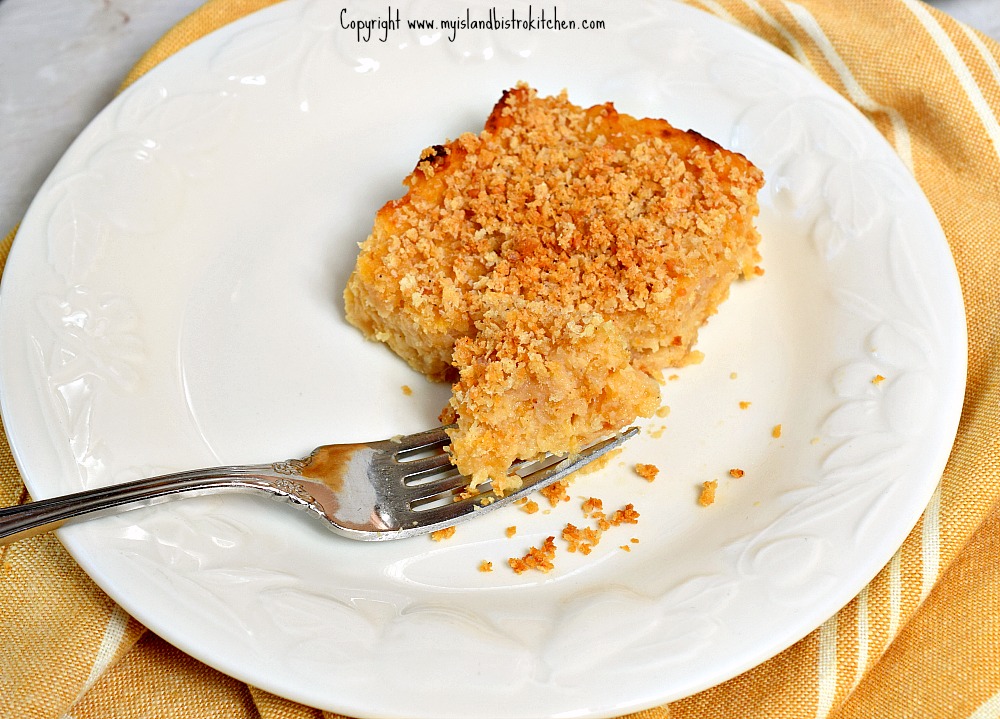
A casserole or baking pan with about a 1.5-quart capacity (or slightly less) is required for this casserole. I find the 6″x8″ baking pan that I have for my toaster oven works perfectly. I would not use a deep casserole dish for this recipe as it would not cut out well for serving purposes so use a shallow baking pan. This recipe will provide six standard-sized serving portions, the size shown in the photographs. If you are serving several other side vegetables for a dinner, or serving this buffet-style, smaller pieces may suffice…..but it’s tasty so don’t be surprised if there are requests for second helpings!
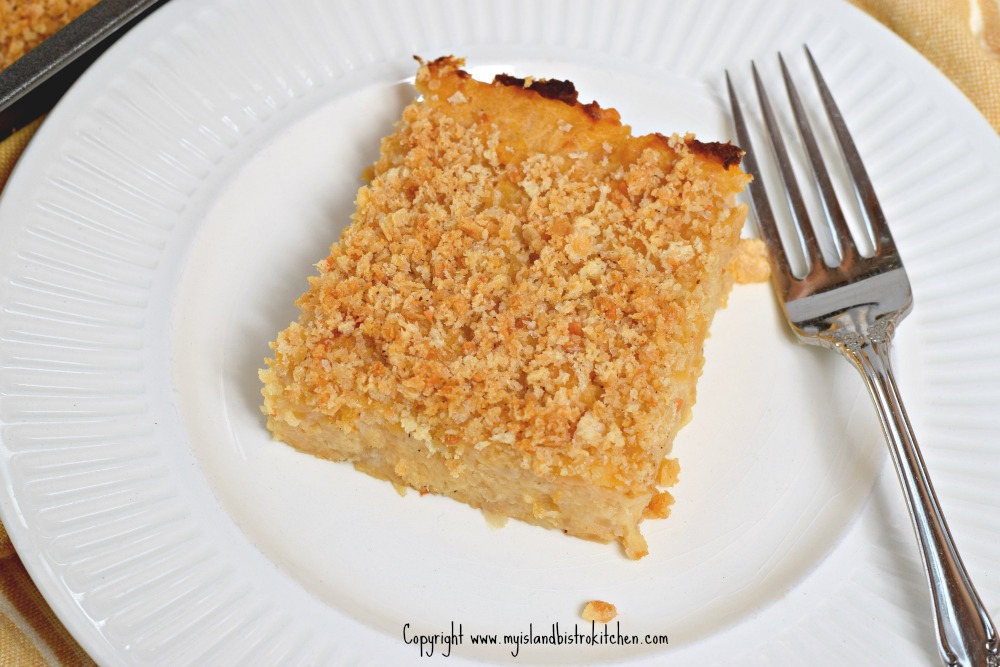
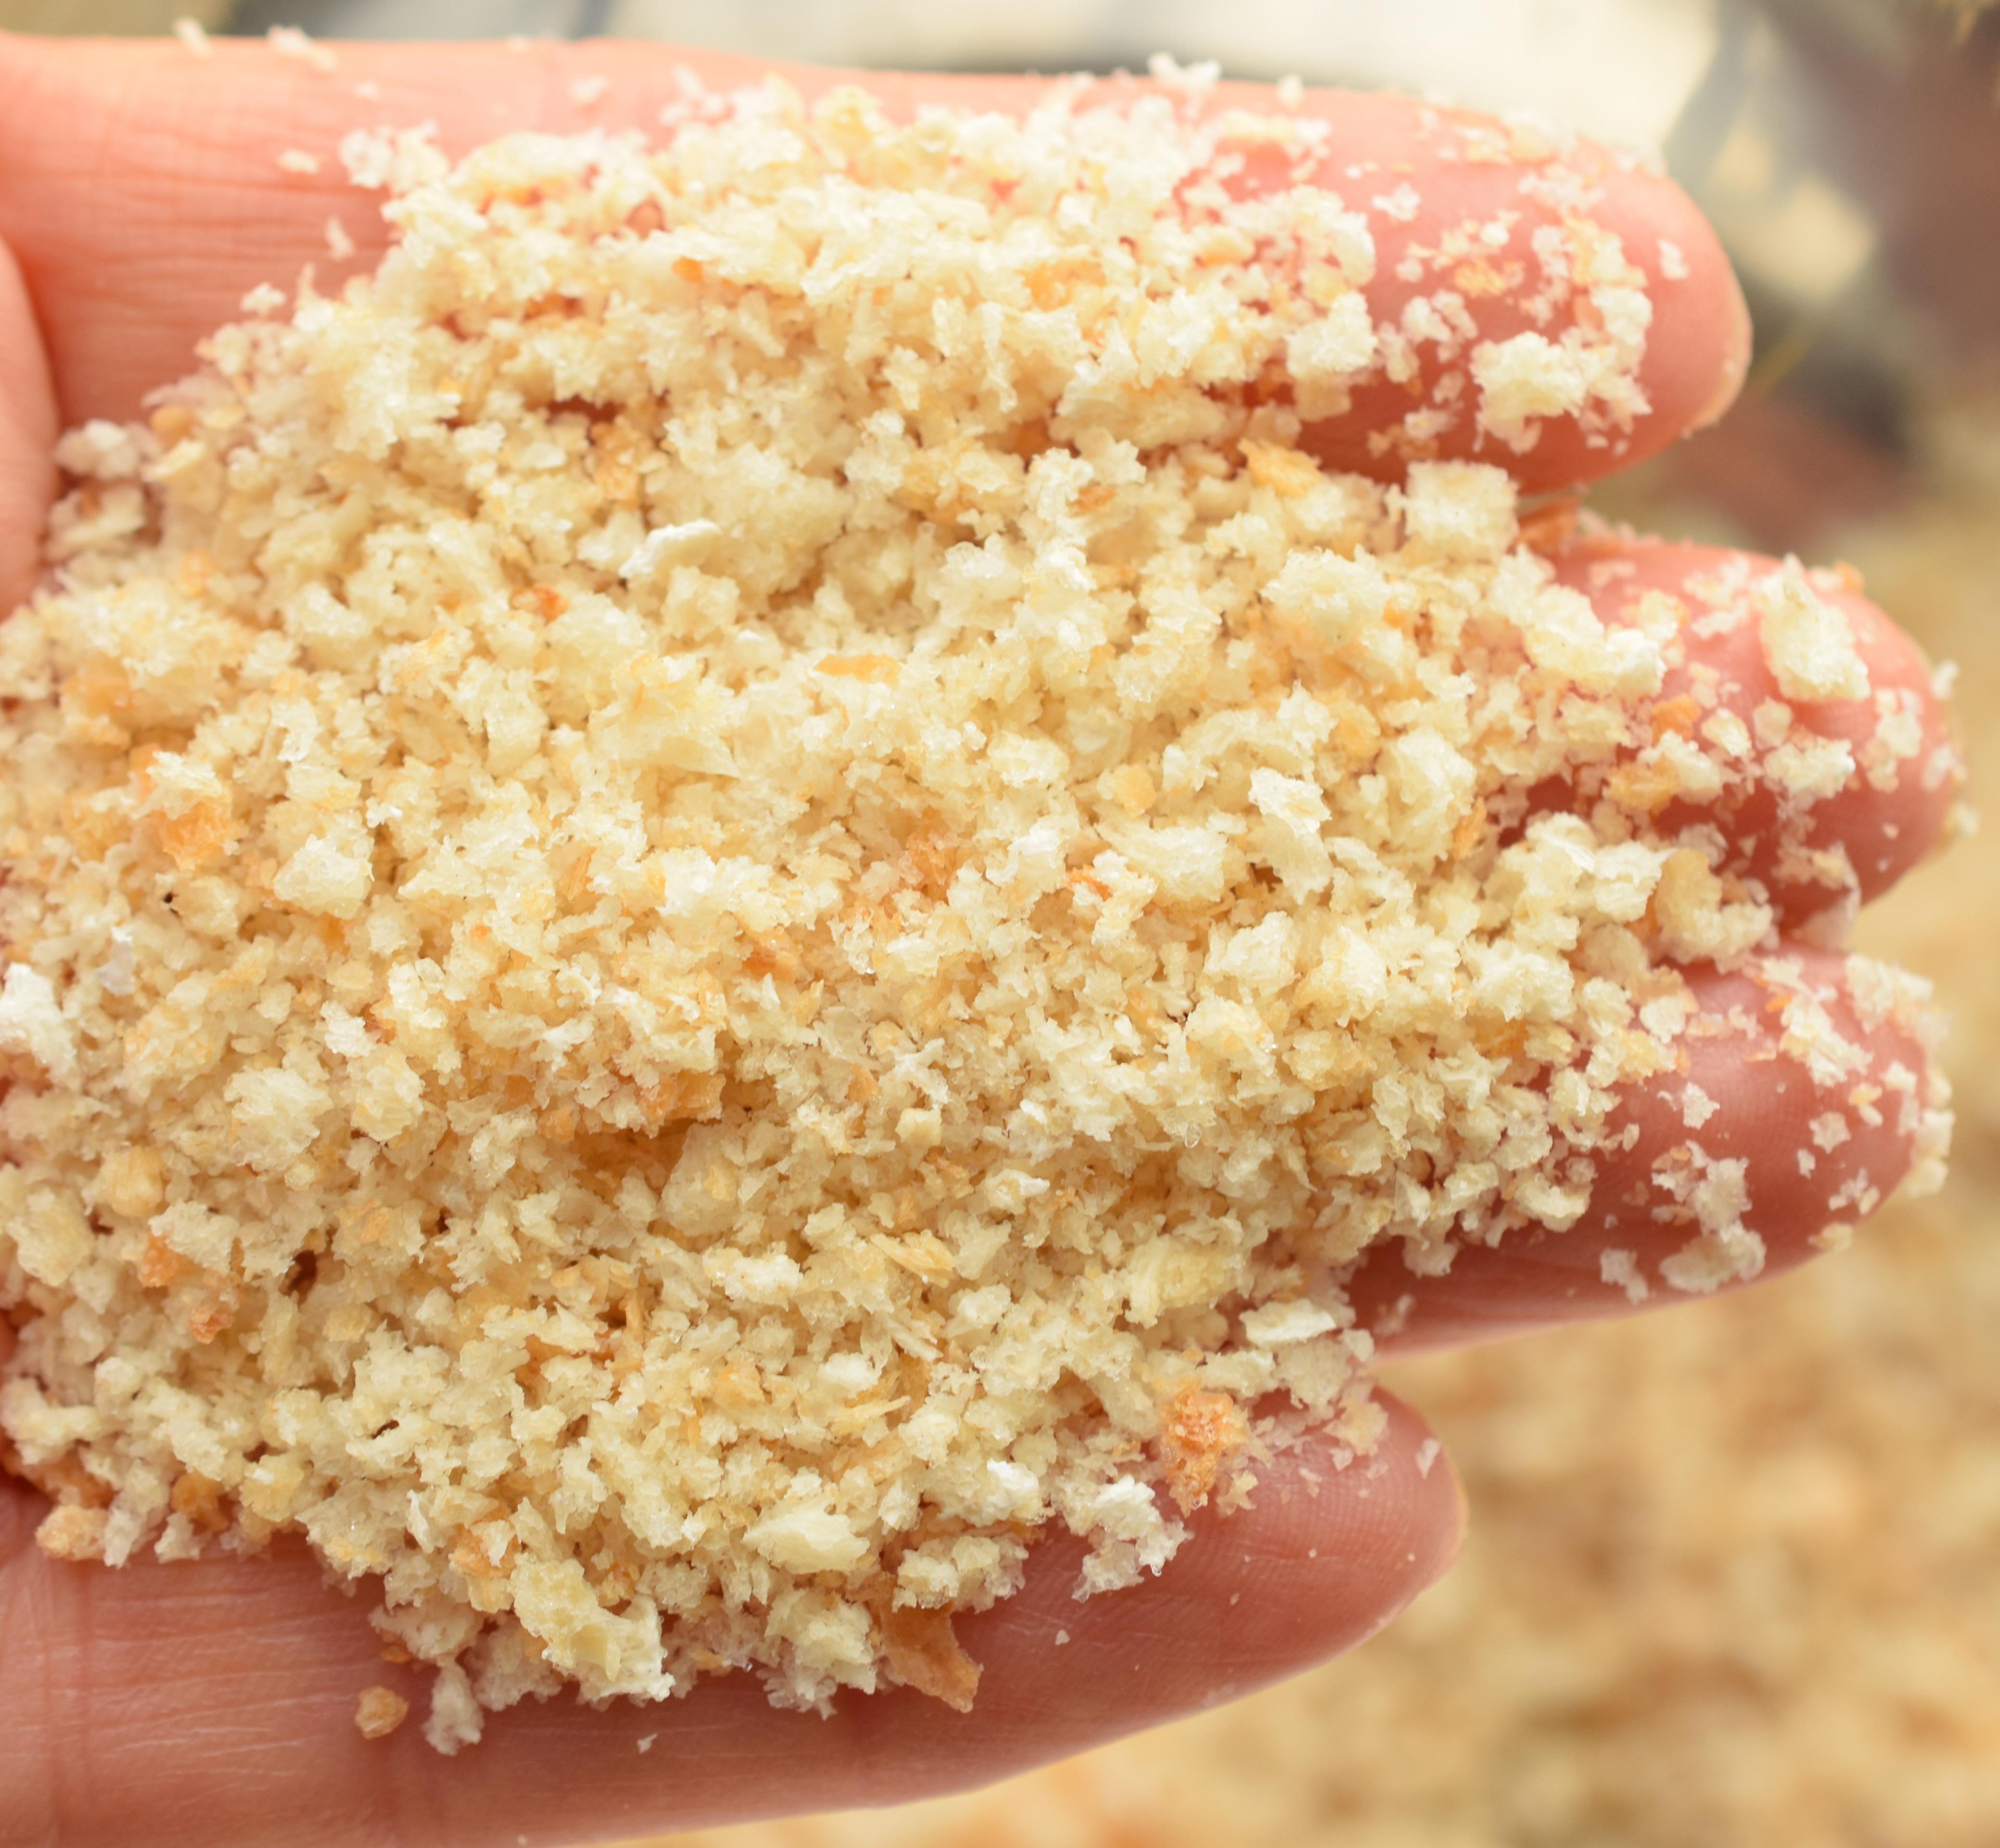
For the breadcrumb topping, I use crumbs that are not super fine as are found in commercial boxes or bags of crumbs. These are ones I crumb (in the food processor) from bread crusts and they are the consistency as shown in the photo below – not super-fine but not overly chunky.
Bake this casserole in the oven for 30-35 minutes, just until the breadcrumb topping is lightly browned. Let stand for about 10 minutes before cutting into squares and serving.
This recipe is easily adapted to be gluten-free — simply replace the breadcrumbs called for in the recipe with those that are gluten-free and use gluten-free all purpose flour.
While this dish may be served at any time of the year, it is especially good at Easter, Thanksgiving, and Christmas with roast poultry, beef, or pork. This casserole may be made several hours in advance and refrigerated until needed.
[Printable Recipe Follows at end of Posting]
Ingredients:
2 cups warm cooked, mashed rutabaga (pre-cooked rutabaga weight apx. 1 lb 7 oz)
1/3 cup applesauce
1 tbsp grated onion
2 tbsp butter, softened
1 extra-large egg, lightly beaten
2 tbsp brown sugar
¼ tsp nutmeg
1/8 tsp garlic salt
¾ tsp baking powder
1 tbsp all-purpose flour (or gluten-free all-purpose flour)
2 tbsp finely grated Parmesan cheese
2 tbsp finely grated cheddar cheese
Salt and Pepper, to taste
½ cup fine bread crumbs
2 tsp finely grated Parmesan cheese
Pinch nutmeg
1½ tbsp melted butter
Method:
Preheat oven to 350°F. Grease a 6”x8” baking pan.
In medium-sized saucepan, combine the mashed rutabaga, applesauce, grated onion, butter, and egg. Mix well.
In small bowl, combine the brown sugar, nutmeg, garlic salt, baking powder, flour, Parmesan and cheddar cheese, and salt and pepper, to taste. Stir well into the rutabaga mixture. Transfer to prepared baking pan.
In small bowl, combine the bread crumbs, Parmesan cheese, and nutmeg with the melted butter. Sprinkle crumbs over rutabaga mixture. Bake, uncovered, for approximately 30-35 minutes, until lightly browned.
Serve hot as a side dish to any hot meal in which turnip/rutabaga would typically be served.
Yield: Apx. 6 servings
Join the Facebook page for My Island Bistro Kitchen: https://www.facebook.com/MyIslandBistroKitchen/
Follow “the Bistro” on “X” (formerly Twitter): https://twitter.com/PEIBistro/
See the drool-worthy gallery of mouth-watering food photos from My Island Bistro Kitchen on Instagram: https://www.instagram.com/peibistro/
Follow “the Bistro” on Pinterest at https://www.pinterest.ca/peibistro/ and pin the Pinterest-ready photo found at the end of this post to your favorite Pinterest boards.
A vegetable side dish made with rutabaga purée, applesauce, cheese, and light seasonings. Perfect accompaniment to roast turkey, beef, or pork.
Ingredients
Instructions


It’s inevitable, when you live in Prince Edward Island, that you’ll eat a lot of potatoes and find creative ways in which to serve them, including these PEI Potato Patties. That’s because there are lots and lots of spuds grown on our little Island with the rich red soil on Canada’s east coast. Continue reading Bistro Style Potato Patties

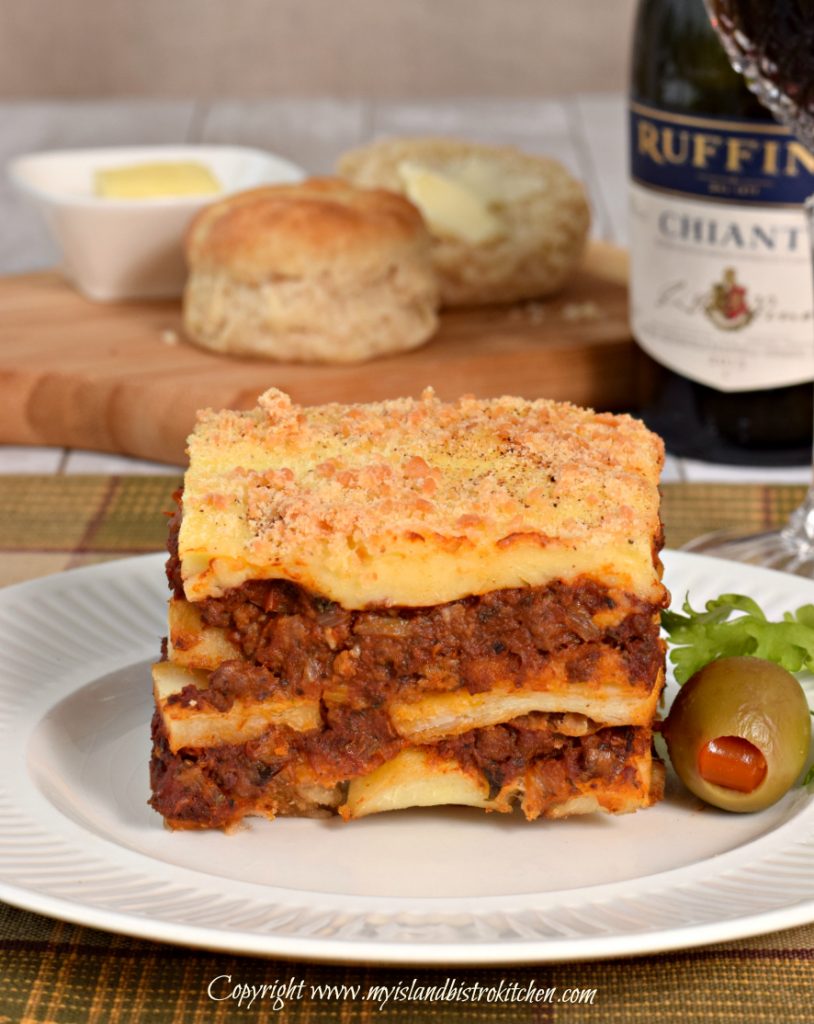
I have been invited by www.thinkbeef.ca to participate, as one of ten food bloggers from across Canada, in the Rethink Beef Global Recipe Swap Campaign to promote recipes using ground beef. Each blogger was asked to develop a recipe (using ground beef) that is inspired by his or her cultural background or a culinary adventure experienced. Each blogger was paired with another and the two exchanged their own recipe for the other to try. This posting involves showcasing my own recipe as well as a recipe from my swap partner, Jason Lee, who writes the blog, “Shut Up and Eat”.
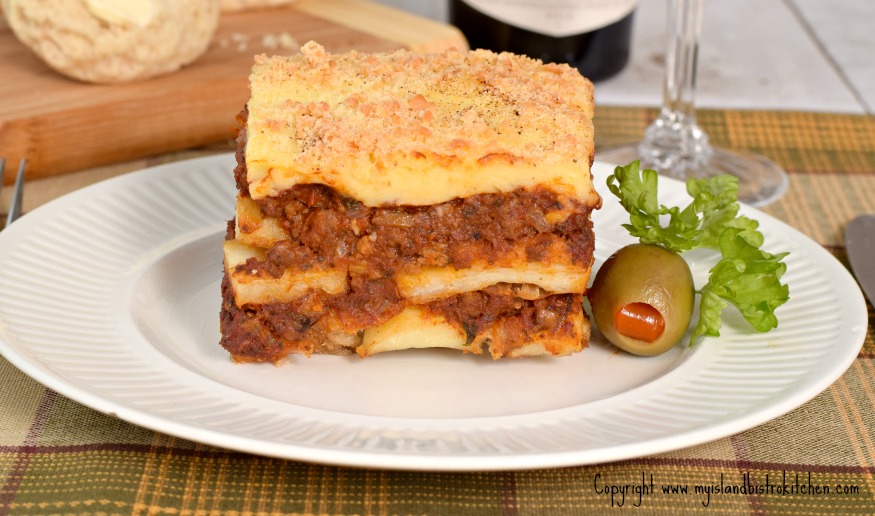
I frequently use ground beef in recipes and am never at a loss to come up with meal ideas to use this versatile meat. The recipe I have chosen is Moussaka. This is a one-dish meal typically characterized by ground meat, eggplant, and tomato sauce with a white sauce on top. So, I will begin with a discussion on why I chose Moussaka to feature ground beef, followed by some hints and tips on making this Greek-inspired dish, and will end with my experience cooking my recipe swap partner’s Beef and Coriander Dumplings inspired by his Chinese heritage. This posting has two recipes from two different cultures but both use ground beef as the main ingredient. Continue reading Rethink Beef Global Recipe Swap Campaign: Moussaka

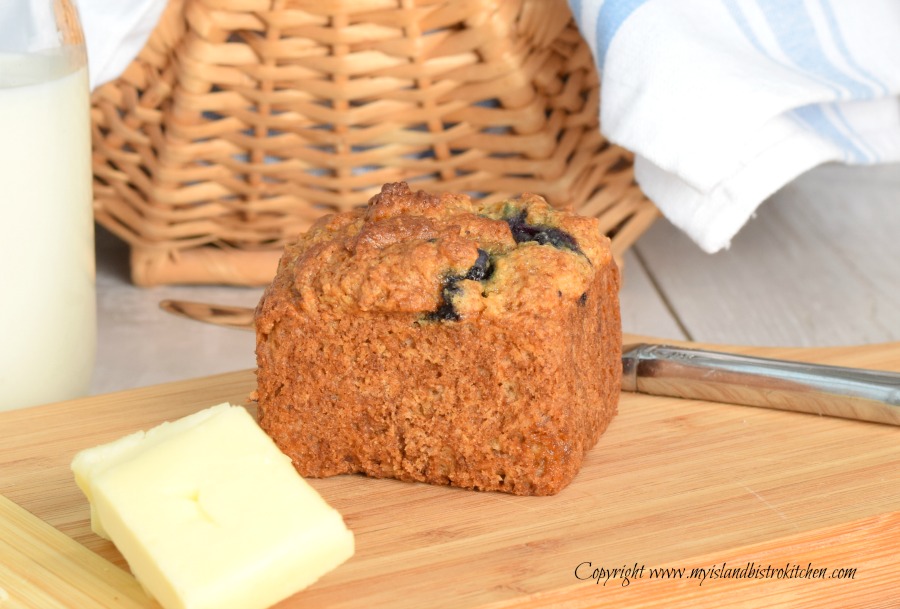
Blueberry muffins are a favorite and, while I have a “go-to” recipe for blueberry muffins that calls for regular gluten flour, I did not have a recipe for Gluten-free Blueberry Muffins. So, I set about developing one of my own and this is the result. My aim was to create a bistro, or deli-style, muffin and I am pleased with the end result. Continue reading Gluten-free Blueberry Muffins

Crepes filled with delectable fillings are one of my favorite meals. Chicken and Mushroom Crepes with Cheese Sauce are a real treat and a lot easier to make than one might think. At one time considered the fare of stylish restaurants and bistros, they can actually be very easily made at home. Continue reading Chicken and Mushroom Crepes

Today, I am sharing my newly-developed recipe for Ham Lentil Soup that is made from a leftover ham bone, broth, and ham. Continue reading Ham Lentil Soup Recipe

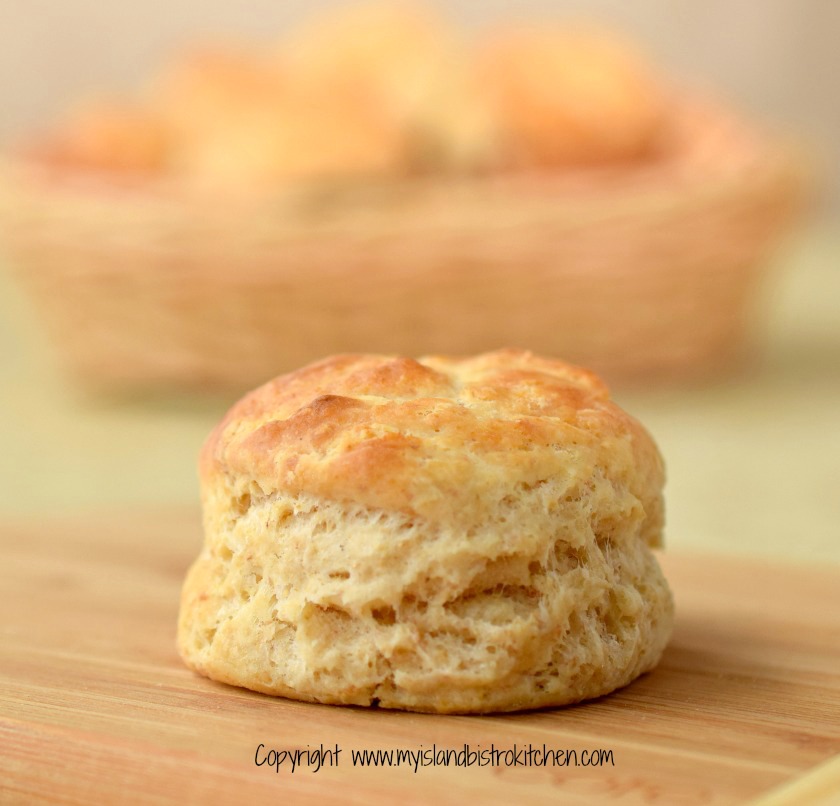
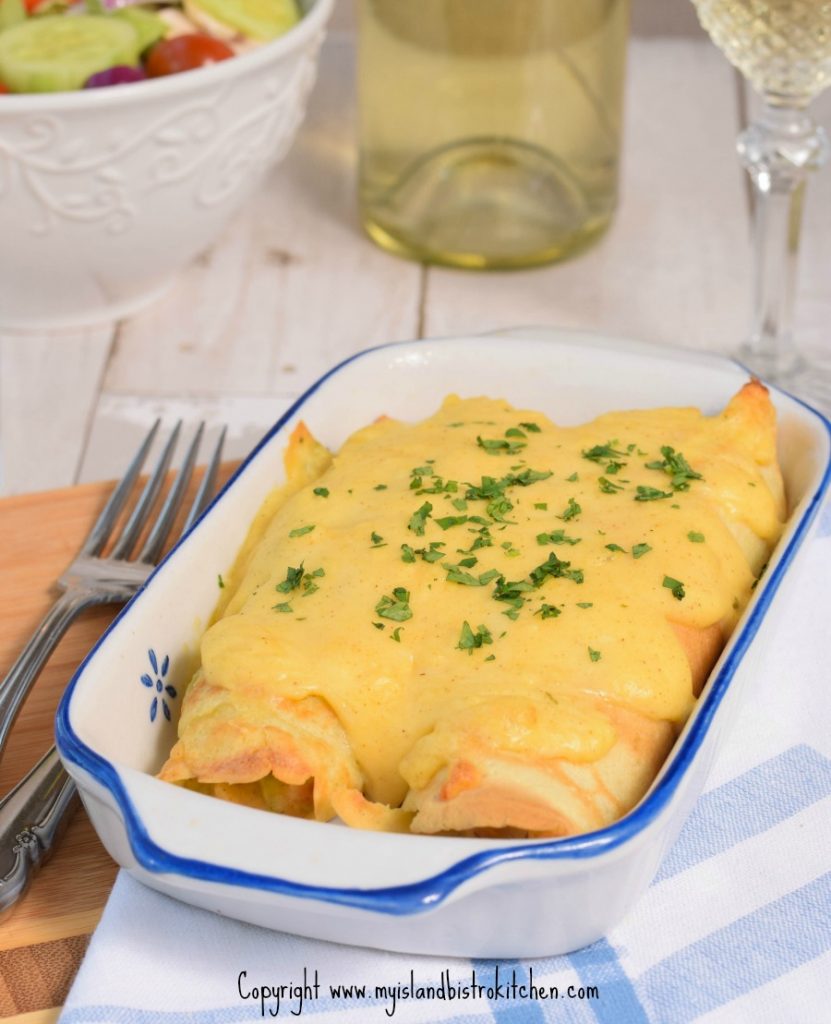
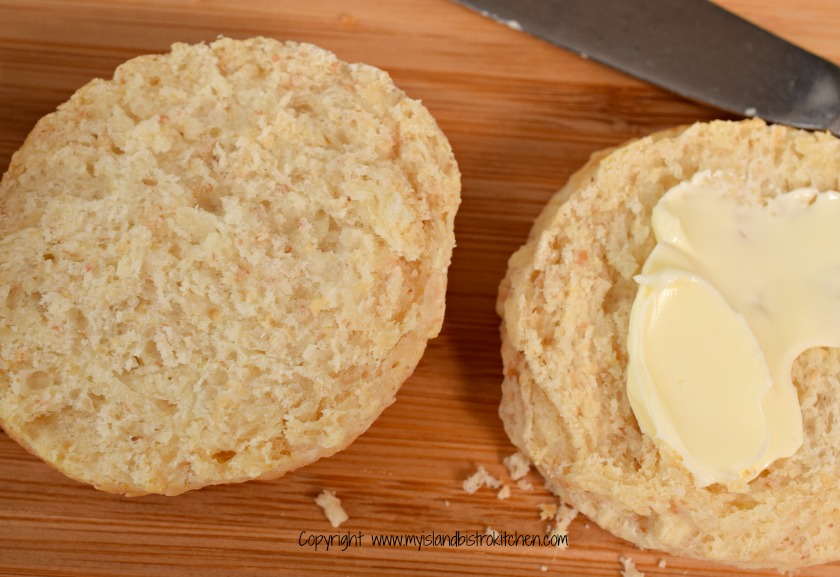
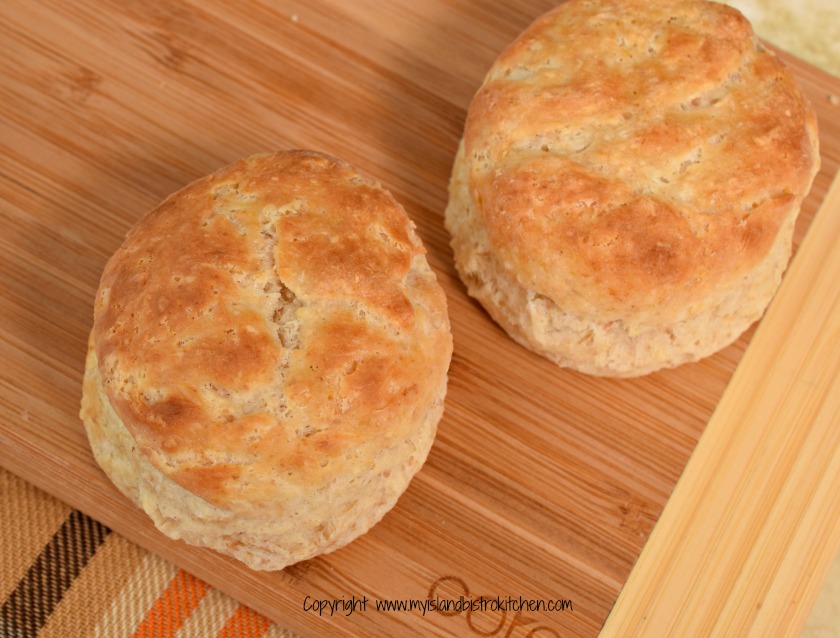
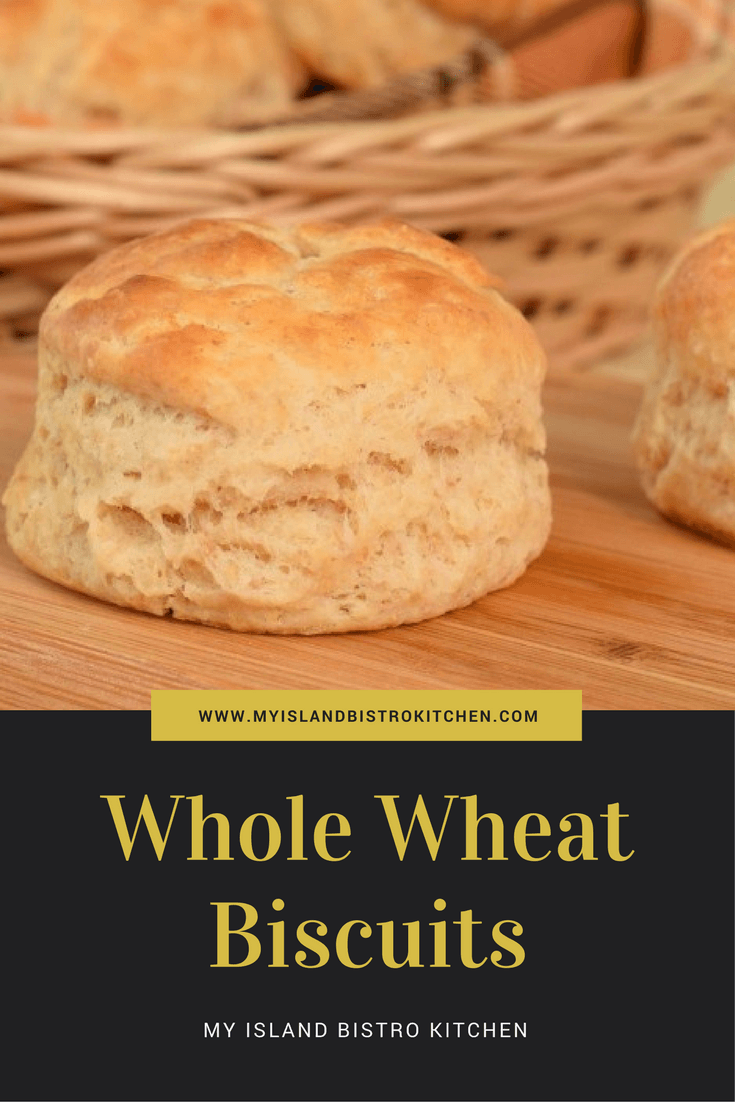
For me, one of the hallmarks of a wonderful homemade meal is a fresh batch of tender and flavorful whole wheat biscuits on the table! These are particularly good with baked beans (especially when the biscuits are slathered with molasses!) or, well, just about anything! Biscuits are a form of a quick bread so they don’t take long to whip up and, best of all, they only call for pantry staples like flour, baking powder, salt, butter, milk and sometimes a small amount of sugar.
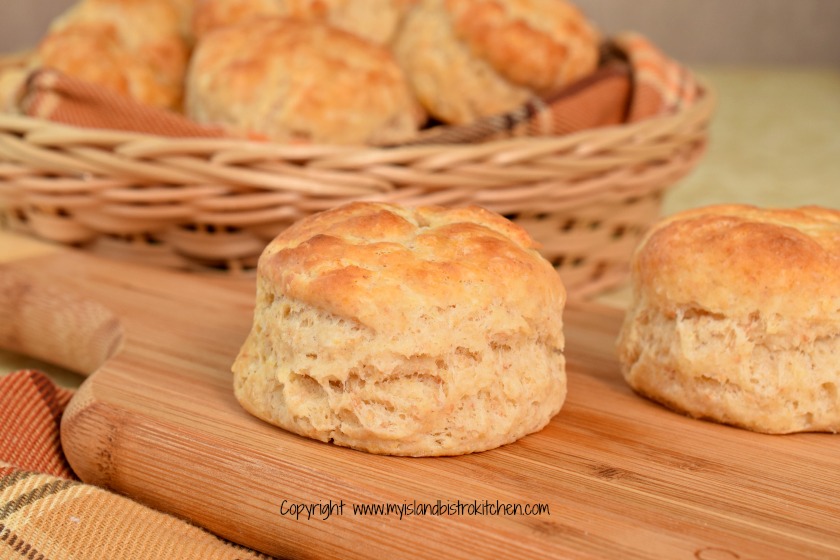
My recipe calls for a combination of flours – 1 1/4 cups of all-purpose flour and 3/4 cup whole wheat flour. I find that using all whole wheat flour does not yield the tender texture that can be achieved by blending all-purpose flour with the whole wheat. Shortening or butter can be used as the fat for biscuits; however, nothing beats butter for flavor!
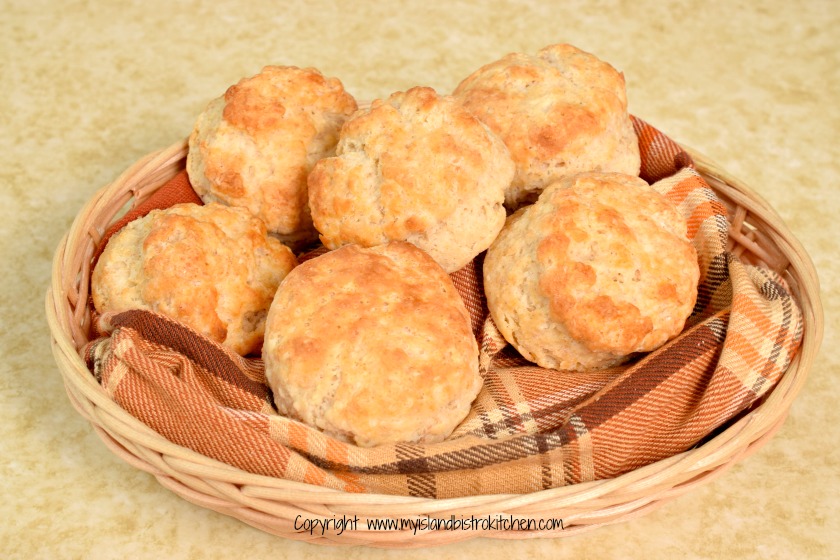
These biscuits have a different flavor and texture than my standard white biscuits and these are made with buttermilk (or sour milk) instead of with whipping cream and whole milk (click here for the recipe for my white tea biscuits). They are two distinctly different types of biscuits. The whole wheat ones are slightly more “rustic” while the white biscuits are very refined. I tend to make the whole wheat biscuits to serve alongside a more rustic meal like beans, chili, and stews, for example. My regular “go-to” standard biscuits are the white tea biscuits and, for sure, they are the ones I use for afternoon teas because of their light, tender crumb.
My hints for making biscuits are –
Biscuits are best served slightly warm so make them just before the meal.
[Printable recipe follows at end of posting]
Ingredients:
1¼ cups all-purpose flour
¾ cup whole wheat flour
4 tsp baking powder
1 tsp salt
1 tbsp granulated sugar
6 tbsp cold, unsalted butter, cut into small chunks
1 cup buttermilk or sour milk*
1-2 tbsp milk for brushing tops of biscuits
Method:
Preheat oven to 450°F. Line baking sheet with parchment paper.
In large bowl, whisk together the flours, baking powder, salt, and sugar.
Grate cold (or frozen) butter over flour in bowl, or use a pastry cutter to cut in the butter until mixture resembles coarse crumbs.
Make a well in the center of the ingredients. Pour milk into well in dry ingredients. Using a fork, mix ingredients together just until flour mixture is incorporated. Do not overmix. Mixture will be a soft, moist batter.
Let batter rest in bowl for 1-2 minutes then turn out onto a floured surface. Knead dough 8-10 times. Do not over-knead.
Roll or pat dough to desired thickness, about 1” thick. Using a 2” floured round cookie cutter, cut out biscuits, re-flouring cutter before cutting out each biscuit. Gather up remaining dough, pat down to about 1” thick and cut out biscuits.
Using a small spatula, transfer the biscuits to prepared baking sheet, placing them about 1” to 1½ “ apart. Prick tops of biscuits with fork tines and lightly brush with milk, if desired. Bake for 14-16 minutes or until lightly browned on top. Remove from oven and let cool on baking sheet for 3-4 minutes then transfer to wire rack.
Biscuits may also be placed close together in a greased baking pan with sides. Baking the biscuits in this manner will yield soft-sided biscuits.
*To sour milk, place 1 tbsp white vinegar in a measuring cup. Add enough milk to make 1 cup. Stir. Let stand for 5 minutes to sour.
Yield: Apx. 12-13 – 2” biscuits

Delicious easy-to-make classic whole wheat biscuits that are tender and flavorful.
Ingredients
Instructions

Join the Facebook page for My Island Bistro Kitchen: https://www.facebook.com/MyIslandBistroKitchen/
Follow “the Bistro” on “X” (formerly Twitter): https://twitter.com/PEIBistro/
See the drool-worthy gallery of mouth-watering food photos from My Island Bistro Kitchen on Instagram: https://www.instagram.com/peibistro/
Follow “the Bistro” on Pinterest at https://www.pinterest.ca/peibistro/ and pin the Pinterest-ready photo found at the end of this post to your favorite Pinterest boards.
Tea Biscuits
Buttery Buttermilk Biscuits
Rustic Oat Bran Biscuits

I am a huge fan of cooking with the intent of having leftovers for several meals. It’s great to have cold leftover turkey, ham, or roast beef but, after a couple of days, well, it can get a little monotonous. I don’t like to throw out food so the alternative is to find other creative ways to use the leftovers and stretch the food budget. Sometimes, as in the case of a large family, perhaps the leftovers don’t span far enough unless they are used in a way that extends them.
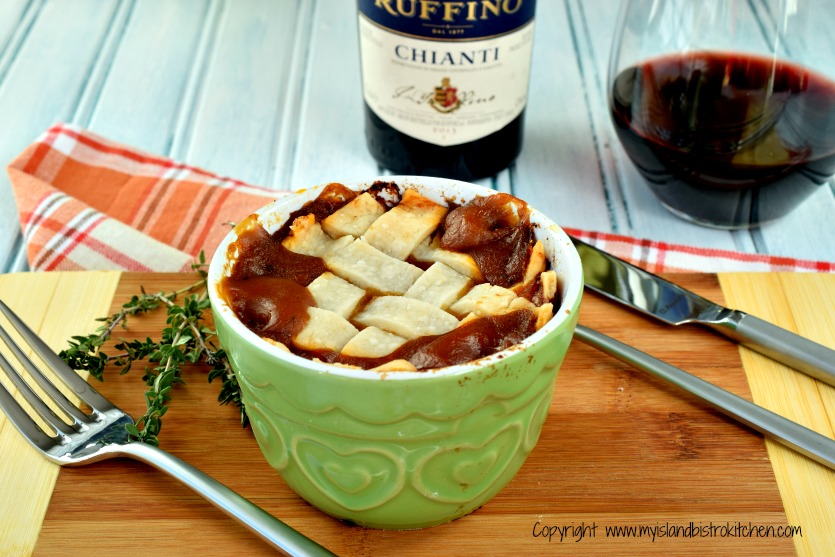
So, whether it’s a case of having leftover meat you’re tired of or not having enough left to plate as straight cold meat slices to make another meal, my recipe for Beef Pot Pie will be the answer for leftover roast beef. Just make sure you make an extra 1 1/3 cups of gravy when preparing that roast beef dinner so you will have enough gravy to make this recipe. Continue reading The Bistro’s Beef Pot Pie

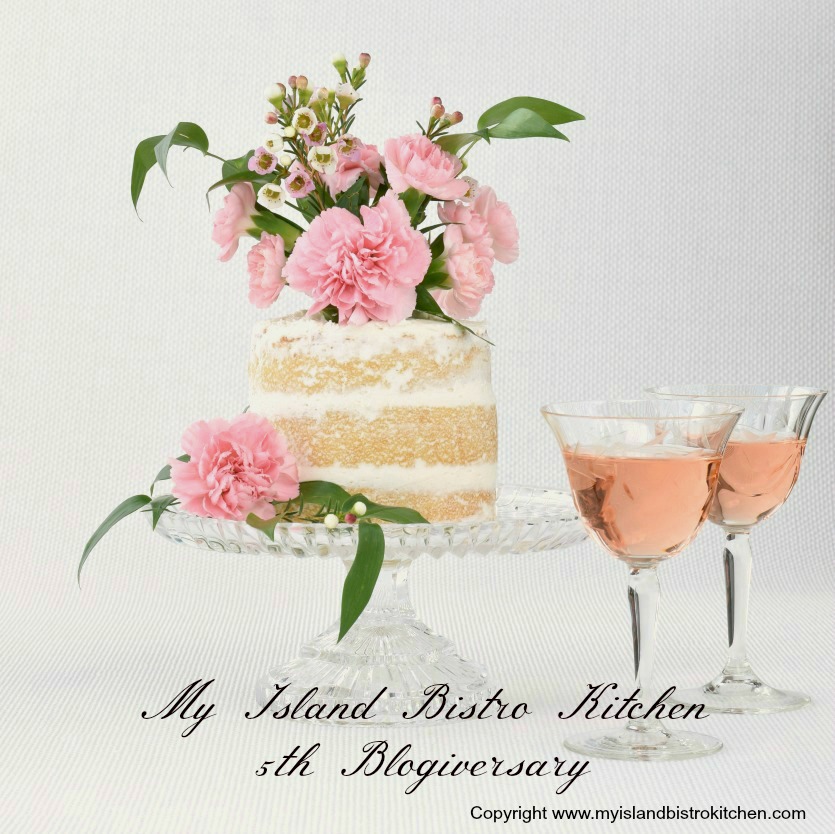
Five years ago today, January 18, 2012, I established my food blog, My Island Bistro Kitchen. Where did those five years go – they have just flown by! Time flies when you’re having fun, they say! So, today, I celebrate my 5th blogiversary!
I attempt to keep the recipes I develop and share real — nothing too wild and wacky. I am mindful of the different levels of culinary skills and food budgets that followers may have. While I do try to provide some newer, upscale recipes, it has been my experience over the past five years that the most popular recipes tend to be the traditional dishes that call for common ingredients and are not overly complicated or time-consuming to make. Where possible, I try to use locally produced food ingredients from right here in Prince Edward Island. And, for added interest, I continue to include stories about Island food producers and local culinary events.
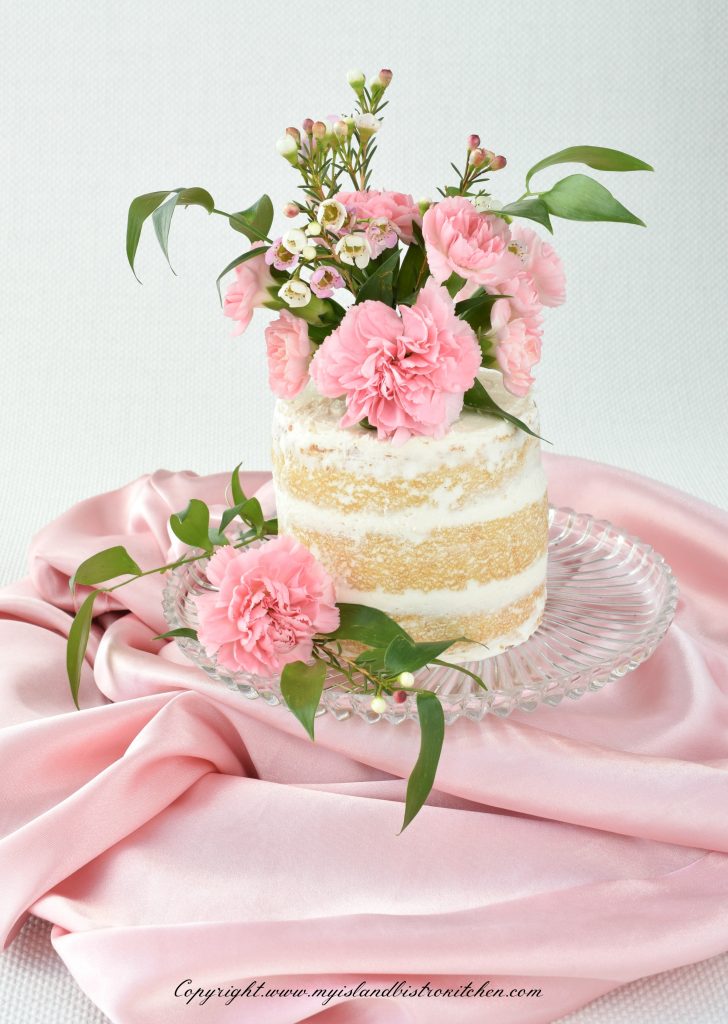
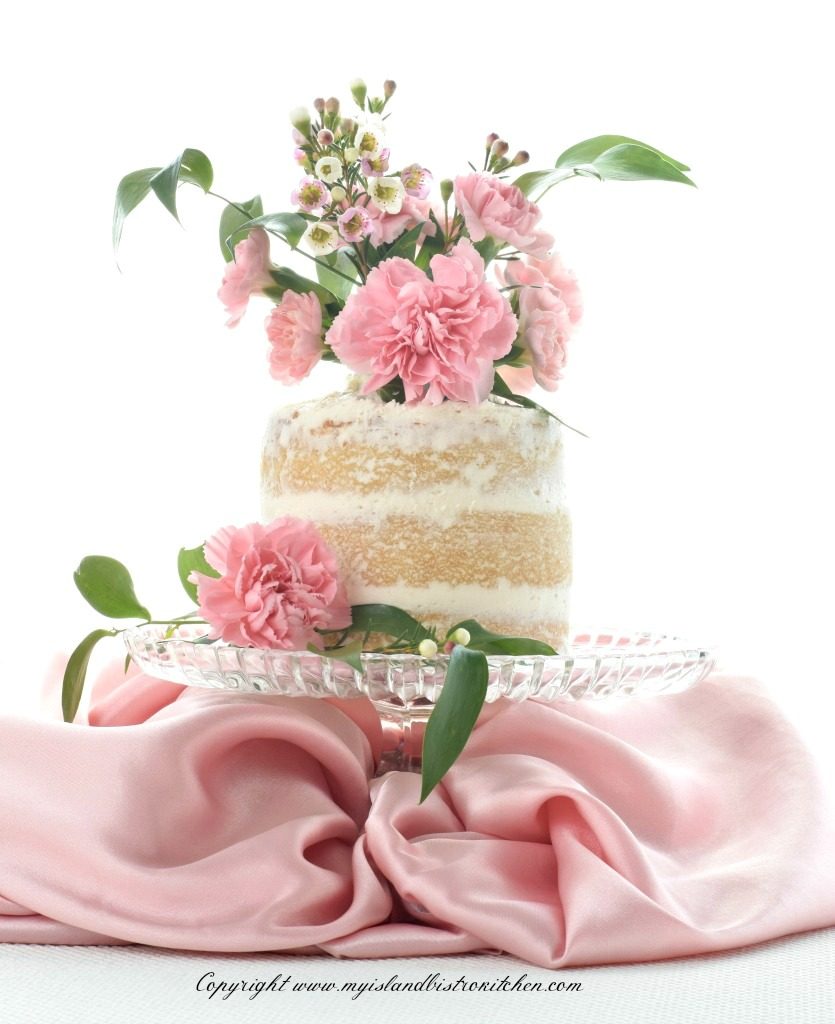
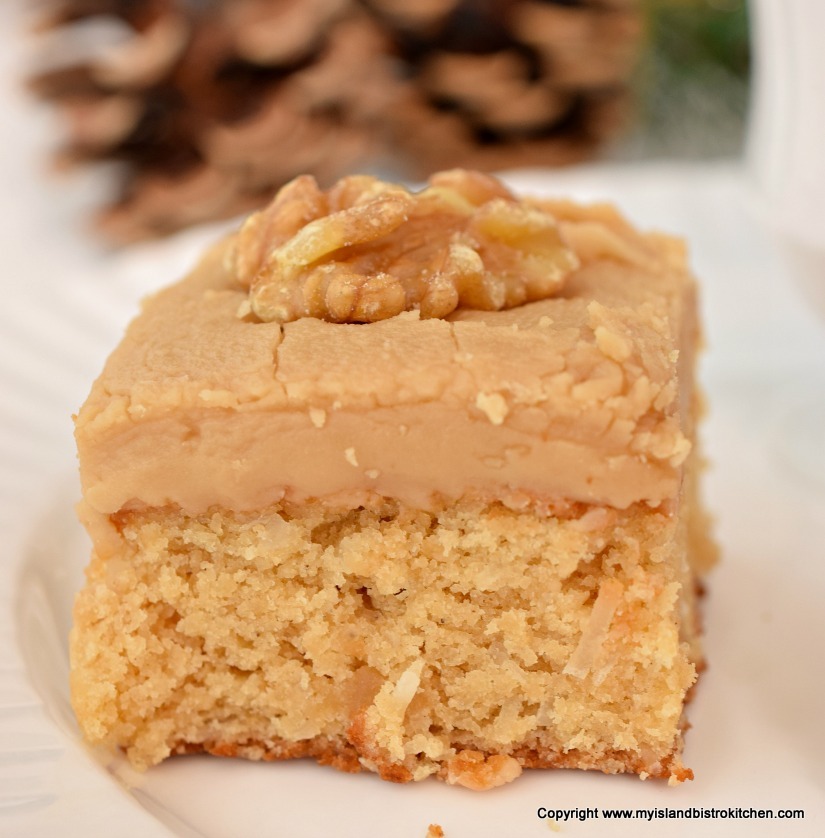
To celebrate my five-year anniversary, I have made a cake and decorated it in the trendy “naked cake” style. Naked cake means that very little, if any, frosting is used on the sides of the cake allowing much of the cake itself to be visible. In fact, even less frosting is used on one of these cakes than I would normally use to crumb coat a cake I would completely cover with frosting! The absence of a lot of frosting allows the texture, color, and filling in the cake to show. This is a style currently favored by many brides, probably for its romantic and casual look and feel. This style also looks very nostalgic and has a vintage air about it.
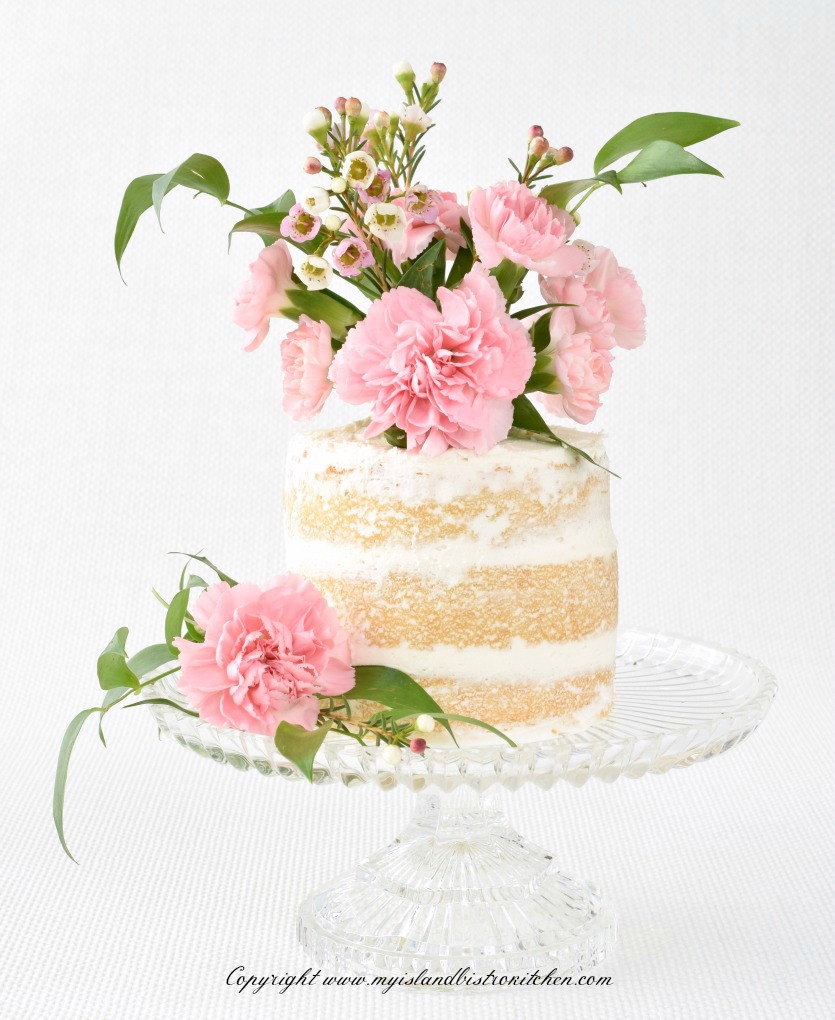
Naked cakes are very non-pretentious and, in my opinion, do not require a lot of cake decorating skill. If you can spread butter on bread, you can decorate a naked cake! Perfection is not a goal in the application of minimal frosting that characterizes this style of cake! The rustic look allows a cake topper to stand out and be the focal point because there is no fancy frosting or a cake covered in piped roses or frosting ruffles to compete for the limelight. Garnishes for these types of cakes usually involve real or natural elements such as berries, fruit, or as I have done with this cake, fresh flowers. Sometimes, chocolate or caramel is drizzled over the top and down the sides of the cake.
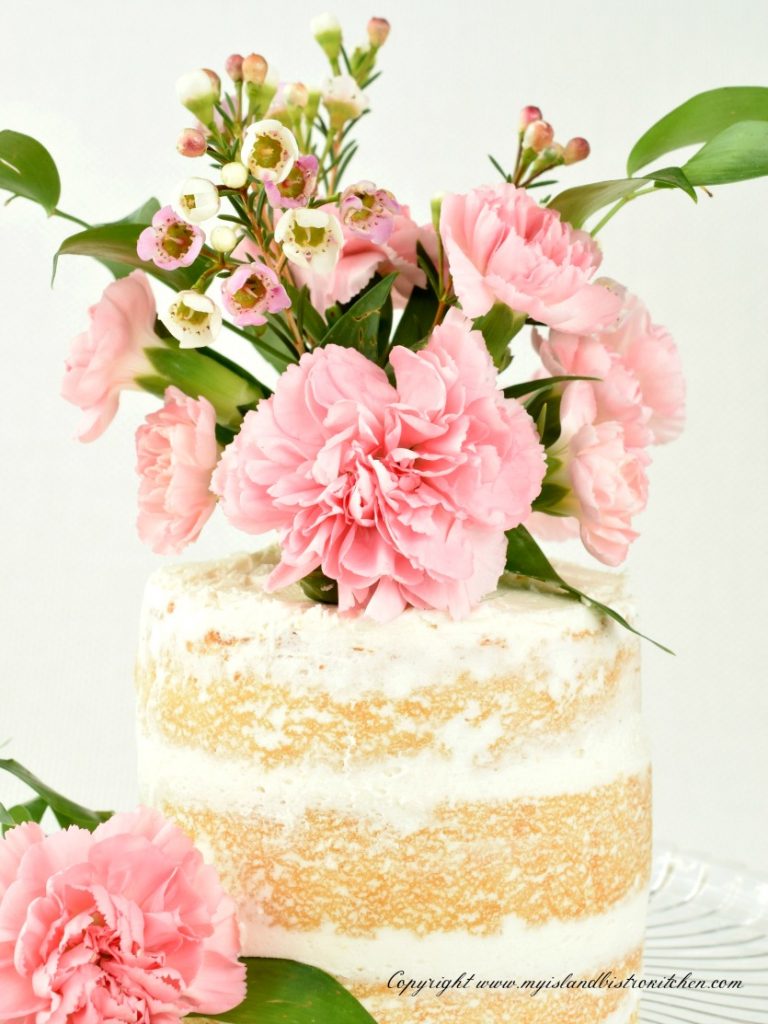
Cakes decorated in this style have a very natural look to them. In fact, with dark-colored cakes and a slim swipe of white frosting, I think they almost look a bit like birch bark. When used on lighter toned cakes, the effect can resemble a white wash look.
This is a good type of decorating to use if the cake is for someone who does not like a lot of frosting that is the hallmark of traditionally-decorated celebratory cakes. In fact, some naked cakes sport only frosting on the top of the cake and in between the layers. Now, those are real naked cakes!
The disadvantage of this style of decorating is that the cake can dry out rather quickly. When completely frosted, the frosting acts as a seal, to help keep the cake moist. Without complete coverage of frosting, care must be taken that the cake does not dry out. I recommend frosting the cake just before serving or, if it must be done in advance, store it in an airtight cake storer/caddy.
The “naked cake” is not a new style as it has been around for a few years now but it is a cake decorating style that has gained traction and this trend shows no signs of disappearing any time soon. While it is not a style for everyone’s taste, it is an option to add variety to cake decorating.
Thank you to those faithful followers of My Island Bistro Kitchen food blog who have been with me from the start. Thanks also to those who have joined along the way. If you are new to “the Bistro”, a hearty warm welcome! I hope all will continue to follow “the Bistro” into the future as I have more great recipes in the hopper and under construction and some stories in the plans!
To view other cakes and cupcakes that have been part of my earlier blogiversaries, click on the links below.
1st blogiversary
2nd blogiversary
3rd blogiversary
4th blogiversary

I am a big believer in meal planning and follow it regularly. I recommend meal planning for several reasons:
The keys to good meal planning are:
Here is my suggested meal plan for the upcoming week, focusing primarily on dinners with some suggestions for a couple of lunches making the most of a boiled picnic ham. I’ve provided a list of the main ingredients that, for the most part, would probably involve a shopping trip to the supermarket for most. However, as always, read each recipe thoroughly and carefully to create your own shopping list as I have not listed what I consider to be “staple” items like milk, butter, eggs, spices, etc. Click on the green hotlinks to access the recipes.
Blueberry Muffins – These are great breakfast or coffee break muffins and they freeze very well. Nice treat to start off the week!
Shopping List: Blueberries (fresh or frozen), orange juice, orange rind
Dinner: Meatloaf
Serve with mashed or riced potatoes and your favorite side of veggies. Homemade mustard pickles go great with meatloaf!
Shopping List: Ground beef, onion, prepared mustard, tomato soup, dry onion soup mix, graham wafer crumbs, fine bread crumbs, garlic powder, vegetables of choice
Dessert: Gingerbread
At least once every winter, I have to have a dose of this yummy comfort food! Drizzle with brown sugar sauce for an extra-special treat!
Shopping List: Applesauce, molasses, coffee
Homemade White Bread – This is always such a treat! This bread will be super good with the ham sandwiches this week!
Shopping List: All-purpose flour, dry yeast, milk, butter/shortening
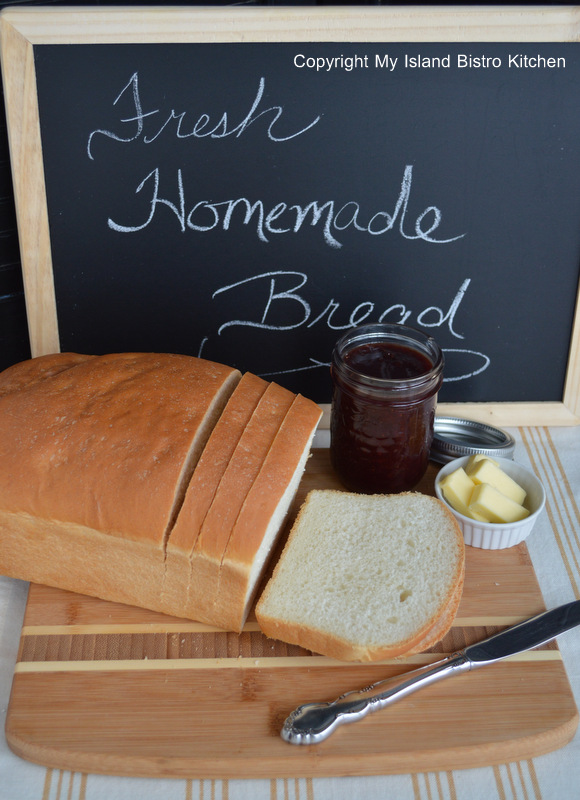
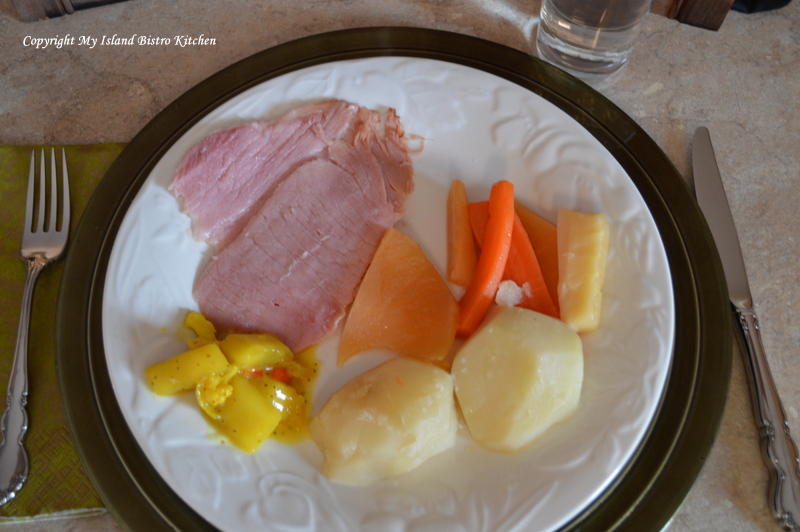
Dinner: Old-fashioned Boiled Ham Dinner – This is truly dinner-in-a-pot and is my definition of “comfort food”! The meat and vegetables are all cooked in the same broth in the same pot. Make sure you cook enough veggies for Wednesday night as this always tastes even better the second day. Easy to heat the vegetables in the microwave and, poof, you have two nights’ meals prepared in one effort. You’ll want those mustard pickles or mustard beans with this dinner!
Shopping List: Smoked pork picnic shoulder (ham), parsnips, carrots, rutabaga (turnip), potatoes
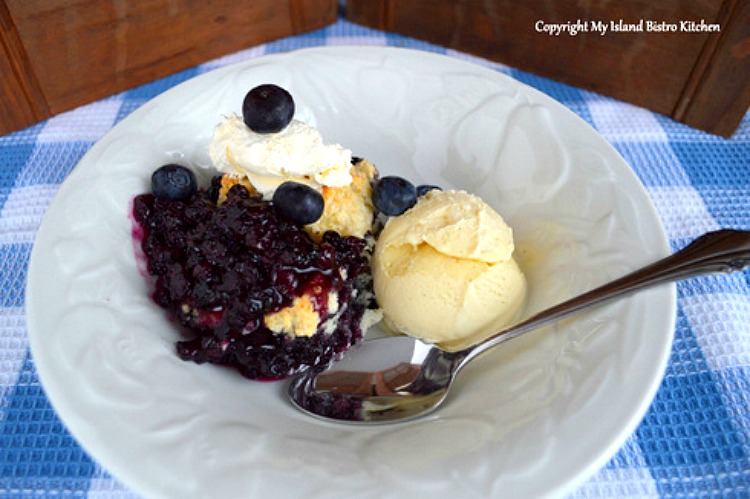
Dessert: Blueberry Grunt
This is such an incredibly yummy dessert – serve it with your favorite vanilla ice cream!
Shopping List: Blueberries (fresh or frozen) and lemon rind, vanilla ice cream
Lunch: Ham Sandwiches made with homemade white bread! Don’t forget the mustard!
Dinner: Leftover boiled ham dinner from Tuesday.
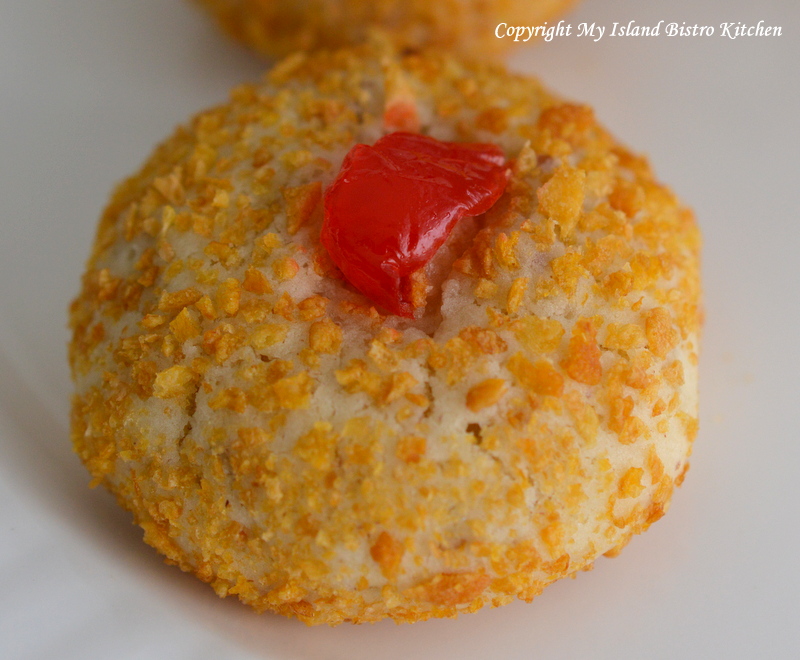
Dessert: Cherry Wink Cookies
Shopping List: Dates, cornflake crumbs, maraschino cherries
Homemade Tea Biscuits
Shopping list: Whole milk, whipping cream, unsalted butter
Lunch: Ham Salad Sandwiches
Shopping List: Sweet pickle relish, Dijon mustard, maple syrup, celery, red pepper, mayonnaise, Havarti cheese
Dinner: Hawaiian Fiesta Casserole – this is a great way to use up left-over cooked ham and stretch its use. Serve these with those tasty biscuits and perhaps a green salad!
Shopping List: Rice, cream of celery soup, sour cream, liquid chicken bouillon, broccoli, canned pineapple chunks, Parmesan cheese, fine bread crumbs, leftover cooked ham, and ingredients for a green salad and dressing

Dessert: Decadent Chocolate Chip Squares
Shopping List: Chocolate chips and coconut
Dinner: Mac ‘n Cheese with a green salad and homemade tea biscuits
Shopping List: Elbow macaroni, liquid chicken bouillon, cheddar cheese, Parmesan cheese, salad ingredients and dressing

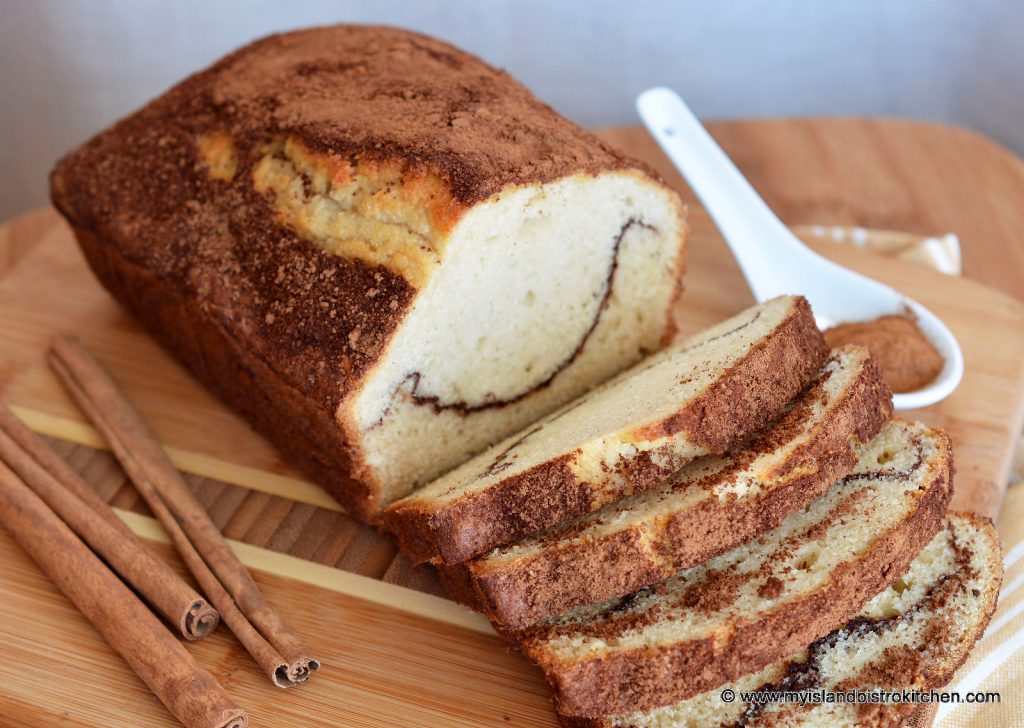
Dessert: Cinnamon Sweet Bread
Shopping List: Staple baking ingredients
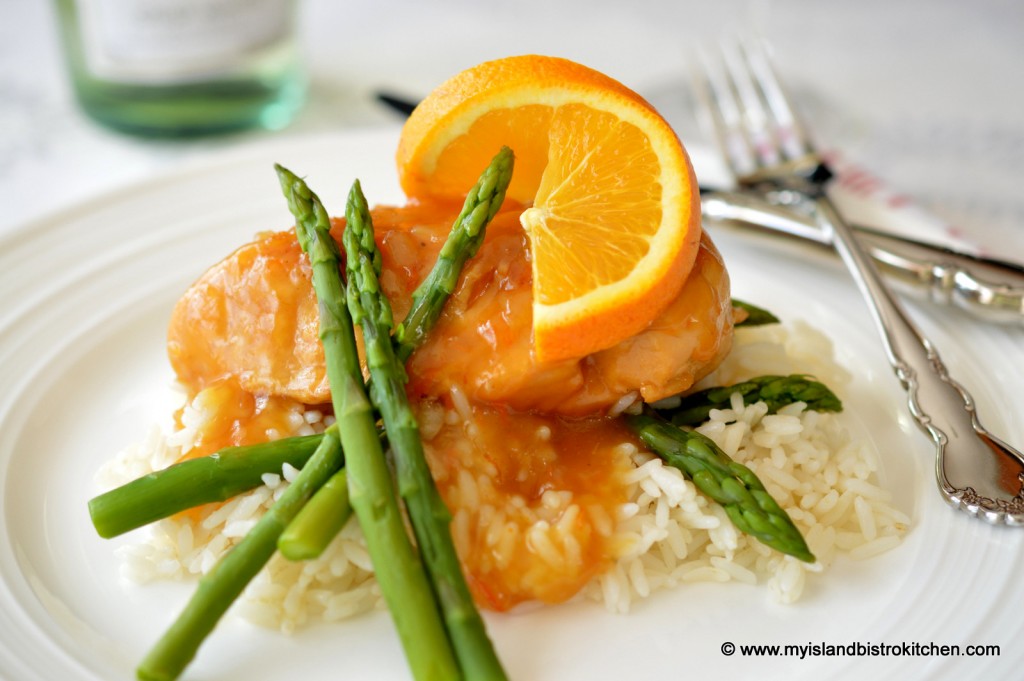
Dinner: Maple-Orange Sauced Chicken Breasts with Rice
An extra special weekend treat!
Shopping List: Boneless skinless chicken breasts, onion, fennel, orange juice, orange rind, chicken stock, maple syrup, orange marmalade, rice
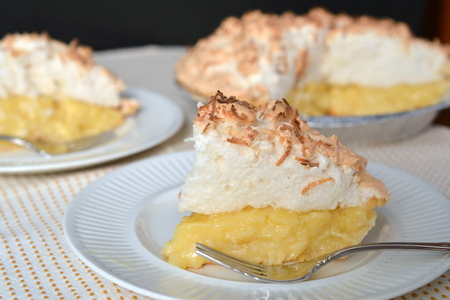
Dessert: Coconut Cream Pie
One of the best pies going!
Shopping List: 9” pie shell, coconut milk, whole milk or cream, sweetened shredded coconut
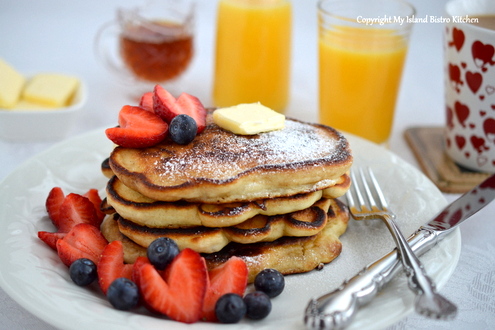
Sunday Breakfast: Pancakes
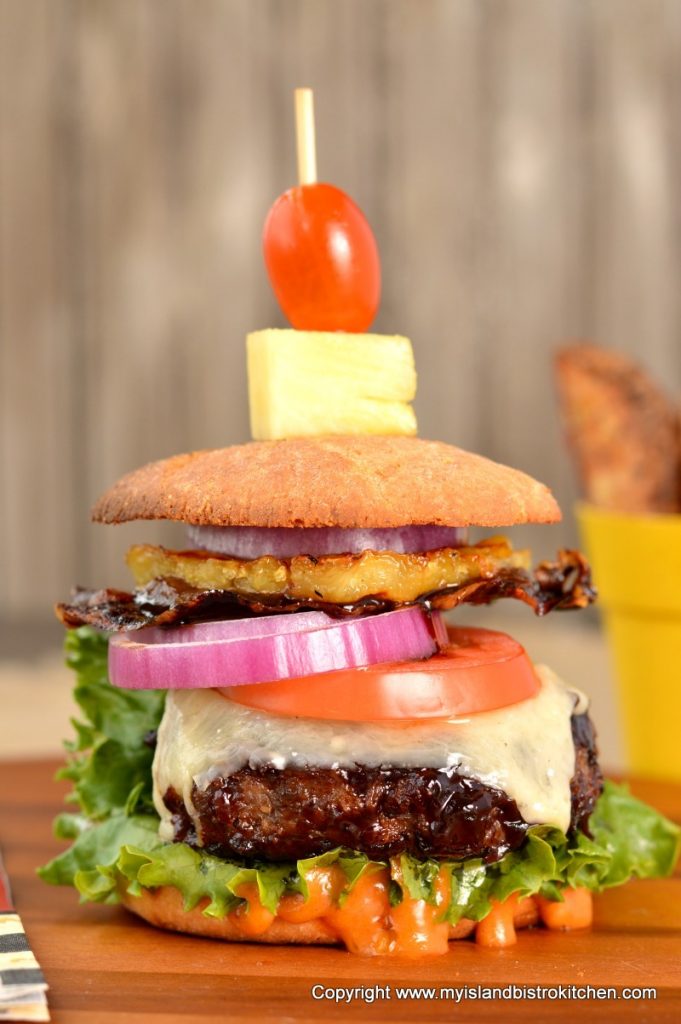
Dinner: Bistro Burgers with Home Fries
Shopping List: Ground chuck, mayonnaise, maple syrup, ketchup, rhubarb relish, Dijon mustard, sour cream, onion salt, Parmesan cheese, Blueberry BBQ sauce, dry onion soup mix, bread crumbs, Cheddar cheese slices, red onion, tomato, prosciutto, fresh pineapple, bread and butter pickles, hamburger rolls, potatoes (for home fries)
Dessert: Leftover Coconut Cream Pie
Meal planning can be a challenge, especially with high food prices, ingredient availability (particularly in winter for fresh local ingredients) and, of course, for those who are busy and time-challenged. However, with having a plan in place and establishing a routine for meal preparation, it is a way to eat better, save money, reduce food waste, and eliminate the stress of last-minute meal preparation that can sometimes result in unhealthy food choices. For those with children, it’s a good way to help them make good food choices and engage them in meal preparation by assigning them tasks to help with the work of making meals.
For my Week 2 Meal Plan, click here.
For my Week 3 Meal Plan, click here.
For my Week 4 Meal Plan, click here.
For my Week 5 Meal Plan, click here.
For my Week 6 Meal Plan, click here.


When you live in Prince Edward Island, Canada, where potatoes are one of the main agricultural crops, you find lots of ways to serve potatoes. Twice-baked potatoes, or stuffed baked potatoes, are one of my all-time favorites. I make up big batches of these and freeze them so they are always on hand, ready to be popped in the oven for dinner. Continue reading Twice-baked Potatoes Recipe

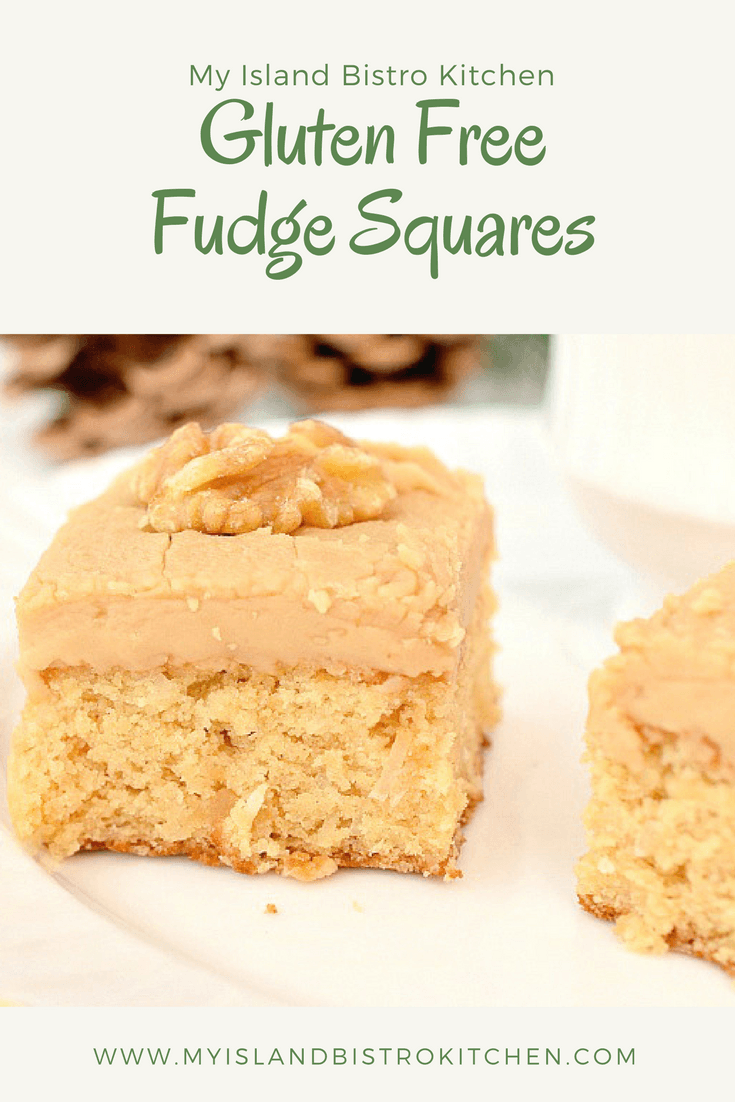
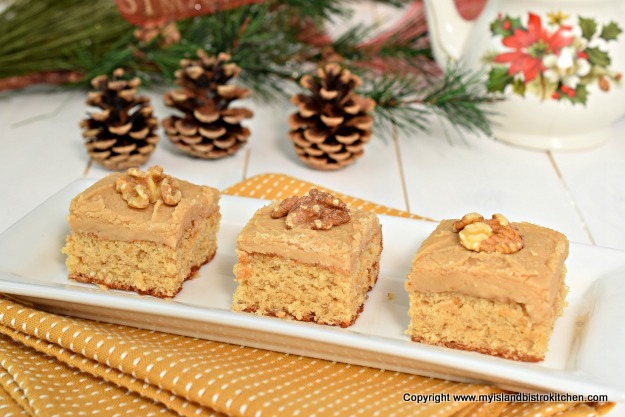
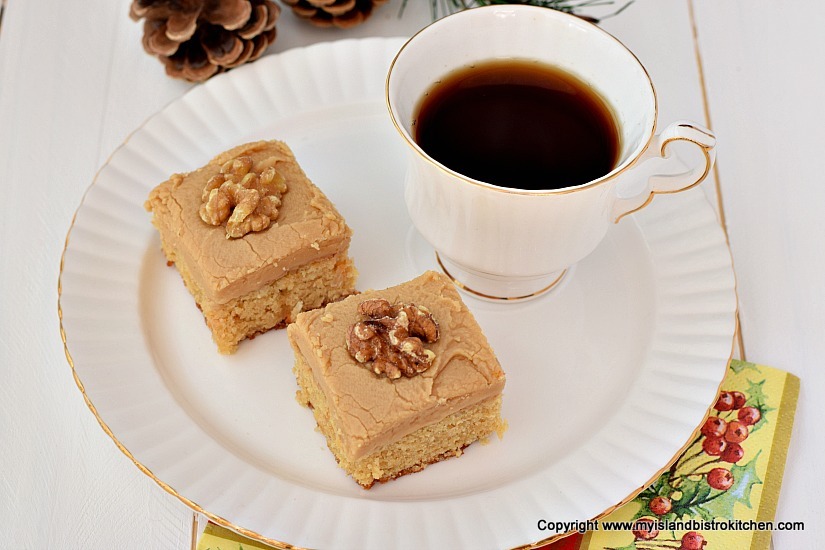
If you like brown sugar fudge, you’ll love this Gluten-free Brown Sugar Fudge Square, even if you aren’t gluten-intolerant or on a grain-restrictive diet! With a cake-type base, it’s the fudge icing that makes this square and takes it from plain to yummy. It’s like having cake and candy at the same time!
I use 1-to-1 gluten-free baking flour along with a small amount of coconut flour in this square. The coconut flour blends well with the shredded coconut in the recipe and gives the square extra flavor. Super easy square to make.

The slightly tricky part is making the icing as it will “set up” very fast. Make sure you have all the ingredients pre-measured and at hand when you start to make the icing. It’s essential that the icing sugar be sifted to remove any lumps as there won’t be any time to work out any lumps when beating the icing sugar into the hot butter-sugar mixture. Once the icing starts to thicken, work quickly to spread it over the square.
This square freezes beautifully and is great to have on hand when you just need to have something sweet!
[Printable version of recipe follows at end of posting]
Gluten-free Brown Sugar Fudge Square
Ingredients:
Square
½ cup minus 1 tbsp butter, softened at room temperature
1 cup brown sugar, lightly packed
1 extra-large egg (at room temperature for 20 minutes)
½ tsp pure vanilla
1 cup 1-to-1 gluten-free baking flour
2 tbsp coconut flour
1 tsp baking powder
pinch salt
1/3 cup milk
½ cup shredded coconut
Icing
3 tbsp butter, softened at room temperature
¾ cup brown sugar, lightly packed
3 tbsp cream
1 cup sifted icing sugar
1 tsp vanilla
Walnut halves for decoration (optional)
Method:
Preheat oven to 350°F. Grease or, alternatively, line 9” square baking pan with tin foil and spray with cooking oil.
Square: Cream butter and sugar together. Add the egg and beat well to combine with butter-sugar mixture. Beat in vanilla.
Sift the 1-to-1 gluten-free flour, coconut flour, baking powder, and salt together. Add the dry ingredients and milk to the creamed mixture in three parts (3 parts dry and 2 parts wet) starting and ending with the dry ingredients. Beat for 1 minute longer on medium speed. Fold in the shredded coconut. Spread batter evenly in prepared pan.
Bake for 30-32 minutes or until cake tester inserted into center of square comes out clean. Remove square from oven and place on wire rack to cool completely.
Icing: When square has cooled, make the icing by combining the butter and brown sugar in a saucepan over medium heat. Stir until both have melted/dissolved. Add the cream. Bring mixture to a boil. Reduce heat and simmer for 2 minutes, stirring occasionally. Remove from heat and, with an electric hand mixer, beat in the icing sugar until mixture starts to thicken. Immediately stir in the vanilla and, working quickly (as this icing will “set up” very fast), spread the icing evenly over square. Score cutting lines on square and, if desired, place one walnut half on each individual square. Let icing set completely before cutting squares.
Yield: One 9” pan of squares
An old-fashioned fudge square made with gluten-free flour and topped with brown sugar fudge icing.
Ingredients
Instructions


Turkey Chowder is the perfect way to use up leftover turkey. It’s a welcome tummy-warming and tasty chowder for cold winter days and is a real treat after skiing, a long winter walk, snowshoeing, or coasting on the snow-covered hills. Serve with warm rolls or biscuits straight from the oven for an extra special treat. Continue reading Turkey Chowder Recipe

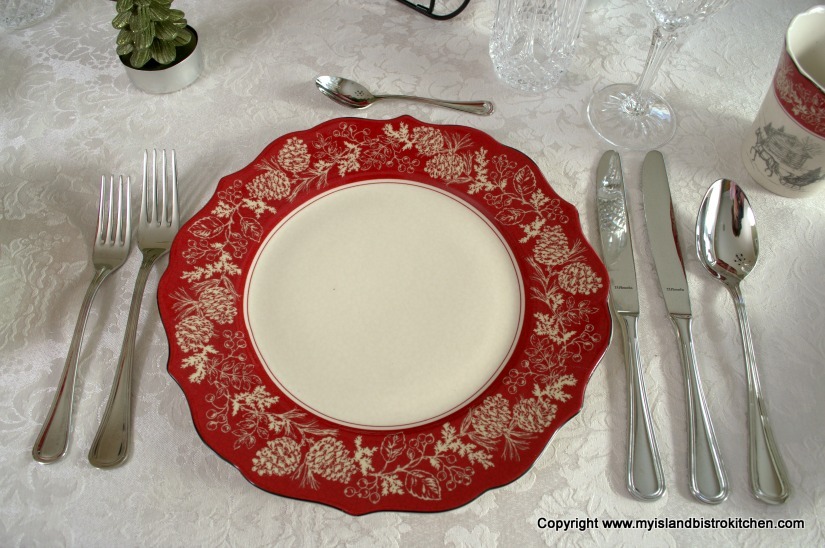
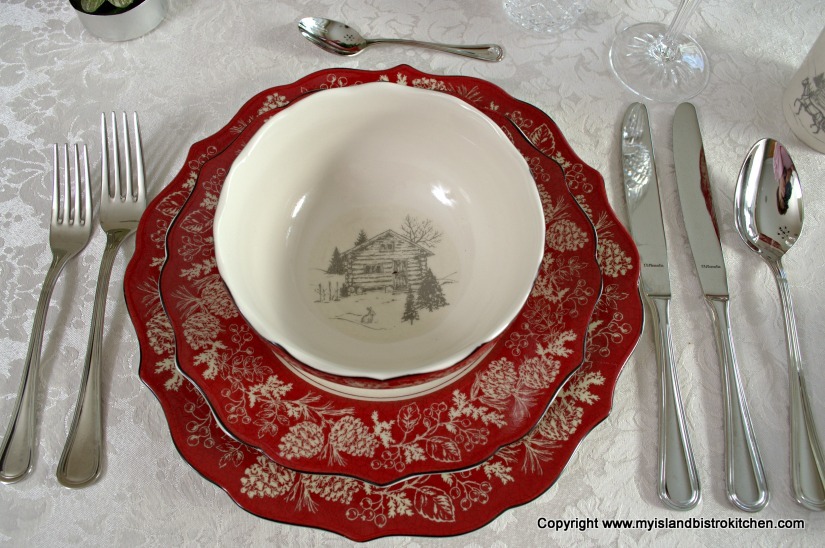
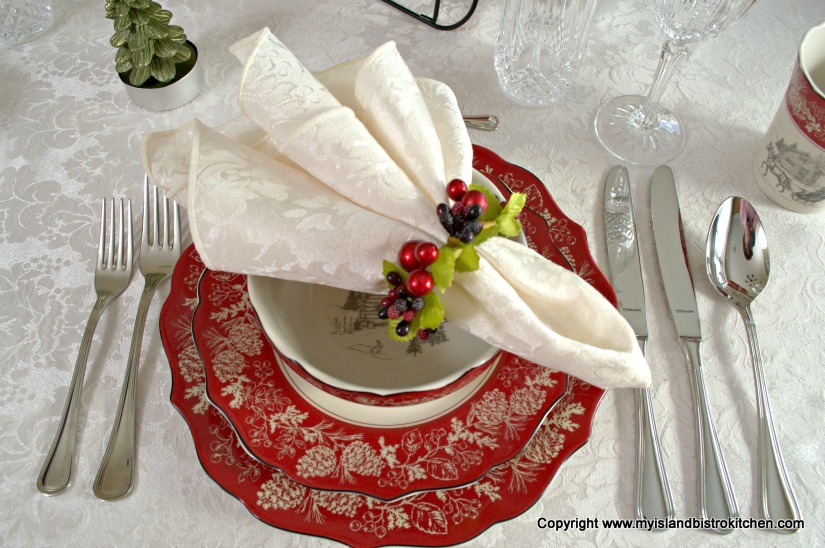
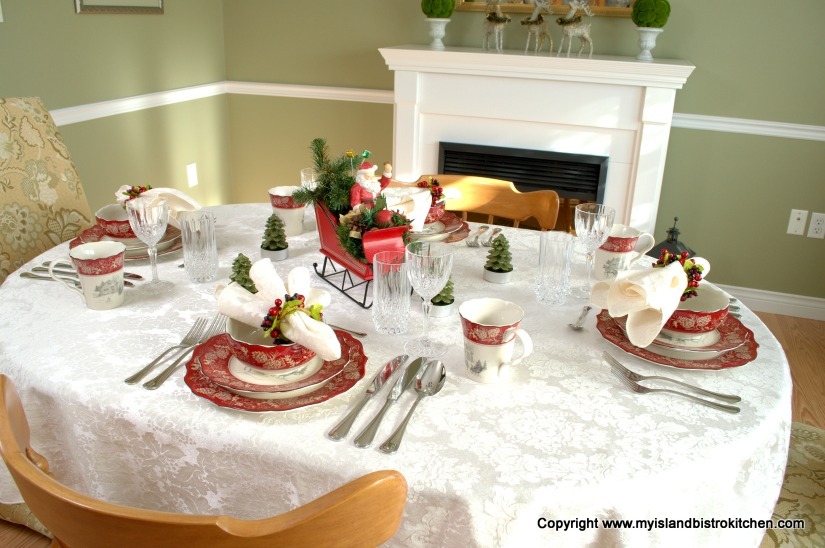
Just hear those sleigh bells jinglin’, ring ting tinglin’, to…..This is the song this tablesetting brings to my mind. Set with 222 Fifth’s Andover pattern, this dinnerware features a horse and sleigh in front of an old log cabin. This dinnerware evokes a very nostalgic setting that is reminiscent of Christmas past.
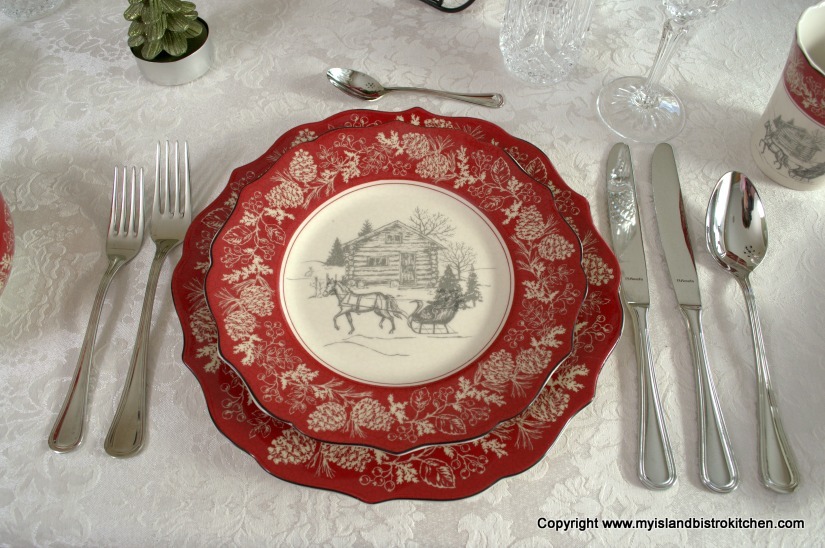
The border on the outside of each plate is a rust-red shade with ivory pinecones and holly. The horse and sleigh design is gray on an ivory background. This design appears only on the supper plate. The dinner plate has a plain center which allows the food to present well on it.
The cereal/soup bowl features only the log cabin design in the bottom of the bowl.
I used an off-white tablescloth and matching napkins to connect to the background in the dinnerware. Holly-berry napkin rings make napkin preparation very easy and add, what I call, jewelry to the table.
It seemed only fitting that the centerpiece for the table should feature a sleigh.
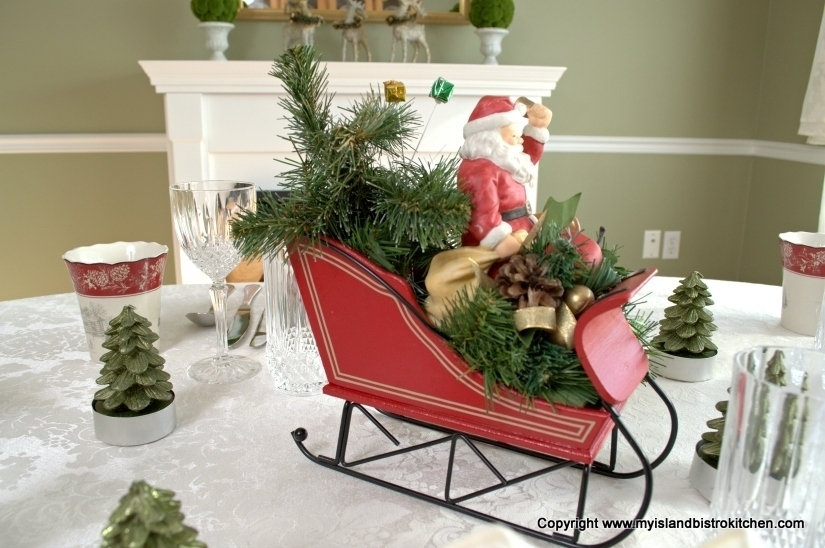
And, of course, who should be in the sleigh but old St. Nick!
![]()
And, here is a look at the table all set for dinner!
I added a few small tree candles to draw in that feature from the dinnerware design.
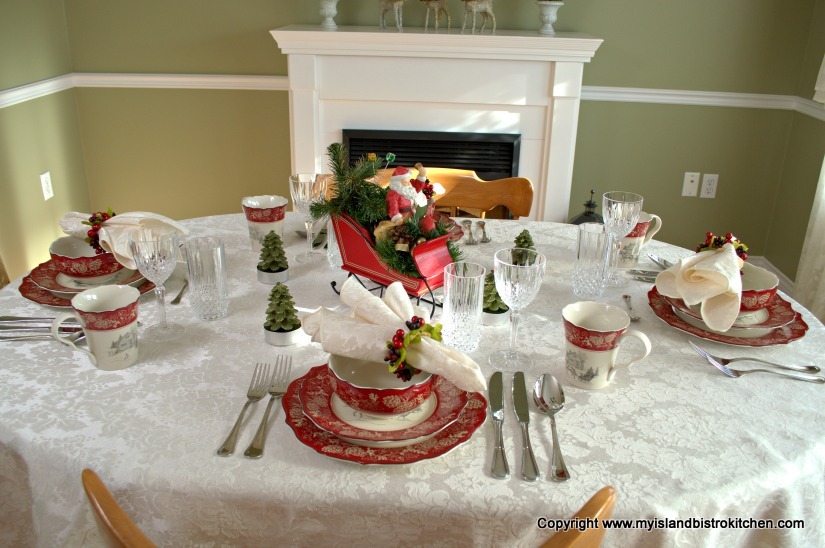
This is a very pretty set of dishes and, keeping the centerpiece simple, they get to be the stars on the table.
To view photos of other Holiday tablesettings from My Island Bistro Kitchen, click on the links below:
Glitz ‘n Glamour New Year’s Eve Tablesetting
The Warmth of the Christmas Light Tablesetting
Christmas Eve Tablesetting and Dinner
A Tartan Holiday Tablesetting
Pretty Poinsettia Tablesetting
Poinsettia Trio Tablesetting
The Holiday Table
The Pink and Green Holiday Table
Christmas at My Island Bistro Kitchen
Purple Tablesetting for the Holidays
Evergreens and Reindeer Christmas Tablesetting
Cupcake Tablescape
Twas The Night Before Christmas

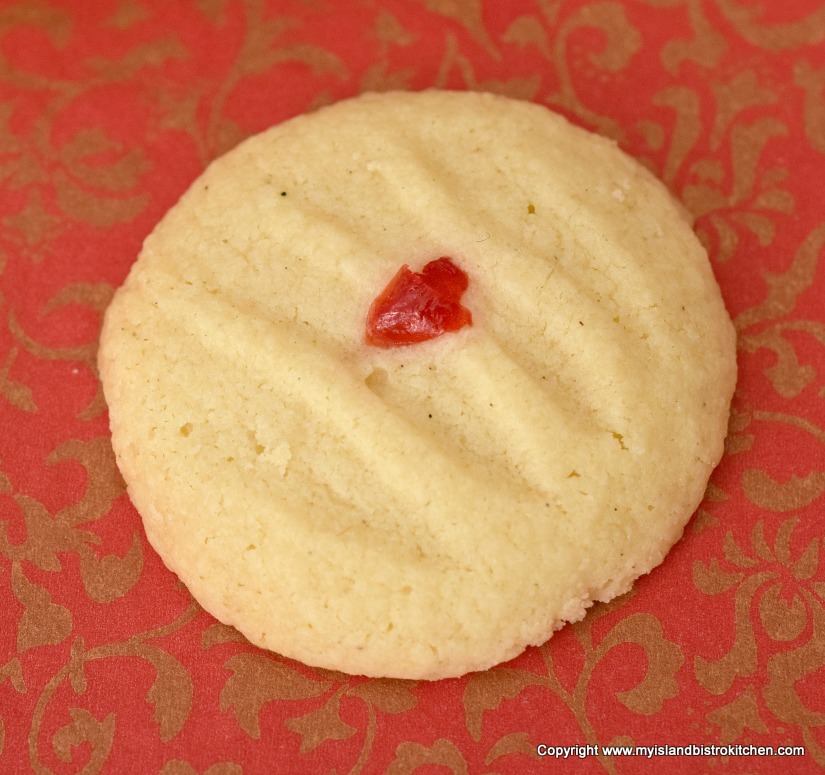
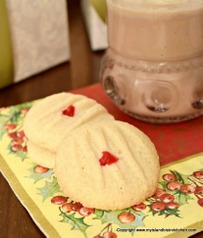
These gluten-free melting moments cookies prove that being on a gluten-free diet does not mean one has to compromise on favorite sweet treats!
I use a 1-to-1 gluten-free baking flour, such as Bob’s Red Mills brand, for these cookies. I also add a small amount of very finely ground almonds to the batter as this lends a tenderness to the cookie crumb which justifies the name of the cookies because they do melt in the mouth!
These cookies are very easy to make. Mix up the dough. Pinch off small amounts of the dough and form into small balls. Place on parchment-lined baking sheets and flatten with the tines of a fork. Bake. It’s really no more complicated than that!
[Printable recipe follows at end of posting]
Gluten-Free Melting Moments
Ingredients:
½ cup butter, softened at room temperature
¼ cup icing sugar (aka confectioner’s sugar or powdered sugar)
¼ tsp pure vanilla
½ cup 1-to-1 gluten-free baking flour
¼ cup finely ground almonds
¼ cup cornstarch
Method:
Preheat oven to 325°F. Line baking sheets with parchment paper.
Cream butter. Add the icing sugar and cream well with the butter. Mix in vanilla.
In separate bowl, whisk the flour, ground almonds, and cornstarch together. Add to the creamed mixture and blend until well incorporated.
Form dough into small round balls (apx. 5/8 oz dough per ball). Place balls on prepared baking sheets, about 2“ apart, and flatten each ball with the tines of a fork. Decorate with small bits of maraschino cherries, if desired.
Bake for approximately 15-18 minutes, just until edges of cookies start to tint a golden tan color. Don’t over-bake. Let cool on baking sheet for 2-3 minutes then transfer cookies to wire rack to cool completely.
Yield: Apx. 1½ dozen cookies

These melt-in-your-mouth gluten-free melting moments cookies have a tender crumb and delicate butter and almond flavor.
Ingredients
Instructions

Pin Me To Pinterest:

For other tasty gluten-free cookie recipes, click on the links below:
Gluten Free Lemon-Filled Thumbprint Cookies
Gluten Free Snickerdoodles
Gluten-free Earl Grey Cranberry-Orange Shortbread