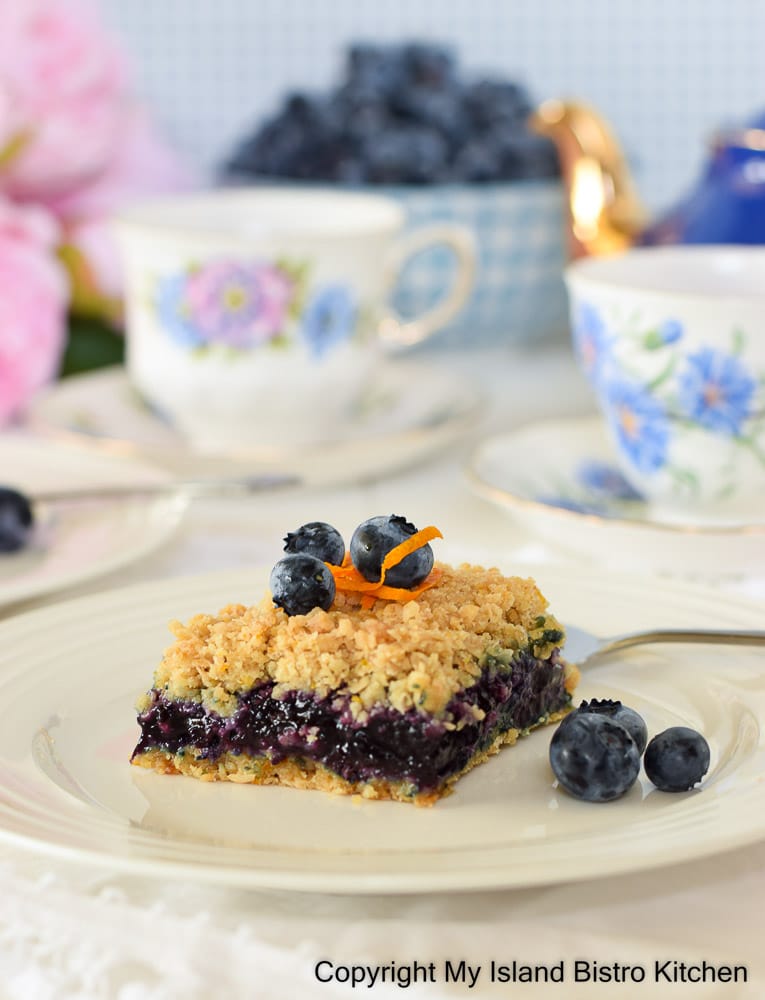
Modelled after, and made with the same method as, a traditional Date Square, this wholesome Orange-Scented Blueberry Oat Square features a delectable blueberry filling sandwiched between a sweet and buttery orange-scented oatmeal crumb base and topping. Continue reading Orange-scented Blueberry Oat Square→
Living in PEI, we have access to fresh locally-fished lobster during the Island’s two lobster fishing seasons, commonly known as the spring and fall fisheries.
Lobster Fishing Boats Loaded with Traps for Setting Day, North Rustico, PEI
The first season begins in late April/early May and goes until the end of June. The second season runs from August to October.
Lobster Fishing Boat Loaded with Traps, French River, PEI
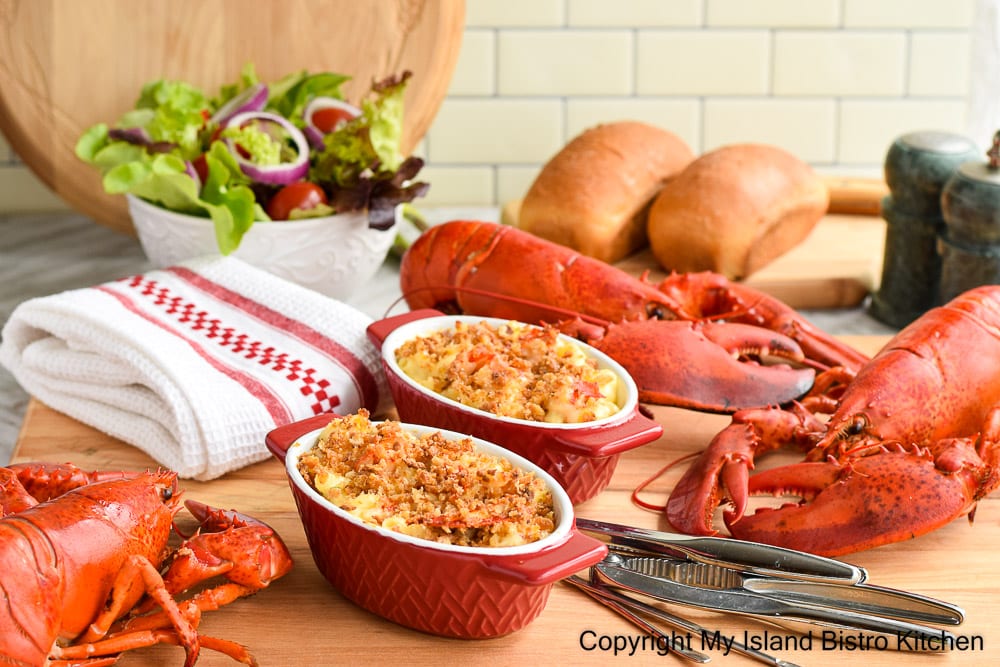
After a few good “feeds” of lobster straight from the shell, I am ready to incorporate lobster as an ingredient in other dishes such as in this tasty Lobster Macaroni and Cheese. This is not your usual weeknight Mac ‘n Cheese dish. Rather, I refer to it as a more extravagant grown-up version of an old family classic. Continue reading Lobster Macaroni and Cheese Recipe→
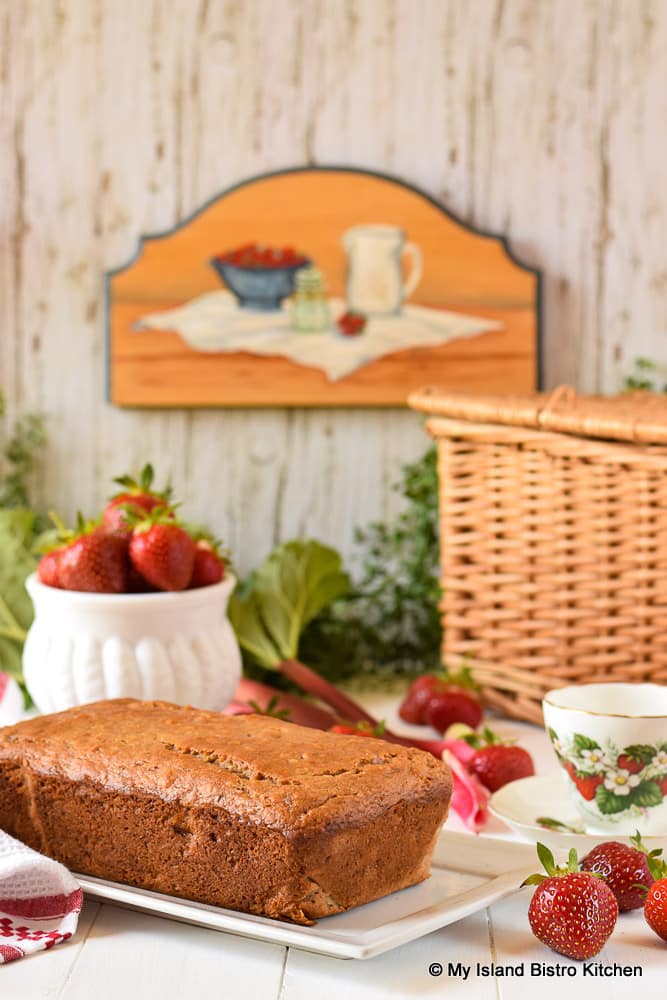
Quick breads are easy to make and are lovely for tea or coffeebreaks. Today’s quick bread combines strawberry and rhubarb with some flavorful spices (nutmeg and cardamom) to make a delightful treat. While this Strawberry Rhubarb Quick Bread can certainly be made with frozen strawberries and rhubarb since they are cooked into a sauce before being added to the bread batter, it is an extra-special treat to make when both are in season locally. Continue reading Strawberry Rhubarb Quick Bread Recipe→
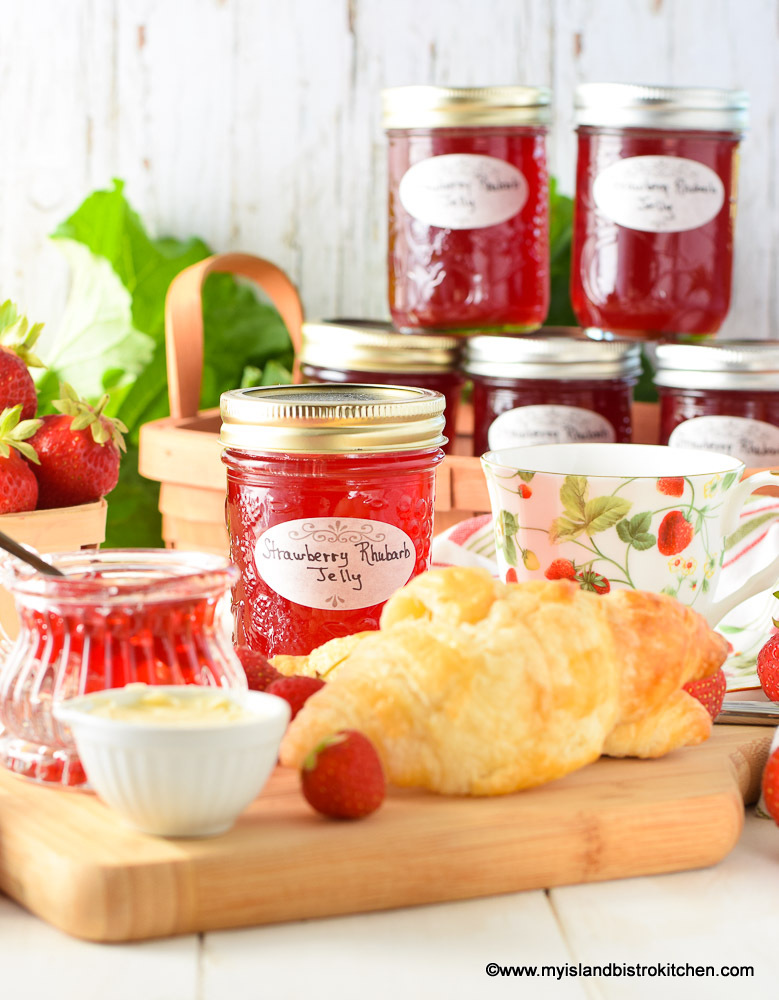
Strawberry and rhubarb are two of my favorite flavor combinations. It should come as no surprise, then, that I would create a Strawberry Rhubarb Jelly recipe. With its stunning color and beautiful flavor, this jelly is sure to become a family favorite. Continue reading Strawberry Rhubarb Jelly Recipe→
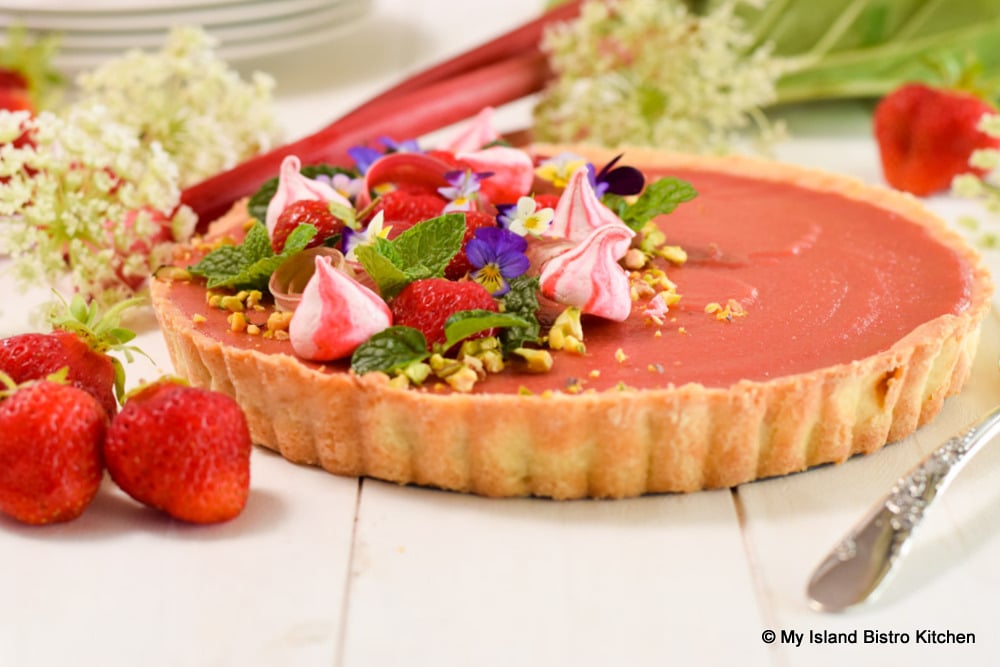
Today’s dessert is the lovely Strawberry Rhubarb Tart modeled after the famous French Lemon Tart. This divine tart combines two of the season’s best flavors into a silky-smooth filling which is then placed in a buttery rich and tender Pâte Sucrée shell. Simply, this is a decadent dessert of restaurant quality that can be made at home!
While a “Jump to Recipe” button has been activated on this post, it is highly recommended that the entire text of this post be read before making the Strawberry Rhubarb Tart as it contains additional information that is not included in the printable version of the recipe. Continue reading Strawberry Rhubarb Tart Recipe→
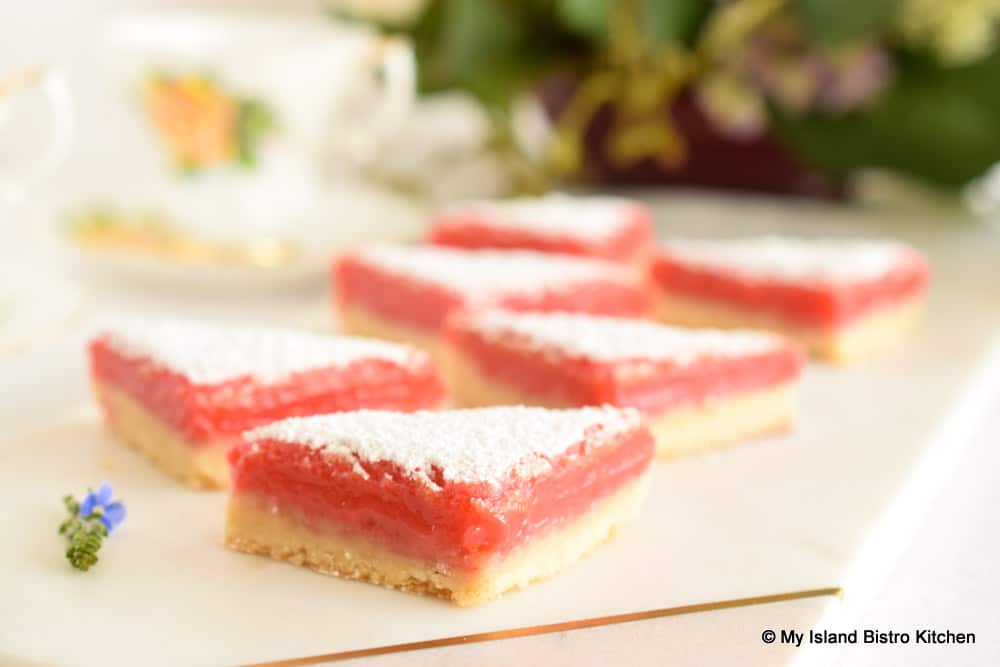
Two of the season’s best treats – strawberries and rhubarb – combine to make a luscious topping for Scrumptious Strawberry Rhubarb Bars with a rich buttery shortbread base. Continue reading Scrumptious Strawberry Rhubarb Bars→
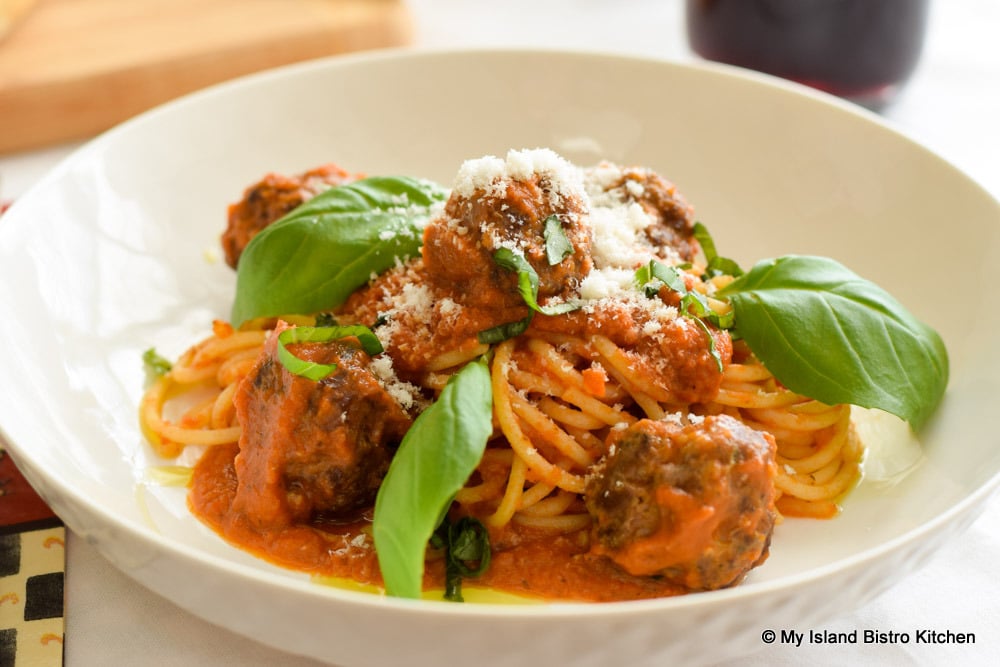
Homemade Spaghetti and Meatballs make a super tasty meal. Spaghetti sauce is not difficult to make and this sauce freezes very well so it is great to have on hand when needed. Likewise, meatballs are not difficult to make either and they also freeze well. So, this is a great make-ahead meal to have on hand when the tastebuds crave a Spaghetti and Meatballs meal. It’s simply a matter of thawing and reheating the sauce and meatballs and cooking up a pot of spaghetti. Continue reading Bistro Style Spaghetti and Meatballs Recipe→
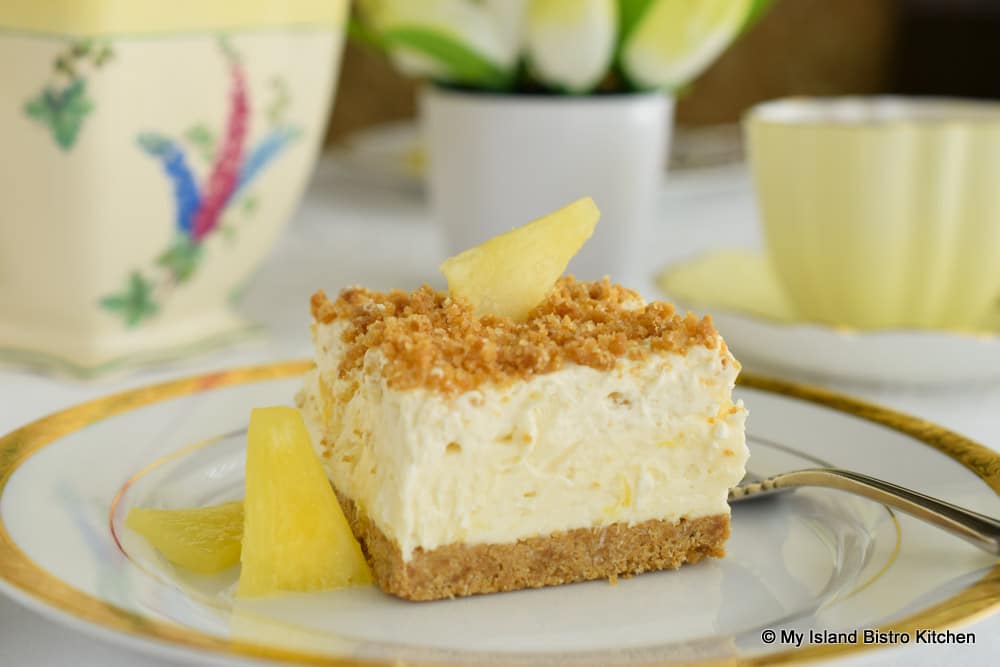
Who doesn’t love a no-bake dessert! This delectable Pineapple Cheesecake Dessert is very easy to make and does not take a lot of ingredients. While no baking is required, some refrigerator time in between steps is needed for the dessert to set. Continue reading No-Bake Pineapple Cheesecake Dessert→
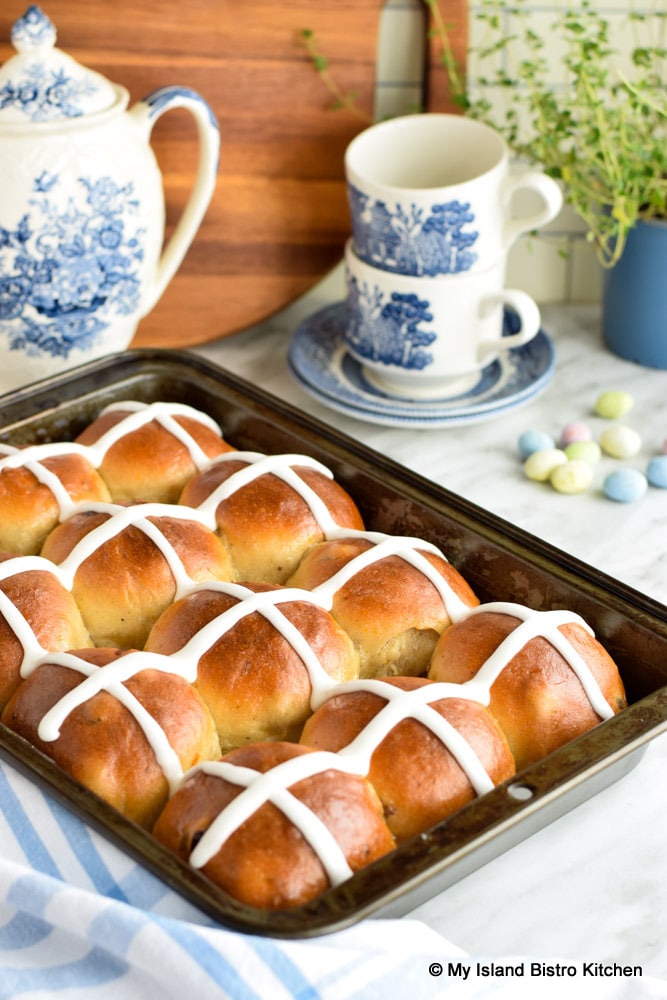
Hot Cross Buns are made with a yeasted enriched dough that is fragrant with warm spices. Usually, dried fruit is added. These buns are an Easter tradition in many homes. Traditionally eaten on Good Friday, and marking the end of Lent, Hot Cross Buns, with their signature cross on the top, carry the symbolism of the crucifixion of Jesus. Continue reading Billowy Soft Hot Cross Buns→
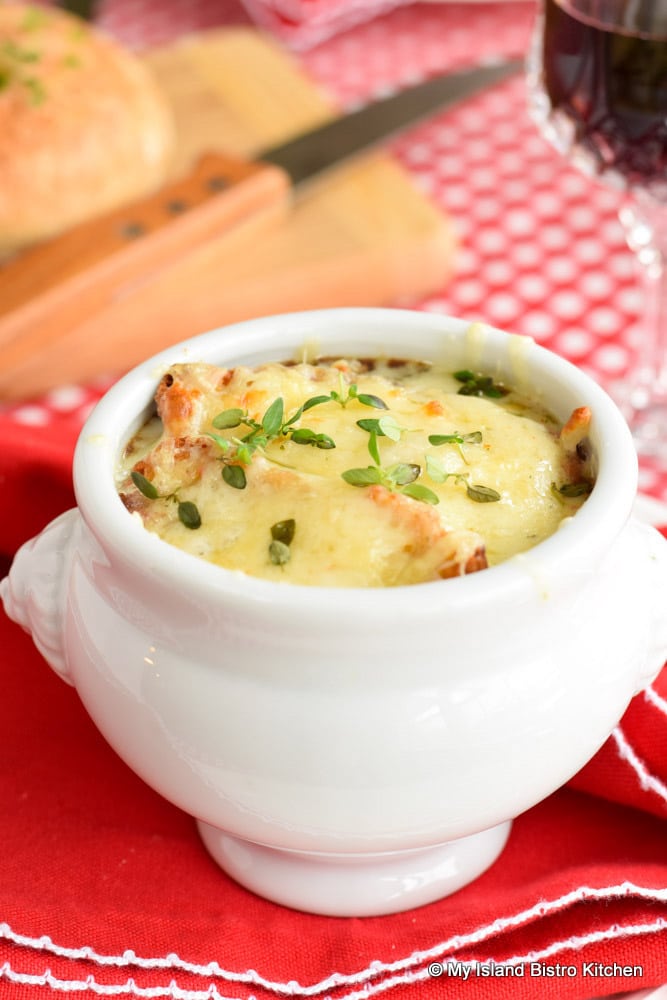
While many cast French Onion Soup as fine dining restaurant fare, it really is easy enough to make this soup at home. Read on for my recipe, hints, and tips for making this Classic French Onion Soup in your own kitchen. Yes, you really can make fine restaurant-quality food at home and your kitchen will have the intoxicating aroma of a French bistro! Continue reading Classic French Onion Soup Recipe→
Mini Bundt cakes have become quite popular and trendy and they are ideal individual desserts that present so attractively on a plate. Today, I used my pan of fluted mini Bundt pan molds (each having a 1-cup capacity) to make individual Mini Blueberry Bundt Cakes with a lemon glaze. Continue reading Mini Blueberry Bundt Cakes→
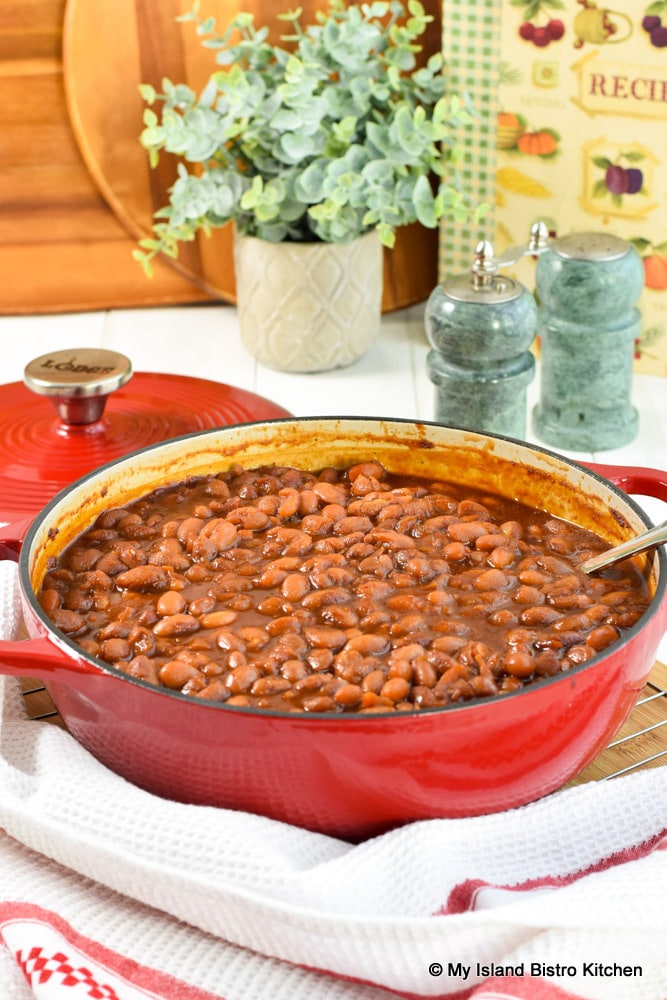
Homemade Baked Beans make a hearty stick-to-the-ribs meal. Add some homemade bread or biscuits along with molasses and a simple yet tasty meal awaits. I originally published my traditional Baked Beans in Maple Syrup recipe in 2012 and that recipe can be accessed by clicking here. My newest recipe, Baked Beans in Tomato Sauce, differs from my original recipe in that the yellow eye beans are slowly baked in a sweet and savory tomato-based sauce giving them a lovely rich flavor and reddish-brown color. Continue reading Baked Beans in Tomato Sauce→
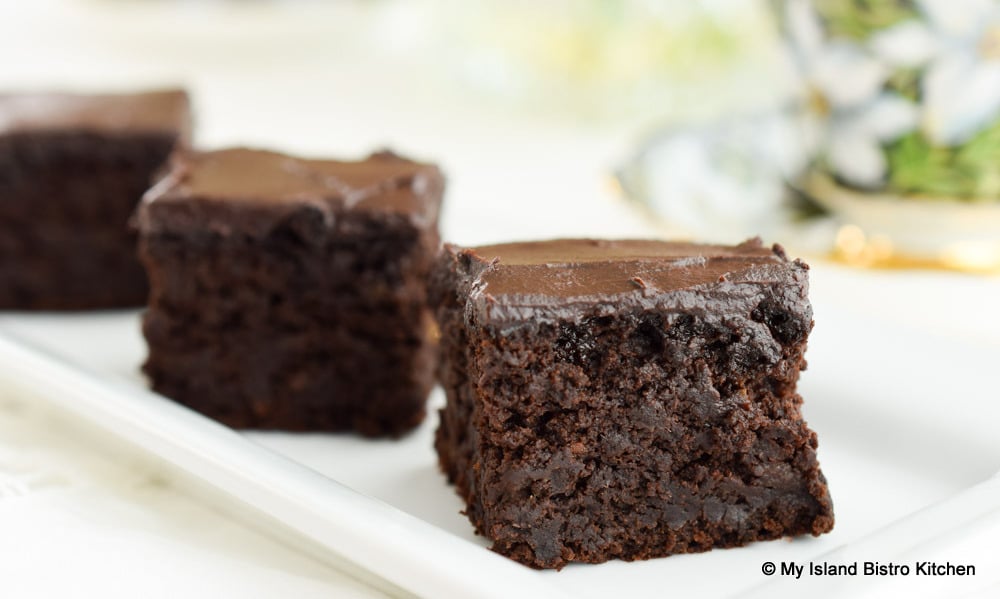
Who would ever think that the lowly black beans, known for their fibre and protein content, could be transformed into moist, fudgy, decadent, and super tasty brownies! But, it’s true and these Black Bean Mocha Brownies (now my new favorite) do not have the slightest taste of beans! Serve the brownies to folks and don’t tell them there are black beans in them and I seriously doubt they’d ever guess as much. With maple syrup, cocoa powder, coffee, and vanilla as flavor enhancers along with almond flour, you’d be hard pressed to find a hint of bean flavor in these brownies. Continue reading Black Bean Mocha Brownies→
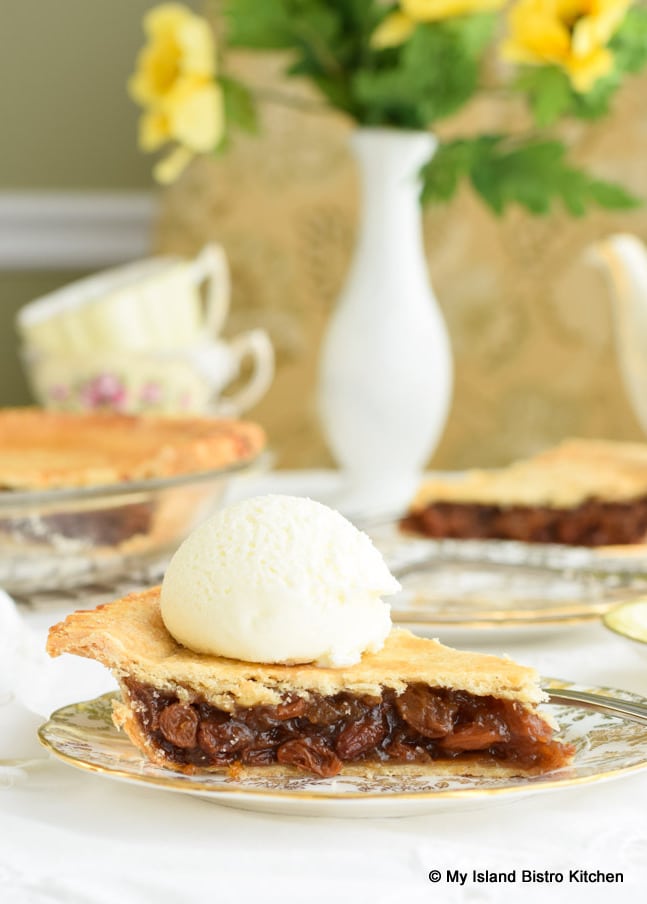
For some reason, I always think of Raisin Pie as a late autumn or winter time pie. I suppose, perhaps, it might have something to do with spring, summer, and fall being the time when we think of fruit pies like rhubarb, strawberry, peach, and apple, for example, when such fruits are in season. In winter, those fruits are likely to be imported and more expensive so one tends to look for other types of fillings for pies. Continue reading Old-fashioned Raisin Pie Recipe→
I am often asked for my recipe for pie pastry so that is the focus of this posting. There are many different kinds of pastry but, today, I am focusing on a basic all-purpose pastry suitable for both sweet and savory pies. But, first, let’s start with some hints and tips on making the pastry. There are many sources of information on pastry making and what follows is the method I have used for years with success to make my pastry. Hope it is of use. Continue reading How to Make Pie Pastry (plus Recipe)→
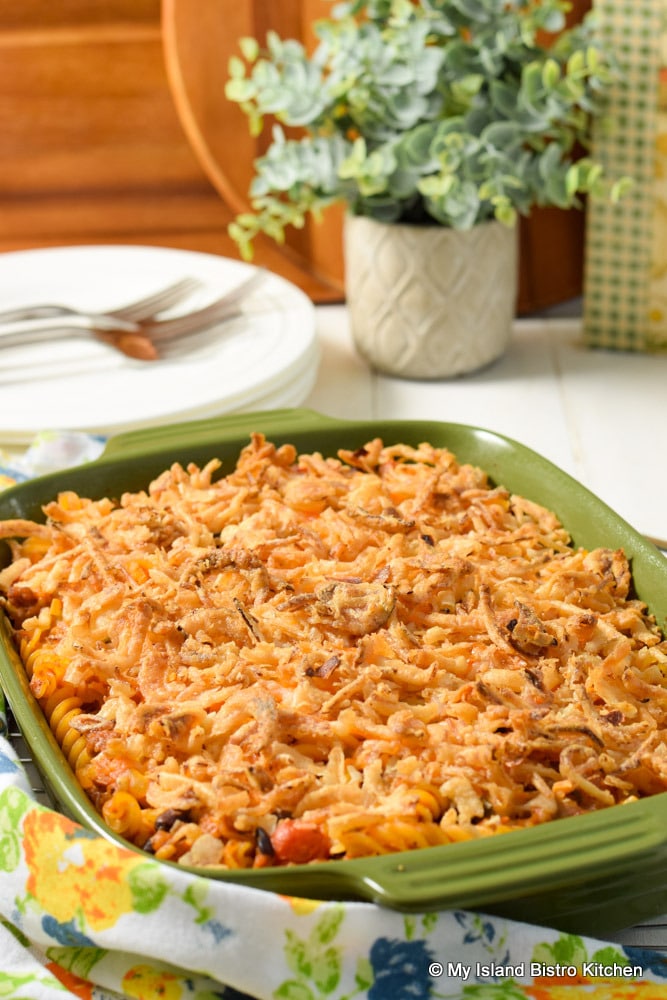
The primary inspiration for this Sausage, Black Beans, and Pasta Casserole came from an abundance of tomato sauce in my freezer. I had surplus tomatoes in the garden last year and, since I detest food waste of any kind, I made and froze a lot of tomato sauce (recipe here) that needed to be transformed into meals. Continue reading Sausage, Black Beans, and Pasta Casserole→
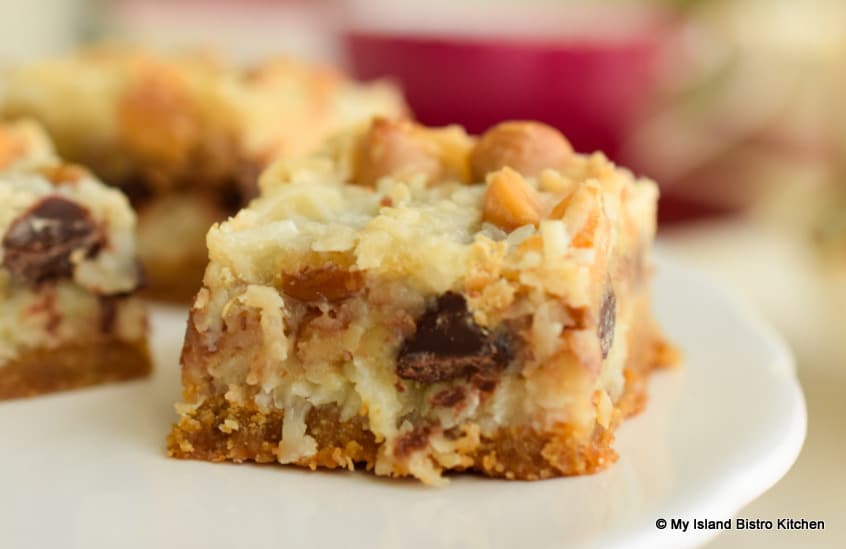
Hello Dolly Square (aka 7-layer Bars or Magic Bars)
This is an oldie but always a goodie! This irresistible Hello Dolly Square is believed to have started circulating c. 1960s and may have been named in honor of the Hello Dolly musical of the same era. Continue reading Hello Dolly Square Recipe→
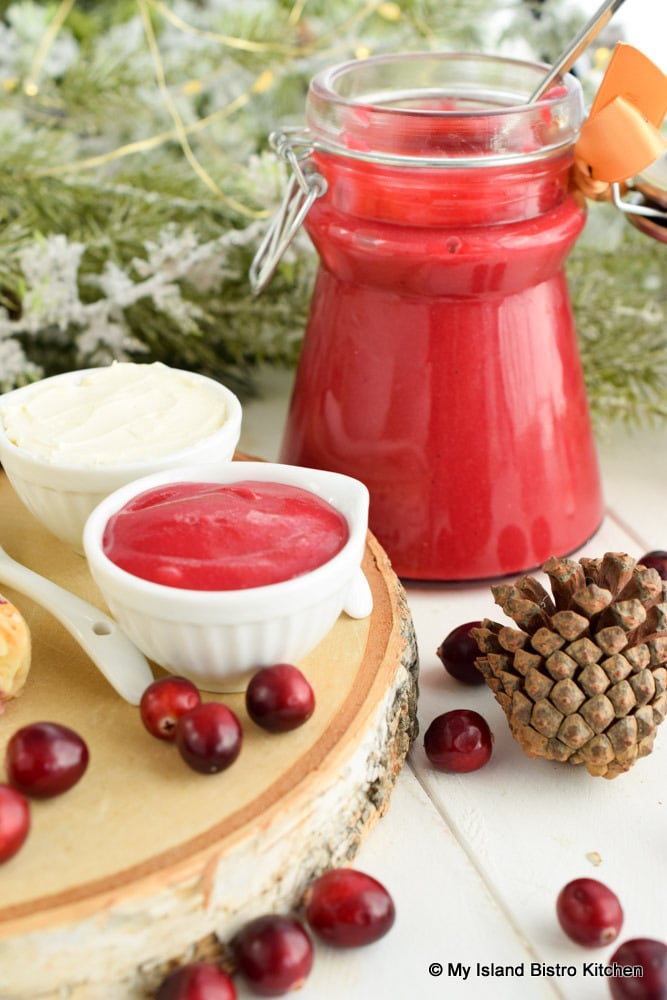
Cranberries are a flavor often associated with Christmas so, today, I have taken seasonal cranberries and turned them into a divine Cranberry Curd for which the possibilities to enjoy it are endless and limited only by your creativity. Continue reading How to Make Cranberry Curd→
These Rum Balls are adult-only treats. They are not intended for consumption by children. So, yay, the adults get to have their very own secret treats they don’t have to share with the kids! These rum-infused balls are a classic adult treat around the holidays. Continue reading Right Some Good Rum Balls→
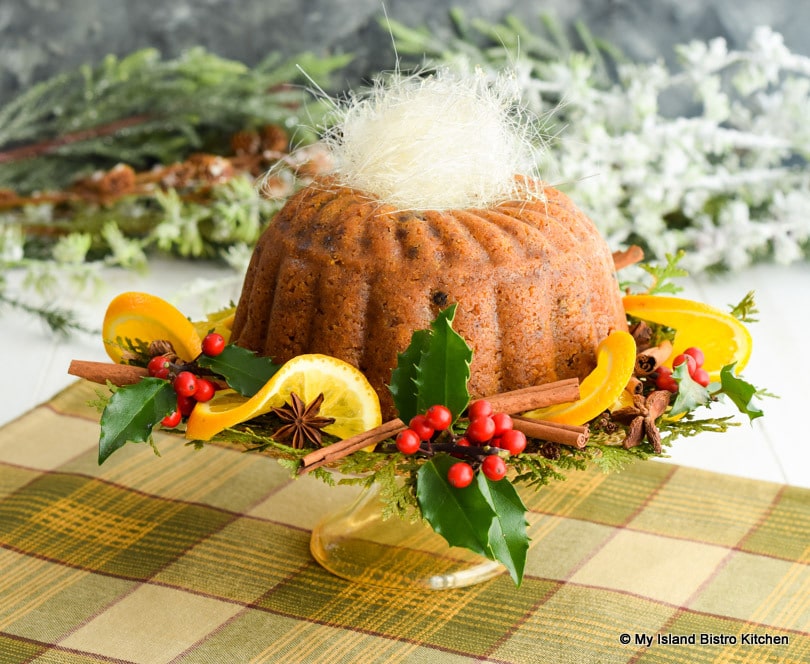
Mincemeat is a traditional Christmas food in many parts of the world, including mine. As mincemeat is a common staple ingredient in my pantry, I use mincemeat in a whole host of recipes including muffins, cookies, tarts, pies, squares, and quick breads. Today, however, I have used my own homemade Green Tomato Mincemeat to create a divine Steamed Mincemeat and Apple Pudding. Continue reading Steamed Mincemeat and Apple Pudding→
(Mostly) PEI and Maritime Food – Good Food for a Good Life!